Norton Abrasives Paper Shredder 8 Users Manual EN PartitionMagic 8.05 User Guide
8 to the manual 538c19b7-f005-4203-b648-b68be490b139
2015-02-05
: Norton-Abrasives Norton-Abrasives-Paper-Shredder-8-Users-Manual-495831 norton-abrasives-paper-shredder-8-users-manual-495831 norton-abrasives pdf
Open the PDF directly: View PDF ![]() .
.
Page Count: 159 [warning: Documents this large are best viewed by clicking the View PDF Link!]
- Introduction
- Getting Started
- PartitionMagic Basics
- PartitionMagic Main Window
- Rescue Disk Main Window
- Process Overview
- Selecting a Hard Disk and Partition
- Selecting an Operation
- Undoing an Operation
- Viewing Pending Operations
- Applying Changes to Your System
- Supported File Systems
- Changing PartitionMagic Preferences
- Using International Keyboards
- Defragmenting a Hard Drive
- Getting Help
- Managing Partitions
- Integrity Checks
- Browsing Partitions
- Resizing and Moving Partitions
- Creating Partitions
- Deleting Partitions
- Undeleting Partitions
- Changing Partition Labels
- Formatting Partitions
- Copying Partitions
- Checking Partitions for Errors
- Merging Partitions
- Splitting Partitions
- Getting Information About Partitions
- Scanning a Disk for Errors
- Defragmenting Drives
- Completing Advanced Disk Operations
- Converting Partitions
- Procedure for Converting Partitions
- Converting FAT Partitions to FAT32
- Converting FAT Partitions to NTFS
- Converting FAT32 Partitions to FAT
- Converting FAT32 Partitions to NTFS
- Converting FAT/FAT32 Partitions to 4K Aligned
- Converting NTFS Partitions to FAT or FAT32
- Converting Partitions to Logical or Primary
- Using Wizards
- Using PartitionMagic Utilities
- BootMagic
- Getting Started
- Configuring BootMagic
- Setting BootMagic Passwords
- Adding an Operating System to the BootMagic Menu
- Removing an Item from the BootMagic Menu
- Modifying a Menu Item’s Properties
- Setting a Default Operating System
- Booting from a Second Hard Disk
- Setting the Startup Delay
- Disabling BootMagic
- Using the BootMagic Menu
- Using BootMagic to Install Operating Systems
- Troubleshooting
- Using PartitionMagic With Other Programs
- Troubleshooting
- General Troubleshooting
- Freeing Memory to Run PartitionMagic under DOS
- Assigning a CD-ROM Drive Letter
- Using PartitionMagic With a SCSI Hard Disk
- PqRP Partitions
- Merging Partitions with Different NTFS Version Numbers
- Resolving Check Errors
- Resolving Partition Table Errors
- Partition Tables and Viruses
- Partition Will Not Boot After Resizing
- Generating Diagnostic Reports with PartitionInfo
- Error Messages and Solutions
- Miscellaneous Errors (3–38)
- Disk Access Errors (40–56)
- Miscellaneous Errors
- Partition Table Errors (100–199)
- #100 Partition table is bad
- #104 No sectors in partition
- #105 Partition starts on wrong boundary
- #106 Partition doesn’t start with sector one
- #107 Partition begins after end of disk
- #108 Partition doesn’t end at end of cylinder
- #109 Partition ends after end of disk
- #110 Partition table number of sectors is inconsistent
- #111 Logical partition starts outside of Extended
- #112 Logical partition ends outside Extended
- #113 Partitions overlap
- #116 Partition table Begin and Start inconsistent
- #117 Partition’s drive letter cannot be identified
- #120 The logical drive chain is incompatible
- #121 The first sector of the drive cannot be read
- #122 A bad sector was found in the current or new partition area
- #140 Overlapping partitions found. No partitions can be undeleted.
- Check Errors (500–599)
- Batch Errors (600–633)
- User Interaction Errors (950–999)
- #950 Unable to detect any disk drives
- #951 An invalid value was entered
- #952 Value entered is the same as the current value
- #963 Selected operation is currently invalid
- #968 Incorrect Volume Label entered, Deletion not performed
- #969 Incorrect Volume Label entered, Unable to proceed.
- #970 Invalid Bad Sector Check value specified
- #971 The label entered was too long
- #972 Invalid characters in the label
- #973 Volume Label cannot have leading spaces
- #974 Root size specified was not in the valid range
- #975 The cluster size specified was invalid for this partition
- #976 Cannot create the file system specified in the current space
- #977 Partition selected is invalid
- #978 Unable to set to proper partition after last operation. Script halted.
- #986 Unable to get information for the specified partition
- #993 Partition contains open files. Use the operating system check utility.
- NTFS Check Errors (1500–1699)
- #1501 Wrong version of NTFS
- #1503 Bad NTFS cluster size
- #1512 Restart record mismatch
- #1513 Bad attribute position in file record
- #1516 Partition improperly dismounted
- #1527 Bad update sequence number
- #1529 Information mismatch in directory entry
- #1538 Can’t find contiguous space to move
- #1539 File size mismatch
- #1544 External attribute list in external attribute
- #1545 File attributes out of order
- #1546 Attribute neither resident nor nonresident
- #1547 Wrong run limits
- #1548 File table has fewer than 16 entries
- #1549 File table has more than 4 billion entries
- #1604 File’s parent does not contain the file
- #1609 Lost cluster(s)
- #1630 Inconsistent sizes in attribute header
- #1644 Bad system file sequence number
- #1647 Error in root directory index
- #1681 Data is compressed or sparse
- #1687 An object index is present
- FAT Check Errors (2000–2099)
- #2001 FAT copies are not identical
- #2002 There are invalid entries in the FAT
- #2003 File size does not match FAT allocation for file
- #2005 One or more lost clusters are present
- #2012 Formatted FAT file system too big for partition
- #2013 A component of FAT geometry is bad
- #2024 The OS/2 Extended Attribute file is corrupt
- #2027 Too many root entries in the FAT32 partition to convert it to FAT16
- #4002 No valid NetWare volumes signature in volume definition table
- BootMagic Errors (8000-8999)
- Operating System Errors (over 10,000)
- Exit Code 12
- General Troubleshooting
- Service and Support Solutions
- Index
User’s Guide
Norton™
PartitionMagic 8.0
®
Includes Symantec™ BootMagic®
Norton™ PartitionMagic® 8.0
User Guide
© 1994-2004 Symantec Corporation
All rights reserved. This product and/or its use may be covered by one or more of the
following patents: 5,675,769; 5,706,472; 5,930,831; 6,088,778; 6,108,697; 6,108,759;
6,173,291; 6,178,487; 6,178,503; 6,185,575; 6,185,666; 6,253,300; 6,330,653;
and 6,377,958. Additional patents may be pending.
The software described in this book is furnished under a license agreement and may be used only in accordance with the
terms of the agreement.
Copyright Notice
Copyright ©2004 Symantec Corporation.
All Rights Reserved.
Any technical documentation that is made available by Symantec Corporation is the copyrighted work of Symantec
Corporation and is owned by Symantec Corporation.
NO WARRANTY. The technical documentation is being delivered to you AS-IS, and Symantec Corporation makes no
warranty as to its accuracy or use. Any use of the technical documentation or the information contained therein is at the
risk of the user. Documentation may include technical or tother inaccuracies or typographical errors. Symantec reserves the
right to make changes without prior notice.
No part of this publication may be copied without the express written permission of Symantec Corporation, 20330 Stevens
Creek Blvd., Cupertino, CA 95014.
Trademarks
Symantec, the Symantec logo, and Norton PartitionMagic are U.S. registered trademarks of Symantec Corporation. Norton,
BootMagic, Drive Image, DriveMapper, and GoBack are trademarks of Symantec Corporation in the United States and
elsewhere. DOS, Microsoft, Windows, and Windows NT are trademarks or registered trademarks of Microsoft
Corporation. All other brand and product names are trademarks or registered trademarks of the respective owners.
World Headquarters
20330 Stevens Creek Boulevard
Cupertino, CA 95014 USA
800.441.7234
541.334.6054
World Wide Web site:
http://www.symantec.com

iii
SYMANTEC SOFTWARE LICENSE AGREEMENT
Norton PartitionMagic
IMPORTANT: PLEASE READ THE TERMS AND CONDITIONS OF THIS LICENSE AGREEMENT CAREFULLY
BEFORE USING THE SOFTWARE. SYMANTEC CORPORATION AND/OR ITS SUBSIDIARIES (“SYMANTEC”) IS
WILLING TO LICENSE THE SOFTWARE TO YOU AS THE INDIVIDUAL, THE COMPANY, OR THE LEGAL ENTITY
THAT WILL BE UTILIZING THE SOFTWARE (REFERENCED BELOW AS “YOU” OR “YOUR”) ONLY ON THE
CONDITION THAT YOU ACCEPT ALL OF THE TERMS OF THIS LICENSE AGREEMENT. THIS IS A LEGAL AND
ENFORCEABLE CONTRACT BETWEEN YOU AND SYMANTEC. BY OPENING THIS PACKAGE, BREAKING THE
SEAL, CLICKING THE “ACCEPT” OR “YES” BUTTON OR OTHERWISE INDICATING ASSENT ELECTRONICALLY, OR
LOADING THE SOFTWARE, YOU AGREE TO THE TERMS AND CONDITIONS OF THIS AGREEMENT. IF YOU DO
NOT AGREE TO THESE TERMS AND CONDITIONS, CLICK THE “I DO NOT ACCEPT” OR “NO” BUTTON OR
OTHERWISE INDICATE REFUSAL, MAKE NO FURTHER USE OF THE SOFTWARE, AND CONTACT SYMANTEC
CUSTOMER SERVICE FOR INFORMATION ON HOW TO OBTAIN A REFUND OF THE MONEY YOU PAID FOR THE
SOFTWARE (LESS SHIPPING, HANDLING, AND ANY APPLICABLE TAXES) AT ANY TIME DURING THE SIXTY (60)
DAY PERIOD FOLLOWING THE DATE OF PURCHASE.
1. License. The software and documentation that accompanies this license (collectively the “Software”) is the property of
Symantec, or its licensors, and is protected by copyright law. While Symantec continues to own the Software, You will have
certain rights to use the Software after Your acceptance of this license. This license governs any releases, revisions, or
enhancements to the Software that Symantec may furnish to You. Except as may be modified by a Symantec license certificate,
license coupon, or license key (each a “License Module”) that accompanies, precedes, or follows this license, Your rights and
obligations with respect to the use of this Software are as follows.
You may:
A. use one copy of the Software on or in conjunction with a single computer that is owned or leased by You. Once the Software
has been accessed by one computer, it may not be used on additional computers without purchasing additional licenses. Once You
have used the Software, You may use the Software on a replacement computer, provided that the Software is completely removed
from the computer being replaced and such computer is permanently decommissioned. If a License Module accompanies,
precedes, or follows this license, You may make the number of copies of the Software licensed to You by Symantec as provided in
Your License Module. Your License Module shall constitute proof of Your right to make such copies;
B. make one copy of the Software for archival purposes, or copy the Software onto the hard disk of Your computer and retain the
original for archival purposes;
C. use the Software on a network, provided that You have a licensed copy of the Software for each computer that can access the
Software over that network;
D. use the Software for internal business purposes only and may not use the Software on behalf of a client or customer;
E. after written notice to Symantec, transfer the Software on a permanent basis to another person or entity, provided that You retain
no copies of the Software and the transferee agrees to the terms of this license; and
F. use the Software in accordance with any additional permitted uses set forth below.
You may not:
A. copy the printed documentation that accompanies the Software;
B. sublicense, rent, or lease any portion of the Software; reverse engineer, decompile, disassemble, modify, translate, make any
attempt to discover the source code of the Software, or create derivative works from the Software;
C. use the Software as part of a facility management, timesharing, service provider, or service bureau arrangement;
D. use a previous version or copy of the Software after You have received and installed a disk replacement set or an upgraded
version. Upon upgrading the Software, all copies of the prior version must be destroyed;
E. use a later version of the Software than is provided herewith unless You have purchased upgrade insurance or have otherwise
separately acquired the right to use such later version;

iv
F. use, if You received the software distributed on media containing multiple Symantec products, any Symantec software on the
media for which You have not received a permission in a License Module;
G. use the Software in any manner not authorized by this license; nor
H. use the Software in any manner that contradicts any additional restrictions set forth below.
2. Content Updates. Certain Software utilize content that is updated from time to time (including but not limited to the following
Software: antivirus software utilize updated virus definitions; content filtering software utilize updated URL lists; some firewall
software utilize updated firewall rules; and vulnerability assessment products utilize updated vulnerability data; these updates are
collectively referred to as “Content Updates”). You shall have the right to obtain Content Updates for any period for which You
have purchased maintenance, except for those Content Updates that Symantec elects to make available by separate paid
subscription, or for any period for which You have otherwise separately acquired the right to obtain Content Updates. Symantec
reserves the right to designate specified Content Updates as requiring purchase of a separate subscription at any time and without
notice to You; provided, however, that if You purchase maintenance hereunder that includes particular Content Updates on the date
of purchase, You will not have to pay an additional fee to continue receiving such Content Updates through the term of such
maintenance even if Symantec designates such Content Updates as requiring separate purchase. This License does not otherwise
permit the licensee to obtain and use Content Updates.
3. Product Installation and Required Activation. There are technological measures in this Software that are designed to prevent
unlicensed or illegal use of the Software. You agree that Symantec may use these measures to protect Symantec against software
piracy. This Software may contain enforcement technology that limits the ability to install and uninstall the Software on a
computer to not more than a finite number of times for a finite number of computers. This License and the Software containing
enforcement technology require activation as further set forth in the documentation. The Software will only operate for a finite
period of time prior to Software activation by You. During activation, You will provide Your unique product key accompanying
the Software and computer configuration in the form of an alphanumeric code over the Internet to verify the authenticity of the
Software. If You do not complete the activation within the finite period of time set forth in the documentation, or as prompted by
the Software, the Software will cease to function until activation is complete, which will restore Software functionality. In the
event that You are not able to activate the Software over the Internet, or through any other method specified during the activation
process, You may contact Symantec Customer Support using the information provided by Symantec during activation, or as may be
set forth in the documentation.
4. Sixty (60) Day Money Back Guarantee. If You are the original licensee of this copy of the Software and are not completely
satisfied with it for any reason, please contact Symantec Customer Service for a refund of the money You paid for the Software
(less shipping, handling, and any applicable taxes) at any time during the sixty (60) day period following the date of purchase.
5. Limited Warranty. Symantec warrants that the media on which the Software is distributed will be free from defects for a period
of sixty (60) days from the date of delivery of the Software to You. Your sole remedy in the event of a breach of this warranty will
be that Symantec will, at its option, replace any defective media returned to Symantec within the warranty period or refund the
money You paid for the Software. Symantec does not warrant that the Software will meet Your requirements or that operation of
the Software will be uninterrupted or that the Software will be error-free.
TO THE MAXIMUM EXTENT PERMITTED BY APPLICABLE LAW, THE ABOVE WARRANTY IS EXCLUSIVE
AND IN LIEU OF ALL OTHER WARRANTIES, WHETHER EXPRESS OR IMPLIED, INCLUDING THE IMPLIED
WARRANTIES OF MERCHANTABILITY, FITNESS FOR A PARTICULAR PURPOSE, AND NONINFRINGEMENT
OF INTELLECTUAL PROPERTY RIGHTS. THIS WARRANTY GIVES YOU SPECIFIC LEGAL RIGHTS. YOU
MAY HAVE OTHER RIGHTS, WHICH VARY FROM STATE TO STATE AND COUNTRY TO COUNTRY.
6. Disclaimer of Damages. SOME STATES AND COUNTRIES, INCLUDING MEMBER COUNTRIES OF THE EUROPEAN
ECONOMIC AREA, DO NOT ALLOW THE LIMITATION OR EXCLUSION OF LIABILITY FOR INCIDENTAL OR
CONSEQUENTIAL DAMAGES, SO THE BELOW LIMITATION OR EXCLUSION MAY NOT APPLY TO YOU.
TO THE MAXIMUM EXTENT PERMITTED BY APPLICABLE LAW AND REGARDLESS OF WHETHER ANY
REMEDY SET FORTH HEREIN FAILS OF ITS ESSENTIAL PURPOSE, IN NO EVENT WILL SYMANTEC OR ITS
LICENSORS BE LIABLE TO YOU FOR ANY SPECIAL, CONSEQUENTIAL, INDIRECT, OR SIMILAR DAMAGES,
INCLUDING ANY LOST PROFITS OR LOST DATA ARISING OUT OF THE USE OR INABILITY TO USE THE
SOFTWARE EVEN IF SYMANTEC HAS BEEN ADVISED OF THE POSSIBILITY OF SUCH DAMAGES.

v
IN NO CASE SHALL SYMANTEC’S OR ITS LICENSORS’ LIABILITY EXCEED THE PURCHASE PRICE FOR THE
SOFTWARE. The disclaimers and limitations set forth above will apply regardless of whether You accept the Software.
7. U.S. Government Restricted Rights. RESTRICTED RIGHTS LEGEND. All Symantec products and documentation are
commercial in nature. The software and software documentation are “Commercial Items,” as that term is defined in 48 C.F.R.
section 2.101, consisting of “Commercial Computer Software” and “Commercial Computer Software Documentation,” as such
terms are defined in 48 C.F.R. section 252.227-7014(a)(5) and 48 C.F.R. section 252.227-7014(a)(1), and used in 48 C.F.R. section
12.212 and 48 C.F.R. section 227.7202, as applicable. Consistent with 48 C.F.R. section 12.212, 48 C.F.R. section 252.227-7015,
48 C.F.R. section 227.7202 through 227.7202-4, 48 C.F.R. section 52.227-14, and other relevant sections of the Code of Federal
Regulations, as applicable, Symantec's computer software and computer software documentation are licensed to United States
Government end users with only those rights as granted to all other end users, according to the terms and conditions contained in
this license agreement. Manufacturer is Symantec Corporation, 20330 Stevens Creek Blvd., Cupertino, CA 95014.
8. Export Regulation. Certain Symantec products are subject to export controls by the U.S. Department of Commerce (DOC),
under the Export Administration Regulations (EAR) (see www.bxa.doc.gov). Violation of U.S. law is strictly prohibited. You agree
to comply with the requirements of the EAR and all applicable international, national, state, regional and local laws, and
regulations, including any applicable import and use restrictions. Symantec products are currently prohibited for export or
re-export to Cuba, North Korea, Iran, Iraq, Libya, Syria and Sudan or to any country subject to applicable trade sanctions. You
agree not to export, or re-export, directly or indirectly, any product to any country outlined in the EAR, nor to any person or entity
on the DOC Denied Persons, Entities and Unverified Lists, the U.S. Department of State’s Debarred List, or on the U.S.
Department of Treasury's lists of Specially Designated Nationals, Specially Designated Narcotics Traffickers, or Specially
Designated Terrorists. Furthermore, You agree not to export, or re-export, Symantec products to any military entity not approved
under the EAR, or to any other entity for any military purpose, nor will it sell any Symantec product for use in connection with
chemical, biological, or nuclear weapons or missiles capable of delivering such weapons.
9. General. If You are located in North America or Latin America, this Agreement will be governed by the laws of the State of
California, United States of America. Otherwise, this Agreement will be governed by the laws of England and Wales. This
Agreement and any related License Module is the entire agreement between You and Symantec relating to the Software and: (i)
supersedes all prior or contemporaneous oral or written communications, proposals, and representations with respect to its subject
matter; and (ii) prevails over any conflicting or additional terms of any quote, order, acknowledgment, or similar communications
between the parties. This Agreement shall terminate upon Your breach of any term contained herein and You shall cease use of and
destroy all copies of the Software. The disclaimers of warranties and damages and limitations on liability shall survive termination.
Software and documentation is delivered Ex Works California, U.S.A. or Dublin, Ireland respectively (ICC INCOTERMS 2000).
This Agreement may only be modified by a License Module that accompanies this license or by a written document that has been
signed by both You and Symantec. Should You have any questions concerning this Agreement, or if You desire to contact
Symantec for any reason, please write to: (i) Symantec Customer Service, 555 International Way, Springfield, OR 97477, U.S.A.,
(ii) Symantec Authorized Service Center, Postbus 1029, 3600 BA Maarssen, The Netherlands, or (iii) Symantec Customer Service,
1 Julius Ave, North Ryde, NSW 2113, Australia.

vi
Norton PartitionMagic vii
Introduction
What Is PartitionMagic? . . . . . . . . . . . . . . . . . . . . . . . . . . . . . . . . . . . . . . . . . . . . . . . 1
New Features . . . . . . . . . . . . . . . . . . . . . . . . . . . . . . . . . . . . . . . . . . . . . . . . . . . . . . . . 1
Chapter 1: Getting Started
PartitionMagic System Requirements . . . . . . . . . . . . . . . . . . . . . . . . . . . . . . . . . . . . . 4
Installing PartitionMagic under Windows . . . . . . . . . . . . . . . . . . . . . . . . . . . . . . . . . . 4
Creating Rescue Disks . . . . . . . . . . . . . . . . . . . . . . . . . . . . . . . . . . . . . . . . . . . . . . . . . 5
Before Running PartitionMagic . . . . . . . . . . . . . . . . . . . . . . . . . . . . . . . . . . . . . . . . . . 7
Running PartitionMagic . . . . . . . . . . . . . . . . . . . . . . . . . . . . . . . . . . . . . . . . . . . . . . . . 8
Setting a Password for PartitionMagic . . . . . . . . . . . . . . . . . . . . . . . . . . . . . . . . . . . 10
Uninstalling PartitionMagic . . . . . . . . . . . . . . . . . . . . . . . . . . . . . . . . . . . . . . . . . . . . 11
Chapter 2: PartitionMagic Basics
PartitionMagic Main Window . . . . . . . . . . . . . . . . . . . . . . . . . . . . . . . . . . . . . . . . . . 14
Rescue Disk Main Window . . . . . . . . . . . . . . . . . . . . . . . . . . . . . . . . . . . . . . . . . . . . 15
Process Overview . . . . . . . . . . . . . . . . . . . . . . . . . . . . . . . . . . . . . . . . . . . . . . . . . . . 16
Selecting a Hard Disk and Partition . . . . . . . . . . . . . . . . . . . . . . . . . . . . . . . . . . . . . . 17
Selecting an Operation . . . . . . . . . . . . . . . . . . . . . . . . . . . . . . . . . . . . . . . . . . . . . . . . 18
Undoing an Operation . . . . . . . . . . . . . . . . . . . . . . . . . . . . . . . . . . . . . . . . . . . . . . . . 18
Viewing Pending Operations . . . . . . . . . . . . . . . . . . . . . . . . . . . . . . . . . . . . . . . . . . . 19
Applying Changes to Your System . . . . . . . . . . . . . . . . . . . . . . . . . . . . . . . . . . . . . . 19
Supported File Systems . . . . . . . . . . . . . . . . . . . . . . . . . . . . . . . . . . . . . . . . . . . . . . . 20
Changing PartitionMagic Preferences . . . . . . . . . . . . . . . . . . . . . . . . . . . . . . . . . . . . 21
Using International Keyboards . . . . . . . . . . . . . . . . . . . . . . . . . . . . . . . . . . . . . . . . . 23
Defragmenting a Hard Drive . . . . . . . . . . . . . . . . . . . . . . . . . . . . . . . . . . . . . . . . . . . 24
Getting Help . . . . . . . . . . . . . . . . . . . . . . . . . . . . . . . . . . . . . . . . . . . . . . . . . . . . . . . . 24
Chapter 3: Managing Partitions
Integrity Checks . . . . . . . . . . . . . . . . . . . . . . . . . . . . . . . . . . . . . . . . . . . . . . . . . . . . . 28
Browsing Partitions . . . . . . . . . . . . . . . . . . . . . . . . . . . . . . . . . . . . . . . . . . . . . . . . . . 28
Resizing and Moving Partitions . . . . . . . . . . . . . . . . . . . . . . . . . . . . . . . . . . . . . . . . . 29
Creating Partitions . . . . . . . . . . . . . . . . . . . . . . . . . . . . . . . . . . . . . . . . . . . . . . . . . . . 34
Deleting Partitions . . . . . . . . . . . . . . . . . . . . . . . . . . . . . . . . . . . . . . . . . . . . . . . . . . . 44
Table of Contents
Table of Contentsviii
Undeleting Partitions . . . . . . . . . . . . . . . . . . . . . . . . . . . . . . . . . . . . . . . . . . . . . . . . . 45
Changing Partition Labels . . . . . . . . . . . . . . . . . . . . . . . . . . . . . . . . . . . . . . . . . . . . . 47
Formatting Partitions . . . . . . . . . . . . . . . . . . . . . . . . . . . . . . . . . . . . . . . . . . . . . . . . . 48
Copying Partitions . . . . . . . . . . . . . . . . . . . . . . . . . . . . . . . . . . . . . . . . . . . . . . . . . . . 48
Checking Partitions for Errors . . . . . . . . . . . . . . . . . . . . . . . . . . . . . . . . . . . . . . . . . . 50
Merging Partitions . . . . . . . . . . . . . . . . . . . . . . . . . . . . . . . . . . . . . . . . . . . . . . . . . . . 52
Splitting Partitions . . . . . . . . . . . . . . . . . . . . . . . . . . . . . . . . . . . . . . . . . . . . . . . . . . . 54
Getting Information About Partitions . . . . . . . . . . . . . . . . . . . . . . . . . . . . . . . . . . . . 56
Scanning a Disk for Errors . . . . . . . . . . . . . . . . . . . . . . . . . . . . . . . . . . . . . . . . . . . . . 58
Defragmenting Drives . . . . . . . . . . . . . . . . . . . . . . . . . . . . . . . . . . . . . . . . . . . . . . . . 60
Chapter 4: Completing Advanced Disk Operations
Changing a Drive Letter . . . . . . . . . . . . . . . . . . . . . . . . . . . . . . . . . . . . . . . . . . . . . . . 62
Retesting Bad Sectors . . . . . . . . . . . . . . . . . . . . . . . . . . . . . . . . . . . . . . . . . . . . . . . . . 62
Hiding and Unhiding Partitions . . . . . . . . . . . . . . . . . . . . . . . . . . . . . . . . . . . . . . . . . 63
Resizing the Root Directory . . . . . . . . . . . . . . . . . . . . . . . . . . . . . . . . . . . . . . . . . . . . 64
Setting an Active Partition . . . . . . . . . . . . . . . . . . . . . . . . . . . . . . . . . . . . . . . . . . . . . 65
Resizing Clusters . . . . . . . . . . . . . . . . . . . . . . . . . . . . . . . . . . . . . . . . . . . . . . . . . . . . 66
Chapter 5: Converting Partitions
Procedure for Converting Partitions . . . . . . . . . . . . . . . . . . . . . . . . . . . . . . . . . . . . . . 70
Converting FAT Partitions to FAT32 . . . . . . . . . . . . . . . . . . . . . . . . . . . . . . . . . . . . 71
Converting FAT Partitions to NTFS . . . . . . . . . . . . . . . . . . . . . . . . . . . . . . . . . . . . . 71
Converting FAT32 Partitions to FAT . . . . . . . . . . . . . . . . . . . . . . . . . . . . . . . . . . . . 72
Converting FAT32 Partitions to NTFS . . . . . . . . . . . . . . . . . . . . . . . . . . . . . . . . . . . 72
Converting FAT/FAT32 Partitions to 4K Aligned . . . . . . . . . . . . . . . . . . . . . . . . . . 73
Converting NTFS Partitions to FAT or FAT32 . . . . . . . . . . . . . . . . . . . . . . . . . . . . . 73
Converting Partitions to Logical or Primary . . . . . . . . . . . . . . . . . . . . . . . . . . . . . . . 76
Chapter 6: Using Wizards
Overview . . . . . . . . . . . . . . . . . . . . . . . . . . . . . . . . . . . . . . . . . . . . . . . . . . . . . . . . . . 80
Running Wizards . . . . . . . . . . . . . . . . . . . . . . . . . . . . . . . . . . . . . . . . . . . . . . . . . . . . 80
Create New Partition Wizard . . . . . . . . . . . . . . . . . . . . . . . . . . . . . . . . . . . . . . . . . . . 80
Create Backup Partition Wizard . . . . . . . . . . . . . . . . . . . . . . . . . . . . . . . . . . . . . . . . . 81
Install Another Operating System Wizard . . . . . . . . . . . . . . . . . . . . . . . . . . . . . . . . . 81
Resize a Partition Wizard . . . . . . . . . . . . . . . . . . . . . . . . . . . . . . . . . . . . . . . . . . . . . . 81
Redistribute Free Space Wizard . . . . . . . . . . . . . . . . . . . . . . . . . . . . . . . . . . . . . . . . . 82
Norton PartitionMagic ix
Merge Partitions Wizard . . . . . . . . . . . . . . . . . . . . . . . . . . . . . . . . . . . . . . . . . . . . . . 82
Copy Partition Wizard . . . . . . . . . . . . . . . . . . . . . . . . . . . . . . . . . . . . . . . . . . . . . . . . 82
Chapter 7: Using PartitionMagic Utilities
Changing Drive Letter References with DriveMapper . . . . . . . . . . . . . . . . . . . . . . . 84
Switching between Bootable Partitions with PQBoot . . . . . . . . . . . . . . . . . . . . . . . . 85
Chapter 8: BootMagic
Getting Started . . . . . . . . . . . . . . . . . . . . . . . . . . . . . . . . . . . . . . . . . . . . . . . . . . . . . . 90
Configuring BootMagic . . . . . . . . . . . . . . . . . . . . . . . . . . . . . . . . . . . . . . . . . . . . . . . 94
Setting BootMagic Passwords . . . . . . . . . . . . . . . . . . . . . . . . . . . . . . . . . . . . . . . . . . 96
Adding an Operating System to the BootMagic Menu . . . . . . . . . . . . . . . . . . . . . . . 96
Removing an Item from the BootMagic Menu . . . . . . . . . . . . . . . . . . . . . . . . . . . . . 97
Modifying a Menu Item’s Properties . . . . . . . . . . . . . . . . . . . . . . . . . . . . . . . . . . . . . 98
Setting a Default Operating System . . . . . . . . . . . . . . . . . . . . . . . . . . . . . . . . . . . . . . 98
Booting from a Second Hard Disk . . . . . . . . . . . . . . . . . . . . . . . . . . . . . . . . . . . . . . . 98
Setting the Startup Delay . . . . . . . . . . . . . . . . . . . . . . . . . . . . . . . . . . . . . . . . . . . . . . 99
Disabling BootMagic . . . . . . . . . . . . . . . . . . . . . . . . . . . . . . . . . . . . . . . . . . . . . . . . . 99
Using the BootMagic Menu . . . . . . . . . . . . . . . . . . . . . . . . . . . . . . . . . . . . . . . . . . . 100
Using BootMagic to Install Operating Systems . . . . . . . . . . . . . . . . . . . . . . . . . . . 100
Troubleshooting . . . . . . . . . . . . . . . . . . . . . . . . . . . . . . . . . . . . . . . . . . . . . . . . . . . 100
Appendix A: Using PartitionMagic With Other Programs
Norton Utilities . . . . . . . . . . . . . . . . . . . . . . . . . . . . . . . . . . . . . . . . . . . . . . . . . . . . 104
Disk Compression Utilities . . . . . . . . . . . . . . . . . . . . . . . . . . . . . . . . . . . . . . . . . . . 105
Operating System Boot Utilities . . . . . . . . . . . . . . . . . . . . . . . . . . . . . . . . . . . . . . . 106
Virus Protection Software . . . . . . . . . . . . . . . . . . . . . . . . . . . . . . . . . . . . . . . . . . . . 106
Drive Overlay Programs . . . . . . . . . . . . . . . . . . . . . . . . . . . . . . . . . . . . . . . . . . . . . 107
SoundBlaster . . . . . . . . . . . . . . . . . . . . . . . . . . . . . . . . . . . . . . . . . . . . . . . . . . . . . . 107
GoBack . . . . . . . . . . . . . . . . . . . . . . . . . . . . . . . . . . . . . . . . . . . . . . . . . . . . . . . . . . 107
Defragmenting Software . . . . . . . . . . . . . . . . . . . . . . . . . . . . . . . . . . . . . . . . . . . . . 108
Appendix B: Troubleshooting
General Troubleshooting . . . . . . . . . . . . . . . . . . . . . . . . . . . . . . . . . . . . . . . . . . . . . 110
Generating Diagnostic Reports with PartitionInfo . . . . . . . . . . . . . . . . . . . . . . . . . 115
Error Messages and Solutions . . . . . . . . . . . . . . . . . . . . . . . . . . . . . . . . . . . . . . . . . 117
Exit Code 12 . . . . . . . . . . . . . . . . . . . . . . . . . . . . . . . . . . . . . . . . . . . . . . . . . . . . . . 136
Table of Contentsx
Appendix C: Service and Support Solutions
Customer service . . . . . . . . . . . . . . . . . . . . . . . . . . . . . . . . . . . . . . . . . . . . . . . . . . . 139
Technical support . . . . . . . . . . . . . . . . . . . . . . . . . . . . . . . . . . . . . . . . . . . . . . . . . . . 140
Subscription policy . . . . . . . . . . . . . . . . . . . . . . . . . . . . . . . . . . . . . . . . . . . . . . . . . . 140
Worldwide service and support . . . . . . . . . . . . . . . . . . . . . . . . . . . . . . . . . . . . . . . . 141
Service and support offices . . . . . . . . . . . . . . . . . . . . . . . . . . . . . . . . . . . . . . . . . . . 141
Index
Norton PartitionMagic 1
Introduction
What Is PartitionMagic?
Norton™ PartitionMagic® is a utility that lets you quickly and easily create, delete,
merge, or convert file systems of partitions on your hard disk without destroying existing
data. PartitionMagic will make your hard disk more efficient and provide greater security
for your data.
PartitionMagic enables you to secure your data by physically separating it from other files.
Separate partitions also make backups easy.
PartitionMagic helps you reliably run multiple operating systems on the same computer.
PartitionMagic also includes BootMagic, a powerful boot manager that helps you safely
install new operating systems and lets you choose which operating system you want to use
when starting your computer.
In addition to powerful partitioning features, PartitionMagic offers a variety of other
options. For instance, you can perform partitioning operations and view the changes that
will be made before applying them to your system. Additionally, you can view
comprehensive information about your hard disk geometry and your hardware system, and
you can resize root directories (FAT, FAT32) to make room for more long filenames.
New Features
Norton PartitionMagic 8.0 includes the following new features:
•New user interface – Makes PartitionMagic easier to navigate.
•Large partition support – Enables management of partitions up to 300 GB when the
partition is less than 90% full. Larger hard drives may require additional memory.
•File browser – Makes it possible to browse the contents of a partition or copy, move,
and rename files and folders from within PartitionMagic.
•Running multiple operating systems – BootMagic has been enhanced, so it can be
installed on a FAT or FAT32 partition on any hard disk. PQBoot for Windows has
been added, enabling you to boot into an alternate operating system from Windows
and return to the standard operating system on the next reboot.
Introduction2
•Ability to resize clusters on NTFS partitions – Reclaims lost performance that can
result from converting a FAT32 partition to NTFS as part of an operating system
upgrade. Larger clusters can also reduce the rate of fragmentation.
•Installing Another Operating System wizard – Includes built-in information so
more of the operations are automated when you are preparing your system to run
multiple operating systems. Also includes information you can print to help you with
the part of the process that is not directly tied to PartitionMagic.
•Create Backup Partition wizard – Helps you create a partition for backup data files.
•Flash tutorial – Introduces partitioning concepts and provides an overview of the
tasks you can complete with PartitionMagic.

Chapter 1: Getting Started4
PartitionMagic System Requirements
PartitionMagic for Windows requires a minimum of 70 MB of hard disk space, a CD drive
(any speed), a 3.5-inch floppy drive, VGA or higher resolution monitor with a screen area
of at least 800 x 600 pixels, and processor and memory requirements as shown below.
* Resizing NTFS clusters on partitions over 120 GB in size requires 256 MB RAM.
PartitionMagic supports hardware RAID level 0 (disk striping) and RAID level 5 (striping
with parity).
PartitionMagic supports external USB, USB2, and FireWire (1394) hard drives under
Windows. Operations that are executed in boot mode are not supported on these devices.
See “USB, USB2, and FireWire Support” on page 17.
The rescue disk version of PartitionMagic requires a Pentium/150 MHz processor (or
faster), a 3.5-inch floppy drive, 8 MB of RAM (16 MB for NTFS partitions; 32 MB
recommended for FAT32 partitions; some very large partitions may require up to 256
MB). Microsoft recommends 128 MB RAM for Windows 2000 and Windows XP
systems, although the product can run on systems with 64 MB RAM.
Installing PartitionMagic under Windows
You must have administrative privileges to install PartitionMagic on a Windows NT,
Windows 2000, or Windows XP system.
IMPORTANT! PartitionMagic must be installed on a local drive, not on a network drive.
Operating System Minimum RAM Minimum Processor
Windows 95b through
Windows 98 SE
32 MB Pentium/150 MHz or compatible
Windows Me 32 MB Pentium/150 MHz or compatible
Windows NT 4.0
Workstation with SP6a
applied
32 MB* Pentium/150 MHz or compatible
Windows 2000
Professional
64 MB* Pentium/150 MHz or compatible
Windows XP 128 MB* Pentium/233 MHz or compatible
Norton PartitionMagic 5
NOTE Before installing PartitionMagic 8.0 under Windows 2000, ensure you have
updated the operating system with the latest Microsoft Service Pack (SP2 or
greater).
As a good computing practice, regardless of operating system, run chkdsk /f
before running Partition Magic to make sure there are no file system errors on
the partition.
1 Insert the PartitionMagic CD into your CD drive.
2If the installation program does not start automatically, click Start ➤ Run on the
Windows taskbar. Then type
drive
:\AUTORUN, where
drive
is the drive letter of
your CD drive.
3Click PartitionMagic ➤ Install, and follow the on-screen installation instructions.
There is sometimes a delay after you click Install. If you click it twice, you will start two
instances of the installation and will have to cancel the second one.
Creating Rescue Disks
You can run a DOS version of PartitionMagic or the BootMagic configuration program
from the PartitionMagic CD if your computer has the ability to boot from a CD. If your
computer cannot boot from a CD, Norton recommends that you create rescue diskettes at
the end of the PartitionMagic installation.
You can create rescue disks from the PartitionMagic CD or from the Start menu. The
bootable CD and rescue disks also enable you to run PartitionMagic from DOS, Windows
3.x, or Linux machines.
Rescue disks are useful when:
• You want to run PartitionMagic, but you do not have an operating system that is
supported by the Windows version of the software.
• You have hidden the partition where PartitionMagic is installed and need to run
PartitionMagic to unhide the partition.
• You have accidently converted a partition to FAT32 or NTFS and your operating
system does not support that operating system, so your computer will not boot. (You
can use the rescue disks to convert the partition back to FAT.)
• Other occasions arise when you do not have access to PartitionMagic on the CD or
hard drive.

Chapter 1: Getting Started6
You must have two blank 1.44 MB floppy disks available before you begin this procedure
(three disks for double-byte languages).
1 You can create rescue disks three ways:
2Insert a blank formatted 1.44 MB disk into your 3.5-inch disk drive and click OK.
3Follow the prompts and the instructions on the progress bar (located at the bottom of
the window).
To create rescue
disks from: Do this:
Windows
(preferred
method)
Click Start ➤ Programs ➤ Norton PartitionMagic 8.0 ➤
PartitionMagic 8.0 Tools ➤ Create Rescue Disks.
PartitionMagic
CD (useful if you
do not have
Windows)
1a Open the English\DOSMAKE folder on the
PartitionMagic CD.
1b Type MAKEDISK A:, where A: is the drive letter for
your floppy disk drive.
You can also install the DOS version of PartitionMagic to
your hard disk using this process. If you install to your hard
disk, the PartitionMagic files (but not the system files) will be
installed to a PQMAGIC directory at the root of the disk, and
you will not need floppy disks.
PartitionMagic
main window
Click Tools ➤ Create Rescue Disks on the menu bar.

Norton PartitionMagic 7
The rescue disks contain the following files:
If you create rescue disks for a double-byte language, the third disk includes fonts.
Before Running PartitionMagic
It is wise to run a file check (such as CheckDisk or ScanDisk) before running
PartitionMagic. Doing so can help you avoid problems you could encounter if you try to
manipulate partitions on a disk with bad sectors or file system errors. See “Checking
Partitions for Errors” on page 50.
You should back up your hard disk before using PartitionMagic. While PartitionMagic has
been thoroughly tested and is reliable, other factors, (such as power failures, operating
system bugs, and hardware defects), can put your data at risk. Before using any utility that
makes extensive changes to your hard disk, you should back up your data.
PartitionMagic cannot run while other low-level disk utilities (such as virus detection
software, defragmenting software like Diskeeper®, or backup software like Norton
GoBack™) are running. Close all such utilities prior to starting PartitionMagic.
Verify that the version of PartitionMagic you are running is supported on the operating
system (and Service Pack, if applicable) you are running. See “PartitionMagic System
Requirements” on page 4.
PartitionMagic Disk 1 PartitionMagic Disk 2
• Autoexe2.bat
• Autoexec.bat
• Command.com
• Ega.cpi
•Keyb.com
• Mode.com
• Partinfo.exe (utility program)
• PTEDIT (utility program)
• Miscellaneous system (.SYS) files
• MSCDEX.exe (Windows 9x/Me
only)
• NWCDEX.exe (Windows
NT/2000/XP only)
•Fdisk.com (Windows NT/2000/XP
only)
• CHKDSK.exe
• Autoexec.bat
• Command.com
• Mouse.com
• PMHelp.dat (help file)
•PQMagic.exe
•PQMagic.ovl
•PQMagic.pqg
•PQPB.rtc
• Rescue.txt
•zAbout.pqg
• Boot.ini (Windows NT/2000/XP
only)

Chapter 1: Getting Started8
If you would like a high-level overview of PartitionMagic, click Help ➤ Flash Tutorial
to run a Flash presentation that explains the product.
Running PartitionMagic
You can run PartitionMagic from Windows 95, Windows 98, Windows Me, Windows NT
4.0 Workstation, Windows 2000 Professional, or Windows XP. Under any other operating
system, you must run PartitionMagic from the rescue disks.
Running PartitionMagic from Rescue Disks
When you boot your computer from the first rescue disk, PQMAGIC automatically runs.
You must insert the second rescue disk when prompted.
Preparation
Before you run PartitionMagic from the rescue disks, you should:
• Turn off third-party disk caches.
• Deactivate/unload any TSR programs that access or modify partitions being changed.
You cannot run PartitionMagic on a Windows 2000 Professional, Windows XP
Professional, or Windows Me machine that is in hibernation. To use the rescue diskette or
PartitionMagic for Windows, Windows 2000, Windows XP, or Windows Me must have
been shut down normally.
Rescue Disk Limitations
The following features are not available when you run the DOS version of PartitionMagic
from the rescue disks or from the PartitionMagic bootable CD.
• Split partitions
• Secure erase of partitions
• Undo last change
• Wizards
To run from: Do this:
Windows Start menu Click Start ➤ Programs ➤ Norton PartitionMagic 8.0 ➤
PartitionMagic 8.0.
Windows Explorer Right-click any drive object, and click PartitionMagic 8.0.

Norton PartitionMagic 9
If you run out of space on the first rescue disk as a result of adding network, SCSI, or
CD-ROM drivers to your boot sequence, you can delete the following files from the disk:
chkdsk.com, fdisk.exe, ptedit.exe, and partinfo.exe. We recommend that you delete the
files in that order, freeing up only the space that you need to accommodate additional files.
These files are included in the Utilities folder on the PartitionMagic CD where you can
access them later, if necessary.
If you use an international keyboard or character set, you will need to modify the
AUTOEXE2.BAT and CONFIG.SYS files on the rescue disks. Refer to “Using
International Keyboards” on page 23 for additional information.
Checking an NTFS partition with the rescue disk version of PartitionMagic may take an
unusually long time. Since PartitionMagic performs checks both before and after the
move, copy, and resize operations, these operations may be slower with the rescue disk
version of PartitionMagic than with the Windows version.
Command Line Switches
The following command line options are supported by the Windows version and the DOS
(rescue disk) version of PartitionMagic, unless noted otherwise. When you specify
multiple options, the order is unimportant.
Switch Description
/? Lists all the command line options switches for the version of
PartitionMagic you are running.
/CAS Copies all sectors within partitions.
/CBS Checks for all bad sectors.
/CEC Checks for extra cylinders.
/DBG Enables debug messages.
/IFC Ignores file system checks.
/I24 Ignores the 1024 cylinder boundary.
/MUP Allows you to move partitions of unknown types.
/NBS Disables bad sector checking.
/NRB Instructs PartitionMagic not to reboot after the program exits.
Chapter 1: Getting Started10
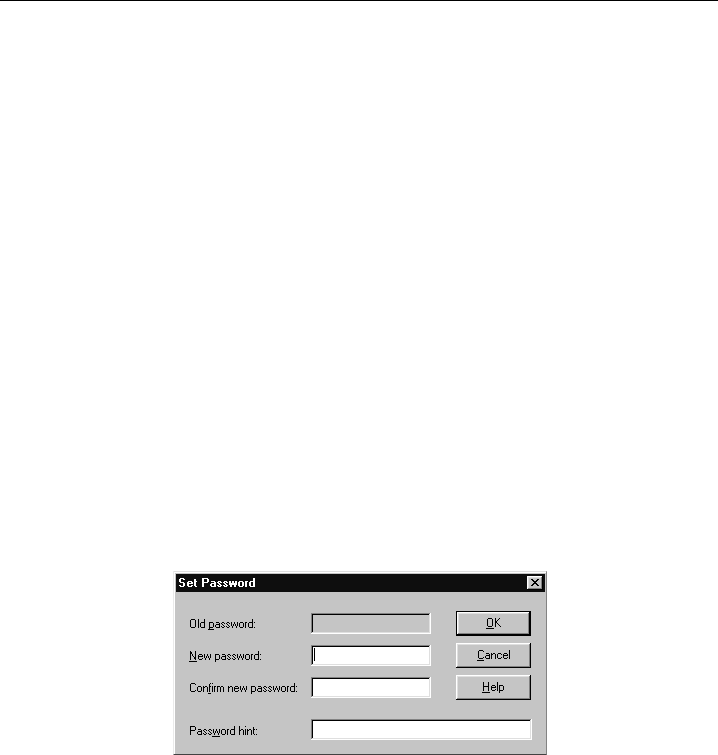
Setting a Password for PartitionMagic
You can assign a password that must be entered before PartitionMagic for Windows will
start.
1 Click General ➤ Set Password.
The Set Password dialog appears.
2Type a new password, then press <Tab>.
3Confirm the new password, then press <Tab>.
4(Optional) Add a hint.
5Click OK.
/NSS Does not display the splash screen.
/PQB Forces the batch file to the specified location. PartitionMagic creates a
batch file when it must perform some operations in boot mode.
Syntax: PQMAGIC /PQB=C:\, where C: is the location where you
want the batch file to be saved.
/RAV Tells PartitionMagic to read and verify all disk writes. Enabling this
option increases the length of time needed to perform some operations,
but it ensures that the operation outcome is accurate.
/UVM Tells PartitionMagic to use virtual memory.
/WFS Wipes the first sector after deleting all partitions.
Switch Description
Norton PartitionMagic 11
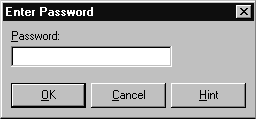
Entering a Password
When you start PartitionMagic and there is a password assigned, the Enter Password
dialog appears.
1 Type the password assigned to PartitionMagic.
You can click Hint to display a reminder.
2Click OK.
Changing a Password
1 Click General ➤ Set Password.
2Type the old password, then press <Tab>.
3Type the new password, then press <Tab>.
To remove password protection, leave the new password fields blank.
4Confirm the new password, then press <Tab>.
5(Optional) Change the hint.
6Click OK.
Uninstalling PartitionMagic
1 On the Windows taskbar, click Start ➤ Settings ➤ Control Panel.
2Double-click Add/Remove Programs, then select PartitionMagic 8.0.
3Click Add/Remove.
13
CHAPTER
2
PartitionMagic Basics
This chapter includes the following information:
• PartitionMagic Main Window
• Rescue Disk Main Window
• Process Overview
• Selecting a Hard Disk and Partition
• Selecting an Operation
• Undoing an Operation
• Viewing Pending Operations
• Applying Changes to Your System
• Supported File Systems
• Changing PartitionMagic Preferences
• Using International Keyboards
• Defragmenting a Hard Drive
• Getting Help
Chapter 2: PartitionMagic Basics14
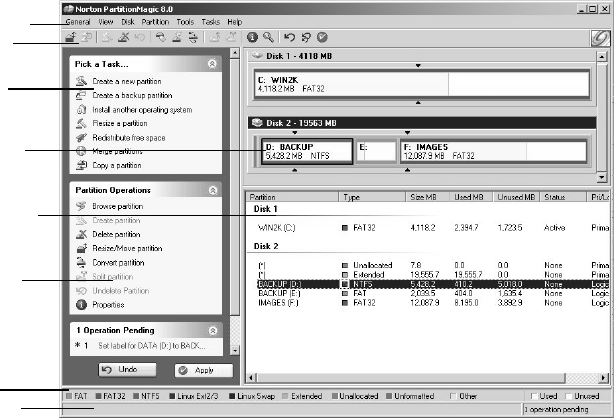
PartitionMagic Main Window
The main window includes an action panel with shortcuts for common tasks and an
overview of pending operations, a map of each disk, and a list of the partitions on the
selected disk.
The menu bar and a toolbar appear at the top of the window. The menu bar gives you
access to all of PartitionMagic’s features. The toolbar gives you quick access to
commonly used options. When the pointer is over a toolbar, the status bar shows what the
button does.
You can customize the main screen by clicking commands on the View menu.
Note that the main screen is different if you run PartitionMagic from the rescue disks. See
“Rescue Disk Main Window” on page 15.
Disk Map
The disk map shows the partitions approximately to scale and also shows unallocated
space (space not assigned to any partition). You can also display hard disks to scale by
clicking View ➤ Scale Disk Map. Each partition is represented by a different color
according to the file system it uses. If the selected hard disk contains logical partitions, the
logical partitions are shown within an extended partition.
Menu Bar
Toolbar
Disk Map
Partition List
Tasks
(Wizards)
Status Bar
Operations
for selected
partition
(unavailable
options are
dimmed)
Legend
Norton PartitionMagic 15
Each partition is color-coded to show the file system it uses and the used and unused space
within the partition. A legend is displayed just above the status bar located at the bottom of
the PartitionMagic window. You can use the Legend to help you understand the different
colors used in the disk map and partition list.
There are triangle indicators to mark the 2 GB boot boundary and the 8 GB boot boundary
(1024 cylinder limit). The boundary markers can help you as you create, move, or resize
partitions, so you will not make primary partitions unbootable by accident. For additional
information about the boot boundaries, refer to “Understanding the BIOS 1024 Cylinder
Limit” or “Understanding the 2 GB Boot Code Boundary” in the PartitionMagic online
help located under Getting Started > Partitioning Basics.
Partition List
The partition list displays the following information about each partition: drive letter,
volume label, file system type, size, amount of used and unused space in megabytes,
status, and whether the partition is a primary or logical partition. If the partition does not
have a volume label, “Local Disk” displays next to the drive letter.
An asterisk (*) appears in place of a drive letter for:
• Hidden partitions
• Extended partitions
• Partitions with file systems not supported by the active operating system
• Unallocated space (space not currently assigned to any partition)
A partition’s status can be:
•Active: The partition the computer boots from.
•Hidden: Partitions that do not have a drive letter. Partitions can be hidden by the
operating system (which may hide all primary partitions except the active one), or
you can hide partitions with PartitionMagic. Under Windows 2000/XP Professional,
hidden partitions are permitted to have a drive letter.
•None: Partitions that are not active or hidden.
Rescue Disk Main Window
The main screen appears different when you run from rescue disks than it does when you
run PartitionMagic from Windows.
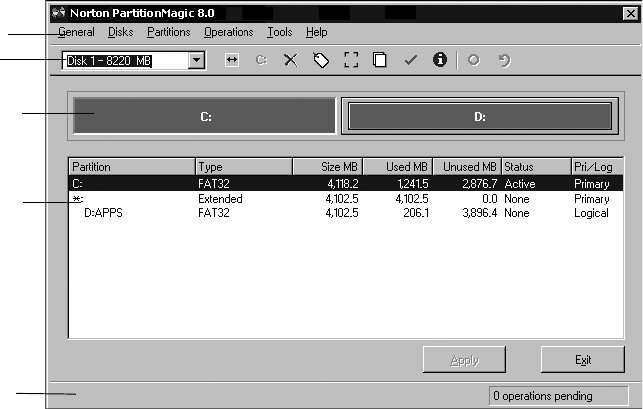
Chapter 2: PartitionMagic Basics16
•Menu bar — gives you access to all of PartitionMagic’s features. Be aware that the
operations available from the Partition menu when you run PartitionMagic under
Windows are available under the Operations menu when you run from the rescue
disks.
•Toolbar — gives you quick access to commonly used options and allows you to
select the disk you want to operate on.
•Partition information — provides both a visual and text description of the partitions
on the disk.
•Status bar — shows you how many operations are pending; also includes a brief
description of the currently selected option.
Process Overview
To complete a task, follow this general process:
1 Select a hard disk and partition.
The steps for selecting a hard disk and partition are included in this chapter of the user
guide. You must follow these steps before you can perform any operation within
PartitionMagic.
2Select an operation and enter details about the changes you want to perform.
Menu Bar
Toolbar
Disk Map
Status Bar
Partition List
Norton PartitionMagic 17
3Apply changes to your system. See “Applying Changes to Your System” on page 19.
You can also perform some tasks using the wizards. See “Using Wizards” on page 79.
Selecting a Hard Disk and Partition
You can select a partition without first selecting a hard disk. To select a partition, click it
in the disk map or partition list on the main screen.
To select a hard disk, click the title bar on the disk map or click the disk in the partition
list. There are two operations that can be performed on a hard disk: delete all the partitions
or display information about the hard disk. When you select a hard disk, its partitions
display in the partition list in the main window.
PartitionMagic does not support volume sets, stripe sets, stripe sets with parity, or
partitions located on disk mirror/duplex sets configured using Windows NT Disk
Administrator. Under Windows 2000/XP, PartitionMagic supports standard partitions
located on basic disk sets only.
USB, USB2, and FireWire Support
PartitionMagic supports external USB, USB2, and FireWire (1394, IEEE) hard drives
under Windows. Operations that are executed in boot mode are not supported on these
devices.
You can see if an operation will be performed in boot mode by clicking View ➤
Operations Pending. If an operation displays with an asterisk (*), it will not work on a
USB, USB2, or FireWire drive. If any of the queued operations displays with an asterisk,
all of the queued operations will be applied in boot mode.
You may increase the chances of an operation’s being applied under Windows by closing
all applications other than PartitionMagic and only working on operations on that drive (as
opposed to the USB or FireWire drive and drive C:, for example).
Removable Media Support
PartitionMagic is not designed to work on removable media. Norton technical support
does not guarantee they will be able to resolve problems you encounter when partitioning
removable media.
Chapter 2: PartitionMagic Basics18
Dynamic Disks
Windows 2000 and Windows XP use basic disks and dynamic disks. You cannot perform
PartitionMagic operations on dynamic disks.
Selecting an Operation
After you have selected a disk or a partition, you can select an operation using the action
panel, toolbar, context menu, or menu bar. If an operation cannot be performed on the
selected partition, the item appears dimmed on the menu and in the action panel.
• Click one of the operations on the action panel or the toolbar.
When you place the pointer on a toolbar button, a pop-up window displays the
button’s function.
• In the disk map or partition list, right-click the partition you want to change, then
click the desired operation from the context menu.
• On the menu bar, click Partition, then choose the desired operation. (If you are
running PartitionMagic from the rescue disks, click Operations on the menu bar,
then choose the desired operation.)
For more information about the items on the Partition menu, see Chapters 3, 4, and 5 of
this user guide.
Undoing an Operation
To undo or reverse the last operation performed, click General ➤ Undo Last Change on
the menu bar, press <Ctrl+Z>, or click Undo in the action panel.
If you have performed an operation using a wizard, Undo Last Change will undo all the
changes made by the wizard.
To discard all the pending operations, click General ➤ Discard all Changes, or press
<Ctrl+D>.
Norton PartitionMagic 19
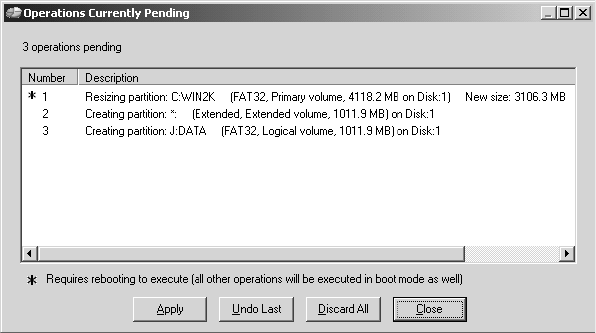
Viewing Pending Operations
PartitionMagic queues operations until you apply them. You can view the operations that
are pending at any time at the bottom of the action panel, or you can display a more
detailed view.
1 Click View ➤ Operations Pending.
The Operations Currently Pending dialog appears.
If an asterisk displays to the left of an operation, the operation will be applied in boot
mode rather than in Windows. If any operation in the list appears with an asterisk, all of
the operations will be applied in boot mode.
From the list of pending operations, you can choose to undo the last change, discard all
changes, apply all changes, or close the window.
If you are running PartitionMagic from the rescue disks, you cannot modify pending
operations from this window.
Applying Changes to Your System
As you complete tasks using the Partition menu (or Operations menu if running from the
rescue disks), the disk map and partition list reflect the changes you have made. However,
no changes physically take place on your system until you apply them. You can perform
several operations and then apply all the changes at once.

Chapter 2: PartitionMagic Basics20
To apply changes to your system, click General ➤ Apply Changes, or click Apply in the
action panel.
To discard the changes and start over, click General ➤ Discard All Changes. With the
exception of being able to undelete some partitions, you cannot discard or undo changes
after you have applied them.
Applying Changes in Windows vs. Boot Mode
When you apply changes, PartitionMagic evaluates your system to see if changes are
being made to partitions where there are open files (such as when you modify the C: drive
while running Windows). If there are no open files, the changes will be applied while
Windows is running. If there are open files, PartitionMagic must go into boot mode to
apply the changes. When prompted, click OK to go into boot mode. You do not need to
have DOS installed on your system to apply changes in boot mode.
Supported File Systems
You can create or modify the following partition types with PartitionMagic. Before
making modifications, you should ensure that both the partition type and operating system
on your machine are supported by PartitionMagic.
Partition
Type Description
Extended The extended partition gets around the arbitrary four-partition limit
for a disk. An extended partition is a container in which you can
further divide your disk space by creating logical partitions. An
extended partition does not directly hold data. You must create
logical partitions within the extended partition to store data.
Extendedx An extendedx partition functions like an extended partition but is not
limited to the first 8 GB (1024 cylinders) on a hard disk.
Linux kernels below 2.2 do not support extendedx partitions.
FAT Uses file allocation table (FAT) and clusters. The FAT file system is
used by DOS, Windows 3.x, and most Windows 95 installations. A
FAT partition is also accessible by all newer operating systems.
FAT16x FAT16x is a proprietary file system developed by Microsoft to enable
FAT partitions beyond 1024 cylinders (~8GB).

Norton PartitionMagic 21
Changing PartitionMagic Preferences
1 In the main window, click General ➤ Preferences.
FAT32 FAT32 is an enhancement of the FAT file system. It uses 32-bit file
allocation table entries, rather than the 16-bit entries used by the FAT
system, so FAT32 supports larger disk or partition sizes (up to 2
terabytes). The minimum size for a FAT32 partition is 256 MB.
DOS, Windows 3.x, Windows NT 3.51/4.0, and early versions of
Windows 95 (before version 4.00.950B) do not recognize FAT32 and
cannot read files on a FAT32 partition.
FAT32x FAT32x is a proprietary file system developed by Microsoft to enable
FAT32 partitions beyond 1024 cylinders (~8GB). Windows 95 OSR2
and later versions of Windows may use FAT32x partitions.
Linux Ext2
and Ext3
The Linux Ext2 and Ext3 file systems are only accessible by Linux, a
freeware version of UNIX. The Linux Ext2 file system supports a
maximum partition size of 4 terabytes.
Linux Swap Holds a Linux swap file. The maximum usable size of a Linux swap
file is 128 MB. (This limitation, however, does not apply if you are
using a Linux Kernel that is verion 2.2.x or later.) The default size
shown when you create a Linux swap partition may be slightly larger
because of the physical geometry on the hard disk.
NTFS The New Technology File System (NTFS) is accessible by Windows
NT, Windows 2000, and Windows XP. NTFS is not recommended
for use on disks less than 400 MB because it uses a great deal of
space for system structures.
Unformatted Unformatted partitions reserve a portion of the disk but are not
assigned a file structure.
Unallocated
space
Unallocated space is the portion of a hard disk that is not currently
assigned to any partition.
Partition
Type Description

Chapter 2: PartitionMagic Basics22
A check mark next to a preference indicates it is enabled.
2Click check boxes to enable or disable preferences, then click OK.
Allow 64K FAT Clusters for Windows NT/Windows 2000/XP
This preference lets you create FAT partitions with 64 KB clusters, which allows you to
use PartitionMagic to create FAT partitions up to 4 GB.
IMPORTANT! Because DOS and Windows 3.x/95/98/Me do not support cluster sizes
larger than 32K, you cannot access a 64K partition using these operating
systems. You should only use 64K partitions with Windows NT/2000/XP.
If you are using multiple operating systems, Norton recommends not using
64K clusters.
When enabled, the 64K cluster size is available in the Resize/Move Partition and Resize
Clusters dialogs.
Skip Bad Sector Checks
When PartitionMagic modifies partitions, it performs extensive testing to detect bad
sectors on your hard disk. Newer disk types (such as Enhanced IDE and SCSI) often
handle bad sectors internally, making such testing superfluous. For this reason,
PartitionMagic lets you bypass these tests with Skip Bad Sector Checks. When this
preference is enabled, the Resize/Move, Create, Copy, and Format operations run faster.
WARNING! If you skip bad sector checks and your hard disk has bad sectors, data loss
can result.
Indicates whether
the current
operating system
supports FAT32
partitions.
Norton PartitionMagic 23
Bad sector checking is on by default. PartitionMagic lets you set this preference
individually for each of your hard disks. If your system has an older disk and a newer one,
you could check the older disk and skip the newer one. A check mark next to a disk means
to skip bad sector checking for that disk.
Set as Read-Only for PartitionMagic
This preference lets you prevent PartitionMagic from making any changes to a hard disk.
You can set this preference individually for each of your hard disks.
There are some exceptions to how this preference is applied:
• If the disk contains the boot partition, some files may be changed, such as the
Windows NT boot initialization (BOOT.INI) file.
• If you tell PartitionMagic to run DriveMapper automatically, certain files, such as
initialization files and shortcut files, may be changed.
Using International Keyboards
When you use the DOS version of PartitionMagic (see “Running PartitionMagic from
Rescue Disks” on page 8), you may lose the ability to use your keyboard the way you are
accustomed to or to view extended characters properly. The PartitionMagic rescue disks
include the files you need to resolve these problems.
If you use an international keyboard or character set, you must edit the AUTOEXE2.BAT
and CONFIG.SYS files on the rescue disks.
1 The following lines are remarked in the AUTOEXE2.BAT file. Delete the REM from
the beginning of the line, and replace the variables
xx
and
yyy
with the keyboard
code and character set code page for your language.
MODE CON CP PREP=((
yyy
)EGA.CPI)
MODE CON CP SEL=
yyy
KEYB
xx
,
yyy
xx
= two-letter keyboard code (for example, US or FR)
yyy
= character set code page (for example, 437)
2Save the AUTOEXE2.BAT file.
3The following line is remarked in the CONFIG.SYS file. Delete the REM from the
beginning of the line, and replace the variable
yyy
with the character set code page
for your language.
Chapter 2: PartitionMagic Basics24
DEVICE=DISPLAY.SYS CON=(EGA,yyy,)
4Save the CONFIG.SYS file.
5Reboot from the first rescue disk.
Defragmenting a Hard Drive
Defragmenting your hard drive will optimize the storage of data by organizing your files
in a contiguous order. You can run Windows Defragmenter within PartitionMagic for
Windows. Right-click a partition in the disk map, then select Windows Defragmenter
from the menu. PartitionMagic will lock and Windows Defragmenter will run. When the
disk is defragmented, Windows Defragmenter will close, and PartitionMagic will unlock
so you can continue running it.
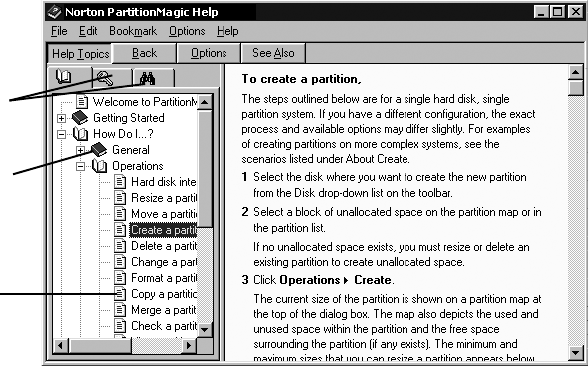
Getting Help
PartitionMagic Help provides in-depth information on features as well as step-by-step
instructions for specific tasks.
To access Help, click Help ➤ Contents on the menu bar in the PartitionMagic main
window.
The Norton PartitionMagic Help is organized into books and pages.
Find information
with the Index
(key) and Find
(binoculars)
tabs.
Double-click a
page to read
the help topic.
Double-click a
book to view the
pages in it.
Norton PartitionMagic 25
Each book focuses on a different aspect of PartitionMagic, so you can quickly locate the
information you need. When you double-click a topic, the information displays in the right
window.
You can click the key tab to search for a topic using keywords.
Context-Sensitive Help
Click Help in the lower right corner of a dialog or press <F1> to display context-sensitive
help for the dialog. Clicking Hints in a wizard dialog displays helpful information about
the task the wizard is performing.
README File
The README.TXT file includes information that changed since this guide was written,
corrections to the manual or help system, and information specific to installation or
configuration issues.
Product Demonstrations
The Norton web site includes multimedia tutorials that visually step you through the most
common PartitionMagic tasks. To view the instructional videos, go to
http://service.symantec.com and click Instructions & Videos.
27
CHAPTER
3
Managing Partitions
This chapter includes the following information:
• Integrity Checks
• Browsing Partitions
• Resizing and Moving Partitions
• Creating Partitions
• Deleting Partitions
• Undeleting Partitions
• Changing Partition Labels
• Formatting Partitions
• Copying Partitions
• Checking Partitions for Errors
• Merging Partitions
• Splitting Partitions
• Getting Information About Partitions
• Scanning a Disk for Errors
• Defragmenting Drives
Chapter 3: Managing Partitions28
Integrity Checks
PartitionMagic checks disk integrity with a sophisticated system of analysis and validation
that operates behind the scenes every time you start the program or complete an operation.
An initial integrity check scans your disk and reports any partition problems that may
prevent PartitionMagic from operating properly. This integrity check acts as an early
warning system that informs you of your disk’s status and assures that the disk’s structure
is thoroughly analyzed and verified before you alter it.
If your physical disk passes the initial integrity check, you can select the disk’s partitions
and use PartitionMagic features; otherwise, an error message appears instead of the
partition list. This indicates a problem with your disk, not with PartitionMagic (because no
disk modification operations have been initiated). If PartitionMagic finds errors that it can
fix automatically, you will be prompted. It is safe to allow PartitionMagic to fix errors.
Correct the disk problem, and then restart PartitionMagic. For additional information, see
“Resolving Partition Table Errors” on page 114.
In addition to the integrity check at startup time, PartitionMagic performs two integrity
checks during any operation. The first check tests the integrity of the file system in the
partition before an operation begins (similar to CheckDisk or ScanDisk), and the second
check validates your disk’s data after an operation is completed. From start to finish,
PartitionMagic examines your disk and informs you immediately if it detects any
irregularities.
Browsing Partitions
You can browse the contents of any hidden or visible partition that is formatted with a file
system PartitionMagic supports. (See “Supported File Systems” on page 20.) Sometimes
it is helpful to see what is in a partition before you modify it. The Norton File Browser
also enables you to modify files and folders.
1 Select the partition you want to browse.
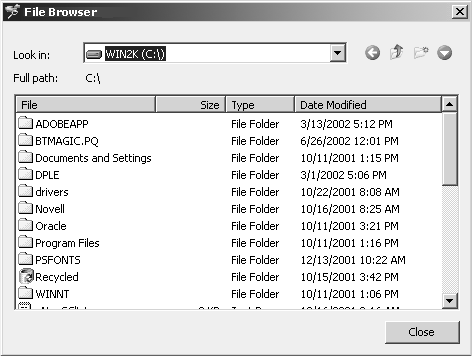
Norton PartitionMagic 29
2Click Partition ➤ Browse.
3Right-click to copy, move, rename, or delete files, and create, copy, move, or delete
folders as you wish.
4Click Close to exit the File Browser and return to PartitionMagic.
The PartitionMagic main screen will be refreshed to reflect any changes you made. This
operation may take a little while.
Resizing and Moving Partitions
You can change the size of a partition and/or move it to another location on a hard disk.
1 Select the partition you want to resize/move.
You cannot move Windows NT volume or stripe sets with parity created by Disk
Administrator.
2Click Partition ➤ Resize/Move.
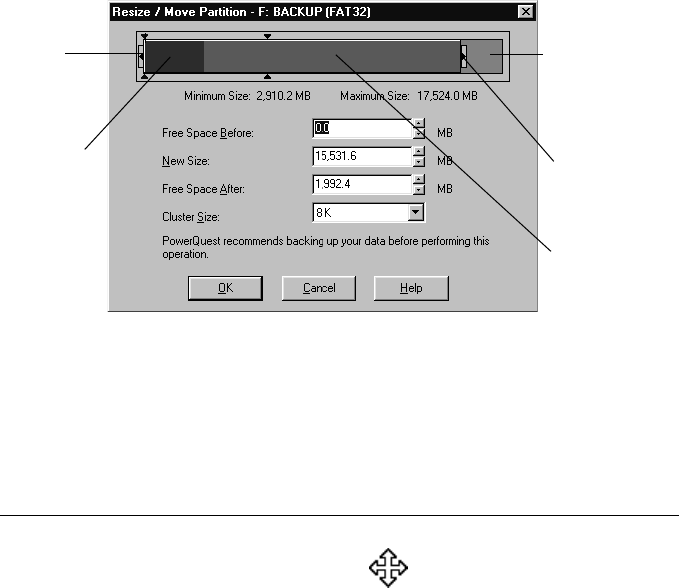
Chapter 3: Managing Partitions30
The Resize/Move Partition dialog appears.
The current size of the partition is shown on a disk map at the top of the dialog. The
map also depicts the used and unused space within the partition and the unallocated
space surrounding the partition (if any exists). The minimum and maximum sizes to
which you can resize the partition appear below the map.
3Choose whether to resize or move the partition.
To do this: Do this:
Move 1 Place the pointer on the partition.
The pointer changes to .
2Drag the partition to the desired location.
There must be unallocated space adjacent to the partition to move
it. If there is none, and the partition contains unused space, make
the partition smaller and then move the partition.
You cannot move unknown partitions, partitions failing the
Check for Errors operation (see “Checking Partitions for Errors”
on page 50 for more information), or unallocated space.
Used space
(minimum
size)
Unallocated
space
outside
partition
Unused
space
inside
partition
Right
partition
handle
Left
partition
handle

Norton PartitionMagic 31
If you know your disk has no bad sectors, Skip bad sector checks in Preferences to
make resize and move operations faster.
PartitionMagic changes the Free Space Before, New Size, and Free Space After
values to show how the partition size is affected.
Move
(continued)
Your Windows NT 4.0 system (SP 6 or higher) partition cannot
start past 4 GB, or Windows NT will not be bootable.
IMPORTANT! Exercise caution when moving a bootable
partition. Operating systems can become
unbootable if moved beyond certain boundaries.
For more information, see “Creating Bootable
Partitions” on page 38.
Resize 1 Place the pointer on the left or right partition handle.
The pointer changes to .
2Drag the handle until the desired partition size is reached.
You can also resize the partition by typing new values in the Free
Space Before, New Size, and Free Space After boxes or by
clicking the arrows next to the boxes. The values you enter may
change slightly to values supported by the drive’s geometry. The
arrow buttons resize the partition by the minimum increment,
allowing you to make very fine adjustments. Changes are
reflected in the disk map.
To make a partition smaller, unused space must exist within the
partition. To enlarge a partition, there must be unallocated space
adjacent to it. For additional information about resizing
partitions, refer to “Notes about Resizing Partitions” below.
IMPORTANT! (Windows NT only) Resizing your NTFS system
partition over 7.8 GB may render your
workstation unbootable. If you resize an NTFS
system partition over this limit by accident, you
can recover your system by using the
PartitionMagic rescue disks to resize the NTFS
system partition below 7.8 GB.
To do this: Do this:
Chapter 3: Managing Partitions32
4(Optional) Click the Cluster Size drop-down list and select a new size or use the
recommend cluster size that is already selected.
This option is only available for FAT and FAT32 partitions. For more information,
see “Resizing Clusters” on page 66. You can resize NTFS clusters by clicking
Partition ➤ Advanced ➤ Resize Clusters.
5Click OK.
Notes about Resizing Partitions
When you resize a partition, data is consolidated, not compressed. To make a partition
smaller, unused space must exist within the partition. To enlarge a partition, there must be
adjacent unallocated space. If there is unallocated space on the disk, but it is not adjacent
to the partition you want to enlarge, adjust the location of the space by moving other
partitions. You can resize/move a partition to create space before it even if there is used
space shown at the beginning of the partition. For example, if you are shrinking a D:
partition so you can enlarge a C: partition, you can just drag the left handle of the D: drive
to create unallocated space next to the C: drive, then drag the right handle of the C: drive
to use that space.
IMPORTANT! Exercise caution when resizing partitions smaller, especially a partition
containing an operating system. Leave at least 50 MB more space in the
partition than the operating system requires. Swap files, drivers, and other
files may require the extra space. Additionally, operating systems can
become unbootable if moved beyond certain boundaries. For more
information, see “Creating Bootable Partitions” on page 38.
Resizing FAT and FAT32 partitions smaller may reduce the amount of wasted space on a
hard disk. When you resize a FAT or FAT32 partition, PartitionMagic automatically
resizes the clusters to their optimal size for the partition. For more information, see
“Resizing Clusters” on page 66.
You should be aware of the following limitations when resizing partitions:
• You cannot make a partition smaller unless it contains unused space. You can only
reduce a partition to the used size shown in the disk map plus a small buffer area.
During a Resize/Move operation, data is consolidated to the front of the partition as
needed, but no data compression takes place. Because of the way a FAT partition is
structured, you can often resize a partition a second time and make it even smaller or
larger than the first time you resized it.
• In certain instances, you cannot make a FAT partition larger when the partition
contains no unused space. If you have a full partition and plenty of unallocated space
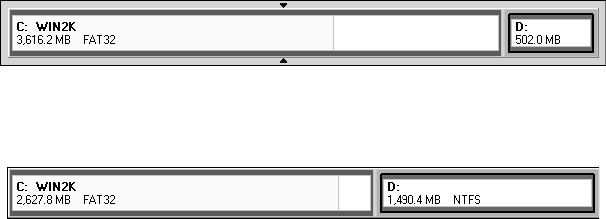
Norton PartitionMagic 33
adjacent to it, yet are not able to enlarge your partition, you may have to delete some
files in the partition so that PartitionMagic has room to work. You may be able to
slightly enlarge the partition (1 MB or less) and then enlarge the partition a second
time to provide the necessary buffer area for PartitionMagic. To see how much space
is needed in a partition to resize past a cluster boundary, see the table in “Freeing Disk
Space Before Enlarging a FAT Partition” in Help under Getting Started > Partitioning
Basics.
• It is difficult to calculate in advance the minimum size to which an NTFS partition
may be resized. If PartitionMagic runs out of space when you are resizing or moving
an NTFS partition, PartitionMagic returns an error without completing the operation.
The integrity of the NTFS partition and data is never compromised.
• A FAT partition has a 2 GB (2047 MB) size limit; however, a FAT partition under
Windows NT (service pack 4 or higher) or Windows 2000/XP can be sized up to 4
GB and have a 64 KB cluster size.
• Under Windows 2000 and Windows XP, you can enlarge an NTFS partition (even the
system partition) without rebooting.
Scenario: Resizing a Logical Partition Larger
This scenario outlines the procedure for adding space to a logical partition. You can also
use the Resize Partitions wizard to perform the same operations.
Sample Configuration
One 1 GB hard disk containing:
• One active primary FAT32 partition (C:) running Windows 2000
• One extended partition enclosing one logical NTFS partition (D:)
Objective
Resize drive C: smaller and add the newly created free space to drive D:.
Chapter 3: Managing Partitions34
Procedure
1 Resize drive C: smaller by the amount you want to add to drive D:.
Resize C: so that the unallocated space is on the right.
2Enlarge drive D: to occupy the unallocated space just created.
The extended partition is automatically enlarged to accommodate drive D:.
3Apply the changes to your system.
Result
Drive D: has room for additional files.
Creating Partitions
The Create operation lets you create primary partitions, extended partitions, and logical
partitions.
If you have multiple hard disks and partitions, the process and available options may differ
slightly from the following steps. For examples of creating partitions on more complex
systems, see the scenarios that begin on page 40 of this user guide.
1 Select a block of unallocated space.
If no unallocated space exists, you must resize or delete an existing partition to create
unallocated space. For instructions on resizing and deleting partitions, see “Resizing
and Moving Partitions” on page 29 and “Deleting Partitions” on page 44.
On a single hard disk, you can have up to four primary partitions or three primary
partitions and one extended partition. Within an extended partition, you can create
unlimited additional subdivisions called logical partitions.
2Click Partition ➤ Create.
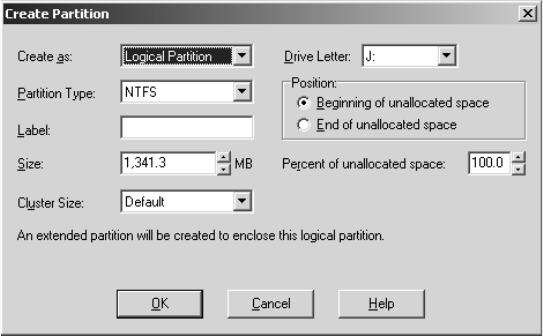
Norton PartitionMagic 35
The Create Partition dialog appears.
3From the Create as drop-down list, select Logical Partition or Primary Partition.
As a general rule, you should create primary partitions to install operating systems
and logical partitions for all other purposes (such as storing data and applications).
However, you can install Windows NT, Windows 2000, or Windows XP to a logical
partition as long as their boot files are in a primary partition. See “Creating Bootable
Partitions” on page 38.
If you have multiple hard disks, you can improve speed by installing operating
systems and applications on separate disks. If you do not know what type of partition
you want to create, see “Understanding Partitions” in Help.
You should create a primary partition if you plan to install an operating system. Refer
to “Creating Bootable Partitions” on page 38 and “Installing a New Operating
System” on page 39 for additional information.
If you select Logical Partition, PartitionMagic automatically creates an extended
partition to enclose the logical partition, or, if you already have an extended partition,
resizes the extended partition larger to encompass the logical partition. (The free
space must be inside of or adjacent to the extended partition.)
If Logical Partition is unavailable, you may already have four primary partitions on
the hard disk. Or, if you have an extended partition, you may not have selected a
block of free space inside of or adjacent to the extended partition.
Chapter 3: Managing Partitions36
If you create a second, third, or fourth primary partition on a physical disk,
PartitionMagic will create the new primary partition as unhidden. However,
PartitionMagic will automatically hide the other primary partitions on that disk when
performing a Set Active operation.
4From the Partition Type drop-down list, select the desired file system type or accept
the default.
FAT is the most universal file system type. It is used by DOS and all versions of
Windows.
FAT32 is used by Windows 95 OEM Service Release 2, Windows 98, Windows Me,
Windows 2000, Windows XP.
NTFS is used by Windows NT, Windows 2000, Windows XP. If you create an NTFS
partition under Windows 9x, it will be created with NTFS version 3.0, which is not
compatible with Windows NT 4.0. To create an NTFS version 1.2 partition that will
work with Windows NT 4.0, run PartitionMagic under Windows NT 4.0 and create
the partition.
Linux Ext2, Linux Ext3, and Linux Swap are used by Linux.
Extended creates an extended partition which can contain any number of logical
partitions. Extended is not an option if the hard disk already contains an extended
partition or four primary partitions.
Unformatted creates an unformatted partition on your hard drive.
5(Optional) Enter a label for the new partition.
Labels can be up to 32 alphanumeric characters for NTFS partitions, 16 alphanumeric
characters for Linux, and 11 alphanumeric characters for other file system types.
6In the Size box, enter the desired size for the partition. Or, in the percent of
unallocated space box, enter the desired percent of unallocated space for the
partition.
PartitionMagic automatically calculates a recommended size (based on the most
efficient use of disk space), which you can accept or change.
If you are creating a Windows NT 4.0 (SP 4or higher) system partition, it cannot be
larger than 7.8 GB, and it must be fully contained within the first 7.8 GB of the hard
disk.
Norton PartitionMagic 37
7If the size you specified for the new partition is smaller than the available unallocated
space, you can position the partition at the beginning (recommended) or end of the
unallocated space. In the Position box, click Beginning of free space or End of free
space.
8In the Cluster size drop-down list, choose a cluster size for the partition or accept the
default cluster size.
9In the Drive Letter box, note the drive letter that will be assigned to the new partition
after you reboot, or (for NT-based operating systems) select the drive letter you want.
10 Click OK.
If you created a new primary partition and plan to install an operating system on it,
refer to “Installing a New Operating System” on page 39 for additional information.
WARNING! Because of conflicts that can result from different hardware and system
configurations, do not create an applications or operating system partition
on one computer and then move that hard disk to another computer. Data
loss may occur.
Managing Drive Letter Changes
Creating a new partition may cause your drive letters to change. For example, if you have
one primary partition (C:) on your hard drive and a CD-ROM drive (D:), and you create a
new logical partition on your hard drive, the new partition becomes D: and the CD-ROM
drive changes to E: after you reboot your computer. As a result, any programs on your
hard drive that were linked to the CD-ROM no longer function because the paths to files
have changed.
Norton recommends that you allow DriveMapper to automatically update the drive letter
references in application shortcuts, initialization files, and registry entries when prompted
to do so. However, you can update drive letter references manually. See “Changing Drive
Letter References with DriveMapper” on page 84.
While you can use DriveMapper to update references to files, for least impact, consider
creating all new partitions on the highest disk (for example, disk 3 in a three-disk system)
and to the right of existing partitions.

Chapter 3: Managing Partitions38
Creating Bootable Partitions
Before creating a partition where you plan to install an operating system (a bootable
partition), you should understand the following information.
* Windows NT/2000/XP must boot from a primary partition on the first drive. However, only a few files
must reside on that partition; the remaining files can reside on a logical partition, which can be located
on the first or a subsequent drive. The Windows NT/2000/XP boot partition can be shared with another
operating system.
** Having an LBA-compatible (Logical Block Addressing) MBR (Master Boot Record) will make the boot
code boundary null with Windows 98SE/Me/2000/XP.
*** Windows XP automatically promotes NTFS partitions to version 3.1.
† If you install LILO to a logical partition, it must be the first logical partition in the extended partition.
‡ Linux also supports the partition types FAT, FAT32, and NTFS (read-only) if Linux is installed to a Linux
Ext2/Ext3 partition.
Operating System Boots from
Supported
Partition Types
Boot Code
Boundary
Space
Required
DOS 6.22 and
earlier
Primary FAT 2 GB 8 MB
Windows 95a Primary FAT 2 GB 90 MB
Windows 95b Primary FAT or FAT32 8 GB 90 MB
Windows 98 Primary FAT or FAT32 8 GB 175 MB
Windows 98SE Primary FAT or FAT32 8 GB** 190 MB
Windows Me Primary FAT or FAT32 8 GB** 300 MB
Windows NT Primary* FAT or NTFS 1.2 2 GB 120 MB
Windows 2000 Primary* FAT, FAT32, or
NTFS 3.0
8 GB** 650 MB
Windows XP Primary* FAT, FAT32, or
NTFS 3.1***
8 GB** >1 GB
Linux (LILO†) Either Linux Ext2, Linux
Ext3‡ and Linux
Swap
8 GB >250 MB
Norton PartitionMagic 39
IMPORTANT! When you create, move, or resize a bootable partition, the partition must
begin below the boot code boundary specified in the above table for the
operating system to boot. With the exception of DOS 6.22 (or earlier),
partitions beyond 8 GB are visible to the current operating system. For
more information, see “Understanding the BIOS 1,024 Cylinder (8 GB)
Limit” and “Understanding the 2 GB Boot Code Boundary” in Help. The
disk map in the PartitionMagic main window displays indicators for the 2
GB boot boundary and the 1024 cylinder limit.
PartitionMagic displays a warning if you attempt to create, move, or resize a bootable
partition outside of the 2 GB boot code boundary. If you continue with the operation,
under some operating systems you may not be able to boot or see the partition. In either
case, you can resolve the problem by moving the partition back within the boot code
boundary with the PartitionMagic rescue disks.
If your system includes SCSI disks and you create a partition before a bootable Linux
partition, Linux may no longer be bootable. In this situation, you may need to create Linux
rescue disks, boot from the rescue disks, and repair the Linux boot information on the
Linux partition.
Some I/O cards (typically older RAID cards) only provide access to the first 8 GB of a
disk under DOS. Consequently, if you resize the operating system partition beyond 8 GB
and it becomes unbootable, the PartitionMagic rescue disks may not allow you to
manipulate partitions on that drive. You should be cautious about resizing any operating
system partition beyond 8 GB.
Installing a New Operating System
If you install multiple operating systems, you must follow the steps below for each of
them.
1 Disable BootMagic if you have it installed. See “Disabling BootMagic” on page 99.
2Create PartitionMagic rescue disks.
See “Creating Rescue Disks” on page 5.
3Make a new partition and set it active (if you are installing Linux to a primary
partition [Linux Ext2/Ext3], then it is necessary to set the partition active; however, it
is not necessary to set the partition active if you are installing Linux to the first logical
partition on the hard disk.)
See “Setting an Active Partition” on page 65.
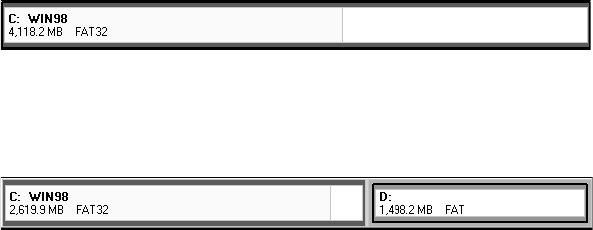
Chapter 3: Managing Partitions40
Most operating systems must be installed on primary partitions. See “Creating
Bootable Partitions” on page 38 for exceptions.
If you are not certain that the partition where you want to install the operating system
will support an operating system, you should create a new operating system partition
using the wizard. See “Install Another Operating System Wizard” on page 81.
4Close all programs and reboot the computer using an operating system installation
diskette.
5Install the operating system.
Norton technical support does not help install operating systems. See your operating
system documentation for details.
6If you have already installed BootMagic, use the PartitionMagic rescue disks to set
the partition active where BootMagic is installed.
If you have not installed BootMagic, use the PartitionMagic rescue disks to set the
operating system partition active for where you want BootMagic installed. Then
install BootMagic.
7(If applicable) With BootMagic installed, add the operating system to your
BootMagic configuration so that you can select the operating system you want to
boot.
For more information about BootMagic, see “BootMagic” on page 89.
8Reboot the computer.
Scenario 1: Creating a Primary Partition for Windows NT
Sample System Configuration
One 4 GB hard disk with one active primary FAT32 partition (C:) running Windows 98.
Objective
Resize drive C: smaller. In the unallocated space created, create a primary FAT partition
where Windows NT can be installed.
Norton PartitionMagic 41
Procedure
1 Resize drive C: smaller by 1.5 GB. For more information, see “Resizing and Moving
Partitions” on page 29.
The partition where you want to install Windows NT must begin in the first 2 GB of
the disk, or Windows NT will not be bootable. You may need to move your existing
partition to the end of the disk, then create the Windows NT partition at the beginning
of the disk.
2Create a primary partition in the unallocated space using the following information:
Partition Type: Select FAT. Do not select FAT32 unless you are using Windows
2000 or later. Earlier versions do not recognize FAT32 partitions.
Label: Type one, if desired.
Size: Type 1500.
IMPORTANT! Before performing the next step, make sure you have the Windows
NT installation CD and disks; otherwise, you will not be able to boot
your computer.
3Set the new partition active. For more information, see “Setting an Active Partition”
on page 65.
4Apply the changes to your system.
IMPORTANT! Before installing Windows NT, make sure that all partitions start
before the 4 GB mark and end prior to cylinder 1024 (8 GB).
Otherwise, Windows NT will not install and will report that all the
partitions are corrupted. If you cannot resize and move all partitions,
you must obtain updated drivers from Microsoft (see article ID:
Q197667 on the Microsoft web site).
5Reboot the computer using the first Windows NT installation diskette.
6Complete the Windows NT installation.
Norton technical support does not help install operating systems. See your operating
system documentation for details.
7Add Windows NT to your BootMagic configuration so that each time you start or
restart your computer, you can select the operating system you want to boot. For more
information, see “BootMagic” on page 89.
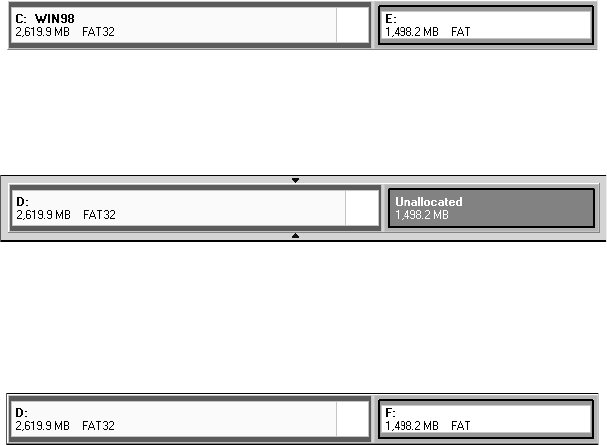
Chapter 3: Managing Partitions42
Result
When the computer restarts, BootMagic presents a list of the available operating systems,
in this case, Windows 98 and Windows NT. Select the operating system you want to boot.
Scenario 2: Creating a Logical Partition on a Secondary Hard Disk
Sample System Configuration
Disk 1 — One 4 GB disk containing:
• One active primary FAT32 partition (C:) running Windows 98.
• One extended partition enclosing one logical FAT partition (E:).
Disk 2 — One 4 GB hard disk containing:
• One FAT32 primary partition (D:).
• Unallocated space.
One CD-ROM drive (F:).
Objective
Create a logical FAT partition on Disk 2.
Procedure
1 Select Disk 2.
2Create a logical partition in the unallocated space using the following information:
Partition Type: Select FAT.
Label: Type one, if desired.
Size: Accept the precalculated size.
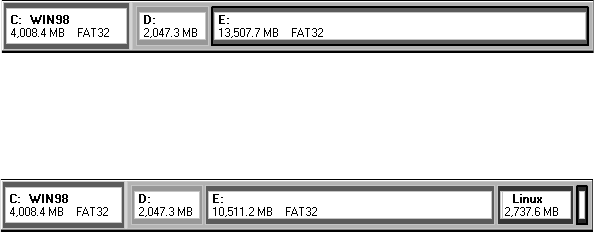
Norton PartitionMagic 43
Create As: Choose Logical.
The partition will be assigned drive F: after reboot. Additionally, an extended partition
will automatically be created to enclose the logical partition.
3Apply the changes to your system.
Result
After the computer reboots, the new logical partition is drive F: and the CD-ROM is drive
G:.
Scenario 3: Creating Linux Logical Partitions
Sample System Configuration
One 20GB hard disk containing:
• One active primary FAT32 partition (C:) running Windows 98.
• One extended partition enclosing one logical FAT partition (D:) and one logical
FAT32 partition (E:).
Objective
Resize drive E: smaller. In the unallocated space created, create one logical Linux Ext2
partition and one logical Linux Swap partition.
Procedure
1 Resize drive E: smaller. For more information, see “Resizing and Moving Partitions”
on page 29.
2Create a logical partition in the unallocated space using the following information:
Partition Type: Select Linux Ext2.
Label: Type one, if desired.
Size: Type 2500.
Chapter 3: Managing Partitions44
3Create a second logical partition in the unallocated space using the following
information:
Partition Type: Select Linux Swap.
Size: Type 256. (The swap partition is typically twice the amount of RAM.)
4Apply the changes to your system.
5Reboot the computer using your Linux installation diskette.
6Complete the Linux installation.
You do not need to change the active partition to install Linux.
Norton technical support does not help install operating systems. See your operating
system documentation for details.
WARNING! If you are using a boot utility like BootMagic, LILO (Linux Loader)
must be installed to the Linux Ext2 partition containing the root
directory and not installed to the master boot record. If you install LILO
to the master boot record, other operating systems may become
unbootable.
7(Optional) Add Linux to your BootMagic configuration so that each time you start or
restart your computer, you can select the operating system you want to boot. For more
information about BootMagic, see “BootMagic” on page 89.
Result
When the computer restarts, BootMagic presents a list of the available operating systems,
in this case, Windows 98 and Linux. Select the operating system you want to boot.
Deleting Partitions
The Delete operation deletes a partition, making its data inaccessible. The Delete and
Secure Erase operation destroys the data in a selected partition by overwriting the data. If
you use secure erase to destroy a partition, it cannot be undeleted. (The Secure Erase
feature does not meet Department of Defense or NSA requirements.)
1 Select the partition you want to delete.
To delete an extended partition, you must first delete all logical partitions within the
extended partition. You cannot securely erase unallocated space.
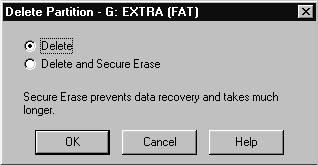
Norton PartitionMagic 45
Do not delete a partition where BootMagic is installed unless you uninstall
BootMagic first.
2Click Partition ➤ Delete.
The Delete Partition dialog appears.
3Click Delete or Delete and Secure Erase.
4Click OK.
Deleting a partition can make your drive letters change, causing applications not to run
because application shortcuts, initialization files, and registry entries refer to incorrect
drives.
If your system includes SCSI disks and you delete a partition before a bootable Linux
partition, Linux may no longer be bootable. In this situation, you may need to create Linux
rescue disks, boot from the rescue disks, and repair the Linux boot information on the
Linux partition.
Undeleting Partitions
The Undelete operation restores partitions that have been deleted on disk. You can
undelete FAT, FAT32, NTFS, and Linux partitions. Undelete works best when you use it
to restore a partition that you just deleted by accident. If you are undeleting partitions after
you have made other changes (written data to them, resized existing partitions, etc.), see
“Restrictions on Undeleting Partitions” on page 46.
1 Select the unallocated space to be searched.
2Click Partition ➤ Undelete.
IMPORTANT! You can undelete a partition only if no other operations are pending on
the unallocated space selected. If any operations are pending, the
Undelete icon and menu option will be dimmed (inaccessible).
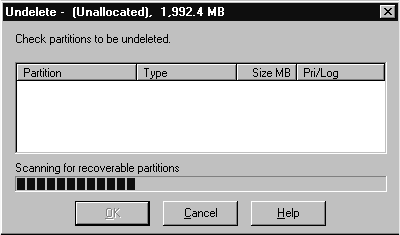
Chapter 3: Managing Partitions46
The Undelete dialog appears, and the selected unallocated space is searched.
All primary and logical partitions that can be undeleted are displayed in the scrollable
list. If no partitions are found within the unallocated space or none can be undeleted, a
message appears indicating no partitions can be undeleted.
3Within the scrollable list, click the checkbox of the partition you wish to undelete.
While it is possible to undelete more than one partition at once, Norton recommends
that you undelete partitions one at a time, beginning with the one that you want most.
Doing so helps ensure the integrity of the data within the partition.
4Click OK.
Restrictions on Undeleting Partitions
There are some situations in which a partition that has been deleted cannot be undeleted
and will not be displayed in the scrollable list. They include the following:
• You cannot undelete a primary partition if your hard disk contains four primary
partitions.
• You cannot undelete a logical partition that was deleted and now is not within the
extended partition.
• You cannot undelete a primary partition that was deleted and now is within the
extended partition.
• The partition includes file system errors. If PartitionMagic finds a partition, it checks
for errors before undeleting it. If the partition has errors, it cannot be undeleted.
• You cannot undelete a partition that has been completely or partially overwritten by
another partition or file system. Because of this limitation, if you see two partitions in
the Undelete dialog and undelete one of them, the other may no longer appear in the
list.
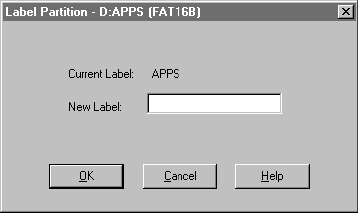
Norton PartitionMagic 47
• If two deleted partitions claim some of the same disk space, Norton cannot guarantee
the integrity of the data in those partitions when they are undeleted. For example,
suppose you had two partitions, a 500 MB E: and a 500 MB F: and you deleted F: and
resized E: to claim all the space (1 GB). Then you saved data to E:. Later, you deleted
E:. Now you want to undelete partitions, and you can see both E: and F: in the
Undelete dialog. If you restore E:, it is fine and F: is no longer displayed in the dialog
(because its space has been claimed). However, if you restore F: instead of E:, you
may get some of the data that you had saved to E:. Undeleting F: could make your
computer unbootable or cause applications not to run.
Changing Partition Labels
The Label operation lets you change a partition’s label. Meaningful names make partition
management easier.
1 Select the partition with the label you want to change.
2Click Partition ➤ Label.
The Label Partition dialog appears.
3In the New Label box, type the new label.
NTFS volume labels can contain up to 32 alphanumeric characters. Linux Ext2 or
Ext3 labels can be up to 16 characters. FAT/FAT32 volume labels can contain up to
11 alphanumeric characters and cannot contain the following characters: * ? [ ] < > | +
= : ; , . \ / ”.
4Click OK.
Chapter 3: Managing Partitions48
Formatting Partitions
The Format operation formats a partition, destroying all its data in the process. Formatting
enables you to put a different file system on a partition.
PartitionMagic has several conversion options that let you convert from one file system to
another without destroying existing files in a partition. See “Converting Partitions” on
page 69.
1 Select the partition you want to format.
2Click Partition ➤ Format.
The Format Partition dialog appears.
3From the Partition Type drop-down list, select the desired file system type.
If the partition is too small or too large, some partition types may not be available.
4(Optional) Type a label for the partition.
5Click OK.
Copying Partitions
The Copy operation lets you to make an exact duplicate of a partition. To copy a partition,
you must have unallocated space that is equal to or larger than the partition you are
copying.
Reasons why you might want to copy a partition include:
• To duplicate your operating system before upgrading to a new version or a different
operating system (so that you can remember how the old operating system’s
windows, program icons, and properties were set up or so you can recover the original
partition if the upgrade fails or is unsatisfactory).
Norton PartitionMagic 49
• To quickly move a smaller hard disk’s contents to a larger, new hard disk.
• To change the relative order of partitions.
• To back up a partition.
1 Select the partition you want to copy.
The Copy command is dimmed if there is not enough unallocated space on your disks
for the partition.
You cannot use PartitionMagic to copy Windows NT stripe sets, stripe sets with
parity, or duplex/mirrored sets.
2Click Partition ➤ Copy.
The Copy Partition dialog appears.
3From the Disk drop-down list, select the disk where you want to copy the partition.
4In the partition list, select the unallocated space where you want to copy the partition.
5If the partition you specified is smaller than the available unallocated space, you can
position the partition at the beginning (recommended) or end of the unallocated
space. Under Position, click Beginning of free space or End of free space.
If you are copying a logical partition and want to ensure that it remains logical, make
sure unallocated space is available within the extended partition. Or, after copying the
partition, you can convert it to a logical partition.
6Click OK.
Chapter 3: Managing Partitions50
The copy is the same size (or slightly different if copied to a disk with a different
geometry) and file system type and contains the same data as the original.
You can also select a partition on the disk map and drag it to unallocated space, then
choose Copy Here or Move Here from the drag-and-drop menu.
Checking Partitions for Errors
The Check for Errors operation checks the integrity of a partition.
Each time PartitionMagic is started, it performs a check on all attached drives and their
partitions. If the check finds a problem, “Check failed” appears in the partition list
window under the Type column. This check is separate from the Check for Errors
operation and is not as exhaustive.
1 Select the partition you want to check.
PartitionMagic can only check partitions that it can lock (that is, partitions that do not
have open files on them). If there are open files on a partition, you should use the
operating system’s check utility (ScanDisk or CHKDSK) instead of the Check for
Errors operation or run PartitionMagic from the rescue disks.
2Click Partition ➤ Check for Errors.
The Check Partition Results dialog appears.
If Check for Errors does not discover any errors, an Info entry appears with “Check
Complete” in the Description column.

Norton PartitionMagic 51
If a Check for Errors operation fails, “Check Failed” appears in the Used and Unused
columns in the partition list. You should fix any errors encountered. For more
information, see “Resolving Check Errors” on page 113.
If Check for Errors finds an error, such as cross-linked files, lost clusters, or bad
directory information on an NTFS volume and can fix it, a Fix button appears at the
bottom of the dialog. For each error found, PartitionMagic displays the following:
•Severity describes the seriousness of the problem, which can be one of the
following:
•Fixed displays Yes for each problem you fix on an NTFS volume. Not applicable
for FAT or FAT32 partitions.
•Number shows a number corresponding to the error. For more information, see
“Error Messages and Solutions” on page 117.
•Description gives a brief description of the problem.
3To fix an error, highlight the problem and click Fix.
4If you want to skip one listed error, click Skip.
If you want to skip all listed errors, click Skip All.
5When you are finished viewing the check results and fixing NTFS errors, click Close.
Check for Errors does not display information about the status and structure of a partition
as do the DOS and Windows CHKDSK utilities. To view that information, use the Info
option. For details, see “Getting Information About Partitions” on page 56.
Severity Description
Info The information given is helpful but not critical. Does not
correspond to any error.
Warning The error may or may not cause problems.
Error A problem was encountered, but PartitionMagic may still be
able to make changes to the partition. Run ScanDisk or
CHKDSK to fix the error, or click Fix, if available.
Critical A catastrophic problem. PartitionMagic cannot make any
changes to the partition.
Chapter 3: Managing Partitions52
Merging Partitions
You can merge two FAT, FAT32, or NTFS partitions that are adjacent to each other on a
disk. You can merge FAT and FAT32 partitions with each other, and you can merge an
NTFS partition with another NTFS partition. You cannot merge a FAT/FAT32 partition
with an NTFS partition.
It is useful to merge partitions if you have reached the maximum number of partitions on
your disk, but you do not want to delete a partition. It is also useful if you want to combine
FAT partitions and convert them to one large FAT32 partition or an NTFS partition.
If you have an empty partition and one that contains data, you should delete the empty
partition and resize the other one larger instead of merging the two partitions.
IMPORTANT! Merging partitions may take a long time (possibly hours), depending on
the partition sizes and amount of data they contain. If you wish to check
whether your machine is still operating, you can press the NumLock key
and see if the light toggles. It may take a few seconds to register activation
of the NumLock key on your keyboard. If you plan to merge partitions,
you may wish to schedule it for a time when you will not need to use your
system for an extended period of time. If you shut down or turn off your
computer while PartitionMagic is still working, it will cause
corruption to the file system, which will result in data loss. Do not shut
down the system until after the process is complete.
1 Run a file check (such as CheckDisk or ScanDisk) on the partitions you intend the
merge to ensure they do not contain file system errors or bad sectors.
2Select one of the two partitions you want to merge with another partition.
IMPORTANT! Do not merge partitions that contain operating systems or compressed
partitions. See “Disk Compression Utilities” on page 105.
If you plan to merge two adjacent NTFS partitions, they must be the same version
type and have the same cluster size. To view the version type and cluster size of an
NTFS partition, right-click the partition in the disk map, select Properties, then click
the NTFS Info tab.
If the cluster sizes are different, you will not be able to merge the partitions. See
“Converting FAT/FAT32 Partitions to 4K Aligned” on page 73.
If the NTFS versions are different, you will not be able to merge the partitions. See
“Merging Partitions with Different NTFS Version Numbers” on page 113.
3Click Partition ➤ Merge.
Norton PartitionMagic 53
The Merge Adjacent Partitions dialog appears.
4In the Merge options group box, click the partitions you would like to merge.
The contents of one partition will be moved into a folder within the other partition.
Do not merge partitions that contain operating systems.
5In the Merge Folder group box, type a name for the new folder that will be created in
the partition you are keeping.
6Click a file system type (FAT, FAT32, or NTFS) for the partition you are keeping.
The NTFS option will automatically be selected if you are merging two NTFS
partitions.
IMPORTANT! If you are combining FAT partitions, be careful not to convert them to
FAT32 unless your operating system supports FAT32 partitions.
DOS, Windows 3.x, early releases of Windows 95, and Windows NT
4.0 cannot access FAT32 partitions.
7Click OK.
The disk map in the main window changes to show the merged partitions.
Chapter 3: Managing Partitions54
Splitting Partitions
Use Split to divide a FAT or FAT32 partition into two contiguous partitions. It may be
useful to split a partition if you have a large set of data or a mixture of data and
applications within one partition.
The new partition is created to the right of the original partition; the original and new
partitions together occupy the same amount of hard disk space as the original partition.
The file system for the partition does not change. For example, if you had a 2 GB FAT
partition and you split it, the left and right partitions together would use 2 GB and both
would be FAT partitions.
When you split a partition, you can select the files and folders that you want the new
partition to include. You can also label the new partition, specify whether it is primary or
logical, and specify the new size of the partition.
1 Select the partition you want to split.
You can split a partition if it is 100 MB or larger.
A FAT partition must have at least 5% unused space, or the Split command will be
dimmed on the menu. A FAT32 partition requires 10% unused space to split.
Norton does not recommend splitting your operating system partition or moving your
Windows folders or program files into the new partition.
2Click Partition ➤ Split.
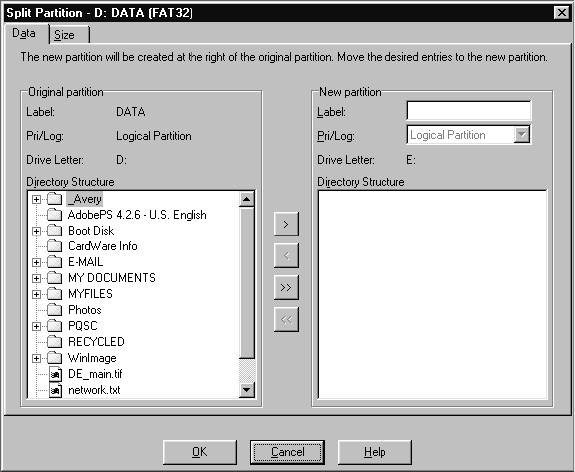
Norton PartitionMagic 55
If Split is dimmed (unavailable) on the menu, it is most likely because you are trying
to split a primary partition when you have already reached the maximum four primary
partitions (such as three primary partitions and one extended partition) allowed on a
hard disk. You can, however, split a logical partition within an extended partition.
3Click the Data tab.
4From the Original Partition group box, select the files and folders you want to move
to the new partition, then click the single right arrow.
Click the left arrow to remove selected files and folders from the new partition. To
move all files and folders to the new partition, click the double right arrow. You can
also click the left arrow to move selected files and folders back to the original
partition if you change your mind. You must, however, have at least one file or folder
remaining in each partition.
IMPORTANT! The Split operation is designed to move data files, not system files.
You should not move folders from the operating system partition
(usually C:) to the new partition unless they ONLY include data files.
If you copy a folder that is used by the operating system (such as
C:\Documents and Settings\username\My Documents), you may be
prompted to reboot your computer an extra time for Windows to apply
Chapter 3: Managing Partitions56
the changes or Windows may not allow you to split the partition. If
Windows allows you to move a standard folder, you will need to
redirect files to the new partition from within the applications that
used the original partition.
5(Optional) Type a name for the new partition in the Label text box.
6Select a partition type for the new partition from the Pri/Log drop-down list.
You cannot use the Split operation to convert the original partition from primary to
logical or vice versa.
7Click the Size tab.
8Size the new partition by moving the bar on the far right in the disk map or by typing
the number of MB in the Size text box.
The original partition will be adjusted to use the remaining space.
Both the original and new partitions must be at least 40 MB. On hard disks larger than
4 GB, PartitionMagic will round the size of the partition up to at least 47 MB.
9Click OK.
The size of the new partition is based on the minimum possible size and the total byte size
of the files you are adding to the new partition. Any remaining free space is split
proportionally between the two partitions according the data in the partitions. For
example, if the two partitions used 2 GB and you included 700 MB of data in the original
(left) partition and 300 MB of data on the new (right) partition, you would have 1 GB of
free space available; the original partition would get 700 MB of unused space, and the new
partition would get 300 MB of unused space.
Getting Information About Partitions
The Properties operation displays information about the status and structure of a selected
partition.
1 Select the partition you want information about.
2Click Partition ➤ Properties.
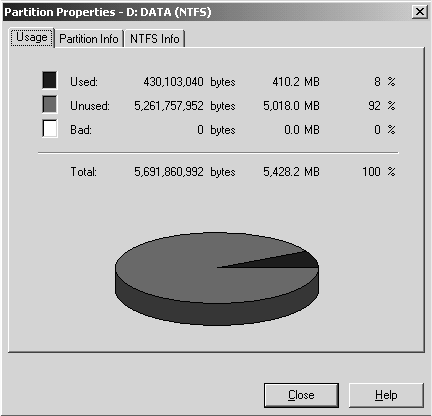
Norton PartitionMagic 57
The Partition Properties dialog appears.
Information is displayed in tabbed pages. To view a page, click its associated tab,
which is always visible at the top of the pages. Based on the file system the partition
uses, different pages appear.
3Click the tab for the page you wish to view.
Each page is described in the following sections.
4Click Close when you are finished viewing information.
Usage
The Usage page is available for the FAT, FAT32, NTFS, Ext2, and Ext3 file systems. This
page displays the following information in bytes, megabytes, and as a percentage:
•Used space on the partition, including space wasted by clusters
•Unused space on the partition
•Bad space on the partition
•Total space on the partition (the sum of used, unused, and bad space)
Cluster Waste
The Cluster Waste page applies only to partitions using the FAT or FAT32 file systems.
Chapter 3: Managing Partitions58
•Current Cluster Size in bytes or kilobytes
•Data stored on the partition in bytes and megabytes
•Wasted space on the partition in bytes and megabytes
•Total used space in bytes and megabytes (the sum of Data and Wasted space)
Partition Info
The Partition Info page is available for all types of partitions, including unallocated space
and extended partitions. Information on this page includes the following:
•Partition type is shown in hexadecimal followed by a text description of the partition
or file system type (such as FAT, FAT32, or NTFS). The hexadecimal designation is
the conventional way to display partition types.
•Serial Number is shown if the partition’s file system uses serial numbers.
The lower portion of the page shows physical information about the partition:
•First physical sector shows the logical number and the location (cylinder, head, and
sector) where the partition begins.
•Last physical sector shows the logical number and the location (cylinder, head, and
sector) where the partition ends.
•Total physical sectors displays the number of sectors in the partition.
•Physical Geometry shows the total number of cylinders, heads, and sectors on the
physical disk where the partition resides.
File System-Specific Info Pages
The last page in the Partition Information dialog corresponds to the file system used on
the selected partition. For example, if the file system is FAT or FAT32, the page is FAT
Info; if the file system is NTFS, the page is NTFS Info, and so forth.
Scanning a Disk for Errors
MS ScanDisk is a utility included with Windows 9x and Windows Me that you can run
from PartitionMagic. ScanDisk scans a partition for errors and fixes them. The Check for
Errors operation also scans for errors, but it does not correct them (for FAT or FAT32
partitions).
If you are running a Windows NT-based system, you can run Windows CHKDSK from
PartitionMagic. The interface for CHKDSK is different from ScanDisk. See your
Windows documentation for more information about CHKDSK.
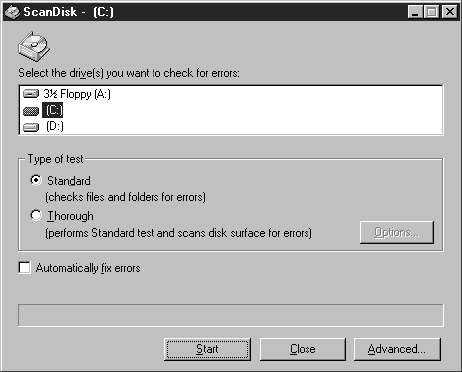
Norton PartitionMagic 59
1 Select the disk you want to scan for errors.
ScanDisk only scans partitions with assigned drive letters; it does not scan hidden
partitions, extended partitions, unallocated space, or partitions with file systems not
supported by the active operating system.
2Click Partition ➤ MS ScanDisk (or Windows CheckDisk) on the menu bar.
The ScanDisk dialog appears.
3In the Type of test box, click Standard or Thorough.
Thorough scans the partition for bad sectors.
4(Optional) Click Automatically fix errors.
5Click Start.
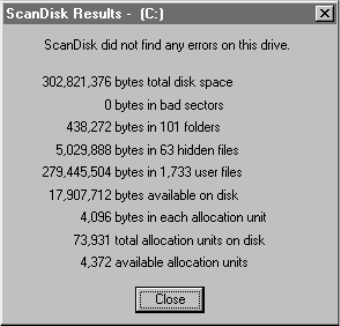
Chapter 3: Managing Partitions60
When ScanDisk is finished, the ScanDisk Results dialog displays information about
errors on the partition (if any were found) and other disk statistics, such as total disk
space, number of bytes in bad sectors, and total allocation units.
For more information about MS ScanDisk, consult Windows Help.
Defragmenting Drives
Disk Defragmenter is a Windows utility you can access from within PartitionMagic to
analyze and defragment drives on your hard disk.
1 From the PartitionMagic main screen, click Partition ➤ Windows Defragmenter.
2Select a partition, then click Action ➤ Analyze or Defragment.
For more information about Disk Defragmenter, consult Windows Help.
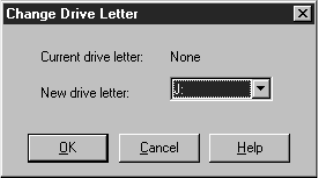
Chapter 4: Completing Advanced Disk Operations62
Changing a Drive Letter
The Change Drive Letter operation lets you change the drive letter assigned to any
partition visible to and supported by Windows NT/2000/XP. If you are running Windows
9x or Windows Me, this operation is not available.
1 Select the partition whose drive letter you want to change.
You cannot use this operation to change the drive letter for your CD drive.
IMPORTANT! You should not change the drive letter originally assigned to the
Windows NT/2000/XP boot partition (the partition where Windows is
installed). Changing the drive letter to anything but its original
designation will cause severe boot problems and may cause your
computer to be unbootable.
2Click Partition ➤ Advanced ➤ Change Drive Letter.
The Change Drive Letter dialog appears.
3In the New drive letter box, type or select the drive letter you want to assign to the
partition.
4Click OK.
Retesting Bad Sectors
The Bad Sector Retest operation lets you check sectors on FAT or FAT32 partitions that
have been marked bad and recover sectors that are usable.
The FAT and FAT32 file systems allocate disk space for file storage in units called
clusters, which are composed of a fixed number of sectors. Because the FAT or FAT32
file system tracks bad sectors at the cluster level, it marks an entire cluster bad even
Norton PartitionMagic 63
though the problem may exist in a single sector. Use Properties to discover whether a
partition contains bad clusters. For more information, see “Getting Information About
Partitions” on page 56.
As a conservative measure, when you move or resize a partition or increase cluster size,
PartitionMagic marks all new clusters containing any part of old bad clusters as bad (even
though the clusters may not actually contain bad sectors). Likewise, when you decrease a
partition’s cluster size, PartitionMagic divides bad clusters into multiple bad clusters. If,
after you complete these tasks, PartitionMagic reports bad sectors, you can perform a bad
sector retest and reclaim the good sectors that were marked bad.
1 Select the partition you want to retest.
2Click Partition ➤ Advanced ➤ Bad Sector Retest.
The Bad Sector Retest dialog appears to explain that PartitionMagic will retest
sectors that are marked bad and reclaim them if they do not include bad sectors.
3To continue with the test, click OK.
Some sectors marked as bad are “marginally bad,” meaning that one time the sector
works fine and another time it does not. Bad Sector Retest may mark a marginally bad
sector as good. This can result in data loss if the marginally bad sector fails in the
future. Most modern hard drives detect bad sectors and automatically remap the
sector, so in general, you do not see bad sectors on modern hard drives. If you do get
bad sector errors on a modern hard drive, it is recommended that you replace the
drive.
Hiding and Unhiding Partitions
The Hide Partition operation lets you secure partitions against unwanted user access. You
can perform this operation on FAT, FAT32, and NTFS partitions.
When you hide a partition, it will not be assigned a drive letter the next time you boot
your computer.
1 Select the partition you wish to hide.
2Click Partition ➤ Advanced ➤ Hide Partition (or Unhide Partition).
Unless you are running Windows NT/2000/XP, unhiding multiple primary partitions
may cause your machine to be unbootable.
The Hide Partition dialog appears, warning you that drive letters may change.
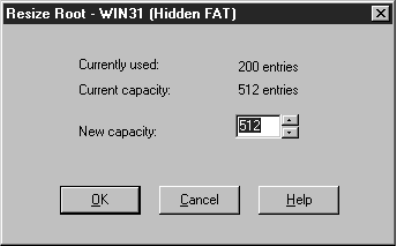
Chapter 4: Completing Advanced Disk Operations64
3To confirm that you want to hide the partition, click OK.
Under Windows 9x and Windows Me, hiding and unhiding partitions can cause the drive
letters of other partitions to change. When this happens, your computer may not boot and
applications may not run. Norton recommends that you allow DriveMapper to run
automatically to update drive letter references that change as a result of hiding or
unhiding partitions.
If your hard disk has more than one primary partition, only one is visible by default.
When you use the Set Active operation, PartitionMagic unhides the selected primary
partition and hides other primary partitions. While you can unhide more than one primary
partition, we recommend that you do not.
If you are running Windows NT/2000/XP, partitions are not hidden automatically;
therefore, you can have multiple visible primary partitions.
Resizing the Root Directory
The Resize Root operation lets you change the maximum number of entries that can be
placed in the root directory of a FAT partition. The number of root entries is set at the
time the partition is formatted; the limit does not expand automatically as it does in a
subdirectory or in a FAT32 partition. Consider increasing this number if you use
Microsoft long filenames in the root directory. During this operation, data within the
partition is unaffected.
1 Select the partition whose root directory you want to resize.
2Click Partition ➤ Advanced ➤ Resize Root.
The Resize Root dialog appears, displaying the number of used entries and the
current capacity.
Norton PartitionMagic 65
3In the New capacity box, type or select the number of entries you want the root
directory to have.
The number you type will be rounded to one that preserves the current cluster
alignment.
4Click OK.
Occasionally, enlarging the root directory displaces the first few files on the partition
(such as IO.SYS and MSDOS.SYS if the partition contains an operating system). If the
root directory is on a boot partition and the partition fails to boot after resizing the root
directory, you should run the SYS command to move the displaced files back to the front
of the disk.
Setting an Active Partition
The Set Active operation lets you make a partition the active partition (the partition the
computer boots from). Norton provides multiple ways to set a partition active:
PartitionMagic (Windows version or rescue disk version), BootMagic, PQBoot, and
PQBoot for Windows. This section explains changing the active partition from within
PartitionMagic.
Only one partition on a hard disk can be active at a time. To boot your computer from a
partition, the partition must be on the first disk, and it must contain an operating system.
When your computer boots, it reads the partition table of the first disk to find out which
partition is active and boots from that partition.
IMPORTANT! Before you make a partition active, it should be bootable. If the partition is
not bootable or if you are not certain if it is (such as before you install an
operating system), have a boot diskette or bootable CD ready.
If you plan to install an operating system to a partition, the partition must be active.
PartitionMagic hides any other FAT, FAT32, and NTFS primary partitions (unlike
Windows 9x and DOS FDISK programs which cannot hide or unhide partitions). Hiding
the other primary partitions makes it easy to install multiple operating systems and
choose the one you want to set active. For example, if you have Windows 95 and want to
install Windows NT in a separate partition, you can make the Windows 95 partition
smaller, create another primary partition, set it as the active partition, and then boot from
the Windows NT installation diskettes.
1 Select the partition you want to make active.

Chapter 4: Completing Advanced Disk Operations66
2Click Partition ➤ Advanced ➤ Set Active on the context menu.
(Windows NT/2000/XP only) In a configuration with mixed IDE and SCSI hard disks,
Windows does not always see the boot drive as the first disk. PartitionMagic displays
drives in the order that Windows reports them. As a result, you may see your boot
device as drive 1, 2, and so forth. PartitionMagic may also incorrectly report that
there is no active partition. Be sure you identify which drive is the boot drive.
The Set Active Partition dialog appears.
3Click OK.
Resizing Clusters
The Resize Clusters operation lets you change the cluster size on FAT, FAT32, and
NTFS partitions. Reducing cluster size may help you reclaim wasted space on your hard
disk.
If you converted FAT or FAT32 partitions to NTFS as part of an operating system
upgrade or file system conversion, resizing to 4K clusters will enable you to regain lost
performance caused by potentially inefficient 512-byte clusters
All files are stored in allocation units called clusters. Each file on a partition is allotted at
least one cluster. The size of a partition determines cluster size. Unless the size of a file is
an exact multiple of cluster size on the partition where the file is located, the file includes
wasted space. Larger partitions have larger clusters, and, therefore, more wasted space.
For more information, see “Making Efficient Use of Disk Space” in Help.
1 Select the partition where you want to resize clusters.
2Click Partition ➤ Advanced ➤ Resize Clusters.
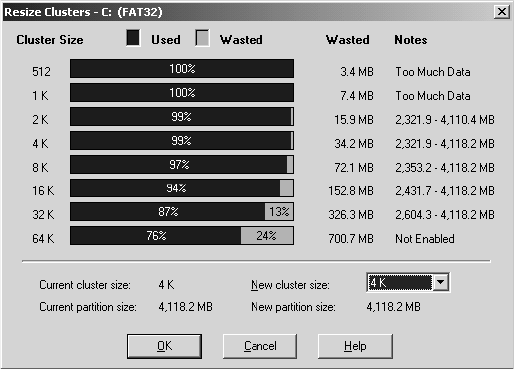
Norton PartitionMagic 67
The Resize Clusters dialog appears.
For each cluster size, PartitionMagic displays the following:
• A bar graph and percentages represent how much space would be used and how
much space would be wasted if you chose that cluster size for the currently
selected partition
• Wasted space (in megabytes)
• The range of allowable partition sizes (in megabytes) or other information
• If a cluster size requires a partition that is too small for the data and files on the
partition, “Too much data” appears in the Notes column. “Not Enabled” appears in
the Notes column for the 64 K cluster size because it is only used for Windows
NT/2000/XP. You can enable the 64 K cluster size, but it is not recommended. For
more information, see “Allow 64K FAT Clusters for Windows NT/Windows
2000/XP” on page 22.
The lower portion of the Resize Clusters dialog displays information about the
current and new cluster size and the current and new partition size (based on the new
cluster size).
3Using the information in the dialog, decide which cluster size you want to use (and
can use) and select it from the New cluster size drop-down list.
PartitionMagic adheres to the established limits for partition and cluster sizes. You
cannot select a cluster size that is invalid for the selected partition.

Chapter 4: Completing Advanced Disk Operations68
It is not recommended that you use the smallest cluster size on partitions containing a
single, large file, such as a database or swap file.
Choosing a smaller cluster size may resize the partition smaller, creating unallocated
space next to the partition. You can use this unallocated space to create a new
partition.
FAT16 partitions are resized automatically to fit the cluster size.
WARNING! Do not choose the 64 K cluster size unless you have Windows NT,
Windows 2000, or Windows XP. Partitions of this type are
incompatible with Windows 9x and DOS.
4Click OK.
Default Cluster Sizes
A partition’s cluster size is set by the DOS FORMAT operation, based on the size of the
partition, as shown in the following tables.
DOS and Windows default FAT cluster sizes
Partition Size (MB) FAT Type Sectors Per Cluster Cluster Size
0-15 12-bit 8 512 bytes
16-127 16-bit 4 2 K
128-255 16-bit 8 4 K
256-511 16-bit 16 8 K
512-1,023 16-bit 32 16 K
1,024-2,047 16-bit 64 32 K
2,048-4,096 16-bit 128 64 K*
*Only compatible with Windows NT/2000/XP.
Windows default FAT32 cluster sizes
Partition Size (GB) Sectors Per Cluster Cluster Size
0.256- 8.01 8 4 K
8.02-16.02 16 8 K
16.03-32.04 32 16 K
> 32.04 64 32 K
69
CHAPTER
5
Converting Partitions
This chapter includes the following information:
• Procedure for Converting Partitions
• Converting FAT Partitions to FAT32
• Converting FAT Partitions to NTFS
• Converting FAT32 Partitions to FAT
• Converting FAT32 Partitions to NTFS
• Converting FAT/FAT32 Partitions to 4K Aligned
• Converting NTFS Partitions to FAT or FAT32
• Converting Partitions to Logical or Primary

Chapter 5: Converting Partitions70
Procedure for Converting Partitions
You can convert the following file system formats:
• FAT partitions to FAT32
• FAT partitions to NTFS (Windows NT/2000/XP only)
• FAT32 partitions to FAT
• FAT32 partitions to NTFS (Windows 2000/XP only)
• FAT/FAT32 partitions to 4K aligned
• NTFS partitions to FAT
• NTFS partitions to FAT32
You can also convert primary partitions to logical and logical partitions to primary.
IMPORTANT! You cannot convert FAT or FAT32 partitions to NTFS if you are running
PartitionMagic from the rescue disks.
IMPORTANT! You cannot convert file system types on compressed drives. First,
uncompress the drive, then run the conversion.
The basic conversion steps (1-5) are found below. However, for each file system type
there is specific information you need to know before beginning any conversion. Please
see the appropriate heading listed in this section before completing the conversion
procedure.
1 Select the partition you want to convert.
2Click Partition ➤ Convert.
The Convert Partition dialog appears.
3Under Convert to, choose the file system to which you want to convert the partition.
Norton PartitionMagic 71
Depending on the file system format of the partition you are converting, some options
may appear dimmed.
If you want to convert your partition to primary or logical, see “Converting Partitions
to Logical or Primary” on page 76.
4Click OK.
Converting FAT Partitions to FAT32
FAT32 partitions have less wasted disk space than FAT partitions. (For more information,
see “Resizing Clusters” on page 66.) However, you should be aware of these issues:
• You must have Windows 95 OEM Service Release 2, Windows 98, Windows Me,
Windows 2000, or Windows XP to access files on a FAT32 partition. If you run an
operating system other than these, FAT32 partitions will be inaccessible when the
other operating system is running, even if one of these operating systems is installed
on your machine.
• Some computers have a sleep mode that saves all memory to disk. Because this
function sometimes requires a FAT partition, consult your computer manual or
contact the manufacturer before converting to FAT32.
• The minimum recommended size for a FAT32 partition is 256 MB.
The steps for this process are listed on page 70.
Converting FAT Partitions to NTFS
This conversion is only possible under Windows NT, Windows 2000, and Windows XP.
The Convert FAT to NTFS operation launches the Microsoft Convert utility to convert a
FAT partition to NTFS. You must be running Windows NT/2000/XP to complete this
conversion. This cannot be performed from the rescue diskette.
If you boot multiple OSs, you must be careful converting FAT to NTFS. NTFS is only
accessible from Windows NT/2000/XP; therefore, the data in this partition will not be
accessible if you boot DOS, Windows 9x, or Windows Me.
After clicking OK, if you have no operations pending and if Windows NT can lock the
partition (no open files), the FAT file system is converted. If you have operations
pending, you must apply them first before converting from FAT to NTFS. If you do not
Chapter 5: Converting Partitions72
apply the operations, a prompt appears asking if you want to apply the changes now before
converting your FAT file. Click OK to apply the changes and continue with the
conversion.
If you have any open files, a message appears indicating that the convert utility cannot
gain exclusive access to the drive and asks if you want to perform the conversion
immediately. If you type Y, your computer is shut down, and the conversion is done at
reboot time.
Converting FAT32 Partitions to FAT
To complete this conversion, the partition must have ~800 MB of unused space because of
how the FAT file system allocates disk space for file storage. The partition must have
approximately 1.7 GB of data or less because FAT partitions are limited to 2 GB. If the
command is dimmed in the dialog, you must delete some data to enable the conversion.
If the FAT menu option is dimmed, your FAT32 partition contains over 2 GB of data. If
the partition size is over 2 GB but it contains less than 2 GB of data, you can convert the
partition (without data loss), but the new partition will be 2047 MB.
During the conversion, PartitionMagic may report too many root directory entries (the
maximum number of entries in a FAT partition’s root directory is limited, unlike a FAT32
partition’s root directory). In this case, move or copy some of the files in the root directory
to another location and then start the conversion again.
Converting FAT32 Partitions to NTFS
This conversion is only possible under Windows 2000 and Windows XP.
The Convert FAT32 to NTFS operation launches the Microsoft Convert utility to convert
a FAT32 partition to NTFS. You must be running Windows 2000/XP to complete this
conversion.
Be aware that data in an NTFS partition will not be accessible if you boot DOS, Windows
9x, or Windows Me.
The steps for this process are listed on page 70.
After clicking OK, if you have no operations pending and if Windows 2000/XP can lock
the partition (no open files), the FAT32 partition is converted. If you have operations
pending, you must apply them first before converting from FAT32 to NTFS. If you do not
Norton PartitionMagic 73
apply the operations, a prompt appears asking if you want to apply the changes now before
converting your FAT partition. Click OK to apply the changes and continue with the
conversion.
If you have any open files, a message appears indicating that the convert utility cannot
gain exclusive access to the drive and asks if you want to perform the conversion
immediately. If you type Y, your computer is shut down, and the conversion is done at
reboot time.
Converting FAT/FAT32 Partitions to 4K Aligned
Unlike an NTFS partition, the first cluster in a FAT or FAT32 partition is not located at
the beginning of the partition. Instead, all the FAT clusters come after a group of sectors
that are designated as a system area. Because the number of sectors needed for this system
area varies, the first cluster may not be aligned on any particular boundary.
During a convert operation from FAT or FAT32 to NTFS, all the sectors in the system
area must be converted to clusters. The cluster size of the resulting NTFS partition is
dependent on how many sectors are in the system area. If the number of sectors in the
system area is a multiple of eight, then the NTFS cluster size can be up to 4K in size (8
sectors x 512 bytes per sector equals 4K). If the number of sectors is not a multiple of
eight, then a smaller cluster size must be used when converting to NTFS.
When you convert a FAT or FAT32 partition to 4K aligned, the operation will check the
number of sectors in the system area to see if it is a multiple of eight. If it is not, it will
adjust the value by padding the number of sectors in the system area and shifting all the
data clusters accordingly. This will ensure that if you decide to convert the partition to
NTFS at a later time, it is possible to have 4K clusters on the resulting partition.
Converting NTFS Partitions to FAT or FAT32
Converting an NTFS partition to FAT lets you view the contents of the partition from
DOS, or Windows 9x/Me/NT/2000/XP.
Converting an NTFS partition to FAT32 lets you view the contents of the partition from
Windows 95b/98/Me/2000/XP. However, a FAT32 partition will not be accessible to
Windows 95a and Windows NT.
Chapter 5: Converting Partitions74
IMPORTANT! You will lose file system-specific information when converting from
NTFS to FAT. Refer to “NTFS Information Lost When Converting to FAT
or FAT32” on page 75 for additional information.
If the conversion fails when you apply changes, refer to the bulleted list below for a list of
possible reasons.
Restrictions on Converting NTFS Partitions to FAT or FAT32
NTFS is a more advanced file system than FAT and FAT32. Therefore, depending on the
NTFS features used on the partition, the type of data, and partition size, you may or may
not be allowed to complete the conversion.
If you receive an error message and the conversion stops, it is usually caused by one or
more of the following:
• The file system for conversion is not allowed for the current partition size. A FAT32
partition should be greater than 256 MB, and a FAT partition must be less than 2 GB.
• The NTFS partition has data in memory that has not yet been written to the hard disk.
• ·The Windows 2000/XP NTFS partition has compressed files, sparse files, reparse
points, or encrypted files. In such case, you can uncompress and/or move (or delete)
the sparse files, then repeat the conversion.
• The file system has errors, such as lost clusters and cross-linked files. You can fix
these problems, then try the conversion again.
• There is not enough temporary space in the partition to do the conversion. The
conversion will require the NTFS system and the FAT32 system files until the last
step of the conversion. Also, there is data in NTFS File Replication Services that must
be moved to external clusters and saved.

Norton PartitionMagic 75
NTFS Information Lost When Converting to FAT or FAT32
If you can complete the conversion from NTFS to FAT or FAT32, you may receive a
warning about the quality of data and feature loss, depending on the features used on the
partition, the type of data, and the partition size.
Warning Description
Error The conversion is not allowed. Because the partition being converted
is using advanced features in NTFS, you may experience unintended
data and feature loss. You will receive an error in one or more of the
following cases:
• There is more than one data stream for any file.
• Any links.
• Any extended attributes.
• Any user-defined attributes in any file.
• Device entries.
• There are sparse files on the volume. Any sparse files, except for
the bad sector file, will stop the conversion.
Warning The conversion is allowed. Although a conversion warning is not as
serious as an error, you may still experience the loss of NTFS-specific
features that are not supported in FAT or FAT32. You will receive a
conversion warning in one or more of the following cases:
• Disk usage quotas - NTFS supports limiting the amount of disk
space for a user. After conversion, all users will have full access
to all free hard disk space.
• Access control lists - This is a file attribute that lists all the users
that can access a file. After conversion, all users will have full
access to all files.
• Index of access control lists - A list of all files that have specific
access rights assigned to them. After conversion, all users will
have full access to all files.
• FAST index file - This file is sometimes created on Windows
2000 computers. After conversion, all indexing of keywords will
be lost.
• Old versions of files - NTFS has the ability to keep versions of
files, however, only the current version of the file is converted
and saved.

Chapter 5: Converting Partitions76
Converting Partitions to Logical or Primary
You might want to convert a primary partition to a logical partition if you have reached
the limit of primary partitions on your hard disk. If you create a logical partition,
PartitionMagic will automatically place it in an extended partition. You can then create
more logical partitions within that extended partition, expanding the maximum number of
partitions on the disk.
You might want to convert a logical partition to a primary partition if you plan to install an
operating system on it. The partition must be a primary partition to be bootable.
IMPORTANT! If you convert an active primary partition to logical (such as your
Windows NT/2000/XP system partition), your computer will not boot
from the hard drive.
5Select the partition you want to convert.
6On the toolbar Partition ➤ Convert.
No Warning The conversion is allowed. The most basic NTFS partition still gives
files more features than are found in FAT or FAT32. When Windows
NT 4.0 is used to copy files from an NTFS partition to a FAT
partition, no warning is given about the features you are losing. Also,
the conversion will not give you a warning about specific features that
cannot be converted. These features include:
• Standard journal file (only used internally by NTFS) - This file is
a transaction log of changes to the NTFS file system. After
conversion, the journal file will be lost.
• NTFS-specific file attributes - NTFS and FAT both have
standard file attributes, such as Read-only, Archive, Hidden, and
System. NTFS has additional file attributes that can be set. After
conversion, however, these additional file attributes will be lost.
• NTFS-specific file dates - The last edit date is converted to the
FAT date. After conversion, the creation date, last access date,
and last edit date (date change only) will be lost.
• Reliable change journal - This journal file is used by Windows
2000 and Windows XP. After conversion, this file will be lost.
Warning Description

Norton PartitionMagic 77
The Convert Partition dialog appears.
7Click either Primary or Logical.
8Click OK.
You cannot convert from primary to logical if another primary partition exists between the
chosen partition and an existing logical partition.
You cannot convert from logical to primary if the conversion would result in more than
four primary partitions or the partition has one or more logical partitions to the left and
one or more logical partitions to the right.
79
CHAPTER
6
Using Wizards
This chapter includes the following information:
•Overview
• Running Wizards
• Create New Partition Wizard
• Create Backup Partition Wizard
• Install Another Operating System Wizard
• Resize a Partition Wizard
• Redistribute Free Space Wizard
• Merge Partitions Wizard
• Copy Partition Wizard
Chapter 6: Using Wizards80
Overview
PartitionMagic includes seven wizards for common tasks. The wizards provide an
alternative to performing the tasks manually using the commands on the Partition menu.
You do not have access to the wizards if you run PartitionMagic from the rescue disks.
Running Wizards
There are two ways to run a wizard:
• Click under Pick a task in the upper left pane of the main screen.
• Choose the task you want to perform from the Tasks menu.
Applying Changes
When you complete a wizard, the disk map and partition list in the main window reflect
the changes you entered. However, the changes do not actually affect your system until
you apply them. To apply the changes to your system, click General ➤ Apply Changes .
To discard the changes without applying them, click General ➤ Discard All Changes (or
Undo Last Change).
After running a wizard, you can run other wizards or perform other partition operations
and then apply or discard all the pending changes at once.
Create New Partition Wizard
The Create new partition wizard creates a new primary or logical partition. To create a
new partition for another operating system, see “Install Another Operating System
Wizard” on page 81, or review the demonstration video at http://service.symantec.com.
You should be aware of the following considerations when creating a new partition:
• Creating a new partition may cause your drive letters to change. For example, if you
have one primary partition (C:) on your hard drive and a CD-ROM drive (D:), and
you create a new logical partition on your hard drive, the new partition becomes D:
and the CD-ROM drive changes to E: after you reboot your computer. As a result, any
programs on your hard drive that were linked to the CD-ROM may no longer function
because the paths to files have changed. (In such cases, you can run DriveMapper to
correct the error.)
Norton PartitionMagic 81
• The file system you choose for the new partition will affect which operating systems
can access the partition. Pay close attention to the information in the dialogs, or you
may inadvertently make your data inaccessible.
• After you apply the changes from the wizard and reboot your computer, the operating
system assigns the new partition a drive letter. You can then save data or install an
operating system to your new partition.
Create Backup Partition Wizard
You can protect your data files by copying them to a dedicated backup partition. The
wizard will resize existing partitions on your hard disk to make room for a new partition.
Then it will create the new partition.
Install Another Operating System Wizard
You can create a new partition especially designed for an operating system. The wizard
prompts you to select the operating system you plan to install. Then it creates a partition
that will work for that operating system—including the right size, the proper boot code
boundary, and so forth. When you use the wizard, you do not need to know all the
requirements of the operating system because the wizard will handle it for you.
If you want the ability to switch between installed operating systems when you boot your
computer, it is recommended that you install Norton™ BootMagic® before running this
wizard.
You should print the instructions displayed when you click the View Instructions button
in the wizard. They will help you install an operating system to the new partition after you
have completed the wizard.
Resize a Partition Wizard
The Resize a Partition wizard helps you resize a partition and lets you specify how the
resize will affect other partitions on the same disk. For example, if you have C: and D:
partitions and you choose to enlarge C:, the wizard could take space from D: and allocate
it to C:.
For information about resizing partitions without the wizard, see “Resizing and Moving
Partitions” on page 29.
Chapter 6: Using Wizards82
Redistribute Free Space Wizard
The Redistribute free space wizard spreads the free space on a hard disk evenly across
partitions. Free space refers to unused space within partitions and space that is not
allocated to any partition. You can redistribute free space on one hard disk at a time. You
cannot redistribute free space across several disks.
For information about redistributing free space without the wizard, see “Resizing and
Moving Partitions” on page 29.
Merge Partitions Wizard
The Merge Partitions wizard helps you merge two adjacent FAT, FAT32, or NTFS
partitions. You choose two partitions, and one will be expanded to include the second. The
contents of the second partition are added as a folder inside the first partition.
Norton recommends that you run a file check (such as CheckDisk or ScanDisk) on the
partitions to be merged before running the wizard and that you run DriveMapper to update
drive letter references after merging partitions. The wizard will prompt you to run
DriveMapper automatically.
Copy Partition Wizard
The Copy Partition wizard helps you duplicate a partition. The copy is the same size and
file type and contains the same data as the original. When you copy a partition, you
specify the hard disk and the unallocated space where you want to place the copy. If
necessary, the wizard will resize neighboring partitions to create sufficient space to
perform the copy.
Chapter 7: Using PartitionMagic Utilities84
Changing Drive Letter References with DriveMapper
When you create, merge, delete, hide, and unhide partitions, your drive letters can change,
causing applications not to run because application shortcuts, initialization files, and
registry entries refer to incorrect drives. DriveMapper is a wizard that lets you easily
update drive letter references.
IMPORTANT! DriveMapper does not change drive letter assignments; it only changes
references to the drive letters, which are assigned by your operating
system.
DriveMapper will run automatically if the following conditions are all met:
• You apply changes to your system that affect drive letter assignments.
• You are running Windows 95, Windows 98, or Windows Me.
• Your hard disk contains only FAT or FAT32 partitions.
• You have no more than one CD-ROM drive and no more than one removable drive.
To run DriveMapper manually,
1 From the PartitionMagic main window, click Tools ➤ DriveMapper.
You can also click Start (on the Windows taskbar) ➤ Programs ➤ Norton
PartitionMagic 8.0 ➤ PartitionMagic 8.0 Tools ➤ DriveMapper.
If you are using Windows NT or Windows 2000/XP Professional as your only operating
system, we recommend using the Change Drive Letter operation rather than
DriveMapper. Change Drive Letter lets you permanently set the drive letters for your
partitions so that adding and removing partitions does not affect drive letters. Note that if
you merge or split partitions, drive letters will change even if you are using Windows
NT/2000/XP and the Change Drive Letter operation.
If you have installed an alternative desktop on Windows 9x with the desktop files residing
on a different drive than the Windows system files, DriveMapper may not be able to adjust
your paths. Because DriveMapper is a Windows program, it must have Windows loaded
to run. If the drive letter has been changed for the drive that holds your desktop files, you
may not be able to start Windows.
For further information about how operating systems assign drive letters, see the second
paragraph under “Assigning a CD-ROM Drive Letter” on page 111.
Norton PartitionMagic 85
Using DriveMapper With Multiple Operating Systems
If you run multiple operating systems, you should reinstall applications rather than use
DriveMapper. The following issues make using DriveMapper in a multiple operating
system environment difficult and error-prone:
• Drive letter assignments are based on the file systems supported by an operating
system. If you do not put all FAT32 and NTFS partitions after all FAT partitions,
drive letters will change depending on the operating system currently running, and
DriveMapper may be unable to correctly identify which changes should be made.
• Registry settings are changed for the current operating system only. If you manually
run DriveMapper from another operating system, references in files will already be
changed in the current operating system and further changes will introduce errors in
the other operating systems.
• When DriveMapper is running, files contained in hidden partitions are not updated. If
you are using multiple primary partitions for different operating systems, only the
active primary partition may be visible to be updated.
Changing Drive Letters in the Correct Order
DriveMapper must change drive letters in the correct order to avoid destroying original
references before they are used to make changes for other drive letters.
For example, assume you have two partitions on your hard disk (a primary partition C: and
a logical partition D:) and a CD-ROM drive E:. Suppose you create a logical partition
between C: and D:. The drive letter of D: changes to E:, and the drive letter of E: changes
to F:; however, references in certain files (such as shortcuts) still reflect the original drive
letter assignments. DriveMapper must first change the drive E: references to F: and then
change the drive D: references to E:.
DriveMapper will automatically place changes in the proper order. Norton strongly
recommends that you apply changes in the order DriveMapper chooses.
Switching between Bootable Partitions with PQBoot
PQBoot™ is a quick and easy way to switch between bootable primary partitions. You
may want to use PQBoot if you only occasionally change the active partition and do not
want to use BootMagic or if you cannot use BootMagic easily because you only have
NTFS partitions on your computer. You can also use PQBoot for Windows in conjunction
with BootMagic to create a “boot once” environment—where you boot from one OS into
another and then return to the orginal OS on the next reboot.
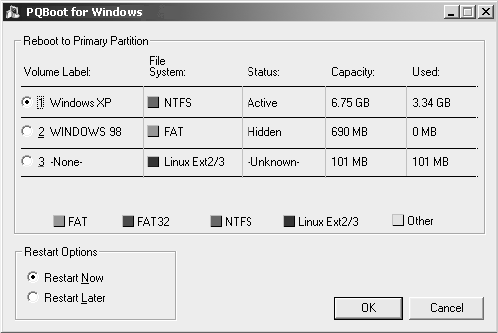
Chapter 7: Using PartitionMagic Utilities86
For more information about BootMagic, see “BootMagic” on page 89.
PQBoot for Windows
You can use PQBoot for Windows in conjunction with BootMagic to switch to another
operating system without changing your BootMagic configuration settings.
You can also use PQBoot for Windows without having BootMagic installed. Then the
settings you choose are “sticky” and will be in effect until you run PQBoot for Windows
again or change the active partition with PartitionMagic.
1 Click Start ➤ Programs ➤ Norton PartitionMagic 8.0 ➤ PartitionMagic 8.0
Tools ➤ PQBoot for Windows.
Under Windows 95/98/Me, PQBoot for Windows will only run if PQVXD.VXD is in
the same directory as PQBOOT32.EXE.
PQBoot for Windows displays the primary partitions on your first hard disk.
2Choose the partition that you want to boot to.
PQBoot for Windows will enable you to choose a partition that does not include an
operating system. If there is no operating system on the active partition, you must
have rescue disks or a boot disk to perform any operations.
3Click Restart Now to reboot to the new partition immediately, or click Restart Later
to boot to that partition the next time you boot the computer.
4Click OK.

Norton PartitionMagic 87
5If you select Restart Now, a confirmation dialog appears. Click Yes to confirm.
When you reboot, PQBoot makes the selected partition active and hides the other primary
partitions on the hard disk.
PQBoot for DOS
1 Go to a DOS prompt. Change to the directory containing PQBOOT.EXE or
PQBOOTX.EXE.
2Type PQBOOT or PQBOOTX, then press <Enter>.
Use PQBOOT if you want a small, fast executable that will fit on a floppy disk that
has limited free space. Be aware, however, that PQBOOT may not display volume
labels correctly for FAT or FAT32 partitions and volume labels for NTFS partitions
will not display at all.
Use PQBOOTX if the executable file size and speed are not critical. PQBOOTX will
display all volume labels in FAT, FAT32, and NTFS partitions.
PQBoot displays a list of all primary partitions.
3Type the ID number of the partition (shown in the first column) you want to make the
bootable primary partition.
4Press <Enter>.
PQBoot makes the partition active and reboots the computer. If you need to maintain
multiple, visible primary partitions under Windows NT, you should run PQBoot with
the /M switch.
PQBoot for DOS Command Line Switches
PQBoot for DOS offers several command line switches that are useful when you know the
ID number or volume name of the partition you want to make active. To use a switch, run
PQBoot from a DOS prompt.
Switch Description
/A:<number or
label>
Marks a partition active without rebooting.
/M Maintains the hidden/visible status of each partition. If you have a
Windows NT installation that looks for multiple, visible primary
partitions, you should run PQBoot with the /M switch.

Chapter 7: Using PartitionMagic Utilities88
For example, to set the second available bootable partition active without rebooting, you
would type PQBOOTX /P:2 /A.
Running PQBoot for DOS with Command Line Switches
1 Go to a DOS prompt.
2Change to the directory containing PQBoot (typically C:\PROGRAM
FILES\Norton\PARTITIONMAGIC 8.0\DOS).
3(DOS) Type PQBOOT
switch
or PQBOOTX
switch
(where
switch
is the
appropriate switch).
/P:<number> Selects the active partition using the partition’s ID number.
/S Shows partition information, including ID numbers and volume
names.
/V:<label> Selects the active partition using the partition’s volume label.
/? Displays a brief description of the switches and examples of how to
use them.
Switch Description
89
CHAPTER
8
BootMagic
This chapter includes the following information:
• Getting Started
• Configuring BootMagic
• Setting BootMagic Passwords
• Adding an Operating System to the BootMagic Menu
• Removing an Item from the BootMagic Menu
• Modifying a Menu Item’s Properties
• Setting a Default Operating System
• Booting from a Second Hard Disk
• Setting the Startup Delay
• Disabling BootMagic
• Using the BootMagic Menu
• Using BootMagic to Install Operating Systems
• Troubleshooting

Chapter 8: BootMagic90
Getting Started
BootMagic® is a powerful disk-management tool that helps you run multiple operating
systems on a single PC. Each time you start or restart your computer, BootMagic presents
a list of operating systems (OSs) you can boot from. The configuration program lets you
quickly select the OSs you want to appear in the BootMagic Menu and lets you set
various boot-time options such as a default OS and a startup delay.
With BootMagic, you can easily switch between OSs, using whichever OS best suits your
immediate needs. You can even try out a new OS risk-free, knowing that your old OS is
there, readily accessible when you need it.
BootMagic System Requirements
The following table lists the minimum and recommended system requirements for
installing and using BootMagic.
Hardware/Software Requirement
Processor Pentium
RAM 32 MB for Windows 9x, Me; 128 MB for Windows NT 4.0,
Windows 2000, or Windows XP
Hard-disk free space 10 MB
CD-ROM drive Any speed
3.5-inch diskette
drive
3.5-inch diskette drive
Operating system Windows 95, Windows 98, Windows Me, Windows NT
4.0, Windows 2000, Windows XP
Monitor SVGA
Pointing Device Microsoft-compatible mouse
Norton PartitionMagic 91
Supported Operating Systems
BootMagic can be configured to boot to the following operating systems:
Installing BootMagic
You can install BootMagic from Windows 95, Windows 98, Windows Me, Windows NT
4.0, Windows 2000 Professional, and Windows XP.
1 Insert the PartitionMagic CD in your CD drive.
2Click BootMagic from the PartitionMagic setup screen, then click Install to launch
the BootMagic installation program.
3Follow the on-screen instructions to install BootMagic.
BootMagic can be installed to any FAT or FAT32 partition (primary or logical). If
your system only has NTFS partitions, see “Installing BootMagic on an NTFS
System” on page 92 or consider using PQBoot for Windows instead of BootMagic.
See “PQBoot for Windows” on page 86.
4After installation is complete, click Back ➤ Exit to close the setup screen.
After installation, BootMagic sorts through your system’s hard disks, looking at the
partition tables and gathering information about each currently installed operating system.
BootMagic then automatically runs the configuration program, adding every detected OS
to the BootMagic Menu.
At this point, it may be necessary for you to edit the items that appear in the menu list.
While BootMagic reliably detects most operating systems, it may also detect some
non-OS partitions. For example, if you have a primary NTFS data partition (that is, a
partition which contains only data, no OS) on the first disk, BootMagic may detect it as
•Windows 98
•Windows 95
•Windows Me
•Windows NT 4.0
• Windows NT 3.51
• Windows 3.x (must be installed
with DOS 5 or later)
• MS-DOS 5.0 or later
• Windows 2000
• Windows XP
• PC-DOS 6.1 or later
• Open DOS
•Linux
•BeOS
• Most other versions of DOS
Chapter 8: BootMagic92
Windows NT. Likewise, a primary FAT or FAT32 data partition may be detected as
MS-DOS or Windows 95/98. Because data partitions cannot be booted, you should
remove them from the menu list. You can also choose to add or remove other OS
selections, modify OS names and icons for easier identification, add passwords, set a new
startup delay, or select a different default OS.
For information on detecting non-OS partitions in the menu list, see “Finding the Right
Operating System” in the BootMagic online Help. For more information on using the
configuration program, see “Configuring BootMagic” on page 94 in this guide or refer to
online Help.
After you make any necessary changes, click Save/Exit. The next time you reboot your
computer the BootMagic Menu appears. To start an operating system, select the desired
menu item from the BootMagic Menu.
IMPORTANT! Do not delete the partition that includes BootMagic without uninstalling
BootMagic first.
Installing BootMagic on an NTFS System
BootMagic must run from a FAT or FAT32 partition. If you are only running Windows
NT-based operating systems, you may only have NTFS partitions on your hard disk. To
use BootMagic on an NTFS system, you must create a FAT (or FAT32) partition, install
BootMagic on it, and configure BootMagic so that it does not hide the FAT partition. The
following steps detail this process.
1 Start PartitionMagic.
2Right-click the first primary NTFS partition, then click Resize/Move.
3In the Free Space Before field, type 50.
4To create the new partition after the NTFS partition, enter the size in the Free Space
After field.
IMPORTANT! The BootMagic partition must start below the 8 GB boundary of the
hard disk and must be at least 32 MB large.
5Click OK.
6Right-click the new unallocated space, then click Create.
7From the Create As drop-down list, click Primary Partition.
Norton PartitionMagic 93
You can have only four primary partitions on a hard disk. If your hard disk already
contains four primary partitions, you must delete one of your existing primary
partitions or convert it to a logical partition before you can create the primary FAT
partition for BootMagic.
8From the Partition Type drop-down list, select FAT.
9(Optional) Under Label, type a descriptive name for the partition (such as
“BootMagic”).
10 Click OK.
11 Verify that the status of the new FAT partition is None.
If the status of the FAT partition is “Hidden,” set the status to None. See “Hiding and
Unhiding Partitions” on page 63.
12 Click General ➤ Apply Changes.
13 Click Yes to confirm that you want to apply the changes.
If the partition you are resizing has open files on it, PartitionMagic will prompt you
that it must reboot the machine to apply the changes. Click "OK" to allow the
machine to reboot. Make sure there are no floppy diskettes or CDs inserted in the
machine. Once the changes have been applied and Windows has loaded, verify that
the new partition has a drive letter.
14 Install BootMagic, then BEFORE REBOOTING, perform the steps under
“Configuring BootMagic to Work on an NTFS System” on page 95.
The new FAT partition will be automatically selected as the destination location for
BootMagic. Create the BootMagic diskette when prompted during the installation
process. When the BootMagic installation is complete, the BootMagic Configuration
program automatically loads.
IMPORTANT! Do not reboot your computer at the end of the BootMagic installation.
Creating a BootMagic Rescue Disk
During installation, you have the option to create a BootMagic rescue diskette. This
diskette is vital if your system’s master boot record (MBR) is ever damaged or
overwritten. It can also be helpful if you inadvertently disable BootMagic and cannot
access the configuration program to re-enable it.
WARNING! Technical support may not be able to assist you if you have not created a
rescue diskette.
Chapter 8: BootMagic94
To launch BootMagic’s configuration program from the rescue diskette, boot from the
rescue diskette and follow the on-screen instructions.
Once in the configuration program, you can make any needed modifications or additions.
When you click Save/Exit to exit the configuration program, BootMagic re-saves all the
necessary files and rewrites the MBR, thereby restoring the program to normal.
Getting Help
Refer to the BootMagic online help for information about all BootMagic features that are
not discussed in this chapter.
• To access Help in the Windows configuration program, select Help ➤ Contents
from the menu bar.
• To access Help in the DOS configuration program, select Help ➤ Topic List from
the menu bar.
• To access context-sensitive Help, click Help in the lower-right corner of most
dialogs, or press <F1>.
Configuring BootMagic
BootMagic’s configuration program consists of two versions: one for DOS and one for
Windows. Both versions have similar interfaces and offer the same functionality.
BootMagic’s configuration program may be manually launched by any of the following:
• In Windows, select Start ➤ Programs ➤ BootMagic 8.0 ➤ BootMagic
Configuration.
• In DOS, run
drive
:\BTMAGIC.PQ\CONFIG.BAT.
• On the PartitionMagic main screen, click Tools ➤ BootMagic Configuration.
• You can run a DOS version of the BootMagic configuration program from the Norton
PartitionMagic CD if your computer has the ability to boot from a CD.
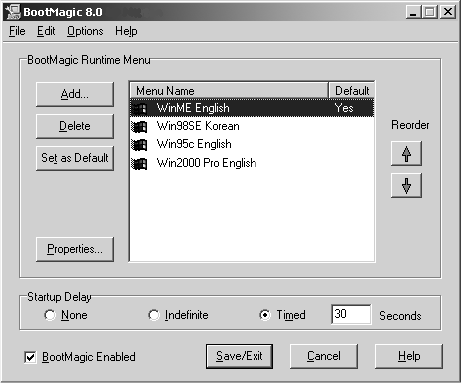
Norton PartitionMagic 95
When you run the configuration program, the BootMagic main window appears.
From this window, you can set a password for the configuration program, the BootMagic
Menu, or specific menu items; add or remove an OS to the BootMagic Menu; modify an
operating system’s BootMagic properties; set your default operating system; set the
startup delay; or disable BootMagic. Each of these options are briefly covered in this
chapter. You can also change the background bitmap. For further information about
configuring BootMagic, see the online help.
Configuring BootMagic to Work on an NTFS System
1 From the BootMagic Configuration menu bar, click Options ➤ Advanced Partition
Hiding.
A checkmark appears to the left of the Advanced Partition Hiding menu item.
2In the BootMagic Runtime Menu group box, verify that your current Windows
operating system is highlighted in the list of available operating systems.
3Click Properties.
4Click the Visible Partitions tab.
5Place a mark in the Override Default Selections checkbox.
6Place a mark in the checkbox next to the FAT partition where BootMagic is installed.
Chapter 8: BootMagic96
7Click OK.
8Click Save ➤ Exit.
9Reboot the computer to apply the changes.
You can now use BootMagic with your NTFS system.
Setting BootMagic Passwords
BootMagic now allows you to password protect the BootMagic configuration program,
the BootMagic Menu, or even specific menu items.
1 In the BootMagic main window, click the Options menu.
2Select Set Configuration Password to password protect the configuration program
or Set Boot-time Password to password protect the BootMagic menu.
3Enter the current password in the Old password text box.
The Old Password text box will be blank and disabled when there is no prior
password.
4Enter the new password in the New password text box.
5Retype the new password in the Confirm new password text box.
6Click OK.
To clear a password, enter the old password and leave the new password fields blank.
To set a password for specific BootMagic Menu items, you must modify the menu item’s
properties. For more information, see “Modifying a Menu Item’s Properties” on page 98
or refer to BootMagic’s online Help.
Adding an Operating System to the BootMagic Menu
1 In the BootMagic main window, click Add.
The BootMagic Add OS dialog appears.
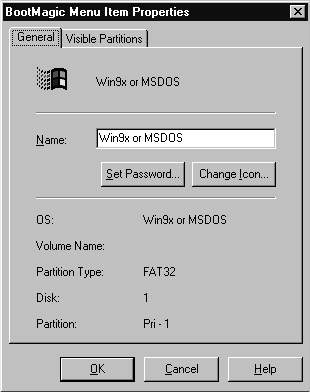
Norton PartitionMagic 97
2(Optional) To view all your system’s partitions, including those that BootMagic does
not recognize as containing an OS (for example, Linux on a logical partition), mark
the Advanced check box.
3Select the OS you wish to add to the BootMagic menu.
BootMagic may sometimes detect an OS that doesn’t exist or may detect the wrong
name for an existing OS. For help on finding the operating system and partition you
want, see “Finding the Right Operating System” in BootMagic’s online Help.
Do not add non-OS partitions to the BootMagic menu. You cannot boot your
computer from a partition without an OS.
4Click OK.
The BootMagic Menu Item Properties dialog appears.
5Define the menu properties as desired, and then click OK.
For more information on defining runtime menu properties, see “BootMagic Menu
Item Properties” in BootMagic’s online help.
Removing an Item from the BootMagic Menu
1 In the BootMagic main window, select the item you wish to delete from the
BootMagic Runtime Menu list.
Chapter 8: BootMagic98
2Click Delete.
Deleting an OS from the BootMagic menu does not remove the OS from your system.
The OS remains in its partition and can be added again to the menu if desired.
Modifying a Menu Item’s Properties
1 In the BootMagic main window, select the item you wish to modify.
2Click Properties.
3Modify the properties as desired, then click OK.
For a description of each property, see “BootMagic Menu Item Properties” in
BootMagic’s online help.
Setting a Default Operating System
BootMagic automatically selects the OS on the home partition (that is, the partition on
which BootMagic is installed) as the system default. This is the OS that BootMagic
automatically boots if another OS is not chosen before the startup delay expires, or if the
startup delay is set to None.
For more information on the startup delay, see the next section, “Setting the Startup
Delay.”
1 In the BootMagic main window, select the operating system you wish to set as the
system default.
2Click Set as Default.
Booting from a Second Hard Disk
To boot an operating system that is not on the first hard drive, you must enable advanced
partition hiding. To enable advanced partition hiding, click Options ➤ Advanced
Partition Hiding. If this option is not selected (the default), you can only boot from the
first hard disk.
Norton PartitionMagic 99
Setting the Startup Delay
By default, BootMagic uses a timed startup delay set to 30 seconds. You can change the
startup delay.
• Select None to eliminate any time delay. BootMagic automatically boots the default
OS at startup without displaying the BootMagic Menu.
• Select Indefinite to specify an unlimited time delay. BootMagic displays the runtime
menu until you choose the OS you wish to boot.
• Select Timed to designate a time delay from 1- 99 seconds. BootMagic waits the
specified amount of time for an OS to be chosen before booting the default OS.
If you set the startup delay to either None or Timed, you must also ensure that a valid OS
item is selected as the system default. Without a default OS, BootMagic cannot boot your
system.
If you set the startup delay to None and select a default OS that cannot run the BootMagic
configuration program, you will be unable to modify the configuration settings and boot
other OSs. If this happens, boot your computer while holding down the left Shift key. This
overrides the timer settings and opens the BootMagic Menu without a timer (as the
Indefinite option) for that one boot.
You can then select DOS or Windows from the BootMagic menu, run the BootMagic
configuration program, and change either the default OS or the startup delay.
Disabling BootMagic
You may encounter situations in which you want to disable BootMagic. For example, if
you are diagnosing an OS startup problem and need to reboot your system multiple times
or, if you are installing another operating system, you may want to bypass loading
BootMagic every time. Disabling BootMagic replaces the BootMagic master boot record
(MBR) with a copy of your original MBR.
Disabling BootMagic does not destroy any of your configuration settings. All of the
current settings are saved until BootMagic is re-enabled.
1 Unmark the BootMagic Enabled check box in the BootMagic main window.
The configuration options become unavailable, and BootMagic remains disabled until
the box is re-checked.
2Click Save/Exit to save your changes and exit the configuration program.
Chapter 8: BootMagic100
When you reboot your computer, BootMagic no longer loads and the default OS is
automatically booted.
To re-enable BootMagic, run the configuration program from either your hard drive or the
BootMagic rescue diskette. Mark the BootMagic enabled check box in the BootMagic
main window. When BootMagic is re-enabled, it saves a copy of the current MBR and
then reinstalls the BootMagic MBR. Upon reboot, BootMagic loads normally and all the
previous configuration settings are restored.
For more information on creating a BootMagic rescue disk, see “Creating a BootMagic
Rescue Disk” on page 93.
Using the BootMagic Menu
Once installed, the BootMagic menu appears each time you start your computer. The
BootMagic menu displays all the OSs configured for booting. Each OS is identified by its
user-assigned name and icon. Although BootMagic automatically highlights the default
OS, you can choose any of the listed OSs. Simply click the OS you want to boot. You can
also use your arrow keys to select an OS and press <Enter>.
If the OS you want is not listed, you can run the BootMagic configuration program and
add it to the menu. For more information on adding an OS to the menu list, see “Adding an
Operating System to the BootMagic Menu” on page 96.
Using BootMagic to Install Operating Systems
In addition to making it easy to choose from multiple operating systems when you boot
your machine, BootMagic makes installing multiple OSs on your system easy. For
information on installing to primary or logical partitions, see “Using BootMagic to Install
a New Operating System” in BootMagic’s online help. You may also want to refer to the
help topic on OS-specific installation issues.
Troubleshooting
Black screen on boot. If you add choose a partition that does not include an operating
system and add it to the BootMagic menu, BootMagic will display a black screen after you
choose the non-OS item from the menu. To fix the problem, press <Control-Alt-Delete>,
boot to DOS or Windows from the BootMagic menu, run the BootMagic configuration
program, and remove the non-OS item from the BootMagic menu.
Norton PartitionMagic 101
Operating system will not boot (bootstrapping issues). If you have two operating
systems that are based on Windows NT (that is, Windows NT, Windows 2000, or
Windows XP) and one of the operating systems is bootstrapping off of the other one,
BootMagic will not work properly for the bootstrapped OS. By default, BootMagic hides
any primary partitions other than the one you choose to boot from. If it hides a partition
that includes the NTLDR and BOOT.INI file (system files that are shared in a
bootstrapped environment), the computer will not boot. There are three ways to resolve
this problem:
• Make sure only one primary partition is visible when you install an NT-based OS, so
that the NTLDR and BOOT.INI are installed in both OS partitions. (This option
avoids bootstrapping, so both operating systems can boot on their own.)
• Use the NT loader menu to boot into the OS you want instead of using BootMagic.
• You may have a bootstrapped operating system but still want to use BootMagic
because you have additional operating systems that are not bootstrapped. In this case,
you should remove the option for the bootstrapped operating system from the
BootMagic menu and choose that OS from the NTLDR menu instead. For example,
assume you had three operating systems installed: Windows 2000, Windows XP, and
Windows 98. If Windows XP were bootstrapped off Windows 2000, it would not
boot if you chose it from the BootMagic configuration menu because BootMagic
would hide the Windows 2000 partition that included critical system files. Instead,
you should make the Windows XP partition visible from the Windows 2000 partition
(see “Configuring BootMagic to Work on an NTFS System” on page 95) and remove
Windows XP from the BootMagic configuration. You would then have two options
on the BootMagic menu: Windows 2000 and Windows 98. You could choose
Windows 98 to boot it directly. If you chose Windows 2000, the NTLDR menu would
appear, allowing you to boot either Windows 2000 or Windows XP.
I cannot install BootMagic on my NTFS system. See “Installing BootMagic on an
NTFS System” on page 92.
Appendix A: Using PartitionMagic With Other Programs104
Norton Utilities
You can safely use PartitionMagic and Norton products together. The following
information will help you avoid any problems.
Norton Disk Doctor
If an extended partition ends at the end of a drive, Norton Disk Doctor (NDD) will
sometimes display this message: “An extended partition has invalid parameters and
probably is inaccessible. Correct this situation if you are unable to access partitions on
hard disk 1. Do you wish to correct this problem?” To eliminate this message, use
PartitionMagic to resize the logical and extended partitions at the end of the drive to leave
some free space before the end of the drive.
Additionally, when you delete, move, or resize partitions, it appears to NDD that you
could have inadvertently deleted a partition. NDD displays the following message: “If you
are unable to access a disk that you previously could, you should revive this partition.
Would you like to revive this partition?” If you inadvertently deleted a partition, select
Yes. If you do not want this message to appear every time you run NDD, complete the
following:
1 Click No.
NDD displays this message: “You have chosen not to revive the partition. Do you
want Norton Disk Doctor to mark the partition so it doesn’t ask about it again?”
2Click Yes.
The Create Undo File dialog appears.
3Click Skip Undo File. (Creating an undo file uses many diskettes.)
NDD displays this message: “If you wish to undelete this partition at a later time, use
the /UNDELETE switch.”
4Click OK.
NDD displays this message: “Partition information has been changed. Would you like
to restart your computer?”
5Click Restart Your Computer.
Norton PartitionMagic 105
Norton AntiVirus
Because Norton AntiVirus (NAV) interprets changes to partition tables and boot records
as potential virus attacks, PartitionMagic takes steps so that NAV automatically
reinoculates. Should NAV give you the choice of repairing the changes, do not select
Repair. Instead, inoculate after using PartitionMagic.
Norton SystemWorks
You can use PartitionMagic on a system where Norton SystemWorks is installed.
However, you must run PartitionMagic from the rescue disks. If you attempt to run
PartitionMagic under Windows with Norton SystemWorks installed, you may receive a
disk-write error.
Disk Compression Utilities
You can safely use PartitionMagic and some disk compression utilities together. The
following information will help you avoid any problems.
WARNING! Do not merge compressed partitions. You will lose the host partition.
DriveSpace and DriveSpace 3
To use PartitionMagic with DriveSpace, you must first change the size of a DriveSpace or
DriveSpace 3 drive in Windows 95 or Windows 98 by completing the following:
1 On the Windows desktop, double-click My Computer.
2Right-click the drive you want to change, then click Properties on the menu.
3Click the Compression tab.
4From the Compression menu, click Advanced.
5From the Advanced Properties menu, click Run DriveSpace.
A list of your physical drives, compressed drives, and host drives appears.
6Select the compressed volume you want to change.
7Click Drive at the top of the menu.
8From the Drive menu, click Adjust Free Space.
The Adjust Free Space menu appears. At the bottom of the menu is a slide bar.
Appendix A: Using PartitionMagic With Other Programs106
9To increase compressed space (enlarge the compressed volume), move the slide bar
to the left. To increase uncompressed space (shrink the compressed volume), move
the slide bar to the right.
If you want to shrink the host for a compressed drive, move the bar to the right to
create more uncompressed space on the host. You can then use PartitionMagic’s
Resize/Move operation to make the host partition smaller. If you have already used
Resize/Move to resize the partition larger and want to add more space to the
compressed volume, move the slide bar to the left.
Operating System Boot Utilities
Both OS/2’s Dual Boot and System Commander 2.0 and above accommodate boot sector
changes made by PartitionMagic. To install System Commander on drives that
PartitionMagic has modified, you may need to use System Commander 2.06 or later.
If you have System Commander on your computer, you must configure it so that it does
not simultaneously unhide multiple primary partitions. To configure System Commander
so that it does not create multiple visible primary partitions, complete these steps for each
operating system selection on the System Commander menu:
1 On the Operating System Selection menu, select an operating system.
2Press <Alt+S>.
3Click Local Special Options ➤ Primary partitions accessible on drive 0.
A screen appears with three options: All, Auto (the default), and None.
4Click None.
The other primary partitions will now be hidden when this operating system boots.
5Repeat steps 1-4 for all operating system selections on the menu.
Virus Protection Software
PartitionMagic modifies the master boot record and partitions’ boot sectors. Virus
protection software should be able to detect that PartitionMagic is changing partition
tables and not boot code; however, it is possible that unsophisticated virus protection
programs may mistake PartitionMagic changes as attempts to install a virus. If this occurs,
turn off the virus protection program while using PartitionMagic and inform the virus
protection software manufacturer of the problem.
Norton PartitionMagic 107
Some motherboards contain virus protection software within the BIOS. If this causes a
problem when you are running PartitionMagic, disable the BIOS virus protection, and
then restart PartitionMagic.
Drive Overlay Programs
Drive overlays, such as Ontrack DDO, Microhouse EZ-Drive or Pro-Drive, Maxblast,
WD DDO, and Seagate DDO, provide your computer with access to larger disk drives.
PartitionMagic is compatible with these programs only if the drive overlay program is
loaded before PartitionMagic.
If you boot your computer from a diskette, the overlay will not load, and PartitionMagic
will not get the correct information from your drive. You can boot from a diskette and still
load the drive overlay by completing the following:
1 Start your computer as if you were going to boot from the hard disk.
2When prompted, press <Space> or <Ctrl>.
3The drive overlay information appears with an option of booting from a diskette.
Select this option and insert the boot diskette when prompted.
SoundBlaster
The DOS drivers for a SoundBlaster Live sound card may conflict with PartitionMagic
operations that require going into boot-mode. Norton recommends that you unload the
SoundBlaster drivers (by remarking them in your CONFIG.SYS and AUTOEXEC.BAT
files) until after you have finished using PartitionMagic.
GoBack
If you need to modify partitions on a hard disk that is being monitored by Norton’s
GoBack software, you must first disable (turn off) GoBack.
1 From GoBack’s main menu, click Options ➤ Disable GoBack.
Before you begin modifying partitions on your hard disk, you must first reboot your
computer, then start PartitionMagic. When you are finished making your changes in
PartitionMagic, you can re-enable GoBack.
109
APPENDIX
B
Troubleshooting
This appendix includes the following information:
• General Troubleshooting
Freeing Memory to Run PartitionMagic under DOS
Assigning a CD-ROM Drive Letter
Using PartitionMagic With a SCSI Hard Disk
PqRP Partitions
Merging Partitions with Different NTFS Version Numbers
Resolving Check Errors
Resolving Partition Table Errors
Partition Tables and Viruses
Partition Will Not Boot After Resizing
• Generating Diagnostic Reports with PartitionInfo
• Error Messages and Solutions
• Exit Code 12
Appendix B: Troubleshooting110
General Troubleshooting
Freeing Memory to Run PartitionMagic under DOS
The DOS PartitionMagic executable requires a minimum of 585 KB of memory in the
first 640 K of the computer’s address space (conventional memory). If you do not have
sufficient conventional memory, there are several ways you can free additional memory.
Running MEMMAKER
MEMMAKER is a program that automatically configures your computer to save
conventional memory (while still loading all of the device drivers and other programs you
usually load when booting DOS). MEMMAKER frees conventional memory by moving
as many programs as possible out of conventional memory into high memory. Run
MEMMAKER by typing MEMMAKER at a DOS prompt. Follow the on-screen
instructions.
MEMMAKER is only available in DOS 5.0 to 6.22. It is not available in Windows 95 or
Windows 98 DOS mode.
Using the F8 Key to Keep Programs From Loading
Press <F8> immediately after booting your computer (while DOS is booting). As DOS
reads the each command in the CONFIG.SYS and AUTOEXEC.BAT files, it asks if you
want the command executed. When you see commands that load device drivers or TSR
programs not needed to run PartitionMagic, press <N> so that the software is not loaded
into memory.
Deleting Operating System Compression Files
If you use DOS 6.22, Windows 95, or Windows 98 and your system does not have any
compressed drives (using programs such as DriveSpace, DoubleSpace, and Stacker), you
can delete the operating system compression files, DRVSPACE.BIN or DBLSPACE.BIN,
from any boot diskette you create. This frees conventional memory because DOS 6.22,
Windows 95, and Windows 98 load these files into memory, regardless of the contents of
CONFIG.SYS and AUTOEXEC.BAT.
DRVSPACE.BIN and DBLSPACE.BIN are hidden system files. To delete them,
complete the following:
1 Place your boot diskette in your diskette drive.
2Go to a DOS prompt.
3Type A: and press <Enter>. You should see A:\> on your screen.
Norton PartitionMagic 111
4Type ATTRIB -R -H -S *.BIN, and press <Enter>.
5Type DEL *.BIN and press <Enter>.
Assigning a CD-ROM Drive Letter
If your computer has a CD-ROM drive or any form of removable media, you should be
aware of potential problems caused by the way drive letters are assigned to these devices.
Under Windows NT/2000/XP, you can change drive letter assignments with
PartitionMagic; otherwise, this is a function of the operating system. The operating system
assigns drive letters in this order: (1) the first recognized primary partition on each hard
disk, (2) all logical partitions on each hard disk, (3) any other primary partitions on each
hard disk, and (4) the CD-ROM drive and any other forms of removable media.
Generally, all removable media should be assigned drive letters after fixed disks.
Because the CD-ROM is one of the last drives to receive a letter, any partition you create
or delete on any of your hard disks affects the drive letter assignment of your CD-ROM
drive. Occasionally, the operating system may not assign a drive letter to the CD-ROM
drive. If this occurs, complete the steps outlined below.
If you are using Windows 95/98 and Windows 95/98 drivers for the CD-ROM:
1 On the toolbar, click Start ➤ Settings ➤ Control Panel.
2Double-click System.
3Click the Device Manager tab.
4Double-click CD-ROM.
5Double-click the name of your CD drive.
6Select the Settings tab.
7In the Start drive letter and End drive letter boxes, type or select Z. Because the OS
assigns all other available drive letters before assigning Z, this ensures that partition
changes you make in the future do not invalidate your CD-ROM drive letter.
8Click OK to close the Settings page.
9Click OK to close the System Properties dialog.
10 When prompted to restart your computer, click Ye s .
Appendix B: Troubleshooting112
If you are using DOS or Windows 3.x or are loading your CD-ROM drivers under DOS
with Windows 95/98:
1 Go to a DOS prompt.
2Type EDIT C:\CONFIG.SYS.
Your CONFIG.SYS file opens in the DOS editor program. Look for this line:
LASTDRIVE=drive (where drive is any letter of the alphabet). Change drive to Z.
This allows the OS to assign all drive letters through Z.
3If your CONFIG.SYS file does not contain the LASTDRIVE=drive statement, you
can add it by simply typing LASTDRIVE=Z.
4Select File ➤ Exit.
5When you are prompted to save the file, select Ye s. You should be back to a C:\>
prompt.
6Type EDIT C:\AUTOEXEC.BAT.
7Your AUTOEXEC.BAT file opens in the DOS editor program. Look for a line that
includes the word “MSCDEX.” The /L:drive parameter (where drive is the drive
letter assigned to your CD-ROM before you made changes with PartitionMagic) may
appear at the end of this line. Change drive to Z. Because the OS assigns all other
available drive letters before assigning Z, this ensures that partition changes you
make in the future do not invalidate your CD-ROM drive letter. For more
information, type HELP MSCDEX at a DOS prompt.
If your computer is on a network, when you log in to the network, the letter “Z” and
other letters at the end of the alphabet may be assigned to network search drives. In
this case, assign your CD-ROM a letter immediately preceding the last letter used by
the network search drives.
8Select File ➤ Exit.
9When you are prompted to save the file, select Ye s.
10 When you see the DOS prompt (C:>), reboot your machine.
Using PartitionMagic With a SCSI Hard Disk
To use PartitionMagic on a SCSI hard disk, you must have a SCSI controller card that
supports software Interrupt 13. Most SCSI controller cards let you enable software
Interrupt 13 support in the BIOS through the card. If your SCSI controller card does not,
contact the manufacturer to determine if your adapter can support software Interrupt 13.
As a general rule, if you are able to use FDISK to partition the disk, you will also be able
to use PartitionMagic.
Norton PartitionMagic 113
PqRP Partitions
If your computer fails during a PartitionMagic operation, you may see a partition that
displays as PqRP or PQFLEX in the partition list in the main screen. PartitionMagic flags
a partition with a PqRP file system and a PQFLEX label, so you know that the partition
has been modified. You should assume that a PqRP partition is not stable. Contact Norton
technical support for help in recovering data from a PqRP partition.
Merging Partitions with Different NTFS Version Numbers
PartitionMagic cannot merge partitions that have different NTFS version numbers.
Where do version numbers come from?
The Windows operating system assigns version numbers to NTFS partitions when they
are created. Windows NT 4.0 creates version 1.2, Windows 2000 creates version 3.0, and
Windows XP creates version 3.1. You cannot change NTFS version numbers for existing
NTFS partitions using PartitionMagic.
If you create an NTFS partition using PartitionMagic, the version number for the partition
will match the operating system. (For example, if you create an NTFS partition while
running under Windows 2000, the partition will be NTFS version 3.0.) If you create an
NTFS partition under Windows 9x or with the PartitionMagic rescue diskettes (which run
under DOS), the new partition will be NTFS version 3.1.
Be aware that if you are running Windows NT 4.0 (prior to SP6) and you install Windows
XP as a second operating system, Windows XP will promote the NTFS partitions to
version 3.1, which could make Windows NT 4.0 inoperable. This is a feature of Windows
XP and is not related to PartitionMagic.
So if the version numbers don't match, what can I do to fix them?
If you install Windows XP, it automatically “promotes” NTFS partitions to version 3.1.
Then you can merge the partitions with PartitionMagic. If you do not want to upgrade to
Windows XP, you cannot merge the mismatched NTFS partitions.
Resolving Check Errors
PartitionMagic checks the integrity of a partition thoroughly before making changes to it.
The Check for Errors and Info operations perform the same checks and display error
messages when they discover problems. For more information, see “Checking Partitions
for Errors” on page 50 and “Getting Information About Partitions” on page 56. These
checks are similar to those made by an operating system’s CHKDSK, ScanDisk, or
AUTOCHK utility.
Appendix B: Troubleshooting114
PartitionMagic also checks a partition after modifying it. While data loss is possible, it is
not typical. The problem is usually a minor file system error that CHKDSK /F /R (or
ScanDisk, if you are using Windows 95/98) can correct without data loss. For more
extensive errors, you may need to restore your files from a backup copy. If problems
persist, report the problem to Norton technical support.
If you receive a Check error message on any partition, back up your hard disk and then run
your operating system’s CHKDSK program on that partition (do not use the /F switch on
the initial run). If you have MS-DOS 6.x, Windows 95, or Windows 98, run ScanDisk.
CHKDSK and ScanDisk generally discover the same problems as PartitionMagic (except
that the DOS CHKDSK program does not detect problems in Extended Attributes).
If CHKDSK or ScanDisk does not show the same errors as the Check for Errors operation,
contact Norton technical support.
If CHKDSK or ScanDisk and the Check for Errors operation detect the same errors, which
is usually the case, run CHKDSK with the /F switch or run ScanDisk to fix the problems.
Then run CHKDSK again without the /F switch to ensure that the partition is error free.
When CHKDSK reports no errors on the partition, run the Check for Errors operation. If
PartitionMagic still reports a problem, reformat the partition and restore your files from
the backup copy.
Resolving Partition Table Errors
Partition table errors are errors in the 100 - 199 range. In most cases, you must resolve
partition table errors by creating new, error-free partition tables. The general steps are: (1)
ensure you have no viruses (see below), (2) back up the data on the affected partitions, (3)
delete the partitions, (4) recreate them, and (5) restore their contents. You may need to use
the FDISK program from a recent DOS version, as earlier versions may refuse to delete
HPFS or hidden partitions, and the OS/2 FDISK program may recognize the partition’s
corruption and refuse to modify it.
In some cases, you can resolve partition table errors manually. Run PartitionInfo to
determine the errors on your partitions. Norton technical support can help resolve partition
table errors if you e-mail the PartitionInfo report to help@symantec.com. Refer to
“Generating Diagnostic Reports with PartitionInfo” on page 115 for additional
information about PartitionInfo.
Partition Tables and Viruses
If partition changes made under one operating system are not reflected under another, and
vice versa, a master boot record (MBR) virus may be present.
Norton PartitionMagic 115
Use a virus check utility that can detect the latest viruses. If a virus is found, data loss is
likely. Before removing the virus, boot each operating system and use the Check for
Errors operation to evaluate the integrity of the partition. Back up the files on any partition
that passes the Check for Errors operation. Then remove the virus and perform the Check
for Errors operation on the partitions again. Delete and recreate any partitions that fail the
check. Finally, reinstall the operating systems and restore the backup files as necessary.
Partition Will Not Boot After Resizing
Occasionally, resizing a FAT partition displaces the first few files on the partition (such as
IO.SYS and MSDOS.SYS if the partition contains an operating system). If you resize a
boot partition and then it fails to boot, run SYS.COM from DOS or from the
PartitionMagic rescue disks.
Generating Diagnostic Reports with PartitionInfo
PartitionInfo generates a report showing the contents of your hard disk partition table.
This information is helpful in resolving various partitioning problems. PartitionInfo is
available in English only.
You can run PartitionInfo under Windows 95, Windows 98, Windows Me, Windows NT
4.0 Workstation, Windows 2000 Professional, and Windows XP. If you are using DOS or
Windows 3.x, run PARTINFO.EXE (see page 117).
Every time you run PartitionMagic, it creates a snapshot file PQ_DEBUG.TXT that
includes information about all the disks and partitions on your machine. The file is saved
in the %system root%\Temp directory (for Windows NT/2000/XP) or the
Windows\System folder (for Windows 95/98/Me). PartitionMagic also saves up to five
previous debug reports, renaming them PQ_DEBUG.001, PQ_DEBUG.002, and so forth,
with PQ_DEBUG.005 being the oldest retained file. The debug files may be beneficial for
Norton Technical Support if you call Norton for help resolving problems with
PartitionMagic.
1 Click Start ➤ Program Files ➤ Norton PartitionMagic 8.0 ➤ Norton
PartitionMagic 8.0 Tools ➤ PartitionInfo.
The PartitionInfo window appears, displaying partition and disk geometry
information and disk and partition errors. Disk geometry information includes data
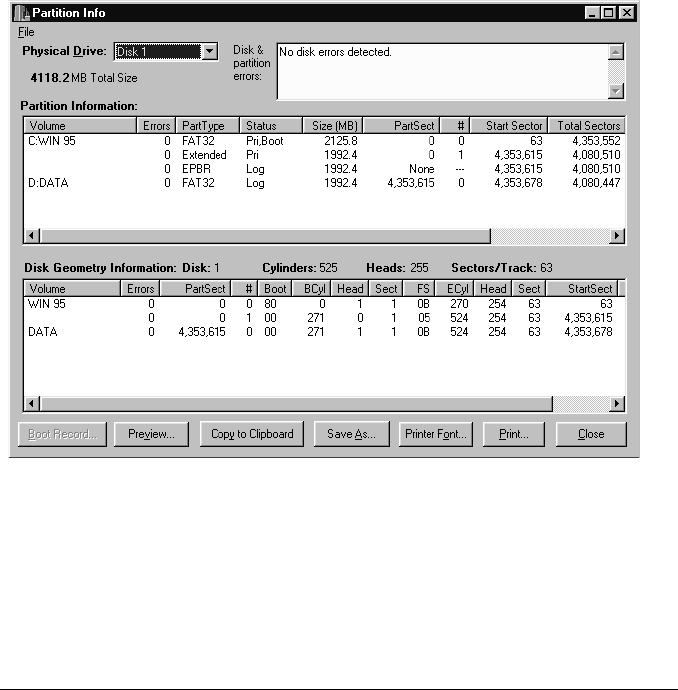
Appendix B: Troubleshooting116
from the master boot record and the extended partition boot records.
Only errors that display in the box near the top of the screen indicate problems. Do
not be concerned with Warnings and Infos in the bottom two boxes.
2From the Physical Drive drop-down list, select the disk for which you wish to view
information.
3You can save the PartitionInfo report as a file, or you can print it.
To do this: Do this:
Save the report as a file Click Save As. In the Filename box, type a name
for the file. Click Save. (Columns of information
are separated by tabs, so you can open the file in a
word processor and easily format the report.)
To change the font for a
printed report
Click Printer Font. Select the desired font, font
style, size, and so forth. Click OK.
To change printer setup Click File ➤ Printer Setup. We recommend that
you set the page orientation to landscape to avoid
text being cut off at the right margin.

Norton PartitionMagic 117
4To exit PartitionInfo, click Close.
Generating Diagnostic Reports with PARTINFO.EXE
You can also run PARTINFO.EXE from the first rescue disk to get partition information.
The PARTINFO program provides essentially the same information as the PartitionInfo
program but without the GUI interface.
1 Boot the computer to DOS.
2Insert the first rescue disk.
3You have several options for running PARTINFO.
Error Messages and Solutions
PartitionMagic error messages and possible solutions are listed below by number. The
messages are also grouped in number ranges by error category.
Miscellaneous Errors (3–38)
#3 Not enough memory
This error can occur when you are resizing, moving, or copying an extremely
large partition (60 GB) or when manipulating smaller partitions in DOS with
EMM386 loaded. EMM386 limits the amount of memory the program can
To print a report Click Print, then click OK.
To do this: Do this:
To display partition
information on your screen
Type PARTINFO, then press <Enter>.
To send a report directly to
your printer
Type PARTINFO >LPT1 or PARTINFO
>PRN, then press <Enter>.
To save the report as a text file
on a floppy disk
Type PARTINFO >A:\PARTINFO.TXT,
then press <Enter>.
To do this: Do this:
Appendix B: Troubleshooting118
access. To solve the problem, modify your CONFIG.SYS file by commenting the
EMM386 line. For more information about memory requirements, see
“PartitionMagic System Requirements” on page 4.
The DOS PartitionMagic executable requires a minimum of 585 KB of memory
in the first 640 KB of the computer’s address space (conventional memory) and 8
MB of total memory. For possible solutions if you have insufficient conventional
memory, see “Freeing Memory to Run PartitionMagic under DOS” on page 110.
You may be able to resolve this problem by rebooting to an A: prompt, typing
LOCK_C:, and running PartitionMagic from the rescue disks.
#8 Could not allocate/deallocate DOS real mode memory
The DOS PartitionMagic executable running under DOS, Windows 3.x,
Windows 95, and Windows 98 requires some memory in the first 1 MB of the
computer’s address space (PartitionMagic uses a DOS extender). If not enough
memory is available, PartitionMagic cannot access the hard disk. For possible
solutions, see “Freeing Memory to Run PartitionMagic under DOS” on page 110.
#27 Cannot lock drive
Under multitasking operating systems such as Windows 95, PartitionMagic must
lock a partition before it can safely modify it. If the hard disk contains files that
are in use by another process, PartitionMagic cannot lock the partition.
#29 Cannot lock a locked drive
Verify that the partitions you are attempting to modify are not on a locked hard
disk.
#34 The Beta version is no longer safe to use
Norton occasionally releases beta versions and evaluation versions of
PartitionMagic. Both versions are not as safe as release versions; therefore,
Norton builds an expiration date into each version. After a predetermined test
period, the beta or evaluation version no longer functions.
Disk Access Errors (40–56)
Errors in the 40–56 number range indicate that accessing your disk is not possible, and
often result from hardware problems. Some problems may have simple solutions; for
others, the only solution may be replacing the hard disk. When possible, PartitionMagic
detects major errors before any changes have been made so you can back up your data
before replacing the hard disk.
Norton PartitionMagic 119
#45 CRC error in data
When PartitionMagic or any other program reads information off of a hard
disk, it checks the CRC (cyclic redundancy check) information c on ta i n ed in
each sector. If it performs a CRC test and the result is different from the
value st ored on that sector, there is a CRC error. This usually means one of
two things.
• The file being read has become corrupted by some other means.
• A sector used in the file’s storage has become bad and corrupted
that part of the stored file.
The solution is to do a surface test to make sure any bad sectors are marked as
bad, then reinstall the software involved to ensure that files on the system are not
corrupted. You may also want to try running PartitionMagic with an /IRE switch.
#48 Sector not found
This error can be reported when a given sector cannot be read or written to.
There are many possible causes.
If you are encountering this error, make sure that your BIOS supports the
operating system and hard disk on the system. Also run a thorough ScanDisk on
the drive to prevent data from being written to bad sectors.
#49 Write fault
#50 Read fault
(The following information applies to errors 49 and 50.)
PartitionMagic is unable to write to/read from a specific sector on the hard disk.
Possible causes include:
• If your PC beeps or displays a black box in the middle of the screen, virus
protection is enabled in your computer’s BIOS. Disable virus or boot sector
protection in the BIOS.
• A virus protection application (which may be a TSR or DLL program) is in
use. Disable the application before using PartitionMagic.
• There is a bad sector on the hard disk (this is usually the case only with older
hard disks). Run ScanDisk on the hard disk to perform a surface scan to verify
the existence of bad sectors. If your drive has bad sectors, we recommend you
replace it.
• You have set up disk mirroring with PC-Tools. Disable the disk mirroring
option.
Appendix B: Troubleshooting120
Miscellaneous Errors
#70 Windows was deleted
If you are using Windows 3.x, you must create PartitionMagic rescue disks and
run PartitionMagic for DOS.
#89 EZ-Drive has been detected on the drive but EZ-Drive is not running
#90 EZ-Drive has been detected on the drive but EZ-Drive is corrupt
#91 Disk Manager has been detected on the drive but is not running
These errors are “first head” errors. They can be resolved with assistance from
Norton technical support. Before calling technical support, please type the
following at a DOS prompt: wrprog /bak >
x:
head1.dat, where
x:
is
one of the drives on your machine.
The wrprog.exe file can be found in the Utility\DOS folder under your Norton
product folder. If you are running under Windows NT and do not have DOS
available, you can use the DOS rescue diskettes you created for your Norton
software.
#98 Hibernate Windows 2000/XP
#99 Hibernate Windows Me
Hibernation saves the system RAM to a file, then uses Advanced Power
Management to shut the system down. When the machine is subsequently booted,
the hibernation file is read into RAM, and execution begins where it left off.
A hibernated system assumes when it is booted that the system is in the same
state as when hibernation occurred. Any changes made to the system’s hardware
(including disks and disk partitions) may cause unexpected results.
See Microsoft’s Knowledge Base article #241354 for more information about
making modifications to a system while in hibernation mode.
To avoid this error, shut down your machine normally and then restart.
Partition Table Errors (100–199)
Errors in the 100–199 number range are partition table errors. For general information
about resolving these errors, see “Resolving Partition Table Errors” on page 114 and
“Partition Tables and Viruses” on page 114.
#100 Partition table is bad
The master boot record (MBR) can contain, at most, one extended partition, and
each extended partition boot record (EPBR) can contain, at most, one link to
another EPBR. This error occurs when a partition table violates the foregoing
Norton PartitionMagic 121
rule. It can also occur if you have more than one active partition. Since any
modifications PartitionMagic makes may decrease the amount of data that is
recoverable from the hard disk, PartitionMagic does not recognize any of the hard
disk’s partitions. If you must create new, error-free partition tables to resolve
your problem, see “Resolving Partition Table Errors” on page 114 for
instructions.
#104 No sectors in partition
No partition should contain zero sectors. Delete the partition before using
PartitionMagic.
#105 Partition starts on wrong boundary
The hard-disk partition table contains erroneous values. PartitionMagic expects
partitions to begin and end on the correct cylinder boundaries. If they do not, the
disk may be partially corrupted. In this circumstance, if PartitionMagic were to
make any modifications it might cause the loss of data. Therefore, PartitionMagic
refuses to recognize any of the hard disk’s partitions. To resolve this problem, see
the instructions in “Resolving Partition Table Errors” on page 114.
#106 Partition doesn’t start with sector one
See error #105.
#107 Partition begins after end of disk
This error can occur if a partition erroneously extends beyond the physical end of
the hard disk. This may happen if the hard disk has been used on a different
computer or with a different hard-disk controller or if BIOS settings have been
changed. Be advised that the physical geometry of the hard disk may differ from
the logical geometry assigned to the hard disk by the operating system.
#108 Partition doesn’t end at end of cylinder
See error #105.
#109 Partition ends after end of disk
See error #107.
#110 Partition table number of sectors is inconsistent
The hard-disk partition table contains two inconsistent descriptions of the number
of sectors on the hard disk. This error is serious if both DOS and another
operating system use the hard disk. Because DOS uses one description and other
Appendix B: Troubleshooting122
operating systems may use the other, data loss is likely once the partition is
almost full. To resolve this error, see the instructions in “Resolving Partition
Table Errors” on page 114.
#111 Logical partition starts outside of Extended
An extended partition boot record (EPBR) is a sector on the hard disk that
contains a partition table. The EPBR partition table is special because it generally
only has two valid entries: one for the logical partition and one that is a pointer to
the next EPBR. The standard is for the logical partition's entry to be the first entry
in the table and the second entry is the pointer to the next EPBR. The third and
fourth entries are not used. For some utilities, such as IBM's Boot Manager, the
order of these entries is important because the utility expects the first entry to be
the logical and the second entry to be the pointer to the next EPBR. If
PartitionMagic detects that the EPBR entries are out of order, you will be
prompted to fix the error. If you choose to fix the error, PartitionMagic will
reorder the EPBR entries for you automatically.
#112 Logical partition ends outside Extended
See error #111.
#113 Partitions overlap
The hard disk partition table contains erroneous values. If data partitions overlap,
writing to one may destroy data in another.
This error is sometimes the result of an OS/2 FDISK bug. If free space exists
within the extended partition, OS/2’s FDISK program allows a primary partition
to be created that overlaps the extended partition. A logical partition is
subsequently created in the space occupied by the overlapping primary partition.
If a primary partition overlaps the end of the extended partition but does not
overlap any logical partitions within the extended partition, the problem can be
remedied by patching the partition table. Only qualified individuals should
attempt this repair! An incorrect patch could destroy all data on the hard
disk! In most instances, you should resolve the problem as explained in
“Resolving Partition Table Errors” on page 114.
#116 Partition table Begin and Start inconsistent
The hard disk partition table contains two inconsistent descriptions of the
partition’s starting sector. This error can occur if the operating system reports a
hard-disk geometry that is different than the geometry in use when the partition
table was written. Possible causes include: (1) different operating systems report
different hard-disk geometries, (2) you boot from a diskette that loads a different
Norton PartitionMagic 123
driver than is loaded when you boot from the hard disk, (3) upgrading the
operating system causes a different driver to be used, (4) the hard disk or
controller has been changed, (5) the BIOS has been upgraded, (6) the BIOS LBA
setting has been changed, or (7) there is a partition table virus present on the hard
disk.
In most instances, you should resolve the problem as explained in “Resolving
Partition Table Errors” on page 114. You can also use a virus scanning program
to remove any partition table virus. Data loss is possible if the number of heads or
sectors per track has changed since you first created your partitions.
#117 Partition’s drive letter cannot be identified
Under OS/2, PartitionMagic must be able to find the drive letter for each partition
before modifications can be made. There are various reasons why OS/2 might not
be able to find a drive letter for each partition. For example, a driver on your
system may change the drive letters from their defaults, or your partitions may
not have serial numbers.
You may also see this error when running PartitionMagic under Windows.
The solution is to run PartitionMagic from DOS or from MS-DOS mode (in
Windows 95 or Windows 98). When PartitionMagic runs from DOS or from
MS-DOS mode, it does not need to be able to find the drive letter for each
partition. Thus, if the problem indicated by this error message is the only
problem, PartitionMagic can run successfully.
#120 The logical drive chain is incompatible
This error occurs under some operating systems when logical partitions are not
chained together in the expected order. DOS, OS/2, Windows 95, Windows 98,
and Windows NT require that logical partitions be chained together in ascending
order. Some other operating systems do not require this. For example, some
versions of the Linux FDISK utility chain logical partitions together in the order
they are created. This error message identifies a very dangerous situation; using
the DOS FDISK in this situation can cause loss of one or more partitions.
For solutions to this problem, see the instructions in “Resolving Partition Table
Errors” on page 114. If you decide to back up your data and recreate your
partitions, you may have to use the same partitioning program that you used to
create the partitions in order to delete them. Norton recommends recreating the
partitions with DOS FDISK or PartitionMagic.
Appendix B: Troubleshooting124
#121 The first sector of the drive cannot be read
The first sector of the hard disk (cylinder 0, head 0, sector 1) contains the master
boot record (MBR) and the primary partition table. PartitionMagic cannot make
changes to this hard disk because an error occurred when it read the first sector.
See error #50 for information on resolving this error.
#122 A bad sector was found in the current or new partition area
The partition cannot be moved safely because there is a bad sector in the new or
current partition area. When you see this error message, the move operation is
aborted before any corruption can occur. Try moving the partition to a different
place. Run ScanDisk or CHKDSK /F with a surface scan before continuing. If
your hard disk has bad sectors, we recommend that you replace the hard disk.
#140 Overlapping partitions found. No partitions can be undeleted.
Two or more deleted file systems were found in the unallocated space. However,
each file system claims space that another file system also claims. There are no
other partitions that can be undeleted.
Check Errors (500–599)
Check errors occur when PartitionMagic checks the integrity of a partition. For general
information about resolving these errors, see “Resolving Check Errors” on page 113.
#500 Subdirectory is corrupted
This error message reveals the name of the corrupted subdirectory. Back up the
contents of that directory and its subdirectories. You can then delete the corrupted
subdirectory.
#501 Cross-linked files were found
Multiple files claim the same clusters. PartitionMagic can fix this error when it
occurs on an NTFS partition. For more information, see “Checking Partitions for
Errors” on page 50. PartitionMagic lets you fix this error by: (1) copying the
shared clusters to each affected file, (2) deleting all affected files, or (3) keeping
one file and deleting the other affected files.
#506 Not enough free space on partition to shrink
Some free space (which is dependent on the hard disk’s current contents) is
required to resize a partition smaller. Delete unneeded and duplicate files in the
partition and then attempt the operation again.
Norton PartitionMagic 125
#508 As specified, the operation does not change the partition
You have entered a value that is the same as or (when rounded to the required
cylinder boundary) rounds to the same as the partition’s present value. Enter a
larger change.
#509 A bad sector was detected in the current or new FS area
In order to perform the resize operation that you requested, PartitionMagic
attempted to expand the file system area. However, the program found a bad
sector in the new area. Try moving the partition before you resize it. No
corruption occurs when you encounter this error.
#510 The version of the file system is not supported
An updated version of PartitionMagic is required to operate on this new version
of the file system. Visit www.symantec.com for information about updated
versions of PartitionMagic.
Batch Errors (600–633)
#600 Batch file could not be opened
#601 Error trying to write batch file
#602 Batch file not found
PartitionMagic lets you specify a series of changes you want to make to your
partitions, and then executes all the changes when you click Apply. At this point,
PartitionMagic writes out a command list file (called a “batch file”) to disk in
preparation for execution, and then reads the file upon execution (immediately if
a lock can be secured on all impacted partitions, or in a special “reboot” mode
after rebooting your computer if not all locks can be secured). In the Windows
95, Windows 98, and Windows NT Workstation versions of PartitionMagic, the
batch file is located in your Windows\System directory. In the DOS versions, it is
located in the directory from which PartitionMagic is running. The batch
filename is PQ_SM40.PQB.
If the batch file cannot be created, cannot be written, or cannot be located when
PartitionMagic attempts to execute the command file, the above error messages
appear. If you are running PartitionMagic from rescue disks, ensure they are not
write-protected. If you cannot determine the source of the problem, contact
Norton technical support.
#603 Unknown batch operation
The batch file contained an operation unknown to PartitionMagic. Contact
Norton technical support.
Appendix B: Troubleshooting126
#625 Batch structure has changed
Generally error 625 only occurs when the system needs to go into boot-mode to
execute your commands. A 625 error occurs when your disk geometry is seen
differently in your native Windows version of PartitionMagic than it is in the
boot-mode version. For security reasons, PartitionMagic cannot apply your
changes without risking data loss.
One common configuration that will cause a 625 error is a system that has a hard
disk (such as a SCSI or removable drive) that is visible in Windows but that
cannot be seen in the boot-mode environment.
Some possible solutions include:
• Make sure the operation executes in native Windows mode (without resorting
to boot-mode execution). PartitionMagic will only go into boot-mode if it
cannot lock a partition (that is, if there are any open files on the partition). Try
to confine all operations to drives PartitionMagic can lock before clicking the
Apply Changes button.
• Change the configuration of the offending disk (most likely the SCSI or
removable drive) by changing the BIOS setup for that disk. Doing so will
ensure that the native and boot-mode environments detect identical hard disk
configurations. If this does not work, you can try temporarily disabling the
offending disk.
This error usually indicates that some other application has modified your disk
configuration while you were running PartitionMagic. Make sure no other
applications are loaded while PartitionMagic is running.
User Interaction Errors (950–999)
#950 Unable to detect any disk drives
No partitionable hard disks were found on your computer. Diskette drives and
many removable media drives do not support partitioning. PartitionMagic cannot
perform operations on disks in such drives.
#951 An invalid value was entered
The value entered is outside the range or (when rounded to the required cylinder
boundary) rounds to a value that is outside the range for the operation specified.
Check the displayed range and reenter the value.
#952 Value entered is the same as the current value
See error #508.
Norton PartitionMagic 127
#963 Selected operation is currently invalid
Not all PartitionMagic operations can be performed on all partitions. For
example, you cannot create a partition if there is not enough unallocated space on
the hard disk.
Options that are not available either do not appear on the menus or they appear
dimmed. Refer to the relevant information in this user guide or the online Help
for restrictions that explain why an operation is not available.
#968 Incorrect Volume Label entered, Deletion not performed
To delete a partition, PartitionMagic requires you to enter that partition’s volume
label. If the volume label you enter does not match the volume label of the
partition you want to delete, this error appears.
#969 Incorrect Volume Label entered, Unable to proceed.
To format an existing partition, PartitionMagic requires you to enter that
partition’s volume label. If the volume label you enter does not match the volume
label of the partition you are attempting to format, this error appears.
#970 Invalid Bad Sector Check value specified
This error occurs only in the enterprise version of PartitionMagic from a running
script. If the script command SET DEFAULT BAD SECTOR TEST STATE is
not followed by either ON or OFF, this error appears.
#971 The label entered was too long
When you enter a volume label, the process that checks the validity of the label
displays this message if the label is too long. The label must be no longer than 11
characters.
#972 Invalid characters in the label
When you enter a volume label, the process that checks the validity of the label
displays this message if the label has characters that are invalid. Invalid
characters include the following: [ * ? : < > | + = ; \ / ” , ].
#973 Volume Label cannot have leading spaces
When you enter a volume label, the process that checks the validity of the label
displays this message if you enter a label in which a space or spaces are the
leading characters.
Appendix B: Troubleshooting128
#974 Root size specified was not in the valid range
This error occurs only in the enterprise version of PartitionMagic from a running
script. If you use the Create, Format, or Resize Root operations, and the number
of root entries specified is not within the acceptable range for that partition, this
error appears. Generally, the valid range is from 64 to 1,024.
#975 The cluster size specified was invalid for this partition
This error message displays only in the enterprise version of PartitionMagic from
a running script. Many commands have a cluster size option. If a script command
specifies an invalid cluster size (for the type and size of the partition), this error
appears.
#976 Cannot create the file system specified in the current space
This error message displays only in the enterprise version from a running script.
When you use the Create or Format commands, you must also choose a file
system type. If the file system or partition type you specified cannot be created in
the space available, this error appears.
#977 Partition selected is invalid
This error message displays only in the enterprise version of PartitionMagic from
a running script. If the partition selected from the Select Partition command is not
a valid partition, this error appears.
#978 Unable to set to proper partition after last operation. Script halted.
This error message appears only in the enterprise version of PartitionMagic from
a running script. After each operation, PartitionMagic ensures that the right
partition is still selected. If PartitionMagic is not able to select the proper
partition, it ends script processing and displays this error.
#986 Unable to get information for the specified partition
PartitionMagic reports this error most commonly when MS-DOS-based
terminate-and-stay-resident programs (TSRs) are running in the background.
These TSRs will be located in the Config.sys or Autoexec.bat files.
One such TSR is the SUBST command. The SUBST can be used to associate a
path with a drive letter. This creates a “virtual drive” that can be accessed as an
additional local drive. The SUBST command is classified as a “dirty” or “deadly”
TSR, and cannot be loading at the same time that PartitionMagic is loading.
To solve the problem, you must remark out the Config.sys or Autoexec.bat line
that is loading the SUBST command. This command can be reinstated after
running PartitionMagic.
Norton PartitionMagic 129
There are other “dirty” or “deadly” TSRs that may cause a problem. If you are
experiencing this error and are not using the SUBST command, find and remark
out any of the following commands: Join, Append, or Assign.
This error can also be reported if your C: drive is compressed. If the C: drive is
compressed, you will need to either uncompress the drive, or run PartitionMagic
from the rescue diskettes.
This error can also be caused by multiple partition table errors. If any of the
above solutions do not apply, run PartitionInfo and send the report to Norton
technical support. Refer to “Generating Diagnostic Reports with PartitionInfo”
on page 115 for information about PartitionInfo and PARTINFO.
#993 Partition contains open files. Use the operating system check utility.
To fix this error, disable any anti-virus programs on your system and run a
thorough ScanDisk. You cannot use the Check for Errors operation on a partition
with open files.
NTFS Check Errors (1500–1699)
Errors 1500–1699 are NTFS-specific check errors, which can occur when PartitionMagic
checks the integrity of a partition. PartitionMagic can fix certain errors when you perform
the Check for Errors operation. For more information, see “Checking Partitions for
Errors” on page 50 and “Resolving Check Errors” on page 113.
In this section, “attribute” does not mean read-only, hidden, system, etc. Rather,
“attribute” means one of a file’s data streams.
#1501 Wrong version of NTFS
The partition was created using a version of the NTFS file format that
PartitionMagic cannot work with.
#1503 Bad NTFS cluster size
The NTFS cluster size must be 512, 1,024, 2,048, 4,096, 8,192, 16,384, 32,768,
or 65,536 bytes.
#1512 Restart record mismatch
The two restart entries in the journal file are different. This may happen if
Windows NT Workstation is not properly shut down. To fix this problem, restart
Windows NT Workstation and shut it down using the Shut Down command.

Appendix B: Troubleshooting130
#1513 Bad attribute position in file record
This error can often be resolved by running CHKDSK /F on the affected disk. For
instructions on running CHKDSK, see Symantec Solution How to Run
Microsoft CHKDSK from the Command Line.
If running CHKDSK /F does not help, please send the following items to Norton
Technical Support:
• A debug report. See Symantec Solution Running a Debug Report.
• A PARTINFO report. See “Generating Diagnostic Reports with PartitionInfo”
on page 115.
• The information outlined in Symantec Solution Information Needed for a
Trouble Report.
• If possible, an image of the machine or the actual hard disk, so Norton
developers can examine the source of the issue more closely.
#1516 Partition improperly dismounted
The partition dirty flag is set in a restart record in the journal file. This error may
have been caused by a power failure or system crash while the Windows NT
operating system was writing the partition.
This problem can often be resolved by running CHKDSK /F on the affected
drive. For instructions on running CHKDSK, see Symantec Solution How to Run
Microsoft CHKDSK from the Command Line.
If running CHKDSK /F does not help, please send the following items to Norton
Technical Support:
• A debug report. See Symantec Solution Running a Debug Report.
• A PARTINFO report. See “Generating Diagnostic Reports with PartitionInfo”
on page 115.
• The information outlined in Symantec Solution Information Needed for a
Trouble Report.
• If possible, an image of the machine or the actual hard disk so Norton
developers can examine the source of the issue more closely.
#1527 Bad update sequence number
A buffer contains mismatched update sequence numbers. This error may have
been caused by a power failure or system crash while the Windows NT operating
system was writing to the partition. Reboot Windows NT Workstation and
execute CHKDSK /F to repair the damage.
Norton PartitionMagic 131
#1529 Information mismatch in directory entry
A file attribute stored in a file record is different from the attribute stored in its
directory entry. If this error is in a system file (file 0–10), Windows NT
CHKDSK does not fix it, but Windows NT rebuilds the root directory on the
partition the next time the operating system is started.
#1538 Can’t find contiguous space to move
The partition does not contain enough contiguous free space to hold the new copy
of a file that must be contiguous. You normally encounter this error when you use
the Resize option to resize a partition smaller.
#1539 File size mismatch
The size of a system file (file 0–15) recorded in its file record does not match
either the size recorded in its directory entry in the root directory or the size of its
data stream.
#1544 External attribute list in external attribute
An external file record has an external attribute list.
#1545 File attributes out of order
The attributes in a file must appear in order of increasing numeric type.
#1546 Attribute neither resident nor nonresident
The attribute resident flag has a value other than resident or nonresident.
#1547 Wrong run limits
A run has more clusters than the difference between its highest and lowest
cluster.
#1548 File table has fewer than 16 entries
The file table must have at least 16 entries.
#1549 File table has more than 4 billion entries
The file table must have fewer than 4 billion entries.
Appendix B: Troubleshooting132
#1604 File’s parent does not contain the file
The file’s parent directory does not contain a reference to the file, or a file’s size,
date, or time information does not match the file’s parent directory information.
This error can be fixed when you perform the Check operation. For more
information, see “Checking Partitions for Errors” on page 50. When you fix this
error, PartitionMagic updates the file’s parent directory information.
#1609 Lost cluster(s)
The volume bitmap shows clusters as being used which are not used (no file
claims them). This error can be fixed when you perform the Check operation. For
more information, see “Checking Partitions for Errors” on page 50.
PartitionMagic lets you fix this error by either deleting the lost clusters or by
saving them in a file in the root directory. The filename is FILEXXXX.PQE,
where XXXX is a number between 0000 and 9999.
#1630 Inconsistent sizes in attribute header
File size information is incorrect. This error can be fixed when you perform the
Check operation. For more information, see “Checking Partitions for Errors” on
page 50. When you fix this error, PartitionMagic computes the correct file size
information.
#1644 Bad system file sequence number
A system file has a bad sequence number. System files must have a sequence
number from 1 to 15. A partition with this problem may pass Windows NT
CHKDSK, but Windows NT does not mount the partition the next time the
operating system is started.
#1647 Error in root directory index
There is an error in the root directory’s index. Running Windows NT CHKDSK
does not fix this problem, but Windows NT automatically rebuilds the root
directory on the partition the next time it is started.
#1681 Data is compressed or sparse
There are compressed or sparse files on an NTFS file system that is being
converted to FAT. Since FAT does not support sparse files and the compression
technique used by Windows NT/2000/XP on the FAT file system is different than
that used with NTFS, the compressed and sparse files would be unreadable if the
conversion were performed.
Norton PartitionMagic 133
When this error occurs on a Windows XP system, you can often fix the problem
by disabling the Windows System Restore feature. To do this, right-click My
Computer, select Properties, click the System Restore tab, and place a mark in
the checkbox next to Turn off System Restore on all drives.
If the error occurs on a Windows NT or Windows 2000 system, or if turning off
System Restore in XP does not solve the problem, perform the following:
1 In Windows, bring up a command prompt window.
2Change to the root directory of the affected drive.
3Type the following at the command COMPACT /U /S /A /I /F *.*.
IMPORTANT! This command uncompresses all the files in the partition you run
it on. Consequently, you should have ample free space in the
partition to accommodate the larger file sizes. Also, depending on
how many files are compressed, this process can be quite time
consuming. If you need to abort the process at any point, press
<Ctrl+C> inside the command prompt window.
4After the uncompression process is complete, perform a search for the file
EGA.CPI.
5When you find the file, right-click on it, select Properties, click Advanced,
and verify that the file is uncompressed.
You should now be able to perform the file system conversion without getting
Error 1681.
If you still receive the error, try locating and uncompressing the particular file
that is referenced in the Error 1681 message by its FRS number (the first number
that is not enclosed in parentheses). To do this:
1 Download the file BTIni.zip from
ftp://ftp.symantec.com/public/english_us_canada/tools/pq/utilities, then unzip
the file.
2Copy the BTINI.EXE file from the directory where you unzipped the
BTIni.zip file to a floppy diskette.
3Boot to the PartitionMagic rescue disk 1. When prompted for disk 2, insert the
floppy diskette containing BTINI.EXE, and press <Enter>.
4Press <Ctrl+C> to halt the rescue disk batch process.
5At the A:\ prompt, type BTINI /SHOW.
This command displays the partition ID for the NTFS partition.

Appendix B: Troubleshooting134
6Now enter the following command:
BTINI /FRS <partition ID for the NTFS partition>:<FRS
number displayed in the Error 1681 message>
This command returns the filename associated with the FRS number referenced
in the Error 1681 message.
7Reboot the computer to Windows and search for the file reported by BTINI.
8Uncompress or unencrypt the file.
You can also copy the file to another location and then delete it from its original
location. After PartitionMagic has completed the conversion operation, you may
then copy the file back to its original location.
For more information on using the BTINI utility (in English), please see
Symantec Solution BTini and PQFile Syntax and Uses.
If Error 1681 is still reported after you have tried all the preceding steps, then
reboot Windows, search for compressed files manually using Windows Explorer,
and uncompress the files you find. For instructions (in English) on how to do this,
see Symantec Solution Uncompressing Files in Windows NT, 2000, and XP.
#1687 An object index is present
A file with an object index created by Windows 2000 was found. For example,
users may have been assigned disk space quotas. When converting a partition to
FAT or FAT32, this information will not be saved, since FAT and FAT32 file
systems do not support object indexes. (The FRS number for the compressed file
found is shown.)
FAT Check Errors (2000–2099)
Check errors occur when PartitionMagic checks the integrity of a partition. For general
information about resolving these errors, see “Resolving Check Errors” on page 113.
#2001 FAT copies are not identical
Run ScanDisk to fix this error.
This problem may also be caused by a virus. Run a virus checker and remove the
virus if possible.
#2002 There are invalid entries in the FAT
This error can generally be fixed by running a thorough ScanDisk on the
partitions reporting the error.
Norton PartitionMagic 135
#2003 File size does not match FAT allocation for file
Run ScanDisk or CHKDSK to fix this error.
#2005 One or more lost clusters are present
Run ScanDisk or CHKDSK to fix this error.
#2012 Formatted FAT file system too big for partition
This error can occur when:
• The number of sectors in the partition is larger than 65,536, and the
bsHugeSects field of the boot sector (“Big total number of sectors” in Norton’s
DISKEDIT utility) shows that there are more sectors in the partition than the
partition table shows.
• The number of sectors in the partition is less than 65,536, and the bsSects field
of the boot sector (“Total sectors on disk” in Norton’s DISKEDIT utility)
shows that there are more sectors in the partition than the partition table shows.
This situation can result in data loss when the FAT file system tries to use space
outside the partition that does not exist or that belongs to another partition. Since
file data may exist outside the partition boundary, you cannot fix the problem by
simply patching the boot sector.
To correct the error, back up all data on the partition, delete the partition, recreate
the partition, and restore the data. Alternately, it has been reported that you can
use Norton Disk Doctor to fix this problem.
#2013 A component of FAT geometry is bad
This error can occur when:
• The number of clusters on the hard disk is greater than the FAT limits allow.
This can result from bad values in the boot sector for the number of sectors,
FATs, root entries, reserved sectors, and sectors per cluster.
• The number of sectors in the FAT is not large enough to hold the number of
clusters present on the hard disk.
A qualified consultant may be able to fix the hard disk by performing simple
patches. Alternately, you can back up the data on the partition, delete the
partition, recreate the partition, and restore the files.
Appendix B: Troubleshooting136
#2024 The OS/2 Extended Attribute file is corrupt
This error only occurs if you are running OS/2 and a program mistakenly writes
to or overwrites the OS/2 Extended Attribute file. If this error occurs, you should
back up your data, delete the partition, recreate the partition, and restore your
data.
#2027 Too many root entries in the FAT32 partition to convert it to FAT16
Long filenames may be causing this problem, since they use multiple entries per
file. To fix this error, move some of the root directory entries into a subdirectory
and defragment the disk.
#4002 No valid NetWare volumes signature in volume definition table
See error #3.
BootMagic Errors (8000-8999)
These errors are “first head” errors. They can be resolved with assistance from Norton
technical support. Before calling technical support, please type the following at a DOS
prompt: wrprog /bak >
x:
head1.dat, where
x:
is one of the drives on your
machine.
The wrprog.exe file can be found in the Utility\DOS folder under your Norton product
folder. If you are running under Windows NT and do not have DOS available, you can use
the DOS rescue diskettes you created for your Norton software.
Operating System Errors (over 10,000)
Any number over 10,000 indicates an operating system error. To determine the number of
the operating system error, subtract 10,000. (For example, 10,032 - 10,000 = 32) Consult
your operating system documentation for information about resolving the error.
Exit Code 12
PartitionMagic needs free sectors in track 0 to install the virtual floppy file that applies
operations in boot mode. If PartitionMagic cannot find free sectors in track 0, it returns
this exit code.
If you encounter this error, the following steps should resolve the problem.
Norton PartitionMagic 137
1 Download the head.zip file from
ftp.symantec.com/public/english_us_canada/tools/pq/utilities/ , and unzip it to a
folder on your hard disk.
2Bring up a command prompt, change to the folder where you unzipped the head.zip
file, and type MBRutil /SH=head0.dat.
This creates a backup of the first head (head 0) of your hard drive, which you can
restore if something goes wrong when you run the Wipetrk.exe program. NOTE: The
command to restore the first head is MBRutil /RH=head0.dat.
3At the command line, type Wipetrk.
This clears out everything on your hard drive between bytes 512 and 32255 (the
location of the data that is causing exit code 12).
If this does not resolve your issue, you should run PartitionMagic from rescue diskettes.

139
APPENDIX
C
Service and Support Solutions
The Service & Support Web site at http://service.symantec.com supports Symantec
products. Customer Service helps with nontechnical issues such as orders, upgrades,
replacements, and rebates. Technical Support helps with technical issues such as
installing, configuring, or troubleshooting Symantec products.
Methods of technical support and customer service can vary by region. For information on
support offerings in your region, check the appropriate Web site listed in the sections that
follow.
If you received this product when you purchased your computer, your computer
manufacturer may be responsible for providing your support.
Customer service
The Service & Support Web site at http://service.symantec.com tells you how to:
•Subscribe to Symantec newsletters.
•Locate resellers and consultants in your area.
•Update your product registration.
•Find out about orders, returns, or a rebate status.
•Access Customer Service FAQs.
•Post a question to a Customer Service representative.
•Obtain product information, literature, or trialware.
For upgrade orders, visit the Symantec Store at: http://www.symantecstore.com
Appendix C: Service and Support Solutions140
Technical support
Symantec offers two technical support options for help with installing, configuring, or
troubleshooting Symantec products:
•Online Service and Support
Connect to the Symantec Service & Support Web site at http://service.symantec.com,
select your user type, and then select your product and version. You can access hot
topics, Knowledge Base articles, tutorials, contact options, and more. You can also
post a question to an online Technical Support representative.
•PriorityCare telephone support
This fee-based (in most areas) telephone support is available to all registered
customers. Find the phone number for your product at the Service & Support Web
site. You’ll be led through the online options first, and then to the telephone contact
options.
Support for old and discontinued versions
When Symantec announces that a product will no longer be marketed or sold, telephone
support is discontinued 60 days later. Technical information may still be available through
the Service & Support Web site at: http://service.symantec.com
Subscription policy
If your Symantec product includes virus, firewall, or Web content protection, you may be
entitled to receive updates via LiveUpdate. Subscription length varies by Symantec
product.
After your initial subscription ends, you must renew it before you can update your virus,
firewall, or Web content protection. Without these updates, you will be vulnerable to
attacks.
When you run LiveUpdate near the end of your subscription period, you are prompted to
subscribe for a nominal charge. Simply follow the instructions on the screen.
Norton PartitionMagic 141
Worldwide service and support
Technical support and customer service solutions vary by country. For Symantec and
International Partner locations outside of the United States, contact one of the service and
support offices listed below, or connect to http://service.symantec.com and select your
region under Global Service and Support.
Service and support offices
North America
Symantec Corporation
555 International Way
Springfield, OR 97477
U.S.A.
www.symantec.com/
Australia and New Zealand
Symantec Australia
Level 2, 1 Julius Avenue
North Ryde, NSW 2113
Sydney
Australia
http://www.symantec.com/region/reg_ap/
+61 (2) 8879-1000
Fax: +61 (2) 8879-1001
Europe, Middle East, and Africa
Symantec Authorized Service Center
Postbus 1029
3600 BA Maarssen
The Netherlands
http://www.symantec.com/region/reg_eu/
+353 (1) 811 8032
Latin America
Symantec Brasil
Market Place Tower
Av. Dr. Chucri Zaidan, 920
12° andar
São Paulo - SP
CEP: 04583-904
Brasil, SA
Portuguese:
http://www.service.symantec.com/br
Spanish:
http://www.service.symantec.com/mx
Brazil: +55 (11) 5189-6300
Mexico: +52 55 5322 3681 (Mexico DF)
01 800 711 8443 (Interior)
Argentina: +54 (11) 5382-3800
Norton PartitionMagic 143
Numerics
1394 drive support 17
4K aligned, converting FAT/FAT32 partitions to 73
64K clusters 22
use of 67
7.8 GB limit for NTFS system partition 31
A
advanced operations
changing drive letters 62
hide/unhide partition 63
resize root 64
resizing clusters 66
retesting bad sectors 62
set active 65
advanced partition hiding 98
applying changes 19
from wizards 80
Windows vs. boot mode 20
asterisk (*) in partition list, explained 15
automating tasks with wizards 80
B
backing up data files 81
backing up partitions 48
backup partition, creating 81
bad sectors 22
retesting 62
batch error messages 125
boot code boundary 15, 39
boot disks, creating BootMagic 93
boot mode 20
bootable partitions
creating 38
FAT, troubleshooting 115
Linux, troubleshooting 39, 45
NT, troubleshooting 31
booting an OS on a second hard disk 98
BootMagic 89
adding operating systems to menu 96
booting from a second hard disk 98
configuring 94
creating a rescue disk 93
deleting items from menu 97
disabling 99
installing 91
modifying menu item properties 98
online help 94
setting passwords 96
startup delay, setting 99
system requirements 90
troubleshooting 100
using on a system that ony has NTFS partitions 92
bootstrapping 100
browsing partitions 28
C
cancelling changes 19
CD-ROM, assigning a drive letter to 111
changes, applying 19
changing a password 11
changing drive letters 62
check
error messages 124
resolving errors 113
checking disk integrity 28
checking partitions 50
cluster size 58, 68
cluster waste 57
clusters
64K 22
64K, use of 67
FAT, required size 68
resizing 66
size 66
clusters, bad 62
combining partitions 52
command line switches 9
PQBoot 87
completing tasks, general process for 16
compression utilities and PartitionMagic 105
configuring BootMagic 94
context-sensitive help 25
conventional memory, freeing 110
converting 71
FAT or FAT32 partitions to 4K aligned 73
Index
Index144
FAT to FAT32 71
FAT to NTFS 71
FAT32 to FAT 72
NTFS partitions to FAT or FAT32 73
NTFS to FAT or FAT32, limitations 75
primary partitions to logical 76
copying
files within PartitionMagic (File Browser) 28
partitions 48
partitions (wizard) 82
create new partition wizard 80
creating partitions 34
backup 81
bootable 38
drive letter changes resulting from 37
file systems 81
scenarios 42
with wizard 80
creating rescue disks 5
D
data files, backing up 81
data loss, causes of 63, 115, 122, 123, 135
data partition 91
data protection 1
default operating system 98
setting startup delay 99
defragmenting drives 60
deleting all the partitions on a hard disk 17
deleting BootMagic menu items 97
deleting partitions 44
demo of PartitionMagic (Flash tutorial) 8
destroying partitions 44
details, viewing 19
diagnostic reports 117
disabling BootMagic 99
disaster recovery 81
discarding changes 19
from wizards 80
disk access error messages 118
disk compression utilities, DriveSpace 105
Disk Doctor, Norton 104
disk space, determining wasted 57, 68
disk usage 57
disk, selecting 17
Diskeeper 108
disks, dynamic 18
displaying contents of a partition 28
DOS
keyboard doesn’t work the same under 23
mode, applying changes in 20
running PartitionMagic from 8
drive letters
changes to 37
changing under Windows NT 62
problems, caused by changes to 84
remapping with DriveMapper 84
drive overlay programs, compatibility with
PartitionMagic 107
DriveMapper 37, 84
running after merging partitions 82
DriveSpace, compatibility with PartitionMagic 105
Dual Boot, compatibility with PartitionMagic 106
duplicating partitions 48
dynamic disks 18
E
emergency disks
See rescue disks
error messages 117
batch 125
check 124
disk access 118
FAT 134
free space, regarding 124, 131
miscellaneous 117, 120
NTFS-specific 129
OS/2-specific 122, 123, 136
partition table 120
user interaction 126
errors, resolving
check 113
master boot record 114
partition table 114, 115
examples
creating partitions 42
resizing and moving partitions 33
exit code 12 136
extended attributes, errors involving 136
extended characters do not display properly 23
extended partitions 20
extendedx file system 20
F
FAT file system 20
Norton PartitionMagic 145
allow 64K clusters for Windows NT 22
check error messages 134
cluster size, 64K 67
cluster size, changing 66
cluster waste 57
converting from FAT32 72
converting to FAT32 71
converting to NTFS 71
partitions, information about 57
partitions, resizing 32
FAT/FAT32 partitions, converting to 4K aligned 73
FAT16x 20
FAT32 file system 21
partitions, converting to FAT 72
partitions, information about 57
supported by current operating system 22
FAT32x file system 21
FDISK, error messages involving 122, 123
features, new 1
File Browser 28
file systems supported by PartitionMagic 20
file systems, information displayed by wizard 81
files, copying, moving, renaming, or deleting from
within PartitionMagic 28
FireWire support 17
first physical sector 58
folders, creating or deleting 28
formatting partitions 48
free space
displayed 58
error messages involving 124, 131
redistributing, with wizard 82
required to install BootMagic 90
required to move a partition 30
required to resize a partition 32
G
GoBack 107
H
hard disk
formatting 48
geometry 1, 121, 122
SCSI, using PartitionMagic on 112
selecting 17
hard disk, read-only 23
hardware requirements See system requirements
help, context-sensitive 25
help, online 24
hibernating Windows 8
hiding partitions 63
I
index, error in root directory 132
Info 56
cluster waste 57
disk usage 57
partition info 58
installing
BootMagic 91
operating systems 39
operating systems, multiple 65
PartitionMagic, Windows 4
Windows NT, troubleshooting 41
integrity checks, disk 28
integrity checks, partition 50
interface, overview of 14
international keyboards 23
J
Jaz drives 17
K
KEYB.COM 23
keyboards, international 23
L
label 47
large hard disk support 1
last physical sector 58
letters, drive See drive letters
LILO 44
Linux
creating a bootable partition, requirements 38
creating logical partition for, scenario 43
file system 21
installing on a new partition 39
unbootable after creating partition 39, 45
list, partition See partition list
long filenames 64
M
main window
overview 14
rescue disk 15
Index146
status bar 16
master boot record 120, 124
master boot record viruses, removing 114
memory, freeing to run PartitionMagic 110
merging partitions 52
with different NTFS version numbers 113
wizard 82
moving
files within PartitionMagic (File Browser) 28
partitions 29
partitions, bootable 31
partitions, scenarios 33
MS ScanDisk 58
multiple operating systems 81
N
naming a partition 47
new features 1
Norton utilities 104
AntiVirus 105
Disk Doctor 104
SystemWorks 105
NT CheckDisk 58
NTFS
check error messages 129
file system 21
NTFS partitions
checking 9
converting to FAT or FAT32 73
information about 57
minimum size of 33
NTFS version numbers 113
O
online help 24
BootMagic 94
operating system boot utilities
BootMagic 89
Dual Boot 106
PQBoot 85
System Commander 106
operating systems
adding to BootMagic menu 96
creating new partitions for 38
installing 39
installing multiple 65
setting a default with BootMagic 98
supported by BootMagic 91
switching between (PQBoot) 85
operating systems, preparing to run multiple 81
operations
check 50
copy 48
create 34
delete 44
info 56
label 47
move 29
MS ScanDisk 58
NT CheckDisk 58
performing from the rescue disks 15
resize 29
selecting 18
undoing 18
viewing pending 19
operations process overview 16
OS/2
Dual Boot 106
error messages involving 122, 123, 136
FDISK, errors involving 121, 122
overlapping partitions, fixing 122
P
PARTINFO 117
partition info 58
See also PartitionInfo program
partition list
asterisk (*) in, explained 15
status in 15
partition list in main window 15
partition map 14
Partition menu 15
partition table
error messages 120
removing viruses 114
resolving errors 114, 115
partition type 58
PartitionInfo program 115
PartitionMagic
compatibility with other programs 104
PartitionInfo program 115
preferences, setting 21
system requirements 4
uninstalling 11
partitions
active 15
Norton PartitionMagic 147
active, setting 65, 85
applying changes to 19
backing up 48
bootable 38, 65, 85
browsing 28
checking integrity 50
checking NTFS 9
copying 48
creating 34
creating with wizard 80
creating, scenarios 42
data 91
deleting 44, 127
deleting all 17
file systems supported 20
formatting 48, 127
hidden 15
hiding/unhiding 63
information 56
map in main window 14
merging 52
moving 29
moving, scenarios 33
multiple visible primary 63, 106
naming 47
overlapping, fixing 122
PqRP 113
primary, hiding/unhiding 64
resizing 29
resizing limitations 32
resizing, scenarios 33
scanning for errors 58
selecting 17
serial number 58
shredding 44
sizes supported 1
splitting 54
status 15
undeleting 45
using 64K FAT clusters on 22
password protection 10
passwords
changing 11
setting for BootMagic 96
pending changes 19
pending operations, viewing 19
performance, improving by resizing clusters 66
physical disk, selecting 17
physical geometry 58
PQ_DEBUG.TXT file 115
PQBoot 85
command line switches 87
using with multiple visible primary partitions
(Windows NT) 87
PQFLEX partitions 113
PqRP partitions 113
preferences 21
allow 64K FAT clusters for Windows NT 22
set as read-only for PartitionMagic 23
skip bad sector checks 22
system supports FAT32 22
primary partitions
converting to logical 76
hiding/unhiding 64
process overview 16
R
README file 25
read-only, set hard disk as 23
reclaiming wasted space 66
recovering data files 81
redistribute free space wizard 82
reducing the number of partitions 52
remapping drive letters 84
removable media 17
removable media, assigning a drive letter to 111
requirements, system 4
rescue disks
BootMagic 93
contents of 7
creating 5
international keyboards and 23
ran out of space on 9
running from, if hard disk is compressed 129
running PARTINFO from 117
running PartitionMagic from 8
running under Windows 2000 Professional,
Windows XP or Windows Me 8
system requirements 4
resizing clusters 66
resizing operations 29
resizing partitions
limitations 32
partition won’t reboot after resizing 115
scenarios 33
resizing the root directory 64
restoring deleted partitions 45
Index148
retesting bad sectors 62
root directory
index, error in 132
long filenames in 64
resizing 64
running wizards 80
S
ScanDisk 58
scanning for errors 58
scenarios
creating Linux partition 43
creating partitions 42
resizing and moving partitions 33
SCSI hard disk, using PartitionMagic on 112
sectors, bad 119, 127
sectors, retesting bad 62
selecting
operations 18
partitions 17
physical disks 17
set active 65
set hard disks as read-only for PartitionMagic 23
showing contents of a partition 28
shredding partitions 44
skipping bad sector checks 22
software requirements 4
sound card drivers 107
SoundBlaster Live DOS drivers 107
splitting partitions 54
startup delay, setting for BootMagic 99
startup switches 9
startup switches, PQBoot 87
startup, BootMagic menu and 100
status bar 16
support, technical 139
switching between bootable partitions 85
System Commander 106
system requirements
BootMagic 90
PartitionMagic 4
system supports FAT32 22
SystemWorks 105
T
technical support 139
instructional videos 25
total physical sectors 58
troubleshooting 109
BootMagic 100
can’t reboot after resizing the root directory 65
changes entered seem to have disappeared 80
computer won’t boot 5
disk write error on machine with SystemWorks
installed 105
DOS version of PartitionMagic 9
exit codes 136
hid partition where PartitionMagic is installed 8
I undeleted a partition but it’s not the same as it
used to be 46
Linux 39, 45
merging NTFS partitions 113
NTFS features lost when converting to FAT or
FAT32 75
partition unbootable after resizing 115
PartitionMagic crashes in boot-mode 107
rescue disks, ran out of space on disk 1 9
using BootMagic on a system that only has NTFS
partitions 92
Windows NT won’t install 41
workstation is unbootable 31
tutorial 8
tutorials on web site 25
U
unallocated space 21
unallocated space, redistributing 82
undeleting partitions 45
restrictions 46
undo 18
unformatted partitions 21
unhiding partitions 63
uninstalling PartitionMagic 11
unused space 57
unused space, redistributing 82
USB/USB2 support 17
utilities 7
utilities, operating system
AUTOCHK 113
CHKDSK 50, 113
FDISK 122, 123
NT CheckDisk 58
ScanDisk 58, 113
Norton PartitionMagic 149
V
videos 25
View menu 14
virus protection software 106
viruses, removing 114
volumes, naming 47
W
warnings 75
wasted space, reclaiming 66
Windows
check errors, resolving 114
drive letters, changing 84
DriveSpace, using with 105
installing PartitionMagic from 4
running PartitionMagic from 8
Windows 2000, running rescue disks on 8
Windows 95, deleting operating system compression
files 110
Windows Defragmenter 60
Windows Me, hibernating 8
Windows NT
64K FAT clusters 22
changing drive letters 62
CheckDisk 58
creating primary partition for (scenario) 40
error messages, involving 129
installing on a new partition 39
using PQBoot with 87
won’t install 41
wizards
applying or discarding changes 80
copying partitions 82
create new partition 80
install another operating system 81
merging partitions 82
overview 15, 80
redistributing free space 82
running 80
Z
Zip disks 17
