Novatel Wireless NRM-G2000 PCMCIA card for use with Laptop computers User Manual manual FCC
Novatel Wireless, Inc. PCMCIA card for use with Laptop computers manual FCC
Contents
Manual

Revision 0.A 1
GPRS for Voicestream User’s Manual

Revision 0.A
2
Table of Contents
Purpose 4
Overview 4
Mouse-Over 4
Right-Click 5
Shortcut and Accelerator Keys 6
The Modem Manager Components 6
About GPRS Modem Manager Dialog Box .................................................6
Basic View ...............................................................................................7
Connect To Dialog Box 9
Connecting Using GPRS Modem Manager 9
Detailed Status Report Dialog Box 10
Detailed View 11
Error Messages 14
GPRS Connect Confirmation Dialog Box 14
GSM Connect Confirmation Dialog Box 15
Menu Bar 15
Modem Configuration Dialog Box 21
Modem Properties Dialog Box 22
Title Bar 23
Tray Icon 24
User Interaction During Connection 24
Connecting Using Dial-Up Networking Connection Icons 24

Revision 0.A 3
Safety and Regulatory Notices
SAFETY WARNING
This product is not to be used in any environment where radio frequency equipment is prohibited
or restricted in its use. This includes aircraft/airports, hospitals, and other sensitive electronic
areas. To ensure that your modem is deactivated you should remove it from your computer under
the above conditions.
SAFETY WARNING
Under extended operation the Merlin for GPRS modem will generate a noticeable amount of heat.
Like all PC Cards, the modem generates heat during normal operations and is also heated by the
host computer. For this reason it is recommended that you allow the modem to cool down after
extensive operation so that it is cool to the touch when you remove it from your computer.
REGULATORY NOTICES
Federal Communications Commission Radio Frequency Interference Statement
This equipment has been certified to comply within the limits of a class B digital device pursuant
to part 15 of the FCC Rules. These limits are designed to provide reasonable protection against
harmful interference in residential situations. This equipment generates, uses, and can radiate
radio frequency energy, and, if not properly installed and used in accordance with the
instructions, may cause harmful interference to radio or television reception, which can be
determined by turning the equipment on and off. You are encouraged to try to correct the
interference by one or more of the following measures:
• Reorient or relocate the receiving antenna of the television, radio or cordless telephone.
• Increase the separation between the equipment and the receiver.
• Connect the equipment to an outlet on a circuit different from that to which the receiver is
connected.
• Consult the dealer or an experienced radio/television technician for additional
suggestions.
FCC guidelines state that the antenna should be more than 17 mm (0.7 “) from all persons.
FCC ID: NBZNRM-G2000

Revision 0.A
4
Purpose
This main window is intended to allow the user, during normal operation, to immediately and
definitively determine the state of the modem. This will allow the user to confirm the modem is in
the expected state or trigger the user to take action to change the state of the modem as
required. Any fields that are only required for diagnostics or troubleshooting will be found deeper
in the application to avoid creating an overly complex main interface.
The purpose of this document is to provide detailed information regarding the appearance and
operation of the user interface for the GPRS Modem Manager application developed for Windows
95, 98, NT, ME, and 2000. The Software Engineering group will attempt to meet the
specifications outlined in this document when developing the application.
Overview
The GPRS Modem Manager application provides the user with both control over the modem’s
operation and feedback about the status of the modem. The basic information and controls
needed during day-to-day operation will be quickly and easily accessible. Less frequently used
functionality will still be easy to access but should not get in the way or obstruct the user’s view of
essential status information.
The main window will be split into two sections, one that provides information about and control
over the modem’s connection to the network, and another section that displays other necessary
status information. The second section will have two views, which the user will be able to switch
between using the button provided. The first, basic view will provide the minimal amount of status
information required by the user. This view is provided to help keep the application simple, but
also to keep its dimensions small for users who wish to leave the GPRS Modem Manager
program open all the time. The second, detailed view will display the fields that a more advanced
user may find useful. Whenever the application is re-launched, the most recently used view will
be displayed.
Mouse-Over
When the user leaves the cursor over the icon, a small tool tip type window will be displayed
showing the connection status.
The possible strings to display for the connection status are listed in a later section.
Revision 0.A 5
Right-Click
For a DUN connection, right-clicking on the icon will open the following menu.
For a NIC connection, right-clicking on the icon will open this menu.
The operation of the menu commands is detailed in the table below.
Command Implementation
Open Modem
Manager When selected, the GPRS Modem Manager’s main window is opened with the most
recently used view displayed. This command can be accessed by using Alt+o.
Connect When selected, the modem attempts to intiate a data session. When a data session
is already open, this command is disabeled. This command is only displayed for a
DUN connection. This command can be accessed by using Alt+c.
Disconnect When selected, the modem closes the data session. When a data session is not
open, this command is disabled. This command in only displayed for a DUN
connection. This command can be accessed by using Alt+d.
Suspend When selected, the data session is closed. When a data session is open, this
command is disabled.
Resume When selected, the modem attempts to resume the data session that was
previously closed. When a data session is already established, this command is
disabled. This command is only provided for a NIC connection. This command is
accessed by using Alt+r.
Exit When selected, an open connection is closed and the GPRS Modem Manager
application closes, removing the tray icon and main window. This command can be
accessed using Alt+x
Revision 0.A
6
Shortcut and Accelerator Keys
Because most of the commands available in the menu will not be used very often, there will be no
shortcut keys provided beyond the standard Windows keys, which include the F1 key to open the
on-line help. This will avoid any conflict with international keyboard layouts.
Accelerator keys will be provided as detailed in the previous two tables. These keys will need to
be adjusted when localizing the software but this is a fairly simple task.
The Modem Manager Components
About GPRS Modem Manager Dialog Box
The About GPRS Modem Manager dialog box displays information regarding the GPRS Modem
Manager application itself, including copyright and trademark information and the software
version. Also, the Novatel Wireless logo and an OK button, which closes the dialog box, should
be included. This dialog box must be closed for the main GPRS Modem Manager window
become active.
The fields on page 6 should be displayed.
Revision 0.A 7
Field/Control Label Implementation
-Simple text field, right justified, containing the software
name.
Version Simple text field, right justified, containing the version
number of the software.
-Simple text field, right justified, containing the date of the
software build.
OK Button that closes the dialog box, making the main window
active.
Always enabled.
-Simple text field containing all copyright information.
When applicable, the width of the window should be set so
that this field takes up the complete width of the panel.
Basic View
The basic view shows both the registration status and the signal strength. For a DUN connection,
a Disconnect or Connect button is provided and for a NIC connection, the Suspend or Resume
button replaces it. For both a DUN and NIC connection, another button is included to allow the
user to switch the interface to the detailed view.
For a DUN connection, the main window will look similar to that below.
For a NIC connection, the following display will be used.
For both connection types, when the mouse moves over the link area, a drop shadow will appear
to indicate to the user that the text and rounded rectangles to the left and right can be clicked.
Revision 0.A
8
The implementation of the fields and controls in the basic view is explained below.
Field/Control Label Implementation
-A simple text field displaying one of the strings listed in a later section.
Signal Strength A five-bar indicator in which the number of black-filled bars indicates the
signal strength.
The value of each bar is TBD.
If there is no service available, this field will be disabled.
When disabled, the field label will remain but the field itself will be
empty.
Disconnect/Connect This button is only displayed for a DUN connection.
Context-sensitive button that is labeled Disconnect and allows the user
to close an established data session. If the modem has been detected
but no session is open, this button is labeled Connect and allows the
user to initiate a data session.
If the modem has not been detected, this control is disabled.
The button should be the same width as the button.
Suspend/Resume This button is only provided for a NIC connection.
Context-sensitive button that is labeled Suspend and allows the user to
close an open data session. If the modem has been detected and the
data session has been closed, it is labeled Resume and allows the user
to restart the session.
If the modem has not been detected, this control is disabled.
The button should be the same width as the button.
Button that allows the user to switch to the detailed view, upon which the
button label will change to an upward pointing arrow (see Detailed View
section).
The button should be the same width as the Disconnect/Connect or
Suspend/Resume button.
This button will always be enabled.
-Link to the Novatel Wireless web site.
When clicked, a new window of the default browser will open with the
main page of the Novatel Wireless web site displayed.
As mentioned above, this section of the window will change when the
mouse passes over it.
This control is always enabled.
Revision 0.A 9
Connect To Dialog Box
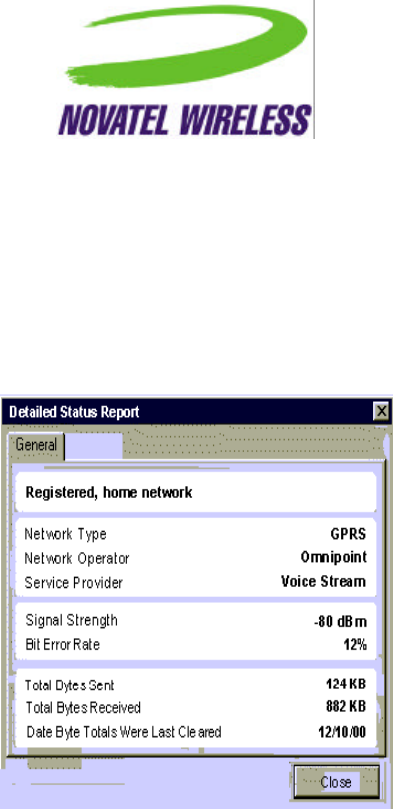
This is the standard dial-up networking connection box provided by Windows. Depending on the
version of Windows and the connection settings, it will look somewhat similar to that shown
below.
Connecting Using GPRS Modem Manager
The user can attempt to connect to the network by opening GPRS Modem Manager. If the
Automatically connect when GPRS Modem Manager is launched option is enabled, the modem
will automatically attempt to connect. If this option is not enabled, the user will need to use either
the Connect command in either the main menu or tray icon menu or the Connect button.
Depending on the type of service available and the network preference, the appropriate dialog
boxes will be displayed as described below.
If the user has selected Prefer to use GPRS or Prefer to use GSM, the modem will attempt to
connect to the preferred network first and only the Connect To dialog box will be displayed. If the
connection attempt is not successful, and the user has enabled the Prompt if selected network is
not available option, the appropriate confirmation dialog box from either section 0 or 0 will be
displayed before the second Connect To dialog box, asking if the user wishes to connect to the
other network. If this option is disabled, the Connect To dialog box will automatically be displayed
for the other network.
If the user has selected Use GPRS Only or Use GSM Only, the modem will attempt to connect to
the preferred network first and only the Connect To dialog box will be displayed. If the connection
attempt is not successful, and the user has enabled the Prompt if selected network is not
available option, the appropriate confirmation dialog box from either section 0 or 0 will be
displayed before the second Connect To dialog box, asking if the user wishes to connect to the
Revision 0.A
10
other network. If this option is disabled, the user will not be prompted and the modem will not try
to connect to the other network.
Detailed Status Report Dialog Box
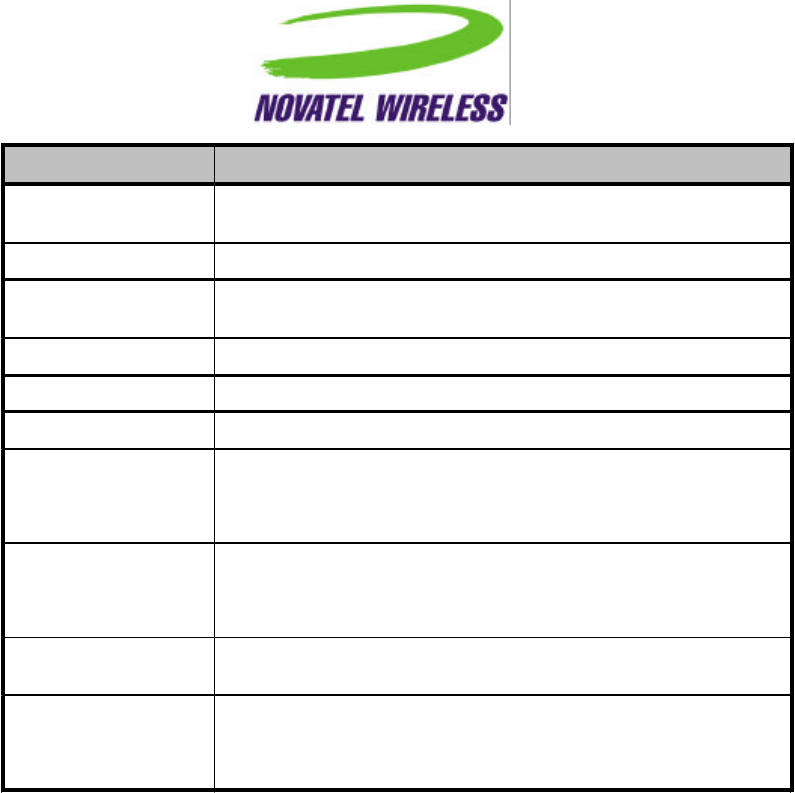
The Detailed Status Report dialog box displays all the fields necessary for troubleshooting any
problems. Its intent is to provide users with the information Technical Support would require.
This dialog box can remain open while the main GPRS Modem Manager window is active.
The table on page 10 describes the fields to be displayed in this dialog box.
Revision 0.A 11
Field/Control Label Implementation
-Simple text field displaying one of the strings listed in a later
section.
Network Type Simple text field displaying one of the string listed in a later section.
Network Operator Simple text field displaying the name of the network operator
provided by the modem.
Service Provider Simple text field displaying the service provider.
Signal Strength Simple text field displaying the signal strength.
Bit Error Rate Simple text field displaying the current bit error rate.
Total Bytes Sent Simple text field displaying the kilobytes sent since the byte totals
were last cleared.
Serves as an indicator that the modem is transmitting data.
Total Bytes Received Simple text field displaying the kilobytes received since the byte
totals were last cleared.
Serves as an indicator that the modem is receiving data.
Data Byte Totals Were
Last Cleared Simple text field displaying the data the byte totals were last
cleared using the Clear Byte Totals command in the Tools menu.
Close Button that, when selected, closes the Detailed Status Report
dialog.
This button is always enabled.
If any other tabs are created, each tab will be accessible using Alt with a character from the tab
name. For example, Alt+g would select the General tab.
Detailed View
The detailed view retains the same connection status section as the basic view, but the second
section is expanded to show more information.
As for the basic view, for a DUN connection the Disconnect/Connect button is displayed.
Revision 0.A
12
For an NIC connection, the Disconnect/Connect button is replaced with a Suspend/Resume
button.
Also, the link changes slightly when the mouse moves over it in the same way as for the basic
view.
The table on page 12 provides a description of each of the fields included in this view.
Revision 0.A 13
Field/Control Label Implementation
-A simple text field displaying on of the strings listed in a later
section.
Network Type A simple text field displaying one of the strings listed in a later
section.
This field will only be enabled when the modem is attempting to
register, roaming, or registered. Otherwise, it will be disabled.
Network Operator A simple text field displaying the network operator.
This field will only be enabled when the modem is attempting to
register, roaming, or registered. Otherwise, it will be disabled.
Signal Strength A simple text field displaying the current signal strength in dBm.
If there is no service available, this field will be disabled.
Average Data Transfer
Rate A simple text field displaying the average rate in Kbps.
If the modem is not transferring data, this field will be disabled.
Bytes Transferred in
Session A simple text field displaying the bytes transferred in the current
session in KB.
Total Bytes
Transferred A simple text field displaying the total number of bytes transferred
since the total was last cleared in KB.
Disconnect/Connect This button is only provided for a DUN connection.
Context-sensitive button that is labeled Disconnect and allows the
user to close an open data session and, if the modem has been
detected, is labeled Connect and allows the user to initiate a data
session when one is not already established.
If the modem has not been detected, this control is disabled.
The button should be the same width as the button.
Suspend/Resume This button is only provided for a NIC connection.
Context-sensitive button that is labeled Suspend and allows the
user to close an open data session. If the modem has been
detected and the data session is closed, it is labeled Resume and
allows the user to restart the session.
If the modem has not been detected, this control is disabled.
The button should be the same width as the button.
Button that allows the user to switch to the basic view, upon which
the button label will change to the downward pointing arrow (see
Basic View section).
The button should be the same width as the Disconnect/Connect or
Suspend/Resume button.
This button will always be enabled.
-Link to the Novatel Wireless web site.
When any of the text fields are disabled, the field label will remain but the field itself will be empty.

Revision 0.A
14
Error Messages
When the connection attempt fails because there is no service available, the following error
message is provided.
If the user attempts to connect and the modem cannot be detected, the following error will be
displayed.
If the attempt to register was unsuccessful for other reasons, the message below will be provided.
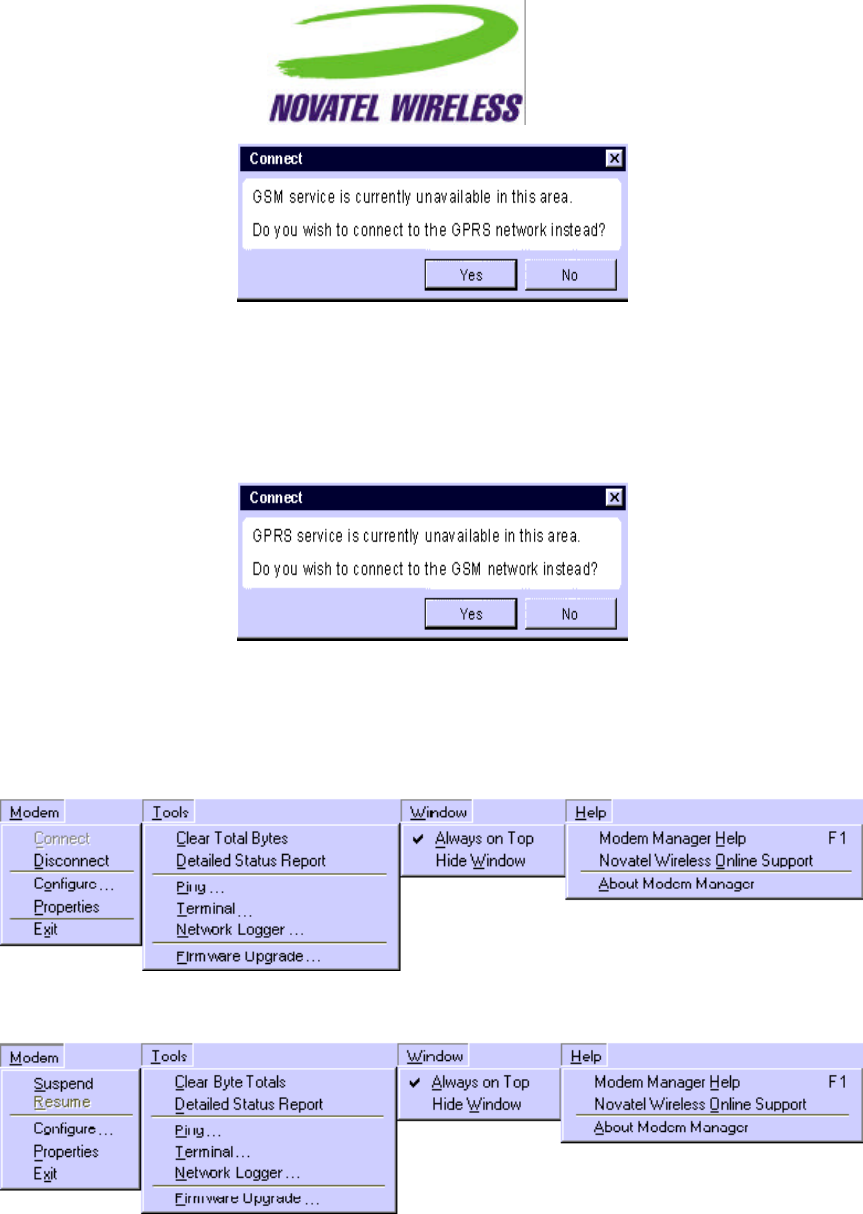
GPRS Connect Confirmation Dialog Box
This dialog box indicates to the user that GSM service is unavailable and asks them whether they
wish to connect to the GRPS network instead.
Revision 0.A 15
GSM Connect Confirmation Dialog Box
This dialog box indicates to the user that GPRS service is unavailable and asks them whether
they wish to connect to the GSM network instead.
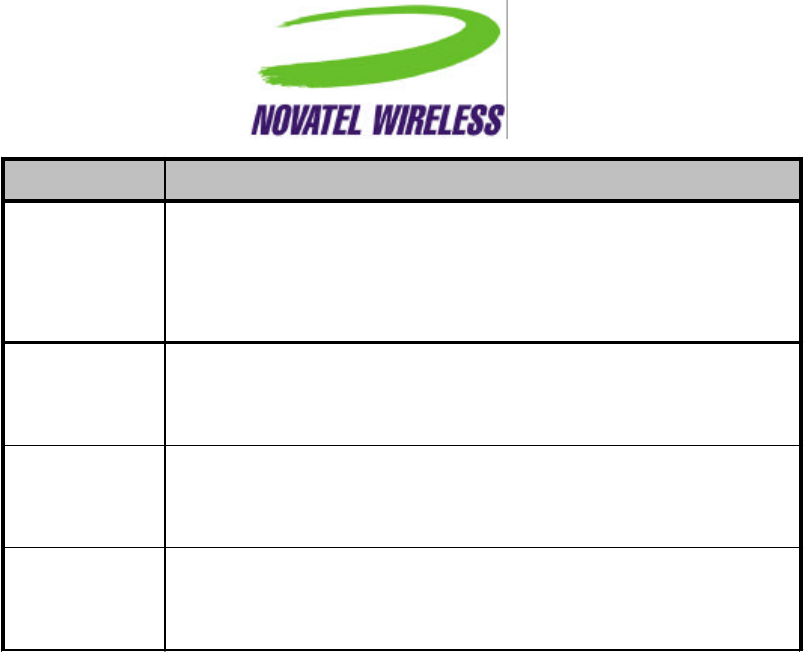
Menu Bar
The menu bar will be as follows for a DUN connection.
For a NIC connection, the menu bar will be as shown below.
A description of the intent of each menu is given in the table below.
Revision 0.A
16
Menu Description
Modem All commands that directly manipulate or query the modem and are
used on a daily basis.
Similar to the File menu in a word processor.
This menu can be accessed using the accelerator Alt+m.
Tools All commands that manipulate or query the modem in order to
diagnose a problem or test out the modem and/or its connection.
This menu can be accessed using the accelerator Alt+t.
Window All commands that involve the placement of the GPRS Modem
Manager window on the desktop.
This menu can be accessed using the accelerator Alt+w.
Help All commands that involve information about the GPRS Modem
Manager application including the online-help.
This menu can be accessed using the accelerator Alt+h.
The operation of commands in the menu bar is detailed in the tables on page 16.

Revision 0.A 17
Menu Command Implementation
Connect When selected, the modem attempts to initiate a data
session.
When a data session is already established, this
command is disabled.
This command is only provided for a DUN
connection.
This command can be accessed from within the
Modem menu using the accelerator Alt+c.
Disconnect When selected, the modem closes the data session.
When a data session is not open, this command is
disabled.
This command is only provided for a DUN
connection.
This command can be accessed from within the
Modem menu using the accelerator Alt+d.
Suspend When selected, the data session is closed.
When a data session is not open, this command is
disabled.
This command is only provided for a NIC connection.
This command can be accessed from within the
Modem menu using the accelerator Alt+s.
Resume When selected, the modem attempts to resume the
data session that was previously closed.
When a data session is already established, this
command is disabled.
This command is only provided for a NIC connection.
This command can be accessed from within the
Modem menu using the accelerator Alt+r.
Modem
Configure… When selected, opens the Modem Configuration
dialog box, which is described in a later section.
When the modem cannot be detected, this command
is disabled.
This command can be accessed from within the
Modem menu using the accelerator Alt+o.
Revision 0.A
18
Properties When selected, opens the Modem Properties dialog
box, which is described in a later section.
When the modem cannot be detected, this command
is disabled.
This command can be accessed from within the
Modem menu using the accelerator Alt+p.
Exit When selected, an open connection is closed and
the GPRS Modem Manager application closes
completely, removing the tray icon and main window
from sight.
Always enabled.
This command can be accessed from within the
Modem menu using the accelerator Alt+x.

Revision 0.A 19
Menu Command Implementation
Clear Byte Totals When selected, the Total Bytes Transferred, Total
Bytes Received, and Total Bytes Sent fields are
cleared to 0 and the value for Date Byte Totals Were
Last Cleared is set to the current date.
This will always be enabled.
This command can be accessed from within the
Tools menu using the accelerator Alt+c.
Detailed Status
Report When selected, the Detailed Status Report dialog
box will be opened, which is described in a later
section.
This will always be enabled.
This command can be accessed from within the
Tools menu using the accelerator Alt+d.
Ping… When selected, the Ping utility will be opened.
When the modem cannot be detected, this command
is disabled.
This command can be accessed from within the
Tools menu using the accelerator Alt+p.
Terminal… When selected, the Terminal utility will be opened.
When the modem cannot be detected, this command
is disabled.
This command can be accessed from within the
Tools menu using the accelerator Alt+t.
Network Logger… When selected, the Network Logger utility will be
opened.
When the modem cannot be detected, this command
is disabled.
This command can be accessed from within the
Tools menu using the accelerator Alt+n.
Tools
Firmware
Upgrade… When selected, the Firmware Upgrade utility will be
opened.
When the modem cannot be detected, this command
is disabled.
This command can be accessed from within the
Tools menu using the accelerator Alt+f.
Revision 0.A
20
Menu Command Implementation
Always on Top A check mark beside the text will indicate whether or
not this option is selected.
When selected, the window will always be displayed
in front of any other active applications.
When not selected, the window will be covered when
other applications are made active.
This command is always enabled.
This command can be accessed from within the
Window menu using the accelerator Alt+a.
Window
Hide Window When selected, the main GPRS Modem Manager
window is closed but the tray icon remains.
The modem’s network connection is not altered.
This command is always enabled.
This command can be accessed from within the
Window menu using the accelerator Alt+w.
Menu Command Implementation
GPRS Modem
Manager Help When selected, the online, context-sensitive GPRS
Modem Manager help is launched.
This command is always enabled.
This command can be accessed from within the Help
menu using the accelerator Alt+h.
Novatel Wireless
Online Support Opens a new window of the default web browser to
the support section of the Novatel Wireless website.
This command is always enabled.
This command can be accessed from within the Help
menu using the accelerator Alt+o.
Help
About GPRS
Modem Manager Opens the About GPRS Modem Manager dialog box,
which is described in a later section.
This command is always enabled.
This menu item can be accessed from within the
Help menu using the accelerator Alt+a.
Revision 0.A 21
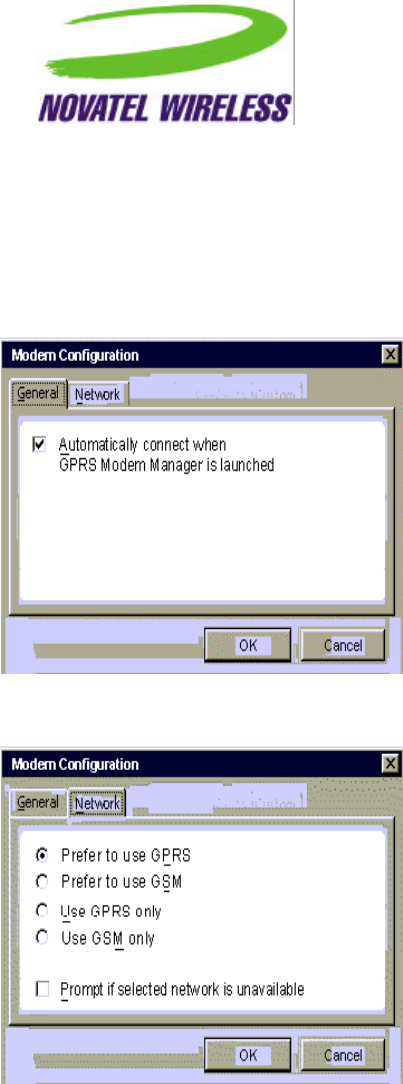
Modem Configuration Dialog Box
The Modem Configuration dialog box displays fields that the user can change in order to
configure and customize the modem. It will not include any fields that involve the operation of
data sessions that are controlled separately by the OS. Multiple tabs are used to organize the
fields. At the bottom of the window, the standard OK and Cancel buttons will be provided.
The table below explains the fields provided in this dialog box.

Revision 0.A
22
Field/Control Label Implementation
Automatically
connect… Checkbox that, when enabled, indicates that the modem will
automatically attempt to connect when GPRS Modem Manager is
launched.
The default value upon installation is enabled.
This option is always available.
This command can be accessed by using Alt+a.
-Set of radio buttons that specify which type of network the user
would like to connect to. Default upon installation is Prefer to use
GPRS.
These radio buttons are always available.
This command can be accessed by using Alt with the letter
underlined in the image above for each item.
Prompt if selected… Checkbox that, when selected, indicates that the user should be
prompted if their selected network is unavailable.
The default value upon installation is disabled or not selected.
This option is always available.
This command can be accessed by using Alt+p.
Cancel Button that, when selected, does not save any changes to the
configuration. The Modem Configuration dialog box closes and the
main GPRS Modem Manager window becomes active.
This button is always enabled.
OK
Button that, when selected, saves any changes to the configuration.
The Modem Configuration dialog box closes and the main GPRS
Modem Manager window becomes active.
This button is always enabled.
The General and Network tabs can be accessed using Alt+g and Alt+n, respectively.
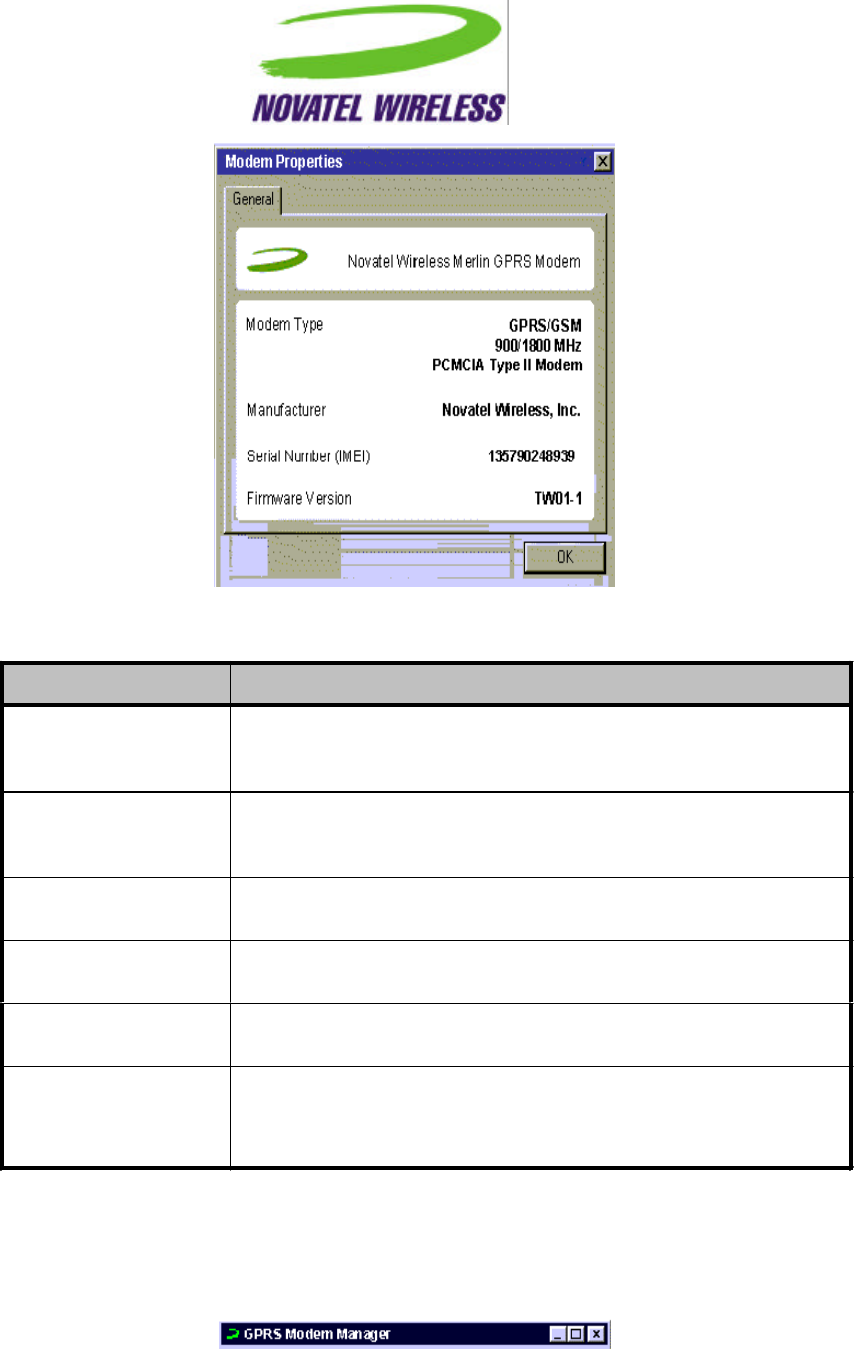
Modem Properties Dialog Box
The Modem Properties dialog box displays the fields listed in the table below in a General tab.
The dialog box must be closed before the main GPRS Modem Manager window can be made
active.
Revision 0.A 23
The table below describes the implementation of each of the fields shown above.
Field/Control Label Implementation
-Simple text field displaying the Modem Friendly Name as described
in the Consistency & Naming Conventions Requirements
Document.
Modem Type Simple text field displaying the type of modem. The modem type
will be determined by querying the modem. The value returned
may need to be formatted.
Manufacturer Simple text field displaying the manufacturer of the modem. The
manufacturer will be determined by querying the modem.
Serial Number (IMEI) Simple text field displaying the serial number of the modem as
provided by querying the modem.
Firmware Version Simple text field displaying the version of the firmware currently
installed in the modem as provided by querying the modem.
OK Button that, when selected, closes Modem Properties dialog box
and the main GPRS Modem Manager window becomes active.
This button is always enabled.
Title Bar
The title bar will show the name GPRS Modem Manager to the left of the green Novatel Wireless
“swoosh, with the traditional buttons to close, minimize, and maximize the window.
Revision 0.A
24
Clicking the close button will close the main window but will not alter the connection and the tray
icon will remain.
Tray Icon
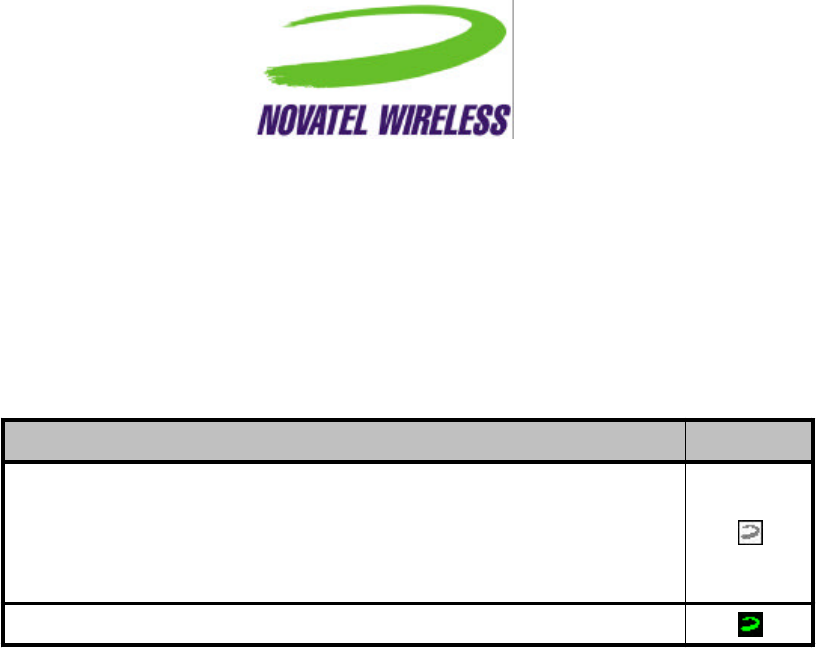
When GPRS Modem Manager is first launched, the main window will be displayed. However, at
any time, the GPRS Modem Manager can be hidden or minimized to a tray icon that will provide
basic status information to the user. Depending on the status of the modem, the icon will change
as outlined in the following table.
Status Icon Shown
Modem not inserted or not detected
OR
Modem detected but no data session has been established, either
because the user has not chosen to connect yet or there is an error
Modem detected and a data session is currently established
If only the tray icon is open and the main window has been closed, the user can open the main
window again by re-launching the application using the entry in the Start menu.
User Interaction During Connection
In order to illustrate how the user will interface with the software when a successful connection
attempt occurs, the following sections are provided.
Connecting Using Dial-Up Networking Connection
Icons
The user can also attempt to connect without using GPRS Modem Manager by clicking the DUN
icons created when the software is installed. One will be for GSM service and the other for
GPRS. In this case, all user feedback will be provided by the Windows dial-up networking
utilities.

Revision 0.A 25
Index
Basic View .................................................................................................................7
Connecting Using Dial-Up Networking Connection Icons.............................................24
Detailed View...........................................................................................................11
Error Messages ........................................................................................................14
GPRS Connect Confirmation Dialog Box ....................................................................14
GSM Connect Confirmation Dialog Box......................................................................15
Menu Bar........................................................................................................... 15, 16
Modem Configuration Dialog Box...............................................................................21
Modem Properties Dialog Box ...................................................................................22
Purpose.....................................................................................................................4
Title Bar...................................................................................................................23
Tray Icon..................................................................................................................24
User Interaction During Connection............................................................................24