Novatel Wireless NRM6834 MINSTREL S Wireless CDPD modem User Manual S
Novatel Wireless, Inc. MINSTREL S Wireless CDPD modem S
EX9 MANUAL

August 2000 APREL Project No.: NVWB-MINSTREL S
Consulting
*
Research
*
Training
*
Certification
Testing Since 1981
Exhibit 9
Minstrel S
Novatel Wireless Technologies Ltd.
FCC ID: NBZNRM6834
User’s Manual
www.novatelwireless.com
Toll Free: 1-888-888-9231
As shown below, your Minstrel STM can be ready to download web pages and send and
receive email in just a few steps. For more detailed information on setting up your
Minstrel S, read the Getting Started section of the Minstrel S User Guide.
Insert the Minstrel S into the SpringboardTM expansion slot of your VisorTM.
Remove the slot protector and insert the Minstrel S into the slot until the
connectors are secure. The Modem Manager software, which controls the
modem’s connection to the Wireless IP network, will automatically launch.
Start the Setup Wizard utility to begin configuration of the Minstrel S.
Once the Minstrel screen appears, tap the Menu icon and select Setup
Wizard from the Minstrel menu.
Follow the directions on the screen to configure the Minstrel S.
As directed, select the Wireless IP network provider you wish to use and
contact the provider to set up an account. When prompted, enter the IP
and DNS addresses and test the network registration.
Install email and web browsing applications on your Visor.
Install any email and web browsing applications you would like to use on
your Visor following the directions provided by the software manufacturer.
Charge the Minstrel S battery.
The Minstrel S is shipped with a partially charged battery and, therefore, it
is necessary to charge the battery before the modem is used. The battery
status LED on the front of the Minstrel S flashes green when the battery is
being charged and is solid green when the battery is fully charged.
Connect to the Wireless IP network.
Once your Minstrel S has been configured, you can connect to the
Wireless IP network simply by inserting your Minstrel S into the Visor’s
expansion slot. The Modem Manager software will automatically launch
and register the modem to the network.
Congratulations!
Now that your Minstrel S has registered to the Wireless IP network, you
can send and receive data across the Internet using your Visor and just
about any email or web browsing application you choose.
Quick Start Guide
www.novatelwireless.com
Toll Free: 1-888-888-9231
QSG-90023060 Version B
Version BQSG-90023060

1
Minstrel STM User Guide Version B
90023058

2
Minstrel STM User Guide Version B
90023058
The information contained in this document is subject to change without notice and should not be
construed as a commitment by Novatel Wireless Inc. unless such commitment is expressly given
in a covering document.
The information herein is the exclusive property of Novatel Wireless Inc. No part of this publication
may be reproduced or transmitted in any form or by any means including electronic storage, repro-
duction, execution, or transmission without the prior written consent of Novatel Wireless Inc.
© 2000 Novatel Wireless, Inc. All rights reserved.

3
Minstrel STM User Guide Version B
90023058
Getting Started.......................................................................................................................................4
Welcome....................................................................................................................................5
Requirements ............................................................................................................................6
Overview of the Minstrel S Modem............................................................................................7
Overview of the Minstrel S Software .......................................................................................10
Charging the Battery................................................................................................................ 11
Installing the Minstrel S Software ............................................................................................12
Connecting the Minstrel to the Visor........................................................................................13
Configuring the Minstrel...........................................................................................................14
Connecting to the Internet .......................................................................................................15
Working with the Minstrel S................................................................................................................16
Managing the Network Connection .........................................................................................17
Using the Power Switch...........................................................................................................19
Changing the Configuration.....................................................................................................22
Updating the Flash ..................................................................................................................23
Using File Mover......................................................................................................................26
Configuring the Button.............................................................................................................34
Setup Wizard........................................................................................................................................37
Introduction to Setup Wizard ...................................................................................................38
Starting Setup Wizard..............................................................................................................39
Select Provider ........................................................................................................................41
Configure Palm Device............................................................................................................44
Contact a Provider...................................................................................................................46
Settings....................................................................................................................................48
Confirm Settings......................................................................................................................50
Auto Config..............................................................................................................................52
Check Network ........................................................................................................................54
Successful ...............................................................................................................................56
Modem Manager ..................................................................................................................................57
Introduction to Modem Manager..............................................................................................58
Starting Modem Manager........................................................................................................61
Minstrel....................................................................................................................................64
Config ......................................................................................................................................67
Detailed Status ........................................................................................................................75
Push Message Configuration ..................................................................................................79
Terminal...................................................................................................................................82
Ping .........................................................................................................................................87
Glossary ...............................................................................................................................................90
Glossary A-H ...........................................................................................................................91
Glossary I-R.............................................................................................................................92
Glossary S-V ...........................................................................................................................93
Glossary W-Z...........................................................................................................................94
Index .....................................................................................................................................................95
Index A-Co...............................................................................................................................96
Index Co-Em............................................................................................................................97
Index En-Ld .............................................................................................................................98
Index Le-Ou.............................................................................................................................99
Index Ov-R ............................................................................................................................100
Index S-St..............................................................................................................................101
Index Su-Z.............................................................................................................................102

Getting Started 4
Minstrel STM User Guide Version B
90023058
Getting Started

Getting Started 5
Minstrel STM User Guide Version B
90023058
Welcome
Welcome to the Minstrel S User Guide. This guide provides information on using the many com-
ponents and features of your Minstrel STM Wireless SpringboardTM Modem, including the follow-
ing:
• General information about the Minstrel S modem and software
• Instructions to help get you started with your Minstrel S so you can download web
pages and send email almost immediately
• Detailed information about the software used to configure and control the opera-
tion of your Minstrel S
Caution
To satisfy FCC RF exposure compliance requirements for mobile transmitting devices, the user
should generally maintain a separation distance of 20 cm between the person’s body, and the
device and its antenna. The hands and wrists have a higher exposure limit because they are
extremities, and the device should be used in a hand-held, hand-operated configuration only.
This device has been tested for compliance with a separation distance of 4 cm from a person's
body. The operating configurations of this device generally do not support normal transmissions
while it is carried in pockets or holsters next to a person’s body.
Technical Support
If you have any questions or comments about your Minstrel S, please contact the Novatel Wireless
Technical Support Team.
WWW: www.novatelwireless.com/support/index.html
Email: support@novatelwireless.com
Phone: 1-888-888-9231

Getting Started 6
Minstrel STM User Guide Version B
90023058
Requirements
The following is required to set up and use your Minstrel S for sending and receiving data across
the Internet:
•A HandspringTM VisorTM handheld computer
•Desktop software that allows you to communicate between your desktop PC and
the Visor
•Modem application software for the Visor (included with your Minstrel)
•An account with a Wireless IP network service provider in your area
•Application software for your Visor such as an email client and web browser
Wireless IP service is available from your local cellular carrier in most North American cities.
Check your product packaging or www.novatelwireless.com for network provider contact informa-
tion.
Getting Started 7
Minstrel STM User Guide Version B
90023058
Overview of the Minstrel S Modem
The Minstrel S modem has many important features such as status indicator LEDs, a configurable
button, and a DC jack for powering the unit with the supplied AC adapter.
Information on the operation of the configurable button and status indicator LEDs are provided in
the sections below.
Configurable Button
On the front of the Minstrel S there is a button that can be customized to launch any program when
pressed. For information on how to customize this button, refer to Configuring the Button.

Getting Started 8
Minstrel STM User Guide Version B
90023058
Status Indicator LEDs
The Minstrel S has three LED indicators that allow you to easily determine the status of various
modem parameters.
Service LED
The LED labeled with the icon below indicates the status of the connection to the Wireless IP net-
work.
The table below explains the various states of this LED.
Data/Message Waiting LED
The LED labeled with the icon shown below is used to indicate the transfer of data and provide
notification of waiting messages.
Color State Meaning
Green Solid The Minstrel is registered or con-
nected to the Wireless IP network and,
therefore, data can be sent and
received across the Internet.
Green Solid but flashes off
every 5 seconds The Minstrel is registered to the net-
work but is in sleep mode.
Green Flashing quickly The Minstrel is attempting to register
to the network.
Green Flashing slowly The Minstrel is attempting to locate a
network provider.

Getting Started 9
Minstrel STM User Guide Version B
90023058
The table below shows the various states of this LED and their meanings.
Battery LED
The LED that indicates the state of the Minstrel’s internal battery is labeled with the icon below.
The table below describes the various states of this LED.
For more information on charging the battery, refer to the section entitled Charging the Battery.
Color State Meaning
Green Flashing The Minstrel is sending or receiving
data.
Red Flashing The Minstrel has received a “push”
message notification. Push messag-
ing must be enabled for this to occur.
For more information, refer to Push
Message Configuration.
Color State Meaning
Green Flashing The Minstrel’s battery is being
charged. The Minstrel is being pow-
ered by the AC adapter.
Green Solid The Minstrel’s battery is fully charged
but the AC adapter is still plugged in
and, therefore, powering the unit.
Red Flashing The Minstrel’s battery is low and
requires charging.

Getting Started 10
Minstrel STM User Guide Version B
90023058
Overview of the Minstrel S Software
In order for you to easily configure and operate your Minstrel S, there are two main software pro-
grams included with the Minstrel S modem. These programs, which are described below, are
already installed on the flash memory of the unit.
Setup Wizard
The Setup Wizard utility is designed to guide you step-by-step through the setup of your Minstrel
S. Once you have a Wireless IP account established with a network provider, you can use the
Setup Wizard to enter and save the necessary settings to the Minstrel S modem and configure
your Visor for use with the Minstrel S. For more information about this program and the configura-
tion process refer to the Setup Wizard section of this document.
Modem Manager
The Modem Manager software provides you with complete status information about the Minstrel S
and control over its connection to the Wireless IP network. It also contains screens for more
advanced users to configure their modem without the use of Setup Wizard. For more information
about this program and its many features, refer to the Modem Manager section of this document.
Getting Started 11
Minstrel STM User Guide Version B
90023058
Charging the Battery
The Minstrel S contains a rechargeable Lithium-ion battery. This battery is shipped only partially
charged, so it is necessary to charge the battery to its full capacity before using the unit.
To charge the battery, plug the AC adapter (supplied) into an outlet and insert the barrel connector
into the DC jack found on the top of the Minstrel.
It will take approximately 3 hours to charge the battery from a zero charge state. With sleep mode
enabled, the battery will provide power to the unit for many hours of web browsing.
Battery LED
When the Battery LED is flashing red, this indicates that the battery is low and requires charging.
For more information about the Battery LED, refer to Status Indicator LEDs in the Overview of the
Minstrel S Modem section.
NOTE: If the battery charge goes lower than a pre-set threshold, the modem will automatically
disconnect from the network and power off in order to preserve the settings in its internal
memory.

Getting Started 12
Minstrel STM User Guide Version B
90023058
Installing the Minstrel S Software
The software necessary for configuring and operating the Minstrel S is already installed on the
Minstrel’s flash memory. In the future, there may be updates to this software which will be
released at our web site (www.novatelwireless.com). For information on how to install these soft-
ware updates, refer to the section entitled Updating the Flash.
Additional software such as email and web browsing applications may be required for accessing
the Internet. For information on installing these applications, consult the software manufacturer’s
instructions.
Getting Started 13
Minstrel STM User Guide Version B
90023058
Connecting the Minstrel to the Visor
The Minstrel S uses Handspring’s SpringboardTM technology to attach to and communicate with
your Visor handheld computer. In order to configure and use your Minstrel S, you must first con-
nect the Minstrel to the Visor by following the directions below.
First, remove the Visor’s Springboard slot protector. Then, with the front of the Minstrel S facing
the same direction as the front of the Visor, slide the Minstrel into the slot until the connectors are
secure.
As soon as the Minstrel is inserted into the slot, the Modem Manager software will automatically
start and attempt to establish a connection to the Wireless IP network.
Getting Started 14
Minstrel STM User Guide Version B
90023058
Configuring the Minstrel
In order to connect to the Internet, the Minstrel S must first be configured with the necessary
parameters to be able to register to the Wireless IP network.
To configure the Minstrel, first insert the Minstrel into the Visor’s expansion slot as explained in
Connecting the Minstrel to the Visor. The Modem Manager software will automatically start
when this happens. Tap the Menu icon when the Minstrel screen appears and select Setup Wiz-
ard from the Minstrel menu.
For more information about starting Setup Wizard and the configuration process, refer to the sec-
tion entitled Setup Wizard.
NOTE: In order to configure and use the Minstrel, an account must first be established with a
Wireless IP network provider.

Getting Started 15
Minstrel STM User Guide Version B
90023058
Connecting to the Internet
To send and receive data across the Internet using the Minstrel S, a connection to the Wireless IP
network is required. To register to the network once configuration has been completed, simply
insert your Minstrel S into the Springboard slot of your Visor. The Modem Manager program will
automatically run, attempting to connect to the network.
Once the Minstrel is registered, you can use almost any Internet application on your Visor or Min-
strel S to send and receive data, including downloading web pages and sending email.

Working with the Minstrel S 16
Minstrel STM User Guide Version B
90023058
Working with the Minstrel S

Working with the Minstrel S 17
Minstrel STM User Guide Version B
90023058
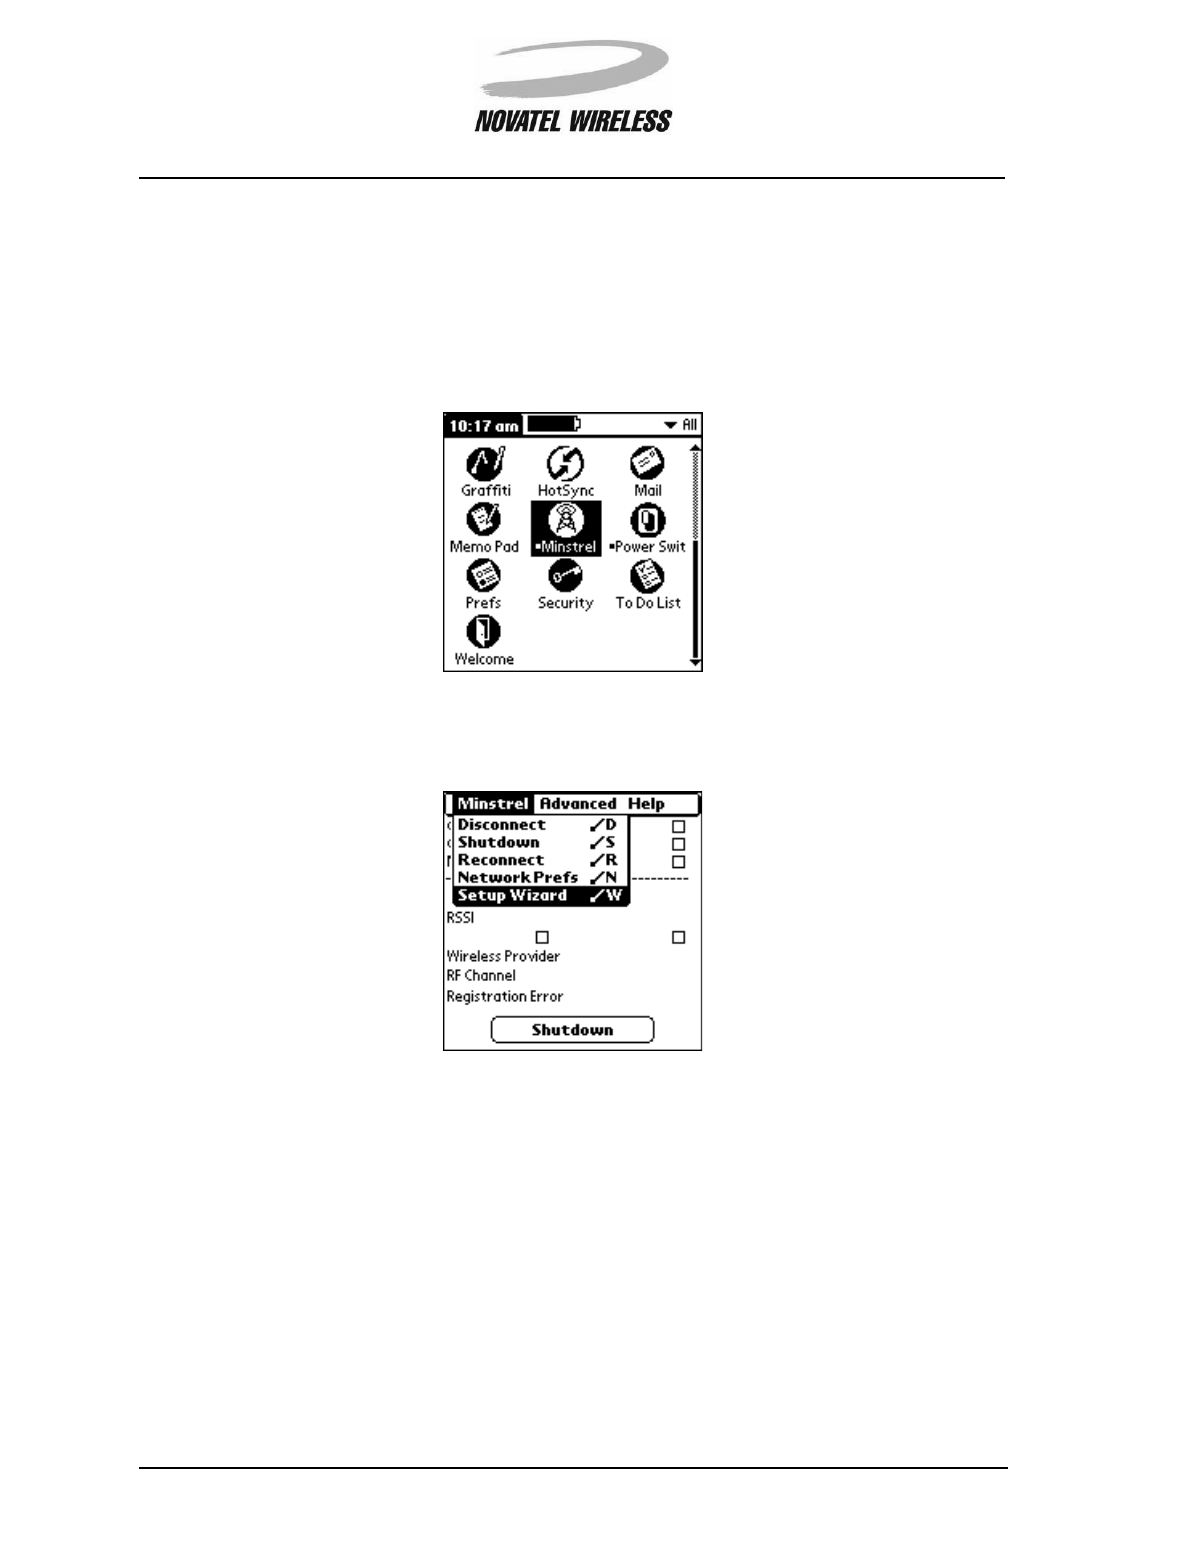
Managing the Network Connection
In order to send and receive data across the Internet, the modem must be connected or registered
to the Wireless IP network. In the sections below, information is provided on how to
•establish the network connection
•disconnect from the network
•close the PPP session.
Connecting to the Network
To establish a connection, or register, to the Wireless IP network, simply insert the Minstrel S into
the Visor’s expansion slot. The Modem Manager will automatically launch and attempt to register
to the Wireless IP network. If the Minstrel S is already inserted, tap the Applications icon and
then the Minstrel icon to start the Modem Manager software.
Disconnecting from the Network
To disconnect, or de-register, from the Wireless IP network and power off the modem, tap the
Shutdown button at the bottom of the Minstrel screen of the Modem Manager software.
Working with the Minstrel S 18
Minstrel STM User Guide Version B
90023058
You can also tap the Menu icon and select Shutdown from the Minstrel menu to de-register and
power off the unit or use the Power Switch utility, which is described in Using the Power Switch.
Closing the PPP Session
To close the active PPP session but remain registered to the Wireless IP network, tap the Menu
icon and select Disconnect from the Minstrel menu.
Closing the PPP session means that you cannot send and receive data across the Internet but
because the modem is registered it can still communicate with the Wireless IP network, including
receiving push message notifications.
NOTE: If Auto Power Off is enabled, tapping Disconnect will close the active PPP session
causing the modem to de-register from the Wireless IP network and power off. If Auto
Power Off is disabled, tapping Disconnect will close the PPP session but the modem will
remain registered to the Wireless IP network. For more information on the Auto Power Off
feature, refer to Auto Power Off in the Config section.
Working with the Minstrel S 19
Minstrel STM User Guide Version B
90023058
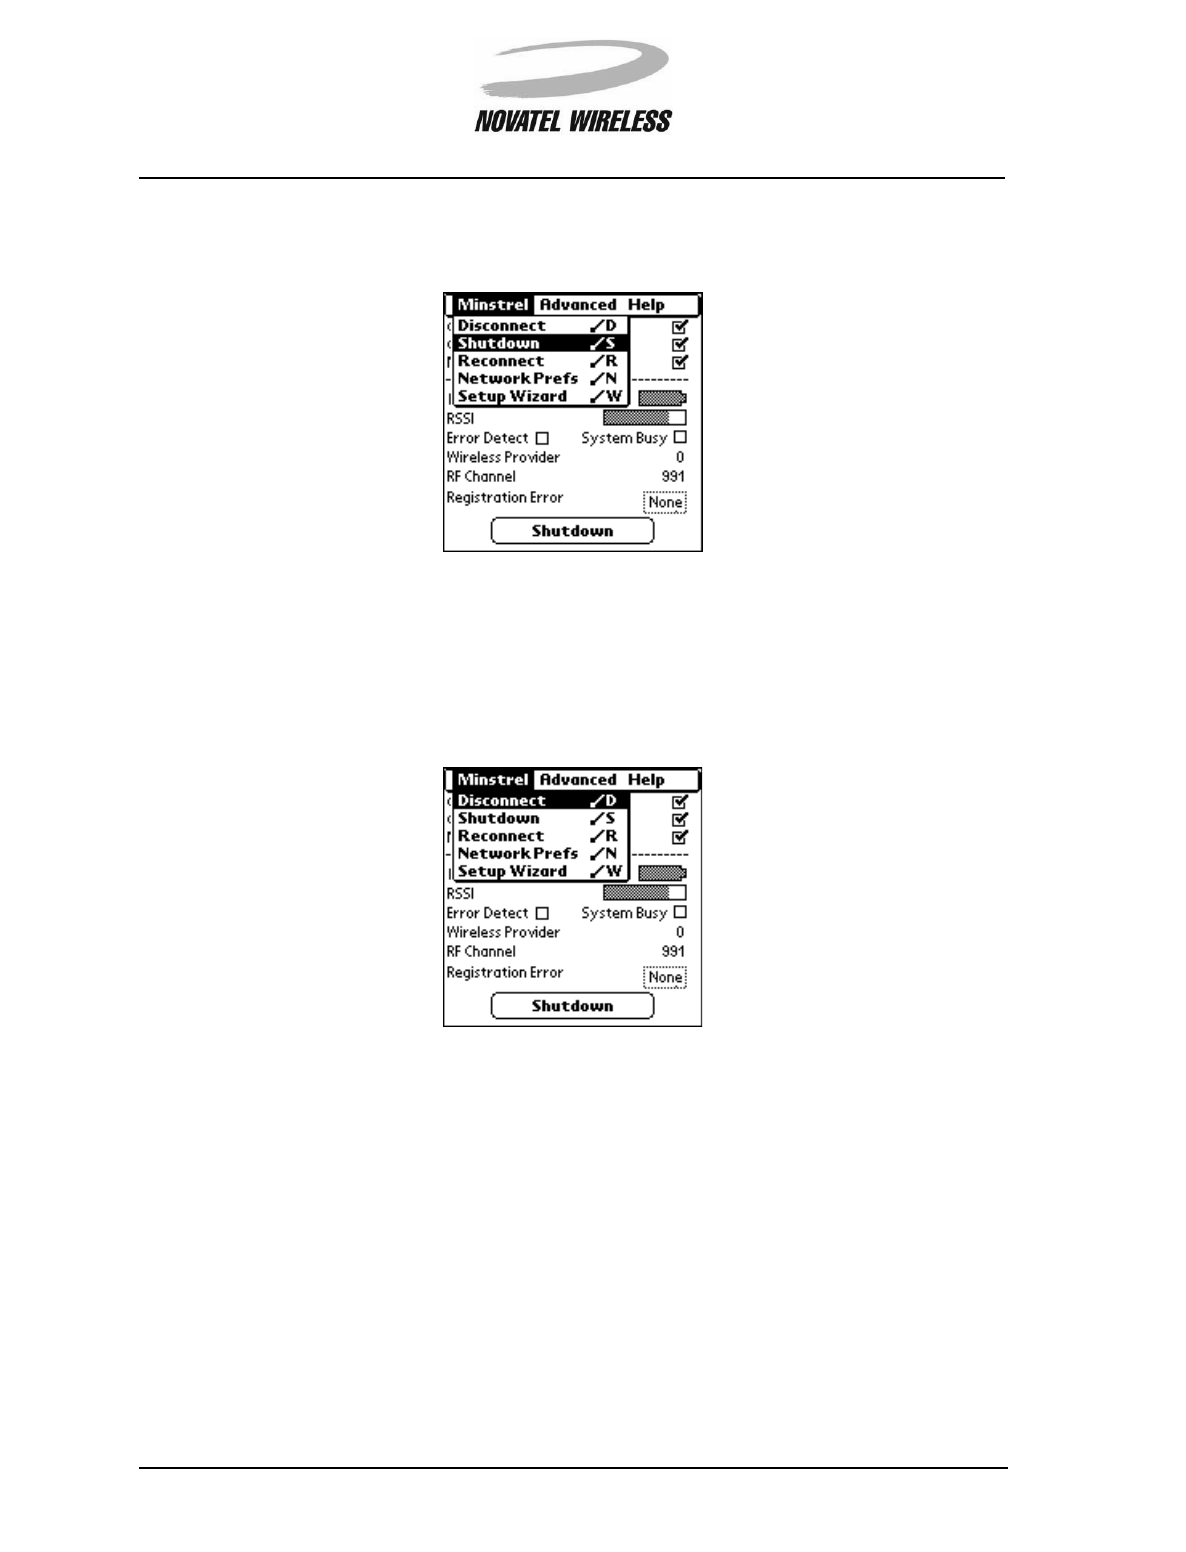
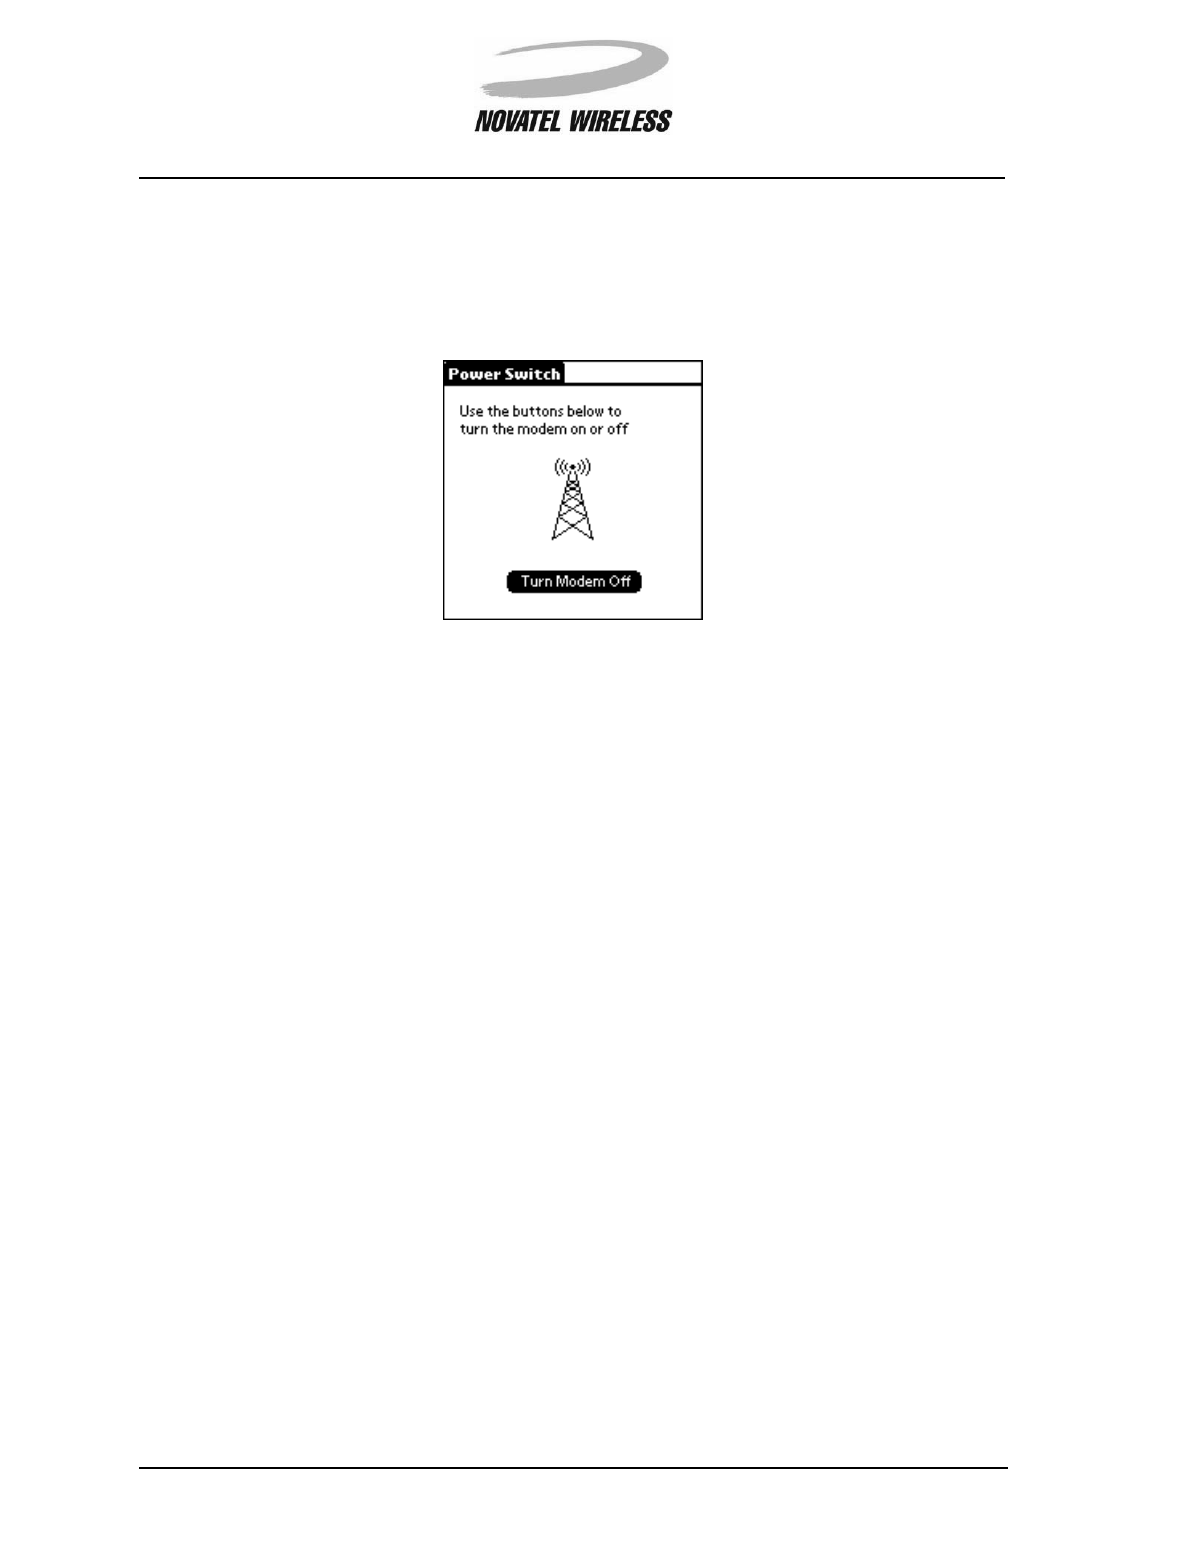
Using the Power Switch
The Power Switch utility allows you to quickly power on and power off your Minstrel S with the tap
of a button.
Starting Power Switch
To start the Power Switch utility, tap the Applications icon and then the Power Switch icon.
The Power Switch screen will show the current status of the Minstrel S. If the animated antenna
is radiating power, the Minstrel S is powered on.
Working with the Minstrel S 20
Minstrel STM User Guide Version B
90023058
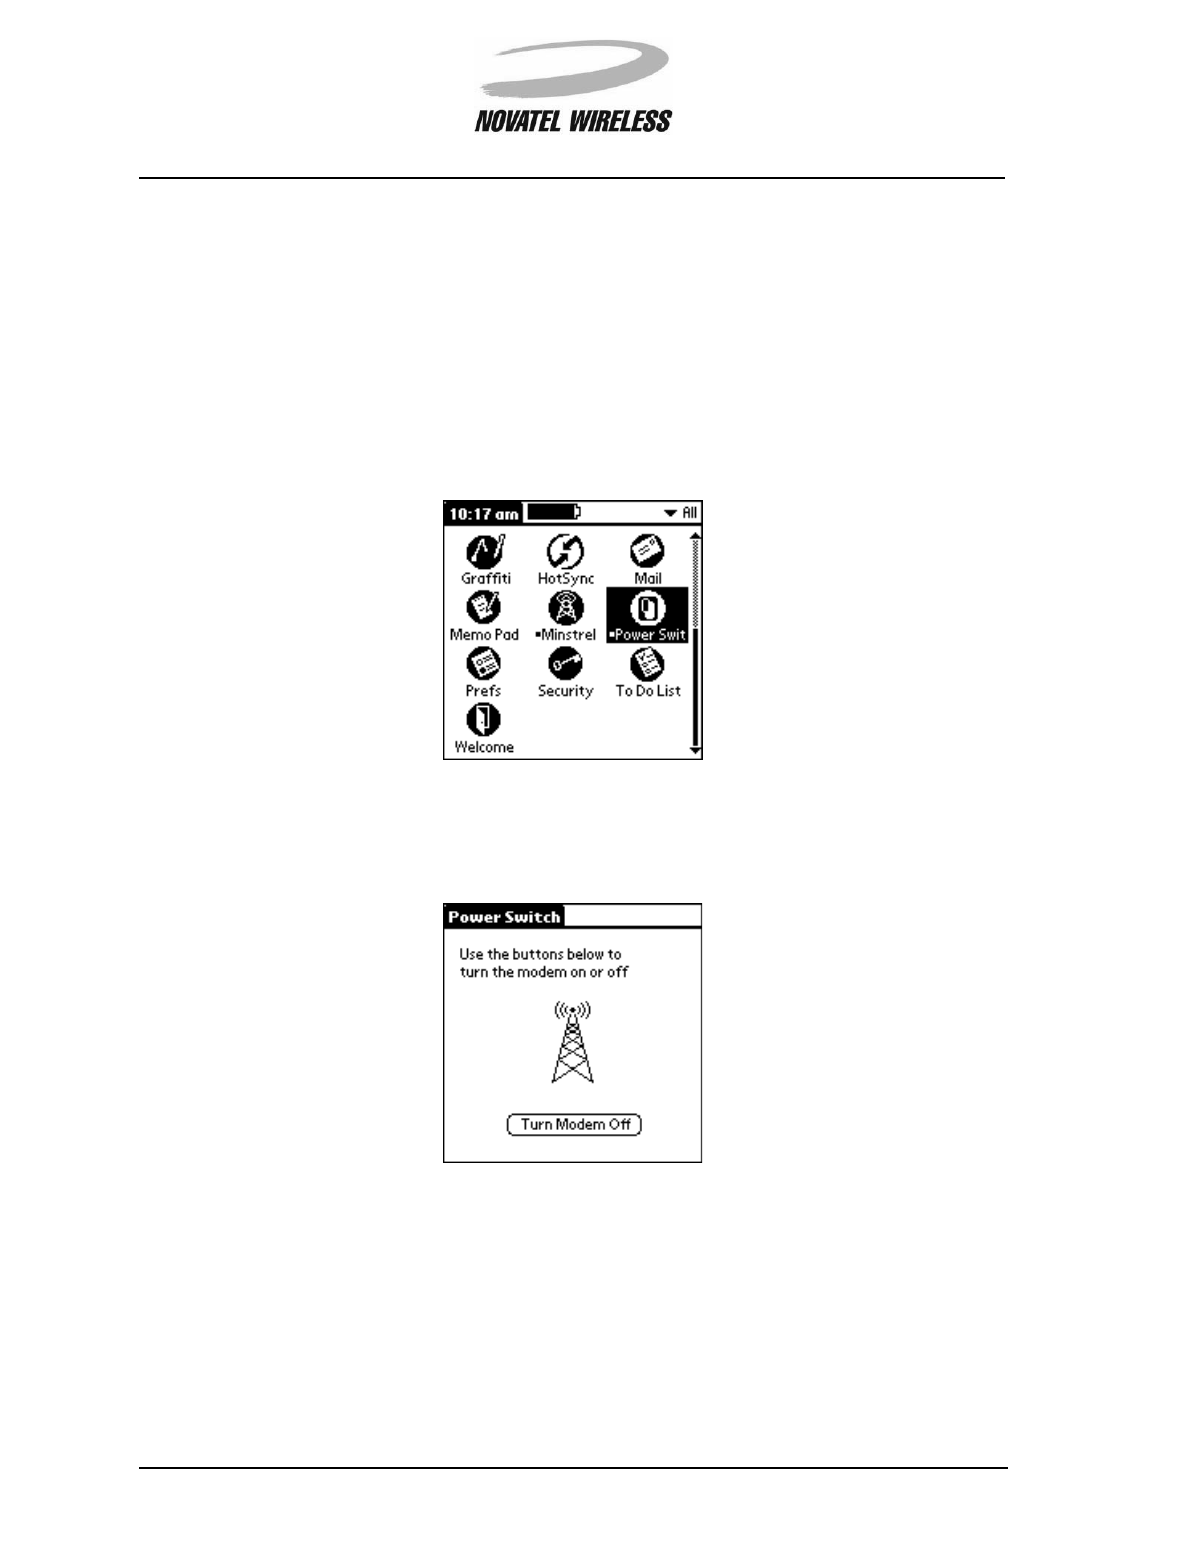
If the antenna is not radiating power, the Minstrel S is off.
Powering On the Minstrel S
To power on the Minstrel S, start the Power Switch utility and tap the Turn Modem On button.
As soon as the Minstrel S is turned on, it will attempt to register to the Wireless IP network.
Working with the Minstrel S 21
Minstrel STM User Guide Version B
90023058
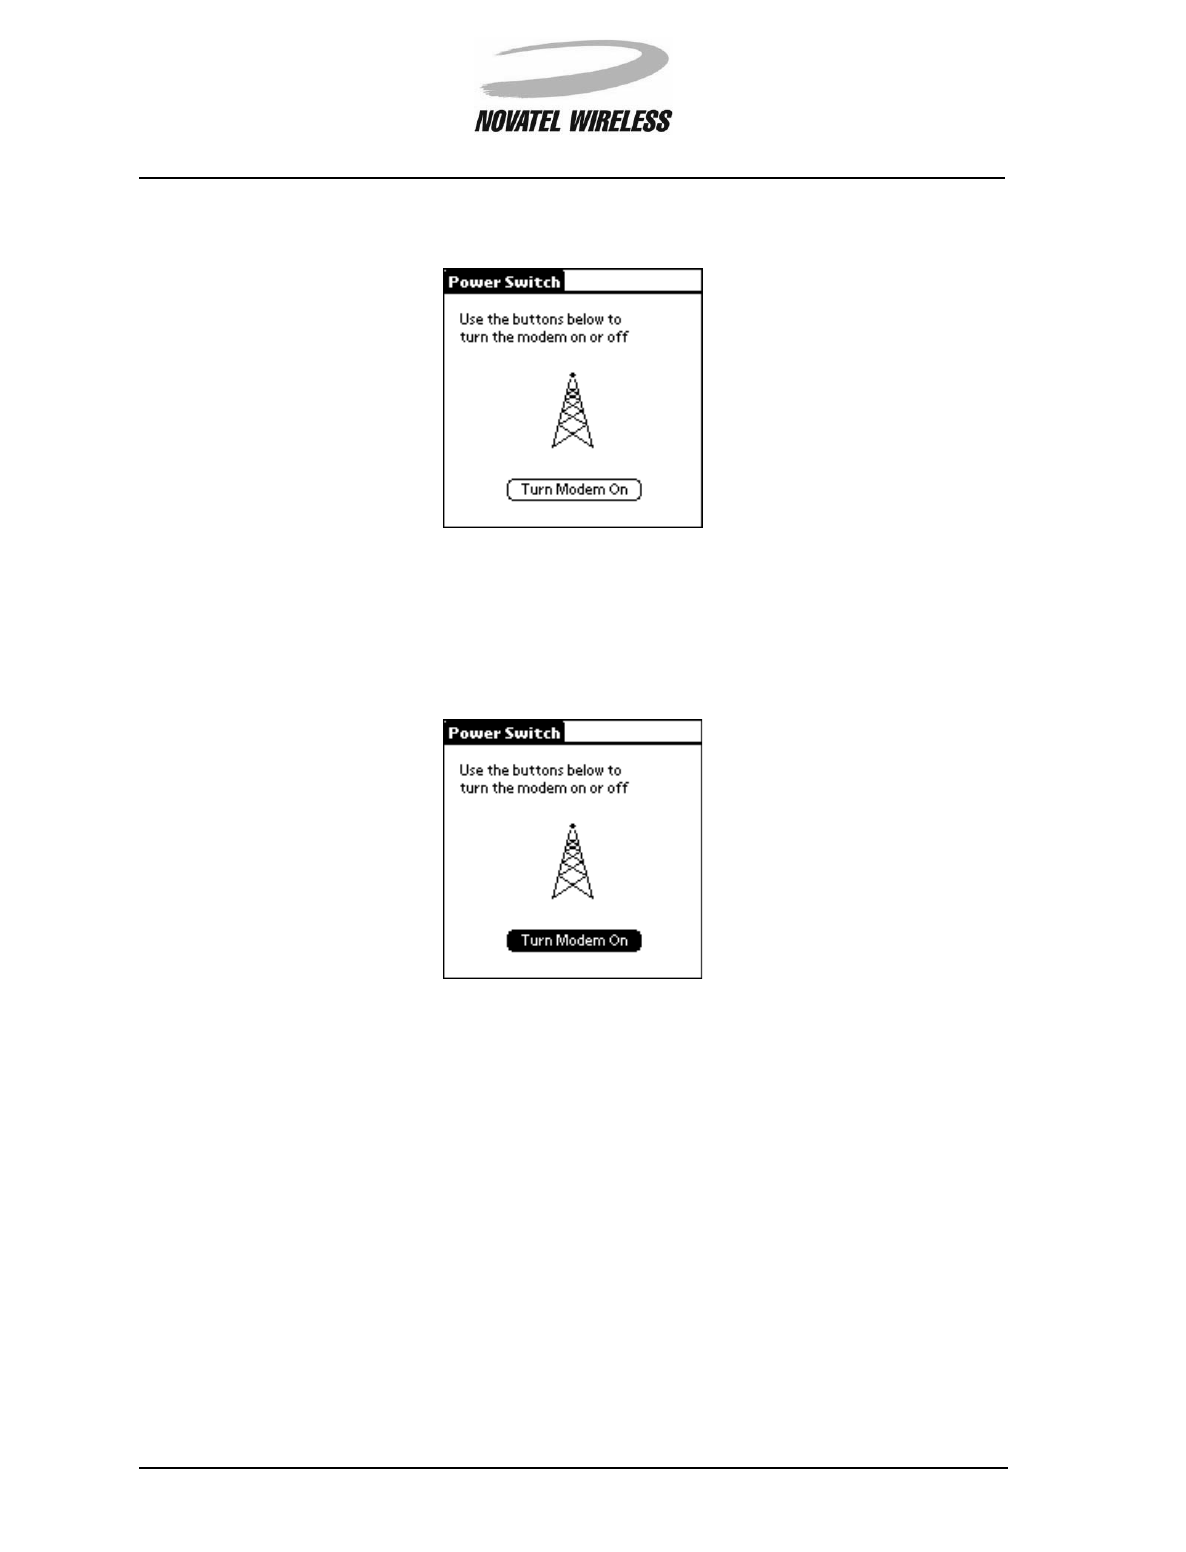
Powering Off the Minstrel S
To de-register and power off the Minstrel S, start the Power Switch utility and tap the Turn Modem
Off button.

Working with the Minstrel S 22
Minstrel STM User Guide Version B
90023058
Changing the Configuration
Unless instructed to do so by your network provider or by Novatel Wireless, you will not need to
change the configuration of your modem once the Setup Wizard has been run. In the event that
you do need to change the configuration, you can either run the Setup Wizard utility again or
directly edit the settings using the Config screen in the Modem Manager software.
Setup Wizard
The Setup Wizard utility will guide you step-by-step through the configuration. As before, you will
be required to select the network provider. However, the saved network addresses will be dis-
played and you will only need to edit the specific addresses that need to be changed. For more
information about the configuration process and starting Setup Wizard, refer to the Setup Wizard
section of this document.
Config Screen
Using the Config screen, you can directly edit the configuration settings that need to be changed
and then save the settings to the modem by tapping the Save button. For more information on the
Config screen and changing any of the fields that it contains, refer to the section entitled Config.
Working with the Minstrel S 23
Minstrel STM User Guide Version B
90023058
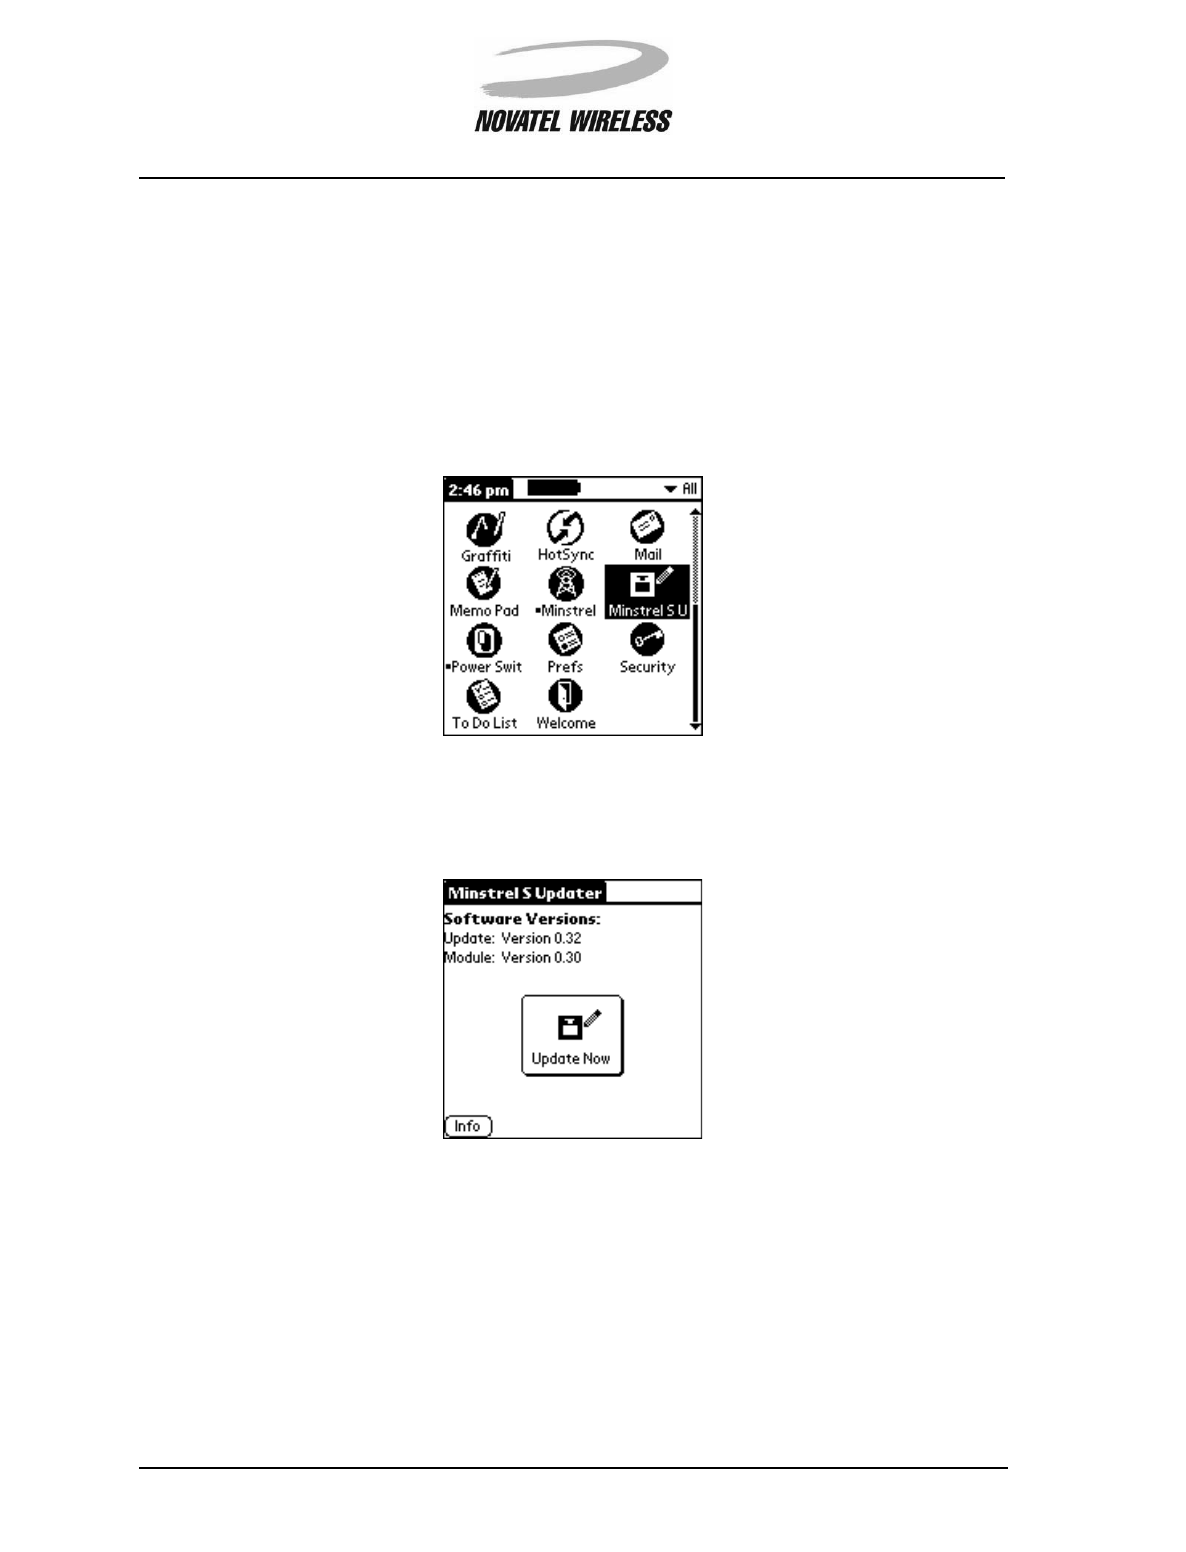
Updating the Flash
In the future, software upgrades may be available for the Minstrel S. These upgrades will be avail-
able at our web site (www.novatelwireless.com) and will be in the form of a Minstrel S Updater .prc
file.
To update the software on the flash, first install the Minstrel S Updater application on to your Visor
as you would any other application and tap the Applications icon and then the Minstrel S U icon.
The Minstrel S Updater screen shows the software version of the update in the Update: field and
the version currently installed on the Minstrel S in the Module: field.
Working with the Minstrel S 24
Minstrel STM User Guide Version B
90023058
To begin the software update, first ensure that the Minstrel S is inserted into the expansion slot,
and then tap the Update Now button.
NOTE: Do not remove the Minstrel S from the Visor’s expansion slot while using the Updater
utility.
Tap OK when asked if you wish to continue.
The Updating Minstrel S screen will appear showing the progress of the software update. First,
the currently installed software is erased from the flash.
Working with the Minstrel S 25
Minstrel STM User Guide Version B
90023058
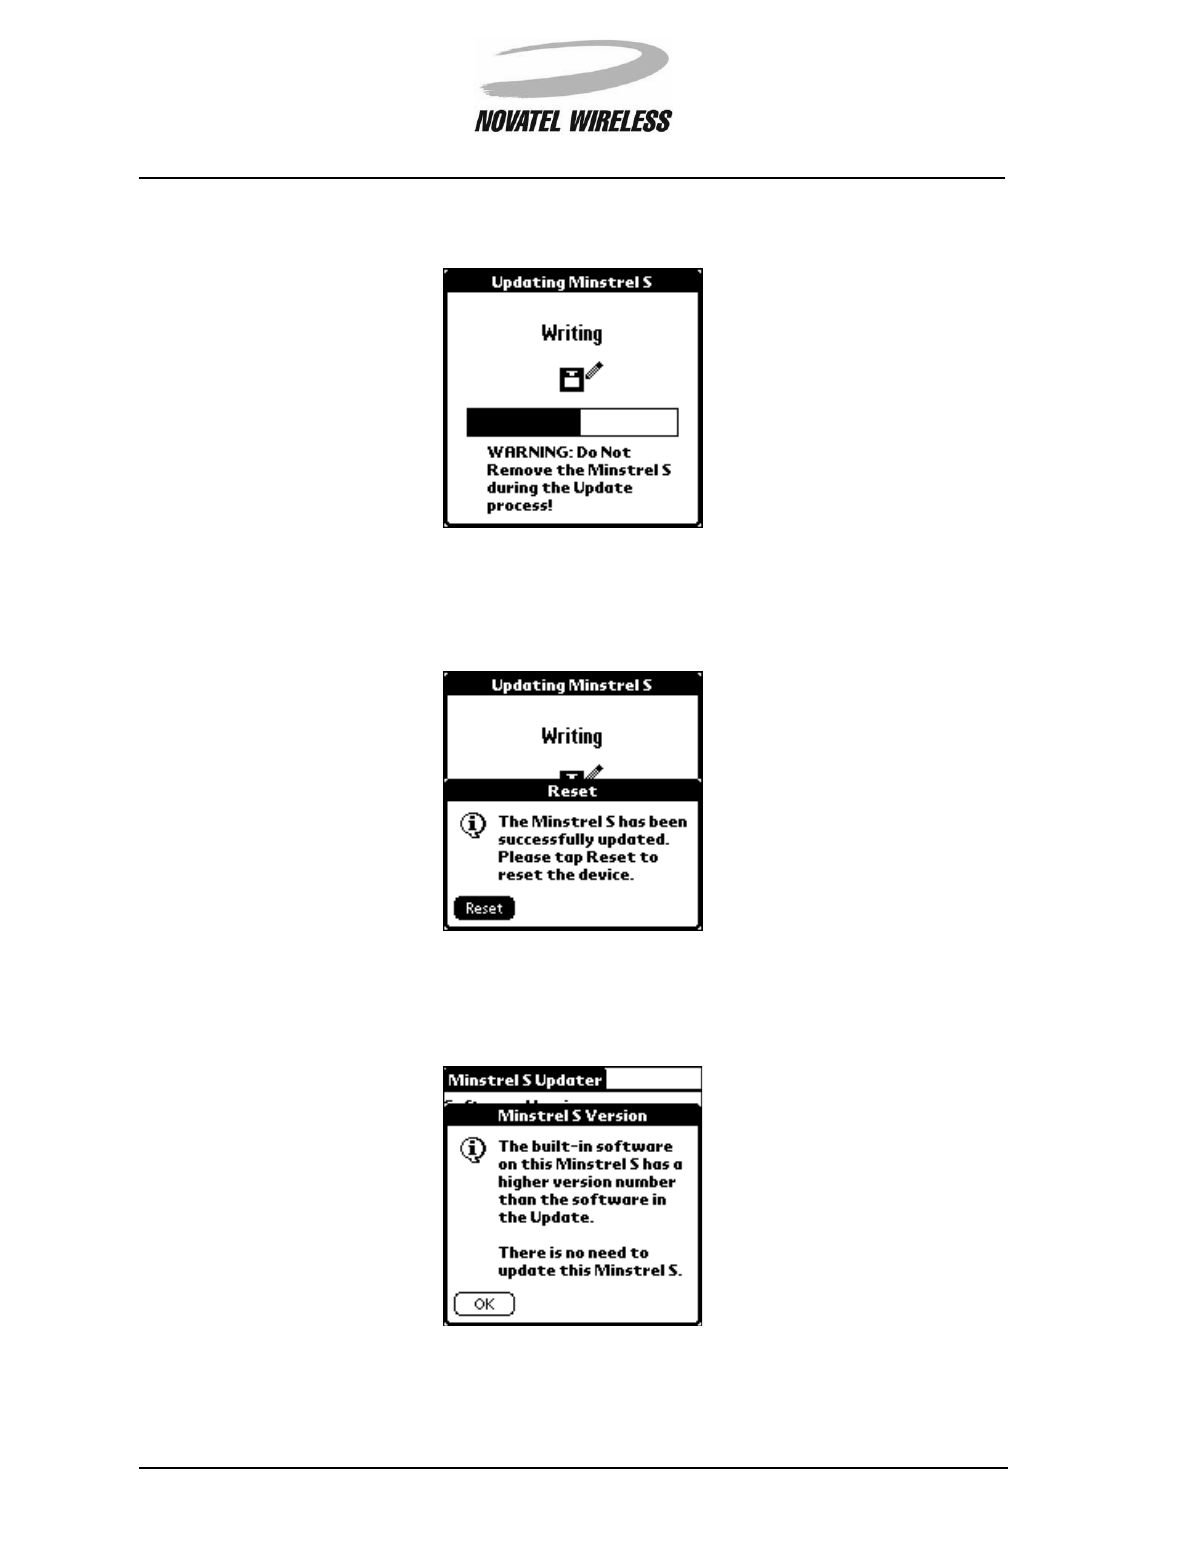
Next, the updated software is written to the flash.
Once the update is complete, reset your Visor by tapping the Reset button when the window
below appears.
NOTE: If the software currently installed on the Minstrel S is a more recent version than the
update, the following message will appear when the Update Now button is tapped.
Tap OK to close the message.
Working with the Minstrel S 26
Minstrel STM User Guide Version B
90023058
Using File Mover
Since both the Visor and the Minstrel S have their own separate flash memory, the File Mover
application has been included with the Minstrel S. This application allows you to delete items from
the flash of either device or move items between the two devices.
Starting File Mover
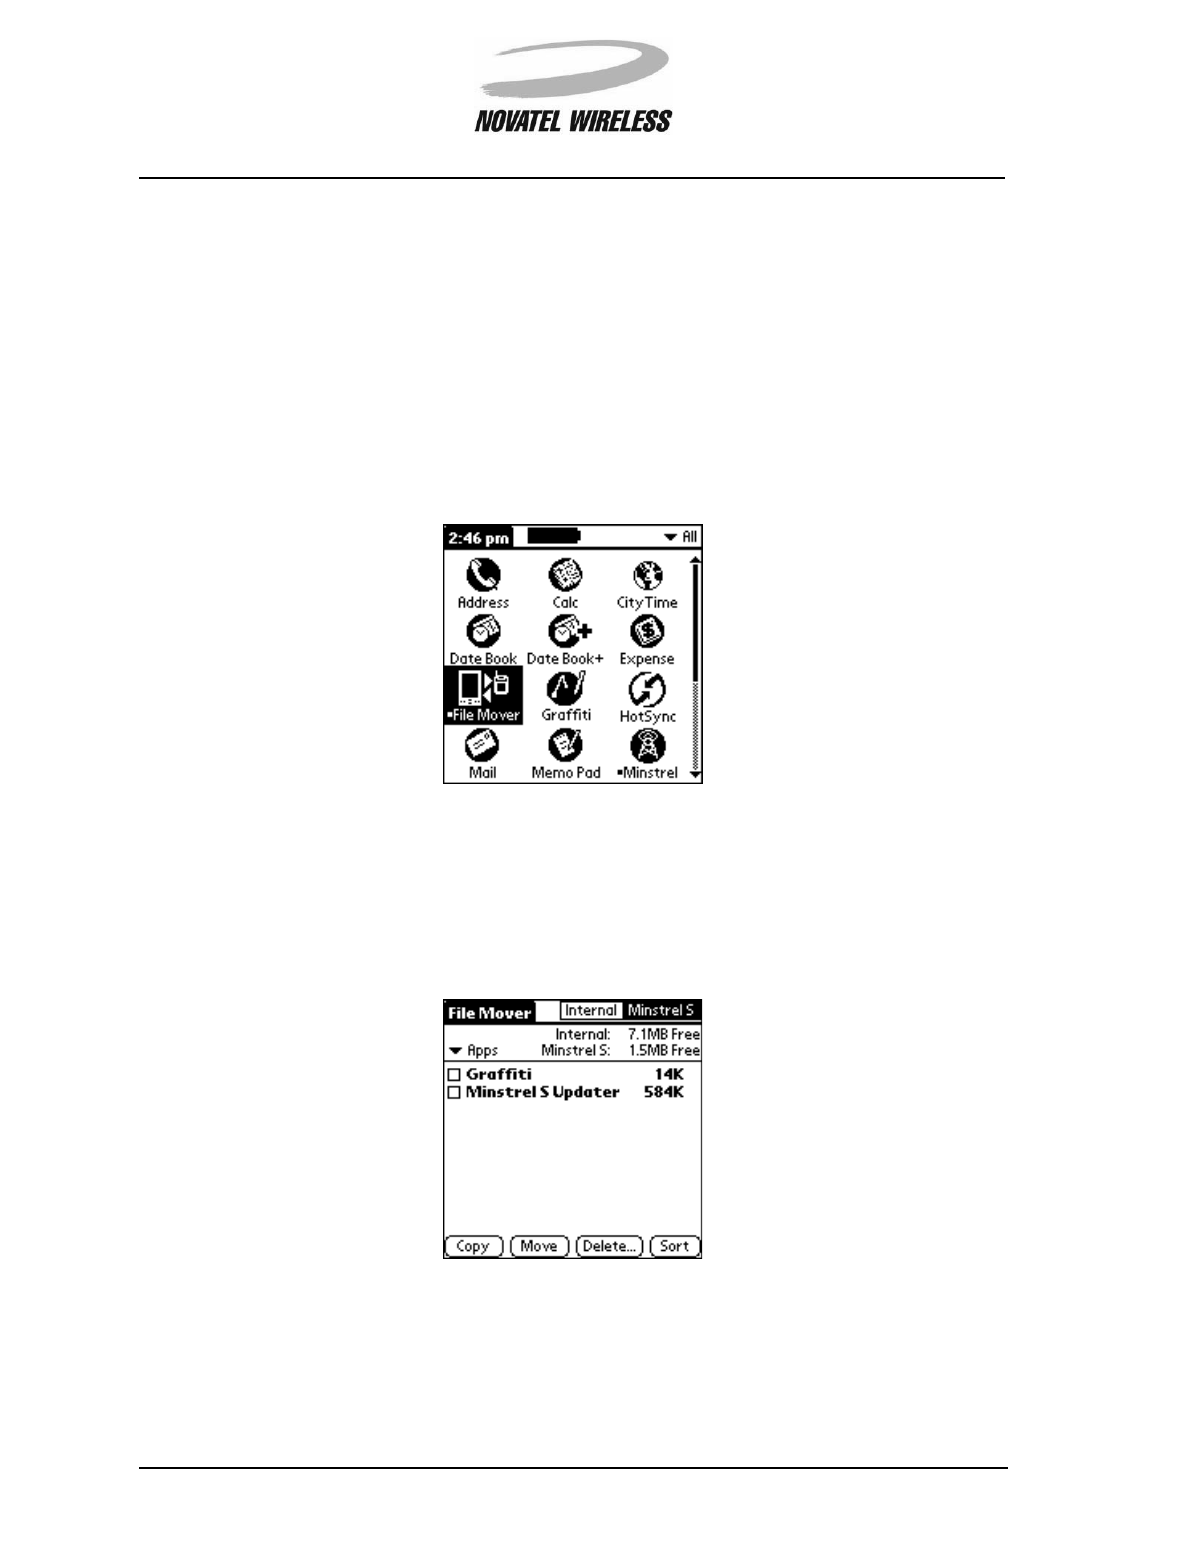
To start this application, tap the Applications icon and then the File Mover icon.
Viewing the Contents of the Minstrel S Flash
To view the contents of the Minstrel’s flash memory, start the File Mover application and tap the
Minstrel S box in the top, right-hand corner of the screen.
Working with the Minstrel S 27
Minstrel STM User Guide Version B
90023058
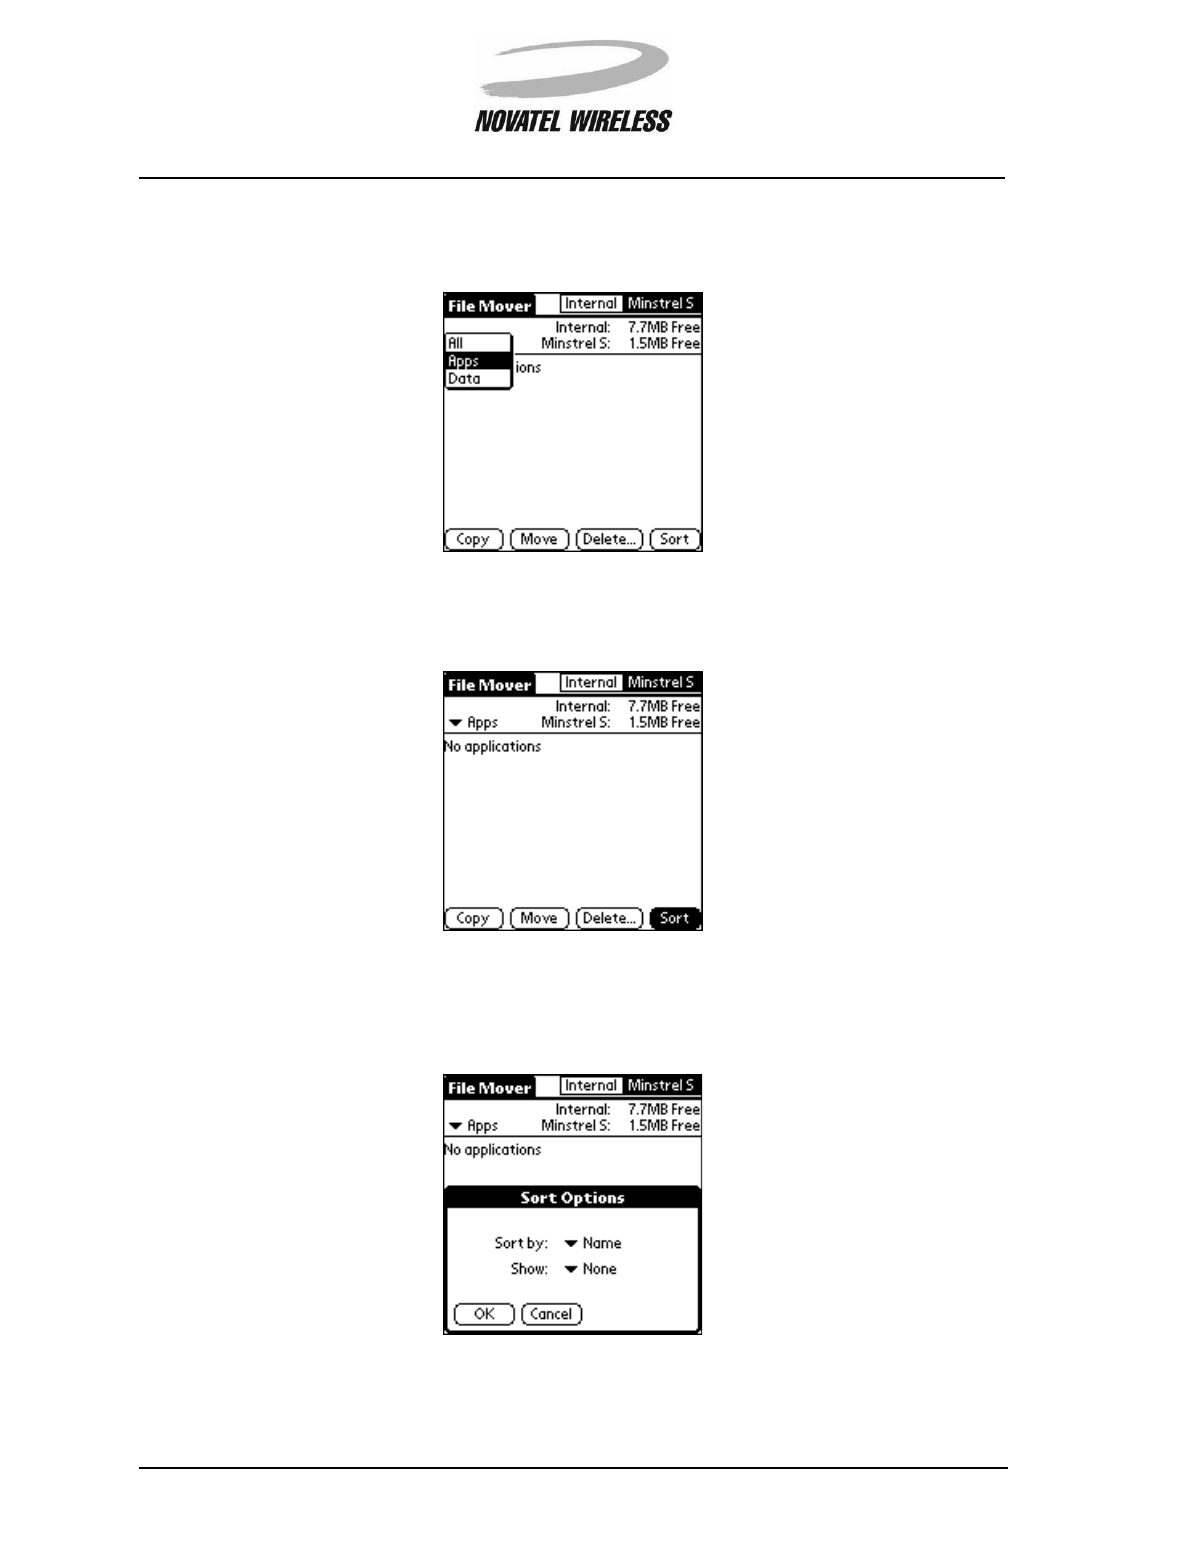
The pick list just above the list of contents controls whether applications, data, or both are dis-
played.
Tap the Sort button to change the way the memory contents are displayed.
The Sort Options window will open, allowing you to change the way the contents are sorted and
what information is displayed using the Sort by and Show pick lists, respectively.
Working with the Minstrel S 28
Minstrel STM User Guide Version B
90023058
Moving or Copying Items to the Minstrel S
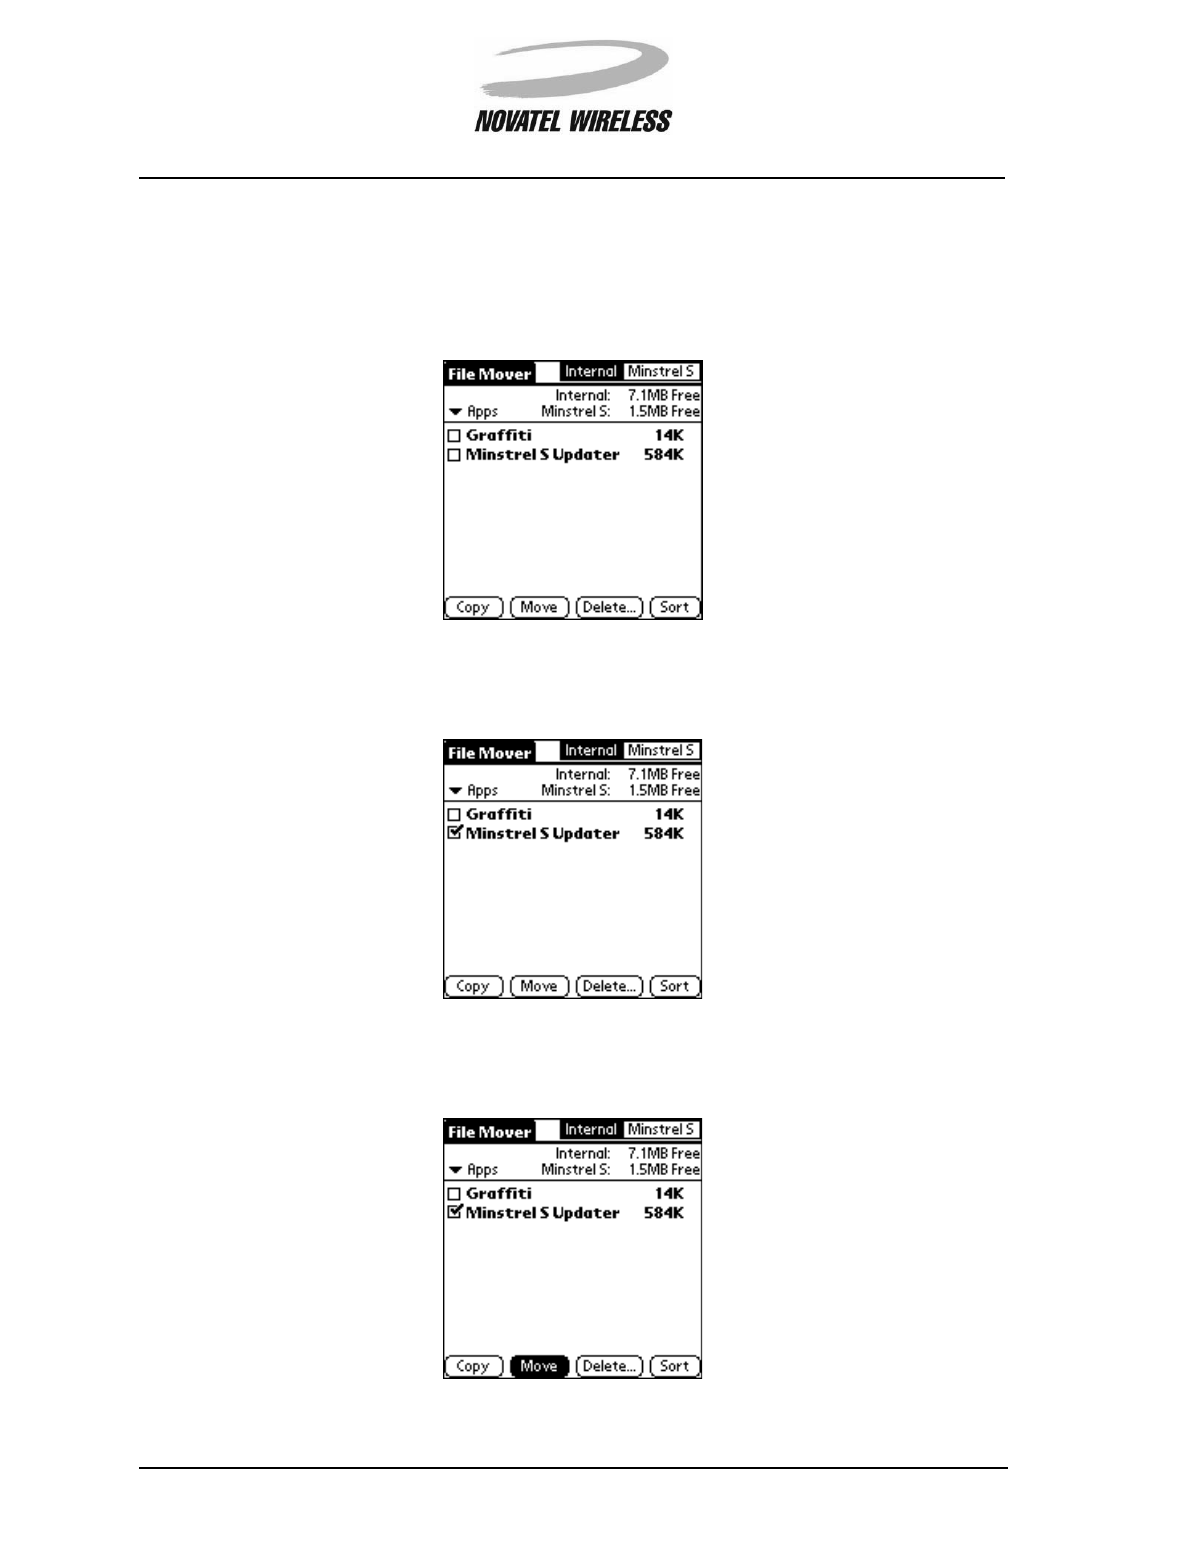
To move or copy items from the Visor’s flash to the Minstrel S’s flash, start File Mover and then tap
the Internal box in the top, right-hand corner of the screen if it is not already selected.
Tap the check box beside the item(s) you wish to move or copy.
Once all the items to be moved or copied are checked, tap the Move or Copy button as required.
Working with the Minstrel S 29
Minstrel STM User Guide Version B
90023058
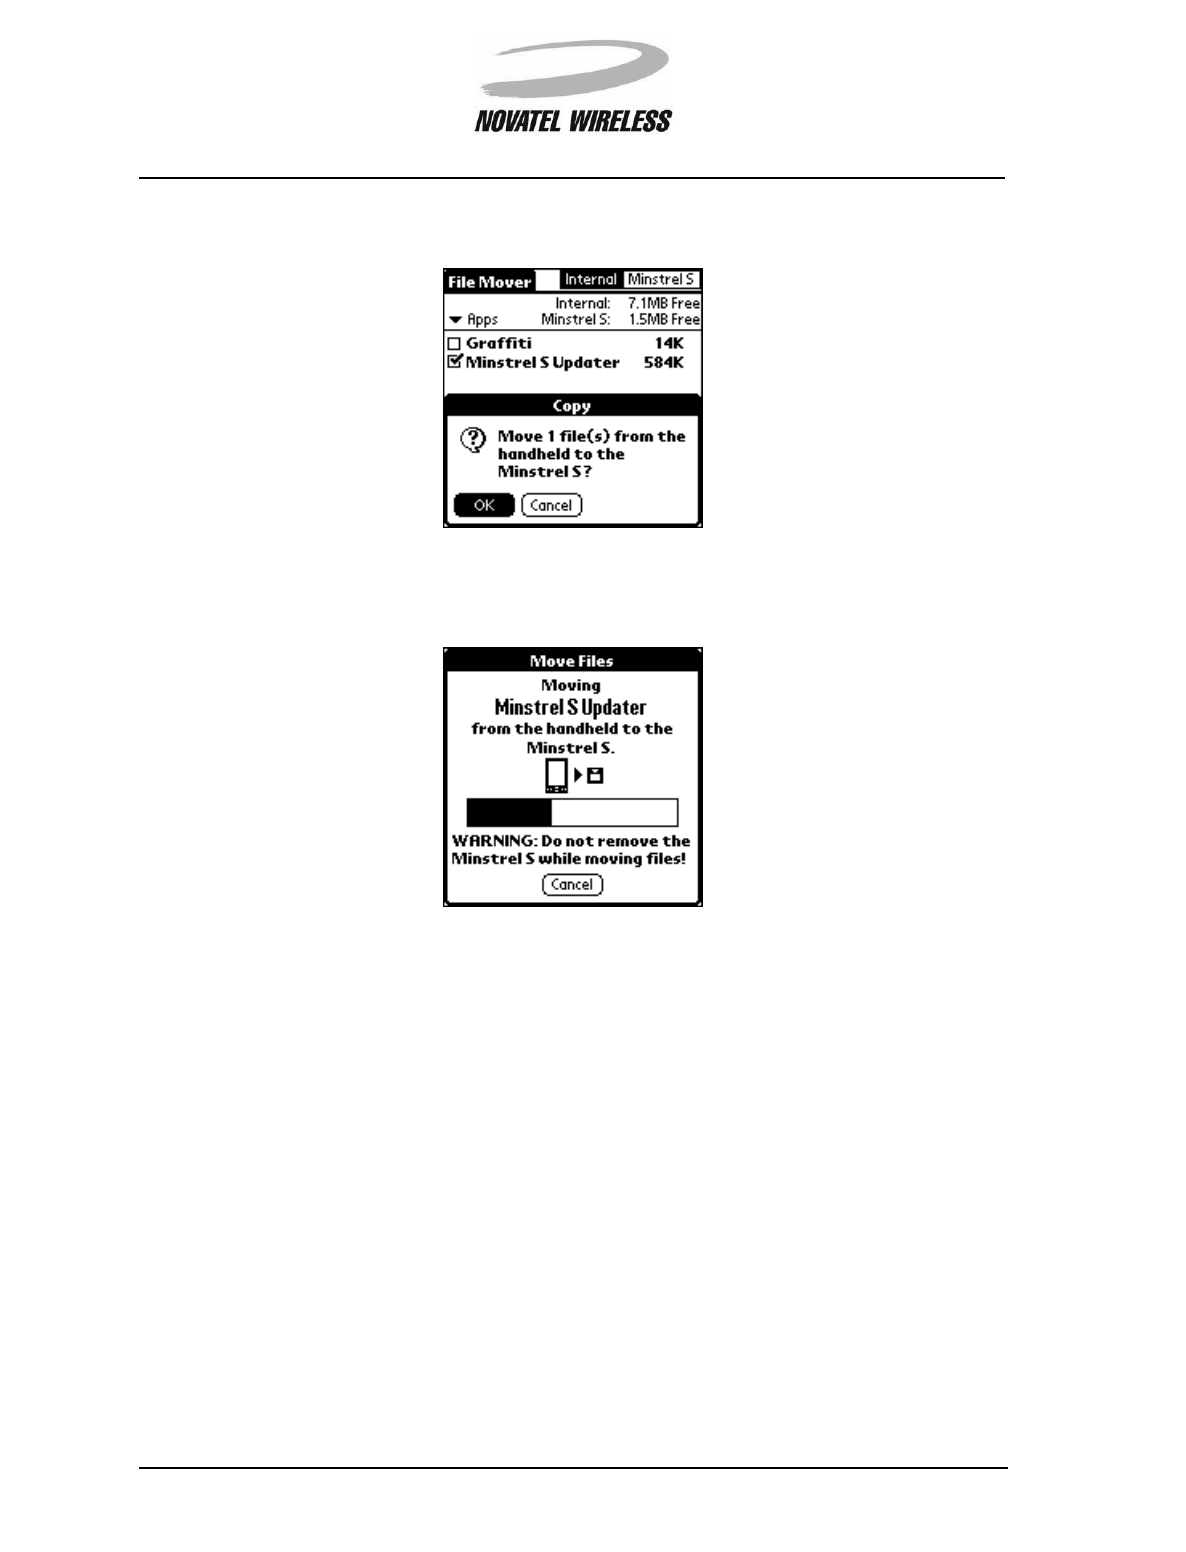
Tap OK when asked to confirm that you wish to either move or copy the items.
The following screen will appear, showing the status as the items are being moved or copied.
NOTE: Do not remove the Minstrel S from the Visor’s expansion slot while transferring files.
Working with the Minstrel S 30
Minstrel STM User Guide Version B
90023058
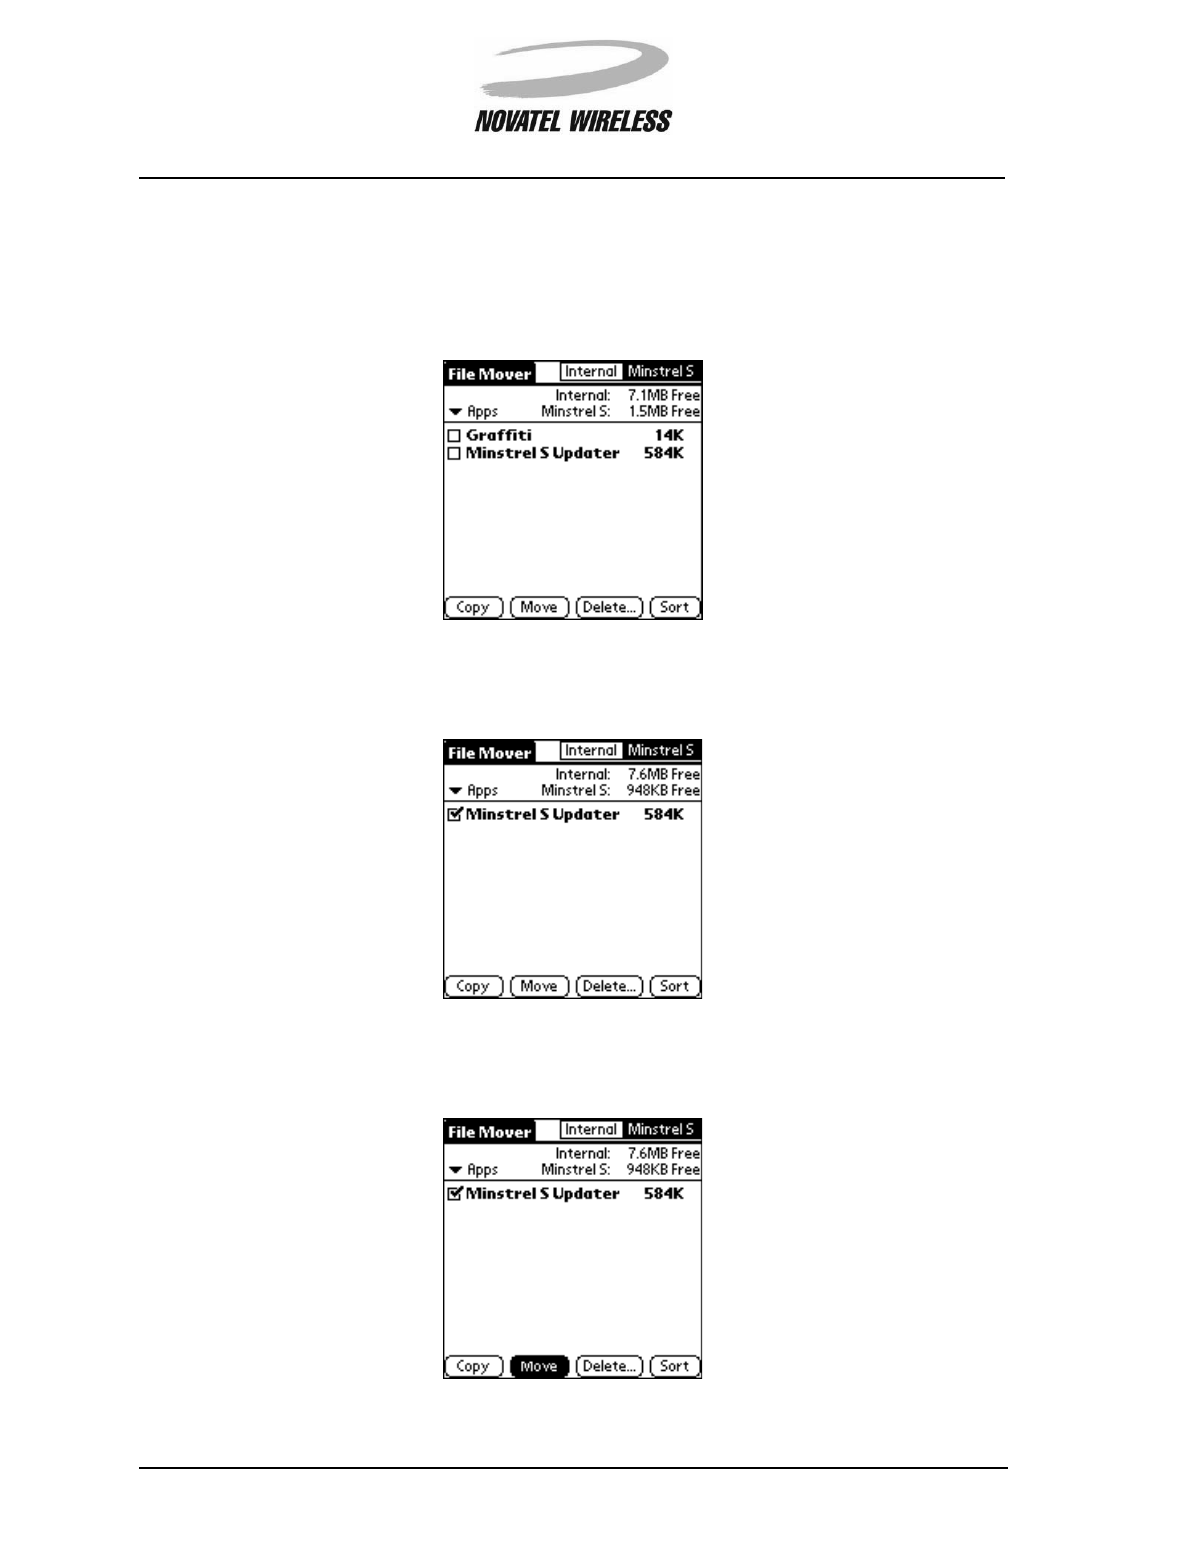
Moving or Copying Items from the Minstrel S
To move data or applications from the Minstrel’s flash to the Visor’s flash, start the File Mover pro-
gram and select the Minstrel S box in the top, right-hand corner.
Tap the check box beside the item(s) you wish to move or copy.
Once all the items to be moved or copied are checked, tap the Move or Copy button as required.
Working with the Minstrel S 31
Minstrel STM User Guide Version B
90023058
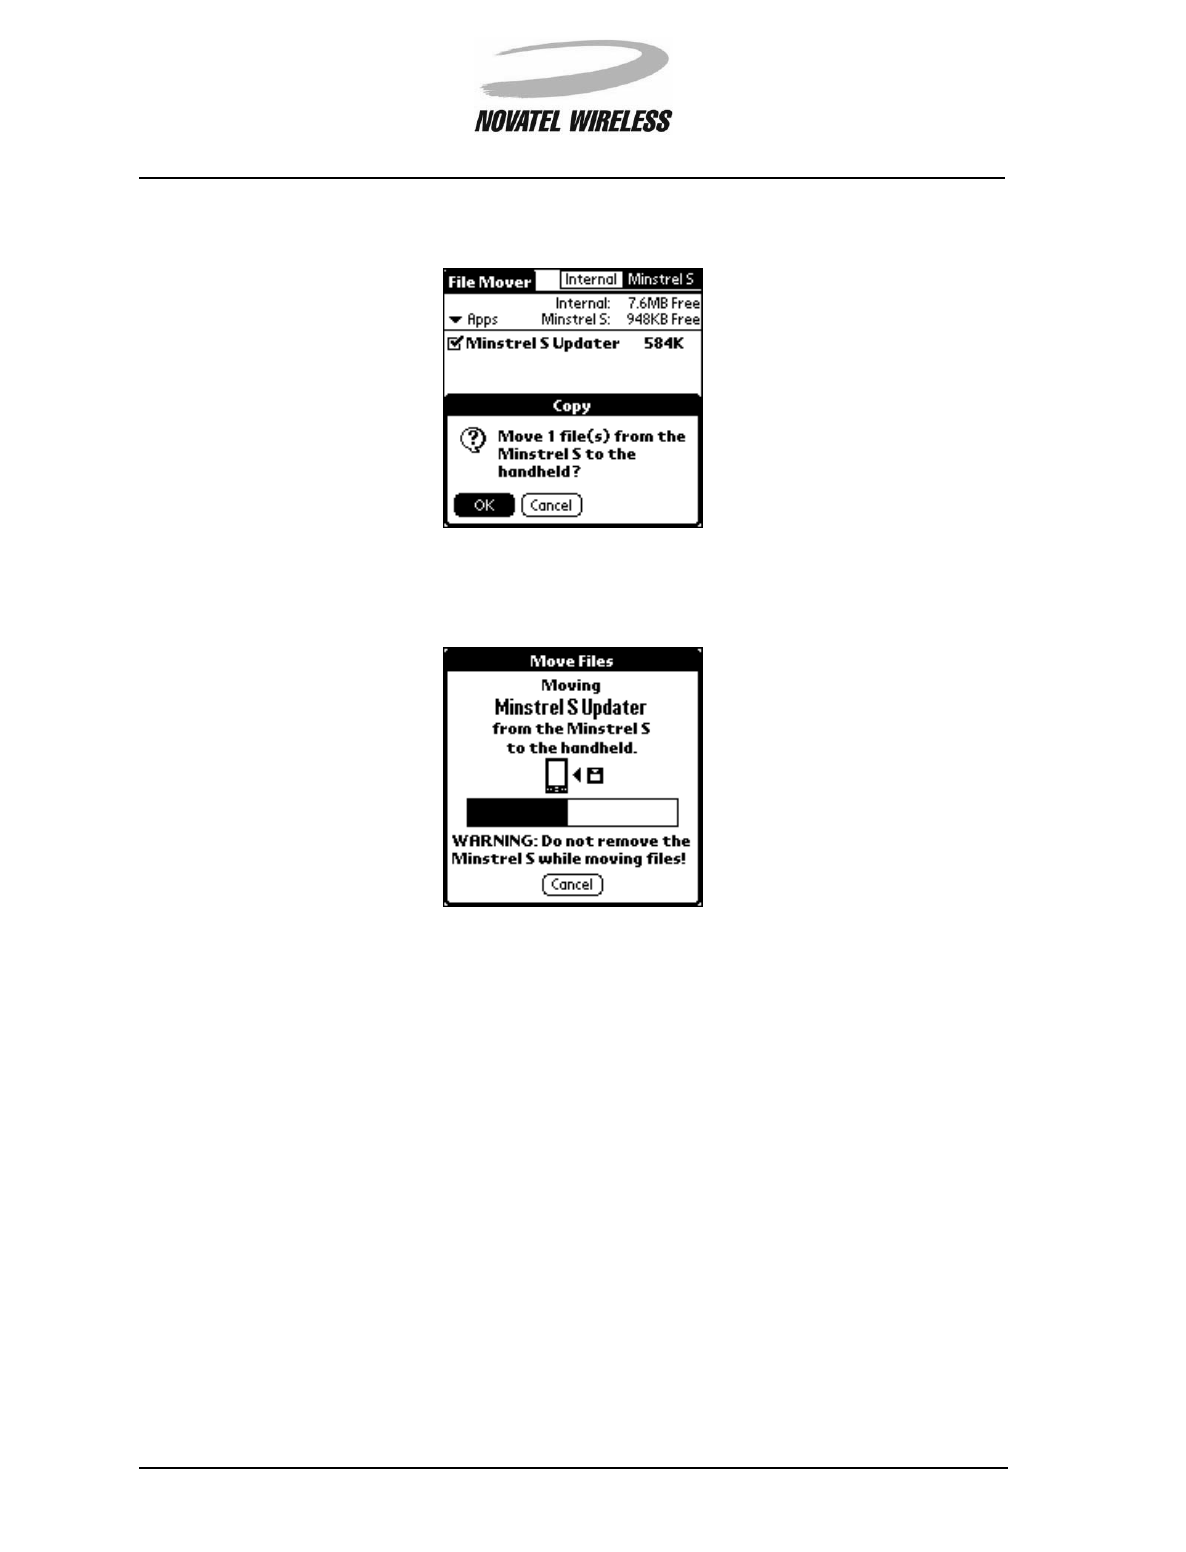
Tap OK when asked to confirm that you wish to either move or copy the items.
The following screen will appear, showing the status as the items are being moved or copied.
NOTE: Do not remove the Minstrel S from the Visor’s expansion slot while transferring files.
Working with the Minstrel S 32
Minstrel STM User Guide Version B
90023058
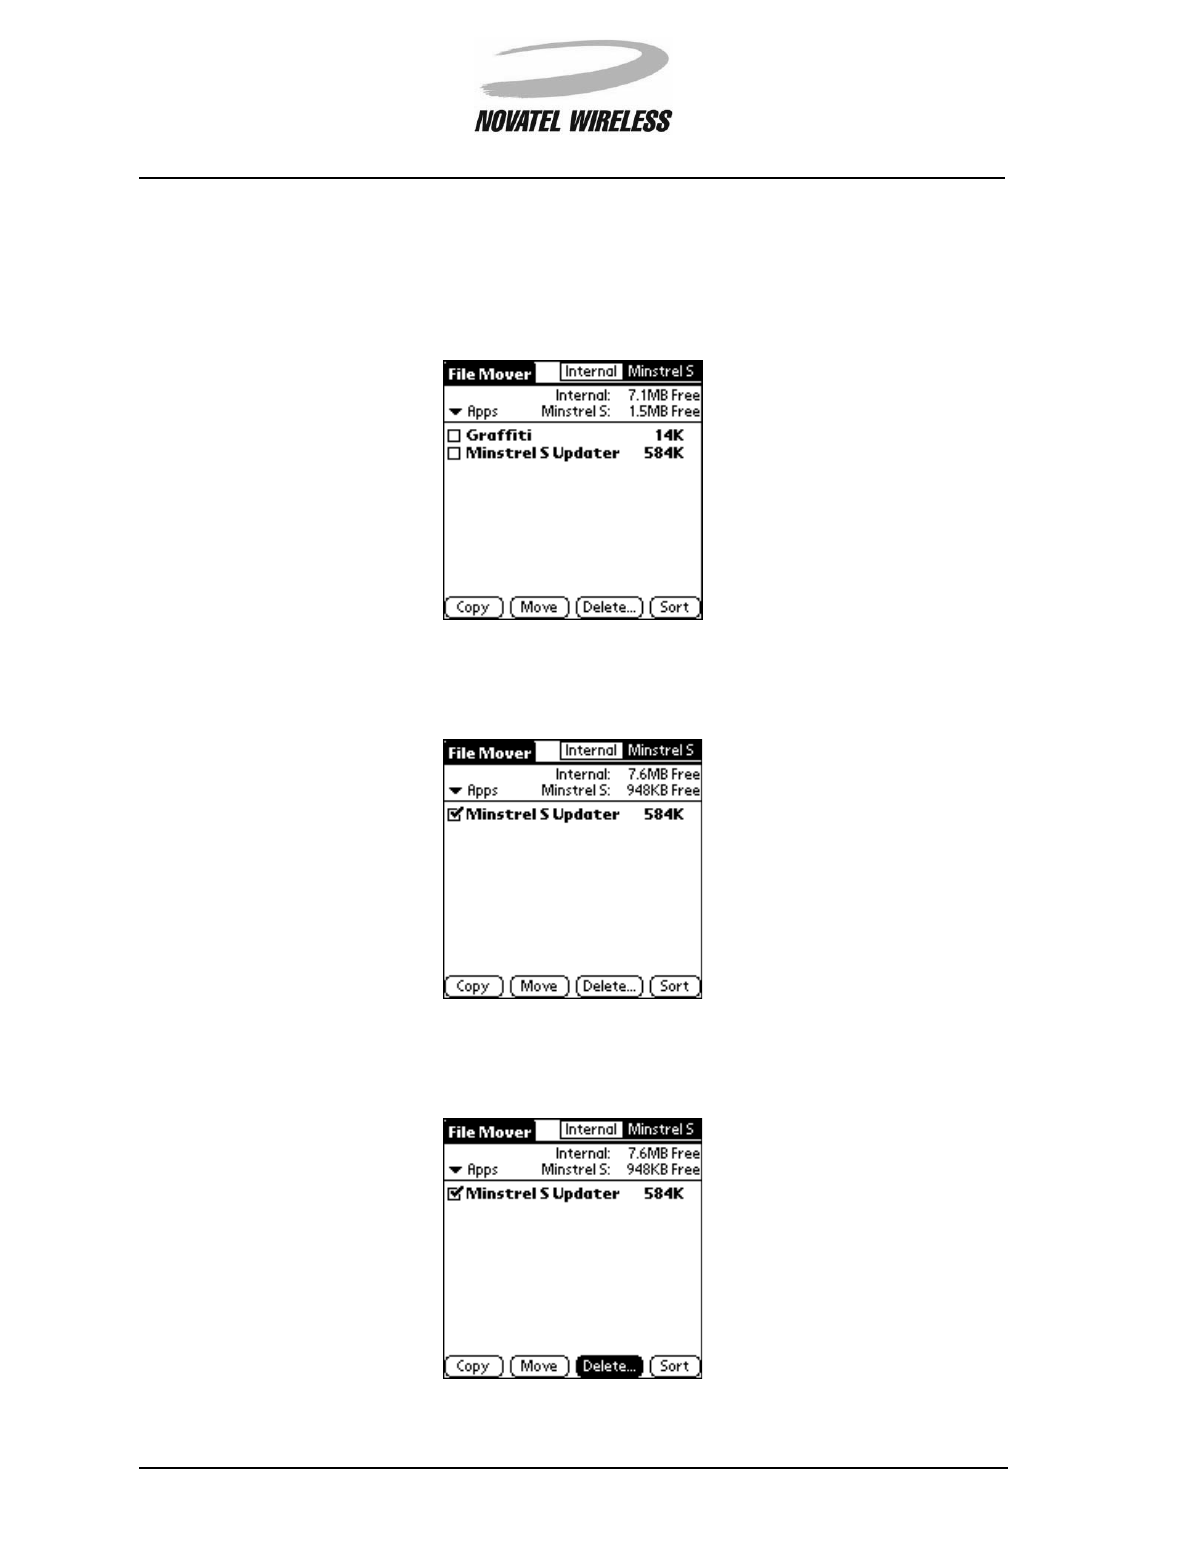
Deleting Items from the Minstrel S
To delete items from the Minstrel S’s flash, start the File Mover application and select the Minstrel
S box in the top, right-hand corner.
Tap the check box beside the item(s) you wish to delete.
Once all the items you wish to delete are selected, tap the Delete... button.
Working with the Minstrel S 33
Minstrel STM User Guide Version B
90023058
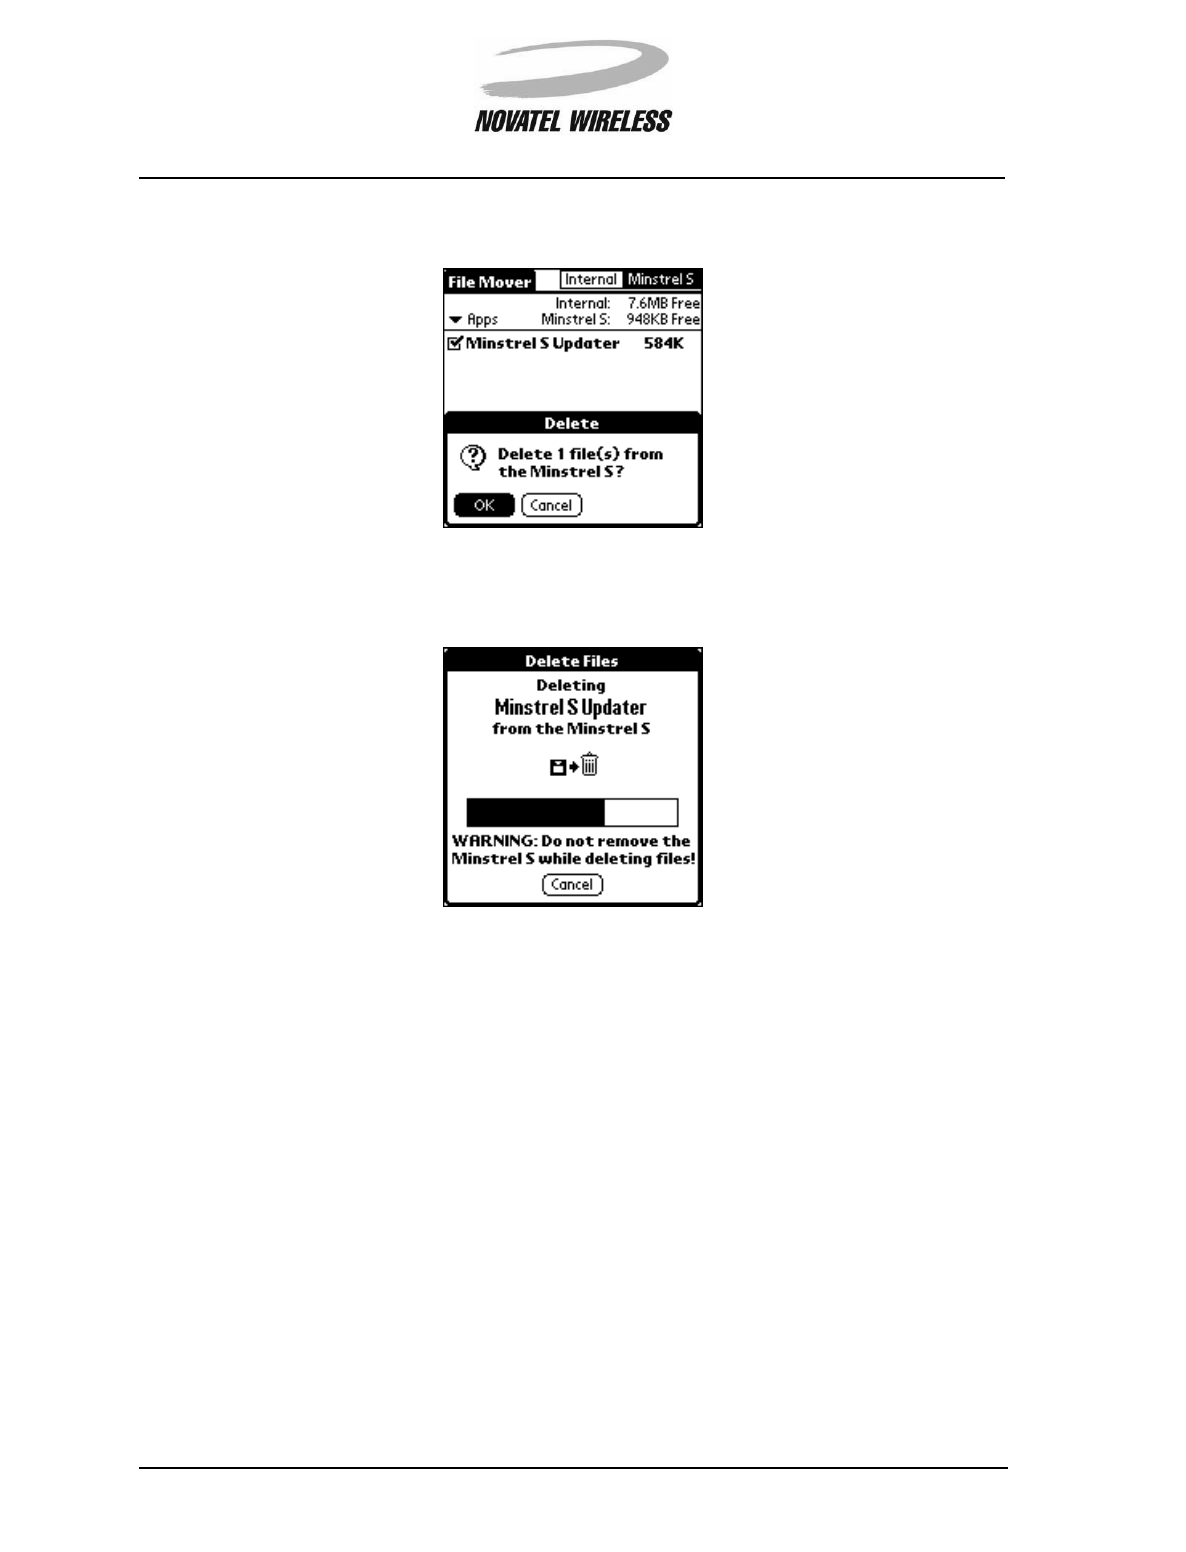
Tap OK when asked to confirm that you wish to delete the items.
The following screen will appear, showing the status as the items are being deleted.
NOTE: Do not remove the Minstrel S from the Visor’s expansion slot while deleting files.
Working with the Minstrel S 34
Minstrel STM User Guide Version B
90023058
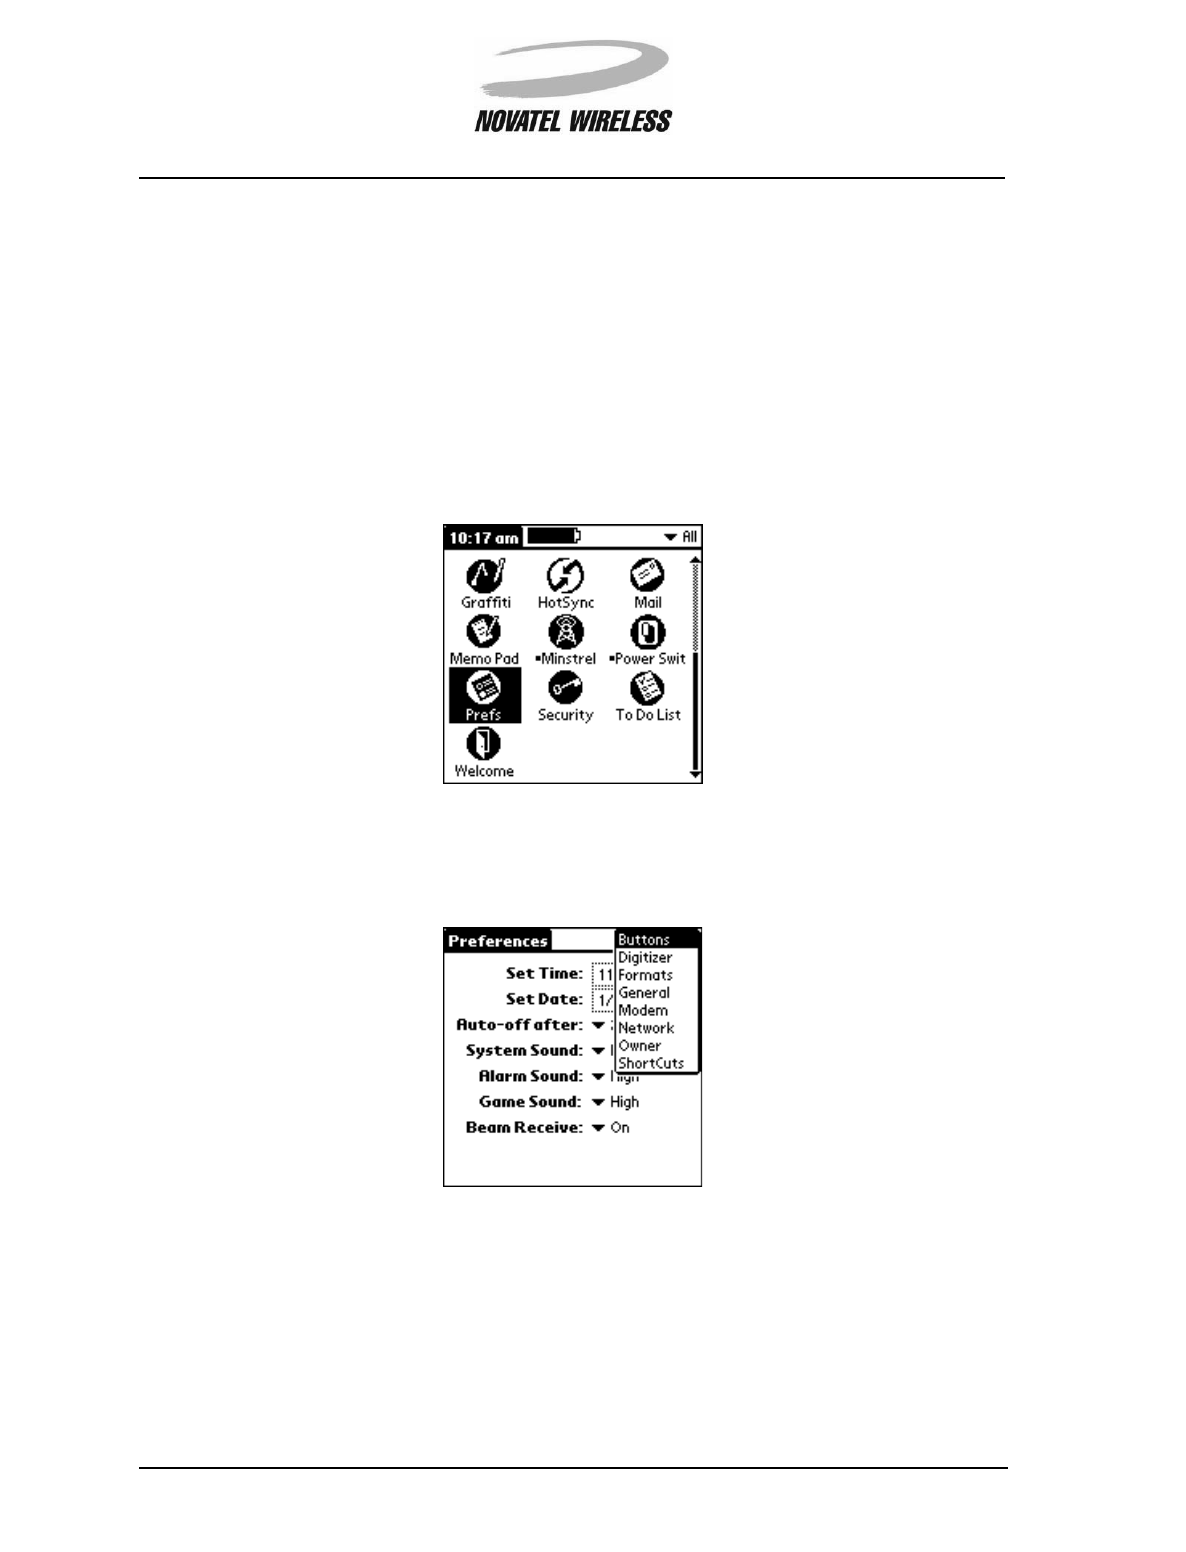
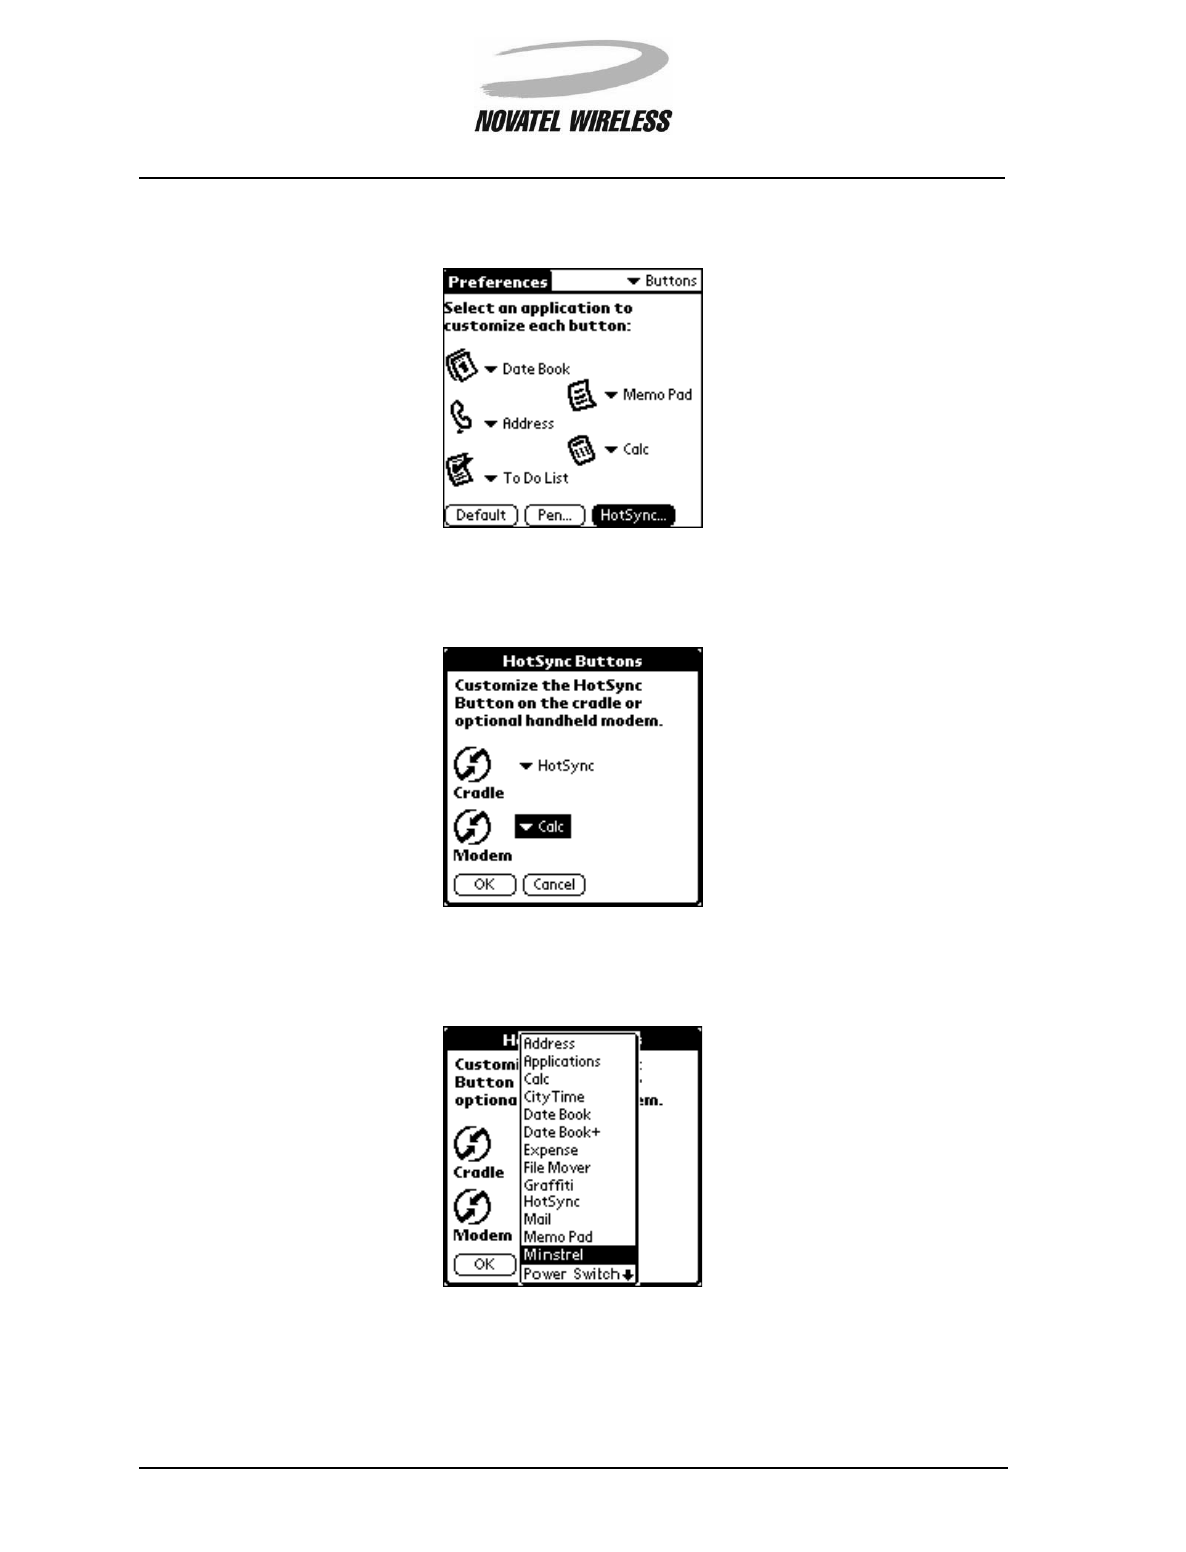
Configuring the Button
The button found on the front of the Minstrel S can be customized to launch any application you
choose when pressed. For example, you can configure this button to launch a web browsing
application. Then, to access web pages, you will only need to insert your Minstrel S into the
expansion slot and then press the button. Your Minstrel S will automatically register to the Wire-
less IP network and the web browser will be launched.
To configure the button to launch a specific application, tap the Applications icon and then the
Prefs icon.
Once the Preferences panel is displayed, select Buttons from the pick list in the top, right-hand
corner.
Working with the Minstrel S 35
Minstrel STM User Guide Version B
90023058
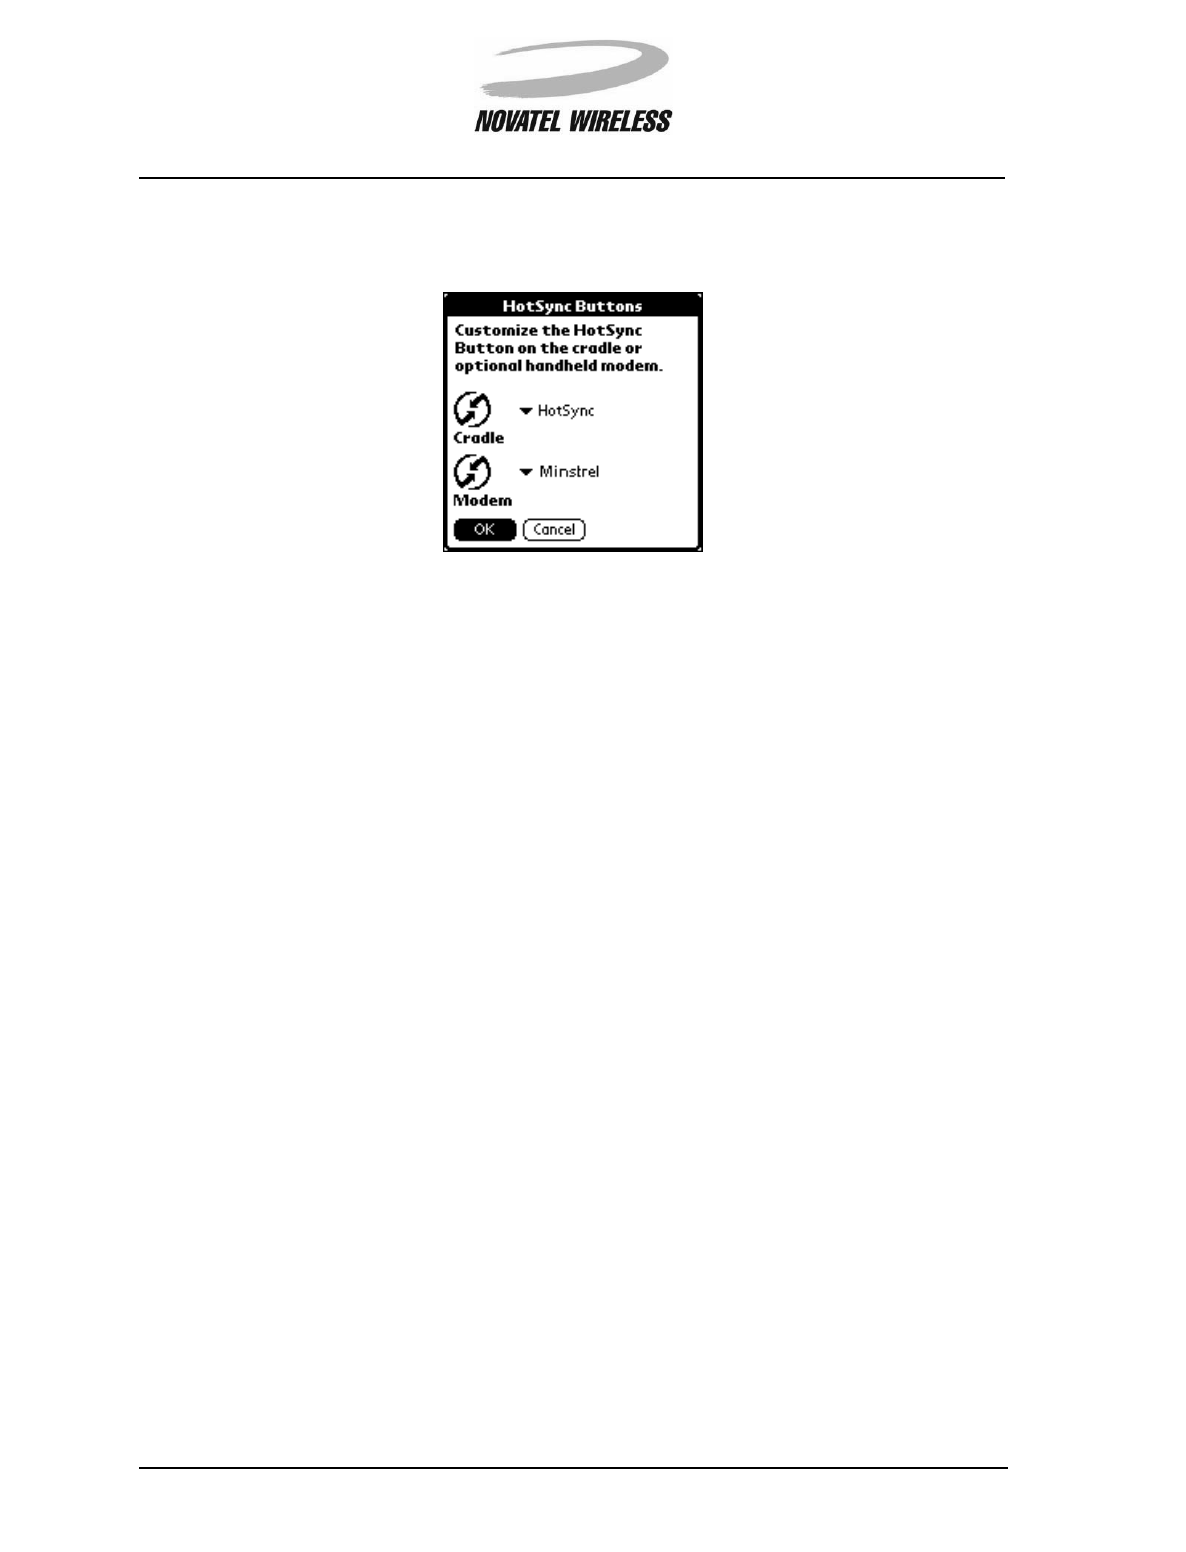
Then, tap HotSync....
Tap to open the pick list to the right of the Modem icon.
Select the application you would like to have launched when the button is pressed from the list.
Working with the Minstrel S 36
Minstrel STM User Guide Version B
90023058
Once you have selected the application to launch and it is listed to the right of the Modem icon, tap
the OK button.
The next time you press the button on the Minstrel S, the application you selected will automati-
cally launch.

Setup Wizard 37
Minstrel STM User Guide Version B
90023058
Setup Wizard
Setup Wizard 38
Minstrel STM User Guide Version B
90023058
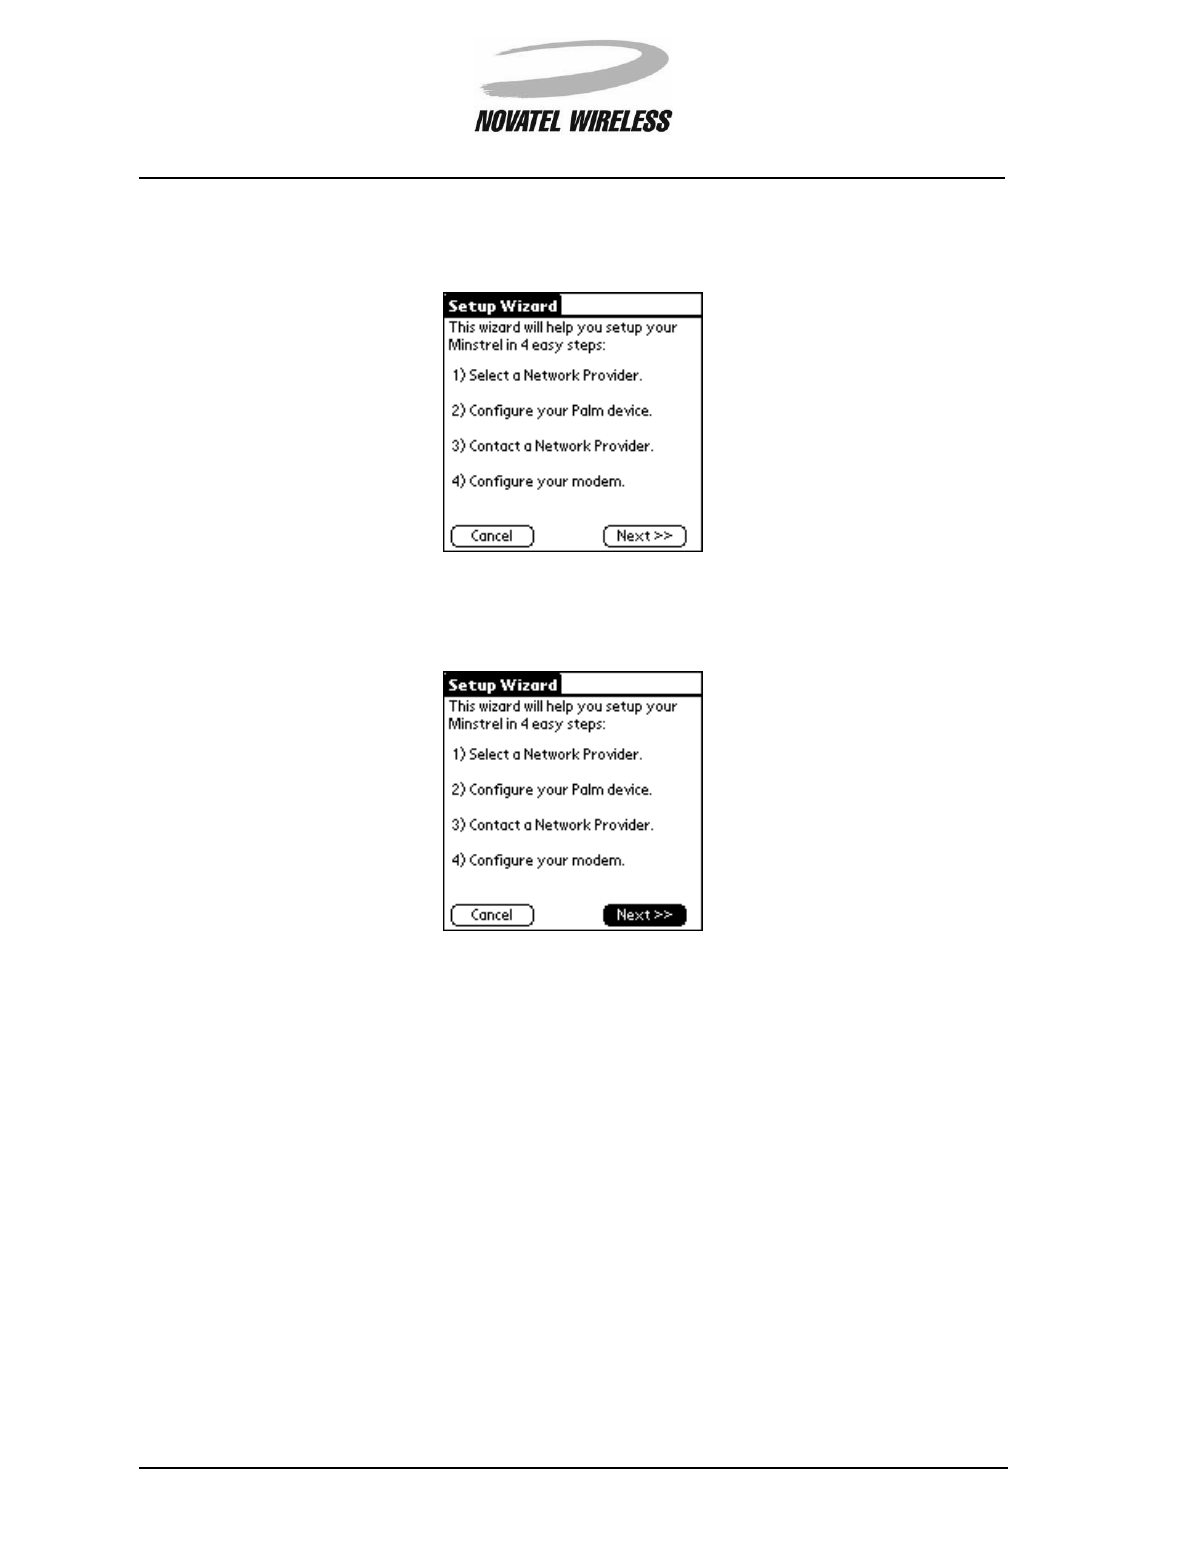
Introduction to Setup Wizard
Before the Minstrel S can register to the Wireless IP network and connect to the Internet, certain
network properties must be configured. Setup Wizard is designed to guide the user step-by-step
through this configuration. It includes instructions for setting the service provider and network con-
nection properties. Once the required properties have been set, the software saves the configura-
tion to the modem. Setup Wizard also helps you to configure your Visor to work with the Minstrel
S.
Navigating Setup Wizard
To advance to the next step of the Setup Wizard utility at any time, tap the Next>> button, found at
the bottom of the screen.
To advance to the previous step of the Setup Wizard utility, tap the <<Back button.
To exit from Setup Wizard without completing the configuration of your Minstrel S, tap the Cancel
button.
If you do exit before the configuration is complete, you can re-start the Setup Wizard at a later
date.
Setup Wizard 39
Minstrel STM User Guide Version B
90023058
Starting Setup Wizard
The Setup Wizard utility is accessed through the Modem Manager software. Insert the Minstrel S
into the Springboard expansion slot of your Visor to automatically start Modem Manager. If the
Minstrel S is already inserted, tap the Applications icon and then the Minstrel icon to start
Modem Manager.
Once the Minstrel screen appears, select Setup Wizard from the Minstrel menu.
Setup Wizard 40
Minstrel STM User Guide Version B
90023058
The following screen will appear when Setup Wizard has been started, giving information on the
steps to be completed during the setup process.
To start with the first step in the configuration, tap the Next>> button.
Setup Wizard 41
Minstrel STM User Guide Version B
90023058
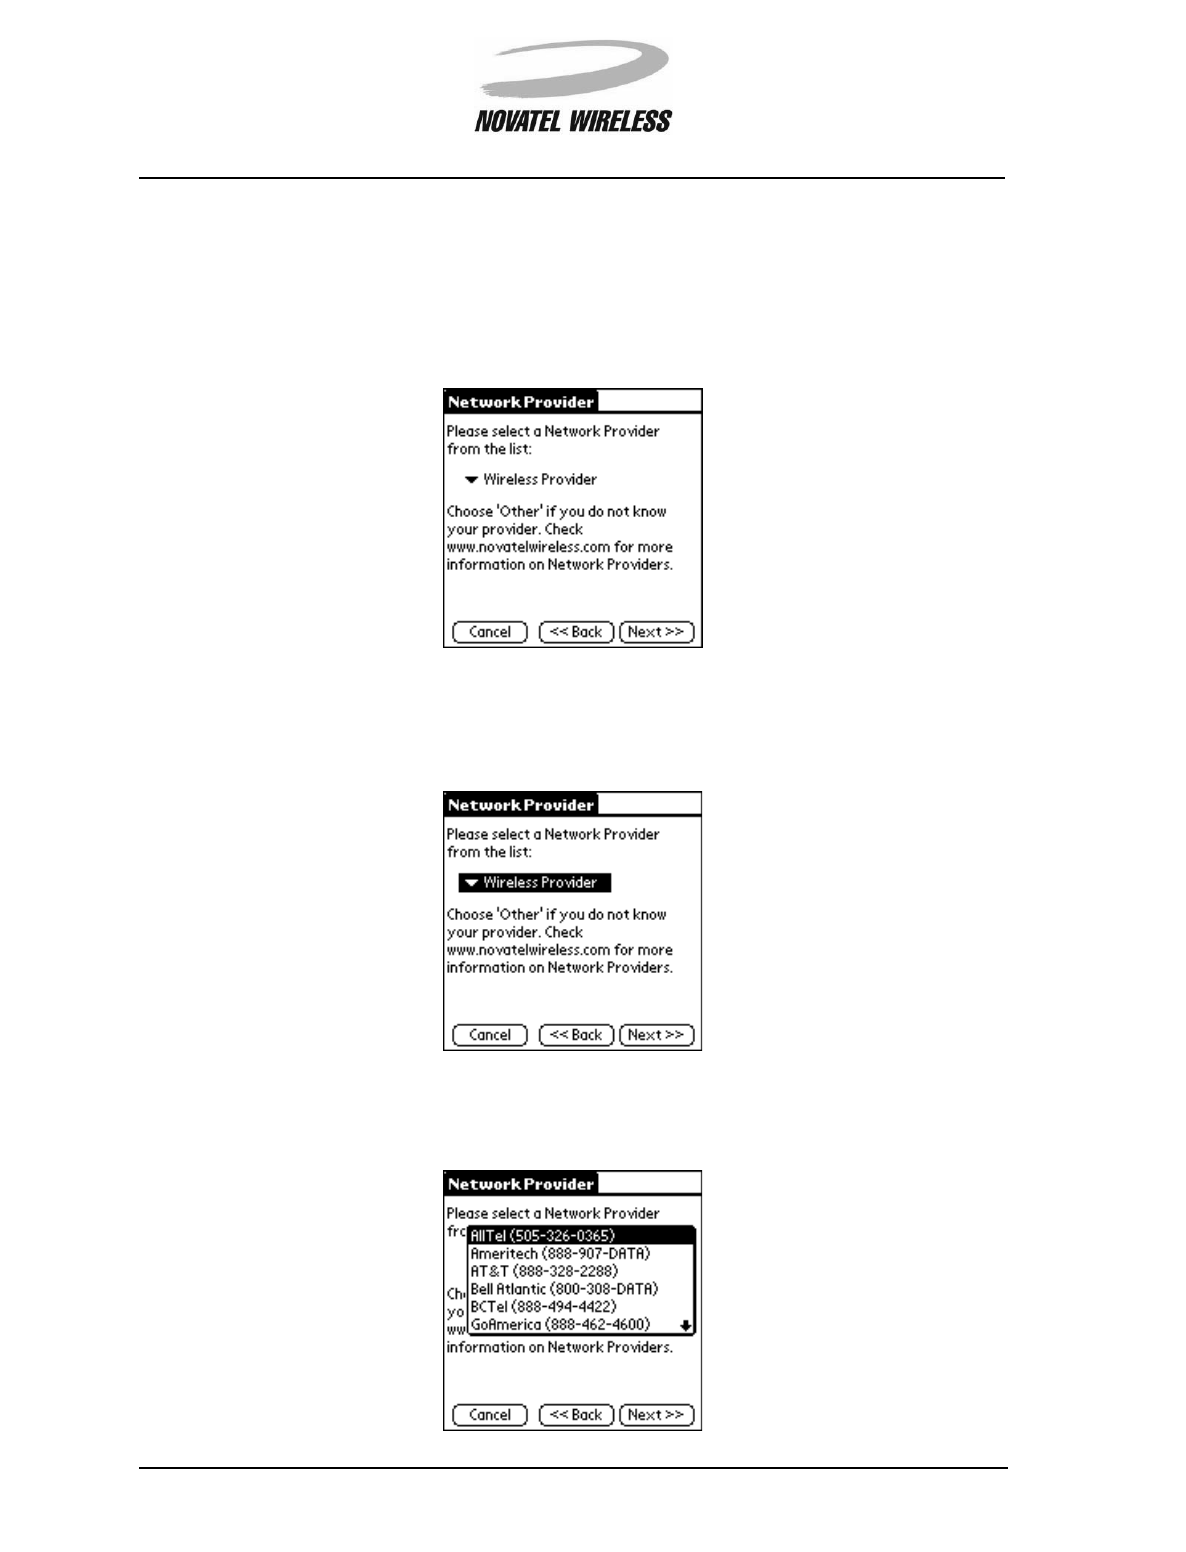
Network Provider
In order to send and receive information across the Internet using your Minstrel S, an account with
a Wireless IP network provider is required. The Network Provider screen contains a single pick
list for you to select the network provider you would like to use.
For information on service availability, contact a network provider in your area. To enter the net-
work provider you have chosen, click on the pick list to view the entries.
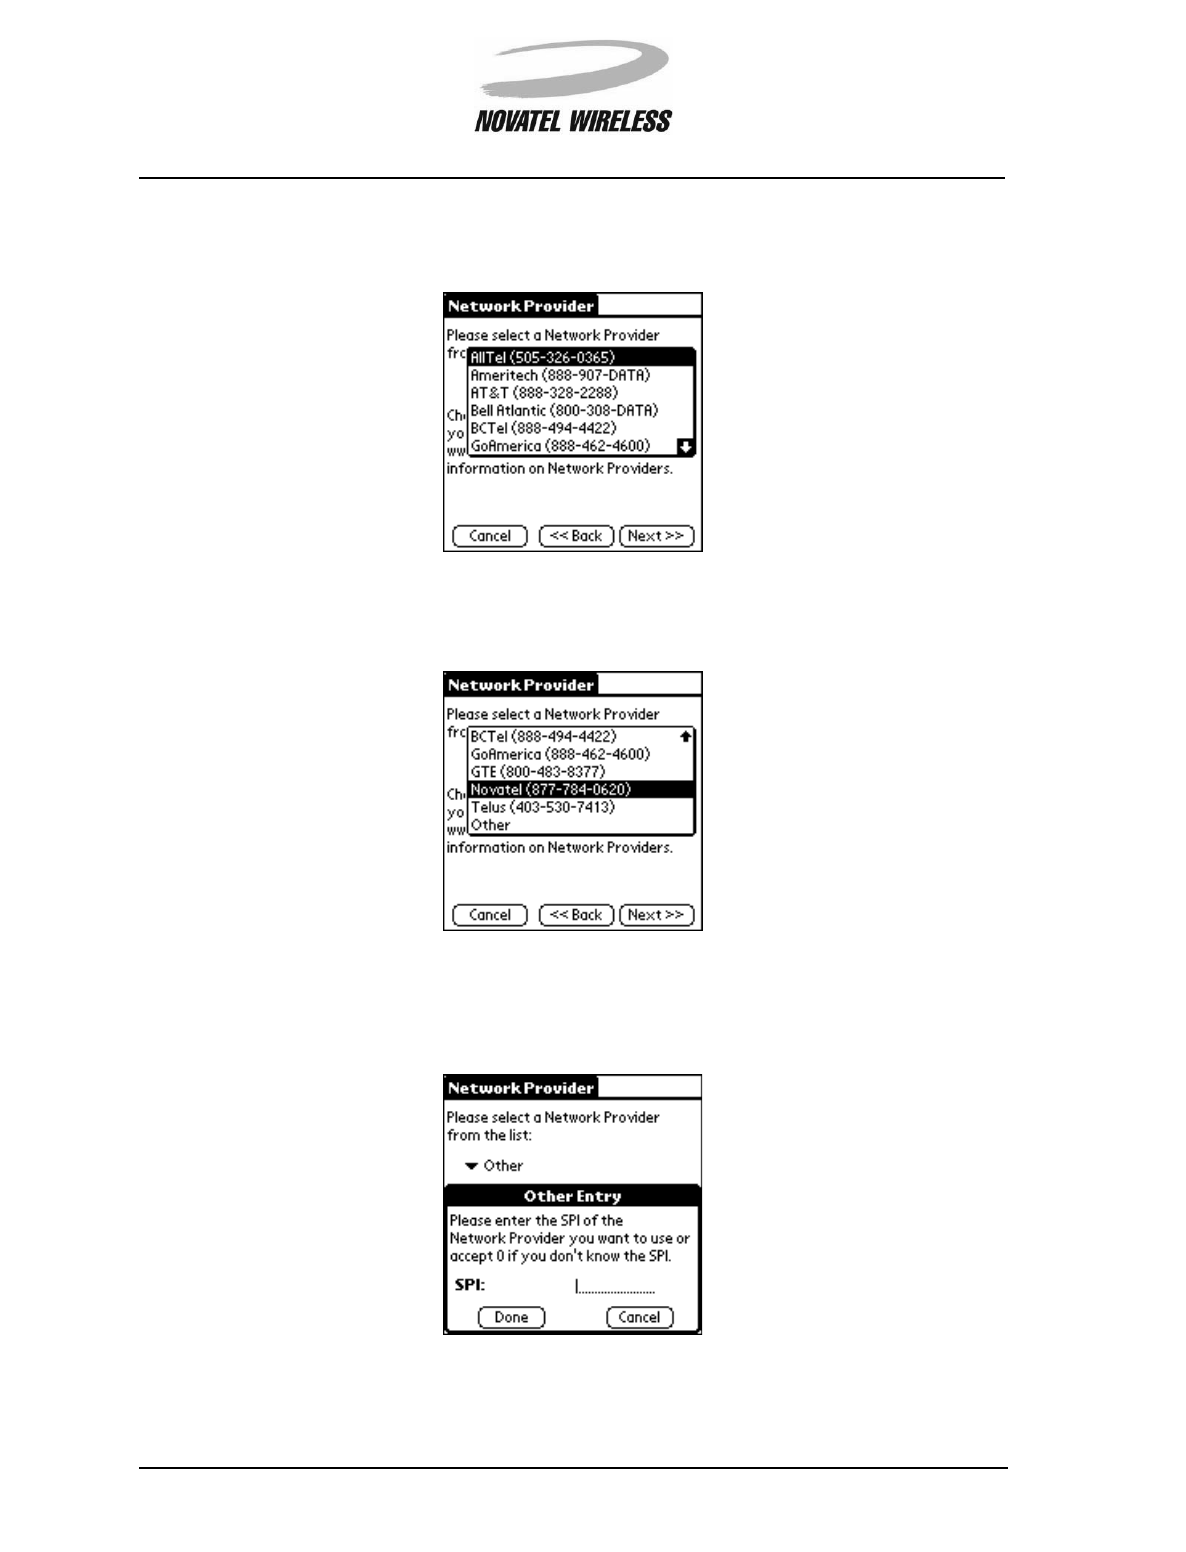
A list of available network providers opens.
Setup Wizard 42
Minstrel STM User Guide Version B
90023058
To display the bottom half of the list, tap the downward-pointing arrow or press the bottom scroll
button.
Tap the name of the network provider you wish to use.
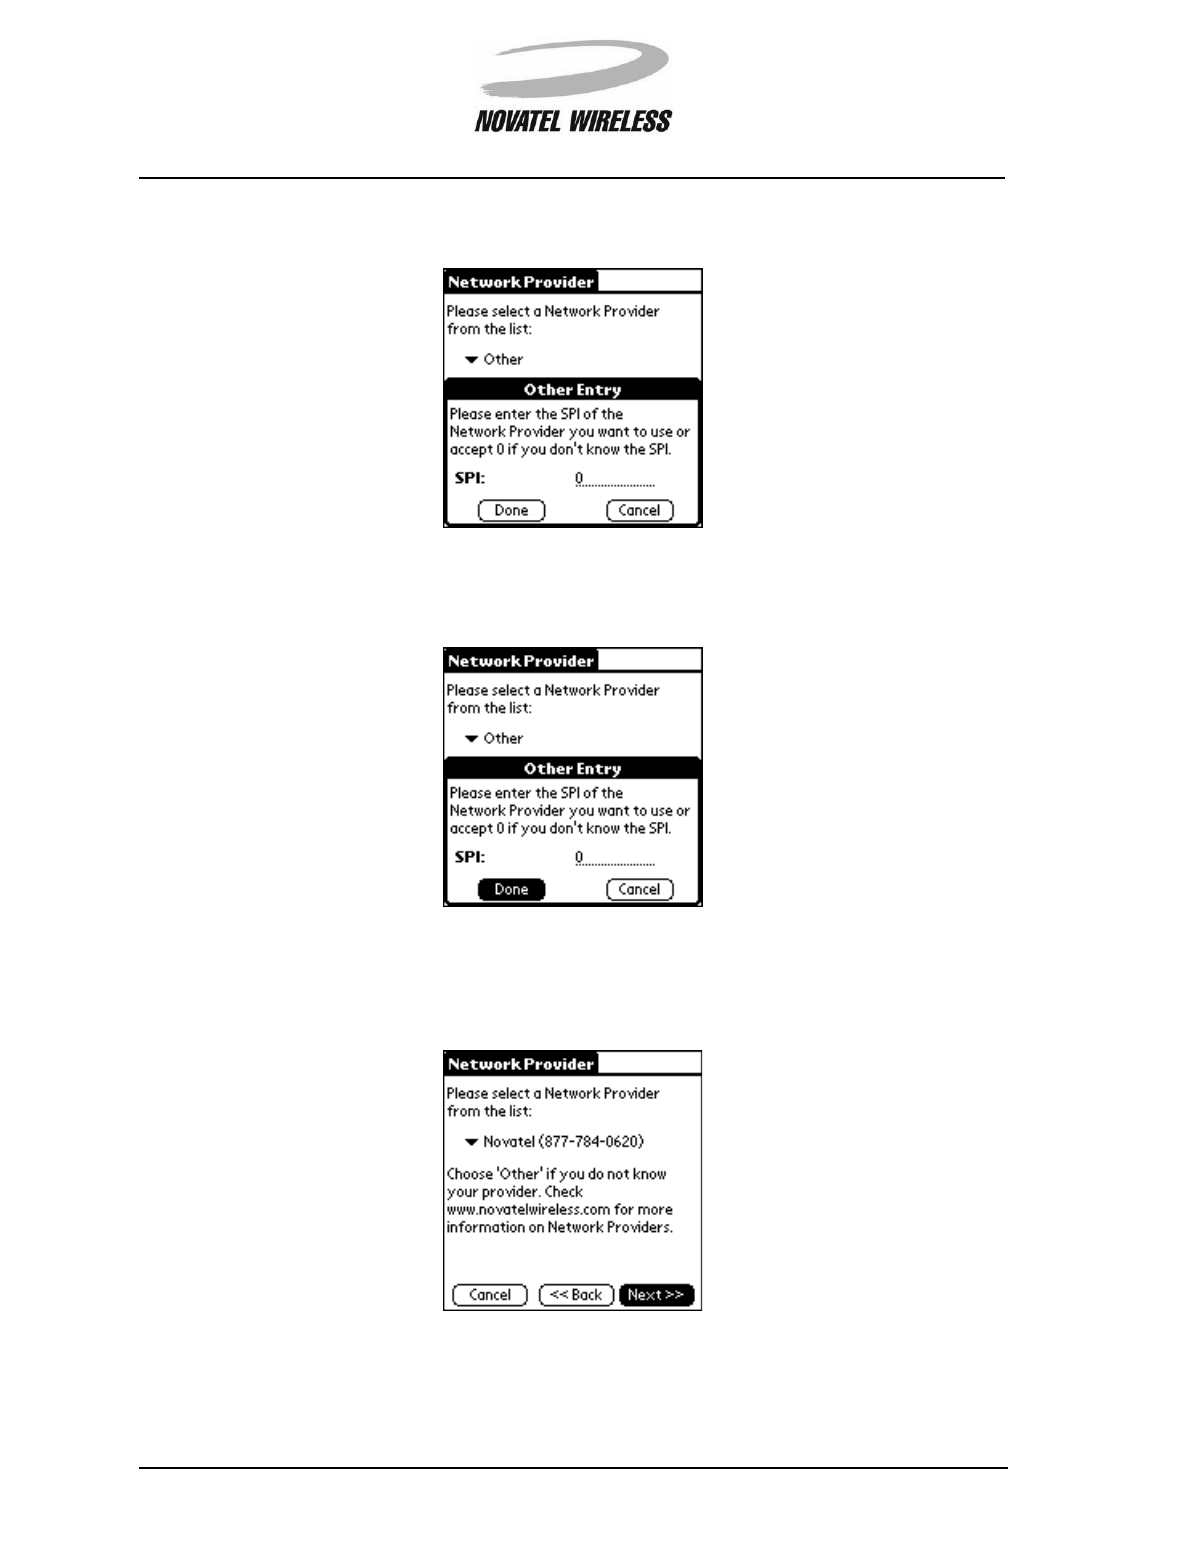
If you would like to use a network provider not shown on the list, select Other and then enter the
SPI of the chosen network provider on the dotted line in the Other Entry window.
Setup Wizard 43
Minstrel STM User Guide Version B
90023058
NOTE: If you do not know the SPI of the network provider, enter 0.
After you have entered the SPI, tap the Done button.
Once the correct network provider appears on the Network Provider screen, tap Next>> to
advance to the next step.
Setup Wizard 44
Minstrel STM User Guide Version B
90023058
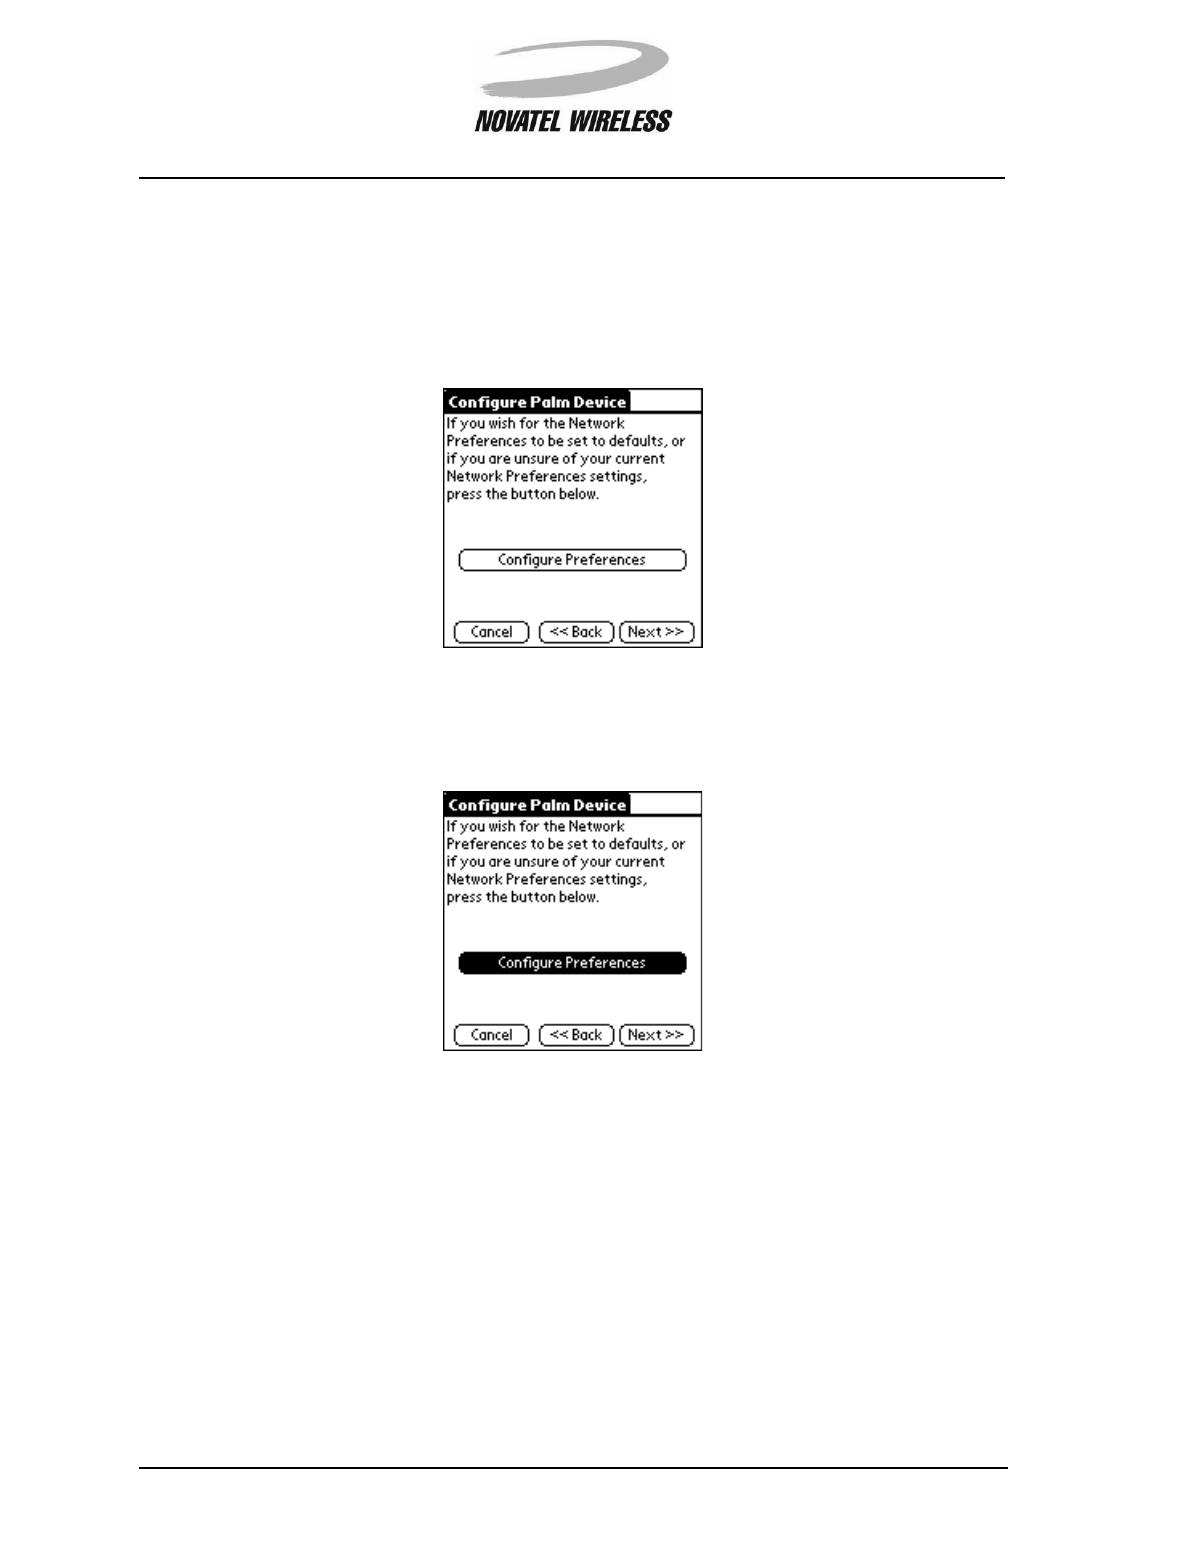
Configure Palm Device
In order for your Visor to communicate properly with your Minstrel S, certain Network Preferences
settings must be configured. The Configure Palm Device screen allows you to easily configure
these settings.
To set the Network Preferences to the default values for the Minstrel S, tap the Configure Prefer-
ences button.
Setup Wizard 45
Minstrel STM User Guide Version B
90023058
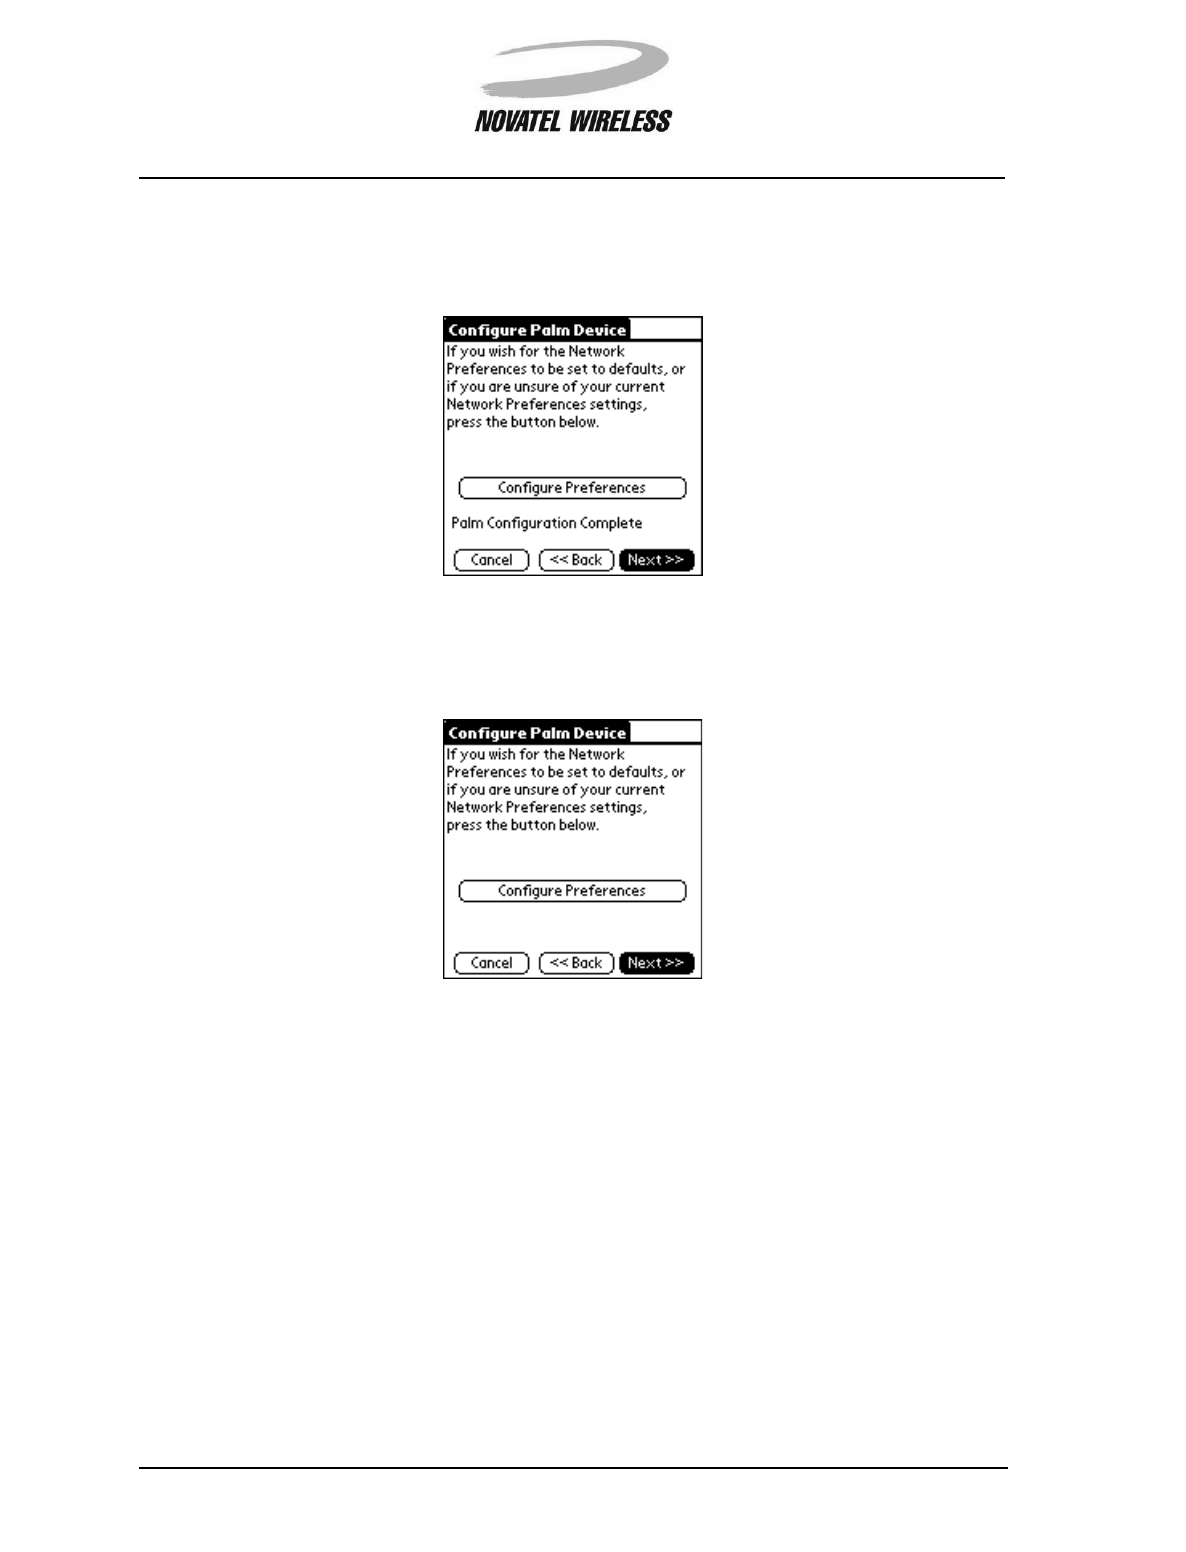
Once the Network Preferences have been set to their default values for the Minstrel S, the screen
will show that the configuration is complete. Tap the Next>> button to advance to the next step in
the setup.
If you do not wish to change your Network Preferences from their current settings, tap the Next>>
button to advance to the next step in the Minstrel S setup.
If the modem is not already powered on, it will be powered on when Next>> is tapped so that the
Setup Wizard can retrieve the current configuration settings from the modem to display in the next
step.
For more information on the Network Preferences, consult your Visor documentation.
Setup Wizard 46
Minstrel STM User Guide Version B
90023058
Contact a Provider
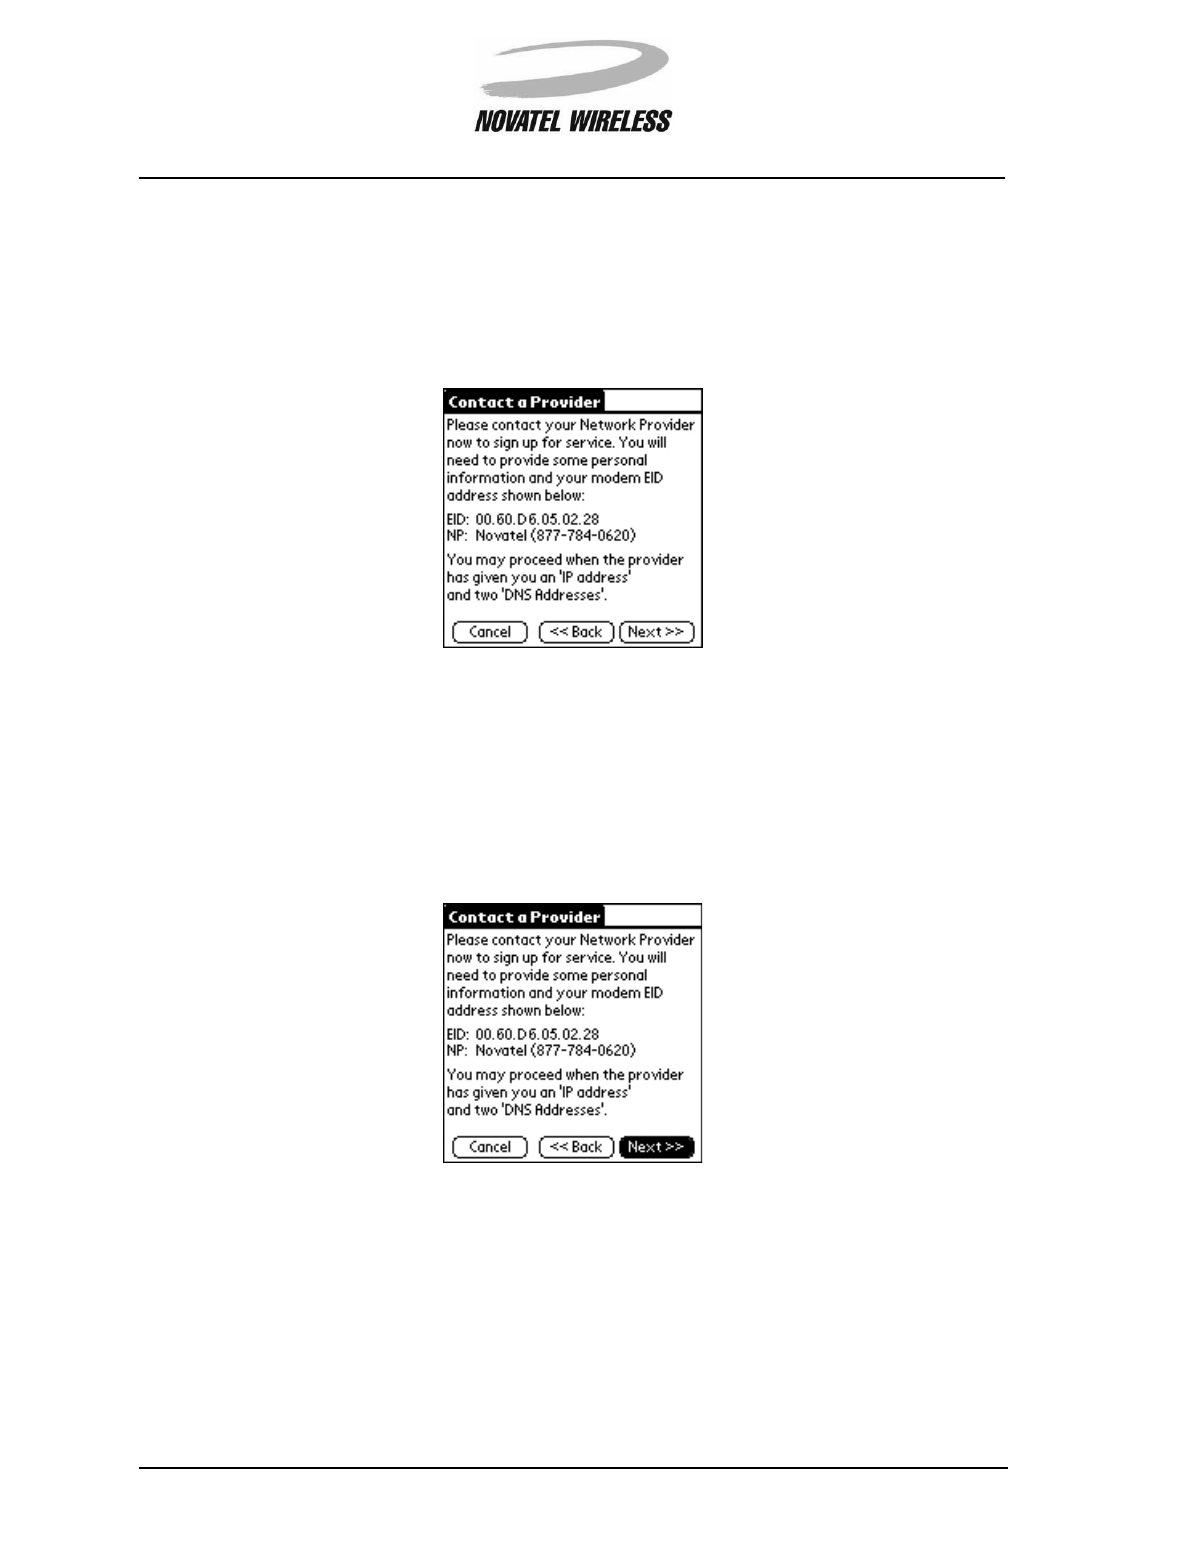
The next step in setting up your Minstrel S is contacting your chosen network provider to set up a
Wireless IP service account. The network provider you selected previously and the EID of your
Minstrel S are shown on the Contact a Provider screen.
To set up a Wireless IP service account, contact the provider you have chosen using the phone
number shown after the provider’s name in the NP: field. Record the EID of your Minstrel S as you
will have to provide the EID to the network provider when setting up the account.
Once your provider has given you an IP address and DNS addresses, you can advance to the next
step by tapping the Next>> button.
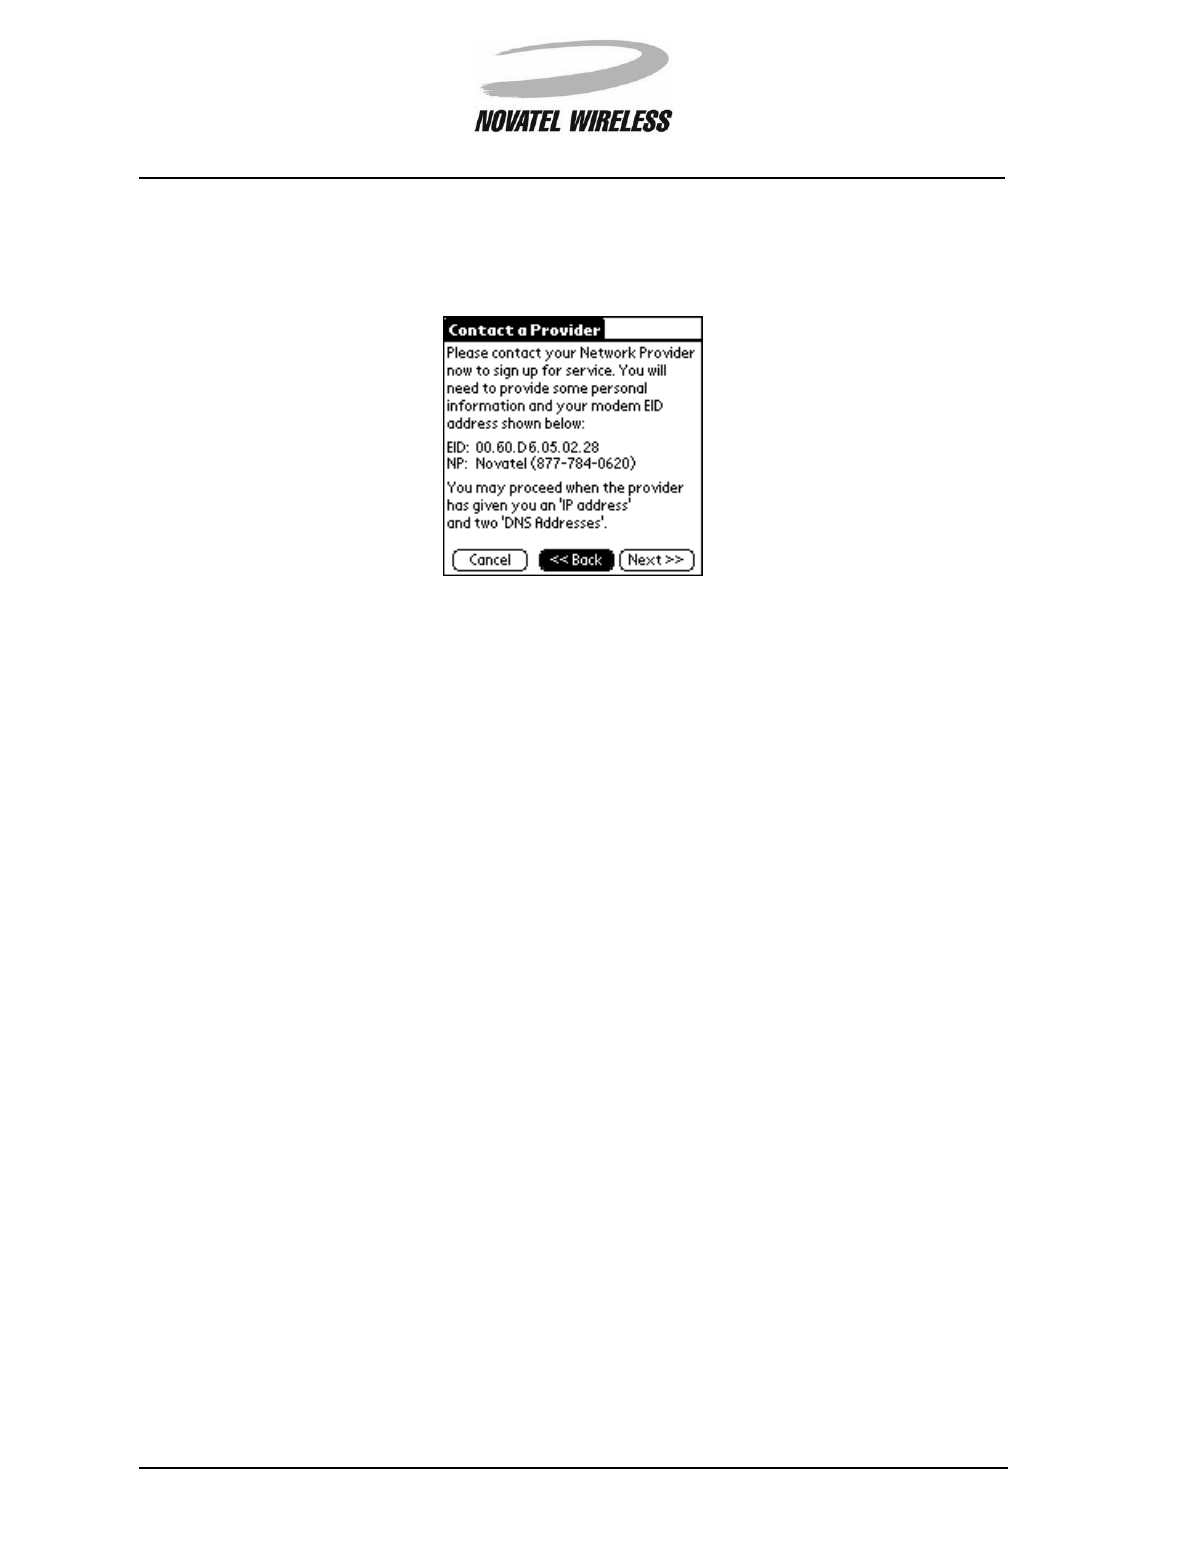
Setup Wizard 47
Minstrel STM User Guide Version B
90023058
If you wish to change the network provider, tap the <<Back button until you reach the Network
Provider screen and then select another provider as explained in the section entitled Network
Provider.
Setup Wizard 48
Minstrel STM User Guide Version B
90023058
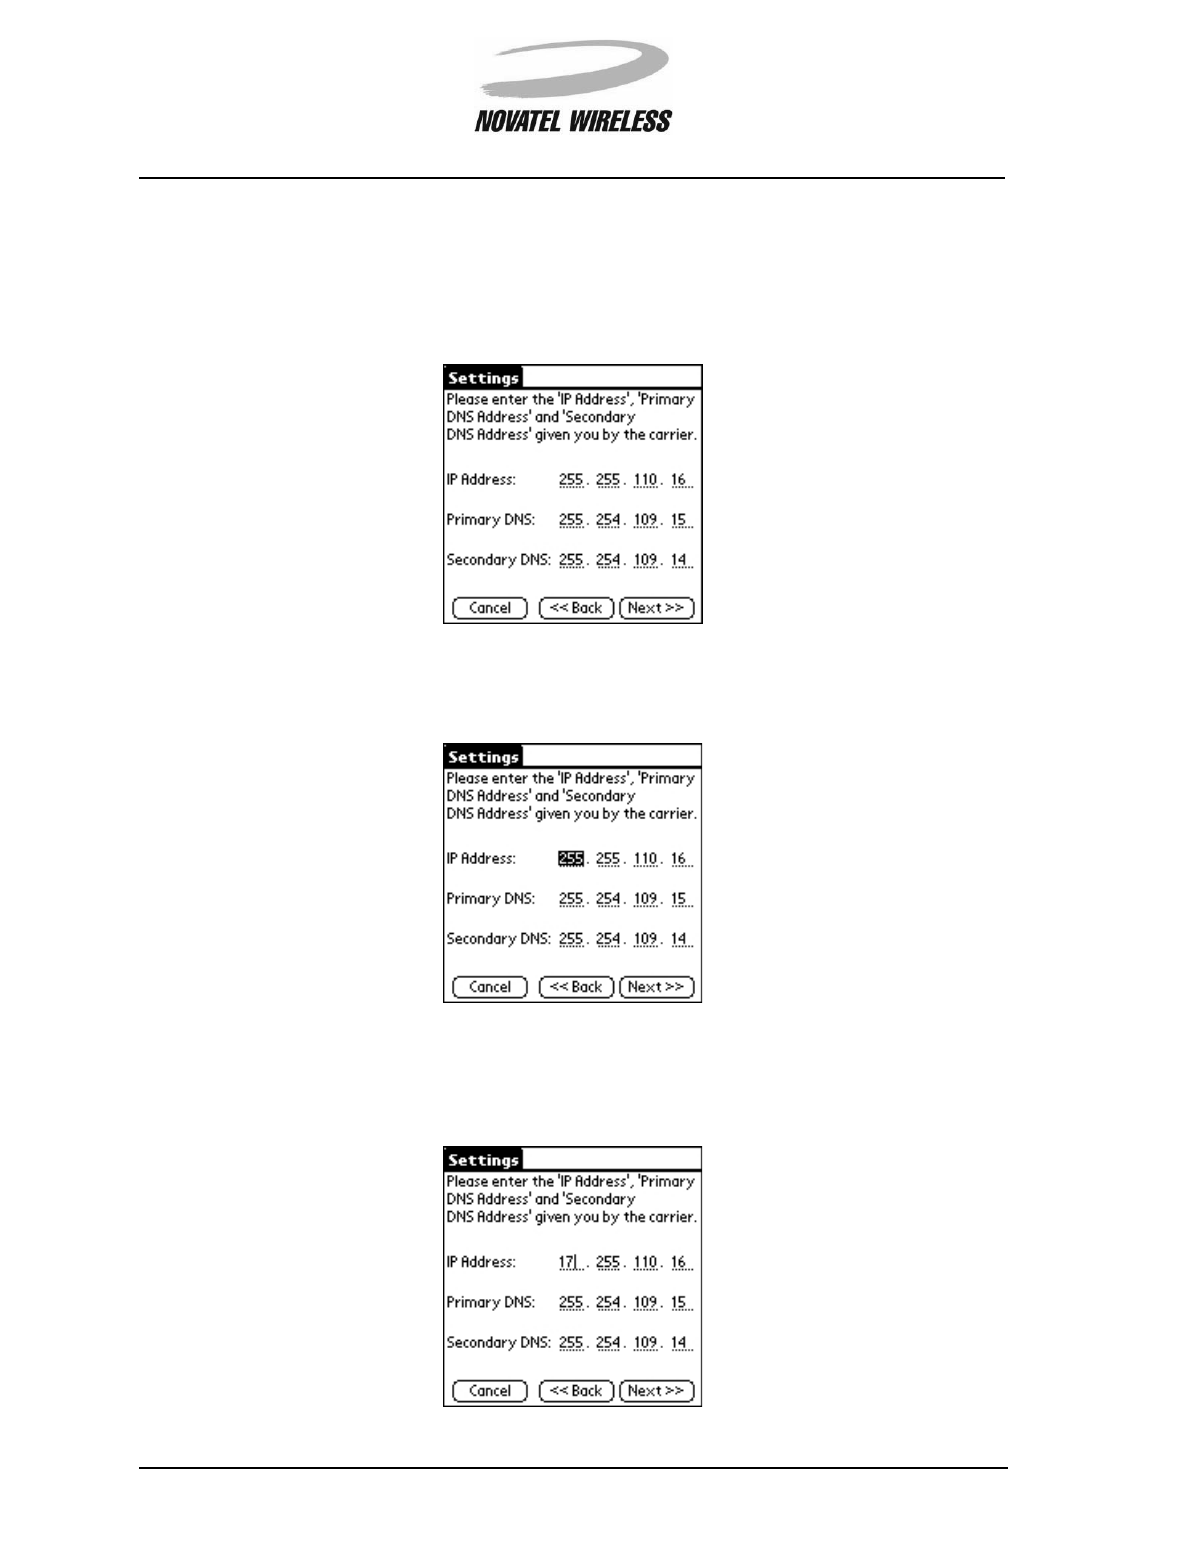
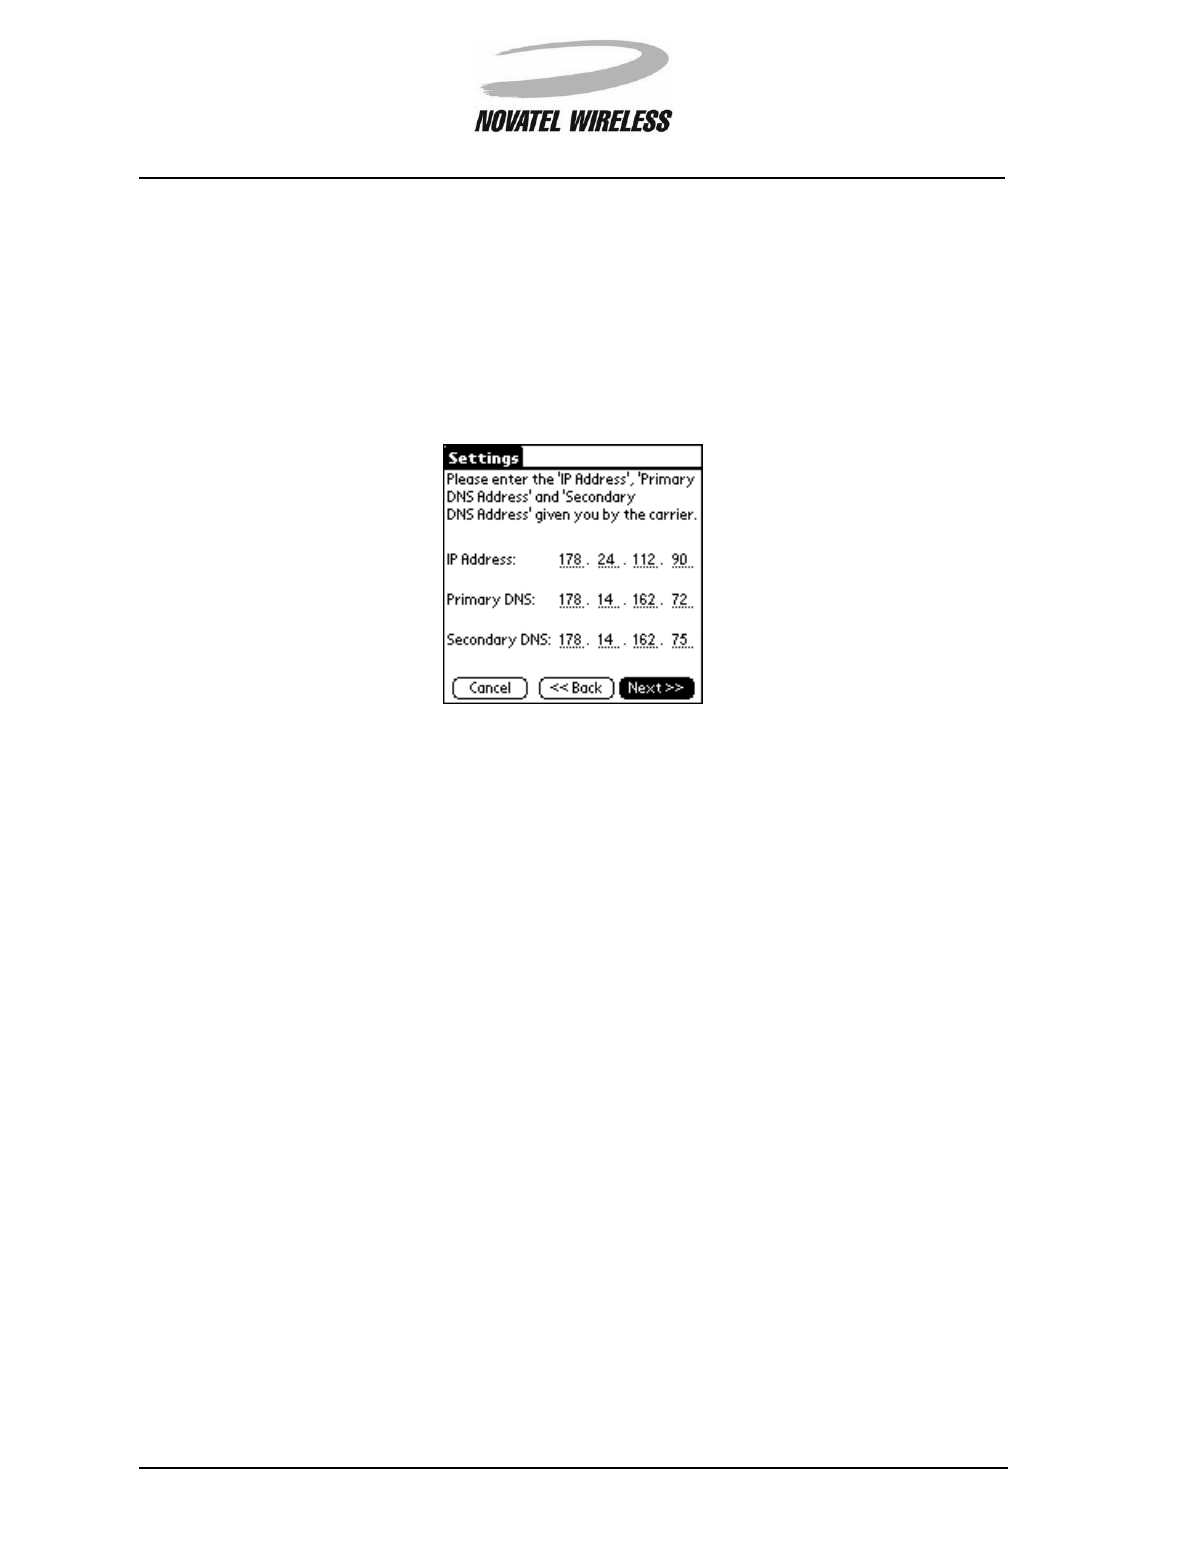
Settings
In order to configure your Minstrel S, you must enter the network addresses supplied by your net-
work provider in the Settings screen.
To enter the IP address, tap to select the first segment of the IP Address: field.
Delete the selected text and enter in the first segment of the IP address as given to you by your
network provider.
Setup Wizard 49
Minstrel STM User Guide Version B
90023058
Repeat this for the second, third, and fourth segments of the IP Address: field.
Enter the primary and secondary DNS addresses in the same way in the Primary DNS: and Sec-
ondary DNS: fields, respectively
Once the network addresses have been entered correctly, tap the Next>> button to advance to the
next step.
Setup Wizard 50
Minstrel STM User Guide Version B
90023058
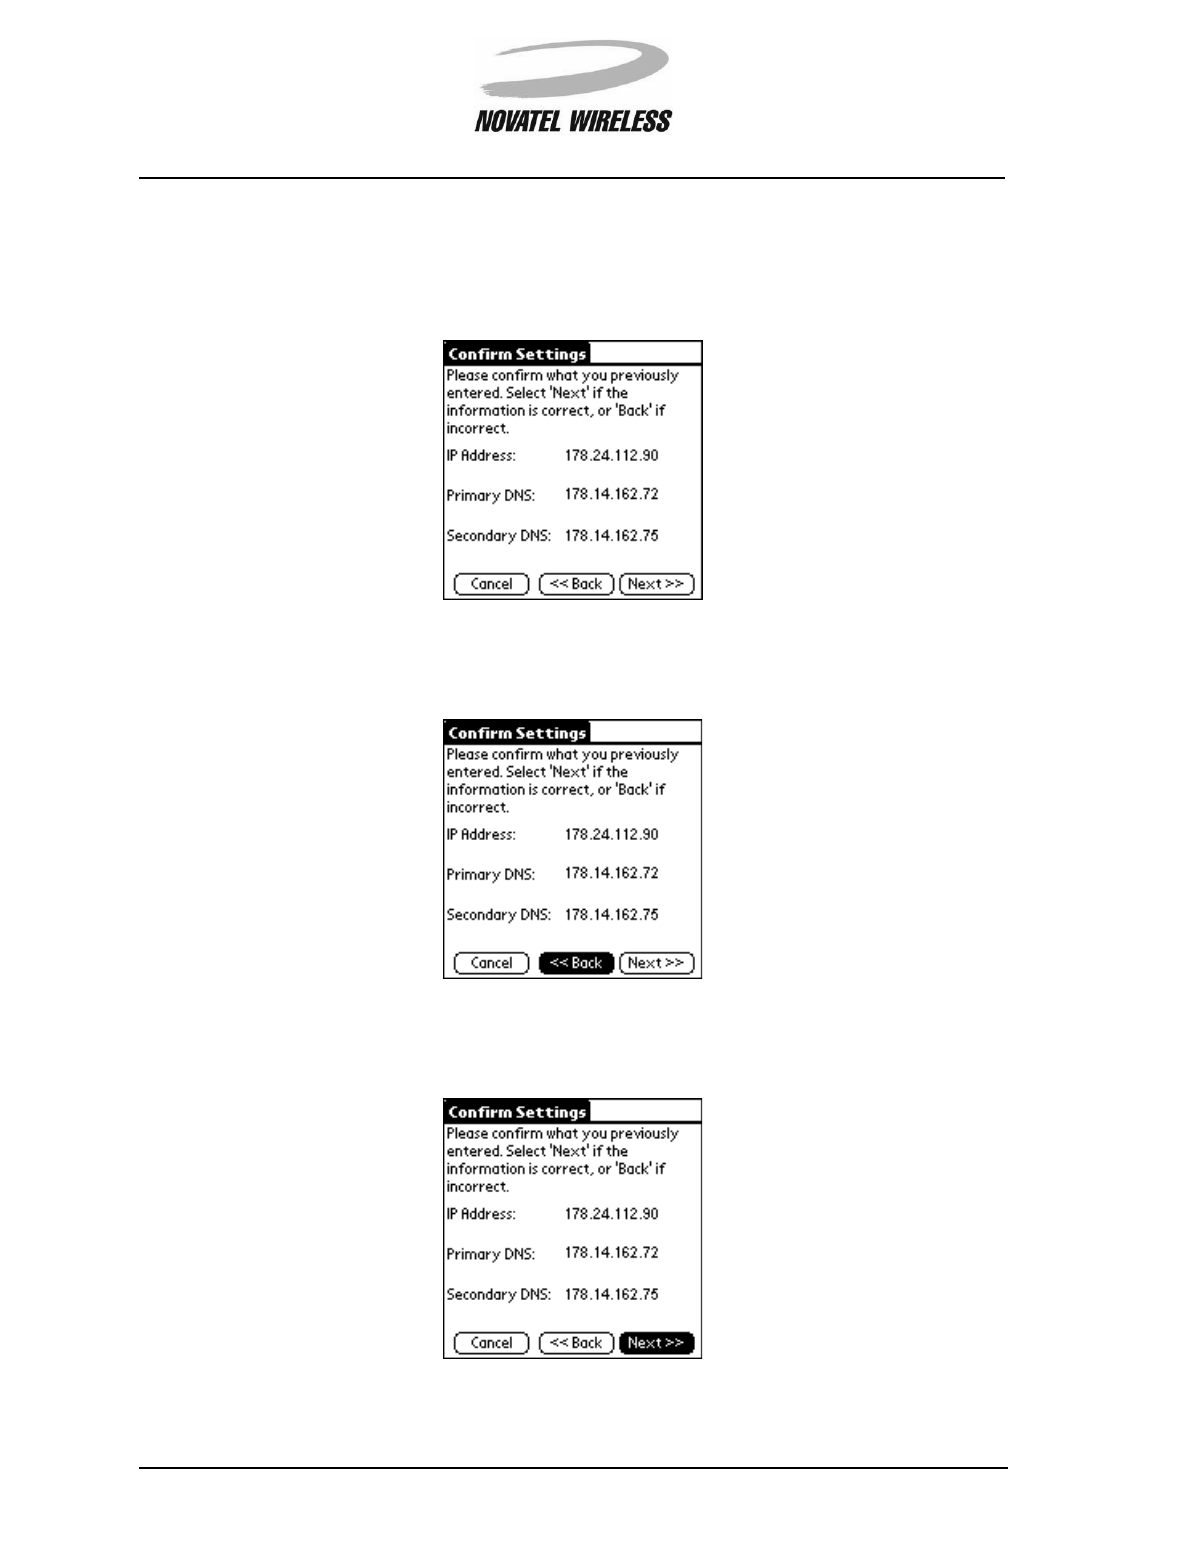
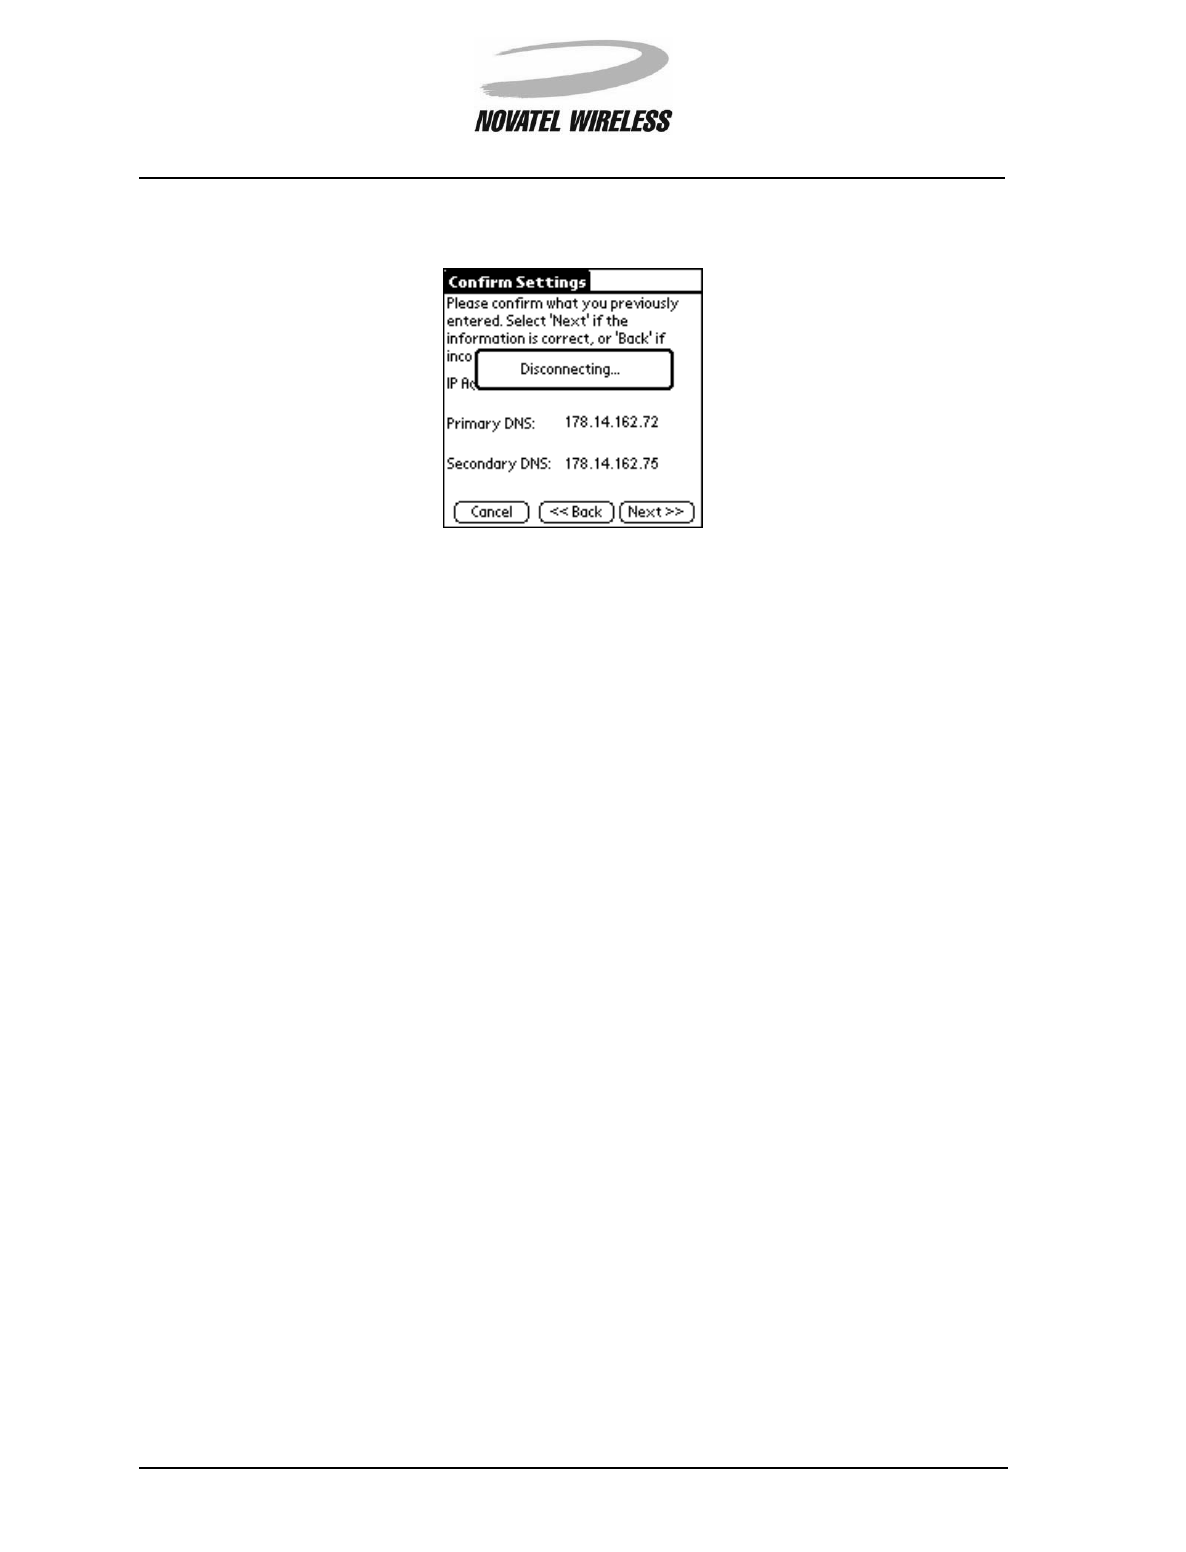
Confirm Settings
The Confirm Settings screen shows the network addresses entered in the previous step.
If the addresses are incorrect, tap <<Back to change the addresses.
If the addresses shown are correct, tap Next>>.
Setup Wizard 51
Minstrel STM User Guide Version B
90023058
The software will save the settings and power down the modem before moving on to the next step.
Setup Wizard 52
Minstrel STM User Guide Version B
90023058
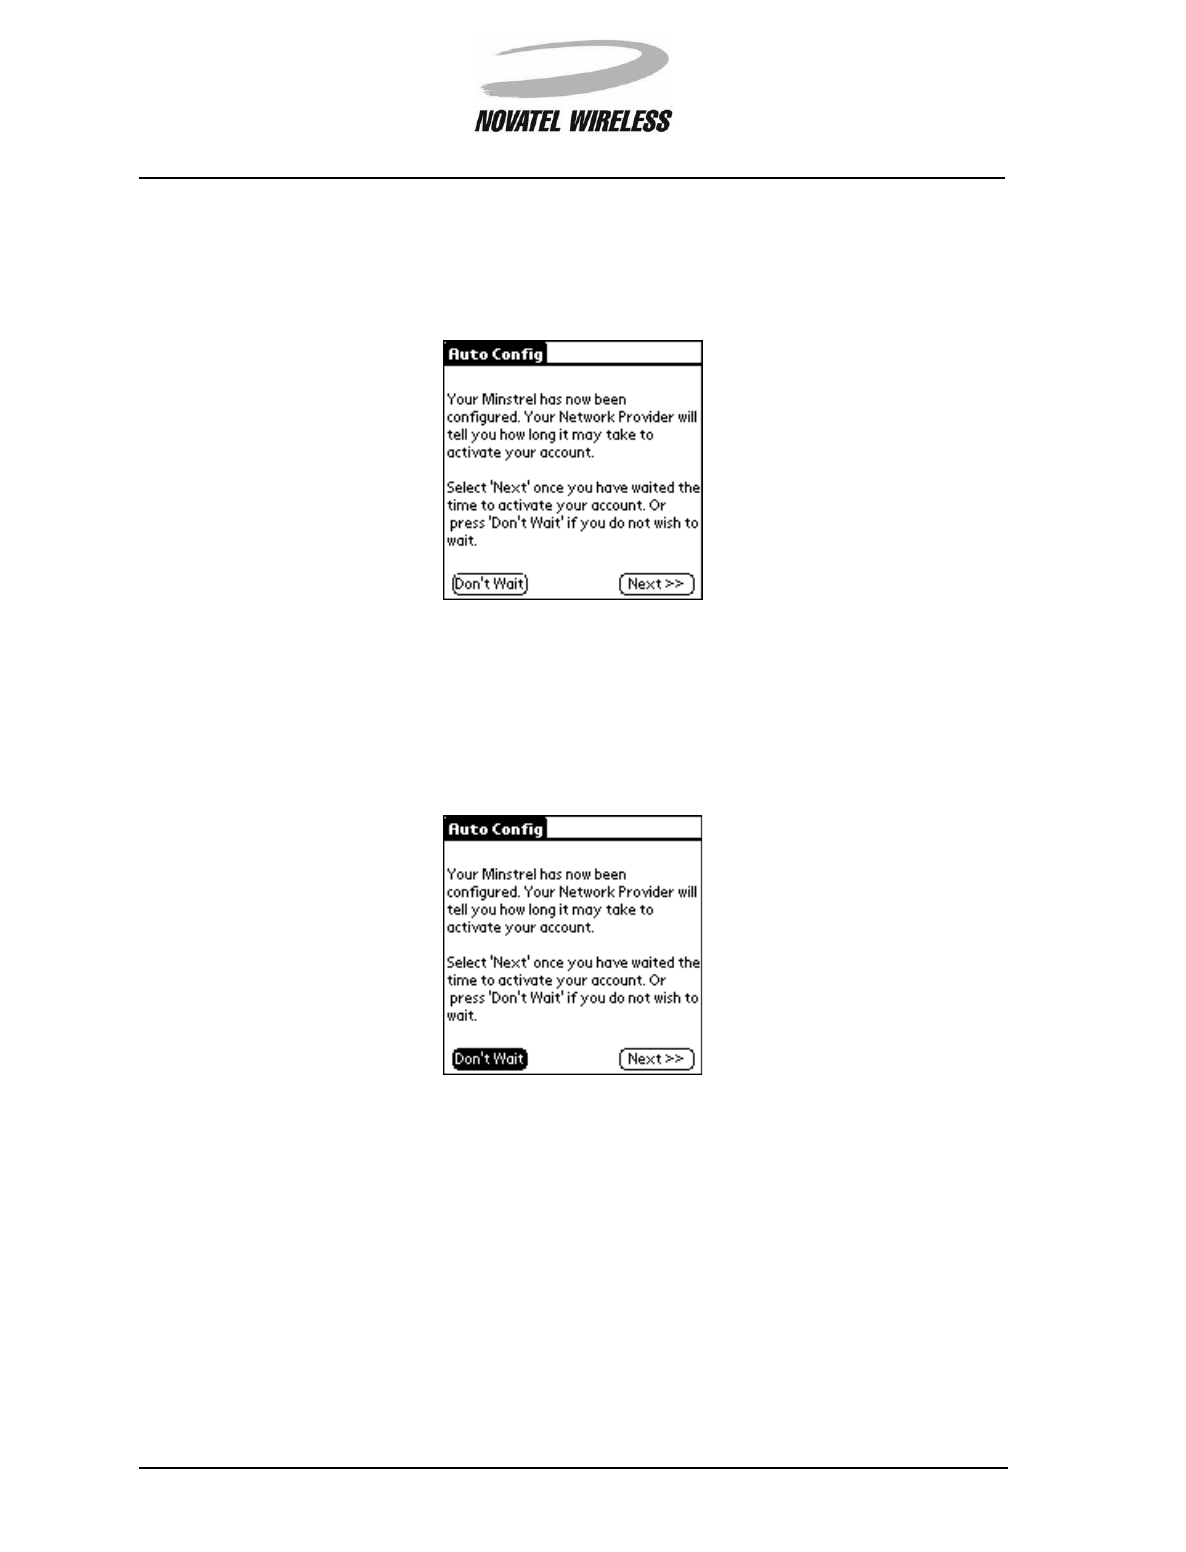
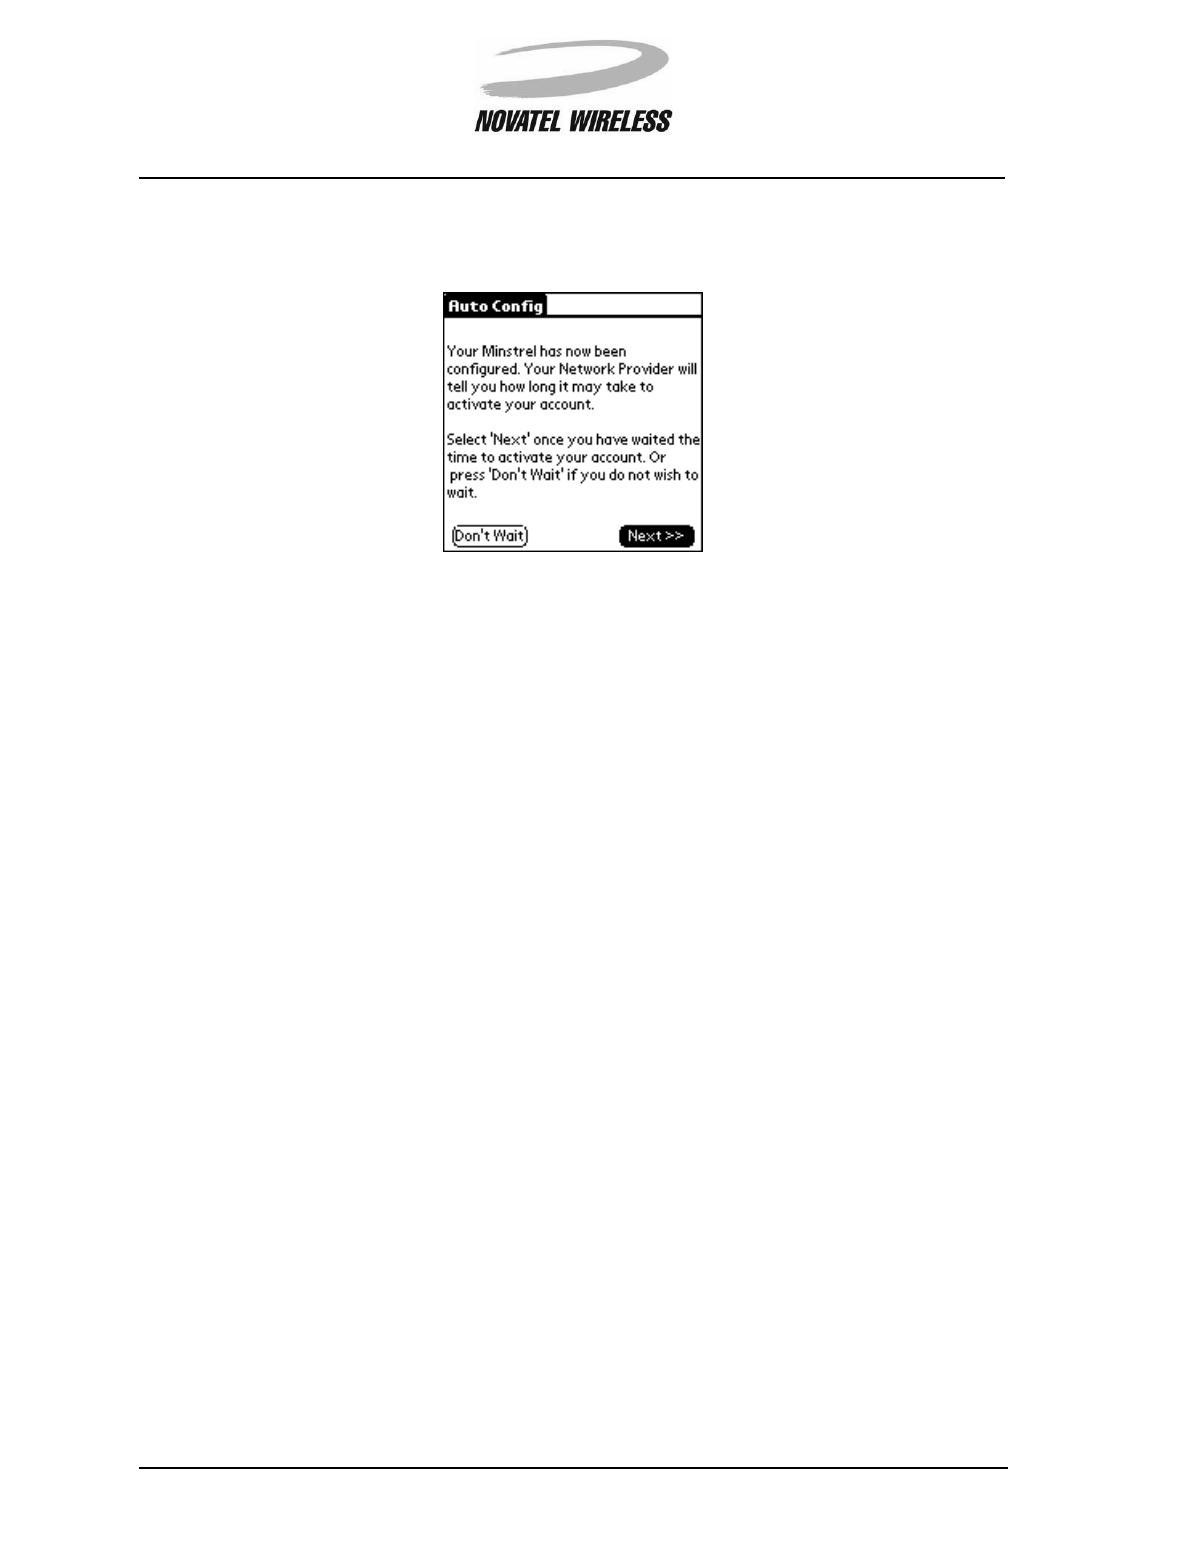
Auto Config
The Auto Config screen confirms that your Minstrel S has been configured.
The next step in configuration is testing the network registration. Because it may take some time
for your network provider to activate your Wireless IP account, you may need to wait before
advancing to the next step. Your network provider will tell you how long it will take when you set up
your account. If you know your account has already been activated, tap the Don’t Wait button to
move to the next step.
Setup Wizard 53
Minstrel STM User Guide Version B
90023058
If it will take some time to activate your account, wait the specified time and then tap the Next>>
button to advance.
Setup Wizard 54
Minstrel STM User Guide Version B
90023058
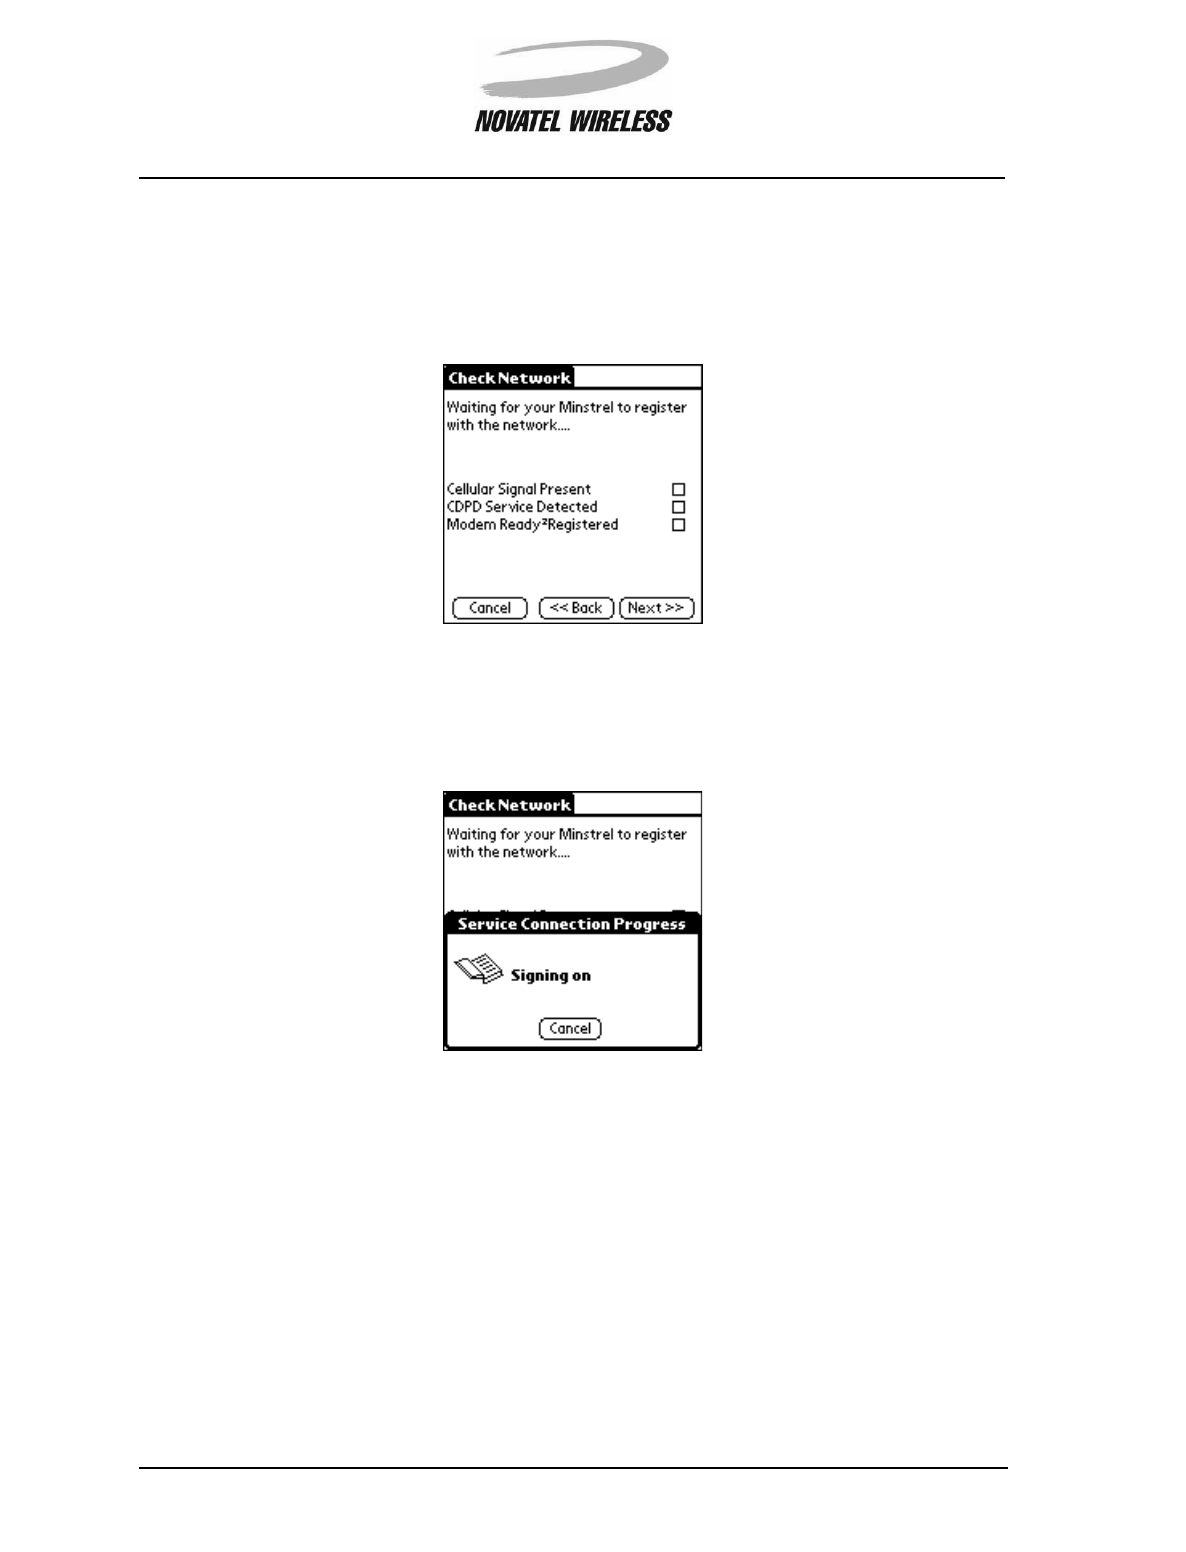
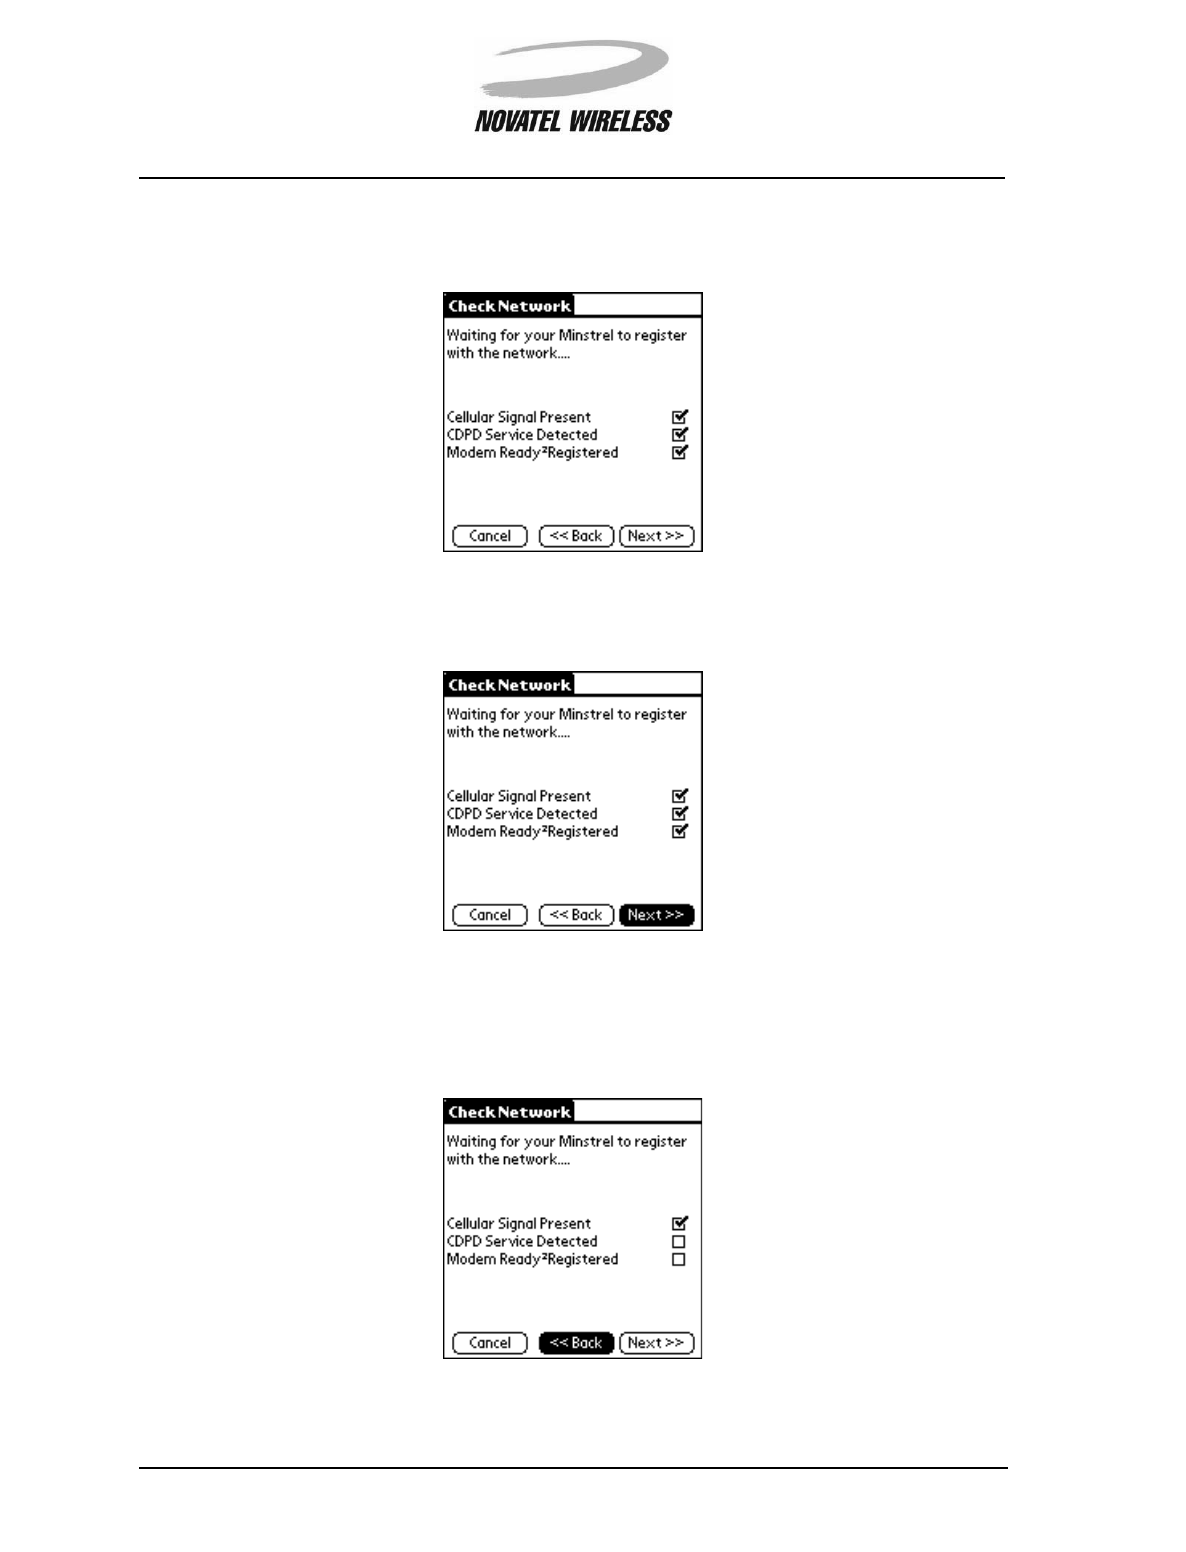
Check Network
The Check Network screen contains three check boxes which indicate the status as the network
registration is tested.
When you first advance to this step, the modem will attempt to connect to the Wireless IP network,
showing the progression of the connection in the Service Connection Progress window at the
bottom of the screen.
Setup Wizard 55
Minstrel STM User Guide Version B
90023058
When all three of the check boxes are checked, the modem has successfully registered to the net-
work.
Once the modem has registered, tap Next>> to advance to the next step.
If the modem is not able to register, you may need to contact your network provider to verify the
addresses you entered and that your account is active. If you need to change any of the settings
entered previously, tap the <<Back button.
Setup Wizard 56
Minstrel STM User Guide Version B
90023058
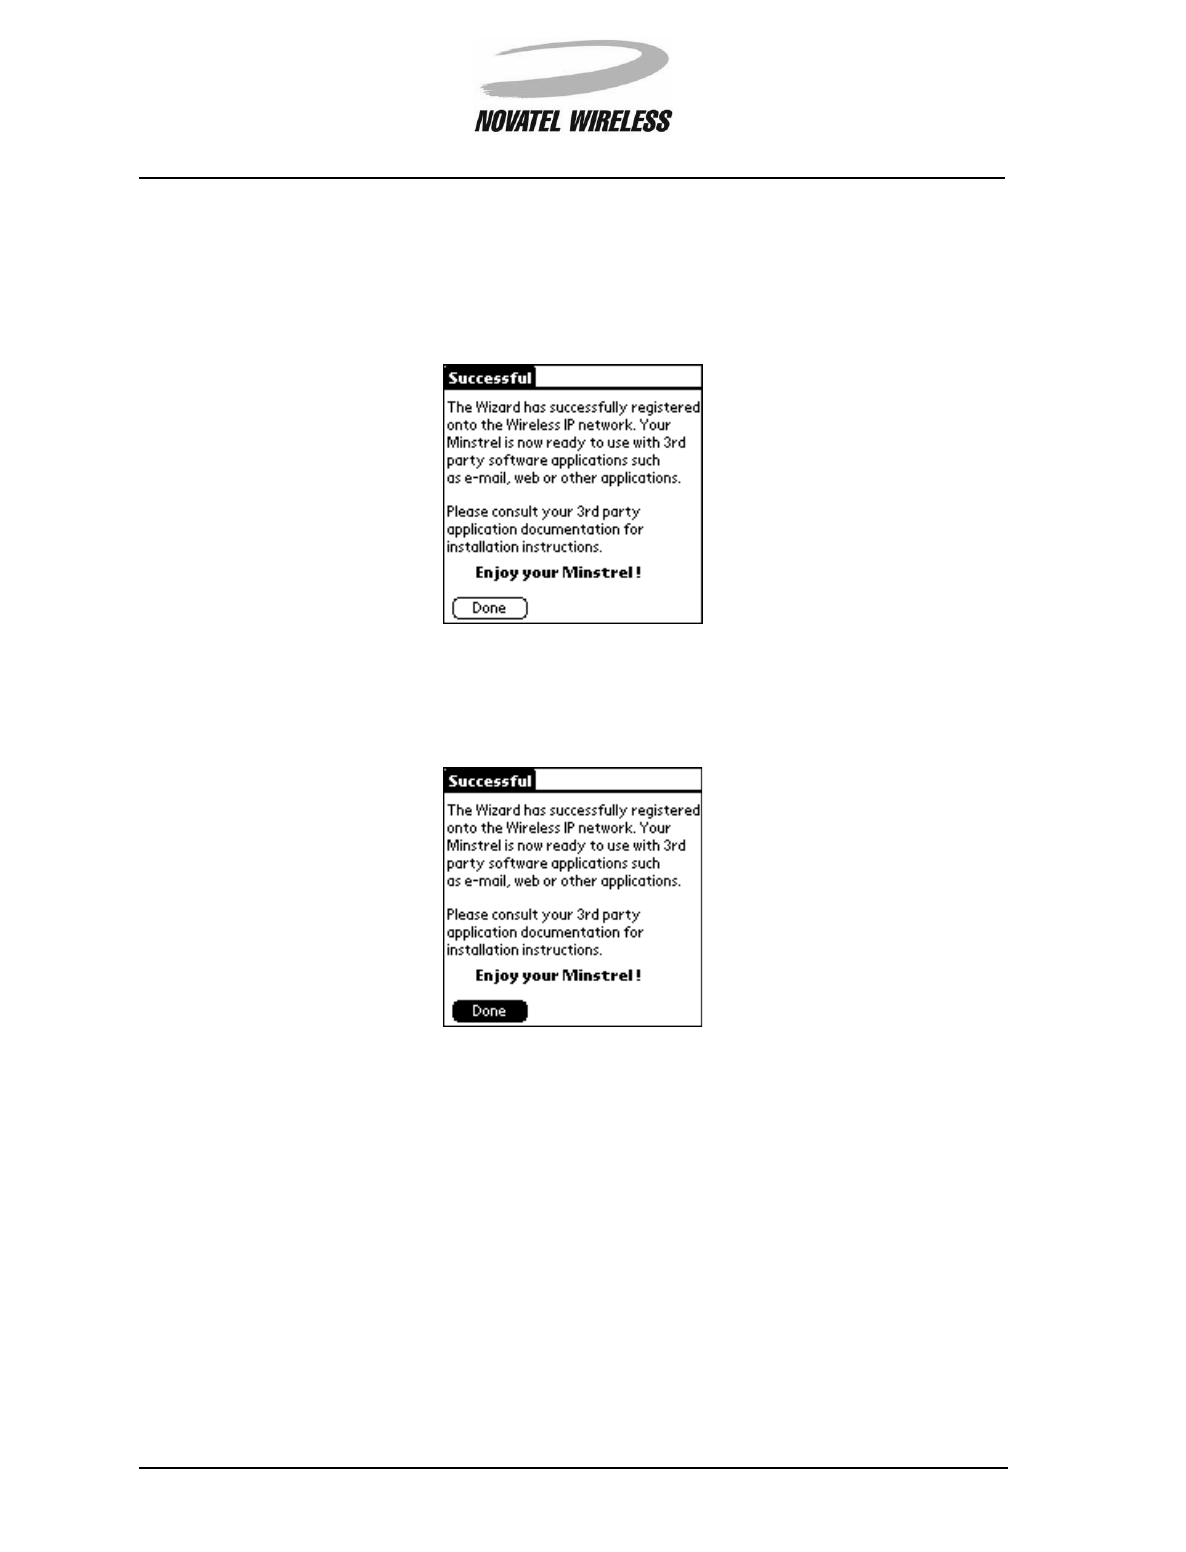
Successful
The Successful screen confirms that your Minstrel S has been successfully configured and pro-
vides information about third party applications.
Tap Done to close the Setup Wizard utility and return to Modem Manager, where the modem will
register to the network.

Modem Manager 57
Minstrel STM User Guide Version B
90023058
Modem Manager
Modem Manager 58
Minstrel STM User Guide Version B
90023058
Introduction to Modem Manager
The Modem Manager software provides you with control over the connection to the Wireless IP
network and status information about the Minstrel S.
Navigating Modem Manager
The Minstrel screen is the main interface used in the Modem Manager software. Tapping the
Menu icon when you are in this screen opens the Modem Manager menu bar.
As described in the sections below, this menu bar provides access to the various features of the
Modem Manager software, including detailed status information and commands for controlling the
operation of the modem.
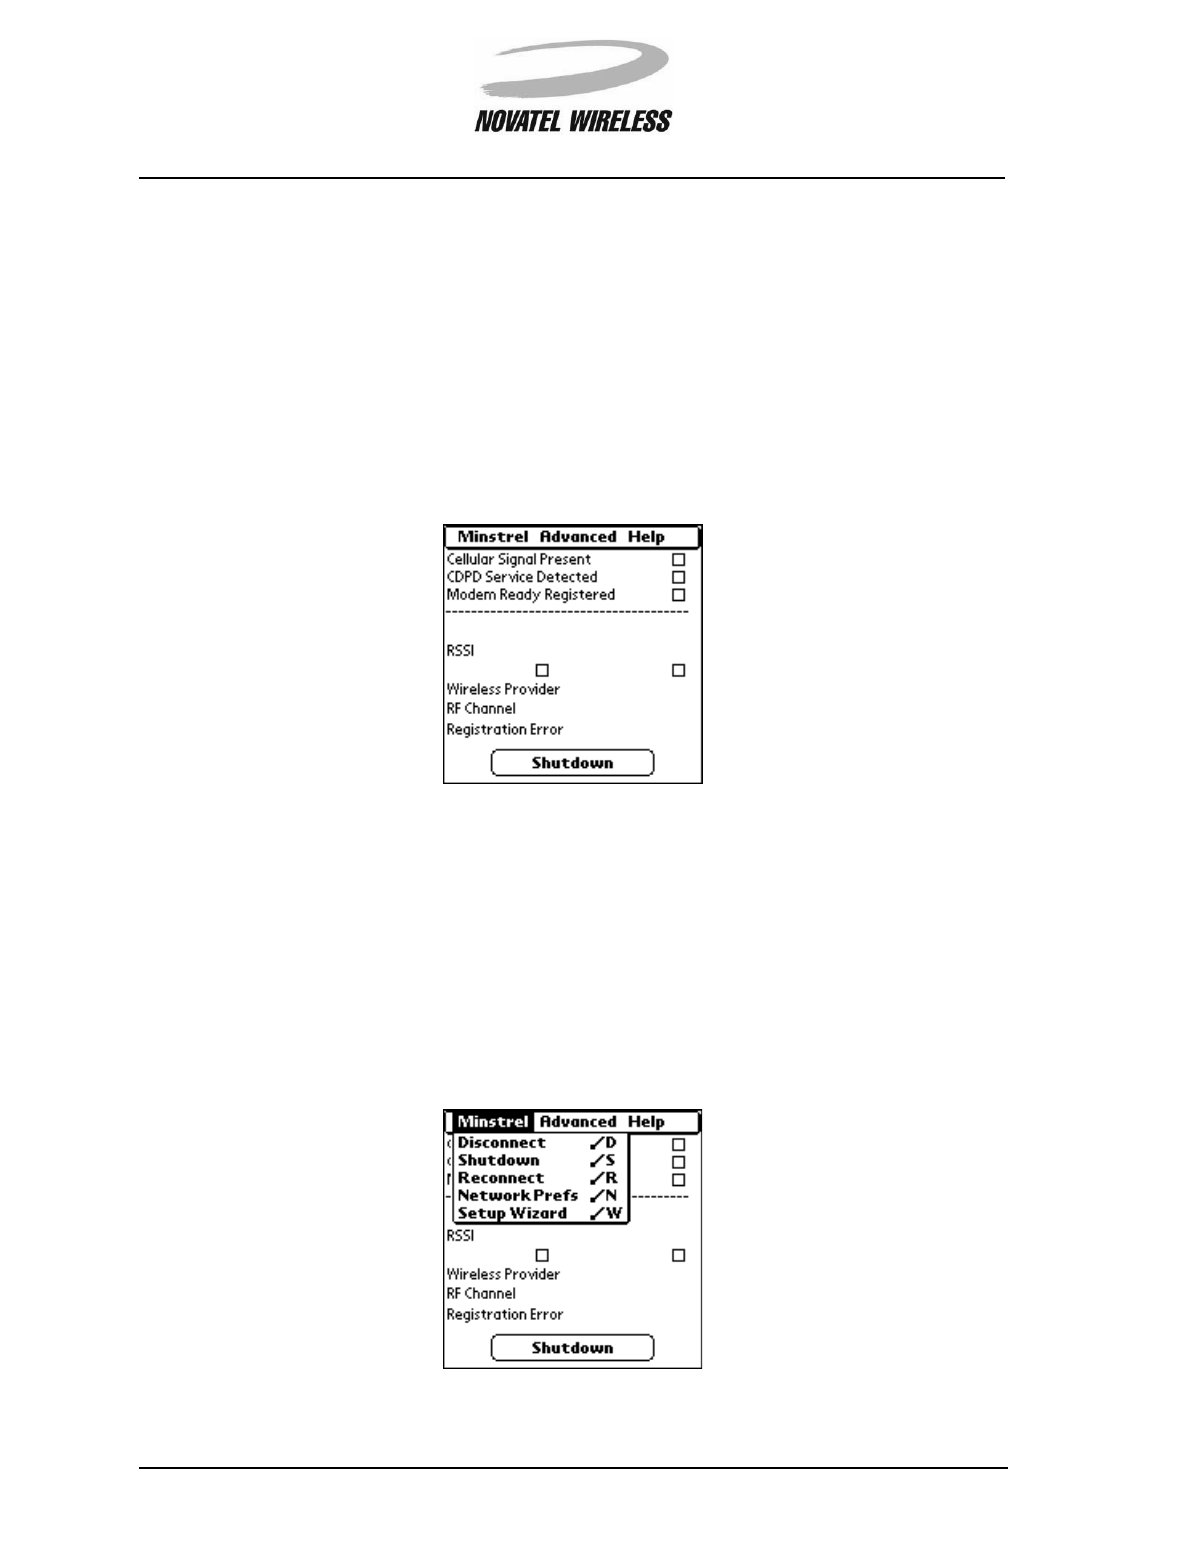
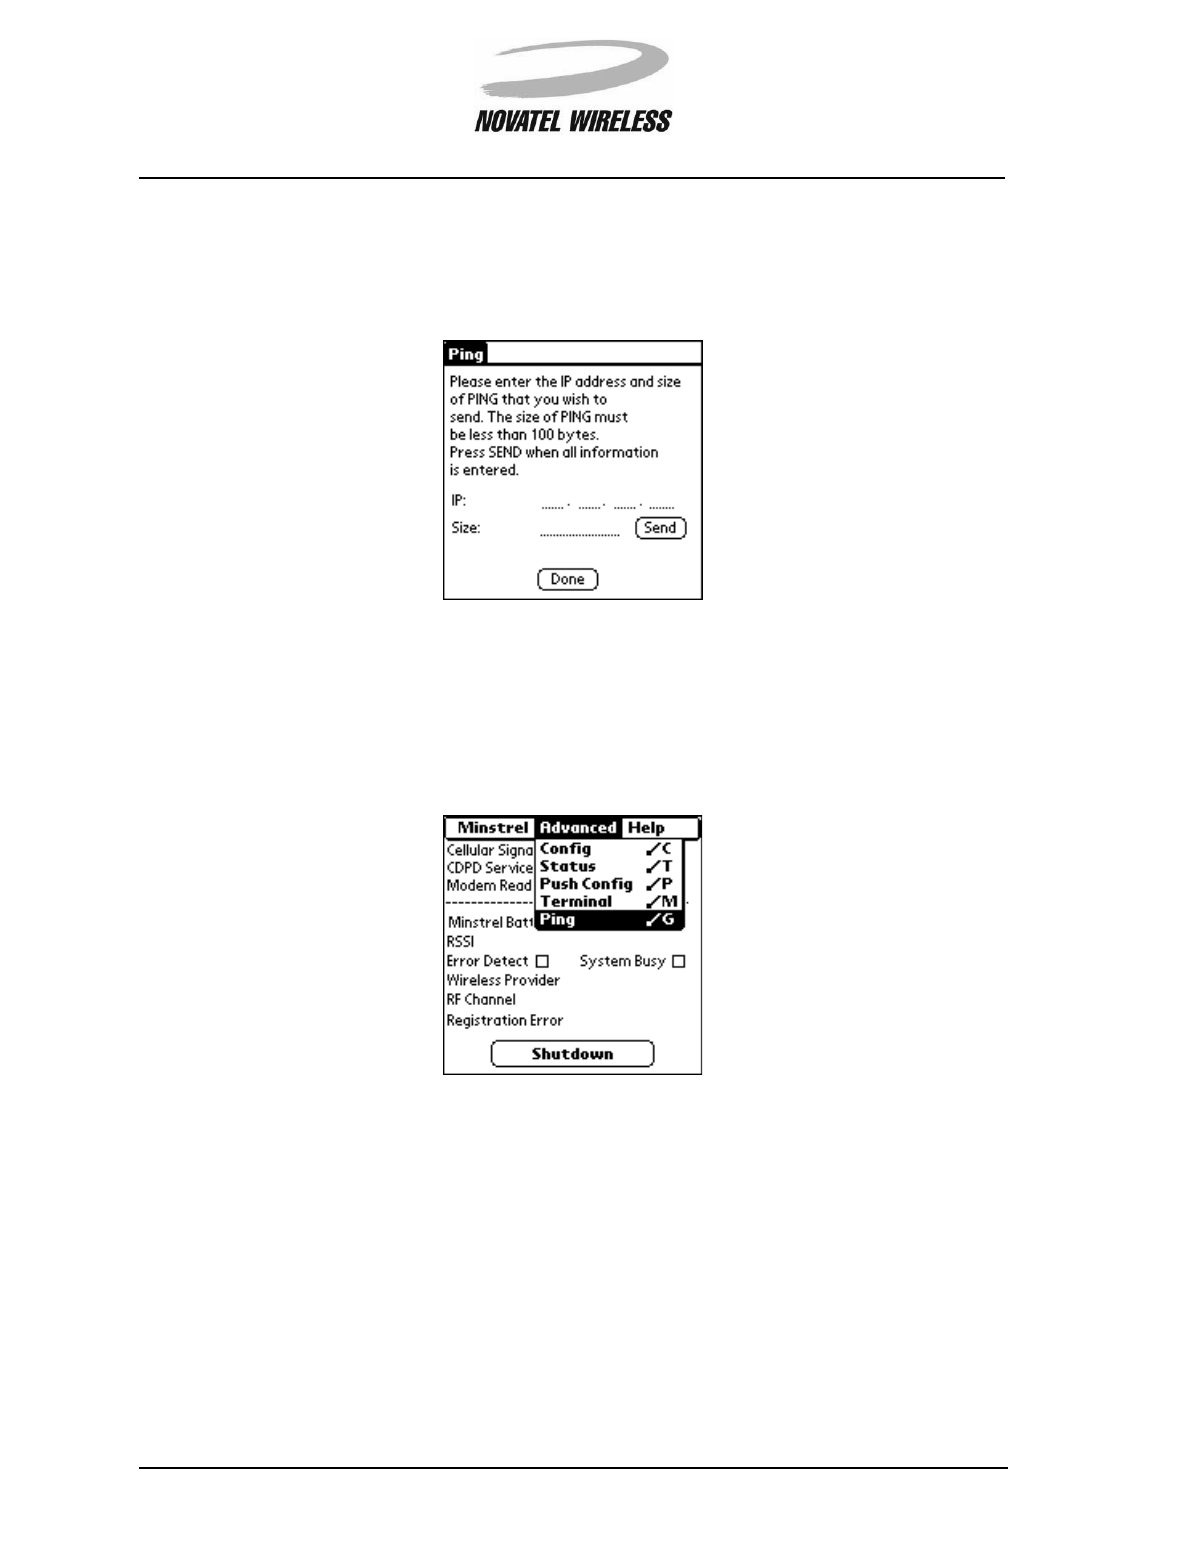
Minstrel Menu
The Minstrel menu includes commands used for controlling the network connection and configur-
ing the modem.
Modem Manager 59
Minstrel STM User Guide Version B
90023058
The table below lists the commands that can be found in the Minstrel menu and the action that
occurs when the command is selected.
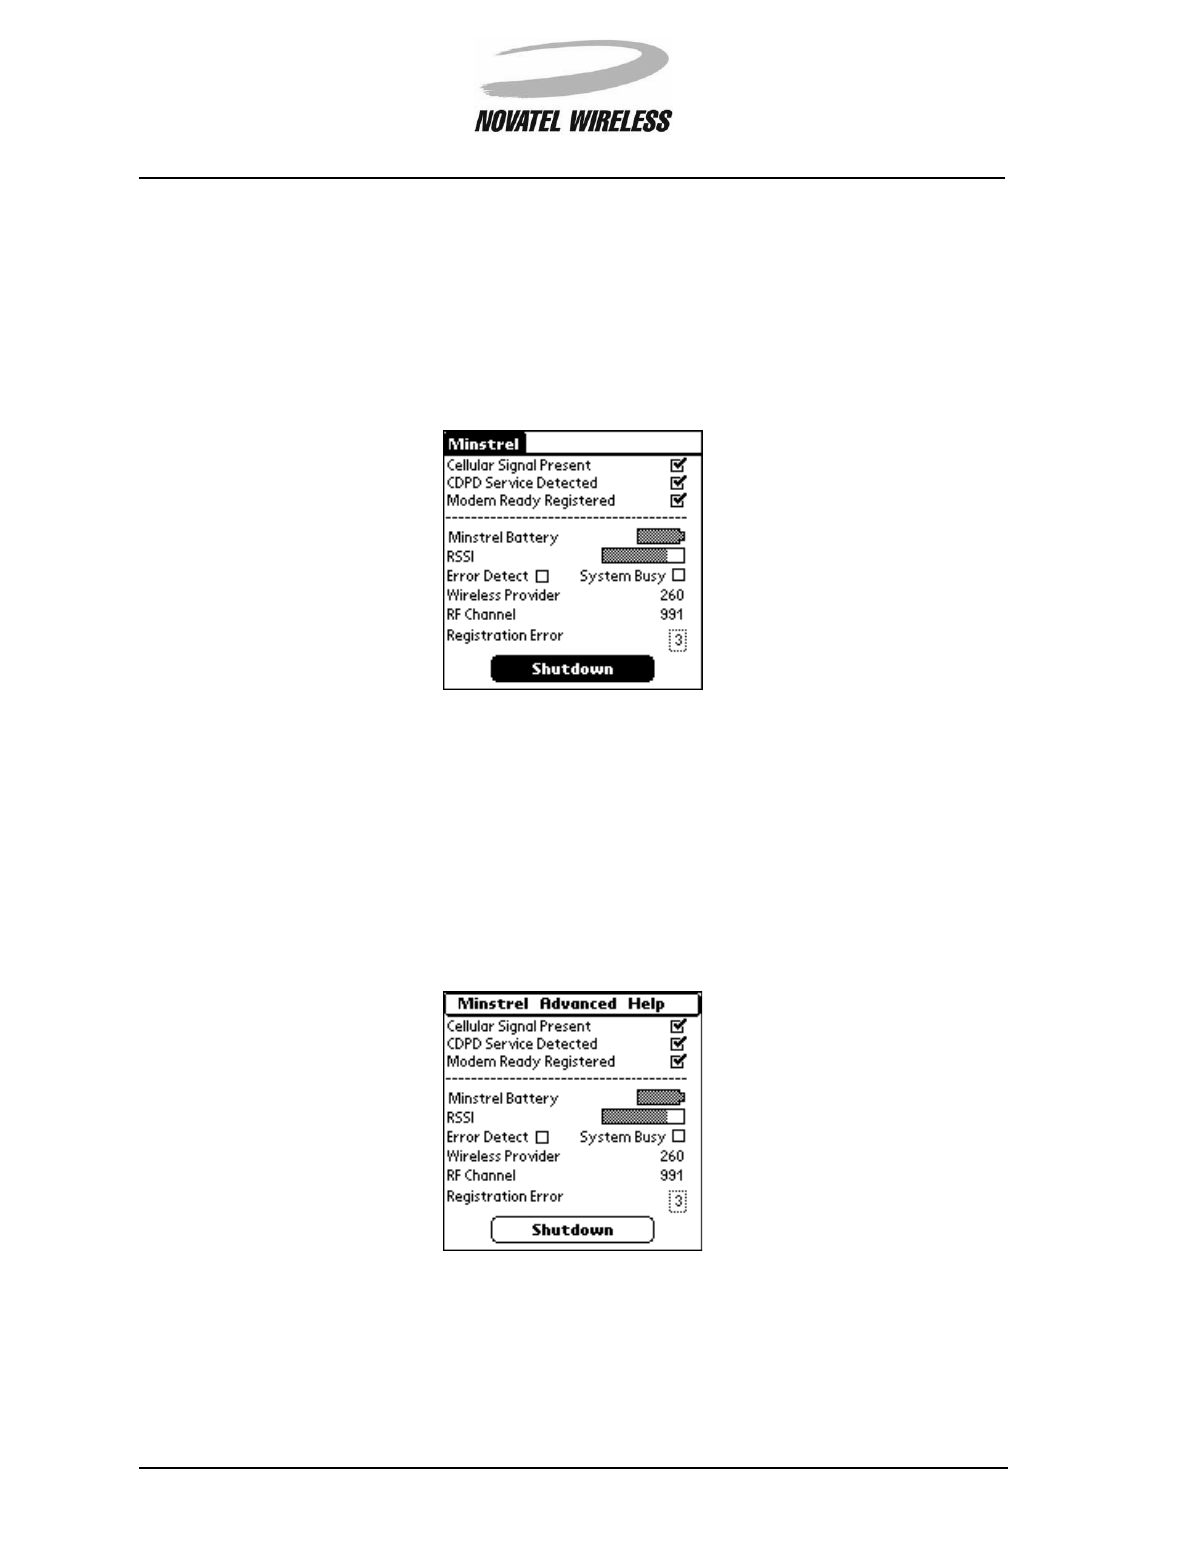
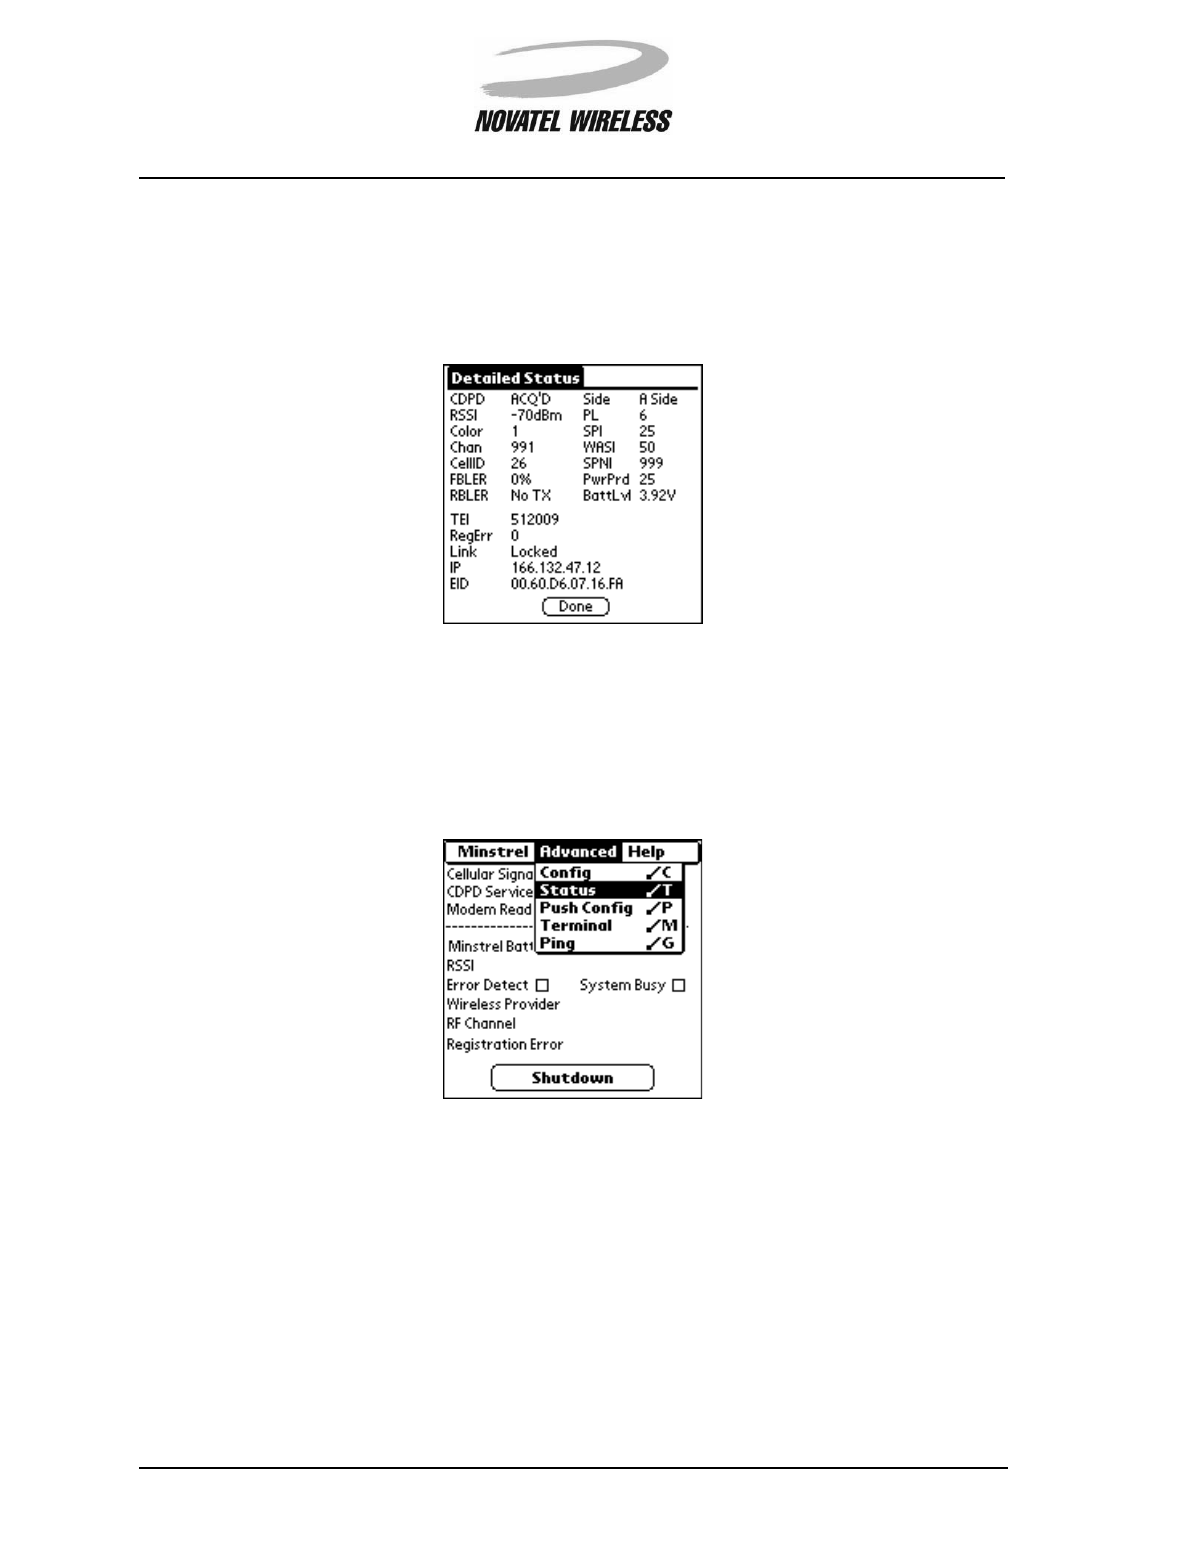
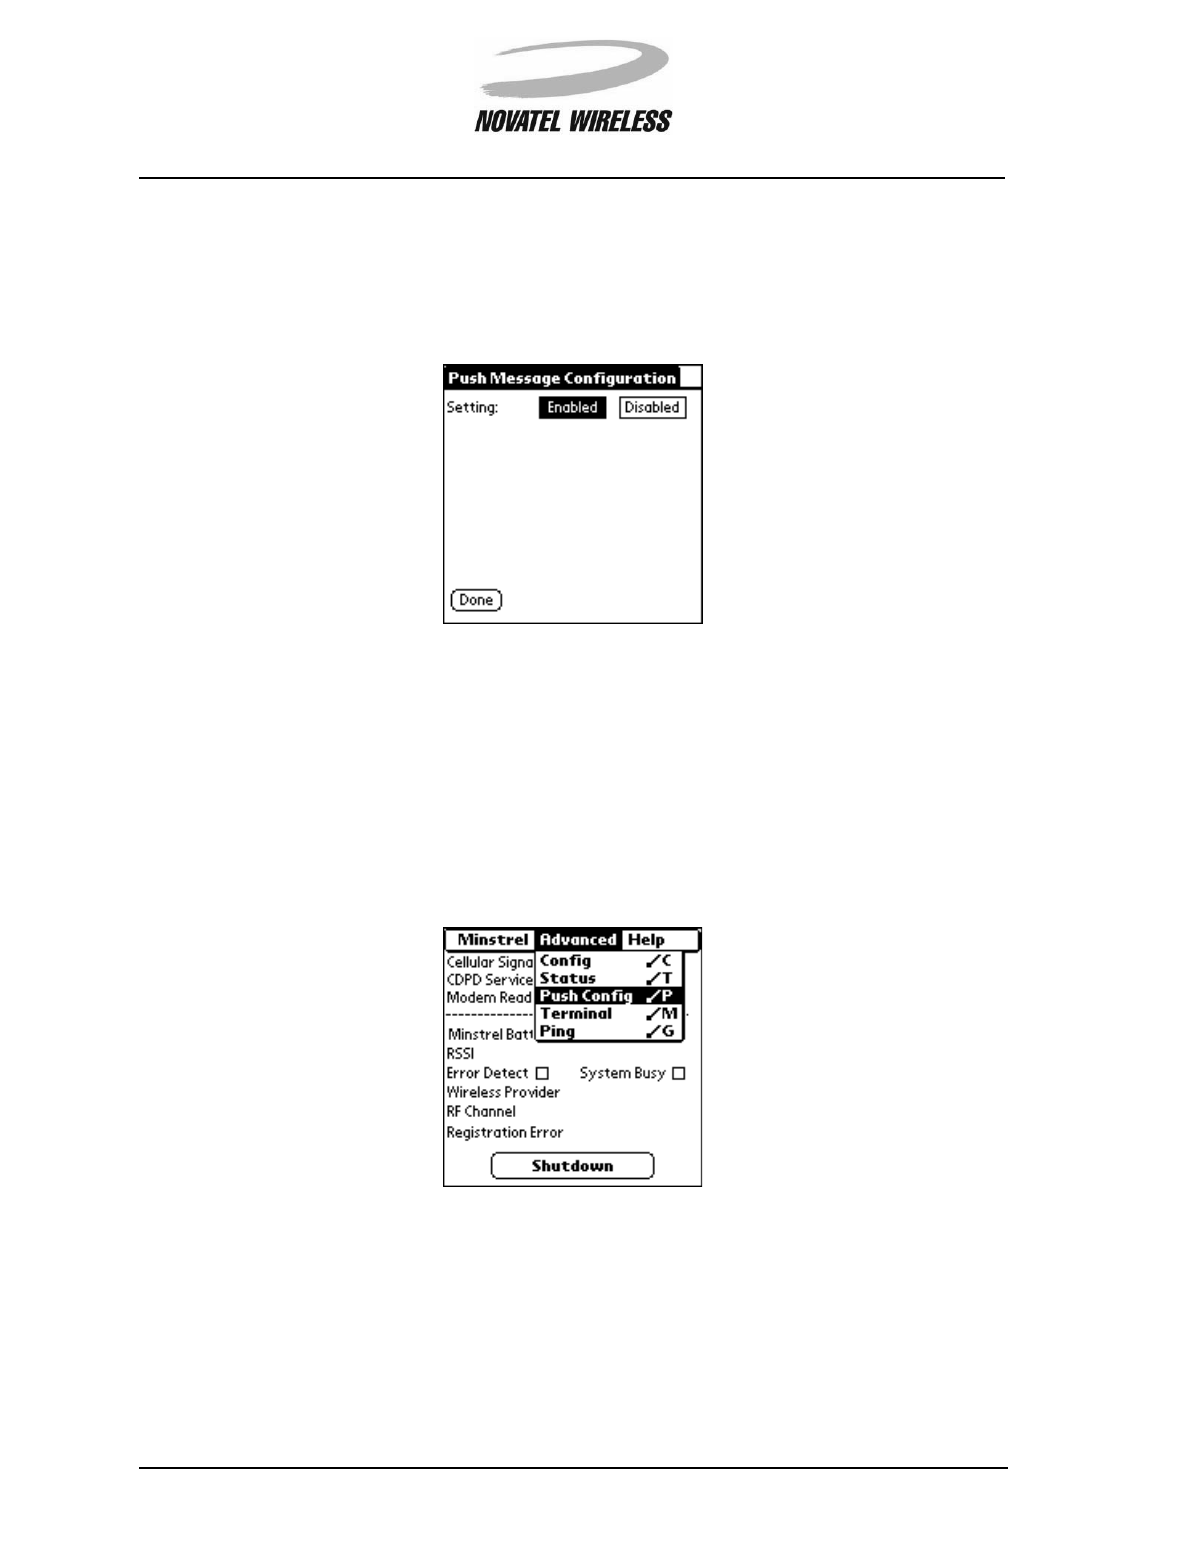
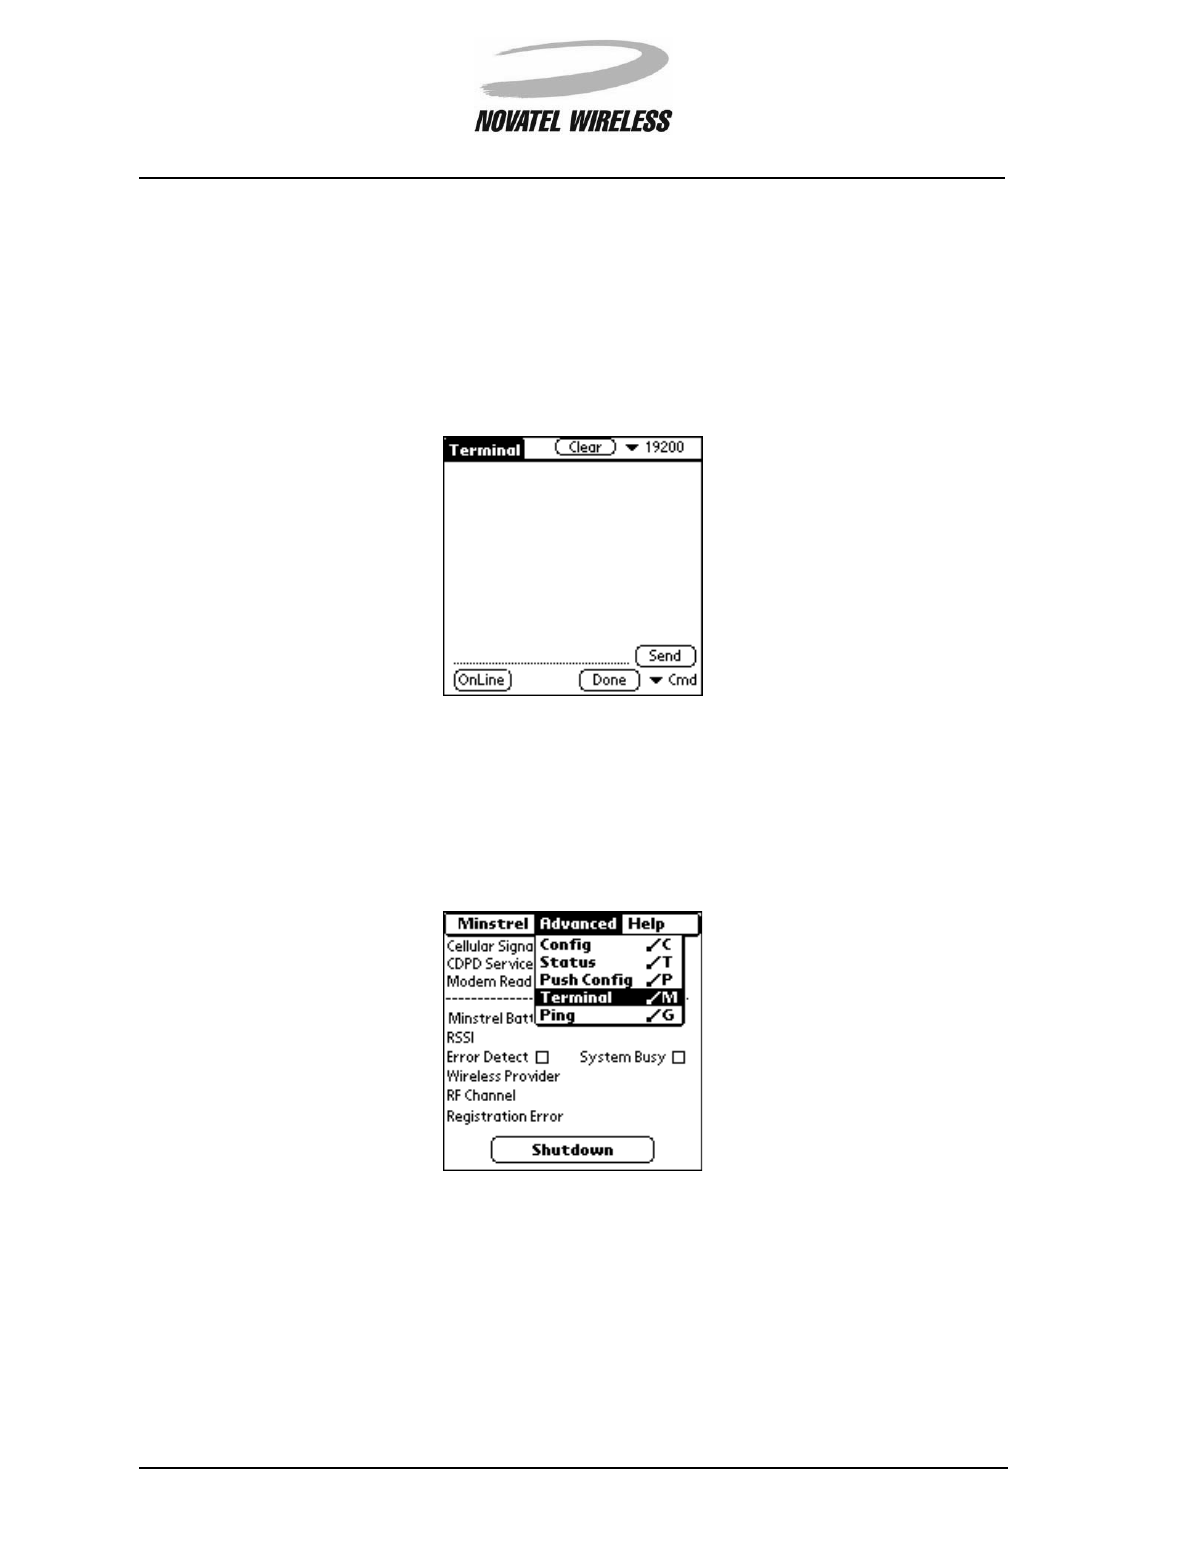
Advanced Menu
The Advanced menu provides access to more advanced features and controls for the Minstrel S.
Command Action
Disconnect The active PPP session is closed. If the Auto Power Off
feature is disabled, the modem will stay registered to the
Wireless IP network.
Shutdown The modem de-registers from the Wireless IP network
and powers off, closing any active PPP sessions.
Reconnect The modem attempts to re-establish a connection to the
Wireless IP network.
Network Prefs The Network Preferences panel of the Palm OS is
opened.
Setup Wizard The Setup Wizard utility is started.
Modem Manager 60
Minstrel STM User Guide Version B
90023058
The table below lists the commands that can be found in the Advanced menu and the action that
occurs when the command is selected.
Help Menu
The Help menu provides access to information about the software and hardware versions of your
Minstrel S.
The table below lists the commands that can be found in the Help menu and the action that occurs
when the command is selected.
Command Action
Config The Config screen is opened.
Status The Advanced Status screen is opened.
Push Config The Push Message Configuration screen is opened.
Term in al The Terminal screen is opened.
Ping The Ping screen is opened.
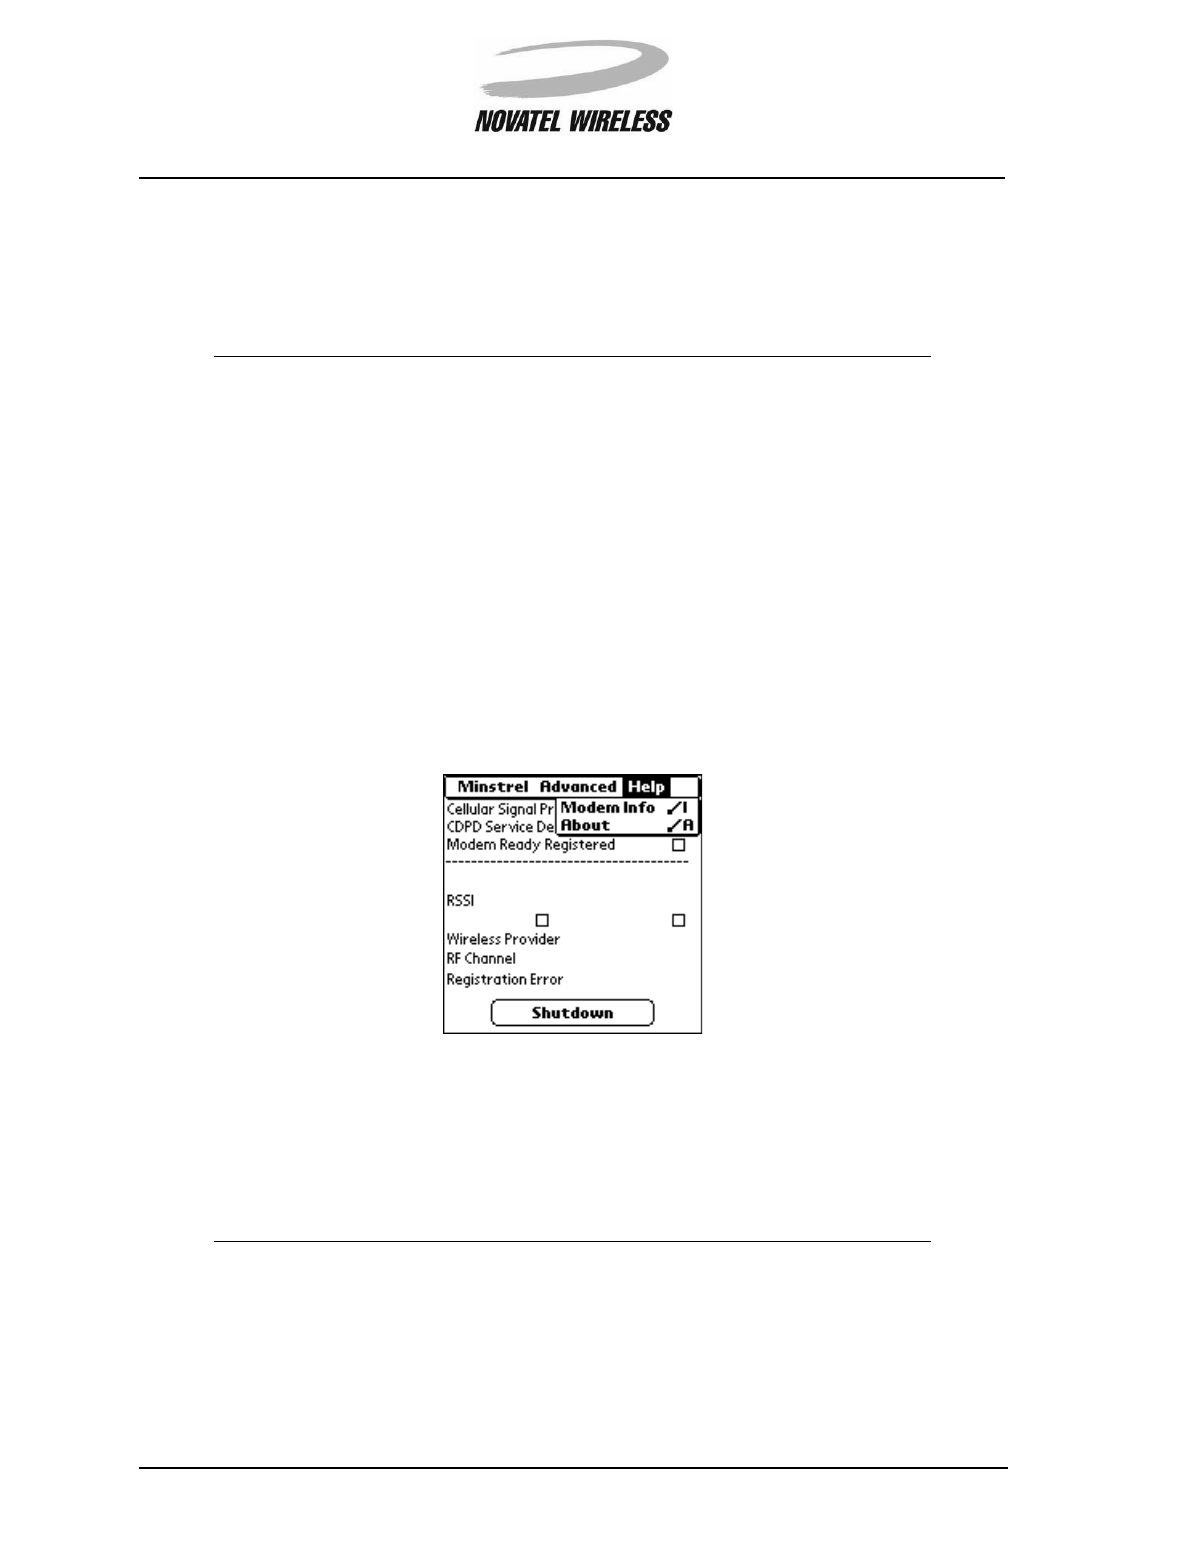
Command Action
Modem Info A window containing information about the Minstrel S
modem, including the EID and hardware and firmware
version number, is displayed.
About A window containing information about the Modem
Manager software, including the software version num-
ber, is displayed.
Modem Manager 61
Minstrel STM User Guide Version B
90023058
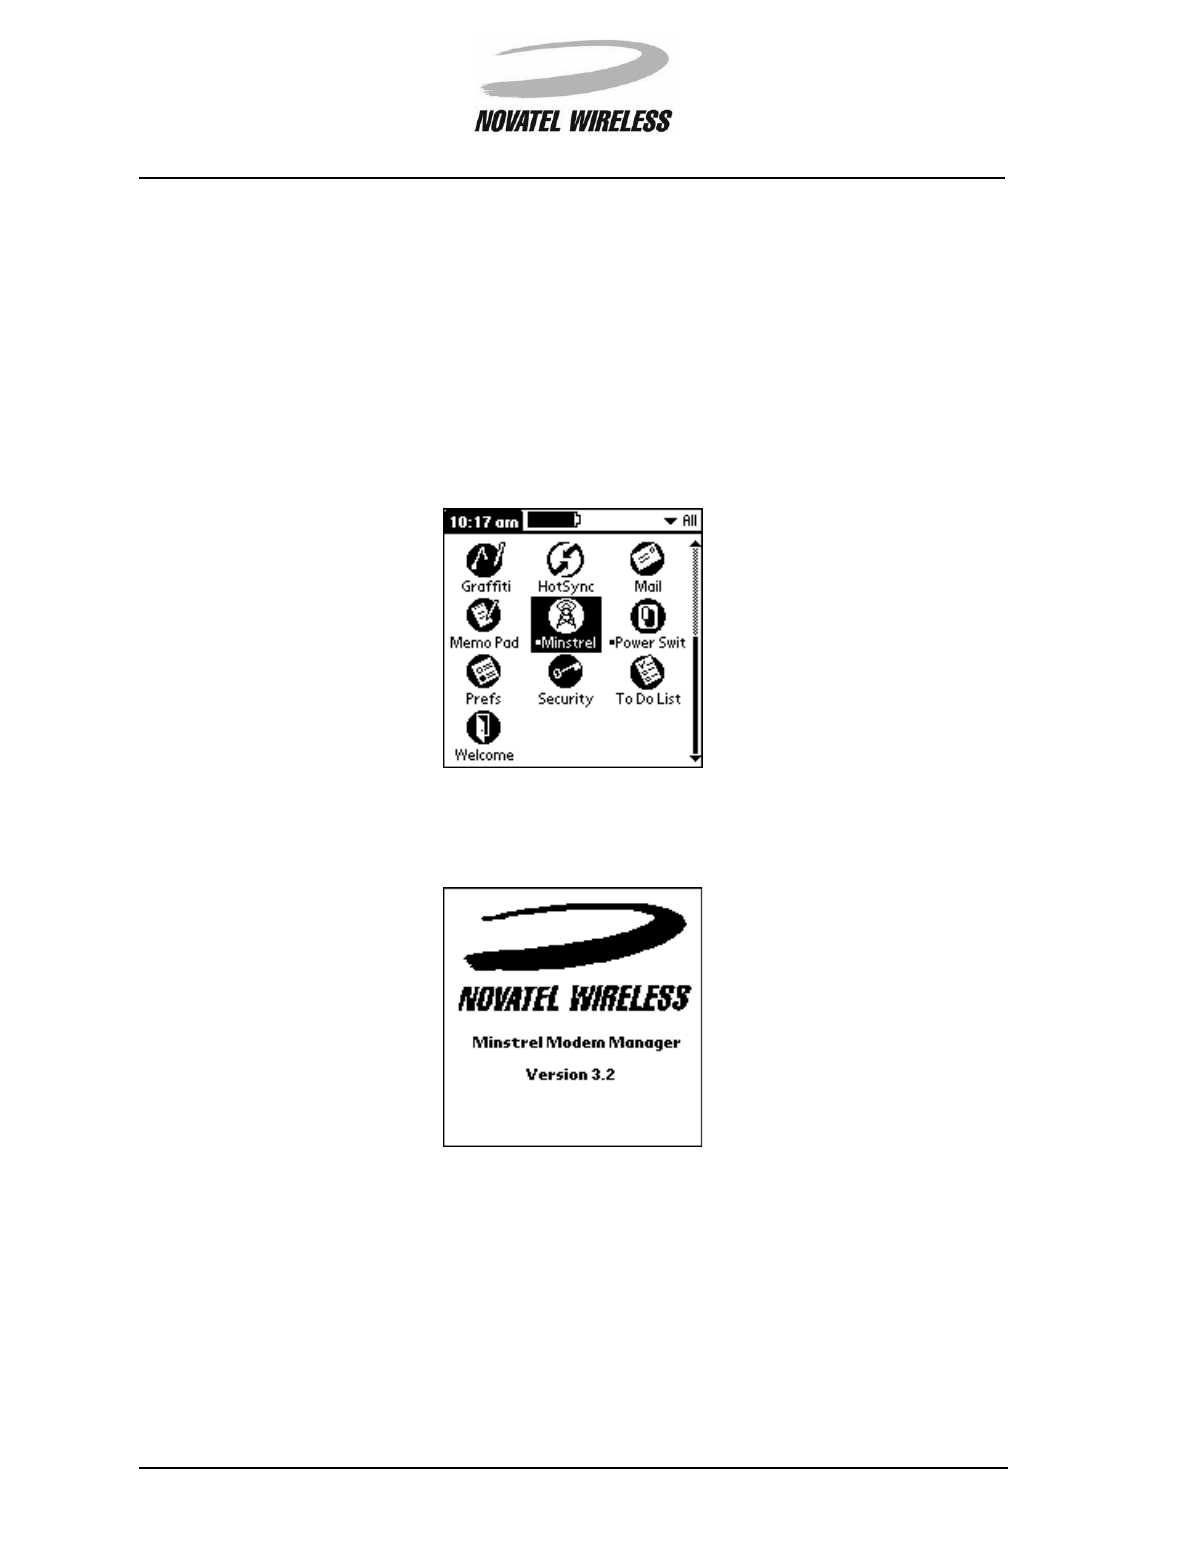
Starting Modem Manager
If your Minstrel S is not inserted into the Visor’s Springboard expansion slot, simply insert the Min-
strel S and the Modem Manager software will start, automatically connecting you to the Wireless
IP network.
If your Minstrel S is already attached to the Visor, tap the Applications icon and then the Minstrel
icon to start Modem Manager.
The following screen will appear briefly when Modem Manager launches.
Modem Manager 62
Minstrel STM User Guide Version B
90023058
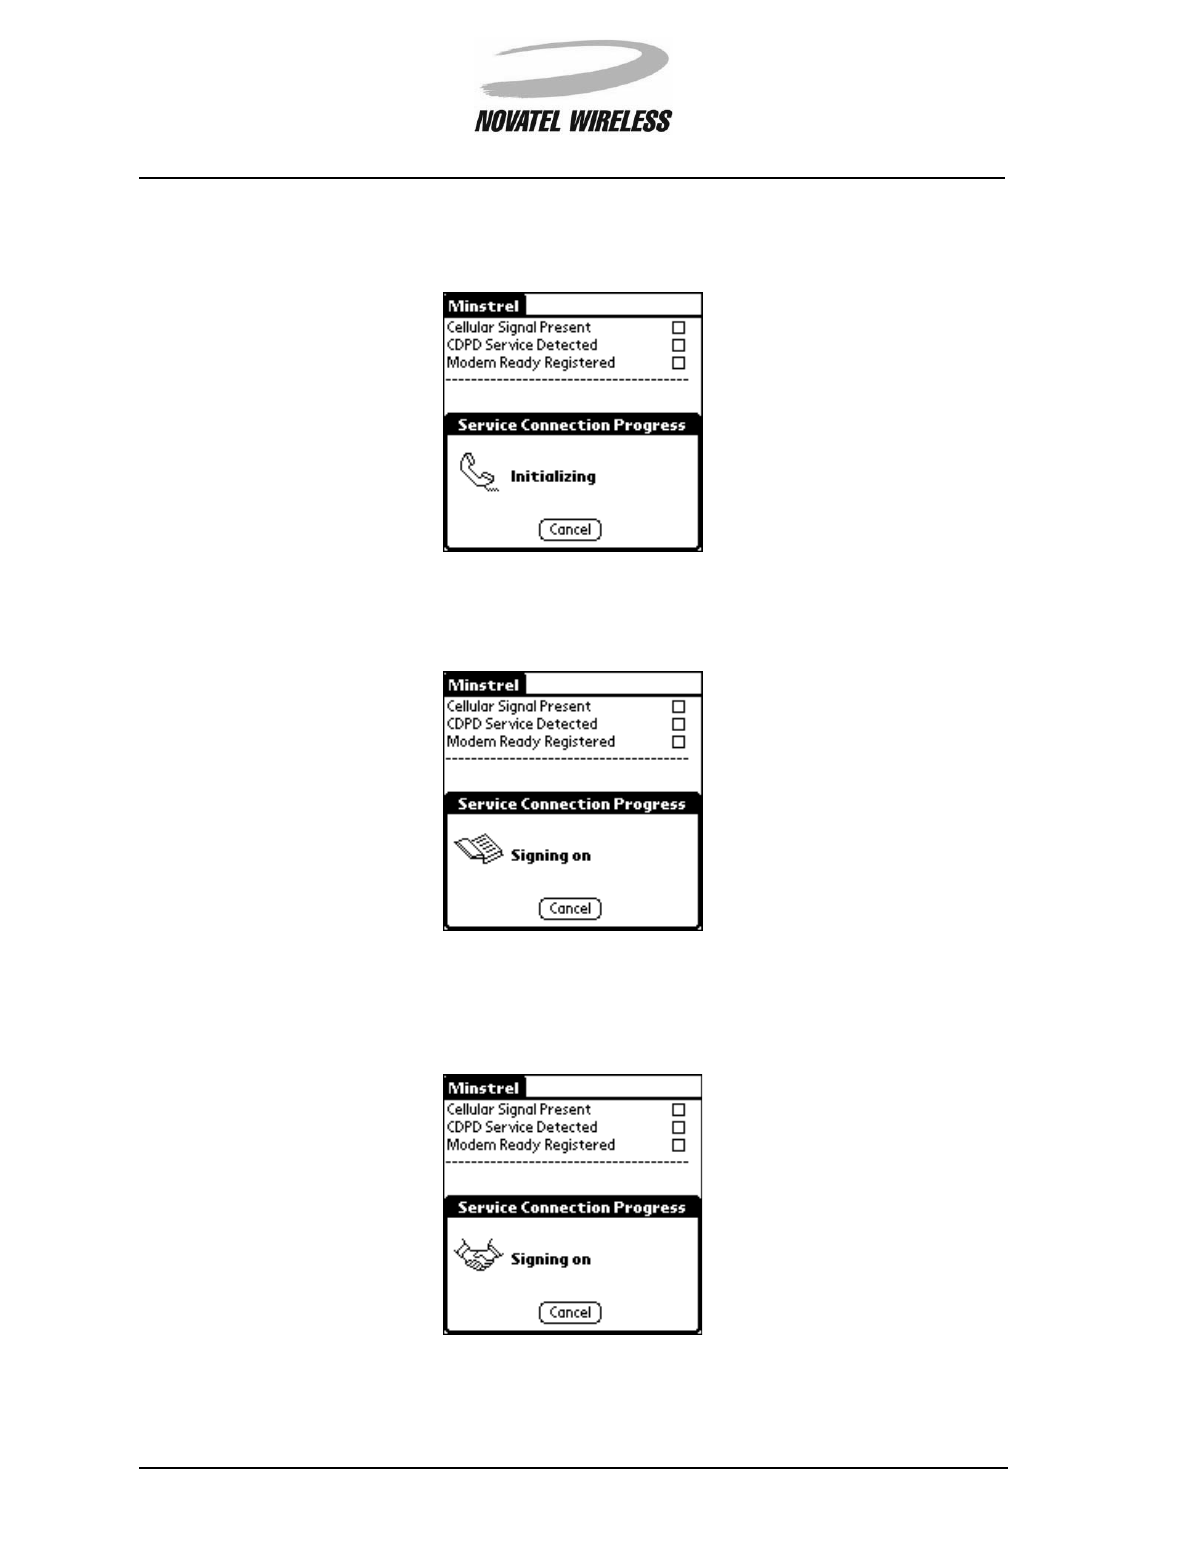
The Modem Manager software will begin establishing a connection to a Wireless IP network pro-
vider by initializing the modem.
Then, the modem will attempt to find an available Wireless IP network provider.
Once the modem finds a Wireless IP provider, information is exchanged between the modem and
the provider’s network.
Modem Manager 63
Minstrel STM User Guide Version B
90023058
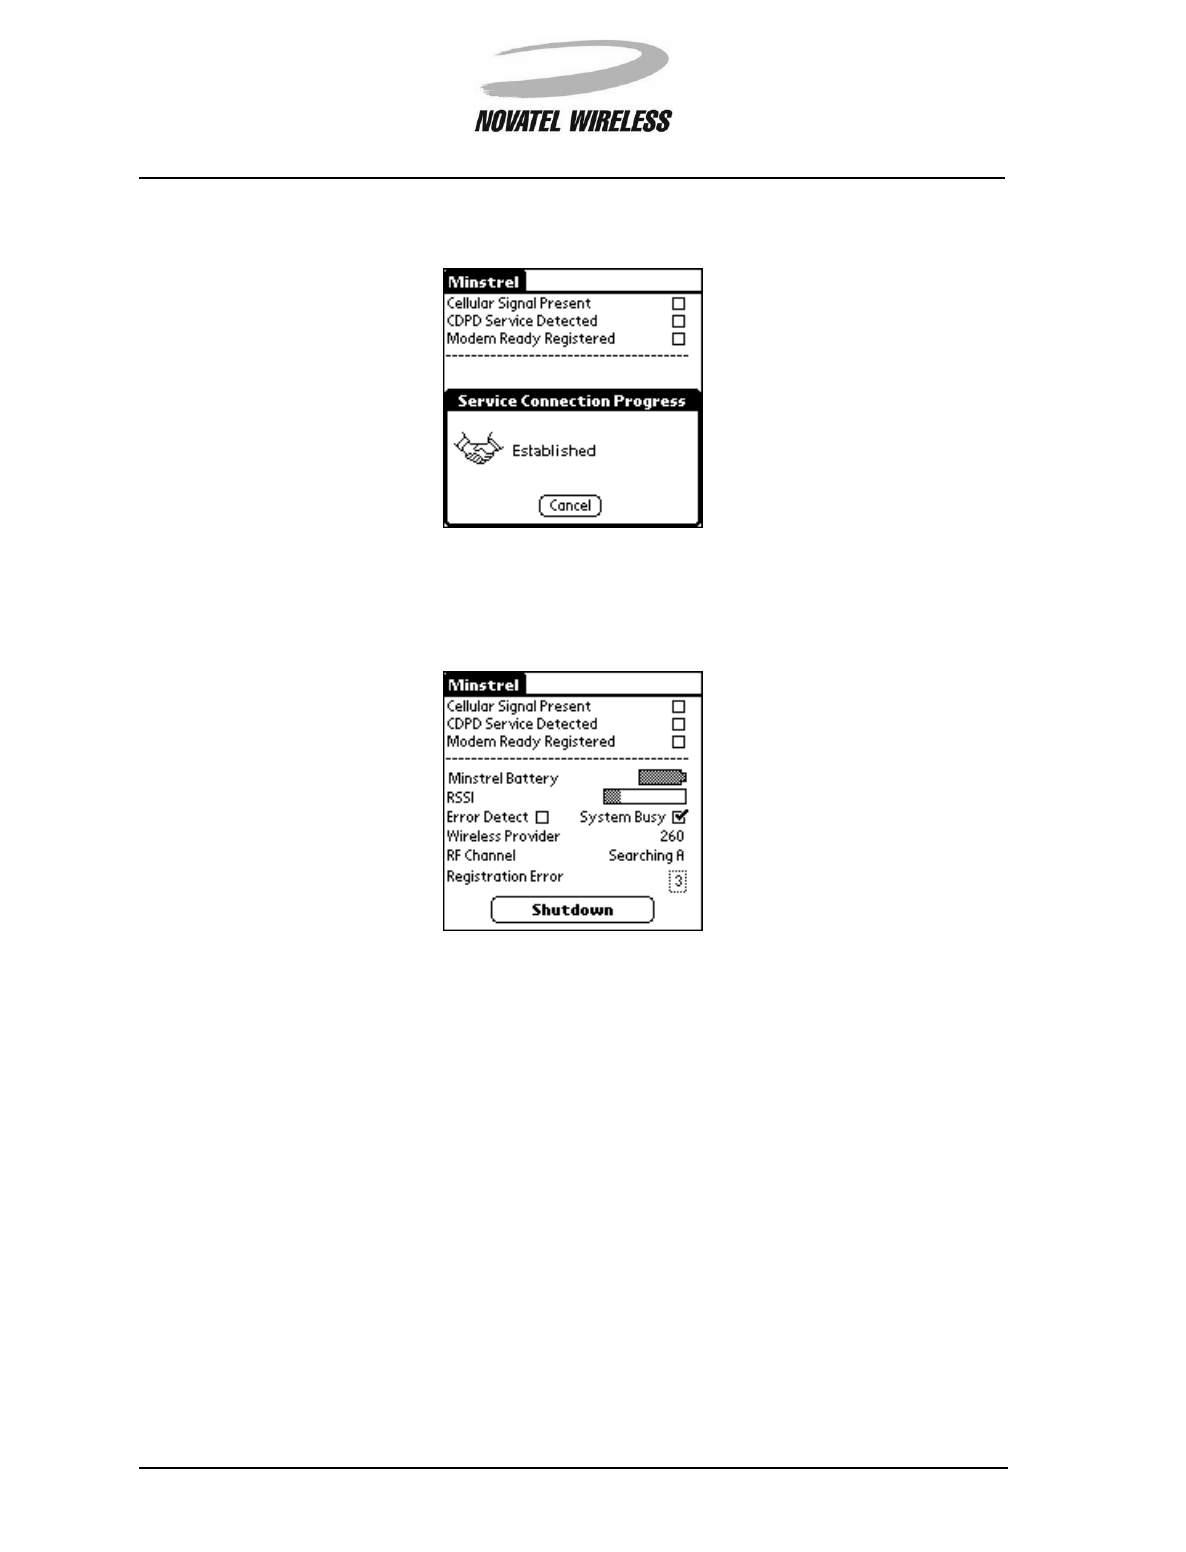
The network connection is established once the information exchange is complete.
Once a connection to the network provider has been established, the Minstrel screen will appear,
showing the status of the connection.
For more information on the Minstrel screen refer to the section entitled Minstrel.
Modem Manager 64
Minstrel STM User Guide Version B
90023058
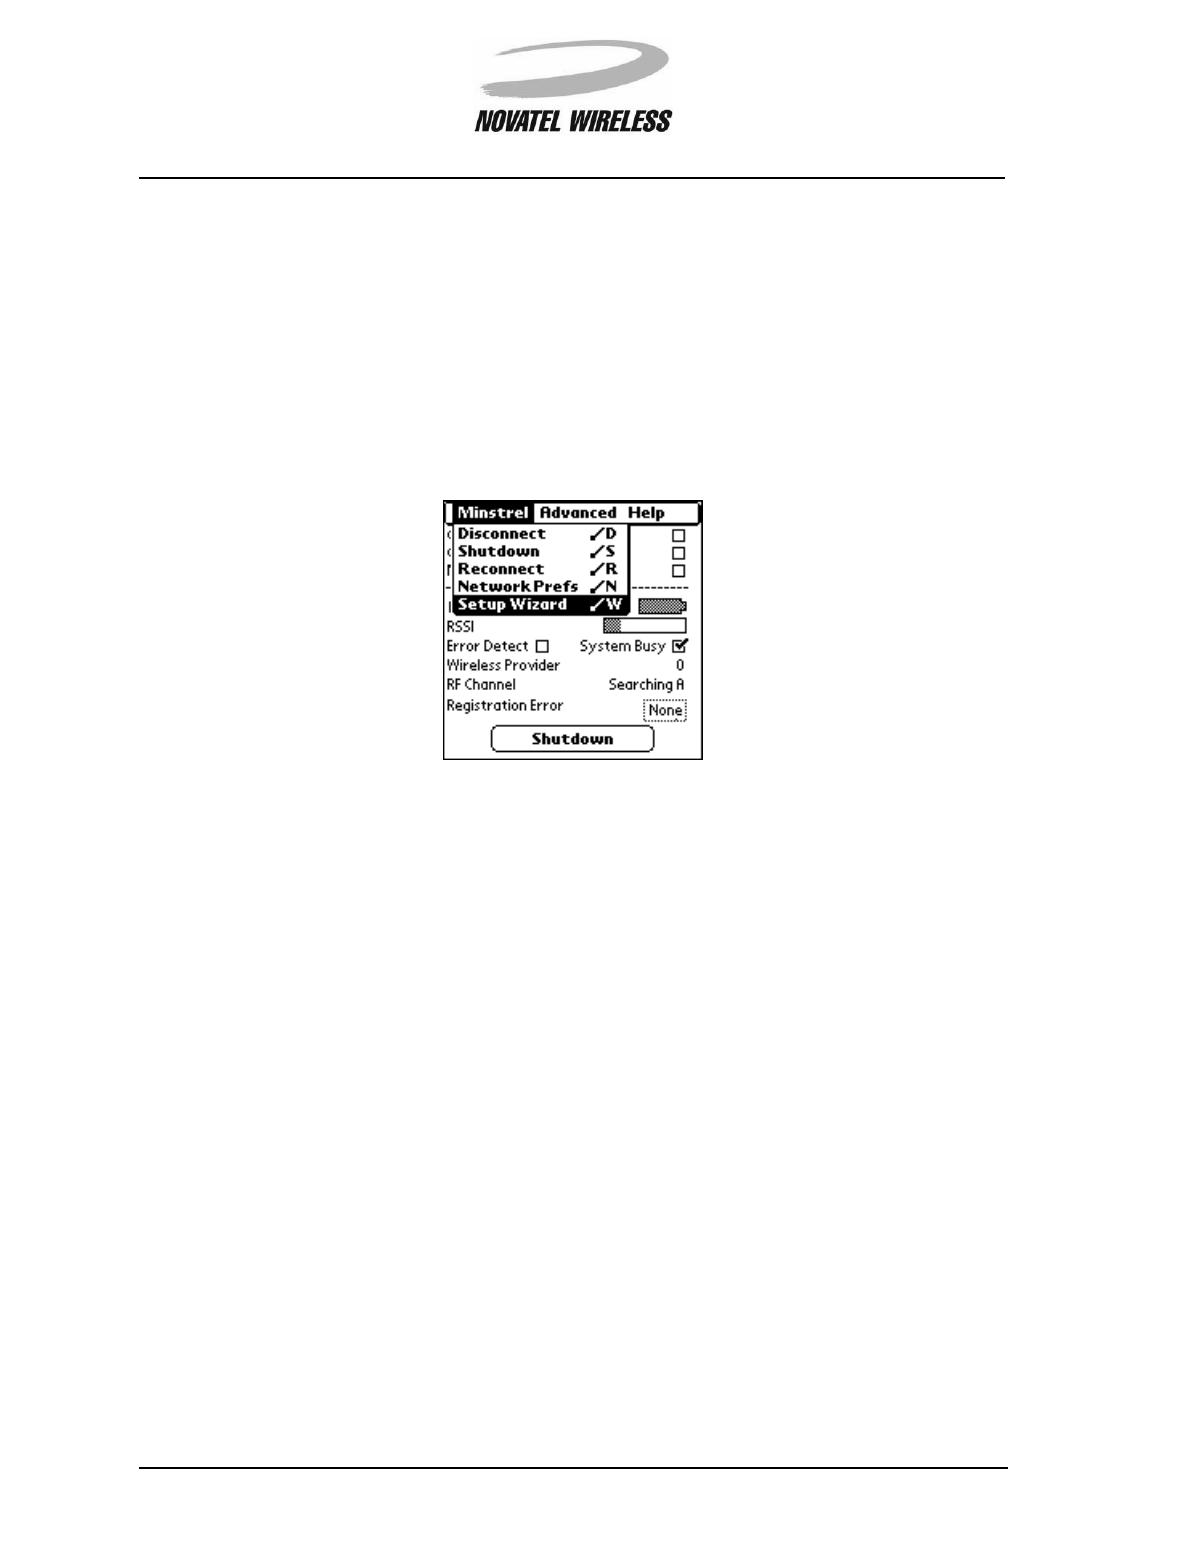
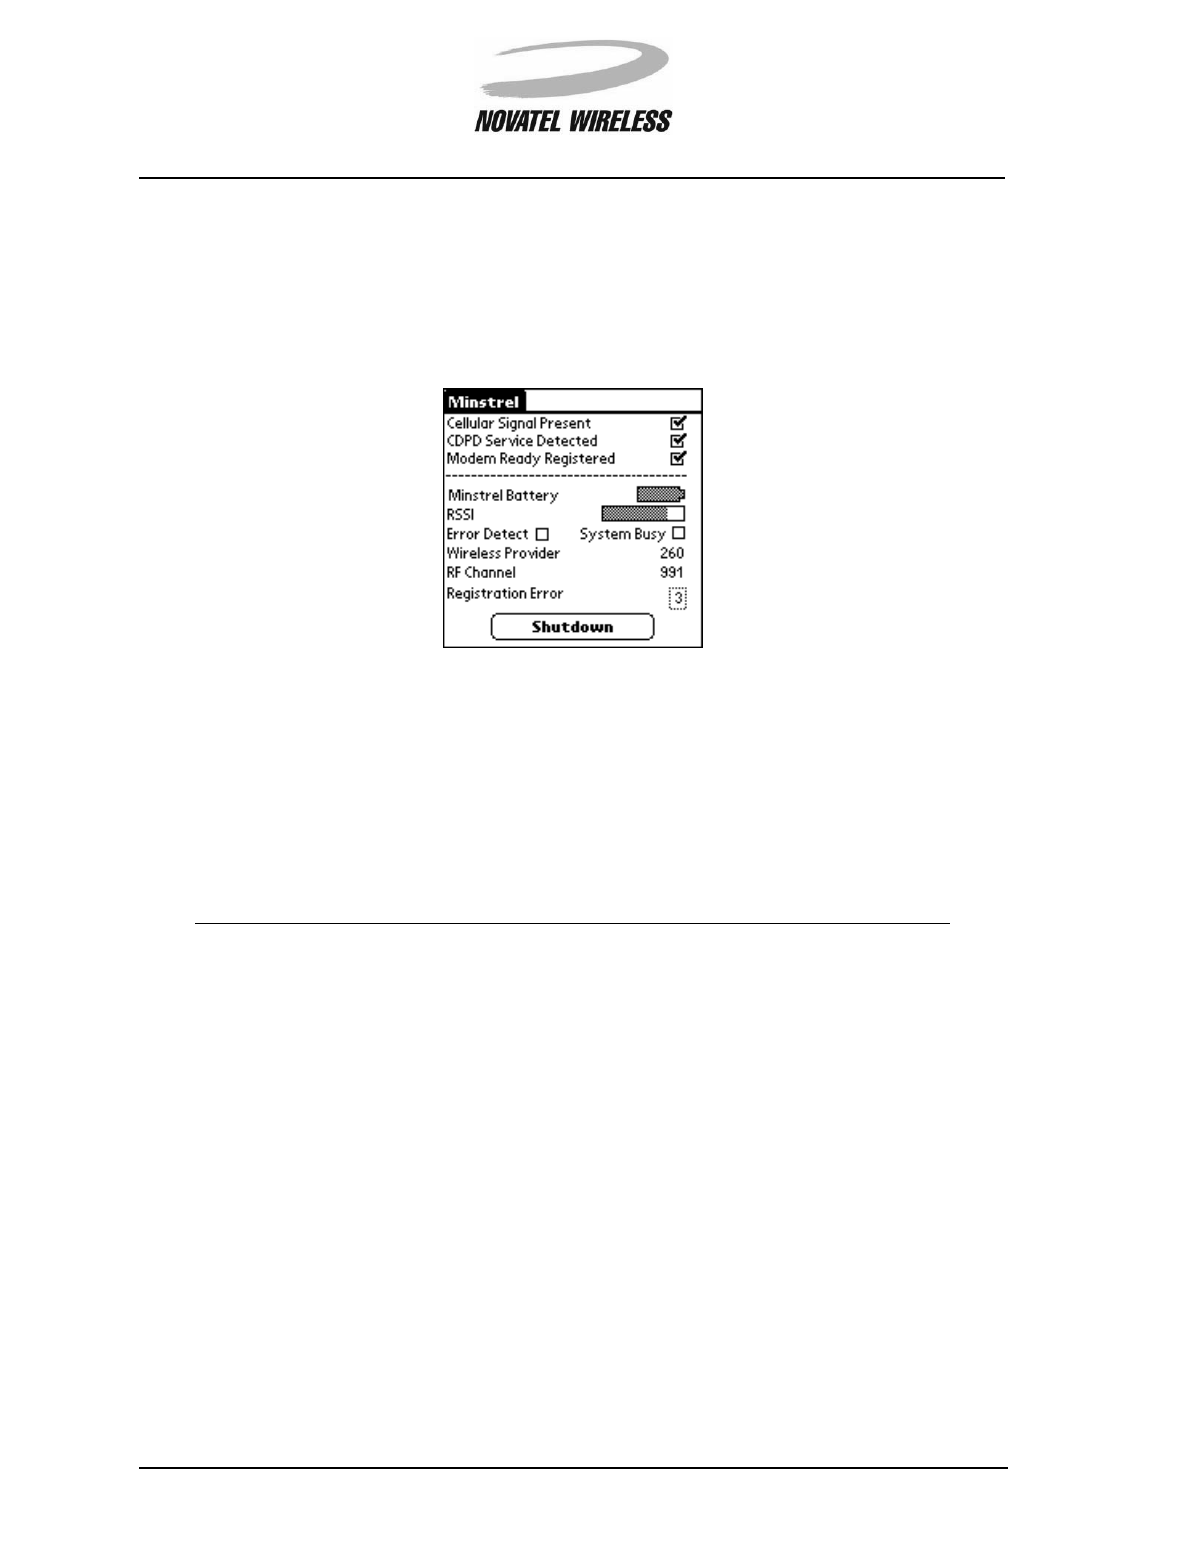
Minstrel
The main screen of the Modem Manager program is labeled Minstrel. This screen shows basic
modem and network connection status information and provides access to the other features and
screens of the Modem Manager through a menu bar.
Fields
The fields shown in the Minstrel screen are listed below, along with a brief explanation of their
meaning.
Field Description
Cellular Signal Present When this box is checked, the modem has found
a cellular signal.
CDPD Service Detected When the box is checked, it indicates the pres-
ence of Wireless IP service which the modem can
use. This may not necessarily be the service pro-
vider with which you have a subscription, but
shows that there is Wireless IP service available
at your current location.
Modem Ready Registered When this box is checked, the modem is con-
nected to the Wireless IP network. Your modem
is ready to send and receive data once the con-
nection is made.
Minstrel Battery The battery status bar shows the amount of
charge left on the Minstrel’s battery.
RSSI This status bar shows the strength of the signal
being received from the Wireless IP network.

Modem Manager 65
Minstrel STM User Guide Version B
90023058
Error Detect When this box is checked, an error in communica-
tions with the Wireless IP network has been
detected. The modem will attempt to re-establish
the communication with the network.
System Busy This box will be checked when the Wireless IP
network is busy. The cause is normally too many
users on the network. You may notice a decline in
the performance of sending and receiving data.
Wireless Provider When registered, this text field shows the identi-
fier (SPI) of the Wireless IP network provider
being used.
RF Channel This text field shows the number of the Wireless
IP channel which you are currently using to send
and receive data. Each channel number repre-
sents a range of frequencies. If the unit is not reg-
istered or is searching for a channel, the value
displayed will be either Searching A or Search-
ing B, depending on which side of the Wireless IP
network is being scanned.
Registration Error This text field indicates whether or not an error
has occurred during the attempt to register. If
None is displayed, registration was successful. If
a number is displayed, there was an error during
registration. Each of the possible numbers, 1
through 7, correspond to a specific registration
error. To read an description of the error, tap on
the text box of the Registration Error field. A
window will open explaining the error.
Field Description
Modem Manager 66
Minstrel STM User Guide Version B
90023058
Controls
Shutdown Button
In order to provide easy control over the network connection, there is also a Shutdown button at
the bottom of the screen.
When this button is tapped, the modem de-registers from the Wireless IP network and powers off.
Menu Bar
By tapping the Menu icon, you can open the Modem Manager menu bar when the Minstrel
screen is active. This menu bar provides access to various commands used to control and config-
ure the modem.
For more information about the menu bar, refer to Navigating Modem Manager in the section
Introduction to Modem Manager.

Modem Manager 67
Minstrel STM User Guide Version B
90023058
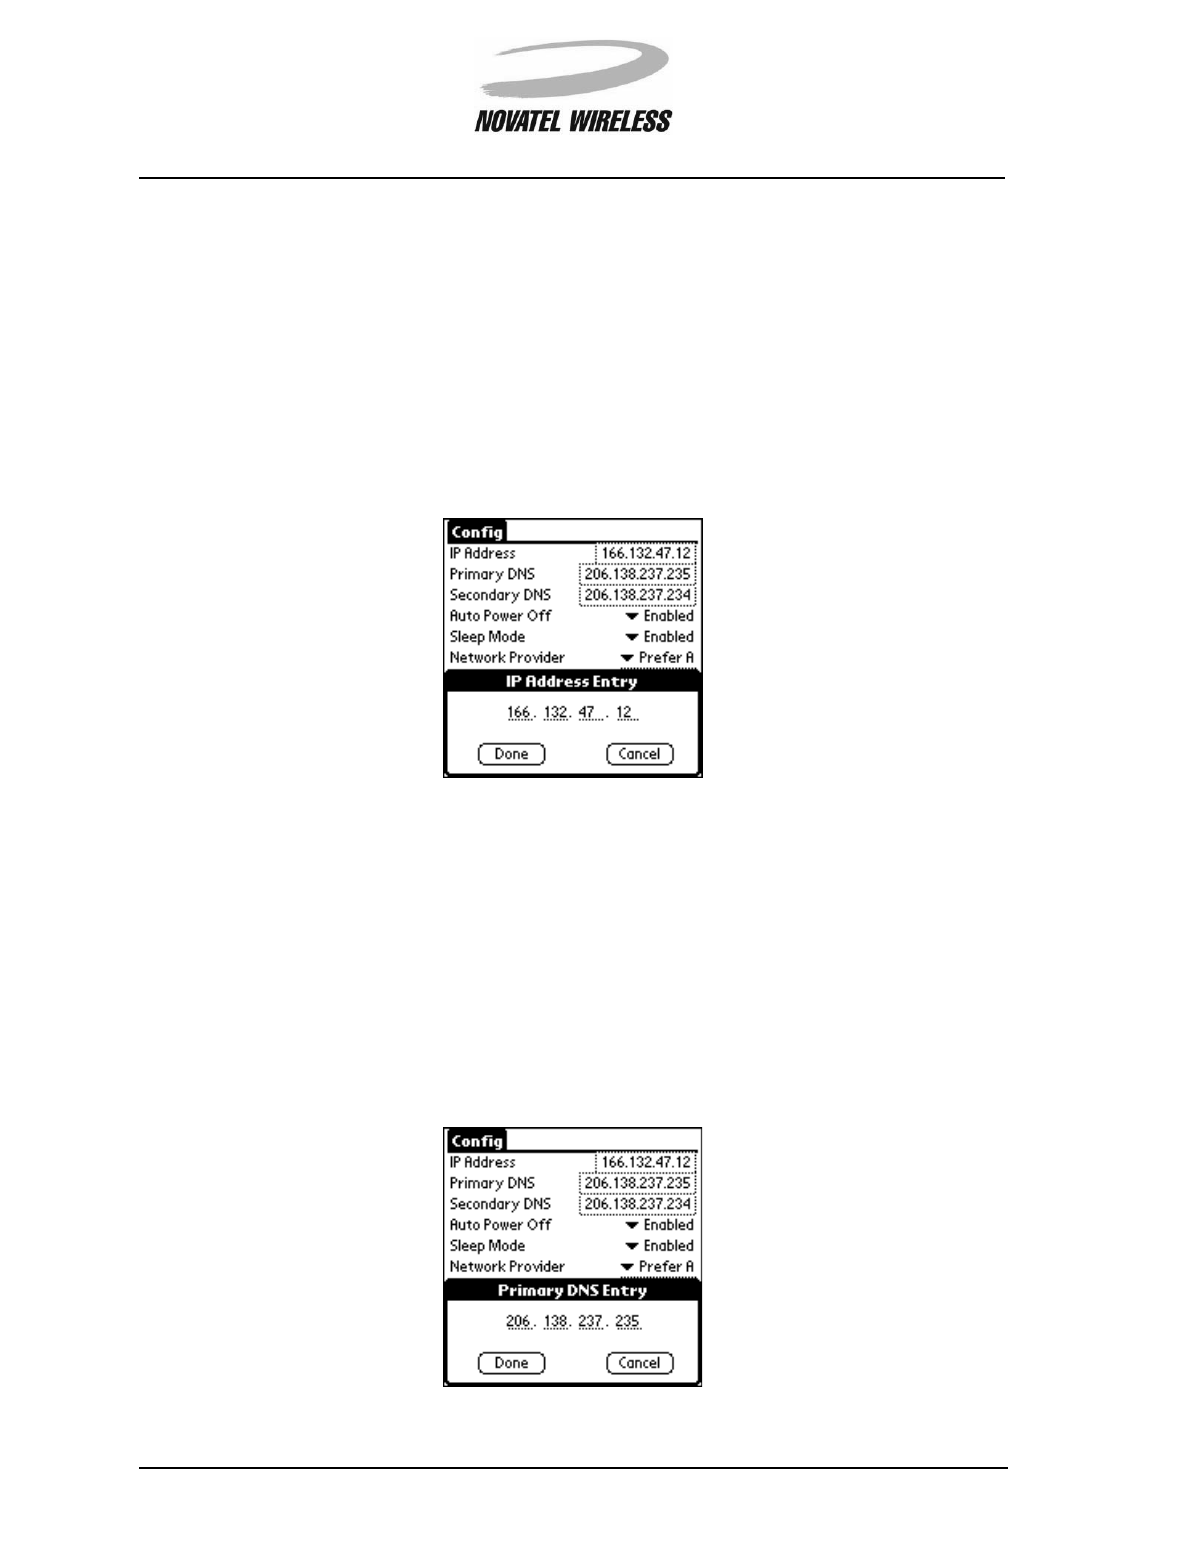
Config
The Config screen provides access to the configurable settings and features of the Minstrel S.
Opening the Config Screen
To open this screen, tap the Menu icon when the Minstrel screen is open and select Config from
the Advanced menu.
Changing the Configuration
To change any of the configuration settings, tap on the text box or pick list for that field. For more
information on each of the fields and their associated settings, refer to the Fields section.
Once the fields have been changed as required, tap the Save button to save the new settings to
the Minstrel S.
NOTE: Unless instructed to do so by your service provider, you will not normally need to change
any of these settings. If you wish, you can run the Setup Wizard program to guide you
through the configuration changes.
Modem Manager 68
Minstrel STM User Guide Version B
90023058
Fields
IP Address
The IP Address text field shows the current IP address of your Minstrel S. This value should not
be changed unless you are instructed to do so by your Wireless IP network provider.
To edit the IP address, tap the text of the IP Address field to open the IP Address Entry window.
In this window, you can directly edit the IP address as you would normal text.
Primary DNS
The Primary DNS text field shows the current primary DNS address for your Minstrel S. This
value should not be changed unless you are instructed to do so by your Wireless IP network pro-
vider.
To edit the primary DNS address, tap the text of the Primary DNS field to open the Primary DNS
Entry window. In this window, you can directly edit the primary DNS address as you would normal
text.
Modem Manager 69
Minstrel STM User Guide Version B
90023058
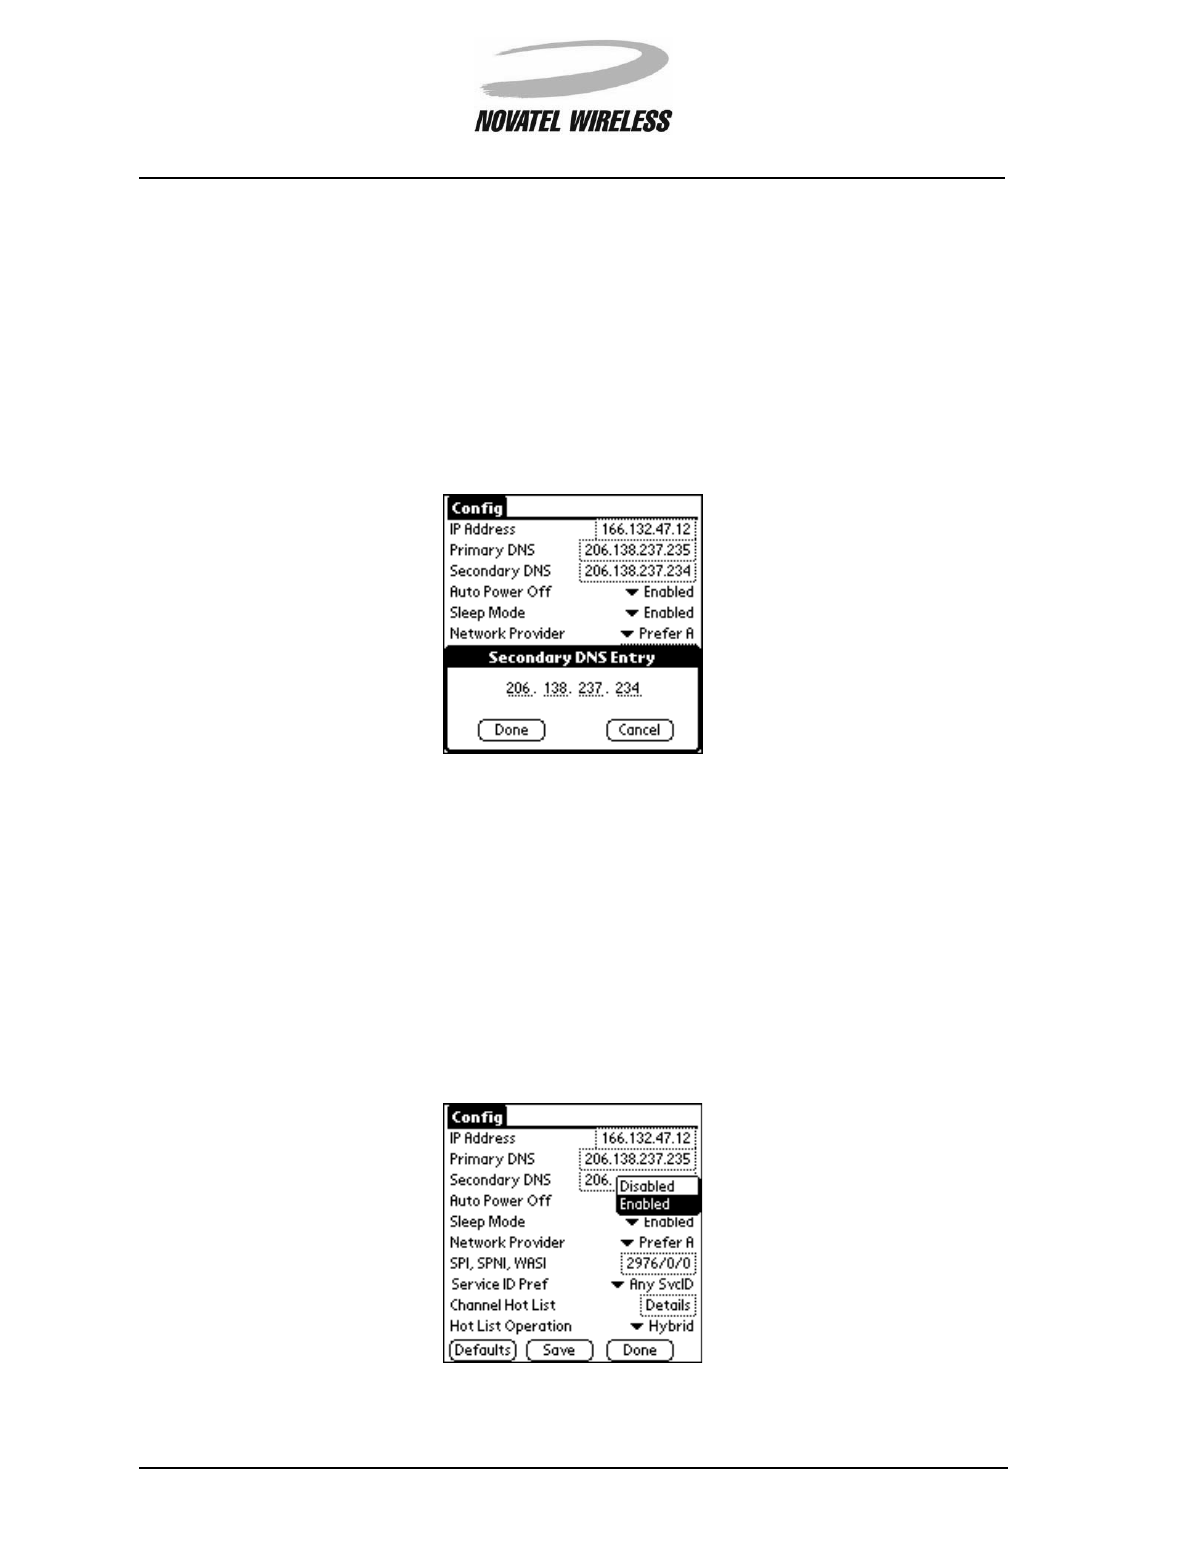
Secondary DNS
The Secondary DNS text field shows the current primary DNS address for your Minstrel S. This
value should not be changed unless you are instructed to do so by your Wireless IP network pro-
vider.
To edit the primary DNS address, tap the text of the Secondary DNS field to open the Secondary
DNS Entry window. In this window, you can directly edit the secondary DNS address as you
would normal text.
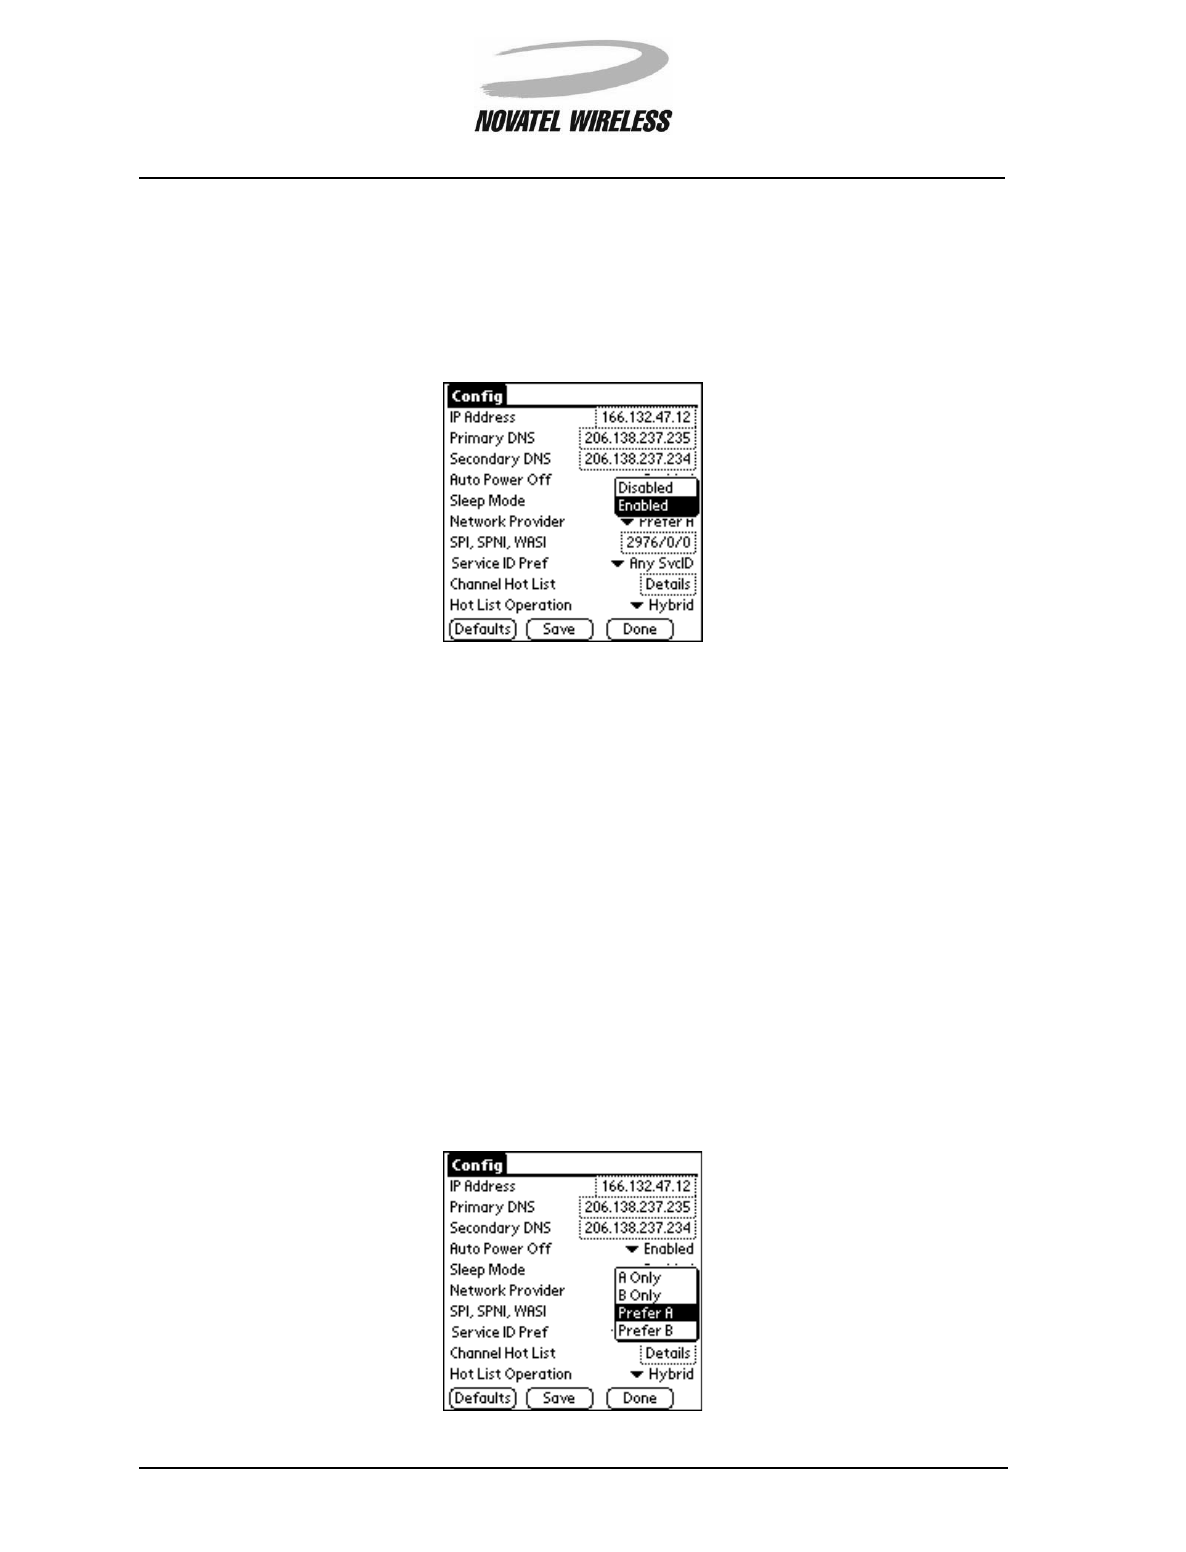
Auto Power Off
The Auto Power Off field shows whether the Auto Power Off feature of the Minstrel S is enabled
or disabled. If this feature is Enabled, any time the active PPP session is closed the modem will
de-register from the network and power off. If it is Disabled, closing the PPP session will not
cause the modem to de-register.
To change the setting for the Auto Power Off field, tap to open the pick list and then tap to select
either Disabled or Enabled as desired.
Modem Manager 70
Minstrel STM User Guide Version B
90023058
Sleep Mode
The Sleep Mode field indicates whether sleep mode is disabled or enabled. If this feature is
Enabled, when the modem is not actively sending or receiving data, it will enter a low current con-
sumption mode called sleep mode. If it is Disabled, the modem will never enter this mode.
To change the setting for the Sleep Mode field, tap to open the pick list and then tap to select
either Disabled or Enabled as desired.
Network Provider
The Network Provider field indicates what side of the Wireless IP network your Minstrel S is con-
figured to use. Each area of the Wireless IP network has an A side and a B side, with a single net-
work provider assigned to each side. The side a network provider is assigned to may change
between service areas. If the Network Provider field is set to A Only, the modem will only scan
the A side of the network for usable channels. If it is set to B Only, only the B side will be used.
Setting this field to Prefer A means that the modem will scan the A side first and then the B side.
Prefer B sets the modem to scan side B and then A.
To change the setting for the Network Provider field, tap to open the pick list and select the new
value you wish to have your modem configured with.
Modem Manager 71
Minstrel STM User Guide Version B
90023058
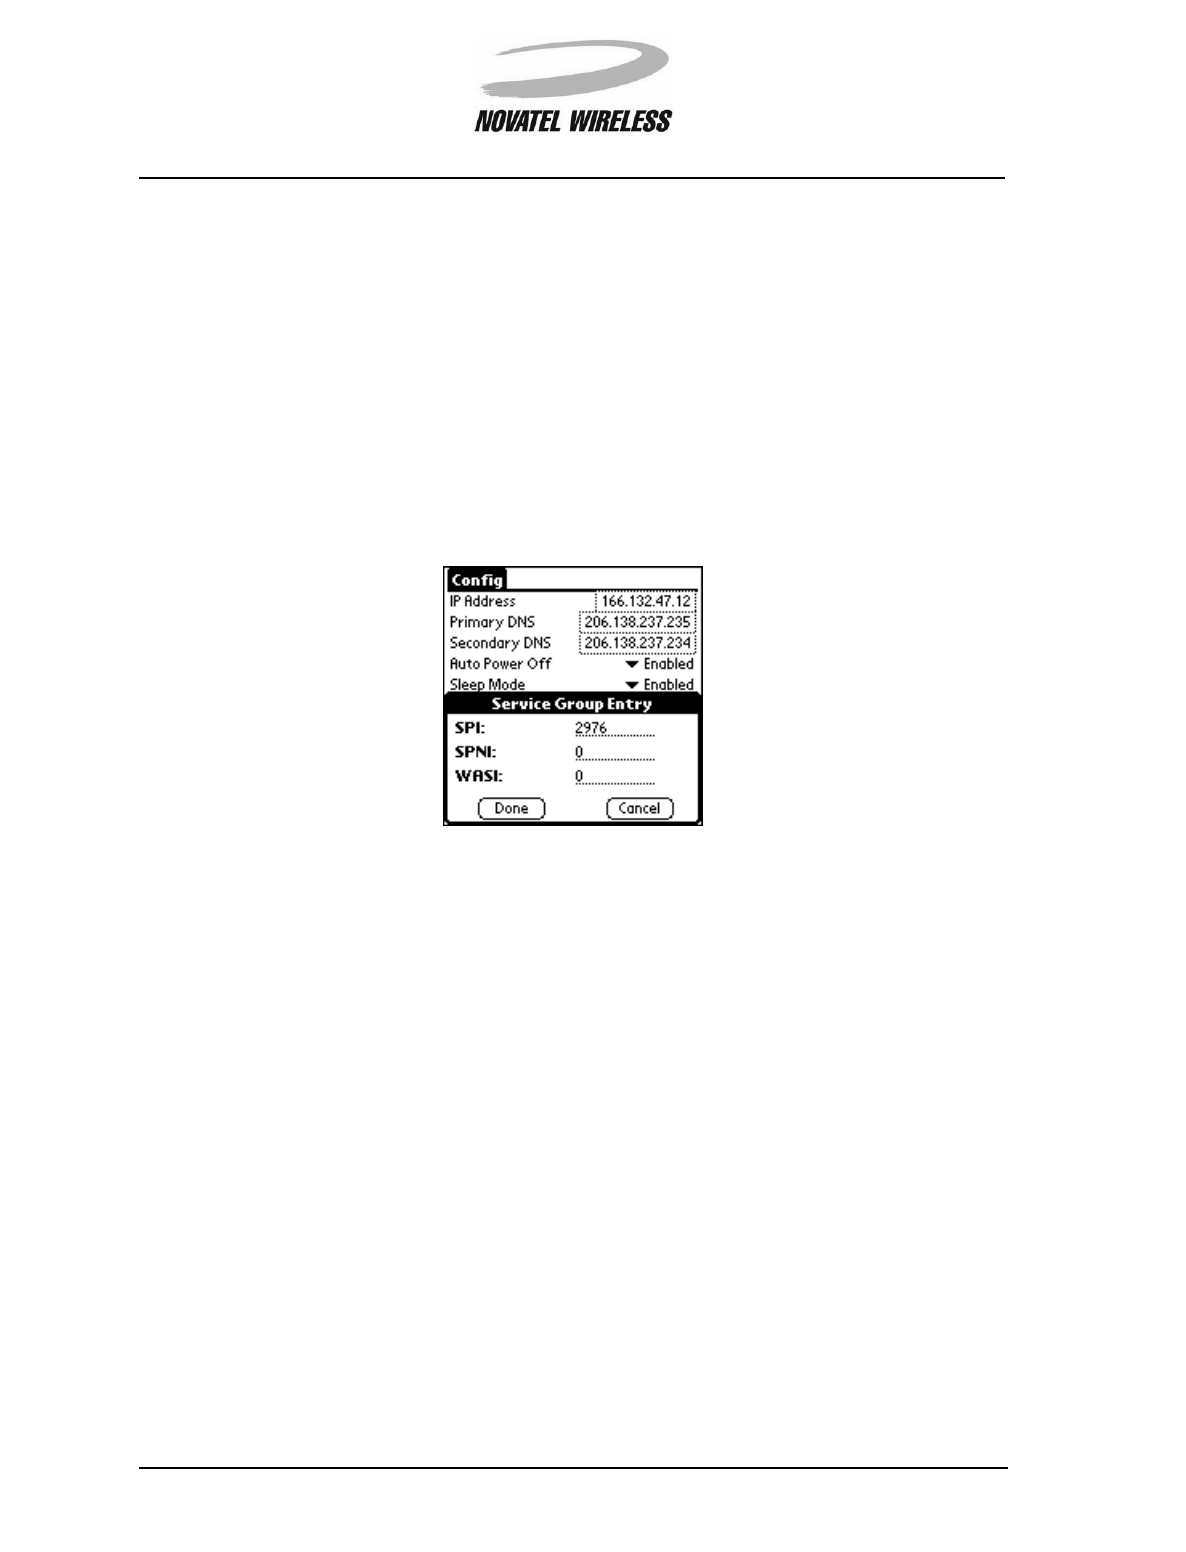
SPI, SPNI, WASI
The SPI, SPNI, WASI field displays the current settings for the various network identifiers, sepa-
rated by slashes. The first number shown is the Service Provider Identifier, or SPI. This number is
a globally used identifier for the network provider the modem is currently using. The middle num-
ber is the Service Provider Network Identifier, or SPNI, which identifies the specific network region
or domain you are currently in. The final number is the Wide Area Service Identifier, or WASI. The
WASI represents a group of network providers that have agreed to provide service over a large
geographic area.
To change any of these identifiers, tap the text field to open the Service Group Entry window.
You can directly edit any of these values as you would normal text.
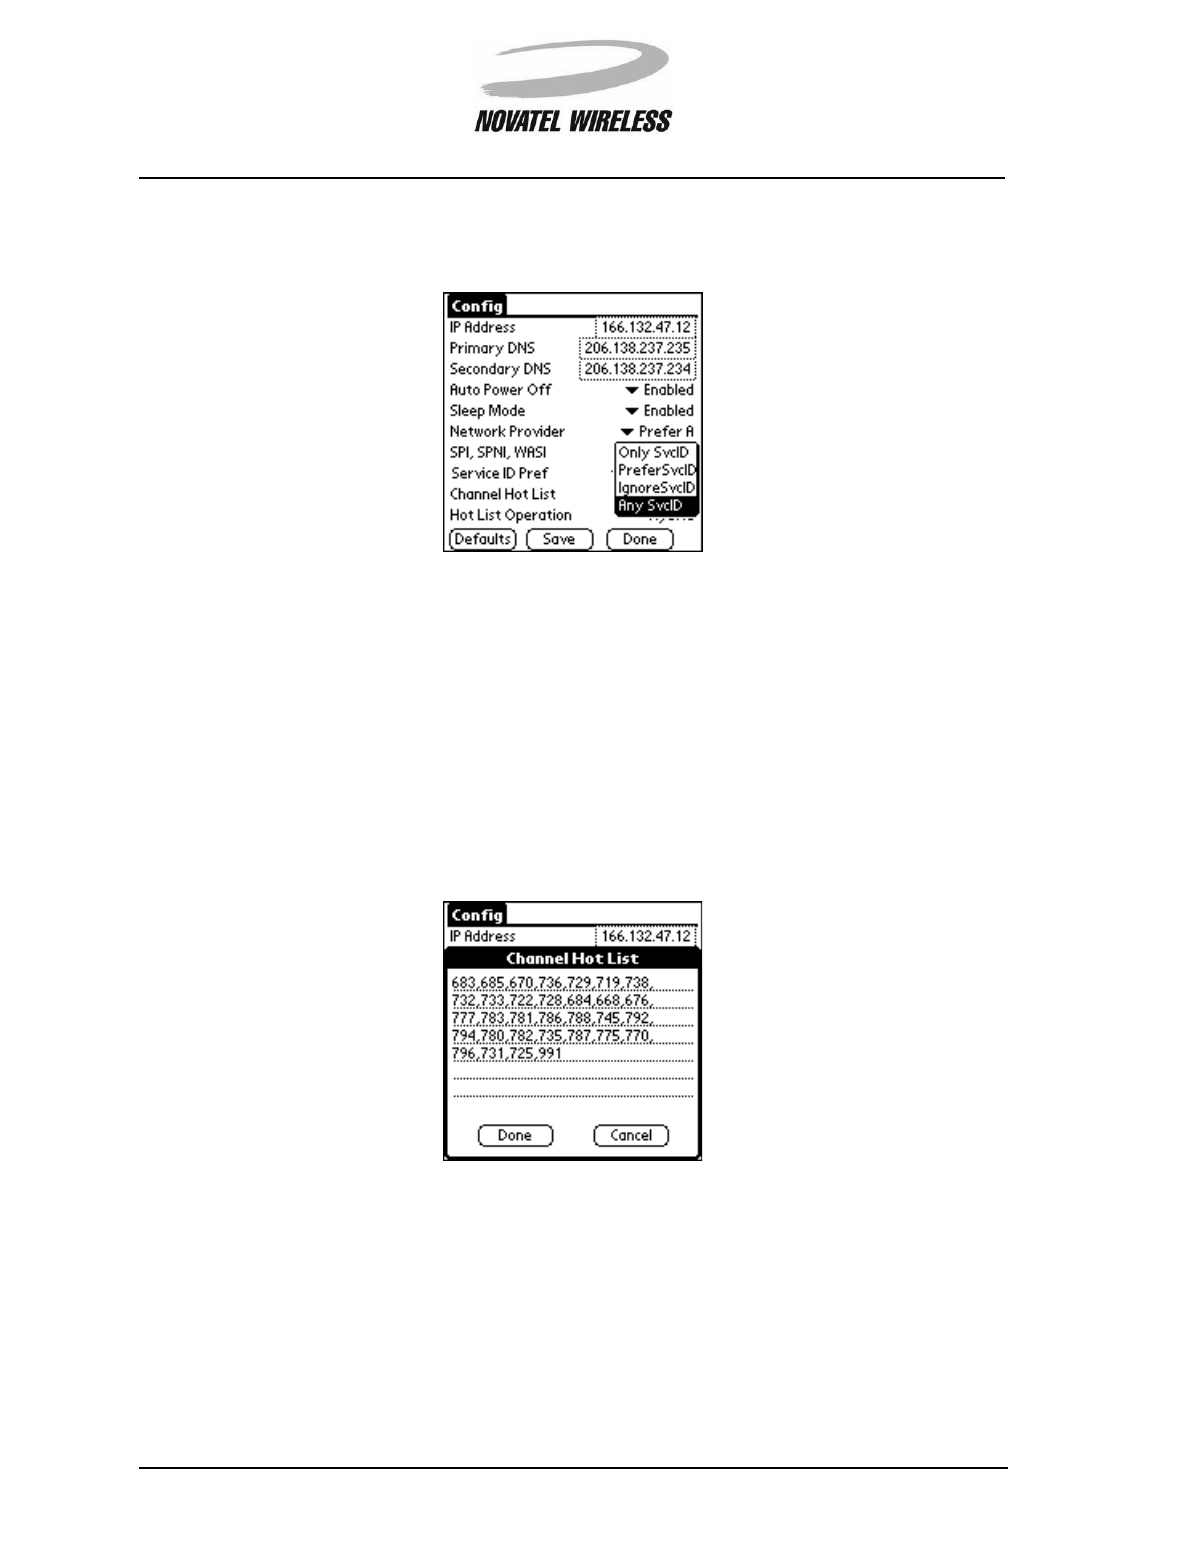
Service ID Pref
Some network providers have set up roaming agreements, similar to that used by cellular phones,
to expand their coverage areas. Therefore, you can use a different network provider than the one
you have an account with if there is a roaming agreement in place. The Service ID Pref field con-
trols how the modem uses your chosen network provider and other providers. If it is set to Only
SvcID, the modem will only use the network provider entered during the initial configuration done
using the Setup Wizard utility. PreferSvcID indicates that the modem will first try to register with
your chosen network provider, but if it cannot, it will attempt to use another provider. Selecting
IgnoreSvcID or Any SvcID tells the modem to use the first available network provider it finds.
Modem Manager 72
Minstrel STM User Guide Version B
90023058
To change the Service ID Pref setting, tap to open the pick list and select the setting you wish to
use.
Channel Hot List
The Channel Hot List field contains a list of your most commonly used channels. A channel is a
range of frequencies used for sending and receiving data that is represented by a number. How
this list is used is determined by the setting of the Hot List Operation field.
This list is automatically updated by information provided by the Wireless IP network, but if you
wish to change the channels in the Channel Hot List field, tap the Details box to open the Chan-
nel Hot List window where you can directly edit the list.
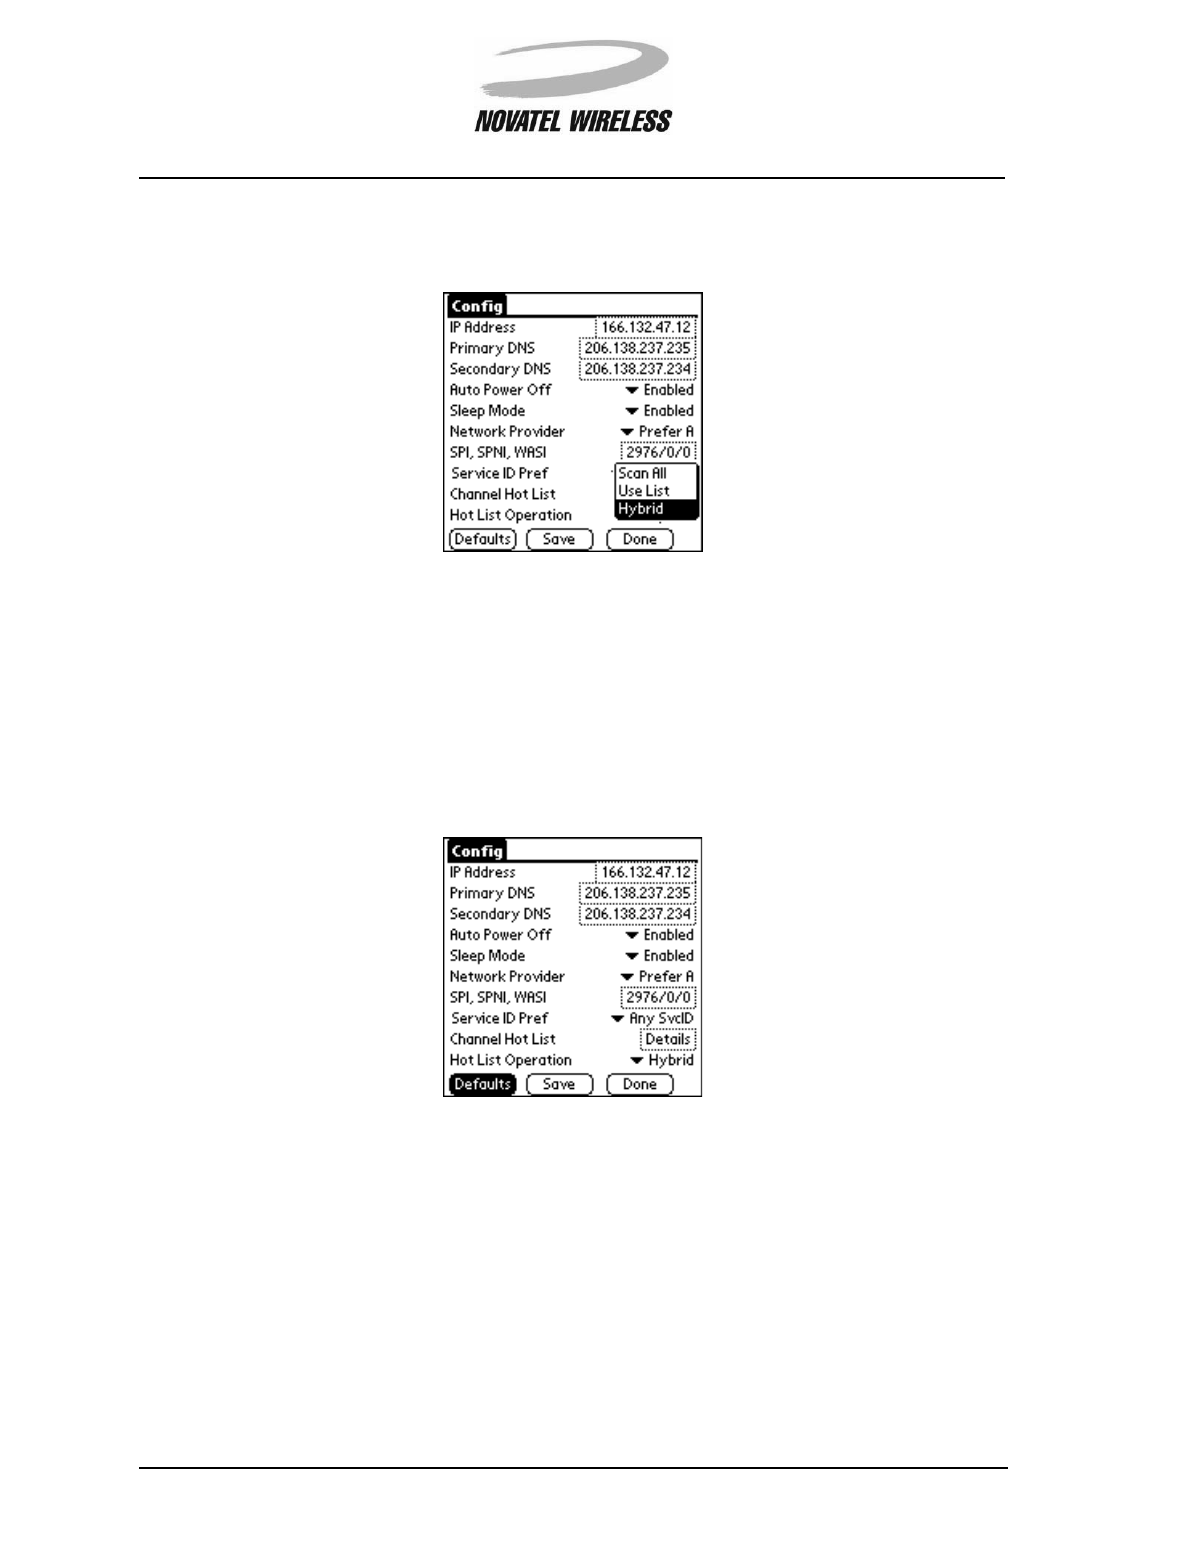
Hot List Operation
The Hot List Operation field indicates how the channels in the Channel Hot List are used. If
Scan All is selected, all available channels will be scanned. If Use List is selected, only the chan-
nels in the Channel Hot List will be used. When this field is set to Hybrid, first the channels in the
Channel Hot List will be scanned. If no usable channels are found, the modem will scan all the
other channels.
Modem Manager 73
Minstrel STM User Guide Version B
90023058
To change the Hot List Operation field, tap to open the pick list and select the setting you wish to
use.
Controls
Defaults Button
Tap the Defaults button to change the settings shown in the Config screen back to their factory
defaults.
NOTE: Using this button will change fields that are vital to maintaining registration, including the
network addresses. If you use this feature, you will need to completely re-configure your
modem using Setup Wizard before you can register to the Wireless IP network again. If
you do tap this button accidentally, tap Done to close the window without saving the
changes.
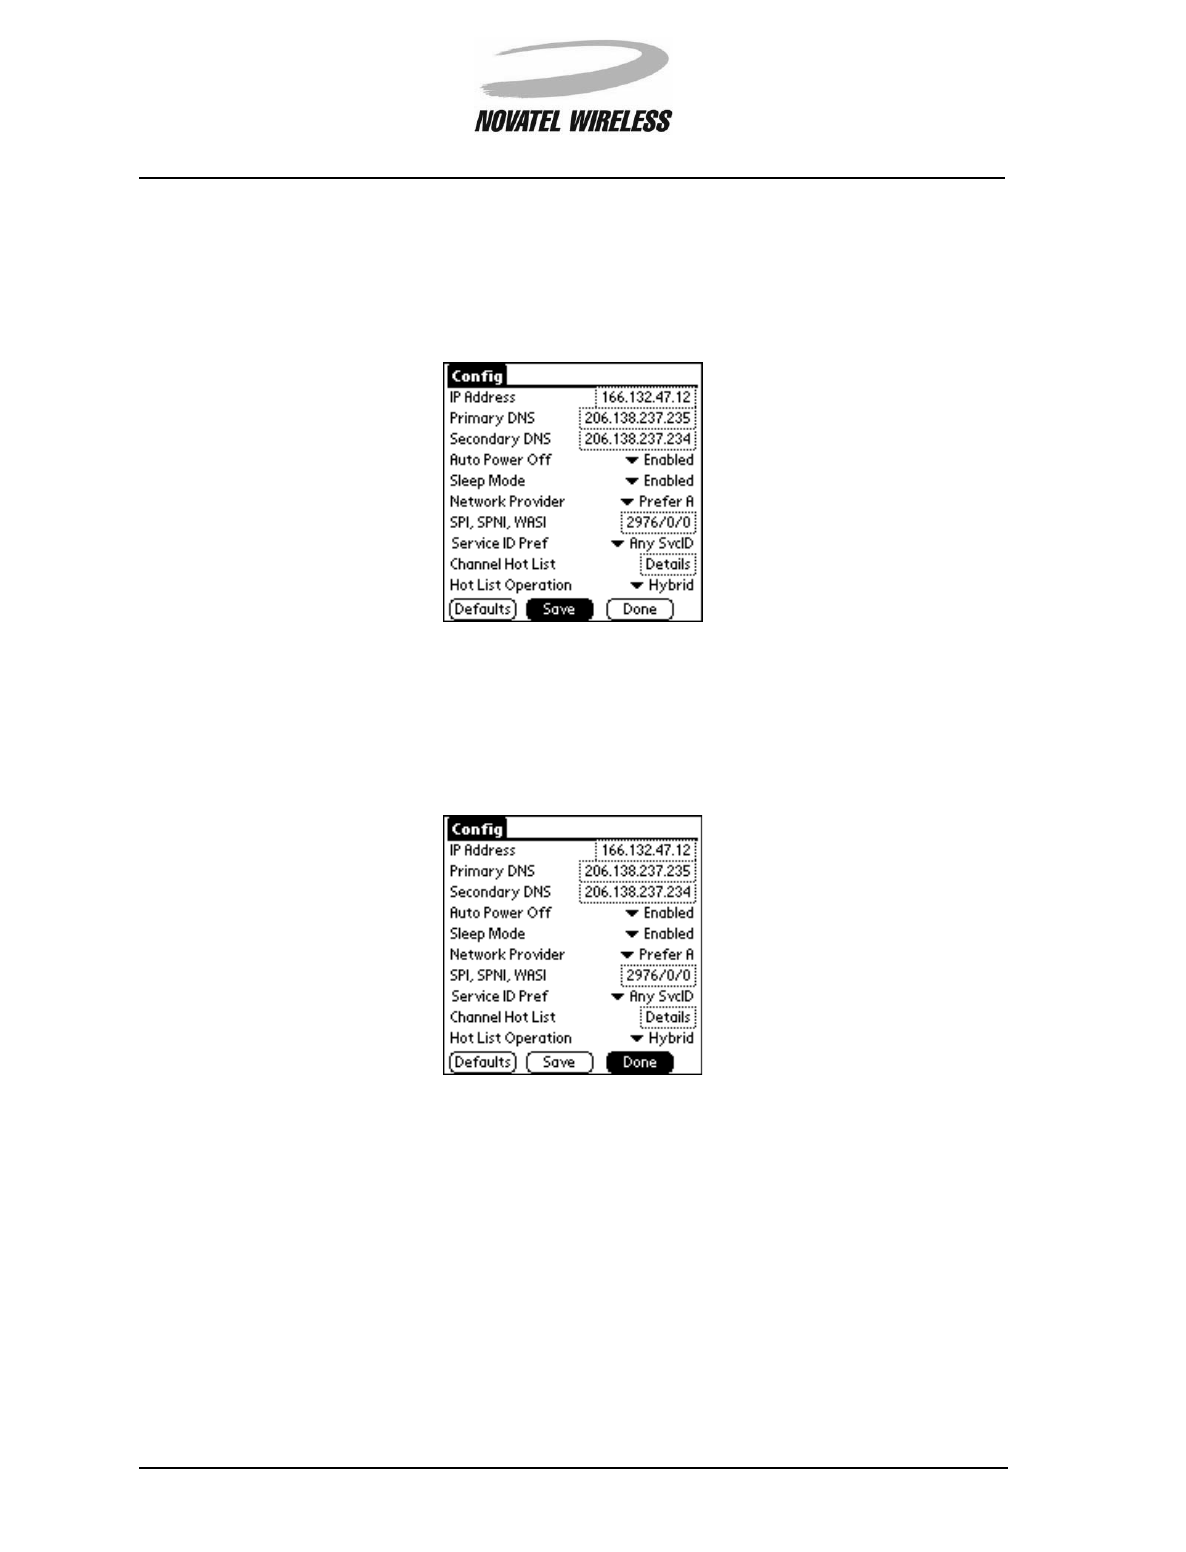
Modem Manager 74
Minstrel STM User Guide Version B
90023058
Save Button
Tap the Save button to save any changes you have made to the settings. The settings will be
saved and the modem will power off and then on again to ensure the changes take effect.
Done Button
Tap the Done button to close the Config screen without saving any changes you have made to the
settings.
Modem Manager 75
Minstrel STM User Guide Version B
90023058
Detailed Status
The Detailed Status screen shows more detailed status information about the network connection
and the modem.
Opening the Detailed Status Screen
To access this screen, tap the Menu icon when the Minstrel screen is open and select Status
from the Advanced menu.

Modem Manager 76
Minstrel STM User Guide Version B
90023058
Fields
The fields shown on this screen are listed in the table below along with an explanation of the value
displayed.
Field Description
CDPD This text field indicates the status of communications between
the modem and the Wireless IP or CDPD network. This field
will show SEARCH when the modem is searching for an avail-
able network connection and ACQ’D when the modem has
acquired a connection.
RSSI This text field shows the strength of the signal currently being
received in dBm.
Color This field displays the color code of the service area you are
currently in. Color codes are used by the Wireless IP network
to coordinate channel usage and interference.
Chan This field shows the Wireless IP channel being used for send-
ing and receiving data. Each channel number represents a
range of frequencies.
CellID This field displays the identifier for the Wireless IP base station
that the Minstrel is currently using.
FBLER This field represents the rate of errors in data transmission
from the Wireless IP network to your Minstrel S as a percent-
age of the data transferred.
RBLER This field represents the rate of errors in data transmission
from your Minstrel S to the Wireless IP network as a percent-
age of the data transferred.
Side This field shows which side of the Wireless IP network is being
used or scanned. Each area of the network has an A side and
a B side, with a single network provider assigned to a side.
PL This field will display an number between 2 and 7. These num-
bers indicate the current power level your Minstrel S is trans-
mitting at, with 2 being the highest power level and 7 being the
lowest.
SPI The SPI field shows an identifier for the network provider the
Minstrel is currently registered to called the Service Provider
Identifier. This number is used globally for each specific net-
work provider.
WASI The WASI, or Wide Area Service Identifier, field displays the
unique identifier used for a group of network providers that
have agreed to provide service over a large geographic area.

Modem Manager 77
Minstrel STM User Guide Version B
90023058
SPNI This field shows the Service Provider Network Identifier, which
is used to identify a specific network region or domain for a ser-
vice provider.
PwrPrd The value shown in this field is sent by the Wireless IP network
to indicate the power the modem should transmit at.
BattLvl The number shown for this field is the current voltage of the
internal Lithium-Ion battery, which indicates the amount of
charge left in the battery. The maximum battery voltage is
approximately 4.2 V. If the battery voltage goes lower than
about 3.0 V, the modem will automatically power off to main-
tain. The battery status indicator LED will start flashing red
before this point.
TEI This field indicates the Temporary Equipment Identifier that has
been assigned to your Minstrel S by the Wireless IP network.
As you move into different service areas, the TEI will change.
RegErr This field will show a number between 0 and 7 indicating any
errors in the registration process. Each number represents a
specific error, with 0 indicating no registration error.
Link This field indicates the current status of communications with
the Wireless IP network. It will show Locked when the unit has
synchronized to a channel and completed registration.
Searching will be displayed if the modem is still searching for
the Wireless IP network in the area.
IP This field displays the IP address for your Minstrel S.
EID This field displays the Equipment Identifier (EID) of your Min-
strel S. The EID is a unique number assigned to your modem
by the manufacturer.
Field Description
Modem Manager 78
Minstrel STM User Guide Version B
90023058
Controls
Done Button
Tap the Done button to close the Detailed Status screen and return to the Minstrel screen.
Modem Manager 79
Minstrel STM User Guide Version B
90023058
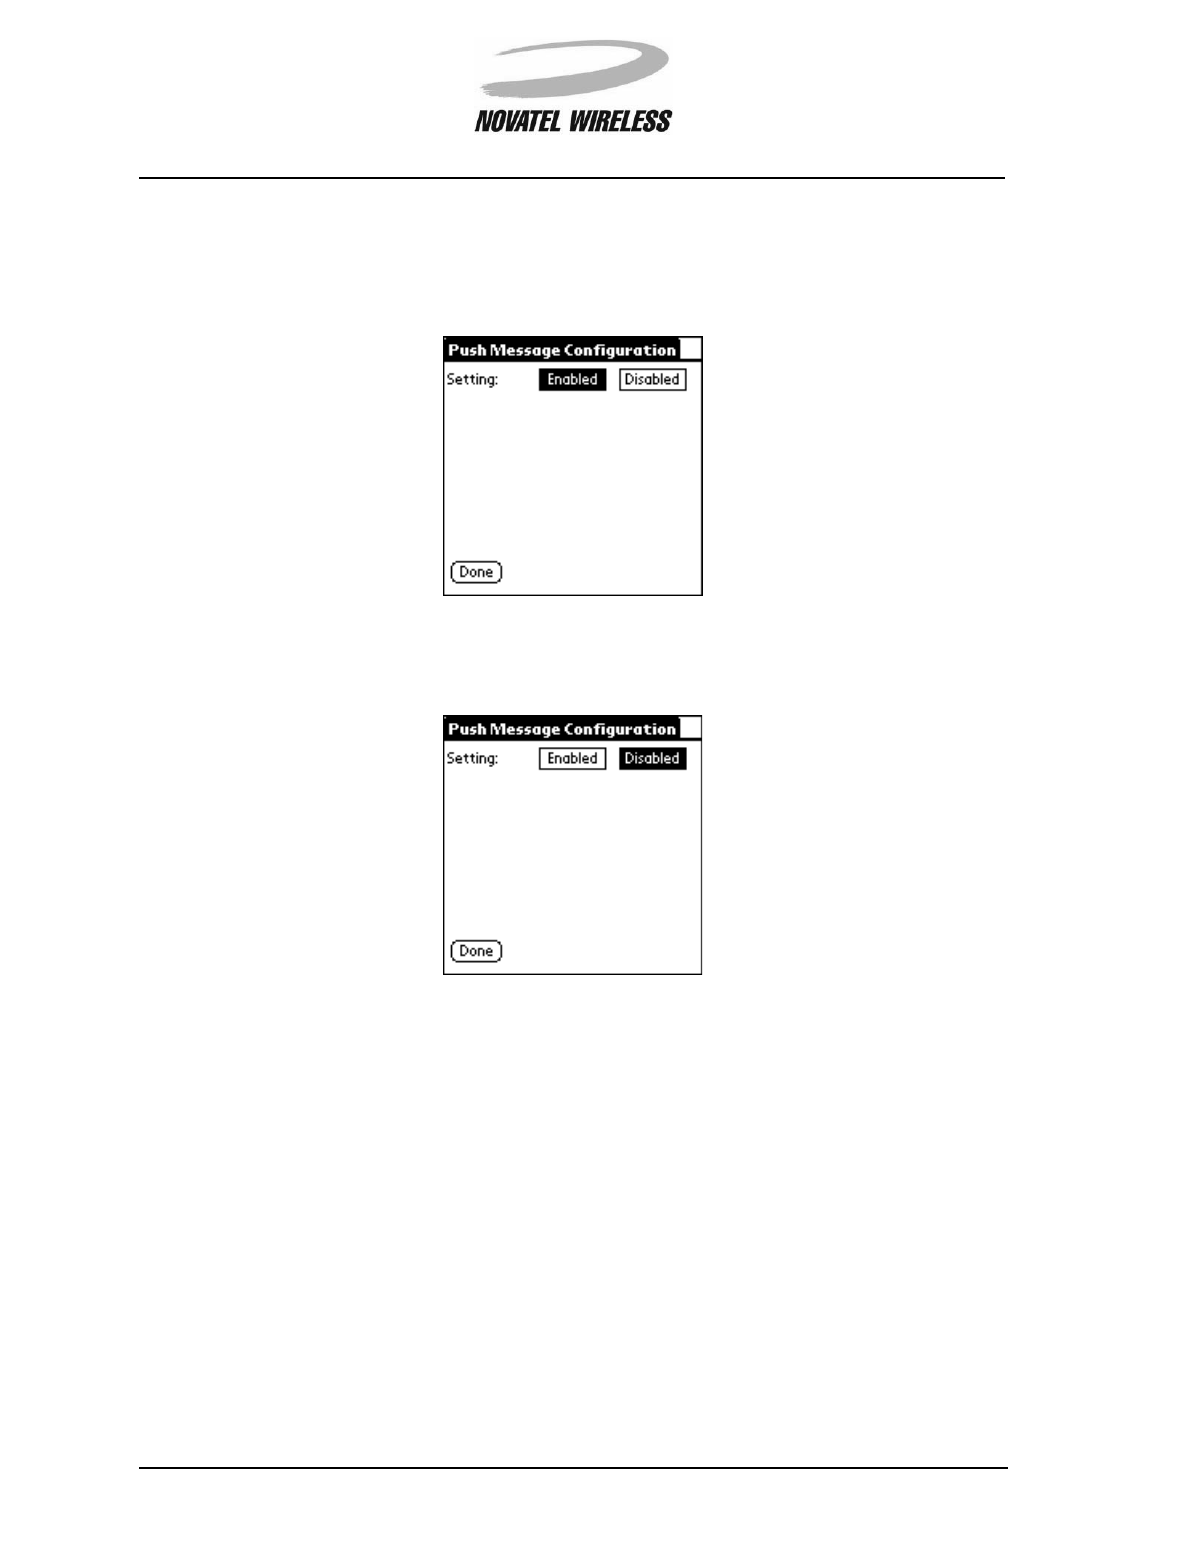
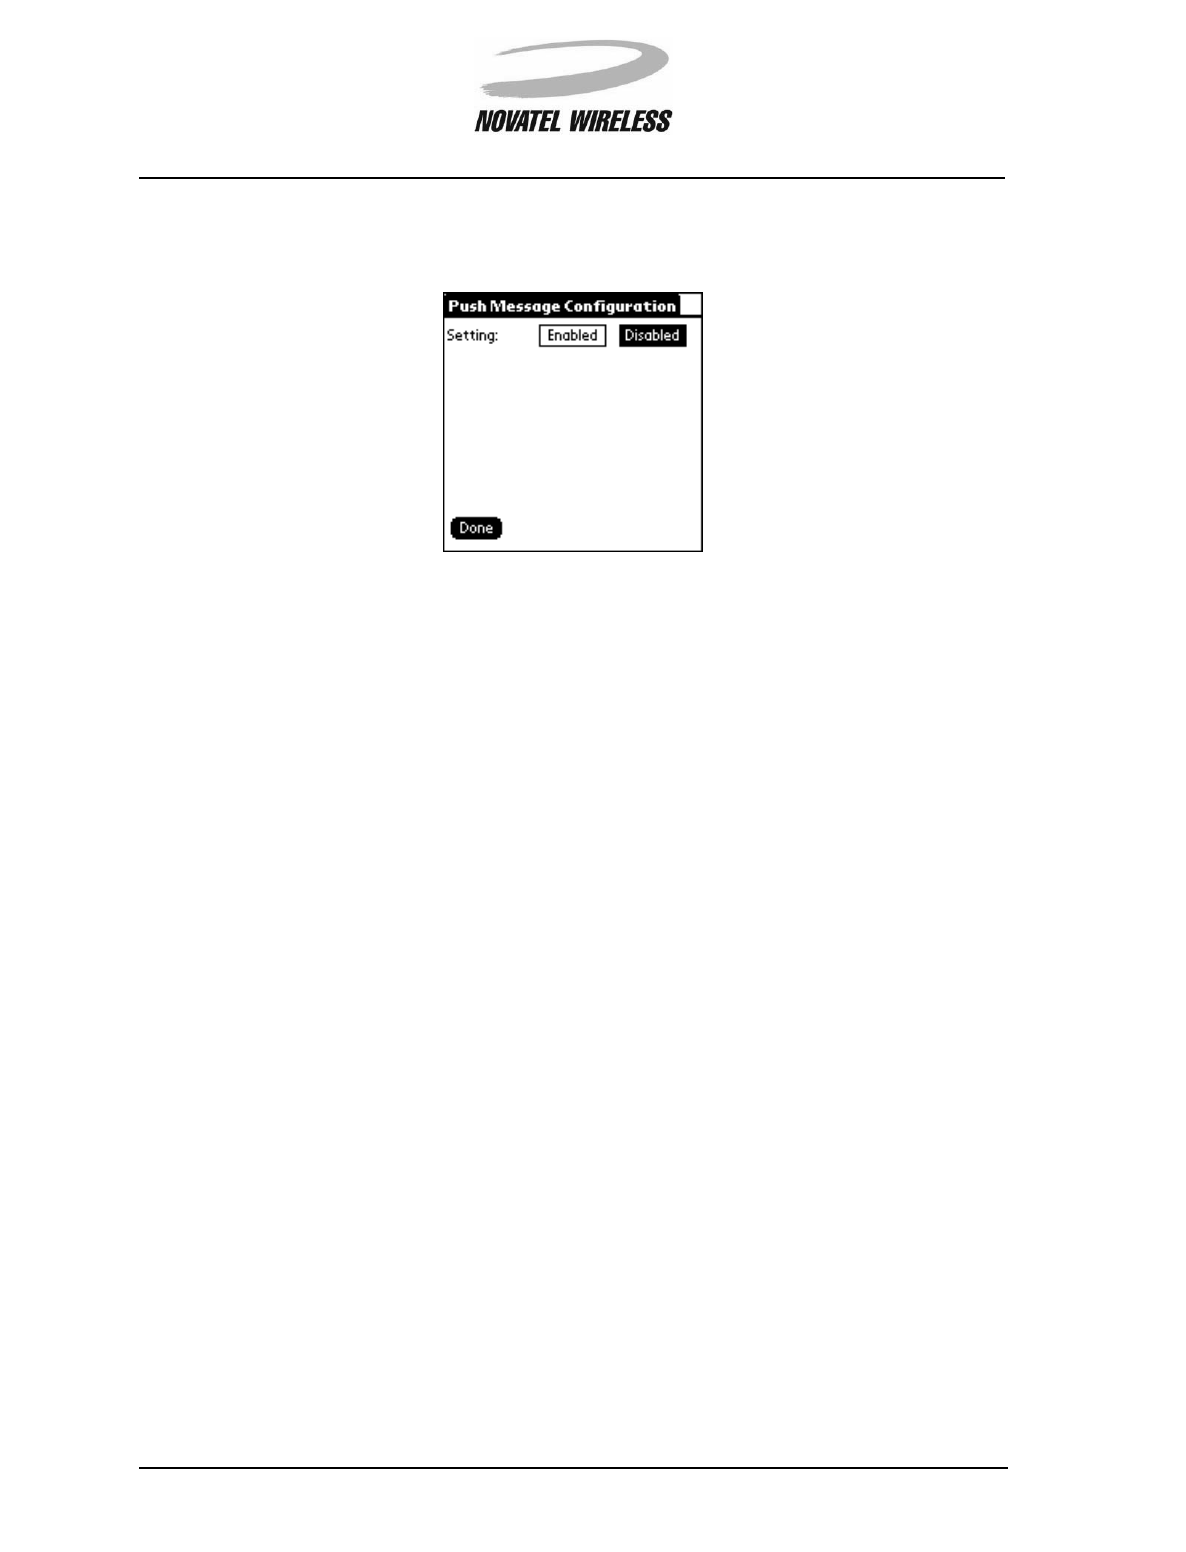
Push Message Configuration
The Push Message Configuration screen allows you to enable or disable the push message fea-
ture of the Minstrel S.
Push messaging allows you to receive notification of messages even when a PPP session is not
active.
Opening the Push Message Configuration Screen
To access this screen, tap the Menu icon when the main Minstrel screen is open and select Push
Config from the Advanced menu.
Modem Manager 80
Minstrel STM User Guide Version B
90023058
Controls
To enable push messaging, tap the Enabled box.
To disable push messaging, tap the Disabled box.
The new setting will automatically be saved to the modem as soon as the box is tapped. In order
to save the settings, the modem must power off and then power on again.
Modem Manager 81
Minstrel STM User Guide Version B
90023058
To close the Push Message Configuration screen and return to the Minstrel screen, tap the
Done button.
Modem Manager 82
Minstrel STM User Guide Version B
90023058
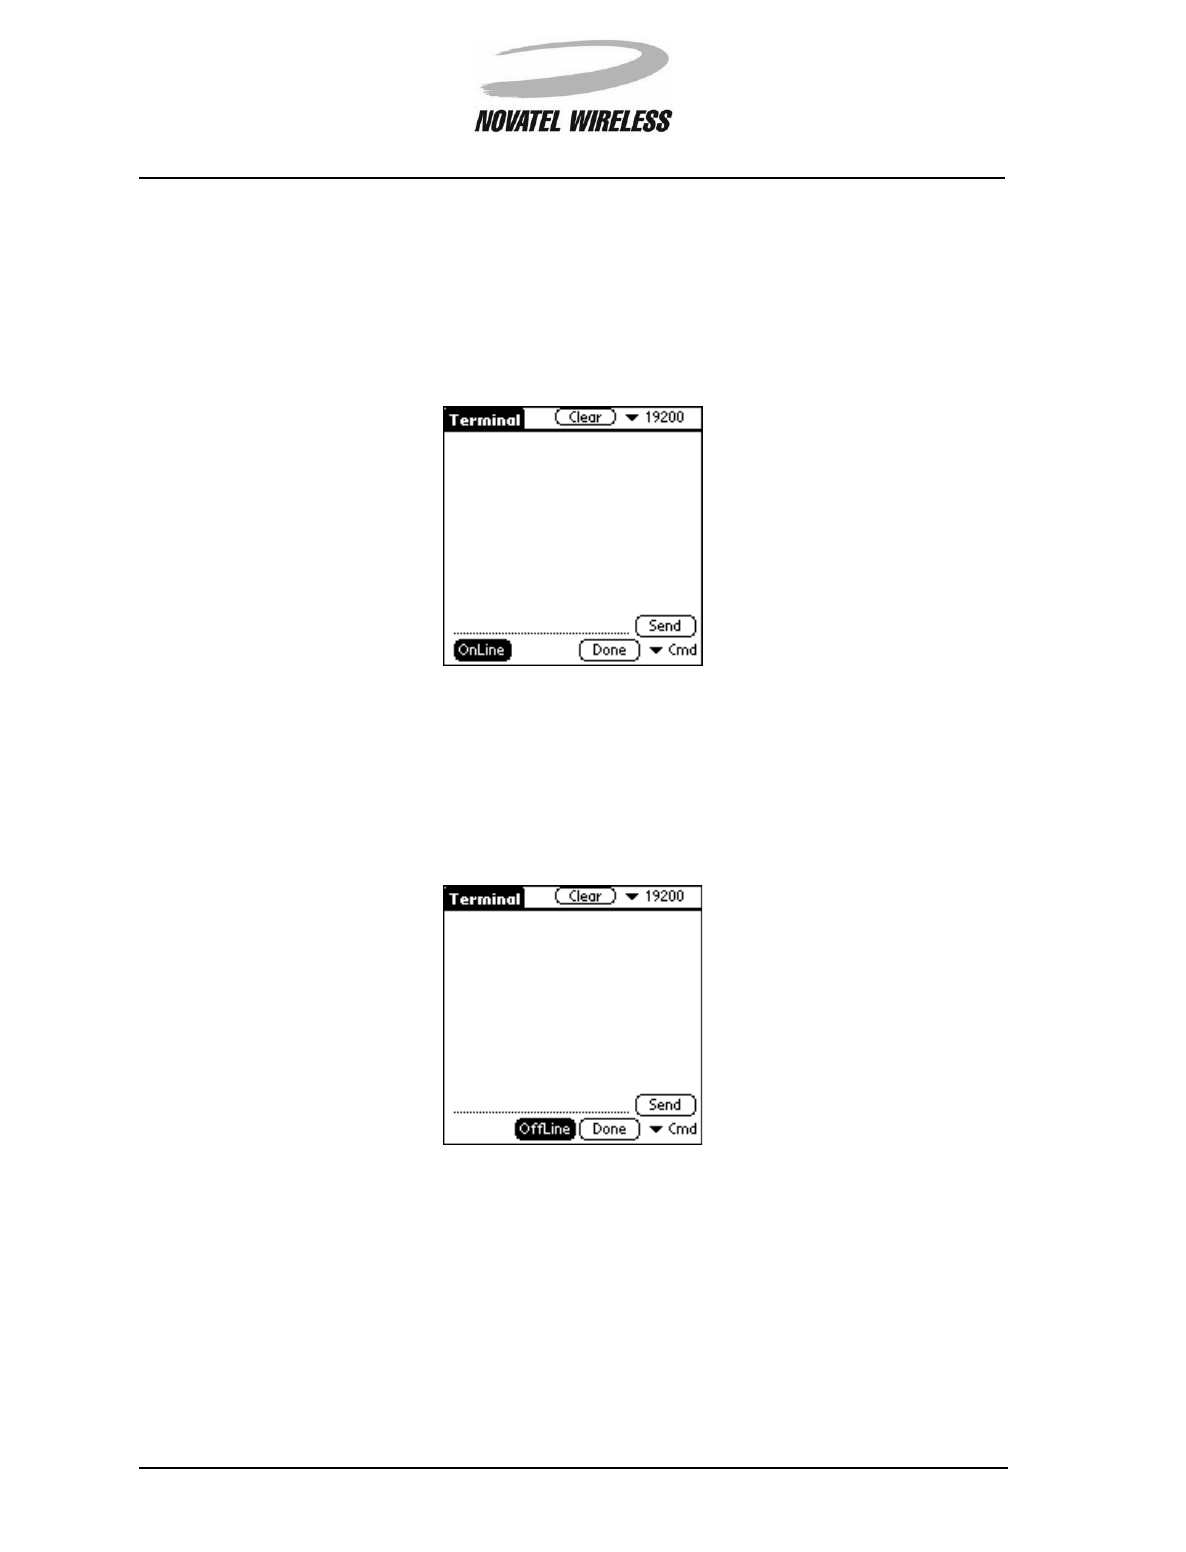
Terminal
The Terminal screen provides an internal terminal emulator for communication with the Minstrel S,
allowing you to further customize the operation of your Minstrel using the AT command set. AT
commands are commands used to control various types of modems. Wireless IP modems have
their own set of AT commands, which contains some of the commands used by wireline modems
but also includes commands specific to Wireless IP modems.
Opening the Terminal Screen
To access this screen, tap the Menu icon when the Minstrel screen is active and select Terminal
from the Advanced menu.
Modem Manager 83
Minstrel STM User Guide Version B
90023058
Controls
OnLine Button
Tap the OnLine button to open communications with the Minstrel S.
OffLine Button
Tap the OffLine button to close communications between the terminal emulator and the Minstrel
S.
Modem Manager 84
Minstrel STM User Guide Version B
90023058
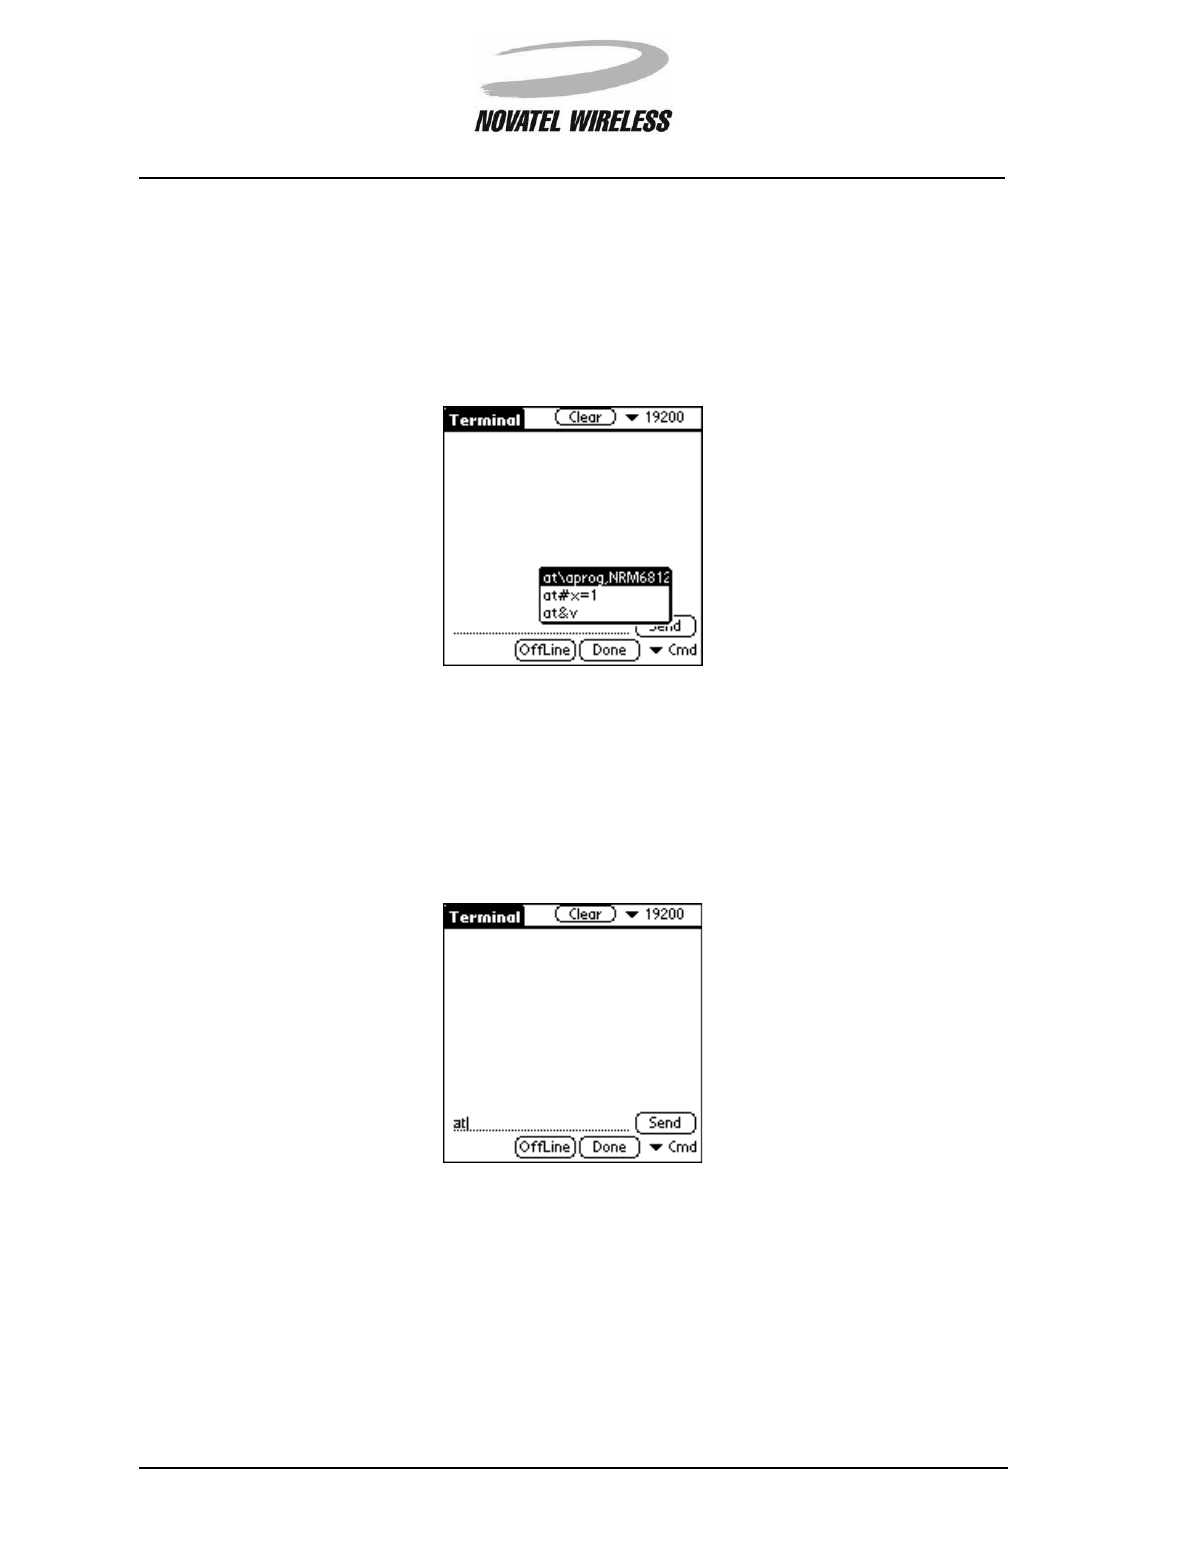
Cmd Pick List
In the bottom, right-hand corner of the Terminal screen there is a pick list labeled Cmd. This pick
list contains some of the more common AT commands. To send one of these commands, simply
tap to open the pick list and tap to select the command. It will automatically be sent to the Minstrel
S.
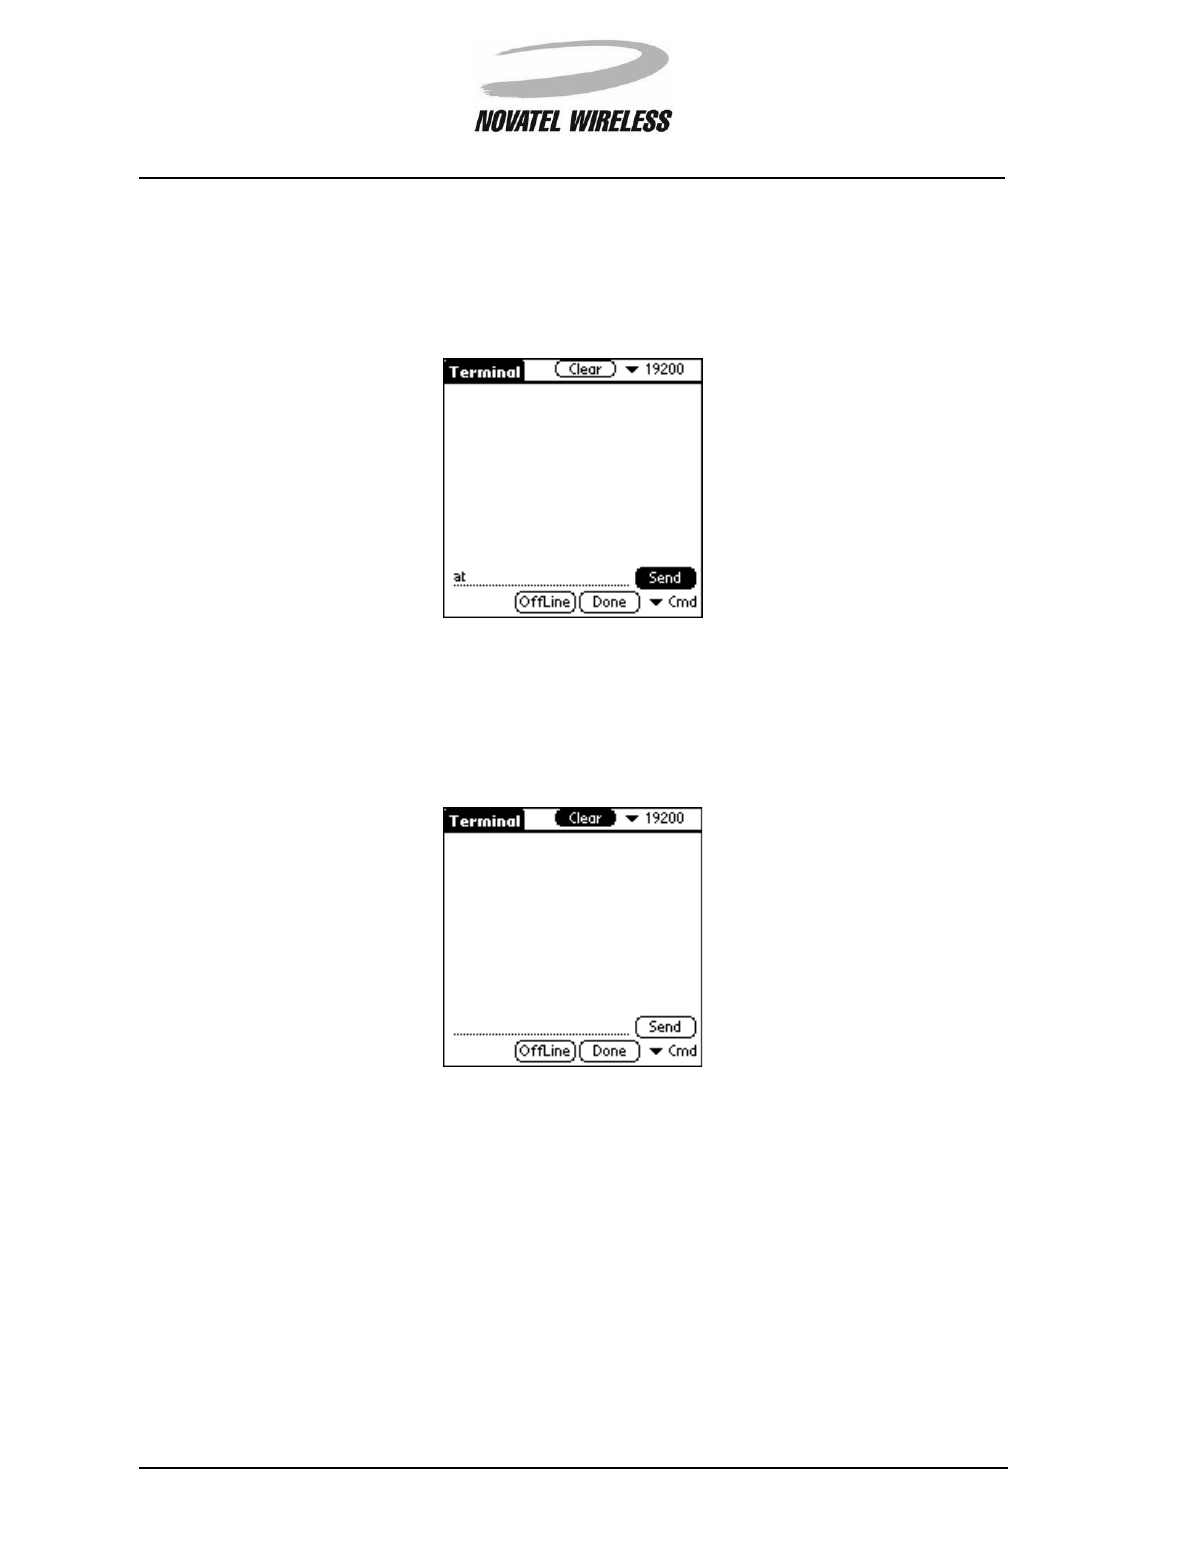
Command Entry Line
At the bottom of the Terminal screen, right above the OnLine, OffLine, and Done buttons, there
is a dotted line. By tapping on this line, you can make a cursor appear which allows you to enter
any text you wish to send to the Minstrel S.
When entering commands this way, you must tap Send to send the command to the Minstrel, as it
will not be sent automatically.
Modem Manager 85
Minstrel STM User Guide Version B
90023058
Send Button
Tap the Send button to send any commands entered on the Command Entry Line to the Minstrel
S.
Clear Button
Tap the Clear button to clear any text from the text display area.
Modem Manager 86
Minstrel STM User Guide Version B
90023058
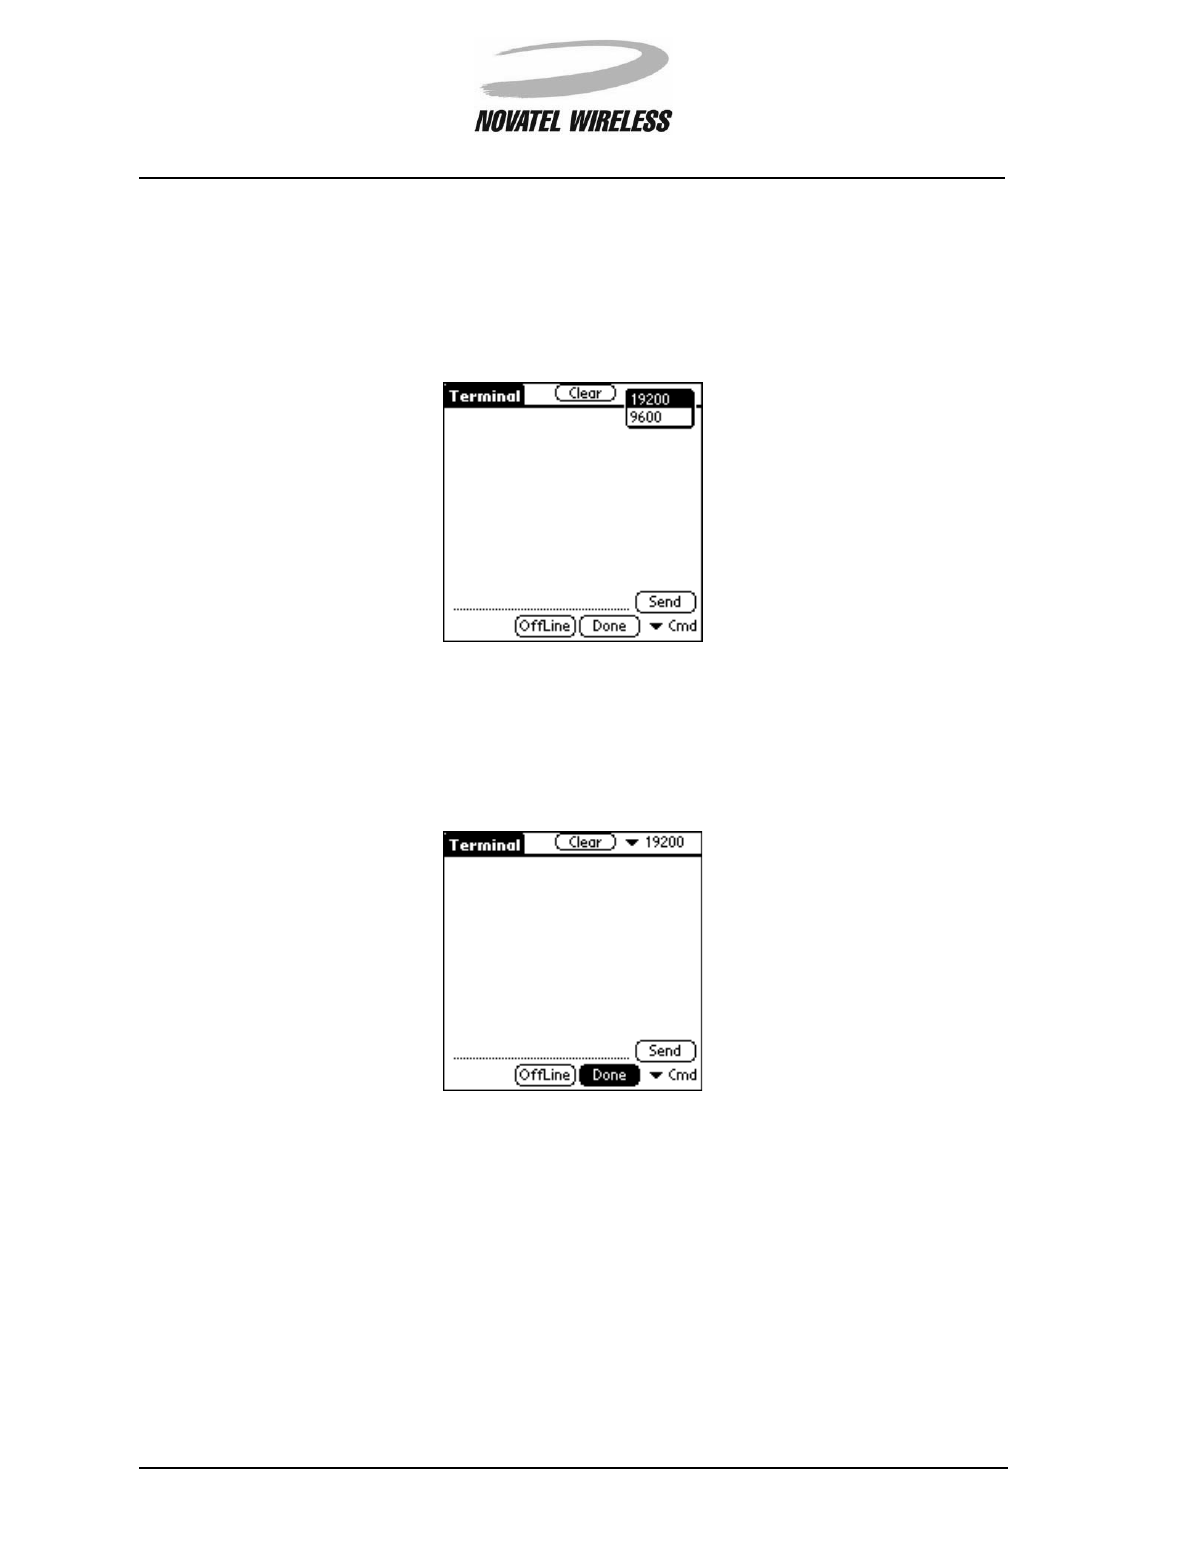
Baud Rate Pick List
In the top corner of the Terminal screen, there is a pick list that allows you to select the baud rate
to be used between the Minstrel S and the terminal emulator. The Minstrel S is set to communi-
cate at 19200 bps.
Done Button
Tap the Done button to close the Terminal and go back to the Minstrel screen.
Modem Manager 87
Minstrel STM User Guide Version B
90023058
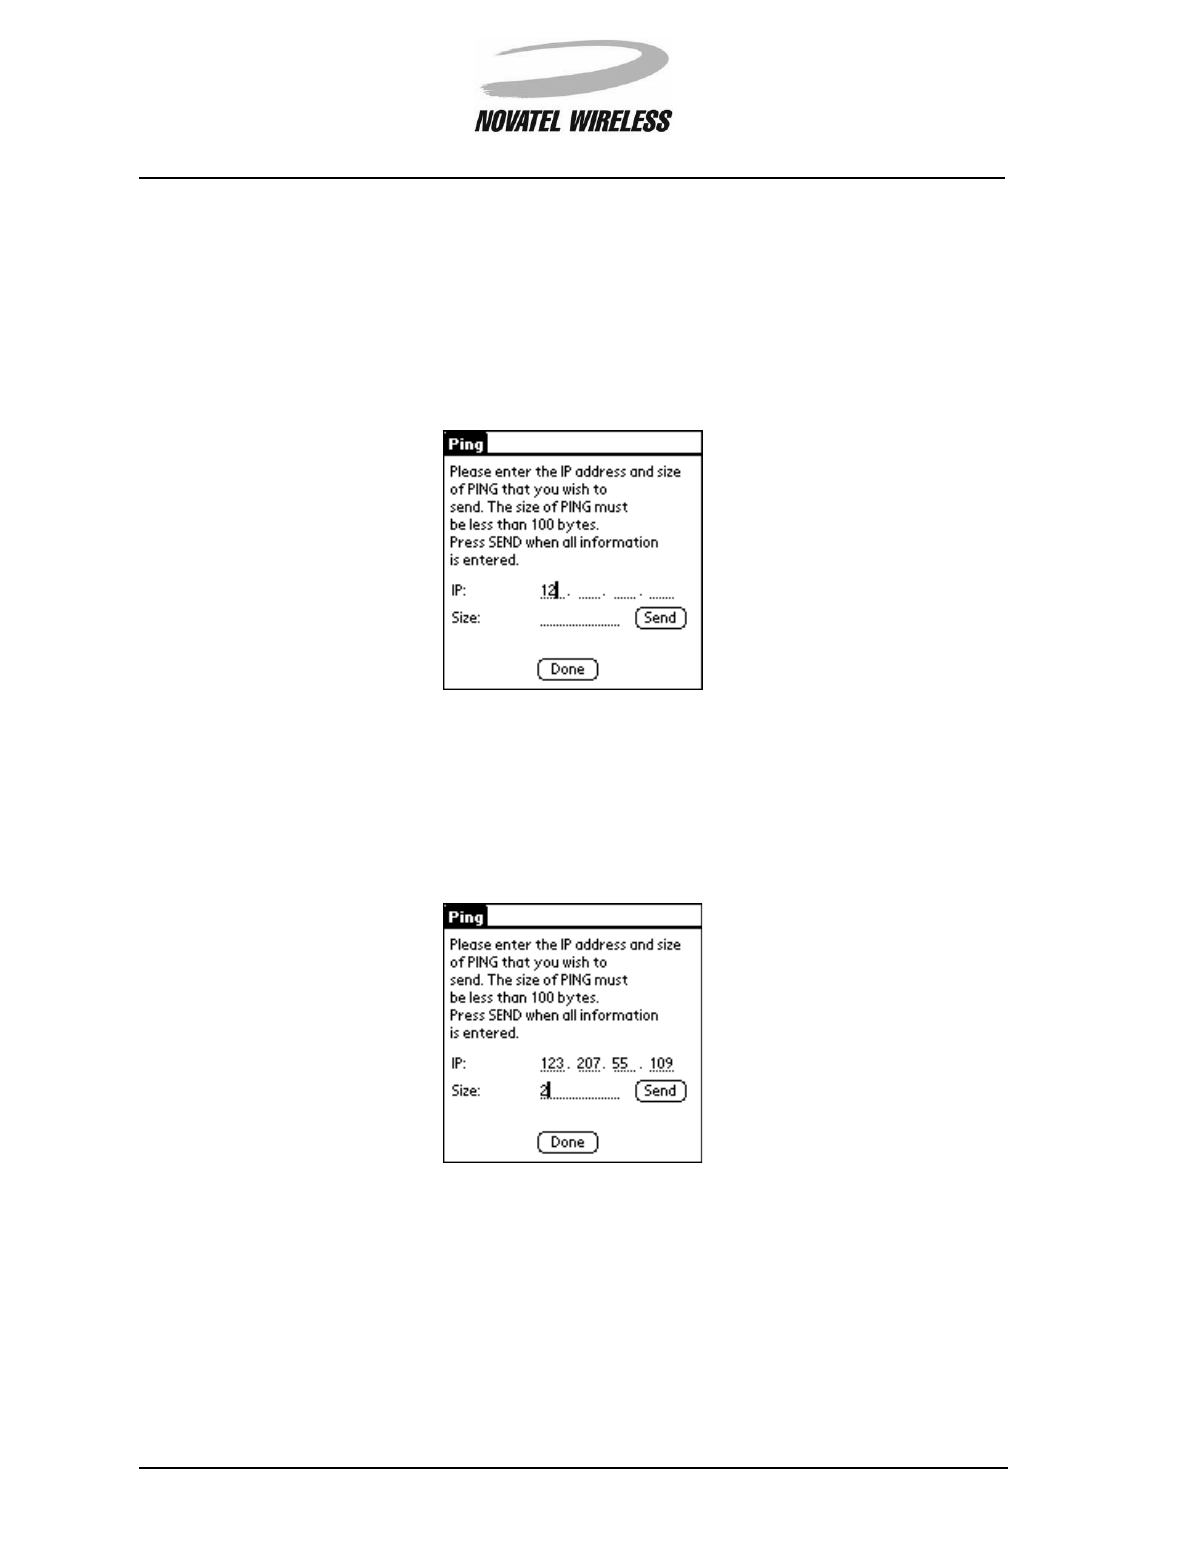
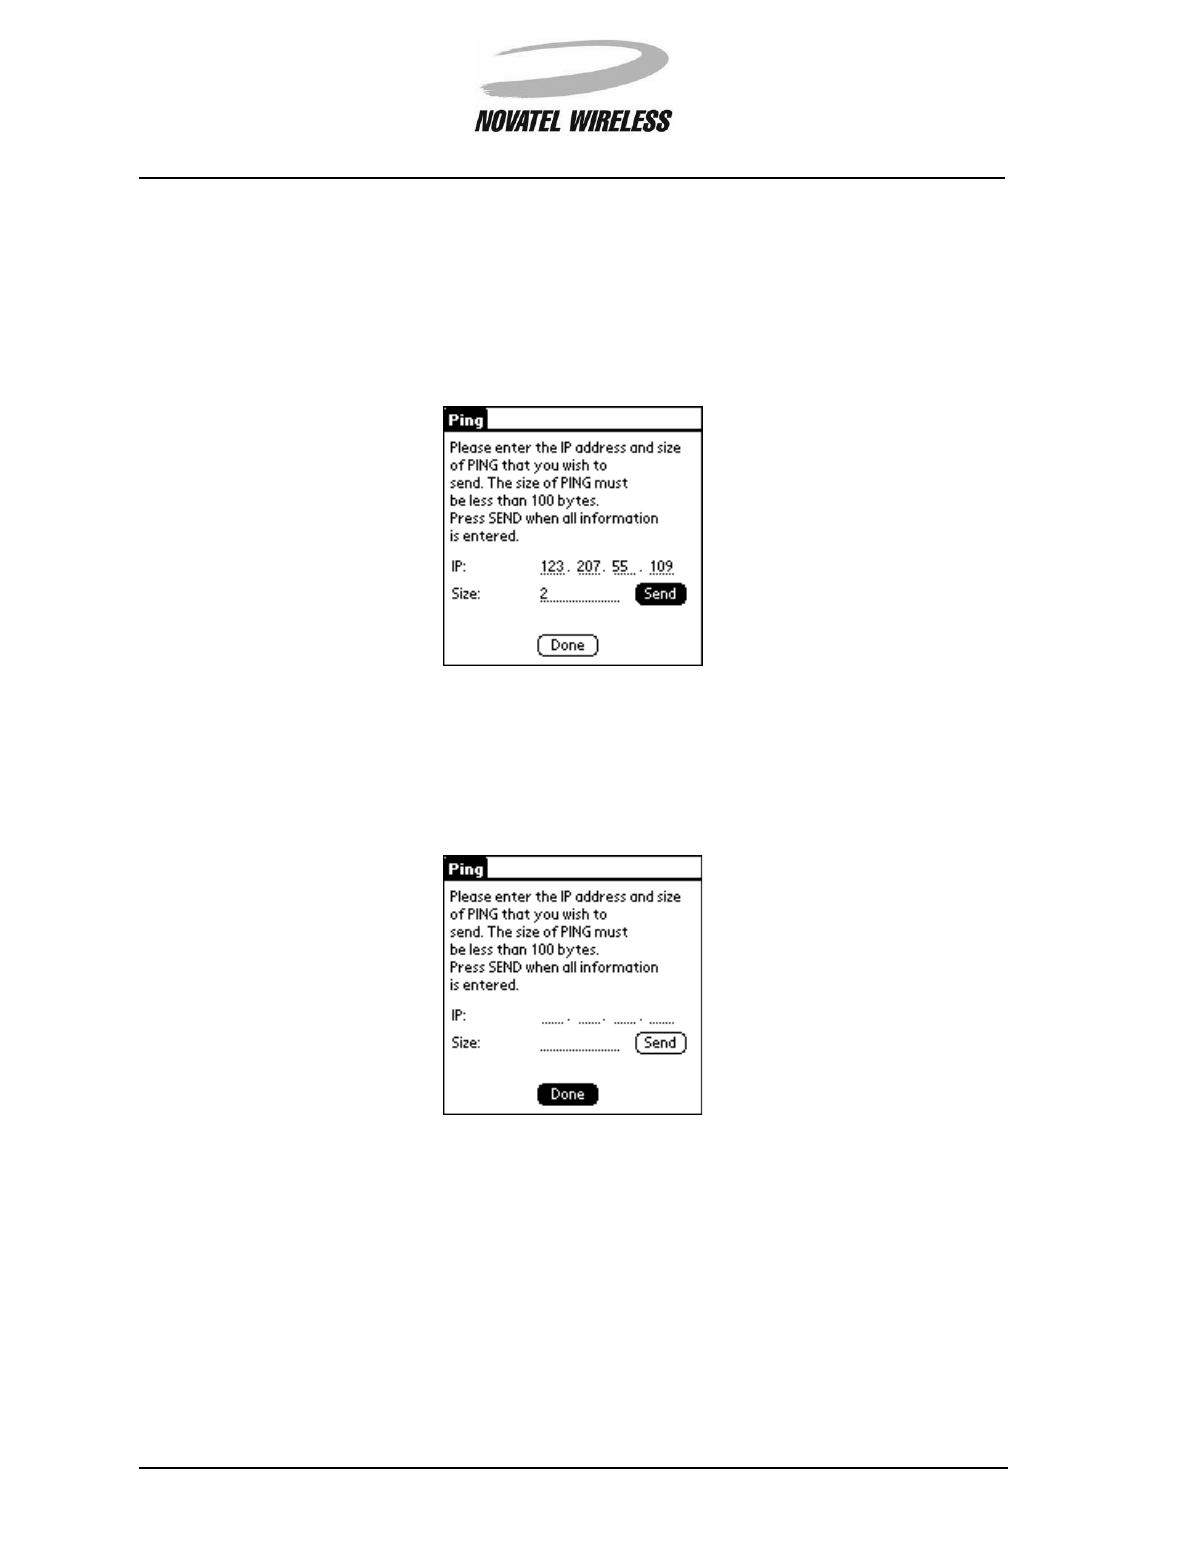
Ping
The Ping screen enables you to ping another IP address to see if it is accessible.
Opening the Ping Screen
To open this screen, tap the Menu icon when the Minstrel screen is open and select Ping from the
Advanced menu.
Modem Manager 88
Minstrel STM User Guide Version B
90023058
Fields
IP
This IP: field displays the IP address you wish to ping. Each segment of this value can be edited
by tapping on the dotted line and changing the text on that line.
Size
The Size: field displays the size of the packet you wish to send to the chosen IP address. This
value can be edited by tapping on the dotted line and changing the text on that line.
Status
The status of the ping will be shown below the Size: field.
Modem Manager 89
Minstrel STM User Guide Version B
90023058
Controls
Send Button
Once the IP address and size are entered, tap the Send button to ping the address.
Done Button
Tap the Done button to close the Ping screen and return to the Minstrel screen.

Glossary 90
Minstrel STM User Guide Version B
90023058
Glossary

Glossary 91
Minstrel STM User Guide Version B
90023058
Glossary A-H
AT commands
AT commands are commands used to control a modem. Wireless IP modems have their
own set of AT command. This set of commands contains some of the commands used by
wireline modems but also includes commands specific to Wireless IP modems.
auto power off
Auto power off is a feature of the Minstrel S that, when enabled, will cause the modem to
de-register and power off whenever the active PPP session is closed.
CDPD
CDPD, or Cellular Digital Packet Data, is a Wireless IP technology developed for use on
cellular phone frequencies. CDPD uses unused cellular channels to transmit data in pack-
ets. To send and receive data across the Internet, the Minstrel S must first register to the
CDPD network.
channel
The range of Wireless IP frequencies used to transmit and receive data is broken up into
channels, which act as individual paths for communication. Each of these channels is
assigned a number.
de-registration
De-registration involves disconnecting and closing the communication path being used on
the CDPD network. When the modem is de-registered, it can no longer send or receive
data across the network.
Equipment Identifier (EID)
Every wireless IP modem manufactured has a unique serial number associated with it,
which is referred to as the Equipment Identifier or EID. Each EID consists of six sets of
two hexadecimal numbers that are often separated by a period (“.”), as in the sample EID
00.60.D6.04.BC.FE.
flash memory
Flash memory is a type of memory that is easily updatable and retains its contents when
power is removed. The Minstrel S has its own flash memory which holds the Minstrel’s
software and has room to hold other applications and data. The File Mover utility can be
used to move or copy items to the Minstrel’s flash. The Minstrel S Updater utility writes
updates to the Minstrel software to the flash.
hot list
The Minstrel S keeps a list of most recently used channels called the hot list. When the
Minstrel S attempts to register, it will use this list as dictated by the Hot List Operation
field in the Config screen.

Glossary 92
Minstrel STM User Guide Version B
90023058
Glossary I-R
IP address
As with personal computers that access the Internet, modems using CDPD technology
also have a static Internet Protocol (IP) address, which is used to identify the node or
access point for the modem on the Internet. The network provider assigns this IP address.
Network Preferences panel
The Network Preferences panel is part of the Palm OS and contains information regarding
how the Visor communicates with other devices, including the Minstrel S. These prefer-
ences can be configured for the Minstrel S using the Setup Wizard utility.
network provider
The Minstrel S modem works with the Wireless IP network. To access the Internet using
this network, an account with a network provider must be set up. For information on avail-
ability and rates, contact a network provider in the area.
ping
Ping stands for Packet Internet Groper and is a utility that is used to determine if a specific
IP address is accessible. It works by sending a packet of data to the IP address in ques-
tion and waits for a reply to.
PPP session
PPP, or Point-to-Point Protocol, is a method of connecting a device to the Internet. In
order for the Minstrel S to send and receive information across the Internet, a PPP session
must first be established. A session is automatically opened when the modem registers to
the network.
primary DNS address
As with personal computers that access the Internet, modems using CDPD technology
must also have access to a Domain Name Server (DNS). The DNS translates Universal
Resource Locators (URLs) such as World Wide Web addresses or domain names into IP
addresses and is shared by multiple devices. In order to get the translated IP addresses,
the modem will try to connect to the server with the primary DNS address. If the modem
cannot connect to this address, it will try to connect using the secondary DNS address.
push messaging
Push messaging is a technology that allows you to receive notification of a waiting mes-
sage through the Wireless IP network without having a PPP session open. Auto power off
mode must be disabled for this feature to work.
registration
In order to send and receive data across the Internet, a CDPD modem must first register
to the CDPD network. This involves selection of an appropriate channel to use and inter-
action with various systems in the CDPD network to set up a path for communication.

Glossary 93
Minstrel STM User Guide Version B
90023058
Glossary S-V
scanning
The Minstrel S will look for the best cellular channel to use for data transmission by scan-
ning through the channels. This involves measuring the signal strength of various chan-
nels to determine which is the strongest and, therefore, most reliable.
secondary DNS address
As with personal computers that access the Internet, modems using CDPD technology
must also have access to a Domain Name Server (DNS). The DNS translates Universal
Resource Locators (URLs) such as World Wide Web addresses or domain names into IP
addresses and is shared by multiple devices. If the modem cannot connect to the DNS
using the primary address, it will try to connect using the secondary DNS address.
segment
Each network address consists of four numeric segments, which are divided by a period
(".").
side
Each Wireless IP service area is divided into two sides, which are labeled A and B. A sin-
gle carrier or service provider is assigned to each side. How these sides are used is dic-
tated by the setting of the Network Provider field in the Config screen. Note that the side
associated with a selected service provider may change with the service area.
sleep mode
The Minstrel S can be configured to automatically enter sleep mode when the modem is
not actively transmitting or receiving data. In this mode, the modem will consume very lit-
tle power, thus extending the host device's battery life.
SPI
The SPI is an identifier for a Wireless IP network provider and is called the Service Pro-
vider Identifier. This number is used globally for each specific network provider.
SPNI
The SPNI is the Service Provider Network Identifier, which is used to identify a specific
network region or domain for a Wireless IP network provider.
TEI
A TEI is a Temporary Equipment Identifier and is assigned to your Minstrel S by the Wire-
less IP network upon registration. The TEI changes as you move into different service
areas.
terminal emulator
A terminal emulator allows you to communicate with a device directly. The Terminal
screen provides this functionality.

Glossary 94
Minstrel STM User Guide Version B
90023058
Glossary W-Z
WASI
The WASI, or Wide Area Service Identifier, is a unique identifier for a group of network pro-
viders that have agreed to provider service over a large geographic area comprising of
many SPNIs.
Wireless IP
Wireless IP is a group of wireless protocols used to access the Internet. CDPD, which is
used by the Minstrel S, is one of the protocols.

Index 95
Minstrel STM User Guide Version B
90023058
Index

Index 96
Minstrel STM User Guide Version B
90023058
Index A-Co
A
About command 60
AC adapter 11
account
activation time 52
Wireless IP 14
Advanced menu 59
AT commands, definition 91
Auto Config screen 52
auto power off 18, 59
definition 91
Auto Power Off field 69
B
battery 11
level 77
battery LED 9
BattLvl field 77
baud rate 86
button 7
configuring 34
C
CDPD, definition 91
CDPD field 76
CDPD Service Detected field 64
CellID field 76
Cellular Signal Present field 64
Chan field 76
changing the
channels in the Hot List 72
configuration 22, 67
IP address 68
primary DNS address 68
secondary DNS address 69
SPI 71
SPNI 71
WASI 71
way the channel hot list is used 72
Channel Hot List field 72
channel, definition 91
charging the battery 11
Check Network screen 54
closing the PPP session 18
Color field 76
Config command 60

Index 97
Minstrel STM User Guide Version B
90023058
Index Co - Em
Config screen 22, 67
Defaults button 73
Done button 74
opening 67
Save button 74
configuration
changing 22, 67
successful 56
configuring the
button 34
Minstrel 14
Visor 44
confirming settings 50
connecting the Minstrel to the Visor 13
connecting to the
Internet 15
network 17
contacting a network provider 46
copying items
from the Minstrel S 30
to the Minstrel S 28
customer support 5
D
data LED 8
DC jack 7, 11
deleting items from the Minstrel S 32
de-registering 17, 21
definition 91
Detailed Status screen 75
Done button 78
disabling
auto power off 69
push messaging 80
sleep mode 70
Disconnect command 59
disconnecting from the network 17
DNS addresses 48, 50
definition 92
E
EID 60
definition 91
EID field 77

Index 98
Minstrel STM User Guide Version B
90023058
Index En-Ld
enabling
auto power off 69
push messaging 80
sleep mode 70
entering commands manually 84
entering network addresses 48
Error Detect field 65
errors in registration 65
exiting Setup Wizard 38
F
FBLER field 76
File Mover 26
starting 26
flash memory 23, 26
copying items 28, 30
definition 91
deleting items 32
moving items 28, 30
viewing contents 26
G
getting started 4
H
Help menu 60
Hot List Operation field 72
hot list, definition 91
HotSync button 35
I
inserting the Minstrel 13
installing the software 12
Internet 15
introduction to
Modem Manager 58
Setup Wizard 38
IP address 48, 50
definition 92
IP Address field 68
IP field 77, 88
L
launching applications with the button 34

Index 99
Minstrel STM User Guide Version B
90023058
Index Le-Ou
LEDs 8
Link field 77
M
managing the network connection 17
menu bar 58, 66
message waiting LED 8
Minstrel Battery field 64
Minstrel menu 58
Minstrel S Updater 23
Minstrel screen 58, 64
Modem Info command 60
Modem Manager 10, 15, 39, 57
introduction 58
navigating 58
starting 61
modem overview 7
Modem Ready Registered field 64
moving items
from the Minstrel S 30
to the Minstrel S 28
N
navigating
Modem Manager 58
Setup Wizard 38
network connection 17
Network Preferences panel 59
definition 92
Network Prefs command 59
network provider 41, 52
contacting 46
definition 92
selecting 41
Network Provider field 70
network registration, checking 54
O
opening the
Config screen 67
Detailed Status screen 75
Ping screen 87
Push Message Configuration screen 79
Terminal screen 82

Index 100
Minstrel STM User Guide Version B
90023058
Index Ov-R
overview
modem 7
software 10
P
Ping screen 87
Done button 89
Ping command 60
Send button 89
ping status 88
pinging 87
definition 92
PL field 76
Power Switch 19
starting 19
powering off the Minstrel S 21
powering on the Minstrel S 20
PPP session
closing 18, 59
definition 92
Preferences panel 34
primary DNS address 48, 50
definition 92
Primary DNS field 68
Push Config command 60
Push Message Configuration screen 79
Done button 81
push messaging 79
definition 92
PwrPrd field 77
R
RBLER field 76
Reconnect command 59
RegErr field 77
registering 17, 20
Registration Error field 65
registration
definition 92
testing 54
requirements 6
RF Channel field 65
roaming 71
RSSI field 64, 76

Index 101
Minstrel STM User Guide Version B
90023058
Index S-St
S
saving changes 67
saving the configuration 51
scanning, definition 93
secondary DNS address 48, 50
definition 93
Secondary DNS field 69
segment, definition 93
Service ID Pref field 71
service LED 8
Service Provider Identifier, definition 93
Service Provider Network Identifier, definition 93
settings
confirming 50
entering 48
Setup Wizard 10, 14, 22, 37
exiting 38
introduction 38
navigating 38
starting 39, 59
Shutdown button 66
Shutdown command 59
Side field 76
sides, network 70
definition 93
Size field 88
Sleep Mode field 70
sleep mode, definition 93
software
overview 10
updates 23
installing 12
SPI field 76
SPI, definition 93
SPI, SPNI, WASI field 71
SPNI field 77
SPNI, definition 93
Springboard expansion slot 13
starting
File Mover 26
Modem Manager 61
Power Switch 19
Setup Wizard 39
Status command 60
status indicator LEDs 7, 8
status of ping 88
stub antenna 7

Index 102
Minstrel STM User Guide Version B
90023058
Index Su-Z
successful configuration 56
support 5
System Busy field 65
T
technical support 5
TEI field 77
TEI, definition 93
Terminal command 60
terminal emulator 82
definition 93
Terminal screen 82
Clear button 85
Cmd pick list 84
Done button 86
OffLine button 83
OnLine button 83
Send button 85
U
updating the flash 23
V
version
hardware 60
software 60
Visor 6, 13
configuring 44
W
waiting for account activation 52
WASI field 76
WASI, definition 94
welcome 5
Wide Area Service Identifier, definition 94
wireless IP service 6
Wireless IP, definition 94
Wireless Provider field 65
working with the Minstrel S 16