OKIN Refined Electric Technology RF31 Remote Control User Manual RF31 UserManual
OKIN Refined Electric Technology Co., Ltd. Remote Control RF31 UserManual
Users Manual
Issue department:Bedding Division Date: 2017-09-21
ProductFunction
instruction
Author: Kyle
No:RF.31.18.01
RF.31.18.01 Version: 1.1
Page 1 of 8
1
RF.31.18.01 Functioninstruction
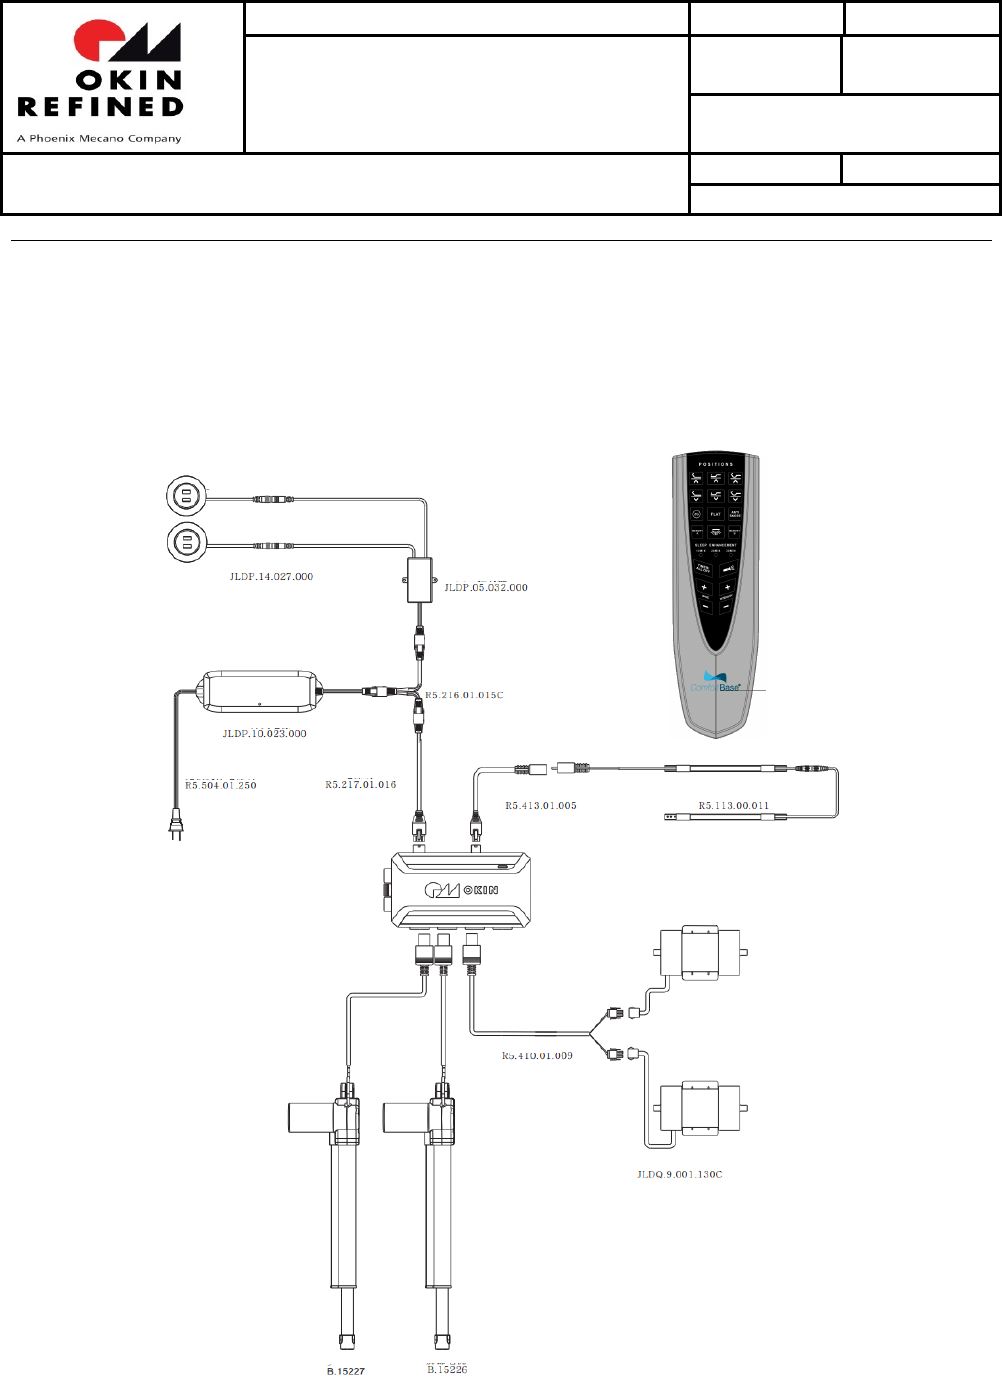
1. Electricalconfigurationdiagram:
CB.13.22.01
Issue department:Bedding Division Date: 2017-09-21
ProductFunction
instruction
Author: Kyle
No:RF.31.18.01
RF.31.18.01 Version: 1.1
Page 2 of 8
2
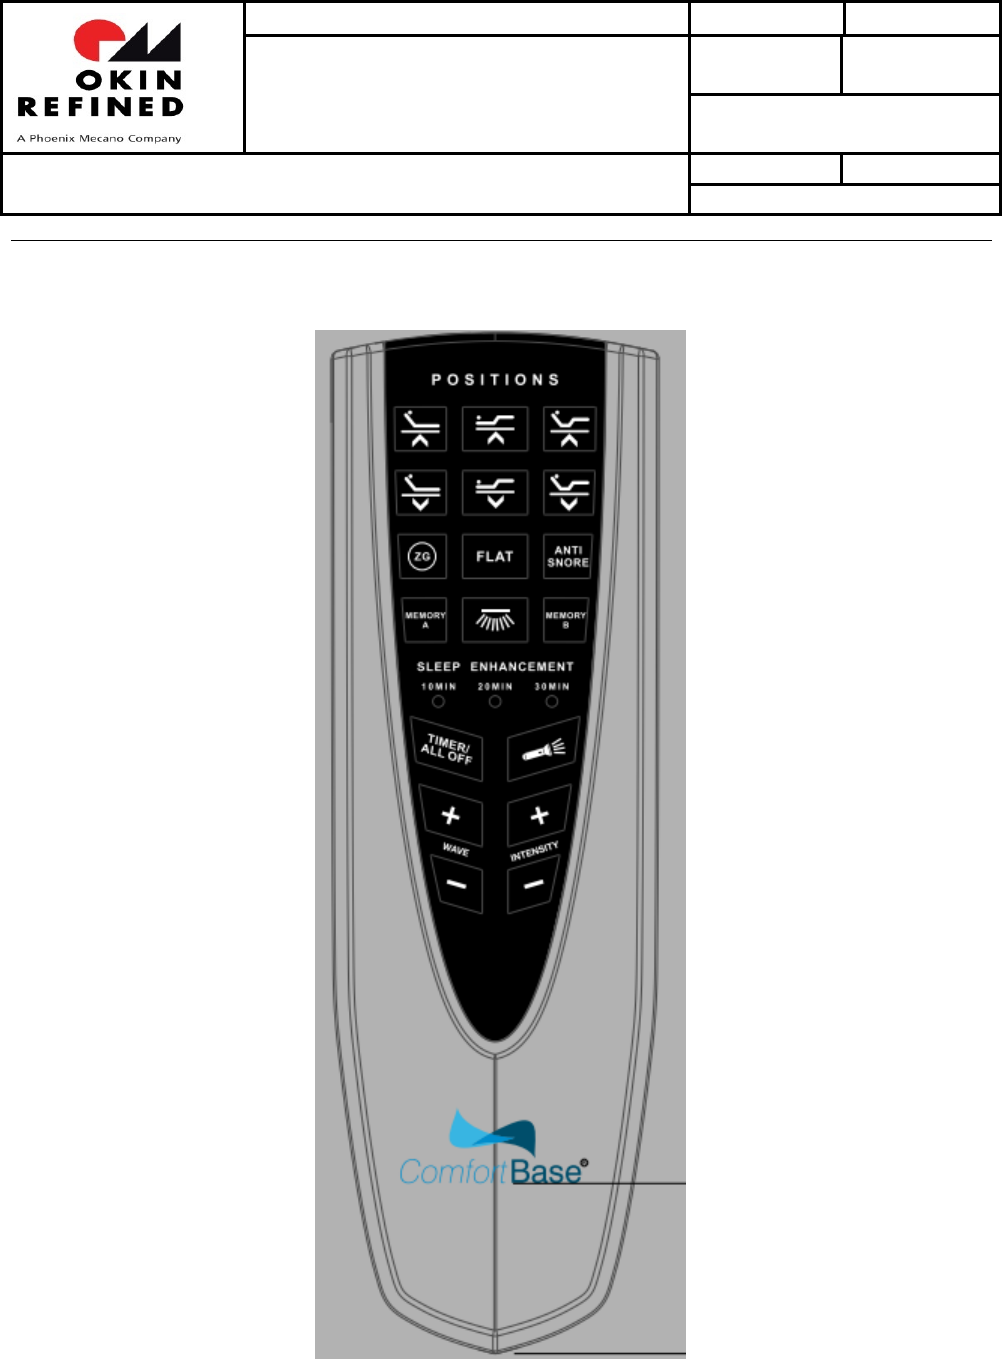
2. FunctionPicture
Issue department:Bedding Division Date: 2017-09-21
ProductFunction
instruction
Author: Kyle
No:RF.31.18.01
RF.31.18.01 Version: 1.1
Page 3 of 8
3
1. Process of test
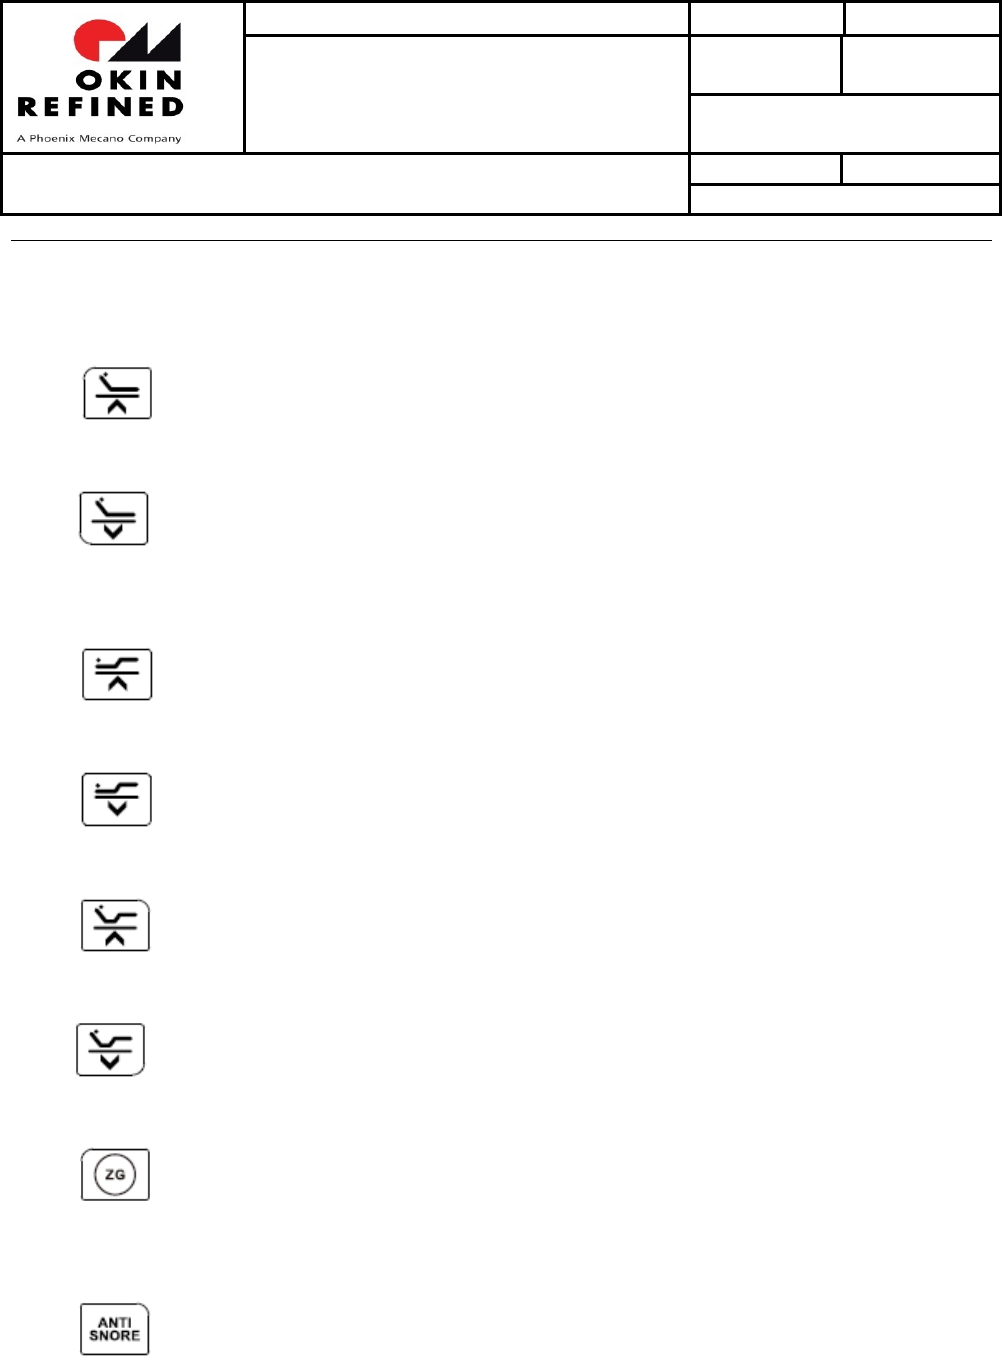
A. HEAD UP button:Press and hold the button, the Head actuatorwill go up. Stop
when released.
B. HEAD DN button:Press and hold the button, the Head actuator will go down.
Stop when released.
C. FOOT UP button:Press and hold the button, the Foot actuator will go up. Stop
when released.
D. FOOT DN button:Press and hold the button, the Foot actuator will go down. Stop
when released.
E. HEAD & FOOT UP button:Press and hold the button, the Head and Foot actuator
will simultaneously go up. Stop when released.
F. HEAD & FOOT DN button:Press and hold the button, the Head and Foot actuator
will simultaneously go down. Stop when released.
G. ZERO GRAVITY button: Click the button, the Head and Foot actuator will start up
and keep running until arriving to the zero gravity position. Running can be stopped by
clicking any button.
H. ANTI SNORE button: Click the button, the Head and Foot actuator will start up
and keep running until arriving to the ANTI SNORE position. Running can be stopped by
clicking any button.
Issue department:Bedding Division Date: 2017-09-21
ProductFunction
instruction
Author: Kyle
No:RF.31.18.01
RF.31.18.01 Version: 1.1
Page 4 of 8
4
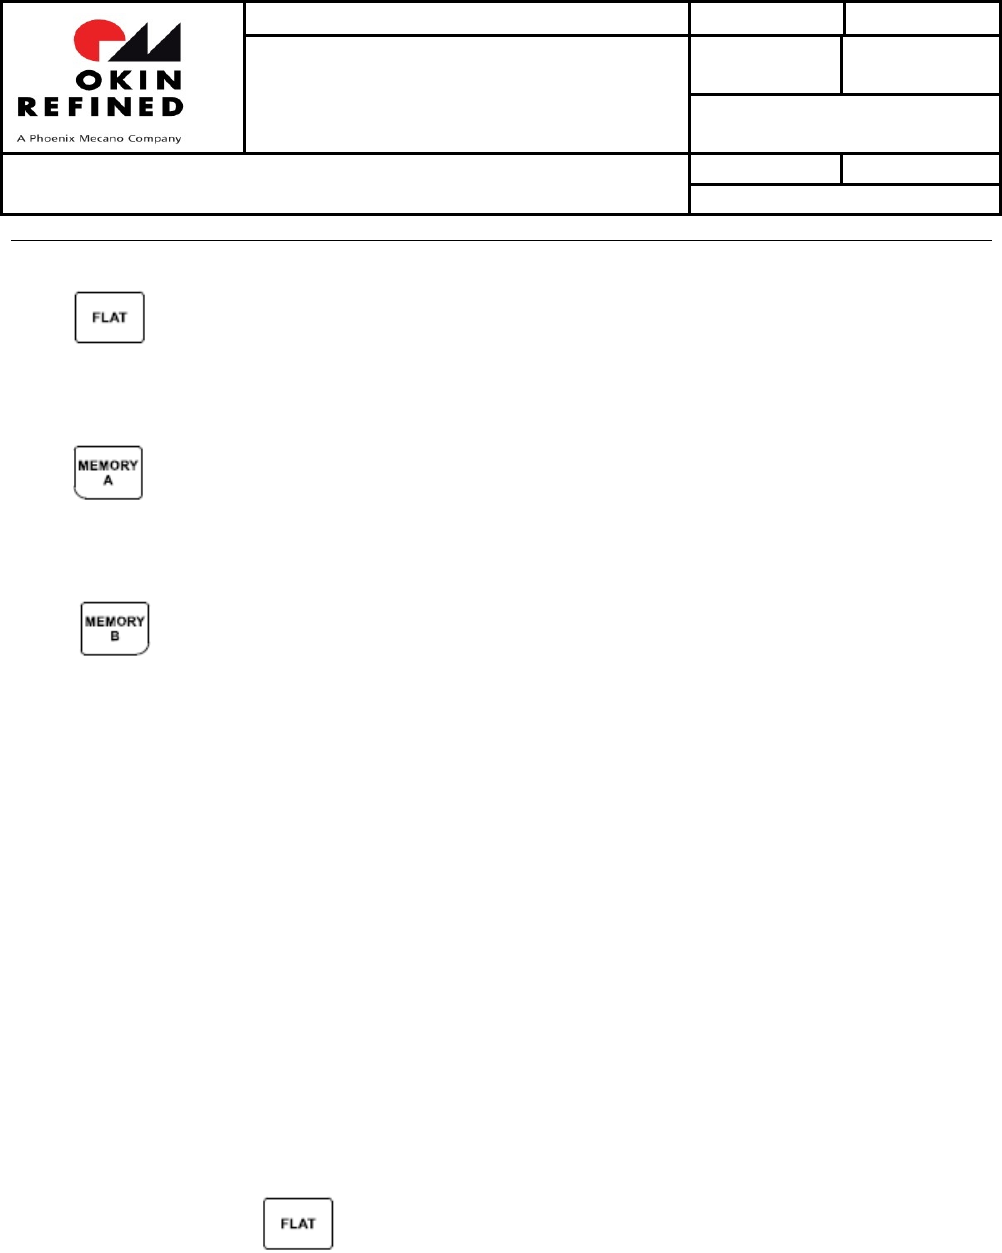
I. FLAT button: Click the button, the Head and Foot actuator will start up and keep
running until arriving to the FLAT position. Running can be stopped by clicking any
button.
J. MEMORY A button: Click the button, the Head and Foot actuator will start up and
keep running until arriving to the Memory A position preset by user. Running can be
stopped by clicking any button.
K. MEMORY B button: Click the button, the Head and Foot actuator will start up and
keep running until arriving to the Memory B position preset by user. Running can be
stopped by clicking any button.
The blue LEDs for backlight are on as long as any button is pressed. IF all buttons are
released the LEDs will automatically turn off three seconds later.
The blue LED for power is always on as long as the power on.
The below positions can be changed or set by the end user.
The Zero gravity position;
The Memory A position;
The Memory B position;
The procedure to set these special positions is below:
Step 1: Click the button to flat the bed;
Step 2: Adjust the Head and Foot position to a desired position by pressing the
button HEAD_ UP or HEAD_DOWN or FOOT_UP or FOOT_DOWN;

Issue department:Bedding Division Date: 2017-09-21
ProductFunction
instruction
Author: Kyle
No:RF.31.18.01
RF.31.18.01 Version: 1.1
Page 5 of 8
5
Step 3: Press and hold the button for 3sec, backlight LED start flashing;
Step 4: Release the button then click one of or or
button before LED stop flashing. Then the Flashing stops immediately to
indicate the corresponding operating has completed successfully.
ALL of the Zero gravity position and the Memory A position and the Memory A
position can be restored to default sets by pressing and holding the
button for approximate six seconds until the backlight LEDs finally stop flashing
from first flashing.
L. FLASHLIGHT button:Click the button, the Flashlight on the remote control will
turn on if it is being off or turn off if it is being on. If the Flashlight is turning on as the
button pressed, it will keep on as long as the button pressed. When the button is released,
the Flashlight will still keep on for several seconds then turn off with the backlight turning
off together.
M. UNDERLIGHT button:Click the button, the Under-light under the bed will turn
on if it is being off or turn off if it is being on. If the Under-light is turning on as the button
pressed, it will keep on for 5 minutes then turn off automatically if the button isn’t
pressed again.
N. Vibration INTENSITY ICREASEMENT button:
Click the button the vibrating intensity will raise up one level, total 3levels.
O. Vibration INTENSITY DECREASEMENT button:
Issue department:Bedding Division Date: 2017-09-21
ProductFunction
instruction
Author: Kyle
No:RF.31.18.01
RF.31.18.01 Version: 1.1
Page 6 of 8
6
Click the button the vibrating intensity will lower down one level, total 3 levels.
The number of level represents the vibrating intensity. More big number of the level,
more strongly vibrating it is. The strongest vibrating is level 3, and the weakest is level
1.
Implement adjustment of the vibrating intensity is the way known as “PWM”.
Different vibration of PWM makes different intensity. The value of the vibration
corresponding to the level is below:
vibration Level
20% 1
35% 2
50% 3
P. Vibration SPEED INCREASEMENT button:
If the vibrating has started up, click the button, the vibrating speed will raise up one
level, total 4 levels.
Q. Vibration SPEED DECREASEMENT button:
If the vibrating has started up, click the button, the vibrating speed will lower down
one level, total 4 levels.
The “Speed” essentially represents the vibrating mode. The mode in speed level 0~2 is
that the motor vibrates at intervals and the mode in speed level 3 does continuously.
The intervals and the corresponding level are below:
ON time OFF time Level
500mS 500mS 0
350mS 350mS 1
200mS 200mS 2
Continuous 3
Note: ON time-----On vibrating
Issue department:Bedding Division Date: 2017-09-21
ProductFunction
instruction
Author: Kyle
No:RF.31.18.01
RF.31.18.01 Version: 1.1
Page 7 of 8
7
OFF time-----Stop vibrating
PS: If the vibrator has stopped, press any one of the four buttons of
, the vibrator will start up in the intensity of level one and in the previous speed.
R. Vibration time button:
Press the button and released to stop all moves(including the actuators and vibrator) and
change circularly the vibrating time of the vibrator by one level once, total 3 levels。
The time means that vibrating keeps on for this period then automatically stops if no
any button related to vibrating is pressed again. The time and the LED indication are
below:
This LED flash a time, the vibrating time is 10minutes;
This LED flash a time, the vibrating time is 20minutes;
This LED flash a time, the vibrating time is 30minutes;
10min,20min,30min LED

Issue department:Bedding Division Date: 2017-09-21
ProductFunction
instruction
Author: Kyle
No:RF.31.18.01
RF.31.18.01 Version: 1.1
Page 8 of 8
8
FCC:
AnyChangesormodificationsnotexpresslyapprovedbythepartyresponsibleforcompliancecouldvoidthe
user’sauthoritytooperatetheequipment.
Thisdevicecomplieswithpart15oftheFCCRules.Operationissubjecttothefollowingtwoconditions:(1)This
devicemaynotcauseharmfulinterference,and(2)thisdevicemustacceptanyinterferencereceived,including
interferencethatmaycauseundesiredoperation.
ISEDRSSWarning:
ThisdevicecomplieswithInnovation,ScienceandEconomicDevelopmentCanadalicenceexemptRSSstandard(s).
Operationissubjecttothefollowingtwoconditions:(1)thisdevice
maynotcauseinterference,and(2)thisdevicemustacceptanyinterference,includinginterferencethatmay
causeundesiredoperationofthedevice.
LeprésentappareilestconformeauxCNRd'ISEDapplicablesauxappareilsradio
exemptsdelicence.
L'exploitationestautoriséeauxdeuxconditionssuivantes:
(1)l'appareilnedoitpasproduiredebrouillage,et
(2)l'utilisateurdel'appareildoitacceptertoutbrouillageradioélectriquesubi,
mêmesilebrouillageestsusceptibled'encompromettrelefonctionnement.