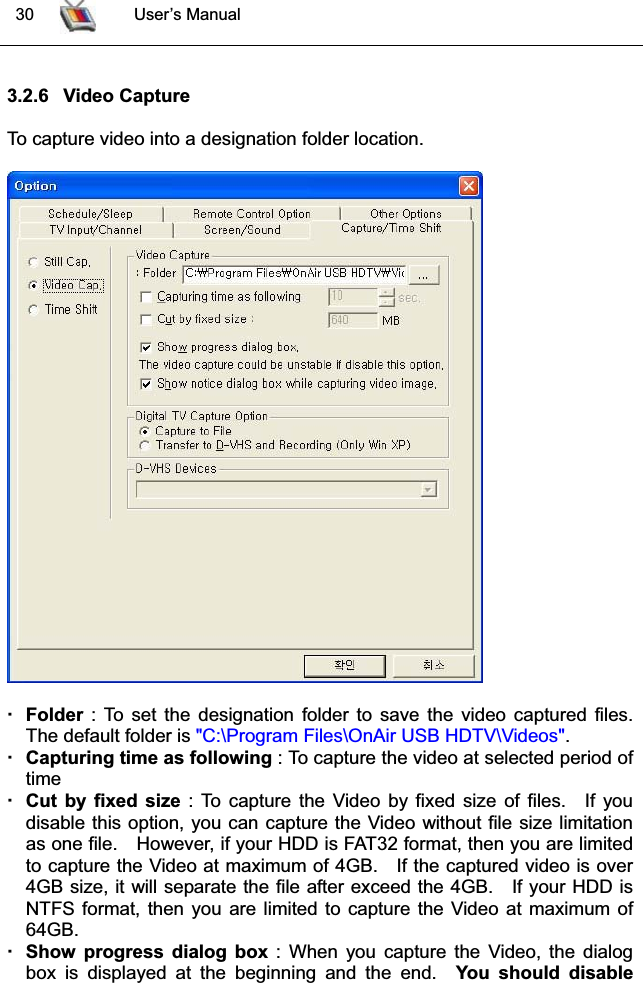
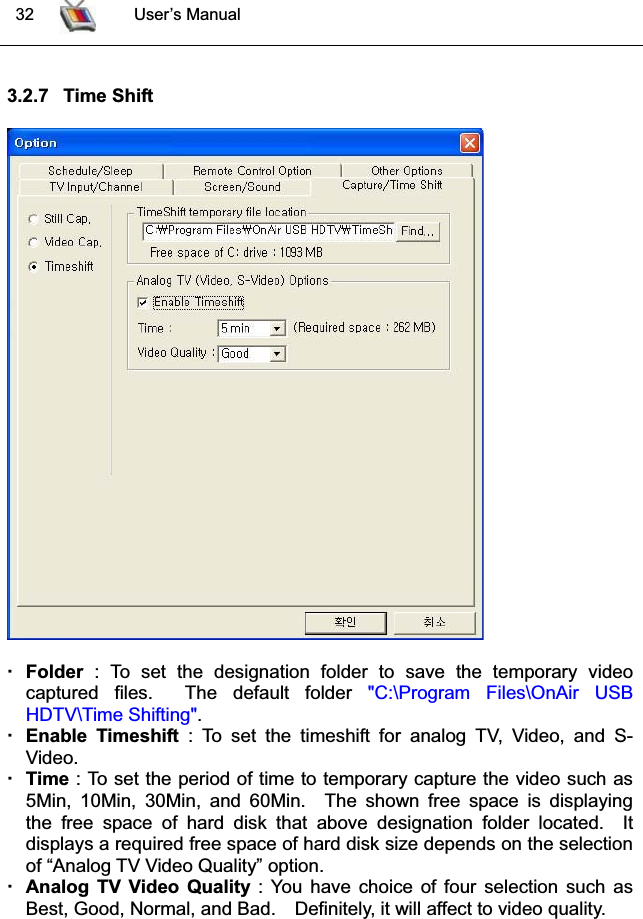
ONAIRSOLUTION ONAIRCREATOR USB HDTV Receiver User Manual OnAir USB HDTV
ONAIRSOLUTION Co., Ltd. USB HDTV Receiver OnAir USB HDTV
UserManual.wiki
>
ONAIRSOLUTION
>
ONAIRCREATOR User Manual
Users Manual
Navigation menu
Upload a User Manual
Namespaces
Wiki Guide
HTML
PDF
Info
Views
User Manual
Discussion / Help
Navigation


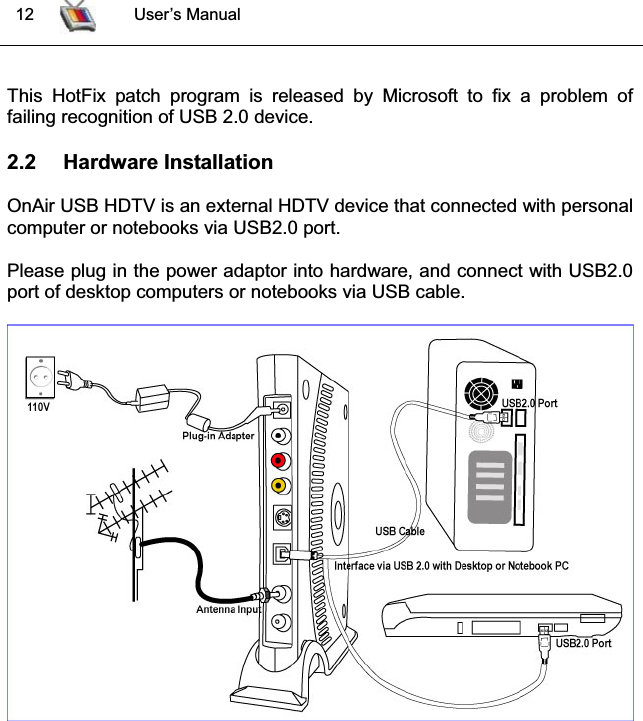
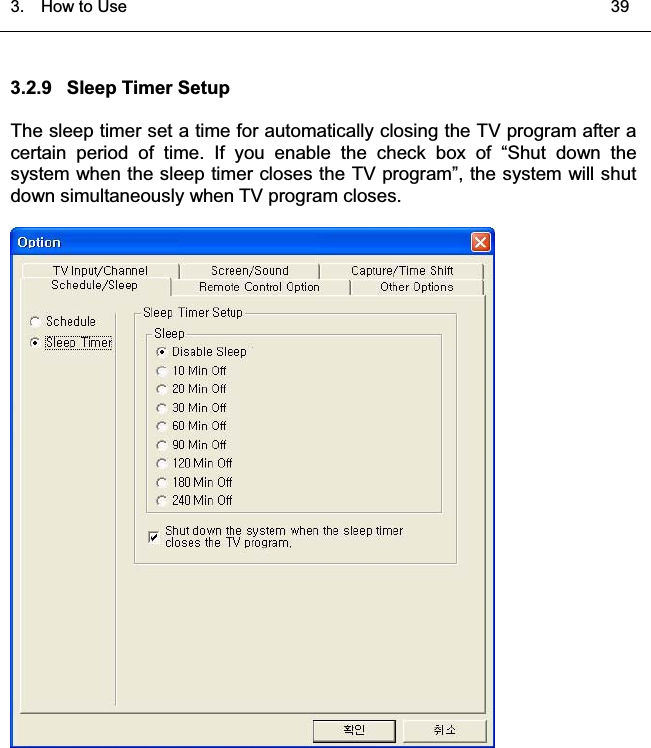
![2. Installation 132.3 OnAir USB HDTV Device Driver InstallationPlease insert the provided installation CD into your system’s CD-ROM drive.The installation CD will automatically start the installation. From the displayed product list, select the driver installation under OnAir USB HDTV.If the installation CD does not auto-run, please open window explorer tofind the “installer.exe” file and execute the file.2.3.1 OnAir USB HDTV Device Driver Installation for Windows XP XUThis is a dialog box ofchoosing a language ofinstallation program.Please choose one oflanguages of either Englishor Korean, and press [OK]button to continue.YUThis is a dialog box of thewarning notice to usersthat the driver may not beinstalled if the OnAir USBHDTV is connected to thesystem. If the OnAir USB HDTV is connected to yoursystem’s USB2.0 port,please remove it first and then click [Next] button tocontinue.͑](https://usermanual.wiki/ONAIRSOLUTION/ONAIRCREATOR/User-Guide-548024-Page-11.png)
![14 User’s ManualZUPlease close all otherwindows applicationprograms before runningthe installation, and clickthe [Next] button to continue.[UIf you are ready to run theinstallation program,please click the [Next]button to continue.\UThe OnAir USB HDTVdevice driver installation iscompleted. Please clickthe [Finish] button, andplug in the OnAir USBHDTV device into yoursystem via USB2.0.](https://usermanual.wiki/ONAIRSOLUTION/ONAIRCREATOR/User-Guide-548024-Page-12.png)
![2. Installation 152.4 OnAir USB HDTV Application Software InstallationThe given installation CD with package includes the application software ofOnAir USB HDTV.Please insert the provided installation CD into your system’s CD-ROM drive.The installation CD will automatically start the installation. From the displayed product list, please select the application software under OnAirUSB HDTV.If the installation CD does not auto-run, please open window explorer andchoose the “installer.exe” file to execute the installation.XUThe installation wizard ofOnAir USB HDTV will guideyou to install the applicationsoftware. To continue theinstallation, please click[Next] button.YUPlease choose adesignation folder locationto install the software. Ifyou would like to choosedifferent folder location,please click [Browse] button and choose another folderlocation. Please click the[Next] button to continue. ͑](https://usermanual.wiki/ONAIRSOLUTION/ONAIRCREATOR/User-Guide-548024-Page-13.png)
![16 User’s ManualZUPlease choose items that you wish to install, andplease click the [Next]button to continue.[UThe OnAir USB HDTVapplication software issuccessfully installed.To complete the installationprocess, please rebootyour system. Please clickthe “Yes” button to rebootyour system now or click“No” button to rebootsystem later. Please clickthe [Finish] button tocomplete the installation.](https://usermanual.wiki/ONAIRSOLUTION/ONAIRCREATOR/User-Guide-548024-Page-14.png)
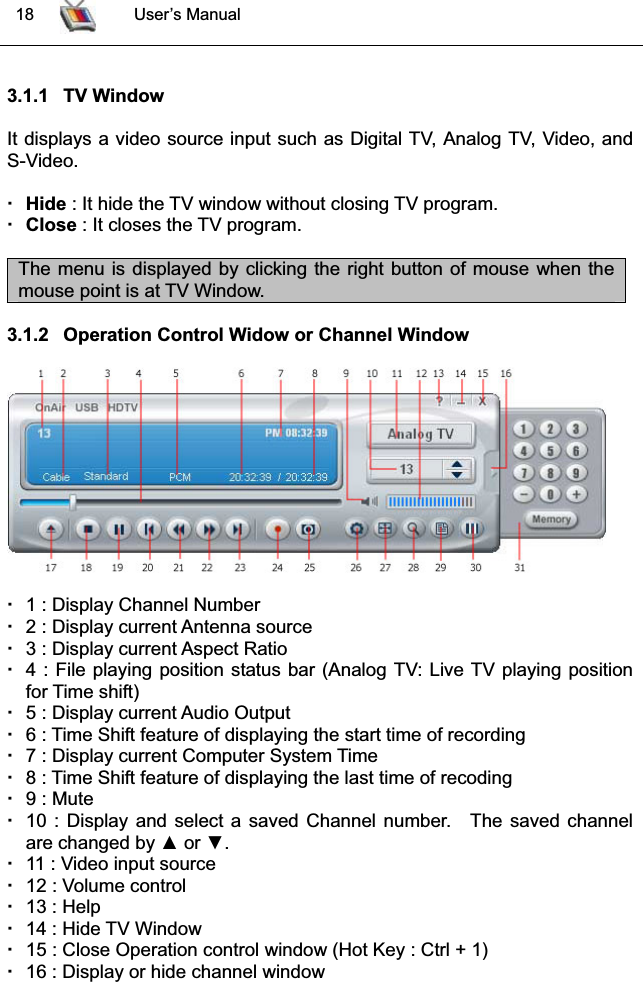
![3. HowtoUse 173 How to use3.1 Screen Components[ TV Window ][OperationControlWindow] [ChannelWindow][Color Adjustment] [Play List] [Zoom Navigator]͑](https://usermanual.wiki/ONAIRSOLUTION/ONAIRCREATOR/User-Guide-548024-Page-15.png)