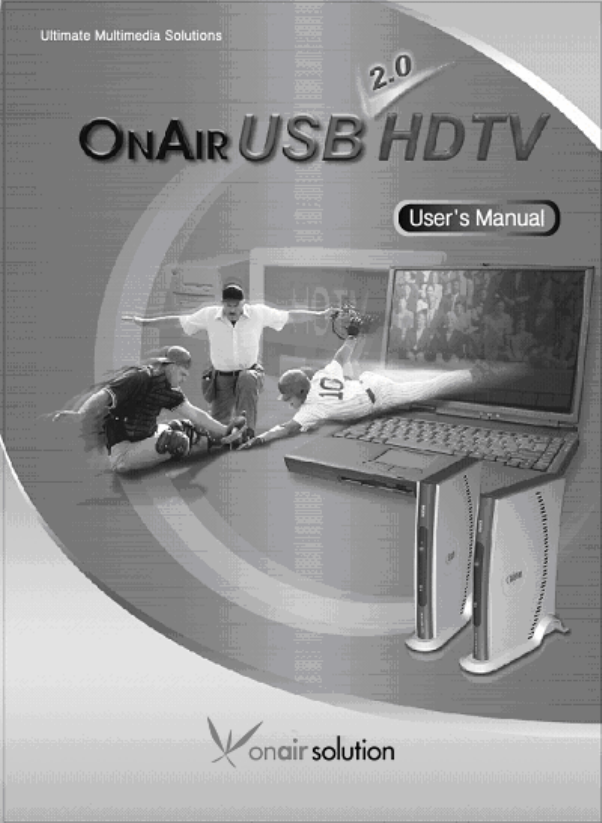
ONAIRSOLUTION ONAIRCREATOR USB HDTV Receiver User Manual OnAir USB HDTV
ONAIRSOLUTION Co., Ltd. USB HDTV Receiver OnAir USB HDTV
Users Manual

If you have any difficulties to use the products or have any
questions, please contact our technical support for
assistance.
Tel : 82-2-1588-6778
Fax : 82-2-2165-3376
URL : http://www.onaiirsolution.co.kr or
http://www.usbhdtv.com
E-mail : support@onairsolution.co.kr
Technical Support office hour
Mon-Fri : 10:00 AM - 17:00 PM
2nd,4th, and 5th Sat : 10:00 AM -15:00 PM
1st and 3rd Sat or Holidays are closed.
Copyrights
Each involving company copyrights the software and the
firmware in this manual.
Every software and firmware is protected under the
intellectual property right and treaty, computer program
preservation and copyright law and international copyright
convention.
You cannot copy and excerpt this manual without
permission.
Warranty
The warranty period is one year after a date of
purchasing.
ᐕ2005 onairsolution Co., Ltd. All right reserved.
Made in Korea.
Important Safety Notice
(Always follow these instructions to help guard against personal injury and
damage to your system.)
It is strongly recommend you to read the user’s manual before you use the
product.
ଖThere are two attention messages such as warning and notice.
The definition of warning and notice are following
.
It may cause a serious injury or death if you
violate the instruction
G
It may cause a minor injury or product damage
if you violate the instruction
GG
Should be careful to be secured against a
specify condition.
The technical support expense will be charged to users if the damage
causes by user’s carelessness usage.
Contents
1GIntroduction of OnAir USB HDTV ........................ 7G
1.1GMain Specifications and Features ..................................7G
1.2GPackage Included ...........................................................8G
1.3GSystem Requirements ....................................................9G
1.4GParts Decription ............................................................10G
2GInstallation ........................................................... 11G
2.1GInstallation Checklist..................................................... 11G
2.2GHardware Installation....................................................12G
2.3GOnAir USB HDTV Device Driver Installation ................13G
2.4GOnAir USB HDTV Application Software Installation .....15G
3GHow to use........................................................... 17G
3.1GScreen Components.....................................................17G
3.2GOption ...........................................................................22G
4GFAQ ...................................................................... 43G
4.1GHow to use Hot Keys ....................................................43G
4.2GRemote Controller Button Description..........................45G

1. Introduction of OnAir USB HDTV 7
1 Introduction of OnAir USB HDTV
1.1 Main Specifications and Features
The main specifications and features of OnAir USB HDTV are following.
Digital & Analog TV
Full HDTV of 1920 X 1080 (ATSC)
Digital (ATSC) HDTV / Analog (NTSC) TV
AC3 / AAC Audio Decoding output
Recording & Playback
Real-time or Schedule Recording
Still Capture (JPEG or BMP File)
Hardware MPEG2 Encoding for Analog Video Source (easy to create
own DVD title via DVD-RW and tool) : Resolution 720 x 480
Playback HD Stream File format (ATSC and Japan BS)
Playback Analog TV File (MPEG2 DVD Stream : Resolution 720 x
480 )
Playback of HD Stream files (Random access)
Time-Shift*
D-VHS HD Stream playback or real-time recording (Win XP only)
Provide OnAir HD Editor
External A/V Input & Output
External A/V Input (Video, Stereo Audio, S-Video , NTSC/PAL Video )
SPDIF Output through sound card (will support AAC)
Bundle WinDVD4 Player (InterVideo, Inc.)
Suitable Features
Wall Paper TV View
Zoom-In
Various Aspect Ratios
Individual Channel Color Adjustment
Digital Signal Strength Display
Sleep Timer
Remote Control (IR Model Only)
* Time-Shift is ? While playing live Analog TV, the time shift offers you ability to
pause the live TV for pre-defined period of time. It provides by recording Live TV in
8 User’s Manual
real-time for pre-defined period of time while playing Live TV. It helps you to not
miss any part of Live TV even though you stay away from TV for a while. (Analog
TV only)
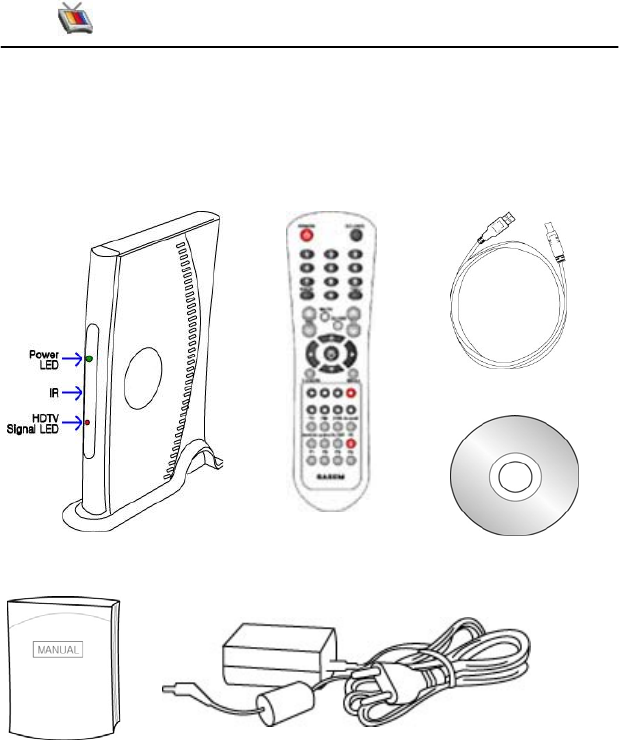
1.2 Package Included
3.USB Cable
1. OnAir USB HDTV/Stand 2. Remote Controller (AAA
Batteries included)
4. Installation CD
5. User’s Manual 6. Power Adapter
If any one of items are missing, please contact our technical support at 82-
31-909-7990.

1. Introduction of OnAir USB HDTV 9
1.3 System Requirements
USB 2.0 port supported Desktop PC or Notebook (PCI / PCMCIA types
of USB2.0)
OS : MS Windows XP Service Pack 1 or above, MS Windows XP Media
Center Edition (MCE 1.x)
DirectX 9.0
Minimum system requirement (with DXVA support)
ATI RADEON 7200 or above
ATI Mobility Radeon 7500 or
above
Nvidia Geforce MX 440 or
above
Nvidia Geforce 4 Go or above
VGA
Video Memory 32MB or above
CPU PentiumIII 800 Mhz or above / AMD Athlon XP or above
Mem. 128MB (256MB Recommend)
Minimum system requirement (not recommended, without DXVA
support)
VGA : AGP4X with video memory 32MB or above
CPU : Pentium4 1.6Ghz or AMD Athlon XP
Memory : 128MB (256MB Recommend)
10 User’s Manual
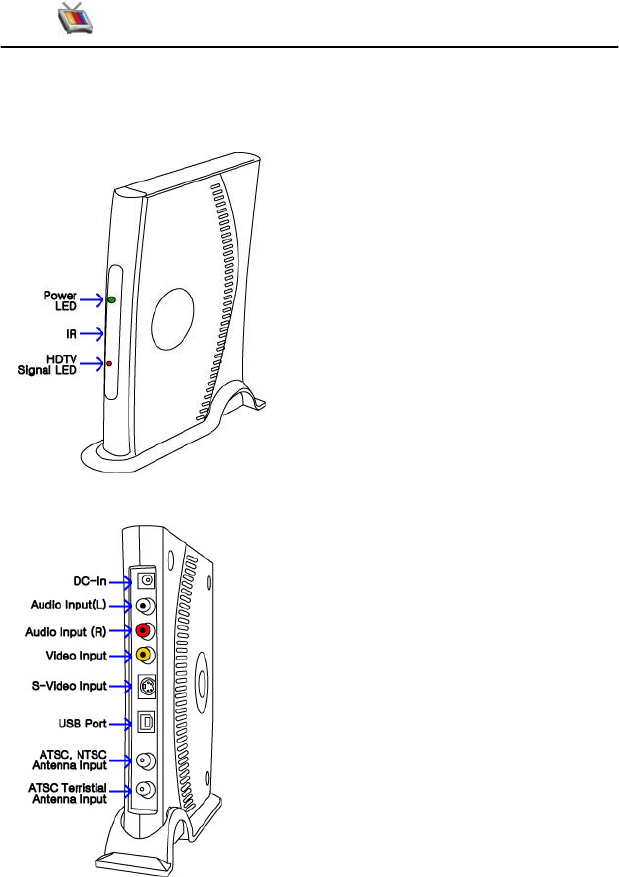
1.4 Parts Decription
Power LED : The Power LED
displays when the power is on to
OnAir USB HDTV device and it
connects with a computer system via
USB cable.
IR : This is a remote controller’s
signal reception part.
HDTV Signal LED : The HDTV
Signal LED displays when there is
no Digital TV signal input.
DC-In : The place of power adapter
connects into OnAir USB HDTV.
Audio Input(L), Audio Input : The
stereo input of Video. Generally, it
connects with Audio-Out of VTRs or
the others.
Video Input : Composite type of
image input. Generally, it connects
with Video Out of VTRs, Video
Camera, and Camcorder.
S-Video Input : S-Video type of
image input. It connects with S-
Video Out of Super-VHS VTRs or
SEGA Saturn and SONY
PlayStation, etc.
USB Port : It connects with a
computer system’s USB2.0 port via
USB cable.
ATSC, NTSC Antenna Input : Either
Cable or terrestrial digital antenna
input.
ATSC Terrestrial Input : Terrestrial
Digital antenna input only.

2. Installation 11
͑
2 Installation
2.1 Installation Checklist
2.1.1 Windows XP Service Pack 1 Installation
From the desktop menu of "My Computer", click the mouse’s right button to
open the “Properties". Then, find out what the current operating system is
running on your system. If your operation system is not "Microsoft Windows
XP Service Pack 1" then please install the “Service Pack 1” from the
Windows Update through the internet
Please open Microsoft Internet Explorer, and choose the tool menu on top
of menu bar and click the “windows update” and run the update scan. If
the update scan is completed, there will be update scan result displayed.
From the update scan result list, please install the Microsoft Windows XP
Service Pack 1 from "Critical Updates and Service Pack”.
2.1.2 USB2.0 Patch (HotFix)
Because the USB 2.0 is a new device, even Microsoft Windows XP
Service Pack 1 has a bug on the USB 2.0 Device Driver.
At first, please confirm the "Windows XP HotFix - KB822603" is
installed on your system from the “program add / remove” under
control panel. If your system already installed this, your system
had completed the patch of USB2.0 Device Driver Bug. If your
system did not have this, please open Microsoft Internet Explorer,
and choose the tool menu on top of menu bar and click the
“windows update” and run the update scan. If the update scan is
completed, there will be a list of update scan result displayed.
From the list of update scan result, please find the "Windows XP
SP1 recommended update (KB822603)" under Windows XP menu
and install it on your system, or please download the HotFix from
following URL and install it on your system.
http://www.microsoft.com/downloads/details.aspx?amp;amp;displaylang=e
n&familyid=733dd867-56a0-4956-b7fe-e85b688b7f86&displaylang=en
12 User’s Manual
This HotFix patch program is released by Microsoft to fix a problem of
failing recognition of USB 2.0 device.
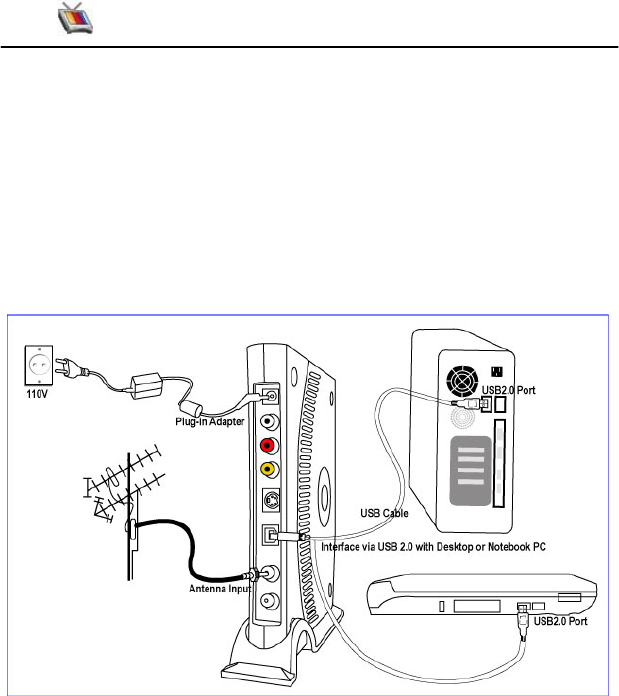
2.2 Hardware Installation
OnAir USB HDTV is an external HDTV device that connected with personal
computer or notebooks via USB2.0 port.
Please plug in the power adaptor into hardware, and connect with USB2.0
port of desktop computers or notebooks via USB cable.
2. Installation 13
2.3 OnAir USB HDTV Device Driver Installation
Please insert the provided installation CD into your system’s CD-ROM drive.
The installation CD will automatically start the installation. From the
displayed product list, select the driver installation under OnAir USB HDTV.
If the installation CD does not auto-run, please open window explorer to
find the “installer.exe” file and execute the file.
2.3.1 OnAir USB HDTV Device Driver Installation for Windows XP
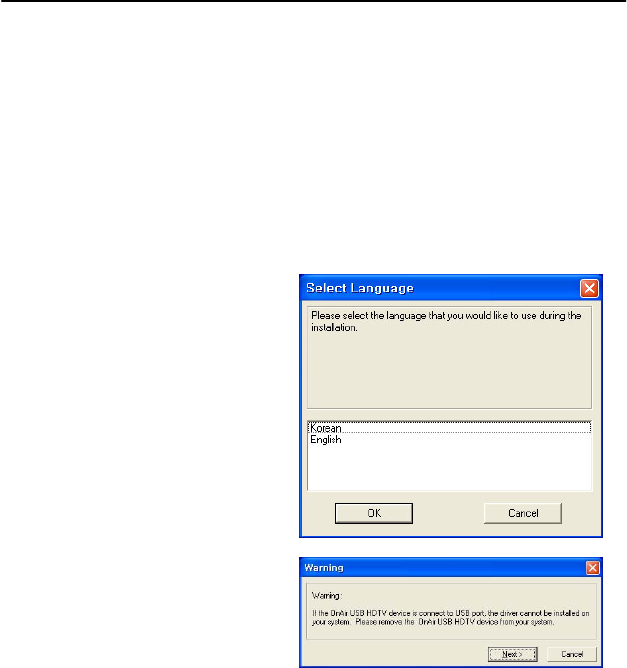
XU
This is a dialog box of
choosing a language of
installation program.
Please choose one of
languages of either English
or Korean, and press [OK]
button to continue.
YU
This is a dialog box of the
warning notice to users
that the driver may not be
installed if the OnAir USB
HDTV is connected to the
system. If the OnAir USB
HDTV is connected to your
system’s USB2.0 port,
please remove it first and
then click [Next] button to
continue.
͑

14 User’s Manual
ZU
Please close all other
windows application
programs before running
the installation, and click
the [Next] button to
continue.
[U
If you are ready to run the
installation program,
please click the [Next]
button to continue.
\U
The OnAir USB HDTV
device driver installation is
completed. Please click
the [Finish] button, and
plug in the OnAir USB
HDTV device into your
system via USB2.0.
2. Installation 15
2.4 OnAir USB HDTV Application Software Installation
The given installation CD with package includes the application software of
OnAir USB HDTV.
Please insert the provided installation CD into your system’s CD-ROM drive.
The installation CD will automatically start the installation. From the
displayed product list, please select the application software under OnAir
USB HDTV.
If the installation CD does not auto-run, please open window explorer and
choose the “installer.exe” file to execute the installation.
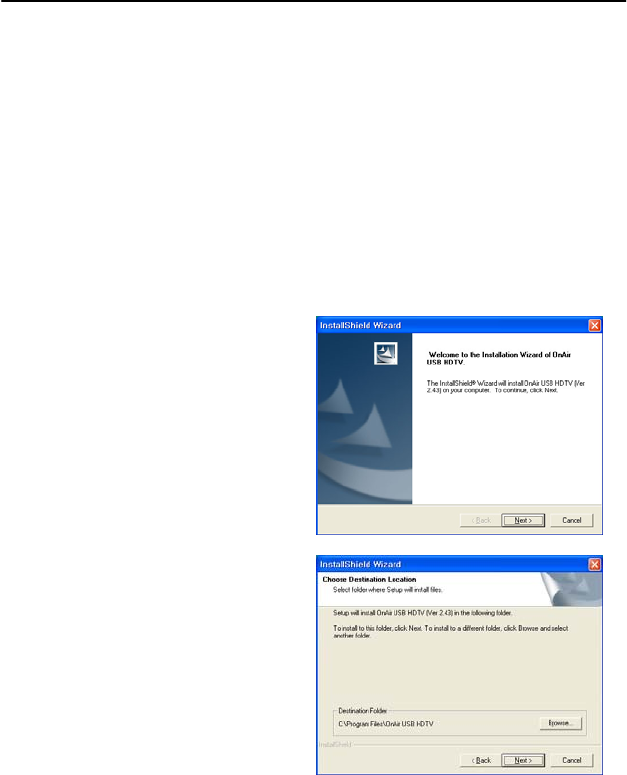
XU
The installation wizard of
OnAir USB HDTV will guide
you to install the application
software. To continue the
installation, please click
[Next] button.
YU
Please choose a
designation folder location
to install the software. If
you would like to choose
different folder location,
please click [Browse] button
and choose another folder
location. Please click the
[Next] button to continue.
͑
16 User’s Manual
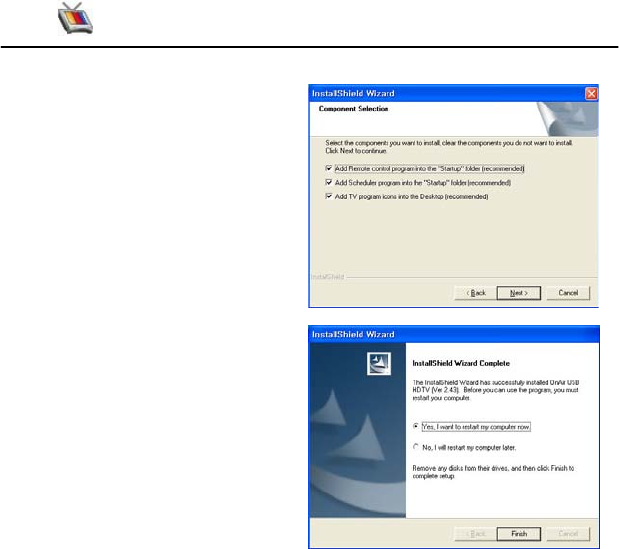
ZU
Please choose items that
you wish to install, and
please click the [Next]
button to continue.
[U
The OnAir USB HDTV
application software is
successfully installed.
To complete the installation
process, please reboot
your system. Please click
the “Yes” button to reboot
your system now or click
“No” button to reboot
system later. Please click
the [Finish] button to
complete the installation.
3. HowtoUse 17
3 How to use
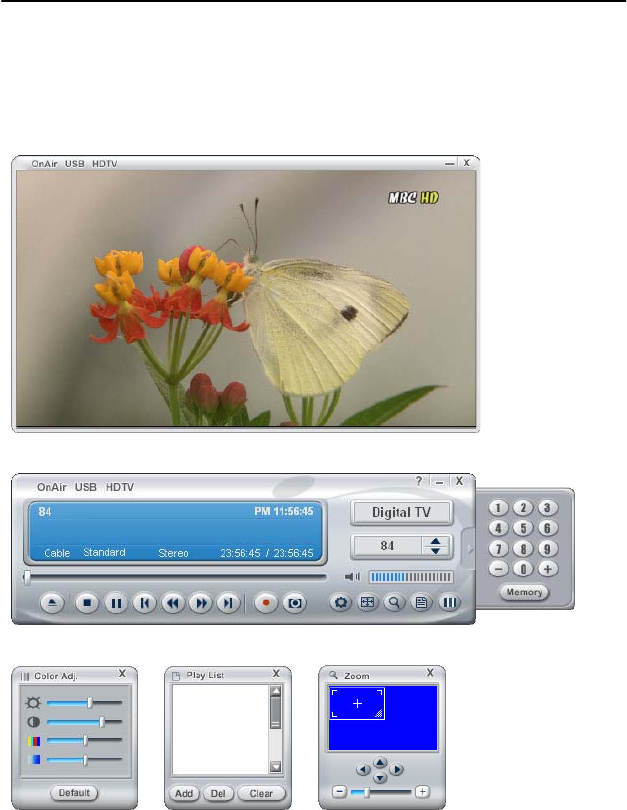
3.1 Screen Components
[ TV Window ]
[OperationControlWindow] [ChannelWindow]
[Color Adjustment] [Play List] [Zoom Navigator]
͑
18 User’s Manual
3.1.1 TV Window
It displays a video source input such as Digital TV, Analog TV, Video, and
S-Video.
Hide : It hide the TV window without closing TV program.
Close : It closes the TV program.
The menu is displayed by clicking the right button of mouse when the
mouse point is at TV Window.
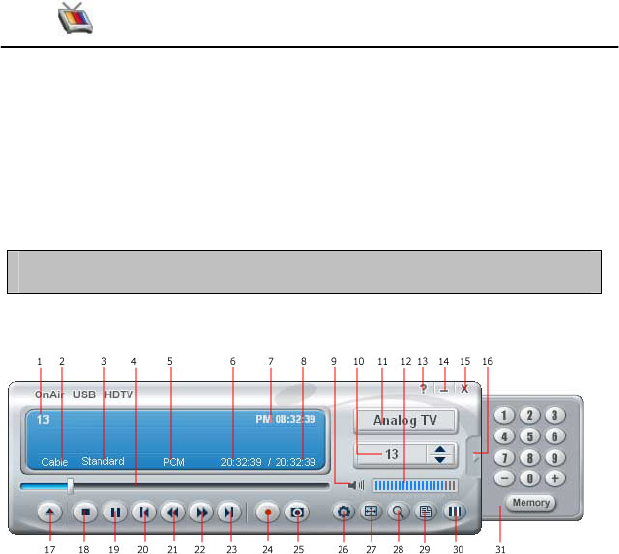
3.1.2 Operation Control Widow or Channel Window
1 : Display Channel Number
2 : Display current Antenna source
3 : Display current Aspect Ratio
4 : File playing position status bar (Analog TV: Live TV playing position
for Time shift)
5 : Display current Audio Output
6 : Time Shift feature of displaying the start time of recording
7 : Display current Computer System Time
8 : Time Shift feature of displaying the last time of recoding
9 : Mute
10 : Display and select a saved Channel number. The saved channel
are changed by Ÿ or ź.
11 : Video input source
12 : Volume control
13 : Help
14 : Hide TV Window
15 : Close Operation control window (Hot Key : Ctrl + 1)
16 : Display or hide channel window

3. HowtoUse 19
͑
17 : Open File
18 : Stop
19 : Pause (When the Time shift activates, it pauses or play by toggling)
20 : Previous (When the Time shift activates, it moves to at the beginning
position.)
21 : Jump to backward (When the Time shift activates, it moves back to a
certain time period of previous record position)
22 : Jump to forward (When the Time shift activates, it moves back to a
certain time period of next record position)
23 : Next (When the Time shift activates, it moves to Live mode)
24 : Video Capture
25 : Still Capture
26 : Option
27 : Aspect Ratio
28 : Zoom (Zoom Navigator)
29 : Play List window
30 : Color Adjustment (Hot Key : Ctrl+2)
31 : The numeric buttons are for channel selection(1~9), “-“ and “+” is
for channel up and down, and “Memory” button is for saving a
channel.
20 User’s Manual
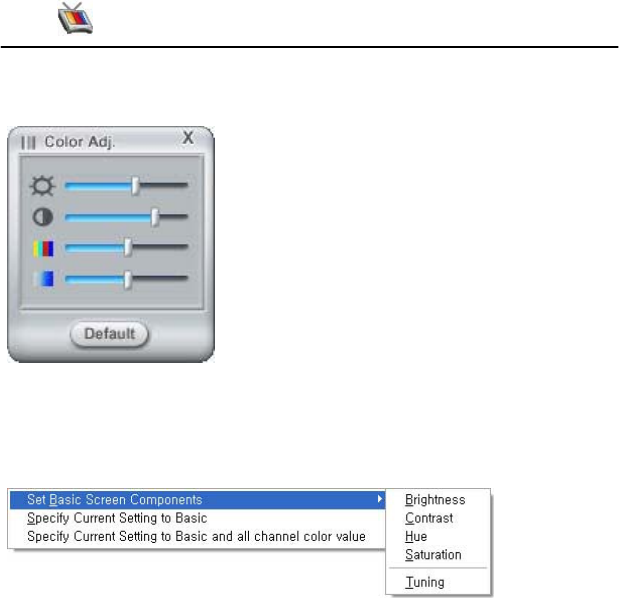
3.1.3 Color Adjustment
Default : Program default value applies if you click the button.
If you click the mouse’s right button at the Color Adjustment window, the
below submenu will be displayed.
Set Default Color Adjustment Components (D) : To restore default
value from a user customized value.
Set Current Setting as Default (S) : To set a default value with a user
customized current color adjustment setting.
Set Current Setting as Default and all other channels : To set a
default value with a user customized current setting. In addition, it
applies to all other channels
3. HowtoUse 21
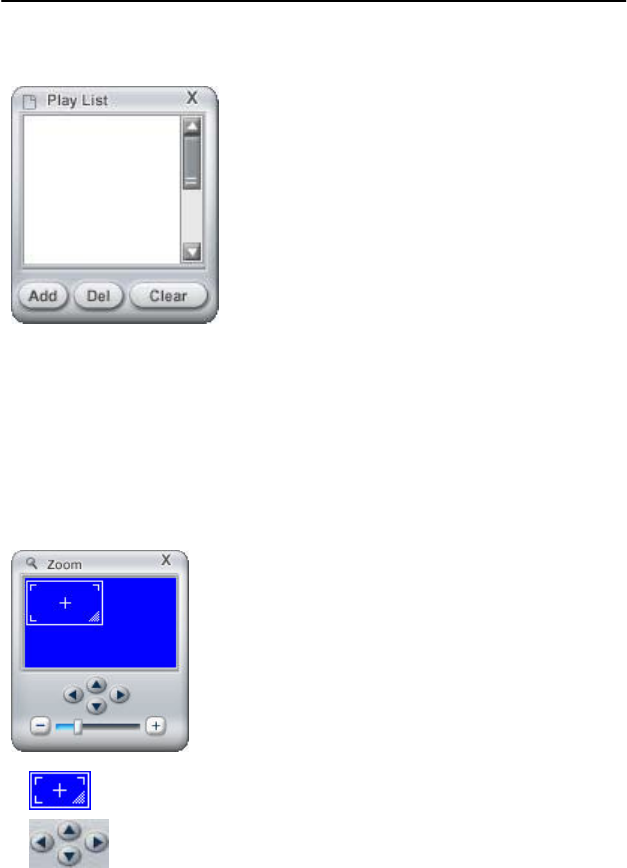
3.1.4 Play List
ADD : To add files into play list.
Del : To delete selected files from play list.
Clear : To delete all files from play list.
3.1.5 Zoom Navigator
While you are watching analog or digital TV, you can zoom-in a certain area
of video. If you move your mouse’s point on scroll bar, it displays the
zoom ratio in percentage (%). The maximum zoom in size is 500%.
Users free to zoom in any area by moving mouse point o
r
dragging down the “–“ or “+” button.
Enable to move the Zoom area by arrow buttons
͑
22 User’s Manual
Zoom-out by 25%
Zoom-In ratio bar indicator
Zoom-In by 25%
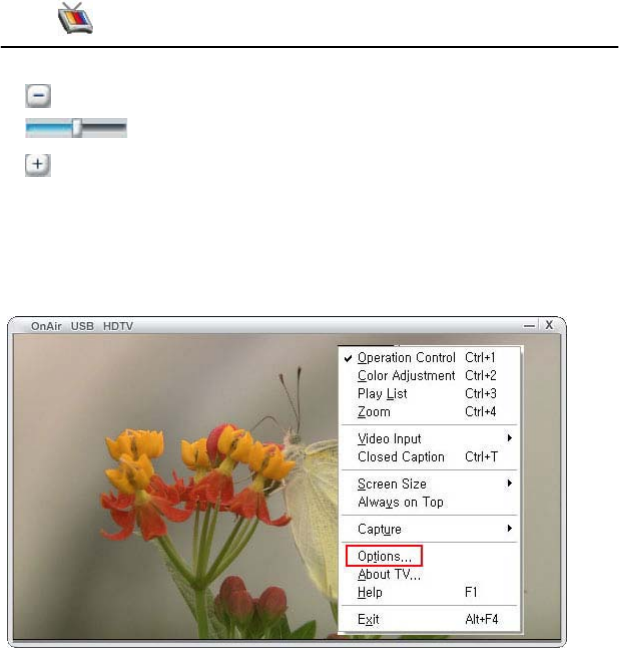
3.2 Option
The Option menu can be selected from sub-menu as below, or selecting it
from Operation control window.
3. HowtoUse 23
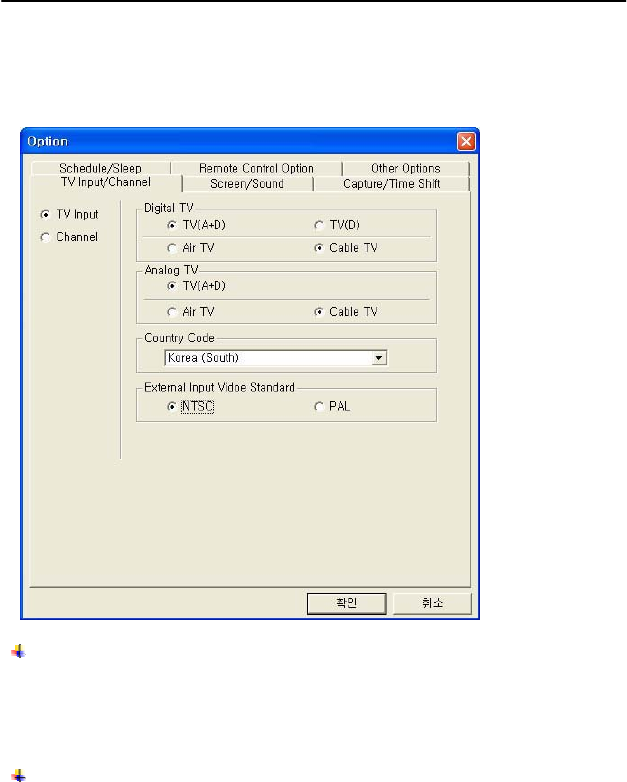
3.2.1 Antenna Configuration
TV(D),TV(A+D) To set the proper antenna signal that connected
Digital TV
TV(A+D) : For standard cable TV, choose cable TV option. For using
outdoor or indoor terrestrial antenna, choose terrestrial TV option.
TV(D) : Choose this option if you use only digital terrestrial (UHF) TV
antenna. (Important: Please do not connect analog TV antenna.)
Analog TV
TV(A+D) : Connects the terrestrial TV antenna.
Air TV : To set this when you have outdoor or indoor TV antenna
connected.
Cable TV : To set this when you have a general cable TV service.
͑
24 User’s Manual
Country Code : To set your country code to play Live TV. If you choose
a different country code, it may cause abnormal operation.
GExternal Video Input Standard
͑ͫ͑
Please select proper video input signal
format of either NTSC or PAL.
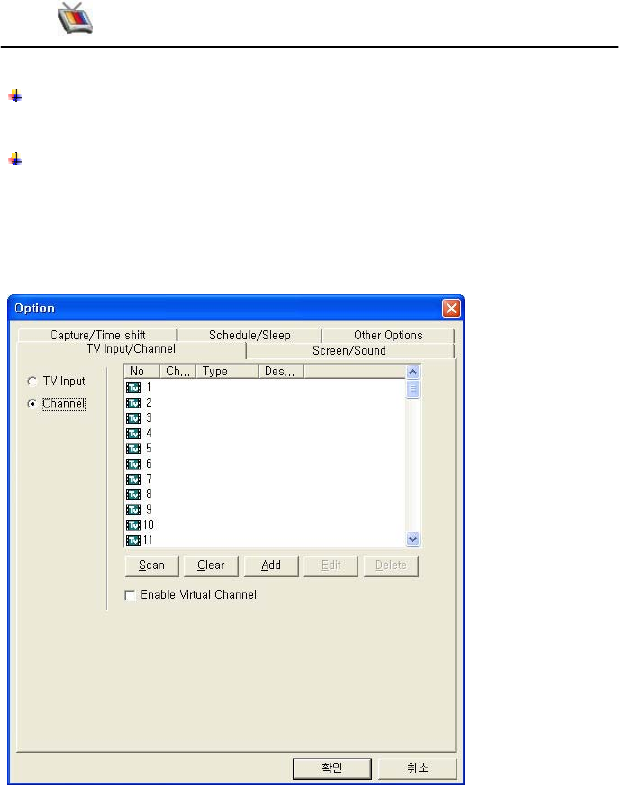
3.2.2 Channel Setup
Configuring channels as scanning, clear, add, edit, and delete.
Scan : Automatically scanning the all channels of Digital TV and Analog
TV.
Clear : To delete scanned channels from the list.
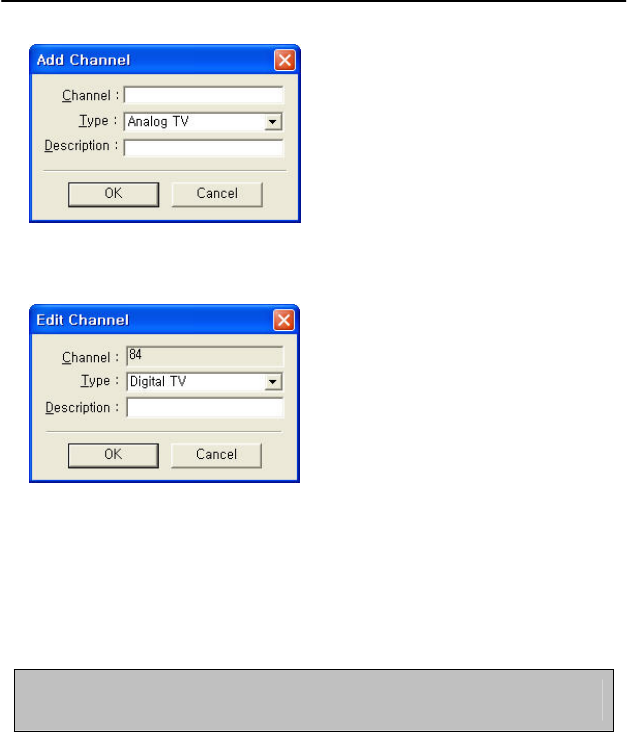
Add : To add selected channel.
3. HowtoUse 25
Edit : To edit selected channel information. In description, you can type
in the channel information.
Delete : To delete selected channel.
Virtual Channel Preference Mode : When scanning the channels, it has
preference to scan virtual channels and display at first. In addition, if
you choose this option, the digital TV channels display as virtual
channels. For example, If you watch a channel 9-1 in digital TV mode,
you can also watch it in analog TV mode as 9-0.(Same channel number
but different TV mode).
If you stop during the channel scanning before it finishes, it saves only
scanned channel.
͑
26 User’s Manual
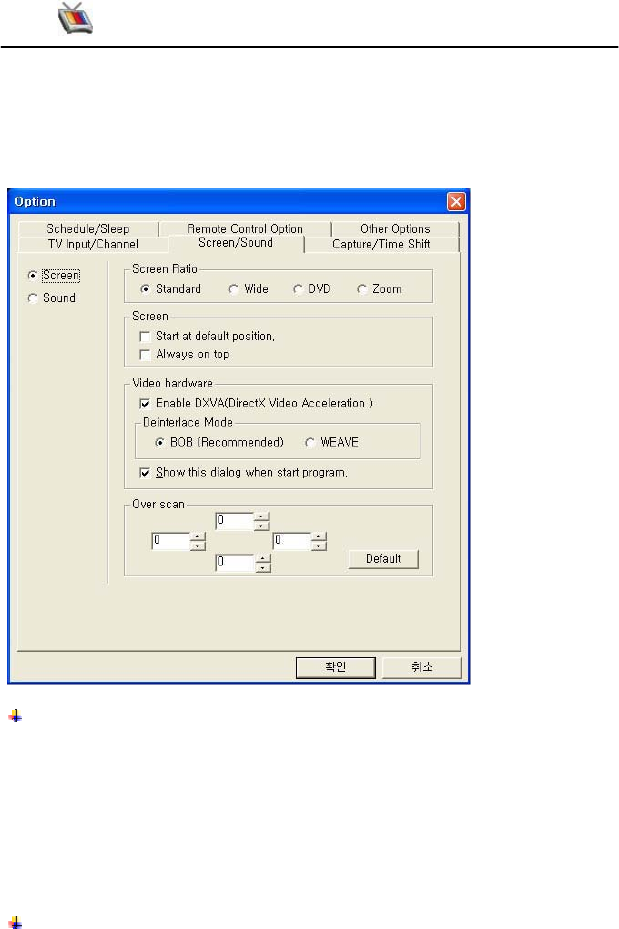
3.2.3 Screen Setup
Configuring the screen size (Standard, Wide, DVD, Pillar) and video
acceleration.
Screen Size
Standard (4:3): TV window displays as standard screen ratio size.
Wide (16:9) : TV window displays as wide screen ratio size.
DTV (720x480) : TV window displays as DVD screen ratio size.
Pillar : TV window displays as expended screen ratio size. When some
of digital TV broadcast the converted analog TV sources to digital TV,
these digital TV broadcast add the pillars(black bar) to fit in 16:9 wide
screen ratio. If you select the pillar screen ratio at this time, you can
omit the pillar parts and it fits in 4:3 standard screen ratio.
Screen Position
3. HowtoUse 27
Start at default position : When the program start, it always start at
default position.
Always on top : To set the TV window is always on top. It will prevent
to block the TV window when you open the other application windows
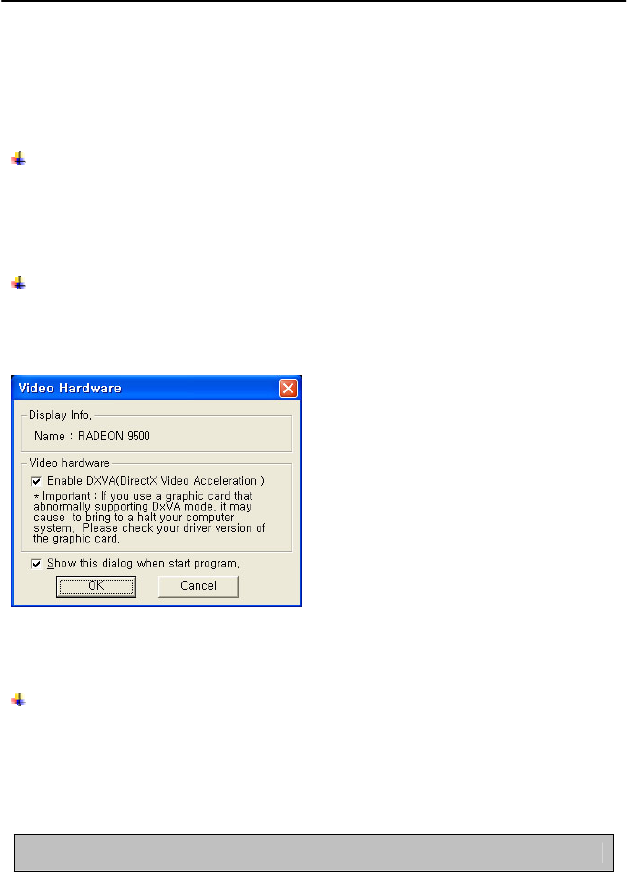
Video Hardware
To set to use video hardware acceleration to minimize the usage of CPU.
If you use a video card that not supporting DxVA mode, please disable
this option.
De-interlaced Mode : It is recommended to use BOB mode.
Show this dialog when start program
If you select the option of “Show this dialog when start program.”, the
following dialog box will appear every time you execute the OnAir USB
HDTV program.
The above dialog box displays the system’s graphic card information, and
you can select the option of “Enable DxVA(DirectX Video Acceleration).
Over Scan Control
When you watch the digital live TV or analog live TV, the noise may be
appeared at the bottom of TV window. The over scan means to display
the image by zoom in 1.xx:1 instead of 1:1. Thus, the over scan mode will
hide all of noise that appears in TV window.
Enabling DxVA mode is recommended as shown above.
͑
28 User’s Manual
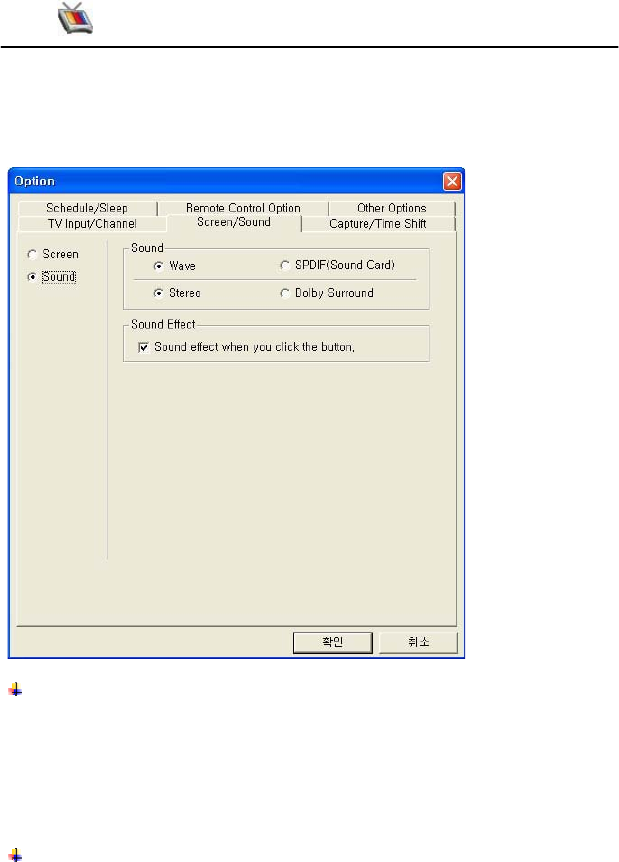
3.2.4 Sound
To configure the audio output and sound effect.
Audio Output
WAVE : To set the audio output as WAVE format.
SPDIF (through sound card) : To set the audio output as SPDIF by
transferring the audio to the sound card that supporting the SPDIF output.
Stereo : To set the audio output as Stereo.
Dolby Surround : To set audio output as Dolby Surround. (It supports
when the video input is Digital TV.)
Sound Effect
Sound effect when you click the button : To set the sound effect when
you click the buttons from TV programs.
3. HowtoUse 29
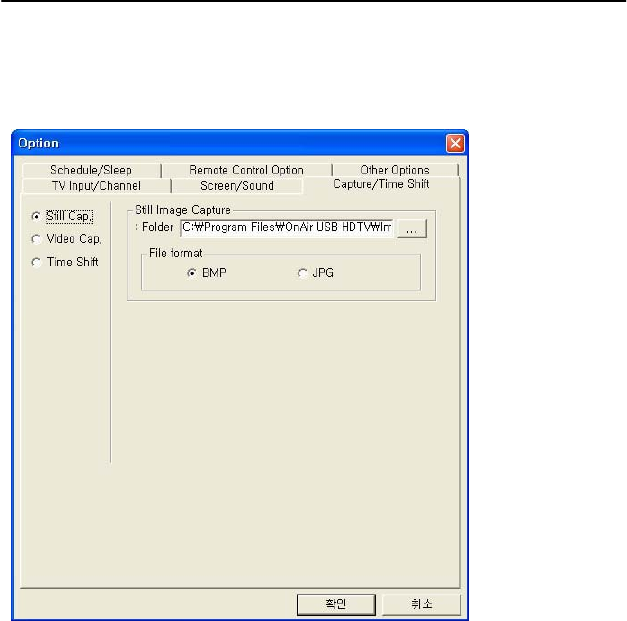
3.2.5 Still Capture
To capture a still image into a designation folder location.
Folder : To set the designation folder to save the image captured files.
The default folder is “C:\Program Files\OnAir USB HDTV\Images".
File format : To choose a saving file format of capture image.
͑
30 User’s Manual
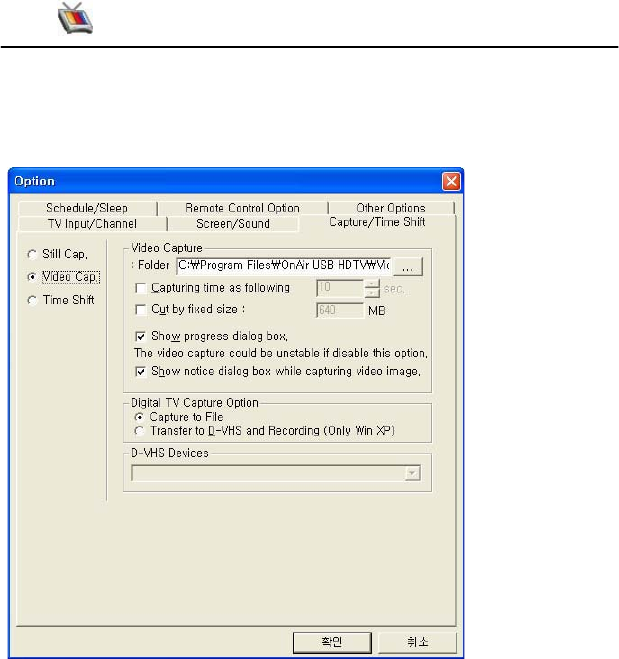
3.2.6 Video Capture
To capture video into a designation folder location.
Folder : To set the designation folder to save the video captured files.
The default folder is "C:\Program Files\OnAir USB HDTV\Videos".
Capturing time as following : To capture the video at selected period of
time
Cut by fixed size : To capture the Video by fixed size of files. If you
disable this option, you can capture the Video without file size limitation
as one file. However, if your HDD is FAT32 format, then you are limited
to capture the Video at maximum of 4GB. If the captured video is over
4GB size, it will separate the file after exceed the 4GB. If your HDD is
NTFS format, then you are limited to capture the Video at maximum of
64GB.
Show progress dialog box : When you capture the Video, the dialog
box is displayed at the beginning and the end. You should disable

3. HowtoUse 31
͑
this option when you capture the Video by schedule.
Show notice dialog box while capturing video image : When you
capture the Video, the notice dialog is displayed.
Digital TV Capture Option : The “Capture as file” is for saving the HD
stream into system’s HDD as a file. The “Transfer to D-VHS and
Recording” is for saving the HD stream into the D-VHS. These
options are when you saving the HD streams.
D-VHS Devices : It displays the D-VHS that connected with your system.
If you have more than one D-VHS devices, please choose a correct D-
VHS device that you are willing to save the HD stream into because it
displays all D-VHS devices that connected with your system.
The option of “Show notice dialog while capturing video image” is
displayed when you enable this option.
32 User’s Manual
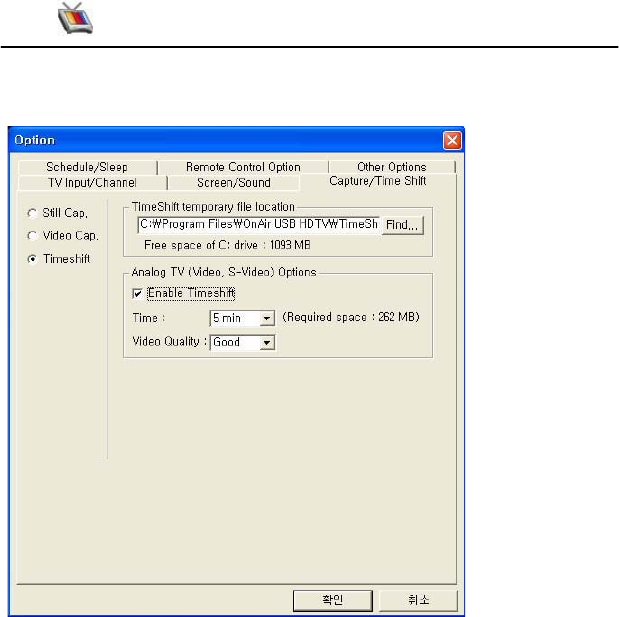
3.2.7 Time Shift
Folder : To set the designation folder to save the temporary video
captured files. The default folder "C:\Program Files\OnAir USB
HDTV\Time Shifting".
Enable Timeshift : To set the timeshift for analog TV, Video, and S-
Video.
Time : To set the period of time to temporary capture the video such as
5Min, 10Min, 30Min, and 60Min. The shown free space is displaying
the free space of hard disk that above designation folder located. It
displays a required free space of hard disk size depends on the selection
of “Analog TV Video Quality” option.
Analog TV Video Quality : You have choice of four selection such as
Best, Good, Normal, and Bad. Definitely, it will affect to video quality.

3. HowtoUse 33
͑
The Time shift is always enabled when you play Live analog TV. The
following table shows the file size of each video quality when you play 1
minute. Please verify your free space of HDD, and set the length of
Time shift and its video quality. The following table’s data is varied
under condition of input signal analog TV or system’s environment.
Best 70 MB / 1min
Good 56MB / 1min
Average 41MB / 1min
Minimum 26MB / 1min
Time Shift is?
While play live analog TV, the time shift offers you ability to pause the
live TV for pre-defined period of time. It provides by recording live TV
in real time for pre-defined period of time while playing live TV. It helps
you to not miss any part of live TV even though you stay away from TV
for a while (analog TV only).
34 User’s Manual
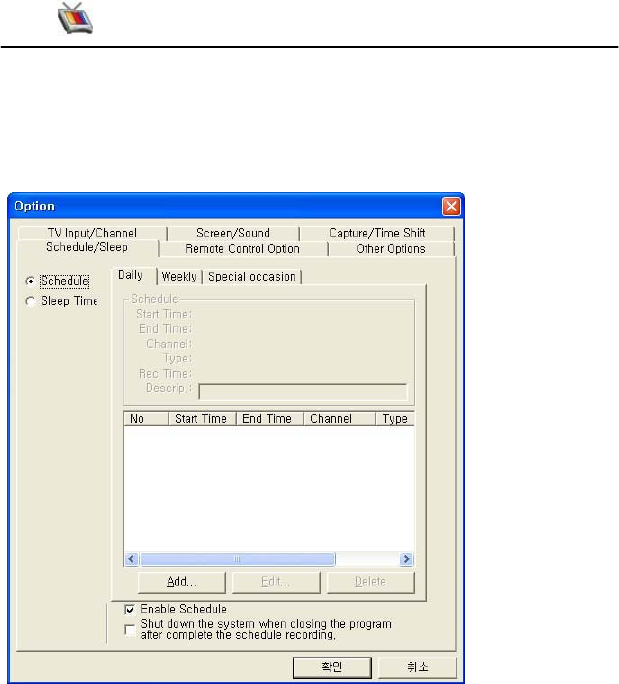
3.2.8 Schedule Recording
Enable to set recording schedule by daily, weekly or special
occasion schedule.
3. HowtoUse 35
͑
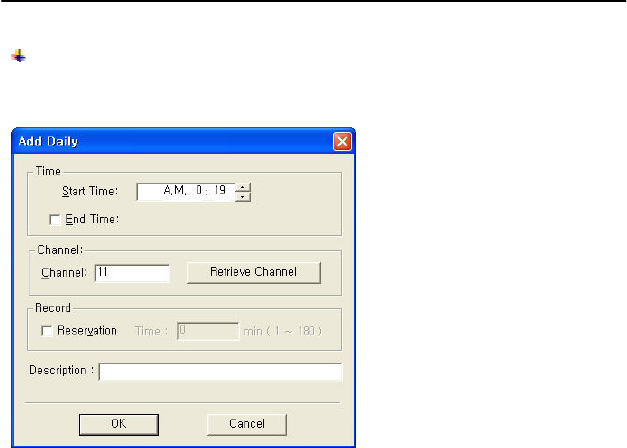
Daily Schedule
To record on daily selected time.
Start Time : To set recording schedule start time or scheduled Live TV
play start time.
End Time : To set recording schedule end time or scheduled Live TV
play end time.
Channel : To set the channels by Input channels number or clicking
retrieve channels button.
Record : If you uncheck the record reservation option, the recording is
not activated. If you select the record reservation, “record time” will
activate. If you set the “Start time” and “End Time”, the recording time
will automatically set the recording period in between this time interval.
The recording period can not be exceeded in between “Start Tim” and
“End Tim” interval, and you can set the recording time from at least 1 min
to the maximum of 180 mins. Among initializing or completing the
recording, it requires about less than 2 seconds. The image and sound
may have an interruption among initializing and completing the recording.
Description : To insert the description of recording program information.
36 User’s Manual
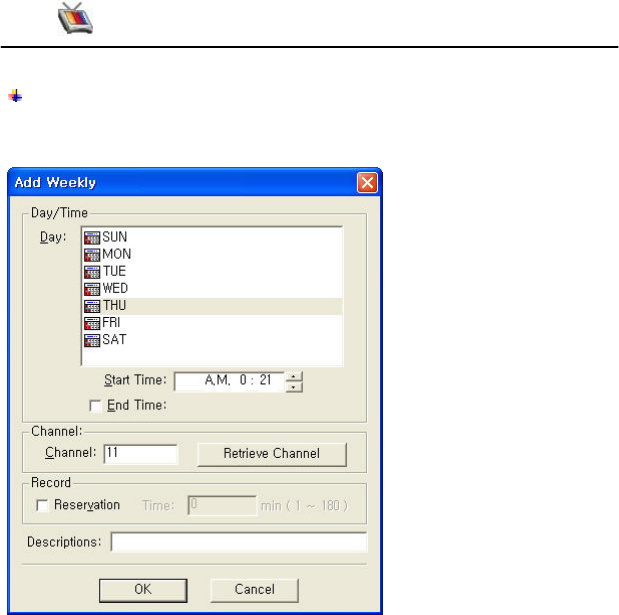
Weekly Schedule
To record on selected day or time by weekly.
Day/Time : To set a day when you record
Start Time : To set recording schedule start time or scheduled Live TV
play start time.
End Time : To set recording schedule end time or scheduled Live TV
play end time.
Channel : To set the channels by Input channels number or clicking
retrieve channels button.
Record : If you uncheck the record reservation option, the recording is
not activated. If you select the record reservation, “record time” will
activate. If you set the “Start time” and “End Time”, the recording time
will automatically set the recording period in between this time interval.
The recording period can not be exceeded in between “Start Tim” and
“End Tim” interval, and you can set the recording time from at least 1 min
to the maximum of 180 mins. Among initializing or completing the
recording, it requires about less than 2 seconds. The image and sound
3. HowtoUse 37
may have an interruption among initializing and completing the recording.
Description : To insert the description of recording program information.
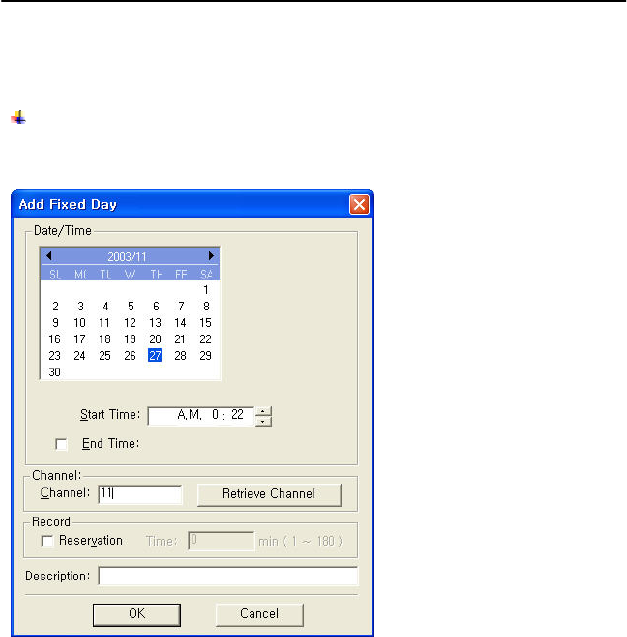
Special Occasion Schedule
To record on special occasion day or time.
Date / Time : To set special occasion day.
Start Time : To set recording schedule start time or scheduled Live TV
play start time.
End Time : To set recording schedule end time or scheduled Live TV
play end time.
Channel : To set the channels by Input channels number or clicking
retrieve channels button.
Record : If you uncheck the record reservation option, the recording is
not activated. If you select the record reservation, “record time” will
activate. If you set the “Start time” and “End Time”, the recording time
will automatically set the recording period in between this time interval.
͑

38 User’s Manual
The recording period can not be exceeded in between “Start Tim” and
“End Tim” interval, and you can set the recording time from at least 1 min
to the maximum of 180 mins. Among initializing or completing the
recording, it requires about less than 2 seconds. The image and sound
may have an interruption among initializing and completing the recording.
Description : To insert the description of recording program information.
Enable Schedule : It is required to check the enable schedule to
activate your pre-defined schedule playing or recording. If you uncheck
it, then it does not activate. There are two schedule options such as
schedule playing and schedule recording.
Shut down the system when you closing the program after
complete schedule recording : If the schedule recording is
completed, then system shut down when it closes the program.
However, it requires to set the end time.
͑
When you activate the schedule feature, the TV may stop temporary.
3. HowtoUse 39
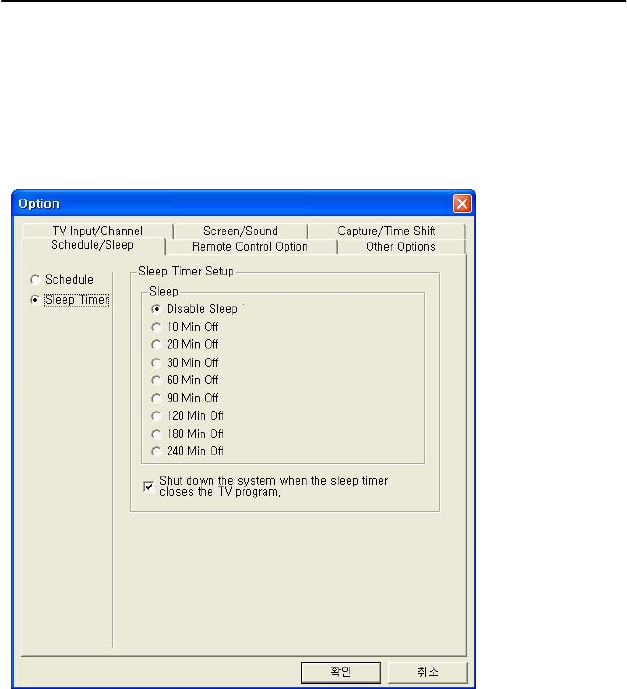
3.2.9 Sleep Timer Setup
The sleep timer set a time for automatically closing the TV program after a
certain period of time. If you enable the check box of “Shut down the
system when the sleep timer closes the TV program”, the system will shut
down simultaneously when TV program closes.
͑
40 User’s Manual
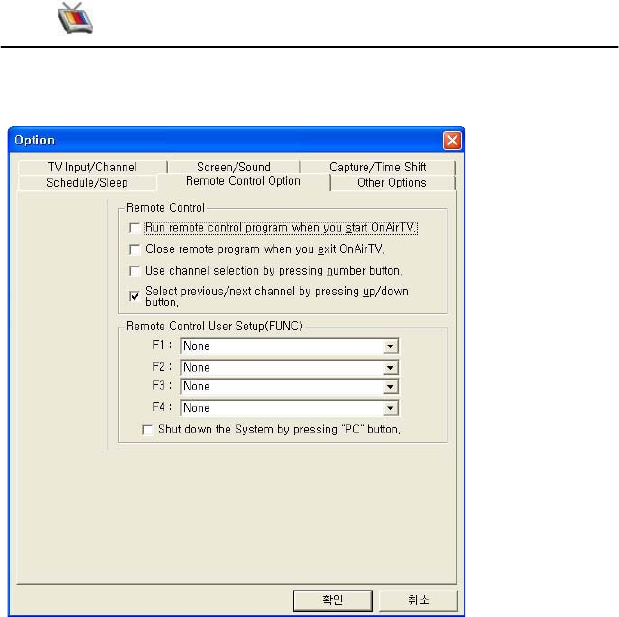
3.2.10 Remote Controller
Run remote control program when you start OnAir TV : It starts the
remote control program when the TV program activates.
Close remote program when you exit OnAir TV : It closes the remote
control program when the TV program closes.
Use channel selection by pressing numeric buttons : To set the
remote controller’s number buttons to select the saved channels.
Select previous/next channel by pressing up/down buttons : To set
the remote controller’s channel button to select the channels by pressing
the buttons to choose previous channel or next channel.
Remote Control User Setup (FUNC) : To set the customizable buttons
of F1~F4.
Shut Down System by “PC” button : If you choose this option, the
system will shut down by pressing the “PC” button from the remote
controller.
3. HowtoUse 41
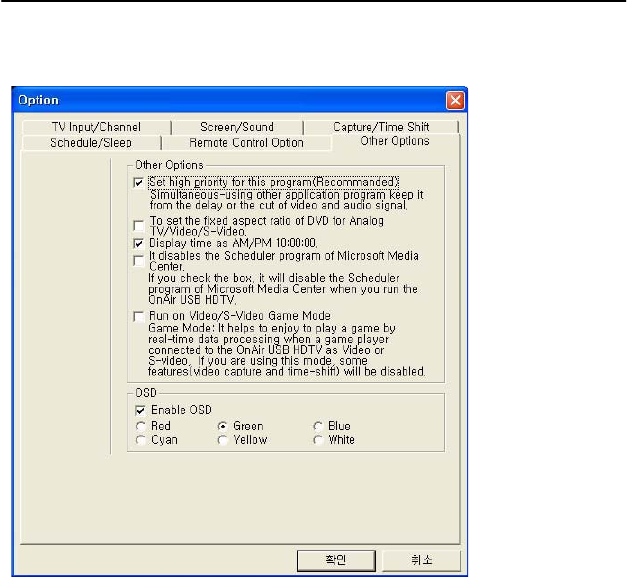
3.2.11 Other Options
Set high priority for this program : When you use other application
programs simultaneously while using OnAir USB HDTV, it may cause a
problem of mis-sync or frame loss. It is recommended to avoid those
problems
To set the fixed aspect ratio of DVD for Analog TV/Video/S-Video :
To set the analog TV, Video, and S-Video as fixed DVD screen aspect
ratio of 720x480. If you enable this option, the screen aspect ratio is not
changed in operation control window. Moreover, option ĺ Screen /
Sound ĺ Screen ĺ Screen Ratio is not applicable.
Display time as AM/PM 10:00:00 : To set display time format on
operation control window.
Disable the Scheduler program of Microsoft Media Center : OnAir
USB HDTV supports Microsoft Media Center. It will disable the
Scheduler program of Microsoft Media Center when you run the OnAir
͑

42 User’s Manual
USB HDTV.͑͑
Run On Vide/S-Video Game Mode : OnAir USB HDTV displays the
analog TV, Video, and S-Video by after hardware MPEG2 video
encoding , and then decoding. Because of this procedure, the video
displays in about 1 sec delay. Therefore, you may have a difficulty to
play the game when you input the game device into Video or S-Video
because of display delay time. This feature will help to enjoy the game
by handling the data in real-time. If you are using the game mode,
some features such as video capture and timeshift will be disabled. If
you select either input of Video or S-Video with the Game mode, the
following sub-menu will be shown by clicking the mouse’s right button
from the TV screen. The De-interlaced mode is added into sub-menu.
For the fast movement display such as game play, it is recommend to
activate the de-interlace mode.
Enable OSD : To set the on screen display color of TV window such as
volume, channel, and option.

3. HowtoUse 43
͑
4 FAQ
4.1 How to use Hot Keys
Hot Keys Functions
Ctrl + 1
Ctrl + 2
Ctrl + 3
Ctrl + 4
Operation Cotrol Window
Color Adjustment Window
Play list window
Zoom Navigator
Tab
PgDown
TV source selection (Digital TV ļ Analog TV)
Video Input selection (Digital TV, Analog TV, Video,
S-Video)
Ctrl + Enter
Ctrl + D
Ctrl + J
Ctrl + K
Ctrl + L
Ctrl + H
PgUp
Full screen view
Desktop View
Standard (Aspect Ratio)
Wide (Aspect Ratio)
Pillar (Aspect Ratio)
DVD (Aspect Ratio)
Screen size (Small, Medium, Full Screen)
Ĺ
Ļ
Saved next channel
Saved previous channel
+
-
1Channel up
1Channel down
ĺ
ĸ
Volume Up
Volume down
Home
End
Previous channel
Mute

44 User’s Manual
Hot Keys Functions
Space
Ctrl + R
Ctrl + C
ESC
Still Image Capture
Video Capture
Still image copy
Stop video capture
Ctrl + T Closed caption (in case the analog TV, Video,
and S-Video support closed caption)
Ctrl + G De-interlaced Mode (this option available in game
mode only)
Ctrl + Z Sleep
Ctrl + N Current status information
D-VHS Play
Ctrl + V
Ctrl + R
ESC
D-VHS Play
Record
Close
F1
Alt+F4
Help
Close TV program
3. HowtoUse 45
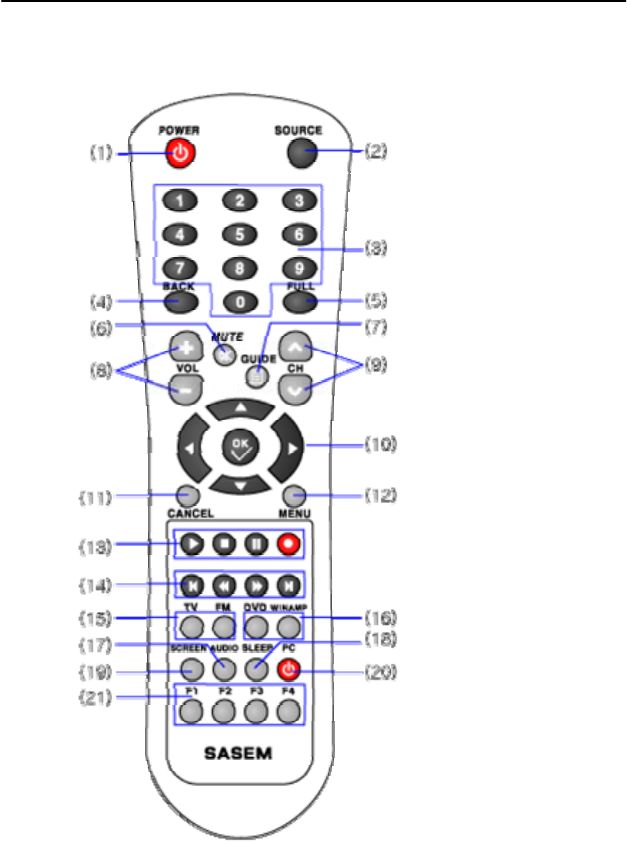
4.2 Remote Controller Button Description
͑
46 User’s Manual
Item Functions
(1) POWER TV
(2) SOURCE Digital TV / Analog TV / Video / S-Video
(3) Numeric Button Direct channel number input
(4) BACK Previous channel
(5) FULL Full screen
(6) MUTE Mute
(7) GUIDE Will be supported later program update (EPG).
(8) VOL +/- Volume Control
(9) CH / Channel Control
(10) Arrow Keys Left, Right, Up, Down (Will be supported) / Confirm
button (OK)
(11) CANCEL Cancel
(12) MENU Will be supported later program update.
File play / Stop
Pause
(13)
Video Capture
Previous / Next button of file selection for file play
(14) For file play, Rewind / FF
TV When File play for Trp, it changes to TV mode
(15) FM Not Available
(16) DVD/WINAMP Not Available
(17) AUDIO Stereo / Dolby Surround
(18) SLEEP Sleep button
(19) SCREEN Standard, Wide, Expanded, DVD
(20) Based on configuration, it turn offs the PC power
(21) FUNC Customizable Keys of F1/F2/F3/F4 that configured
from Option
G
G
G
G
G
G
G
G
G
G
G