user manual

BOOX 60 User Manual
Version 1.0

Copyright © 2009 Onyx International. All rights reserved.
Table of Contents
1 Preface.............................................................................................................. 11
2 Guidelines ........................................................................................................13
3 Precautions......................................................................................................14
4 Components.....................................................................................................15
4.1 Boox 60 ..................................................................................................15
4.2 Power Adaptor.......................................................................................15
4.3 USB Cable..............................................................................................15
4.4 Cover ......................................................................................................15
4.5 SD Card ..................................................................................................15
5 Boox..................................................................................................................16
5.1 Power Key..............................................................................................18
5.2 MENU Key ..............................................................................................18
5.3 BACK Key ..............................................................................................18
5.4 NEXT Key ...............................................................................................18
5.5 PREV Key...............................................................................................18
5.6 Direction Key .........................................................................................18
5.7 Volume Keys..........................................................................................19
5.8 Wifi Key ..................................................................................................19
5.9 Headphone Jack....................................................................................19
5.10 Indicator Light .....................................................................................19
6 User Interface...................................................................................................20
6.1 Main View ...............................................................................................20
6.1.1 Internal Flash...............................................................................21

Copyright © 2009 Onyx International. All rights reserved.
6.1.2 SD Card........................................................................................22
6.1.3 Recent Document........................................................................23
6.1.4 Shortcuts .....................................................................................24
6.1.5 Notes ............................................................................................25
6.1.5.1 Create Note........................................................................ 26
6.1.5.2 Open Existing Notes......................................................... 27
6.1.6 Settings........................................................................................27
6.1.6.1 Date ....................................................................................28
6.1.6.2 Time Zone..........................................................................30
6.1.6.3 Locale.................................................................................31
6.1.6.4 Power Management..........................................................32
6.1.6.5 Stylus Calibration .............................................................33
6.1.6.6 Format Flash .....................................................................38
6.1.6.7 About..................................................................................39
6.1.7 Web sites .....................................................................................40
6.2 Navigation Bar.......................................................................................41
6.3 Tool Bar..................................................................................................42
6.3.1 Menu Button ...........................................................................42
6.3.2 Progress Bar................................................................................42
6.3.3 Stylus Indicator ...........................................................................47
6.3.3.1 Sketch .........................................................................47
6.3.3.2 Erase Sketches ...........................................................47
6.3.3.3 Hand Tool ....................................................................47
6.3.3.4 Selection Zoom ..........................................................47
6.3.3.5 Annotate ......................................................................47
Copyright © 2009 Onyx International. All rights reserved.
6.3.3.6 Erase Annotations ......................................................48
6.3.4 Power Indicator .....................................................................48
6.3.5 Clock .....................................................................................48
6.4 Menu.......................................................................................................49
6.4.1 Screen Rotation ...............................................................49
6.4.2 Save Remove SD Card ....................................................50
6.4.3 Music ..................................................................................50
6.4.4 Standby .............................................................................50
6.4.5 Shutdown ..........................................................................50
6.4.6 View ...................................................................................50
6.4.6.1 List View .................................................................50
6.4.6.2 Details View ............................................................51
6.4.6.3 Thumbnail View .....................................................53
6.4.6.4 By Name .................................................................54
6.4.6.5 By Type ...................................................................55
6.4.6.6 By Size ....................................................................56
6.4.6.7 By Access Time .....................................................57
6.4.6.8 By Rating ................................................................58
Copyright © 2009 Onyx International. All rights reserved.
6.4.6.9 Ascending..........................................................................59
6.4.6.10 Descending......................................................................60
6.4.7 File .....................................................................................60
6.4.7.1 Delete ......................................................................61
6.4.7.2 Search .....................................................................62
6.4.7.3 Create shortcut .......................................................63
6.4.7.4 Return Book ............................................................64
6.4.8 Settings .............................................................................64
6.4.8.1 Date Settings ..........................................................64
6.4.8.2 Locale Settings ......................................................64
6.4.8.3 Power Management ............................................... 64
6.4.8.4 Screen Calibration .................................................64
6.4.8.5 Format Flash .....................................................................65
6.4.8.6 About ......................................................................65
6.4.9 Font ...................................................................................65
6.4.9.1 By Levels ........................................................................... 66
6.4.9.2 By Numbers....................................................................... 67
6.4.9.3 By Ratio .............................................................................68
6.4.9.4 Bold....................................................................................69

Copyright © 2009 Onyx International. All rights reserved.
6.4.9.5 Italic....................................................................................70
6.4.10 Zooming ..........................................................................71
6.4.10.1 To Page .................................................................71
6.4.10.2 To Width ................................................................ 71
6.4.10.3 To Height ..............................................................71
6.4.10.4 Selection Zoom ....................................................72
6.4.10.5 By Ratio ...........................................................................74
6.4.11 Annotations ....................................................................75
6.4.11.1 Add Annotation ....................................................75
6.4.11.2 Erase Annotation .................................................77
6.4.11.3 All Annotations .....................................................78
6.4.11.4 Sketch ...................................................................79
6.4.11.5 Erase Sketch ........................................................80
6.4.11.6 Sketch Colors .......................................................80
6.4.11.7 Sketch Shapes .....................................................82
6.4.12 Layout .............................................................................83
6.4.12.1 Single Page .......................................................... 83
Copyright © 2009 Onyx International. All rights reserved.
6.4.12.2 Scroll Pages .........................................................84
6.4.13 Tools ................................................................................85
6.4.13.1 Search ...................................................................85
6.4.13.2 Dictionary Lookup ...............................................88
6.4.13.3 Add Bookmark .....................................................90
6.4.13.4 Delete Bookmark .................................................91
6.4.13.5 Show Bookmarks ................................................91
6.4.13.6 Hand Tool .............................................................92
6.4.13.7 Previous View ........................................................93
6.4.13.8 Next View ................................................................93
6.4.13.9 Slide Show ........................................................... 94
6.4.13.10 Thumbnail View .................................................95
6.4.13.11 Table of Content .................................................96
6.4.13.12 Export .................................................................97
6.4.13.13 Insert Page ..........................................................97
6.4.13.14 Remove Page ......................................................97
6.4.14 Font Family .....................................................................98
Copyright © 2009 Onyx International. All rights reserved.
6.4.15 Encoding .........................................................................99
6.4.16 Full Refresh Switch .....................................................100
6.4.17 Navigation ....................................................................100
6.4.17.1 Backward ..............................................................100
6.4.17.2 Forward ................................................................100
6.4.17.3 Home ...................................................................100
6.4.18 Network .........................................................................100
6.4.18.1 Wifi ...................................................................... 100
6.5 Web Browser .......................................................................................101
6.5.1 Tool Bar......................................................................................102
6.5.2 Input by Keyboard..................................................................... 102
6.6 Music Player ........................................................................................103
6.6.1 Playlist........................................................................................104
6.6.2 Minimize Button ..............................................................104
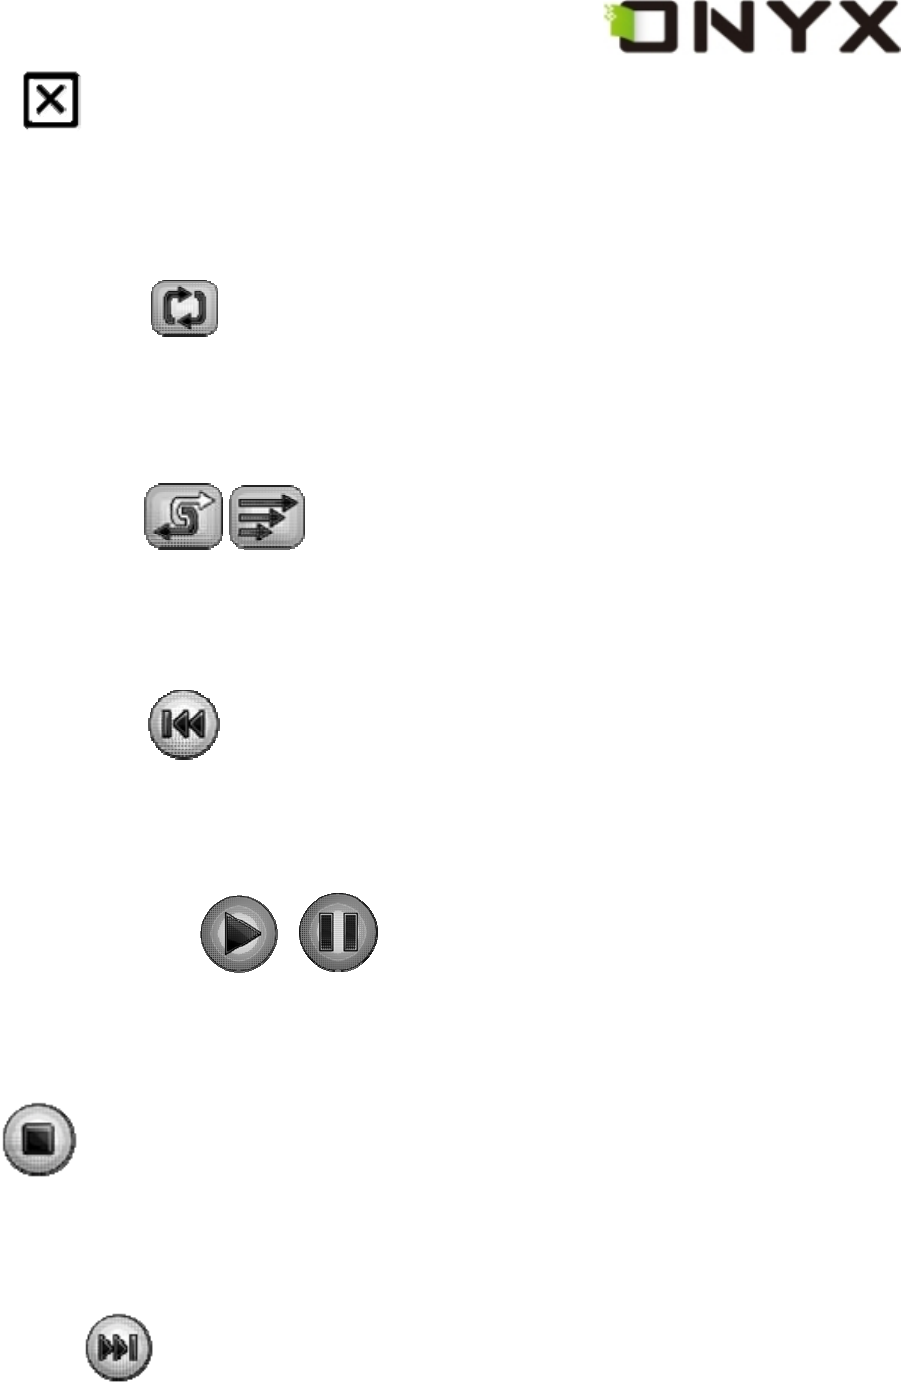
6.6.3 Close Button ....................................................................105
6.6.4 Repeat Playlist Button ....................................................105
6.6.5 Shuffle Switch Button ..........................................105
6.6.6 Previous Song Button ....................................................105

Copyright © 2009 Onyx International. All rights reserved.
6.6.7 Play/Pause Switch Button .................................105
6.6.8 Stop Button .....................................................................105
6.6.9 Next Song Button ............................................................105
6.6.10 Repeat Current Song Button ........................................106
6.6.11 Previous Page Button .........................................................106
6.6.12 Next Page Button ................................................................106
6.6.13 Playing Status Bar...................................................................107
6.7 Keyboard.............................................................................................. 108
6.7.1 Number Keys.............................................................................108
6.7.2 Character Keys..........................................................................108
6.7.3 Caps Key.................................................................................... 108
6.7.4 Back Key....................................................................................109
6.7.5 Space Key ..................................................................................109
6.7.6 Shift Key.....................................................................................109
6.8 Search View ......................................................................................... 110
6.8.1 Free Text Search ....................................................................... 110
6.8.1.1 Input Box ......................................................................... 111
6.8.1.2 Search Button ................................................................. 111
6.8.1.3 Clear Button .................................................................... 112
6.8.2 File Search................................................................................. 113
6.8.2.1 Input Box ......................................................................... 113
6.8.2.2 Search Button ................................................................. 114
6.8.2.3 Clear Button .................................................................... 115

Copyright © 2009 Onyx International. All rights reserved.
6.8.2.4 Check Button of Including Subdirectories................... 115
6.9 Dictionary View.................................................................................... 115
6.9.1 Content View ............................................................................. 116
6.9.2 Explanation Button ................................................................... 116
6.9.3 Similar Words Button ............................................................... 117
6.9.4 Dictionaries Button................................................................... 117
6.10 Annotations View .............................................................................. 118
6.11 Bookmarks View................................................................................ 119
6.12 Wifi Configuration Dialog ................................................................. 119
6.12.1 Scanning List...........................................................................121
6.12 2 Connecting Message Area .....................................................121
6.12.3 Refresh Button ........................................................................ 121
6.12.4 Configuring WPA Security Access Point..............................122
6.12.5 Configuring WEP Security Access Point..............................123
7 Sketch.............................................................................................................124
7.1 Make new sketches.............................................................................124
7.2 Erase..................................................................................................... 125
8 Annotation......................................................................................................126
8.1 Add Annotation....................................................................................126
8.2 Erase Annotations...............................................................................127
9 OTA Functionalities.......................................................................................128
9.1 Activate Boox 60..................................................................................128
9.2 Fulfillment ............................................................................................130
10 Software Update ..........................................................................................133
11 Connect to PC.............................................................................................. 135

Copyright © 2009 Onyx International. All rights reserved.
12 Charge ..........................................................................................................136
FCC Class B Notice..........................................................................................136
1 Preface
Boox, presented by Onyx International, a group of professionals who dedicate
themselves in designing state-of-the-art reading terminal.
The beauty of the Boox is embodied in both its simplicity and its power. As we are going
to show you, Boox is an open and flexible platform for both consumers and content
providers.
Boox is powered by an 8-level grayscale e-ink screen that looks and feels like paper.
Passive lighting and diffuse surface relaxes your eyes and reduces eye strain. The
hand-writing system lets you take notes while reading and sketch up ideas that happen
to emerge. Boox takes full advantage of new-generation e-ink screens: extremely low
power consumption. Each full charge can sustain a few weeks' reading. By reducing
paper consumption while providing a realistic paper-like reading experience, digital
content helps to protect the environment without sacrificing convenience or life style.
Boox comes with viewers for most popular ebook and image formats, including PDF,
HTML, CHM, EPub, TXT, and MobiPocket(NON-DRM). For content partners, we also
provide support for custom formats and digital rights management solutions. All of our
viewers have standard features such as layout management, font adjustment, full text
search, zooming, and page flow.
For a next-generation information device, connectivity is essential. The user can
connect to the Internet with build-in WiFi or other add-on modules to download new
content or just surf the web. The web browser on Boox uses WebKit, the same software

Copyright © 2009 Onyx International. All rights reserved.
engine that powers desktop browsers such as Safari and Chrome, customized for the
e-ink screen.
Boox, the new reading experience.

Copyright © 2009 Onyx International. All rights reserved.
2 Guidelines
Please read this manual before using the product.
The product should only be used in the manner described in this manual.
The latest downloads and information are available at our website:
www.onyx-international.com.
The outer layer of the display is scratch resistant, but if handled roughly it can still be
damaged.
Operating temperature is 0°C to 50°C
Storage temperature is –20°C to 70°C

Copyright © 2009 Onyx International. All rights reserved.
3 Precautions
Avoid applying excessive force to the display. The device uses a glass based display is
thus liable to break if mistreated.
Never open the device as this will invalidate any warranty or manufacturer’s
responsibility. Please contact your Onyx retailer if you have any technical difficulties.
Do NOT expose the device to excessive moisture, rain or heat sources caused by
heating equipment.

Copyright © 2009 Onyx International. All rights reserved.
4 Components
4.1 Boox 60
4.2 Power Adaptor
4.3 USB Cable
4.4 Cover
4.5 SD Card

Copyright © 2009 Onyx International. All rights reserved.
4-Direction
Navigation
button
PREV button
BACK button
NEXT
MENU button
5 Boox
Indicator Light
OK button
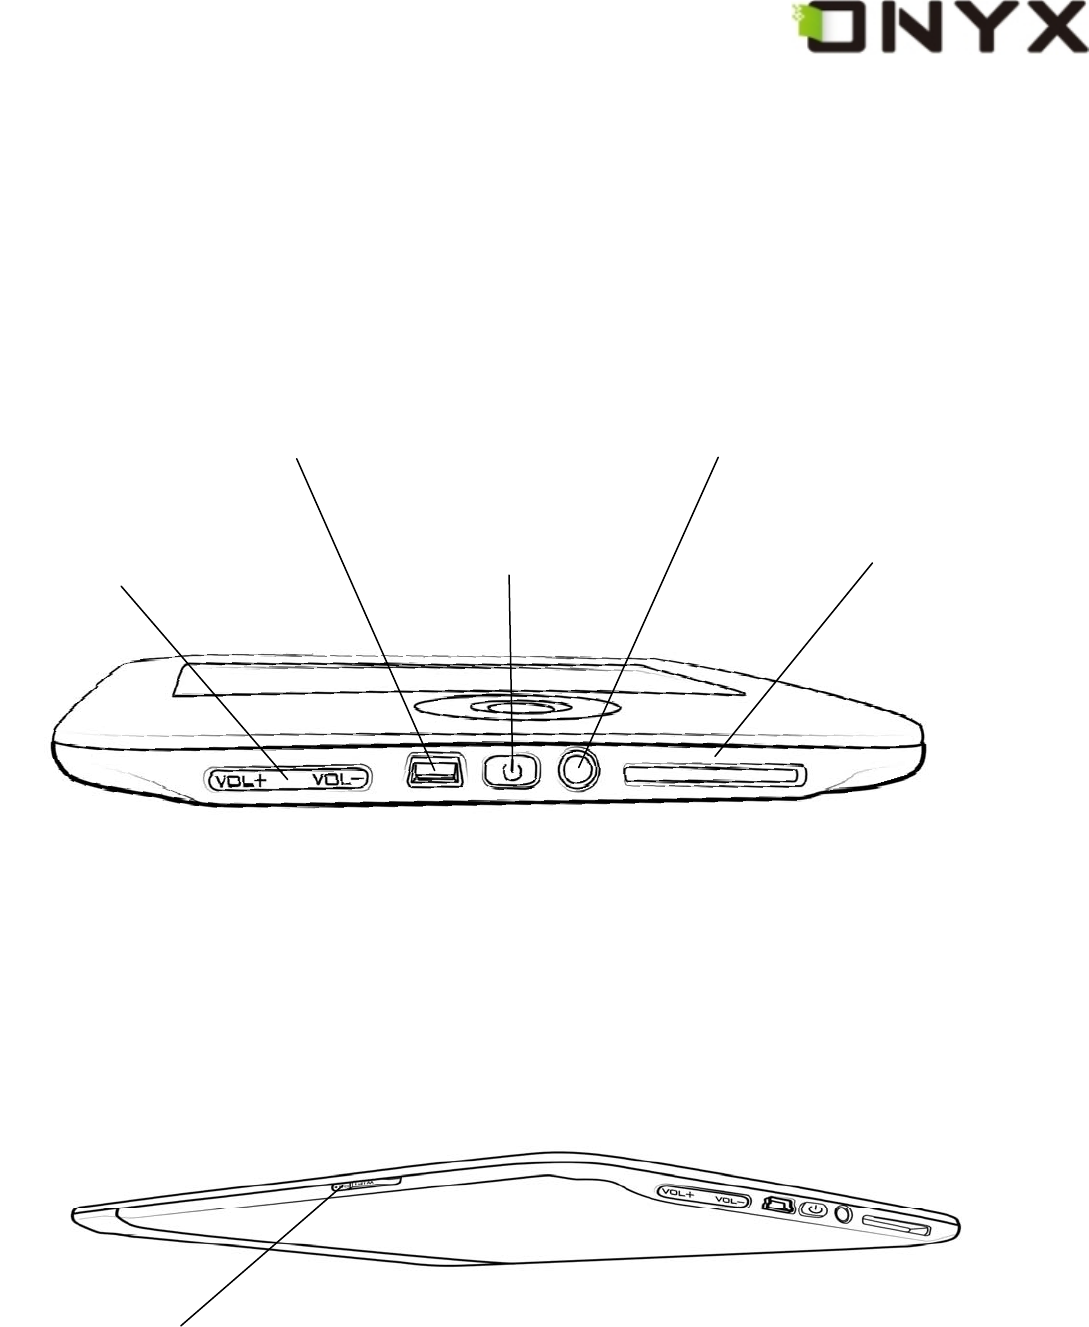
Copyright © 2009 Onyx International. All rights reserved.
SD Card Slot
Power On/Off button
Headphone Jack USB Connector
Volume Control button
WIFI On/Off button

Copyright © 2009 Onyx International. All rights reserved.
5.1 Power Key
z Press the power key to turn device on
z Press the power key and hold for 2 seconds to turn device off, similar as selecting
showdown item in menu
z Press the power key and release it immediately, device turns into sleep mode.
5.2 MENU Key
z Press the menu key to pop up the menu.
z Similar as tapping icon with stylus
5.3 BACK Key
z Return from current application
z Return from current view or dialog
z Turn back to the parent directory
5.4 NEXT Key
z Flip to next screen while viewing document
z Flip to next screen while browsing documents in main view
5.5 PREV Key
z Flip to previous screen while viewing document
z Flip to previous screen while browsing documents in main view
5.6 Direction Key
z Navigate items on current screen, e.g. navigate from Library to SD Card by pressing

Copyright © 2009 Onyx International. All rights reserved.
RIGHT key
z Turn back to previous view or forward to next view while reading PDF/EPub
documents
z Turn back to previous web page or forward to next page while browsing the website.
5.7 Volume Keys
z Increase the volume by pressing key Vol+
z Decrease the volume by pressing key Vol-
5.8 Wifi Key
z Turn on the wifi by sliding the wifi key from bottom to top
z Turn off the wifi by sliding the wifi key from top to bottom
5.9 Headphone Jack
Diameter of the headphone jack is 3.5mm.
5.10 Indicator Light
The indicator light is on while charging.
Copyright © 2009 Onyx International. All rights reserved.
6 User Interface
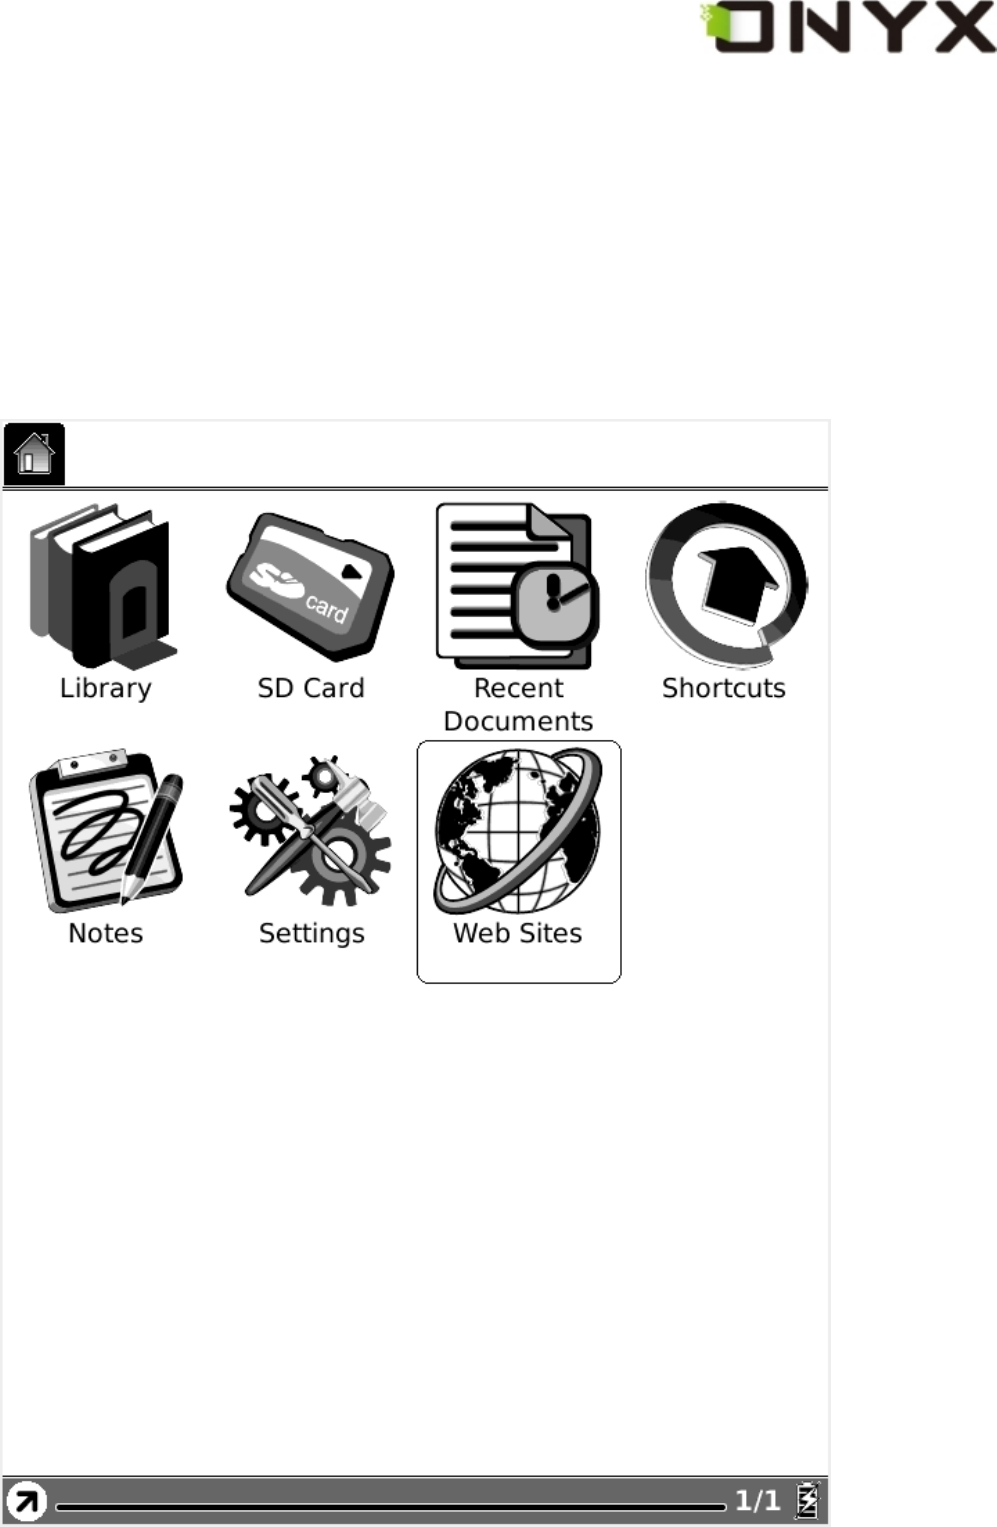
6.1 Main View
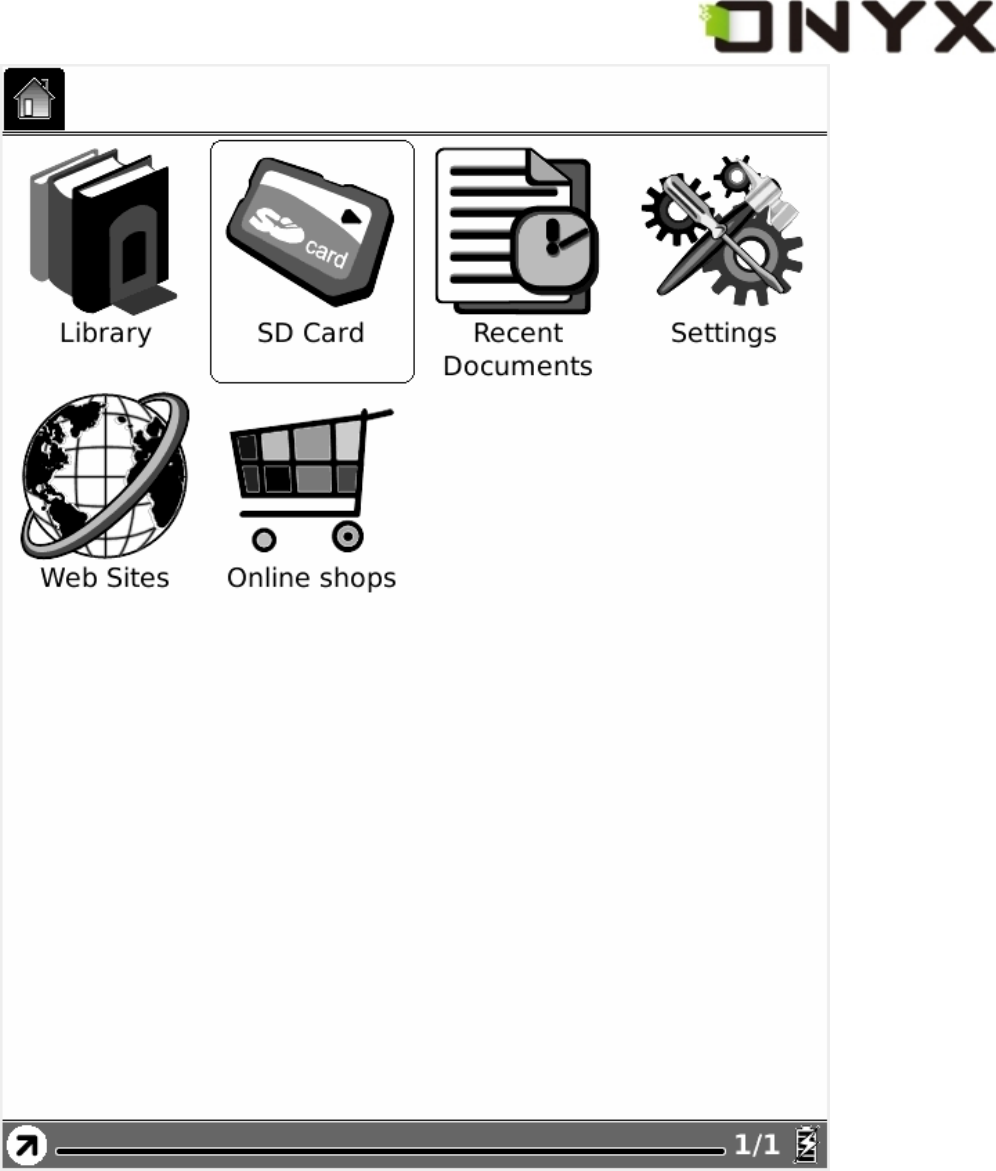
Like the desktop of the most popular PC OS, main view of Boox provides entries to
access the storages, device settings and common websites.
Fig. 6.1 Snapshot of Main View
Copyright © 2009 Onyx International. All rights reserved.
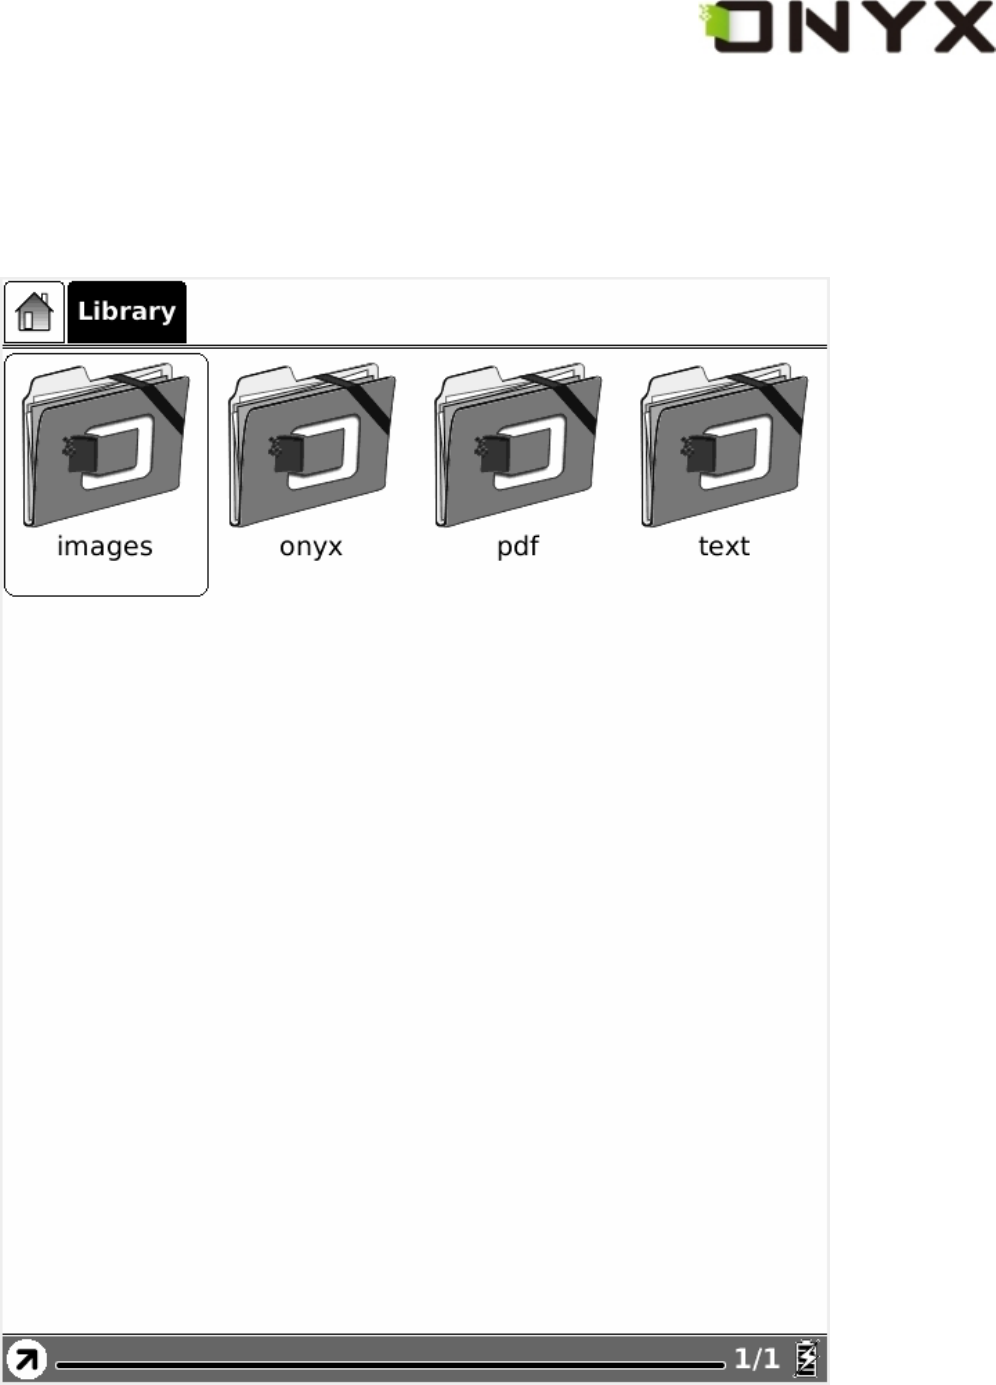
6.1.1 Internal Flash
Select the Internal Flash button (by stylus or keyboard), all of the items stored in
internal flash are retrieved.
Fig. 6.1.1 Snapshot of Internal Flash View
Copyright © 2009 Onyx International. All rights reserved.
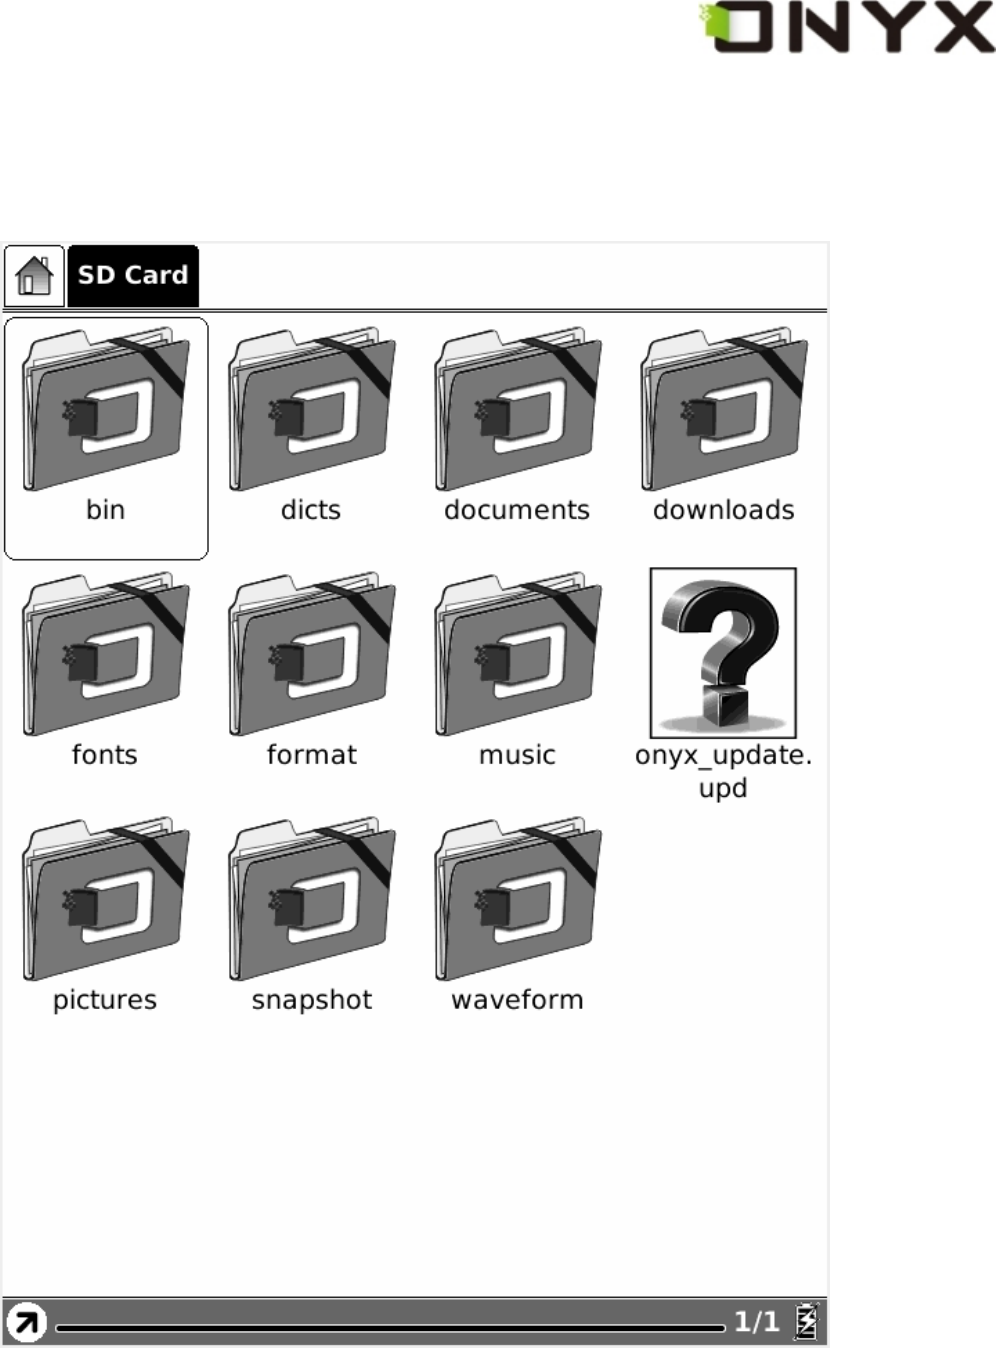
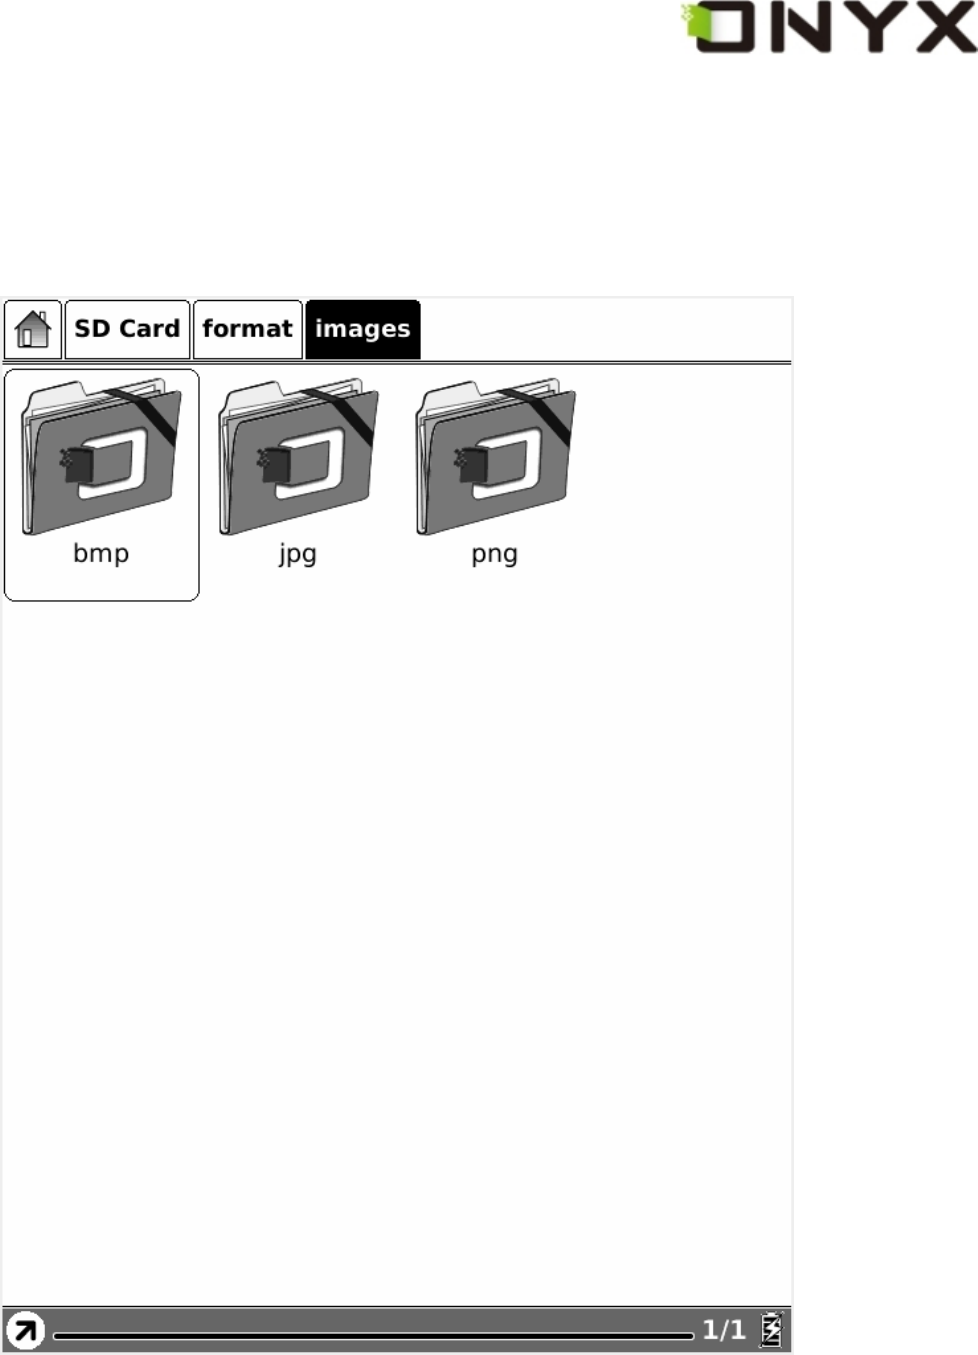
6.1.2 SD Card
Select the SD Card button, all of the items stored in SD card are retrieved.
Fig. 6.1.2 Snapshot of SD Card View

Copyright © 2009 Onyx International. All rights reserved.
6.1.3 Recent Document
Select the Recent Document button, all of the recent read documents are displayed.
Fig. 6.1.3 Snapshot of Recent Document View
Copyright © 2009 Onyx International. All rights reserved.
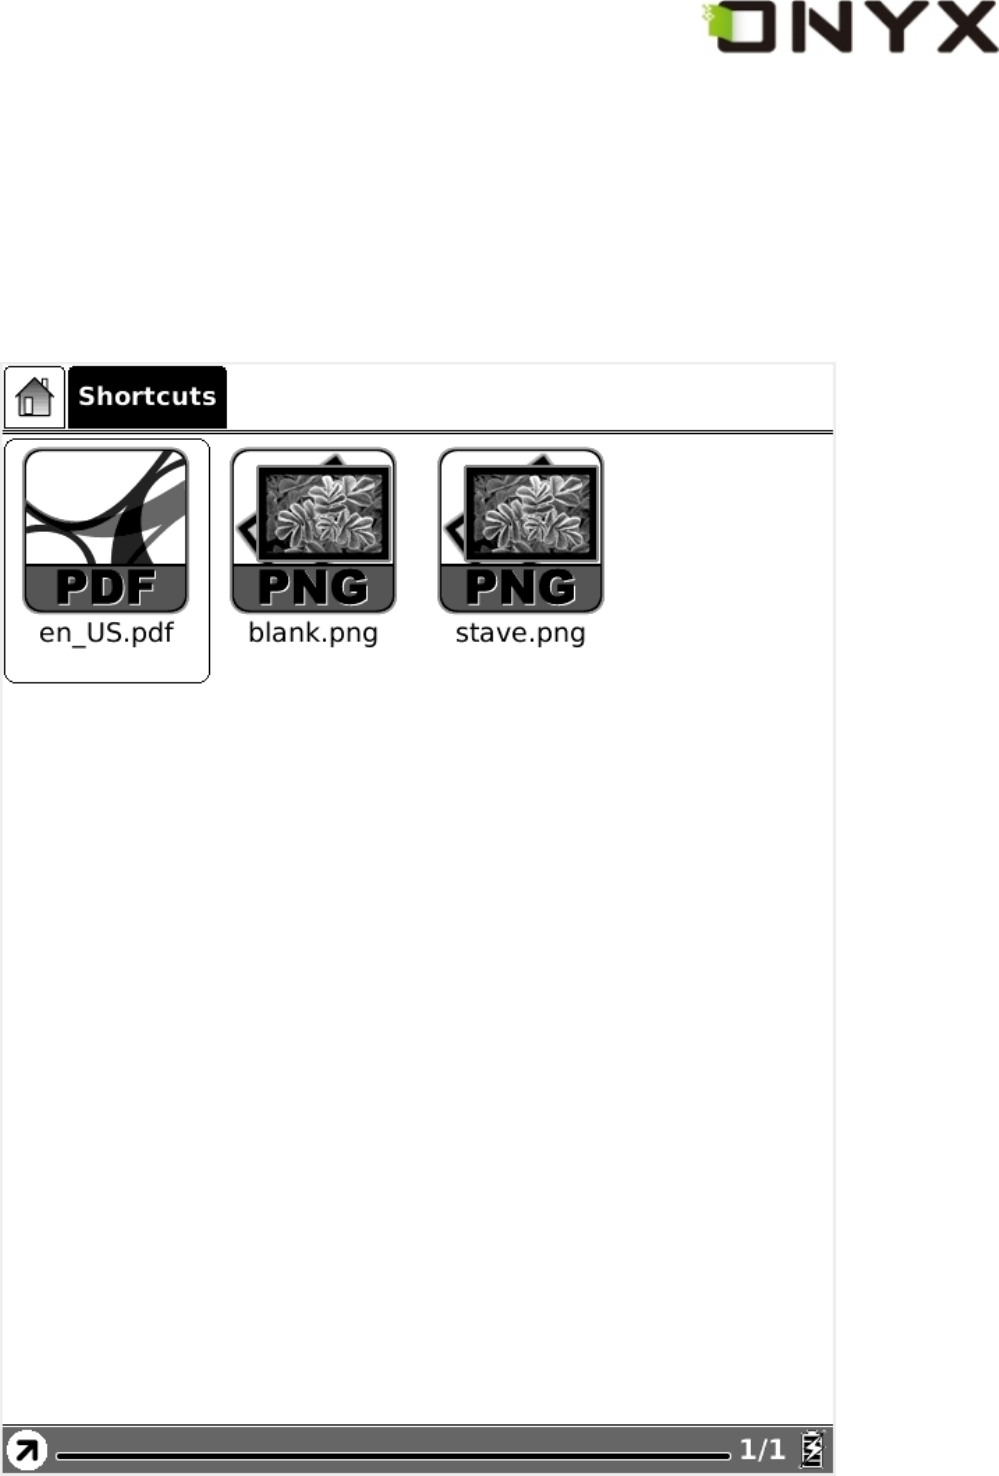
6.1.4 Shortcuts
Select button Shortcuts, all of the shortcuts to specified applications or documents are
displayed in a single view. Once you create shortcut for an application or a document,
you can easily start or open it by Shortcuts function.
Fig. 6.1.4 Snapshot of Shortcuts View

Copyright © 2009 Onyx International. All rights reserved.
6.1.5 Notes
Select button Notes, you can create a new notepad or open the existing
notes.
Fig. 6.1.5 Snapshot of Notes View
Copyright © 2009 Onyx International. All rights reserved.
6.1.5.1 Create Note
Create a new notepad. Before you sketch any ideas on Boox 60, a dialog
pops up letting you select the background of notes, as shown in Fig. 6.1.5.1.
Fig. 6.1.5.1 Snapshot of Selecting Background
Note: You can customize any backgrounds as you like. The steps are:

Copyright © 2009 Onyx International. All rights reserved.
1. Create a folder notes_template in your SD card.
2. Put the background images in that folder. Onyx recommends you use
images with dimensions 600 × 800 then you will get best performance.
6.1.5.2 Open Existing Notes
Any notes are saved in internal flash of Boox 60. You can see and open them
in Notes view, just like opening a normal document. The thumbnail of first
sketched page will be display in Notes view.
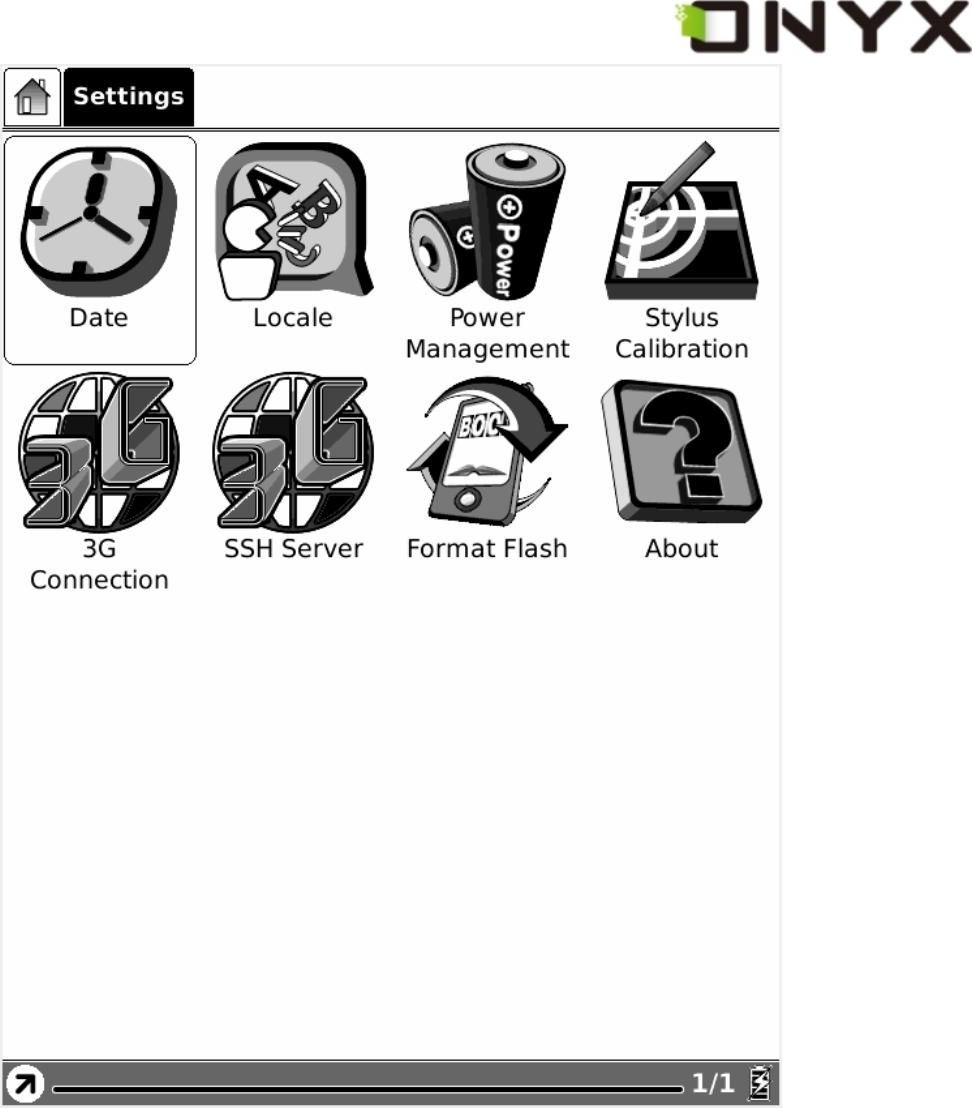
6.1.6 Settings
Select Settings button, you can enter the device settings view. Now the configuration of
date, locale, power management are supported. Stylus calibration, format flash and
about view are also listed here.
Copyright © 2009 Onyx International. All rights reserved.
Fig. 6.1.4 Settings
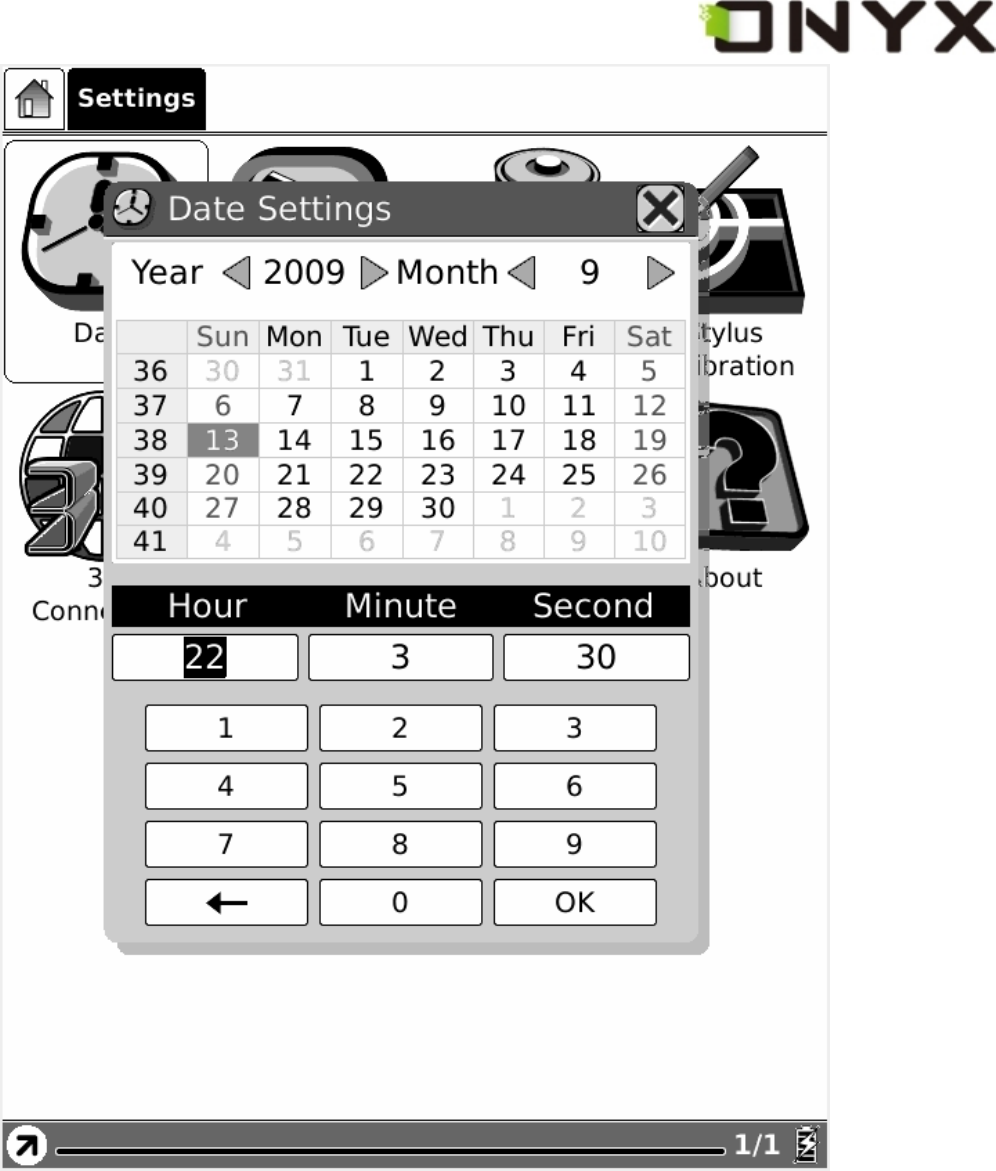
6.1.6.1 Date
Select the Date button in settings, you can set current date (year, month, day) and time
(hour, minute, second) of device.
Copyright © 2009 Onyx International. All rights reserved.
Fig. 6.1.6.1 Data Configuration Dialog
Copyright © 2009 Onyx International. All rights reserved.
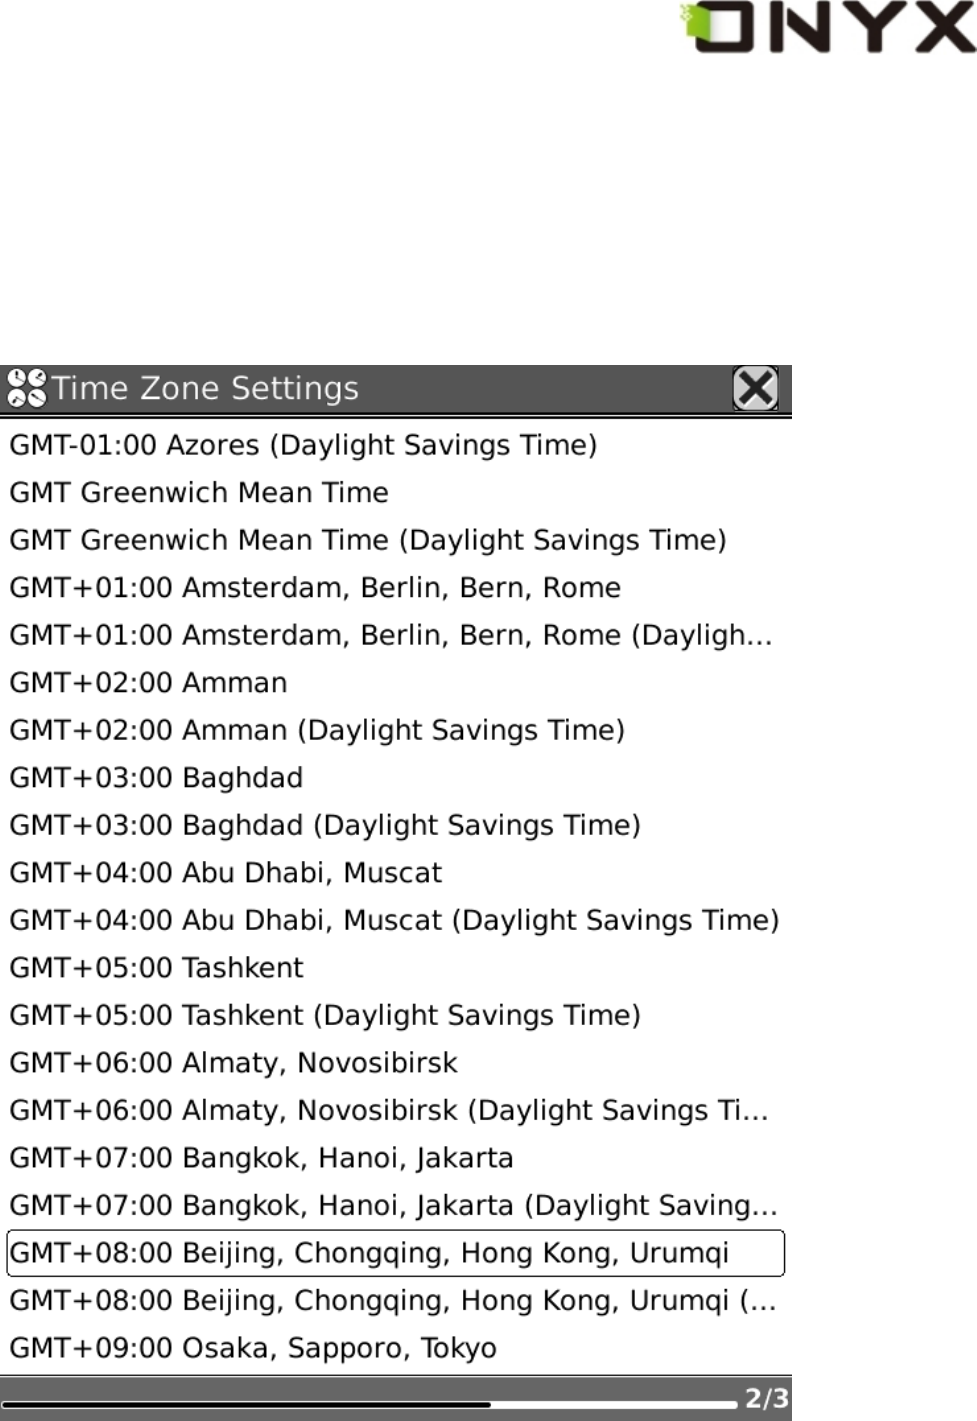
6.1.6.2 Time Zone
Select button Time Zone in settings, you can update time zone setting on
Boox 60. The time zone setting is very IMPORTANT for DRM functionalities
so make sure your device is set to correct time zone.
Fig.6.1.6.2 Time Zone Settings

Copyright © 2009 Onyx International. All rights reserved.
6.1.6.3 Locale
Select the Locale Button in settings, you can set the current operation language of the
device.
Fig. 6.1.6.3 Locale Dialog
Copyright © 2009 Onyx International. All rights reserved.
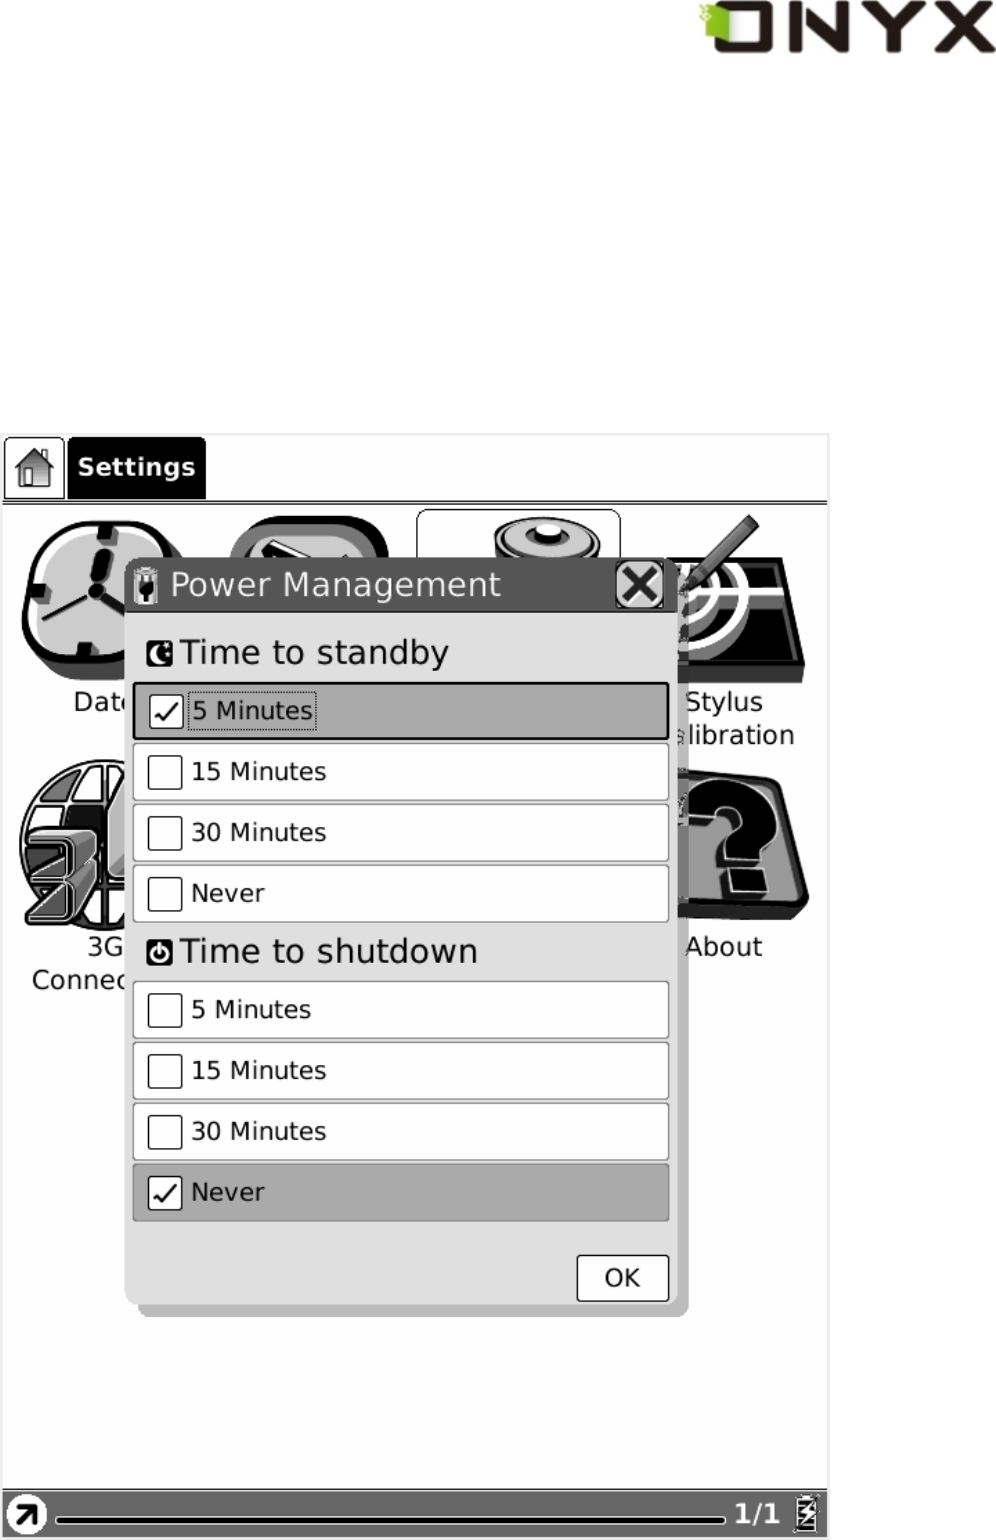
6.1.6.4 Power Management
Select the Power Management button in settings, you can set the (waiting) time of
standby and automatically shutdown for the device. Note, if the time of shutdown is set,
the device won’t enter standby status anymore; in the other side, if you set the time of
standby, the device won’t shutdown automatically.
Fig. 6.1.6.4 Power Management Dialog

Copyright © 2009 Onyx International. All rights reserved.
6.1.6.5 Stylus Calibration
If the tip of your stylus does not match with the position on the screen, you can improve
the precision by stylus calibration.
Fig. 6.1.6.5 (1) Initial Screen of Stylus Calibration
Follow the guideline displayed on the screen: ‘Please press once at each of the marks
shown on the screen’. After you click on the center of the mark, the screen will refresh

Copyright © 2009 Onyx International. All rights reserved.
and you will be asked to do the same action for next point.
Fig. 6.1.6.5 (2) Snapshot of Step 1

Copyright © 2009 Onyx International. All rights reserved.
Fig. 6.1.6.5 (3) Snapshot of Step 2

Copyright © 2009 Onyx International. All rights reserved.
Fig. 6.1.6.5 (4) Snapshot of Step 3

Copyright © 2009 Onyx International. All rights reserved.
Fig. 6.1.6.5 (5) Snapshot of Step 4
Copyright © 2009 Onyx International. All rights reserved.
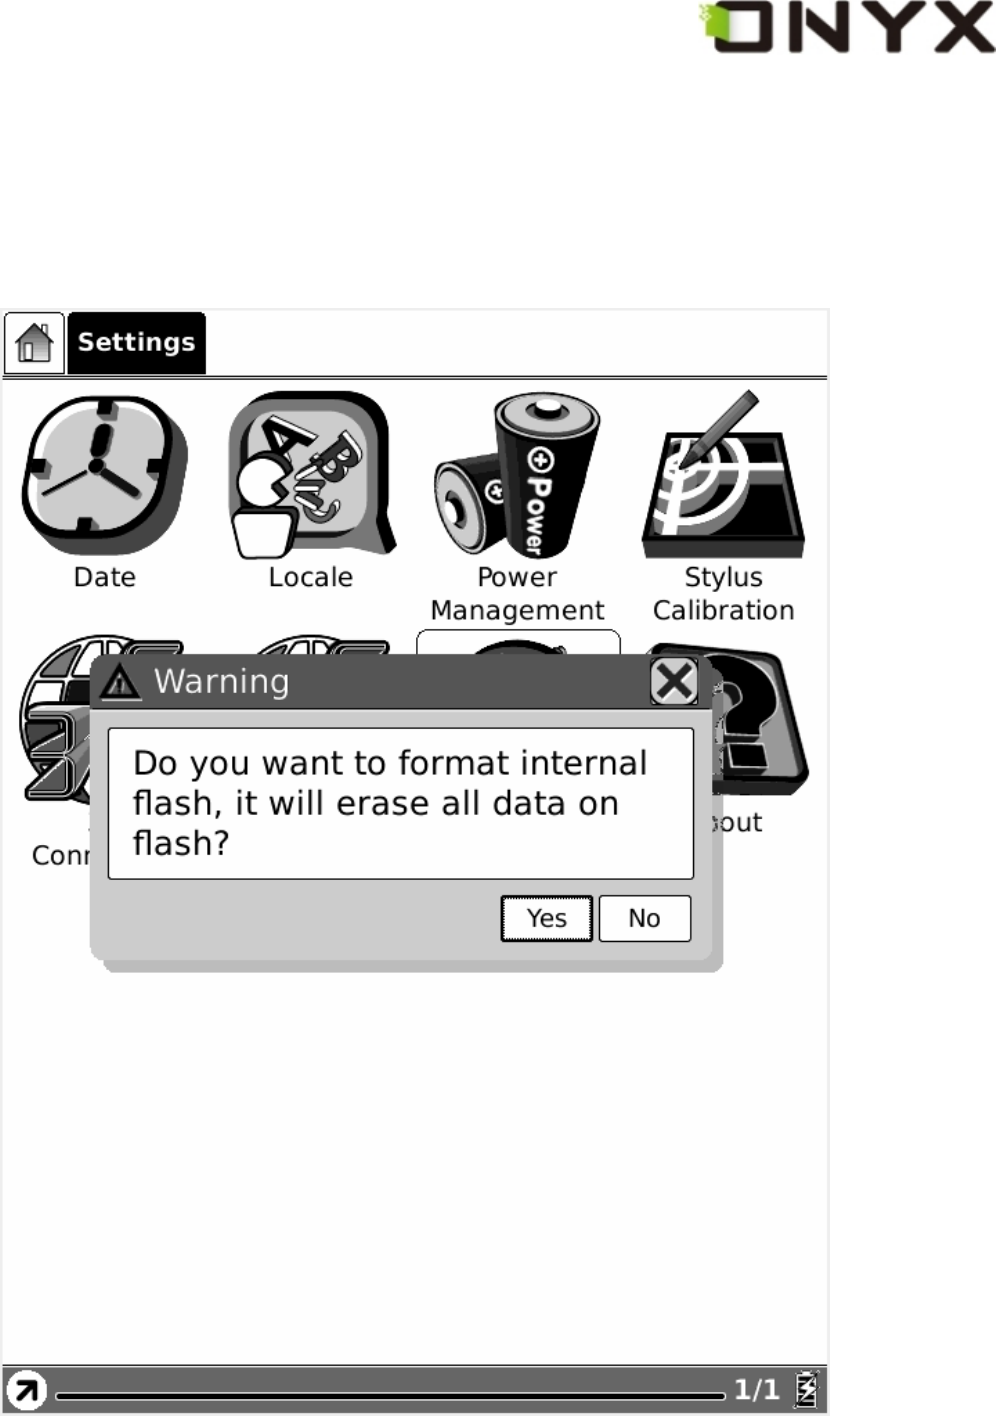
6.1.6.6 Format Flash
Select Format Flash button in settings, you can format the internal flash. Note, after
doing this operation all of the data in internal flash would be removed.
Fig. 6.1.6.6 Snapshot of Formatting Flash

Copyright © 2009 Onyx International. All rights reserved.
6.1.6.7 About
Select About button to see the information of Onyx International and Onyx’s partners.
Fig. 6.1.6.7 Snapshot of About Dialog
Copyright © 2009 Onyx International. All rights reserved.
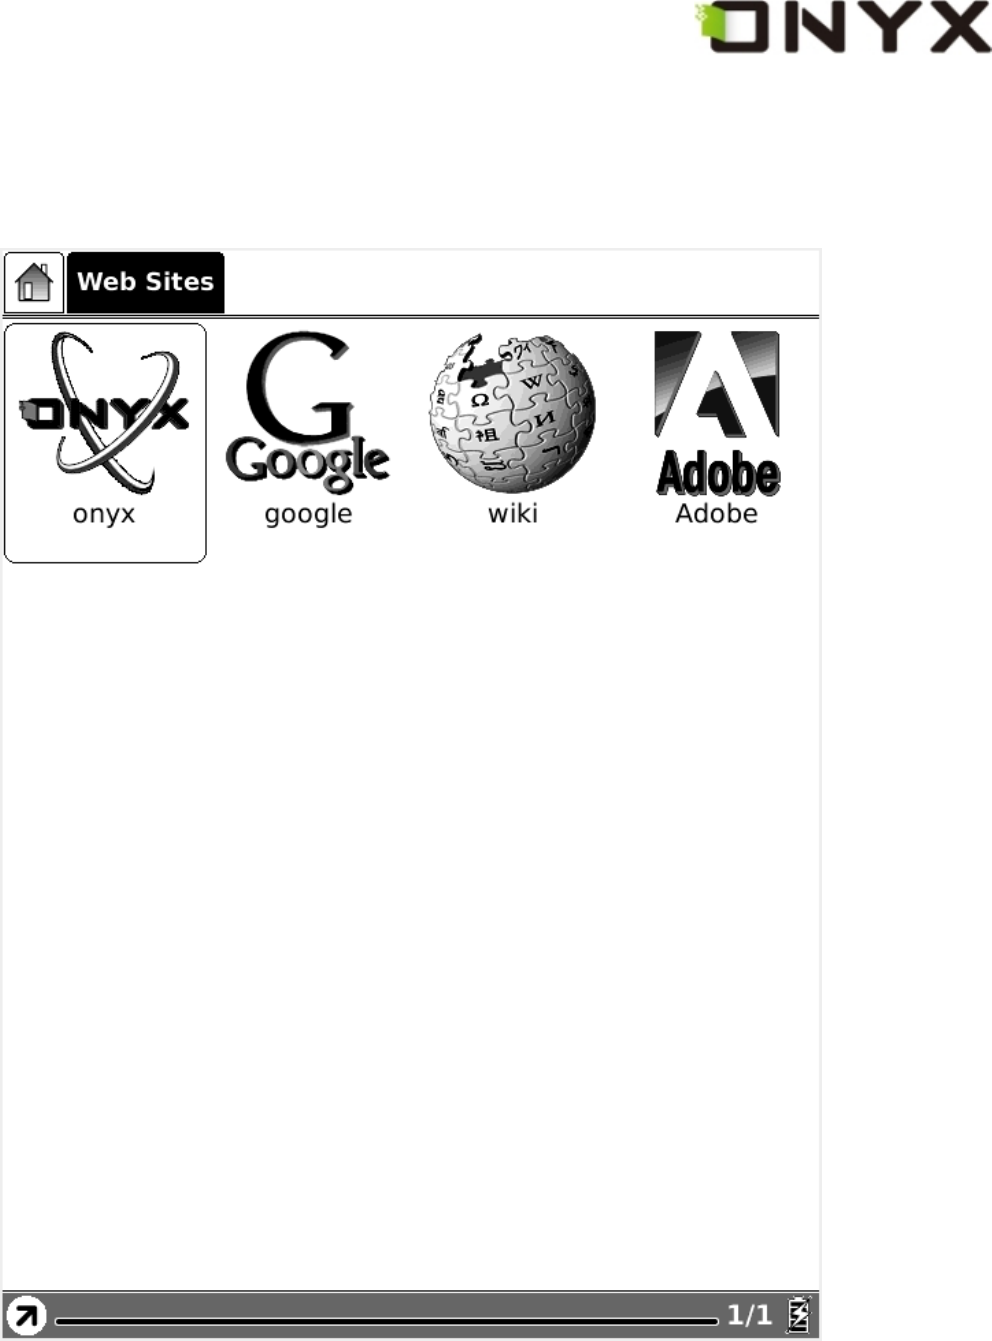
6.1.7 Web sites
Boox provides entries to access the most common websites.
Fig. 6.1.7 Common Websites
Copyright © 2009 Onyx International. All rights reserved.
6.2 Navigation Bar
Navigation bar displays the path of document. Each folder in this path is displayed as a
button. You can jump into any parent folder by clicking the button.
Fig, 6.2 Snapshot of Navigation Bar
Copyright © 2009 Onyx International. All rights reserved.
6.3 Tool Bar
Fig. 6.3 Snapshot of Tool Bar
6.3.1 Menu Button
Select the Menu button then the menu pops up. Most of the operations to Boox should
be done by accessing the menu.
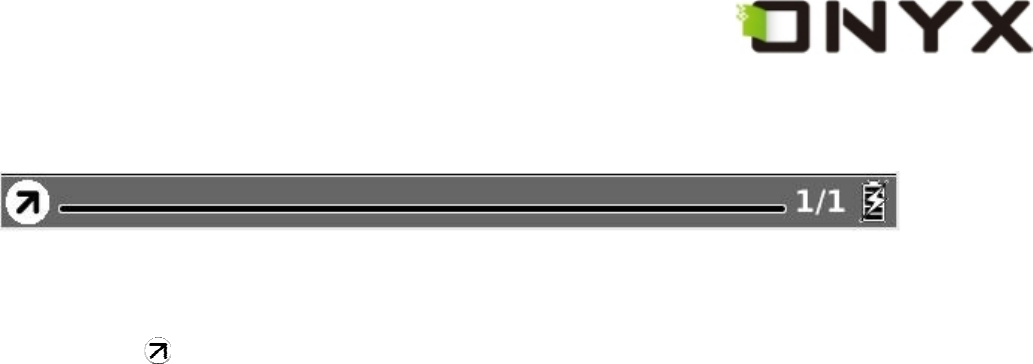
6.3.2 Progress Bar
Progress bar displays the reading progress of viewing documents. The number of
current page and the total pages are displayed on the right of the progress bar. Clicking
or dragging on the progress bar leads to flipping screens.

Copyright © 2009 Onyx International. All rights reserved.
Fig. 6.3.2 (1) Snapshot of Progress Bar while Viewing Document
Progress bar displays the progress of viewing contents in main view. The number of
current screen and the total screens are displayed on the right of the progress bar.
Copyright © 2009 Onyx International. All rights reserved.
Fig. 6.3.2 (2) Snapshot of Progress Bar in Main View
Progress bar displays the progress (in ratio) of loading a website.

Copyright © 2009 Onyx International. All rights reserved.
Fig. 6.3.2 (3) Snapshot of Progress Bar while Loading Website
Progress bar displays the relative position of current viewport while viewing a website.
Clicking or dragging on the progress bar leads to moving the viewport.
Copyright © 2009 Onyx International. All rights reserved.
Fig. 6.3.3 (3) Snapshot of Progress Bar while Viewing Website

Copyright © 2009 Onyx International. All rights reserved.
6.3.3 Stylus Indicator
The stylus indicator is shown while viewing PDF/EPub/Image document.
6.3.3.1 Sketch
This icon appears when device enters sketch status. You can sketch on the drawing
area of the screen.
6.3.3.2 Erase Sketches
This icon appears when device enters erasing sketch status. You can erase the
sketches displayed on screen. If the pen hits the notes, the notes disappear
immediately.
6.3.3.3 Hand Tool
This icon appears when device enters dragging status. You can drag the content by
stylus as using the hand.
6.3.3.4 Selection Zoom
This icon appears when device enters selection zoom status. You can zoom in the
content you are interested by stylus. A box appears following the track of the pen, then
the area of the box would be zoomed in to fit the screen.
6.3.3.5 Annotate
This icon appears when device enters annotation status. You can take annotations on
the text-based content. The annotated texts are highlighted following the track of the

Copyright © 2009 Onyx International. All rights reserved.
pen.
6.3.3.6 Erase Annotations
This icon appears when device enters erasing annotation status. You can erase the
annotations displayed on screen by stylus. If the pen hits the highlighted texts, the
highlighting effect on these texts disappears.
6.3.4 Power Indicator
Power indicator shows current status of the battery.
6.3.5 Clock
The current date time as well as the reading time are displayed if you click the clock on
toolbar.

Copyright © 2009 Onyx International. All rights reserved.
Fig.6.3.4 Snapshot of Clock
6.4 Menu
6.4.1 Screen Rotation
Rotate the screen by clicking this button. The screen rotates between 0° and 270°
Copyright © 2009 Onyx International. All rights reserved.
(counterclockwise).
6.4.2 Save Remove SD Card
Savely remove SD card from Boox by clicking this button.
6.4.3 Music
Launch the music player by clicking this button.
6.4.4 Standby
Turn Boox into standby status by clicking this button. Once standby, Boox stops
working and screen saver (pictures) appears. Boox consumes very little power while
standing by.
Pressing any key can wake up the device from standby status.
6.4.5 Shutdown
Shut down Boox by clicking this button.
6.4.6 View
View means the way of displaying and arranging contents in main view.
6.4.6.1 List View
Display the contents by listing. The name, type, size and last access time of the
document are displayed.
Copyright © 2009 Onyx International. All rights reserved.
Fig. 6.4.6.1 Snapshot of List View
6.4.6.2 Details View
Display the contents in details. The details includes name, last access time, read count
and reading progress.
Copyright © 2009 Onyx International. All rights reserved.
6.4.6.2 Snapshot of Details View
Copyright © 2009 Onyx International. All rights reserved.
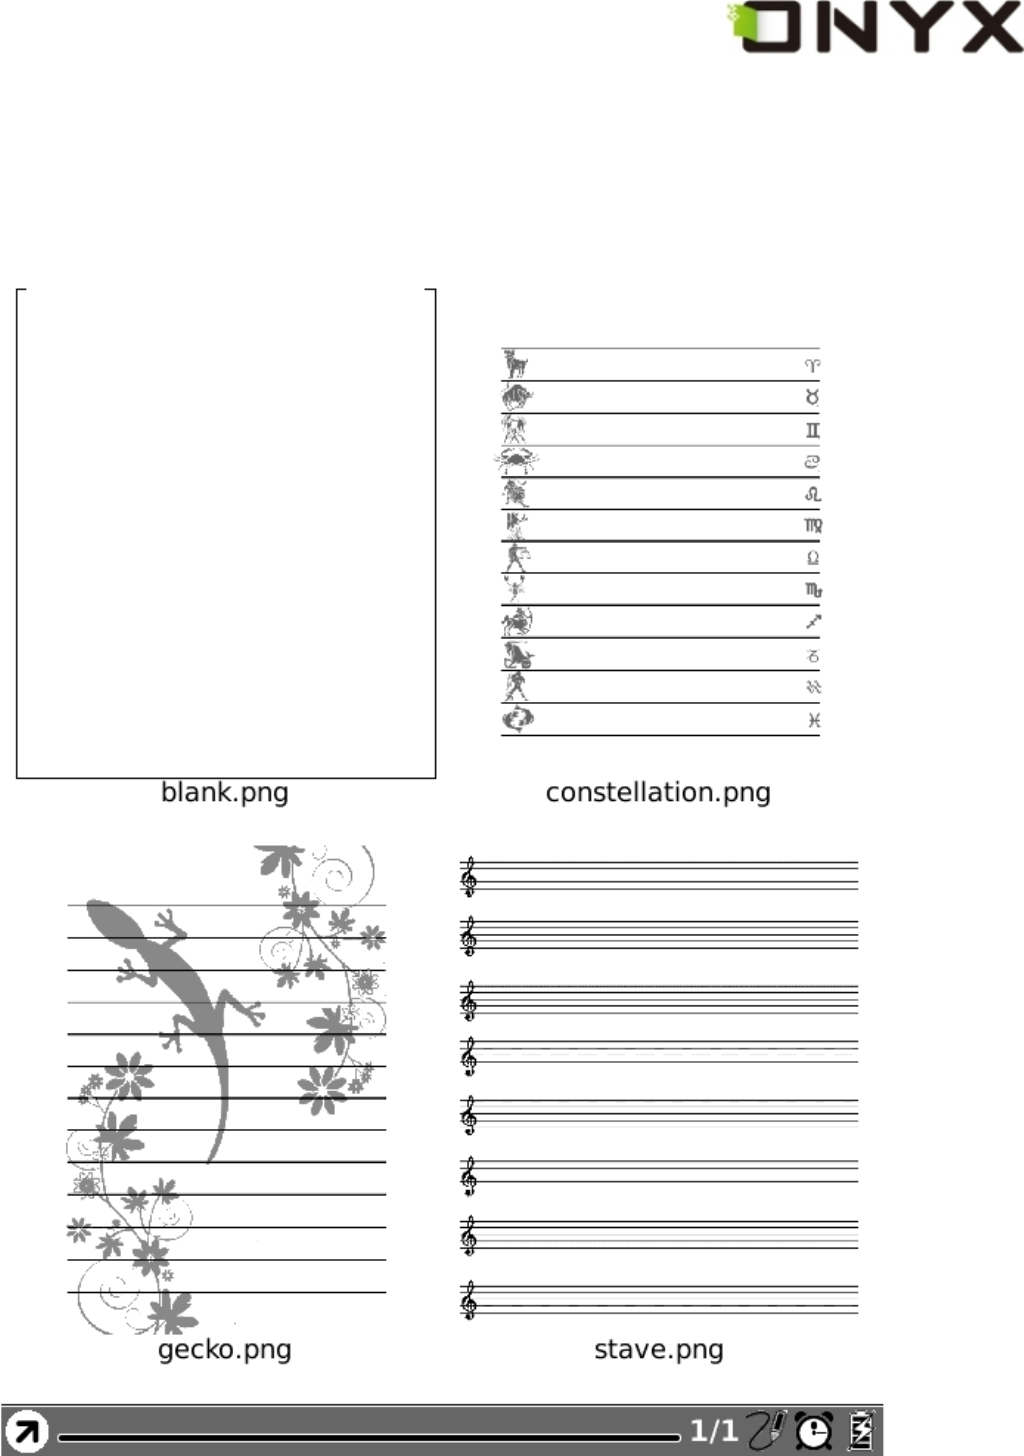
6.4.6.3 Thumbnail View
Display the contents in thumbnails. For image format (including JPEG/BMP/PNG/…),
the thumbnail of image is displayed. For other document format, the large icon of the
format is displayed.
Fig. 6.4.6.3 Snapshot of Thumbnail View
Copyright © 2009 Onyx International. All rights reserved.
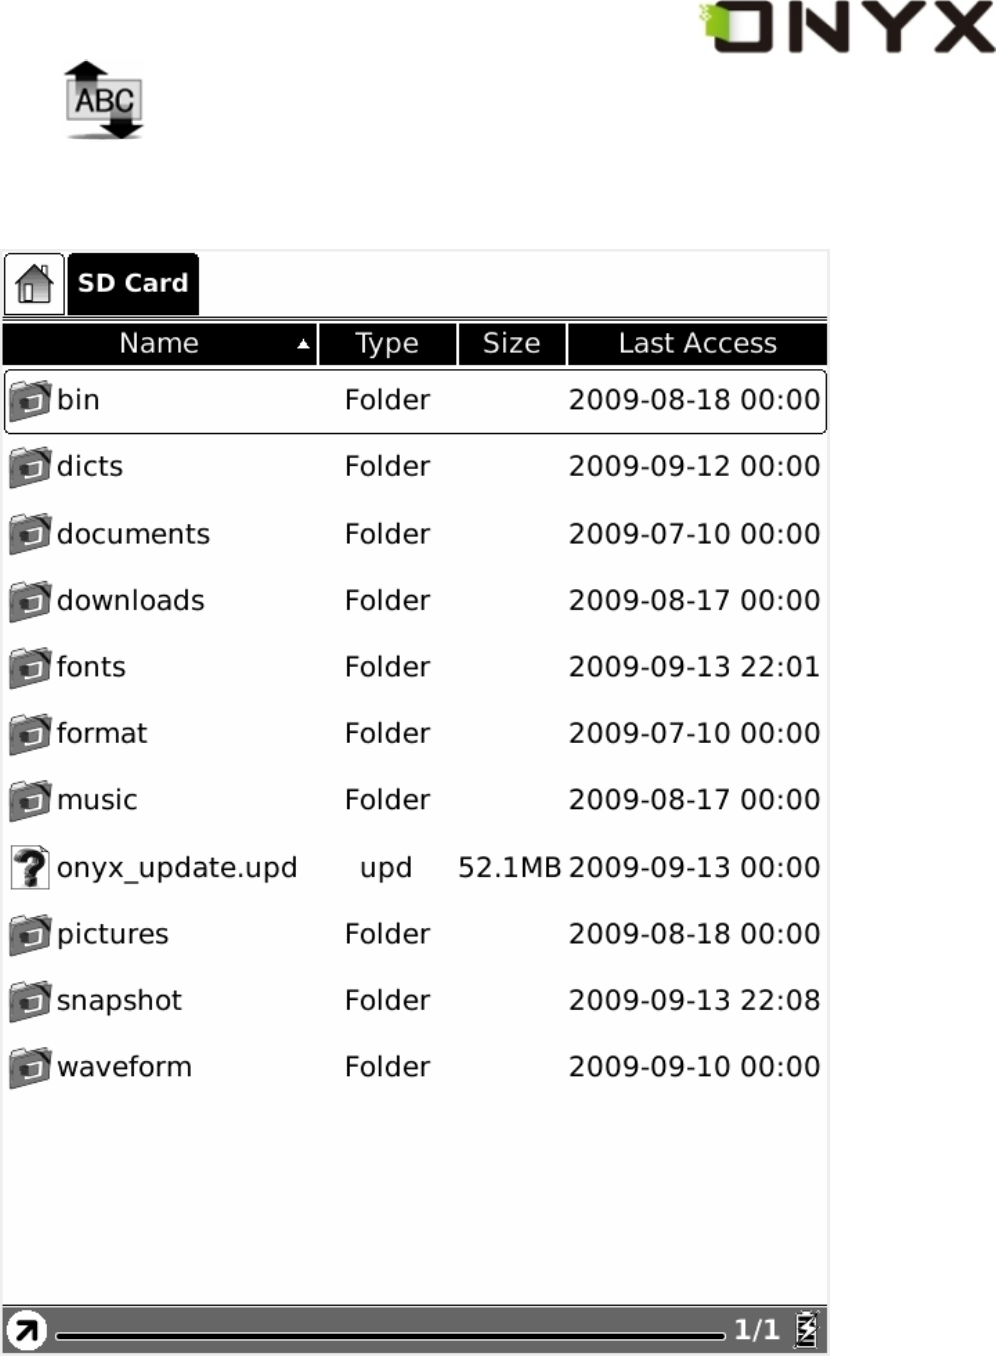
6.4.6.4 By Name
Sort the contents in current directory by name.
Fig. 6.4.6.4 Snapshot of Sorting the Contents in Current Directory by Name

Copyright © 2009 Onyx International. All rights reserved.
6.4.6.5 By Type
Sort the contents in current directory by document type.
Fig. 6.4.6.5 Snapshot of Sorting the Contents in Current Directory by Type
Copyright © 2009 Onyx International. All rights reserved.
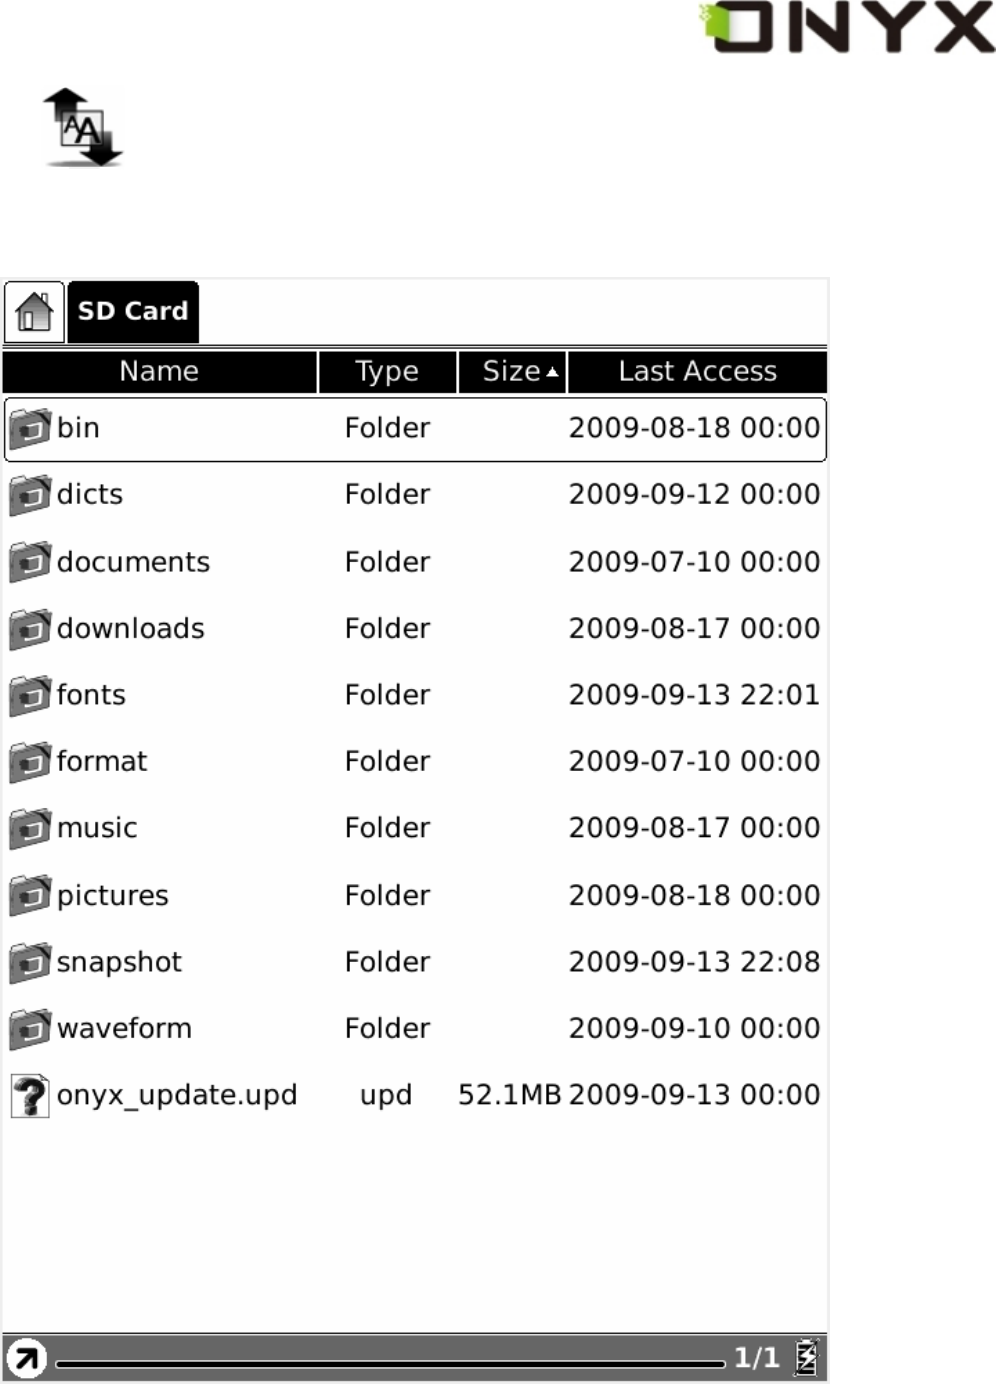
6.4.6.6 By Size
Sort the contents in current directory by document size.
Fig. 6.4.6.6 Snapshot of Sorting the Contents in Current Directory by Size

Copyright © 2009 Onyx International. All rights reserved.
6.4.6.7 By Access Time
Sort the contents in current directory by access time.
Fig. 6.4.6.7 Snapshot of Sorting the Contents in Current Directory by Access Time

Copyright © 2009 Onyx International. All rights reserved.
6.4.6.8 By Rating
Sort the contents in current directory by rating.
Fig. 6.4.6.8 Snapshot of Sorting the Contents in Current Directory by Rating
Copyright © 2009 Onyx International. All rights reserved.
6.4.6.9 Ascending
Sort the contents in current directory by ascending order.
Fig. 6.4.6.9 Snapshot of Sorting Contents in Current Directory by Ascending Order

Copyright © 2009 Onyx International. All rights reserved.
6.4.6.10 Descending
Sort the contents in current directory by descending order.
Fig. 6.4.6.10 Snapshot of Sorting Contents in Current Directory by Descending Order
6.4.7 File
File means the operations to a file.

Copyright © 2009 Onyx International. All rights reserved.
6.4.7.1 Delete
Delete a selected file.
Fig. 6.4.7.1 Delete a Selected File

Copyright © 2009 Onyx International. All rights reserved.
6.4.7.2 Search
Search for target file by given pattern. The search results are displayed in the main
view.
Fig. 6.4.7.2 Search Files by Given Pattern
Copyright © 2009 Onyx International. All rights reserved.
Fig. 6.4.7.3 Search Results
6.4.7.3 Create shortcut
Create shortcut on selected file.
Copyright © 2009 Onyx International. All rights reserved.
6.4.7.4 Return Book
Return a borrowed book.
Note: The wifi configuration dialog pops up after you decide to return a borrowed
book(because the wifi is only opened when it is necessary). The returning starts after
the configuration succeeds.
6.4.8 Settings
Settings in menu is identical with the Setting button in main view. Please refer to 6.1.4
for details.
6.4.8.1 Date Settings
Configure the date and time of device, as the same as 6.1.6.1.
6.4.8.2 Locale Settings
Configure the device language, as the same as 6.1.6.3.
6.4.8.3 Power Management
Configure the time of standby and automatically shutdown, as the same as 6.1.6.4.
6.4.8.4 Screen Calibration
Enter the screen calibration application, as the same as 6.1.6.5.

Copyright © 2009 Onyx International. All rights reserved.
6.4.9.1 By Levels
Configure the font size by several font levels: small, medium, large, larger and largest.
This function is activated while viewing PDF/EPub document.
Fig. 6.4.7.1 Configure the Font Size by Levels
Copyright © 2009 Onyx International. All rights reserved.
6.4.9.2 By Numbers
Configure the font size by actually number. This function is activated while viewing
TXT/Mobi(non-drm)/RTF/PDB document.
Fig. 6.4.7.2 Configure the Font Size by Numbers
Copyright © 2009 Onyx International. All rights reserved.
6.4.9.3 By Ratio
Configure the font size by ratio. This function is activated while viewing HTML/CHM
document.
Fig. 6.4.7.3 Configure the Font Size by Ratio

Copyright © 2009 Onyx International. All rights reserved.
6.4.9.4 Bold
Set the font bold.
Fig. 6.4.7.4 Configure the Font to be Bold
Copyright © 2009 Onyx International. All rights reserved.
6.4.9.5 Italic
Set the font italic.
Fig. 6.4.7.5 Configure the Font to be Italic
Copyright © 2009 Onyx International. All rights reserved.
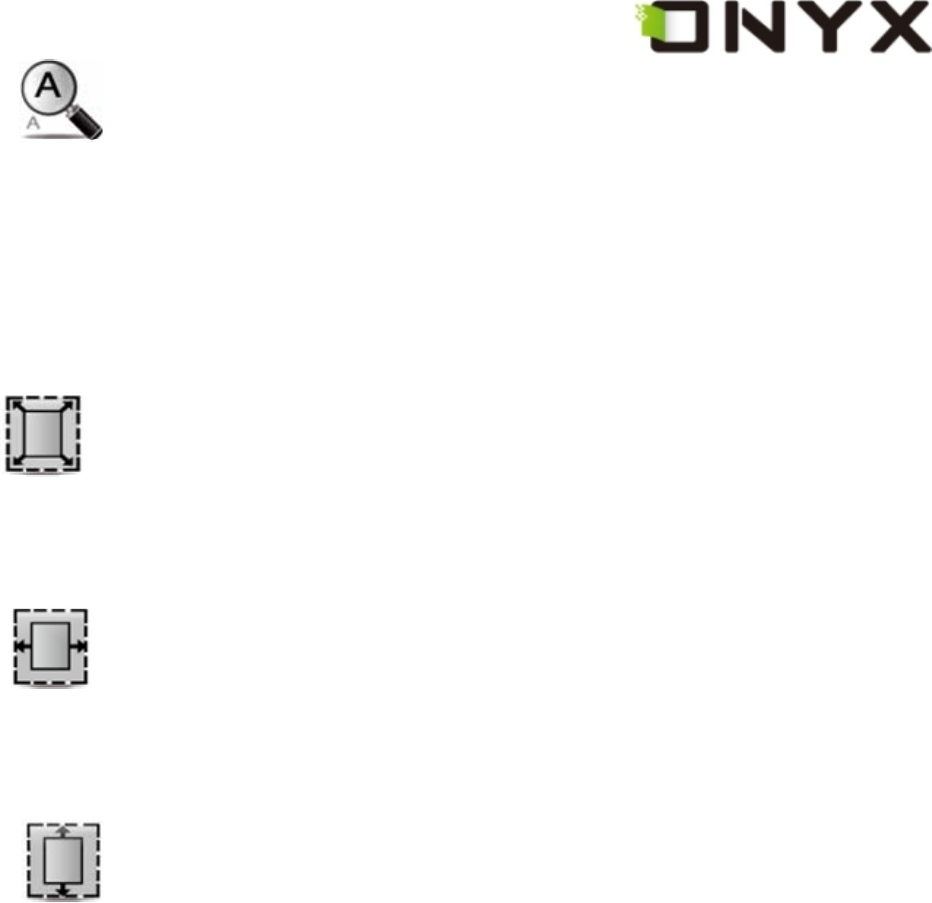
6.4.10 Zooming
Adjust the zoom of current screen. The screen can be scaled by fixed value (such as
zooming to page, 75%, 200%). The screen can also be scaled up by given stylus
box(selection zoom).
6.4.10.1 To Page
Zoom the current page/image to fit the screen.
6.4.10.2 To Width
Zoom the current page/image to fit the width of screen.
6.4.10.3 To Height
Zoom the current page/image to fit the height of screen.
Copyright © 2009 Onyx International. All rights reserved.
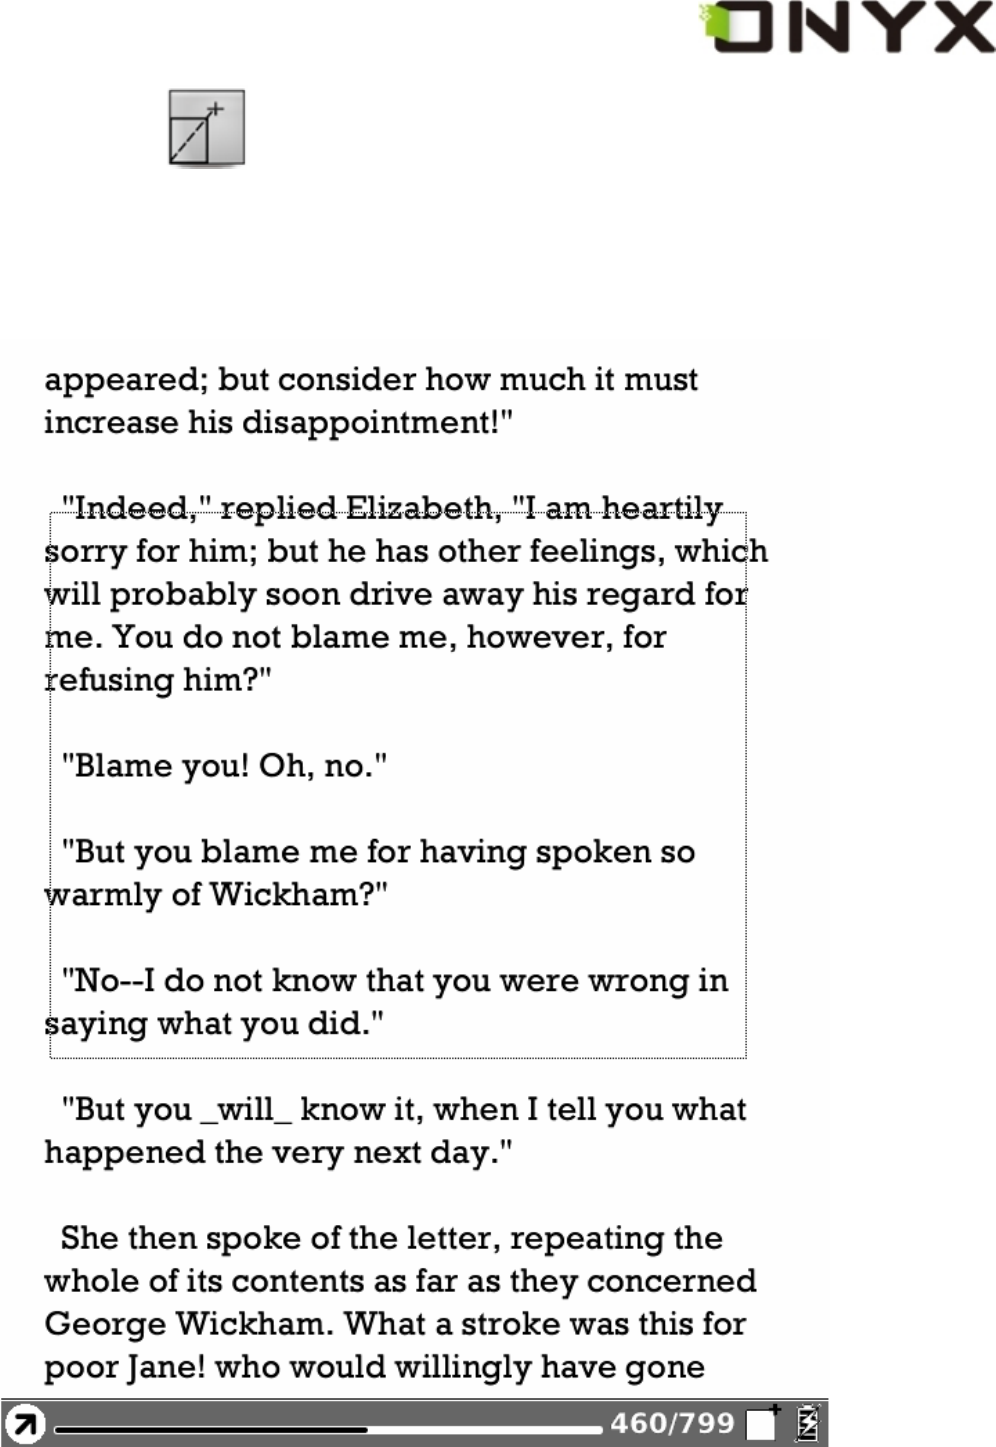
6.4.10.4 Selection Zoom
Scale up the current screen by selecting a box. The content in the selected box is
enlarged to fill the whole drawing area.
Fig. 6.4.8.4 (1) Snapshot of Selection Zoom

Copyright © 2009 Onyx International. All rights reserved.
Fig. 6.4.8.4 (2) Snapshot of the Render Result after Selection Zoom

Copyright © 2009 Onyx International. All rights reserved.
6.4.10.5 By Ratio
Zoom the current page/image by ratio.
Fig. 6.4.8.5 Snapshot of Zooming by Ratio

Copyright © 2009 Onyx International. All rights reserved.
6.4.11 Annotations
Annotations means a group of annotation operations, including annotating and
sketching.
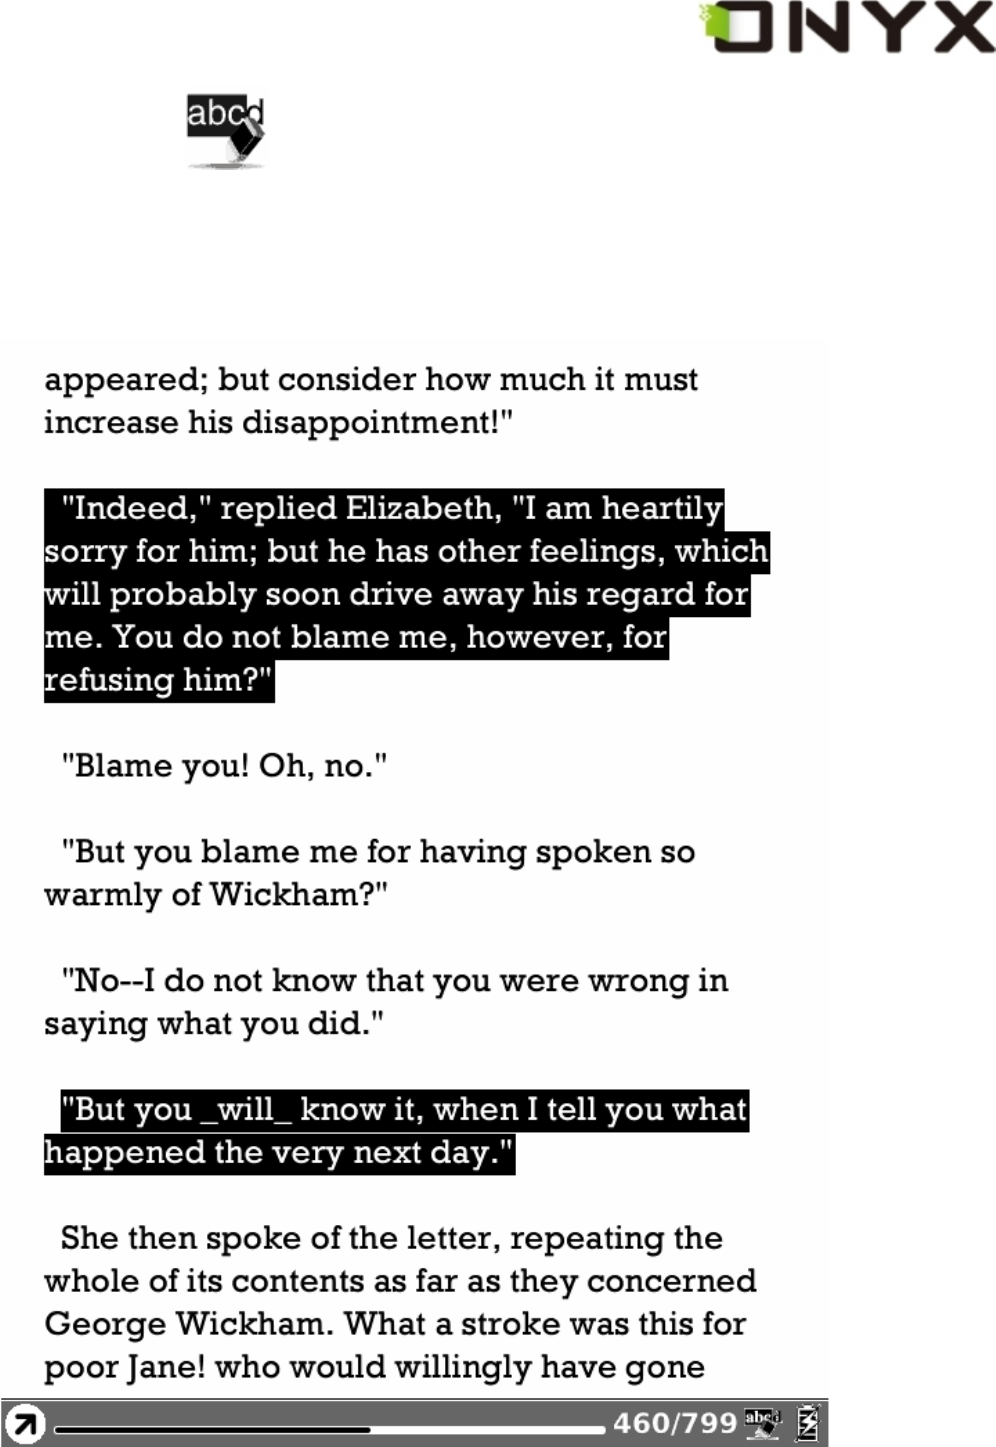
6.4.11.1 Add Annotation
Take annotation on the text of current screen. The annotated texts are highlighted.

Copyright © 2009 Onyx International. All rights reserved.
Fig. 6.4.9.1 Snapshot of Adding Annotation
Copyright © 2009 Onyx International. All rights reserved.
6.4.11.2 Erase Annotation
Erase annotation on current screen. The annotations are erased when you click on
them or drag the stylus through them.
Fig. 6.4.9.2 Snapshot of Erasing Annotation
Copyright © 2009 Onyx International. All rights reserved.
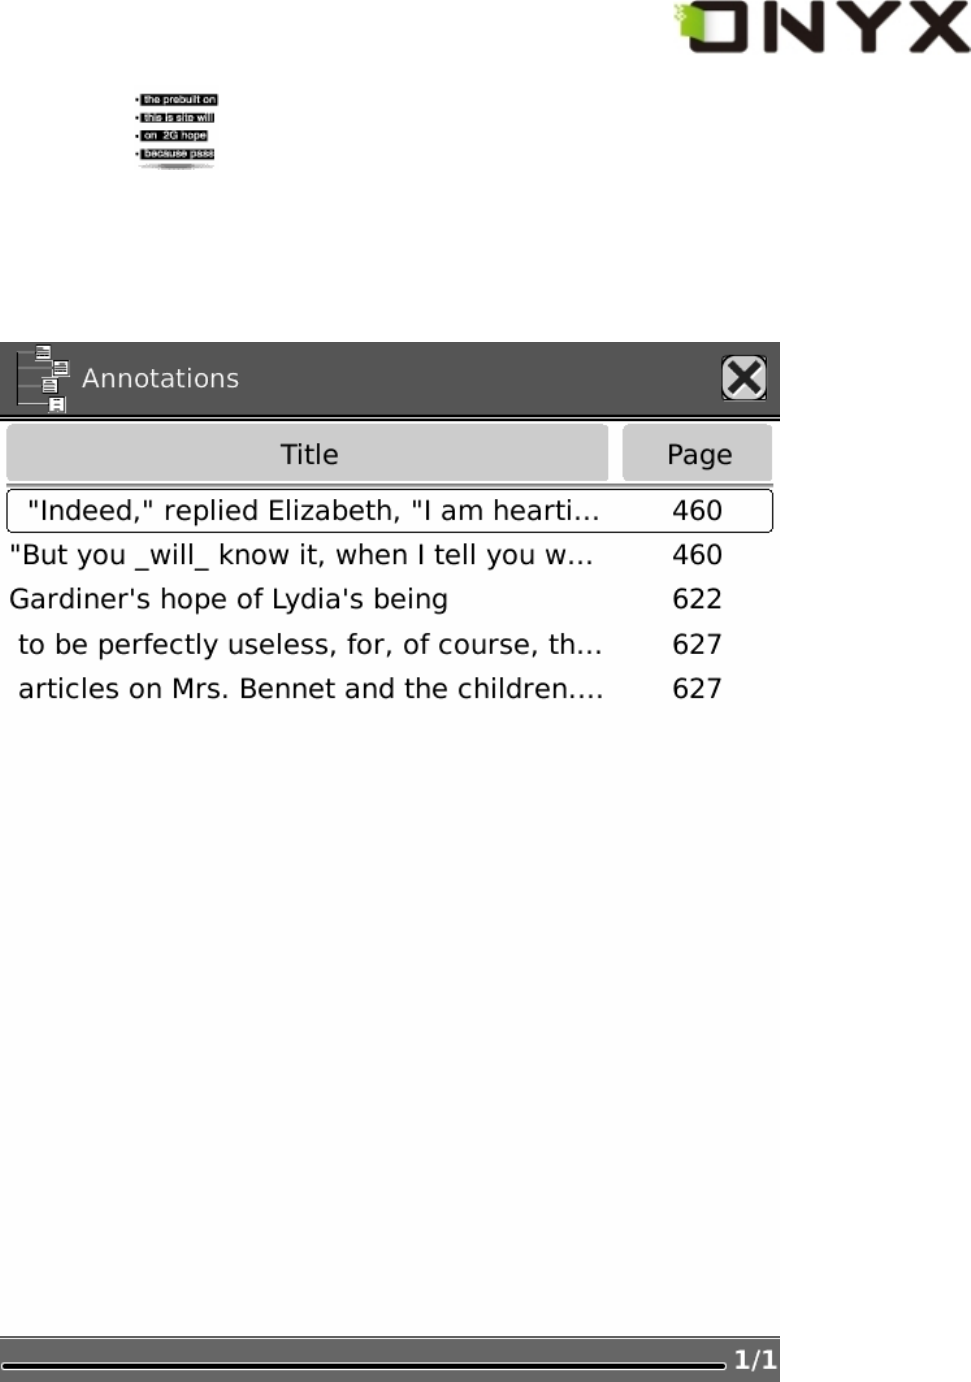
6.4.11.3 All Annotations
Display all of the annotations by list. The highlighted texts as well as the corresponding
page numbers are displayed on the list view.
Fig. 6.4.9.3 Display All Annotations

Copyright © 2009 Onyx International. All rights reserved.
6.4.11.4 Sketch
Sketch on the content area of current screen by stylus.
6.4.9.4 Sketch on the Screen

Copyright © 2009 Onyx International. All rights reserved.
6.4.11.5 Erase Sketch
Erase existing sketches by stylus. The sketches are erased when you click on them or
drag the stylus through them.
6.4.11.6 Sketch Colors
Select the color of sketches. Now black and white are supported.

Copyright © 2009 Onyx International. All rights reserved.
Fig. 6.4.9.6 Sketch Colors

Copyright © 2009 Onyx International. All rights reserved.
6.4.11.7 Sketch Shapes
Select the shape (line width) of sketches. Now five levels of line widths are supported.
Fig. 6.4.9.7 Sketch Shapes
Copyright © 2009 Onyx International. All rights reserved.
6.4.12 Layout
Select the layout of pages while viewing document.
6.4.12.1 Single Page
Only one page is displayed on screen.
Fig. 6.4.10.1 Snapshot of Single Page

Copyright © 2009 Onyx International. All rights reserved.
6.4.12.2 Scroll Pages
Multiple pages can be displayed on screen. If there are enough blanks besides one
page on the screen, the parts of adjacent pages fill these blanks. There is a small
spacing between two pages.
Fig. 6.4.10.2 Snapshot of Scroll Pages
Copyright © 2009 Onyx International. All rights reserved.
6.4.13 Tools
Tools represents a group of assistant functions for better reading.
6.4.13.1 Search
Search for the pattern in current document. The search results in a screen are
highlighted.
Fig. 6.4.11.1 (1) Input Search Pattern

Copyright © 2009 Onyx International. All rights reserved.
Fig. 6.4.11.1 (2) Display Search Results
Copyright © 2009 Onyx International. All rights reserved.
Fig. 6.4.11.1 (3) Search for Next Results

Copyright © 2009 Onyx International. All rights reserved.
6.4.13.2 Dictionary Lookup
Look up for the explanation of a pattern string.
Fig. 6.4.11.2 (1) Popup Dictionary Lookup Dialog

Copyright © 2009 Onyx International. All rights reserved.
Fig. 6.4.11.2 (2) Select a Word on Content Area
Copyright © 2009 Onyx International. All rights reserved.
6.4.13.3 Add Bookmark
Add a bookmark of current page.
Fig. 6.4.11.3 Snapshot of Adding Bookmark

Copyright © 2009 Onyx International. All rights reserved.
6.4.13.4 Delete Bookmark
Delete the bookmark of current page.
6.4.13.5 Show Bookmarks
Show all bookmarks in a list view. The front text portion as well as the number of the
bookmarked page is displayed in an item. You can jump to the target page by selecting
the bookmark item.
Copyright © 2009 Onyx International. All rights reserved.
Fig. 6.4.11.5 Snapshot of Bookmarks View
6.4.13.6 Hand Tool
Select the hand tool item in the menu to enable browsing through document by stylus.

Copyright © 2009 Onyx International. All rights reserved.
6.4.13.7 Previous View
Select previous/next view to retrace the path within a document. Select item Previous
View to return to previous screen while browsing document.
6.4.13.8 Next View
Select item Next View to go to next screen while browsing document. This button is
activated only if you have chosen Previous View.

Copyright © 2009 Onyx International. All rights reserved.
6.4.13.9 Slide Show
Continuously display the pages of a document (or documents, e.g. images files) by
slide show.
6.4.11.9 Snapshot of Slide Show
Copyright © 2009 Onyx International. All rights reserved.
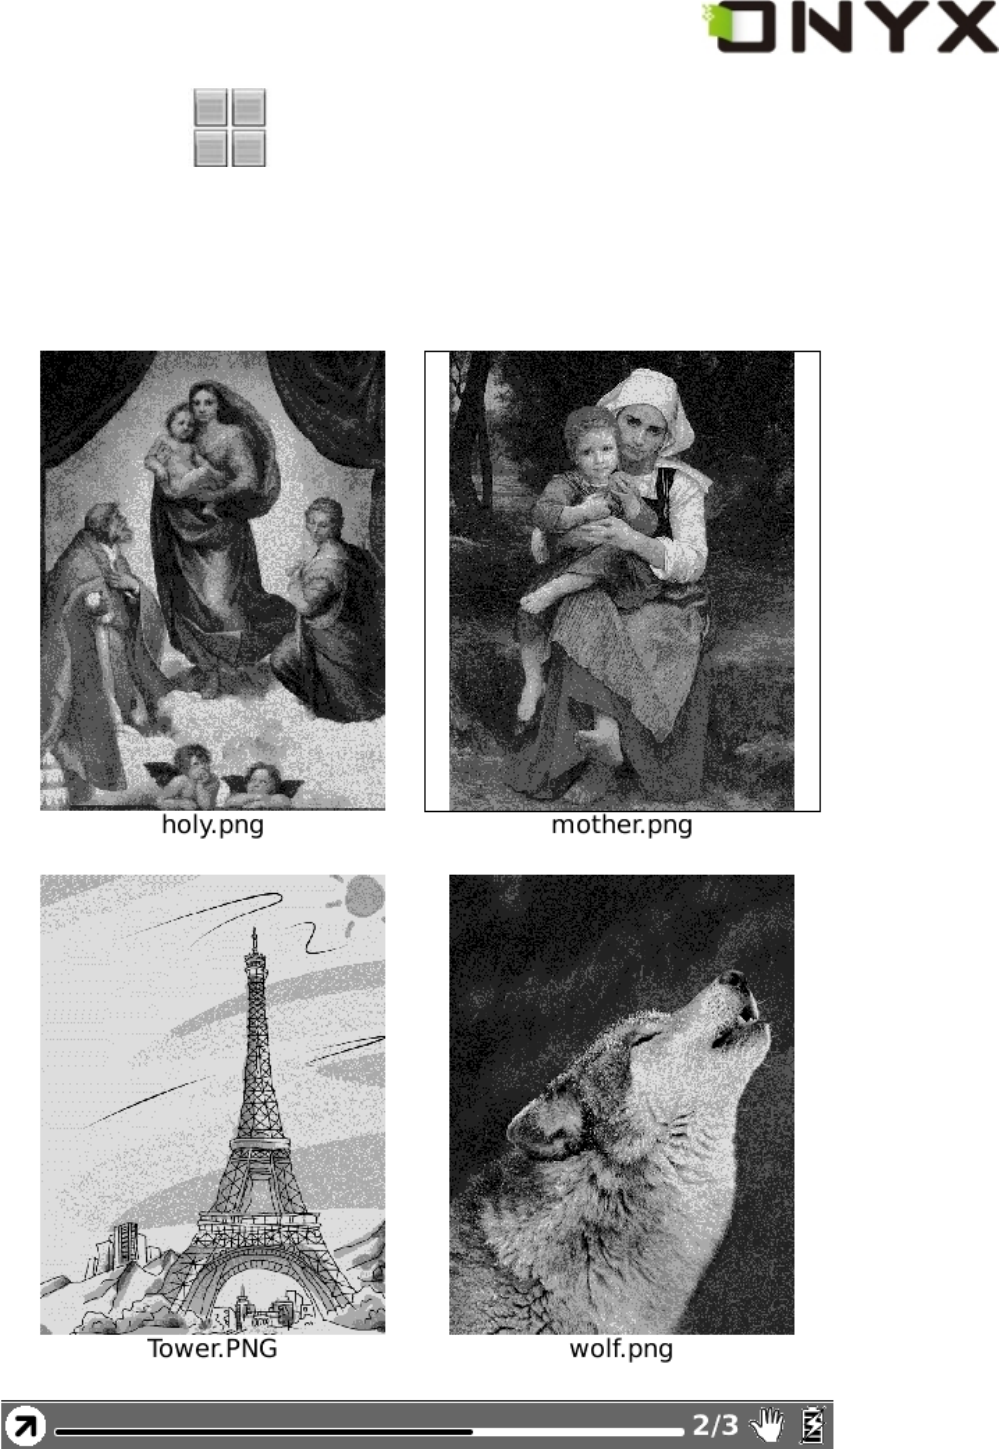
6.4.13.10 Thumbnail View
Display the images by thumbnail view. Now the thumbnails are displayed by two
columns and 2 rows.
Fig. 6.4.11.10 Snapshot of Thumbnail View
Copyright © 2009 Onyx International. All rights reserved.
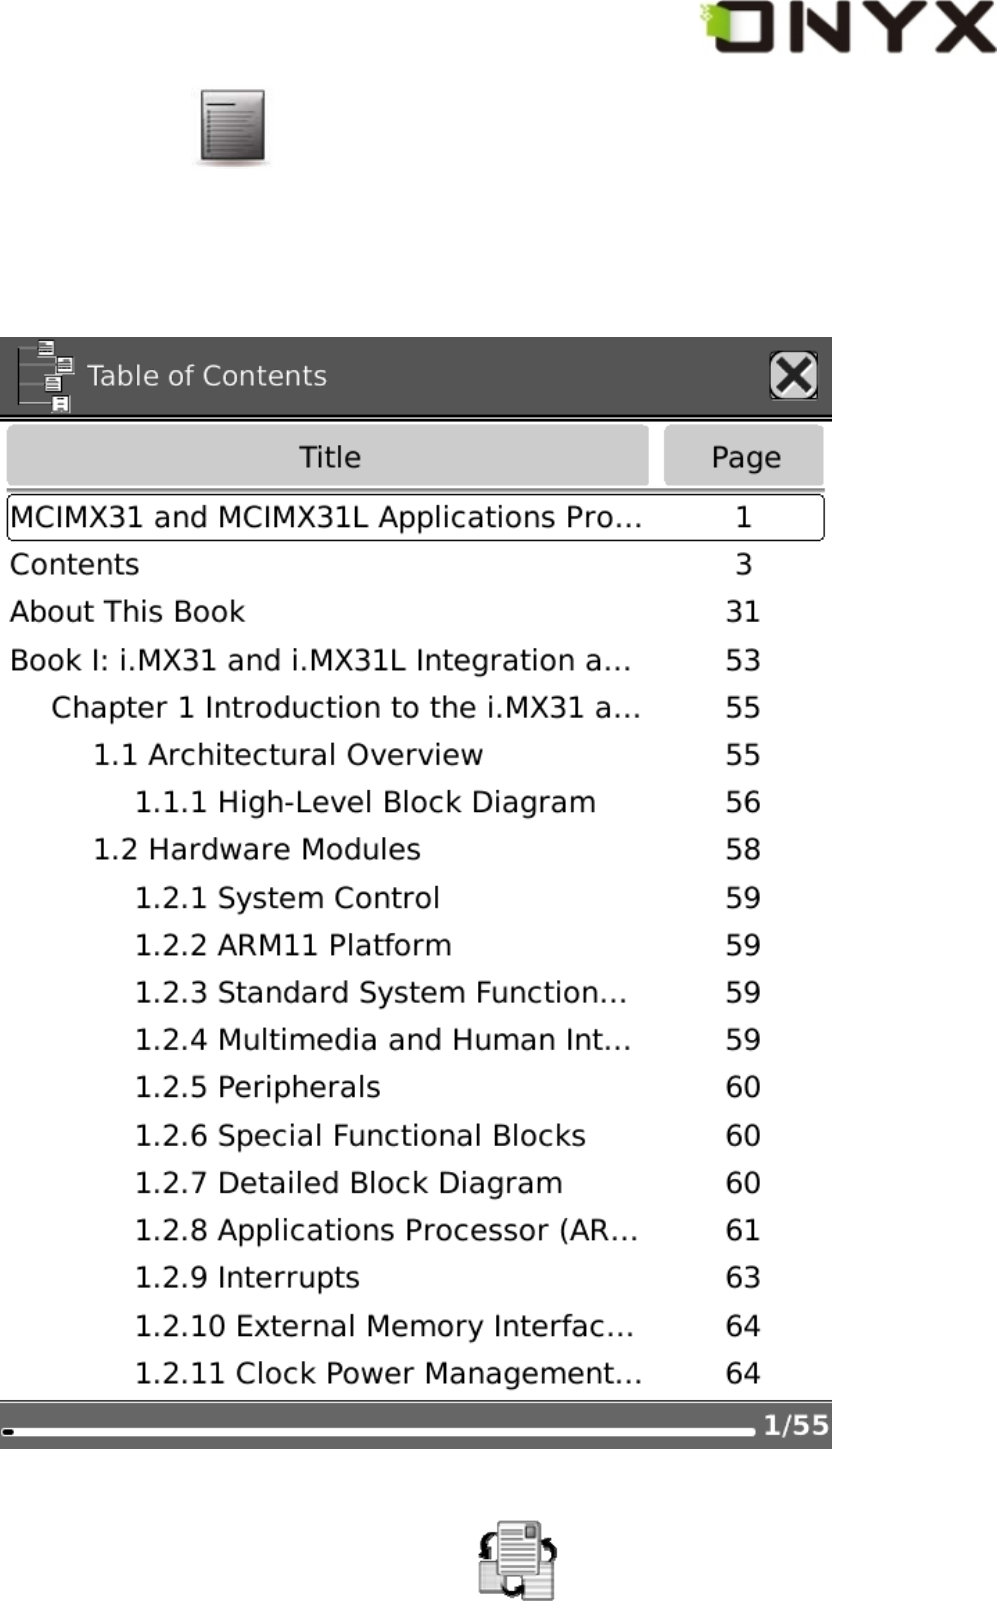
6.4.13.11 Table of Content
Display the table of content of current document by list view. You can jump to a target
page by selecting an item.
6.4.11.11 Snapshot of Table of Content
6.4.11.12 Select Background (of Notepad)

Copyright © 2009 Onyx International. All rights reserved.
Select background of notepad. The new background replaces the previous
one in current page.
6.4.13.12 Export
Export all of the pages in a notepad to SD card. The exported images are
saved in folder “notes” of SD card.
6.4.13.13 Insert Page
Insert a new page before current one.
6.4.13.14 Remove Page
Remove current page.
Copyright © 2009 Onyx International. All rights reserved.
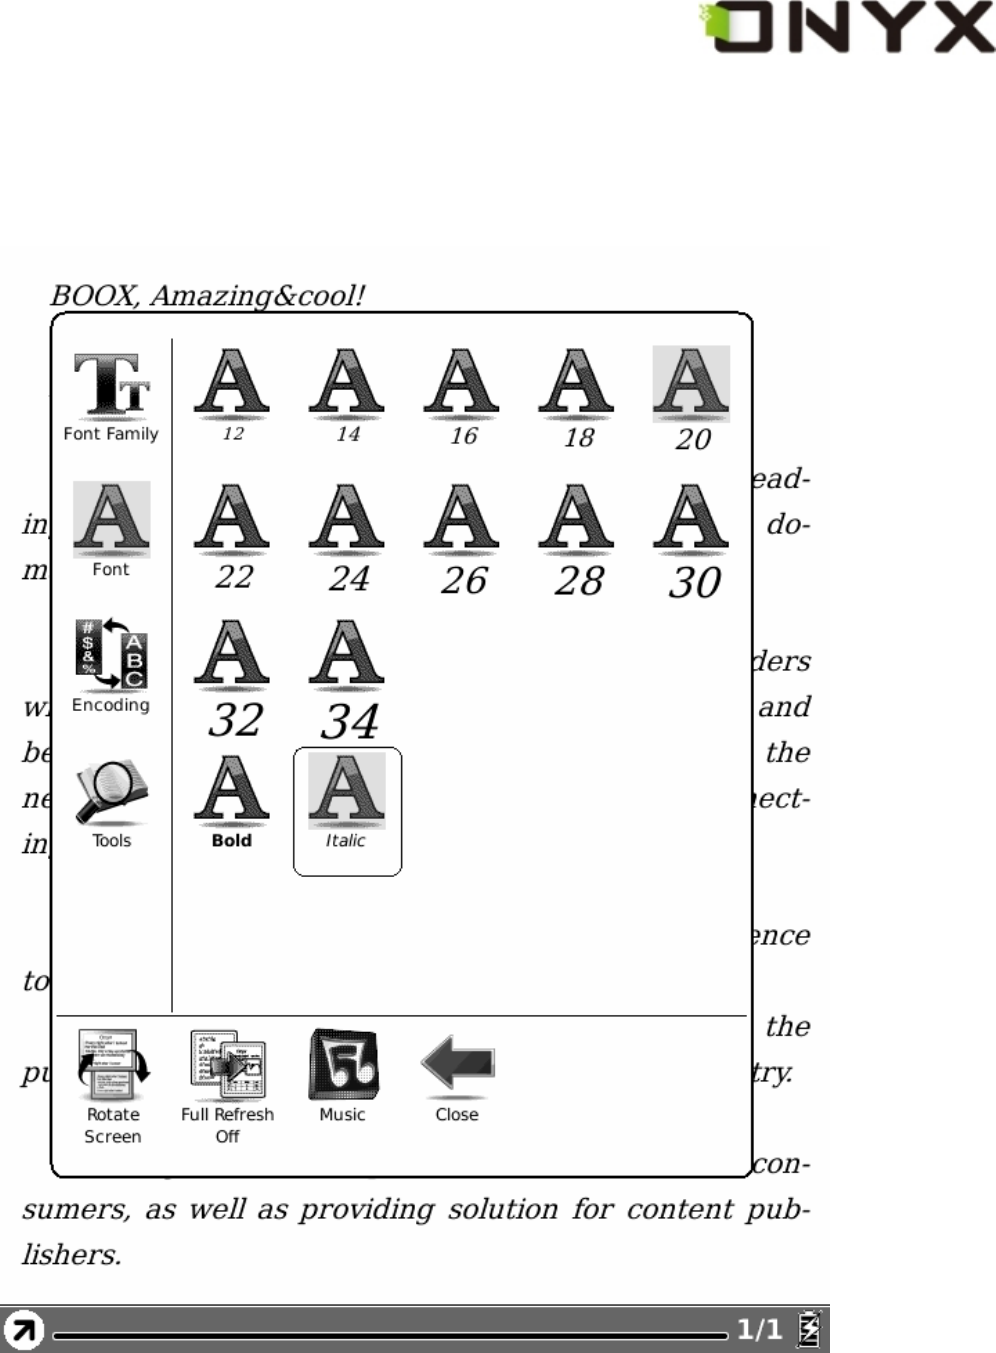
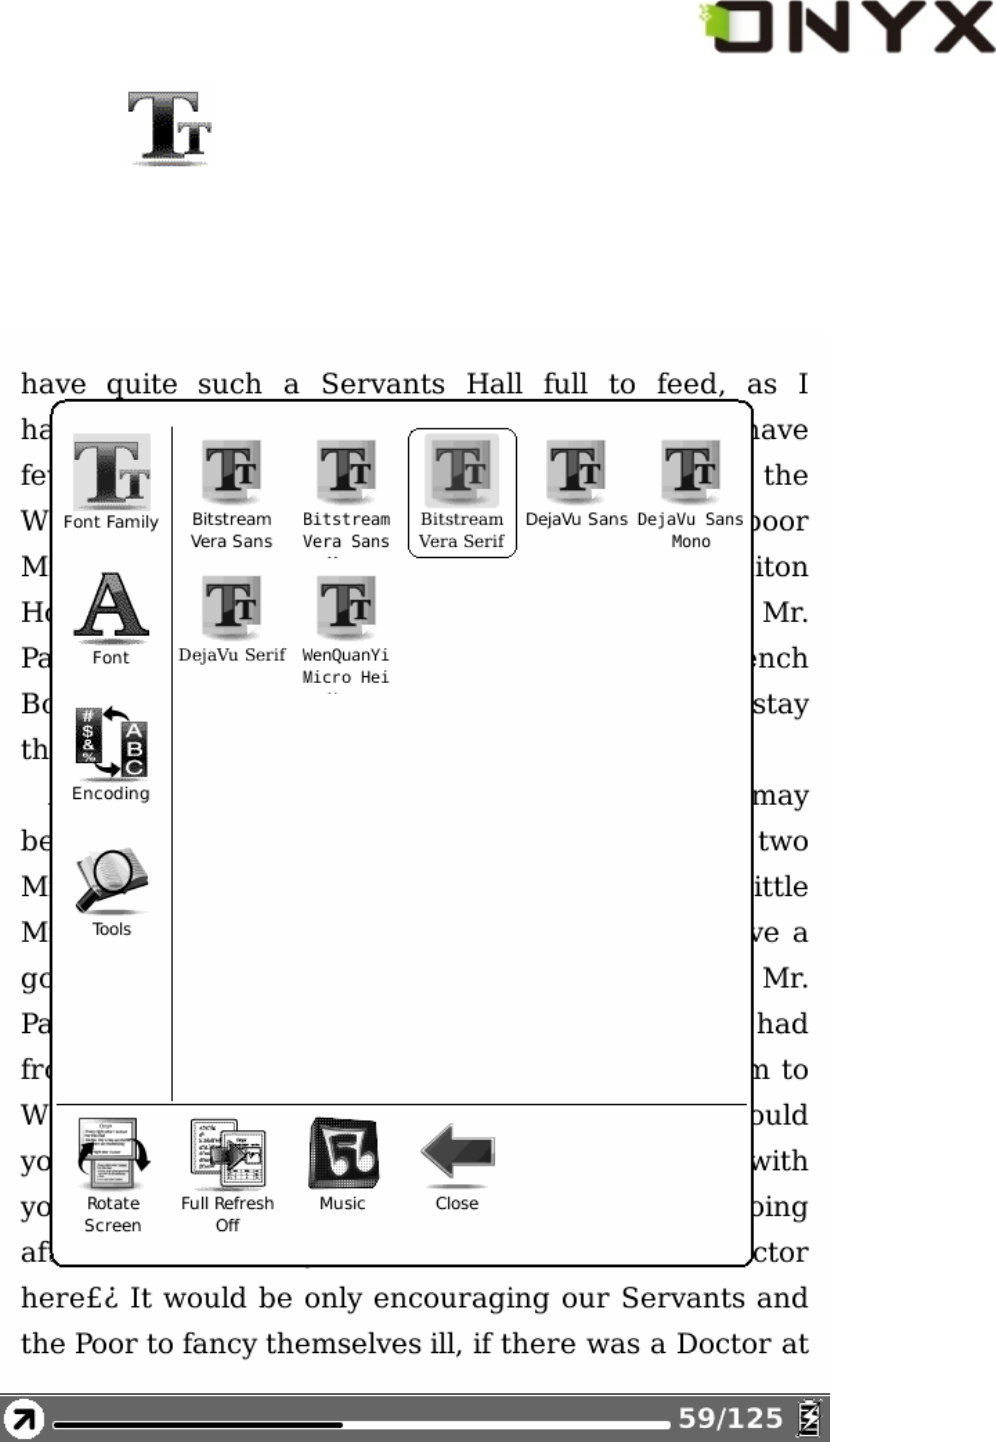
6.4.14 Font Family
Configure the font family while viewing a document. The existing font families of Boox
are shown on the menu.
Fig. 6.4.12 Snapshot of Font Family Configuration
Copyright © 2009 Onyx International. All rights reserved.
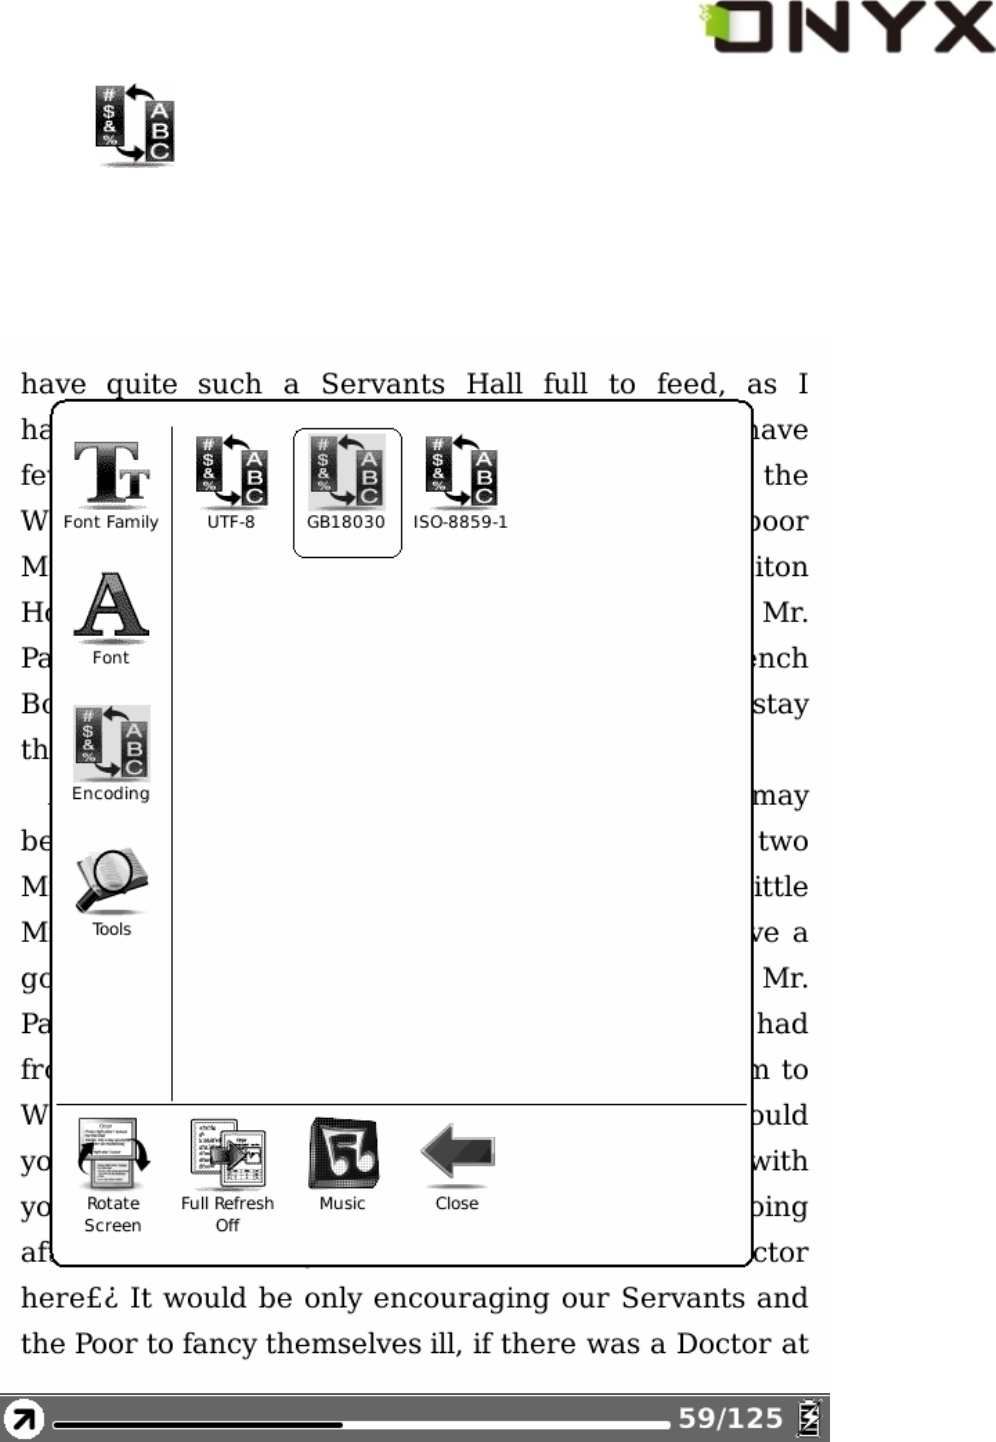
6.4.15 Encoding
Configure the encoding type while viewing text-based document. The configurable
encoding types are shown on the menu.
Fig.6.4.13 Snapshot of Encoding Configuration
Copyright © 2009 Onyx International. All rights reserved.
6.4.16 Full Refresh Switch
Set screen update type. You can turn on/off full refresh.
6.4.17 Navigation
Navigation operations are used for accessing websites and viewing html-based
documents, e.g. CHM document.
6.4.17.1 Backward
Go back to previous website.
6.4.17.2 Forward
Go forward to next website. This button is activated only if you have chosen Backward.
6.4.17.3 Home
Go to the home page.
6.4.18 Network
Configure the network connection.
6.4.18.1 Wifi
Configure the wifi connection.

Copyright © 2009 Onyx International. All rights reserved.
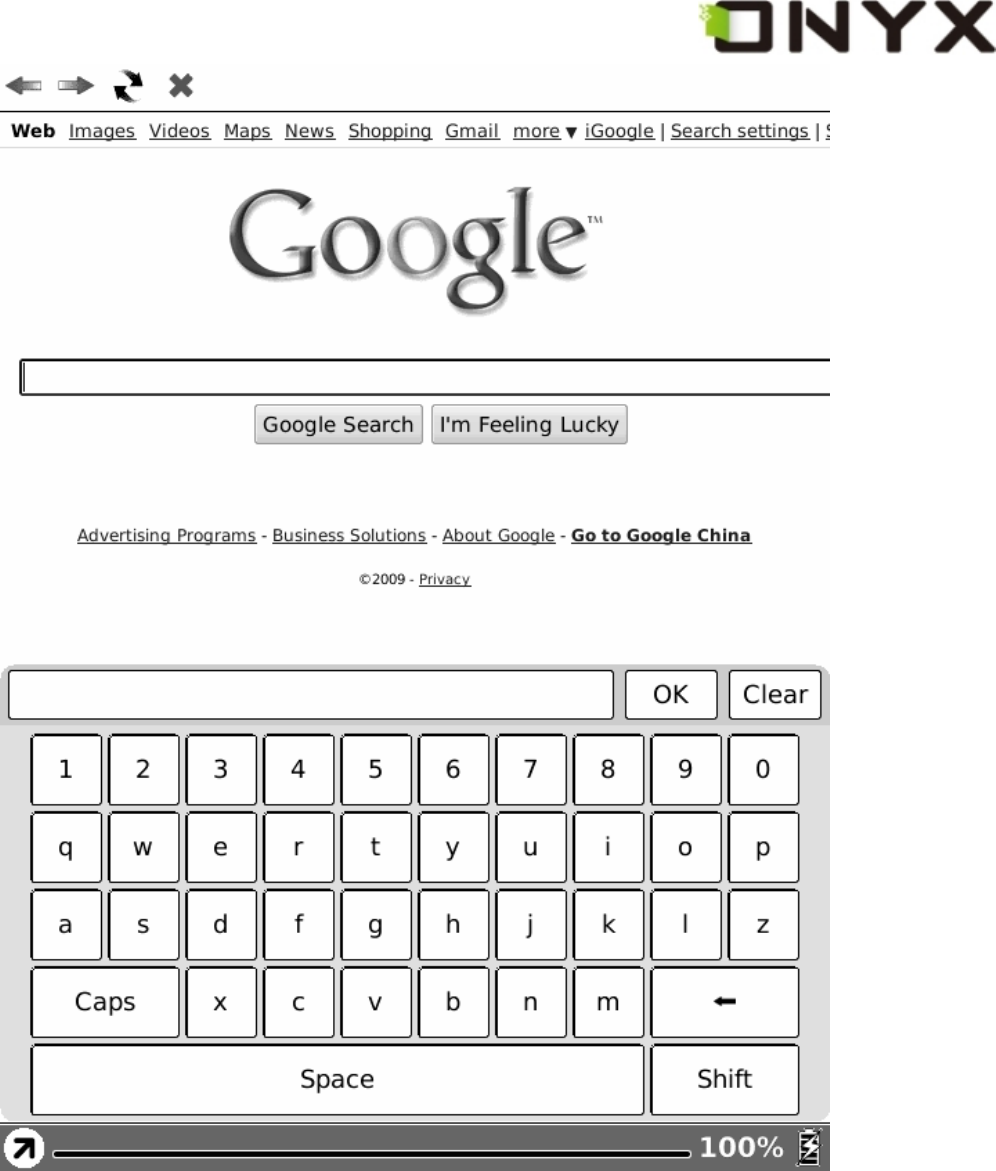
6.5 Web Browser
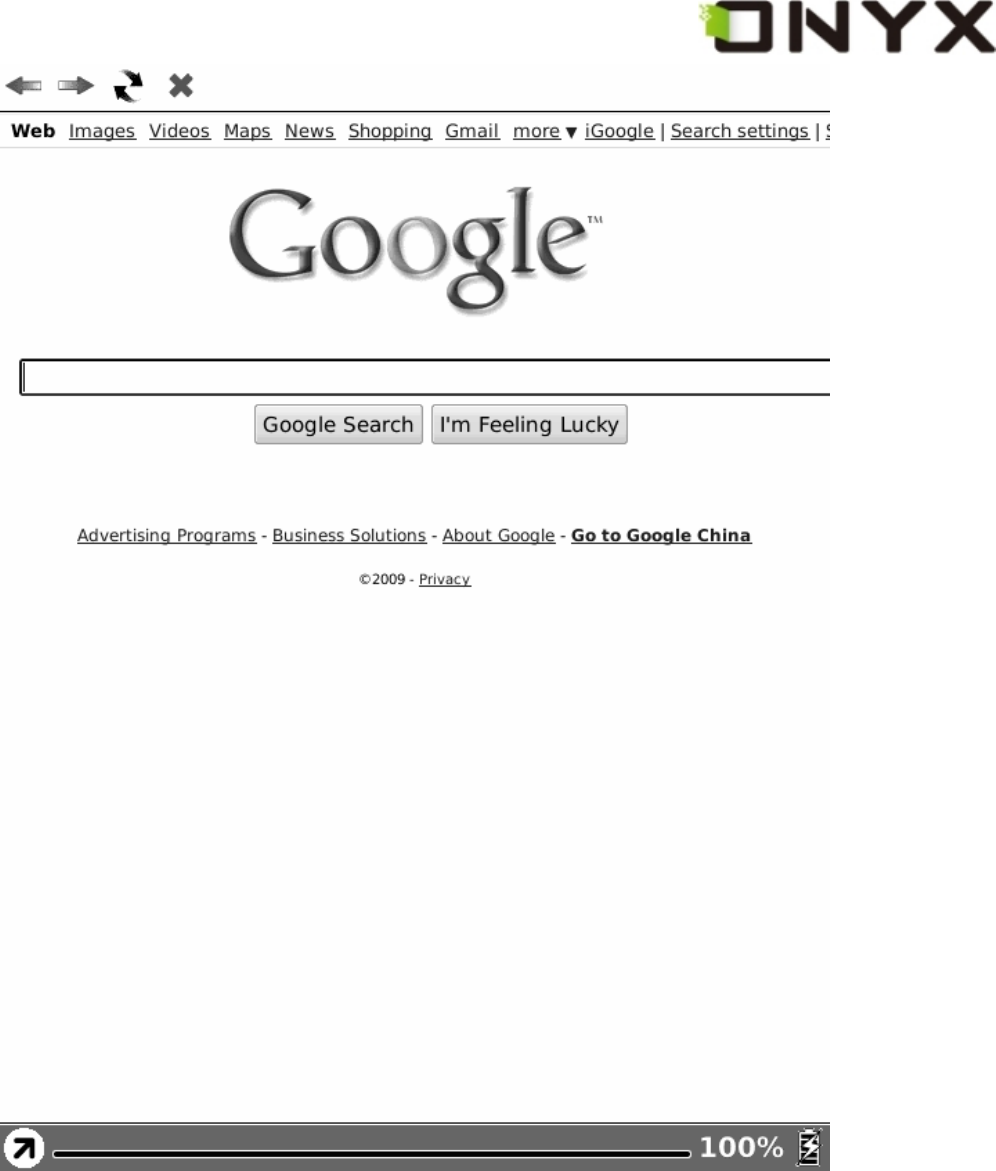
Through built-in web browser, you can access the specified websites.
Fig. 6.5 Snapshot of Web Browser

Copyright © 2009 Onyx International. All rights reserved.
6.5.1 Tool Bar
Tool bar provides four functions: going back to the previous website, going forward to
the next website, refreshing current website, stopping the loading of current page.
6.5.1 Tool Bar of Web Browser
6.5.2 Input by Keyboard
You can input text on website by stylus if the page provides standard form widget. A
keyboard appears after you put focus on the form. The input text string is displayed on
the form after you confirm the input is done (by clicking OK button).
Copyright © 2009 Onyx International. All rights reserved.
6.5.2 Snapshot of Inputting Text on Website
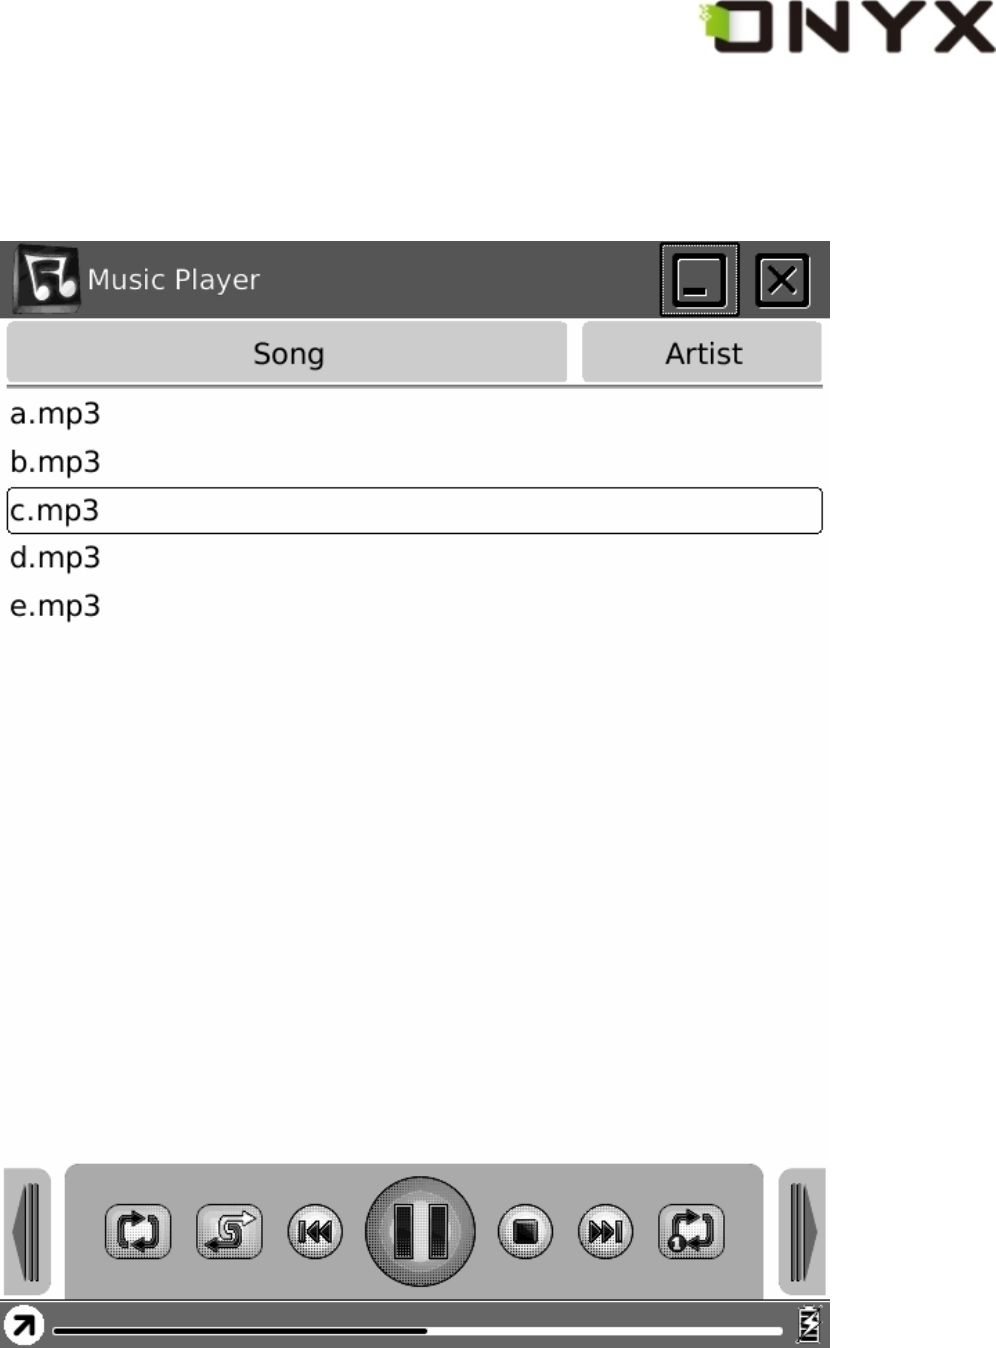
6.6 Music Player
Music player of Boox supports MP3 files.

Copyright © 2009 Onyx International. All rights reserved.
6.6 Snapshot of Music Player
6.6.1 Playlist
Displays the music list and the current song.
6.6.2 Minimize Button
Minimize the music player.
Copyright © 2009 Onyx International. All rights reserved.
6.6.3 Close Button
Close the music player.
6.6.4 Repeat Playlist Button
Repeat playing the songs of playlist.
6.6.5 Shuffle Switch Button
Switch between shuffle playing and normal playing modes.
6.6.6 Previous Song Button
Turn to previous song.
6.6.7 Play/Pause Switch Button
Switch between playing and pausing modes.
6.6.8 Stop Button
Stop the music playing.
6.6.9 Next Song Button
Turn to the next song.

Copyright © 2009 Onyx International. All rights reserved.
6.6.10 Repeat Current Song Button
Repeat playing current song.
6.6.11 Previous Page Button
Turn to previous page of playlist.
6.6.12 Next Page Button
Turn to next page of playlist.
Copyright © 2009 Onyx International. All rights reserved.
6.6.13 Playing Status Bar
Display the playing progress of current song.
Fig. 6.6.13 Snapshot of Playing Status Bar

Copyright © 2009 Onyx International. All rights reserved.
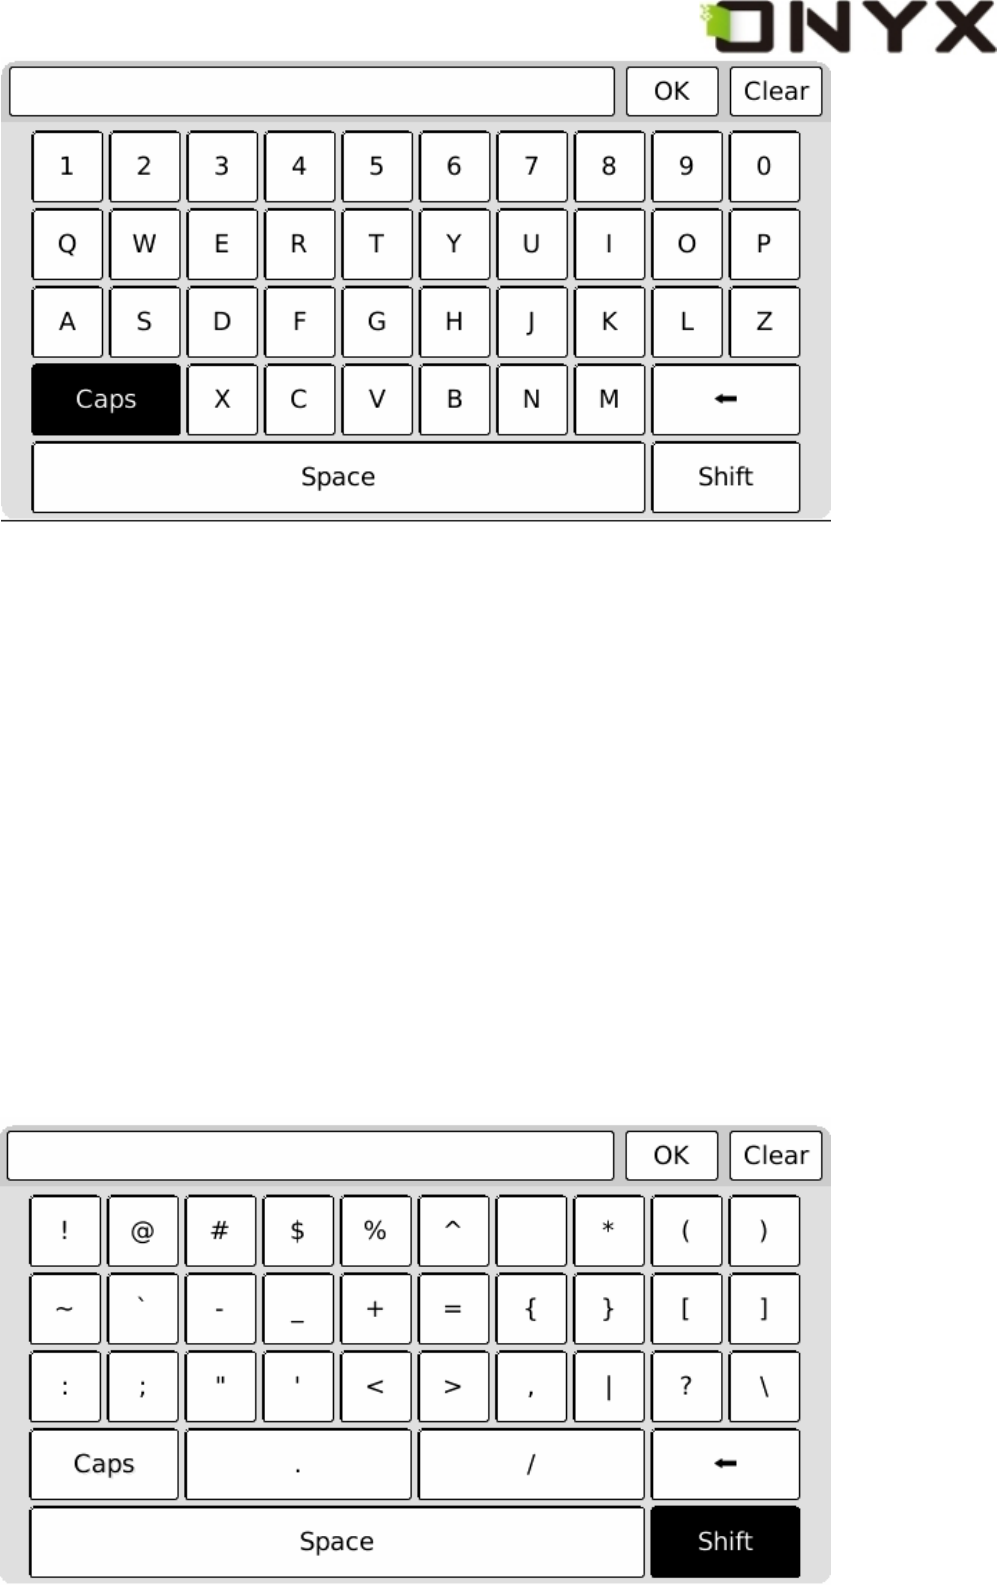
6.7 Keyboard
Fig. 6.7 Snapshot of Keyboard
6.7.1 Number Keys
You can input numbers by these keys.
6.7.2 Character Keys
You can input characters by these keys.
6.7.3 Caps Key
Switch all of the characters between lowercase and uppercase.
Copyright © 2009 Onyx International. All rights reserved.
Fig. 6.7.3 Caps is Activated
6.7.4 Back Key
Move the cursor to previous character and remove current one.
6.7.5 Space Key
Insert a space character.
6.7.6 Shift Key
Shift between characters (including numbers) and symbols.

Copyright © 2009 Onyx International. All rights reserved.
Fig. 6.7.6 Shift Key is Activated
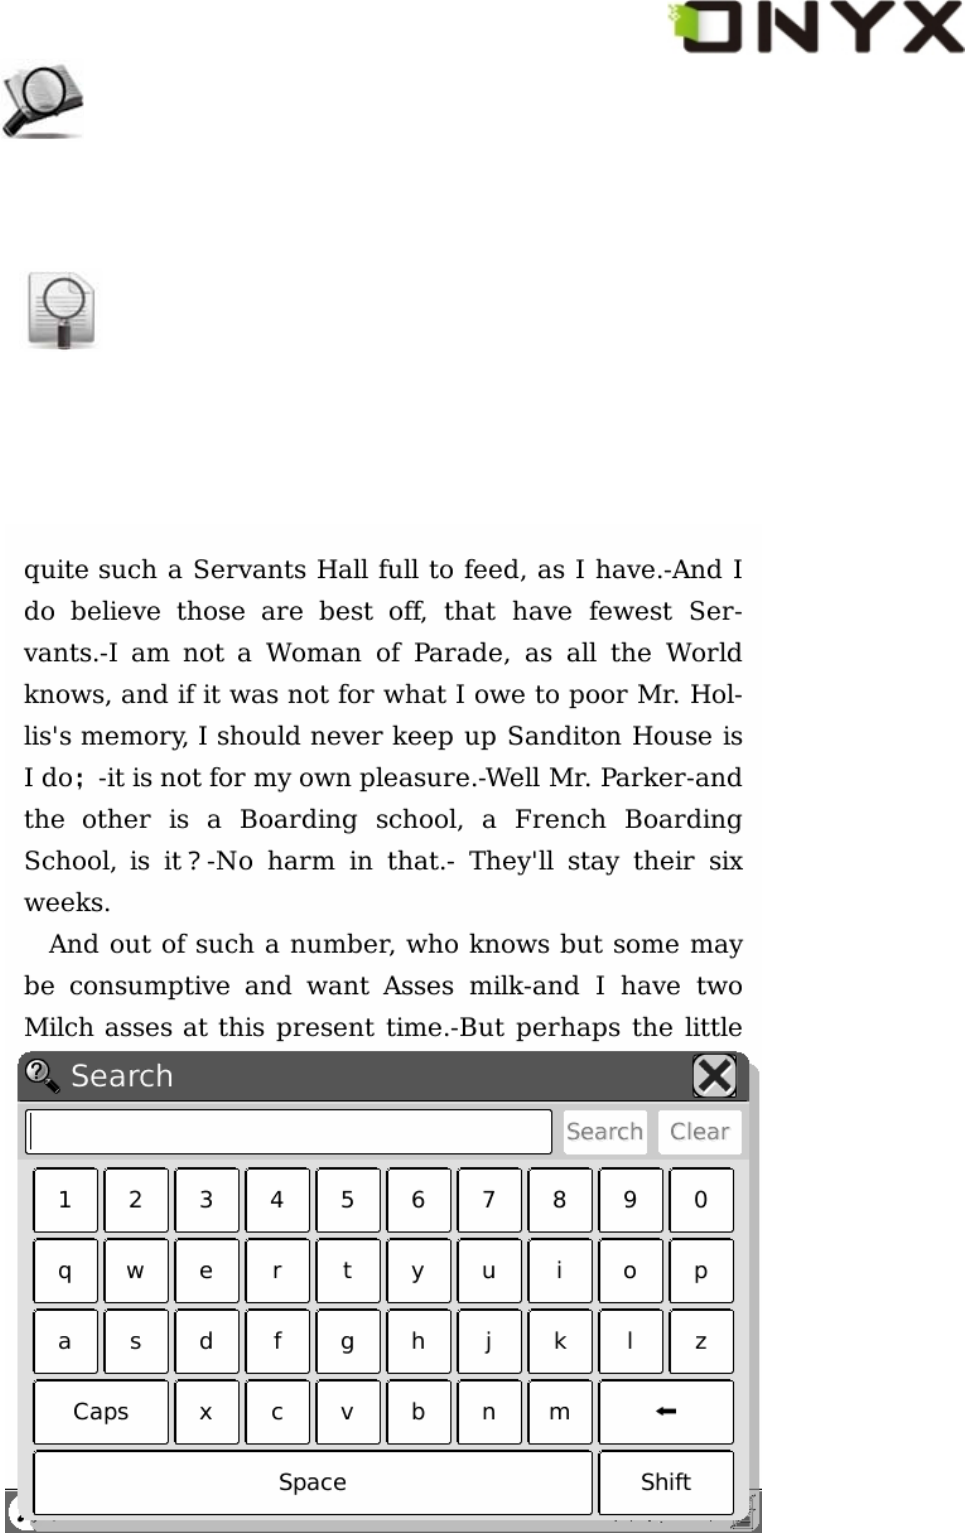
6.8 Search View
Search view is used for inputting the pattern string and other requirements when you
search for files or texts.
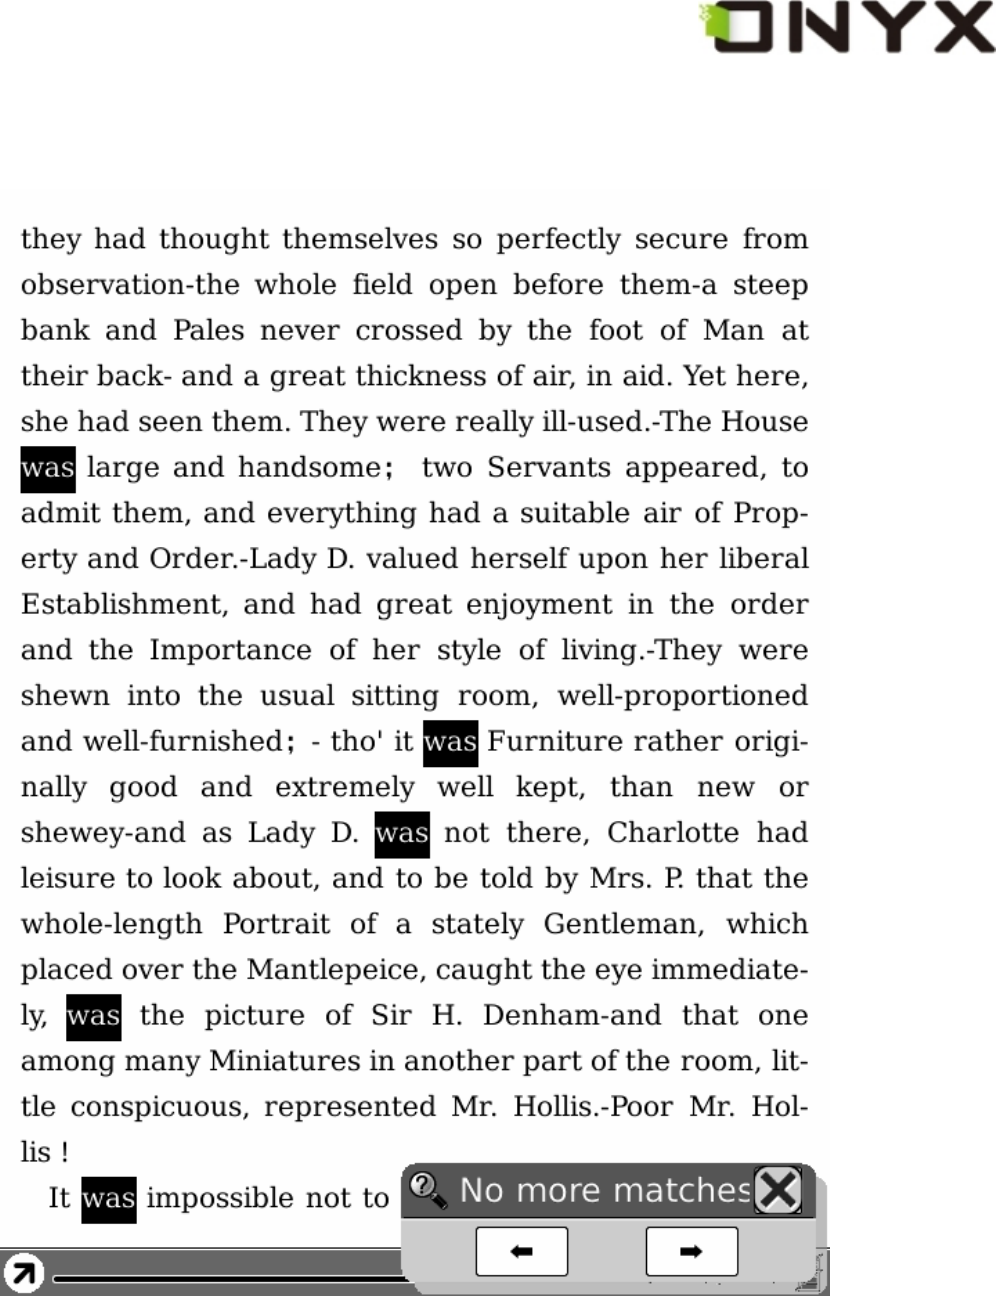
6.8.1 Free Text Search

Copyright © 2009 Onyx International. All rights reserved.
Fig. 6.8.1 Snapshot of Free Text Search
6.8.1.1 Input Box
Display the input pattern string.
6.8.1.2 Search Button
Start searching after clicking this button. The search results of a screen are highlighted.
Copyright © 2009 Onyx International. All rights reserved.
Fig. 6.8.1.2 (1) Search Results of Texts
If no matched result is found, the dialog displays ‘No More Matches’.
Fig, 6.8.1.2 (2) No More Matches
6.8.1.3 Clear Button
Clear the input pattern string.

Copyright © 2009 Onyx International. All rights reserved.
6.8.2 File Search
Fig. 6.8.2 Snapshot of File Search
6.8.2.1 Input Box
Display the pattern string used for searching the files.

Copyright © 2009 Onyx International. All rights reserved.
6.8.2.2 Search Button
Start searching after clicking this button. The search results of all matched files are
displayed.
Fig. 6.8.2.2 Search Results of Files

Copyright © 2009 Onyx International. All rights reserved.
6.8.2.3 Clear Button
Clear the input pattern string.
6.8.2.4 Check Button of Including Subdirectories
Check this button to include the subdirectories for searching.
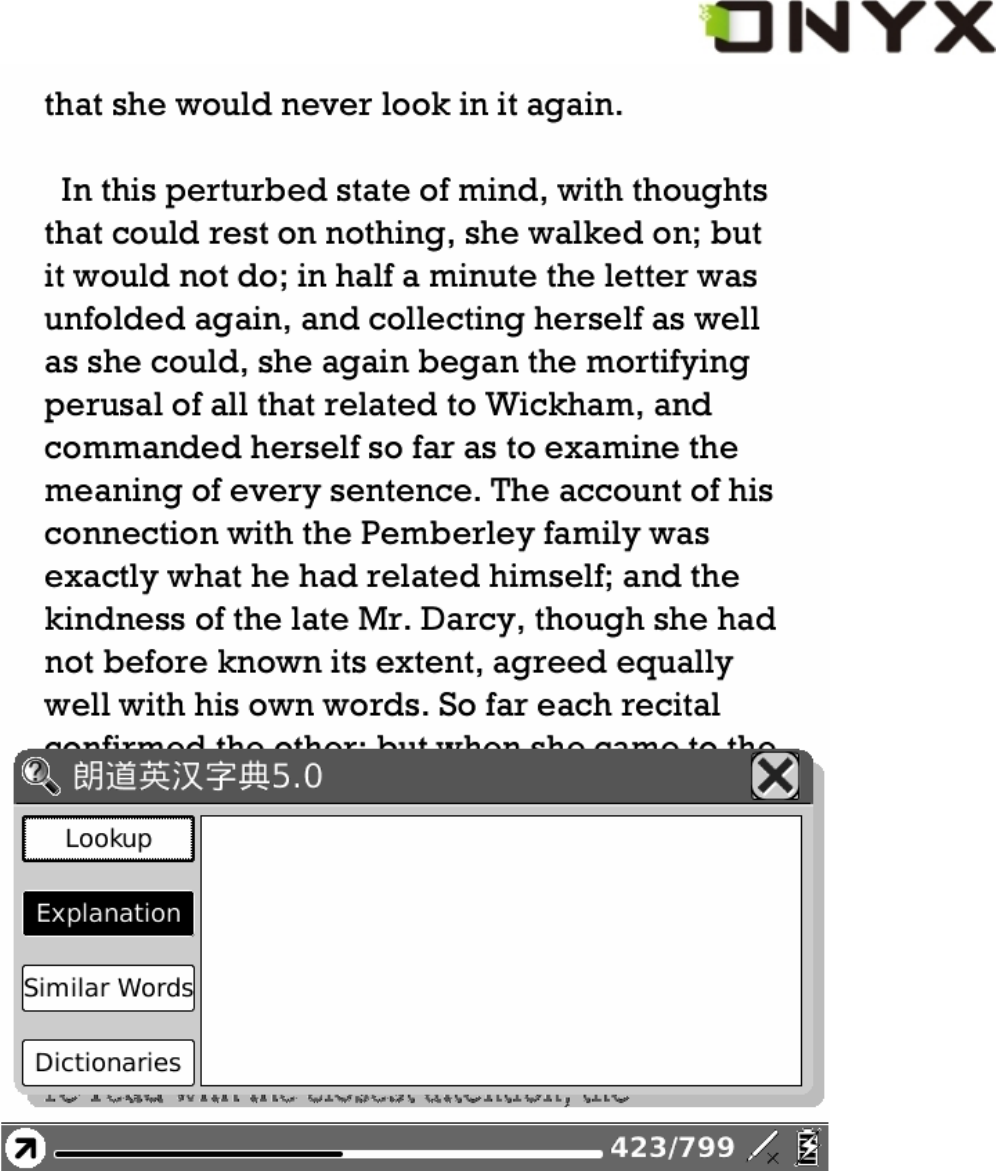
6.9 Dictionary View
Dictionary view is used for translating or explaining a pattern string. You select a string
from the texts of current screen, then the translation or explanation of this string
displays on the content view.
Copyright © 2009 Onyx International. All rights reserved.
Fig. 6.9 Dictionary View
6.9.1 Content View
Display the translation or explanation of the pattern string.
6.9.2 Explanation Button
Click this button to display the explanation of the pattern string.

Copyright © 2009 Onyx International. All rights reserved.
6.9.3 Similar Words Button
Click this button to display the similar words of the pattern string.
6.9.4 Dictionaries Button
Click this button to display the translation of the pattern string.

Copyright © 2009 Onyx International. All rights reserved.
6.10 Annotations View
Display all of the annotations of the document by list view.
Fig. 6.10 Snapshot of Annotations View

Copyright © 2009 Onyx International. All rights reserved.
6.11 Bookmarks View
Display all of the bookmarks of the document by list view.
Fig. 6.11 Snapshot of Bookmarks View
6.12 Wifi Configuration Dialog
Configure the wifi through this dialog. The operations used for activating a wifi access
Copyright © 2009 Onyx International. All rights reserved.
point are:
z Make sure the wifi switch is turned on (slide upward)
z Boox scans the wifi access points around
z All of the connectable access points are listed
z You select one then Boox starts connecting to it
z If it is an encrypted access point, a keyboard dialog pops up. You can input
password for connection.

Copyright © 2009 Onyx International. All rights reserved.
Fig. 6.12 Snapshot of Wifi Configuration Dialog
6.12.1 Scanning List
List all of the scanned results (wifi access points).
6.12 2 Connecting Message Area
Display the current status of connection.
6.12.3 Refresh Button
Click Refresh button to rescan the access points.

Copyright © 2009 Onyx International. All rights reserved.
6.12.4 Configuring WPA Security Access Point
Input the password for WPA security access point.
Fig. 6.12.4 Snapshot of Configuring WPA Security Access Point
Copyright © 2009 Onyx International. All rights reserved.
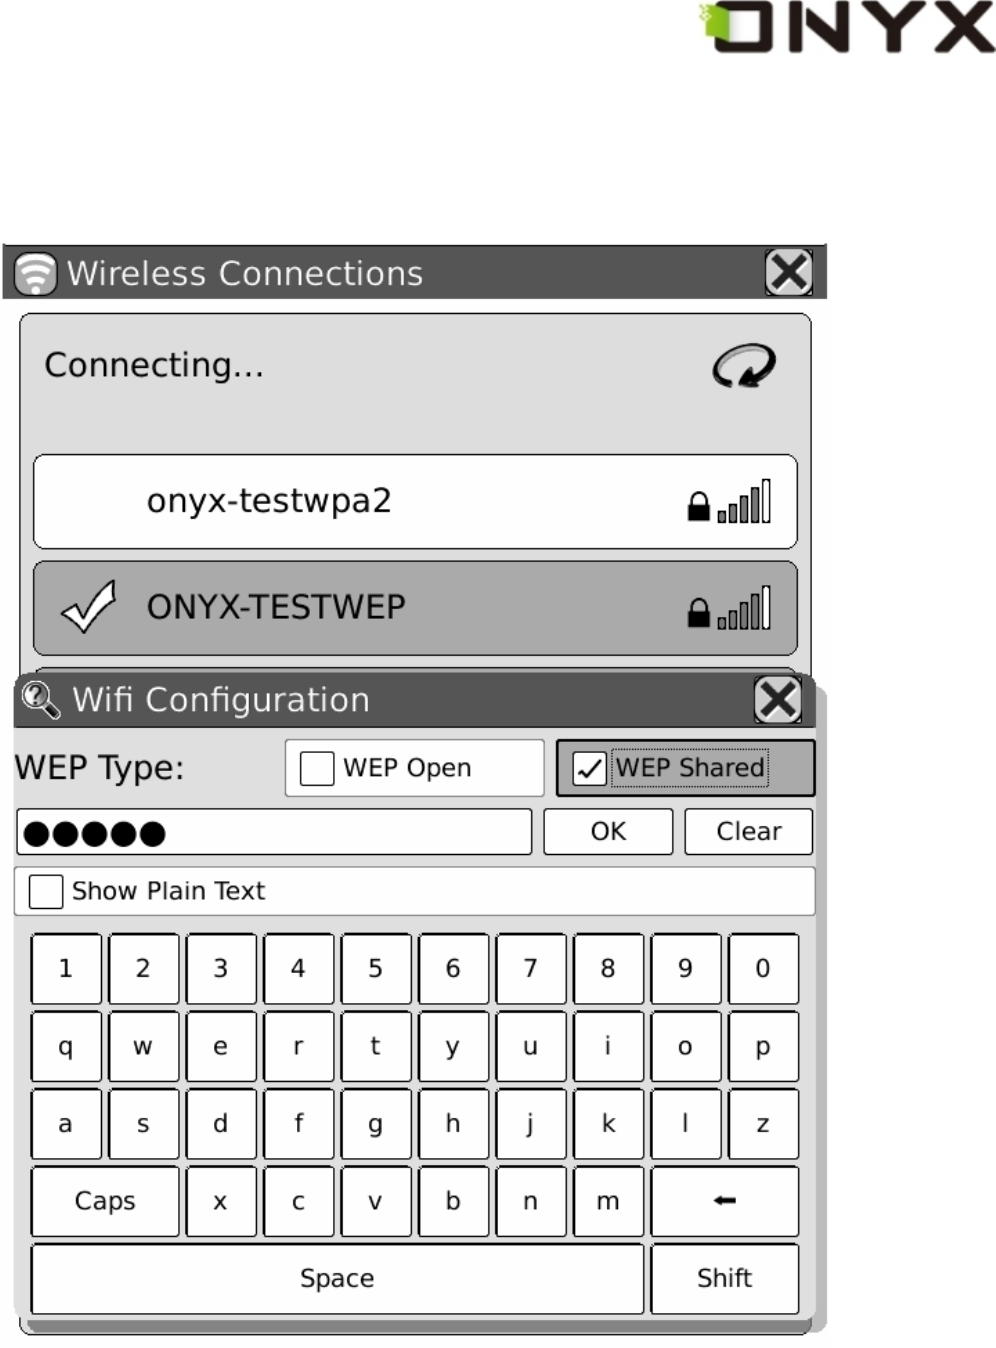
6.12.5 Configuring WEP Security Access Point
Input the password for WEP security access point.
Fig. 6.12.5 Snapshot of Configuring WEP Security Access Point

Copyright © 2009 Onyx International. All rights reserved.
7.2 Erase
You can erase the drawn sketches by stylus. You can click on the stroke or drag across
it, then the stroke disappears immediately.

Copyright © 2009 Onyx International. All rights reserved.
8 Annotation
After activating annotation functions (by menu 6.4.9.1), you can make new annotations
or erase existing ones.
8.1 Add Annotation
After selecting function ‘Add Annotation’, you can highlight the texts you are interested
on by dragging the stylus pen. You can also highlight the word by clicking any

Copyright © 2009 Onyx International. All rights reserved.
character of it.
Fig. 8.1 Add Annotation
8.2 Erase Annotations
You can erase an annotation by stylus. You can click on the highlighted area or drag
across it, then the annotation is removed.

Copyright © 2009 Onyx International. All rights reserved.
9 OTA Functionalities
Boox 60 fully supports Adobe OTA functionalities. You can easily purchase
or borrow books from any content provider who uses Adobe Content Server
maintaining the DRMed contents.
9.1 Activate Boox 60
Boox 60 must be activated before you use any DRM functionalities, such as
purchasing, loaning and returning. The steps of activation are:
1. Get an Adobe ID. You can create an account from the server hosted by the
content provider. You can also create it from:
https://www.adobe.com/cfusion/membership/index.cfm
2. Go to the online shop of your content provider and start purchasing a
book.
3. A dialog of device activation pops up letting you input the Adobe ID and
the password, as shown in Fig.9.1(1).
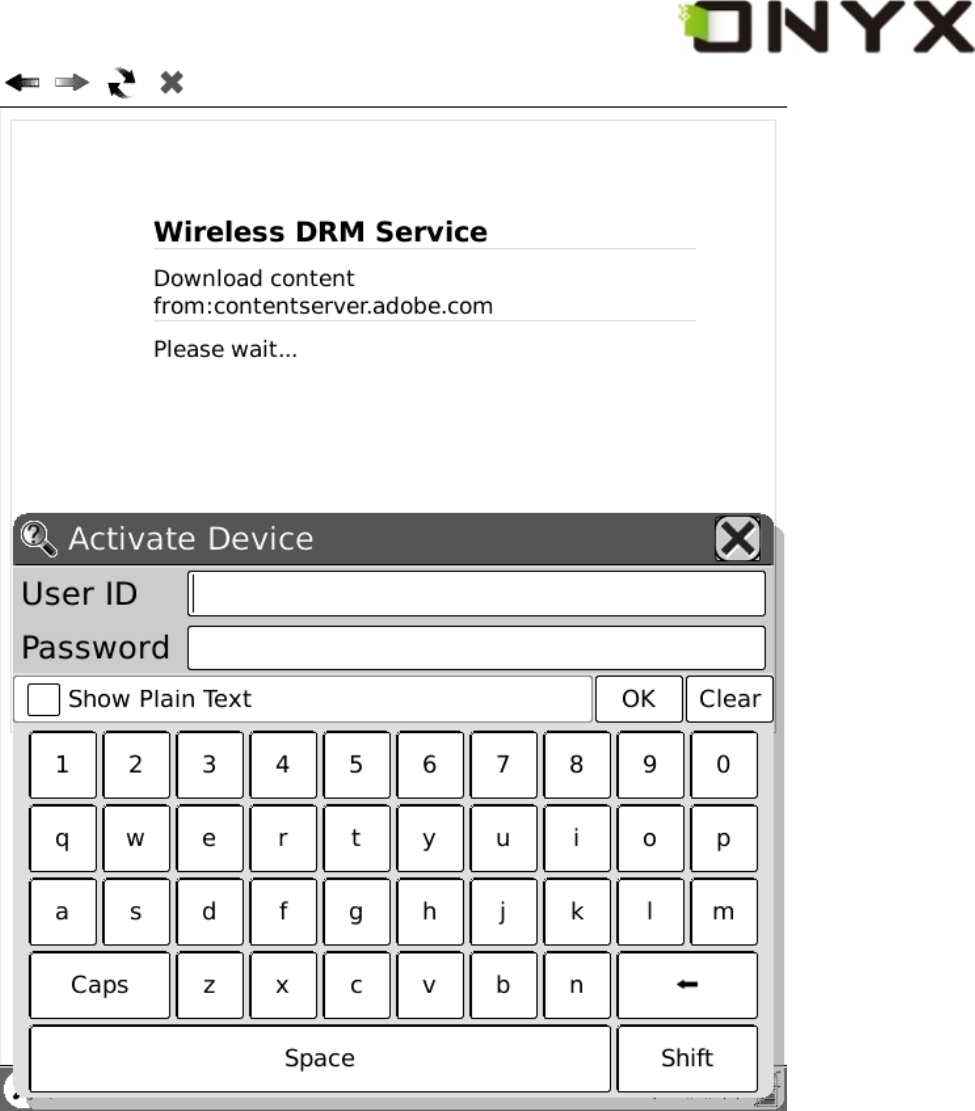
Copyright © 2009 Onyx International. All rights reserved.
Fig.9.1(1) Activate Boox 60
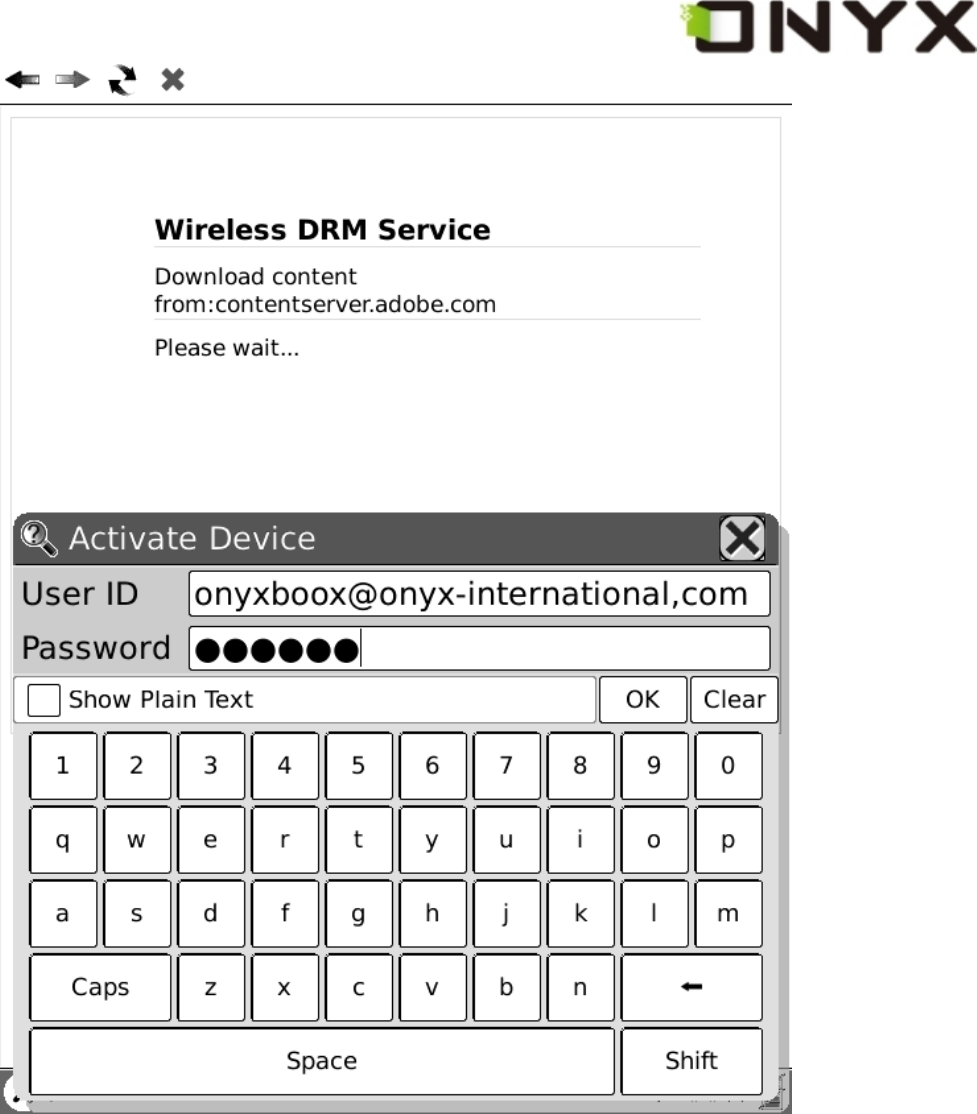
Note: If your device has been activated by ADE, you need only sign in. At
this time, a sign-in dialog pops up asking you input the password for a given
Adobe ID(you used in ADE).
Copyright © 2009 Onyx International. All rights reserved.
Fig.9.1(2) Input Adobe ID and Password
4. The activation starts.
5. Fulfillment of the purchased book starts if activation succeeds.
9.2 Fulfillment
ACS(Adobe Content Server) prepares a DRMed book after you decide to
purchase(buy or borrow) it. The book will be downloaded from the server
after the DRM process finishes. The whole fulfillment might take several

Copyright © 2009 Onyx International. All rights reserved.
minutes so please wait until it finishes. The web browser displays “Please
wait…” notice during this procedure.
9.2(1) Snapshot of “Please wait…” message
You will see the success message after fulfillment finishes. A dialog pops up
asking you whether opening the book immediately.

Copyright © 2009 Onyx International. All rights reserved.
9.2(2) Snapshot of “Fulfillment Succeed” message
The errors will be displayed if the fulfillment fails by any causes.
9.3 Return a Loan Book
You can return a borrowed book by selecting “return book” functionality in
menu of main view. You need configure the network before returning it.


Copyright © 2009 Onyx International. All rights reserved.
z Save the updates package in a SD card.
z Make sure the updates package is located at the root directory of the SD card. The
name should be ‘onyx_update.upd’.
z Insert the SD card into Boox.
z Restart Boox, press and hold the OK button. NOTE, the OK button should be
pressed before the device restarts. Hold it until you see the message ‘Software
update request detected, checking updates…’.
z Boox updates itself automatically. It restarts after update finishes.
Reminder: Make sure Boox has enough power to finish the software update (at least 2
grids displayed).
Copyright © 2009 Onyx International. All rights reserved.
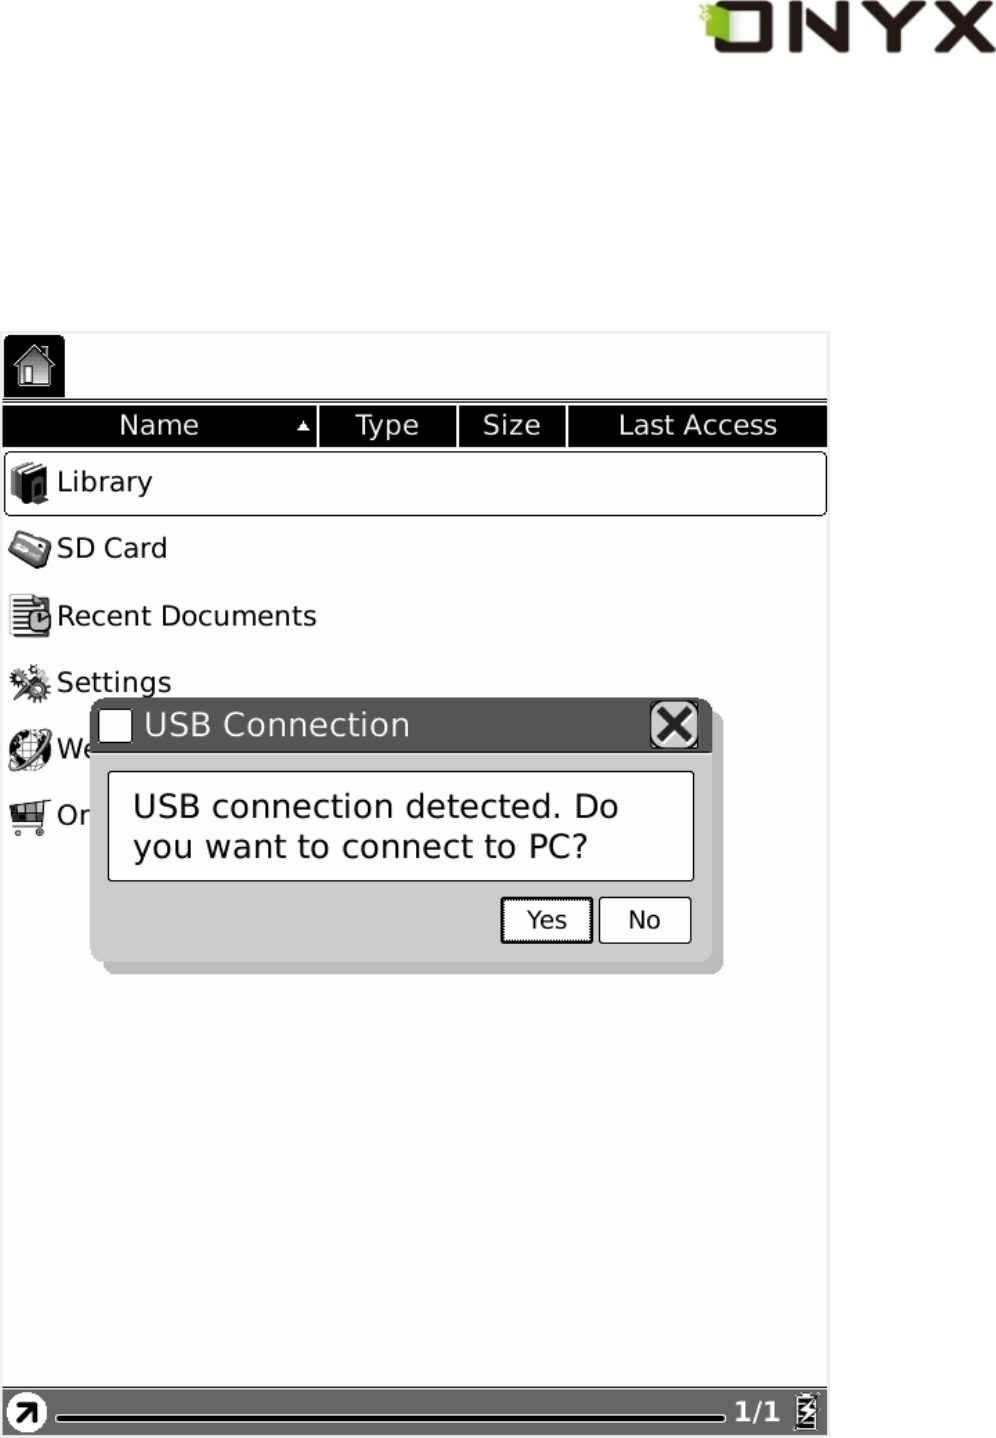
11 Connect to PC
Boox can be easily connected to PC by USB cable. A dialog pops up immediately after
the connection establishes. Select ‘Yes’ to confirm the connection.
Fig. 10 USB Connection Dialog
You can find at least one removable disk (internal flash of Boox) on the OS of PC. If you

Copyright © 2009 Onyx International. All rights reserved.
insert SD card in Boox, the SD card is also displayed as a removable disk.
12 Charge
You can charge Boox by two ways:
z Connect Boox to PC by USB cable
z Charge Boox by power adaptor
FCC Class B Notice
This device complies with Part 15 of the FCC Rules. Operation is subject to the following two conditions:
1. This device may not cause harmful interference.
2. This device must accept any interference received, including interference that may cause undesired operation.
Note: This equipment has been tested and found to comply with the limits for a Class B digital device, pursuant to Part
15 of the FCC Rules. These limits are designed to provide reasonable protection against harmful interference in a
residential installation. This equipment generates, uses and can radiate radio frequency energy and, if not installed and
used in accordance with the instructions, may cause harmful interference to radio communications. However, there is no
guarantee that interference will not occur in a particular installation. If this equipment does cause harmful interference to
radio or television reception, which can be determined by turning the equipment off and on, the user is encouraged to try
to correct the interference by one or more of the following measures:
z Reorient or relocate the receiving antenna.
z Increase the separation between the equipment and receiver.
z Connect the equipment into an outlet on a circuit different from that to which the receiver is connected.
z Consult the dealer or an experienced radio/television technician for help.
Modifications: Any modifications made to this device that are not approved by Onyx International, Inc. may void
the authority granted to the user by the FCC to operate this equipment.