OPTOELECTRONICS BC0164AAA390 PDA Phone User Manual 3
OPTOELECTRONICS Co., Ltd. PDA Phone Users Manual 3
Contents
Users Manual 3

Chapter 8.
Messaging & Contacts
8.1 Text Messaging
8.2 Multimedia Messaging Service
8.3 E-mail
8.2 Using Contacts
128
Chapter 8. Messaging & Contacts
Messaging is the unified point of access for all message types within your device. With Messaging, you
can send and receive text messages, e-mails, and MMS messages.
Contacts helps you to manage your contact information. Using Contacts you can quickly communicate
with people.
This section describes the procedure on sending and receiving different kinds of messages, and using
Contacts to manage addresses and phone numbers.
8.1 Text Messaging
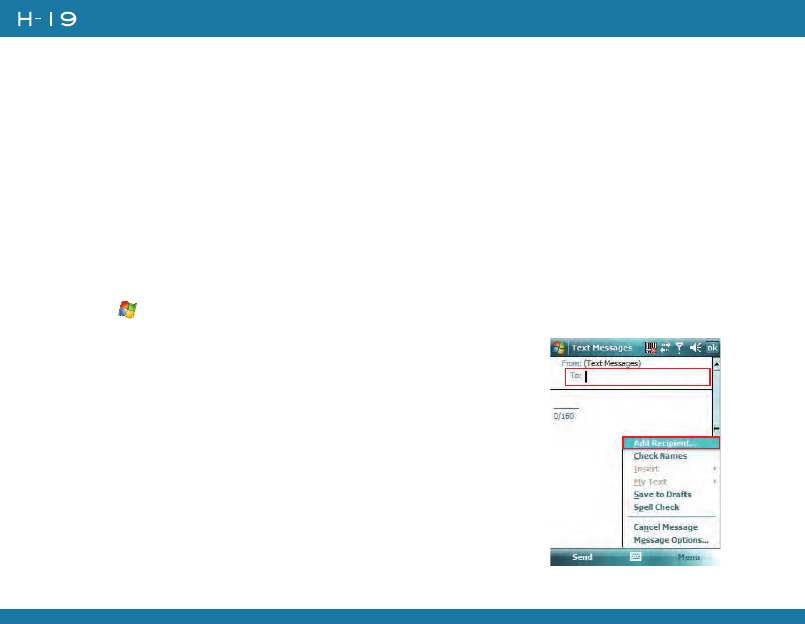
Creating a Text Message
1. Tap > Messaging > Text Messages.
2. In the message list, tap Menu > New.
3. Do either of the following:
• Enter the recipient’s text message number in the To field. Insert a
semicolon (;) between multiple text message numbers.
• Tapping Menu > Add Recipient, and then select a name.
• Enter your message and tap Send. Text messages are sent
immediately.

129
Using Preset Text Messages
You can quickly insert preset or frequently used messages into your text message. While
composing a message, tap Menu > My Text and select a preset message to insert.
To edit a preset message:
1. While composing a message, tap Menu > My Text > Edit My Text Messages.
2. Select a message and edit.
3. Tap .
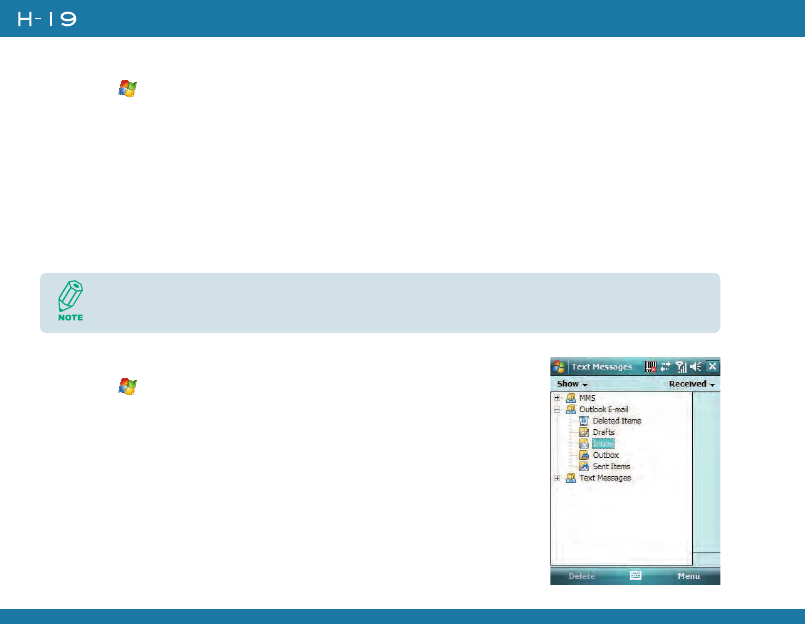
Reading a Text Message
1. Tap > Messaging > Text Message.
2. Select Inbox under Text Messages.
3. In the message list, tap the text message you want to read.
130
Chapter 8. Messaging & Contacts
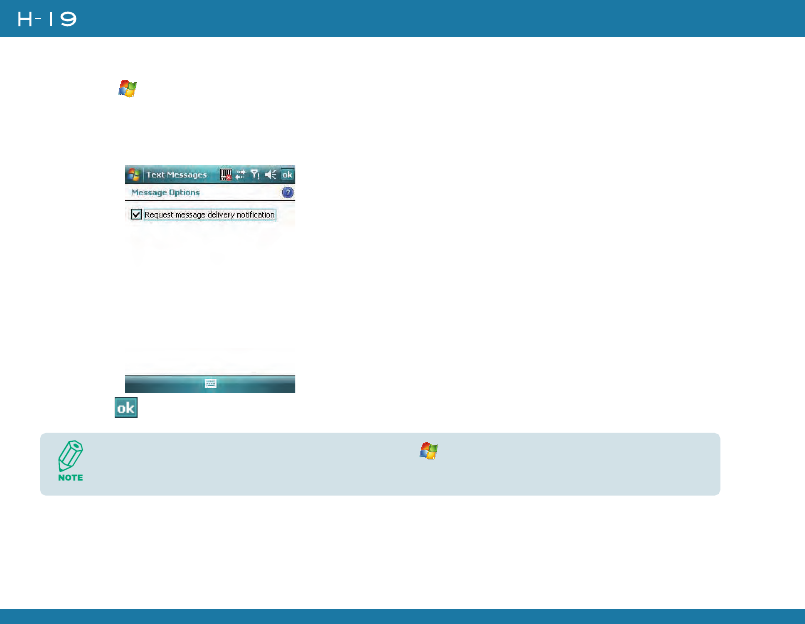
Requesting Message Delivery Notification
1. Tap > Messaging > Text Messages.
2. Tap Menu > New.
3. Tap Menu > Message Options.
4. Select this check box to request a message delivery notification.
5. Tap .
To change options for the Text Message, tap > Messaging > Menu > Tools >
Options, and select the type of options to change.
131
8.2 Multimedia Messaging Service
Creating and sending Multimedia Message Service (MMS) messages to your friends and family is fun
and easy. You can include or capture photos or video clips, include or record audio, add text, then
send them along with your MMS message.
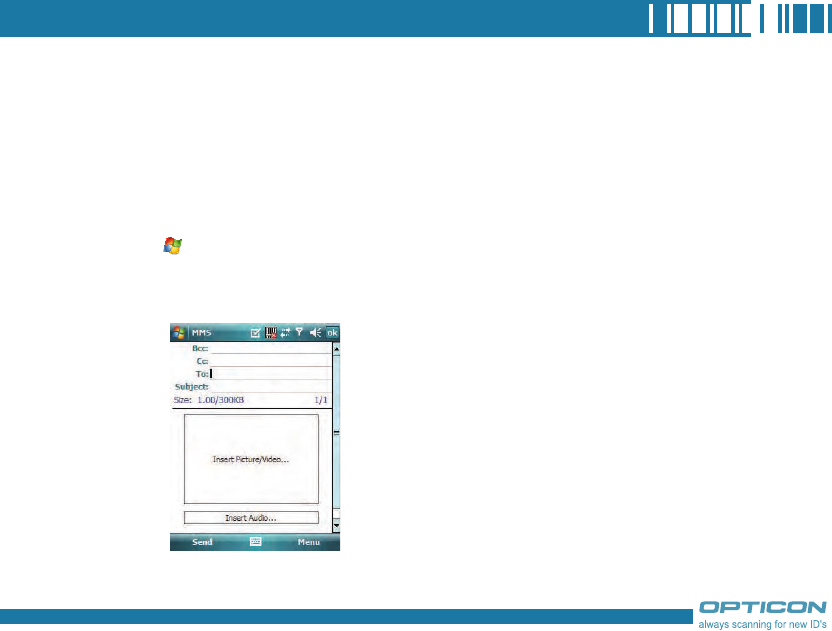
Composing a MMS Message
MMS messages can be composed in a combination of various slides where each of the slides can
be any combination of audio or video clip, an image, and/or text.
1. Tap > Messaging, and select MMS.
2. Tap Menu > New.
3. In To, Cc, and/or Bcc, enter recipient e-mail addresses. Insert a semicolon (;) between multiple
addresses. You can tap Menu > Add Recipient to add recipients.
132
Chapter 8. Messaging & Contacts
4. In Subject, enter a subject.
5. To create a slide, do any combinations of the following:
• Tap Insert Picture/Video and select an picture or video clip.
• Tap Insert Audio and select an audio clip.
• Tap Insert Text and enter a message.
• Tap Menu > Insert > Sound Recorder and tap RECORD ( ) button to record a new
audio clip. Tap STOP ( ) button to stop recording.
• Tap Menu > Options > Background Color and select a background color for the slide.
6. Tap Send.
Previewing a MMS Message
You can preview a MMS message before sending it.
1. To preview your MMS message, tap Menu > Preview after you composed your message.
2. Tap Done or Replay.
Reading a MMS Message
1. Tap > Messaging > MMS.
After the first slide is filled with content, you can tap Menu > Slides > Insert to add
another slide to your MMS message.

133
2. Select Inbox under MMS.
3. In the message list, tap the MMS message you want to read.
Configuring MMS Settings
1. Tap > Messaging > MMS.
2. Tap Menu > MMS Settings.
3. Select the type of options to change.
4. Tap .
Most of the time, you have to configure MMS settings in Messaging as well as a GPRS
connection in order to use MMS.
134
Chapter 8. Messaging & Contacts
Setting Description
User name Usually the first part of your e-mail address, which appears be-
fore the “at” sign (@).
Password Choose a strong password. You will have the option to save
your password, so that you do not need to enter it each time
you connect to your e-mail server.
Domain The domain name. This may be required.
Server type The type of e-mail server that hosts your mailbox (POP3 or
IMAP4).
Account name A name for this account. You must use a different name for
each account that you set up.
Network The type of network your e-mail server connects to.
Incoming mail server The name of your e-mail server (POP3 or IMAP4).
8.3 E-mail
Setting Up an Internet E-mail Account Manually
Before you set up your Internet e-mail account, please ensure that you have the necessary
information.
135
Setting Description
Require SSL connection Select this to ensure you always receive e-mail for this account
using an SSL connection. This enables you to receive personal
information more securely. Please note that if you select this and
your ISP does not support an SSL connection, you will not be
able to connect to receive e-mail.
Outgoing mail server The name of your outgoing e-mail server (SMTP).
Outgoing server requires au-
thentication
Your outgoing e-mail server (SMTP) may require authentication.
Note: Your user name and password from above will be used.
Outgoing server settings Your outgoing e-mail server may require different authentication
settings than your incoming e-mail server.
Use different user name for
outgoing server
A check box that lets you enter separate settings for your outgo-
ing e-mail server.
User name Your user name for the outgoing e-mail server.
Password Your password for the outgoing e-mail server.
Domain The domain name of the outgoing e-mail server.
Require SSL connection (Out-
going mail server only)
A connection that enables you to send personal information
more securely. Note that if you select this and your ISP does not
support an SSL connection, you will not be able to send e-mail.
136
Chapter 8. Messaging & Contacts
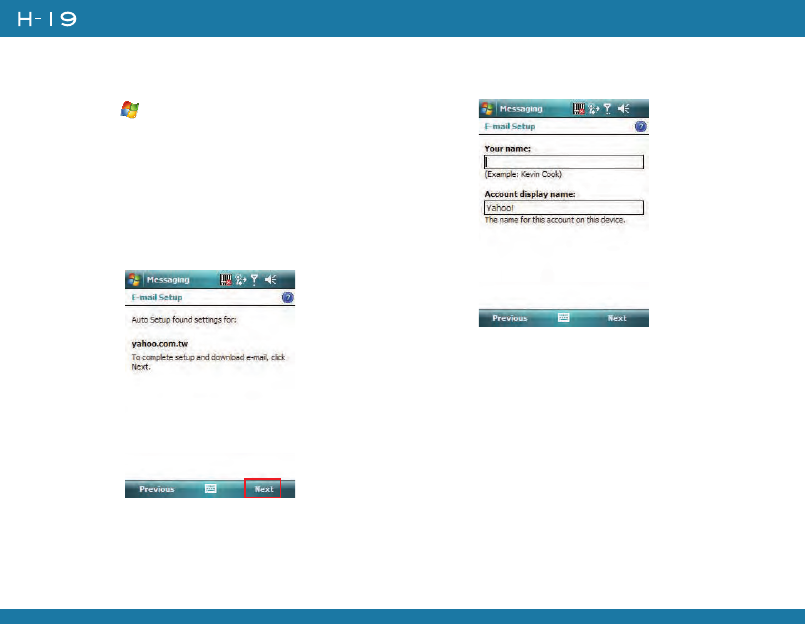
Now you are ready to set up your
account:
1. Tap > Messaging > New E-mail
Account.
2. Enter your e-mail address, select the
check box of Try to get e-mail settings
automatically from the Internet, and
tap Next.
3. Tap N ex t , and the Auto Setup
automatically enters your servers settings.
4. Enter the name you want to appear when
you send messages, then tap Next.
137
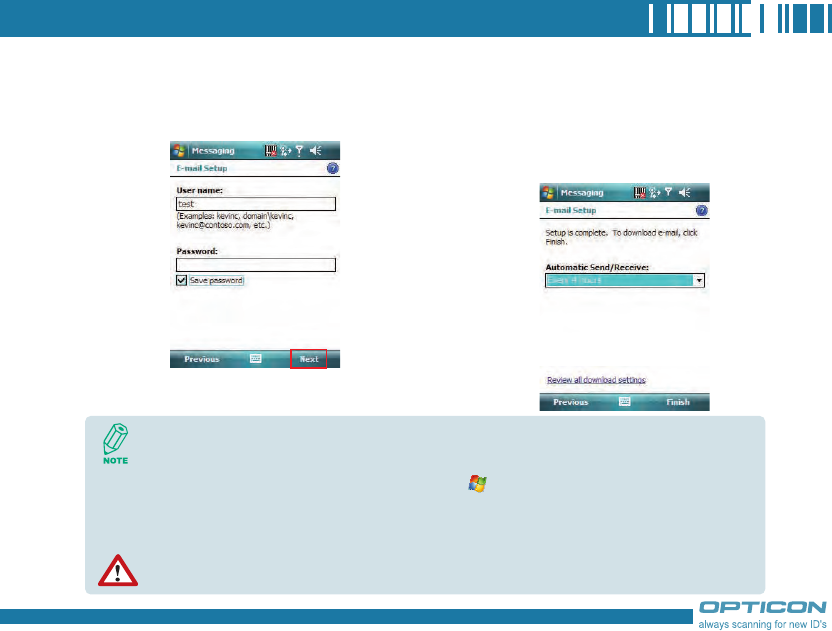
5. Enter your password. Select Save
password if you want, or you can enter
the password each time you send and
receive e-mail. Then tap Next.
6. In Automatic Send/Receive, select a
frequency for sending/receiving e-mail.
Tap Review all download settings to
change your e-mail settings; otherwise,
tap Finish to start downloading
messages.
If Auto Setup was not successful, enter required information (Incoming mail server, User
name, Password, Outgoing mail server) manually until setup is complete.
To change options for an e-mail account, tap > Messaging > Menu > Tools >
Options, and select the type of options to change.
If you save your password and then lose your device, someone finding your device might be
able to gain access to your e-mail.
138
Chapter 8. Messaging & Contacts
Composing an E-mail Message
1. Tap > Messaging.
2. Select an e-mail account.
3. Tap Menu > New.
4. In To, Cc and/or Bcc, enter recipient e-mail addresses. Insert a semicolon (;) between multiple
addresses.
5. In Subject, enter a subject.
6. Enter a message.
7. Tap Send. E-mail messages are stored in Outbox and are sent to recipients the next time you
synchronize or connect to your e-mail server and send and receive mail.
Reading an E-mail Message
1. Tap > Messaging.
2. Select an e-mail account.
3. Tap Inbox under this e-mail account.
4. In the message list, tap the e-mail message you want to read.
You can quickly enter e-mail addresses from your contact cards. Tap on To and select a
recipient from the list. Then, select the recipient’s e-mail address.
139
E-mail Message Options
1. Tap > Messaging, and select an e-mail account.
2. Tap Menu > New.
3. Tap Menu > Message Options.
4. Select the type of options to change.
5. Tap .
8.4 Using Contacts
Contacts is your address book and information storage for the people and businesses you
communicate with. It stores phone numbers, e-mail addresses, home addresses, and any other
information that relates to a contact, such as a birthday or an anniversary date. You can also add a
picture or assign a ring tone to a contact.
From the contact list, you can quickly communicate with people. Click a contact in the list for a
summary of contact information. From there, you can call or send a message.
If you use Outlook on your PC, you can synchronize contacts between your device and PC.
140
Chapter 8. Messaging & Contacts
Creating a New Contact
1. Tap > Contacts > New.
2. Select Outlook Contact.
3. Enter information for the new contact.
4. Tap .
Viewing and Editing Contact Information
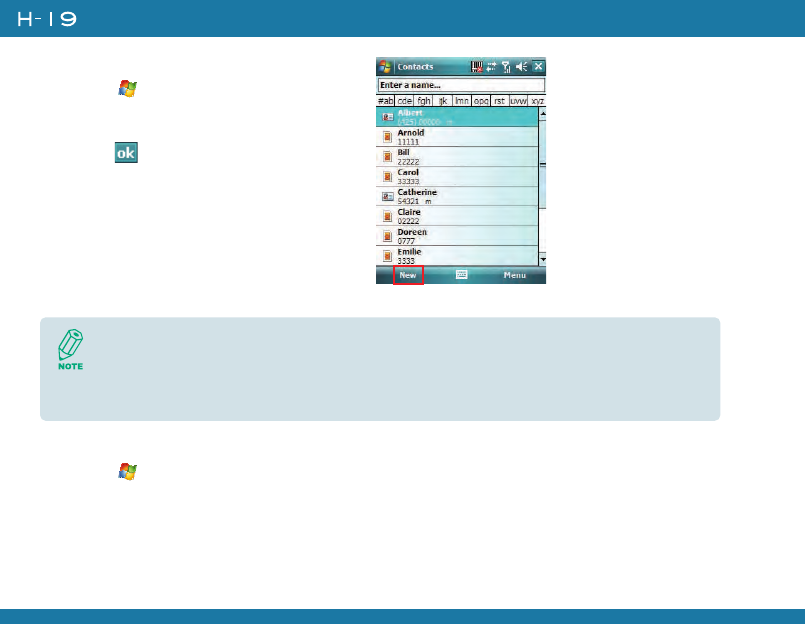
1. Tap > Contacts.
2. Tap the contact whose information you want to view. You can quickly search through Contacts
by entering the first letter of the contact.
If someone who isn't in your list of contacts calls you, you can create a contact from Call
History. Tap and hold the item and then select Save to Contacts on the pop-up submenu.
To save an existing contact to your SIM card, open the contact and tap Menu > Save to
SIM.
141
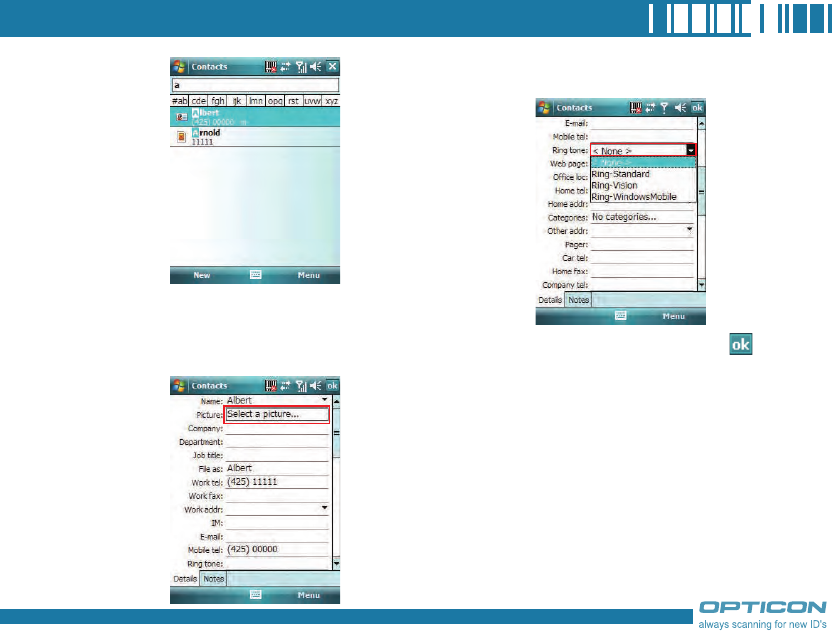
3. To edit the information, tap Menu > Edit.
4. Do any of the following:
• Tap Picture and select a picture you
want to add.
• Tap Ring tone and select the ring tone
you want.
5. When finished making changes, tap .
142
Chapter 8. Messaging & Contacts
Sending an E-mail to a Contact
1. Tap > Contacts.
2. Tap the contact you want to send an e-mail to.
3. Tap the e-mail address.
4. Select the e-mail account to use.
5. Enter a subject, compose your message, and then tap Send.
Sending a Text Message to a Contact
1. Tap > Contacts.
2. Tap the contact you want to send a text message to, and tap Menu > Send Text Message.
3. Compose your message, and tap Send.
Creating a SIM Contact
Contacts can be created and stored on a subscriber identity module (SIM.) If you move the SIM to
another device, your SIM contacts are moved as well.
1. Tap > Contacts.
2. Tap New > SIM Contact.
3. Enter the name and phone number of the contact and tap .
Remember to install a valid SIM to your device before creating a SIM Contact.

Chapter 9.
Using Barcode Reader
9.1 Setting Barcode Reader
9.2 Scanning and Reading Barcode
labels
144
Chapter 9. Using Barcode Reader
In the top of your device, a reader for barcode/2D code reading and decoding is built in, with which
various types of barcode/2D code labels are decoded into readable information such as letters and
numbers. Settings of barcode/2D code reader can be changed to fit your specific requests.
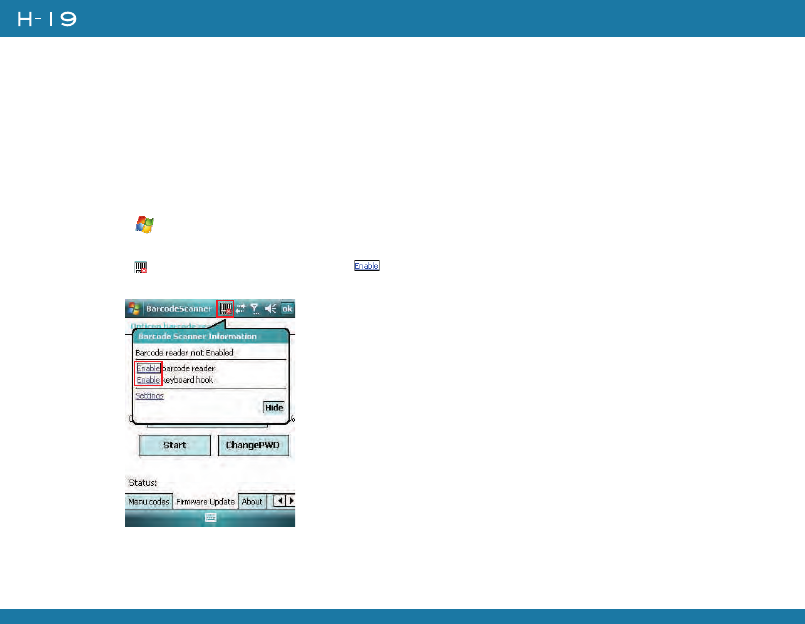
9.1 Setting Barcode Reader
Changing Options in Barcode Reader
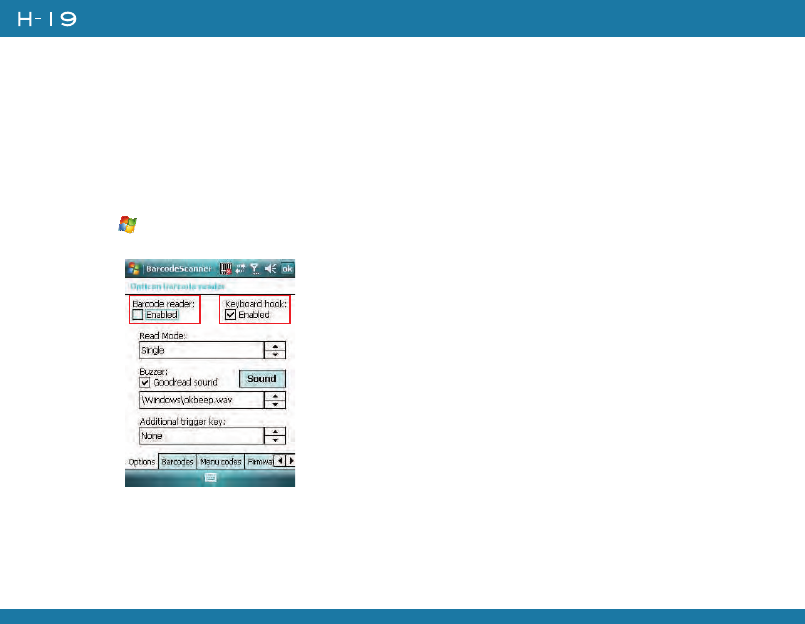
Barcode reader is set to be disabled by default, please remember to activate it before scanning.
1. Tap > Settings > System tab > Barcode settings > Options tab.
2. Check the check box of Barcode reader or/and Keyboard hook.
When Keyboard hook is enabled, data is received as key message; when Keyboard hook is
disabled, data is stored in the memory buffer temporarily. To retrieve the data, use specific
software development kit (SDK) and compatible Windows application program interfaces (APIs).
You can download the SDK from http://www.opticon.com.
145
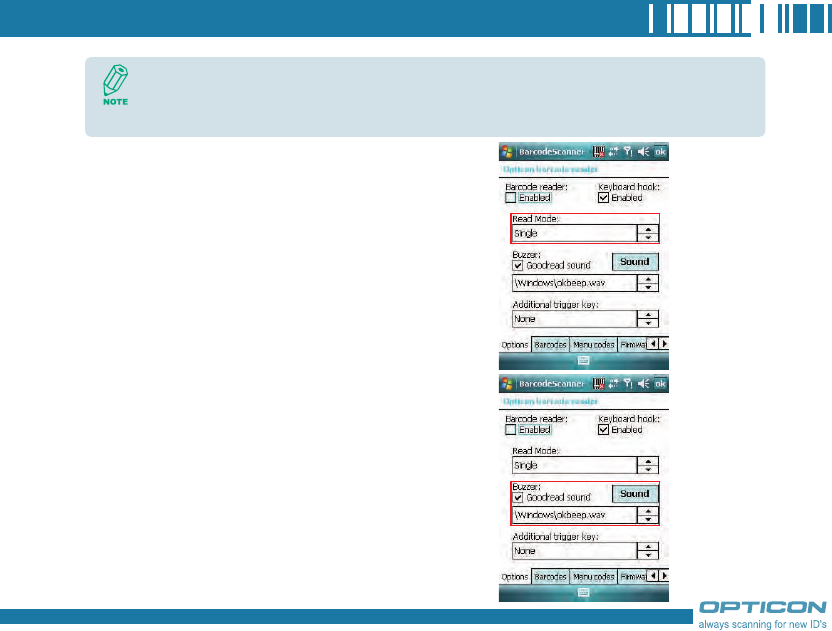
3. In Read Mode, tap the upward/downward arrow to
toggle between Multiple and Single. Multiple read
mode enables reading of multiple barcodes within a
specified time after one time triggering, while being
in single read mode needs the reader to be triggered
again to read another label.
4. In Buzzer, check the checkbox of Goodread
sound. It enables the function of playing a sound
effect after a barcode has been decoded successfully.
You can change the sound effect by tapping the
upward/downward arrow and play the sound effect
you choose by tapping the Sound button on the
screen.
Keyboard hook can convert received characters to keyboard messages; therefore, you can
read barcode in applications such as Notes, Tasks, Excel Mobile and Word Mobile as long
as you enable the keyboard hook.
146
Chapter 9. Using Barcode Reader
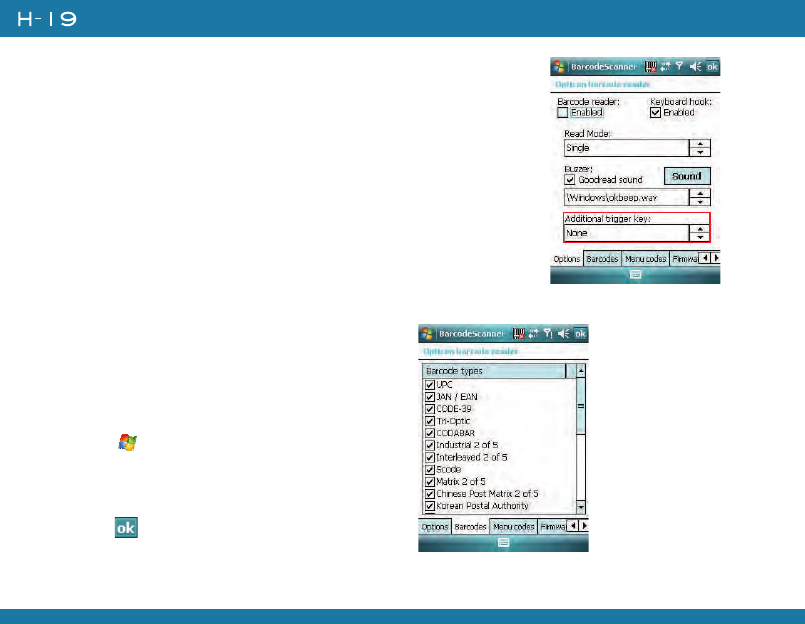
5. In Additional trigger key, tap the upward/downward arrow to
choose another access key for the reader. Otherwise you can set the
additional trigger key to be none.
Choosing Barcode Types
Your device is capable of scanning and decoding
various barcode types; to check what kind of
barcode is readable and to assign specific barcode
types to scan for, do as follows:
1. Tap > Settings > System tab > Barcode
settings > Barcodes tab.
2. Select specific barcode types or select all of
them.
3. Tap .
147
Advanced Setting
You can set specific configuration to your barcode reader by editing a list of codes in the menu
codes file. The codes you enter will be stored in the menu code file and replace default settings.
For descriptions of menu codes, refer to Universal Menu Book (you can download it from www.
opticon.com). Please note that supported menu codes depend on the module type or the firmware
version of your device.
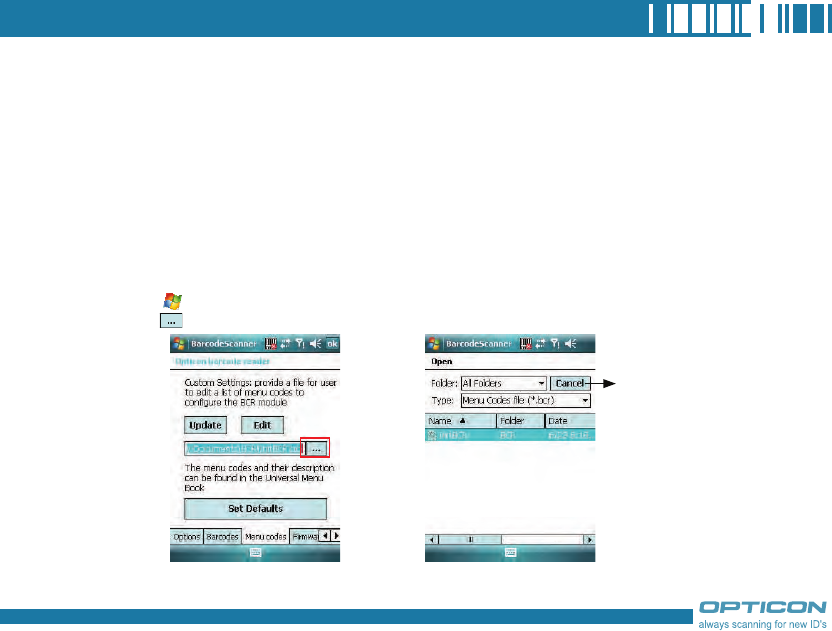
Inputting Menu Codes from a File
You can input menu codes automatically from a file, please do as follow to access the file and
configure the barcode reader.
1. Tap > Settings > System tab > Barcode settings > Menu codes tab.
2. Tap to view available files in your device.
Tap Cancel if you want
to stop the procedure.
148
Chapter 9. Using Barcode Reader
3. Tap after you select a file.
4. Tap to continue.
Editing Existent Menu Codes
You can input characters directly to edit an
existent menu codes file.
1. Ta > Settings > System tab >
Barcode settings > Menu codes tab.
2. Tap .
5. Tap .
149
3. Input or delete menu codes.
4. Tap .
Returning to Defaults
You can cancel all personalized settings in
the barcode reader.
1. Tap > Settings > System tab >
Barcode settings > Menu codes tab.
2. Tap .

150
Chapter 9. Using Barcode Reader
3. Tap to continue. 4. Tap .
Firmware Update
How to update the firmware of your device
You can update the firmware of the barcode reader from an adapted file on your device or a
Mini-SD card inserted to your device. Please connect your device with the AC adapter before
updating the firmware.
1. Tap > Settings > System tab > Barcode setting > Firmware Update tab.
151
2. Tap to view available files and select one of them.
3. Tap the file you want to update the firmware from. The selected file will be showed on the
screen then.
Tap Cancel if you want
to stop the procedure.

152
Chapter 9. Using Barcode Reader
4. Input the default password
“1234567890AB” and tap
. You can then see current completed
percentage of the update to be displayed
on the screen.
5. Tap to complete the operation.
Change Password
You can change the default password of
firmware update to another one.
1. Tap > Settings > System tab >
Barcode setting > Firmware Update
tab.
2. Tap .
153
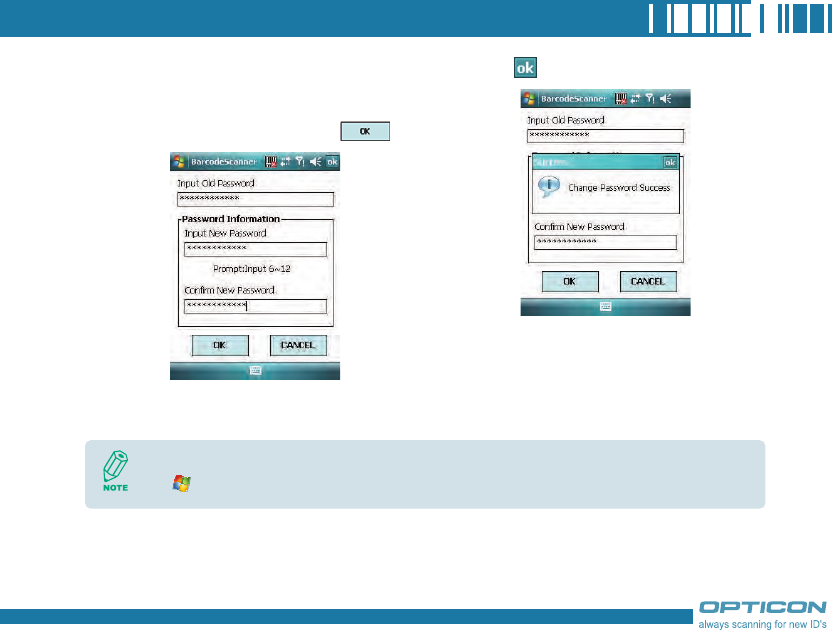
3. Input old password first. In Password
Information, input your new password
in both of the boxes in sequence for
double confirmation. Then tap .
4. Tap to complete the procedure.
You can see more information about the barcode reader such as scanner version, please
tap > Settings > System tab > Barcode settings > About tab.
154
Chapter 9. Using Barcode Reader
9.2 Scanning and Reading Barcode labels
Your device can scan and decode barcode labels depending on the scanner equipped with your
device. If you prefer to read a barcode on your device right after scanning, open an application in
which letters and numbers can be displayed before you activate the barcode reader.
1. Open an application, e.g. Notes, Tasks and Contacts, in which you want to display converted
barcode information after scanning.
2. Do one of the following to enable barcode reader and keyboard hook:
• Tap > Settings > System tab > Barcode settings > Options tab. Then check the
checkboxes of Barcode reader and Keyboard hook.
• Tap icon on the screen and tap in the dialog box to active barcode reader and
keyboard hook directly.
155
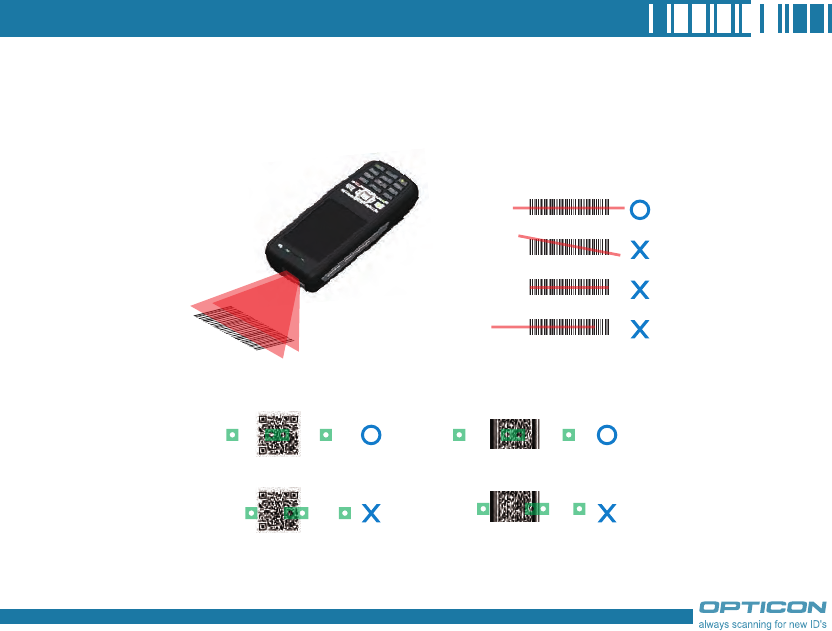
3. Point the barcode reader to a barcode label and press the scan key (left scan key, right scan
key or the assigned trigger key).
4. Adjust the distance between your device and the label, and make sure the light emitted from
the scanner exceeds the width of the label.
5. A Goodread Sound plays and the content of the barcode shows when the label is decoded
successfully.
optoelectronics
optoelectronics
optoelectronics
optoelectronics
optoelectronics
optoelectronics
optoelectronics
optoelectronics
Bar code
2D code

156
Chapter 9. Using Barcode Reader

Chapter 10.
Other Applications
10.1 Backing up/Recovering
10.2 Managing Memory
10.3 Windows Live Messenger
10.4 Windows Media
10.5 Office Mobile
10.6 Phone Profile
10.7 Formatting Storage Card and
DiskOnChip
10.8 Setting up GPS
158
Chapter 10. Other Applications
10.1 Backing up/Recovering
It is advisable to make backups of your device data regularly in case important data is accidentally
lost or damaged. You can restore your data from those backup copies as needed. Device data
can be backed up to or be restored from DiskOnChip of your device or a compatible memory
card.
Backing up Data
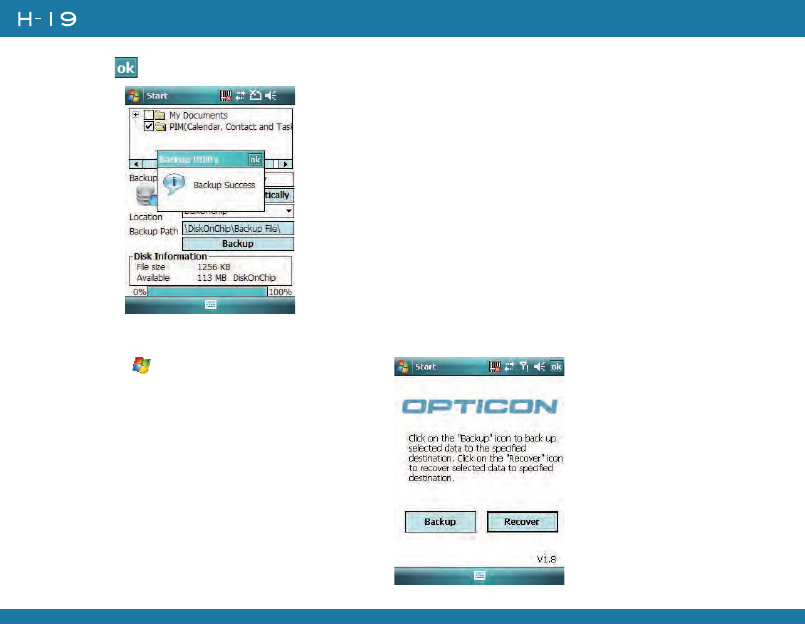
1. Tap > Programs > Backup Manager.
2. Tap the Backup button.
DiskOnChip is flash memory device which locates in an independent area of OS.
DiskOnChip keeps the data even after a factory reset.
159
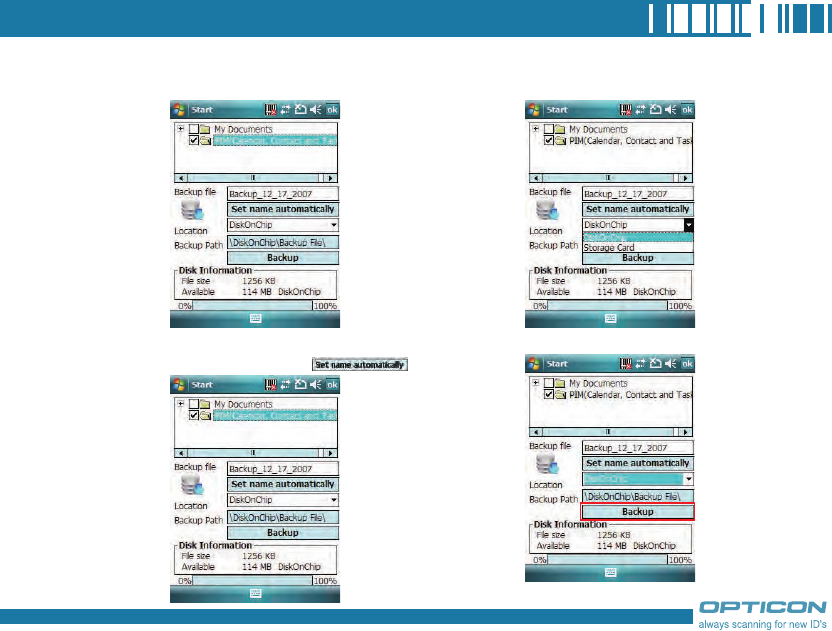
3. Select the check box(es) of the item(s) that
you want to backup.
4. Input a file name for the backup copy. To
name it automatically, tap .
5. Select a location for storing the backup
copy: Storage Card or DiskOnChip.
6. Tap the Backup Button.
160
Chapter 10. Other Applications
7. Tap .
Recovering Data
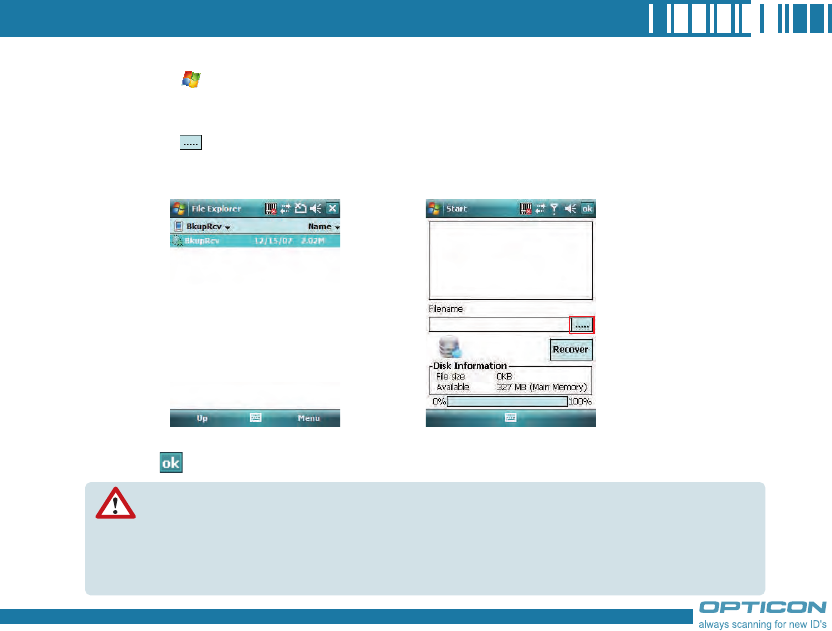
1. Tap > Programs > Backup
Manager.
2. Tap the Recover button.
161
3. Do one of the following to select a file:
• Tap > Program > File Explorer > DiskOnChip/Storage Card > Backup File
folder and select a file. Please note the Backup File may be located under DiskOnChip or
Storage card. It depends on the backup path you had chosen.
• Tap on the screen to view available files. You can then select one of them. Please
note that the selected backup file will be deleted once it has been restored to your device
successfully.
4. Tap the Recover Button.
5. Tap .
Only items that have already been backed up can be restored on your device.
Your device will be rebooted automatically after you restore Personal Information (Calendar,
Contact and Task) on the device.
Installed applications will not be backed up.
162
Chapter 10. Other Applications
10.2 Managing Memory
Checking Available Storage
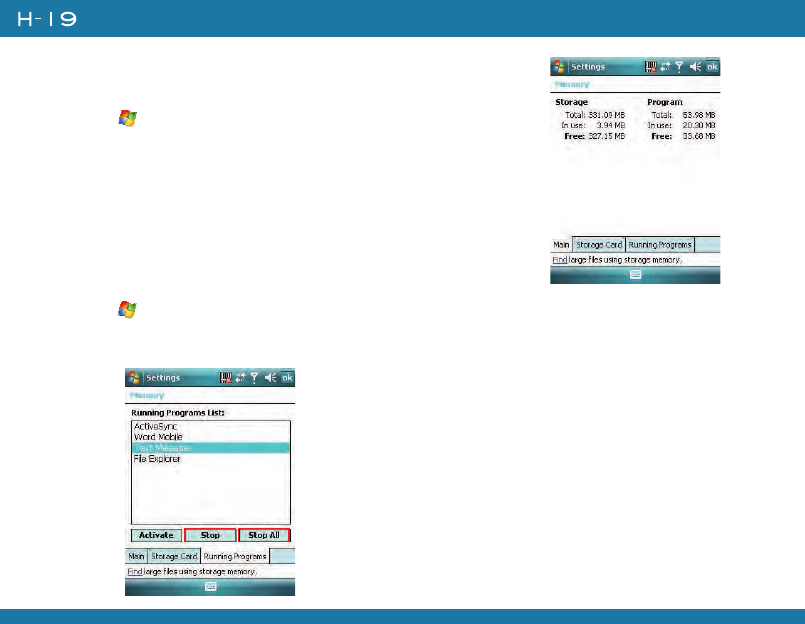
1. Tap > Settings > System tab > Memory.
2. In Main tab, you can see how much storage is available on the
main memory of your device.
3. To see how much storage is available on your storage cards, tap
Storage Card tab.
4. Use the drop-down menu to select your available storage cards and
view their available memory.
Closing a Running Program
1. Tap > Settings > System tab > Memory > Running Programs tab.
2. In Running Program List, select a program. You can tap Stop on the screen to close the
program or tap Stop All to close all programs.
163
10.3 Windows Live Messenger
You can send instant messages with Windows Live Messenger.
Signing In/Out Windows Live Messenger
With Windows Live Messenger, you can send and receive instant messages from other Windows
Live Messenger users.
Your device must be connected to the Internet before you can start using Windows Live
Messenger. To connect to the Internet, refer to “Chapter 7. Connecting to the Internet” for
details.
You must have a valid Microsoft .NET Passport or Hotmail account before you can sign in
to Windows Live Messenger.
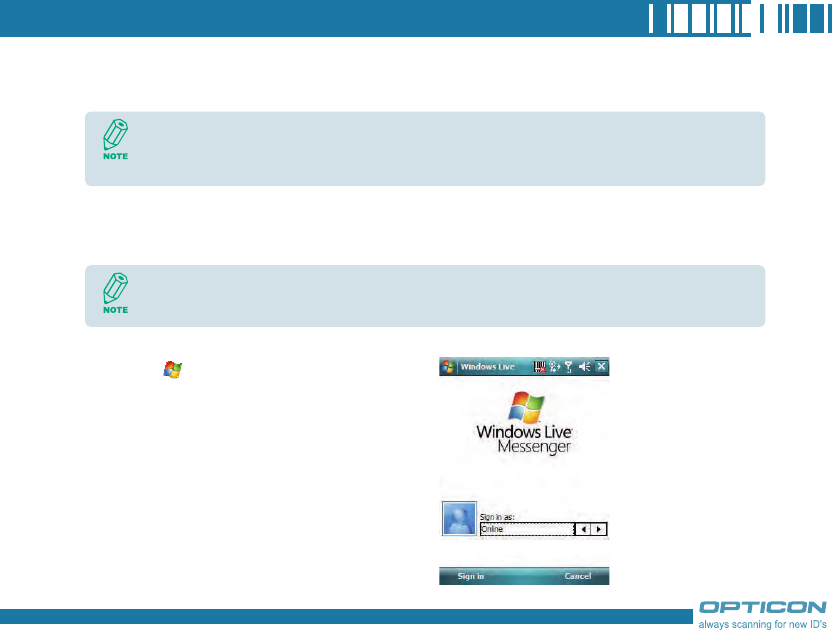
To sign in Windows Live Messenger
1. Tap > Programs > Messenger.
2. In Sign in as, select a condition which
you want to show on your Windows Live
Messenger. Then tap Sign in.
164
Chapter 10. Other Applications
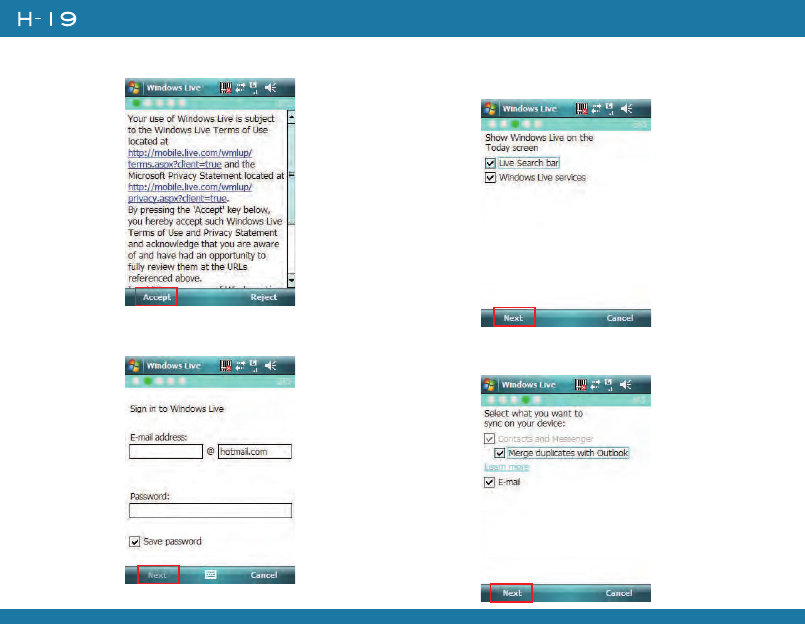
3. Tap Accept
4. Enter your e-mail and password and tap
Next.
5. Select whether to show Windows Live on
the Today screen or not. Then tap Next.
6. Select what you want to sync on your
device. Then tap Next.

165
7. System will sign in to Windows Live
automatically while all procedures are
done.
To sign out Windows Live Messenger
• Tap Menu > Sign out.
Adding/Deleting a Windows Live
Messenger Contact
1. Sign in Windows Live Messenger.
2. Do any of the following:
• To add a contact, tap Menu > Add
New Contact, and follow the on-
screen instructions.
• To delete a contact, tap and hold the
contact name in the Windows Live
contact list, then tap View contacts’
info. Next, Tap Menu > Delete
Contact.
Sending an Instant Message
1. Sign into Windows Live Messenger.
2. Select the contact’s name to whom you
want to send a message to. Then tap
Send IM.
3. Enter a message and tap Send.
4. To close the dialog box of instant
messages, tap Menu > E n d
conversation.
166
Chapter 10. Other Applications
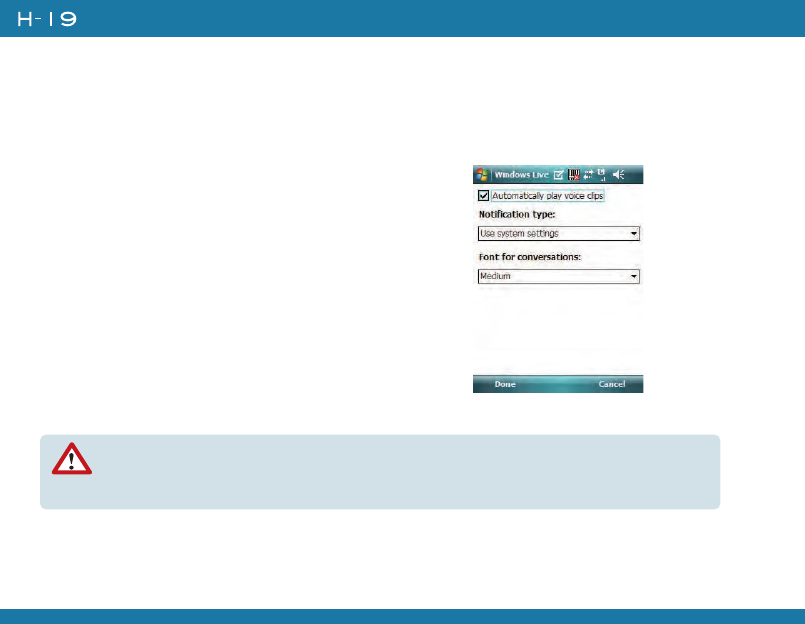
Changing Windows Live Messenger
Settings
1. Sign in Windows Live Messenger.
2. Tap Menu > Options.
3. Select the type of options to change.
4. Tap Done.
Changing Windows Live Messenger
Display Name
1. Sign in Windows Live Messenger.
2. Tap Menu > Change appearance.
3. Enter a new display name and tap Done.
Blocking/Unblocking a Contact
• To block a contact from seeing you on-
line, select the contact and tap Menu >
Contact options > Block contact.
• To unblock a contact, select the contact
and tap Menu > Contact options >
Unblock contact.
If you connect to Window Live Messenger through a Wi-Fi network, please don’t disconnect
the Wi-Fi network before you sign out Windows Live Messenger. Otherwise, your Windows
Live contacts stored in your device may be lost.
167
10.4 Windows Media
You can play digital audio and video files that are stored on your device or on a network.
Transferring Your Music and Videos to Your Device
1. On your computer, open Windows Media Player.
2. Connect your device to your computer using a USB cable.
3. In Windows Media Player on your computer, click Sync.
4. Drag each item you want to synchronize to the Sync List on the right side of the computer
screen.
5. Insert a mini-SD card to your device now if you want to synchronize media files to your device
via a storage card.
6. At the bottom of the Sync List, click Start Sync. The file will be
synchronized to your device or the storage card.
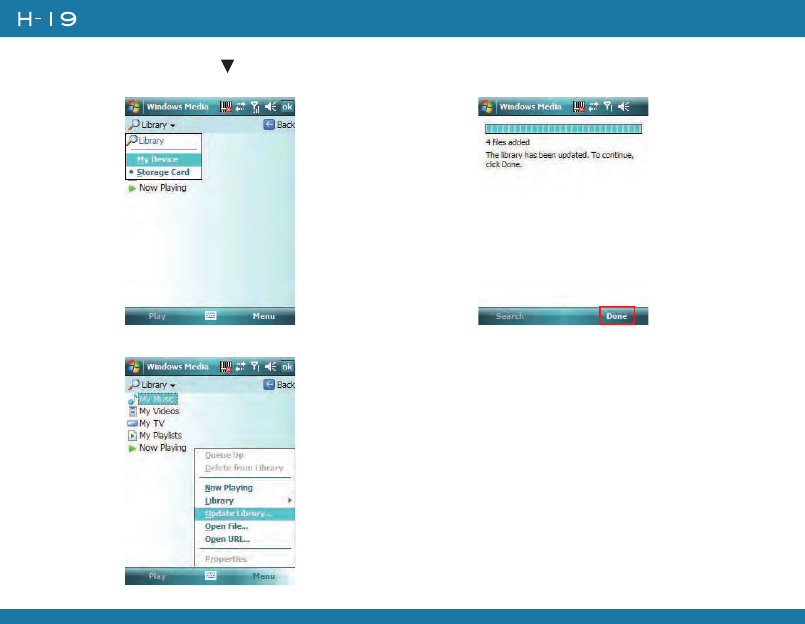
7. After transferring your media files, update your mobile device Media
Library:
I. Tap > Programs > Windows Media.
II. Tap Menu > Library.
When synchronizing media files via a storage card, your will need a 32 MB or larger
storage card in your device.
168
Chapter 10. Other Applications
III. Tap Library , then select My
Device/Storage Card.
IV. Tap Menu > Update Library.
V. Tap Done when update is completed.
169
Playing Media File on Your Device
1. Tap Menu > Library to open the Library screen.
2. Select a category (e.g. My Music > All Music).
3. Select an item, and tap Play.
4. You can then use the following functions
when playing audio or video files:
: Display the video in full screen
: Displays a Web site where you can find music and
videos to play.
: Skip to the beginning of the current file or to the
previous file.
: Pause/Play
: Skip to the next file.
: Decrease the volume level.
: Increase the volume level.
: Adjust the playback progress of a
selected file.
170
Chapter 10. Other Applications
Saving a New Playlist
1. Tap > Programs > Windows Media.
2. Tap Menu > Library.
3. Select a category (e.g. My Music > All Music).
4. Select an item, then tap Menu > Queue Up. Selected item will be added to the Now Playing
list immediately.
5. Tap Menu > Now Playing.
6. Tap Menu > Save Playlist.
7. Enter a name for the playlist and tap Done.
10.5 Office Mobile
Excel Mobile
With Excel Mobile, you can create, view and edit spreadsheet on your device. Moreover, you can
edit documents created on your desktop computer.
Creating a New Spreadsheet
1. Tap > Office Mobile > Excel Mobile.
2. Enter text, numbers, and formulas as desired.
3. Tap Menu > File > Save As.
4. Enter a name for the document and tap the Save button.
Unlike Microsoft Excel, you can only have one document open at a time in Excel Mobile.
You can also tap Ok to save a spreadsheet and Excel Mobile gives it a name automatically.
171
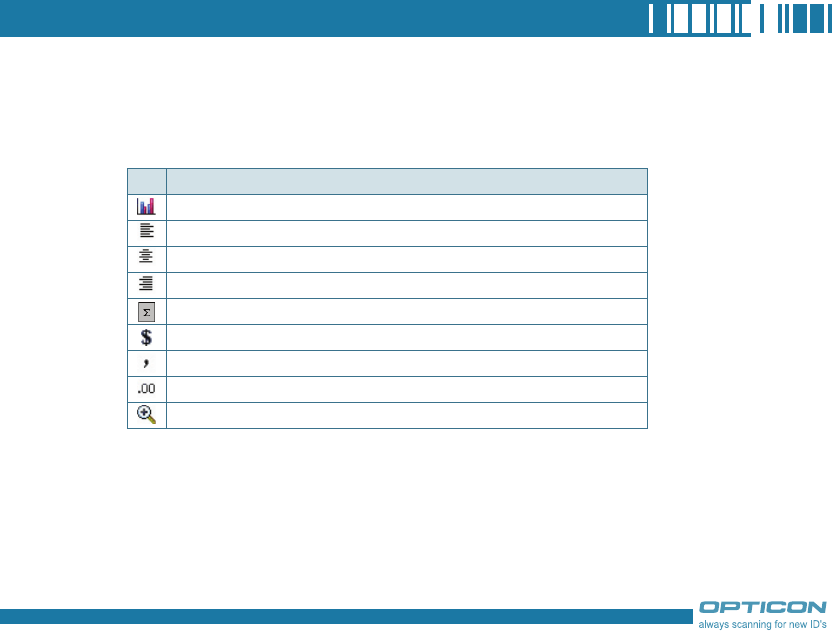
Excel Mobile Formatting Toolbar
The formatting toolbar in Excel Mobile provides a quick way to apply common functions such as
create a chart or align text to the left.
• In an Excel Mobile workbook, tap View > Toolbar.
A check mark appears next to Toolbar when the toolbar is visible.
Tap To
Create a chart from the selected cells
Align text to the left
Center the selected text
Align text to the right
Add all contiguous numbers in a column or row
Add a currency symbol
Add the default thousands separator
Add a decimal point
Increase and decrease the magnification
172
Chapter 10. Other Applications
PowerPoint Mobile
With PowerPoint Mobile, you can view PowerPoint slides on you device.
Starting a PowerPoint Presentation
1. Tap > Office Mobile > PowerPoint Mobile.
2. Tap the slide show you want to view in the presentation list.
3. Tap the current slide to advance to the next slide if slides don’t advance automatically.
4. Tap Menu > Rename/Move .
5. Enter a name for the document and tap .
Stopping a PowerPoint Presentation
• In a slide show, tap > End Show.
Navigating Between Slides
• Tap > Next to go to the next slide.
• Tap > Previous to go back to the previous slide.
• To jump to any slide in the slide show, tap > Go to Slide and tap on the slide you want
to view.
PowerPoint Mobile only supports slides in .ppt and .pps formats.
173
Word Mobile
With Word Mobile, you can create and edit Microsoft Word documents and templates, plain text
files, and/or rich text format files.
Creating a Document
1. Tap > Office Mobile > Word Mobile.
2. Tap New, if a new document is not opened by itself.
3. Enter text as desired.
4. Tap Menu > File > Save As.
5. Enter a name for the document and tap the Save button.
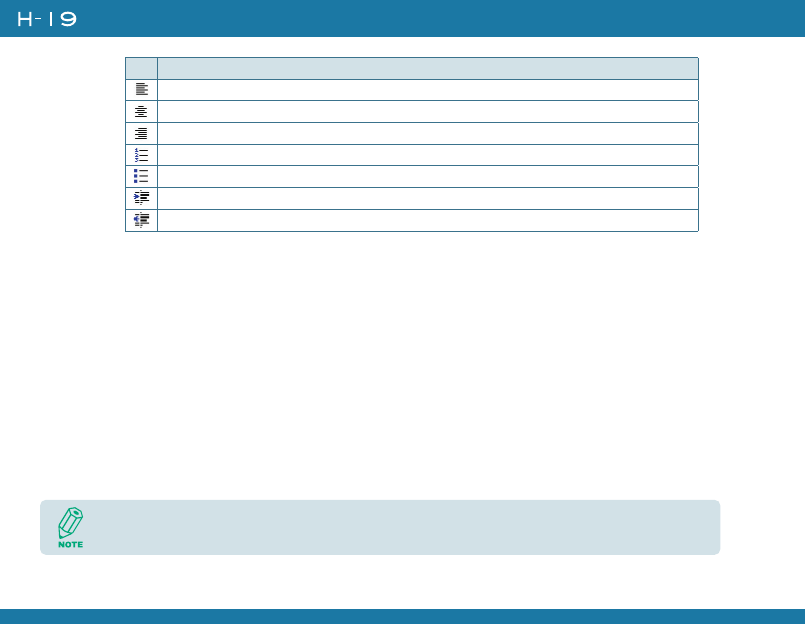
Word Mobile Formatting Toolbar
The Formatting toolbar in Word Mobile provides a quick way to apply common formatting such
as bold type, bulleted or numbered lists, and paragraph indentation to your text.
• In a Word Mobile document, tap View > Toolbar.
A check mark appears next to Toolbar when the toolbar is visible.
Unlike Microsoft Word, you can only have one document open at a time in Word Mobile.
You can also tap Ok to save a document after you finish editing text. This way, the first few
words of the document are used as the filename.
Tap To
Make the selected text bold
Make the selected text italic
Underline the selected text
174
Chapter 10. Other Applications
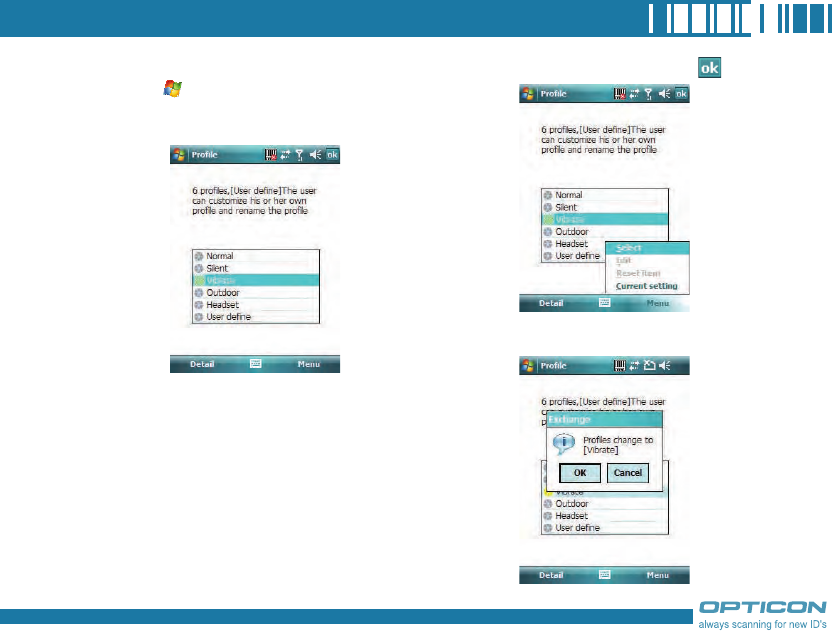
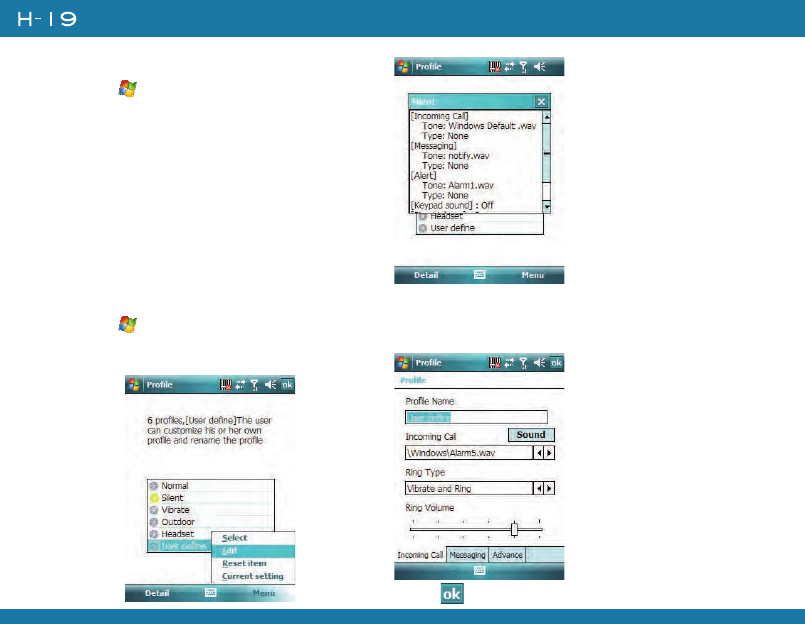
10.6 Phone Profile
Phone Profile defines how your device reacts when you receive a call or a message, how your keypad
sounds when you press a key, and more. Select or customize the most suitable profile for your
situation, such as when you are in a meeting or outdoors. The phone profiles available are Normal,
Silent, Vibrate, Outdoor, Headset, and User define.
Tap To
Align text to the left
Center the text
Align text to the right
Add or remove a numbered list in the selected text
Add or remove bullets in the selected text
Increase the indent of numbered or bulleted list text one tab stop to the right
Decrease the indent of numbered or bulleted list text one tab stop to the left
Only User defined profile can be customized.
175
Selecting a Profile
1. Tap > Programs > Phone Profile.
2. Select the most suitable profile for your
situation from the list.
3. Tap Menu > Select. Then Tap .
4. Tap OK to confirm the selection.
176
Chapter 10. Other Applications
Defining Your Own Profile
1. Tap > Programs > Phone Profile.
2. Select User Defined, and tap Menu >
Edit.
Viewing Profile Details
1. Tap > Programs > Phone Profile.
2. Select the profile you want to view its details.
3. Tap Detail.
3. Select the type of options to change.
4. Tap .
177
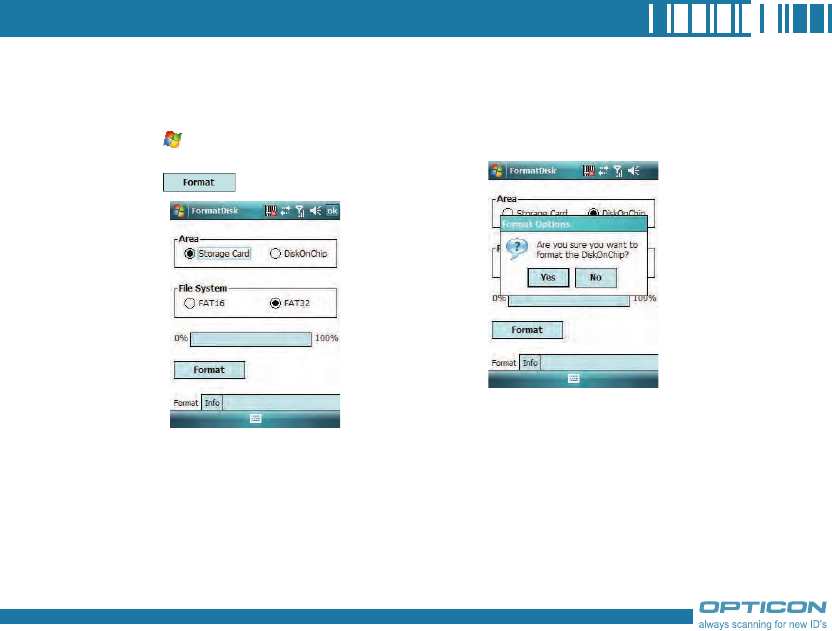
10.7 Formatting Storage Card and DiskOnChip
With Format Disk, you can format and check the capacity of an inserted storage card and DiskOnChip
in your device.
1. Tap > Programs > Format Disk.
2. Select the area and file system.
3. Tap .
4. Tap Yes to continue.
178
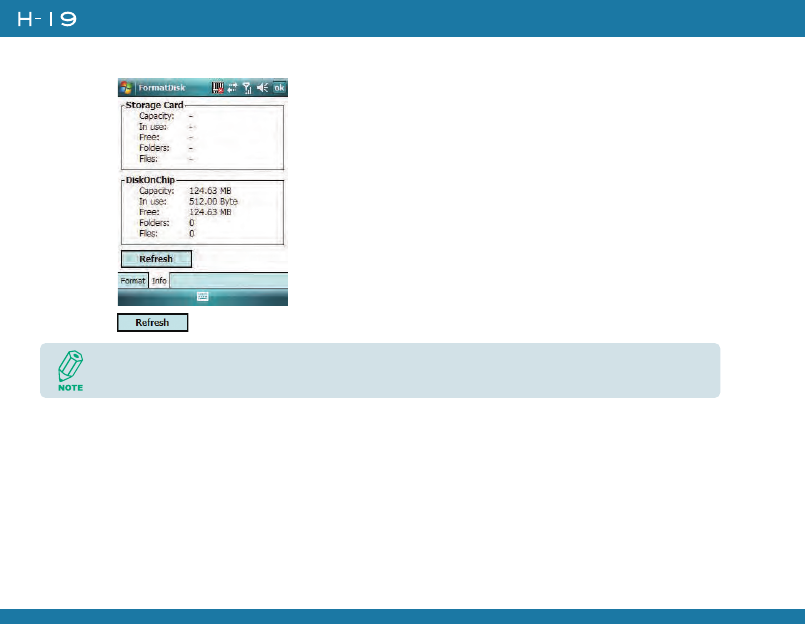
Chapter 10. Other Applications
5. Tap the Info tab.
6. Tap and check the capacity of an inserted storage card and/or DiskOnChip.
Only a valid storage card can be formatted with Format Disk.
10.8 Setting up GPS
A GPS (Global Positioning System) signal receiver is built in your device. You have to install a mapping
software on your device to start navigating. Please follow the instruction of your mapping software
to install it and use the navigation functions. You may need to specify the GPS hardware port when
installing the mapping software. Select the following value if requested.
• GPS hardware port: COM4.
• Baud rate: 57600.

179
Some mapping software or GPS navigation software may not be compatible with your
device, please consult with the software provider/retailer before installing the software.
Receiving Better Satellite Signals
GPS positioning is limited by bad weather (e.g. rainy or cloudy days) and usage location (e.g. tall
buildings, tunnels, underpasses, trees, bridges…etc). Most GPS do not work indoors, nor can GPS
signals penetrate buildings, car sun shades and heat reflective film with metallic content.
It can take several minutes the first time you establish a GPS connection. If you find the device can
not detect the satellite signal, try the following:
• Move the device to an open space without tall buildings or trees around it.
• Make sure there are no wireless communication products (e.g. radar-detecting devices and
mobile phones) nearby since these products may cause unstable signal reception.
• Connect an external Bluetooth GPS receiver (not included in the package) to your device in
order to enhance the reception.
Important Notice about Using GPS
• It is forbidden in most counties to use the GPS system when driving.
• The GPS is built and operated by the US Defense Department. The accuracy of location data
may be affected by changes made by the Department.
• GPS should not be used for precise location measurement. It can only be used as a navigation
aid.
• Do not turn on the car engine when your device is connected to the car charger (not included in
the package) as this may damage your device.

180
Chapter 10. Other Applications
• Make sure the DC voltage provided by your car and the electric current supplied from your car
charger are compatible with your device before using them.
• Using the GPS may drain the battery faster than usual.

Appendix
A.1 Regulatory Notices
A.2 PC Requirement to Run ActiveSync 4.5
A.3 Specifications

182
Appendix
A.1 Regulatory Notices
European Union Notice
Products with CE marking comply with the R&TTE Directive (99/5/EC), the EMC Directive (89/336/
EEC), and the Low Voltage Directive (73/23/EEC) issued by the Commission of the European
Community.
Compliance with these directives implies conformity to the following European Norms (in parentheses
are the equivalent international standards).
• ETSI EN 301 489-1
Electromagnetic compatibility and Radio spectrum Matters (ERM); ElectroMagnetic Compatibility
(EMC) standard for radio equipment and services; Part 1: Common technical requirements.
• ETSI EN 300 328
Electromagnetic compatibility and Radio spectrum Matters (ERM); Wideband Transmission
systems; data transmission equipment operating in the 2.4 GHz ISM band and using spread
spectrum modulation techniques.
• EN 50360 / EN50361
Product standard to demonstrate the compliance of mobile phones with the basic restrictions
related to human exposure to electromagnetic fields (300MHz – 3GHz)
• ETSI EN 301 489-7
Eletromagnetic compatibility and Radio spectrum matters (ERM); ElectroMagnetic Compatibility
(EMC) standard for radio equipment and services; Part 7: Specific conditions for mobile and
portable radio and ancillary equipment of digital cellular radio telecommunications systems
(GSM and DCS).
• ETSI EN 301 489-17
183
Electromagnetic compatibility and Radio spectrum Matters (ERM); ElectroMagnetic Compatibility
(EMC) standard for radio equipment and services; Part 17: Specific conditions for 2.4 GHz
wideband transmission systems and 5 GHz high performance RLAN equipment.
• EN 60950-1 (IEC 60950-1)
Safety of information Technology Equipment.
• ETSI EN 301 511
Global system for mobile communications (GSM); Harmonized EN for mobile stations in the
GSM 900 and GSM 1800 bands, covering essential requirements of article 3.2 of the R&TT
directive (1995/5/EC).
Federal Communications Commission Notice
This device complies with part 15 of the FCC Rules. Operation is subject to the following two
conditions: (1) This device may not cause harmful interference, and (2) this device must accept
any interference received, including interference that may cause undesired operation. This
equipment has been tested and found to comply with the limits for a Class B digital device,
pursuant to Part 15 of the FCC Rules. These limits are designed to provide reasonable protection
against harmful interference in a residential installation. This equipment generates, uses, and can
radiate radio frequency energy and, if not installed and used in accordance with the instructions,
may cause harmful interference to radio communications. However, there is no guarantee does
cause harmful interference to radio or TV reception, which can be determined by turning the

184
Appendix
equipment on and off, the user is encourage to try to correct the interference by one or more of
the following measures:
• Reorient or relocate the receiving antenna.
• Increase the separation between the equipment and receiver.
• Connect the equipment into an outlet on a circuit different from that to which the receiver is
connected.
• Consult the dealer or an experienced radio or television technician for help. Changes or
modifications not expressly approved by the party responsible for compliance could void
the user‘s authority to operate the equipment.
RF Exposure Information (SAR)
This device meets the government’s requirements for exposure to radio waves. This device is
designed and manufactured not to exceed the emission limits for exposure to radio frequency (RF)
energy set by the Federal Communications Commission of the U.S. Government.
The exposure standard for wireless devices employs a unit of measurement known as the Specific
Absorption Rate, or SAR. The SAR limit set by the FCC is 1.6W/kg. *Tests for SAR are conducted
using standard operating positions accepted by the FCC with the device transmitting at its highest
certified power level in all tested frequency bands. Although the SAR is determined at the highest
certified power level, the actual SAR level of the device while operating can be well below the
maximum value. This is because the device is designed to operate at multiple power levels so as
to use only the poser required to reach the network. In general, the closer you are to a wireless
base station antenna, the lower the power output.
While there may be differences between the SAR levels of various devices and at various positions,
they all meet the government requirement.
185
The FCC has granted an Equipment Authorization for this device with all reported SAR levels
evaluated as in compliance with the FCC RF exposure guidelines. SAR information on this device
is on file with the FCC and can be found under the Display Grant section of http://www.fcc.gov/
oet/ea after searching on FCC ID:UFOBC0164AAA390.
For body worn operation, this device has been tested and meets the FCC RF exposure guidelines
for use with an accessory that contains no metal and the positions the handset a minimum of 1.5
cm from the body. Use of other enhancements may not ensure compliance with FCC RF exposure
guidelines. If you do no t use a body-worn accessory and are not holding the device at the ear,
position the handset a minimum of 1.5 cm from your body when the device is switched on.
SAR Information
The maximum standalone SAR is 0.951 W/Kg, and the volume scan SAR for GSM and WLAN col-
transmission is 1 W/Kg.
Exposure to Radio Frequency (RF) Signals
Your wireless device is a radio transmitter and receiver. It is designed and manufactured not
to exceed the emission limits for exposure to radio frequency (RF) energy set by the Federal
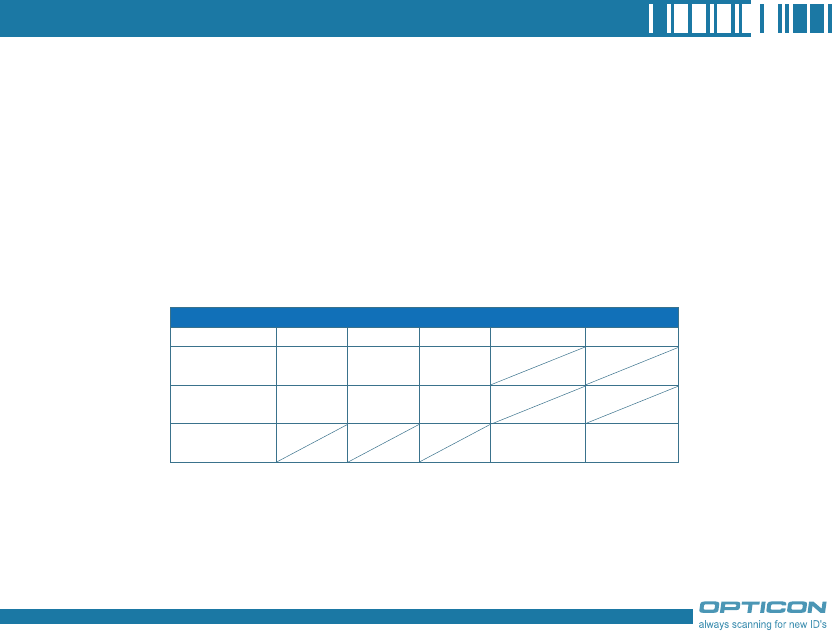
Maximum Scaled SAR Values (W/kg)
Band 850 1900 2450 850+2450 1900+2450
Head SAR
(Held to ear)
0.169 0.189 0.032
Body SAR
(Worn)
0.252 0.951 0.102
Body SAR
(Volume Scan)
0.233 1
186
Appendix
Communications Commission of the U.S. Government. These limits are part of comprehensive
guidelines and establish permitted levels of RF energy for the general population. The guidelines
are based on the safety standards previously set by both U.S. and international standards bodies:
• American National Standards Institute (ANSI) IEEE. C95.1-1992
• National Council on Radiation Protection and Measurement (NCRP). Report 86. 1986
• International Commission on Non-Ionizing Radiation Protection (ICNIRP) 1996
• Ministry of Health (Canada), Safety Code 6. The standards include a substantial safety margin
designed to assure the safety of all persons, regardless of age and health.
In the U.S. and Canada, the SAR limit for mobile phones used by the public is 1.6 Watts/kg
(W/kg) averaged over one gram of tissue. The standard incorporates a substantial margin of
safety to give additional protection for the public and to account for any variations in usage.
Normal conditions only ensure the radiative performance and safety of the interference. As with
other mobile radio transmitting equipment, users are advised that for satisfactory operation of the
equipment and for the safety of personnel, it is recommended that no part of the human body be
allowed to come too close antenna during operation of the equipment.
Warning!
DANGER OF EXPLOSION IF BATTERY IS INCORRECTLY REPLACED. TO REDUCE RISK OF FIRE
OR BURNS, DO NOT DISASSEMBLE, CRUSH, PUNCTURE, SHORT EXTERNAL CONTACTS,
EXPOSE TO TEMPERATURE ABOVE 60.C (140.F), OR DISPOSE
OF IN FIRE OR WATER. REPLACE ONLY WITH SPECIFIED
BATTERIES. RECYCLE OR DISPOSE OF USED BATTERIES
ACCORDING TO THE LOCAL REGULATIONS OR REFERENCE
GUIDE SUPPLIED WITH YOUR PRODUCT.

187
A.2 PC Requirement to Run ActiveSync 4.5
To connect your device to the PC, you must have Microsoft ActiveSync program installed on
your PC. ActiveSync 4.5 is included in the Installation CD, which is compatible with the following
operating systems and applications:
• Microsoft Windows 2000 Service Pack 4
• Microsoft Windows Server 2003 Service Pack 1
• Microsoft Windows Server 2003 IA64 Edition Service Pack 1
• Microsoft Windows Server 2003 x64 Edition Service Pack 1
• Microsoft Windows XP Professional Service Packs 1 and 2
• Microsoft Windows XP Home Service Packs 1 and 2
• Microsoft Windows XP Tablet PC Edition 2005
• Microsoft Windows XP Media Center Edition 2005
• Microsoft Windows XP Professional x64 Edition
• Microsoft Outlook XP and Microsoft Outlook 2003 messaging and collaboration clients
• Microsoft Office XP
• Microsoft Office 2003
• Microsoft Internet Explorer 6.0 or later (required)
• Microsoft Systems Management Server 2.0
188
Appendix
A.3 Specifications
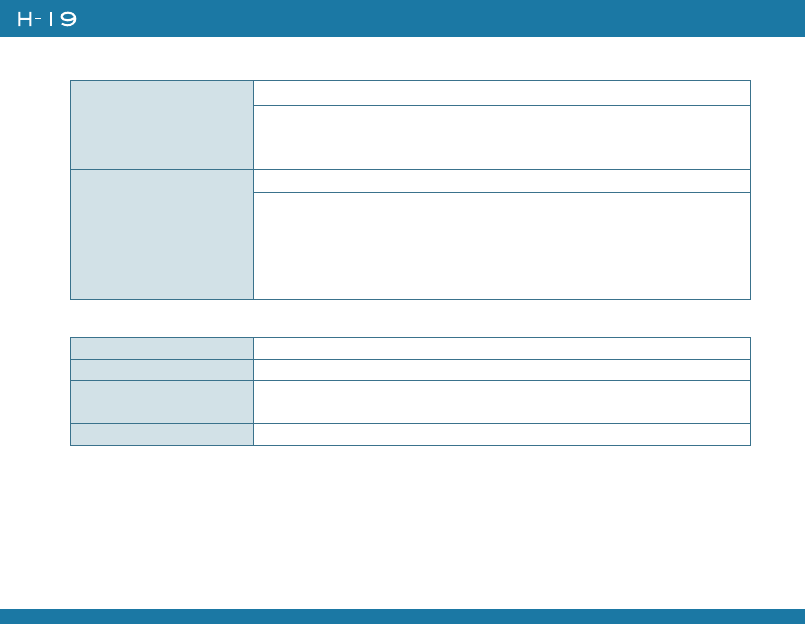
System Information
Dimensions and Weigh
CPU Samsung S3C2440A, 400MHz
Operating System Windows Mobile 6 Professional
Memory 128 MB RAM
512 MB ROM
Dimension 140.8 x 62.3 x 24.5 (25.5) mm
Weight <H-19A> 193±5g with battery
153±5g without battery
<H-19B> 199±5g with battery
159±5g without battery
189
Key •5-way navigation with action input
•2 Scan key
•Volume up and down
•Power button
•Talk key and End key
•Reset button
•Voice Record
•2 Soft key
•Fn key and Backspace key
•12 key numeric dial pad
Indication •Vibrate
•Audible
•Visual message
•LED 1: Wi-Fi (Green)/Bluetooth(Blue)
•LED 2: Low Power/Missed Call(Red)/Charging(Orange)/GSM on(Green)
Key and Indication
Type Transflective TFT LCD with touch panel and backlight
Mode Portrait/Landscape
Size/Resolution/Color 2.8", 240x320, 65K colors
Display
190
Appendix
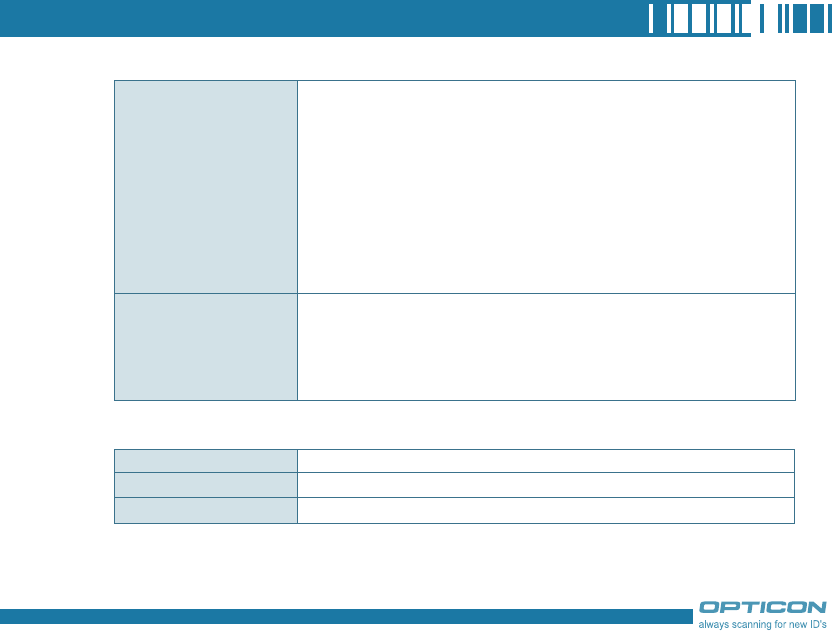
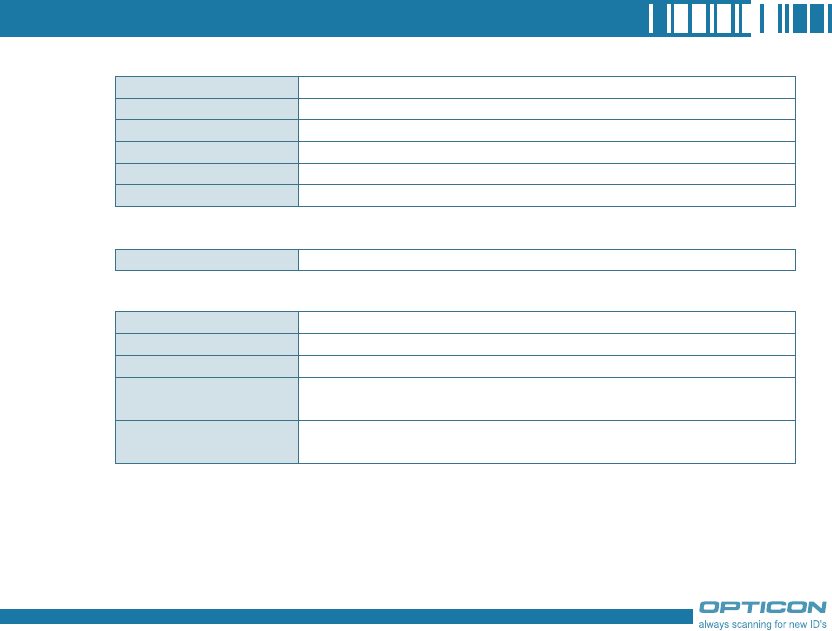
Scanner/Barcode Reader
Connectivity
Bluetooth Bluetooth 1.2 compliant
Wi-Fi IEEE 802.11 b/g compliant
Telecom GSM 850/EGSM 900/DCS 1800/PCS 1900,
GPRS class 12, EDGE class 10
USB mini USB (Revision 1.1 client)
<H-19A> 1D Model Red laser diode
Supported Symbologies
1D : EAN, JAN, UPC-A, UPC-E, Industrial 2 of 5, IATA, Interleaved 2 of 5,
NW-7 (CODABAR), CODE-39, CODE-93, CODE-128, and so on
<H-19B> 1D/2D Model CMOS Area Sensor
Supported Symbologies
1D : EAN, JAN, UPC-A, UPC-E, Industrial 2 of 5, IATA, Interleaved 2 of 5,
NW-7 (CODABAR), CODE-39, CODE-93, CODE-128, and so on
2D : PDF417, Micro PDF417, QR Code, Data Matrix, Maxi Code, and
so on
191
GPS
External Memory Card
Battery and Power
Card Slot Mini-SD card slot (maximum current: 200 mAh)
Main Battery Li-Ion Polymer 4.2V 1580mAh
Talk Time 4 hours
Standby Time 150 hours
Battery Charing Time 4 hours (AC charger via mini USB)
6 hours (USB cable connected to PC)
Backup Battery 5 minutes RTC after main battery removal
168 hours RTC in main battery low power
Built-in GPS module SiRF Star III
Cold Start Time 45s (maximum in open space)
Warm Start Time 45s (maximum in open space)
Hot Start Time 10s (maximum in open space)
Reacquisition Time < 1s
Accuracy Static: 3m Dynamic:30m
192
Appendix
WEEE Notice
The Waste Electrical and Electronic Equipment (WEEE) Directive is designed to encourage and
regulate the collection, reuse, recycling and recovery of waste electrical and electronic equipment,
which entered into force as European law on 13th February 2003. The Directive aims to improve
the level of recycling of electrical and electronic equipment (EEE) and encourages designers
to develop products with recycling efficiency in mind; it also aims to improve our environment,
reduce risks to human health through the proper treatment of discarded goods.
The WEEE logo ( ) on the product and its accessories or on its box indicates that this product
must not be disposed of or dumped with your other household wastes. You are liable to dispose of
all your electronic or electrical waste equipment by relocating over to the specified collection point
for recycling of such hazardous waste. Isolated collection and proper recovery of your electronic
and electrical waste equipment at the time of disposal will allow us to help conserving natural
resources. Moreover, proper recycling of the electronic and electrical waste equipment will ensure
safety of human health and environment.
For more information about electronic and electrical waste equipment disposal, recovery and
collection point, please contact your local city center, household waste disposal service, shop from
where you purchased the equipment, or manufacturer of the equipment.
RoHS Compliance
This product is in compliance with Directive 2002/95/EC of the European Parliament and of
the Council of 27 January 2003, on the restriction of the use of certain hazardous substances in
electrical and electronic equipment (RoHS) and its amen.