ORION ELECTRIC M115A BLUETOOTH MODULE User Manual Reference Host device
ORION ELECTRIC CO., LTD. BLUETOOTH MODULE Users Manual Reference Host device
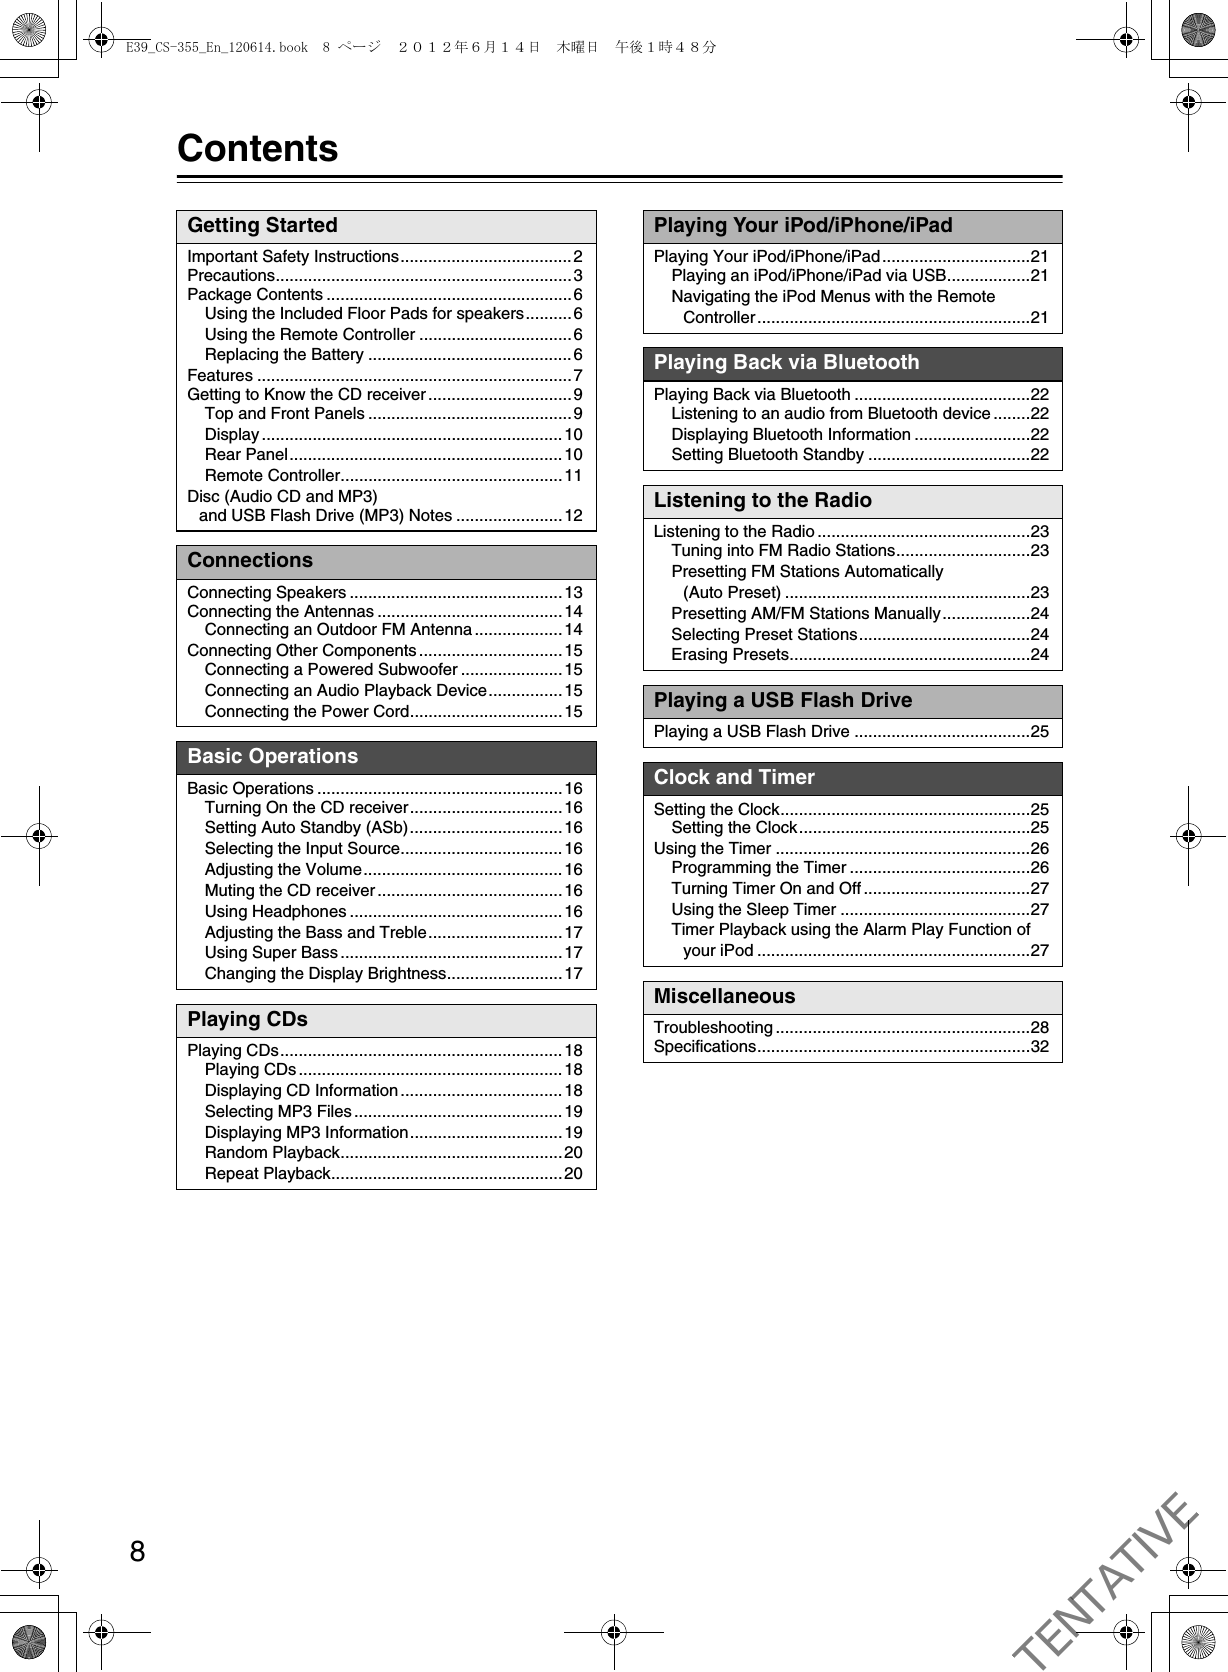
Contents
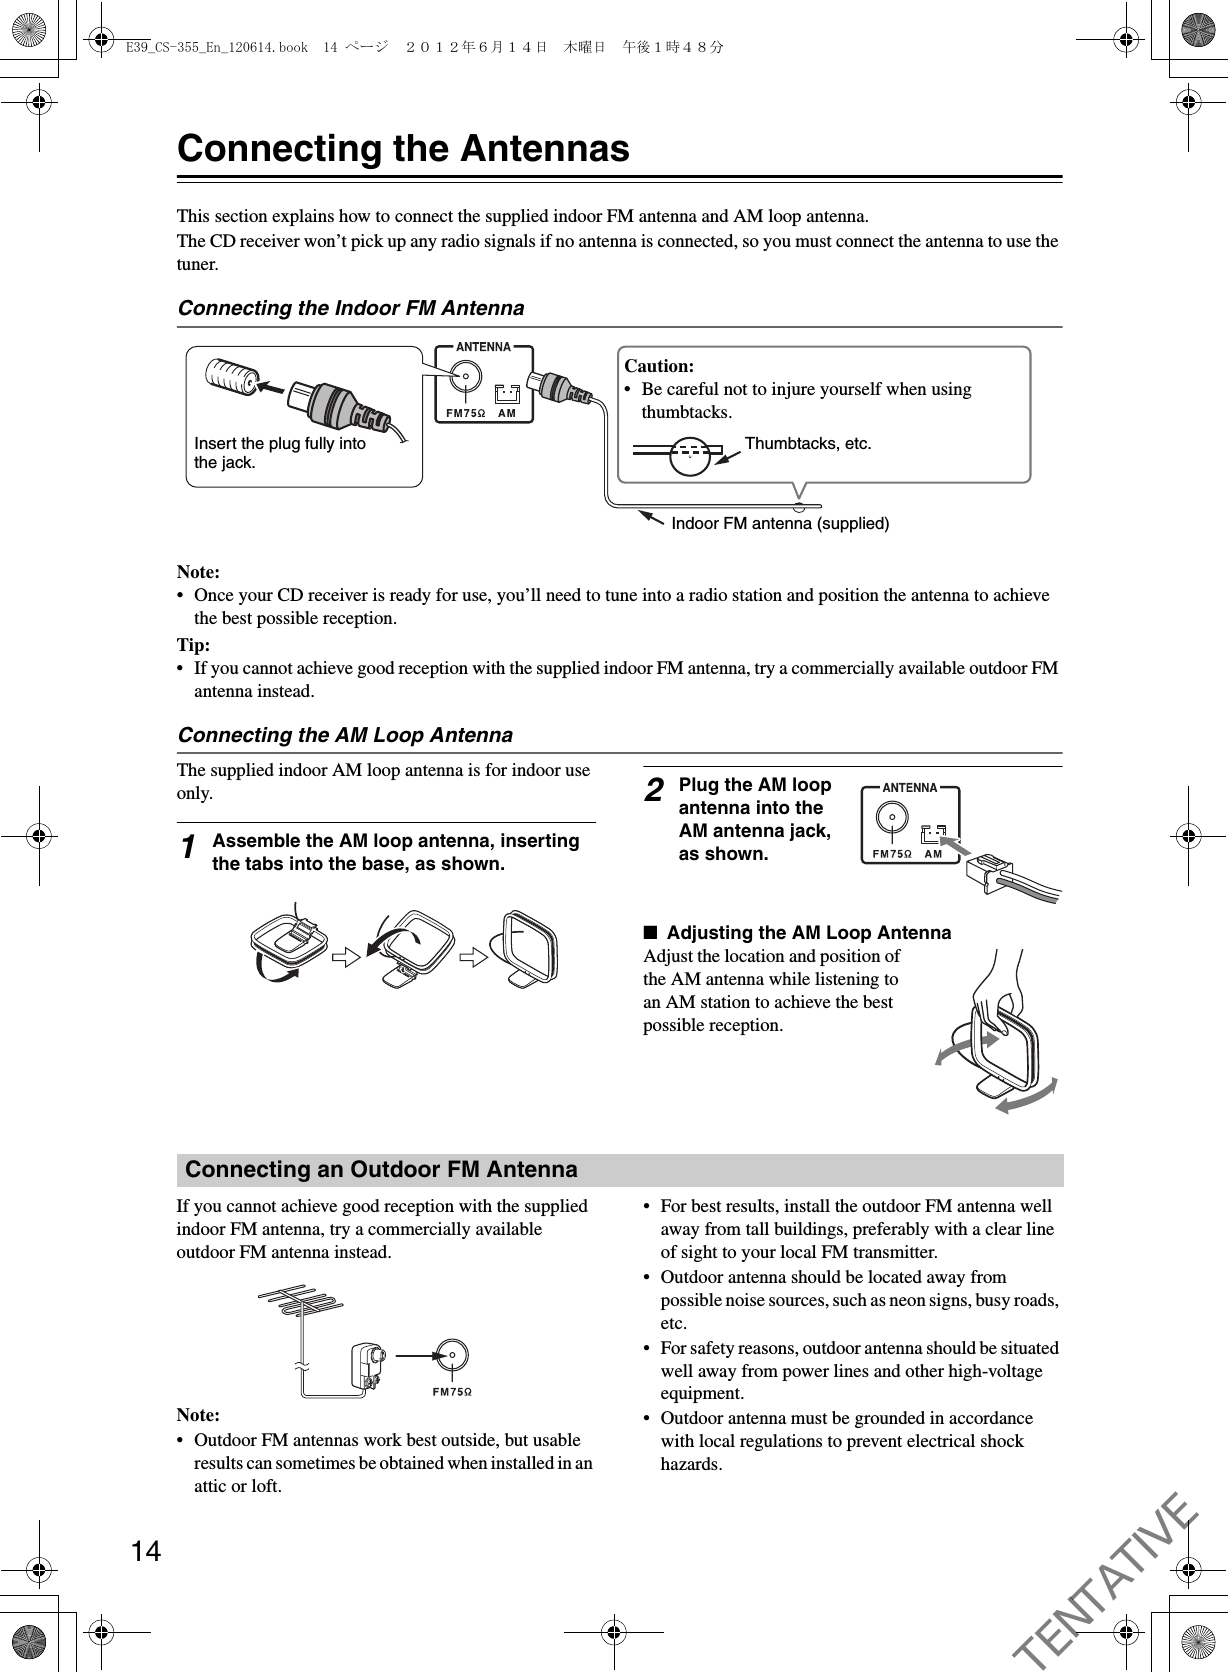
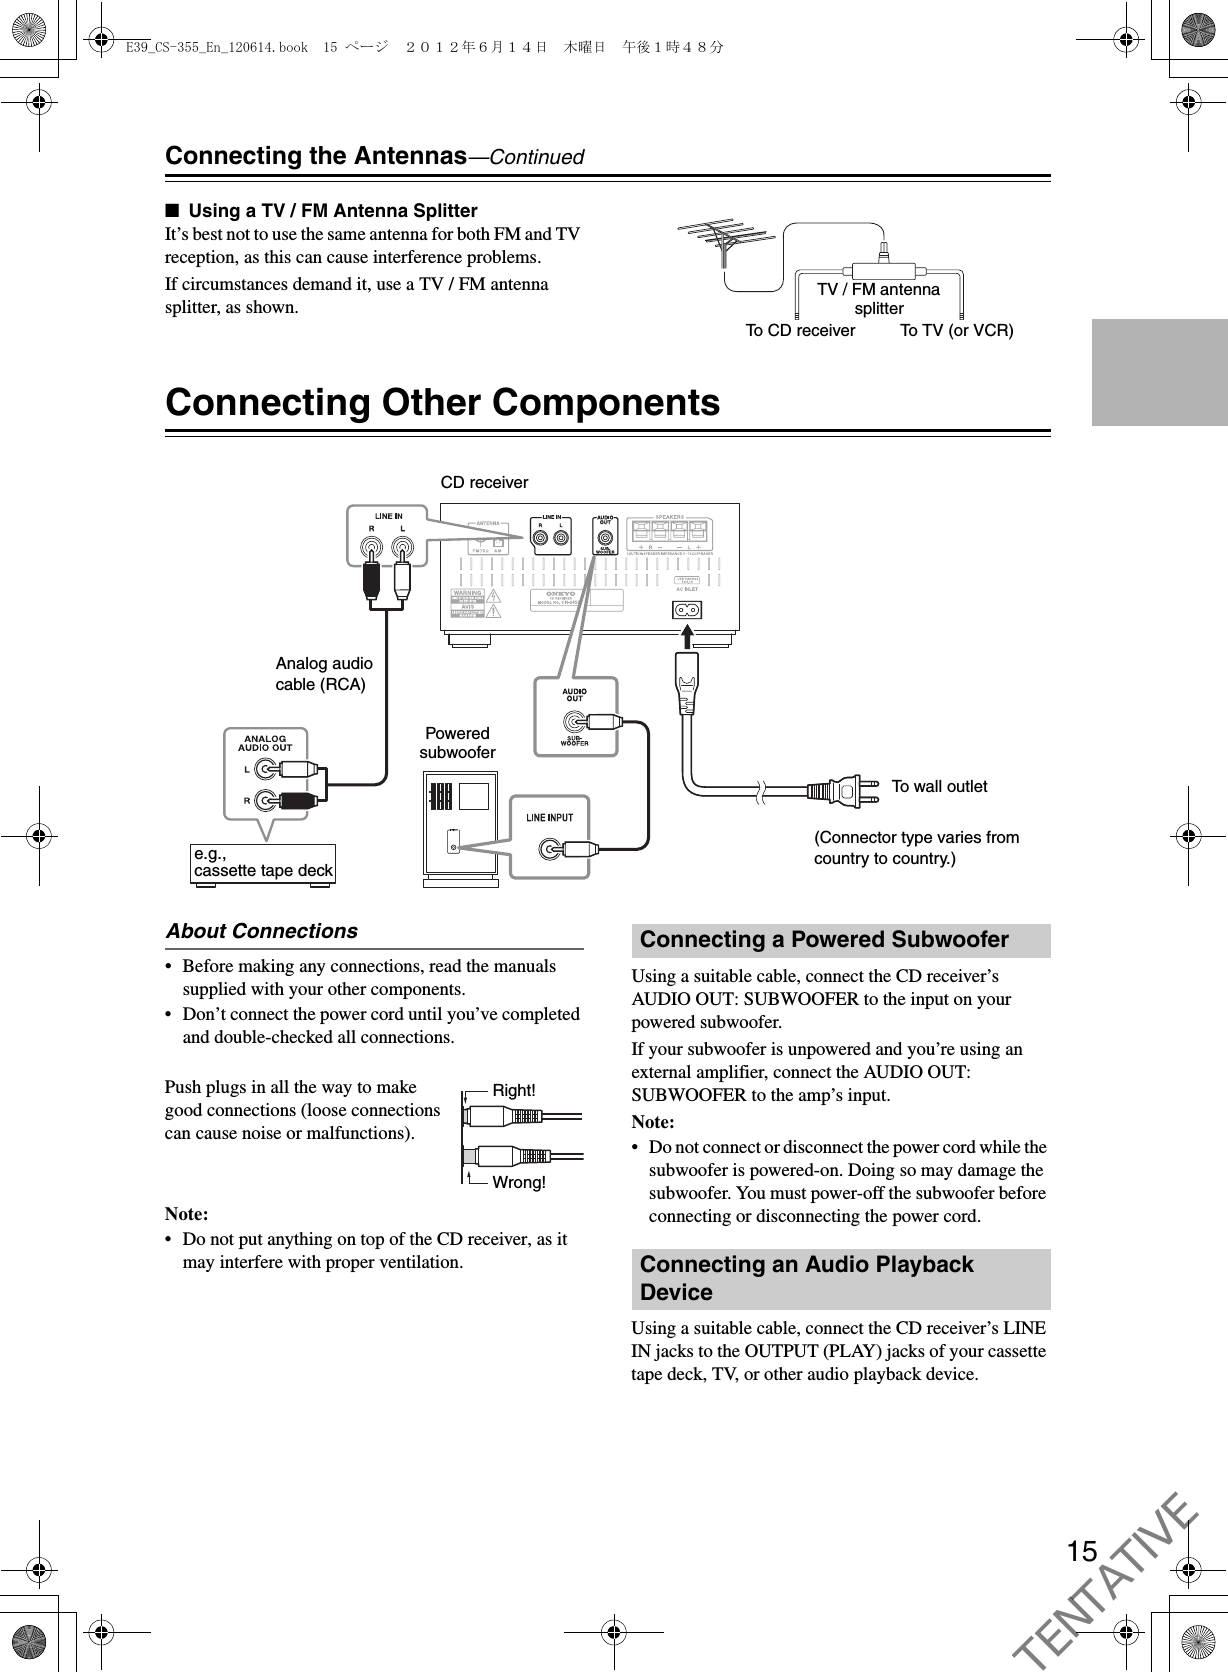
- 1. Installation manual
- 2. Users Manual(Reference Host device)
Users Manual(Reference Host device)

![3Precautions1. Recording Copyright—Unless it’s for personal use only, recording copyrighted material is illegal without the permission of the copyright holder.2. AC Fuse—The AC fuse inside the unit is not user-serviceable. If you cannot turn on the unit, contact your Onkyo dealer.3. Care—Occasionally you should dust the unit all over with a soft cloth. For stubborn stains, use a soft cloth dampened with a weak solution of mild detergent and water. Dry the unit immediately afterwards with a clean cloth. Don’t use abrasive cloths, thinners, alcohol, or other chemical solvents, because they may damage the finish or remove the panel lettering.4. PowerWARNINGBEFORE PLUGGING IN THE UNIT FOR THE FIRST TIME, READ THE FOLLOWING SECTION CAREFULLY.AC outlet voltages vary from country to country. Make sure that the voltage in your area meets the voltage requirements printed on the unit’s rear panel (e.g., AC 230 V, 50 Hz or AC 120 V, 60 Hz).The power cord plug is used to disconnect this unit from the AC power source. Make sure that the plug is readily operable (easily accessible) at all times.For models with [POWER] button, or with both [POWER] and [ON/STANDBY] buttons:Pressing the [POWER] button to select OFF mode does not fully disconnect from the mains. If you do not intend to use the unit for an extended period, remove the power cord from the AC outlet.For models with [ON/STANDBY] button only:Pressing the [ON/STANDBY] button to select Standby mode does not fully disconnect from the mains. If you do not intend to use the unit for an extended period, remove the power cord from the AC outlet.5. Preventing Hearing LossCautionExcessive sound pressure from earphones and headphones can cause hearing loss.6. Batteries and Heat ExposureWarningBatteries (battery pack or batteries installed) shall not be exposed to excessive heat as sunshine, fire or the like.7. Never Touch this Unit with Wet Hands—Never handle this unit or its power cord while your hands are wet or damp. If water or any other liquid gets inside this unit, have it checked by your Onkyo dealer.8. Handling Notes• If you need to transport this unit, use the original packaging to pack it how it was when you originally bought it.• Do not leave rubber or plastic items on this unit for a long time, because they may leave marks on the case.• This unit’s top and rear panels may get warm after prolonged use. This is normal.• If you do not use this unit for a long time, it may not work properly the next time you turn it on, so be sure to use it occasionally.• When you’ve finished using this unit, remove all discs and turn off the power.9. Installing this Unit• Install this unit in a well-ventilated location.• Ensure that there’s adequate ventilation all around this unit, especially if it’s installed in an audio rack. If the ventilation is inadequate, the unit may overheat, leading to malfunction.• Do not expose this unit to direct sunlight or heat sources, because its internal temperature may rise, shortening the life of the optical pickup.• Avoid damp and dusty places, and places subject to vibrations from loudspeakers. Never put the unit on top of, or directly above a loudspeaker.• Install this unit horizontally. Never use it on its side or on a sloping surface, because it may cause a malfunction.• If you install this unit near a TV, radio, or VCR, the picture and sound quality may be affected. If this occurs, move this unit away from the TV, radio, or VCR.10. Moisture CondensationMoisture condensation may damage this unit.Read the following carefully:Moisture may condense on the lens of the optical pickup, one of the most important parts inside this unit.• Moisture condensation can occur in the following situations:– The unit is moved from a cold place to a warm place.– A heater is turned on, or cold air from an air conditioner is hitting the unit.– In the summer, when this unit is moved from an air conditioned room to a hot and humid place.– The unit is used in a humid place.• Do not use this unit when there’s the possibility of moisture condensation occurring. Doing so may damage your discs and certain parts inside this unit.If condensation does occur, unplug the power cord and leave the unit for two to three hours in the room temperature.This unit contains a semiconductor laser system and is classified as a “CLASS 1 LASER PRODUCT”. So, to use this model properly, read this Instruction Manual carefully. In case of any trouble, please contact the store where you purchased the unit.To prevent being exposed to the laser beam, do not try to open the enclosure.CAUTION:CLASS 1M VISIBLE AND INVISIBLE LASER RADIATION WHEN OPEN. DO NOT VIEW DIRECTLY WITH OPTICAL INSTRUMENTS.E39_CS-355_En_120614.book 3 ページ 2012年6月14日 木曜日 午後1時48分TENTATIVE](https://usermanual.wiki/ORION-ELECTRIC/M115A.Users-Manual-Reference-Host-device/User-Guide-1744577-Page-3.png)
![9Getting to Know the CD receiverFor detailed information, see the pages in parentheses.a8ON/STANDBY button (17, 23, 27, 28, 29)bBluetooth PAIRING button (23)cINPUT button (17, 23)dPrevious [7]/PRESET [e] button (19, 22, 25, 29)eNext [6]/PRESET [r] button (19, 22, 25)fPlay/Pause [1/3] button (19, 26)gVOLUME [–]/[+] buttons (17, 22)hHeadphones [=] jack (17)iUSB port (26)jDisplaykDisc tray (19)lRemote control sensor (6)mOpen/Close [0] button (19)Top and Front Panelsijk l mhagbcdefTop PanelFront PanelE39_CS-355_En_120614.book 9 ページ 2012年6月14日 木曜日 午後1時48分TENTATIVE](https://usermanual.wiki/ORION-ELECTRIC/M115A.Users-Manual-Reference-Host-device/User-Guide-1744577-Page-9.png)
![11Getting to Know the CD receiver—ContinuedFor detailed information, see the pages in parentheses.aCLOCK CALL button (26)bMUTING button (17)cTIMER button (26, 27, 28)dInput Selector buttons (17, 22, 24, 25, 26)eStop [2] (19, 22), Play/Pause [1/3] (19, 20, 22, 26), [7]/[6], PRESET [e]/[r] (19, 22, 25), [5]/[4], TUNING [e]/[r] (19, 22, 24) buttonsfVOLUME [–]/[+] buttons (17, 22)gMENU button (22)hArrow [q]/[w]/[e]/[r] buttons and ENTER buttoniMODE button (20, 24)jDIMMER button (18)kSHUFFLE button (21, 22)lPLAYLIST [q]/[w] buttons (22)mOn/Standby [8] button (17, 27, 28)nSLEEP button (28)oPRESET MEMORY button (24, 25)pTREBLE/BASS buttons (18)qS.BASS button (18)rCLEAR button (18, 21, 25)sREPEAT button (21, 22)tDISPLAY button (19, 20, 23, 26, 27)Remote ControlleragijklbcdefhmsnopqrtE39_CS-355_En_120614.book 11 ページ 2012年6月14日 木曜日 午後1時48分TENTATIVE](https://usermanual.wiki/ORION-ELECTRIC/M115A.Users-Manual-Reference-Host-device/User-Guide-1744577-Page-11.png)
![17Basic OperationsPress the On/Standby [8] button.The CD receiver comes on, and the display lights up.Press the On/Standby [8] button again to set the CD receiver to Standby.You can also use the [8ON/STANDBY] button on the CD receiver.During the use of your iPod/iPhone/iPad connected to the CD receiver with a USB cable, if the connection mode of the CD receiver is set to iPod (see page 22), “Charging” appears on the display of the CD receiver and your iPod/iPhone/iPad will be charged even with the CD receiver on standby.Tip:• For details on power management settings, see “Set-ting Auto Standby (ASb)”.With Auto Standby, you can set the CD receiver so that it will be automatically turned off and enter the standby mode if there is no operation for 20 minutes with no audio input.The default setting is “Off”.Make settings for this function while playback is stopped.1Press and hold down the remote controller’s [SLEEP] button (about 3 seconds).If this setting is “On”, “AutoStby On” will appear on the CD receiver’s display.Note:• To switch between “On” and “Off”, repeat this procedure.• If an iPod/iPhone/iPad is connected, ASb will not operate because the connected unit is being charged.• If playback is paused, the power will remain on even after 20 minutes have elapsed; the Auto Standby function will not operate.• With Bluetooth Standby “On”, the CD receiver will enter the Bluetooth Standby mode if the Auto Standby function is enabled (see page 23).You can select CD, iPod (USB), FM, AM, Bluetooth, or LINE, which can be an external component.To select the input source, use the remote controller’s Input Selector buttons. On the CD receiver, press the [INPUT] button repeatedly.The input sources are selected in the following order.To adjust the volume, use the VOLUME [–]/[+] buttons.You can also use the CD receiver’s VOLUME [–]/[+] buttons.You can temporarily mute the output of the CD receiver.Press the [MUTING] button.The CD receiver is muted.“Muting” appears on the display for a few seconds. The MUTING indicator flashes continuously while the CD receiver is muted.Note:• To unmute, press the [MUTING] button again or adjust the volume.• Muting is automatically cancelled when the CD receiver is set to standby.You can connect a pair of stereo headphones (ø3.5 mm, 1/8-inch phone plug) to the receiver’s headphones [=] jack for private listening.Note:• Always turn down the volume before connecting your headphones.• While the headphones plug is inserted in the headphones [=] jack, the speakers are turned off.This section describes the procedure for using the remote controller, unless otherwise specified.Turning On the CD receiverSetting Auto Standby (ASb)Selecting the Input SourceAdjusting the VolumeMuting the CD receiverUsing HeadphonesFM iPod (USB)LINE BluetoothCD AME39_CS-355_En_120614.book 17 ページ 2012年6月14日 木曜日 午後1時48分TENTATIVE](https://usermanual.wiki/ORION-ELECTRIC/M115A.Users-Manual-Reference-Host-device/User-Guide-1744577-Page-17.png)
![18Basic Operations—ContinuedPress the [BASS] or [TREBLE] button, and then use the [q]/[w] buttons to adjust the bass or treble, respectively.The default setting is “0”. You can adjust the bass and treble from –5 to +5.While adjusting the bass or treble, you can press the [CLEAR] button to return the setting to “0”.Note:• If you press no buttons for about 5 seconds, the previous display will appear automatically.To turn on Super Bass, press the [S.BASS] button.The setting will alternate between S.Bass Off, S.Bass 1, and S.Bass 2 each time you press the button.To turn off Super Bass, press the [S.BASS] button repeatedly until “S.Bass Off” appears.The default setting is “Off”.You can adjust the brightness of the display.Press the [DIMMER] button repeatedly to select: dim, or normal brightness.Adjusting the Bass and TrebleUsing Super BassChanging the Display BrightnessE39_CS-355_En_120614.book 18 ページ 2012年6月14日 木曜日 午後1時48分TENTATIVE](https://usermanual.wiki/ORION-ELECTRIC/M115A.Users-Manual-Reference-Host-device/User-Guide-1744577-Page-18.png)
![19Playing CDs1Press the CD receiver’s [0] button to open the disc tray.Tip:• Pressing the [0] button while the CD receiver is on Standby will turn on the CD receiver and open the disc tray.2Place CD on the tray with the label-side facing up.Place 8 cm CDs in the center of the tray.3To start playback, press the CD receiver’s [1/3] button.Alternatively, press the remote controller’s [CD] button followed by the [1/3] button.The disc tray closes and playback starts.Then the “1” indicator appears.To stop playback:Press the [2] button.Playback stops automatically when the last track has been played.To pause playback:Press the [1/3] button. The Pause “3” indicator appears. To resume playback, press the [1/3] button again.To Fast-Forward or Fast-Reverse:During playback, press and hold the Fast Forward [4] button to fast forward, or the Fast Reverse [5] button to fast reverse.To remove the CD:Press the CD receiver’s [0] button to open the disc tray.■Information Displayed When Playback is Stopped:Selecting TracksTo return to the beginning of the track currently playing, press the Previous [7] button.Press the Previous [7] button repeatedly to select earlier tracks.Press the Next [6] button repeatedly to select subsequent tracks.During playback or while playback is paused, press the [DISPLAY] button repeatedly to display the following CD information.• Elapsed time•“REMAIN”Lights up while the remaining track time is being displayed.•“TOTAL REMAIN”Lights up while the remaining disc time is being displayed.•Type of CDThis section describes the procedure for using the remote controller, unless otherwise specified.Playing CDsCD „„ „„19„† „„67„‡29“DISC TOTAL” lights up• Audio CDTotal number of tracks Total playing timeDisplaying CD InformationE39_CS-355_En_120614.book 19 ページ 2012年6月14日 木曜日 午後1時48分TENTATIVE](https://usermanual.wiki/ORION-ELECTRIC/M115A.Users-Manual-Reference-Host-device/User-Guide-1744577-Page-19.png)
![20Playing CDs—ContinuedThe files on an MP3 CD can be located at the disc’s root level or within a folder.A folder can contain additional folders, with other folders inside them in a hierarchical structure.A maximum of 648 files and folders (total) can be shown within a folder. Files and folders are listed alphabetically without distinction.If you don’t select a specific MP3 file or folder for playback, all of the MP3 files will be played in numerical order starting with file #1.If random playback is selected, the files will not be played in the numerical order. If you want the files to play in the numerical order, you must cancel random playback (see page 21).1While playback is stopped, press the [MODE] button.“FOLDER” will light, and the name of the first folder will be shown.2Use the arrow [q]/[w] buttons to select a folder.Press the [ENTER] button or the [r] button to enter the folder.Repeat this operation to select the desired folder. When the “ ” message is shown, you can press the [ENTER] button to return to the upper-level folder.3Use the arrow [q]/[w] buttons to select the MP3 files within the folder.The name of the MP3 file inside the folder is displayed.To select a different folder, press the [e]/[r] button, then use the [q]/[w] buttons to select the desired folder, and finally press the [ENTER] button. Use the [q]/[w] buttons to select the desired file.4To start playback, press the [ENTER] button or Play/Pause [1/3] button.Playback will start with the specified file and continue until all of the MP3 files have been played.To select an MP3 file in another folder during playback, press the [MODE] button, select the folder by using the arrow [e]/[r]/[q]/[w] buttons, and then press the [ENTER] button. Now use the arrow [q]/[w] buttons to select the MP3 files within that folder.■Pausing PlaybackTo pause playback, press the Play/Pause [1/3] button.To resume playback, press it again.■Selecting a higher or lower folderPress the [e] button to select a higher-level folder, or the [r] button to select a lower-level folder.■To return to the rootPress the [MODE] button, and then press the [MENU] button.You can display various information about the MP3 file currently playing, such as title, artist, and album.During playback, press the [DISPLAY] button repeatedly to display the following MP3 information.The information is shown in the following order.Elapsed time: The length of time that the current MP3 file has been playing (default display).Remain time: The length of remaining time for the current MP3 file.File name: Name of the current MP3 file.Folder name: Name of the current folder.Sampling rate and bit rate: Sampling rate and bit rate of the current MP3 file.Volume label: Title of the current disc.Note:• Only single-byte alphanumeric characters can be shown.• A folder name, file name, or volume label that contains anything other than single-byte alphanumeric characters might be garbled.Selecting MP3 FilesDisplaying MP3 InformationE39_CS-355_En_120614.book 20 ページ 2012年6月14日 木曜日 午後1時48分TENTATIVE](https://usermanual.wiki/ORION-ELECTRIC/M115A.Users-Manual-Reference-Host-device/User-Guide-1744577-Page-20.png)
![21Playing CDs—ContinuedWith random playback, all of the tracks on the disc are played in random order.Random playback can also be used in conjunction with repeat playback.Note:• In the case of MP3 files, the same song might be played.Random playback can be set when the input source is set to CD or USB.1Press the [SHUFFLE] button until the RANDOM indicator appears.2To start random playback, press the Play/Pause [1/3] button.■Cancelling Random PlaybackTo cancel random playback, press the [SHUFFLE] or [CLEAR] button.When playing a CD, random playback will be cancelled automatically when the CD is removed.With repeat playback, you can play an entire CD repeatedly or play one track repeatedly.Repeat playback can also be used in conjunction with random playback.Press the [REPEAT] button repeatedly until the REPEAT or REPEAT 1 indicator appears.“REPEAT” will repeatedly play all songs.“REPEAT 1” will repeatedly play the currently-playing song or the selected song.Note:• If REPEAT 1 is selected, pressing the [SHUFFLE] button will cancel REPEAT 1; random playback will occur.■Cancelling Repeat PlaybackTo cancel repeat playback, press the [REPEAT] button repeatedly until both the REPEAT and REPEAT 1 indicators disappear.When playing a CD, repeat playback will be cancelled automatically when the CD is removed.Random Playback Repeat PlaybackE39_CS-355_En_120614.book 21 ページ 2012年6月14日 木曜日 午後1時48分TENTATIVE](https://usermanual.wiki/ORION-ELECTRIC/M115A.Users-Manual-Reference-Host-device/User-Guide-1744577-Page-21.png)
![22Playing Your iPod/iPhone/iPad• Before using your iPod/iPhone/iPad with the CD receiver, be sure to update your iPod/iPhone/iPad with the latest software, available from the Apple Web site.• Depending on your iPod/iPhone/iPad, or the type of content being played, some functions may not work as expected.Compatible iPod/iPhone/iPad modelsMade for:iPod touch (1st, 2nd, 3rd and 4th generation), iPod nano (2nd, 3rd, 4th, 5th and 6th generation), iPhone, iPhone 3G, iPhone 3GS, iPhone 4, iPhone 4S, iPad, iPad 2 and iPad (3rd generation)1Press the [iPod] button.Alternatively, you can use the CD receiver’s [INPUT] button.Note:• If “USB” appears on the display of the CD receiver, the connection mode is set to USB. Press and hold the [MODE] button until “iPod” appears to switch the connection mode to iPod. And then reconnect your iPod/iPhone/iPad with a USB cable.2Connect the USB cable that comes with the iPod/iPhone/iPad to the USB port on the front of the CD receiver.While reading the contents of your iPod/iPhone/iPad, the message “Connecting” appears on the CD receiver’s display.“iPod” appears on the display of the CD receiver. If your iPod/iPhone/iPad is not connected properly, “No Device” appears.Tip:• When connecting your iPod/iPhone/iPad with a USB cable, we recommend you use an official USB cable from Apple Inc.3Press the Play/Pause [1/3] button.Playback starts. ■Pausing PlaybackTo pause playback, press the Play/Pause [1/3] button.Press the Play/Pause [1/3] button again to resume playback. You can also pause playback by pressing the [2] button.■Selecting TracksTo return to the beginning of the track that’s currently playing or paused, press the Previous [7] button.Press the Previous [7] button repeatedly to select earlier tracks.Press the Next [6] button repeatedly to select subsequent tracks.■Fast-Forward or Fast-ReverseDuring playback, press and hold the Fast Forward [4] button to fast forward, or the Fast Reverse [5] button to fast reverse.■Random PlaybackPress the [SHUFFLE] button repeatedly to switch the random function of your iPod/iPhone/iPad.■Repeat PlaybackPress the [REPEAT] button repeatedly to switch the repeat function of your iPod/iPhone/iPad.■Selecting PlaylistPress the PLAYLIST [q]/[w] button to select the playlist.1Press the [MENU] button to display the iPod menu.2Use the Arrow [q]/[w]/[e]/[r] buttons to select an item on the menu, and then press the [ENTER] button.Note:• The volume level is adjusted by using the VOLUME [–]/[+] buttons on the CD receiver or its remote controller. Adjusting the volume on your iPod/iPhone/iPad has no effect.This section describes the procedure for using the remote controller, unless otherwise specified.Playing an iPod/iPhone/iPad via USBNavigating the iPod Menus with the Remote ControllerE39_CS-355_En_120614.book 22 ページ 2012年6月14日 木曜日 午後1時48分TENTATIVE](https://usermanual.wiki/ORION-ELECTRIC/M115A.Users-Manual-Reference-Host-device/User-Guide-1744577-Page-22.png)
![23Playing Back via BluetoothNote:• If your mobile phone supports A2DP protocol, its music will play through the CD receiver.• You can build a Bluetooth connection with a mobile phone, an iPod or any other Bluetooth-enabled devices.1Press the [INPUT] button on the top panel repeatedly to select the “Bluetooth” input.Tip:• Alternatively, you can use the remote controller’s [ /LINE] button.2Press the [ Bluetooth PAIRING] button on the top panel. to put the CD receiver into the pairing mode.“Pairing...” appears on the CD receiver’s display.If you hold the [ Bluetooth PAIRING] button for more than 2 seconds during the process of pairing, the operation will be cancelled.3During this period, you can operate the mobile phone, iPod or Bluetooth-enabled device to pair with the CD receiver within a 10m range.For details on the Bluetooth connection, refer to the user manual of the Bluetooth-enabled device.The CD receiver may not work as normal depending on the circumstance even though the CD receiver is placed within the 10 m range. In such cases, get the Bluetooth-enabled device closer to the CD receiver and retry the operation.4Once the CD receiver is detected and its name “Onkyo CR-245BT” appears on the display of your Bluetooth-enabled device, select the “Onkyo CR-245BT.” If a prompt requests a password, key in the “0000”.When a Bluetooth connection is established successfully, the “ ” indicator will be solid on and “Bluetooth” appears on the display of the CD receiver.5Select the desired music and press “1/3” button on your device. The CD receiver automatically starts playing the audio.If the “ ” indicator is not lit and “Bluetooth” appears on the display of the CD receiver after 2 minutes have elapsed after “Pairing...” appears, this means that the pairing is not done successfully. Perform the above procedure 1 to 4 again.Note:• If there is no sound output even after the paring is done successfully, consult the user manual of the Bluetooth-enabled device, and then select the “Onkyo CR-245BT” as the audio output device.• The CD receiver can store the pairing information of up to 8 Bluetooth devices. If the pairing is done for the ninth Bluetooth device, the pairing information of device connected via Bluetooth in the most past times is erased.• The multiple Bluetooth devices cannot be connected at the same time.If you press the [DISPLAY] button during the Bluetooth connection, the following Bluetooth information appears.The information is shown in the following order.• Audio CODEC• Sampling frequencyWith Bluetooth Standby, you can set the CD receiver so that it will be automatically turned on if the Bluetooth device is operated while the CD receiver is on standby.The default setting is “Off”.Make settings for this function while CD receiver is in standby mode.Press and hold the [8ON/STANDBY] button on the CD receiver while it is on standby (about 3 seconds).The SLEEP indicator will be dimly-lit.Note:• To switch between “On” and “Off” , repeat this procedure.Listening to an audio from Bluetooth deviceDisplaying Bluetooth InformationSetting Bluetooth StandbyE39_CS-355_En_120614.book 23 ページ 2012年6月14日 木曜日 午後1時48分TENTATIVE](https://usermanual.wiki/ORION-ELECTRIC/M115A.Users-Manual-Reference-Host-device/User-Guide-1744577-Page-23.png)
![24Listening to the RadioWhen tuned to a station, the Tuned ( ) indicator appears. When receiving a stereo FM signal, the FM ST indicator appears as well.The [MODE] button is used to select Auto mode or Mono mode. In Auto mode, the output will be stereo or mono depending on the station being received. In Mono mode, the output will be mono regardless of the station.1Press the [TUNER] button repeatedly to select “AM” or “FM”.Alternatively, you can use the CD receiver’s [INPUT] button.2Use the TUNING [e]/[r] buttons to tune into a station.Each time you press the TUNING button, the frequency changes 0.2 MHz steps for FM and 10 kHz steps for AM.If you press and hold a TUNING button, the frequency will change continuously. Once you release the button, tuning will stop automatically when a frequency on which a radio station is broadcasting is found. If you want to interrupt this process, press the [CLEAR] button.Tuning into weak stereo FM stationsIf the signal from a stereo FM station is weak, it may be impossible to get good reception. In this case, press the [MODE] button to switch to Mono mode and listen to the station in mono.With the Auto Preset function, you can automatically preset all of the FM radio stations available in your area in one go. Presets make it easy to select your favorite stations and eliminate the need to tune the radio manually each time you want to change stations.As an alternative to this Auto Preset function, there’s also a Manual Preset function that lets you manually preset individual FM stations (see page 25).Auto Preset Caution!Any existing presets will be deleted when the Auto Preset function is run.1Press the [TUNER] button repeatedly to select “FM”.Alternatively, you can use the CD receiver’s [INPUT] button.Make sure the FM antenna is positioned to achieve the best possible reception.2Press the [PRESET MEMORY] button.“Auto Preset?” appears on the display.3To start the Auto Preset function, press [ENTER].Up to 30 stations can be preset and presets are stored in frequency order.If you want to interrupt the Auto Preset process, press the [CLEAR] button.Note:• Depending on your location, a preset may be stored with no station, and you’ll hear only noise when you select it. In this case, delete the preset (see page 25).This section describes the procedure for using the remote controller, unless otherwise specified.Tuning into FM Radio StationsPresetting FM Stations Automatically(Auto Preset)E39_CS-355_En_120614.book 24 ページ 2012年6月14日 木曜日 午後1時48分TENTATIVE](https://usermanual.wiki/ORION-ELECTRIC/M115A.Users-Manual-Reference-Host-device/User-Guide-1744577-Page-24.png)
![25Listening to the Radio—Continued With the Preset Write function, you can manually preset individual AM and FM radio stations. Presets make it easy to select your favorite stations and eliminate the need to tune the radio manually each time you want to change stations.FM stations can also be preset automatically (see page 24).About PresetsYou can store up to 30 AM and 30 FM stations as presets.1Tune into the station that you want to store as a preset (see page 24).2Press and hold down the [PRESET MEMORY] button to the preset number flashes.When the preset has been stored, the preset number will change from blinking to steadily lit.Preset numbers are automatically stored starting with the lowest unused number.If all 30 AM or 30 FM presets have been set, the display will indicate “Preset FULL,” and no further presets can be stored. You’ll need to erase an existing preset before storing another one.You must store some presets before you can select them (see pages 24 to 25).1Press the [TUNER] button repeatedly to select “AM” or “FM”.Alternatively, you can use the CD receiver’s [INPUT] button.The preset you selected the last time you listened to the radio will be selected.2Use the PRESET [e]/[r] buttons to select a preset.Press the PRESET [e] button to select the previous preset. Press the PRESET [r] button to select the next preset.Tip:• If you press the remote controller’s [TUNER] button while the CD receiver is on Standby, it will turn on automatically and the station that you listened to last time will be heard.1Select the preset you want to erase.2Press and hold down the [CLEAR] button to erase the preset.When the preset has been erased, presets following the erased preset will be renumbered forward and redisplayed.Presetting AM/FM Stations ManuallySelecting Preset StationsErasing PresetsE39_CS-355_En_120614.book 25 ページ 2012年6月14日 木曜日 午後1時48分TENTATIVE](https://usermanual.wiki/ORION-ELECTRIC/M115A.Users-Manual-Reference-Host-device/User-Guide-1744577-Page-25.png)
![26Playing a USB Flash Drive1Press the [iPod] button to select “iPod”.Alternatively, you can use the CD receiver’s [INPUT] button.2Press and hold the [MODE] button until “USB” appears (about 3 seconds).3Insert a USB flash drive in the USB port.4To start playback, press the [1/3] button.Selecting folders and files, and using the random play and repeat play functions, are the same as when playing back MP3 files from a CD (see page 20).Note:• Do not connect your USB flash drive via a USB hub.• When connecting or disconnecting a USB flash drive, use your hand to support the CD receiver so that it does not move.• For details on the usable formats for a USB flash drive, refer to page 12 “Playback from USB Flash Drives”.• If your iPod/iPhone/iPad is used, switch the connection mode to iPod (see page 22).• Do not connect the CD receiver’s USB port to a USB port on your computer. Music on your computer cannot be played through the CD receiver in this way.Setting the Clock1Press the [TIMER] button repeatedly until “Clock” appears.2Press [ENTER].3Use the arrow [q]/[w] buttons to enter the current hour.When the CD receiver is shipped from the factory, the time display format is set to 24-hour time. Set the current hour as it would appear in 24-hour time.If you want to set the current hour as 12-hour time, press the [DISPLAY] button.4Press [ENTER].5Use the arrow [q]/[w] buttons to enter the current minute.6Press [ENTER].The clock is set and the second dot starts flashing.Displaying the TimeTo display the time, press the remote controller’s [CLOCK CALL] button. Press the button again or perform another operation to cancel the time display.If the CD receiver is on Standby, the time will be displayed for about 8 seconds.While the CD receiver is on, the time are displayed continuously.Change the time formatTo change the time format between 12-hour and 24-hour, press the [DISPLAY] button.This section describes the procedure for using the remote controller, unless otherwise specified.USB flash driveThis section describes the procedure for using the remote controller, unless otherwise specified.Setting the ClockE39_CS-355_En_120614.book 26 ページ 2012年6月14日 木曜日 午後1時48分TENTATIVE](https://usermanual.wiki/ORION-ELECTRIC/M115A.Users-Manual-Reference-Host-device/User-Guide-1744577-Page-26.png)
![27Using the TimerThe CD receiver has a programmable timer for automated playback, and a sleep timer for turning the CD receiver off after a specified period.You can also use the alarm playback function of your iPod to initiate timer playback on the CD receiver.The timer can be used to start AM/FM, CD, iPod/USB, or LINE playback at a specified time. You could, for example, use a timer to turn on the CD receiver every morning, just like a radio alarm clock.Note:• If iPod is selected as the input source for the timer settings, USB will play if only a USB flash drive is connected, and iPod/iPhone/iPad will play if an iPod/iPhone/iPad is connected.Note:• You must set the clock before you can program the timer.• If you don’t operate any buttons for about 5 seconds while programming a timer, the procedure will be cancelled and the previous display will reappear.• When the CD receiver is turned on by the timer, playback will begin with the most recently received station in the case of AM/FM, the first song in the case of a CD or iPod (USB), and the current state of the connected device in the case of LINE.• Only one timer can be set.1Prepare the source that you want the timer to play.If you want AM/FM to play, tune to the station you want to hear.If you want a CD to play, insert the disc.If your iPod/iPhone/iPad is used, switch the connection mode to iPod (see page 22). If your USB flash drive is used, switch the connection mode to USB (see page 26).If you want to play a device connected to LINE, make settings on the connected device so that it will start playing when the timer operates.2Press the [TIMER] button repeatedly until “Timer XX” appears.“XX” indicates the source that was last selected for timer playback.3Use the arrow [q]/[w] buttons to select the source, and then press [ENTER].You can select the following sources:AM/FM, CD, iPod (USB), LINE.In the display, “TIMER” and a number indication will blink according to the input source you’ve selected.The number will be “1” for AM/FM, “2” for CD, “3” for iPod (USB), and “4” for LINE.4Use the arrow [q]/[w] buttons to specify the “hour” at which you want the timer to play, and then press [ENTER].5Use the arrow [q]/[w] buttons to specify the “minute” at which you want to timer to play, and then press [ENTER].6Use the arrow [q]/[w] buttons to select “Timer On,” and then press the [ENTER] button.When a timer is turned on, its TIMER and number appears on the display.If there is no operation for several seconds, the setting will be made with the currently-shown content.The display will return to its previous state except for “TIMER” and the number of the selected input source; the timer is now set.7Press the On/Standby [8] button to set the CD receiver to Standby.Tip:• If you decide to cancel during this procedure without making timer settings, press the [TIMER] button.• By pressing the [DISPLAY] button when specifying the time, you can switch between 12-hour and 24-hour displays.Note:• Be sure to set the CD receiver to Standby, otherwise the timed operation will not work.If the timer has been set, timed operation will work even if the SLEEP timer caused the CD receiver to enter Standby mode.Once the timer has been turned on, playback will start at the same time every day. Be sure to turn off the timer before leaving on vacation.• If the timer turns the power on, the “SLEEP” indication will light. If no operation is performed for one hour, the CD receiver will automatically enter Standby mode. If you perform any operation, the “SLEEP” indication will turn off, and the CD receiver will continue operating.This section describes the procedure for using the remote controller, unless otherwise specified.Programming the TimerE39_CS-355_En_120614.book 27 ページ 2012年6月14日 木曜日 午後1時48分TENTATIVE](https://usermanual.wiki/ORION-ELECTRIC/M115A.Users-Manual-Reference-Host-device/User-Guide-1744577-Page-27.png)
![28Using the Timer—ContinuedOnce a timer has been programmed, you can turn it on or off as necessary. For example, while you’re on holiday, you may want to turn off the timer you use as an early morning alarm.1Press the [TIMER] button repeatedly until “Timer On” or “Timer Off” appears.2Use the arrow [q]/[w] buttons to select either “Timer On” (set) or “Timer Off” (cancel), and then press the [ENTER] button.If there is no operation for several seconds, the setting will be made with the currently-shown content, and the display will return to its previous state.If you specify Timer On (set), the “TIMER” indication and the number of the selected input source will light.If you select Timer Off (i.e., turn off the timer), the “TIMER” indicator will disappear.With the sleep timer, you can set the CD receiver so that it automatically turns off after a specified period.Press the [SLEEP] button repeatedly to select the required sleep time.With the [SLEEP] button, you can set the sleep time from 90 to 10 minutes in 10 minute steps.When the sleep timer has been set, the SLEEP indicator appears on the display. The sleep time appears on the display for about 3 seconds, then the previous display reappears.Checking the Remaining Sleep TimeTo check the remaining sleep time, press the [SLEEP] button.Note that if you press the [SLEEP] button while the sleep time is being displayed, you’ll shorten the sleep time by 10 minutes.For example if you press the [SLEEP] button and the remaining time is shown as 55 minutes, pressing the [SLEEP] button once again will shorten this time to 50, and each subsequent press will shorten the time in 10 minute increments.Canceling the Sleep TimerTo cancel the sleep timer, press the [SLEEP] button repeatedly until “Sleep Off” appears.Note:• If the timer turns the power on, the “SLEEP” indication will light. If you perform any operation, the “SLEEP” indication will turn off. If you want to set the SLEEP timer, you’ll need to make the setting again after the “SLEEP” indication turns off.When the alarm play function of the iPod connected to the CD receiver starts playing a song, the CD receiver will power-on and switch to the iPod input.1On your iPod, make settings for its alarm play function.2Repeatedly press the [TIMER] button to make the iPod alarm mode “iPodAlarmOff” message appear.3Use the arrow [q]/[w] buttons to select “iPodAlarmOn”, and then press the [ENTER] button.If there is no operation for several seconds, the setting will be made with the currently-shown content, and the display will return to its previous state.4Press the On/Standby [8] button to put the CD receiver in standby mode.When the alarm play function of the iPod begins, the CD receiver will power-on and the input will be switched to iPod.Note:• In order for the timer to work, the CD receiver must be in standby mode.• This function will not work if the iPod is not connected.• This function won’t work when the sound set for the alarm is a built-in sound (Beep).• This function won’t work with models on which music files cannot be used to set the alarm sound.Tip:• This function will power-on the CD receiver and switch the input to iPod when it detects a song being played back by the iPod. If you play back a song on the iPod without using its alarm play function, the CD receiver will power-on and switch to the iPod input in the same way.Turning Timer On and OffUsing the Sleep TimerTimer Playback using the Alarm Play Function of your iPodE39_CS-355_En_120614.book 28 ページ 2012年6月14日 木曜日 午後1時48分TENTATIVE](https://usermanual.wiki/ORION-ELECTRIC/M115A.Users-Manual-Reference-Host-device/User-Guide-1744577-Page-28.png)
![29TroubleshootingIf you have any trouble using the CD receiver, look for a solution in this section.Can’t turn on the CD receiver.• Make sure that the power cord is properly plugged into the wall outlet (see page 16).• Make sure that the power cord is properly plugged into the CD receiver’s AC INLET (see page 16).• Unplug the power cord from the wall outlet, wait 30 minutes or more, then plug it in again.The CD receiver turns off unexpectedly.• If the sleep timer has been set and the SLEEP indicator is shown on the display, the CD receiver will turn off automatically after a specified period (see page 28).•The CD receiver will automatically enter standby mode when Auto Standby has been set and launches (see page 17).There’s no sound.• Make sure the CD receiver’s volume is not set too low (see page 17).• Make sure the correct input source is selected (see page 17).• Make sure the CD receiver is not muted (see page 17).• Check all connections and correct as necessary (see pages 13 to 15).• While headphones are connected, the speakers output no sound (see page 17).• If there’s no sound from an external device connected to LINE IN, check whether the external device’s audio output level (volume) might be too low.The sound quality is not good.• Make sure the speaker cables are connected with the correct polarity (see page 13).• Make sure all audio connecting plugs are pushed in all the way (see page 15).• The sound quality can be affected by strong magnetic fields, such as that from a TV. Try moving any such devices away from the CD receiver.• If you have any devices that emit high-intensity radio waves near the CD receiver, such as a cellular phone that’s being used to make a call, the CD receiver may output noise.• The CD receiver’s precision drive mechanism may emit a faint hissing sound while reading discs during playback or when searching for tracks. You may be able to hear this noise in extremely quiet environments.Audio output is intermittent when the CD receiver is subjected to vibration.• The CD receiver is not a portable device. Use it in a location that’s not subject to shock or vibration.• Make sure that the included cork floor pads are attached to the speakers (see page 6).Headphones output is intermittent or there’s no sound.• This may be due to dirty contacts. Clean the headphones plug. See your headphones’ instruction manual for cleaning information. Also, make sure that the headphones cable is not broken or damaged.PowerAudioIf you can’t resolve the issue yourself, try resetting the CD receiver before contacting your Onkyo dealer.To reset the receiver to its factory defaults, turn it on and, while holding down the CD receiver’s Previous [7] button, press the [8ON/STANDBY] button.When the display indicates “RESET”, release the buttons. After a while, the CD receiver will enter standby mode.Note that resetting the CD receiver will delete your radio presets and custom settings.E39_CS-355_En_120614.book 29 ページ 2012年6月14日 木曜日 午後1時48分TENTATIVE](https://usermanual.wiki/ORION-ELECTRIC/M115A.Users-Manual-Reference-Host-device/User-Guide-1744577-Page-29.png)
![31Troubleshooting—ContinuedBluetooth connection cannot be built.• When building a Bluetooth connection between the CD receiver and your device for the first time, if the connection is fail, you need to power off your device and power on again to clear the device name, and build the connection again (see page 23).Can’t access the music files on a USB flash drive.• Check if “USB” appears on the display of the CD receiver. If “iPod” appears, switch the connection mode to USB (see page 26).• The CD receiver supports USB flash drives only. Note, however, that playback may not be possible with some USB flash drives.• Make sure that the USB flash drive has been formatted as FAT16 or FAT32.• USB flash drives with built-in USB hub functionality are not supported.• This CD receiver cannot play files other than MP3 files.Can’t play MP3 files.• MP3 files without a .MP3 or .mp3 filename extension are not recognized.• Check whether the file format is supported (see page 12).• The MP3 file’s copyright option is on. Don’t use the copyright option.Reception is noisy, stereo FM reception suffers from hiss, the Auto Preset function doesn’t preset all stations, or the FM ST indicator doesn’t light up when tuned to a stereo FM station.• Check the antenna connections (see page 13).• Change the position of the antenna (see page 13).• Move the CD receiver away from a nearby TV or computer.• Cars or airplanes can cause noisy interference.• The radio signal will be weakened if it has to pass through a concrete wall before reaching the antenna.• Switch to Mono mode and listen in mono. The FM ST indicator will go off (see page 24).• If none of the above improves the reception, install an outdoor antenna (see page 13).• When listening to an AM station, noise may be heard when you operate the remote controller.If a power failure occurs or the power cable is disconnected.• A brief power outage will not cause the contents of memory to be lost. However if the power cable is left disconnected for an extended period of time, only the clock settings (including the timer) will be reset. Please make these settings again as necessary (see pages 24 and 25).Can’t adjust the frequency of the radio.• Use the remote controller’s TUNING [e]/[r] buttons to change the frequency of the radio (see page 24).The remote controller doesn’t work properly.• Replace the battery with a new one.• The remote controller is too far away from the CD receiver, or there’s an obstacle between them (see page 6).• The CD receiver’s remote control sensor is being subjected to bright light (inverter-type fluorescent light or sunlight).• The CD receiver is located behind the tinted glass doors of an audio rack or cabinet.BluetoothUSB Flash Drive PlaybackTunerRemote ControllerE39_CS-355_En_120614.book 31 ページ 2012年6月14日 木曜日 午後1時48分TENTATIVE](https://usermanual.wiki/ORION-ELECTRIC/M115A.Users-Manual-Reference-Host-device/User-Guide-1744577-Page-31.png)
![32Troubleshooting—ContinuedNo sound is heard from your turntable.• Make sure the turntable has a built-in phono equalizer. If the turntable doesn’t have a phono equalizer built-in, you must provide one.The timer doesn’t work.• Make sure the clock has been set correctly (see page 26).• Timed operation will fail if the CD receiver is on at the specified On time, so make sure it’s set to Standby (see page 27).• If you press the [TIMER] button while a timed operation is in progress, the timer will be cancelled.• The volume setting for timer playback will be the volume that was set before the CD receiver entered standby mode. Set the appropriate volume beforehand.• If a power failure occurs and the clock stops, the timer will also be reset. Reset the clock, and then make timer settings.The display indicates “- - : - -” when you press the [CLOCK CALL] button.• A power failure has occurred, and the clock has stopped. Set the clock again (see page 26).Standby power consumption.• Charging will begin when you connect an iPod/iPhone/iPad, causing the power consumption to increase. Charging will occur even if the CD receiver enters standby mode.External ComponentsTimerClockOthersOnkyo is not responsible for damages (such as CD rental fees) due to unsuccessful recordings caused by the unit’s malfunction. Before you record important data, make sure that the material will be recorded correctly.The CD receiver contains a microcomputer. In very rare situations, severe interference, noise from an external source, or static electricity may cause it to malfunction or lock up. In the unlikely event that this should happen, unplug the power cord, wait at least 30 minutes, and then plug it back in again. If this doesn’t resolve the issue, reset the CD receiver to its factory defaults (see page 29).E39_CS-355_En_120614.book 32 ページ 2012年6月14日 木曜日 午後1時48分TENTATIVE](https://usermanual.wiki/ORION-ELECTRIC/M115A.Users-Manual-Reference-Host-device/User-Guide-1744577-Page-32.png)