ORION ELECTRIC M2D8D DVD/VCR TV Interface Device User Manual 2D81601A Cover
ORION ELECTRIC CO., LTD. DVD/VCR TV Interface Device 2D81601A Cover
UserManual.wiki
>
ORION ELECTRIC
>
M2D8D User Manual
Users Manual
Navigation menu
Upload a User Manual
Namespaces
Wiki Guide
HTML
PDF
Info
Views
User Manual
Discussion / Help
Navigation


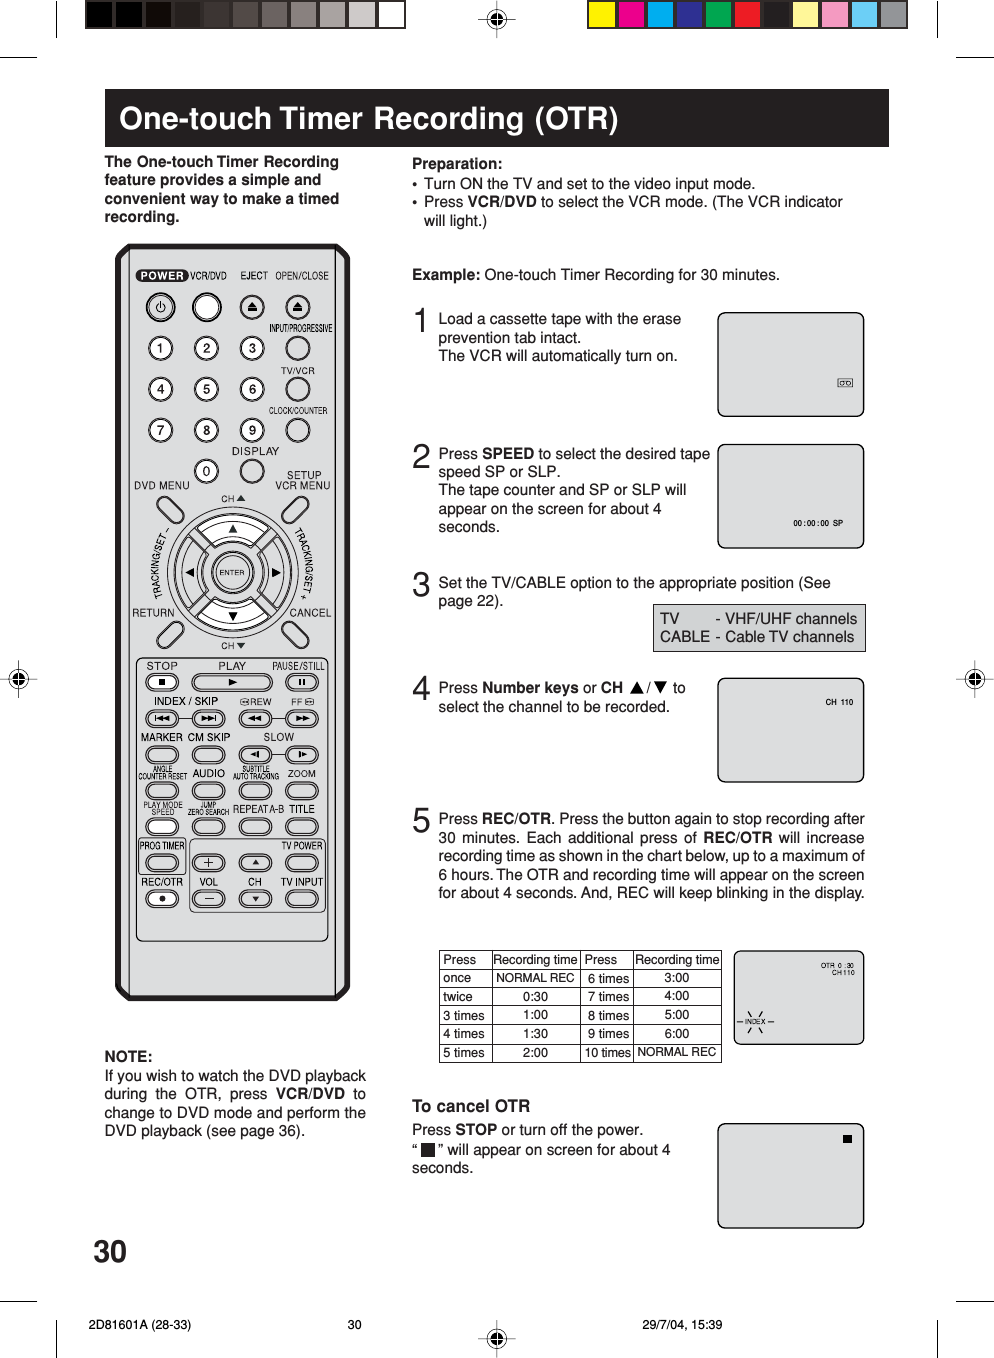
![9No. Display DescriptionWhen this unit and the TV are only connected by a coaxial cable, pressingthe TV/VCR button on the remote control makes this display appear.123456Display9101112VCRDVDCDPM10 : 0001 : 002C036L1, L2ErrTRKRECCH02Playback (lights) / Auto resume (flashes)Still pictureDVD disc is inserted.CD is inserted.Display for afternoon (lights out in the morning)Clock display (colon[ : ] flashes)Counter display by hour/minute at VCR/DVD / by minute/second at CDTrack number display for CDTV channel display for VCRCable TV channel displayExternal input displayError displayTimer recording displayVideo tape is in the unitTrack display for CDNormal recording display (flashes during One-touch Timer Recording - OTR)NOTE:Some discs may be displayed wrong or e.g. chapter number, playback time, etc. may not be displayed.Display window71 2 347651011129 88Progressive scanning mode 2D81601A (06-11) 29/7/04, 15:389](https://usermanual.wiki/ORION-ELECTRIC/M2D8D/User-Guide-458231-Page-9.png)


![37Special playbackPress FF during normal playback.Each press of FF will increase the speed of the search (x2),(x4), (x8), (x20).• To resume normal playback, press PLAY.Fast Forward PlaybackPress REW during normal playback.Each press of REW will increase the speed of the search (x2), (x4), (x8), (x20).• To resume normal playback, press PLAY.Review PlaybackPress PAUSE/STILL during normalplayback.Still PlaybackTo resume normal playback, pressPLAY.Press PAUSE/STILL during still play-back.One frame is advanced each timeyou press PAUSE/STILL.Frame Advance• To resume normal playback, press PLAY.• To resume the still playback, press PAUSE/STILL.Press SLOW(]) Forward or SLOW (^) Reverse duringnormal playback or still playback.Each press of SLOW will change the speed of the slow x1/2, x1/4,x1/6, x1/7.Slow-motion PlaybackTo resume normal playback, pressPLAY.Locating a chapter or trackThe unit is capable of holding a still videoimage or on screen display image on yourtelevision screen indefinitely. If you leavethe still video image or on screen displayimage displayed on your TV for an ex-tended period of time, you risk permanentdamage to your television screen. Projectiontelevisions are very susceptible.Press SKIP ( ) Forward or SKIP ( ) Reverse during play-back to locate a chapter that you want to watch.Each time you press the button, a chapter or track is skipped.NOTE:Note: There may be a slight delaybetween pressing the button and thefunction activation.Turn ON the TV and set to the video input mode.Press VCR/DVD to select the DVD mode. (The DVD indicatorwill light.)Preparation:•• 2D81601A (34-39) 29/7/04, 15:4037](https://usermanual.wiki/ORION-ELECTRIC/M2D8D/User-Guide-458231-Page-37.png)


![63Spanish Quick Use Guide (Guía para rápida consulta)Procedimiento de reproducción4Presione STOP para terminar la reproducción.•El aparato graba el punto de parada, según el disco.Aparece “ ” en la pantalla.“” sigue parpadeando en el visualizador hasta quese detenga por completo la reproducción.Presione PLAY para continuar reproduciendo(desde el mismo punto).•Si presiona nuevamente STOP o se retira el disco(Aparece “ ” en la pantalla), el aparato borrará elpunto de parada.5A continuación presione OPEN/CLOSE.Se abre la bandeja del disco.Saque el disco y POWER. La bandeja del disco se cierraautomáticamente y se desconecta el aparato.Presione FF durante la reproducción normal.Cada vez que presione el botón de FF , aumentará lavelocidad de la búsqueda (x2), (x4), (x8), (x20).• Para seguir con la reproducción normal, presione PLAY.Reproducción con retroceso rápido1Presione OPEN/CLOSE.Se abrirá la bandejadel disco.Ajuste de la selección de idioma1Presione SETUP en elmodo de parada. ElMENÚ DE AJUSTE deDVD aparecerá enpantalla.Presione paraseleccionar Other.2Presione o ENTERpara seleccionar OSDLanguage.3Presione o ENTERy presione o paraseleccionar el idiomadeseado (porejemploEnglish) y presione EN-TER.4Para que desaparezca la pantalla SETUP, presioneSETUP (o RETURN).OSD Language English EnglishFrancaisEspanol/Enter/Setup/ReturnLanguage Picture ParentalSound OtherOSD Language English/Enter/Setup/ReturnLanguage Picture ParentalSound Other/Enter/Setup/ReturnLanguage Picture ParentalSound OtherReading2Coloque un disco en la bandeja.Sujete el disco, colóquelo con ellado de etiqueta impresa haciaarriba, alinee en las guía y coloqueel disco en su posición correcta.3Presione PLAY u OPEN/CLOSE.La bandeja del disco se cierra automáticamente.En la pantalla del TV laindicación “” cambiaa “Reading” y empiezala reproducción.•Aparece la pantalladel menú en la pantallade TV, si el disco tieneuna función de menú.En este caso, presione, , , oENTER para activaruna función de menú.Reproducción con avance rápidoPresione REW durante la reproducción normal.Cada vez que presione el botón de REW, aumentarála velocidad de la búsqueda (x2), (x4), (x8), (x20).• Para seguir con la reproducción normal, presione PLAY.Reproducción FijaPresione PAUSE/STILL durante la reproducción normalpara hacer una pausa en la reproducción.Para seguir con la reproducción normal, presione PLAY.Avance cuadro por cuadroPresione PAUSE/STILL durante la imagen fija.Avanza un cuadro cuando presione PAUSE/STILL una vez.Para seguir con la reproducción normal, presione PLAY.Reproducción de cámara lentaPresione SLOW (^/]) durante la reproducción normalo cuadro a cuadro.Cada vez que presione SLOW, cambiará la velocidaddel slow x1/2, x1/4, x1/6, x1/7.•Para seguir con la reproducción normal, presione PLAY.•Para volver a la imagen fija, presione PAUSE/STILL.Búsqueda de un capítulo o canción o canciónPresione SKIP ( ) en avance o SKIP ( ) enretroceso durante la reproducción para buscar un capítuloque desea ver. Cada vez que presione el botón, se saltaun capítulo o canción. 2D81601A (60-BACK) 29/7/04, 15:4263](https://usermanual.wiki/ORION-ELECTRIC/M2D8D/User-Guide-458231-Page-63.png)