ORION ELECTRIC M2H5A DVD/VCR TV Interface Device User Manual Part 2
ORION ELECTRIC CO., LTD. DVD/VCR TV Interface Device Users Manual Part 2
UserManual.wiki
>
ORION ELECTRIC
>
M2H5A User Manual
>
Users Manual Part 2
Contents
1.
Users Manual Part 1
2.
Users Manual Part 2
Users Manual Part 2
Navigation menu
Upload a User Manual
Namespaces
Wiki Guide
HTML
PDF
Info
Views
User Manual
Discussion / Help
Navigation

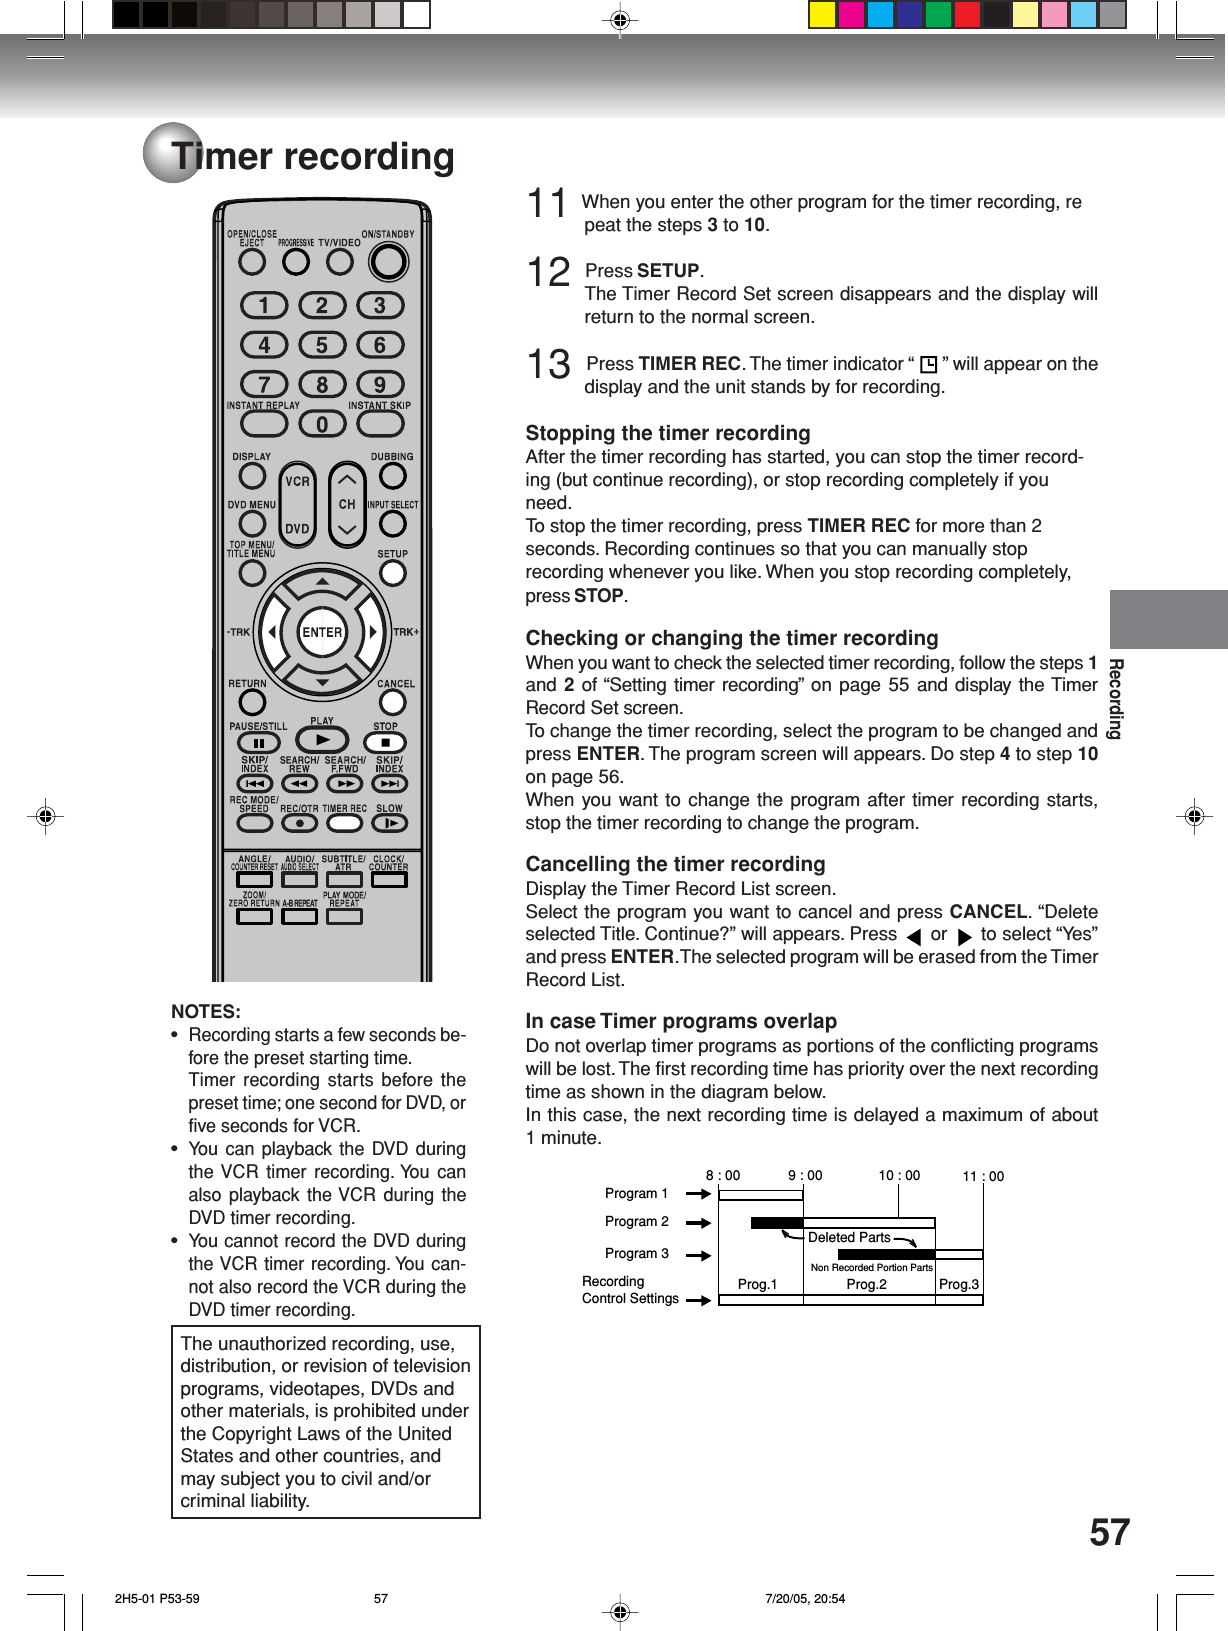
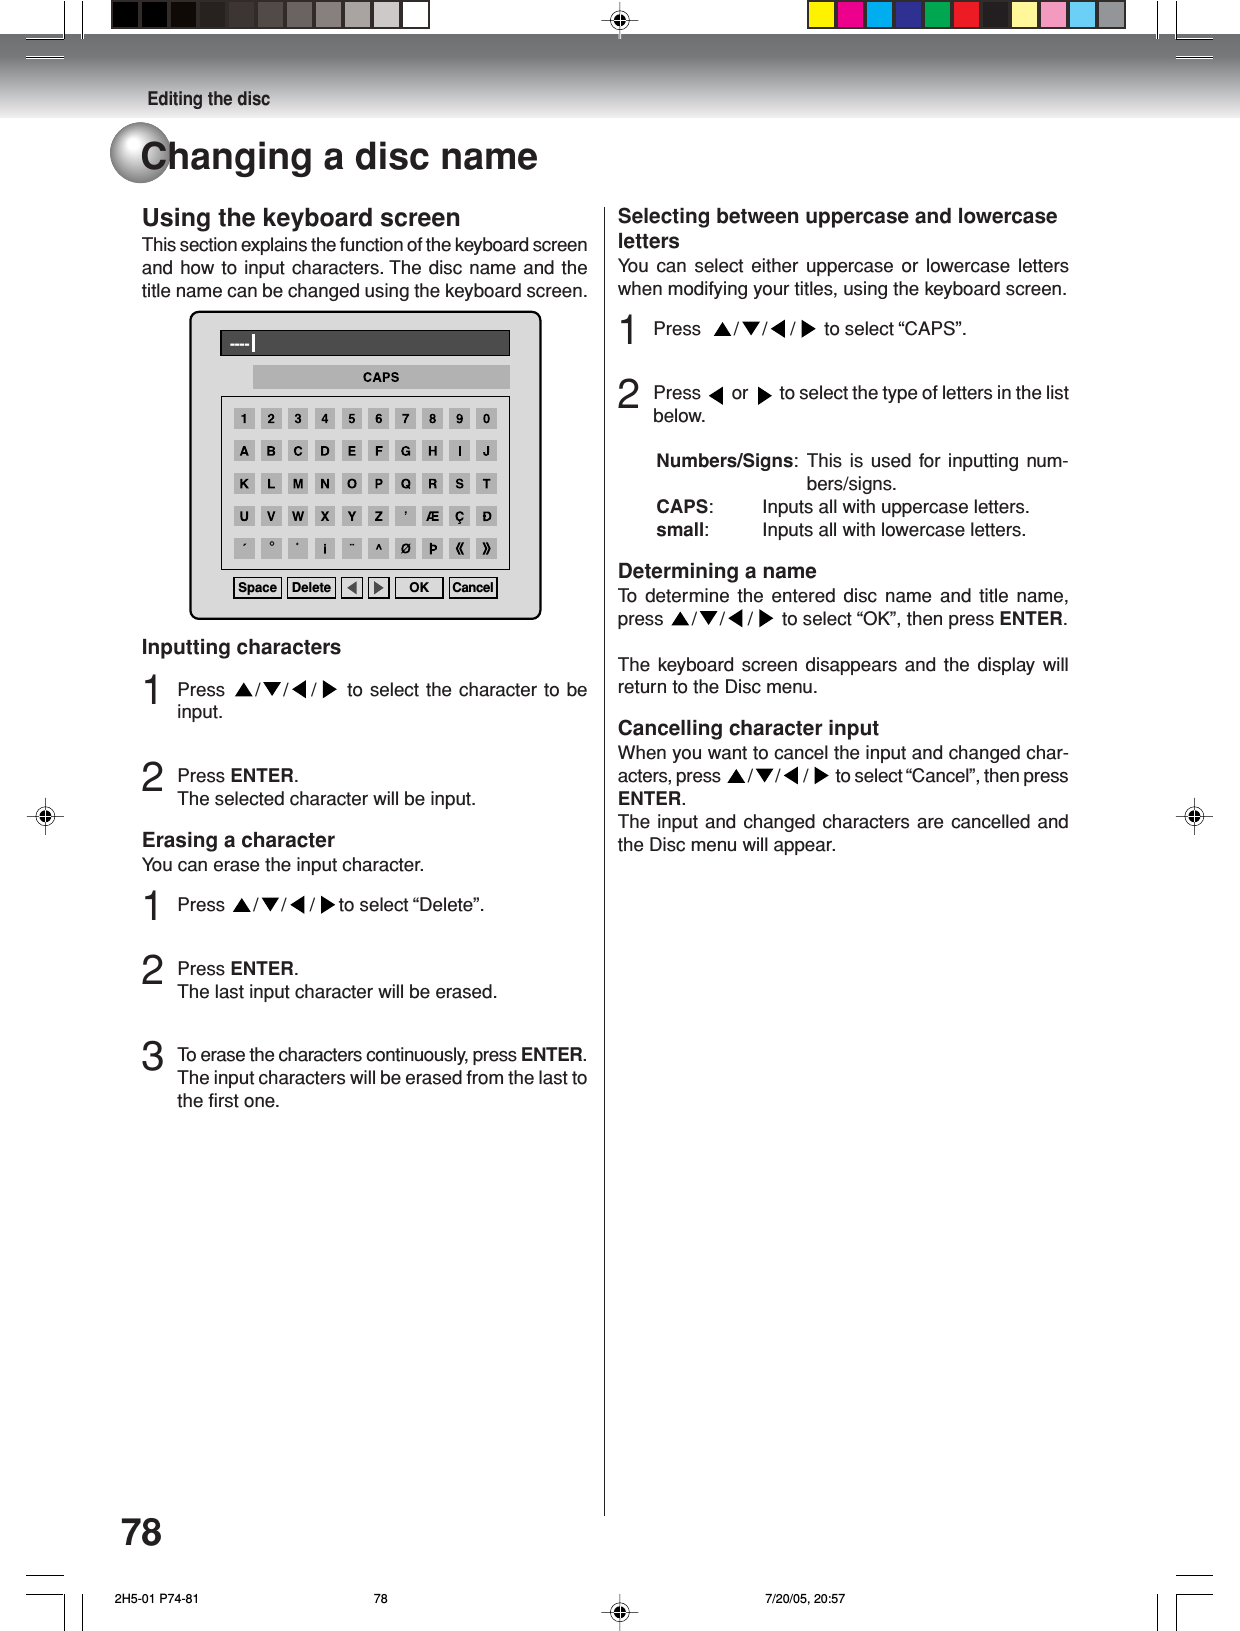
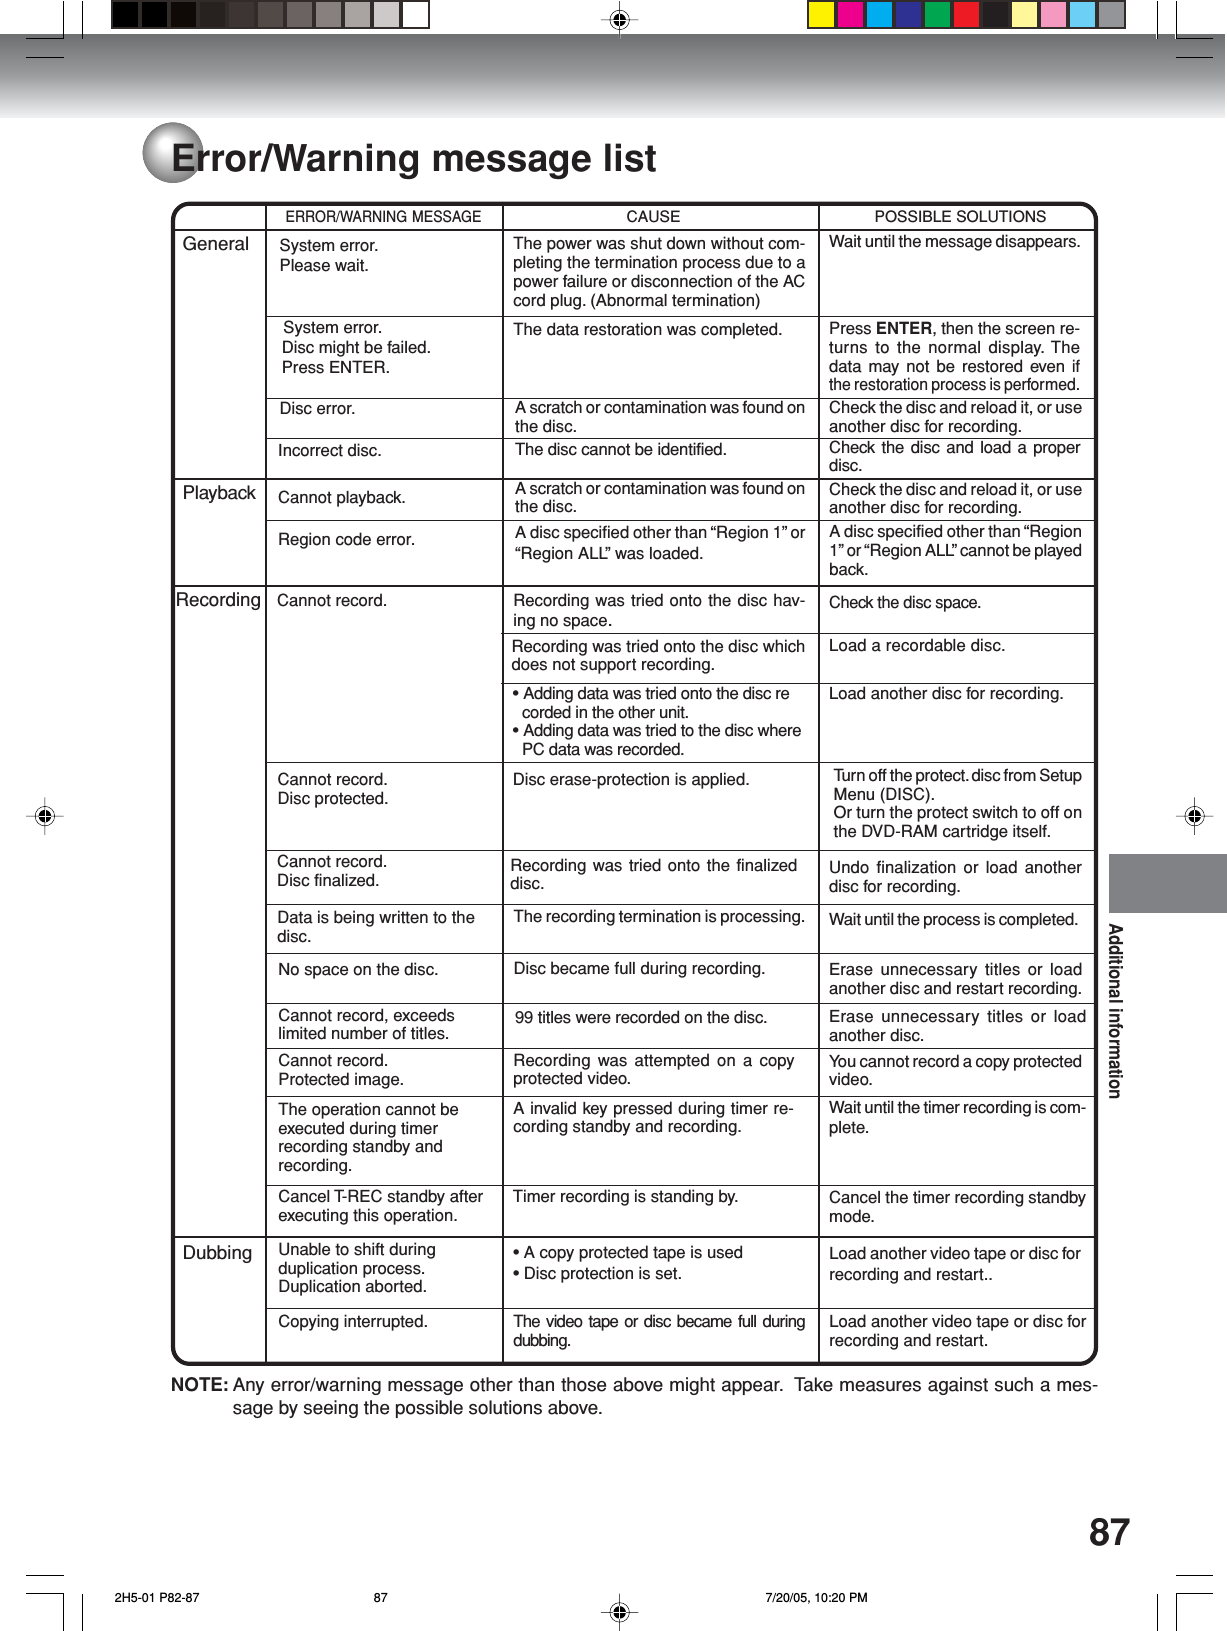
![Recording55Timer recordingThe timer recording system allowsyou to select the date, time, chan-nel and record the desired pro-grams. Up to 12 timer programswithin a month can be stored in thisunit.Setting timer recordingPreparation:• Turn ON the TV and set to the video input mode.• Load a recordable DVD or video tape.• Press DVD or VCR to select the appropriate mode.• Confirm that the clock is indicating the correct time.Example: Set the recording mode to LP; the TV program is on channel12 starting at 8:00 PM and stopping at 9:30 PM on a date of 20th.1Press SETUP.The Easy Menu screen appears.External Audio InputTimer RecordingSetup MenuAdd Chapter MarkSet Index Picture2Press or to select “Timer Recording” and press ENTER.The Timer Record List screen will appear.CANCELSelectDeleteTimer Record List NewEnter BackEndENTER RETURNSETUPRec RecTO ModeCHEndStartDate3Press or to select “New” and press ENTER.The program screen will appear.NOTE:If a recordable tape is not insertedor no disc space is available, thetimer record indicator “ ” flashes.Replace the tape or disc to allow re-cording.The unauthorized recording, use,distribution, or revision of televisionprograms, videotapes, DVDs andother materials, is prohibited underthe Copyright Laws of the UnitedStates and other countries, andmay subject you to civil and/orcriminal liability.RETURNSelectBackTimer Rec Set Free = LP 4:14:51Rec RecTO ModeCHEndStartDateDVD LP 21:21 AM12:21 AMSet EnterENTER1/ 1 [Sat]The remaining record time displayed changes to match the recording mode. 2H5-01 P53-59 7/20/05, 20:5455](https://usermanual.wiki/ORION-ELECTRIC/M2H5A.Users-Manual-Part-2/User-Guide-566948-Page-5.png)
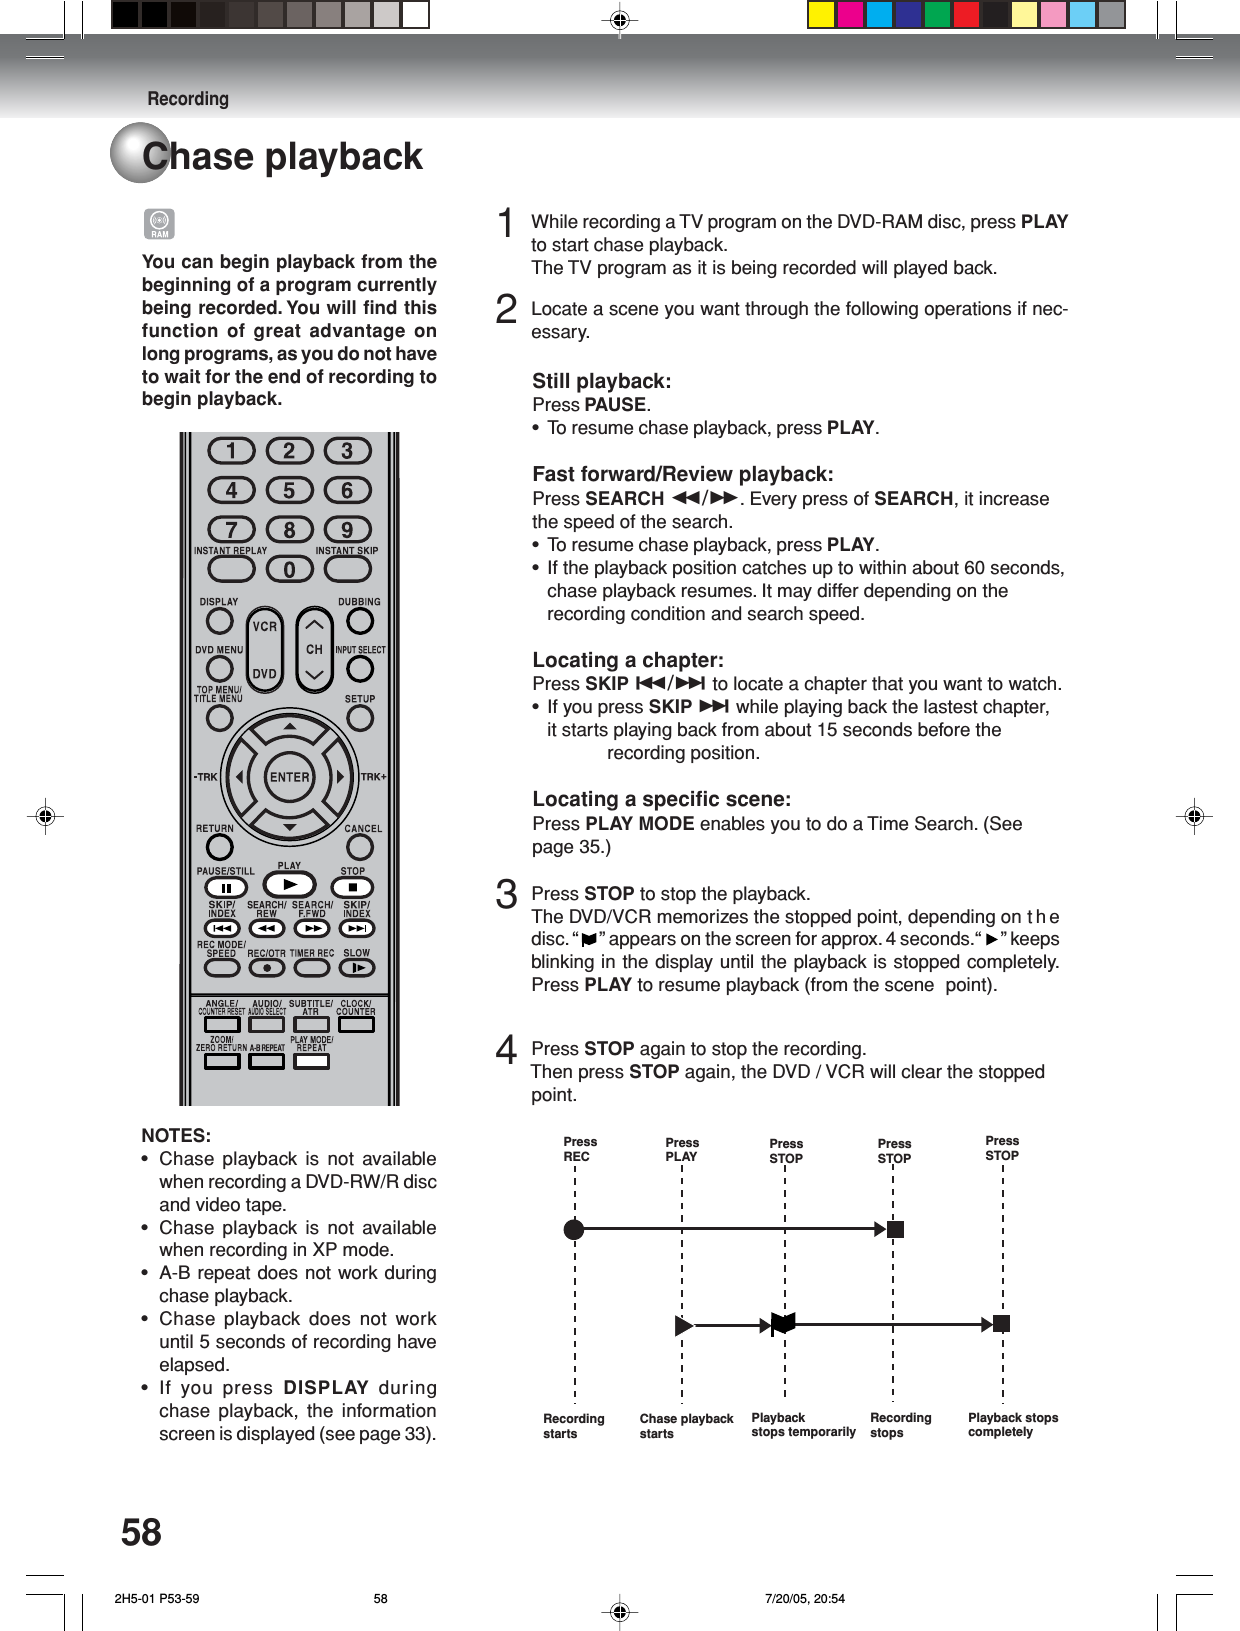
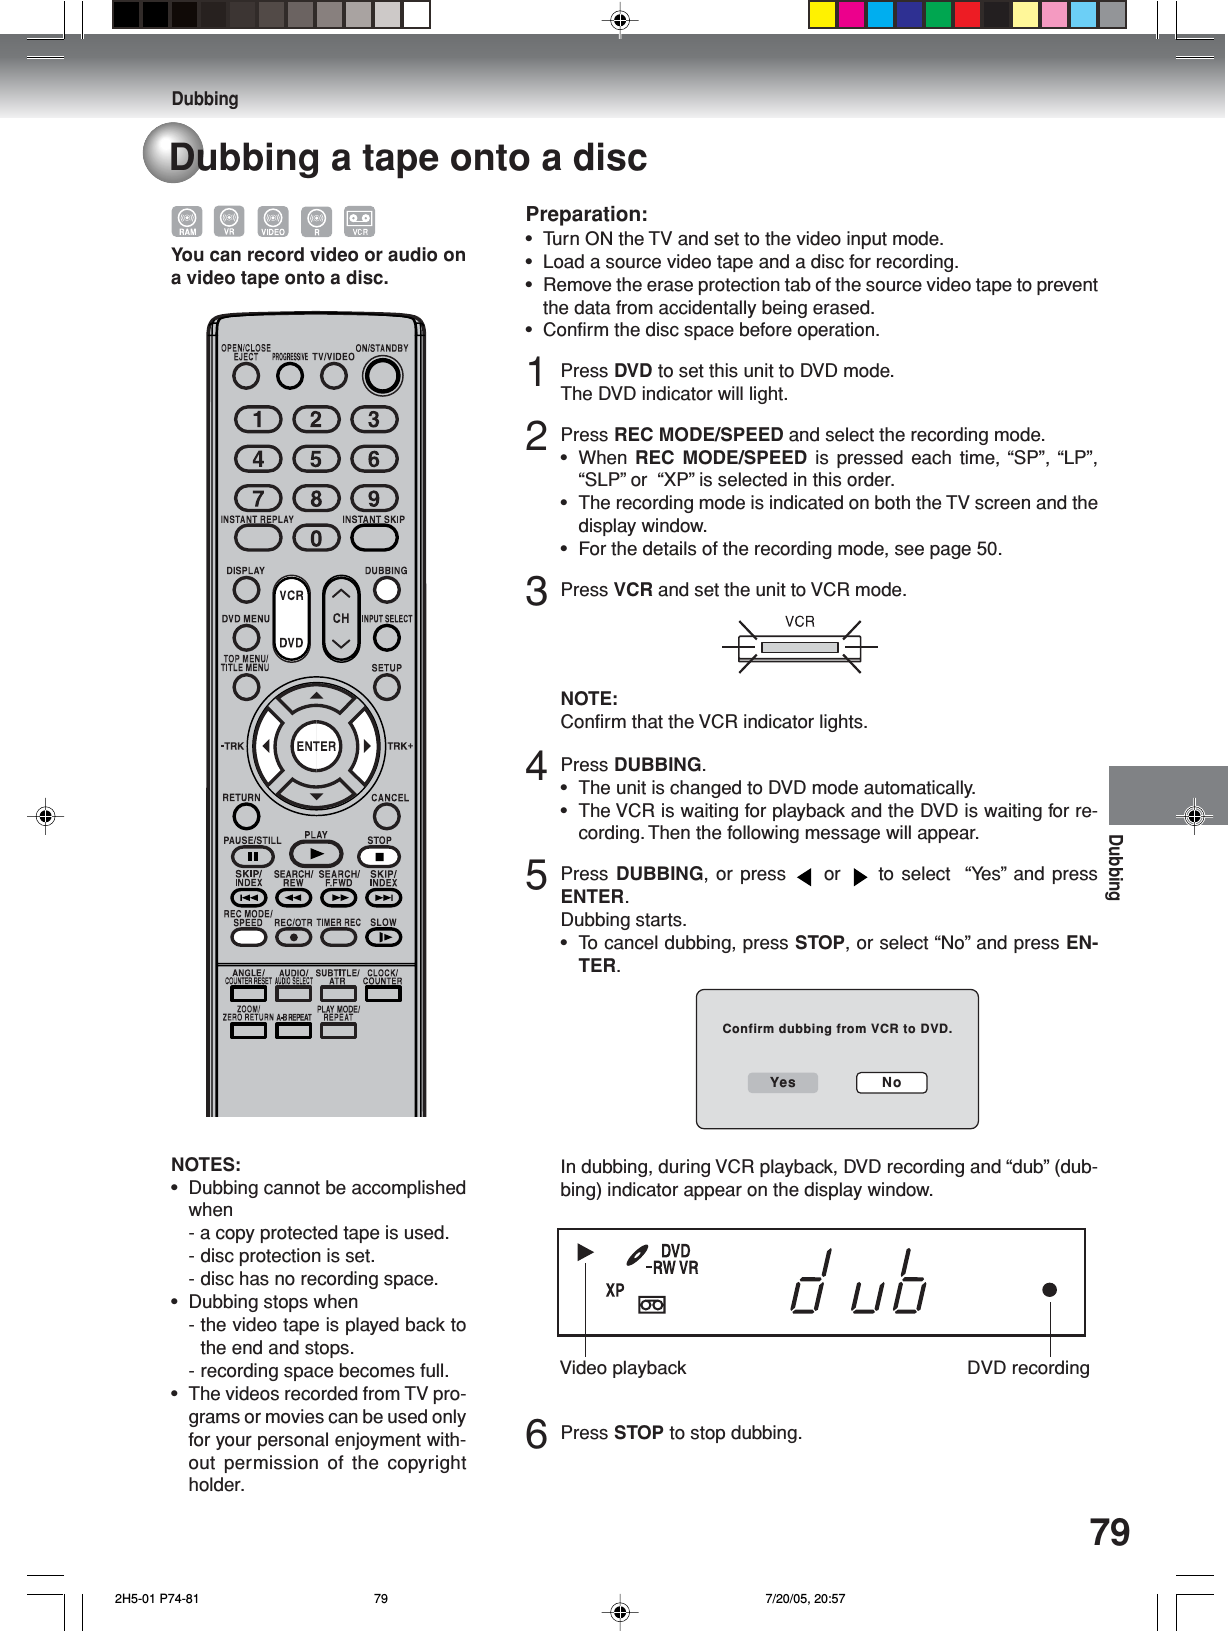
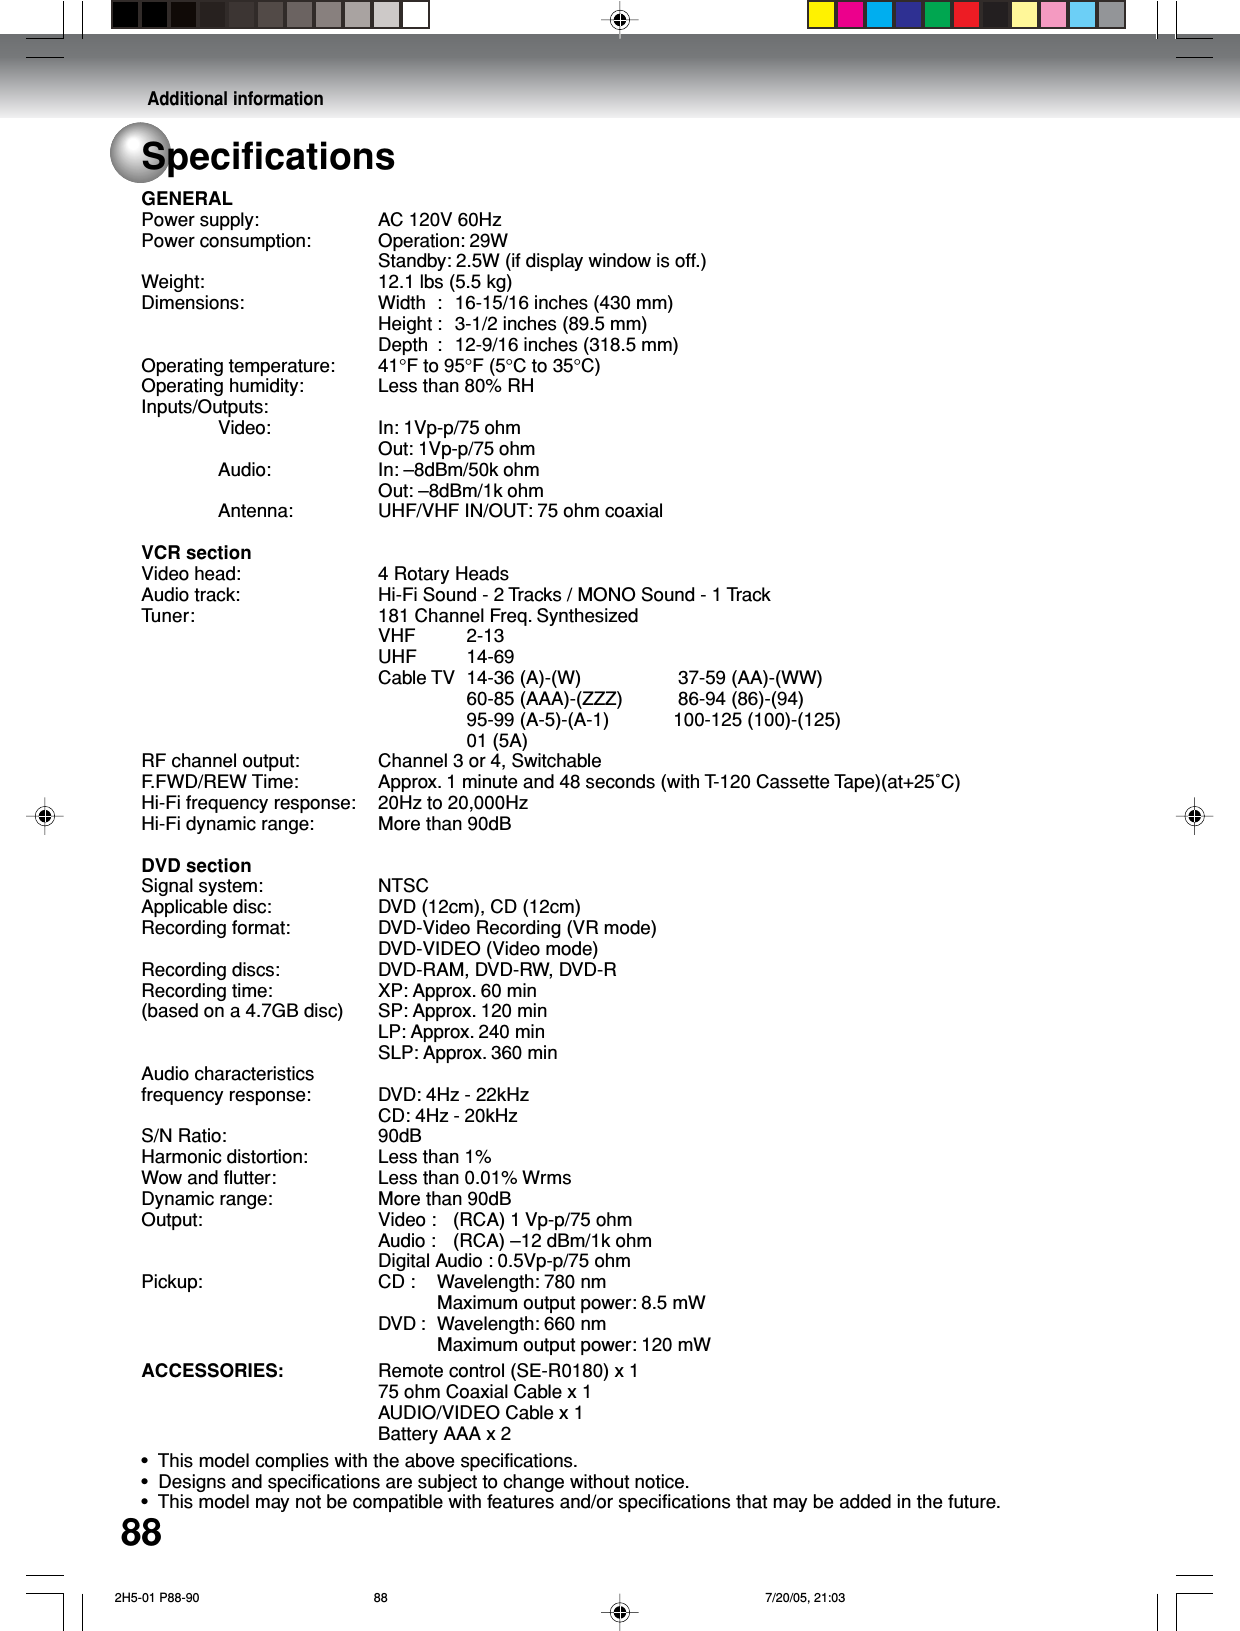
![Recording56Timer recording4Press or to select “Date”.Press or to select the date to be recorded from the list andpress ENTER.5Press or to select “Start”.Set the recording start time.• To switch over the selection item (hour or minute), press or .• Press or to adjust the time.6Press or to select “End”.Set the recording stop time in the same manner in step 5.7Press or to select “CH”.• Press or to select the channel to be recorded.• You can select the external input (Line1 or Line2) by pressing or .8Press or to select “Rec To”.Select the media (DVD or VCR) to be recorded from the list.9 Press or to select “Rec Mode”.The recording modes for the media selected in “Rec To” item arelisted up.Select the recording mode.For the recording modes in VCR, see page 46. For the recordingmodes in DVD, see page 50.CANCELSelectDeleteTimer Record Set Free = LP 4:14:51Rec RecTO ModeCHEndStartDateDVD LP 209:30 PM8:00 PMEnter BackEndENTER RETURNSETUP11/20 [Sun]NOTES:•You can record same day of everyweek or from Monday to Friday us-ing the items. The items you canselect are as follows:Every Sun: Recording every Sun.Every Mon: Recording every Mon.Every Tue: Recording every Tue.Every Wed: Recording every Wed.Every Thu: Recording every Thu.Every Fri: Recording every Fri.Every Sat: Recording every Sat.Mon-Fri: Recording from Mon. to Fri.Mon-Sat: Recording from Mon. toSat.Everyday: Recording everyday.•The starting and stopping times forrecording are displayed on the 12-hour (am/pm) clock. Twelve o’clockmidnight is displayed as “12:00AM”, whereas twelve o’clock noon isdisplayed as “12:00PM”.The unauthorized recording, use,distribution, or revision of televisionprograms, videotapes, DVDs andother materials, is prohibited underthe Copyright Laws of the UnitedStates and other countries, andmay subject you to civil and/orcriminal liability.10 Press ENTER.The timer program is determined and the Timer Record List screenappears again.CANCELSelectDeleteTimer Record List NewEnter BackEndENTER RETURNSETUPRec RecTO ModeCHEndStartDateDVD LP 20 9:30 PM 8:00 PM11/20 [Sun] 2H5-01 P53-59 7/20/05, 20:5456](https://usermanual.wiki/ORION-ELECTRIC/M2H5A.Users-Manual-Part-2/User-Guide-566948-Page-6.png)