Ocean Digital Technology MS280I0000 Internet Radio User Manual
Ocean Digital Technology Ltd. Internet Radio Users Manual
user manual

User Manual
MS-280i
Please read this user manual carefully before using the receiver.
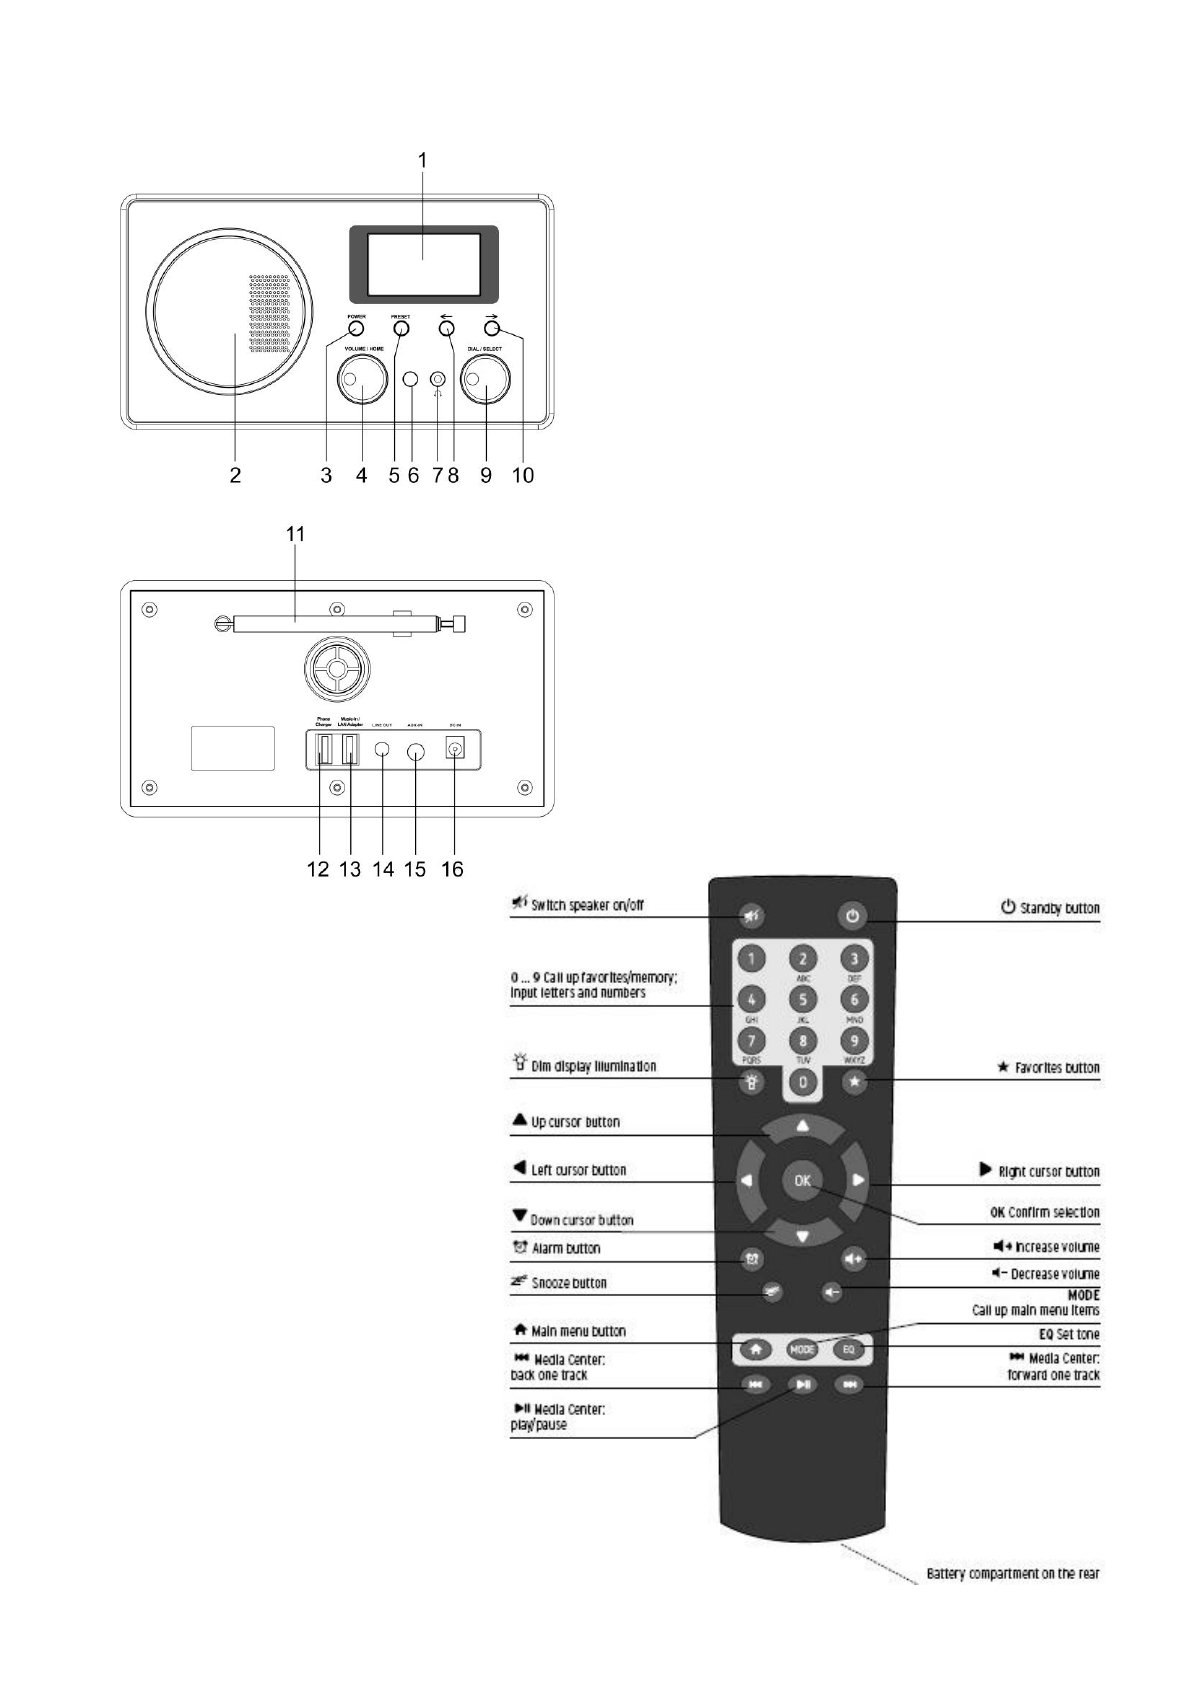
LOCATION OF CONTROLS
1. LCD Display
2. Speaker
3. POWER Press to stand by ON/OFF
4. VOLUME/HOME Dial to increase the volume level
or decrease the volume level. Press to back the main
menu.
5. PRESET Press to store and hold to recall the favorite
stations.
6. Remote lens
7. Earphone jack
8. ← Press to go to the previous station or go back to
the up menu.
9. DIAL/SELECT Dial to find the different menus and
press to confirm the choice.
10. → Press to go the next station or enter the
submenu.
11. Telescope antenna
12. Phone charger (5V)
13. LAN adaptor/USB playback
14. Line out Jack
15. Aux-In jack
16.DC Socket
Remoter controller:

NOTE:
FCC Statements
NOTE: Changes or Modifications not expressly approved by the party responsible could void the
user‟s authority to operate this device.
NOTE: This equipment has been tested and found to comply with the limits for a Class B digital device,
pursuant to Part 15 of the FCC Rules. These limits are designed to provide reasonable protection against
harmful interference in a residential installation. This equipment generates, uses and can radiate radio
frequency energy and, if not installed and used in accordance with the instructions, may cause harmful
interference to radio communications. However, there is no guarantee that interference will not occur in a
particular installation.
If this equipment does cause harmful interference to radio or television reception, which can be determined
by turning the equipment off and on, the user is encouraged to try to correct the interference by one or more
of the following measures:
-- Reorient or relocate the receiving antenna.
-- Increase the separation between the equipment and receiver.
-- Connect the equipment into an outlet on a circuit different from that to which the receiver is connected.
-- Consult the dealer or an experienced radio/TV technician for help.
SETTING UP
Those steps for connecting your radio to your network
Step 1 Switching on the radio
Plug the cable from the AC adapter into the socket labeled DC on the back of the radio, then power on
the radio.
Caution: Use only the mains adapter supplied with the radio. Connecting a power supply with a different
rating will cause permanent damage to the radio and may be hazardous.
The display on the front of the radio will light up and say:
Then show
After a few seconds, it will show:
If it complete the initialing, it will auto scan the ESSID as
Then it will list all the ESSID names it can find, you can select one of you want to use, maybe it will request
you input the correct WEP(Wired Equivalent Privacy) or WPA(Wi-Fi Protected Access) code. If your
network is not configured to need a WEP or a WPA code, the unit will connect to the ESSID auto and
success as
Or if you are requested to input the encryption, you can do as below
1. Select the one you want to use
<linksys>
<aershan>
…….
Network OK
<linksys>
CC WiFi 2
Connecting
to Network
>>>>>>>>>>
Scanning for
Wireless
…….

2. Then it will show you
Note: The encryption code would have been set up by the person who set up and configured your
network.
After 3 seconds the display goes into the code entry mode or press “enter”.
Please refer to the 1.2.5 to know clear of the “Remote control character list” for you to enter the
passwords. Press “→” button to go to the next word, press “←” button to delete the wrong word you have
entered.
3. If you complete the key then you can use “Enter” to confirm. The display shows “Connect WiFI” as the
radio connects to the network.
4. If the connecting is OK, it will show you
Function
1.1 TuneIn Radio
You can listen to the interne radio under this section. There are several methods to browse the stations.
- Browse Presets
- Browse WEB Presets
- Browse Stations
- Search station
Enter Password
■
1/1
←Move→ INPUT:0-9↑↓ OK↙
Connecting
to network
TuneIn Radio
Media Center
FM

- History
Normally, you can choose “Browse Stations” to view the broadcast radio from different countries under the submenu
“By Location”.
When the radio name shows on the display, you can press “→” button to active below operation.
Add to preset
i. Press “DIAL/SELECT” to store the current station into my favorite. User can store 20 stations.
ii. User can recall the station by press number 0-9. Or press “★” from the remote controller to see the favorites list,
then choose the stored station which you want to listen and press “DIAL/SELECT” to confirm.
Auto scan
Auto scanning the every station from the currently list for your review in 30 seconds again and again until you
confirm the one you need.
Remark:Press „Select‟ button or the “OK” button on the remote to stop station scanning and remain on the currently
one.
Play
Play the current radio station.
1.2 Media Center
USB
Play the music from the USB driver.
UPNP
Visit the shared folder from your PC.
My playlist
User can view the playlist under this menu.
Clear my playlist
User can clear the playlist under this section.
1.3 FM
Station selecting
1.You can press“0,1-9” of the remote and enter the station selecting menu,and go with the shortcut into the
station which you like to listen.(1-20).
2.You can press “Preset” button and enter the station selecting menu, Dial the “VOLUME/SELECT” or “↑”&“↓”to
select FM station(1-20), and press „Select‟ button to recall FM station.
3.You can press “Left” & “Right” buttons to turn to the Previous/ Next FM presetting station.
4.20 maximum storage of FM station.
Remark :Press “Left” and “Right” buttons to do the FM stations switching and it will turn to the 1st station if
the currently one is not the presetting station..
Store FM station
1.It can auto store the available FM stations by hold "DIAL/SELECT" or "OK" on remote controller for auto
scanning. (Details refer to2.5.3)
2.You can keep pressing „Preset‟ and enter the storage menu,and press the number buttons or“↑”、“↓” to
select the presetting FM station number(1-20), and press “Select” button for storage confirmed.

Auto searching
Description:The radio can auto scanning from the lowest frequency to the highest frequency and store
the available FM stations.
Function Indication:1.You can press “Select” button for auto searching.
Remark:When you‟re operating the auto searching, the FM related function (such as stations switching、
manual searching、manual tune and figure stored) will don‟t work until the auto searching is
completed, and the second searching also will be refused as well.
Manual searching
Description:Do Searching for Next or Previous FM Station.
Function Indication:
1.You can press “Right” button for next FM station searching.
2.You can press “Left” button for previous FM station searching.
3.You can press “Right” / “Left” buttons to stop searching during the manual searching .
Remark:Stations switching、manual tune and figure stored will don‟t work during the manual searching ,
which will not be stop until auto searching is started.
Manual Tune ( Remote control only)
Description:Manual tune up/down 0.05MHz
Function Indication:
You can press‟↑↓‟ buttons for manual tune up/down 0.05MHz
1.4 Information Center
1.4.1 Weather Information
Description:You can learn the weather forecast all over the world
Function Indication:
1.Add to Standby Display
2.‟Currently Date & Time‟ and „Currently Weather‟ will be on alternating display every 10 seconds under the
standby mode if the weather forecast display is started.
You also can press „Select‟ button for the switching of ‟Currently Date & Time‟ and „Currently Weather‟. You can
press “Left” and “Right” buttons to display the previous/next day weather forecast.
1.4.2 Financial Information
Description:You can learn the information of Stock Market all over the world
1.4.3 System Information
Description:You can learn the information of Version / Wlan Mac / Ip address ect.
1.5 AUX
User can use the audio cable to enjoy the music from audio players, such as mobile phone, MP3, etc..
1.6 Bluetooth
User can set the radio as a Bluetooth device, when the display shows “Bluetooth”, user can find the “Crane Radio”
from the device list, after pairing, we can enjoy the music from the radio device via Bluetooth.

1.7 Configuration
1.7.1 Configuration-Network
Description:Setting WiFi/WLAN to Enable or Disable and related setting.
Remark:1)When you enter this menu, it will remain on the previous option.
1.7.2 Configuration-Date & Time
1.7.2.1 Set Date and Time
Description:Currently Date & Time setting
Remark:1).You can press “Left” and “Right” buttons for choose, and rotate the “DIAL/SELECT” knob or press
Up/Down for
parameter setting, and move cursor with “Right” and “Left” buttons and press „Select‟ to confirm.
1.7.2.2 Time Format setting
Description:Time format setting:12hours / 24hours
Remark:1)When you enter this menu, it will remain on the previous option.
1.7.2.3 Date Format setting
Description:Date format:YY/MM/DD、DD/MM/YY and MM/DD/YY
Remark:1)When you enter this menu, it will remain on the previous option.
1.7.2.4 Daylight Saving Time(DST)
Description:Daylight Saving Time setting:On / Off
Remark:1)When you enter this menu, it will remain on the previous option.
1.7.2.5 GMT
Description:Set the currently time as GMT
1.7.3 Configuration-Alarm
Description:Alarm Clock setting,Alarm Clock goes off on the setting time and alarm volume.
Function Indication:
1.Alarm Clock types(3 Alarm Clock setting)
Alarm Clock(1): You can select your favorite Alarm setting for every day
Alarm Clock(2): Same as (1)
Alarm Clock(NAP):You can set a certain time such as 1 hour later/2hours later/any hours later as you wish from the
beginning setting.
2.Alarm Clock NAP types:( one choose only)
Alarm Clock:End the time of NAP Alarm Clock after setting
5minutes(NAP): Alarm Clock goes off after 5minutes (1 time only)
10minutes(NAP): Alarm Clock goes off after 10 minutes (1 time only)
20minutes(NAP): Alarm Clock goes off after 20 minutes (1 time only)
30minutes(NAP): Alarm Clock goes off after 30 minutes (1 time only)
60minutes(NAP):Alarm Clock goes off after 60 minutes (1 time only)
90minutes(NAP): Alarm Clock goes off after 90 minutes (1 time only)
120minutes(NAP): Alarm Clock goes off after 120 minutes (1 time only)
3.Alarm Sounds setting:
1)Beep
2)Melody
3)Radio
Remark:Alarm Clock(NAP)- Beep only
4. When the Alarm Clock goes off, press any key except for “ON/OFF” button, you can enter the “Snooze” mode.

You can press “ON/OFF” button to stop the ringing when the alarm goes off 5minutes later again.
5. You also can set Alarm Clock with „Alarm‟ key from remote control.
6. Alarm volume, user can set the alarm volume by turn the
Remark:
[1]You can select any internet station as Alarm tone from the function of internet station. When the internet station
doesn‟t work in 1 minute, it will auto set into Beep.
[2] Alarm tone is fixed on volume 15
[3]Alarm Clock stops 1 hour later in auto
1.7.4 Configuration-Language
Description:Language setting
Function Indication:1.11 Language options
1.English 2.German 3.Spanish 4.French 5.Portuguese 6.Dutch 7.Italian 8.Russian etc.
Remark:When you enter this menu, it will remain on the previous option.
1.7.5 Configuration-Dimmer
Description:Set the Screen Backlight
Function Indication:1.Options
1) Power Saving
Remark:when the backlight is under the Low-power mode,it will turn into highlight when you press any key,and
low-power mode will be Auto started again after 15 minutes without any operation.
2)Turn on(Default setting)
20 Levels option of backlight
3) Dimmer Timer
Set the timer for Dimmer
Remark: When you enter this menu, it will remain on the previous option.
1.7.6 Configuration-Power management
Set the radio go to standby mode timer or turn off the setting for power management.
1.7.7 Configuration-Sleep Timer
Description: You can set a related time to enter standby mode automatically
Function Indication: 1.Options:
1)Off
2)15minutes
3)30minutes
4)60minutes
5)90minutes
6)120minutes
7)150minutes
8)180minutes
2.You also can do the setting with the “Sleep” button from remote control
Remark:When you enter this menu, it will remain on the previous option.
1.7.8 Configuration-Buffer
Description:Buffer time for internet radio playing
Function Indication: 1.Options:
1)2 seconds(default setting)
2)4 seconds

3)8 seconds
Remark:When you enter this menu, it will remain on the previous option.
1.7.9 Configuration-Weather
Description:You can set the display of weather forecast on the standby mode and the temperature units.
Function Indication: 1. You can select Weather Display show on standby or not.
2. Temperature units:1)Centigrade(℃) 2)Fahrenheit (℉)
3. Set Location
1.7.10 Configuration-FM setup
1.7.10.1 FM Audio mode setup
Description:You can set FM station as Mono/Stereo
Remark:1)When you enter this menu, it will remain on the previous option.
1.7.10.2 FM Area setup
Description:You can setup the manual tune range of FM station
Other place of FM tune range as{87.5,108.0}.
Japan of FM tune range as : {76.0,108.0}.
Remark:1)When you enter this menu, it will remain on the previous option.
1.7.11 Configuration-Playback setup
Description: You can set the playback off, repeat all, repeat one, or shuffle.
1.7.12 Configuration-Login TuneIn
Description: You can use the A/C and password to login in the TuneIn or logout.
1.7.13 Configuration-Euqalizer
Description: You can set different EQ.
1.7.14 Configuration-Resume When Power On
1.7.15 Configuration-Software update
Description:Upgrade the version
1)Upgrade information will be display on the main menu when there is a upgrade version on the server.
2)When there is a upgrade version on the server or USB root directory, you can do the manual upgrade from the
update menu.
1.7.16 Configuration- Reset to default
Description:You can do this factory reset to empty all of the settings and it comes back to default settings.
Related setting as below:
1)Language:English
2)Tone:15
3)Mute:Off
4)Time format:12hours
5)Alarm Clock:Off
6)Alarm Clock(1)/(2)Time:00:00
7)Alarm Sounds(1)/(2)/NAP:Beep
8)Backlight:Turn on
9)Sleep Timer:Off
10)Buffer:2seconds

11)Weather Display:Off
12)Temperature Unit:Fahrenheit
13)Folder/FM/History List:Empty
14) Default Alarm Clock station:Empty
15)FM Audio Setting:Stereo
16)Internet Radio Alarm Sounds:Nil
17)Time Zone:hour=0,Min=0
18)WiFi Setup:Disable
19)WiFi DHCP:On
20)WiFi IP Address/ Subnet Mask/Default Gateway/DNS1/2:Empty
21)WiFi ESSID, ESSID PW:Empty
22)Default weather forecast display:Berlin
Remark:Playing stopped when it comes back to default settings and skip into Language Setting automatically, after
that it will turn to the internet setting.
2.1 Figure Button
Description: i. Figure button input
ii. When you input the letters,cycle pressing the keys will be the characters as below:
key 0: „0‟->„DEL‟(Delete button)
key 1: „1‟->„@‟->„ ‟(Space)->„!‟-> ”(double quotes)
->„#‟->„$‟->„%‟->„&‟-> ‟(single quotes)->„(‟
->„)‟->„*‟->„+‟->„,‟->„-‟->„.‟->„/‟->„:‟->„;‟->„<‟->„=‟->„>‟->„?‟->„[‟->„\‟->„]‟->„^‟->„_‟->„`‟->„{‟->„|‟->„}‟->„~‟
Key 2: „2‟->„A‟->„B‟ ->„C‟->„a‟ ->„b‟ ->„c‟
Key 3: „3‟->„D‟->„E‟ ->„F‟->„d‟ ->„e‟ ->„f‟
Key 4: „4‟->„G‟->„H‟ ->„I‟->„g‟ ->„h‟ ->„i‟
Key 5: „5‟->„J‟->„K‟ ->„L‟->„j‟ ->„k‟ ->„l‟
Key 6: „6‟->„M‟->„N‟ ->„O‟->„m‟ ->„n‟ ->„o‟
Key 7: „7‟->„P‟->„Q‟->„R‟->„S‟->„p‟->„q‟
->„r‟->„s‟
Key 8: „8‟->„T‟->„U‟ ->„V‟->„t‟ ->„u‟ ->„v‟
Key 9: „W‟->„X‟->„Y‟->„Z‟->„w‟->„x‟
->„y‟->„z‟