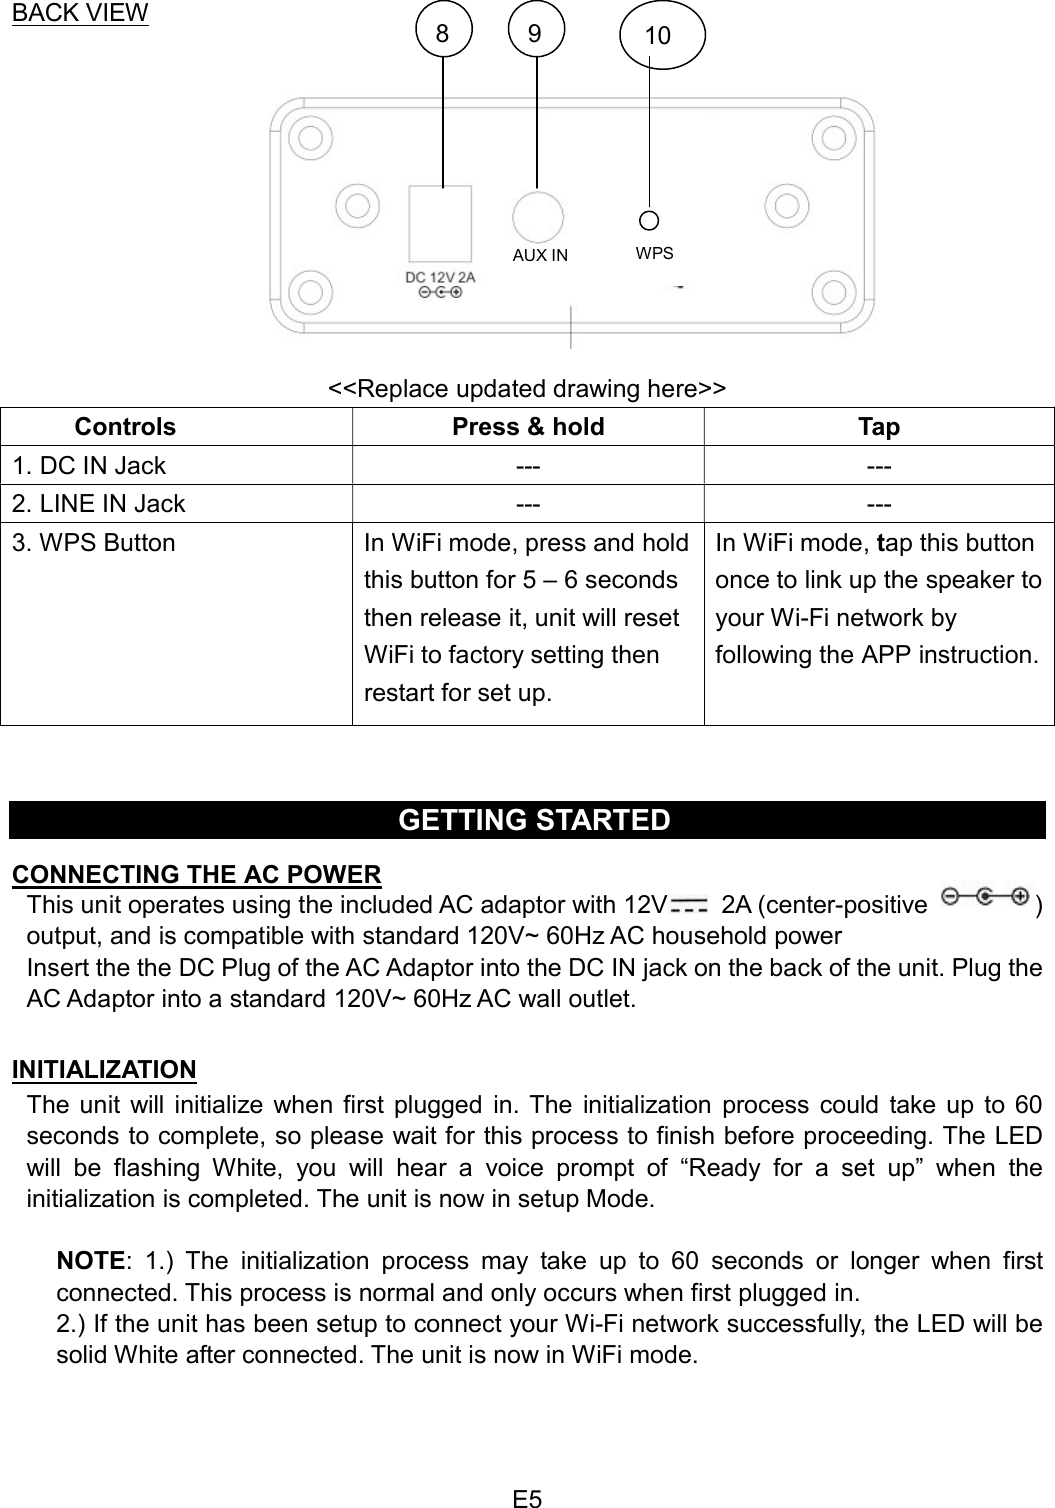
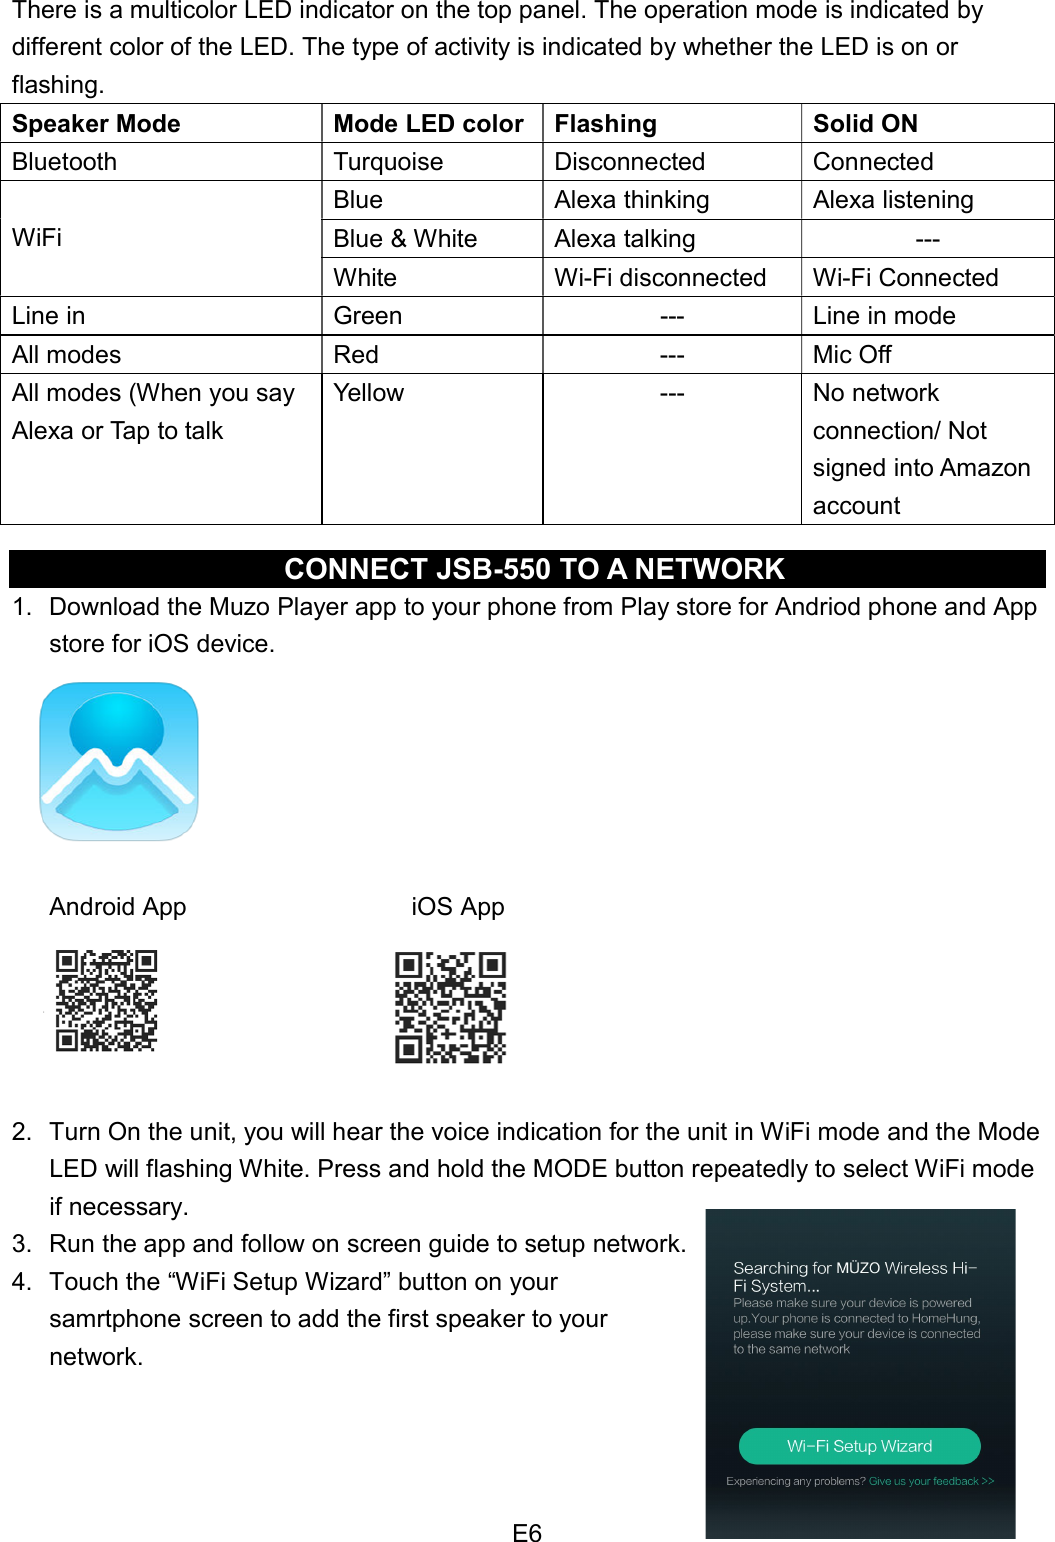
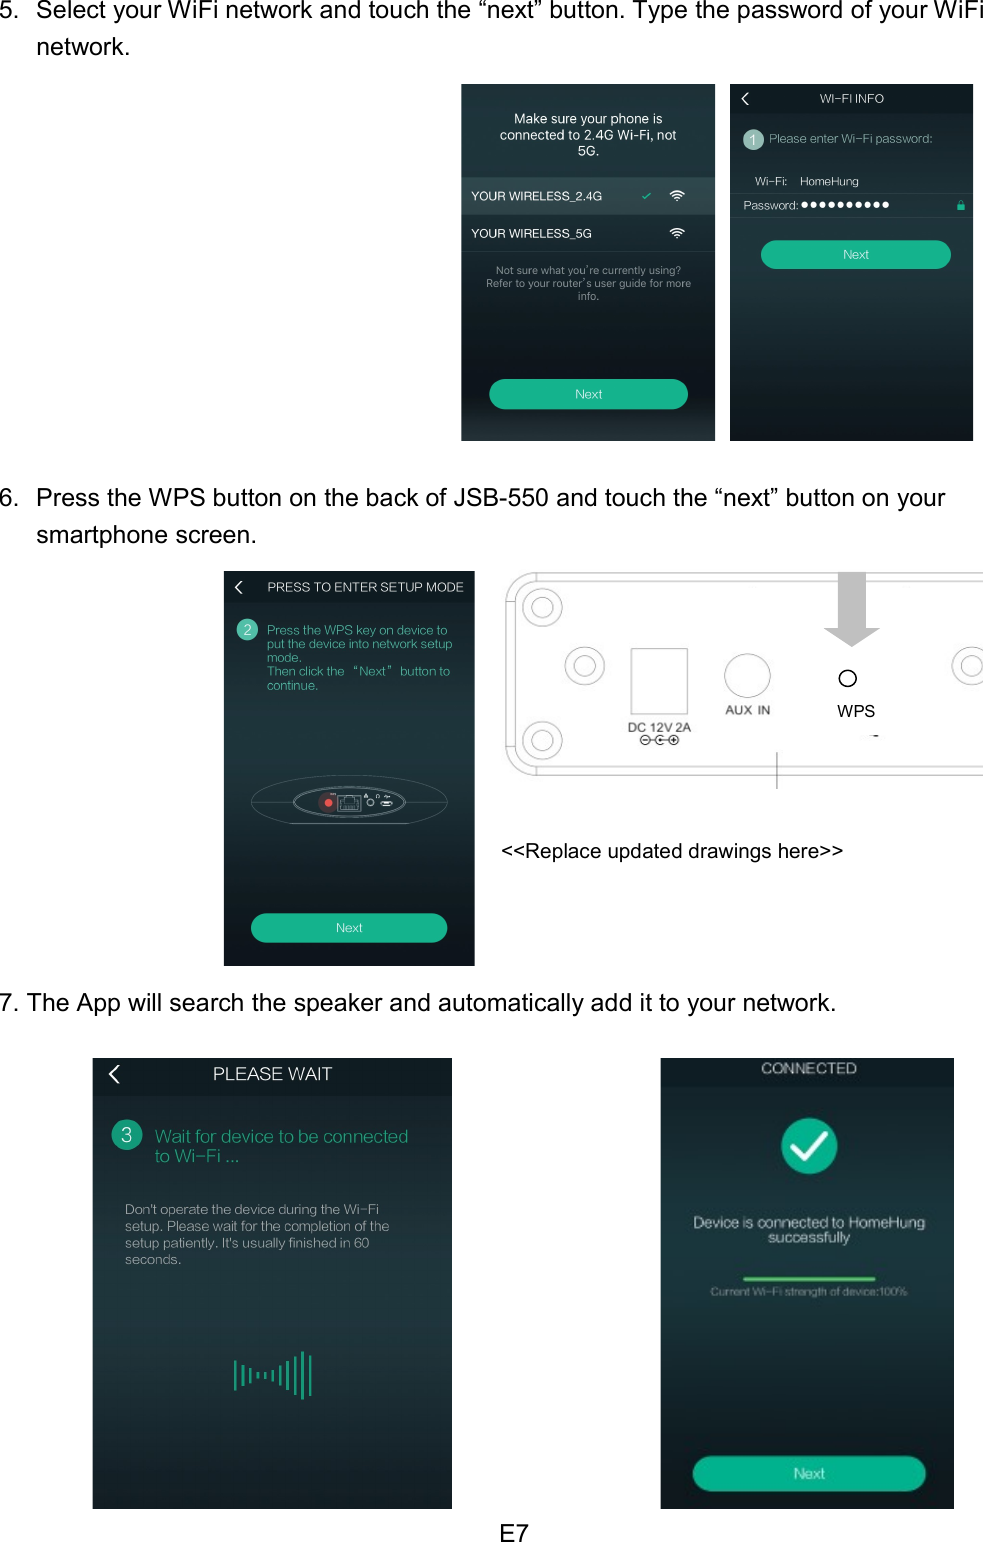
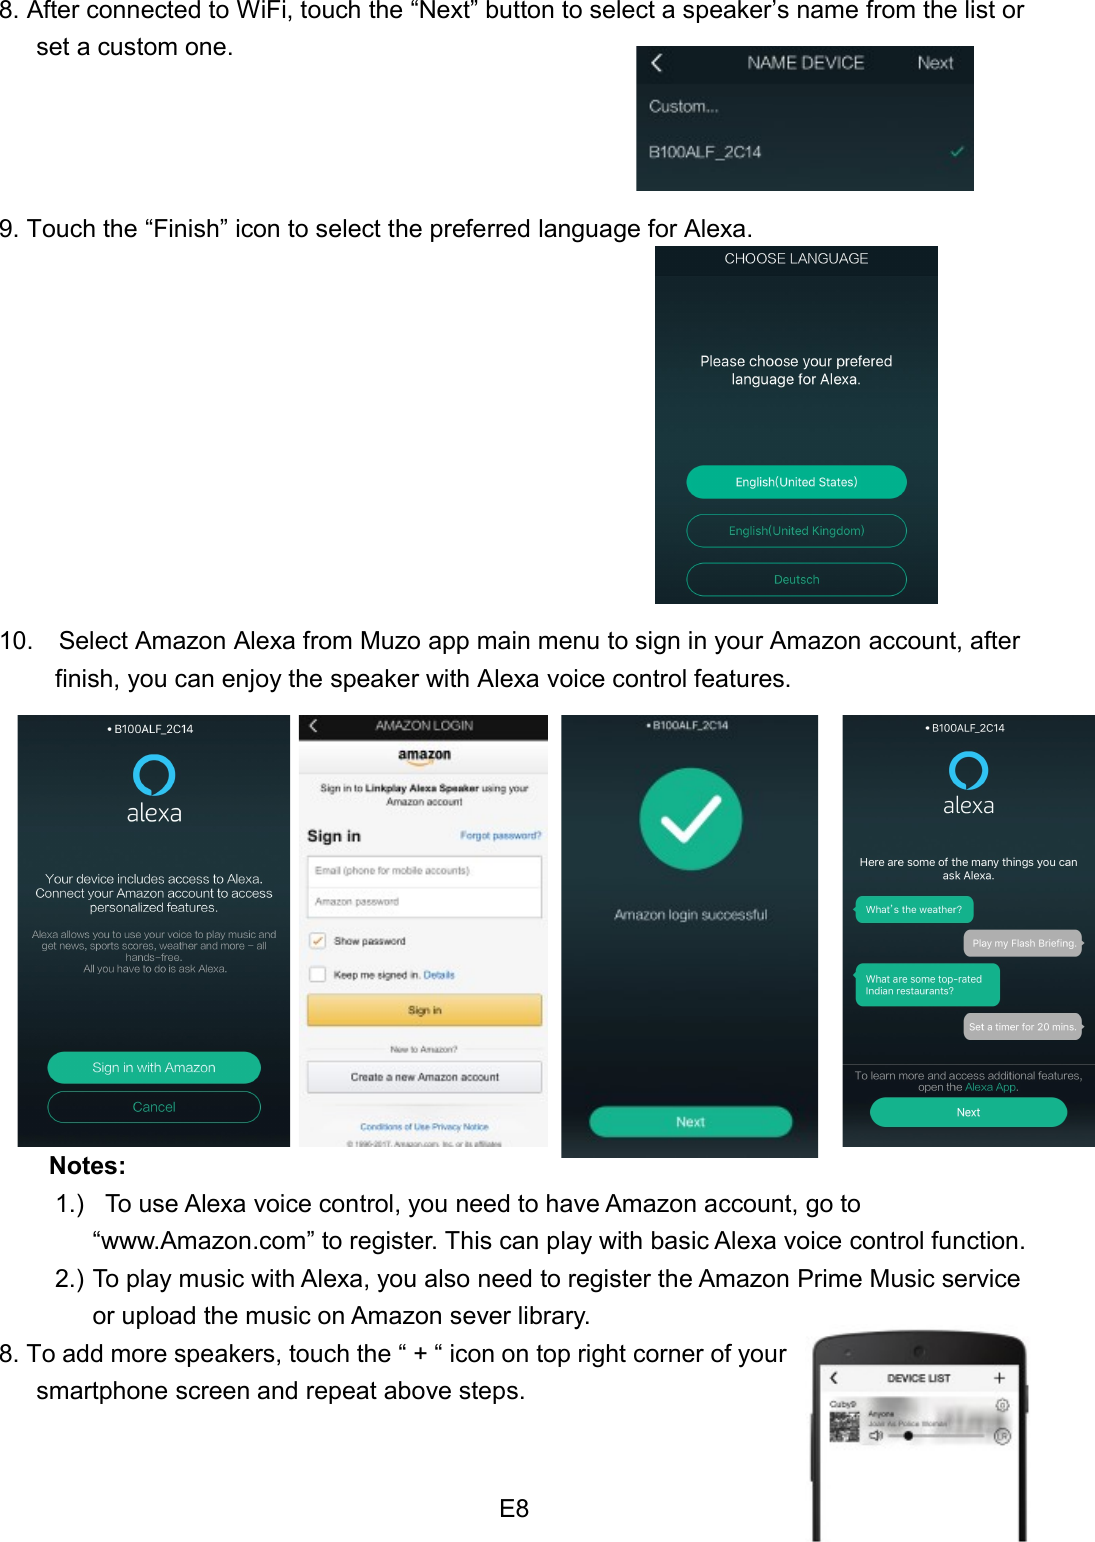
Ocean Star Electronics 31324GC ALEXA ENABLED Bluetooth/WiFi WIRELESS STEREO SMART SPEAKER User Manual LMZ 31324GC UserMan

Ocean Star Electronics Ltd. ALEXA ENABLED Bluetooth/WiFi WIRELESS STEREO SMART SPEAKER LMZ 31324GC UserMan

LMZ-31324GC UserMan

      ALEXA ENABLED BLUETOOH/WIFI   WIRELESS STEREO SMART SPEAKER                              MODEL: JSB-550        USER MANUAL                           PLEASE READ THIS USER MANUAL COMPLETELY BEFORE OPERATING THIS UNIT AND RETAIN THIS BOOKLET FOR FUTURE REFERENCE.
 E1 IMPORTANT SAFETY INSTRUCTIONS  When used in the directed manner, this unit has been designed and manufactured to ensure your personal safety. However, improper use can result in potential electrical shock or fire hazards. Please read all safety and operating instructions carefully before installation and use, and keep these instructions handy for future reference. Take special note of all warnings listed in these instructions and on the unit.   1.  Read these instructions – All the safety and operating instructions should be read     before the appliance is operated. 2.  Keep these instructions – The safety and operating instructions should be kept for future reference. 3.  Heed all warnings – All warnings on the appliance and in the operating instructions should be adhered to. 4.  Follow all instructions – All operation and use instructions should be followed. 5.  Do not use this apparatus near water – The appliance should not be used near water; for example, near a bath tub, washbowl, kitchen sink, laundry tub, in a wet basement, or near a swimming pool. 6.  Clean only with dry cloth – The appliance should be cleaned only as recommended by the manufacturer. 7.  Do not block any ventilation openings. Install in accordance with the manufacturer’s instructions. The appliance should be situated so that its location or position does not interfere with its proper ventilation. For example, the appliance should not be situated on a bed, sofa, rug, or similar surface that may block the ventilation openings; or placed in a built-in installation, such as a bookcase or cabinet that may impede the flow of air through the ventilation openings. 8.  Do not install near any heat sources such as radiators, heat registers, stoves, or other apparatus (including amplifiers) that produce heat. 9.  AC adaptor is used as disconnect device and it should remain readily operable during intended use. In order to disconnect the apparatus from the mains completely, the AC adaptor should be disconnected form the mains socket outlet completely.   10.  Only use attachments / accessories specified by the manufacturer. 11.  Use only with a cart, stand, tripod, bracket, or table specified by the manufacturer, or sold with the apparatus.    When a cart is used, use caution when moving the cart/apparatus combination to avoid injury from tip-over. 12.  Unplug this apparatus during lightning storms or when unused for long periods of time. 13.  Refer all servicing to qualified service personnel. Servicing is required when the apparatus has been damaged in any way, such as power-supply cord or plug is damaged, liquid has been spilled or objects have fallen into the apparatus, the apparatus has been exposed to rain or moisture, does not operate normally, or has been dropped. 14.  This appliance shall not be exposed to dripping or splashing water and that no object filled with liquids such as vases shall be placed on the apparatus. 15.  Power Sources – The appliance should be connected to a power supply only of the type described in the operating instructions or as marked on the appliance. Do not overload wall outlet.  16.  Do not attempt to dismantle, open or repair this product yourself. If a fault occurs, seek advice from your local qualified service technician or contact the distributor via the telephone number at the back of this instruction manual. 17.  Nameplate is located on the bottom of product.
 E2 IMPORTANT NOTES Avoid installing the unit in locations described below:   Places exposed to direct sunlight or close to heat radiating appliances such as     electric heaters.   Places subject to constant vibration.   Dusty, humid or moist places.   Sources of electrical noise such as fluorescent lamps or motors.   In case of malfunction due to electrostatic discharge, the apparatus has to be reset by disconnecting it from mains supply, wait at least for 60 seconds before reconnect    COMPLIANCE WITH FCC REGULATIONS  FCC ID: LMZ-31324GC  This device complies with Part 15 of the FCC Rules. Operation is subject to the following two conditions: (1)  this device may not cause harmful interference, and   (2)  this device must accept any interference received, including interference that may cause undesired operation. NOTE:  This  equipment  has  been  tested  and  found  to  comply  with  the  limits  for  a  Class  B digital  device,  pursuant to Part 15  of  the  FCC Rules.  These  limits are  designed to  provide reasonable protection against harmful interference in a residential installation. This equipment generates,  uses  and  can  radiate  radio  frequency  energy  and,  if  not  installed  and  used  in accordance  with the instructions, may cause  harmful  interference to  radio communications. However, there is no guarantee that interference will not  occur in a particular installation. If this equipment does cause harmful interference to radio or television reception, which can be determined by turning the equipment off and on, the user is encouraged to try to correct the interference by one or more of the following measures: -  Reorient or relocate the receiving antenna. -  Increase the separation between the equipment and receiver. -  Connect the equipment into an outlet on a circuit different from that to which the receiver is connected. -  Consult the dealer or an experienced radio/TV technician for help.  CAUTION:  Changes or modifications not expressly approved by the party responsible for compliance could void the user’s authority to operate the equipment.  PROTECT YOUR FURNITURE  This product is equipped with non-skid rubber 'feet' to prevent the product from moving when you operate the controls. These 'feet' are made from non-migrating rubber material specially formulated to avoid leaving any marks or stains on your furniture. However certain types of oil based furniture polishes, wood preservatives, or cleaning sprays may cause the rubber 'feet' to soften, and leave marks or a rubber residue on the furniture. To prevent any damage to your furniture we strongly recommend that you purchase small self-adhesive felt pads, available at hardware stores and home improvement centers everywhere, and apply these pads to the bottom of the rubber 'feet' before you place the product on fine wooden furniture.
 E3 DEAR JENSEN® CUSTOMER  Selecting fine audio equipment such as the unit you've just purchased is only the start of your  musical  enjoyment.  Now  it's  time  to  consider  how  you  can  maximize  the  fun  and excitement  your  equipment  offers.  This  manufacturer  and  the  Electronic  Industries Association's Consumer Electronics Group want you to get the most out of your equipment by playing it at a safe level. One that lets the sound come through loud and clear without annoying  blaring  or  distortion  and,  most  importantly,  without  affecting  your  sensitive hearing.   Sound can be deceiving. Over time your hearing "comfort level" adapts to higher volumes of sound. So what sounds "normal" can actually be loud and harmful to your hearing. Guard against this by setting your equipment at a safe level BEFORE your hearing adapts.  To establish a safe level:   Start your volume control at a low setting.   Slowly  increase  the  sound  until  you  can  hear  it  comfortably  and  clearly,  and  without distortion.  Once you have established a comfortable sound level:   Set the dial and leave it there. Taking a minute to do this now will help to prevent hearing damage or loss in the future. After all, we want you listening for a lifetime.  We Want You Listening For a Lifetime Used wisely, your new sound equipment will provide a lifetime of fun and enjoyment. Since hearing damage from loud noise is often undetectable until it is too late, this manufacturer and  the  Electronic  Industries Association's  Consumer  Electronics  Group  recommend  you avoid prolonged exposure to excessive noise.    Customer's Record: The  serial  number  of  this  product  is found  on  its  back  cover.  You should  note  the  serial number of this unit in the space provided as a permanent record of your purchase to aid in identification in the event of theft of loss.              Model Number: JSB-550  Serial Number: ____________________
 E4 ACCESSORIES 1 x AC Adaptor     1 x Stereo Audio Connection Cable with 3.5mm stereo plugs   1 x User Manual    LOCATION OF CONTROLS  MAIN UNIT  TOP VIEW               <<Replace updated drawing here>>            Controls    Press & hold  Tap 1. Microphone    ---  --- 2. Mode/ Tap to talk Button  Switch input mode   (Bluetooth/ Line in/ WiFi)   Activate Mic to talk to Alexa without saying Alexa first   3.  Power On/Standby;         Mic ON/OFF Button Turn unit On/ Off    Switch Mic/ Alexa On/ Off 4. Volume - Button  Decrease Volume Continuously Decrease Volume by step 5. Volume + Button  Increase Volume Continuously Increase Volume by step 6. Play/ Pause/ Pair    In BT mode, enter pairing mode   Play/ Pause at WiFi/ BT playback     7. Mode indication LED  ---  ---    1 4 3 5 6 7 2
 E5  BACK VIEW          <<Replace updated drawing here>>           Controls    Press & hold  Tap 1. DC IN Jack  ---  --- 2. LINE IN Jack      ---  --- 3. WPS Button  In WiFi mode, press and hold this button for 5 – 6 seconds then release it, unit will reset WiFi to factory setting then restart for set up.   In WiFi mode, tap this button once to link up the speaker to your Wi-Fi network by following the APP instruction.   GETTING STARTED  CONNECTING THE AC POWER This unit operates using the included AC adaptor with 12V   2A (center-positive  ) output, and is compatible with standard 120V~ 60Hz AC household power   Insert the the DC Plug of the AC Adaptor into the DC IN jack on the back of the unit. Plug the AC Adaptor into a standard 120V~ 60Hz AC wall outlet.  INITIALIZATION The  unit  will  initialize  when  first  plugged  in. The  initialization  process  could  take  up  to  60 seconds to complete, so please wait for this process to finish before proceeding. The LED will  be  flashing  White,  you  will  hear  a  voice  prompt  of  “Ready  for  a  set  up”  when  the initialization is completed. The unit is now in setup Mode.  NOTE:  1.)  The  initialization  process  may  take  up  to  60  seconds  or  longer  when  first connected. This process is normal and only occurs when first plugged in. 2.) If the unit has been setup to connect your Wi-Fi network successfully, the LED will be solid White after connected. The unit is now in WiFi mode.  WPS  AUX IN 8 9 10
 E6 There is a multicolor LED indicator on the top panel. The operation mode is indicated by different color of the LED. The type of activity is indicated by whether the LED is on or flashing.   Speaker Mode  Mode LED color  Flashing  Solid ON   Bluetooth    Turquoise    Disconnected    Connected Blue    Alexa thinking  Alexa listening Blue & White  Alexa talking  --- WiFi White  Wi-Fi disconnected  Wi-Fi Connected Line in  Green  ---  Line in mode All modes  Red    ---  Mic Off All modes (When you say Alexa or Tap to talk Yellow  ---  No network connection/ Not signed into Amazon account    CONNECT JSB-550 TO A NETWORK 1.  Download the Muzo Player app to your phone from Play store for Andriod phone and App store for iOS device.             Android App                                    iOS App                                                   2.  Turn On the unit, you will hear the voice indication for the unit in WiFi mode and the Mode LED will flashing White. Press and hold the MODE button repeatedly to select WiFi mode if necessary. 3.  Run the app and follow on screen guide to setup network. 4.  Touch the “WiFi Setup Wizard” button on your samrtphone screen to add the first speaker to your network.
 E7 5.  Select your WiFi network and touch the “next” button. Type the password of your WiFi network.            6.  Press the WPS button on the back of JSB-550 and touch the “next” button on your smartphone screen.                                                                                                                         <<Replace updated drawings here>>      7. The App will search the speaker and automatically add it to your network.            WPS
 E8  8. After connected to WiFi, touch the “Next” button to select a speaker’s name from the list or set a custom one.    9. Touch the “Finish” icon to select the preferred language for Alexa.        10.    Select Amazon Alexa from Muzo app main menu to sign in your Amazon account, after finish, you can enjoy the speaker with Alexa voice control features.           Notes:   1.)   To use Alexa voice control, you need to have Amazon account, go to “www.Amazon.com” to register. This can play with basic Alexa voice control function. 2.) To play music with Alexa, you also need to register the Amazon Prime Music service or upload the music on Amazon sever library. 8. To add more speakers, touch the “ + “ icon on top right corner of your smartphone screen and repeat above steps.
 E9 Reconnect JSB-550 to a WiFi network 1.  Turn on unit and select WiFi mode, tap the WPS button on the back of JSB-550, you will hear “Connecting to your network” voice prompt.   2.  Follow steps 3-8 above.  Reset JSB-550 WiFi to Factory data reset 1.  Turn on unit and select WiFi mode, press and hold the WPS button for 5 – 6 seconds and release the button, you will hear “Factory data reset” voice prompt.   2.  Wait for unit restart until you hear voice prompt for ready to set up. 3.  Follow steps 3-8 above.  Note: Always setup WiFi connection in JSB-550 power on and WIFi mode. Press WPS button in other operation modes or Standby mode will not hear voice prompt and may cause WiFi setup error.    USE AMAZON ALEXA VOICE CONTROL   When asking Alexa questions always say “Alexa” first or tap the “Tap to talk” button on the top panel, Mode LED turns Blue, this indicate Alexa is listening.  Play music from Amazon Music, Tuneln and many more apps/ services just by using voice commands.  Answers questions, such as time and date, find out sports scores and schedules, read Audible audio books, listen to news, traffic and weather reports, find info on local businesses, consult Wikipedia    Take notes, prepare shopping lists, shop at Amazon.  Note: To enable voice control, you will need an account to play music from Amazon Music and some other services Now by simply say “Alexa” or tap the Tap to talk button, when Mode LED turns to solid blue,  Things to try: Hello         Who are you         What is the whether today         Who is Michael Jackson         What is the time now Wikipedia: George Washington   Tell me a joke Play iHeart Radio
 E10 Set Alarm.. Set Timer ..         Play a song (need Amazon Prime Music service registed or have songs at Amazon Music Library)  For more examples, go to “Thing to Try” in the Alexa App.  INTERACTIVE WITH AMAZON ALEXA   You can download the Amazon Alexa app from Play Store or Apple Store.  Please login your Amazon account. In the settings you can use the menus to connect to apps like Amazon Music, Live Radio, Tuneln and others as well as reviewing your Alexa history and check your timer & Alarm settings.  GROUP AND UNGROUP THE SPEAKERS GROUP THE SPEAKERS Open the Muzo app, in the list of the available speakers, grab and drag one speaker and drop it over another speaker. In this way, this speaker (slave) becomes part of a group and Master speaker’s music is also played through all the Slave speakers.           Mode LED indication when speakers grouped Speaker Mode  Mode LED Color Master Speaker (BT)  Turquoise Master Speaker (Line in) Green Master Speaker (WiFi) White Slave Speaker  Red  Note: Only Master speaker in the group has Alexa Voice feature.
 E11 UNGROUP THE SPEAKERS If you want to ungroup, just grab and drag the slave speaker below the middle line. Slave speaker becomes Master speaker and can play different music         Note:    You can make one or more speaker groups.  You can have more than one Slave speakers under the same Master  In a Group, even if the source is Line in/Bluetooth, you can listen to Slave speakers playing the same song as Master speaker (Redirect feature)  You can simultaneously control the volume of all the speakers in a group by Volume buttons of your device  For a group configuration, choose which speaker can play Left (L), Right (R) or Left/Right (L/R), by touching the relevant icon.  Master Speaker Mode LED – Shows current operation Mode color    Slave Speaker LED – Shows RED color to indicate it is a Slave, voice control and mode button are disabled.  PLAYBACK MUSIC ON THE SPEAKERS In Muzo app screen,
 E12   Select your local songs through MY MUSIC.   Access Web Radio through Tuneln.   Change Input through Bluetooth or Line In.   Search for online songs through Search.   Access your Favorite songs through Favorites.   Access Web services by touching the corresponding icons.  PRESET WEB RADIO STATIONS To assign web radio stations to preset button (up to 5 stations can be assigned), open the main menu of Muzo app.  To access the preset web radio stations, in the “DEVICE LIST” page of Muzo app, touch the setup icon.    Select “PRESET CONTENT” from menu, the stored preset list will show for you to select for playback.  BLUETOOTH OPERATION   PAIRING (LINKING) A BLUETOOTH ENABLED CELL PHONE OR OTHER BLUETOOTH ENABLED DEVICE to the JSB-550 1.  With  the  JSB-550  in  power  ON  Mode,  press  and  hold  the  MODE  button  to  select Bluetooth  mode.  The  Mode  Indicator  LED  turns  Turquoise  and  will  be  flashing.  The JSB-550 is now ready to pair (link) with your Bluetooth device.   2.  Turn  on  the  Bluetooth  feature  of  your  cell  phone  and  turn  down  the  volume  to  avoid
 E13 sudden loud sound bursts from the speaker. Enable the search or scan feature to find the JSB-550.   Note: If you have more than one JSB-550 within range, make sure you are connecting to the appropriate speaker.   3.  Select "JSB-550" from the device list when it appears on your device screen. If required, enter the pass code “0000” to pair (link) the JSB-550 with your cell phone.   4.  After successfully pairing (linking) your cell phone with the JSB-550, the Mode Indicator LED  stops flashing and  remains  lit Turquoise. You  can  now play  music from  your  cell phone or Bluetooth device wirelessly to the JSB-550.         Note:  If  you  want  to  connect  the  JSB-550  to  another  cell  phone  after  pairing     successfully, then you need to turn off the Bluetooth on the paired cell phone first if it is in range before going through the above steps. Otherwise, the JSB-550 will automatically reconnect to the previously linked cell phone or device. Then press and  hold  the  Bluetooth    /PLAY/PAUSE    button  to  put  the  JSB-550  into Bluetooth pairing mode, the LED Indicator will be flashing Turquoise.   5.  Press the VOLUME +/- button to adjust the volume level. 6.  Press the PLAY/PAUSE   button to pause or resume playback. 7.  To  turn  off  the  JSB-550  Bluetooth,  press  and  hold  the    button  on  main  unit  for  2 seconds to turn the unit to standby mode. Mode Indicator LED turns off. Don’t forget to also turn off the Bluetooth feature on your cell phone or Bluetooth device. Notes:   1.) Refer to manual of your cell phone or other Bluetooth enabled device for Bluetooth operation, since it may vary from model to model. 2.) If your Bluetooth enabled device does not support A2DP, it will not play the music through the speaker, even after it's paired (linked). 3.) If you are pairing (linking) your computer to the JSB-550 using Bluetooth, you may need to set the JSB-550 as your computer’s default sound device.  Note: In power on mode, If no sound playback or paused by user for 15 minutes, unit will turn into standby mode automatically for power saving.  Re-linking to a cell phone or Bluetooth device   If your cell phone or Bluetooth device is already paired with the JSB-550, but became unlinked at some point, even with both Bluetooth devices turned on. You can re-link them by: 1.  Press and hold the  /PLAY/PAUSE button to re-link your cell phone. The Mode Indicator LED will turn Turquoise and flash while linking. 2.  Select the JSB-550 from the devices list on your cell phone for linking. The Mode Indicator LED stops flashing and remains lit Turquoise if the JSB-550 and your cell phone have been re-linked successfully. 3.  You can also re-link the JSB-550 by using Bluetooth operation of your cell phone. Please refer to operation manual of your cell phone for more information.
 E14 LINE IN OPERATION  This unit provides a LINE IN jack for connecting external audio devices like MP3 players, CD players and listen to them through the speakers of this unit. 1.  Use an audio cable (included) with one 3.5 mm stereo plug on each end of the cable. 2.  To select auxiliary audio input, plug one end into the Aux IN jack on the back of main unit.   3.  Plug the other end of the cable into the Line-out Jack or Headphone Jack of your external audio device. 4.  Turn on the external audio device and the main unit. 5.  Press and hold the MODE button to select AUX mode, Mode Indicator LED turns Green. 6.  The volume level can now be controlled through the main unit. Operate all other functions on the auxiliary device as usual.  NOTE:  If you connect this unit to the Line-Out Jack of your external device then you only need to adjust  the  volume  control  of  this  unit.  If  you  connected  the  Headphone  Jack  of  your external  device  then  you  may  need  to  adjust  both  the  volume  control  of  your  external device and the volume control of this unit to find the most desirable volume setting.  In power on mode, If no sound playback or paused by user for 15 minutes, unit will turn into standby mode automatically for power saving.  Press and hold the POWER    button for 2 seconds to turning off the unit when you finish listening. Don't forget to switch off the power of your external device as well.  POWER SAVING    To save power, the speaker will automatically turn off if no sound has played through it for 15 minutes.    RESETTING THE JSB-550      In  case  of  malfunction  due  to  electrostatic  discharge,  the  apparatus  has  to  be  reset  by disconnecting it from mains supply. Unplug the AC adaptor from main power, wait at least for 60 seconds before reconnect the AC adaptor power.  CARE AND MAINTENANCE    1. Do not subject the unit to excessive force, shock, dust or extreme temperature. 2. Do not tamper the internal components of the unit. 3. Clean your unit with a dry cloth. Solvent or detergent should never be used. 4. Avoid leaving your unit in direct sunlight or in hot, humid or dusty places. 5. Keep your unit away from heating appliances and sources of electrical noise such as fluorescent lamps or motors.  CLEANING THE UNIT  To  prevent  fire  or  shock  hazard,  disconnect  your  unit  from  the  AC  power  source  when cleaning.  The finish on the unit may be cleaned with a dust cloth and cared for as other furniture, Use caution when cleaning and wiping the plastic parts.  If the cabinet becomes dusty wipe it with a soft dry dust cloth. Do not use any wax or polish sprays on the cabinet.
 E15  If the top panel becomes dirty or smudged with fingerprints it may be cleaned with a soft cloth slightly dampened with a mild soap and water solution. Never use abrasive cloths or polishes, as these will damage the finish of your unit.  CAUTION: Never allow any water or other liquids to get inside the unit while cleaning.  Note: This unit is not magnetically shielded and may cause color distortion on the screen of some TVs or video monitors. To avoid this, you may need to move the unit further away from the TV or monitor if unnatural color shifts or image distortion occurs.  TROUBLESHOOTING GUIDE  Should you experience difficulties in the use of this player please refer to the following chart or call 1-800-777-5331 for Product Service and Support.   Symptom  Possible Problem  Solution The  unit  is  disconnected from the AC outlet.  Reconnect to the AC outlet. The unit does not respond (no power)  The  AC  outlet  has  not power.  Try the unit on another outlet. Unit is ON but there is low or no volume The  volume  control  has been  turned  all  the  way down. Turn  the  Volume  control  to  a higher output. Speaker is off or not in WiFi mode. Turn on speaker and select WiFi mode. WiFi network is incorrect or malfunction. Select correct Wifi network, Try your other device to ensure your WiFi network is working properly. Cannot connect to WiFi network App is not installed properly  Uninstall then reinstall the app, power the speaker Off, then On, and restart setup by use WPS button. Alexa speaker is not in same WiFi network of your smartphone. Use the same WiFi network for speaker & your smartphone. Speaker is not set up for Amazon Alexa. Set up speaker by following the set up steps in the manual. You have not select casting to speaker. Select speaker in your smartphone screen. Bluetooth speaker is not linked with the cell phone. Go through “Bluetooth Operations” process to link the speakers. No Sound Speaker placement out of range. Relocate the speaker within Bluetooth operating range JSB-550 is not connected to your WiFi network. Use  Muzo  app  to  connect JSB-550 to your WiFi network. You  have  not  login  your Amazon Alexa account. Create  and  login  your  Amazon Alexa account. Alexa voice control not function.  JSB-550  microphone  is disabled Tap  the  POWER    button  to enable the microphone.
 E16 Volume level is set too high. Decrease the volume. If  the  external  device  original sound  source  is  of  poor  quality, distortion  and  noise  are  easily noticed  with  high-power speakers.  Try  a  different  audio source such as a music CD . Sound is distorted Sound source is distorted.  If  you  are  using  an  external sound  source  like  older generation  of  iPod,  try  reducing the  output  volume  on  the  device itself. Also try turning bass boost OFF or change the EQ setting. Unit gets warm after extended play at high volume This is normal.  Turn  the  unit  off  for  a  period  of time or lower volume.  SPECIFICATION  Power requirement:   Main Unit                                      AC-DC Adaptor DC 12V, 2A      At Spectra, environmental and social responsibility is a core value of our business. We are dedicated to continuous implementation of responsible initiatives with an aim to conserve and maintain the environment through responsible recycling. Please visit us at http://www.spectraintl.com/green.htm for more information on Spectra’s green initiatives or to find a recycler in your area.  The Bluetooth® word mark and logos are registered trademarks owned by Bluetooth SIG, Inc. and any use of such marks by Spectra Merchandising Intl, Inc. is under license. Other trademarks and trade names are those of their respective owners.  ALEXA legal line? Spotify legal line?  90 DAY LIMITED WARRANTY AND SERVICE VALID IN THE U.S.A. ONLY  SPECTRA  MERCHANDISING  INTERNATIONAL,  INC.  warrants  this  unit  to  be  free  from  defective materials or factory workmanship for a period of 90 days from the date of original customer purchase and provided the product is utilized within the U.S.A. This warranty is not assignable or transferable.   Our obligation under this warranty is the repair or replacement of the defective unit or any part thereof, except batteries, when it is returned to the SPECTRA Service Department, accompanied by proof of the date of original consumer purchase, such as a duplicate copy of a sales receipt.    You must pay all shipping charges required to ship the product to SPECTRA for warranty service. If the product  is  repaired  or replaced  under  warranty,  the  return  charges  will  be  at  SPECTRA’s  expense. There are no other express warranties other than those stated herein.
 E17 This warranty is valid only in accordance with the conditions set forth below: 1.  The warranty applies to the SPECTRA product only while: a.  It remains in the possession of the original purchaser and proof of purchase is demonstrated. b.  It  has  not  been  subjected  to  accident,  misuse,  abuse,  improper  service,  usage  outside  the descriptions  and  warnings  covered  within  the  user  manual  or  non-SPECTRA  approved modifications. c.  Claims are made within the warranty period. 2.  This  warranty  does  not  cover  damage  or  equipment  failure  caused  by  electrical  wiring  not  in compliance  with  electrical  codes  or  SPECTRA  user  manual  specifications,  or  failure  to  provide reasonable care and necessary maintenance as outlined in the user manual. 3. Warranty of all SPECTRA products applies to residential use only and is void when products are used in a nonresidential environment or installed outside the United States. This warranty gives you specific legal rights, and you may also have other rights which vary from state to  state. TO OBTAIN  SERVICE please remove  all  batteries (if  any) and  pack the unit carefully and send  it  freight  prepaid  to  SPECTRA  at  the  address  shown  below.  IF  THE  UNIT  IS  RETURNED WITHIN THE WARRANTY  PERIOD  shown  above,  please include a  proof  of  purchase  (dated  cash register  receipt)  so  that  we may  establish  your  eligibility  for  warranty  service  and  repair  of  the  unit without cost. Also include a note with a description explaining how the unit is defective. A customer service representative may need to contact you regarding the status of your repair, so please include your name, address, phone number and email address to expedite the process. IF THE UNIT IS OUTSIDE THE WARRANTY PERIOD, please include a check for $XXX.00 to cover the cost of repair, handling and return postage. All out of warranty returns must be sent prepaid.  It  is  recommended  that  you  contact  SPECTRA  first  at  1-800-777-5331  or  by  email  at custserv@spectraintl.com for updated information on the unit requiring service.    In some cases the model you have may be discontinued, and SPECTRA reserves the right to offer alternative options for repair or replacement.    SPECTRA MERCHANDISING INTERNATIONAL, INC. 4230 North Normandy Avenue, Chicago, IL 60634, USA. 1-800-777-5331  To register your product, visit the link on the website below to enter your information. http://www.spectraintl.com/wform.htm      0717        Printed in China

Navigation menu