Omni Intelligent Technology C1 Wireless remote control of intelligent tail lights User Manual
Shenzhen Omni Intelligent Technology Co., Ltd. Wireless remote control of intelligent tail lights
user manual
VI I
.
Warning :
1. Don’t disassemble the rear light by yourself . Inside the light there is dismantling fragile stickers,
damage is not included in warranty
2. Please charge this light if six months no use, otherwise may cause battery less charged
3. This product waterproof level is IPX4. Could be used in small to moderate rain, please don’t suck
the product in to water
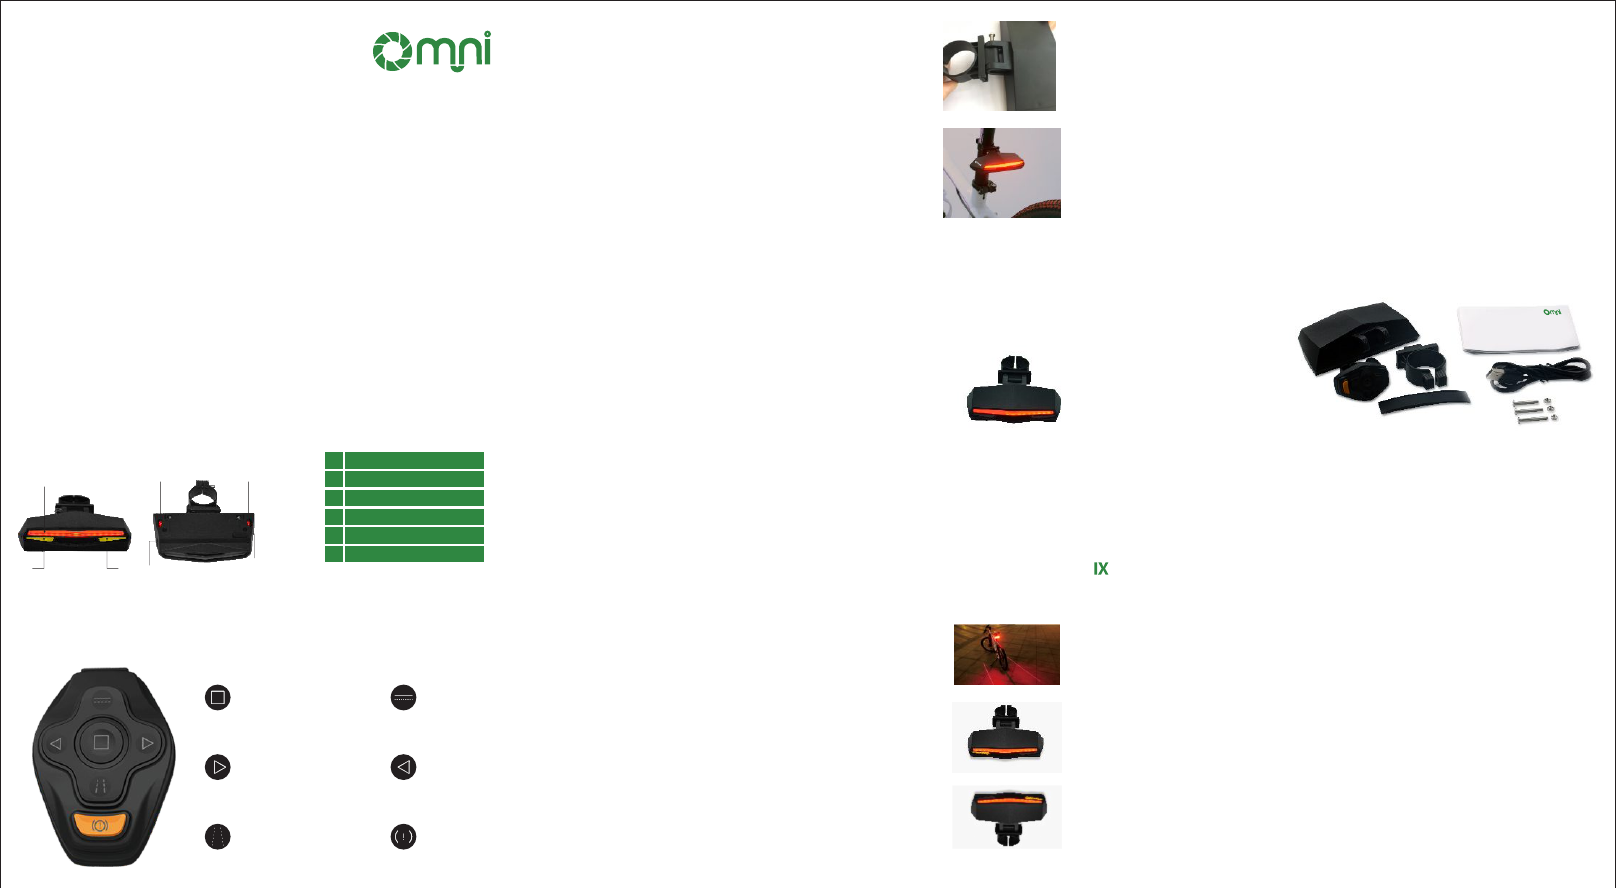
.Packing list :
Remote control
bicycle turning rear laser light
manual guide
1.
433.92MHz Bicycle Rear Light 1pcs
2. Remote control 1pcs
3. Rear light bracket 1pcs
4. Rubber belt 1pcs
5. Screw ,nut 3pcs
6. USB Charging Wire 1pcs
7. Manual Instruction 1pcs
NOTE : Rear light screw , nut : M5*30mm Remote control screw , nut : M5*30mm
Light-bracket screw, nut : M4*26.5mm
VI. Product specication:
◇
Rear light weight : 125g
◇Rear light charging input : DC5V 800Ma
◇Laser light transmission distance : 5m
◇
Remote control battery capacity: 180mAh
◇Rear light size : 110mm*65mm*30mm ◇Wireless
transfer mode : 433.92MHz
◇
Red alarming light brightness : 85 lumen
◇Rear light battery capacity: 2200mAh
◇Working environment: -20-- +60℃ ◇Waterproof level : IPX4
◇
Rear light endurance: normal brightness 7 hours
◇
Rear light charging time: charging take 3.5 hours. When charging 3 red light flashing.
Full charge red light constant on
◇Rear light full battery standby: rear light button on but light off standby time 14 days
Rear light off standby over 3 years
◇Remote control endurance: standby more than 4 months
◇Remote control charging time: 2.5 hours. Led light will be flashing white charging and stay
constantly ON when fully charged.
Remote control function(rear light should be on)
1. On / Off Button: Press and hold the power button to turn ON and OFF.
2.Mode Switch Button: Press to switch between the 3 modes; constant ON,
blinking, and OFF (ambient sensor).
3.Laser Light Button: Press to select between 3 modes; constantly ON, blinking,
and OFF. See photo D.
4.Left Turning Button: Press to activate the left turning signal. The yellow LED light
will be flashing on the left side of the bike light. Press again to turn OFF. The
light will turn itself OFF and return to original mode after 1 minute. See photo E.
5.Right Turning Button: Same as left turning button. See photo F.
6.Braking Light: Press and hold the brake light when braking. The LED light will
be get brighter to signal users that you are braking.
Photo D
Photo E
Photo F
V. Function:
Button on rear light:
Photo C
60% Power Display
Ambient light sensor
1.When the light is OFF, press the power button to check the battery status and
the red LED lights will come on to show current power. Each set of 3 LED lights
represents 20% power. When the power is too low to turn the unit ON, the red
LED lights with blink 3 times and then turn OFF.
2.Press and hold the power button to turn the unit ON and the LED red light
will stay ON.
3.When light is ON, press the power button to switch between 3 modes; constant
ON, blinking, and OFF.
When the unit is in OFF mode (bike light turned ON but red LED turned OFF), the ambient light sensor
is active. If the sensors (located on the underbelly of the bike light) are exposed to light for more than
5 seconds, the unit's red LED lights will shut off. If the sensors are exposed to darkness for more than
2 seconds, the red LED lights will come ON.
IV. Installation:
Installation of the rear light:
1. Remove the rear light and bracket from packaging. Attach the bracket to the light
using the provided bolt and secure with the nut. See Photo A for reference.
2. As shown in Photo B, attach the bracket onto the bicycle's seat tube and secure with
the bolt and nut. If it is too loose, add the provided rubber belt by wrapping it around
the tube within the bracket. The bracket is for a suitable seat tube of 25-32mm.
3.The degree of the rear light can be adjusted and secured into place by tightening
the bolt and nut combo from step 1.
Photo A
Photo B
Installation of the remote control
Remove the remote control from packaging and attach to the handlebar of the bicycle. Use the provided bolt
and nut to secure onto the handlebar. The remote control is suitable for 18-20mm wide handlebars.
III. Remote control button :
On/off button
Right turning light
Laser light
Mode Switch Button
Brake light
Left turning light
Ⅰ.Product information:
A rechargeable bicycle light that offers additional safety for cyclists while riding at night. A design
inspired by batman himself, the light is stylish and functional. The light offers left and right turn signal
lights, brake light, safety laser lane guidance lights, low battery warning light, and ambient sensor
detection. All this controlled by the rechargeable remote that attaches to the handlebars for easy
functionality.
Ⅱ.Product appearance :
②
①
③④⑤
⑥⑥
Red alarming light
Yellow left turning light
Yellow right turning light
①
②
③
On/off button
USB charging interface
Left/right laser light
④
⑤
⑥
Wireless remote control of
intelligent tail lights
Manual guide
FCC Warning Statement
VI I.I
Changes or modifications not expressly approved by the party responsible for compliance could void the
user’s authority to operate the equipment. This equipment has been tested and found to comply with the
limits for a Class B digital device, pursuant to Part 15 of the FCC Rules. These limits are designed to provide
reasonable protection against harmful interference in a residential installation. This equipment generates
uses and can radiate radio frequency energy and, if not installed and used in accordance with the instructions,
may cause harmful interference to radio communications. However, there is no guarantee that interference
will not occur in a particular installation. If this equipment does cause harmful interference to radio or
television reception, which can be determined by turning the equipment off and on, the user is encouraged
to try to correct the interference by one or more of the following measures:
This device complies with Part 15 of the FCC Rules. Operation is subject to the following two conditions:
(1)This device may not cause harmful interference, and (2)This device must accept any interference received,
including interference that may cause undesired operation.
‐‐ Reorient or relocate the receiving antenna.
‐‐ Increase the separation between the equipment and receiver.
‐‐ Connect the equipment into an outlet on a circuit different from that to which the receiver is connected.
‐‐ Consult the dealer or an experienced radio/TV technician for help.