Onkyo Home Entertainment MHPAV1 Base Station of Wireless Headphone User Manual MHK AV1 MANUAL
Onkyo Corporation Base Station of Wireless Headphone MHK AV1 MANUAL
Users Manual
1
Wireless Headphone
User’s Manual
MHP-AV1(WT-1+WR-1)
2
Acknowledgment & Trademark
Manufactured under license from Dolby Laboratories “Dolby”, “Dolby Digital”, “Dolby
Pro Logic”, and the Double – D symbol are trademarks of Dolby Laboratories.
FCC Compliance Statement
The equipment has been tested and found to comply with the limits for a Class B digital
device, pursuant to Part 15 of the FCC Rules. These limits are designed to provide
reasonable protection against harmful interference in residential installation. This
equipment generates, uses, and can radiate radio frequency energy and, if not installed
and used in accordance with the instructions, may cause harmful interference to radio
communications. However, there is no guarantee that interference will not occur in a
particular installation. If this equipment does cause interference to radio or television
reception, which can be determined by turning the equipment off and on. The user is
encouraged to try to correct the interference by one or more of the following measure:
‧ Reorient or relocates the receiving antenna.
‧ Increase the separation between the equipment at receiver.
‧ Connect the equipment into an outlet on a circuit different from that to which the
receiver is connected.
‧ Consult the dealer or an experienced radio / TV technician for help.
Notice: This device complies with Part 15 of the FCC rules. Operation is subject to
the following two conditions: (1) this device may not cause harmful interference, and (2)
this device must accept any interference received, including interference that may cause
undesired operation. Shielded cables and I/O cords must be used for this equipment to
comply with the relevant FCC regulations. Changes or modifications that are not
expressly approved in writing by HC Technology Co., Ltd. May void the user’s quthorty
to operate this equipment. This digital apparatus does not exceed the Class B limits for
radio noise emissions from digital apparatus set out in the radio interference regulation of
the Canadian Department of Communication.
IMPORTANT NOTE: FCC Radiation Exposure Statement:
This equipment complies with FCC radiation exposure limits set forth for an uncontrolled
environment. This equipment should be installed and operated with minimum distance 20cm
between the radiator & your body.
This transmitter must not be co-located or operating in conjunction with any other antenna or
transmitter.
Table of Contents
Introduction 3
Specification 3
Package Includes 3
Safety Voltage Chart 4
Description of Parts 5
Connection Chart 6-7
3
In case of insurance claim, please make sure to record the Model Number and Serial
Number printed on the real panel of the cabinet. The space below is provided for you to
record the information.
Model Number : _______________________________
Serial Number :________________________________
Purchase Date : ________________________________
Dealer Name : _________________________________
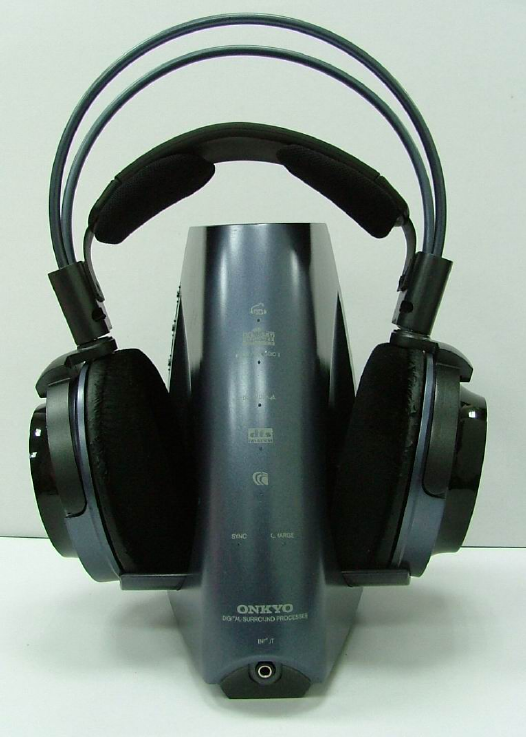
Introduction
Using a sophisticated room modeling techniques, the Juster Wireless Dolby Headphone
combines the 5.1 surround signals to create an amazingly vivid surround sound
environment. It is a perfect solution for travelers and late-night movie viewers.
Specification
‧Audio Mode Support: Dolby Digital, Dolby Pro Logic II, DTS, MPEG2 AAC
‧Dolby Headphone Mode: Dolby Headphone and Stereo
‧Audio Input: Digital: Optical / coaxial and Analog: RCA /Stereo Line in
Wireless: 2.4GHz RF Communication
‧
‧Headphone driver: Φ40mm
F
‧requency Response: 20Hz - 20kHz
‧Power: DC 2.4V (Rechargeable battery x 2)
DC 3V (AA battery x 2)
Package Includes
‧ Dolby headphone decoder with Wireless Transmitter (1pc)
‧ Short stereo cable: 0.5M (1pc
‧ Long stereo cable: 2.5M (1pc)
‧ Short optical cables: 0.5M (1pc)
‧ Long optical cables: 2.5M (1pc)
‧ Optical adapter (1pcs)
‧ AAA Rechargeable battery (2pcs)
‧ Battery-charge adapter (1pc)
‧ User manual (1pc)
4
Safety Voltage Chart :
Use the following chart to find out the correct power voltage in your country :
Input
Voltage Frequency Area
AC 100-120V 50-60Hz North America/ Taiwan/Japan
AC 230V 50 Hz Europe/UK
Description of Parts
Front panel of Transmitter Base
Headphone
Indicator
Dts
Indicator
Charger
Indicator
Dobly Digital
Indicator
AAC
Indicator
Standby
Indicator
Dolby Pro Logic II
Indicator

5
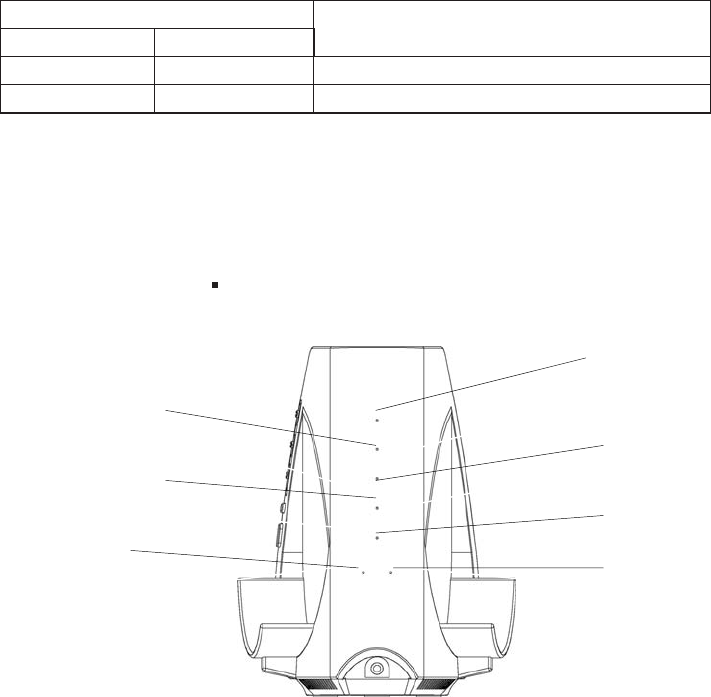
Back Panel
1. Analog/Optical Input
- Input for either Digital or Analog signal source
2. Decode mode indicator for Dolby Pro Logic II & Left 2
channel indicator in Noise Test mode
3. Indicator for Dolby Headphone or Stereo Headphone
mode & Center channel indicator in Noise Test mode 10
4. Decode mode indicator for Dolby Digital & Right
channel indicator in Noise Test mode
5. Digital signal input mode indicator & Surround Left
channel indicator in Noise Test mode
6. Analog signal input mode indicator
7. Decode mode indicator for DTS & Surround Right
channel indicator in Noise Test mode
8. Headphone Volume Control
-Push the switch to get the desired volume level
9. Battery Charger Jack
-Plug in the battery charger for battery charge
10. Input select button
- Switch the input signal source (Digital/ Analog)
11. Output mode select button
-Switch between Dolby Headphone and Stereo Headphone
12. Test button
-Performs function test of the system with pink
noise signal in Left, Center, Right, Surround Right,
and Surround Left channels
13. Power Off/On switch
14. Power Off/On indicator
Analog Input
Right Sound
Jack
Optical Input
Adapter
Input
Left Sound
Jack
Digital Coaxial
Optical
Output

6
Back Panel
Side Panel
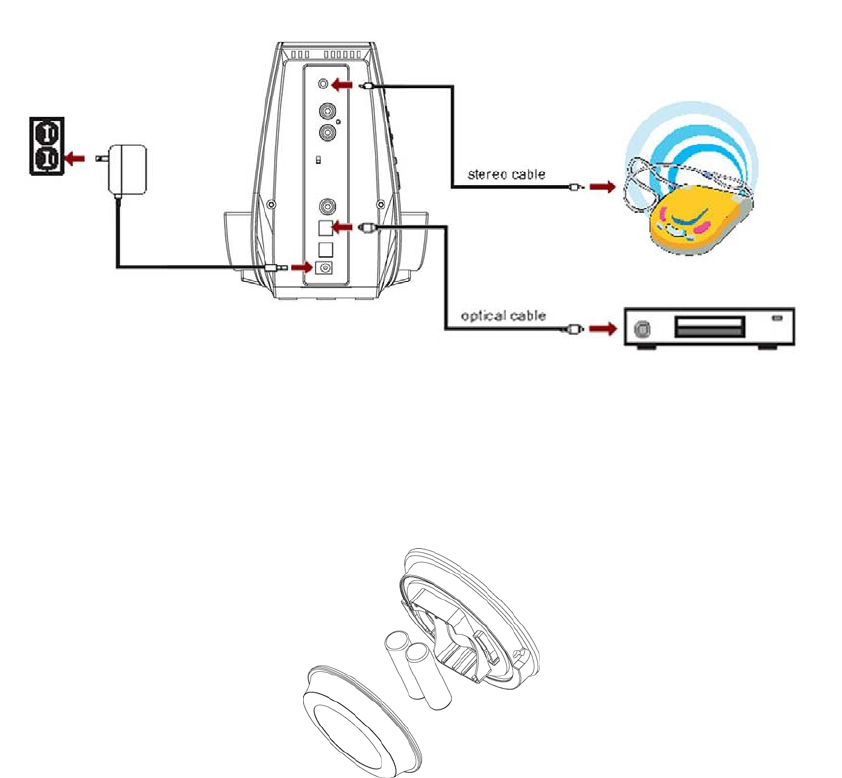
Connection Chart
1. Digital Input
a. Use associate optical cable to connect the optical signal output device and decoder
b. Use associate stereo cable to connect the anlog signal output device and decoder
Analog Input
Left Sound
Jack
Right Sound
Jack
Digital Coaxial
Optical Input
Optical
Output
Adapter
Input
RCA SW Mode
Digital/Analog
SW Mode
Digital/Coaxial
SW Mode
Dolby Headphone
Chanel Selector
7
2. Charge
-Plug in the battery charger for battery charge
3. Battery Insert
ٛ.a. Remove the cover of battery case
ٛ.b. Insert the fully charged batteries with correct pole direction
ٛ.c. Put back the cover
ٛ.