Option OMO0201 GSM/GPRS/UMTS/HSDPA QUAD BAND PCI MINI CARD User Manual Z06 131 GTM kit 353W QS v2 indd
Option NV GSM/GPRS/UMTS/HSDPA QUAD BAND PCI MINI CARD Z06 131 GTM kit 353W QS v2 indd
Option >
Contents
- 1. User Manual Quick Start Guide I
- 2. User Manual Quick Start Guide II
- 3. Safety Manual
- 4. User Guide
- 5. User Manual Software
- 6. Annex to User Manual FCC Statements
User Manual Quick Start Guide I
GLOBETROTTER PCI EXPRESS MINI CARD
OPTION NV, GASTON GEENSLAAN 14, 3001 LEUVEN - BELGIUM - WWW.OPTION.COM
QUICK START GUIDE
CONNECT
ANYTIME,
ANYWHERE

ABOUT THIS DOCUMENT
Overview and Purpose
This document describes the Module Development Kit hardware, software and
installation instructions.
Confidentiality
All data and information contained or disclosed by this document is confidential and
proprietary of Option NV, and all rights therein are expressly reserved. By accepting
this document, the recipient agrees that this information is held in confidence and
in trust and will not be used, copied, reproduced in whole or in part, nor its contents
revealed in any manner to others without prior and written permission of Option NV.
Version history
Date Version Author(s) Revision(s) Remarks
Aug 8, 2006 V01-D1 R. Biesemans Initial version
June 26, 2006 V01-D2 G. Van Overbeke S. Lodewijckx Generic document
and revision
July 3, 2006 Vo1-D3 G. Van Overbeke S. Lodewijckx Revision changes
July 13, 2006 V01-D4 G. Van Overbeke Small corrections
July 13, 2006 V01-F1 G. Van Overbeke Final Version
Aug 8, 2006 V01-F3 G. Van Overbeke Revision changes
GLOBETROTTER QUICK START GUIDE PAGE: 1 of 30
AUTHOR: G. Van Overbeke | CREATION DATE: Aug 8, 2006 | VERSION: v01-f3
[ OPTION CONFIDENTIAL ]

TABLE OF CONTENTS
1 Introduction 3
2 Overview 4
3 Package content 6
4 Hardware installation 7
5 Driver installation 9
5.1 Installation procedure 9
6 Dashboard application: GT Connect 13
7 HyperTerminal 16
8 Set up a data call 21
9 Set up a voice call 28
GLOBETROTTER QUICK START GUIDE PAGE: 2 of 30
AUTHOR: G. Van Overbeke | CREATION DATE: Aug 8, 2006 | VERSION: v01-f3
[ OPTION CONFIDENTIAL ]

1 INTRODUCTION
For evaluation purposes the GlobeTrotter PCI Express mini cards modules are housed in a
cradle, offering a convenient evaluation and development platform. This document further
describes the Module Development Kit hardware and software installation and basic usage
instructions for Windows XP English edition.
This Module Development Kit can be used for all Option modules with the PCI Express interface:
• GTM351
• GTM353
• GTM378
Design specific information for the Modules is outside of the scoop of this document and can
be found in the respectively Integration Manuals instead.
To make a successful connection to the Internet following prerequisites are assumed:
• Module Development Kit
• Live Network connection (GPRS and/or EDGE and/or 3G and/or HSDPA)
• Activated (U)SIM for the available network
• Host platform with an USB host controller (e.g. laptop or PC desktop)
GLOBETROTTER QUICK START GUIDE PAGE: 3 of 30
AUTHOR: G. Van Overbeke | CREATION DATE: Aug 8, 2006 | VERSION: v01-f3
[ OPTION CONFIDENTIAL ]
2 OVERVIEW
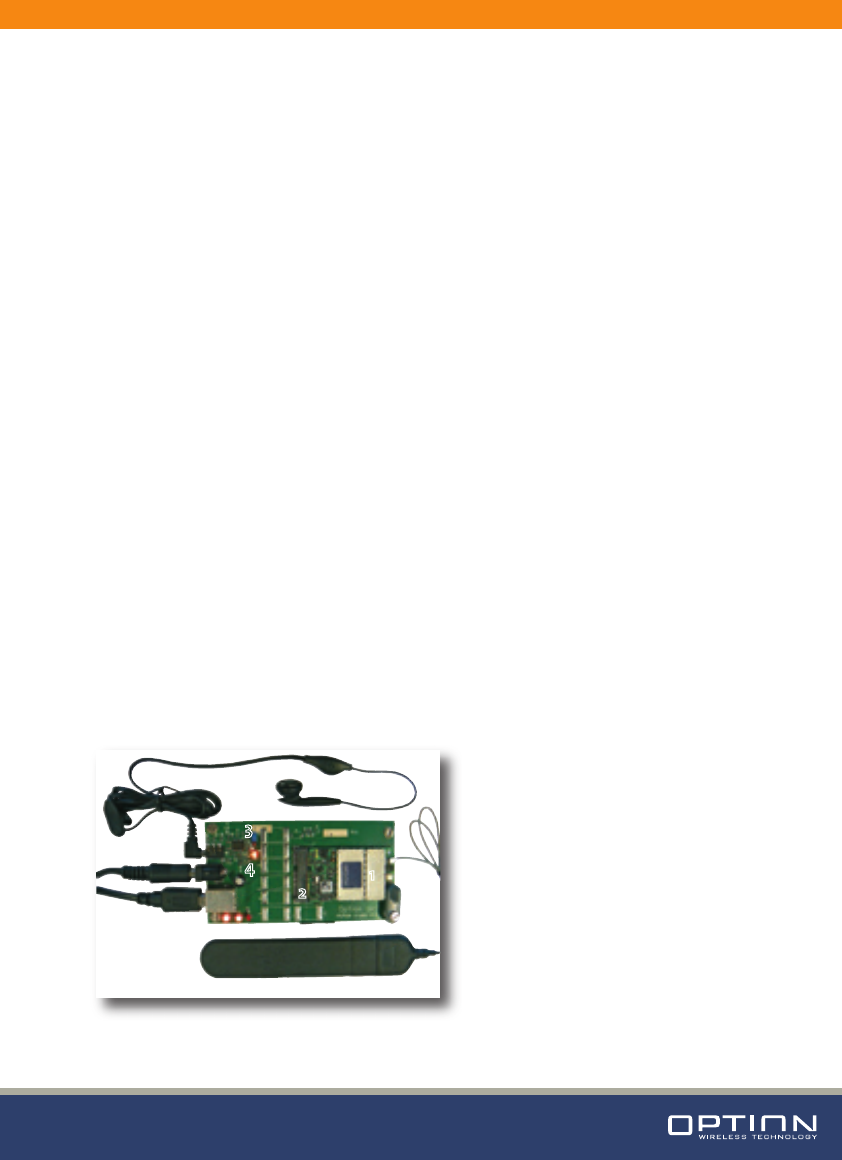
The Module Development Kit consists of a main PEPIJN Cradle board which provides a
standard USB interface, a SIM card holder and an external power supply for the GlobeTrotter
Modules. With this cradle it is possible to connect the GTM card to any standard USB host
controller.
Points of interest:
1. Option PCI Express Mini Card
2. PCI Express connector
3. 8/16 bit CODEC jumper: see section 9
4. 1.8 Volt LED indication
5. USB power LED: indicates that USB is connected and powered
6. Power LED: indicates that the GTM module is powered with 3.3 Volts
7. Registration and USB activity LED: indicates that the module has registered to the
mobile network when it burns continuously. Also indicates USB communication
activity when the LED is blinking
8. USB connector and cable
9. Power plug and cable
10. Audio jack and headset
11. RF connector and cable
12. Module locking mechanism
13. External antenna
Figure 1: Pepijn Cradle with module and accessories
8
910
5
13
12
11
1
2
3
4
67
GLOBETROTTER QUICK START GUIDE PAGE: 4 of 30
AUTHOR: G. Van Overbeke | CREATION DATE: Aug 8, 2006 | VERSION: v01-f3
[ OPTION CONFIDENTIAL ]
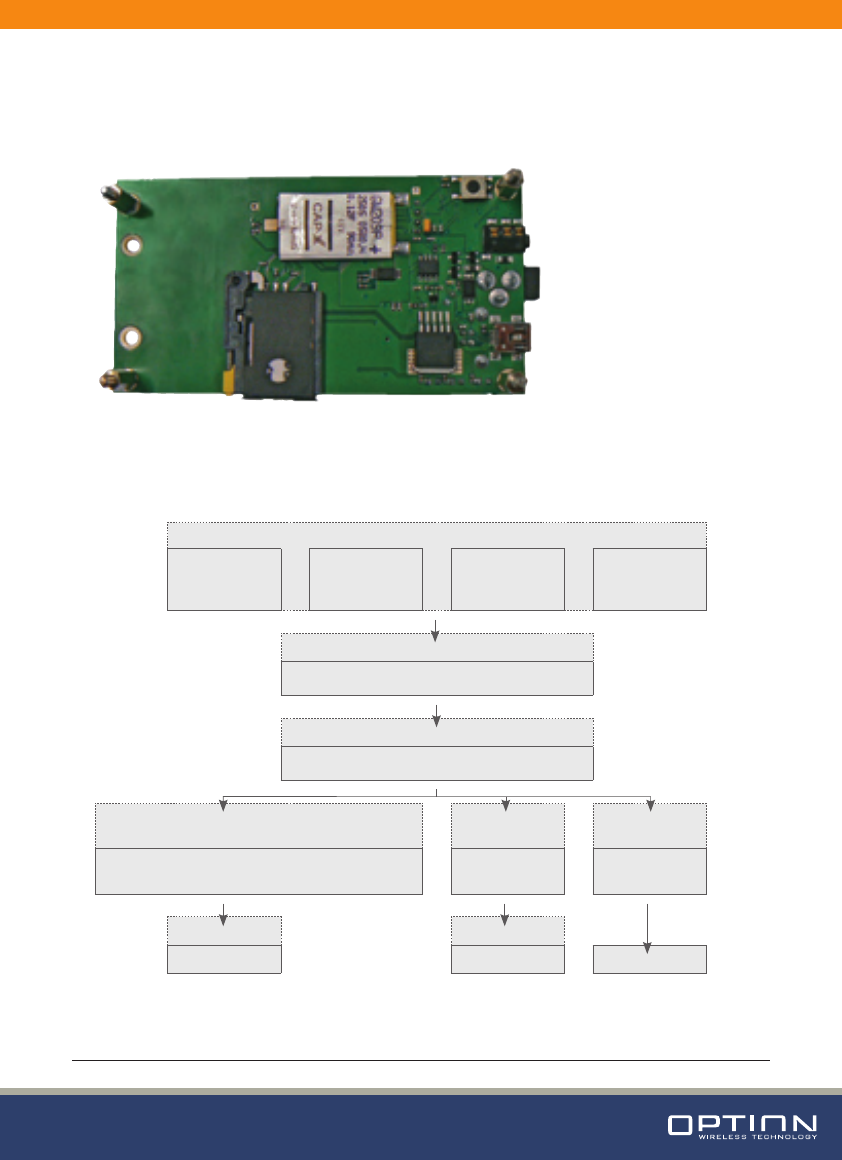
And for the bottom view:
1. SIM card holder 3. Audio CODEC chip reset button
2. SIM card eject mechanism 4. Small USB connector1
Figure 2: Pepijn Cradle bottom view
To get your module working correctly, please follow the installation instruction carefully and in
the order of Chapter 4 and 5. After which you can proceed with Chapter 6, 7, 8 and 9.
Prerequisite:
Host Live
Network
Activated
(U)SIM
Module
Development
Kit
Chapter 4
Hardware installation
Chapter 5
Driver installation
Chapter 6 Chapter 7 Integration
Manual
Applications
(e.g. GT Connect - Dial)
HyperTerminal
AT commands
Engineering
tools
Chapter 8 Chapter 9
Data Voice Debug
Figure 3: Module Development Kit overview
1 The small and big USB connector both work for the same USB interface
1
2
3
4
GLOBETROTTER QUICK START GUIDE PAGE: 5 of 30
AUTHOR: G. Van Overbeke | CREATION DATE: Aug 8, 2006 | VERSION: v01-f3
[ OPTION CONFIDENTIAL ]
3 PACKAGE CONTENT
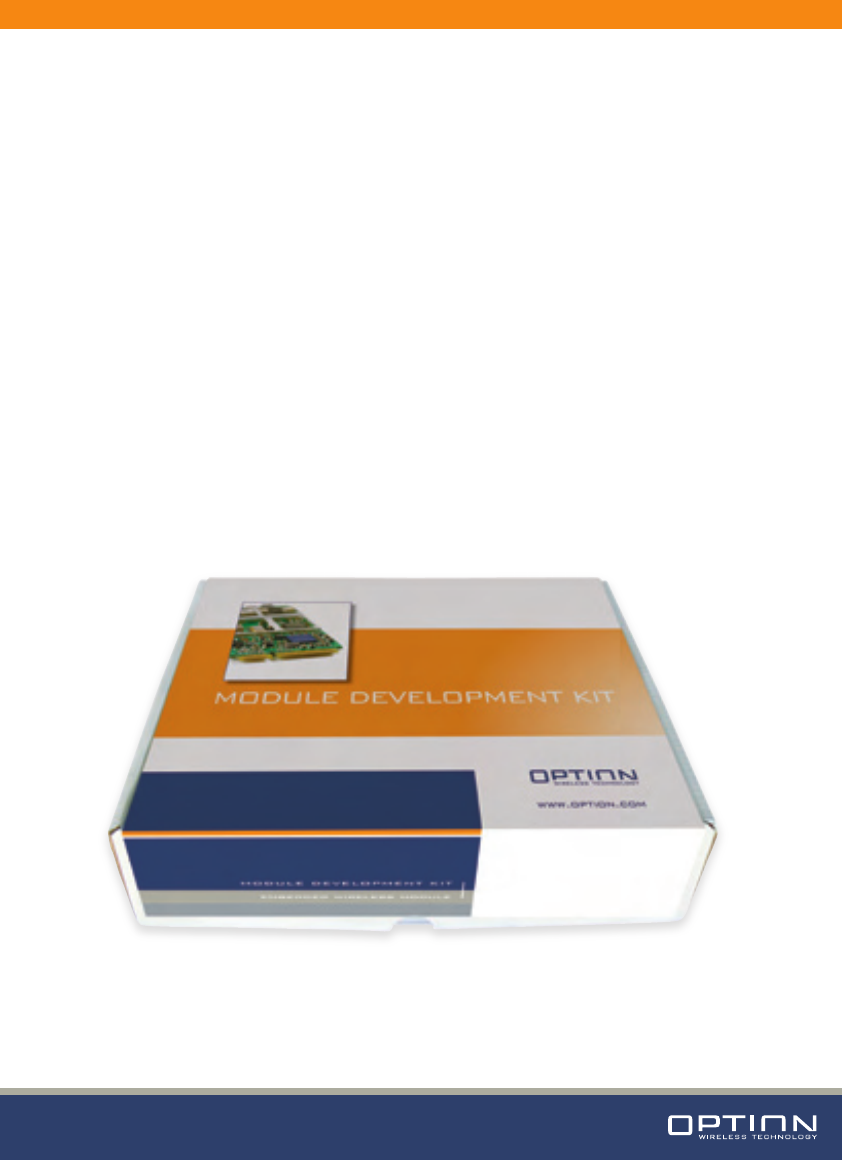
Your Module Development Kit comes with the following items:
• PCI Express Mini Card module(s)
• Pepijn Cradle main board(s)
• USB cable(s)
• Power adaptors (5VDC / min 1A @ 100-240V – European plug)
• External antenna(s)
• RF cable(s) with SMA connector(s)
• Headset(s)
• CD-ROM with dashboard installation and driver package
The software package consist of Windows XP, Windows 2000 and Windows XP x64 bit edition
drivers. Also a dashboard application and engineering tools are provided. These tools can be
used to set up a connection to a network provider.
To set up a successful data connection to the Internet you will need to have mobile network
coverage and an activated SIM card from your local operator.
Figure 4: Module Development Kit
GLOBETROTTER QUICK START GUIDE PAGE: 6 of 30
AUTHOR: G. Van Overbeke | CREATION DATE: Aug 8, 2006 | VERSION: v01-f3
[ OPTION CONFIDENTIAL ]
4 HARDWARE INSTALLATION
Step-by-step instructions:
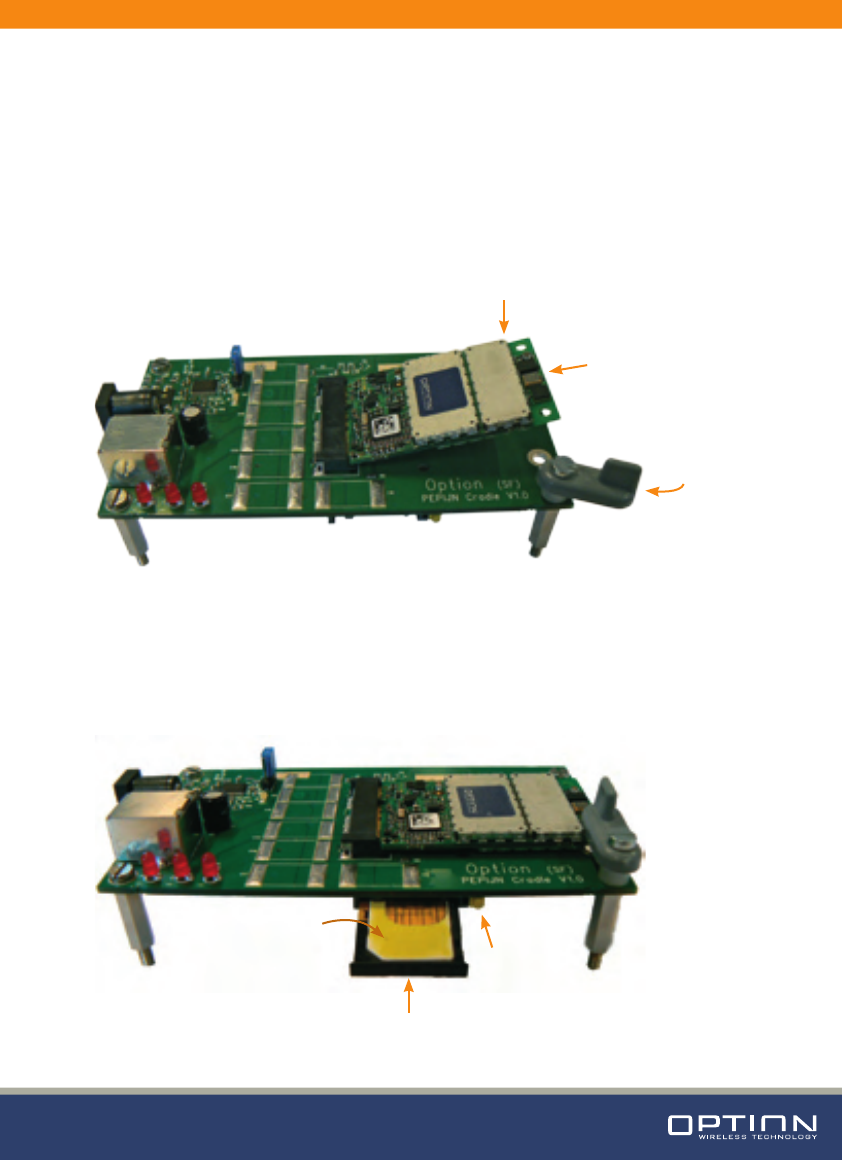
(1) Insert the module skew into the cradle and (2) push the module down, so it makes proper
contact in the PCI Express connector. (3) Secure the module with the locking mechanism.
Remark: Fasten the screw of the locking mechanism when it becomes too loose by holding one
finger on top of the screw and turning the leg in counter clockwise direction.
Figure 5: Module and Cradle board
(4) Carefully insert your SIM card in the SIM card holder (with the contact side up), and (5) insert
the holder into the socket, making sure it is aligned correctly. (6) To open the SIM card holder,
press the small eject button with the tip of a pen (you may need to apply gentle force).
Figure 6: SIM card holder
1
2
4
5
6
3
GLOBETROTTER QUICK START GUIDE PAGE: 7 of 30
AUTHOR: G. Van Overbeke | CREATION DATE: Aug 8, 2006 | VERSION: v01-f3
[ OPTION CONFIDENTIAL ]
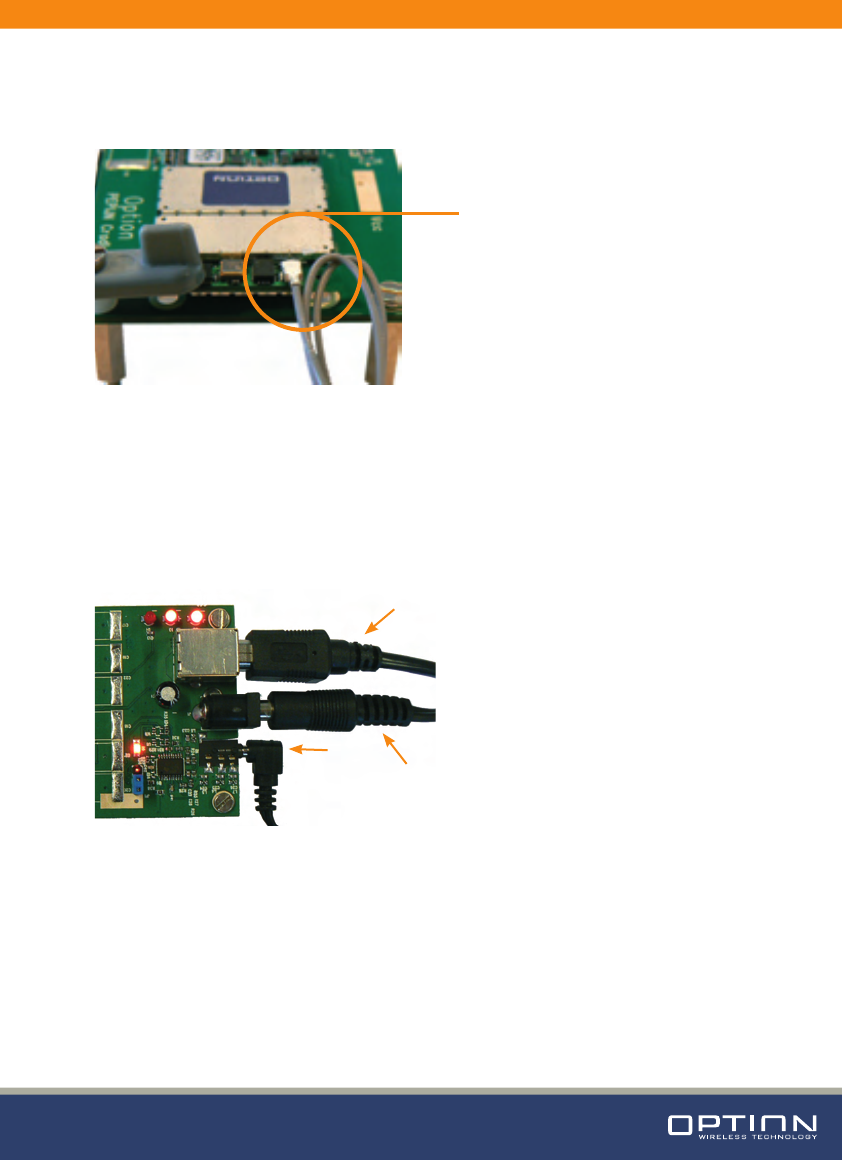
(7) Connect the external antenna (or SMA connector cable for test equipment) to the
RF connector on the module.
Figure 7: RF connector on the module
(8) Connect the headset into the audio jack. Next, (9) connect the power supply plug (the
adapter should already be connected to the mains) to the evaluation platform. And when you
are ready you can (10) connect the USB cable from the GTM cradle to your PC. At this point your
module should be detected by the host PC. Proceed with the next Chapter.
Figure 8: Top to bottom: USB cable, power plug and audio jack
NOTES:
In case a hard reset of the unit is necessary, unplug the power supply and wait until the power led
(led closest to the fan) is fully extinguished before reconnecting the power supply (A large buffer
capacitor on the cradle board needs about 10 seconds to discharge).
10
7
9
8
GLOBETROTTER QUICK START GUIDE PAGE: 8 of 30
AUTHOR: G. Van Overbeke | CREATION DATE: Aug 8, 2006 | VERSION: v01-f3
[ OPTION CONFIDENTIAL ]
5 DRIVER INSTALLATION
Following drivers are available for Win XP, Win 2K and Win XP x64 edition:
• Device: GlobeTrotter Module 3G+
• Multifunction Adapter: GlobeTrotter Module 3G+ Flip-Flop Bus
• Ports: GlobeTrotter Module 3G+ Diagnostics Port
• Ports: GlobeTrotter Module 3G+ Application Port
• Network: GlobeTrotter Module 3G+ Network Card
• Modem: GlobeTrotter Module 3G+ Modem
• Smart Card: GlobeTrotter Module 3G+ Smart Card Interface (Optional)
For full functionality of your module, you need to make sure all drivers are installed correctly.
5.1 Installation procedure:
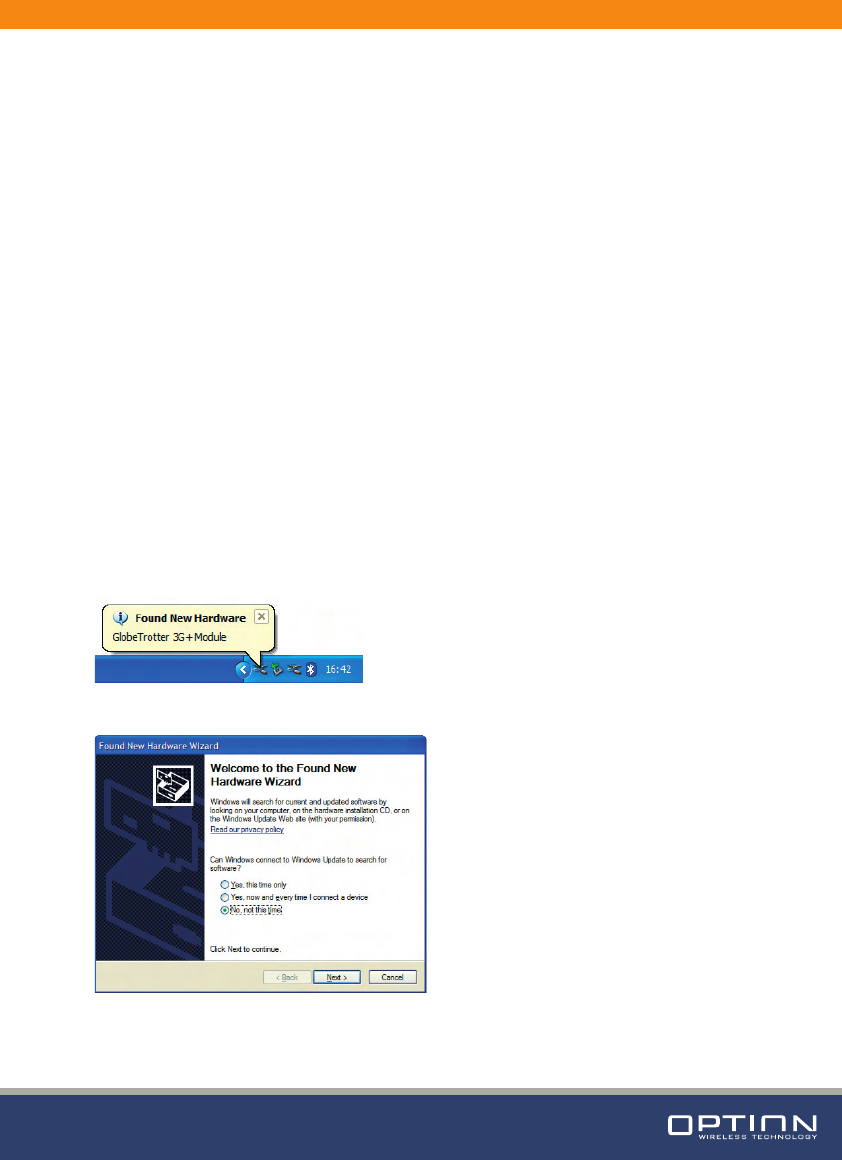
(1) If you have not already done so, install and connect the cradle as described in chapter 4.
The unit is connected correctly only if the “Found New Hardware” balloon and subsequent the
”Welcome to the Found New Hardware” Wizard appears.
Figure 9: Found New Hardware
Figure 10: Welcome to the Found New Hardware
GLOBETROTTER QUICK START GUIDE PAGE: 9 of 30
AUTHOR: G. Van Overbeke | CREATION DATE: Aug 8, 2006 | VERSION: v01-f3
[ OPTION CONFIDENTIAL ]

(2) For Windows XP: on the first dialog (“Can Windows connect to Windows Update to search
for software?”) select “No, not this time”
(3) On the next dialog, select ”Install software automatically (Recommended)”. At this point
make sure the CD-ROM with drivers is inserted into your optical drive.
Figure 11: Install the software automatically (Recommended)
Or if you know the location of the drivers yourself you can select “Install from a list or specific
location (Advanced)”. In this case make sure to select the option “Include this location in the
search:” in the next screen and enter the correct path to your drivers.
Figure 12: Install from a list or specific location (Advanced)
GLOBETROTTER QUICK START GUIDE PAGE: 10 of 30
AUTHOR: G. Van Overbeke | CREATION DATE: Aug 8, 2006 | VERSION: v01-f3
[ OPTION CONFIDENTIAL ]
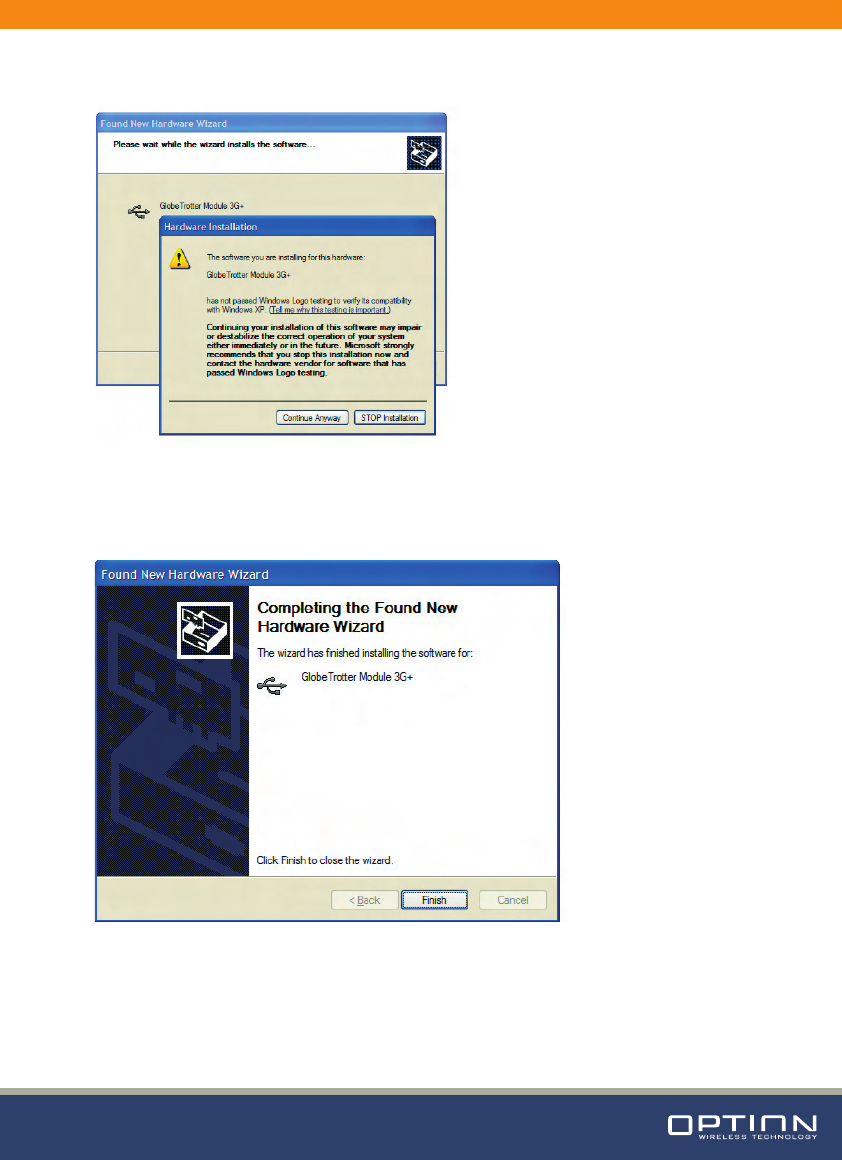
(4) For the driver signing warning, click “Continue Anyway”:
Figure 13: Continue Anyway
(5) Click “Finish” in the next screen “Completing the Found New Hardware Wizard”
Figure 14: Completing the Found New Hardware Wizard
(6) Repeat step 3 to 5 for all mentioned drivers.
GLOBETROTTER QUICK START GUIDE PAGE: 11 of 30
AUTHOR: G. Van Overbeke | CREATION DATE: Aug 8, 2006 | VERSION: v01-f3
[ OPTION CONFIDENTIAL ]
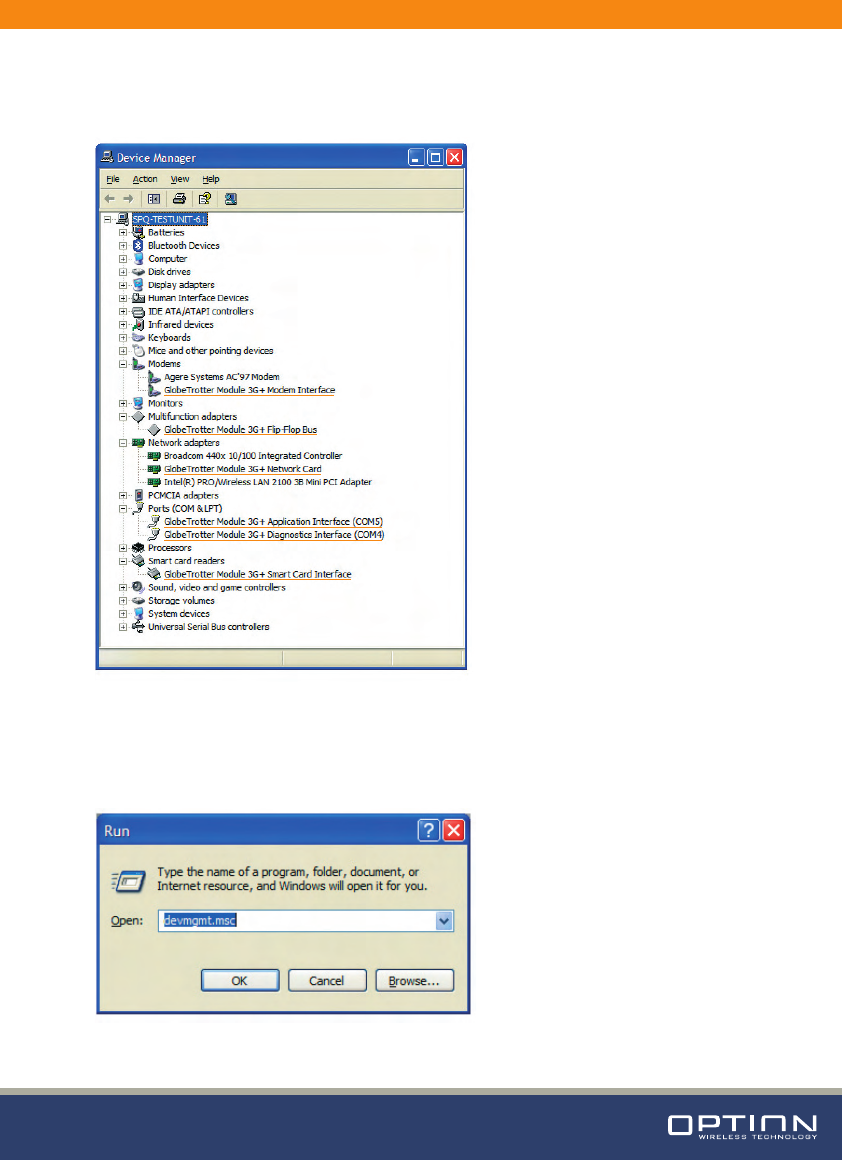
(7) On successful installation of all drivers the device manager will show following typical
installed devices.
Figure 15: Device manager after driver installation
To get to device manager go to “Start” menu and select “Run”. In the next dialogue type
“devmgmt.msc” as shown on the next screenshot:
Figure 16: Run to device manager
GLOBETROTTER QUICK START GUIDE PAGE: 12 of 30
AUTHOR: G. Van Overbeke | CREATION DATE: Aug 8, 2006 | VERSION: v01-f3
[ OPTION CONFIDENTIAL ]
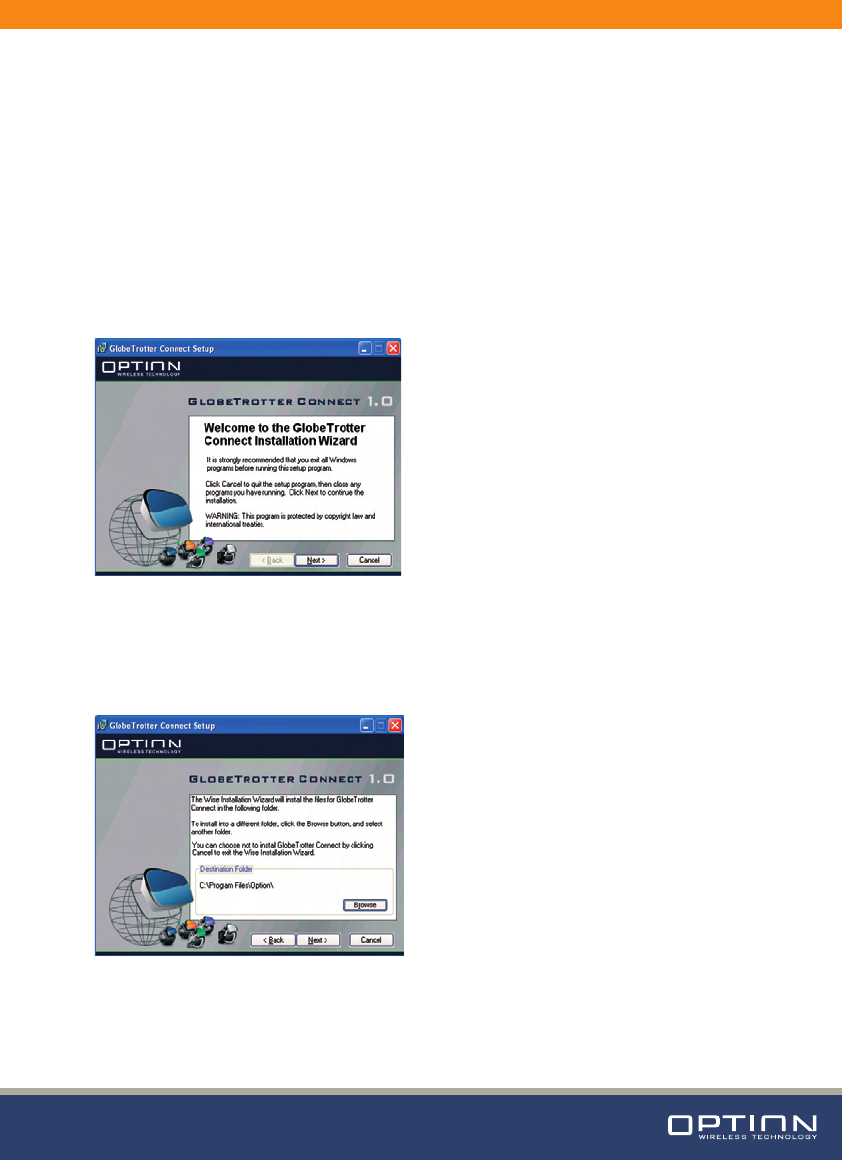
6 DASHBOARD APPLICATION: GT CONNECT
GlobeTrotter Connect is a dashboard application. This chapter describes the installation of the
dashboard application.
(1) Installation file: Brows on the CD-ROM to the directory “\Software_package\GTConnect”
where you can find the installation file of the dashboard.
(2) Start installation: double click in the “GlobeTrotterConnect.msi” file and the window in
Figure 17 will pop up.
Figure 17: GT Connect installation wizard
(3) Click “Next” to continue the installation. Figure 18 will be displayed. Choose the folder in
which the application program may be installed, and click “Next”.
Figure 18: Installation destination folder
GLOBETROTTER QUICK START GUIDE PAGE: 13 of 30
AUTHOR: G. Van Overbeke | CREATION DATE: Aug 8, 2006 | VERSION: v01-f3
[ OPTION CONFIDENTIAL ]
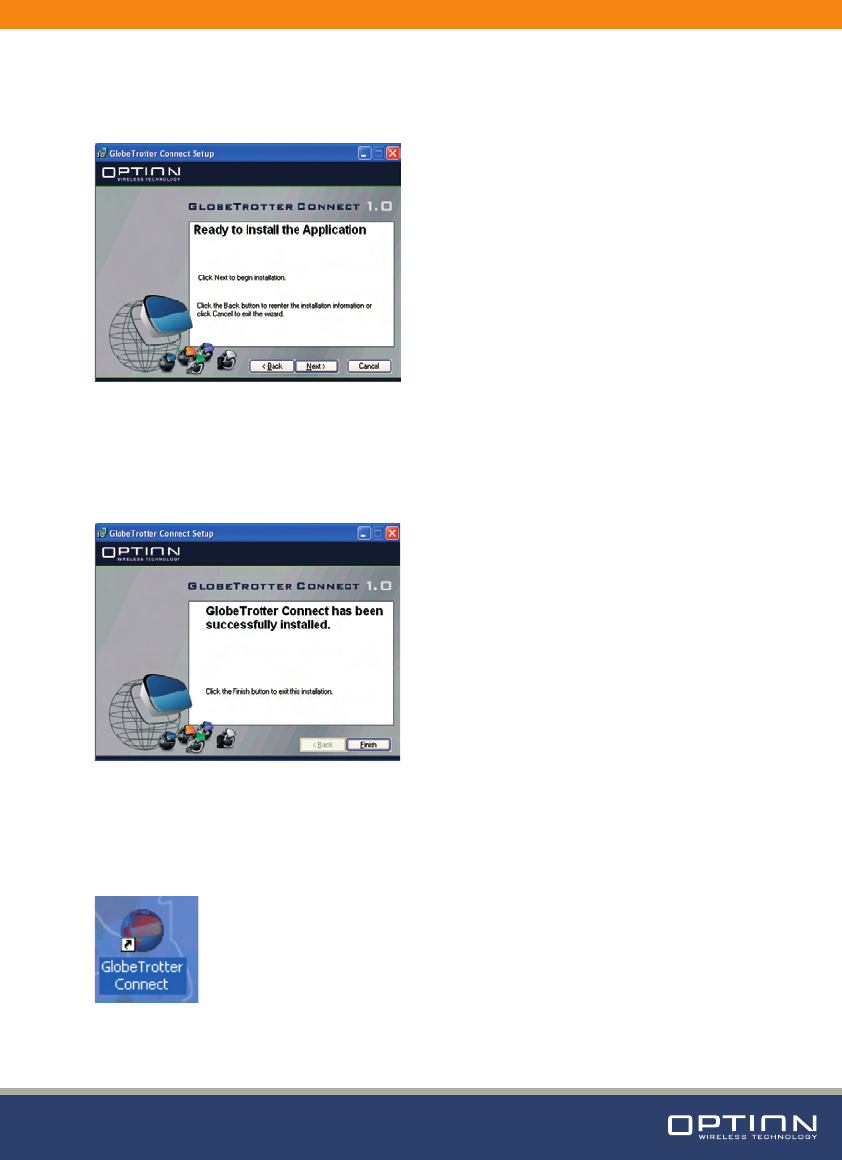
(4) The GT Connect application is now ready for installation. Click “Next” and the actual
installation will start (Figure 19).
Figure 19: GT Connect ready to install
(5) When everything is installed correctly, Figure 20 will be shown. Click “Finish” to close the
installation wizard.
Figure 20: Successfully installed GT Connect
(6) A shortcut of the application can be found on your desktop. To start the application, double
click on the shortcut.
Figure 21: Shortcut to GT Connect
GLOBETROTTER QUICK START GUIDE PAGE: 14 of 30
AUTHOR: G. Van Overbeke | CREATION DATE: Aug 8, 2006 | VERSION: v01-f3
[ OPTION CONFIDENTIAL ]