Option OMO0201 GSM/GPRS/UMTS/HSDPA QUAD BAND PCI MINI CARD User Manual Z06 131 GTM kit 353W QS v2 indd
Option NV GSM/GPRS/UMTS/HSDPA QUAD BAND PCI MINI CARD Z06 131 GTM kit 353W QS v2 indd
Option >
Contents
- 1. User Manual Quick Start Guide I
- 2. User Manual Quick Start Guide II
- 3. Safety Manual
- 4. User Guide
- 5. User Manual Software
- 6. Annex to User Manual FCC Statements
User Manual Quick Start Guide II
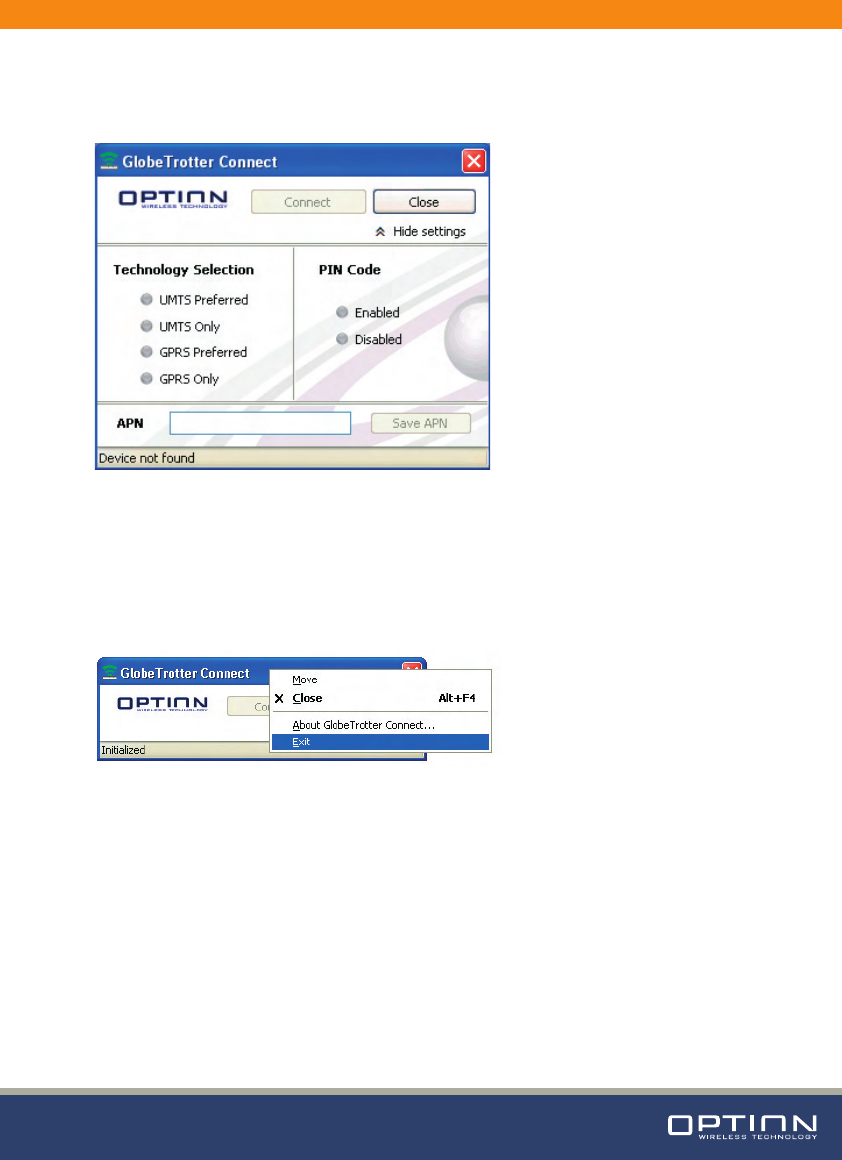
(7) When you launch the GT connect application it looks like Figure 22. For detailed application
description and usage, refer to the release notes on the CD-ROM provided with the package.
Figure 22: GT Connect application
With this application you can easily connect to the internet.
(8) To close GT Connect completely, go with your mouse pointer to the title bar and choose
“Exit” from the context menu.
Figure 23: Exit GT Connect
GLOBETROTTER QUICK START GUIDE PAGE: 15 of 30
AUTHOR: G. Van Overbeke | CREATION DATE: Aug 8, 2006 | VERSION: v01-f3
[ OPTION CONFIDENTIAL ]
7 HYPERTERMINAL
This section describes briefly how to setup HyperTerminal to communicate with the PCI
Express Mini Card by AT commands.
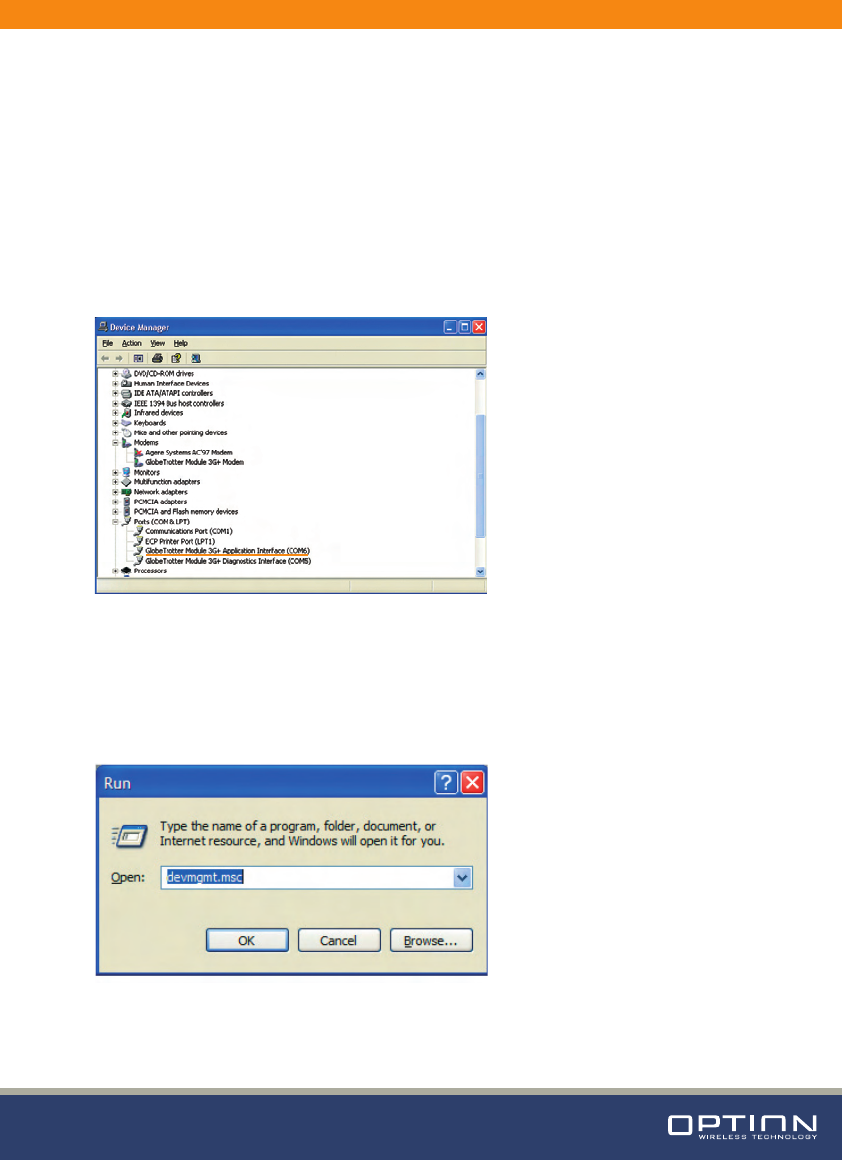
(1) Go to device manager, and check which port is the Application port.
In this example, the application port is COM6. It also important to know is that GT Connect
takes hold of the Application port. So before going any further, exit GT Connect completely.
Refer to the previous chapter.
Figure 24: Device manager
To get to device manager go to “Start” menu and select “Run”. In the next dialogue type
“devmgmt.msc” as shown on the next screenshot:
Figure 25: Run to device manager
GLOBETROTTER QUICK START GUIDE PAGE: 16 of 30
AUTHOR: G. Van Overbeke | CREATION DATE: Aug 8, 2006 | VERSION: v01-f3
[ OPTION CONFIDENTIAL ]
(2) Open HyperTerminal with the “Start” menu in Windows:
Start > Programs > accessories > Communication > HyperTerminal
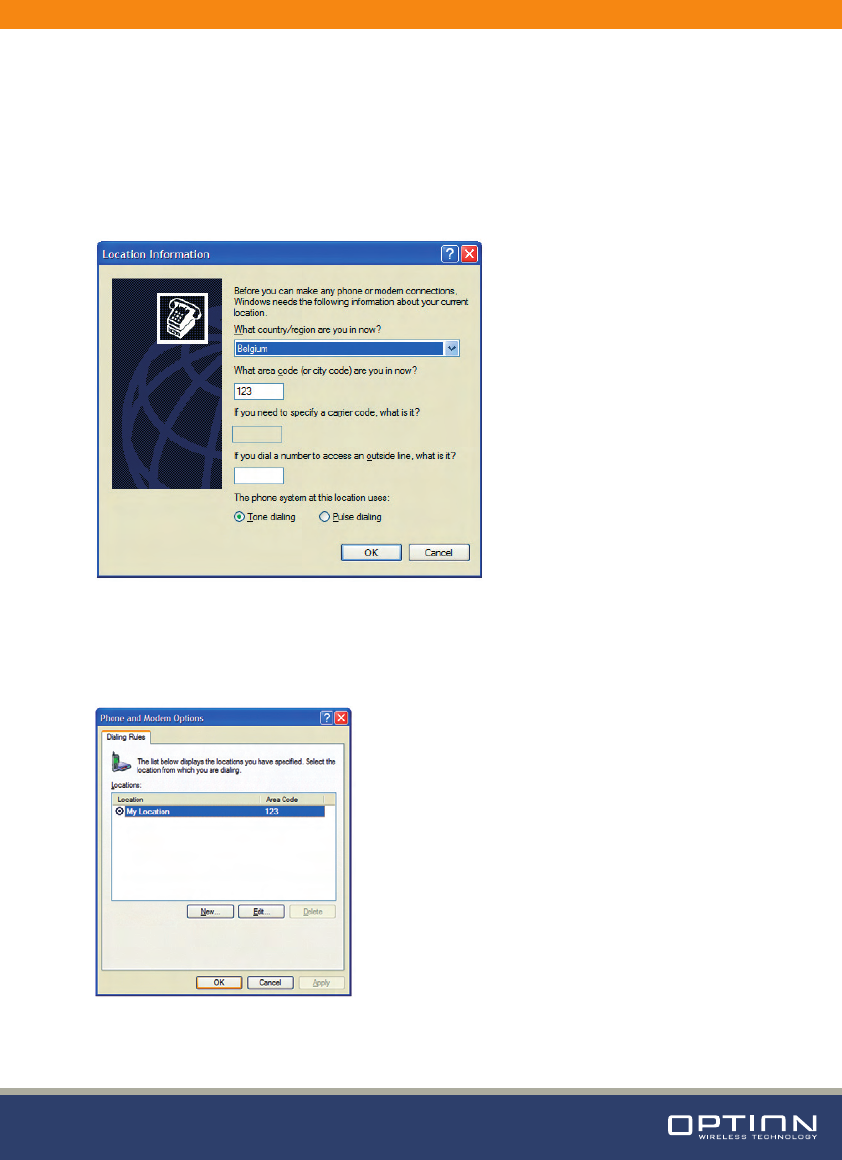
(3) Normally, you have to do the following two steps only once. If you already have done so
in the past you can skip to step 5. If not, choose a country and an area code. For use with the
module, it does not matter, so just enter anything.
Figure 26: Location information
(4) Just “OK” the next “Phone and Modem Options” screen.
Figure 27: Phone and Modem Options
GLOBETROTTER QUICK START GUIDE PAGE: 17 of 30
AUTHOR: G. Van Overbeke | CREATION DATE: Aug 8, 2006 | VERSION: v01-f3
[ OPTION CONFIDENTIAL ]
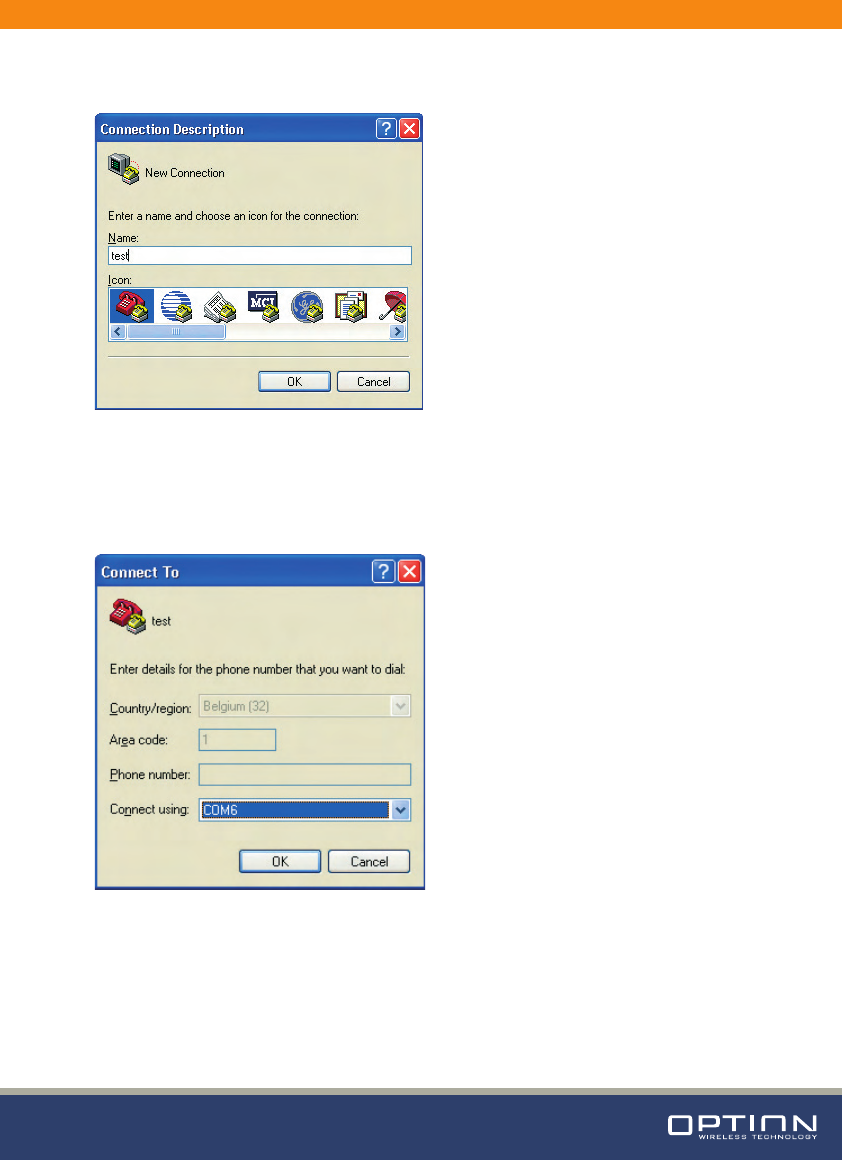
(5) Enter a name for your HyperTerminal Connection and press OK.
Figure 28: Location information
(6) In the next window, change the “Connect using:” field to the Application Port
(COM6 in this example). Click OK.
Figure 29: Phone and Modem Options
GLOBETROTTER QUICK START GUIDE PAGE: 18 of 30
AUTHOR: G. Van Overbeke | CREATION DATE: Aug 8, 2006 | VERSION: v01-f3
[ OPTION CONFIDENTIAL ]

(7) Now the next window will appear. Modify the Bit per second field to 115200 and click OK.
Figure 30: Connection Properties
HyperTerminal is configured and you are now ready issue AT commands to the PCI Express
Mini Card module. Figure 31 shows a typical HyperTerminal session. If you don’t have visual
feedback of what you are typing, you need to turn echo on by typing ATE1 followed by enter
first as shown in below example.
GLOBETROTTER QUICK START GUIDE PAGE: 19 of 30
AUTHOR: G. Van Overbeke | CREATION DATE: Aug 8, 2006 | VERSION: v01-f3
[ OPTION CONFIDENTIAL ]
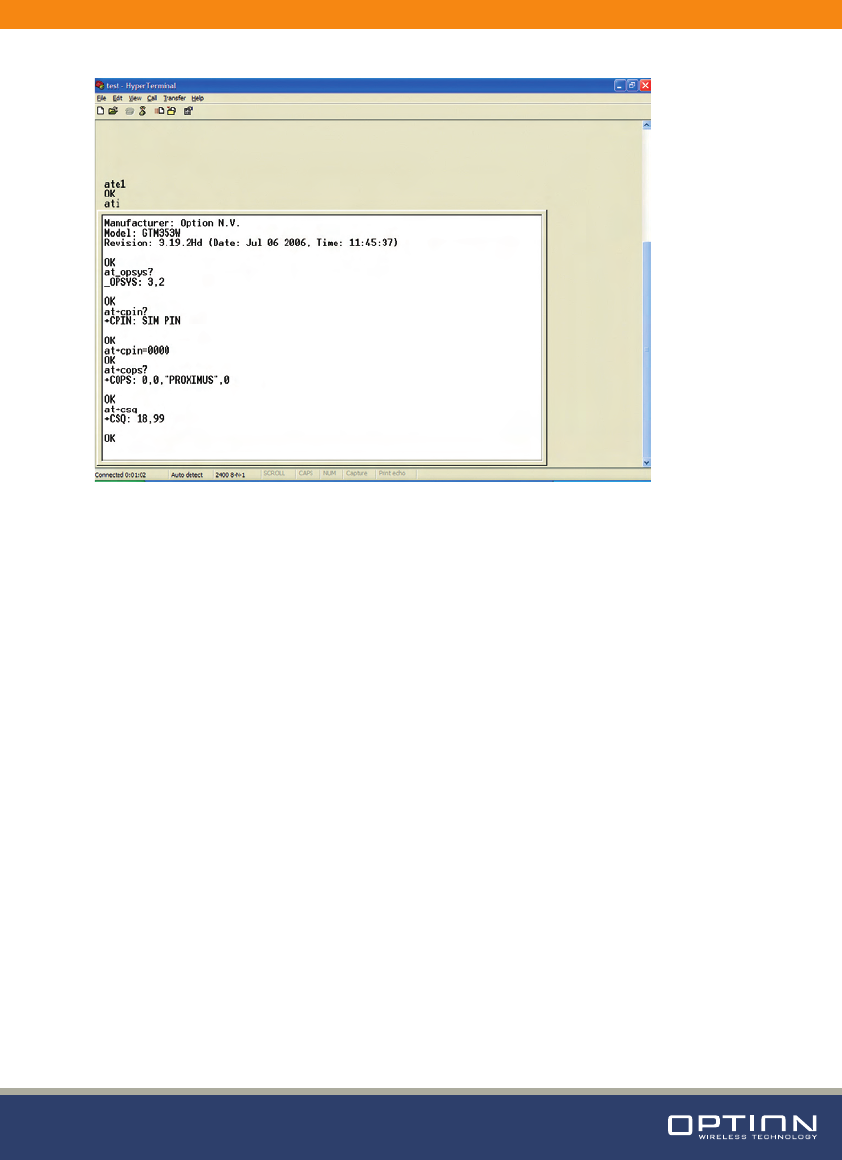
Figure 31: Typical HyperTerminal session
When you close HyperTerminal, you have the opportunity to save your HyperTerminal profile.
Saved profiles can be found under Start > Programs > accessories > Communication
> HyperTerminal
GLOBETROTTER QUICK START GUIDE PAGE: 20 of 30
AUTHOR: G. Van Overbeke | CREATION DATE: Aug 8, 2006 | VERSION: v01-f3
[ OPTION CONFIDENTIAL ]
8 SET UP A DATA CALL
Besides using dashboard applications, it is also possible to set up a data call using
windows dial-up networking.
This section explains how to set up a dial-up connection.
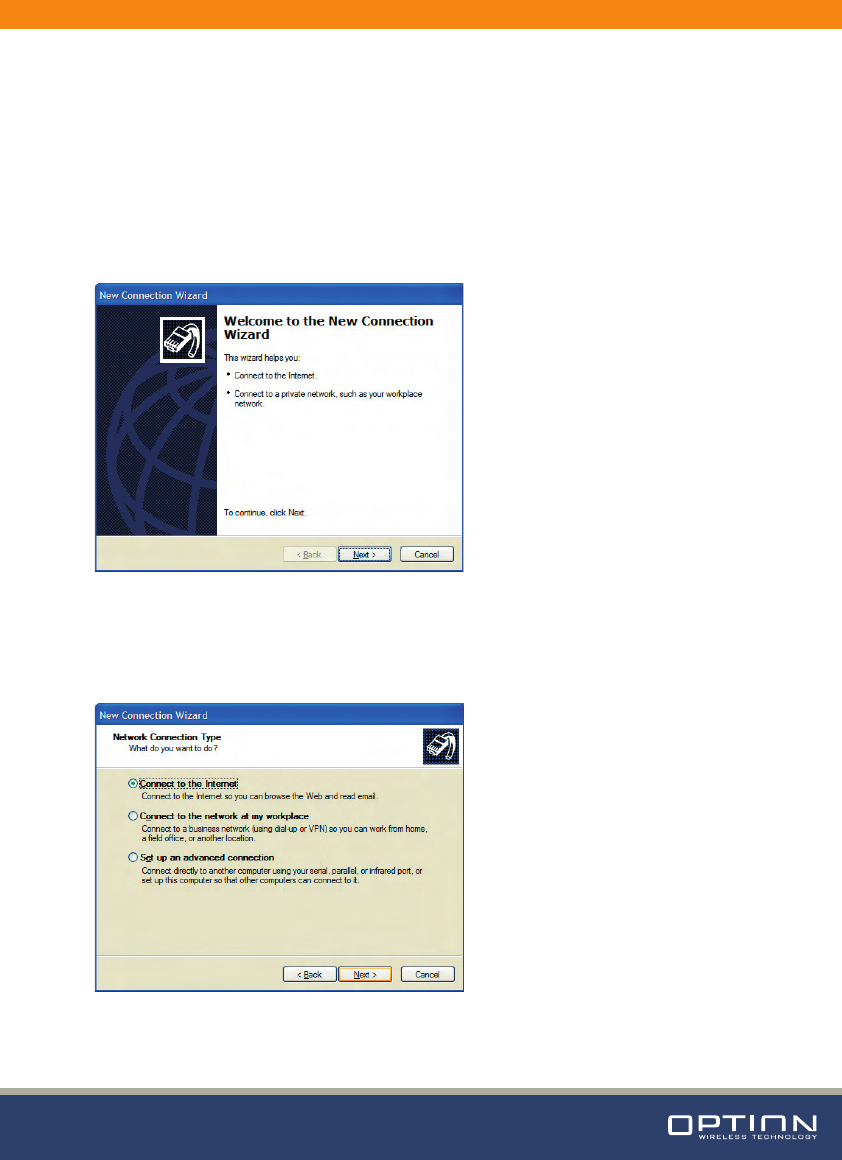
(1) Go to Start > Control Panel > Network Connections and click on the icon “New
Connection Wizard”. The next screen will appear:
Figure 32: Network connections
(2) Click ‘Next’ and Figure 33 will appear. Select “Connect to the Internet” and click
“Next” again. Now Figure 34 will appear.
Figure 33: New network connection
GLOBETROTTER QUICK START GUIDE PAGE: 21 of 30
AUTHOR: G. Van Overbeke | CREATION DATE: Aug 8, 2006 | VERSION: v01-f3
[ OPTION CONFIDENTIAL ]
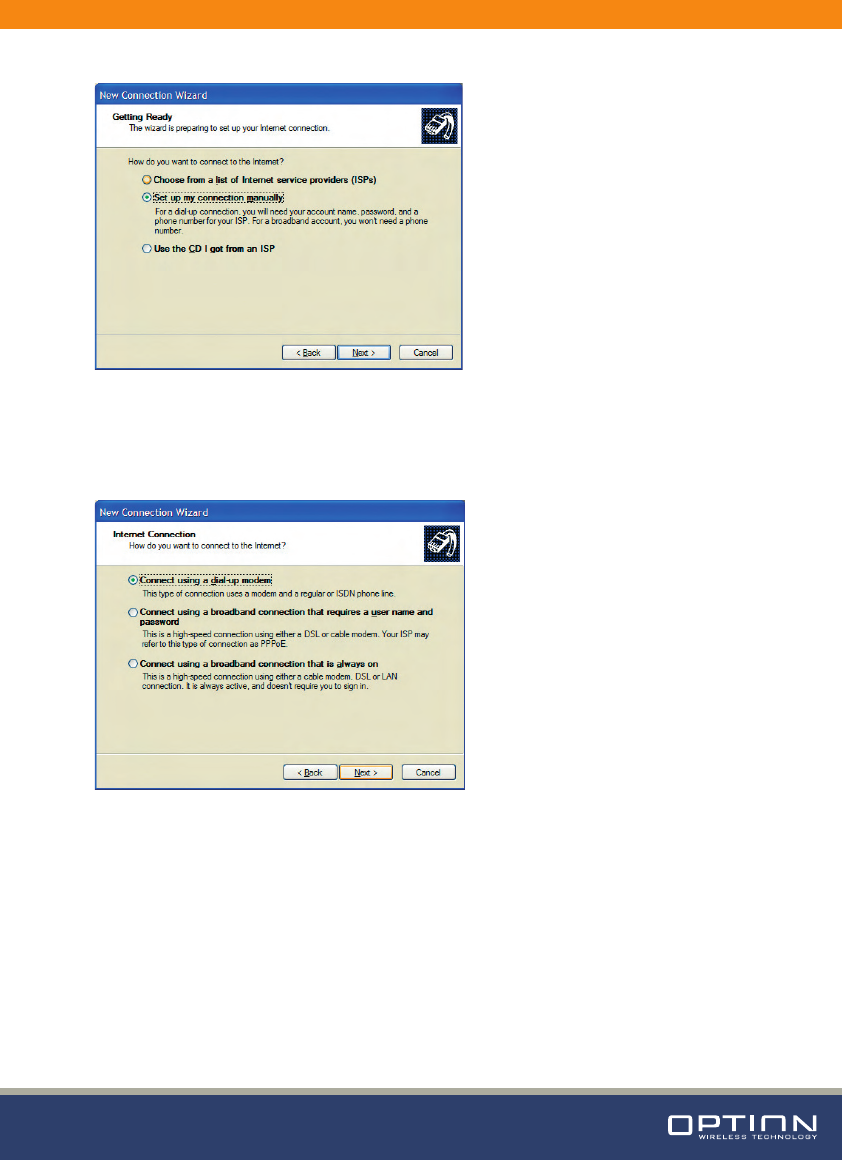
Figure 34: Manual connection setup
(3) Select “Set up the connection manually”, and click the “Next” button.
Choose the “Connect using a dial-up modem” option, and click the “Next” button.
Figure 35: Connection with dial-up modem
GLOBETROTTER QUICK START GUIDE PAGE: 22 of 30
AUTHOR: G. Van Overbeke | CREATION DATE: Aug 8, 2006 | VERSION: v01-f3
[ OPTION CONFIDENTIAL ]
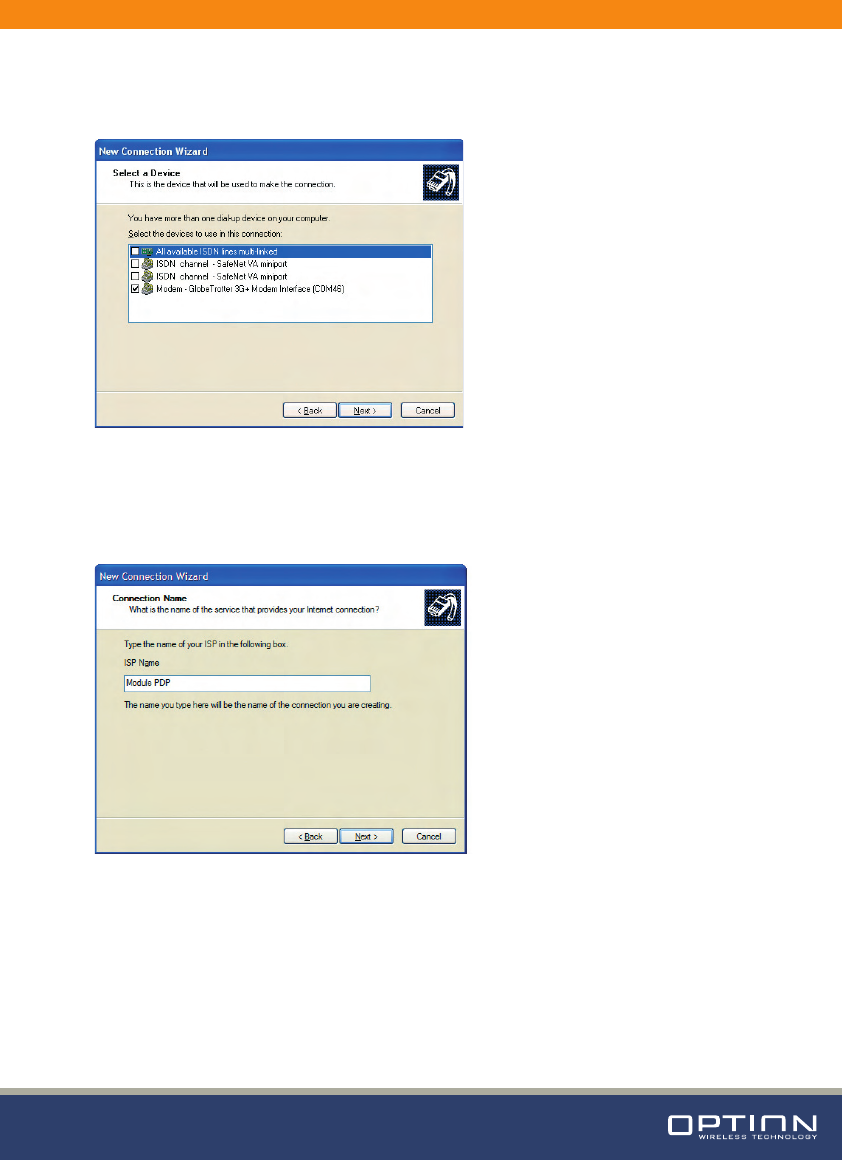
(4) Select the correct modem (Modem - Globetrotter 3G+ modem interface), and
click the ‘Next’ button.
Figure 36: Select modem
(5) Type a name for the connection, which you will select the next time you need this
dial-up connection, and click the ‘Next’ button.
Figure 37: Connection Name
GLOBETROTTER QUICK START GUIDE PAGE: 23 of 30
AUTHOR: G. Van Overbeke | CREATION DATE: Aug 8, 2006 | VERSION: v01-f3
[ OPTION CONFIDENTIAL ]
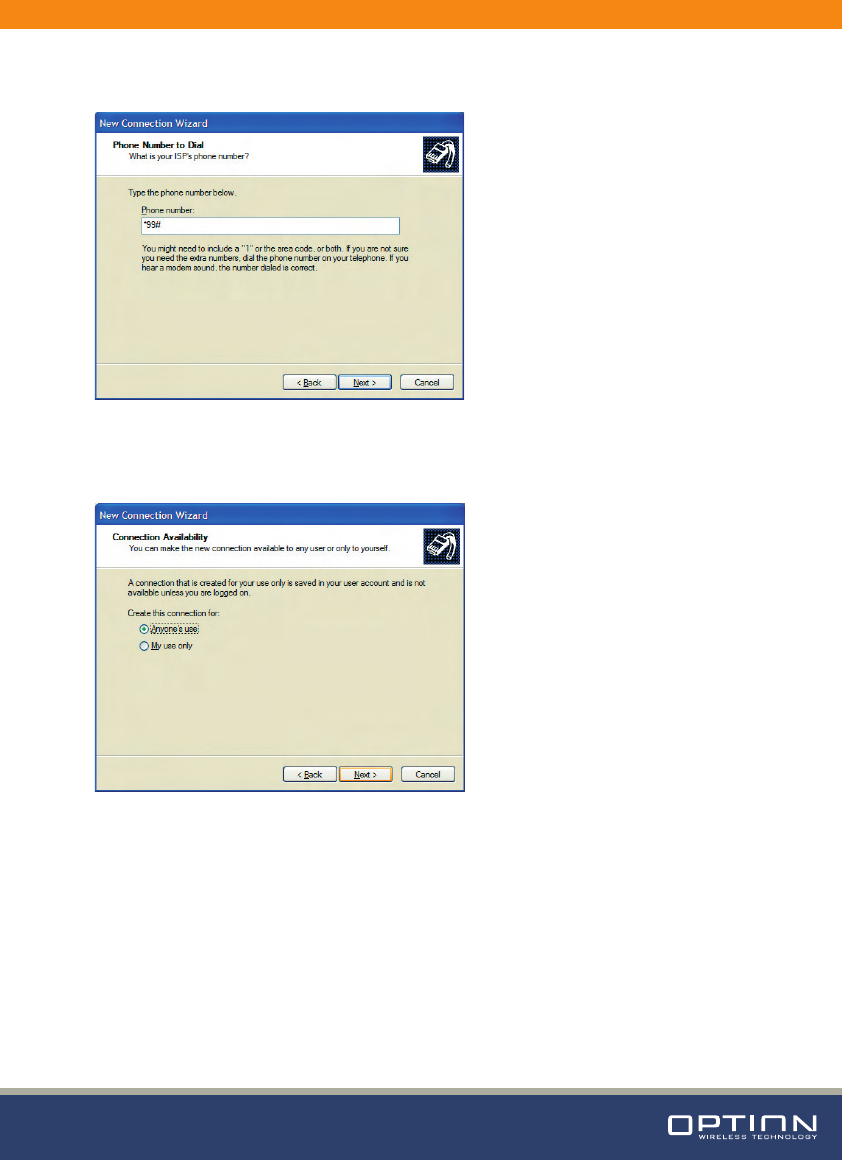
(6) Type in the Phone number to dial, which is *99#, and click the ‘Next’ button.
Figure 38: Number to dial
(7) Choose the option you like, and then click the ‘Next’ button.
Figure 39: Connection availability
GLOBETROTTER QUICK START GUIDE PAGE: 24 of 30
AUTHOR: G. Van Overbeke | CREATION DATE: Aug 8, 2006 | VERSION: v01-f3
[ OPTION CONFIDENTIAL ]
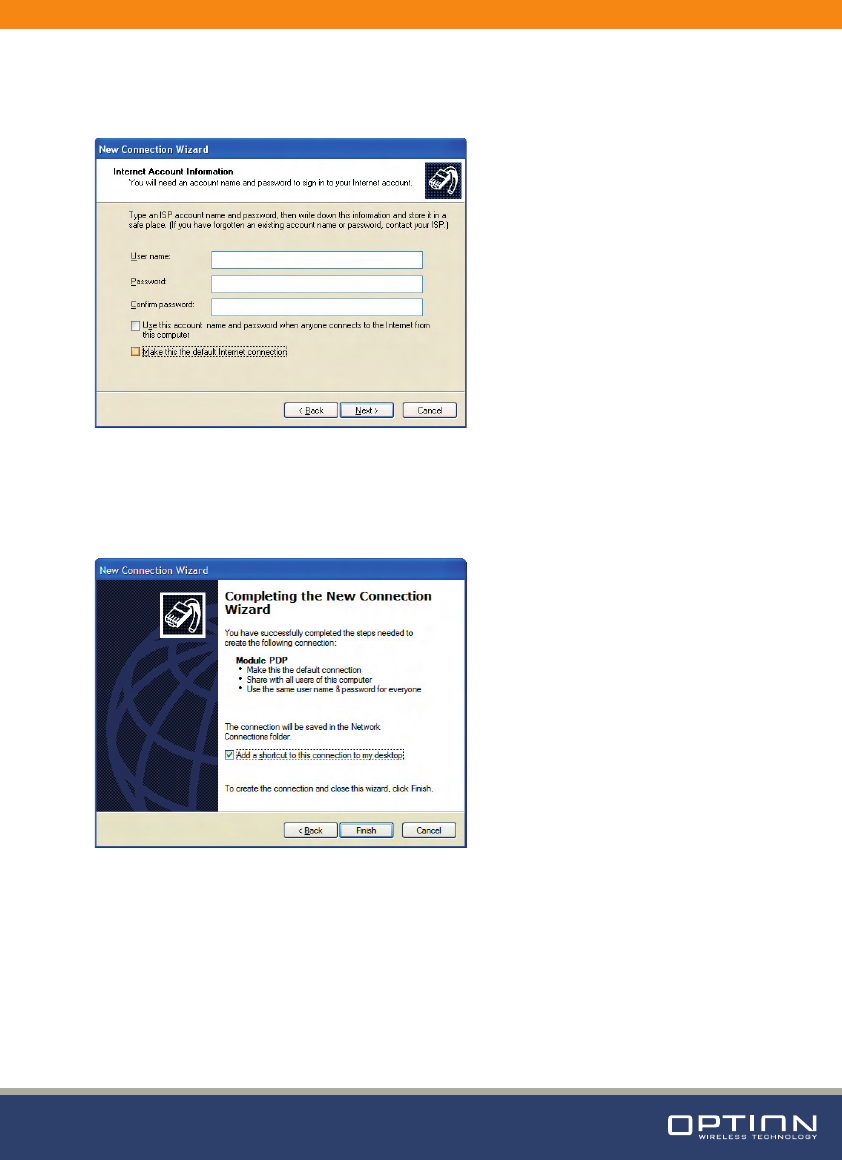
(8) If your service provider requests to enter username and password for setting up a
PS data call connection, please enter it using the screen below.
Figure 40: Internet Account Information
(9) The connection is set up and ready to use. Click the ‘Finish’ button to close the
wizard.
Figure 41: Connection complete
GLOBETROTTER QUICK START GUIDE PAGE: 25 of 30
AUTHOR: G. Van Overbeke | CREATION DATE: Aug 8, 2006 | VERSION: v01-f3
[ OPTION CONFIDENTIAL ]
(10) Before attempting to make the dial-up connection, make sure you are registered
to the network. Observe that the Registration LED in Figure 1 is on. Also, the APN for
your operator should be set correctly in the module. This can be done with
the following AT command:
AT+CGDCONT=1,,”your APN here”
You have to set this command only once for each module as this setting is stored in
non-volatile memory of the module. Use the explanation from the previous chapter
on how to use HyperTerminal to send AT commands.
To verify the APN setting just type: AT+CGDCONT?
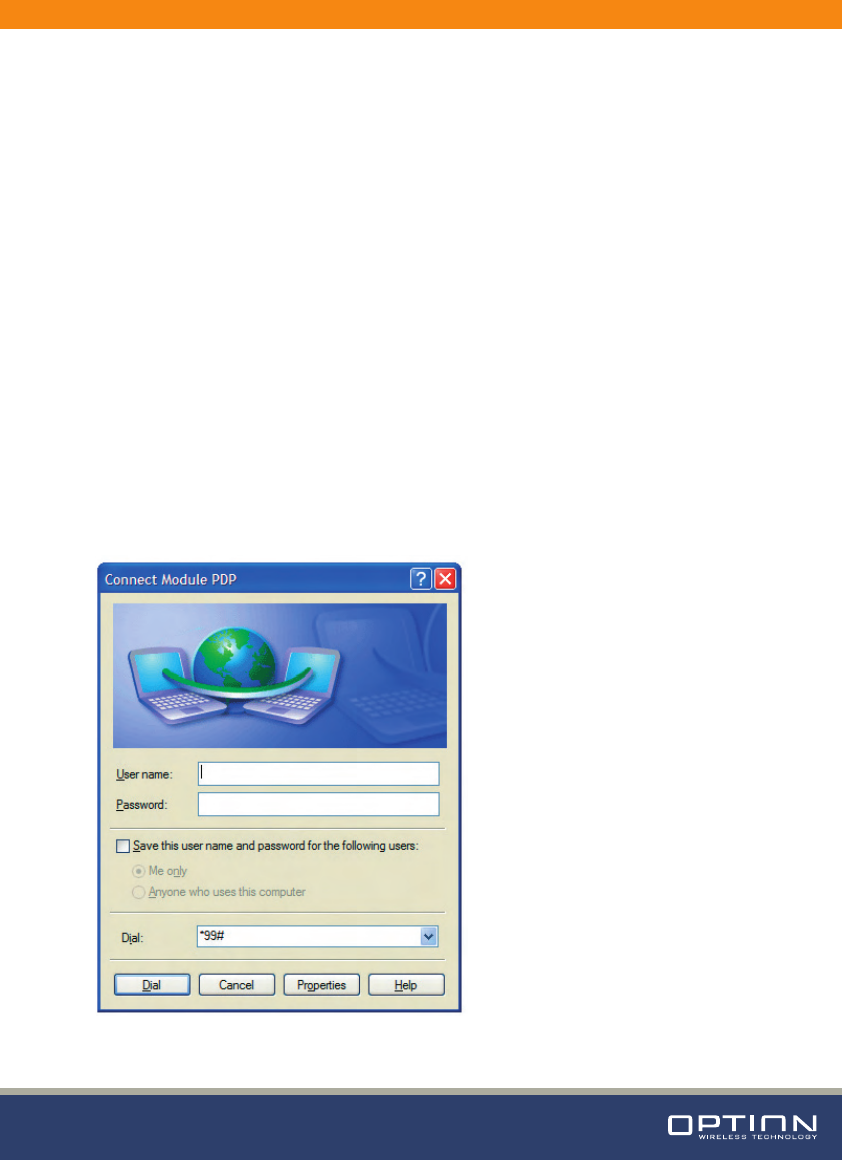
(11) Then, if your module is registered on the network, you can use the above
configured dial-up connection to activate a PDP context and make an internet
connection.
Go to Start > Connect to > “Module PDP” and select it.
Figure 42: Connect Module PDP
GLOBETROTTER QUICK START GUIDE PAGE: 26 of 30
AUTHOR: G. Van Overbeke | CREATION DATE: Aug 8, 2006 | VERSION: v01-f3
[ OPTION CONFIDENTIAL ]
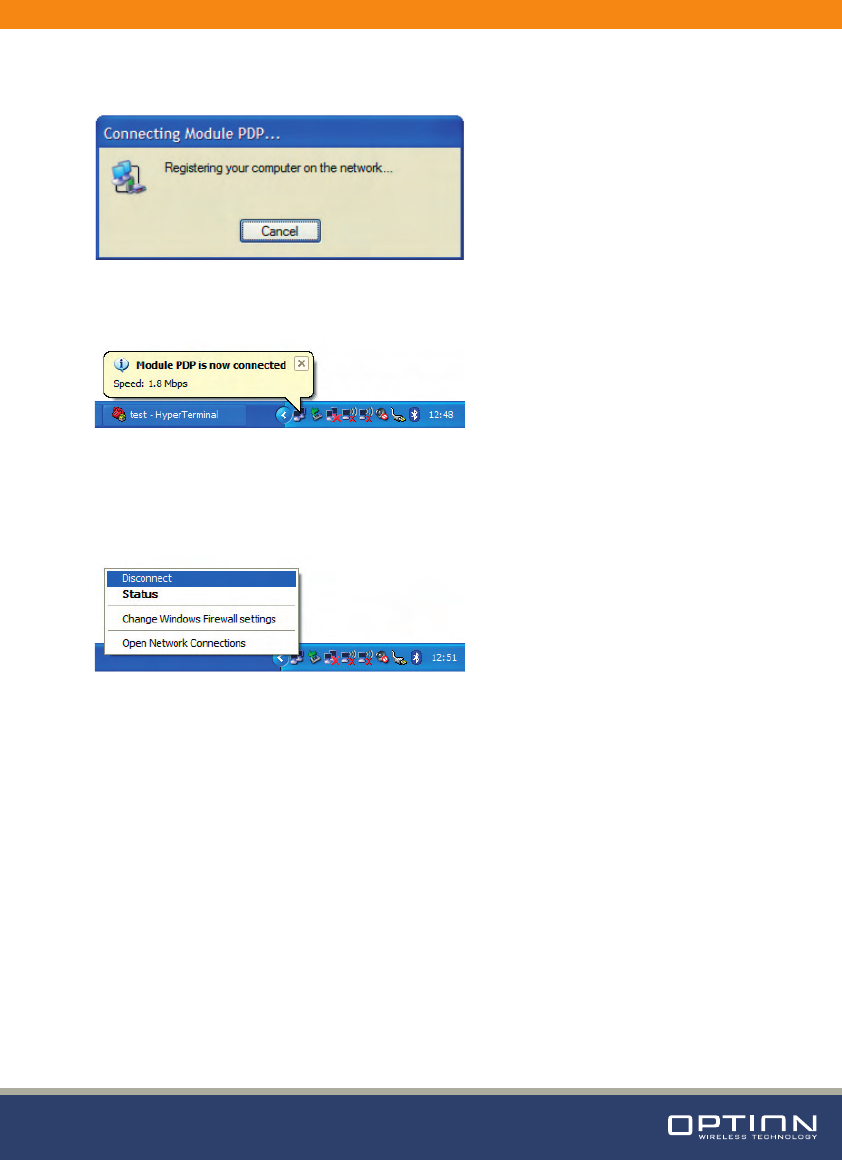
(12) Click the Dial button. After a while, a connection to the internet is made.
Figure 43: Connecting Module PDP
Figure 44: Module PDP is now connected
To disconnect, go to the appropriate network systray icon and select “Disconnect”
from the context menu (right mouse button).
Figure 45: Disconnect Module PDP
GLOBETROTTER QUICK START GUIDE PAGE: 27 of 30
AUTHOR: G. Van Overbeke | CREATION DATE: Aug 8, 2006 | VERSION: v01-f3
[ OPTION CONFIDENTIAL ]

9 SET UP A VOICE CALL
Remark! This section is only applicable for GTM378 and GTM353 (Hardware version
3.1 or later).
Verify below AT commands in order to set-up the module for voice calls. Refer to
Chapter 7 on how to send AT commands to the module using HyperTerminal.
First of all make sure your PIN code is entered and that you are registered to the
network. Observe the Registration LED on Figure 1.
• AT_ODO=0
With this AT command circuit switched data transfer, which is needed for voice
calls, is enabled. This setting is stored in non-volatile memory on the module.
The response on this AT command should be: OK
• AT_OPCMENABLE=1
Per default, the voice part of the firmware is disabled. To enable digital voice, the
command above must be set. This setting is stored in non-volatile memory on the
module.
The response on this AT command should be: OK
• AT_OPCMCONFIG=102,3,0,256,0,1,4
This AT command configures the PCM codec for 16bit linear with volume
padding, maximum volume (Short Synch 8kHz, 2MHz CLK). This is also the default
configuration. NOTE: In this configuration the jumper in the upper right corner
should be set to the two most right pins (see Figure 1). This setting is stored in
non-volatile memory on the module.
The response on this AT command should be: OK
OR
• AT_OPCMCONFIG=0,0,0,256,0,1,4
This AT command configures the PCM codec for 8bit Ulaw, maximum volume
(Short Synch 8kHz, 2MHz CLK). NOTE: In this configuration the jumper in the upper
right corner should be set to the two most left pins (see Figure 1). This setting is
stored in non-volatile memory on the module.
The response on this AT command should be: OK
GLOBETROTTER QUICK START GUIDE PAGE: 28 of 30
AUTHOR: G. Van Overbeke | CREATION DATE: Aug 8, 2006 | VERSION: v01-f3
[ OPTION CONFIDENTIAL ]
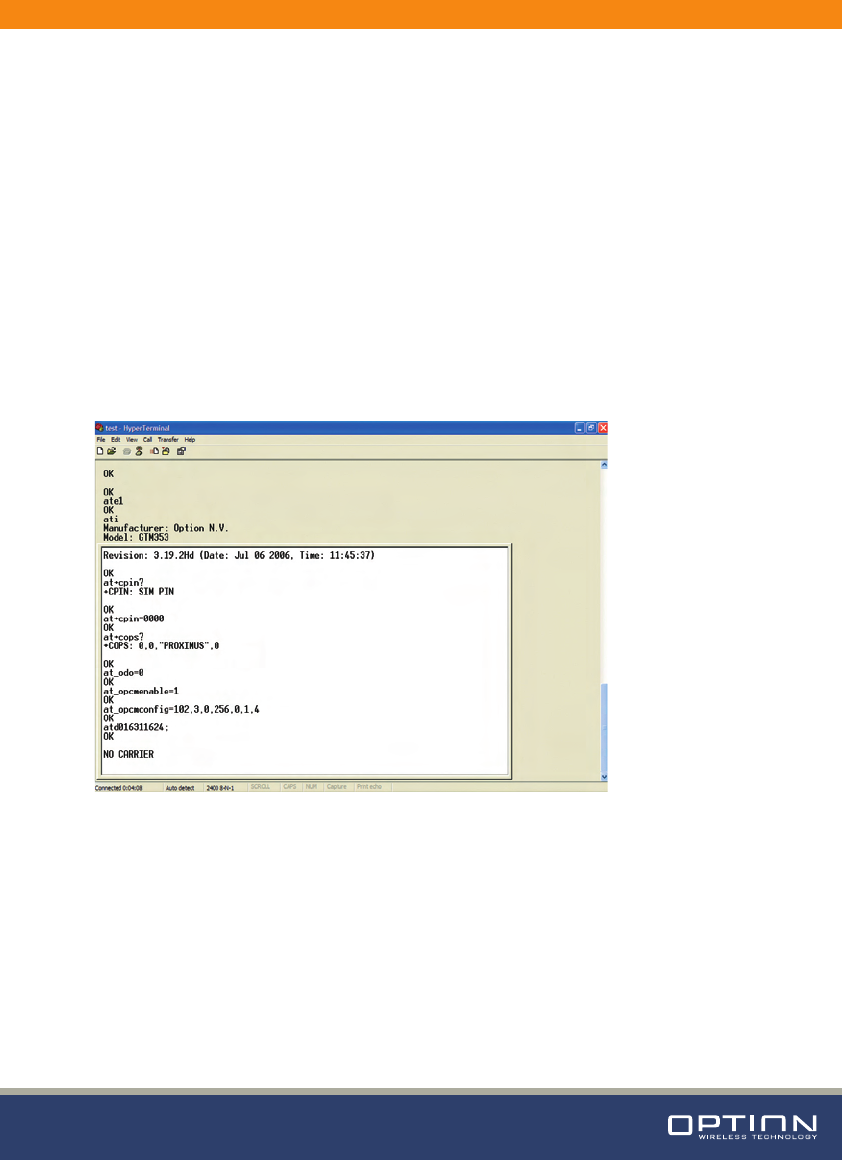
• ATD<phone number>;
To set-up the call, the ATD command followed by a phone number must be used.
NOTE: Do not forget the semicolon (;) at the end of the AT command!!!
The response on this AT command should be: OK
Now the phone on the other side should answer the paging and a voice
conversation can be made. To stop the conversation to other side can simply hang-
up the phone and a “NO CARRIER” string is displayed in HyperTerminal. If you want
to end the call from your side you can type ATH, followed by an OK. The next figure
shows an example voice call set-up and termination.
Figure 46: Voice call set-up
GLOBETROTTER QUICK START GUIDE PAGE: 29 of 30
AUTHOR: G. Van Overbeke | CREATION DATE: Aug 8, 2006 | VERSION: v01-f3
[ OPTION CONFIDENTIAL ]

REFERENCES
Ref Document
Integration Manual
GLOBETROTTER QUICK START GUIDE PAGE: 30 of 30
AUTHOR: G. Van Overbeke | CREATION DATE: Aug 8, 2006 | VERSION: v01-f3
[ OPTION CONFIDENTIAL ]