Otodata Wireless Network C008TR900 TELEMATIC Transceiver User Manual
Otodata Wireless Network Inc. TELEMATIC Transceiver Users Manual
Users Manual
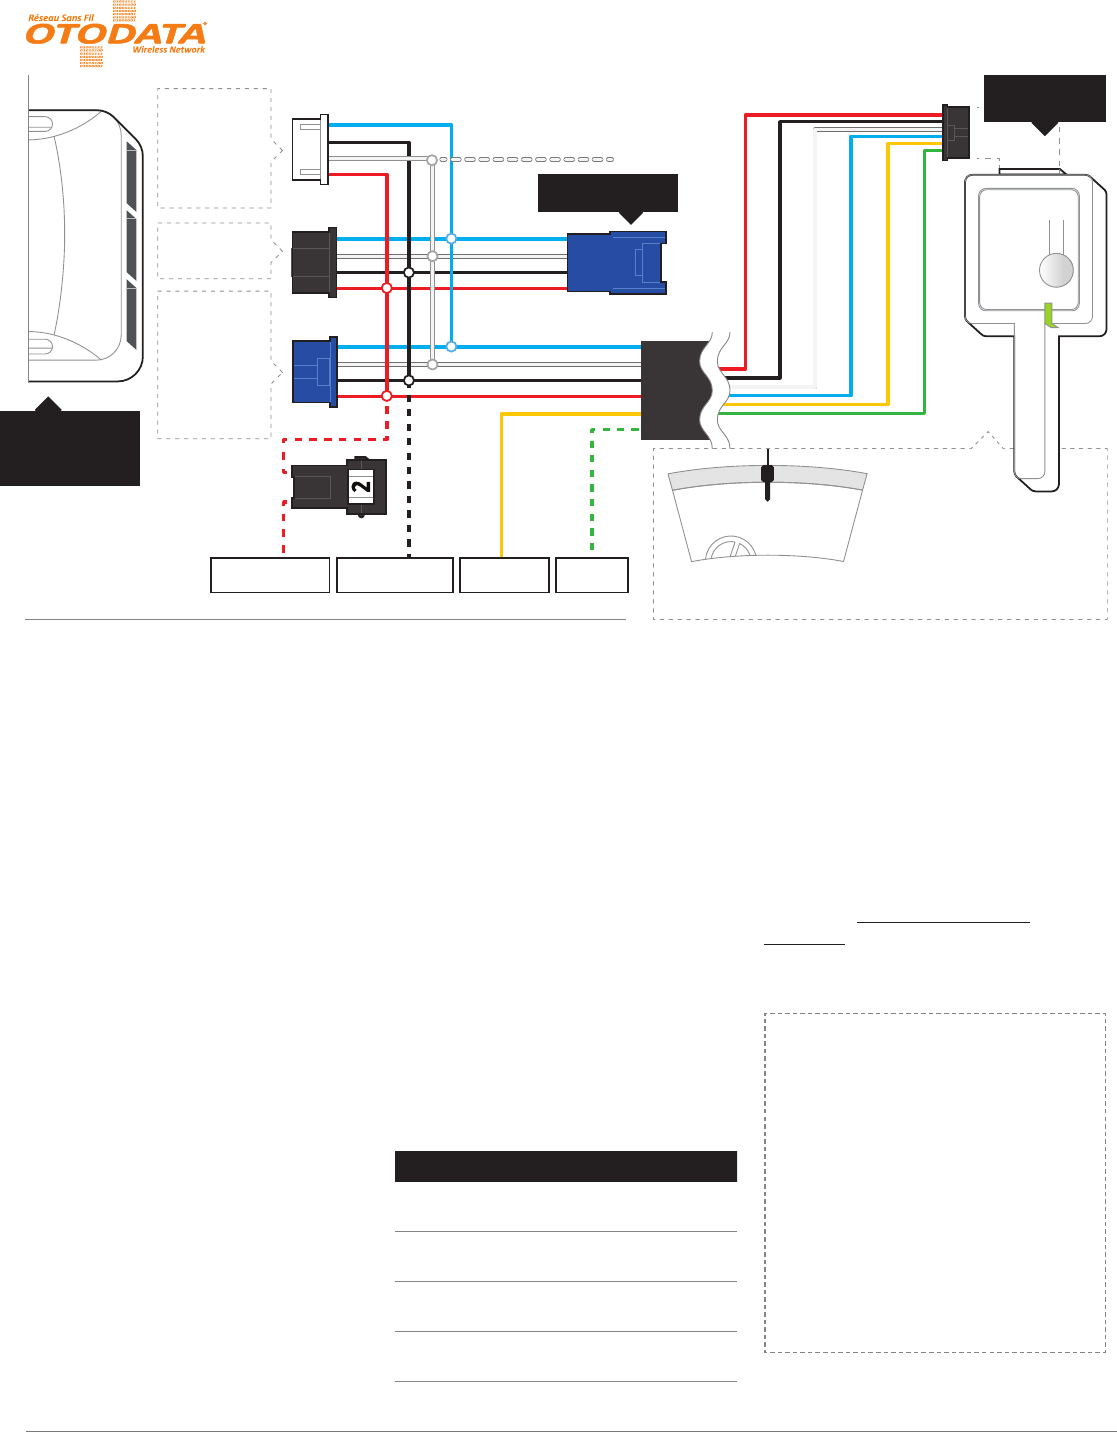
(+) ALLUMAGE
(+) BATTERIE 12V (1) MISE À LA MASSE (1) KLAXON (3)
4 PIN
(BLANC)
- DBALL 2
- Autostart Pager
Port (HRN-RS-1) (2)
- ASD-200
- 4X10
4 PIN
(BLEU)
- AKX
- iDatastart
- EVO-ONE
- ADS-AL-CA
- Compustar
- DSE (INTV1) (2)
+12V Battery (ROUGE)
Ground (NOIR)
Data (BLANC)
Data (BLEU)
+ Ignition (JAUNE)
Horn (VERT)
Antenne: Longueur du fil 9 pieds
Installation: Placer
l’antenne à 3 pouces (minimum)
de tout obstacle
Orientation: Verticale; l’antenne
tournée vers le bas (tel qu’indiqué
dans le graphique)
PAGER PORT /
TRIGGER START (-)
4 PIN
(NOIR)
- EVO-ALL
DÉMARREUR
ou BYPASS
C5040/MS2
RF KIT INPUT (3)
11
2. PROGRAMMER
a. Brancher l’unité C5040
b. Attendre la séquence de démarrage
c. L’unité est en mode de programmation
par défaut lorsqu’elle n’est pas déjà
programmée
d. La DEL bleue clignote selon le
protocole sélectionné:
i. ADS (par défault)
ii. Fortin
iii. Xpresskit
iv. Smart Start
(PolarStart version
H7.0 V6.0 et +)
v. Polarstart Pager Legacy
vi. Trigger Start (-)
e. Appuyer brièvement sur le bouton pour
changer le protocole
f. Appuyer sur le bouton pendant 2
secondes (la DEL verte clignotera deux
fois) pour sauvegarder le protocole
sélectionné
g. Fortin seulement(Procédure
d’apprentissage) :
i. Suivre les instructions du démarreur
pour activer la programmation d’une
télécommande
ii. Lorsque la DEL bleue clignote,
appuyer brièvement sur le bouton
pour envoyer une commande LOCK
iii. L’unité C5040 est maintenant
enregistrée dans le démarreur
iv. Quitter le mode de programmation
de télécommande du démarreur
h. L’unité C5040 est maintenant en
mode « opération ».
3. VALIDER
1. Débrancher le C5040
2. Mettre la clé à la position «Ignition On»
3. Brancher l’unité C5040
4. Attendre la séquence de démarrage
5. L’unité C5040 est maintenant en mode
«Test installateur» pendant 15 secondes
et la DEL mauve clignote lentement
6. Durant cette periode, mettre la clé
en position «O» pour envoyer une
commande UNLOCK
7. L’unité C5040 est maintenant en
mode «Normal».
MODE «OPÉRATION»
Action / Événement Description de l’état des DELs
Séquence de démarrage DEL rouge, verte et bleue
allumées séquentiellement
Commande envoyée au
démarreur
Clignotement rapide de la
DEL verte durant 1 seconde
Échec d’envoi de
commande au démarreur
Clignotement rapide de la
DEL rouge durant 1 seconde
Réinitialisation (maintenir
bouton avant de brancher)
Clignotement rapide de la DEL
orange durant 2 secondes
4. CONFIGURER
a. Installez l’app du téléphone intelligent
b. Créez une session de client
(si elle n’existe pas déjà)
c. Allez à «Ajouter un véhicule»
d. Entrez le code d’activation
e. l’Inscription est complétée
5. LIVRER
Déplacer et éteindre le véhicule à
l’extérieur dans un endroit dégagé pour
permettre au véhicule de s’enregistrer dans
l’infrastructure.
PIT-STOP
Si votre démarreur supporte
le mode “Pit-Stop” :
1. Lorsque vous êtes stationnés et
que le moteur tourne, appuyer
sur le bouton pendant 2 secondes
(la DEL verte clignotera deux
fois). L’unité C5040 envoie une
commande START au démarreur
pendant que le moteur tourne, ce
qui active le mode « Pit-Stop ».
2. Retirer la clé et sortir du véhicule
(le moteur tourne toujours).
(1) A utiliser avec EVO-ALL, ADS-AL-CA ou DBALL 2
(2) Unidirectionnel (troubles non disponibles)
(3) Optionnel
DIRECTIVES D’INSTALLATION
C5040/MS2 COMMUNICATEUR TÉLÉMATIQUE
Le présent appareil est conforme aux CNR d’Industrie Canada applicables aux appareils radio exempts de licence. L’exploitation est autorisée aux deux conditions suivantes : (1) l’appareil ne doit pas produire de brouillage, et (2) l’utilisateur de l’appareil doit accepter tout brouillage radioélectrique
subi, même si le brouillage est susceptible d’en compromettre le fonctionnement. Tout changement ou modification non expressément approuvé par la partie responsable de la conformité risque d’invalider l’autorisation accordée à l’utilisateur d’utiliser cet appareil. Avertissement RF conformité de
l’exposition. L’antenne (s) utilisée pour cet émetteur doit être installée pour fournir une distance de séparation d’au moins 20 cm de toutes personnes et ne doit pas être situé à proximité ou fonctionner en conjonction avec une autre antenne ou émetteur. Les utilisateurs et les installateurs doivent
recevoir des instructions d’installation de l’antenne et des conditions de fonctionnement du transmetteur satisfaisant le respect de l’exposition aux RF.
1. BRANCHER
Le système doit être installé
par un professionnel.
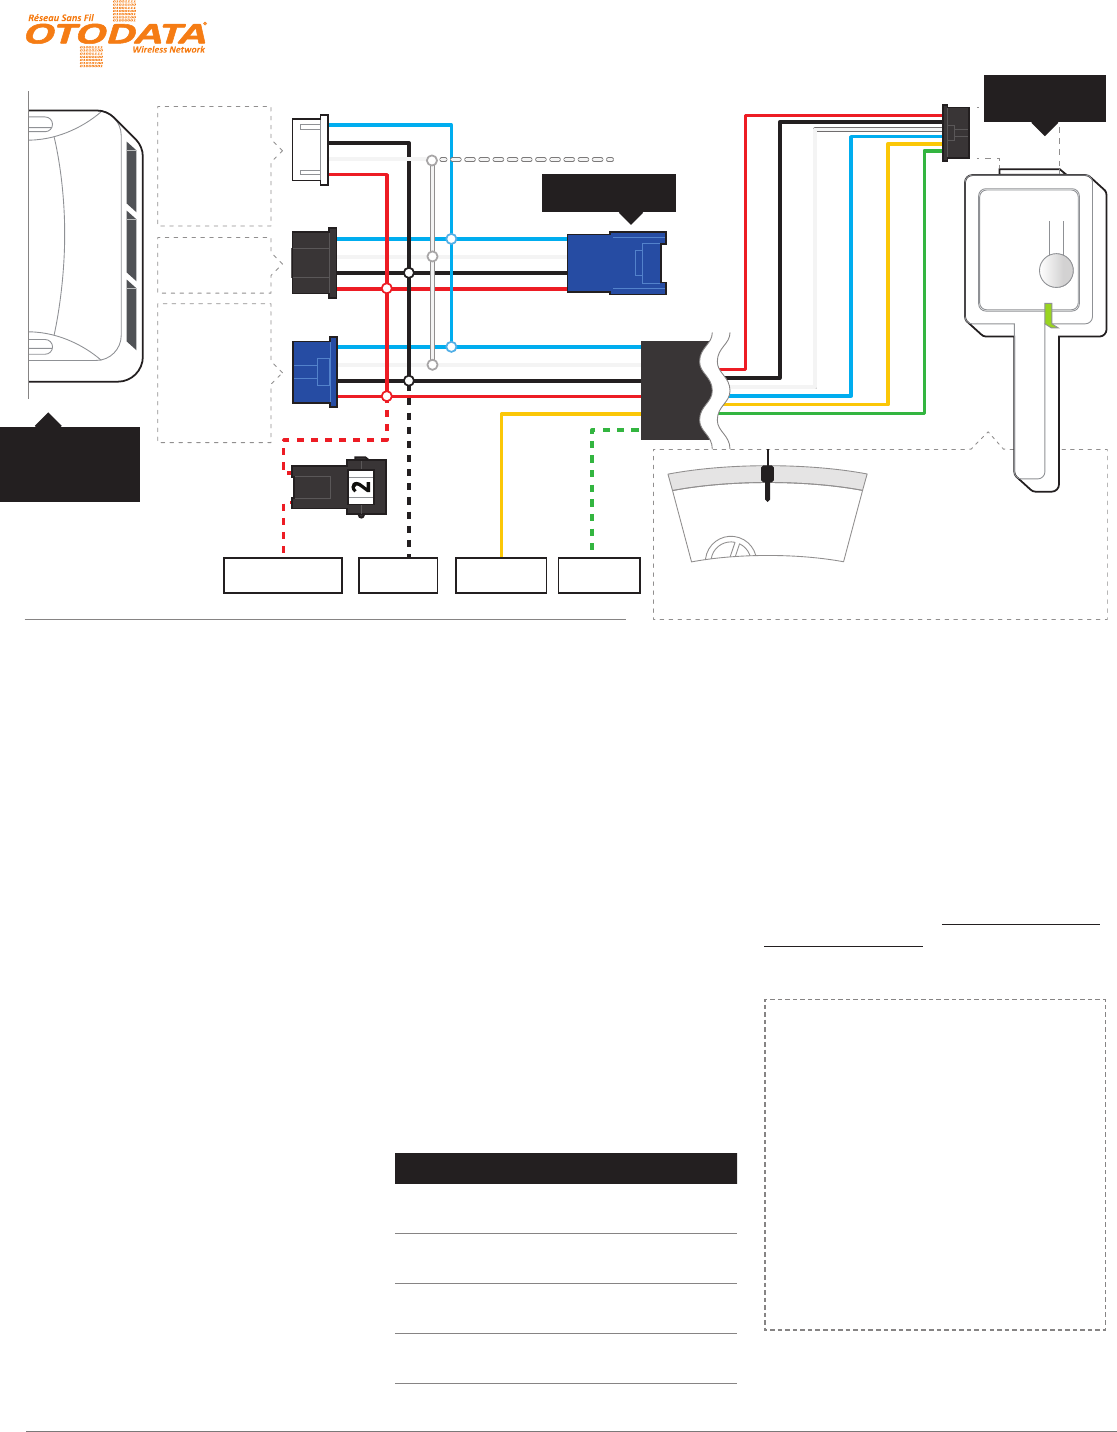
(+) IGNITION
(+) 12V BATTERY (1) GROUND (1) (+) HORN (3)
4 PIN
(WHITE)
- DBALL 2
- Autostart Pager
Port (HRN-RS-1) (2)
- ASD-200
- 4X10
4 PIN
(BLACK)
- EVO-ALL
4 PIN
(BLUE)
- AKX
- iDatastart
- EVO-ONE
- ADS-AL-CA
- Compustar
- DSE (INTV1) (2)
+12V Battery (RED)
Ground (BLACK)
Data (WHITE)
Data (BLUE)
+ Ignition (YELLOW)
Horn (GREEN)
Antenna: Cord length 9 feet
Installation: Place
antenna 3 inches (minimum)
from any obstructions
Orientation: Vertical; antenna
facing downwards (as seen in
diagram)
PAGER PORT /
TRIGGER START (-)
CAR STARTER
or BYPASS
RF KIT INPUT (3)
C5040/MS2
11
2. PROGRAM
a. Connect the C5040 unit
b. Wait for the start up sequence
c. The module is in programming mode
by default if not already programmed
d. The blue LED will blink according to the
selected protocol:
i. ADS
(default)
ii. Fortin
iii. Xpresskit
iv. Smart Start
(PolarStart version
H7.0 V6.0 +)
v. Polarstart Pager Legacy
vi. Trigger Start (-)
e. Briefly press the button to change
the protocol
f. Press and hold the button for 2 seconds
to save the selected protocol
g. For Fortin only (learning procedure):
i. Enter the transmitter learning
mode by following the remote
starter instructions
ii. Once the transmitter learning mode
is entered, the Blue LED will start
blinking on the C5040 unit. Briefly
press and release the programming
button to send a LOCK command to
the remote starter
iii. The C5040 unit should now be
registered with the remote car starter
iv. Exit the remote learning mode of
the remote car starter
h. The C5040 unit is now in “operation”
mode.
3. VALIDATE
a. Disconnect the C5040 unit
b. Turn ignition ON
c. Connect the C5040 unit
d. Wait for the start up sequence
e. The C5040 will now be in “Installer
Mode” for 15 seconds and the purple
LED will blink slowly
f. During this time, turn ignition OFF to
send an UNLOCK command to confirm
programming
g. The C5040 unit is now in “operation”
mode.
“OPERATION” MODE
Action / Event LED Display
Start-up sequence Red, Green and Blue LED
are ON sequentially
Command to remote car
starter succeeded
Fast blink of the Green LED
during 1 second
Command to remote car
starter failed
Fast blink of the Red LED
during 1 second
Reset Defaults (hold
button before plugging)
Fast blink of the Orange LED
during 2 seconds
4. CONFIGURE
a. Install the smartphone app
b. Create customer login
(if one does not already exist)
c. Go to “Add vehicle”
d. Enter activation code
e. Registration completed
5. DELIVER
Move the vehicle to an open space outside
and turn ignition o to allow the system to
register in the network.
PIT-STOP
If your car starter supports the
“Pit-Stop” mode:
1. While your vehicle is parked and
your motor is idling, press and
hold the button for 2 seconds (the
green LED will blink 2 times). The
C5040 unit will send a START
command to the car starter while
the motor is running. This will
activate the “Pit-Stop” mode.
2. Pull out the key and get out of the
vehicle (the motor still running).
(1) Must be used with EVO-ALL, ADS-AL-CA or DBALL 2
(2) One-way only (no feedback on start troubles)
(3) Optional
INSTALLATION PROCEDURE
C5040/MS2 TELEMATICS COMMUNICATOR
This device complies with Industry Canada licence-exempt RSS standard(s). Operation is subject to the following two conditions: (1) this device may not cause interference, and (2) this device must accept any interference, including interference that may cause undesired operation of the device. Changes
or modifications not expressly approved by the party responsible for compliance could void the user’s authority to operate the equipment. Warning RF Exposure Compliance. The antenna(s) used for this transmitter must be installed to provide a separation distance of at least 20cm from all persons and
must not be co-located or operating in conjunction with any other antenna or transmitter. Users and installers must be provided with antenna installation instructions and transmitter operating conditions for satisfying RF exposure compliance.
1. CONNECT
This system must be installed
by a professional.