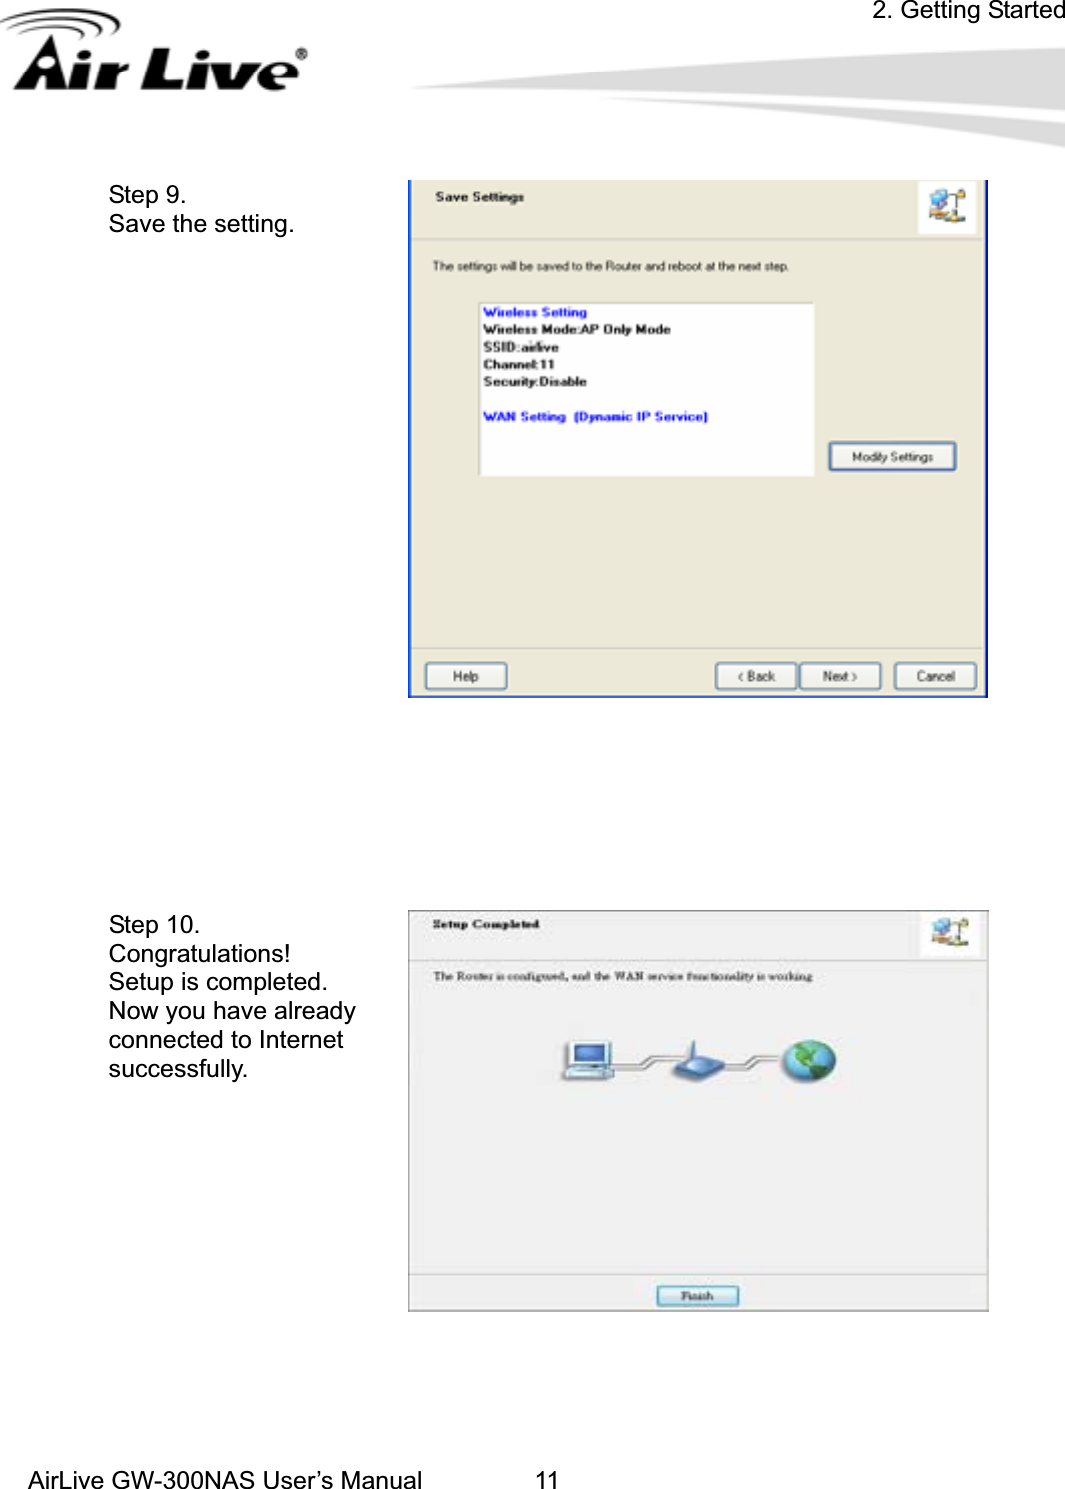
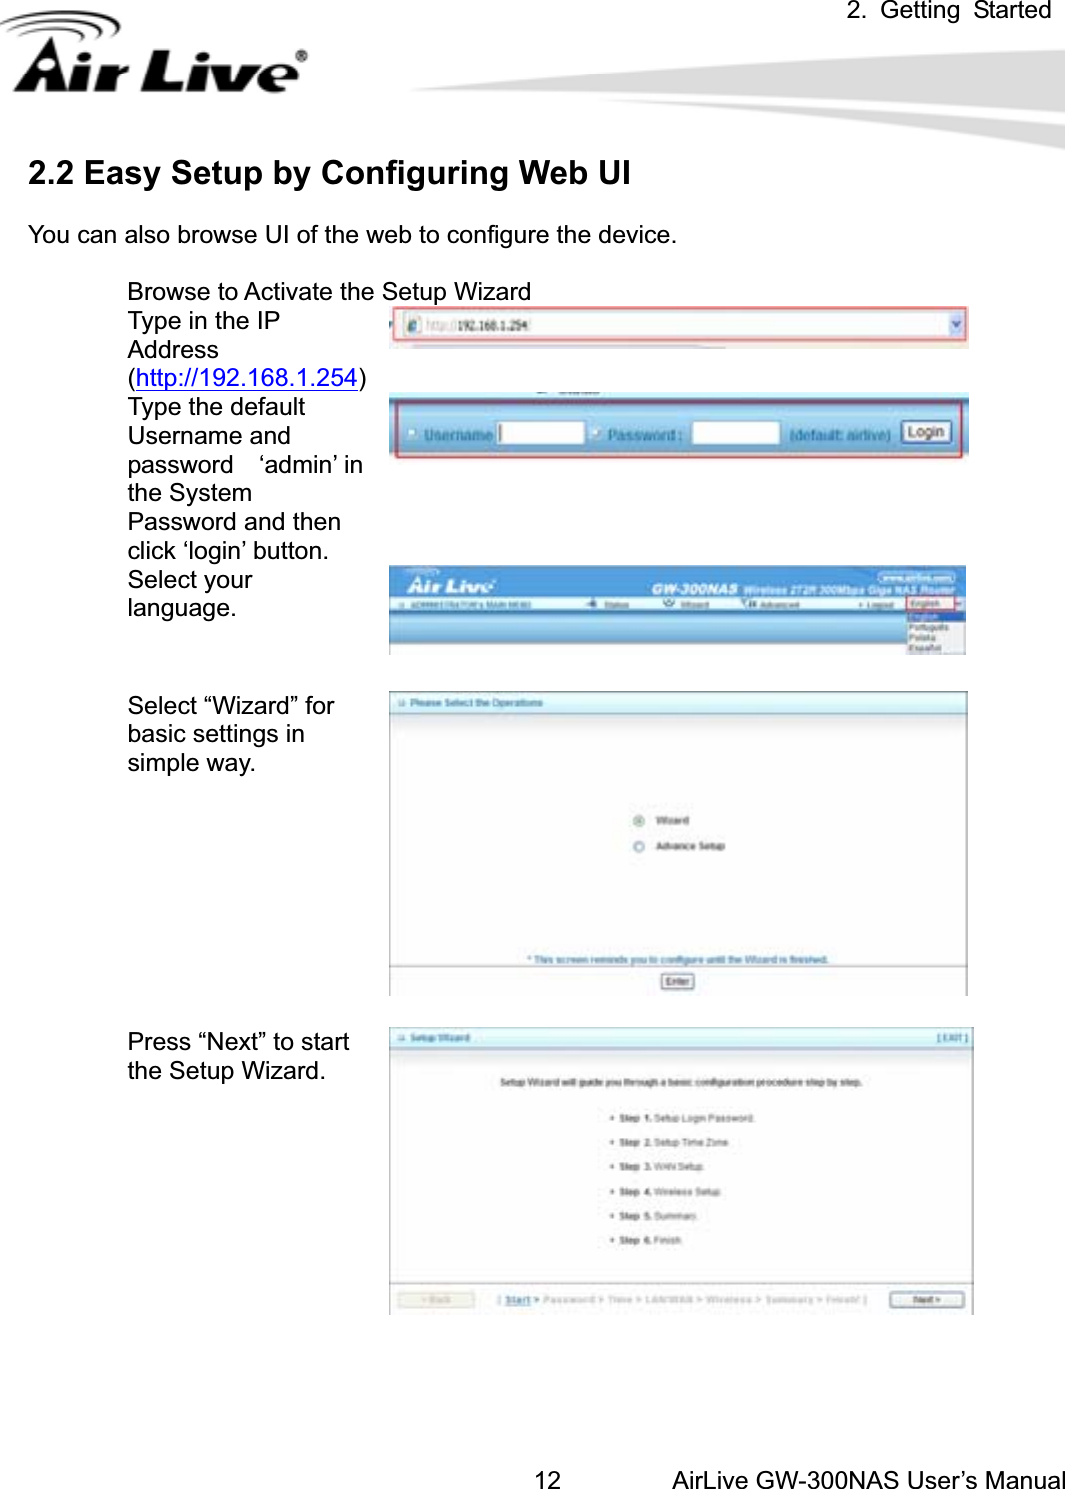
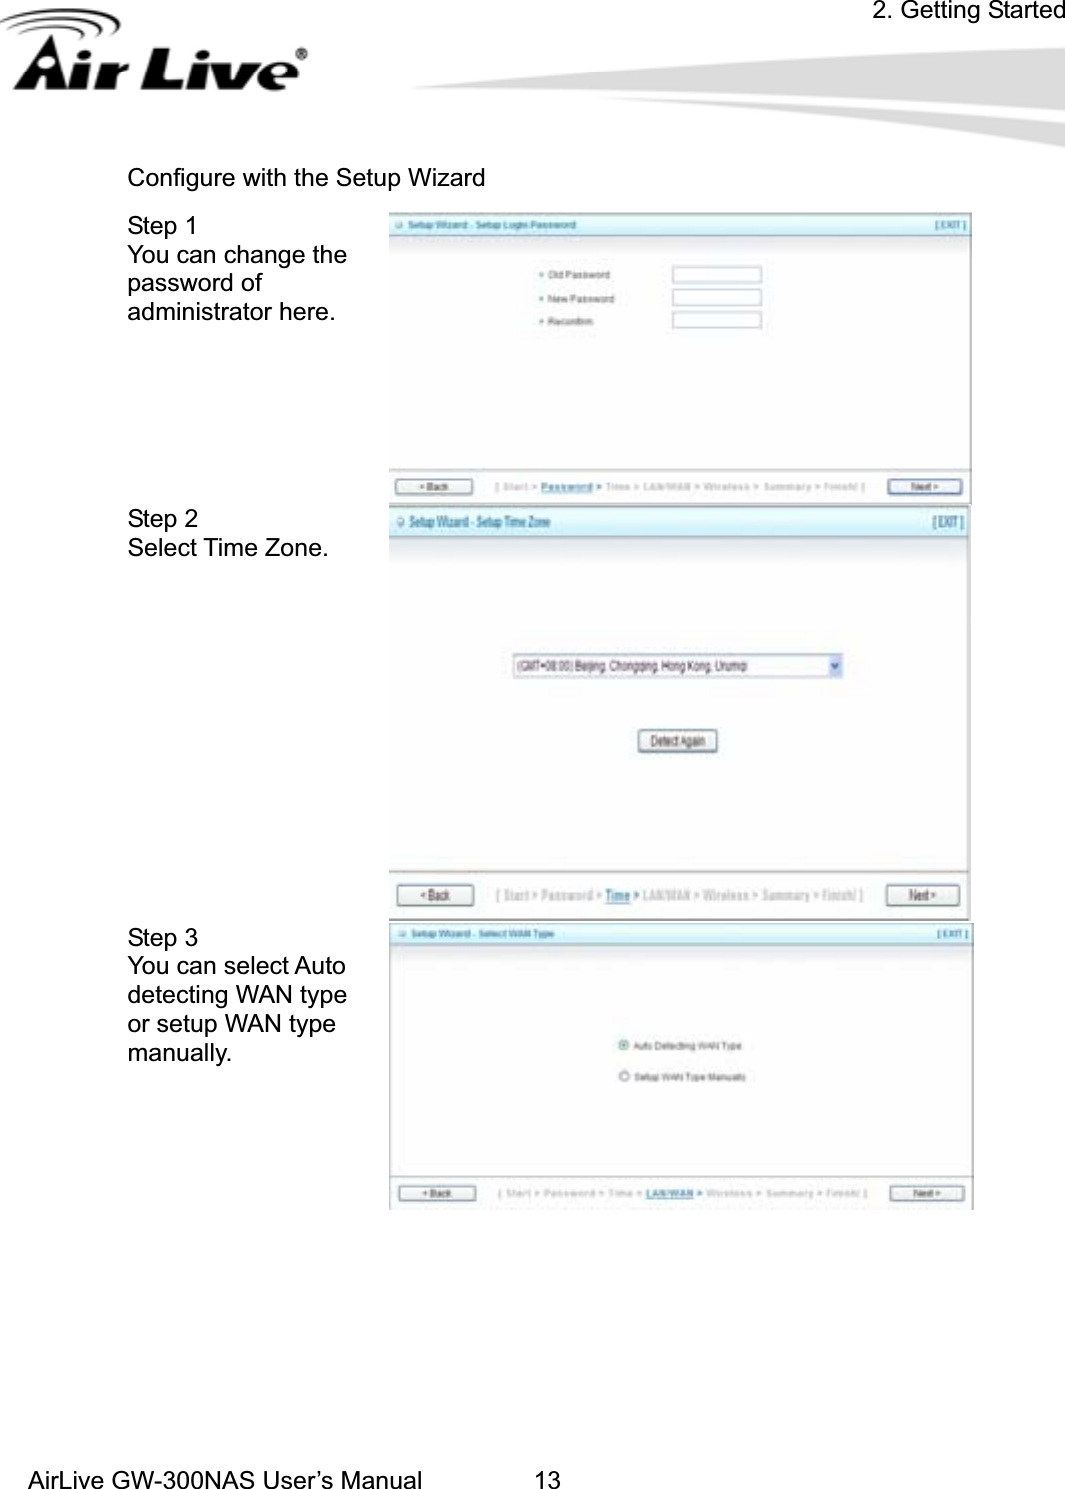
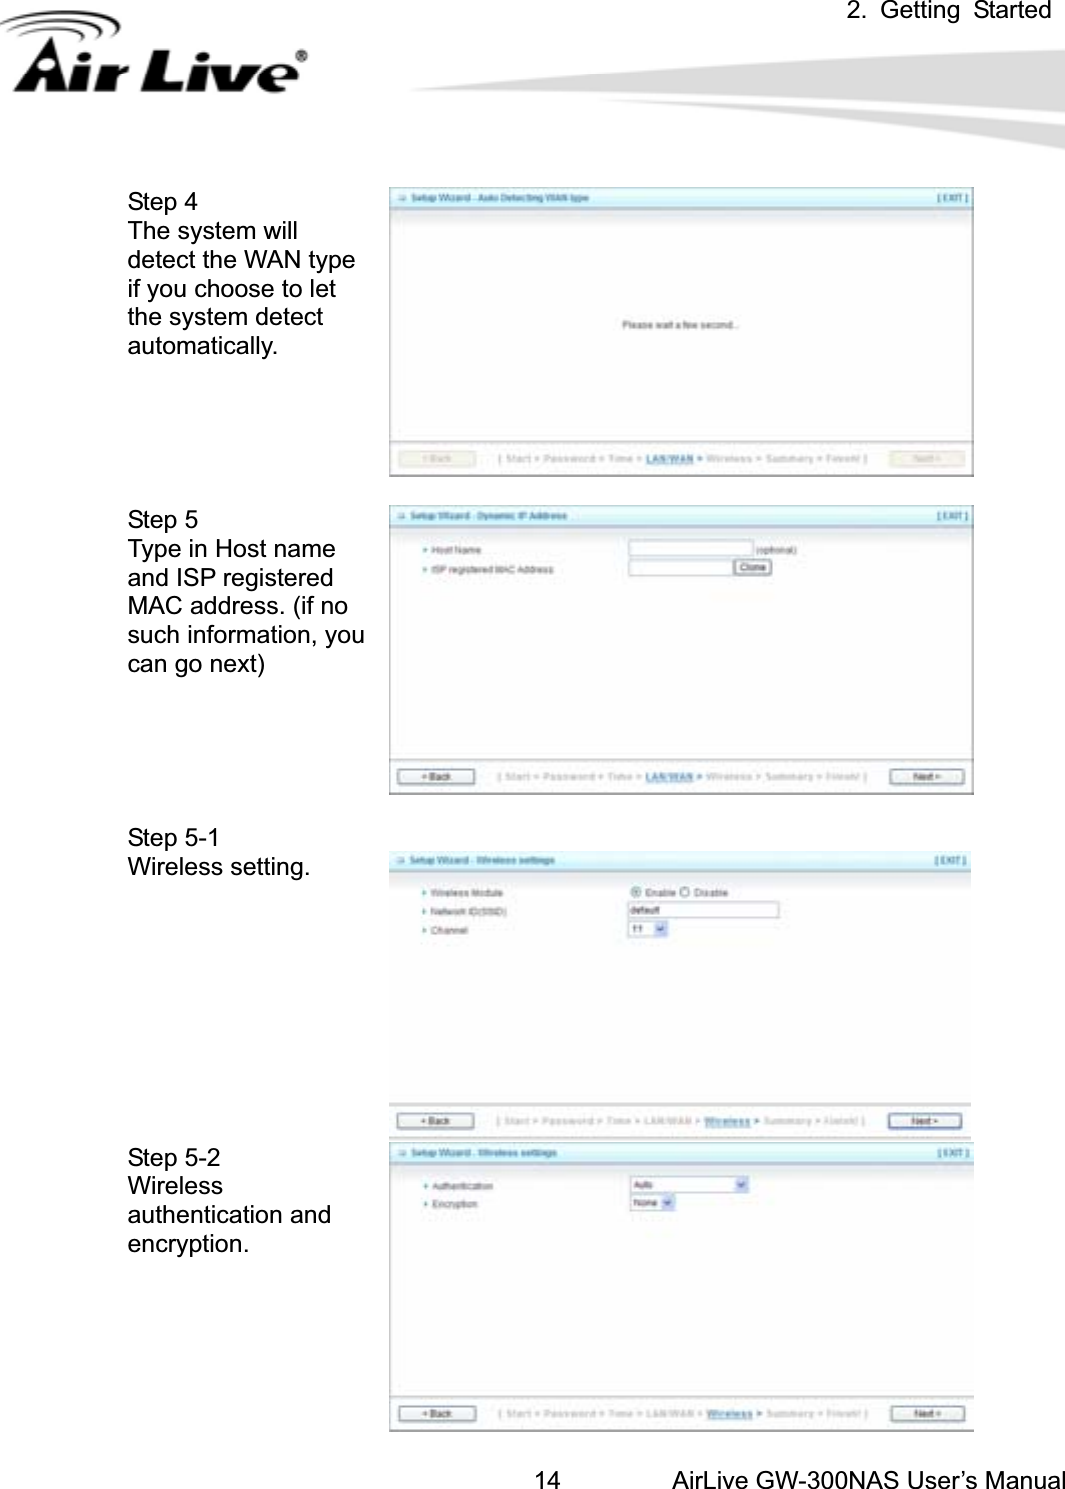
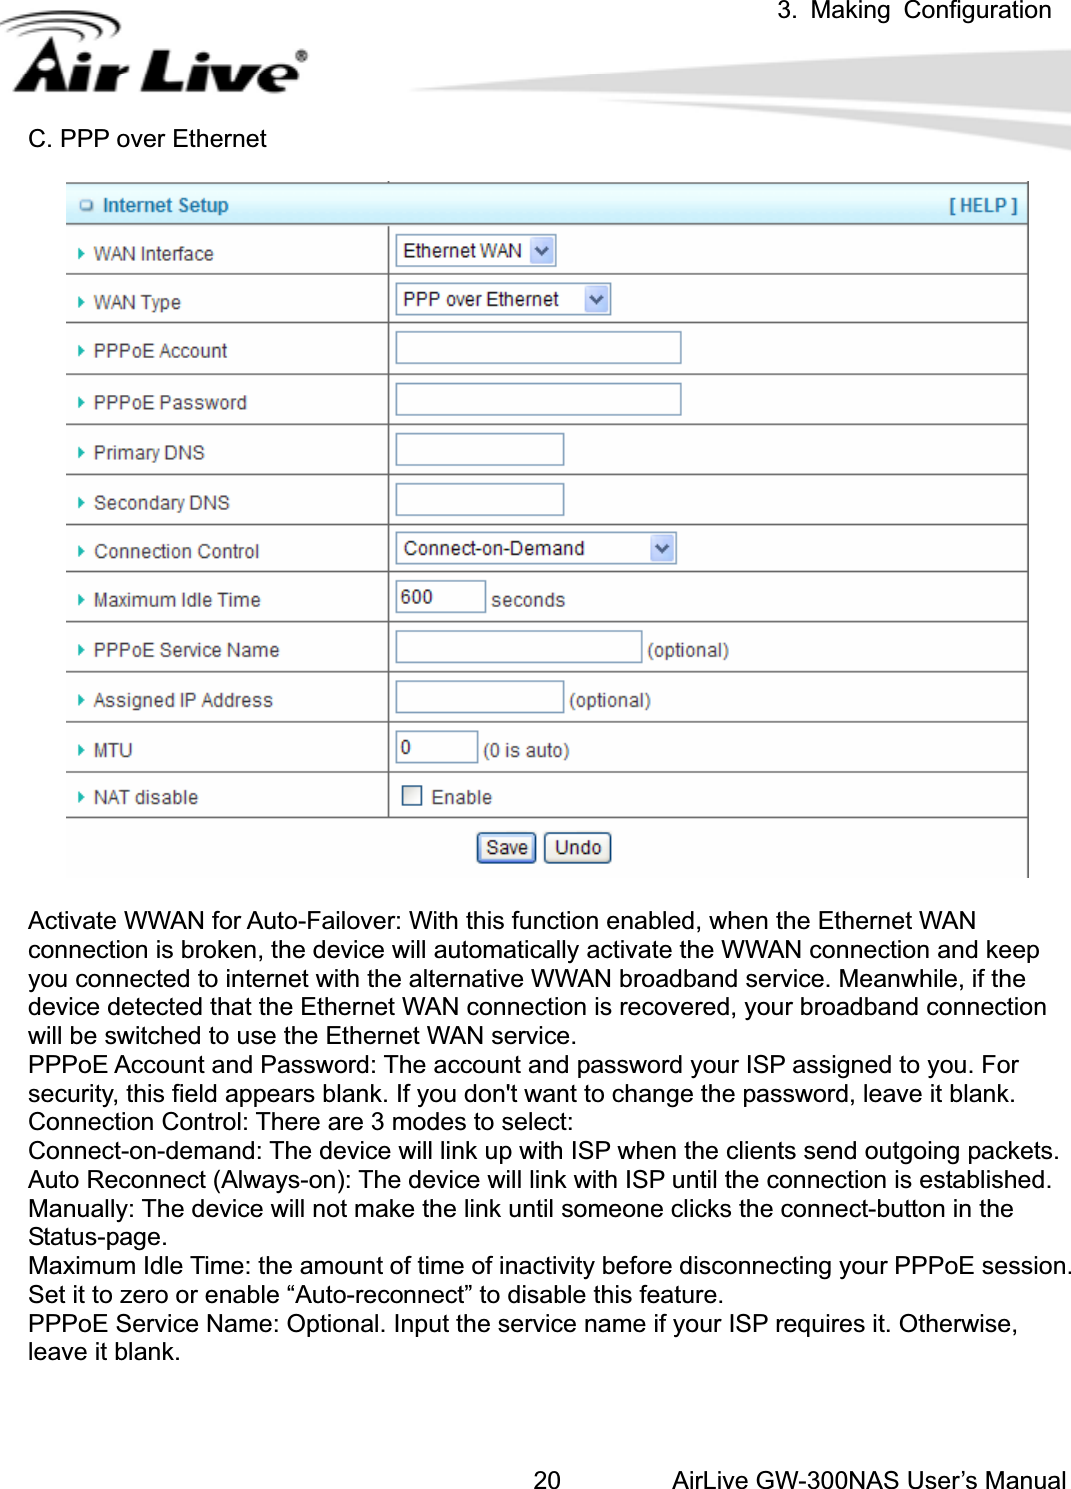
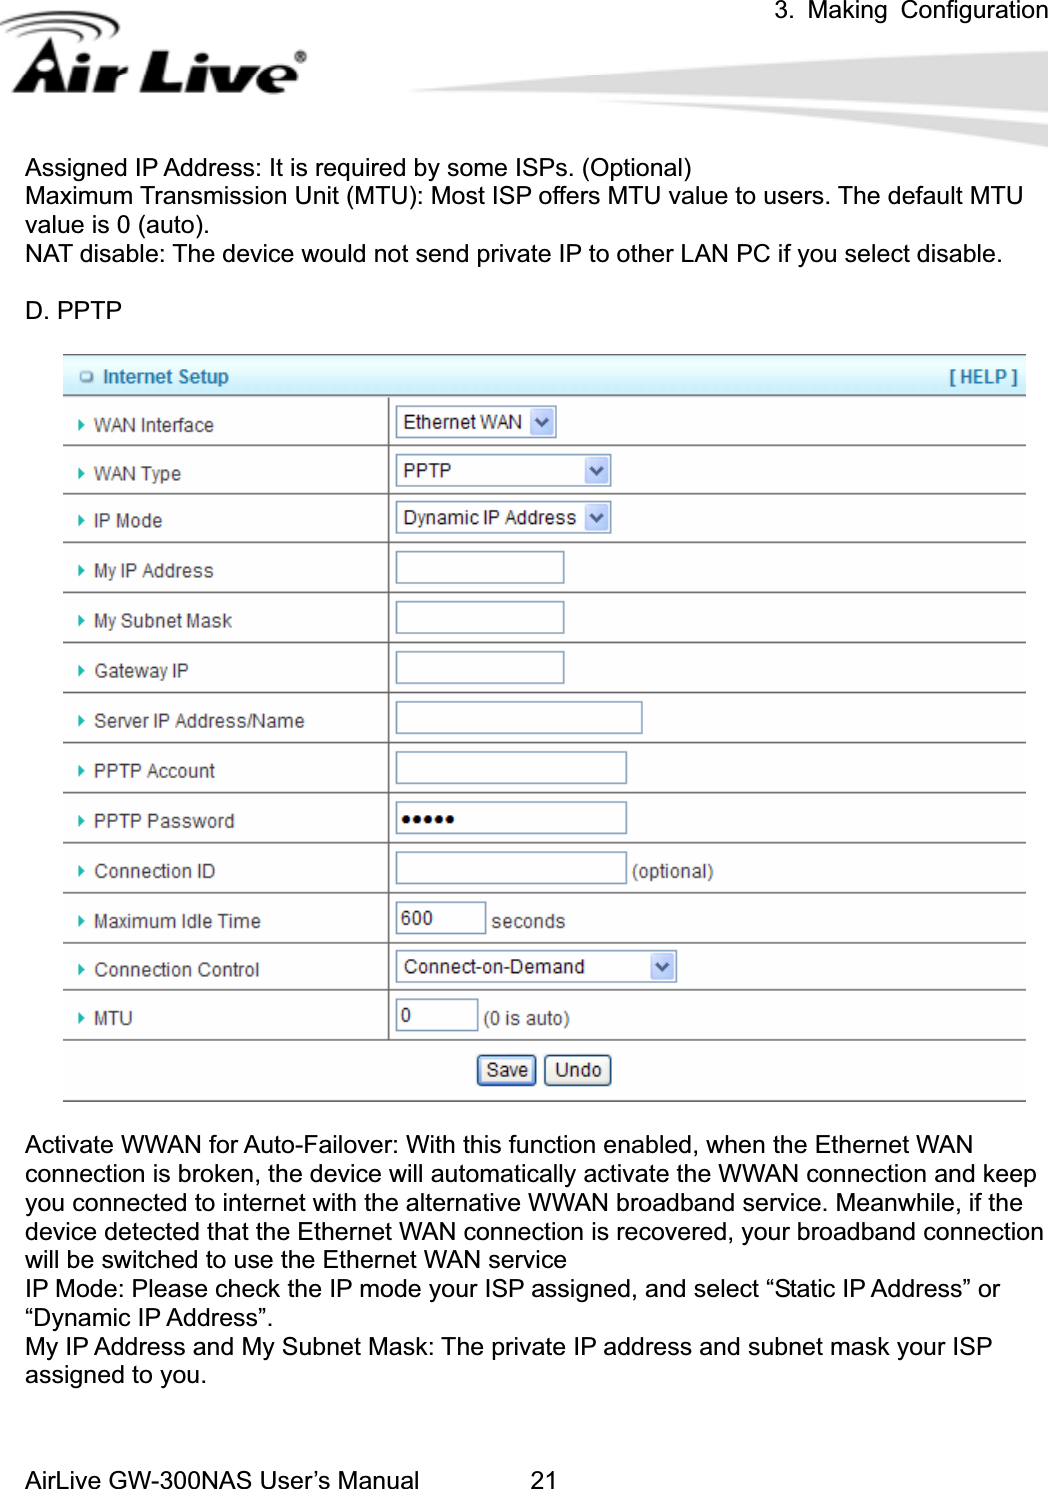
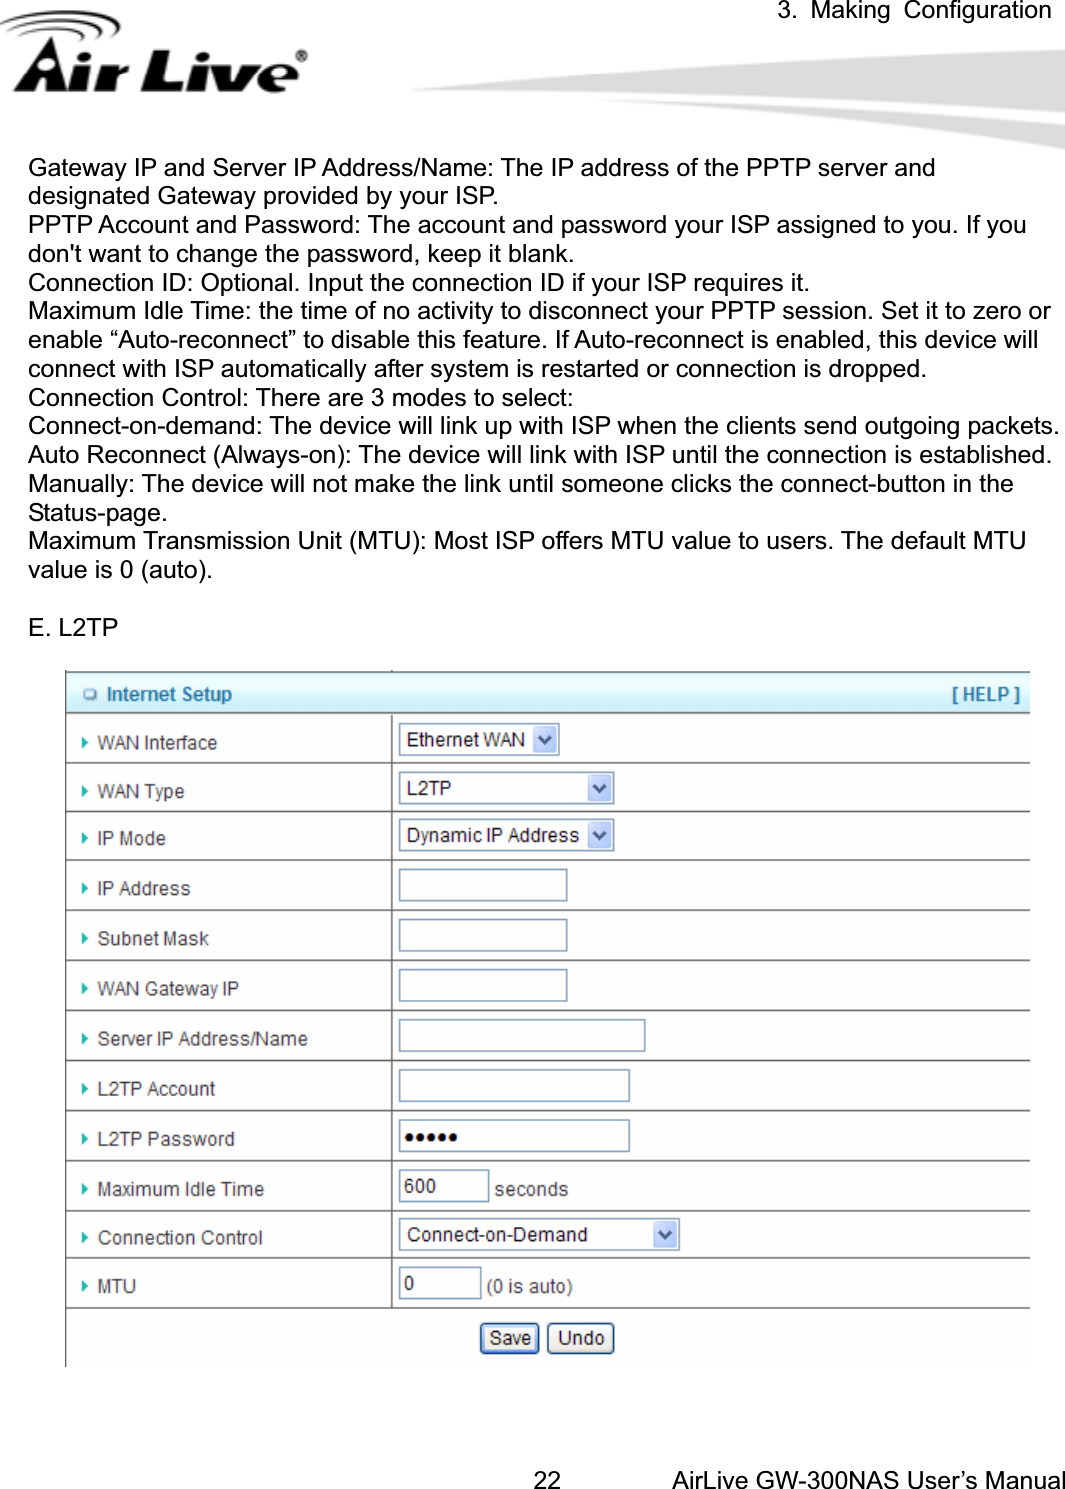
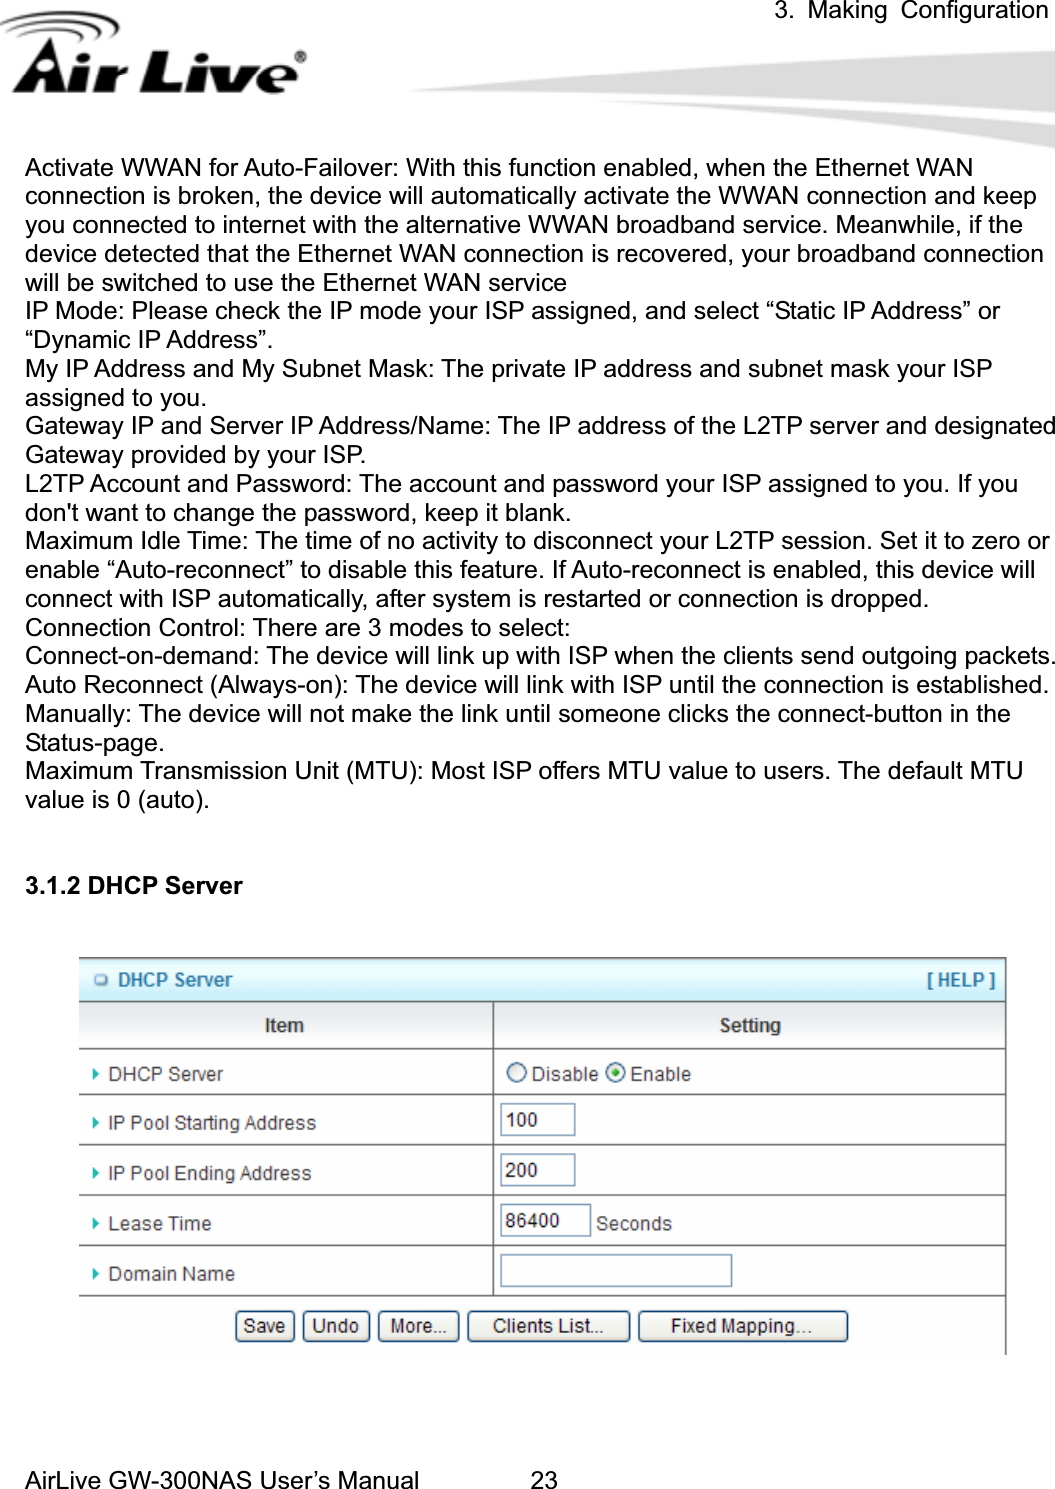
OvisLink GW300R-NAS Wireless 2T2R 300Mbps Giga NAS Router User Manual 300NAS 1of 2

OvisLink Corp. Wireless 2T2R 300Mbps Giga NAS Router 300NAS 1of 2

300NAS User manual 1of 2

                                           AirLive GW-300NAS User’s ManualGW-300NAS Wireless 2T2R 300Mbps Giga NAS Router User’s Manual
Copyright and DisclaimerAirLive GW-300NAS User’s ManualCopyright & Disclaimer The contents of this publication may not be reproduced in any part or as a whole, stored, transcribed in an information retrieval system, translated into any language, or transmitted in any form or by any means, mechanical, magnetic, electronic, optical, photocopying, manual, or otherwise, without the prior written permission. Trademarks All products, company, brand names are trademarks or registered trademarks of their respective companies. They are used for identification purpose only. Specifications are subject to be changed without prior notice.
Copyright and DisclaimerAirLive GW-300NAS User’s ManualCE Declaration of Conformity This equipment complies with the requirements relating to electromagnetic compatibility, EN 55022/A1 Class B.
Table of contents AirLive GW-300NAS User’s ManualTable of contents 1.INTRODUCTION ............................................................................................................... 1 1.1 Package List ............................................................................................................ 2 1.2 Hardware Installation ............................................................................................... 3 1.2.1 Hardware configuration ................................................................................. 3 1.2.2 LED indicators ............................................................................................... 4 2.GETTING STARTED......................................................................................................... 7 2.1 Easy Setup by Windows Utility ................................................................................ 7 2.2 Easy Setup by Configuring Web UI ....................................................................... 12 3.MAKING CONFIGURATION ........................................................................................... 16 3.1 Basic Setting.......................................................................................................... 17 3.1.1 Network Setup ............................................................................................. 18 3.1.2 DHCP Server............................................................................................... 23 3.1.3 Wireless Settings......................................................................................... 26 3.1.4 Change Password ....................................................................................... 29 3.2 Forwarding Rules................................................................................................... 38 3.3 Security Setting...................................................................................................... 41 3.4 Advanced Setting................................................................................................... 47 4.TROUBLESHOOTING .................................................................................................... 60 APPENDIX A. SPEC SUMMARY TABLE.......................................................................... 63 APPENDIX B. LICENSING INFORMATION ...................................................................... 65
1. IntroductionAirLive GW-300NAS User’s Manual 111.IntroductionCongratulations on your purchase of this outstanding product: WiFi Broadband Router. This product is specifically designed for those who need to have the file sharing and P2P download services beyond his home and office. It provides a complete solution for Internet surfing and broadband sharing. Instructions for installing and configuring this product can be found in this manual. Before you install and use this product, please read this manual carefully for fully exploiting the functions of this product.
1. IntroductionAirLive GW-300NAS User’s Manual21.1 Package List Items Description Contents Quantity1 WiFi BroadbandRouter12 Antenna 23 Power adapter 14CD 1
1. IntroductionAirLive GW-300NAS User’s Manual 31.2 Hardware Installation 1.2.1 Hardware configuration
1. IntroductionAirLive GW-300NAS User’s Manual41.2.2 LED indicators       LED Status  Description Status LED  Green Power ON Green USB storage attached Green in flash  Data access USB LED  Green in flash then stop Press ‘USB off’ button till LED flashing, then can remove USB storage when LED stop flashing. Green    It is connected to local Ethernet. WAN LED  Green in flash  Data access Green RJ45 cable is plugged Ethernet LED  Green in flash  Data access   Green WLAN is on WiFi LED  Green in flash  Data access Power LED  Green Power ON
1. IntroductionAirLive GW-300NAS User’s Manual 5How to Operate   DO NOT connect WiFi Broadband Router to power before performing the installation   steps below. Step 1. Screw the antenna in a clockwise direction to the back panel of the unit.Step 2.   Plug the RJ45 cable into LAN port 1~4 and connect with your PC or NB.Step 3.   Plug your RJ-45 into the WAN port and connect with your xDSL modem.
1. IntroductionAirLive GW-300NAS User’s Manual6Step 4.   Plug the power jack into it.   Step 5. Power ON. Step 6. Prepare a USB Storage and then   plug into the USB port.
2. Getting StartedAirLive GW-300NAS User’s Manual 722.Getting Started Please use windows EZ setup utility or Web UI wizard to enter the setup process.     2.1 Easy Setup by Windows Utility   Step 1.   Install the Easy Setup Utility from the provided CD then follow the steps to configure the device. Step 2.   Select Language then click “Next” to continue.
2. Getting StartedAirLive GW-300NAS User’s Manual8Step 3.   Then click the “Wizard” to continue. Step 4. Click “Next” to continue.
2. Getting StartedAirLive GW-300NAS User’s Manual 9Step 5. One free DDNS account ‘ MAC address.ezguard.net’ for end user to access the NAS router remotely, you can rename an alias name to remember it easily. Once you type in a name, you can click ‘ check’ to see if the name server accept it or not. You also can click ‘Ignore’ to pass it. Step 6.   Select Wireless Enable, and then click “Next” to continue.
2. Getting StartedAirLive GW-300NAS User’s Manual10Step 7. Enter SSID, Channel and Security options, and then click “Next” to continue.Step 8. uto Detect WAN Select Aservice.
2. Getting StartedAirLive GW-300NAS User’s Manual 11Step 9. Save the setting. Step 10. lations!.yCongratuSetup is completedNow you have alreadconnected to Internet successfully.
2. Getting StartedAirLive GW-300NAS User’s Manual12.2 Easy Setup by Configuring Web UI   ou can also browse UI of the web to configure the device. Browse to Activate the Setup Wizard .168.1.2542YType in the IP Address(http://192 )Type the default Username and password  ‘admthe System Password anclick ‘login’ button. in’ in d then Select your language. Select “Wizard” for basic settings in simple way. Press “Next” to start the Setup Wizard.
2. Getting StartedAirLive GW-300NAS User’s Manual 13Configure with the Setup Wizard Step 1   You can change the password of administrator here. Step 2   Select Time Zone. Step 3   You can select Auto detecting WAN type or setup WAN type manually.
2. Getting StartedAirLive GW-300NAS User’s Manual14Step 4   The system will detect the WAN type if you choose to let the system detect automatically.  Step 5   Type in Host name and ISP registered MAC address. (if no such information, you can go next) Step 5-1 Wireless setting. Step 5-2 Wirelessauthentication and encryption.
2. Getting StartedAirLive GW-300NAS User’s Manual 15Step 6   Check the information again. Step 7   System is applying the setting.   Step 8   Click finish to complete it.
3. Making ConfigurationAirLive GW-300NAS User’s Manual16.33.Making Configuration Whenever you want to configure your network or this device, you can access the Configuration Menu by opening the web-browser and typing in the IP Address of the device. The default IP Address is: 192.168.1.254.   Enter the default username and password “admin” in the System Password and then click ‘login’ button. Afterwards, select ‘Advanced’ indicated in the user interface for further configuring this device. In the “Advanced” page, it could be categorized several sections, respectively Basic Setting, Forwarding Rules, Security Setting, NAS and Advanced Setting.     DDNS support This NAS router provide one free DDNS account, so that end user can enter the NAS router by using this DDNSaccount remotely. Note : Once you finish setting DDNA alias in EZsetup utility, you can use this DDNS alias to connect to your EzGuard via windows IE browser or 3G smart phone or device. For example : type in http://AliasTest.ezguard.net/ and enter the system. Username and password support This NAS router provides another model for guest to enter it with lower level authorization.
3. Making ConfigurationAirLive GW-300NAS User’s Manual 17Note : Once you type in username and password ‘ guest/guest’, you can see as below WebHDD contents, which means your guest can only be allowed to check the ‘public’ area in the Hard drive under this NAS router. 3.1 Basic Setting
3. Making ConfigurationAirLive GW-300NAS User’s Manual183.1.1 Network Setup There are two ways to configure the network, respectively LAN Setup and Internet setup. LAN type LAN IP Address: The local IP address of this device. The computer on your network    must use the LAN IP address of this device as their Default Gateway. You can change it if necessary. 2.    Subnet Mask: Input your Subnet mask. (All devices in the network must have the same             subnet mask.) The default subnet mask is 255.255.255.0. Internet Setup   1.    WAN Interface: Select Ethernet WAN or Wireless WAN to continue.   2.    WAN Type: WAN connection type of your ISP. You can click WAN Type combo button to choose a correct one from the following options:     Ethernet WAN A. Static IP Address
3. Making ConfigurationAirLive GW-300NAS User’s Manual 19Activate WWAN for Auto-Failover: With this function enabled, when the Ethernet WAN connection is broken, the device will automatically activate the WWAN connection and keep you connected to internet with the alternative WWAN broadband service. Meanwhile, if the device detected that the Ethernet WAN connection is recovered, your broadband connection will be switched to use the Ethernet WAN service.   WAN IP Address, Subnet Mask, Gateway, Primary and Secondary DNS: Enter the proper settings provided by your ISP. NAT disable: The device would not send private IP to other LAN PC if you select disable. B. Dynamic IP Address Activate WWAN for Auto-Failover: With this function enabled, when the Ethernet WAN connection is broken, the device will automatically activate the WWAN connection and keep you connected to internet with the alternative WWAN broadband service. Meanwhile, if the device detected that the Ethernet WAN connection is recovered, your broadband connection will be switched to use the Ethernet WAN service.   Host Name: Optional, required by some ISPs, for example, @Home. ISP registered MAC Address: Enter MAC address of your ISP. (Optional) Connection Control: There are 3 modes to select:   Connect-on-demand: The device will link up with ISP when the clients send outgoing                packets.  Auto Reconnect (Always-on): The device will link with ISP until the connection is   established.  Manually: The device will not make the link until someone clicks the connect-button in       the Status-page. NAT disable: The device would not send private IP to other LAN PC if you select disable.
3. Making ConfigurationAirLive GW-300NAS User’s Manual20C. PPP over Ethernet Activate WWAN for Auto-Failover: With this function enabled, when the Ethernet WAN connection is broken, the device will automatically activate the WWAN connection and keep you connected to internet with the alternative WWAN broadband service. Meanwhile, if the device detected that the Ethernet WAN connection is recovered, your broadband connection will be switched to use the Ethernet WAN service.   PPPoE Account and Password: The account and password your ISP assigned to you. For security, this field appears blank. If you don't want to change the password, leave it blank.   Connection Control: There are 3 modes to select:   Connect-on-demand: The device will link up with ISP when the clients send outgoing packets.   Auto Reconnect (Always-on): The device will link with ISP until the connection is established.   Manually: The device will not make the link until someone clicks the connect-button in the Status-page. Maximum Idle Time: the amount of time of inactivity before disconnecting your PPPoE session. Set it to zero or enable “Auto-reconnect” to disable this feature.   PPPoE Service Name: Optional. Input the service name if your ISP requires it. Otherwise, leave it blank.
3. Making ConfigurationAirLive GW-300NAS User’s Manual 21Assigned IP Address: It is required by some ISPs. (Optional) Maximum Transmission Unit (MTU): Most ISP offers MTU value to users. The default MTU value is 0 (auto).   NAT disable: The device would not send private IP to other LAN PC if you select disable.   D. PPTP Activate WWAN for Auto-Failover: With this function enabled, when the Ethernet WAN connection is broken, the device will automatically activate the WWAN connection and keep you connected to internet with the alternative WWAN broadband service. Meanwhile, if the device detected that the Ethernet WAN connection is recovered, your broadband connection will be switched to use the Ethernet WAN service IP Mode: Please check the IP mode your ISP assigned, and select “Static IP Address” or “Dynamic IP Address”.   My IP Address and My Subnet Mask: The private IP address and subnet mask your ISP assigned to you.
3. Making ConfigurationAirLive GW-300NAS User’s Manual22Gateway IP and Server IP Address/Name: The IP address of the PPTP server and designated Gateway provided by your ISP. PPTP Account and Password: The account and password your ISP assigned to you. If you don't want to change the password, keep it blank.   Connection ID: Optional. Input the connection ID if your ISP requires it.   Maximum Idle Time: the time of no activity to disconnect your PPTP session. Set it to zero or enable “Auto-reconnect” to disable this feature. If Auto-reconnect is enabled, this device will connect with ISP automatically after system is restarted or connection is dropped.   Connection Control: There are 3 modes to select:   Connect-on-demand: The device will link up with ISP when the clients send outgoing packets.   Auto Reconnect (Always-on): The device will link with ISP until the connection is established.   Manually: The device will not make the link until someone clicks the connect-button in the Status-page.  Maximum Transmission Unit (MTU): Most ISP offers MTU value to users. The default MTU value is 0 (auto). E. L2TP
3. Making ConfigurationAirLive GW-300NAS User’s Manual 23Activate WWAN for Auto-Failover: With this function enabled, when the Ethernet WAN connection is broken, the device will automatically activate the WWAN connection and keep you connected to internet with the alternative WWAN broadband service. Meanwhile, if the device detected that the Ethernet WAN connection is recovered, your broadband connection will be switched to use the Ethernet WAN service IP Mode: Please check the IP mode your ISP assigned, and select “Static IP Address” or “Dynamic IP Address”.   My IP Address and My Subnet Mask: The private IP address and subnet mask your ISP assigned to you.   Gateway IP and Server IP Address/Name: The IP address of the L2TP server and designated Gateway provided by your ISP. L2TP Account and Password: The account and password your ISP assigned to you. If you don't want to change the password, keep it blank.   Maximum Idle Time: The time of no activity to disconnect your L2TP session. Set it to zero or enable “Auto-reconnect” to disable this feature. If Auto-reconnect is enabled, this device will connect with ISP automatically, after system is restarted or connection is dropped.   Connection Control: There are 3 modes to select:   Connect-on-demand: The device will link up with ISP when the clients send outgoing packets.   Auto Reconnect (Always-on): The device will link with ISP until the connection is established.   Manually: The device will not make the link until someone clicks the connect-button in the Status-page. Maximum Transmission Unit (MTU): Most ISP offers MTU value to users. The default MTU value is 0 (auto). 3.1.2 DHCP Server
3. Making ConfigurationAirLive GW-300NAS User’s Manual24DHCP Server: Choose either Disable or Enable. If you enable the DHCP Server function, the following settings will be effective. IP Pool Starting/Ending Address: Whenever there is a request, the DHCP server will automatically allocate an unused IP address from the IP address pool to the requesting computer. You must specify the starting / ending address of the IP address pool. Lease Time: DHCP lease time to the DHCP client. Domain Name: Optional, this information will be passed to the clients. Press “More>>” and you can find more settings. Primary DNS/Secondary DNS: Optional. This feature allows you to assign a DNS Servers Primary WINS/Secondary WINS: Optional. This feature allows you to assign a WINS Servers Gateway: Optional. Gateway Address would be the IP address of an alternate Gateway. This function enables you to assign another gateway to your PC, when DHCP server offers an IP to your PC.   Press “Clients List” and the list of DHCP clients will be shown consequently.
3. Making ConfigurationAirLive GW-300NAS User’s Manual 25Press “Fixed Mapping” and the DHCP Server will reserve the special IP for designated MAC   Address.
3. Making ConfigurationAirLive GW-300NAS User’s Manual263.1.3 Wireless Settings Wireless settings allow you to set the wireless configuration items. Wireless Module: You can enable or disable wireless function. Network ID (SSID): Network ID is used for identifying the Wireless LAN (WLAN). Client stations can roam freely over this device and other Access Points that have the same Network ID. (The factory default setting is “default”) SSID Broadcast: The router will broadcast beacons that have some information, including SSID so that wireless clients can know how many AP devices by scanning the network. Therefore, if this setting is configured as “Disable”, the wireless clients can not find the device from beacons. Channel: The radio channel number. The permissible channels depend on the Regulatory Domain. The factory default setting is as the following: channel 6 for North America; channel 7 for European (ETSI); channel 7 for Japan.   Wireless Mode: Choose “B/G mixed”, “B only”, “G only”, “N only”, “G/N mixed” or “B/G/N mixed”. The factory default setting is “B/G/N mixed”. Authentication mode: You may select one of the following authentications to secure your wireless network: Open, Shared, Auto, WPA-PSK, WPA, WPA2-PSK, WPA2, WPA-PSK/WPA2-PSK, or WPA /WPA2.
3. Making ConfigurationAirLive GW-300NAS User’s Manual 27OpenOpen system authentication simply consists of two communications. The first is an authentication request by the client that contains the station ID (typically the MAC address). This is followed by an authentication response from the AP/router containing a success or failure message. An example of when a failure may occur is if the client's MAC address is explicitly excluded in the AP/router configuration. SharedShared key authentication relies on the fact that both stations taking part in the authentication process have the same "shared" key or passphrase. The shared key is manually set on both the client station and the AP/router. Three types of shared key authentication are available today for home or small office WLAN environments. AutoThe AP will Select the Open or Shared by the client’s request automatically.     WPA-PSK Select Encryption and Pre-share Key Mode If you select HEX, you have to fill in 64 hexadecimal (0, 1, 2…8, 9, A, B…F) digits. If you select ASCII, the length of pre-share key is from 8 to 63. Fill in the key, Ex 12345678 WPA Check Box was used to switch the function of the WPA. When the WPA function is enabled, the Wireless user must authenticate to this router first to use the Network service. RADIUS Server IP address or the 802.1X server’s domain-name.   Select Encryption and RADIUS Shared Key. If you select HEX, you have to fill in 64 hexadecimal (0, 1, 2…8, 9, A, B…F) digits. If you select ASCII, the length of pre-share key is from 8 to 63. Key value shared by the RADIUS server and this router. This key value is consistent with the key value in the RADIUS server. WPA2-PSK WPA2-PSK user AES and TKIP for Same the encryption, the others are same as the WPA2-PSK. WPA-PSK/WPA2-PSK Another encryption options for WPA-PSK-TKIP and WPA2-PSK-AES, the others are same as the WPA-PSK. WPA/WPA2  Another encryption options for WPA-TKIP and WPA2-AES, the others are same the WPA.   Press “WDS Setting” and It allows PC to get connected to wireless network within the area.
3. Making ConfigurationAirLive GW-300NAS User’s Manual28Wireless Bridging: You could enable this function by selecting “Enable”.   Remote AP MAC 1~Remote AP MAC 2: Enter the wireless MAC into the blank.   Encryption type: Select the appropriate category. Once you set up that type of encryption, second LAN PC must enter the same encryption type as the first one.     Encryption key: Set up encryption key based on the rule of encryption type. Once you set up encryption, second LAN PC must enter the same encryption type as the first one.     Press “WPS Setup”, you can configure and enable the easy setup feature WPS (Wi-Fi Protection Setup) for your wireless network.   WPS:.You can enable this function by selecting “Enable”. WPS offers a safe and easy way to allow the wireless clients connected to your wireless network.
3. Making ConfigurationAirLive GW-300NAS User’s Manual 29AP PIN: You can press Generate New Pin to get an AP PIN. Config Mode: Select your config Mode from “Registrar” or “Enrollee”. Config Status: It shows the status of your configuration. Config Method: You can select the Config Method here from “Pin Code” or “Push Button”. WPS status: According to your setting, the status will show “Start Process” or “No used”. Press “Wireless Clients List” and the list of wireless clients will be shown consequently. 3.1.4 Change Password You can change the System Password here. We strongly recommend you to change the system password for security reason. Click on “Save” to store your settings or click “Undo” to give up the changes.
3. Making ConfigurationAirLive GW-300NAS User’s Manual30NAS Configuration Disk Utility 1. Format This utility would format the certain partition. Please be noted! This action will clear all your data in this partition. You will not be able to recover it any more. 2. Check This utility could help you check the partition, find the lost files, try to fix some problems. File Sharing Basic Setting These settings are for Samba Server (Windows Network Neighbors). Computer Name The name that is showed on the windows network neighbors search result. WorkGroup This name MUST be the same as your computer, or you could not search this device via windows. Server Comment Just a comment for recognize.
3. Making ConfigurationAirLive GW-300NAS User’s Manual 31FTP Service These settings are for FTP service. FTP Port: The default port is 21, but sometimes you might want to hide your FTP service by changing it. We have the ability to receive the request on non-standard FTP port, but please be noted, some NAT router could not support non-standard FTP port, that means some of your clients might have to use passive mode to get file. Client Support UTF8: This option is used when your FTP client could support UTF8. Usually, the default value “No” is okay for most clients. Codepage: Please set correct value to suit your language. Access Control The default setting is “Guest mode”, all clients could access as anonymous users. If you want to control the permission, change to “Authorization mode” and save it, then go to “User Configuration”.
3. Making ConfigurationAirLive GW-300NAS User’s Manual32User Configuration In this page, you can manage the user account. Key in the user name and password then press “Add” could let you add a new user. If you want to delete an account, select it and click “Delete” button. iTunes Server This function could enable the built-in iTunes Server to support iTunes which is a media player released by Apple. Server Name: The name of this server, it will be shown on the iTunes. Service Port: The TCP port for WEB management interface, for example, if the default value is 3689, then your iTunes server URL will be http://This_Device_IP:3689 Access Password: The password for iTunes Server WEB management interface.
3. Making ConfigurationAirLive GW-300NAS User’s Manual 33Download Assistant FTPIf you want to download something from a FTP site regularly but you don’t want to spend time on remembering doing this, this FTP download assistant could help you. Job Name: It’s for you to remember the job easily, and the device would use this name to info you when the job is done. URL:The URL for the file you want to download. You have to use this format: IP/path/file, you don’t have to add protocol part such like “ftp://”. Save To: The destination path on USB disk that you want to save files. Default value is /C/Download/FTP Login method: Anonymous, you can access this site without any authentication Account, you have to enter the username and password to login.
3. Making ConfigurationAirLive GW-300NAS User’s Manual34Start Time: Schedule: this device will start FTP download on the time that you specified. The schedule job that is saved could be check on Status page by selecting “View Scheduled Download Status”. At Once: the FTP download would be started immediately. HTTPJob Name: It’s for you to remember the job easily, and the device would use this name to info you when the job is done. URL:The URL for the file you want to download. You have to use this format: IP/path/file, you don’t have to add protocol part such like “http://”. Save To: The destination path on USB disk that you want to save files. Default value is /C/Download/HTTP Start Time: Schedule: this device will start FTP download on the time that you specified. The schedule job that is saved could be check on Status page by selecting “View Scheduled Download Status”. At Once: the FTP download would be started immediately.
3. Making ConfigurationAirLive GW-300NAS User’s Manual 35BT (Bit Torrent) Start BT download First, you have to get a seed file, which we called “torrent”. Then click the “Open” link on UI, it would pop up a sub menu to let you upload. Or, if your torrent file could be download from network, you could just enter a URL.
3. Making ConfigurationAirLive GW-300NAS User’s Manual36BT download status After you upload the torrent, download job would be started immediately.The device could support 3 concurrent download jobs, other jobs would wait in job queue. If one of the three running job is done, the next new job would be started.At this page, you could see the download process and the bandwidth. Stop, Resume and Remove seed Select any job on the list, and click right button of mouse, you could see a menu with several actions you could do.You could Stop (Pause), Resume, or Remove a job with this sub menu.

Navigation menu