OvisLink WL5470POE Multi-function Wireless Access Point User Manual AirLive WL 5470PoE Manual
OvisLink Corp. Multi-function Wireless Access Point AirLive WL 5470PoE Manual
OvisLink >
Contents
- 1. User Manual
- 2. User Manual II
- 3. User Manual III
User Manual III

25 AirLive WL-5470POE User’s Manual
network, you can enter new Fragment Threshold value to split the
packet. The value can be set from 256 to 2346. The default value
is 2346.
RTS Threshold RTS Threshold is a mechanism implemented to prevent the “Hidden Node”
problem. “Hidden Node” is a situation in which two stations are within range of
the same Access Point, but are not within range of each other. Therefore, they
are hidden nodes for each other. When a station starts data transmission with
the Access Point, it might not notice that the other station is already using the
wireless medium. When these two stations send data at the same time, they
might collide when arriving simultaneously at the Access Point. The collision
will most certainly result in a loss of messages for both stations.
Thus, the RTS Threshold mechanism provides a solution to prevent data
collisions. When you enable RTS Threshold on a suspect “hidden
station”, this station and its Access Point will use a Request to Send
(RTS). The station will send an RTS to the Access Point, informing
that it is going to transmit the data. Upon receipt, the Access Point
will respond with a CTS message to all station within its range to
notify all other stations to defer transmission. It will also confirm the
requestor station that the Access Point has reserved it for the
time-frame of the requested transmission.
If the “Hidden Node” problem is an issue, please specify the packet size. The
RTS mechanism will be activated if the data size exceeds the value you set..
The default value is 2347.
Warning: Enabling RTS Threshold will cause redundant network overhead
that could negatively affect the throughput performance instead of providing
a remedy.
This value should remain at its default setting of 2347. Should you encounter
inconsistent data flow, only minor modifications of this value are
recommended.
Beacon Interval Beacon Interval is the amount of time between beacon transmissions. Before
a station enters power save mode, the station needs the beacon interval to
know when to wake up to receive the beacon (and learn whether there are
buffered frames at the access point).
Data Rate By default, the unit adaptively selects the highest possible rate for
transmission. Select the basic rates to be used among the following options:
Auto, 1, 2, 5.5, 11or 54 Mbps. For most networks the default setting is Auto
which is the best choice. When Auto is enabled the transmission rate will

26 AirLive WL-5470POE User’s Manual
select the optimal rate. If obstacles or interference are present, the system will
automatically fall back to a lower rate.
Preamble Type
A
preamble is a signal used in wireless environment to synchronize the
transmitting timing including Synchronization and Start frame delimiter. In a
"noisy" network environment, the Preamble Type should be set to Long
Preamble. The Short Preamble is intended for applications where minimum
overhead and maximum performance is desired. If in a "noisy" network
environment, the performance will be decreased.
Broadcast SSID Select enabled to allow all the wireless stations to detect the SSID of this
Access Point.
IAPP IAPP (Inter Access Point Protocol) is designed for the enforcement of unique
association throughout a ESS (Extended Service Set) and a secure exchange
of station’s security context between current access point (AP) and new AP
during handoff period.
802.11g Protection The 802.11g standard includes a protection mechanism to ensure mixed 802.11b and
802.11g operation. If there is no such kind of mechanism exists, the two kinds of
standards may mutually interfere and decrease network’s performance.
TX Power Level For countries that impose limit on WLAN output power, it might be necessary
to reduce TX (transmit) power. There are 7 TX Power Levels to choose
from — select a level to make sure that the output power measured at the
antenna end will not exceed the legal limit in your country.
Enable Watch dog Check and enable this watch dog function
Watch Interval Setup the interval time for watch dog function between 1 to 60 mins
Watch Host Enter the watch dog host ip address .
ACK Timeout When a packet is sent out from one wireless station to the other, it will waits
for an Acknowledgement frame from the remote station. If the ACK is NOT
received within that timeout period then the packet will be re-transmitted
resulting in reduced throughput. If the ACK setting is too high then
throughput will be lost due to waiting for the ACK Window to timeout on lost
packets. By having the ability to adjust the ACK setting we can effectively
optimize the throughput over long distance links. This is especially true for
802.11a and 802.11g networks
You can set as default for auto adjustment.
Apply Change Press to save the new settings on the screen.
Reset Press to discard the data you have entered since last time you press Apply
Change.
Notice: Output Power selection feature to be disabled for
products marketed to the US.
27 AirLive WL-5470POE User’s Manual
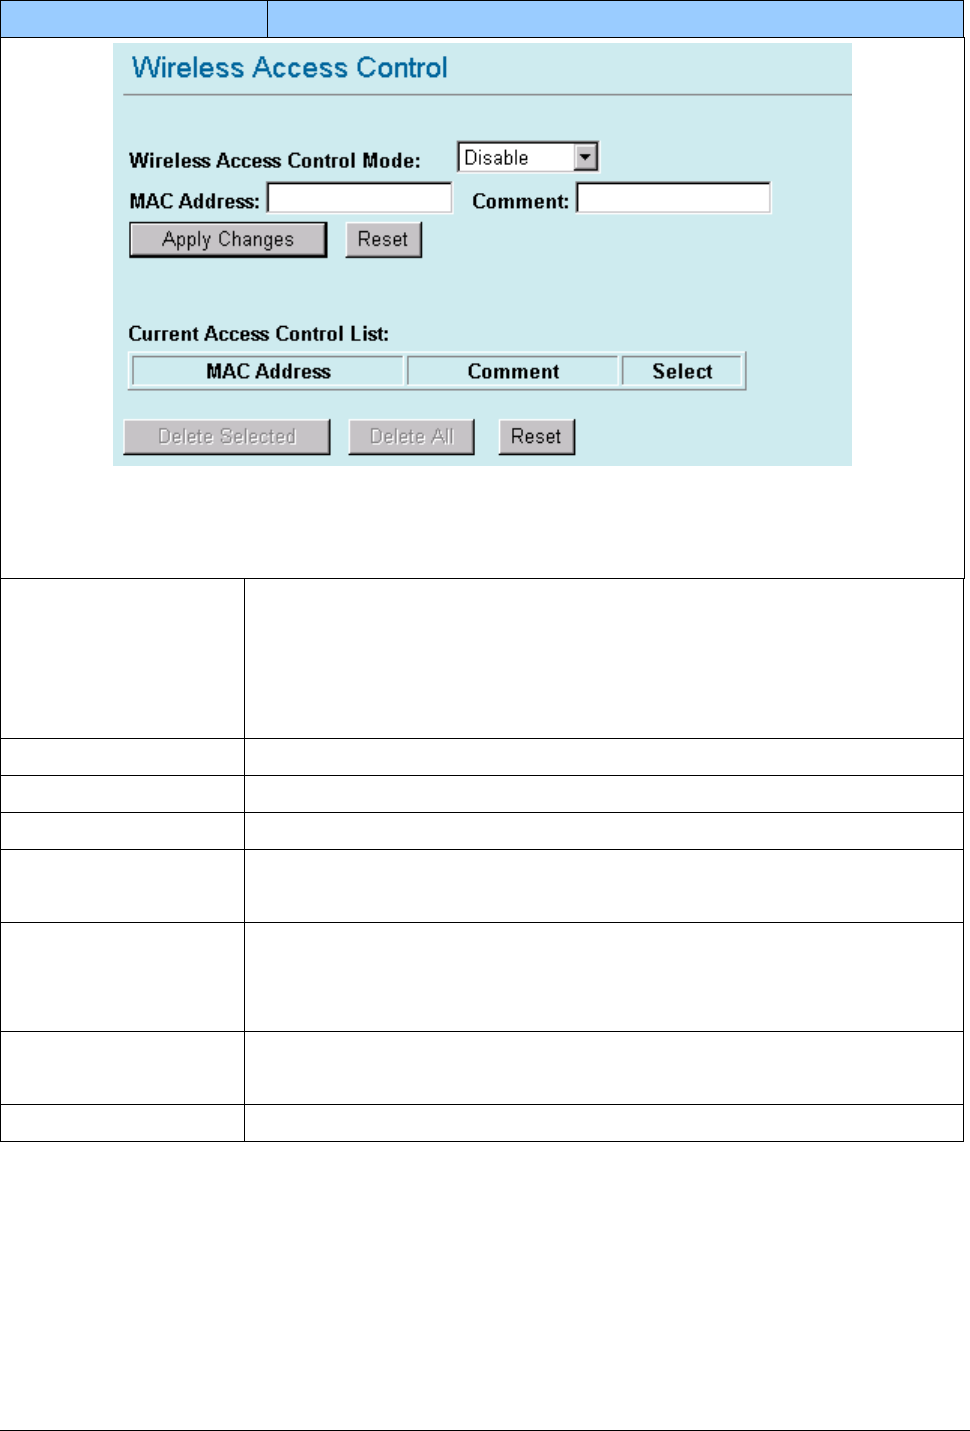
Access Control Press the setup button for detail configurations
When Enable Wireless Access Control is checked, only those clients whose wireless MAC addresses
listed in the access control list can access this Access Point. If the list contains no entries with this function
being enabled, then no clients will be able to access this Access Point.
Wireless Access Control
Mode
Select the Access Control Mode from the pull-down menu.
Disable: Select to disable Wireless Access Control Mode.
Allow Listed: Only the stations shown in the table can associate with the AP.
Deny Listed: Stations shown in the table won’t be able to associate with the AP.
MAC Address Enter the MAC Address of a station that is allowed to access this Access Point.
Comment You may enter up to 20 characters as a remark to the previous MAC Address.
Apply Changes Press to save the new settings on the screen.
Reset Press to discard the data you have entered since last time you press Apply
Change.
Delete Selected To delete clients from access to this Access Point, you may firstly check the
Select checkbox next to the MAC address and Comments, and press Delete
Selected.
Delete All To delete all the clients from access to this Access Point, just press Delete All
without selecting the checkbox.
Reset If you have made any selection, press Reset will clear all the select mark.
28 AirLive WL-5470POE User’s Manual
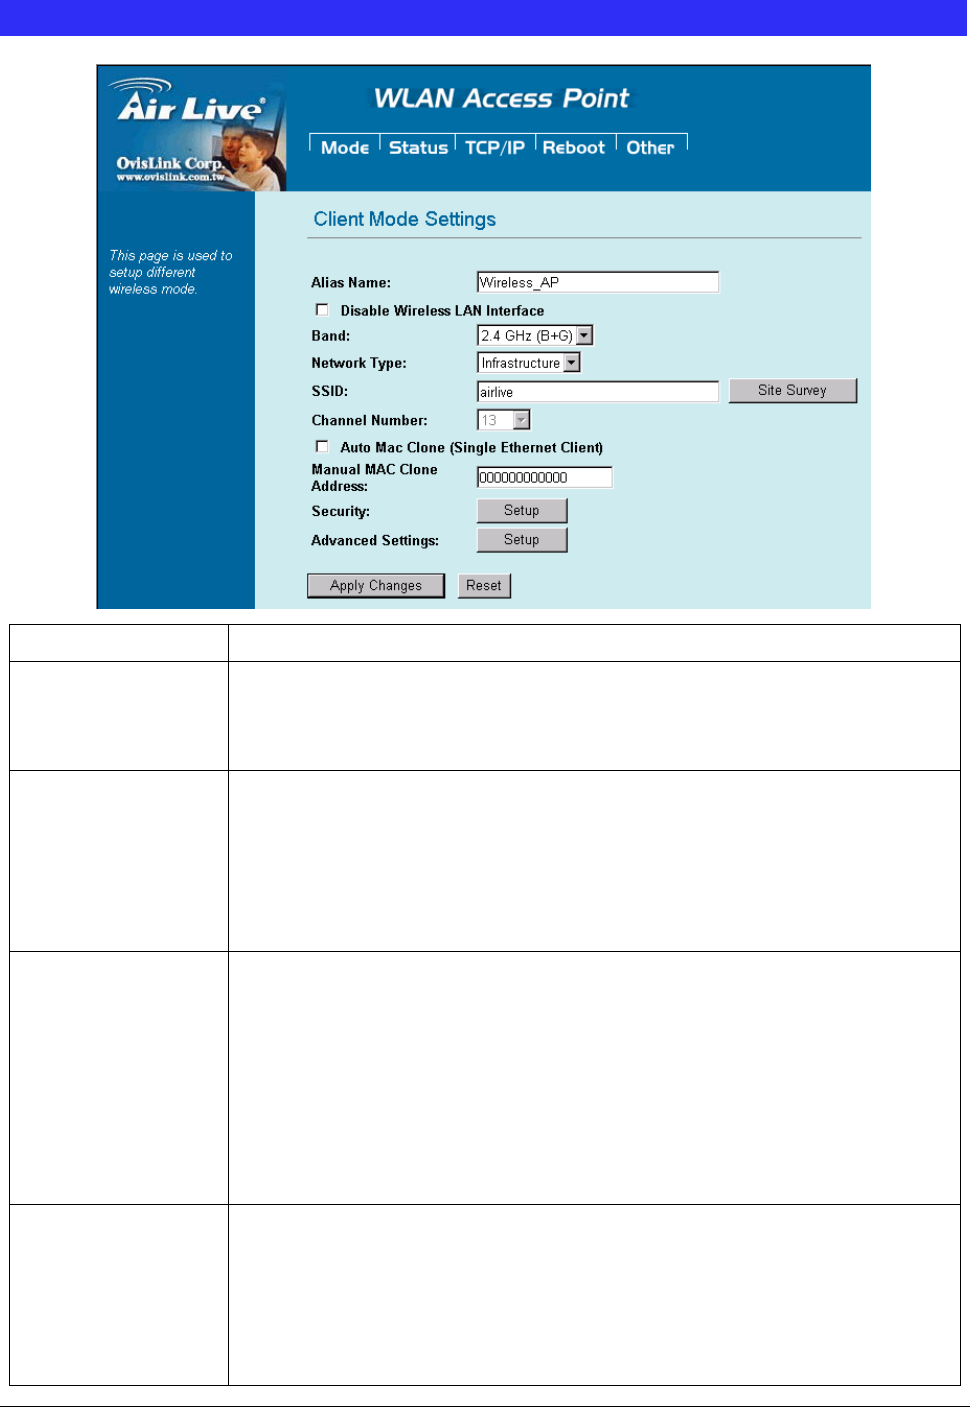
Client Mode Setting
Alias Name You can set the alias name for this device. limited not exceed 32 characters.
Disable Wireless
LAN Interface
Check the box to disable the Wireless LAN Interface, by so doing, you won’t be
able to make wireless connection with this Access Point in the network you are
located. In other words, this device will not be visible by any wireless station.
Band You can choose one mode of the following you need.
~ 2.4GHz (B): 802.11b supported rate only.
~ 2.4GHz (G): 802.11g supported rate only.
~ 2.4GHz (B+G): 802.11b supported rate and 802.11g supported rate. The
default is 2.4GHz (B+G) mode.
Network Type Client mode have two Network type :
Infrastructure
A wireless network that is built around one or more access points, providing
wireless clients access to wired LAN or Internet service. It is the most popular
WLAN network structure today.
AdHoc wireless network do not use wireless AP orrouter as the central hub of the
network. Instead, wireless client are connected directly to each other.
SSID The SSID differentiates one WLAN from another; therefore, all access points and
all devices attempting to connect to a specific WLAN must use the same SSID. It is
case-sensitive and must not exceed 32 characters.
A
device will not be permitted
to join the BSS unless it can provide the unique SSID. An SSID is also referred to
as a network name because essentially it is a name that identifies a wireless
29 AirLive WL-5470POE User’s Manual
network.
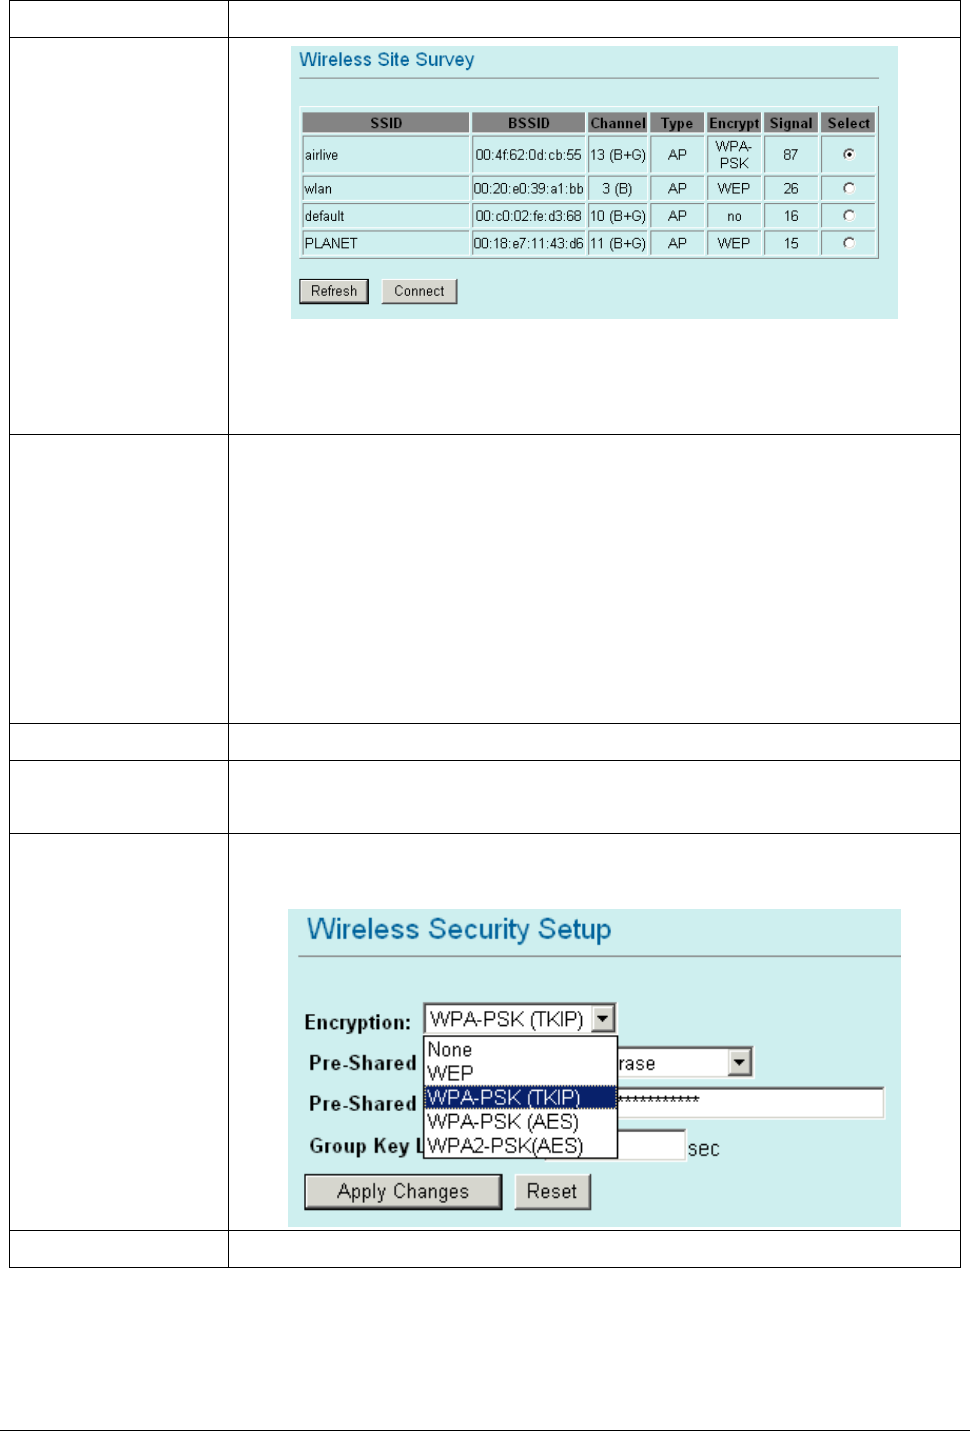
Site Survey
Site survey displays all the active Access Points and IBSS in the neighborhood.
You can select one AP to associate. Press Site Survey button to search the
wireless device that this client want to connect.
Channel Number Allow user to set the channel manually or automatically.
If set channel manually, just select the channel you want to specify.
If “Auto” is selected, user can set the channel range to have Wireless Access Point
automatically survey and choose the channel with best situation for
communication. All stations communicating with the Access Point must use the
same channel.
when setup infrastructure of Client mode, the channel number can not
Be changed. You have to go to AP mode to change the channel number
Auto MAC Clone Check the box to enable MAC Clone for Single Ethernet Client.
Manual MAC Clone
Address
Enter the MAC Address of Single Ethernet Client.
Security Please refer the AP mode settingsÆ Security for details.
In client mode are not supported with RADIUS 802.1x authentication.
Advance Setting Please refer the AP mode settingsÆ Advance Setting for details.
30 AirLive WL-5470POE User’s Manual
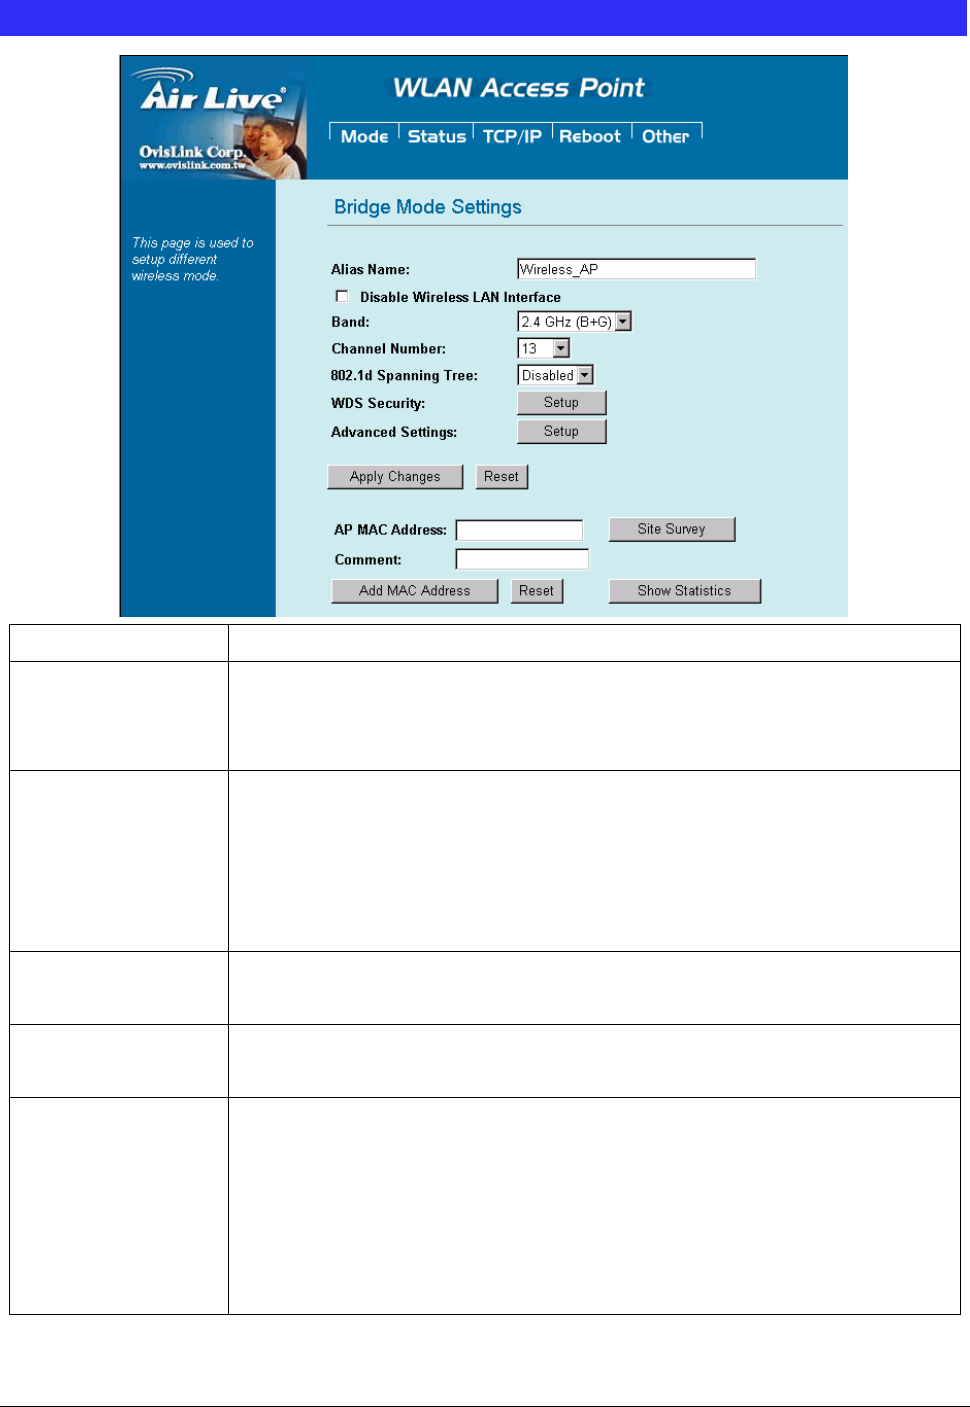
Bridge Mode Setting
Alias Name You can set the alias name for this device. limited not exceed 32 characters.
Disable Wireless
LAN Interface
Check the box to disable the Wireless LAN Interface, by so doing, you won’t be
able to make wireless connection with this Access Point in the network you are
located. In other words, this device will not be visible by any wireless station.
Band You can choose one mode of the following you need.
~ 2.4GHz (B): 802.11b supported rate only.
~ 2.4GHz (G): 802.11g supported rate only.
~ 2.4GHz (B+G): 802.11b supported rate and 802.11g supported rate. The
default is 2.4GHz (B+G) mode.
Channel Number In Bridge mode, both wireless AP/Router device need set to the same Channel
number.
Security Please refer the AP mode settingsÆ Security for details.
But bridge mode are not supported with RADIUS 802.1x authentication.
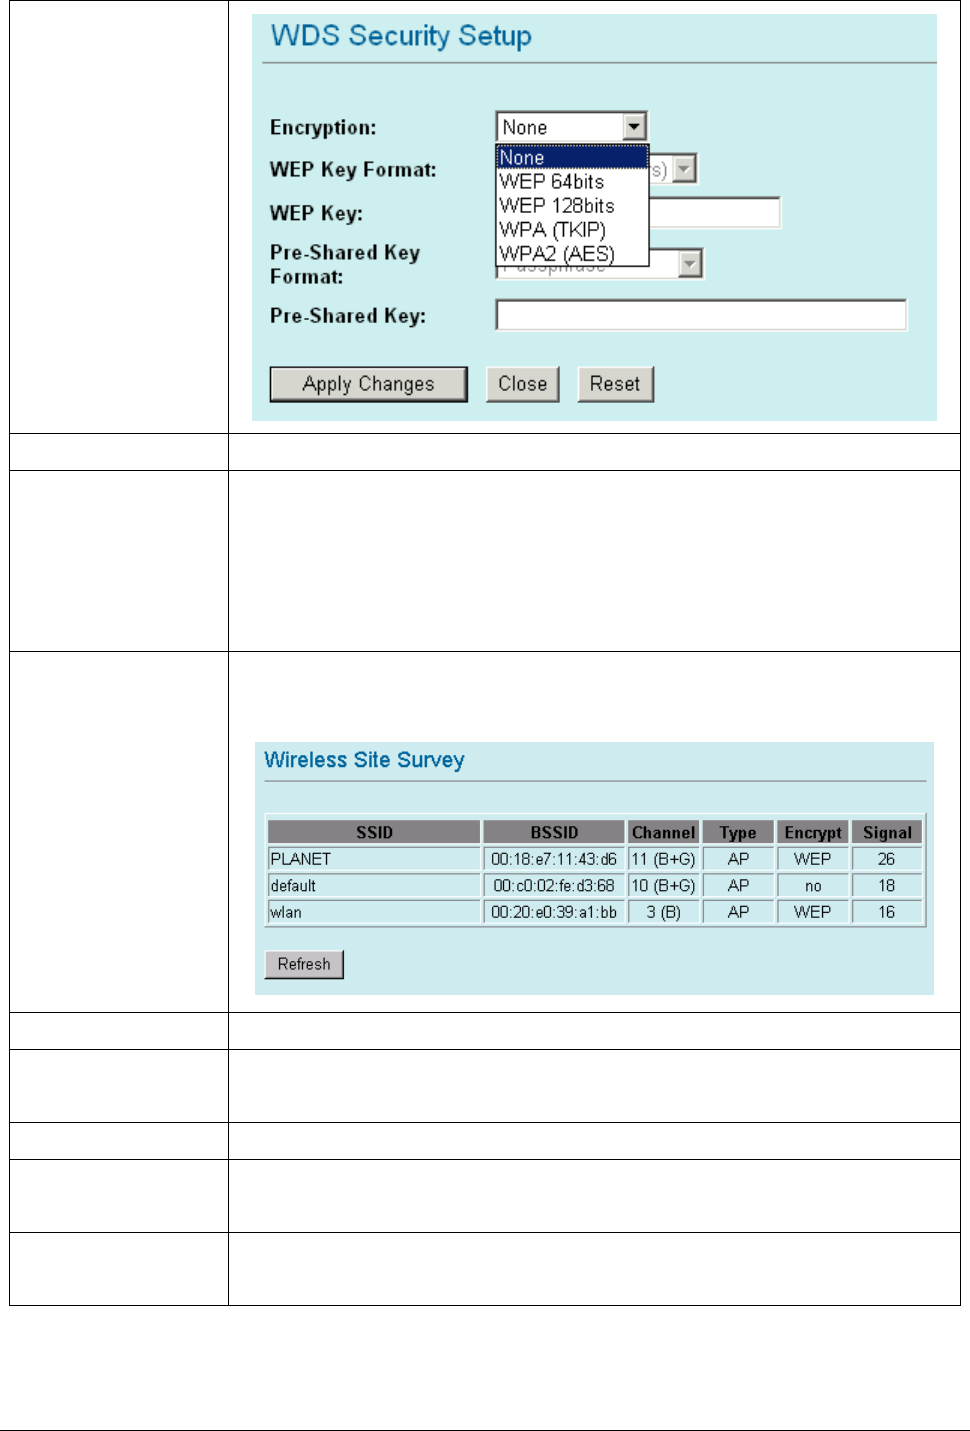
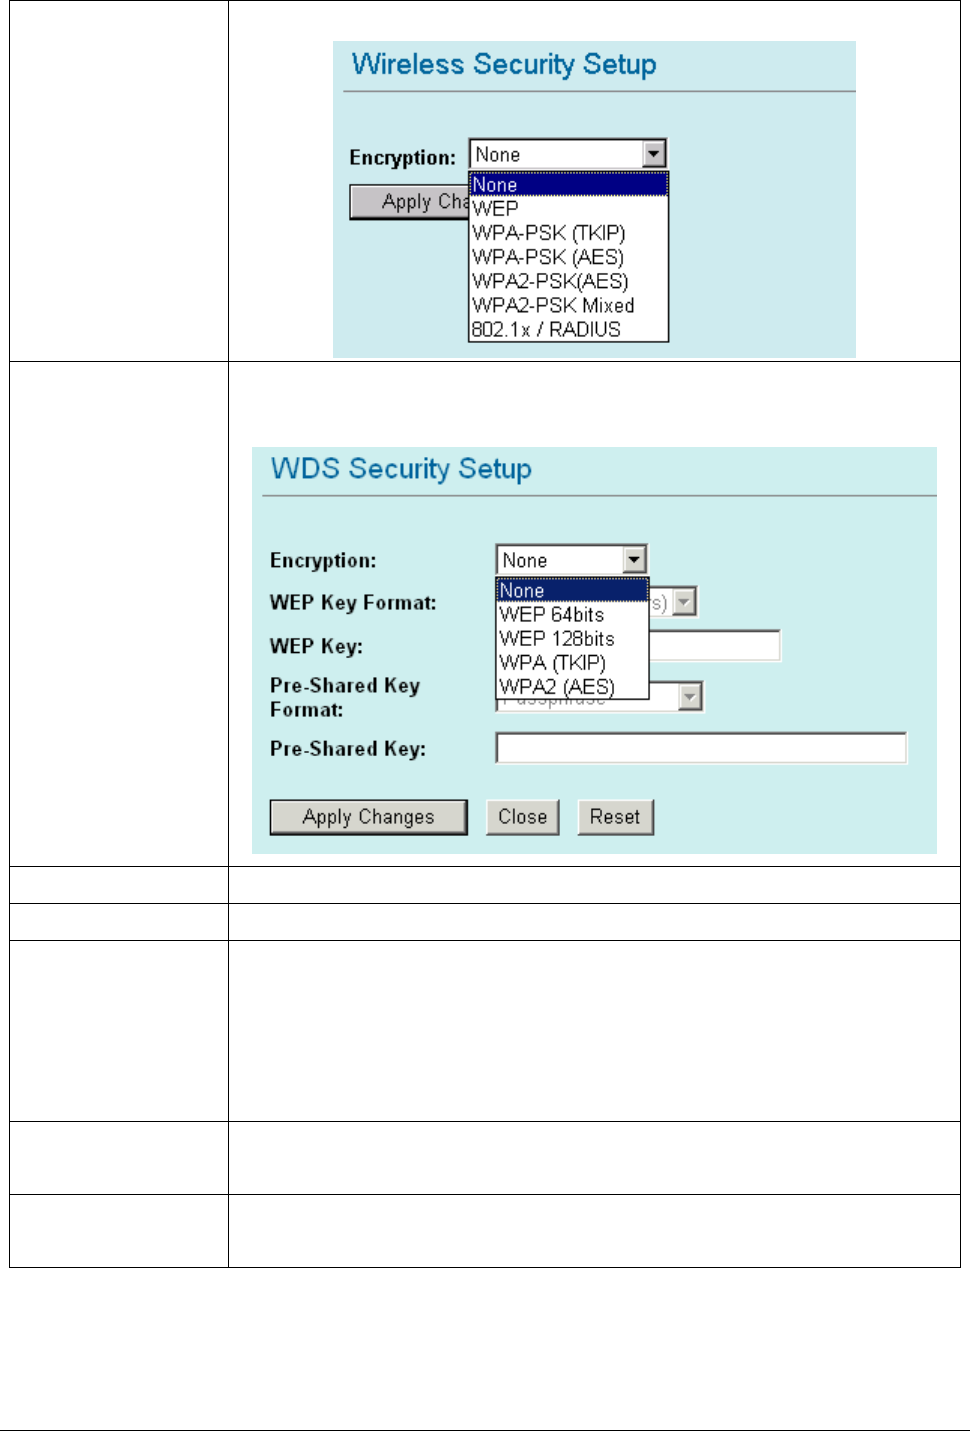
WDS Security To enable security between wireless AP/Router , you can select WEP 64bits, WEP
128bits, WPA (TKIP), WPA2(AES) for data encryption.
For WEP encryption, Select ASCII if you are using ASCII characters. Select HEX if
you are using hexadecimal numbers (0-9, or A-F).
For WPA/WPA2 encryption, you need enter the Pre-Shared Key Information for
the authentication purpose.
31 AirLive WL-5470POE User’s Manual
Advance Setting Please refer the AP mode settingsÆ Advance Setting for details.
AP MAC address Enter 12 digits in hex numbers in the AP MAC address (BSSID) field and press the
Add MAC Address Button to associate with other’s Wireless access point.
Before you want to use bridge mode to connect each other to provide
A wireless bridge between 2 remote LANs, you need add the BSSID of other’s
wireless AP first.
Site Survey Site survey displays all the active Access Points and IBSS in the neighborhood.
Press Site Survey button to search the wireless device.
Add MAC Address Enter MAC address of remote access point.
Reset Press to discard the data you have entered since last time you press Apply
Change.
Show Statistics List all packets information of traffic.
Delete Selected To delete bridge from access to this Access Point, you may firstly check the Select
checkbox next to the MAC address and Comments, and press Delete Selected.
Delete All To delete all the clients from access to this Access Point, just press Delete All
without selecting the checkbox.
32 AirLive WL-5470POE User’s Manual
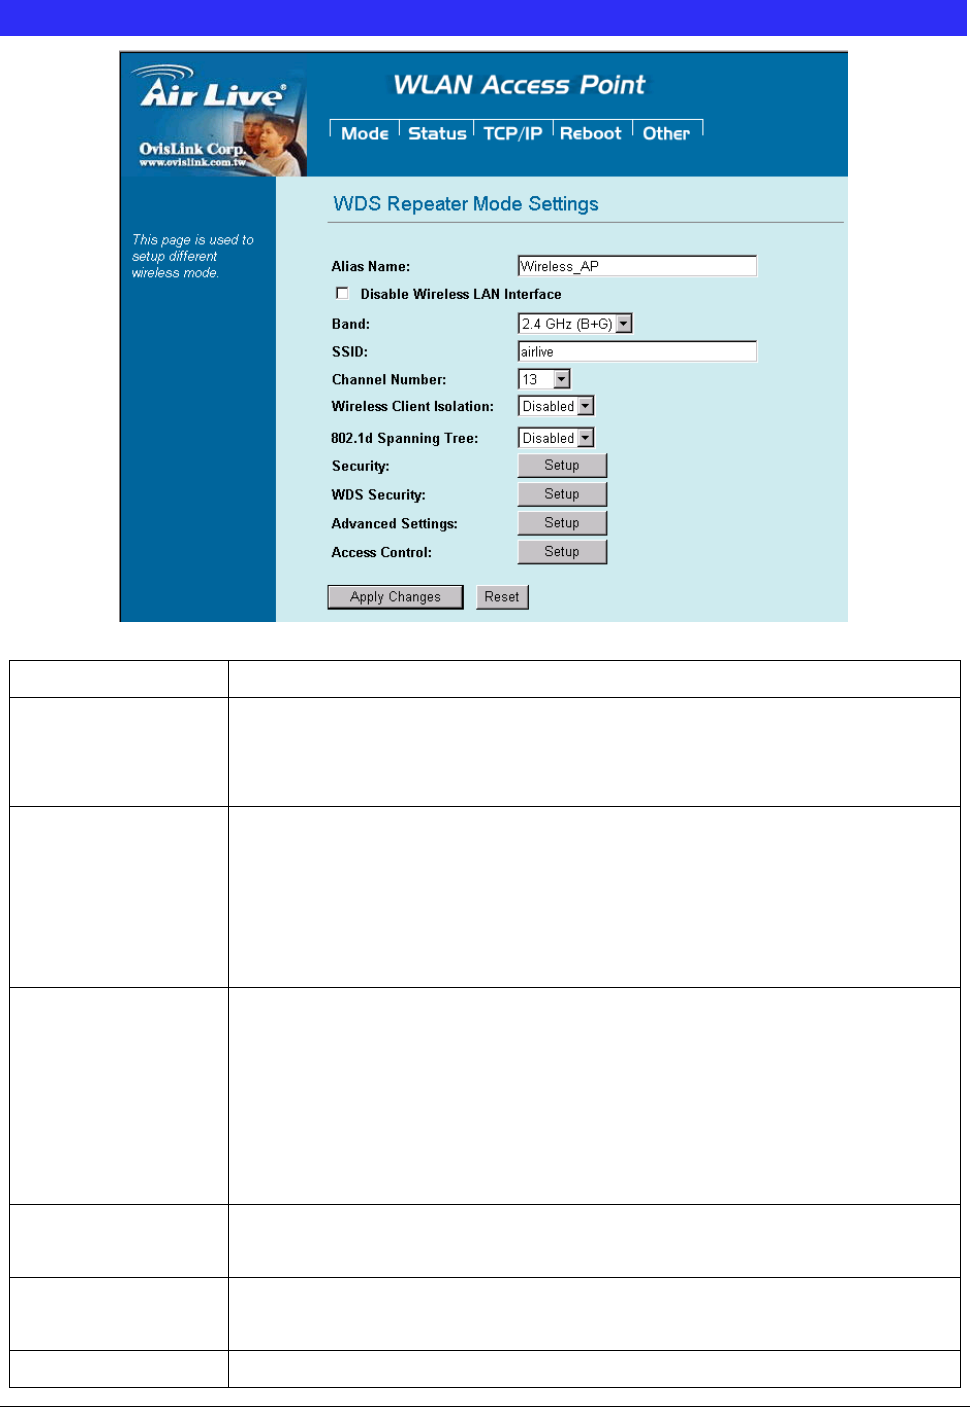
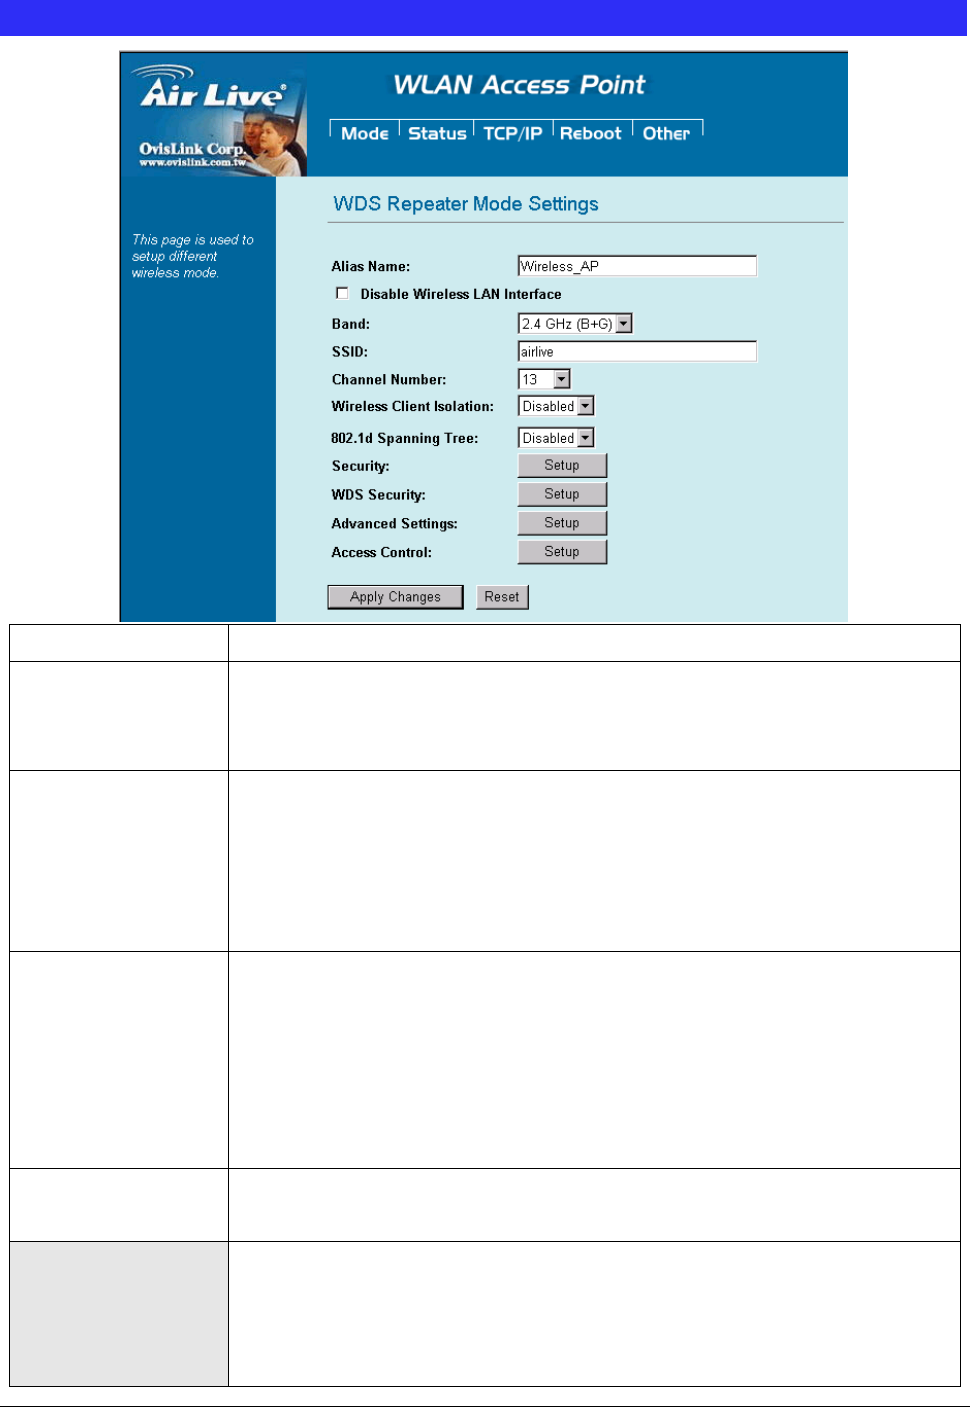
WDS Repeater Mode Setting
Alias Name You can set the alias name for this device. limited not exceed 32 characters.
Disable Wireless
LAN Interface
Check the box to disable the Wireless LAN Interface, by so doing, you won’t be
able to make wireless connection with this Access Point in the network you are
located. In other words, this device will not be visible by any wireless station.
Band You can choose one mode of the following you need.
~ 2.4GHz (B): 802.11b supported rate only.
~ 2.4GHz (G): 802.11g supported rate only.
~ 2.4GHz (B+G): 802.11b supported rate and 802.11g supported rate. The
default is 2.4GHz (B+G) mode.
SSID The SSID differentiates one WLAN from another; therefore, all access points and
all devices attempting to connect to a specific WLAN must use the same SSID. It
is case-sensitive and must not exceed 32 characters.
A
device will not be
permitted to join the BSS unless it can provide the unique SSID. An SSID is also
referred to as a network name because essentially it is a name that identifies a
wireless network
Channel Number The number of channels supported depends on the region of this Access Point.
A
ll
stations communicating with the Access Point must use the same channel.
Wireless Client
Isolation
When enabled, the wireless clients are separated from each other. Please refer
the AP mode settingsÆ Wireless Client Isolation for details.
Security Please refer the AP mode settingsÆ Security for details,
33 AirLive WL-5470POE User’s Manual
This setting is use between Wireless client and this device.
WDS Security Please refer to the Bridge mode settings Æ WDS Security for details
This setting is use between both wireless AP/Router devices.
Advance Setting Please refer the AP mode settingsÆ Advance Setting for details.
Access Control Please refer the AP mode setting Æ Access Control for details.
AP MAC Address Enter 12 digits in hex numbers in the AP MAC address (BSSID) field and press the
Add MAC Address Button to associate with other’s Wireless access point.
Before you want to use bridge mode to connect each other to provide
A wireless bridge between 2 remote LANs, you need add the BSSID of other’s
wireless AP first.
Delete Selected To delete bridge from access to this Access Point, you may firstly check the Select
checkbox next to the MAC address and Comments, and press Delete Selected.
Delete All To delete all the clients from access to this Access Point, just press Delete All
without selecting the checkbox.
34 AirLive WL-5470POE User’s Manual
Universal Repeater Mode Setting
Alias Name You can set the alias name for this device. limited not exceed 32 characters.
Disable Wireless
LAN Interface
Check the box to disable the Wireless LAN Interface, by so doing, you won’t be
able to make wireless connection with this Access Point in the network you are
located. In other words, this device will not be visible by any wireless station.
Band You can choose one mode of the following you need.
~ 2.4GHz (B): 802.11b supported rate only.
~ 2.4GHz (G): 802.11g supported rate only.
~ 2.4GHz (B+G): 802.11b supported rate and 802.11g supported rate. The default
is 2.4GHz (B+G) mode.
SSID The SSID differentiates one WLAN from another; therefore, all access points and
all devices attempting to connect to a specific WLAN must use the same SSID. It is
case-sensitive and must not exceed 32 characters. A device will not be permitted
to join the BSS unless it can provide the unique SSID. An SSID is also referred to
as a network name because essentially it is a name that identifies a wireless
network
Channel Number The number of channels supported depends on the region of this Access Point.
A
ll
stations communicating with the Access Point must use the same channel.
SSID of extended
Interface
When in Universal Repeater mode, you have to enter the ESSID of other’s
AP/Router that device want to connect.
The device SSID and the SSID of extended interface can be the same or different.
When you are using the universal repeater mode, please make sure the remote

35 AirLive WL-5470POE User’s Manual
AP/Router WDS function is turned off.
Site Survey Please refer the Bridge mode settingsÆ Site Survey for details.
Security Please refer the AP mode settingsÆ Security for details,
This setting used Wireless client or remote AP to link this device.
Advance Setting Please refer the AP mode settingsÆ Advance Setting for details.
Access Control Please refer the AP mode setting Æ Access Control for details.
36 AirLive WL-5470POE User’s Manual
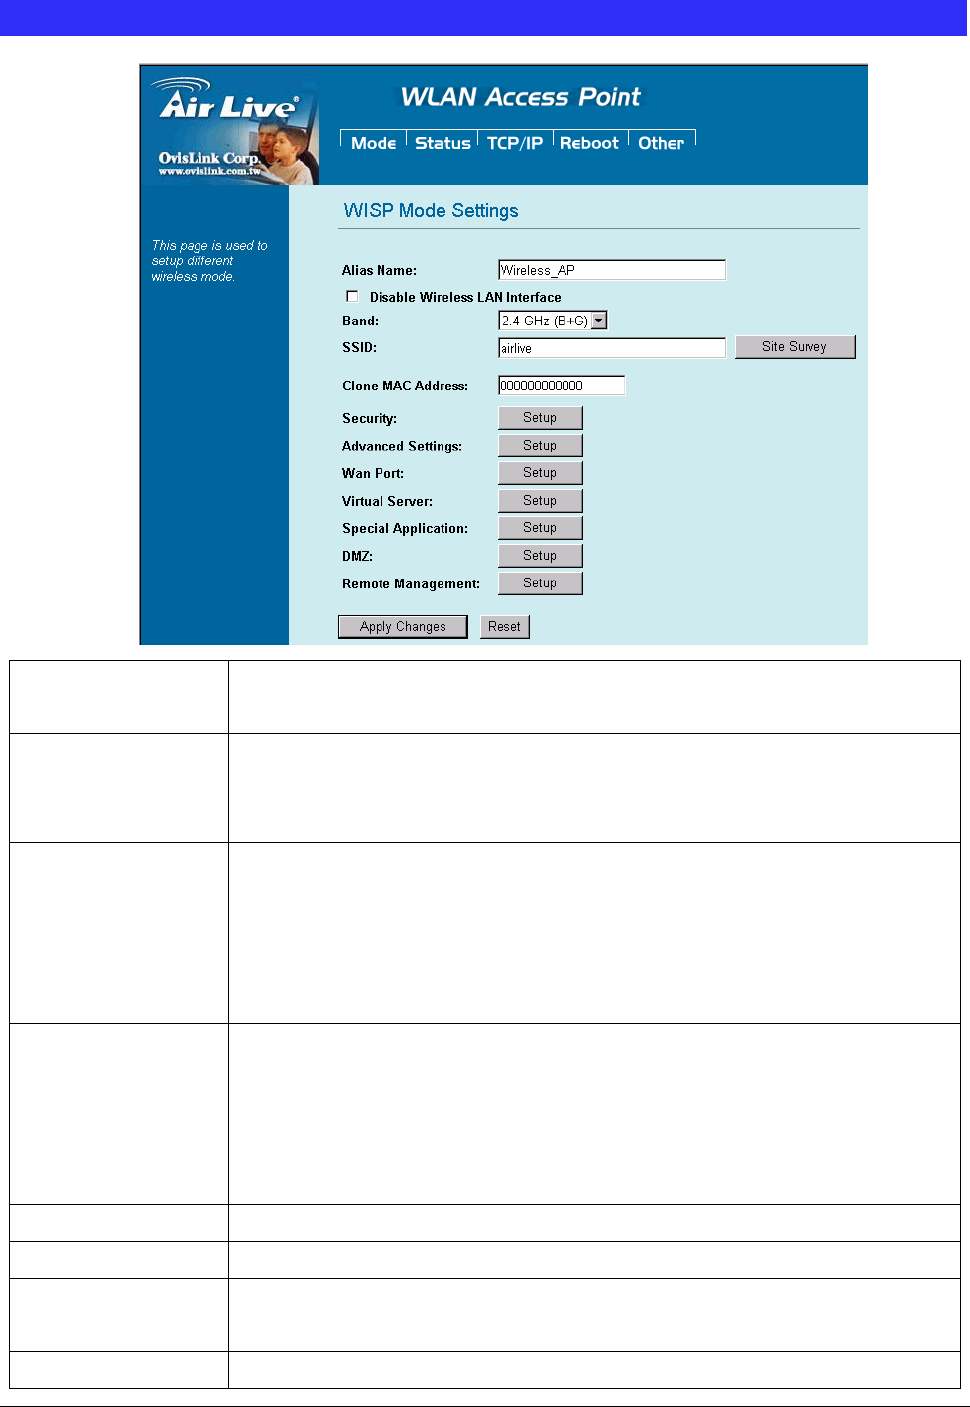
WISP (Client Router) Mode Setting
Alias Name You can set the alias name for this device. limited not exceed 32
characters
Disable Wireless
LAN Interface
Check the box to disable the Wireless LAN Interface, by so doing, you won’t be
able to make wireless connection with this Access Point in the network you are
located. In other words, this device will not be visible by any wireless station.
Band You can choose one mode of the following you need.
~ 2.4GHz (B): 802.11b supported rate only.
~ 2.4GHz (G): 802.11g supported rate only.
~ 2.4GHz (B+G): 802.11b supported rate and 802.11g supported rate. The
default is 2.4GHz (B+G) mode.
SSID The SSID differentiates one WLAN from another; therefore, all access points and
all devices attempting to connect to a specific WLAN must use the same SSID. In
WISP mode, you have to enter the WISP Outdoor AP
SSID manually or click the “site survey” button to connect and get
SSID automatically.
Site Survey Please refer the Client mode settingsÆ Site Survey for details.
MAC Clone Address Enter the MAC Address of Single Ethernet Client.
Security Please refer the AP mode settingsÆ Security Survey for details.
Not supported with RADIUS 802.1x authentication.
Advance Setting Please refer the AP mode settingsÆ Advance Setting for details.
37 AirLive WL-5470POE User’s Manual
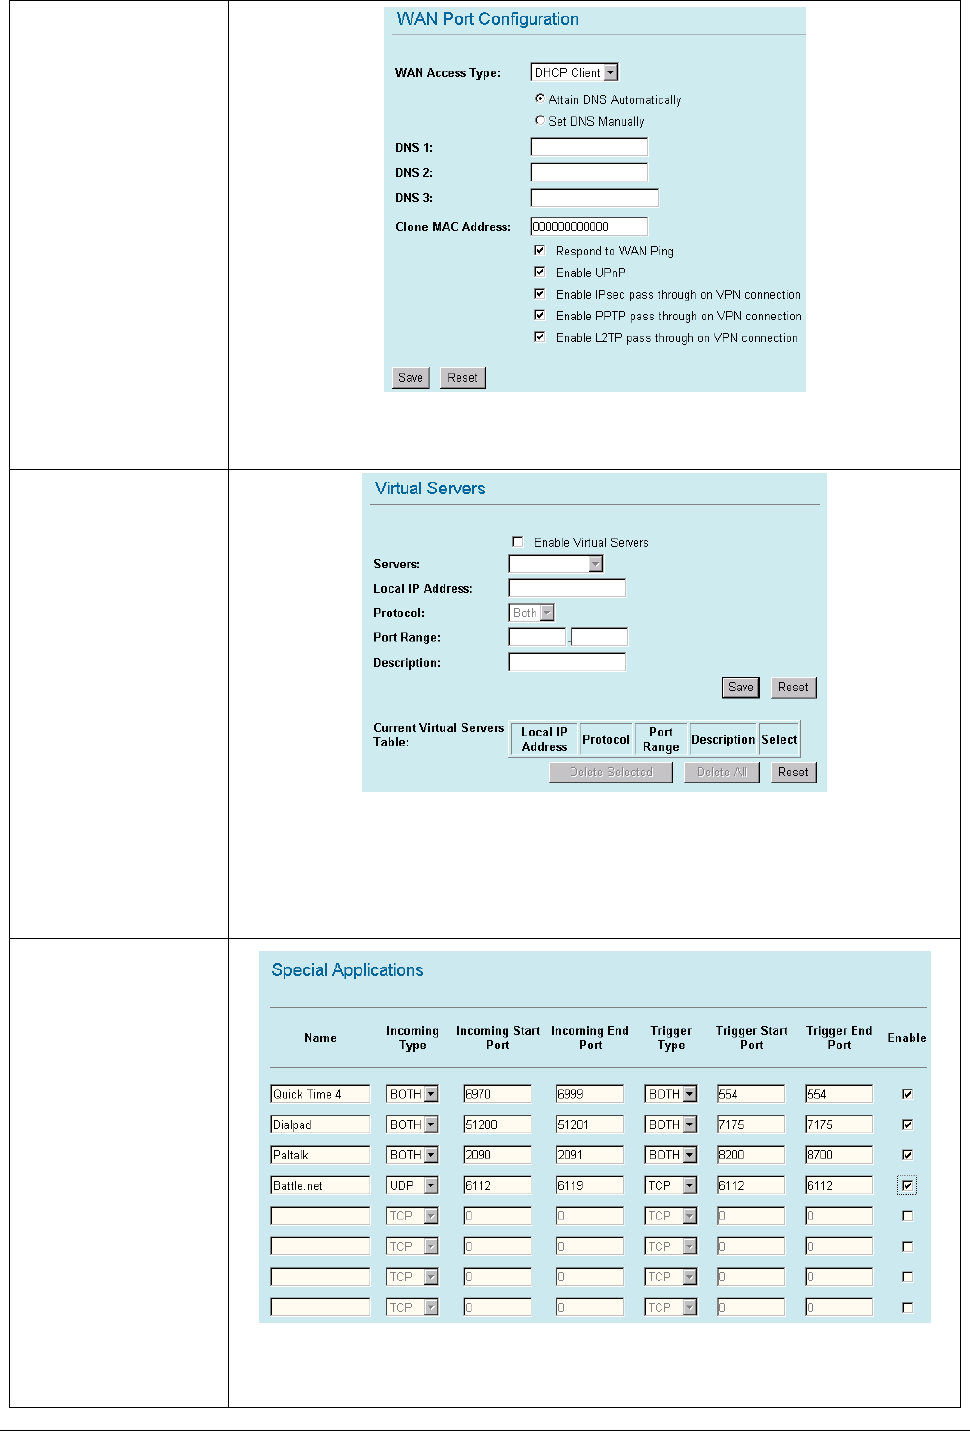
WAN port
You can select many WAN Access Type : Static IP , DHCP Client, PPPOE,
PPTP, and L2TP for WAN connection depend on you WISP provided.
Virtual Server
In WISP mode, you can setup and enable Virtual server function. Like Web, FTP,
Email, DNS, Telnet server.
Select one virtual server type and enter the Local IP address, Local Port Range
and click the save button.
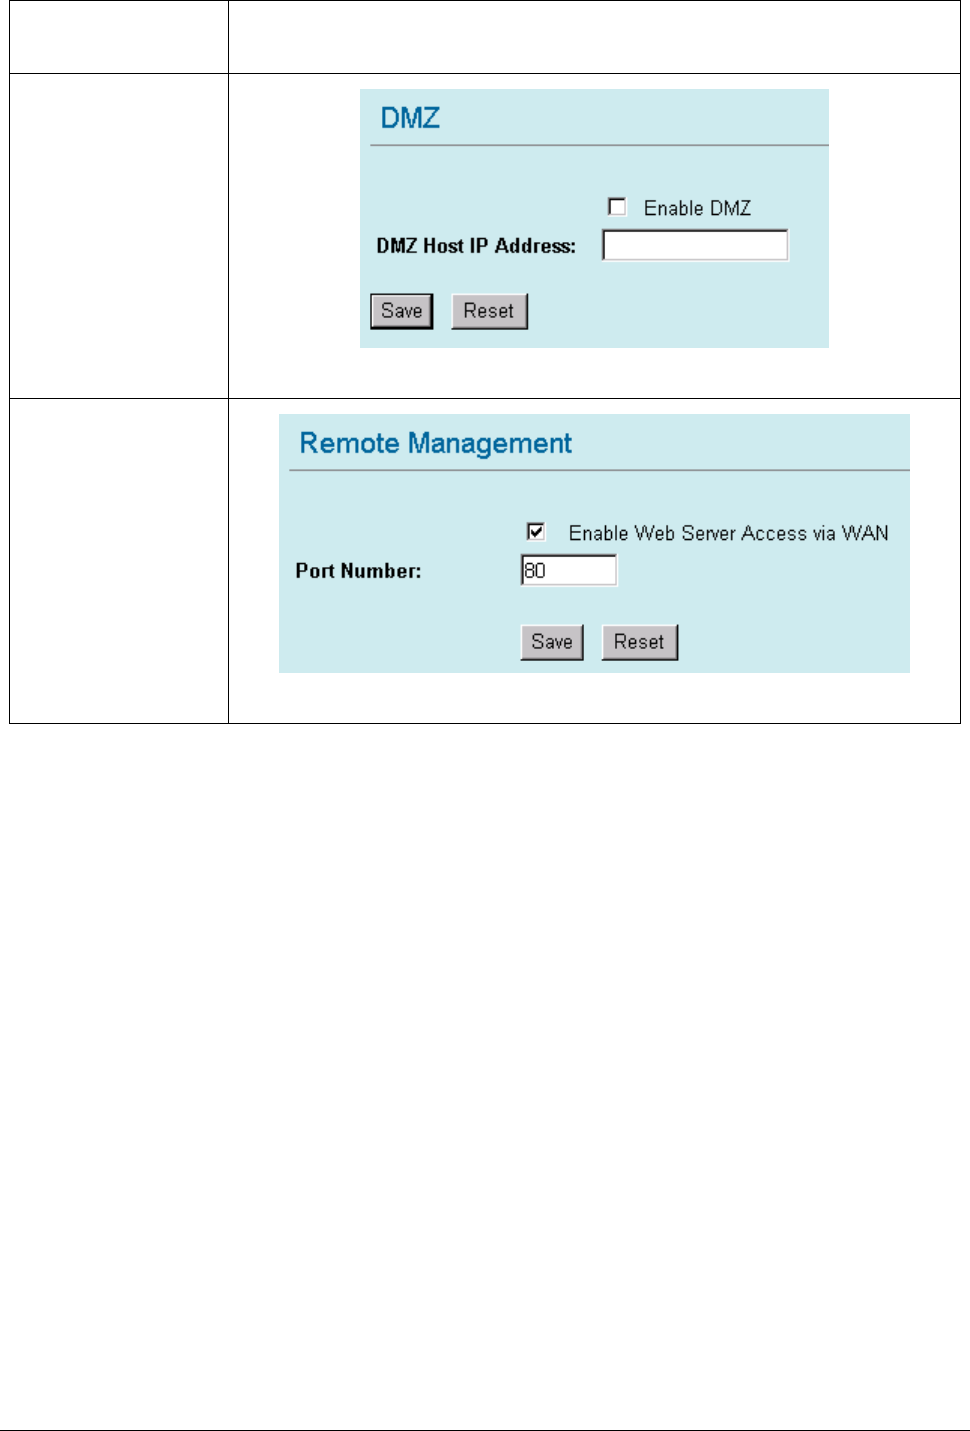
Special Application
You can enable some system default special application, like Qucktime 4
Audio/Video application, Dialpad internet phone service. or define the special
38 AirLive WL-5470POE User’s Manual
application manually, select the incoming type (TCP/UDP) Incoming start ~ End
port ,Trigger Start ~ End port. Select the Trigger Type.
DMZ
Enable DMZ and enter the DMZ Host IP address.
Remote Management
Enable the function that setting configuration from Internet.
39 AirLive WL-5470POE User’s Manual
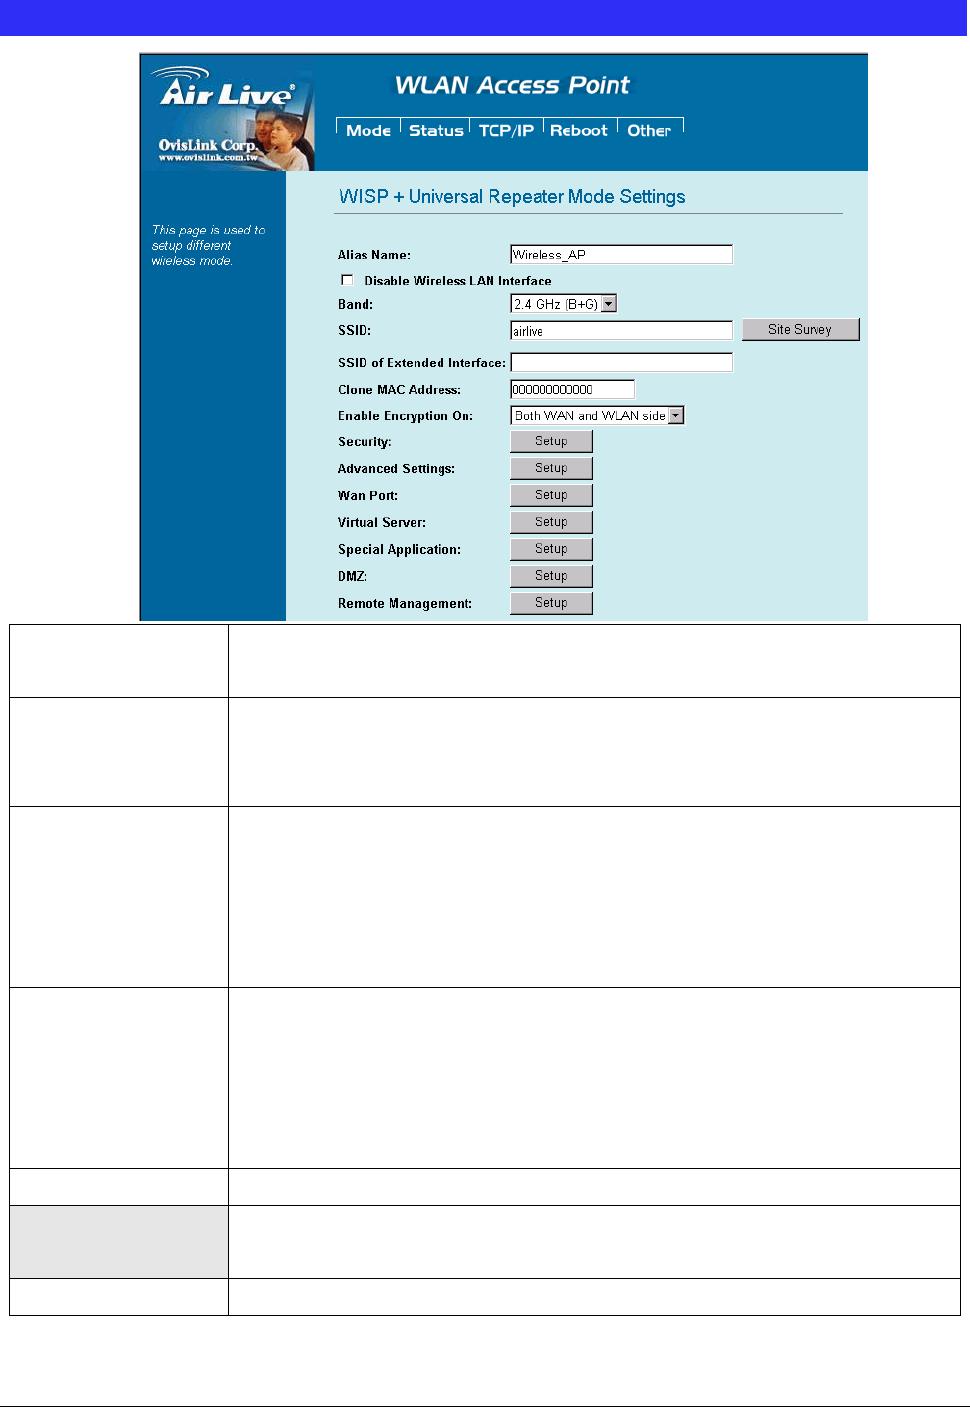
WISP + Universal Repeater Mode Setting
Alias Name You can set the alias name for this device. limited not exceed 32
characters
Disable Wireless
LAN Interface
Check the box to disable the Wireless LAN Interface, by so doing, you won’t be
able to make wireless connection with this Access Point in the network you are
located. In other words, this device will not be visible by any wireless station.
Band You can choose one mode of the following you need.
~ 2.4GHz (B): 802.11b supported rate only.
~ 2.4GHz (G): 802.11g supported rate only.
~ 2.4GHz (B+G): 802.11b supported rate and 802.11g supported rate. The
default is 2.4GHz (B+G) mode.
SSID The SSID differentiates one WLAN from another; therefore, all access points and
all devices attempting to connect to a specific WLAN must use the same SSID. In
WISP mode, you have to enter the WISP Outdoor AP
SSID manually or click the “site survey” button to connect and get
SSID automatically.
Site Survey Please refer the Client mode settingsÆ Site Survey for details.
SSID of extended
Interface
Please refer the Universal repeater mode settingsÆ SSID of extended Interface
for details.
MAC Clone Address Enter the MAC Address of Single Ethernet Client.
40 AirLive WL-5470POE User’s Manual
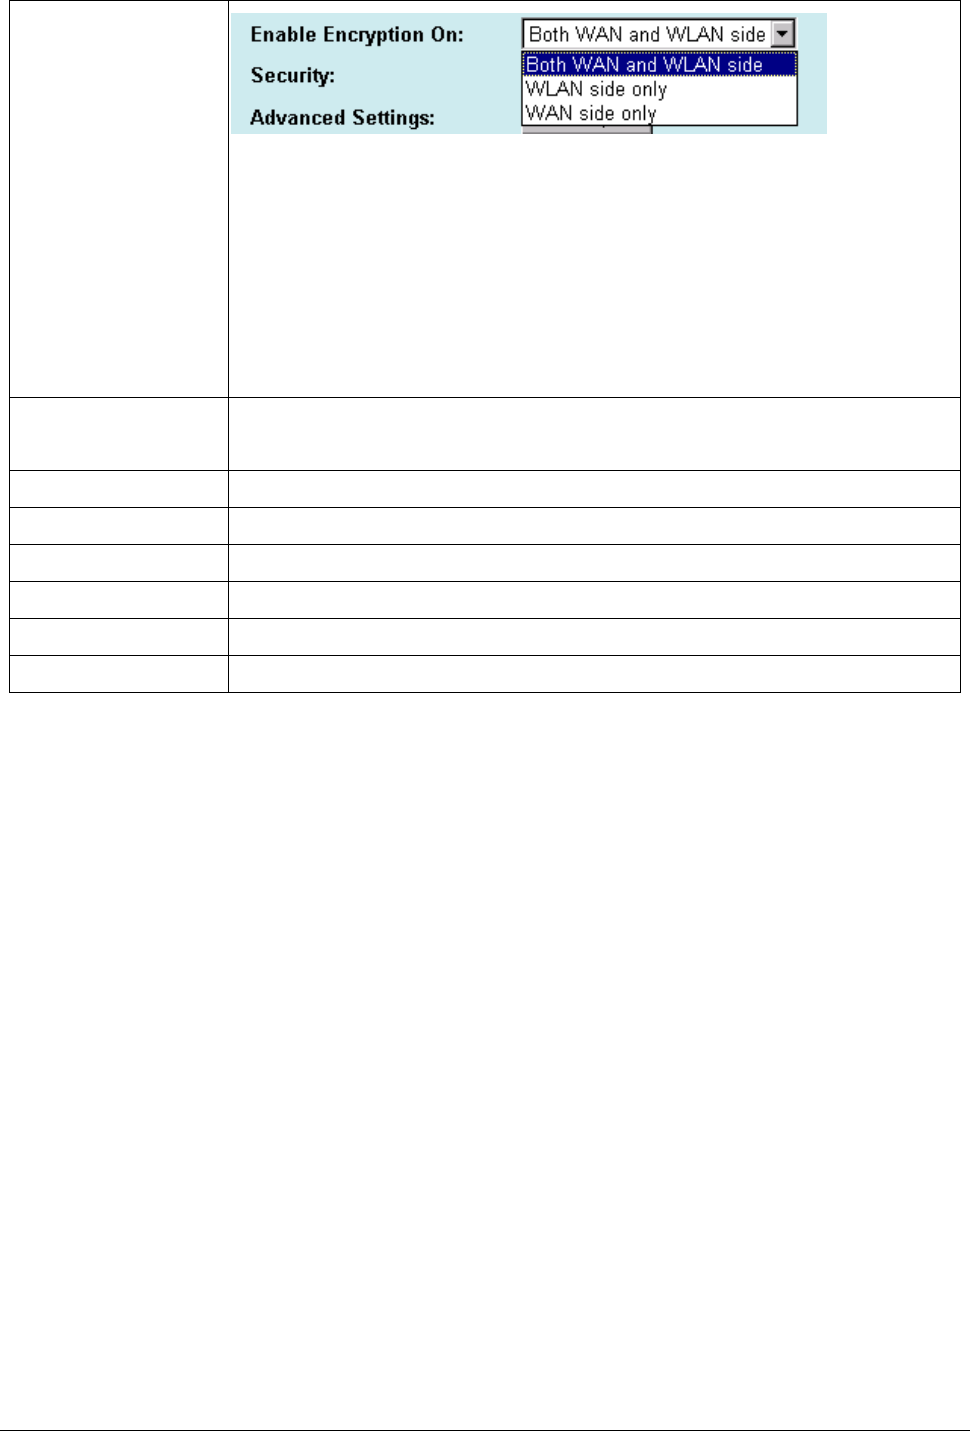
Enable Encryption On
You can designate security to use for WLAN side, WAN side or both sides.
Both WAN and WLAN side: The security is used on both the WISP and the
Wireless Client(PC side) connection..
WLAN side only: The security used on wireless client connection only. The
WISP side is not encrypted.
WAN side only: The security used on WISP connection only. The WLAN side is
not encrypted..
Security Please refer the AP mode settingsÆ Security Survey for details.
Not supported with RADIUS 802.1x authentication.
Advance Setting Please refer the AP mode settingsÆ Advance Setting for details.
WAN port Please refer the WISP mode settingsÆ WAN port Setting for details.
Virtual Server Please refer the WISP mode settingsÆ Virtual Server Setting for details.
Special Application Please refer the WISP mode settingsÆ Special Application Setting for details.
DMZ Please refer the WISP mode settingsÆ DMZ Setting for details.
Remote Management Please refer the WISP mode settingsÆ Remote Management Setting for details.
41 AirLive WL-5470POE User’s Manual
Status
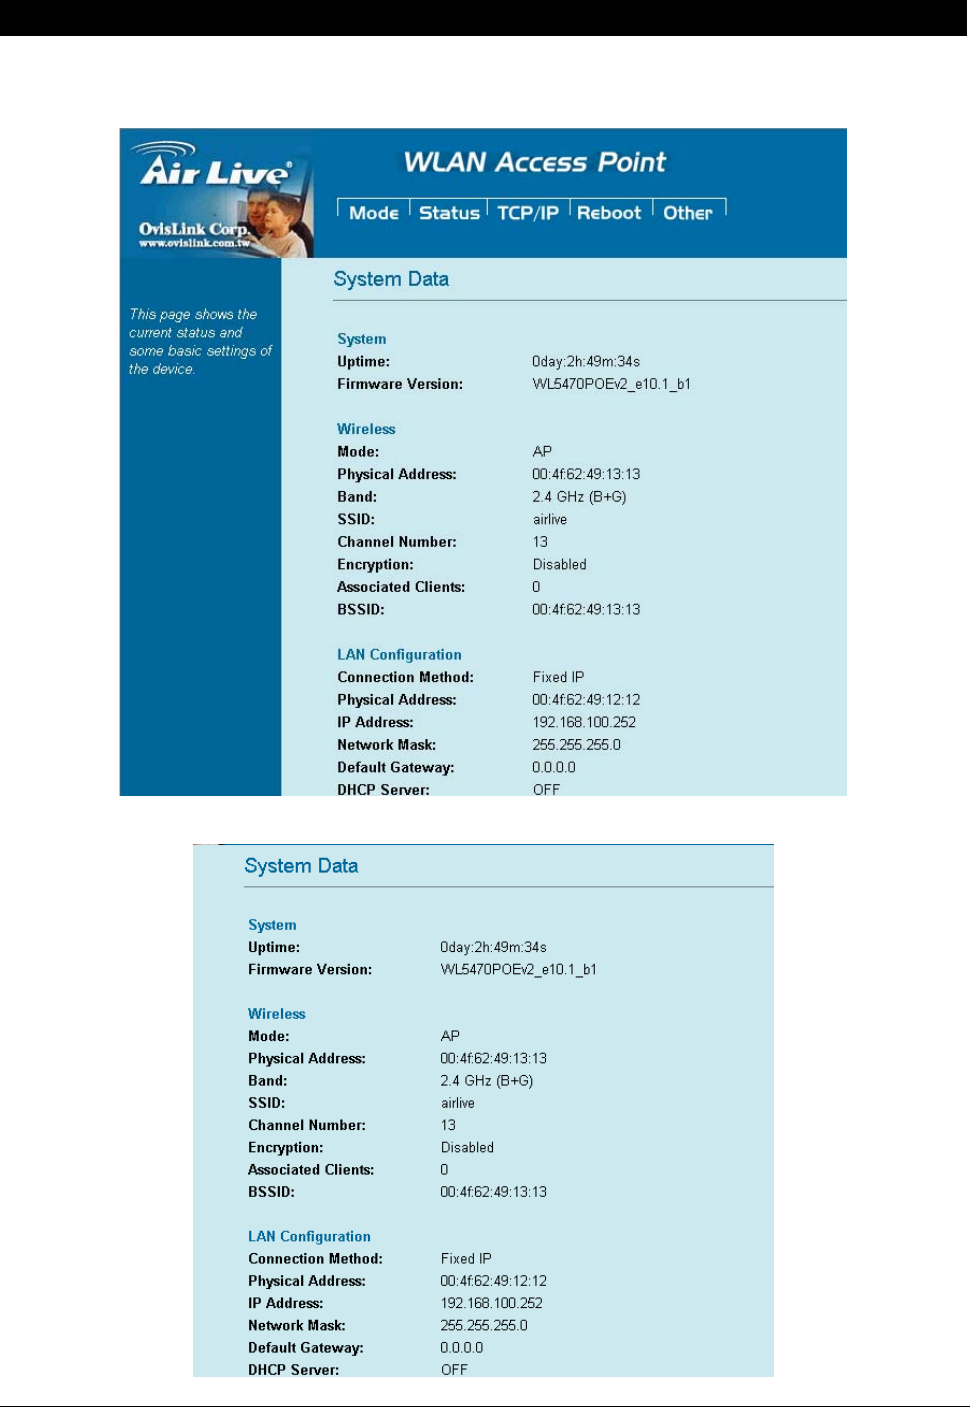
In this screen, you can see the current settings and status of this Access Point. You can change settings by
selecting specific tab described in below.
. System

42 AirLive WL-5470POE User’s Manual
System
Uptime The time period since the device was up.
Firmware Version The current version of the firmware installed in this device.
Wireless
Mode There are 7 modes supported, The default mode is Access Point. If you want to
change to other mode, please click the Mode and select the wireless mode you
want.
Physical Address Display wireless MAC address information.
Band Display wireless band type information.
SSID Display the SSID of this device.
Channel Number The number of channels supported depends on the region of this Access Point.
A
ll
stations communicating with the Access Point must use the same channel.
Encryption Display encryption setting information.
Associated Clients Displays the total number of clients associated to this AP. You can have up to 64
clients to associate to this Access Point.
BSSID BSSID displays the ID of current BSS, which uniquely identifies each BSS. In AP
mode, this value is the MAC address of this Access Point.
LAN Configuration (TCP/IP)
Connection Method: Display the connection method, you can setup in TCP/IP section
Physical Address: Display the LAN MAC address
IP Address: Display the LAN IP address, you can setup in TCP/IP section
Network Mask: Display the network mask, you can setup in TCP/IP section
Default Gateway: Display the default gateway ip , you can setup in TCP/IP section
DHCP Server: Default the DHCP Server is enabled(ON)
DHCP Start IP
Address:
Display the DHCP server start IP address.
DHCP Finish IP
Address:
Display the DHCP server finish IP address.
Internet Configuration
Connection Method: Display the internet connection method, you can setup in WISP modeÆWAN
Port configuration
Physical Address: Display the AP MAC address information
IP Address: Display the internet IP Address, you can setup in WISP modeÆWAN
Port configuration
Network Mask: Display the network mask, you can setup in WISP modeÆWAN
Port configuration
43 AirLive WL-5470POE User’s Manual
Default Gateway: Display the default gateway , you can setup in WISP modeÆWAN
Port configuration
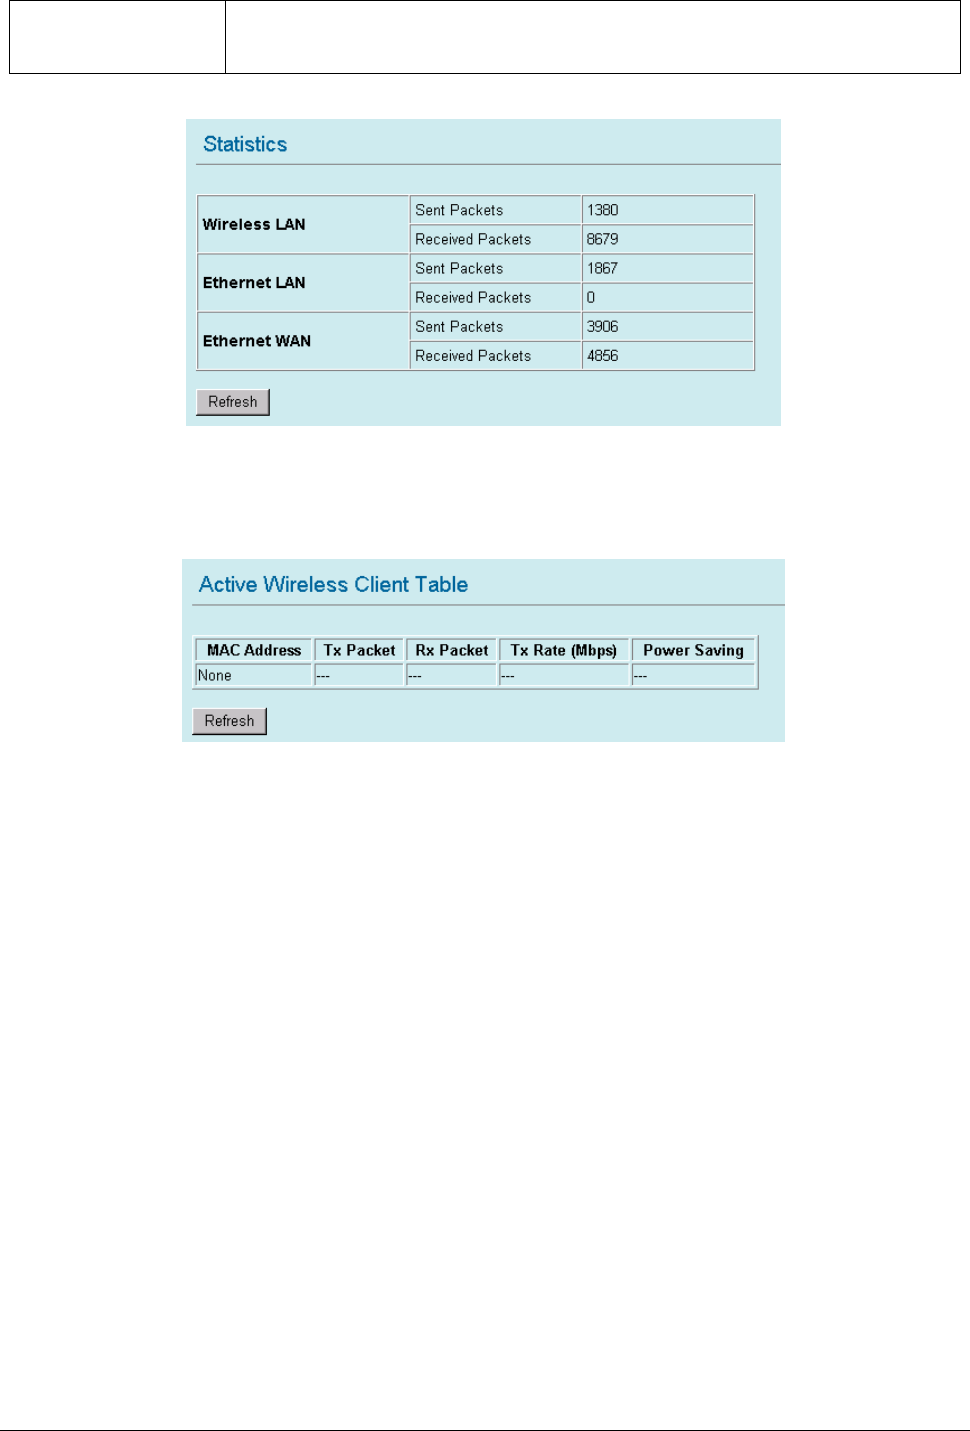
. Statistics
The Statistics table shows the packets sent/received over wireless and ethernet LAN respectively.
. Active Clients
Display the active Wireless Clients information: Wireless MAC address, Tx/Rx Packet, Tx Rate, and Power
Saving information.
44 AirLive WL-5470POE User’s Manual
TCP/IP
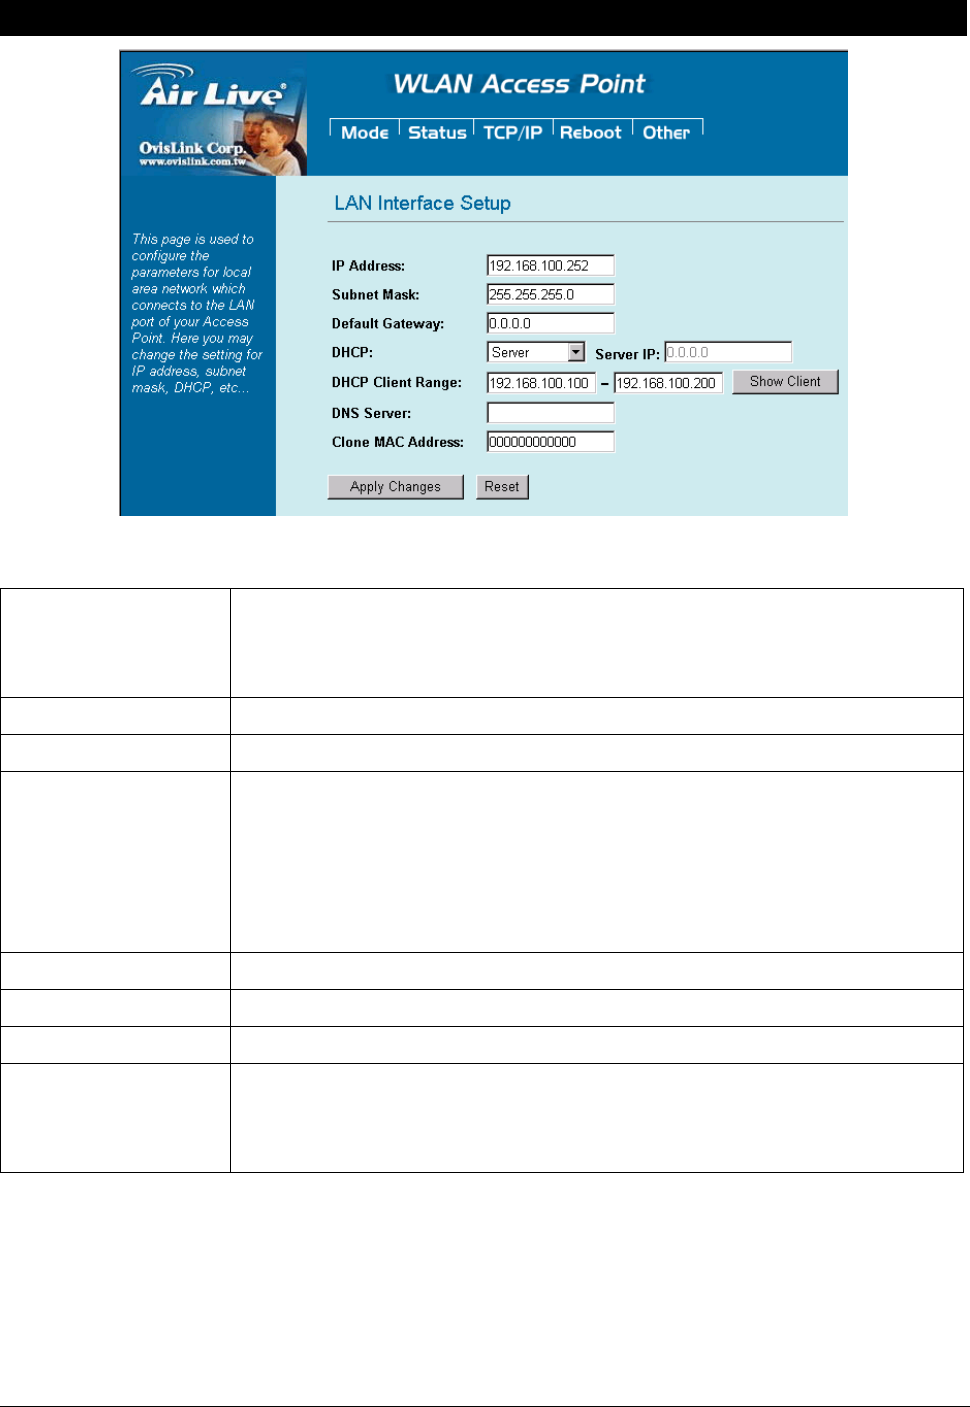
In this page, you can change the TCP/IP settings of this Access Point, select to enable/disable the DHCP
Client, 802.1d Spanning Tree, and Clone MAC Address.
IP Address This field can be modified only when DHCP Client is disabled. If your system
manager assigned you static IP settings, then you will have to enter the
information provided.
Subnet Mask Enter the information provided by your system manager.
Default Gateway Enter the information provided by your system manager.
DHCP Select Disable, Client or Server from the pull-down menu.
Disable: Select to disable DHCP server function.
Client: Select to automatically get the LAN port IP address from ISP (For
ADSL/Cable Modem).
Server: Select to enable DHCP server function.
DHCP Client Range WL-5060AP IP addresses continuing from 192.168.100.1 to 192.168.100.253
Show Client Click to show Active DHCP Client table.
DNS Server Enter the Domain Name Service IP address.
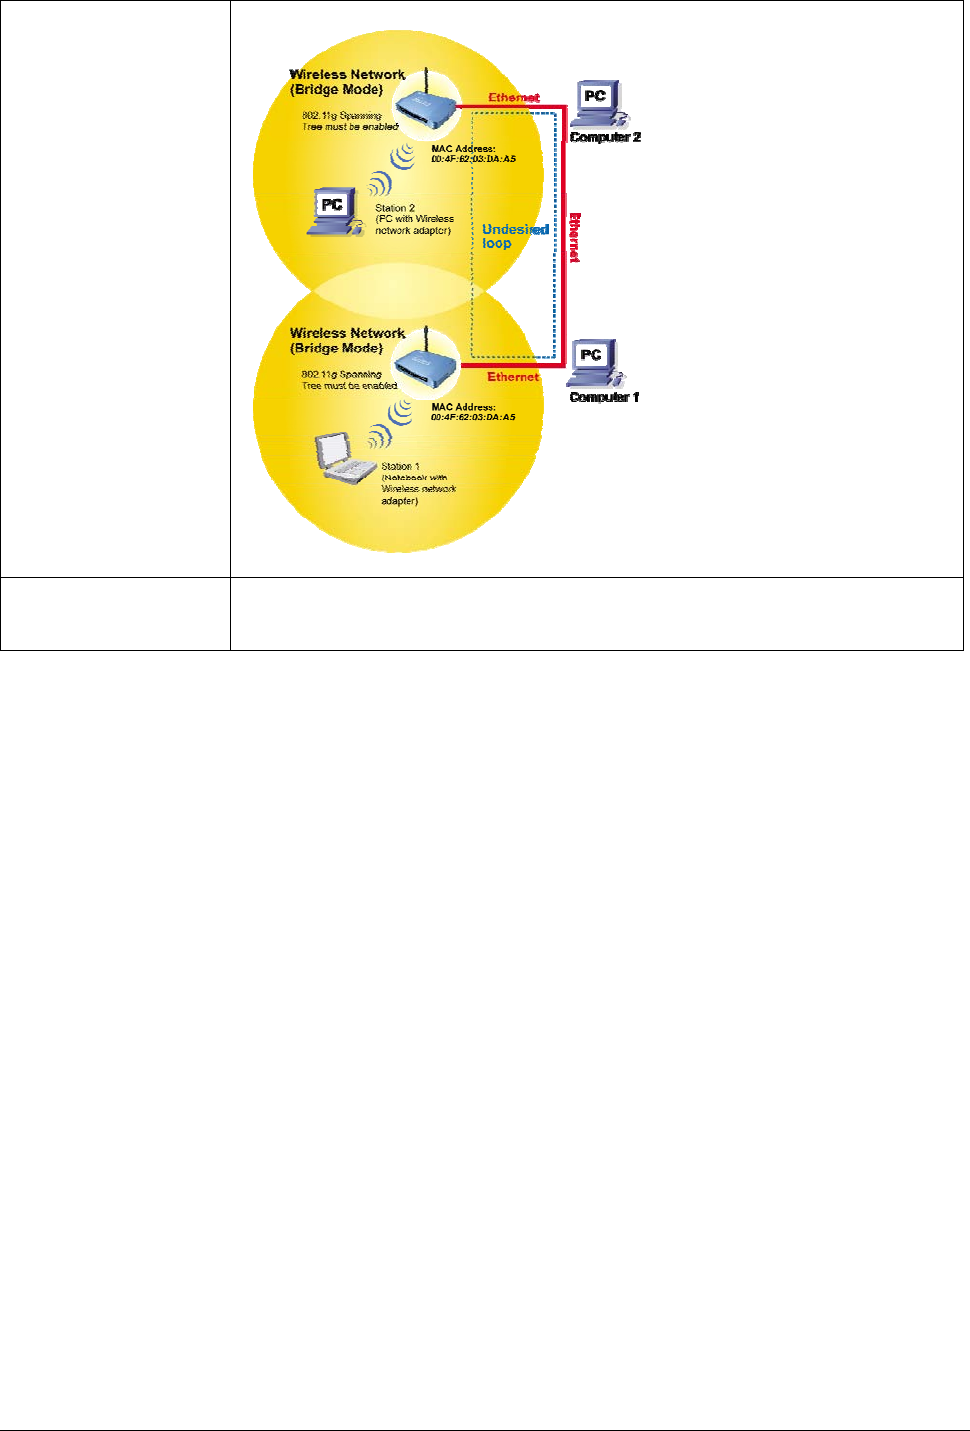
802.1d Spanning Tree To enable 802.1d Spanning Tree will prevent the network from infinite loops.
Infinite loop will happen in the network when WDS is enabled and there are
multiple active paths between stations.
45 AirLive WL-5470POE User’s Manual
Clone MAC Address You can specify the MAC address of your Access Point to replace the factory
setting.

46 AirLive WL-5470POE User’s Manual
Reboot
Click the Reboot button to restart device.
47 AirLive WL-5470POE User’s Manual
Other
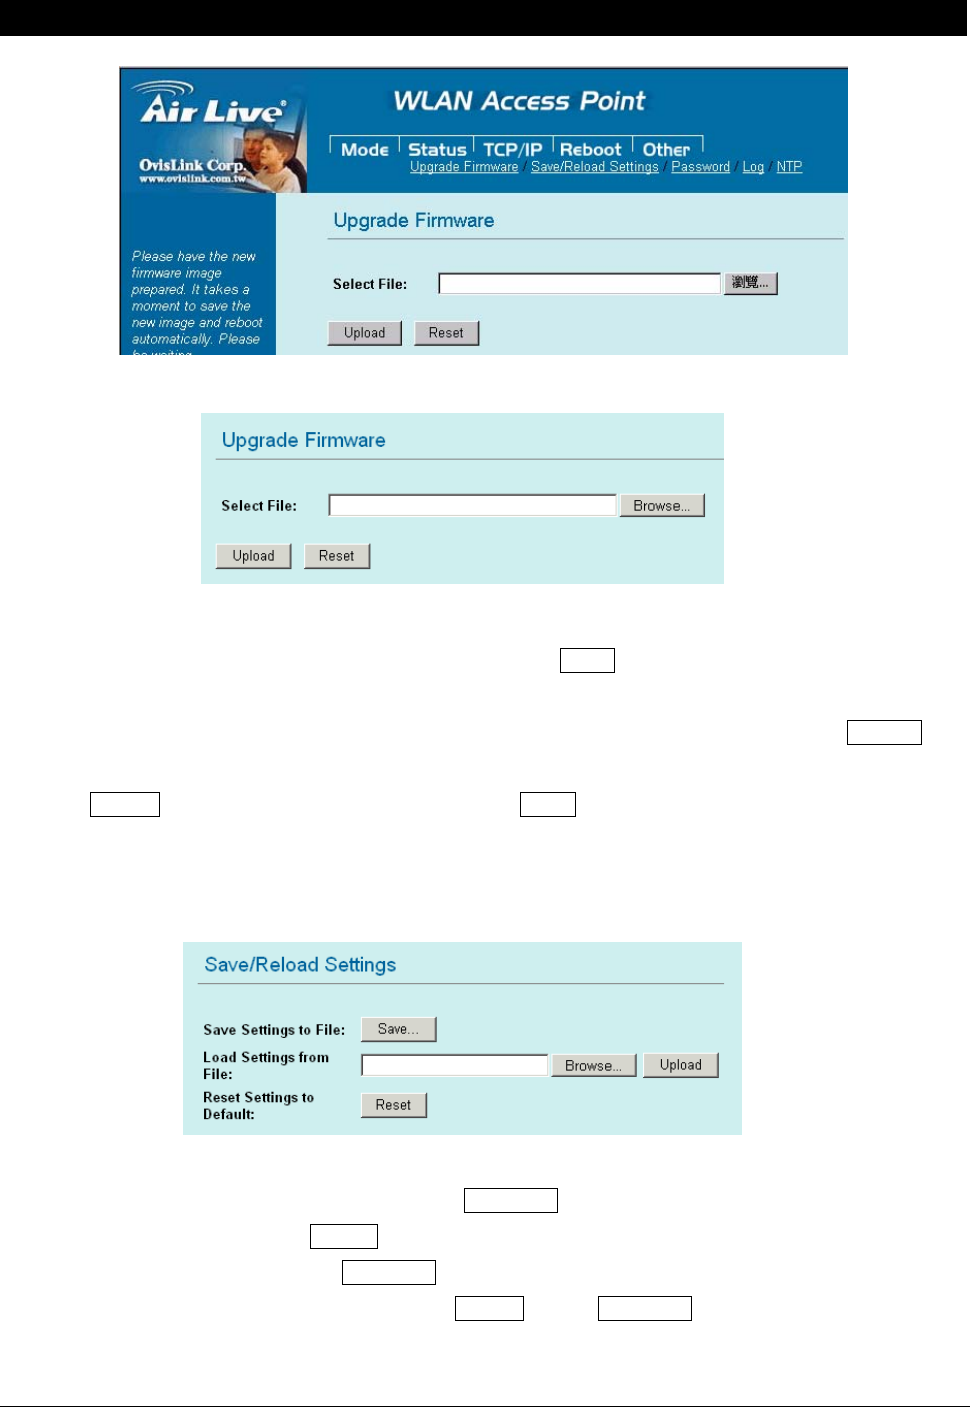
. Upgrade Firmware
1. Download the latest firmware from your distributor and save the file on the hard drive.
2. Start the browser, open the configuration page, click on Other, and click Upgrade Firmware to
enter the Upgrade Firmware window.
3. Enter the new firmware’s path and file name (i.e. C:\FIRMWARE\firmware.bin) or click the Browse
button to find and open the firmware file (the browser will display to correct file path).
4. Click Upload button to start the upgrade function or Reset button to clear all the settings on this
page.
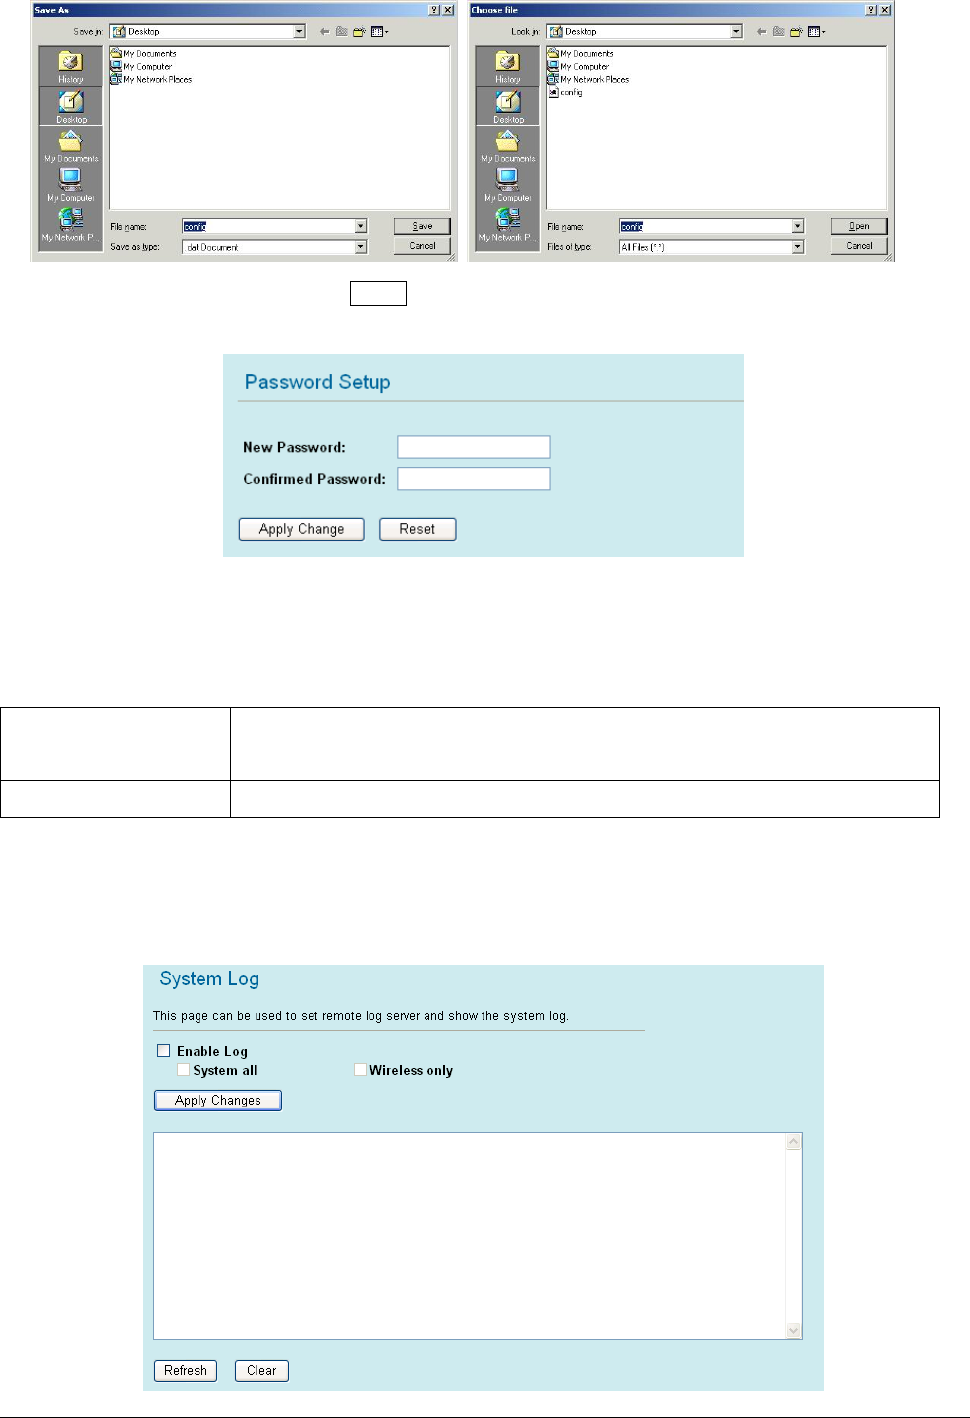
. Save / Reload Settings
This function enables users to save the current configuration as a file (i.e. config.dat) or loades
configuration from a file. Enter the file name or click Browse… to find the file from your computer.
Save Settings to File: Click SAVE.. to save the current configuration to file.
Load Settings From File: Click Browse… if you want to load a pre-saved file, enter the file name
with the correct path and then click on Upload or click Browse… to select the file.
48 AirLive WL-5470POE User’s Manual
Reset Settings to Default: Click Reset button to restore the default configuration.
. Password
For secure reason, It is recommended that you set the account to access the web server of this Access Point.
Leaving the password blank will disable the protection. The login screen prompts immediately once you finish
setting password. Remember your password for you will be asked to enter them every time you access the
web server of this Access Point.
New Password Set your new password. Password can be up to 30 characters long. Password
can contain letter, number and space. It is case sensitive.
Confirm Password Re-enter the new password for confirmation.
Note: when you setup the password and click the apply change button, system will pop-up Window and ask
the username and password, Please enter system default username “admin” (not changeable) and your
password for entering the configuration WEB UI.
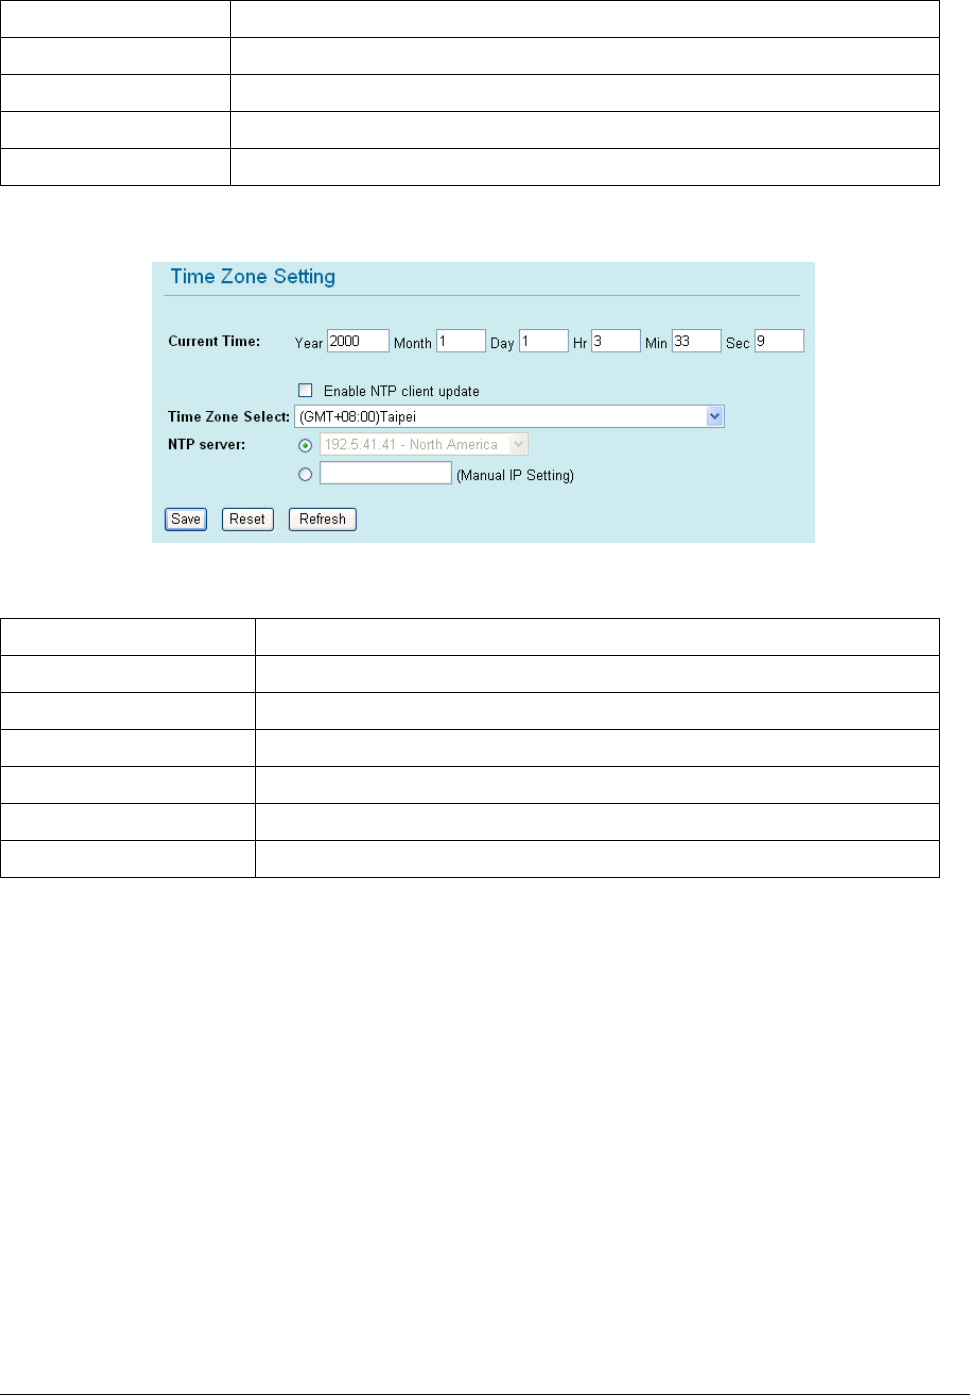
. Log
49 AirLive WL-5470POE User’s Manual
This function can list all log information about device.
Enable Log Enabled or Disabled display system log information.
System All List system all log information.
Wireless Only List wireless log information only.
Refresh Refresh log information.
Clear Clear all information in window.
. NTP
This function can setting system time from local computer or Internet.
Current Time Setting system time
Enable NTP client update Enable or Disable setting system from Internet NTP Server.
Time Zone Select Select system time zone.
NTP Server Select NTP Server by Server List or Manual Input.
Save Save configuration to flash.
Reset Reset system time configuration.
Refresh Refresh system time information.