OvisLink WS12G 802.11G Internet Access Server User Manual
OvisLink Corp. 802.11G Internet Access Server
OvisLink >
Contents
- 1. Users Manual
- 2. Users Manual 2
Users Manual 2
AirLive WIAS-1200G
User’s Guide
83
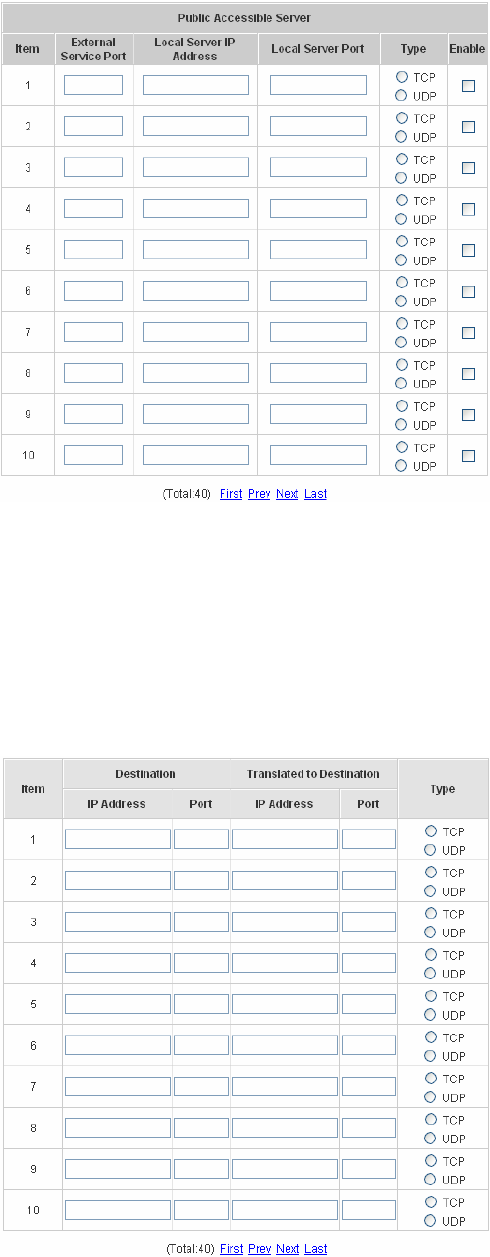
y Port and IP Redirect
This function allows the administrator to set 40 sets of the IP addresses at most for redirection purpose. When
the user attempts to connect to a destination IP address listed here, the connection packet will be converted and
redirected to the corresponding destination. Please enter the “IP Address” and “Port” of Destination, and the
“IP Address” and “Port” of Translated to Destination. According to the different services provided, choose
the “TCP” protocol or the “UDP” protocol. These settings will become effective immediately after clicking
Apply.
AirLive WIAS-1200G
User’s Guide
84
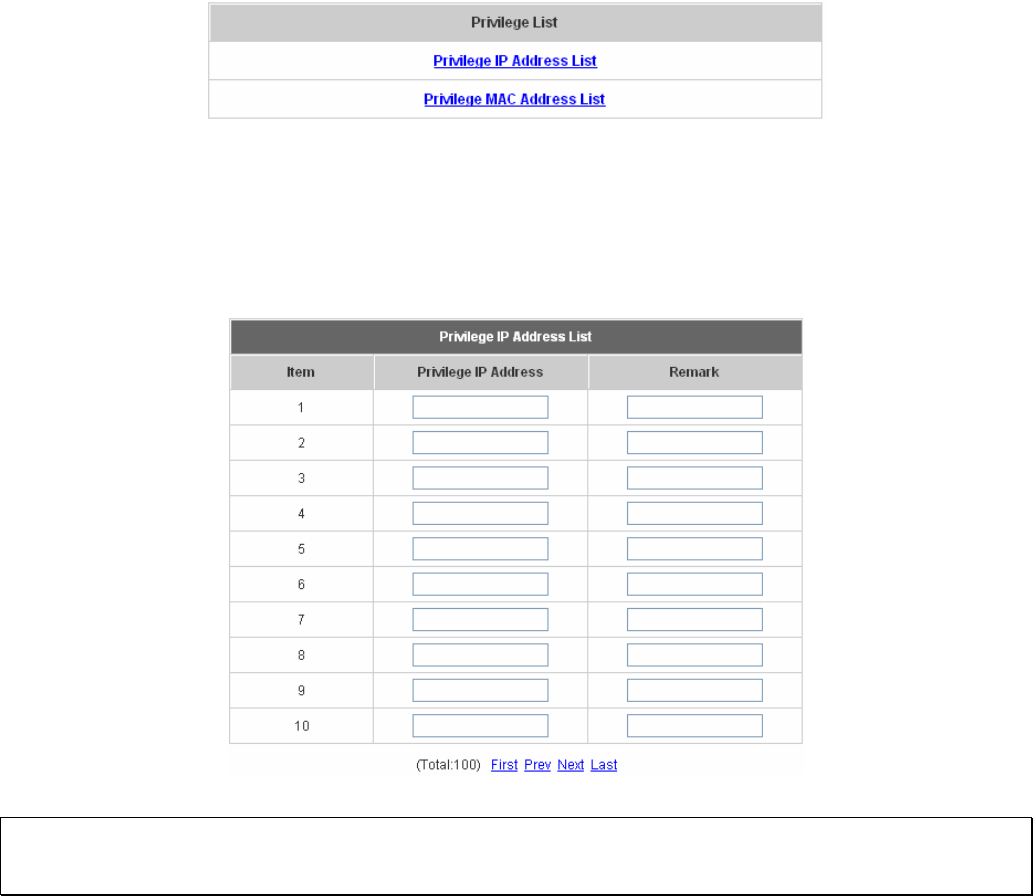
4.3.2 Privilege List
There are two parts, Privilege IP Address List and Privilege MAC Address List, can be set.
y Privilege IP Address List
If there are some workstations belonging to the managed server that need to access the network without
authentication, enter the IP addresses of these workstations in this list. The “Remark” blank is not necessary
but is useful to keep track. AirLive WIAS-1200G allows 100 privilege IP addresses at most. These settings will
become effective immediately after clicking Apply
Note: Permitting specific IP addresses to have network access rights without going through standard authentication
process at the Public LAN (LAN1/LAN2) may cause security problems.
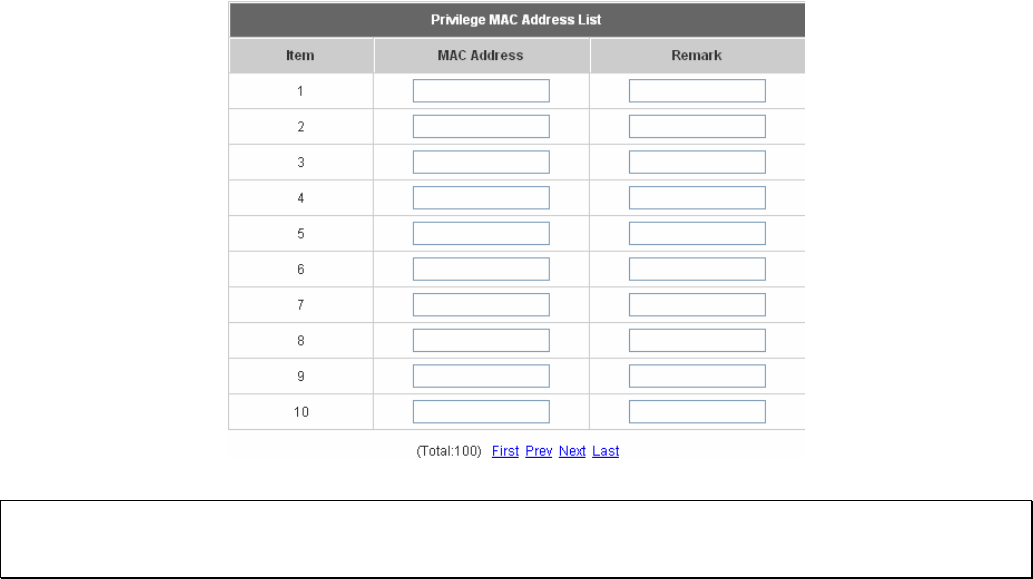
y Privilege MAC Address List
In addition to the IP address, the MAC address of the workstations that need to access the network without
authentication can also be set in this list. AirLive WIAS-1200G allows 100 privilege MAC addresses at most.
When manually creating the list, enter the MAC address (the format is xx:xx:xx:xx:xx:xx) as well as the remark
(not necessary). These settings will become effective immediately after clicking Apply.
AirLive WIAS-1200G
User’s Guide
85
Note: Permitting specific MAC addresses to have network access rights without going through standard
authentication process at the Public LAN (LAN1/LAN2) may cause security problems..
AirLive WIAS-1200G
User’s Guide
86
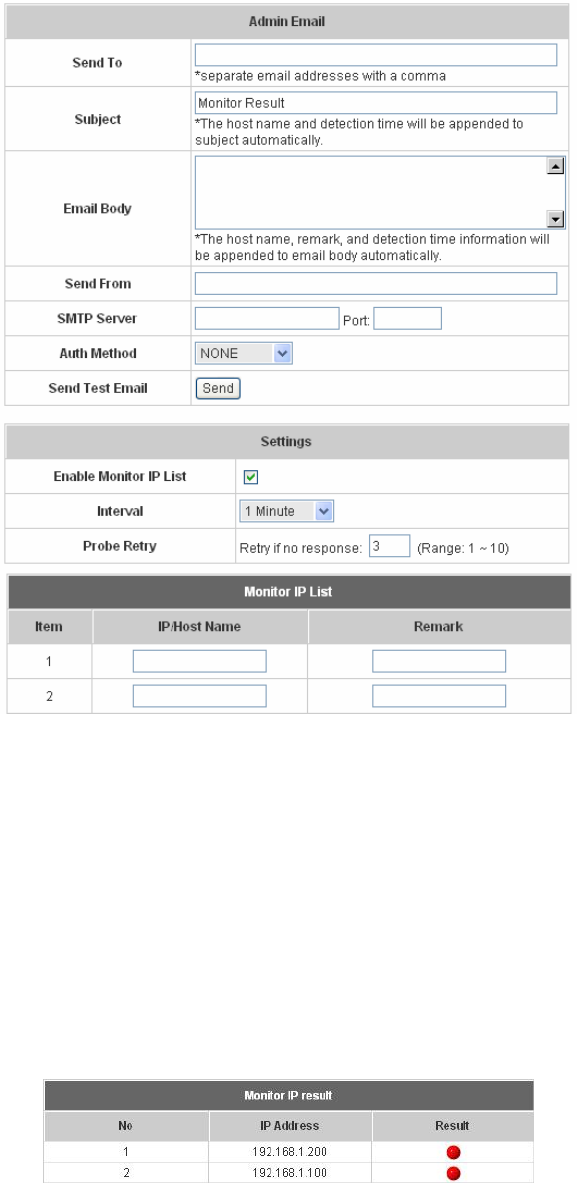
4.3.3 Monitor IP List
AirLive WIAS-1200G will send out a packet periodically to monitor the connection status of the IP addresses on the
list. If the monitored IP address does not respond, the system will send an e-mail to notify the administrator that such
destination is not reachable. After entering the related information, click Apply and these settings will become
effective immediately. Click Monitor to check the current status of all the monitored IP. The system provides 40 IP
addresses for the “Monitor IP List”.
y Send From: The e-mail address of the administrator in charge of the monitoring. This will show up as the
sender’s e-mail.
y Send To: The e-mail address of the person whom the monitoring result is for. This will be the receiver’s e-mail.
y Interval: The time interval to send the e-mail report.
y SMTP Server: The IP address of the SMTP server.
y Auth Method: The system provides four authentication methods, Plain, Login, CRAM-MD5 and NTLMv1, or
“None” to use none of the above. Depending on which authentication method selected, enter the Account
Name, Password and Domain.
y Send Test Email: To test the settings correct or not.
y Monitor IP Address: The IP addresses under monitoring.
AirLive WIAS-1200G
User’s Guide
87
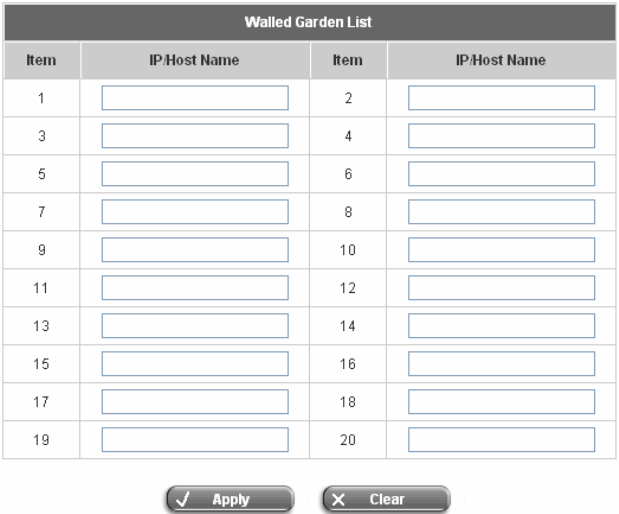
4.3.4 Walled Garden List
This function provides some free services to the users to access websites listed here before login and authentication.
Up to 20 addresses or domain names of the websites can be defined in this list. Users without the network access
right can still have a chance to experience the actual network service free of charge. Please enter the website IP
Address or Domain Name in the list and these settings will become effective immediately after clicking Apply.
AirLive WIAS-1200G
User’s Guide
88
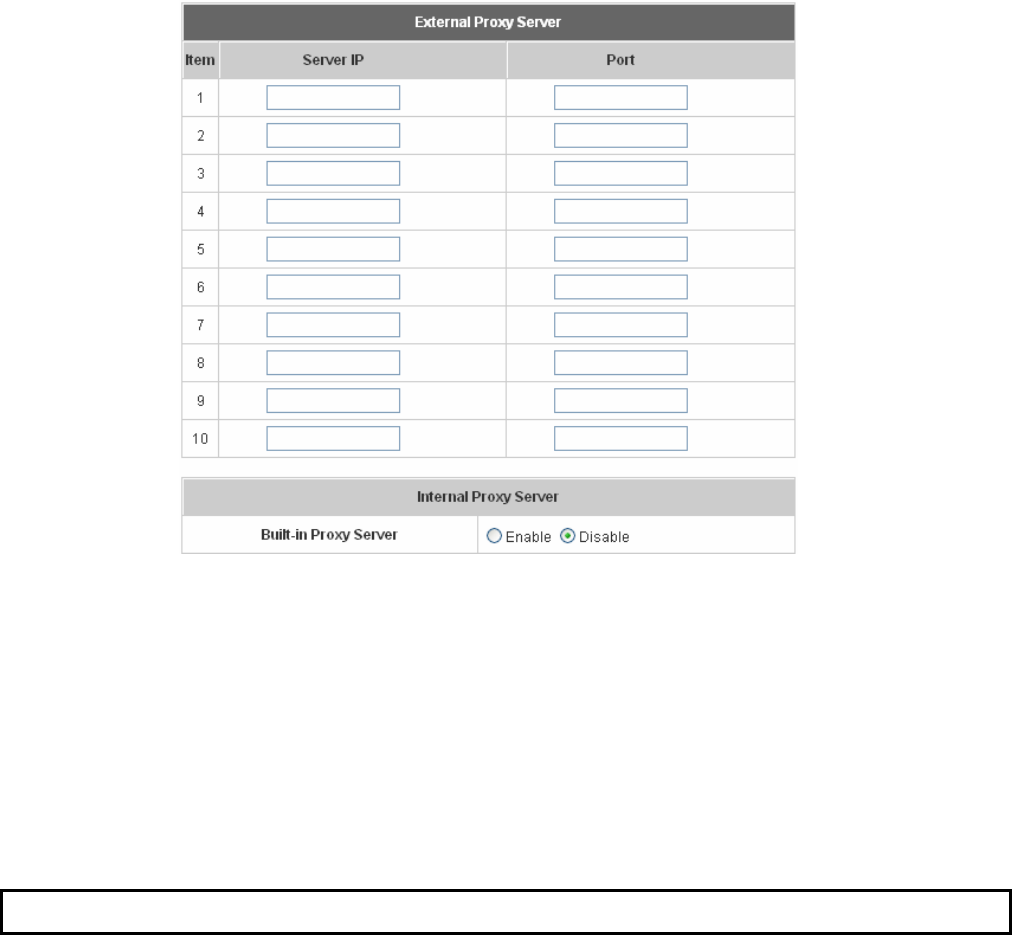
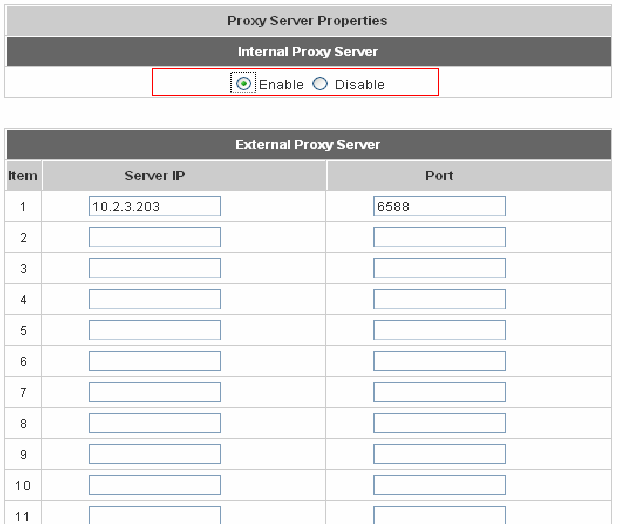
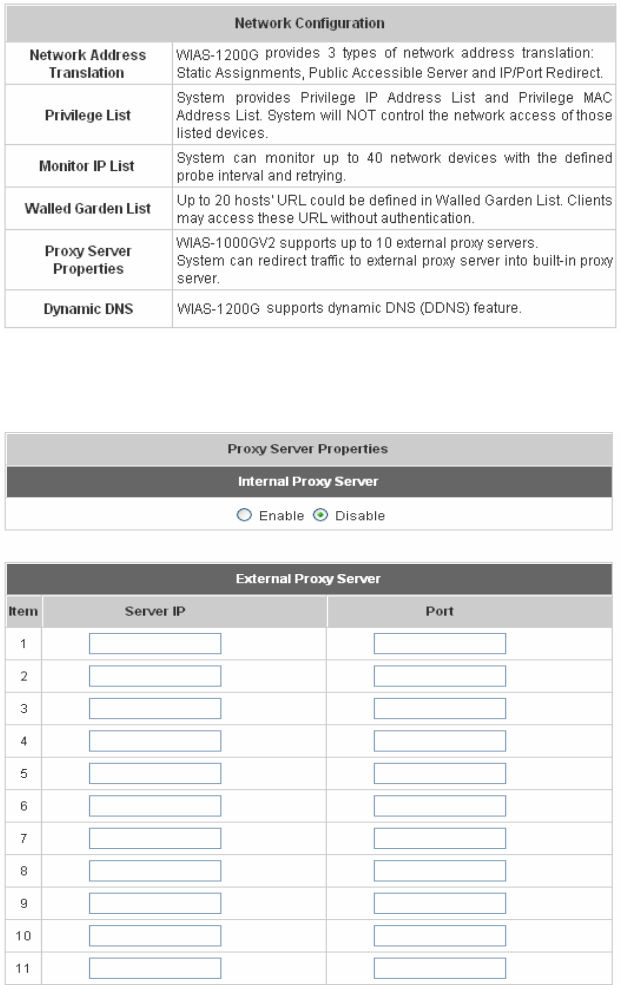
4.3.5 Proxy Server Properties
AirLive WIAS-1200G supports Internal Proxy Server and External Proxy Server functions. Please select an Access
Gateway and then perform the necessary configurations.
y External Proxy Server: Under the AirLive WIAS-1200G security management, the system will match the
External Proxy Server list to the end-users’ proxy setting. If there isn’t a match, then the end-users will no be
able to reach the login page and thus unable to access the network. If there is a match, the end-users will be
directed to the system first for authentication. After a successful authentication, the end-users will be redirected
back to the desired proxy servers depending on various situations.
y Internal Proxy Server: AirLive WIAS-1200G has a built-in proxy server. If this function is enabled, the end users
will be forced to treat AirLive WIAS-1200G as the proxy server regardless of the end-users’ original proxy
settings.
Note: For more details about how to set up the proxy servers, please refer to Appendix E and Appendix F.
AirLive WIAS-1200G
User’s Guide
89
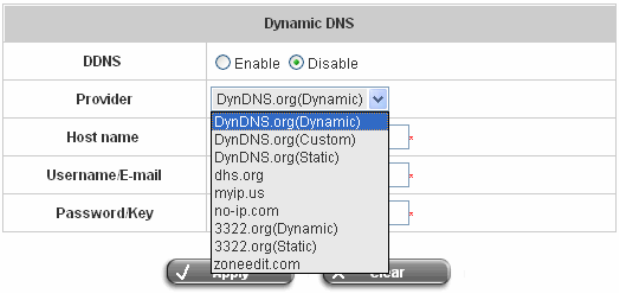
4.3.6 Dynamic DNS
AirLive WIAS-1200G provides a convenient DNS function to translate the IP address of WAN port to a domain name
that helps the administrator memorize and connect to WAN port. If the DHCP is activated at WAN port, this function
will also update the newest IP address regularly to the DNS server. These settings will become effective immediately
after clicking Apply.
y DDNS: Enabling or disabling of this function.
y Provider: Select the DNS provider.
y Host name: The IP address/domain name of the WAN port.
y Username/E-mail: The register ID (username or e-mail) for the DNS provider.
y Password/Key: The register password for the DNS provider.
AirLive WIAS-1200G
User’s Guide
90
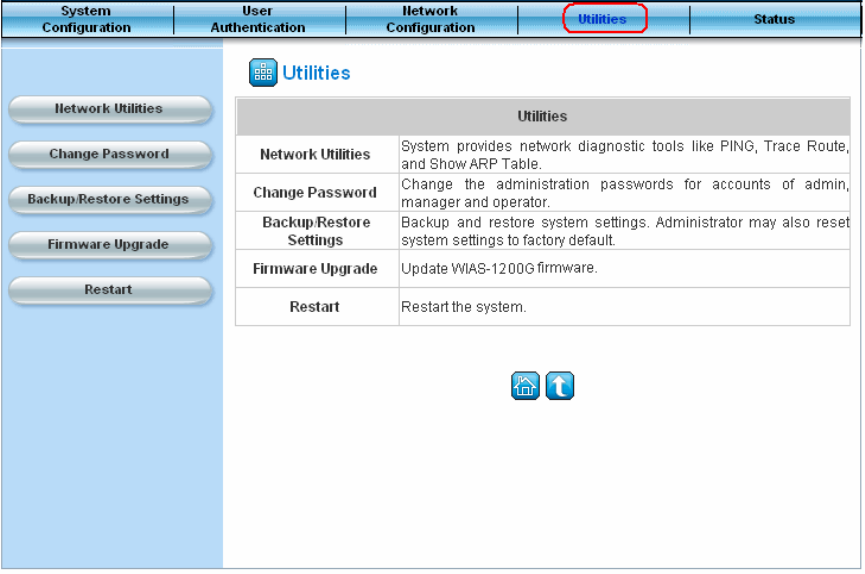
4.4 Utilities
This section provides four utilities to customize and maintain the system including Change Password,
Backup/Restore Setting, Firmware Upgrade and Restart.
AirLive WIAS-1200G
User’s Guide
91
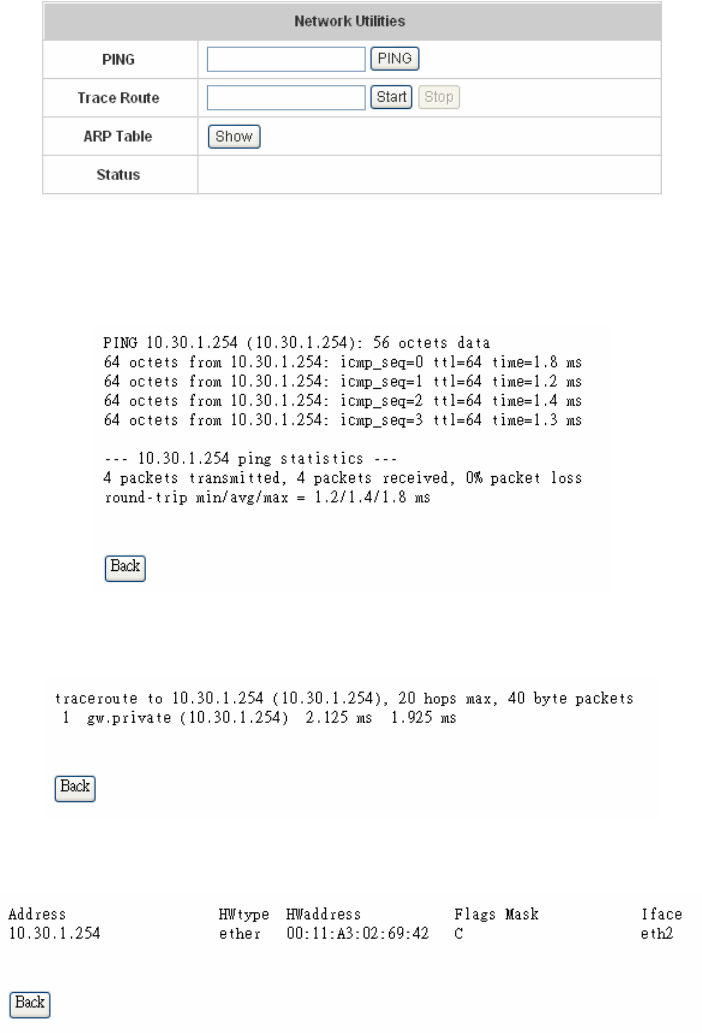
4.4.1 Network Utilities
The system provides three network diagnostic tools like PING, Trace Route, and ARP Table, for the administrator to
diagnose the network status.
y PING: Enter the desired IP address such as “10.30.1.254” and click PING button to execute PING. The ping
result will be shown on the screen. Click Back button to go back to the Network Utilities page.
y Trace Route: Enter the desired IP address such as “10.30.1.254” and click Start button. The Trace Route result
will be shown on the screen. Click Back button to go back to the Network Utilities page.
y ART Table: Click Show button to get the ART table of the system. The ART Table result will be shown on the
screen. Click Back button to go back to the Network Utilities page.
AirLive WIAS-1200G
User’s Guide
92
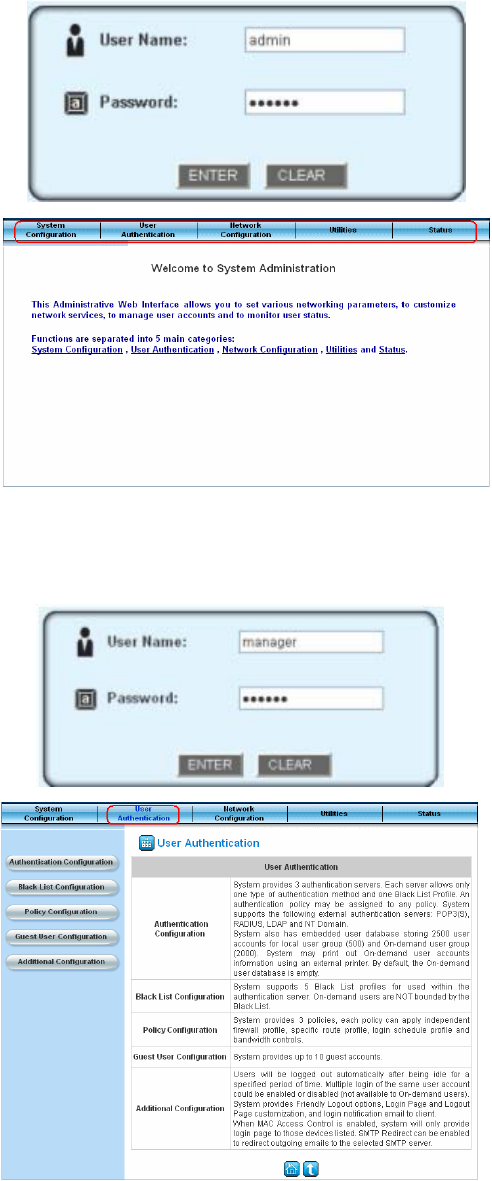
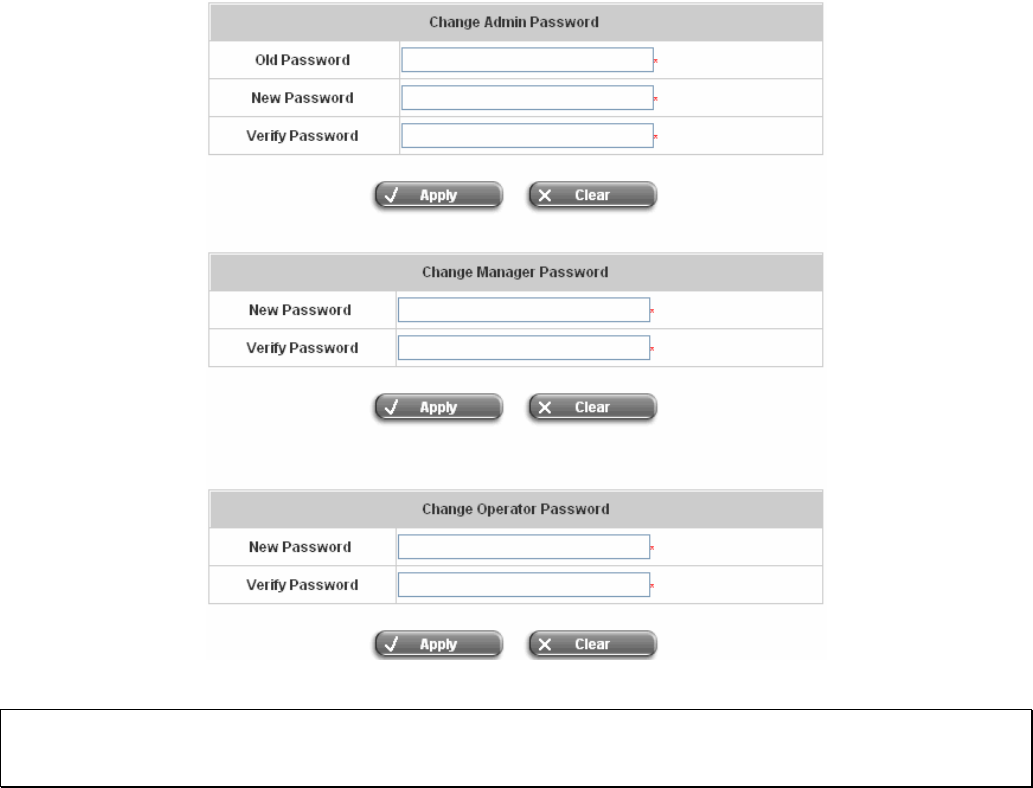
4.4.2 Change Password
There are three levels of authorities to use: admin, manager or operator. The default usernames and passwords
are as follow:
Admin: The administrator can access all configuration pages of the AirLive WIAS-1200G.
User Name: admin
Password: airlive
Manager: The manager can only access the configuration pages under User Authentication to manage the user
accounts, but has no permission to change the settings of the profiles for Firewall, Specific Route and Schedule.
User Name: manager
Password: airlive

AirLive WIAS-1200G
User’s Guide
93
Operator: The operator can only access the configuration page of Create On-demand User to create and print out
the new on-demand user accounts.
User Name: operator
Password: airlive
AirLive WIAS-1200G
User’s Guide
94
The administrator can change the passwords here. Please enter the current password and then enter the new
password twice to verify. Click Apply to activate this new password.
Note: If the administrator’s password is lost, the administrator’s password still can be changed through the text
mode management interface on the serial console port.

AirLive WIAS-1200G
User’s Guide
95
4.4.3 Backup/Restore Setting
This function is used to backup/restore the AirLive WIAS-1200G settings. Also, AirLive WIAS-1200G can be
restored to the factory default settings here.
y Backup Current System Setting: Click Backup to create a .db database backup file and save it on disk.
y Restore System Setting: Click Browse to search for a .db database backup file created by AirLive
WIAS-1200G and click Restore to restore to the same settings at the time the backup file was created.
y Resetting to the Factory-Default configuration: Click Reset to load the factory default settings of AirLive
WIAS-1200G.
AirLive WIAS-1200G
User’s Guide
96
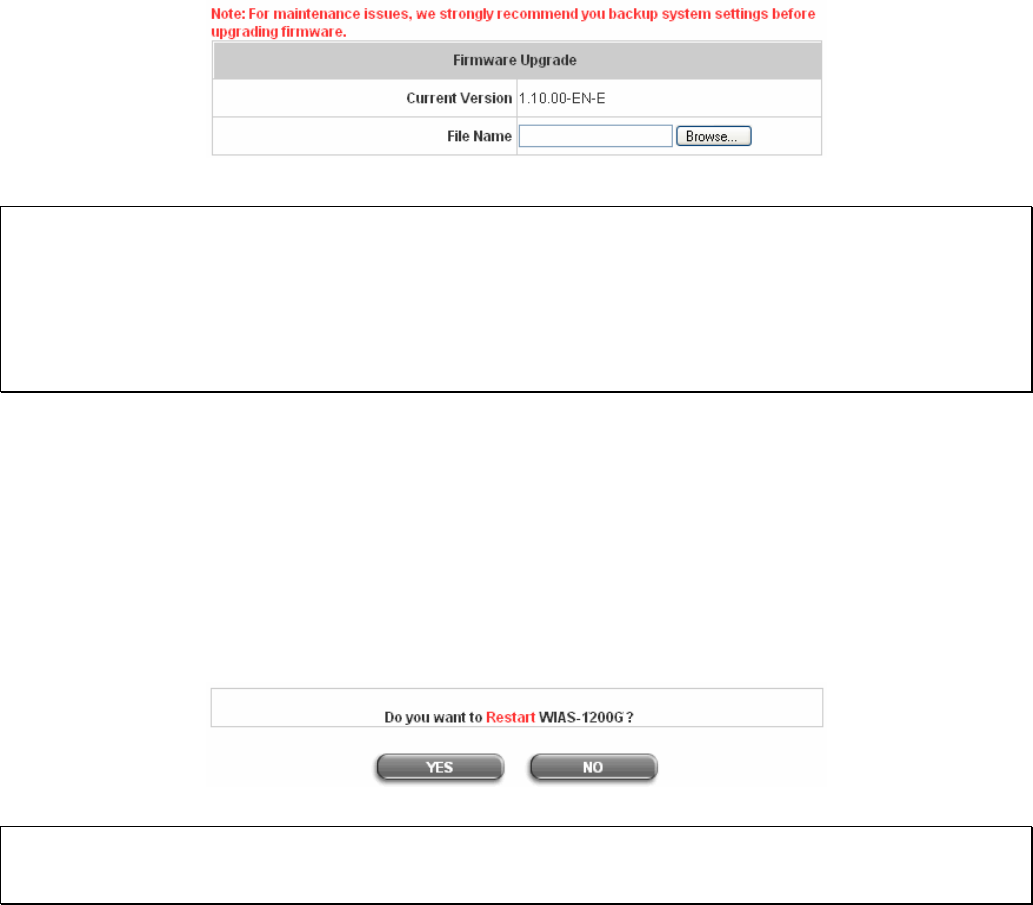
4.4.4 Firmware Upgrade
The administrator can download the latest firmware from website and upgrade the system here. Click Browse to
search for the firmware file and click Apply to go on with the firmware upgrade process. It might be a few minutes
before the upgrade process completes and the system needs to be restarted afterwards to make the new firmware
effective.
Note:
1. Firmware upgrade may cause the loss of some of the data. Please refer to the release notes for the limitation
before upgrading the firmware.
2. Please restart the system after upgrading the firmware. Do not power on/off the system during the upgrade or the
restart process. It may damage the system and cause it to malfunction.
4.4.5 Restart
This function allows the administrator to safely restart AirLive WIAS-1200G and the process should take about three
minutes. Click YES to restart AirLive WIAS-1200G; click NO to go back to the previous screen. If the power needs to
be turned off, restarting AirLive WIAS-1200G first and then turning off the power after completing the restart process
is highly recommended.
Note: The connection of all online users of the system will be disconnected when system is in the process of
restarting.
AirLive WIAS-1200G
User’s Guide
97
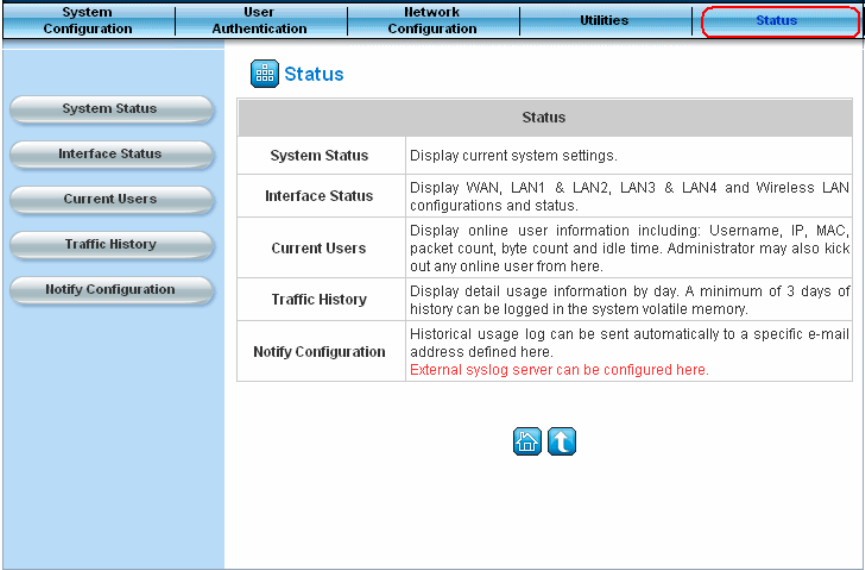
4.5 Status
This section includes System Status, Interface Status, Current Users, Traffic History, and Notification
Configuration to provide system status information and online user status.
AirLive WIAS-1200G
User’s Guide
98
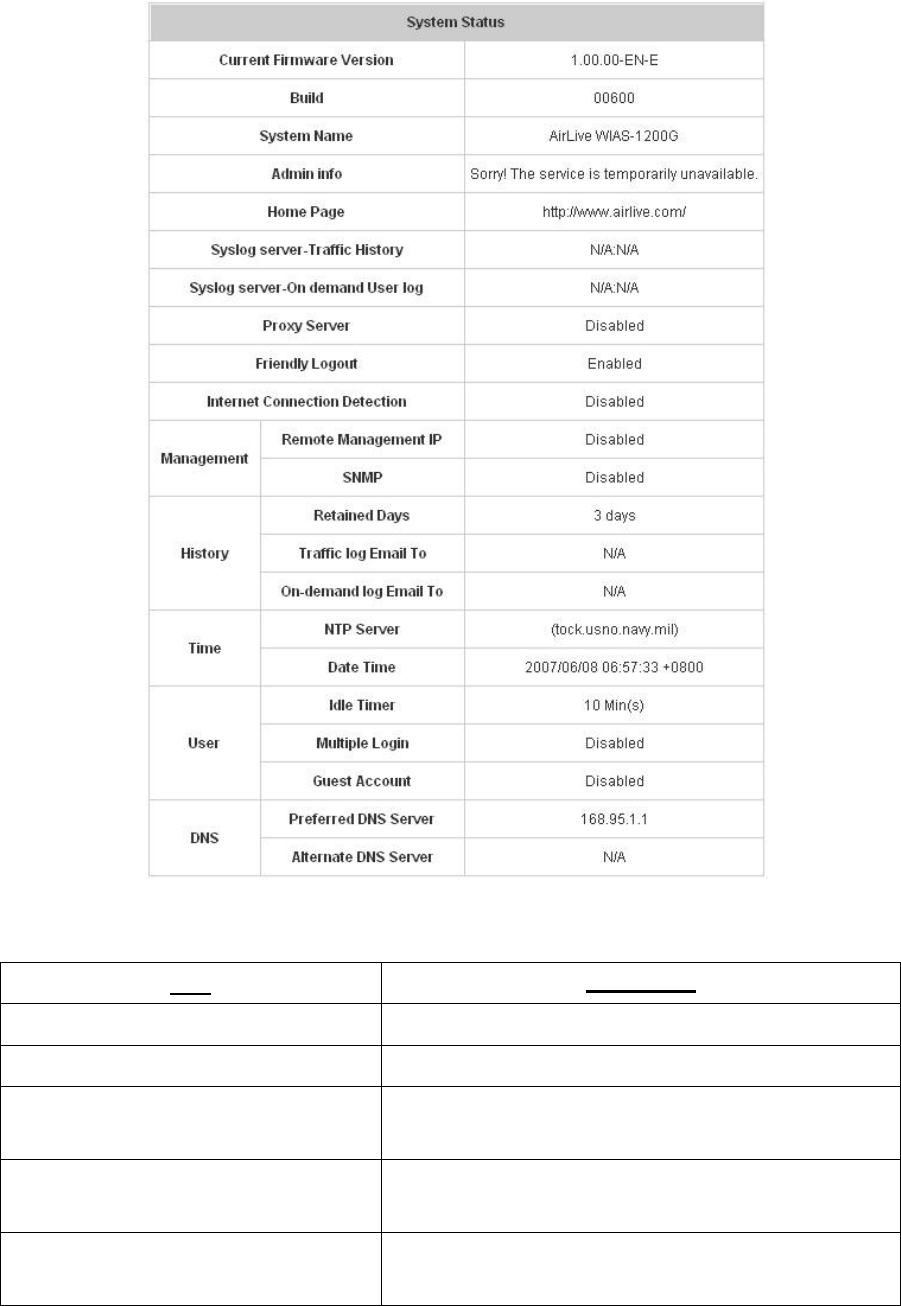
4.5.1 System Status
This section provides an overview of the system for the administrator.
The description of the table is as follows:
Item Description
The present firmware version of AirLive WIAS-1200G
Current Firmware Version
The system name. The default is AirLive WIAS-1200G
System Name
The information to be shown on the login screen when a
user has a connection problem.
Admin Info
The page the users are directed to after initial login
success.
Home Page
Syslog server-Traffic History The IP address and port number of the external Syslog
Server. N/A means that it is not configured.

AirLive WIAS-1200G
User’s Guide
99
Syslog server-On demand User log The IP address and port number of the external Syslog
Server. N/A means that it is not configured.
Proxy Server Enabled/disabled stands for that the system is currently
using the proxy server or not.
Friendly Logout
Enabled/disabled stands for the setting of
hiding/displaying an extra confirmation window when
users click the logout button.
Internet Connection Detection
Enabled/Disabled stands for the connection at WAN is
normal or abnormal (Internet Connection Detection)
and all online users are allowed/disallowed to log in the
network.
Remote Management IP The IP or IPs that is allowed for accessing the
management interface.
Management
SNMP Enabled/disabled stands for the current status of the
SNMP management function.
Retained Days The maximum number of days for the system to retain the
users’ information.
Traffic log Email To The email address that the traffic history information will
be sent to.
History
On-demand log Email
To
The email address the history information about
on-demand users is sent to.
NTP Server The network time server that the system is set to align.
Time
Date Time(GMT+0:00) The system time is shown as the local time.
Idle Timer The number of minutes allowed for the users to be
inactive.
Multiple Login Enabled/disabled stands for the current setting to
allow/disallow multiple logins form the same account.
User
Guest Account Enabled/disabled stands for the current status of allowing
Guest Accounts to log in.
Preferred DNS Server IP address of the preferred DNS Server.
DNS Alternate DNS Server IP address of the alternate DNS Server.

AirLive WIAS-1200G
User’s Guide
100
4.5.2 Interface Status
This section provides an overview of the interface for the administrator including WAN, LAN1 & LAN2, LAN3 &
LAN4, and Wireless Port.

AirLive WIAS-1200G
User’s Guide
101
The description of the table is as follows.
Item Description
MAC Address The MAC address of the WAN port.
IP Address The IP address of the WAN port.
WAN
Subnet Mask The Subnet Mask of the WAN port.
Operation Mode The mode of the wireless port.
MAC Address The MAC address of the wireless port.
IP Address The IP address of the wireless port.
Subnet Mask The Subnet Mask of the wireless port.
SSID The ESSID of the wireless port, such as AirLive
WIAS-1200G.
Channel The assigned Channel of the Wireless port.
Wireless
Encryption Function Enabled/disabled stands for the status of the encryption
function of the wireless port.
Status Enable/disable stands for status of the DHCP server on
the Wireless port.
WINS IP Address The WINS server IP on DHCP server. N/A means that it is
not configured.
Start IP Address The start IP address of the DHCP IP range.
End IP address The end IP address of the DHCP IP range.
Wireless
DHCP Server
Lease Time Minutes of the lease time of the IP address.
Mode The mode of the LAN1 & LAN2 port.
MAC Address The MAC address of the LAN1 & LAN2.
IP Address The IP address of the LAN1 & LAN2.
LAN1 & LAN2
Subnet Mask The Subnet Mask of the LAN1 & LAN2.
Status Enable/disable stands for status of the DHCP server on
the LAN1 & LAN2.
WINS IP Address The WINS server IP on DHCP server. N/A means that it is
not configured.
Start IP Address The start IP address of the DHCP IP range.
End IP address The end IP address of the DHCP IP range.
LAN1 & LAN2
DHCP Server
Lease Time Minutes of the lease time of the IP address.
Mode The mode of the LAN3 & LAN4.
LAN3 & LAN4
MAC Address The MAC address of the LAN3 & LAN4.
AirLive WIAS-1200G
User’s Guide
102
IP Address The IP address of the LAN3 & LAN4.
Subnet Mask The Subnet Mask of the LAN3 & LAN4.
Status Enable/disable stands for status of the DHCP server on
the LAN3 & LAN4 port
WINS IP Address The WINS server IP on DHCP server. N/A means that it is
not configured.
Start IP Address The start IP address of the DHCP IP range.
LAN3 & LAN4
DHCP Server
The end IP Address of the DHCP IP range.
End IP address
Minutes of the lease time of the IP address.
Lease Time
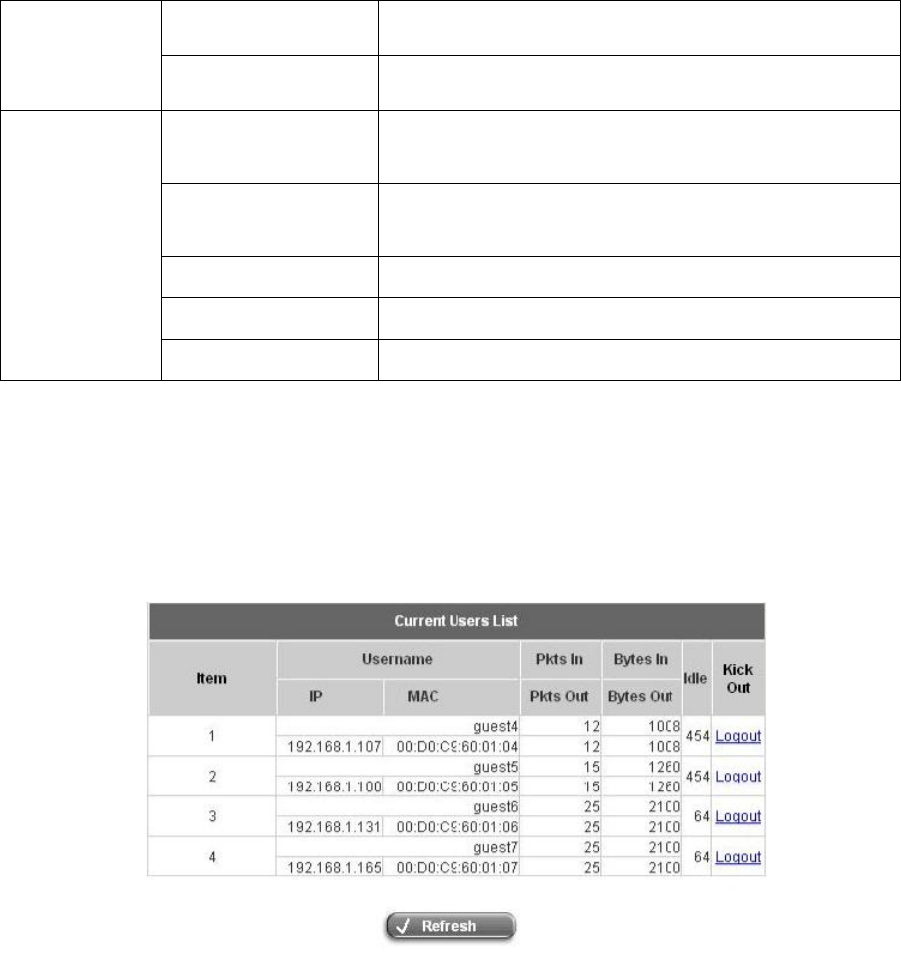
4.5.3 Current Users
In this function, each online user’s information including Username, IP Address, MAC Address, Packets In, Bytes
In, Packets Out, Bytes Out, Idle Time and Logout can be obtained. Administrator can use this function to force a
specific online user to log out. Click the hyperlink of Logout next to the online user’s name to logout that particular
user. Click Refresh to renew the current users list.
AirLive WIAS-1200G
User’s Guide
103
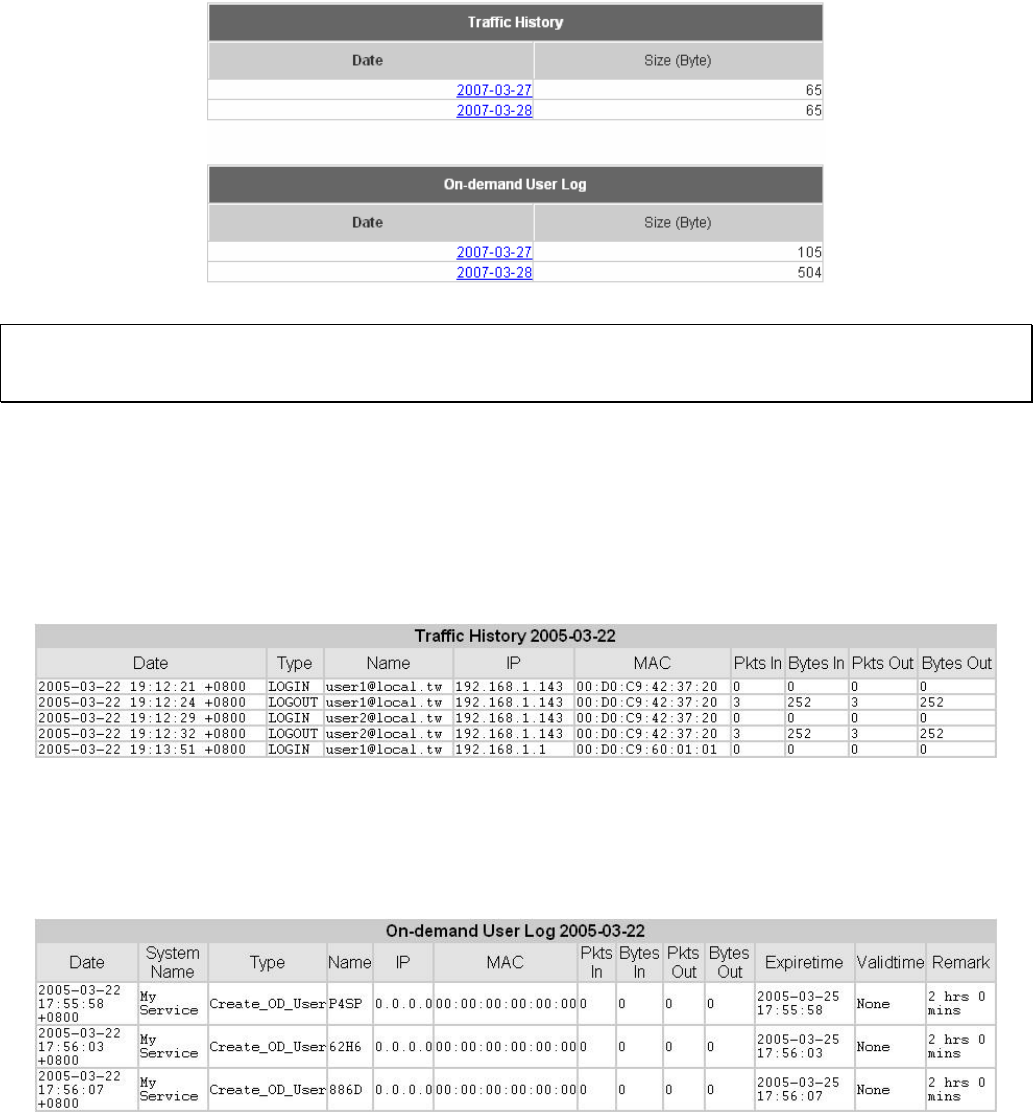
4.5.4 Traffic History
This function is used to check the history of AirLive WIAS-1200G. The history of each day will be saved separately in
the DRAM for at least3 days.
Note: Since the history is saved in the SDRAM, if you need to restart the system and also keep the history, then
please manually copy and save the information before restarting.
If the History Email has been entered under the Notify Configuration page, then the system will automatically
send out the history information to that email address.
y Traffic History
As shown in the following figure, each line is a traffic history record consisting of 9 fields, Date, Type, Name, IP,
MAC, Pkts In, Bytes In, Pkts Out, and Bytes Out, of user activities.
y On-demand User Log
As shown in the following figure, each line is a on-demand user log record consisting of 13 fields, Date, System
Name, Type, Name, IP, MAC, Pkts In, Bytes In, Pkts Out, Bytes Out, Expiretime, Validation and Remark, of
user activities.
AirLive WIAS-1200G
User’s Guide
104
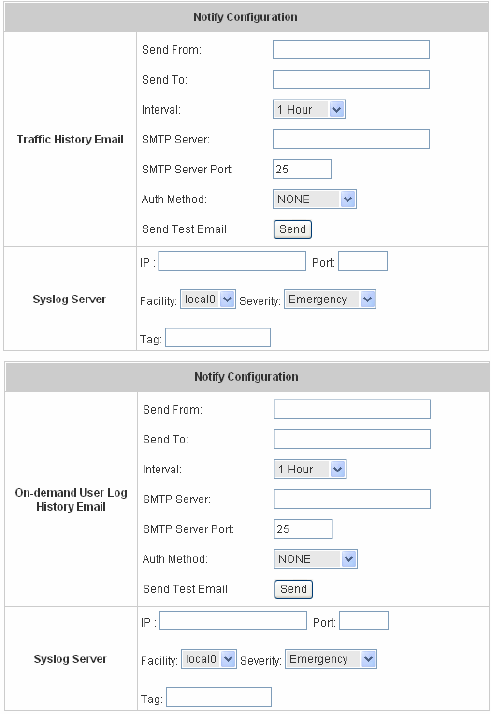
4.5.5 Notify Configuration
The AirLive WIAS-1200G will save the traffic history into the internal DRAM. If the administrator wants the system to
automatically send out the history to a particular email address, please enter the related information in these fields.
y Send From: The e-mail address of the administrator in charge of the monitoring. This will show up as the
sender’s e-mail.
y Send To: The e-mail address of the person whom the history email is for. This will be the receiver’s e-mail.
y Interval: The time interval to send the e-mail report.
y SMTP Server: The IP address of the SMTP server.
y Auth Method: The system provides four authentication methods, Plain, Login, CRAM-MD5 and NTLMv1, or
“None” to use none of the above. Depending on which authentication method you select, you have to enter
the Account Name, Password and Domain.
NTLMv1 is not currently available for general use.
Plain and CRAM-MD5 are standardized authentication mechanisms while Login and NTLMv1 are Microsoft
proprietary mechanisms. Only Plain and Login can use the UNIX login password. Netscape uses Plain.
Outlook and Outlook express uses Login as default, although they can be set to use NTLMv1.
Pegasus uses CRAM-MD5 or Login but you are not able to configure which method to use.
y Send Test Email: To test the settings correct or not.
y Syslog Server: It specifies the IP and Port of the Syslog server.
AirLive WIAS-1200G
User’s Guide
105
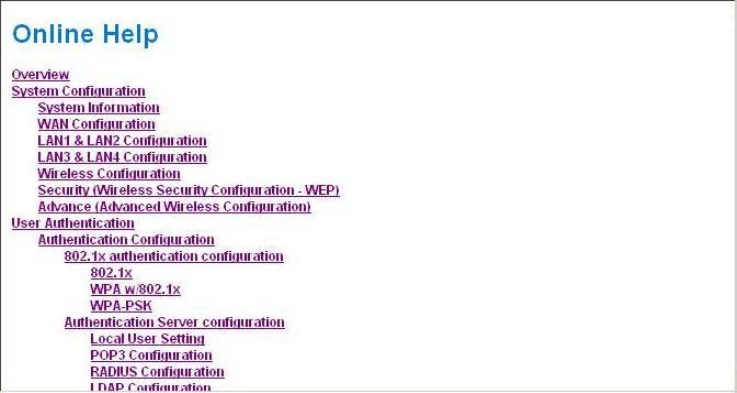
4.6 Help
On the screen, the Help button is on the upper right corner.
Click Help to the Online Help window and then click the hyperlink of the items to get the information.
AirLive WIAS-1200G
User’s Guide
106
Appendix A – Console Interface
Via this port to enter the console interface for the administrator to handle the problems and situations occurred
during operation.
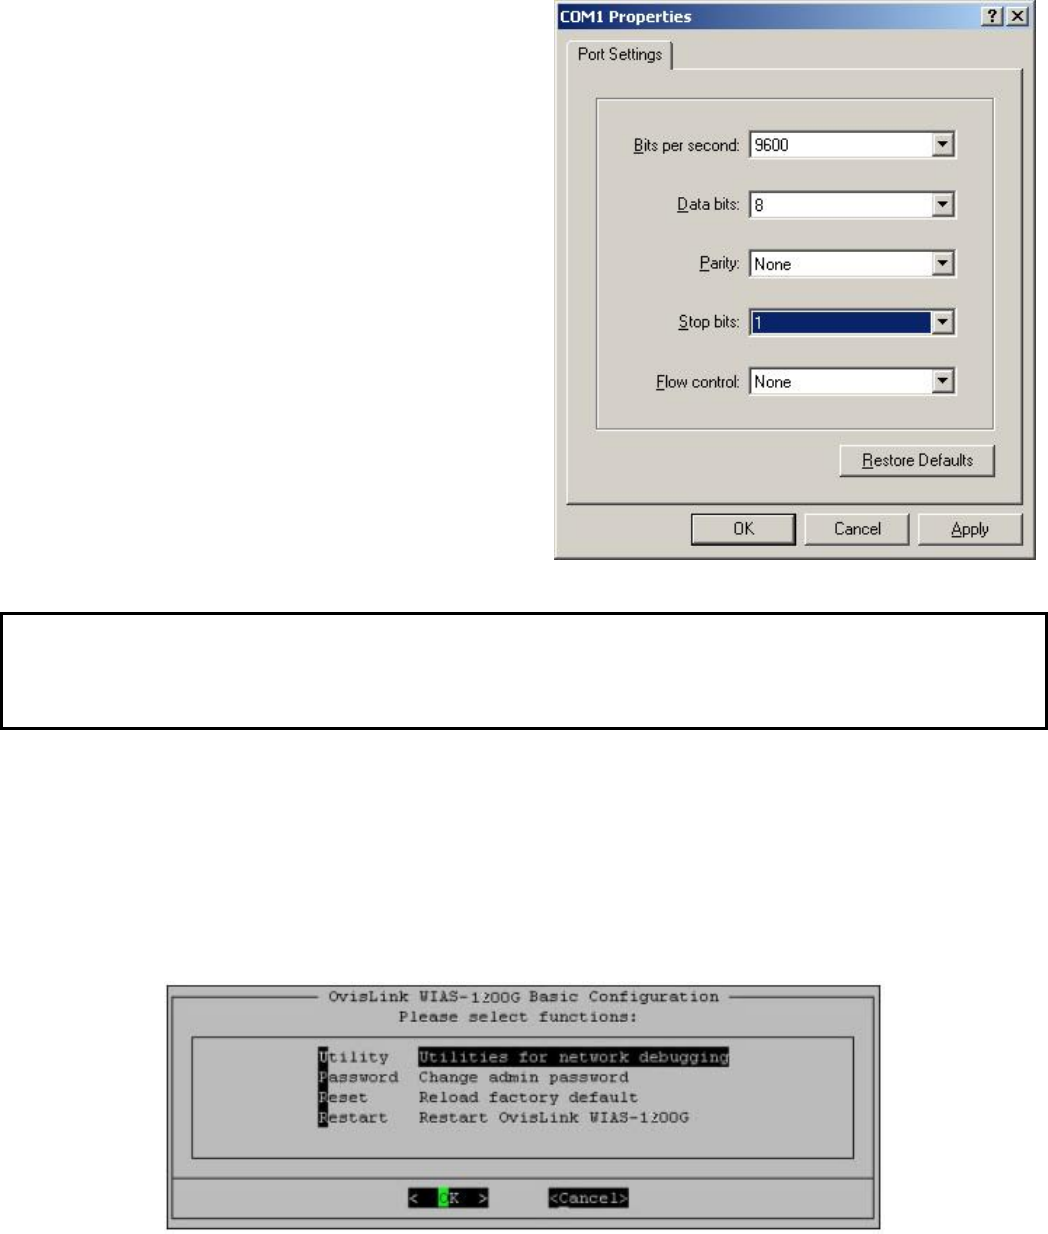
1. In order to connect to the console port of AirLive
WIAS-1200G, a console, modem cable and a terminal
simulation program, such as the Hyper Terminal are
needed.
2. If a Hyper Terminal is used, please set the parameters
as 9600,8,n,1.
Note:
The main console is a menu-driven text interface with dialog boxes. Please use arrow keys on the keyboard to
browse the menu and press the Enter key to make selection or confirm what you enter.
3. Once the console port of AirLive WIAS-1200G is connected properly, the console main screen will appear
automatically. If the screen does not appear in the terminal simulation program automatically, please try to press
the arrow keys, so that the terminal simulation program will send some messages to the system and the
welcome screen or the main menu should appear. If you are still unable to see the welcome screen or the main
menu of the console, please check the connection of the cables and the settings of the terminal simulation
program.
AirLive WIAS-1200G
User’s Guide
107
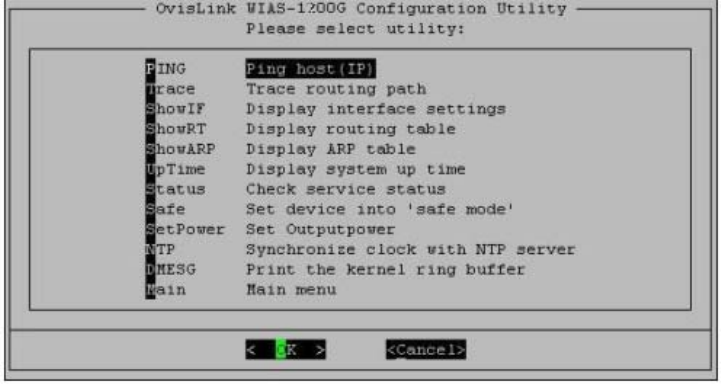
y Utilities for network debugging
The console interface provides several utilities to assist the Administrator to check the system conditions
and to debug any problems. The utilities are described as follow:
¾ Ping host (IP): By sending ICMP echo request to a specified host and wait for the response to test
the network status.
¾ Trace routing path: Trace and inquire the routing path to a specific target.
¾ Display interface settings: It displays the information of each network interface setting including the
MAC address, IP address, and netmask.
¾ Display the routing table: The internal routing table of the system is displayed, which may help to
confirm the Static Route settings.
¾ Display ARP table: The internal ARP table of the system is displayed.
¾ Display system up time: The system live time (time for system being turn on) is displayed.
¾ Check service status: Check and display the status of the system.
¾ Set device into “safe mode”: If administrator is unable to use Web Management Interface via the
browser for the system failed inexplicitly. Administrator can choose this utility and set IT into safe
mode, then administrator can management this device with browser again.
¾ Synchronize clock with NTP server: Immediately synchronize the clock through the NTP protocol
and the specified network time server. Since this interface does not support manual setup for its
internal clock, therefore we must reset the internal clock through the NTP.
¾ Print the kernel ring buffer: It is used to examine or control the kernel ring buffer. The program helps
users to print out their boot-up messages instead of copying the messages by hand.
¾ Main menu: Go back to the main menu.

AirLive WIAS-1200G
User’s Guide
108
y Change admin password
Besides supporting the use of console management interface through the connection of null modem, the
system also supports the SSH online connection for the setup. When using a null modem to connect to
the system console, we do not need to enter administrator’s password to enter the console management
interface. But connecting the system by SSH, we have to enter the username and password.
The username is “admin” and the default password is also “admin”, which is the same as for the web
management interface. You can use this option to change the administrator’s password. Even if you
forgot the password and are unable to log in the management interface from the web or the remote end of
the SSH, you can still use the null modem to connect the console management interface and set the
administrator’s password again.
Note:
Although it does not require a username and password for the connection via the serial port, the same management
interface can be accessed via SSH. Therefore, we recommend you to immediately change the AirLive WIAS-1200G
Admin username and password after logging in the system for the first time.
y Reload factory default
Choosing this option will reset the system configuration to the factory defaults.
y Restart AirLive WIAS-1200G
Choosing this option will restart AirLive WIAS-1200G.
AirLive WIAS-1200G
User’s Guide
109
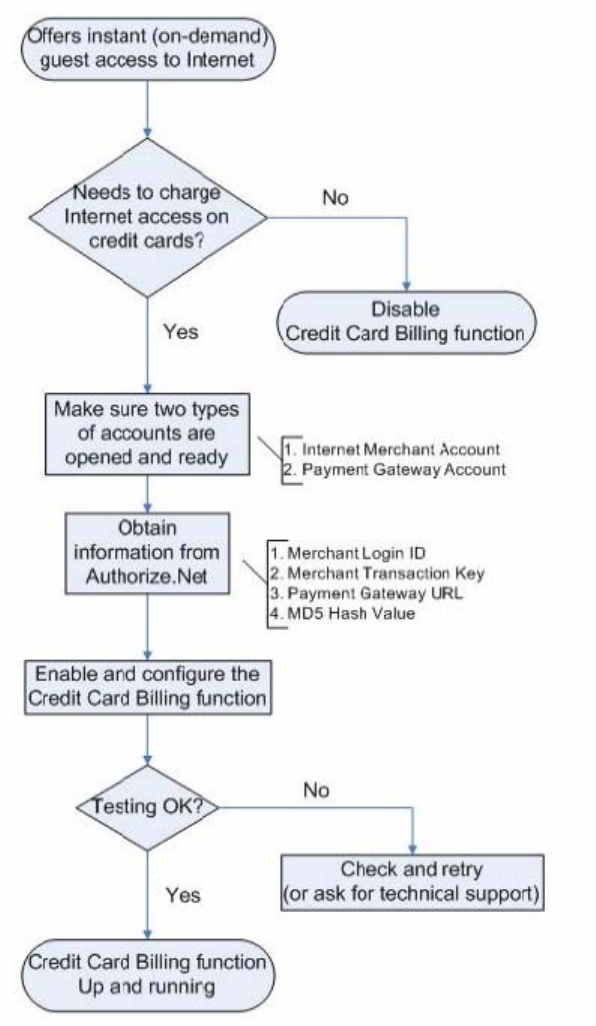
Appendix B – Accepting Payments via Authorize.Net
This section is to show independent Hotspot owners how to configure related settings in order to accept credit card
payments via Authorize.Net, making the Hotspot an e-commerce environment for end users to pay for and obtain
Internet access using their credit cards.
AirLive WIAS-1200G
User’s Guide
110
1. Setting Up
1.1 Open Accounts
To set up AirLive WIAS-1200G to process credit card billing, the merchant owner will need two accounts (Internet
Merchant account and Authorize.Net account).
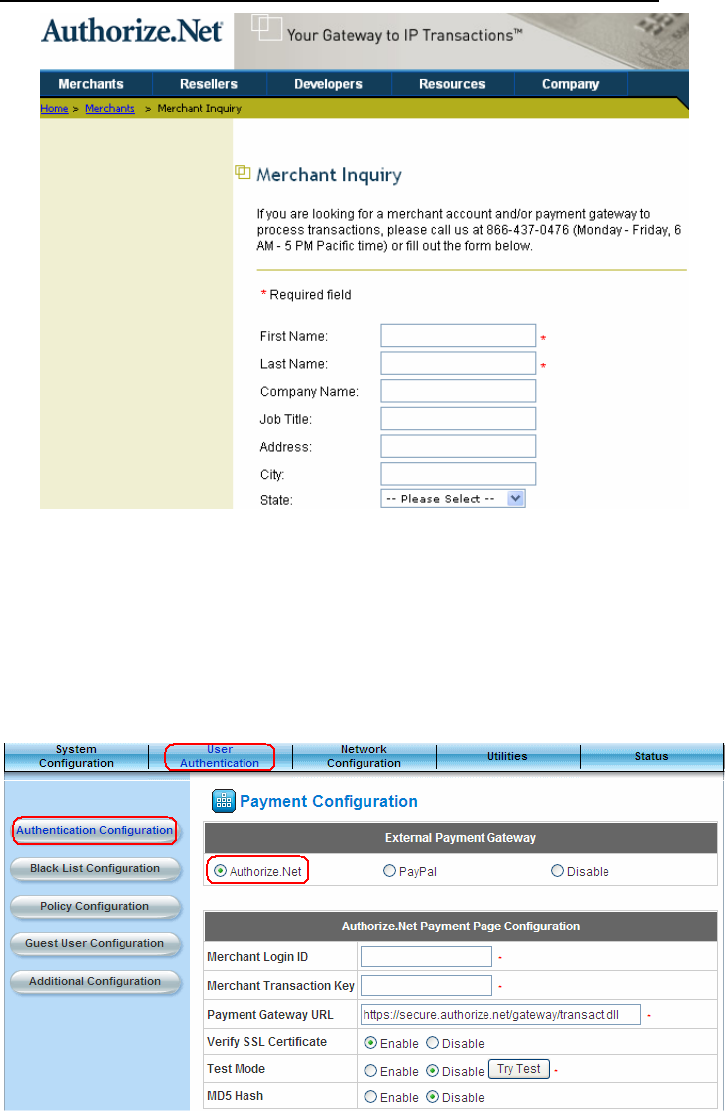
If you are looking for a merchant account or Internet payment gateway to process transactions, you can fill out the
Inquiry Form on http://www.authorize.net/solutions/merchantsolutions/merchantinquiryform/.
1.2 Configure AirLive WIAS-1200G using an Authorize.Net account
Please log in AirLive WIAS-1200G. User Authentication → Authentication Configuration → Click the server
On-demand User → On-demand User Server Configuration → Click Payment → Payment Configuration
→ External Payment Gateway → Select Authorize.Net

AirLive WIAS-1200G
User’s Guide
111
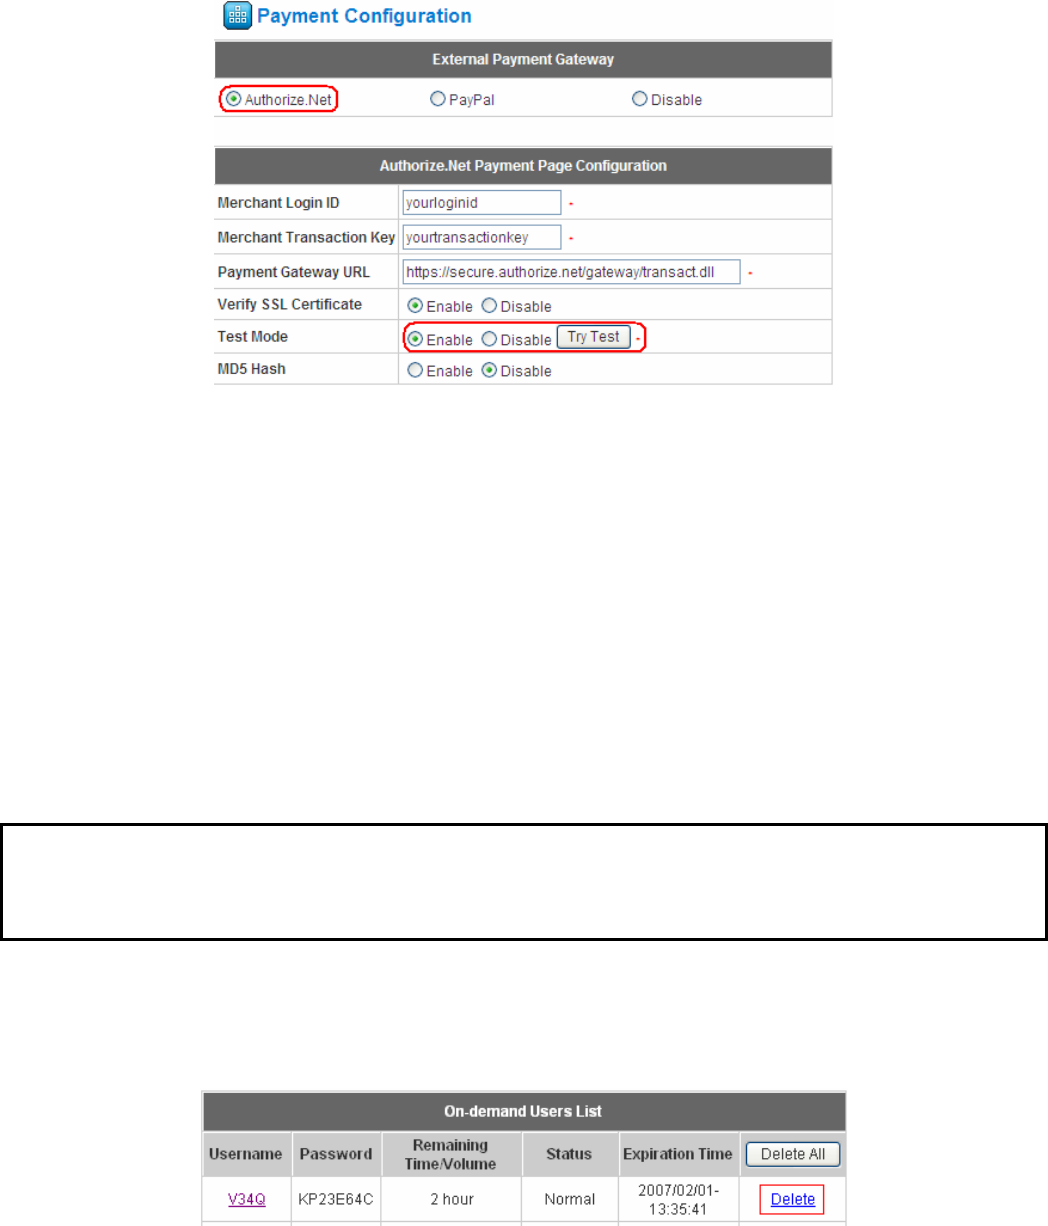
Some major fields are required:
Setting Description
Merchant Login ID This is the “Login ID” that comes with the Authorize.Net account.
Merchant Transaction Key To get a new key, please log in Authorize.Net → Click Settings and Profile
→ Go to the “Security” section → Click Obtain Transaction Key → Enter
“Secret Answer” → Click Submit.
Payment Gateway URL https://secure.authorize.net/gateway/transact.dll (default payment gateway)
MD5 Hash To enhance the transaction security, merchant owner can choose to enable this
function and enter a value in the text box: “MD5 Hash Value”.
Note:
For detailed description, please see 4.2.1.6 Authentication Method – On-demand User
→
Payment
1.3 Configure the Authorize.Net Merchant Account to Match the Configuration of AirLive WIAS-1200G
Settings of the merchant account on Authorize.Net should be matched with the configuration of AirLive
WIAS-1200G:
Setting Description
MD5 Hash To configure “MD5 Hash Value”, please log in Authorize.Net → Click
Settings and Profile → Go to the “Security” section → click MD5 Hash →
Enter “New Hash Value” & “Confirm Hash Value” → Click Submit.
Required Card Code If the “Card Code” is set up as a required field, please log in Authorize.Net →
Click Settings and Profile → Go to the “Security” section → click
Card
Code Verification → Check the Does NOT Match (N) box → Click Submit.
Required Address Fields After setting up the required address fields on the “Credit Card Payment Page
Billing Configuration” section of AirLive WIAS-1200G, the same requirements
must be set on Authorize.Net. To do so, please log in Authorize.Net → Click
Settings and Profile → Go to the “Security” section → click
Address
Verification System (AVS) → Check the boxes accordingly → Click Submit.
1.4 Test The Credit Card Payment via Authorize.Net
To test the connection between AirLive WIAS-1200G and Authorize.Net, please log in AirLive WIAS-1200G. User
Authentication → Authentication Configuration → Click the server On-demand User → On-demand User
Server Configuration → Payment → Payment Configuration → Select Authorize.Net →Go
to ”Authorize.Net Payment Page Configuration” section → Enable the “Test Mode” → Click Try Test and
follow the instructions
AirLive WIAS-1200G
User’s Guide
112
2. Basic Maintenance
In order to maintain the operation, merchant owners will have to manage the accounts and transactions via
Authorize.Net as well as AirLive WIAS-1200G.
2.1 Void A Transaction and Remove the On-demand Account Generate on AirLive WIAS-1200G
Sometimes, a transaction (as well as the related user account on AirLive WIAS-1200G) may have to be canceled
before it has been settled with the bank.
a. To void an unsettled transaction, please log in Authorize.Net. Click Unsettled Transactions → Locate the
specific transaction record on the “List of Unsettled Transactions” → Click the Trans ID number → Confirm
and click Void.
Note:
To find the on-demand account name, click Show Itemized Order Information in the “Order Information” section
→
Username can be found in the “Item Description”
b. To remove the specific account from AirLive WIAS-1200G, please log in AirLive WIAS-1200G. User
Authentication → Authentication Configuration → Click the server On-demand User → On-demand
User Server Configuration → Users List → Click Delete on the record with the account name.
c. Click Delete All to delete all users at once.
AirLive WIAS-1200G
User’s Guide
113
2.2 Refund A Settled Transaction and Remove the On-demand Account Generated on AirLive WIAS-1200G
a. To refund a credit card, please log in Authorize.Net. Click Virtual Terminal → Select a Payment Method →
Click Refund a Credit Card → Payment/Authorization Information → Type information in at least three
fields: Card Number, Expiration Date, and Amount → Confirm and click Submit.
b. To remove the specific account from AirLive WIAS-1200G, please log in AirLive WIAS-1200G. User
Authentication → Authentication Configuration → Click the server On-demand User → On-demand
User Server Configuration → Users List → Click Delete on the record with the account name
2.3 Find the Username and Password for A Specific Customer
Please log in Authorize.Net. Click Unsettled Transactions → Try to locate the specific transaction record on the
“List of Unsettled Transactions” → Click the Trans ID number → Click
Show Itemized Order Information in
the “Order Information” section → Username and Password can be found in the “Item Description”.
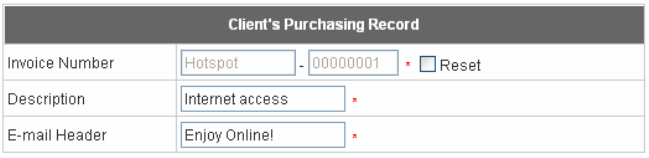
2.4 Send An Email Receipt to A Customer
If a valid email address is provided, AirLive WIAS-1200G will automatically send the customer an email receipt for
each successful transaction via Authorize.Net. To change the information on the receipt for customer, please log in
AirLive WIAS-1200G. User Authentication → Authentication Configuration → Click the server On-demand
User → On-demand User Server Configuration → Payment → Payment Configuration → External
Payment Gateway → Select Authorize.NET → Scroll down to Client's Purchasing Record section of the page
→ Type in information in the text boxes: “Description and E-mail Header” → Confirm and click Apply.
2.5 Send An Email Receipt for Each Transaction to the Merchant Owner
A copy of email receipt with payment details for each successful transaction will also be automatically sent to the
merchant owner/administrator via Authorize.Net.
To configure the contact person who will receive a receipt for each transaction, please log in Authorize.Net. Click
Settings and Profile → Go to the “General” section → click Manage Contacts → click Add New Contact to
→ Enter necessary contact information on this page → Check the “Transaction Receipt” box → Click Submit.
AirLive WIAS-1200G
User’s Guide
114
3. Reporting
During normal operation, the following steps will be necessary to generate transaction reports.
3.1 Transaction Statistics by Credit Card Type during the Period
Please log in Authorize.Net. → Click Reports → Check “Statistics by Settlement Date” radio button
→ Select “Transaction Type”, “Start Date”, and “End Date” as the criteria → Click Run Report
3.2 Transaction Statistics by Different Location
a. To deploy more than one AirLive WIAS-1200G, the way to distinguish transactions from different locations is to
make the invoice numbers different. To change the invoice setting, please log in AirLive WIAS-1200G. User
Authentication → Authentication Configuration → Click the server On-demand User → On-demand
User Server Configuration → Payment → Payment Configuration → External Payment Gateway →
Scroll down to “Client's Purchasing Record” section of the page → Check the “Reset” box → A
location-specific ID (for example, Hotspot-A) can be used as the first part of “Invoice Number” → Confirm and
click Apply.
b. Please log in Authorize.Net → Click Search and Download → Specify the transaction period (or ALL Settled,
Unsettled) in “Settlement Date” section → Go to “Transaction” section → Enter the first part of invoice
number plus an asterisk character (for example, Hotspot-A*) in the “Invoice #” text box → Click Search → If
transaction records can be found, the number of accounts sold is the number of search results → Or, click
Download To File to download records and then use MS Excel to generate more detailed reports.
3.3 Search for The Transaction Details for A Specific Customer
Please log in Authorize.Net. Click Search and Download → Enter the information for a specific customer as
criteria → Click Search → Click the Trans ID number to view the transaction details.
For more information about Authorize.Net, please see http://www.authorize.net.
AirLive WIAS-1200G
User’s Guide
115
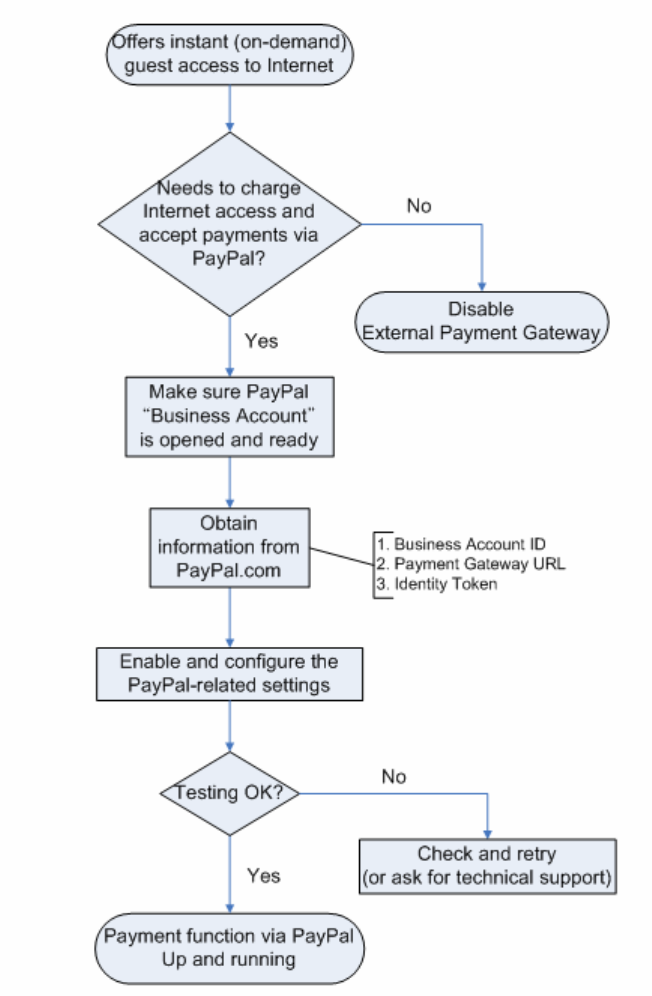
Appendix C – Accepting Payments via PayPal
This section is to show independent Hotspot owners how to configure related settings in order to accept payments
via PayPal, making the Hotspot an e-commerce environment for end users to pay for and obtain Internet access
using their PayPal accounts or credit cards.
AirLive WIAS-1200G
User’s Guide
116
1. Setting Up
As follows are the basic steps to open and configure a “Business Account” on PayPal.
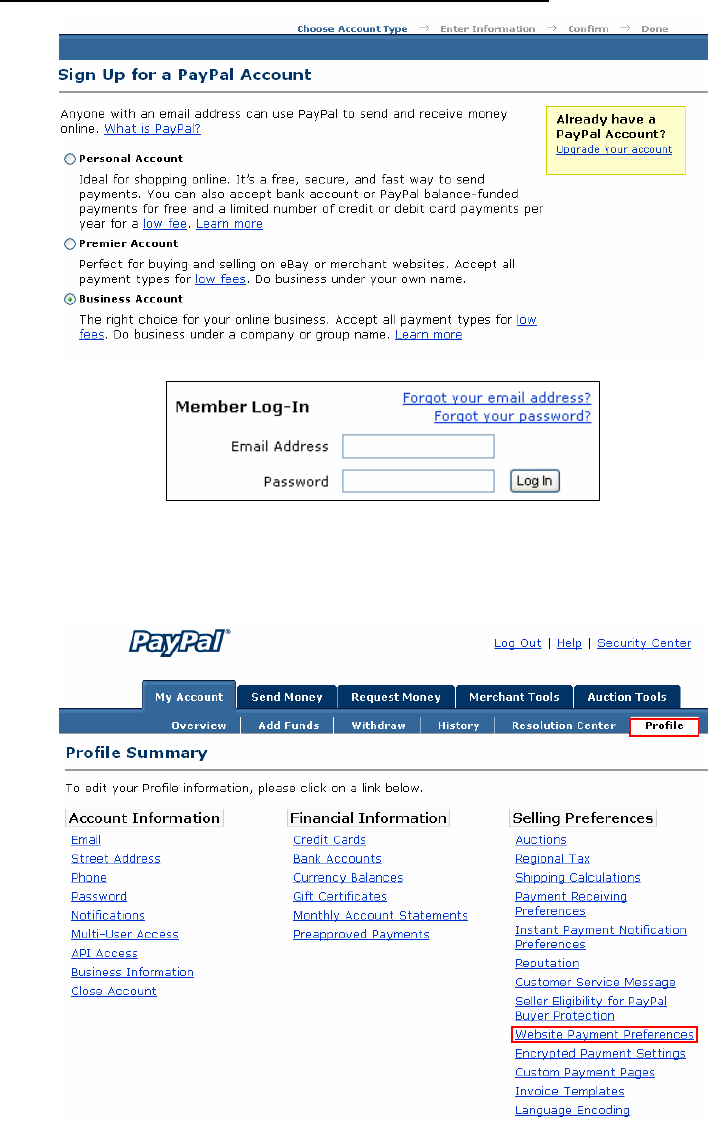
1.1 Open An Account
Step 1: Sign up for a PayPal Business Account and login.
Here is a link: https://www.paypal.com/cgi-bin/webscr?cmd=_registration-run
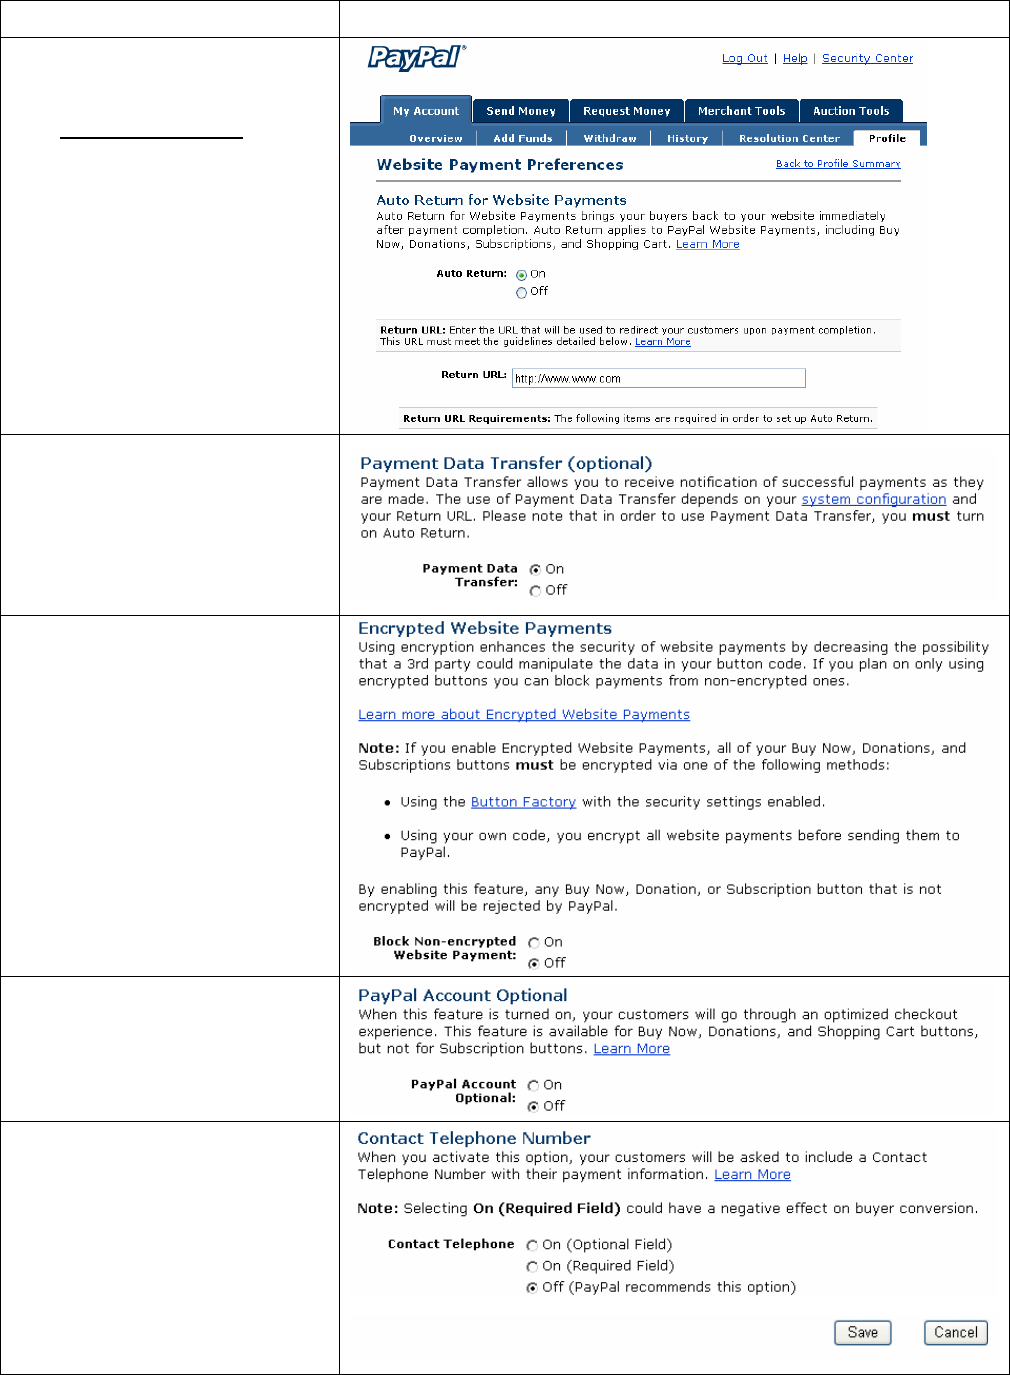
Step 2: Edit necessary settings in “Website Payment Preferences”
Click Profile → Click Website Payment Preferences in the Selling Preferences section
Administrators should scroll down to edit each setting as shown in the table below. To activate all the changes,
please click Save at the end of the page.
AirLive WIAS-1200G
User’s Guide
118
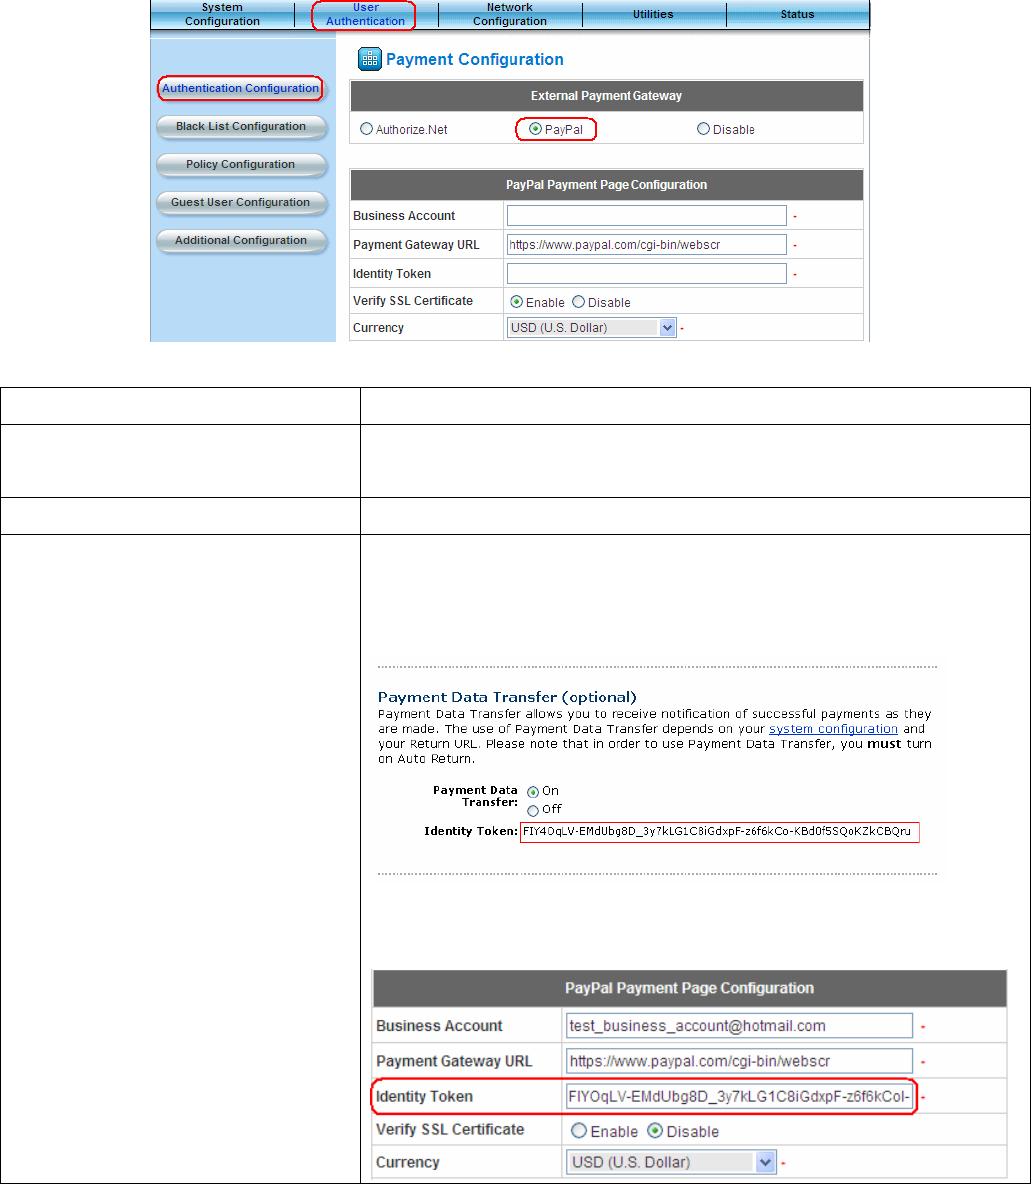
1.2 Configure AirLive WIAS-1200G with a PayPal Business Account
Please log in AirLive WIAS-1200G:
User Authentication → Authentication Configuration → Click the server On-demand User → On-demand User
Server Configuration → Click Payment → Payment Configuration → External Payment Gateway → Select
PayPal
Three fields are required:
Setting Description
Business Account ID This is the “Login ID” (email address) that is associated with the PayPal
Business Account.
https://www.paypal.com/cgi-bin/webscr (default URL for PayPal)
Payment Gateway URL
Please log in PayPal after saving the above settings → Click Profile
Identity Token
→ Click Website Payment Preferences in the Selling Preferences
section → Scroll down to the section, Payment Data Transfer (optional).
Copy the Identity Token in the above page to the section “PayPal
Payment Page Configuration” of AirLive WIAS-1200G.
AirLive WIAS-1200G
User’s Guide
119
1.3 Requirements for Building a Secure PayPal-based E-Commerce Site
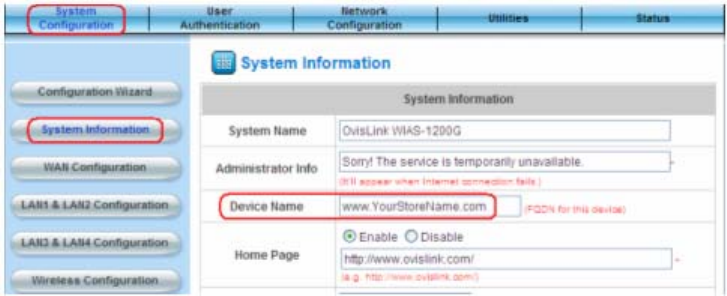
To deploy the PayPal function properly, it is required that the merchant register an Internet domain name (for
example, www.StoreName.com) for this subscriber gateway device.
In addition, it is necessary to sign up for a SSL certificate, licensed from a “Certificate Authority” (for example,
VerSign), for this registered Internet domain name.
Thus, by meeting these two requirements, it will allow end customers or subscribers to pay for the Internet access in
a securer and convenient way.
2. Basic Maintenance
In order to maintain the operation, the merchant owner will have to manage the accounts and payment transactions
on PayPal website as well as AirLive WIAS-1200G.
2.1 Refund a completed payment and remove the on-demand account generated on AirLive WIAS-1200G
(1) To refund a payment, please log in PayPal → Click History → Locate the specific payment listing in the activity
history log → Click Details of the payment listing → Click Refund Payment at the end of the details page → Type in
information: Gross Refund Amount and/or Optional Note to Buyer → Click Submit → Confirm the details and
click Process Refund
AirLive WIAS-1200G
User’s Guide
120
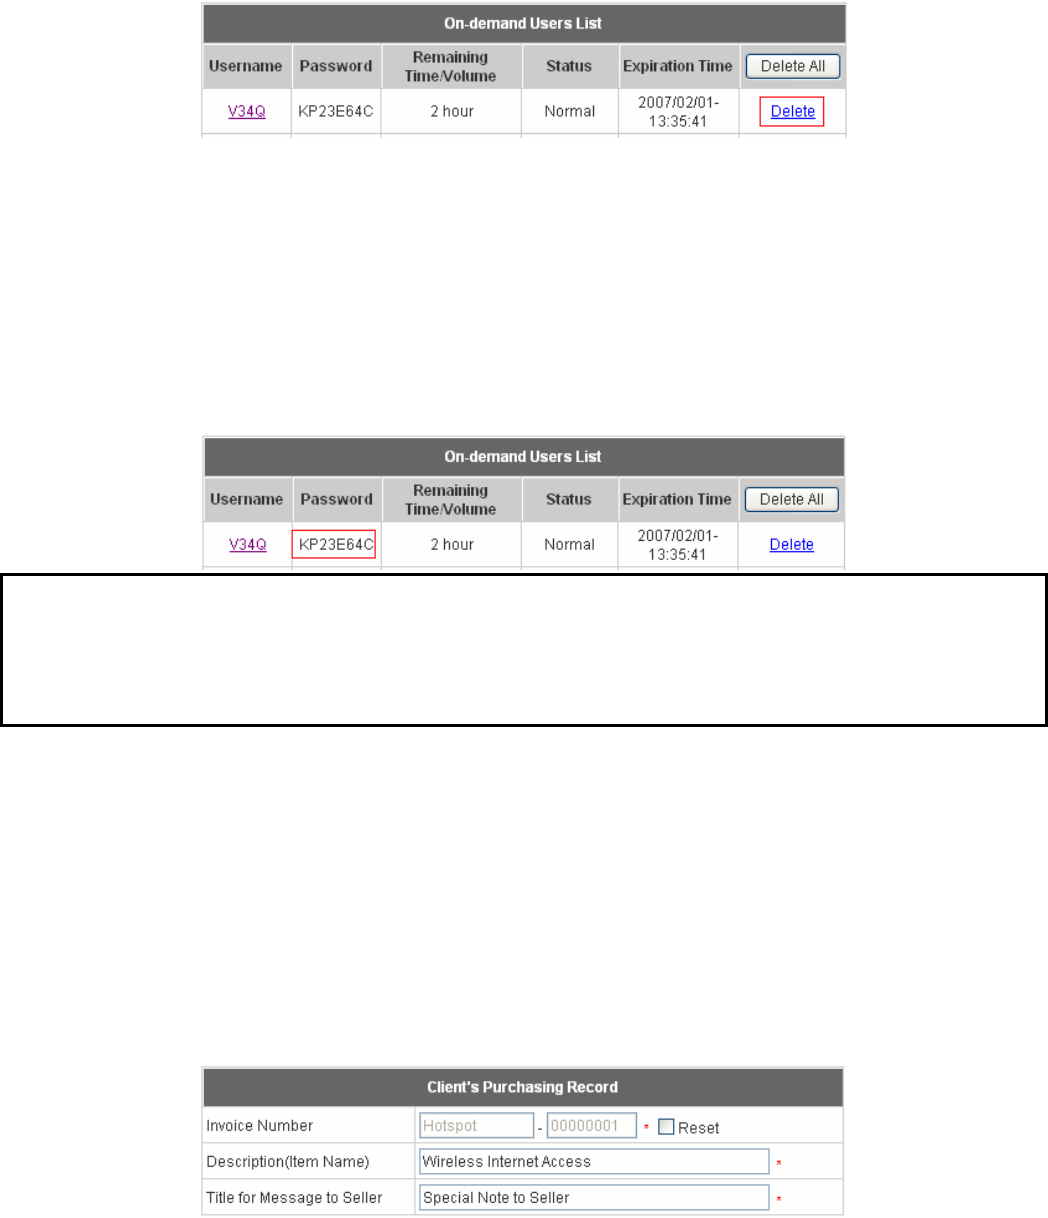
(2) To remove the specific account from AirLive WIAS-1200G, please log in AirLive WIAS-1200G:
User Authentication → Authentication Configuration → Click the server On-demand User → On-demand User
Server Configuration → Users List → Click Delete on the record with the account ID. Click Delete All to delete all
users at once.
2.2 Find the username and password for a specific customer
(1) To find the username, please log in PayPal → Click History → Locate the specific payment listing in the activity
history log → Click Details of the payment listing → Username can be found in the “Item Title” field
(2) To find the password associated with a specific username, please log in AirLive WIAS-1200G:
User Authentication → Authentication Configuration → Click the server On-demand User → On-demand User
Server Configuration → Users List. Search for the specific username. Password can be found in the same record
Note:
As stated by PayPal, you can issue a full or partial refund for any reason and for 60 days after the original payment
was sent. To find the on-demand account name for a specific payment, click Details of the payment listing in the
activity history log
→
Username can be found in the “Item Title” field
2.3 Send an email receipt to a customer
If a valid email address is provided, an email receipt with payment details for each successful transaction will be
automatically sent to the customer via PayPal. To change the information on the receipt for customer, please log in
AirLive WIAS-1200G:
User Authentication → Authentication Configuration → Click the server On-demand User → On-demand User
Server Configuration → Payment → Payment Configuration → External Payment Gateway→ Select PayPal
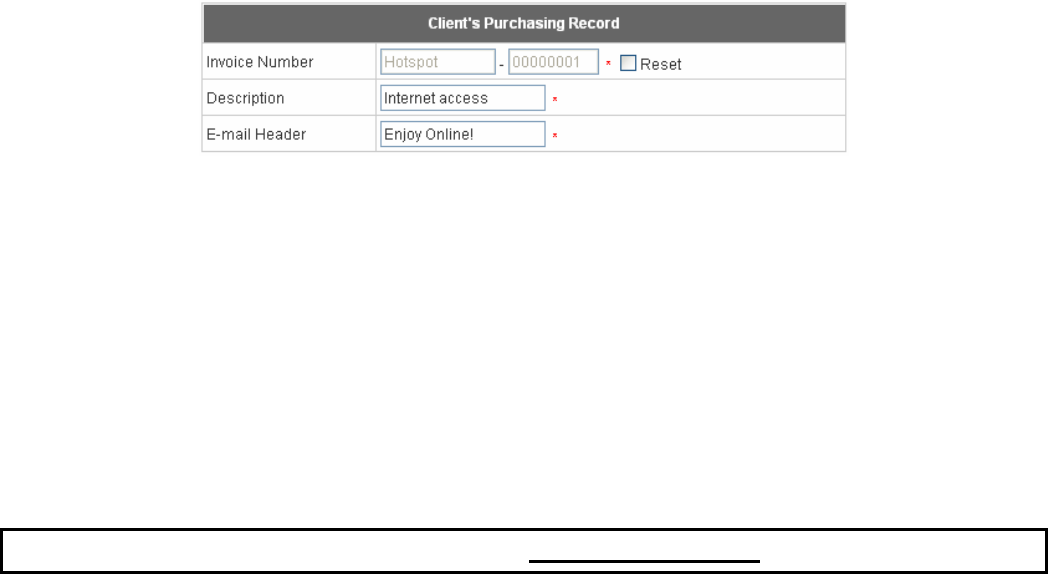
→ Go to “Client's Purchasing Record” section → Type in information in the text boxes: Invoice Number and
Description (Item Name) → Confirm and click Apply
AirLive WIAS-1200G
User’s Guide
121
2.4 Send an email receipt for each transaction to the merchant
A copy of email receipt with payment details (including available message note from buyer) for each successful
transaction will also be automatically sent to the merchant owner/administrator via PayPal.
3. Reporting
During normal operation, the following steps will be necessary to generate transaction reports.
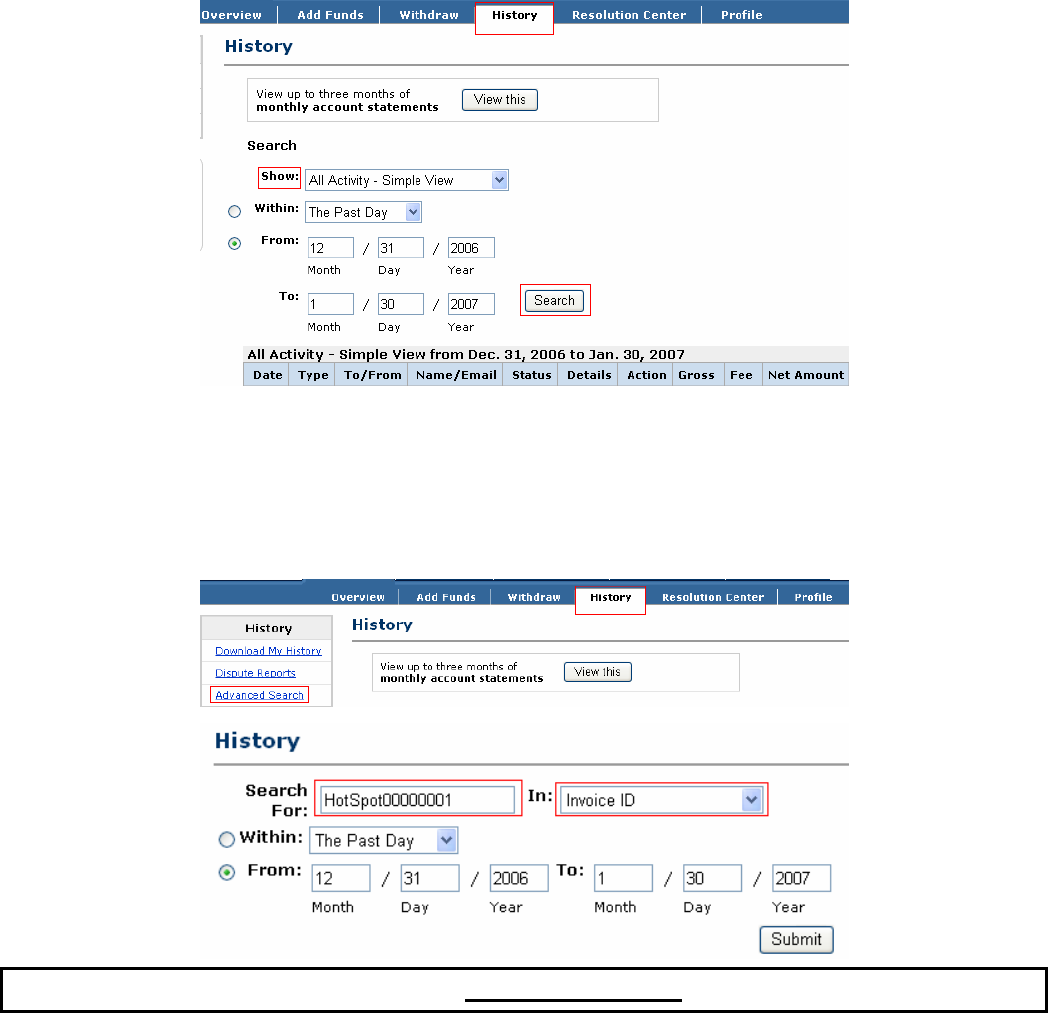
3.1 Transaction activity during a period
(1) Please log in PayPal → Click History → Choose activity type from the Show field as the search criteria
→ Specify the dates (From and To fields) for the period → Click Search
3.2 Search for the transaction details for a specific customer
Please log in PayPal → Click History → Click Advanced Search → Enter the name for a specific customer as
criteria in the Search For field and Choose Last Name or Last Name, First Name in the In field → Specify the time
period → Click Submit → Click Details to view the transaction details
For more information about PayPal, please see http://www.paypal.com
AirLive WIAS-1200G
User’s Guide
122
Appendix D – Examples of Making Payments for End
Users
1. Making Payments via Authorize.Net
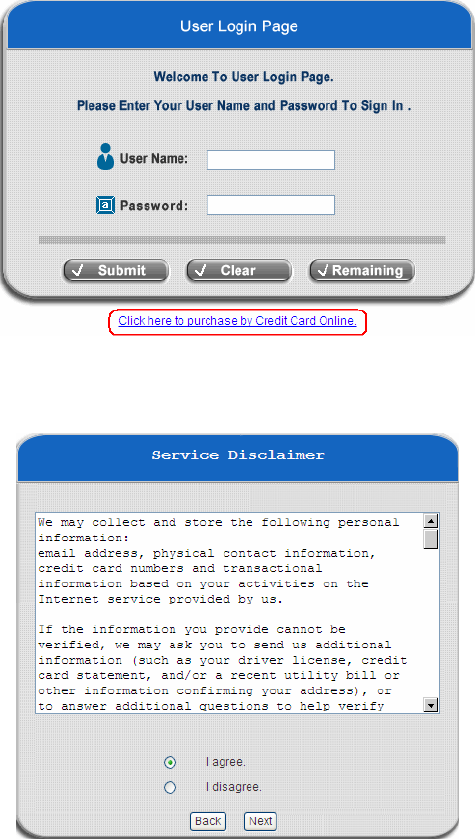
Step 1: Click the link below the login window to pay for the service by credit card via Authorize.Net.
Step 2: Choose I agree to accept the terms of use and click Next.
AirLive WIAS-1200G
User’s Guide
123
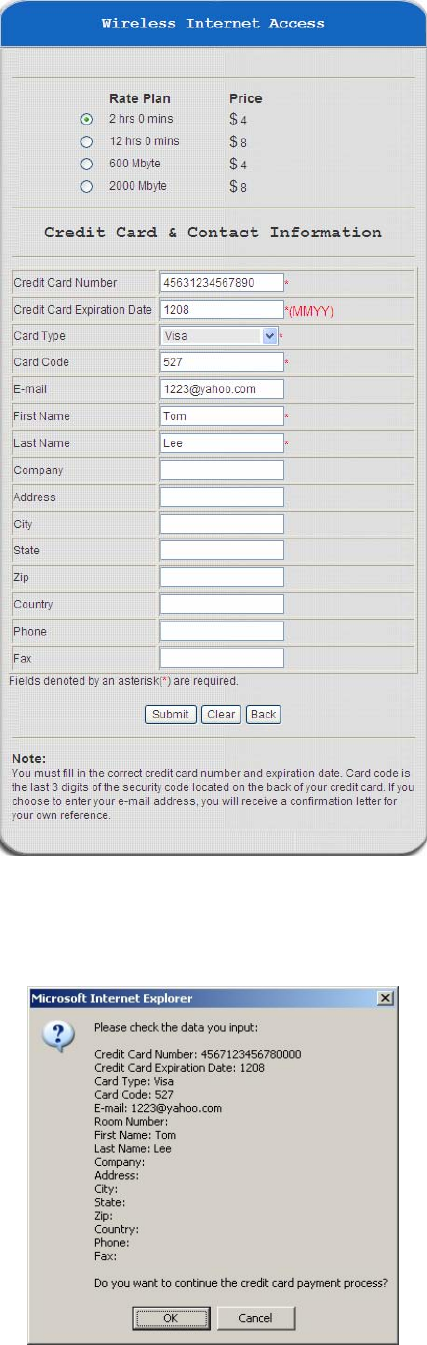
Step 3: Please fill out the form and Click Submit to send out this transaction. There will be a confirm dialog box.
Step 4: Please confirm the data and the click OK to go on the transaction or click Cancel to revise the data or cancel
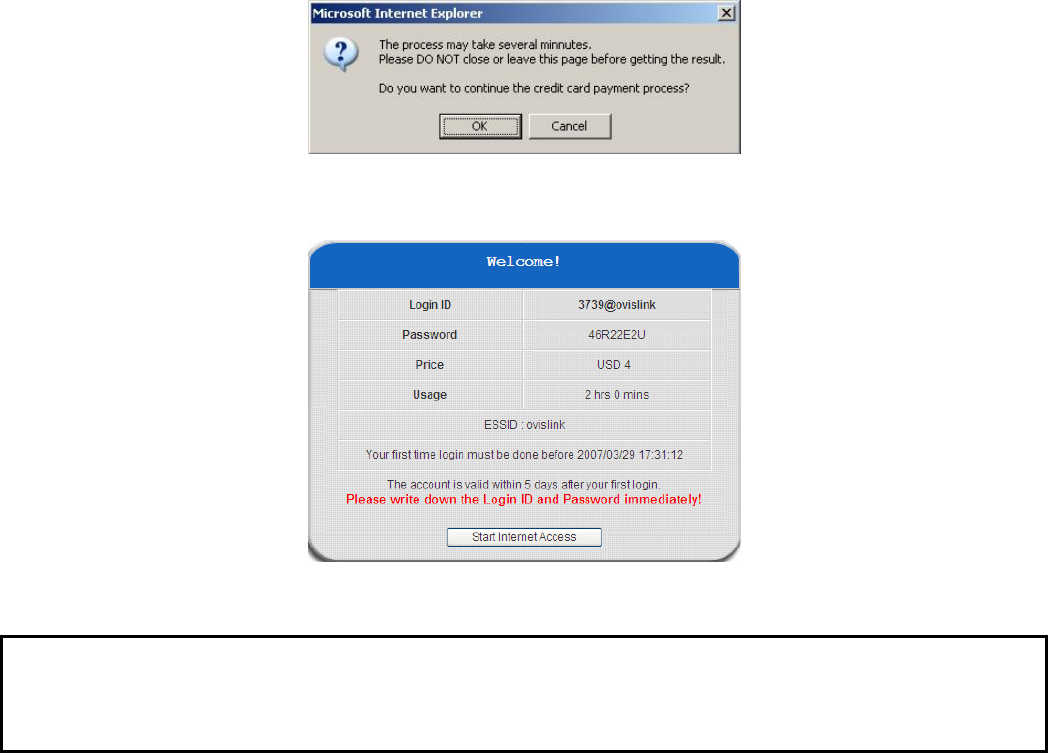
this transaction. After clicking OK, there will be another dialog box showing up to confirm this transaction again.
AirLive WIAS-1200G
User’s Guide
124
Step 5: Click OK to complete the process or click Cancel to revise the data or cancel this transaction.
Step 6: Click Start Internet Access to use the Internet access service.
Note: The clients must fill in the correct credit card number and expiration date. Card code is the last 3 digits of the
security code located on the back of your credit card. If clients choose to enter the e-mail addresses, clients will
receive confirmation letters for reference.
AirLive WIAS-1200G
User’s Guide
125
2. Making Payments via PayPal
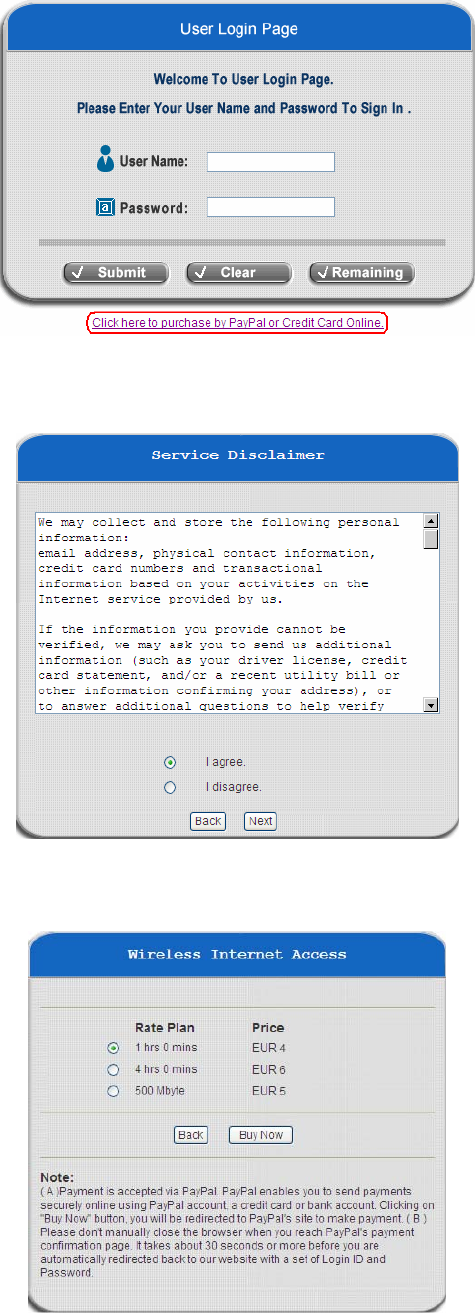
Step 1: Click the link below the login window to pay for the service via PayPal.
Step 2: Choose I agree to accept the terms of use and click Next.
Step 3: Please fill out the form and Click Submit to send out this transaction. There will be a confirm dialog box.
AirLive WIAS-1200G
User’s Guide
126
Step 4: You will be redirected to PayPal website to complete the payment process.
AirLive WIAS-1200G
User’s Guide
127
Step 5: Click Start Internet Access to use the Internet access service.
Note:
1. Payment is accepted via PayPal. PayPal enables you to send payments securely online using PayPal account,
a credit card or bank account. Clicking on Buy Now button, you will be redirected to PayPal’s site to make
payment.
2. Please do not manually close the browser when you reach PayPal’s payment confirmation page. It takes
about 30 seconds or more before you are automatically redirected back to our website with a set of Login
ID and Password.
AirLive WIAS-1200G
User’s Guide
128
Appendix E – Proxy Setting for Hotspot
HotSpot is a place such as a coffee shop, hotel, or a public area where provides Wi-Fi service for mobile and
temporary users. HotSpot is usually implemented without complicated network architecture and using some proxy
servers provided by Internet Service Providers.
In Hotspots, users usually enable their proxy setting of the browsers such as IE and Firefox. Therefore, so we need
to set some proxy configuration in the Gateway need to be set. Please follow the steps to complete the proxy
configuration:
1. Login Gateway by using “admin”.
2. Click the Network Configuration from top menu and the homepage of the Network Configuration will
appear.
AirLive WIAS-1200G
User’s Guide
129
3. Click the Proxy Server Properties from left menu and the homepage of the Proxy Server Properties will
appear.
4. Add the ISP’s proxy Server IP and Port into External Proxy Server Setting.
AirLive WIAS-1200G
User’s Guide
130
5. Enable Built-in Proxy Server in Internal Proxy Server Setting.
6. Click Apply to save the settings.

AirLive WIAS-1200G
User’s Guide
131
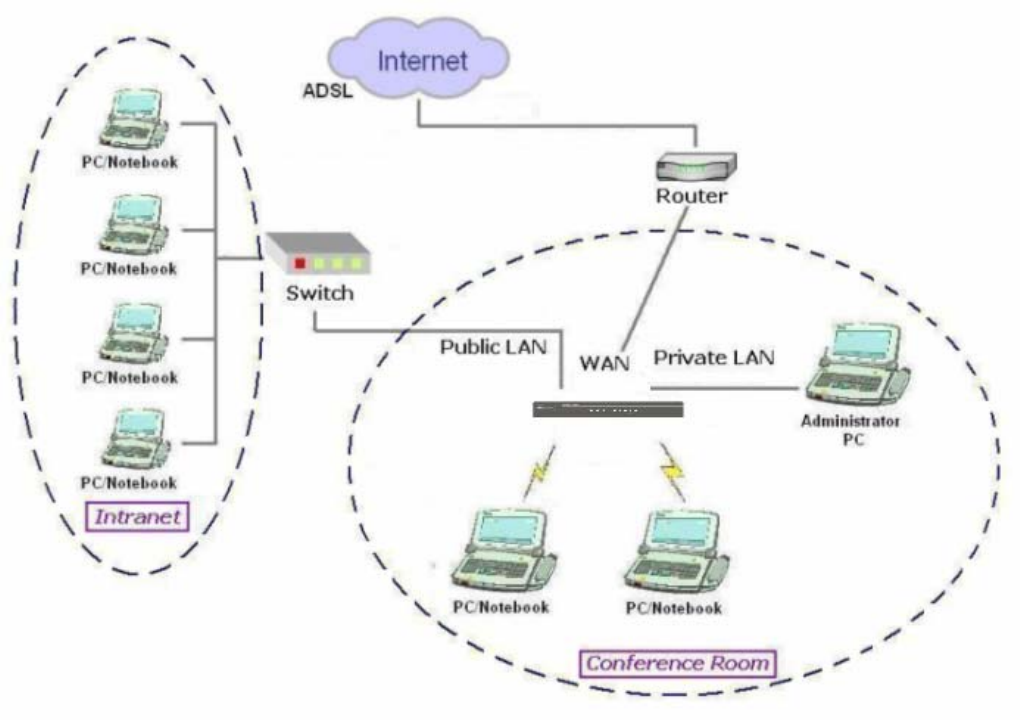
Appendix F – Proxy Setting for Enterprise
Enterprises usually isolate their intranet and internet by using more elaborated network architecture. Many
enterprises have their own proxy server which is usually at intranet or DMZ under the firewall protection.
Internet
Notebook Notebook
Access PointAccess Point
Gateway
Desktop
Core Switch Firewall
Router
L2 Switch
Proxy Server Web Server Mail Server
DMZ
In enterprises, network managers or MIS staff may often ask their users to enable their proxy setting of the browsers
such as IE and Firefox to reduce the internet access loading. Therefore some proxy configurations in the Gateway
need to be set.
Note:
Some enterprises will automatically redirect packets to proxy server by using core switch or Layer 7 devices. By the
way, the clients don’t need to enable their browsers’ proxy settings, and administrators don’t need to set any proxy
configuration in the Gateway.
Please follow the steps to complete the proxy configuration:
AirLive WIAS-1200G
User’s Guide
132
Gateway setting
1. Login Gateway by using “admin”.
2. Click the Network Configuration from top menu and the homepage of the Network Configuration will
appear.
3. Click the Proxy Server Properties from left menu and the homepage of the Proxy Server Properties will
appear.
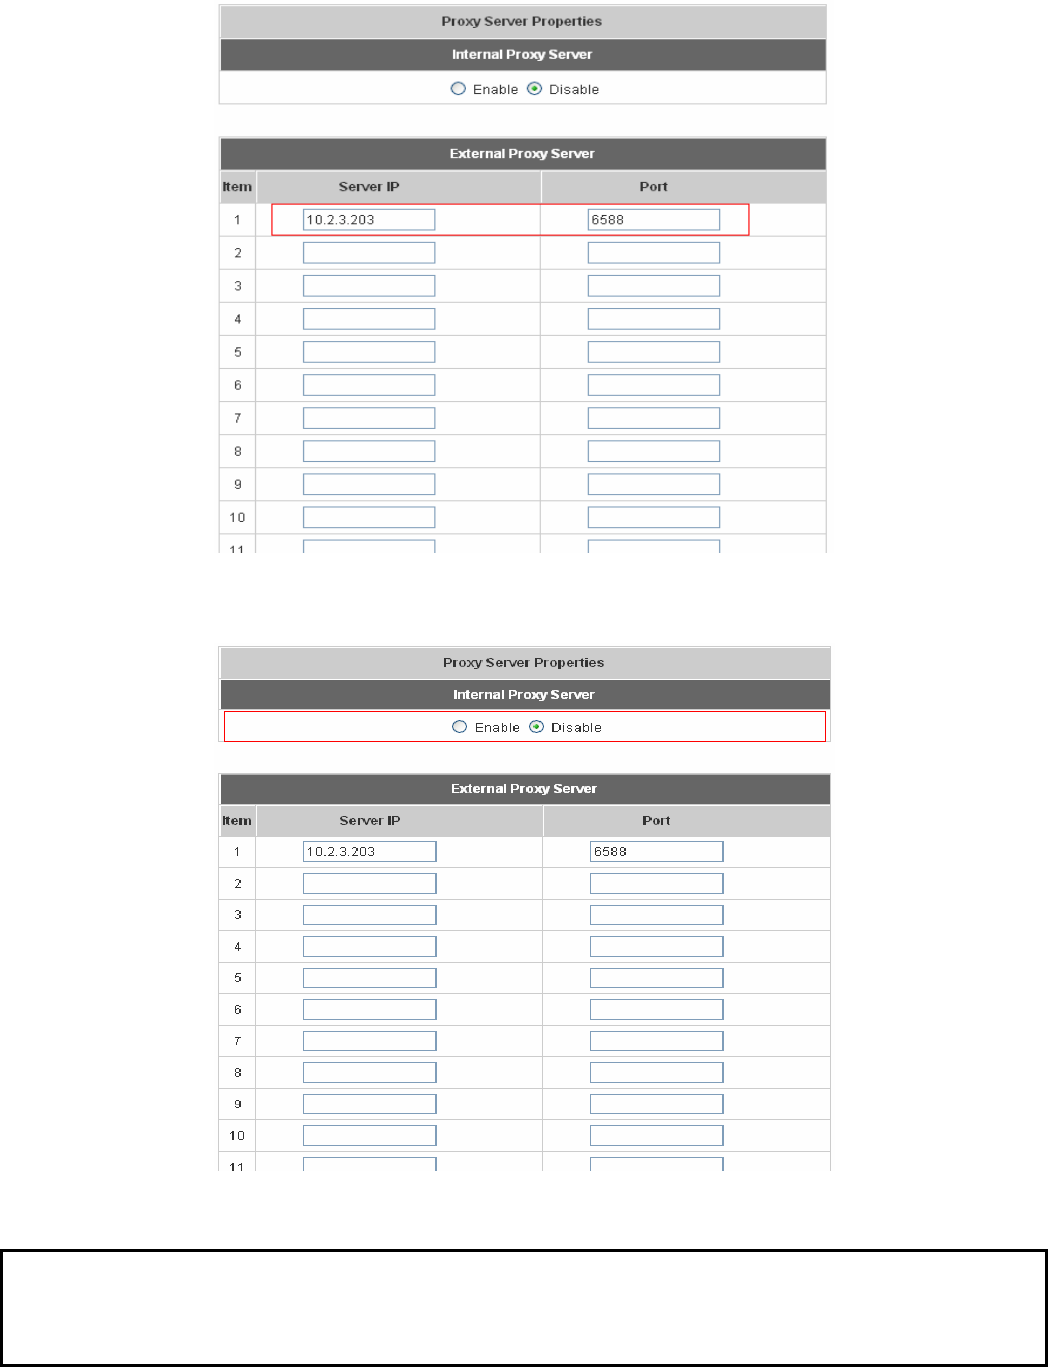
AirLive WIAS-1200G
User’s Guide
133
4. Add your proxy Server IP and Port into External Proxy Server Setting.
5. Disable Built-in Proxy Server in Internal Proxy Server Setting.
6. Click Apply to save the settings.
Note
:
If your proxy server is disabled, it will make the user authentication operation abnormal. When users open the
browser, the login page won’t appear because the proxy server is down. Please make sure your proxy server is
always available.
AirLive WIAS-1200G
User’s Guide
134
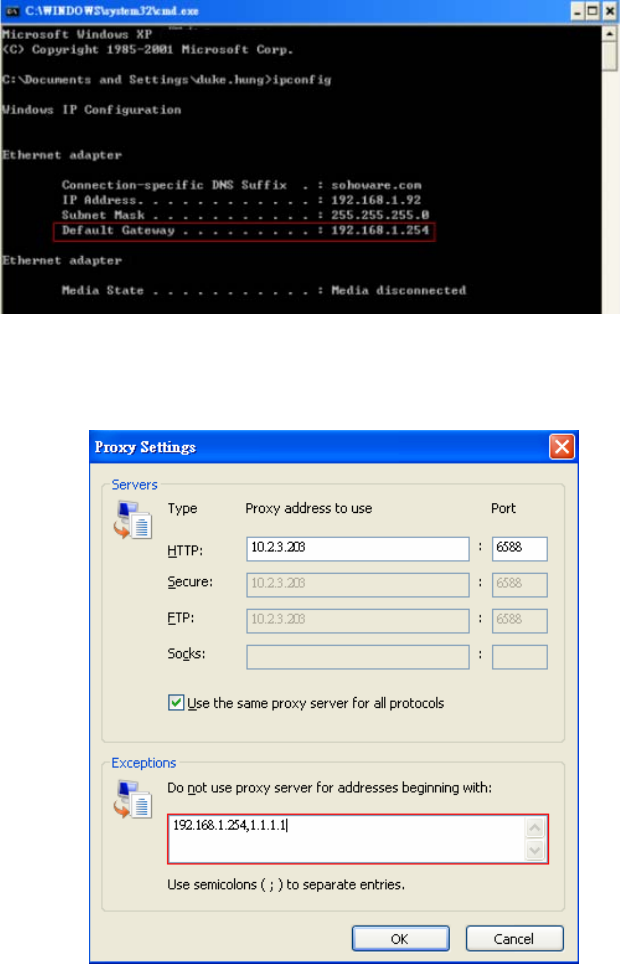
Client setting
It is necessary for clients to add default gateway IP address into proxy exception information so the user login
successful page can show up normally.
1. Use command “ipconfig” to get Default Gateway IP Address.
2. Open browser to add default gateway IP address (e.g. 192.168.1.254) and logout page IP address
“1.1.1.1” into proxy exception information.
z For IE
AirLive WIAS-1200G
User’s Guide
135
z For Firefox
AirLive WIAS-1200G
User’s Guide
136
Appendix G – Disclaimer for On-Demand Users
In AirLive WIAS-1200G, the end user first gets a login page when she/he opens its web browser right after
associating with an access point. However, in some situations, the hotspot owners or MIS staff may want
to display “terms of use” or announcement information before the login page. Hotspot owners or MIS staff
can design a new disclaimer/announcement page and save the page in their local server. After the
agreement shown on the page is read, users are asked whether they agree or disagree with the
disclaimer. By clicking “I agree,” users are able to log in. If users choose to decline, they will get a popup
window saying they are unable to log in. The basic design is to have the disclaimer and login function in
the same page but with the login function hidden until users agree with the disclaimer.
Here the codes are supplied. Please note that the blue part is for the login feature, the red part is the
disclaimer, and the green part can be modified freely by administrators to suit the situation better. Now
the default is set to “I disagree” with the disclaimer. Administrators can change the purple part to set
“agree” as the default or set no default. These codes should be saved in local storage with a name
followed by .html, such as login_with_disclaimer.html.
<html>
<head>
<META HTTP-EQUIV="Pragma" CONTENT="no-cache">
<meta http-equiv="Content-Type" content="text/html; charset=utf-8">
<META HTTP-EQUIV="Cache-Control" CONTENT="no-cache">
<link href="../include/style.css" rel="stylesheet" type="text/css">
<title>Login</title>
<script language="javascript1.2">
var pham = document.cookie;
var disableButton=false;
function getCookie(name)
{
name += "="; // append '=' to name string
var i = 0; // index of first name=value pair
while (i < pham.length) {
var offset = i + name.length; // end of section to compare name string
if (pham.substring(i, offset) == name) { // if string matches
var endstr = pham.indexOf(";", offset); //end of name=value pair
if (endstr == -1) endstr = pham.length;
return unescape(pham.substring(offset, endstr));
AirLive WIAS-1200G
User’s Guide
137
// return cookie value section
}
i = pham.indexOf(" ", i) + 1; // move i to next name=value pair
if (i == 0) break; // no more values in cookie string
}
return null; // cookie not found
}
function CodeCookie(str)
{
var strRtn="";
for (var i=str.length-1;i>=0;i--)
{
strRtn+=str.charCodeAt(i);
if (i) strRtn+="a";
}
return strRtn;
}
function DecodeCookie(str)
{
var strArr;
var strRtn="";
strArr=str.split("a");
for(var i=strArr.length-1;i>=0;i--)
strRtn+=String.fromCharCode(eval(strArr[i]));
return strRtn;
}
function MM_swapImgRestore() { //v3.0
var i,x,a=document.MM_sr; for(i=0;a&&i<a.length&&(x=a[i])&&x.oSrc;i++) x.src=x.oSrc;
}
function MM_preloadImages() { //v3.0
var d=document; if(d.images){ if(!d.MM_p) d.MM_p=new Array();
var i,j=d.MM_p.length,a=MM_preloadImages.arguments; for(i=0; i<a.length; i++)
AirLive WIAS-1200G
User’s Guide
138
if (a[i].indexOf("#")!=0){ d.MM_p[j]=new Image; d.MM_p[j++].src=a[i];}}
}
function MM_findObj(n, d) { //v4.01
var p,i,x; if(!d) d=document; if((p=n.indexOf("?"))>0&&parent.frames.length) {
d=parent.frames[n.substring(p+1)].document; n=n.substring(0,p);}
if(!(x=d[n])&&d.all) x=d.all[n]; for (i=0;!x&&i<d.forms.length;i++) x=d.forms[i][n];
for(i=0;!x&&d.layers&&i<d.layers.length;i++) x=MM_findObj(n,d.layers[i].document);
if(!x && d.getElementById) x=d.getElementById(n); return x;
}
function MM_swapImage() { //v3.0
var i,j=0,x,a=MM_swapImage.arguments; document.MM_sr=new Array; for(i=0;i<(a.length-2);i+=3)
if ((x=MM_findObj(a[i]))!=null){document.MM_sr[j++]=x; if(!x.oSrc) x.oSrc=x.src; x.src=a[i+2];}
}
function init(form)
{
id = getCookie("username");
if(id!="" && id!=null)
{
form.myusername.value = id;
}
disclaimer.style.display='';
login.style.display='none';
}
function Before_Submit(form)
{
if(form.myusername.value == "")
{
alert("Please enter username.");
form.myusername.focus();
form.myusername.select();
disableButton=false;
return false;
}
if(form.mypassword.value == "")
AirLive WIAS-1200G
User’s Guide
139
{
alert("Please enter password.");
form.mypassword.focus();
form.mypassword.select();
disableButton=false;
return false;
}
if(disableButton==true)
{
alert("The system is now logging you in, please wait a moment.");
return false;
}
else
{
disableButton=true;
return true;
}
return true;
}
function reminder_onclick(form)
{
Reminder.myusername.value = form.myusername.value;
Reminder.mypassword.value = form.mypassword.value;
Reminder.submit();
}
function cancel_onclick(form)
{
form.reset();
}
function check_agree(form)
{
if(form.selection[1].checked == true)
{
alert("You disagree with the disclaimer, therefore you will NOT be able to log in.");
return false;
}
AirLive WIAS-1200G
User’s Guide
140
disclaimer.style.display='none';
login.style.display='';
return true;
}
</script>
</head>
<body style="font-family: Arial" bgcolor="#FFFFFF"
onload="init(Enter);MM_preloadImages('../images/submit0.gif','../images/clear0.gif','../images/remaining0.gif')">
<ilayer width=&{marquee_width}; height=&{marquee_height}; name="cmarquee01">
<layer name="cmarquee02" width=&{marquee_width}; height=&{marquee_height};></layer>
</ilayer>
<form action="userlogin.shtml" method="post" name="Enter">
<table name="disclaimer" id="disclaimer" width="460" height="430" border="0" align="center"
background="../images/agreement.gif">
<tr>
<td height="50" align="center" valign="middle"><div align="center" class="style5">Service
Disclaimer</div></td>
</tr>
<tr>
<td height="260" align="center" valign="middle"><table width="370" height="260" border="0" align="center">
<tr>
<td>
<textarea name="textarea" cols="50" rows="15" align="center" readonly>
We may collect and store the following personal information:
e-mail address, physical contact information, credit card numbers and transactional information based on your
activities on the Internet service provided by us.
If the information you provide cannot be verified, we may ask you to send us additional information (such as your
driver license, credit card statement, and/or a recent utility bill or other information confirming your address), or to
answer additional questions to help verify your information.)
Our primary purpose in collecting personal information is to provide you with a safe, smooth, efficient, and
customized experience. You agree that we may use your personal information to: provide the services and customer
support you request; resolve disputes, collect fees, and troubleshoot problems; prevent potentially prohibited or
illegal activities; customize, measure, and improve our services and the site's content and layout; compare
AirLive WIAS-1200G
User’s Guide
141
information for accuracy, and verify it with third parties.
We may disclose personal information to respond to legal requirements, enforce our policies, respond to claims that
an activity violates the rights of others, or protect anyone's rights, property, or safety.
We may also share your personal information with:
members of our corporate family to help detect and prevent potentially illegal acts; service providers under contract
who help with our business operations; (such as fraud investigations and bill collection) other third parties to whom
you explicitly ask us to send your information; (or about whom you are otherwise explicitly notified and consent to
when using a specific service) law enforcement or other governmental officials, in response to a verified request
relating to a criminal investigation or alleged illegal activity; (In such events we will disclose name, city, state,
telephone number, email address, User ID history, and fraud complaints)
xxxxx participants under confidentiality agreement, as we in our sole discretion believe necessary or appropriate in
connection with an investigation of fraud, intellectual property infringement, piracy, or other unlawful activity; (In such
events we will disclose name, street address, city, state, zip code, country, phone number, email, and company
name.) and other business entities, should we plan to merge with, or be acquired by that business entity. (Should
such a combination occur, we will require that the new combined entity follow this privacy policy with respect to your
personal information. If your personal information will be used contrary to this policy, you will receive prior notice.)
Without limiting the above, in an effort to respect your privacy and our ability to keep the community free from bad
actors, we will not otherwise disclose your personal information to law enforcement, other government officials, or
other third parties without a subpoena, court order or substantially similar legal procedure, except when we believe
in good faith that the disclosure of information is necessary to prevent imminent physical harm or financial loss or to
report suspected illegal activity.
Your password is the key to your account. Do not disclose your password to anyone. Your information is stored on
our servers. We treat data as an asset that must be protected and use lots of tools (encryption, passwords, physical
security, etc.) to protect your personal information against unauthorized access and disclosure. However, as you
probably know, third parties may unlawfully intercept or access transmissions or private communications, and other
users may abuse or misuse your personal information that they collect from the site. Therefore, although we work
very hard to protect your privacy, we do not promise, and you should not expect, that your personal information or
private communications will always remain private.
By agreeing above, I hereby authorize xxxxx to process my service charge(s) by way of my credit card.
</textarea>
</td>
</tr>
</table></td>
</tr>
AirLive WIAS-1200G
User’s Guide
142
<tr>
<td height="40"><table width="170" height="20" border="0" align="center" cellpadding="2">
<tr>
<td align="left"><input name="selection" value="1" type="radio"></td>
<td><span class="style4">I agree.</span></td>
</tr>
<tr>
<td align="left"><input name="selection" value="2" checked type="radio"></td>
<td><span class="style4">I disagree.</span></td>
</tr>
</table></td>
</tr>
<tr>
<td height="30"><table width="110" height="20" border="0" align="center" cellpadding="2">
<tr>
<td width="45" align="center" valign="middle"><input name="next_button" type="button" value="Next"
onclick="javascript:check_agree(Enter)"></td>
</tr>
</table></td>
</tr>
<tr>
<td height="20"> </td>
</tr>
</table>
<div align="center">
<table name="login" id="login" width="497" height="328" border="0" align="center" cellpadding="2" cellspacing="0"
background="../images/userlogin.gif">
<tr>
<td height="146" colspan="2"> </td>
</tr>
<tr>
<td width="43%" height="53"> </td>
<td><input type="text" name="myusername" size="20"></td>
</tr>
<tr>
<td height="42"> </td>
<td><input type="password" name="mypassword" size="20"></td>
</tr>
AirLive WIAS-1200G
User’s Guide
143
<tr>
<td colspan="2">
<div align="center">
<a onclick="javascript:if(Before_Submit(Enter)){Enter.submit();}" onMouseOut="MM_swapImgRestore()"
onMouseOver="MM_swapImage('Image3','','../images/submit0.gif',1)">
<img src="../images/submit.gif" name="Image3" width="124" height="38" border="0" >
</a>
<a onclick="cancel_onclick(Enter)" onMouseOut="MM_swapImgRestore()"
onMouseOver="MM_swapImage('Image5','','../images/clear0.gif',1)">
<img src="../images/clear1.gif" name="Image5" width="124" height="38" border="0">
</a>
<a onclick="javascript:if(Before_Submit(Enter)){reminder_onclick(Enter);}"
onMouseOut="MM_swapImgRestore()" onMouseOver="MM_swapImage('Image4','','../images/remaining0.gif',1)">
<img src="../images/remaining.gif" name="Image4" width="124" height="38" border="0">
</a>
</div>
</td>
</tr>
</table>
<table>
<tr>
<td width="100%">
<font color="#808080" size="2"><script language="JavaScript">if( creditcardenable == "Enabled" )
document.write("<a href=\"../loginpages/credit_agree.shtml\">Click here to purchase by Credit Card
Online.<a>");</script></font>
</td>
</tr>
</table>
</div>
</form>
<form action="reminder.shtml" method="post" name="Reminder">
<input type=hidden name=myusername value="">
<input type=hidden name=mypassword value="">
</form>
<br>
<div align="center">
<table>
<tr>
AirLive WIAS-1200G
User’s Guide
144
<td width="100%">
<font color="#808080" size="2"><script language="JavaScript">document.write(copyright);</script></font></td>
</tr>
</table>
</div>
</body>
</html>
AirLive WIAS-1200G
User’s Guide
145
Appendix H – Network Configuration & External Network
Access
1. Network Configuration on PC
After AirLive WIAS-1200G is installed, the following configurations must be set up on the PC: Internet Connection
Setup and TCP/IP Network Setup.
y Internet Connection Setup
Windows 9x/2000
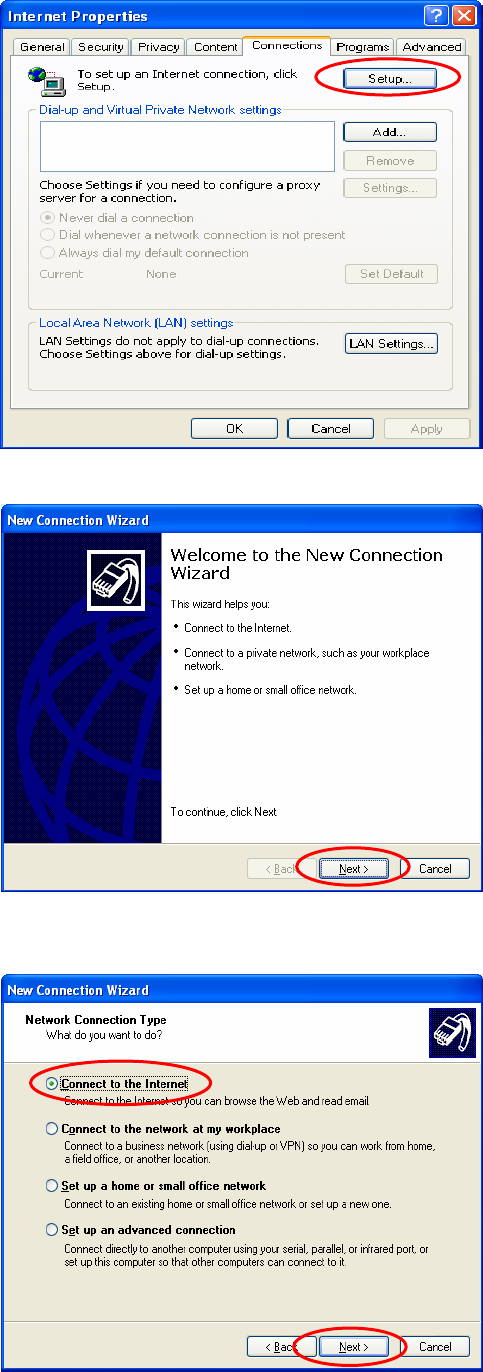
1) Choose Start > Control Panel > Internet
Options.
2) Choose the “Connections” label, and then click
Setup.
AirLive WIAS-1200G
User’s Guide
146
3) Choose “I want to set up my Internet
connection manually, or I want to connect
through a local Area network (LAN)”, and then
click Next.
4) Choose “I connect through a local area
network (LAN)” and click Next.
5) DO NOT choose any option in the following LAN
window for Internet configuration, and just click
Next.
AirLive WIAS-1200G
User’s Guide
147
6) Choose “No”, and click Next.
7) Finally, click Finish to exit the Internet
Connection Wizard. Now, the set up has been
completed.
Windows XP
1) Choose Start > Control Panel > Internet
Option.
AirLive WIAS-1200G
User’s Guide
148
2) Choose the “Connections” label, and then click
Setup.
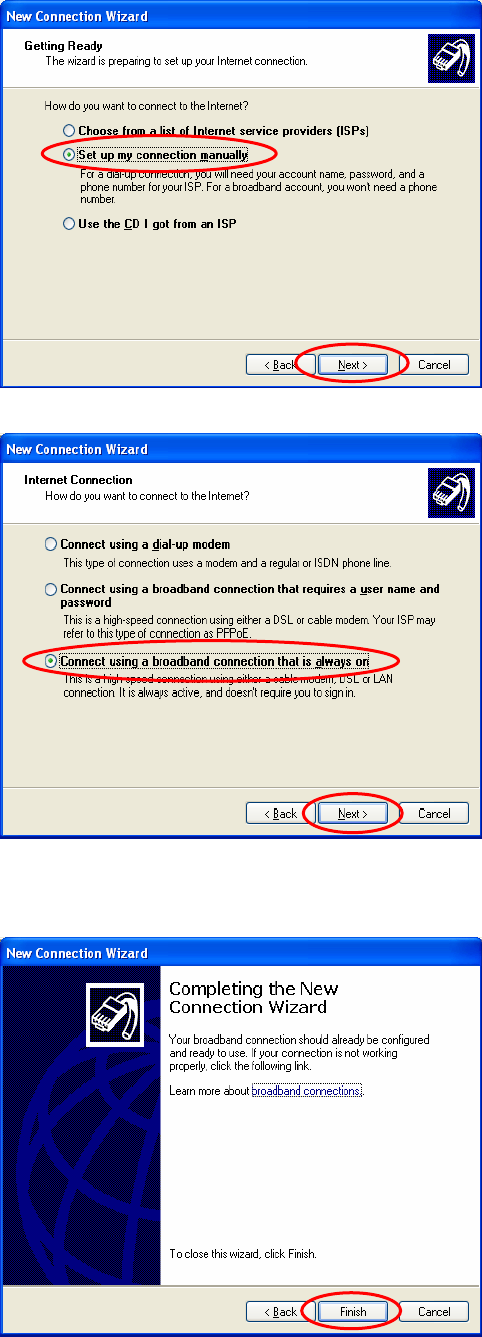
3) Click Next when Welcome to the New
Connection Wizard screen appears.
4) Choose “Connect to the Internet” and then
click Next.
AirLive WIAS-1200G
User’s Guide
149
5) Choose “Set up my connection manually” and
then click Next.
6) Choose “Connect using a broadband
connection that is always on” and then click
Next.
7) Finally, click Finish to exit the Connection
Wizard. Now, you have completed the setup.
AirLive WIAS-1200G
User’s Guide
150
y TCP/IP Network Setup
If the operating system of your PC is Windows 95/98/ME/2000/XP, keep the default settings without any change
to directly start/restart the system. With the factory default settings, during the process of starting the system,
AirLive WIAS-1200G with DHCP function will automatically assign an appropriate IP address and related
information for each PC. If the Windows operating system is not a server version, the default settings of the
TCP/IP will regard the PC as a DHCP client, and this function is called “Obtain an IP address automatically”.
If you want to check the TCP/IP setup or use the static IP in the LAN1/LAN2 or LAN3/LAN4 section, please
follow the following steps:
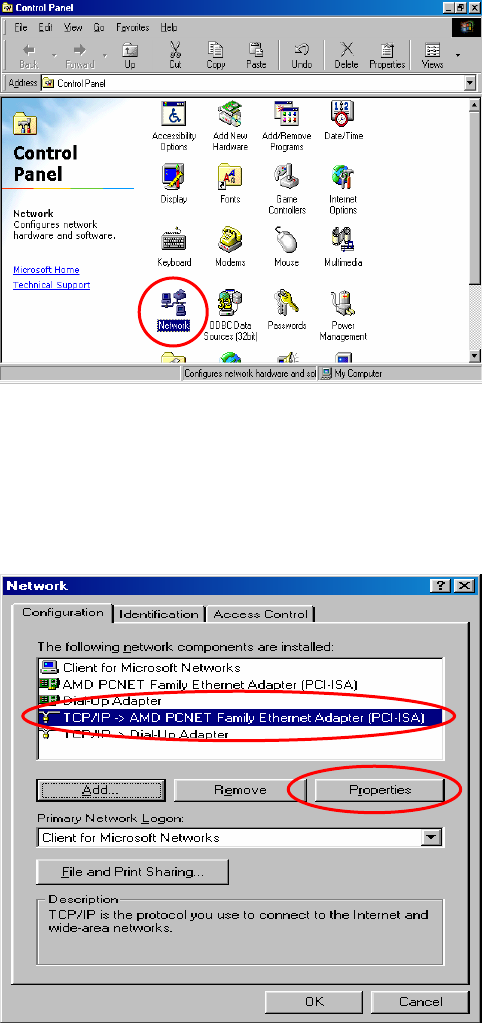
Check the TCP/IP Setup of Window 9x/ME
1) Choose Start > Control Panel > Network.
2) Choose “Configuration” label and select
“TCP/IP > AMD PCNET Family Ethernet
Adapter (PCI-ISA)”, and then click Properties.
Now, you can choose to use DHCP or specific IP
address.
AirLive WIAS-1200G
User’s Guide
151
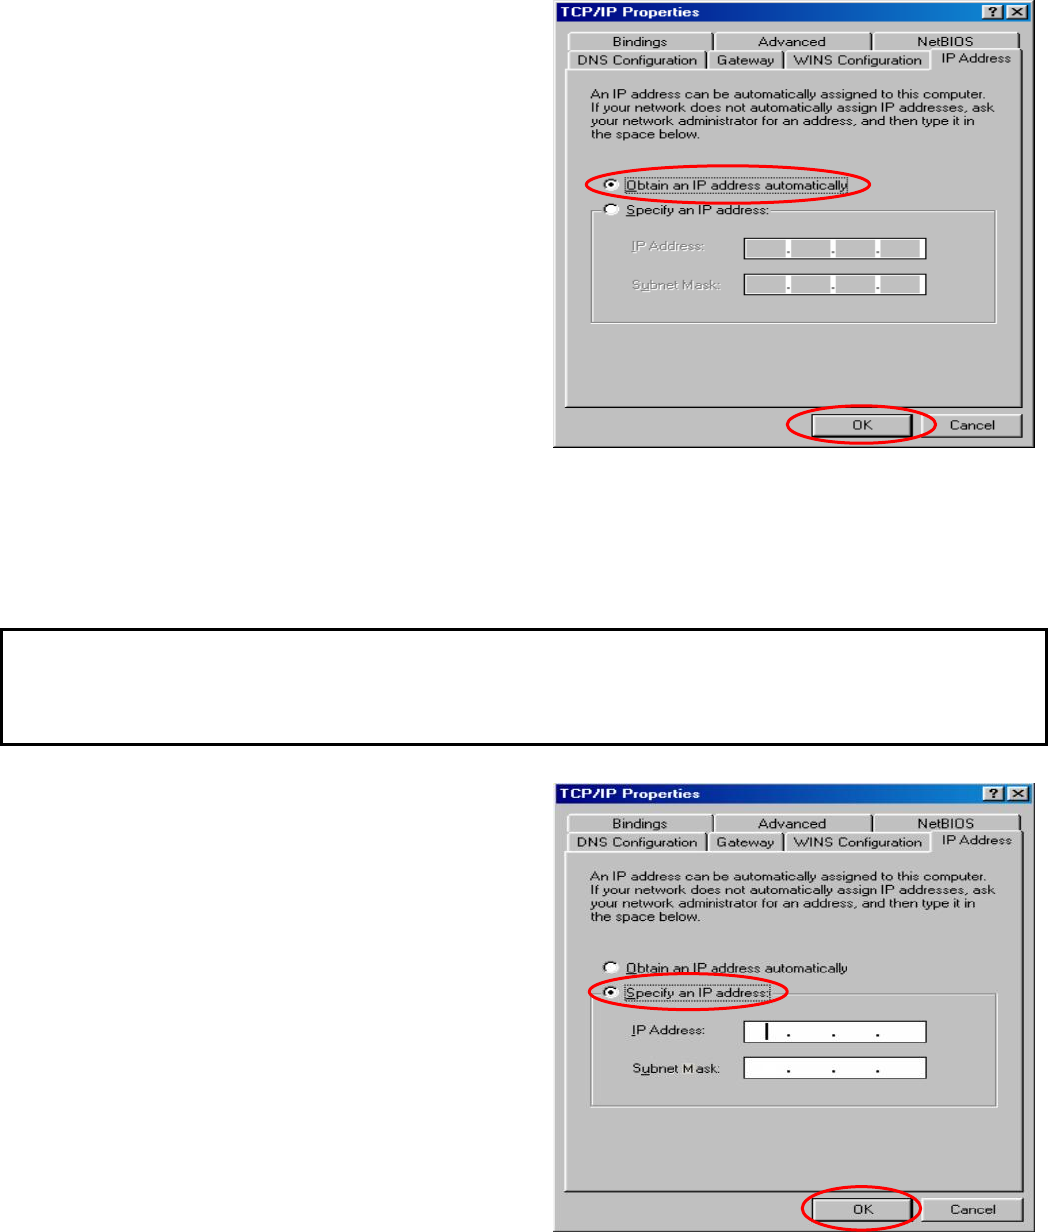
3) Using DHCP: If you want to use DHCP, please
choose “Obtain an IP address automatically”
on the “IP Address” label and click OK. This is
also the default setting of Windows. Then, reboot
the PC to make sure an IP address is obtained
from AirLive WIAS-1200G.
4) Using Specific IP Address: If you want to use specific IP address, you have to ask the network
administrator for the information of AirLive WIAS-1200G: IP address, Subnet Mask, New gateway and
DNS server address.
Note:
If your PC has been set up completed, please inform the network administrator before proceeding to the following
steps.
y Please choose “Specify an IP address”
and enter the information given by the
network administrator in “IP Address” and
“Subnet Mask” on the “IP Address” label
and then click OK.
AirLive WIAS-1200G
User’s Guide
152
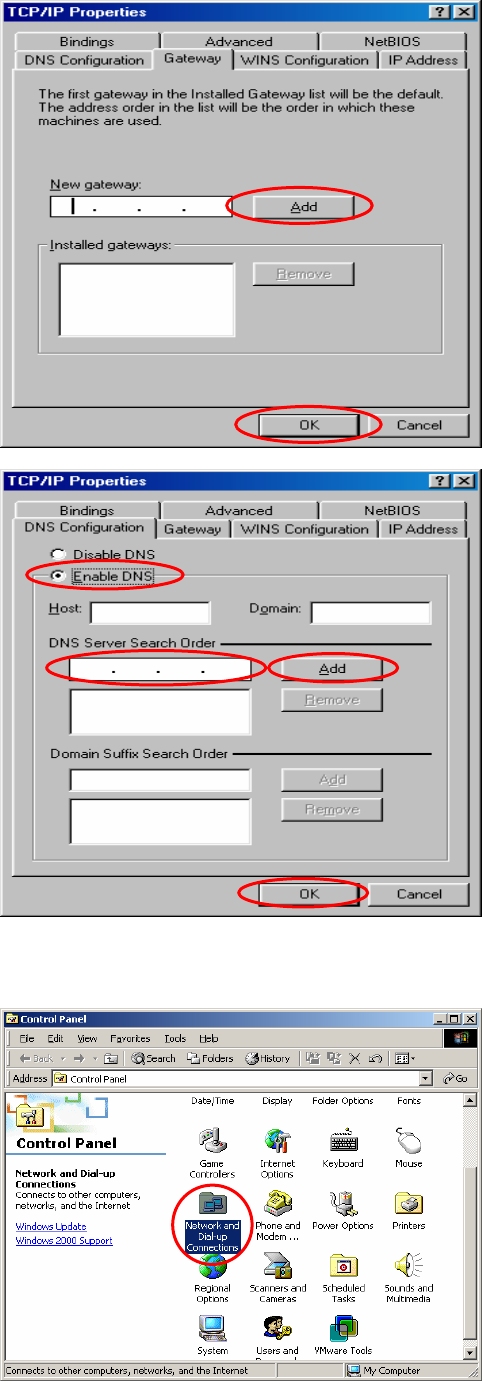
y Choose “Gateway” label and enter the
gateway address of AirLive WIAS-1200G in
the “New gateway:” and then click Add
and OK.
y Choose “DNS Configuration” label. If the
DNS Server column is blank, please click
Enable DNS and then enter the DNS
address or the DNS address provided by
ISP. Then, click Add and click OK.
Check the TCP/IP Setup of Window 2000
1) Select Start > Control Panel > Network and
Dial-up Connections.
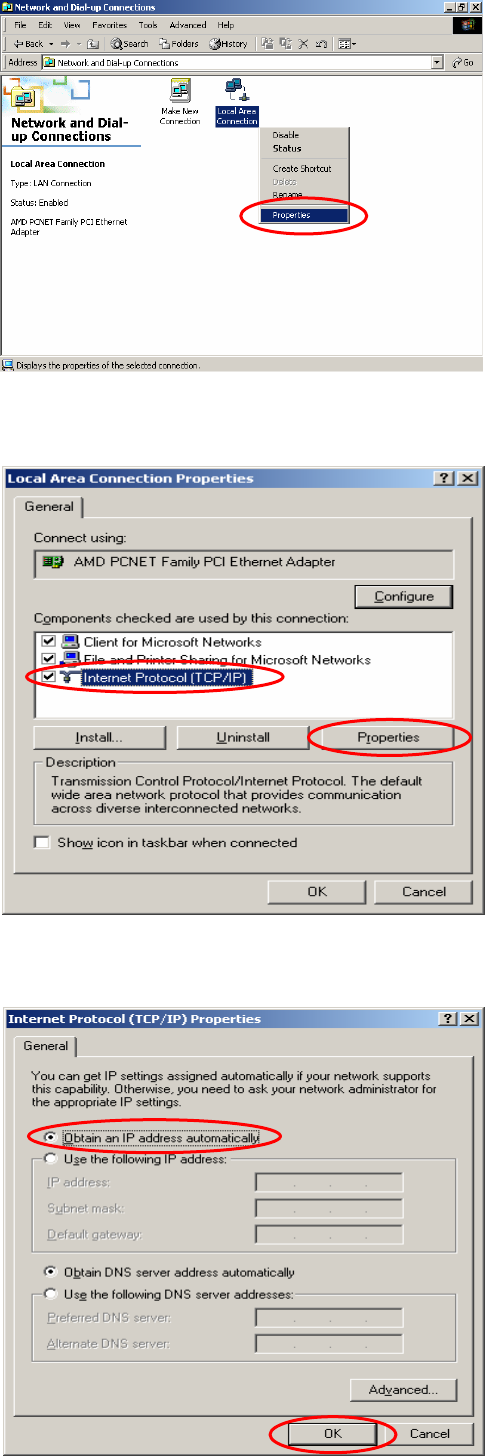
AirLive WIAS-1200G
User’s Guide
153
2) Click the right button of the mouse on “Local
Area Connection” icon and then select
“Properties”.
3) Select “Internet Protocol (TCP/IP)” and then
click Properties. Now, you can choose to use
DHCP or specific IP address, please proceed to
the following steps.
4) Using DHCP: If want to use DHCP, please
choose “Obtain an IP address automatically”
and click OK. This is also the default setting of
Windows. Then, reboot the PC to make sure an
IP address is obtained from AirLive WIAS-1200G.
AirLive WIAS-1200G
User’s Guide
154
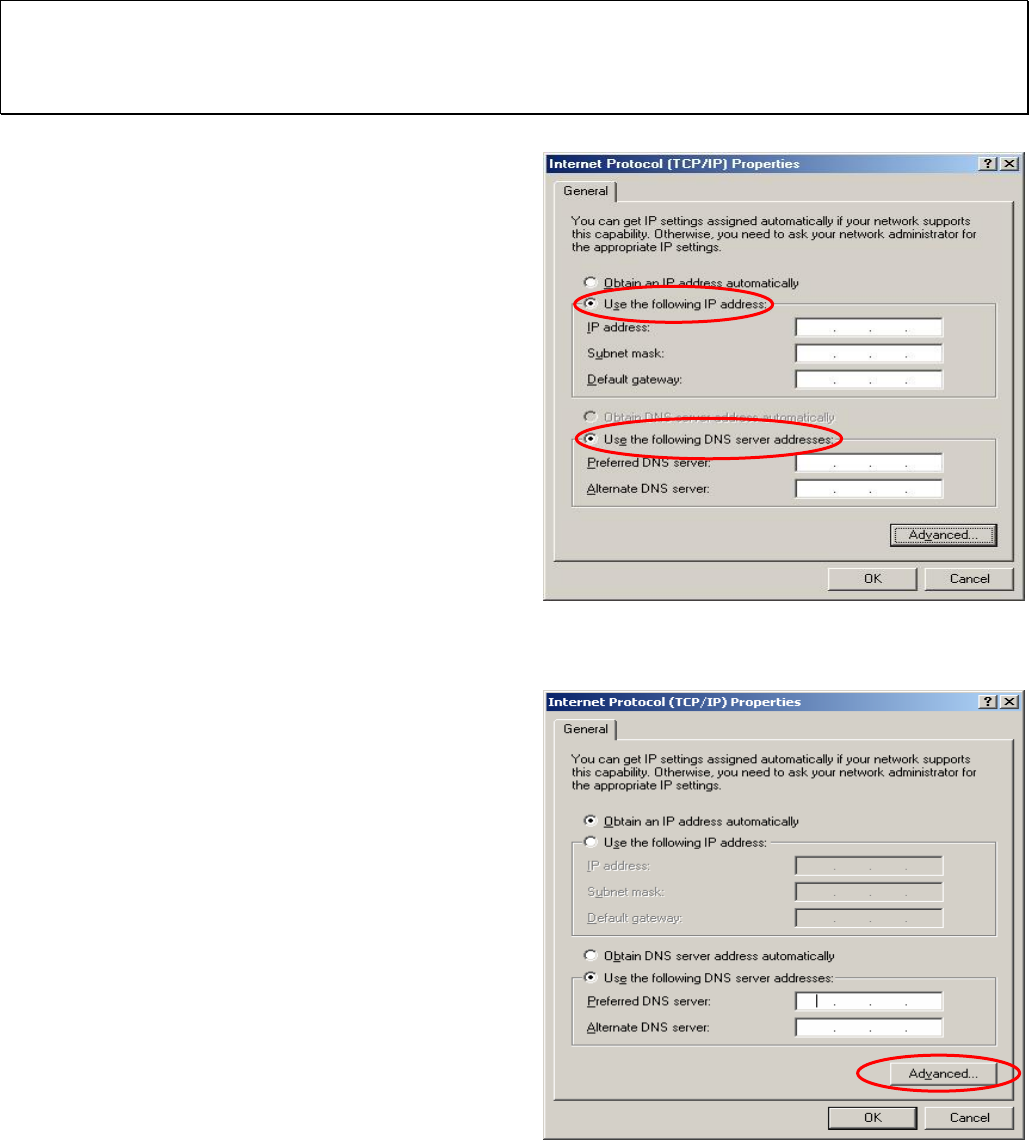
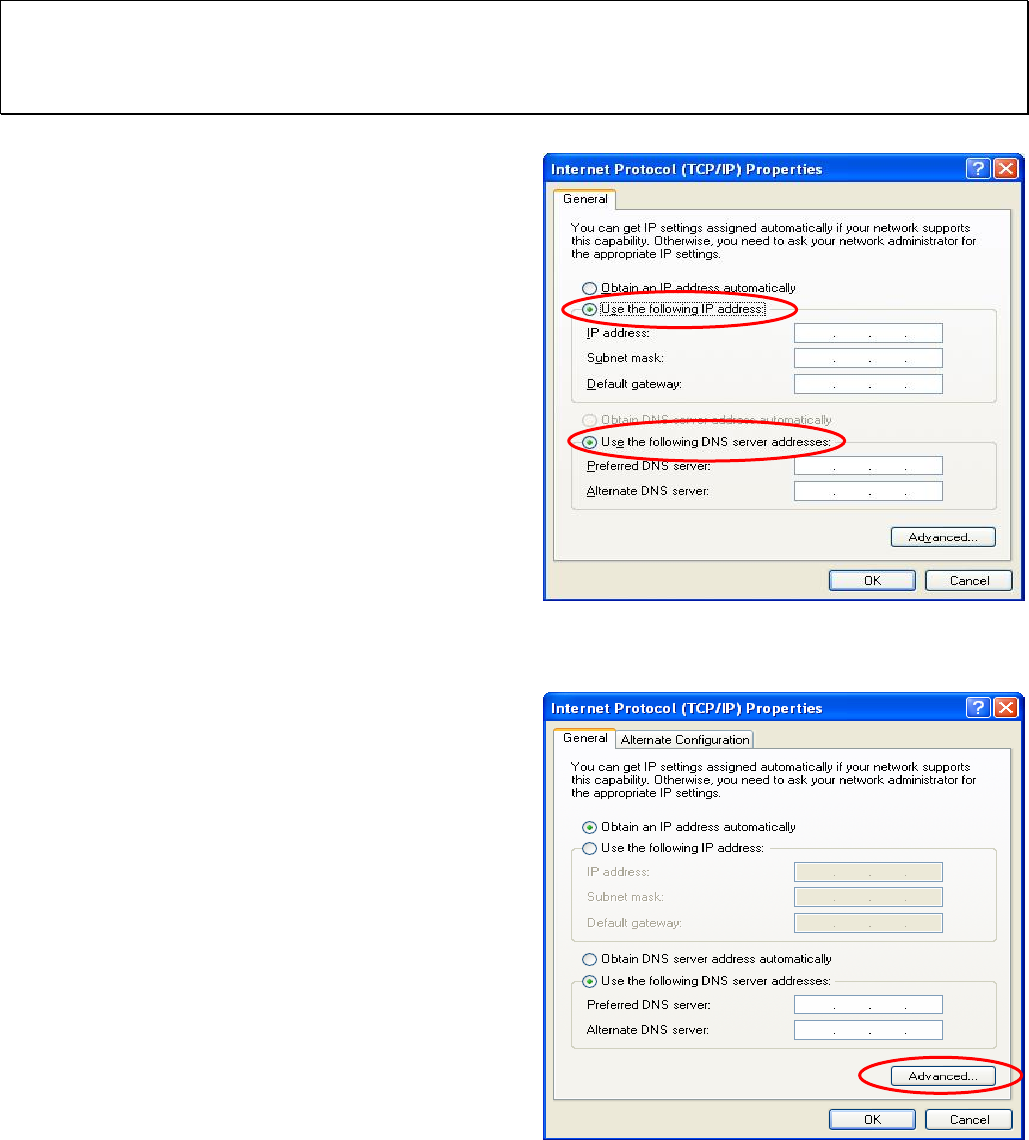
5) Using Specific IP Address: If you want to use specific IP address, you have to ask the network
administrator for the information of the AirLive WIAS-1200G: IP address, Subnet Mask, New gateway
and DNS server address.
Note:
If your PC has been set up completed, please inform the network administrator before proceeding to the following
steps.
y Please choose “Use the following IP
address” and enter the information given
from the network administrator in “IP
address” and “Subnet mask” If the DNS
Server column is blank, please choose
“Using the following DNS server
addresses” and then enter the DNS
address or the DNS address provided by
ISP and then click OK.
y Then, click Advanced in the window of
“Internet Protocol (TCP/IP)”.
AirLive WIAS-1200G
User’s Guide
155
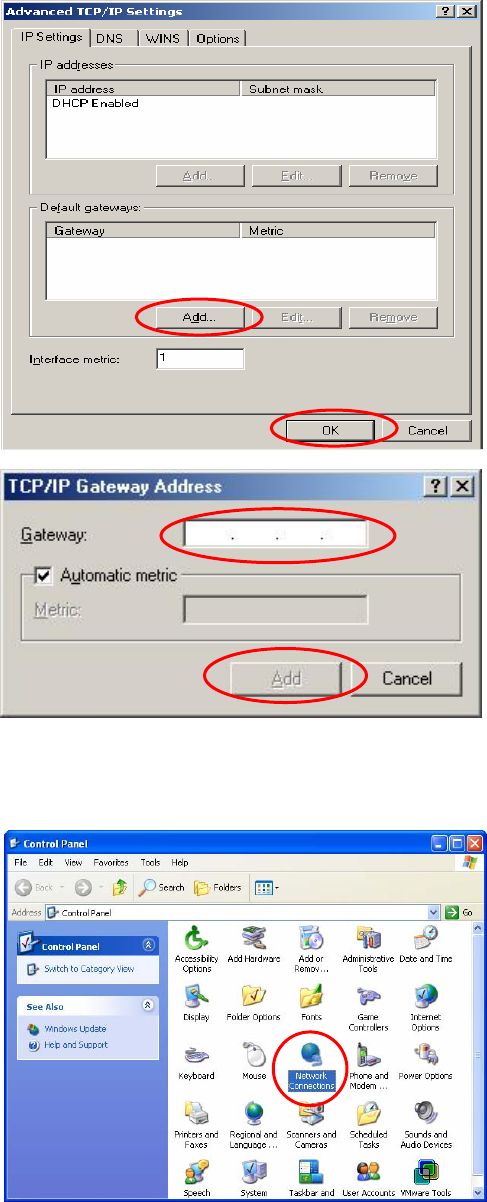
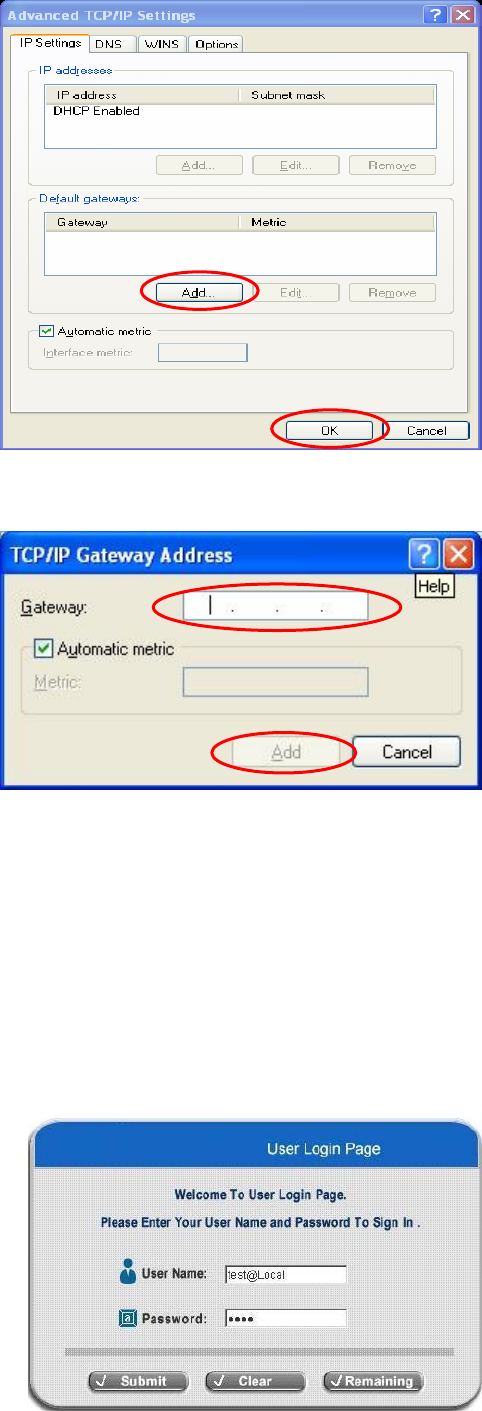
y Choose the “IP Settings” label and click
Add below the “Default Gateways” column
and the “TCP/IP Gateway Address”
window will appear. Enter the gateway
address of AirLive WIAS-1200G in the
“Gateway” of “TCP/IP Gateway Address”
window, and then click Add. After back to
the “IP Settings” label, click OK to finish.
Check the TCP/IP Setup of Window XP
1) Select Start > Control Panel > Network
Connection.

AirLive WIAS-1200G
User’s Guide
156
2) Click the right button of the mouse on the “Local
Area Connection” icon and select “Properties”
3) Select “General” label and choose “Internet
Protocol (TCP/IP)” and then click Properties.
Now, you can choose to use DHCP or specific IP
address, please proceed to the following steps.
4) Using DHCP: If want to use DHCP, please
choose “Obtain an IP address automatically”
and click OK. This is also the default setting of
Windows. Then, reboot the PC to make sure an
IP address is obtained from AirLive WIAS-1200G.
AirLive WIAS-1200G
User’s Guide
157
5) Using Specific IP Address: If want to use specific IP address, you have to ask the network administrator
for the information of the AirLive WIAS-1200G: IP address, Subnet Mask, New gateway and DNS server
address.
Note:
If your PC has been set up completed, please inform the network administrator before proceeding to the following
steps.
y Please choose “Use the following IP
address” and enter the information given
from the network administrator in “IP
address” and “Subnet mask” If the DNS
Server column is blank, please choose
“Using the following DNS server
addresses” and then enter the DNS
address or the DNS address provided by
ISP and then click OK.
y Then, click Advanced in the window of
“Internet Protocol (TCP/IP)”.
AirLive WIAS-1200G
User’s Guide
158
y Choose the “IP Settings” label and click
“Add” below the “Default Gateways”
column and the “TCP/IP Gateway
Address” window will appear. Enter the
gateway address of AirLive WIAS-1200G in
the “Gateway” of “TCP/IP Gateway
Address” window, and then click Add. After
back to the “IP Settings” label, click OK to
finish.
2. External Network Access
If all the steps are set properly, AirLive WIAS-1200G can be further connected to the managed network to
experience the controlled network access environment. Firstly, connect an end-user device to the network at AirLive
WIAS-1200G’s LAN1/LAN2 and set to obtain an IP address automatically. After the network address is obtained at
the user end, open an Internet browser and link to any website. Then, the default logon webpage will appear in the
Internet browser.
1) First, connect a user-end device to LAN3/LAN4 port of the
AirLive WIAS-1200G, and set the dynamical access
network. After the user end obtains the network address,
please open an Internet browser and the default login
webpage will appear on the Internet browser.
Key in the username and password created in the local
user account or the on-demand user account in the
interface and then click Submit button. Here, we key in
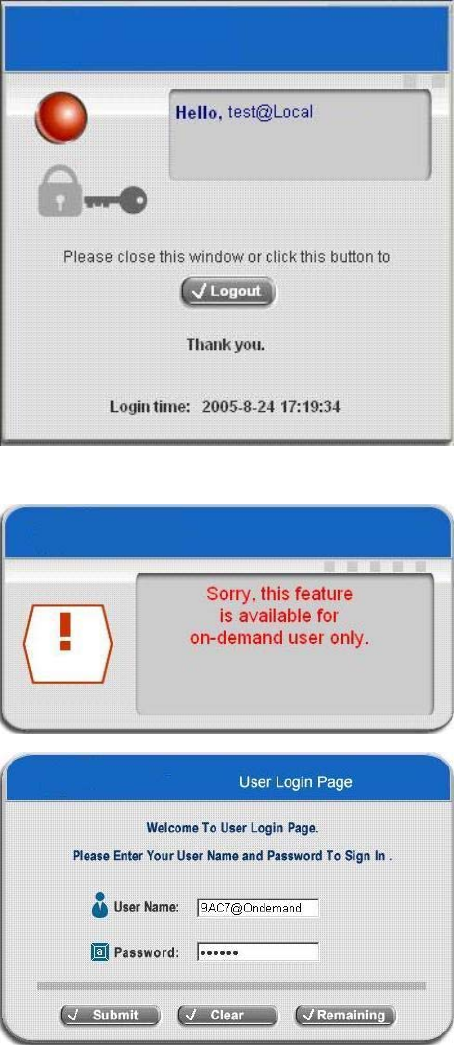
AirLive WIAS-1200G
User’s Guide
159
the local user account (e.g. test@Local for the username and test for the password) to connect the network.
2) Login page appearing means AirLive WIAS-1200G has
been installed and configured successfully. Now, you can
browse the network or surf the Internet!
3) If the screen shows “Sorry, this feature is available for
on-demand user only”, the “Remaining” button has
been clicked. This button is only for on-demand users. For
users other than on-demand users, please click the
Submit button.
4) An on-demand user can enter the username and
password in the “User Login Page” and click the
Remaining button to view the remaining time the account.
AirLive WIAS-1200G
User’s Guide
160
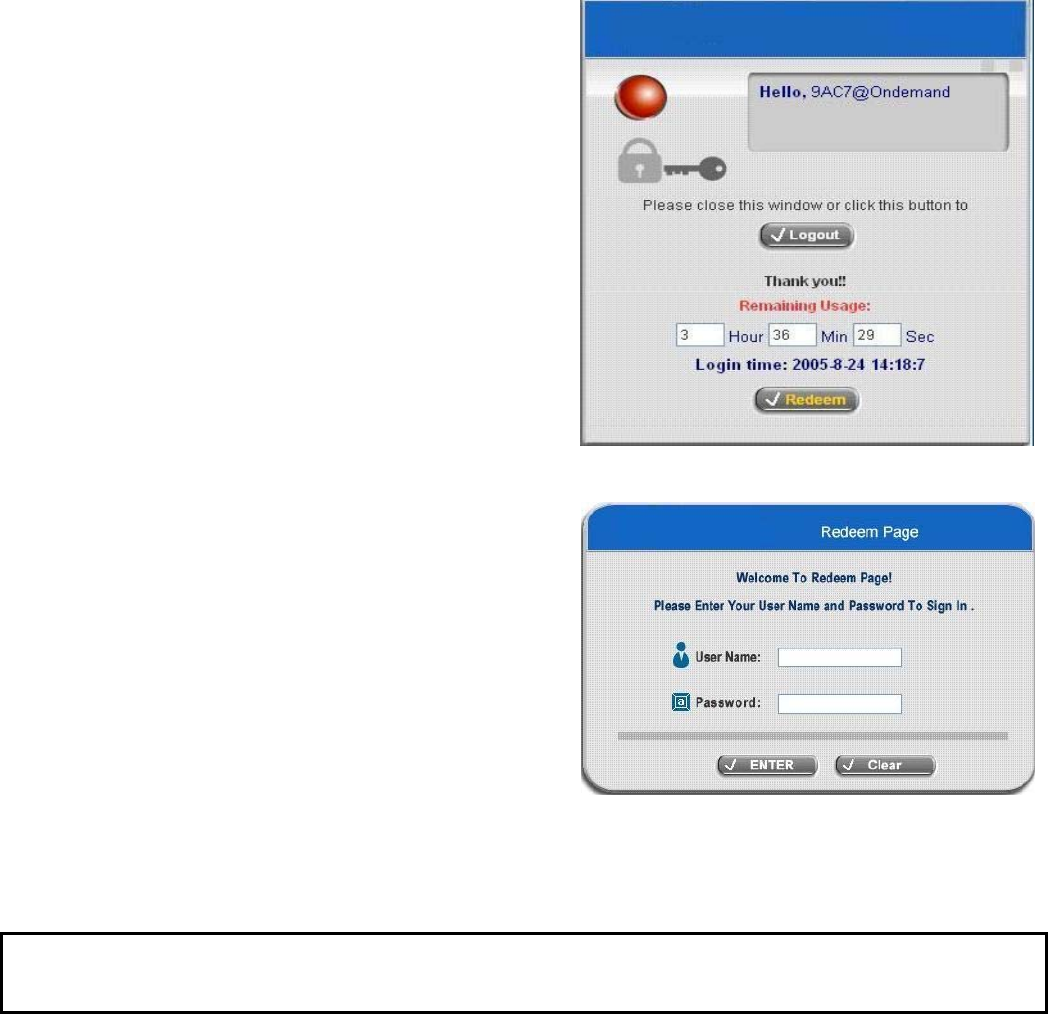
5) When an on-demand user logs in successfully, the
following Login Successfully screen will appear. There is
an extra line showing “Remaining usage” and a
“Redeem” button.
y Remaining usage: Show the rest of use time that the
on-demand user can surf Internet.
y Redeem: When the remaining time or data size is
insufficient, the user has to pay for adding credit at the
counter, and then, the user will get a new username
and password. After clicking the Redeem button, you
will see the following screen. Please enter the new
username and password you got and click Redeem
button to merge the two accounts and add up the
available use time and data size by the system, and then, you will see the total available use time and data
size after adding credit.
Note: The maximum session time/data transfer is 24305 days/9,999,999 Mbyte. If the redeem amount exceeds this
number, the system will automatically reject the redeem process.
AirLive WIAS-1200G
User’s Guide
161
Appendix I – Common Settings
AirLive WIAS-1200G is an all-in-one product specially designed for small wireless network environment. It integrates
“Access Control” and “Wireless Network Access” into one system to fulfill the needs in Hotspot and SMB.
In the Quick Installation Guide, two common scenarios are described below that allows you to use the
Configuration Wizard utility to speed up the configuration process of AirLive WIAS-1200G. Please refer to section 1.
Hotspot for hotspot environment and section 2. SMB for small & medium size business environment.
1. Hotspot
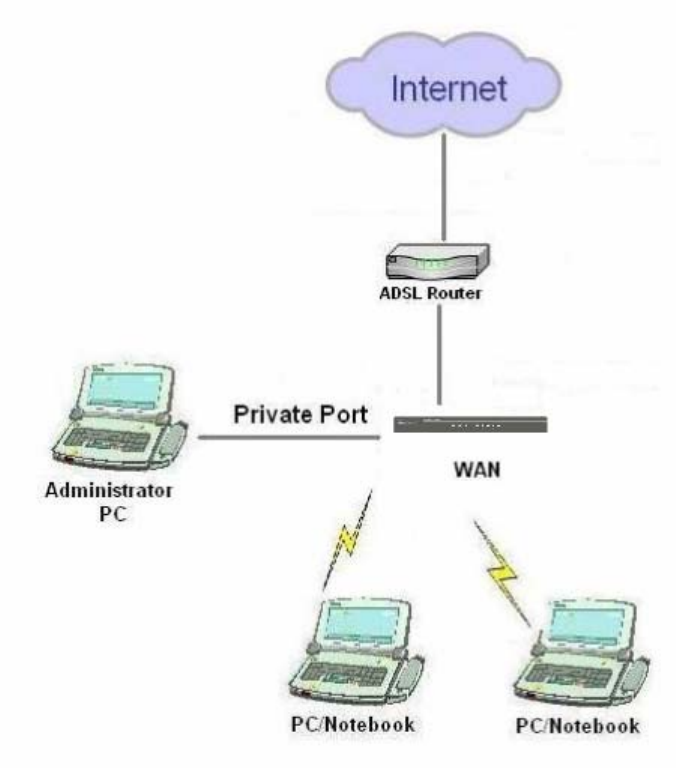
AirLive WIAS-1200G used in the hotspot environment is usually connected to the Internet through ADSL. Please
refer to the following diagram on connecting AirLive WIAS-1200G with an ADSL modem.

AirLive WIAS-1200G
User’s Guide
162
After completing the hardware installation and successfully logging into the web management interface, AirLive
WIAS-1200G can then be configured from the web browser. In the hotspot environment, it is convenient to use the
built-in authentication server to quickly setup the services. One example is to set Local User authentication method
in the Configuration Wizard for employees and for visitors.
Click the System Configuration from the top menu and the
System Configuration page will appear. Then, click
Configuration Wizard.
Click Run Wizard to begin the Configuration Wizard.
The Configuration Wizard will appear in a separated
window.
Click Next to begin.
AirLive WIAS-1200G
User’s Guide
163
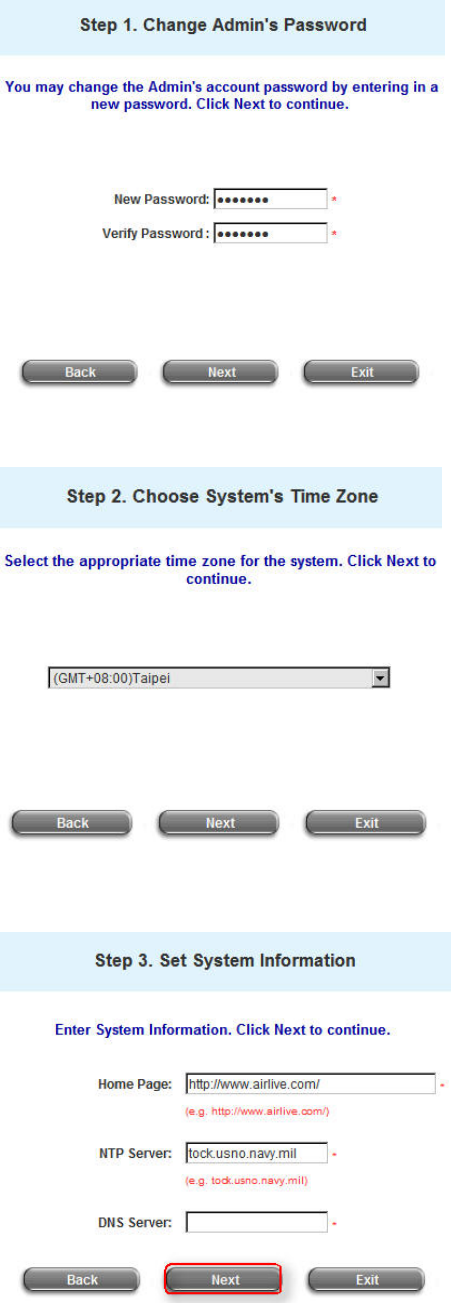
Step 1. Change Admin’s Password
Enter a new password for the admin account and retype it in
the Verify Password field (maximum characters are twenty and
no spaces are allowed).
Click Next to continue.
Step 2. Choose System’s Time Zone
Select a proper time zone via the drop-down menu.
Click Next to continue.
Step 3. Set System Information
y Home Page: Enter the URL that clients should be initially
redirected to after successfully authenticated to the
network.
y NTP Server: Enter the URL of the external time server for
AirLive WIAS-1200G time synchronization or use the
default.
y DNS Server: Enter a DNS Server provided by your ISP
(Internet Service Provider). Contact your ISP if you are not
sure of the DNS IP Address.
Click Next to continue.
AirLive WIAS-1200G
User’s Guide
164
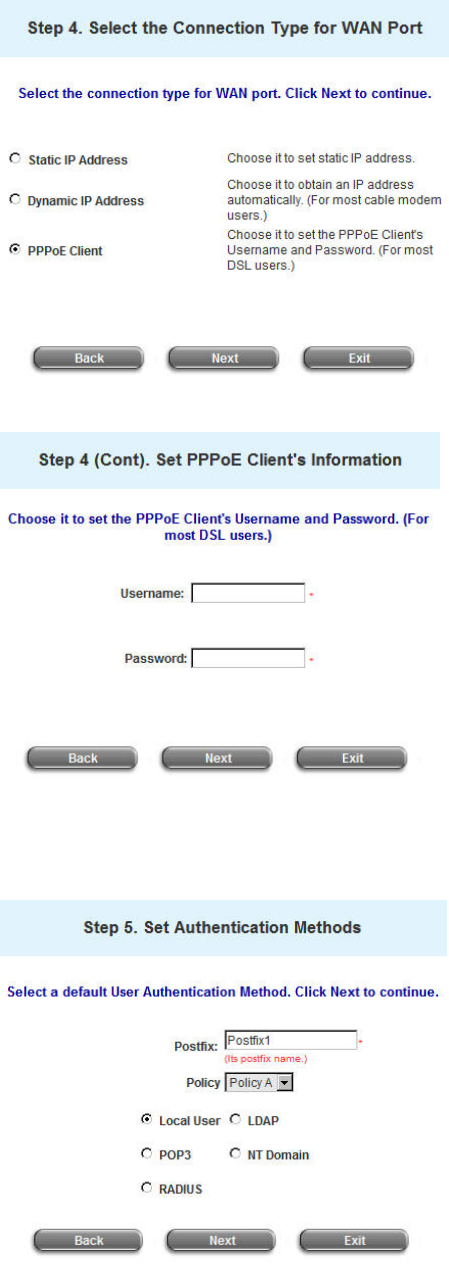
Step 4. Select the Connection Type for WAN Port
There are three types of WAN connection types: Static IP
Address, Dynamic IP Address and PPPoE Client. Select a
proper Internet connection type.
PPPoE connection type is chosen as an example, so select
PPPoE Client. Then, click Next to continue.
Step 4 (Cont). Set PPPoE Client’s Information
Enter the Username and Password provided by your ISP.
Click Next to continue.
Step 5. Select Authentication Methods
Please specify the postfix name for this authentication method.
The Postfix field (e.g. Local) will be used as the postfix name
(e.g. username@Local). A policy can be chosen to apply to this
authentication method. An authentication method has to be
selected from one of the five options appeared in this window
(Local User is selected for this example). Local User is an
authentication method that uses the built-in user database
supported by AirLive WIAS-1200G.
Click Next to continue.
AirLive WIAS-1200G
User’s Guide
165
st),
g
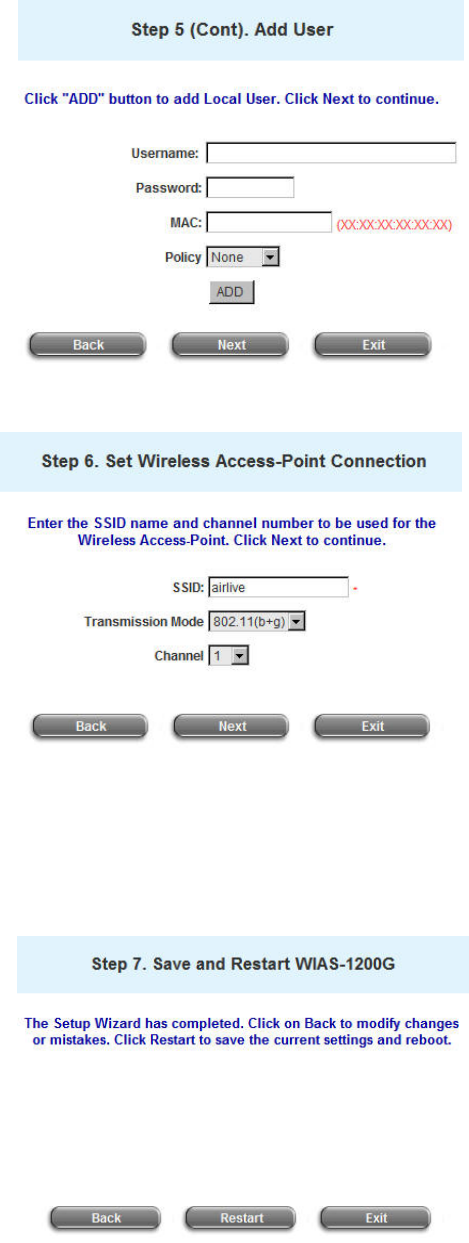
Step 5 (Cont). Add User
A new user can be added to the local user database. To add a
user here, enter the Username (e.g. test), Password (e.g. te
and MAC (optional). Assign a policy to add this particular local
user (or use the default). Upon completing to add a user, more
users can be added to this authentication method by clickin
the ADD button.
Click Next to continue.
Step 6. Set Wireless – Access Point Connection
y SSID: Enter a SSID (up to 32 characters) for the system.
The default is airlive. SSID (Service Set Identifier) is a
unique identifier used for the wireless client’s devices to
associate with the built in AP of AirLive WIAS-1200G.
y Transmission Mode: AirLive WIAS-1200G supports two
transmission modes, 802.11b and 802.11 (b+g). Select
the appropriate transmission mode to work with the
wireless clients in the network.
y Channel: If the default channel is occupied by many
other APs, it is necessary to select another channel from the Channel field for a better performance.
Click Next to continue.
Step 7. Save and Restart AirLive WIAS-1200G
Click Restart to save the current settings and restart AirLive
WIAS-1200G. The Setup Wizard is now completed.
AirLive WIAS-1200G
User’s Guide
166
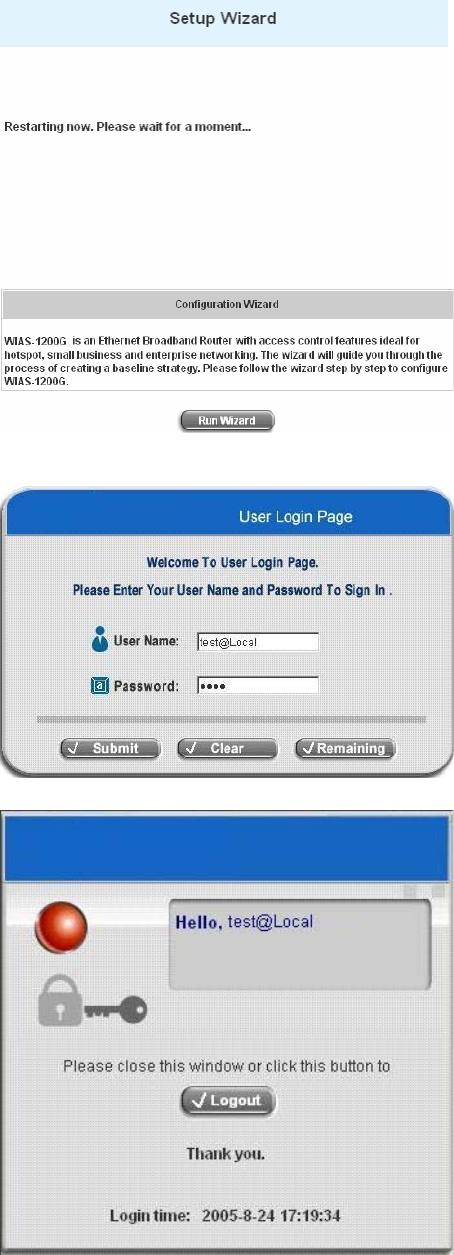
During AirLive WIAS-1200G restarting, a “Restarting now.
Please wait for a moment...” Message will appear on the
screen. Please do not interrupt AirLive WIAS-1200G until the
Configuration Wizard window has disappeared. Then the
Administrator Login page will appear. This indicates that the
restart process has completed.
Now, the basic configuration for Hotspot environment has
been finished!
If all the steps are done properly, AirLive WIAS-1200G can be
further connected to the managed network to experience the
controlled network access environment. Firstly, connect a
client’s networking device to Public Port or Wireless interface of
WIAS-1200G to obtain an IP address automatically. After the IP
address is obtained, launch an Internet browser and link to any
website. The User Login Page will appear.
Key in the username and password created previously by
Setup Wizard in the local user database (e.g. test@Local for
the username and test for the password) or from on-demand
user account, click Submit to connect to the network.
Congratulation!
Login success page appearing means AirLive WIAS-1200G
has been installed and configured successfully. Now, you can
browse the network or surf on the Internet!
AirLive WIAS-1200G
User’s Guide
167
2. SMB (Small & Medium Size Business)
AirLive WIAS-1200G used in the enterprise environment (mostly small and medium size business) is usually
connected Internet through ADSL. Please refer to the following figure on connecting AirLive WIAS-1200G with ADSL
modem.
After completing the hardware installation and successfully logging into the web management interface, AirLive
WIAS-1200G can then be configured from the web browser. Please refer to the following steps.
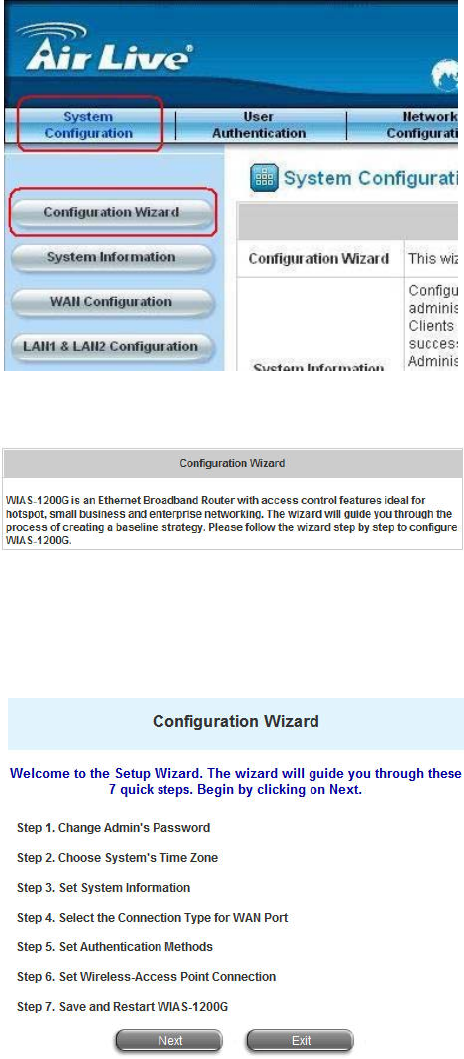
AirLive WIAS-1200G
User’s Guide
168
Click the System Configuration from the top menu and the
System Configuration page will appear. Then, click on
Configuration Wizard.
Click Run Wizard to begin the Configuration Wizard.
The Setup Wizard will appear in a separated window.
Click Next to begin.
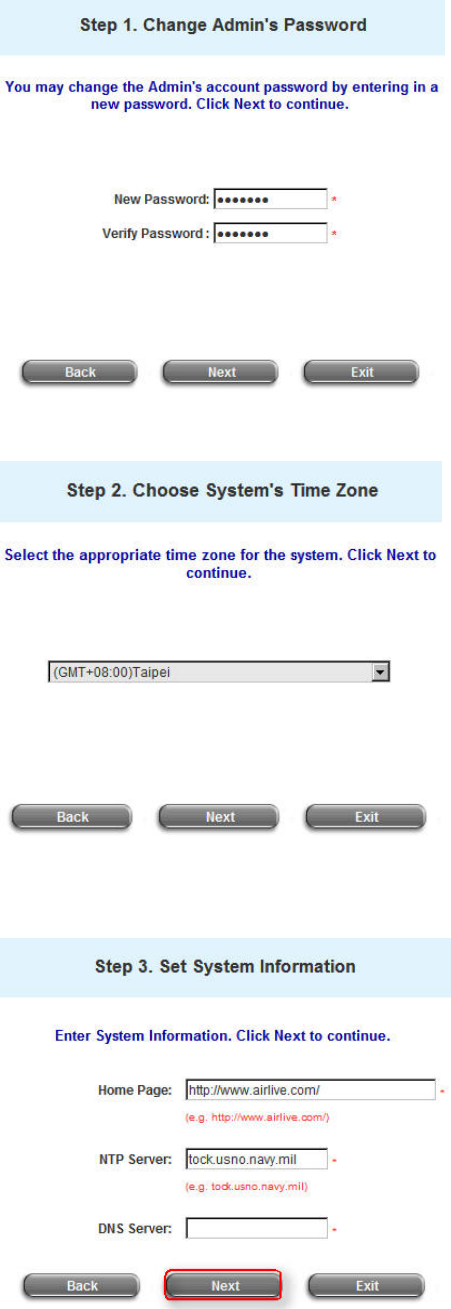
AirLive WIAS-1200G
User’s Guide
169
Step 1: Change Admin’s Password
Enter a new password for the admin account and retype it in
the Verify Password field (maximum characters are twenty and
no spaces are allowed).
Click Next to continue.
Step 2: Choose System’s Time Zone
Select a proper time zone via the drop-down menu.
Click Next to continue.
Step 3: Set System Information
y Home Page: Enter the URL that clients should be initially
redirected to after successfully authenticated.
y NTP Server: Enter the URL of the external time server for
AirLive WIAS-1200G time synchronization or use the
default.
y DNS Server: Enter a DNS Server provided by your ISP
(Internet Service Provider). Contact your ISP if you are not
sure of the DNS IP Address.
Click Next to continue.
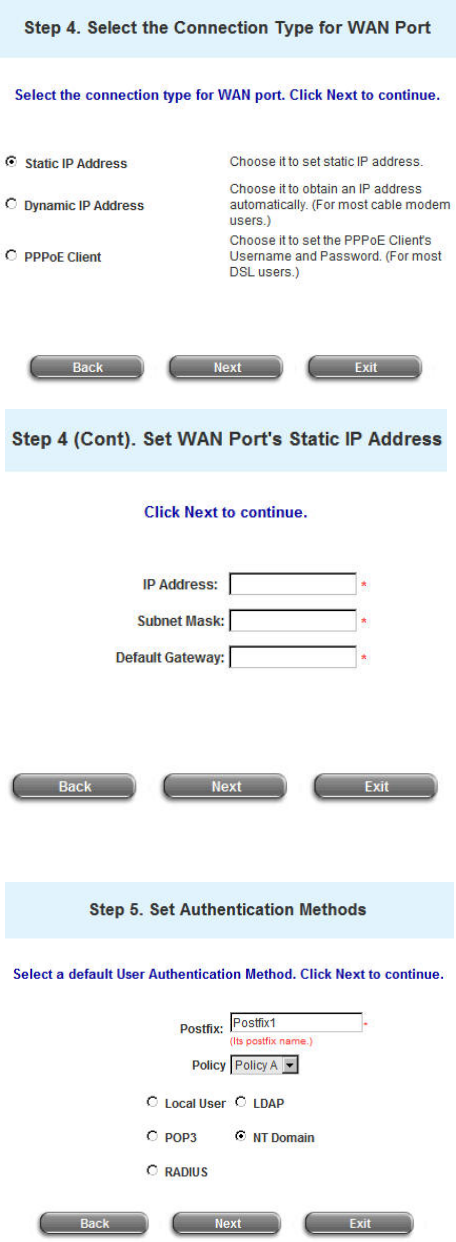
AirLive WIAS-1200G
User’s Guide
170
Step 4: Select the Connection Type for WAN Port
Select a proper Internet connection. Static IP Address is
chosen as the example for SMB scenario. Static IP Address is
an assigned IP address from the ISP used to connect to the
Internet. Click Next to continue.
Step 4 (Cont). Set WAN Port’s Static IP Address
Enter the IP Address, Subnet Mask and Default Gateway
provided by your ISP.
Click Next to continue.
Step 5: Set Authentication Methods
Please specify the postfix name for this authentication method.
The Postfix field (e.g. NT Domain) will be used as the postfix
name (e.g. username@NTDomain). An authentication method
has to be selected from one of the five options appeared in this
window (NT Domain is selected for this setup example). NT
Domain is an authentication method that uses the external NT
server for authentication.
Click Next to continue.
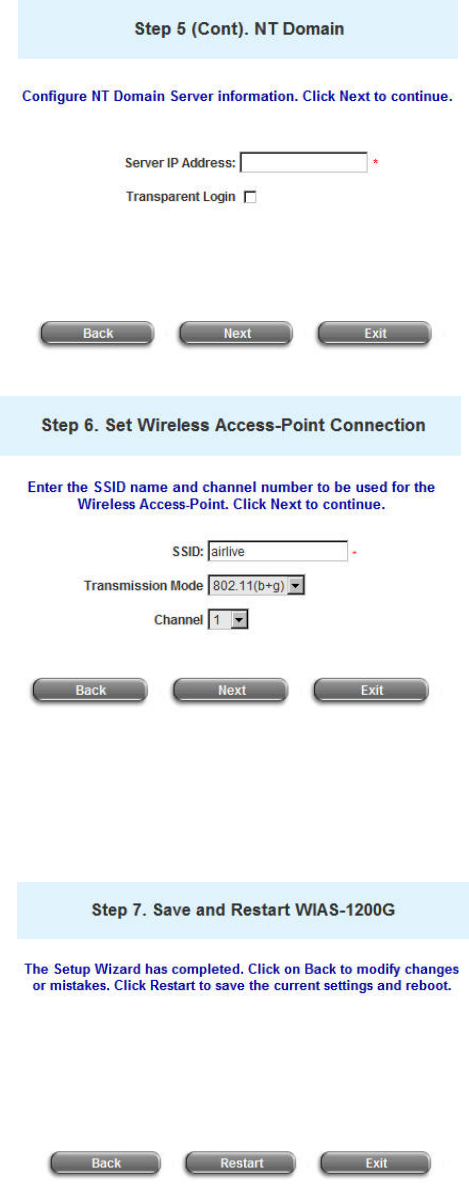
AirLive WIAS-1200G
User’s Guide
171
Step 5 (Cont). NT Domain
When NT Domain User is selected, please enter the NT
Domain Server information for Server IP Address, and
enable/disable Transparent Login. Click Next to continue.
Step 6: Set Wireless – Access Point Connection
y SSID: Enter a SSID (up to 32 characters) for the system.
The default is airLive. SSID (Service Set Identifier) is a
unique identifier used for the wireless client’s device to
associate with the built in AP of AirLive WIAS-1200G.
y Transmission Mode: AirLive WIAS-1200G supports two
transmission modes, 802.11b and 802.11 (b+g). Select
the appropriate transmission mode to work with the
wireless clients in the network.
y Channel: If the default channel is occupied by many
other APs, it is necessary to select another channel from the Channel field for a better performance.
Click Next to continue.
Step 7: Save and Restart AirLive WIAS-1200G
Click Restart to save the current settings and restart AirLive
WIAS-1200G. The Setup Wizard is now completed.
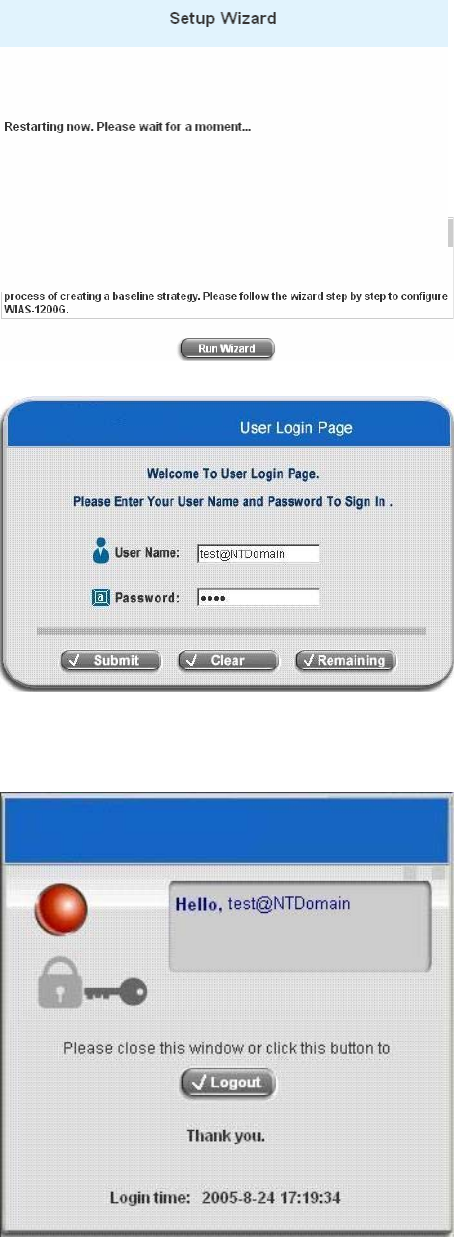
AirLive WIAS-1200G
User’s Guide
172
e
During AirLive WIAS-1200G restarting, a “Restarting now.
Please wait for a moment….” message will appear on the
screen. Please do not interrupt AirLive WIAS-1200G until the
Configuration Wizard window has disappeared. Then the
Administrator Login page will appear. This indicates that the
restart process has completed.
Now, the basic configuration for SMB environment has
been finished!
If all the steps are done properly, AirLive WIAS-1200G can b
further connected to the managed network to experience the
controlled network access environment. Firstly, connect a
client’s networking device to Public Port or Wireless Interface
of WIAS-1200G to obtain an IP address automatically. After
the IP address is obtained, launch an Internet browser and
link to any website. The User Login Page will appear.
Key in the username and password (e.g. test@NTDomain
for the username and test for the password) created in the
NT Domain server user account in the interface and then click Submit to connect the network.
Congratulation!
Login success page appearing means AirLive WIAS-1200G
has been installed and configured successfully. Now, you can
browse the network or surf on the Internet!
P/N: V10020070525