Oxford Instruments WL18SBMOD 802.11 b/g, Bluetooth disabled, UNII disabled User Manual
Oxford Instruments 802.11 b/g, Bluetooth disabled, UNII disabled
User Manual
Oxford Instruments
Industrial Analysis
VULCAN Series
User Manual
Issue 02 / March 2017 / 54-5103459

Contents
Vulcan series components ....................................................................................................................... 2
Vulcan series product overview .............................................................................................................. 3
Vulcan Series External Connectors .......................................................................................................... 5
Safety First ............................................................................................................................................... 6
About safety goggles ............................................................................................................................... 7
Safe operation of the Vulcan series ......................................................................................................... 8
Vulcan safety features ........................................................................................................................... 11
Battery ................................................................................................................................................... 12
Get started ............................................................................................................................................. 15
User interface overview .................................................................................................................... 15
Gestures ......................................................................................................................................... 15
Pull-down menu............................................................................................................................. 16
Basic use ............................................................................................................................................ 17
Switching on the instrument ......................................................................................................... 17
How to perform a measurement? ................................................................................................. 18
Measuring programs ............................................................................................................................. 19
What is a measuring program? ......................................................................................................... 19
Program types.................................................................................................................................... 21
See more with the Chemistry setting ................................................................................................ 21
Viewing camera image ...................................................................................................................... 22
Pinning important elements .............................................................................................................. 23
Sample naming ...................................................................................................................................... 24
Grades .................................................................................................................................................... 25
Measurement results ............................................................................................................................ 31
Viewing results history ...................................................................................................................... 32
Results and reporting ........................................................................................................................ 33
Search and filter functions ............................................................................................................. 34
Exporting results to USB ................................................................................................................ 35
Changing reporting settings ........................................................................................................... 36
Settings .................................................................................................................................................. 38
Device settings ................................................................................................................................... 39
System settings .................................................................................................................................. 42
Performing a good measurement from dirty surfaces .......................................................................... 45
Vulcan Series
Sample preparation - light contamination, water, dust or similar .................................................... 45
Sample preparation - thin oxide layer, anodization .......................................................................... 45
Sample preparation – rust, paint, coatings or similar ....................................................................... 46
Maintenance .......................................................................................................................................... 47
Cleaning the housing ......................................................................................................................... 47
Cleaning the measurement window ................................................................................................. 48
Measuring the check sample ............................................................................................................. 49
Technical specifications ......................................................................................................................... 53
Regulatory Notices ................................................................................................................................ 56
Appendix A: Troubleshooting ................................................................................................................ 60
2
Welcome
This guide is for the operators and supervisors who are trained to analyze samples with Vulcan series LIBS
(Laser Induced Breakdown Spectroscopy) analyzers. The local Oxford Instruments representative can train
personnel in the safe and accurate use of the Vulcan series, or give advice about how to train personnel.
The trademark of this LIBS device is Vulcan. Oxford Instruments wishes to ensure that every customer
is able to get the maximum benefit from their use of the Vulcan series.
Whilst you may be eager to use your Vulcan series, you should remember that it is a complex and
potentially hazardous piece of equipment. You must not proceed without having a basic knowledge
of how to operate the unit safely and securely.
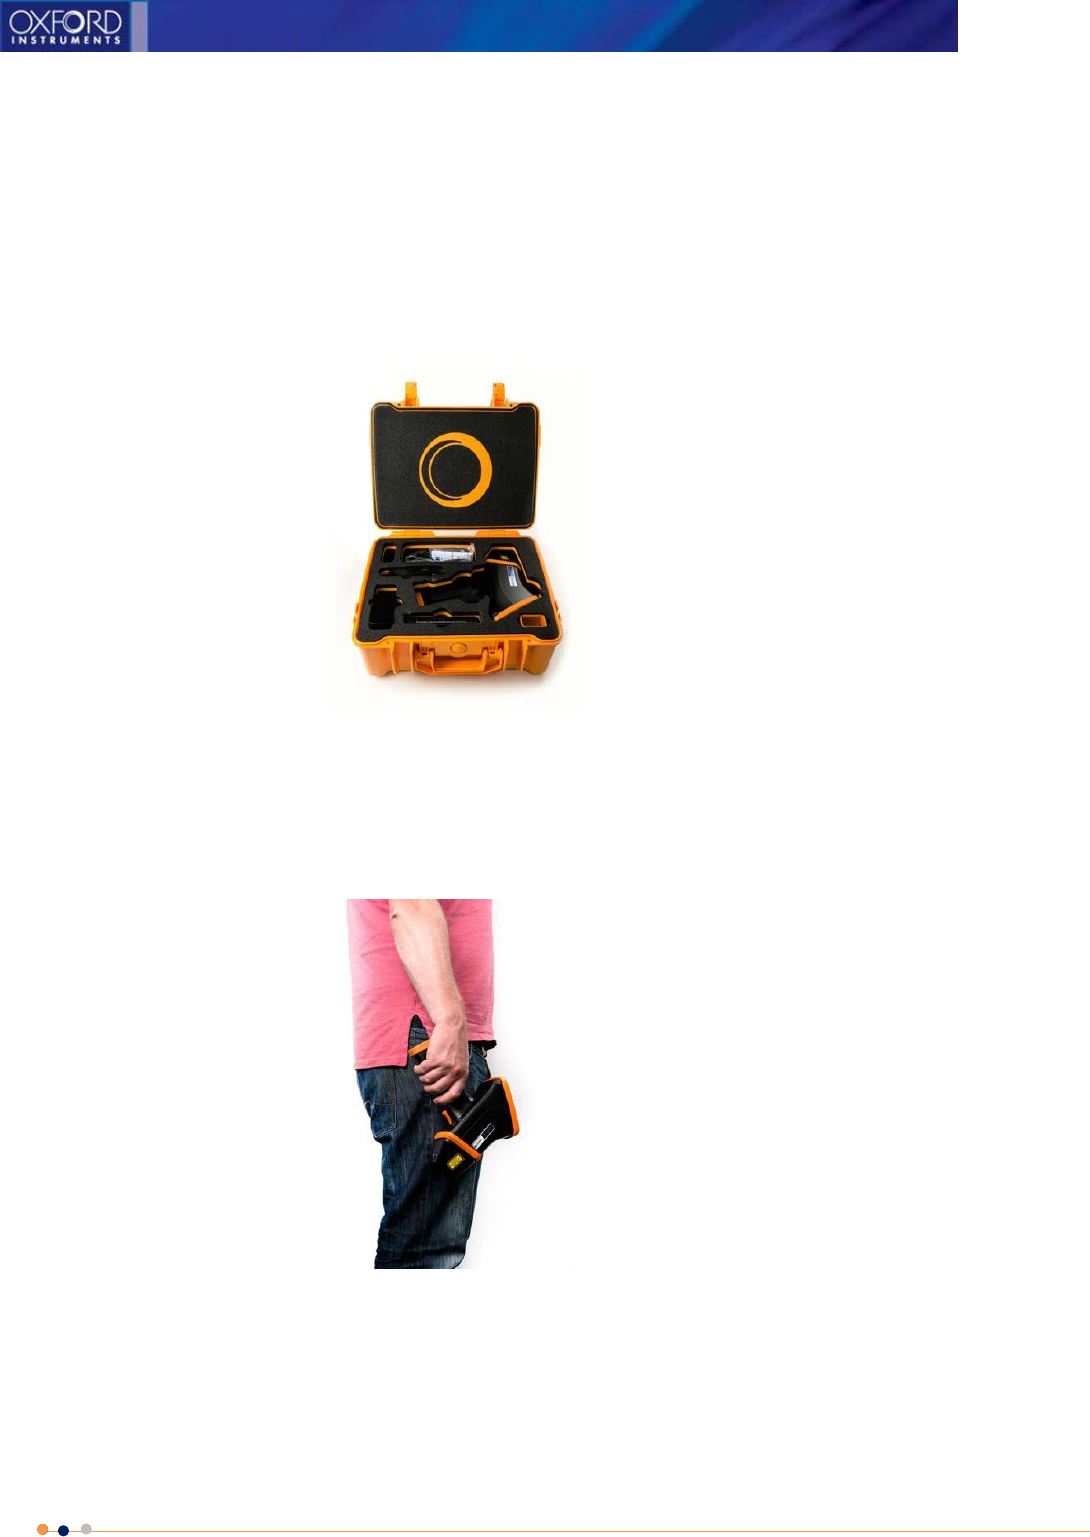
Vulcan series components
Vulcan series includes a rugged transit case a standard. The color of the instrument might differ
depending on the version you have purchased. The case contains the following items:
1. Vulcan LIBS analyzer
2. Battery charger
3. Battery (x2)
4. Power supply
5. Cotton buds
6. Lanyard and wrist strap
Vulcan Series
1
3
1
6
1
5
1
4
1
2
1

3
In addition to the accessories listed above, every instrument comes with a quick guide, check
sample calibration folder and USB flash drive for data download. The USB drive also contains this
manual and the quick guide in several different languages.
The included accessories depend upon the version of the Vulcan series. The Power Supply includes
international plug adapters.
Vulcan series product overview
Some features of the Vulcan series depend on the selected variant.
The Vulcan series might not include features such as camera, or Wi-Fi capability. Also there might
be differences in software features and calibrations available. And also the available user interface
languages might depend on the purchased version of the Vulcan analyzer.
Some features can be activated by purchasing a license and some features might also be available
for temporary use or trial period for evaluation use. A license can be either permanent or
restricted. Possible restrictions are time and use-count.
Please contact your local Oxford Instruments’ representative for more information.
Vulcan Series
4
Vulcan Series
1. Measurement window
2. Power button: The instrument is turned on by pushing and holding the power button until
the screen lights up. When the measurements are completed, the instrument can be
switched off by pushing and holding the power button until the progress bar on the
instrument screen is complete. The Vulcan device can be locked by pressing the power
button slightly.
3. Home button: By pushing the home button, the user can always return directly to the main
measurement screen.
4. Connector port: The connections are protected by a plastic cover. Open the cover to access
the connectors.
5. Safety sensor is located in the analyzer nose and must be covered with a sample;
otherwise the instrument won’t start the measurement. When measuring small samples,
the sensor can be temporarily switched off from the user interface.
6. Warning light starts to flash when the proximity sensor detects a sample indicating that the
instrument is now ready to take a measurement. At the same time the top bar of the
graphical user interface turns to red.
7. LCD touch screen
8. Trigger
9. Lanyard / wrist strap connector
Measurement window
Power and home
buttons
Connector port
Battery door
5
Vulcan Series
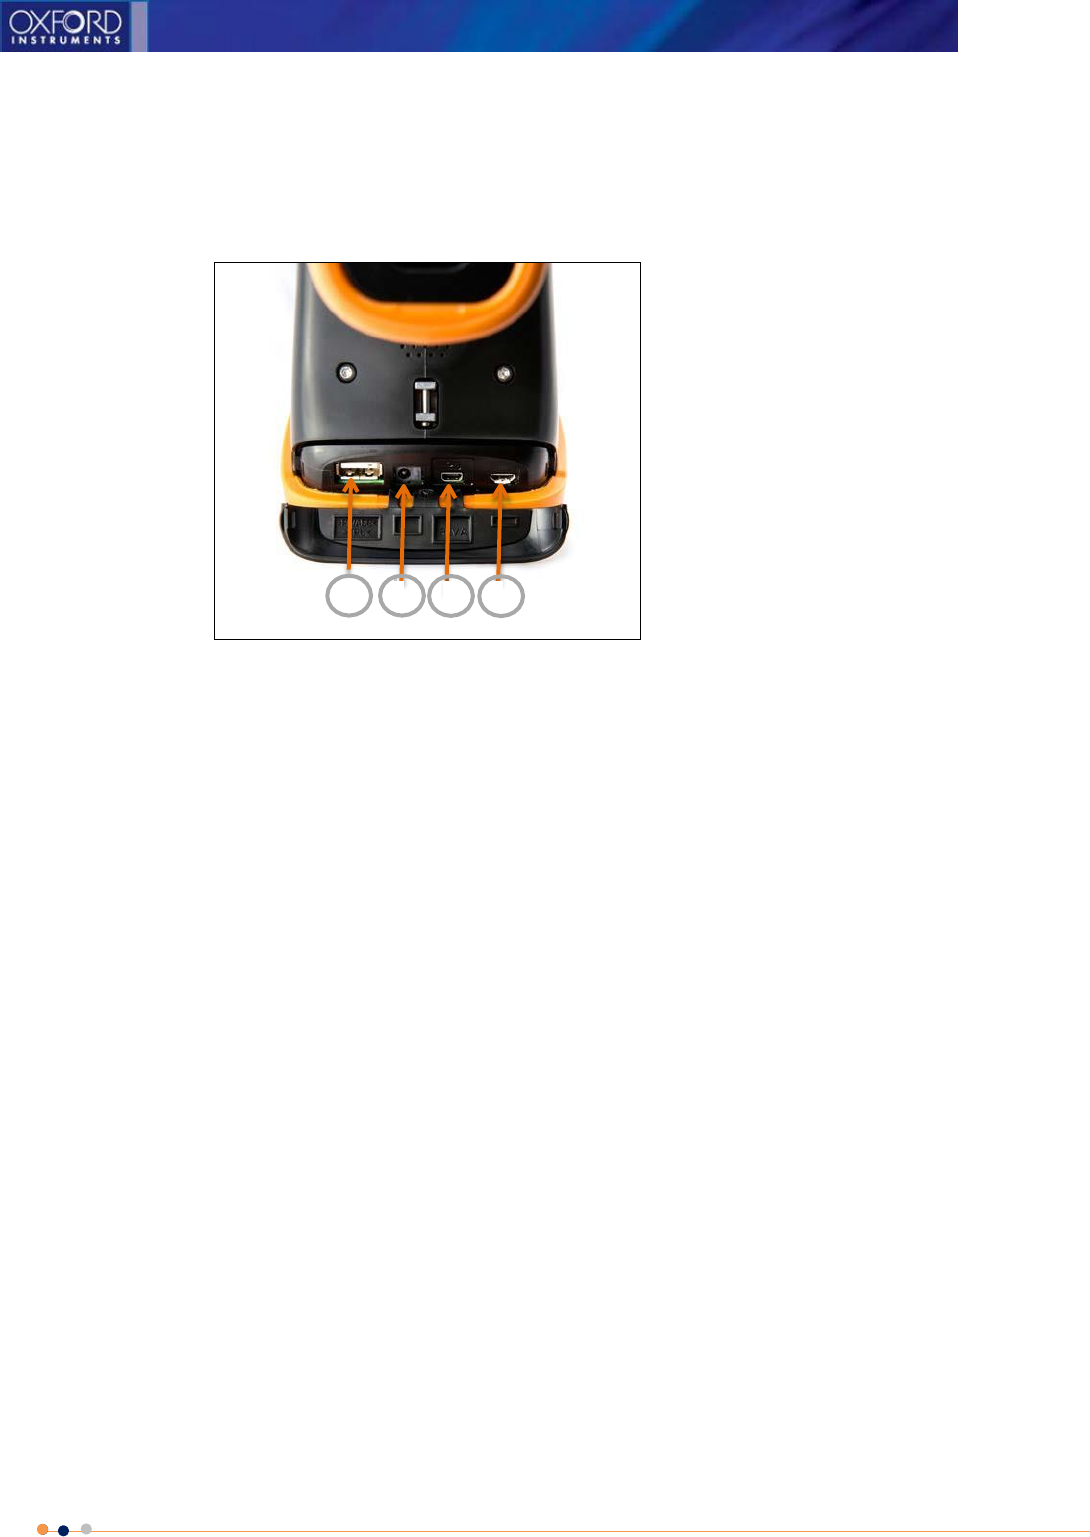
Vulcan Series External Connectors
Connectors
The Vulcan series has four external connections that are located underneath the display under a
plastic cover:
1. USB A connector
2. DC supply connector
3. Extension connector
4. USB Micro-B connector
USB A connector for a USB memory device such as USB flash drive (supplied with the instrument) is
used to download results, update the software or to manage the grade libraries.
Use the USB Micro-B connector to connect the Vulcan series to a PC with the USB cable. This is used
for service use only.
Use the DC connector to connect the Power Supply to charge or power the Vulcan series.
Only use the provided Power Supply to charge of power the Vulcan series device and batteries. The
use of an incompatible power supply and/or charger might result in damage of personal injury.
1 2 3 4
6
Vulcan Series
Do not connect generic devices to the extension connector.
The extension connector is designed only for Vulcan accessories. It is not compatible with any
generic consumer devices regardless of similar appearance. Connecting incompatible devices to the
extension port might damage the Vulcan series and/or the device(s) connected to it.
Safety First
You must read the following section about the safety before using Vulcan series as it will enable you
to operate the instrument safely. The instrument is designed to be used only by trained personnel.
Caution: Use of controls or adjustments or performance of procedures other than those specified
herein may result in hazardous radiation exposure.
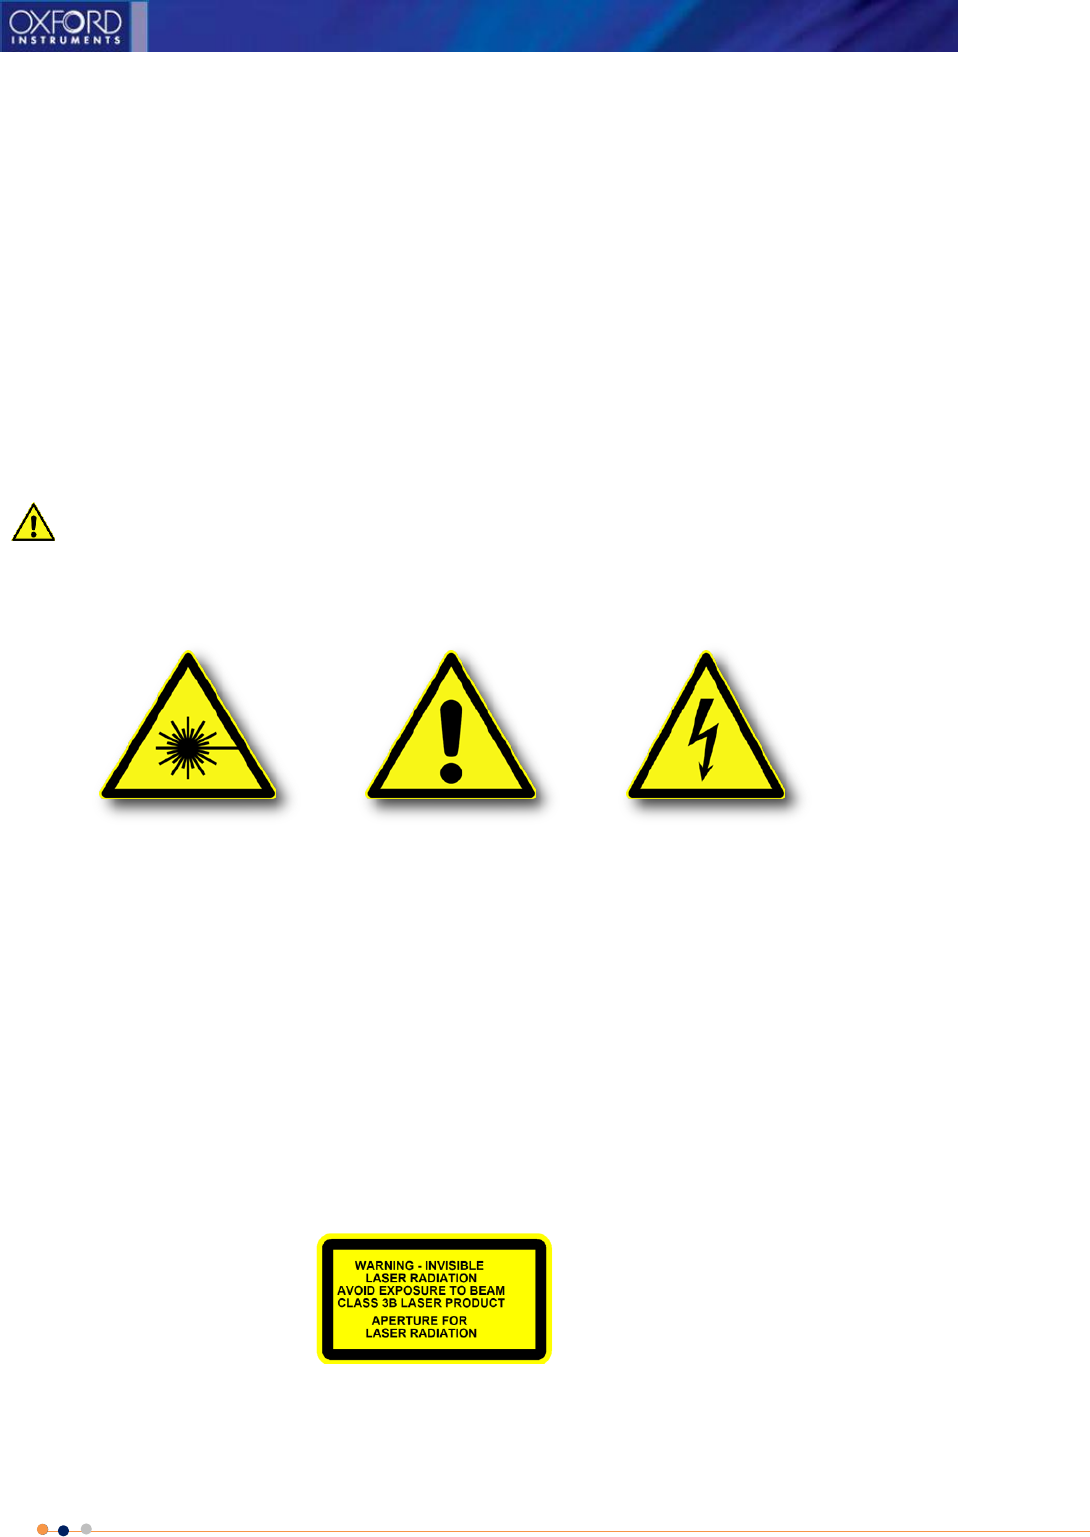
The following symbols are used to indicate hazards:
You will see these symbols wherever a hazard exists. Take particular care to understand sections
denoted in this way.
Vulcan series is a Class 3B laser device and must be considered hazardous. Serious injury can occur if the
safety instructions are not being followed.
If the Vulcan series is used in a manner not specified by Oxford Instruments, the safety features can
be impaired.
It might be necessary to register or license the Vulcan series in your territory or country. Please
contact your local Oxford Instrument’ representative for more information.
Laser
Caution
Risk of electric
shock
Laser warning label
7
Vulcan Series
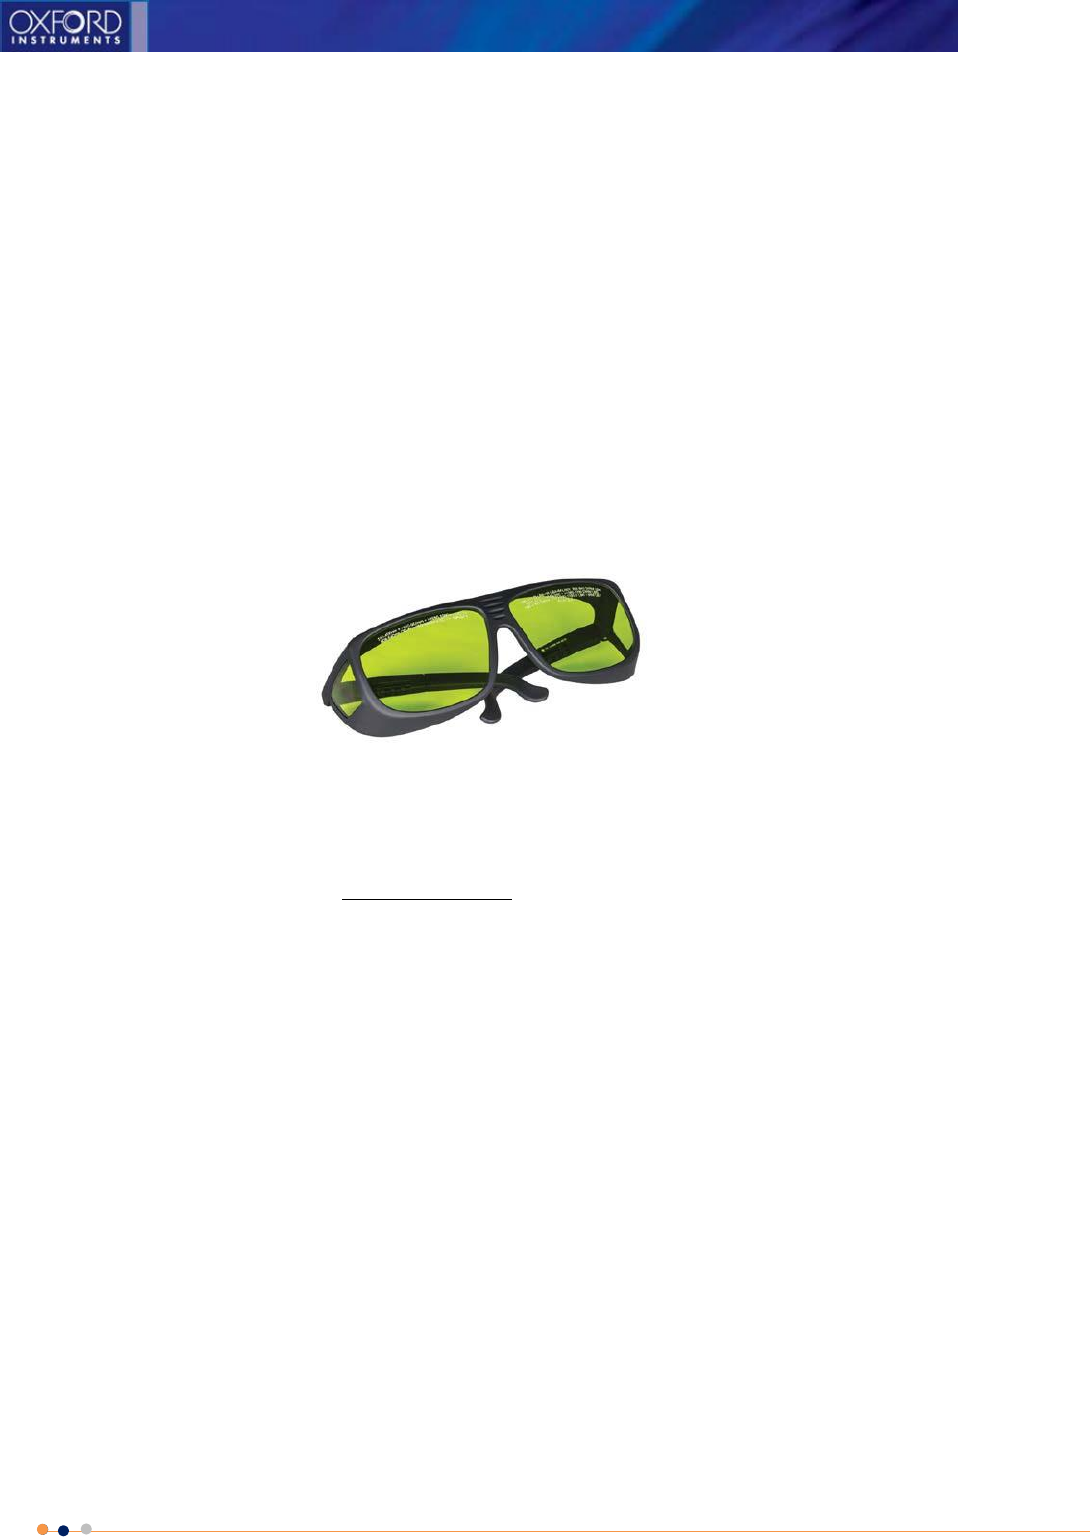
About safety goggles
Oxford Instruments strongly recommends using safety goggles whenever operating the Vulcan analyzer.
Wearing safety goggles when operating a class 3B laser might also be mandatory in your region or
country. Always check the local legislation before operating the Vulcan series. Please contact your local
Oxford Instruments’ representative for assistance and advice.
The safety goggles must meet the following specifications: OD6+ (1064 nm), or EN207 compliant
marking 1064 R LB6 D LB6. Please notice that normal safety goggles, sunglasses, weld masks etc.
does not provide protection against laser radiation.
Oxford Instrument does not sell or provide laser safety goggles. The safety goggles are supplied by
several companies such as Thorlabs (www.thorlabs.com) or Laser Safety Industries
(www.lasersafetyindustries.com).
Safety
goggles
8
Vulcan Series
Safe operation of the Vulcan series
Never leave the Vulcan series analyzer unattended. Store the instrument in the carrying case when
not in use.
Never look into the analyzer nose and never point the Vulcan series at another person. Always
point the analyzer nose downwards and away from people when not taking a measurement.
Man holding the Vulcan and pointing the instrument downwards
Point the instrument away from yourself when taking a measurement.
Vulcan in a carry case
9
Vulcan Series
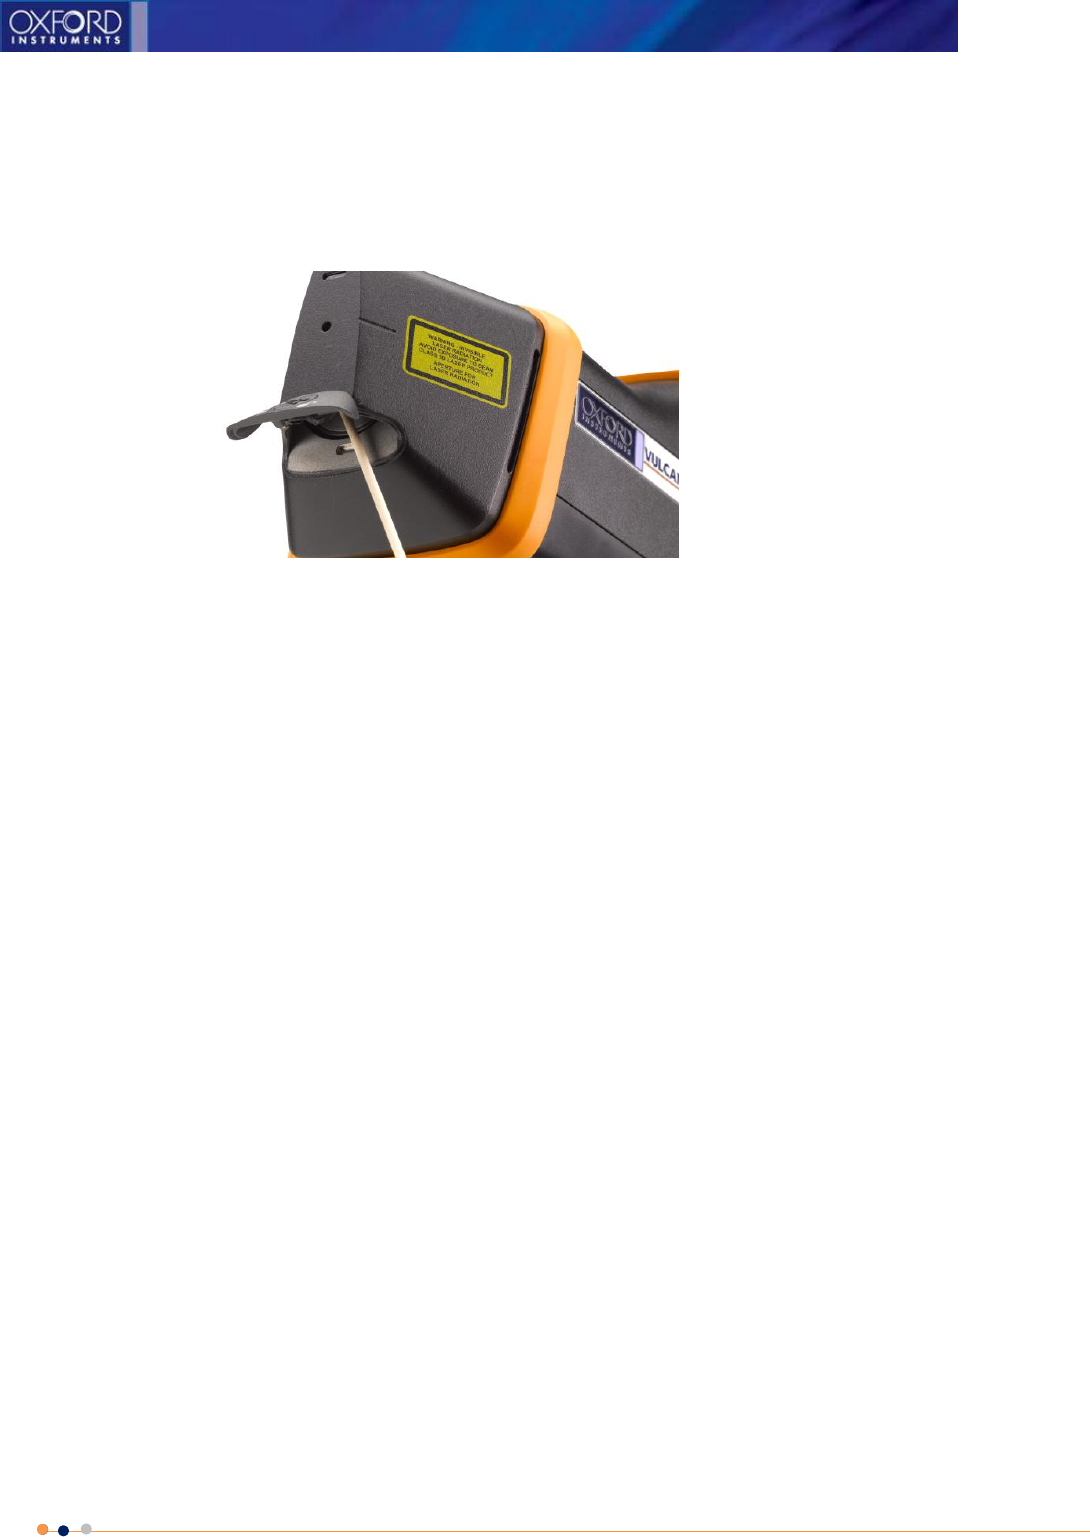
Always turn off the Vulcan series power, pull out the battery and disconnect the instrument from
mains outlet before cleaning the laser aperture.
Cleaning the measurement window with a cotton bud
Vulcan Series
10
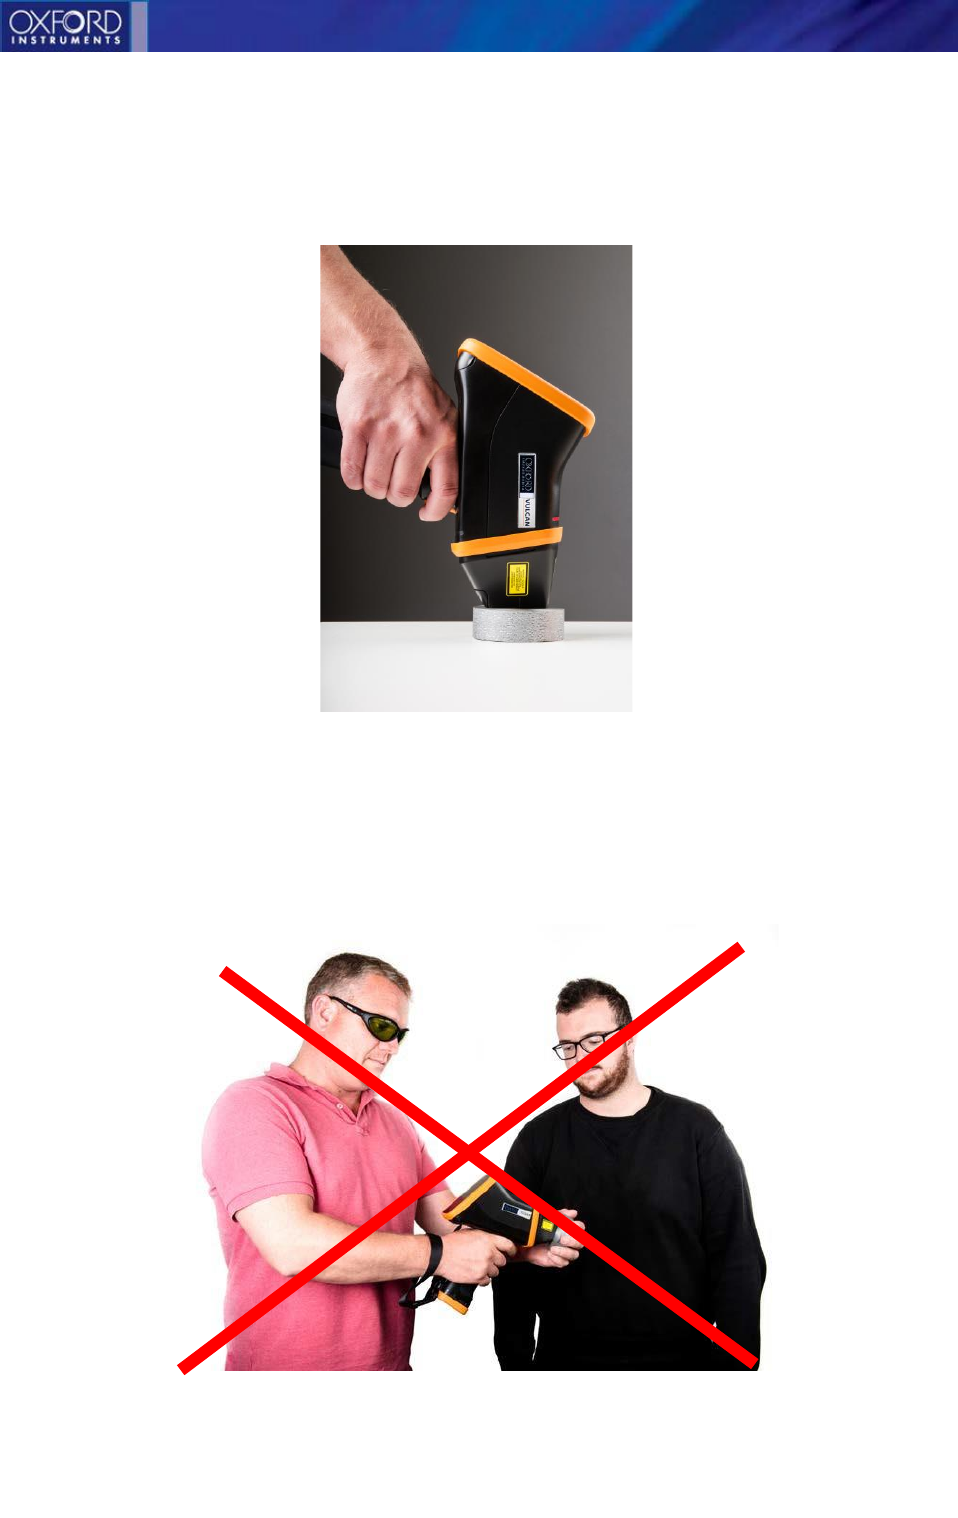
Keep the analyzer nose in direct contact with the sample when taking a measurement. There
should not be any gap between the sample and the instrument; otherwise the analytical
performance will be compromised. When the proximity sensor light flashes, the instrument is
ready to take a measurement.
Analyzer nose in contact with the
sample
The nominal ocular hazard distance (NOHD) for Vulcan series is approximately 3 meters (direct
beam). Also direct reflections from shiny surfaces must be considered hazardous.
Do not let unauthorized people near the analyzer when taking a measurement.
Vulcan Series
11
Vulcan safety features
The Vulcan series includes several safety features to protect the operator.
Power button and indicator: Press and hold the power button until the screen lights up to turn the
Vulcan series on and off.
Password protection: The operator must have correct password to use the Vulcan series.
Supervisor can change the passwords.
Proximity sensor: Before taking a measurement, the sample must cover the proximity sensor to
avoid laser beam emission. When the sample covers the measurement window, the warning light
starts to flash and the status bar on the top of the LCD screen changes to red color. The Vulcan
series will not take a measurement if the proximity window is not covered.
Trigger: The operator must pull the trigger of Vulcan Series to start the measurement.
Proximity sensor and the warning light
Vulcan Series
12
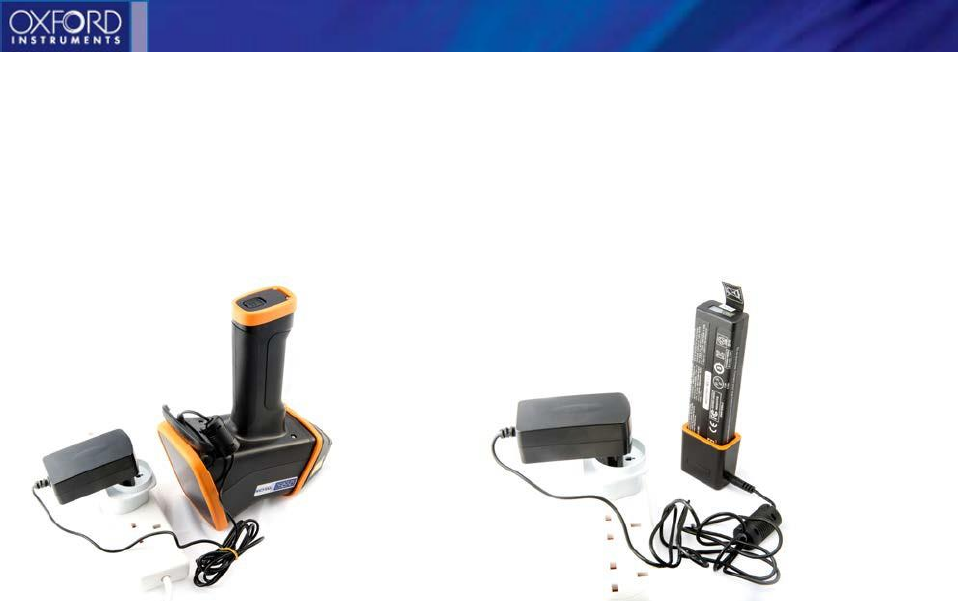
Battery
The Vulcan series is battery operated. Two Li-ion batteries are included in the delivery. Before
taking the first measurement, fully charge the batteries. This will take approximately 5 hours per
battery.
Typical battery life is up to 8-10 hours of use in room temperature. The battery life may be
shorter in cold and hot environments.
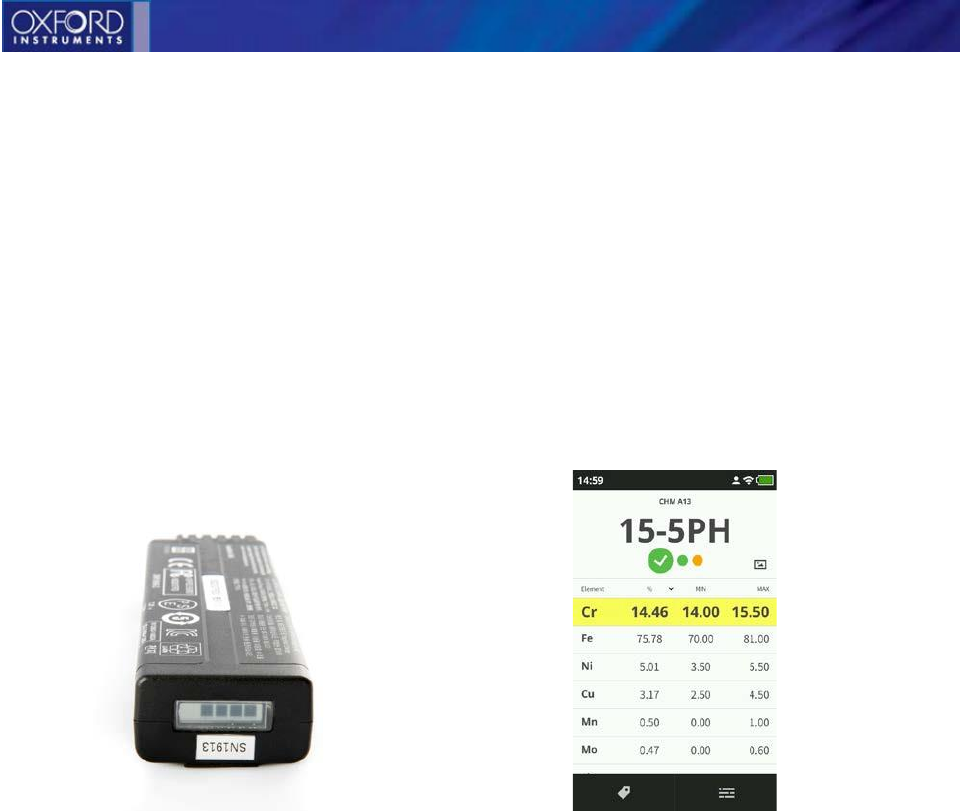
There is a battery charge indicator in both the battery itself and on the top right corner of the LCD
screen. When only one bar remains in the battery indicator or the battery symbol on the screen
turns red, replace the battery with a fresh one and charge the empty battery right away.
Battery charge level Battery charge level on the LCD screen
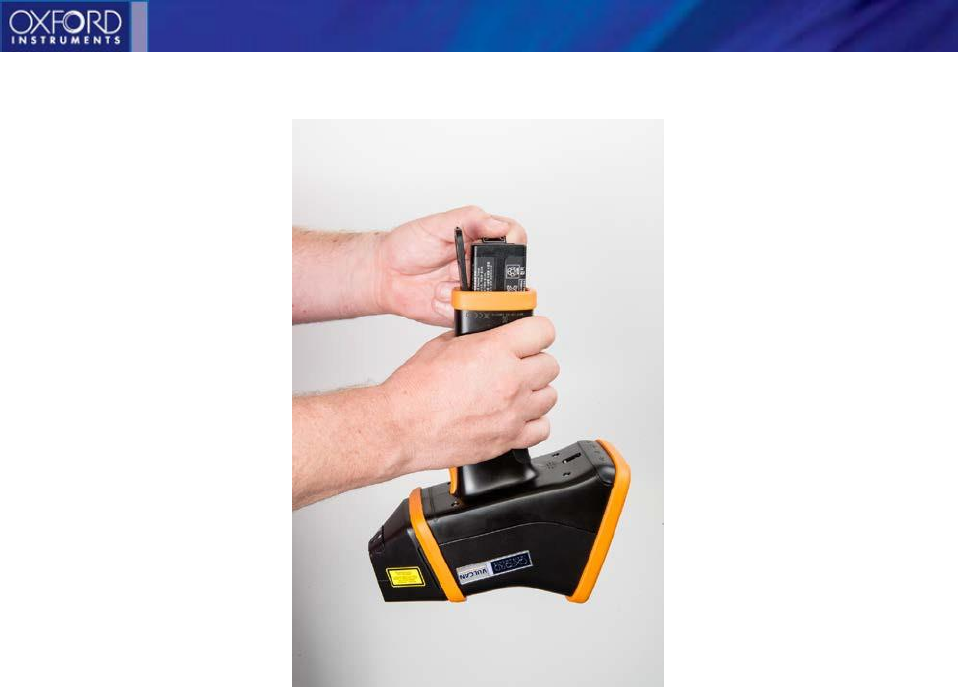
To change the battery, open the battery compartment door and pull the battery out from the
compartment. When putting the battery back in place, do not use excess force and check that the
battery is put in a right way.
Vulcan Series
13
Pulling the battery out of the battery compartment
To charge the battery, first connect the charger (1) to the power supply (2). Then connect the
power supply into the mains outlet. Adaptor plugs are supplied for the most common wall
sockets. The power supply is compatible with 100-240 V voltages.
Connect the battery to the charger and a green charge light will be lit. Battery is fully charged
when the light turns off.
Vulcan Series
14
Always store the batteries in a cool and dry place. It is recommended to keep the batteries
charged when being stored for a longer periods of time.
Battery charged inside the instrument Battery charged in battery charger
The instrument can also be operated on mains power. The DC connector is located underneath
the plastic connector cover. To operate the Vulcan series on mains power, connect the power
supply into mains outlet and the cable into the DC connector in the instrument.
Vulcan Series
14
Get started
User interface overview
Main result screen
Status bar shows the time, name of the measuring program you are using, battery
level, and also a Wi-Fi symbol when you are connected to a wireless network and
a camera icon if the camera is turned on.
Content area is where the actual measurements, results and other primary
information are displayed.
Button area is reserved for action buttons. These depend on the context.
Vulcan Series
15
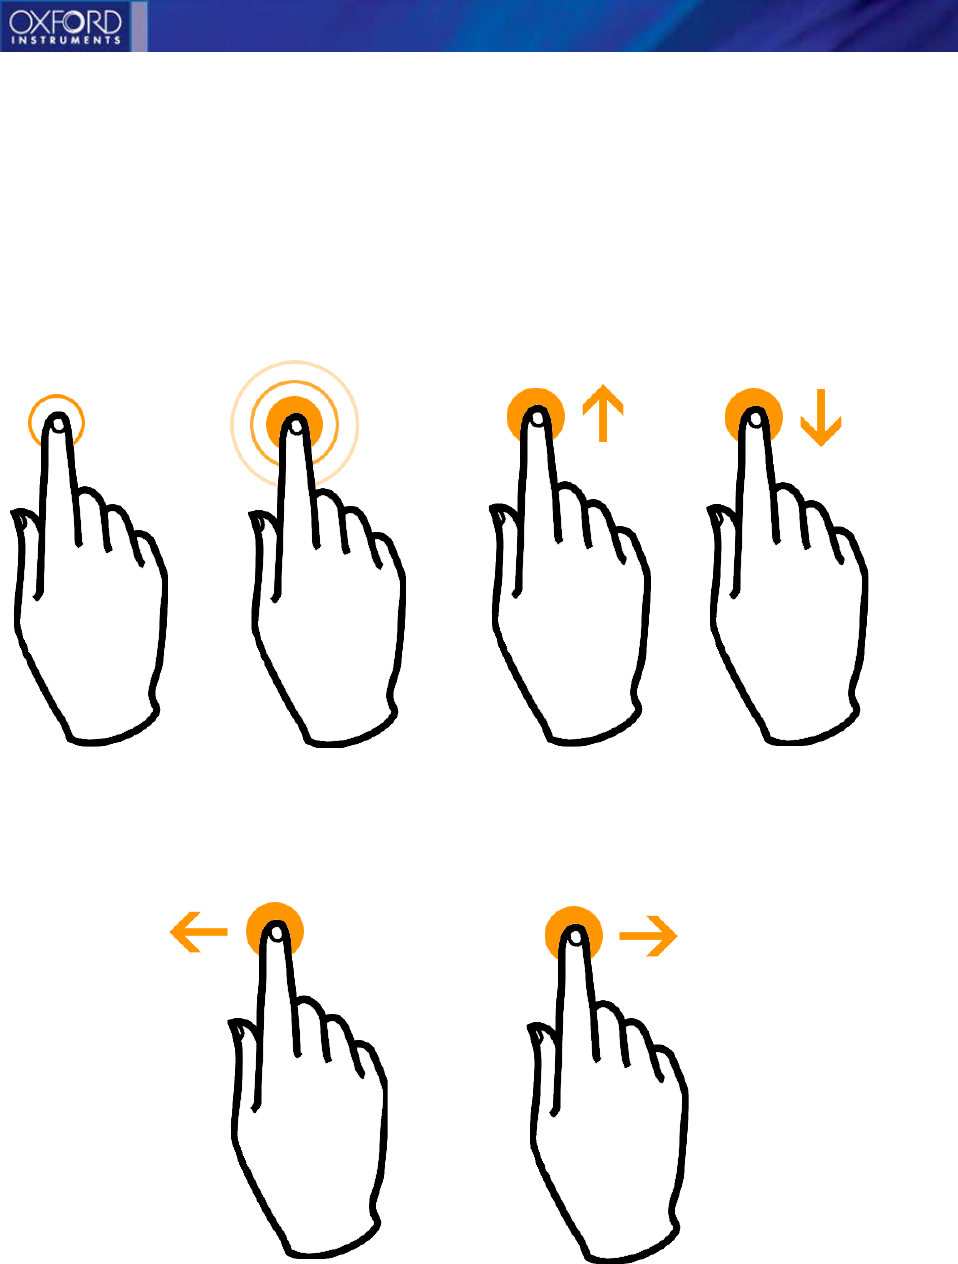
Gestures
Tap is used to make selections.
Slide or Drag is used to scroll views and menus.
Long press is used to “pin” and “unpin” elements in Measurements results.
Flick is when you quickly move your finger to jump ahead in a scrolling list.
Tap Long Press Scroll Up Scroll Down
Flick Left Flick Right
Vulcan Series
16
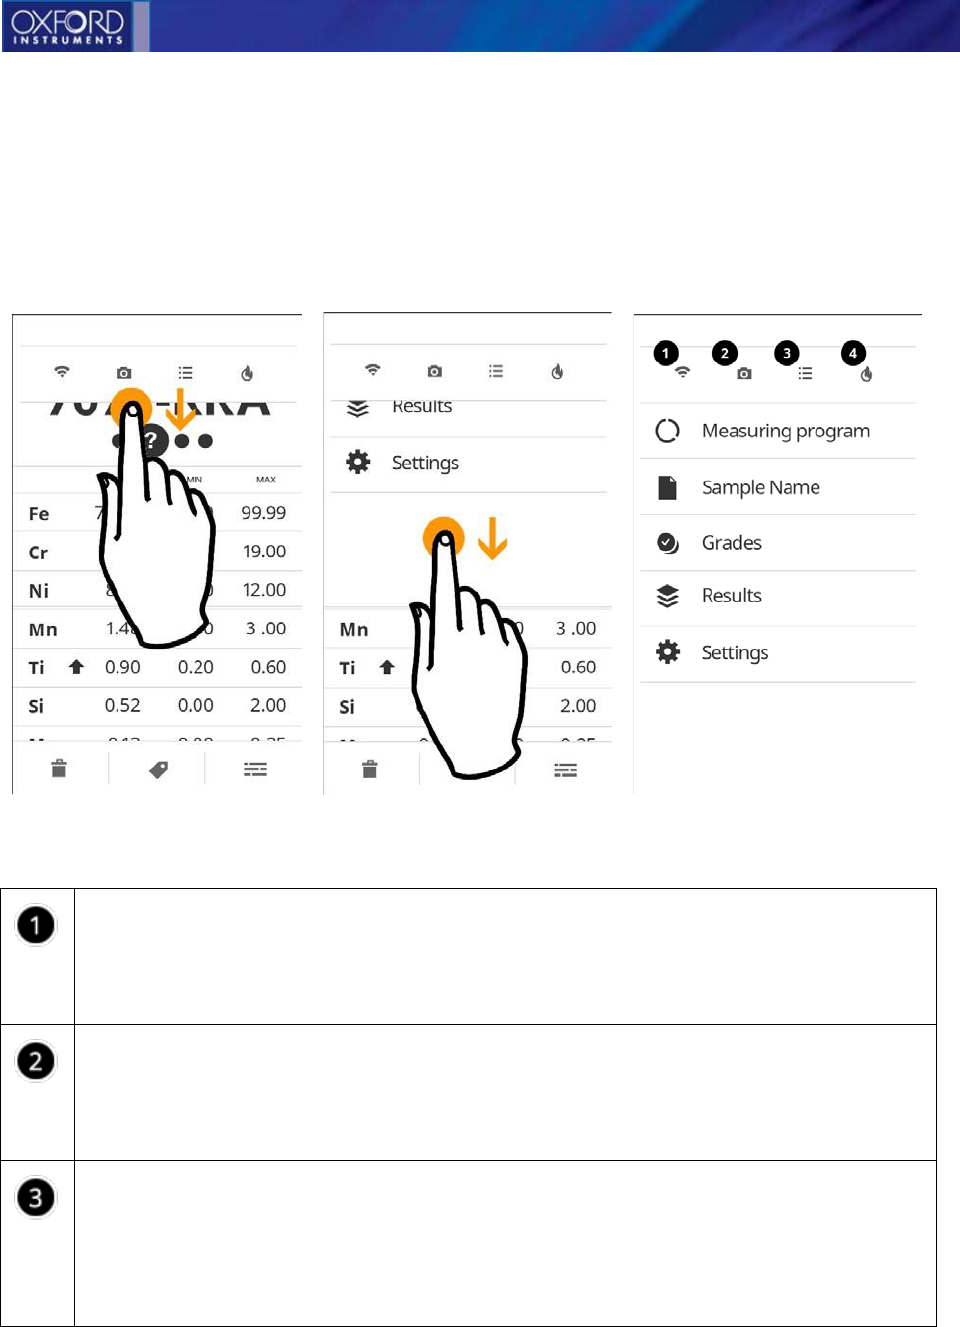
Pull-down menu
The pull-down is accessed by dragging the status bar down with finger. From there you can
quickly toggle Wi-Fi and other measurement settings on or off, access camera or programs,
sample naming, result history and settings.
Pull-down menu
Wi-Fi button is used to toggle Wi-Fi on/off. When turned on, it opens Wi-Fi settings,
where a network can be selected.
Camera toggle is used to select whether a camera image is shown to help aiming when doing
a measurement.
Chemistry toggle is used to select if additional information is shown in the
measurement results. If Chemistry is on, the percentages, minimums and maximums
are listed for each element.
Vulcan Series
17
Basic use
Switching on the instrument
● Push and hold the “Power” button on the top of the instrument until the screen turns on.
● First you will see a laser warning splash screen. Tap to continue.
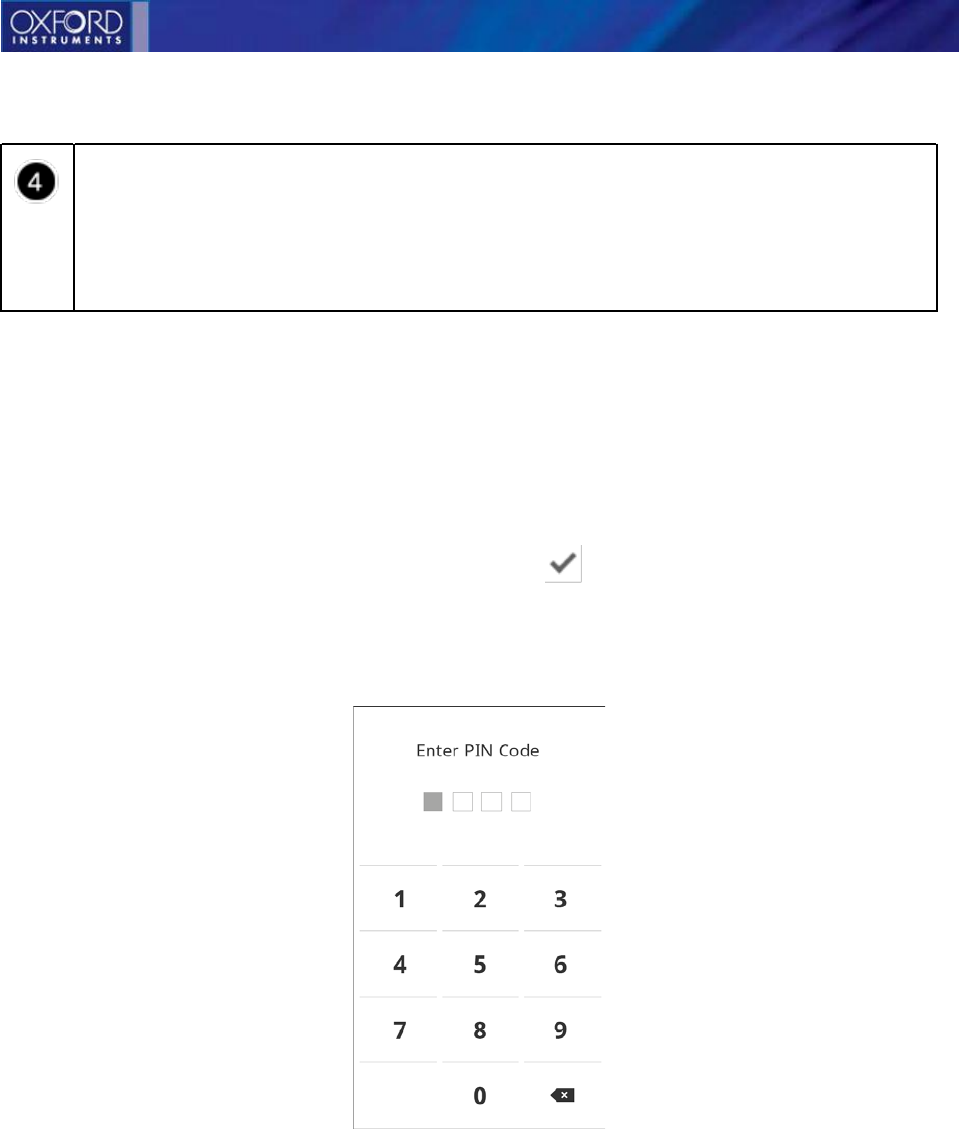
● You need to login in order to use the instrument. Enter your PIN code. The default PIN codes
are 1111 for normal user and 0000 for supervisor.
Login screen
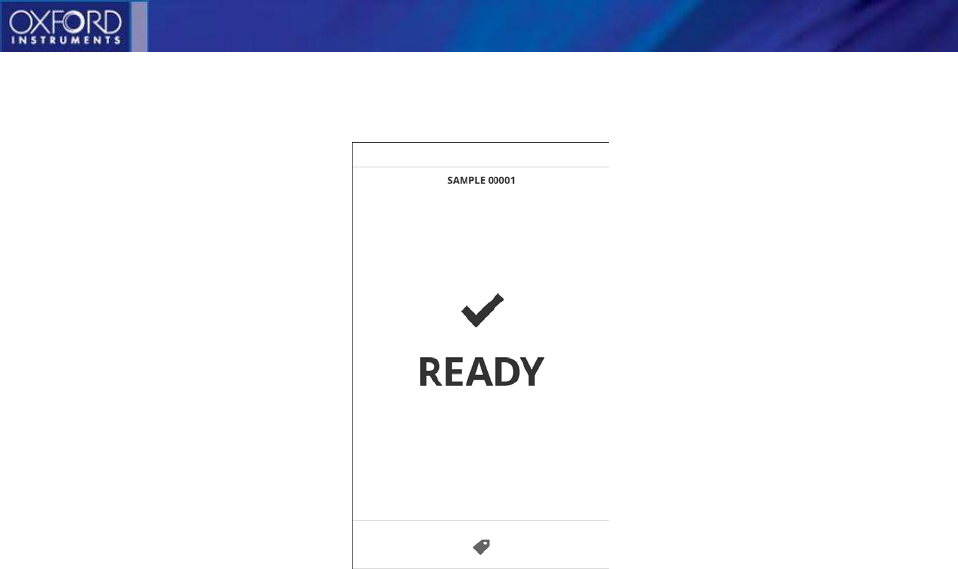
● Once logged in, you will see the Startup screen.
Pre-burn toggle is used to select if the sample will be heated with the laser before the
actual measurement, in order to burn away possible impurities on the surface of the
sample.
Vulcan Series
18
Startup screen
How to perform a measurement?
1. Make sure you have the right Program settings configured. Please refer to the Measuring
programs section for more details.
2. OPTIONAL: Switch on the camera from the pull-down menu.
3. OPTIONAL: Name the sample by selecting Sample name from the pull-down menu.
4. OPTIONAL: Tap the Sticky tag icon to access the tags, if you want to set a descriptive tag that will
be attached to all the measurements. The tags can be either created or deleted only from the
Ready screen.
5. OPTIONAL: If you suspect that the sample surface isn’t clean, set Pre-burn on from the pull-
down menu. You can adjust the number of pre-burns from the “Settings” menu.
6. Place the instrument against the sample surface.
7. Check that the laser warning light is flashing red and the status bar turns to red color. This
indicates that the instrument is safely aimed against a surface.
8. Use the camera picture to help you with targeting if you need to be exact with the position.
9. Pull the trigger.
10. Keep the instrument steady and wait for the progress bar to complete.
11. Wait for the result to appear.

Vulcan Series
19
After the measurement, you should do the following:
1. OPTIONAL: The tags can either be selected or deselected for a sample in the results screen by
tapping the Tag and then selecting the appropriate tag for the sample.
2. Check that the result is OK.
3. If you’re not happy with the result (the instrument wasn’t properly positioned etc.), you can tap
the Delete to remove it.
4. If Averaging is on, instead of the Delete icon there is a Redo . Use this to redo the
previous measurement without affecting the measured Averages.
5. Pull the trigger to measure the next sample.
Measuring programs
What is a measuring program?
Specific settings may be needed for measuring different samples. These are stored as programs.
The default program is Analyze. After first time use, the instrument will remember the last used
program.
● Selecting a program
○ Open pull-down menu.
○ Tap Measuring Program.
○ Tap the program name you want to use.
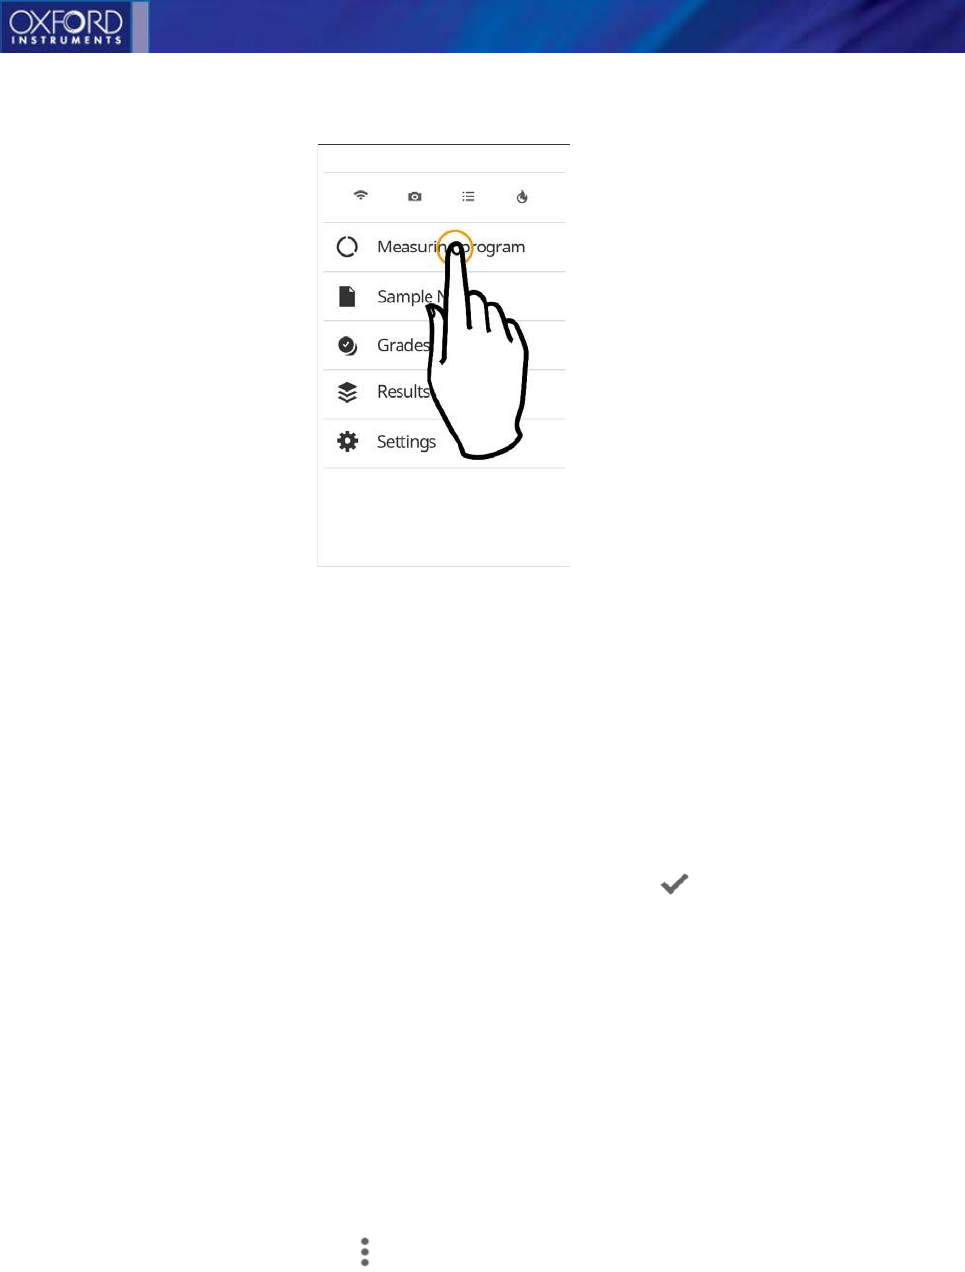
20
Accessing programs
● Adding programs
○ Open pull-down menu.
○ Tap Measuring Program.
○ Tap Add New Program.
○ Select type: Analyze or Sort. See next chapter for more info about the types.
○ Give your new program a descriptive name or tap the Done to accept the default
name.
○ OPTIONAL: Switch Average measuring on, if you need to measure the average qualities
of the samples. Then select either Continuous or Preset number to set a limit to how
many measurements will be included. See next chapter for more info aboutAveraging.
● Deleting programs
○ Open pull-down menu.
○ Tap Measuring Program.
○ Tap the program’s menu and select Delete program.
Vulcan Series

Vulcan Series
21
Program types
There are two main types of measuring programs available, and both of them can be used with or
without the averaging feature.
● Analyze is the default measurement mode. It is used to identify unknown samples. After
measuring in Analyze mode, the closest matching grades are shown. TIP: You can customize
how many Good/Possible matches are shown in Grades settings.
● Analyze with averaging is an expanded version of normal Analyze. Averaging calculates the
average result from a preset amount of analyzes, which can be set when adding a Program.
If continuous averaging is selected instead of a preset amount, it can be stopped by tapping
the Done .
● Sort is used when you are looking for one or more known grades and need to find out if
the sample belongs to these. It’s quick and shows immediately if the sample passes or
fails the sorting.
● Sort with averaging is similar to normal Sort, but with the averaging function as described
above.
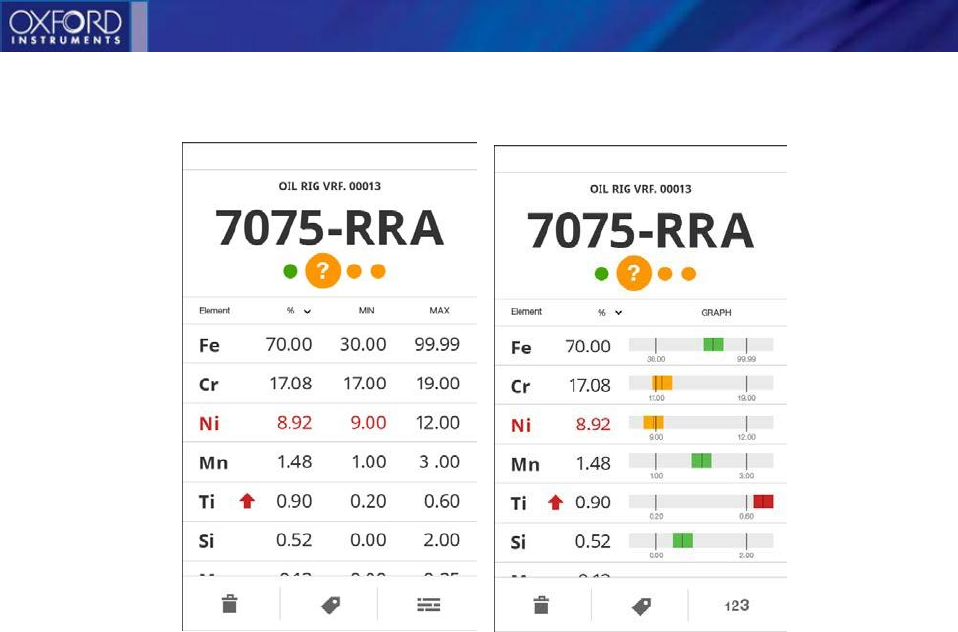
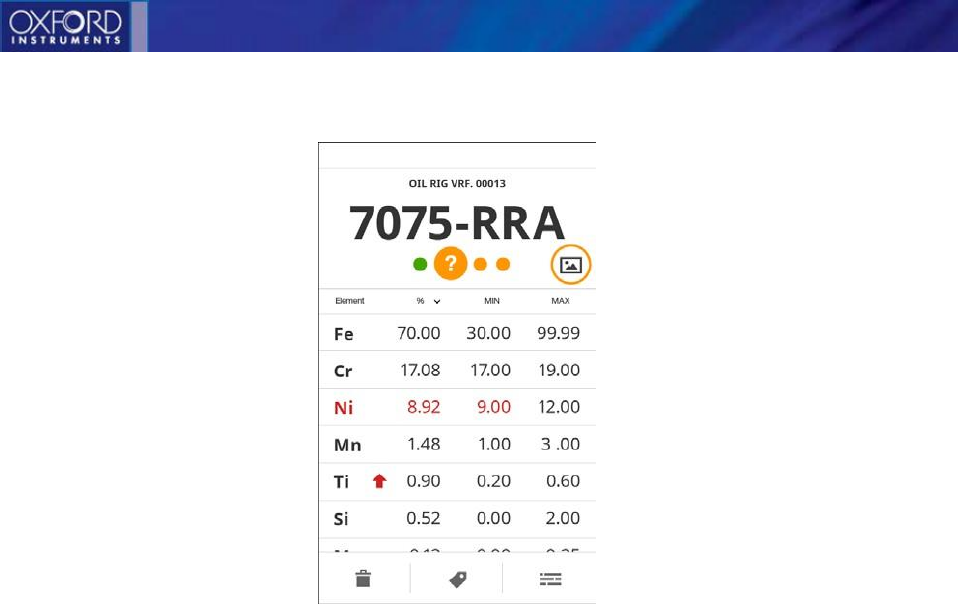
See more with the Chemistry setting
Additional details about both Analyze and Sort results can be seen by switching on Chemistry by tapping
it’s icon in the pull-down menu. It will display the concentrations of each element in the result and
it’s allowed minimum and maximum.
You can switch between a numerical and graphical view of the Chemistry data by tapping the numerical icon
or the graphical icon .
Vulcan Series
22
Numerical and graphical Chemistry views
In the graphical view you can see the concentrations of the elements on a vertical scale. The more
centered the indicator is, the better the match is. If the indicator is green, the match is good,
orange is possible and red means no match.
You can sort the results columns according to concentration, minimum or maximum by tapping
the column header.
Viewing camera image
If the camera was used when measuring a sample, a thumbnail of the photo will be attached to
the result view. Tap the thumbnail to open a full screen view of the photo. Close the photo view
by tapping the X icon.
Vulcan Series
23
Viewing saved camera image
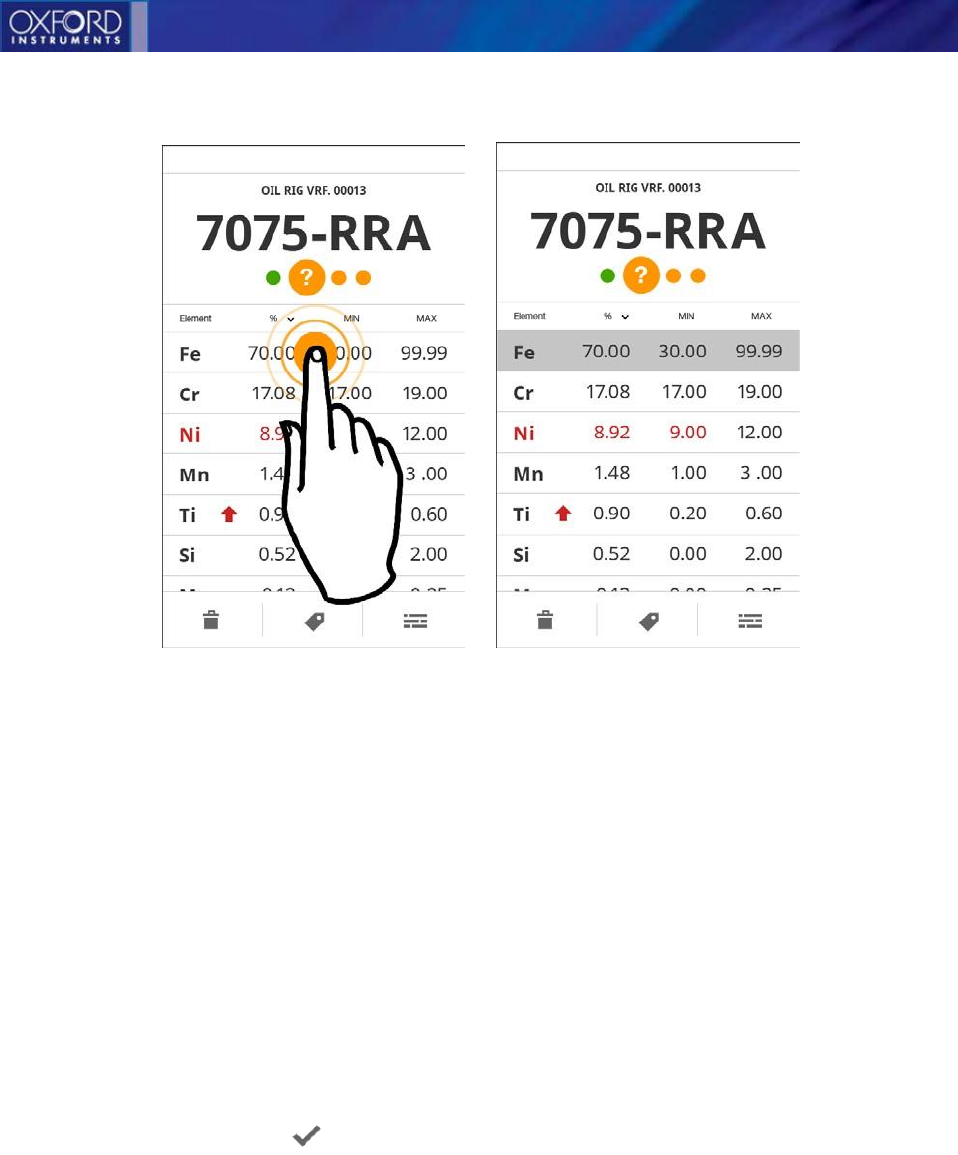
Pinning important elements
If you need to keep an eye on certain elements in the results, you can pin them by long pressing
the element list item. This will make them always appear on the top of the list, marked with
attention color. If the element is not detected in the sample, it is not shown. To unpin an element,
long press it again.
Pinning an element is a persistent global setting: It will stay on even if the program is changed or
the instrument is turned off.
Sticky elements override the sorting buttons in the title bar. Sticky elements will be presented
first and their internal order follows the selected sorting.
Vulcan Series
24
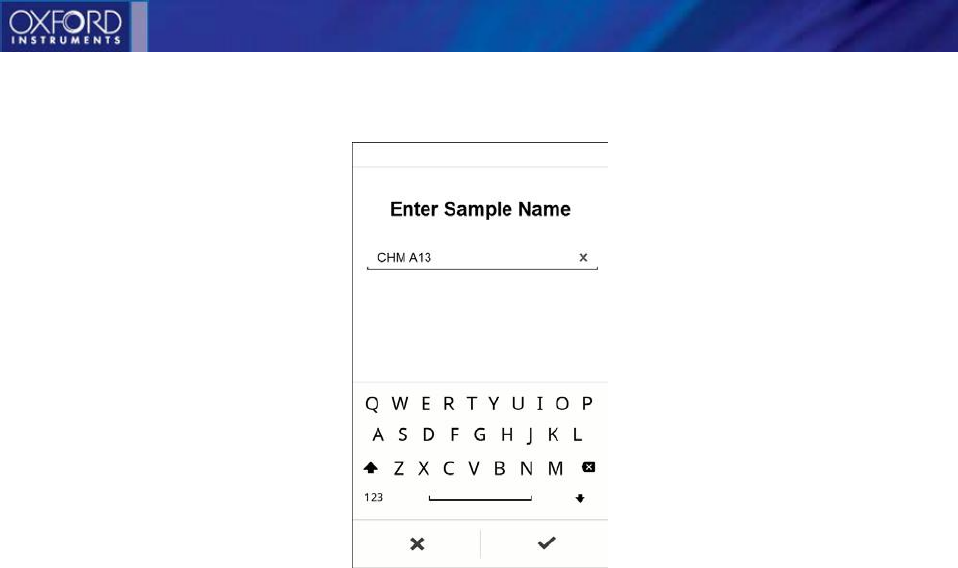
Sample naming
Pinning an element
To find your measuring results easily later, you should name your samples. A default name is
always given, but you can change it to something more meaningful. You can also add running
numbering to the names so that the samples from the same working session will be named
conveniently.
● Naming the sample
○ Open pull-down menu.
○ Tap Sample Name.
○ Type in new name (16 characters maximum).
○ Tap Done icon .
Vulcan Series
25
Entering a sample name
Grades
Grade is a commercial name for an alloy, e.g. “stainless steel 316” is a grade. Besides the name, it
consists of a list of elements and their minimum and maximum concentrations.
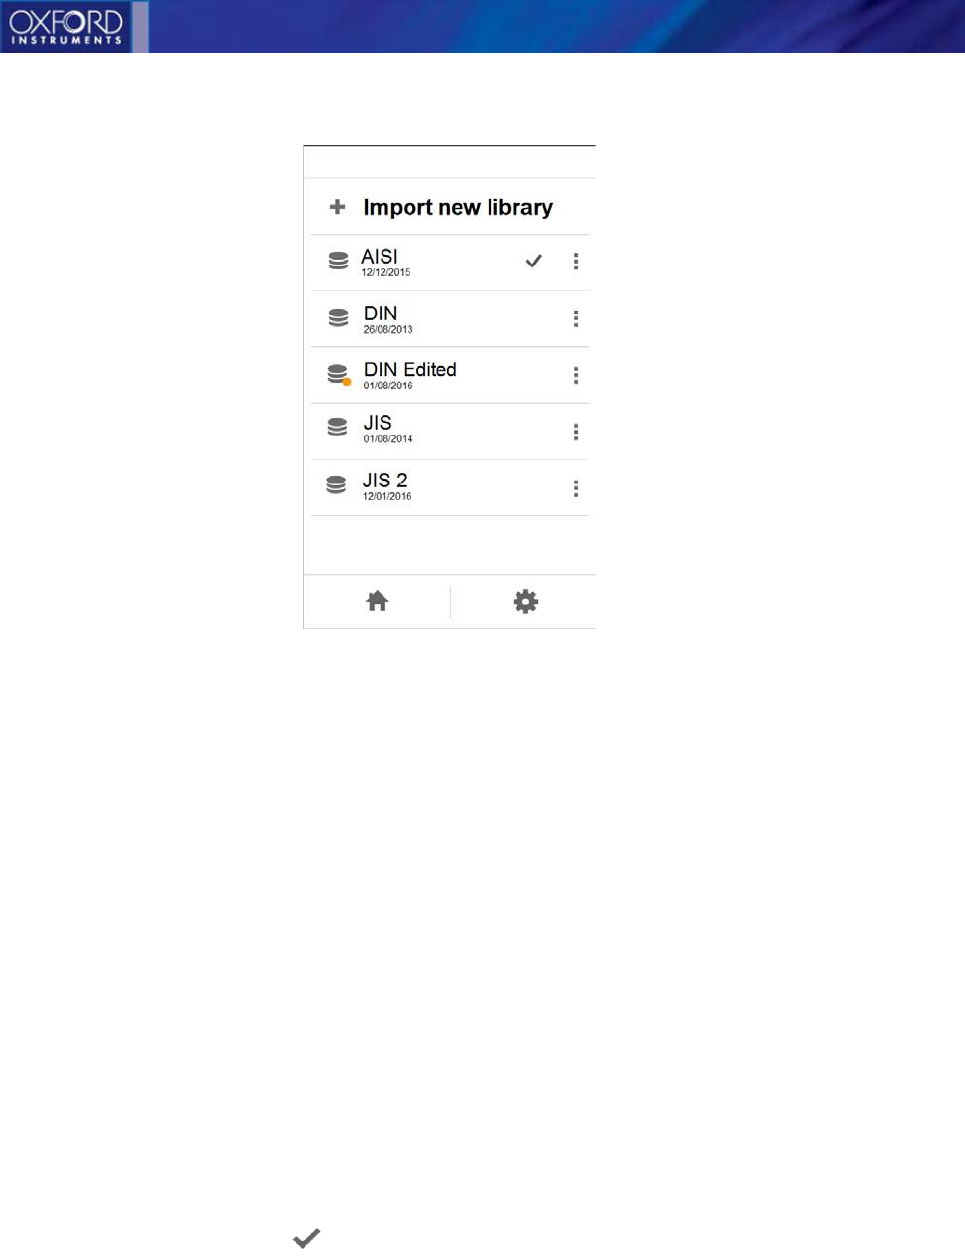
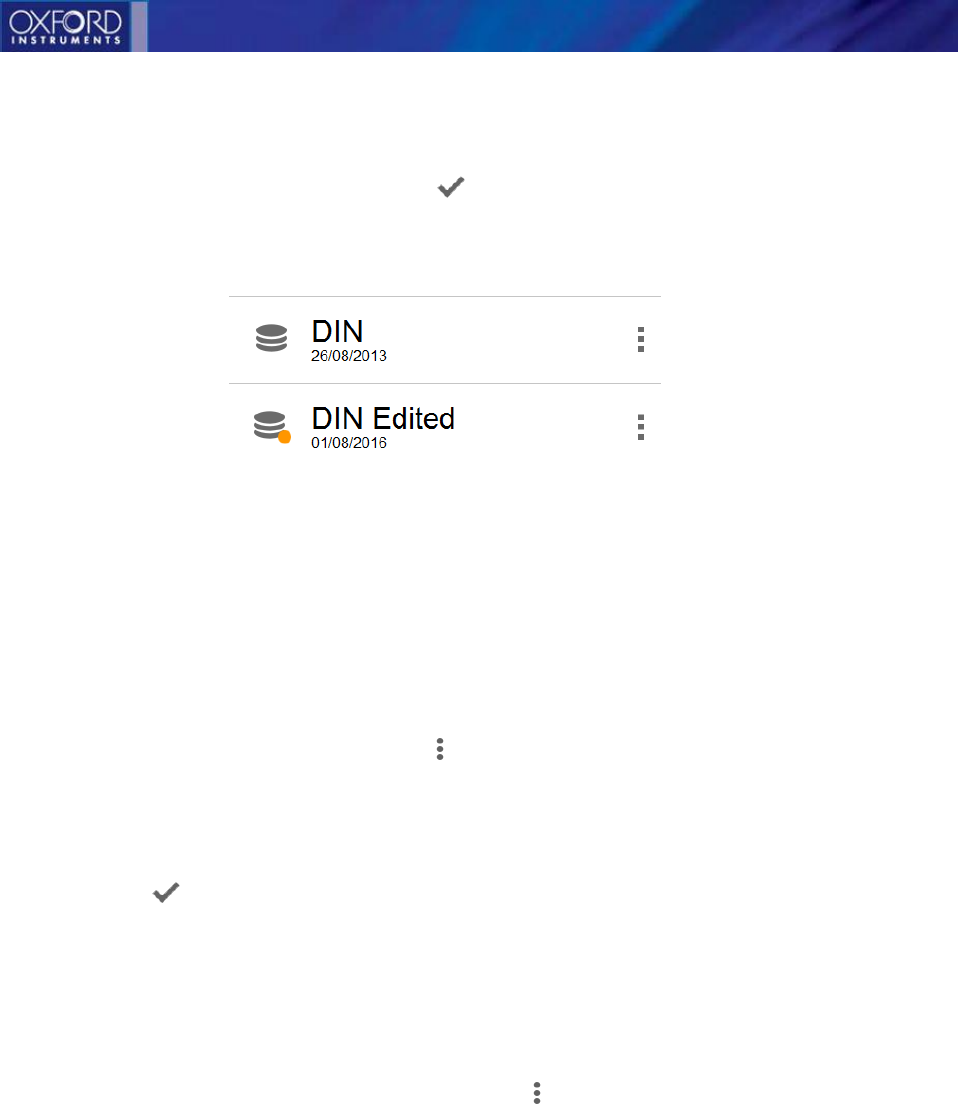
Grade library is a collection of grades. These libraries (e.g. AISI, DIN, JIS) include more than a
thousand grades and even more can be added by the user. The instrument can have multiple
libraries and you can select which one to use.
26
Grade library
● Selecting which grade library to use
1. Open pull-down menu.
2. Select Grades.
3. Currently selected grade library is indicated with a checkmark.
4. Tap the library name you wish to switch to.
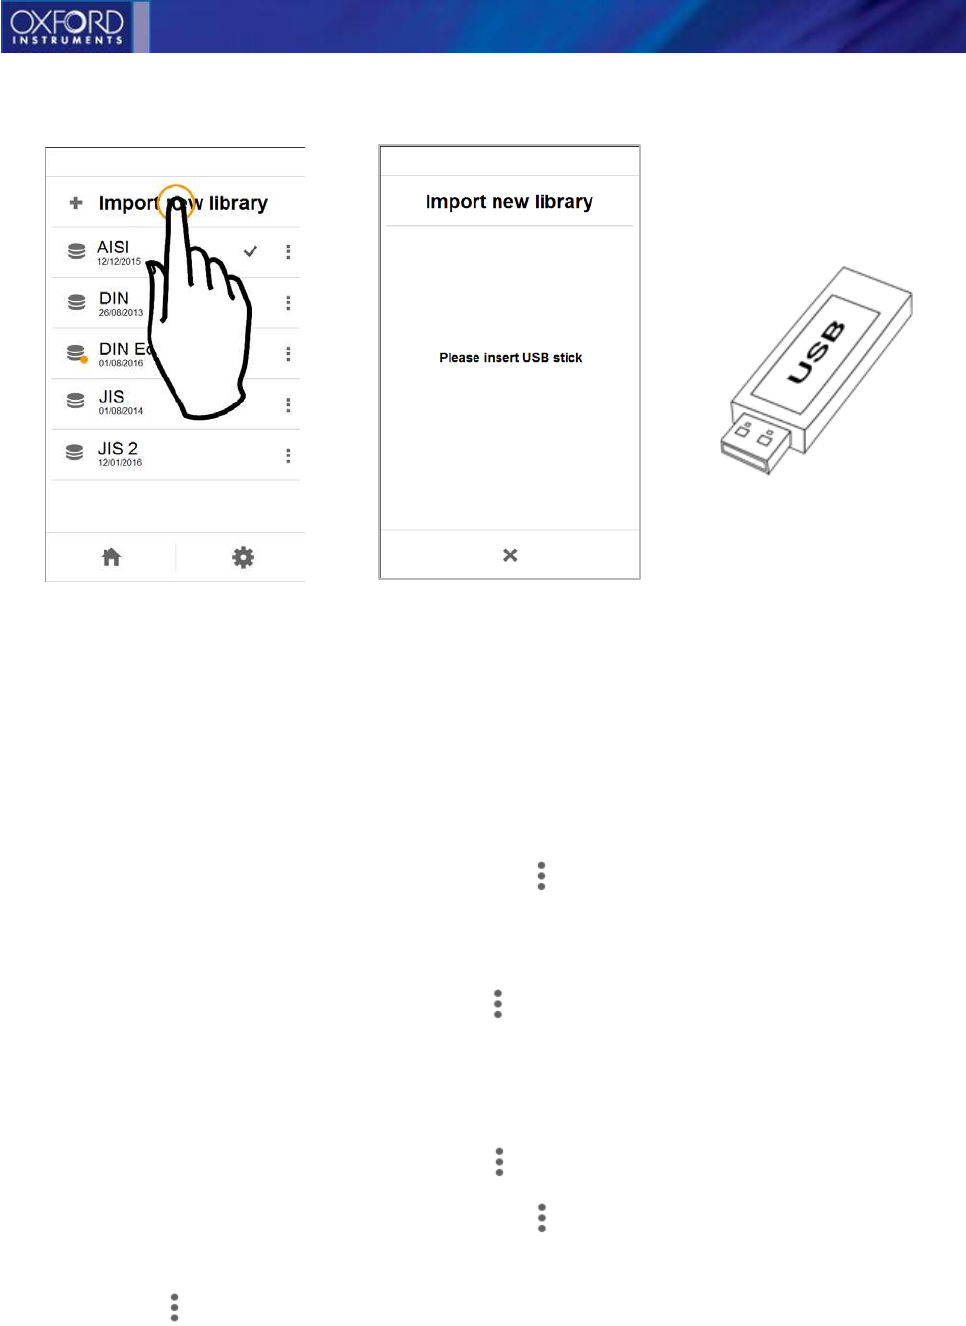
● Importing a new library into the instrument
1. Preparations on a computer: Copy the grade libraries to an USB stick in a folder
named “grades”.
2. In grades view, tap Import new library.
3. Insert the USB stick.
4. Wait while the instrument automatically searches for libraries.
5. All found libraries are shown. Select which ones you want to import to the instrument
and tap Done icon . If there are libraries with the same name already in
the instrument, they will be replaced with the imported libraries.
Vulcan Series
27
Importing new library
If you need to add, edit or remove grades, it is recommended to first duplicate the library and
then edit the copy.
● Viewing a grade
1. In Grades view, double tap on the grade library.
2. In the library view, tap the grade’s menu and select View grade.
● Duplicating a library (supervisor only)
1. In Grades view, tap a library’s menu and select Duplicate grade library.
2. Enter a name for the duplicate. If you don’t name it, it will be called “Copy of [name]”.
● Editing a grade (supervisor only)
1. In Grades view, tap a library’s menu and select View / Edit.
2. In the library view, tap the grade’s menu and select Edit grade.
3. You’ll see a list of the elements in the grade. Choose an element and tap its menu button
.
4. Select Edit element to adjust the maximum and minimum allowed concentrations.
Vulcan Series
28
Vulcan Series
5. Tap Min or Max fields to edit the limits.
6. When you’re done, tap Done icon .
7. Libraries with edited grades will be indicated visually to distinguish them from the originals.
Edited libraries are marked with a dot
● Adding a new grade to a library
If a grade is missing from a library, it can be added there without the need to replace the
whole library.
1. In Grades view, tap the menu of the library you want to add a grade into.
2. Tap Add new grade.
3. Enter a name (e.g. “316”).
4. You’ll see a list of elements. Tap the ones you want to add and tap Done icon
to continue. TIP: Use the search field to quickly locate an element.
5. Next fill in the minimum and maximum allowed concentrations for each element.
● Deleting a grade from a library (supervisor only)
1. In Grades view, double tap a library.
2. In the library view, tap the grade’s menu and select Delete grade.
Grades themselves can also be edited. The elements and their properties can be set.
● Adding elements into existing grades (supervisor only)
1. In Grades view, double tap the grade library.
2. In the library view, double tap the grade’s menu.
3. Tap Add New Elements.
29
Vulcan Series
4. You’ll see a list of elements. Tap the ones you want to add and tap Done icon to
continue. TIP: Use the search field to quickly locate an element.
5. Next fill in the minimum and maximum allowed concentrations for each element.
6. When you’re done, tap Done icon .
● Deleting elements from an existing grade (supervisor only)
1. In Grades view, double tap the grade library.
2. In the library view, double tap the grade’s menu.
3. You’ll see a list of the elements in the grade. Choose an element and
tap its menu button .
4. Select Delete element.
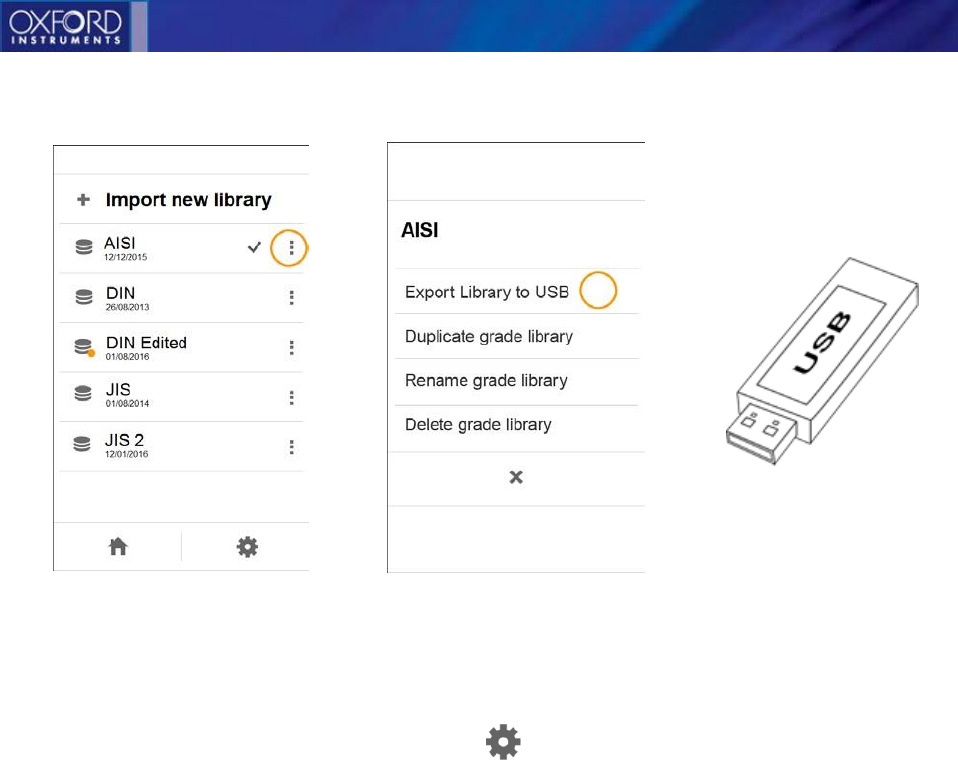
● Renaming or Deleting a library (supervisor only)
1. In Grades view, tap a library’s menu and select Rename grade library or Delete
grade library.
● Exporting library to USB (supervisor only)
1. In Grades view, tap a library’s menu and select Export to USB.
2. Insert a USB stick.
3. Wait while the system mounts the USB stick.
4. Tap Done icon to start the export.
5. The file will be named with the date of the exporting plus the sample name.
Vulcan Series
30
Exporting library to USB procedure
● Changing Grade settings and preferences
1. In Grades view, tap the settings icon .
2. Tap Good match limit to set the maximum number of how many good match results are
displayed.
3. Tap Possible match limit to set the maximum number of how many possible matches are
displayed. If there are no good matches, this is the amount of possible matches that can
be shown.
4. Tap No match limit to set the maximum number of how many No matches are displayed.
If there are no good matches or possible matches, this is the amount of no matches that
can be displayed.
5. Tap Closest matches to set the maximum number of closest matches shown. Closest
matches are shown if there are less good/possible/no matches than this number.
6. Maximum total of matches shown is three.
Vulcan Series
31
Measurement results
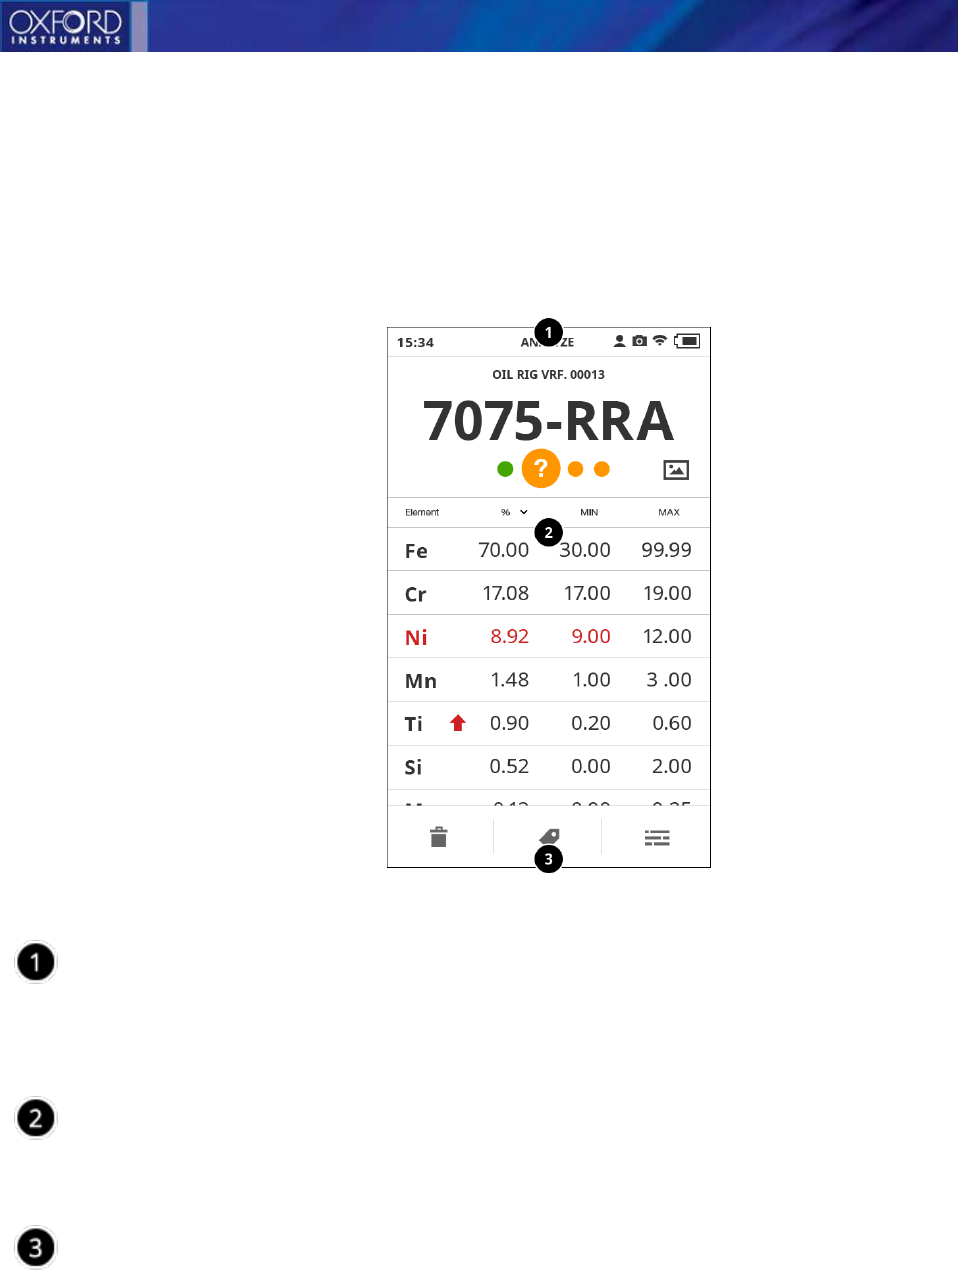
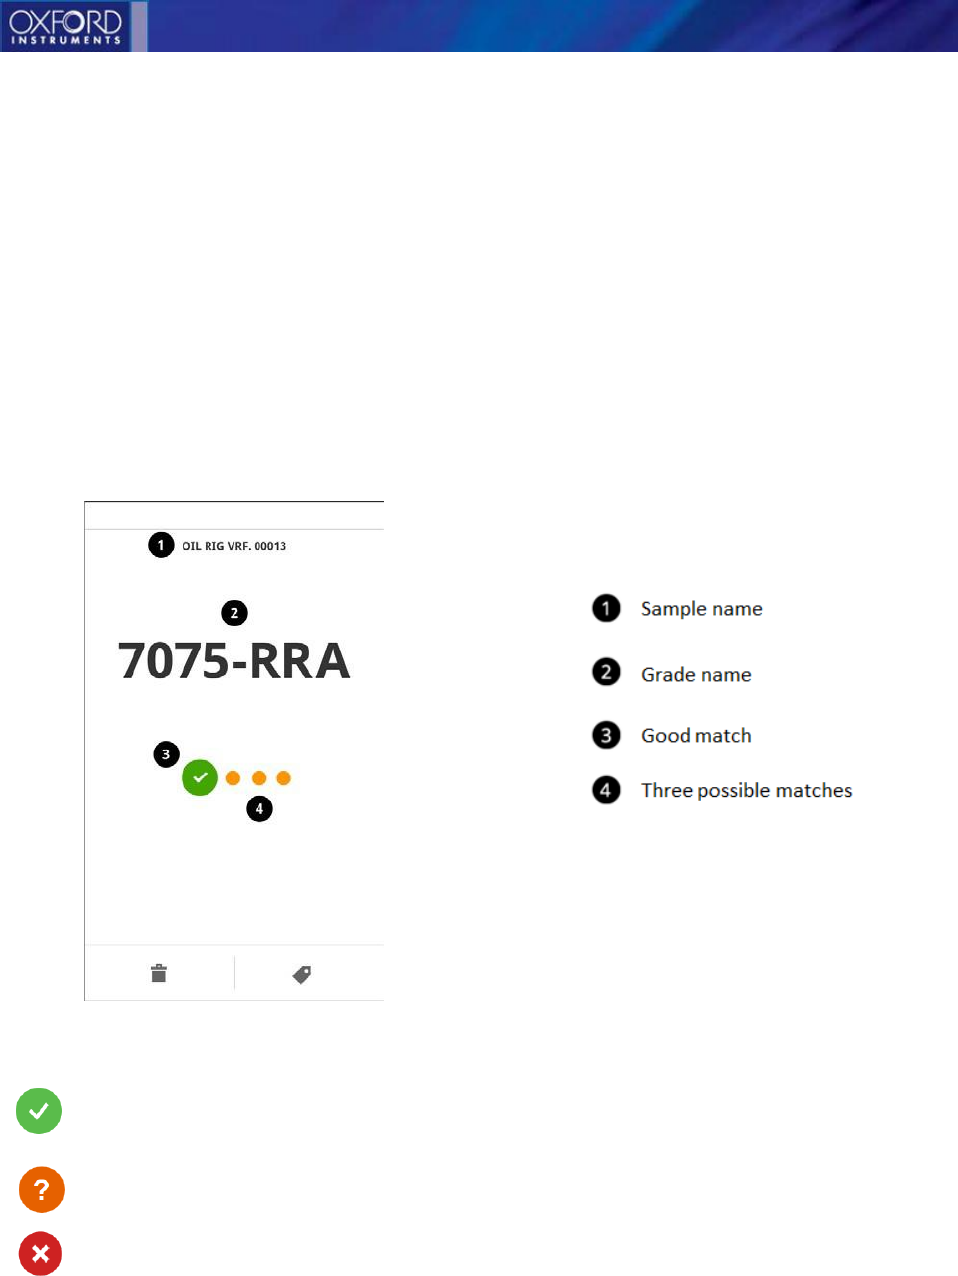
After the measurement, a results screen will be displayed. The name of the sample is shown [1],
and the grade name [2] if a matching grade was found. Under the grade are icons indicating good
and possible matches [3, 4].
If more than one grade match was found, you can see the others by moving between the result
pages by tapping on the match icons [3, 4]. The best match is always shown first, on the left.
Result screen explained (without Chemistry)
Indicates a good match
Indicates a possible match
Indicates no match
The threshold values for good, possible, no match and closest match can be set in the Grade
settings.

Vulcan Series
32
Viewing results history
You can view your previous results by swiping from left to right with your finger. The latest results
are on the right, the oldest on the left. The rightmost is always the Ready screen.
Swipe from left to right to see the older results
Vulcan Series
33
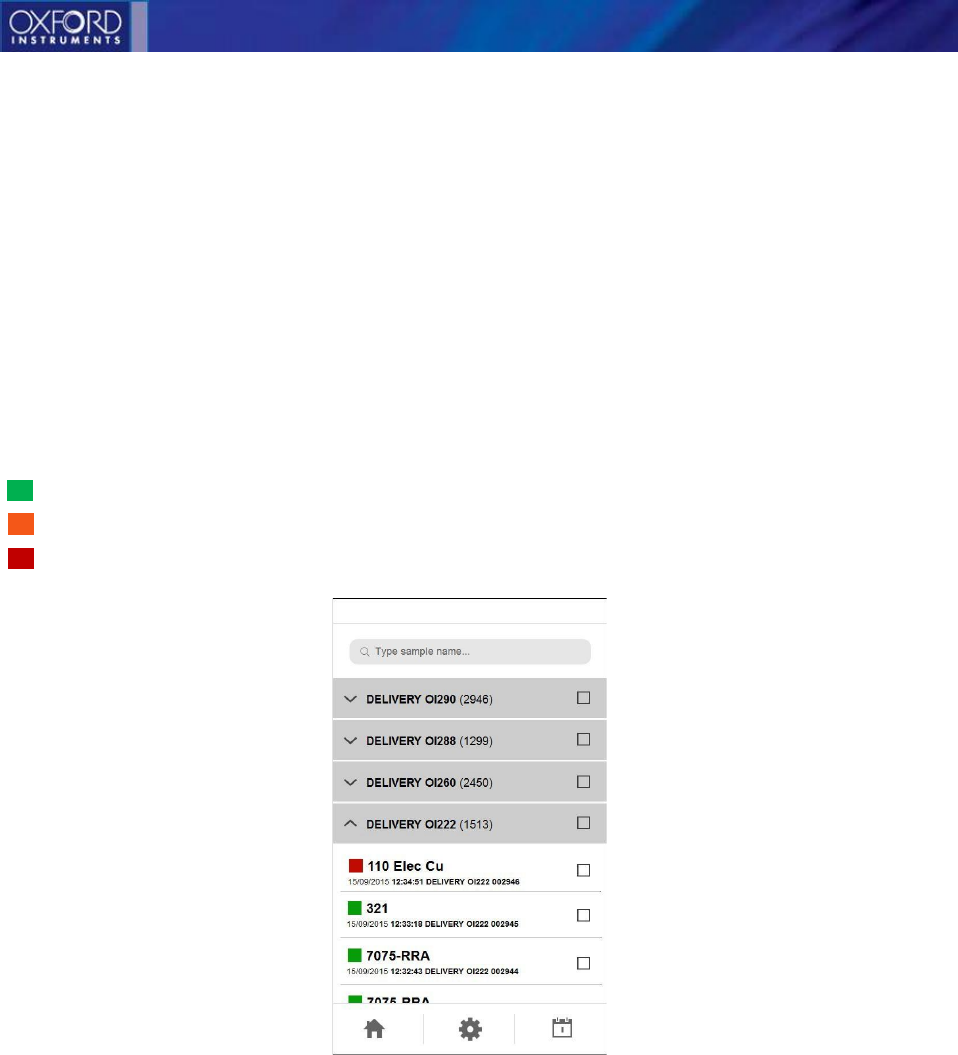
Results and reporting
Old results are stored in the instrument and can be viewed by opening the pull-down menu and
tapping Results.
The results are organized in a list of “batches”, i.e. sets of measurements that have been stored
under the same name. The number after the name of the batch indicates how many results it
includes. You can open and close a batch by tapping its title.
Indicates a good match
Indicates a possible match
Indicates no match
Result history
Vulcan Series
34
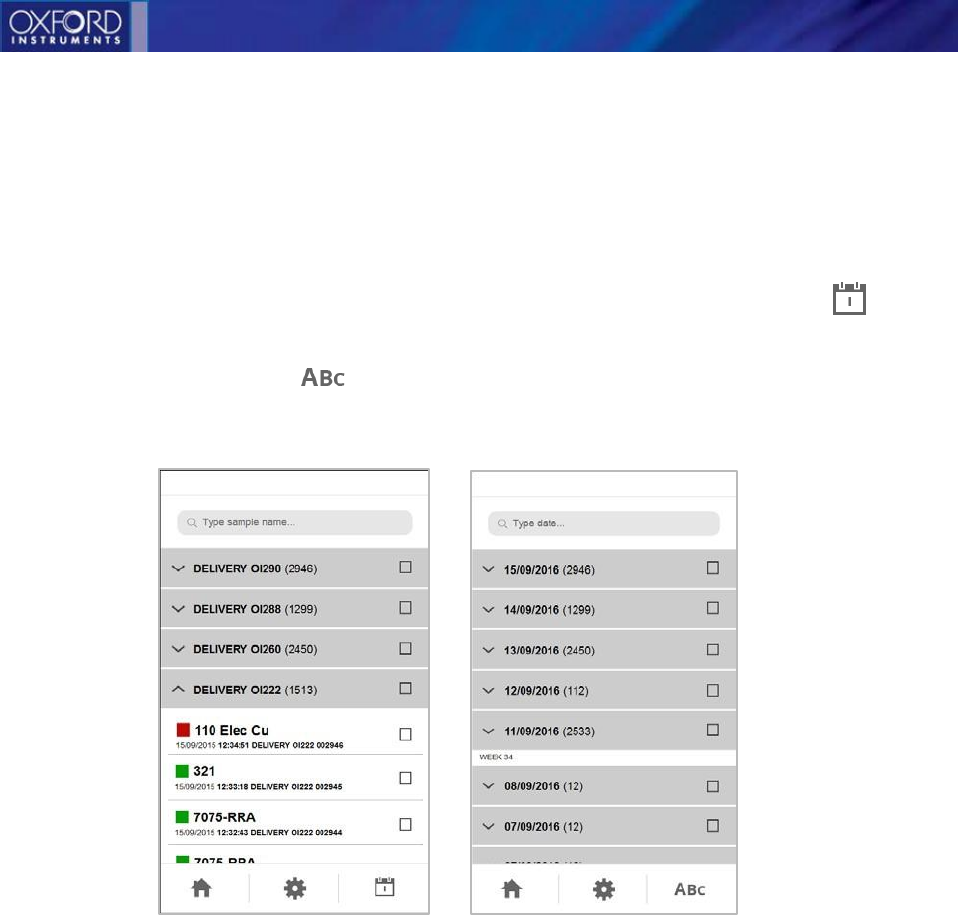
Search and filter functions
To find a certain result, you can search for its batch name by tapping the search field and typing in
a part of its name. Alternatively you can switch to date view by tapping the calendar icon and
then type in the date in the format “dd/mm/yyyy”, e.g. 15/09/2016. You can switch back to name
view by tapping the text icon .
Results by name (left) and by date (right)
Vulcan Series
35
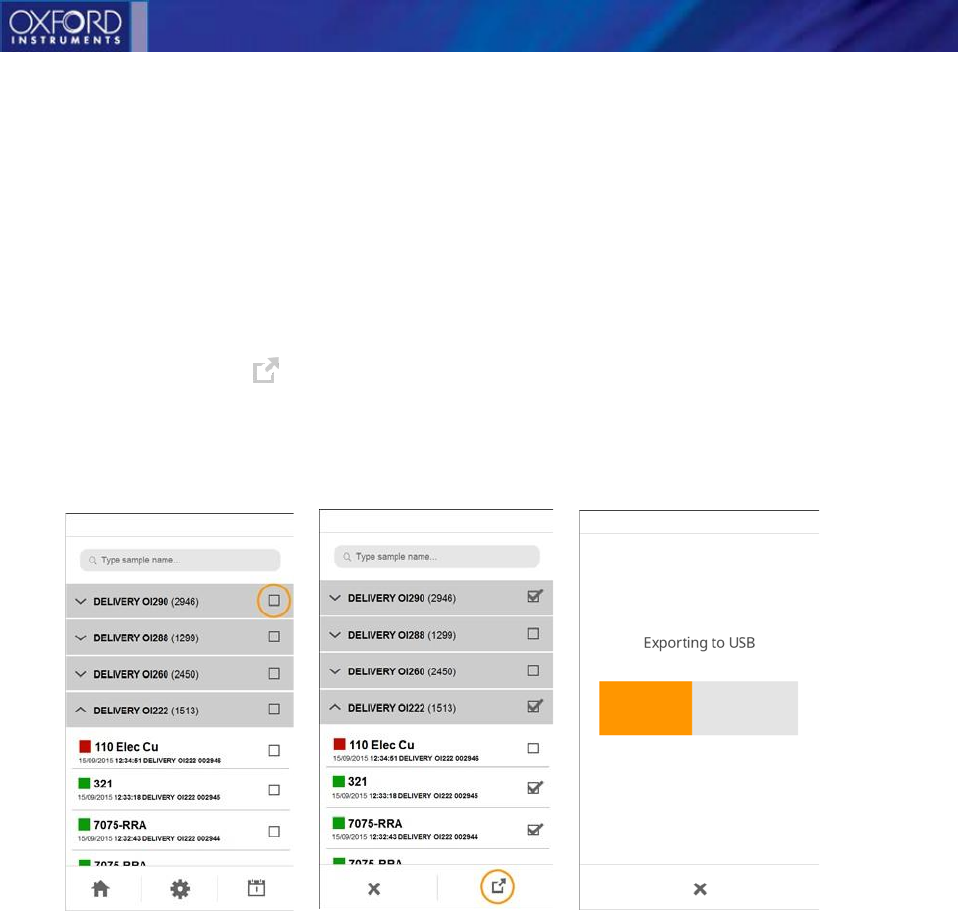
Exporting results to USB
o Insert the USB stick to the device.
o Select the results that you want to export by tapping the check box next to the batch name or
the result name. If you select a whole batch, all results in it will be exported.
o Tap the export icon to start exporting.
o When the export is complete, a pop up message is displayed.
Exporting to USB flow
Vulcan Series
36
Changing reporting settings
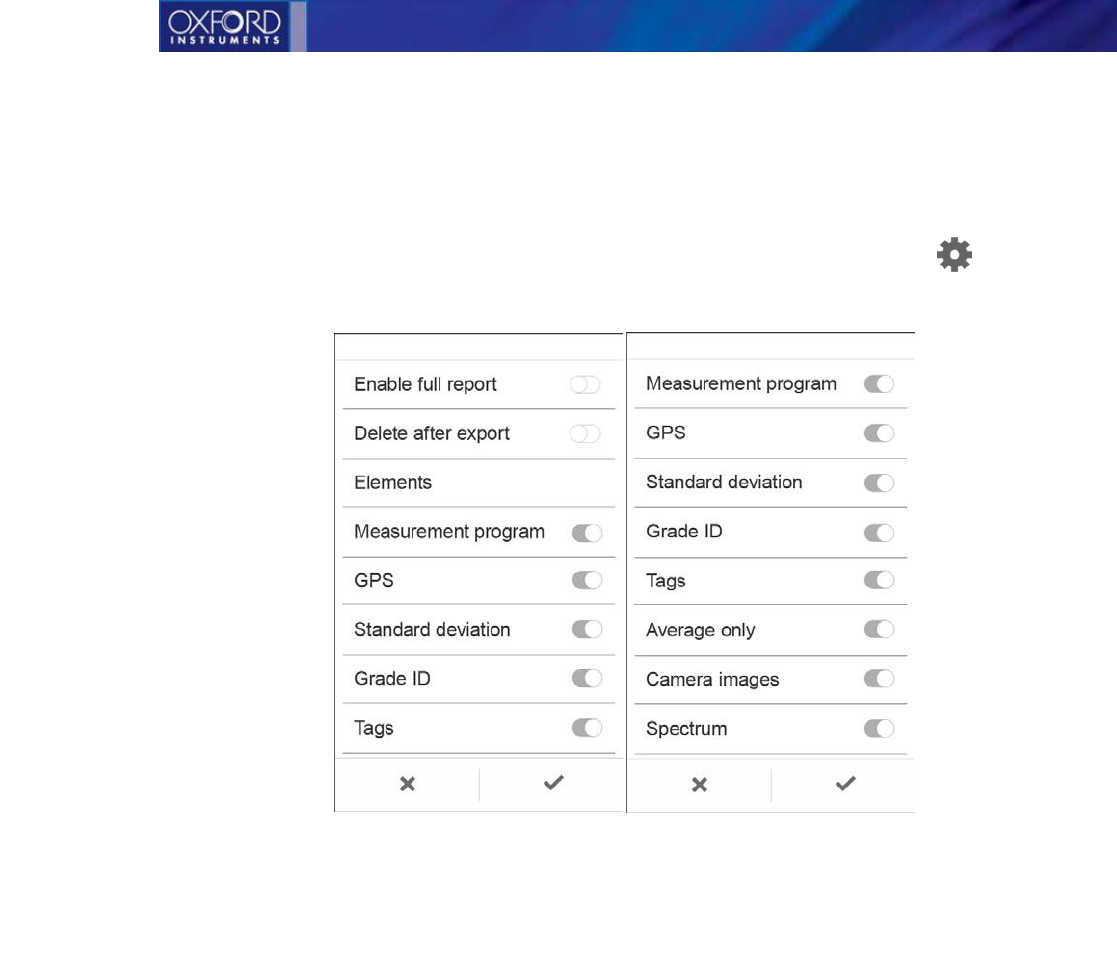
You can customize the reporting settings to your liking by tapping the settings icon in
results. After that you can select what information is included in the reports.
Reporting settings
Report settings
Enable full report
Enabling the full report gets all the information related to the result.
Delete after export (Supervisor only)
Switch this on if you want to remove the results from the instruments after exporting them.
This way you’ll save storage space. The instrument can store up to 30 000 results. When the
memory is full, the oldest results will be deleted automatically. It is a good measurement
practice to download the results from the instrument after completing a task or at the end
of the day.
Elements
You can choose which elements are listed in the exported results. The order can be
changed by tapping the headers of the elements
Measurement program
If this is on, the measurement program of the result will be exported with the result.

Vulcan Series
37
Standard deviation
Standard deviation indicates the repeatability (precision) of the analysis results and can be
exported with the result if enabled.
Grade ID
If this is enabled, grade information of the measurement is exported with the result.
Tags
Select whether the user-defined custom info tags are exported.
Average only
If this enabled, only average measurements are exported.
Camera Image
Set this on to export the sample’s camera image with the result.
Spectrum
If this is on, the spectrum of the sample will be exported with the result.
Vulcan Series
38
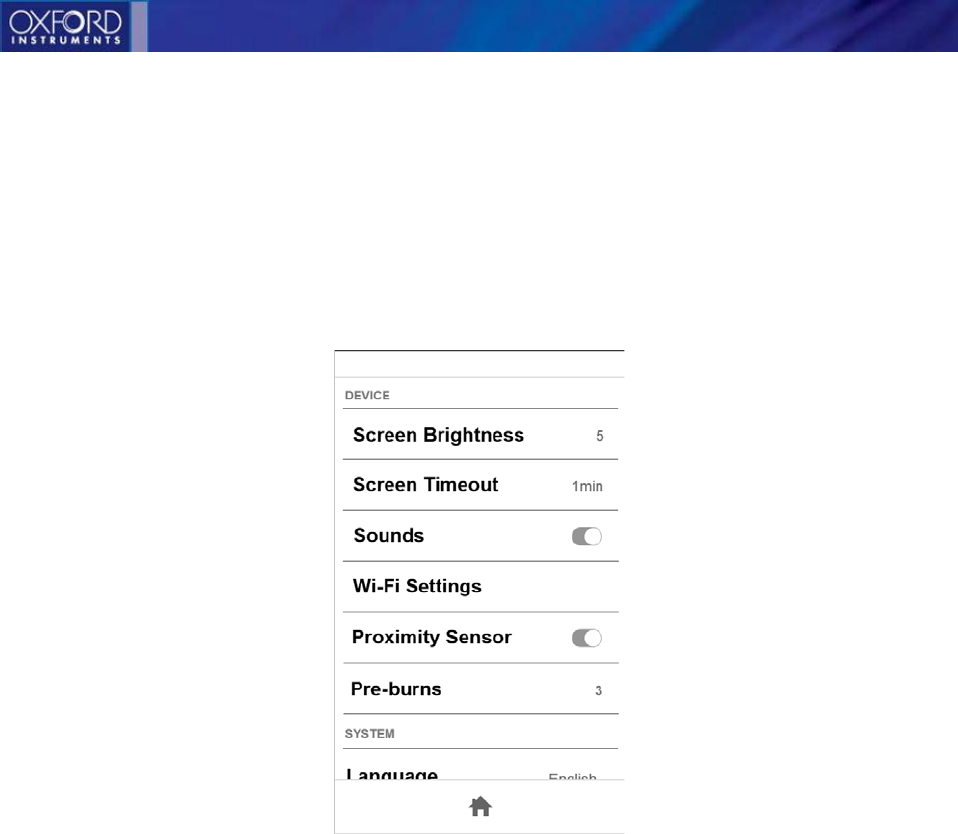
Settings
In this menu you can adjust the instrument’s general parameters and user preferences such as
screen settings, dark or light theme, sounds, power saving etc.
Settings menu
Vulcan Series
39
Device settings
Screen brightness
Here the user can increase or decrease the device brightness
Screen Timeout
Dimming time: Set how many minutes the instrument can be idle until the screen dims.
Device lock timeout: Set how many minutes the instrument can be idle until the device
is automatically locked and then the user needs to login again
Sounds
Turn warning and measurement ready sounds on or off.
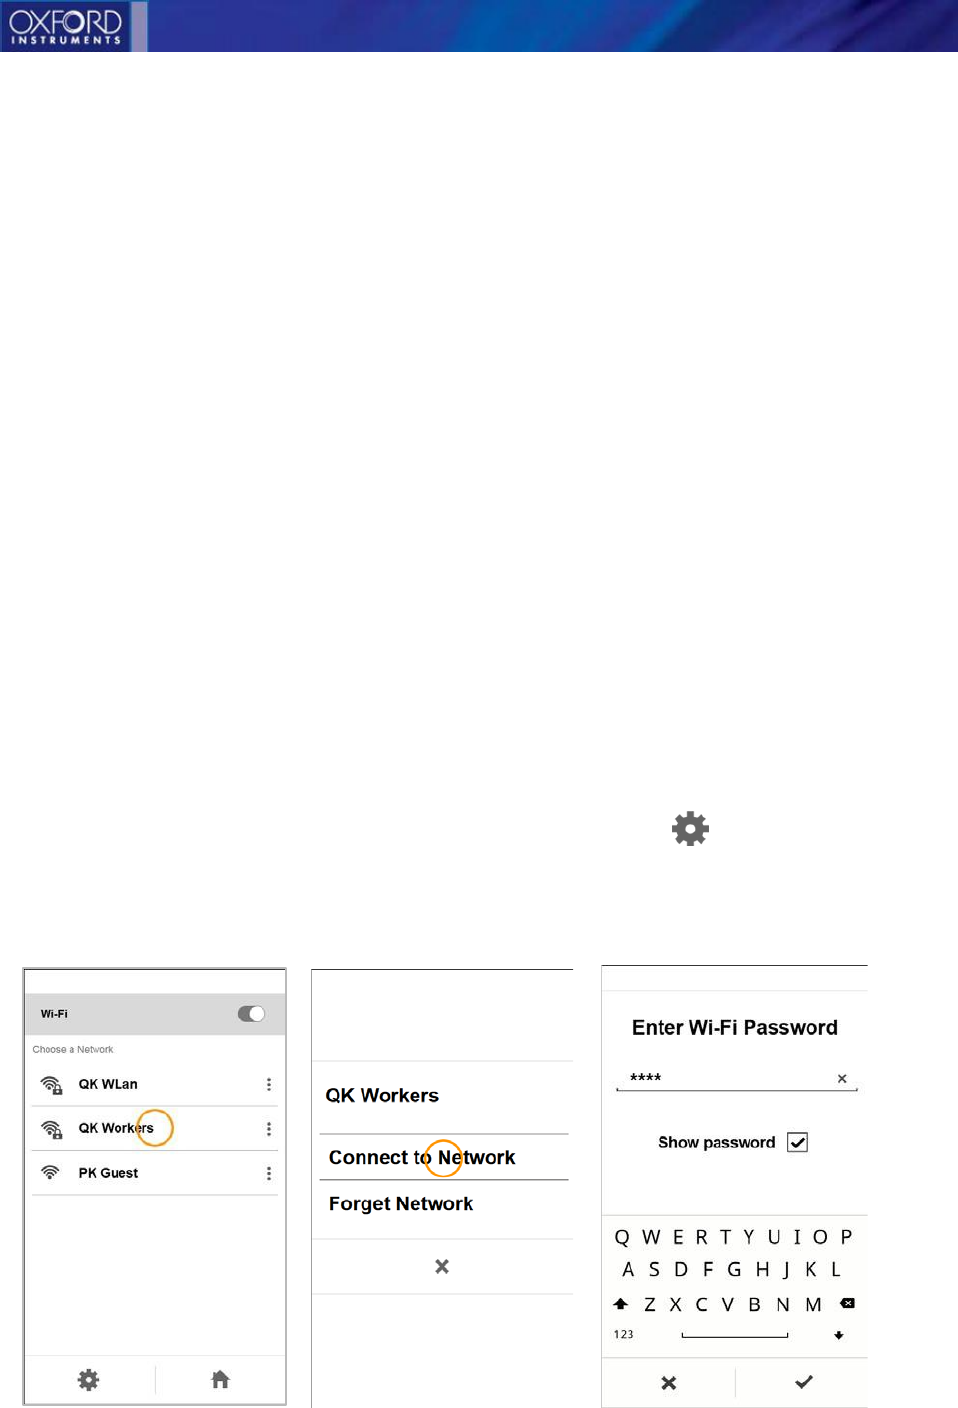
Wi-Fi setup
1. Tap to open the Wi-Fi settings screen.
2. In Wi-Fi settings tap the Wi-Fi toggle to turn the Wi-Fi on/off.
When Wi-Fi is on, you’ll see the symbol in the status bar.
TIP: You can also turn Wi-Fi on/off quickly from the pull-down menu.
3. Select a network. All available networks are listed. Choose one to connect to. Tapping it
opens a dialog where you can select to connect. After connecting once, you’ll connect
automatically to the same network if it’s available. If a password is required (a lock icon
appears over the network icon), you will be asked to type it in.
4. If you don’t see your network in the list, tap the Settings icon
5. Select Refresh to scan for available networks again, or Add network to add network details
manually.
Wi-Fi setup
Vulcan Series
40
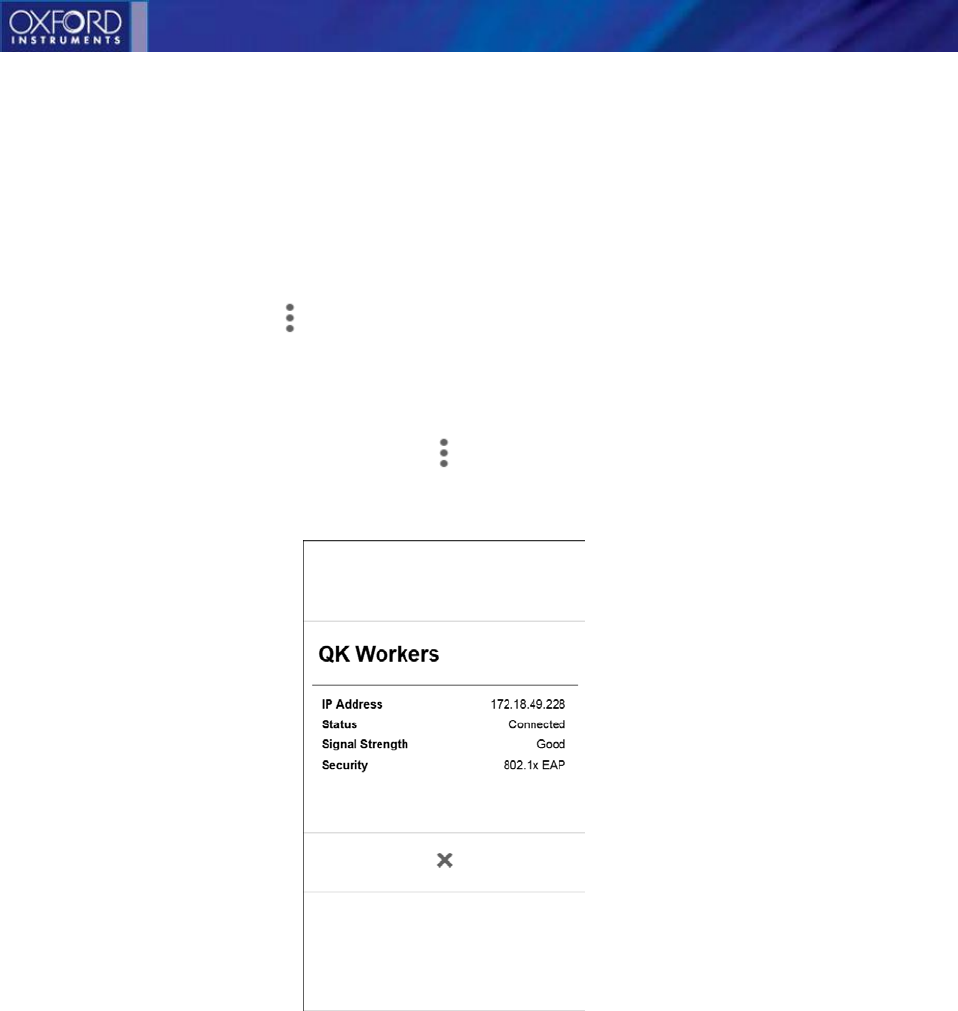
● More Wi-Fi features
○ To prevent the instrument from automatically connecting to a network, tap the
network’s menu and select Forget network.
○ To see details of a network you’re currently connected to, tap its name. A status popup
will open and display the IP address, Signal Strength, Link Speed, Frequency and
Security protocol.
○ To edit the network, tap its menu and select Modify network. This will allow
you to select the authentication protocol and change login identity and password.
Wi-Fi information dialog
Vulcan Series
41
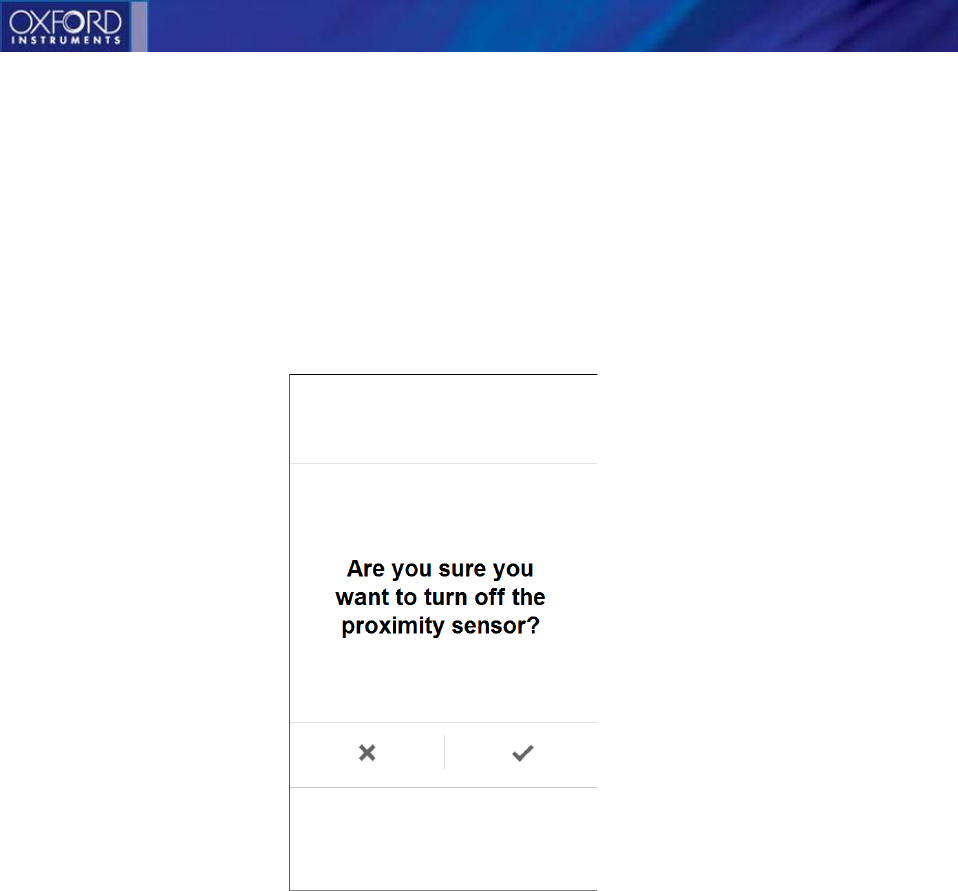
● Proximity sensor
Proximity sensor is a safety feature that warns you if the instrument is not directly aimed
at the sample. When the status bar turns orange, you should re-aim the instrument.
You can turn off the warning, but this is not recommended - especially if other people
also using the same instrument.
Proximity sensor warning screen
● Pre-burn
Pre-burn toggle is suitable for cleaning light contamination such as light rust or
anodization. Painted, rusty etc. surfaces require mechanical cleaning before taking a
measurement.
Optional: If you suspect that the sample surface isn’t clean, set Pre-burn on from the
pull-down menu. You can adjust the number of pre-burns from the ‘Settings’ menu.

Vulcan Series
42
System settings
Language
Here you can change the device language.
Theme
Here you can change the device theme either to light or dark.
Time and Date
Here you can set the device time and date. Different time and Date formats can be
selected.
User administration (Supervisor only)
Here you can change the user and supervisor passwords.
Matrix corrections (Supervisor only)
Here user can define corrections to factory calibrations.
Calibration matrix (Supervisor only)
Here User can disable automatic calibration selection and pick the calibration manually from
the list.
Remote UI
User can operate the Vulcan series graphical user interface from PC. Connection requires USB
Micro-B cable (not supplied with the instrument).
Localization
This is where you set region-specific settings such as different splash screens for different
countries.
Vulcan Series
43
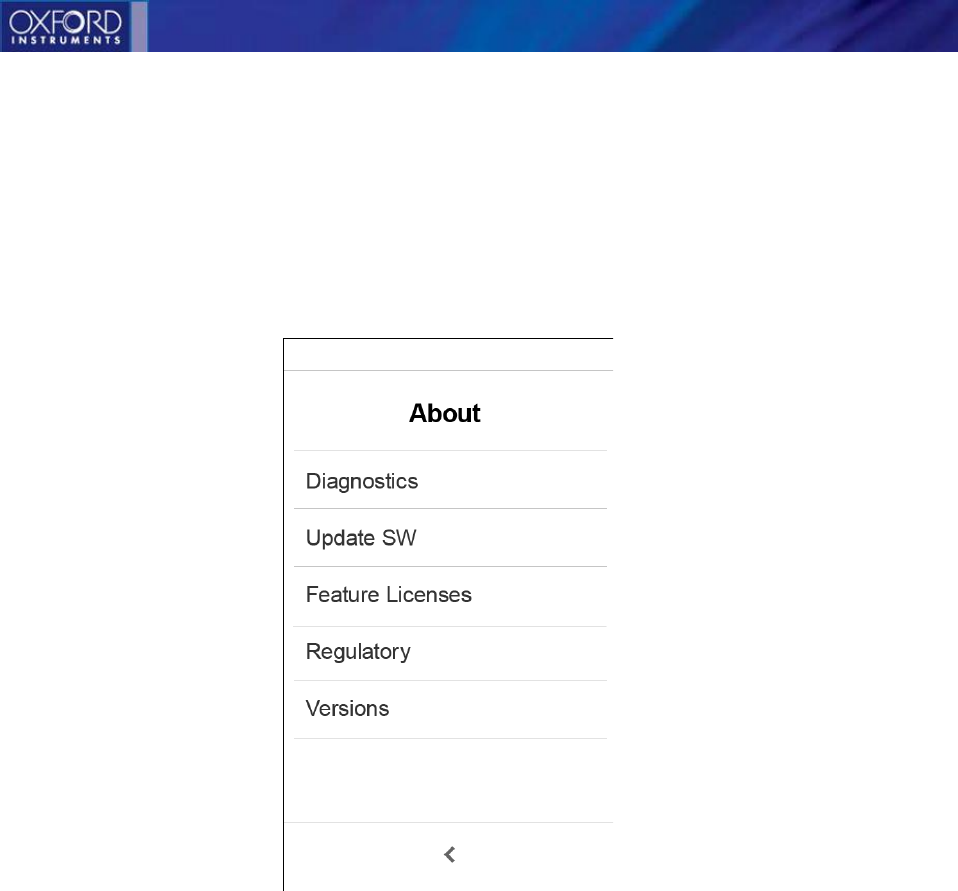
About
If you need to read about regulatory information or terms of use, it collected here. You can
check the instrument’s current software version here and initiate an update. To update the
software, you need a USB stick with the software.
About menu screen

44
Vulcan Series
Proper measurement technique
Vulcan series is designed to be used for metallic samples only. The instrument is not capable of
analyzing plastics, ceramics, wood, rubber, soil or similar samples. If such samples should be
measured the results are not reliable.
The laser in the Vulcan series is focused very close to the nose plane of the instrument. Therefore
it is important to keep the instrument steady and in direct contact with the sample during the
whole measurement.
To ensure good measurement results:
○ Before starting any measurement, it is important to wear the safety goggles.
○ Take the measurement from a clean surface. Clean the surface if necessary.
○ Ensure that the sample covers the whole measurement window and that there is no
gap between the sample and the analyzer nose
○ Ensure that you point the instrument at the right place. There are grooves on the both
sides of the instrument that indicate the location of the laser beam. Optional camera
can also be used to aim the targeting.
○ Hold the instrument firmly and steadily against the sample. Do not tilt the analyzer.
○ Pull the trigger until ‘Measurement complete’ appears on the LCD screen
○ Read the results from the screen
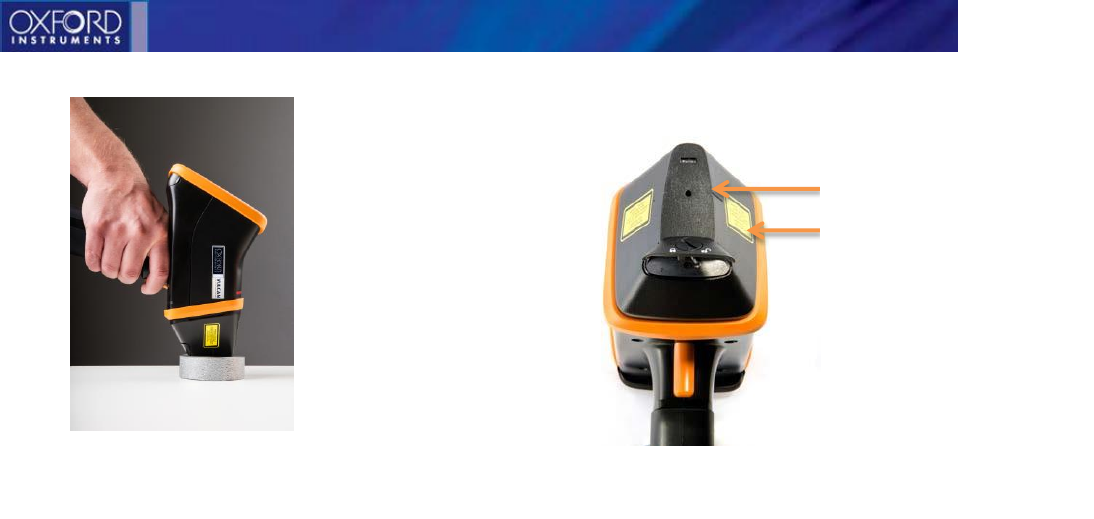
45
Vulcan Series
The analyzer nose showing the groove on the sides of the
and indicating the center of the laser spot.
Performing a good measurement from dirty surfaces
Most of the real life samples are not clean and flat surfaces. Therefore it is important to understand
the effect of the shape of the sample and possible surface contamination to the analysis results.
The LIBS is a surface analysis technique and the laser can penetrate only couple of micrometers (µm)
through the sample surface. Like any other analyzer, Vulcan series gives the best results when the
sample is properly prepared. The best results can be obtained from a clean, smooth and flat surface.
Any contamination such as water, dust, rust, paint, coating, oxide layer, anodization etc. will have an
effect on the measurement results. The magnitude of the effect depends on the thickness and the
material of the layer.
Before taking a measurement, it is recommended to clean the sample surface. There are several
ways to that:
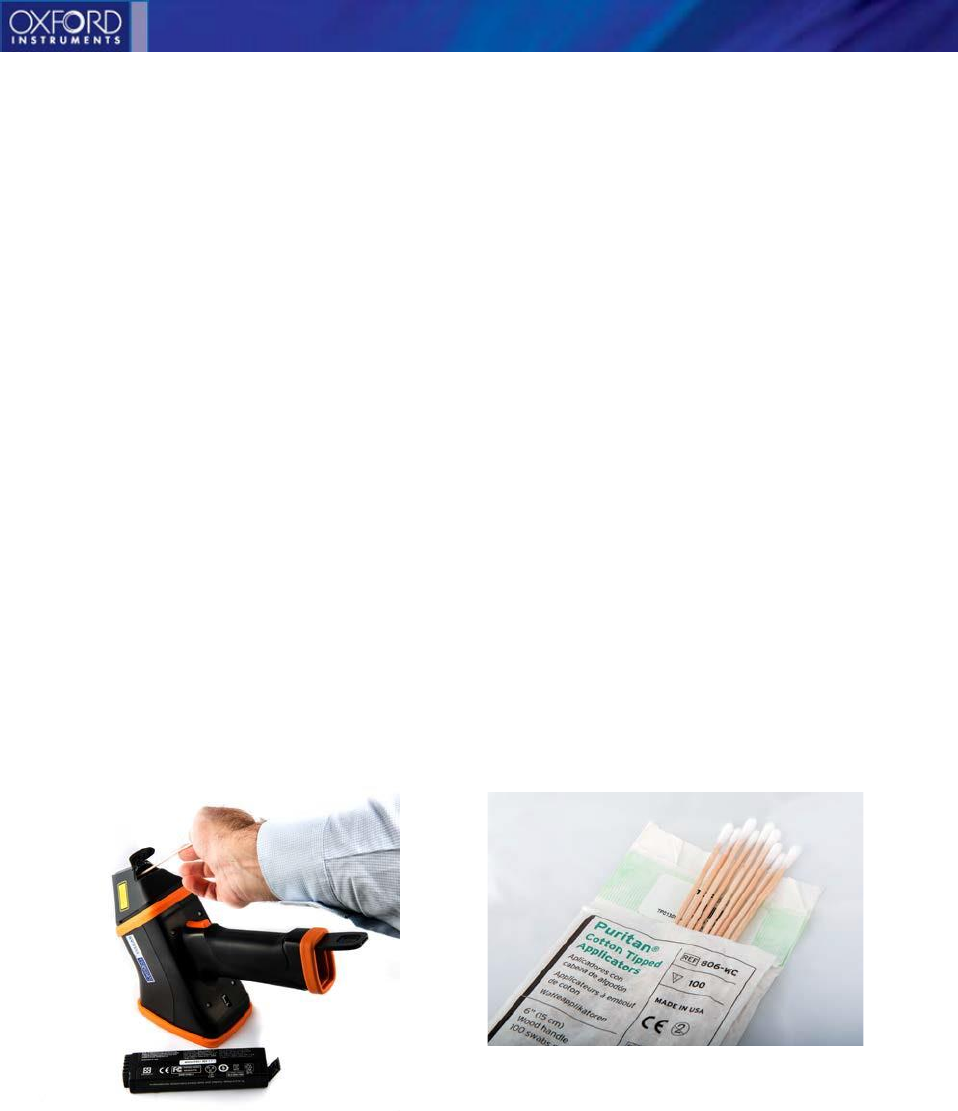
Sample preparation - light contamination, water, dust or similar
If there is only a thin layer of water or dust on the sample surface, it can be cleaned by just wiping
the surface clean with a piece of cloth, paper or similar. After cleaning the sample, point the analyzer
nose at the object to be measured and ensure that the instrument is in direct contact with the
sample. Hold the instrument steadily, pull the trigger and read the results on the screen.
Sample preparation - thin oxide layer, anodization
Vulcan series laser can burn through thin oxide layers and anodization. The built-in pre-burn feature
cleans the sample surface with thousands of laser bursts before taking the measurement. The
intensity of the pre-burn can be adjusted in the Settings menu. Notice that the pre-burn feature will
increase the total measurement time.
Laser aperture
Laser warning
label
Instrument properly placed against the
sample

46
Vulcan Series
When you have activated the pre-burn feature from the user interface and selected the number
of pre- burns, point the instrument at the sample and hold it steadily. Pull the trigger and wait
until the measurement is complete and the results appear on the screen. Then release the trigger.
If the results are not good and the laser beam hasn’t penetrated the surface layer, you can
increase the pre-burn intensity from the Settings menu.
Measuring aluminum profile
If the results are still not satisfactory and the laser is not able to burn through the layer of
contamination, then the sample surface needs to be cleaned mechanically.
Sample preparation – rust, paint, coatings or similar
Some surface contaminations such as thick rust, paint and some coatings are too thick to be
cleaned with the Vulcan series’ pre burn feature. In these cases the surface must be cleaned
mechanically prior to taking a measurement.
To clean the surface, use piece of sand paper or angle grinder to clean an area from where the
analysis can be taken. It is not needed to clean more than 1x1 cm (½ x ½ inch) area for the
measurement. When using sand paper or angle grinder, wipe the object clean before taking the
measurement to ensure no contamination is left on the surface from sample or grinding tools.

47
Vulcan Series
Maintenance
Proper maintenance is important to ensure that Vulcan series analyzer gives you accurate and
reliable results. Please notice that there are no user serviceable parts inside the Vulcan series
housing and opening the housing will void the warranty.
Cleaning the housing
Before starting the cleaning procedure, the device needs to be shut down.
If the plastic housing gets dirty, it can be cleaned with a piece of cloth and light detergent
solution. Do not immerse the Vulcan series instrument into water. Strong solvents and detergents
must not be used as they might damage the housing material.
Wiping the instrument housing clean with a piece of cloth and mild detergent
48
Vulcan Series
Notice, do not expose the connectors to water and dust when the connector cover is open during
the cleaning process.
Cleaning the measurement window
Before starting the cleaning procedure, the device needs to be shut down and remove the battery
and disconnect from the mains.
The measurement window is recessed and located inside the instrument nose. To access the
measurement window, open the small hatch underneath the nose with a coin, screw driver or
similar. The nose will open and expose the measurement window and optional camera optics.
The window should be cleaned by using soft cotton buds. Pack of cotton buds are supplied with
the instrument. If the window is very dirty it can be cleaned by using optical grade isopropanol.
Do not use other detergents or solvents as they might leave a thin film on the measurement
window that might compromise the analysis results.
It is recommended to clean the measurement window every day before starting to take
measurements. This procedure guarantees the best possible results without the risk of window
contamination compromising the quality of the analysis results. When cleaning a very dirty
measurement window use optical grade isopropanol (isopropyl alcohol). Other solvents might
leave a film on the window surface that might compromise the measurement results.

49
Vulcan Series
Measuring the check sample
The Vulcan series instruments are supplied with a check sample and certificate. It is a good
operating practice to measure the check sample every morning before the first actual
measurement. It only takes couple of seconds but measuring the check sample gives the
confidence that the instrument is working according to the specifications.
Measuring a check sample
It is important to measure the check sample with right technique, so the results are
representative:
○ Always store the check sample in the supplied plastic bag to keep it clean.
○ Clean the measurement window before measuring the check sample.
○ Place the check sample on a flat surface.
○ Point the analyzer at the sample. Take the measurement from a fresh surface, not from top
of an old burn mark.
○ Hold the instrument steadily and keep the analyzer nose in direct contact with the check sample.
○ Pull the trigger, wait for the results to appear and read the results from the screen. Then release
the trigger.
○ Compare the results to the certificate. The grade identification should show correctly.
○ Compare the results to previous measurement done with the instrument and the same
check sample.
It is a good practice to keep a log book of the check sample measurements. That way it is easy to
check the data later, if there should be a question of the instrument performance on a specific
day.
52
What if the check sample doesn’t give correct results?
○ Check that you have measured the sample from the right side, do not measure the sample from the
label/printed side
○ Clean the measurement window
○ Clean the check sample surface with isopropanol, dry the surface
○ Ensure that the instrument nose is in direct contact with the sample
○ Repeat the measurement.
If the problem persists, contact your local Oxford Instruments representative for further
instructions.
53
Technical specifications
Technical specifications, battery charger
Battery charger part number OI IA, 54-6002586
Operating temperature range 0 °C – 40 °C / 32 – 104 F
Operating humidity range 10 % RH – 90 % RH
DC-input Voltage range 12.0 VDC – 15.0 VDC
Maximum operating altitude 2000 m / 6500 ft
Note: the battery charger is designed for indoor use only
Technical specifications, power supply
Power supply part number OI IA, 54-6003398
Output voltage 12 VDC
Operating temp range 0 °C – 40 °C / 32 – 104 F
Mains supply voltage range 100 VAC – 240 VAC
Mains supply current 0.35 A, maximum
Mains supply frequency range 50 Hz – 60 Hz
Maximum operating altitude 2000 m / 6500 ft
Note: the power supply is designed for indoor use only
Radio module
LMDS2850 (Vulcan) is handheld material analyser using ‘WIFI, IEEE 802.11b/g module’ made by Texas
Instruments (FCC ID: Z64WL18SBMOD) for WLAN.
The device has USB port for transferring data from the device. The EUT uses battery which can be charged
when it is connected to the device or via separate charger.
The module’s Bluetooth 802.11n, HT40 and MIMO capabilities have been disabled
Standard accessories and consumables
Vulcan Series Quick Guide
Power supply with mains plugs for US/Japan, UK, Europe and Australia
Desktop Battery charger
Two Li-ion battery packs
USB Flash Drive (includes the User Manual and Quick guide)
Cleaning kit (100 pcs cotton buds)
Lanyard
Wrist Strap
Check Sample for Vulcan Expert (Al 7075)
Check Sample for Vulcan Smart (SS 316)
Calibration Folder
Carrying Case set
54
Calibrations (Vulcan Smart)
Cobalt (Co), copper (Cu), lead (Pb), low alloy steels, nickel (Ni), stainless steels, tin
(Sn), titanium (Ti), tool steels, zinc (Zn) (*)
(*) Note: some calibrations might not be included as standard and an optional calibration upgrade package
is required
Calibrations (Vulcan Expert)
Aluminium (Al), Cobalt (Co), copper (Cu), lead (Pb), low alloy steels, magnesium (Mg), nickel (Ni), stainless
steels, tin
(Sn), titanium (Ti), tool steels, zinc (Zn) (*)
Dimensions and weight
Dimensions 97 mm (W) x 291 mm (L) x 274 mm (H)
Weight 1.5 kg (with battery)

55
Vulcan Series
Oxford Instruments Industrial Analysis Customer Support
Industrial Analysis China
No. 129, Lane 150, Pinbei Rd Tel: 400 820 1572
Minghang District, Fax: +86 21 5446 2078
Shanghai, China Email: iasupport.CHINA@oxinst.com
Industrial Analysis Europe
Oxford Instruments Analytical GmbH Tel: +49 (0) 2825 -9383 403
Wellesweg 31 Email: xmet.support@oxinst.com
D-47589 Uedem
Germany
Industrial Analysis UK
Tubney Woods, Tel: +44 (0) 1865 393200
Abingdon, Fax: +44 (0)1865 393333
Oxfordshire, Email: IA-Hotline@oxinst.com
OX13 5QX, UK
Industrial Analysis Americas
300 Baker Avenue, Suite 150, Tel: +1 978 369 9933
Concord, Fax: Toll Free +1 800 447 4717
MA 01742, USA Email: csg@oxinst.com
Industrial Analysis Asia and Japan
No. 129, Lane 150, Pingbei Rd, Tel: +86 21 6490 7709
Xinzhuang Industrial Area, Minhang Email: ASIA.IAsupport@oxinst.com
District,
Shanghai,
201102, China
Industrial Analysis India
11, Marwah´s Complex Tel: +91 9619784666
Krishanlal Marwah Marg Email: india.analytical@oxinst.com
Andheri East
Mumbai 400072, India

56
Vulcan Series
Regulatory Notices
RF Exposure Notice
This product emits radio frequency energy, but the radiated output power of this device is below
FCC and IC radio frequency exposure limits. This equipment complies with FCC RF and IC radiation
exposure limits for the uncontrolled environment. Nevertheless, the device should be used in
such a manner that the potential human contact with the antenna during normal operation is
minimized.
FCC Notice
This equipment has been tested and found to comply with the limits for a Class B digital device,
pursuant to Part 15 of the FCC Rules. These limits are designed to provide reasonable protection
against harmful interference in a residential installation. This equipment generate, uses and can
radiate radio frequency energy and, if not installed and used in accordance with the instructions,
may cause harmful interference to radio communications. However, there is no guarantee that
interference will not occur in a particular installation.
If this equipment does cause harmful interference to radio or television reception, which can be
determined by turning the equipment off and on, the user in encouraged to try correcting the
interference by one or more of the following measures:
Reorient / relocate the receiving aerial.
Increase the separation between the equipment and receiver.
Connect the equipment into an outlet on a circuit different from the outlet the
receiver is currently connected.
Consult the dealer or an experienced radio / TV technician for help.
This device contains FCC ID: Z64-WL18SBMOD and complies with Part 15 of the FCC
Rules. Operation is subject to the following two conditions:
1. This device may not cause harmful interference.
2. This device must accept any interference received, including interference that may
cause undesired operation.
Caution: Changes or modifications not expressly approved by the party responsible
for compliance could void the user´s authority to operate the equipment.
57
Vulcan Series
Canadian Notice
This Class B digital apparatus meets all requirements of the Canadian Interference Causing
Equipment Regulations.
This device contains transmitter IC: 451I-WL18SBMOD and complies with Industry Canada license-
exempt RSS standard(s).
Operation is subject to the following two conditions:
1. This device may not cause interference.
2. This device must accept any interference, including interference that may cause
undesired operation of the device.
Le présent appareil est conforme aux CNR d'Industrie Canada
applicables aux appareils radio exempts de licence.
Lʹexploitation est autorisée aux deux conditions suivantes :
(1) lʹappareil ne doit pas produire de brouillage
(2) lʹutilisateur de lʹappareil doit accepter tout brouillage radioélectrique subi,
même si le brouillage est susceptible d'ʹen compromettre le fonctionnement.
Taiwan NCC Notice

58
Vulcan Series
Mexico Notice
La operación de este equipo está sujeta a las siguientes dos condiciones:
1. Es posible que este equipo o dispositivo no cause interferencia perjudicial.
2. Este equipo o dispositivo debe aceptar cualquier interferencia. Incluyendo la que
pueda causar su operación no deseada.

59
Vulcan Series
EC Declaration of Conformity, Vulcan Series
We:
Oxford Instruments Industrial Products Limited
Of:
Tubney Woods, Abingdon, OX13 5QX, UK
In accordance with the following Directives:
1999/5/EC R&TTE Directive
2011/65/EU Restriction of Hazardous Substances Directive
Declare under our sole responsibility that the following equipment:
LMDS2850
is in conformity with the applicable requirements of the following standards:
EN 61010-1 2010
EN 61326-1 2013
EN 62311 2008
EN 301 489-1, V1.9.2
EN 301 489-17, V2.2.1
EN 300 328, V1.9.1
We, the undersigned, hereby declare that the product specified above conforms to the
listed directive(s) and standard(s).
Dawn Brooks, Managing Director
Tubney Woods, December 2016

60
Vulcan Series
Appendix A: Troubleshooting
Nothing happens when I pull the trigger.
○ Make sure that the proximity sensor window is covered with a sample.
○ The measurement can only be started from the measurement screen. Push the “home” button
next to the “power” button on top of the analyzer or “home” button on the touch screen.
When taking a measurement, I can only see the grade ID but no chemistry.
○ Check that the “chemistry” tab is activated in the user interface.
When taking a measurement, I can see the chemistry but there’s no grade ID.
○ This can happen when analyzing an alloy that is not included in the factory grade library. You can
easily add new grades to the library. See user manual page 27.
The results are poor. I get wrong results and the chemistry changes every time I take a new
measurement.
○ Check that the sample surface is clean. If the sample surface is dirty, clean it properly
according to the instructions on page 45 and repeat the measurement.
○ Check that the measurement window is clean and clean it if necessary according to
the instructions on page 48.
○ If the surface of the sample is uneven, try to find a spot where the sample would be flat and
covers the whole measurement window leaving no gap between the instrument and the
sample.
○ If the problem persists, contact your local Oxford Instruments representative.
I used the instrument connected to mains outlet but the battery didn’t charge.
○ The battery does not charge when the instrument is turned on and connected to mains outlet.
To charge the battery, either switch off the unit or charge the battery outside the instrument in
battery charger.

61
Vulcan Series
The measurement time is long and I hear the instrument motor run repeatedly
○ The “pre-burn” feature is activated. Switch it off from the main pull down menu.
I don’t see results and ‘Measurement interrupted’ message appears on the screen. The instrument
can’t take a good measurement.
○ This can happen when trying to take a measurement from a very small component, thin wire
or uneven surface. Move the analyzer and take the measurement from another location.
○ Check that both the proximity sensor and measurement windows are covered with the
sample. If you can’t cover the proximity sensor, you can temporarily disable it from the
“Settings” menu (supervisor mode).
I don’t have laser safety goggles, can I use sunglasses instead?
○ No. The Vulcan series instruments emit infrared laser that is invisible to the eye. Only
designated safety goggles with OD6+ (1064nm), 1064 R LB6 D LB6 rating provides
protection against the direct and reflected beams.
The screen brightness changes constantly. Is the screen broken?
○ The Vulcan series has a built in ambient light sensor and automatic screen brightness
adjustment. This behavior is normal. You can also set the brightness level manually from the
settings menu.