user manual

QUICK START GUIDE
GUIDE D’UTILISATION RAPIDE
GUÍA DE INSTALACIÓN RÁPIDA
BEDIENUNGSANLEITUNG
GUIDA ALL’USO
GEBRUIKERSHANDLEIDING
ユーザー ガイド
ࠌش円ࣔ䢰


www.parrot.com
English ..............................................
Français ............................................
Español .............................................
Deutsch .............................................
Italiano ...............................................
Nederlands ........................................
日本語 ...............................................
繁體中文 ...........................................
...........................................
General Information............................
p.05
p.13
p.21
p.29
p.37
p.45
p.53
p.61
p.76
p.77


EN
English
In order to limit our paper consumption, and as part of our environ-
mentally friendly and responsible approach, Parrot prefers to put user
documents online rather than print them out.
We therefore invite you to consult the Parrot DIA user guide directly on
your photo frame. To do so, select Settings > Information > User guide. The
legal notice is also available in the user guide.
About This
Guide
Updating
the Frame If your frame is connected to a Wi-Fi network it will automatically download and
install updates. If your frame is not connected to a Wi-Fi network, you can also
download the latest update for your frame, free of charge, from our website:
http://www.parrot.com in the Support and downloads section.
First-Time Use ..................................................................
Wi-Fi .................................................................................
Using the Mover application.............................................
Bluetooth ..........................................................................
USB / SD ..........................................................................
Managing Pictures ............................................................
Before Getting Started
Contents
p.06
p.07
p.09
p.10
p.11
p.12
Complete user guide, tutorials, software updates
http://www.parrot.com/uk/support
5
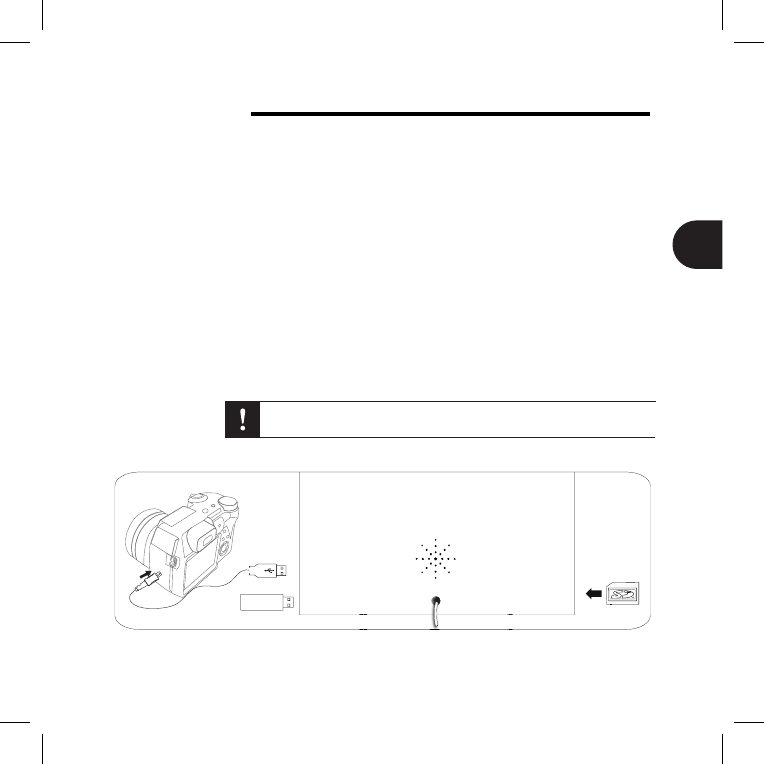
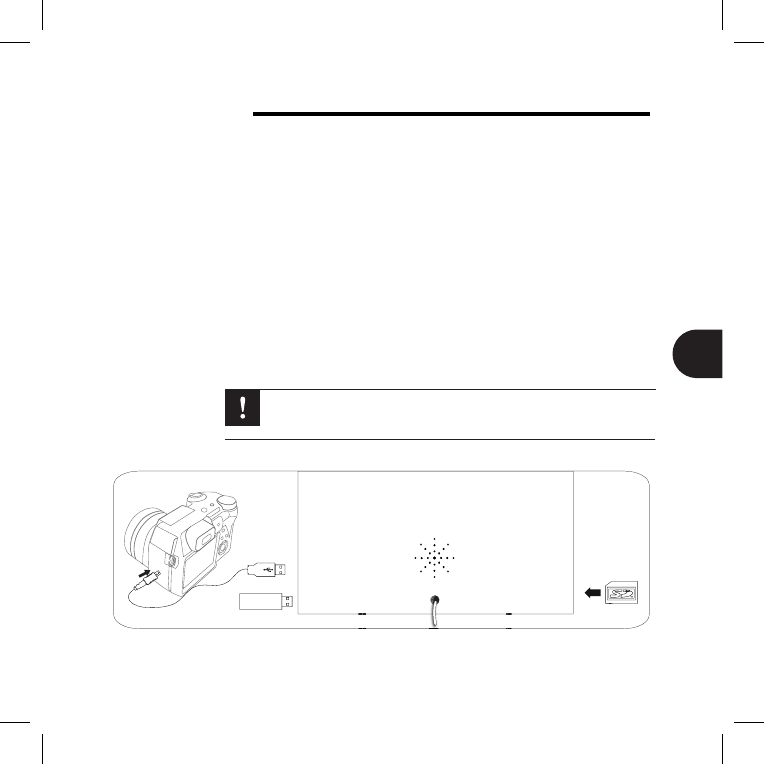
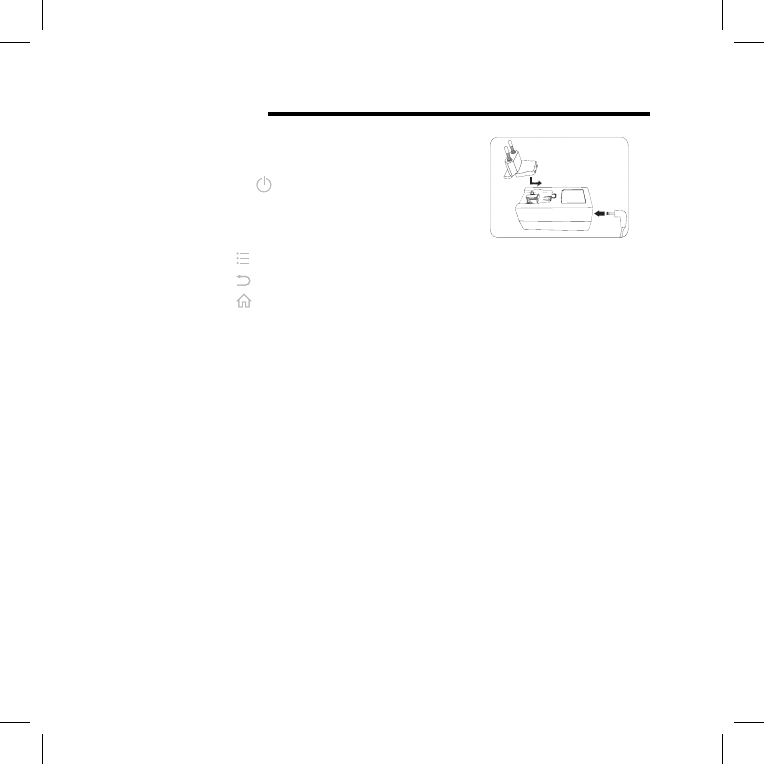
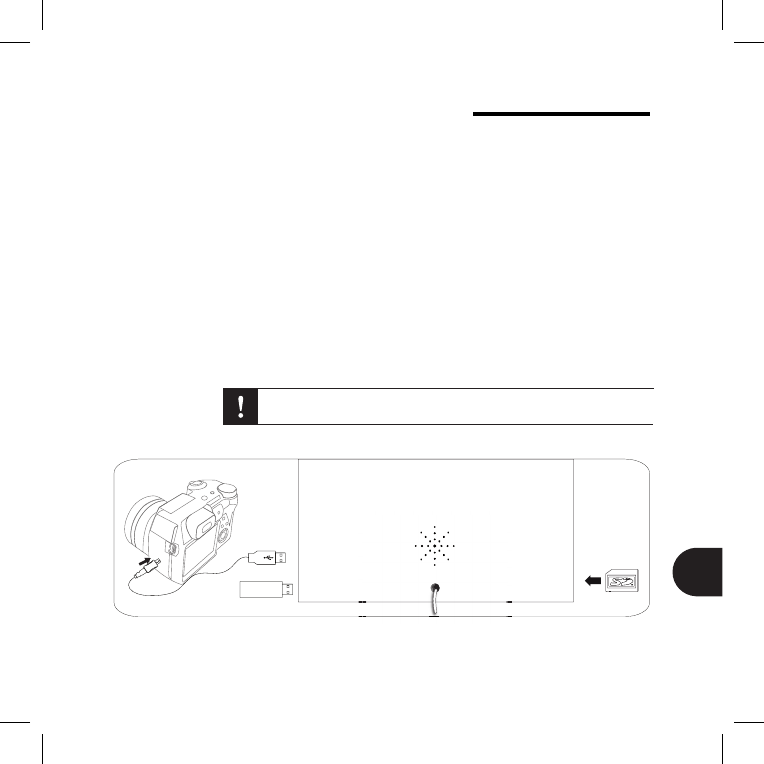
First-Time Use
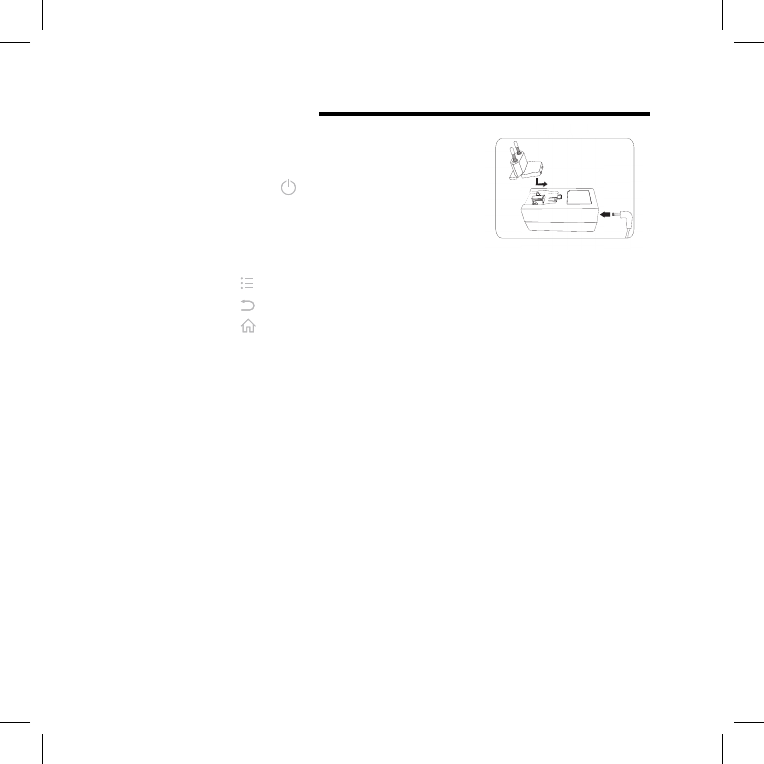
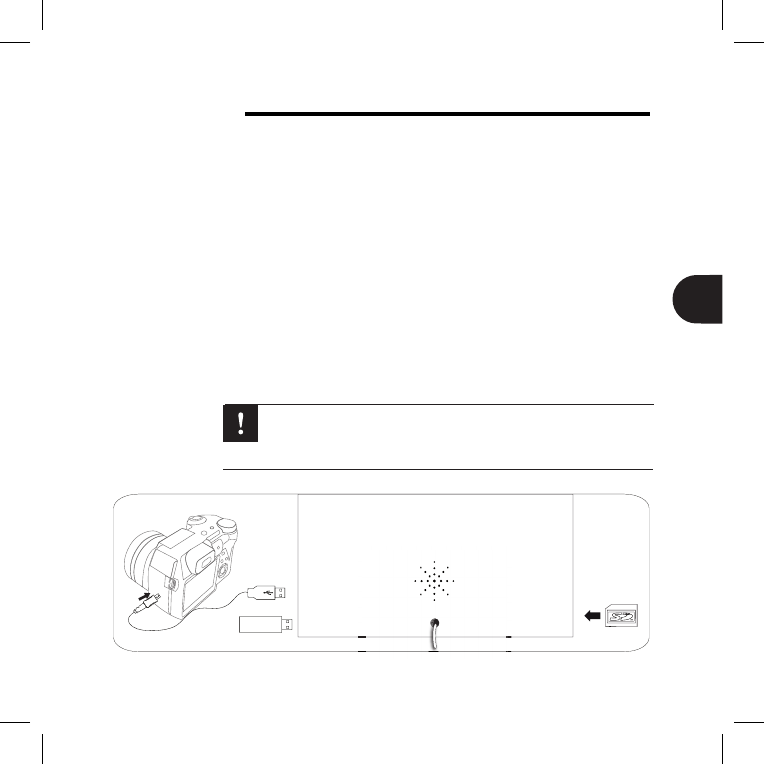
Connect the power cable to the adapter, then 1.
plug it into the power outlet.
Press the 2. button to turn the frame on / off.
Turning On
the Frame
Selecting the
Language
The first time you use the frame, you are asked to choose a language. If you want
to change this setting afterwards, select Settings > Language.
Setting the
Date and
Time
The date and time are automatically set when the frame is connected to a Wi-Fi •
network.
If you would rather set them manually, select • Settings > Date/Time, then
Adjustment > Manual.
Use the trackball to browse the menus. Press the trackball to confirm a selection.•
The • button is used to access the context menu.
The • button is used to return to the previous menu.
The • button is used to return to the main menu.
Browsing
the Menus
Use of a USB
keyboard or
mouse
To use your frame or browse on the internet more easily you can connect a USB
mouse or a USB keyboard to the frame’s USB ports.
6
EN
Wi-Fi
Connecting
Wirelessly
If your wireless modem/router does not support WPS technology:•
Depending on your modem/router’s model, pressing the synchronization
button may be necessary in order to establish the connection. Check
your device’s documentation for more information.
Select 1. Settings > Wi-Fi.
Select 2. Configure.
> The frame begins searching for Wi-Fi networks.
Select your network from the list of results, or select 3. Manual to configure
your network manually.
Enter your network’s WEP or WPA key using the virtual keyboard, then 4.
select OK.
> Once the connection has been established, a window appears containing
all the information about your frame’s Wi-Fi connection.
If your wireless modem/router supports WPS technology:•
Press the WPS button on your wireless modem or router.1.
Select 2. Settings > Wi-Fi.
Select 3. Configure > Auto.
Disabling the
Connection
Once the connection has been established, you can disable/re-enable it.
To do so, select Settings > Wi-Fi > Connection > Disable / Enable.
Accessing
the Web
Interface
The Web interface enables you to easily assign an e-mail address, RSS
feed, or computer to your frame, but you can also assign them directly
from the frame.
In order to access the frame’s web interface, your PC and the frame must
be connected to the same Wi-Fi network.
Take down the IP address assigned to your frame. To find it, select 1. Settings >
Information.
Open your web browser and enter the IP address in the address bar.2.
7

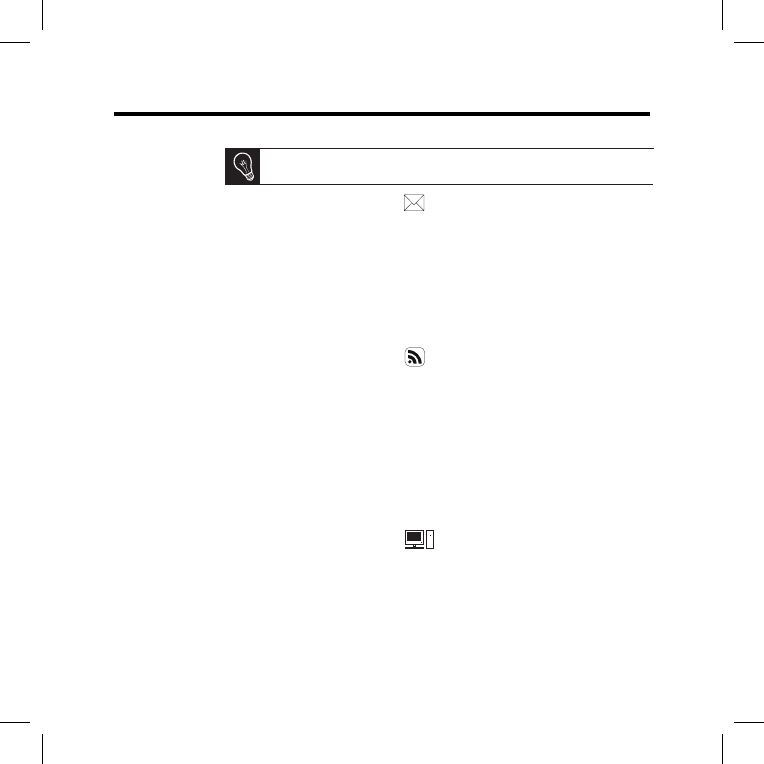
Viewing Photo
Albums Online In the web interface, click on 1. .
In the 2. Registered feeds field, click on New to assign an RSS feed to the frame.
Select your photo server, enter the login associated with the selected album, 3.
then the password if any, or enter the URL of the RSS feed.
Click on 4. Save.
> The images contained in the associated album are now accessible on the
frame. To access them, select Browse > Directory > RSS feeds.
Viewing Photos
Stored on a PC
On your computer, activate folder sharing for the photos that you wish to 1.
view on the frame.
On the web interface, click on 2. .
Click on 3. Add a share and select your computer, then the shared folder.
> The images contained in the shared folder are now accessible on the frame.
To access them, select 4. Browse > Directory > PC shares.
Browsing the
Internet
You can browse the Internet using the frame. To do so, select Browser, then use
the trackball to browse.
Getting Images
Received by
E-Mail
On the web interface, click on 1. .
In the 2. Email account field, click on New to assign an e-mail address
to the frame.
Enter your login and password in the corresponding fields. Check your e-mail 3.
service’s documentation for information on the server and protocol.
> All images that you receive in this e-mail account will then be accessible
on the frame. To access them, select 4. Browse > Directory > E-mail.
We recommend that you create an e-mail address just for the frame.
Wi-Fi
8
EN
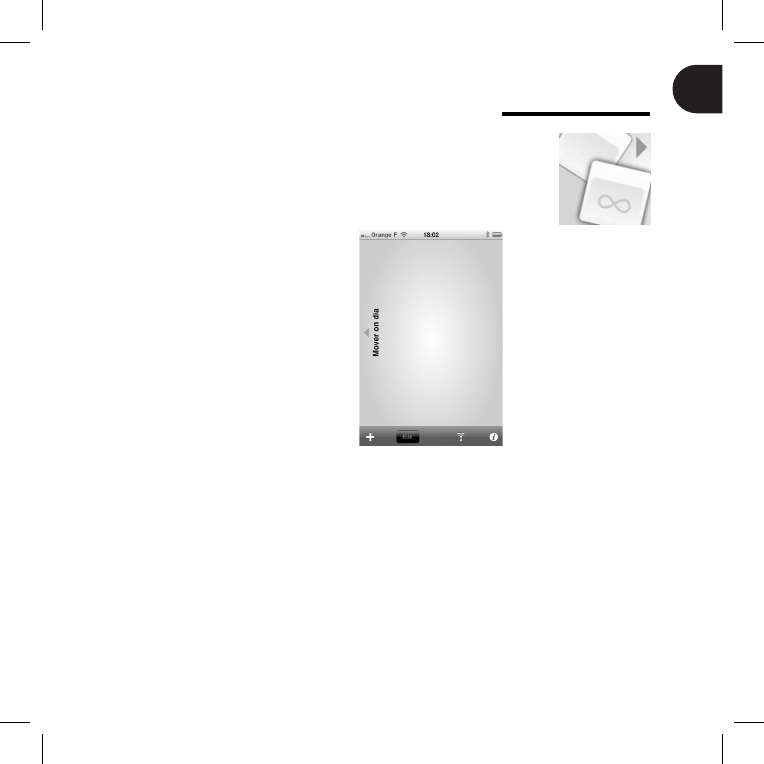
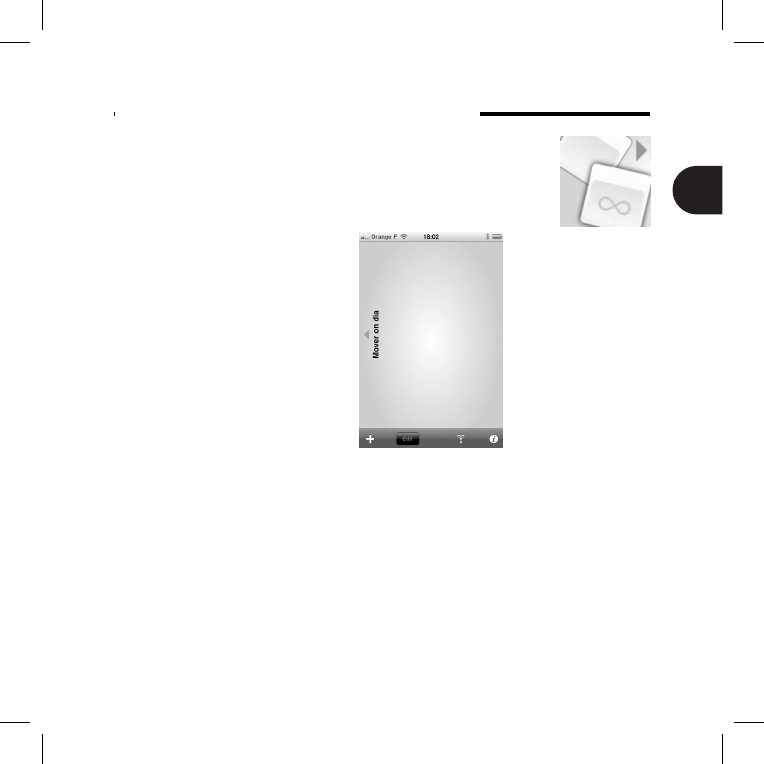
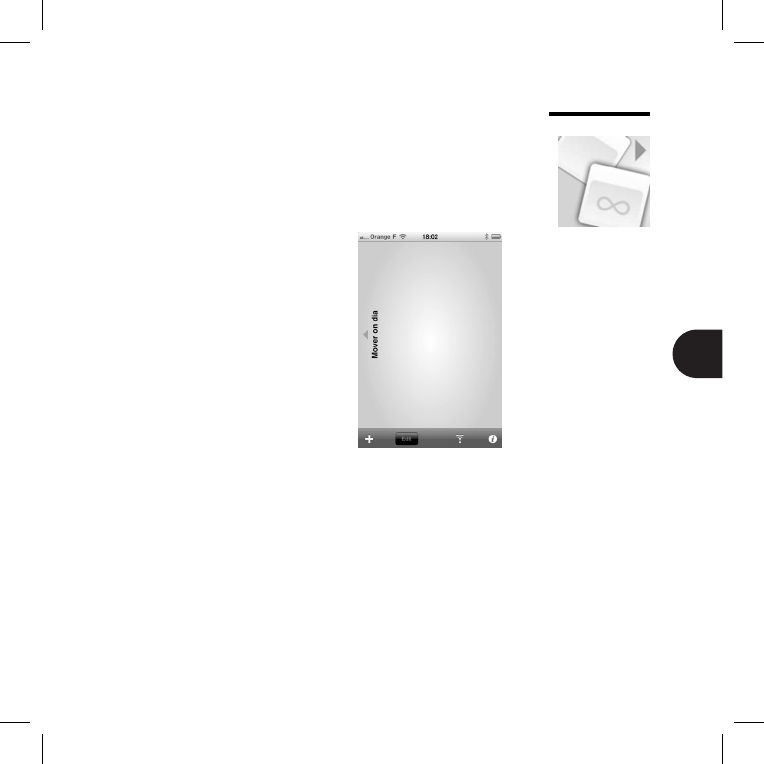
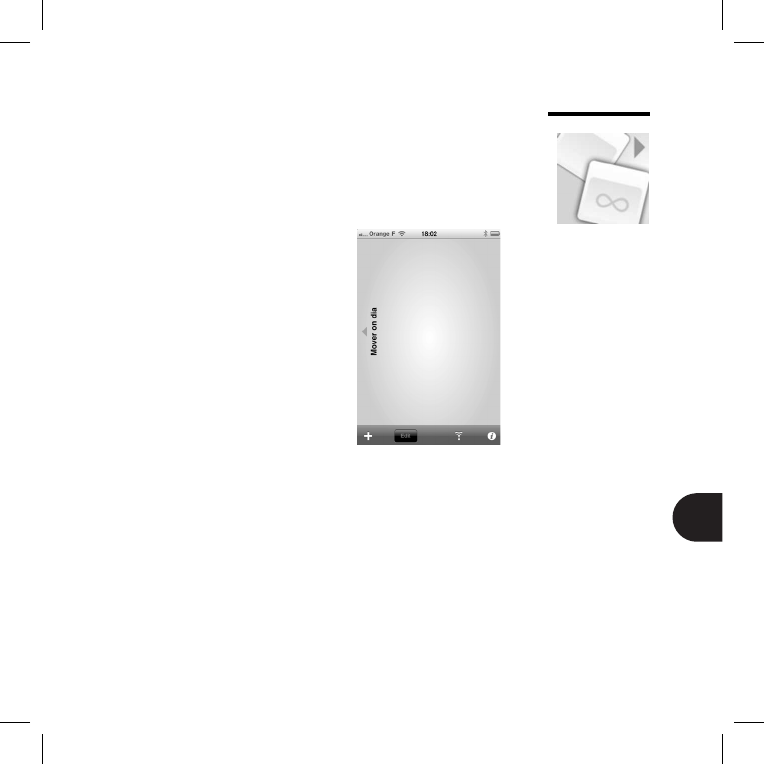
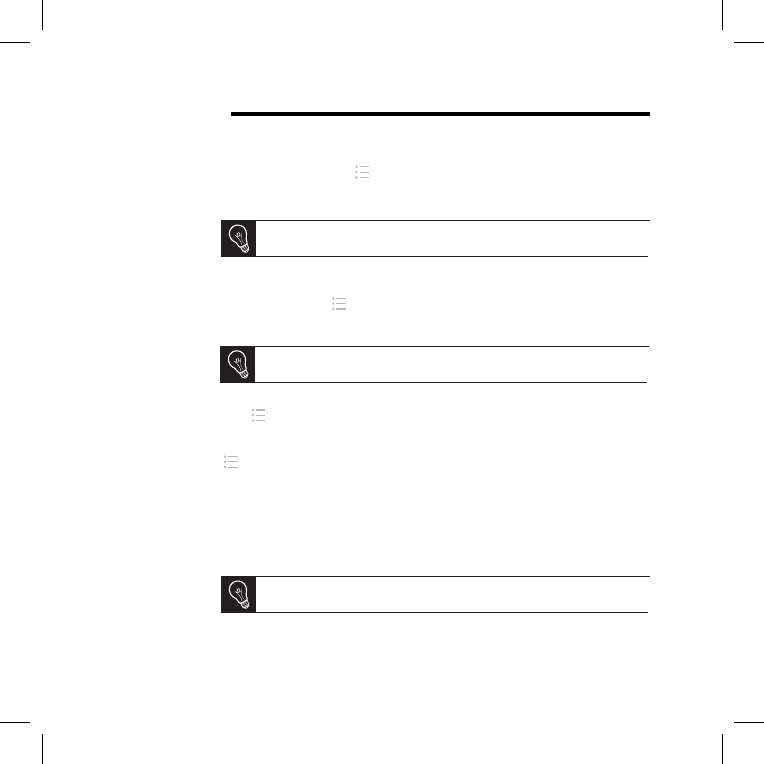
Using the Mover application
The Mover application allows you to easily transfer photos to the frame from your
iPhone, iPod touch or iPad. To do this:
Download the Mover (or Mover Lite) application from the App Store.1.
Connect the frame and the iPhone to the same Wi-Fi network.2.
Run the Mover application 3.
> The screen shown opposite appears.
Press on the + button then select the 4.
Add photo option.
Select your image.5.
Slide this image towards the instruction 6.
Mover on Dia.
> The image gradually appears on the
frame. You can then find it by selecting
9

Bluetooth
Check that the 1. Bluetooth® feature is enabled. To do so, select Settings >
Bluetooth > Status > Enabled.
Activate your computer’s 2. Bluetooth feature.
Right click on the image that you want to send, and select “Send 3.
by Bluetooth”.
Select 4. DIA from the list of available Bluetooth devices.
Enter the code 5. 0000 if asked for one.
Sending Images
from a PC Via
Bluetooth
Sending
Images from
a Phone Via
Bluetooth
Check that the 1. Bluetooth feature is enabled on the frame. To do so, select
Settings > Bluetooth > Status > Enabled.
From your phone, select an image and choose “Send by 2. Bluetooth”.
> Your phone will begin searching for Bluetooth devices.
Select DIA from the list of available 3. Bluetooth devices.
Enter the code 4. 0000 if asked for one.
10
EN
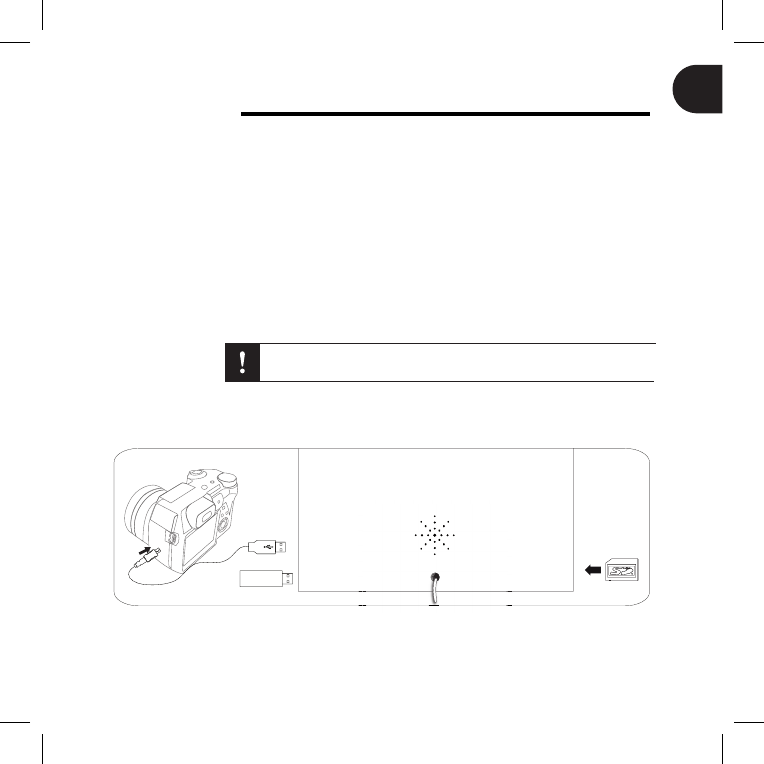
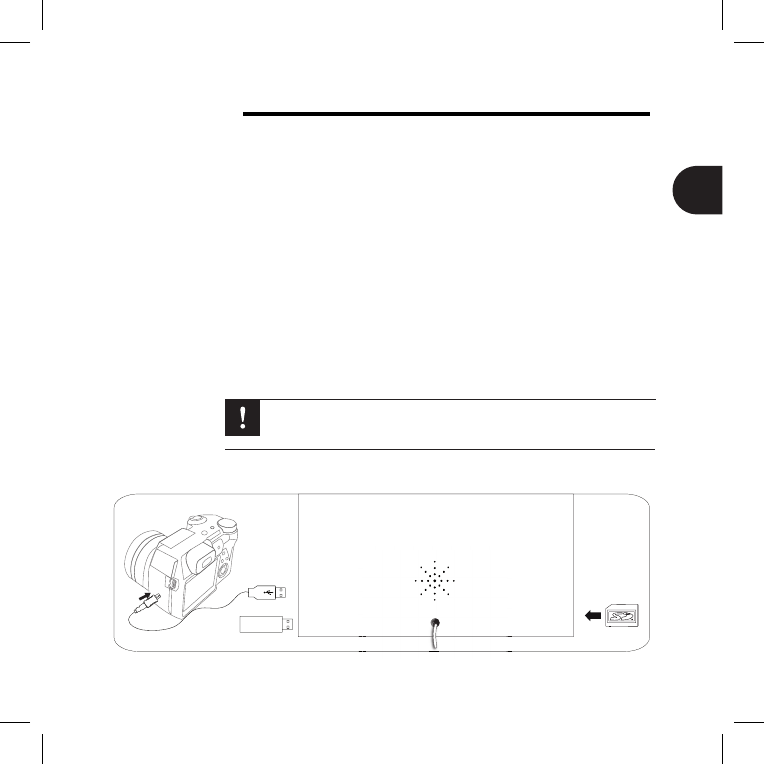
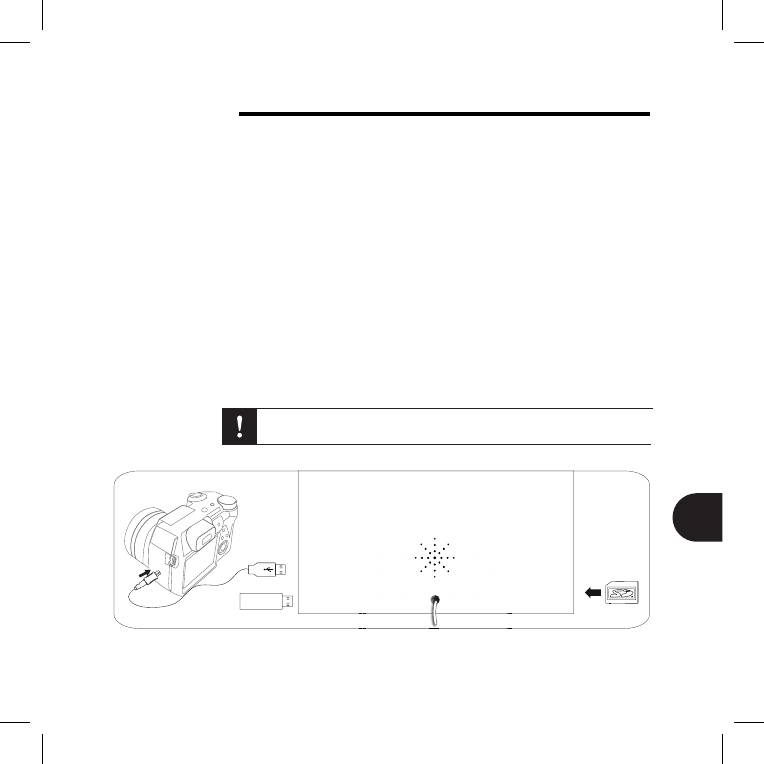
USB / SD
Compatibility You can display images stored on the following devices:
SD, micro SD (with adapter), mini SD (with adapter), SDHC (class 2, 4, -
and 6), mini SDHC (with adapter), MMC, MMC plus, MMC mobile (with
adapter), MMC micro (with adapter), and RS-MMC (with adapter) cards
USB keys -
Cameras (if your camera is recognized as a mass storage unit). -
Using the
Frame with a
Storage Device
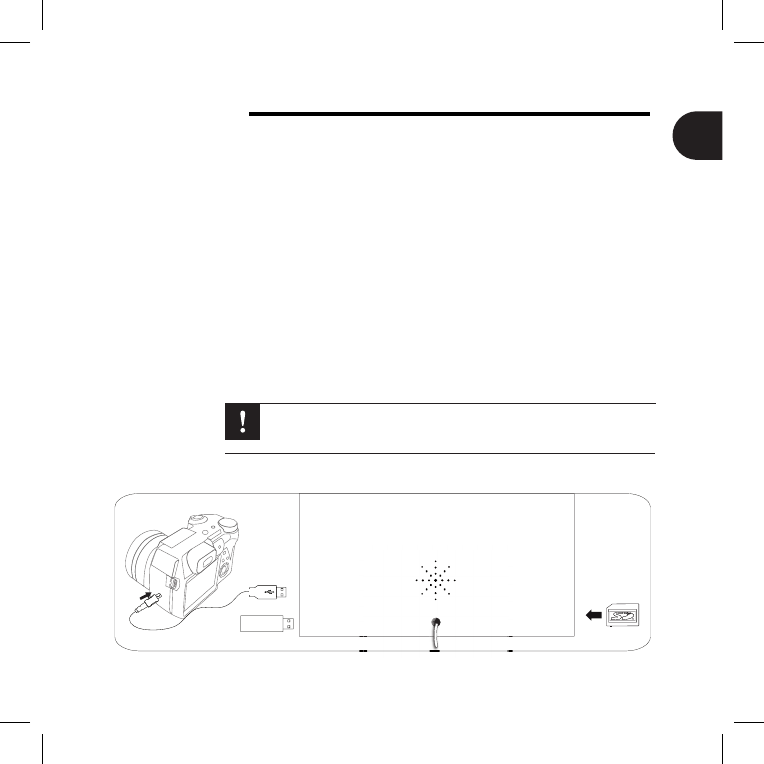
Insert your device into the appropriate slot. 1.
> The images stored on your device will appear.
Press the trackball. 2.
> You can now browse the contents of your device and select an image by
pressing the trackball.
- Only images in JPG format may be displayed on the frame.
- Never remove the storage device while copying is under way.
PARROT BY NODESIGN
11
Managing Pictures
Rotating Images Press the button and select Rotate.
Programming a
Slideshow
Run a slideshow then press the button and select Slideshow settings. You
can adjust the following parameters:
Browsing mode - : view your images by folder, by date, at random, or
based on the Customize folder.
Timer - : select how long the slideshow’s images are displayed for.
Transition - : select the transition that you have between each image.
Fit to screen - : define whether or not the images whose format does not
fit the screen must be adjusted.
An image can only be adjusted if its dimensions are greater than or
equal to 800x600.
Deleting an
Image
Select 1. Browse > Directory, then select the folder containing the images
to be deleted.
Select the image then press the 2. button.
Select 3. Delete.
You can also delete multiple images by using the Select option.
Copying/
Moving an
Image
Select 1. Browse > Directory then select the folder that contains the images
to be copied or moved.
Select the image and press the 2. button.
Select 3. Copy or Move, then select the destination folder.
You can also copy/move multiple images by using the Select option.
12

Français
Mise à jour
du cadre
Si votre cadre est connecté à un réseau Wi-Fi, le téléchargement et l’installation
des mises à jour se fera automatiquement. Si votre cadre n’est pas connecté à
un réseau Wi-Fi, vous avez également la possibilité de télécharger gratuitement
la dernière mise à jour du cadre sur notre site web http://www.parrot.com section
Support et téléchargements.
Première utilisation ...........................................................
Wi-Fi .................................................................................
Utiliser l’application Mover ...............................................
Bluetooth ..........................................................................
USB / SD ..........................................................................
Gestion des photos ..........................................................
Avant de commencer
Sommaire
Afin de limiter notre consommation de papier et dans le cadre de
notre démarche aussi responsable et respectueuse que possible de
l’environnement, Parrot privilégie la mise en ligne des documents
utilisateurs plutôt que leur impression. Nous vous invitons donc à
consulter le guide utilisateur du Parrot DIA directement sur votre cadre photo.
Pour cela, sélectionnez Réglages > Guide utilisateur. Les mentions légales sont
également disponibles sur ce guide utilisateur.
A propos de
ce guide
Notice complète, didacticiels, mises à jour...
http://www.parrot.com/fr/support
p.14
p.15
p.17
p.18
p.19
p.20
13
FR

Première utilisation
Sélectionner
la langue
Le choix de la langue vous est demandé lors de votre 1ère utilisation du cadre.
Si vous souhaitez par la suite modifier ce paramètre, sélectionnez Réglages >
Langue.
Régler heure
et date
Le réglage de la date et de l’heure se fait automatiquement lorsque le cadre est •
connecté à un réseau Wi-Fi.
Si vous préférez procéder à ces réglages manuellement, sélectionnez • Réglages >
Date/heure puis Réglage > Manuel.
Utilisez la trackball pour naviguer dans les menus. Appuyez sur la trackball pour •
confirmer la sélection.
La touche • permet d’accéder au menu contextuel.
La touche • permet de revenir au menu de niveau supérieur.
La touche • permet de revenir au menu principal.
Navigation
dans les
menus
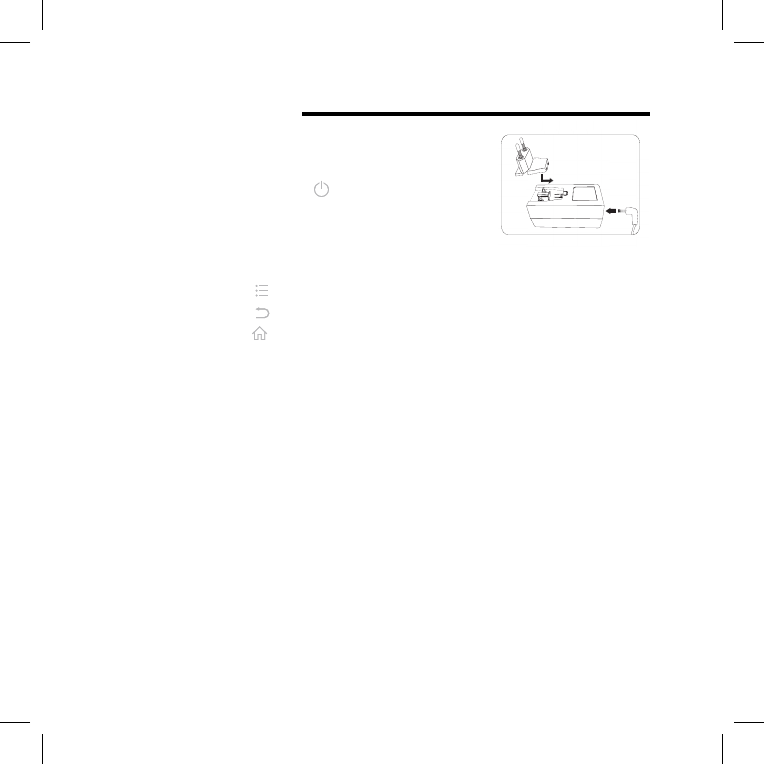
Connectez le câble d’alimentation au transforma-1.
teur, puis branchez-le sur le secteur.
Appuyez sur la touche 2. pour allumer / mettre
en veille le cadre.
Mise sous
tension
Utilisation
avec clavier
ou souris USB
Pour utiliser le cadre ou naviguer sur Internet plus facilement, vous avez la possibilité
de connecter une souris USB et / ou un clavier USB aux ports USB du cadre.
14
Wi-Fi
Etablir une
connexion
sans fil
Si votre modem / routeur sans fil ne supporte pas la technologie WPS :•
En fonction du modèle de votre modem / routeur, un appui sur un bou-
ton de synchronisation peut être nécessaire afin d’établir la connexion.
Consultez la documentation de votre dispositif pour plus d’informations.
Sélectionnez 1. Réglages > Wi-Fi.
Sélectionnez2. Configurer.
> Le cadre lance une recherche de réseaux Wi-Fi.
Sélectionner votre réseau dans la liste proposée ou sélectionnez 3. Autres
pour configurer votre réseau manuellement.
Entrez la clé WEP ou WPA de votre réseau à l’aide du clavier virtuel puis 4.
sélectionnez OK.
> Une fois la connexion établie, une fenêtre apparait contenant toutes les
informations relatives à la connexion de votre cadre via Wi-Fi.
Si votre modem / routeur sans fil supporte la technologie WPS :•
Appuyez sur le bouton WPS de votre modem sans fil ou routeur sans fil.1.
Sélectionnez 2. Réglages > Wi-Fi.
Sélectionnez3. Configurer > Auto.
Désactiver la
connexion
Une fois la connexion établie, vous avez la possibilité de la désactiver / réactiver.
Pour cela, sélectionnez Réglages > Wi-Fi > Connexion > Activer / Désactiver.
Accéder à
l’interface web
L’interface web vous permet d’associer facilement une adresse mail, un
flux RSS ou un ordinateur à votre cadre, mais vous pouvez également
établir ces associations directement depuis le cadre.
Pour accéder à l’interface web du cadre, votre PC et le cadre doivent
être connectés au même réseau Wi-Fi.
Relevez l’adresse IP attribuée à votre cadre. Pour cela, sélectionnez 1.
Réglages > Informations.
Lancez votre navigateur web et entrez l’adresse IP dans la barre d’adresse.2.
15
FR
Visualiser des
albums photos
en ligne
Sur l’interface web, cliquez sur 1. .
Dans l’espace 2. Flux enregistrés, cliquez sur Nouveau pour associer
un flux RSS au cadre.
Sélectionnez votre serveur de photos, entrez l’identifiant associé à l’album sélec-3.
tionné puis éventuellement le mot de passe ou entrez l’adresse URL du flux RSS.
Cliquez sur 4. Enregistrer.
> Les images contenues dans l’album associé sont désormais accessibles sur le
cadre. Pour cela, sélectionnez Parcourir > Dossier > Flux RSS.
Visualiser des
photos stockées
sur un PC
Sur votre ordinateur, activez le partage des dossiers de photos que vous 1.
souhaitez visualiser sur le cadre.
Sur l’interface web, cliquez sur 2. .
Cliquez sur 3. Ajouter un partage et sélectionnez votre ordinateur, puis le
dossier partagé.
> Les images contenues dans le dossier partagé sont désormais
accessibles sur le cadre. Pour cela, sélectionnez Parcourir > Dossier > PC.
Naviguer sur
Internet
Vous avez la possibilité de naviguer sur Internet en utilisant le cadre. Pour cela,
sélectionnez Navigateur Web, puis utilisez la trackball pour naviguer.
Réceptionner des
images reçues
par E-mail
Sur l’interface web, cliquez sur 1. .
Dans l’espace 2. Compte de messagerie, cliquez sur Nouveau pour
associer une adresse de messagerie au cadre.
Entrez vos identifiants de connexion dans les champs correspondants. 3.
Consultez la documentation de votre messagerie électronique pour obtenir
les informations relatives au serveur et au protocole.
> Toutes les images que vous recevrez sur ce compte de messagerie seront
désormais accessibles sur le cadre. Pour cela, sélectionnez Parcourir >
Dossier > E-mail.
Nous vous conseillons de créer une adresse E-mail spécifique au cadre.
Wi-Fi
16

Utiliser l’application Mover
L’application Mover vous permet de transférer très facilement des photos sur le
cadre depuis votre iPhone, iPod touch ou iPad. Pour cela :
Téléchargez l’application 1. Mover (ou Mover Lite) sur l’App Store.
Connectez le cadre et l’iPhone sur le même réseau Wi-Fi.2.
Lancez l’application 3. Mover.
L’écran ci-contre apparait.
Appuyez sur la touche 4. + puis sélec-
tionnez l’option Add photo.
Sélectionnez votre image.5.
Faites glisser cette image vers 6.
l’indication Mover on Dia.
> L’image apparait progressivement
sur le cadre. Vous pourrez ensuite la
retrouver en sélectionnant Parcourir >
Dossier > Mover.
17
FR

Bluetooth
Vérifiez que la fonctionnalité 1. Bluetooth® est activée. Pour cela, sélectionnez
Réglages > Bluetooth > Activé > Oui.
Activez la fonctionnalité 2. Bluetooth de votre ordinateur.
Faites un clic droit sur l’image que vous voulez envoyer, et sélectionnez 3.
« Envoyer par Bluetooth ».
Sélectionnez 4. Dia dans la liste des périphériques Bluetooth disponibles.
Entrez le code 5. 0000 s’il vous est demandé.
Envoyer des
images depuis
un PC via
Bluetooth
Envoyer des
images depuis
un téléphone
via Bluetooth
Vérifiez que la fonctionnalité 1. Bluetooth est activée sur le cadre. Pour cela,
sélectionnez Réglages > Bluetooth > Activé > Oui.
Depuis votre téléphone, sélectionnez une image et choisissez « Envoyer par 2.
Bluetooth ».
> Votre appareil lance une recherche des périphériques Bluetooth.
Sélectionnez 3. Dia dans la liste des périphériques Bluetooth disponibles.
Entrez le code 4. 0000 s’il vous est demandé.
18
USB / SD
Compatibilité Vous pouvez afficher les photos stockées sur les périphériques suivants:
Carte SD, micro SD (avec adaptateur), mini SD (avec adaptateur), -
SDHC (classe 2, 4, 6), mini SDHC avec adaptateur, MMC, MMC plus,
MMC mobile avec adaptateur, MMC micro (avec adaptateur), RS-MMC
(avec adaptateur) ;
Clés USB ; -
Appareil photo (si votre appareil est reconnu comme unité de -
stockage de masse).
Utiliser le
cadre avec
un périphérique de
stockage
Insérez votre périphérique dans l’emplacement prévu à cet effet. 1.
> Les images stockées sur votre périphérique apparaissent.
Appuyez sur la trackball. 2.
> Vous pouvez maintenant naviguer dans le contenu de votre périphérique
et sélectionner une image en appuyant sur la trackball.
> En fonction de votre intention, vous pouvez alors l’afficher, la faire pivoter,
la sélectionner, la supprimer, la copier ou la déplacer.
- Seules les images au format JPG peuvent être affichées sur le cadre.
- Ne retirez pas le périphérique de stockage lorsqu’une copie
est en cours.
PARROT BY NODESIGN
19
FR

Gestion des photos
Rotation d’images Appuyez sur la touche et sélectionnez Tourner.
Paramétrer
un diaporama
Lancez un diaporama puis appuyez sur la touche et sélectionnez Réglages du
diaporama. Vous pourrez modifier les paramètres suivants:
Ordre de parcours -: visualisez vos photos par dossier, par date, de façon
aléatoire, ou en fonction du dossier Personnalisé.
Durée d’affichage -: sélectionnez la durée d’affichage des images du
diaporama.
Transition -: sélectionnez la transition que vous souhaitez entre chaque
image.
Ajusté à l’écran - : définissez si les images dont le format ne correspond
pas à celui de l’écran doivent être ajustées ou non.
L’ajustement d’une image ne peut se faire que si sa définition est
supérieure ou égale à 800x600.
Supprimer
une image
Sélectionnez 1. Parcourir > Dossier puis sélectionnez le dossier contenant les
images à supprimer.
Sélectionnez l’image et appuyez sur la touche 2. .
Sélectionnez l’option 3. Supprimer.
Vous avez également la possibilité de supprimer plusieurs images en
utilisant l’option Sélectionner.
Copier /
déplacer
une image
Sélectionnez 1. Parcourir > Dossier puis sélectionnez le dossier contenant les
images à copier ou à déplacer.
Sélectionnez l’image et appuyez sur la touche 2. .
Sélectionnez l’option 3. Copier ou Déplacer puis sélectionnez le dossier de
destination.
Vous avez également la possibilité de copier / déplacer plusieurs
images en utilisant l’option Sélectionner.
20

Español
Actualización
del marco Si el marco está conectado a una red Wi-Fi, la descarga y la instalación de las
actualizaciones se realizarán automáticamente. Si el marco no está conectado a
una red Wi-Fi, puede descargar gratuitamente la última actualización del marco
en nuestra página web http://www.parrot.com sección Apoyo al cliente.
Primera utilización ............................................................
Wi-Fi .................................................................................
Utilizar la aplicación Mover ..............................................
Bluetooth .........................................................................
USB / SD ..........................................................................
Gestión de las fotos .........................................................
Antes de comenzar
Índice
p.22
p.23
p.25
p.26
p.27
p.28
Manual completo, softwares didácticos y actualizaciones
http://www.parrot.com/es/apoyoalcliente
Para limitar nuestro consumo de papel, siguiendo nuestra actuación lo
más responsable y respetuosa posible con el medio ambiente, Parrot
prefiere poner en línea los documentos para los usuarios en lugar de
imprimirlos.
Le invitamos a que consulte el manual del usuario del Parrot DIA directamente en
su marco de fotos. Para ello, seleccione Ajustes > Informaciones > Manual del
usuario. El manual del usuario también incluye las menciones legales.
A propósito de
este manual
21
ES

Primera utilización
Conecte el cable de alimentación al transforma-1.
dor y después a la red eléctrica.
Pulse el mando 2. para encender / poner en
stand-by el marco.
Ponerlo en
funciona-
miento
Seleccionar
el idioma
La primera vez que utilice el marco se le pedirá que elija el idioma. Si desea
modificar después este parámetro, seleccione Ajustes > Idioma.
Ajustar la
hora y la
fecha
El ajuste de la fecha y la hora se realiza automáticamente cuando el marco está •
conectado a una red Wi-Fi.
Si prefiere efectuar estos ajustes manualmente, seleccione • Ajustes > Hora y
después Ajuste > Manual.
Utilice el trackball para navegar en los menús. Pulse el trackball para confirmar •
la selección.
El mando • permite acceder al menú contextual.
El mando • permite volver al menú de nivel superior.
El mando • permite volver al menú principal.
Navegación
en los menús
Utilización
con teclado
o con ratón
USB
Para utilizar el marco o navegar por Internet más fácilmente, puede conectar un
ratón USB, un teclado USB o ambas cosas en los puertos USB del marco.
22
Wi-Fi
Establecer
una conexión
inalámbrica
Si su módem / router inalámbrico no soporta la tecnología WPS:•
En función del modelo de su módem / router, puede que sea necesario
pulsar una vez el botón de sincronización para poder establecer la co-
nexión. Consulte la documentación del dispositivo para más información.
Seleccione 1. Ajustes > Wi-Fi.
Seleccione 2. Configurar.
> El marco lanza una búsqueda de redes Wi-Fi.
Seleccione su red en la lista propuesta o seleccione 3. Configuración
manual para configurar la red manualmente.
Introduzca la clave WEP o WPA de su red utilizando el teclado virtual y 4.
después seleccione OK.
> Una vez establecida la conexión, aparecerá una ventana con todas las
informaciones relativas a la conexión de su marco a través de Wi-Fi.
Si su módem / router inalámbrico soporta la tecnología WPS:•
Pulse el botón WPS de su módem o su router inalámbrico.1.
Seleccione 2. Ajustes > Wi-Fi.
Seleccione 3. Configurar > Automático.
Desactivar la
conexión
Una vez establecida la conexión, puede desactivarla y volverla a activar.
Para ello, seleccione Ajustes > Wi-Fi > Conexión > Activado / Desactivado.
Acceder a
la interfaz
web
La interfaz web le permite asociar fácilmente una dirección de e-mail,
un flujo RSS o un ordenador a su marco, pero también puede estable-
cer esas asociaciones directamente desde el marco.
Para acceder a la interfaz web del marco, su PC y el marco deberán
estar conectados a la misma red Wi-Fi.
Anote la dirección IP atribuida a su marco. Para ello, seleccione 1. Ajustes >
Informaciones.
Lance su navegador web e introduzca la dirección IP en la barra de direcciones.2.
23
ES

Ver álbumes
de fotos en
línea
En la interfaz web, pinche 1. .
En el espacio 2. Flujos guardados, pinche Nuevo para asociar un flujo
RSS al marco.
Seleccione su servidor de fotos, introduzca la identificación asociada al 3.
álbum seleccionado y si es necesario la contraseña o introduzca la dirección
URL del flujo RSS.
Pinche 4. Guardar.
> Ya puede acceder desde el marco a las imágenes que contiene el álbum
asociado. Para ello, seleccione Navegar > Directorio > Flujo RSS.
Ver fotos
guardadas
en un PC
En su ordenador, active compartir las carpetas de fotos que desea 1.
ver en el marco.
En la interfaz web, pinche 2. .
Pinche 3. Compartir con, seleccione su ordenador y después la
carpeta compartida.
Ya puede acceder desde el marco a las imágenes que contiene la carpeta com-4.
partida. Para ello, seleccione Navegar > Directorio > Compartir desde el PC.
Navegar por
Internet
Puede navegar por Internet utilizando el marco. Para ello, seleccione Navegador
Web y utilice después el trackball para navegar.
Recibir
imágenes
transmitidas
por E-mail
En la interfaz web, pinche 1. .
En el espacio 2. Mensajerías, pinche Nuevo para asociar una dirección de
correo electrónico al marco.
Introduzca sus identificaciones de conexión en los campos correspondientes. 3.
Consulte la documentación de su correo electrónico para obtener las infor-
maciones relativas al servidor y al protocolo.
> Todas las imágenes que reciba en esa cuenta de correo electrónico estarán
accesibles en el marco. Para ello, seleccione Navegar > Directorio > Correo
electrónico.
Le aconsejamos que cree una dirección de e-mail específica para el
marco.
Wi-Fi
24
Utilizar la aplicación Mover
La aplicación Mover le permite enviar muy fácilmente fotos al marco desde el
iPhone, el iPod touch o el iPad. Para ello:
Descargue la aplicación Mover (o Mover Lite) del App Store.1.
Conecte el marco y el iPhone a la misma red Wi-Fi.2.
Lance la aplicación Mover. 3.
> Aparecerá la siguiente pantalla.
Pulse el botón + y seleccione la opción 4.
Add photo.
Seleccione su imagen.5.
Deslice la imagen hacia la indicación 6.
Mover on Dia.
> La imagen irá apareciendo pro-
gresivamente en el marco. Podrá
encontrarla después seleccionando
Examinar > Carpeta > Mover.
25
ES

Bluetooth
Compruebe que la función 1. Bluetooth® está activada. Para ello, seleccione
Ajustes > Bluetooth > Estado > Activado.
Active la función 2. Bluetooth de su ordenador.
Haga un clic sobre la imagen que desea enviar y seleccione “Enviar por 3.
Bluetooth”.
Seleccione 4. DIA en la lista de periféricos Bluetooth disponibles.
Introduzca el código 5. 0000 si le es solicitado.
Enviar imágenes
desde un PC
a través de
Bluetooth
Enviar imágenes
desde un
teléfono a través
de Bluetooth
Compruebe que la función 1. Bluetooth está activada en el marco. Para ello,
seleccione Ajustes > Bluetooth > Estado > Activado.
Seleccione una imagen desde su teléfono y elija “Enviar por 2. Bluetooth”.
> El aparato lanza una búsqueda de periféricos Bluetooth.
Seleccione 3. DIA en la lista de periféricos Bluetooth disponibles.
Introduzca el código 4. 0000 si le es solicitado.
26
USB / SD
Compatibilidad Puede ver fotos guardadas en los siguientes periféricos:
Tarjeta SD, micro SD (con adaptador), mini SD (con adaptador), SDHC -
(clase 2, 4, 6), mini SDHC con adaptador, MMC, MMC plus, MMC móvil
con adaptador, MMC micro (con adaptador), RS-MMC (con adaptador)
Pendrives -
Máquinas de fotos (si se reconoce su aparato como unidad de -
almacenamiento)
Utilizar el
marco con un
periférico de
almacenamiento
Introduzca el periférico en el alojamiento previsto para ello. 1.
> Aparecerán las imágenes almacenadas en el periférico.
Pulse el trackball. 2.
> Ya puede navegar por el contenido de su periférico y seleccionar una
imagen pulsando el trackball.
> Según lo que desee hacer, puede verla, girarla, seleccionarla, eliminarla,
copiarla o moverla.
- Sólo se pueden ver en el marco las imágenes con formato JPG.
- No saque el periférico de almacenamiento mientras se está realizando
una copia.
PARROT BY NODESIGN
27
ES

Gestión de las fotos
Fijar los
parámetros de
un diaporama
Lance un diaporama, pulse el botón y seleccione Ajustes del diaporama.
Puede modificar los siguientes parámetros:
Modo de recorrido - : vea las fotos por capetas, fechas, de manera
aleatoria o en función de la carpeta Customize.
Duración de visualización - : seleccione la duración de la visión de las
imágenes del diaporama.
Transición - : seleccione la transición que desea entre cada imagen.
Ajustar a la pantalla - : defina si hay que ajustar o no las imágenes cuyos
formatos no correspondan al de la pantalla.
El ajuste de una imagen sólo se puede realizar si su definición es
superior o igual a 800x600.
Rotación de
imágenes Pulse el bótón y seleccione Girar.
Eliminar
una imagen
Seleccione 1. Navegar > Directorio y después seleccione la carpeta que
contiene las imágenes que desea eliminar.
Seleccione la imagen y pulse el botón 2. .
Seleccione la opción 3. Suprimir.
También puede eliminar varias imágenes utilizando la opción Seleccionar.
Copiar o
mover una
imagen
Seleccione 1. Navegar > Directorio y después seleccione la carpeta que
contiene las imágenes que desea copiar o mover.
Seleccione la imagen y pulse el botón 2. .
Seleccione la opción 3. Copiar o Desplazar y después seleccione la
carpeta de destino.
También puede copiar o mover varias imágenes utilizando la opción
Seleccionar.
28

Deutsch
Update des
Rahmens
Wenn Ihr Rahmen mit einem WLan-Netzwerk verbunden ist, erfolgen das
Herunterladen und die Installation der Updates automatisch. Wenn Ihr Rah-
men nicht mit einem WLan-Netzwerk verbunden ist, können Sie auch kostenlos
das neueste Update des Rahmens auf unserer Website http://www.parrot.com
herunterladen, unter Support und Downloads.
Vorbemerkung
Erste Nutzung ..................................................................
Wi-Fi .................................................................................
Nutzung der Anwendung Mover ......................................
Bluetooth ..........................................................................
USB / SD ..........................................................................
Fotoverwaltung ................................................................
Inhalt
p.30
p.31
p.33
p.34
p.35
p.36
Vollständige Anleitung, Lernsoftware, Updates
http://www.parrot.com/de/kundenkontakt
Wir wollen unseren Papierverbrauch einschränken und so
verantwortungsbewusst und umweltfreundlich wie möglich handeln.
Daher zieht Parrot es vor, Dokumente für die Benutzer im Internet zu
veröffentlichen, anstatt sie auszudrucken.
Wir möchten Sie bitten, das Benutzerhandbuch des
Parrot DIA direkt auf Ihrem Fotorahmen zu lesen. Wählen Sie dafür
Einstellungen > Informationen > Benutzerhandbuch. Auch die
Rechtlichen Hinweise sind in diesem Benutzerhandbuch verfügbar.
Zu diesem
Leitfaden
29
DE

Erste Nutzung
Sprach-
auswahl
Bei der ersten Inbetriebnahme des Rahmens werden Sie zur Sprachauswahl
aufgefordert. Über Einstellungen > Sprache können Sie diesen Parameter später
ändern.
Einstellung
von Uhrzeit
und Datum
Uhrzeit und Datum stellen sich automatisch ein, wenn der Rahmen an ein Wi-Fi •
Netzwerk angeschlossen wird.
Wenn Sie diese Einstellungen manuell einstellen wollen, wählen Sie •
Einstellungen > Datum/Uhrzeit und Ausrichtung > Manuell.
Mit dem Trackball durch die Menüs navigieren. Die Auswahl über Druck auf den •
Trackball bestätigen.
Über die Taste • hat man Zugriff auf das Kontextmenü.
Über die Taste • kann man zu einer höheren Ebene des Menüs zurück kehren.
Über die Taste • kehrt man in das Hauptmenü zurück.
Menünavi-
gation
Nutzung mit
einem USB-
Keybord
oder einer
USB-Maus
Um die Benutzung des Rahmens oder das Surfen im Internet zu vereinfachen,
können Sie eine USB-Maus und/oder ein USB-Keyboard an den USB-Ports des
Rahmens anschließen.
Das Stromkabel mit dem Transformator verbin-1.
den und diesen an die
Stromversorgung anschließen.
Taste 2. betätigen, um den Rahmen einzus-
chalten / auf Standby zu schalten.
Netzspannung
einschalten
30
Wi-Fi
Einrichtung
einer drahtlosen
Verbindung
Wenn Ihr WiFi Modem / Router die WPS-Technik nicht unterstützt:•
Je nach dem Modell Ihres Modems oder Routers müssen Sie auf die
Synchronisationsschaltfläche drücken, um die Verbindung herzustellen.
Weitere Angaben finden Sie in den Unterlagen zu Ihrem Gerät.
Einstellungen1. > Wi-Fi auswählen.
Konfigurieren 2. auswählen.
> Der Rahmen startet die Suche nach dem Wi-Fi-Netz.
Wählen Sie Ihr Netzwerk aus der vorgeschlagenen Liste aus oder wählen 3.
Sie Manuell um Ihr Netzwerk manuell zu konfigurieren.
Geben Sie mithilfe Ihrer virtuellen Tastatur den WEP- oder WPA-Schlüssel 4.
Ihres Netzes ein und wählen Sie dann OK.
> Nach Herstellung der Verbindung erscheint ein Fenster, das alle Informa-
tionen bezüglich der Verbindung Ihres Rahmens via Wi-Fi enthält.
Wenn Ihr WiFi Modem / Router die WPS-Technik unterstützt:•
Drücken Sie auf den Knopf WPS Ihres drahtlosen Modems oder Routers.1.
Einstellungen > Wi-Fi 2. auswählen.
Konfigurieren> Auto 3. auswählen.
Die Verbindung
deaktivieren
Nach Herstellung der Verbindung können Sie diese deaktivieren / wieder aktivieren.
Wählen Sie dafür Einstellungen > Wi-Fi > Verbindung > Verhindern / Zulassen.
Zugang zur
Internet
Schnittstelle
Über die Internet-Schnittstelle können Sie Ihrem Rahmen leicht eine E-
Mailadresse, einen RSS Feed oder einen Computer zuordnen, diese Zuord-
nungen lassen sich aber auch leicht direkt vom Rahmen aus herstellen.
Zugriff auf die Internet-Schnittstelle des Rahmens bekommt man, wenn
der PC und der Rahmen an das gleiche Wi-Fi Netz angeschlossen sind.
Finden Sie die IP-Adresse für Ihren Rahmen 1. Einstellungen > Informationen
auswählen.
Starten Sie Ihren Browser und geben Sie die IP-Adresse in die Adressleiste ein.2.
31
DE
Online- Fotoalben
anzeigen
Klicken Sie auf der Internet-Schnittstelle auf 1. .
Im Speicherplatz 2. Registrierte Feeds, klicken Sie auf Neu um einen RSS-Feed
mit dem Rahmen zu verknüpfen.
Wählen Sie Ihren Fotoserver aus und geben Sie die mit dem gewählten Album 3.
verbundene Kennung und eventuell das Passwort oder die URL-Adresse des
RSS-Feeds ein.
Klicken Sie auf 4. Speichern.
> Die im verknüpften Album enthaltenen Bilder sind nun für den Rahmen zugän-
glich. Wählen Durchsuchen > Verzeichnis > Registrierte Feeds.
Auf einem
Computer
gespeicherte
Fotos anzeigen
Aktivieren Sie auf Ihrem Computer die Freigabe der Foto-Ordner, die Sie auf dem 1.
Rahmen anzeigen möchten.
Klicken Sie auf der Webschnittstelle auf das 2. .
Einen Austausch hinzufügen3. anklicken, Ihren PC und den freigegebenen
Ordner auswählen.
>Die im freigegebenen Ordner enthaltenen Bilder sind nun vom Rahmen aus
zugänglich. Wählen Sie dafür Durchsuchen > Verzeichnis > PC Austausch.
Im Internet
browsen
Mit dem Rahmen können Sie im Internet browsen. Dazu Browser auswählen und
mit dem Trackball browsen.
Empfangen von
per E-Mail
erhaltenen
Bildern
Klicken Sie auf der Internet-Schnittstelle auf das 1. .
Im Bereich Emailadresse2. Neu anklicken, um dem Rahmen eine E-Mail-
Adresse zuzuweisen.
Geben Sie die Kennung Ihrer Verbindung in die entsprechenden Felder ein.3.
Konsultieren Sie die Unterlagen zu Ihrem E-Mail-Service für die Informationen
zu Server und Protokoll.
> Alle Bilder, die Sie auf Ihrem E-Mail-Konto erhalten, sind von nun an auf
Ihrem Rahmen zugänglich. Wählen Sie dafür Durchsuchen > Ordner > Email.
Wir empfehlen Ihnen, für den Rahmen eine eigene E-Mail-Adresse
anzulegen.
Wi-Fi
32

Nutzung der Anwendung Mover
Mit der Anwendung Mover können Sie ganz einfach Ihre Fotos von Ihrem iPhone,
iPod Touch oder iPad aus auf Ihren Fotorahmen übertragen. Vorgangsweise:
Laden Sie die Anwendung Mover (oder Mover Lite) im App Store herunter.1.
Verbinden Sie den Rahmen und das iPhone mit dem selben WLan-Netz.2.
Starten Sie die Anwendung Mover. 3.
> Es erscheint der nebenstehende
Bildschirm.
Drücken Sie auf die Taste + und wählen 4.
Sie die Option Foto hinzufügen.
Wählen Sie Ihr Bild.5.
Verschieben Sie dieses Bild auf die 6.
Angabe Mover on Dia.
> Das Bild erscheint schrittweise im
Rahmen. Sie können es dann über
folgenden Weg wiederfinden:
Durchsuchen > Ordner > Mover.
33
DE

Bluetooth
Prüfen, dass die 1. Bluetooth® Funktion aktiviert ist. Dazu
Einstellungen > Bluetooth > Status > Zugelassen auswählen.
Die 2. Bluetooth Funktion Ihres PC aktivieren.
Das zu sendende Bild mit der rechten Maustaste anklicken und „Mit 3. Bluetooth
senden“ auswählen.
In der Liste verfügbarer 4. Bluetooth Geräte DIA auswählen.
Auf Aufforderung den Code 5. 0000 eingeben.
Bilder über
Bluetooth von
einem PC aus
versenden
Bilder über
Bluetooth von
einem Telefon
aus versenden
Prüfen, dass die 1. Bluetooth Funktion des Rahmens aktiviert ist. Dazu
Einstellungen > Bluetooth > Status > Zugelassen auswählen.
Aus dem Telefon ein Bild auswählen und „Per 2. Bluetooth senden“ auswählen.
> Ihr Gerät leitet die Suche nach Bluetooth Geräten ein.
In der Liste verfügbarer 3. Bluetooth Geräte DIA auswählen.
Auf Aufforderung den Code 4. 0000 eingeben.
34
USB / SD
Kompatibilität Sie können Fotos anzeigen, die auf folgenden Geräten gespeichert sind:
SD-Karte, Mikro-SD Karte (mit Adapter), Mini-SD-Karte (mit Adapter), -
SDHC-Karte (Klasse 2, 4, 6), Mini SDHC-Karte mit Adapter, MMC, MMC
plus; MMC mobil mit Adapter, MMC Mikro (mit Adapter), RS-MMC
(mit Adapter)
USB Stick -
Fotoapparat (wenn Ihr Gerät als Massenspeichergerät anerkannt wird) -
Benutzung des
Rahmens
mit einem
Speichergerät
Die Speicherkarte in den entsprechenden Steckplatz einführen. 1.
> Die auf dem Gerät gespeicherten Geräte werden angezeigt.
Auf den Trackball drücken. 2.
> Sie können jetzt durch den Inhalt des Gerätes blättern und durch Druck
auf den Trackball ein Bild auswählen.
> Je nach Wunsch können Sie das Bild anzeigen, drehen, auswählen,
löschen, kopieren oder verschieben.
- Der Rahmen kann nur Bilder im JPG-Format anzeigen.
- Ein Speichergerät nie während eines Kopiervorgangs entfernen.
PARROT BY NODESIGN
35
DE
Fotoverwaltung
Bilder drehen Taste drücken und Drehen auswählen.
Diashoweins-
tellung
Starten Sie die Diashow, drücken Sie auf die Taste und wählen Sie
Einstellungen Diashow. Sie können folgende Parameter ändern:
Ablaufmodus : -Zeigen Sie Ihre Fotos nach Ordner, Datum, willkürlich
oder nach dem Customize-Ordner an. -
Anzeigedauer -: Wählen Sie die Anzeigedauer der Bilder der Diashow.
Übergang : -Wählen Sie den Übergang, den Sie zwischen jedem Bild
möchten.
Bildgröße anpassen - : Legen Sie fest, ob Bilder, deren Format dem des
Bildschirms nicht entspricht, angepasst werden sollen oder nicht.
Ein Bild kann nur angepasst werden, wenn die Auflösung
800x600 oder höher ist.
Ein Bild löschen Durchsuchen > Verzeichnis1. und anschließend den Ordner mit den zu
löschenden Bildern auswählen.
Bild auswählen und die Taste 2. drücken.
Option 3. Löschen auswählen.
Über die Option Auswahl können Sie auch mehrere Bilder löschen.
Ein Bild kopieren
/ verschieben
Durchsuchen > Verzeichnis 1. und anschließend den Ordner mit den zu
kopierenden oder zu verschiebenden Bildern auswählen.
Bild auswählen und die Taste 2. drücken.
Option 3. Kopieren oder Verschieben und anschließend den Zielordner
auswählen.
Über die Option Auswahl können Sie auch mehrere Bilder
kopieren / verschieben.
36

Italiano
Aggiornamento
della cornice Se la cornice è connessa alla rete Wi-Fi, il download e l’installazione degli ag-
giornamenti verranno eseguiti automaticamente. Se la cornice non è connessa
alla rete Wi-Fi, si ha anche la possibilità scaricare gratuitamente l’ultimo aggior-
namento della cornice sul nostro sito web http://www.parrot.com sezione
Assistenza e download.
Primo utilizzo .....................................................................
Wi-Fi ..................................................................................
Utilizzare l’applicazione Mover .........................................
Bluetooth ..........................................................................
USB / SD ...........................................................................
Gestione delle fotografie ...................................................
Prima di iniziare
Sommario
p.38
p.39
p.41
p.42
p.43
p.44
Manuale completo, documenti didattici, aggiornamenti
http://www.parrot.com/it/assistenza
Per limitare il consumo della carta e nell’ambito della sua azione di
responsabilizzazione e tutela dell’ambiente, Parrot ha scelto di mettere
on-line i documenti destinati agli utenti, invece di stamparli.
Si invita quindi l’utente a consultare la guida utente del Par-
rot DIA direttamente sulla propria cornice foto. A tale scopo selezionare
Regolazioni > Informazioni > Guida utente. Su questa guida utente sono di-
sponibili anche le note legali.
A proposito di
questa guida
37
IT
Primo utilizzo
Collegare il cavo di alimentazione al trasforma-1.
tore, poi collegarlo alla rete elettrica.
Premere il tasto 2. per accendere/mettere in
stand-by la cornice.
Collegamento
alla rete
elettrica
Scelta della
lingua
La scelta della lingua viene richiesta alla prima utilizzazione della cornice. Se, in
seguito, si desidera modificare questo parametro, selezionare Regolazioni > Lingua.
Impostazione
dell’ora e
della data
L’impostazione della data e dell’ora si effettua automaticamente quando la •
cornice è collegata alla rete Wi-Fi.
Se si preferisce effettuare queste impostazioni manualmente, selezionare •
Regolazioni > Data/ora poi Regolazione > Manuale.
Per navigare nei menu occorre far ruotare la rotella. Premere sulla rotella per •
confermare la selezione.
Il tasto • consente di accedere al menu contestuale.
Il tasto • consente di ritornare al menu di livello superiore.
Il tasto • consente di ritornare al menu principale.
Navigazione
nei menu
Utilizzo con
tastiera o
mouse USB
Per utilizzare la cornice o navigare su Internet più facilmente, è possibile collegare un
mouse USB e/o una tastiera USB alle porte USB della cornice.
38
Wi-Fi
Connessione
wireless
Se il modem/router wireless non supporta la tecnologia WPS:•
Secondo il modello del modem o del router, potrebbe essere necessario
premere il pulsante di sincronizzazione per stabilire la connessione. Per
maggiori informazioni, consultare la documentazione del dispositivo.
Selezionare 1. Regolazioni > Wi-Fi.
Selezionare 2. Configurar.
> La cornice avvia una ricerca di rete WiFi.
Selezionare la propria rete nell’elenco proposto o selezionare 3.
Configurazione manuale
per configurare la propria rete manualmente.
Digitare la chiave WEP o WPA della propria rete con la tastiera virtuale, 4.
quindi selezionare OK.
> Stabilita la connessione, appare una finestra contenente tutte le
informazioni relative alla connessione WiFi della cornice.
Se il modem/router wireless supporta la tecnologia WPS:•
Premere il pulsante WPS del modem wireless o del router wireless.1.
Selezionare 2. Regolazioni > Wi-Fi.
Selezionare 3. Configurar > Automatico.
Disattivazione
della connessione
Dopo avere stabilito la connessione, è possibile disattivarla/riattivarla.
A questo scopo, selezionare Regolazioni > Wi-Fi > Connessione > Attivato /
Disattivato.
Accesso all’
interfaccia web
L’interfaccia web permette di associare facilmente un indirizzo e-mail,
un flusso RSS o un computer alla cornice ma è possibile altresì effet-
tuare queste associazioni direttamente dalla cornice.
Per accedere all’interfaccia web della cornice, il computer e la cornice
devono essere collegati alla stessa rete WiFi.
Prendere nota dell’indirizzo IP assegnato alla cornice. A questo scopo, 1.
selezionare Regolazioni > Informazioni.
Lanciare il browser web e digitare l’indirizzo IP nella barra degli indirizzi.2.
39
IT

Visualizzazione
degli album
fotografici
on-line
Nell’interfaccia web, fare clic su 1. .
Nello spazio 2. Flussi salvati, fare clic su Nuovo per associare un flusso RSS
alla cornice.
Selezionare il server delle foto, digitare l’identificativo associato all’album selezio-3.
nato ed eventualmente la password, o digitare l’indirizzo URL del flusso RSS.
Fare clic su 4. salva.
> Le immagini contenute nell’album associato sono ora accessibili sulla cornice.
A questo scopo, selezionare Scorri > Cartella > Flusso RSS.
Visualizzazione
delle fotografie
memorizzate nel
computer
Sul computer, attivare la condivisione delle cartelle fotografiche da visualizzare 1.
sulla cornice.
Nell’interfaccia web, fare clic su 2. .
Fare clic su 3. Aggiungi una condivisione e selezionare il computer, poi la
cartella condivisa.
> Le immagini contenute nella cartella condivisa sono ora accessibili sulla
cornice. A questo scopo, selezionare Scorri > Cartella > Condivisione dal PC.
Navigazione in
Internet
E’ possibile navigare in Internet utilizzando la cornice. A questo scopo,
selezionare Browser Web, poi utilizzare la rotella per navigare.
Verifica dell’
arrivo delle
immagini
ricevute via
e-mail
Nell’interfaccia web, fare clic su 1. .
Nello spazio 2. Email account, fare clic su Nuovo per associare un indirizzo di
messaggeria alla cornice.
Digitare gli identificativi di connessione nei campi corrispondenti. Per ottenere 3.
le informazioni relative al server e al protocollo, consultare la documentazione
della messaggeria elettronica.
> Tutte le immagini ricevute su questo account di messaggeria saranno da
questo momento accessibili sulla cornice. A questo scopo, selezionare Scorri
> Cartella > Account messaggeria.
Si consiglia di creare un indirizzo e-mail riservato alla cornice.
Wi-Fi
40

Utilizzare l’applicazione Mover
L’applicazione Mover consente di trasferire foto molto facilmente sulla cornice a
partire dal proprio iPhone, iPod touch o iPad. A questo scopo:
Scaricare l’applicazione Mover (o Mover Lite) sull’App Store. 1.
Collegare la cornice e l’iPhone sulla stessa rete Wi-Fi.2.
Avviare l’applicazione Mover. 3.
> Appare la schermata qui accanto.
Premere il tasto + quindi selezionare 4.
l’opzione Add photo.
Selezionare la propria immagine.5.
Trascinare quest’immagine verso 6.
l’indicazione Mover on Dia.
> L’immagine appare progressivamente
sulla cornice. E’ possibile in seguito
ritrovare l’immagine selezionando
Scorri > Cartella > Mover.
41
IT

Bluetooth
Verificare che la funzionalità 1. Bluetooth® sia attivata. A questo scopo,
selezionare Regolazioni > Bluetooth > Stato > Attivato.
Attivare la funzionalità 2. Bluetooth del computer.
Fare un clic destro sull’immagine che si desidera inviare e selezionare « Invia 3.
tramite Bluetooth ».
Selezionare DIA nella lista delle periferiche 4. Bluetooth disponibili.
Immettere il codice 0000 se viene richiesto.5.
Invio delle
immagini da
un computer
tramite il sistema
Bluetooth
Invio delle
immagini da un
telefono tramite
il sistema
Bluetooth
Verificare che la funzionalità 1. Bluetooth® sia attivata sulla cornice. A questo
scopo, selezionare Regolazioni > Bluetooth > Stato > Attivato.
Dal telefono, selezionare un’immagine e scegliere « Invia tramite 2. Bluetooth ».
> L’apparecchio avvia una ricerca delle periferiche Bluetooth.
Selezionare DIA nella lista delle periferiche 3. Bluetooth
disponibili.
Immettere il codice 0000 se viene richiesto.4.
42
USB / SD
Compatibilità E’ possibile visualizzare le fotografie memorizzate sulle seguenti periferiche:
Scheda SD, micro SD (con adattatore), mini SD (con adattatore), SDHC -
(classe 2, 4, 6), mini SDHC con adattatore, MMC, MMC plus, MMC
cellulare con adattatore, MMC micro (con adattatore), RS-MMC (con
adattatore)
Chiave USB -
Macchina fotografica (se la macchina fotografica utilizzata è ricono- -
sciuta come unità di memorizzazione in massa)
Utilizzazione
della cornice con
una periferica di
memorizzazione
Inserire la periferica nell’apposito alloggiamento. 1.
> Le immagini memorizzate sulla periferica compaiono.
Premere sulla rotella. 2.
> Adesso è possibile navigare nel contenuto della periferica e selezionare
un’immagine premendo sulla rotella.
> Secondo ciò che si vuole fare, è possibile visualizzarla, ruotarla, selezion-
arla, eliminarla, copiarla o spostarla.
- Solo le immagini con formato JPG possono essere visualizzate
sulla cornice.
- Non togliere mai la periferica di memorizzazione mentre l’apparecchio
sta effettuando una copia.
PARROT BY NODESIGN
43
IT

Gestione delle fotografie
Impostazione
dei parametri di
un diaporama
Avviare il diaporama quindi premere il tasto e selezionare Regolazioni del
diaporama. Sarà possibile modificare i seguenti parametri:
Modalità di scorrimento - : visualizzare le foto per cartella, per data, in
ordine casuale o in base alla cartella Customize
Durata di visualizzazione - : selezionare la durata di visualizzazione delle
immagini del diaporama.
Transizione - : selezionare la transizione desiderata tra le diverse immagini.
Adatta allo schermo - : indicare se le immagini il cui formato non corri-
sponde a quello dello schermo devono essere modificate o meno.
La modifica di un’immagine può essere effettuata soltanto se la sua
definizione è superiore o pari a 800 x 600.
Rotazione delle
immagini Premere il tasto e selezionare Ruota.
Cancellazione
di un’immagine
Selezionare 1. Scorri > Cartella, poi selezionare la cartella contenente le
immagini da cancellare.
Selezionare l’immagine e premere il tasto 2. .
Selezionare l’opzione 3. Elimina.
E’ possibile anche cancellare più immagini utilizzando l’opzione Seleziona.
Copia/
spostamento di
un’immagine
Selezionare 1. Scorri > Cartella, poi selezionare la cartella contenente le
immagini da copiare o da spostare.
Selezionare l’immagine e premere il tasto 2. .
Selezionare l’opzione 3. Copia o Sposta poi selezionare la cartella di destinazione.
E’ possibile anche copiare/spostare più immagini utilizzando l’opzione
Seleziona.
44

Nederlands
De fotolijst
updaten
Als uw lijst is aangesloten op een Wi-Fi netwerk worden de downloads en
updates automatisch uitgevoerd. Als uw lijst niet is aangesloten op een Wi-Fi
netwerk kunt u ook de nieuwste update voor de lijst gratis downloaden op onze
website web http://www.parrot.com onderdeel Ondersteuning en downloads.
Eerste gebruik ..................................................................
Wi-Fi .................................................................................
De toepassing Mover gebruiken ......................................
Bluetooth ..........................................................................
USB / SD ..........................................................................
Uw foto’s beheren ............................................................
Voordat u begint
Inhoudsopgave
p.46
p.47
p.49
p.50
p.51
p.52
Complete documentatie, educatieve software, updates
http://www.parrot.com/nl/support
Om ons papierverbruik te beperken en in het kader van onze zo verant-
woordelijk mogelijke aanpak op het gebied van milieubehoud, geeft
Parrot er de voorkeur aan om documentatie online beschikbaar te
stellen in plaats van deze af te drukken.
Wij nodigen u dus uit om de gebruikershandleiding van de Parrot DIA
direct op uw fotolijst te raadplegen. Hiertoe kiest u Instellingen >
Informatie > Gebruikershandleiding. De wettelijke vermeldingen zijn ook bes-
chikbaar in deze gebruikershandleiding.
Over deze gids
45
NL

Eerste gebruik
Sluit het voedingssnoer aan op de transformator 1.
en sluit deze aan op het lichtnet.
Druk op de toets 2. om de fotolijst in te scha-
kelen / op stand-by te zetten.
Inschakelen
De taal
kiezen
Bij het eerste gebruik van de fotolijst wordt u gevraagd om een taal te kiezen. Als u
deze instelling vervolgens wilt wijzigen, kiest u Instellingen > Taal.
Tijd en datum
instellen
De tijd en de datum worden automatisch ingesteld wanneer de fotolijst wordt •
aangesloten of een Wi-Fi netwerk.
Als u deze instellingen handmatig wilt uitvoeren, kies dan • Instellingen > Datum/
tijd en vervolgens Instellen > Handmatig.
Gebruik de trackball om door de menu’s te bladeren Druk op de trackball om de •
keuze te bevestigen.
Met de toets • opent u het themamenu.
Met de toets • gaat u terug naar een hoger menu.
Met de toets • opent u het hoofdmenu.
Door de
menu’s
bladeren
Gebruik met
een toetsen-
bord of USB
muis
Om de lijst te gebruiken of eenvoudiger op Internet te surfen kunt u een USB muis
en/of een toetsenbord aansluiten op de USB poorten van de lijst.
46
Wi-Fi
Een draadloze
verbinding
leggen
Als uw draadloze modem / router geen WPS technologie ondersteunt:•
Afhankelijk van het model van uw modem / router, kan het mogelijk zijn
dat u op de synchronisatietoets moet drukken om verbinding te maken.
Raadpleeg de documentatie van uw apparaat voor meer informatie.
Kies 1. Instellingen > Wi-Fi.
Kies2. Configureren.
> De fotolijst gaat zoeken naar een Wi-Fi netwerk.
Kies uw netwerk in de aangeboden lijst of kies 3. Handmatige configuratie
om uw netwerk handmatig te configureren.
Voer de WEP of WPA sleutel van uw netwerk in met behulp van het virtuele 4.
toetsenbord en kies OK.
> Wanneer de verbinding gelegd is, verschijnt een venster met alle
informatie van de verbinding van uw fotolijst via de Wi-FI.
Als uw draadloze modem / router WPS technologie ondersteunt:•
Druk op de WPS knop van uw draadloze modem of router.1.
Kies 2. Instellingen > Wi-Fi.
Kies3. Configureren > Automatisch.
De verbinding
deactiveren
Als de verbinding gelegd is, kunt u ervoor kiezen om deze te deactiveren / activeren.
Hiertoe kiest u Instellingen > Wi-Fi > Verbinding > Geactiveerd / Gedeactiveerd.
De webinterface
openen
Via de web interface kunt u eenvoudig een e-mail adres, een RSS flux
of een computer koppelen aan uw fotolijst, maar u kunt deze koppelin-
gen ook direct via de lijst uitvoeren.
Om toegang te krijgen tot de web interface van de lijst, moeten uw PC en
uw lijst zijn aangesloten op hetzelfde Wi-Fi netwerk.
Zoek het IP adres dat aan uw fotolijst is toegekend. Hiervoor kiest u 1.
Instellingen > Informatie.
U opent uw web browser en voert het IP adres in de adresbalk in.2.
47
NL
Online
fotoalbums
bekijken
In de webinterface klikt u op 1. .
In het venster 2. Registered feeds klikt u op Novo om een RSS stroom te
koppelen aan de fotolijst.
Kies uw fotoserver, voer de identificatie in voor het gekozen album en eventueel 3.
het paswoord of voer het URL adres van de RSS stroom in.
Klik op 4. Save.
> De afbeeldingen in het gekoppelde album zijn nu beschikbaar op de fotolijst.
Hiervoor kiest u Doorbladeren > Map > RSS-feeds.
Foto’s weergeven
die op een pc zijn
opgeslagen
Op uw pc activeert u het delen van de fotomappen die u op het kader wilt 1.
weergeven.
In de webinterface klikt u op 2. .
Klik op 3. Een share toevoegen en kies uw computer en vervolgens
de gedeelde map.
> De afbeeldingen in de gedeelde map zijn nu beschikbaar op de fotolijst.
Hiervoor kiest u Doorbladeren > Map > Delen vanaf de pc.
Op Internet
surfen
U kunt op Internet surfen met behulp van de fotolijst. Hiertoe kiest u Webbrowser
en gebruikt u vervolgens de trackball om te surfen.
Per e-mail
verzonden
afbeeldingen
ontvangen
In de webinterface klikt u op 1. .
In het onderdeel 2. Email account, klikt u op Novo om een e-mail adres aan de
lijst te koppelen.
Voer uw identificatiegegevens in de daarvoor bestemde velden in. 3.
Bewaar de documentatie van uw elektronische berichtendienst voor de
benodigde informatie over de server en het protocol.
> Alle afbeeldingen die u ontvangt op dit e-mail adres zullen voortaan
beschikbaar zijn voor de fotolijst. Hiervoor kiest u Doorbladeren > Map >
E-mail.
Wij raden u aan om een specifiek e-mail adres te creëren voor de
fotolijst.
Wi-Fi
48
De toepassing Mover gebruiken
Met de toepassing Mover kunt u heel eenvoudig de foto’s op de lijst overzetten
vanaf uw iPhone, iPod touch of iPad. Hiertoe:
Downloadt u de toepassing Mover (of Mover lite) op App Store.1.
Sluit u de lijst en de iPhone aan op hetzelfde Wi-Fi netwerk.2.
U start de toepassing Mover. 3.
> Het scherm hiernaast wordt weerge-
geven.
Druk op de toets + en kies vervolgens 4.
de optie Foto toevoegen.
Kies uw afbeelding.5.
Laat deze afbeelding naar de indicatie 6.
Mover op Dia glijden.
> De afbeelding verschijnt langzaam
aan op de lijst. Vervolgens kunt u de
afbeelding terugvinden via
Bladeren > Map > Mover.
49
NL

Bluetooth
Controleer dat de 1. Bluetooth® functie geactiveerd is. Hiertoe kiest u
Instellingen > Bluetooth > Status > Geactiveerd.
Activeer de Bluetooth functie van uw computer.2.
Klik rechts op de afbeelding die u wilt verzenden en kies «Verzenden via 3.
Bluetooth».
Kies 4. DIA in de lijst van beschikbare Bluetooth randapparatuur.
Voer de code 5. 0000 in als deze u wordt gevraagd.
Afbeeldingen
verzenden
vanaf een PC
via Bluetooth
Afbeeldingen
verzenden vanaf
een telefoon via
Bluetooth
Controleer dat de 1. Bluetooth® functie op de fotolijst geactiveerd is. Hiertoe
kiest u Instellingen > Bluetooth > Status > Geactiveerd.
Kies een afbeelding op uw telefoon en kies “Verzenden via Bluetooth”. 2.
> U apparaat gaat op zoek naar Bluetooth randapparatuur.
Kies 3. DIA in de lijst van beschikbare Bluetooth randapparatuur.
Voer de code 4. 0000 in als deze u wordt gevraagd.
50
USB / SD
Compatibiliteit U kunt foto’s weergeven die op de volgende randapparaten zijn opgeslagen:
SD kaart, micro SD kaart (met adapter), mini SD kaart ( met adapter), -
SDHC (klasse 2, 4, 6), mini SDHC met adapter, MMC, MMC plus, MMC
mobile met adapter, MMC micro (met adapter), RS-MMC (met adapter)
USB-stick -
Fototoestel (als uw toestel herkend wordt als opslageenheid) -
De fotolijst
gebruiken met een
opslageenheid
Sluit uw apparaat aan in de daarvoor voorziene sleuf. 1.
> De afbeeldingen die op uw apparaat zijn opgeslagen worden
weergegeven.
Druk op de trackball. 2.
> Nu kunt u door de inhoud van uw randapparaat bladeren en een afbeeld-
ing kiezen door op de trackball te drukken.
> U kunt nu naar behoefte deze afbeelding weergeven, draaien, kiezen,
wissen, kopiëren of verplaatsen.
- Alleen afbeeldingen in JPG formaat kunnen op de fotolijst worden
weergegeven.
- Verwijder de opslageenheid nooit terwijl een kopie wordt gemaakt.
PARROT BY NODESIGN
51
NL

Uw foto’s beheren
Afbeeldingen
draaien Druk op de toets en kies Draaien.
Een afbeelding
kopiëren /
verplaatsen
Kies 1. Doorbladeren > Map en kies vervolgens de map waarin de afbeeldingen
staan die u wilt kopiëren of verplaatsen.
Kies de afbeelding en druk op de toets 2. .
Kies de optie 3. Kopiëren of Verplaatsen en kies de bestemmingsmap.
U kunt ook meerdere afbeeldingen kopiëren / verplaatsen door gebruik
te maken van de optie Selecteren.
Een afbeelding
wissen
Kies 1. Doorbladeren > Map en kies vervolgens de map waarin de afbeeldingen
staan die u wilt wissen.
Kies de afbeelding en druk op de toets 2. .
Kies de optie 3. Verwijderen.
U kunt ook meerdere afbeeldingen wissen door gebruik te maken van
de optie Selecteren.
Een diashow
instellen
Start een diashow en druk vervolgens op de toets en kies Instellingen van de
diashow. U kunt de volgende instellingen wijzigen:
Wijze van doorbladeren -: bekijk uw foto’s per map, per datum, willekeurig, of
volgens de map Individualiseren.
Weergaveduur -: kies de weergaveduur van de afbeeldingen in de
diashow.
Overgang -: kies de transitie die u wenst tussen de afbeeldingen.
Aangepast aan het scherm - : geef aan of de afbeeldingen waarvan het for-
maat niet overeenkomt met het scherm, moeten worden aangepast of niet.
Een afbeelding kan worden aangepast als de definitie ervan hoger of
gelijk is aan 800x600.
52
日本語
フレームの
更新
お使いのフレームがワイヤレスネットワークに接続している場合は、更新の
ダウンロードおよびインストールも自動的に行われます。お使いのフレー
ムがワイヤレスネットワークに接続されていない場合は、当社のサイト:
http://www.parrot.com の「サポートおよびダウンロード」のページから、フ
レームの最新の更新を無料でダウンロードしていただけます。
本製品をご使用になる前に ............................................
ワイヤレス接続 ..............................................................
アプリケーションMoverの使用 .......................................
Bluetooth .........................................................................
USB/SD ...........................................................................
写真の管理 ......................................................................
はじめに
目次
p.54
p.55
p.57
p.58
p.59
p.60
改訂版フルユーザーガイド、チュートリアル
http://www.parrot.com/uk/support
紙の消費量を抑えるため、また、環境に対する最大限の責任と配慮の
一環として、Parrotはユーザーガイドの印刷を控え、オンライン化を
優先しています。
お使いのフレームから、Parrot DIAのユーザガイドを直接ご覧くださ
い。それには、Settings > Information > User guideを選択してください。同ユ
ーザガイドには、免責事項も記載されています。
本ユーザーガイド
について
53
日本語

本製品をご使用になる前に
電源コードをACアダプタに接続し、プラグを1.
コンセントに差込みます。
2. を押して、フレームの電源を入れるか、ま
たはスタンバイモードにします。
電源を入れる
言語を選択
する
フレームを初めて使用する際に、言語を選択します。後で言語を変更するには、
Settings > Language を選択します。
日付と時刻を
調整する
日付と時刻の調整は、フレームがワイヤレスネットワークに接続された際に自動•
的に行われます。
手動で日付と時刻の設定を行う場合は• Settings > Date/time を選択した後
Adjustment > Manual を選択
メニューを見る際は、トラックボールを使用します。選択を決定するには、トラ•
ックボールを押してください。
• ボタンを押すと、ショートカットメニューにアクセスできます。
• ボタンを押すと、一つ上のメニューに戻ります。
• ボタンを押すと、メインメニュー画面に戻ります。
メニューを
見る
キーボードま
たはUSBマウ
スでの使用
フレームのUSBポートへUSBマウスおよび / またはUSBキーボードを接続していた
だくと、フレームの使用またはインターネット閲覧をより簡単に行っていただけ
ます。
54
ワイヤレス接続
ウェブ・インタ
ーフェースにア
クセスする
フレームに割り当てられているIPアドレスを入力します。それには、1. Settings >
Informations を選択してください。
お使いのウェブブラウザを起動し、アドレスバーにIPアドレスを入力してくだ2.
さい。
ワイヤレス接続
を設定する
お使いのワイヤレスモデム/ルータが WPS(ワイヤレス保護設定)機能をサポート•
していない場合:
Settings > Wi-Fi1. を選択します。
Configure2. を選択します。
> フレームがワイヤレス・ネットワークを検索します。
表示されたリストから該当するネットワークを選択するか、3. Manual を選択
して、手動でネットワークの設定を行ってください。
バーチャル・キーを使用して、使用するネットワークのWEPキーまたは WPAキ4.
ーを入力した後、OK を選択してください。
> 接続が完了すると、フレームのワイヤレス経由接続に関するすべての情報
を含んだウィンドウが表示されます。
お使いのワイヤレスモデム/ルータが WPS(ワイヤレス保護設定)機能をサポート•
している場合:
お使いのワイヤレスモデムまたはワイヤレスルーターのWPSボタンを押して1.
ください。
Settings > Wi-Fi2. を選択します。
Configure > Auto3. を選択します。
お使いのモデム /ルータの機能によっては、同期化ボタンを押してワイ
ヤレス接続の設定を行う必要があります。詳しい情報は、お使いの機
の使用説明書をご覧ください。
フレームのウェブ・インターフェースにアクセスするには、お使いの PC
がフレームと同じワイヤレス・ネットワークに接続されていなければな
りません。
55
日本語

アルバムをオ
ンラインで閲
覧可能にする
ウェブ・インターフェースから、 1. をクリックしてください。
Registered feeds2. のページから New をクリックして、フレームにRSSフィ
ードを関連付けてください。
利用する写真サーバーを選択した後、選択したアルバムに関連付けられてい 3.
るユーザ名(必要な場合はパスワードも)を入力するか、またはRSSフィー
ドのURL アドレスを入力してください。
Save4. をクリックしてください。
> 関連付けたアルバムに含まれる画像を、今後フレームから見ることができ
るようになります。それには、 Browse > Directory > RSS-feeds を選択し
てください。
PCに保存されてい
る写真を見る
お使いのパソコンから、フレームで見たい写真ドキュメントの共有を有効に 1.
してください。
ウ2. ェブ・インターフェースから、 をクリックしてください。
Add a share 3. をクリックした後お使いのパソコンを選択し、次に共有するド
キュメントを選択してください。
> 関連付けたアルバムに含まれる画像を、今後フレームから見ることができ
るようになります。それには、 Browse > を選択してください。
Directory > PC shares。
Eメール経由で画
像を受信する
ウェブ・インターフェースから、1. をクリックしてください。
Email account2. から New をクリックして、フレームにメールアドレスを関
連付けてください。
該当する欄に、接続に必要な認証コードを入力してください。3.
サーバーやプロトコルに関する情報については、お使いの電子メールの説明
書をご覧ください。
> 今後このメールアカウントに受信する画像はすべて、フレームからアクセ
スできるようになります。それには、Browse > Directory > E-mail を選択
してください。
フレーム専用のEメールアドレスを作成することをお勧めします。
Wi-Fi
56
アプリケーションMoverの使用
アプリケーションMoverをお使いいただくと、お使いのiPhone、iPod touchまたは
iPadから写真をフレームに大変簡単に転送することができます。それには:
App Storeから、アプリケーションMover(またはMover Lite)をダウンロー1.
ドしてください。
フレームとiPhoneを、同じワイヤレス2.
ネットワーク上に接続してください。
アプリケーションMoverを起動します。 3.
> 右の画面が表示されます。
[+] キーを押した後、オプションの4.
[Add photo]を選択します。
画像を選択してください。5.
選択した画像を、 6. [Mover on Dia]へド
ラッグします。
> 画像が少しずつフレームに表示され
ます。その後は、
Browse > Folder > Mover を選択し
て、画像を確認していただけます。
57
日本語

Bluetooth
Bluetooth1. ® 機能が有効になっていることを確認してください。それに
は、Settings > Bluetooth > Status > Enabled を選択してください。
お使いのパソコンのBluetooth機能を有効にしてください。2.
転送したい画像を右クリックした後、「Bluetoothで送信する」を選択します。3.
利用可能なBluetooth近接機器リストから、4. DIA を選択してくだ
さい。必要な場合は、コード 「5. 0000」を入力してください。
Bluetooth経由で
PCから画像を転
送する
Bluetooth経由で
電話機から画像を
転送する
フレームのBluetooth® 機能が有効になっていることを確認してください。そ1.
れには、Settings > Bluetooth > Status > Enabled
お使いの電話機から画像を選択し、次に「2. Bluetoothで送信する」を選択して
ください。
> お使いの電話機がBluetooth近接検知を行います。
利用可能な3. Bluetooth近接機器リストから、 DIA を選択してください。
必要な場合は、コード「4. 0000」を入力してください。
58
USB / SD
互換性 以下の周辺機器に保存されている写真を表示させることができます:
SDカード、micro SDカード(アダプタ要)、mini SDカード(アダプタ -
要)SDHCカード(classe 2, 4, 6)、mini SDHCカード(アダプタ要)
、MMC、MMC plus、MMC mobile(アダプタ要)、MMC micro(アダプタ
要)、RS-MMC(アダプタ要)
USBメモリ -
カメラ(お使いのカメラが大容量記憶デバイスと認識される場合)。 -
記憶デバイスで
フレームを使用
する
記憶デバイスを適切な場所に取り付けてください。1.
> お使いのデバイスに保存されている画像が表示されます。
トラックボールを押してください。2.
> これで、デバイス中の画像を閲覧したり、 トラックボールを押して画像
を選択することができます。
> ご希望に応じて、画像の表示、回転、選択、削除、コピー、移動などが
行えます。
- フレームに表示できるのはJPG形式の画像のみです。
- コピー中に記憶デバイスを取り外さないでください。
PARROT BY NODESIGN
59
日本語

写真の管理
画像を回転させる キーを押した後、Rotate を選択してください。
画像をコピーま
たは移動する
Browse > Directory1. を選択した後、コピーまたは移動する画像を含むドキュメ
ントを選択してください。
画像を選択した後、2. キーを押してください。
オプションから3. Copy または Move を選択した後、コピーまたは移動先のファ
イルを選択してください。
オプションから Select を利用して、複数の画像をコピーまたは移動する
こともできます。
画像を削除する Browse > Directory1. を選択した後、削除する画像を含むファイルを選択して
ください。
画像を選択した後、2. キーを押してください。
オプションの3. Delete を選択します。
オプションから Select を利用して、複数の画像を削除することもでき
ます。
スライドショーを
設定する
スライドショーを起動させた後、 キーを押して、[Slideshow settings]を選
択してください。次の設定を変更することができます:
Browsing mode -: ファイル毎、日付毎、ランダムまたはカスタマイズフ
ァイルにしたがって写真を表示することができます
Timer -: スライドショーで表示する画像の表示時間を選択してください。
Transition -: 画像間の切り替え方法を選択してください。
Fit to screen - : 画像形式を画面に合わせるかどうかを決定してください。
画像の調整は、解像度が800x600かそれ以上の場合のみ可能です。
60

繁體中文
相框更新 如您的相框已連接上Wi-Fi網路,更新程式的下載及安裝將自動進行。如您的相
框未連接到Wi-Fi網路,您同樣能夠在我們的網站 http://www.parrot.com上免費
下載相框的最新更新程式。
支持與下載篇。
第一次使用 ......................................................................
无线网络 ..........................................................................
Mover應用程式的使用 ......................................................
蓝牙 .................................................................................
USB闪存和SD卡 .............................................................
图片管理 .........................................................................
在您開始操作之前
目錄
p.62
p.63
p.65
p.66
p.67
p.68
完全使用手冊、教程、更新內容。
http://www.parrot.com/uk/support
o为了控制我们的纸张消耗量,本着尊重环境和对生态负责的态
度,Parrot品牌的用户文件优先采用在线而非纸张打印的形式。
因此,我們請您直接在您的相框上查閱ParrotDIA的用戶指南,為此,
請選擇設置>信息>用戶手冊。法律聲明亦載於此用戶指南。
關於本指南
61
汉语
第一次使用
將電源線連接至變壓器,隨後將其插入相應的1.
區域;
按下2. 操作鍵,開啟或休眠相框。
供電
語言選擇 當您第一次使用相框時,程序會提示您進行語言選擇。如果您希望更改該設置,請
選擇 Settings > Language。
設置時間與
日期
相框將在第一次連接至無線網絡時自動設置時間和日期。 •
如果您想要手動更改這些設置,請選擇• Settings > Date/time 然後 Adjustment >
Manual 選項。
使用觸球鍵瀏覽菜單。按下觸球鍵來確定選項。 •
使用• 鍵瀏覽當前菜單。
使用• 鍵返回上級菜單。
使用• 鍵可以返回主菜單。
瀏覽菜單
USB键盘或鼠
标的联用
為了更加簡便地使用相框或導航器上網,您可以在相框的USB介面上,連接USB滑鼠
和/或USB鍵盤。
6262

無綫網絡 (Wi-Fi)
禁用連接 連接建立後,您可以停用/重新啟用連接。 Settings > Wi-Fi > Connection > Disable /
Enable 來停用/重新啟用連接。
訪問Web界面
網頁界面可以讓您輕鬆地將電子郵件地址,RSS流或電腦添加至您的相
框。當然,您也可以通過相框直接建立該類連接。
從相框直接訪問網頁界面時,您的電腦和相框必須連接至同一個無線網
絡上。
通過選擇 1. Settings > Informations 獲取分配給相框的IP地址;
啟用瀏覽器,並在地址欄中輸入IP地址。2.
建立無線網絡
連接
如果您的無線調製解調器/路由器不支持WPS技術:•
選擇 1. Settings > Wi-Fi;
選擇2. Configure;
> 相框會展開對無線網絡的搜索。
在可用的無線網絡列表中選擇要連接的網絡,或選擇3. Manual 來手動配置您
的網絡。
使用虛擬鍵盤輸入網絡的WEP或WPA密鑰,最後選定 4. OK。
> 連接建立後,一個窗口將自動彈出,顯示所有關於相框無線連接的信息。
如果您的無線調製解調器/路由器支持WPS技術: •
按下您無線調製解調器/無線路由器的WPS按鈕; 1.
選擇2. Settings > Wi-Fi;
選擇3. Configure > Auto。
根據您的調製解調器/路由器的型號,可能需要通過按下一個同步按鈕來建
立連接。欲了解更多的相關信息,請參閱您的設備的使用資料。
63
汉语
查看在線相冊 在網頁界面中點擊 1. .
在2. Registered feeds 空間中點擊 New 將一個RSS流添加至相框;
選擇您的照片服務器,輸入選定相冊所對應的用戶名,以及可能需要的密碼, 3.
或直接輸入RSS流的URL地址;
點擊 4. Save。
> 現在可以通過相框查看已添加的網絡相冊中的照片。操作時請選擇 Browse >
Directory > RSS-feeds 。
查看儲存在電腦
中照片
在您的計算機中,啟動要通過相框查看的照片文件夾的共享功能; 1.
在網頁界面中點擊 2. 。
點擊3. Add a share 並選擇您的電腦,以及共享文件夾;
> 現在您可以通過相框查看共享文件夾的內容了。操作時請選擇 Browse >
Directory > PC shares 。
上網瀏覽 您還可以通過相框上網。使用該功能請選擇 Browser 然後用觸球鍵操作瀏覽器。
接收通過電子郵件
收取的圖片
在網絡界面中點擊1. 。
在 2. Email account 空間中點擊 New 給相框添加一個信箱地址;
在對應的欄目中輸入您的用戶登陸信息。 3.
查看您的郵箱資料以便取得服務器以及網絡協議的相關信息。 4.
> 該郵箱接收的所有圖片都能夠通過相框進行查看。操作時請選擇
Browse > Directory > E-mail 。
我們建議您為相框創建一個專門的電子郵件地址。
Wi-Fi
6464

Mover應用程式的使用
Mover應用程式使您能夠非常輕鬆地從您的iPhone、iPod touch或ipad傳輸相片到
您的相框上。為此:
在App Store下載Mover應用程式(或Mover Lite應用程式)。1.
將相框和iPhone連接到同一Wi-Fi網路。2.
運行Mover應用程式。 3.
>側螢幕顯現。
按+鍵,然後選擇Add Photo選項。4.
選擇您的圖片。5.
將此圖片滑向提示語Mover on Dia。 6.
>圖片逐漸顯示在相框上。然後,您可
以通過選擇流覽>文件>Mover,重新將
其找到。
65
汉语

藍牙
通過選擇 1. Settings > Bluetooth > Status > Enabled 確認藍牙®功能已啟用;
啟用您電腦的藍牙功能; 2.
右鍵單擊您要發送的圖片,選擇“使用藍牙發送”; 3.
在可用的藍牙設備列表中選擇 4. DIA;
如果需要密碼,請輸入5. 0000。
通過藍牙發送電
腦中的圖片
通過藍牙發送手機
中的圖片
通過選擇 1. Settings > Bluetooth > Status > Enabled 確認藍牙®功能已啟用;
用您的手機選中要發送的圖片,選擇“使用藍牙發送”; 2.
> 您的手機會展開對藍牙設備的搜索。
在可用的藍牙設備列表中選擇 3. DIA;
如果需要密碼,請輸入4. 0000。
6666
USB閃存和SD卡 (USB / SD)
兼容性 您可以顯示儲存於下列設備中的照片:
SD儲存卡、微型SD卡(帶適配器)、迷你SD卡(帶適配器)、SDHC卡(2、4、6 -
類)、帶適配器的迷你SDHC卡、MMC卡、MMC升級卡、帶適配器的MMC移動
卡、微型MMC卡(帶適配器)、RS-MMC卡(帶適配器)
USB閃存 -
數碼相機(如果您的數碼相機可作為大容量的存儲設備使用) -
將相框作為存儲設
備使用
將您的設備插入對應的區域; 1.
>儲存在設備中的圖片將會自動顯示。
按下觸球鍵。 2.
> 現在您可以瀏覽存儲設備中的內容,並通過觸球鍵來選定圖片。
> 根據您的意願查看、旋轉、選定、刪除、複製或移動圖片。
- 該相框只顯示JPG格式的圖片。
- 請勿在復制操作正在進行的過程中移除存儲設備。
PARROT BY NODESIGN
67
汉语
圖片管理
旋轉圖片 按下 鍵,接著選定 Rotate 項目。
複製/移動圖片 選擇 1. Browse > Directory 然後選中將被複製或移動的圖片所在的文件夾;
選中圖片,接著按下2. 鍵;
選擇 3. Copy 或 Move 選項,然後選定目標文件夾。
您也可以使用 Select 選項來複製/移動多張圖片。
刪除圖像 選擇 1. Browse > Directory 以及將被刪除的圖片所在的文件夾;
選中圖片,按下 2. 鍵。
選擇3. Delete 選項。
您也可以使用 Select 選項來刪除多張圖片。
設置幻燈片 運行一個幻燈片,然後按鍵並選擇幻燈片設置。您可以修改以下參數:
Browsing mode -: 按照文件夾順序、日期、隨機或根據自定義文件夾來瀏
覽圖片。
Timer -: 選擇幻燈片圖片的顯示時間。
Transition -: 選擇圖片之間的過渡模式。
Fit to screen - : 設定是否需要對格式與顯示屏不匹配的圖片做出調整。
對於圖片的調整隻有在其尺寸大於等於800x600時才能進行。
6868

69
AR

PARROT BY NODESIGN
7070
71
AR

7272

73
AR
7474

75
AR
75
74
71
70
69
7676
Without prejudice of legal warranty, Parrot
products are warranted during 1 year from the
date of purchase for defects in materials and
workmanship, provided that no deterioration to
the product has been made, and upon presen-
tation of proof of purchase (date of purchase,
location of sale and product serial number) to
the retailer or Parrot directly.
Warranty does not cover: data recovery, deterio-
ration of the external aspect due to normal use
of the product, any damage caused by accident,
misuse, misapplication, or non-Parrot products.
Parrot is not responsible for storage, loss or
damaged to data during transit or repair.
Any product wrongfully declared to be defec-
tive will be returned to sender and inspection,
process and carriage costs will be invoiced to him.
Correct disposal of This Product
(Waste Electrical & Electronic Equipment)
(Applicable in the European Union and other
European countries with separate collection
systems).
This marking shown on the product or its
literature, indicates that it should not be
disposed with other household wastes
at the end of its working life. To prevent
possible harm to the environment or
human health from uncontrolled waste disposal,
please separate this from other types of wastes
and recycle it responsibly to promote the sustai-
nable reuse of material resources.
Household users should contact either the
retailer where they purchased this product,
or their local government office, for details
of where and how they can take this item for
environmentally safe recycling. Business users
should contract their supplier and the terms
and conditions of the purchase contract. This
product should not be mixed with other
commercial wastes for disposal.
Modifications
The explanations and specifications in this gui-
de are given for information purposes only and
may be modified without prior notice. They are
deemed to be correct at time of going to press.
The utmost care has been taken when writing
this guide,as part of the aim to provide you with
accurate information.
However, Parrot shall not be held responsible
for any consequences arising from any errors
or omissions in the guide, nor for any damage
or accidental loss of data resulting directly or
indirectly from the use of the information
herein. Parrot reserves the right to amend or im-
prove the product design or user guide without
any restrictions and without any obligation to
notify users. As part of our ongoing concern to
upgrade and improve our products, the product
that you have purchased may differ slightly from
General Information
Warranty
77

the model described in this guide.
If so, a later version of this guide might be
available in electronic format at Parrot’s website
at www.parrot.com.
FCC Compliance Statement
This device complies with part 15 of a FCC
rules. Operation is subject to the following two
conditions:
(1) This device may not cause interference, and
(2) This device must accept any interfe-
rence, including interference that may
cause undesired operation of this device.
This equipment has been tested and found
to comply with the limits for a Class B digital
device, pursuant to part 15 of the FCC Rules.
These limits are designed to provide reasona-
ble protection against harmful interference in a
residential installation.
This equipment generates, uses and can ra-
diate radio frequency energy and, if not installed
and used in accordance with the instructions,
may cause harmful interference to radio com-
munications. However, there is no guarantee
that interference will not occur in a particular
installation. If this equipment does cause harmful
interference to radio or television reception,
which can be determined by turning the equi-
pment off and on, the user is encouraged to try
to correct the interference by one or more of the
following measures:
-Reorient or relocate the receiving antenna.
-Increase the separation between the equip-
ment and receiver.
-Connect the equipment into an outlet on a cir-
cuit different from that to which the receiver is
connected.
-Consult the dealer or an experienced
radio/ TV technician for help.
“Changes or modifications not expressly ap-
proved by the party responsible for compliance
could void the user’s authority to operate the
equipment“
“This Class B digital apparatus complies with
Canadian ICES-003”
Caution: Exposure to Radio Frequency
Radiation
To comply with RF exposure compliance requi-
rements, a separation distance of at least 20 cm
must be maintained between the antenna of this
device and all persons.
This device must not be co-located or operating in
conjunction with any other antenna or transmitter.
To prevent radio interference to the licensed
service, this device is intended to be operated
indoors and away from windows to provide
maximum shielding. Equipment (or its transmit
antenna) that is installed outdoors is subject to
licensing.
Declaration of Conformity
Parrot SA, 174 quai de Jemmapes, 75010
Paris, France, declares under its own liability
78
that the product described in the present user
guide conforms to the technical standards: EN
301489-17, EN300328, EN60065, according to
the provisions of the directive R&TTE 1999/5/
EC and technical standards: IEC 62087 and IEC
62301 of directive 2005/32/EC.
Protection and personal safety
Carefully read the user guide and follow the in-
dicated procedure when setting up the device.
Do not dismantle or open the device and do not
touch the electronic components or the drivers.
Do not attempt to dismantle or modify either of
the speakers.
Never introduce any metal object to avoid the
risks of electric shocks, fire, short circuits or
dangerous emissions. If your device shows
signs of faulty operation, call the approved
Parrot technical support centre or an approved
retailer. Never leave the frame exposed to rain or
chemical products; do not place them in a damp
area or where they are likely to be splashed with
water. Never place your device on a recipient
containing any type of liquid, which might seep
inside the device. Doing so will reduce the risks
of electric shocks, short circuits, fire and injury.
Caution: Exposure to Radio Frequency
Radiation
The installer of this radio equipment must ensure
that the antenna is located or pointed such that
it does not emit RF field in excess of Health
Canada limits for the general population; consult
Safety Code 6, obtainable from Health Canada’s
website at www.hc-sc.gc.ca/rpb.
Copyrights
Copyright © 2009 Parrot. All rights reserved. The
total or even partial reproduction, transmission
or storage of this guide in any form or by any
process whatsoever (electronic, mechanical,
photocopy, recording or otherwise) is strictly
prohibited without prior consent from Parrot.
Important safety instructions
1. This apparatus shall not be exposed to drip-
ping or splashing and no object filled with liquid,
such as vases, shall be placed on the appara-
tus.
2. The AC/DC adaptor which provides
disconnection from mains supply shall remain
readily operable. Unplug this apparatus when
unused for long periods of time.
3. Read these instructions.
S3125A
The exclamation point within an equi-
lateral triangle is intended to alert the
user to the presence of important ope-
rating and maintenance (servicing) instructions
in the literature accompanying the product.
An equilateral triangle, is intended
to alert the user to the presence of
uninsulated «dangerous voltage»
within the product’s enclosure that may be
of sufficient magnitude to constitute a risk of
electric shock to persons.
S3125A
79

4. Keep these instructions.
5. Heed all warnings.
6. Follow all instructions.
7. Do not use this apparatus near water.
8. Clean only with dry cloth.
9. Do not block any ventilation openings. Install
in accordance with the manufacturer’s instruc-
tions.
10. Do not install near any heat as radiators.
Heat registers, stoves or other apparatus (inclu-
ding amplifiers) that produce heat.
11. Do not defeat the safety purpose of the
polarized or grounding type plug. A polarized
plug has two blades with one wider than the
other. A grounding type plug has two blades
and a third grounding prong. The wide blade or
the third prong are provided for your safety. If
the provided plug does not fit into your outlet,
consult an electrician for replacement of the
obsolete outlet.
12. Only use attachments/accessories specified
by the manufacturer.
13. Unplug this apparatus during lightning storms
or when unused for long periods of time.
14. WARNING: To reduce the risk of fire or elec-
tric shock, do not expose this apparatus to rain or
moisture and objects filled with liquids, such as
vases, should not be placed on this apparatus..
This apparatus is designed for indoor use only.
Do not expose the frame to outside tempera-
tures below 5°C or above 40°C. The system
could be damaged or the cabinet warped. Avoid
placing the system near a source of heat or
exposing it to sunlight (even through a window).
Similarly, excessively low temperatures
and humidity could damage the device.
Licences
Parrot logo and trademarks are the property of
PARROT SA.
The Bluetooth ® word mark and logos are
owned by the Bluetooth SIG, Inc. and any use
of such marks by Parrot S.A. is under license.
Bluetooth QDID: B015990, B013839, B013838
Wi-Fi is a registered mark of the Wi-Fi Alliance.
Wi-Fi CERTIFIED is a mark of the Wi-Fi Alliance.
The Wi-Fi CERTIFIED logo is a certification mark
of the Wi-Fi Alliance.
Additional typefaces for this product can be
obtained at www.linotype.com.
All trademarks and trade names are those of
their respective owners.
80

Informations générales
Garantie
Sans préjudice de la garantie légale, les produits
Parrot sont garantis, pièces et main d’oeuvre,
pendant 1 an à compter de la date d’achat, sauf
altération du produit, et sur présentation d’une
preuve d’achat (date et lieu d’achat n° de série
du produit) au revendeur.
La garantie ne couvre pas la mise à jour des
logiciels inclus dans les produits Parrot avec
des téléphones mobiles Bluetooth® à des fins
de compatibilité, la récupération de données,
la détérioration extérieure du produit due à une
utilisation normale du produit, tout dommage
causé par accident, une utilisation anormale ou
non autorisée du produit, un produit non Parrot.
Parrot n’est pas responsable du stockage, de
la perte ou de l’endommagement des données
durant le transport ou la réparation.
Tout produit s’avérant non défectueux sera
retourné à l’expéditeur et les frais de traitement,
de vérification et de transport lui seront facturés.
Comment recycler ce produit
Déchets d’équipements électriques et
électroniques
Le symbole sur le produit ou sa documen-
tation indique qu’il ne doit pas être
éliminé en fin de vie avec les autres déchets
ménagers. L’élimination incontrôlée
des déchets pouvant porter préjudice à
l’environnement ou à la santé humaine, veuillez le
séparer des autres types de déchets et le recycler
de façon responsable. Vous favoriserez ainsi la
réutilisation durable des ressources matérielles.
Les particuliers sont invités à contacter le
distributeur leur ayant vendu le produit ou à se
renseigner auprès de leur mairie pour savoir
où et comment ils peuvent se débarrasser de
ce produit afin qu’il soit recyclé en respectant
l’environnement. Les entreprises sont invitées
à contacter leurs fournisseurs et à consulter les
conditions de leur contrat de vente. Ce produit
ne doit pas être éliminé avec les autres déchets
commerciaux.
Modifications
Les explications et spécifications contenues
dans ce guide utilisateur ne sont fournies qu’à
titre d’information et peuvent être modifiées
sans notification préalable. Ces informations
sont correctes au moment de l’impression
et le plus grand soin est apporté lors de leur
rédaction afin de vous fournir des informations
les plus précises possible.
Cependant, Parrot S.A. ne saurait être tenu
responsable, directement ou indirectement,
des éventuels préjudices ou pertes de données
accidentelles résultant d’une erreur ou omission
au sein du présent document. Parrot S.A. se
réserve le droit d’amender ou améliorer le
produit ainsi que son guide utilisateur sans
aucune restriction ou obligation de prévenir
l’utilisateur.
81
Déclaration de conformité
Parrot SA, 174 quai de Jemmapes,
75010 Paris, France, déclare sous
son unique responsabilité que le
produit décrit dans le présent guide utilisateur
est en conformité avec les normes techniques,
EN 301489-17, EN300328, EN60065, suivant
les dispositions de la directive R&TTE 1999/5/
CE et les normes techniques IEC 62087
et IEC 62301 de la directive 2005/32/CE.
Instructions de sécurité
ATTENTION : Afin de réduire le risque d’incen-
die ou de chocs électriques, n’exposez pas cet
appareil à la pluie ou à l’humidité.
1. Lisez ces instructions.
2. Conservez ces instructions.
3. Tenez compte de tous les avertissements.
4. Suivez toutes les instructions.
5. N’utilisez pas cet appareil à proximité de
substances liquides.
6. Nettoyez l’appareil uniquement avec
un chiffon sec.
7. N’obstruez pas les ouvertures d’aération.
Installez l’appareil en respectant les instructions
du constructeur.
8. N’installez pas l’appareil à proximité d’une
source de chaleur. Radiateurs, fours ou autres
appareils (amplificateurs inclus) qui produisent
de la chaleur.
9. Ne modifiez pas les connecteurs polarisés ou
de mise à la masse de l’appareil. Les connec-
teurs polarisés sont composés de deux fiches
métalliques, l’une plus large que l’autre. Les
connecteurs de mise à la masse sont composés
de deux fiches métalliques et d’une branche de
masse. La plus large des fiches métalliques et
la branche de masse sécurisent l’utilisation de
votre appareil. Si les connecteurs fournis ne
correspondent pas à votre installation,
consultez un électricien pour le remplacement
de votre installation obsolète.
10. Ne marchez pas sur le cordon d’alimentation
de l’appareil et évitez les pincements au niveau
des connecteurs. Rangez-le dans un réceptacle
adapté. Protégez les connecteurs de l’appareil.
11. Utilisez uniquement les attaches / accessoi-
res spécifiés par le constructeur.
12. Débranchez l’appareil en cas d’orages ou
lors d’une longue période d’inutilisation.
13. Pour toute intervention sur l’appareil,
veuillez vous adresser aux services qualifiés.
Une intervention est requise lorsque l’appareil
présente des détériorations, tel un
cordon d’alimentation défectueux. Mais éga-
lement lorsqu’une substance liquide ait été
renversée sur l’appareil ou que des objets
étrangers y aient été insérés. Ainsi qu’après
toute chute, renversement, exposition à la pluie
ou à l’humidité de l’appareil ou lorsqu’il ne
fonctionne pas correctement.
14. N’exposez cet appareil de sorte qu’il ne soit
pas exposé à des suintements ou projections
de liquides. Ne pas placer d’objets remplis de
liquide, comme des vases, sur l’appareil.
82

15. Pour s’assurer de la déconnexion effective
de cet appareil du réseau électrique, retirez le
câble d’alimentation de l’appareil de la prise
électrique.
16. S’assurer que le cordon d’alimentation
qui assure la déconnexion avec l’alimentation
secteur puisse toujours être facilement
manipulé.
17. Afin de réduire tout risque de choc électrique,
ne démontez les enceintes et ne retirez pas les
vis situées en dessous de celles-ci.
18. Ne démontez pas les enceintes et ne
dévissez aucune vis.
Température maximale d’utilisation : 40°C
Copyright
Copyright © 2009 Parrot.
Marques déposées
Les marques et le logo Parrot sont la propriété
de PARROT SA.
Le nom et le logo Bluetooth sont des marques
déposées de Bluetooth ® SIG, Inc. et toute uti-
lisation de ces derniers par Parrot S.A. est faite
sous licence.
Wi-Fi est une marque déposée de Wi-Fi Alliance.
Wi-Fi CERTIFIED est une marque de Wi-Fi Alliance.
Le logo ‘Wi-Fi CERTIFIED’ est une marque de
certification de Wi-Fi Alliance.
Toutes les marques de commerce et mar-
ques déposées mentionnées dans le présent
document sont protégées par Copyright et sont
la propriété de leurs propriétaires respectifs.
Información general
Garantía
Sin perjudicar la garantía legal, Parrot
garantiza sus productos, piezas y mano de obra
incluidos, por el período de 1 año a partir de la
fecha de compra, salvo en caso de alteración del
producto.
La garantía no cubre: la actualización de los
programas incluidos en los productos
Parrot con teléfonos móviles dotados de la
funcionalidad Bluetooth® con objetivo de
compatibilidad, la recuperación de datos, la
deterioración exterior del producto causada por la
utilización cotidiana del producto, cualquier daño
causado por un accidente, un uso anormal o no
autorizado del producto, un producto de una
marca diferente.Parrot no es responsable del
almacenamiento de los datos, de sus pérdidas
o de daños ocurridos durante el transporte o la
reparación.
Cualquier producto que no sería defectuoso
se retornará al cliente, y los gastos de inter-
vención y de transporte serán a su carga.
Eliminación correcta de este producto
(material eléctrico y electrónico de descarte)
La presencia de esta marca en el producto o en
el material informativo que lo acompaña, indica
que al finalizar su vida útil no deberá eliminarse

junto con otros residuos domésticos. Para
evitar los posibles daños al medio ambiente o a
la salud humana que representa la eliminación
incontrolada de residuos, separe este producto
de otros tipos de residuos y recíclelo correcta-
mente para promover la reutilización sostenible
de recursos materiales.
Los usuarios particulares pueden contac-
tar con el establecimiento donde adquirieron
el producto, o con las autoridades locales
pertinentes, para informarse sobre cómo y
dónde pueden llevarlo para que sea some-
tido a un reciclaje ecológico y seguro. Los
usuarios comerciales pueden contactar con su
proveedor y consultar las condiciones del
contrato de compra. Este producto no debe elimi-
narse mezclado con otros residuos comerciales.
Modificaciones
Las explicaciones y especificaciones conteni-
das en este manual son meramente informati-
vas y pueden ser modificadas sin previo aviso.
Se consideran correctas en el momento de
enviar la publicación a imprenta. Este manual se
ha redactado con el máximo cuidado, con el fin
de proporcionarle una información precisa.
Sin embargo, Parrot no asume responsabilidad
alguna por las consecuencias derivadas de
los errores u omisiones que pueda haber en el
manual, ni por los daños o pérdidas accidentales
de datos que se produzcan como consecuencia
directa o indirecta del uso de la información
aquí contenida. Parrot se reserva el derecho a
modificar o mejorar el diseño del producto o el
manual de usuario sin restricciones y sin la
obligación de notificárselo a los usuarios.
En aras de actualizar y mejorar nuestros produc-
tos, es posible que el producto que usted haya
adquirido sea ligeramente distinto al modelo
que se describe en este manual. En tal caso,
tiene a su disposición una versión más reciente
de este manual en formato electrónico en la
página web de Parrot: www.parrot.com.
Declaración de conformidad
Parrot SA, 174 quai de Jemmapes,
75010 Paris, Francia, declara bajo
su única responsabilidad que el pro-
ducto que se describe en el presente manual del
usuario cumple las normas técnicas EN301489-
17, EN300328 y EN60065, con arreglo a las dis-
posiciones de la directiva R&TTE 1999/5/EC y
las normas técnicas IEC 62087 y IEC 62301 de
la directiva 2005/32/EC.
Marcas registradas
El nombre y el logotipo Bluetooth son
marcas registradas de Bluetooth ® SIG,
Inc. y toda utilización de estos últimos
por Parrot S.A se hace con una licencia.
Wi-Fi es una marca registrada por Wi-Fi Allian-
ce. Wi-Fi CERTIFIED es una marca registrada
por Wi-Fi Alliance.
El logo « Wi-Fi CERTIFIED » es una mar-
ca de certificación de Wi-Fi Alliance.
Vaya a www.linotype.com para obtener más

fuentes de caracteres para este producto.
Todas las otras marcas de comercio y las
marcas registradas mencionadas en este
documento están protegidas por el Copyright
y pertenecen a sus respectivos propietarios.
Copyright
Copyright © 2009 Parrot.
Todos los derechos reservados. Cualquiera
reproducción, que sea total o parcial, del conte-
nido de este documento con el objetivo de ser
publicada o difundida por cualquier medio y
bajo cualquiera forma que sea, incluso de ma-
nera gratuita, está prohibida sin la autorización
previa y escrita de Parrot.
Instrucciones de seguridad
La flecha en forma de relámpago dentro
de un triángulo equilátero sirve para
avisar a los usuarios de la presencia de
“tensiones eléctricas peligrosas” en el interior
del producto. Estas tensiones pueden ser lo
suficientemente elevadas como para suponer
un riesgo de electrocución para las personas.
El signo de exclamación dentro de
un triángulo equilátero sirve para
avisar a los usuarios de la existencia de
importantes instrucciones de uso y de mante-
nimiento en la documentación que acompaña
al producto.
ATENCIÓN: Con el fin de reducir los riesgos de
incendio o de electrocución, no exponga este
aparato a la lluvia o a la humedad.
1. Lea estas instrucciones.
2. Conserve estas instrucciones.
3. Tenga en cuenta todas las advertencias.
4. Siga todas las instrucciones.
5. No utilice este aparato cerca de sustancias
líquidas.
6. Limpie el aparato sólo con un paño seco.
7. No obstruya las aberturas de ventilación.
Instale el aparato siguiendo las instrucciones del
fabricante.
8. No instale el aparato cerca de una fuente de
calor, de radiadores, hornos u otros aparatos
(amplificadores incluidos) que generen calor.
9. No modifique los conectores polarizados o
de toma de tierra del aparato. Los conectores
polarizados se componen de dos enchufes
metálicos, uno más ancho que otro. Los conec-
tores de toma de tierra se componen de dos
enchufes metálicos y de una clavija de toma de
tierra. El enchufe metálico más ancho y la clavija
de toma de tierra protegen el uso de su aparato.
Si los conectores no se corresponden con su
instalación, consulte a un electricista para que
cambie su instalación obsoleta.
10. No camine sobre el cargador sector del
aparato y evite los pinzamientos a la altura de
los conectores. Colóquelo en un receptáculo
adaptado. Proteja los conectores del aparato.
11. Utilice sólo las conexiones / accesorios que
especifica el fabricante.
12. Desconecte el aparato en caso de tormenta
o cuando no vaya a utilizarlo durante un período
S3125A
S3125A
85

prolongado de tiempo.
13. Para realizar cualquier intervención en el
aparato recurra a servicios cualificados. El apa-
rato deberá llevarse a reparar cuando presente
deterioros como un cable de alimentación de-
fectuoso, cuando se haya derramando cualquier
sustancia líquida por encima, cuando se hayan
introducido objetos extraños en su interior, y
tras cualquier caída, golpe y exposición a la
lluvia o a la humedad.
14. No exponga este aparato a goteos o
salpicaduras de líquidos. No coloque sobre el
aparato objetos llenos de líquido como floreros.
15. Para garantizar la desconexión efectiva de
este aparato de la red eléctrica, retire el carga-
dor sector de la toma eléctrica.
16. Asegúrese de que el cable de alimentación
que asegura la desconexión de la alimentación
a la red pueda manipularse siempre fácilmente.
Advertencia
Para impedir que este aparato provoque
interferencias al servicio dotado de una licencia,
éste deberá utilizarse en el interior y situarse
lejos de las ventanas con el fin de proporcio-
narle una pantalla de blindaje máximo. En caso
de que el material (o su antena de emisión) se
encuentre instalado en el exterior, deberá
disponer de una licencia.
Atención: Exposición a las frecuencias
de radio
Con el fin de cumplir las exigencias de la FCC
en materia de exposición a las frecuencias de
radio, se recomienda respetar una distancia de
al menos 20 cm entre la antena del aparato y
cualquier persona que se encuentre cerca. Este
periférico inalámbrico no debe colocarse cerca
de cualquier otra antena o emisor ni utilizarse
con éstos últimos.
Allgemeine Hinweise
Änderungen
Die in dieser Anleitung enthaltenen Beschrei-
bungen und technischen Kenndaten dienen
ausschließlich der Information und können
Änderungen ohne vorhergehende Ankündigung
unterliegen. Zum Zeitpunkt des Drucks galten
die enthaltenen Angaben als zutreffend. Bei
der Verfassung dieser Anleitung wurde größte
Sorgfalt auf deren Inhalt angewendet, damit
Ihnen möglichst präzise Informationen
bereitgestellt werden können.
Parrot haftet jedoch weder für Folgen, die sich aus
ggf. dieser Anleitung enthaltenen Fehlern oder
Unterlassungen ergeben, noch für Schäden
oder den versehentlichen Verlust von Daten als
direkte oder indirekte Folge der Verwendung
der enthaltenen Informationen. Parrot behält
sich das Recht vor, das Produktdesign oder die
Bedienungsanleitung zu ändern bzw. zu verbes-
sern, ohne dass diesbezüglich Beschränkun-
86

gen vorliegen und ohne jede Verpflichtung, die
Benutzer hiervon in Kenntnis zu setzen.
Aufgrund des von Parrot gezeigten Enga-
gements zur kontinuierlichen Weiterentwic-
klung und Verbesserung seiner Produkte
weicht das von Ihnen erworbene Produkt ggf.
leicht von der Produktbeschreibung in dieser
Anleitung ab. In diesem Fall steht auf der
Parrot-Website unter www.parrot.com even-
tuell eine aktualisierte Version dieser Anleitung
in elektronischem Format zur Verfügung.
Korrekte Entsorgung dieses Produkts
(Elektromüll)
(Anzuwenden in den Ländern der
Europäischen Union und anderen europäischen
Ländern mit einem separaten Sammelsystem)
Die Kennzeichnung auf dem Produkt bzw. auf der
dazugehörigen Literatur gibt an, dass es nach
seiner Lebensdauer nicht zusammen mit dem
normalen Haushaltsmüll entsorgt werden darf.
Entsorgen Sie dieses Gerät bitte getrennt von
anderen Abfällen, um der Umwelt bzw. der
menschlichen Gesundheit nicht durch unkon-
trollierte Müllbeseitigung zu schaden. Recy-
celn Sie das Gerät, um die nachhaltige Wie-
derverwertung von stoffl ichen Ressourcen zu
fördern.
Private Nutzer sollten den Händler, bei dem
das Produkt gekauft wurde, oder die zuständi-
gen Behörden kontaktieren, um in Erfahrung zu
bringen, wie sie das Gerät auf umweltfreundli-
che Weise recyceln können. Gewerbliche Nutzer
sollten sich an Ihren Lieferanten wenden und
die Bedingungen des Verkaufsvertrags konsul-
tieren. Dieses Produkt darf nicht zusammen mit
anderem Gewerbemüll entsorgt werden.
Garantie
Unbeschadet der gesetzlichen Garantie gilt
für die Produkte von Parrot eine 1-jähri-
ge Garantie ab Kaufdatum für Ersatzteile
und Reparaturkosten, sofern am Produkt
keine Änderungen vorgenommen werden.
Die Garantie deckt weder die Aktualisierung
der im Lieferumfang der Parrot-Produkte en-
thaltenen Softwareprogramme mit Bluetooth®-
Mobiltelefonen zu Kompatibilitätszwecken
noch die Wiederherstellung von Daten, die
äußere Abnutzung der Produkte aufgrund einer
normalen Produktverwendung, die auf einen
Unfall oder eine unsachgemäße bzw. nicht
autorisierte Verwendung der Produkte zurüc-
kzuführenden Schäden oder Produkte anderer
Hersteller. Parrot haftet keinesfalls für die Spei-
cherung, den Verlust oder die Beschädigung von
Daten während des Transports oder im Rahmen
von Reparaturarbeiten.
Jedes Produkt, an dem keine Mängel
festzustellen sind, wird an den Absen-
der zurückgeschickt, wobei die Kosten für
Bearbeitung, Prüfung und Transport dem
Absender in Rechnung gestellt werden.
87

Konformitätserklärung
Die Parrot S.A., 174 quai de Jemmapes, 75010
Paris, Frankreich, erklärt in eigener und auss-
chließlicher Verantwortung, dass das in der
vorliegenden Bedienungsanleitung beschrie-
bene Produkt mit den technischen Normen
EN300328, EN301489-17 und EN60065 ents-
prechend den Bestimmungen der R&TTE-Richt-
linie 1999/5/EC übereinstimmt.
Eingetragene Marken
Die Marke und das Logo Bluetooth sind einge-
tragene Marken der Bluetooth ® SIG, Inc. Ihre
Verwendung durch die Parrot S.A. erfolgt unter
entsprechender Lizenz
Alle anderen Handelsmarken und eingetragenen
Marken, die im vorliegenden Dokument erwähnt
werden, sind durch Copyright geschützt und
das Eigentum ihrer jeweiligen Inhaber.
Sicherheitshinweise
1. Bei der Positionierung des Geräts ist darauf
zu achten, dass das Gerät weder Flüssigkeits-
tropfen noch -spitzern ausgesetzt ist. Stellen Sie
keinesfalls mit Flüssigkeit gefüllte Gegenstände,
wie z. B. eine Vase, auf dem Gerät ab.
2. Stellen Sie sicher, dass das Stromkabel,
über das die Netzversorgung unterbrochen
werden kann, stets leicht zugänglich ist. Schal-
ten Sie das Gerät aus und ziehen Sie den
Netzstecker, wenn das Gerät während eines
längeren Zeitraums nicht verwendet wird.µ
Hinweis: Wireles-Technologie
Geräte, die Wellen ausstrahlen, können Inter-
ferenzen erzeugen. Aus diesem Grund kann
sich der Betrieb bestimmter Geräte, wie z. B.
eines WLAN-Routers oder eines Mikrowellen-
herds, störend auf die Audioübertragungen mit
der Parrot Grande Specchio by Martin Szekely
auswirken und darüber hinaus eine Beeinträchti-
gung der Audioqualität des Systems zur Folge
haben.
Informazioni generali
Modifiche
Le spiegazioni e le specifiche riportate nella
presente guida sono solo a scopo informa-
tivo e possono subire modifiche senza prea-
vviso. Tali informazioni sono da considerarsi
corrette al momento della pubblicazione. La
presente guida è stata redatta prestando grande
attenzione, al fine di fornire ai clienti informazioni
precise e attendibili.
Tuttavia, Parrot non può essere ritenuta
responsabile per eventuali conseguenze
derivanti da omissioni o errori nella presente
guida, né per eventuali danni o perdite acciden-
tali di dati causati direttamente o indirettamente
dall’uso delle informazioni ivi contenute.
88

Tuttavia, Parrot non può essere ritenuta
responsabile per eventuali conseguenze
derivanti da omissioni o errori nella presente
guida, né per eventuali danni o perdite acci-
dentali di dati causati direttamente o indiretta-
mente dall’uso delle informazioni ivi contenute.
Parrot si riserva il diritto di modificare/migliorare il
prodotto o la guida per l’utente senza limitazione
alcuna e senza l’obbligo di notifica agli utenti.
Poiché il costante impegno dell’azienda è
volto a garantire continui aggiornamenti e
miglioramenti, il prodotto acquistato dall’utente
potrebbe risultare leggermente diverso dal
modello descritto nella presente guida. In tal
caso, verificare la disponibilità di una versione
aggiornata della guida in formato elettronico nel
sito Web di Parrot all’indirizzo www.parrot.com.
Corretto smaltimento del prodotto
(rifi uti elettrici ed elettronici)
(Applicabile nei Paesi dell’Unione Europea e in
quelli con sistema di raccolta differenziata)
Il marchio riportato sul prodotto o sulla sua
documentazione indica che il prodotto non
deve essere smaltito con altri rifi uti domestici al
termine del ciclo di vita. Per evitare eventuali
danni all‘ambiente o alla salute causati dall‘inop-
portuno smaltimento dei rifi uti, si invita l‘utente
a separare questo prodotto da altri tipi di rifi uti e
di riciclarlo in maniera responsabile per favorire
il riutilizzo sostenibile delle risorse materiali.
Gli utenti domestici sono invitati a contattare il
rivenditore presso il quale è stato acquistato il
prodotto o l‘uffi cio locale preposto per tutte le
informazioni relative alla raccolta differenziata
e al riciclaggio per questo tipo di prodotto.
Gli utenti aziendali sono invitati a contattare il
proprio fornitore e verifi care i termini e le condi-
zioni del contratto di acquisto. Questo prodotto
non deve essere smaltito unitamente ad altri rifi
uti commerciali.
Garanzia
Senza pregiudizio della garanzia legale, i
prodotti Parrot sono garantiti, per sostituzione
pezzi e mano d’opera, per 1 anno a partire dalla
data di acquisto, salvo alterazioni del prodotto,
e su presentazione di una prova di acquisto
(data e luogo di acquisto, numero di serie del
prodotto) al rivenditore o a Parrot direttamente.
La garanzia non copre gli aggiornamenti dei
software inclusi nei prodotti Parrot con i te-
lefoni cellulari Bluetooth® ai fini di compa-
tibilità, il recupero di dati, il deterioramento
esterno del prodotto dovuto al normale uso del
prodotto stesso, i danni causati accidental-
mente, da un uso anomalo o non autorizzato del
prodotto, un prodotto non Parrot. Parrot non è
responsabile della memoria, della perdita o del
danneggiamento dei dati durante il trasporto o la
riparazione.
Il prodotto che non risulterà difettoso verrà
restituito al mittente e le spese di trattamento, di
accertamento e di trasporto saranno addebitate
al mittente stesso.
Dichiarazione di conformità
Parrot SA, 174 quai de Jemmapes, 75010
89

Paris, Francia, dichiara dietro sua esclu-
siva responsabilità che il prodotto descritto
nella presente guida utente è conforme alle
norme tecniche, EN 301489-17, EN300328,
EN60065, secondo le disposizioni della diret-
tiva R&TTE 1999/5/CE e le norme tecniche IEC
62087 e IEC 62301 della direttiva 2005/32/CE.
Marchi registrati
Il nome e il logo Bluetooth sono marchi registrati
di Bluetooth ® SIG, Inc. e il loro uso da parte
di Parrot S.A. è soggetto a regolari contratti di
licenza.
Tutti gli altri marchi commerciali e marchi regis-
trati citati nel presente documento sono protetti
da Copyright e sono di proprietà dei rispettivi
proprietari.
Norme di sicurezza
1. Collocare l’apparecchio in modo da non
esporlo a infiltrazioni di liquidi. Non collocare
sull’apparecchio oggetti contenenti liquidi quali
vasi, bicchieri e via dicendo.
2. Assicurarsi che il cavo di alimentazione che
collega l’apparecchio alla presa di rete sia
sempre facilmente raggiungibile e maneggia-
bile. Scollegare l’apparecchio dalla presa di rete
quando non viene utilizzato per un lungo periodo.
Avertenza : tecnologia senza fili
Gli apparecchi che emettono onde radio
possono causare interferenze. Il funzionamento
di apparecchi quali router Wi-Fi o forni a mi-
croonde può causare interferenze negative alle
trasmissioni audio del sistema Parrot Grande
Specchio by Martin Szekely, deteriorando la
qualità audio del sistema.
Algemene informatie
Wijzigingen
De in deze handleiding gegeven uitleg en
technische gegevens dienen uitsluitend ter
informatie en kunnen zonder voorafgaande
kennisgeving worden gewijzigd. Deze gegevens
worden geacht correct te zijn op het moment
van het ter perse gaan van deze handleiding.
Aan het opstellen van deze handleiding is de
uiterste zorg besteed in het kader van ons
streven u accurate informatie te verschaffen.
Parrot zal echter niet aansprakelijk gesteld kun-
nen worden voor de gevolgen die voortvloeien uit
vergissingen of weglatingen in deze handlei-
ding, evenmin als voor enige beschadiging of
accidenteel verlies van gegevens die direct of
indirect voortkomen uit het gebruik van de in
deze handleiding vervatte informatie. Parrot
behoudt zich het recht voor het producton-
twerp of de gebruikershandleiding te wijzigen
of verbeteren zonder enige beerkingen en
zonder de verplichting de gebruikers hiervan op
de hoogte te stellen.
In het kader van ons voortdurende streven om
onze producten uit te breiden en te verbeteren,
kan het door u gekochte product enigszins
verschillen van het in deze handleiding bes-
chreven model.
90

In dit geval is mogelijk een recentere ver-
sie van deze handleiding in elektronische
vorm beschikbaar op de Parrot website:
www.parrot.com.
Afgedankte elektrische en
elektronische apparatuur (WEEE)
In overeenstemming met de Europese richtlijn
2002/96/EG betreffende afgedankte elektrische
en elektronische apparatuur (AEEA) geeft de
vermelding van het hierboven vermelde sym-
bool op het product of de verpakking aan dat
dit artikel niet in de normale, niet-gesorteerde
stedelijke afvalstroom mag worden verwerkt. In
plaats daarvan ligt de verantwoordelijkheid van
de afvoer van dit product bij de gebruiker, die
het dient aan te bieden bij een inzamelpunt voor
de recyclage van afgedankte elektrische en elek-
tronische apparatuur. De gescheiden inzameling
van dit afval helpt de eventuele te recupereren
materialen terug te winnen of te recycleren en
vermindert de impact ervan op het milieu en
de gezondheid van de mens. Voor meer
informatie betreffende de juiste afvoermethode.
Garantie
Op de Parrot producten rust gedurende 1 jaar
vanaf de verkoopdatum garantie op onderde-
len en arbeidsloon, behoudens aan het product
aangebrachte veranderingen, tegen overleg-
ging van de koopbon (met datum en plaats van
aankoop en serienummer van het product) aan
de leverancier of rechtstreeks aan Parrot.
De garantie heeft geen betrekking op het voor
doeleinden van compatibiliteit met de mobiele
Bluetooth® telefoons updaten van de in de Par-
rot producten inbegrepen software, het terugha-
len van gegevens, de uitwendige verslechtering
van het product tengevolge van normaal ge-
bruik van het product, per ongeluk veroorzaakte
schade, abnormaal of ongeoorloofd gebruik van
het product, een niet-Parrot product. Parrot is
niet aansprakelijk voor de opslag, het verlies of
de beschadiging van gegevens tijdens het trans-
port of de reparatie.
Ieder product dat niet defect blijkt te zijn zal aan
de afzender worden geretourneerd en de kosten
voor behandeling, verificatie en transport zullen
hem in rekening worden gebracht.
Conformiteitsverklaring
Parrot SA, 174 quai de Jemmapes, 75010 Parijs,
Frankrijk, verklaart onder haar exclusieve veran-
twoordelijkheid dat het product zoals beschre-
ven in de onderhavige gebruikershandleiding
voldoet aan de technische normen EN301489-
17, EN300328, EN60065 volgens de bepalingen
van de richtlijn R&TTE 1999/5/EC en de tech-
nische normen IEC 62087 en IEC 62301 en de
richtlijn 2005/32/CE.
Gedeponeerde merken
De naam en het logo Bluetooth zijn gedepo-
neerde merken van Bluetooth ® SIG, Inc. en
ieder gebruik hiervan door Parrot S.A. gebeurt
onder licentie.
91

Alle andere in dit document vermelde handels-
merken en gedeponeerde merken worden door
Copyright beschermd en zijn het eigendom van
hun respectieve eigenaren.
Veiligheidsvoorschriften
1. Zet het apparaat zo neer dat het niet aan
vocht of vloeistofspatten is blootgesteld. Plaats
geen met vloeistof gevulde voorwerpen, zoals
vazen, op het apparaat.
2. Controleer of het snoer, waarmee het
apparaat van het lichtnet kan worden losgekop-
peld, altijd gemakkelijk toe gankelijk is. Haal de
stekker uit het stopcontact, wanneer het appa-
raat gedurende langere tijd niet wordt gebruikt.
Waarschuwing :
Dradloze technologie
Apparaten die radiogolven uitze den kunnen
storingen veroorzaken. De werking van appa-
raten zoals Wi-Fi routers of magnetrons kan
de geluidsoverdracht naar uw Parrot Grande
Specchio by Martin Szekely storen en kan
derhalve afbreuk doen aan de geluidskwaliteit
van uw systeem.
92

一般情報
互換性の問題
一部の特別仕様車は、オリジナルモデル
とは仕様が異なる場合があります。その
ため、インターフェースの面で互換性の
問題が生じる可能性があります。
当社は、自動車メーカーによる通知なし
の新しい装備や装置の更新によって生じ
る互換性の問題については責任を負い
かねます。
変更
本ユーザーガイドに記載されているされ
ている説明および仕様は、情報の提供を
目的としたものであり、予告なしに変更
される場合があります。これらの記載事
項は、印刷の時点で正確な情報と見なさ
れます。本ガイドは、皆様に正確な情報
を提供することを目標に、最大限の注意
を払って作成されています。
しかしながら、当社は、ユーザーガイド
における誤りや脱落による何らかの影
響、あるいは本書に記載の情報を利用し
たことによって直接的または間接的に生
じたデータの損傷や不慮の損失につい
て、一切の責任を負いません。当社は、
いかなる制約、およびユーザーへの通知
義務なしに、プロダクトデザイン、ある
いはユーザーガイドを修正または改良す
る権利を有します。
当社では、製品の機能向上と改良に継続
的に取り組んでおります。そのため、ご
購入いただいた製品が、本ユーザーガ
イドで説明されるモデルと一部異なる
可能性があります。当社のホームペー
ジ(www.parrot.com)にて、本ユーザ
ーガイドのより最近のバージョンを電
子形式文書でご利用いただける場合が
あります。
本製品の正しい処分方法(電気・電子機
器の廃棄物)
(分別収集システムを採用する欧州連
合諸国および他のヨーロッパ諸国にお
いて適用)
本製品または本製品の関連文書に表示さ
れているこのマークは、本製品が使用寿
命に達した際に、他の家庭廃棄物ととも
に処分してはならないことを示していま
す。廃棄物の放置による環境や健康への
被害を防ぐため、本製品は他の種類の廃
棄物と分別し、さらに物的資源の持続可
能な再利用を促進するために責任を持っ
てリサイクルして下さい。家庭ユーザー
の方は、本製品を購入した販売店または
地方自治体に連絡し、環境に対して安全
なリサイクルを実施するために、本製品
の収集場所および収集方法について詳細
を確認してください。
企業ユーザーの場合は、サプライヤーと
契約し、購入契約における条件を取
決めてください。本製品を他の商業廃
93

棄物と混ぜて処分することは避けてく
ださい。
商標に関して
商標名およびロゴ Bluetooth
は、Bluetooth ® SIG社の登録商標で
あり、
株式会社Parrotによるこれらの使用は
すべて、ライセンスに基づいて行われ
ています。
Wi-Fi(ワイヤレス)は、Wi-Fi Alliance
社の登録商標です。ロゴ「Wi-Fi CERTI-
FIED」は、Wi-Fi Alliance社の認可商
標です。
本文書に記載されているその他すべての
商業商標および登録商標は、著作権で保
護されており、それぞれの所有者に帰属
する所有物です。
使用
质量保证书
在不损害用户合法权益的原则上,Parrot的产品
自购买日起的一年内,在客户没有对产品自行修
改、购买证明一应俱全的条件下(需包含购买日
期、地点和产品序列号),经销商或Parrot公司
确保产品质量。本产品的质量保证范围不包括恢
复用户数据、正常使用产品导致的外部损坏、由
意外事故造成的所有破损、不正常或不合法的使
用方法以及非Parrot生产的产品。Parrot公司不
对运输和修理过程中的文件储存、丢失和损坏现
象负责。所有确认没有缺陷的产品将被寄回至发
件人,处理、检修和运输的费用由发件人承担。
如何回收本产品
电子设备废料
产品上的标志和说明书均指明此产品不应该在其
寿命终止时与其它家庭废料一起被销毁。
废料的不当处理可能会给环境和人类身体健康造
成损害。请您怀着责任感将废弃的产品和其它种
类废料分开并回收来为资源的可持续利用尽一份
力。专业人员将与售出产品的经销商联系,或
向当地政府咨询,从而正确的回收处理此产品
而不破坏环境。企业将与供应商联系,并查阅
销售合同条款细则。此产品不可与其它商业废
料共同处理。
修正权
此产品说明书中的解释和规范只作为使用信息,
本公司有权在不提前发布通知的情况下进行修
改。为给您提供最为准确的信息,我们在编撰该
说明书时尽量细心,因而以上提供的信息在印刷
出版时应是准确无误的。然而,Parrot S.A.公
司无法为此说明中可能存在的错误和遗漏而造
成的文件损毁或丢失事故承担直接或间接的责
任。Parrot S.A.公司保留改善产品和说明书
质量的权利,公司没有义务将修改事宜提前告
知客户。
由于Parrot S.A.秉承不断改善产品质量的原
则,所以您购买的产品可能会与说明书中描述的
有细微的不同。在这种情况下,请您在www.par-
rot.com.网站上查阅新版本的电子版说明书。
94
95


Hotline
LINE
Our hotline is at your disposal from Monday to Friday between 9 am and 6 pm (GMT + 1)
Hot-line@parrot.com
Italy : [+39] 2 59 90 15 97
Spain : [+34] 902 404 202
UK : [+44] (0)844 472 2360
Germany : [+49] 900 1727768
USA : [+1] (877) 9 Parrot (toll free)
China : [+86] 755 8203 3307
Hong Kong : [+852] 2736 1169
France : [+33] 1 48 03 60 69
Europe : [+33] 1 48 03 60 69 (Spoken languages : French, English and Spanish)
FCC ID: RKXOKIA
CONTAINS FCC ID: EW4DWMW014
IC ID: 5119AOKIA
CONTAINS IC ID: 4250ADWMW014 US ONLY