PLUS N-31SW COPYBOARD User Manual part 2 of 2
PLUS Corporation COPYBOARD Users Manual part 2 of 2
PLUS >
Contents
- 1. Users Manual - part 1 of 2
- 2. Users Manual - part 2 of 2
Users Manual - part 2 of 2
E-19
Printing
ConsecutivePrinting
Multiplescreensfromthescreenatthecurrentpositioncanbeprinted(orstored).
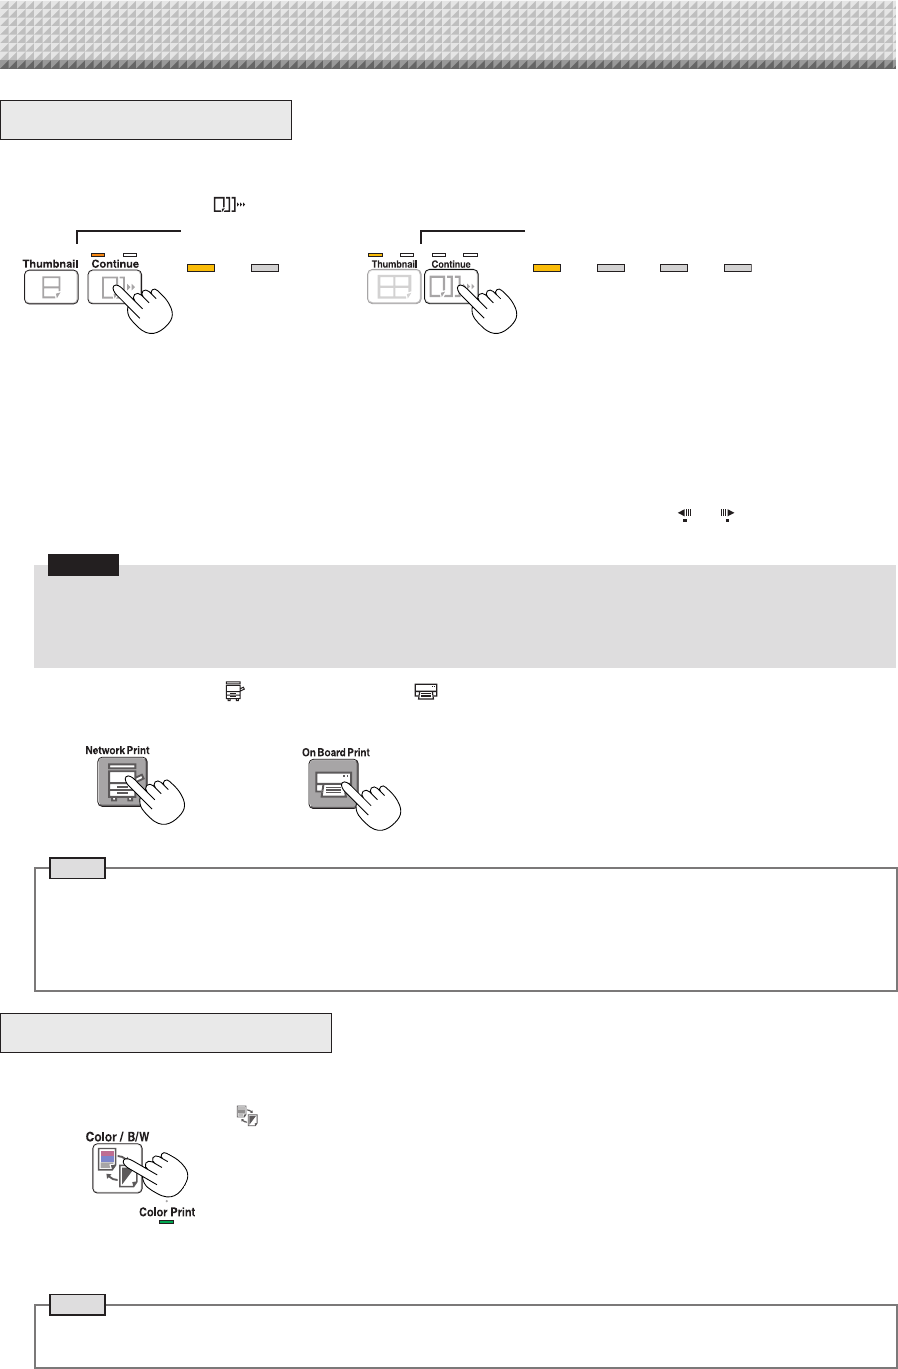
1. PresstheContinue buttonandselectthenumberofscreens.
ChangingPrintingColor
Printingcolorcanbeselectedbetweencolorandmonochrome.
1. PresstheColor/B/W buttontoselectcolorormonochrome.
Themodeswitchesinthefollowingordereachtimethebuttonispressed.
Screens 1 and 2 →Cancel...
(Screens 1 and 2 → Screens 1 to 3 → Screens 1 to 4 →Cancel...onmodelN-314)
Thenumberofconsecutivescreensisindicatedbythenumberofconsecutiveprintingnumberindicatorsthatarelityellow.
(“CP”isdisplayedonthedisplaywindowwhenconsecutiveprintingisselected.)
* Thescreensarecountedinorderfromthecurrentlyvisiblescreenasscreen 1 and screen 2 (screen1,screen2,screen
3,andscreen4onmodelN-314).Tostartfromaparticularscreen,presstheScroll/Stop or buttontoscrolltothat
screen.
Notice
• Notethatifyouhavedrawnonthesheetaftermovingitmanuallypartwayorafterstoppingscrollinginthemiddle,the
amountofmovementforonescreen’sworthchanges,sothepositionofthescannedimageswillbesubstantiallyoff.
• Thisproductusesanendlesssheet.Notethatthepositionofthescannedimagesmaygoslightlyoffduetostretching
ofthesheetorslippage.
Consecutiveprintingnumber
indicators
Consecutiveprinting
numberindicators
Onelit:Cancel(single-screenprinting/storing)
Twolit:Screens1and2printed/storedconsecutively
Threelit:Screens1to3printed/storedconsecutively
Fourlit:Screens1to4printed/storedconsecutively
Onelit:Cancel(single-
screenprinting/storing)
Twolit:Screens1and2
printed/storedconsecu-
tively
Whenprintingisfinished,consecutiveprintingiscanceled.
Note
• Ifthereisablankscreeninthespecifiedsequence,thatscreenisprintedasablank.
• If the ON/Standby button is pressed during scanning, scanning is interrupted and only the images that have been
scannedareprinted.
• Ifprintingofmultiplecopieshasbeenspecified(withtheNumberofCopiesbutton),afterscanning,thespecifiednum-
berofcopiesisprinted,andthisisrepeateduntilthespecifiednumberofscreenshasbeenscannedandprinted.
TheColorPrintstatusindicatorlightstoindicatethefollowingcondition:
Litgreen:Colorprint
Off:Monochromeprint
Note
• If“ColorPrint”inCBSetupissetto“Invalid”,apressoftheColor/B/Wbuttonwillselectforciblymonochromecolor.
Toselect“Valid”for“ColorPrint”inCBSetup,seepageE-26in“CBSetup(OperatingtheNetworkBoard’sButtons)”.
2. PressNetworkPrint orOnBoardPrint buttontoprint.
When one of the print buttons is pressed, the screens are scanned and printed repeatedly until the specified number of
screenshasbeenscannedandprinted.
or
(Buttononmodel
N-314)
E-20
UsingUSBMemory
The content of what has been drawn on the sheet surface of the network board can be saved in USB memory.
Later, the saved image can be read into a personal computer and made into a document of the proceedings of
the meeting, or affixed to a document.
Notice
• NoUSBflashmemorydeviceisincluded.WhenpurchasingaUSBflashmemorydevice,payattentiontothefollowing:
1.USBflashmemorydevicesformattedinFAT16/FAT32aresupported.USBflashmemorydevicesinNTFSformatcannot
beused.
2.USBflashmemorydevicesprotectedbyasecurityfunctioncannotbeused.
3.USBflashmemorydeviceswithacapacityofover32GBcannotbeused.
4.IftheUSBflashmemorydeviceisdividedintomultiplepartitions,onlyonepartitioncanberecognizedwiththisunit.
USBMemoryStorageProcedure
Preparation:
Checkthatthenetworkboard’sACpowerplugisconnectedtoawallpoweroutlet.
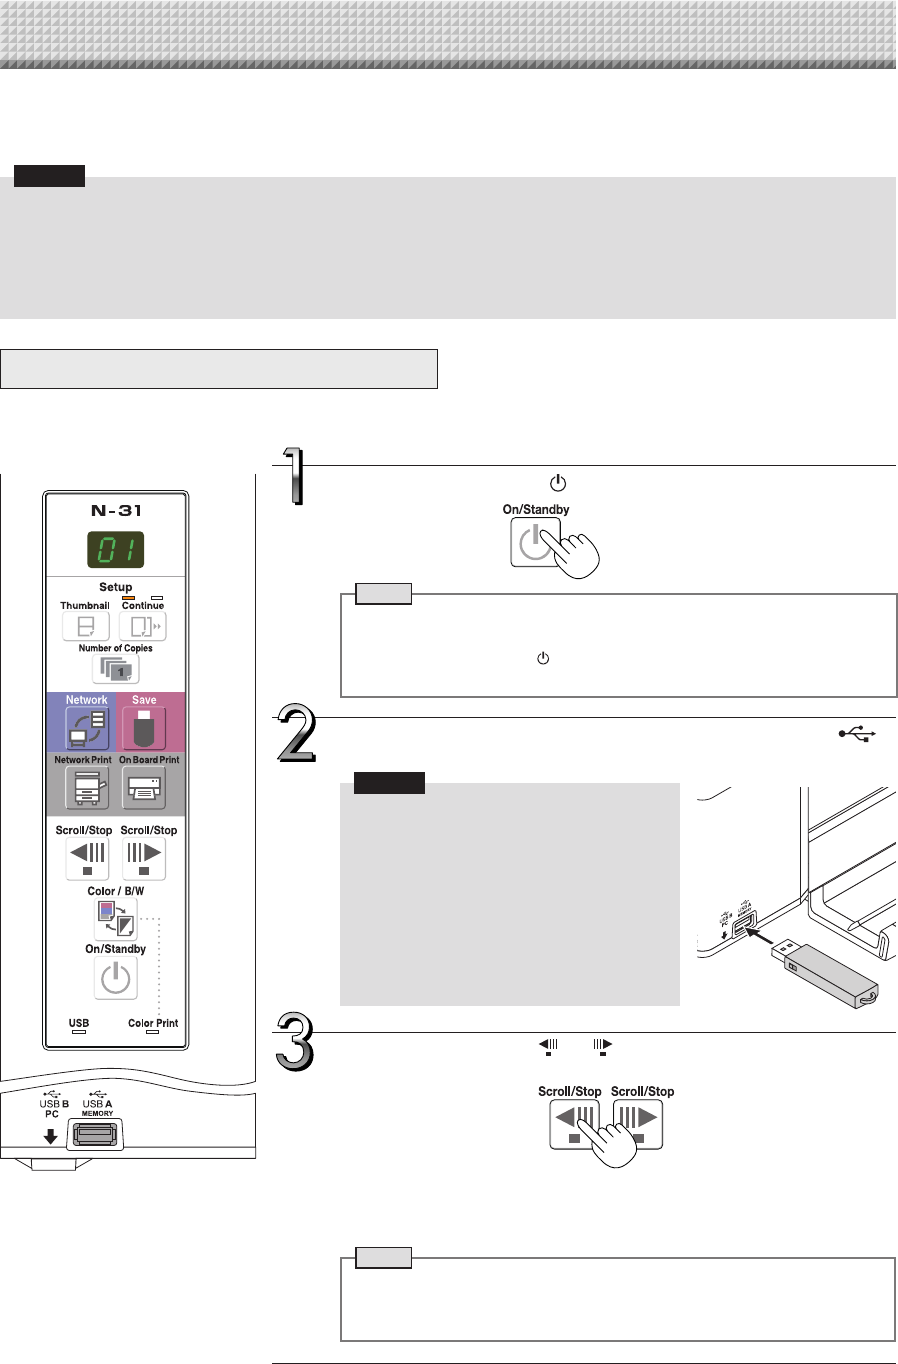
PresstheON/Standby buttonandswitchonthepower.
Note
• Whenturningonthepower,waitabout5secondsormoreafterthepower
plughasbeenconnectedbeforepressingtheON/Standbybutton.
• PresstheON/Standby buttontoswitchonthepower.TheLEDofthe
displaywindowwilllight.
InserttheUSBmemorydeviceintotheUSBAMemory
portofthenetworkboard.
Notice
• Checktheside(polarity)oftheUSBmem-
ory device before inserting it. Forcing it
in the reverse orientation will damage the
USB A Memory port or USB memory
device.
• Be careful not to bump into the USB
memory device with hand or body while
itismounted.Doingsocoulddamagethe
USB memory device or USB A Memory
port.
Theprocedurefordisplayingthesheetsurfaceyouwanttostoreisthesameas
forprinting.
See“BasicPrintingOperation”onpageE-16.
Note
• TheonescreenportionthatisviewablewillbesavedinUSBmemory.
• Savingoftheportionlocatedaroundthesheetsurfacemightnotbepos-
sible.Pleasesee“Effectivereadingsize”onPageE-5.
PresstheScroll/Stop or buttontodisplaythescreento
bestored.
E-21
UsingUSBMemory
RemovingtheUSBmemory
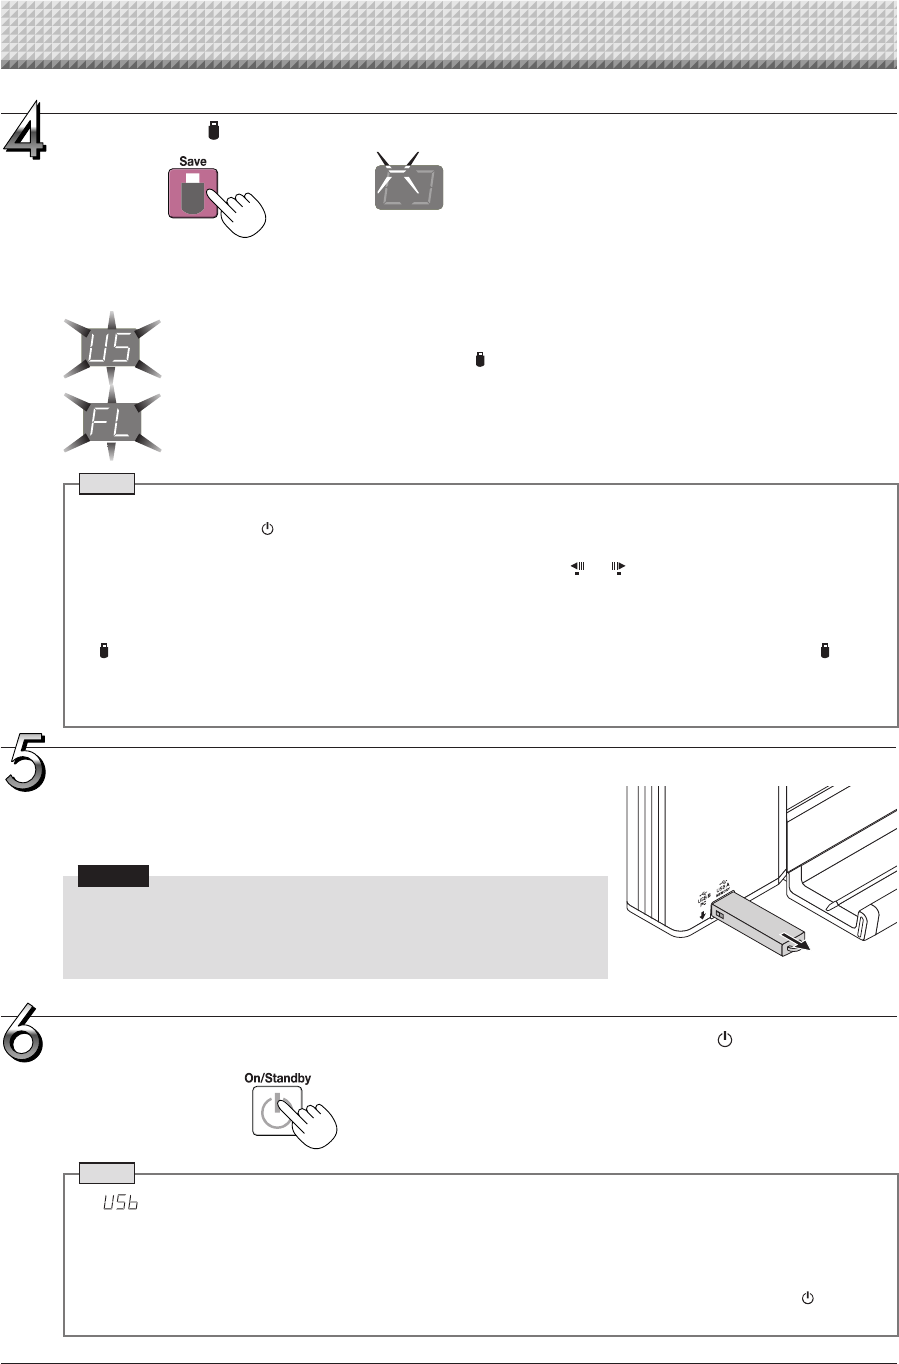
Checkthattheflashingrotationofthedisplaywindowhaschangedtosteady
lightingandthattheUSBmemoryaccessindicatorisnotflashing,thenpullthe
USBmemorystraightout.(PleaseseeyourUSBmemorymanualfordetails.)
Notice
• DonotunplugtheUSBmemorydeviceduringtheUSBmemorystorage
operation (i.e., during the rotating, flashing display in the display win-
dow),orwhiletheaccessindicatoroftheUSBmemorydeviceisflashing
becausedatawillbedestroyed.
Whenthenetworkboardisnotgoingtobeused,presstheON/Standby buttonand
switchoffthepower(standbymode).
Note
• “ ”letters appearingatone-secondintervalsin amovingdisplayinthe display windowindicatethataUSB
memorydeviceismounted.UnpluggingtheUSBmemorydevicewillswitchoffthepower.(Afunctionthatserves
asaremindertounplugtheUSBmemorydevice)
• WhenthenetworkboardandacomputerareconnectedbyUSBcable,theautopowerofffunction(whichturns
thepoweroffautomatically)iscanceled.
• ScannedimagefilesstoredinthememoryforcomputerstoragearedeletedwhentheON/Standby buttonis
turnedoff.Filesinthememoryfornetworkstoragearenotdeleted.
Flashingindicator“rotates”sequentiallyduringUSBmemory
storageoperation.
Display window
PresstheSave buttontostore.
• Thereadingoperationisperformedforaone-sheetportion(whilethesheetisscrolled)andUSBmemorystoragestarts
afterthescrollingcompletes.
• Multiplescreenscanbestoredconsecutively.(SeePageE-19,“ConsecutivePrinting”.)
The(5second)flashing“US”displayindicatesthattheUSBmemoryhasnotbeeninserted.Pleaseinsert
theUSBmemoryandthenpresstheSave button.
A (5 second) flashing “FL” display indicates that there is insufficient free capacity to permit storage in
USBmemory.ReplacewithaUSBmemorydevicehavingsufficientcapacity.
See“MeaningofErrorMessages”onPageE-29forothererrordisplays.
Note
• DependingontheUSBmemory,itmaytaketimeforrecognitionoritmaytaketimeforsaving.
• WhentheON/Standby buttonispressedduringthereadingoperation,thereadingoperationwillbediscontin-
uedandthepartiallyreadimagedatawillbestoredintheUSBmemory.
Tomovethesheetsurface,stopscrolling,thenpresstheScroll/Stop or button.
• The date and time of the saved file will reflect the network board time setting. See “Setting the Time” on Page
E-13.
• WhenacertainamountoffreecapacityisnotavailableintheUSBmemory,“FL”willbedisplayedwhentheSave
buttonispressed.Deletedata,setthesheetsurfacebacktotheoriginalstatus,thenpresstheSave button
again.
• WhenthenetworkboardandacomputerareconnectedbyUSBcable,thedataisstoredinthemainunit’sinternal
memory.
E-22
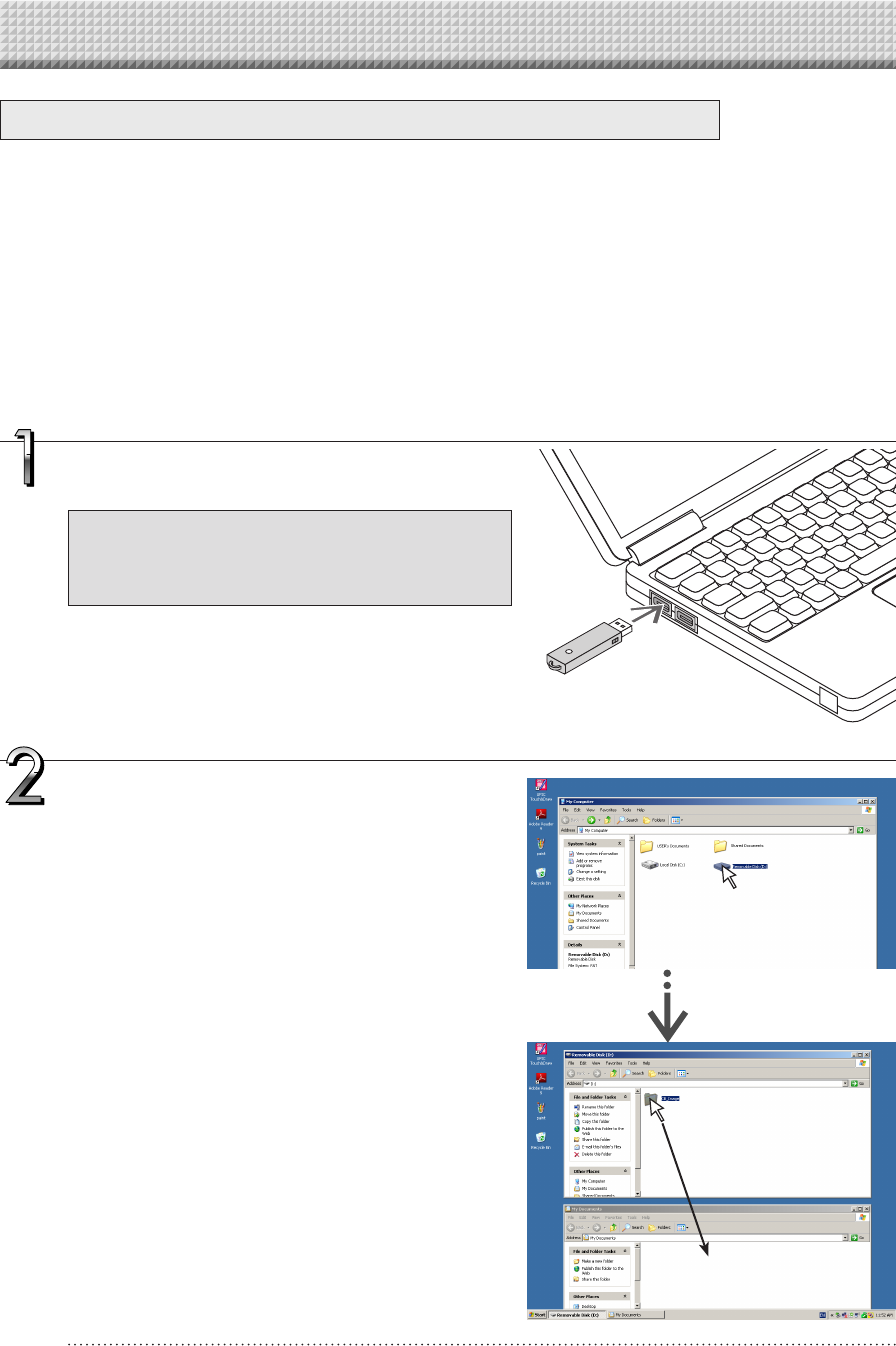
PlugtheUSBmemorydeviceintoaUSBportof
thepersonalcomputer
Whenconnectingtothepersonalcomputerforthefirst
time, the installation of a USB driver is required. Fol-
lowtheinstructionsmanualoftheUSBmemorydevice
thatyouareusing.
• Thestandarddriverisinstalledautomaticallyandthenetwork
boardisidentifiedas“Removabledisk”in“MyComputer”(or
“Computer”).
UsingUSBMemory
SavingImageFilesonaComputer/DeletingImageFiles
Examples of operations follow for saving the image files in the USB memory device to the hard disk of the per-
sonal computer, and for deleting the folder when the USB memory capacity is full. (There are various methods
that can be used for saving and deleting including the use of Explorer.) See the instruction manual of your per-
sonal computer or the software that you are using for information about using a personal computer.
The name of the folder on the USB memory device is “CB_Image”. Image files are stored in this folder.
By factory setting upon purchase, image files are named “PV-xxx.png” (PNG files), where “xxx” refers to a
3-digit number starting from 001 (ex.: PV-001.png).
When consecutive storing is performed, numbers “-1” or “-2” (“-1”, “-2”, “-3” or “-4” on model N-314) are
added to the end of the file name. (Example: When three screens are stored consecutively - PV-001-1.png,
PV-001-2.png.) When a file format is specified to PDF, consecutive stored files will be merged into one file.
Images can be stored in JPEG, PNG or PDF format, selectable in the network board settings (“CB Setup”). (See
pages E-26.)
DragtoMyDocuments
SavingtheimagefilesofaUSBmemorydevice
toapersonalcomputer
1. Open“MyComputer”(or“Computer”)and
fromwithin,openthedriveoftheconnected
USBmemorydevice.
The folder named “CB_Image” is the saved data of the
networkboard.
2. Storethe“CB_Image”folderin“MyDocu-
ments”oranotherlocation.
Allofthedatacontainedin“CB_Image”willbestored.
E-23
DeletingUSBmemoryimagefileswiththecom-
puter
Beforedeletingimportantimage files, be sureto save
themonthecomputer(asadatabackup).
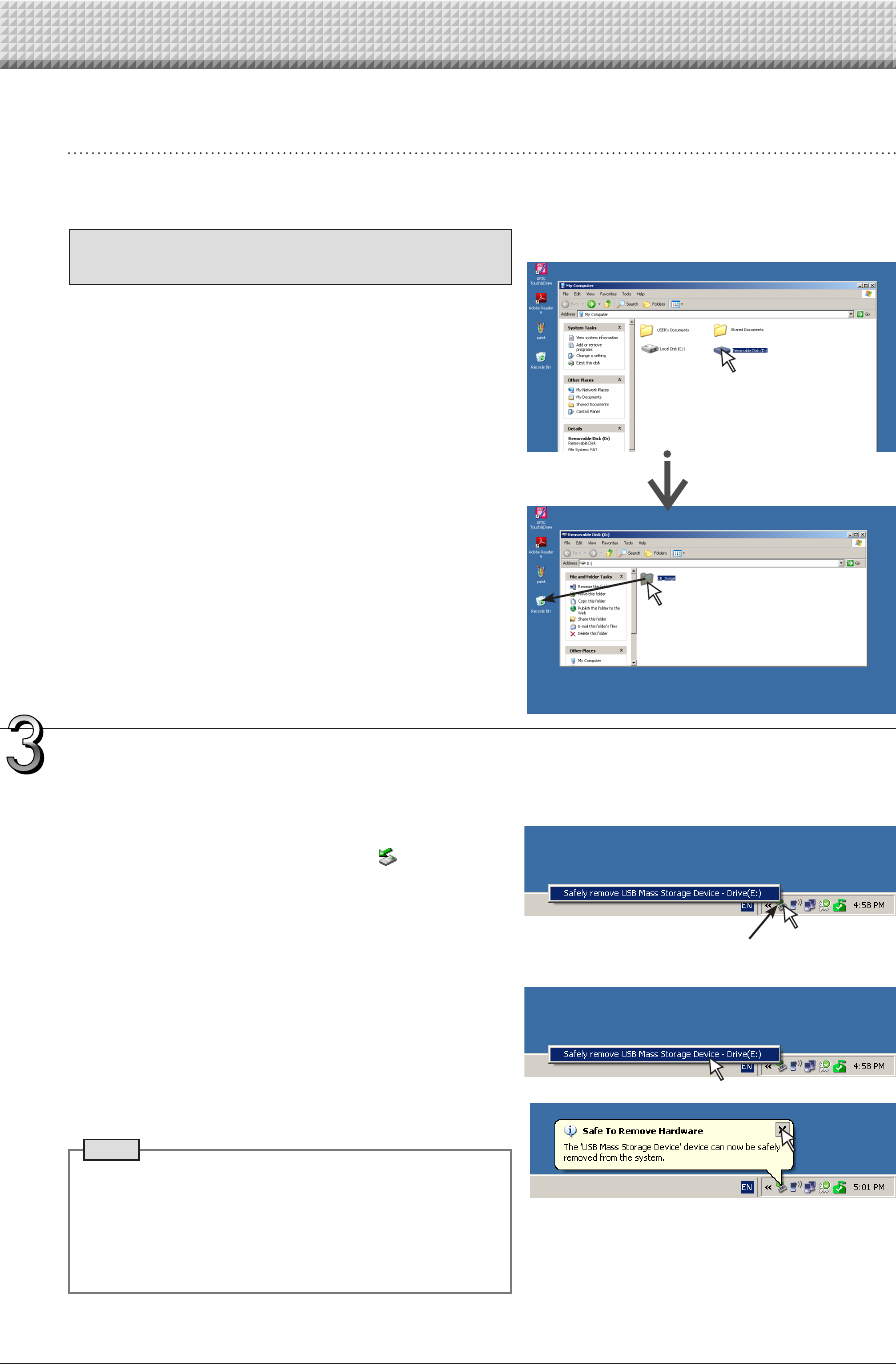
1. Open“MyComputer(or“Computer”)”and
thenopenthedriveiconwhichshowsUSB
memory.
The folder named “CB_Image” contains the memory stor-
agedataofthenetworkboard.
2. Placethe“CB_Image”folderinthe“Recy-
cleBin”,rightclickontheiconandselect
“EmptyRecycleBin”fromthepull-down
menu.
Allofthedatacontainedin“CB_Image”willbedeleted.
Even when the entire folder is deleted, a new CB_Image
folder will be created automatically when USB memory is
usedagainwiththenetworkboard. DragtotheRecycleBin
DisconnecttheUSBmemory
The disconnecting procedure depends on the computer’s
operatingsystem.Fordetails,refertothecomputer’soperating
instructionsorhelpfiles.
1. Clickthe[HardwareRemoval] iconthatis
displayedinthetasktray.
Click “Stop USB Mass storage Device - drive (E)”. (The E
drivecharacterwilldifferdependingonthepersonalcom-
putersystem.)
2. Whenthe“USBmassstoragedevicecanbe
safelyremoved.”screenisdisplayed,click
thedisplay.
3. Click[X]toclose.
ThisallowstheUSBmemorydevicetobeunpluggedfrom
thecomputer.
Note
• Do not disconnect the USB memory device while the
USBmemorydevice’saccessindicatorisflashing.Doing
sowilldamagethedata.
• The USB drive may not be disconnected properly, for
exampleifthecomputerisintheprocessofcheckingthe
statusofperipherals.
“Removehardware”icon(example)
UsingUSBMemory
E-24
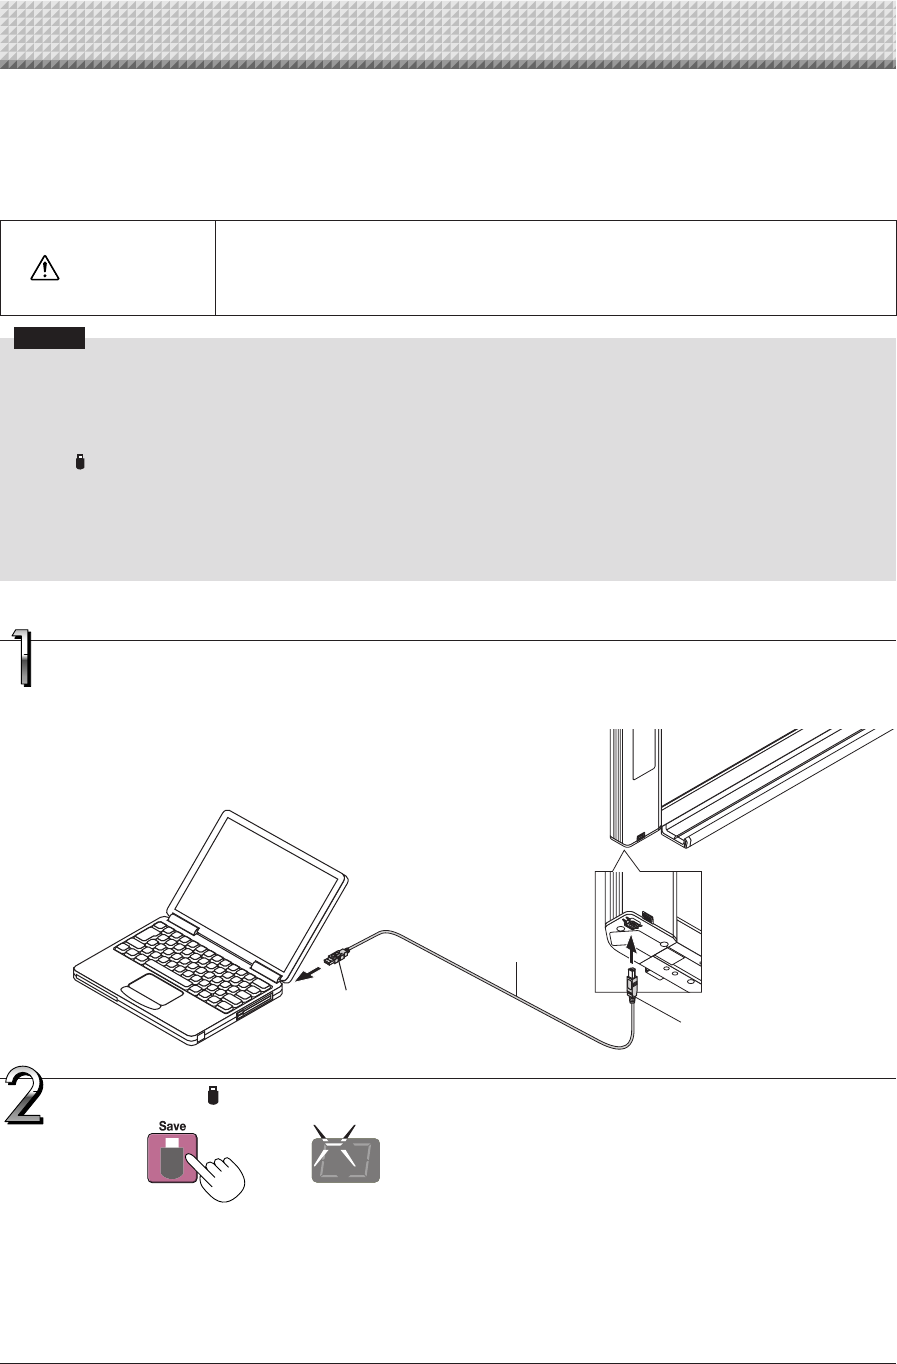
Turnonthenetworkboard’spowerandconnectthePCdedicatedUSBport(typeB)and
computerusingtheUSBcable.
• Usuallythestandarddriverisinstalledautomaticallyandthenetworkboardisidentifiedbythecomputerasaremov-
abledevice.
When the network board and a computer are connected by USB cable, the network board is recognized as an
external memory device (removable device). Below is the procedure for copying the “CBImage” file from this
device onto the computer.
Images can be stored in JPEG (.jpg), PNG (.png) or PDF (.pdf) format, selectable in the network board settings
(“CB Setup”). (See pages E-26.) The factory default is “PNG”.
CAUTION
Withthisfunction,iftheoperationfordisconnectingtheUSBconnectionbetweenthenetwork
boardandcomputerisperformedorthenetworkboard’spoweristurnedoff,theimagedata
inthenetworkboard’scomputerstoragememoryisdeleted.Besuretosaveimportantimage
dataonthecomputer,etc.
Notice
• Onlyonescreen’sworthofdatacanbestoredinthenetworkboard’smemoryforcomputerstorage.
Whenthenetworkboard’ssaveoperationisperformedsuccessively,previousdataisoverwritten.
• Donotstorecomputerdatainthenetworkboard’smemoryforcomputerstorage.
• Thememoryforcomputerstoragecannotbeformattedfromacomputer.
• DonotdisconnecttheUSBcableoraccessthenetworkboardwhiledataisbeingsavedafterpressingthenetworkboard’s
Save button.Doingsowillcausethecomputer’soperationtobecomeunstable.
• Do not press operation buttons on the network board while the network board’s memory for computer storage is being
accessedfromthecomputer.Doingsowillresultinincreasedtimeforresponsebetweenthecomputerandnetworkboard,
andoperationsmaynotbepossible.
• WhenconnectedtoaMacintoshcomputer,thewarningmessage“Thediskwasnotejectedproperly.”isdisplayed,butthe
datacanbestorednormallyinthecomputer’smemory.
Usingthenetworkboardconnectedtoacomputer
• Onesheet’sworth of thescreen is scanned(scrolled) and storingin thememory forcomputer storagestartsonce
scrollingstops.
TheLEDsonthedisplaywindowflashinacircularmotionduringsavinginthememoryforcomputerstorage.
• When storing is performed using consecutive printing function (see page E-19), a consecutive storage number is
addedafter“CBImage”.(Example:Fortwoscreens–CBImage-1.png,CBImage-2.png)
Display window
PresstheSave buttontostore.
ToUSBportoncomputer
(typeA)
USBcableincluded
withnetworkboard
To networkboard’scomputer
USBport(typeB)
LEDsflashincircularmotionduringsavinginmemoryforcomputer
storage
E-25
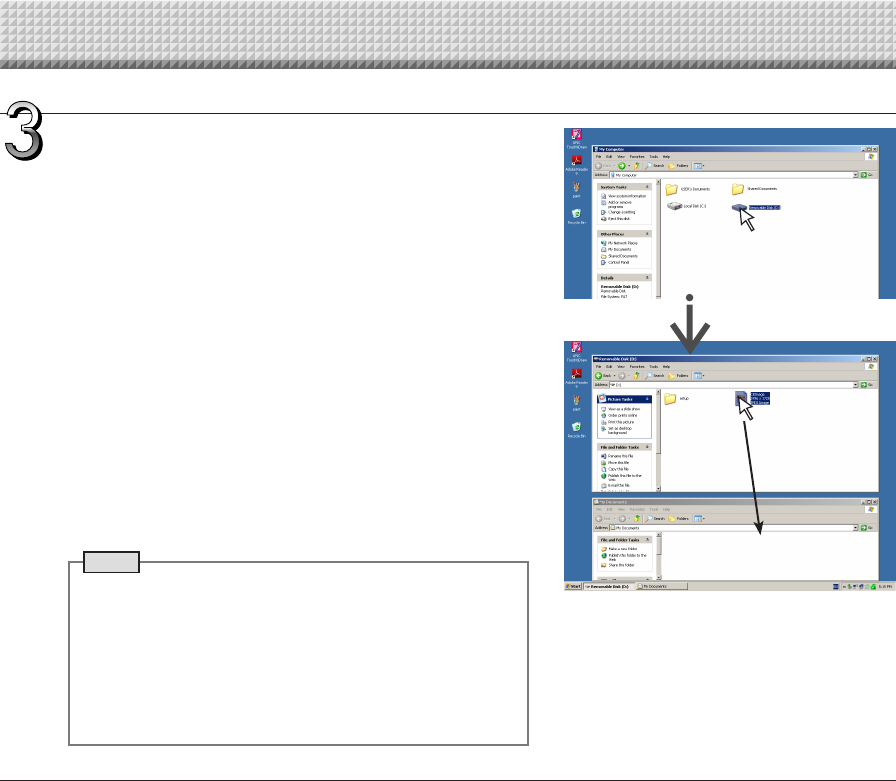
DragtoMyDocuments
Onthecomputer,open“MyComputer”,andfrom
thereopenthenetworkboardidentifiedasa
removabledevice.
(1) Double-clickthe“MyComputer”(or“Computer”)icontoopen
it.
(2) Whenthedevice icon for thenetwork board (displayed as a
removabledisk) isdouble-clicked, the networkboard’s inter-
nalmemoryopens.
The“CBImage”fileisthescannedimagefile(“.jpg”,“.png”or
“.pdf”,accordingtosetting).
• The“setup”foldercontainsthesimplenetworksettingsfile.
(3) Copy the “CBImage” file to [My Documents], etc., on the
computer(“.jpg”,“.png”or“.pdf”,accordingtosetting).
To disconnect the USB cable, follow the procedure in step 3 on
pageE-23.
Notethattheimagedatainthenetworkboard’scomputerstorage
memoryisdeletediftheoperationfordisconnectingtheUSBcon-
nectionbetweenthenetworkboardandcomputerisperformedat
thistime.
Note
If both USB memory device and computer are connected to
the network board, data is saved in memory for PC. Data is
notsavedinmemoryforUSB.
• The “setup” folder will be created in memory for PC. This
folder contains the “setting.ini” file recording the firmware
version,MACaddress,networksettings.
For details, refer to the separate “N-31 Series Network
Manual”.
Usingthenetworkboardconnectedtoacomputer
E-26
There are two ways to make the device settings: using the network board’s operation buttons to make the set-
tings (“CB Setup”) and making the settings via the web on the computer connected to a network.
The description here provides operation using the network board’s buttons.
For using the network board connected to a network, refer to the separate “N-31 Series Network Manual”.
Basicsettingoperation
• Checkthatthepowerison(thatthedisplaywindowislit).
• Wheninthe“CBSetup”mode,thenetworkboardwillreturntothenormalmodeifnobuttonsareoperatedfor10seconds,so
operatethebuttonswithin10seconds.
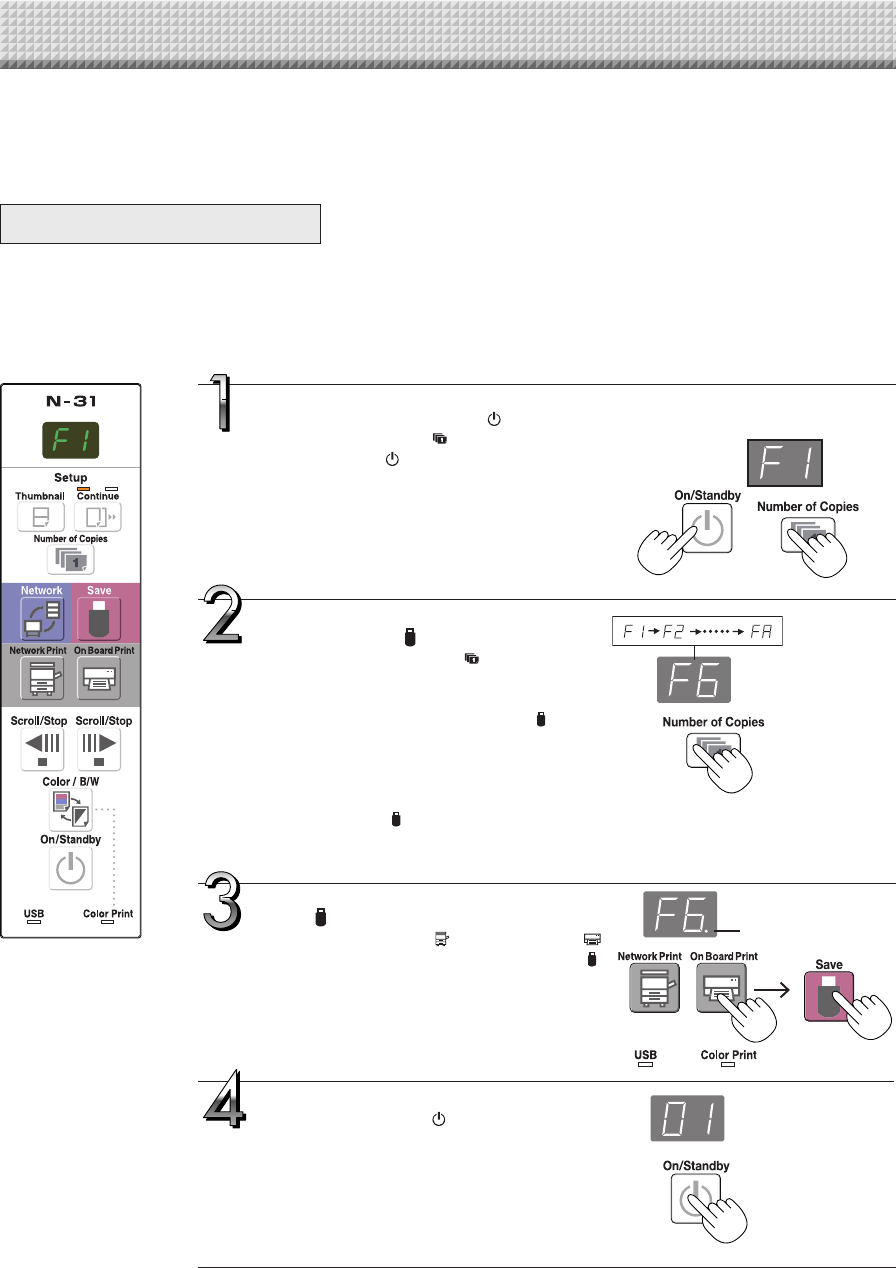
CBSetup(OperatingtheNetworkBoard’sButtons)
SwitchtotheCBSetupmode.
WhilepressingtheON/Standby button,press
the Number of Copies button, then release
the ON/Standby button. The network board
switchestotheCBSetupmode.
“F1”appearsonthedisplaywindow.
“F1” is the time setting. For instructions on the
timesetting,seepageE-13.
Select“thefunctionnumber”,then
presstheSave button.
PresstheNumberofCopies button(thefunc-
tion switches each time the button is pressed,
returning to F1 after FF) to select the desired
functionnumber, then press the Save button
tosetthatfunctionnumber.
Fortheitemnamesofthefunctionnumbers,see
the“TableofFunctionNumbersandSettings”on
thefollowingpage.
• WhentheSave buttonispressed,thefunc-
tion number to be changed is set and a dot
lights(ex.:“F6.”).
Select“thesetting”,thenpressthe
Save button.
PresstheNetworkPrint or OnBoardPrint
button,checkthesetting,thenpresstheSave
buttontoset.
CheckthesettingaccordingtowhethertheUSB
andPrinterStatusindicatorsarelitoroff.Seethe
“TableofFunctionNumbersandSettings”onthe
followingpage.
ExittheCBSetupmode.
Press the ON/Standby button. The network
boardreturnstothenormalmode.
The display window returns to the number of
copiesdisplay.
CBSetupmode
Dot lit
Normalmode
E-27
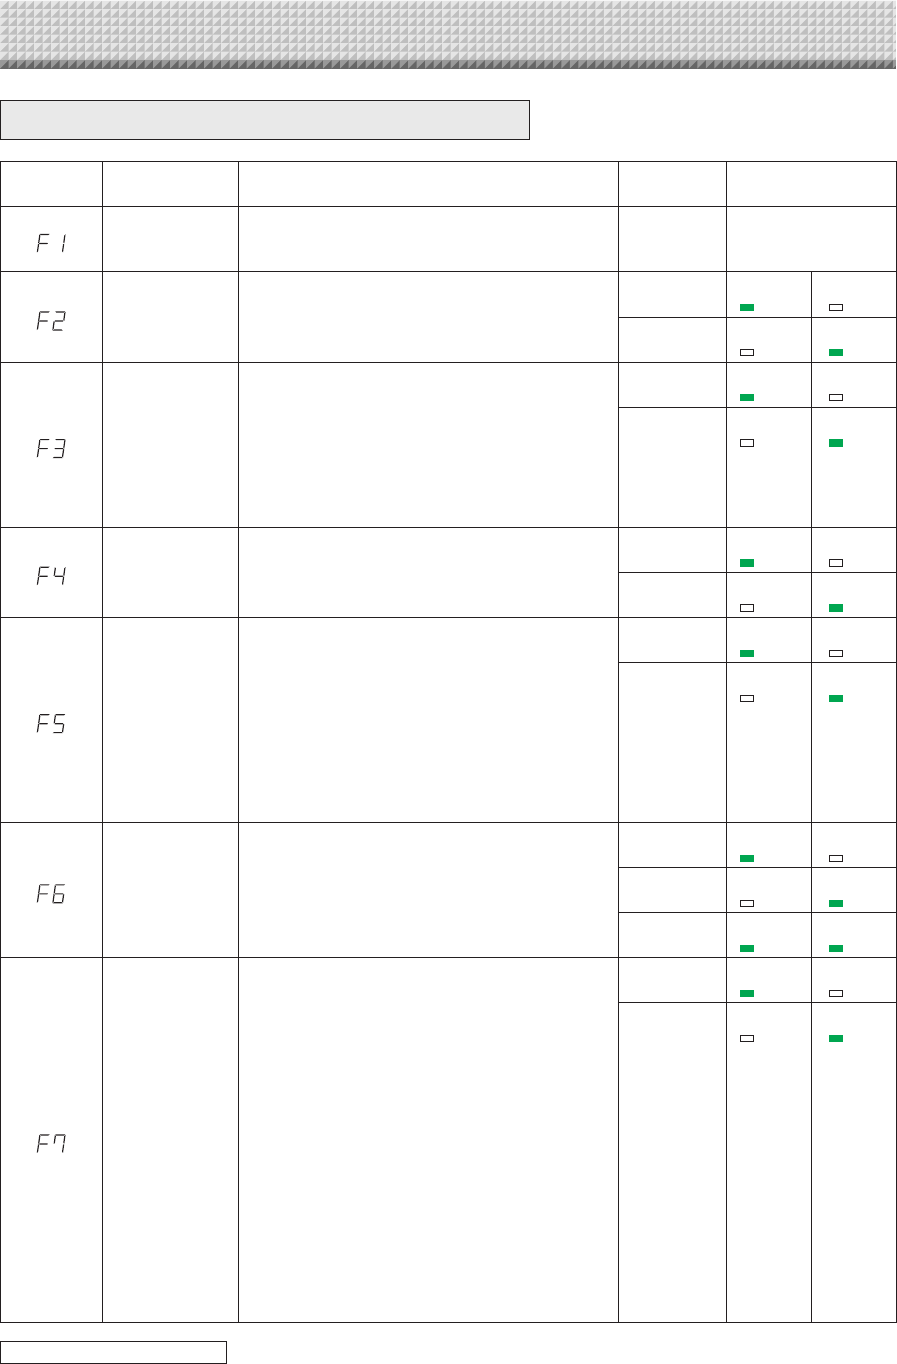
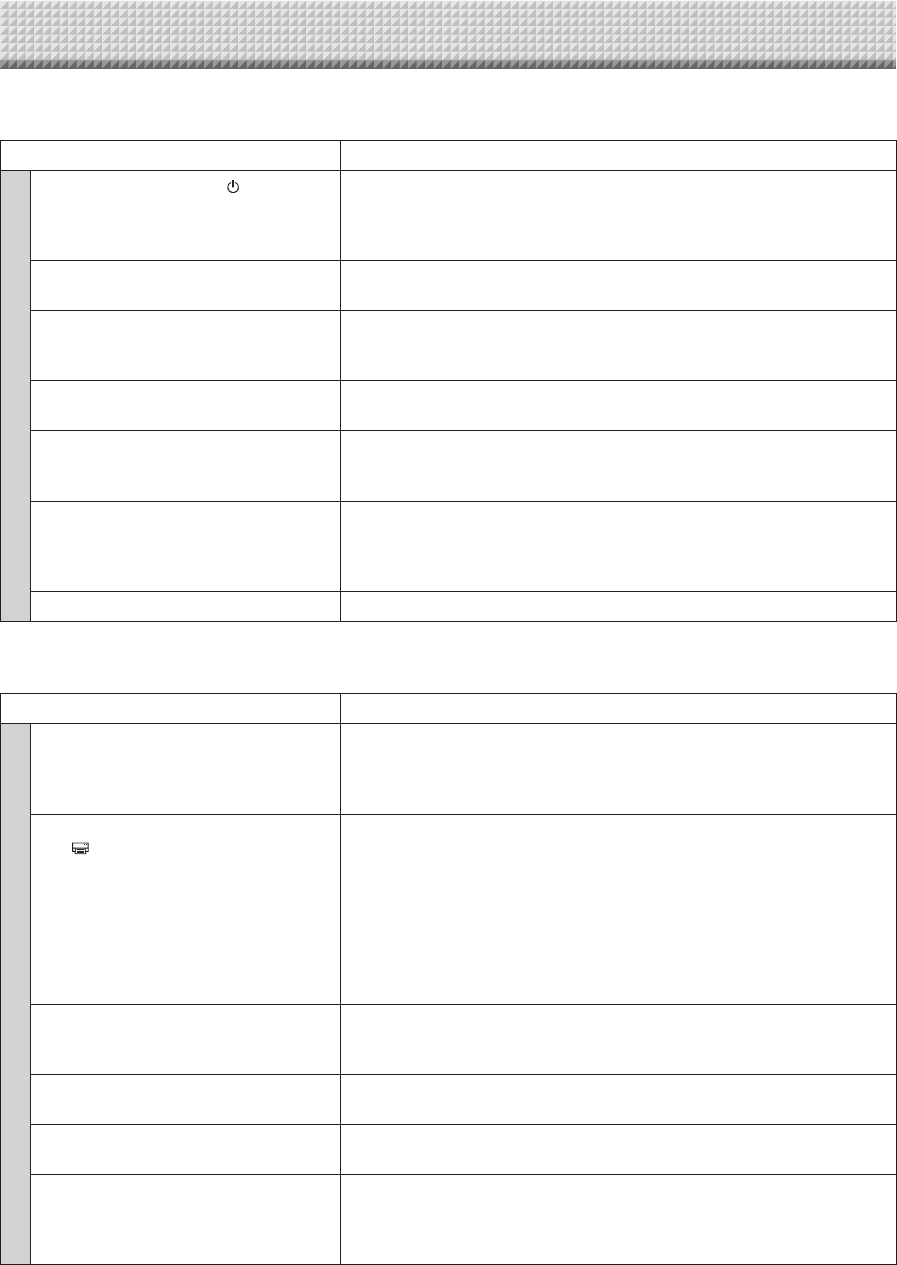
TableofFunctionNumbersandSettings
Function
Number SettingItem Description Setting StatusIndicators
TimeSetting
Thedateandtimearestampedontheprintingpaper
and recorded in the file information when files are
stored.
Year,month,
day,hours,
minutes
Not lit
PaperSize
SelectionofwhethertoprintinA4papersizeorletter
size.
• This operates when the network board is con-
nectedtoaprinter.
A4* USB
(Lit)
ColorPrint
(Off)
Letter USB
(Off)
ColorPrint
(Lit)
AspectRatioSet-
ting
Selection of the image’s vertical-to-horizontal ratio
(aspectratio)whenprinting.
EqualRatio:Theimageisprintedwiththesameratio
asthenetworkboard’ssheetsurface.
Compressed:The image is compressed in the hori-
zontal direction to the ratio of A4 or
lettersizepaperforprinting(ex:circles
becomeellipses).
Compressed* USB
(Lit)
ColorPrint
(Off)
EqualRatio* USB
(Off)
ColorPrint
(Lit)
ColorPrinting
Ifthisissetto[Invalid],colorprintingisnotpossible.
Valid:Whenthisisset,colorprintingispossible.
Invalid:Whenthisisset,colorprintingisnotpossible.
Valid* USB
(Lit)
ColorPrint
(Off)
Invalid USB
(Off)
ColorPrint
(Lit)
Resolution
Selectionoftheimagefile’sresolution.
Standard:Thevertical/horizontal sizeof the scanned
image is set to 1/2. The amount of data
is 1/4 that of when “High Resolution” is
selected.
HighResolution:Theimagefilehasthesameresolu-
tionasthescannedimage(vertical/
horizontal size of 1/1). The picture
quality is better than when “Stan-
dard”isselected.
Standard USB
(Lit)
ColorPrint
(Off)
HighResolu-
tion*
USB
(Off)
ColorPrint
(Lit)
GraphicsFile
Format
Selectionoftheformatinwhichimagefilesaresaved.
ScannedimagesareconvertedintoJPEG(extension
“.jpg”), PNG (extension “.png”) or PDF (extension
“.pdf”)format.
JPEG USB
(Lit)
ColorPrint
(Off)
PNG* USB
(Off)
ColorPrint
(Lit)
PDF USB
(Lit)
ColorPrint
(Lit)
Header/Footer
Settingofwhetherornottooutputtheheader/footer
informationregisteredonthenetworkboard.
“Off”:Theheader/footerinformationisnotoutput.
“On”: The header/footer information is output when
printingandwhensavingimagefiles.
Note:
• Headersandfootersrefertotheinformationatthe
top and bottom margins, respectively, of printed
pagesorimages.Titles,companynames orother
characters or images can be inserted so that the
sameinformationisprovidedonallpages.
• Header/footer information is registered on the
network board via a network. For instructions on
creatingandregisteringheadersandfooters,refer
totheseparate“N-31SeriesNetworkManual”.
• Depending on the type of printer, the colors may
differfromtheactualgraphicimage.
Off* USB
(Lit)
ColorPrint
(Off)
On USB
(Off)
ColorPrint
(Lit)
CBSetup(OperatingtheNetworkBoard’sButtons)
continuedonnextpage
E-28
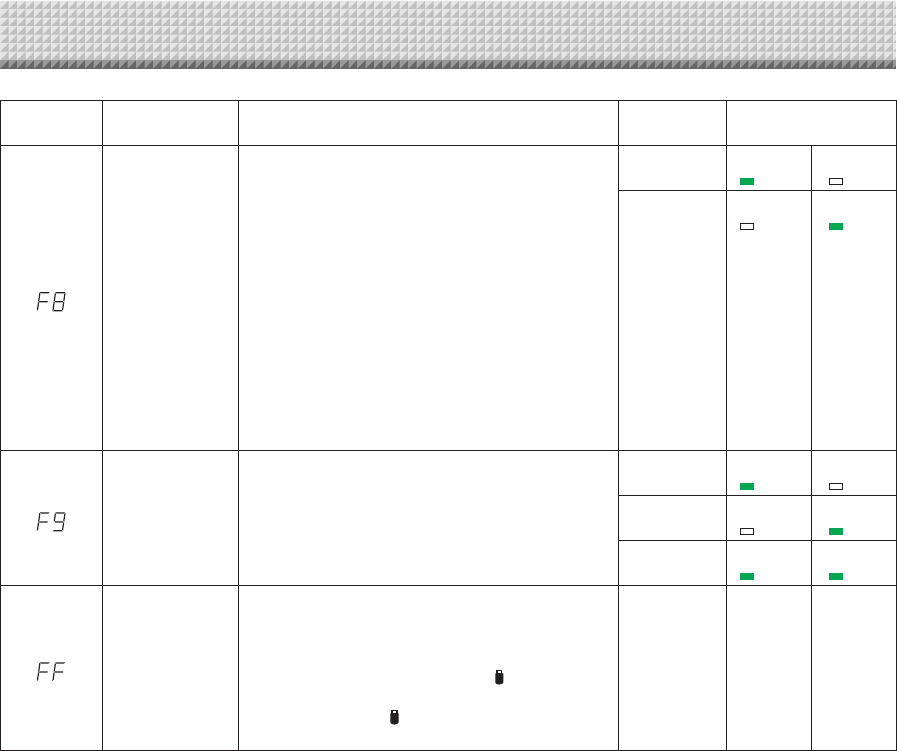
CBSetup(OperatingtheNetworkBoard’sButtons)
Function
Number SettingItem Description Setting StatusIndicators
EraseReminder
Settingofwhetherornottonotifytheuserthatchar-
acters or diagrams drawn on the back side of the
networkboard’ssheetsurfacehavenotbeenerased.
Thisiseffectiveforconfidentialmeetings,etc.
Disable:TheEraseReminderfunctiondoesnotwork.
(Settinguponfactoryshipment)
Enable:When the ON/Standby button is pressed to
turn the power off, the display window on
the network board’s operation panel flashes
and the network board automatically moves
to the non-erased surface, after which the
powerturnsoff.
• TheEraseReminderfunctionmaynot work prop-
erly due to dirt on the sheet adhesive or marker
traces.
Disable* USB
(Lit)
ColorPrint
(Off)
Enable USB
(Off)
ColorPrint
(Lit)
TimeDayStamp
Format
Selectionoftheformatinwhichthedateandtimeare
displayed.
Examplesofdisplays:
YYYY/M/D 2011/1/2301:23
DD-MMM-YYYY 23-Jan-201101:23
MMM-DD-YYYY Jan-23-201101:23
YYYY/M/D* USB
(Lit)
ColorPrint
(Off)
DD-MMM-
YYYY
USB
(Off)
ColorPrint
(Lit)
MMM-DD-
YYYY
USB
(Lit)
ColorPrint
(Lit)
ResetDeviceSet-
tings
This restores the network board device settings at
F2toF9totheirdefaults(settingsuponfactoryship-
ment).
Thesettingsmarked“*”arethedefaults.
(1) Select FF,thenpresstheSave button.“FF.”is
displayed(withthedotlit).
(2) PresstheSave buttonagain.Thesettingsare
reset.
— — —
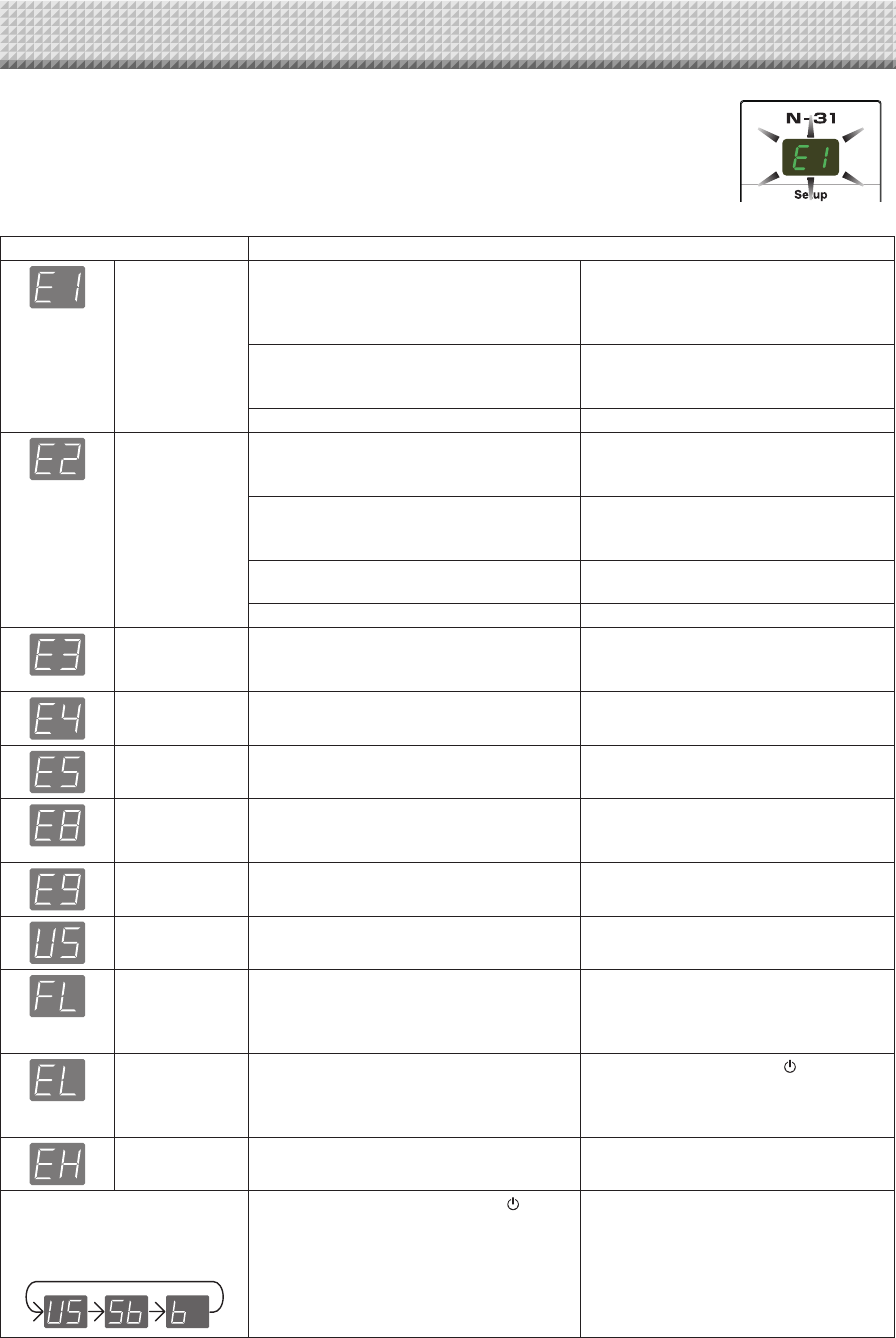
E-29
Networkboard(mainunit)relatederrors
ErrorDisplayNumber ProblemandSolution
Printernotcon-
nected
Noprintingpaper
Printerproblem
• Istheprintercableconnected?
• Ispowerbeingsuppliedtotheprinter?
• WhentheprinterusesanACpoweradapt-
er,isthecabledisconnectedsomewhere?
• Connect the printer properly and switch
ontheprinterpower.
• Haspaperbeensetintheprinter? • Turnthepoweroftheprinteroffandthen
onagain,andloadtheprinterwithA4or
lettersizepaper.
• Istheprintererrorindicatorflashing(orlit)? • Readtheprinterinstructionmanual.
USBMemorynot
recognized
• IstheUSBmemoryunformatted. • This unit supports the FAT and FAT 32
formats. Perform the formatting with the
personalcomputer.
• IsaUSBmemory that is not supportedby
thenetworkboardbeingused?
• ThefileformatsforUSBmemorydevices
that can be used on this network board
areFATandFAT32.
• IstheUSBmemorydevicepluggedinfully? • Please check the operation with a per-
sonalcomputer.
• IstheUSBmemorydamaged? —
Memorystorage
problem
• Anerroroccurredduringmemorystorage. • Pleaseperformmemorystorageagain.
• DonotinsertorremovetheUSBmemory
duringprocessing.
Readingproblem • There is a lighting fault of the reading light
source,orareadsignalerror.
• Unplug the power plug from the power
outletandthenplugitinagain.
Systemerror • Thereisamemoryorinternalfault. • Unplug the power plug from the power
outletandthenplugitinagain.
Security protec-
tion
• The operation is set to “Disable” in the
securitysettings.
• Change the setting of the desired item
to“Enable”.(Refertotheseparate“N-31
SeriesNetworkManual”.)
Colorprinting
prohibited
• Coloringprintingissetto“Disable”. • Change the color printing setting to
“Enable”.(SeepagesE-27.)
USBmemorynot
connected
• USBmemorydeviceisnotpluggedintothe
mainunit.
• Plug the USB memory device into the
USBport.
Memoryisfull • Thereisnoavailablespace. • Please delete unnecessary data using a
personal computer. (See page E-22 and
refer to the separate “N-31 Series Net-
workManual”.)
Anunsupported
printer is con-
nected
• A printer that is not supported by the net-
workboardhasbeenconnected.
• Press the ON/Standby button and
switch off the power. When a record is
required, switch on the power and save
toUSBmemory.
Timesettingerror • An error has occurred when setting the
time.
• Start over and set the proper date and
time.
When the “USb” letter display is
flowing...Warning that disconnec-
tionofUSBmemoryhasbeenfor-
gotten
• Did you press the ON/Standby button
whiletheUSBmemorydevicewasplugged
intothemainunit?
• A USB memory device is plugged into
the main unit. When the USB memory
device is disconnected, the power will
beswitchedoffandtheunitwillenterthe
standbymode.
Iftheproblempersists,pleasecontactyournearbyPLUSCorporationsalesoffice,dealer,orstore.
MeaningofErrorMessages
If any of the following flashing indications appear in the display window of the control
panel, please check the matters described below.
Error messages flash for 5 seconds, then stop flashing, remaining lit.
E-30
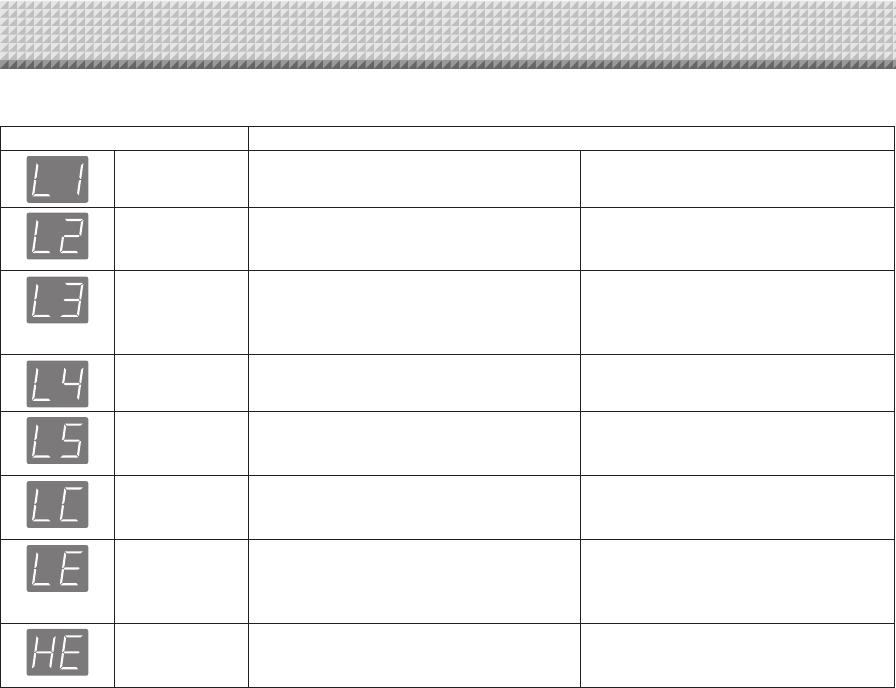
Network(mainunit)relatederrors
ErrorDisplayNumber ProblemandSolution
LANcabledis-
connected
• NocableisconnectedtotheLANterminal. • ConnecttheLANcableproperly.
FTPserverrec-
ognitionerror
• Theusernameorpasswordiswrong. • Input the correct user name and pass-
word.(Refertotheseparate“N-31Series
NetworkManual”.)
FTPservercon-
nection failure
• TheFTPserver’sIPaddressiswrong. • Consult the network administrator then
set the FTP server’s IP address. (Refer
to the separate “N-31 Series Network
Manual”.)
FTPserverwrit-
ingfailure
• ThereisnoFTPstoragefolder. • Consult the network administrator then
settheFTPstoragefolder.
IPaddressnot
set,othernet-
workerror
• An error other than one indicated by L1 to
L4hasoccurred.
• Unplug the power cord from the power
outletthenplugitbackin.
FTPprintingerror • TheFTPprintingerrorhasoccurred. • Check if the settings for FTP printing
are correct. (refer to the separate “N-31
SeriesNetworkManual”.)
Networksettings
reset error
• An error has occurred in resetting the net-
worksettings.
• Thenetworkresetnumberiswrong.Input
thecorrectnumberandrepeattheopera-
tion.(Refer to theseparate “N-31 Series
NetworkManual”.)
Header/footer
writingerror
• This occurs when the size of the inserted
imageistoolarge.
• Adjust the image then repeat the opera-
tion.
Network-relatederrorsindicateerrorsinaccessbetweenthenetworkboardandnetwork.Insomecasestheyarerelatedtothe
networksystem,soconsultthenetworkadministrator.Iftheproblempersists,itmaybeduetoanetworkboardmalfunction.Con-
tactyourstoreofpurchase.
MeaningofErrorMessages
E-31
Please check the following matters before making a request for servicing.
Condition PleaseCheck
NetworkboardRelated
Pressing the ON/Standby button does
notswitchonthepower.
• CheckwhetherthecableoftheACpoweradapterisdisconnectedfromthe
DCconnectoroftheNetworkboardorthewalloutlet.(UnplugtheACpower
cable from the outlet, wait several seconds and then plug it back into the
outletagain.)
Writingonthesheetisnoterasedwiththe
eraser.
• Wasamarkerotherthanadedicatedmarkerused?
Darkhorizontallines on aprinted out hard
copy or image on the screen are gener-
ated.
• Performthescanningadjustment(whitecalibration).(SeepageE-33.)
Parts of characters and lines are not dis-
playedonprintoutsorinimagedata.
• Blurred characters and thin lines may not be displayed on printouts or in
imagedata.
Scanned copy (image) is dirty, Erase
Reminder function is activated even when
sheetiserasedwiththeeraser
• Istheremarkerresidueorsubstantialquantitiesofrefuseonthesheet?
(Ifthesheetisdirty,moistenasoftclothwithwater,wringwell,thenwipethe
sheetinastrokingmanner.)
WhenthenetworkboardandPCarecon-
nected, the PC does not recognize the
networkboard
• Checkwhetherthenetworkboardisinanoperablecondition,andwhether
theUSBcableisconnectedproperly.
• IsthenetworkboardconnectedtothePCviaaUSBhub?
(ConnectthenetworkboarddirectlytotheUSBportofthePC.)
Thedateisnotupdated. • Thenetworkboard’sbatteryisdead.Contactyourstoreofpurchase.
*Iftheproblempersists,pleasecontactyournearbyPLUSCorporationsalesoffice,dealer,orstore.
Condition PleaseCheck
PrinterRelated
The network board’s power turns on, but
theprinter’spowerdoesnot.
• Checkwhethertheprinter’spowerplug(DCplug)issecurelyinserted.
If the power still does not turn on, check whether the printer’s AC power
adaptersideplugisunpluggedfromtheACpoweradapter.(Forsomeprint-
ersitisdirectlymounted.)
Printing is not possible when On Board
Print buttonispressed.
• Checkthatthepowercableoftheprinterandtheprintercablearesecurely
connected.
• Checkthattheprinterpowerindicatorislit.
• Checkwhetherthenetworkboard’sstatusindicatorsandtheprinter’serror
indicatorarelit.
If an error is displayed on the network board’s display window, see page
E-27.
(Please see the printer instruction manual for information about printer
errors.)
Thepaperfeedisabnormal. • Possible causes include damp paper, overly thin or thick paper, only one
sheet of paper is set, and a curved setting of the paper. (Please see the
instructionmanualforyourprinter.)
Analteredcolorisprinted,notthespecified
color.
• Pleasereplacetheprintcartridgeswithnewones.
Thereisnoprinting. • Checkthattheprintcartridgeisproperlyset.
• Checkthattheprintcartridgeisnotplugged.
• Printisverypale,therearewhitelineson
it,orpageisdirty.
• Printed colors are very different from
thoseofthemarkersthatwereused.
Istheprintcartridge’snozzlepartiallychoked?
• Makeatestprintandchecktheconditionsofthenozzle.
Troubleshooting

E-32
Troubleshooting
Also see the descriptions of error indications at “Network (main unit) related errors” on page E-49.
Condition PleaseCheck
Networkrelated
Networkcommunicationsnotpossible • IstheLANcableproperlyinserted?
• TheLANcablecouldbedefective.
Usea straight cable (10Base-Tor 100Base-TX compatible)to connectthe
networkboardtothenetwork.
• SettheIPaddressandsubnetmaskat“SimpleNetworkSettings(viaUSB)”.
* Besureto check with the network administrator beforemakingthe vari-
oussettings.
• DependingonthetypeorsettingofDHCPserver,someIPaddresscannot
beacquired.Ifthishappens,settheIPaddressmanually.
CheckingMACaddress • See“SimpleNetworkSettings(viaUSB)*”.
Cannotlogin. • Is “Caps Lock” set on the computer’s keyboard while inputting the user
nameandpassword?
PrintingisnotpossiblewhenNetworkPrint
buttonispressed.
• SetthePrinterSettinginthe“NetworkSetting”*.
* Forsettingorcheckingfornetwork,refertotheseparate“N-31SeriesNetworkManual”.
TestPrinting
1)Withthenetworkboard’spoweron(withthedisplaywindowlit),presstheNumberofCopiesbuttonrepeatedlytodisplay
“ ”onthedisplaywindow.
2) PresstheColor/B/W buttontoselectaprintingcolormodeandpresstheOnBoardPrint button.
*Testprintingstarts.
Checktheprint
• Istheeachcolorlineprinteduniformly?
• Aretheremissingdots,palelines,lineswiththinnerinkthanothers,etc.?
Remedy
• Ifthenozzleispartiallychoked,cleanit.
• Ifthequalityoftheprintdoesnotimproveeventhoughthenozzlehasbeencleaned,wipeofftheinkonthesurfaceofte
nozzle.
Fordetails,seethe“User’sGuide”includedwiththeprinter.
*Pleaseseeyourprintermanualforinformationaboutprintingproblems,printermaintenance,anddetailsrelatedtoprinting.
Updatingthenetworkboard’sinternalprogram
SeethePLUSwebsiteforinstructionsonupdatingtheprogramandtodownloadthelatestprogram.
E-33
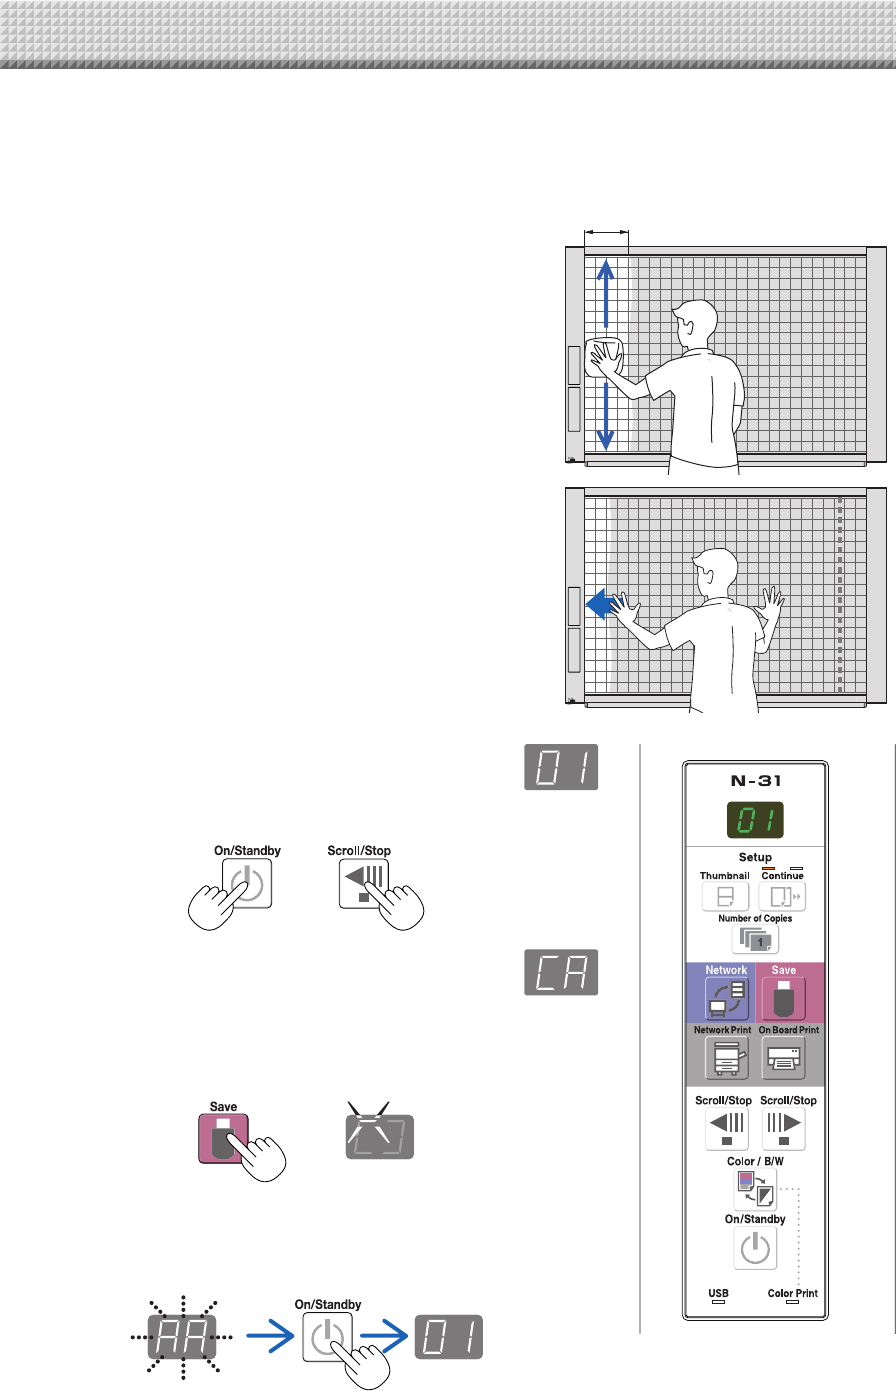
ScanningAdjustment(WhiteCalibration)
If dark lines (horizontal black lines) on a printed out hard copy or image on the screen are generated, you need
to optimally adjust the sensitivity of reading the sheet surface.
If the scanning image does not work due to generation of dark lines, update the program and perform the white
calibration in the following steps.
Preparation:
1. Use the supplied white board cleaner or damp cloth to
clean the 20 cm of width on the left edge of the network
board.
Avoid cleaning the joint part of the sheets. Doing so may cause
incorrect calibration.
20cmorlonger
2. Feed the sheet manually until the half width of cleaned
sheet is covered by the frame of the network board.
Operation
1. Make sure that the network board’s power is turned on.
(Display on the display window is “01”.)
2. Press the Scroll/Stop button (on the left) while pressing and holding
the On/Standby button.
3. Release the buttons.
The display “CAL” will be changed.
* “CA” → “AL” → “L” in this order
4. Press the Save button.
The display on the display window starts rotating and adjusting automati-
cally.
5. When the display on the display window is flashing “AA”, press the
On/Standby button.
The display on the display window returns to “01”, indicating that the
reading adjustment is completed.

E-34
BOARD TYPE (Model name) Standard (N-31S) Wide (N-31W) 4-screen (N-314)
Form
Installation method Self-standing (T-shaped legs), or wall mounting
External dimensions (T-shaped
legs*¹)
W1480 × D675 × H1947*²
mm
W1980 × D675 × H1947*²
mm
W1480 × D675 × H1947*²
mm
Main unit weight 20 kg*³ 25 kg*³ 25 kg*³
T-shaped legs weight 12.5 kg
BOARD
Panel Size H910 × W1300 mm H910 × W1800 mm H910 × W1300 mm
Effective reading size H900 × W1280 mm H900 × W1780 mm H900 × W1280 mm
Number of Pages 2 4
Paging Bi-directional, endless (Horizontal scrolling)
Drive method Sheet movement
Reading method CIS (Contact Image Sensor)
Reading illumination light source RGB LED
Reading resolution Main scanning direction (vertical sheet surface) 1.92 dots/mm (50 dpi or equivalent)
Sub scanning direction (horizontal sheet surface) 1.92 dots/mm (50 dpi or equivalent)
Reading time Black & white: approx. 15 s
Color: approx. 15 s
Black & white: approx. 21 s
Color: approx. 21 s
Black & white: approx. 15 s
Color: approx. 15 s
Interface
Board
File format JPEG, PNG, PDF
Screen size Standard type: 2458 × 1728 dots (fixed)
Wide type: 3418 × 1728 dots (fixed)
External
memory
Type USB Flash memory *4
Compatible FAT
types FAT 16, 32
Interface USB2.0
Network LAN port RJ-45 (10Base-T/100Base-TX)
Supported protocol TCP/IP (FTP, HTTP, DHCP, NetBIOS Name Service)
Printing
Printing resolution 300 dpi or equivalent
No. print colors Eight colors or two color monochrome
Printer interface Conforming to USB 2.0 standards/LAN port
Supported network
printer FTP supported printer
Added functions Clock Used for the timestamp and for file dating properties
PC connection Images can be acquired and device settings made via USB (using a browser)
Power supply AC power adapter Input : AC100–240V/50–60 Hz, Max 0.75 A
Output : DC 12 V, 3.0 A
Power consumption In standby: 3 W, During operation: 12 W (not including printer)
Operating
conditions
Temperature: 10–35°C
Humidity: 30–85% (No condensation)
Miscellaneous Ruled lines 50 mm cross-ruled squares
Miscellaneous Dedicated markers (black, red, blue, and green)
Operating
environment Web browser
Windows: Internet Explorer 8.0 or greater
Macintosh: Safari 5 or greater
* Enable JavaScript.
Remarks
*1: Theheightisadjustableat1747,1847and1947mm.
*2: Thevalueindicatedfor“H”(height)isthemaximumheight.
*3: Notincludingtheweightoftheprinter.
*4: USBmemorydevicenotincluded.Thememorycapacitycorrespondsto32GBorless.
• Pleasenotethatforqualityimprovementpurposes,specificationsanddesignaresubjecttochangewithoutpriornotice.
Specifications
E-35
Appendix
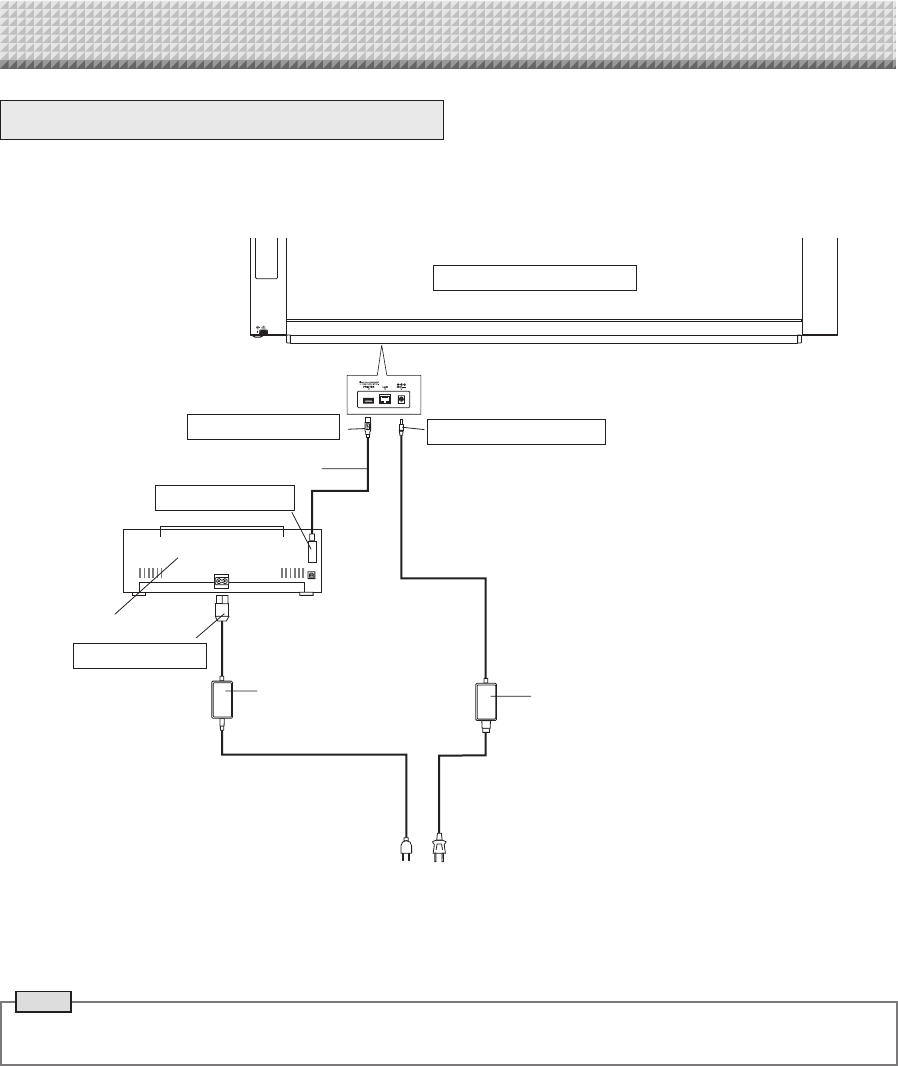
ConnectionsandWiringDiagram
• Theconnectionsandwiringdiagrambelowisincludedhereforcheckingtheconnections.
[NetworkboardandPrinterConnectionsDiagram]
Networkboard front panel
ToPrinterconnector
USBcable(suppliedwiththeprinter)
ToUSBconnector
Printer
ToDCconnector
PrinterACpoweradapter
(suppliedwiththeprinter)
To wall power outlet
ToDCINPUTconnector
ACpoweradapter(supplied)
*Appearanceofprinterisforillustrationpurposes.
Note
• The AC power adapters of accessories and printers that have been verified to be operation many differ from the ones
shownontheconnectionsdiagram(theymaybeofthebuilt-inormounted-ontype).

26-4606-11C