PLUS N-31SW COPYBOARD User Manual part 2 of 2
PLUS Corporation COPYBOARD Users Manual part 2 of 2
UserManual.wiki
>
PLUS
>
N-31SW User Manual
>
Users Manual - part 2 of 2
Contents
1.
Users Manual - part 1 of 2
2.
Users Manual - part 2 of 2
Users Manual - part 2 of 2
Navigation menu
Upload a User Manual
Namespaces
Wiki Guide
HTML
PDF
Info
Views
User Manual
Discussion / Help
Navigation
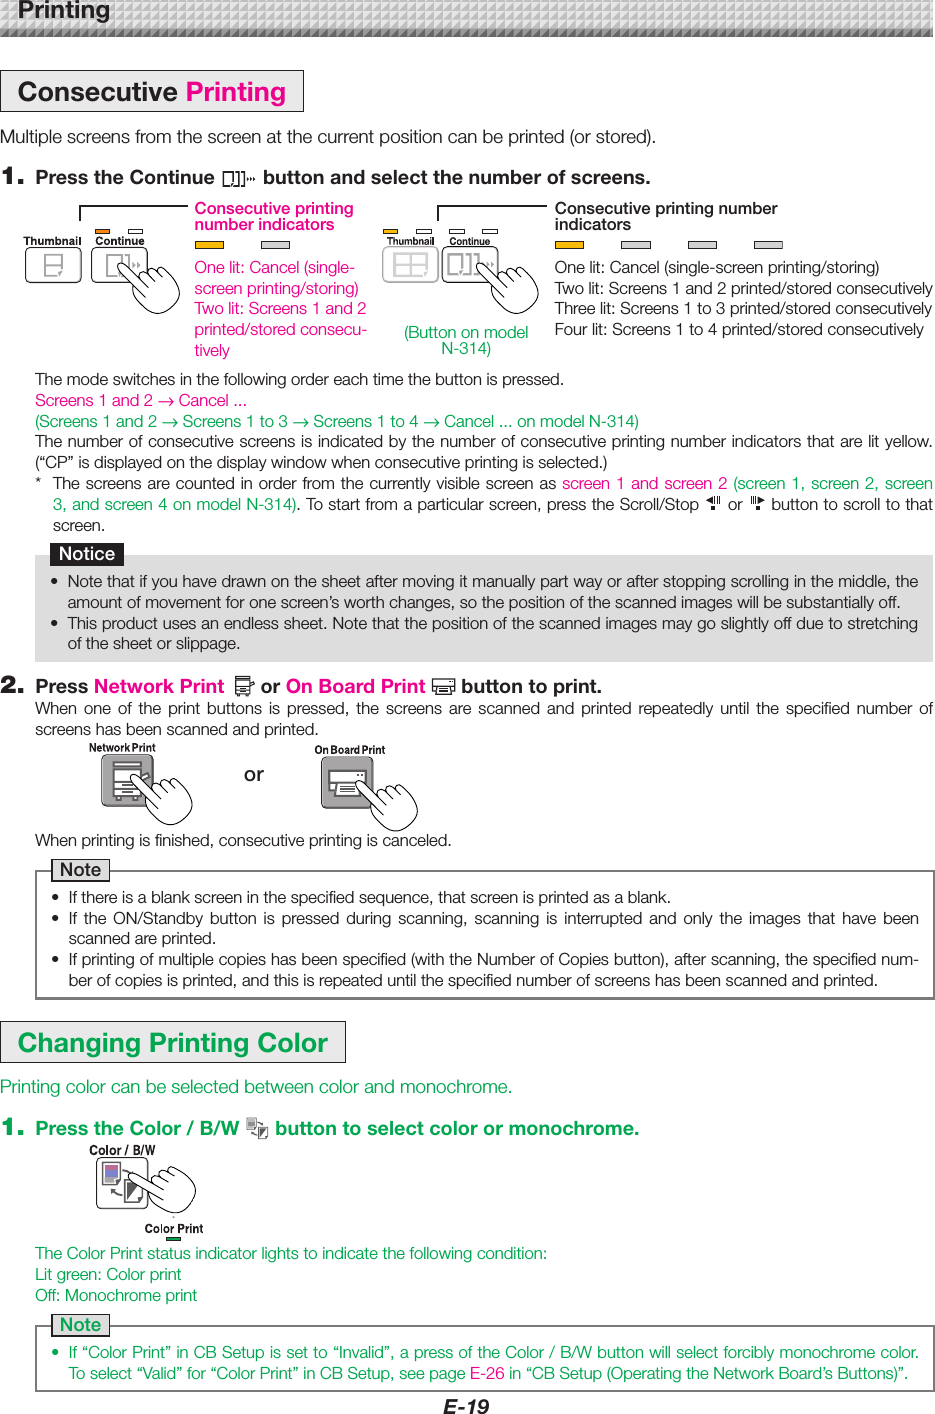

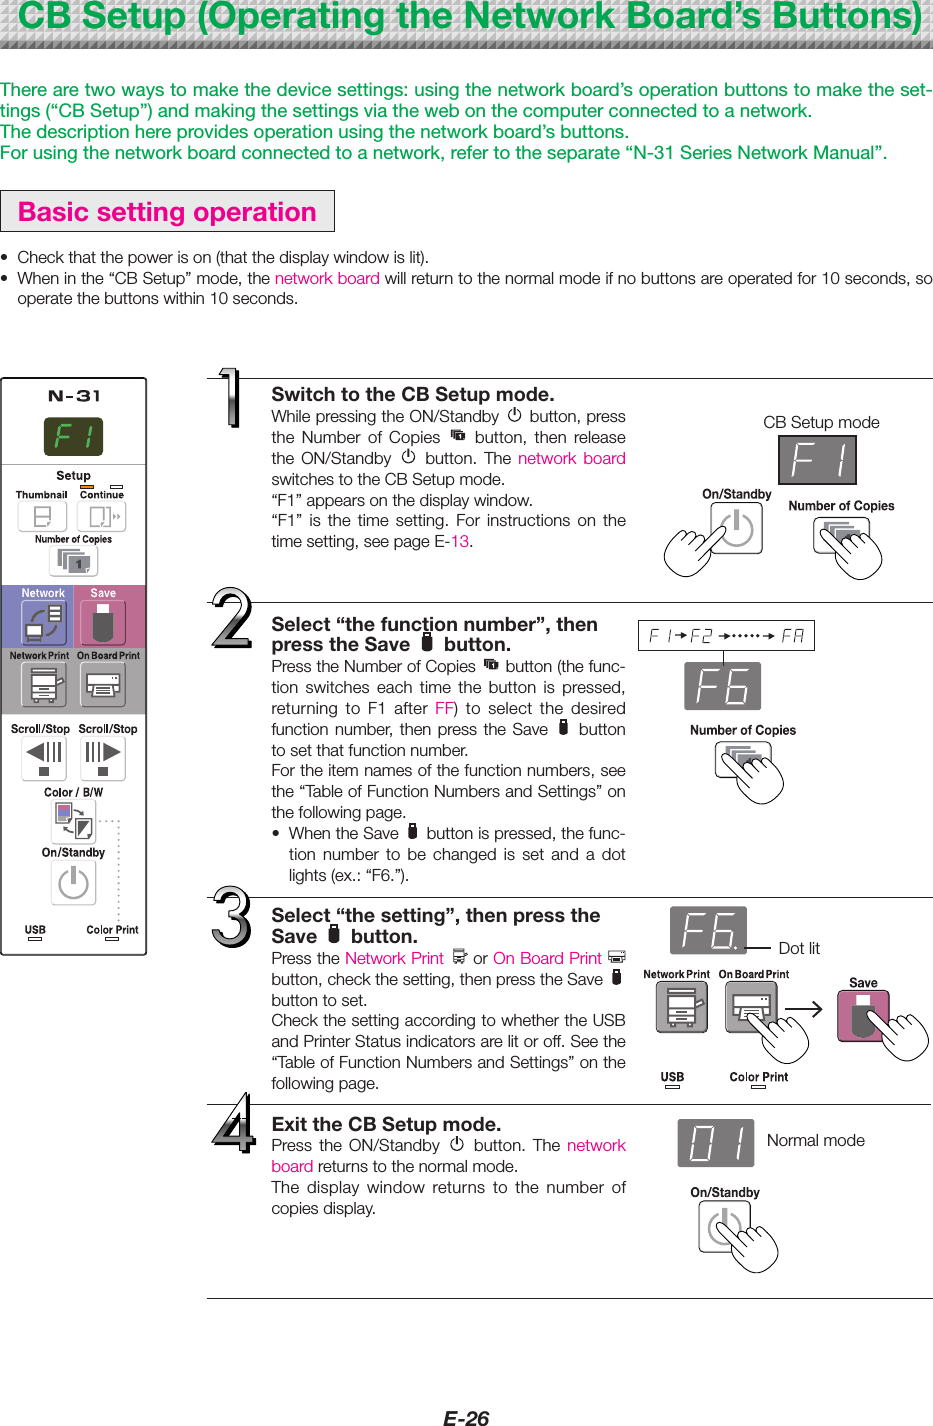
![E-23DeletingUSBmemoryimagefileswiththecom-puterBeforedeletingimportantimage files, be sureto savethemonthecomputer(asadatabackup).1. Open“MyComputer(or“Computer”)”andthenopenthedriveiconwhichshowsUSBmemory.The folder named “CB_Image” contains the memory stor-agedataofthenetworkboard.2. Placethe“CB_Image”folderinthe“Recy-cleBin”,rightclickontheiconandselect“EmptyRecycleBin”fromthepull-downmenu.Allofthedatacontainedin“CB_Image”willbedeleted.Even when the entire folder is deleted, a new CB_Imagefolder will be created automatically when USB memory isusedagainwiththenetworkboard. DragtotheRecycleBinDisconnecttheUSBmemoryThe disconnecting procedure depends on the computer’soperatingsystem.Fordetails,refertothecomputer’soperatinginstructionsorhelpfiles.1. Clickthe[HardwareRemoval] iconthatisdisplayedinthetasktray.Click “Stop USB Mass storage Device - drive (E)”. (The Edrivecharacterwilldifferdependingonthepersonalcom-putersystem.)2. Whenthe“USBmassstoragedevicecanbesafelyremoved.”screenisdisplayed,clickthedisplay.3. Click[X]toclose.ThisallowstheUSBmemorydevicetobeunpluggedfromthecomputer.Note• Do not disconnect the USB memory device while theUSBmemorydevice’saccessindicatorisflashing.Doingsowilldamagethedata.• The USB drive may not be disconnected properly, forexampleifthecomputerisintheprocessofcheckingthestatusofperipherals.“Removehardware”icon(example)UsingUSBMemory](https://usermanual.wiki/PLUS/N-31SW.Users-Manual-part-2-of-2/User-Guide-2397146-Page-5.png)
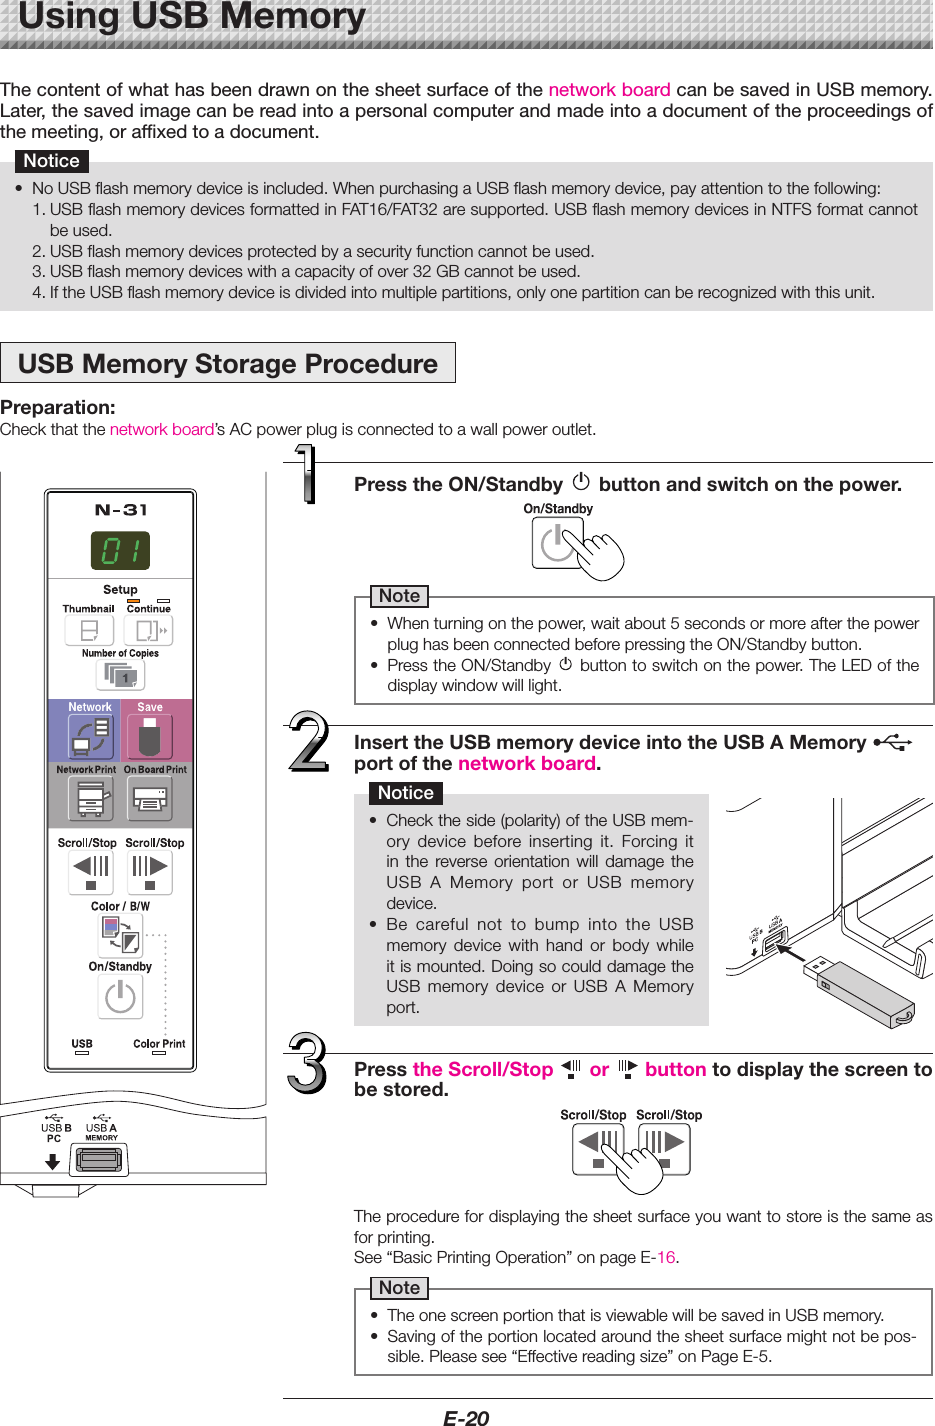
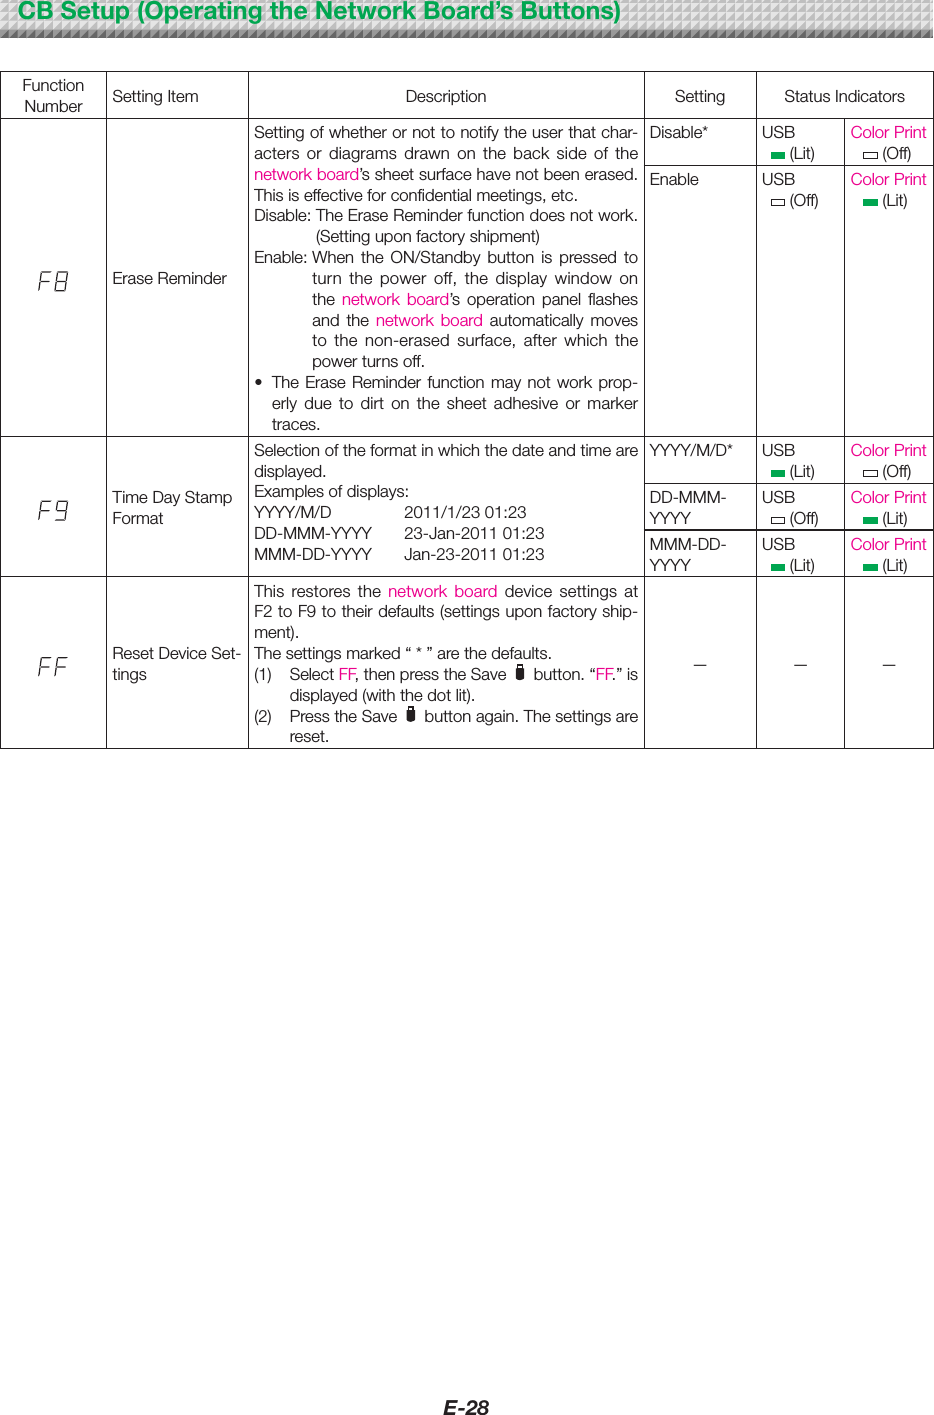
![E-25DragtoMyDocumentsOnthecomputer,open“MyComputer”,andfromthereopenthenetworkboardidentifiedasaremovabledevice.(1) Double-clickthe“MyComputer”(or“Computer”)icontoopenit.(2) Whenthedevice icon for thenetwork board (displayed as a removabledisk) isdouble-clicked, the networkboard’s inter-nalmemoryopens.The“CBImage”fileisthescannedimagefile(“.jpg”,“.png”or“.pdf”,accordingtosetting).• The“setup”foldercontainsthesimplenetworksettingsfile.(3) Copy the “CBImage” file to [My Documents], etc., on thecomputer(“.jpg”,“.png”or“.pdf”,accordingtosetting).To disconnect the USB cable, follow the procedure in step 3 onpageE-23.Notethattheimagedatainthenetworkboard’scomputerstoragememoryisdeletediftheoperationfordisconnectingtheUSBcon-nectionbetweenthenetworkboardandcomputerisperformedatthistime.NoteIf both USB memory device and computer are connected tothe network board, data is saved in memory for PC. Data isnotsavedinmemoryforUSB.• The “setup” folder will be created in memory for PC. Thisfolder contains the “setting.ini” file recording the firmwareversion,MACaddress,networksettings. For details, refer to the separate “N-31 Series NetworkManual”.Usingthenetworkboardconnectedtoacomputer](https://usermanual.wiki/PLUS/N-31SW.Users-Manual-part-2-of-2/User-Guide-2397146-Page-7.png)
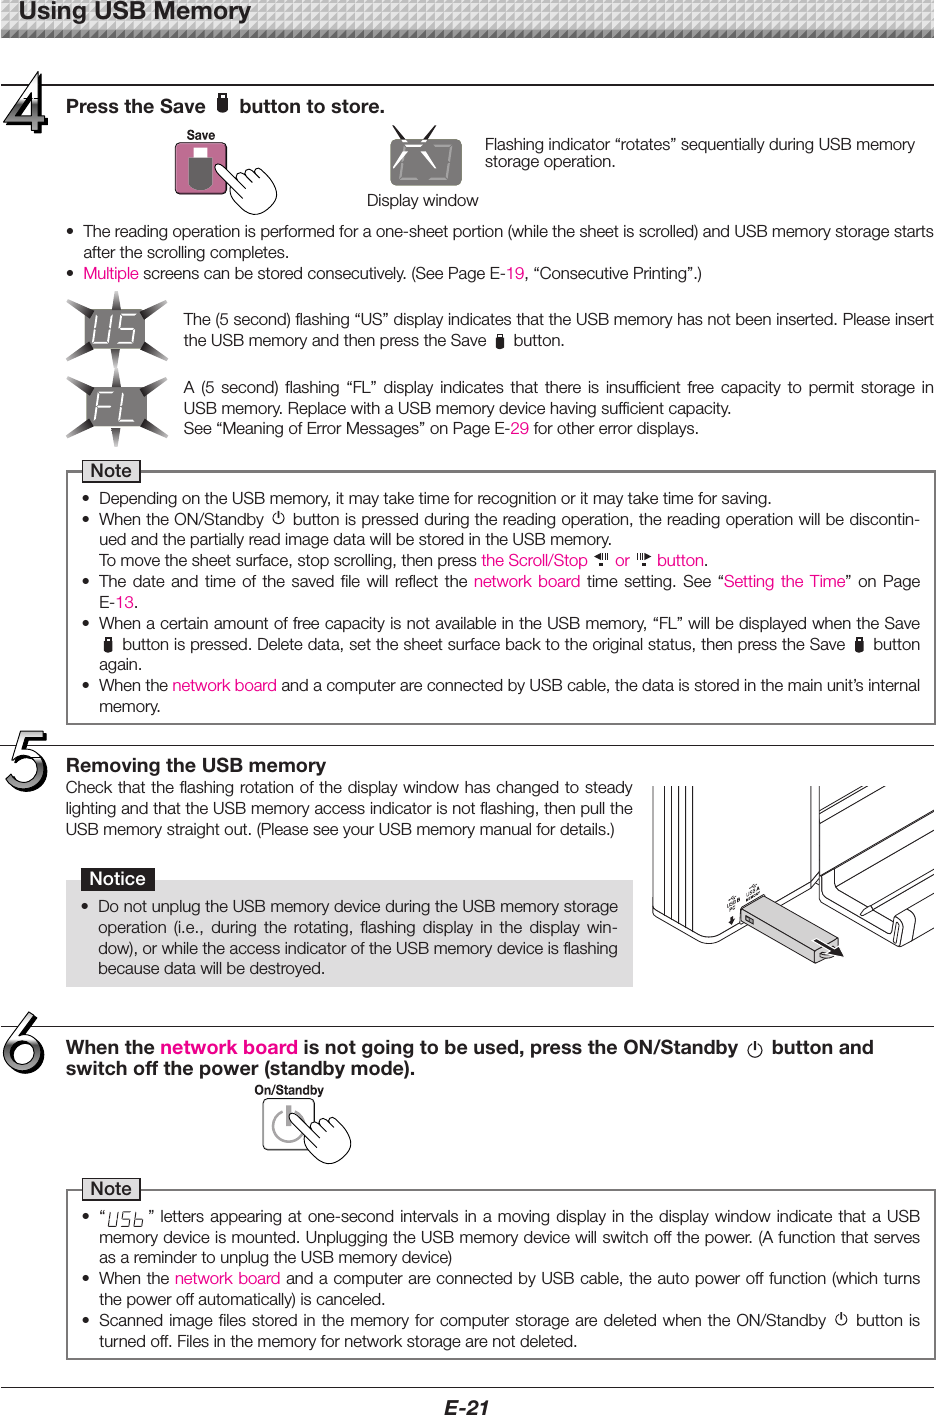
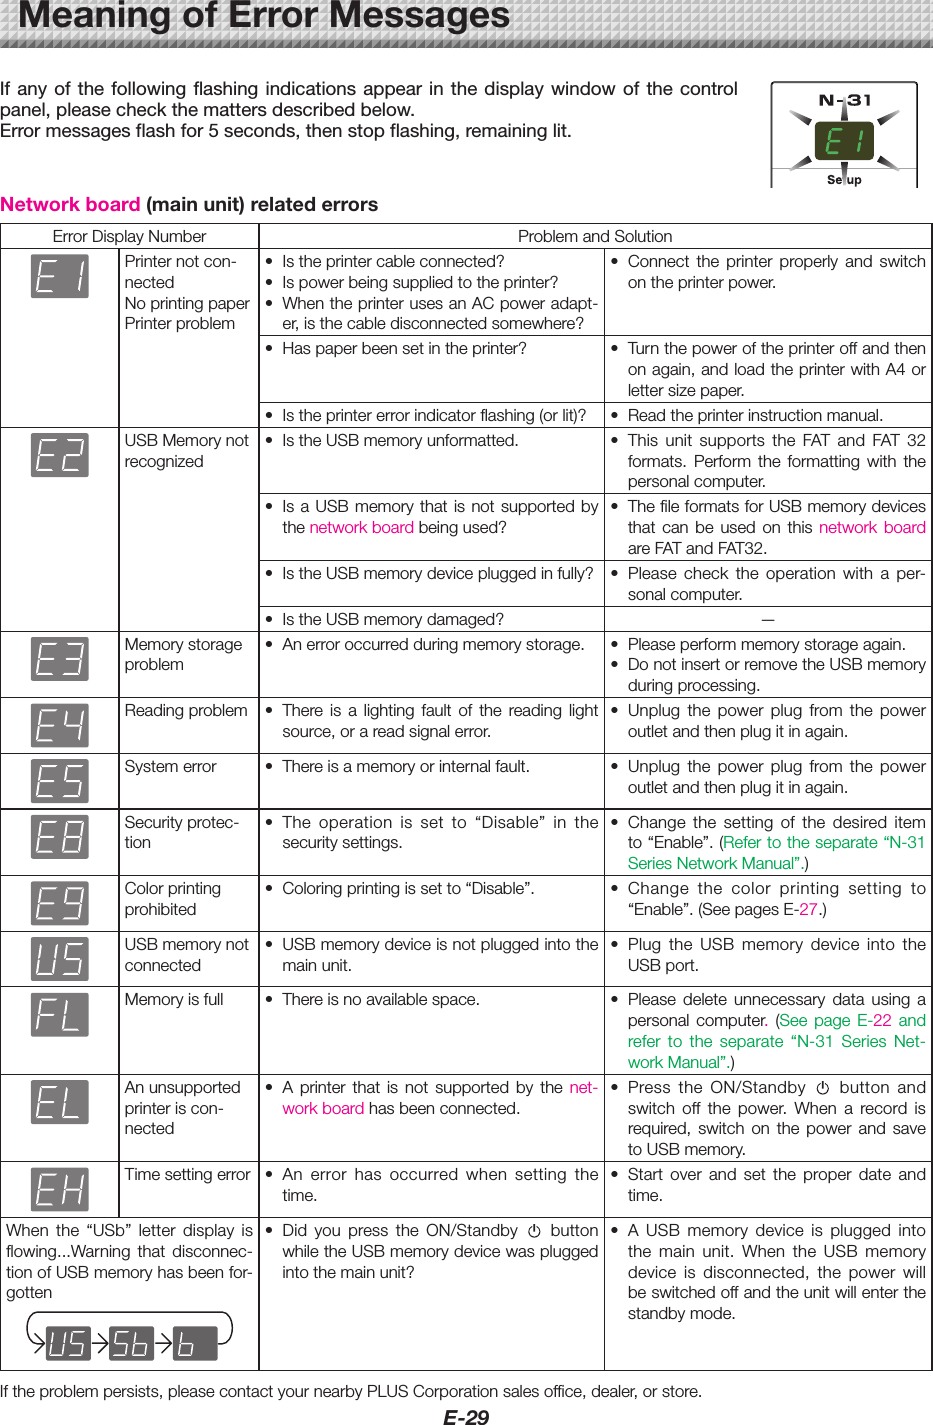
![E-27TableofFunctionNumbersandSettingsFunctionNumber SettingItem Description Setting StatusIndicatorsTimeSettingThedateandtimearestampedontheprintingpaperand recorded in the file information when files arestored.Year,month,day,hours,minutesNot litPaperSizeSelectionofwhethertoprintinA4papersizeorlettersize.• This operates when the network board is con-nectedtoaprinter.A4* USB (Lit)ColorPrint (Off)Letter USB (Off)ColorPrint (Lit)AspectRatioSet-tingSelection of the image’s vertical-to-horizontal ratio(aspectratio)whenprinting.EqualRatio:Theimageisprintedwiththesameratioasthenetworkboard’ssheetsurface.Compressed:The image is compressed in the hori-zontal direction to the ratio of A4 orlettersizepaperforprinting(ex:circlesbecomeellipses).Compressed* USB (Lit)ColorPrint (Off)EqualRatio* USB (Off)ColorPrint (Lit)ColorPrintingIfthisissetto[Invalid],colorprintingisnotpossible.Valid:Whenthisisset,colorprintingispossible.Invalid:Whenthisisset,colorprintingisnotpossible.Valid* USB (Lit)ColorPrint (Off)Invalid USB (Off)ColorPrint (Lit)ResolutionSelectionoftheimagefile’sresolution.Standard:Thevertical/horizontal sizeof the scannedimage is set to 1/2. The amount of datais 1/4 that of when “High Resolution” isselected.HighResolution:Theimagefilehasthesameresolu-tionasthescannedimage(vertical/horizontal size of 1/1). The picturequality is better than when “Stan-dard”isselected.Standard USB (Lit)ColorPrint (Off)HighResolu-tion*USB (Off)ColorPrint (Lit)GraphicsFileFormatSelectionoftheformatinwhichimagefilesaresaved.ScannedimagesareconvertedintoJPEG(extension“.jpg”), PNG (extension “.png”) or PDF (extension“.pdf”)format.JPEG USB (Lit)ColorPrint (Off)PNG* USB (Off)ColorPrint (Lit)PDF USB (Lit)ColorPrint (Lit)Header/FooterSettingofwhetherornottooutputtheheader/footerinformationregisteredonthenetworkboard.“Off”:Theheader/footerinformationisnotoutput.“On”: The header/footer information is output whenprintingandwhensavingimagefiles.Note:• Headersandfootersrefertotheinformationatthetop and bottom margins, respectively, of printedpagesorimages.Titles,companynames orothercharacters or images can be inserted so that thesameinformationisprovidedonallpages.• Header/footer information is registered on thenetwork board via a network. For instructions oncreatingandregisteringheadersandfooters,refer totheseparate“N-31SeriesNetworkManual”.• Depending on the type of printer, the colors maydifferfromtheactualgraphicimage.Off* USB (Lit)ColorPrint (Off)On USB (Off)ColorPrint (Lit)CBSetup(OperatingtheNetworkBoard’sButtons)continuedonnextpage](https://usermanual.wiki/PLUS/N-31SW.Users-Manual-part-2-of-2/User-Guide-2397146-Page-9.png)
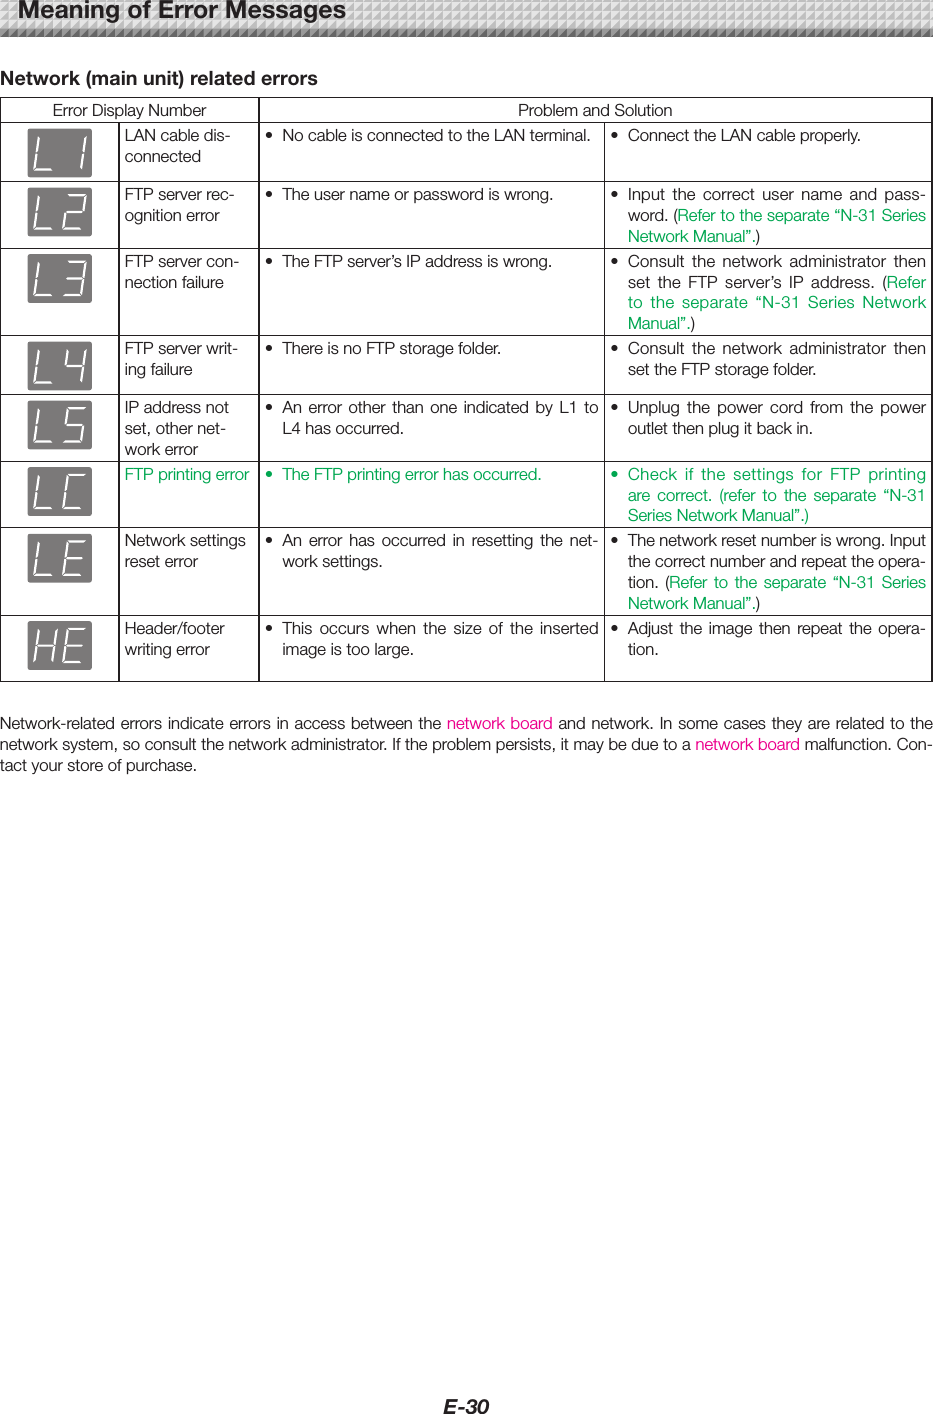
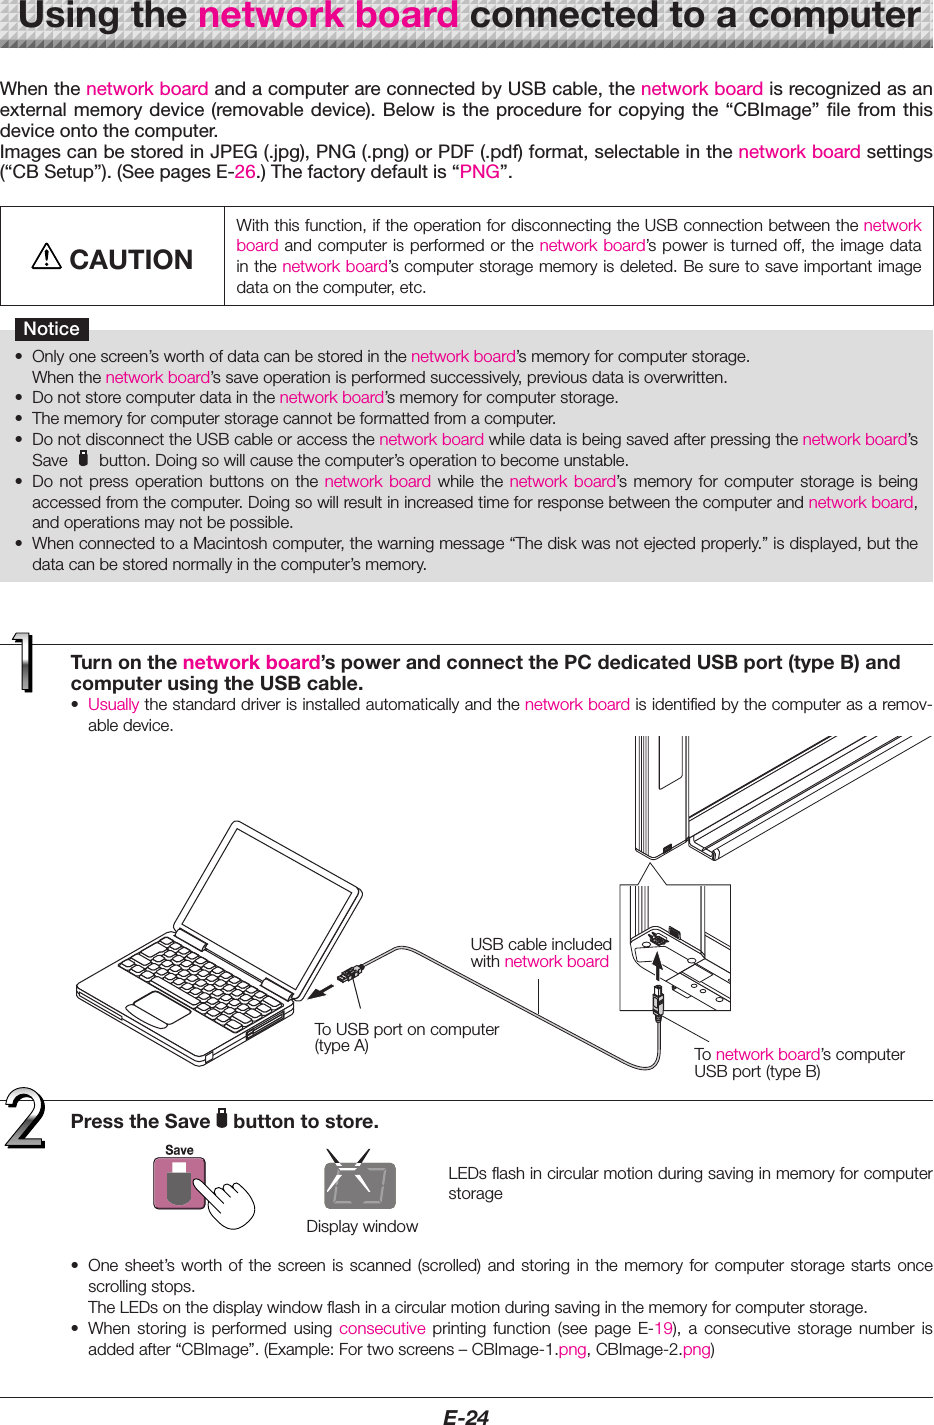
![E-35AppendixConnectionsandWiringDiagram• Theconnectionsandwiringdiagrambelowisincludedhereforcheckingtheconnections.[NetworkboardandPrinterConnectionsDiagram]Networkboard front panelToPrinterconnectorUSBcable(suppliedwiththeprinter)ToUSBconnectorPrinterToDCconnectorPrinterACpoweradapter(suppliedwiththeprinter)To wall power outletToDCINPUTconnectorACpoweradapter(supplied)*Appearanceofprinterisforillustrationpurposes.Note• The AC power adapters of accessories and printers that have been verified to be operation many differ from the onesshownontheconnectionsdiagram(theymaybeofthebuilt-inormounted-ontype).](https://usermanual.wiki/PLUS/N-31SW.Users-Manual-part-2-of-2/User-Guide-2397146-Page-17.png)