PROMILES THN128-01 Thermo Sensor (Transmitter) User Manual NOTICES LONGUES WS 500TLL
PROMILES Thermo Sensor (Transmitter) NOTICES LONGUES WS 500TLL
UserManual.wiki
>
PROMILES
>
THN128 01 User Manual
User Manual
Navigation menu
Upload a User Manual
Namespaces
Wiki Guide
HTML
PDF
Info
Views
User Manual
Discussion / Help
Navigation
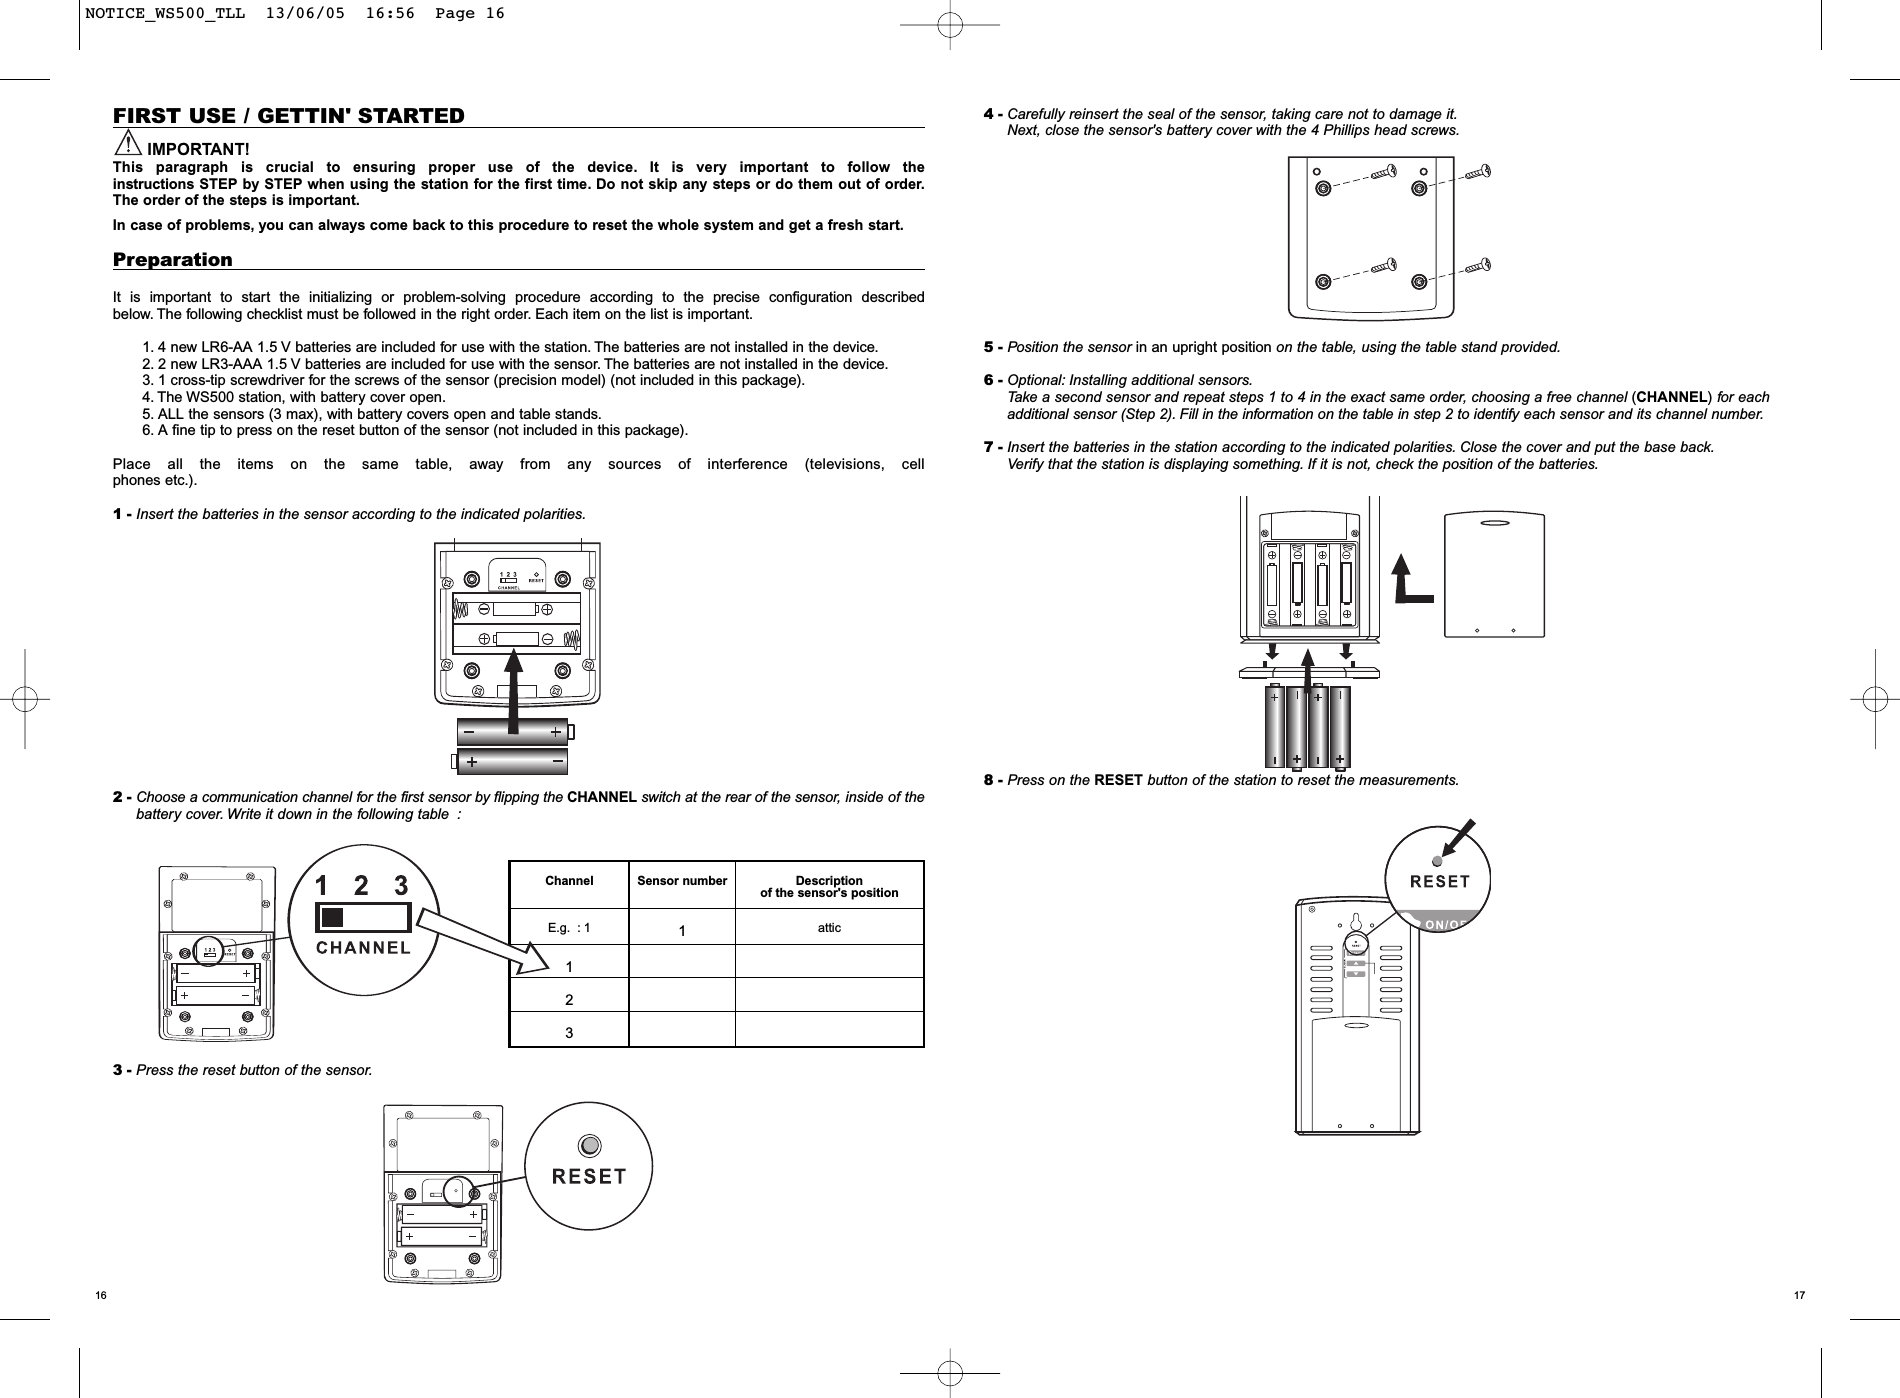
![1514Channel button [CHANNEL]Use this button to select the channel of the remote sensor. Each time this button is pressed, window A.2 in the main unit displays the channel number and the outdoor temperature measured by the corresponding remote sensor.Memory button [MIN/MAX]Use this button to display in windows A.2 and A.3 the minimum, maximum or current temperatures recorded by the main unitand the remote sensor.Alarm button [ALARM]Use this button to change the time display mode A.7 and change the time and date settings (see section on setting the timeand the date)..Mode button [MODE]Use this button to change the time display mode A.7 and change the time and date settings (see section on setting the timeand the date).and UP [up arrow] and DOWN [down arrow] buttonsUse these buttons to increase or decrease the displayed value when changing a setting.Alarm button [ON/OFF]This button activates and deactivates the alarm.Weather forecastsChannel numberIndoor temperatureOutdoor temperatureRadio control indicatorAlarm indicatorTime – date - alarmWe thank you for purchasing the Géonaute WS500 weather station. This device indicates the weather conditions for the next 12-24 hours by measuring trends in atmospheric pressure. Italso lets you see at a glance the indoor temperature, the outdoor temperature (measured bya wireless sensor) and the time and date.Thanks to the weather information provided by this station, you can anticipate changes in theweather, and bring the right gear along to your outdoor sports activities.Read these instructions carefully before using this device and save them as long as you have the product.LIMITED WARRANTYDECATHLON guarantees the initial purchaser that this weather station is free from any defects related to the materials or manufacture for a period of two years from the date of purchase. Please keep your receipt as proof of purchase.•This guarantee does not cover damage resulting from misuse, from a failure to respect the precautions for use or from accidents; neither does this guarantee cover damage resulting from improper maintenance or from use of the item for commer-cial purposes.•This guarantee does not cover damage resulting from repairs carried out by parties not authorized by DECATHLON.•The guarantees contained here explicitly replace all other guarantees including the implicit guarantee of fair and trade qualityand/or adaptation to use. DECATHLON cannot under any circumstances be held responsible for any damage, be it direct orindirect, general or specific, caused by or related to these directions for use or the products they describe.•During the guarantee period, the item will either be repaired free of charge by an authorized repair service or replaced free ofcharge (depending on the distributor).•The guarantee does not cover batteries or cracked or broken casings where signs of a blow are evident.USE/PRECAUTIONS FOR USEDescription of normal operating conditions : The weather station is designed to measure theindoor temperature (at the receiver) and outdoor temperature (at the wireless sensor). It displays a local weather forecast, calculated from barometric measurements, for the upcoming 12 to 24 hours.It gives the time in 2 time zones and features a daily alarm.Restrictions on use /Precautions for use• Handle the device with care; do not drop it or bang it.• Do not dismantle the device or the sensor. Doing so would nullify the Décathlon warranty and may damage the device. This point doesnot concern the procedure of changing the batteries, described under the heading "Changing the batteries".• Please read instructions carefully before use and operate the device under normal operating conditions.• The receiver is not watertight. It is designed for indoor use. Place it on a flat, stable surface or fasten it to the wall in a well-ventila-ted, clean room, away from direct sunlight.• The wireless sensor is resistant to splashes, but it should never be immersed in water or exposed to heavy rain.Avoid prolonged exposure to direct sunlight and wind.• Do not expose the receiver or the sensor to extreme temperatures. In wintertime, cold temperatures reduce the power and life-time of the sensor's batteries. This means that at cold temperatures (0°C), the sensor may stop transmitting a signal although it wastransmitting atsummer temperatures (20°C). To solve the problem, bring the sensor closer or use rechargeable Ni-MH batteries,which are less sensitive to the cold, and change the batteries more often.• Like any device utilizing radio transmission, the receiver and the wireless sensor are sensitive to electromagneticinterference. Do not place them near electromagnetic sources (televisions, computers, cordless telephones, electrical equipment)which may impair their functioning.Recycling :The "crossed-out trash can" symbol means that this product, as well as the batteries it contains, are made of recy-clable materials. They should not be disposed of with municipal waste.When no longer needed, dispose of the batteries, as well as the electronic product, at a recycling collection loca-tion.Recycling electronic waste protects the environment and your health.GBA1A2A3A5B2A4A7B4B1A6B3B7C4C2C1C3A1A2A3A5A6A7A4Battery compartmentReset buttonStandWall mountC1C2C3C4B1B2B3B6B5B5 B6B4B7NOTICE_WS500_TLL 13/06/05 16:56 Page 14](https://usermanual.wiki/PROMILES/THN128-01/User-Guide-605167-Page-2.png)


![2322If you want to deactivate the clock's automatic synchronizing feature, press on the [downarrow] button for three seconds. The radio reception sign disappears.The unit no lon-ger responds to the radio signals DCF77.If you want to reactivate the clock's automatic synchronizing feature, press on the [uparrow] button for three seconds. The radio reception sign starts flashing to automati-cally initiate reception.If the station is not less than 1,000 km from Frankfurt (Germany), e.g. in the USA and inall the countries of North and South America, in China and all the Asian countriesor in places where surrounding conditions prevent proper receptionof the signal, set the clock and the calendar manually as explained in the following pro-cedure.3-2 Setting the time and the calendar manuallyTo set the time manually in a 24-h display, press the MODE button in for three seconds. The hour numbers will flash.Press on the [up arrow] or [down arrow] button to increase or decrease the time readout. Keep pressing down on either buttonto fast forward or reverse the time readout.Press on the MODE button to confirm. The minute numbers will flash.Repeat the same procedure to set the minutes, the date, the month, the language display, the day of the week and to switchto the alternative time zone.For the language display, you can select English (E), German (D), French (F) or Italian (I).The days of the week are displayed in the usual order: Monday through Sunday, in the previously selectedlanguage.For the alternative time zone, indicated by the ZONE icon, enter the time difference using the [up arrow] or [down arrow] but-ton. The unit calculates the time in this zone depending on the time difference.IMPORTANT :The alternative time zone should be used if you live in a country that receives the Frankfurt signal but has a time differencewith Germany. In this case, set the display by pressing repeatedly on MODE to display the alternative time zone and set therelevant time difference.(MODE 4)If you do not want to change any of the items, simply press on the MODE button to go to the next item.When all the items have been set, press on the MODE button to exit and the display will return to the last displaymode you selected.3-3 Setting the alarmThis device features two different alarms: ALARM1 and ALARM2. You can use them together or separately.To set the alarms :1Press on the ALARM button once to select ALARM1 or twice to select ALARM2.The last alarm time set will be dis-played. If you have not set the alarm yet, the time displayed will be 0: 00.2Press on the ALARM button for three seconds and the hour numbers will flash.3Enter the new time using the [down arrow] or [up arrow] button.4Press on the ALARM button. The minute numbers will flash.5Enter the minutes using the [down arrow] or [up arrow] button.6Press on the ALARM button to exit. The [alarm] icon of the selected alarm is displayed, indicating that the alarm is nowon. You can also turn the alarm on by pressing on the ON/OFF button on the back of the device.The alarm will go off at the set time, getting louder four times, in twenty-second intervals. If you do not turn it off, the alarm willstop automatically after a total of two minutes.If the alarm is stopped when the first alarm rings, the alarm is automatically deactivated.To stop the alarm, you can either press on the ALARM button or on the ON/OFF button. Pressing on the ALARM button stopsthe alarm, but leaves the alarm on so that it will go off again the next day. However, if you press on the ON/OFF button, thealarm stops and is deactivated.2 - Displays the temperatures2 -1 Outdoor temperatures (remote sensors)This window displays the temperature in Celsius (°C) as measured by the wireless sensors transmitting data to the main unit.On the left side of the window, the number 1, 2 or 3 specifies the communication channel assigned to each remote sensor dis-played (see the first use section, selecting the channel).Use the memory function to display in this window the minimum and maximum temperatures, which have been saved automa-tically. The respective indicators MAX and MIN are displayed.The icon on the left-hand side indicates the status of the main unit's reception of data transmitted by the remote sensor.There are three possible displays :A low battery indicator alerts you when the batteries of the remote sensor are low.Measuring range of the outdoor temperature : -20.0°C to +60.0°CMeasuring accuracy +/- 0.5°CTransmission frequency: 433 MHzTransmitting distance: 30 meters maximum Interval between 2 outdoor temperature measurements : around 30 seconds2-2 Indoor temperature (at the station)This window displays the indoor temperature in Celsius (°C) as measured by the main unit.Use the memory function to display in this window the minimum and maximum temperatures, which have been saved automa-tically.The respective MAX and MIN indicators are displayed.Measuring range of the indoor temperature: -5.0°C to +50.0°CMeasuring accuracy +/- 0.5°C2-3 Displaying memorized temperatures•The maximum and minimum temperatures are automatically saved as soon as they are measured. To display the maximumtemperature, press once on the Min/Max button. Press on the Min/Max button again to display the minimum temperature.Repeat the same procedure to return to the current temperature display.• To erase the memory, press on the Min/Max button and hold it down for three seconds. The saved temperatures are erased,so if you press on the Min/Max button, the maximum and minimum temperatures will be the same as the current temperature.3 - Displaying the time, the date and the alarmThis device features four different display modes for this window :Each time you press on the MODE button, you switch to the next display in the order indicated above.Mode 1 :Hour – minutes – seconds (local time)Day - month (local date)Mode 2 : Hour – minutes – day of the week (local date)Day – month (local date)Mode 3 : Hour – minutes – day of the week (local date)Hour – minutes (alternative time zone)Mode 4 : Hour – minutes– day of the week (of the second zone)Day – month (alternative time zone)The ALARM ON icon indicates if alarms 1 and 2 are on.3-1 Setting the timeThis device is designed to automatically synchronize its clock and calendar when it is within range of the signal DCF77 inFrankfurt.On the left-hand side, this window displays the radio frequency status indicator.When the unit receives the radio signal, the RADIO RECEPTION sign starts flashing. Total reception takes around tenminutes, depending on the strength of the radio signal. When reception is complete, the RADIO RECEPTION sign stops flas-hing. The reception strength indicator remains on until a new synchronizing cycle begins. To improve reception, move the unitaway from metal objects and electric items to reduce interference.Deactivating the radio-control settingThe unit is searchingThe temperature values are recordingin good conditionsAbsent signalStrongWeakNo receptionReceptionNOTICE_WS500_TLL 13/06/05 16:56 Page 22](https://usermanual.wiki/PROMILES/THN128-01/User-Guide-605167-Page-6.png)