PROMILES THN128-01 Thermo Sensor (Transmitter) User Manual NOTICES LONGUES WS 500TLL
PROMILES Thermo Sensor (Transmitter) NOTICES LONGUES WS 500TLL
PROMILES >
User Manual

NOTICE_WS500_TLL 13/06/05 16:56 Page 140
1514
Channel button [CHANNEL]
Use this button to select the channel of the remote sensor. Each time this button is pressed, window A.2 in the main unit
displays the channel number and the outdoor temperature measured by the corresponding remote sensor.
Memory button [MIN/MAX]
Use this button to display in windows A.2 and A.3 the minimum, maximum or current temperatures recorded by the main unit
and the remote sensor.
Alarm button [ALARM]
Use this button to change the time display mode A.7 and change the time and date settings (see section on setting the time
and the date)..
Mode button [MODE]
Use this button to change the time display mode A.7 and change the time and date settings (see section on setting the time
and the date).
and UP [up arrow] and DOWN [down arrow] buttons
Use these buttons to increase or decrease the displayed value when changing a setting.
Alarm button [ON/OFF]
This button activates and deactivates the alarm.
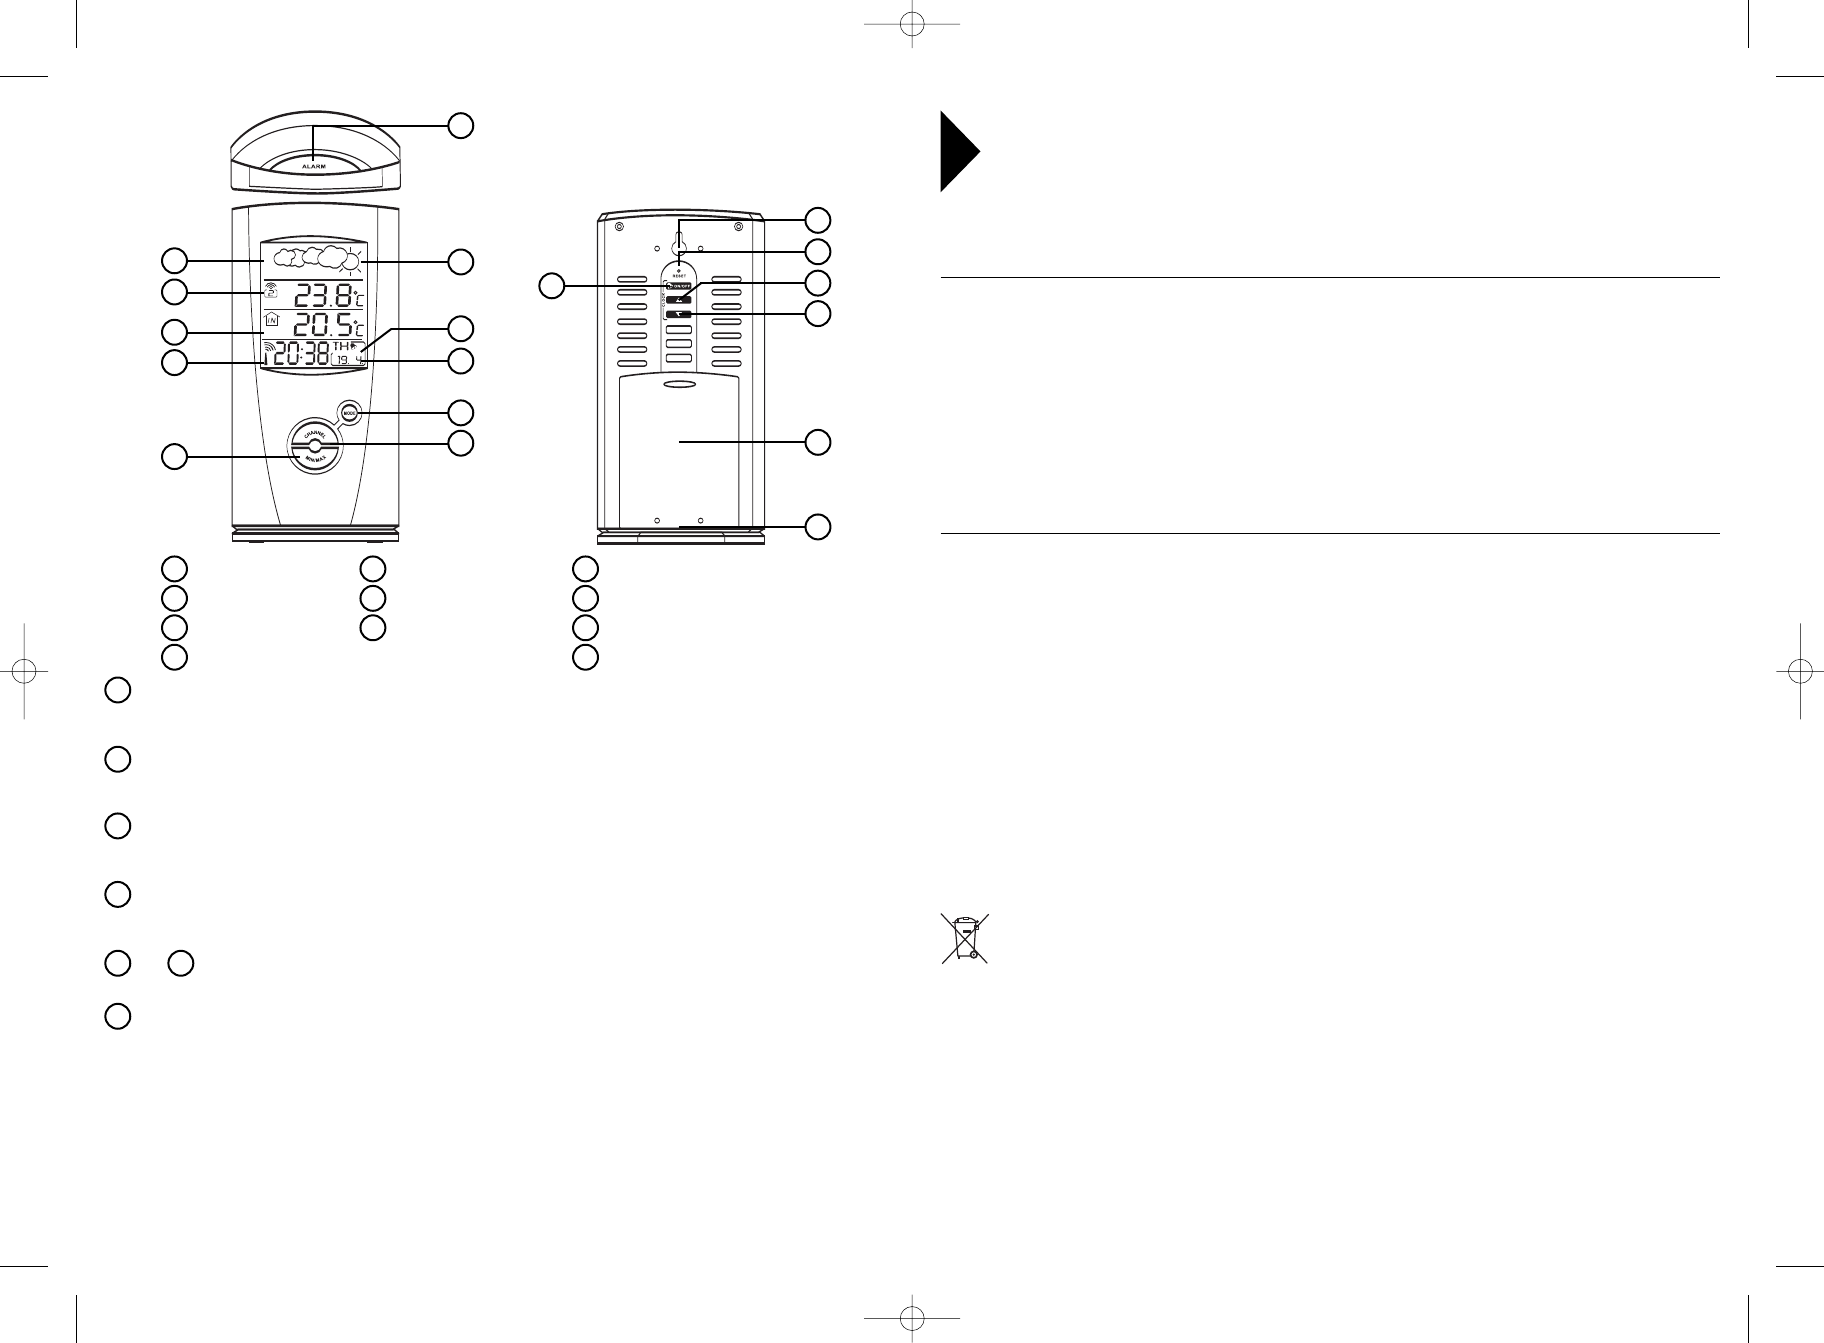
Weather forecasts
Channel number
Indoor temperature
Outdoor temperature
Radio control indicator
Alarm indicator
Time – date - alarm
We thank you for purchasing the Géonaute WS500 weather station. This device indicates the
weather conditions for the next 12-24 hours by measuring trends in atmospheric pressure. It
also lets you see at a glance the indoor temperature, the outdoor temperature (measured by
a wireless sensor) and the time and date.
Thanks to the weather information provided by this station, you can anticipate changes in the
weather, and bring the right gear along to your outdoor sports activities.
Read these instructions carefully before using this device and save them as long as you have the
product.
LIMITED WARRANTY
DECATHLON guarantees the initial purchaser that this weather station is free from any defects related to the materials or
manufacture for a period of two years from the date of purchase. Please keep your receipt as proof of purchase.
•This guarantee does not cover damage resulting from misuse, from a failure to respect the precautions for use or from
accidents; neither does this guarantee cover damage resulting from improper maintenance or from use of the item for commer-
cial purposes.
•This guarantee does not cover damage resulting from repairs carried out by parties not authorized by DECATHLON.
•The guarantees contained here explicitly replace all other guarantees including the implicit guarantee of fair and trade quality
and/or adaptation to use. DECATHLON cannot under any circumstances be held responsible for any damage, be it direct or
indirect, general or specific, caused by or related to these directions for use or the products they describe.
•During the guarantee period, the item will either be repaired free of charge by an authorized repair service or replaced free of
charge (depending on the distributor).
•The guarantee does not cover batteries or cracked or broken casings where signs of a blow are evident.
USE/PRECAUTIONS FOR USE
Description of normal operating conditions : The weather station is designed to measure the
indoor temperature (at the receiver) and outdoor temperature (at the wireless sensor). It displays a local weather forecast,
calculated from barometric measurements, for the upcoming 12 to 24 hours.
It gives the time in 2 time zones and features a daily alarm.
Restrictions on use /Precautions for use
• Handle the device with care; do not drop it or bang it.
• Do not dismantle the device or the sensor. Doing so would nullify the Décathlon warranty and may damage the device. This point does
not concern the procedure of changing the batteries, described under the heading "Changing the batteries".
• Please read instructions carefully before use and operate the device under normal operating conditions.
• The receiver is not watertight. It is designed for indoor use. Place it on a flat, stable surface or fasten it to the wall in a well-ventila-
ted, clean room, away from direct sunlight.
• The wireless sensor is resistant to splashes, but it should never be immersed in water or exposed to heavy rain.
Avoid prolonged exposure to direct sunlight and wind.
• Do not expose the receiver or the sensor to extreme temperatures. In wintertime, cold temperatures reduce the power and life-
time of the sensor's batteries. This means that at cold temperatures (0°C), the sensor may stop transmitting a signal although it was
transmitting atsummer temperatures (20°C). To solve the problem, bring the sensor closer or use rechargeable Ni-MH batteries,
which are less sensitive to the cold, and change the batteries more often.
• Like any device utilizing radio transmission, the receiver and the wireless sensor are sensitive to electromagnetic
interference. Do not place them near electromagnetic sources (televisions, computers, cordless telephones, electrical equipment)
which may impair their functioning.
Recycling :
The "crossed-out trash can" symbol means that this product, as well as the batteries it contains, are made of recy-
clable materials. They should not be disposed of with municipal waste.
When no longer needed, dispose of the batteries, as well as the electronic product, at a recycling collection loca-
tion.
Recycling electronic waste protects the environment and your health.
GB
A1
A2
A3
A5
B2
A4
A7
B4
B1
A6
B3
B7
C4
C2
C1
C3
A1
A2
A3
A5
A6
A7
A4
Battery compartment
Reset button
Stand
Wall mount
C1
C2
C3
C4
B1
B2
B3
B6
B5
B5 B6
B4
B7
NOTICE_WS500_TLL 13/06/05 16:56 Page 14
1716
4 - Carefully reinsert the seal of the sensor, taking care not to damage it.
Next, close the sensor's battery cover with the 4 Phillips head screws.
5 - Position the sensor in an upright position on the table, using the table stand provided.
6 - Optional: Installing additional sensors.
Take a second sensor and repeat steps 1 to 4 in the exact same order, choosing a free channel (CHANNEL)for each
additional sensor (Step 2). Fill in the information on the table in step 2 to identify each sensor and its channel number.
7 - Insert the batteries in the station according to the indicated polarities. Close the cover and put the base back.
Verify that the station is displaying something. If it is not, check the position of the batteries.
8 - Press on the RESET button of the station to reset the measurements.
FIRST USE / GETTIN' STARTED
IMPORTANT!
This paragraph is crucial to ensuring proper use of the device. It is very important to follow the
instructions STEP by STEP when using the station for the first time. Do not skip any steps or do them out of order.
The order of the steps is important.
In case of problems, you can always come back to this procedure to reset the whole system and get a fresh start.
Preparation
It is important to start the initializing or problem-solving procedure according to the precise configuration described
below. The following checklist must be followed in the right order. Each item on the list is important.
1. 4 new LR6-AA 1.5 V batteries are included for use with the station. The batteries are not installed in the device.
2. 2 new LR3-AAA 1.5 V batteries are included for use with the sensor. The batteries are not installed in the device.
3. 1 cross-tip screwdriver for the screws of the sensor (precision model) (not included in this package).
4. The WS500 station, with battery cover open.
5. ALL the sensors (3 max), with battery covers open and table stands.
6. A fine tip to press on the reset button of the sensor (not included in this package).
Place all the items on the same table, away from any sources of interference (televisions, cell
phones etc.).
1 - Insert the batteries in the sensor according to the indicated polarities.
2 - Choose a communication channel for the first sensor by flipping the CHANNEL switch at the rear of the sensor, inside of the
battery cover. Write it down in the following table :
3 - Press the reset button of the sensor.
Channel Sensor number Description
of the sensor's position
E.g. : 1 1attic
1
2
3
NOTICE_WS500_TLL 13/06/05 16:56 Page 16
1918
12 - To enter setting mode, press on the MODE button for 3 seconds. Change the parameters with the arrows located on the
back of the device and switch form one parameter to another by pressing on MODE (see relevant section).
13 - Weather condition settings: the weather condition display does not require any adjustments. It starts with "cloudy weather"
and gradually adjusts within 24 hours.
However, if after 24 hours there is a large discrepancy between local weather and the weather displayed on the station, you
can force the station to initialize by pressing with a fine tip on the station's RESET button. In this case, steps 9 to 12 have to
be redone.
Place the station and the sensors in their permanent locations. Make sure to position the sensors upright and not to exceed
the distances recommended in the instructions, depending on whether there are obstacles between the sensor and the sta-
tion or not.
14 - Scroll through the various outdoor temperature channels by pressing on the "CHANNEL"button and verify that the
temperature measured by each of the sensors is displayed on the screen. If it is not, press simultaneously on MIN/MAX
and CHANNEL to initialize data transmission. If no temperature is displayed, start over, first bringing the unrecognized
sensor closer to the station.
9 - Display channel 1 in the outdoor temperature field, by pressing repeatedly on the CHANNEL button.
10 - Press simultaneously on MIN/MAX and CHANNEL to initiate transmission. The symbol above number 1 starts flashing.
11 - Display channel 2 by pressing on CHANNEL.Initialize transmission by pressing simultaneously on MIN/MAX and
CHANNEL. Repeat the operation for each channel utilized by the sensors, according to the information filled in the table
in step 2.
Setting the time: the station automatically sets the time by connecting with the atomic clock of Frankfurt (Germany). The
"antenna" icon in the lower left-hand corner of the screen flashes while this connection is being made. When the
connection has been made, the icon is displayed constantly with a symbol indicating the status of reception of the time
signal.
If after a few minutes the time has not set automatically, or if the time indicated does not correspond to your time zone,
set the time manually, following the procedure indicated in the corresponding section of the instructions (p 11/3-2).
NOTICE_WS500_TLL 13/06/05 16:56 Page 18

2120
Mounting the remote sensor
The remote sensor is fitted with a two-screw wall mount. It can also be placed on a horizontal surface with the folding table stand.
IMPORTANT:
The sensor and the station must be placed in upright positions for the signal to be transmitted
properly !
Transmission distance
IMPORTANT:
The maximum transmission distances of the signal vary according to the surrounding materials and electromagnetic
interference. The table below describes typical distances in different situations :
NAVIGATION SYSTEM
This device features 4 display lines for easy reading.
Each line has a precise function:
•weather forecasts,
• outdoor temperatures
• indoor temperature
• time, alarm, calendar.
EXPLANATION OF EACH DISPLAY
1 - Displays weather forecasts
This device is capable of detecting changes in local atmospheric pressure.
Based on the gathered data, this device can forecast local weather for the next 12 to 24 hours.
The accuracy of the weather forecasts is 70% to 75%.
IMPORTANT:
The weather indicated does not necessarily reflect the current situation. Rather, it indicates the situation for the next 12 to 24
hours. It is a FORECAST. At night, the "sunny" icon means clear weather.
Batteries
Installing the batteries in the remote sensor and selecting the channel
The remote sensor runs on two AAA (LR3) 1.5 V batteries. To install them and select the channel:
1. Unscrew the cover of the battery compartment.
2. Select the channel number using the CHANNEL switch. If you are simply changing the batteries, do not change the posi-
tion of the CHANNEL switch. Note that once a channel has been assigned to a sensor, you can only change it by remo-
ving the batteries or resetting the unit.
3. Insert the batteries strictly according to the polarities as indicated in the battery compartment.
4. Put the battery compartment cover back on and reinsert the screws.
Once the batteries have been inserted in the sensor, data transmission will occur in thirty-second intervals.
Installing the batteries in the main unit.
Once you have installed the batteries in the remote sensor, you can install the four AA (LR6) 1.5 V batteries in the main unit.
To do so :
1. Gently remove the battery compartment cover.
2. Insert the batteries strictly according to the polarities as indicated in the battery compartment.
3. Put the battery compartment cover back on.
Note :For both the remote sensor and the main unit, change the batteries as soon as they are low. The low battery indicator
is in the indoor/outdoor temperature window and is displayed as soon as the batteries are low.
Installation
Mounting the main unit
This unit can be mounted on a wall using the screw head hole (C4). It can also be placed on a flat surface using the table stand
(C3).
Indications
displayed
on the unit
Display Sunny Cloudy slightly
overcast Rainy
C4
C3
Outdoors, no obstacles
Small obstacles (window, plywood
door, wooden table, couch)
Electric devices (stereo system, TV,
computer, washing machine, microwave)
Radio devices, satellite antenna,
cell phone
Brick walls
Reinforced concrete wall, several walls
20-25 m
15-20 m
10-15 m
10-15 m
with risks of random disconnections
10-15 m
5 m or no transmission
NOTICE_WS500_TLL 13/06/05 16:56 Page 20
2322
If you want to deactivate the clock's automatic synchronizing feature, press on the [down
arrow] button for three seconds. The radio reception sign disappears.The unit no lon-
ger responds to the radio signals DCF77.
If you want to reactivate the clock's automatic synchronizing feature, press on the [up
arrow] button for three seconds. The radio reception sign starts flashing to automati-
cally initiate reception.
If the station is not less than 1,000 km from Frankfurt (Germany), e.g. in the USA and in
all the countries of North and South America, in China and all the Asian countries
or in places where surrounding conditions prevent proper reception
of the signal, set the clock and the calendar manually as explained in the following pro-
cedure.
3-2 Setting the time and the calendar manually
To set the time manually in a 24-h display, press the MODE button in for three seconds. The hour numbers will flash.
Press on the [up arrow] or [down arrow] button to increase or decrease the time readout. Keep pressing down on either button
to fast forward or reverse the time readout.
Press on the MODE button to confirm. The minute numbers will flash.
Repeat the same procedure to set the minutes, the date, the month, the language display, the day of the week and to switch
to the alternative time zone.
For the language display, you can select English (E), German (D), French (F) or Italian (I).
The days of the week are displayed in the usual order: Monday through Sunday, in the previously selected
language.
For the alternative time zone, indicated by the ZONE icon, enter the time difference using the [up arrow] or [down arrow] but-
ton. The unit calculates the time in this zone depending on the time difference.
IMPORTANT :
The alternative time zone should be used if you live in a country that receives the Frankfurt signal but has a time difference
with Germany. In this case, set the display by pressing repeatedly on MODE to display the alternative time zone and set the
relevant time difference.(MODE 4)
If you do not want to change any of the items, simply press on the MODE button to go to the next item.
When all the items have been set, press on the MODE button to exit and the display will return to the last display
mode you selected.
3-3 Setting the alarm
This device features two different alarms: ALARM1 and ALARM2. You can use them together or separately.
To set the alarms :
1Press on the ALARM button once to select ALARM1 or twice to select ALARM2.The last alarm time set will be dis-
played. If you have not set the alarm yet, the time displayed will be 0: 00.
2Press on the ALARM button for three seconds and the hour numbers will flash.
3Enter the new time using the [down arrow] or [up arrow] button.
4Press on the ALARM button. The minute numbers will flash.
5Enter the minutes using the [down arrow] or [up arrow] button.
6Press on the ALARM button to exit. The [alarm] icon of the selected alarm is displayed, indicating that the alarm is now
on. You can also turn the alarm on by pressing on the ON/OFF button on the back of the device.
The alarm will go off at the set time, getting louder four times, in twenty-second intervals. If you do not turn it off, the alarm will
stop automatically after a total of two minutes.
If the alarm is stopped when the first alarm rings, the alarm is automatically deactivated.
To stop the alarm, you can either press on the ALARM button or on the ON/OFF button. Pressing on the ALARM button stops
the alarm, but leaves the alarm on so that it will go off again the next day. However, if you press on the ON/OFF button, the
alarm stops and is deactivated.
2 - Displays the temperatures
2 -1 Outdoor temperatures (remote sensors)
This window displays the temperature in Celsius (°C) as measured by the wireless sensors transmitting data to the main unit.
On the left side of the window, the number 1, 2 or 3 specifies the communication channel assigned to each remote sensor dis-
played (see the first use section, selecting the channel).
Use the memory function to display in this window the minimum and maximum temperatures, which have been saved automa-
tically. The respective indicators MAX and MIN are displayed.
The icon on the left-hand side indicates the status of the main unit's reception of data transmitted by the remote sensor.
There are three possible displays :
A low battery indicator alerts you when the batteries of the remote sensor are low.
Measuring range of the outdoor temperature : -20.0°C to +60.0°C
Measuring accuracy +/- 0.5°C
Transmission frequency: 433 MHz
Transmitting distance: 30 meters maximum
Interval between 2 outdoor temperature measurements : around 30 seconds
2-2 Indoor temperature (at the station)
This window displays the indoor temperature in Celsius (°C) as measured by the main unit.
Use the memory function to display in this window the minimum and maximum temperatures, which have been saved automa-
tically.The respective MAX and MIN indicators are displayed.
Measuring range of the indoor temperature: -5.0°C to +50.0°C
Measuring accuracy +/- 0.5°C
2-3 Displaying memorized temperatures
•The maximum and minimum temperatures are automatically saved as soon as they are measured. To display the maximum
temperature, press once on the Min/Max button. Press on the Min/Max button again to display the minimum temperature.
Repeat the same procedure to return to the current temperature display.
• To erase the memory, press on the Min/Max button and hold it down for three seconds. The saved temperatures are erased,
so if you press on the Min/Max button, the maximum and minimum temperatures will be the same as the current temperature.
3 - Displaying the time, the date and the alarm
This device features four different display modes for this window :
Each time you press on the MODE button, you switch to the next display in the order indicated above.
Mode 1 :Hour – minutes – seconds (local time)
Day - month (local date)
Mode 2 : Hour – minutes – day of the week (local date)
Day – month (local date)
Mode 3 : Hour – minutes – day of the week (local date)
Hour – minutes (alternative time zone)
Mode 4 : Hour – minutes– day of the week (of the second zone)
Day – month (alternative time zone)
The ALARM ON icon indicates if alarms 1 and 2 are on.
3-1 Setting the time
This device is designed to automatically synchronize its clock and calendar when it is within range of the signal DCF77 in
Frankfurt.
On the left-hand side, this window displays the radio frequency status indicator.
When the unit receives the radio signal, the RADIO RECEPTION sign starts flashing. Total reception takes around ten
minutes, depending on the strength of the radio signal. When reception is complete, the RADIO RECEPTION sign stops flas-
hing. The reception strength indicator remains on until a new synchronizing cycle begins. To improve reception, move the unit
away from metal objects and electric items to reduce interference.
Deactivating the radio-control setting
The unit is searching
The temperature values are recording
in good conditions
Absent signal
Strong
Weak
No reception
Reception
NOTICE_WS500_TLL 13/06/05 16:56 Page 22

2524
SPECIFICATIONS Ð TROUBLESHOOTING TABLE
Troubleshooting
This troubleshooting table will guide you in solving minor incidents. Use it to analyze any problems you may encounter. Carry out
the problem-solving procedures in numerical order.
IMPORTANT :
For any other problems than those described above, or for any problems you cannot solve alone, place the station and
the sensors on a table and carry out STEP by STEP the initializing procedure as described in the Gettin' Started
section. The order of the steps is VERY IMPORTANT.
Resetting/RESET
Use this button C.2 if the device is not working satisfactorily or if it is malfunctioning. Use a stylus to press the button in. All the
settings return to their initial default values. Now carry out the manual setting and display customization procedures again.
CARE AND MAINTENANCE
A few tips for the care and maintenance of the weather station :
1. Never immerse this device. If the unit comes into contact with water, dry it immediately with a soft, lint-free cloth.
2. Never use an abrasive or corrosive cleaner on this device. Abrasive cleaners may scratch the plastic parts and corrode
the electronic circuit.
3. Do not expose this unit to excessive pressure, shocks, dust, extreme temperatures or damp. Such treatment would
cause malfunctioning, reduce the lifetime of the electronic circuit, damage the batteries and deform the product.
4. Do not dismantle the device and do not touch the internal components. Doing so would nullify the warranty and could
damage components that cannot be repaired by the user.
Only use brand new batteries. Do not mix brand new batteries with old batteries as the old ones may leak.
REGULATIONS
R&TTE
May be used in EU countries.
Complies with European directive 99/5/EC
FCC
This device complies with Part 15 of the FCC Rules. Operation is subject to the following two conditions:
(1) This device may not cause harmful interference, and
(2) This device must accept any interference received, including interference that may cause undesired operation.
Warning: Changes or modifications to this unit not expressly approved by the party responsible for compliance could void the
user's authority to operate the equipment.
NOTE: This equipment has been tested and found to comply with the limits for a Class B digital device, pursuant to Part 15 of
the FCC Rules. These limits are designed to provide reasonable protection against harmful interference in a residential installation.
This equipment generates, uses and can radiate radio frequency energy and, if not installed and used in accordance with the
instructions, may cause harmful interference to radio communications.
However, there is no guarantee that interference will not occur in a particular installation. If this equipment does cause harmful
interference to radio or television reception, which can be determined by turning the equipment off and on, the user is encouraged
to try to correct the interference by one or more of the following measures:
- Reorient or relocate the receiving antenna.
- Increase the separation between the equipment and receiver.
- Connect the equipment into an outlet on a circuit different from that to which the receiver is connected.
- Consult the dealer or an experienced radio/TV technician for help.
Important: Any changes or modifications not explicitly approved by DŽcathlon ma y nullifythe authorization granted to
the user to utilize the equipment.
CONTACT
As we strive to continually improve the products we develop, we are interested in your feedback regarding the quality, the func-
tionality and the usage of our products.
In France, please call the customer service center at: 0810 080808 (local call rate)
For any other country, please leave a message under the relevant heading on our website: www.decathlon.com
We promise to answer you promptly.
Incident
1 The station is not dis-
playing the temperature
measured by the sensor.
---.- is displayed in the " out-
door temperature field "
2 The temperature is
displayed, but is very
different from the expected
value.
3 The displayed weather
conditions do not corres-
pond to reality.
4 The time indicated is
different from the actual
time.
Solution
1.1 - Connection lost : the signal sent by the sensor is not being received by the sta-
tion.
Force the connection to reset by pressing simultaneously on MIN/MAX and CHANNEL.
The symbol above the channel number flashes while the connection is being made.
1.2 - The channel displayed is not the right one :
Check the parameters of the sensor (position of the CHANNEL switch inside of the sen-
sor's battery cover), verify that the number of the channel displayed on the station mat-
ches the number of the switch in the sensor. If this is not the case, press on the CHAN-
NEL button of the station to scroll through the channels until you find the right number.
1.3 - The sensor has fallen or is lying down.
The sensor's antenna will only work properly if the sensor is in an upright position. Use
the stand provided to ensure that the sensor is in the right position.
1.4 - The sensor and the station are too far apart or transmission is hindered by interfe-
rence-generating objects (concrete walls, antennas etc.) Bring the sensor closer or
eliminate the interference, then reset transmission (MIN/MAX + CHANNEL).
1.5 - The sensor's batteries are low, so the sensor does not have enough power for
data transmission.
Change the sensor's batteries, then reset transmission (MIN/MAX + CHANNEL).
2.1 - The MIN/MAX mode has been displayed by mistake.
Press repeatedly on MIN/MAX to display the current temperature.
2.2 - The sensor is exposed to a local microclimate : a source of heat (e.g. heating
pipe,chimney etc.) or cold (draft) is affecting the temperature measurement very
locally.
Move the sensor away from this source of temperature interference.
3.1 - The calculation algorithm has not had enough time to calculate the forecasts.
Wait at least 24 hours to obtain a reliable forecast.
3.2 - You have changed the altitude of the station.
Wait 24 hours. If the forecasts are still not reliable then, press on RESET and wait ano-
ther 24 hours.
3.3 - In any other case:
Press on RESET and wait 24 hours.
4.1 - The time displayed is the time of the second time zone ; verify that the "ZONE"
icon is not displayed:
As needed, press several times on MODE to display local time.
4.2 - You are not in the same time zone as FRANKFURT
Program the time difference with Frankfurt, then display the time of the time zone as the
local time ; see the relevant section for programming instructions.
4.3 - You are not within range of the antenna in Frankfurt (around 1,000 km).
The antenna icon, in the bottom left-hand corner of the screen, is not displayed.
NOTICE_WS500_TLL 13/06/05 16:56 Page 24
5. Under the environment with radio frequency interference, the sample may malfunction and require user to reset the
sample.
6. Under the environment with electrostatic discharge, the captioned model could not maintain communication link and
require user to reset the sample.
Company Name: Decathlon Promiles - Health & Discovery Dept -
Address: 43A Middlesex Turnpike, Burlington, MA 01803
Tel: 781 270 9200