Palm 810 PDA With Bluetooth User Manual Getting Started with Your Zire XX Handheld
Palm Inc PDA With Bluetooth Getting Started with Your Zire XX Handheld
UserManual.wiki
>
Palm
>
810 User Manual
User Manual
Navigation menu
Upload a User Manual
Namespaces
Wiki Guide
HTML
PDF
Info
Views
User Manual
Discussion / Help
Navigation

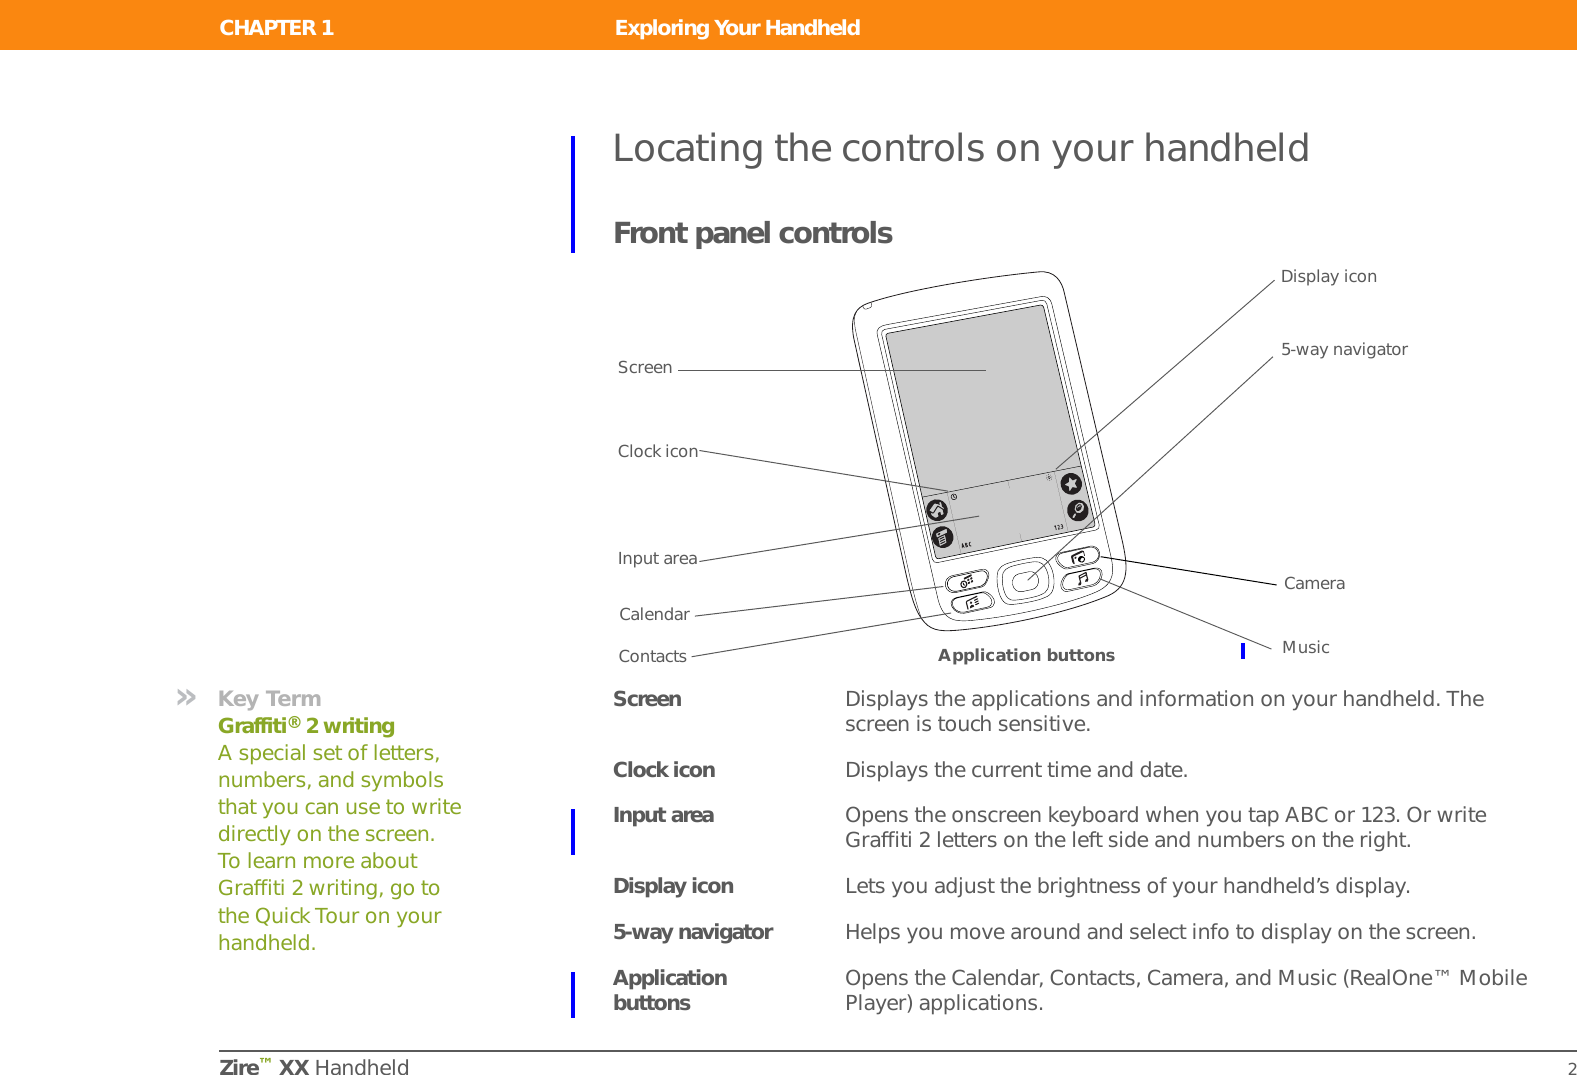
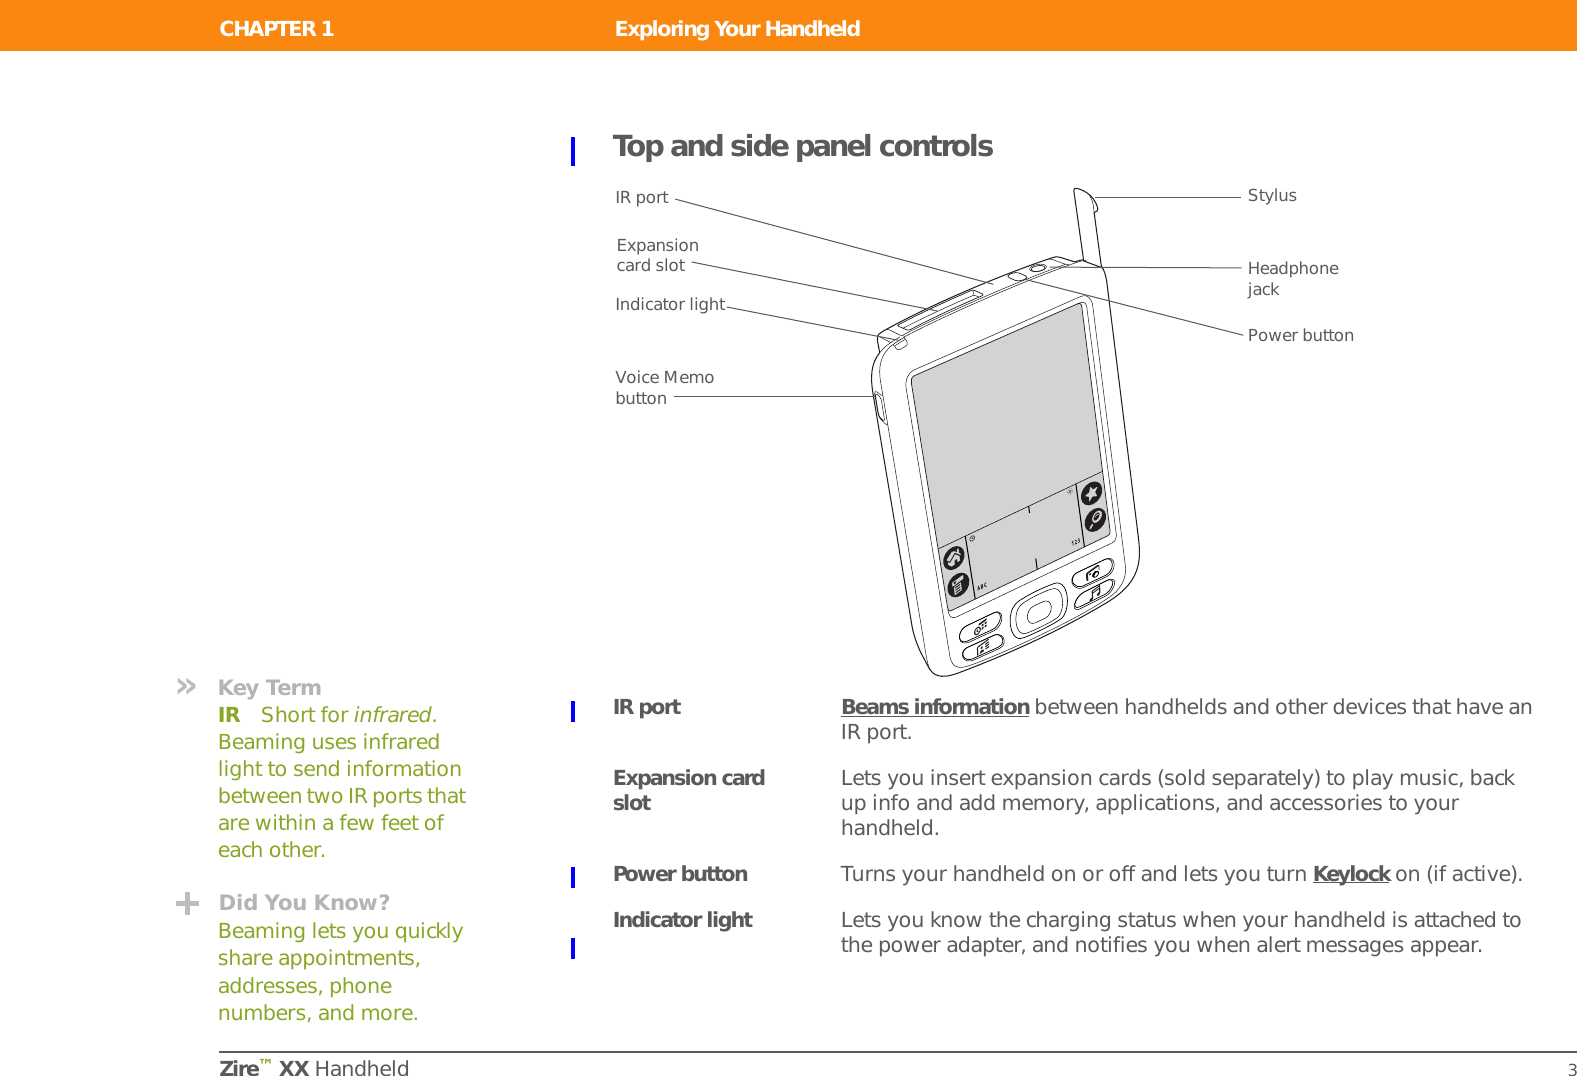
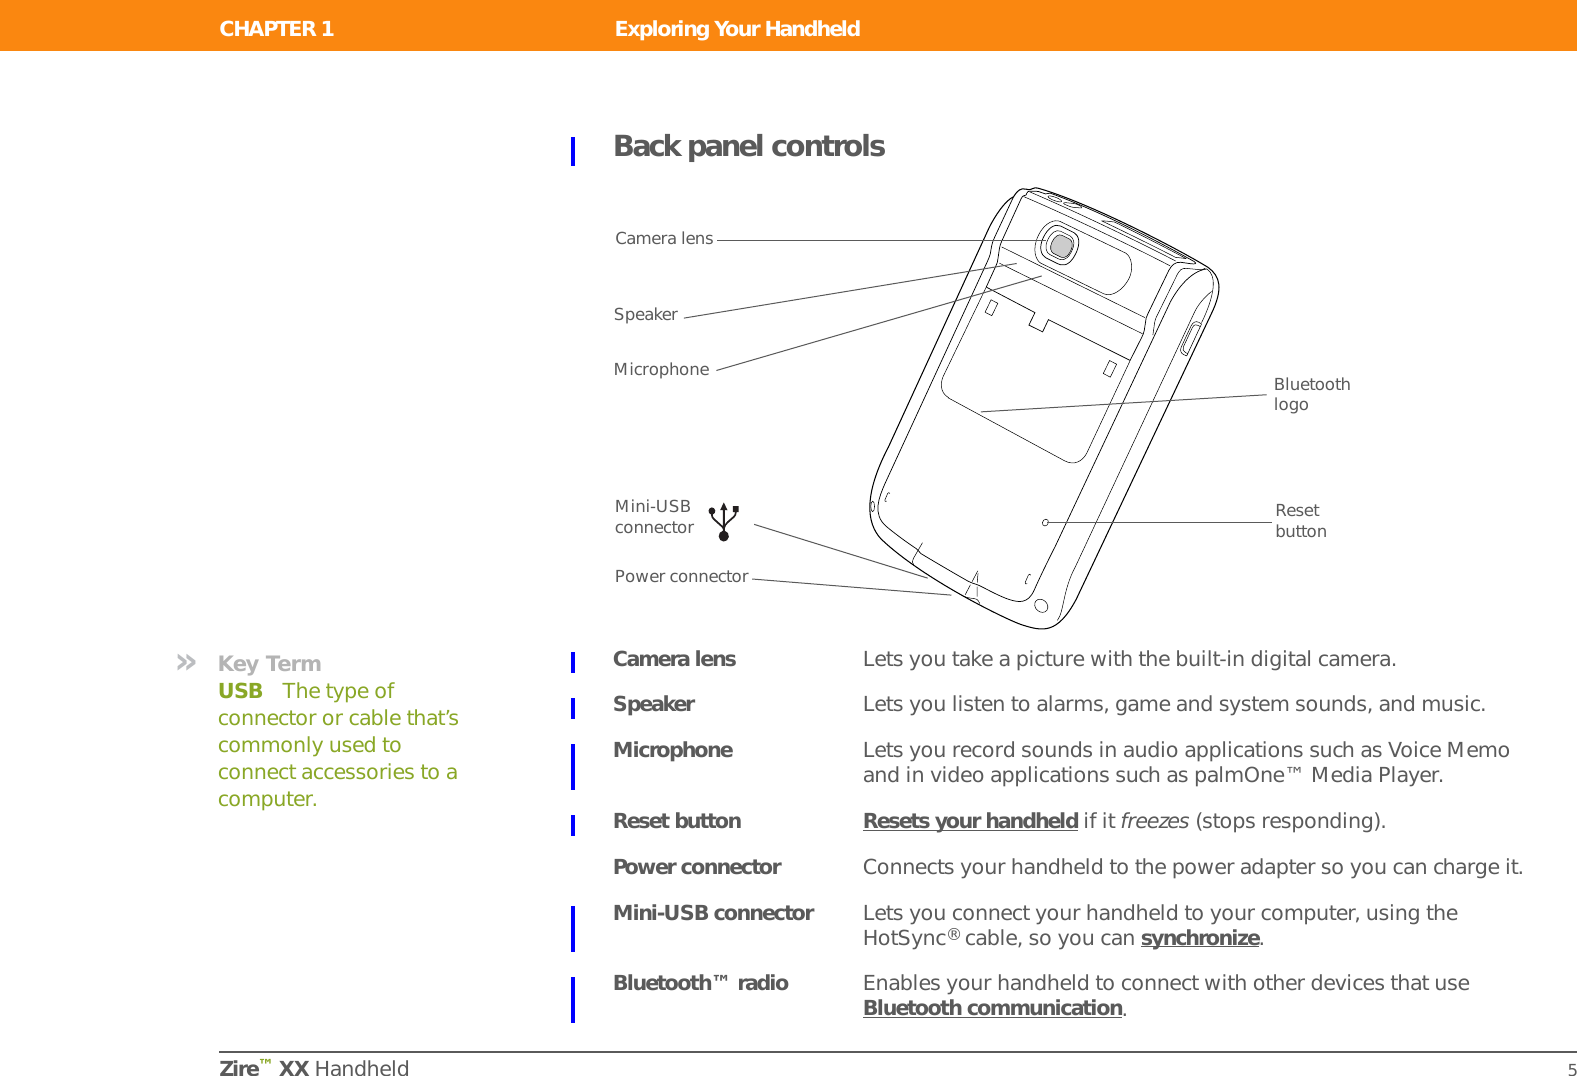
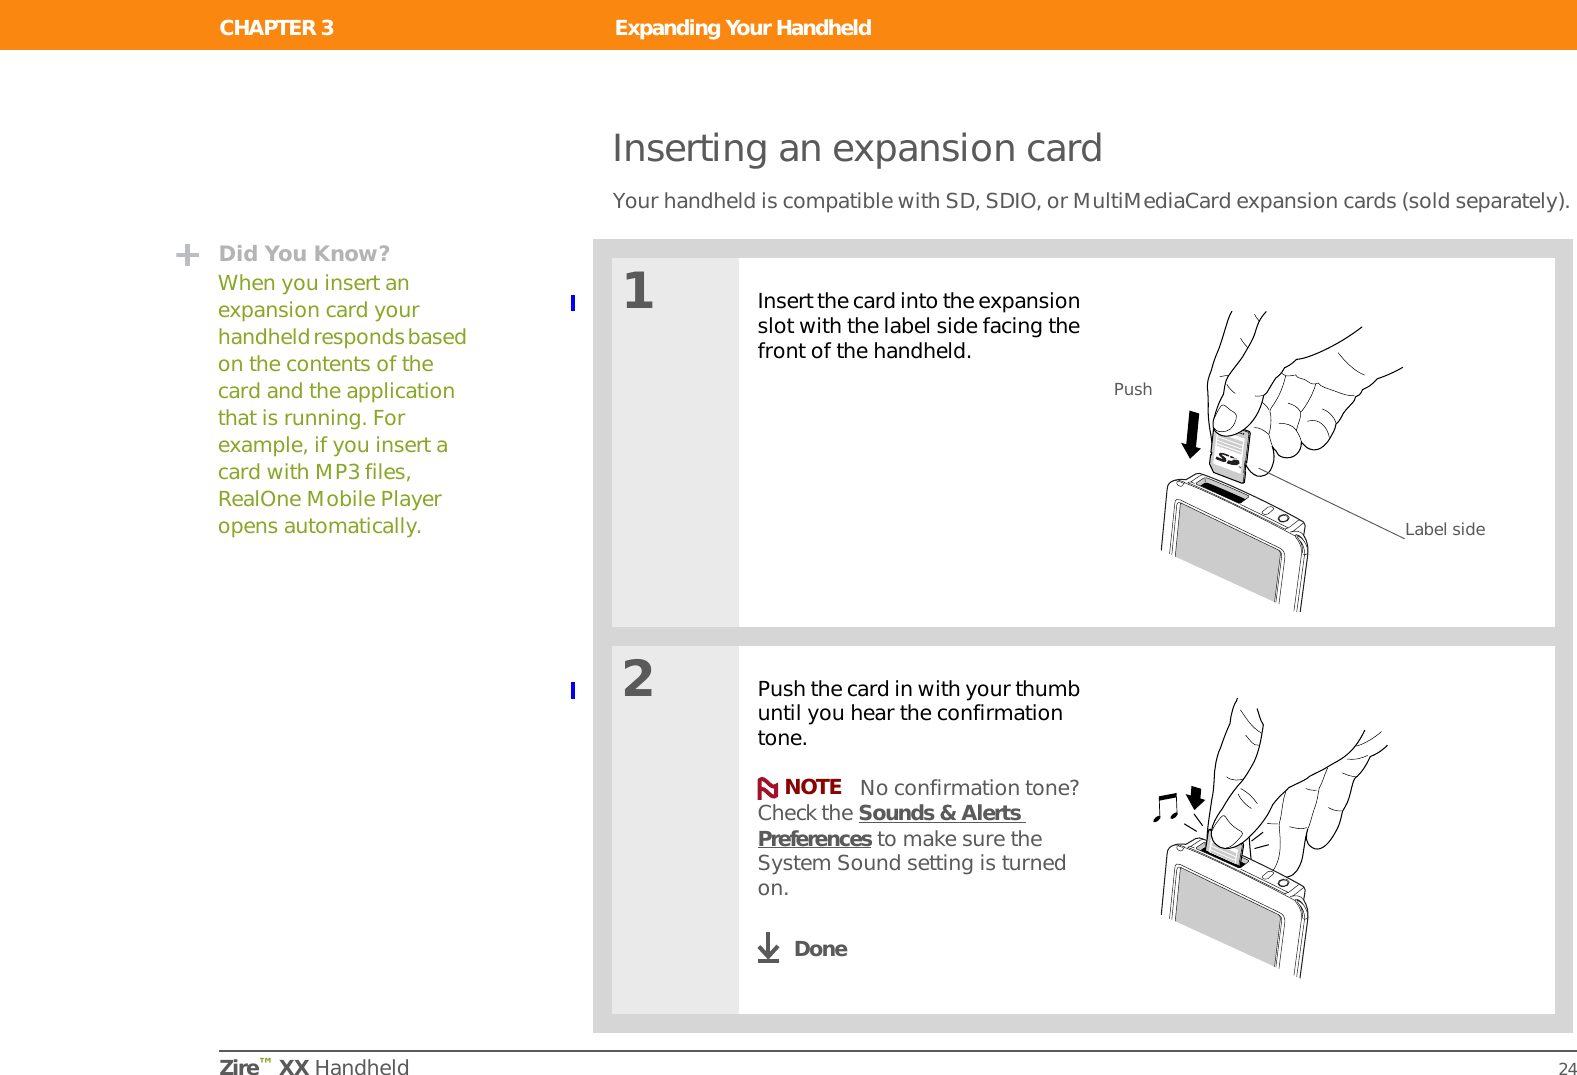
![Zire™ XX Handheld iiCopyright and Trademark© 2003 palmOne, Inc. All rights reserved. Zire, the Zire logo, and VersaMail are trademarks or registered trademarks of palmOne, Inc. Graffiti, HotSync, and the HotSync logo are trademarks or registered trademarks of PalmSource, Inc. palmOne, the palmOne logo, Palm, and Palm OS are trademarks or registered trademarks of the Palm Trademark Holding Company LLC, and are used under license by palmOne, Inc. The Bluetooth trademark is used by palmOne, Inc. under express license from Bluetooth SIG, Inc. palmOne, Inc. uses the MPEG Layer-3 audio decoding technology trademarks under express license from Fraunhofer IIS and Thomson. All other brands are trademarks or registered trademarks of their respective owners.Disclaimer and Limitation of LiabilitypalmOne, Inc. assumes no responsibility for any damage or loss resulting from the use of this guide.palmOne, Inc. assumes no responsibility for any loss or claims by third parties which may arise through the use of this software. palmOne, Inc. assumes no responsibility for any damage or loss caused by deletion of data as a result of malfunction, dead battery, or repairs. Be sure to make backup copies of all important data on other media to protect against data loss.[ ! ] IMPORTANT Please read the End User Software License Agreement with this product before using the accompanying software program(s). Using any part of the software indicates that you accept the terms of the End User Software License Agreement.Software Download AvailablePalm™Desktop software is supplied on a CD. If you do not have access to a CD drive for your computer, you can download Palm Desktop software from www.palmOne.com/support/intl.PN: 407-5565A-US](https://usermanual.wiki/Palm/810/User-Guide-418283-Page-2.png)

![Zire™ XX Handheld viiAbout This BookThis guide tells you everything you need to know to start using your handheld—from the things you’ll do every day, to the things that make your handheld not only useful, but fun.Viewing this guideHere are some helpful tips for making it easier to read and find information in this guide:• Click Zoom In repeatedly to magnify the page size. Click Zoom Out to return to the original view.• Click an entry in the Table of Contents or Index to go directly to that section of the guide.• If you link to a page in the guide, click Previous View or to return to the page you were on before you clicked the link.• You can also print an especially interesting or important page or pages by clicking Print. When selecting the page(s) to print, be sure to use the file page number shown at the bottom of your computer screen, not the printed page number. For example, to print the page you are reading right now, select page 7(the file page), not page vii (the printed page).Before You Begin[!]Complete the steps in Read This First in your handheld package to set up your handheld and install the software on your computer.](https://usermanual.wiki/Palm/810/User-Guide-418283-Page-7.png)
![Zire™ XX Handheld viiiWhat’s in this guide?Each chapter contains step-by-step instructions with cues for action, links to detailed information, and sidebars.Step-by-step instructionsHow-to information. Look for these cues in instructions:LinksLinks appear as underlined words in sidebars and other places throughout this guide. Some links take you to other pages in this guide, and others take you to the User Guide on the web. Cue at the bottom of a page that means the procedure continues on the next page.Cue that signals the end of the procedure. You're done.A step that you must follow; otherwise, you could experience an error or even lose information.[ & ] OPTIONAL A step you might find useful.Information that applies only in certain cases or that tells more about a procedure step.In this chapter Links on the first page of each chapter that send you to a specific section. Beyond the basics Links on the last page of each chapter that send you to the User Guide to learn about more things that you can do with an application or feature. ContinuedDoneNOTE](https://usermanual.wiki/Palm/810/User-Guide-418283-Page-8.png)
![Zire™ XX Handheld ixSidebarsBefore You Begin[!]Things you must complete before you can do the steps described in the chapter.TipA suggestion on how to use a feature more fully; a shortcut; a pointer to a related feature.Did You Know?An interesting fact about the topic being described; may include a pointer to more information.»Key TermA technical term related to the topic being described. It may appear in this guide or only on your handheld.User GuideA pointer to the web where you can find more info on the topics in this guide and on other features of your handheld.My HandheldA pointer to the web where you can share info with other handheld users and learn the latest tips, tricks, and more.SupportA pointer to the web where you can find help if you experience problems with the topics in the chapter or with your handheld.TipTo access the User Guide, you need to be connected to the Internet.](https://usermanual.wiki/Palm/810/User-Guide-418283-Page-9.png)
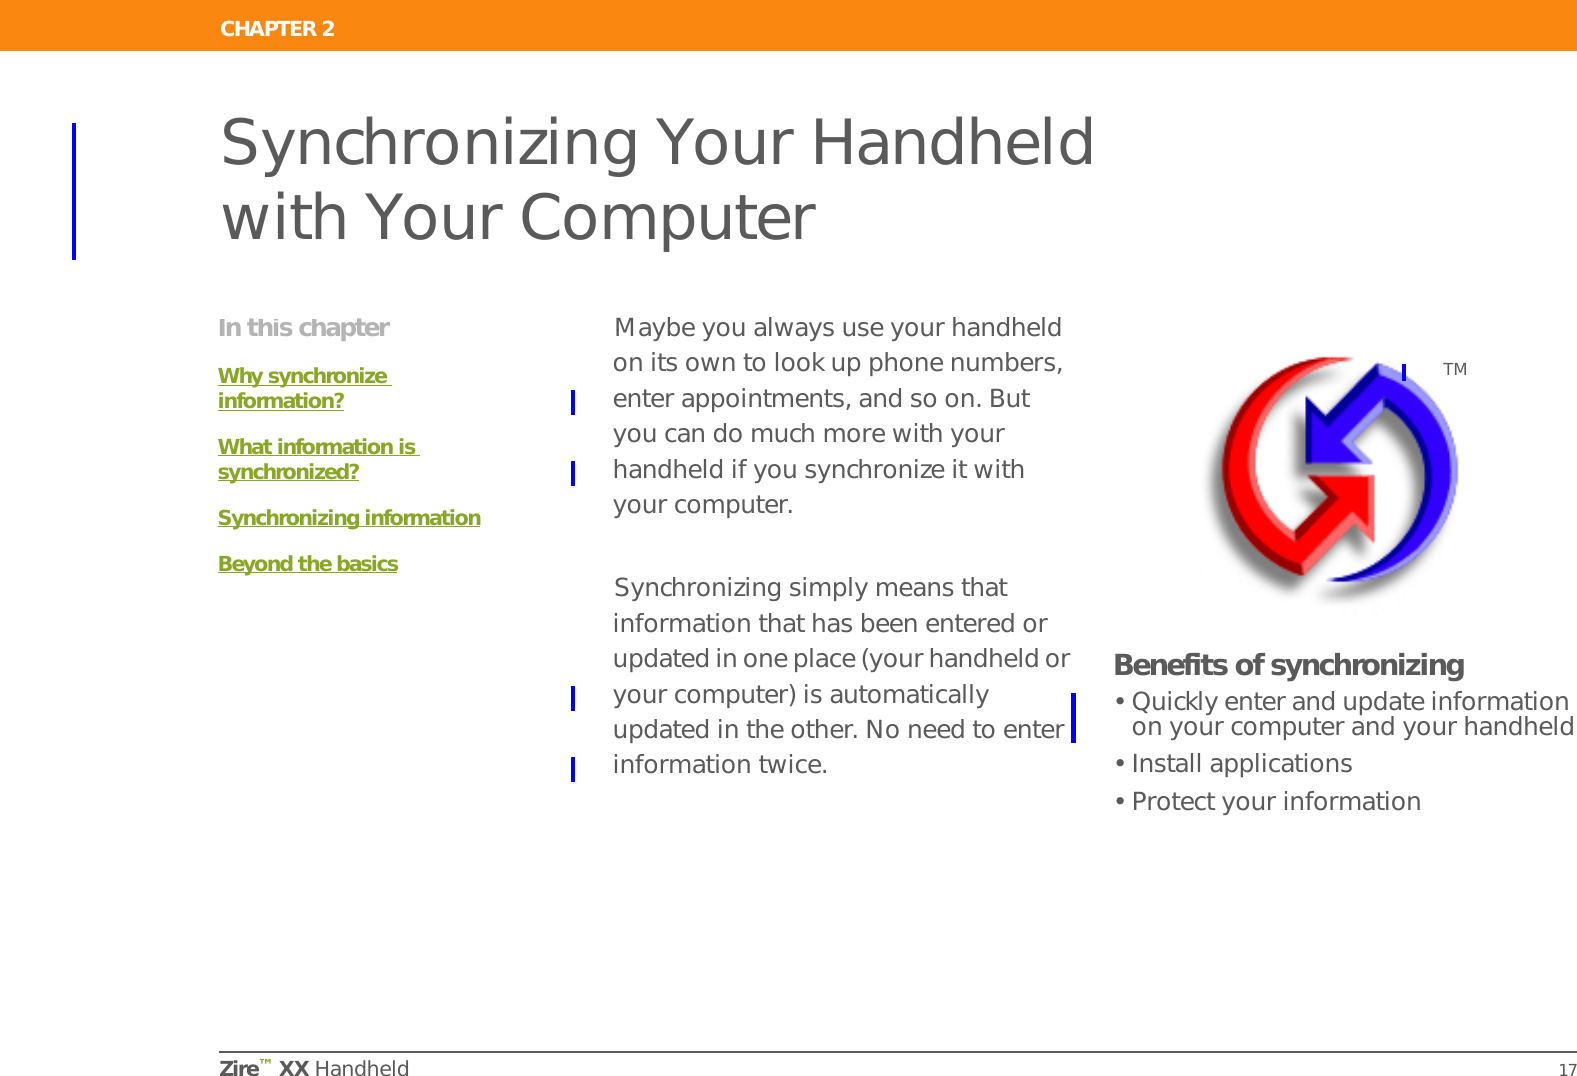
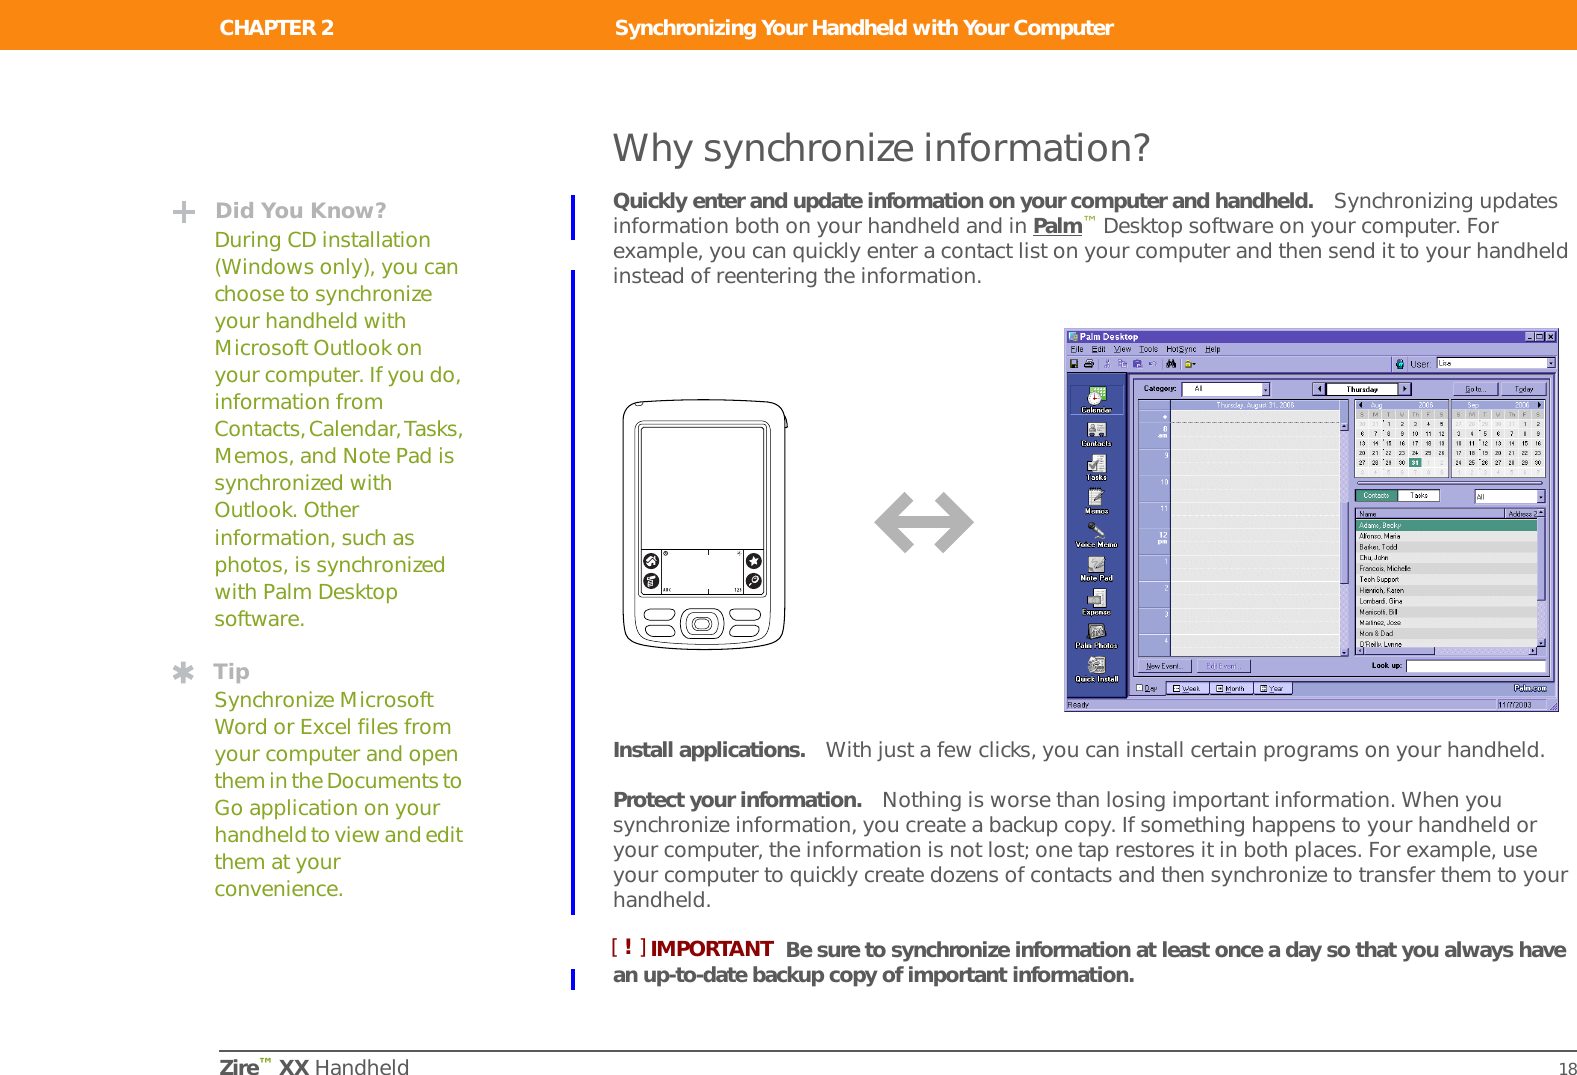
![CHAPTER 2 Synchronizing Your Handheld with Your ComputerZire™ XX Handheld 18Why synchronize information?Quickly enter and update information on your computer and handheld. Synchronizing updates information both on your handheld and in Palm™Desktop software on your computer. For example, you can quickly enter a contact list on your computer and then send it to your handheld instead of reentering the information. IInstall applications. With just a few clicks, you can install certain programs on your handheld.Protect your information. Nothing is worse than losing important information. When you synchronize information, you create a backup copy. If something happens to your handheld or your computer, the information is not lost; one tap restores it in both places. For example, use your computer to quickly create dozens of contacts and then synchronize to transfer them to your handheld.Be sure to synchronize information at least once a day so that you always have an up-to-date backup copy of important information.Did You Know?During CD installation (Windows only), you can choose to synchronize your handheld with Microsoft Outlook on your computer. If you do, information from Contacts, Calendar, Tasks, Memos, and Note Pad is synchronized with Outlook. Other information, such as photos, is synchronized with Palm Desktop software.TipSynchronize Microsoft Word or Excel files from your computer and open them in the Documents to Go application on your handheld to view and edit them at your convenience.IMPORTANT[!]](https://usermanual.wiki/Palm/810/User-Guide-418283-Page-29.png)
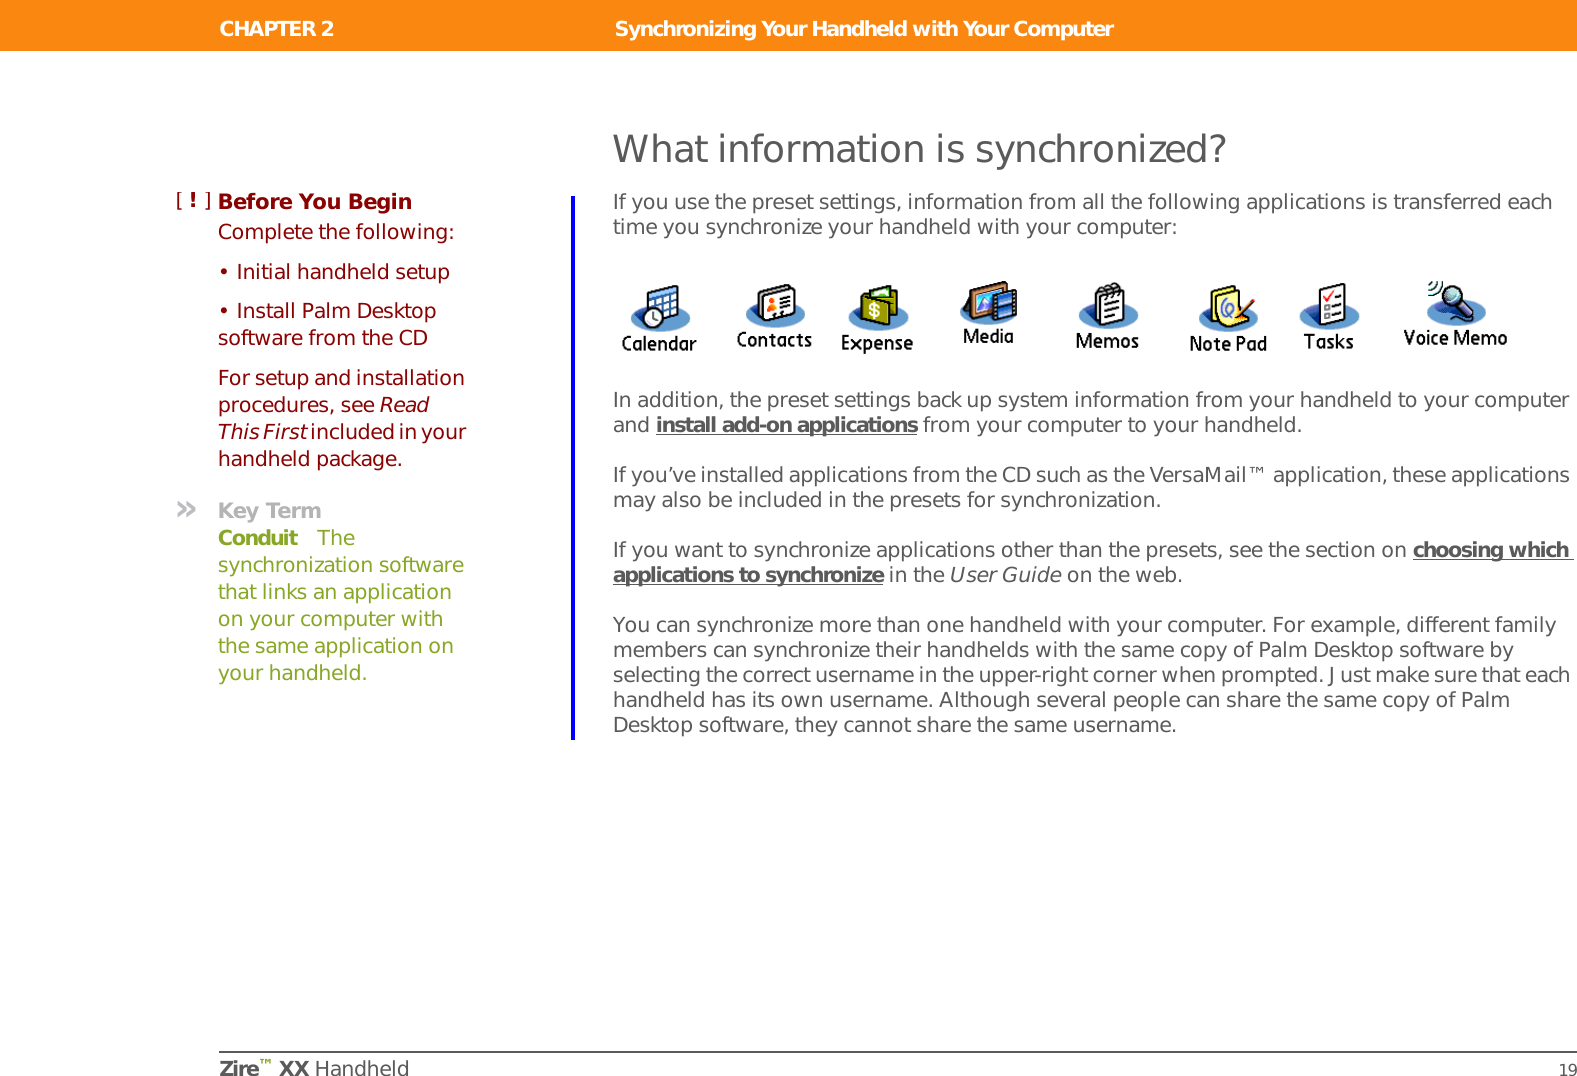
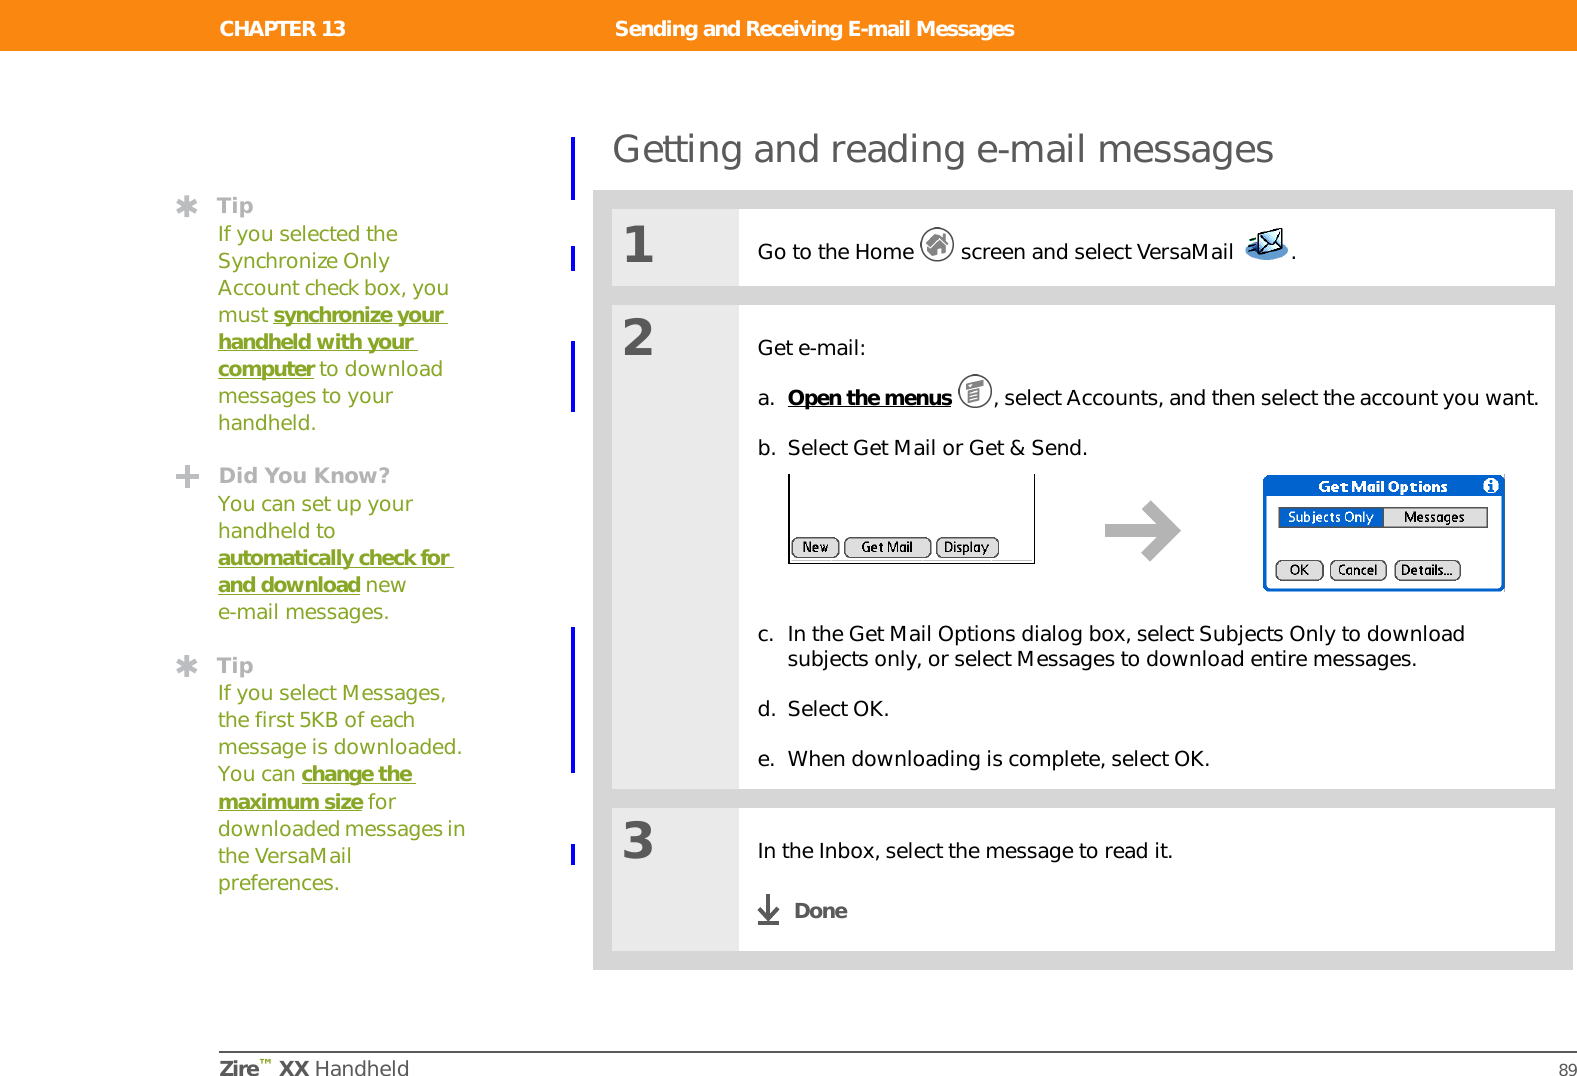
![CHAPTER 2 Synchronizing Your Handheld with Your ComputerZire™ XX Handheld 19What information is synchronized?If you use the preset settings, information from all the following applications is transferred each time you synchronize your handheld with your computer:In addition, the preset settings back up system information from your handheld to your computer and install add-on applications from your computer to your handheld.If you’ve installed applications from the CD such as the VersaMail™ application, these applications may also be included in the presets for synchronization.If you want to synchronize applications other than the presets, see the section on choosing which applications to synchronize in the User Guide on the web.You can synchronize more than one handheld with your computer. For example, different family members can synchronize their handhelds with the same copy of Palm Desktop software by selecting the correct username in the upper-right corner when prompted. Just make sure that each handheld has its own username. Although several people can share the same copy of Palm Desktop software, they cannot share the same username.Before You Begin[!]Complete the following:• Initial handheld setup• Install Palm Desktop software from the CDFor setup and installation procedures, see Read This First included in your handheld package.»Key TermConduit The synchronization software that links an application on your computer with the same application on your handheld.](https://usermanual.wiki/Palm/810/User-Guide-418283-Page-30.png)

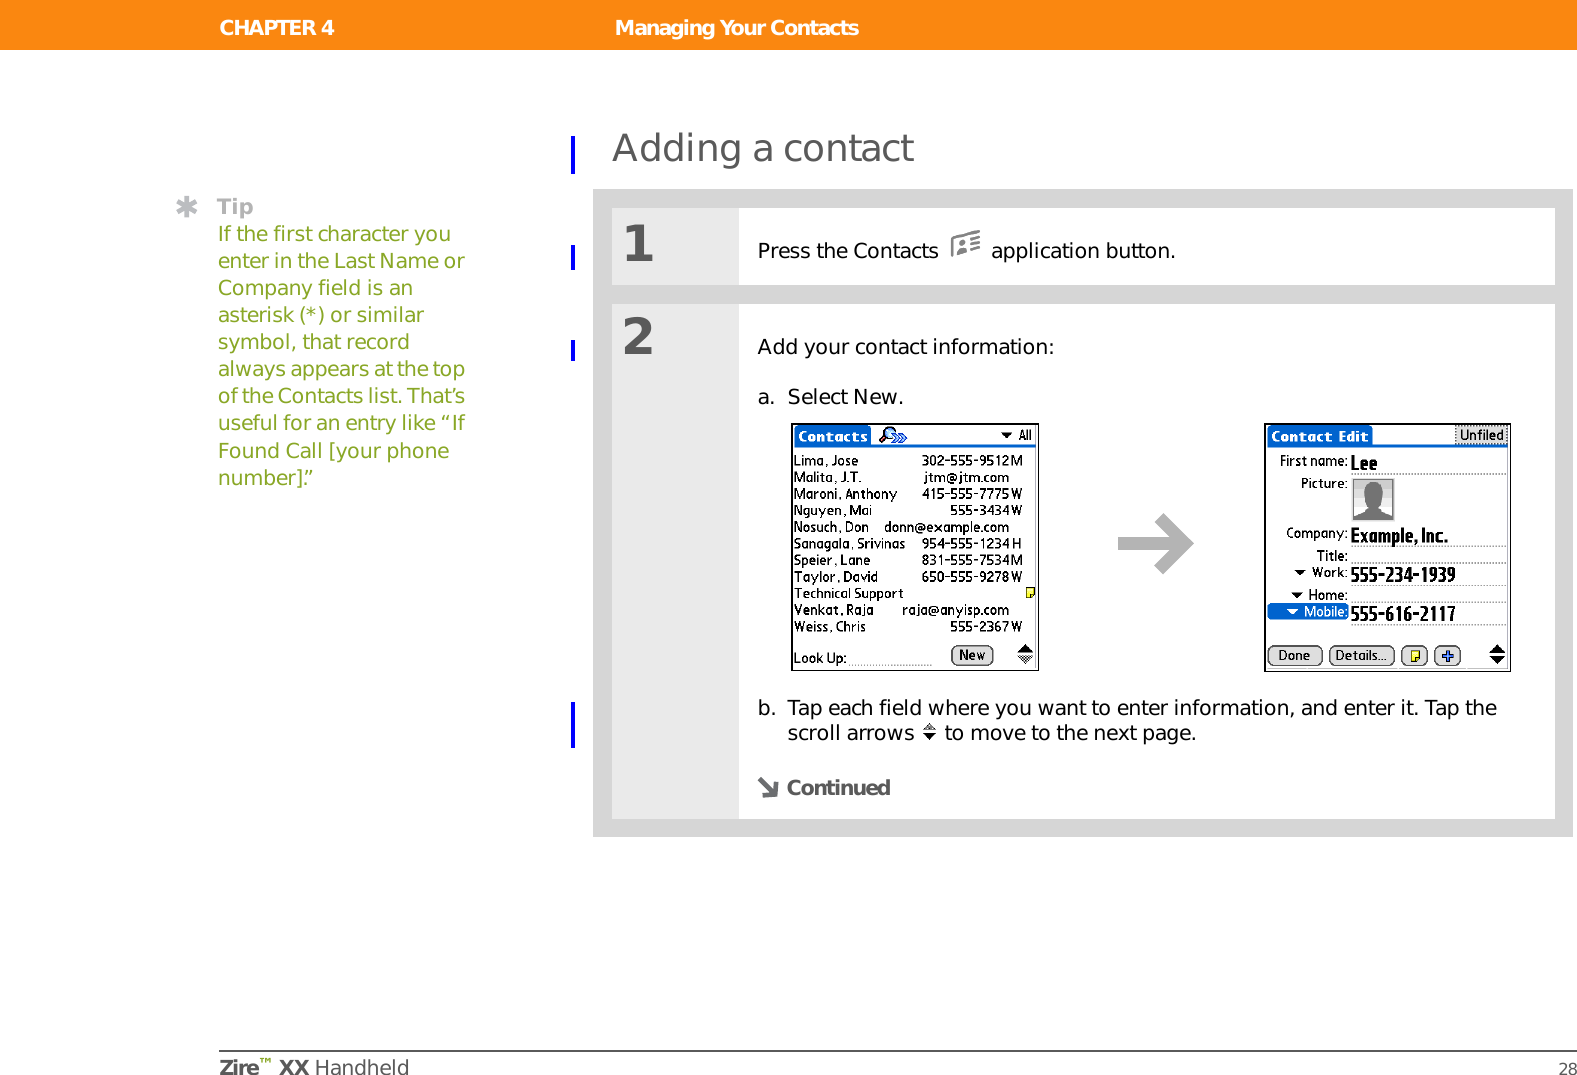

![CHAPTER 4 Managing Your ContactsZire™ XX Handheld 28Adding a contact01Press the Contacts application button.2Add your contact information:a. Select New.b. Tap each field where you want to enter information, and enter it. Tap the scroll arrows to move to the next page.ContinuedTipIf the first character you enter in the Last Name or Company field is an asterisk (*) or similar symbol, that record always appears at the top of the Contacts list. That’s useful for an entry like “If Found Call [your phone number].”](https://usermanual.wiki/Palm/810/User-Guide-418283-Page-39.png)
![Zire™ XX Handheld 29CHAPTER 4 Managing Your ContactsAdding a contact3[ & ] OPTIONAL Add a photo:a. Tap the Picture box.b. To take a photo and add it to a contact, select Camera, take the photo, and select Save.c. To add a photo from palmOne Media, select Photos and select a photo.4[ & ] OPTIONAL Add a birthday:a. Tap the Birthday box.b. Select the birth year, month, and date.5After you finish entering all the information you want, select Done.That's it. Your handheld automatically saves the contact. Make sure you have a current backup. Synchronize often.TipTo learn about capturing and downloading photos to your handheld, see palmOne™ Media later in this guide.TipIf multiple contacts share information, such as a company name and address, you can enter the first contact, open the Record menu, and then select Duplicate Contact. You can then change only the fields that differ.TipIf you want a reminder about a birthday, select the Reminder check box, enter the number of days before the birthday that you want to see the reminder, and then select OK.Done](https://usermanual.wiki/Palm/810/User-Guide-418283-Page-40.png)
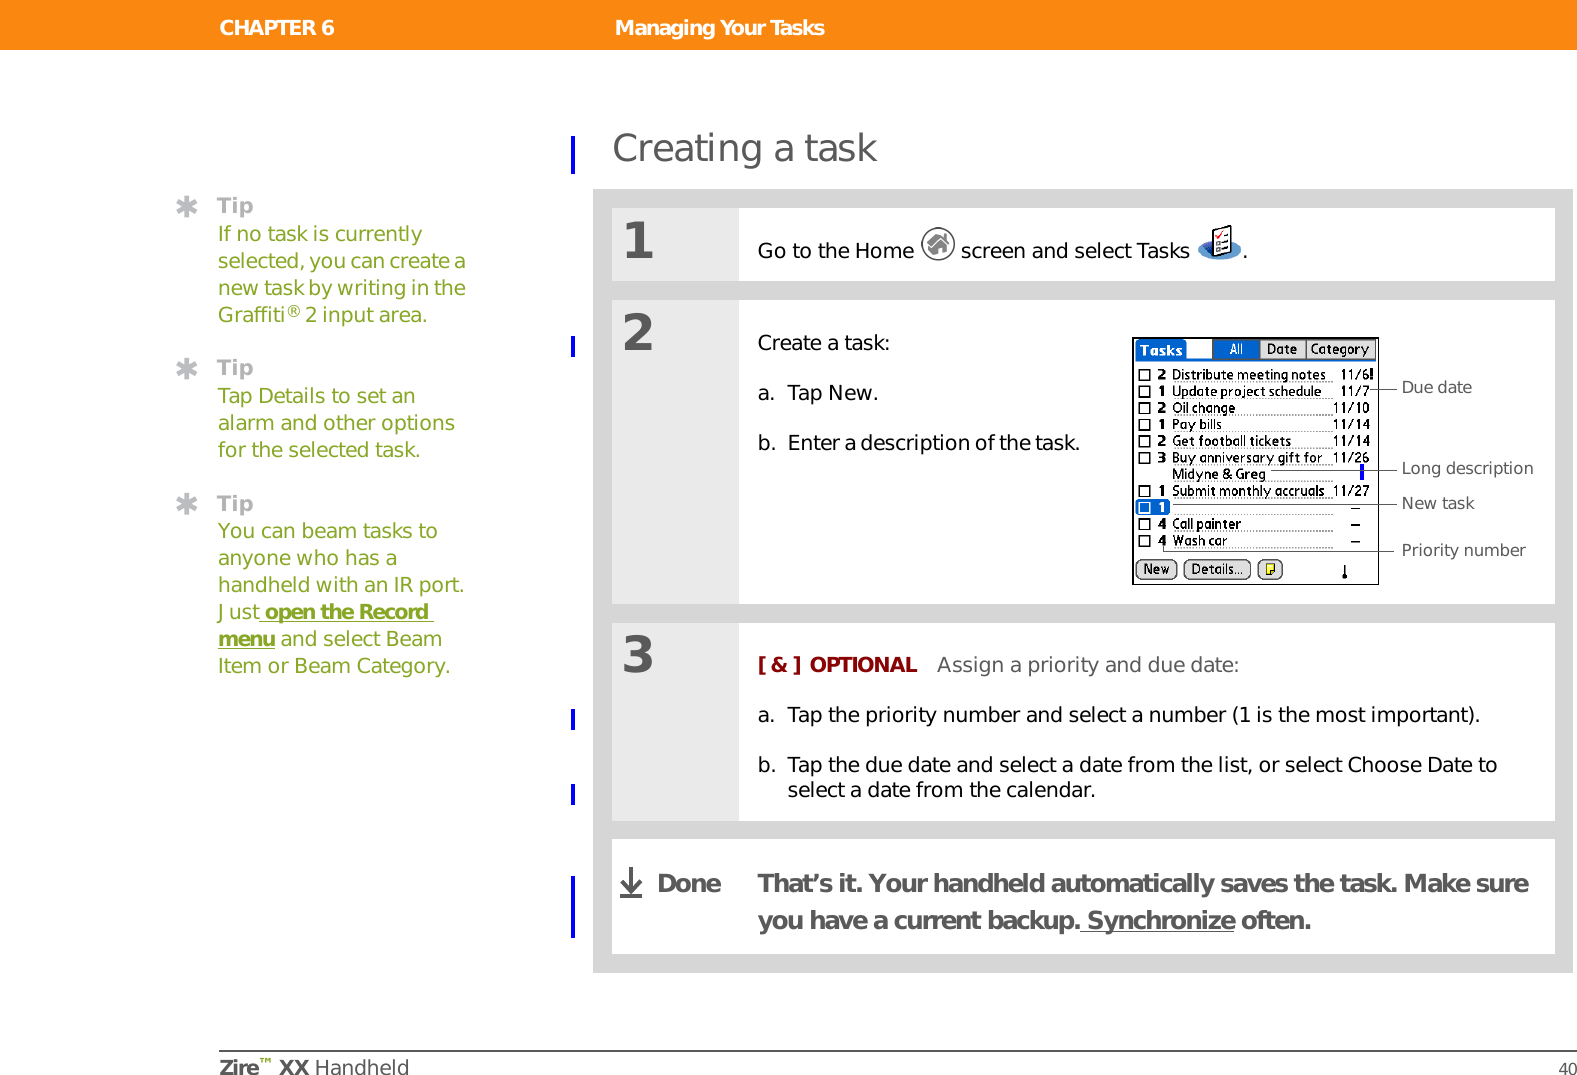
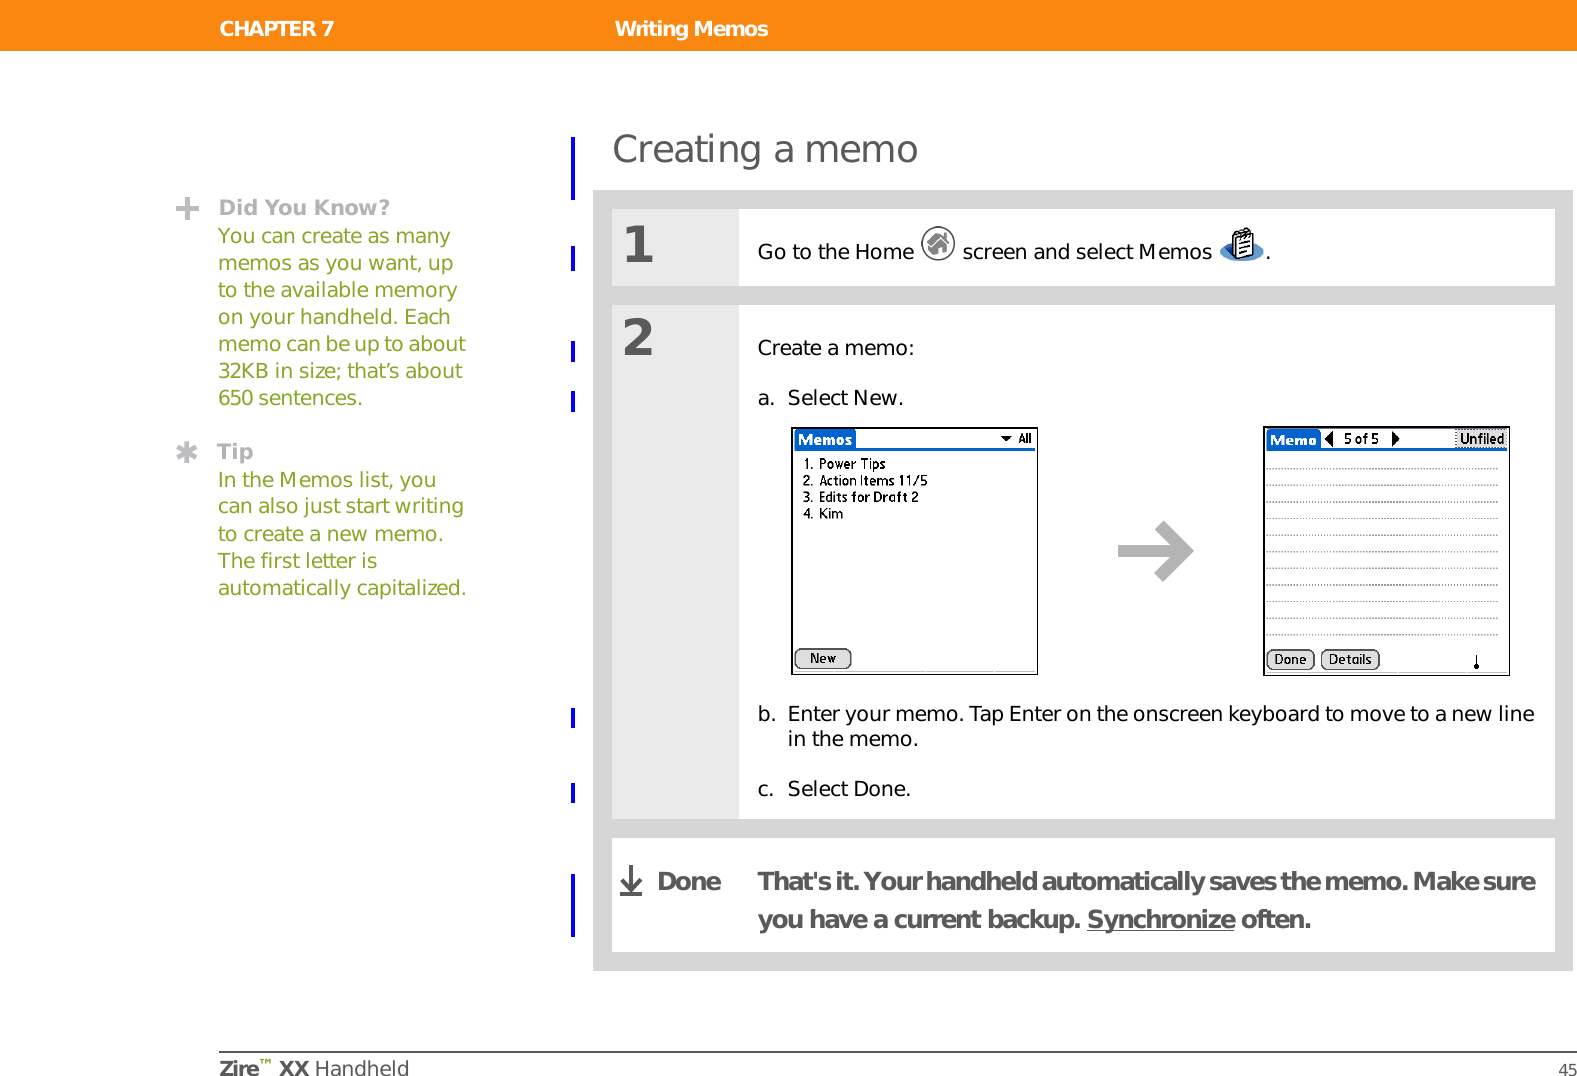
![CHAPTER 6 Managing Your TasksZire™ XX Handheld 40Creating a task01Go to the Home screen and select Tasks .2Create a task:a. Tap New.b. Enter a description of the task. 3[ & ] OPTIONAL Assign a priority and due date:a. Tap the priority number and select a number (1 is the most important).b. Tap the due date and select a date from the list, or select Choose Date to select a date from the calendar.That’s it. Your handheld automatically saves the task. Make sure you have a current backup. Synchronize often.TipIf no task is currently selected, you can create a new task by writing in the Graffiti®2 input area.TipTap Details to set an alarm and other options for the selected task.TipYou can beam tasks to anyone who has a handheld with an IR port. Just open the Record menu and select Beam Item or Beam Category.New task Priority numberDue dateLong descriptionDone](https://usermanual.wiki/Palm/810/User-Guide-418283-Page-53.png)


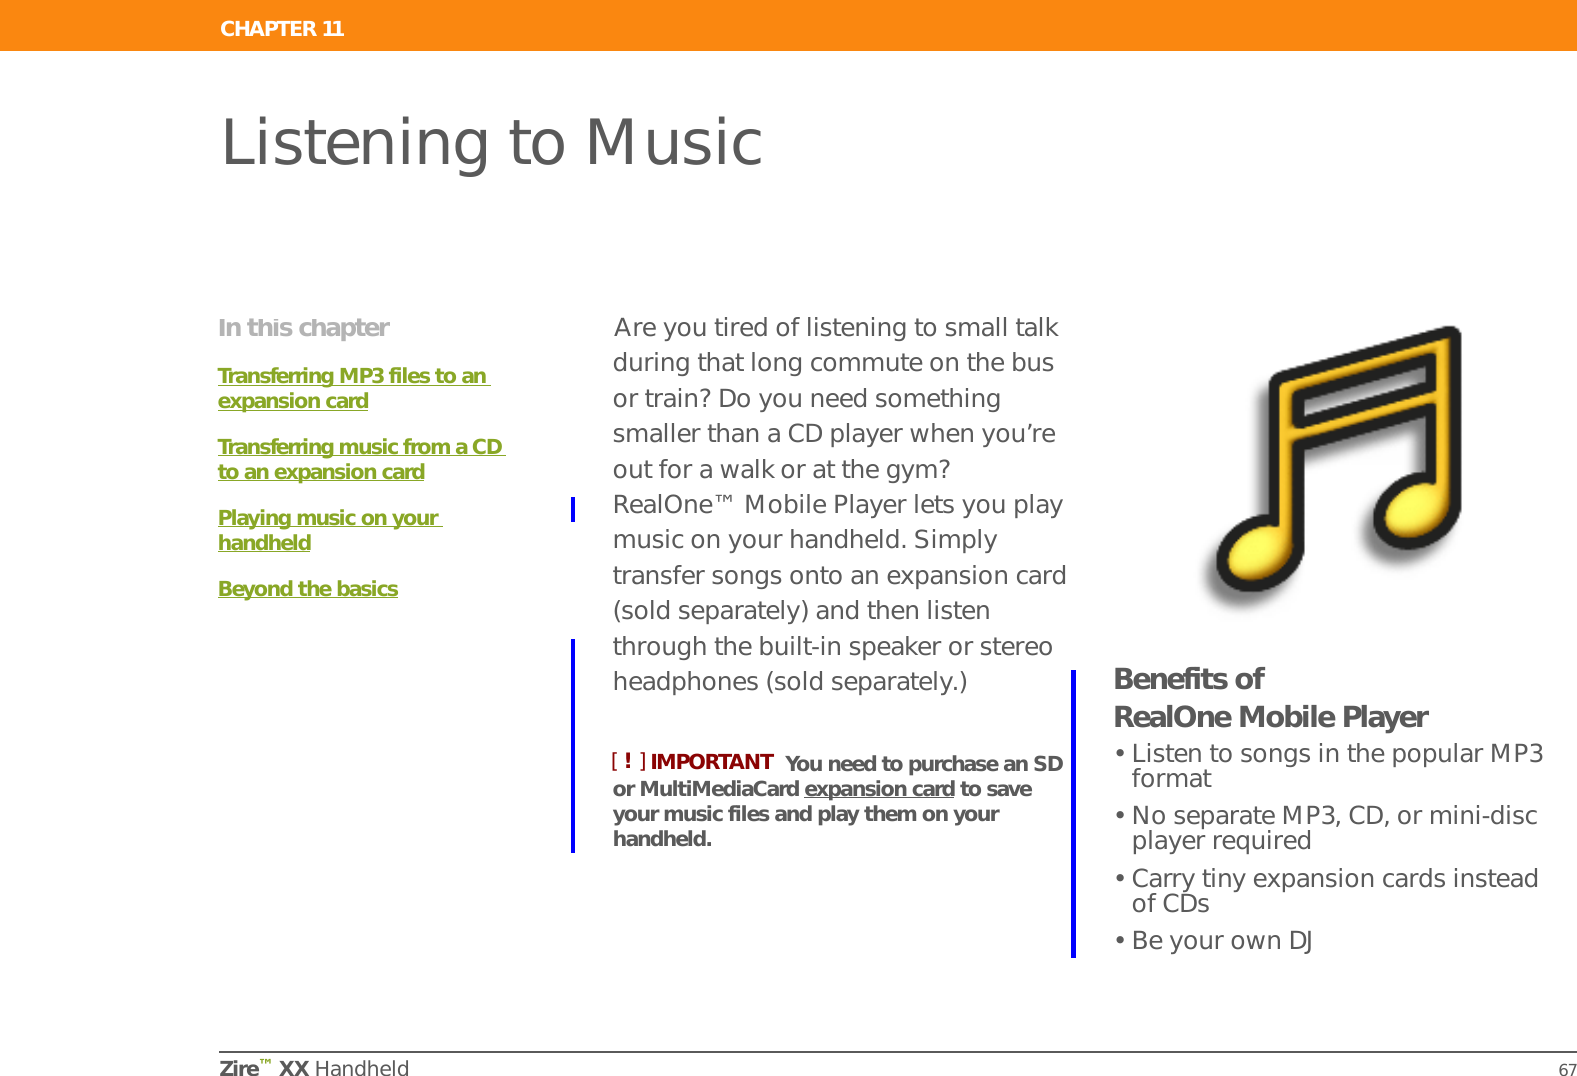
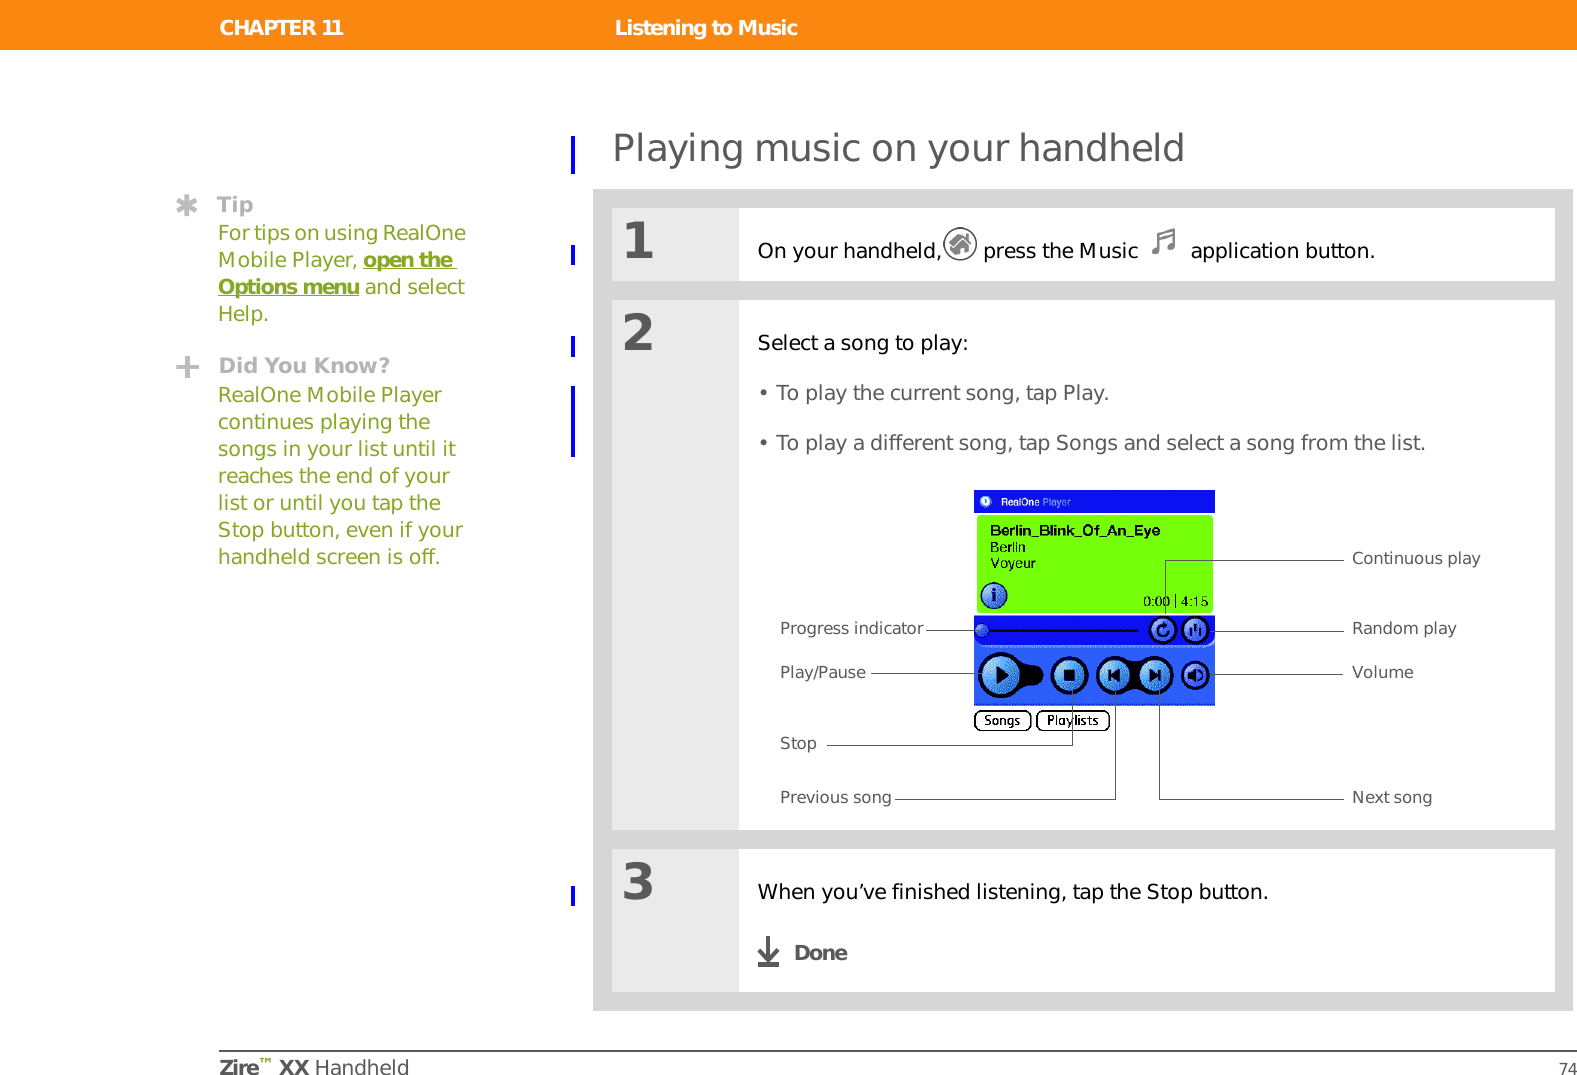
![Zire™ XX Handheld 67CHAPTER 11Listening to MusicAre you tired of listening to small talk during that long commute on the bus or train? Do you need something smaller than a CD player when you’re out for a walk or at the gym? RealOne™ Mobile Player lets you play music on your handheld. Simply transfer songs onto an expansion card (sold separately) and then listen through the built-in speaker or stereo headphones (sold separately.)You need to purchase an SD or MultiMediaCard expansion card to save your music files and play them on your handheld. Benefits of RealOne Mobile Player• Listen to songs in the popular MP3 format• No separate MP3, CD, or mini-disc player required• Carry tiny expansion cards instead of CDs• Be your own DJIn this chapterTransferring MP3 files to an expansion cardTransferring music from a CD to an expansion cardPlaying music on your handheldBeyond the basicsIMPORTANT[!]](https://usermanual.wiki/Palm/810/User-Guide-418283-Page-82.png)
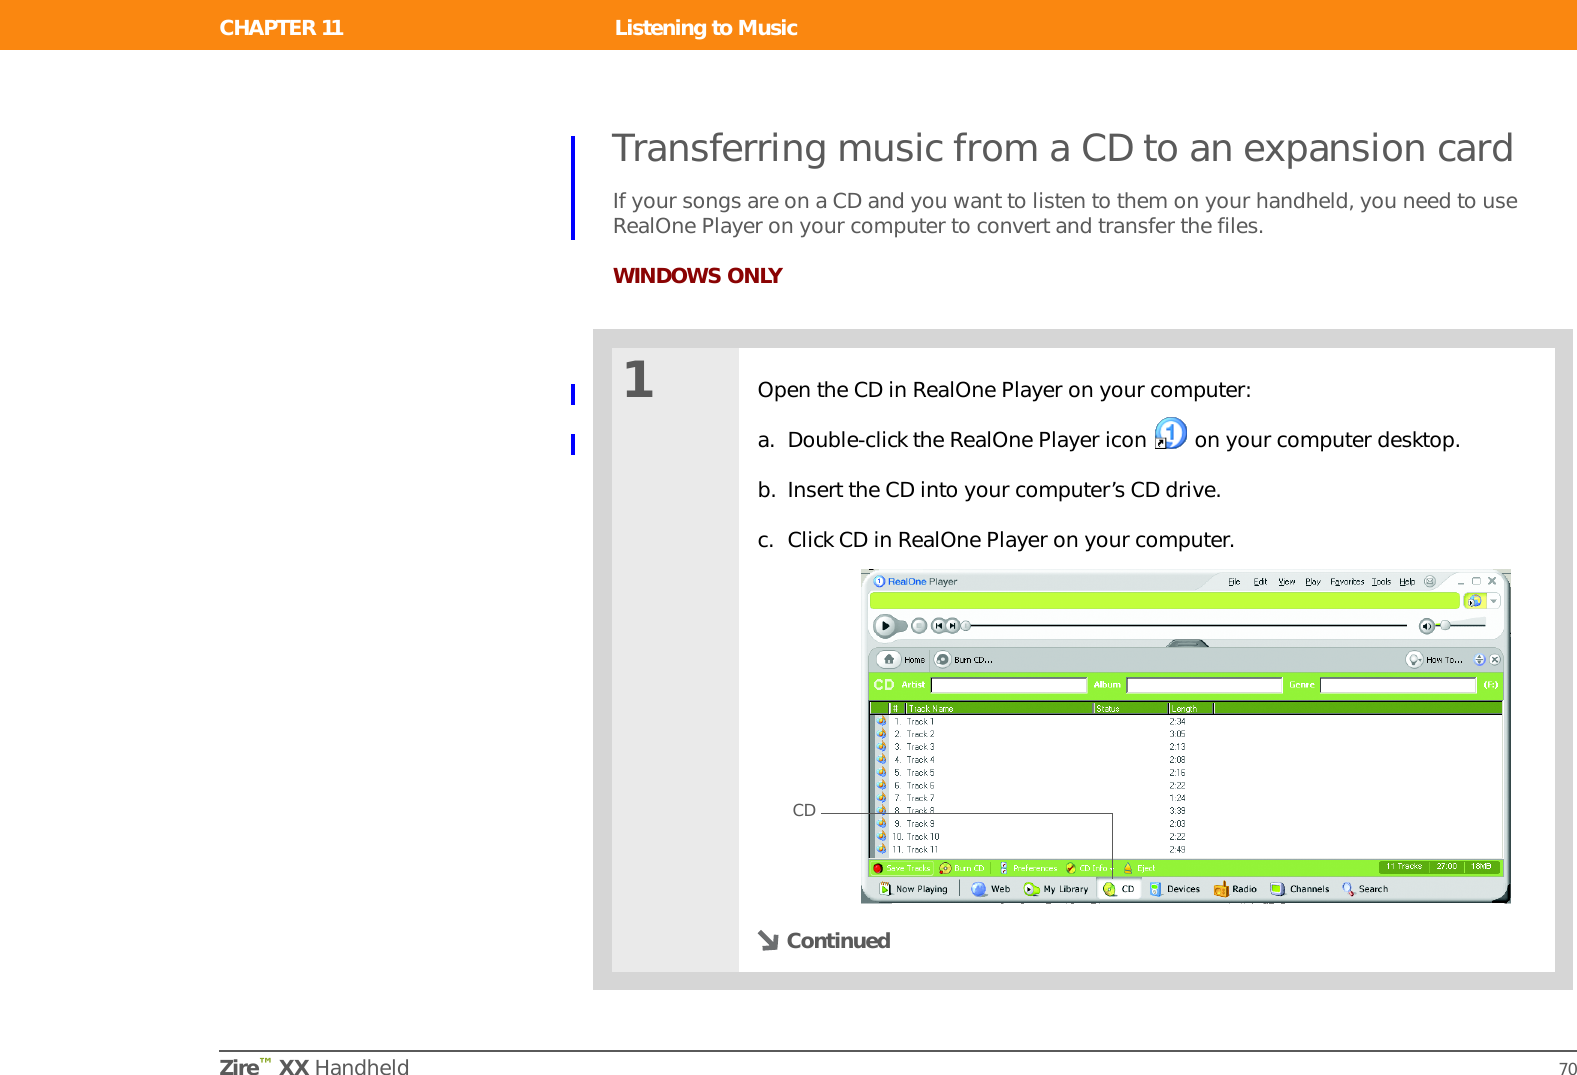
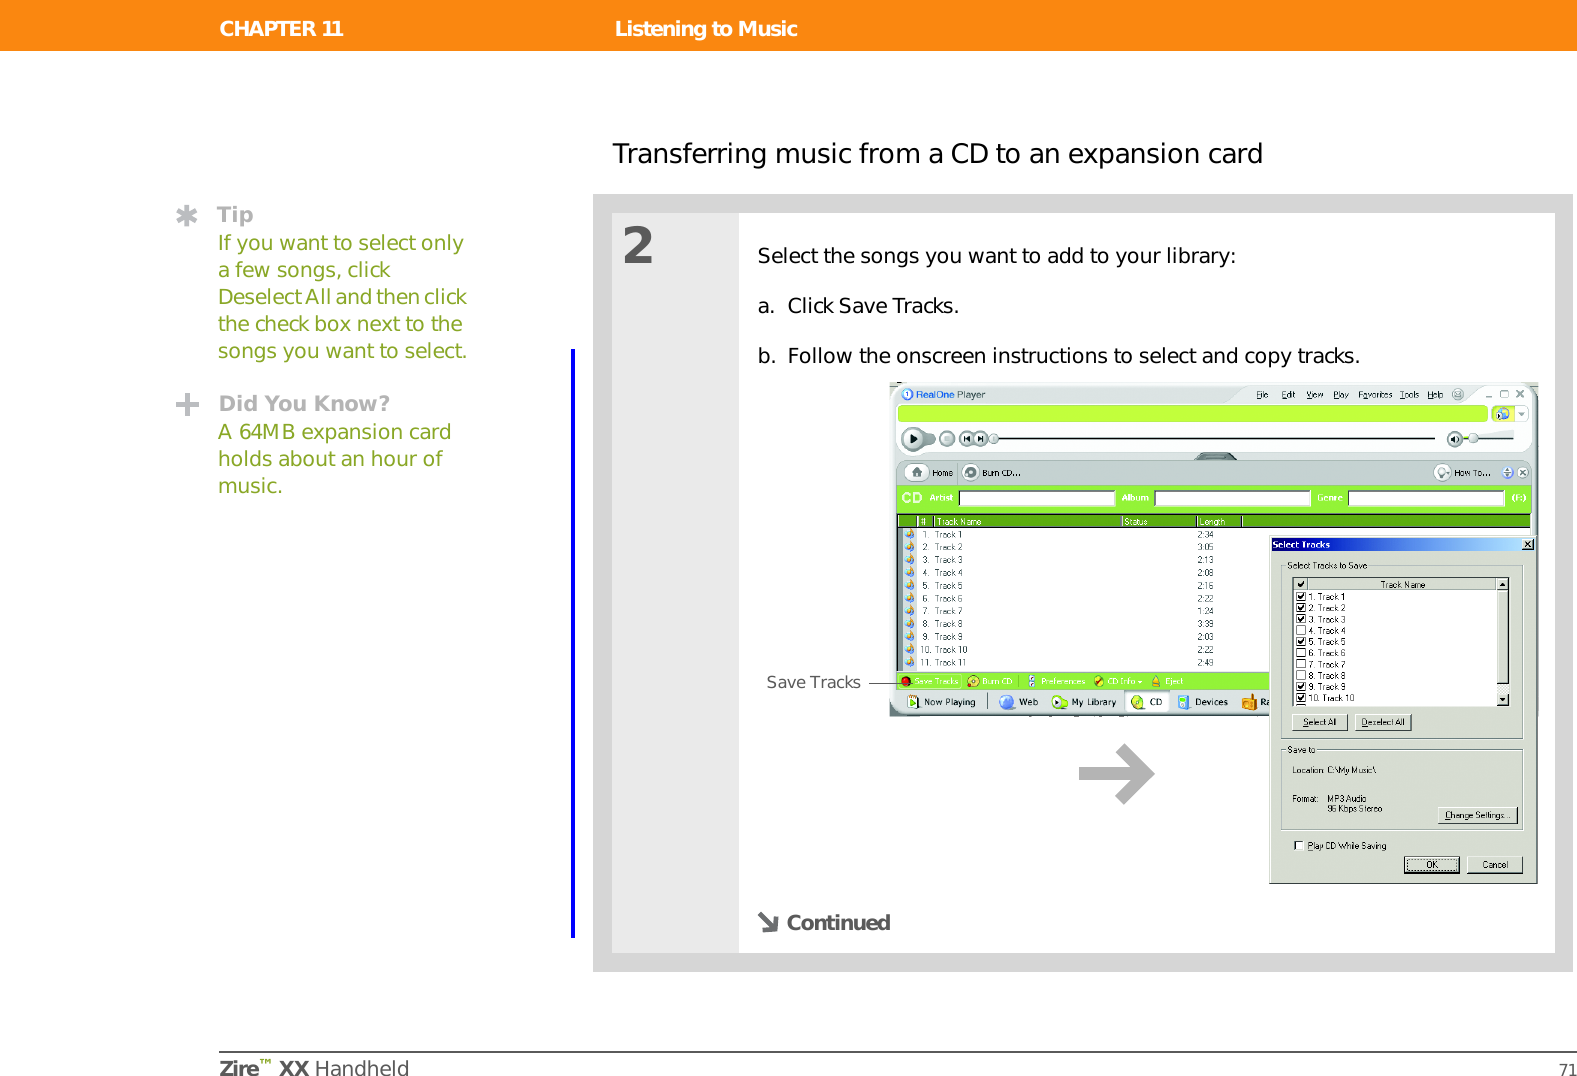
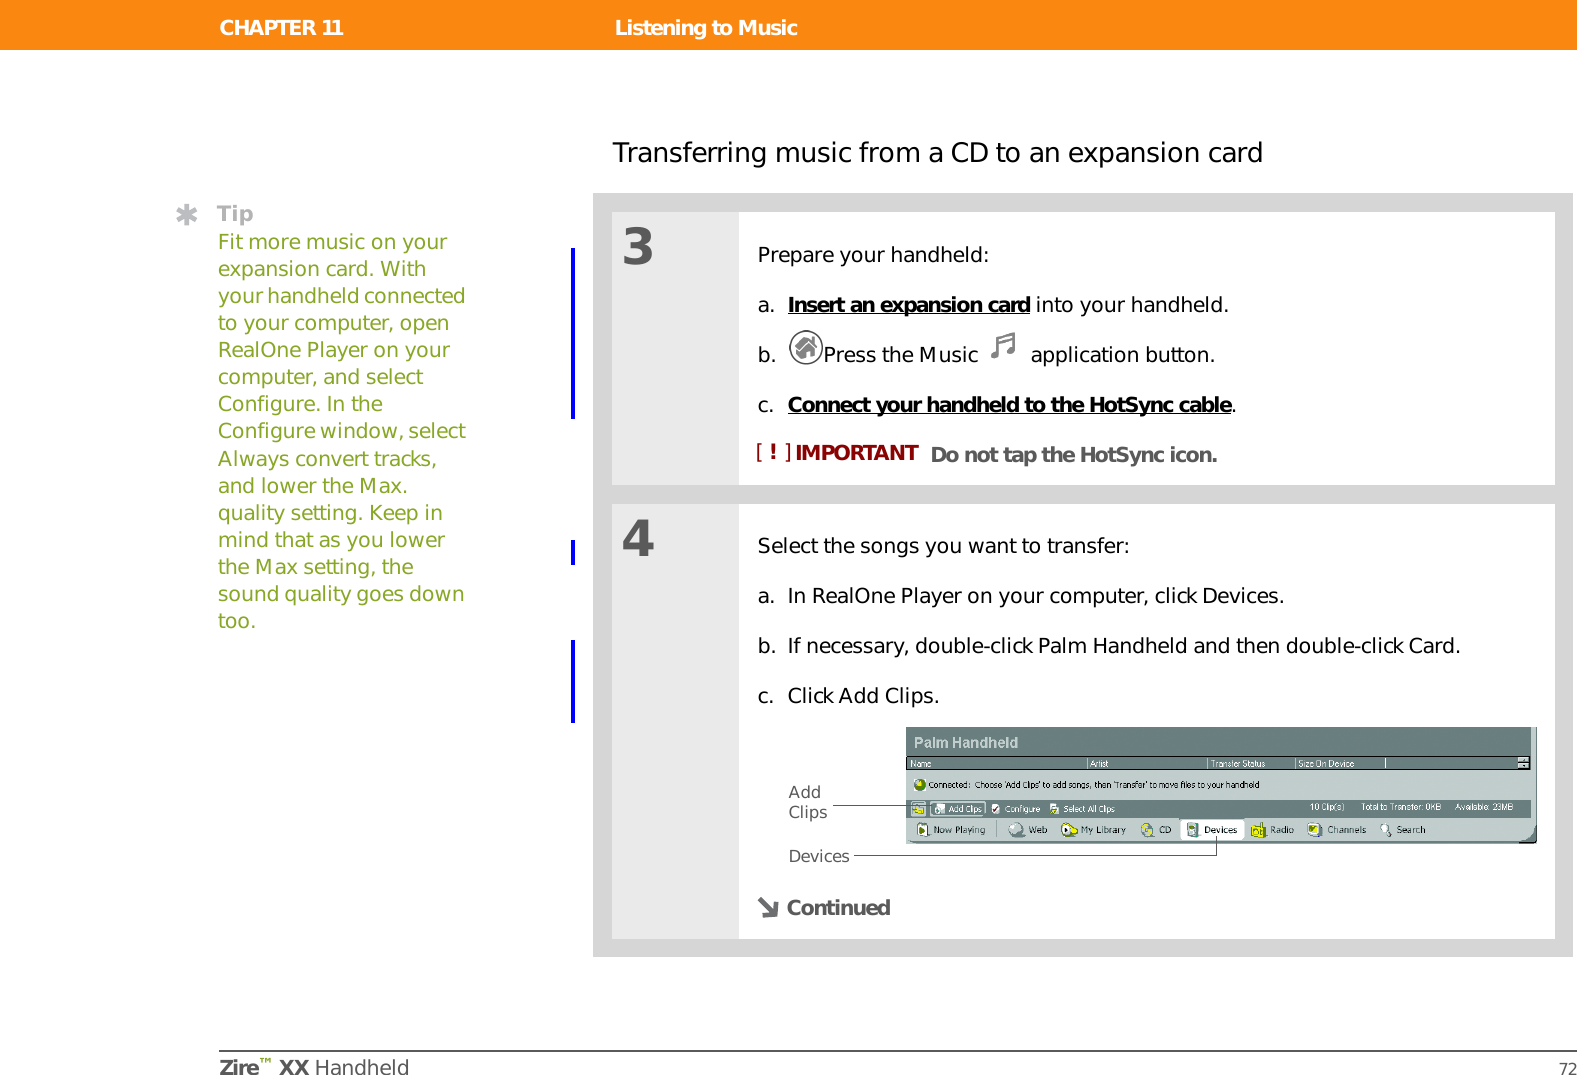
![Zire™ XX Handheld 72CHAPTER 11 Listening to MusicTransferring music from a CD to an expansion card3Prepare your handheld:a. Insert an expansion card into your handheld.b. Press the Music application button.c. Connect your handheld to the HotSync cable.Do not tap the HotSync icon.4Select the songs you want to transfer:a. In RealOne Player on your computer, click Devices. b. If necessary, double-click Palm Handheld and then double-click Card.c. Click Add Clips.ContinuedTipFit more music on your expansion card. With your handheld connected to your computer, open RealOne Player on your computer, and select Configure. In the Configure window, select Always convert tracks, and lower the Max. quality setting. Keep in mind that as you lower the Max setting, the sound quality goes down too.IMPORTANT[!]Add ClipsDevices](https://usermanual.wiki/Palm/810/User-Guide-418283-Page-87.png)
![Zire™ XX Handheld 73CHAPTER 11 Listening to MusicTransferring music from a CD to an expansion cardCont’d.d. In the Add Clips window, select the songs you want to add, and then click Add Clips.e. Click Close. The tracks you selected should now say “Ready To Transfer.”5Transfer the selected songs to your expansion card:a. Be sure your handheld is on and that RealOne Mobile Player is open. If it is, a green Connected light appears in the lower-left corner on your computer.b. In the toolbar below Connected, click Transfer. When the transfer is complete, the tracks you selected should say “On Device.” Do not tap the HotSync icon. RealOne Player is transferring the files, so there’s no need to do anything. DoneTipFor tips on using RealOne Player on your computer, go to the Help menu in RealOne Player or visit www.realone.com.TipOn your handheld, tap Songs to view a list of the songs available for you to play. The songs you just transferred are at the bottom of the list.Add ClipsIMPORTANT[!]](https://usermanual.wiki/Palm/810/User-Guide-418283-Page-88.png)
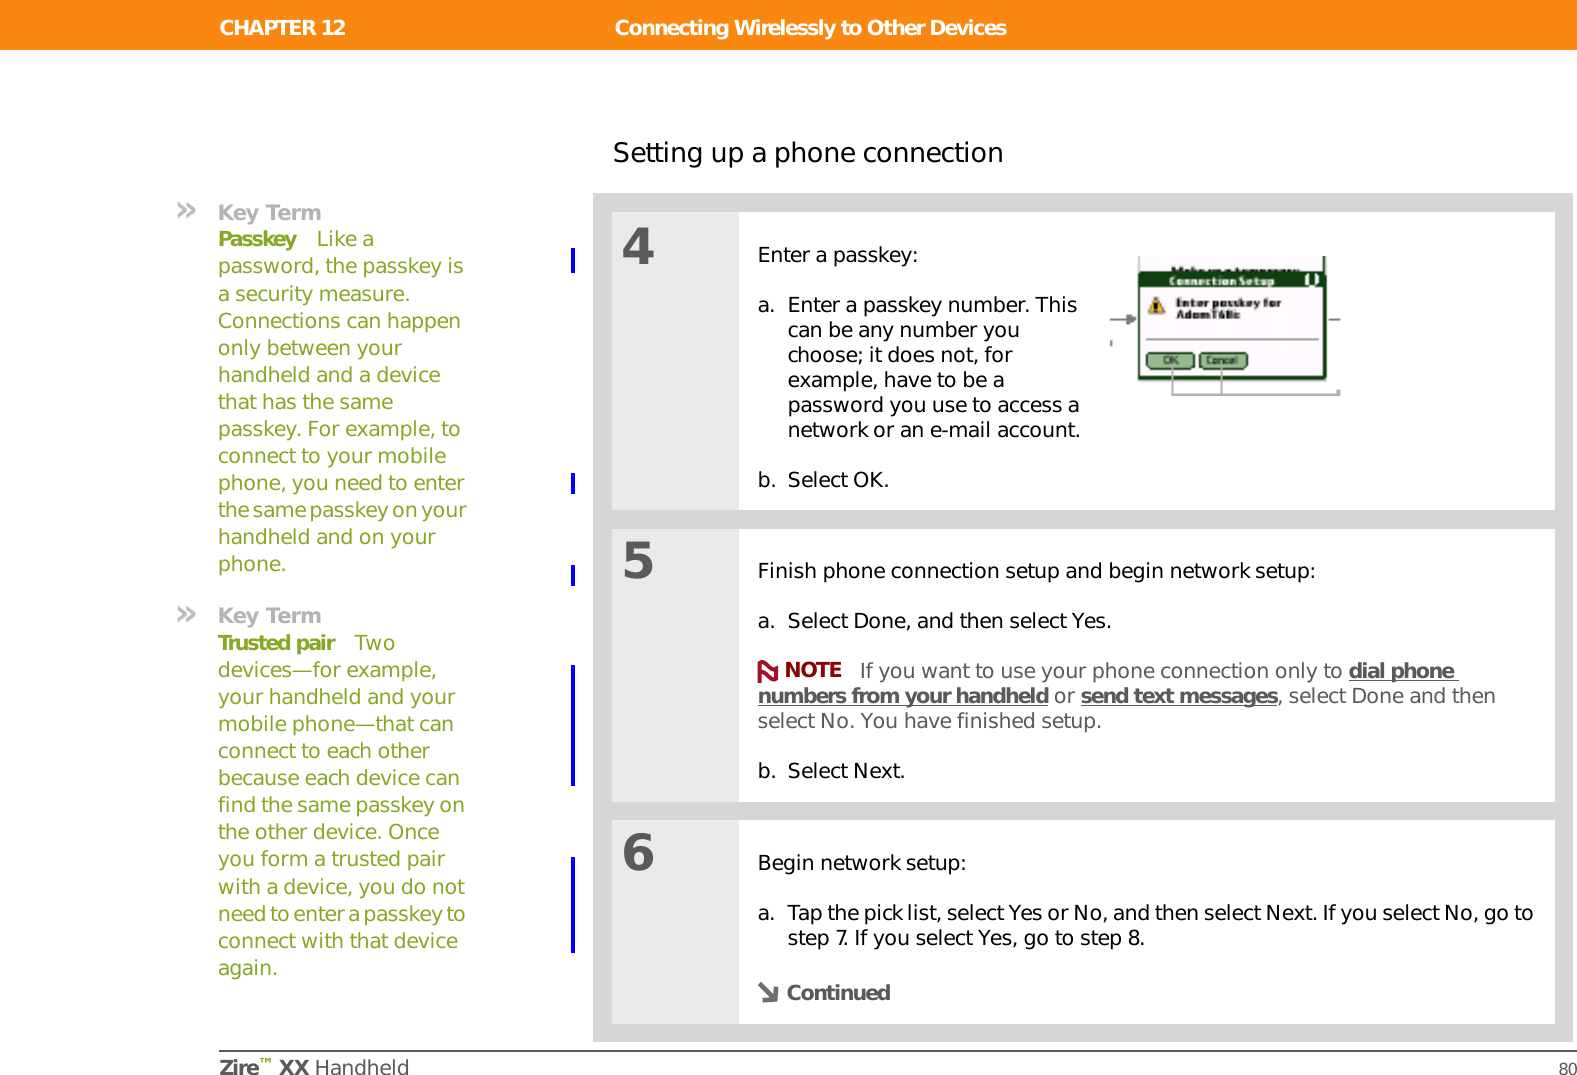

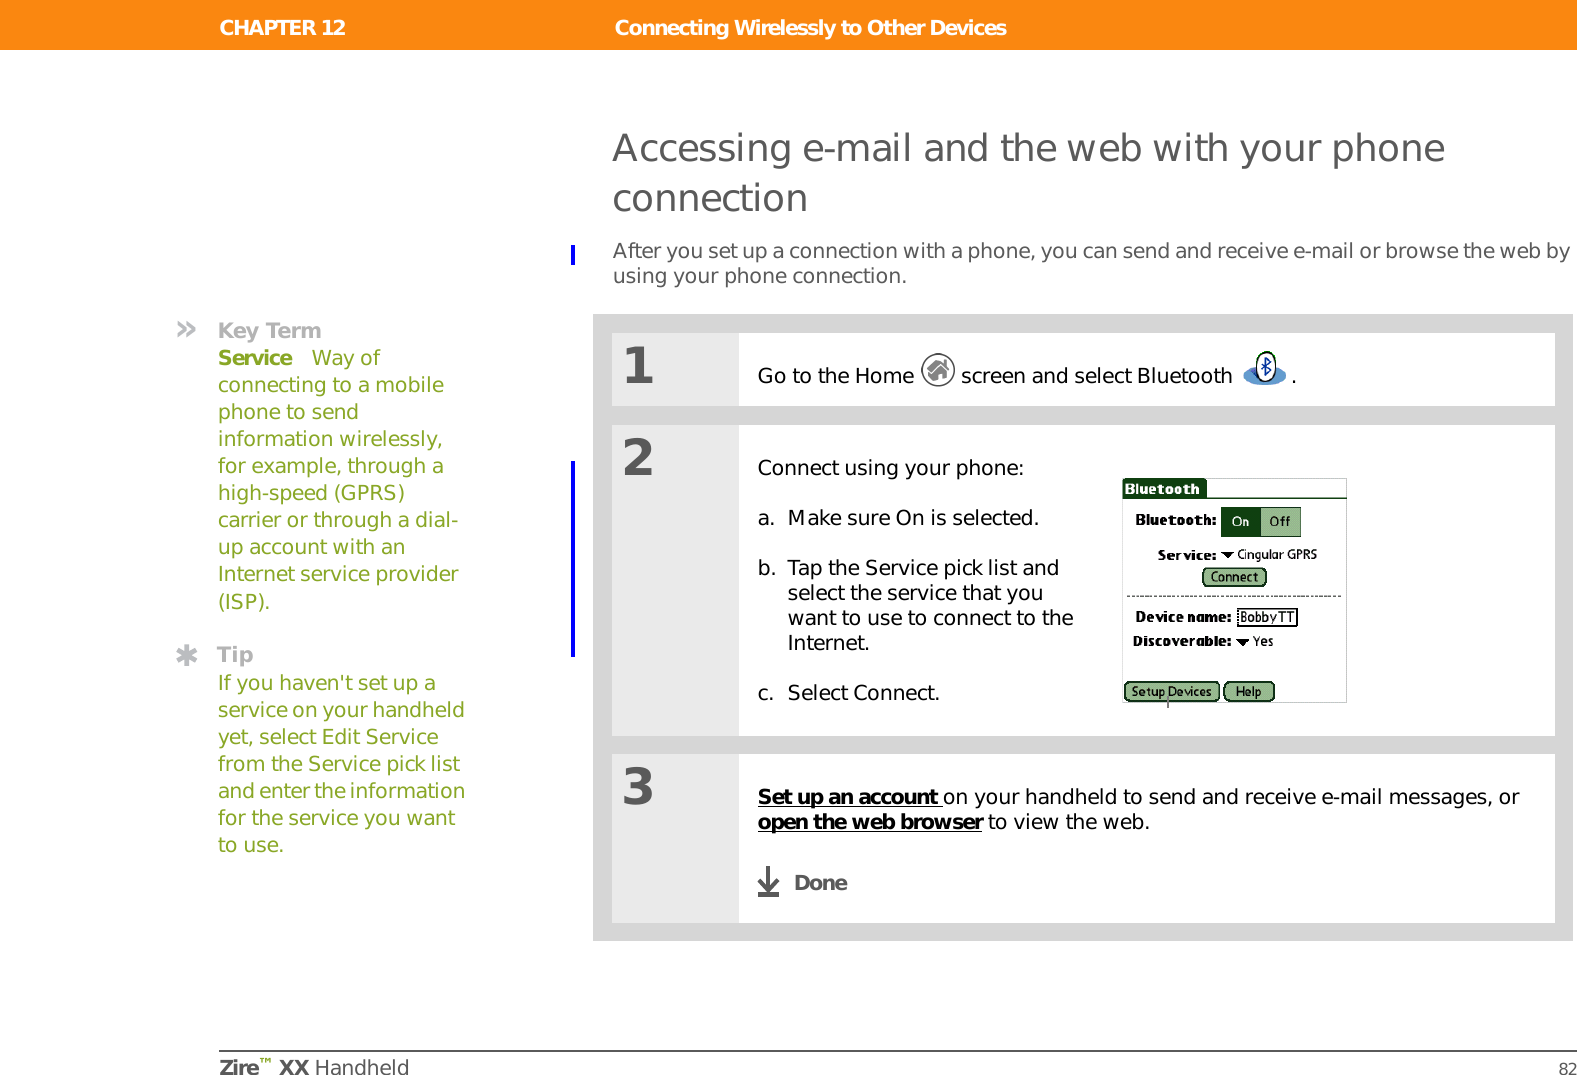
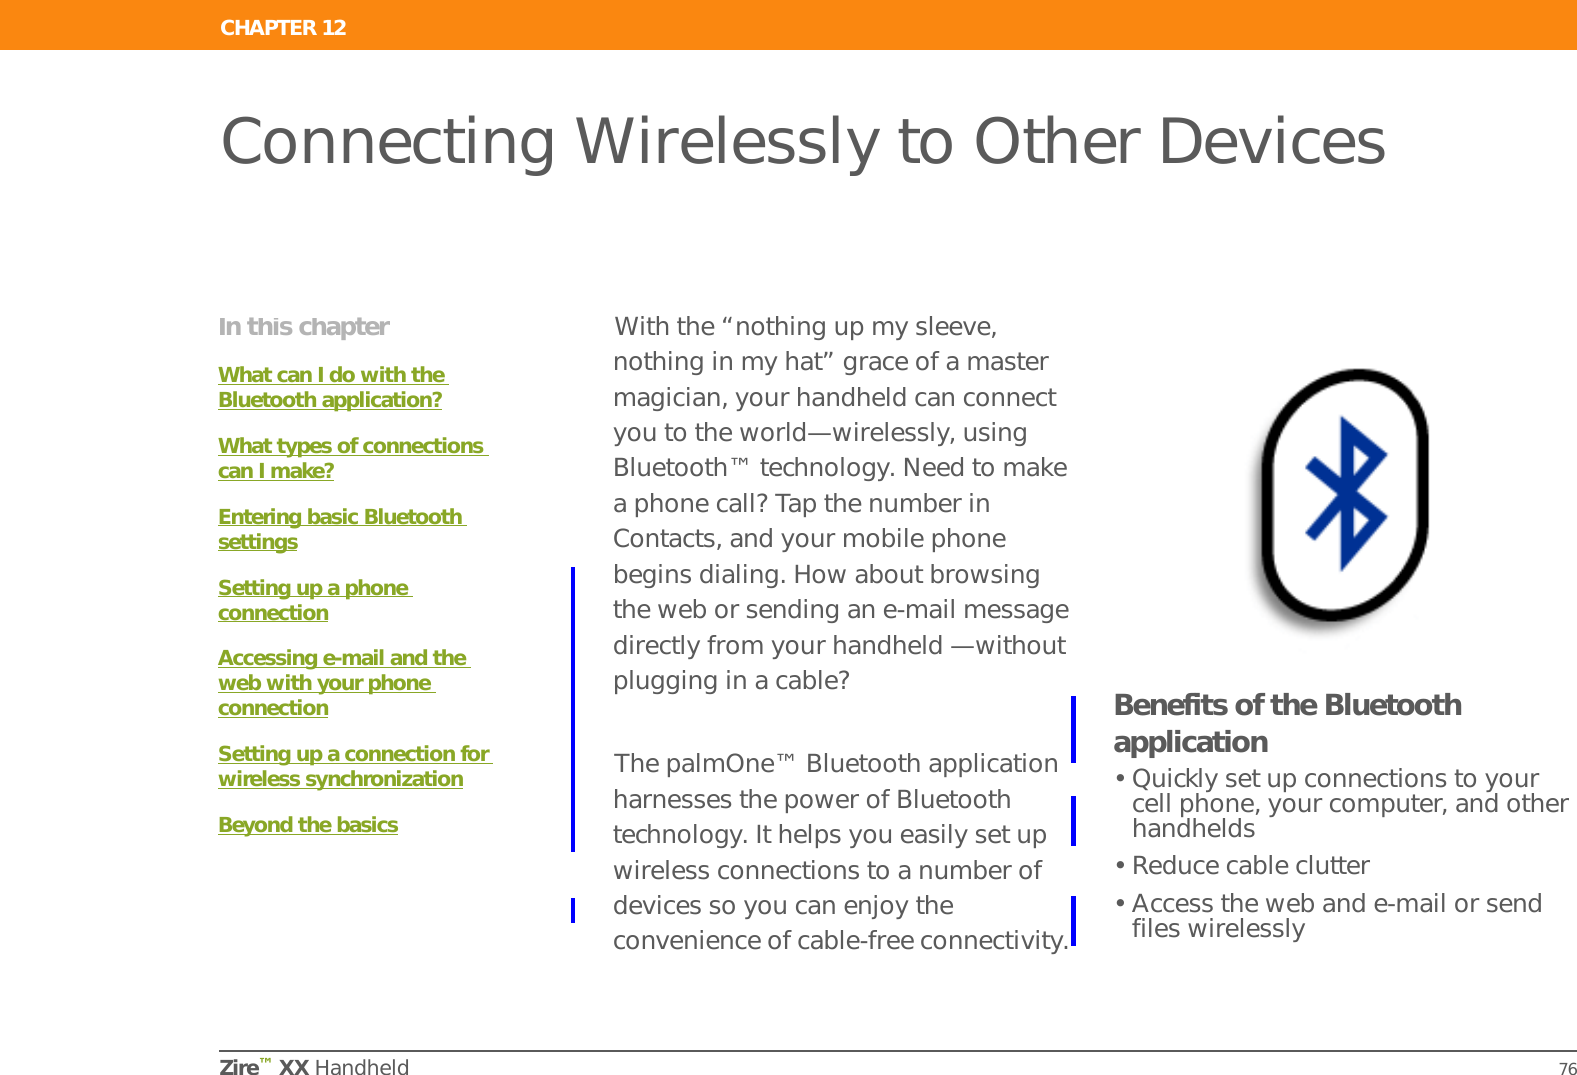
![CHAPTER 12 Connecting Wirelessly to Other DevicesZire™ XX Handheld 77What can I do with the Bluetooth application?Quickly set up connections to your cell phone, your computer, and other handhelds. How much time each day do you spend at your computer? On the phone? Wouldn’t it be great if you could access these devices—dial a phone number, send an e-mail message—directly from your handheld? The Bluetooth application gets you started by helping you set up connections to devices within approximately 30 feet of your handheld.Reduce cable clutter. Imagine a world—or even your workstation—without cables. While using Bluetooth technology on your handheld does not completely eliminate cable clutter, it can replace many of those cables with a wireless connection. For example, Bluetooth technology lets you wirelessly synchronize your handheld with your computer.Access the web and e-mail or send files wirelessly. Whether you access the Internet or your e-mail account once a week or constantly throughout the day, wireless connectivity means that you can get online any time you are in a coverage area for your mobile phone or are within range of your laptop connected to the Internet. You can also send files such as photos.What types of connections can I make?With Bluetooth manager, you can make connections using the following types of devices:• To browse the web and send and receive e-mail messages, connect to the Internet in these ways:• Using your mobile phone, by dialing your ISP or signing up with a high-speed wireless carrier account• Linking through your desktop computer's network connection• Establishing a connection to a Bluetooth Access Point connected to the Internet.• To send and receive text and multimedia messages or photos, connect to your mobile phone.• To synchronize your handheld with your computer wirelessly, connect to your computer.»Key TermBluetooth Technology that enables devices such as handhelds, mobile phones, and computers to connect wirelessly to each other.Before You Begin[!]Any device you connect to must also be a Bluetooth device, and the device must have its Bluetooth communication software enabled. Check the user guide for your device.To set up a phone connection, you must have a GSM or GPRS mobile phone enabled with data services.To browse the web and use e-mail, install the web browser and the e-mail software included on the CD that came with your handheld.](https://usermanual.wiki/Palm/810/User-Guide-418283-Page-92.png)
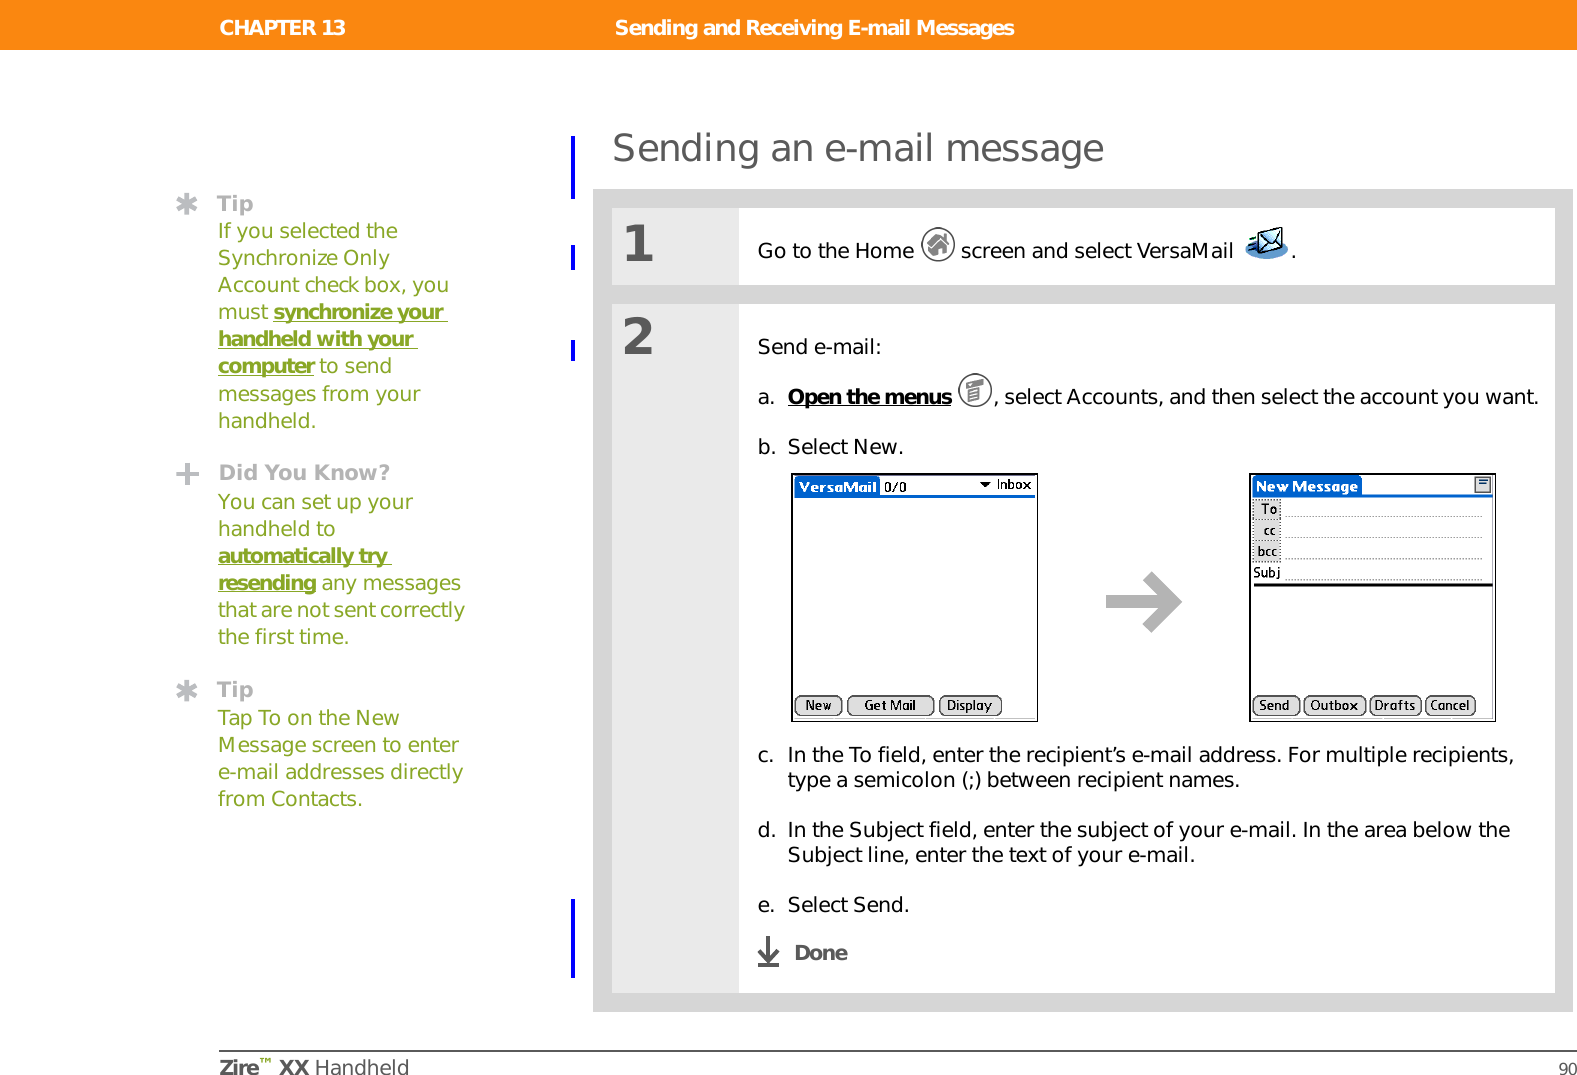
![CHAPTER 13 Sending and Receiving E-mail MessagesZire™ XX Handheld 86Setting up an account01Go to the Home screen and select VersaMail . 2Open the Account Setup screen:a. Open the menus , select Accounts, and then select Account Setup.b. Tap New.3Enter the basic account information:a. In the Account Name field, enter a descriptive name.ContinuedBefore You Begin[!]Before you can set up an e-mail account on your handheld, you must do the following:• If you do not already have one, establish an account with an Internet service provider such as Earthlink or a wireless carrier such as Cingular. You may also use a corporate e-mail account.• For wireless accounts only: Have active service with a wireless carrier and a mobile phone equipped with Bluetooth™ technology. You must also set up a phone connection on your handheld to send and receive information wirelessly.• Install the VersaMail software. Insert the CD and follow the onscreen instructions for installing extra software.](https://usermanual.wiki/Palm/810/User-Guide-418283-Page-101.png)
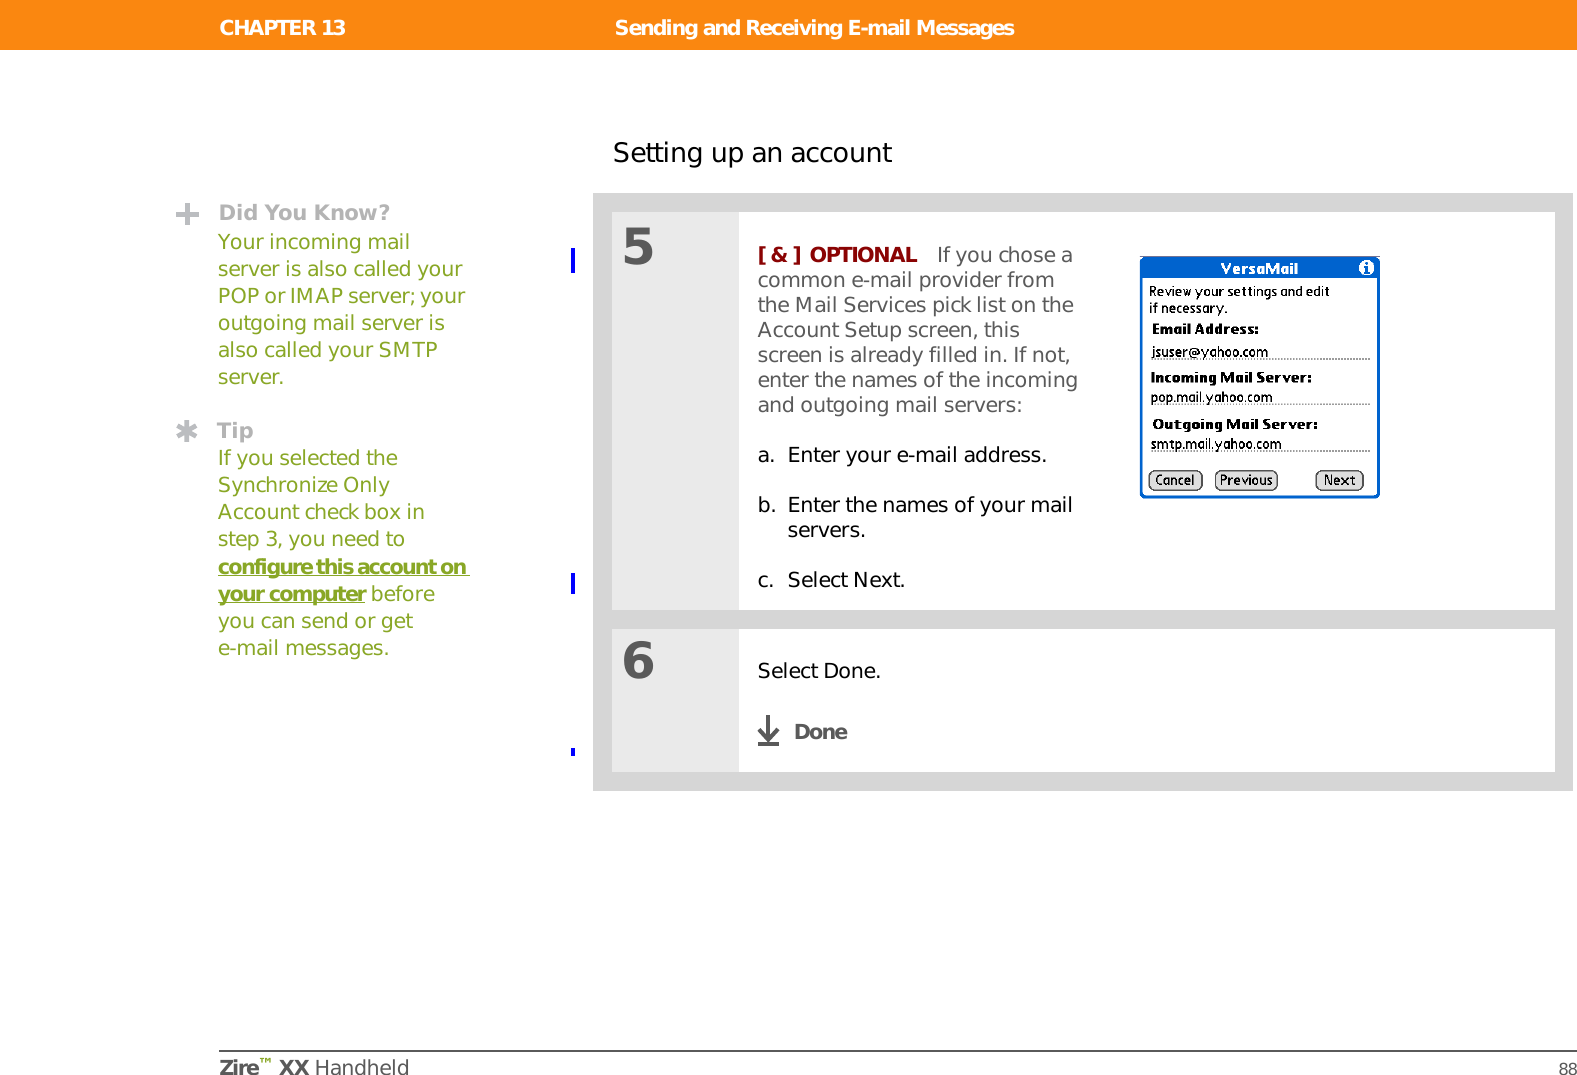
![Zire™ XX Handheld 88CHAPTER 13 Sending and Receiving E-mail MessagesSetting up an account5[ & ] OPTIONAL If you chose a common e-mail provider from the Mail Services pick list on the Account Setup screen, this screen is already filled in. If not, enter the names of the incoming and outgoing mail servers:a. Enter your e-mail address.b. Enter the names of your mail servers.c. Select Next.6Select Done.DoneDid You Know?Your incoming mail server is also called your POP or IMAP server; your outgoing mail server is also called your SMTP server.TipIf you selected the Synchronize Only Account check box in step 3, you need to configure this account on your computer before you can send or get e-mail messages.](https://usermanual.wiki/Palm/810/User-Guide-418283-Page-103.png)
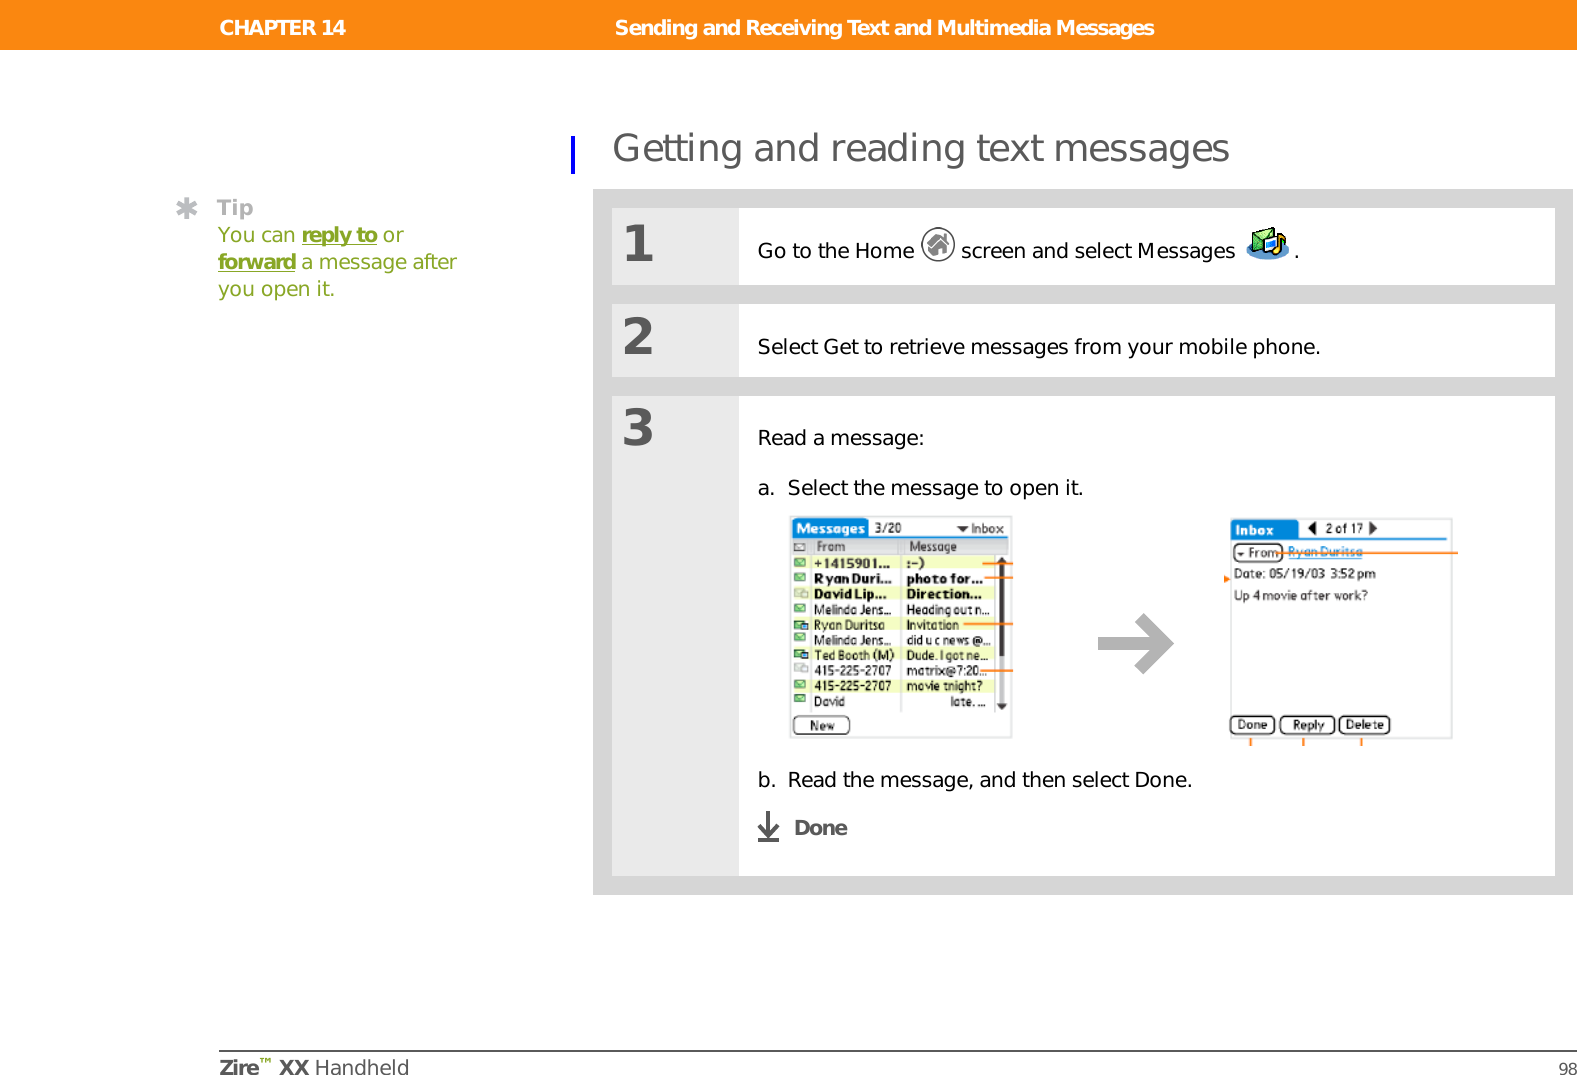
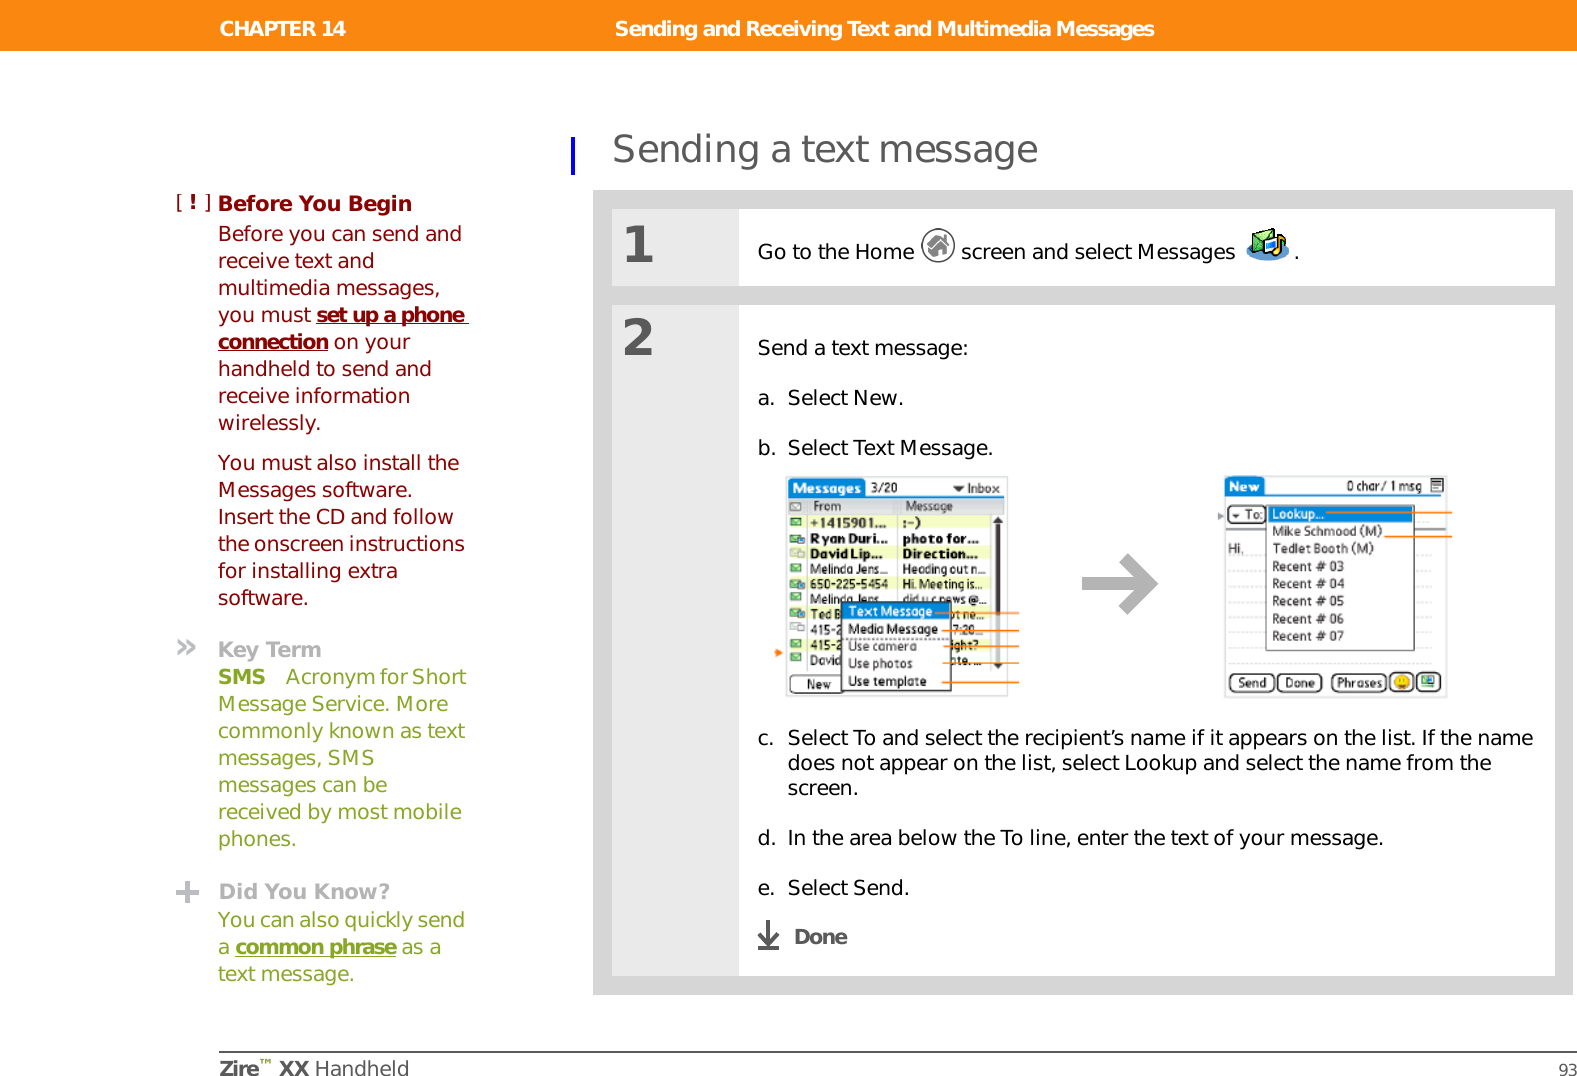
![CHAPTER 14 Sending and Receiving Text and Multimedia MessagesZire™ XX Handheld 93Sending a text message01Go to the Home screen and select Messages . 2Send a text message:a. Select New.b. Select Text Message.c. Select To and select the recipient’s name if it appears on the list. If the name does not appear on the list, select Lookup and select the name from the screen.d. In the area below the To line, enter the text of your message.e. Select Send.DoneBefore You Begin[!]Before you can send and receive text and multimedia messages, you must set up a phone connection on your handheld to send and receive information wirelessly.You must also install the Messages software. Insert the CD and follow the onscreen instructions for installing extra software.»Key TermSMS Acronym for Short Message Service. More commonly known as text messages, SMS messages can be received by most mobile phones.Did You Know?You can also quickly send a common phrase as a text message.](https://usermanual.wiki/Palm/810/User-Guide-418283-Page-108.png)
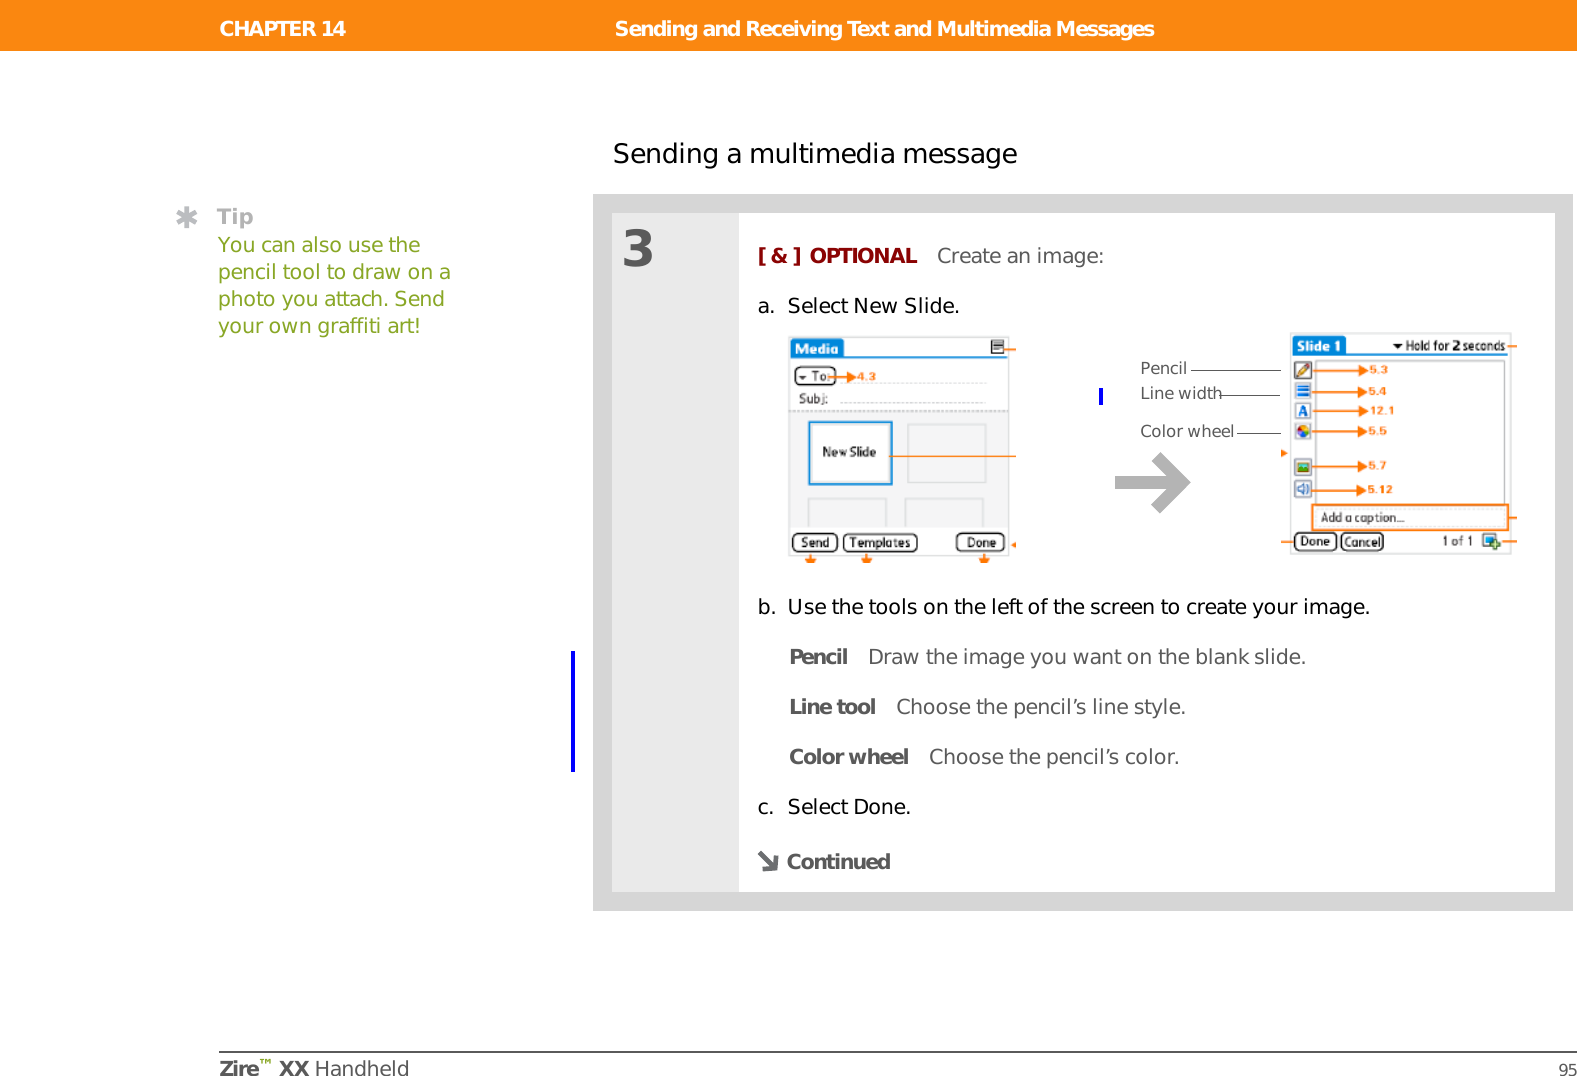
![Zire™ XX Handheld 95CHAPTER 14 Sending and Receiving Text and Multimedia MessagesSending a multimedia message3[ & ] OPTIONAL Create an image:a. Select New Slide.b. Use the tools on the left of the screen to create your image.Pencil Draw the image you want on the blank slide.Line tool Choose the pencil’s line style.Color wheel Choose the pencil’s color.c. Select Done.ContinuedTipYou can also use the pencil tool to draw on a photo you attach. Send your own graffiti art!PencilLine widthColor wheel](https://usermanual.wiki/Palm/810/User-Guide-418283-Page-110.png)
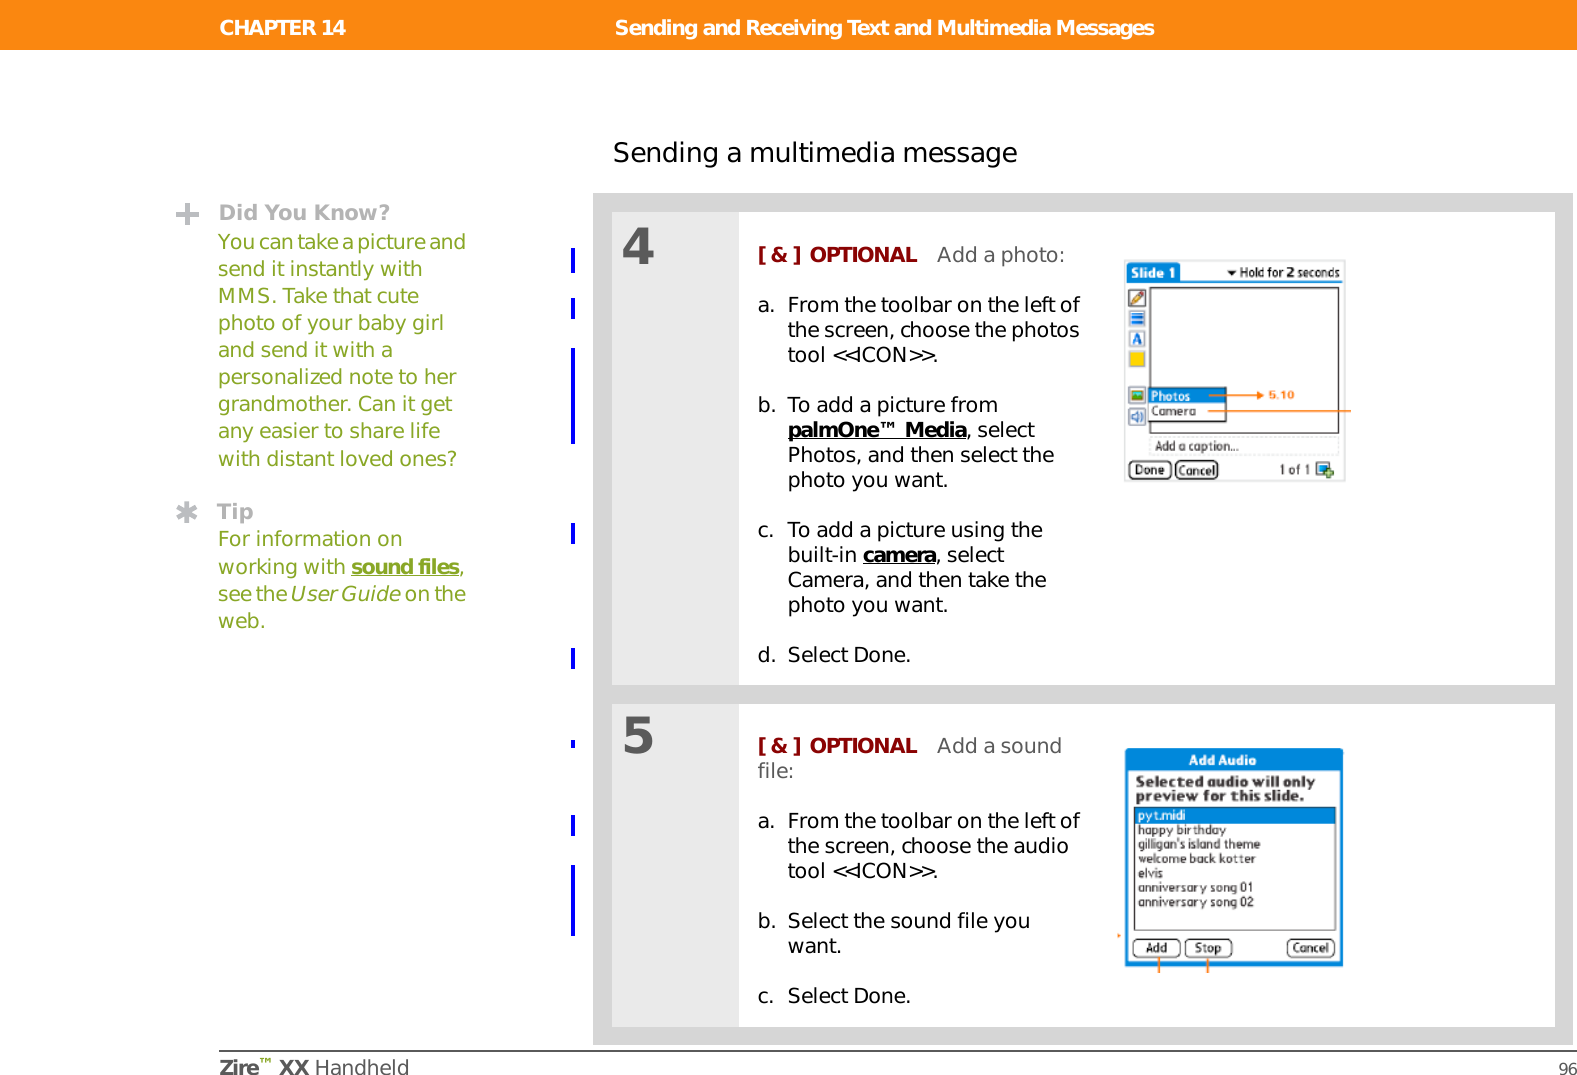
![Zire™ XX Handheld 96CHAPTER 14 Sending and Receiving Text and Multimedia MessagesSending a multimedia message4[ & ] OPTIONAL Add a photo:a. From the toolbar on the left of the screen, choose the photos tool <<ICON>>.b. To add a picture from palmOne™ Media, select Photos, and then select the photo you want.c. To add a picture using the built-in camera, select Camera, and then take the photo you want.d. Select Done.5[ & ] OPTIONAL Add a sound file:a. From the toolbar on the left of the screen, choose the audio tool <<ICON>>.b. Select the sound file you want.c. Select Done.Did You Know?You can take a picture and send it instantly with MMS. Take that cute photo of your baby girl and send it with a personalized note to her grandmother. Can it get any easier to share life with distant loved ones?TipFor information on working with sound files, see the User Guide on the web.](https://usermanual.wiki/Palm/810/User-Guide-418283-Page-111.png)
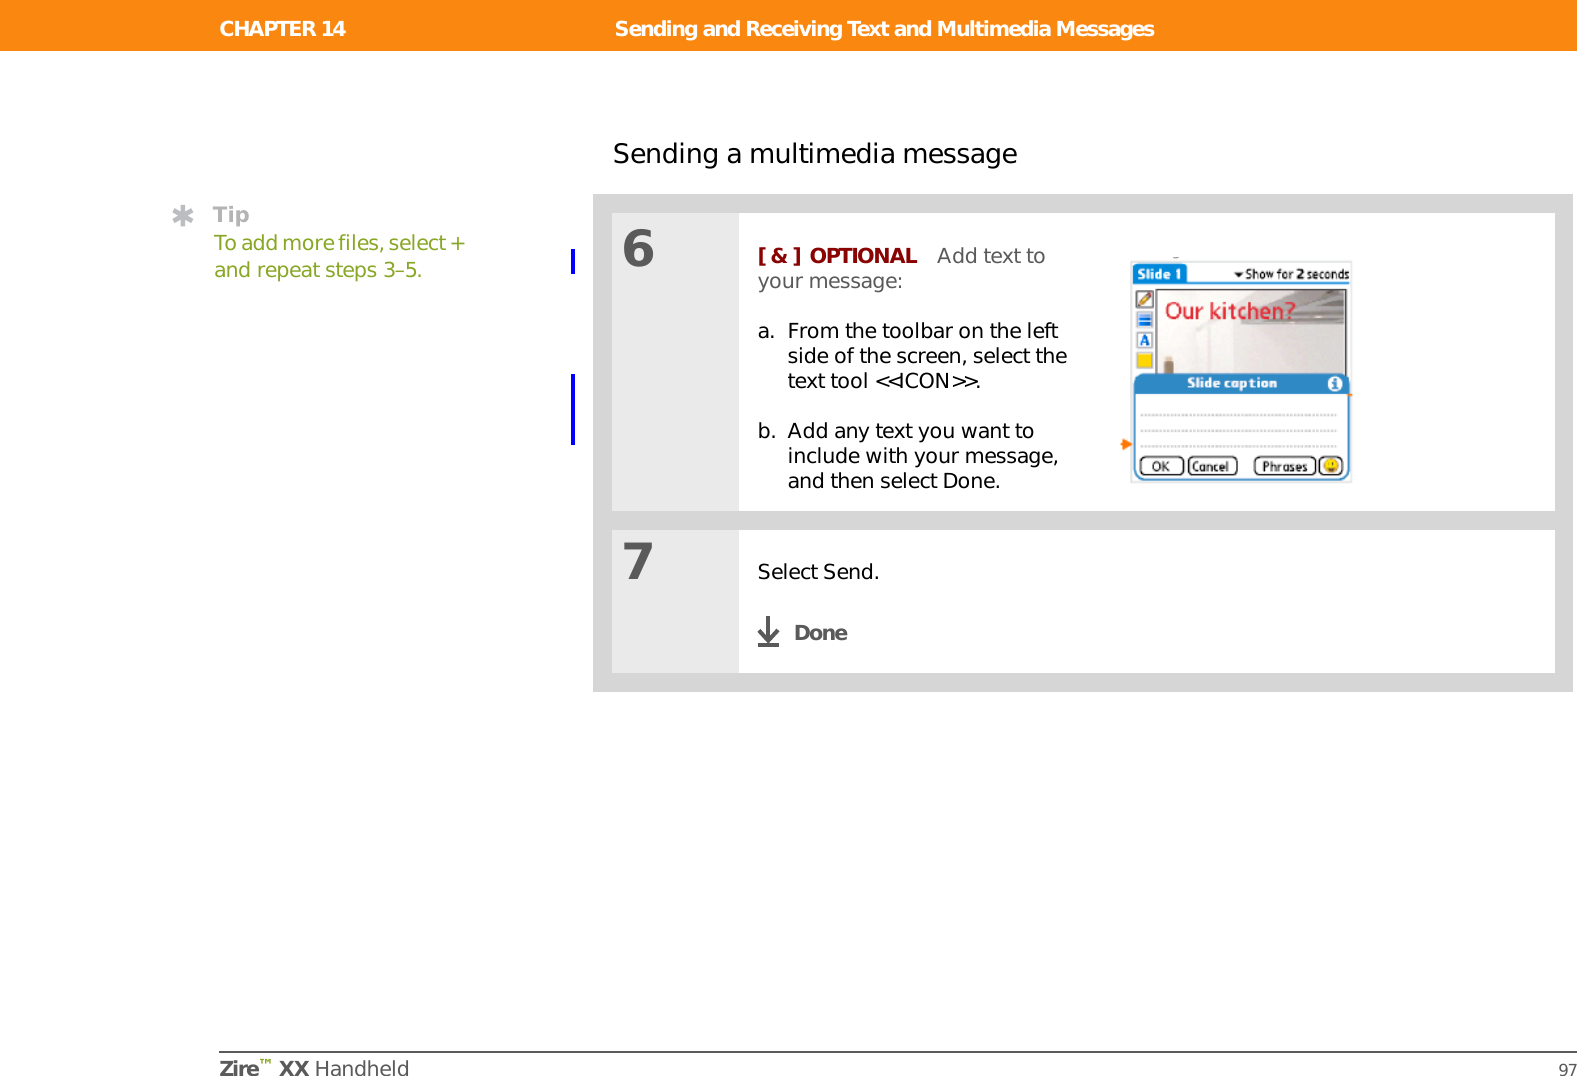
![Zire™ XX Handheld 97CHAPTER 14 Sending and Receiving Text and Multimedia MessagesSending a multimedia message6[ & ] OPTIONAL Add text to your message:a. From the toolbar on the left side of the screen, select the text tool <<ICON>>.b. Add any text you want to include with your message, and then select Done.7Select Send.DoneTipTo add more files, select + and repeat steps 3–5.](https://usermanual.wiki/Palm/810/User-Guide-418283-Page-112.png)
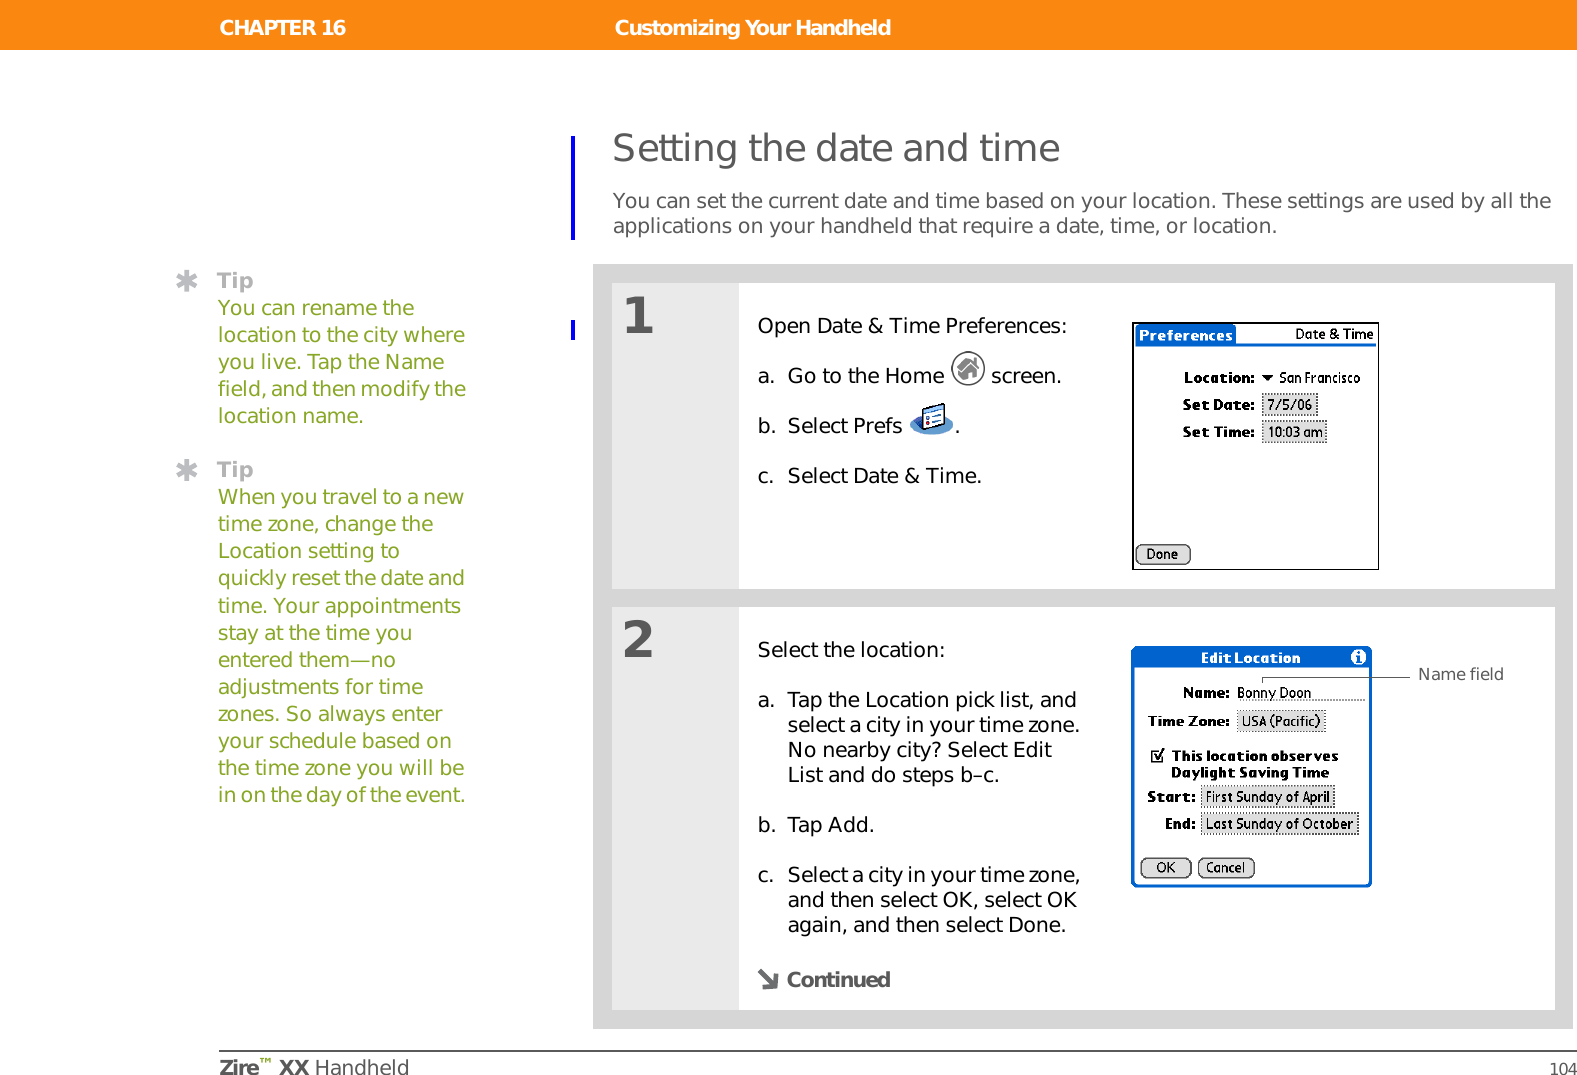
![CHAPTER 15 Browsing the WebZire™ XX Handheld 101Accessing a web page01Go to the Home screen and select Web Pro . 2Go to the web page yo want to view:a. Select the Open URL icon .b. Enter the address of the web page you want to visit. Use the buttons in the Open URL dialog box for quick entry of characters commonly used in web addresses.c. Select Go.DoneBefore You Begin[!]Install the Web Pro software. Insert the CD and follow the onscreen instructions for installing extra software.To browse the web, you must set up a connection to the Internet from your handheld.»Key TermURL Stands for “uniform resource locator,” the technical name for a web address. Think “web address” when you see “URL.”](https://usermanual.wiki/Palm/810/User-Guide-418283-Page-116.png)

![Zire™ XX Handheld 118Product Regulatory InformationFCC StatementThis device complies with part 15 of the FCC rules. Operation is subject to the following two conditions: (1) This device may not cause harmful interference, and (2) this device must accept any interference received, including interference that may cause undesired operation.This equipment has been tested and found to comply with the limits for a Class B digital device, pursuant to Part 15 of the FCC rules. These limits are designed to provide reasonable protection against harmful interference in a residential installation. This equipment generates, uses, and can radiate radio frequency energy and, if not installed and used in accordance with the instructions, may cause harmful interference to radio communications. However, there is no guarantee that interference will not occur in a particular installation. If this equipment does cause harmful interference to radio or television reception, which can be determined by turning the equipment off and on, the user is encouraged to try to correct the interference by one or more of the following measures:• Reorient or relocate the receiving antenna.• Increase the separation between the equipment and receiver.• Connect the equipment into an outlet on a circuit different from that to which the receiver is connected.• Consult the dealer or an experienced radio/TV technician for help.The use of shielded I/O cables is required when connecting this equipment to any and all optional peripheral or host devices. Failure to do so may violate FCC rules.Changes or modifications not covered in this manual must be approved in writing by the manufacturer’s Regulatory Engineering Department. Changes or modifications made without written approval may void the user’s authority to operate this equipment.IMPORTANT[!]Zire™ Product FamilyTested to Comply With FCC StandardsFOR HOME OR OFFICE USEResponsible Party:palmOne, Inc. 400 N. McCarthy Blvd. Milpitas, California 95035United States of America(408) 503-7500](https://usermanual.wiki/Palm/810/User-Guide-418283-Page-133.png)