Palm 830 PDA W/ WiFi and Bluetooth Capabilities User Manual User Guide for the LifeDrive Mobile Manager
Palm Inc PDA W/ WiFi and Bluetooth Capabilities User Guide for the LifeDrive Mobile Manager
Palm >
Contents
- 1. User Manual 1 of 2
- 2. User Manual 2 of 2
- 3. Users Manual 1 of 2
- 4. Users Manual 2 of 2
User Manual 1 of 2
![LifeDrive from palmOne iiCopyright and Trademark© 2005 palmOne, Inc. All rights reserved. palmOne, Addit, Blazer, Graffiti, HotSync, LifeDrive, Palm, Palm Powered, Palm OS, the Palm logo, and VersaMail are among the trademarks or registered trademarks owned by or licensed to palmOne, Inc. All other brand and product names are or may be trademarks of, and are used to identify products or services of, their respective owners.palmOne, Inc. uses the Bluetooth wireless technology trademark under express license from Bluetooth SIG, Inc. and uses the Wi-Fi wireless technology trademark under express license from the Wi-Fi Alliance. Pocket Tunes is a trademark of NormSoft, Inc. MPEG Layer-3 audio decoding technology is licensed from Fraunhofer IIS and Thomson. This product is licensed under the MPEG-4 systems patent portfolio license for encoding in compliance with the MPEG-4 systems standard, except that an additional license and payment of royalties are necessary for encoding in connection with (i) data stored or replicated in physical media which is paid for on a title-by-title basis and/or (ii) data which is paid for on a title-by-title basis and is transmitted to an end user for permanent storage and/or use. Such additional license may be obtained from MPEG, LLC. See www.mpegla.com for additional details. This product includes technology owned by Microsoft Corporation and cannot be used or distributed without a license from Microsoft Licensing, GP. Disclaimer and Limitation of LiabilitypalmOne, Inc. assumes no responsibility for any damage or loss resulting from the use of this guide.palmOne, Inc. assumes no responsibility for any loss or claims by third parties which may arise through the use of this software. palmOne, Inc. assumes no responsibility for any damage or loss caused by deletion of data as a result of malfunction, dead battery, or repairs. Be sure to make backup copies of all important data on other media to protect against data loss.Please read the End User Software License Agreement with this product before using the accompanying software program(s). Using any part of the software indicates that you accept the terms of the End User Software License Agreement.Software Download AvailablePalm®Desktop software is supplied on a CD. If you do not have access to a CD drive for your computer, you can download Palm Desktop software from www.palmOne.com/lifedrive-userguide/IMPORTANT[!]SECOND DRAFT palmOne, Inc. Confidential](https://usermanual.wiki/Palm/830.User-Manual-1-of-2/User-Guide-543159-Page-2.png)


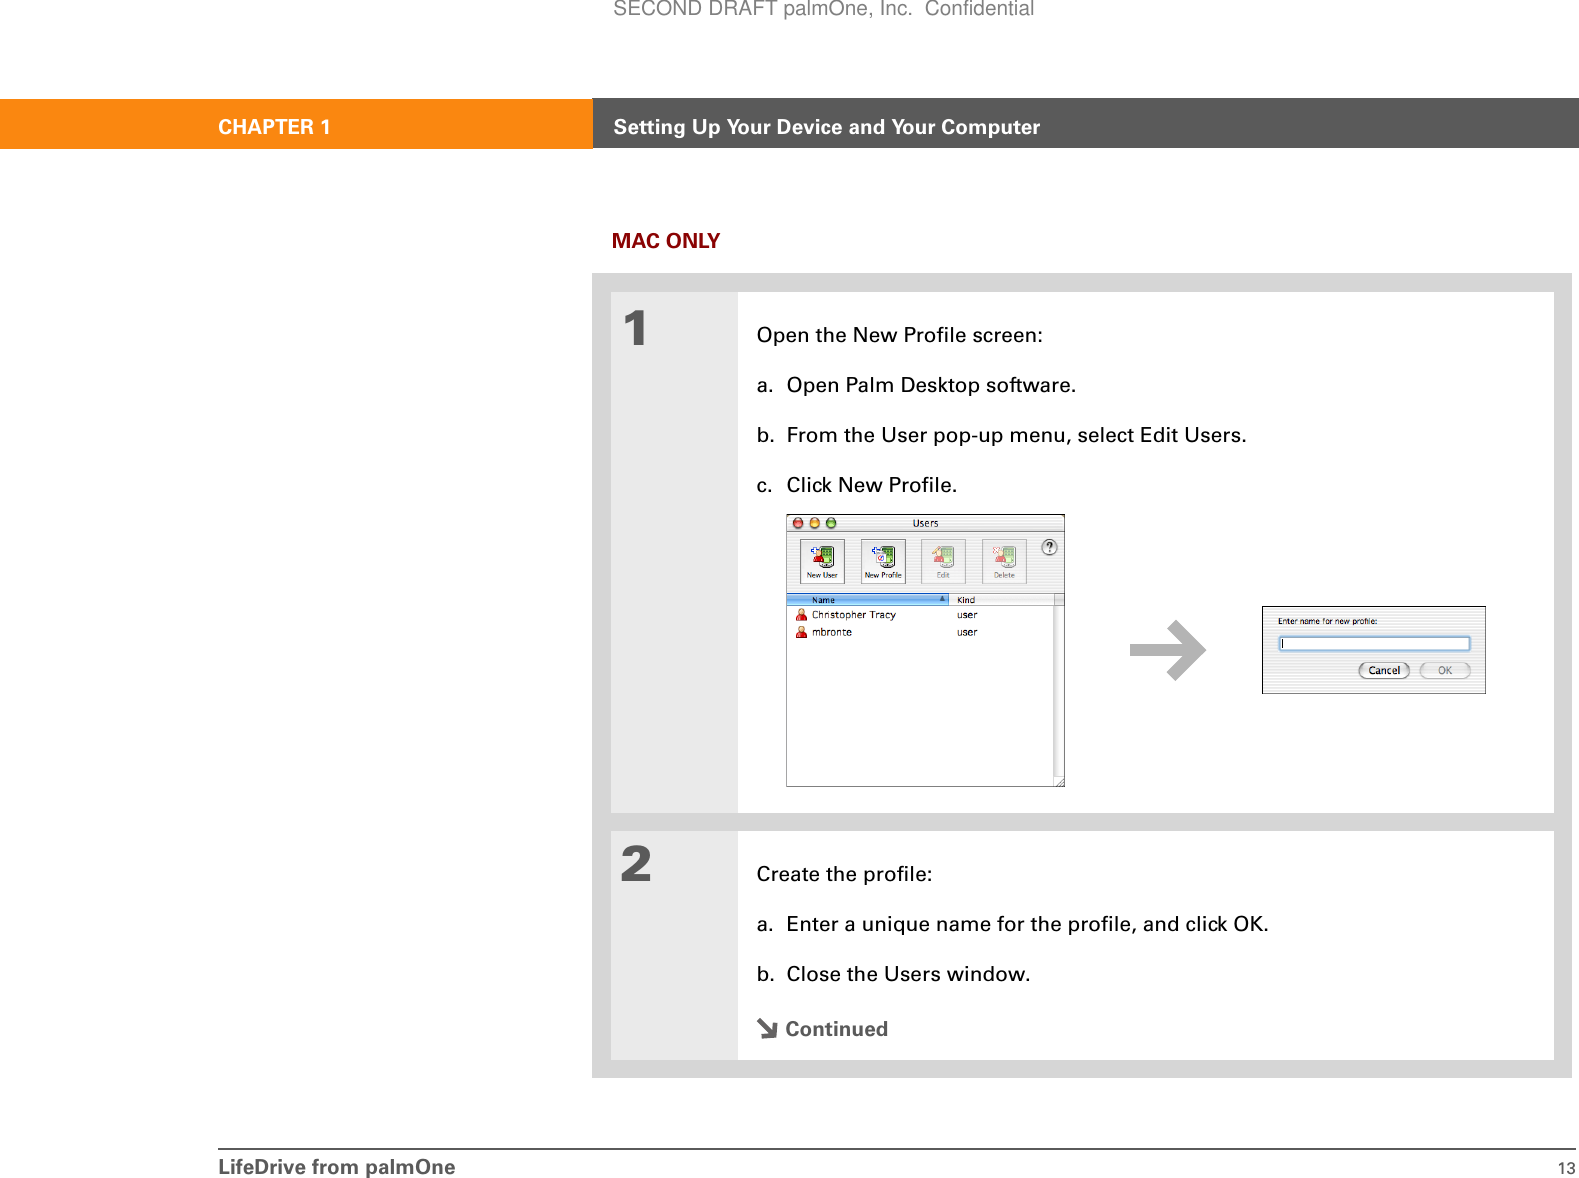
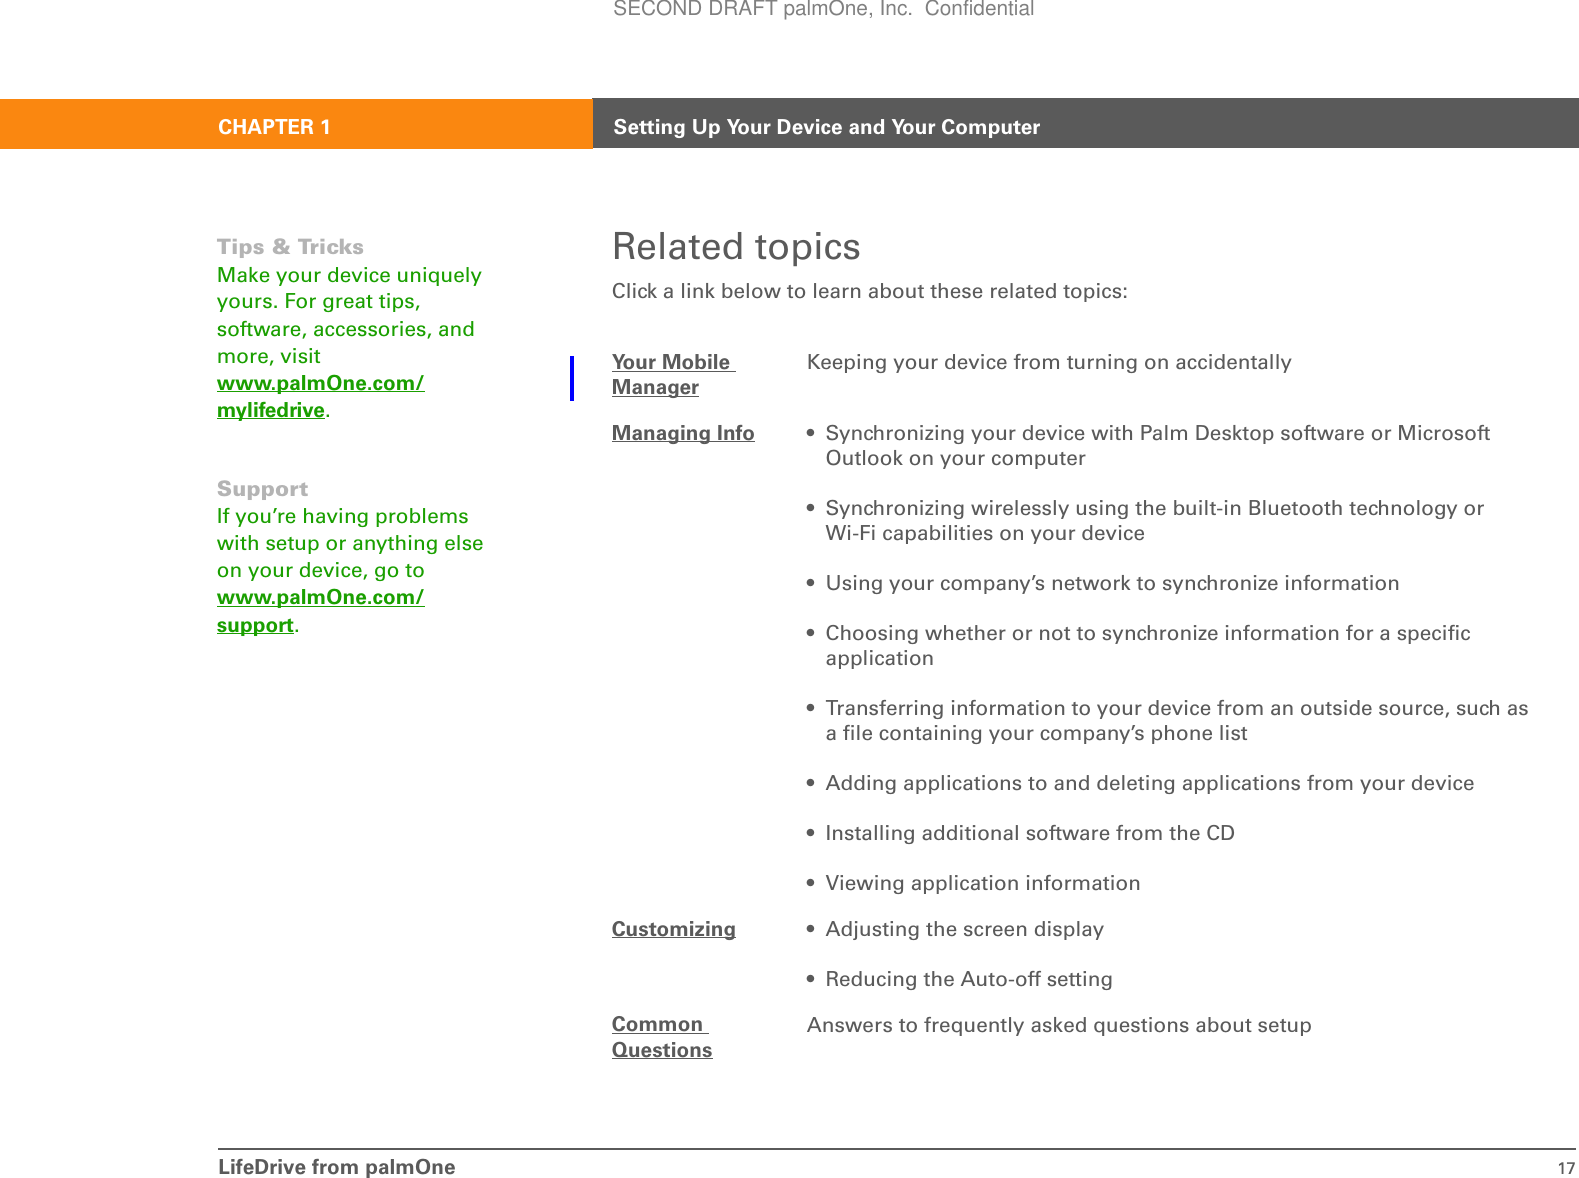
![LifeDrive from palmOne xxiiWhat’s in this guide?The info in this guide includes step-by-step instructions, links to cross-references, and sidebars.Step-by-step instructionsHere you’ll find how-to information. Look for these cues in instructions:LinksLinks that appear as underlined words in body text and in sidebars take you to other sections of this guide. Links also appear in the following sections:Cue that means the procedure continues on the next page.Cue that signals the end of the procedure. You’re done.A step that you must follow; otherwise, you could experience an error or even lose information.[ & ] OPTIONAL A step you might find useful.Information that applies only in certain cases or that tells more about a procedure step.WINDOWS ONLYMAC ONLYA procedure or text that applies to one platform only. In most cases, if you see one heading check the following or preceding sections for the other. Sometimes, there is no Mac counterpart for a Windows procedure or text; this feature is not available to Mac users.In this chapter Links on the first page of each chapter that send you to a specific section. Related topics Links that send you to other topics in this guide to learn about more things you can do with an application or feature. ContinuedDoneIMPORTANT[!]NOTESECOND DRAFT palmOne, Inc. Confidential](https://usermanual.wiki/Palm/830.User-Manual-1-of-2/User-Guide-543159-Page-22.png)
![LifeDrive from palmOne xxiiiSidebarsBefore You Begin[!]Things you must complete before you can do the steps described in a procedure or group of procedures.TipA suggestion on how to use a feature more fully; a shortcut; a pointer to a related feature.Did You Know?An interesting fact about the topic being described; may include a link to more information.»Key TermA technical term related to the topic being described. The term may appear in this guide or only on your device.Tips & TricksA pointer to a website where you can obtain general information about your device and learn the latest tips, tricks, and more.SupportA pointer to a website where you can find help if you experience problems with a specific feature or with your device.SECOND DRAFT palmOne, Inc. Confidential](https://usermanual.wiki/Palm/830.User-Manual-1-of-2/User-Guide-543159-Page-23.png)

![LifeDrive from palmOne 4CHAPTER 1 Setting Up Your Device and Your ComputerStep 1: Charging your device01Connect your device:a. Plug the USB sync cable into your device and into a USB port on the back of your computer.b. Plug the AC charger into the Multi-connector on the sync cable and into an outlet.2Charge your device for three hours. Be sure your device is fully charged before going on to Step 2.DoneBefore You Begin[!]If you’re upgrading from another Palm Powered™ device, synchronize your old device with your old desktop software.TipAfter the initial charge, charge your device at least half an hour every day.SECOND DRAFT palmOne, Inc. Confidential](https://usermanual.wiki/Palm/830.User-Manual-1-of-2/User-Guide-543159-Page-27.png)
![LifeDrive from palmOne 6CHAPTER 1 Setting Up Your Device and Your ComputerStep 2: Turning on your device for the first time01Unplug the USB sync cable from your device.2Slide the power switch to the right.3Press and release the stylus, and then slide it out of the slot.4Hold the stylus as you would hold a pen, and follow the onscreen instructions to set up your device.DoneBefore You Begin[!]Be sure to fully charge your device, as described in the preceding procedure.TipAfter you set up your device, review the Quick Tour on your device and take the tutorial on the CD to learn the basics. Power switchStylusSECOND DRAFT palmOne, Inc. Confidential](https://usermanual.wiki/Palm/830.User-Manual-1-of-2/User-Guide-543159-Page-29.png)
![LifeDrive from palmOne 8CHAPTER 1 Setting Up Your Device and Your ComputerStep 4: Connecting your device to your computerIn this step, you connect your device to your computer and do a full sync for the first time. Synchronizing simply means that any information you enter in one place (your device or computer) is automatically updated in the other. Be sure to do a full sync of the info on your device at least once a day so that you always have an up-to-date backup copy of this info on your computer.01Connect your device to your computer:a. Plug the USB sync cable into a USB port on the back of your computer.b. Plug the cable into your device.ContinuedIMPORTANT[!]TipIf the Select User dialog box appears during synchronization, select the username of the device you want to synchronize, and click OK.»Key TermThird-party applicationA software program that runs on a Palm Powered device but is not created or supported by palmOne, Inc.TipIf you have problems with your new device after you synchronize, you may need to update your third-party applications.SECOND DRAFT palmOne, Inc. Confidential](https://usermanual.wiki/Palm/830.User-Manual-1-of-2/User-Guide-543159-Page-31.png)
![LifeDrive from palmOne 11CHAPTER 1 Setting Up Your Device and Your ComputerUsing user profiles Only IT managers may need to use user profiles for their company. If you are not an IT manager, you can skip this section.Suppose your sales organization wants to distribute two dozen devices that all have a common company phone list, a set of memos, and several key applications. A user profile can be created to install this information before the devices are distributed to employees. When the employees synchronize for the first time, this common information becomes part of their user-specific information.A user profile enables you to install the same information onto multiple devices before each device is individualized with a unique username and user-specific information. A device that has a user profile installed can be given to anyone, because the device is not yet identified by a unique username. When the new user synchronizes for the first time, he or she gives the device a unique username. Devices that are synchronized with a user profile must be either new devices that have never been synchronized or devices that have had their usernames and information removed by a hard reset.IMPORTANT[!]NOTESECOND DRAFT palmOne, Inc. Confidential](https://usermanual.wiki/Palm/830.User-Manual-1-of-2/User-Guide-543159-Page-34.png)


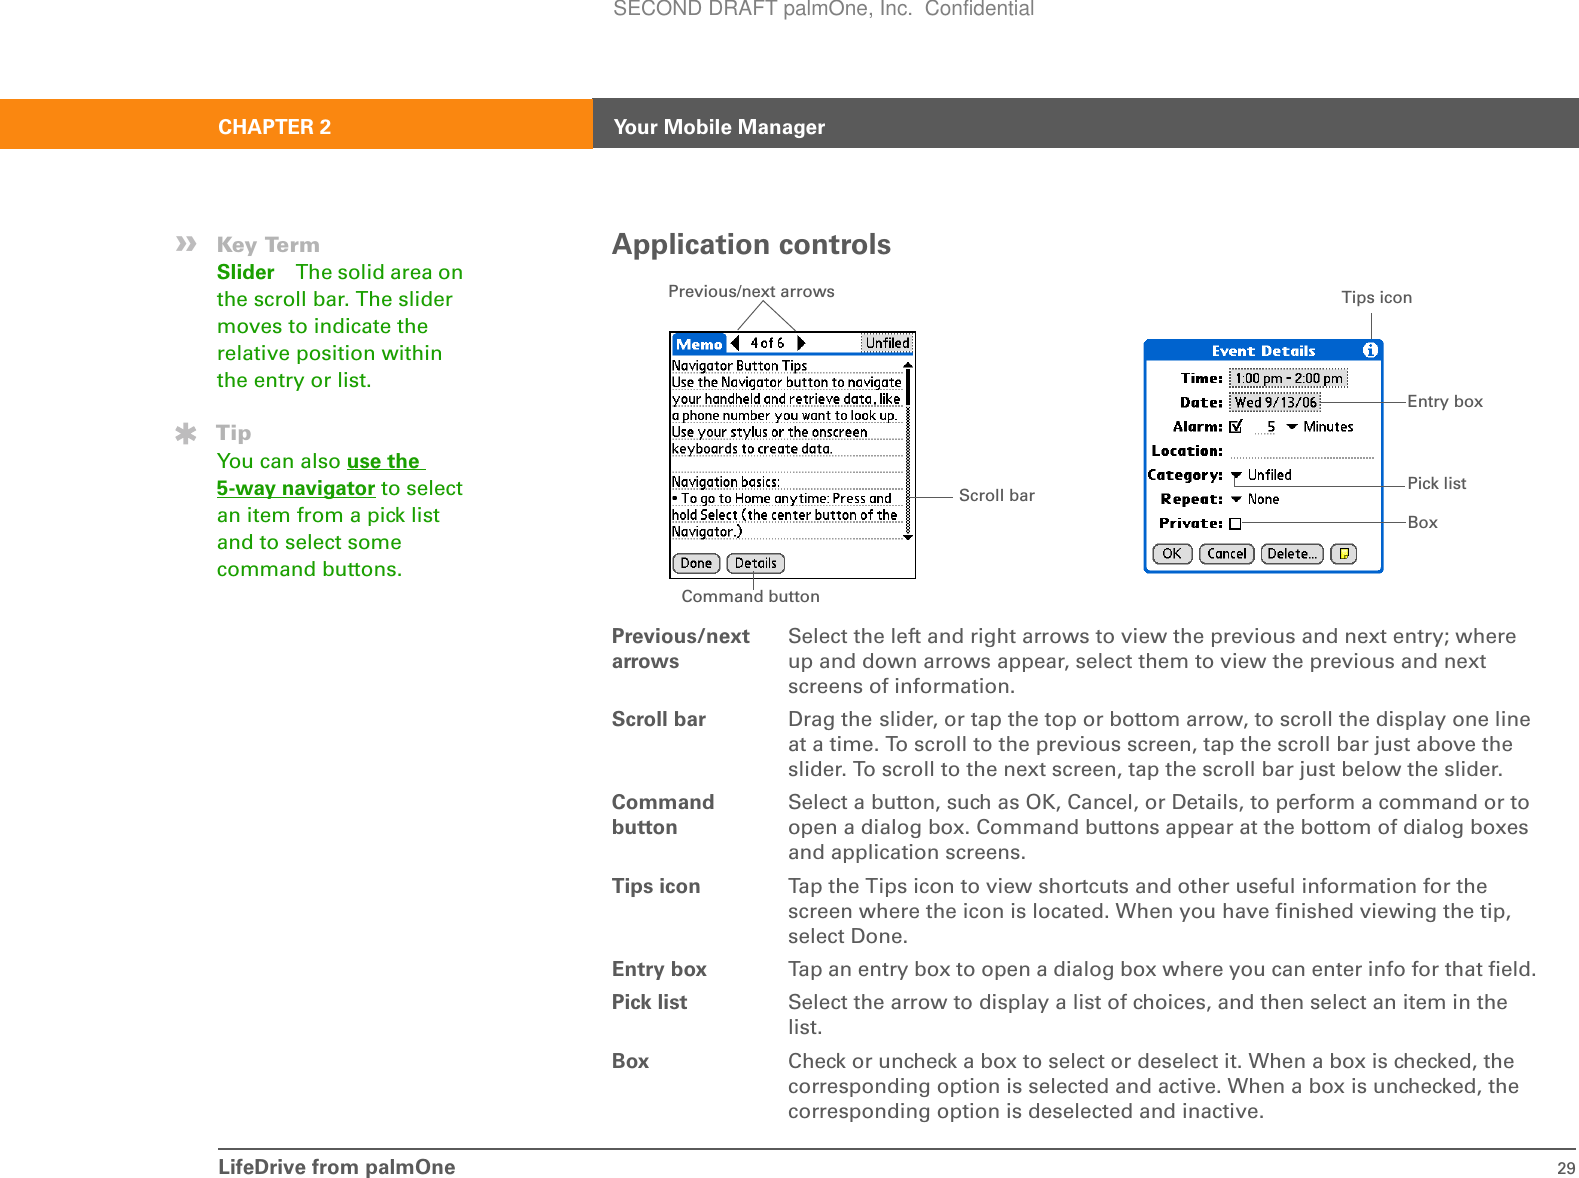


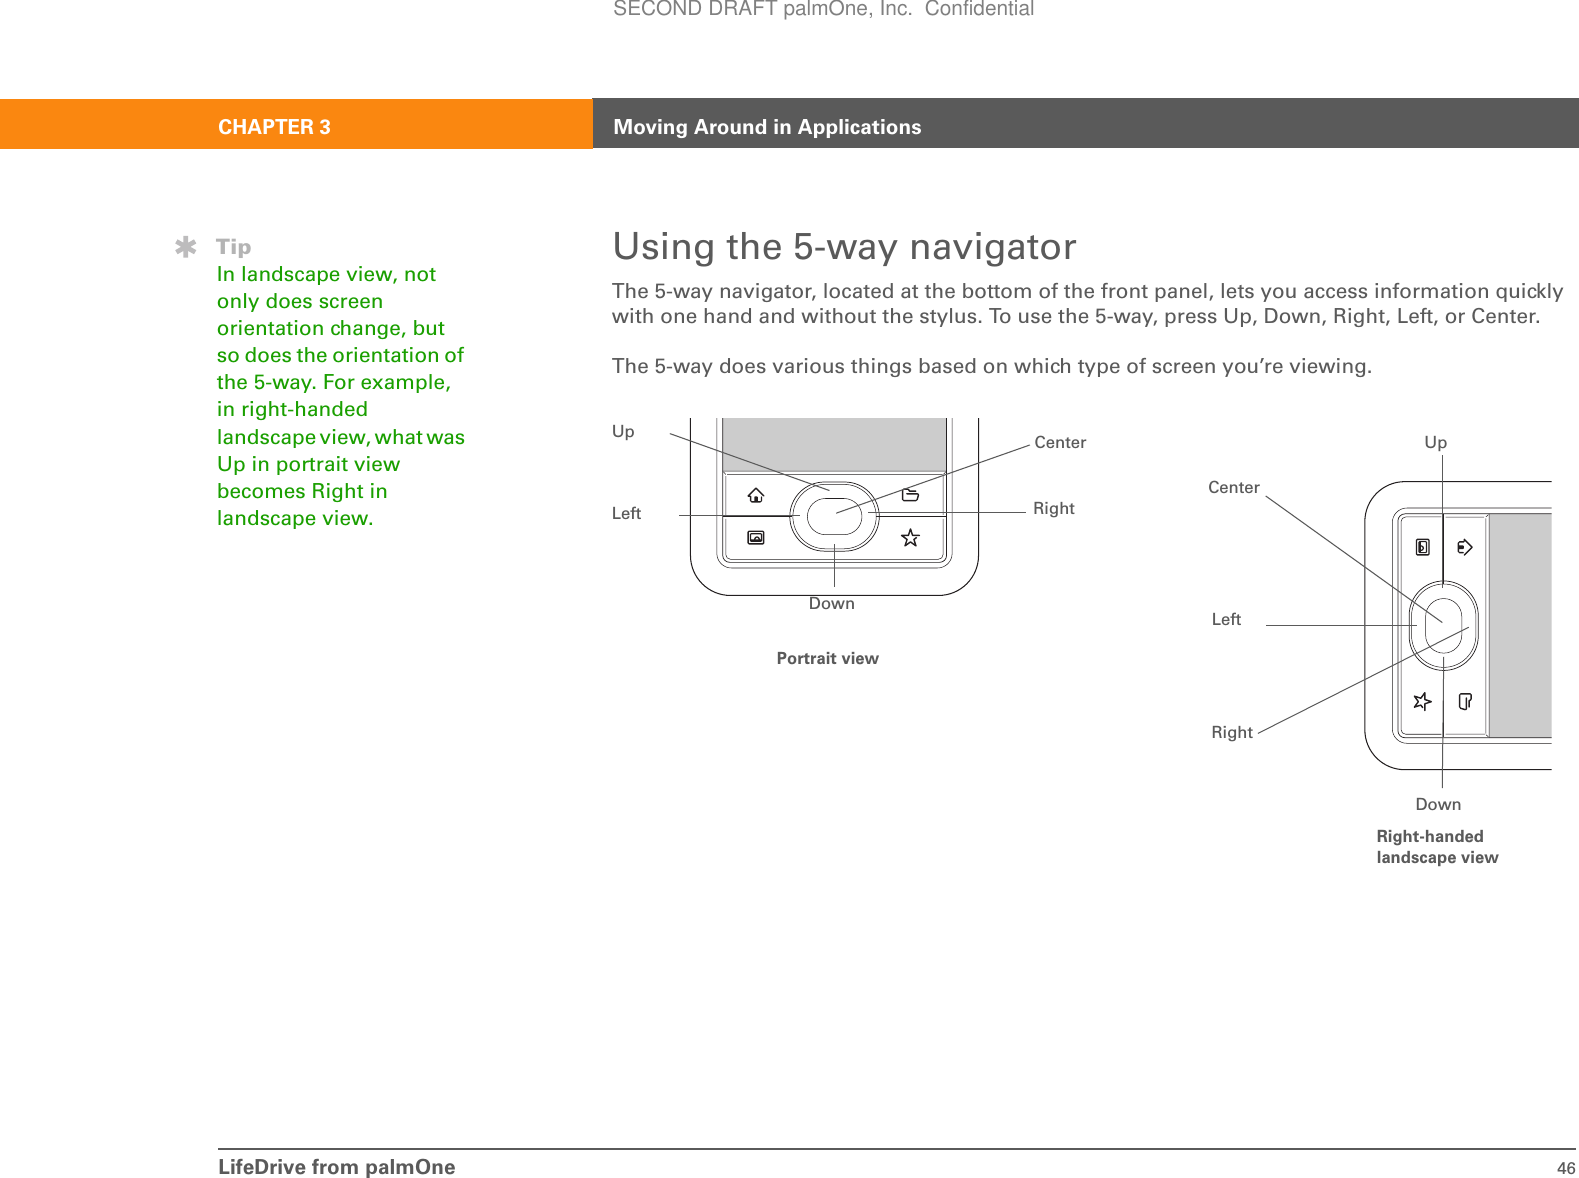
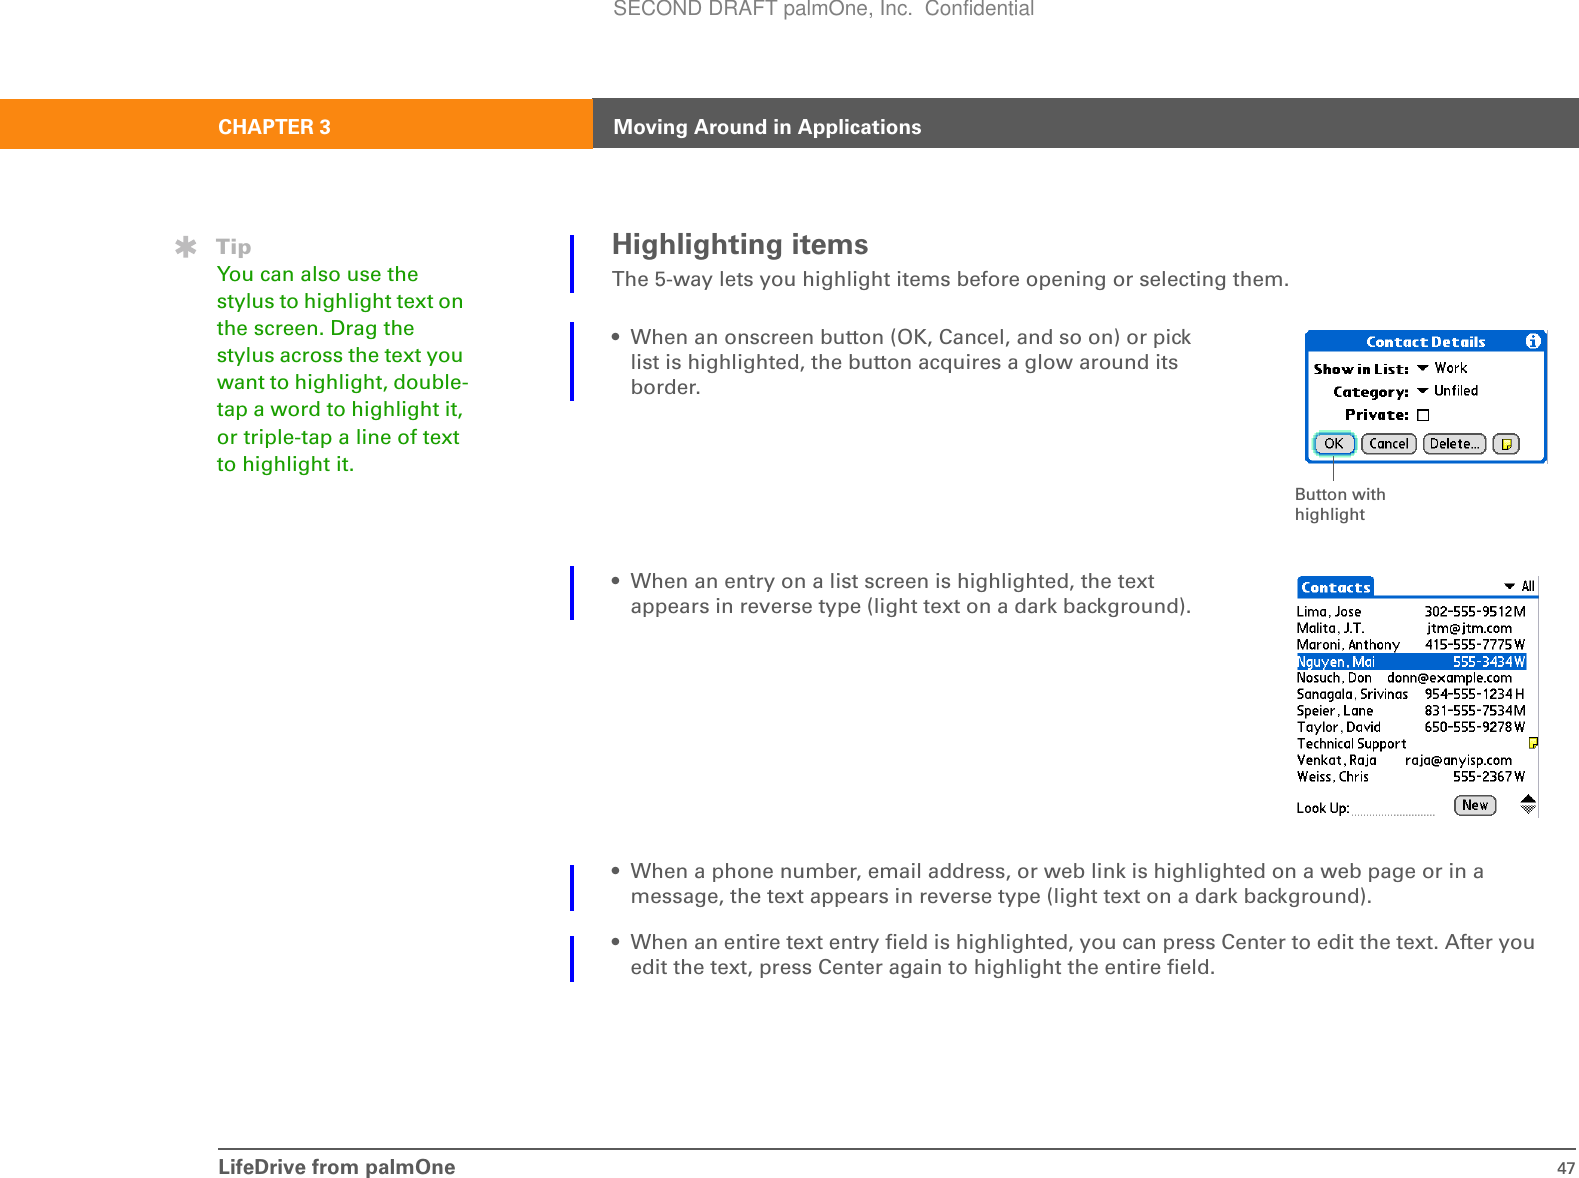
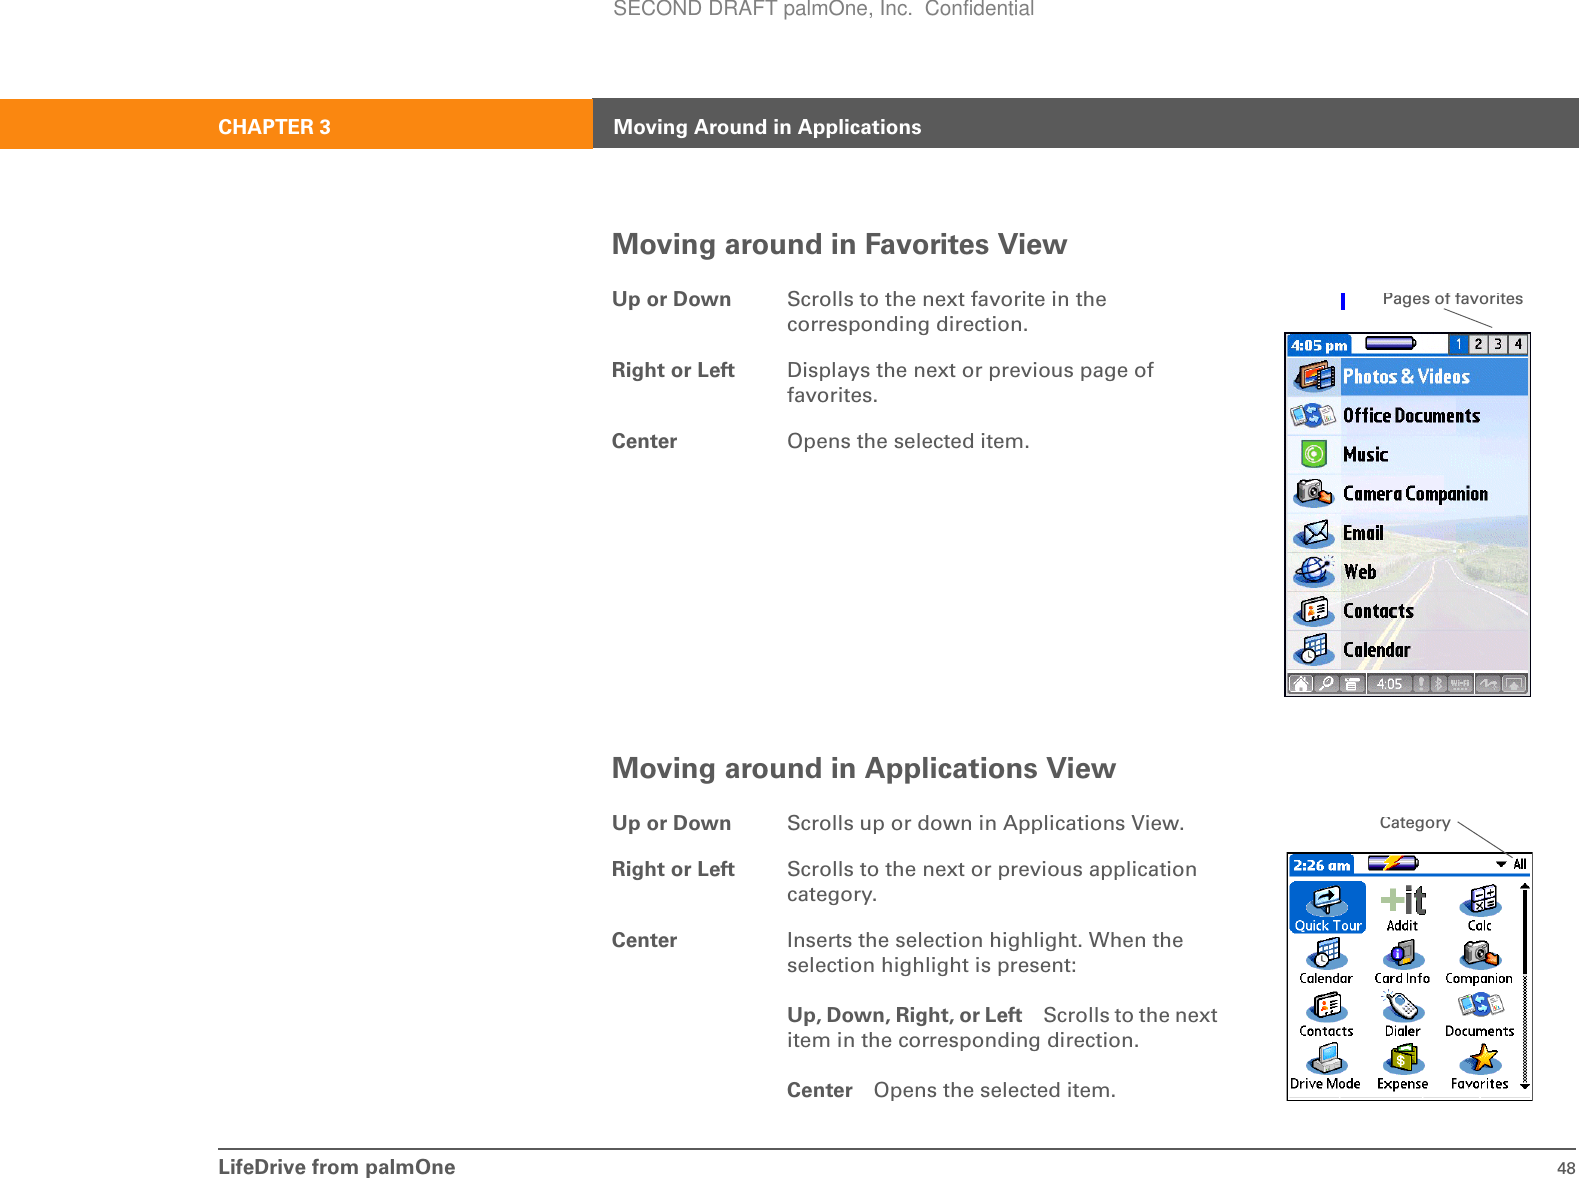
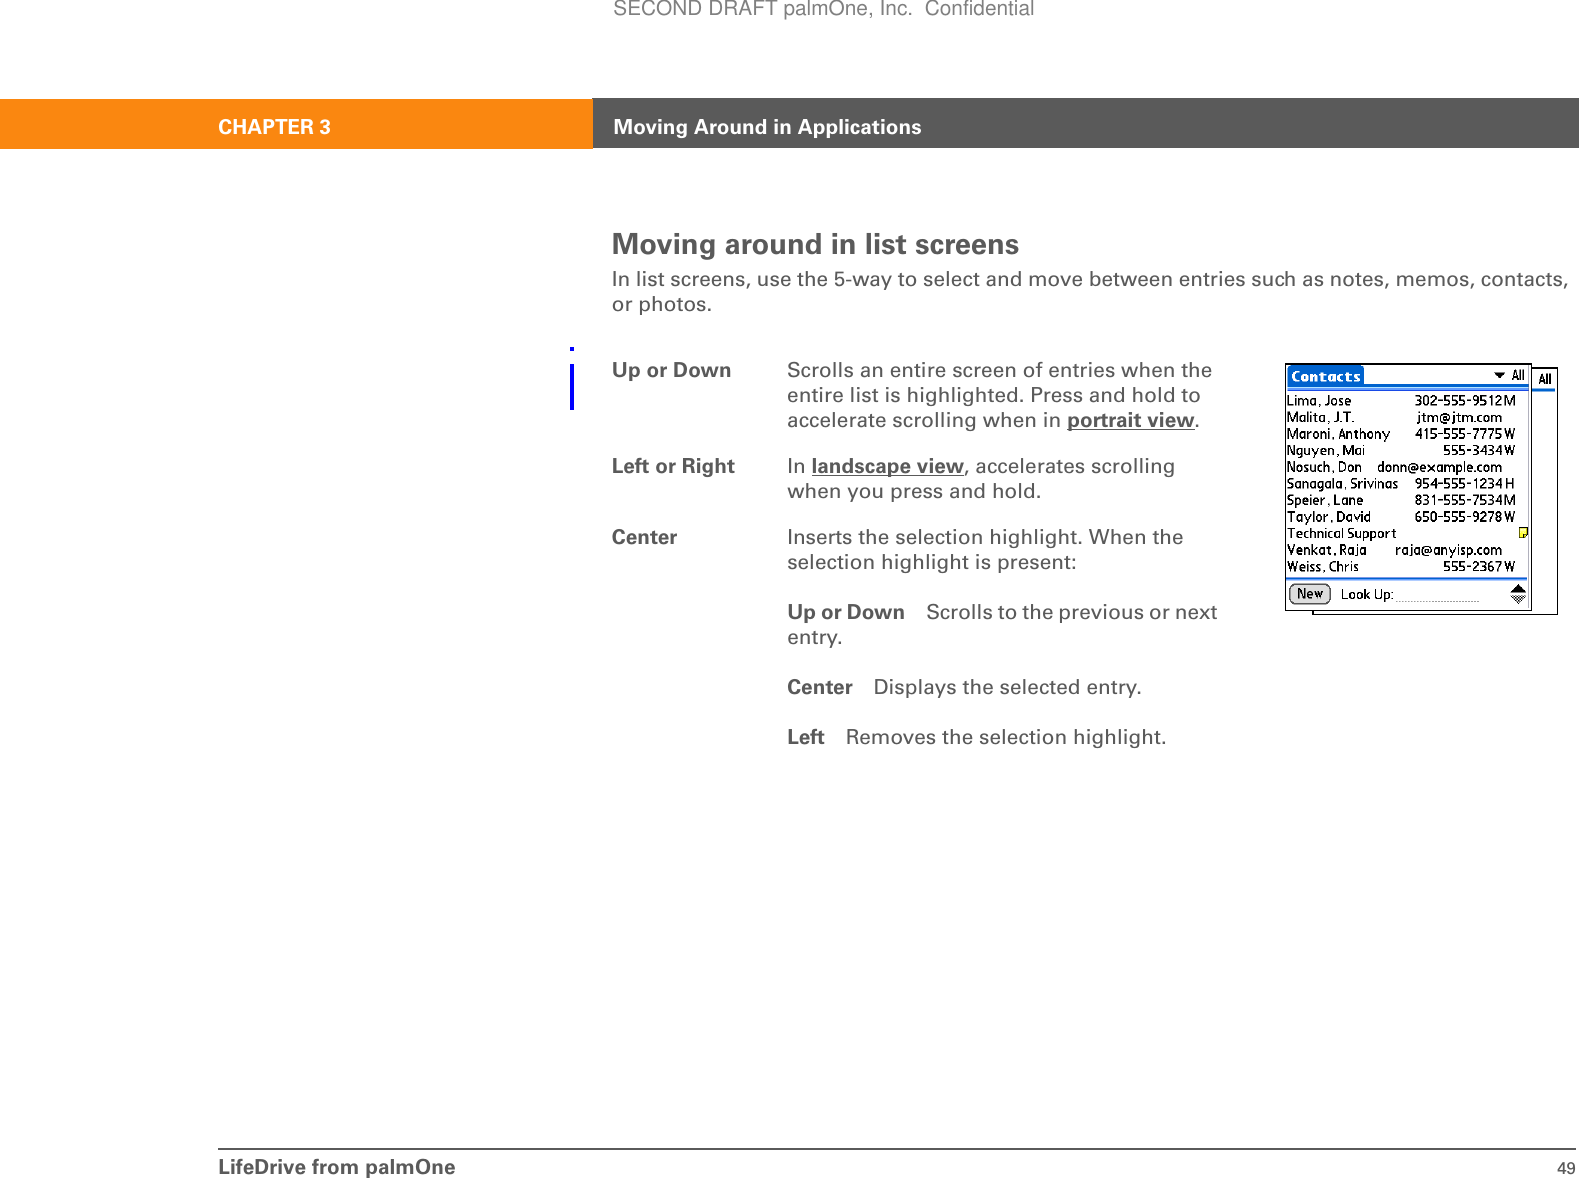
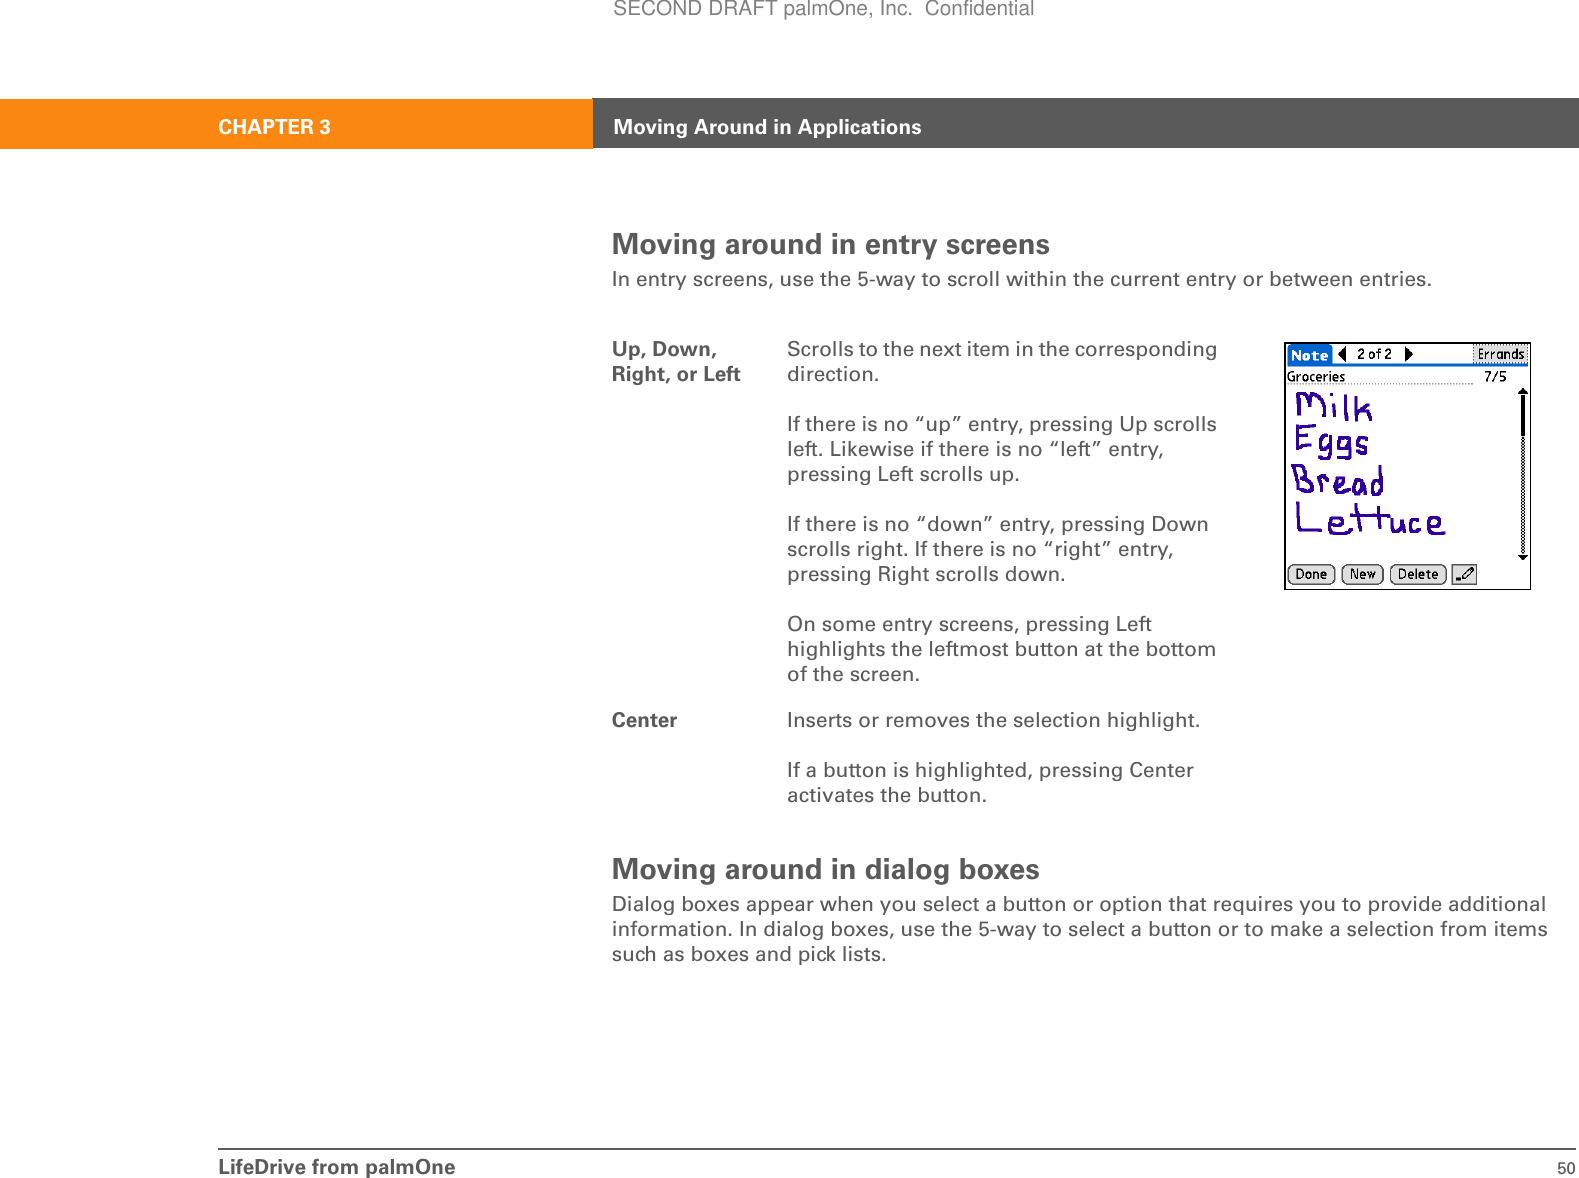
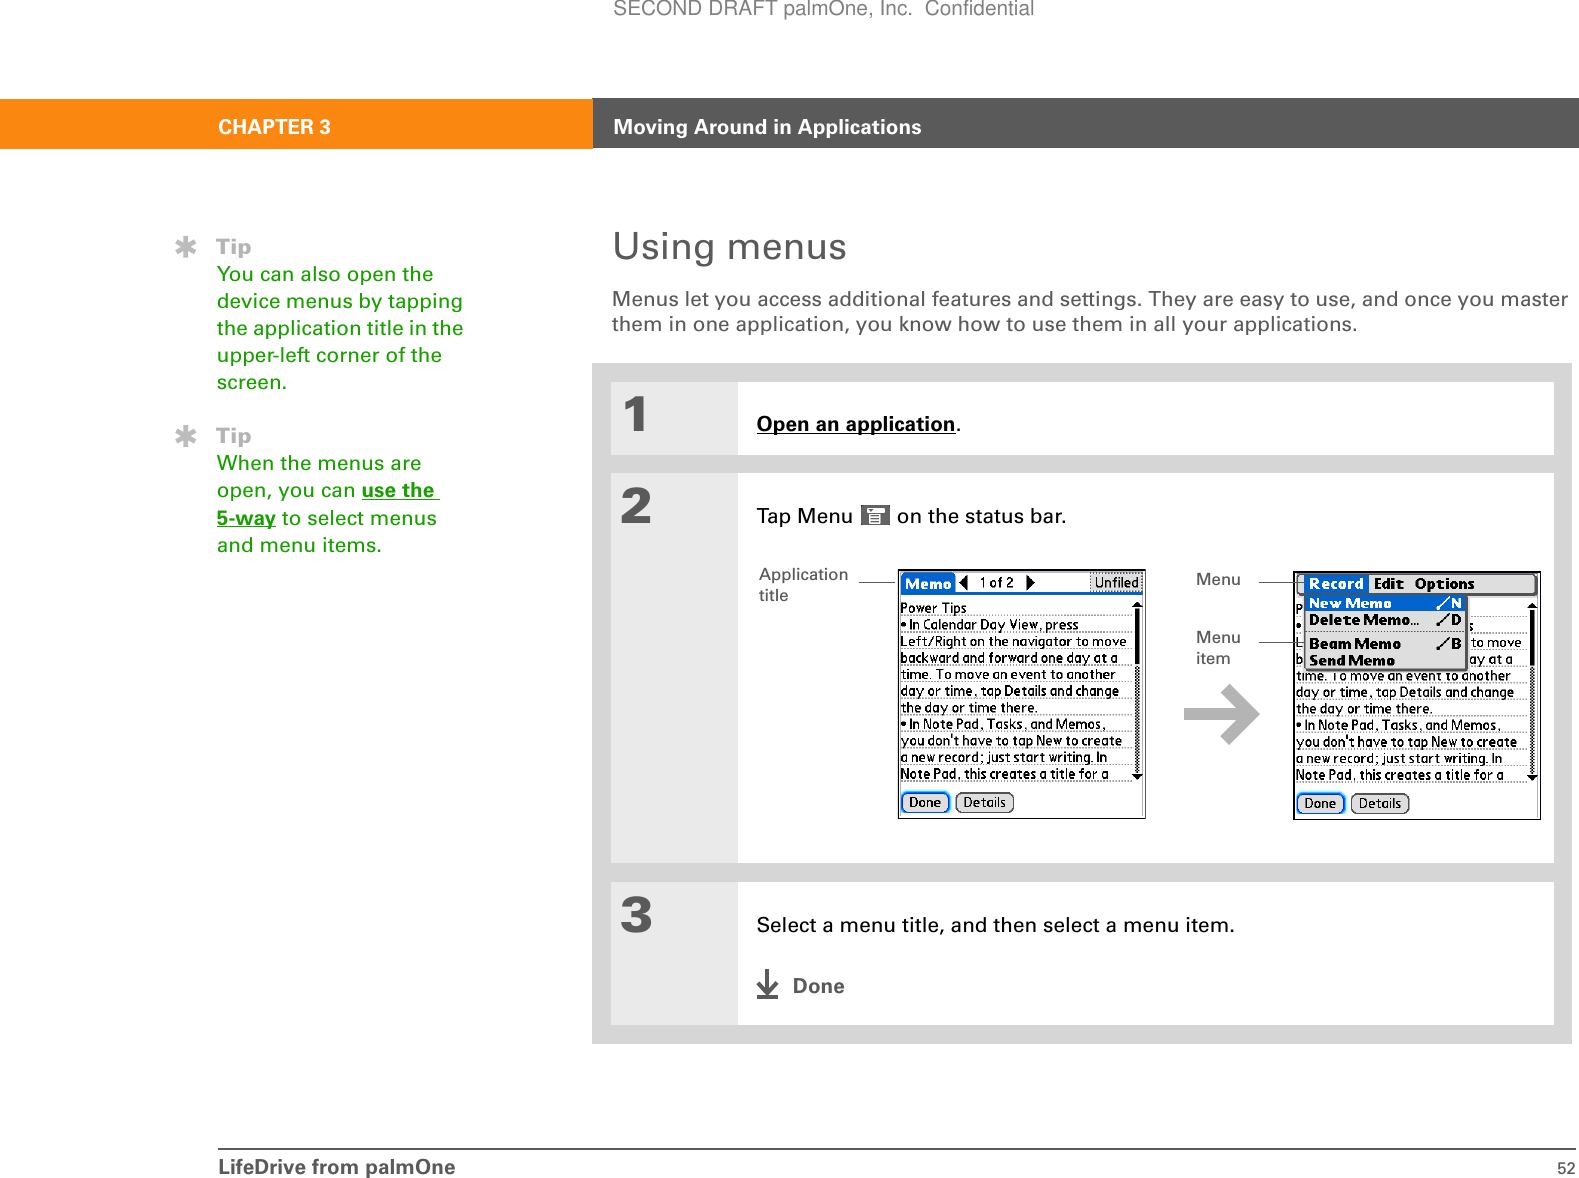
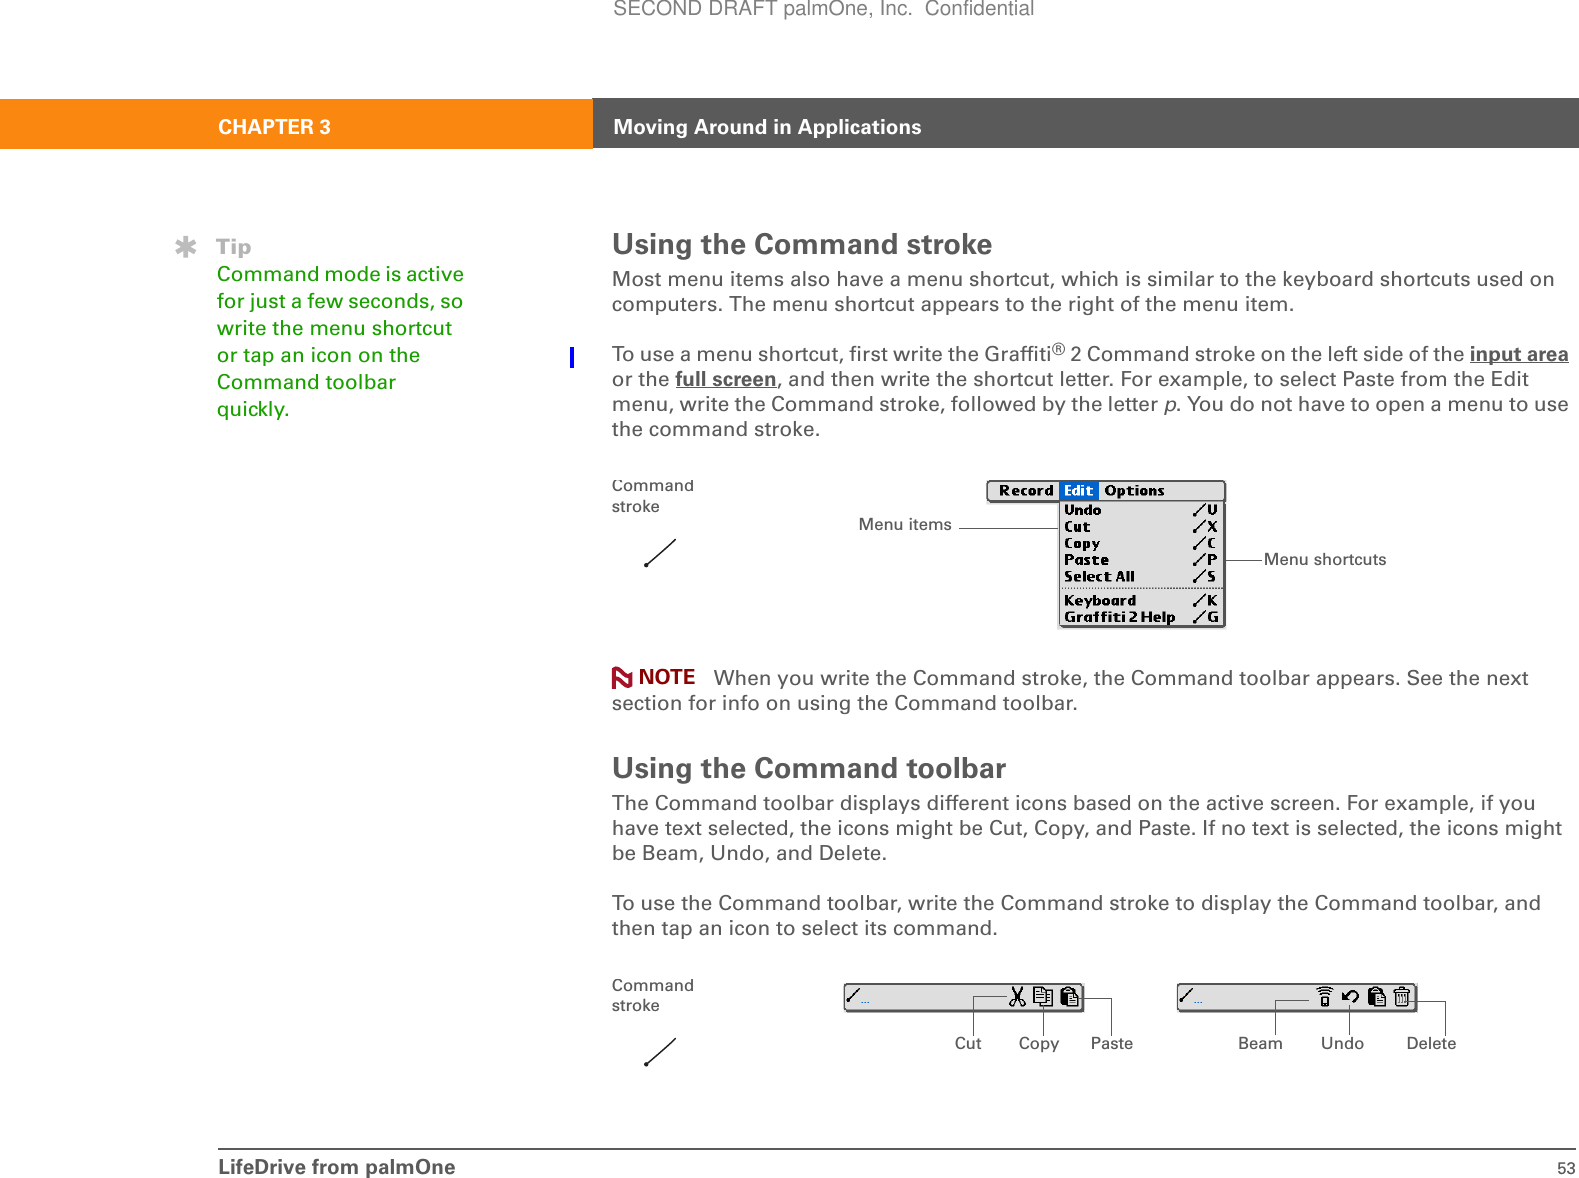
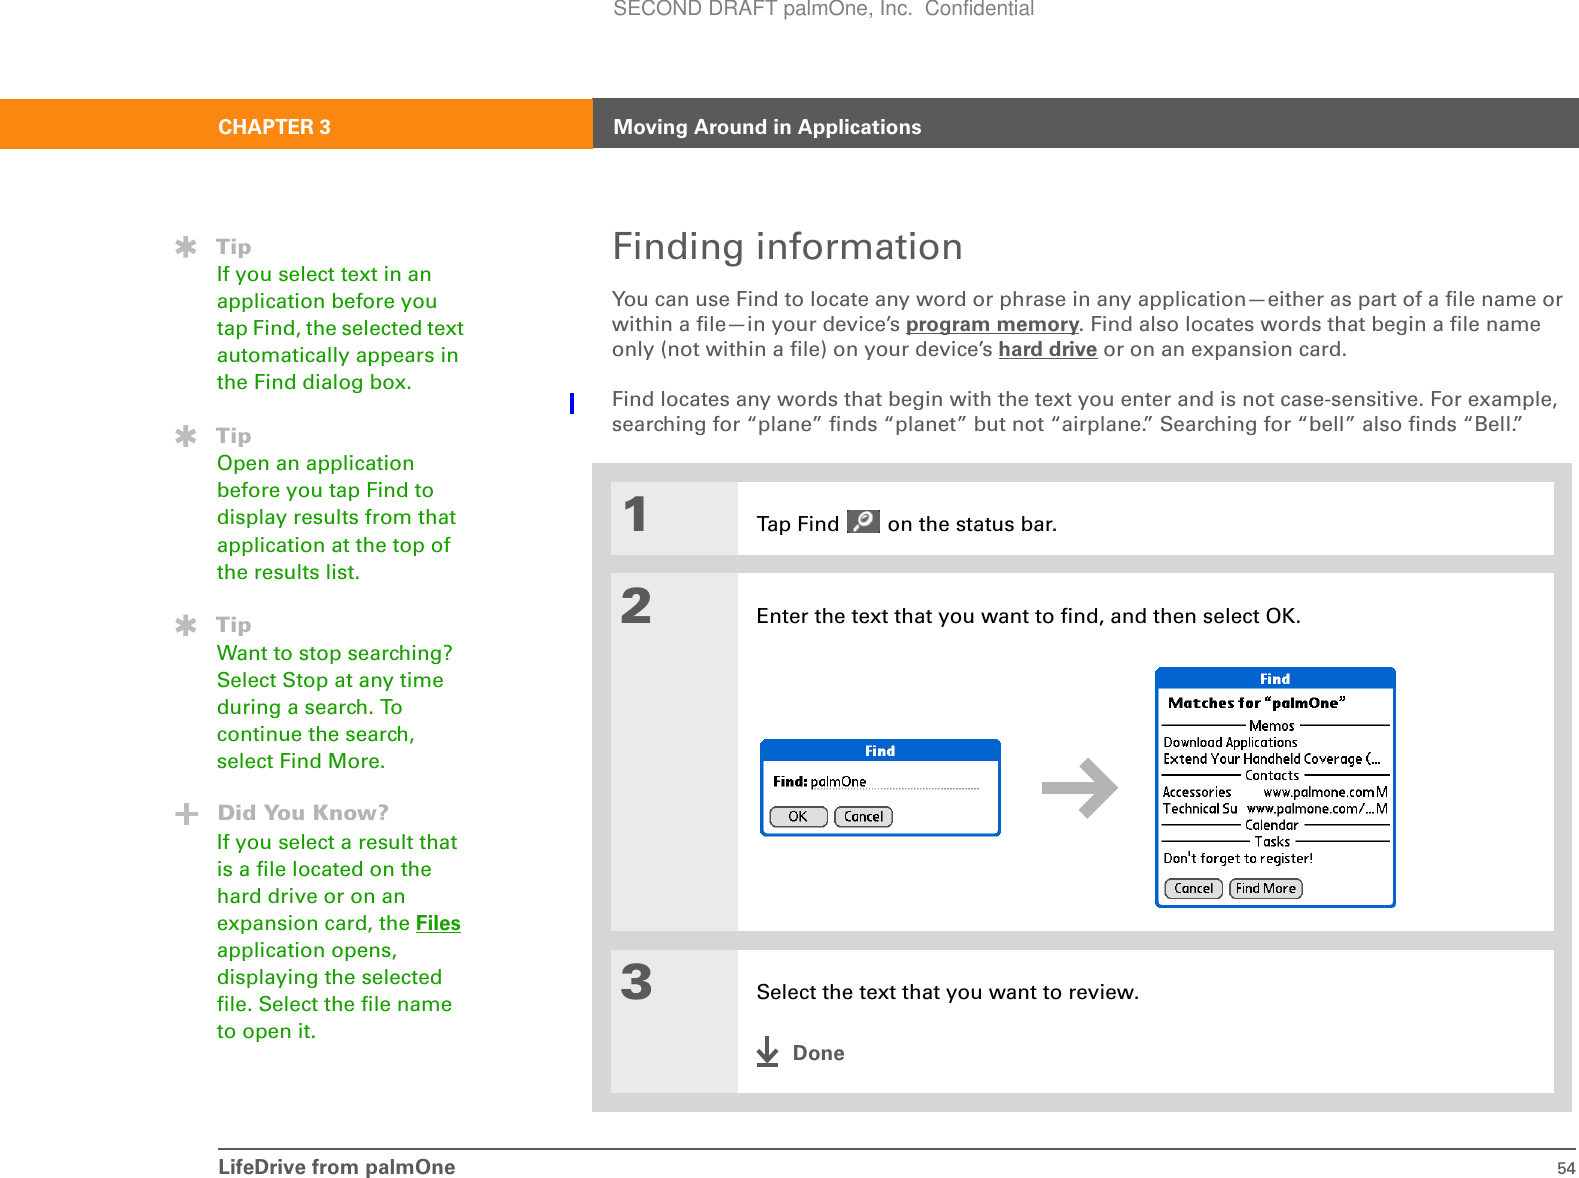
![LifeDrive from palmOne 51CHAPTER 3 Moving Around in ApplicationsRead dialog boxes carefully. Selecting a button such as OK or Yes may cancel an action or delete information.Moving around in menusAfter you open the menus you can use the 5-way to move between and to select menu items:Up, Down, Right, or LeftHighlights the next item in the dialog box (pick list, box, button) in the corresponding direction.Center • If highlight is on a box: Checks or unchecks the box. • If highlight is on a pick list: Opens the pick list. When a pick list is open:Up or Down Scrolls to the previous or next entry.Center Selects the highlighted entry.• If highlight is on a button: Activates the button, and then closes the dialog box. Up or Down Scrolls within the current menu list.Right or Left Scrolls to the next or previous menu on the menu bar.Center Selects the highlighted menu item.BoxPick listButton with highlightIMPORTANT[!]SECOND DRAFT palmOne, Inc. Confidential](https://usermanual.wiki/Palm/830.User-Manual-1-of-2/User-Guide-543159-Page-74.png)


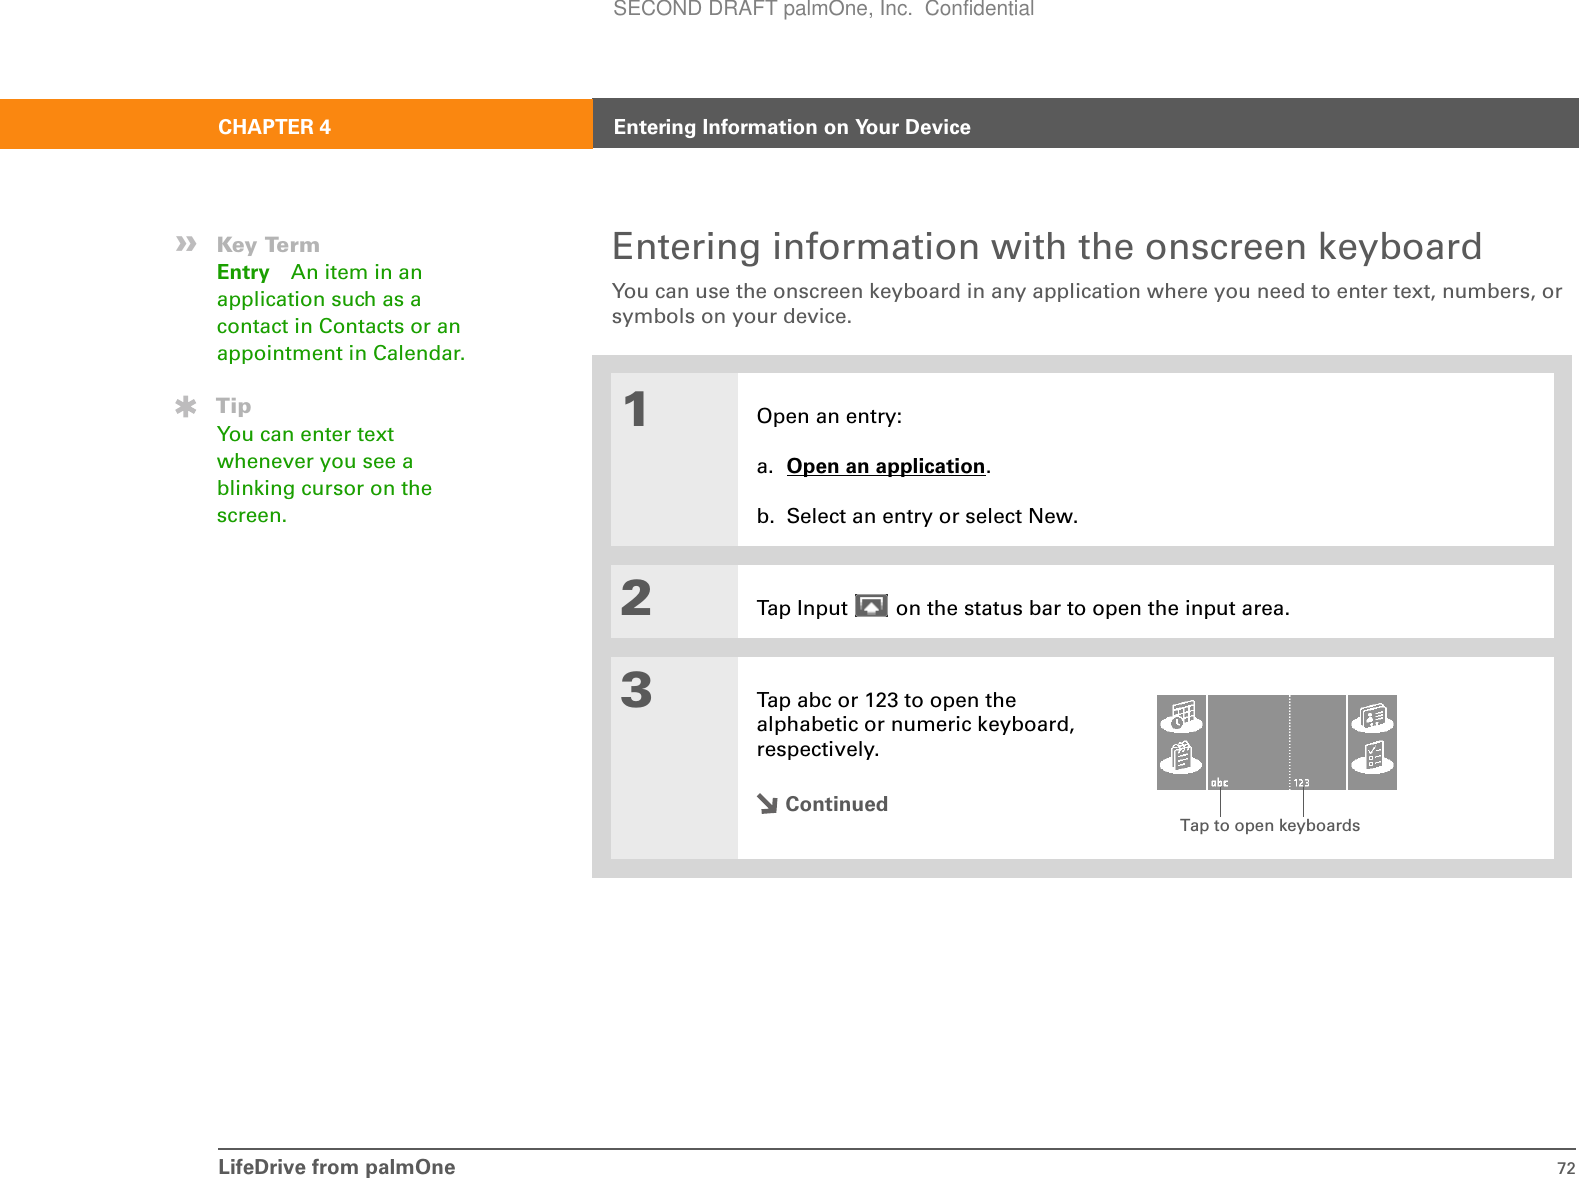
![LifeDrive from palmOne 73CHAPTER 4 Entering Information on Your Device4[ & ] OPTIONAL Select from among four different keyboards.5Tap the characters to enter text, numbers, and symbols.DoneBackspaceCarriage returnTabCaps shiftTap here to display lowercase keyboard Tap here to display uppercase keyboard Tap here to display international keyboard abc - lowercaseABC - uppercase int. - international123 - numericTap here to display numeric keyboard TipWhen a keyboard is open, you can tap abc, 123, or int. to open any of the other keyboards.SECOND DRAFT palmOne, Inc. Confidential](https://usermanual.wiki/Palm/830.User-Manual-1-of-2/User-Guide-543159-Page-96.png)
![LifeDrive from palmOne 75CHAPTER 4 Entering Information on Your DeviceCont’d.d. Select the contact, and then select Add.3[ & ] OPTIONAL To add another contact, repeat step 2.The name and phone number of the contact are automatically entered.TipYou can also enter the first few letters of the contact’s name, and the open Phone Lookup. The first contact name matching the letters you entered is highlighted.DoneSECOND DRAFT palmOne, Inc. Confidential](https://usermanual.wiki/Palm/830.User-Manual-1-of-2/User-Guide-543159-Page-98.png)

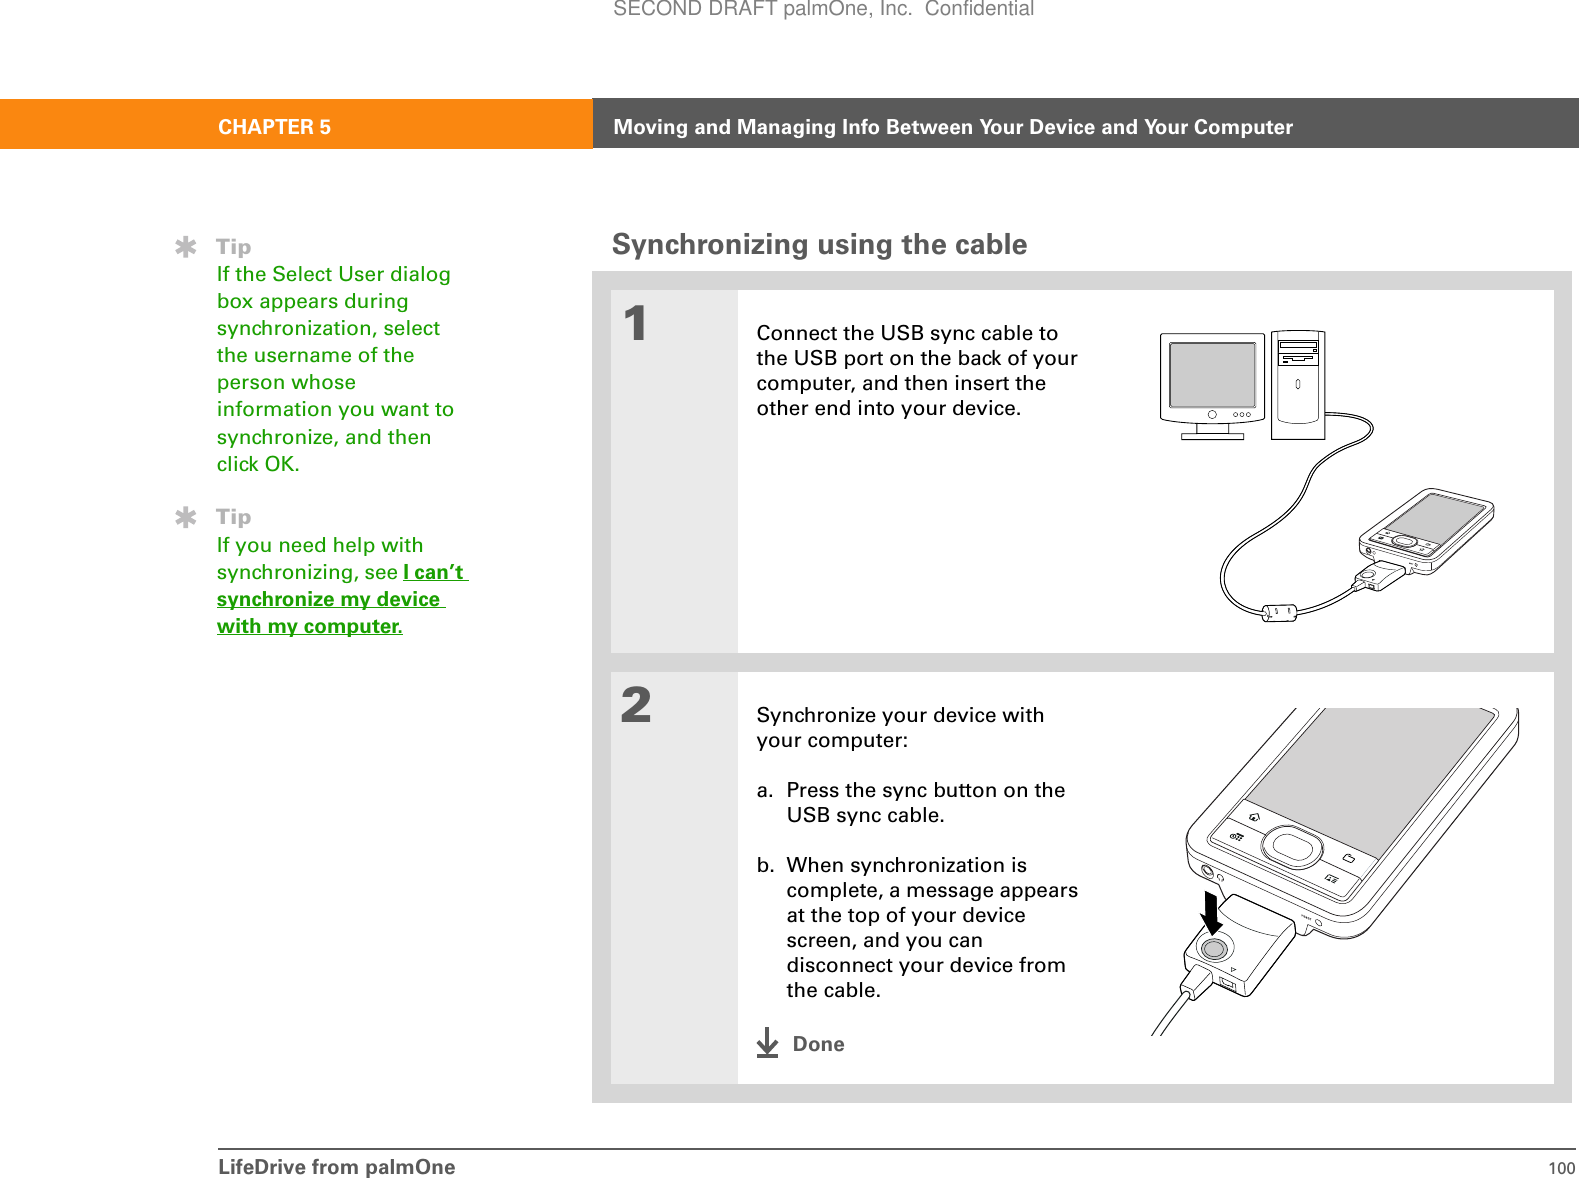
![LifeDrive from palmOne 97CHAPTER 5 Moving and Managing Info Between Your Device and Your Computer5When you have finished working with Drive Mode, do the following: To avoid losing any information that was transferred, be sure to follow these steps to disconnect from Drive Mode before you unplug your device from your computer.a. Eject the device from your Windows computer by selecting the Safely Remove Hardware icon in the taskbar in the lower-right corner of your computer screen. Select the option Stop Mass Storage USB Device that contains the drive letter for the device or the expansion card, and then wait for the message that says you can safely remove your device from your computer. On a Mac computer, select the Eject command from the File menu or drag the drive icon to the Eject icon on the Dock. If a confirmation message appears, click OK.b. Select Turn Drive Mode Off on your device screen, and then select Turn Off.DoneTipIf you are working with an expansion card, you must eject the device from the computer before removing the card in order to avoid losing info on the card.IMPORTANT[!]SECOND DRAFT palmOne, Inc. Confidential](https://usermanual.wiki/Palm/830.User-Manual-1-of-2/User-Guide-543159-Page-120.png)
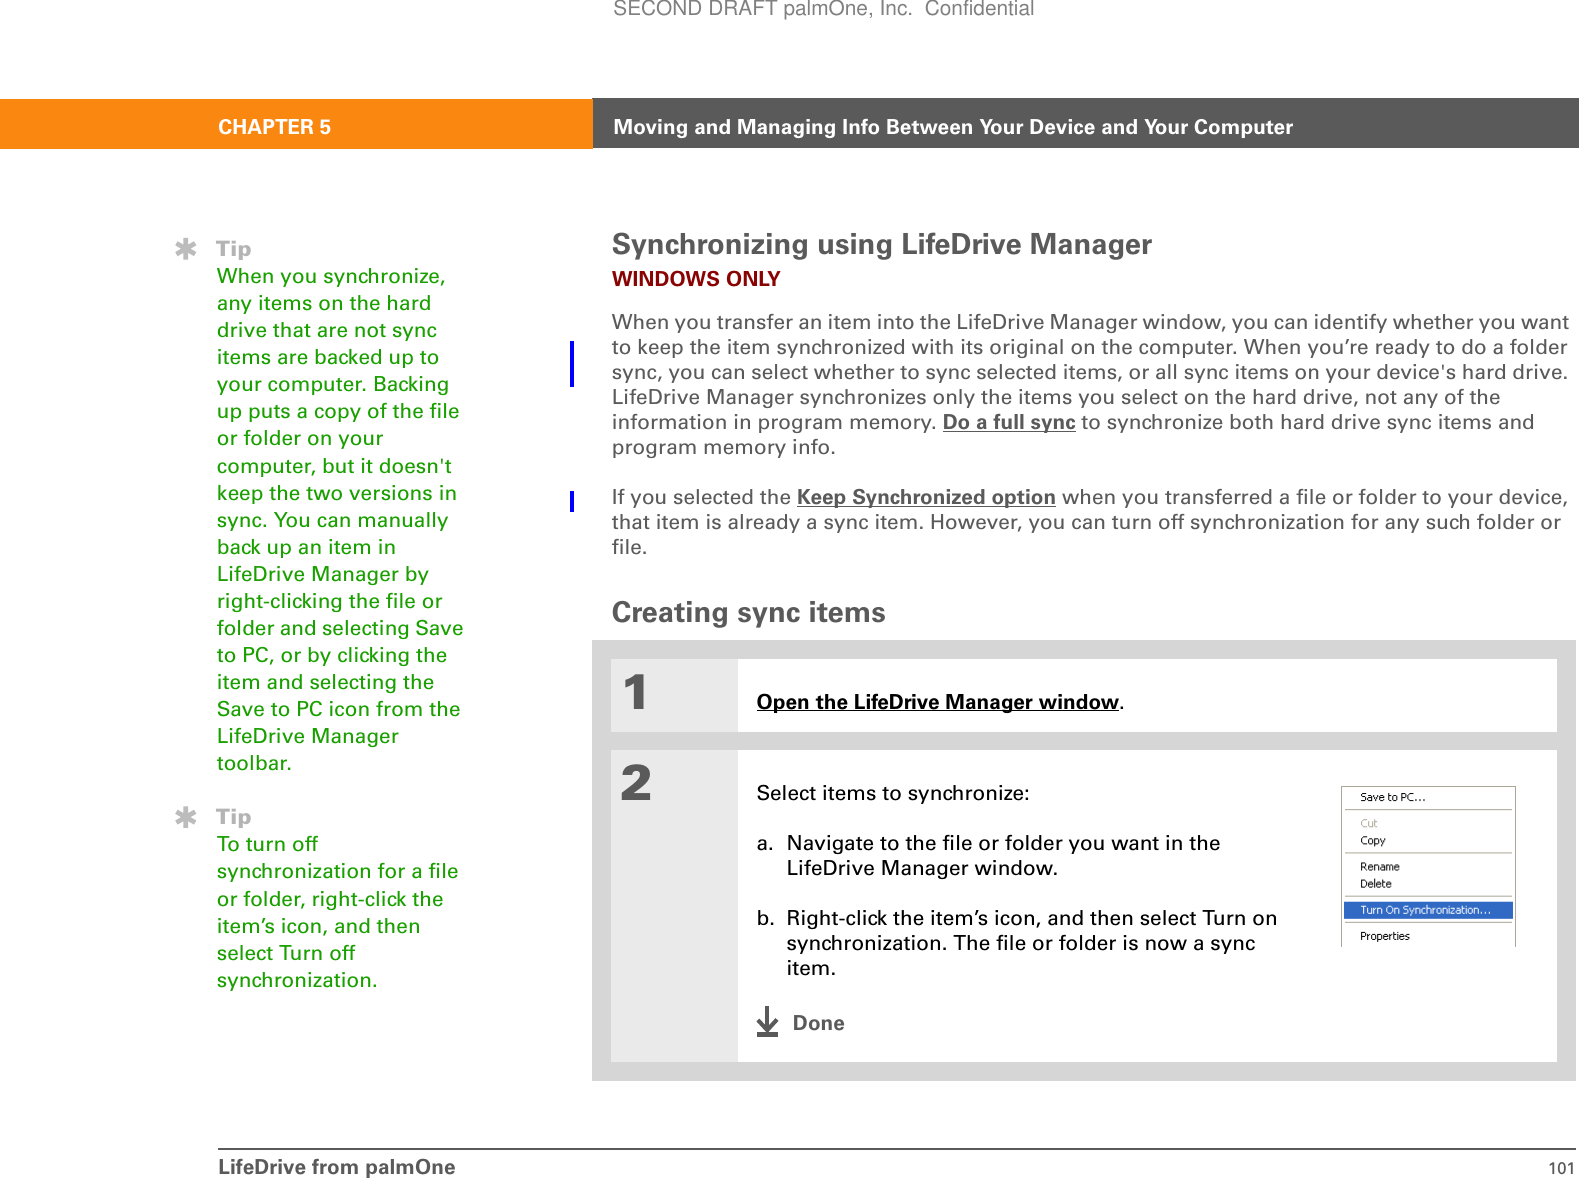
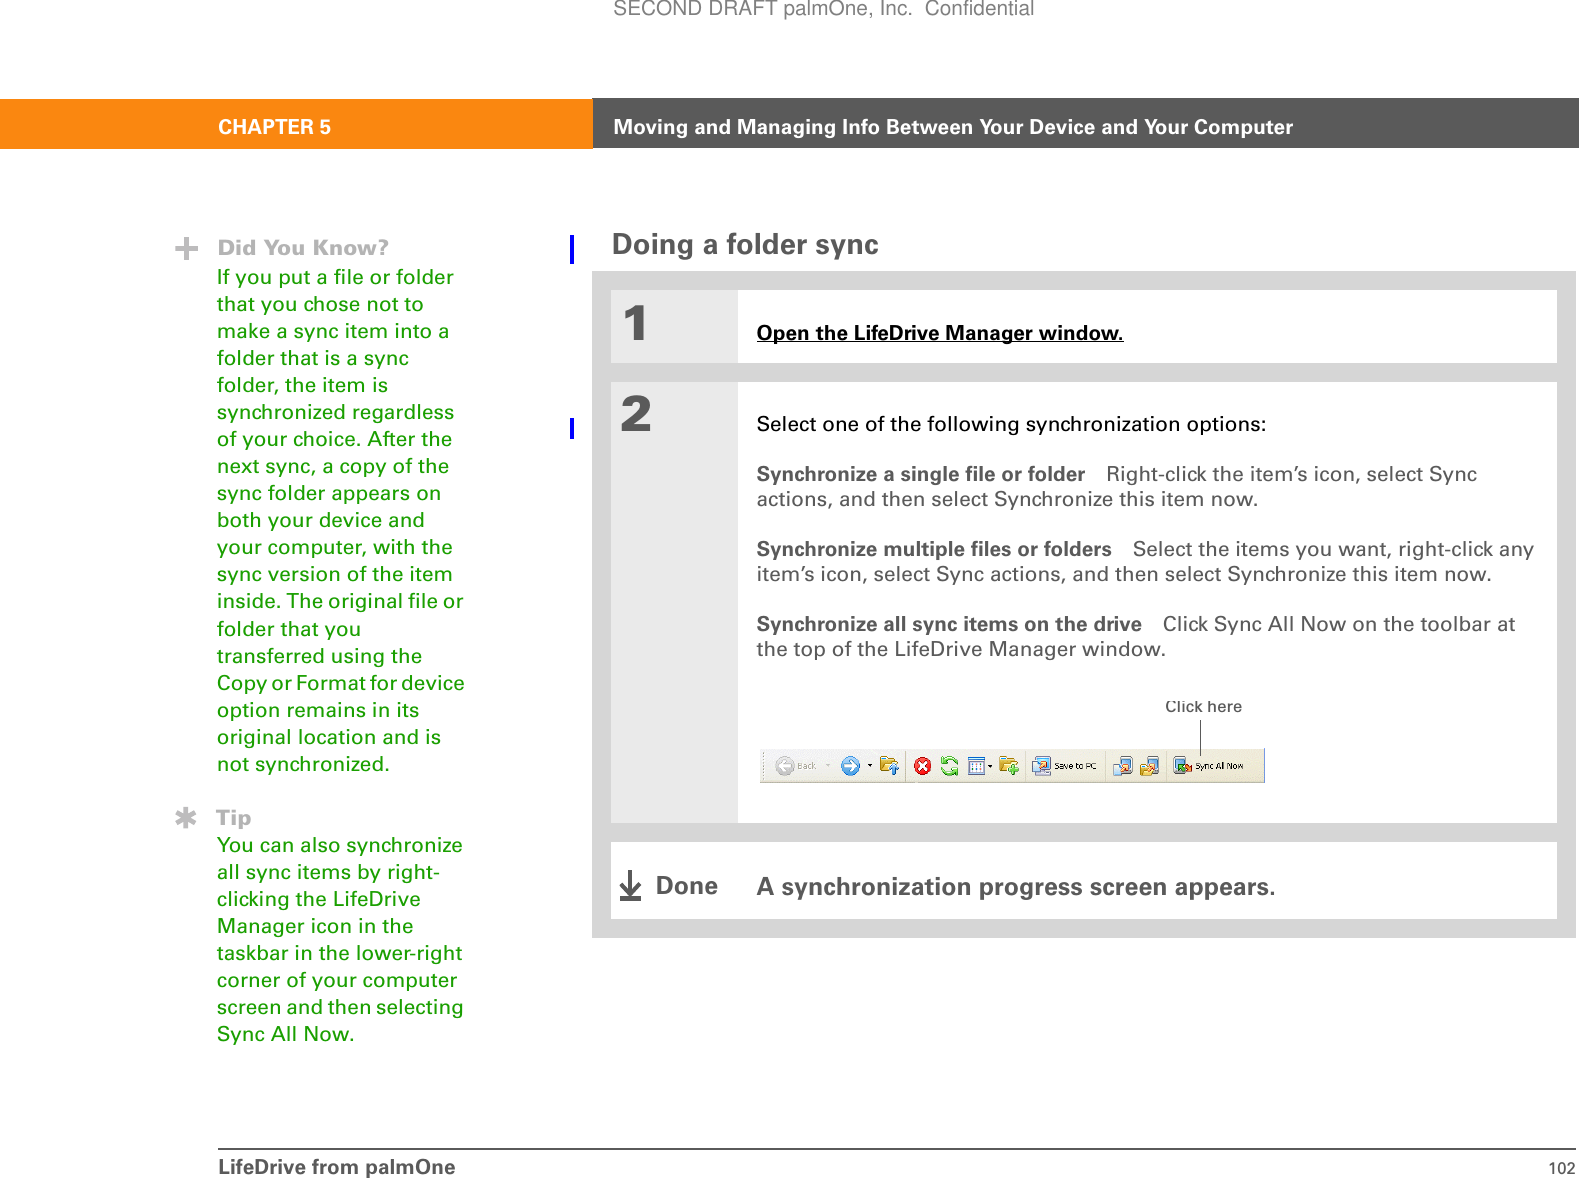
![LifeDrive from palmOne 98CHAPTER 5 Moving and Managing Info Between Your Device and Your ComputerSynchronizing informationSynchronizing means that information that is entered or updated in one place (your device or your computer) is automatically updated in the other. There’s no need to enter information twice.You can synchronize in one of two ways:Full sync Press the sync button on the USB sync cable to synchronize all information in your device’s program memory, as well as all sync items on the hard drive, with info on your computer. Full sync also backs up any files or folders on your hard drive that are not sync items to your computer.Folder sync (Windows only) Use the sync commands in the LifeDrive Manager window to synchronize a single sync item, a group of sync items, or all sync items on your device’s drive, with the corresponding info on your computer. Sync items can be individual files or entire folders, including subfolders. You cannot synchronize info in program memory using the LifeDrive Manager window.Be sure to synchronize your device with your computer frequently so that you always have an up-to-date backup copy of the info on your device on your computer.Doing a full syncWhen you perform a full sync, the following information is updated between your device and your computer:Program memory If you use the default settings, information from all the following applications in program memory is transferred each time you synchronize your device with your computer using the button:If you choose to synchronize with Outlook, info from Contacts, Calendar, Tasks, and Memos is synchronized with info in the same application in Outlook (Memos is called Notes in Outlook). You can also set up the VersaMail® application to synchronize email on your device with email in »Key TermHotSync®Techn ol ogy that allows you to synchronize the information in your device’s program memory and any files or folders on the drive that you selected to copy and synchronize with the information on your computer.TipFolder sync is faster than a full sync, because it only synchronizes the items you select. IMPORTANT[!]SECOND DRAFT palmOne, Inc. Confidential](https://usermanual.wiki/Palm/830.User-Manual-1-of-2/User-Guide-543159-Page-121.png)
![LifeDrive from palmOne 99CHAPTER 5 Moving and Managing Info Between Your Device and Your ComputerOutlook. Other info, such as voice memos and notes, is synchronized with the corresponding info in Palm Desktop software.If you set up a Microsoft Exchange ActiveSync® account so that you can synchronize email and Calendar information with info in Microsoft Exchange Server 2003, info from those applications is synchronized with info in Microsoft Exchange, while information from the other applications listed previously is synchronized with info in Outlook or Palm Desktop.Desktop software Any information you enter using desktop software is updated with info in your device’s program memory.Sync items Any sync items on your device’s hard drive are updated.You can do a full sync in the following ways:• Using the USB sync cable attached to your device and your computer•Wirelessly using Bluetooth® wireless technology or Wi-Fi® capabilities on your device• Using your device’s infrared (IR) port• Connecting to your company’s network, either wirelessly or using a cable (Windows only) The first time you synchronize, you must use the USB sync cable or your device’s IR port. If you followed the instructions to synchronize during initial setup, you’ve already covered this requirement.To synchronize, HotSync Manager must be active. HotSync Manager is installed when you install Palm Desktop software from the software installation CD. If you haven’t run the install program from the CD, you don't have HotSync Manager on your computer.On a Windows computer, you know HotSync Manager is active when its icon appears in the lower-right corner of your screen. If the icon is not there, turn it on by clicking Start and then selecting Programs. Navigate to the palmOne program group, and select HotSync Manager.»Key TermHotSync® Manager Software you use to select synchronization settings and that must be active when you synchronize.Did You Know?Everybody in your family can synchronize their device with the same copy of Palm Desktop software. Just make sure that each device has its own username; Palm Desktop software reads the username and recognizes the device during synchronization.IMPORTANT[!]SECOND DRAFT palmOne, Inc. Confidential](https://usermanual.wiki/Palm/830.User-Manual-1-of-2/User-Guide-543159-Page-122.png)

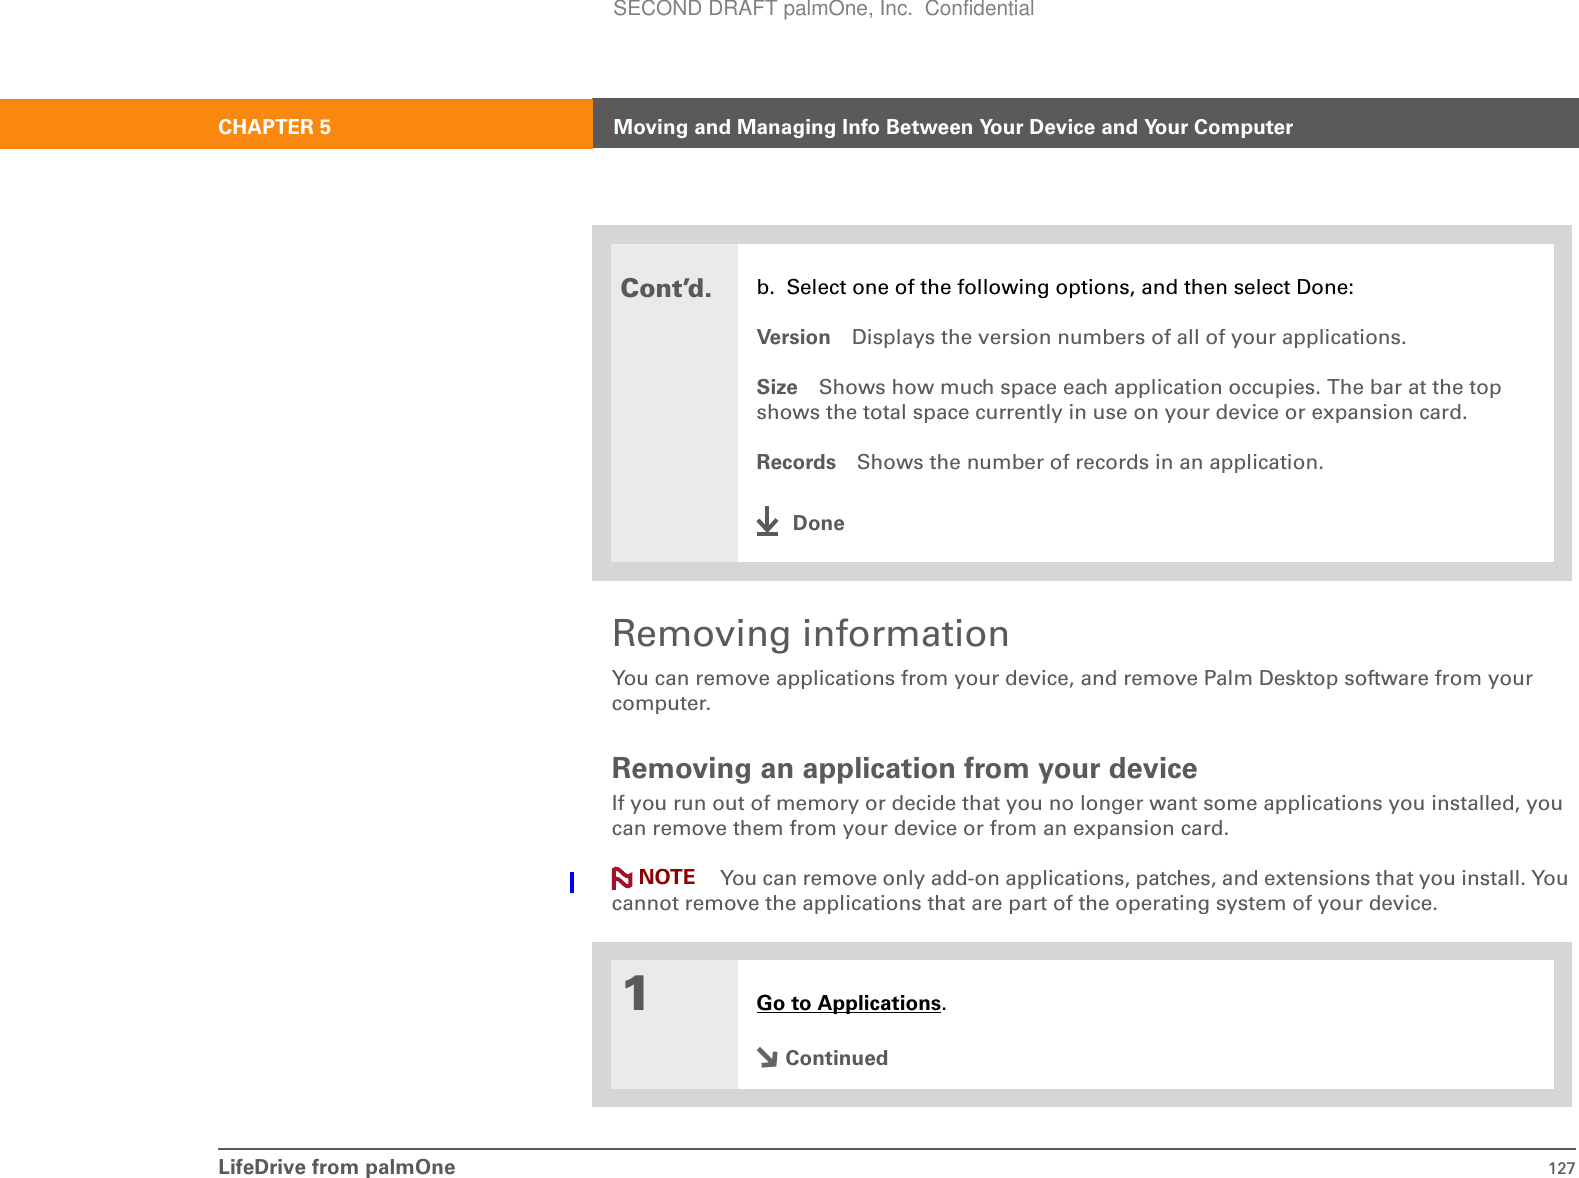
![LifeDrive from palmOne 128CHAPTER 5 Moving and Managing Info Between Your Device and Your ComputerRemoving Palm Desktop software from your computerWINDOWS ONLY Mac computers do not provide an option for uninstalling Palm Desktop software.If you think you’ll never want to synchronize your device with your computer again, you can remove Palm Desktop software from your computer. This process removes only the application files. The information in your Users folder remains untouched.If you remove Palm Desktop software, you also remove the synchronization software and can no longer synchronize your information. Even if you want to synchronize with another personal information manager, like Microsoft Outlook, you must leave Palm Desktop software installed on your computer.2Open the Delete dialog box:a. Open the menus.b. Select Delete from the App menu.3Delete the application:a. Select the Delete From pick list, and then select Device or an expansion card.b. Select the application that you want to remove, and then select Delete.c. Select Yes, and then select Done.DoneNOTEIMPORTANT[!]SECOND DRAFT palmOne, Inc. Confidential](https://usermanual.wiki/Palm/830.User-Manual-1-of-2/User-Guide-543159-Page-151.png)
![LifeDrive from palmOne 132CHAPTER 6 Managing Your ContactsAdding a contact01Tap the Contacts icon.2Add your contact information:a. Select New.b. Select each field where you want to enter information, and enter it. Select the scroll arrows to view more fields.ContinuedTipIf the first character you enter in the Last Name or Company field is an asterisk (*) or another symbol, that record always appears at the top of the Contacts list. That’s useful for an entry like “If Found Call [your phone number].”Did You Know?Contacts info is stored in program memory. This means that you can view the info only by looking at it in the application and you can synchronize the information by pressing the sync button on the USB cable. Info in contacts can be synchronized with info in either Palm®Desktop software or Outlook.SECOND DRAFT palmOne, Inc. Confidential](https://usermanual.wiki/Palm/830.User-Manual-1-of-2/User-Guide-543159-Page-155.png)
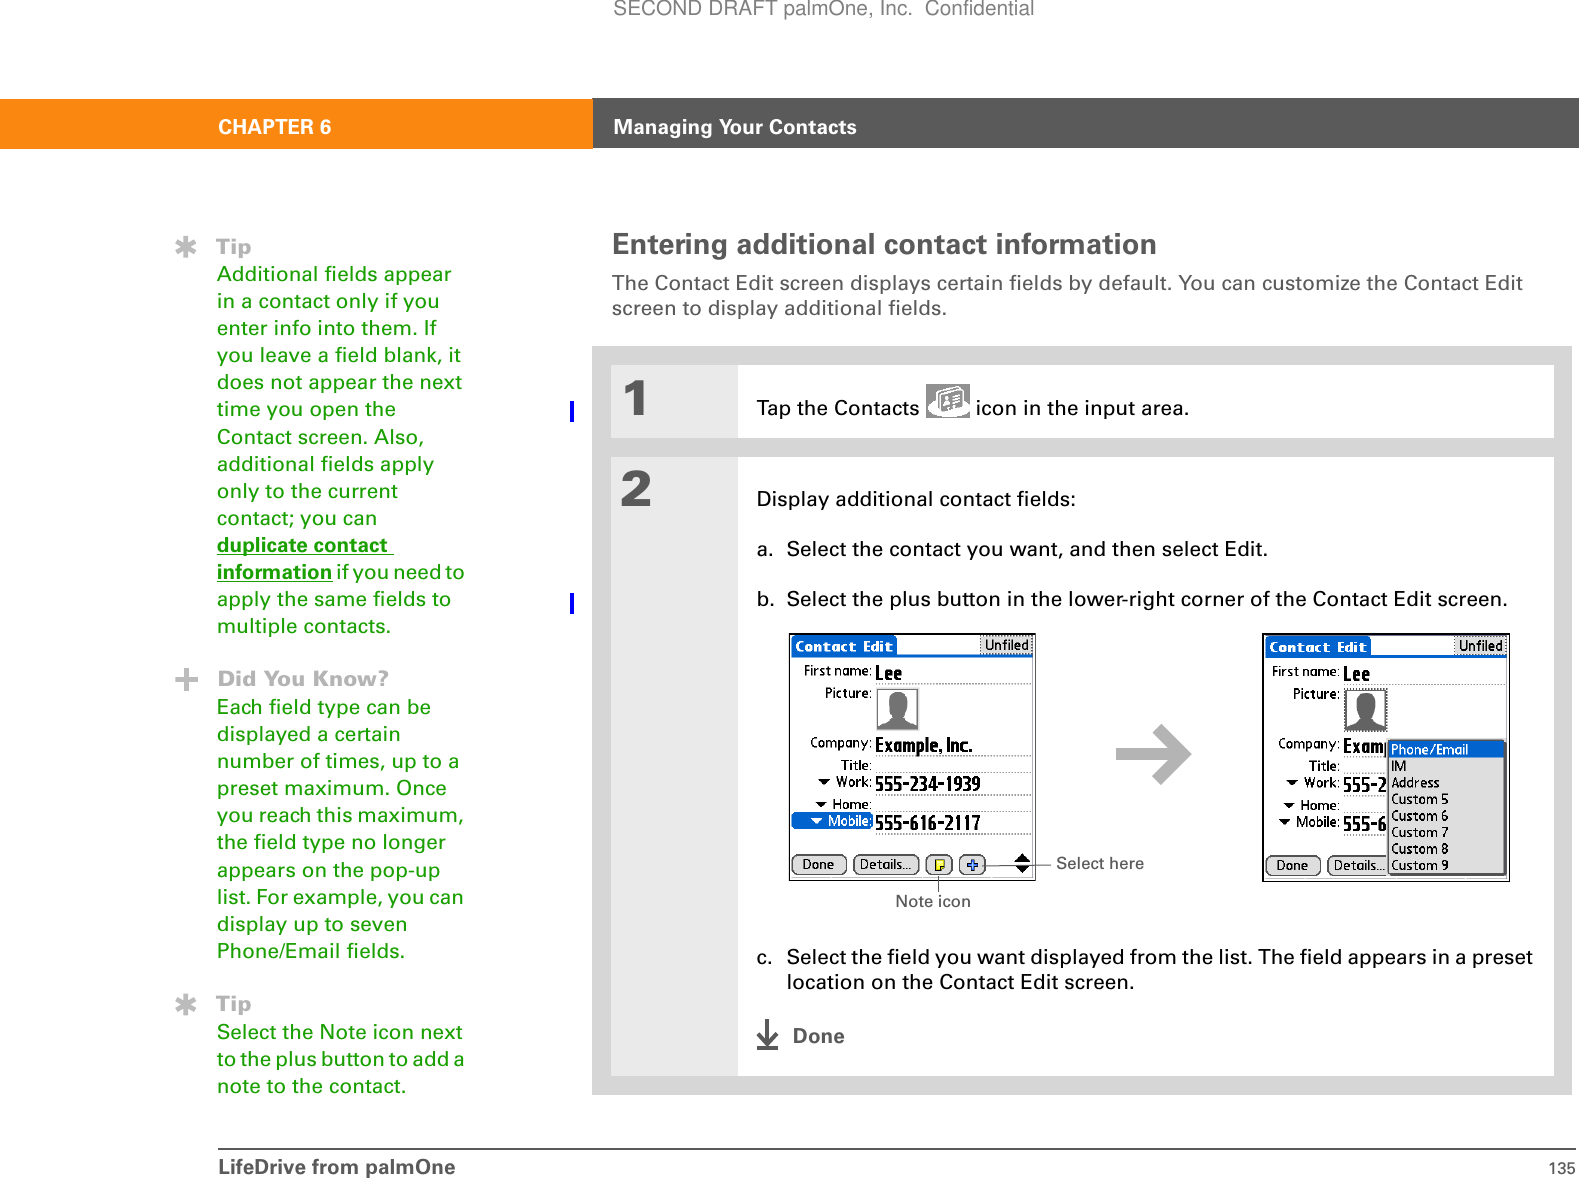
![LifeDrive from palmOne 133CHAPTER 6 Managing Your ContactsCont’d.The following fields contain features to help you enter information quickly:All fields except numeric and email fields The first letter is automatically capitalized.Title, Company, City, and State As you enter letters, a match appears if you have one on your Contacts list. For example, if you enter S, Sacramento might appear, and if you then enter a and n, San Francisco might replace Sacramento. When the word you want appears, select the next field.Address You can enter up to three addresses, each containing five fields: Addr, City, State, Zip Code, and Country. You can designate an address as work (W), home (H), or other (O). By default, the first address is designated as work.3[ & ] OPTIONAL Add a photo:a. Select the Picture box.b. Select and add a photo from palmOne™ Media.ContinuedTipIf multiple contacts share information, such as a company name and address, you can enter the first contact, and then copy the information into other contacts.Did You Know?You can also enter one or more contacts on your desktop computer, and then copy them to your device by synchronizing.Select hereSECOND DRAFT palmOne, Inc. Confidential](https://usermanual.wiki/Palm/830.User-Manual-1-of-2/User-Guide-543159-Page-156.png)
![LifeDrive from palmOne 134CHAPTER 6 Managing Your Contacts4[ & ] OPTIONAL Add a birthday:a. Select the Birthday box.b. Select the birth year, month, and date.5After you finish entering all the information you want, select Done.That's it. Your device automatically saves the contact. Make sure you have a current backup. Synchronize often.TipIf you want a reminder about a birthday, check the Reminder box, enter the number of days before the birthday that you want to see the reminder, and then select OK.Did You Know?Birthdays you enter in Contacts appear as untimed events in Calendar. If you update the birthday in Contacts, it automatically updates in Calendar as well.Select hereDoneSECOND DRAFT palmOne, Inc. Confidential](https://usermanual.wiki/Palm/830.User-Manual-1-of-2/User-Guide-543159-Page-157.png)

![LifeDrive from palmOne 141CHAPTER 6 Managing Your ContactsDeleting a contact01Tap the Contacts icon in the input area.2Open the Delete Contact dialog box:a. Select the contact you want.b. Open the menus. c. Select Delete Contact on the Record menu.3[ & ] OPTIONAL Check the box to save an archive copy of the contact on your computer.4Select OK.DoneTipYou never know when you’re going to need to look up an old business associate. If you save an archive copy of your deleted contacts, you can refer to them later by importing them.SECOND DRAFT palmOne, Inc. Confidential](https://usermanual.wiki/Palm/830.User-Manual-1-of-2/User-Guide-543159-Page-164.png)
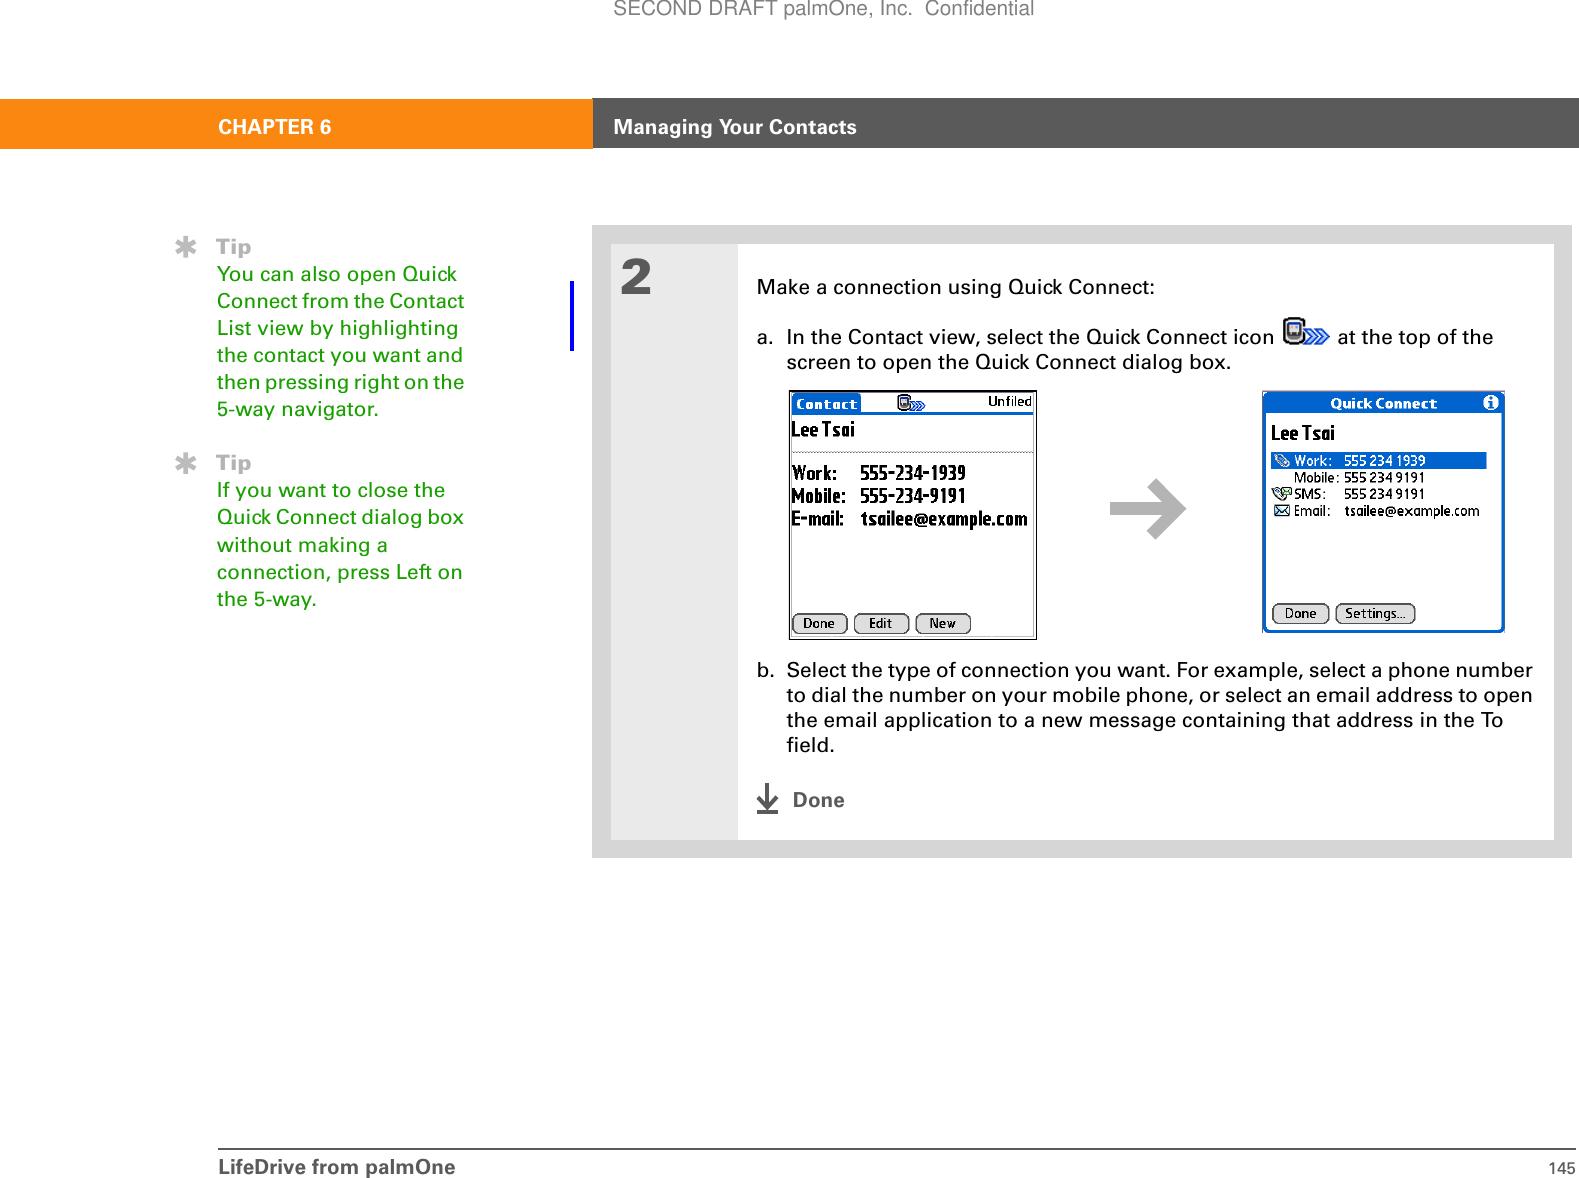
![LifeDrive from palmOne 144CHAPTER 6 Managing Your ContactsMaking connections from ContactsYou can set up your contacts so that you can do tasks like dialing a phone number; creating an email or text message; accessing the web; or sending an instant message (requires additional software, sold separately) directly from a contact screen. Contacts gives you two tools to perform these tasks:Quick Connect Lets you select a connection type and opens the application for making that type of connection directly from the Contacts list view and contact’s information screen.Tap-to-Connect Opens the application to perform a connection task directly by selecting the appropriate entry (phone number, email address, and so on) from a contact’s information screen.Using Quick ConnectIf you have a compatible mobile phone (sold separately) that includes Bluetooth technology, you can use Quick Connect to dial a phone number; address an email or a text message, go to a website, or send an instant message (requires additional software, sold separately) directly from a contact.01Tap the Contacts icon in the input area.ContinuedBefore You Begin[!]You must complete all the prerequisites for the email and messaging applications.To use Quick Connect with your device’s built-in Bluetooth technology, you must set up a phone connection. To use it with your device’s IR port, run Phone Link Updater, and then use the Phone Link application to set up a phone connection.SECOND DRAFT palmOne, Inc. Confidential](https://usermanual.wiki/Palm/830.User-Manual-1-of-2/User-Guide-543159-Page-167.png)
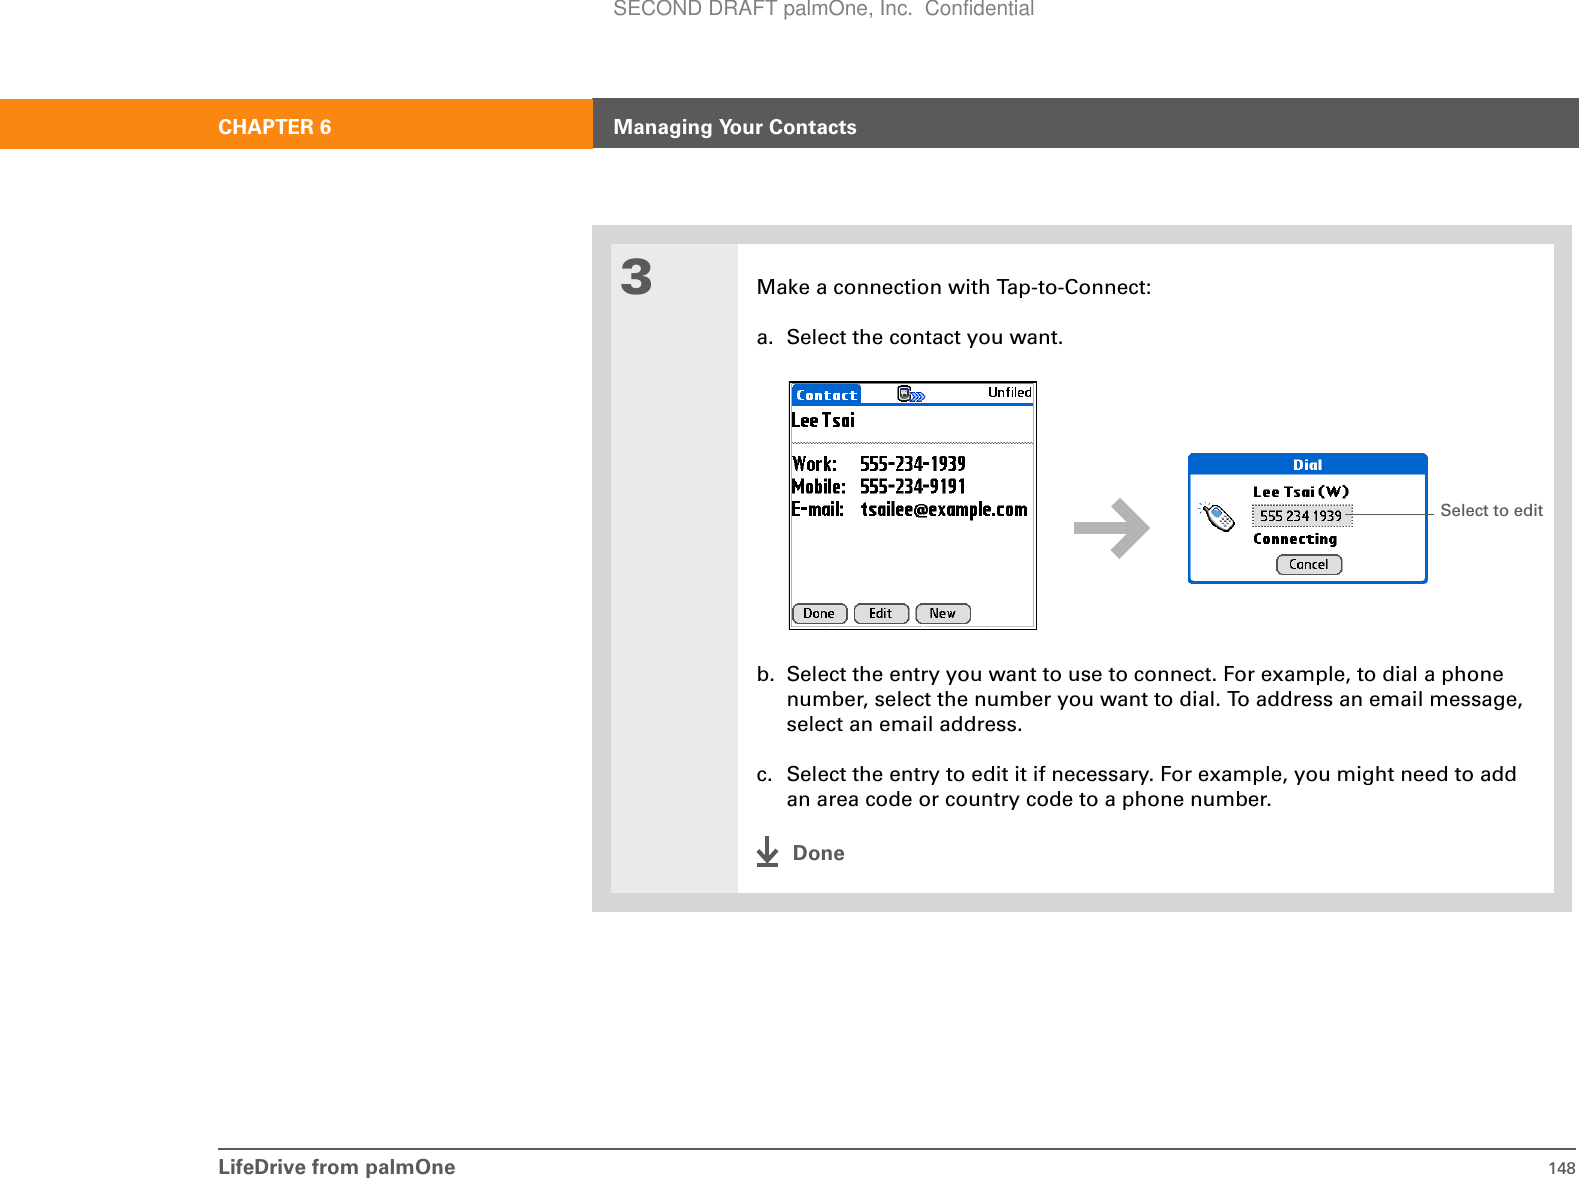
![LifeDrive from palmOne 147CHAPTER 6 Managing Your ContactsUsing Tap-to-ConnectWith Tap-to-Connect, you can select a contact and dial a phone number or address an email or text message by selecting the appropriate entry on the contact screen. By default, Tap-to-Connect is not enabled.01Tap the Contacts icon in the input area.2Enable Tap-to-Connect:a. From the Contacts list, open the menus.b. Select Options, and then select Preferences.c. Select Enable Tap-to-Connect, and then select OK.ContinuedBefore You Begin[!]You must have a compatible mobile phone (sold separately) that includes Bluetooth wireless technology, and you must complete all the prerequisites for the email and messaging applications.To use Tap-to-Connect with your device’s built-in Bluetooth technology, you must set up a phone connection. To use it with your device’s IR port, run Phone Link Updater and then use the Phone Link application to set up a phone connection.SECOND DRAFT palmOne, Inc. Confidential](https://usermanual.wiki/Palm/830.User-Manual-1-of-2/User-Guide-543159-Page-170.png)
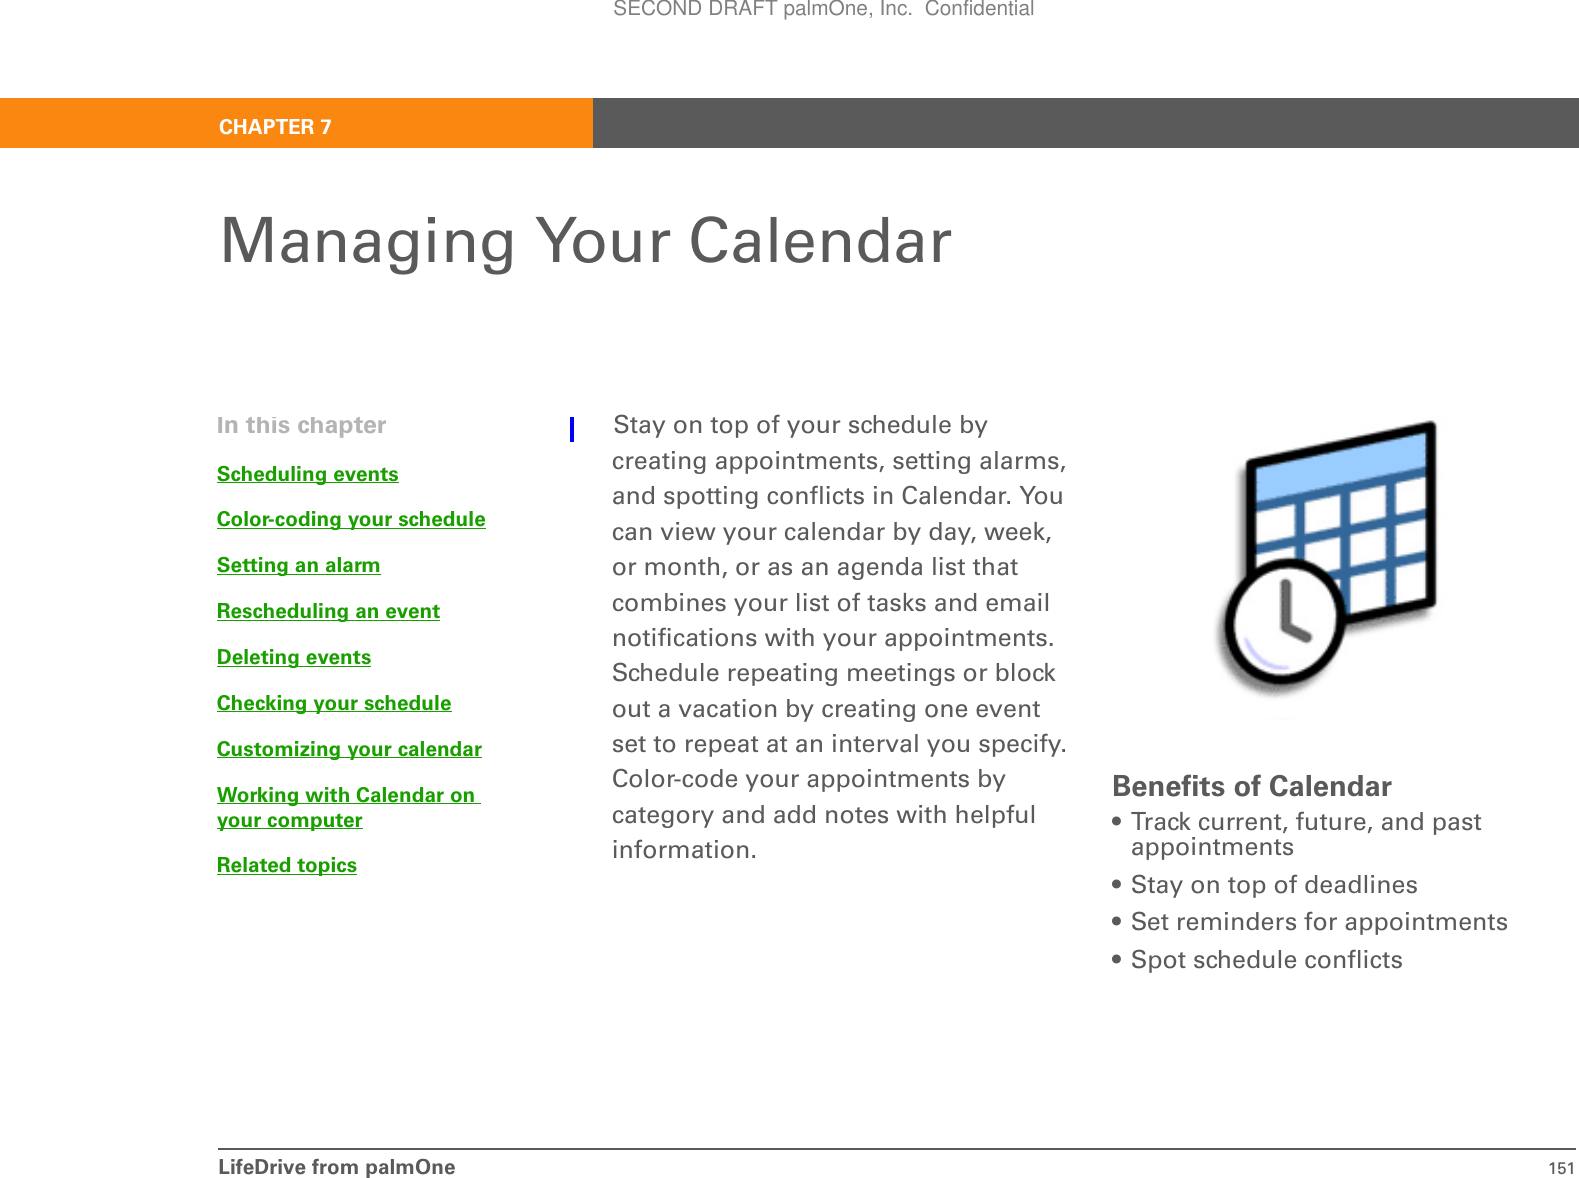
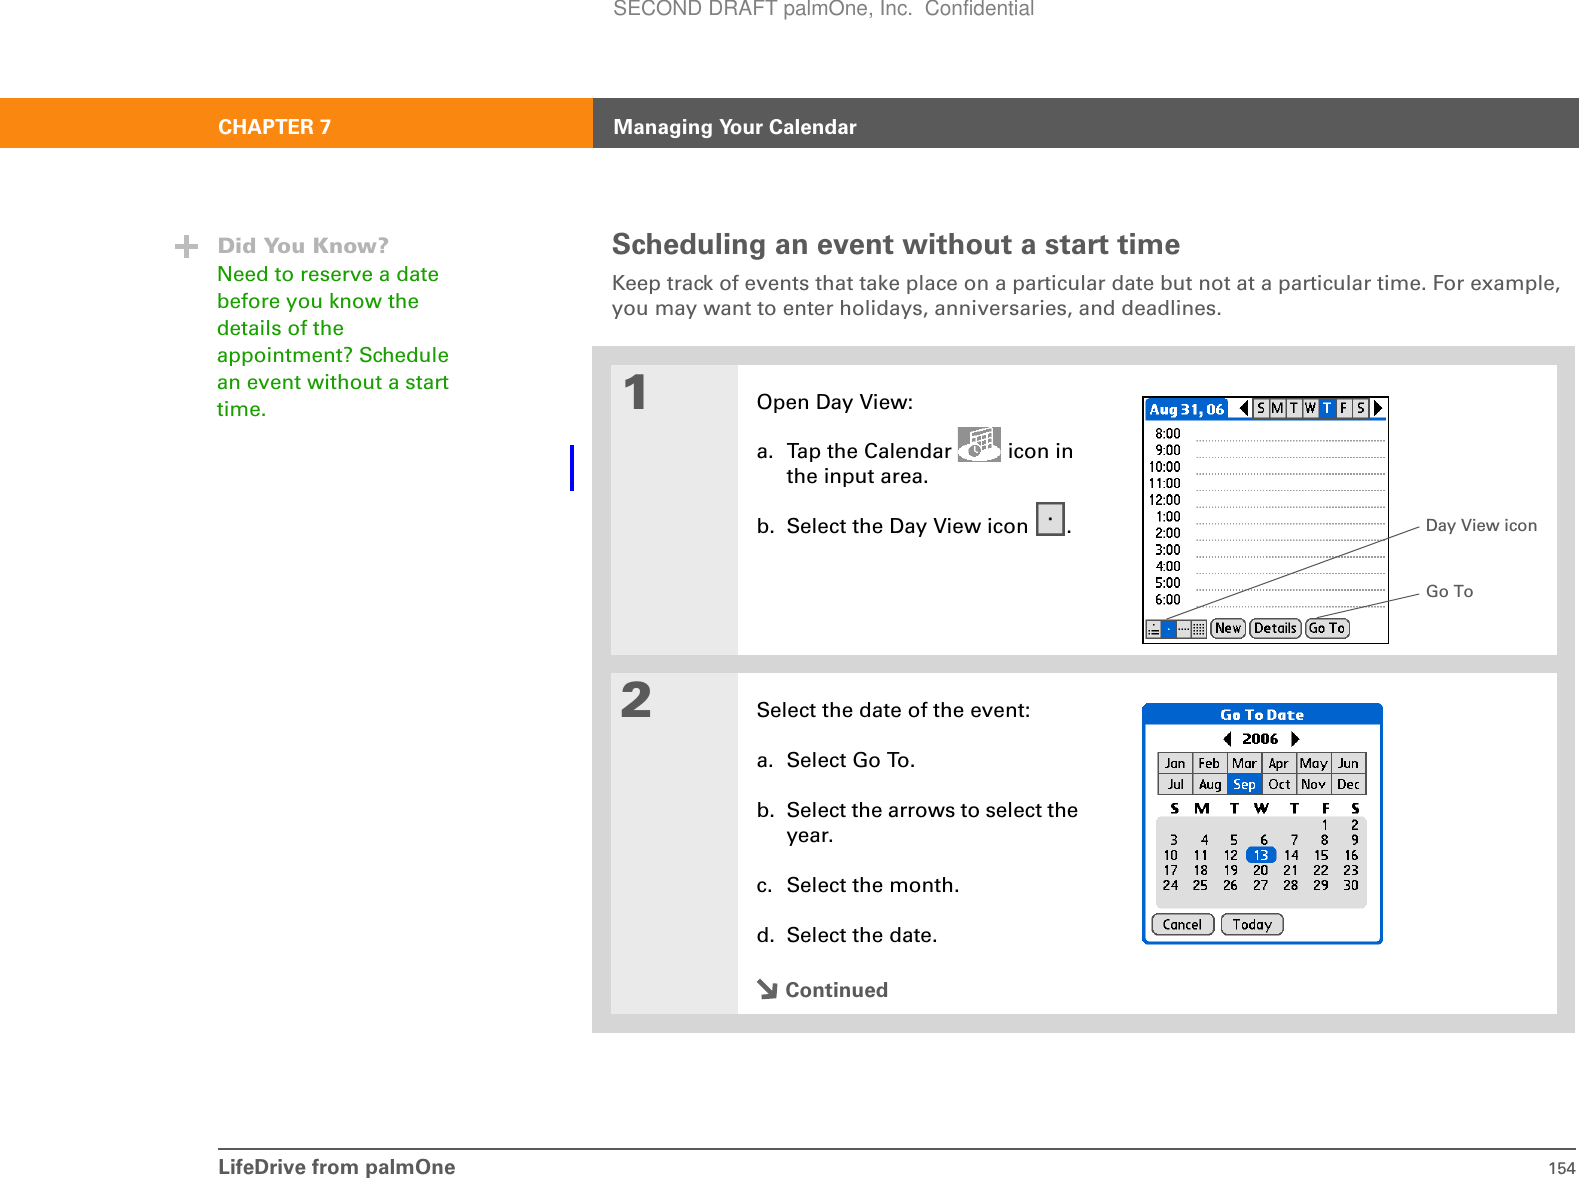
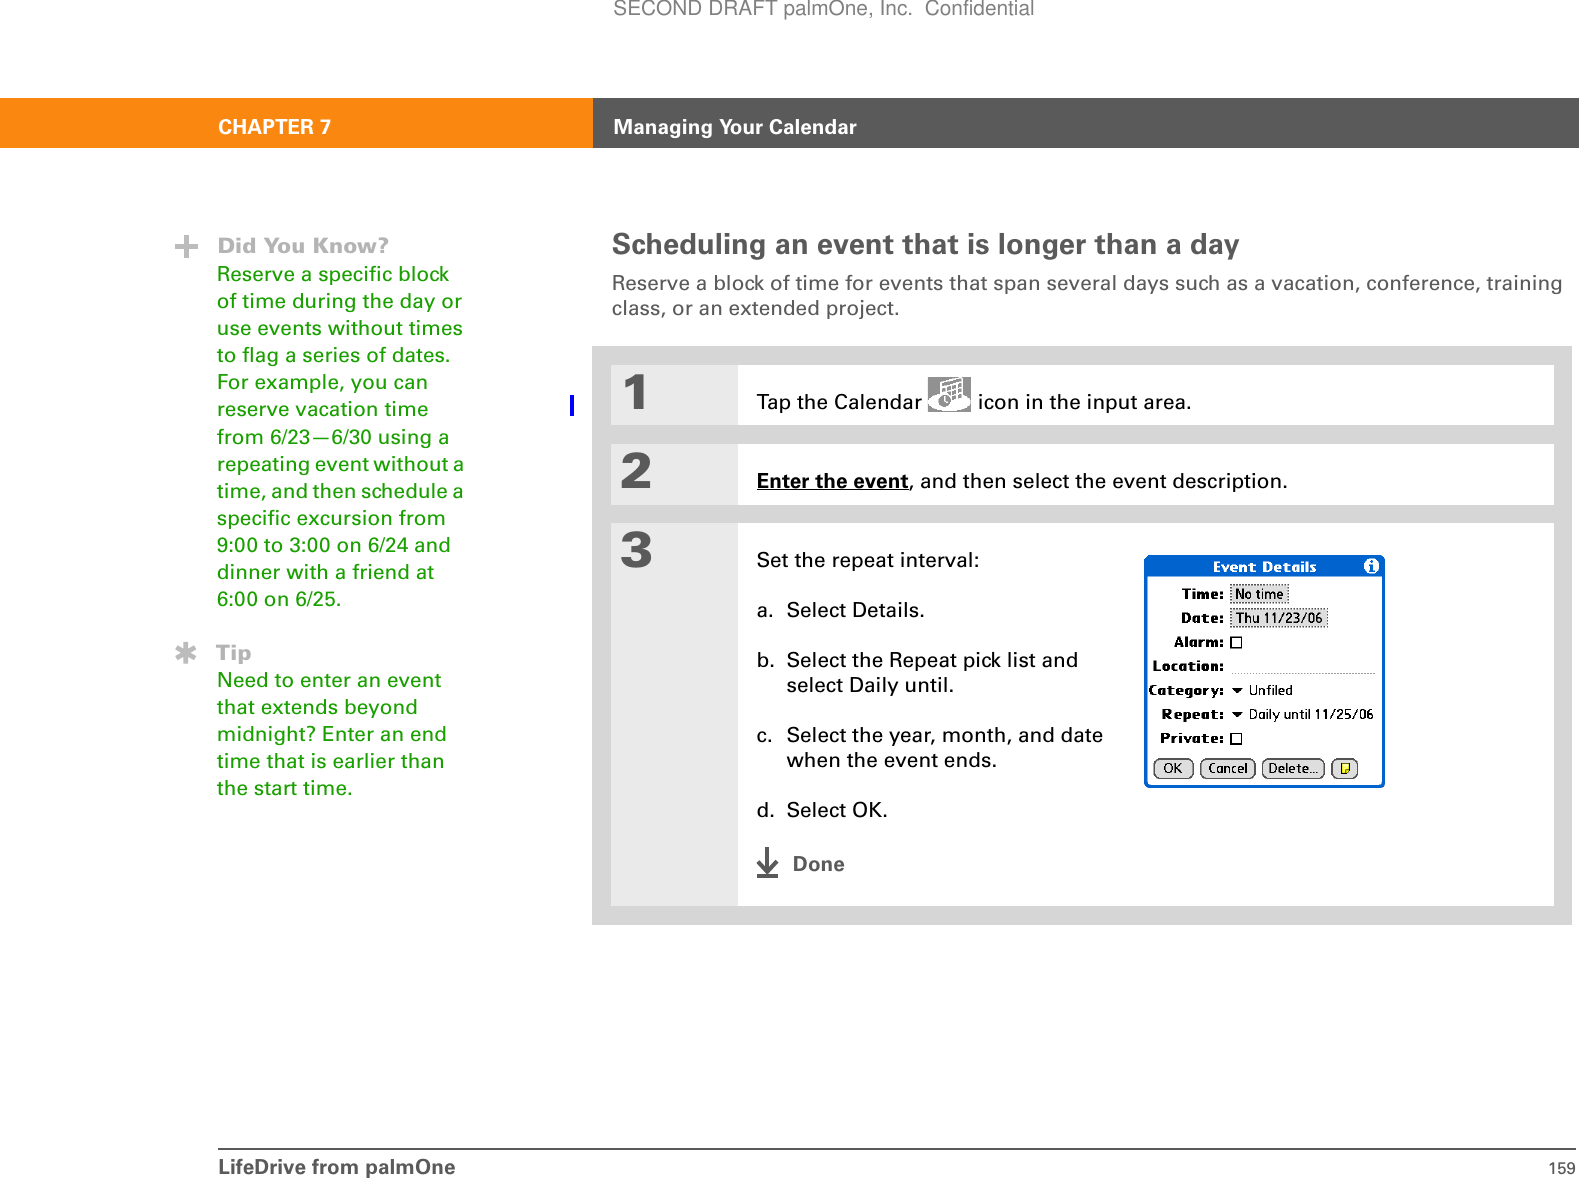
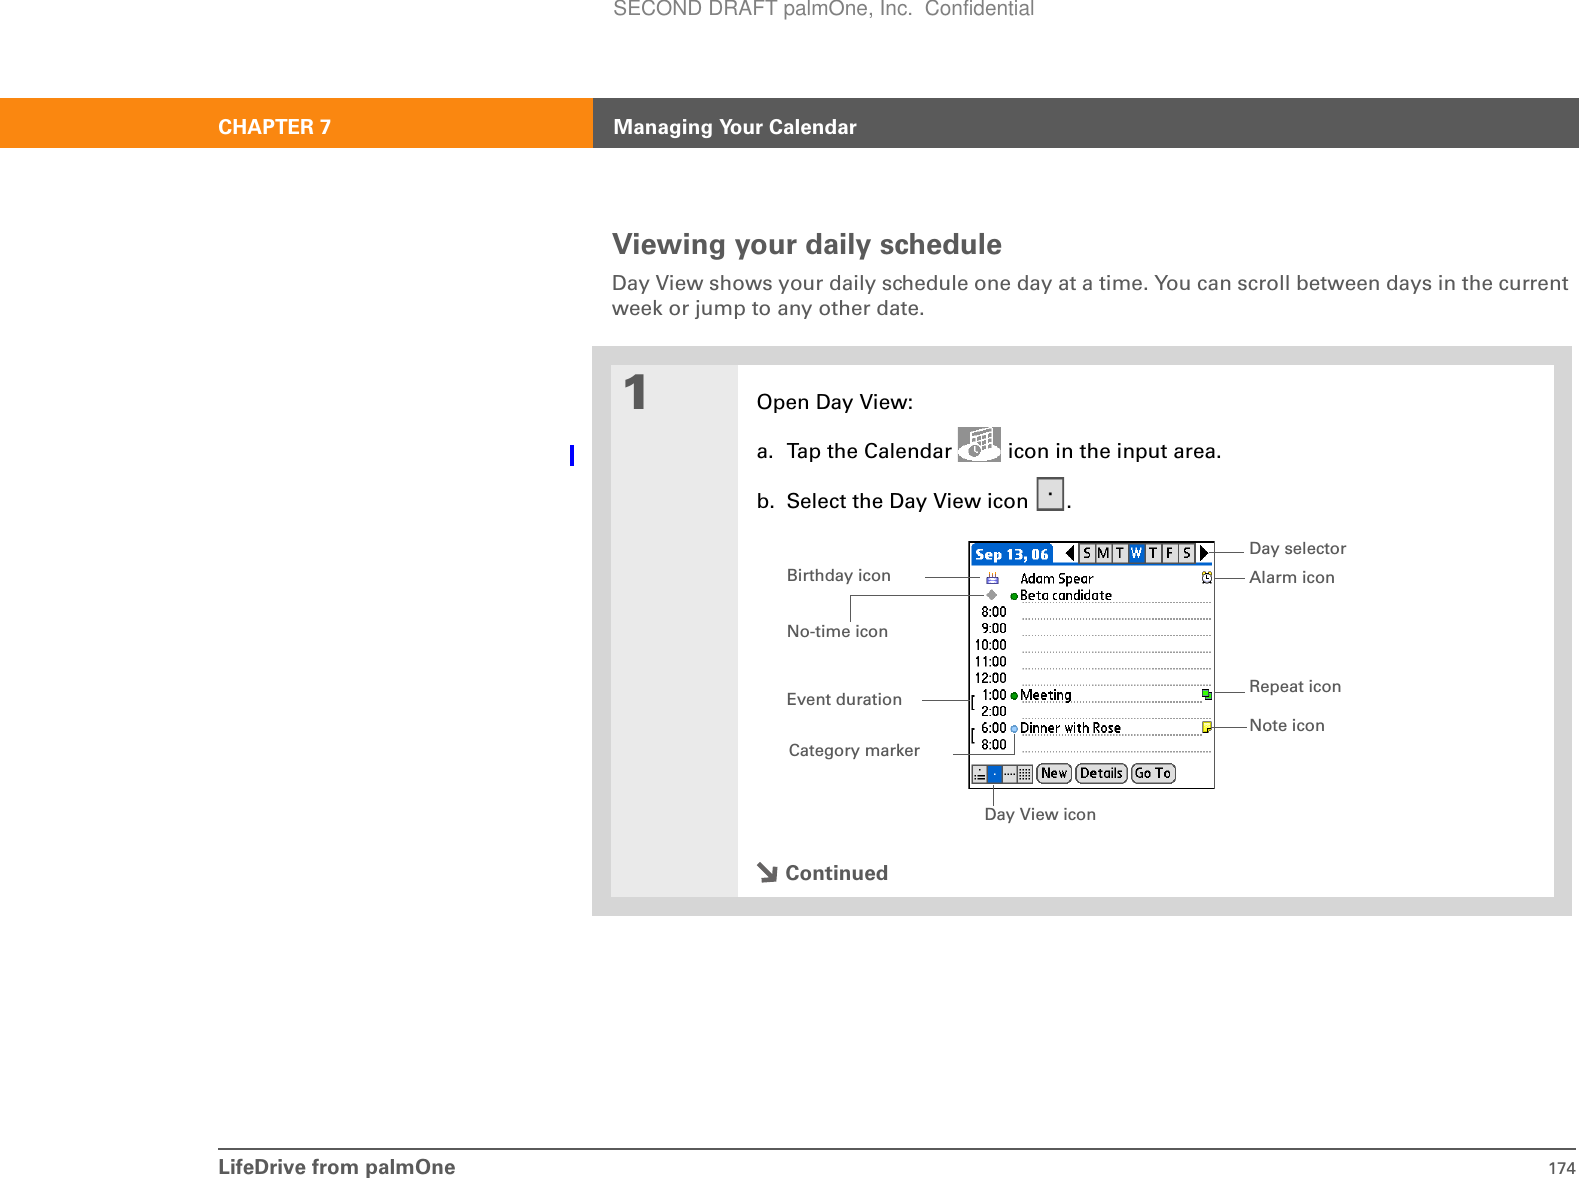
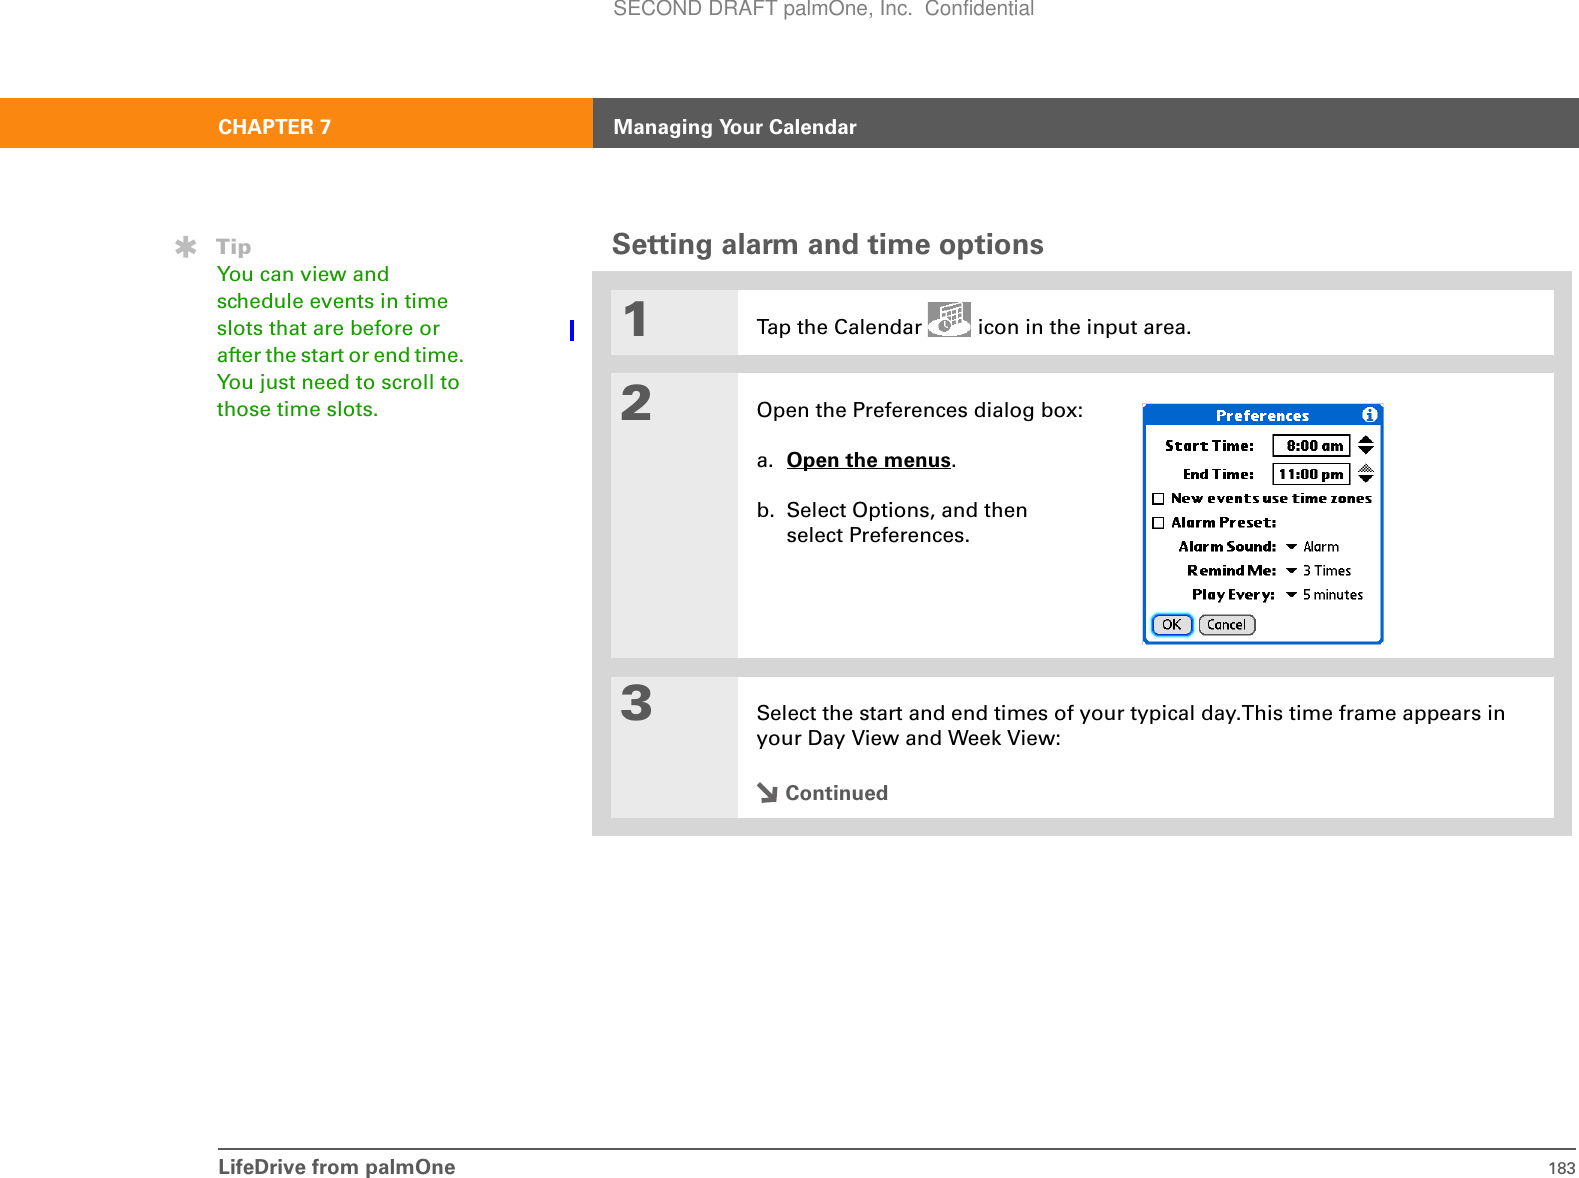
![LifeDrive from palmOne 152CHAPTER 7 Managing Your CalendarScheduling eventsUse Calendar to manage your schedule. You can enter appointments, events without a start time, events that repeat at regular intervals, and events that span a period of time.Scheduling an appointment01Open Day View:a. Tap the Calendar icon in the input area.b. Select the Day View icon .2[ & ] OPTIONAL If the appointment is not for today, select the date of the appointment:a. Tap Go To.b. Select the year, month, and date.Continued»Key TermEvent The name for an entry in the Calendar application, including appointments, birthdays, reminders, recurring meetings, and so on.TipYou can also scroll to a date by pressing Right or Left on the 5-way or by selecting the arrows at the top of the Day View screen.Did You Know?Calendar info is stored in program memory. This means that you can view the info only by looking at it in the application and you can synchronize the info only by pressing the sync button on the USB cable or with Exchange ActiveSync. Info in Calendar can be synchronized with info in either Palm®Desktop software or Outlook.Day View iconGo ToSECOND DRAFT palmOne, Inc. Confidential](https://usermanual.wiki/Palm/830.User-Manual-1-of-2/User-Guide-543159-Page-175.png)
![LifeDrive from palmOne 160CHAPTER 7 Managing Your CalendarEntering a location or a note for an eventEnter a description of the event’s location such as a restaurant, a conference room, or your friend’s house. Enter a note such as dial-in info for a conference call or directions to a location.01Tap the Calendar icon in the input area.2Enter the event, and then select the event description.3[ & ] OPTIONAL Enter the location:a. Select Details.b. Select the Location field and enter a description of the location.4[ & ] OPTIONAL Enter the note:a. Select Note .b. Enter the note text.c. Select Done.ContinuedSECOND DRAFT palmOne, Inc. Confidential](https://usermanual.wiki/Palm/830.User-Manual-1-of-2/User-Guide-543159-Page-183.png)
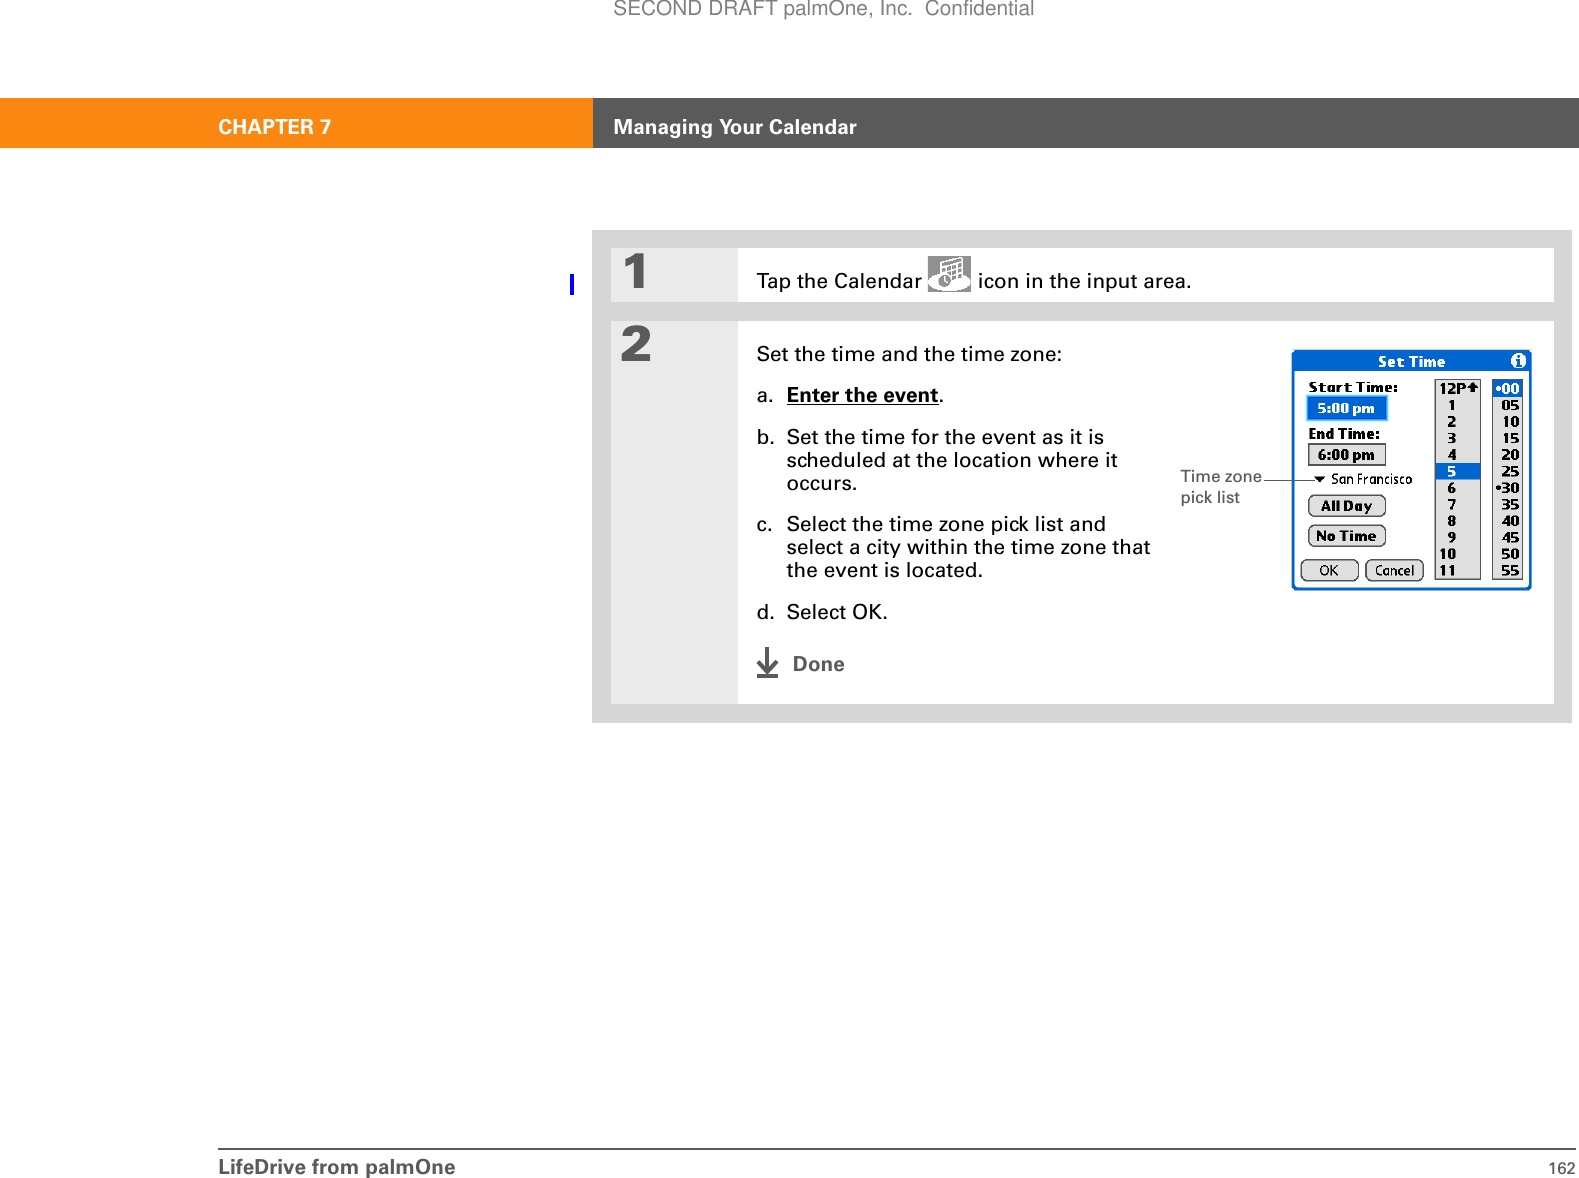
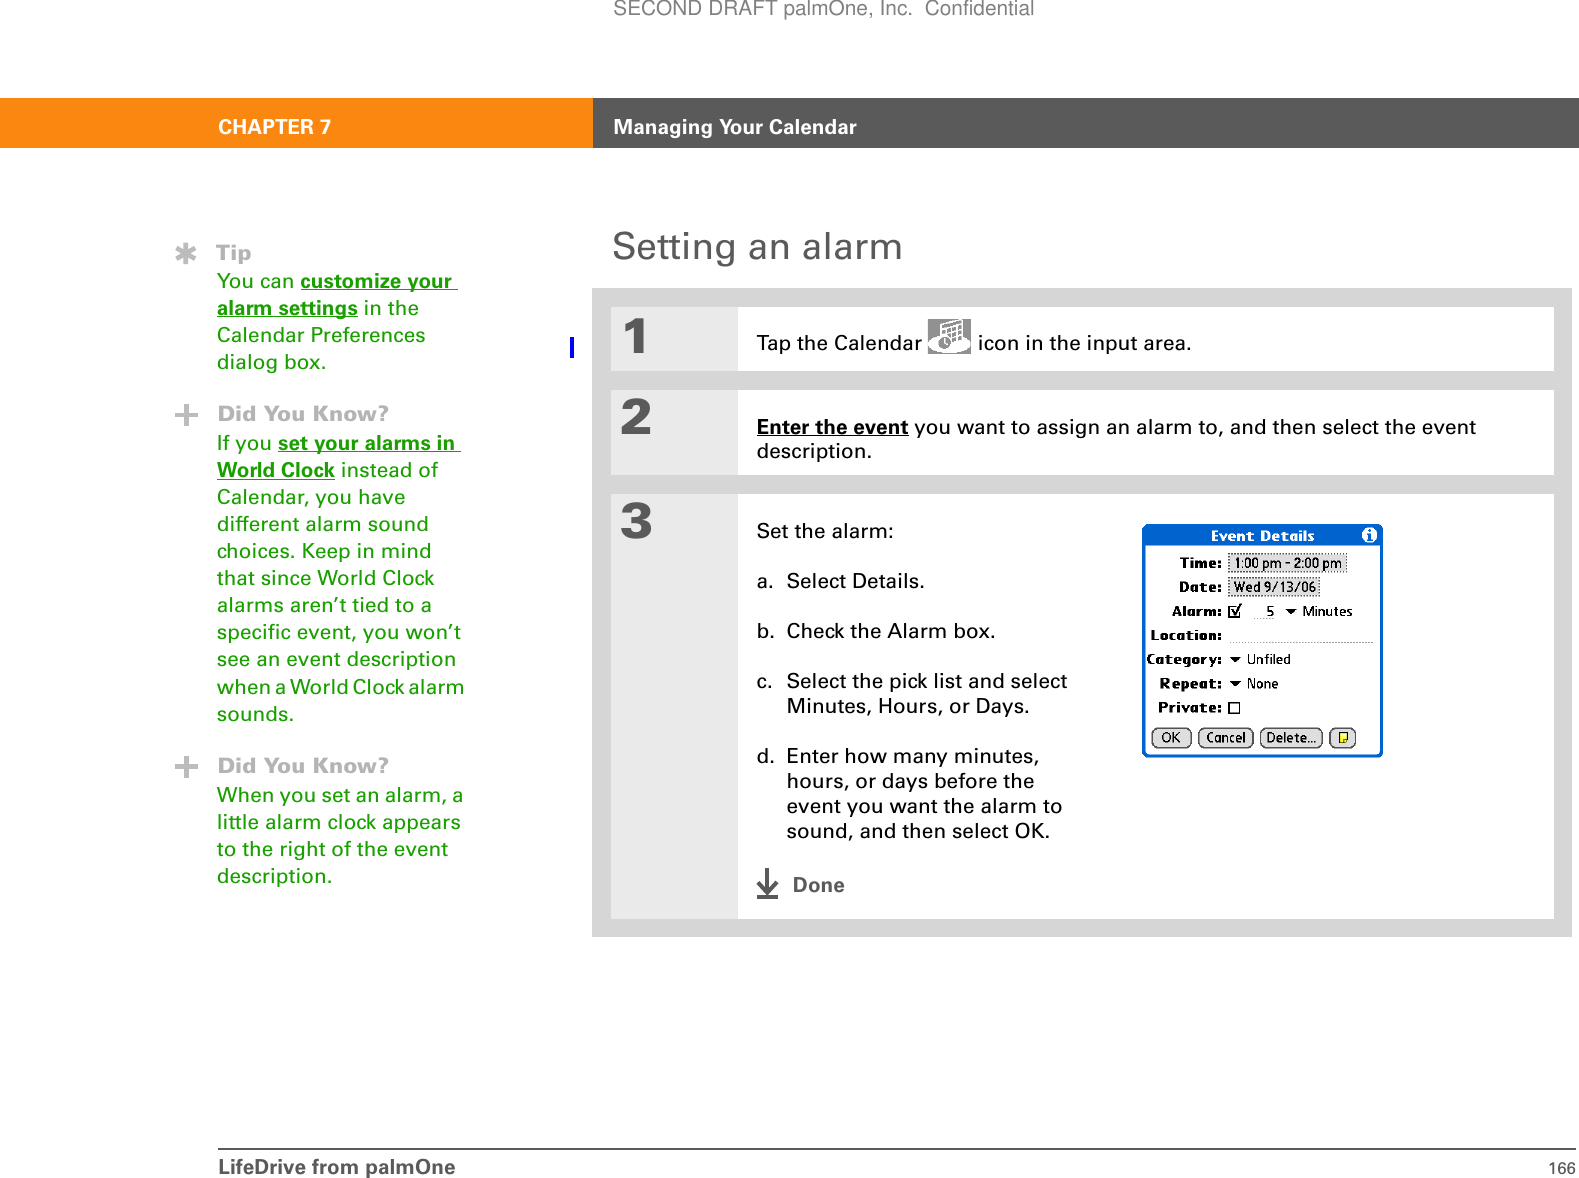
![LifeDrive from palmOne 161CHAPTER 7 Managing Your CalendarScheduling an event with a time zone Do not use times zones if you are synchronizing with Palm®Desktop software. Time zones work only if you are synchronizing with Outlook or Exchange ActiveSync. Palm Desktop software does not recognize time zones.Selecting a time zone when creating a new event allows you to travel and have your events automatically adjust to the time zone in your new location. When you schedule an event, set the time zone and time the event occurs in the location of the event. The event automatically adjusts on your schedule based on the primary location you have set on your device.When you travel, you can change the primary location on your device and the event automatically adjusts on your schedule to the correct time according to the time zone of the new primary location. Only events that have a time zone setting adjust when you change the primary time zone on your device. Events that do not have a time zone setting remain at their set time. 5Select OK.The location name and a note icon appear next to the event description in the Agenda View and in the Day View.DoneIMPORTANT[!]Did You Know?You can also set a preference to automatically include a time zone whenever you create a new event. Open the Options menu and select Preferences. Select New events use time zones. Only new events created after the preference is set are affected. NOTESECOND DRAFT palmOne, Inc. Confidential](https://usermanual.wiki/Palm/830.User-Manual-1-of-2/User-Guide-543159-Page-184.png)
![LifeDrive from palmOne 167CHAPTER 7 Managing Your CalendarRescheduling an event01Tap the Calendar icon in the input area.2Go to the event you want to reschedule:a. From Day View, select Go To.b. Select the year, month, and date of the event.c. Select the event description, and edit it if necessary. If you edit the description of a repeating event, the new description appears in all instances of the event.3Change the date and time:a. Select Details.b. Select the Time box and select the new start and end times.c. Select the Date box and select the new date.d. Select OK.ContinuedTipYou can also use the Event Details dialog box to change the alarm, location, category, repeat, and privacy settings.IMPORTANT[!]SECOND DRAFT palmOne, Inc. Confidential](https://usermanual.wiki/Palm/830.User-Manual-1-of-2/User-Guide-543159-Page-190.png)
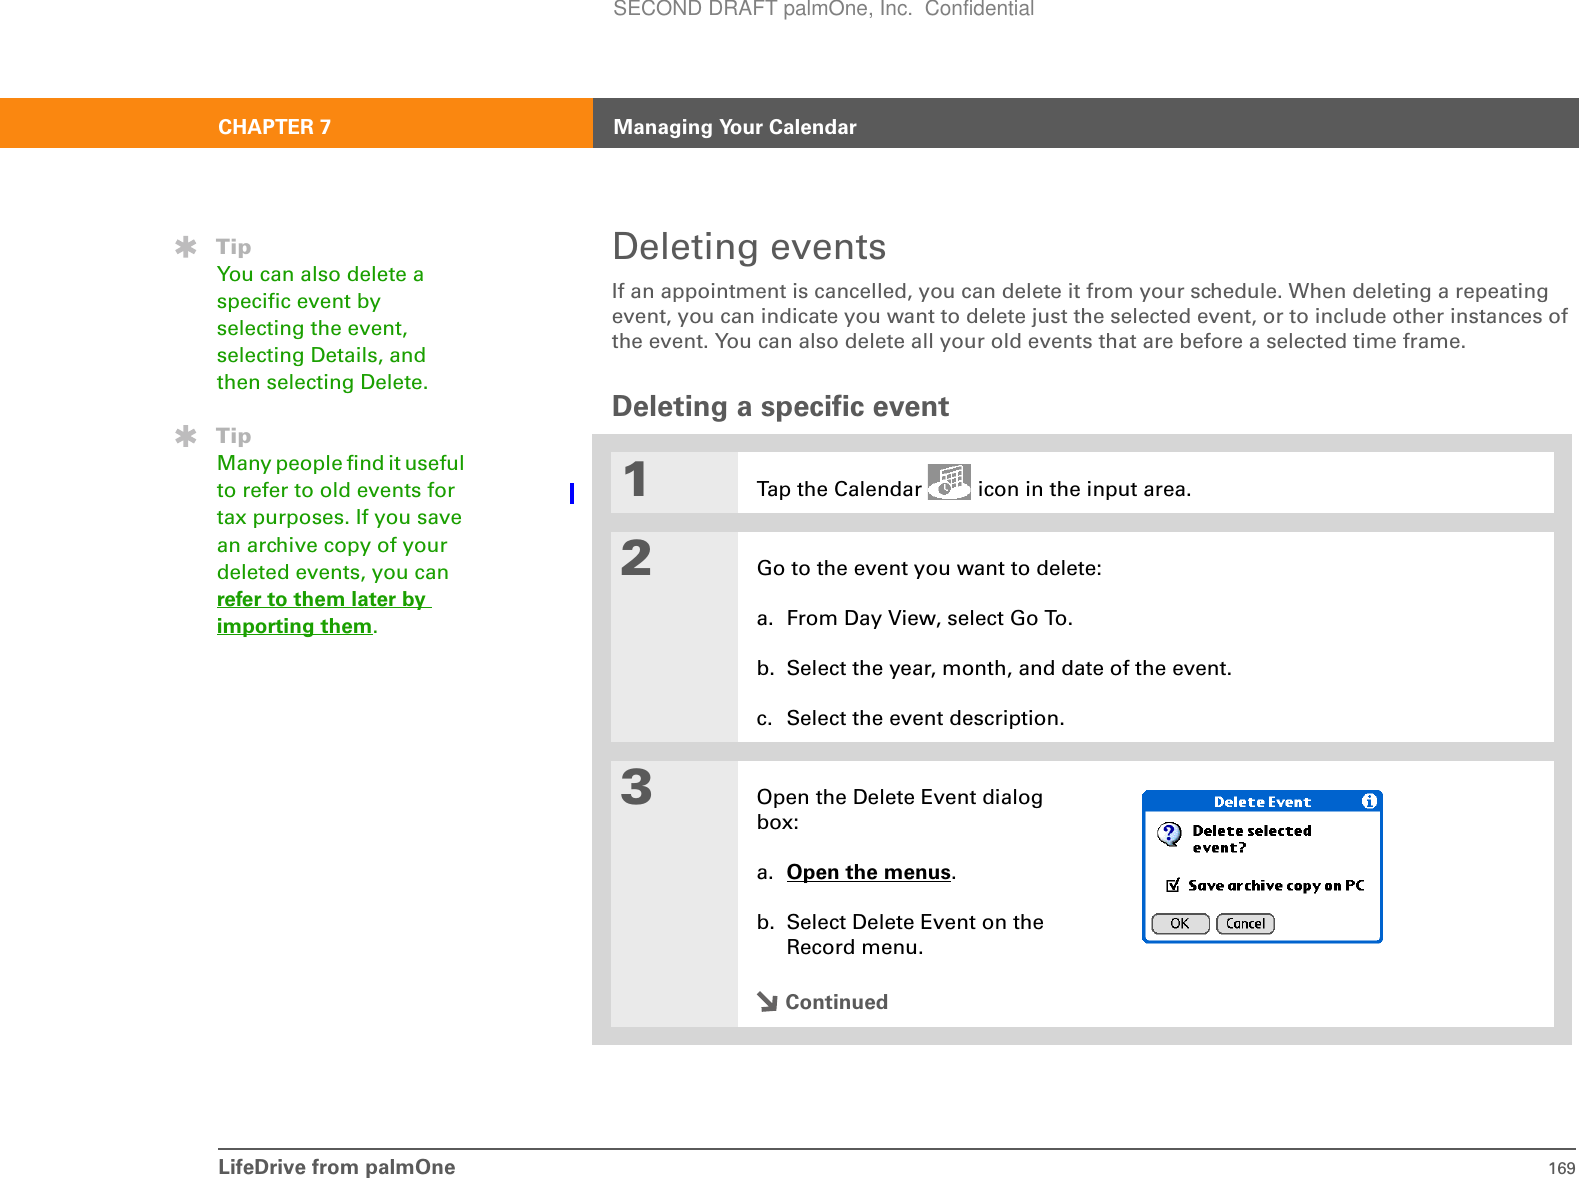
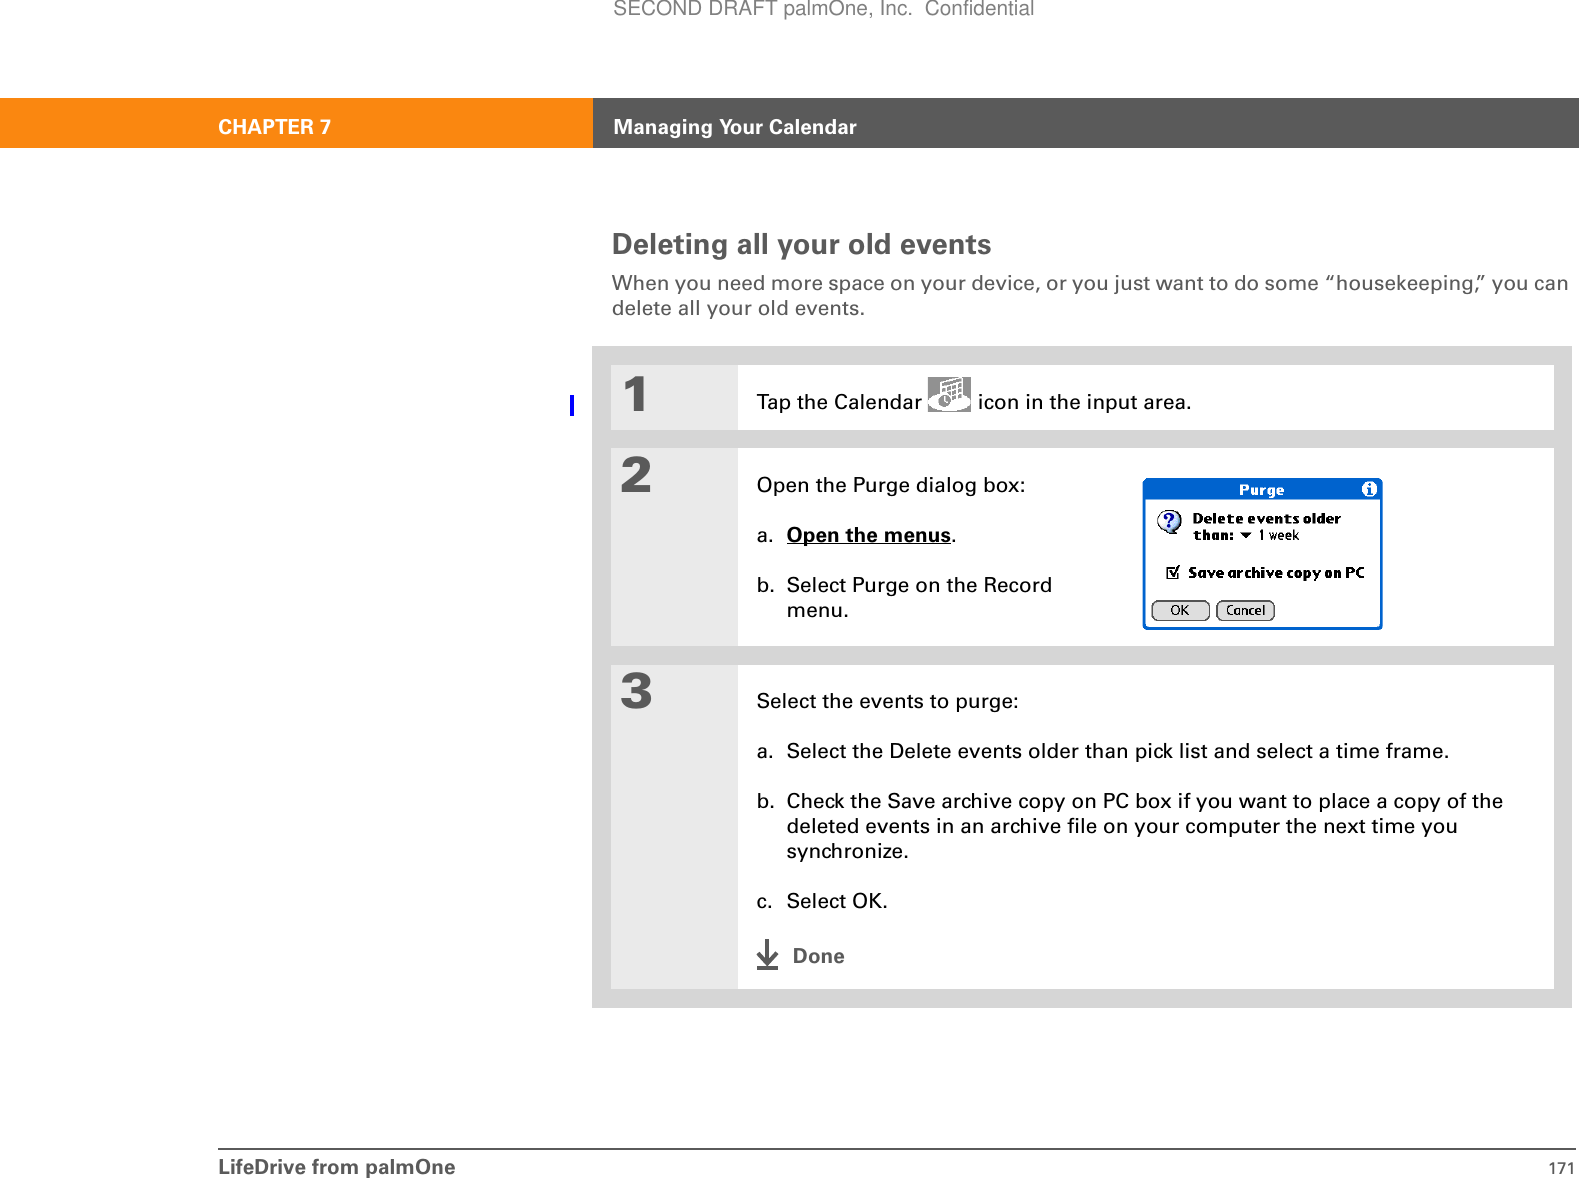
![LifeDrive from palmOne 170CHAPTER 7 Managing Your Calendar4[ & ] OPTIONAL Check the box to save an archive copy of the event on your computer.5Select OK.6If you’re deleting a repeating event, select one of the following to select the event(s) you want to delete:Current Delete only the selected instance of the repeating event.Future Delete the selected event and all instances of the repeating event that occur at a later date.All Delete the selected event and all past and future instances of the repeating event.DoneSECOND DRAFT palmOne, Inc. Confidential](https://usermanual.wiki/Palm/830.User-Manual-1-of-2/User-Guide-543159-Page-193.png)

![LifeDrive from palmOne 185CHAPTER 7 Managing Your CalendarWorking with Calendar on your computer If you use Microsoft Exchange ActiveSync®, your email and calendar information synchronize directly with your info on your company's Exchange server. You must retrieve email and calendar updates from the VersaMail application; they do not update when you synchronize your device with your computer. Use Calendar on your computer to view and manage your schedule. Check out the online Help in Palm®Desktop software to learn how to use Calendar on your computer. The online Help includes info about the following topics:• Scheduling events • Rescheduling events• Setting alarms• Deleting events• Marking events as private and hiding them• Printing your schedule• Working with Day View, Week View, Month View, and Year ViewWINDOWS ONLYTo open Calendar on your computer, double-click the Palm Desktop icon on the Windows desktop, and then click Calendar on the Launch bar.MAC ONLYTo open Calendar on your computer, double-click the Palm Desktop icon in the Palm folder, and then click Date Book.IMPORTANT[!]Did You Know?Mac Check out the Holiday Files folder in the Palm folder. It contains various holidays that you can import into Palm Desktop software on your computer.SECOND DRAFT palmOne, Inc. Confidential](https://usermanual.wiki/Palm/830.User-Manual-1-of-2/User-Guide-543159-Page-208.png)
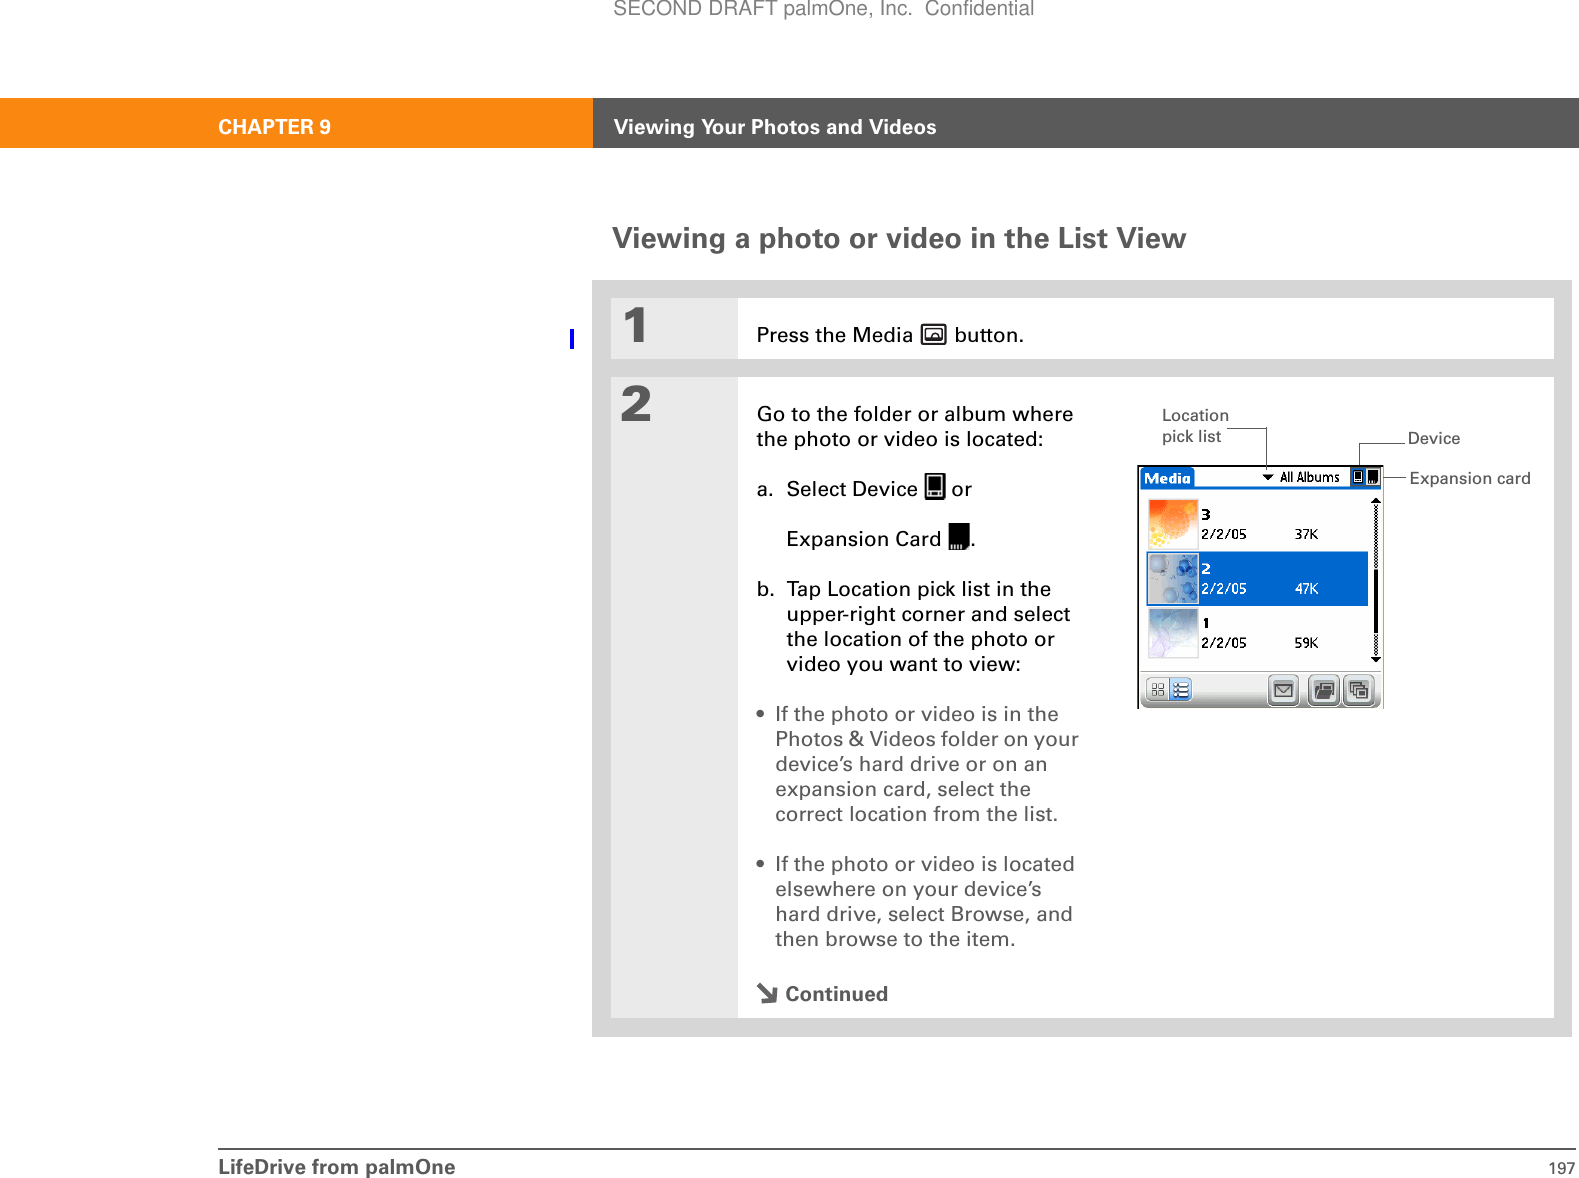
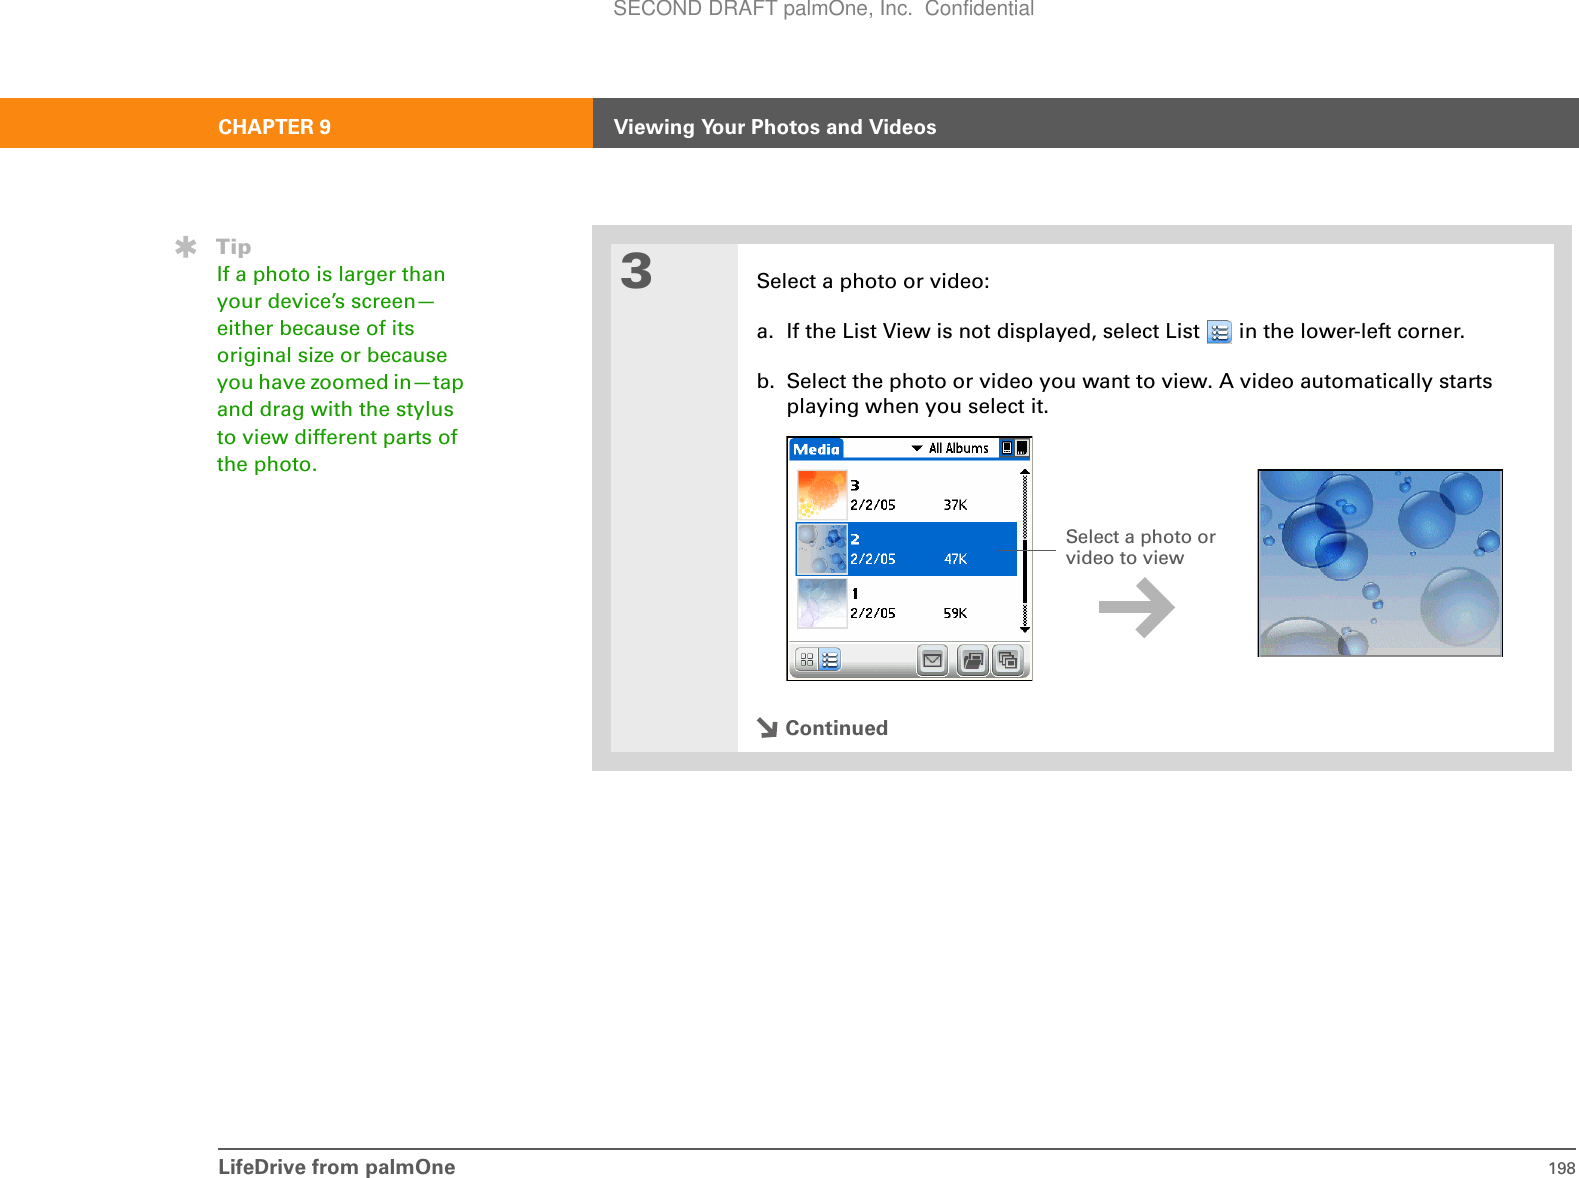
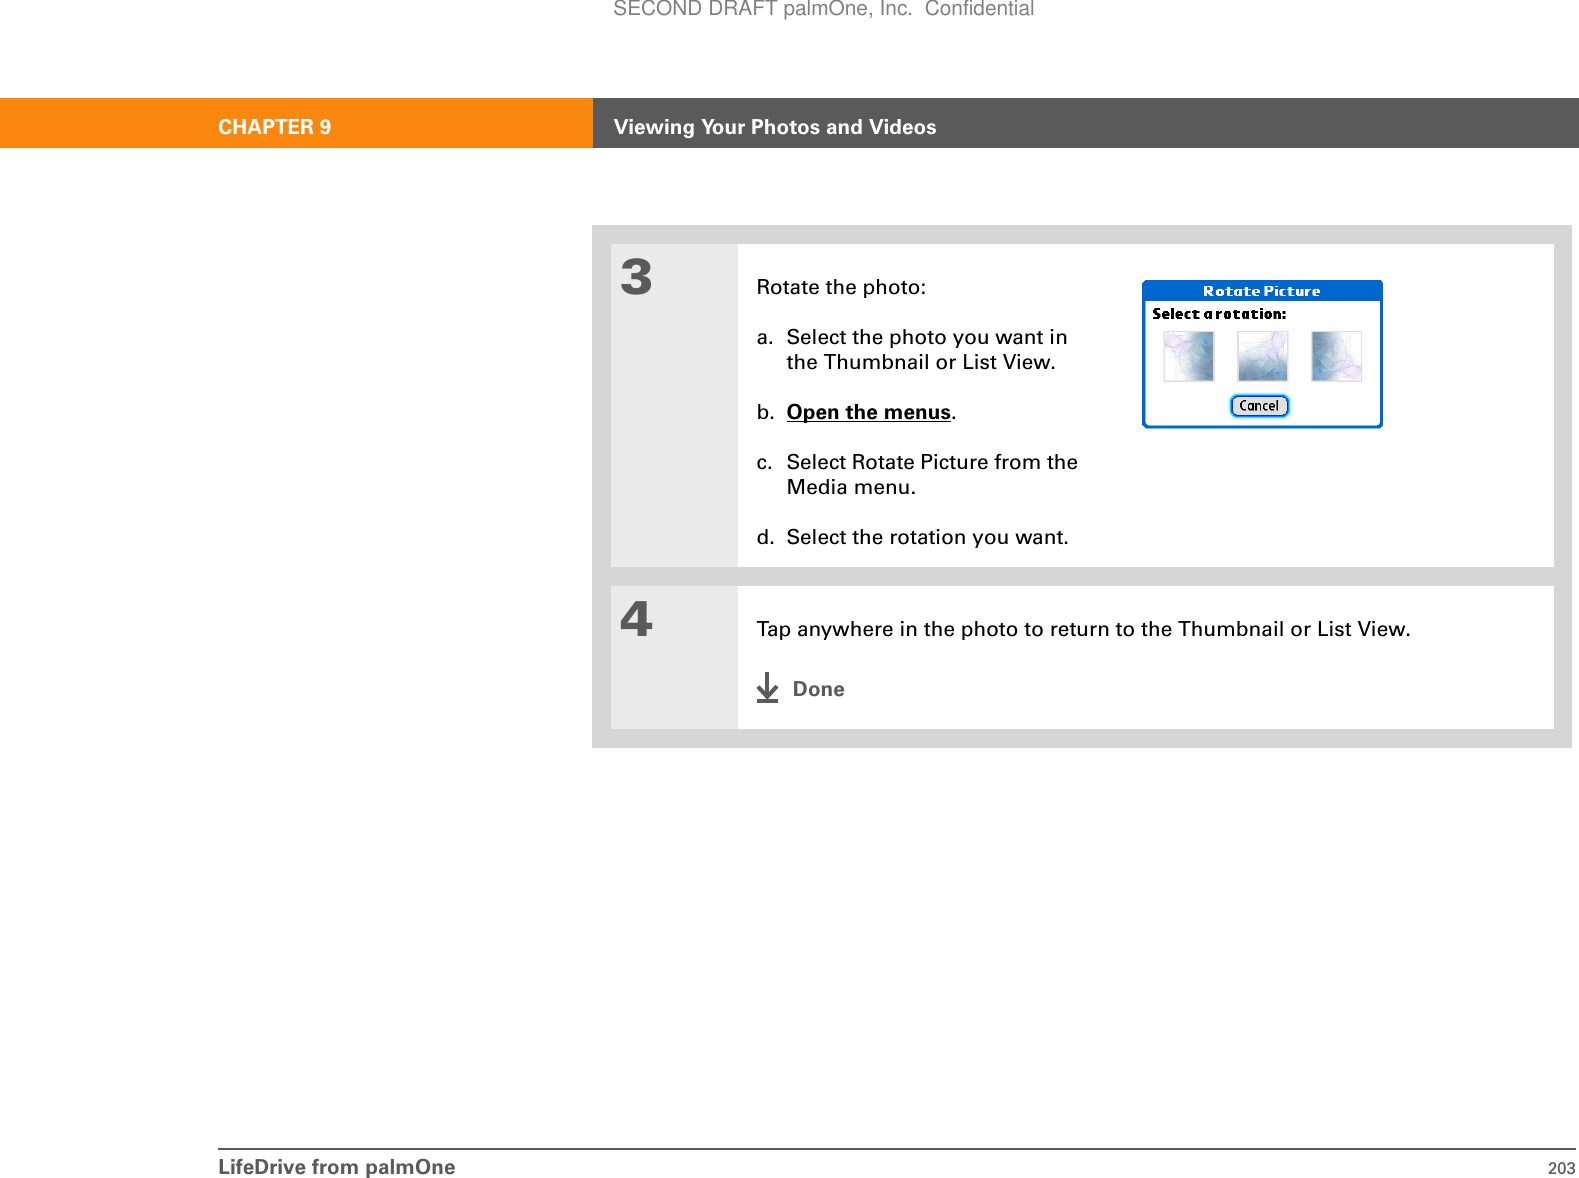
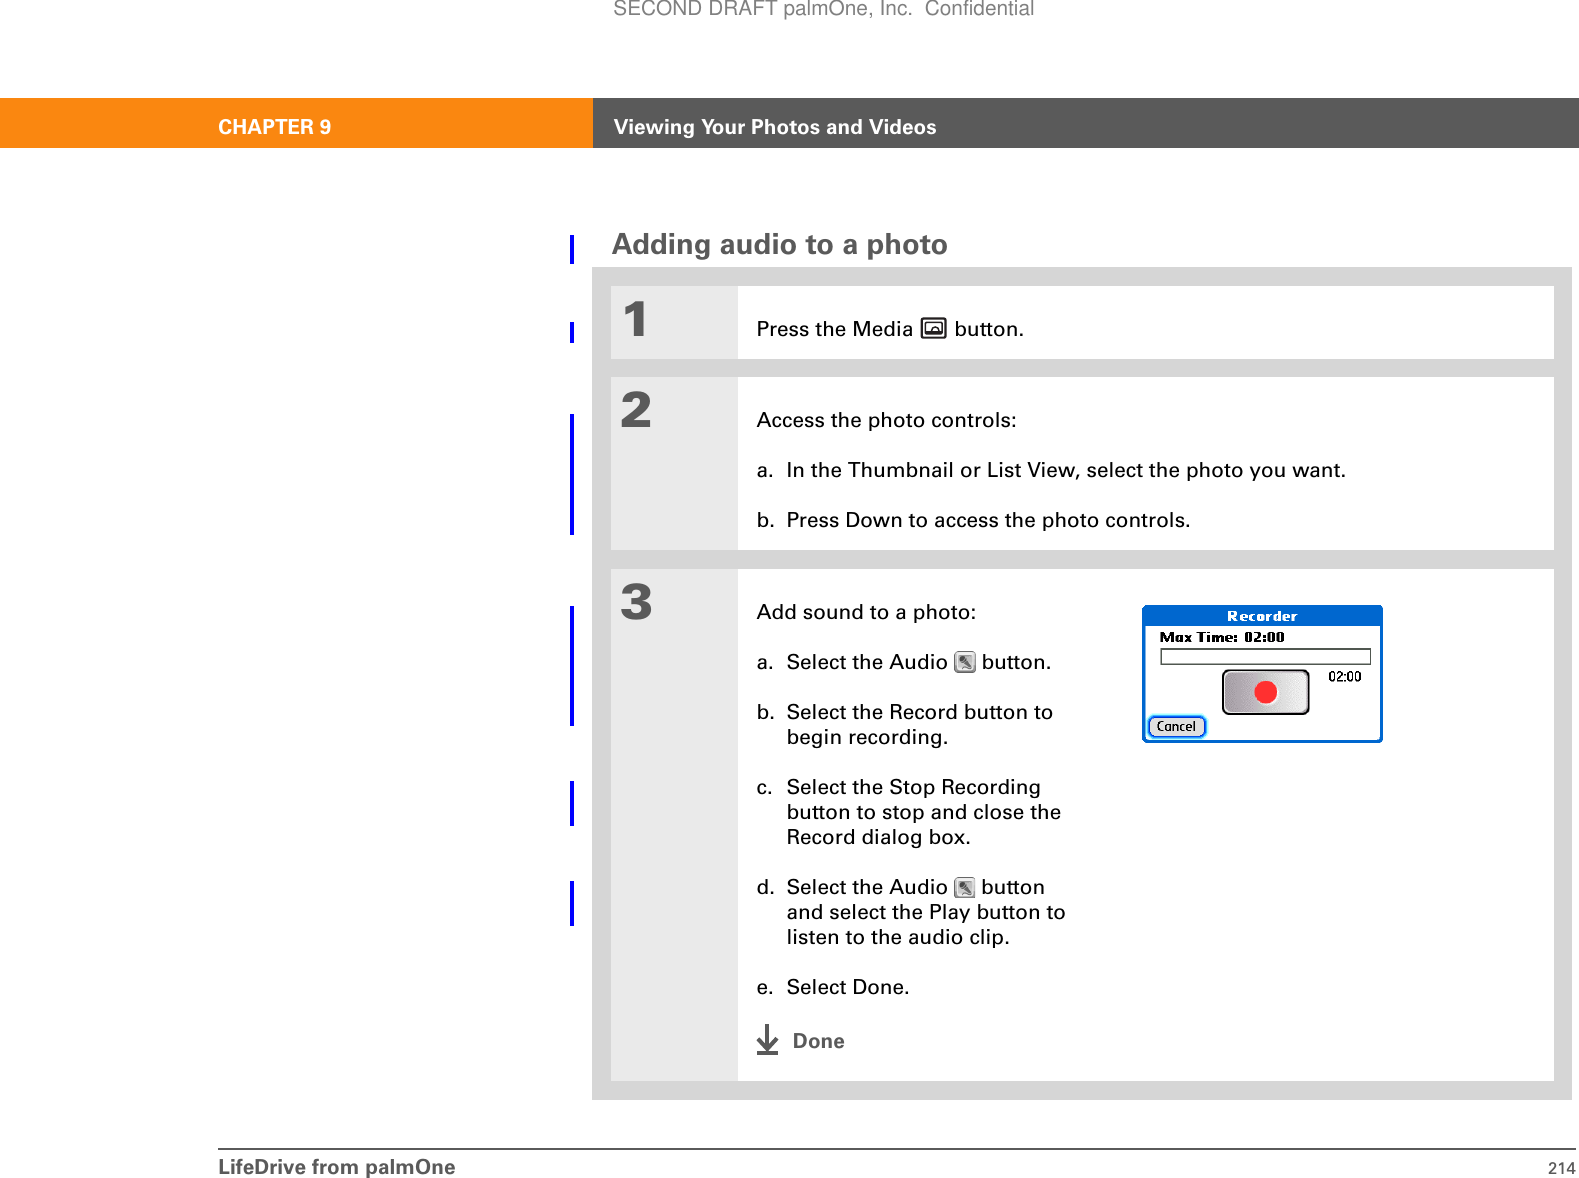
![LifeDrive from palmOne 196CHAPTER 9 Viewing Your Photos and Videos4[ & ] OPTIONAL Access controls:• For photos, press Up on the 5-way navigator to zoom in. Press Down to access the photo controls.• For videos, press Center to access video controls.5Press Center or tap anywhere in the photo or video to return to the Thumbnail View screen.DonePhoto Video VolumePlay or PauseRotateAdd audioProgress indicatorFull-screen viewSendSendSECOND DRAFT palmOne, Inc. Confidential](https://usermanual.wiki/Palm/830.User-Manual-1-of-2/User-Guide-543159-Page-219.png)
![LifeDrive from palmOne 199CHAPTER 9 Viewing Your Photos and Videos4[ & ] OPTIONAL Access controls:• For photos, press Up on the 5-way navigator to zoom in. Press Down to access the photo controls.• For videos, press Center to access video controls.5Press Center or tap anywhere in the photo or video to return to the List View screen.DonePhoto Video VolumePlay or PauseRotateAdd audioProgress indicatorFull-screen viewSendSendSECOND DRAFT palmOne, Inc. Confidential](https://usermanual.wiki/Palm/830.User-Manual-1-of-2/User-Guide-543159-Page-222.png)
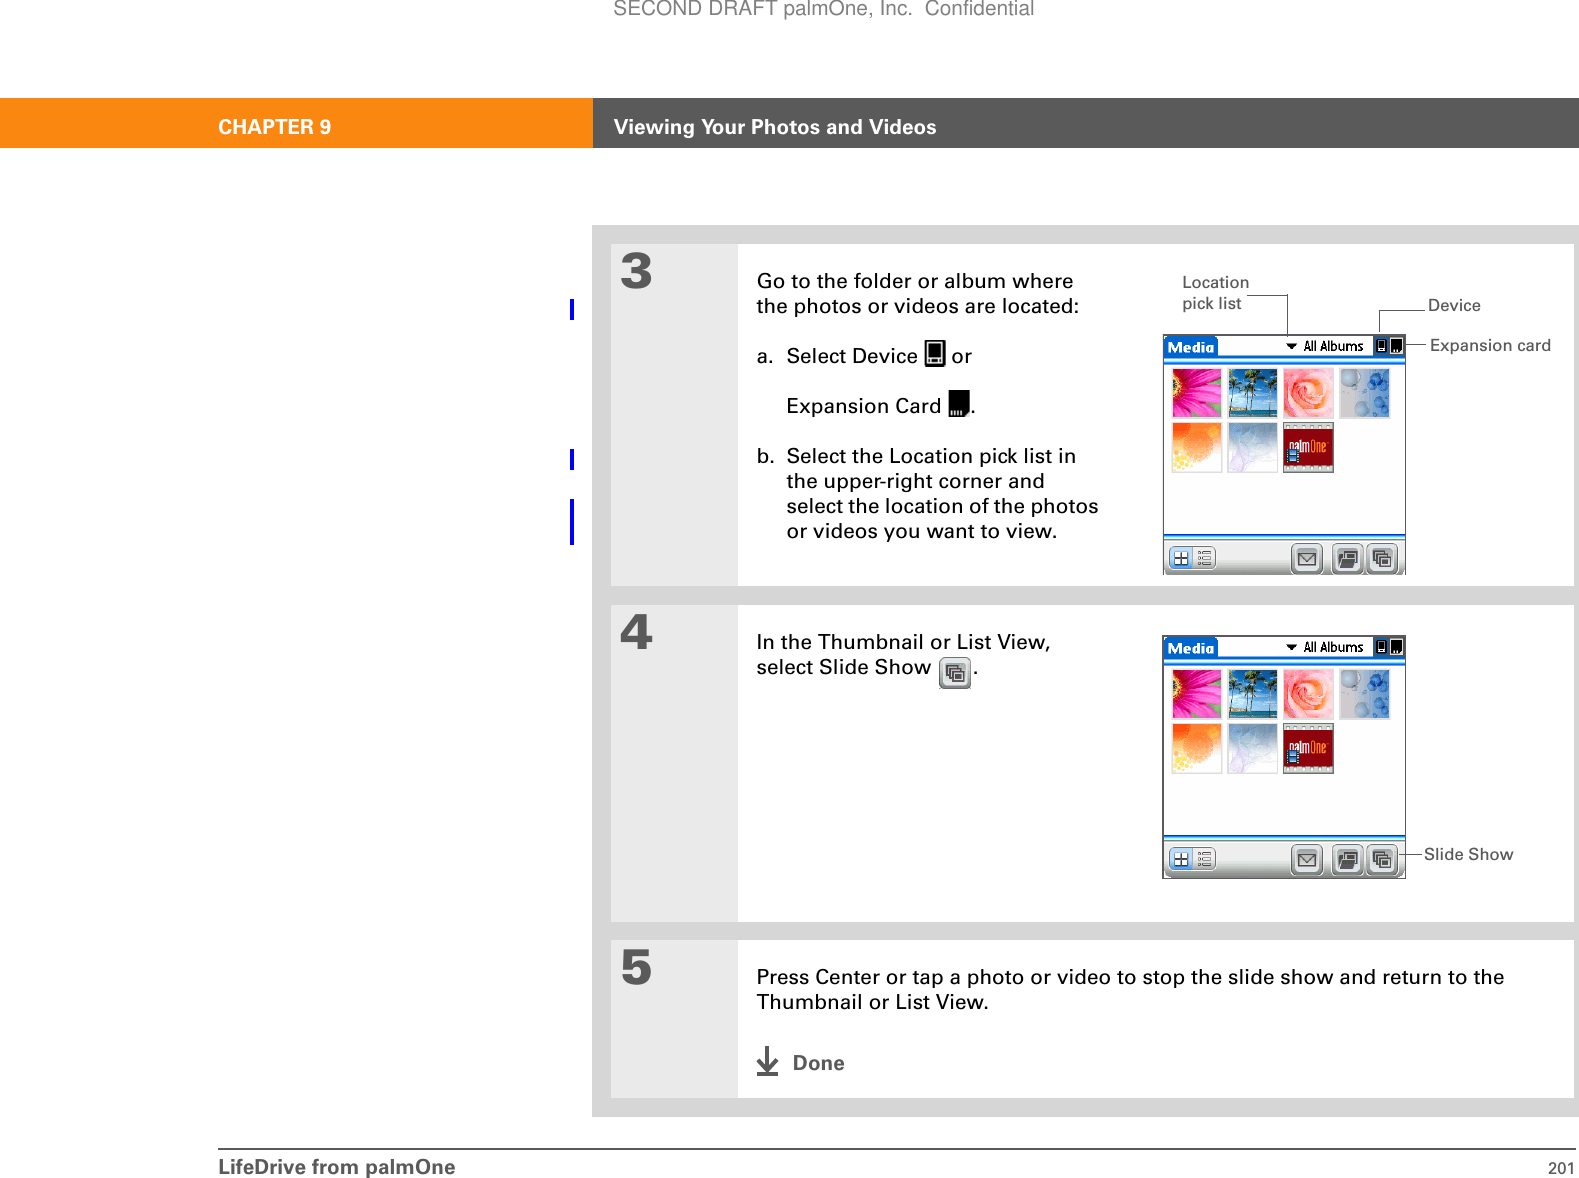
![LifeDrive from palmOne 200CHAPTER 9 Viewing Your Photos and VideosViewing a slide showBy default, both photos and videos in an album are displayed during a slide show. 01Press the Media button.2[ & ] OPTIONAL Set the slide show settings:a. Open the menus.b. Select Options and then select Slideshow.c. Adjust the settings:Show Videos Show videos during the slide show.Audio Add or remove audio. Play the photo voice clips and video sound or background music.Slide Delay Select the time each photo displays.Transitions Select the type of transition between slides.Auto Rotate Automatically rotate the photo or video for optimal viewing.ContinuedDid You Know?In a slide show, videos play through in their entirety before the next item appears.SECOND DRAFT palmOne, Inc. Confidential](https://usermanual.wiki/Palm/830.User-Manual-1-of-2/User-Guide-543159-Page-223.png)
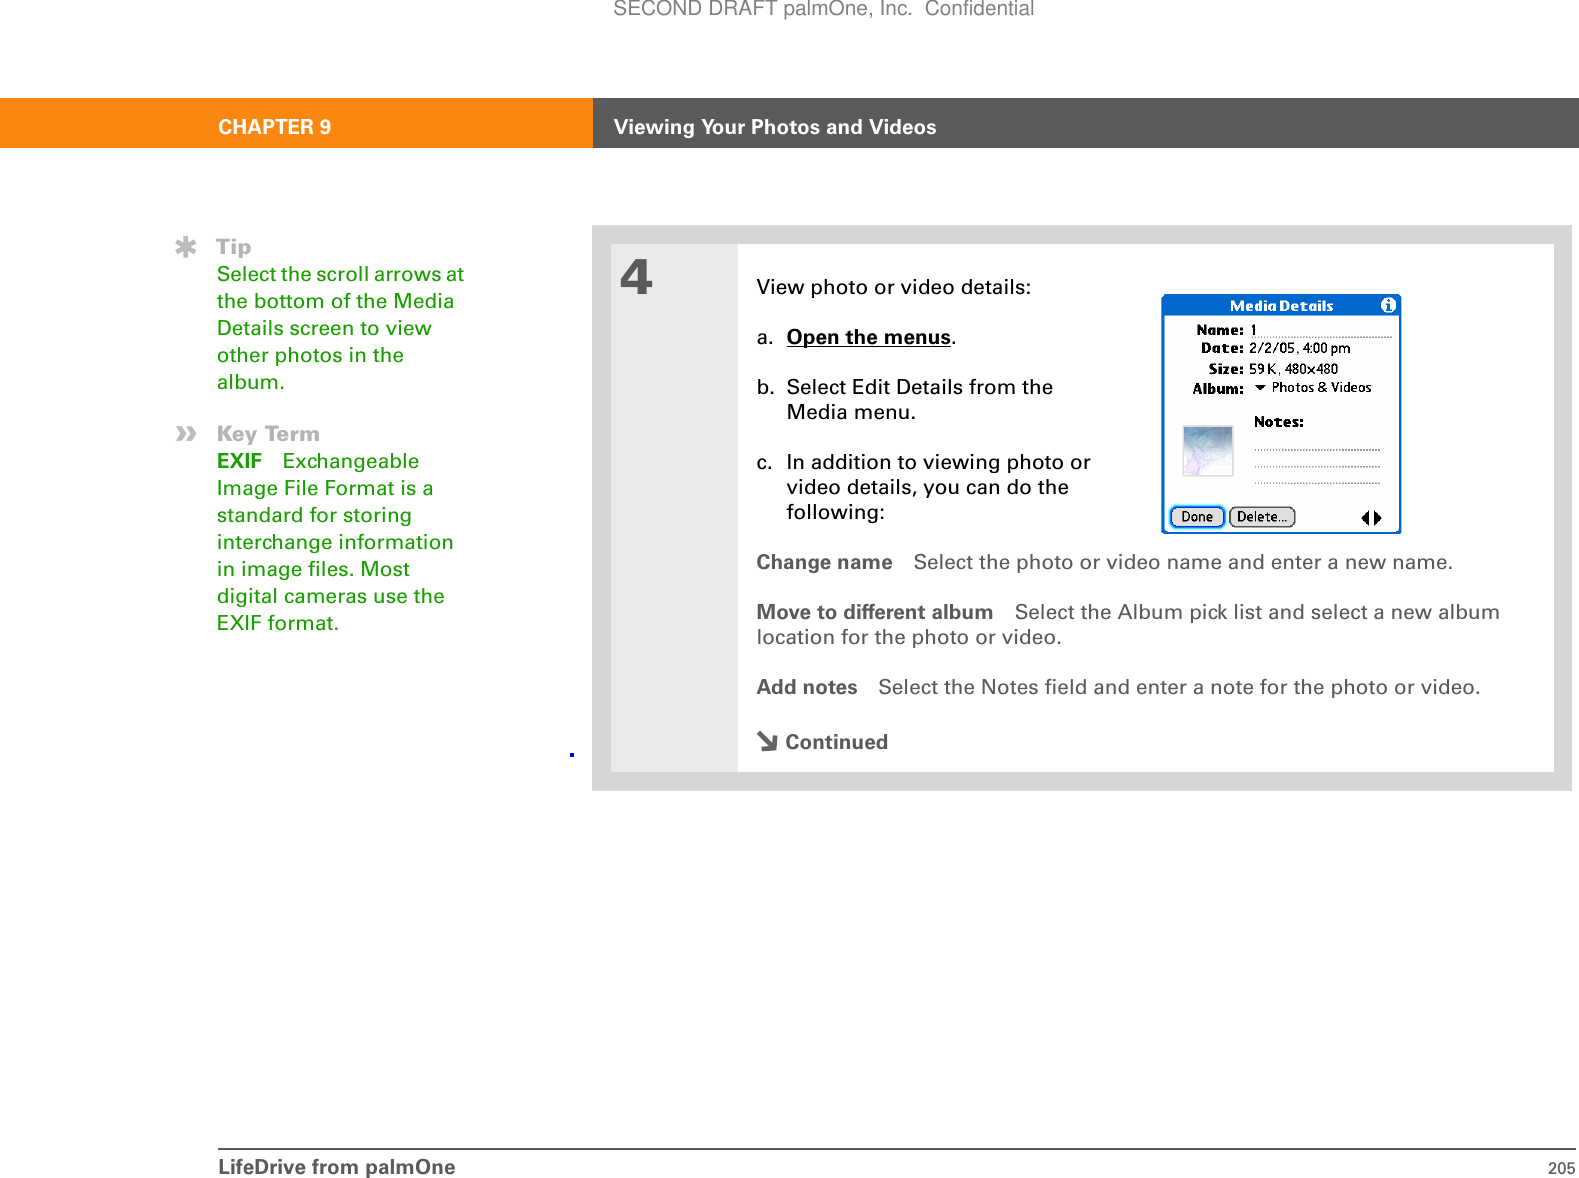
![LifeDrive from palmOne 206CHAPTER 9 Viewing Your Photos and Videos5[ & ] OPTIONAL If the photo was taken from a digital camera that uses the EXIF format, you can view the EXIF information about the photo:a. Select EXIF.b. Select Done when finished viewing the EXIF details.6When finished editing and viewing details, select Done.DoneSECOND DRAFT palmOne, Inc. Confidential](https://usermanual.wiki/Palm/830.User-Manual-1-of-2/User-Guide-543159-Page-229.png)
![LifeDrive from palmOne 208CHAPTER 9 Viewing Your Photos and Videos3[ & ] OPTIONAL Create an album:a. Select whether to create the album on your device or on an expansion card inserted into the expansion slot.b. Select New, enter the name of the new album, and select OK.c. Select OK on the Manage Albums screen.4Do one of the following:To add photos or videos to a newalbum Select the photos or videosyou want on the Organize Albumscreen.To add or remove photos or videosfrom an existing album From theThumbnail or List View, select thealbum you want from the pick list inthe upper-right corner, and then select Manage Albums . Select a photo or video without a plus sign to add it to the album; select a photo or video with a plus sign to remove it from the album.ContinuedTipDrag the stylus across multiple photos and/or videos to add or remove them all at once.Did You Know?If you remove a photo or video from an album, it is moved to the Unfiled category. The photo or video is not deleted from your device or the expansion card.Select to addSelect + to removeSECOND DRAFT palmOne, Inc. Confidential](https://usermanual.wiki/Palm/830.User-Manual-1-of-2/User-Guide-543159-Page-231.png)
![LifeDrive from palmOne 211CHAPTER 9 Viewing Your Photos and VideosSorting photos and videos01Press the Media button.2Sort photos and videos:a. Select the pick list in the upper-right corner and select the album containing the photos and/or videos you want to sort.b. Open the menus.c. Select Album, and then select one of the following:Sort by Date Lists photos and videos from the earliest to the most recent date. Select Sort by Date again to list items from the most recent to the earliest date.Sort by Name Lists photos and videos by name in ascending (A–Z) order. Select Sort by Name again to list items by name in descending (Z–A) order.Sort by Size Lists photos and videos from smallest to largest file size. Select Sort by Size again to list items from largest to smallest file size.Sort manually Lets you tap a photo or video and drag the stylus to where you want the item to appear. A dotted black line indicates the position of the item.DoneBefore You Begin[!]You must be in an album to sort manually. You cannot sort when All Albums is selected from the pick list.SECOND DRAFT palmOne, Inc. Confidential](https://usermanual.wiki/Palm/830.User-Manual-1-of-2/User-Guide-543159-Page-234.png)
![LifeDrive from palmOne 220CHAPTER 10 Managing Your Camera Card MediaCopying photos and videos from your camera card To extend your battery life, connect your device to a power source when copying media from your camera card.0.1Insert your digital camera card into your device. The Camera Companion application automatically opens.2Select the copy location:Copy to Device Copies the photos and videos from the DCIM directory on your camera card to the DCIM directory on your hard drive. Copy to Computer Opens Drive Mode on your device and allows you to copy files to your computer. Your device must be connected to your computer. ContinuedDid You Know?When you use Copy to Device, the program checks for files with the same file name and content. If found, those files are not copied. Also, files with the same file name but different contents are automatically renamed before copying onto the device.Tip(Windows only) When copying files to your computer using Drive Mode, you can click the Windows dialog box selection Copy picture to a folder on my computer using Microsoft Scanner and Camera Wizard to automatically copy files to the computer.IMPORTANT[!]SECOND DRAFT palmOne, Inc. Confidential](https://usermanual.wiki/Palm/830.User-Manual-1-of-2/User-Guide-543159-Page-243.png)
![LifeDrive from palmOne 221CHAPTER 10 Managing Your Camera Card Media3[ & ] OPTIONAL If you selected Copy to Device, you can select the following:Delete Media on Card Deletes the contents of your camera card so that your card is immediately available for more photos or videos. View Copied Media View the photos and videos that you copied to your device.4Remove your camera card.DoneSECOND DRAFT palmOne, Inc. Confidential](https://usermanual.wiki/Palm/830.User-Manual-1-of-2/User-Guide-543159-Page-244.png)
 Install Windows Media Player and the Pocket Tunes plug-in on your computer. Insert the software installation CD and follow the onscreen instructions for installing extra software.TipThe Star button is assigned to open Pocket Tunes. You can also reassign the Star button to open any of your favorite applications.TipYou can also transfer MP3 files to the Music folder on your device using LifeDrive™ Manager (Windows) or Drive Mode (Mac and Windows) on your computer. Select Palm Device Start SyncSECOND DRAFT palmOne, Inc. Confidential](https://usermanual.wiki/Palm/830.User-Manual-1-of-2/User-Guide-543159-Page-248.png)
![LifeDrive from palmOne 226CHAPTER 11 Listening to MusicMAC ONLY03Select Start Sync. The files are transferred to the Music folder on your device’s hard drive.Done1Prepare your computer and your device:a. Go to Applications and select Drive Mode . b. Connect your device and your computer to the USB sync cable.2Open Finder, and then drag the music files you want onto the Music folder under the device icon, which appears as an external drive on your desktop. When you have finished transferring music files, be sure to properly disconnect from Drive Mode.DoneTipYou can also use a card reader accessory (sold separately) to transfer MP3 files from your computer to your expansion card. TipYou can also use a card reader accessory (sold separately) to transfer MP3 files from your computer to your expansion card. TipYou can also transfer MP3 files on a Mac computer by dragging the music file to the Send To Handheld droplet. Select the destination for the file, and then synchronize to transfer it.IMPORTANT[!]SECOND DRAFT palmOne, Inc. Confidential](https://usermanual.wiki/Palm/830.User-Manual-1-of-2/User-Guide-543159-Page-249.png)
 Install Real Rhapsody desktop application on your computer. Insert the software installation CD and follow the onscreen instructions for installing extra software.You must install this software, even if you already have a version of RealPlayer installed on your computer. The version on the CD contains all of the components needed to transfer music files to your device.TipYou can also transfer MP3 files to the Audio folder on your device using File Transfer (Windows) or Drive Mode (Mac and Windows) on your computer. SECOND DRAFT palmOne, Inc. Confidential](https://usermanual.wiki/Palm/830.User-Manual-1-of-2/User-Guide-543159-Page-250.png)
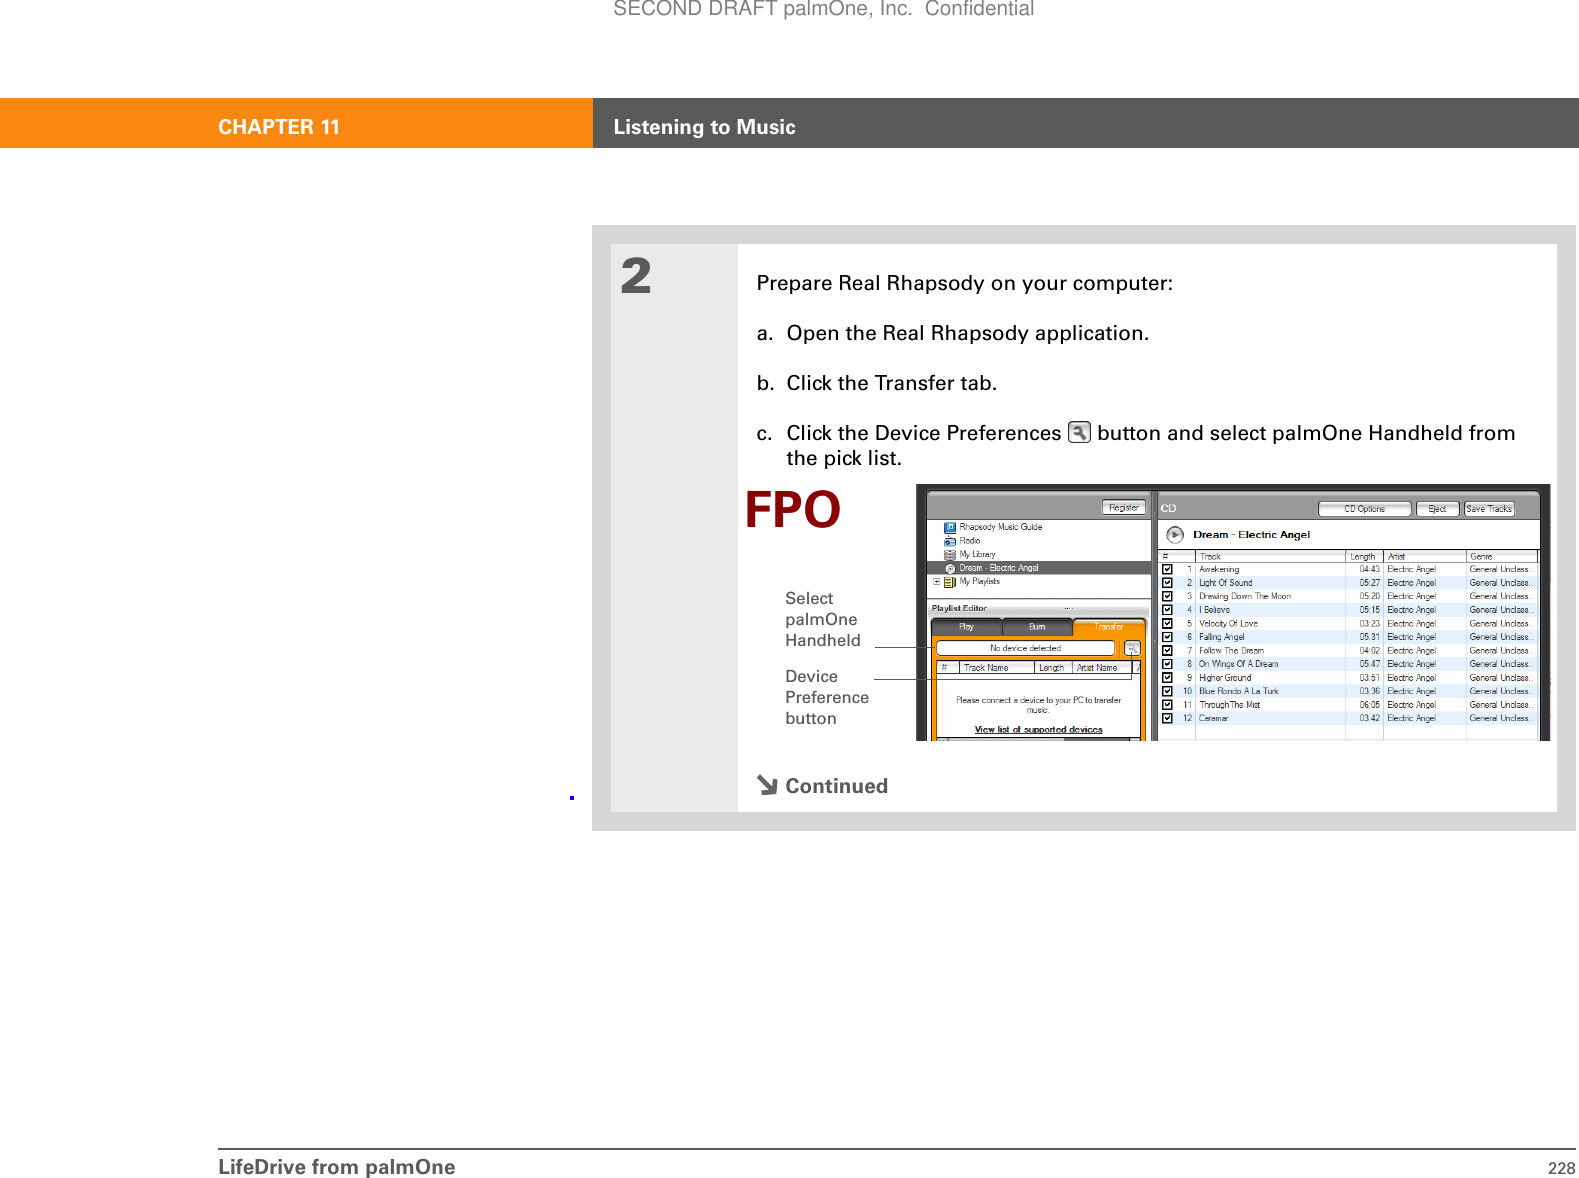
![LifeDrive from palmOne 229CHAPTER 11 Listening to Music3Transfer the files to your device:a. Drag the song files you want from the My Library window into the Transfer window.b. Click Transfer. The files are transferred to the Music folder on your device’s internal drive.Do not press the HotSync button on your cable. Real Rhapsody is transferring the files, so there’s no need to do anything. DoneIMPORTANT[!]SECOND DRAFT palmOne, Inc. Confidential](https://usermanual.wiki/Palm/830.User-Manual-1-of-2/User-Guide-543159-Page-252.png)
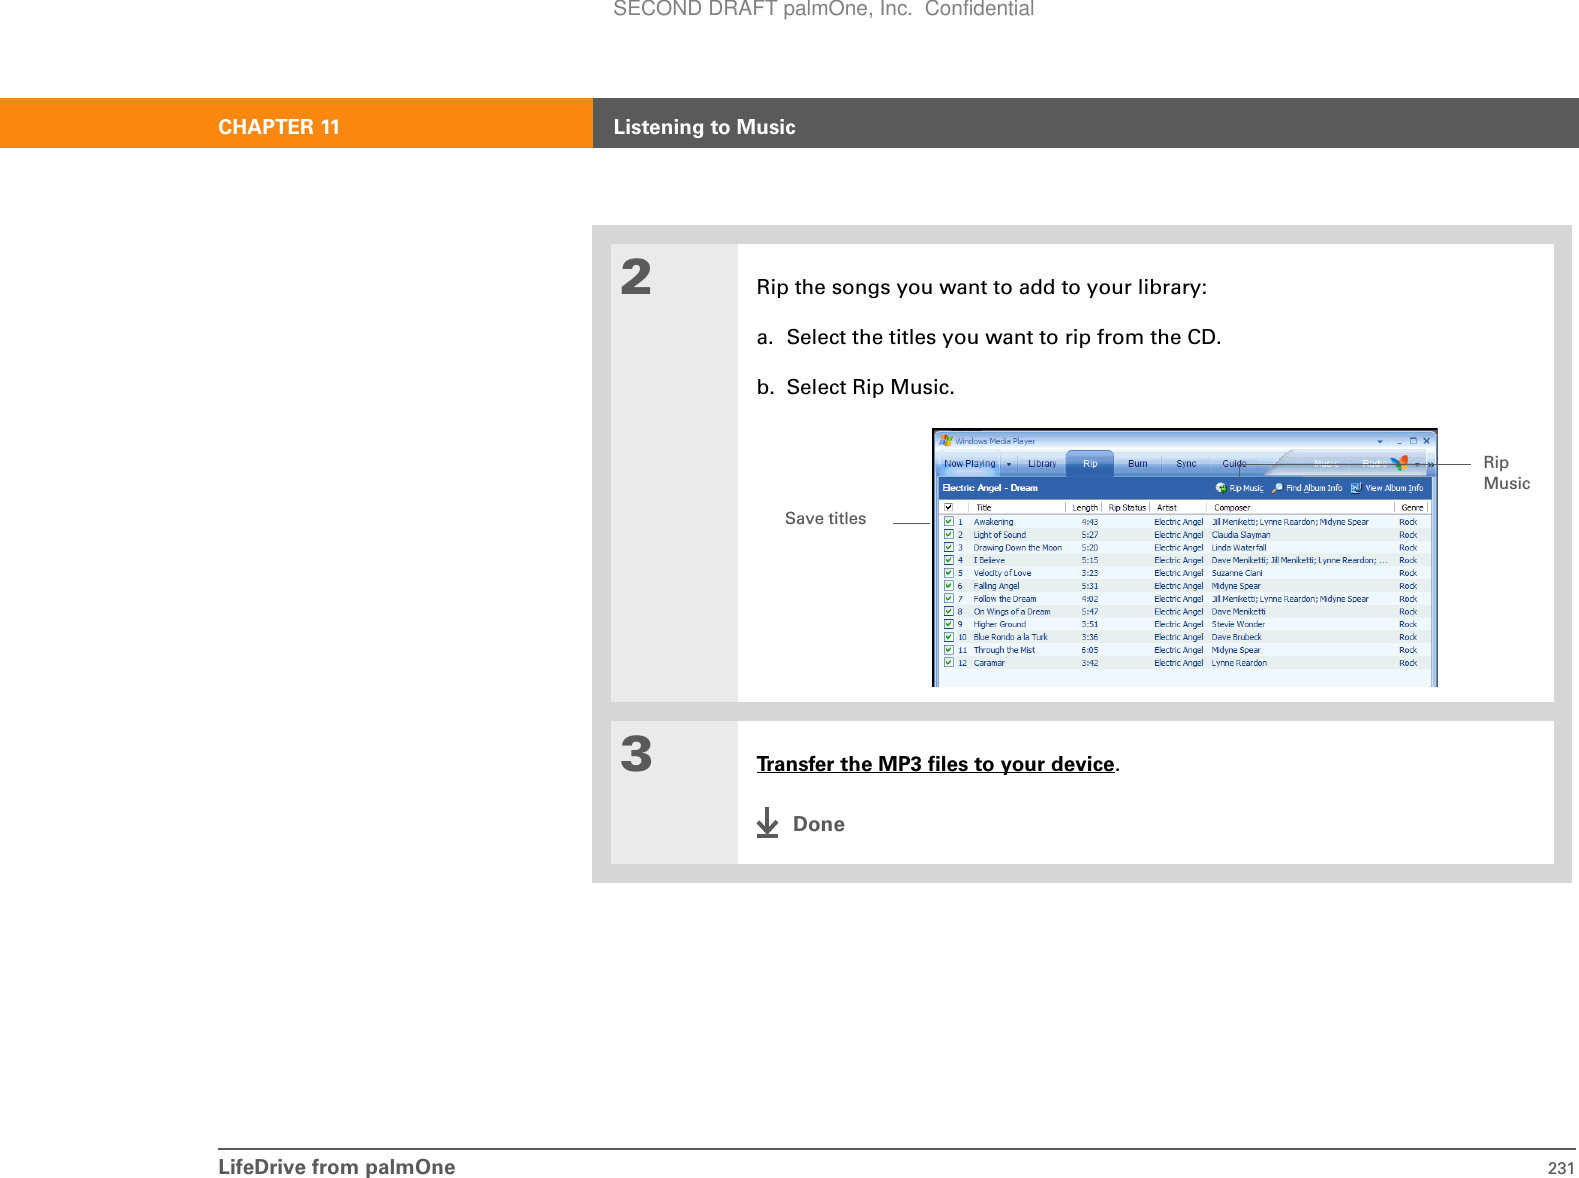
![LifeDrive from palmOne 230CHAPTER 11 Listening to MusicTransferring music from a CD to your deviceIf your songs are on a CD and you want to listen to them on your device, you need to use Windows Media Player on your computer to convert and transfer the files. Mac users can use iTunes, included with OS X, to transfer music from a CD to their device. Music files should be imported in MP3 format.WINDOWS ONLY01Access the music CD from Windows Media Player on your computer:a. Open the Windows Media Player application.b. Insert the CD into your computer’s CD drive.c. Select the Rip tab.ContinuedNOTEBefore You Begin[!]Set the Windows Media Player Rip Music format setting for mp3. Right-click on the Windows Media Player screen and select Tools, and then select Options. Select the Rip Music tab and then select mp3 from the Format pick list.Did You Know?An interactive tutorial on the software installation CD guides you through adding music. Insert the CD, go to the My Music section of the tutorial and select Add music from a CD.SECOND DRAFT palmOne, Inc. Confidential](https://usermanual.wiki/Palm/830.User-Manual-1-of-2/User-Guide-543159-Page-253.png)
 Install Real Rhapsody desktop application on your computer. Insert the software installation CD and follow the onscreen instructions for installing extra software.You must install this software, even if you already have a version of RealPlayer installed on your computer. The version on the CD contains all of the components needed to transfer music files to your device.SECOND DRAFT palmOne, Inc. Confidential](https://usermanual.wiki/Palm/830.User-Manual-1-of-2/User-Guide-543159-Page-255.png)

![LifeDrive from palmOne 234CHAPTER 11 Listening to Music3Prepare your device:a. Connect your device and your computer to the USB sync cable.b. Turn on your device.Do not press the HotSync button on your cable.4Transfer the MP3 files to your device.DoneTipFor tips on using Real Rhapsody on your computer, go to the Help menu in Real Rhapsody or visit www.real.com.IMPORTANT[!]SECOND DRAFT palmOne, Inc. Confidential](https://usermanual.wiki/Palm/830.User-Manual-1-of-2/User-Guide-543159-Page-257.png)


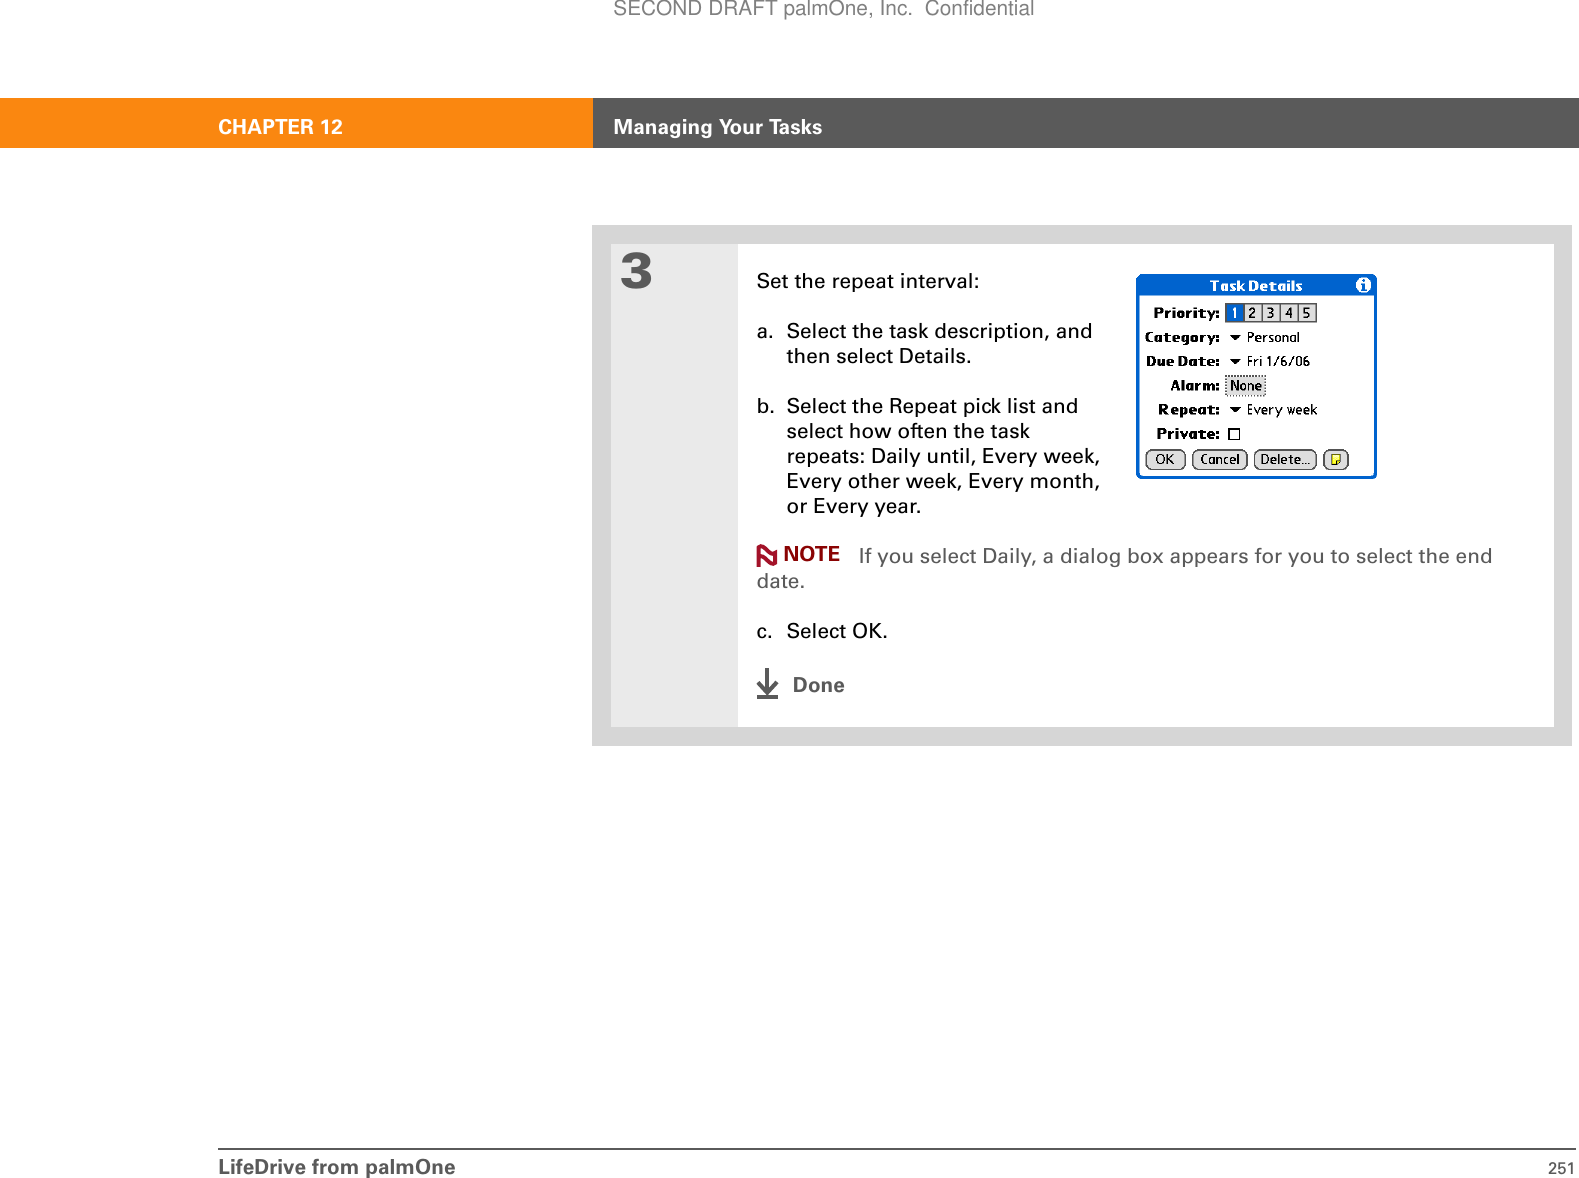
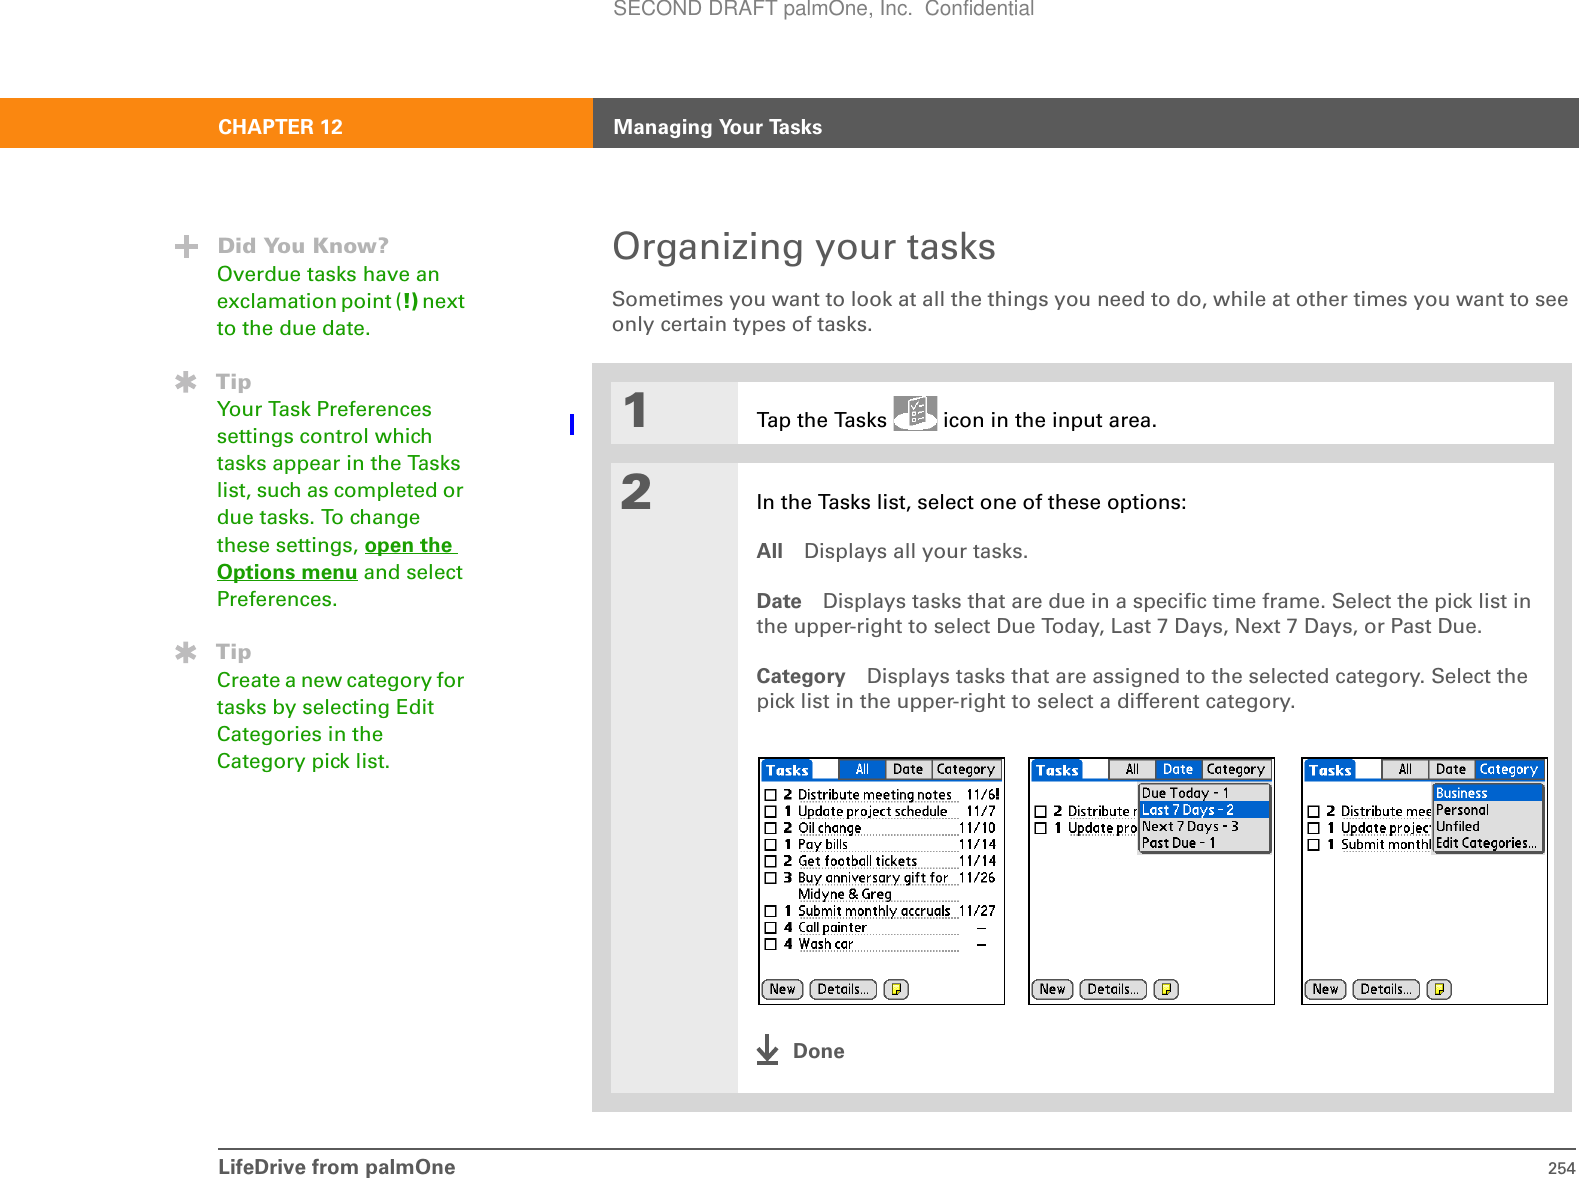
![LifeDrive from palmOne 248CHAPTER 12 Managing Your TasksCreating a task01Tap the Tasks icon in the input area.2Create a task:a. Select New.b. Enter a description of the task. 3[ & ] OPTIONAL Assign a priority and due date:a. Tap the priority number and select a number (1 is the most important).b. Tap the due date and select a date from the list, or select Choose Date to select a date from the calendar.That’s it. Your device automatically saves the task. Make sure you have a current backup. Synchronize often.TipIf no task is currently selected, you can create a new task by writing Graffiti® 2 characters in the input area.TipAdd a note to a task. Select the Note button, enter the note text, and then select Done.Did You Know?You can organize your tasks by filing them into categories. You can also mark tasks as private to hide them from prying eyes.Did You Know?Tasks info is stored in program memory. This means that you can view the info only by looking at it in the application and you can synchronize the information by pressing the sync button on the USB cable. New task Priority numberDue dateLong descriptionNote buttonDoneSECOND DRAFT palmOne, Inc. Confidential](https://usermanual.wiki/Palm/830.User-Manual-1-of-2/User-Guide-543159-Page-271.png)
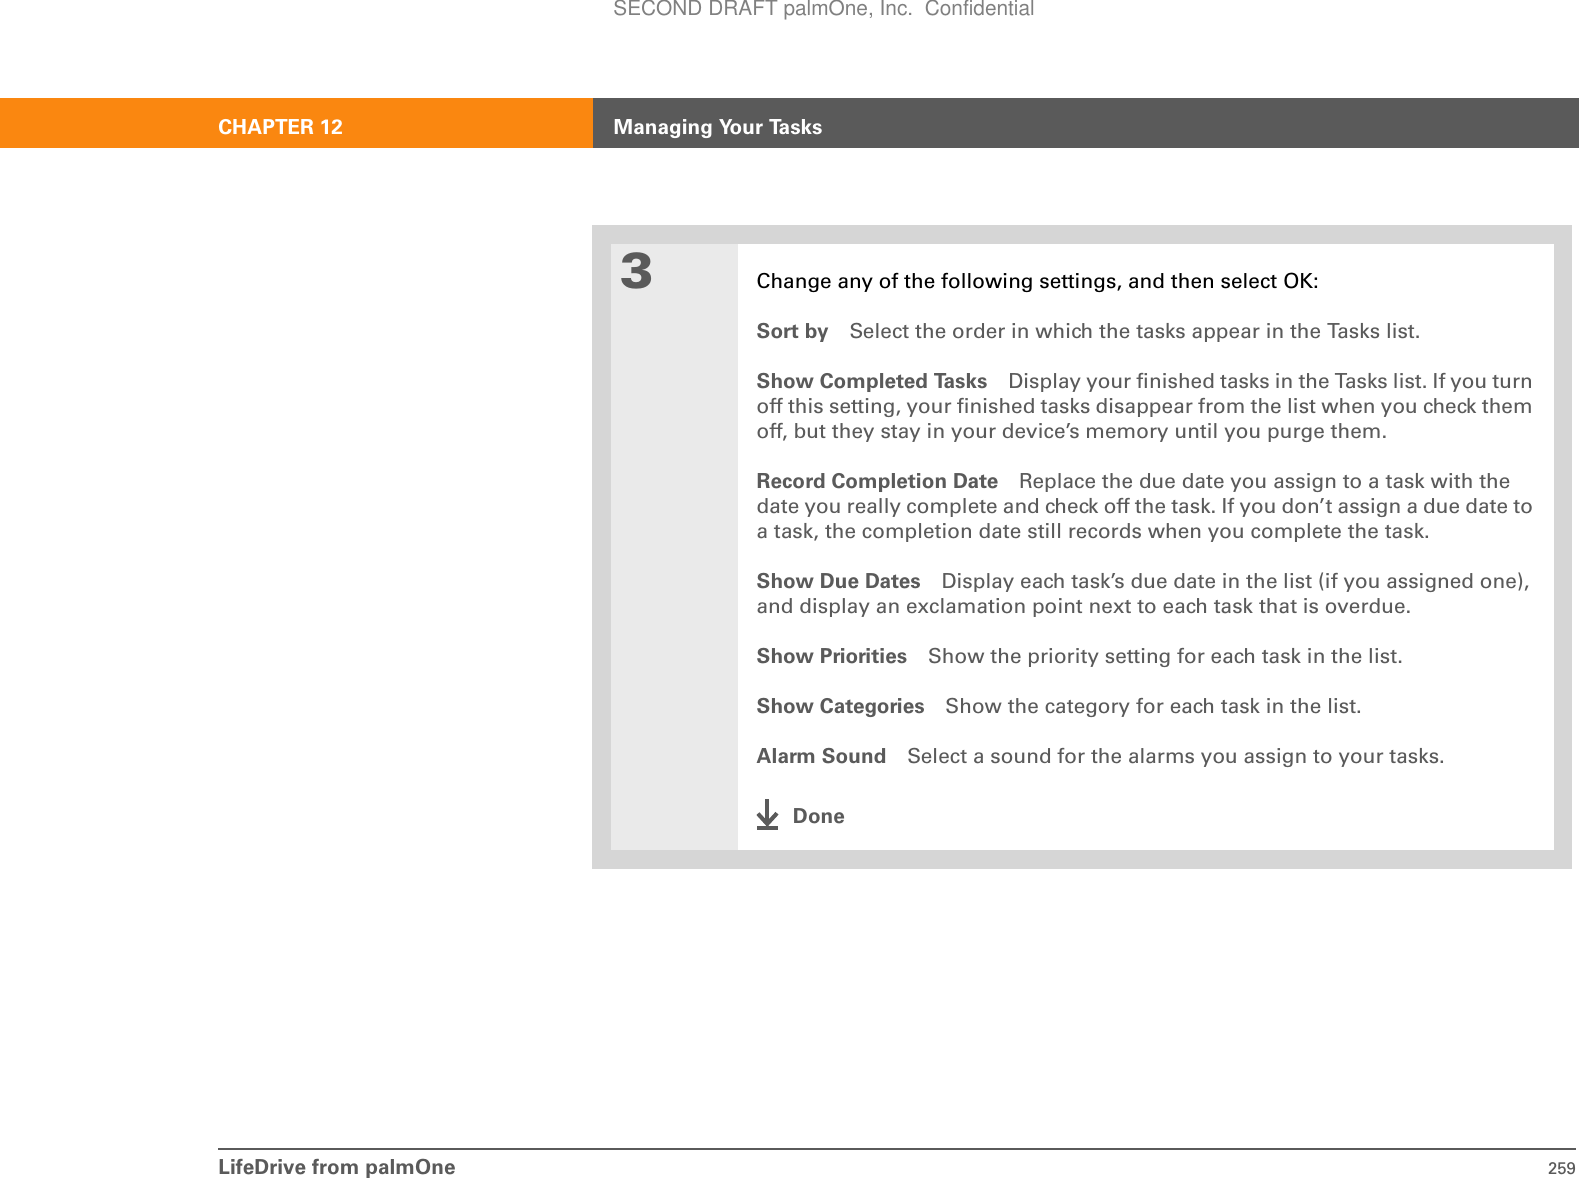
![LifeDrive from palmOne 249CHAPTER 12 Managing Your TasksSetting an alarm01Tap the Tasks icon in the input area.2Open the Set Alarm dialog box:a. Select the task you want to assign an alarm to. b. Select Details.c. Select the Alarm box.ContinuedBefore You Begin[!]Create a task and assign it a due date. A task must have a due date before you can set an alarm.TipYou can customize the alarm sound for your tasks in the Task Preferences dialog box.Did You Know?When you set an alarm, a little alarm clock appears to the right of the task description.SECOND DRAFT palmOne, Inc. Confidential](https://usermanual.wiki/Palm/830.User-Manual-1-of-2/User-Guide-543159-Page-272.png)


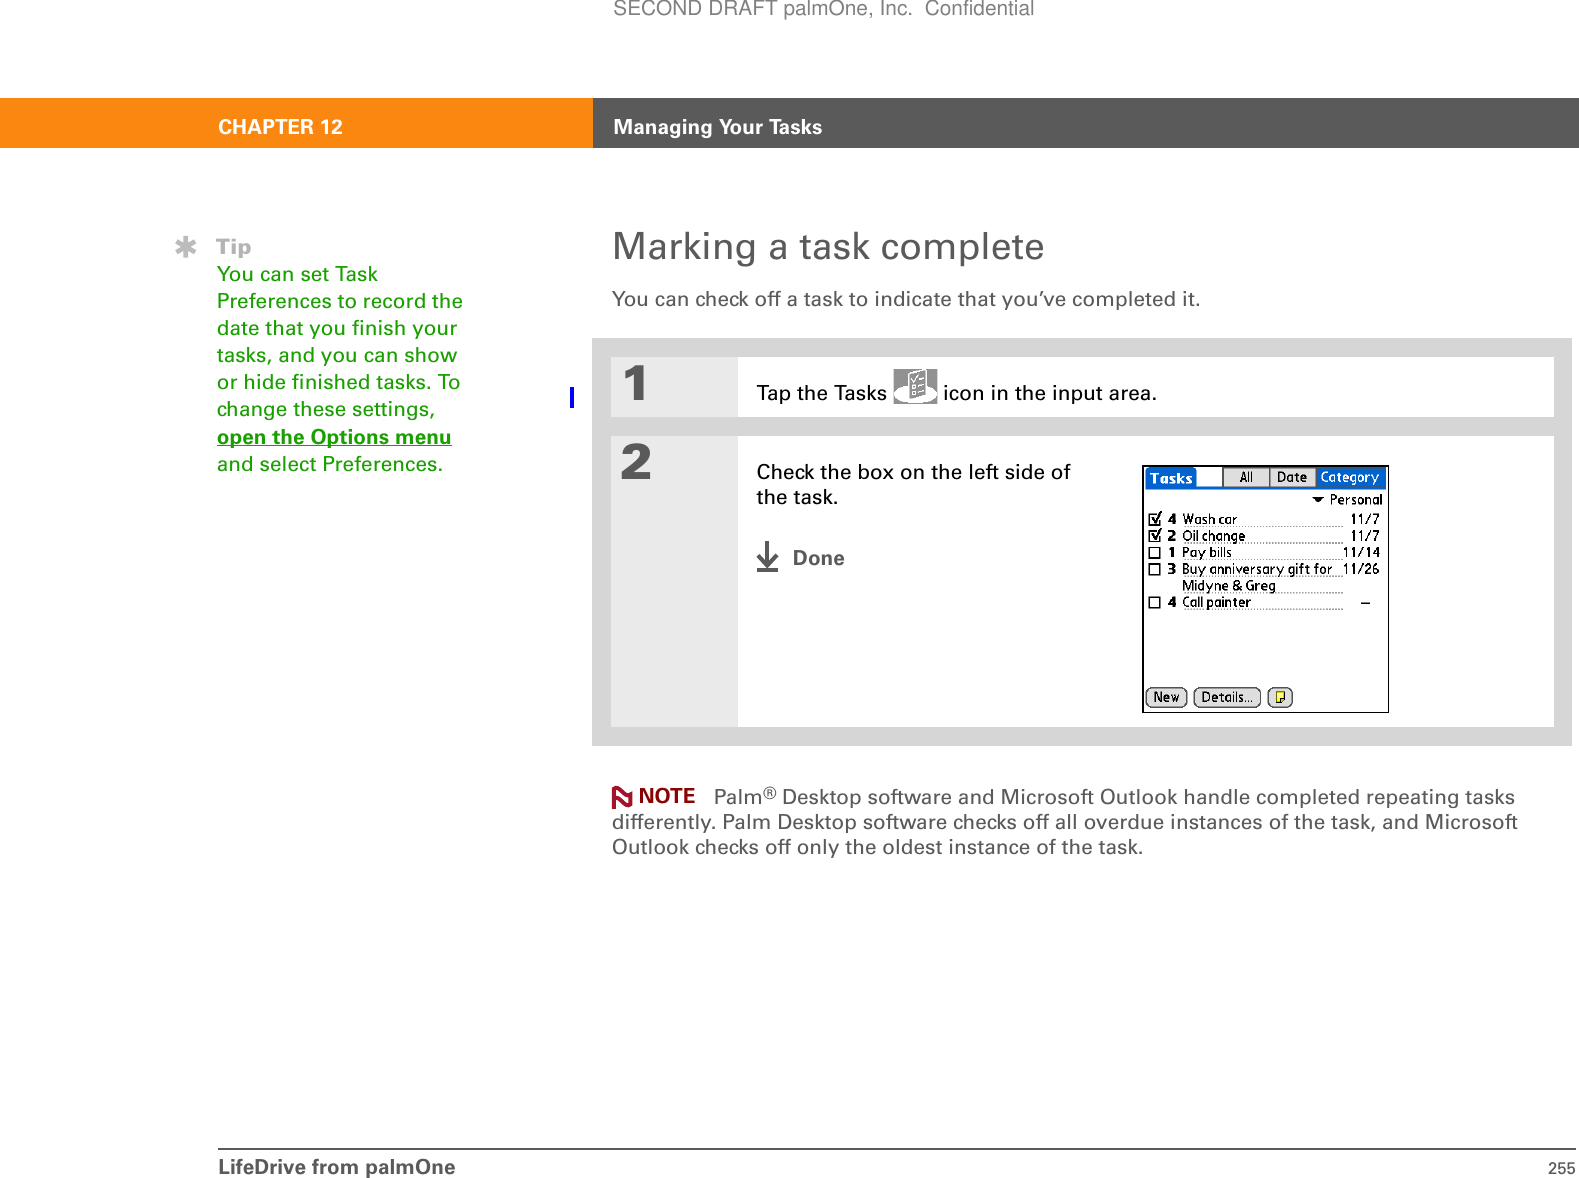
![LifeDrive from palmOne 256CHAPTER 12 Managing Your TasksDeleting tasksIf a task is cancelled, you can delete it from your Tasks list. When you delete a repeating task, you delete all other instances of the task. You can also delete all your completed tasks.Deleting a specific task01Tap the Tasks icon in the input area.2Select the task you want to delete.3Open the Delete Task dialog box:a. Open the menus. b. Select Delete Task on the Record menu.4[ & ] OPTIONAL Check the box to save an archive copy of the task on your computer.5Select OK.DoneTipYou can also delete a specific task by selecting the task, selecting Details, and then selecting Delete.TipIf you save an archive copy of your deleted tasks, you can refer to them later by importing them.SECOND DRAFT palmOne, Inc. Confidential](https://usermanual.wiki/Palm/830.User-Manual-1-of-2/User-Guide-543159-Page-279.png)
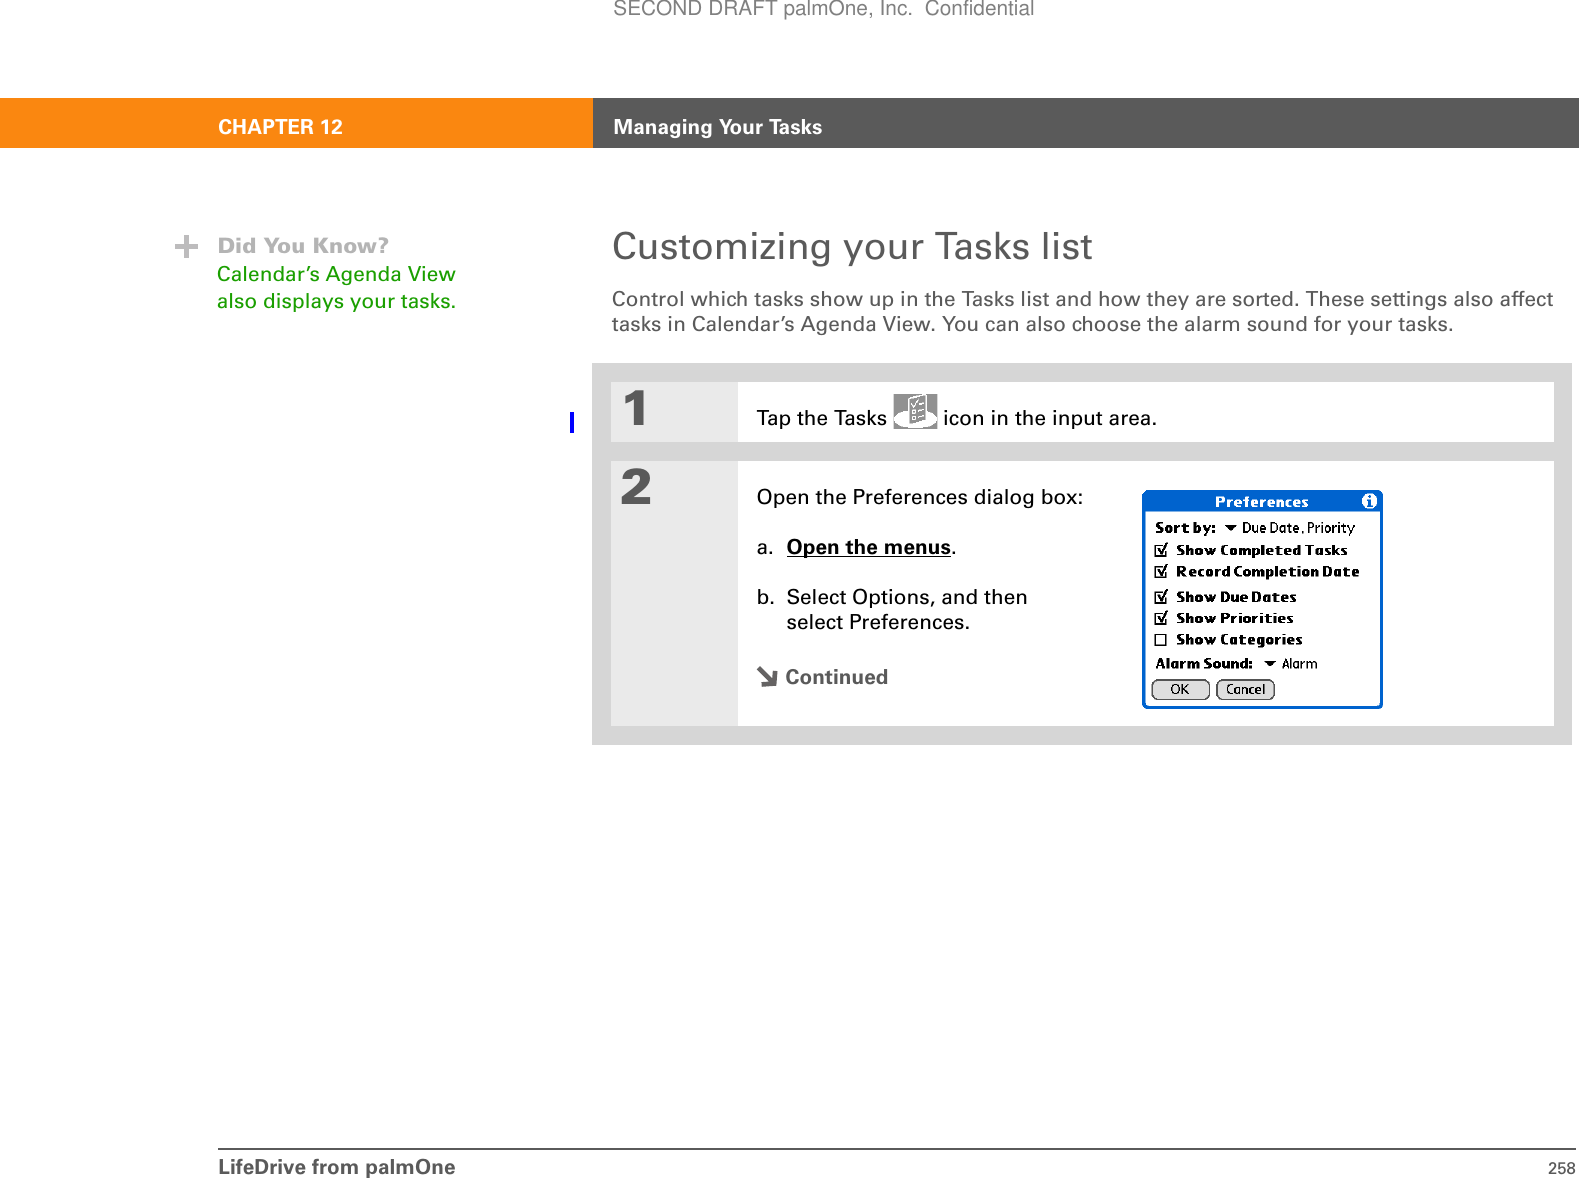
![LifeDrive from palmOne 257CHAPTER 12 Managing Your TasksDeleting all your completed tasks01Tap the Tasks icon in the input area.2Open the Purge dialog box:a. Open the menus. b. Select Purge on the Record menu.3[ & ] OPTIONAL Check the box to save an archive copy of your completed tasks on your computer.4Select OK.DoneTipMany people find it useful to refer to old tasks for tax purposes. If you save an archive copy of your deleted tasks, you can refer to them later by importing them.SECOND DRAFT palmOne, Inc. Confidential](https://usermanual.wiki/Palm/830.User-Manual-1-of-2/User-Guide-543159-Page-280.png)
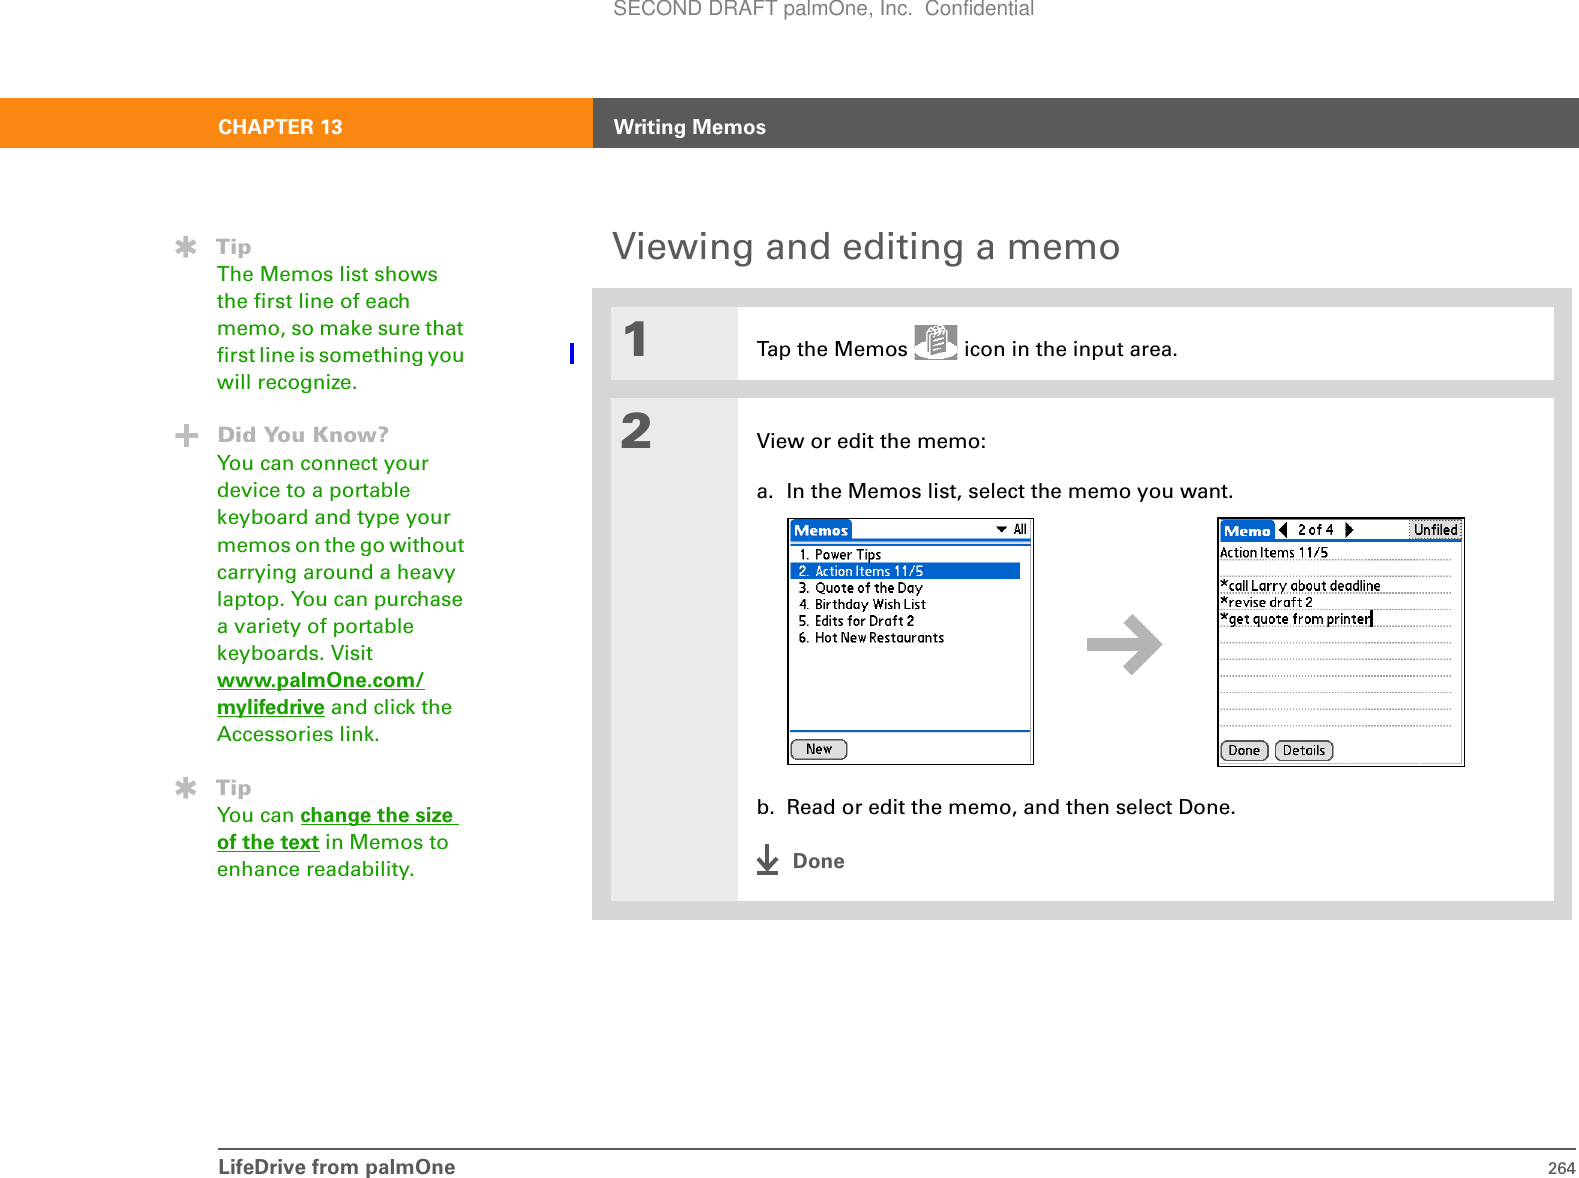
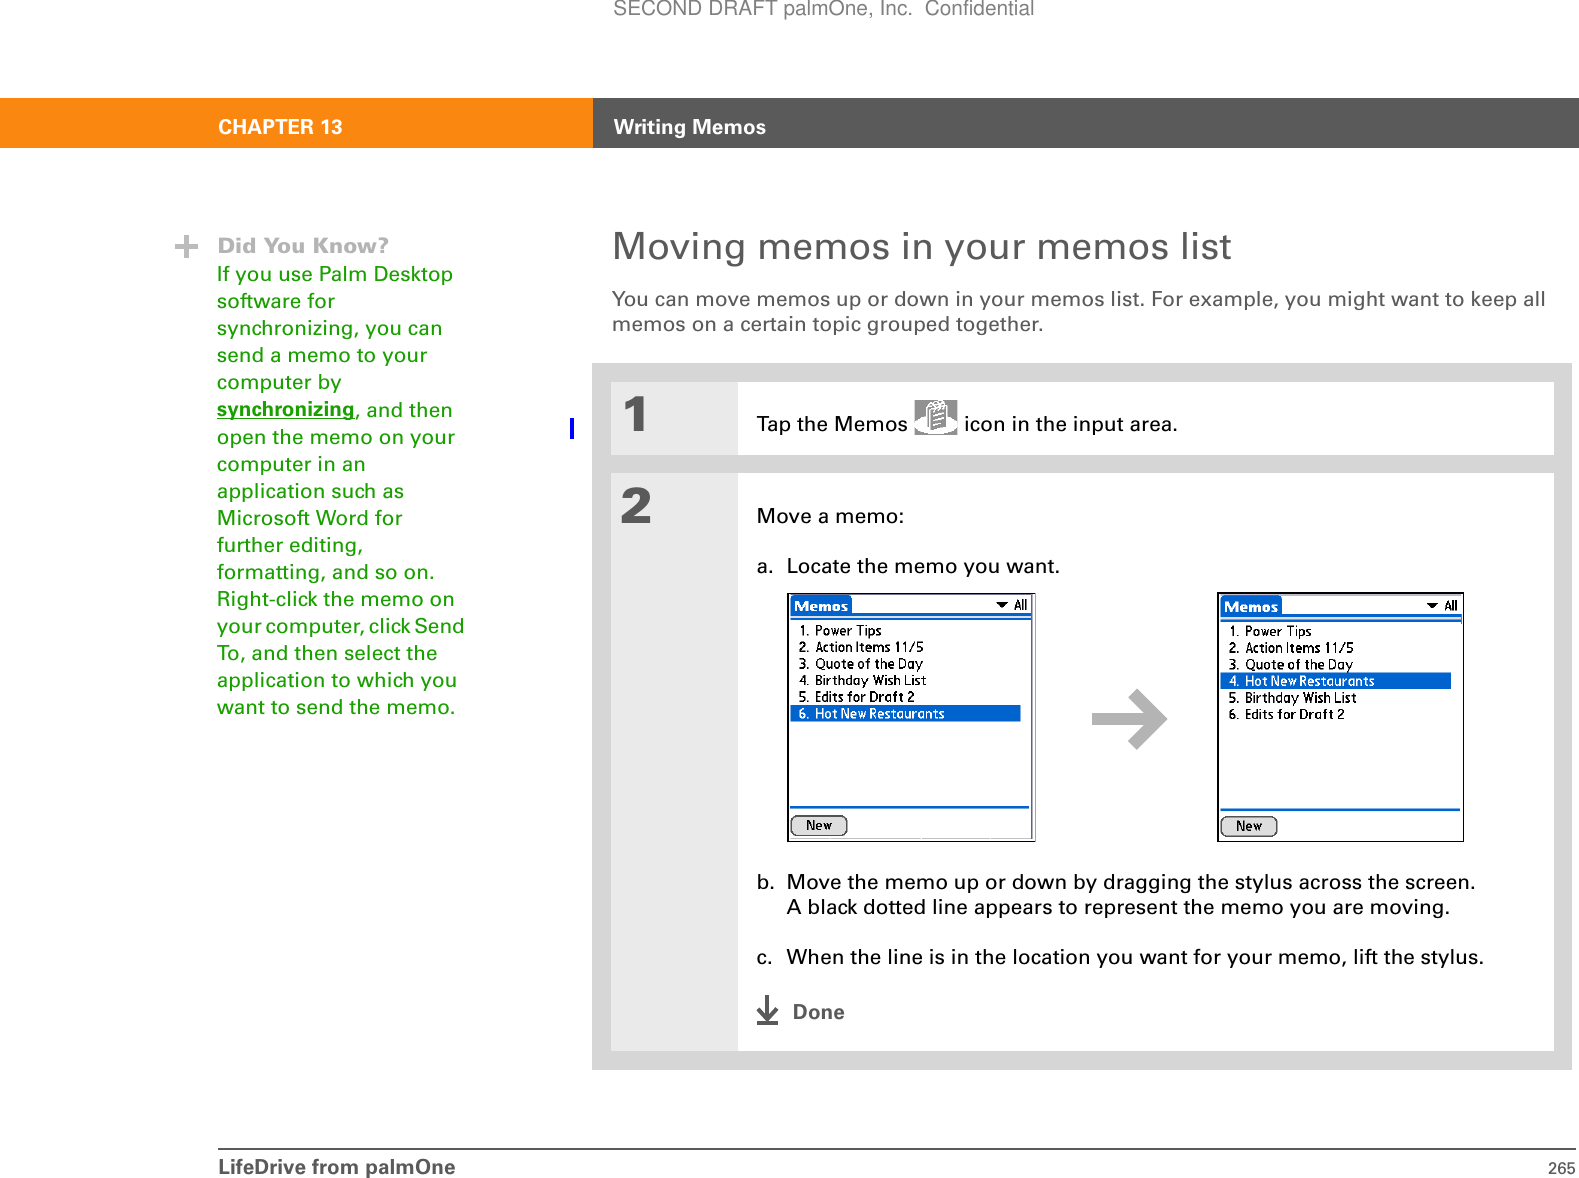
![LifeDrive from palmOne 266CHAPTER 13 Writing MemosDeleting a memo01Tap the Memos icon in the input area.2Open the Delete Memo dialog box:a. Locate the memo you want.b. Open the menus. c. Select Delete Memo on the Record menu.3[ & ] OPTIONAL Check the box to save an archive copy of the memo on your computer.4Select OK.DoneTipNeed to retrieve that holiday recipe you stored? If you save an archive copy of your deleted memos, you can refer to them later by importing them.SECOND DRAFT palmOne, Inc. Confidential](https://usermanual.wiki/Palm/830.User-Manual-1-of-2/User-Guide-543159-Page-289.png)
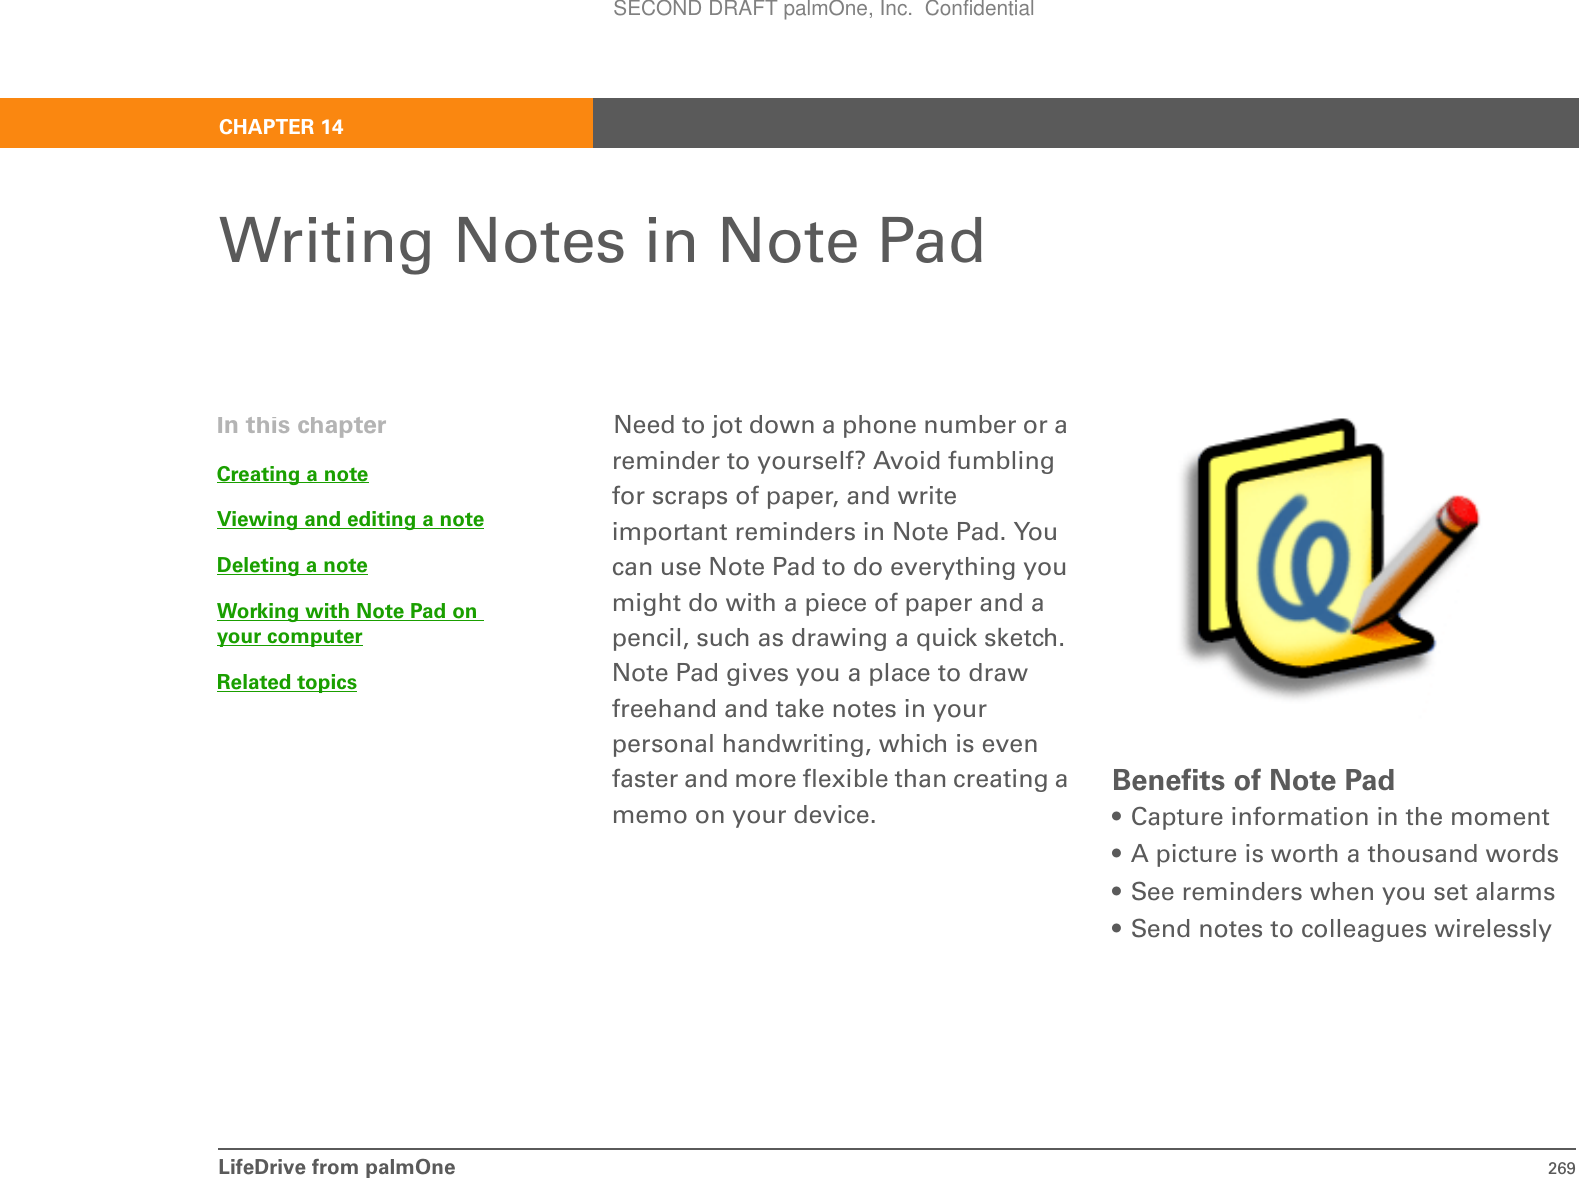
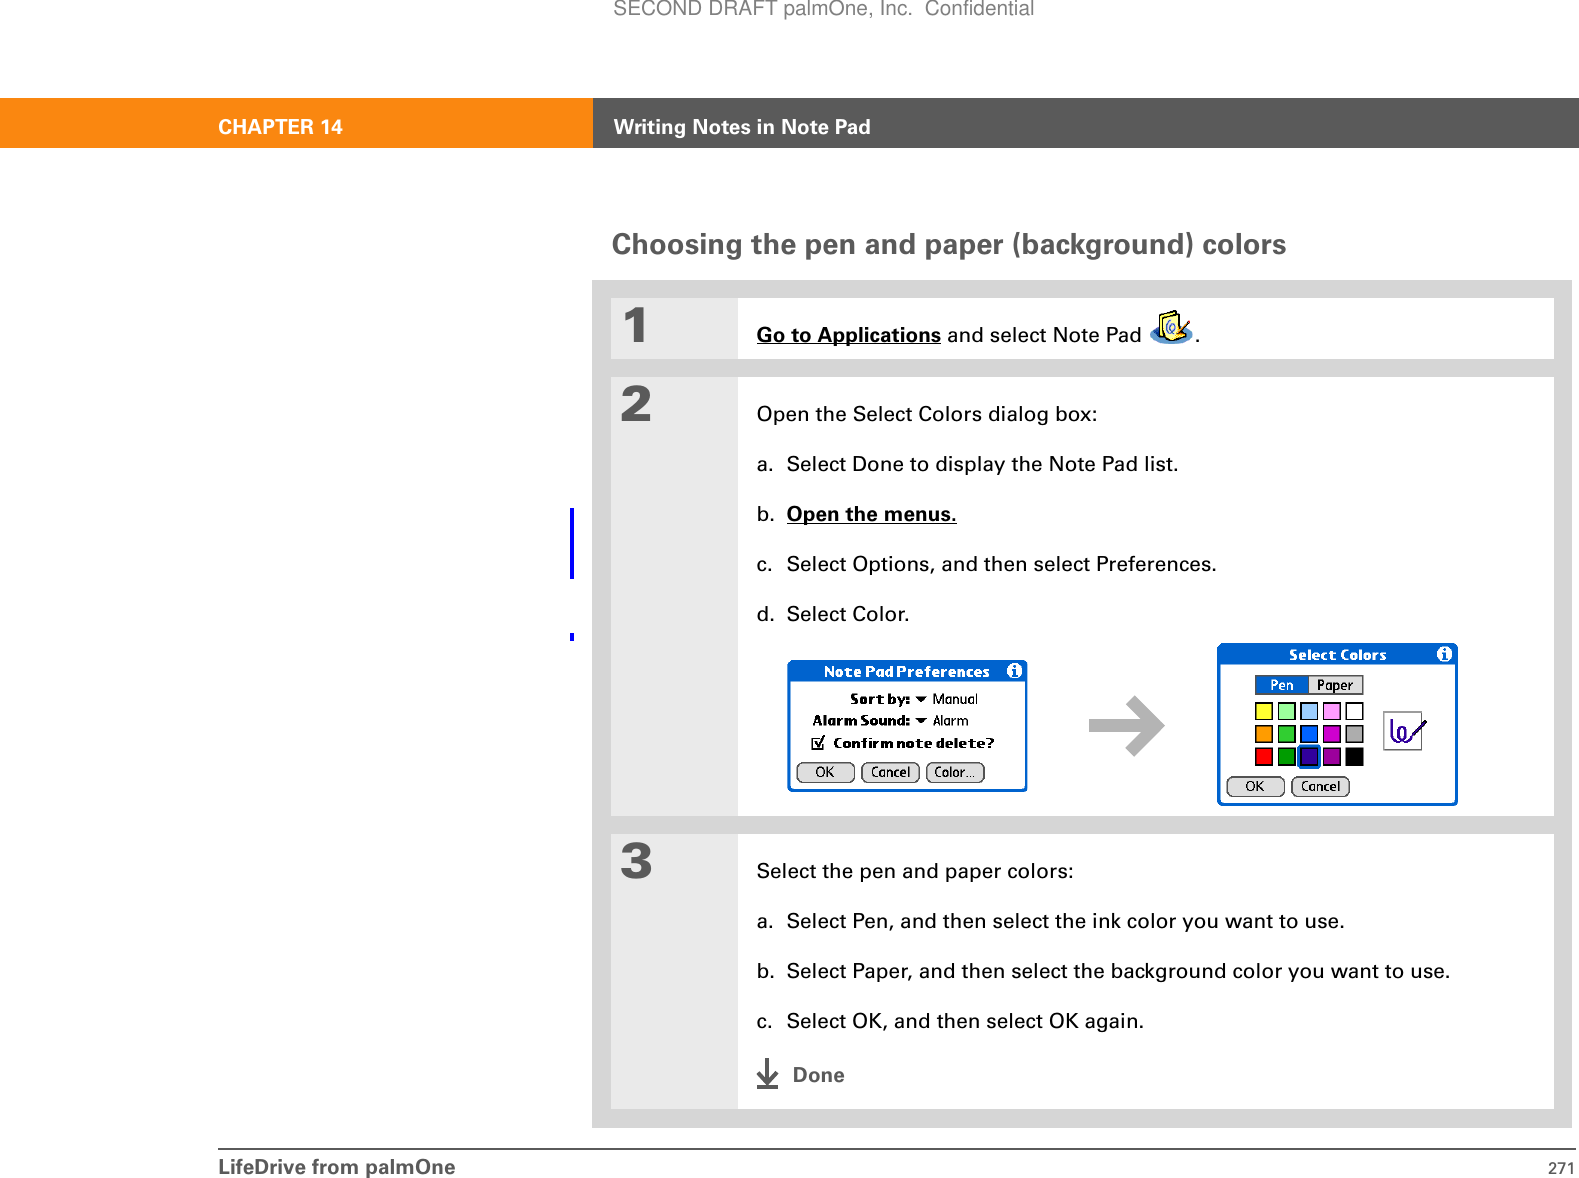
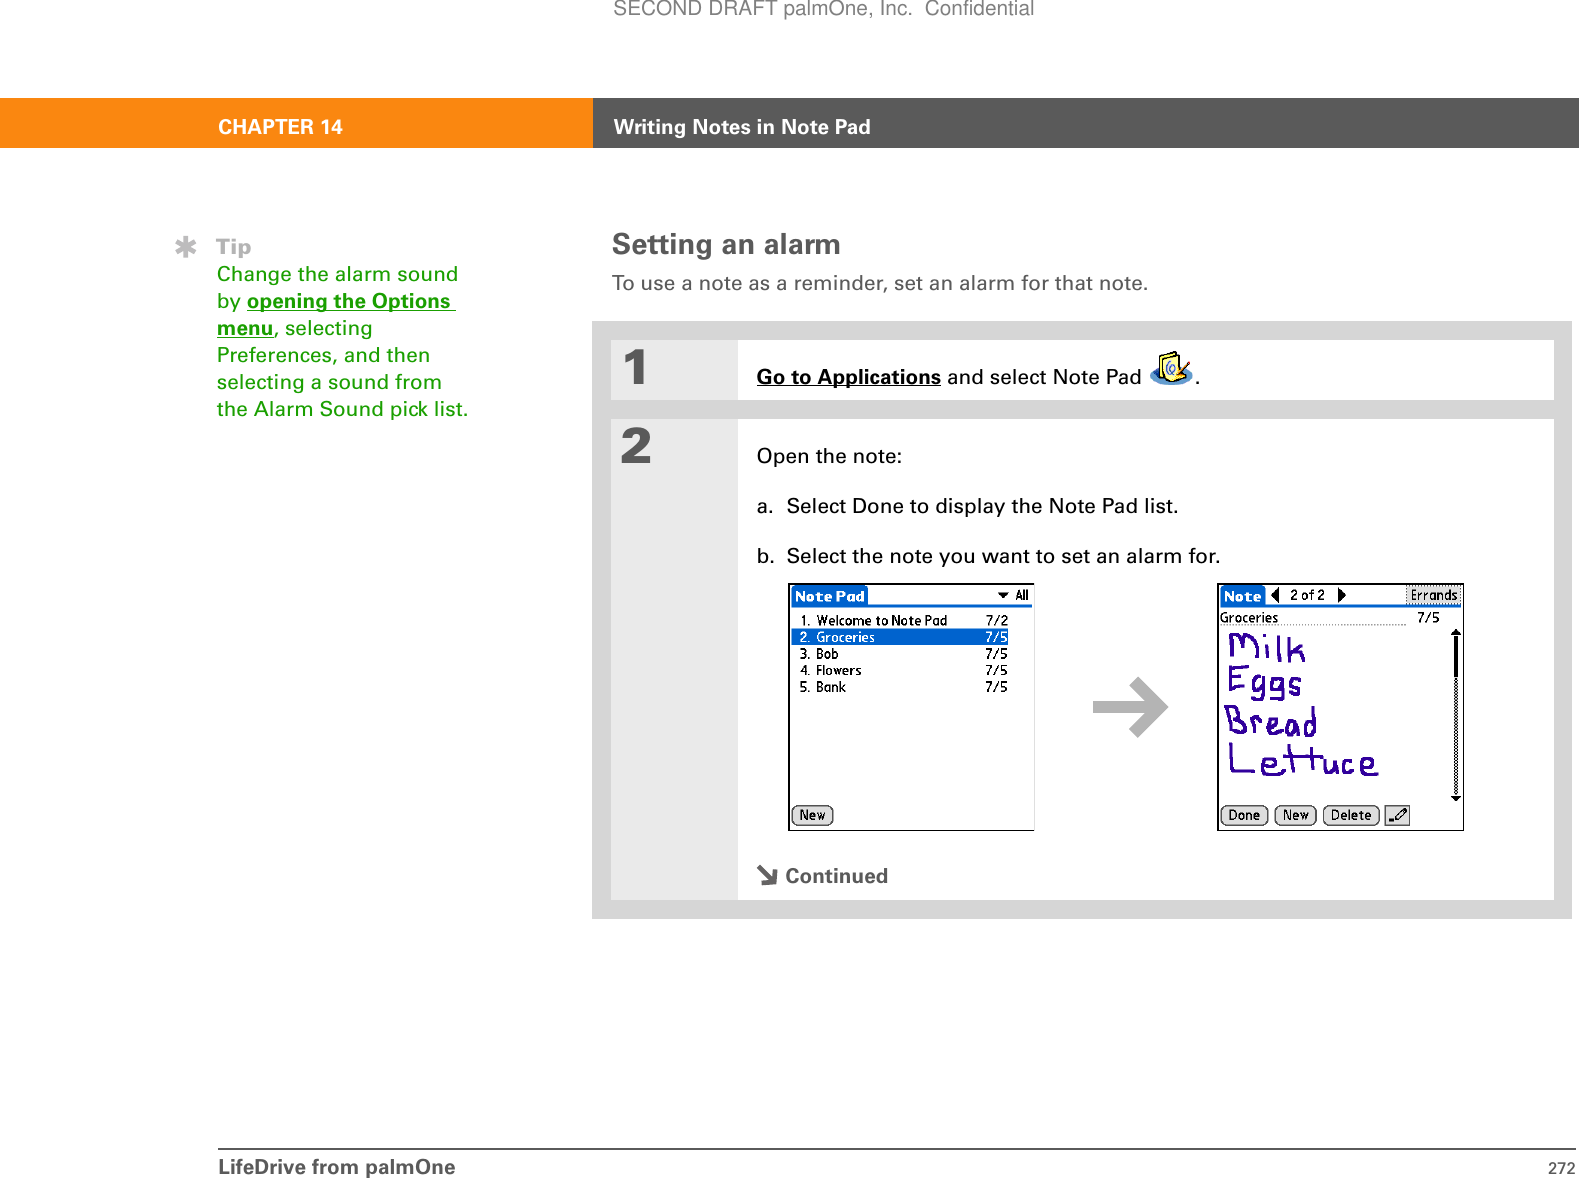
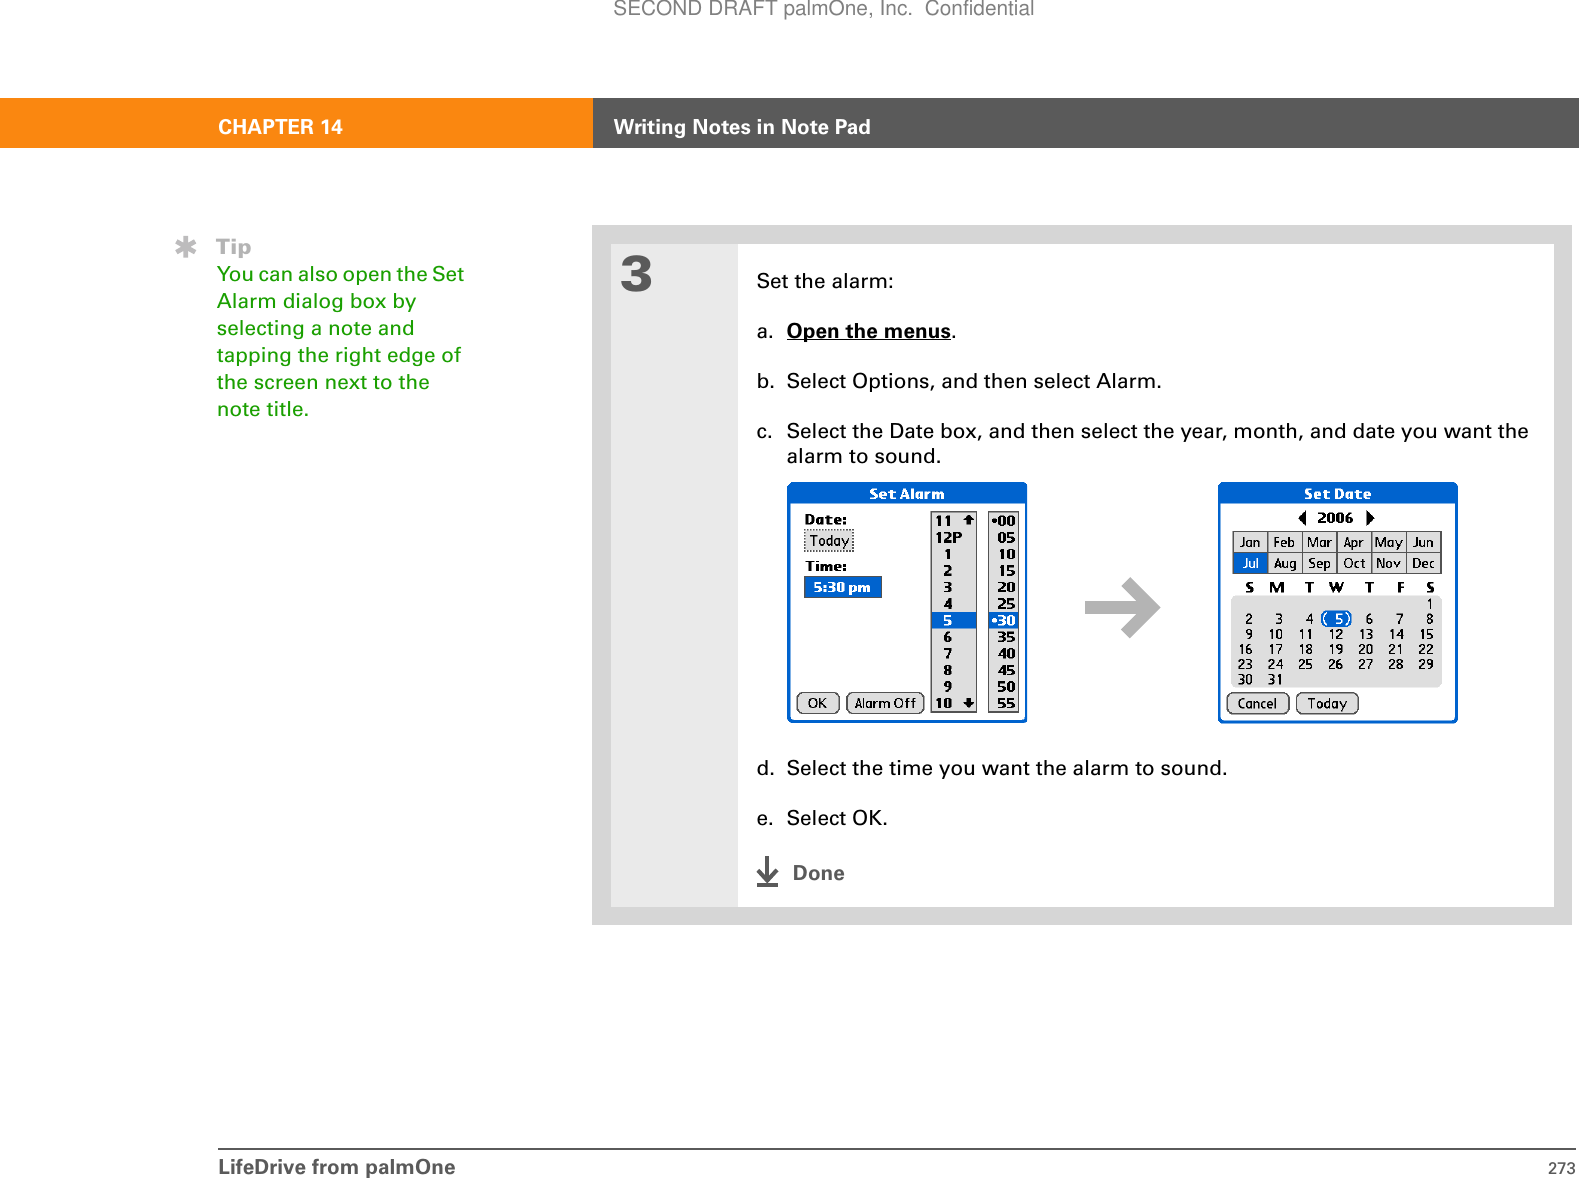
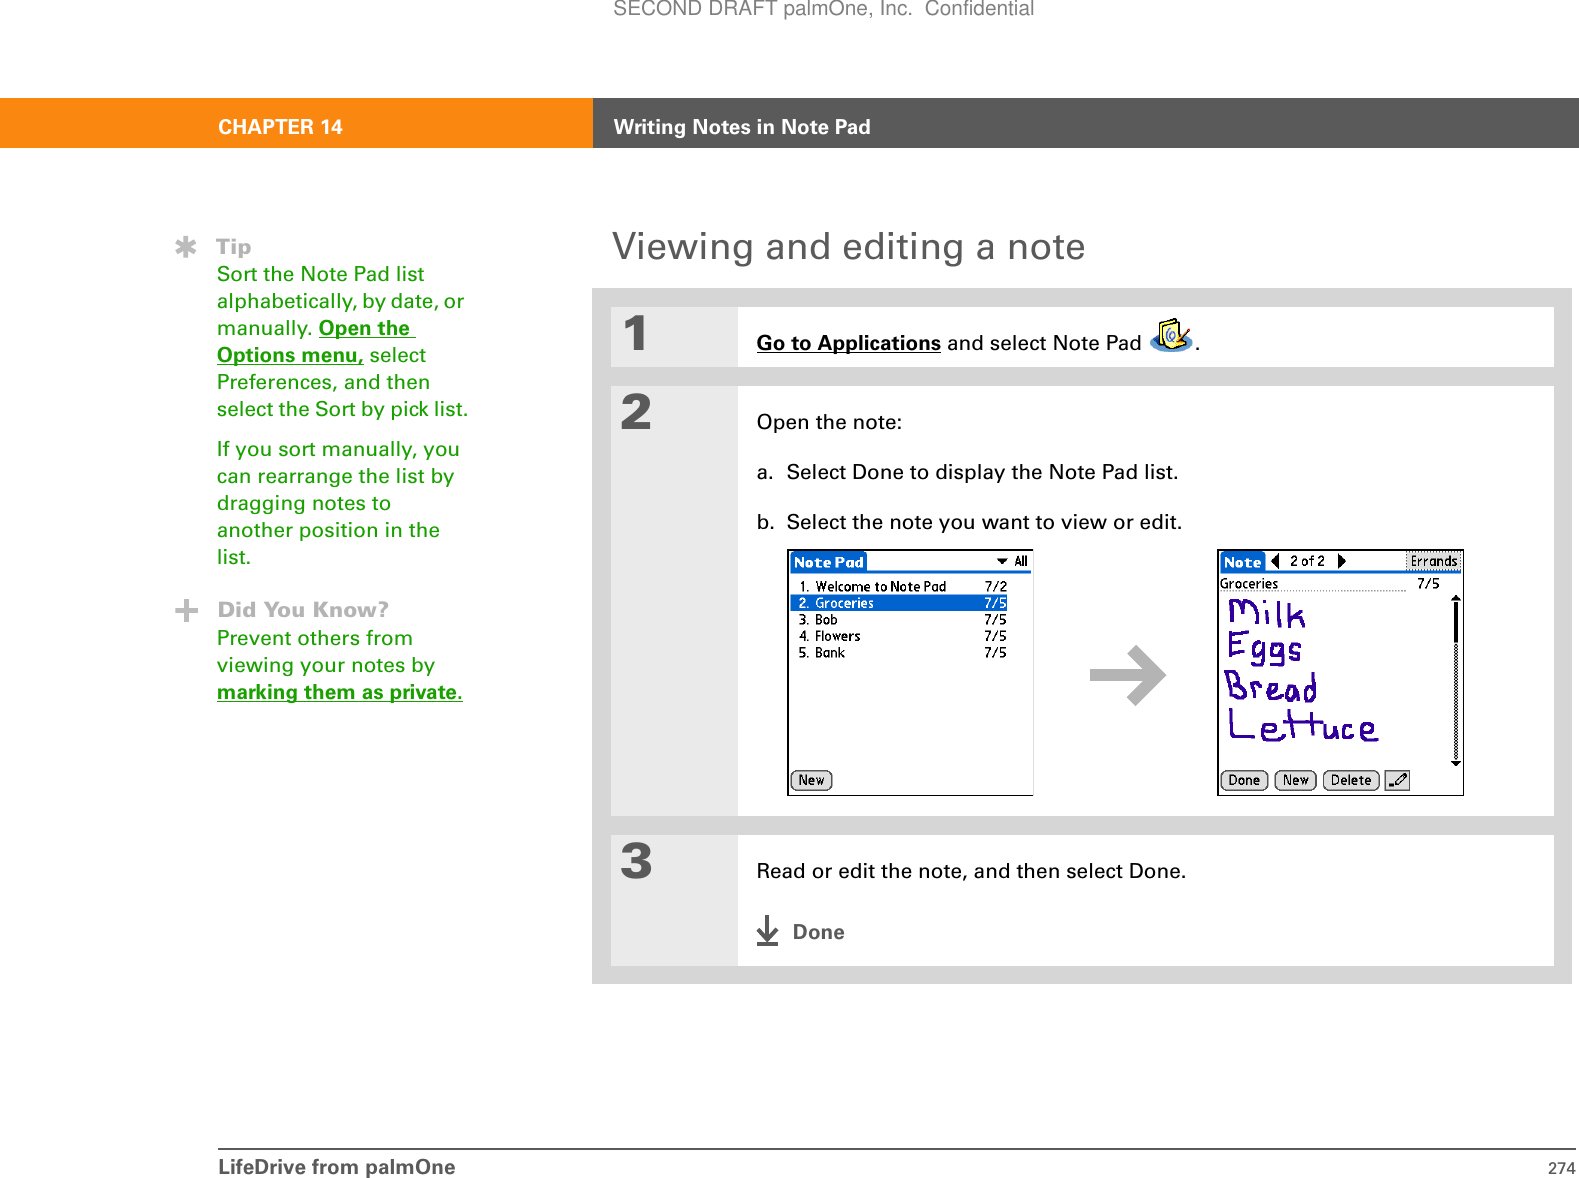
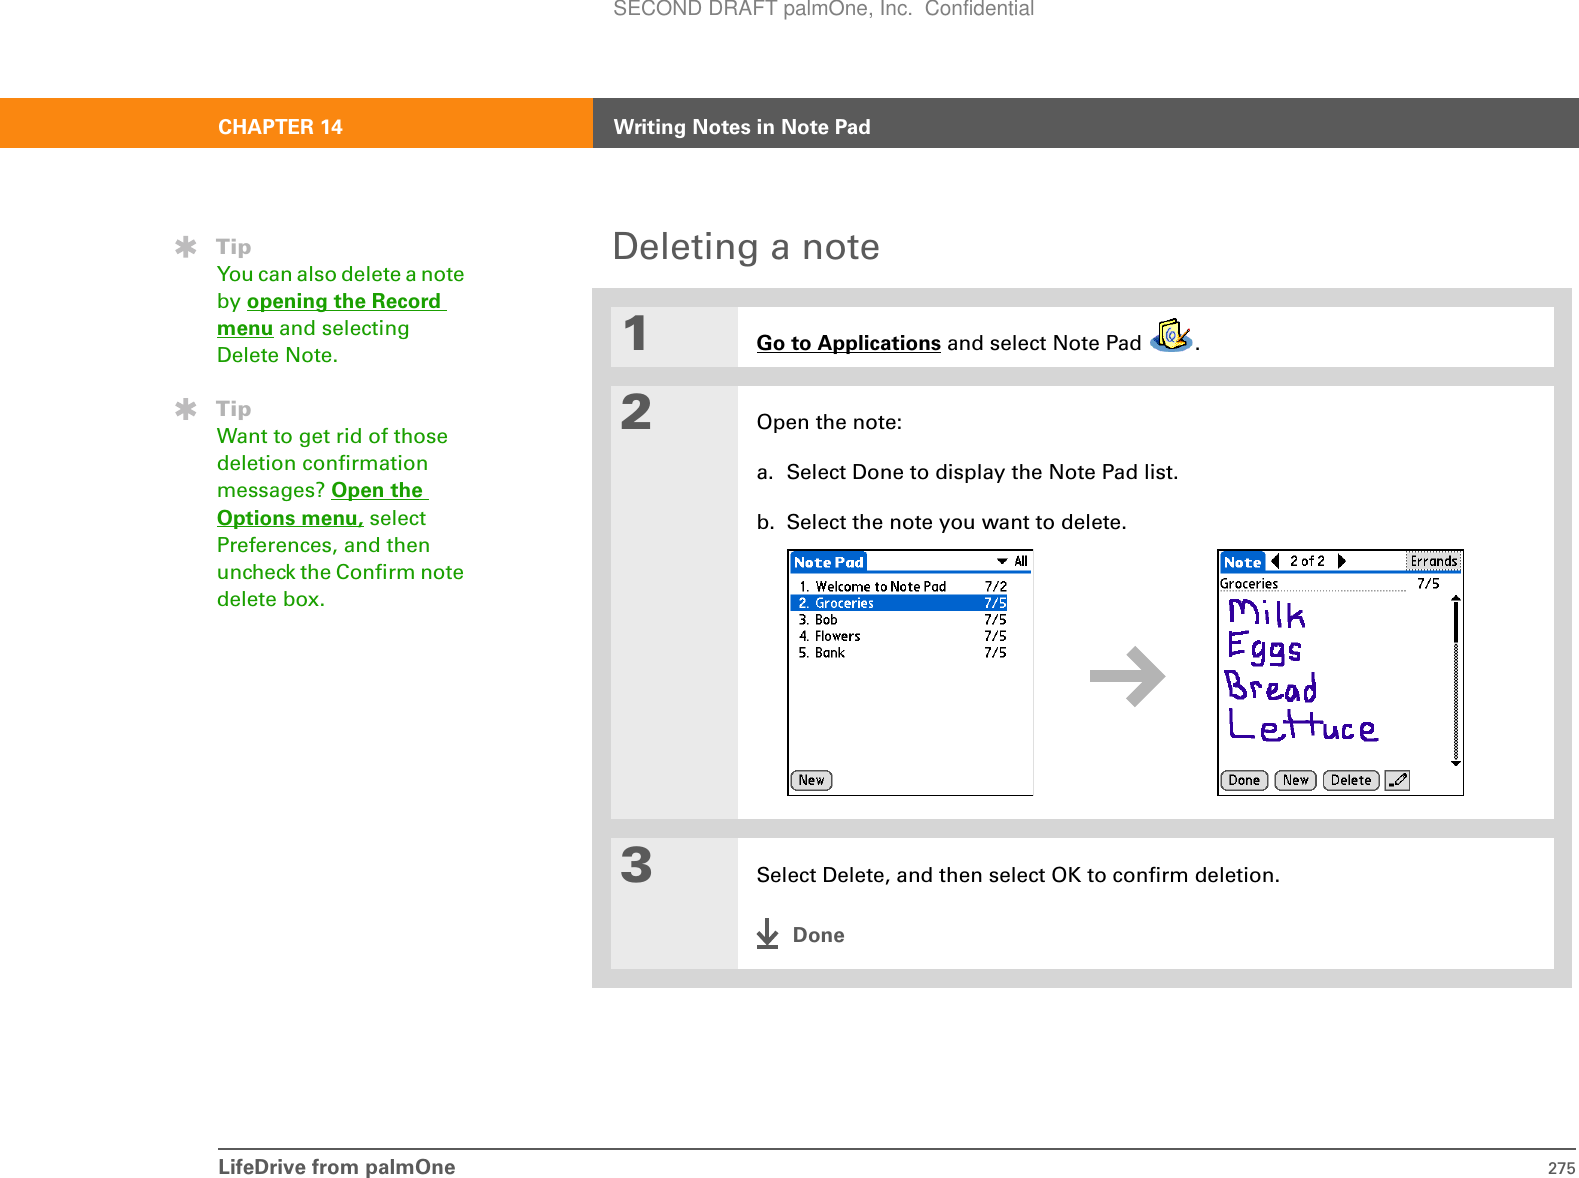
![LifeDrive from palmOne 270CHAPTER 14 Writing Notes in Note PadCreating a note01Go to Applications and select Note Pad .2Create a note:a. Use the stylus to write your note directly on the device screen.b. Select the time at the top of the screen and enter a title using Graffiti® 2 writing or the onscreen keyboard.3[ & ] OPTIONAL Assign the note to a category by selecting the Category box in the upper-right corner, and then selecting a category.4Select Done.That’s it. Your device automatically saves the note. Make sure you have a current backup. Synchronize often.Before You Begin[!]Make sure full-screen writing is turned off. You cannot create or edit notes in Note Pad when full-screen writing is on.TipSelect the pen selector to change the pen width or to select the eraser. To clear the screen completely, select the note (anywhere but the title), open the Edit menu, and select Clear Note.Did You Know?Note Pad info is stored in program memory. This means that you can view the info only by looking at it in the application and you can synchronize the information by pressing the sync button on the USB cable. Pen selectorScroll barTime or titleEraserCategory boxDoneSECOND DRAFT palmOne, Inc. Confidential](https://usermanual.wiki/Palm/830.User-Manual-1-of-2/User-Guide-543159-Page-293.png)
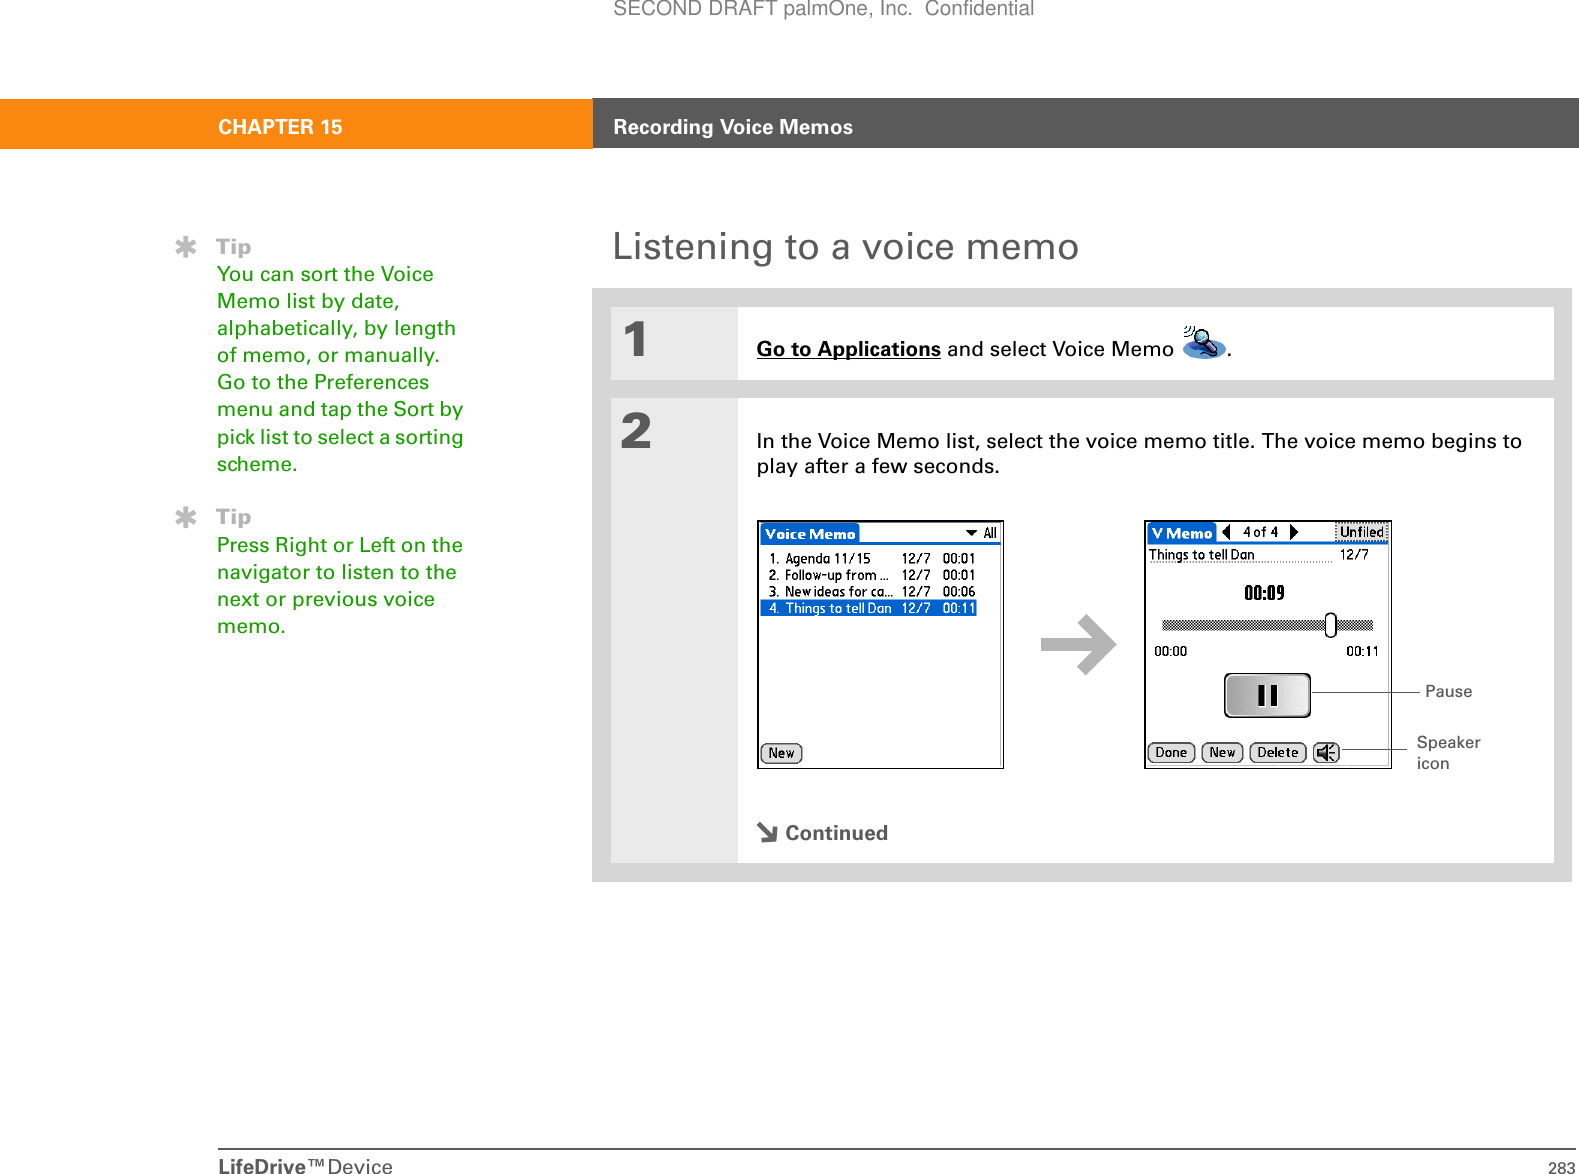
![LifeDrive™Device 282CHAPTER 15 Recording Voice Memos5[ & ] OPTIONAL Tap on the title line and enter a title for your memo. You can choose to leave the time as part of the title or remove it. You can also select a category to store your memo. If you want to listen to your memo, tap the Play button.6Select DoneDoneTap to select a categoryTap the title line and enter a namePlaySECOND DRAFT palmOne, Inc. Confidential](https://usermanual.wiki/Palm/830.User-Manual-1-of-2/User-Guide-543159-Page-305.png)
![LifeDrive™Device 284CHAPTER 15 Recording Voice Memos3[ & ] OPTIONAL Set the volume level:a. Select the Speaker icon. b. Press Up or Down on the navigator to adjust the volume.c. Press Done.4Select Done.DoneSECOND DRAFT palmOne, Inc. Confidential](https://usermanual.wiki/Palm/830.User-Manual-1-of-2/User-Guide-543159-Page-307.png)
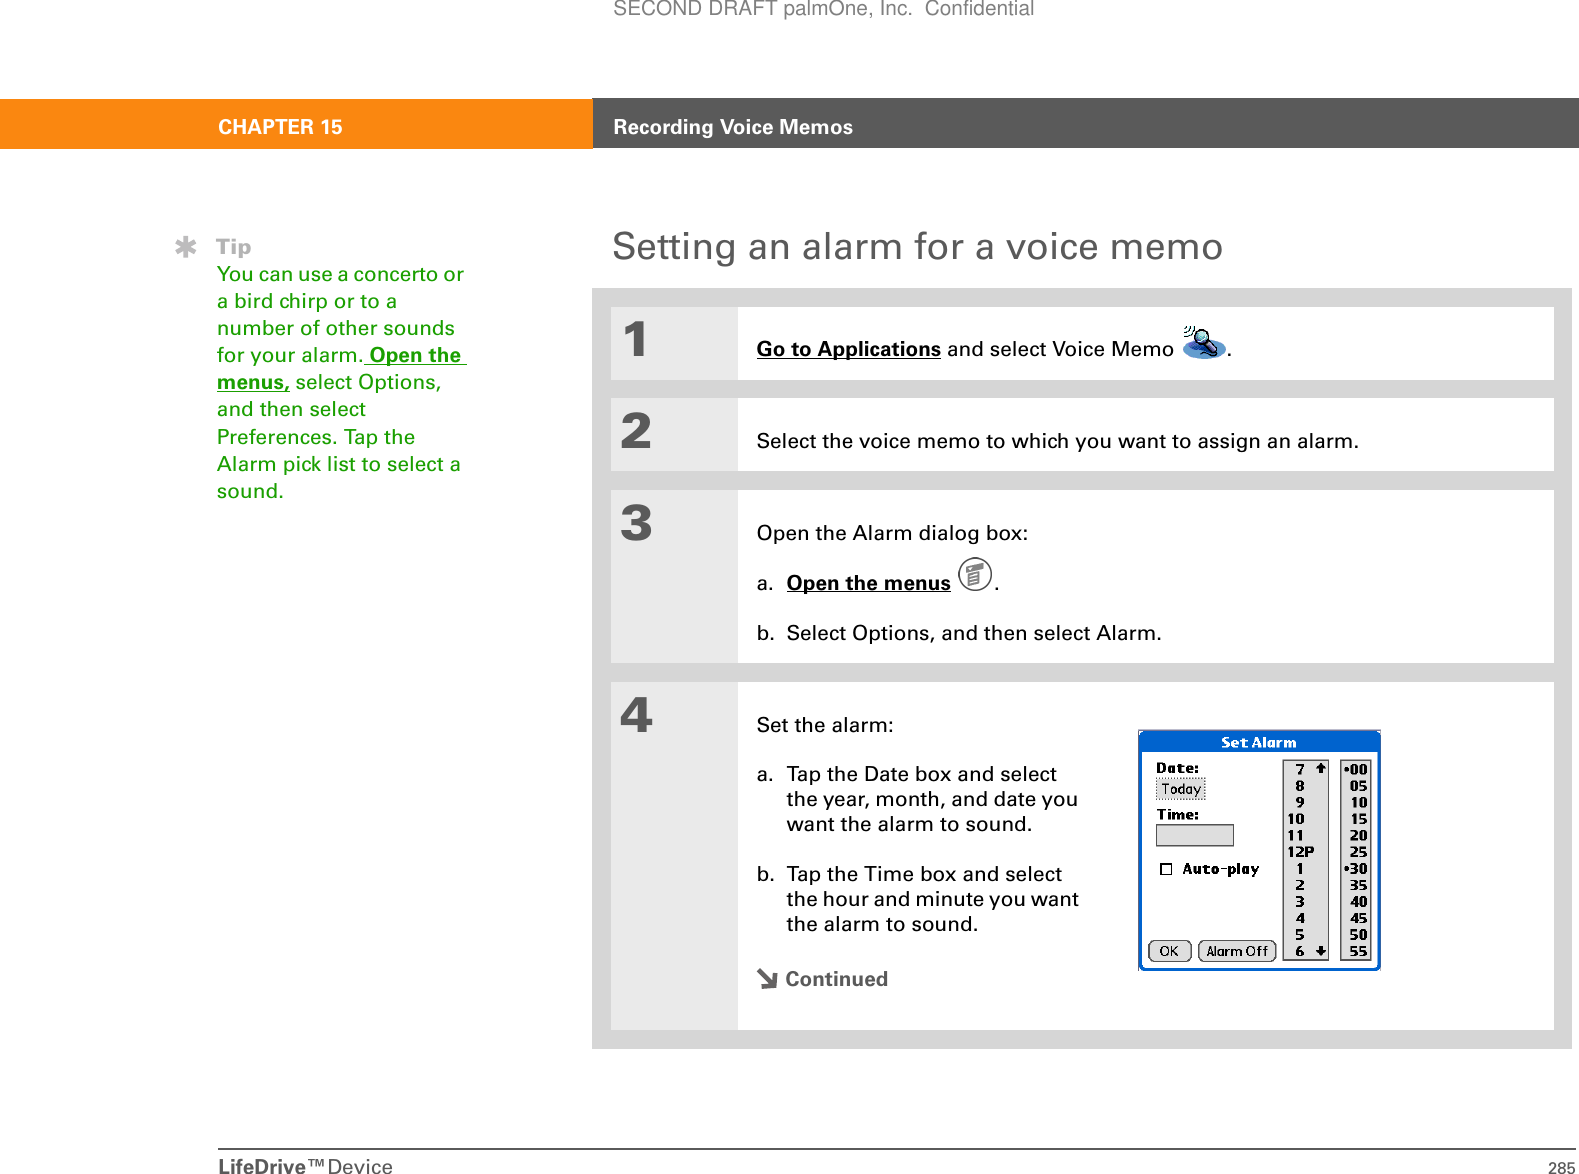
![LifeDrive™Device 286CHAPTER 15 Recording Voice Memos5[ & ] OPTIONAL Select the Auto-play check box to automatically play the voice memo when the alarm goes off.6Select OK.DoneSECOND DRAFT palmOne, Inc. Confidential](https://usermanual.wiki/Palm/830.User-Manual-1-of-2/User-Guide-543159-Page-309.png)
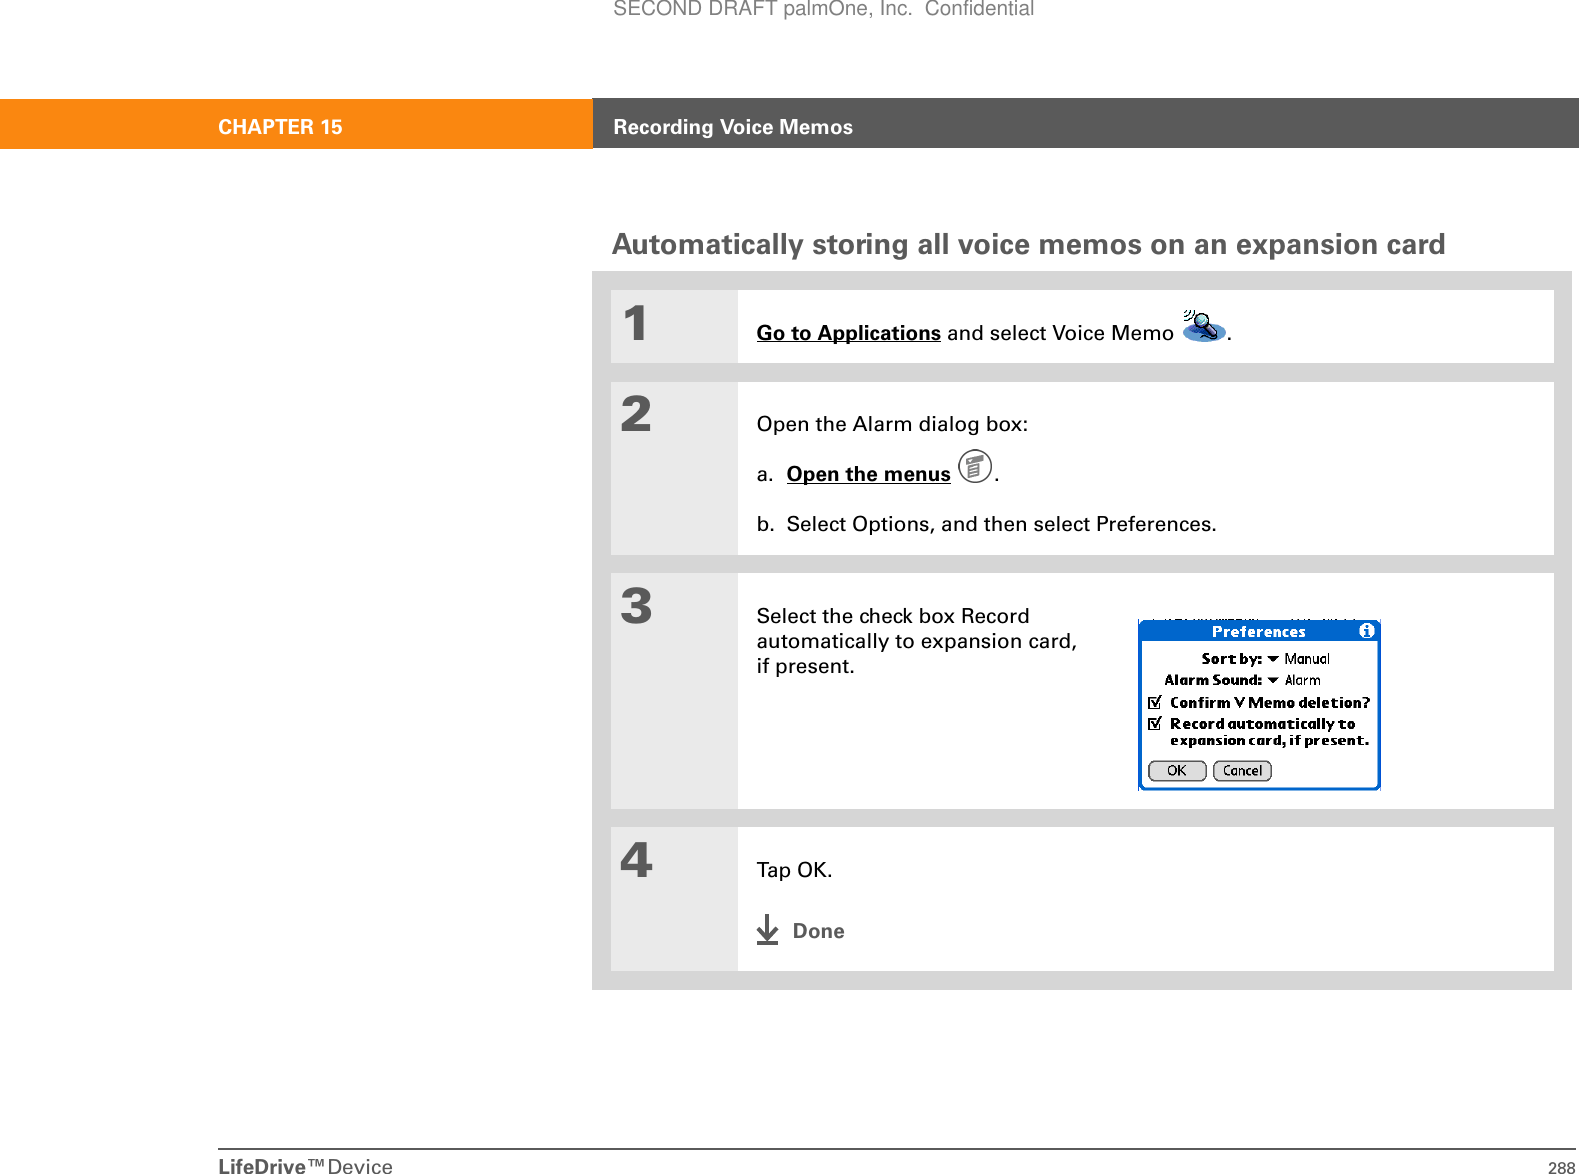
![LifeDrive™Device 287CHAPTER 15 Recording Voice MemosSaving a voice memo to an expansion cardYou can create voice memos for others by storing your voice memos on an expansion card. Voice Memo enables you to store specific voice memos on an expansion card, or to configure your device to always store voice memos on an expansion card when one is present. Saving a specific memo to an expansion card01Go to Applications and select Voice Memo . 2Open a voice memo.3Tap the category pick list in the upper-right corner and select Card.4Select Done.DoneBefore You Begin[!]You must have an expansion card inserted in your device’s expansion card slot.Did You Know?When you store voice memos on an expansion card, they do not appear in the Voice Memo portion of Palm®Desktop software after a HotSync® operation and are not backed up.Did You Know?You cannot mark voice memos private or attach alarms to voice memos that are stored on an expansion card.SECOND DRAFT palmOne, Inc. Confidential](https://usermanual.wiki/Palm/830.User-Manual-1-of-2/User-Guide-543159-Page-310.png)
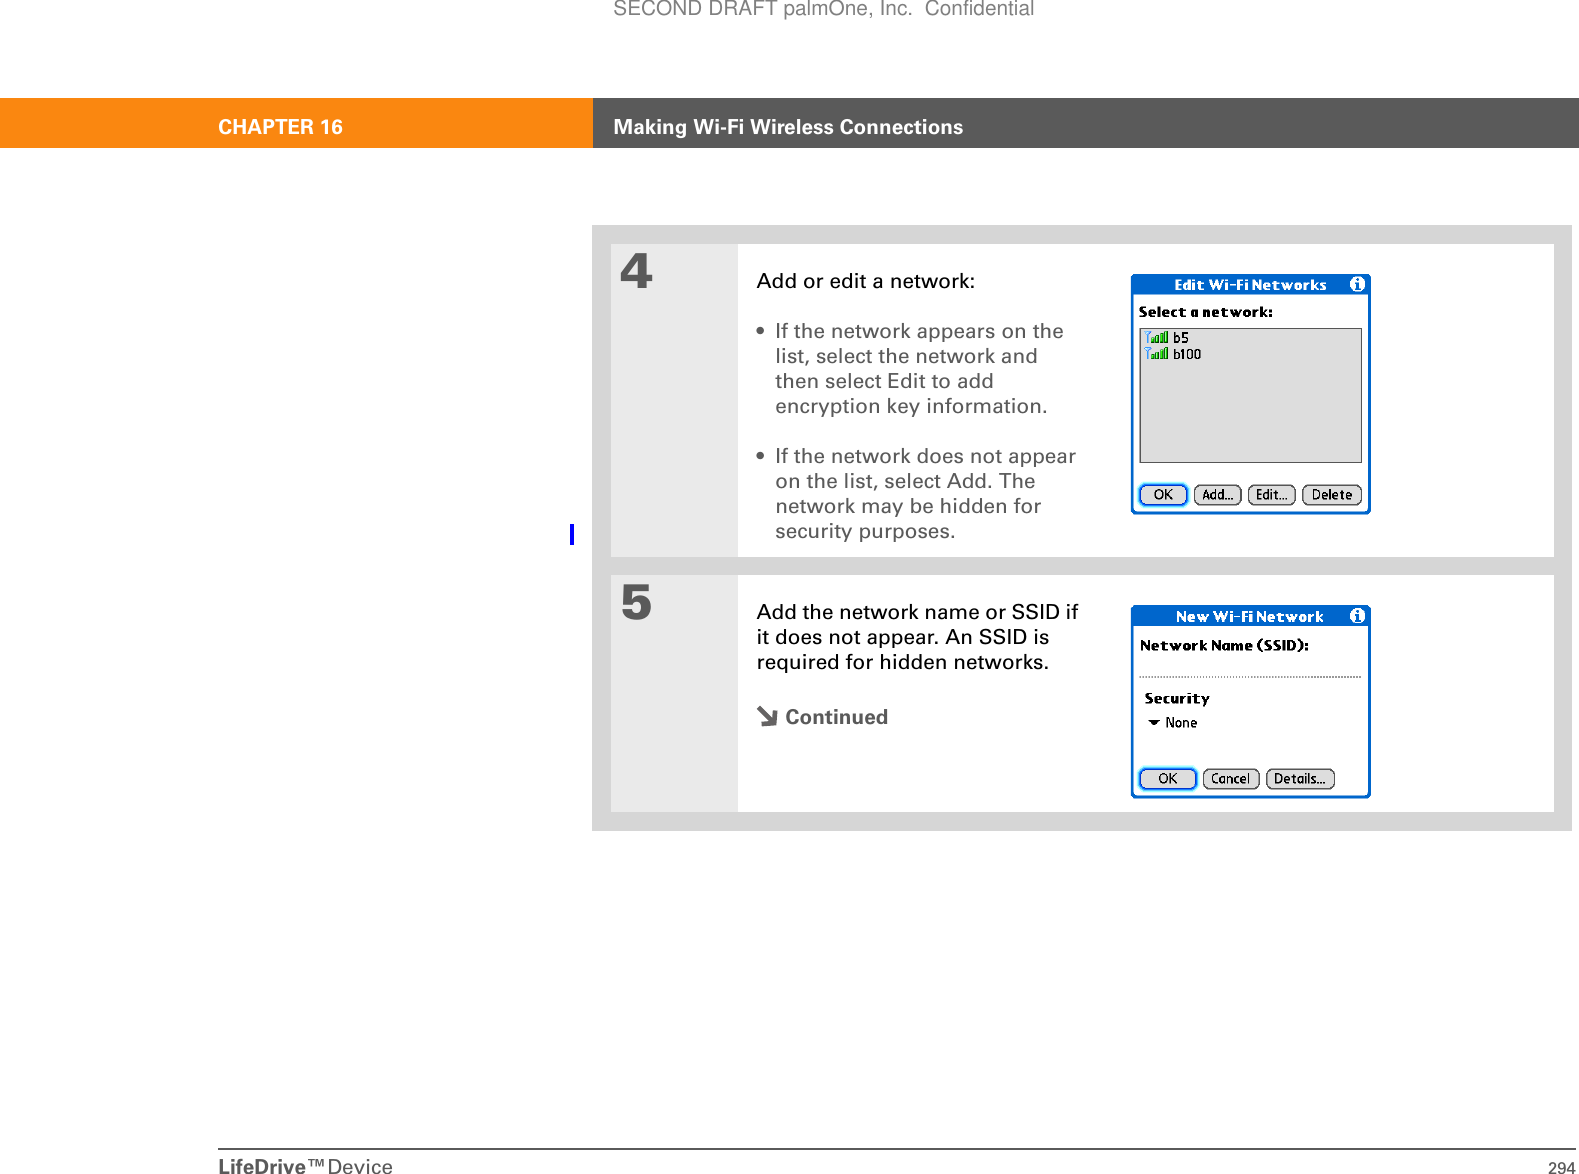
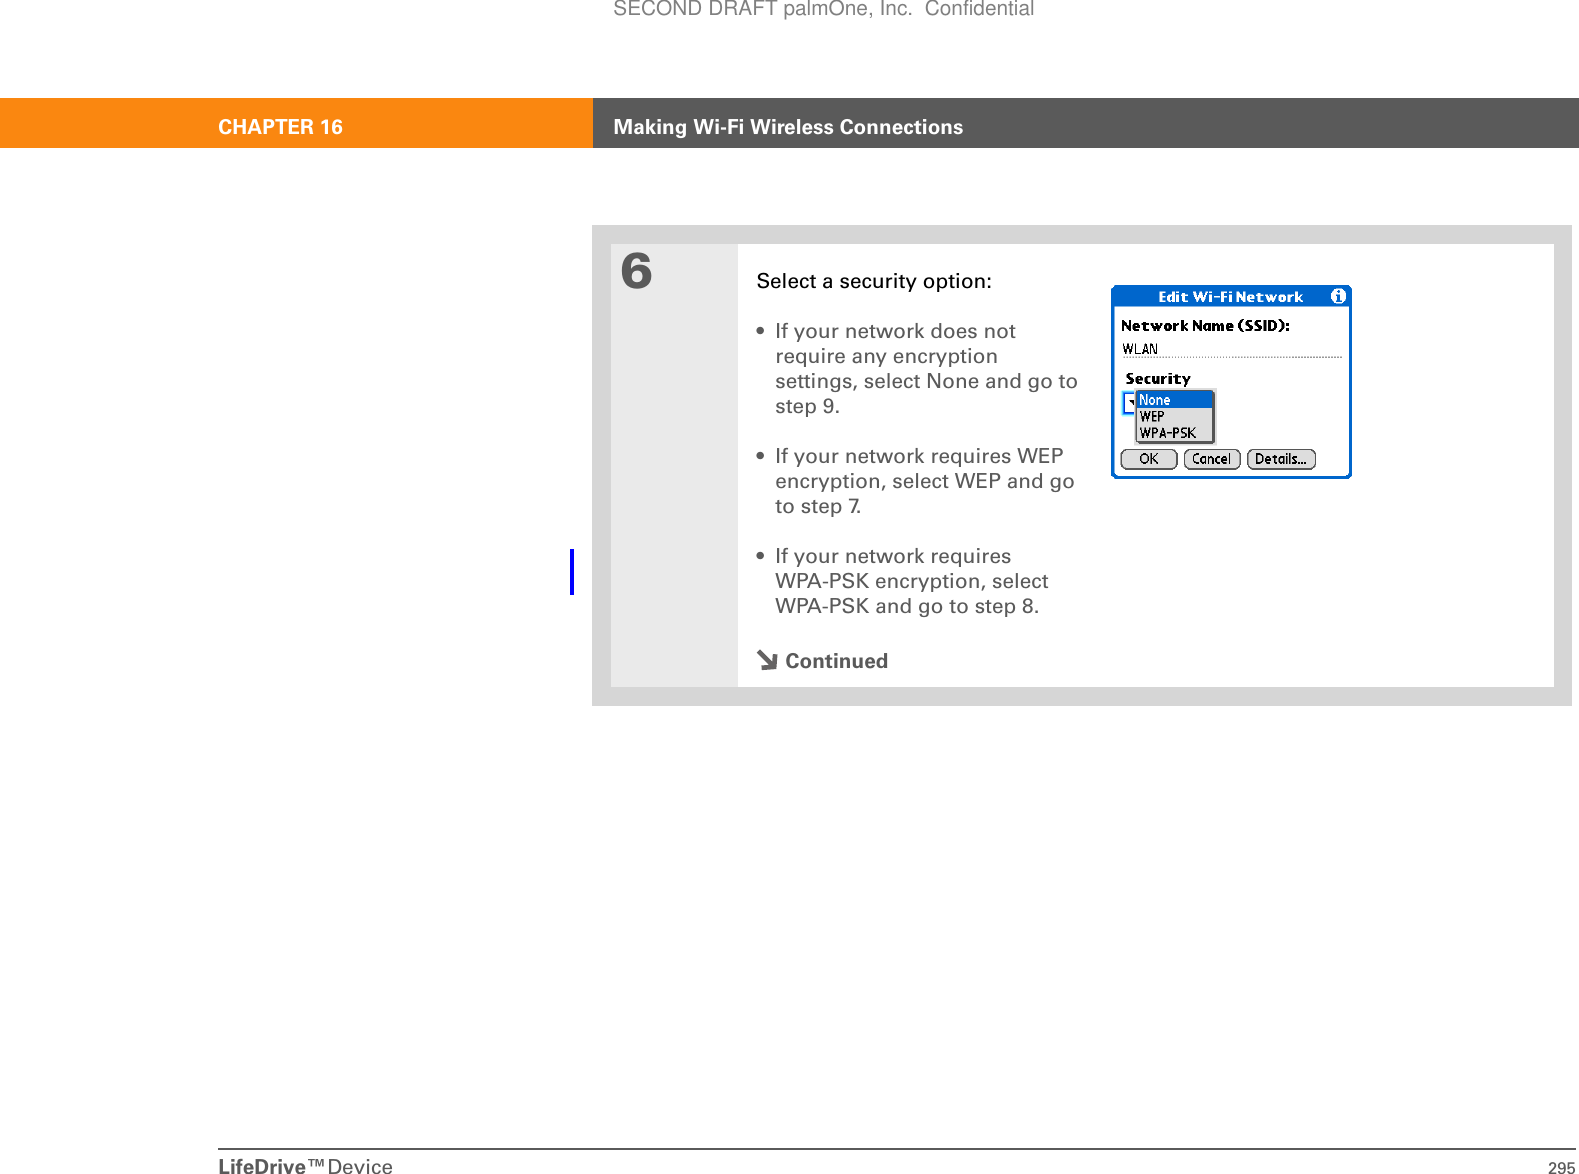
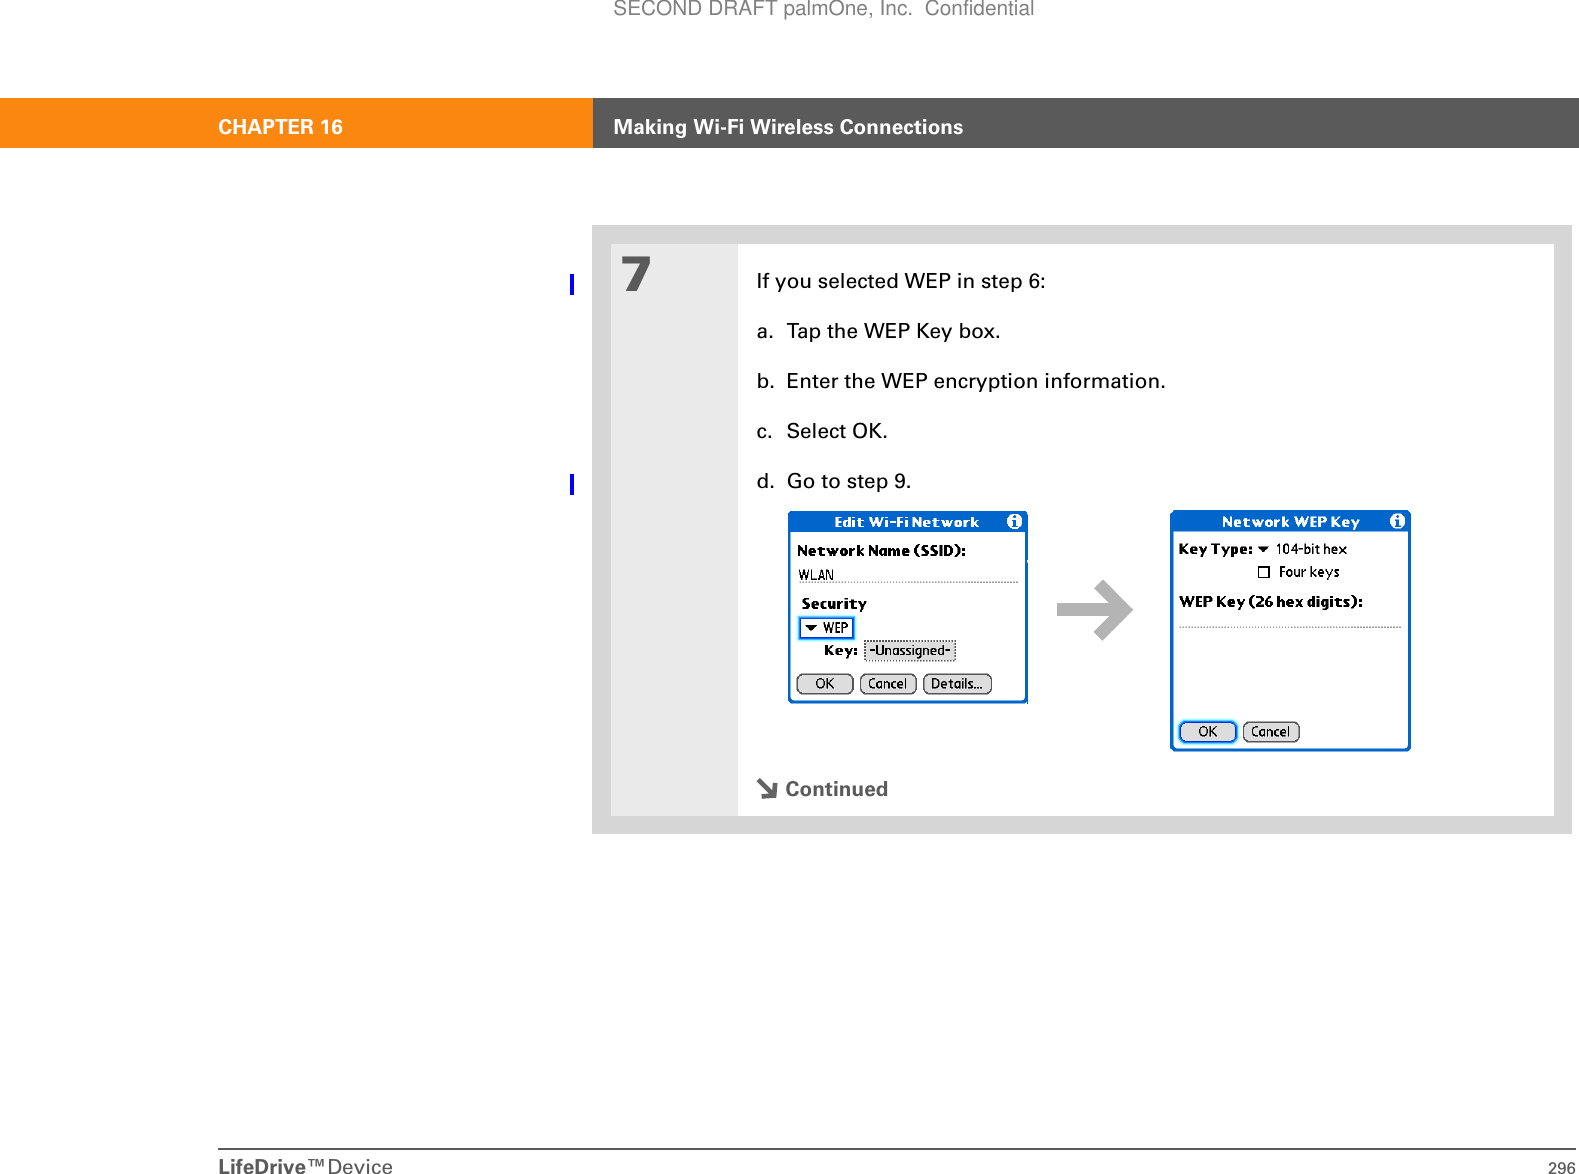
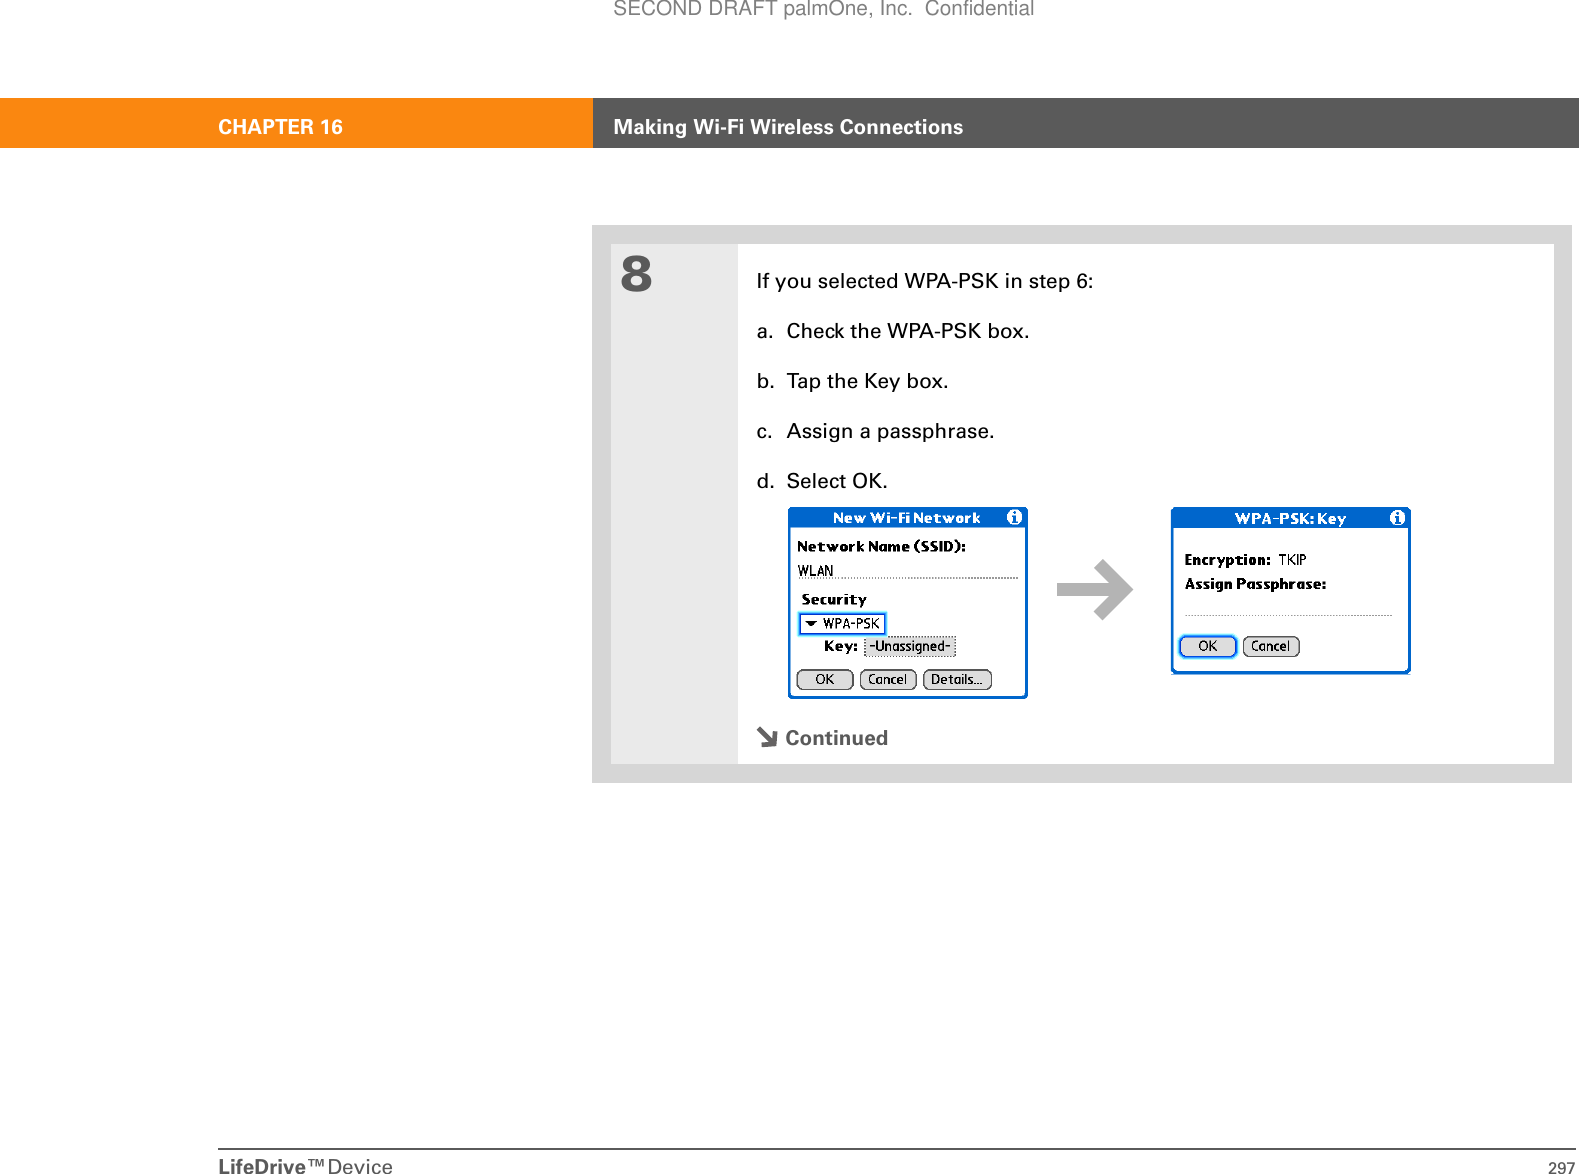
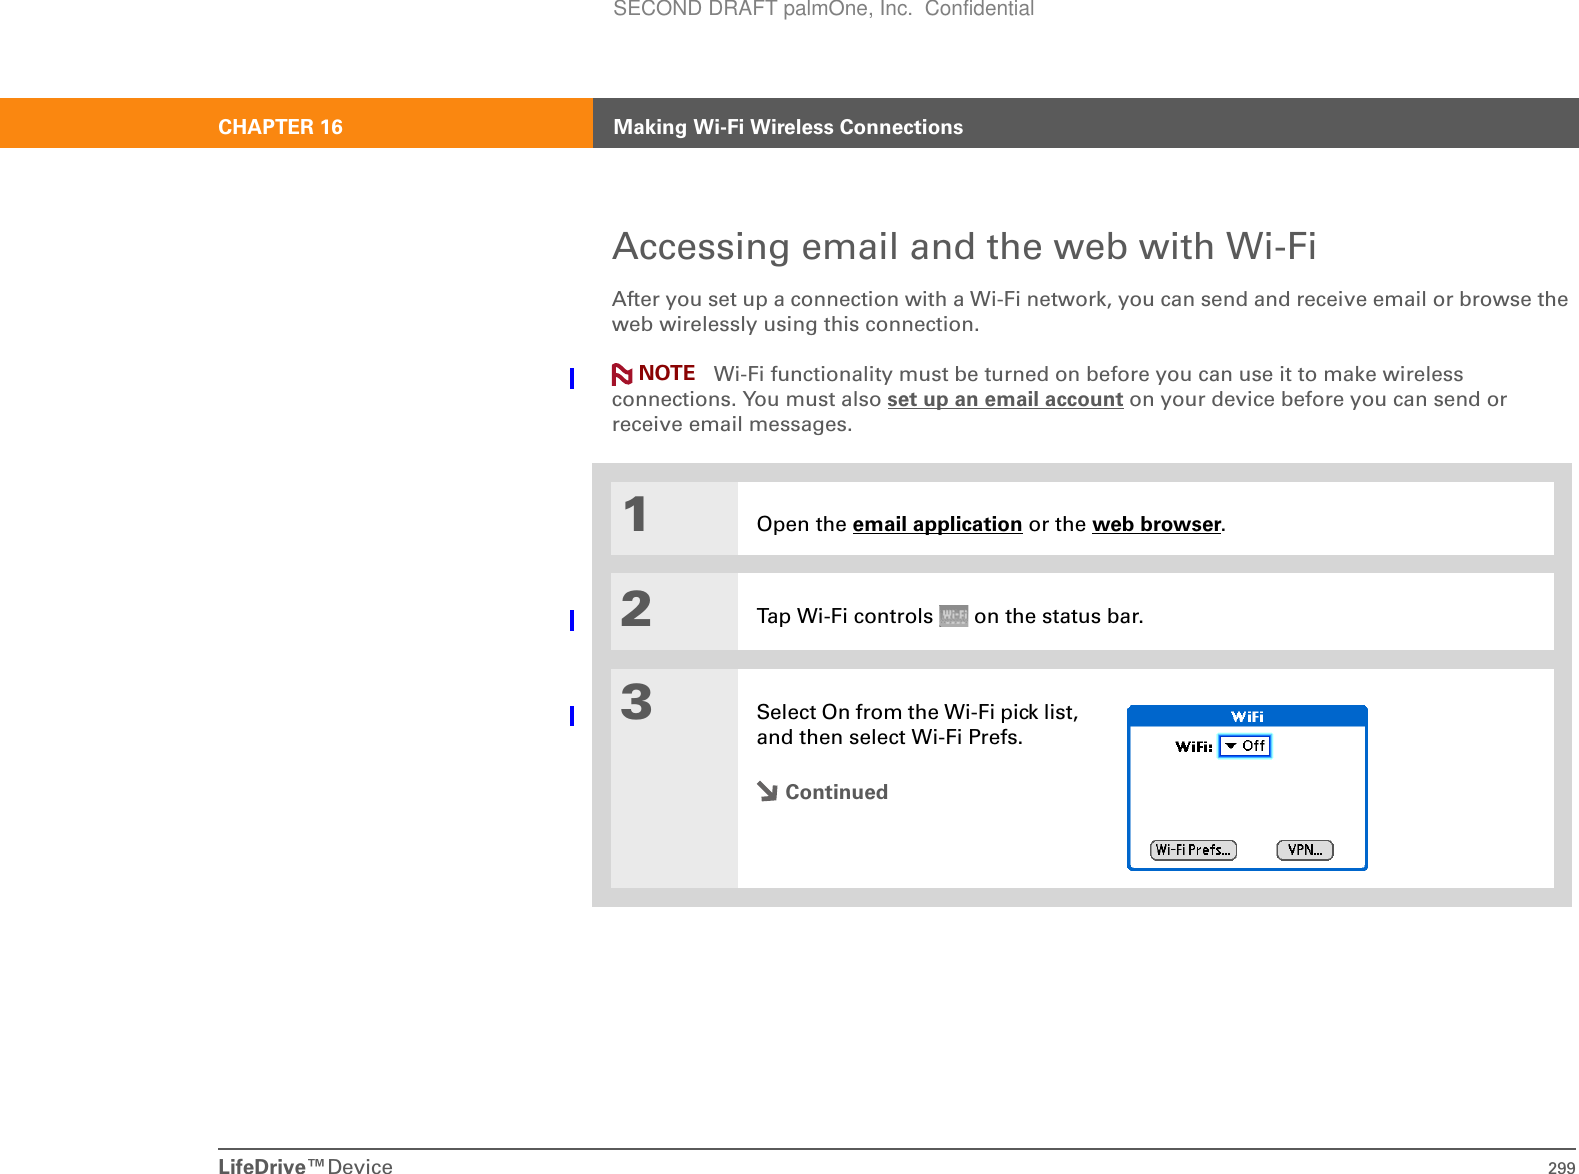
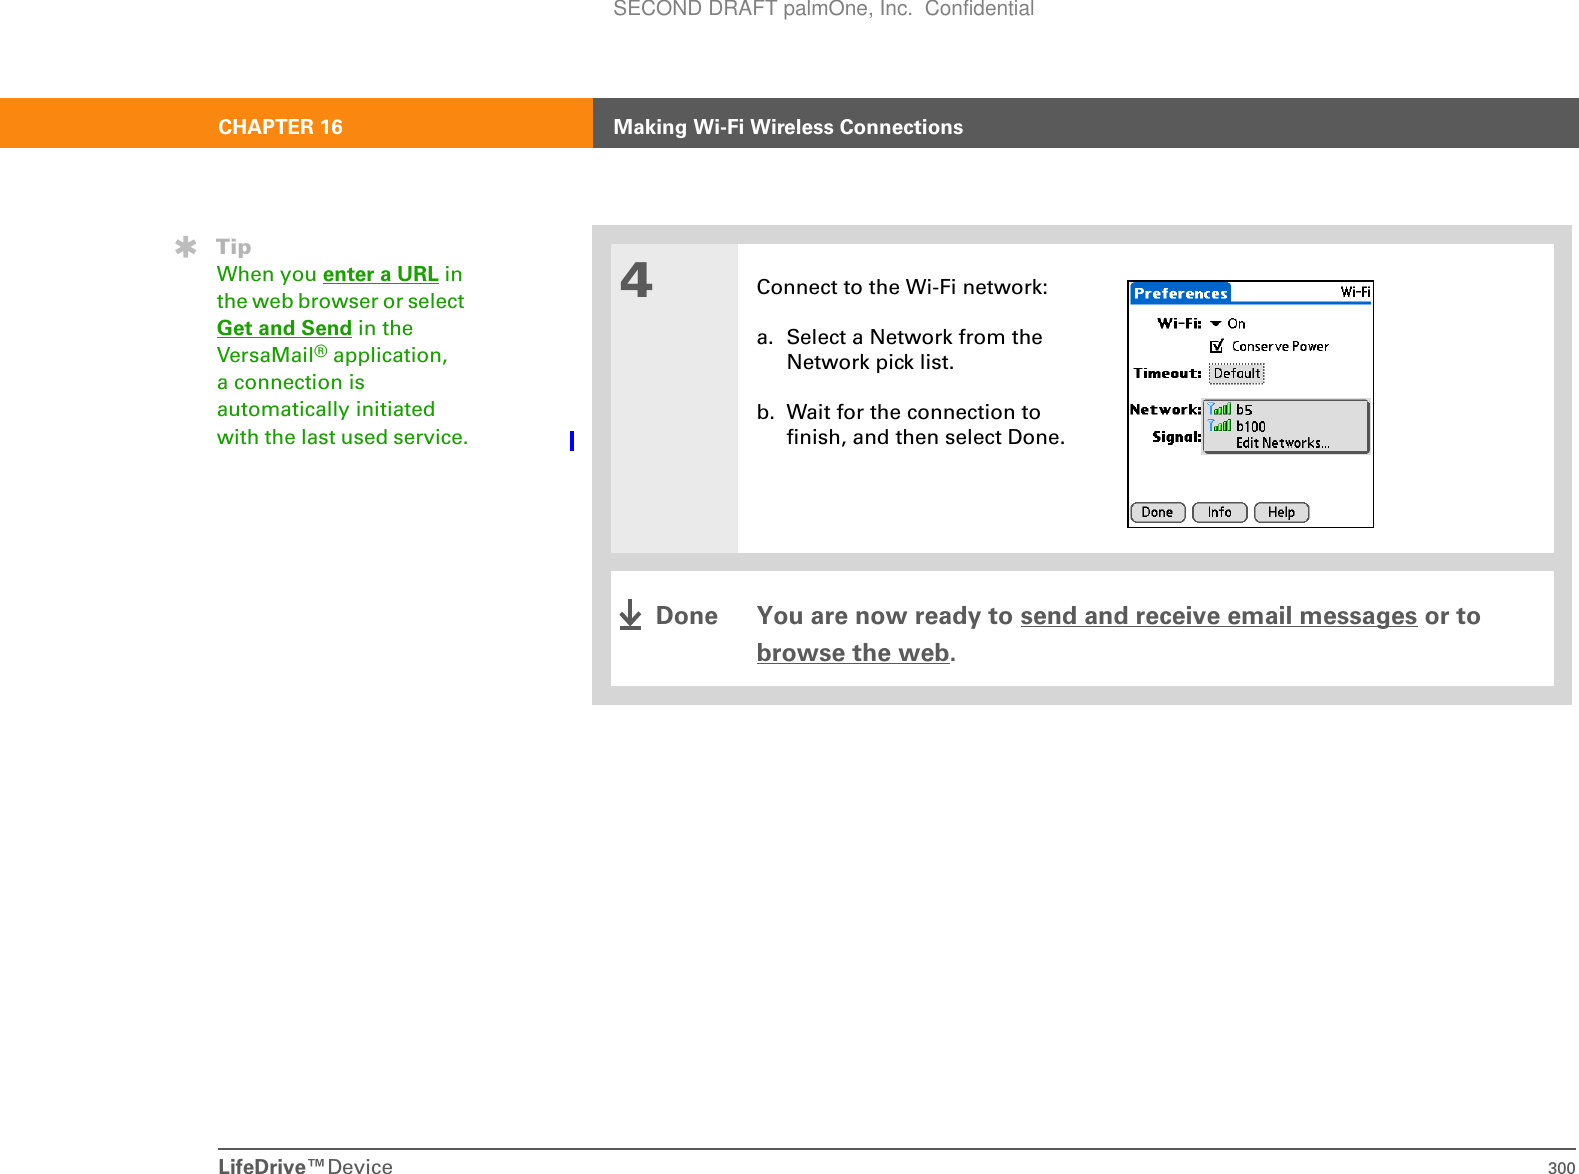
![LifeDrive™Device 293CHAPTER 16 Making Wi-Fi Wireless ConnectionsSetting up a Wi-Fi network connection0O1Tap Wi-Fi controls on the status bar.2Select On from the Wi-Fi pick list and then select Wi-Fi Prefs. 3Select the Network pick list, and then do one of the following:• If the network is listed and does not require an encryption key, select the network. Wait for the connection to finish, and then select Done. You are now connected and this procedure is done.• If the network is not listed or if the network requires an encryption key, select Edit Networks and go to step 4.ContinuedBefore You Begin[!]Contact the network administrator to get the name of the network, also known as an SSID, and the security information, such as WEP or WPA-PSK keys.»Key TermEncryption keyA series of letters and numbers that enables data to be encrypted and then decrypted so it can be safely shared within a network. Your handheld supports two encryption systems: WEP and WPA-PSK.SECOND DRAFT palmOne, Inc. Confidential](https://usermanual.wiki/Palm/830.User-Manual-1-of-2/User-Guide-543159-Page-316.png)
![LifeDrive™Device 298CHAPTER 16 Making Wi-Fi Wireless Connections9[ & ] OPTIONAL Manually set your IP or DNS addresses:a. Tap Details.b. Select Access Point (infrastructure) from the Connect to pick list.c. Select Advanced.d. Select Manual from the IP Address or DNS Server pick list.e. Enter the IP address or DNS server information.f. If you want to use a preamble, check the Use short preamble box.g. Select OK.10 Select OK and then select Done.You can now connect to the network any time you are within range of the access point.DoneSECOND DRAFT palmOne, Inc. Confidential](https://usermanual.wiki/Palm/830.User-Manual-1-of-2/User-Guide-543159-Page-321.png)
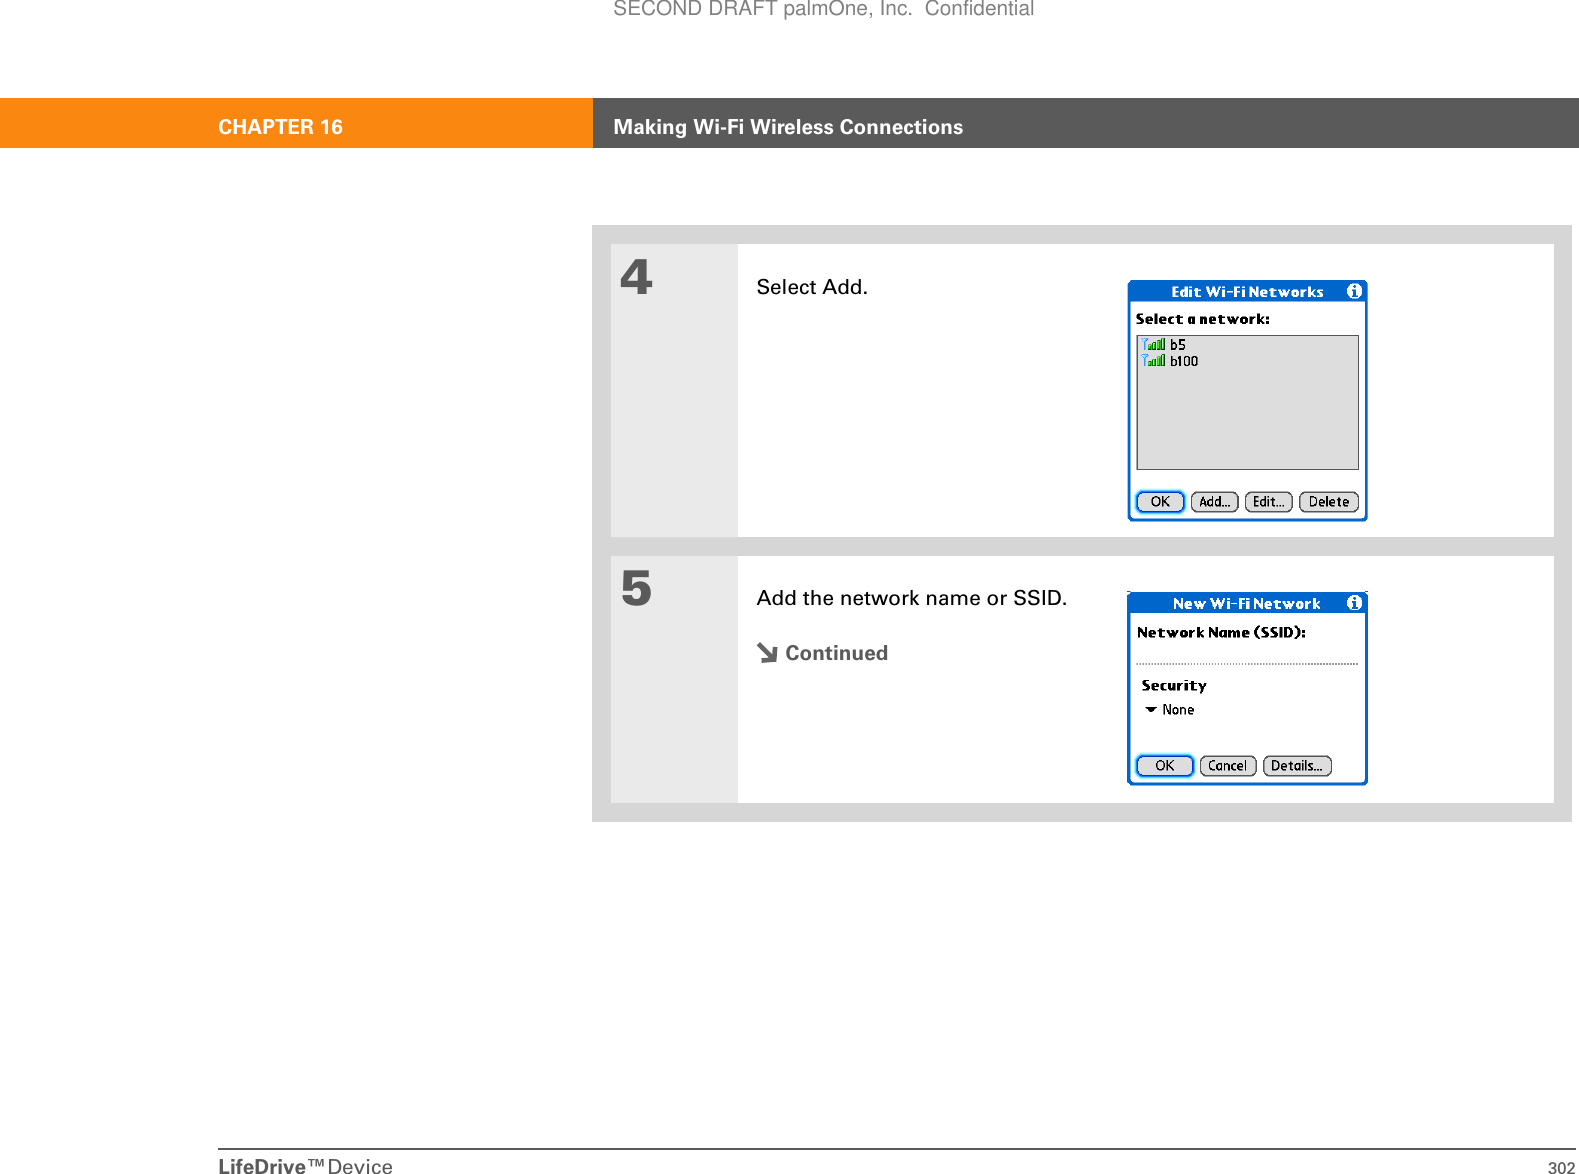
![LifeDrive™Device 301CHAPTER 16 Making Wi-Fi Wireless ConnectionsSetting up a Wi-Fi device-to-device network0O1Tap the Wi-Fi controls on the status bar.2Select On from the Wi-Fi pick list, and then select Wi-Fi Prefs. 3Select Edit Networks. ContinuedBefore You Begin[!]You need to know the following information:• Name of the network, also known as an SSID• Security information, such as WEP or WPA-PSK keys• Channel numberYou may also need to know the IP address and DNS server information.»Key TermEncryption keyA series of letters and numbers that enables data to be encrypted and then decrypted so it can be safely shared within a network. Your handheld supports two encryption systems: WEP and WPA-PSK.SECOND DRAFT palmOne, Inc. Confidential](https://usermanual.wiki/Palm/830.User-Manual-1-of-2/User-Guide-543159-Page-324.png)

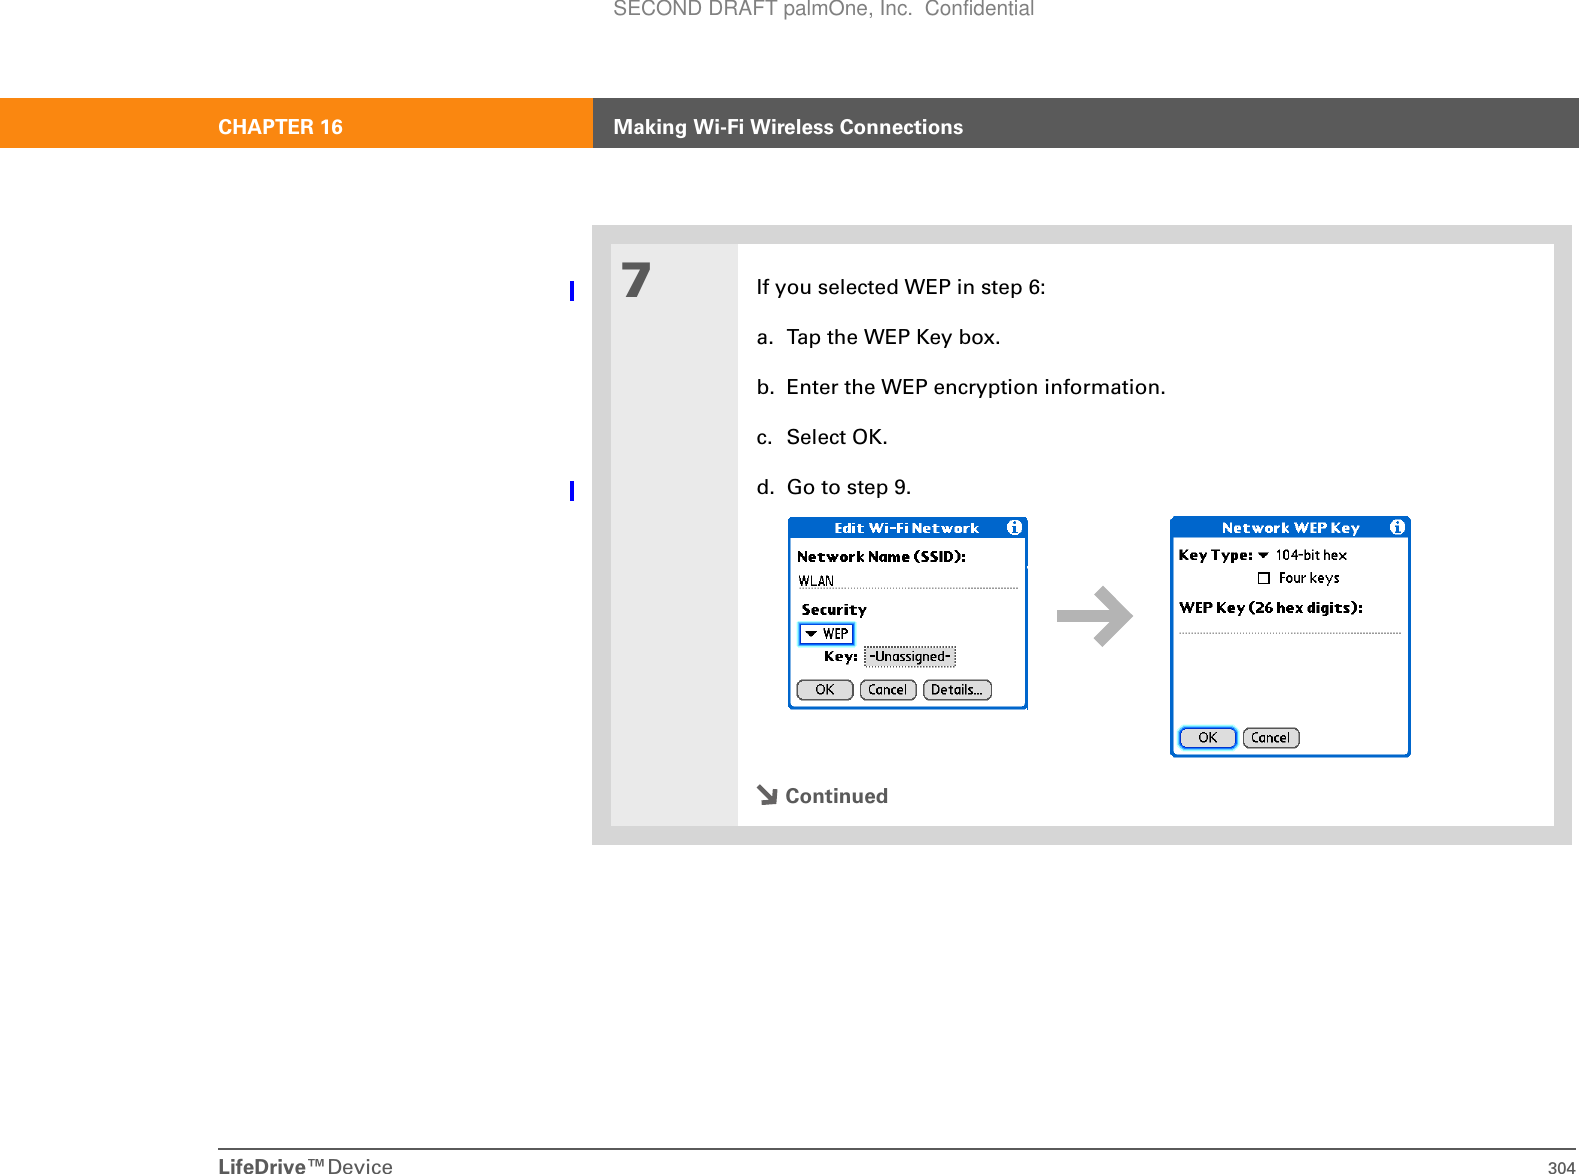
![LifeDrive™Device 306CHAPTER 16 Making Wi-Fi Wireless Connections10 [ & ] OPTIONAL Manually set your IP or DNS address:a. Select Manual from the IP Address or DNS Server pick list.b. Enter the IP address or DNS server information.c. If you want to use a preamble, check the Use short preamble box.d. Select OK.11 Select OK three times and then select Done.You can now connect to the device any time you are within range.DoneSECOND DRAFT palmOne, Inc. Confidential](https://usermanual.wiki/Palm/830.User-Manual-1-of-2/User-Guide-543159-Page-329.png)
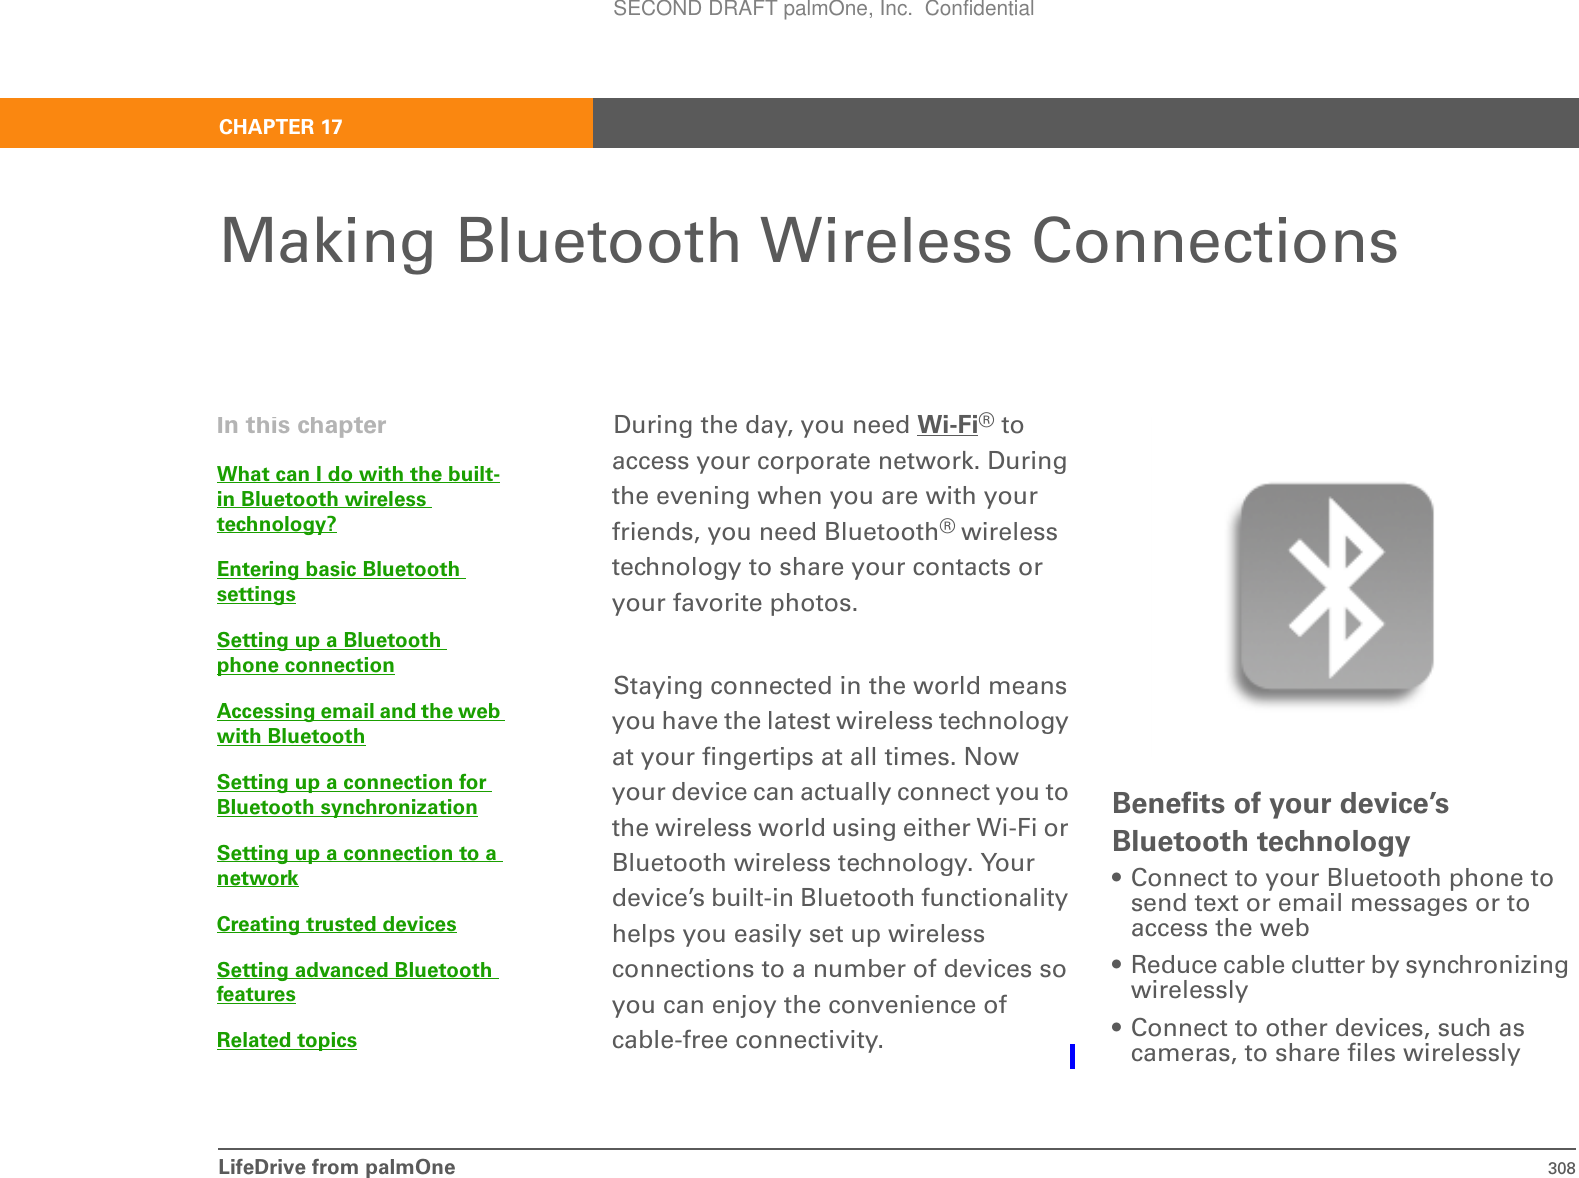
![LifeDrive from palmOne 309CHAPTER 17 Making Bluetooth Wireless ConnectionsWhat can I do with the built-in Bluetooth wireless technology?Connect to your Bluetooth phone to send text or email messages or to access the web.Whether you access the Internet or send text or email messages once a week or constantly throughout the day, wireless connectivity means that you can go online anytime by connecting by means of your mobile phone or your laptop connected to the Internet. Reduce cable clutter by synchronizing wirelessly. Imagine your desk and workstation without cable clutter. Bluetooth wireless technology on your device replaces many of the connecting cables with a wireless connection for tasks such as synchronizing. Connect to other devices to share files wirelessly. Wouldn’t it be great if you could send files such as photos wirelessly or print wirelessly on a Bluetooth printer? Use the built-in Bluetooth wireless technology to set up connections to devices within approximately 30 feet of your device.What types of connections can I make?With Bluetooth wireless technology, you can make connections using the following types of devices:• To browse the Internet or access your email account, link through your desktop computer’s network connection or establish a connection to a Bluetooth LAN Access Point.• To access the Internet or an email account, connect to your mobile phone. To use a mobile phone, you must dial your ISP or sign up for an account with a high-speed wireless carrier.• To send and receive text messages, connect to your mobile phone.• To synchronize your device with your computer wirelessly, connect to your computer.• To share files with another Bluetooth device such as a handheld or printer, form a trusted pair with that device.»Key TermBluetooth Technology that enables devices such as handhelds, mobile phones, and computers to connect wirelessly to each other.Before You Begin[!]Any device you connect to must also be a Bluetooth device with Bluetooth features enabled. Check the user guide that came with the device for information on how to enable the Bluetooth features.SECOND DRAFT palmOne, Inc. Confidential](https://usermanual.wiki/Palm/830.User-Manual-1-of-2/User-Guide-543159-Page-332.png)
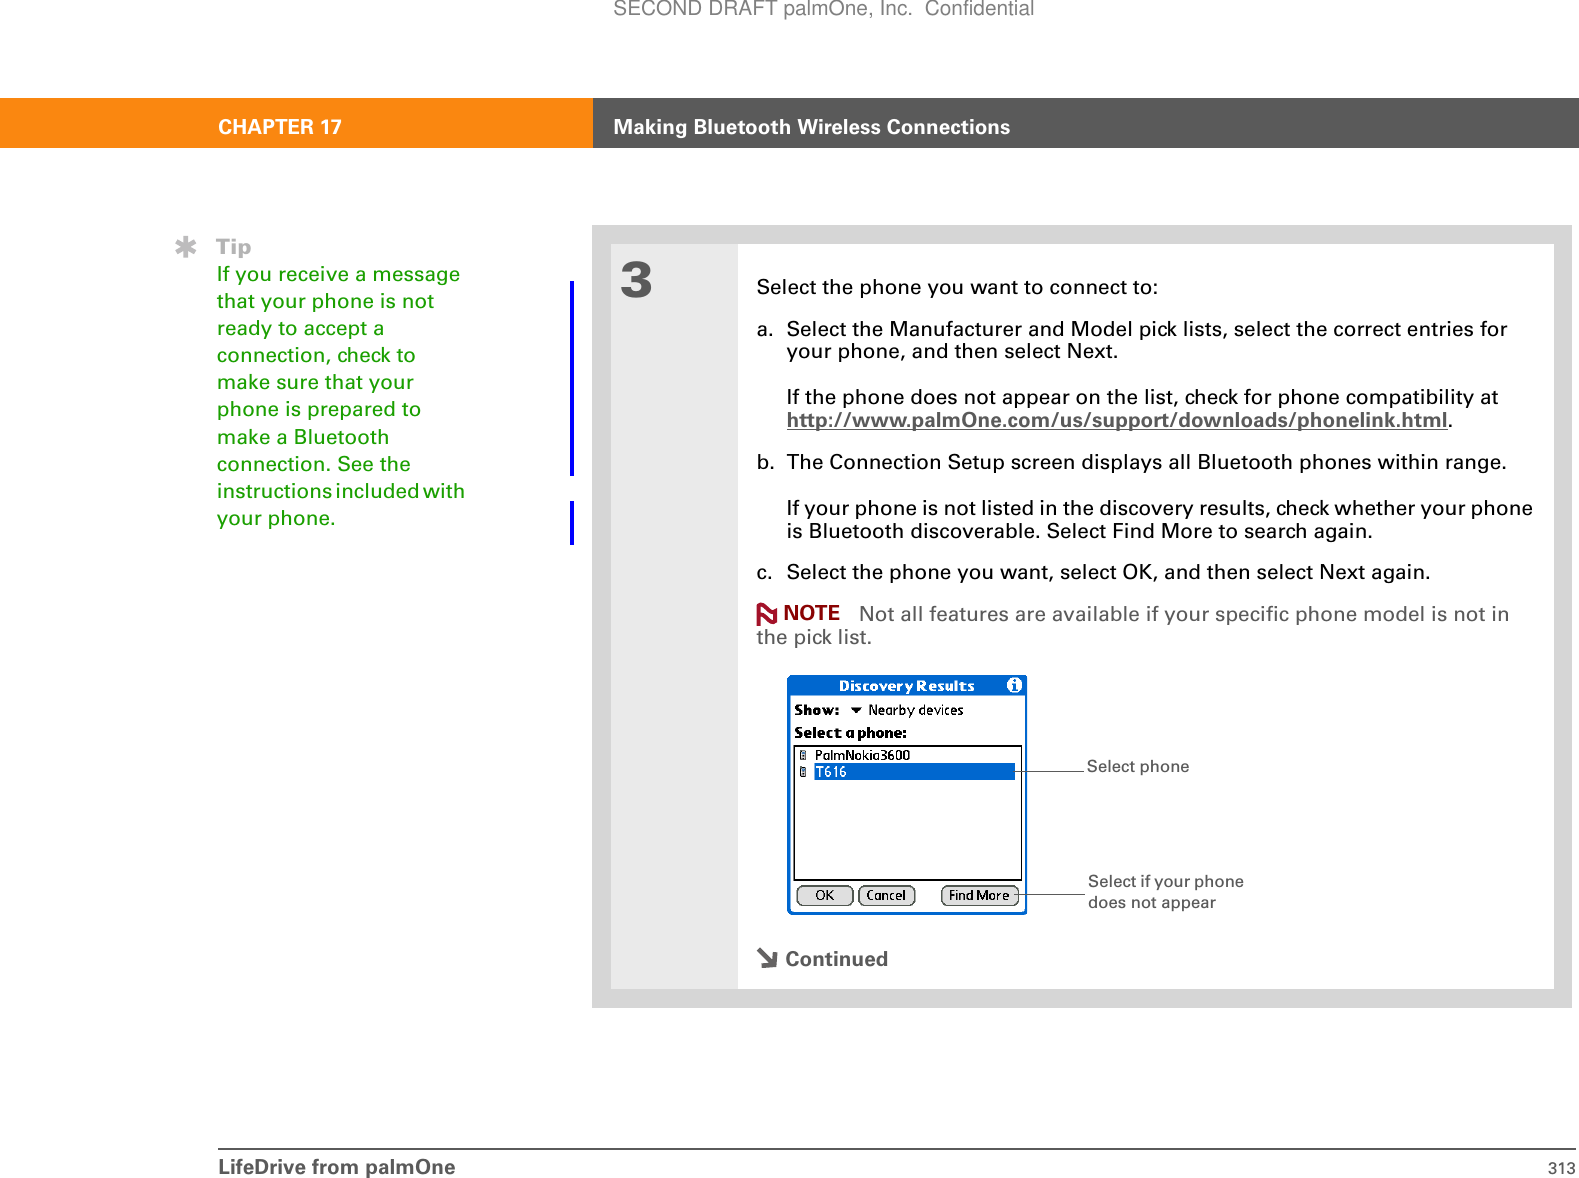
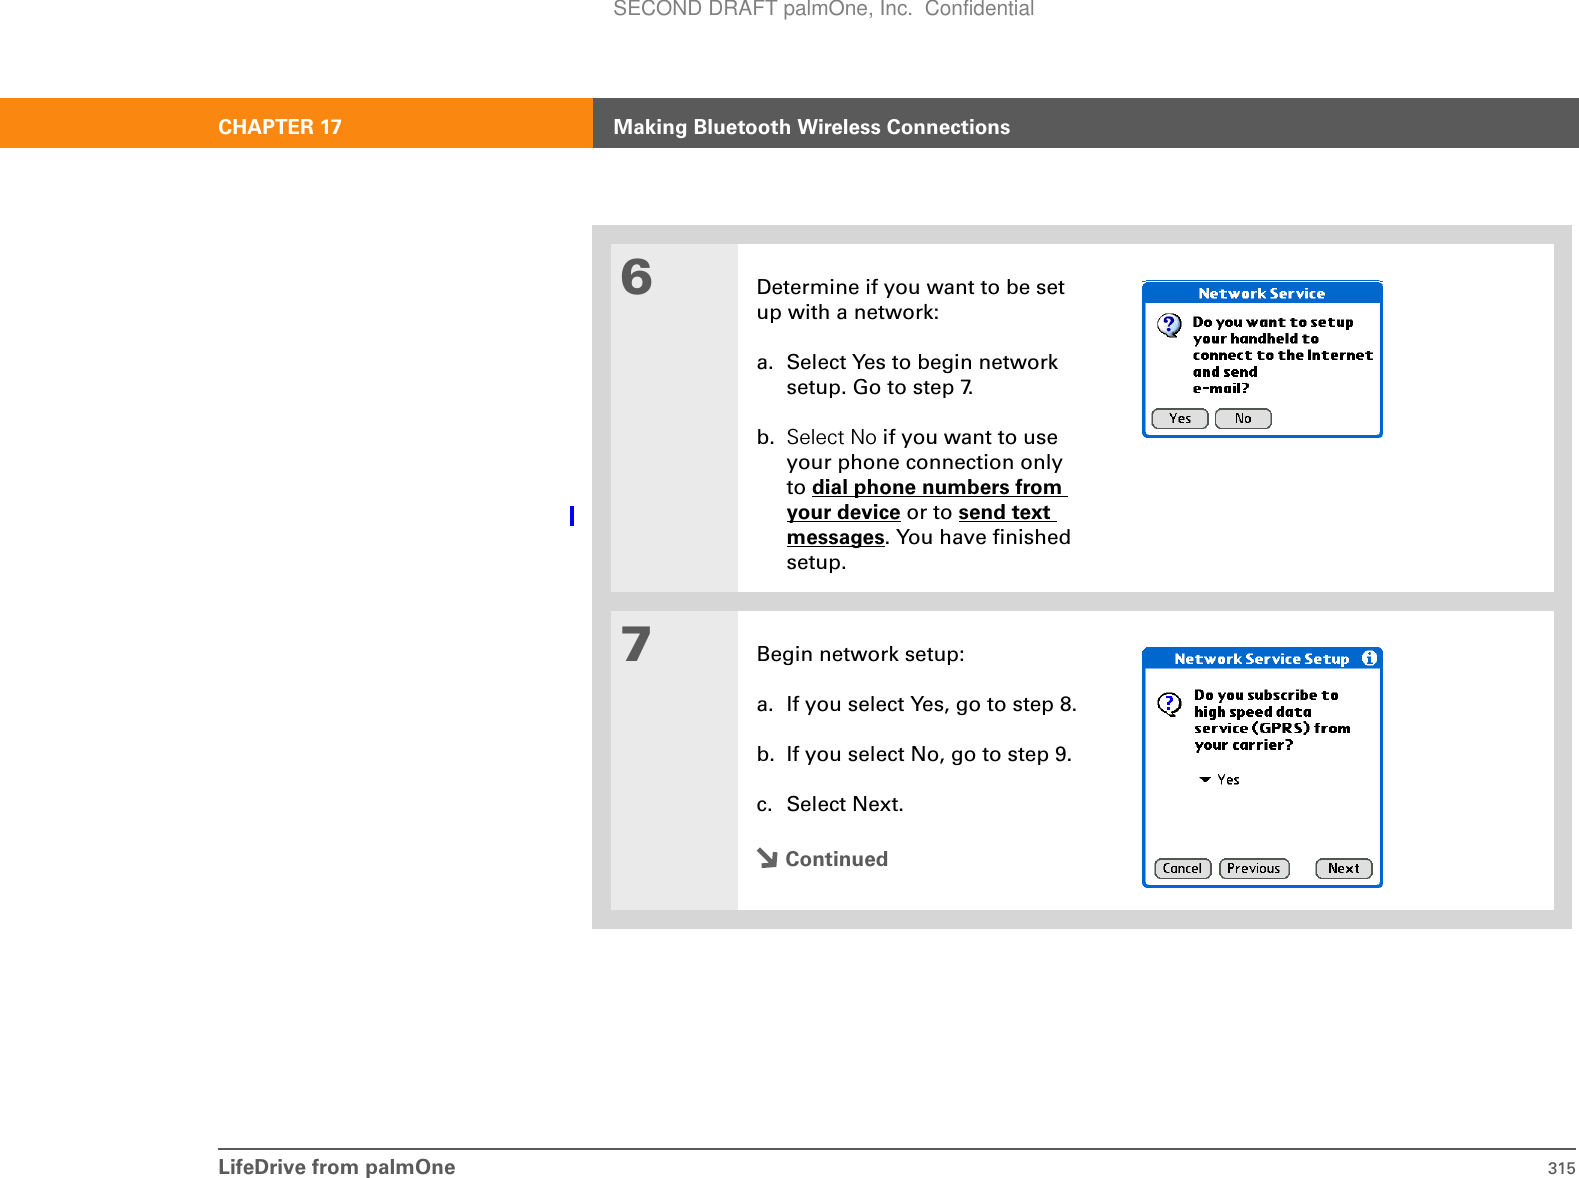
![LifeDrive from palmOne 312CHAPTER 17 Making Bluetooth Wireless ConnectionsSetting up a Bluetooth phone connection To set up a phone connection, you must have a GSM or GPRS mobile phone enabled with data services.You can form a trusted pair between your device and your mobile phone. Once you have set up the trusted pair connection, you automatically connect to your phone when you want a Bluetooth connection.0O1Tap Bluetooth controls on the status bar.2Open the Phone Setup dialog box.a. Select Setup Devices.b. Select Phone Setup.c. Select Phone Connection.d. Select Next.ContinuedBefore You Begin[!]If you have an IR phone, you must download the Phone Link application from the web. Go to http://www.palmOne.com/us/support/downloads/phonelink.html to download the software. »Key TermTrusted pair Two devices—for example, your device and your mobile phone—that can connect to each other because each device can find the same passkey on the other device. Once you form a trusted pair with a device, you do not need to enter a passkey to connect with that device again.IMPORTANT[!]SECOND DRAFT palmOne, Inc. Confidential](https://usermanual.wiki/Palm/830.User-Manual-1-of-2/User-Guide-543159-Page-335.png)
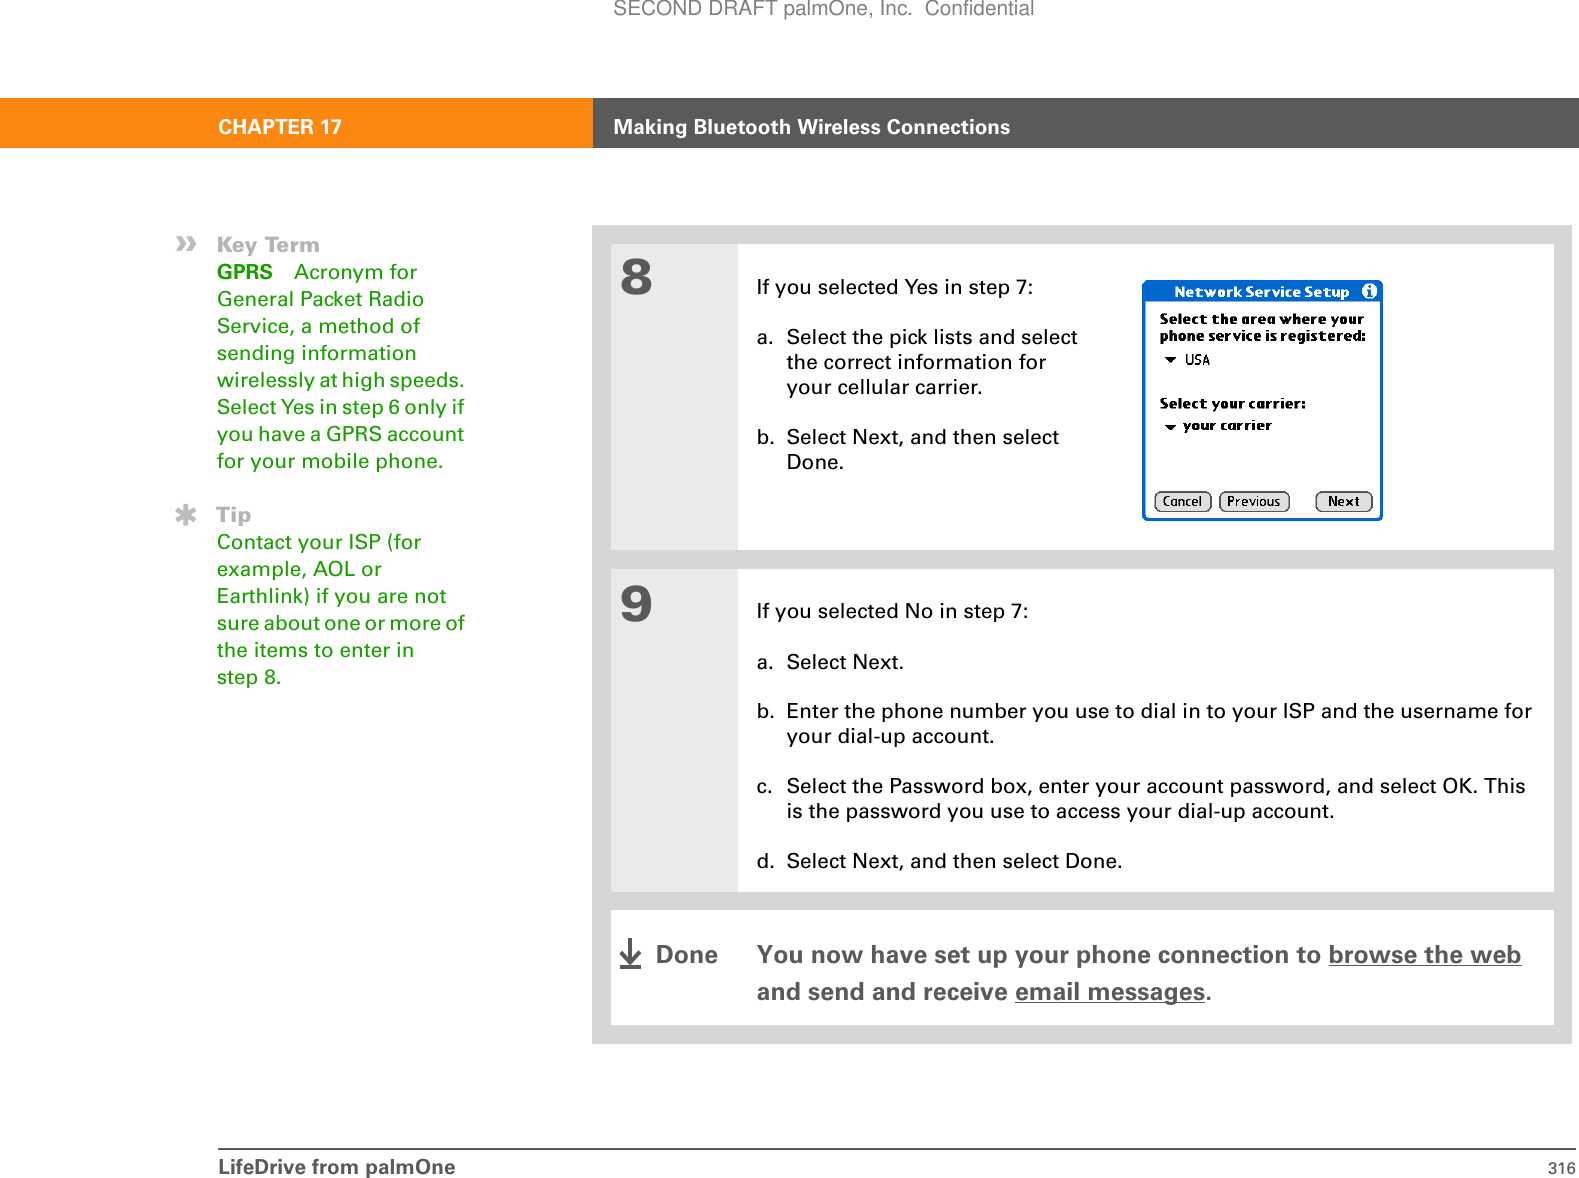
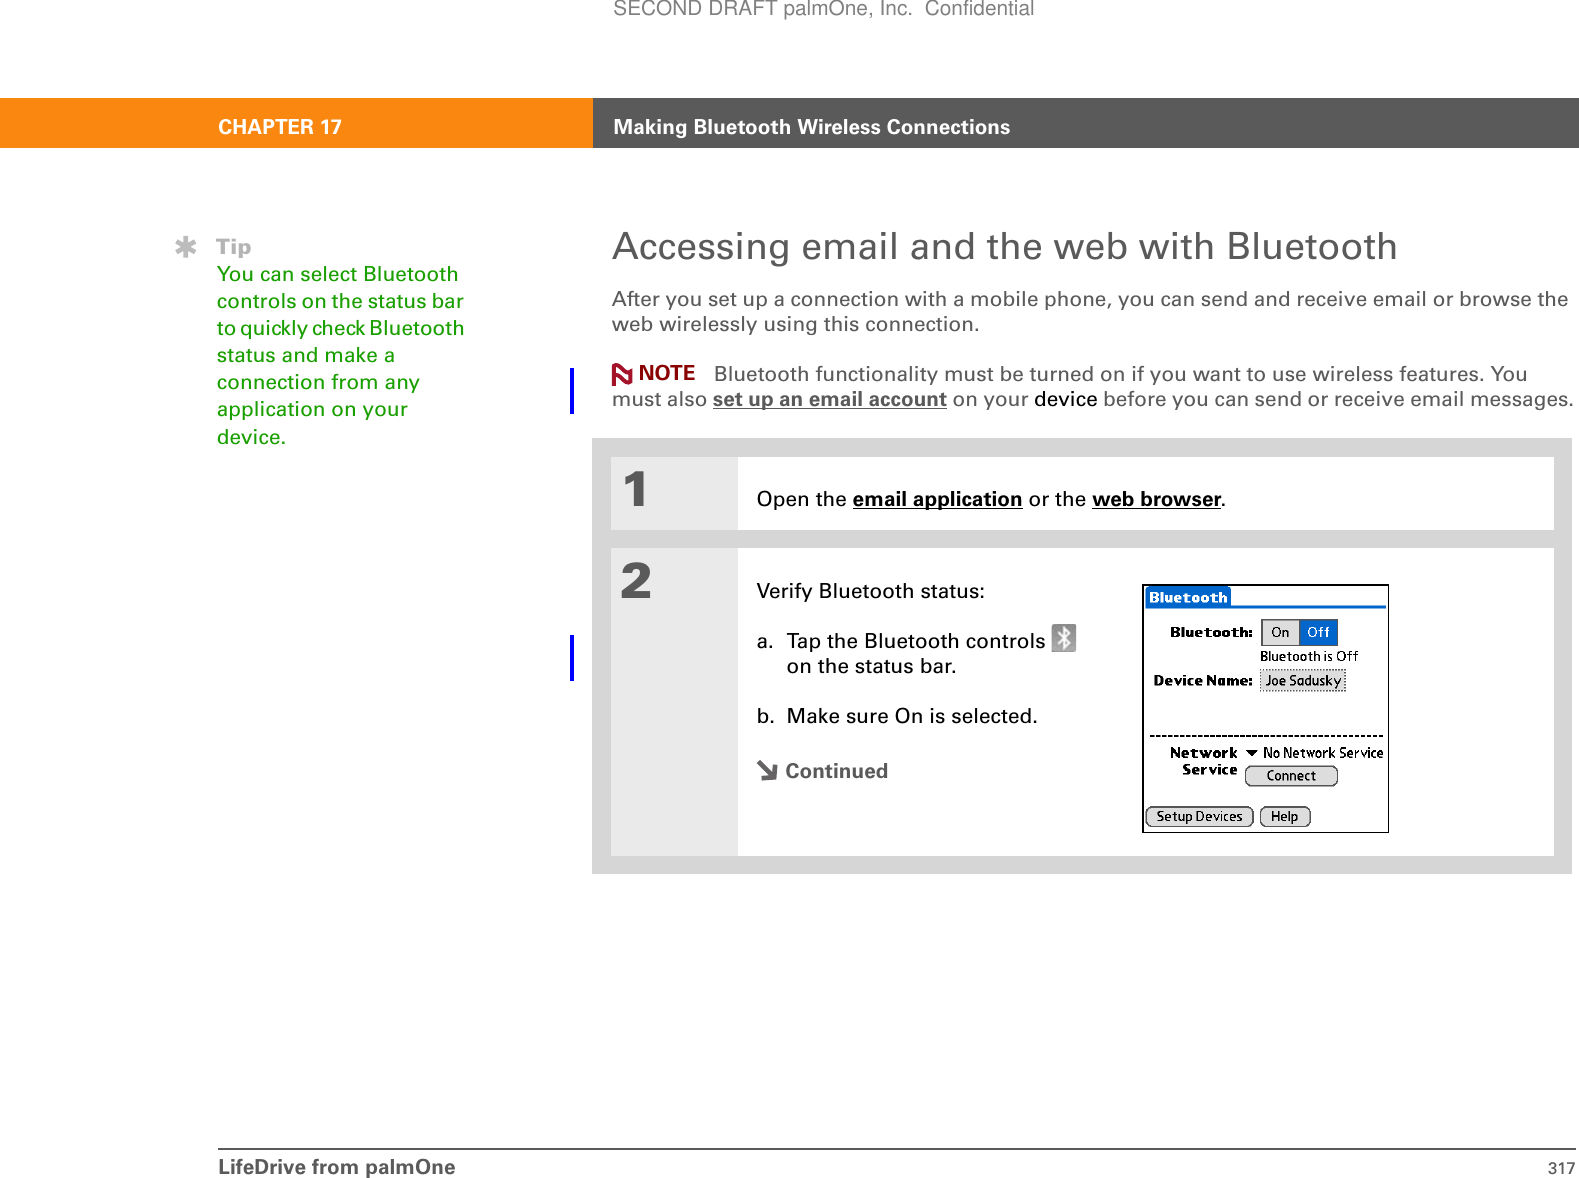
![LifeDrive from palmOne 314CHAPTER 17 Making Bluetooth Wireless Connections4Enter a passkey:a. Enter a passkey number. This can be any number you choose; it does not, for example, have to be a password you use to access a network or an email account. You must enter the same passkey on your device and your mobile phone in order to connect to your phone.b. Select OK.5Select Done to finish phone connection setup.Continued»Key TermPasskey Like a password, the passkey is a security measure. Connections can happen only between your device and a device that has the same passkey. For example, to connect to your mobile phone, you need to enter the same passkey on your device and on your phone.IMPORTANT[!]SECOND DRAFT palmOne, Inc. Confidential](https://usermanual.wiki/Palm/830.User-Manual-1-of-2/User-Guide-543159-Page-337.png)
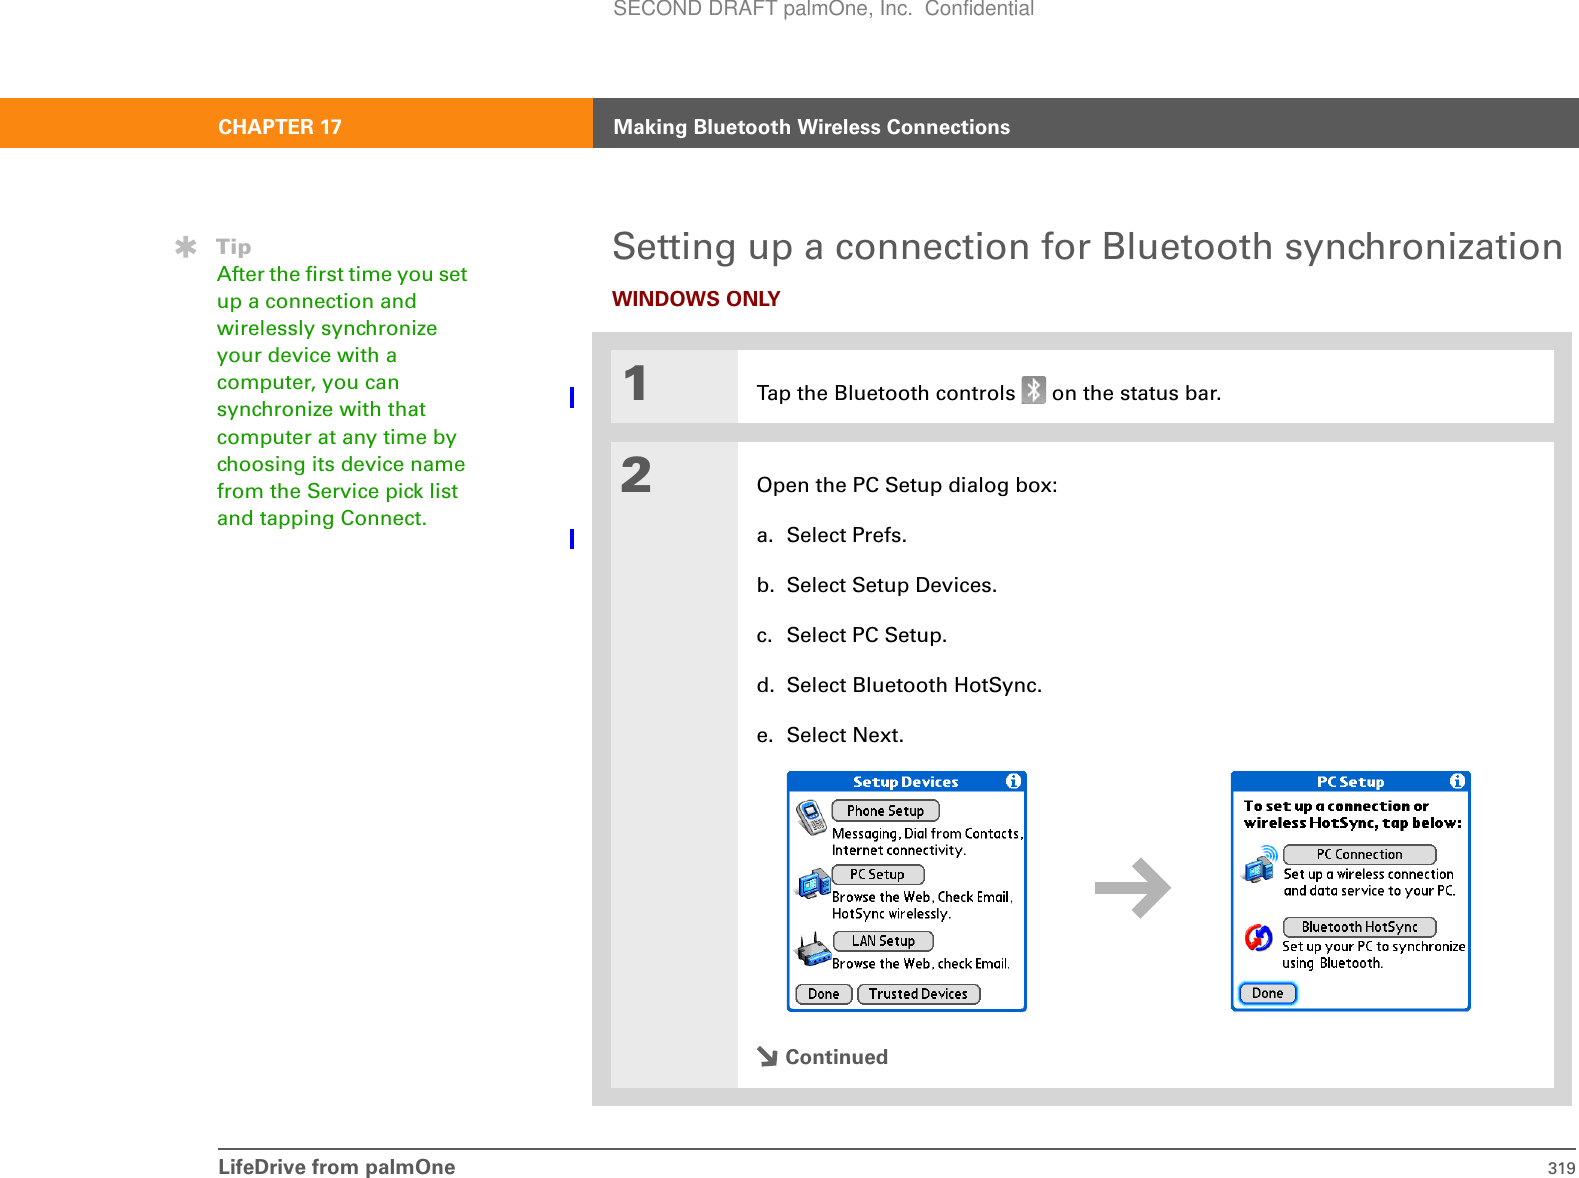


![LifeDrive from palmOne 322CHAPTER 17 Making Bluetooth Wireless ConnectionsCont’d.d. Make sure the computer is ready to accept a Bluetooth connection. See the documentation included with the computer for information on how to prepare it to accept a Bluetooth connection. The documentation might refer to a Bluetooth connection as a Bluetooth pairing or a Bluetooth link.e. Check the Device box. 4Select the computer:a. When the Discovery Results screen appears, select your computer. If your computer does not appear on the list, select Find More.b. Select OK.5[ & ] OPTIONAL If prompted, enter a passkey:a. Enter a passkey number. This can be any number you choose; it does not have to be, for example, a password you use to access a network or an email account. You must enter the same passkey on your device and your computer in order to wirelessly synchronize your device with your computer.b. Select OK.ContinuedTipJust as it is safer to use different personal identification numbers (PINs) for different bank accounts, your passkeys are more secure if you use a different passkey for each device with which you want to connect—one passkey for a connection to a phone, a different one for a connection to a computer, and so on. Just remember that you must enter the same passkey on your device and on the device with which you want to connect.NOTEIMPORTANT[!]SECOND DRAFT palmOne, Inc. Confidential](https://usermanual.wiki/Palm/830.User-Manual-1-of-2/User-Guide-543159-Page-345.png)
![LifeDrive from palmOne 324CHAPTER 17 Making Bluetooth Wireless ConnectionsSetting up a connection to a network01Tap the Bluetooth controls on the status bar.2Open the PC Setup dialog box:a. Select Setup Devices.b. Select LAN Setup.c. Select Next.3Select a LAN and select OK. The Discovery icon appears to indicate that the discovery process is active.If the LAN did not show up on the discovery results, select Find More to search again.ContinuedBefore You Begin[!]You must get the passkey, username, and password for the LAN from the system administrator.»Key TermLAN Acronym for local area network. LAN refers to a local network that connects computers located in your home or business.SECOND DRAFT palmOne, Inc. Confidential](https://usermanual.wiki/Palm/830.User-Manual-1-of-2/User-Guide-543159-Page-347.png)
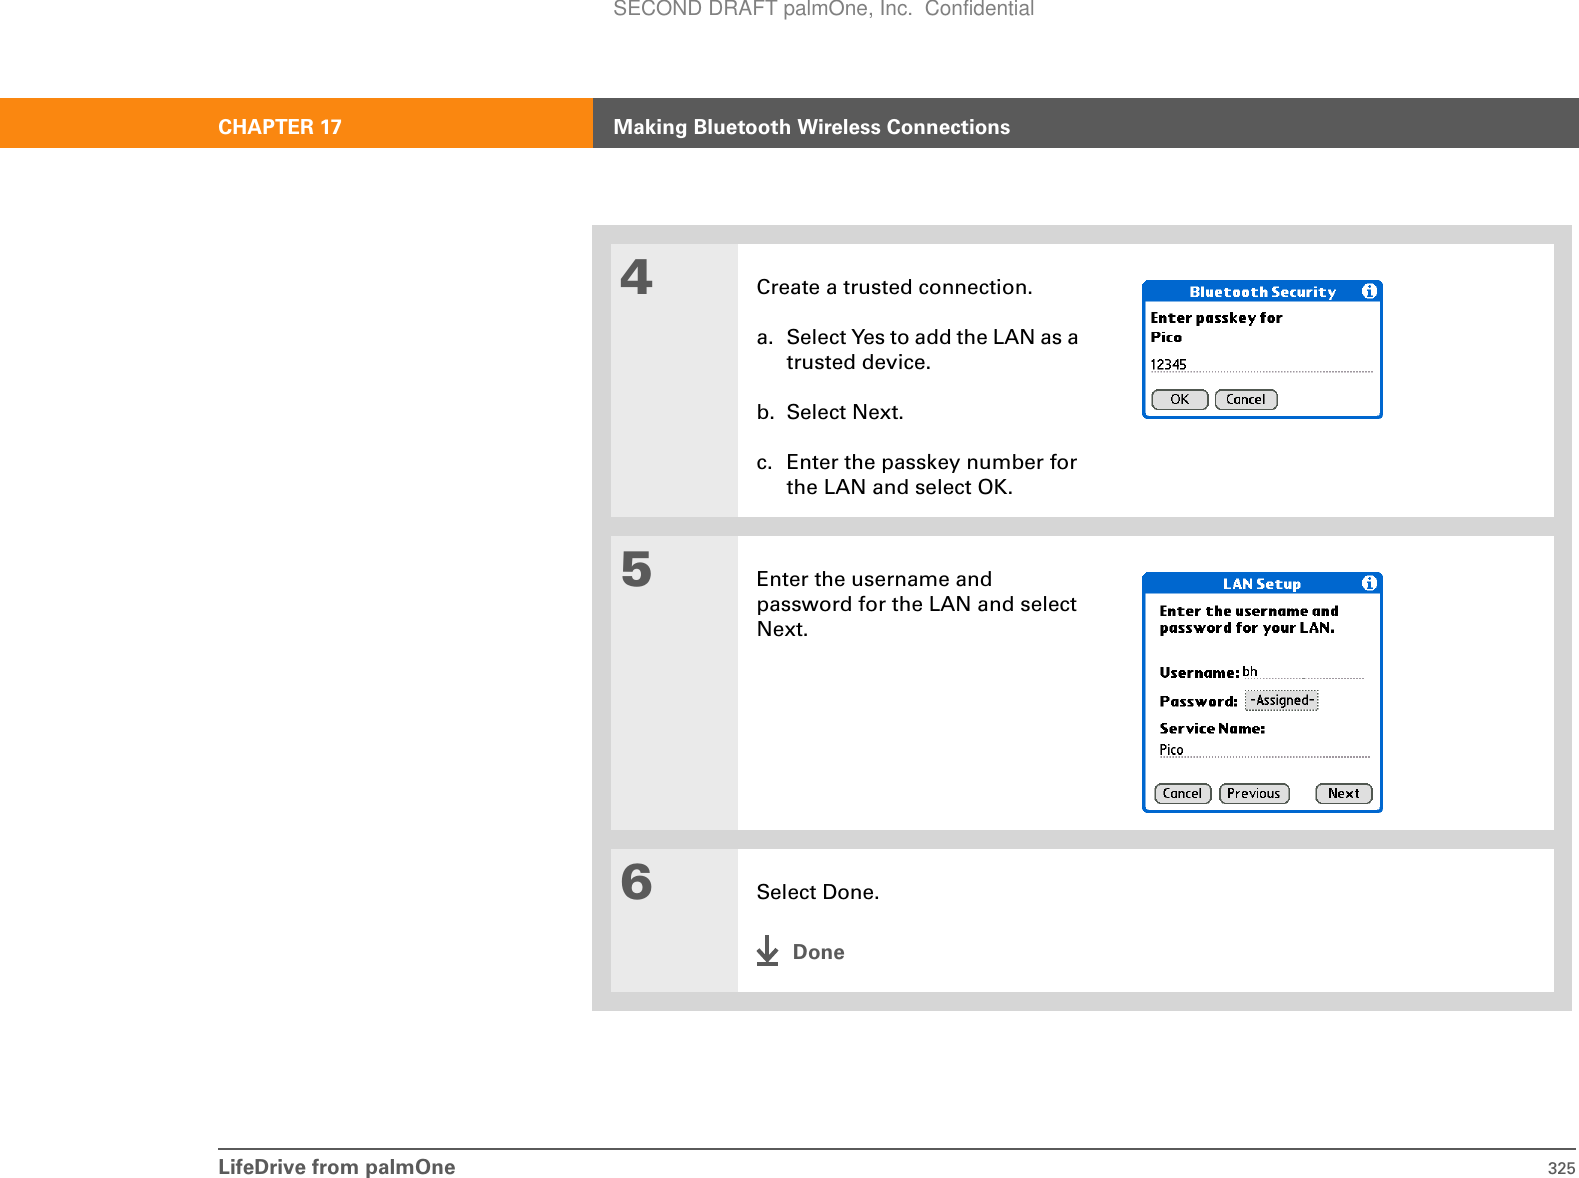
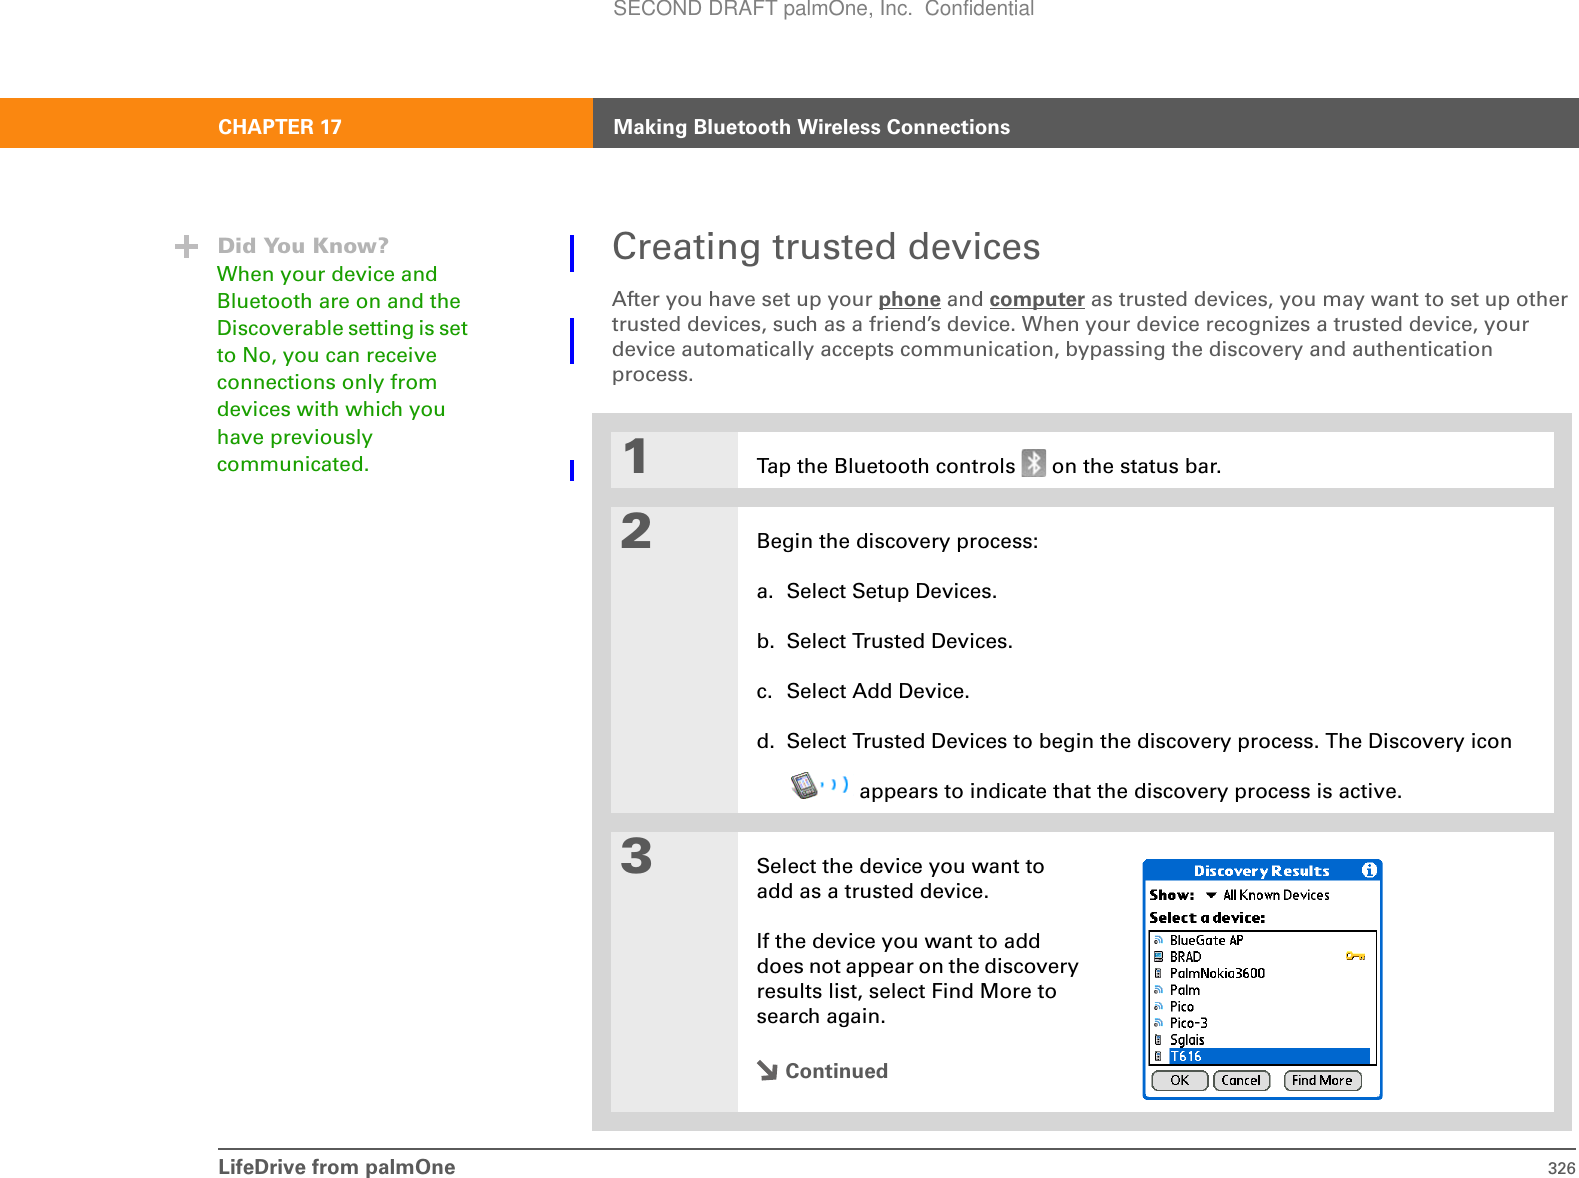
![LifeDrive from palmOne 327CHAPTER 17 Making Bluetooth Wireless Connections4Enter the same passkey on your device and the other device and select OK. Some Bluetooth devices have a built-in passkey; others enable you to choose the passkey; see the documentation included with your Bluetooth device for information. In either case you must use the same passkey on both the device and your device. Many phones also require you to put the phone into a mode where it can accept a key exchange for bonding in a trusted pair. See the documentation included with your phone for information.5Select Done.DoneTipYou can delete a trusted device or view the details about a trusted device, such as the device address and your most recent connection. In Bluetooth Manager, select Setup Devices, and then select Trusted Devices. Select the appropriate device and select Details.IMPORTANT[!]SECOND DRAFT palmOne, Inc. Confidential](https://usermanual.wiki/Palm/830.User-Manual-1-of-2/User-Guide-543159-Page-350.png)
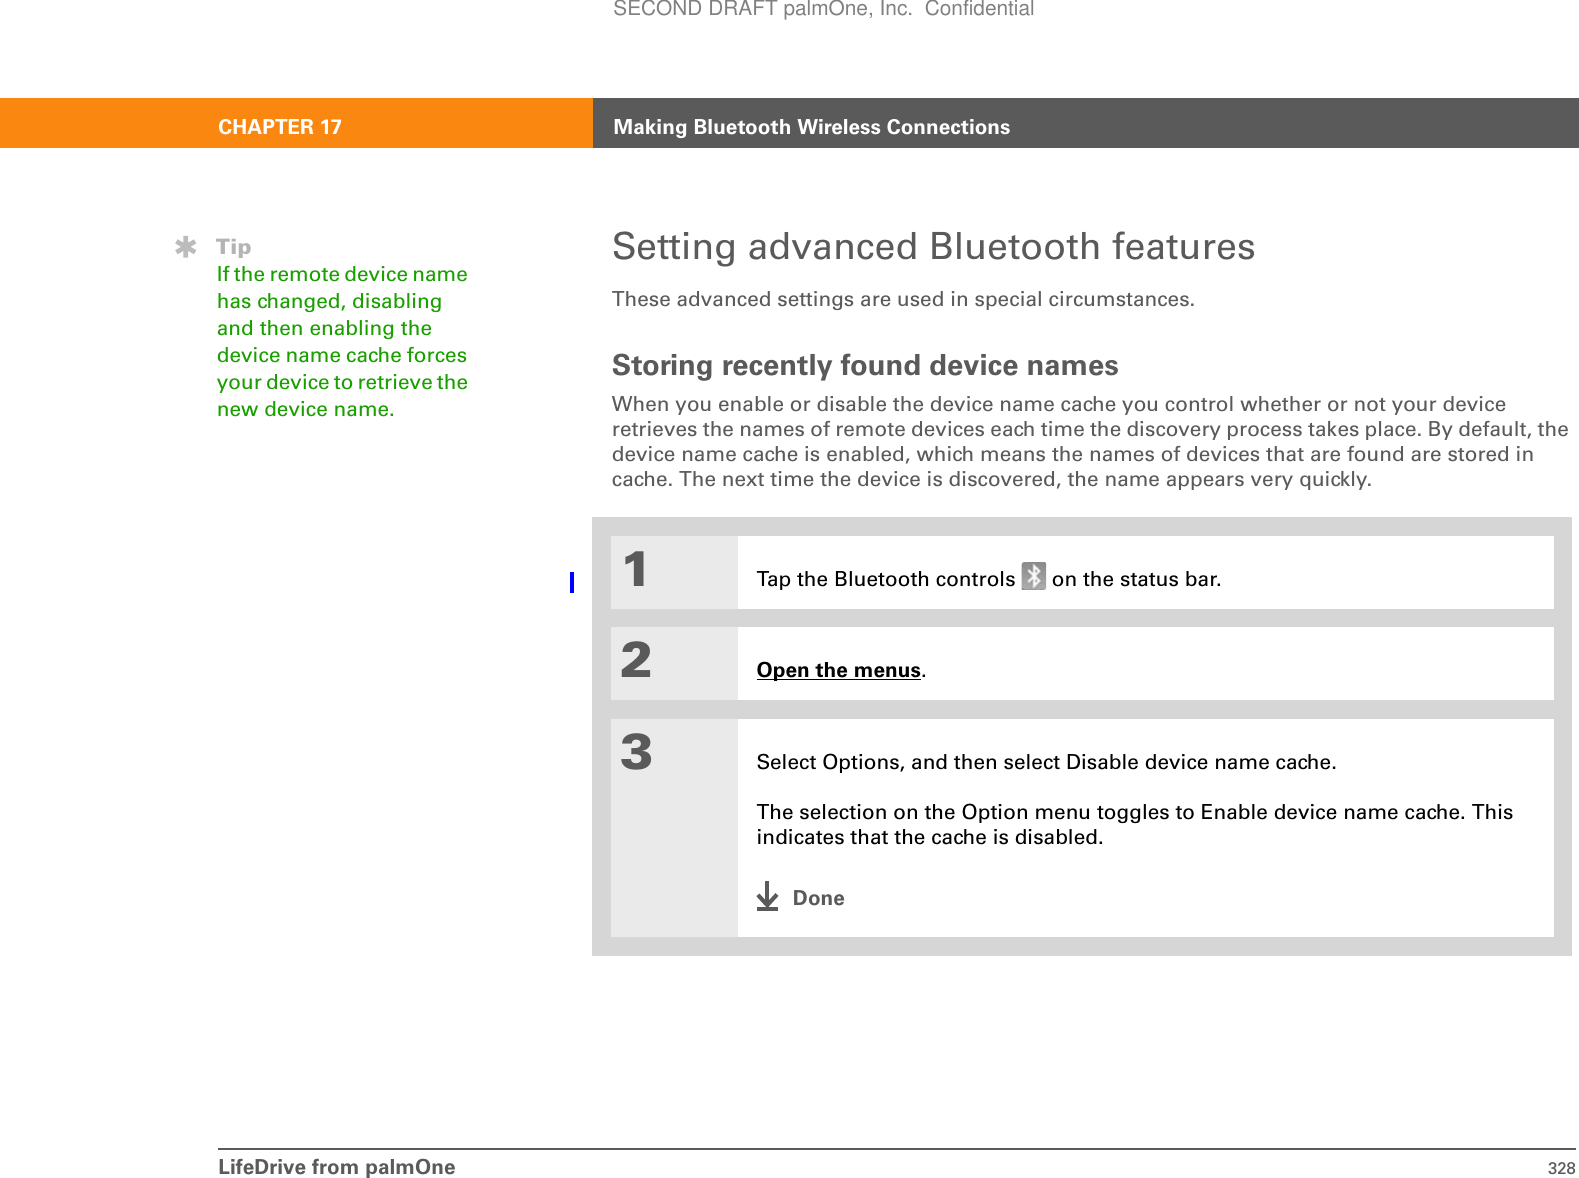
![LifeDrive from palmOne 329CHAPTER 17 Making Bluetooth Wireless ConnectionsAllowing your device to wake up when it is turned offYou can set your device to receive information through Bluetooth connections when your device is turned off. The radio remains on, but your device is not discoverable. For another Bluetooth device or application to wake up your device, it must know your device name. This limits the connections to devices that are trusted or that have connected with you before.01Tap the Bluetooth controls on the status bar.2Open the menus. 3Select Options, and then select Allow wakeup. The selection on the Option menu toggles to Do not allow wakeup indicating that Allow Wakeup is enabled.Enabling the Allow Wakeup setting uses battery power even when your device is turned off. Be sure to monitor your battery level.DoneIMPORTANT[!]SECOND DRAFT palmOne, Inc. Confidential](https://usermanual.wiki/Palm/830.User-Manual-1-of-2/User-Guide-543159-Page-352.png)
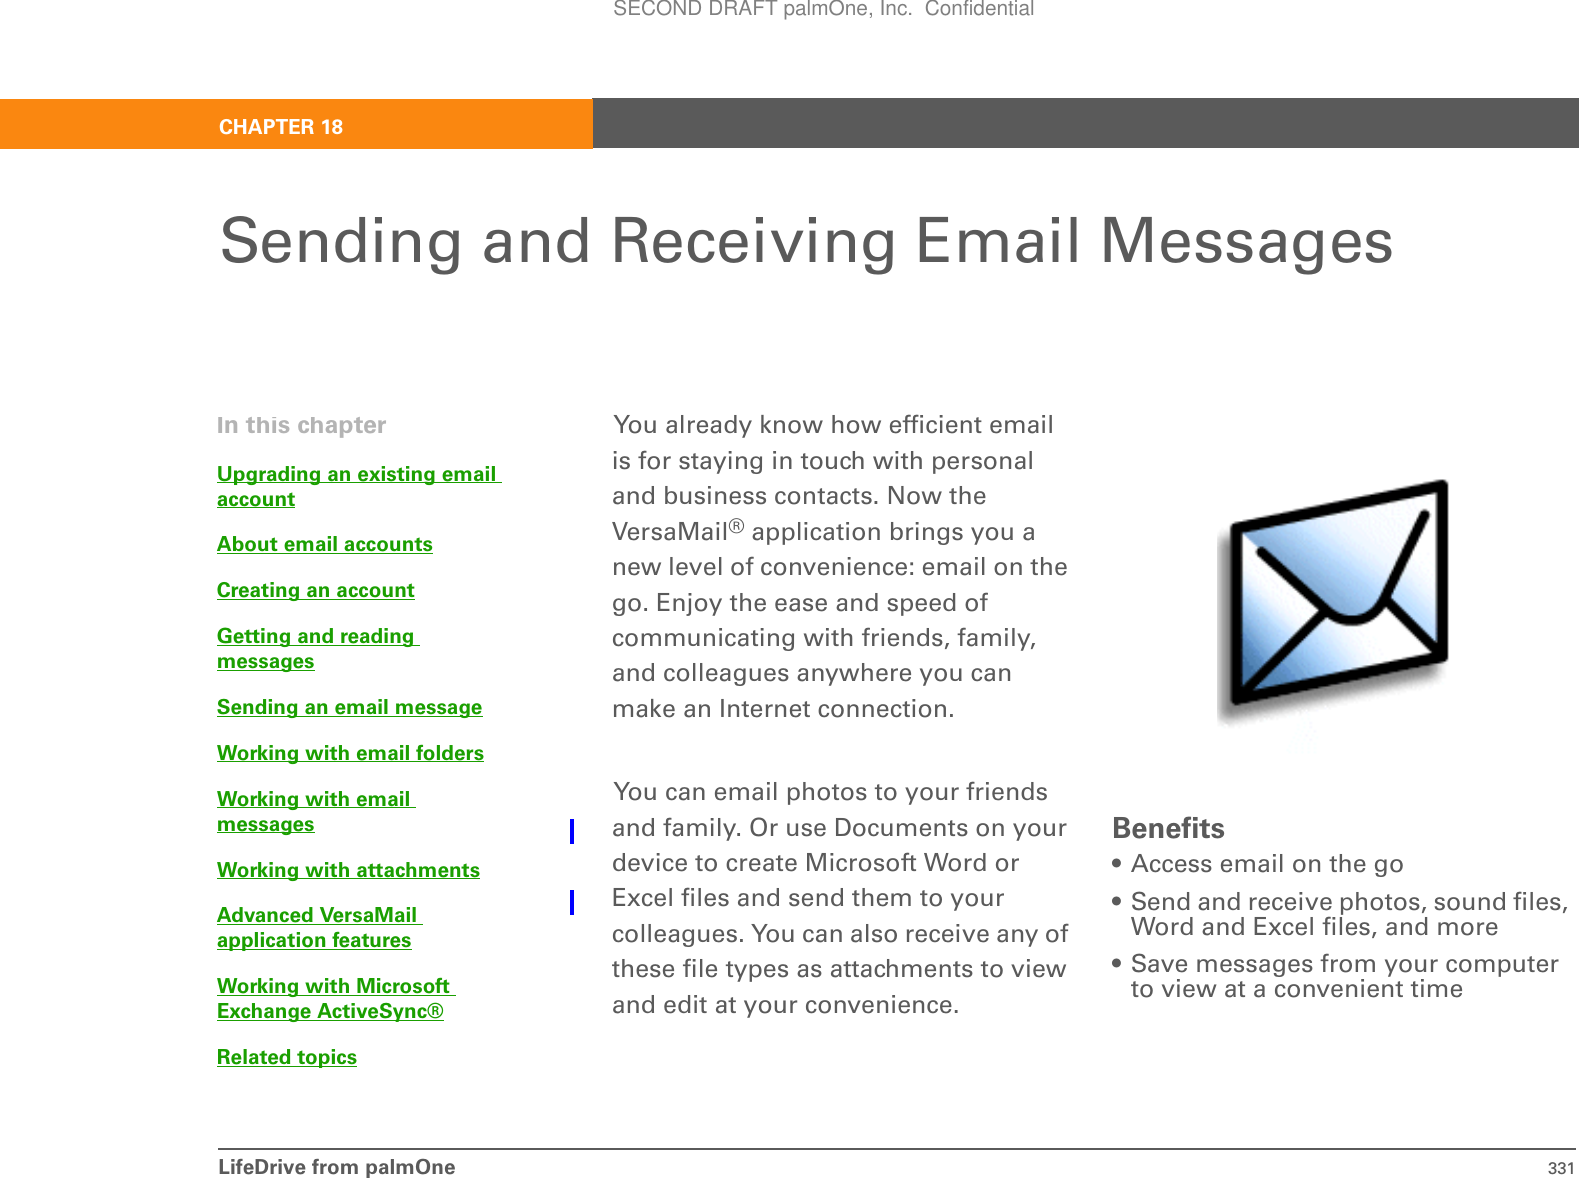
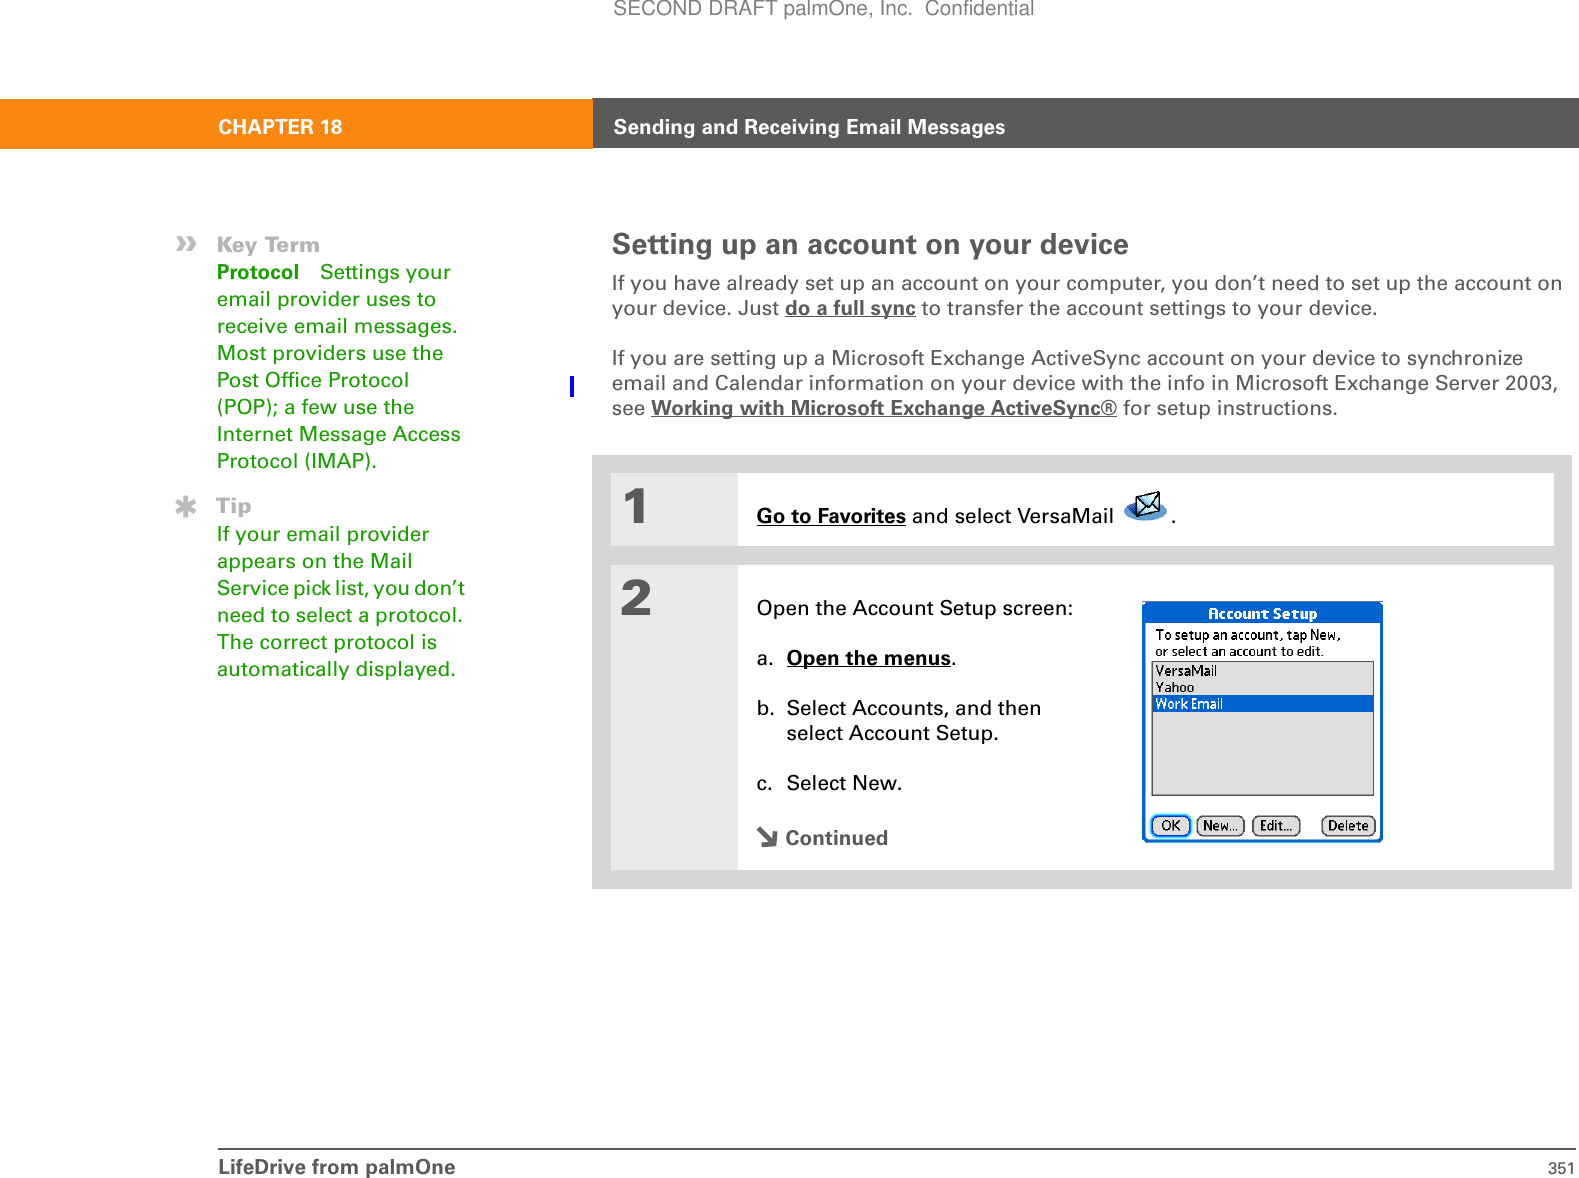
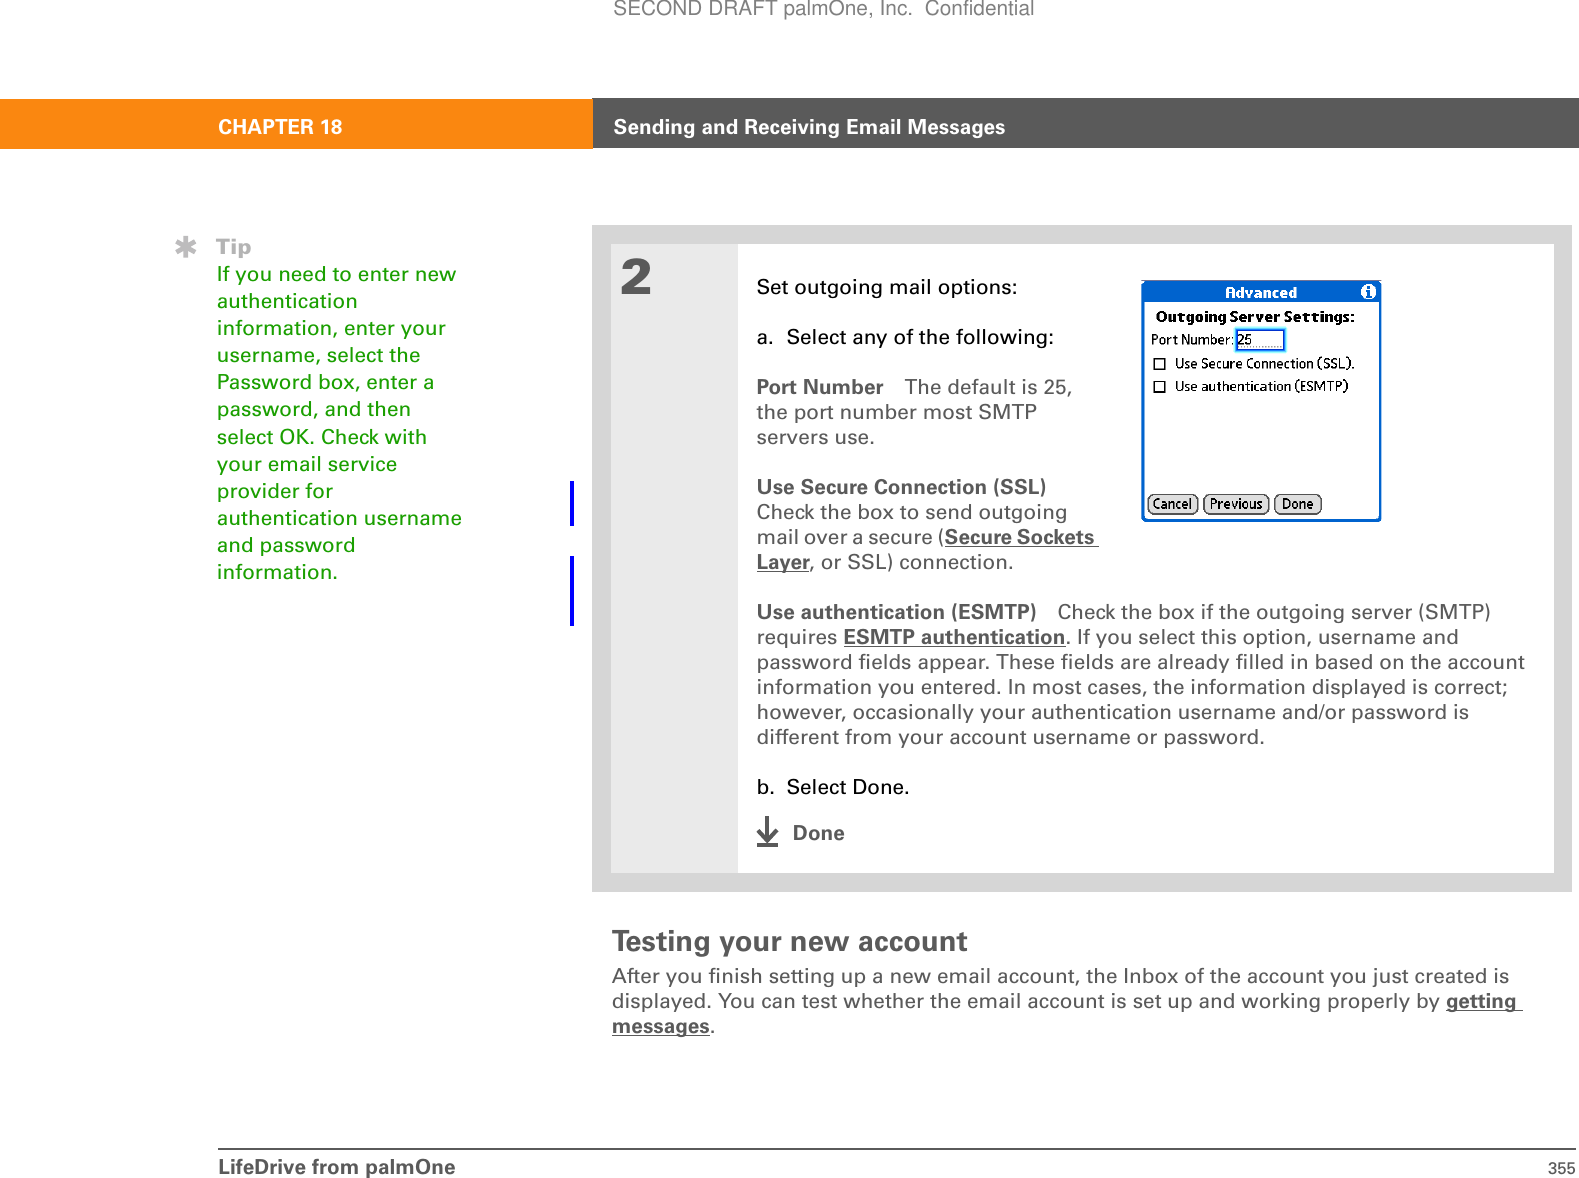
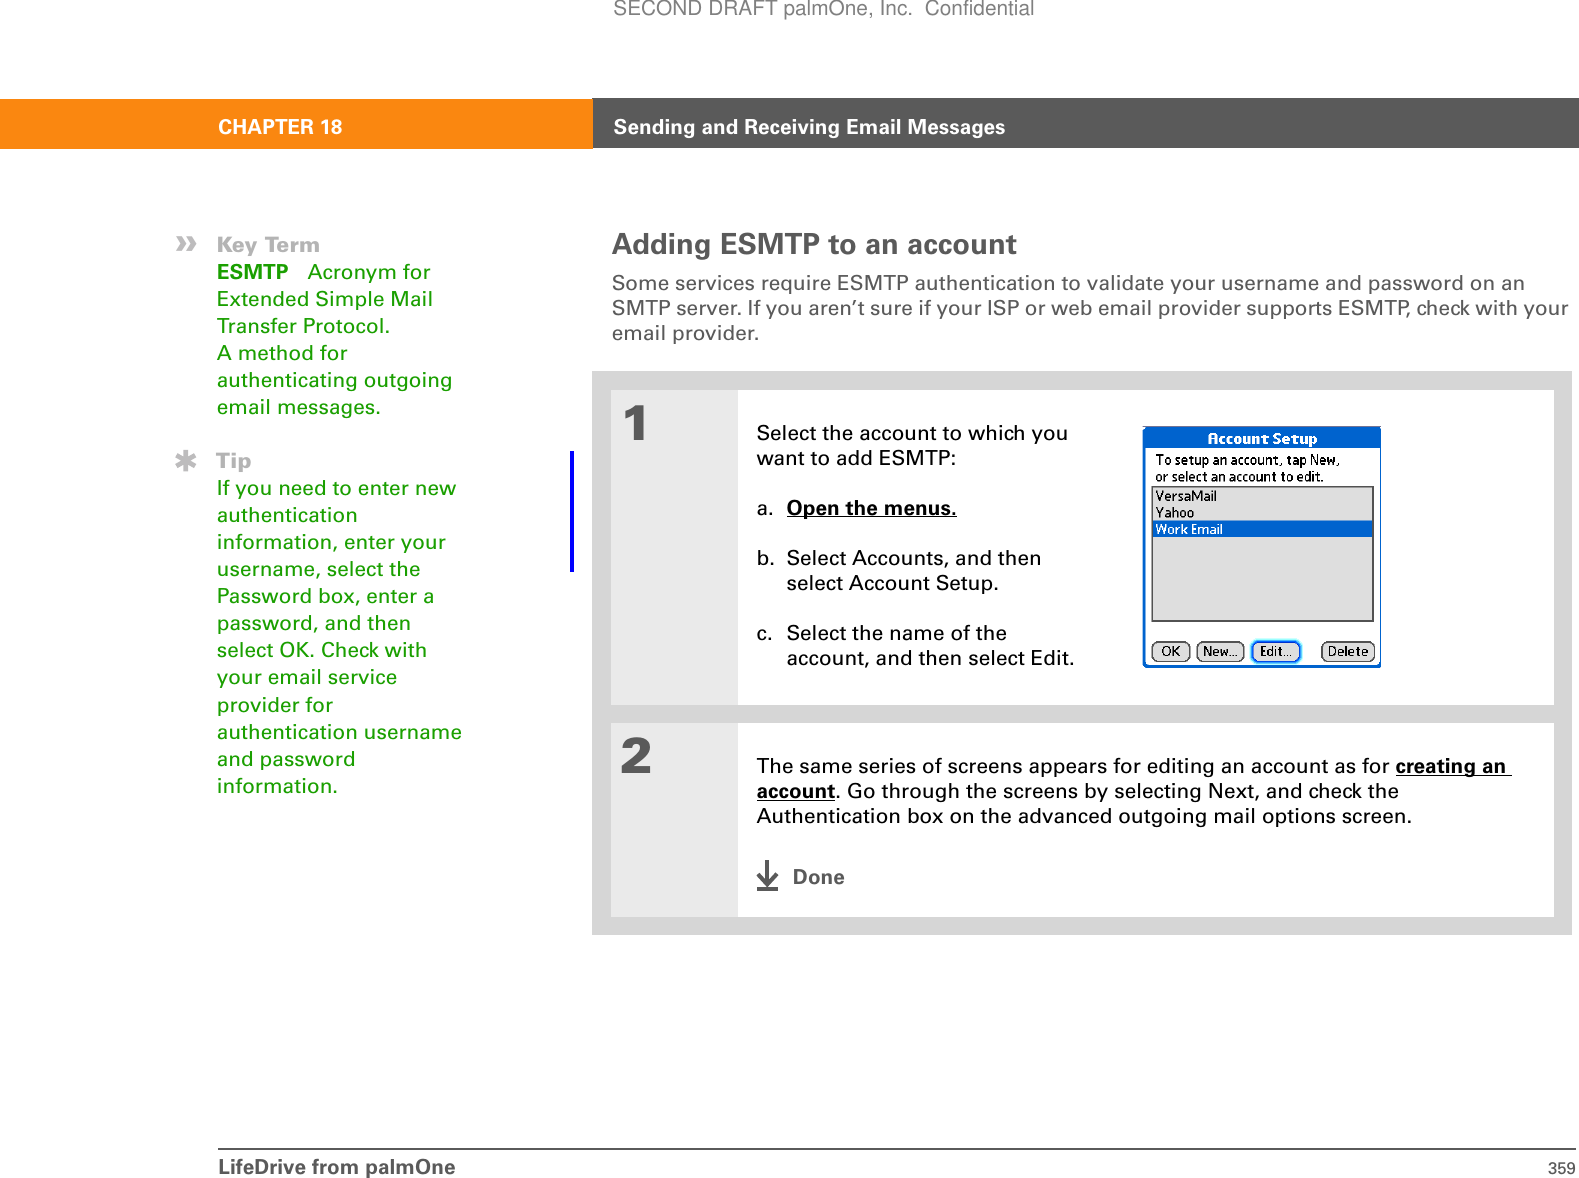
![LifeDrive from palmOne 333CHAPTER 18 Sending and Receiving Email MessagesAbout email accountsThe VersaMail application is software that lets you use your device to access email from an account with an email provider (either an Internet service provider, or ISP, such as Earthlink or Yahoo!, or a wireless carrier) or from your corporate email account. For each email account you want to access, you must set up an account in VersaMail. For example, if you have an Earthlink account and a corporate account, set up one account for each in VersaMail. After you set up an account, you can send and receive email directly to and from your device wirelessly. Or you can download new messages from your computer to your device—and upload messages from your device to be sent from your computer’s email program—when you synchronize. You must have an account with an email provider or a corporate account. VersaMail works with these accounts to transfer messages to and from your device. The application is not an email service provider.Using an email providerIf you are setting up a new email account and have a well-known email provider (ISP or wireless carrier) such as Earthlink or Yahoo!, many of the settings you need during account setup are automatically filled in. For other ISPs, you need the following information:• Your email address and password• The protocol used for incoming mail, such as Post Office Protocol (POP) or Internet Message Access Protocol (IMAP) Some free web-based email providers such as Hotmail do not support either the POP or the IMAP protocol. You cannot use VersaMail to download messages to your device from an account with one of these providers.• The name of the incoming mail serverDid You Know?You can create up to eight email accounts.Did You Know?The VersaMail application provides strong 128-bit AES encryption for your password.TipGo to your email provider’s website or contact their customer support to obtain the setup information you need.IMPORTANT[!]NOTESECOND DRAFT palmOne, Inc. Confidential](https://usermanual.wiki/Palm/830.User-Manual-1-of-2/User-Guide-543159-Page-356.png)
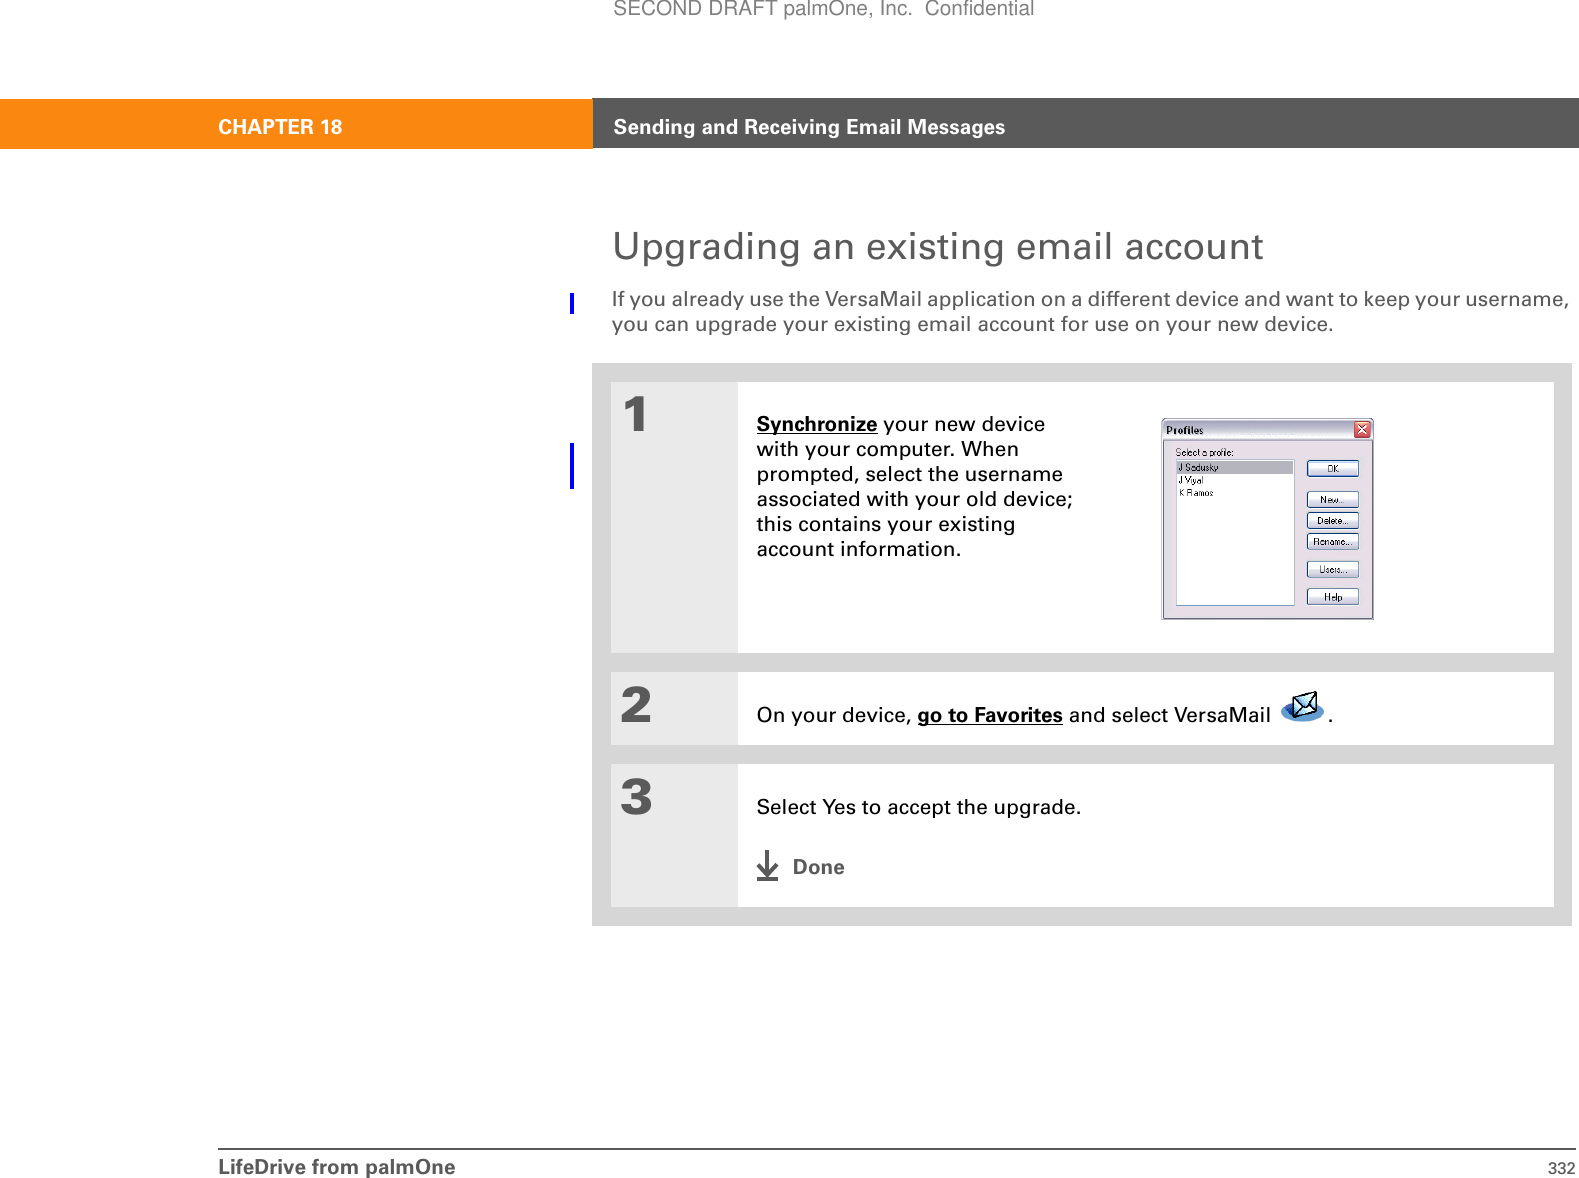
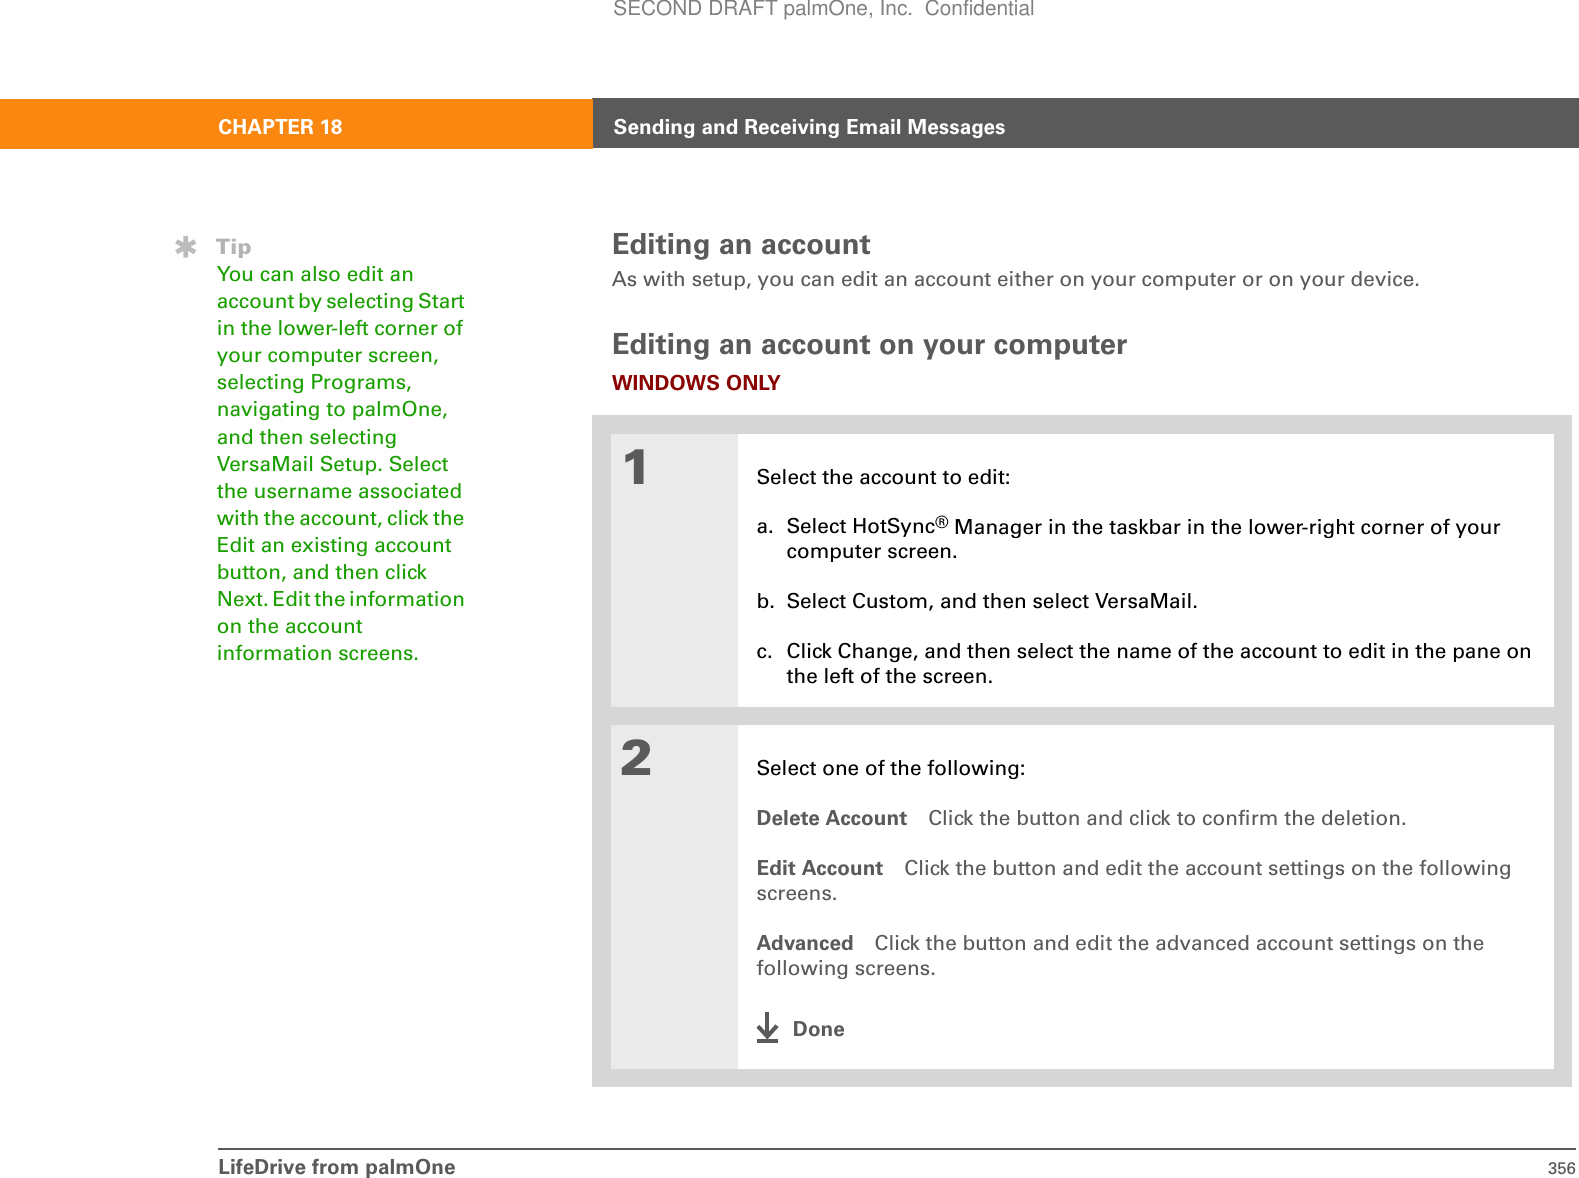
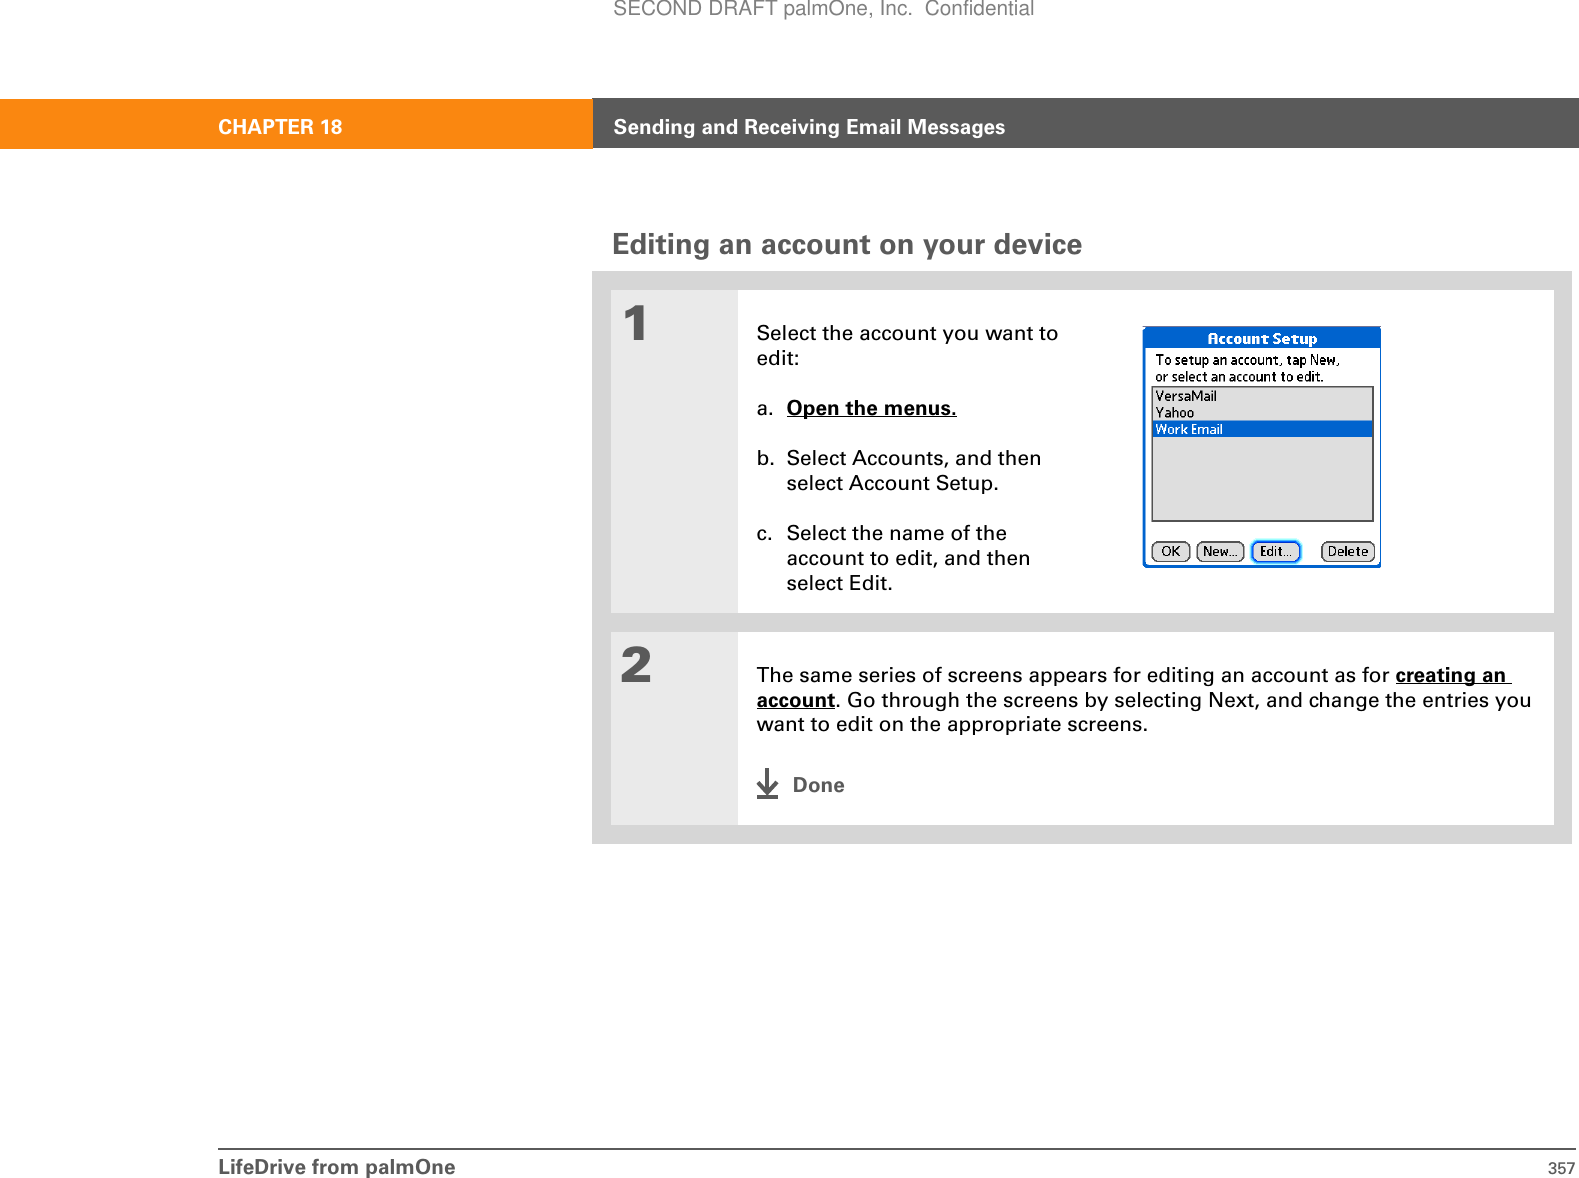
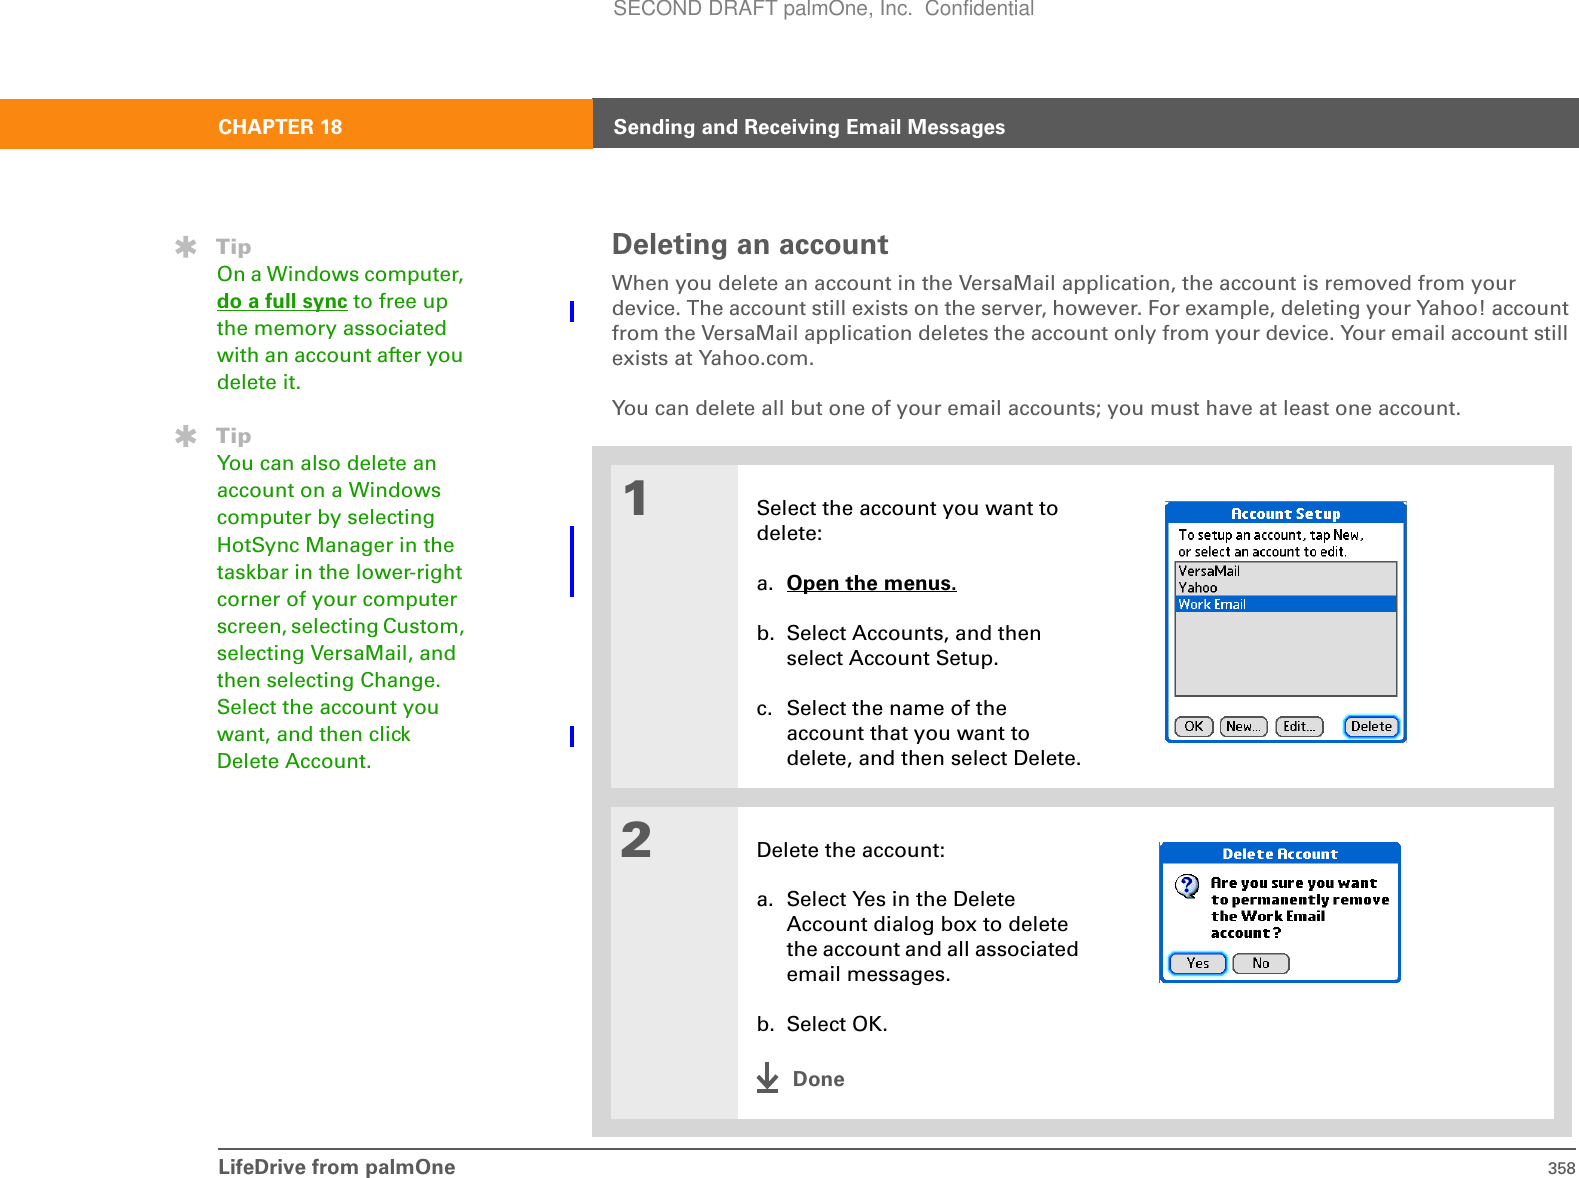
![LifeDrive from palmOne 337CHAPTER 18 Sending and Receiving Email MessagesCreating an accountBefore you can use the VersaMail application with a given email account, you need to set up the account in VersaMail. If you have multiple email accounts, you must set up a VersaMail account for each one. You have three setup options:• On a Windows computer, if the email account is already set up on your computer—for example, if you use Outlook Express on your computer to access your Earthlink account—you can transfer the account settings to your device in just a few steps.• On a Windows computer, if this is a new account, you can quickly set up the account on your computer and synchronize the information to your device. The steps for setting up an account on your computer depend on whether you are using a common email provider such as Earthlink or Yahoo! or whether you are using a less common provider.• For either a new or an existing account, you can set up the account directly on your device.If you are setting up a Microsoft Exchange ActiveSync® account to synchronize email and Calendar information with info in Microsoft Exchange Server 2003, see Working with Microsoft Exchange ActiveSync® for setup instructions.You can open VersaMail account setup in one of two ways:• During software CD installation, select the option to set up your email software on the final installation screen.• From the Start menu, select Programs, navigate to the palmOne program group, and then select VersaMail Setup. If you plan to synchronize your new device using an existing username from another device, you must do so before you enter your email account information in VersaMail. If you enter the email account information first and then synchronize your device with your computer using an existing username, the email account information you entered is overwritten.IMPORTANT[!]SECOND DRAFT palmOne, Inc. Confidential](https://usermanual.wiki/Palm/830.User-Manual-1-of-2/User-Guide-543159-Page-360.png)
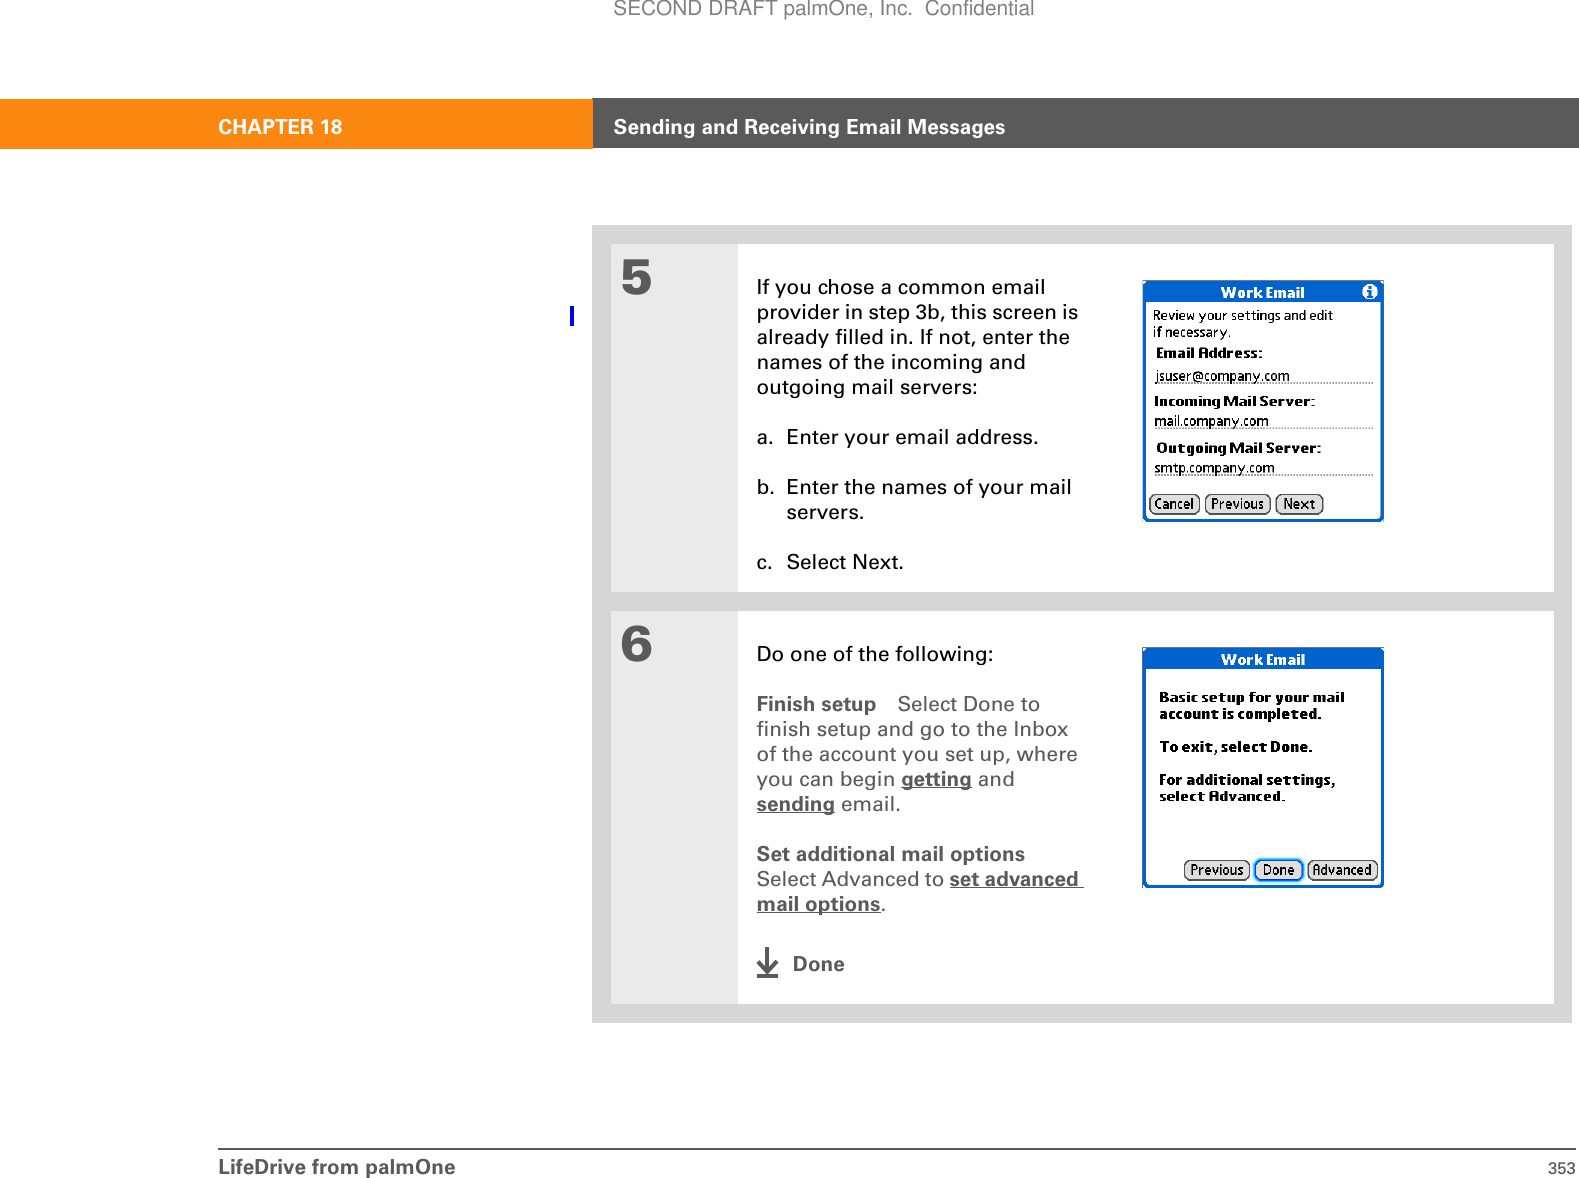
![LifeDrive from palmOne 339CHAPTER 18 Sending and Receiving Email Messages6[ & ] OPTIONAL Set up other accounts:a. Select the option to set up another account, and then click Next.b. Repeat steps 2 through 5 for each account you want to set up. When you have set up the last account, go to the next step.7Finish setting up accounts:a. Select the option to synchronize information for this account, and then click Next.b. Click Finish.8Do a full sync to transfer all account information to your device.DoneSECOND DRAFT palmOne, Inc. Confidential](https://usermanual.wiki/Palm/830.User-Manual-1-of-2/User-Guide-543159-Page-362.png)
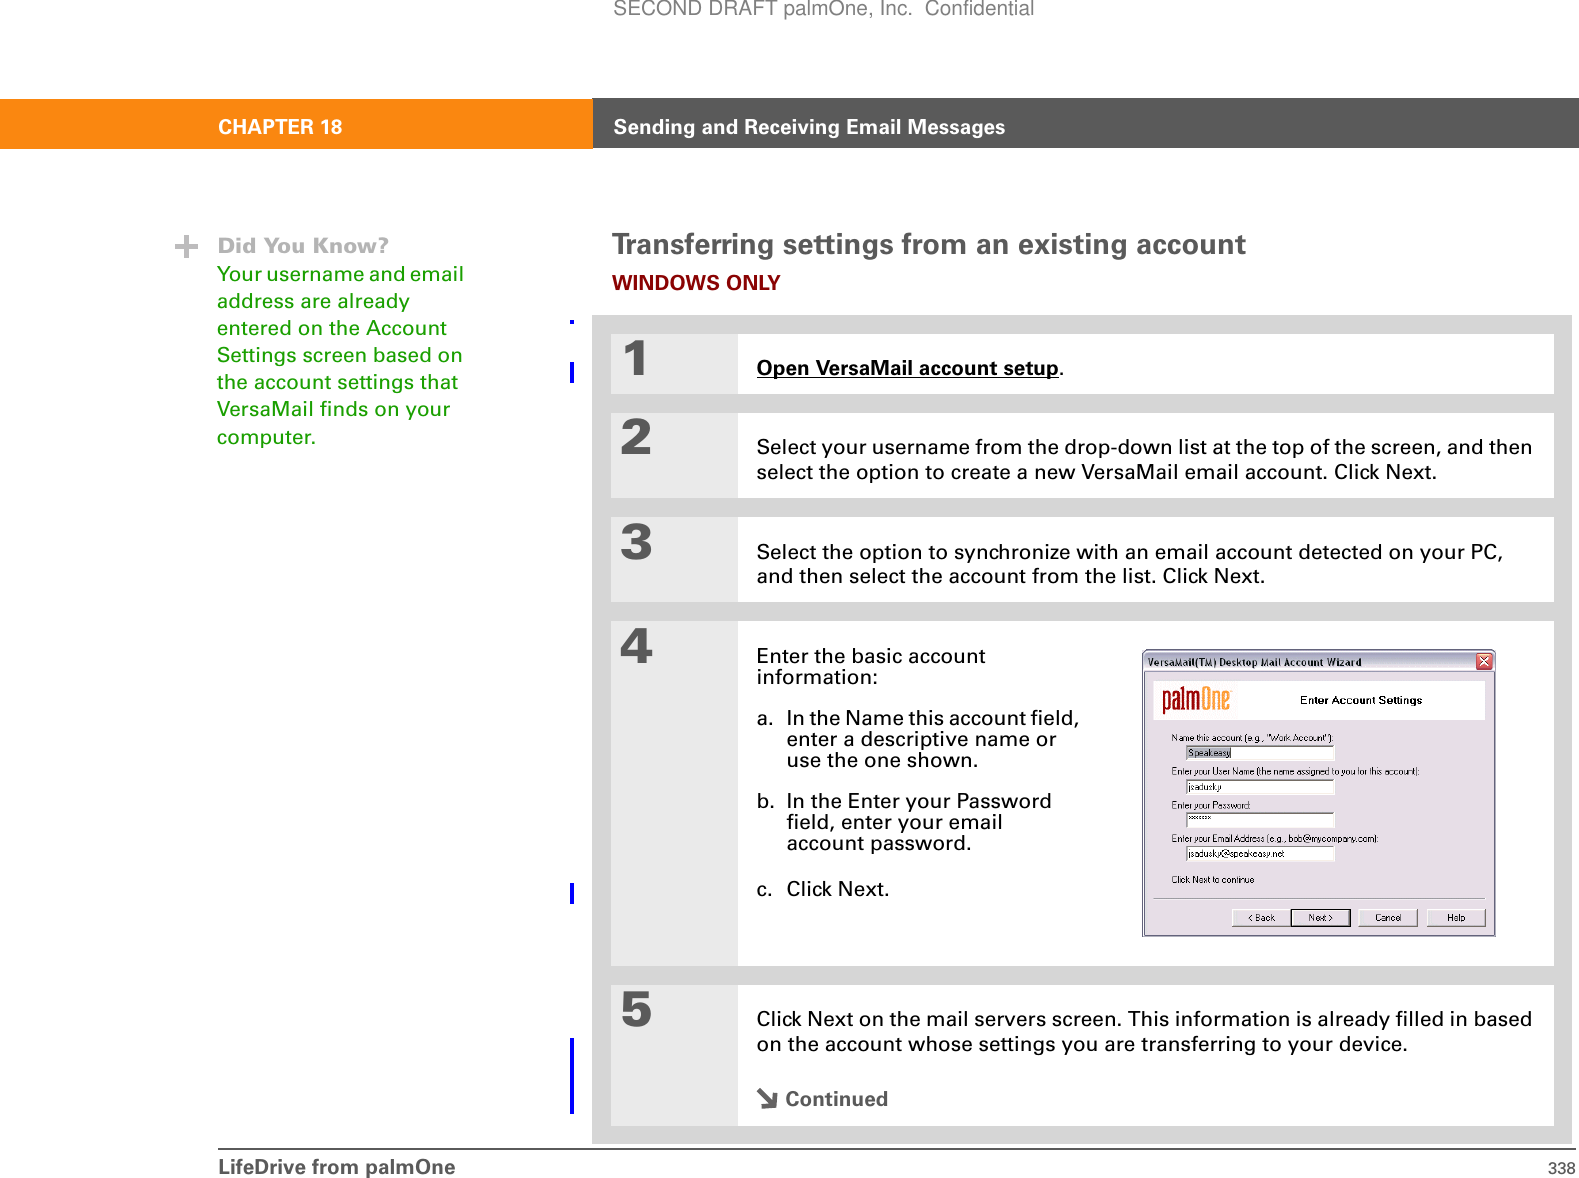
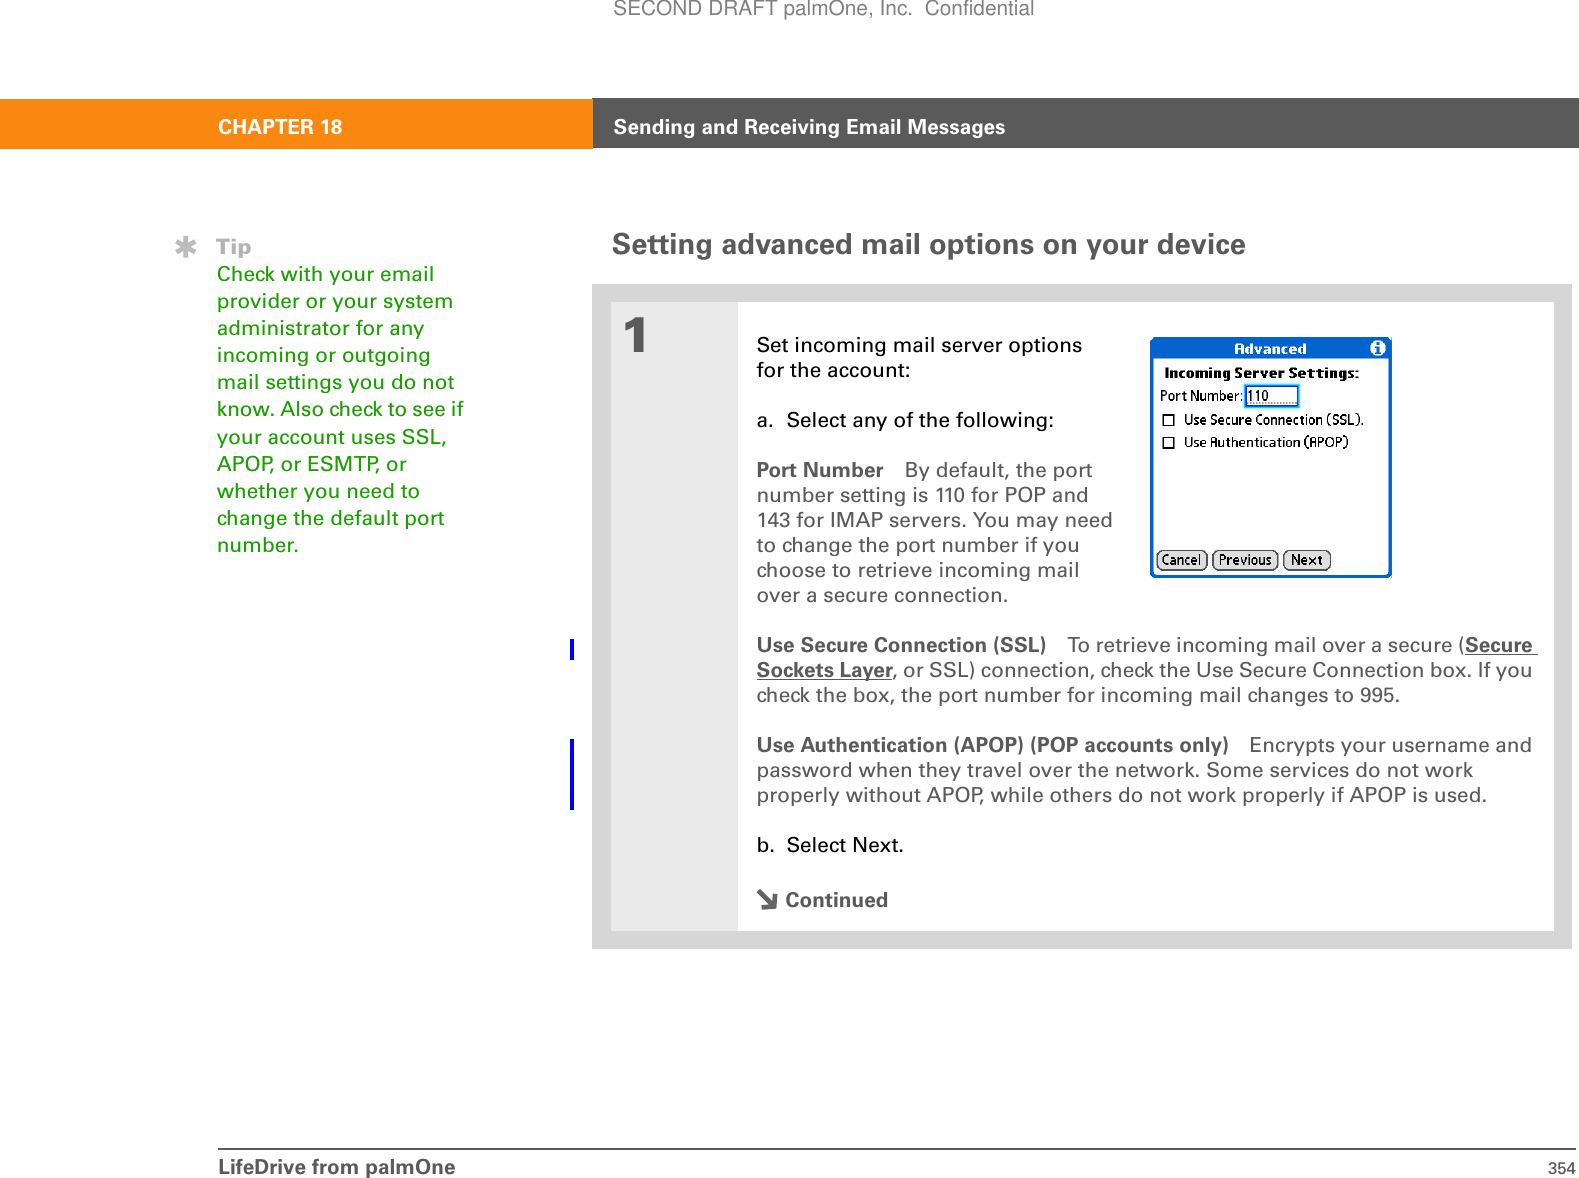
![LifeDrive from palmOne 341CHAPTER 18 Sending and Receiving Email Messages4Enter the basic account information:a. Enter a descriptive name for the account or use the one shown.b. Enter your account username and password. Your email address is entered automatically based on the username you enter.5Click Next on the mail servers screen. This information is already filled in based on the mail service you selected.6[ & ] OPTIONAL Do one of the following:•To enter advanced settings for this account, click Advanced Settings.• To test the account settings you have entered, click Test My Settings. Click OK after settings have been tested.7Click Next.ContinuedDid You Know?Your incoming and outgoing server settings and whether the account needs ESMTP authentication are already entered based on the account type you select.SECOND DRAFT palmOne, Inc. Confidential](https://usermanual.wiki/Palm/830.User-Manual-1-of-2/User-Guide-543159-Page-364.png)
![LifeDrive from palmOne 342CHAPTER 18 Sending and Receiving Email Messages8[ & ] OPTIONAL Set up other accounts:a. Select the option to set up another account, and then click Next.b. Repeat steps 2 through 5 for each account you want to set up. When you have set up the last account, go to step 9.9Finish setting up accounts:a. Select the option to synchronize information for this account, and then click Next.b. Click Finish.10 Do a full sync to transfer all account information to your device.DoneSECOND DRAFT palmOne, Inc. Confidential](https://usermanual.wiki/Palm/830.User-Manual-1-of-2/User-Guide-543159-Page-365.png)
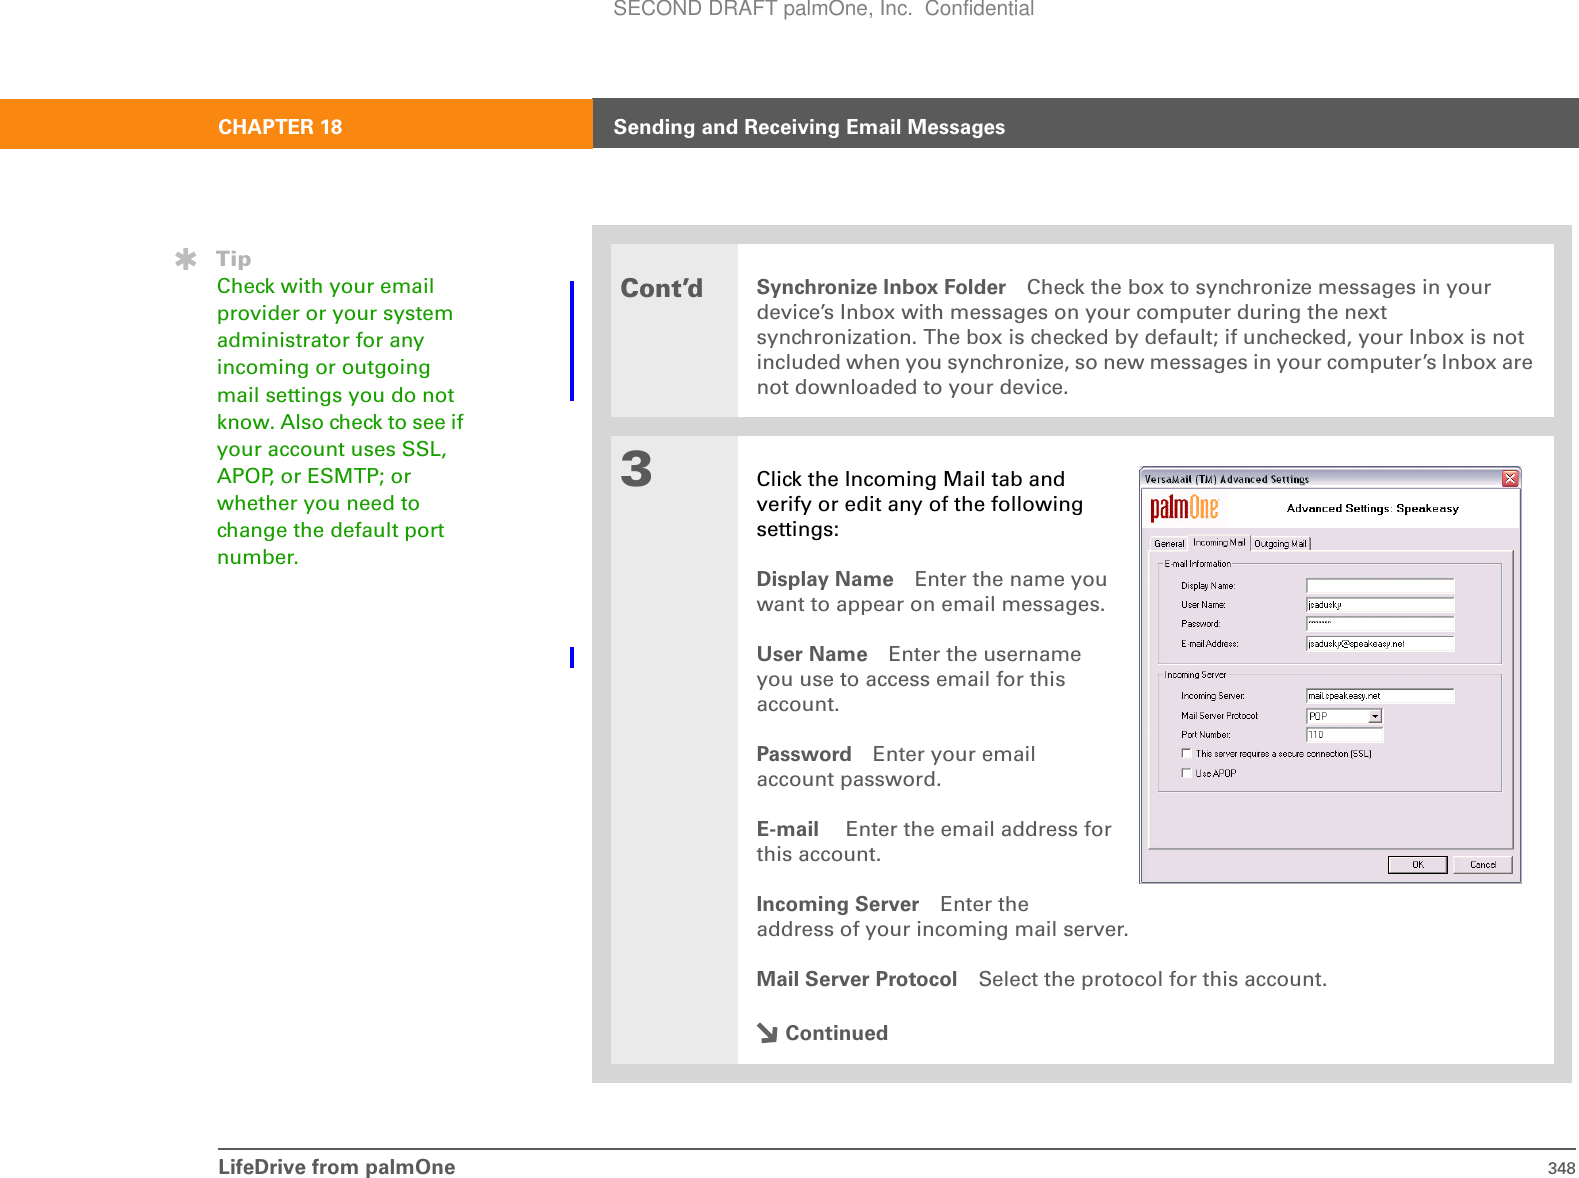
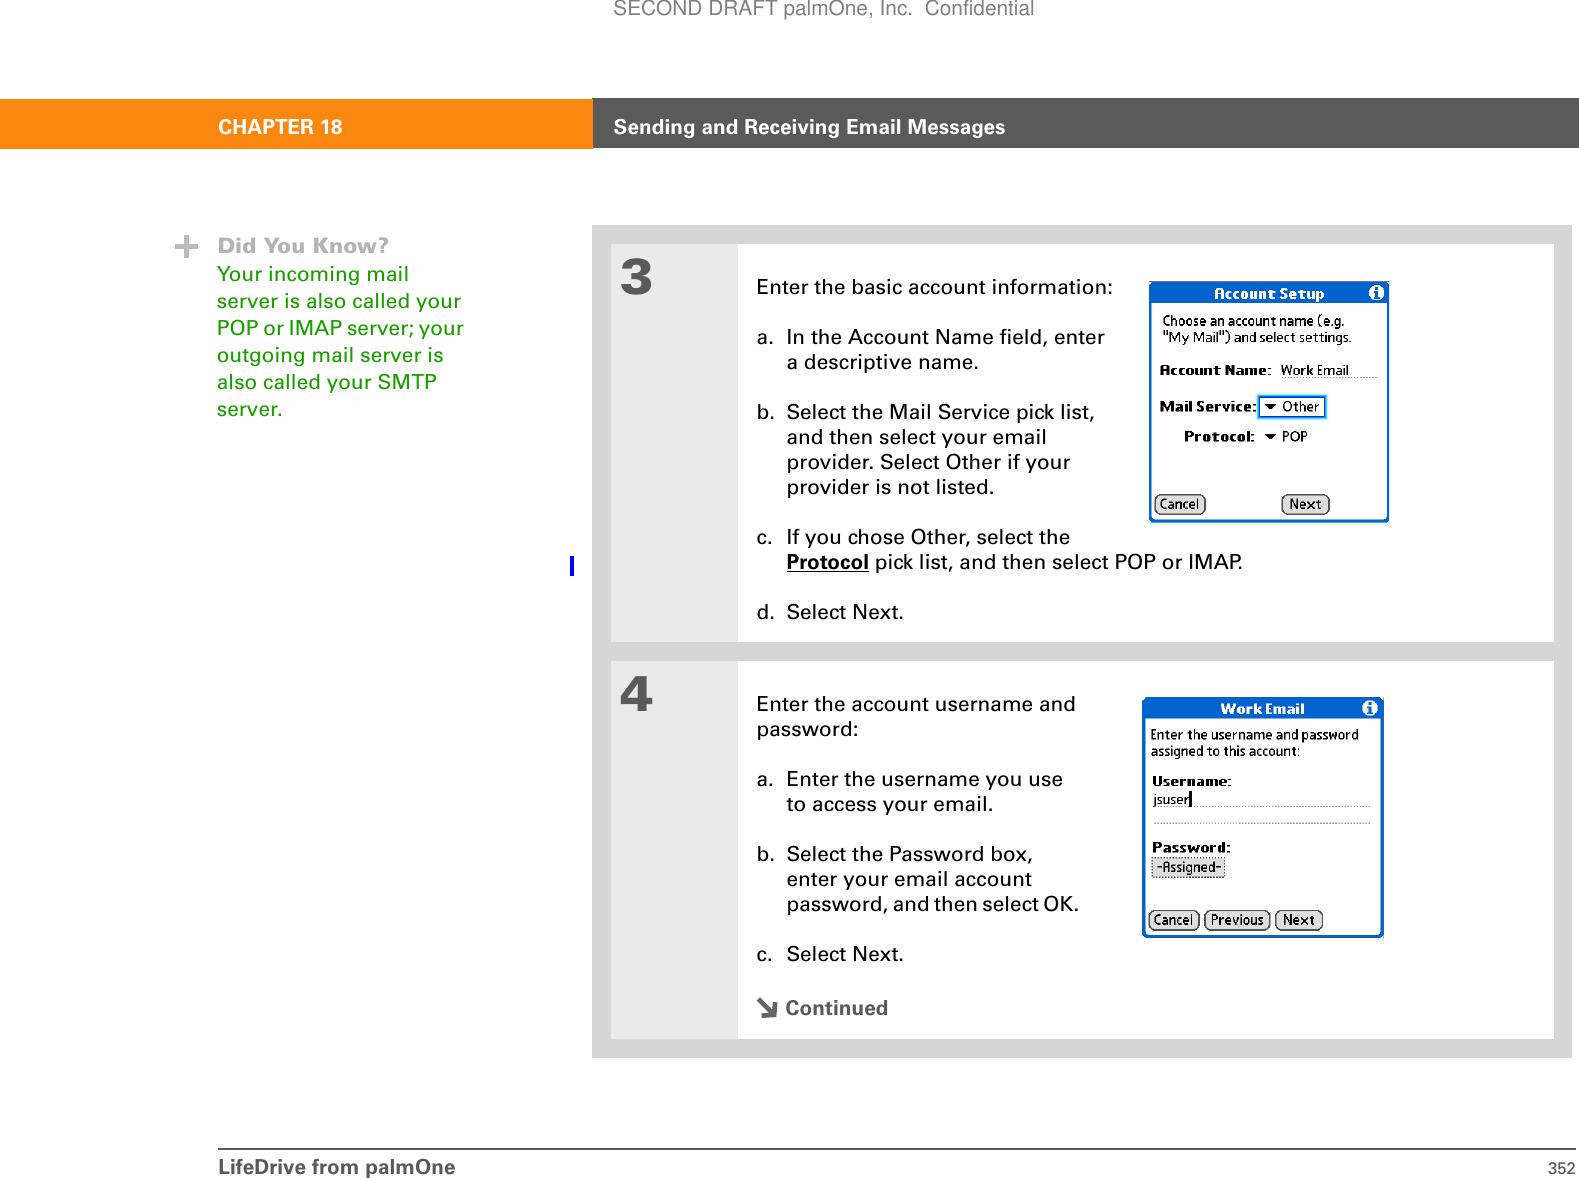
![LifeDrive from palmOne 344CHAPTER 18 Sending and Receiving Email Messages5Enter the basic account information:a. Enter a descriptive name for the account.b. Enter your account username and password.c. Enter your email address for this account.d. Click Next.6Enter the names of the incoming and outgoing mail servers for this account, whether the account requires Extended Simple Mail Transfer Protocol (ESMTP), and, if so, the username and password required for ESMTP. Check with your email service provider for this information.7[ & ] OPTIONAL Do one of the following:•To enter advanced settings for this account, click Advanced Settings.• To test the account settings you have entered, click Test My Settings. Click OK after settings have been tested.8Click Next.ContinuedDid You Know?Your incoming mail server is also called your POP or IMAP server; your outgoing mail server is also called your SMTP server.SECOND DRAFT palmOne, Inc. Confidential](https://usermanual.wiki/Palm/830.User-Manual-1-of-2/User-Guide-543159-Page-367.png)
![LifeDrive from palmOne 345CHAPTER 18 Sending and Receiving Email Messages9[ & ] OPTIONAL Set up other accounts:a. Select the option to set up another account, and then click Next.b. Repeat steps 2 through 5 for each account you want to set up. When you have set up the last account, go to step 10.10 Finish setting up accounts:a. Select the option to synchronize information for this account, and then click Next.b. Click Finish.11 Do a full sync to transfer all account information to your device.DoneSECOND DRAFT palmOne, Inc. Confidential](https://usermanual.wiki/Palm/830.User-Manual-1-of-2/User-Guide-543159-Page-368.png)
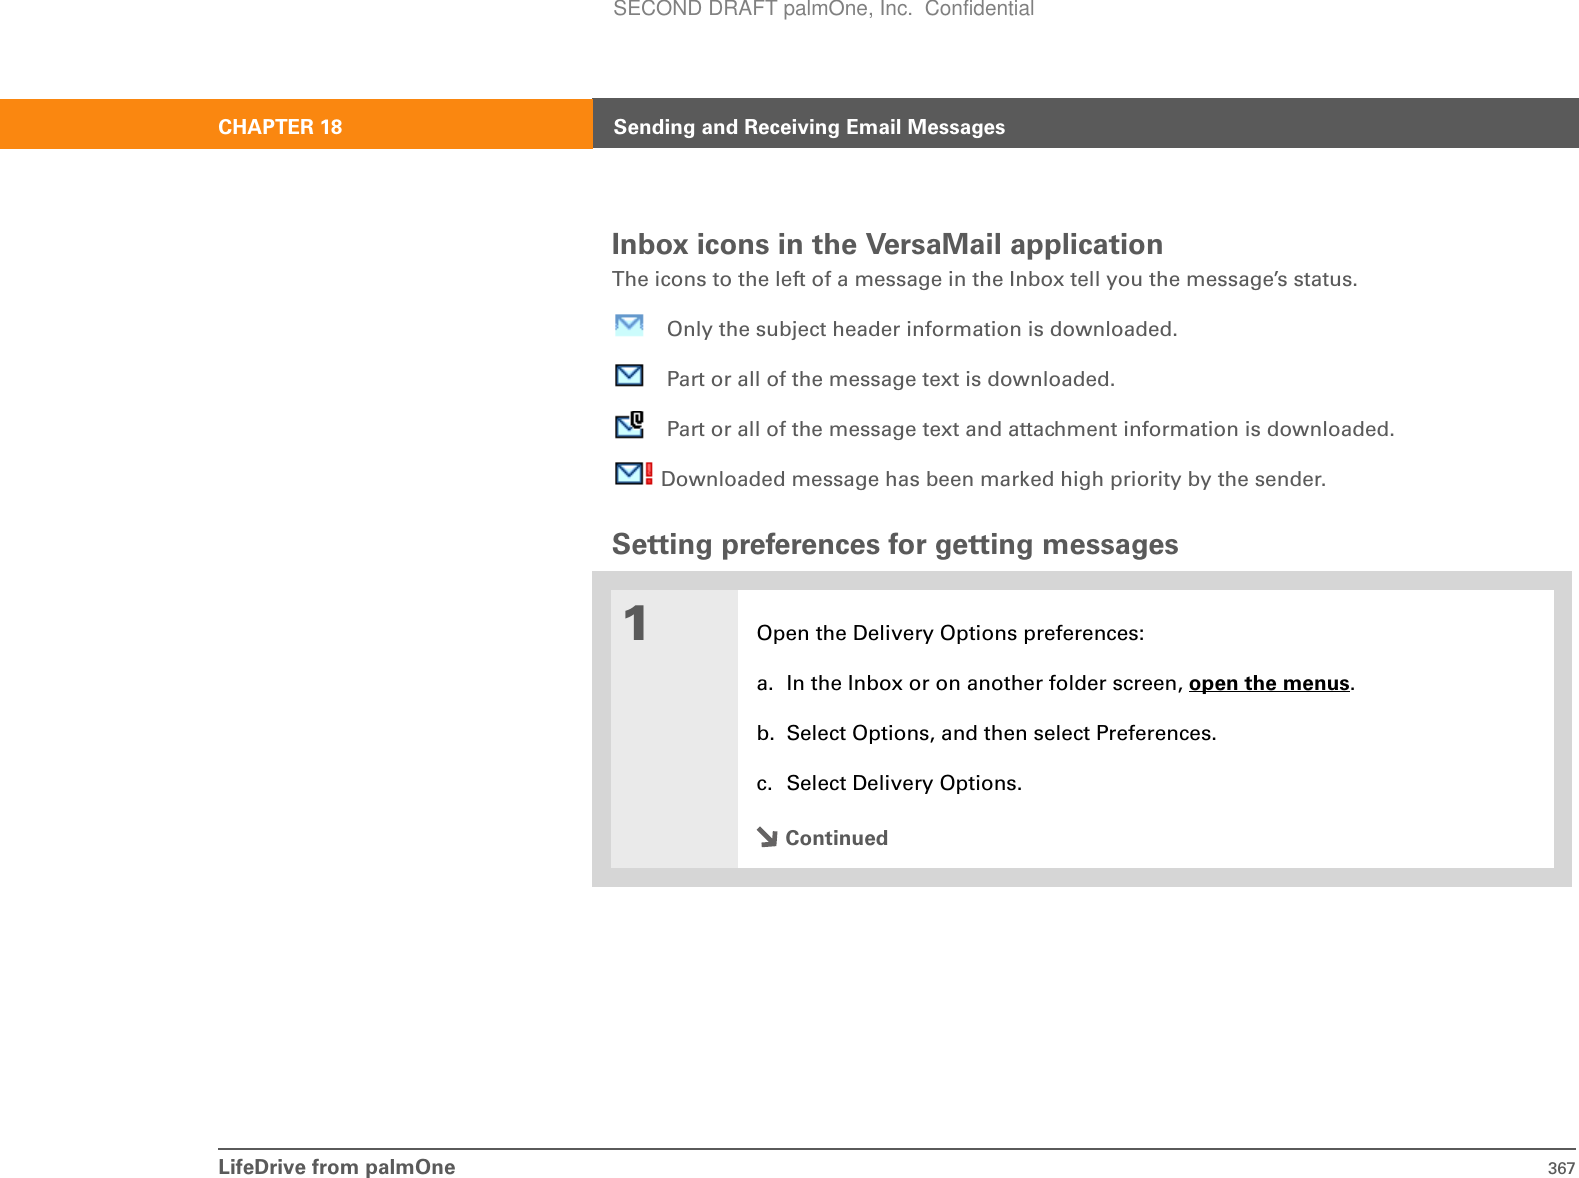
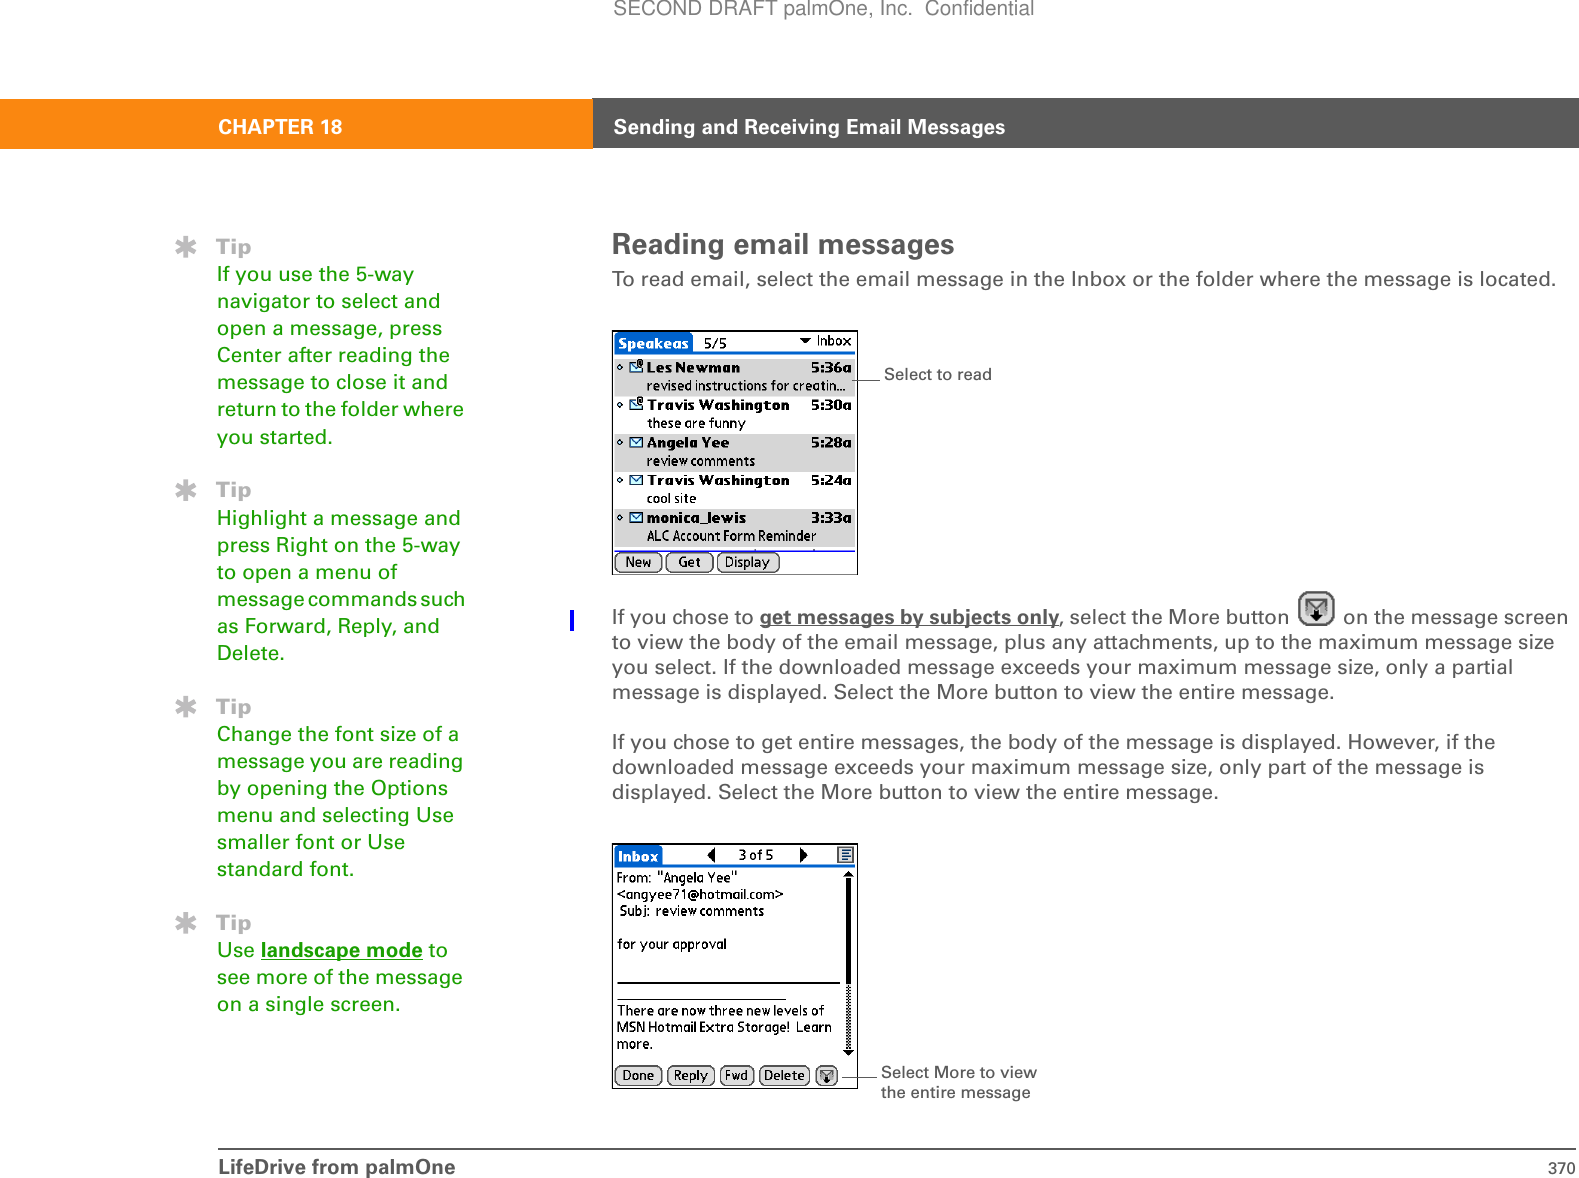
![LifeDrive from palmOne 360CHAPTER 18 Sending and Receiving Email MessagesGetting and reading messagesWhen you get messages, you can choose to see only the subjects of your email (which include message size, sender, and subject), so that you can decide if you want to download the entire message. Or you can choose to get the entire message for all of your incoming email. See Working with Microsoft Exchange ActiveSync® for special considerations when using a Microsoft Exchange ActiveSync account to synchronize email and Calendar information on your device with info in Microsoft Exchange Server 2003.01Go to Favorites and select VersaMail .2[ & ] OPTIONAL If you are using a VPN connection, connect to your VPN.3Choose whether to get message subjects only or full messages:a. Open the menus.b. Select Accounts, and then select the account you want.c. Select Get or Get & Send. ContinuedTipTo get and view messages for a different account, open the Accounts menu and select the account you want. Select the folders pick list in the upper-right corner of the screen, and then select Inbox to display messages in the Inbox.TipFor IMAP accounts, you have the option of wirelessly synchronizing mail folders if the Get Mail Options dialog box is displayed. NOTESECOND DRAFT palmOne, Inc. Confidential](https://usermanual.wiki/Palm/830.User-Manual-1-of-2/User-Guide-543159-Page-383.png)
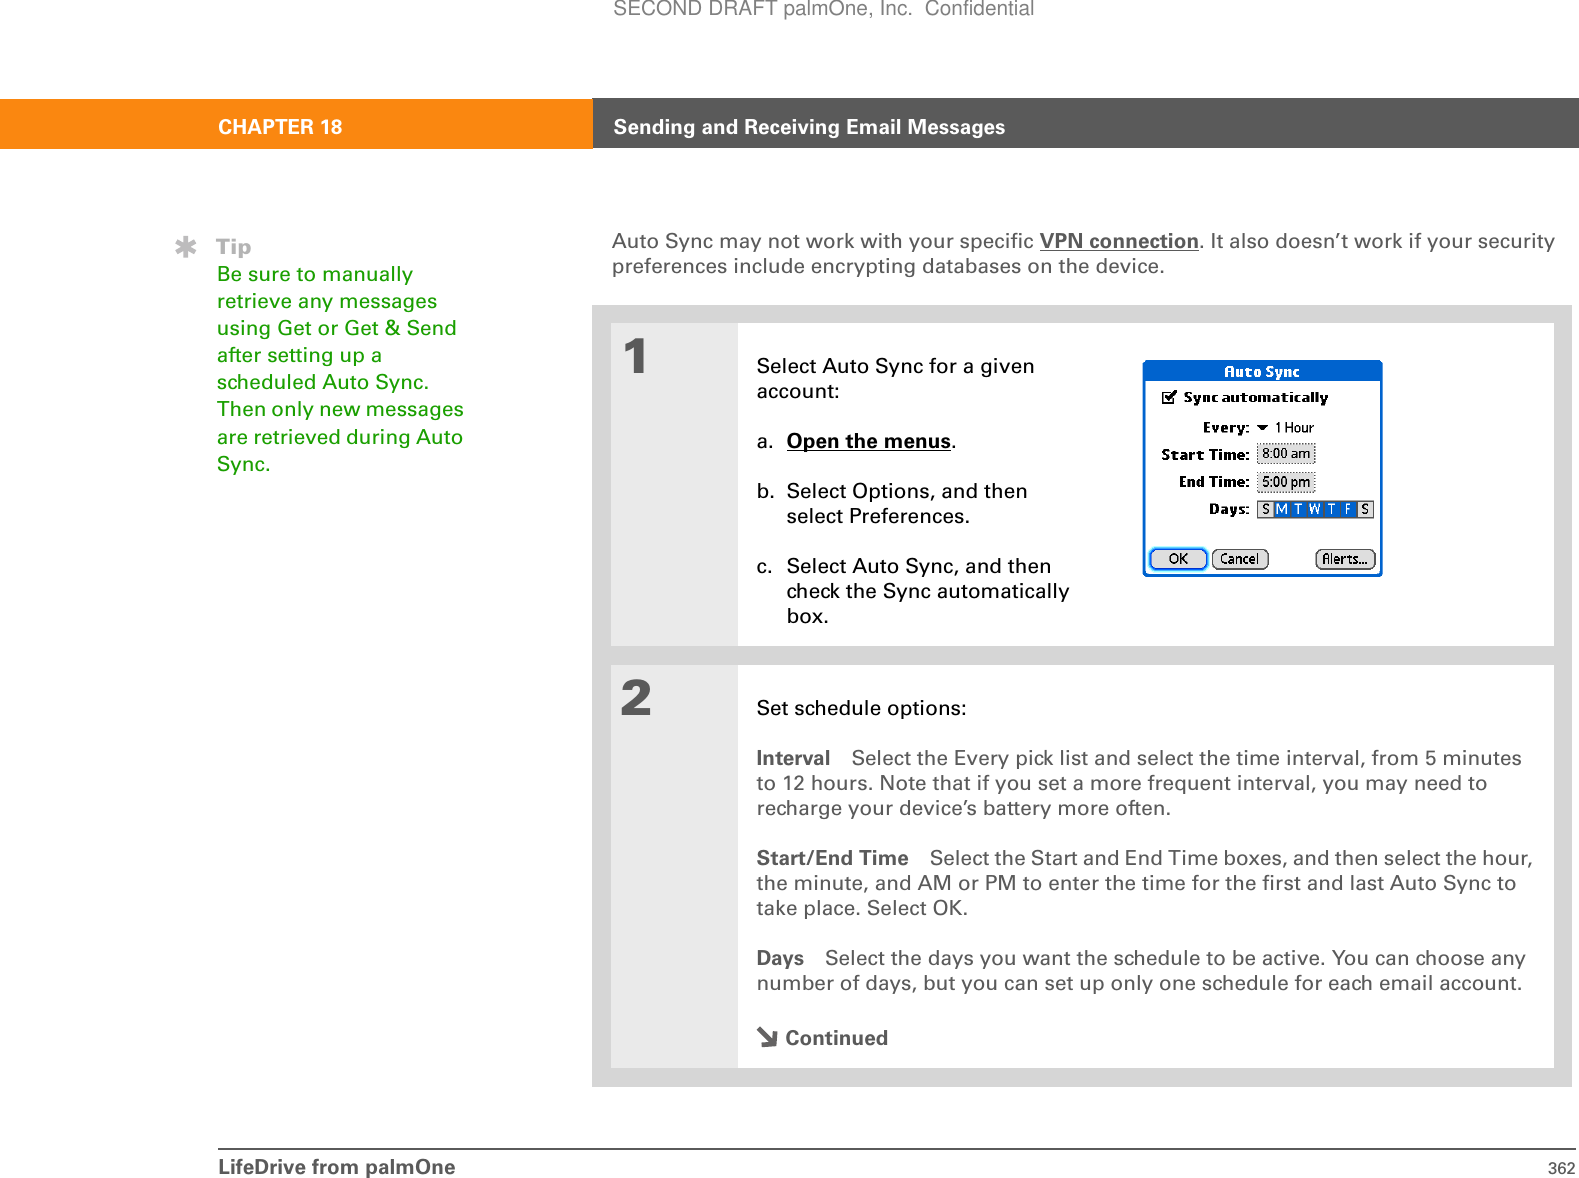
![LifeDrive from palmOne 361CHAPTER 18 Sending and Receiving Email MessagesAuto Sync with notificationYou can set up VersaMail to automatically download new email messages to your device with the Auto Sync feature.If Auto Sync downloads any new messages, your device lets you know with a sound or vibration. A list with the number of new messages retrieved appears on the Reminders screen.The Auto Sync feature downloads only the first 3KB of each message. You can select the More button on the message screen to download the entire message.Auto Sync recognizes any filter criteria you set up for downloading messages. Messages that don’t meet these filter criteria are not downloaded during Auto Sync. You need to turn off all filters and manually retrieve these messages. See Working with Microsoft Exchange ActiveSync® for special considerations when using Auto Sync with a Microsoft Exchange ActiveSync account to synchronize email and Calendar information with info in Microsoft Exchange Server 2003.Scheduling Auto SyncYou can set up different schedules for each of your email accounts, but you can set up only one schedule for each account. For example, if you set up a schedule to get mail on weekdays for your Yahoo! account, you can’t set up a separate schedule for weekends for that account.4[ & ] OPTIONAL If you have selected Ask Every Time in VersaMail Preferences, select whether to download subjects only or entire messages.A list of your messages appears in the Inbox.DoneNOTEDid You Know?If more than one scheduled Auto Sync happens at the same time (for example, for two separate email accounts), Auto Sync performs any past-due Auto Sync first, and then performs current Auto Sync retrievals according to the order of email accounts in the Accounts menu list.SECOND DRAFT palmOne, Inc. Confidential](https://usermanual.wiki/Palm/830.User-Manual-1-of-2/User-Guide-543159-Page-384.png)
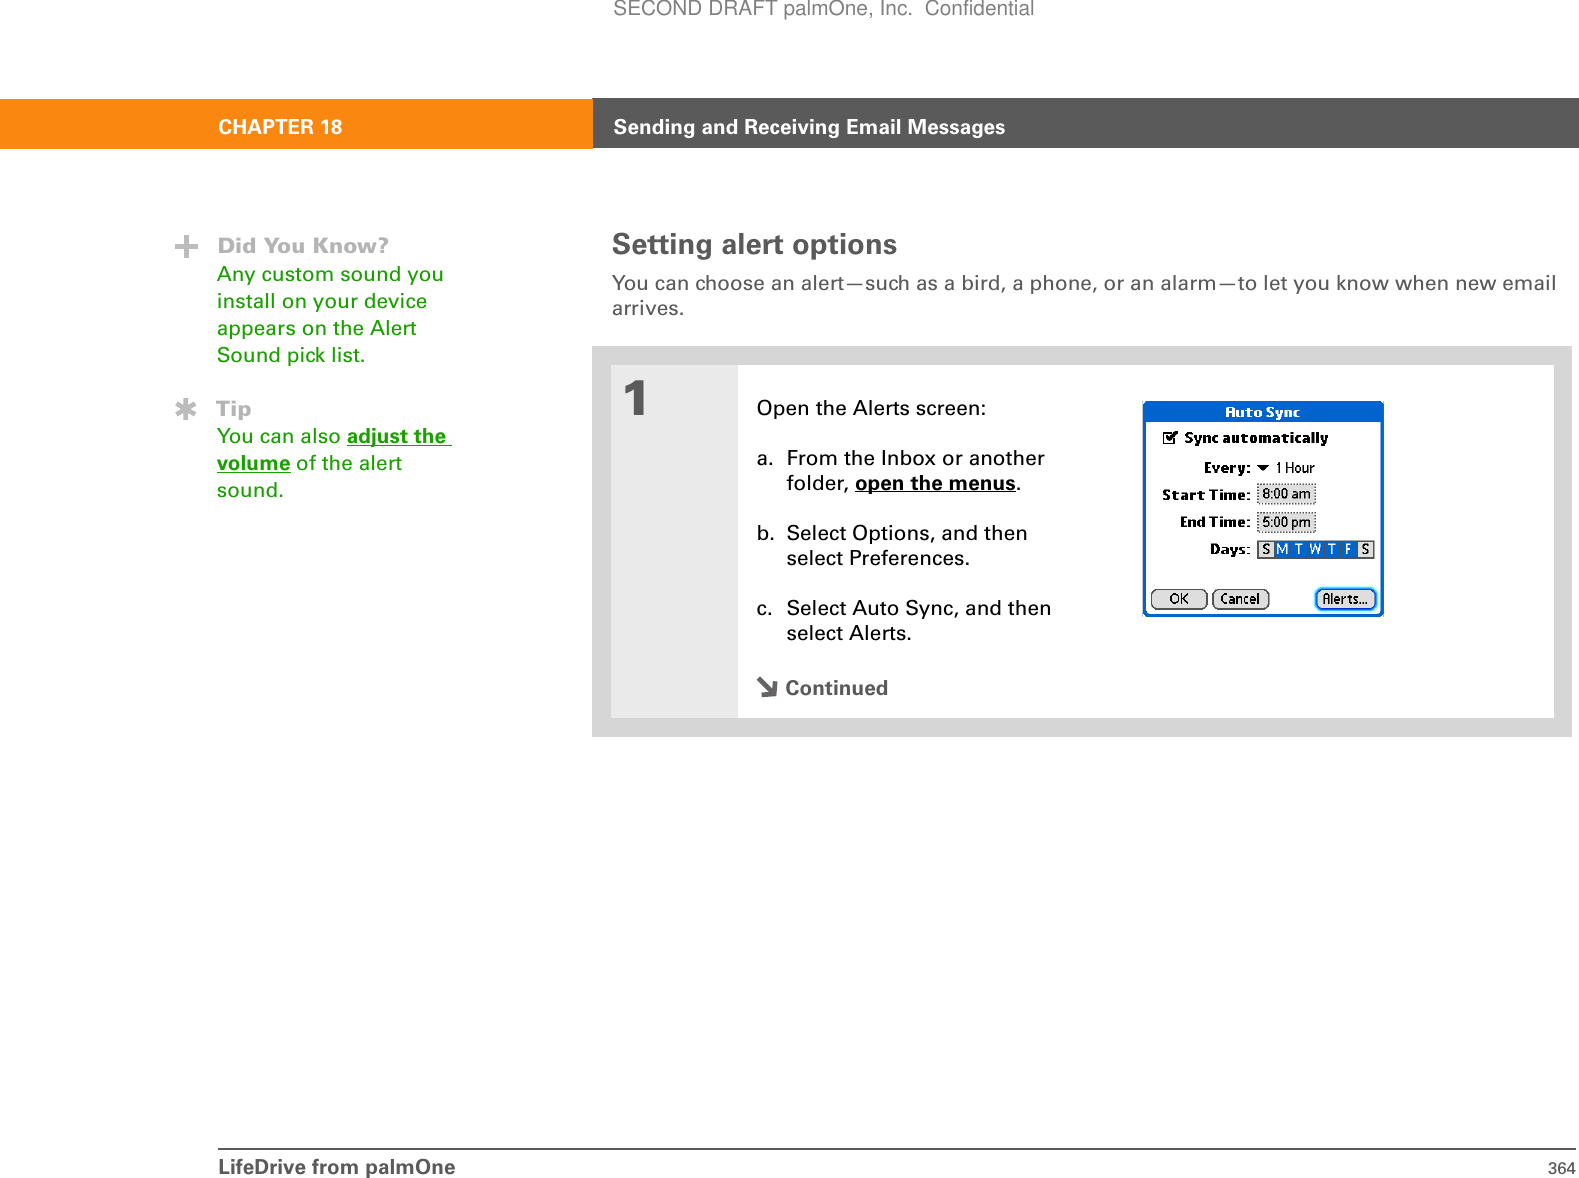
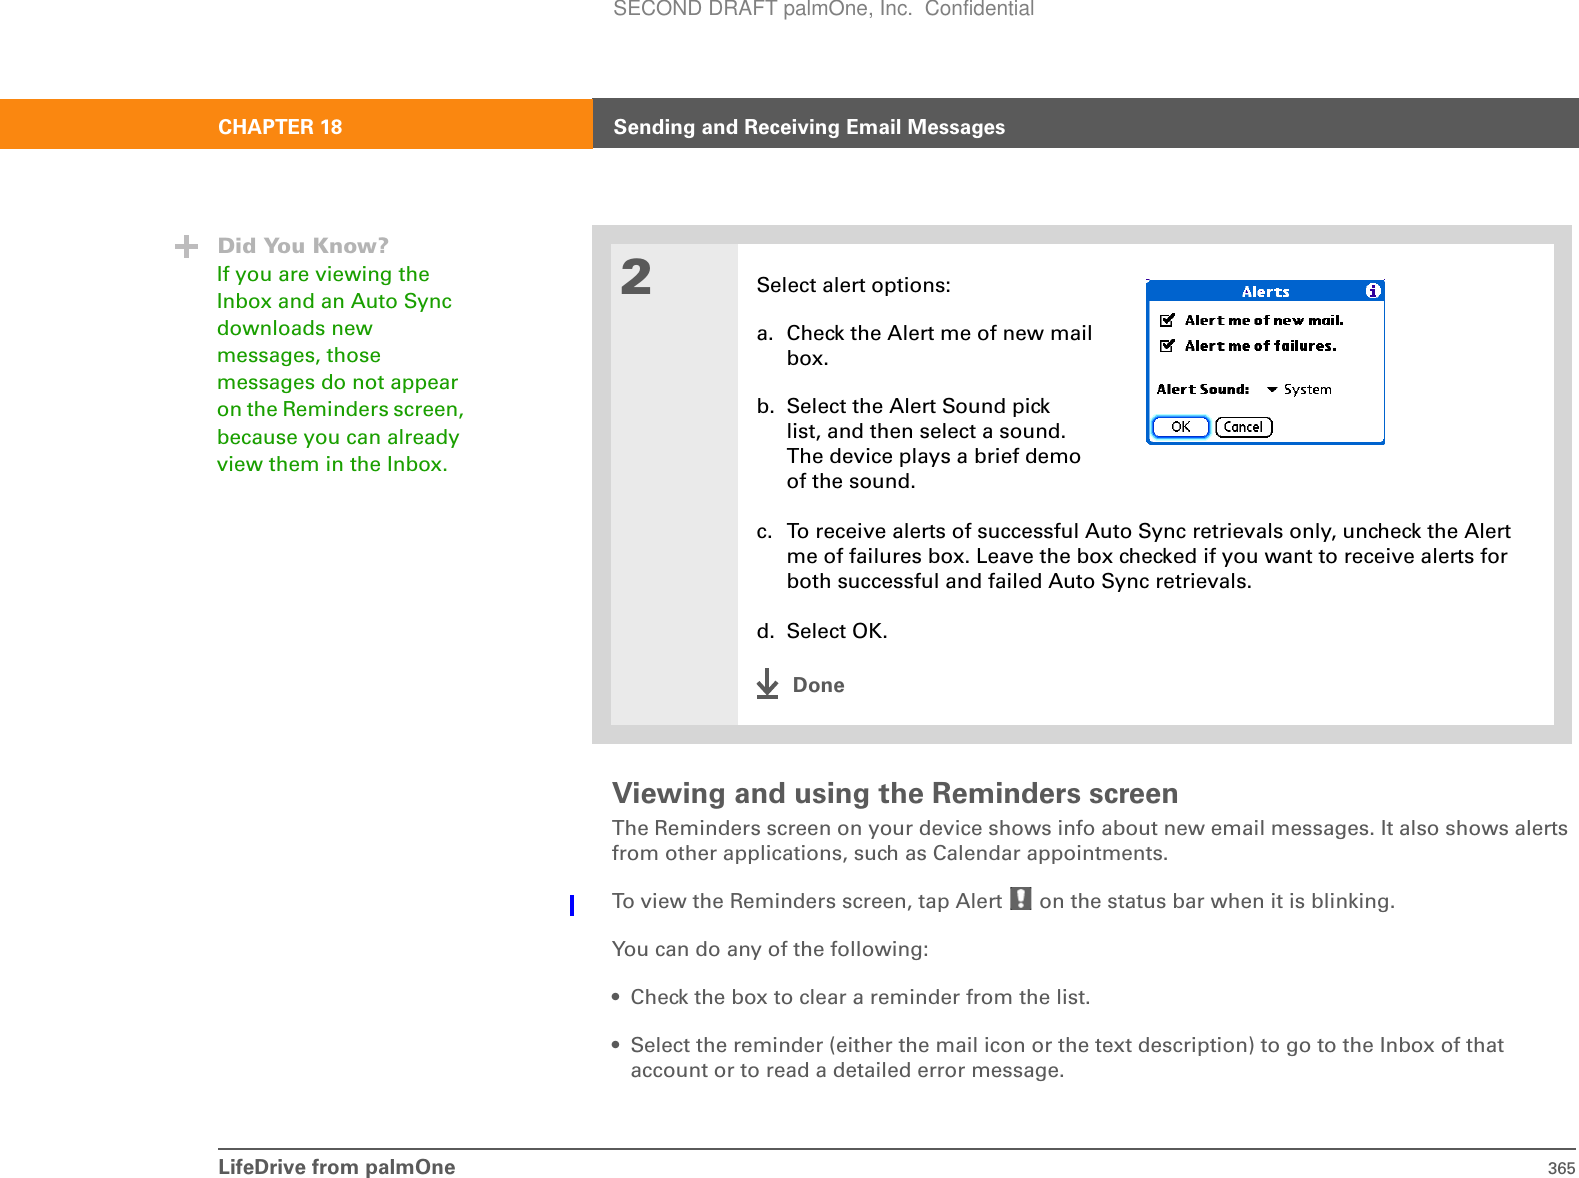
![LifeDrive from palmOne 363CHAPTER 18 Sending and Receiving Email MessagesAuto Sync notificationsThe Auto Sync feature provides two types of notifications during and after it gets messages:Alerts You can choose to have your device alert you with a beep or other sound when a new message arrives in your account. Reminders screen If Auto Sync discovers and downloads new messages for an email account, a notification appears on the Reminders screen, telling you the account name and the number of new messages. If Auto Sync is scheduled for more than one account, a separate notification appears for each account. 3Select OK.4[ & ] OPTIONAL Select Get or Get & Send.DoneSECOND DRAFT palmOne, Inc. Confidential](https://usermanual.wiki/Palm/830.User-Manual-1-of-2/User-Guide-543159-Page-386.png)

![LifeDrive from palmOne 371CHAPTER 18 Sending and Receiving Email MessagesAdding or updating a contact directly from a messageYou can add an email address to Contacts directly from the body of a received email message.01Open the Add Contact dialog box:a. Open the message you want.b. On the message screen, open the menus.c. Select Options, and then select Add to Contacts.2[ & ] OPTIONAL If a display name exists for this Contacts record, the dialog box displays the name in the Last name and First name fields.If the Last name and First name fields are blank, enter the first and last name associated with the “From” email address.3Select OK to add the email address to Contacts, and then select OK in the confirmation dialog box.DoneTipYou can also update an existing Contacts record with a new email address, or create a second Contacts record for a name that has an existing record. The procedure is the same as for adding a new Contacts record. If you select Add to Contacts from an email message and a record already exists for the recipient name, you are prompted either to update the email address for the recipient or to create a new record for the recipient.SECOND DRAFT palmOne, Inc. Confidential](https://usermanual.wiki/Palm/830.User-Manual-1-of-2/User-Guide-543159-Page-394.png)
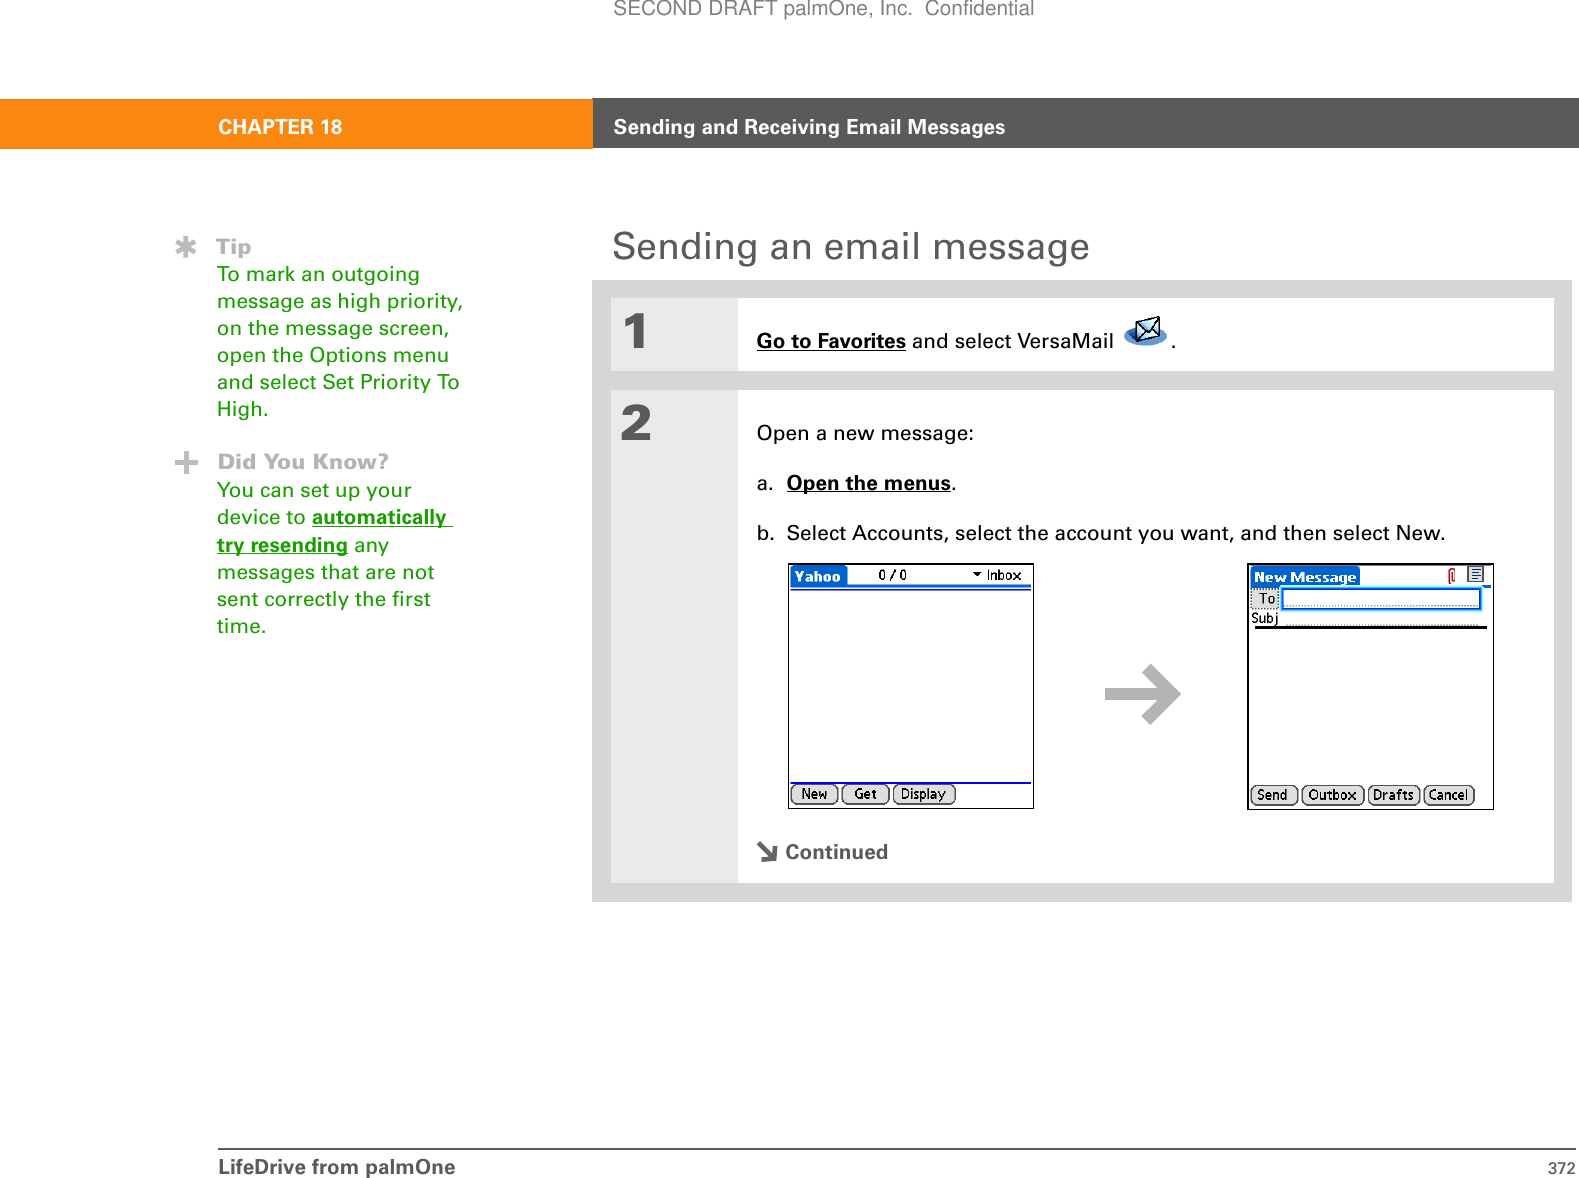
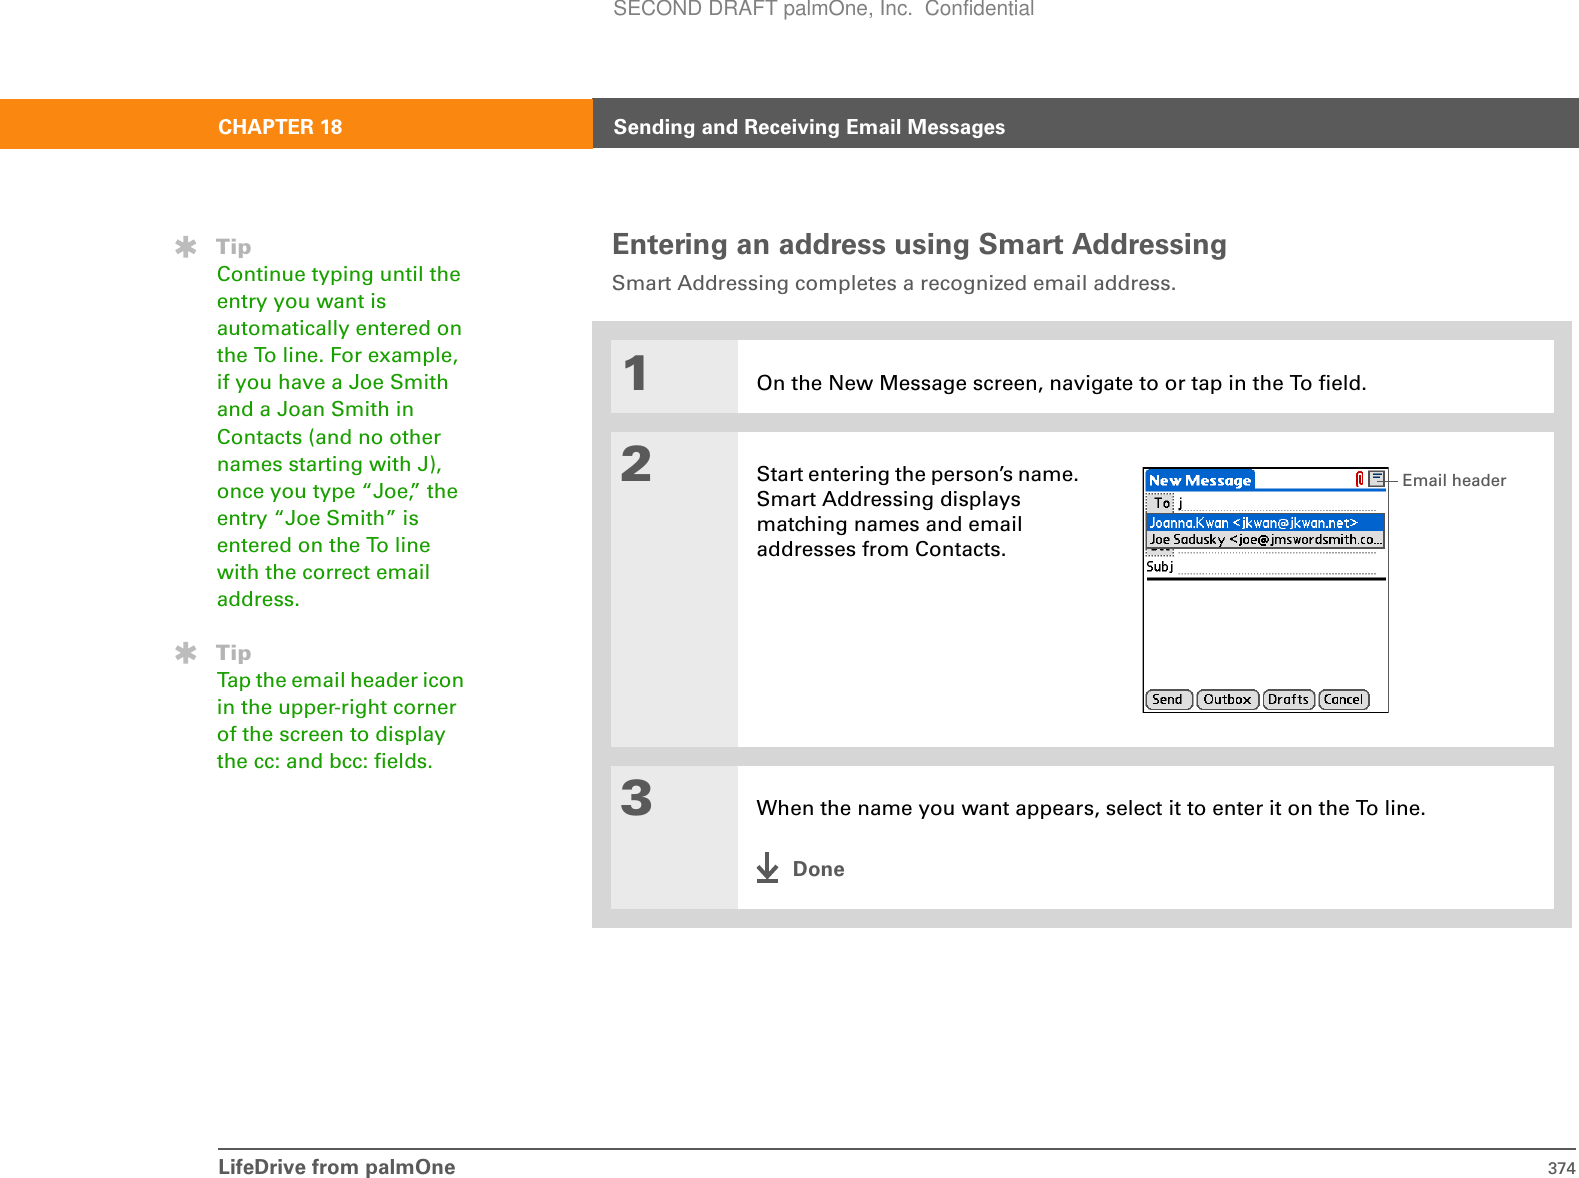
![LifeDrive from palmOne 373CHAPTER 18 Sending and Receiving Email Messages3Address and compose your message:a. Enter the recipient’s emailaddress.b. In the Subject field, enter thesubject of your email. c. In the area below the Subject line, enter the text of your email.4[ & ] OPTIONAL Attach one or more files to send with your message.5Select one of the following options to send your message:Send Sends the email immediately. If the message is not sent successfully on the first attempt, it is moved to the Outbox.Outbox Stores email so you can compose email offline and then send it all during one connection with the server. To send your email, select Get & Send.Drafts Saves your message so you can work on it at another time. DoneTipYou can’t see the whole list of addresses in a field if the list is longer than two lines. To see the whole list, select the word To, cc, or bcc.SECOND DRAFT palmOne, Inc. Confidential](https://usermanual.wiki/Palm/830.User-Manual-1-of-2/User-Guide-543159-Page-396.png)