Palm 830 PDA W/ WiFi and Bluetooth Capabilities User Manual LifeDrive
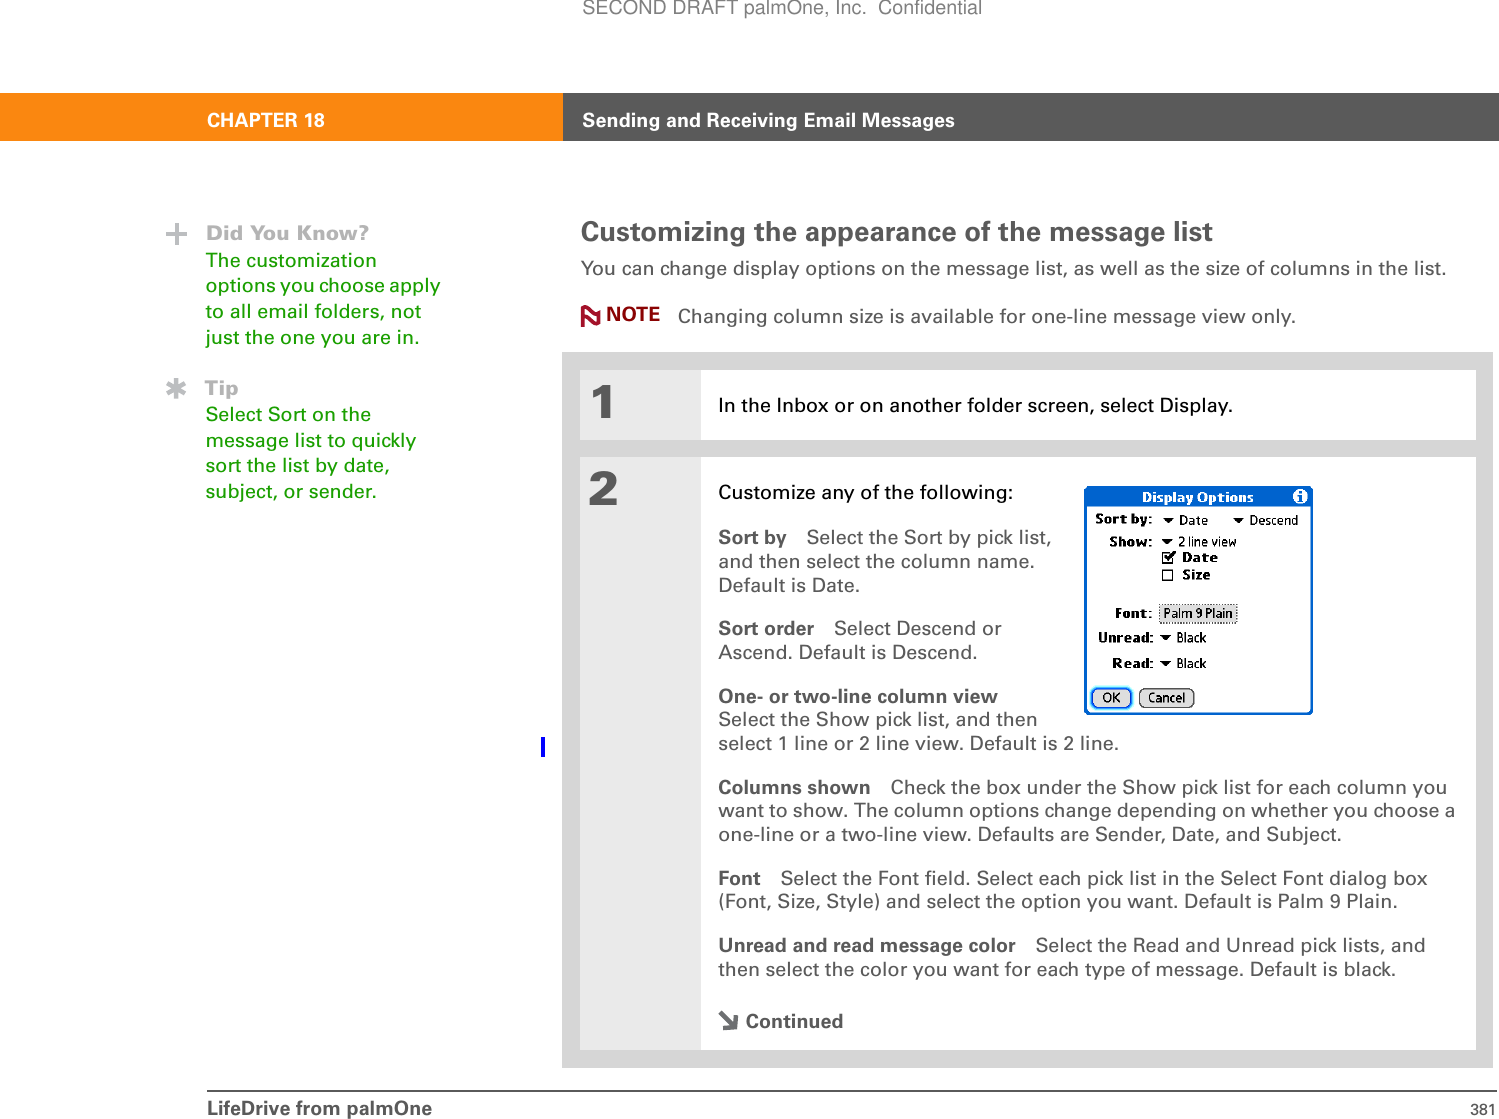
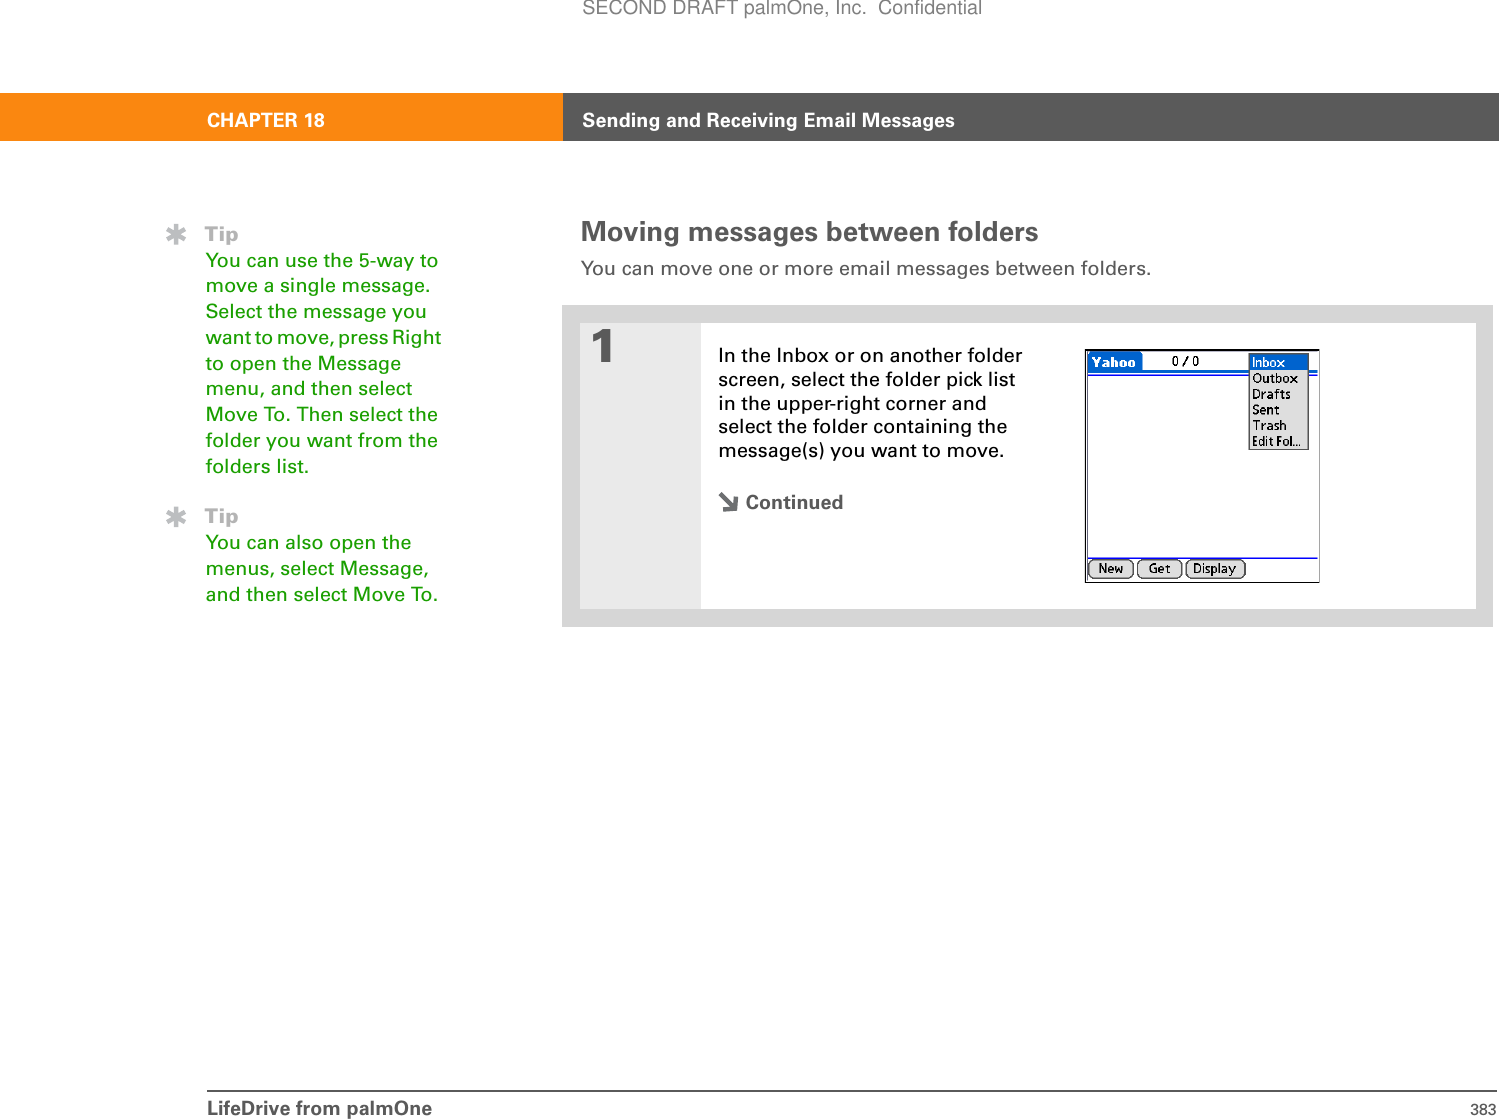
Palm Inc PDA W/ WiFi and Bluetooth Capabilities LifeDrive
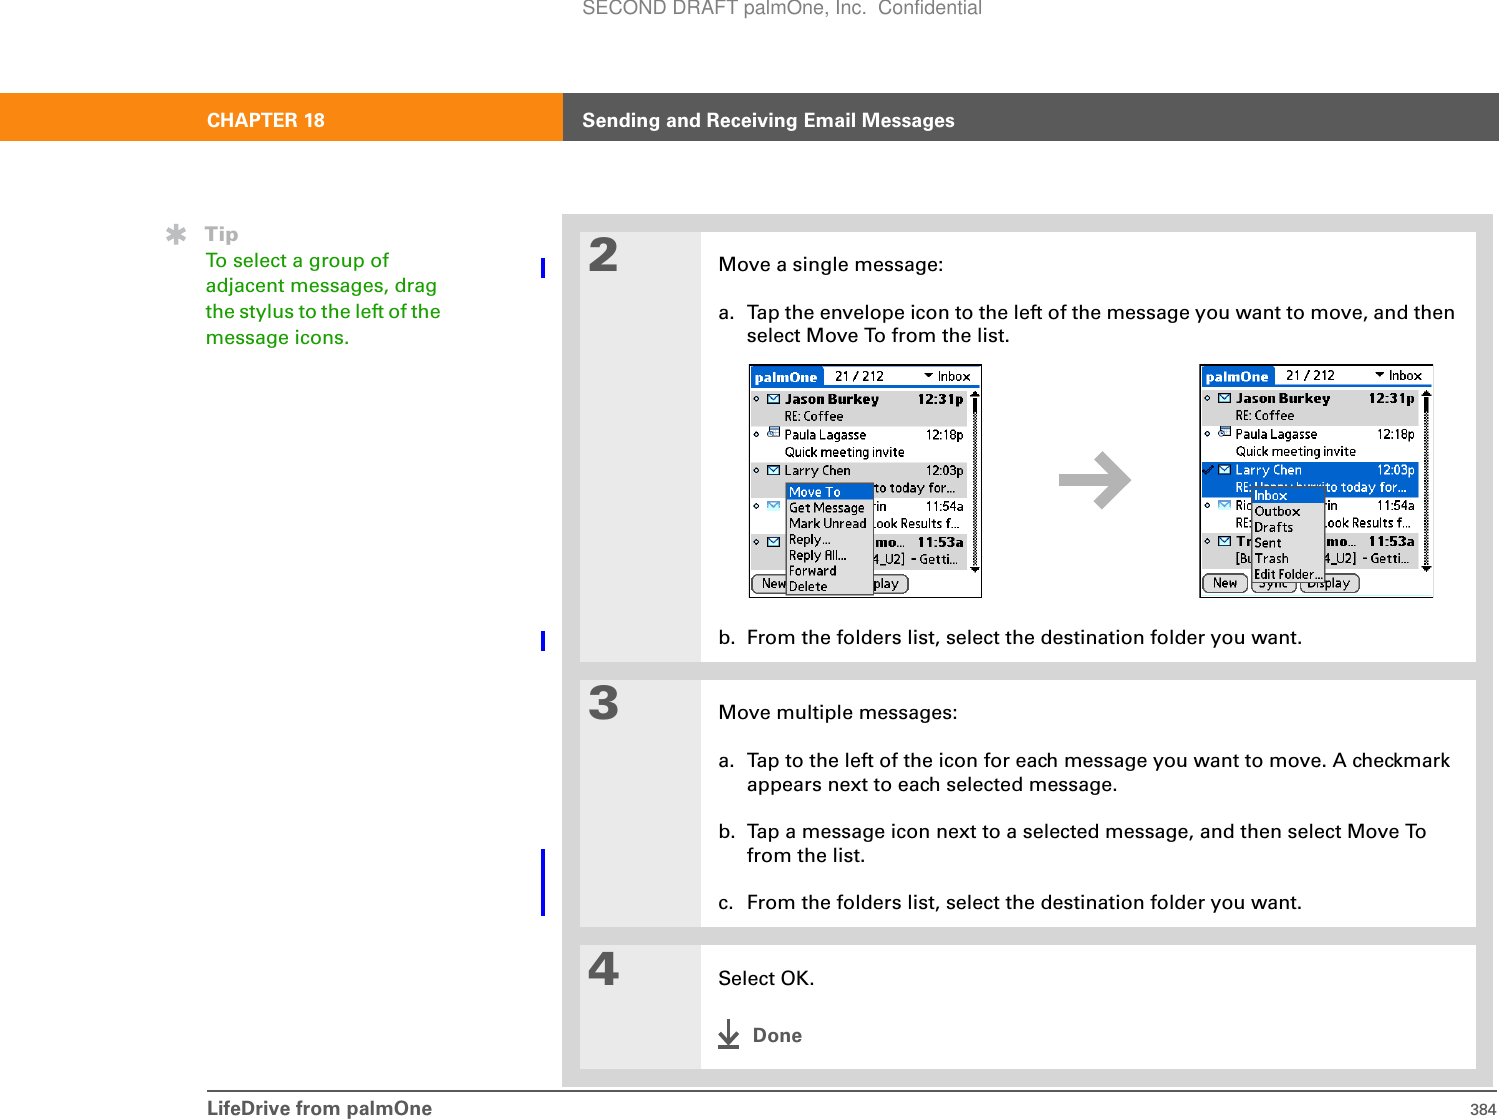
Palm >
Contents
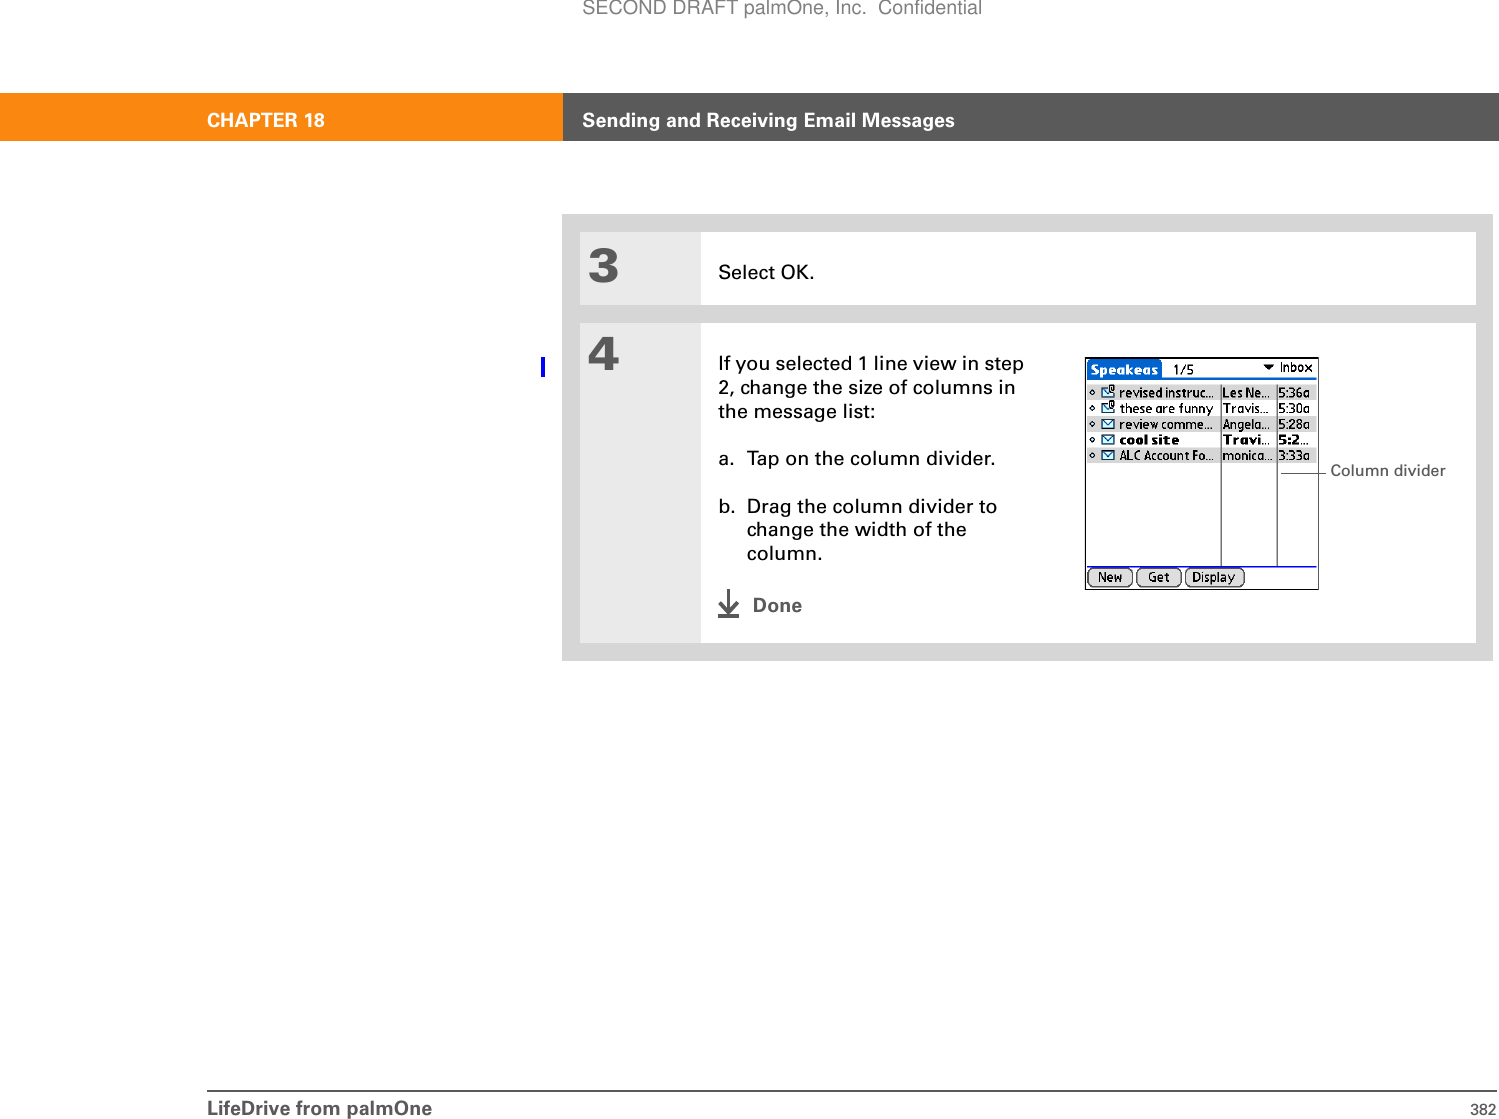
- 1. User Manual 1 of 2
- 2. User Manual 2 of 2
- 3. Users Manual 1 of 2
- 4. Users Manual 2 of 2
User Manual 2 of 2
![LifeDrive from palmOne 386CHAPTER 18 Sending and Receiving Email MessagesWorking with email messagesWhen you receive an email message, you can reply to it or forward it to someone else. You can also open web addresses (URLs) within messages.Forwarding an email message01On a folder screen, select the folder pick list in the upper-right corner, and then select the folder that contains the message you want to forward.2Select the message you want to forward:a. Select the email message to open it.b. Select Fwd (Forward).3[ & ] OPTIONAL Add any desired text to the message beneath the subject line.4Address and send the message.DoneDid You Know?You can forward email messages from any folder other than the Outbox folder.Did You Know?Forwarded messages are always sent as text only, even if you received the original message in HTML format.Select FwdSECOND DRAFT palmOne, Inc. Confidential](https://usermanual.wiki/Palm/830.User-Manual-2-of-2/User-Guide-543160-Page-9.png)
![LifeDrive from palmOne 391CHAPTER 18 Sending and Receiving Email MessagesDeleting old messages03Delete the message or messages:a. Open the menus.b. Select Delete in the Message menu.c. Select Also delete message(s) on server if you want to delete the messages from the server now. If you delete a message from the server, you cannot retrieve it and view it again later.d. Select OK.Done1Open the Delete Old Messages dialog box:a. On a folder screen, open the menus.b. Select Delete Old on the Message menu.ContinuedIMPORTANT[!]TipYou can also select the message icon next to a message and select Delete in the menu to delete a message.TipTo delete messages on the server when you empty the trash on your device, select the Delete Msgs on Server setting in VersaMail Preferences. Many email providers have size restrictions for mail storage. If your mailbox on the server becomes full, messages are returned to the senders.SECOND DRAFT palmOne, Inc. Confidential](https://usermanual.wiki/Palm/830.User-Manual-2-of-2/User-Guide-543160-Page-14.png)
![LifeDrive from palmOne 392CHAPTER 18 Sending and Receiving Email Messages2Choose settings for deleting old messages:a. Select the Folder pick list, and then select the folder that contains the messages you want to delete.b. Select the Older than pick list, and then select One Week, One Month, or Choose Date. If you select Choose Date, select a date from the calendar.3Delete messages:a. Select Delete.b. Select Also delete message(s) on server if you want to delete themessages from the server now. If you delete a message from the server, you cannot retrieve it and view it again later.c. Select OK.DoneDid You Know?Messages you delete from a folder are moved to the Trash folder and remain there until you empty the trash.IMPORTANT[!]SECOND DRAFT palmOne, Inc. Confidential](https://usermanual.wiki/Palm/830.User-Manual-2-of-2/User-Guide-543160-Page-15.png)
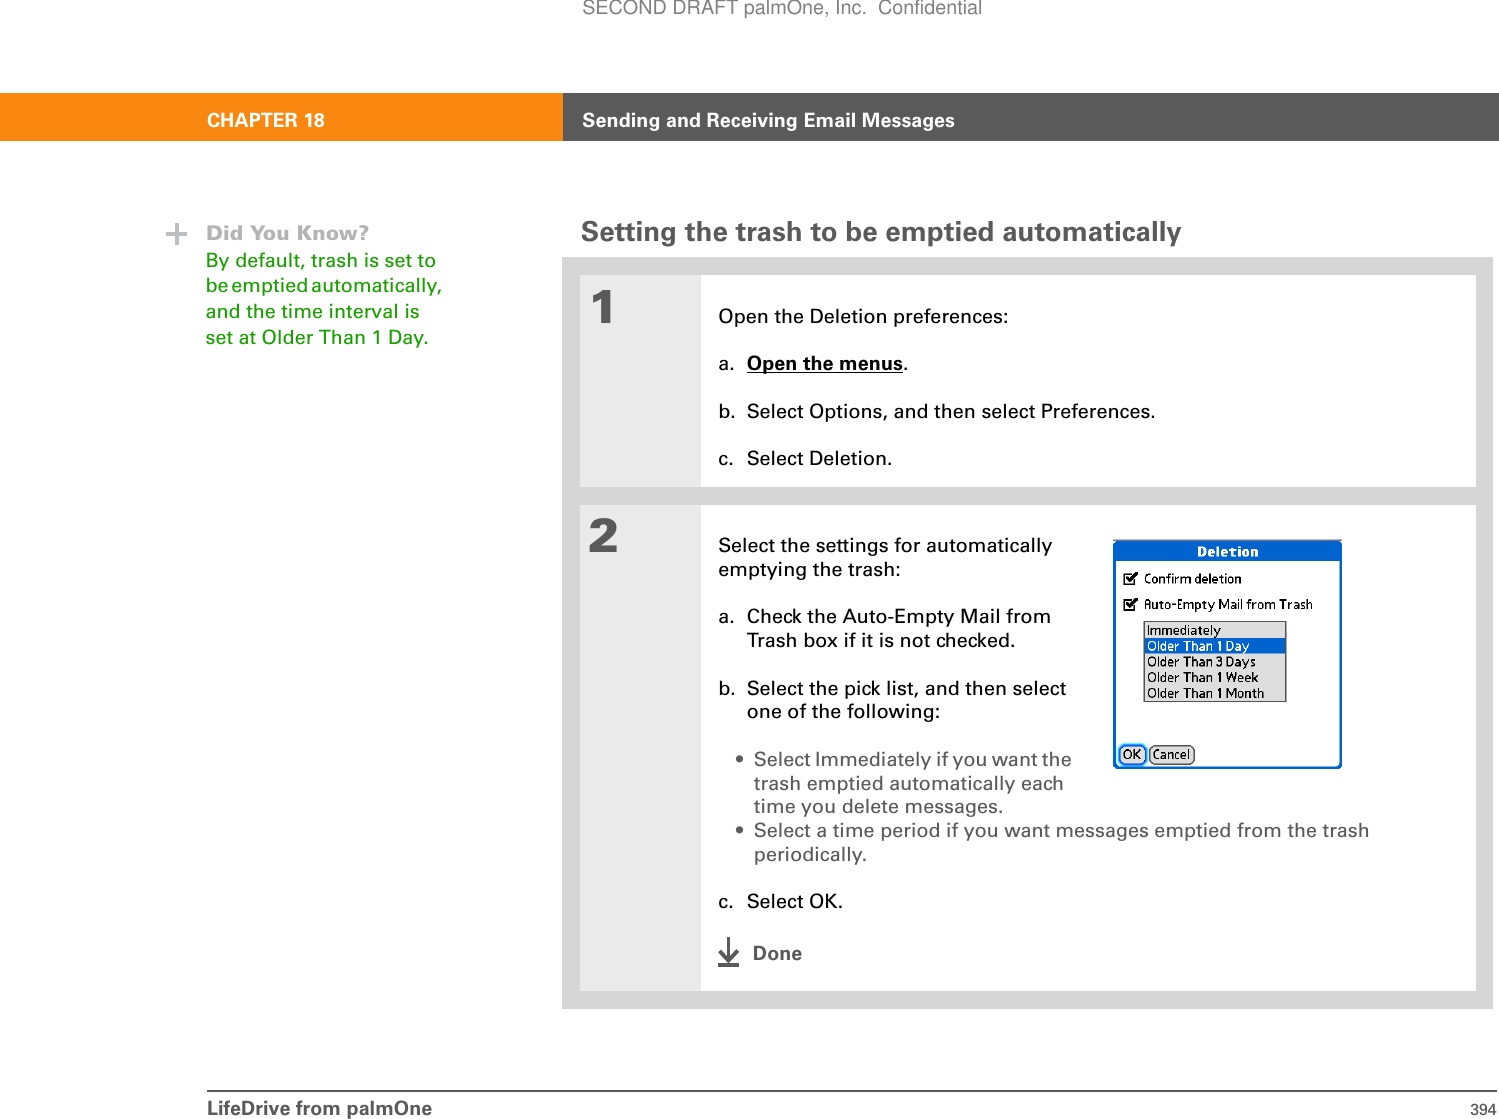
![LifeDrive from palmOne 393CHAPTER 18 Sending and Receiving Email MessagesEmptying the trashWhen you delete a message, it is moved to the Trash folder. Deleted email accumulates in the Trash folder and takes up space on your device. To increase memory, you should empty the trash regularly. 01Open the Empty Trash dialog box:a. On a folder screen, open the menus.b. Select Empty Trash on the Message menu.If you select to automatically empty the trash, a message asks if you want to delete the trash. 2[ & ] OPTIONAL Select Details to see how many messages are in the trash and whether the messages are set to be deleted from the server.3Select one of the following options for emptying the trash:To delete messages from your device as well as from the server Select Both. Select Yes if you want to update the server now. To delete the message from only your device now Select Device. DoneTipYou can set a preference to automatically empty the trash.Did You Know?Many email providers, such as Yahoo!, have size restrictions for mail storage. If your mailbox on the server becomes full, messages are returned to the senders. NOTESECOND DRAFT palmOne, Inc. Confidential](https://usermanual.wiki/Palm/830.User-Manual-2-of-2/User-Guide-543160-Page-16.png)
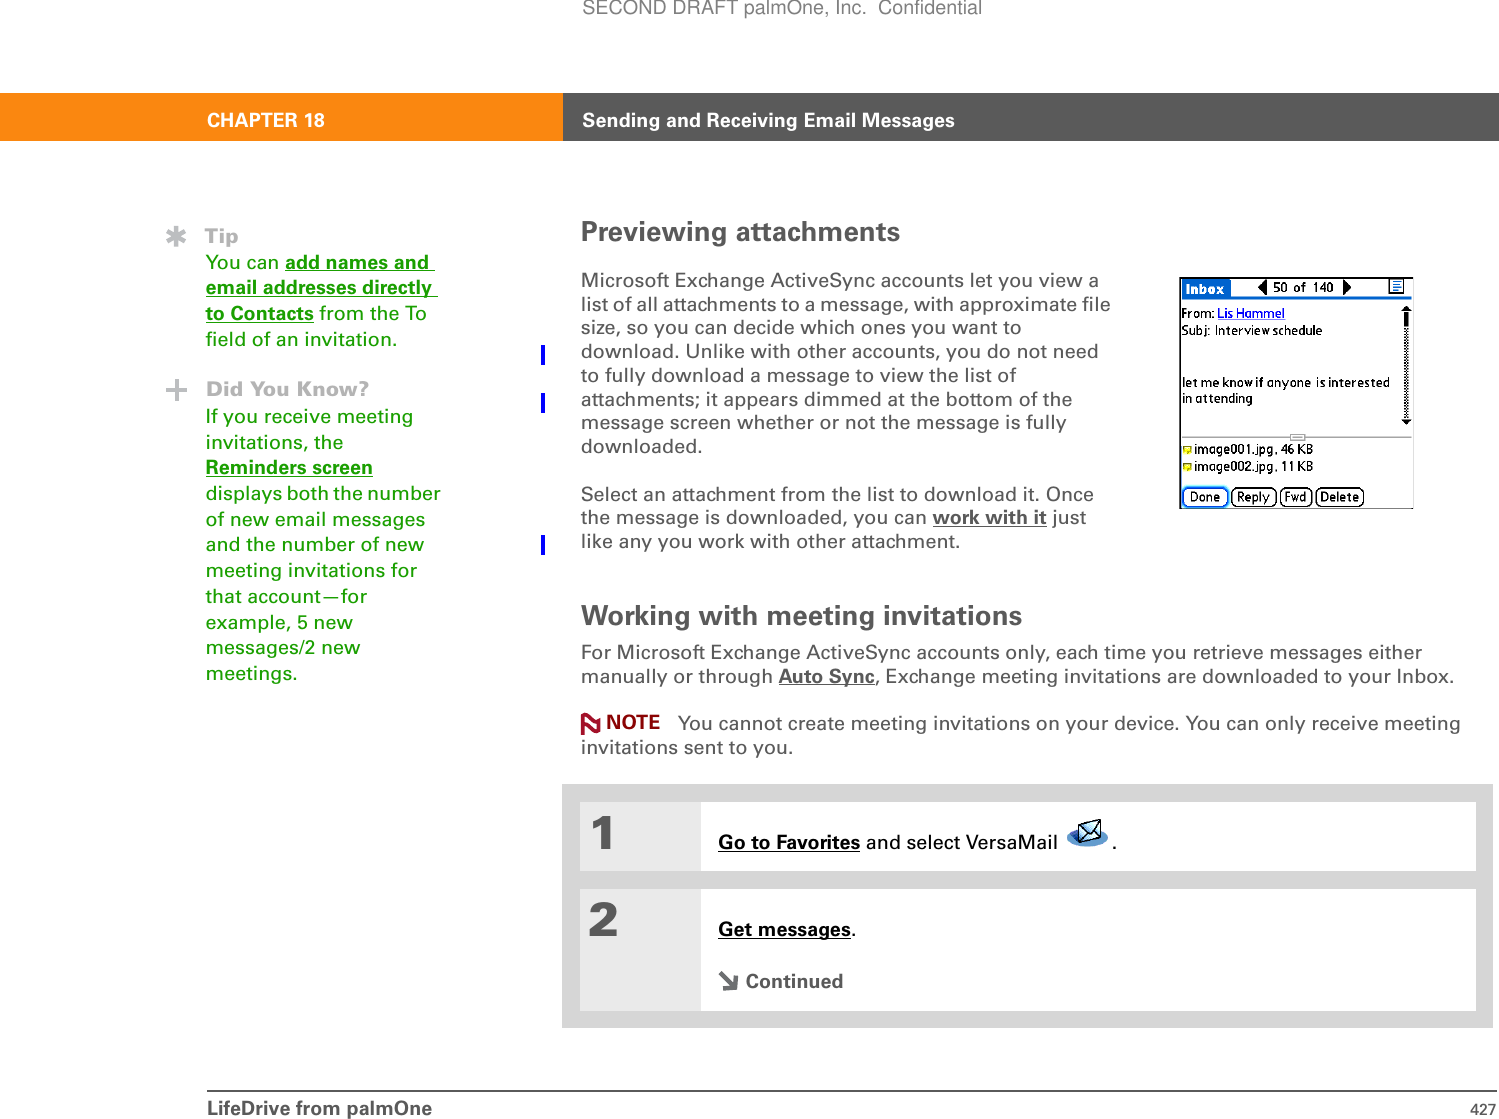
![LifeDrive from palmOne 397CHAPTER 18 Sending and Receiving Email MessagesFor other types of files, your device may contain a viewer that can open and view attachments for that file type. You can open the attachment only if your device has such a viewer. Among the file types that may be supported are MP3 and AAC files.Working with a downloaded attachmentIn the message list, a paper clip on a message’s envelope icon indicates that the message has an attachment that has been downloaded. You can save an attached file or view, edit, or install the file, depending on the file type.01In the Inbox, select the message with the attachment. 2[ & ] OPTIONAL If you choose to get messages by subject only, or if you choose to get entire messages but the message plus any attachments exceeds your maximum message size, select More to view the body of the email message plus any attachments. If prompted, select Yes if you want to download an attachment that exceeds your maximum message size.ContinuedTipIf an attachment is not downloaded, the paper clip does not appear on the envelope icon. You need to open the message and download the complete message to see if there are any attachments.Did You Know?You can download a maximum of ten attachments for any received messages.Paper clipSECOND DRAFT palmOne, Inc. Confidential](https://usermanual.wiki/Palm/830.User-Manual-2-of-2/User-Guide-543160-Page-20.png)
![LifeDrive from palmOne 398CHAPTER 18 Sending and Receiving Email Messages3Select the attachment you want from the list at the bottom of the screen, and then do one of the following:To open the attachment in the default viewer Ta p t he attachment name.To open the attachment menuTap the folder icon to the left of the attachment name.4[ & ] OPTIONAL If you open theattachment menu, select Save tosave the attachment to the harddrive or to an expansion card, or doone of the following, depending onthe attachment file type:Viewable file: text, Word document,task, HTML, graphic, and so onSelect View to view the attachment,or select Select Viewer to choose aviewer for that attachment. For example, if you have two photo-viewing applications on your device and you select a photo attachment from the list, you can select which application to use to view the photo.ContinuedDid You Know?Because downloading large messages can consume device resources, the VersaMail application displays the size and asks if you want to continue downloading any message that exceeds your maximum message size, up to a total size of 5MB.TipDownloaded attachments are automatically saved to the VersaMail Attachments folder on the hard drive. Select Save if you want to also save the attachment to a specific location on the drive or to an expansion card.FPOSECOND DRAFT palmOne, Inc. Confidential](https://usermanual.wiki/Palm/830.User-Manual-2-of-2/User-Guide-543160-Page-21.png)


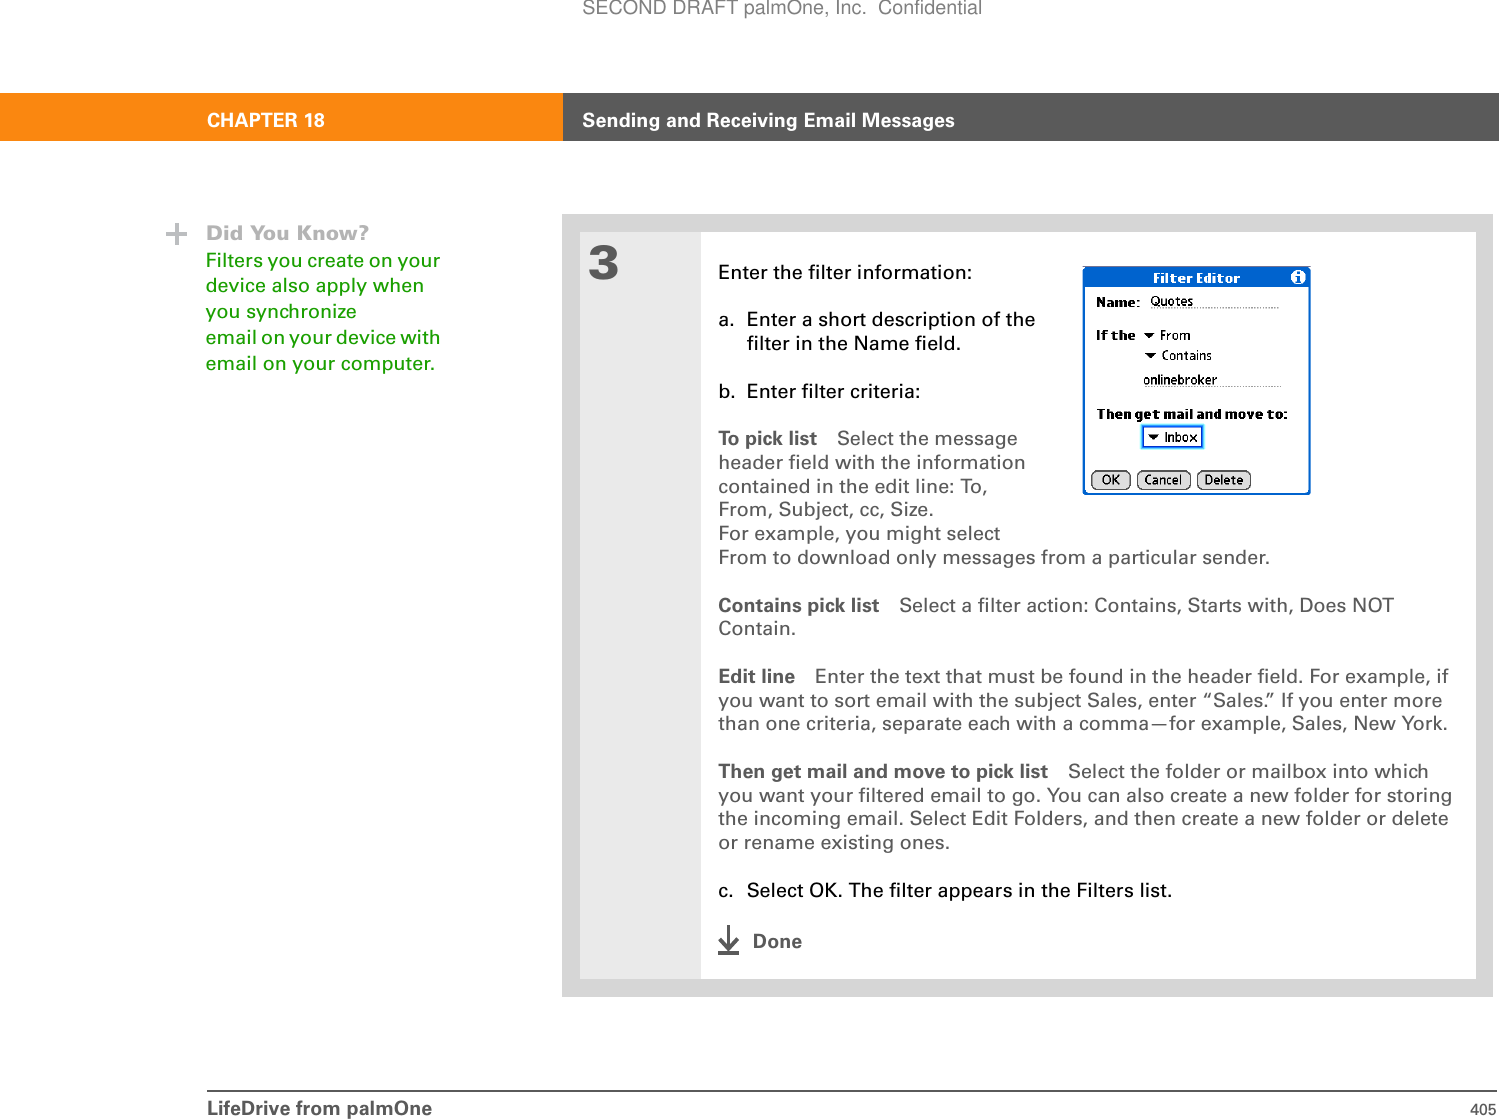
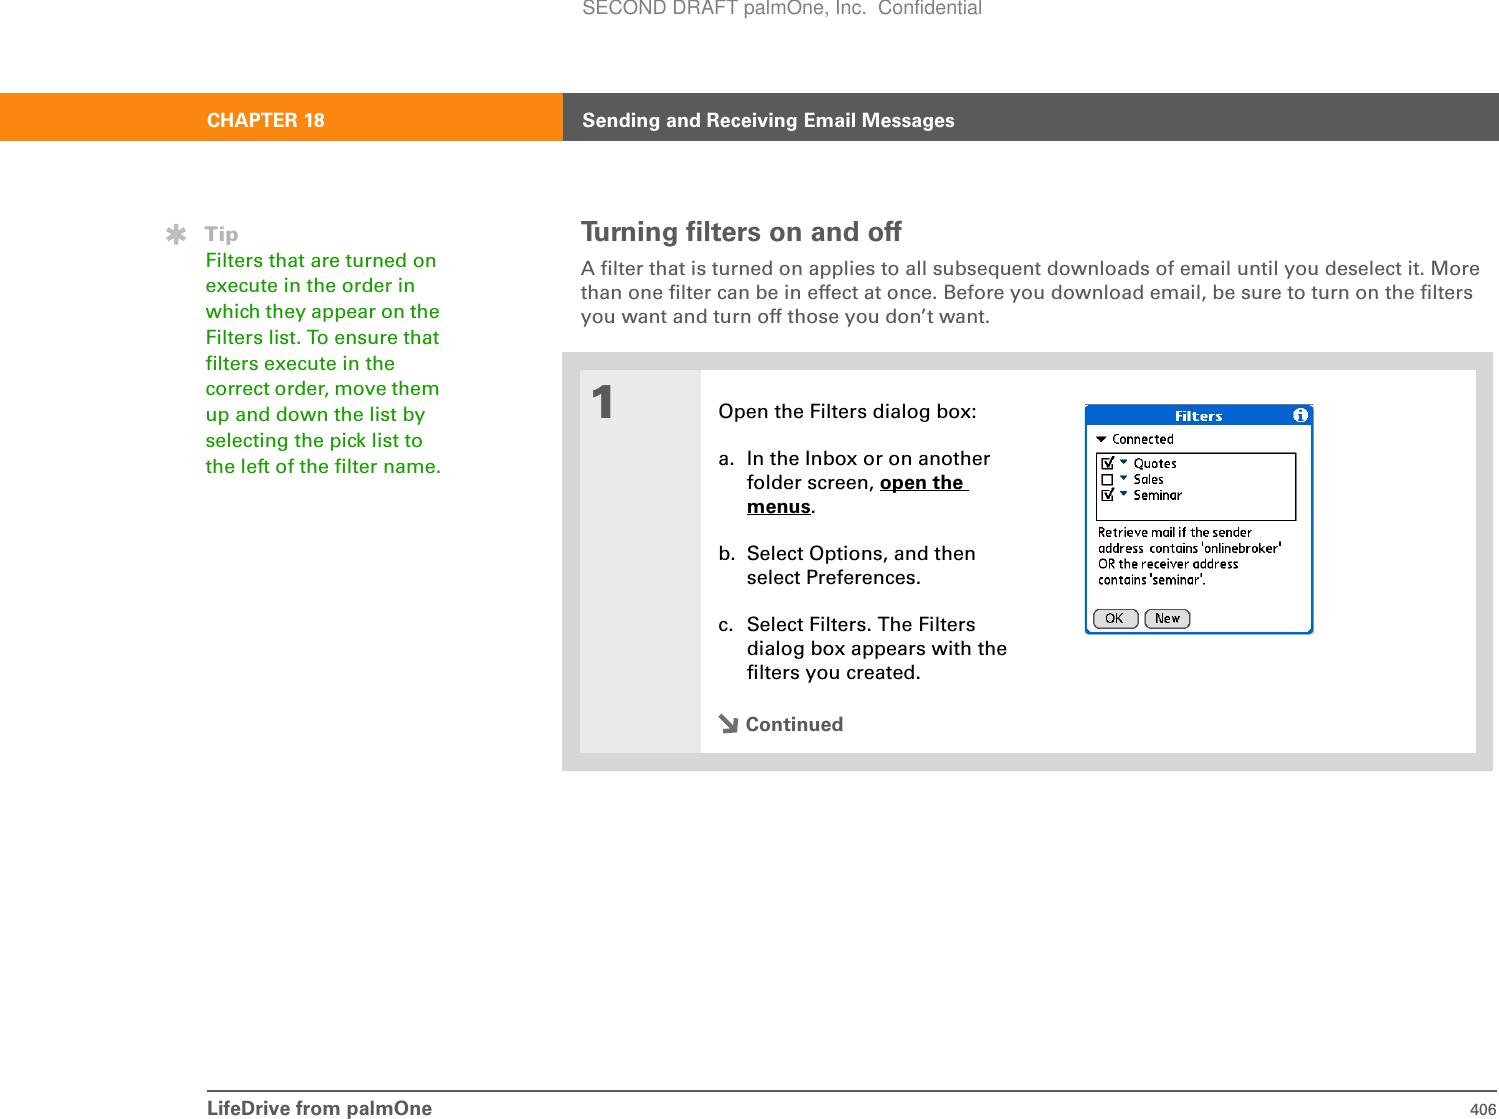
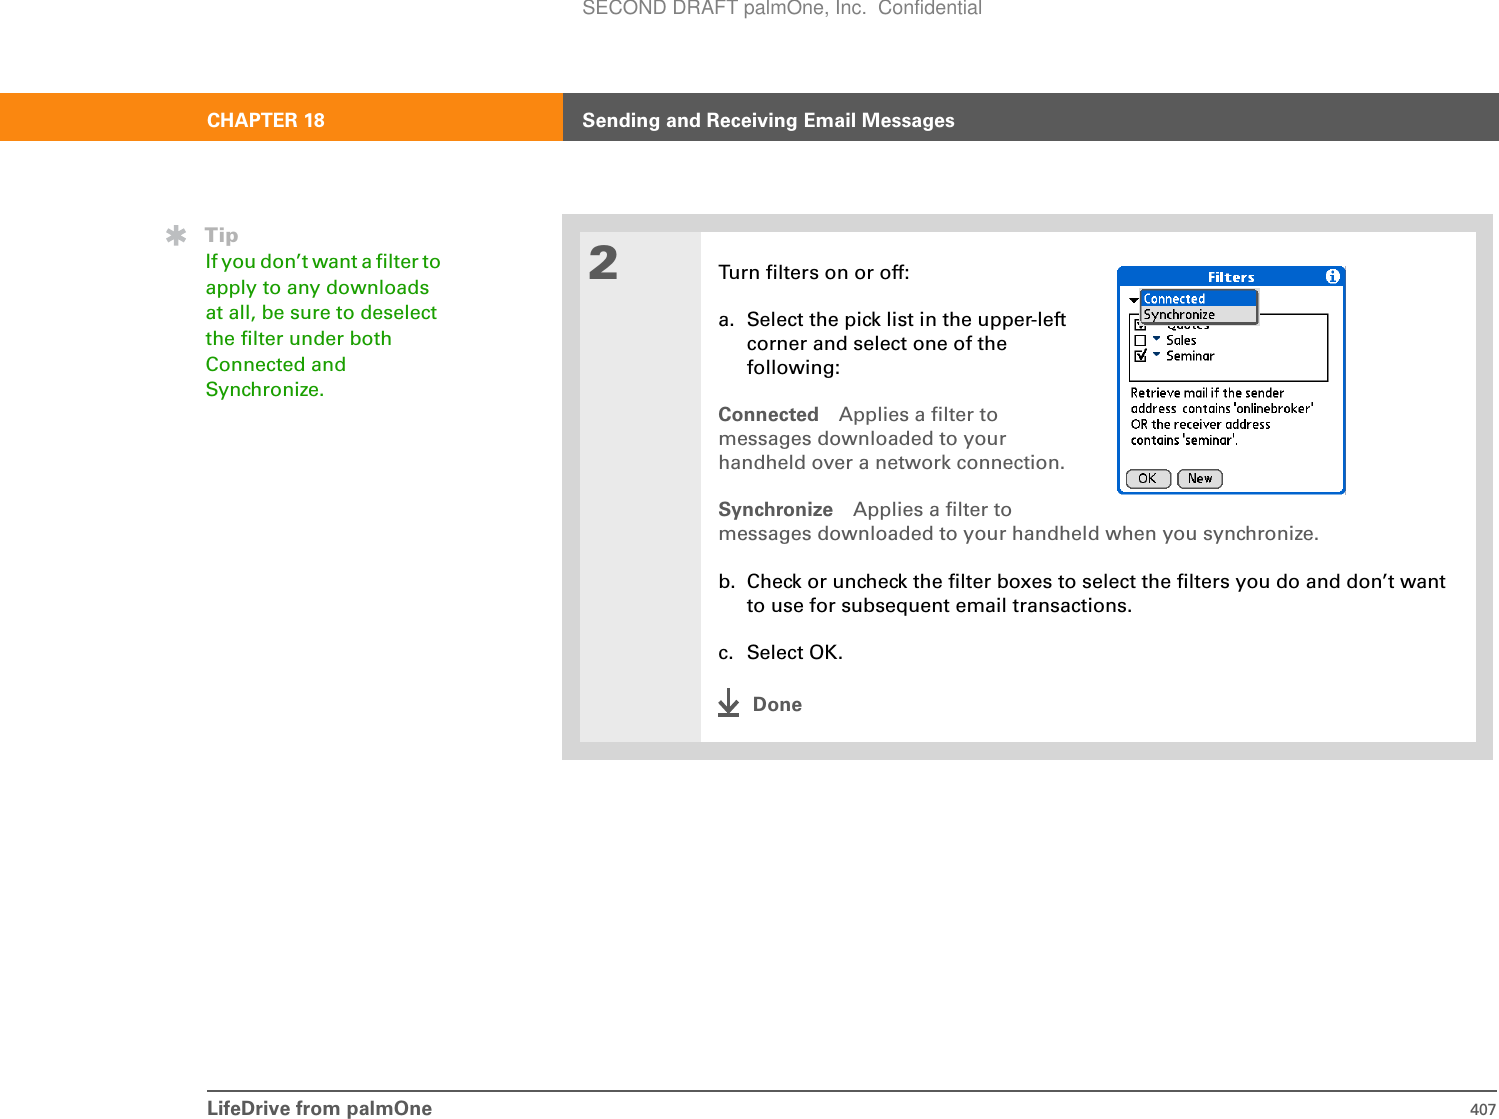
![LifeDrive from palmOne 403CHAPTER 18 Sending and Receiving Email MessagesAdvanced VersaMail application featuresYou can customize and optimize your experience using the VersaMail application in any of the following ways:• Creating and using filters to determine the types of email messages that are downloaded to your device• Managing settings for incoming and outgoing mail• Adding APOP to an account• Setting advanced account preferences• Changing email header details• Backing up mail databases• Synchronizing IMAP mail folders wirelessly• Working with root folders• Using Secure Sockets Layer (SSL)Creating and using filtersFilters provide efficient ways to manage email retrieval and storage. When you select Get or Get & Send, filters determine which email messages are downloaded to your device and in which folder the downloaded messages are stored. If you create a filter, only messages that meet the filter criteria are downloaded to your device. You don’t see any other messages that have been sent to you, even in your Inbox. To avoid this, you must set up two filters. For example, suppose you create a filter to have all messages with “onlinebroker” in the From field moved to your Finance folder. You must then create a second filter specifying that all mail not containing “onlinebroker” in the From field should be moved to the Inbox (or other folder you designate). If you don’t create this second filter, only messages containing “onlinebroker” in the From field are downloaded to your device.IMPORTANT[!]SECOND DRAFT palmOne, Inc. Confidential](https://usermanual.wiki/Palm/830.User-Manual-2-of-2/User-Guide-543160-Page-26.png)

![LifeDrive from palmOne 416CHAPTER 18 Sending and Receiving Email Messages For most email providers that support SSL, you must select SSL for both incoming and outgoing mail. If you select just one or the other, your messages cannot be sent or received successfully.If you set up an account that uses an SSL connection on Outlook, Outlook Express, or Eudora, then SSL is supported in the VersaMail conduit when you synchronize with that account as well.You cannot use scheduled sending retry of email with accounts that use an SSL connection. Working with Microsoft Exchange ActiveSync®If your corporate email system uses Microsoft Exchange Server 2003, you may be able to use Microsoft Exchange ActiveSync® on your device. Microsoft Exchange ActiveSync works with the VersaMail and Calendar applications on your device to directly download email and calendar information from the server—without going through your desktop computer.When you create a Microsoft Exchange ActiveSync account in the VersaMail application, both your email and calendar info synchronize directly with info on the Exchange server; they do not synchronize with info in your desktop software application, such as Palm®Desktop software or Microsoft Outlook. Other information on your device, such as contacts, tasks, and memos, continues to synchronize with information in your desktop software application. What do I need to use Microsoft Exchange ActiveSync?To use Microsoft Exchange ActiveSync on your device, you must obtain the following information from your system administrator:• Whether the corporate mail system uses a Microsoft Exchange 2003 mail server. If it does not, you cannot use Microsoft Exchange ActiveSync.• The name of the mail server that provides wireless access to your mail system. Some companies do not give out this information because they do not want wireless access to the system. If you cannot obtain the server name, you cannot use Microsoft Exchange ActiveSync.IMPORTANT[!]SECOND DRAFT palmOne, Inc. Confidential](https://usermanual.wiki/Palm/830.User-Manual-2-of-2/User-Guide-543160-Page-39.png)

![LifeDrive from palmOne 418CHAPTER 18 Sending and Receiving Email MessagesOn a Windows computer, you can quickly set up a Microsoft Exchange ActiveSync account on your computer and then synchronize the settings to your device. On a Mac computer, you must set up the account on your device. You can set up only one Microsoft Exchange ActiveSync account. If you set up an email account to use Microsoft Exchange ActiveSync, Calendar events on your device automatically synchronize directly with info on the Exchange server, along with email messages. You cannot choose to synchronize Calendar events with info in Palm Desktop software or Outlook once you set up a Microsoft Exchange ActiveSync email account. If you do not want to synchronize Calendar events with info on the server, do not set up a Microsoft Exchange ActiveSync account in VersaMail.Setting up a Microsoft Exchange ActiveSync account on your computerWINDOWS ONLY01Open VersaMail account setup.2Select your username from the drop-down list at the top of the screen, and then select the option to create a new VersaMail email account. Click Next.3Select the option to synchronize with a mail service from this list, and then select Exchange ActiveSync. Click Next.ContinuedIMPORTANT[!]SECOND DRAFT palmOne, Inc. Confidential](https://usermanual.wiki/Palm/830.User-Manual-2-of-2/User-Guide-543160-Page-41.png)
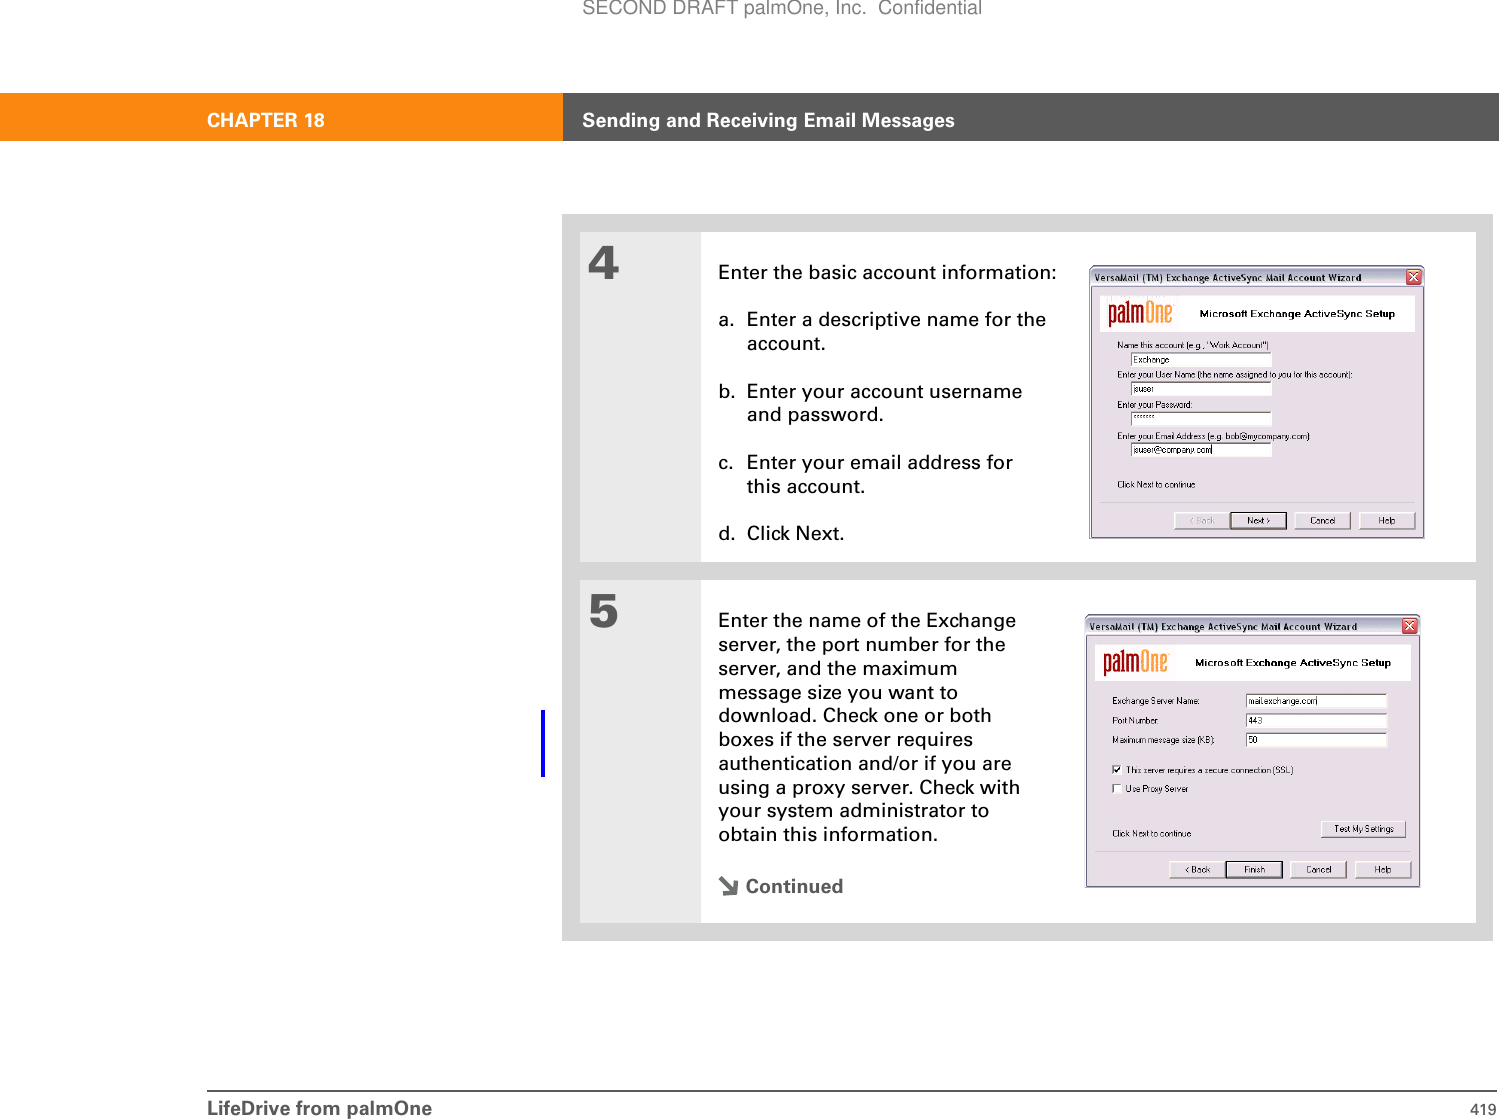
![LifeDrive from palmOne 420CHAPTER 18 Sending and Receiving Email Messages6[ & ] OPTIONAL If you are using a proxy server, enter the server name. Click Next.7[ & ] OPTIONAL To test the account settings you have entered, click Test My Settings. Click OK after settings have been tested.8Click Finish.9Do one of the following:a. To synchronize the account information to your device, click the top button.b. To set up another email account, click the bottom button.You can set up only one Microsoft Exchange ActiveSync account. If you choose to set up another email account, it must be a different type.10 Click Next.11 When you have finished setting up all accounts, click Finish on the Transfer Settings screen.DoneNOTESECOND DRAFT palmOne, Inc. Confidential](https://usermanual.wiki/Palm/830.User-Manual-2-of-2/User-Guide-543160-Page-43.png)
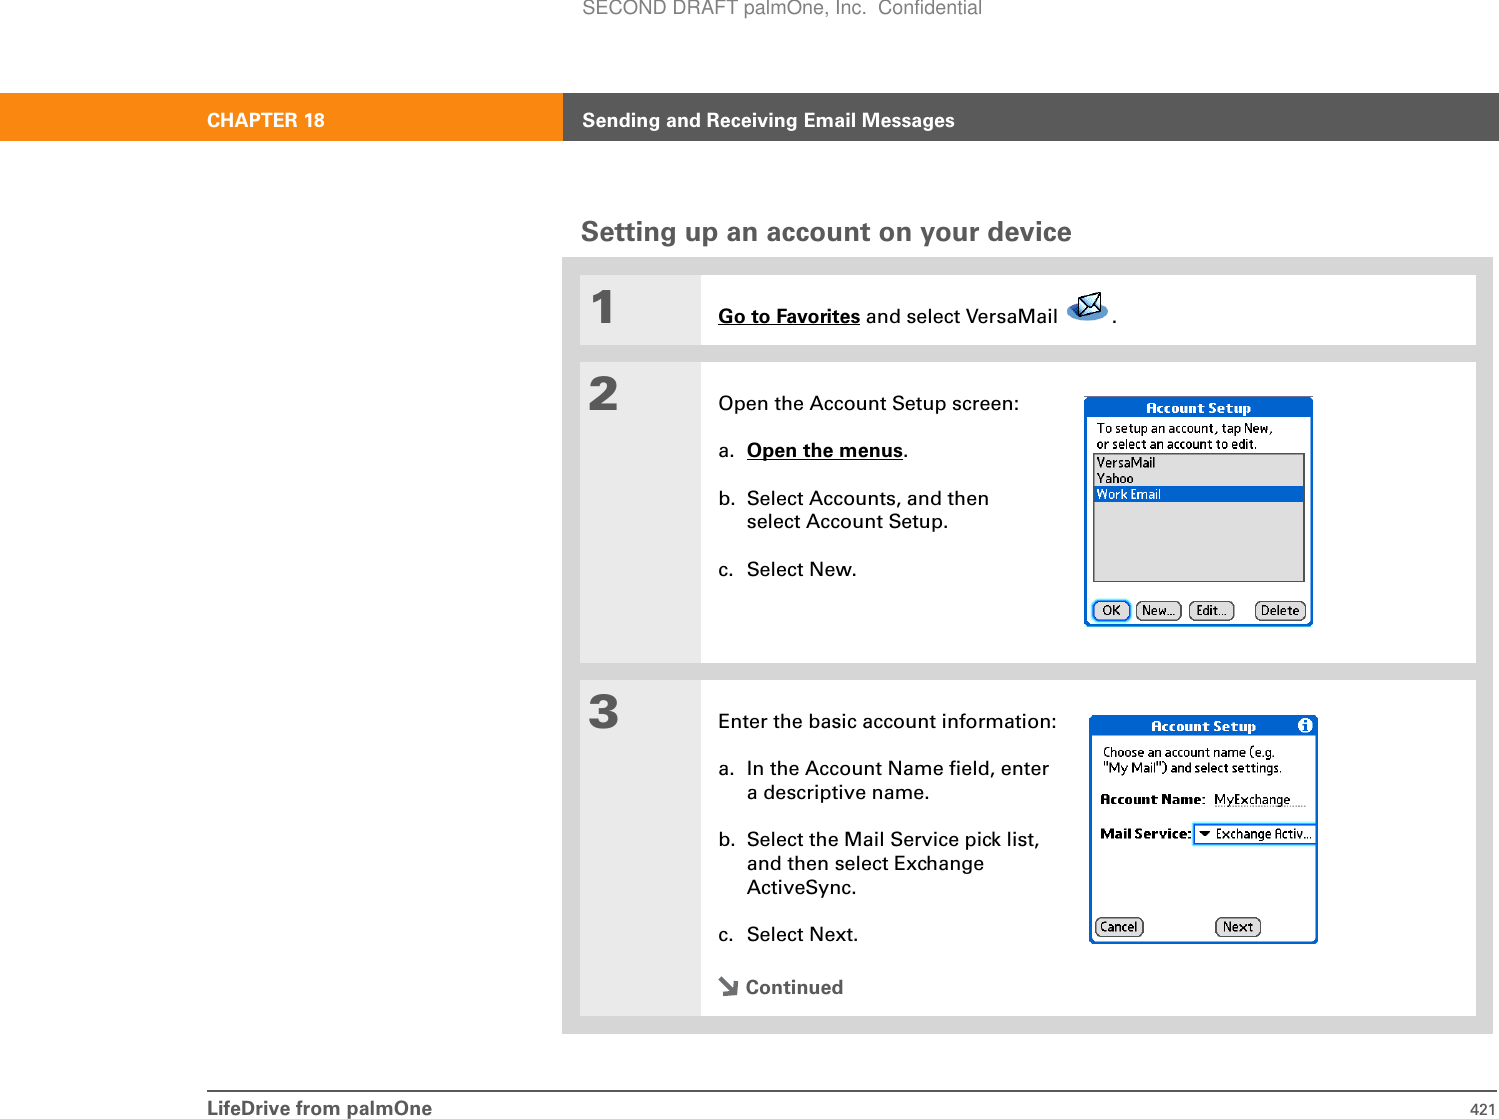

![LifeDrive from palmOne 426CHAPTER 18 Sending and Receiving Email Messages01Go to Favorites and select VersaMail . 2[ & ] OPTIONAL If you are using a VPN connection, connect to your VPN.3Get messages:a. Open the menus.b. Select Accounts, and then select your Microsoft Exchange ActiveSync account.c. Select Sync. This updates your Calendar events also.A list of your messages appears in the Inbox. To see downloaded Calendar events, tap Calendar .Did You Know?When you synchronize a Microsoft Exchange ActiveSync account, a copy of any messages sent from your device is placed in the Sent Items folder on the Exchange server. A copy of any messages deleted from your device is placed in the Deleted Items folder on the server.Did You Know?When you forward or reply to a message, the text is sent from the server copy of the message, not from the copy on your device. This is faster and may save on data charges. DoneSECOND DRAFT palmOne, Inc. Confidential](https://usermanual.wiki/Palm/830.User-Manual-2-of-2/User-Guide-543160-Page-49.png)
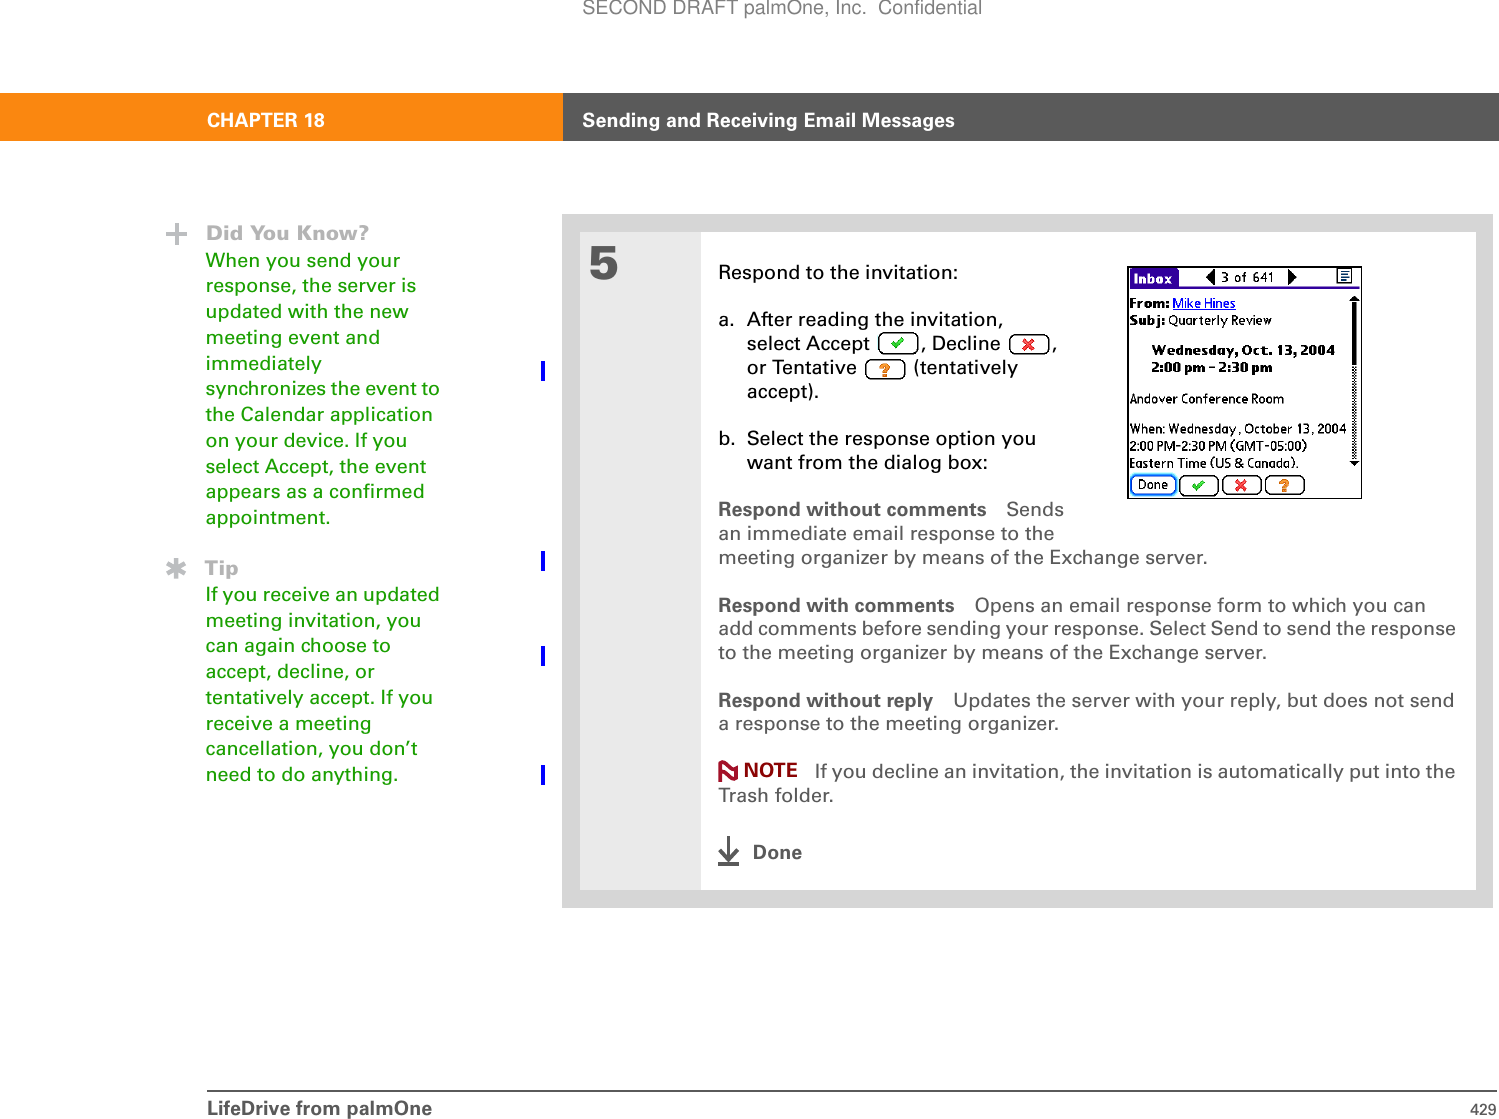
![LifeDrive from palmOne 428CHAPTER 18 Sending and Receiving Email Messages3Select a meeting invitation to open it. Meeting invitations are displayed with a unique icon .4[ & ] OPTIONAL If the invitation contains an attachment, open the attachment and view or save it before responding to the invitation. Once you respond to the invitation the attachment is removed.ContinuedTipAfter opening an invitation, you can switch between full and concise meeting details by switching between full header view and short header view.Did You Know?You can forward meeting invitations in the same way that you forward email messages. The recipient receives the message as a meeting invitation.SECOND DRAFT palmOne, Inc. Confidential](https://usermanual.wiki/Palm/830.User-Manual-2-of-2/User-Guide-543160-Page-51.png)
![LifeDrive from palmOne 430CHAPTER 18 Sending and Receiving Email MessagesWorking with Calendar eventsWhen you set up an account in VersaMail that uses Microsoft Exchange ActiveSync, the Calendar application is synchronized directly with the info on the Exchange server as well. Any new Calendar events on the server for the preceding seven days are downloaded to your device. The interval for synchronizing Calendar events is always seven days, even if you set a different interval on your device for synchronizing email messages. You cannot choose to synchronize Calendar events with info in Palm Desktop software or Outlook once you set up a Microsoft Exchange ActiveSync email account. If you want to stop synchronizing Calendar events with the server, you must delete the Microsoft Exchange ActiveSync email account.Only Calendar and VersaMail information is synchronized directly with info on the Exchange server. Other information on your device, such as contacts, tasks, and memos, continues to be synchronized with information in your desktop software application—either Palm Desktop or Outlook.When using Calendar with Microsoft Exchange ActiveSync, note the following important features:Time zones Time zones are always included for Calendar events when you use Microsoft Exchange ActiveSync. When you synchronize your device with the Exchange server and download new events, the time zone information is included with each event. If you travel to a different time zone, the event times are automatically adjusted in Calendar on your device when you update your location on your device.Attendees For meetings, you can see a full list of attendees to the meeting. From the Day View, select the event, and then select Details. Select the With field. The Attendees field does not appear if the event is not a meeting. It is not available for events you create on your device.IMPORTANT[!]NOTESECOND DRAFT palmOne, Inc. Confidential](https://usermanual.wiki/Palm/830.User-Manual-2-of-2/User-Guide-543160-Page-53.png)
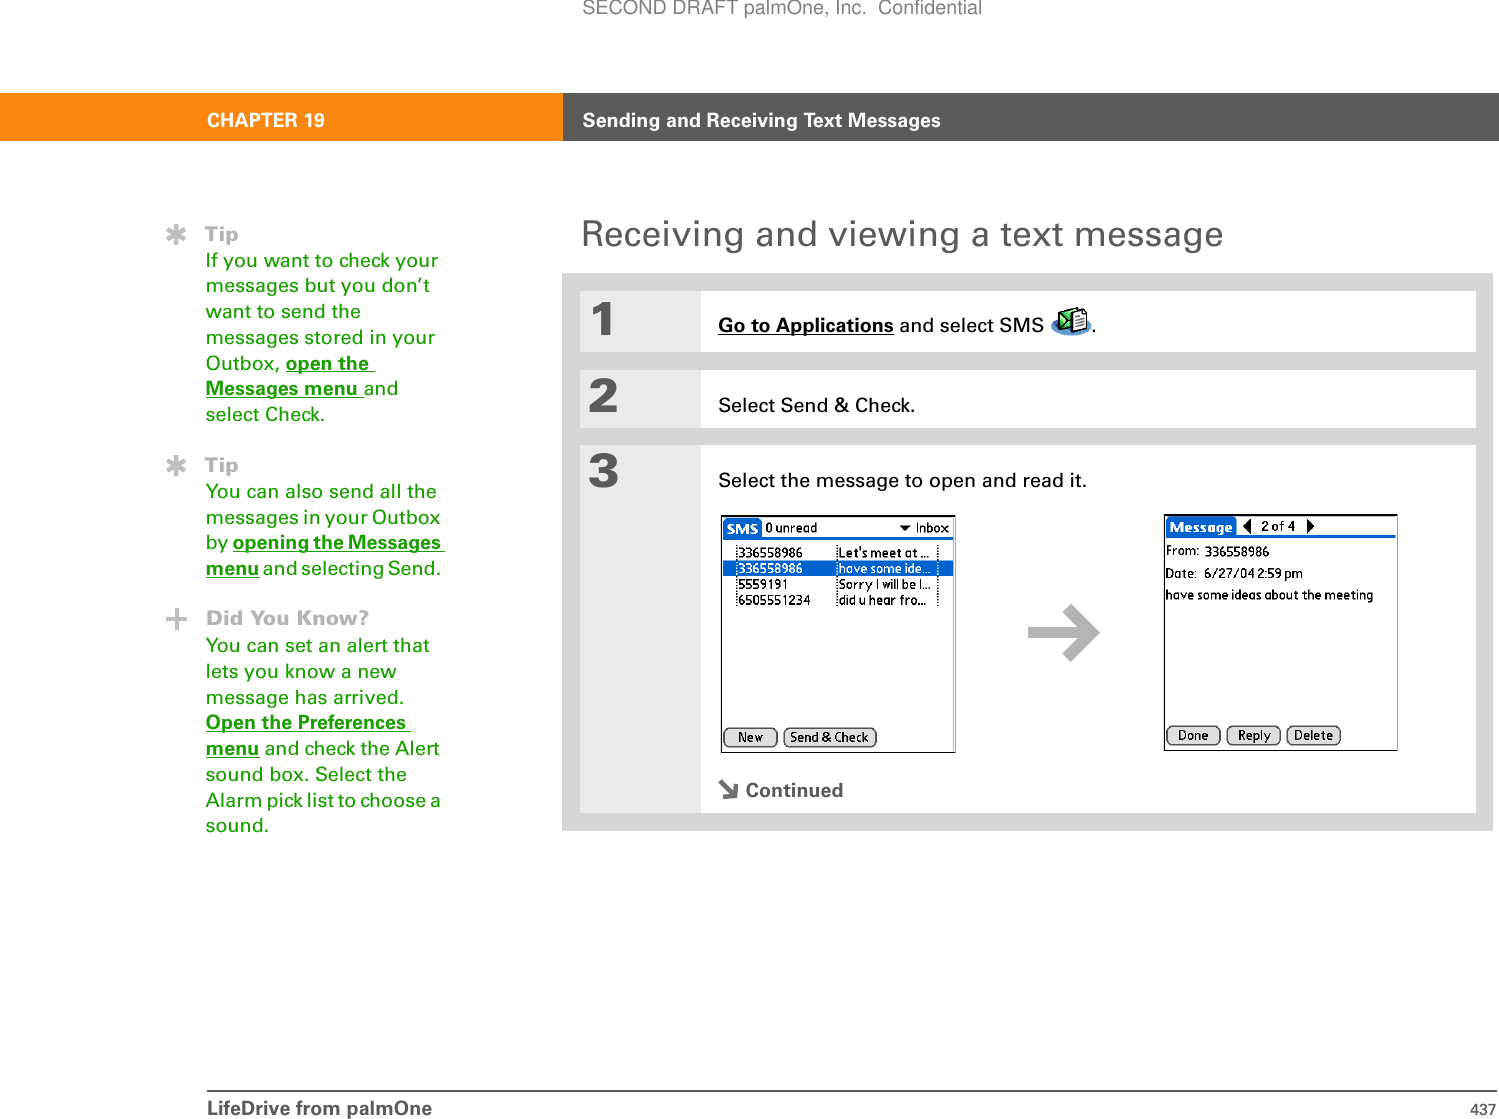
![CHAPTER 19 Sending and Receiving Text MessagesLifeDrive from palmOne 434Creating and sending a text message Many SMS service providers charge per text message or part of a text message. Each message or part is 160 characters. If you create a text message under 161 characters, you are charged for one message. If you create a message that is 161 to 320 characters, you may be charged for two messages, and so forth. A counter appears at the top of the page to indicate the number of characters. Even though a message has more than 160 characters, the message appears as one message to the person receiving the message. 01Go to Applications and select SMS . 2Select New.ContinuedBefore You Begin[!]Before you can send and receive text messages, you must set up a phone connection on your device to send and receive information wirelessly.»Key TermSMS More commonly known as text messages, Short Message Service messages can be received by most mobile phones.IMPORTANT[!]Unread messageReadmessageSECOND DRAFT palmOne, Inc. Confidential](https://usermanual.wiki/Palm/830.User-Manual-2-of-2/User-Guide-543160-Page-57.png)
![LifeDrive from palmOne 435CHAPTER 19 Sending and Receiving Text Messages3Enter the recipient’s address using one of the following methods:Select To Select the recipient’s name on the Mobile Number Lookup list, and then select Add. Enter directly Enter the recipient’s mobile phone number on the To line.4In the area below the To line, enter the text of your message. 5[ & ] OPTIONAL You can store your message in your Draft category and work on it later:a. Open the menus.b. Select Draft on the Message menu.ContinuedTipIf you are concerned about the length of your messages, you can have a warning appear when multipart messages exceed the specified number of parts. Open the Options menu and select Preferences. Select Details and then select the number of parts from the Warn over pick list.Did You Know?You can create a signature that you use to sign your messages by opening the Options menu and selecting Preferences. Enter a signature on the lines. You can add your signature to your message by opening the Options menu and selecting Add Signature.Number of charactersSECOND DRAFT palmOne, Inc. Confidential](https://usermanual.wiki/Palm/830.User-Manual-2-of-2/User-Guide-543160-Page-58.png)
![LifeDrive from palmOne 440CHAPTER 19 Sending and Receiving Text MessagesSetting advanced messaging features01Go to Applications and select SMS . 2Go to the Preferences menu:a. Open the menus.b. Select Options, and then select Preferences.elect3[ & ] OPTIONAL Set the following parameters:Confirm Deleted Message Indicates whether a confirmation message appears each time you delete a message or you select the Empty Trash option from the Message menu. To display confirmation messages, check this box.Delete After Transfer Indicates whether data messages are deleted after you accept the data in the appropriate application. To keep data messages after you transfer them to the application, uncheck this box.ContinuedSECOND DRAFT palmOne, Inc. Confidential](https://usermanual.wiki/Palm/830.User-Manual-2-of-2/User-Guide-543160-Page-63.png)
![LifeDrive from palmOne 441CHAPTER 19 Sending and Receiving Text Messages4[ & ] OPTIONAL Select Details and set the following parameters:Leave Messages on Phone Indicates whether messages are deleted from your phone after you download them to your device. To keep messages on your phone after you transfer them to your device, select this box.Return Receipt Determines whether you receive receipt confirmation notices. To receive receipt confirmation notices, select Requested.Expires Indicates how long unsent messages remain in your Outbox. Select from the following options: 4 Hours, 1 Day, 1 Week, 2 Weeks, 1 Month, and Max. Time.Message Center Indicates whether your device obtains your mobile phone service provider’s Message Center number directly from the phone, or whether you need to enter the number manually. If your phone is already configured to use SMS, you do not need to change this setting. 5Select OK twice.DoneDid You Know?Outgoing SMS message settings may depend on the service offered by your SMS carrier.SECOND DRAFT palmOne, Inc. Confidential](https://usermanual.wiki/Palm/830.User-Manual-2-of-2/User-Guide-543160-Page-64.png)
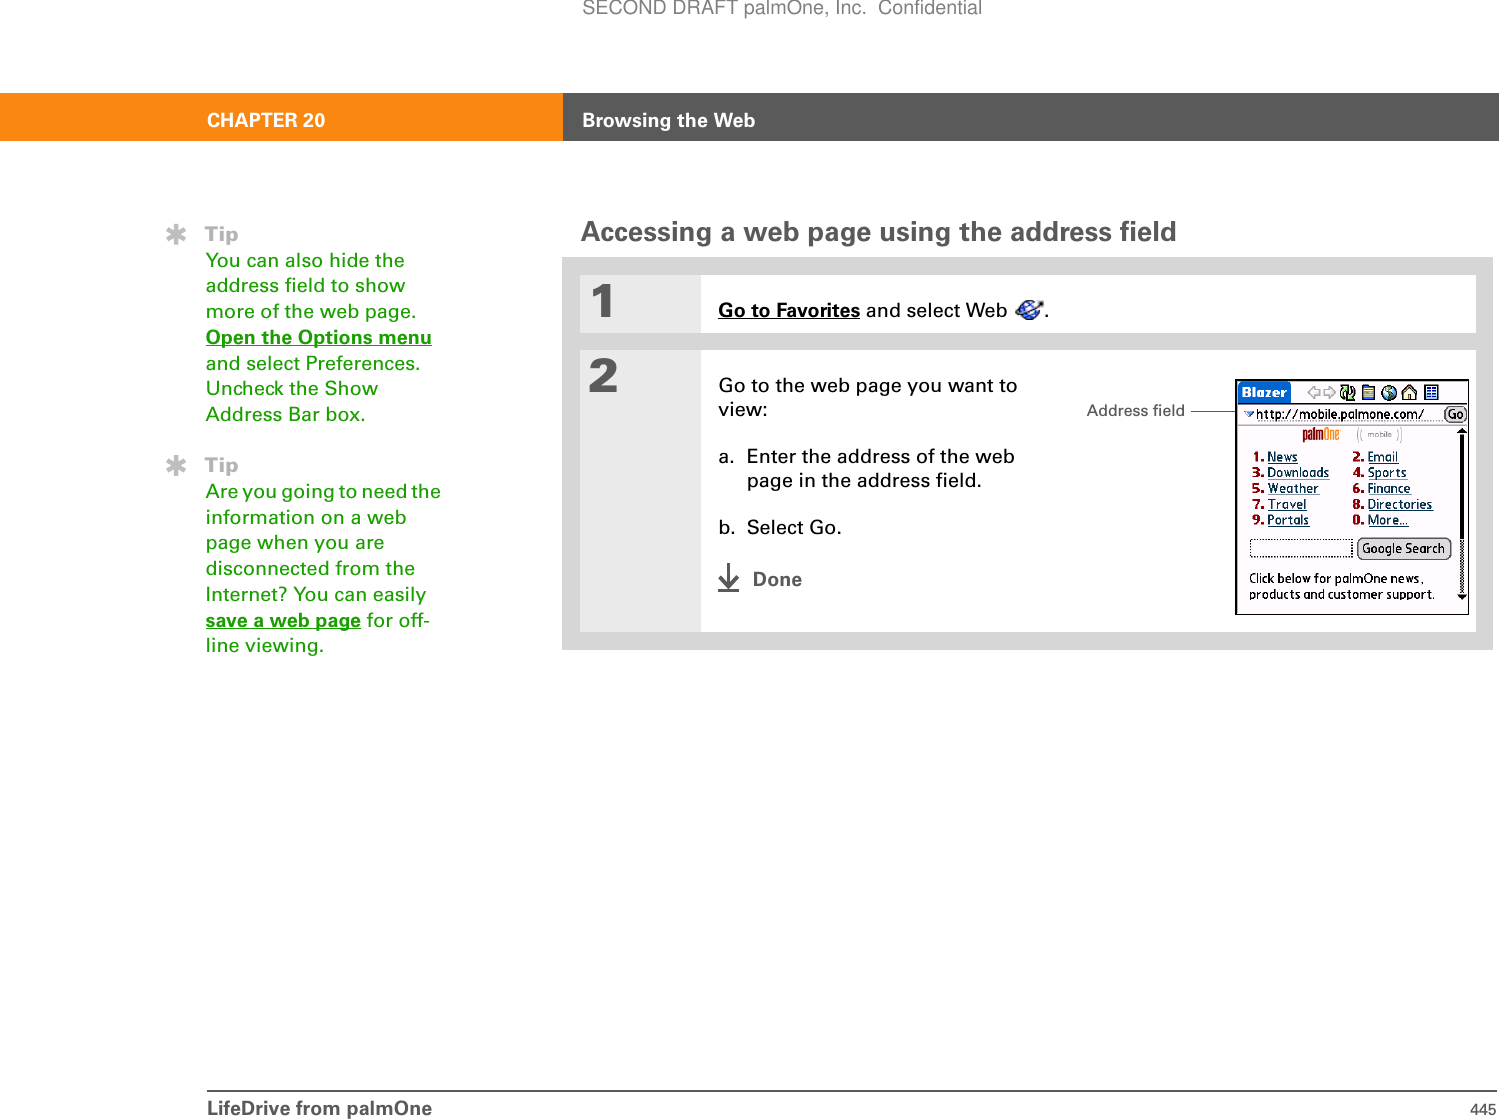
![LifeDrive from palmOne 444CHAPTER 20 Browsing the WebAccessing a web pageYou can open web pages, navigate the pages, and do the same things you can do with a desktop browser.Accessing a web page using the action bar1Go to Favorites and select Web .2Go to the web page you want to view:a. Select Go to Web Page .b. Enter the address of the web page you want to visit. Use the buttons in the Go to Web Page dialog box for quick entry of characters commonly used in web addresses. If the web browser recognizes the address that you are entering due to a previous entry and autofill is enabled, autofill automatically completes the address.c. Select OK.DoneBefore You Begin[!]To browse the web, you must set up a connection to the Internet from your device.If you are accessing a VPN network, you need to install VPN software and set up VPN access. You can turn on VPN from the web browser by opening the Options menu and selecting Turn VPN On. »Key TermURL Stands for uniform resource locator, the technical name for a web address. For example, the URL for palmOne is http://www.palmone.com.SECOND DRAFT palmOne, Inc. Confidential](https://usermanual.wiki/Palm/830.User-Manual-2-of-2/User-Guide-543160-Page-67.png)
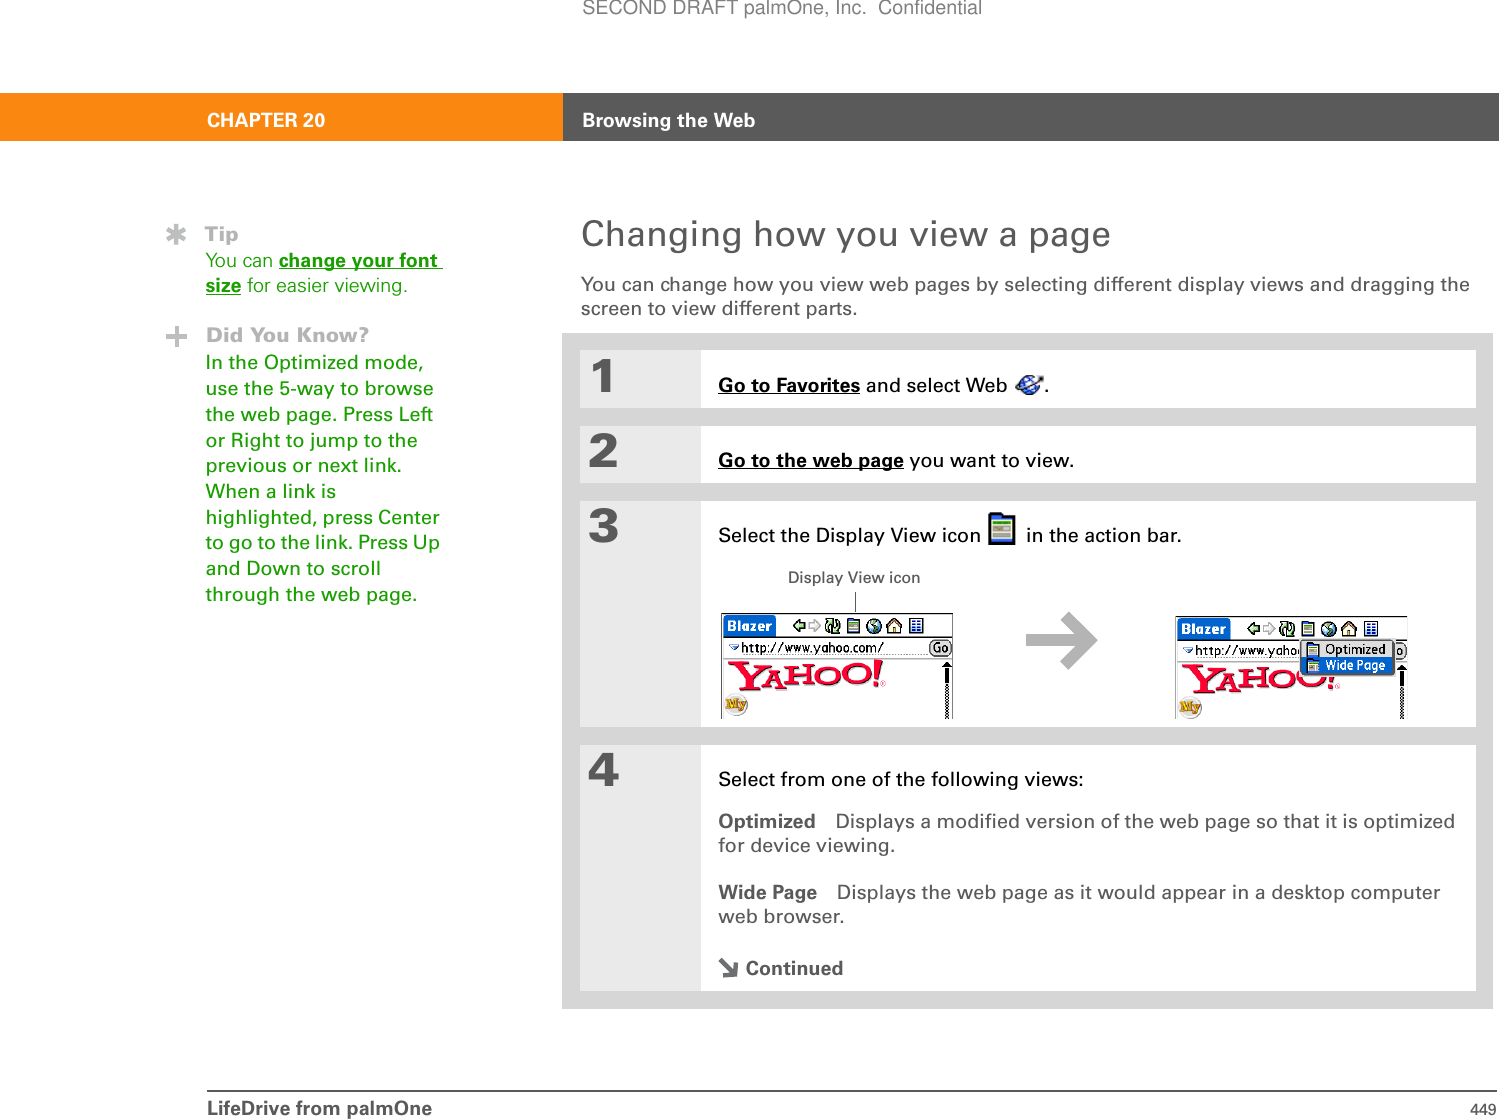
![LifeDrive from palmOne 450CHAPTER 20 Browsing the Web5[ & ] OPTIONAL If the web page is larger than your screen, you can tap and drag the stylus to move the web page in any direction to view different parts of the web page.To activate the Tap and Drag scrolling, you must set the Tap and Drag setting in the General Preferences tab under the Options menu. This feature is disabled when you turn on Writing Area Preferences and use the full screen for Graffiti®2 writing.DoneSECOND DRAFT palmOne, Inc. Confidential](https://usermanual.wiki/Palm/830.User-Manual-2-of-2/User-Guide-543160-Page-73.png)
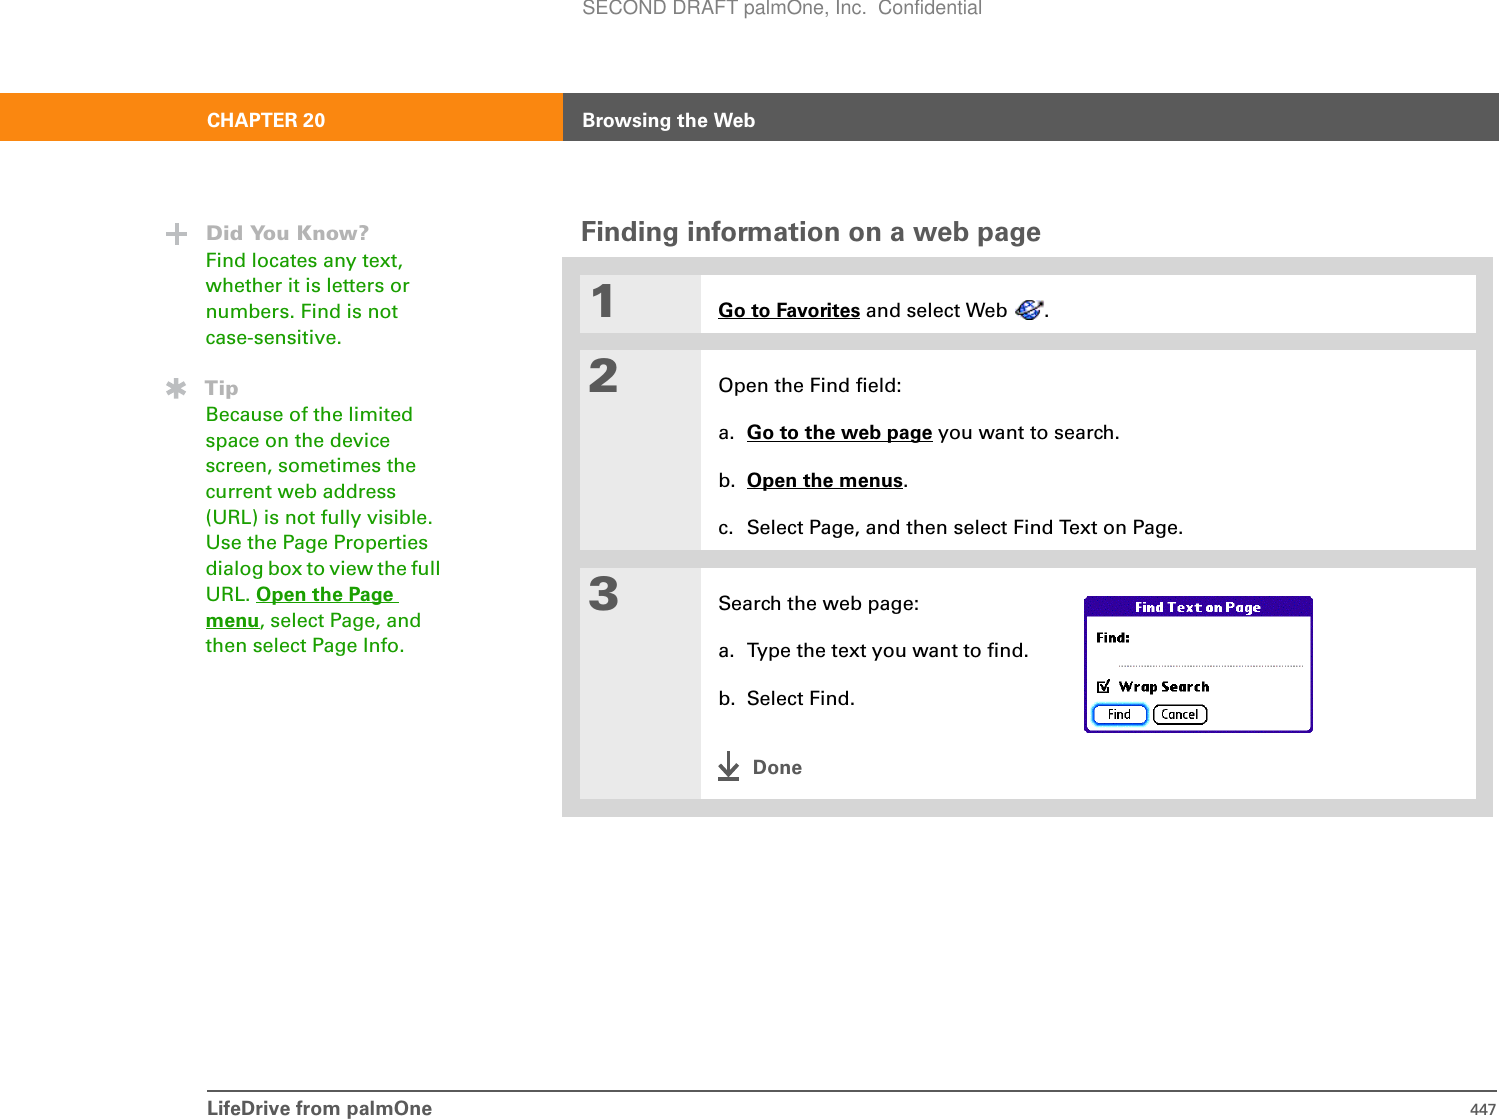
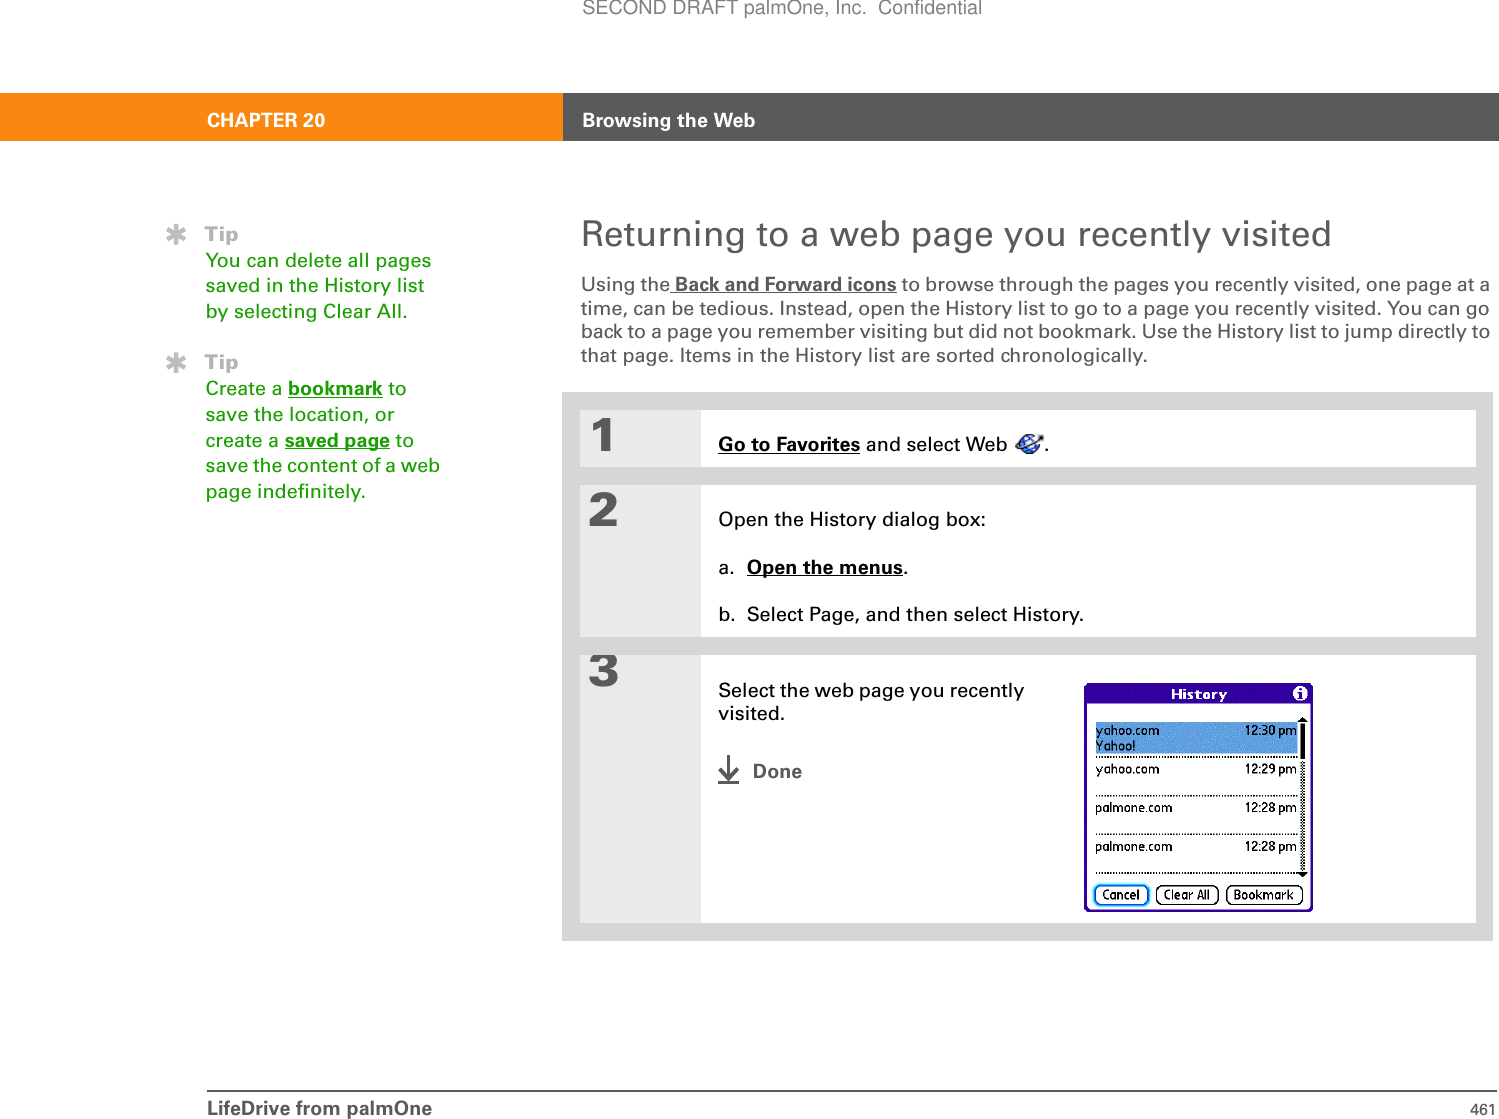
![LifeDrive from palmOne 451CHAPTER 20 Browsing the WebBookmarking your favorite pagesBookmarking your favorite web pages allows you to quickly return to those pages.Adding a bookmark01Go to Favorites and select Web .2Go to the web page that you want to bookmark.3Open the Bookmark Page dialog box:a. Open the menus.b. Select Page, and then select Add Bookmark.4[ & ] OPTIONAL Change the bookmark name, description, or URL. 5Select OK.Done»Key TermBookmark A pointer to a web page. The actual page is not stored, only the URL. Also called a Favorite in some browsers.TipYou can set your bookmark list as your start page.SECOND DRAFT palmOne, Inc. Confidential](https://usermanual.wiki/Palm/830.User-Manual-2-of-2/User-Guide-543160-Page-74.png)


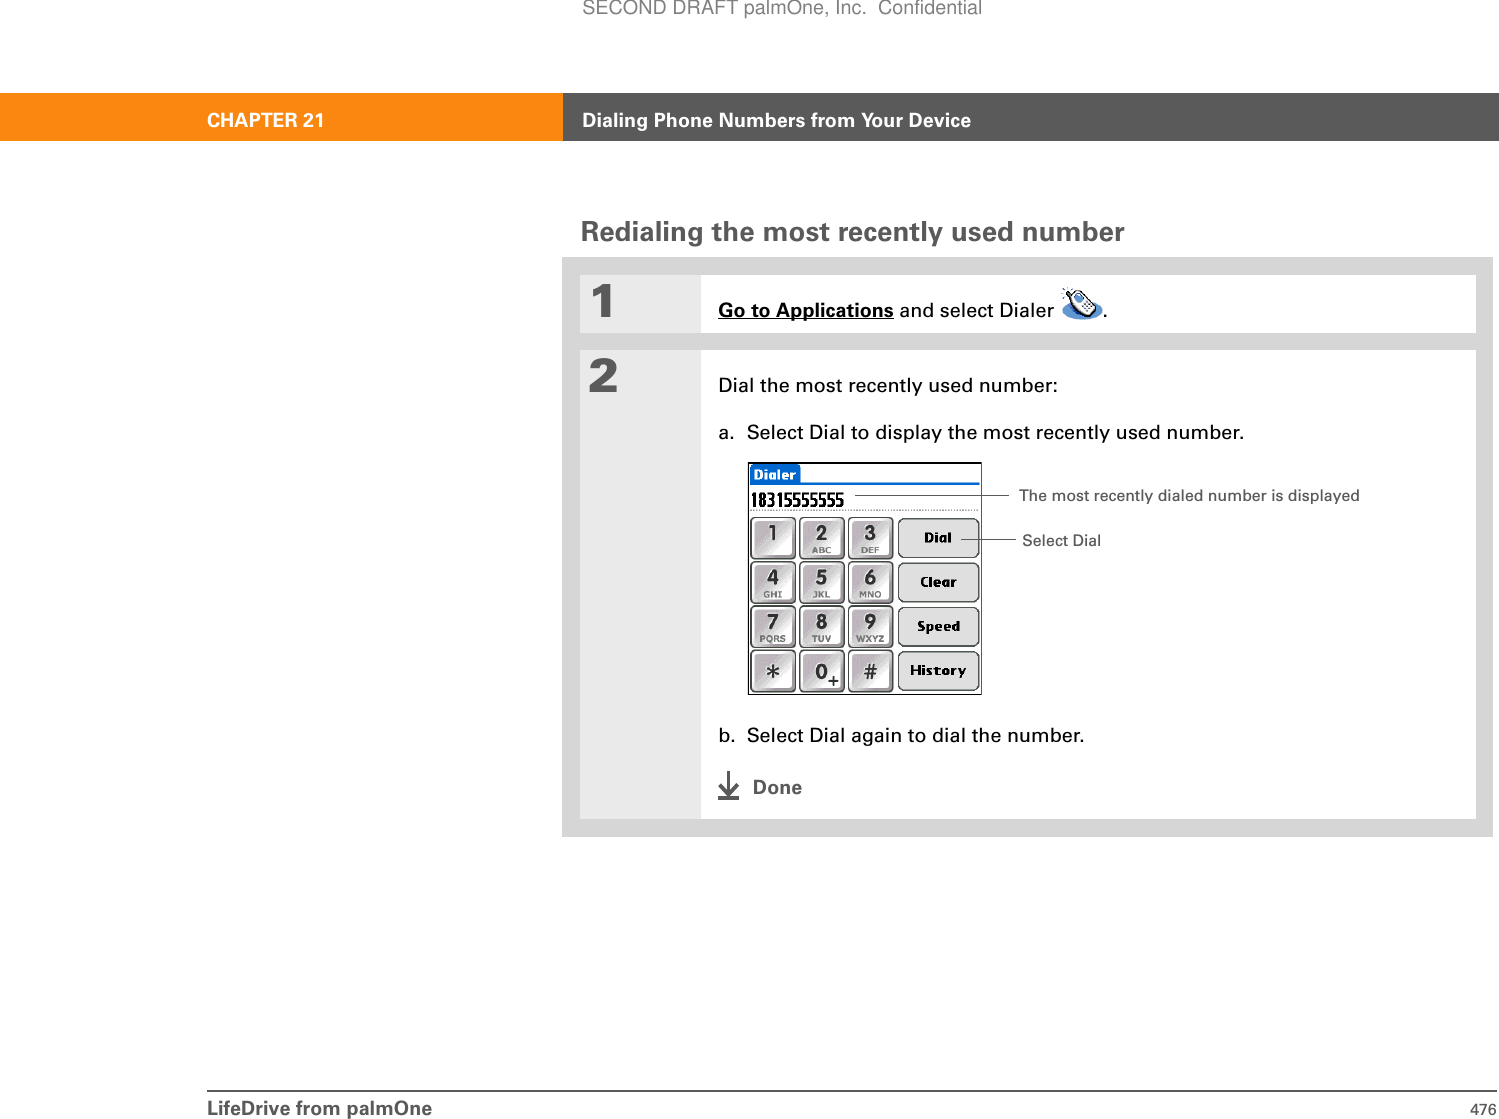
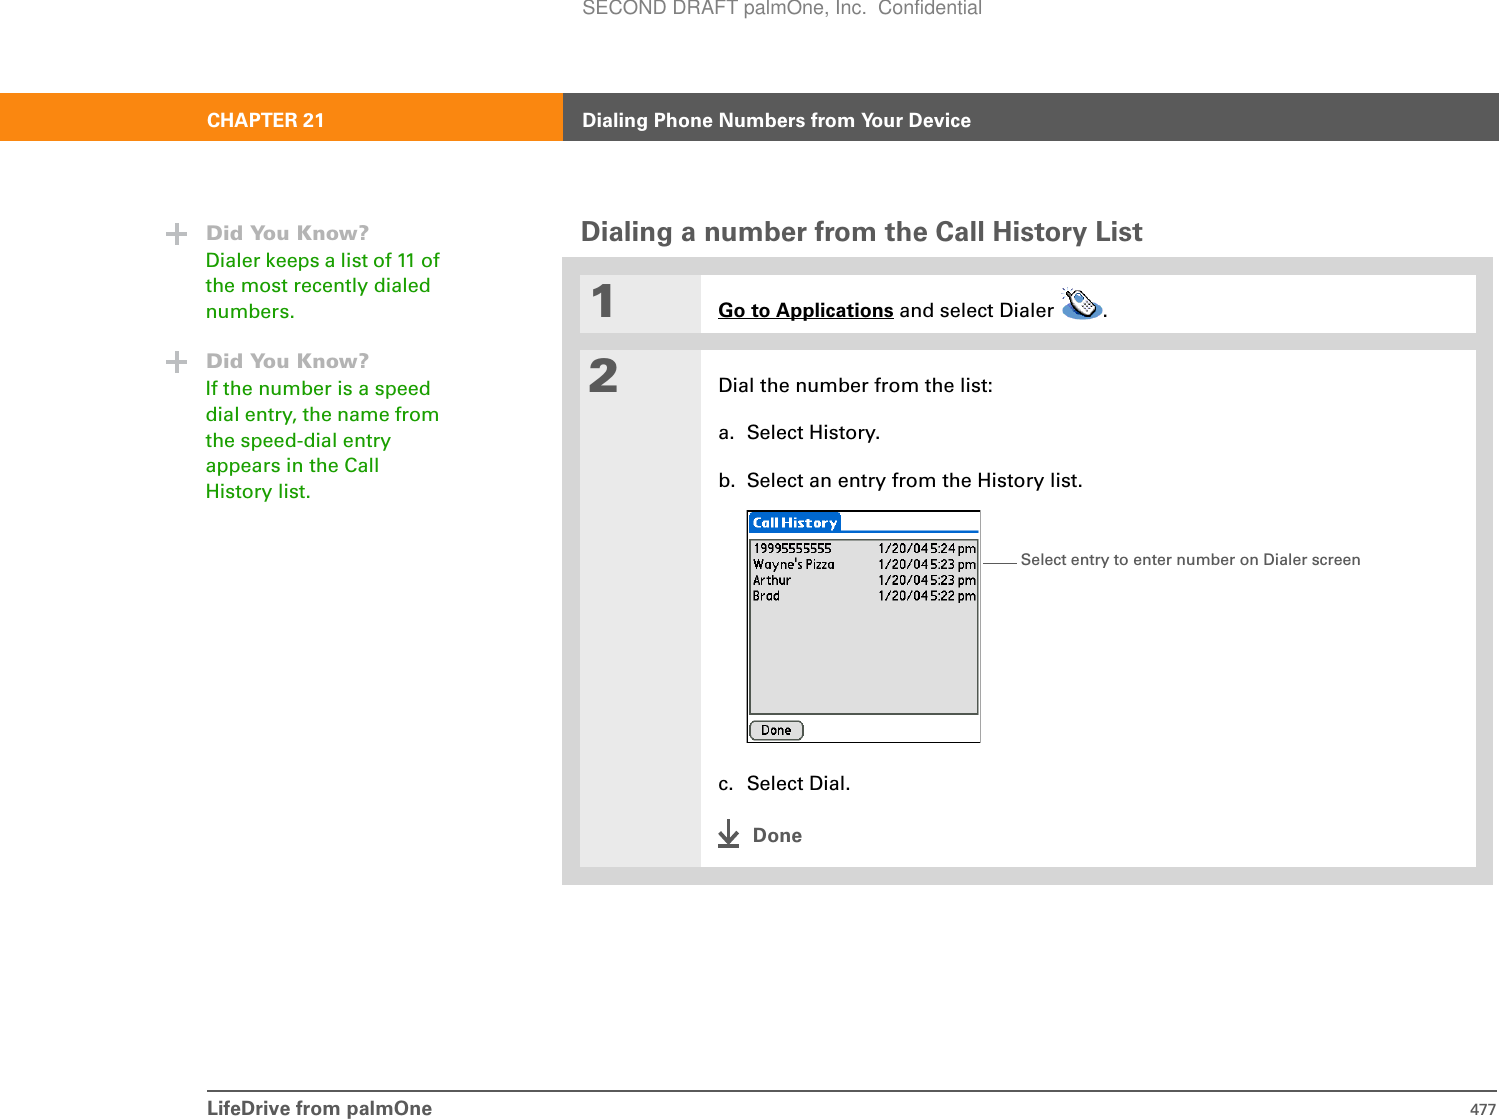
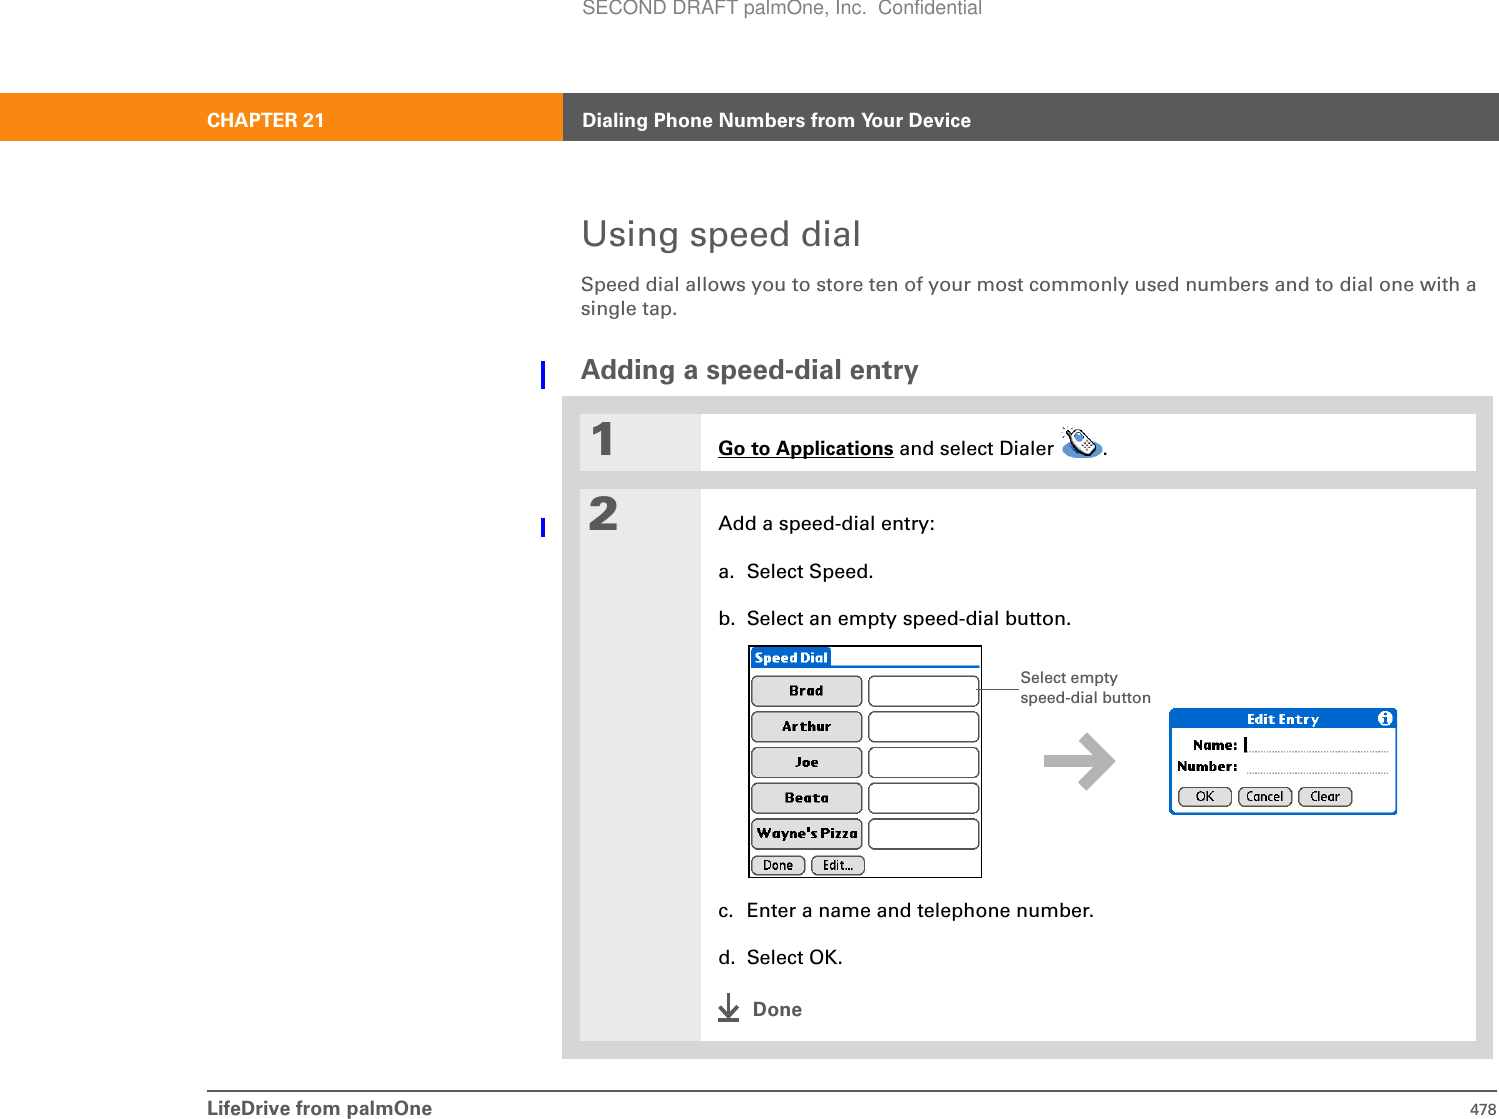
![LifeDrive from palmOne 475CHAPTER 21 Dialing Phone Numbers from Your DeviceDialing a numberTapping out a number on your device is sometimes easier than using your mobile phone.Entering a number01Go to Applications and select Dialer .2Tap the telephone number on the keypad.3Select Dial.DoneBefore You Begin[!]Before you can dial a number, you must set up a phone connection on your device.Select and hold the 0 key to add a + (plus) to the number sequenceDigits appear in the numeric displayEnter phone number and select DialSelect Clear to delete last digit from numeric display. Select and hold to clear entire numeric displaySECOND DRAFT palmOne, Inc. Confidential](https://usermanual.wiki/Palm/830.User-Manual-2-of-2/User-Guide-543160-Page-98.png)
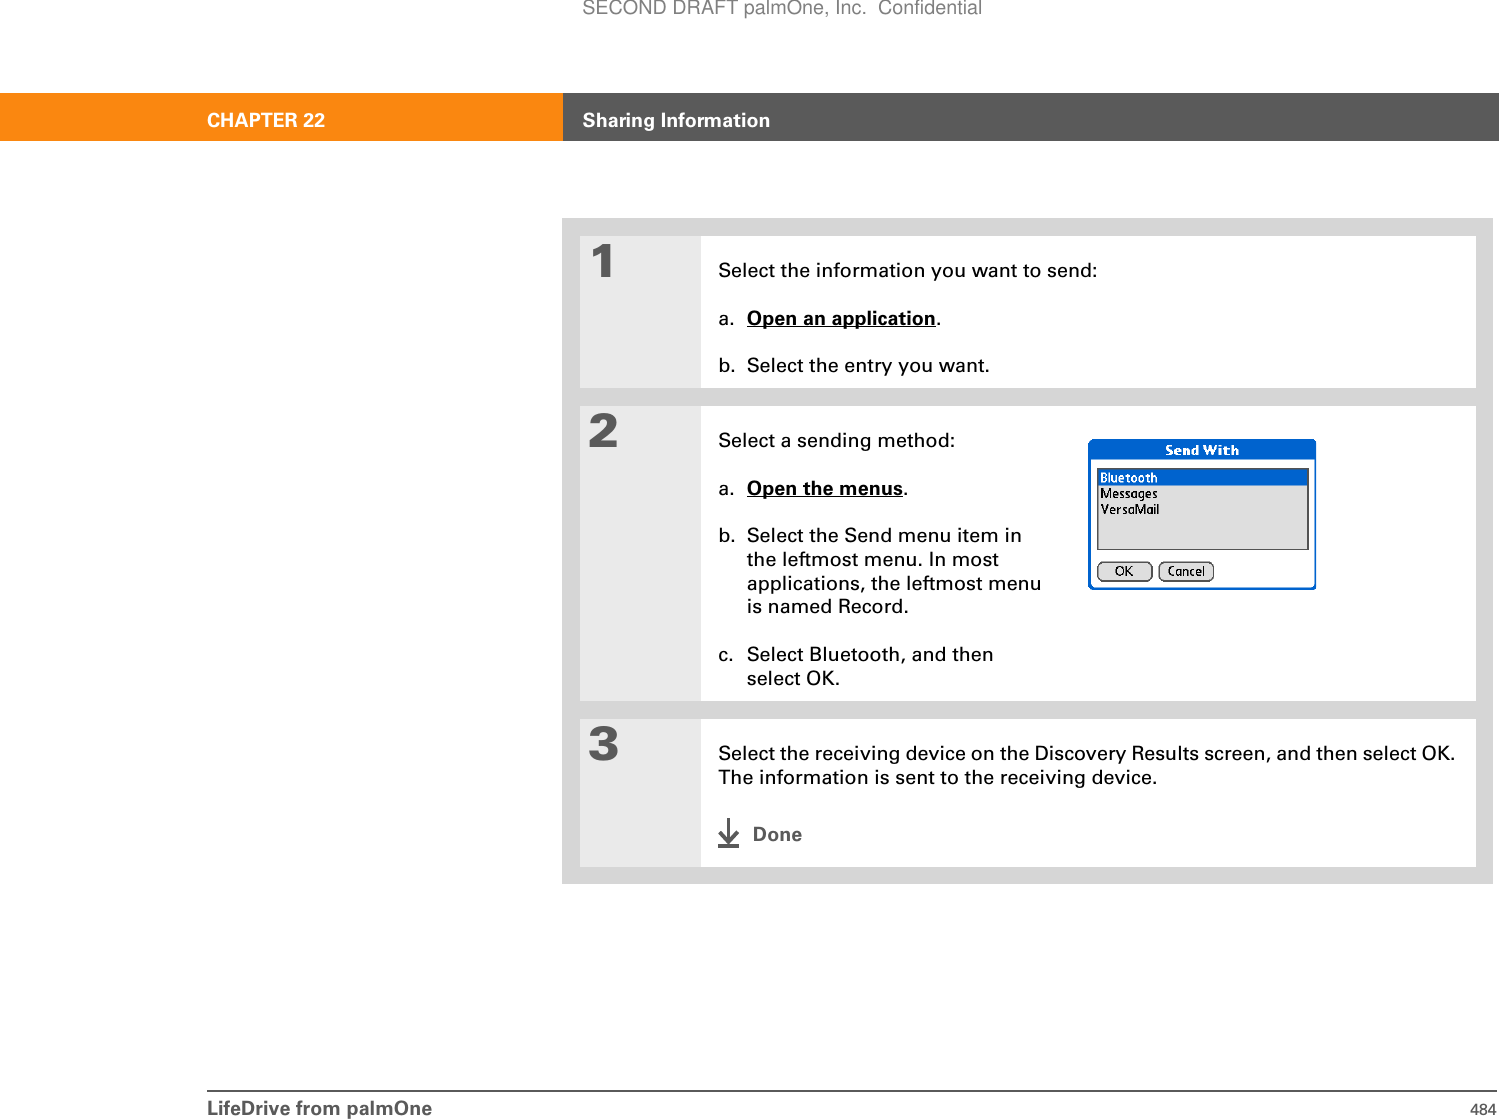
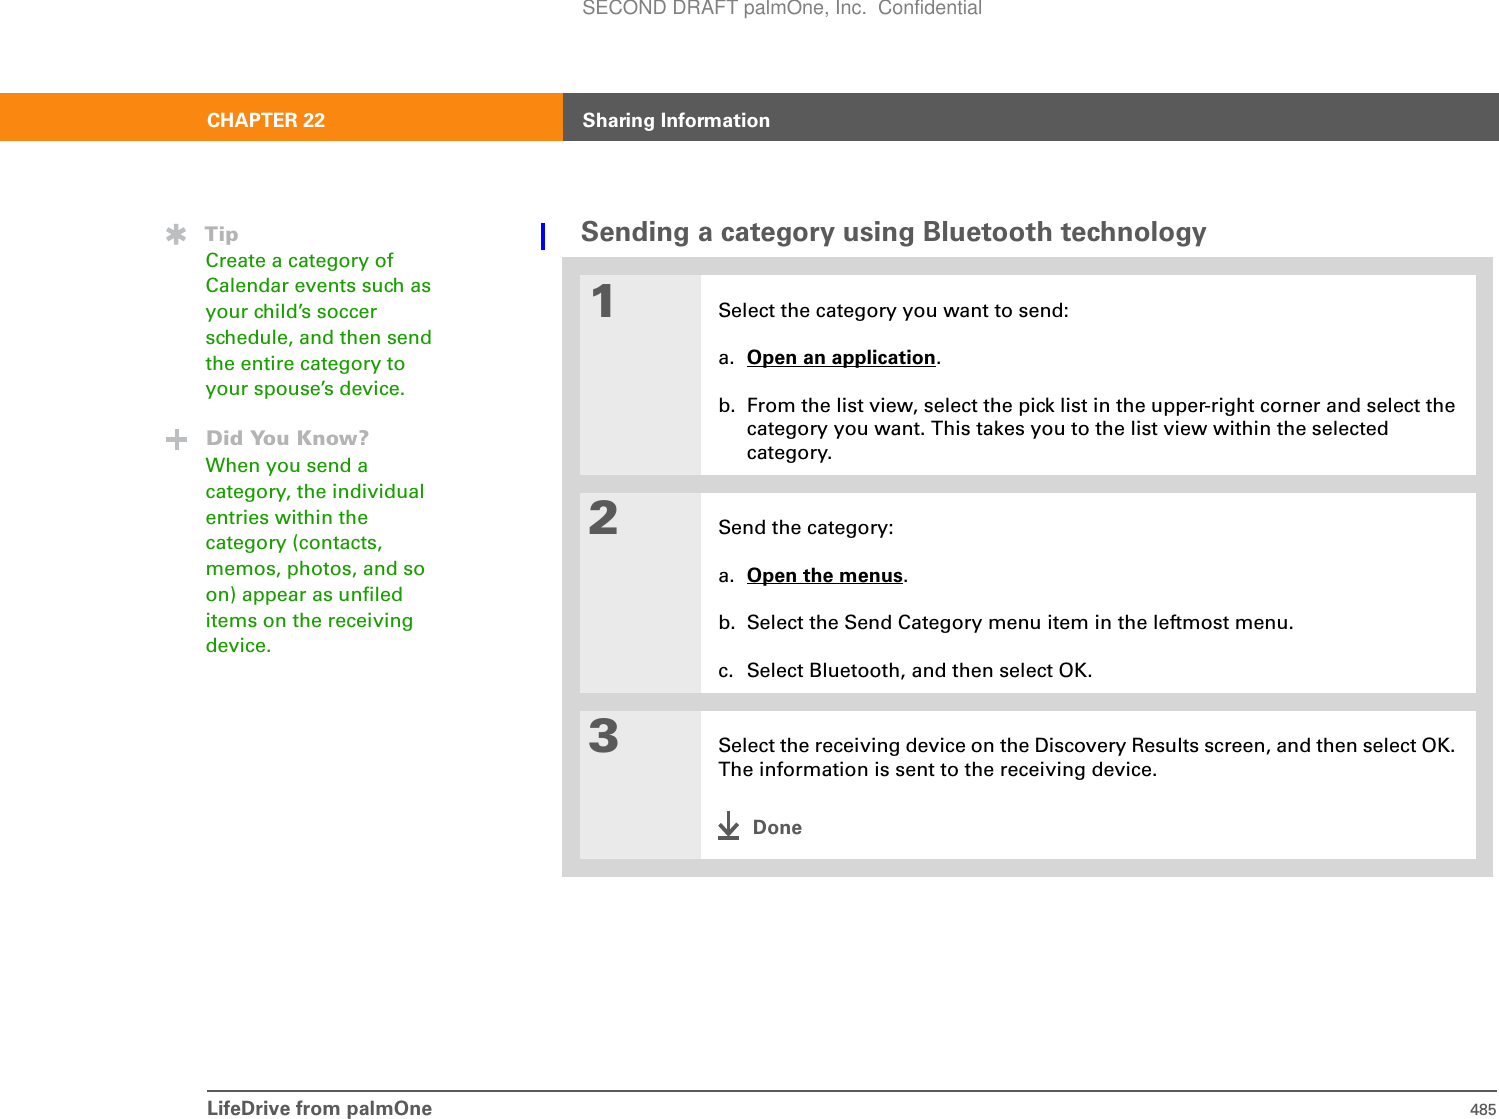
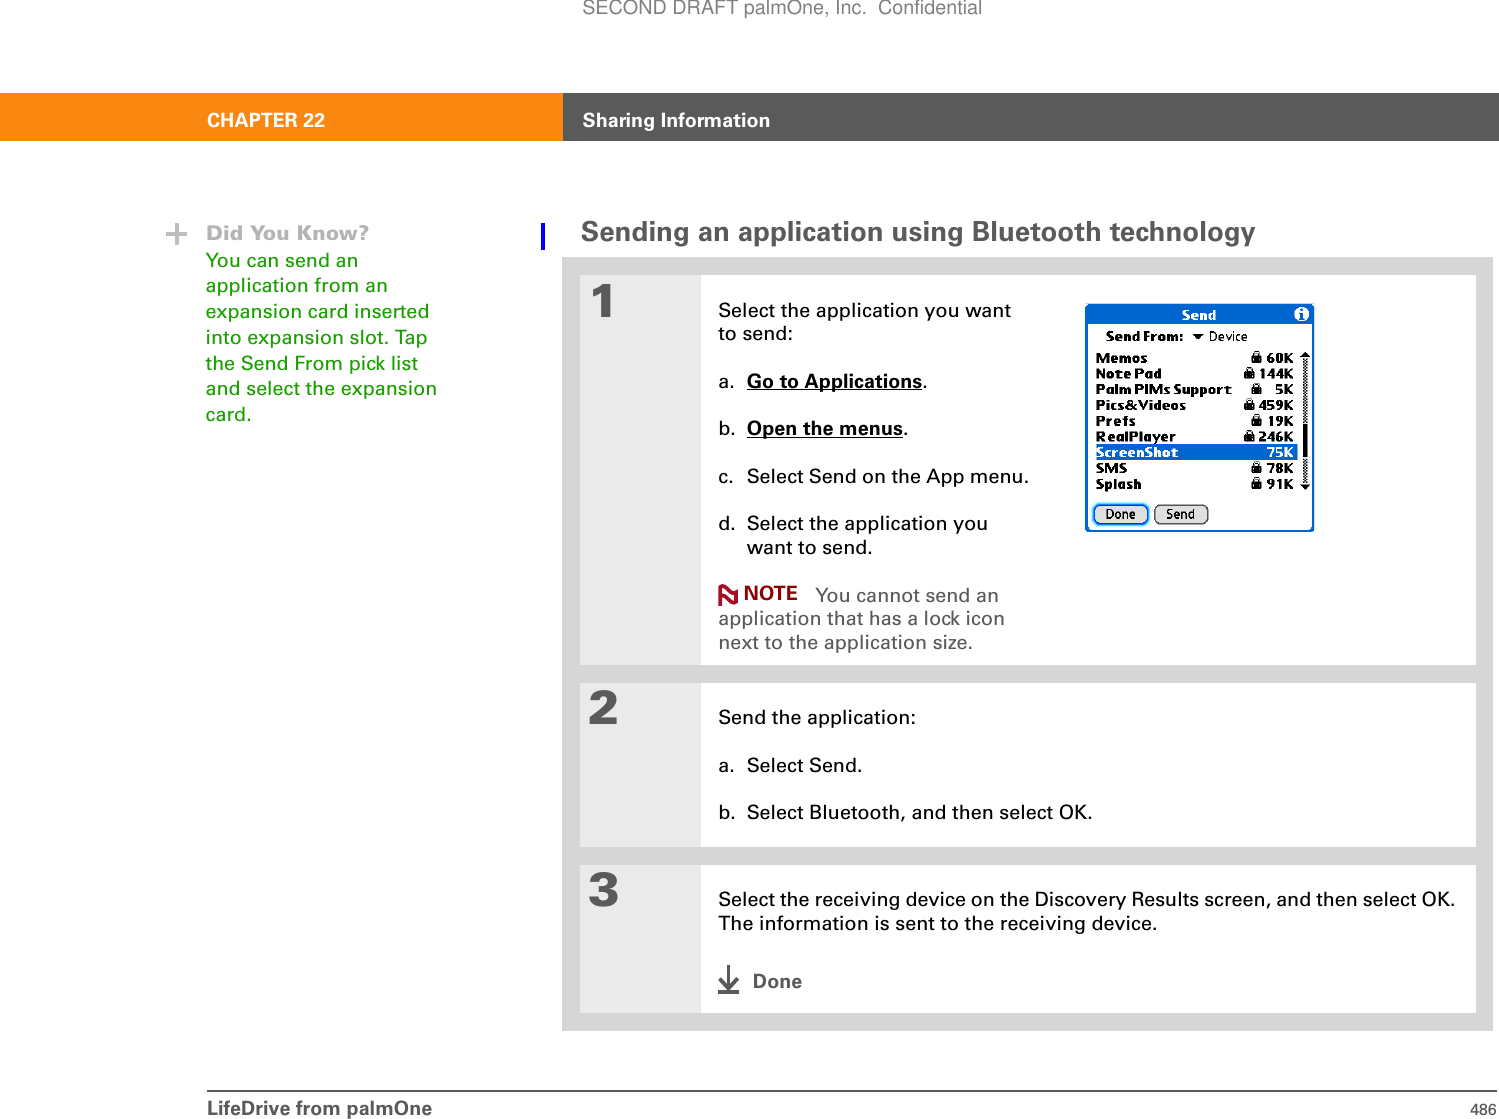
![LifeDrive from palmOne 483CHAPTER 22 Sharing InformationUsing the Send commandYou can send information from within an application—such as a photo or video, a contact, or an appointment—to other Palm OS® device users. You can also send a category of information or even an entire application.You can use the Send command in many applications to send information wirelessly using one of the following methods:• Using the built-in Bluetooth® wireless technology on your device• As an attachment to an e-mail message• As part of a text messageSending information from within an application using Bluetooth technologyYou can use your device’s built-in Bluetooth technology to send information directly to another device that includes Bluetooth technology. You must be within range of the receiving device to send information using Bluetooth technology. The maximum range is approximately 25–30 feet (8–10 meters); however, the shorter the range, the more quickly and accurately you can send information.Before You Begin[!]You must complete all the prerequisites for the messaging application.To use your device’s built-in Bluetooth wireless technology, you must setup a phone connection. To use it with your device’s IR port, run Phone Link Updater, and then use the Phone Link application to set up a phone connection.Did You Know?You can also easily send information from the desktop component of many applications. For example, you can send photos from the palmOne™ Media desktop application. See the online desktop help for information.TipIf you are unable to send information to another device, try moving closer to the receiving device.SECOND DRAFT palmOne, Inc. Confidential](https://usermanual.wiki/Palm/830.User-Manual-2-of-2/User-Guide-543160-Page-106.png)


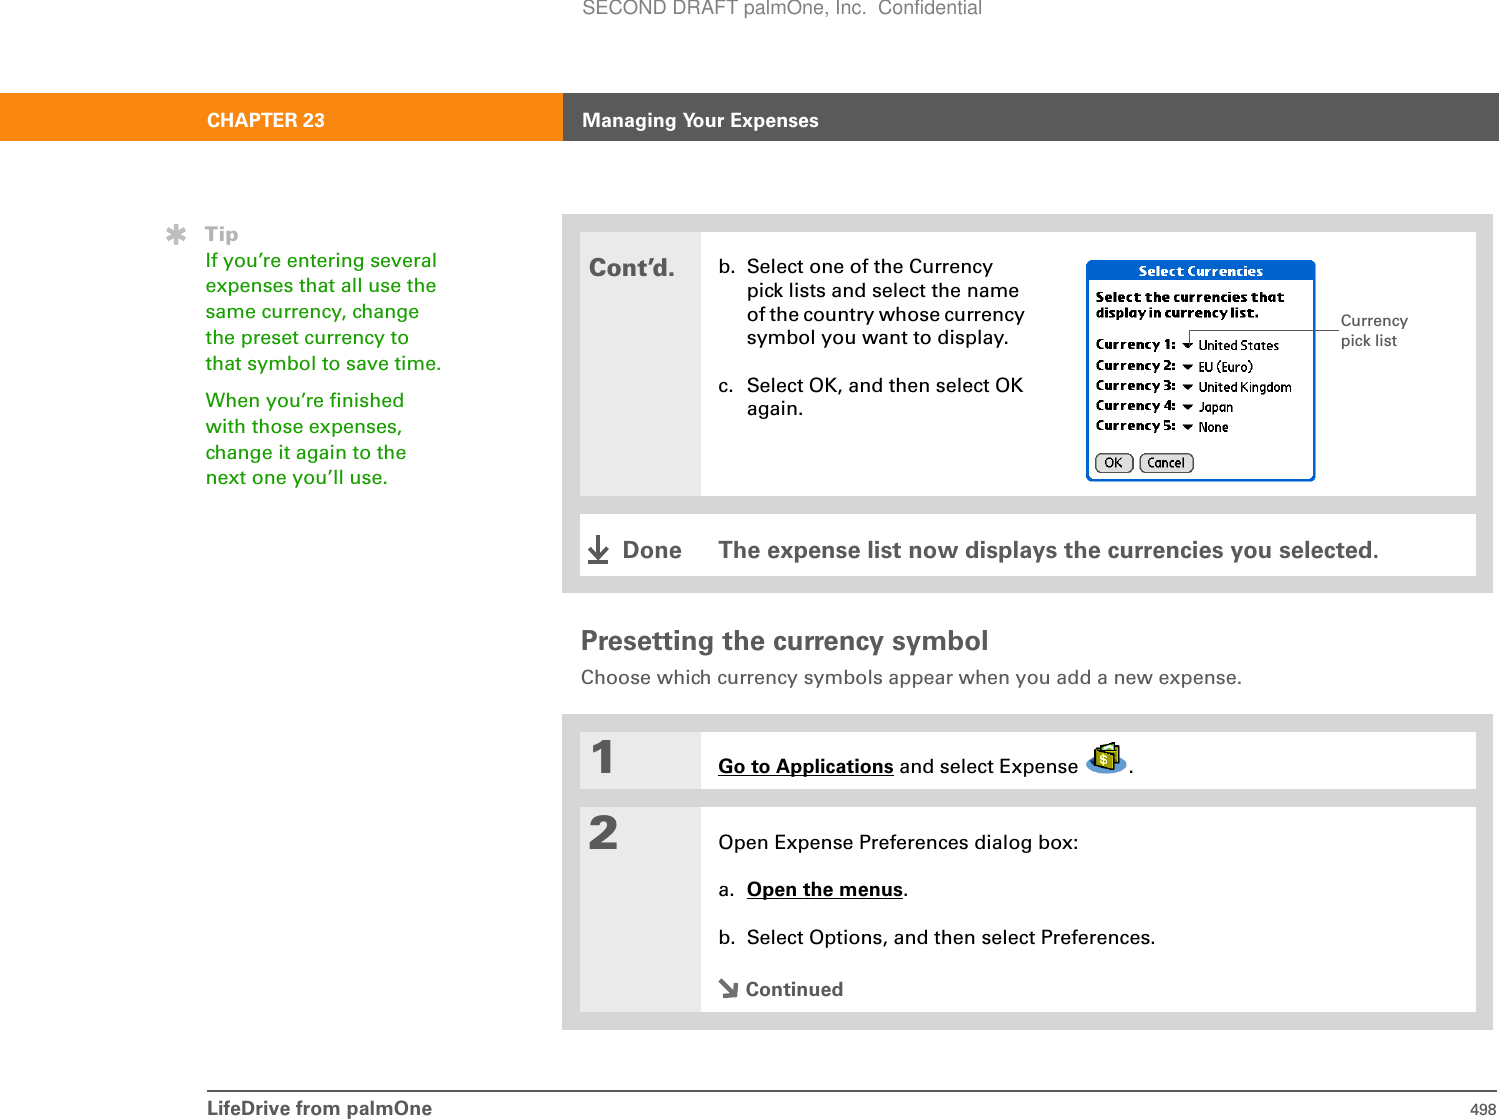
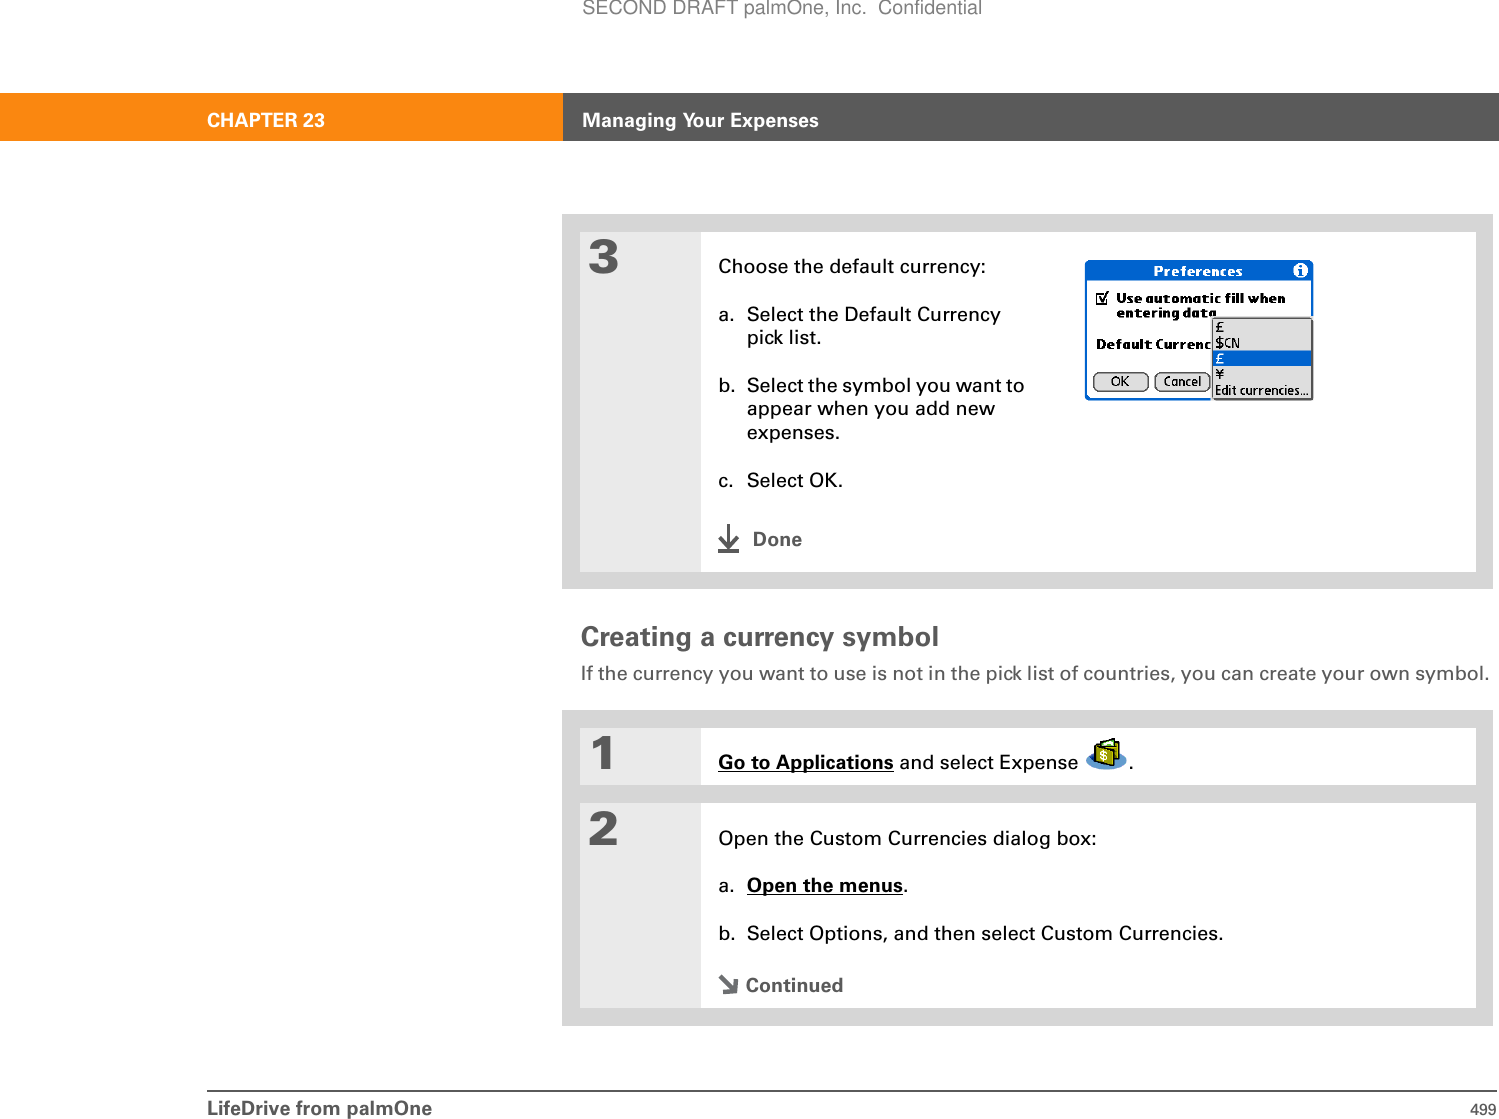
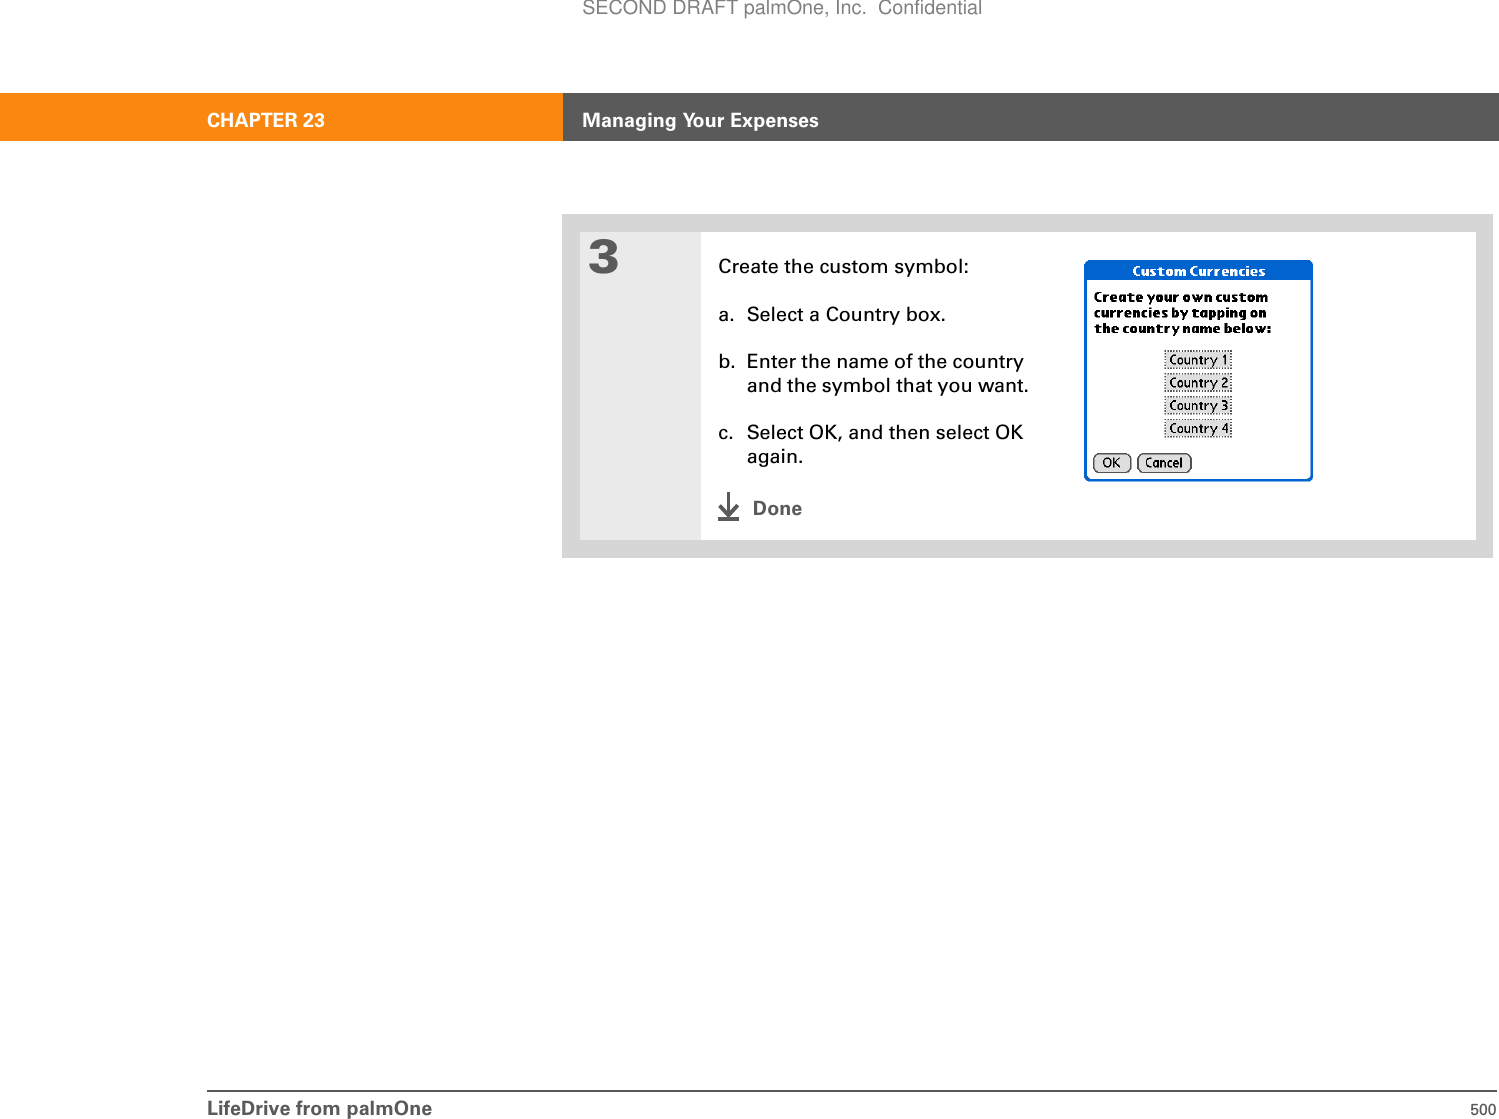
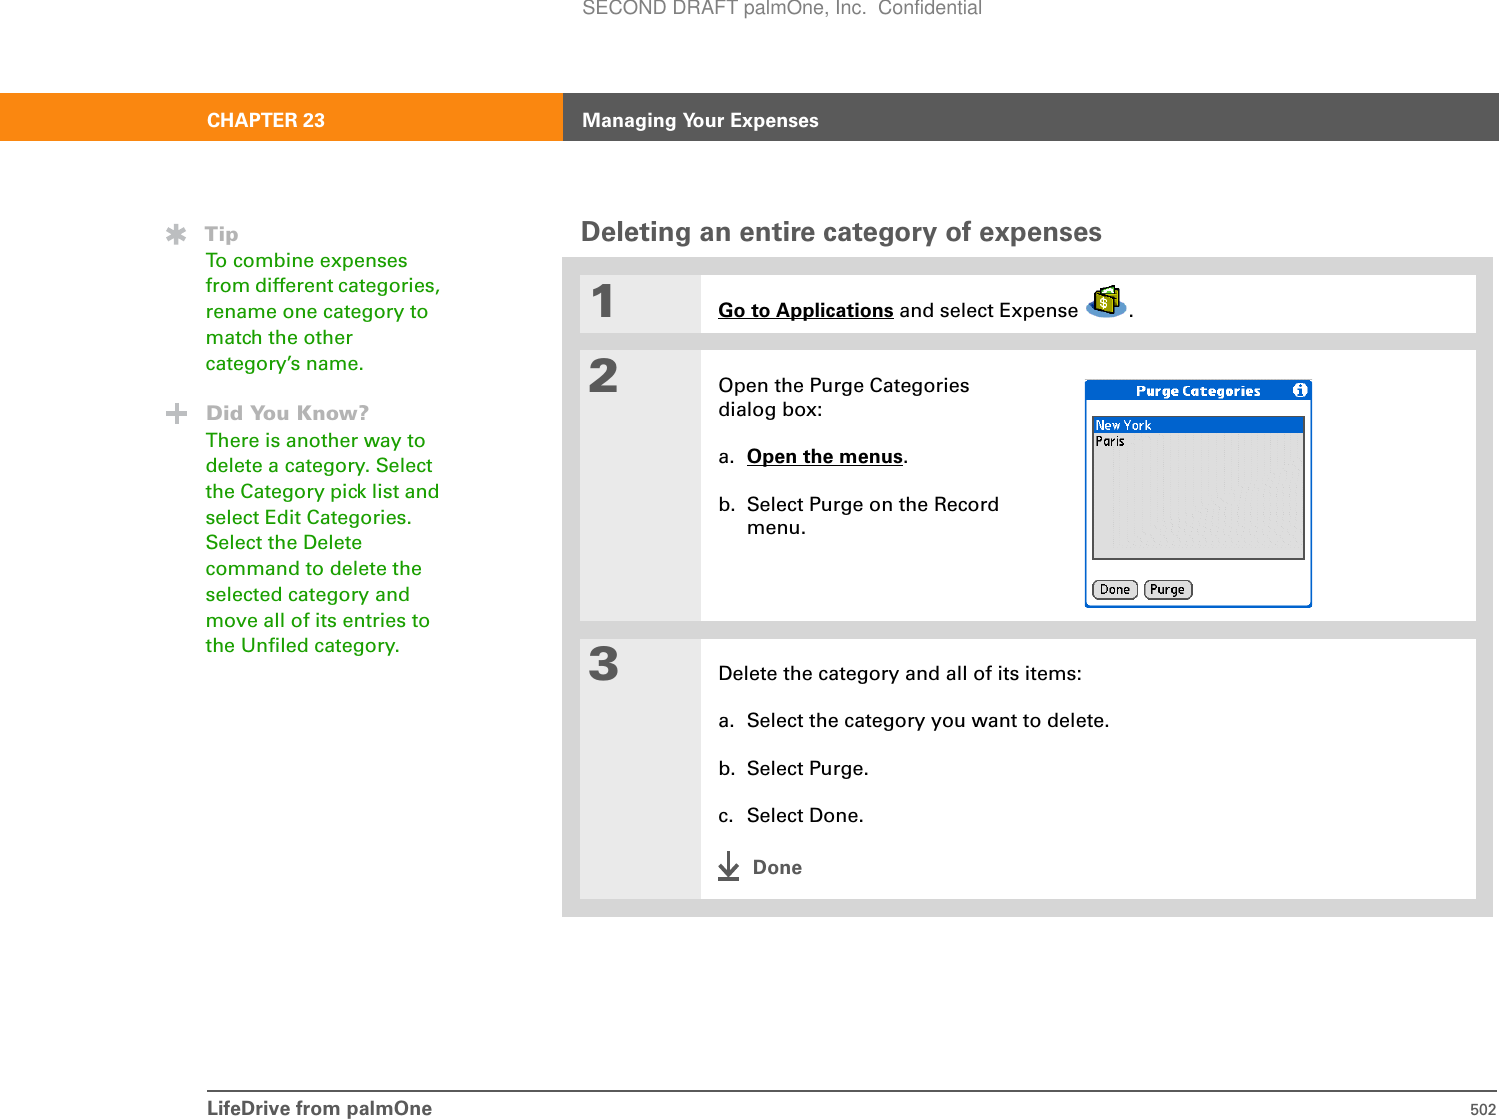
![LifeDrive from palmOne 501CHAPTER 23 Managing Your ExpensesDeleting expensesDelete individual expenses, or an entire category of expenses at once.Deleting an individual expense01Go to Applications and select Expense .2Select the expense you want to delete.3Delete the item:a. Open the menus.b. Select Delete Item in the Record menu.4[ & ] OPTIONAL Check the box to save an archive copy of the expense on your computer.5Select OK.DoneSECOND DRAFT palmOne, Inc. Confidential](https://usermanual.wiki/Palm/830.User-Manual-2-of-2/User-Guide-543160-Page-124.png)


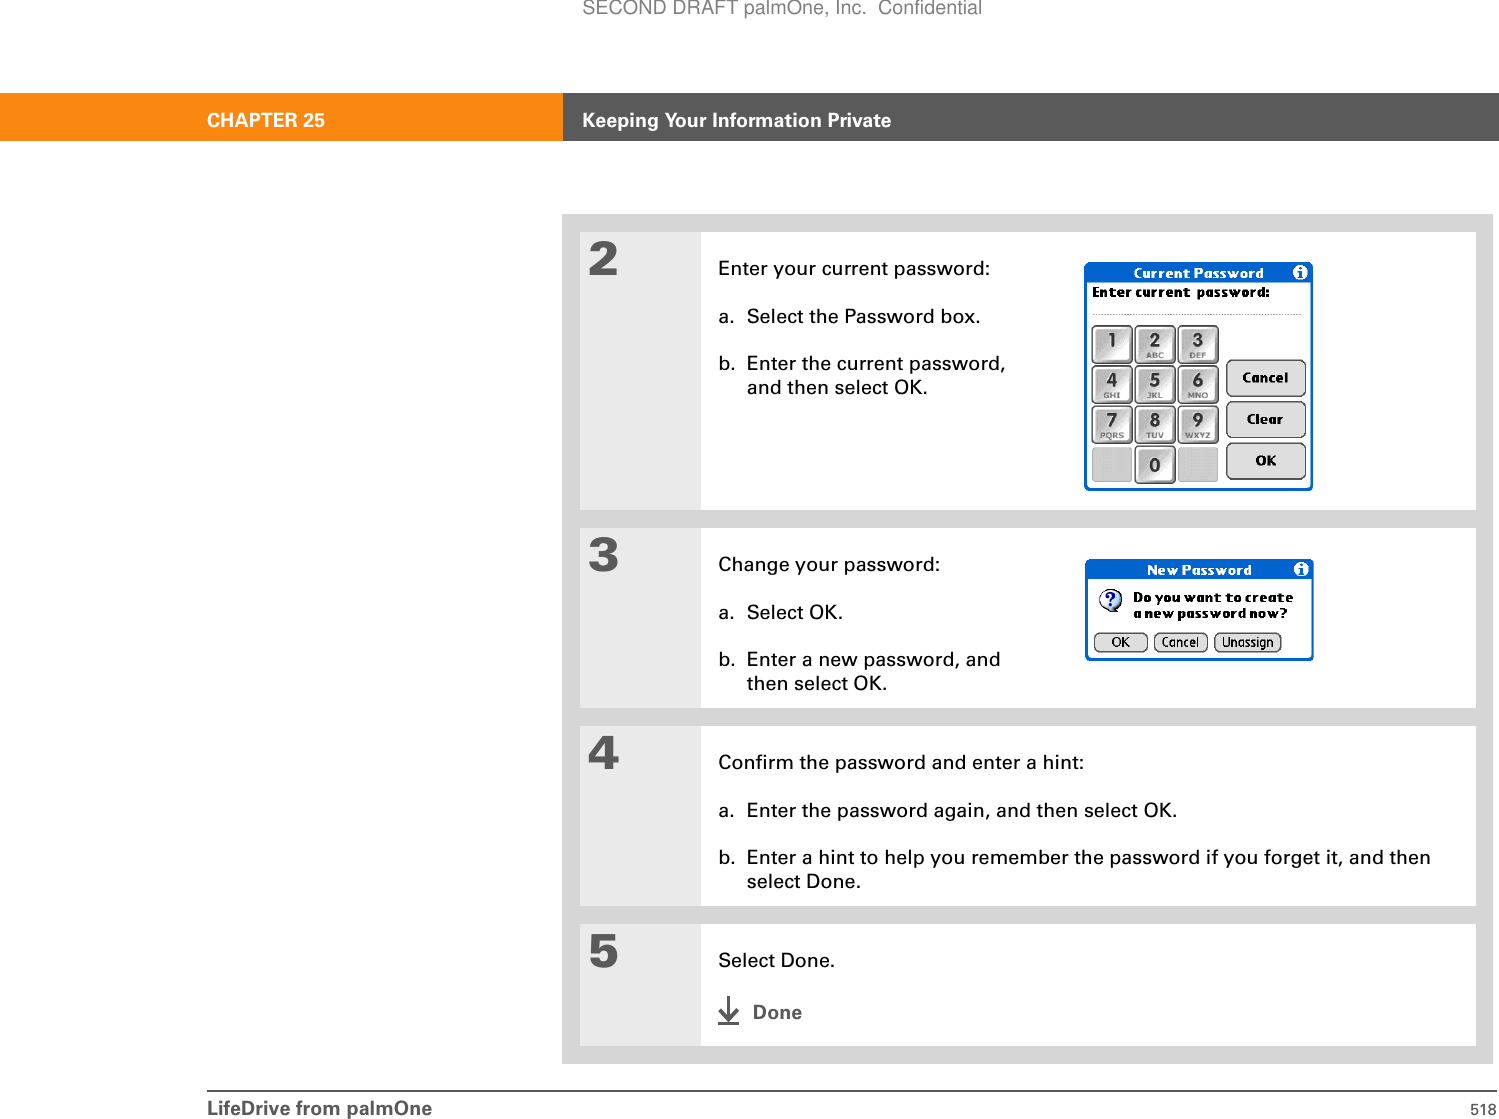
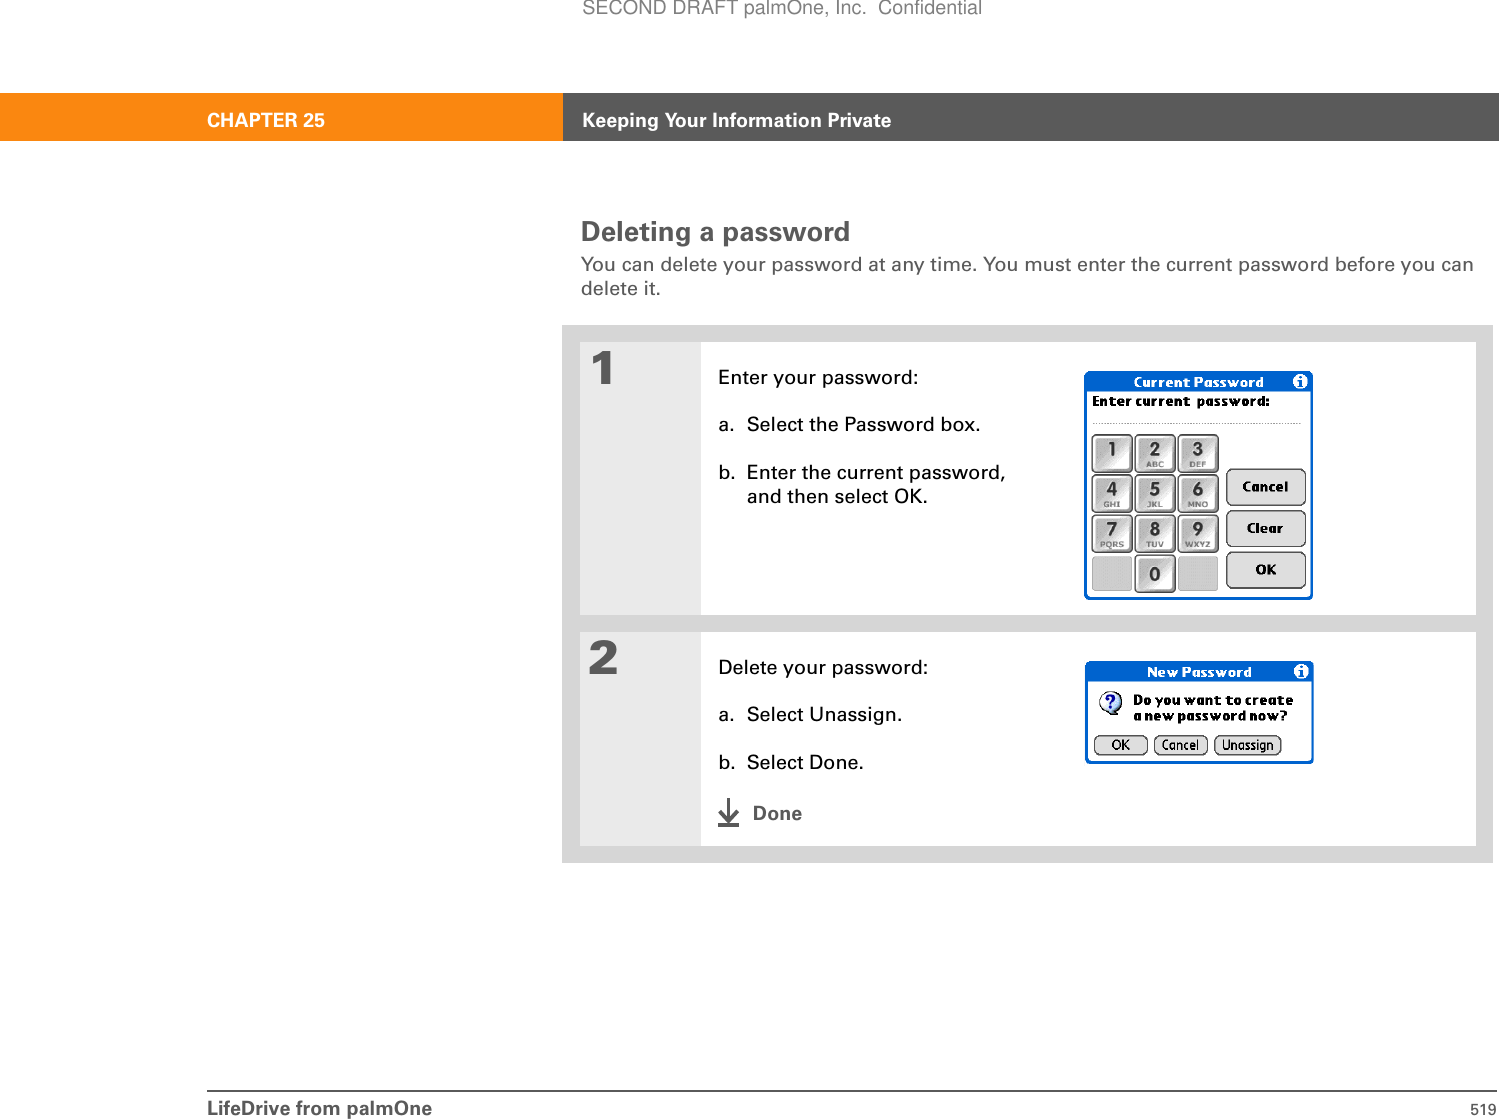
![LifeDrive from palmOne 520CHAPTER 25 Keeping Your Information PrivateDeleting a forgotten passwordIf you forget your password, your device displays the password hint (if you entered one) to help you remember the password. If you still can’t remember the password, you can delete it from your device. Deleting a forgotten password also deletes all entries marked as private.Be sure to synchronize your device with your computer before and after this procedure, so you can restore any private entries that were deleted along with the password.01Open Security:a. Go to Applications.b. Select Prefs .c. Select Security.2Open the Incorrect Password dialog box:a. Select the Password box.b. Tap any number on the keypad, and then select OK.ContinuedIMPORTANT[!]Password boxSECOND DRAFT palmOne, Inc. Confidential](https://usermanual.wiki/Palm/830.User-Manual-2-of-2/User-Guide-543160-Page-143.png)
![LifeDrive from palmOne 521CHAPTER 25 Keeping Your Information Private3Delete the forgotten password:a. Select Lost Password.b. Select Delete Password.4Synchronize your device with your computer to restore any private entries that were deleted.5[ & ] OPTIONAL Create a new password.DoneSECOND DRAFT palmOne, Inc. Confidential](https://usermanual.wiki/Palm/830.User-Manual-2-of-2/User-Guide-543160-Page-144.png)
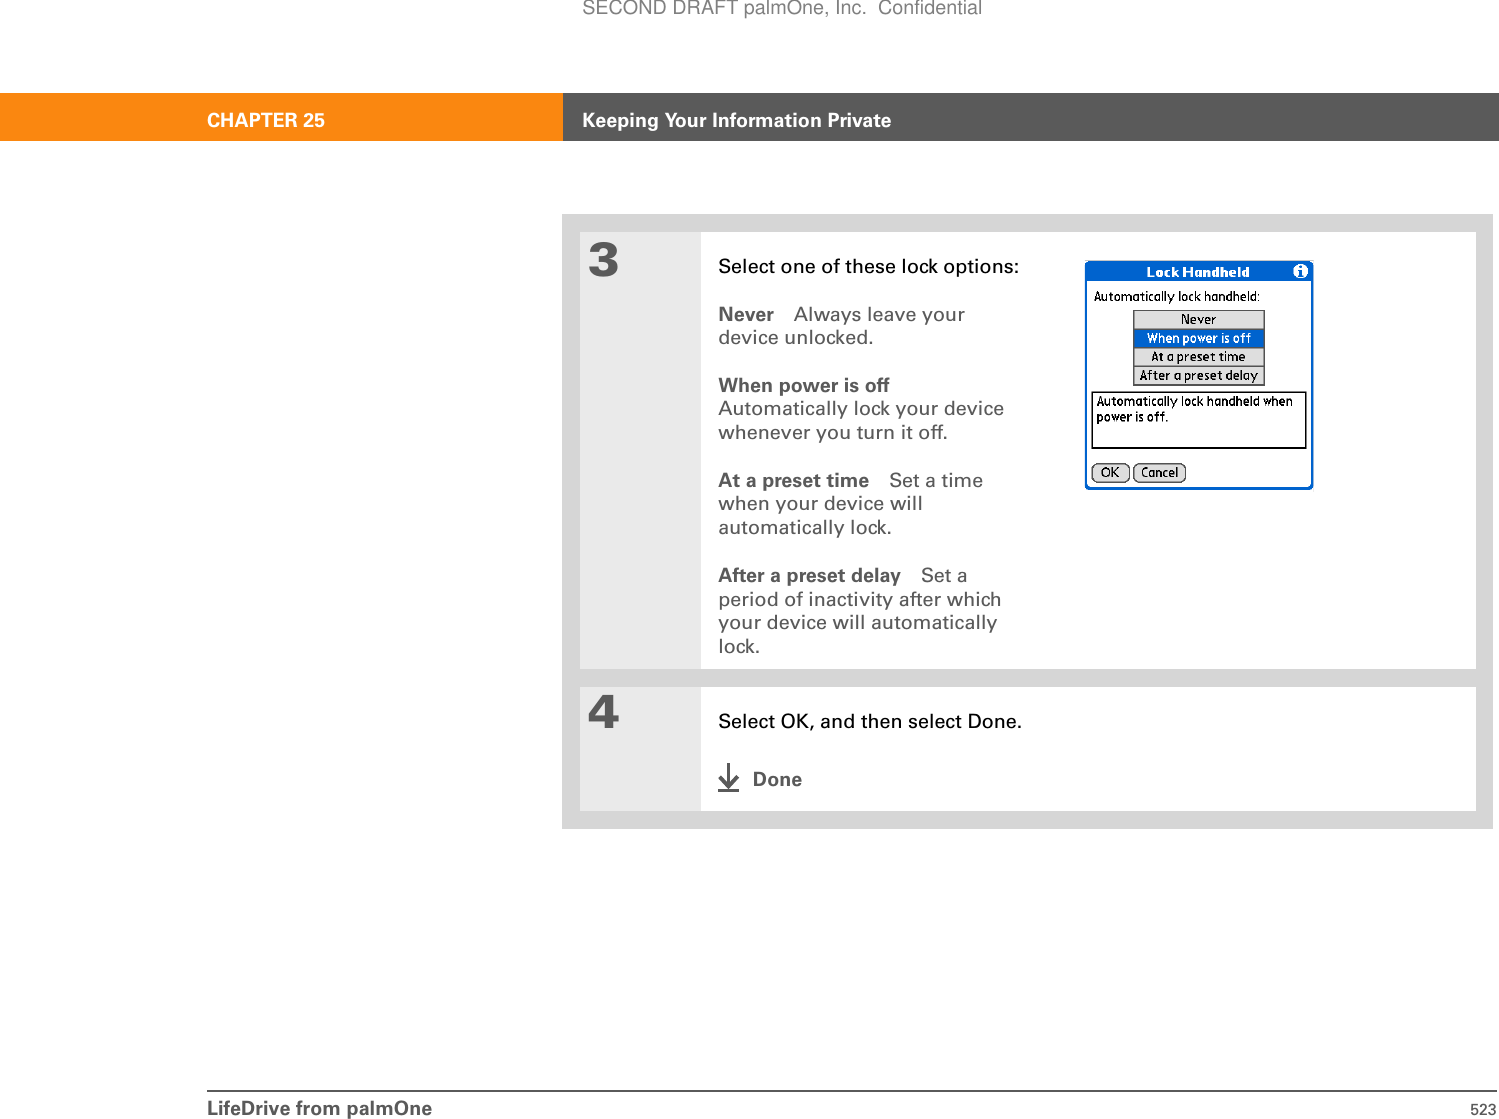
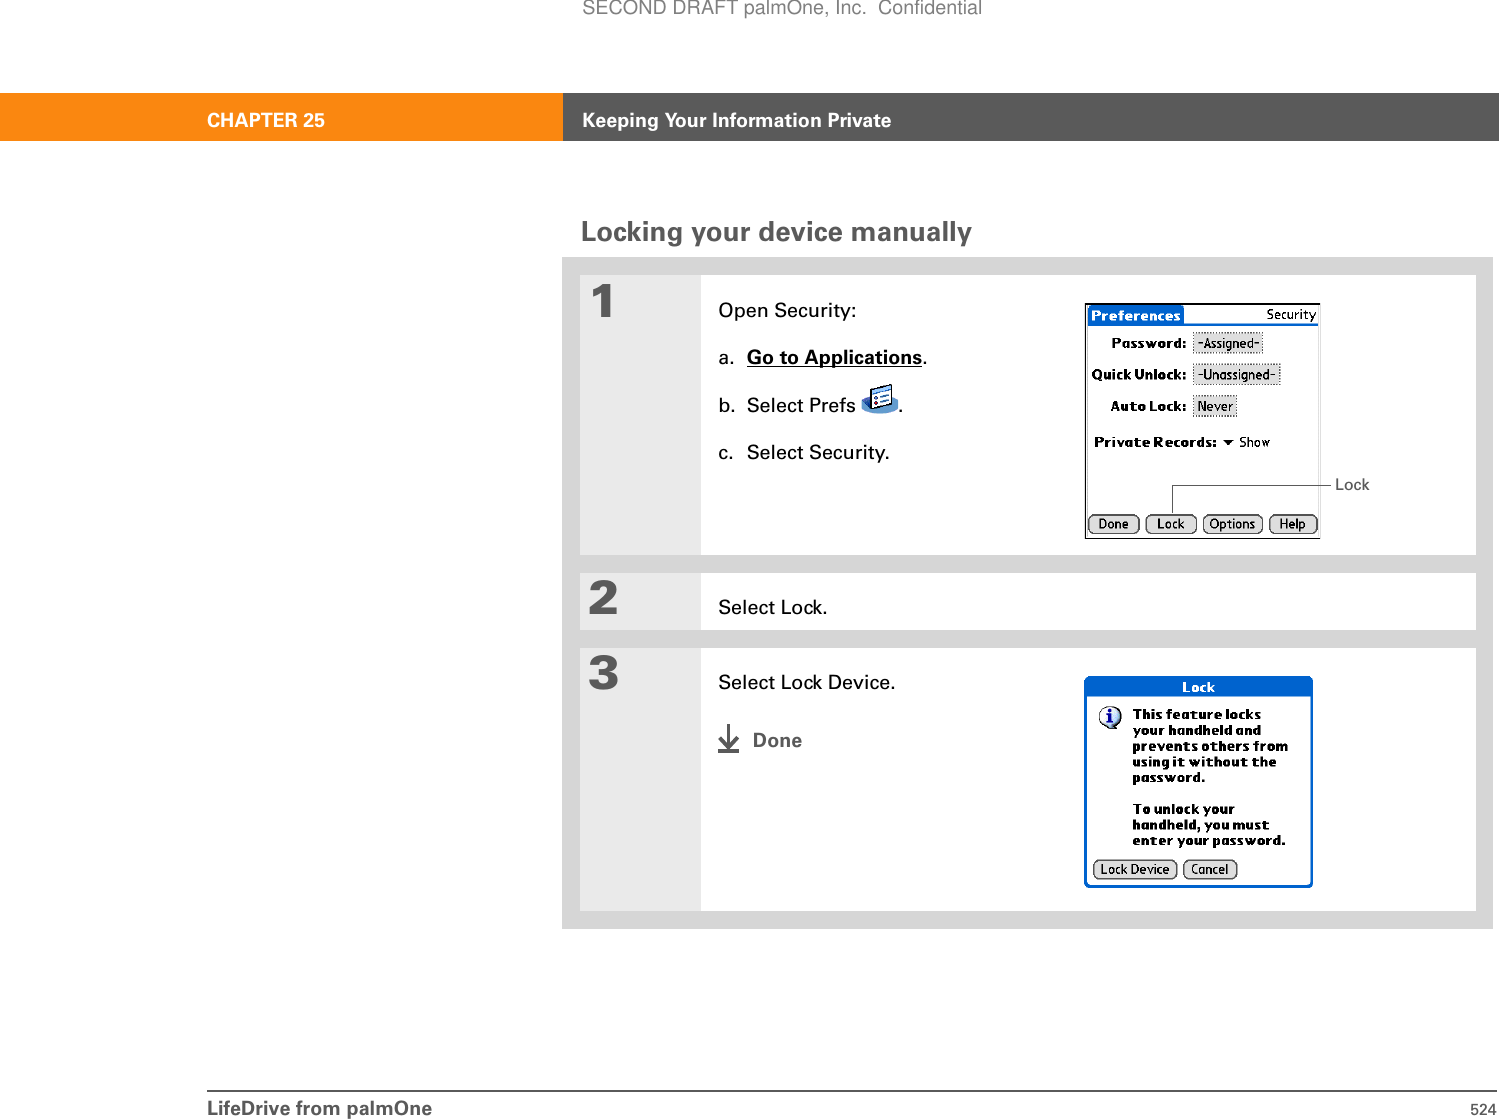
![LifeDrive from palmOne 522CHAPTER 25 Keeping Your Information PrivateLocking your deviceProtect the entire contents of your device, whether marked private or not, by using your password to lock your device. You can set your device to lock automatically, or you can lock it manually.If you lock your device, you must enter the exact password to unlock it. If you forget the password, your device will show you the hint you entered to help you remember the password. If you still cannot remember the password, you must do a hard reset to resume using your device. A hard reset deletes all of the information on your device, including your password. You can restore the information by synchronizing your device with your computer. Locking your device automatically01Open Security:a. Go to Applications.b. Select Prefs .c. Select Security.2Open the Lock Device dialog box:a. Select the Auto Lock box.b. If necessary, enter your password, and then select OK.ContinuedBefore You Begin[!]To use the locking feature, you must first create a password for your device.TipTo start your device when it is locked, turn it on. Enter your password, and then select Done.IMPORTANT[!]Auto Lock boxSECOND DRAFT palmOne, Inc. Confidential](https://usermanual.wiki/Palm/830.User-Manual-2-of-2/User-Guide-543160-Page-145.png)
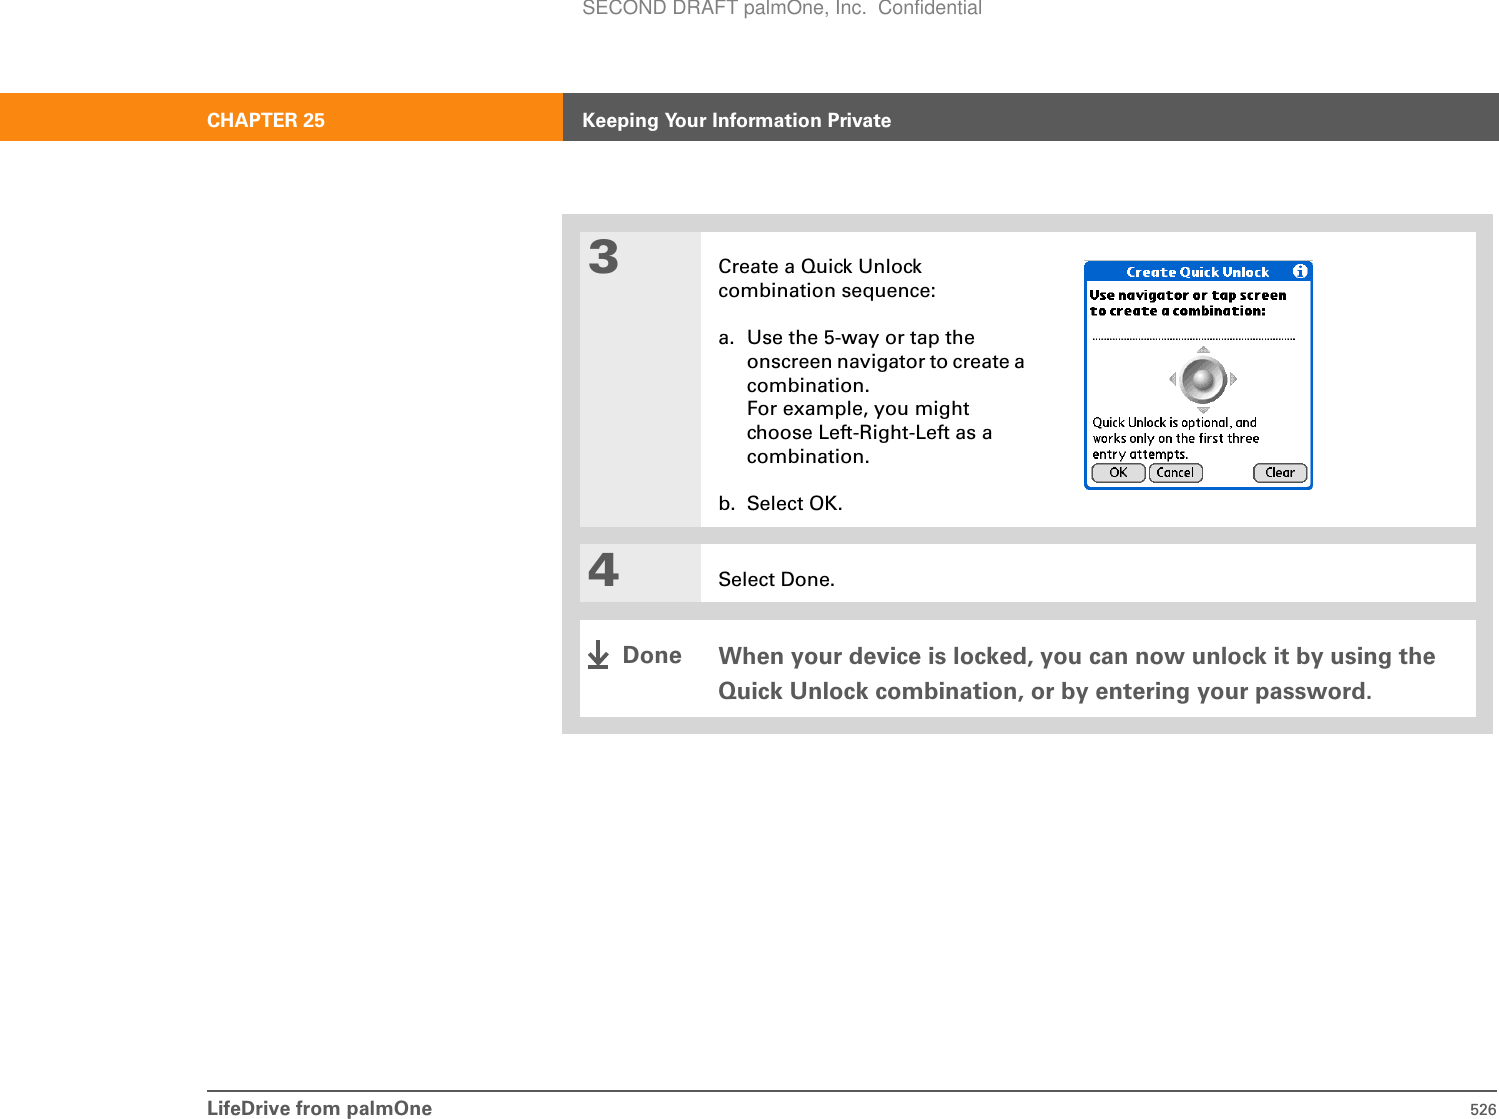
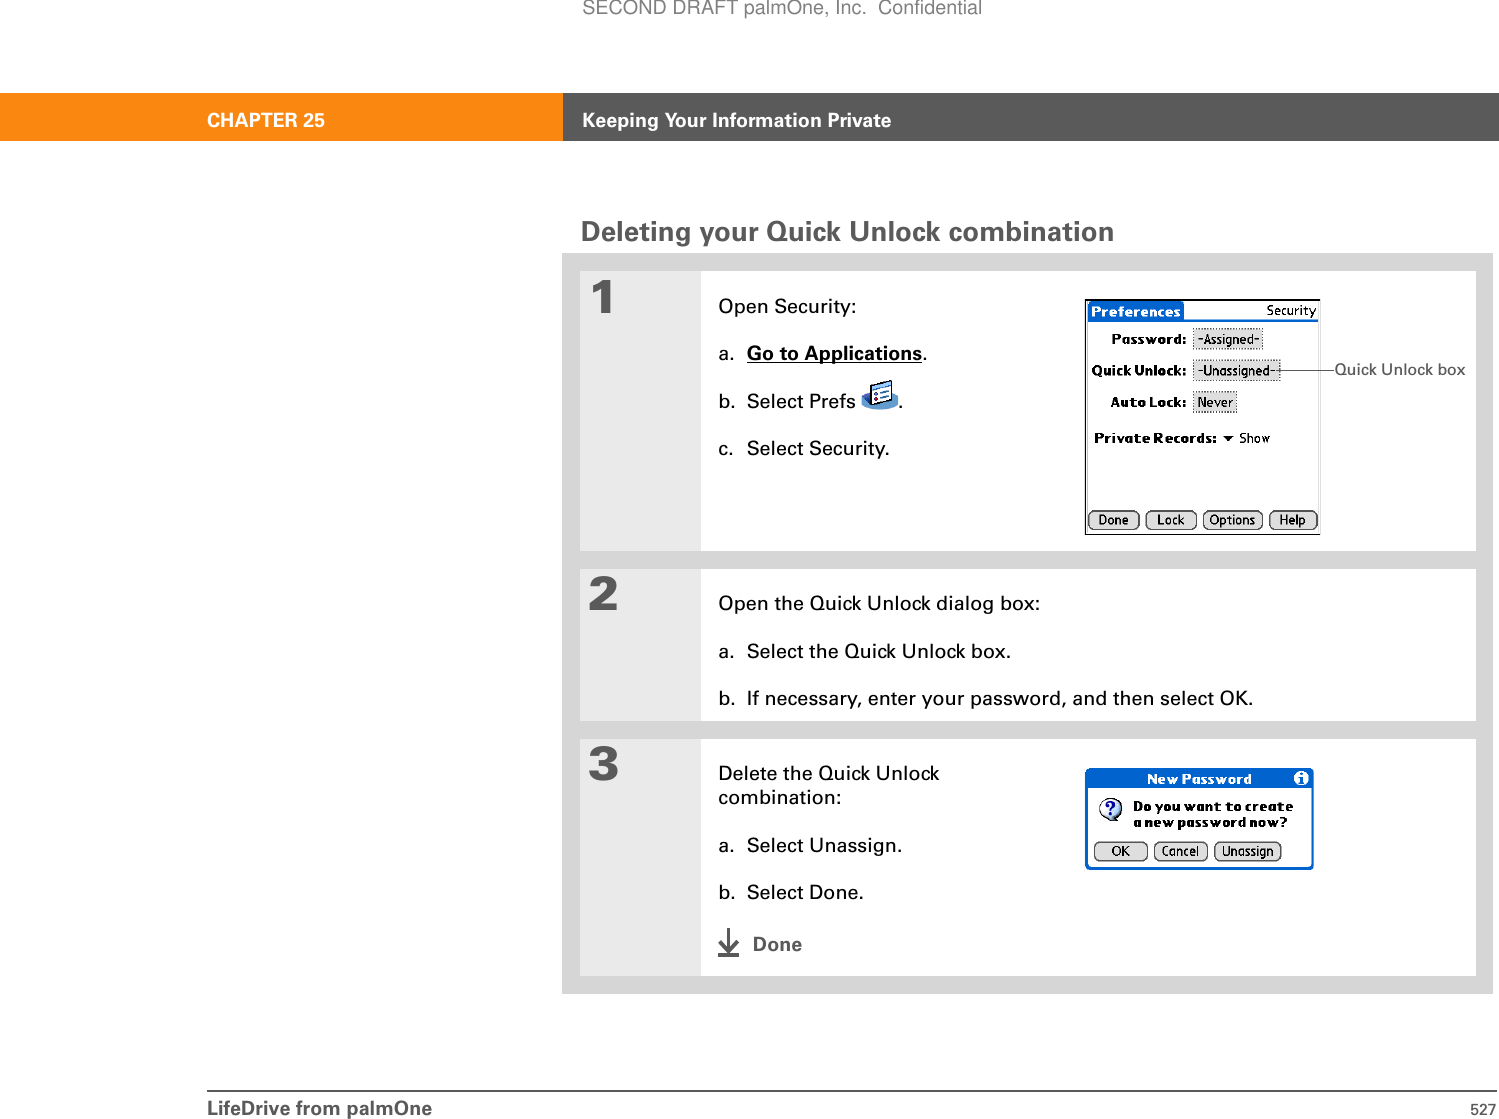
![LifeDrive from palmOne 525CHAPTER 25 Keeping Your Information PrivateUsing Quick UnlockYou can unlock your device by creating a special combination sequence with the 5-way navigator—similar to the combination you use to open a padlock. Use this sequence in place of your password to quickly unlock your device. Quick Unlock works only with your first three attempts to unlock your device. After three attempts, you must use your password to unlock your device. Creating a Quick Unlock combination01Open Security:a. Go to Applications.b. Select Prefs .c. Select Security.2Open the Quick Unlock dialog box:a. Select the Quick Unlock box.b. If necessary, enter your password, and then select OK.ContinuedBefore You Begin[!]To use Quick Unlock, you must first create a password for your device.TipYou can change a Quick Unlock combination at any time. Follow the same steps you used to create the combination.Quick Unlock boxSECOND DRAFT palmOne, Inc. Confidential](https://usermanual.wiki/Palm/830.User-Manual-2-of-2/User-Guide-543160-Page-148.png)
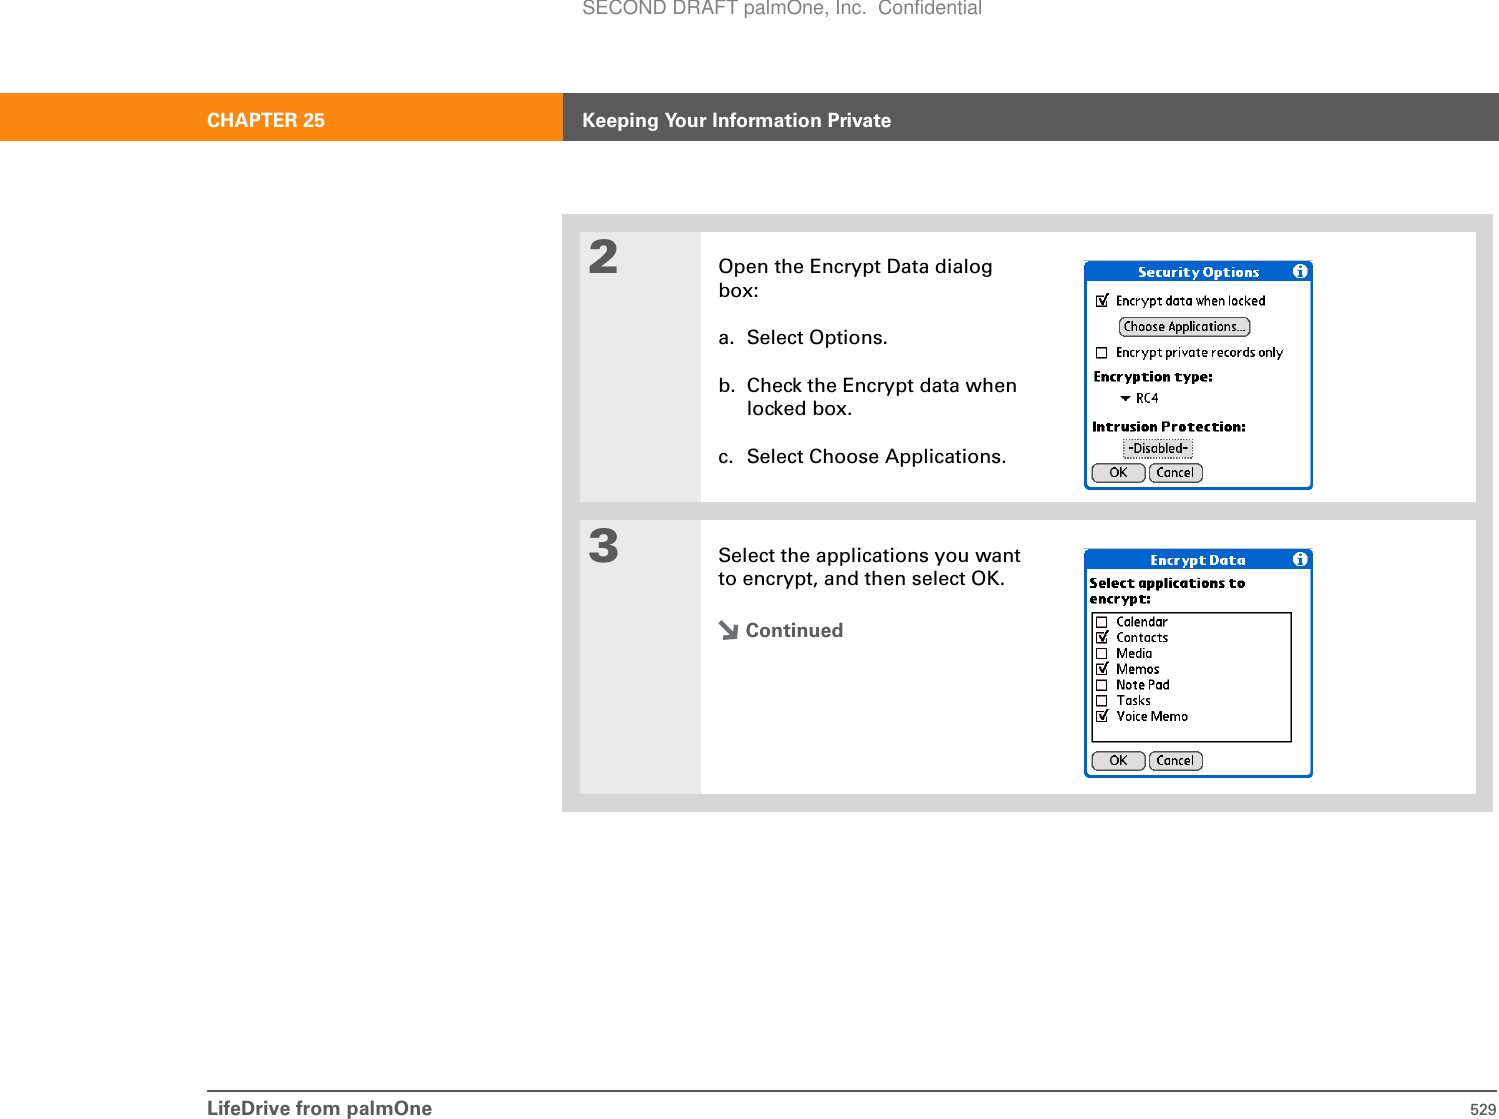
![LifeDrive from palmOne 528CHAPTER 25 Keeping Your Information PrivateEncrypting your informationYou can encrypt selected information whenever your device locks. This means that your information is scrambled so that it cannot be read. When you unlock your device and enter your password or Quick Unlock combination, the encrypted information is unscrambled.The more information you select for encryption, the longer your device takes to scramble (and unscramble) the information. Also, applications that use large files, such as palmOne™ Media,take a long time to encrypt. In these cases, consider the trade-off between security and convenience.01Open Security:a. Go to Applications.b. Select Prefs .c. Select Security.ContinuedBefore You Begin[!]To use encryption, you must first create a password for your device.SECOND DRAFT palmOne, Inc. Confidential](https://usermanual.wiki/Palm/830.User-Manual-2-of-2/User-Guide-543160-Page-151.png)
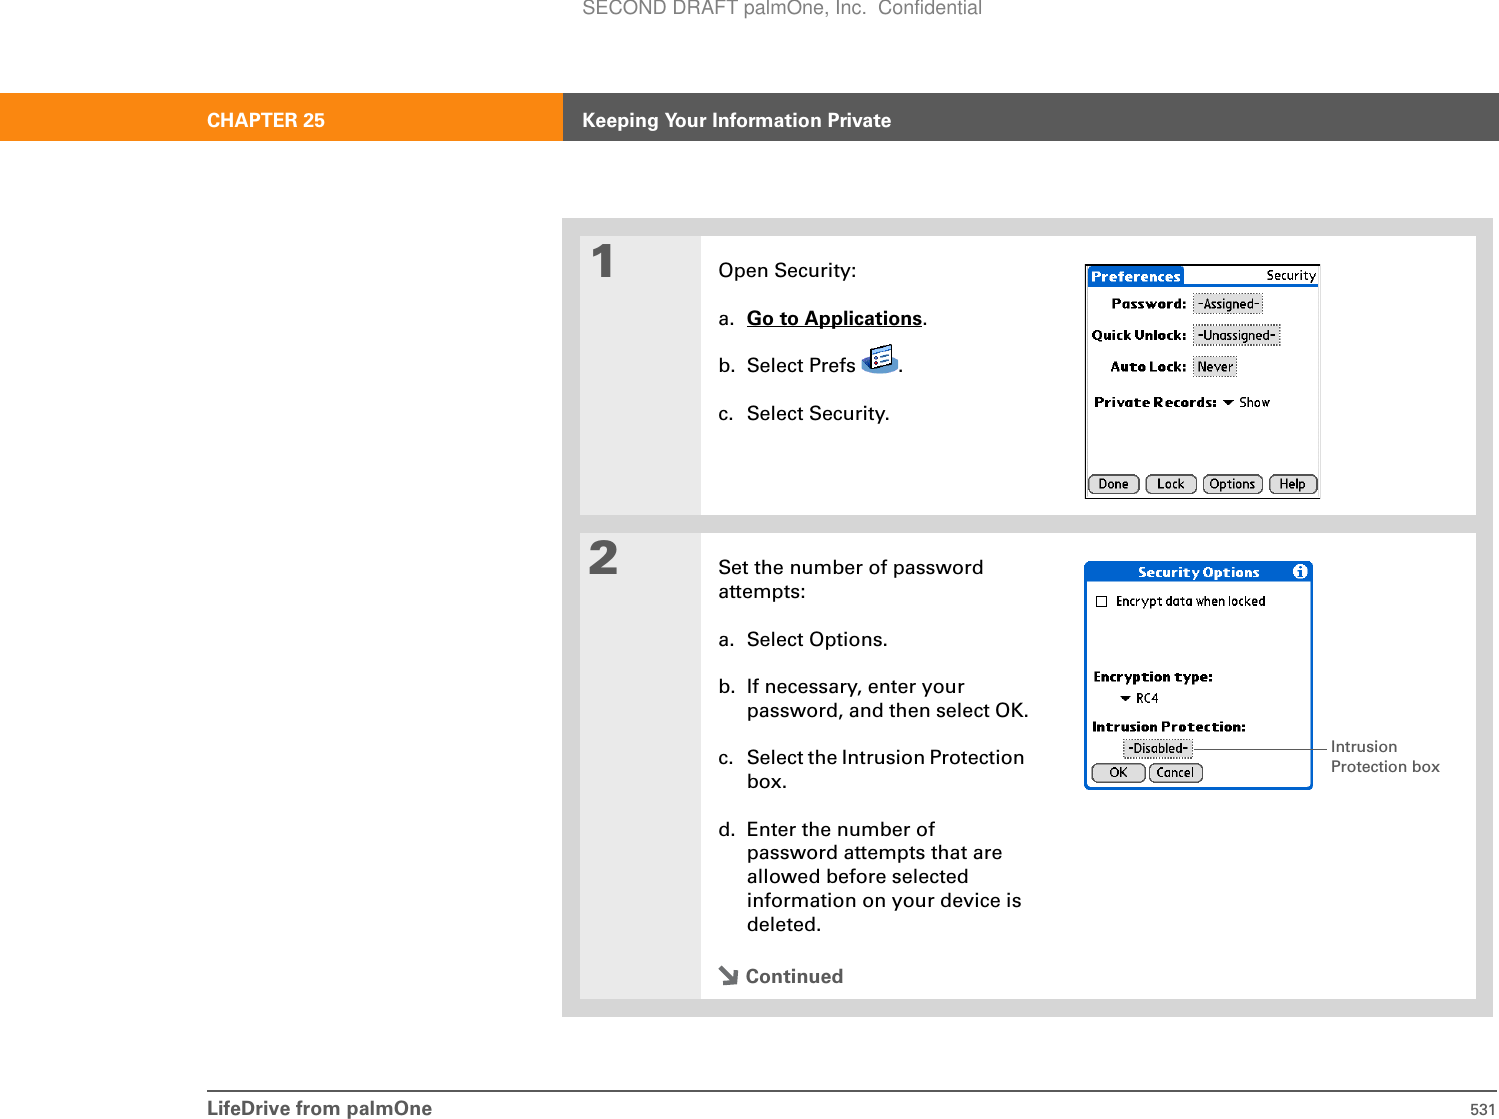
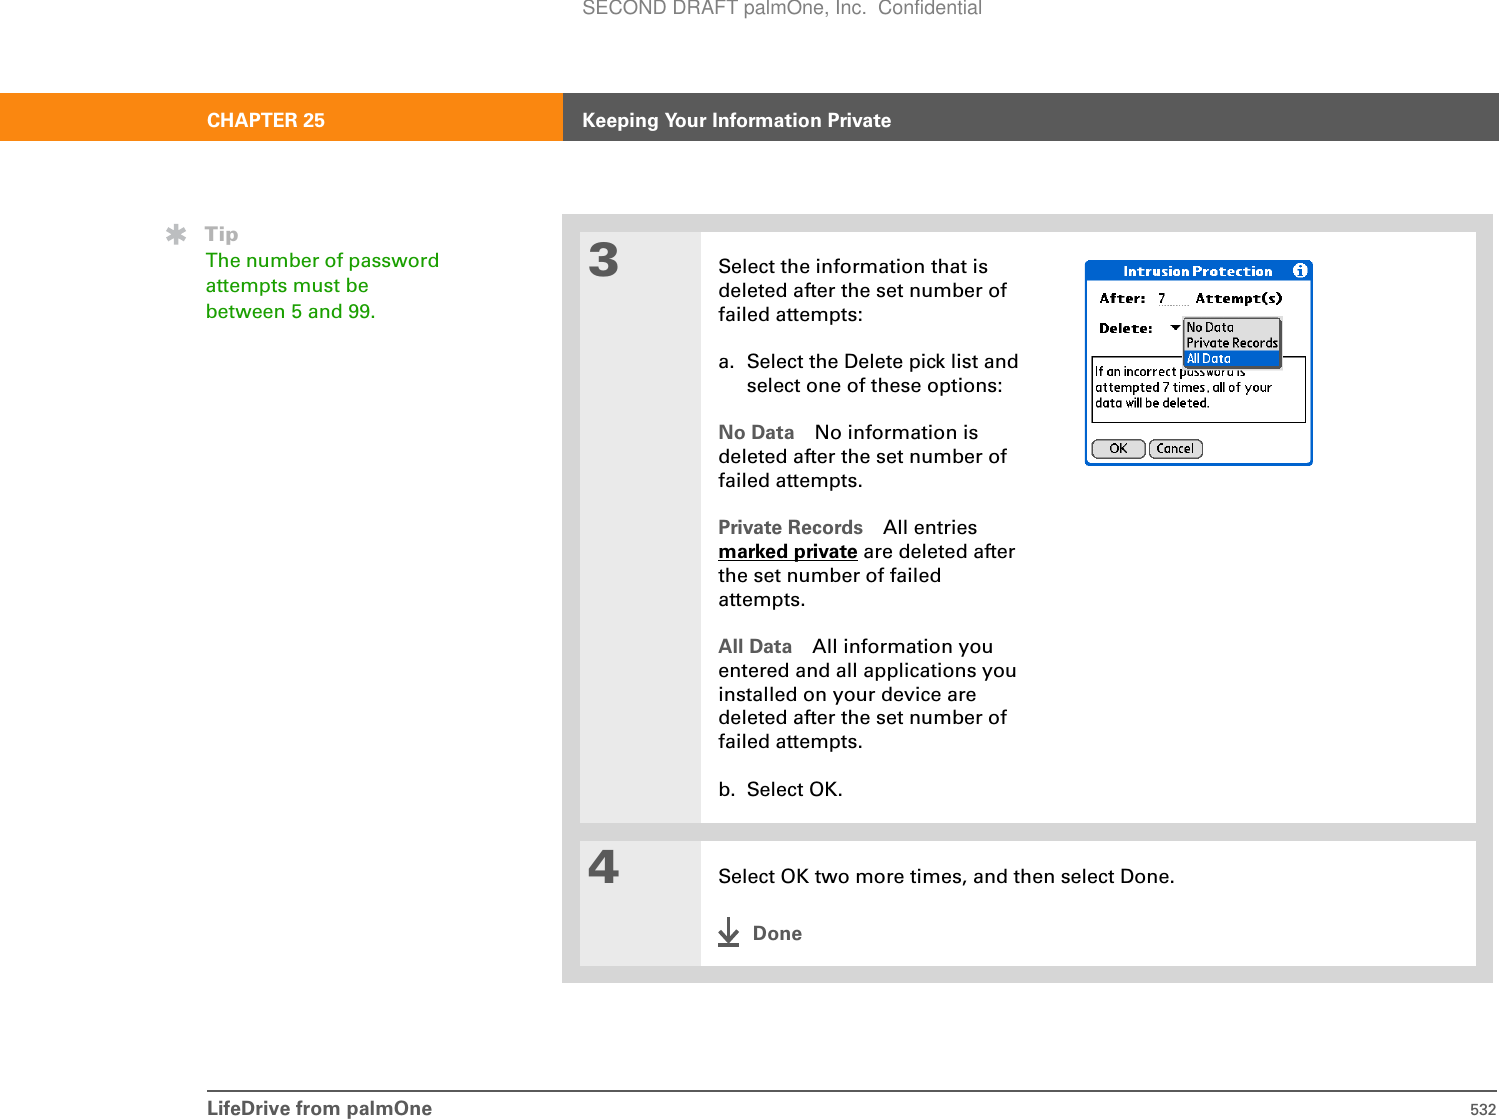
![LifeDrive from palmOne 530CHAPTER 25 Keeping Your Information PrivateLimiting the number of password attemptsYou can set the number of incorrect password attempts that are allowed before selected information is deleted from your device. This feature, called intrusion protection, protects sensitive information from an intruder who uses an automated means to try every possible combination until the password is found. Use intrusion protection if you keep highly confidential information on your device. If you limit the number of password attempts, be sure to use Keylock to prevent accidental password attempts while your device is in a purse or pocket.4[ & ] OPTIONAL To encrypt only the private entries in the applications you selected, check the Encrypt private records only box.5Select OK, and then select Done.DoneTipSynchronize your device with your computerfrequently to prevent loss of information if intrusion protection is triggered.Did You Know?Incorrect Quick Unlockattempts are not included in the intrusion protection counter.IMPORTANT[!]SECOND DRAFT palmOne, Inc. Confidential](https://usermanual.wiki/Palm/830.User-Manual-2-of-2/User-Guide-543160-Page-153.png)


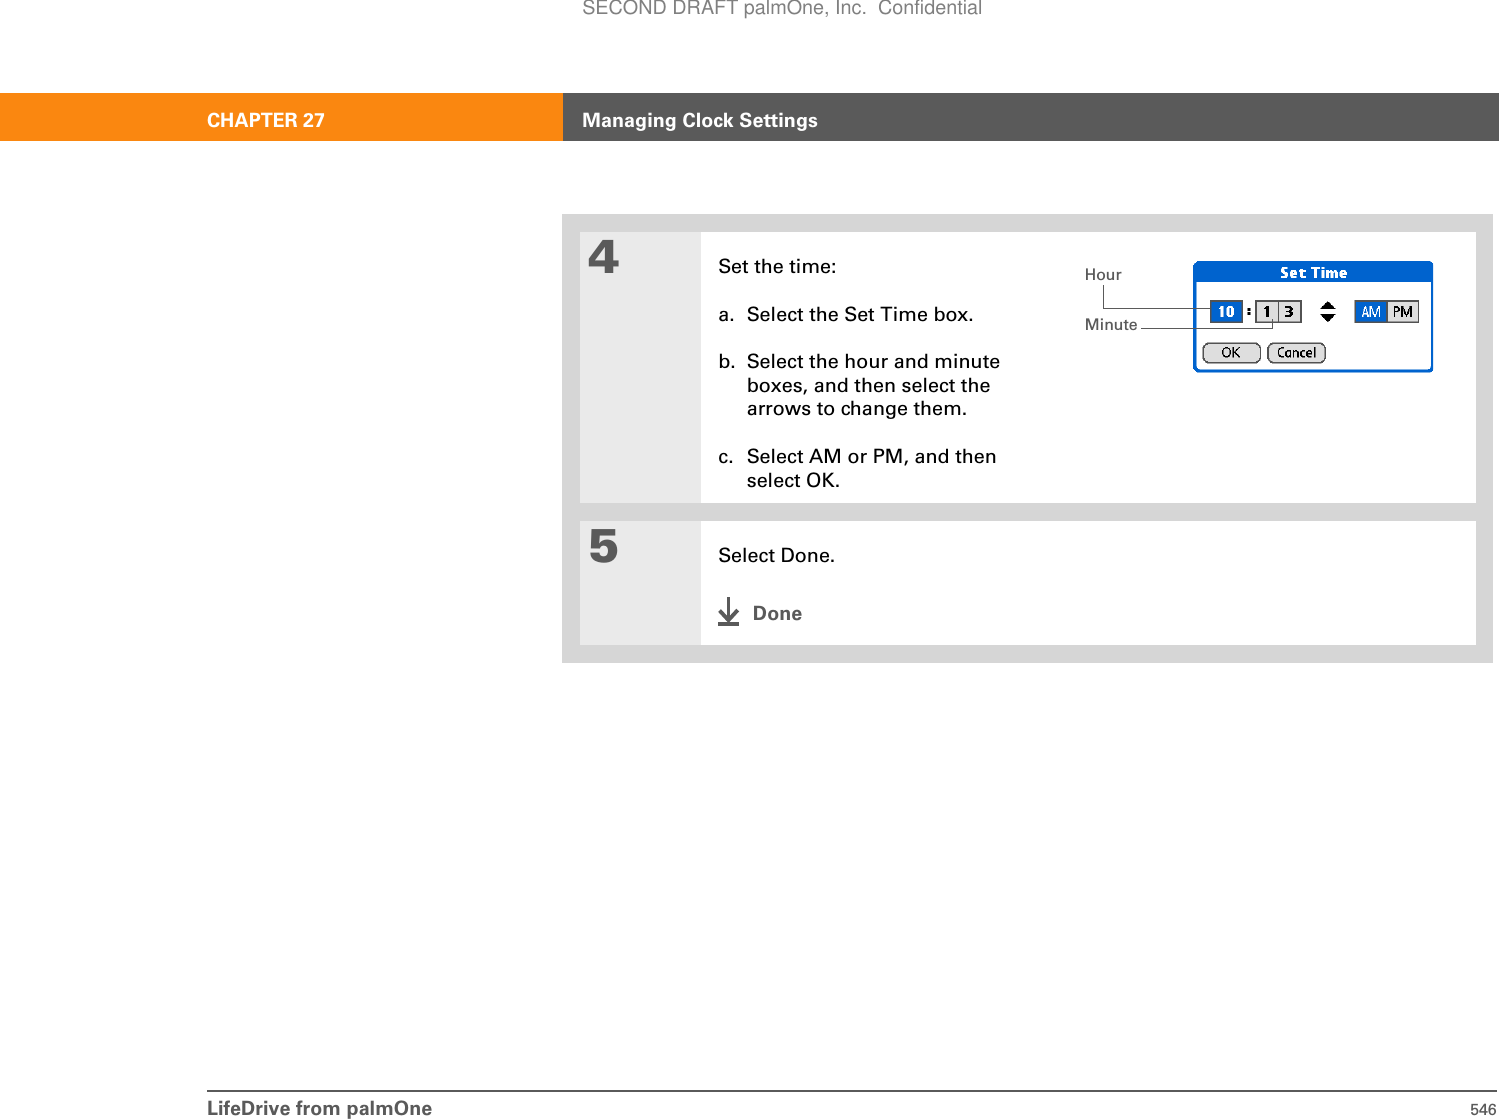
![LifeDrive from palmOne 549CHAPTER 27 Managing Clock Settings4[ & ] OPTIONAL Select each setting you want to change.Name Enter the name of the location.Time Zone Select the time zone for the location.Daylight Saving Time Check for your device to automatically adjust the date and time for Daylight Saving Time in this location.Start and End dates Select the boxes to change the start and end dates of Daylight Saving Time, if necessary.5Select OK, and then select Done.DoneSECOND DRAFT palmOne, Inc. Confidential](https://usermanual.wiki/Palm/830.User-Manual-2-of-2/User-Guide-543160-Page-172.png)
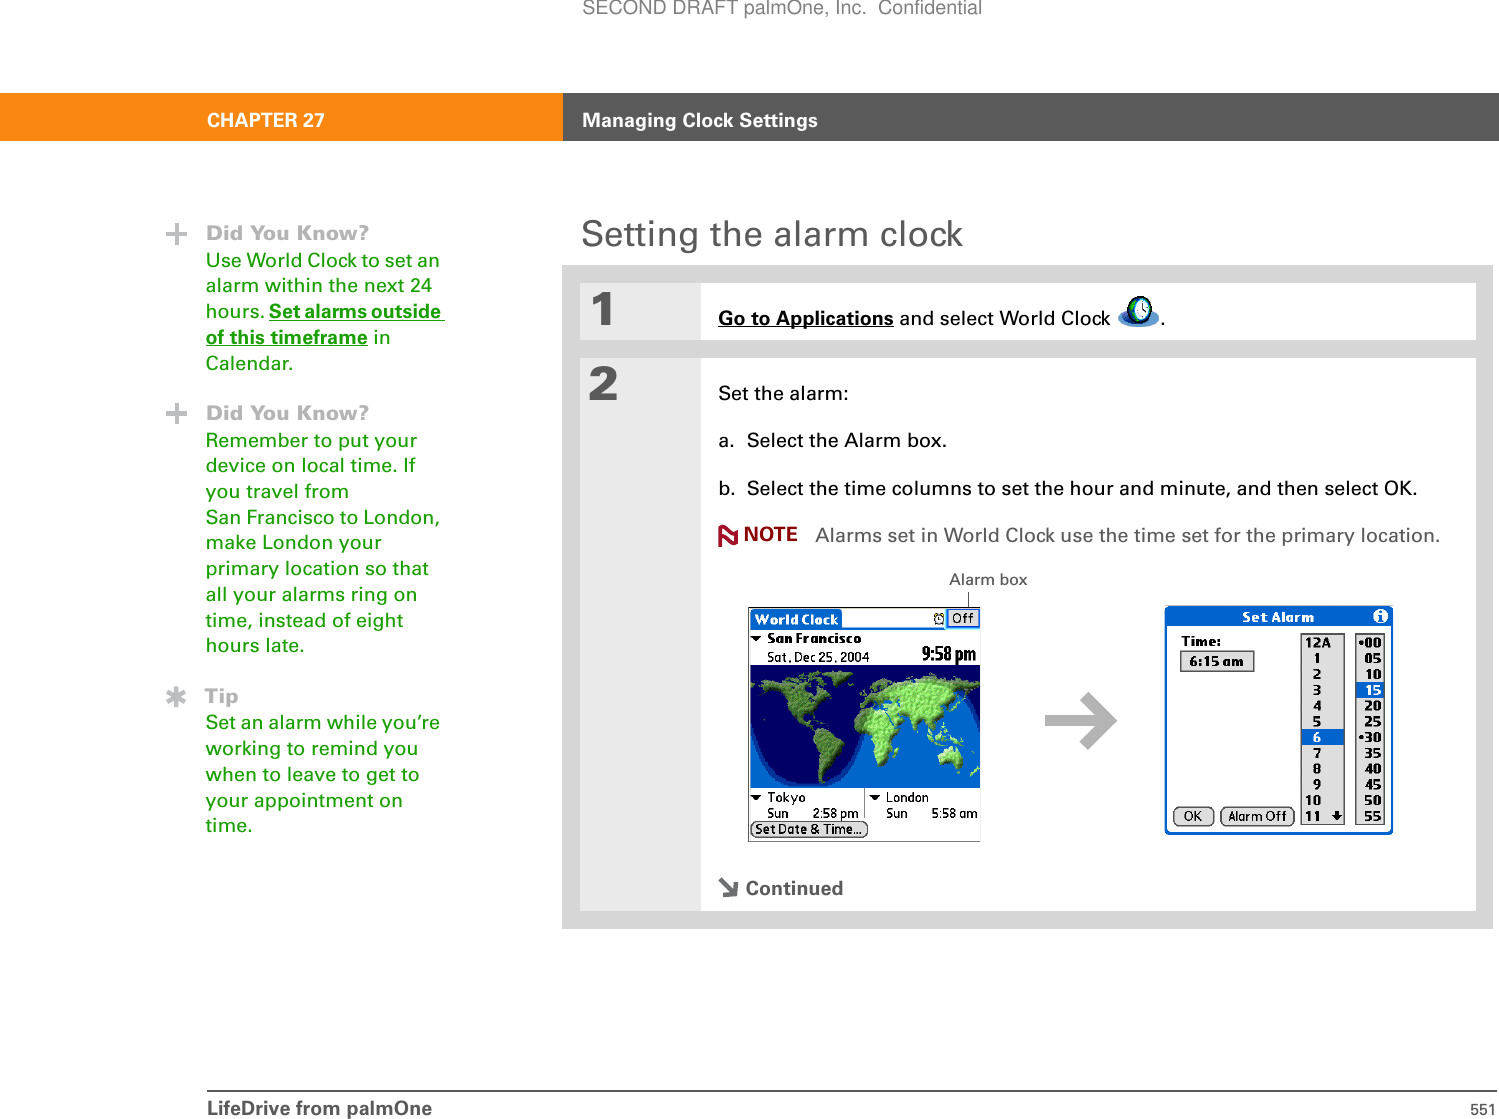
![LifeDrive from palmOne 552CHAPTER 27 Managing Clock SettingsResponding to the alarm clockWhen the World Clock alarm sounds, select one of these three options:OK Cancel the reminder message and return to the current screen.Snooze Close the alarm reminder message and return to the current screen. The message appears again in five minutes. In the meantime, an indicator blinks in the upper-left corner of the screen to remind you of the upcoming alarm.Go To Cancel the reminder message and open World Clock.3[ & ] OPTIONAL Select the alarm sound and volume:a. Open the menus.b. Select Options, and then select Alarm Preferences.c. Select the pick lists to select the alarm sound and volume.This volume setting does not affect the other sounds on your device, including the alarms you set in Calendar. You can change the volume of these other sounds in Preferences.d. Select OK.DoneTipTo turn off an alarm before it sounds, select the Alarm box, and then select Alarm Off.NOTESECOND DRAFT palmOne, Inc. Confidential](https://usermanual.wiki/Palm/830.User-Manual-2-of-2/User-Guide-543160-Page-175.png)
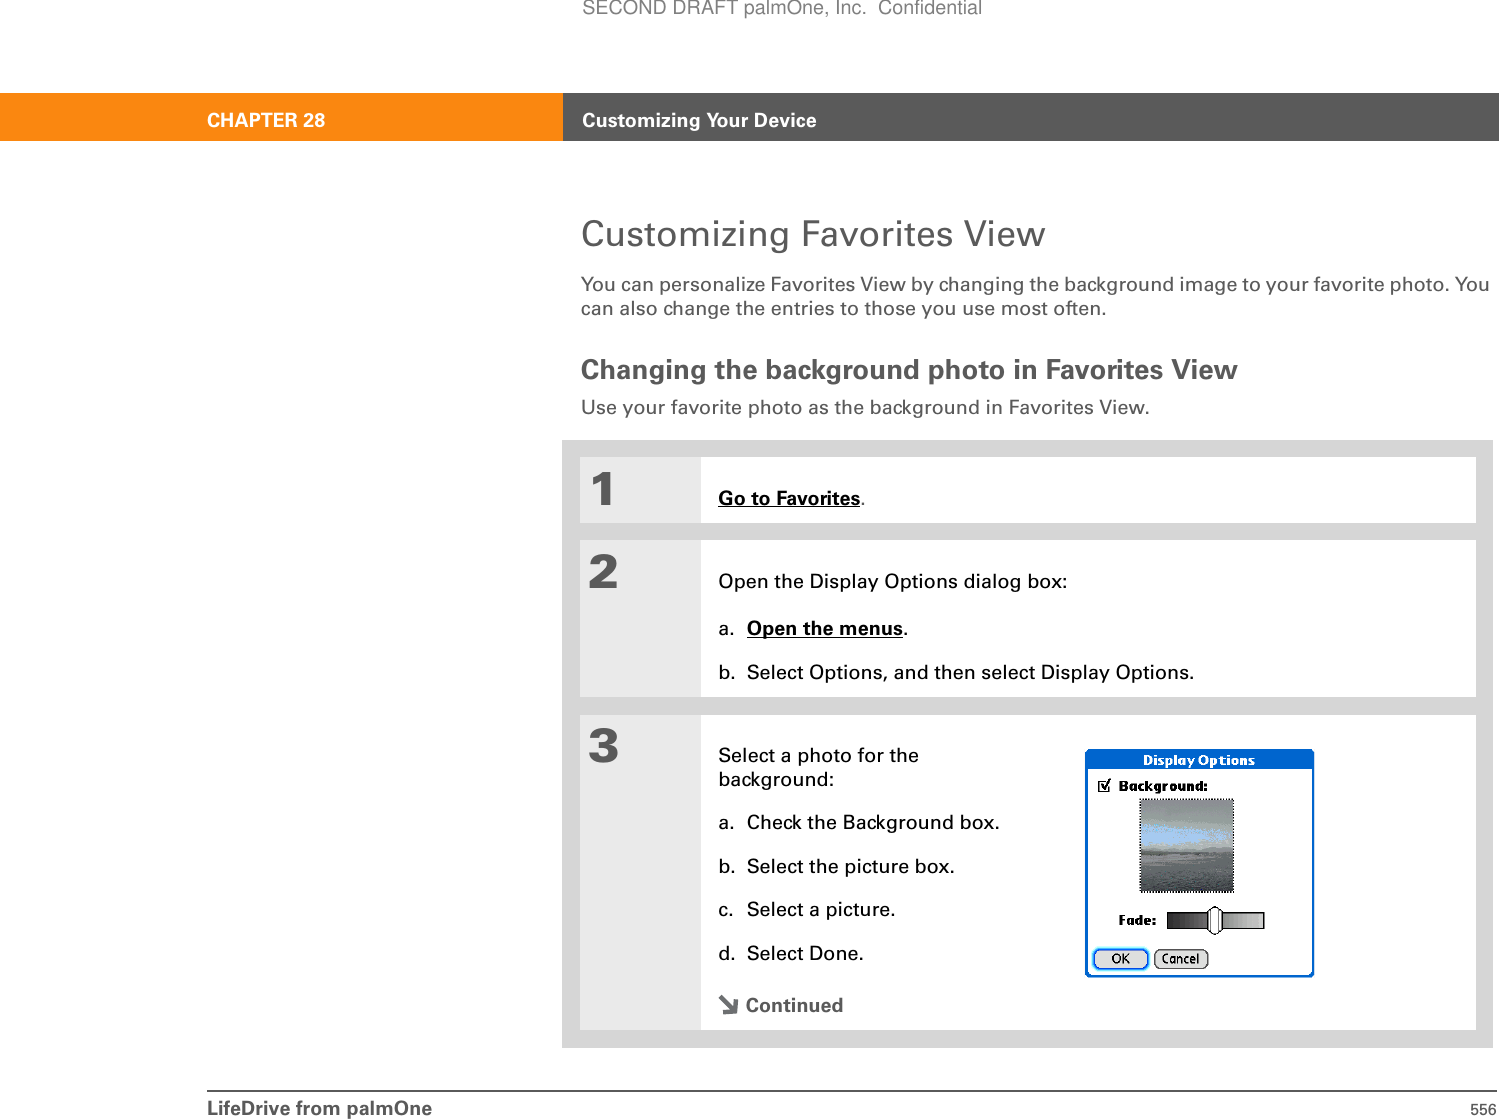
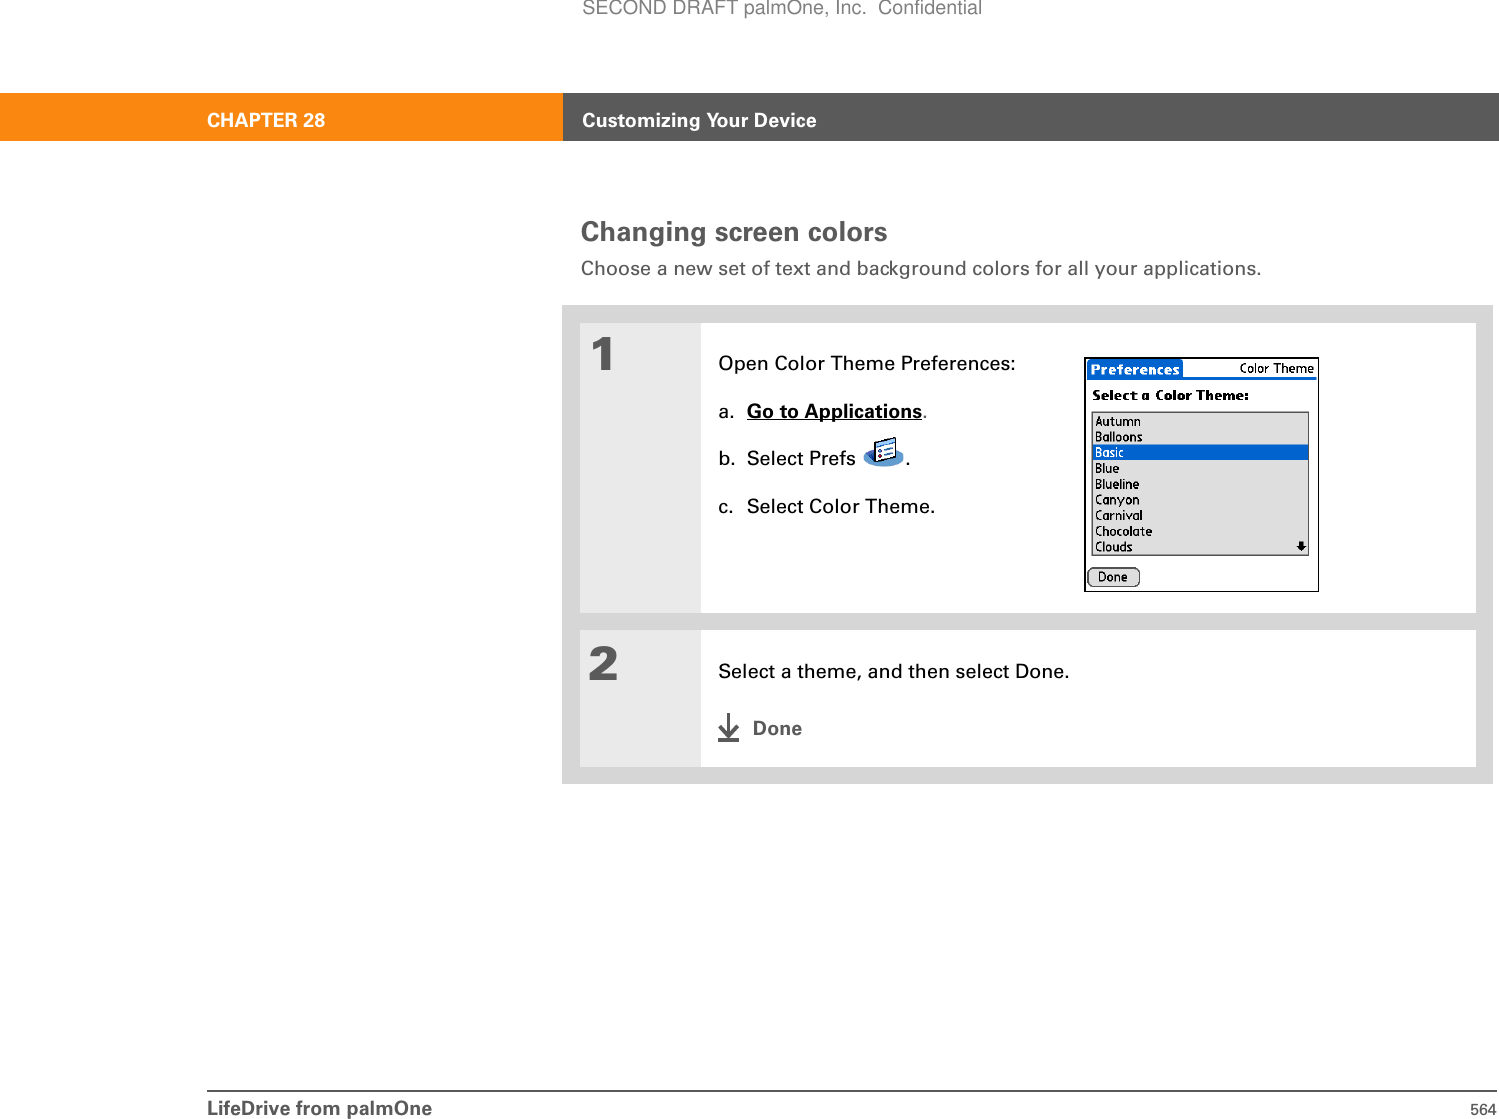
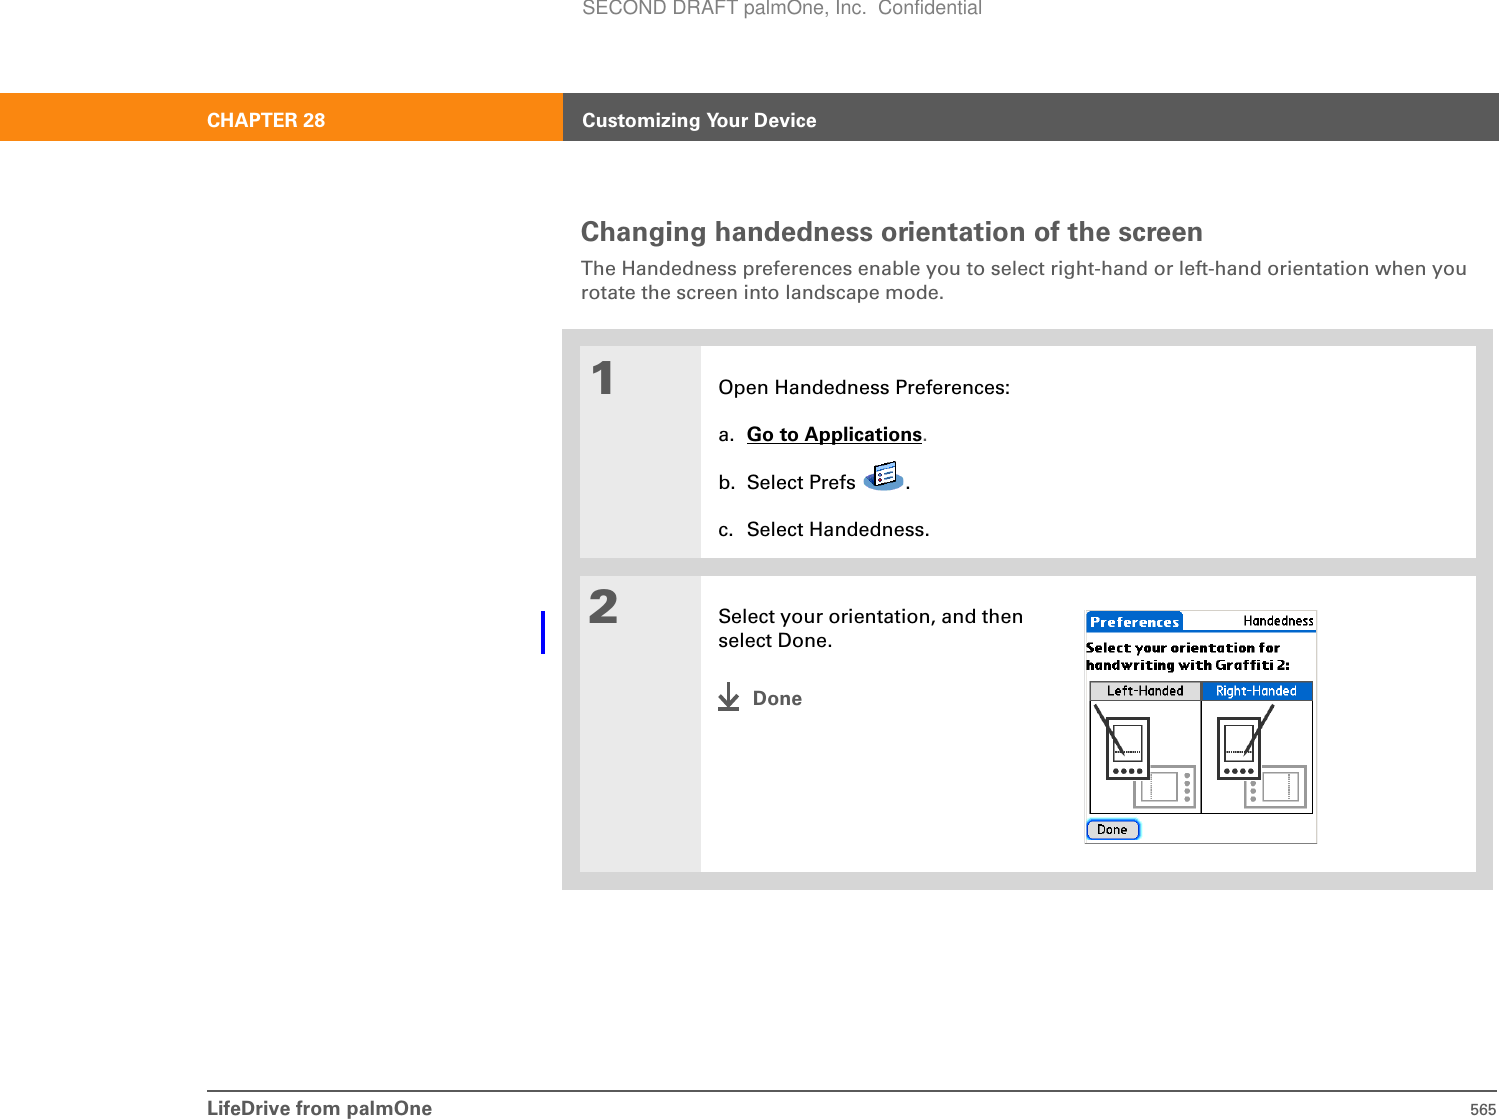
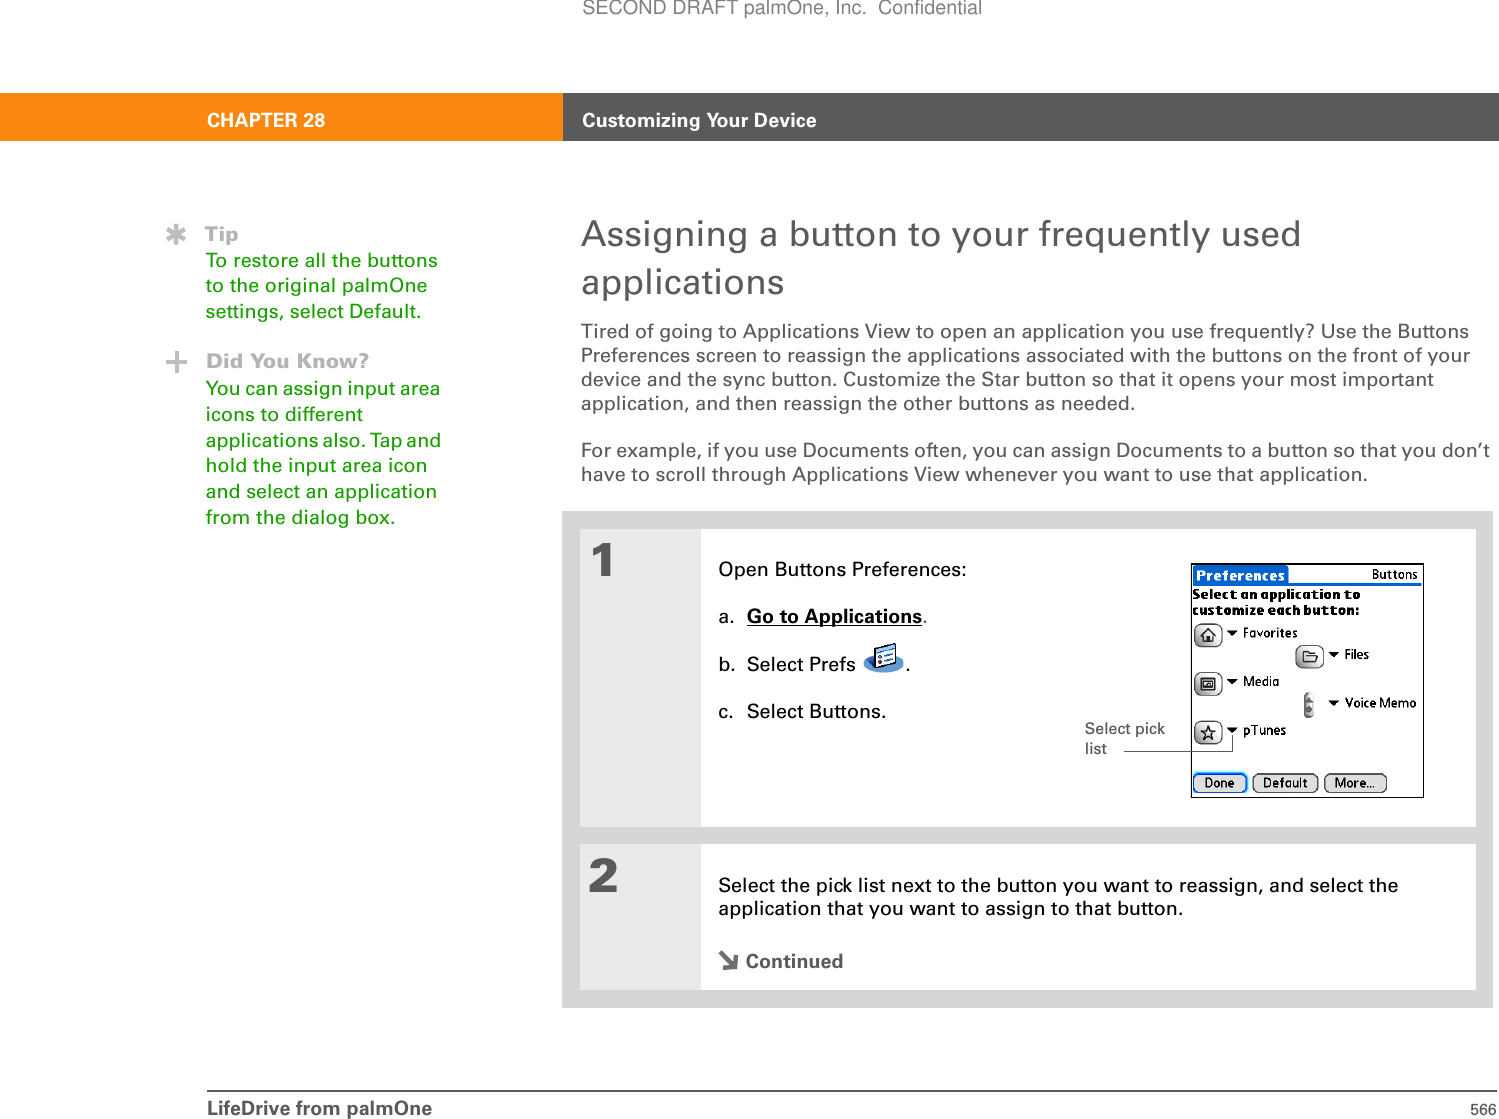
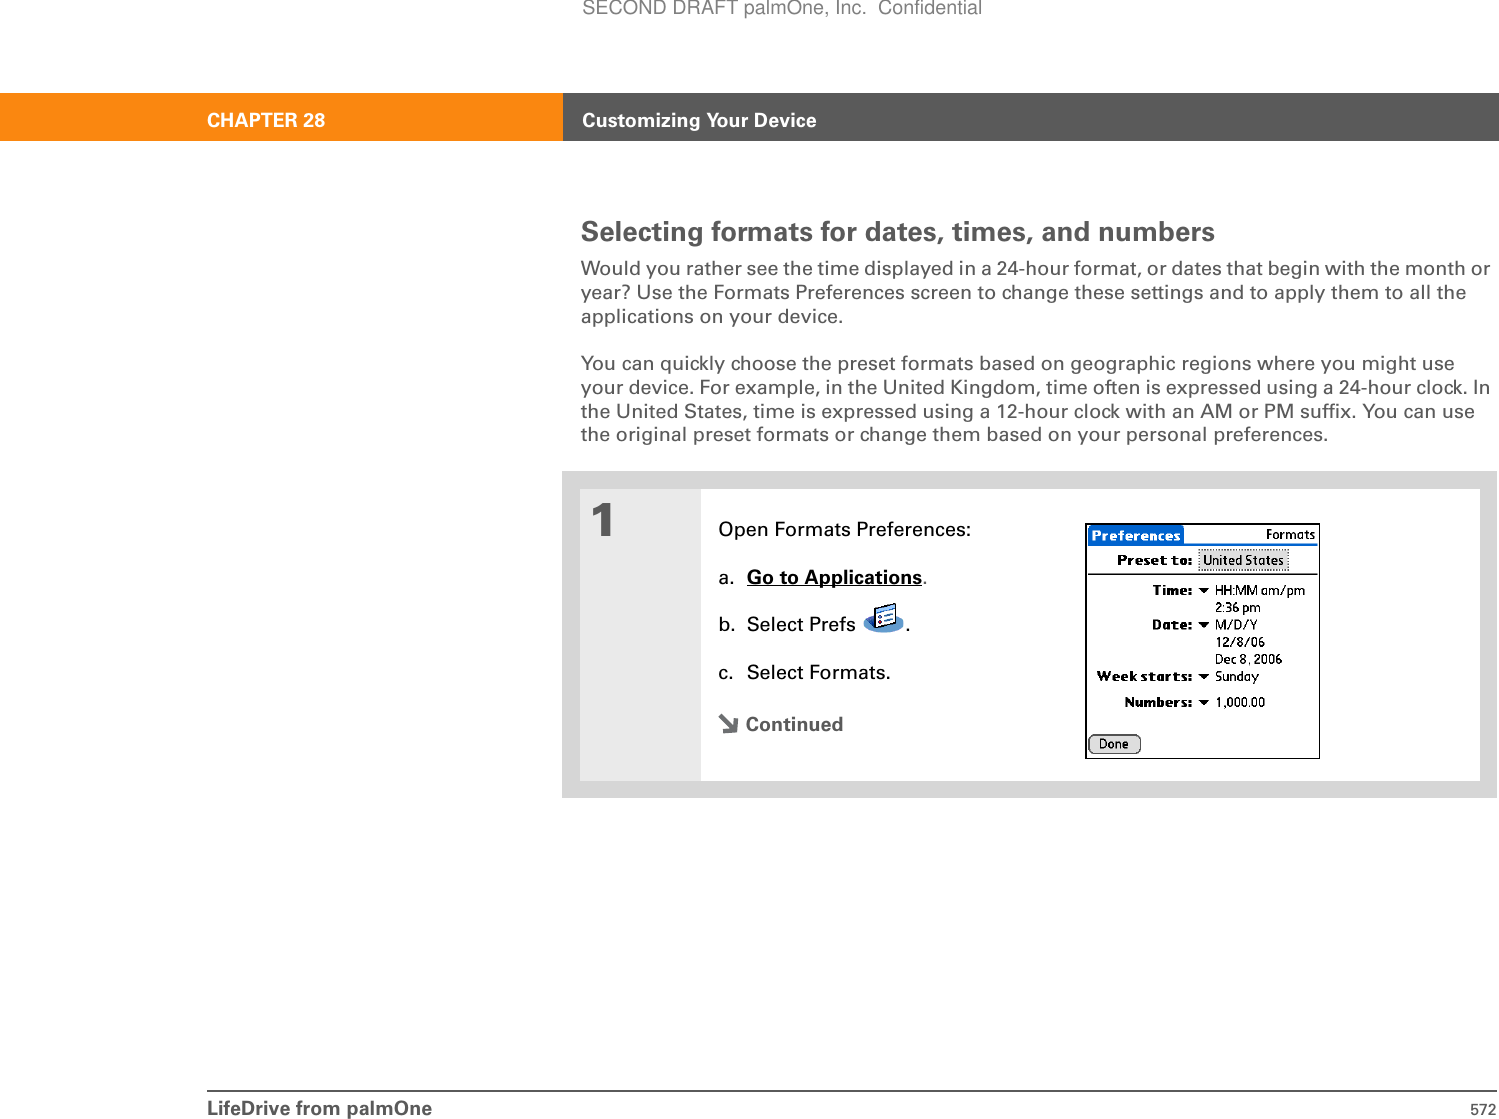
![LifeDrive from palmOne 573CHAPTER 28 Customizing Your Device2Select a country:a. Select the Preset to box to open the Set Country dialog box.b. Select a country.c. Select OK.3[ & ] OPTIONAL Customize any of the following preset formats:Time Controls whether the time is displayed in 12-hour or 24-hour format and which symbol separates the numbers.Date Controls the sequence in which the day, month, and year appear and which symbol separates the segments.Week starts Controls whether applications treat Sunday or Monday as the first day of the week.Numbers Controls the decimal and thousands separator symbols.4Select Done.DoneTipThe country setting changes only the way the date and time look. It doesn’t change your device’s time to that country’s time. To do that, go to Date & Time Preferences or to World Clock.SECOND DRAFT palmOne, Inc. Confidential](https://usermanual.wiki/Palm/830.User-Manual-2-of-2/User-Guide-543160-Page-196.png)
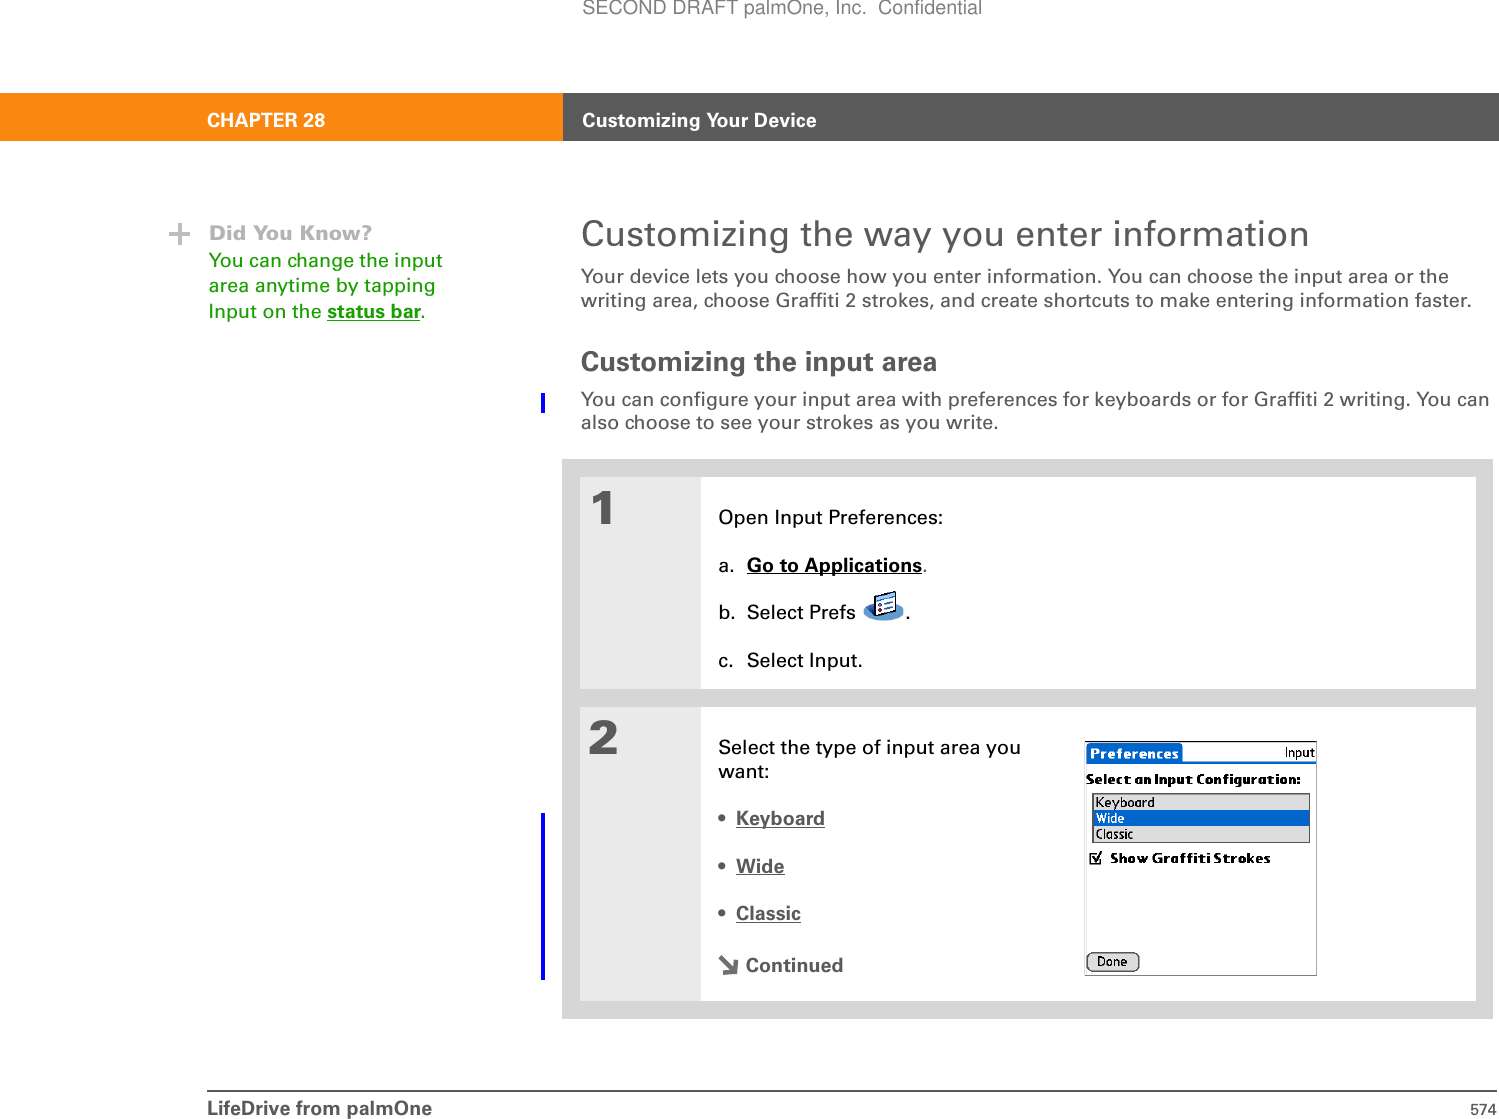
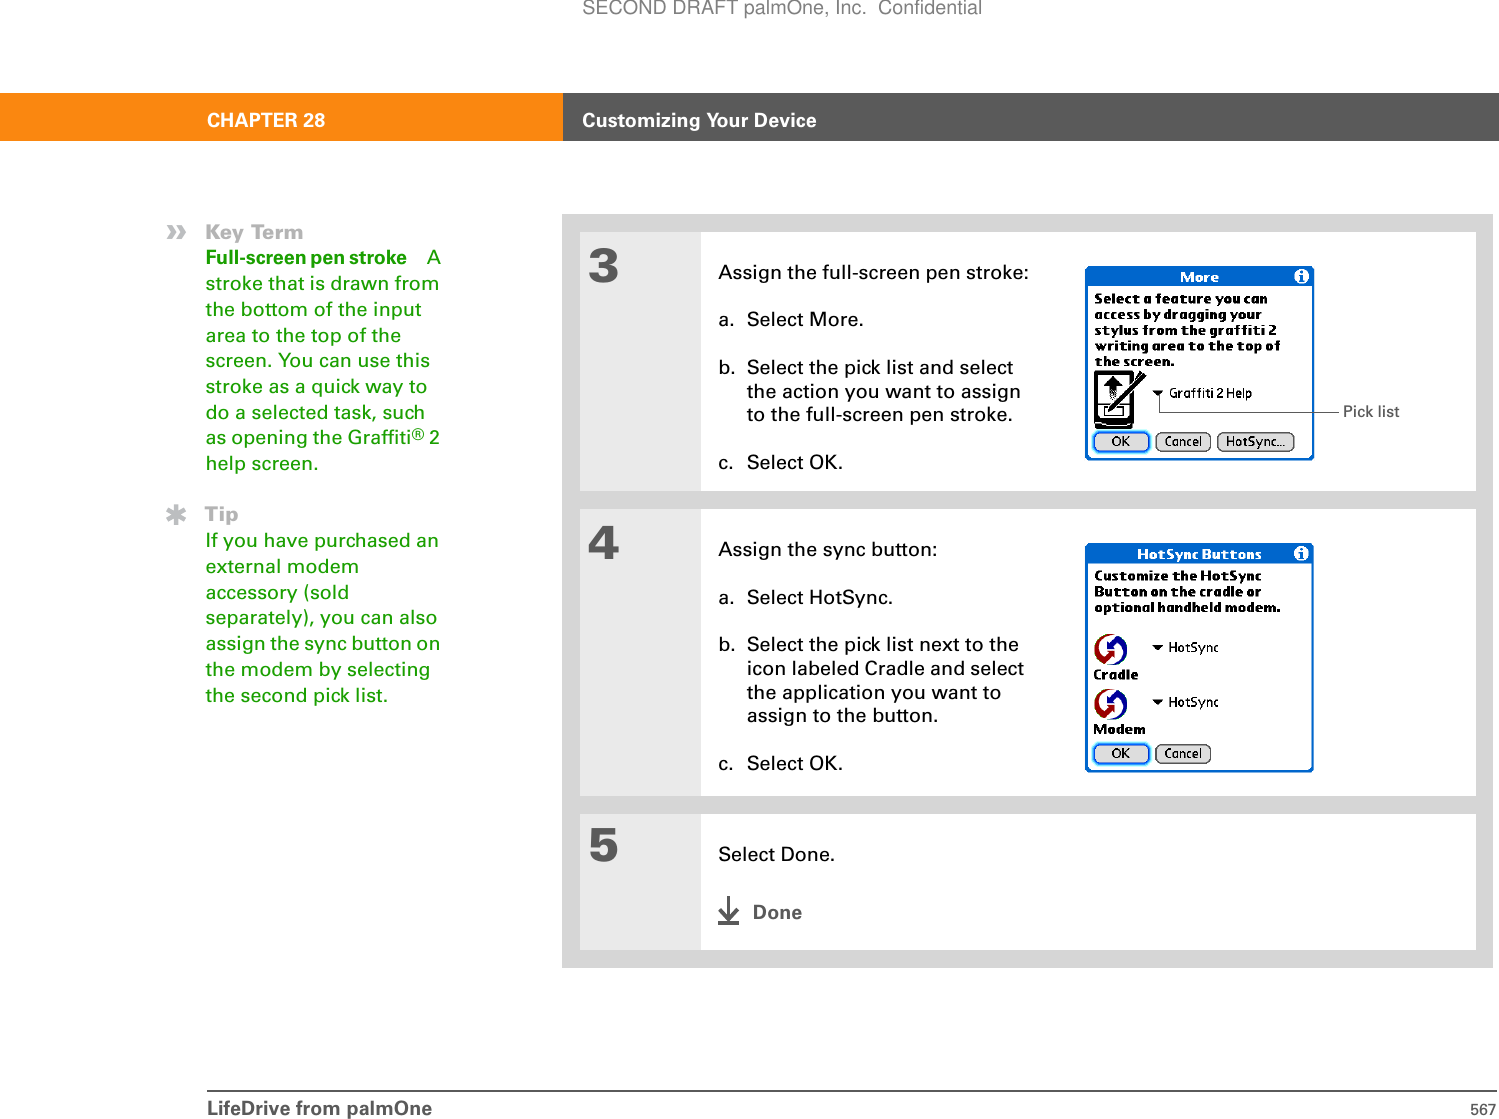
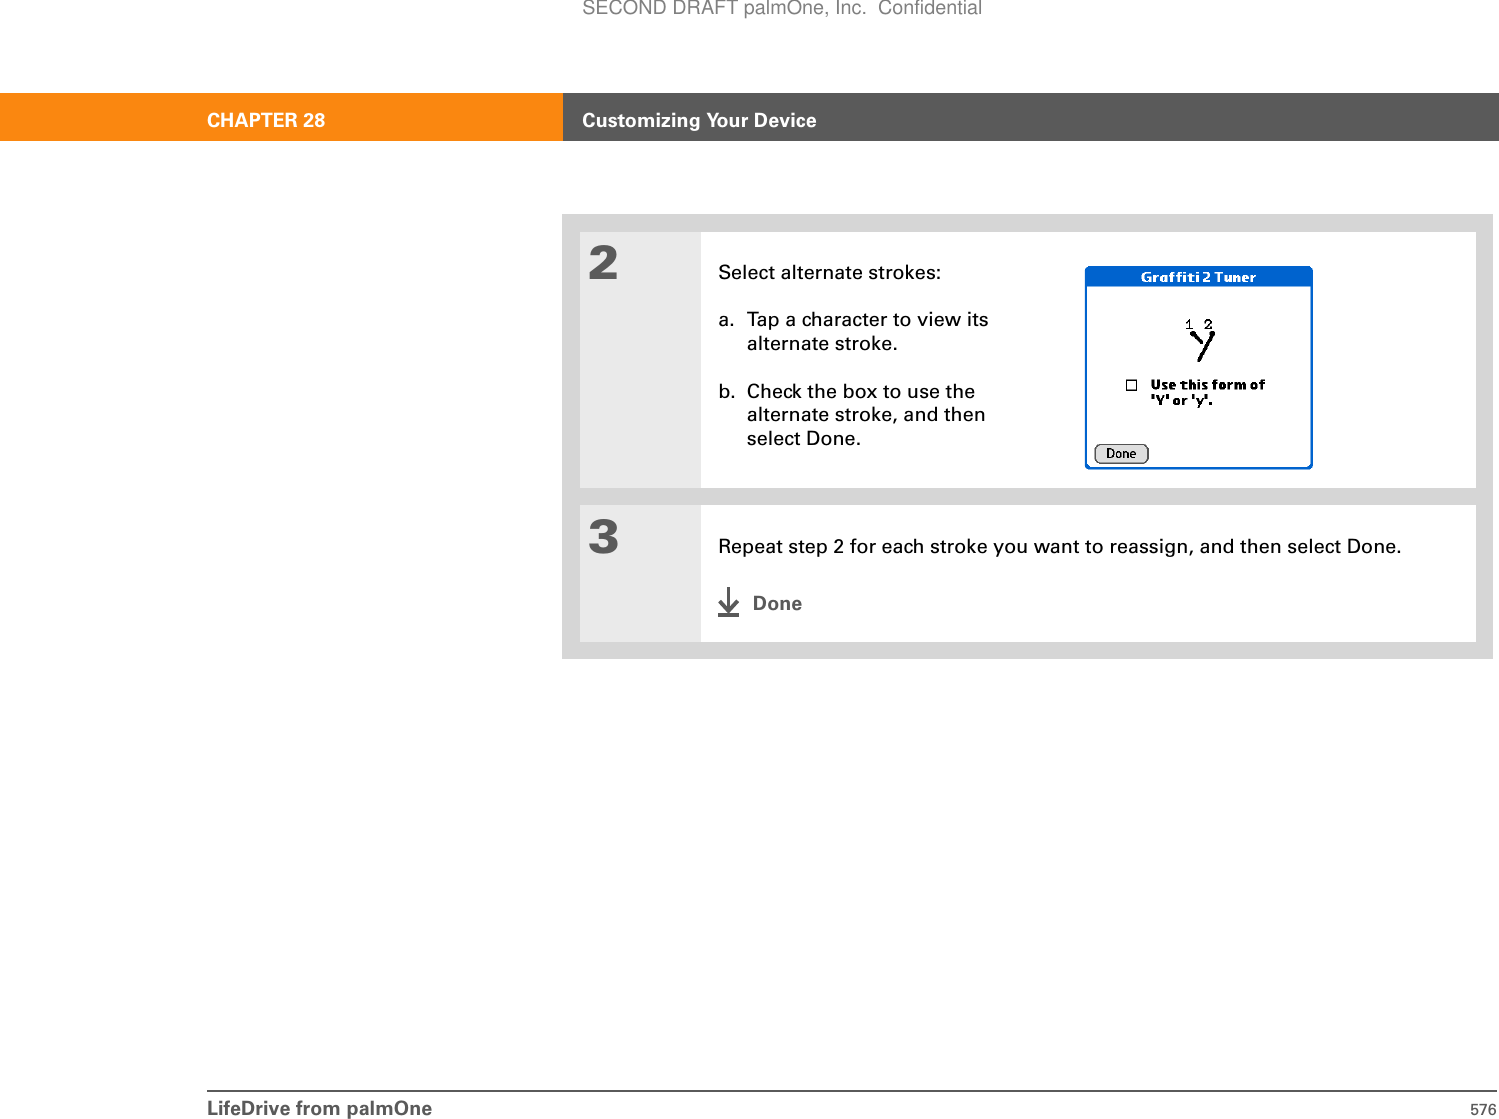
![LifeDrive from palmOne 575CHAPTER 28 Customizing Your DeviceCustomizing Graffiti 2 strokesThere is more than one way to write certain Graffiti 2 characters. Use the Graffiti 2 Preferences screen to select an alternate stroke shape for these characters. 03[ & ] OPTIONAL Uncheck the Show Graffiti Strokes box if you don’t want to have the Graffiti strokes shown as you write a character in the input area.Done1Open Graffiti 2 Preferences:a. Go to Applications.b. Select Prefs .c. Select Graffiti 2.ContinuedTipRight after you write a character, your device interprets a quick tap on the screen as a period character. If you want to tap a button, either wait a few seconds or tap the Full-screen writing icon on the status bar.SECOND DRAFT palmOne, Inc. Confidential](https://usermanual.wiki/Palm/830.User-Manual-2-of-2/User-Guide-543160-Page-198.png)
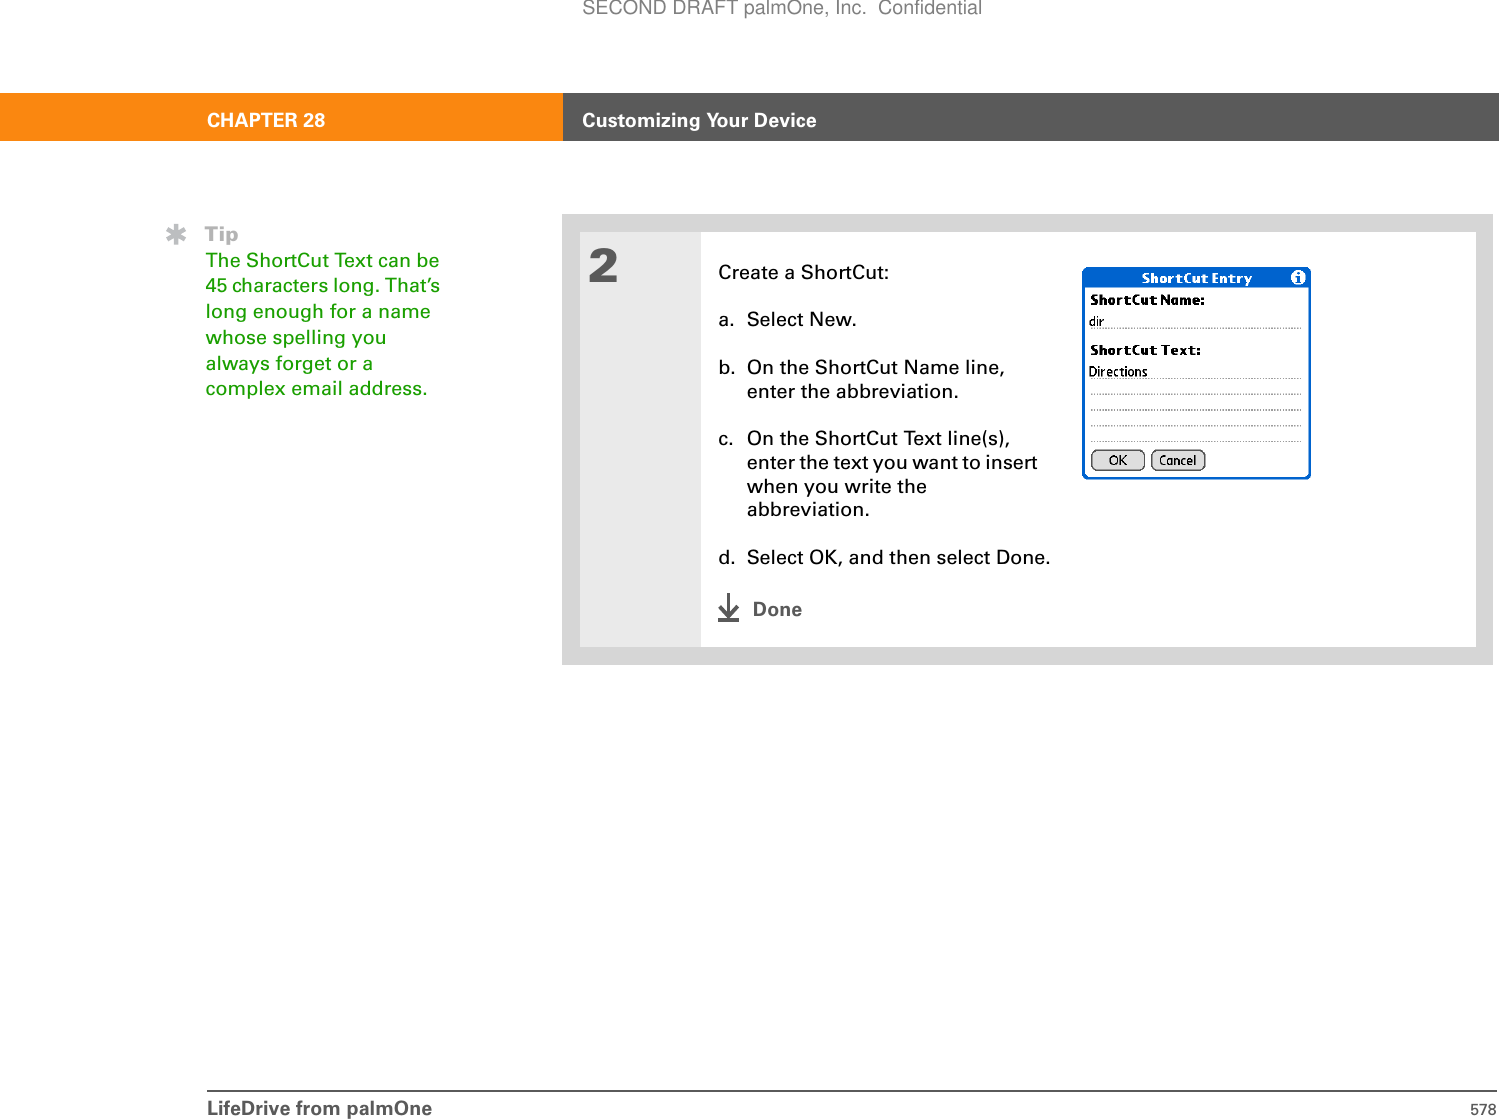


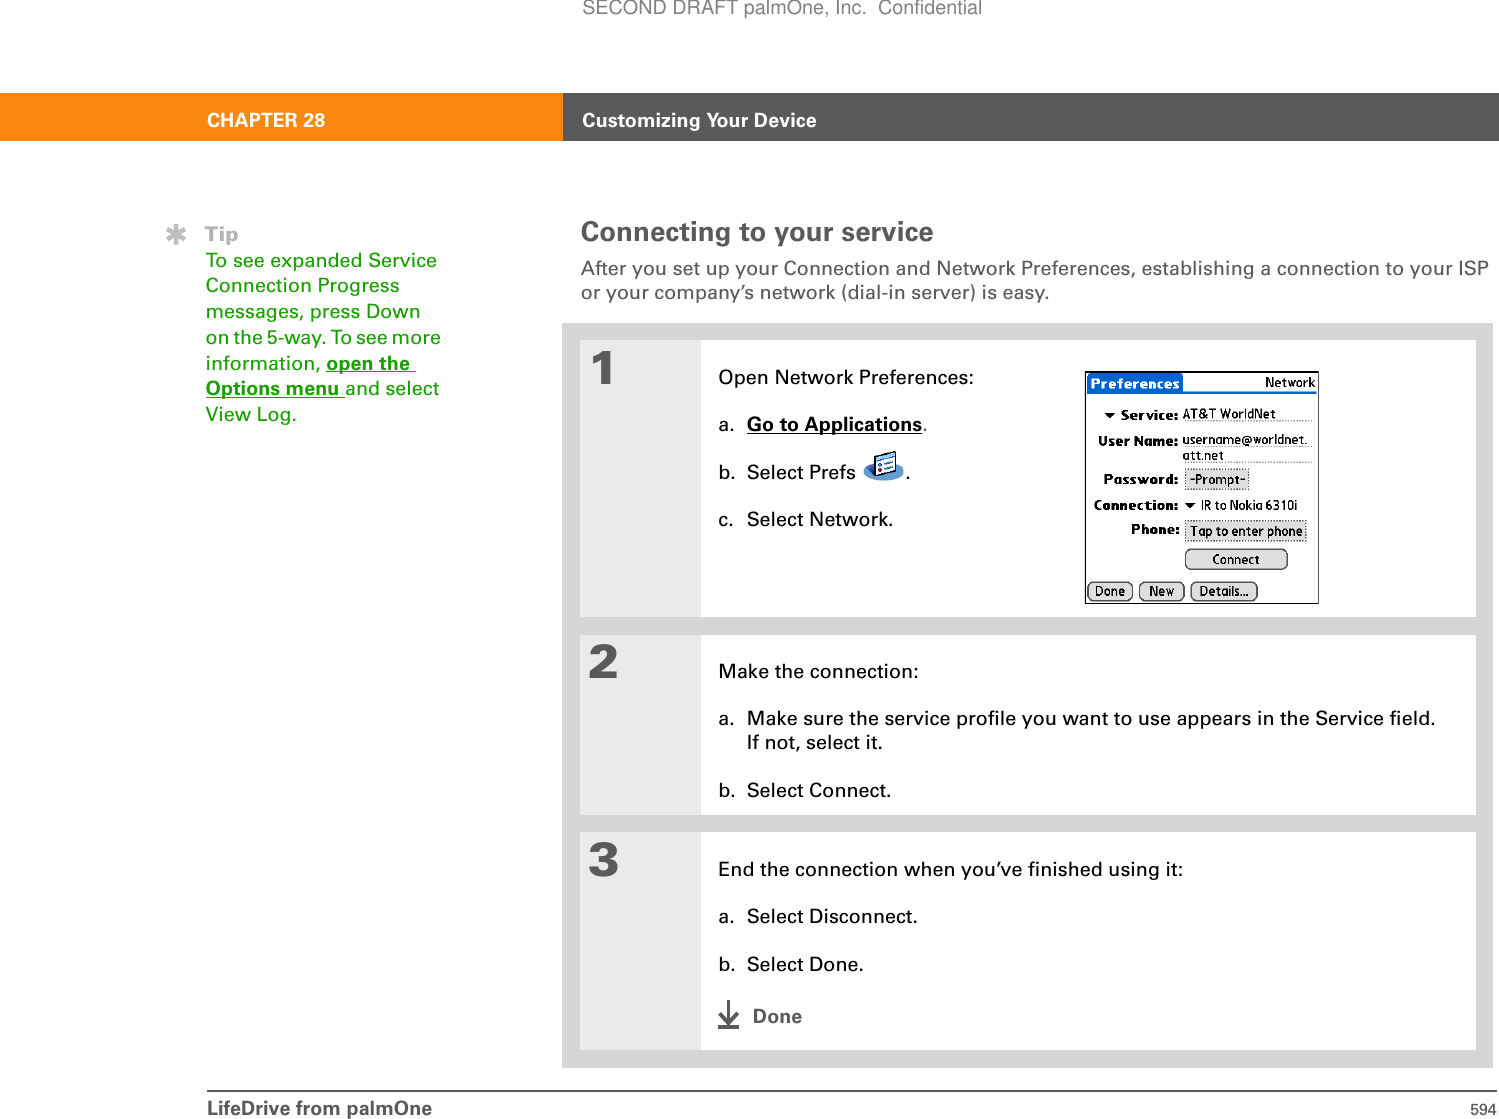
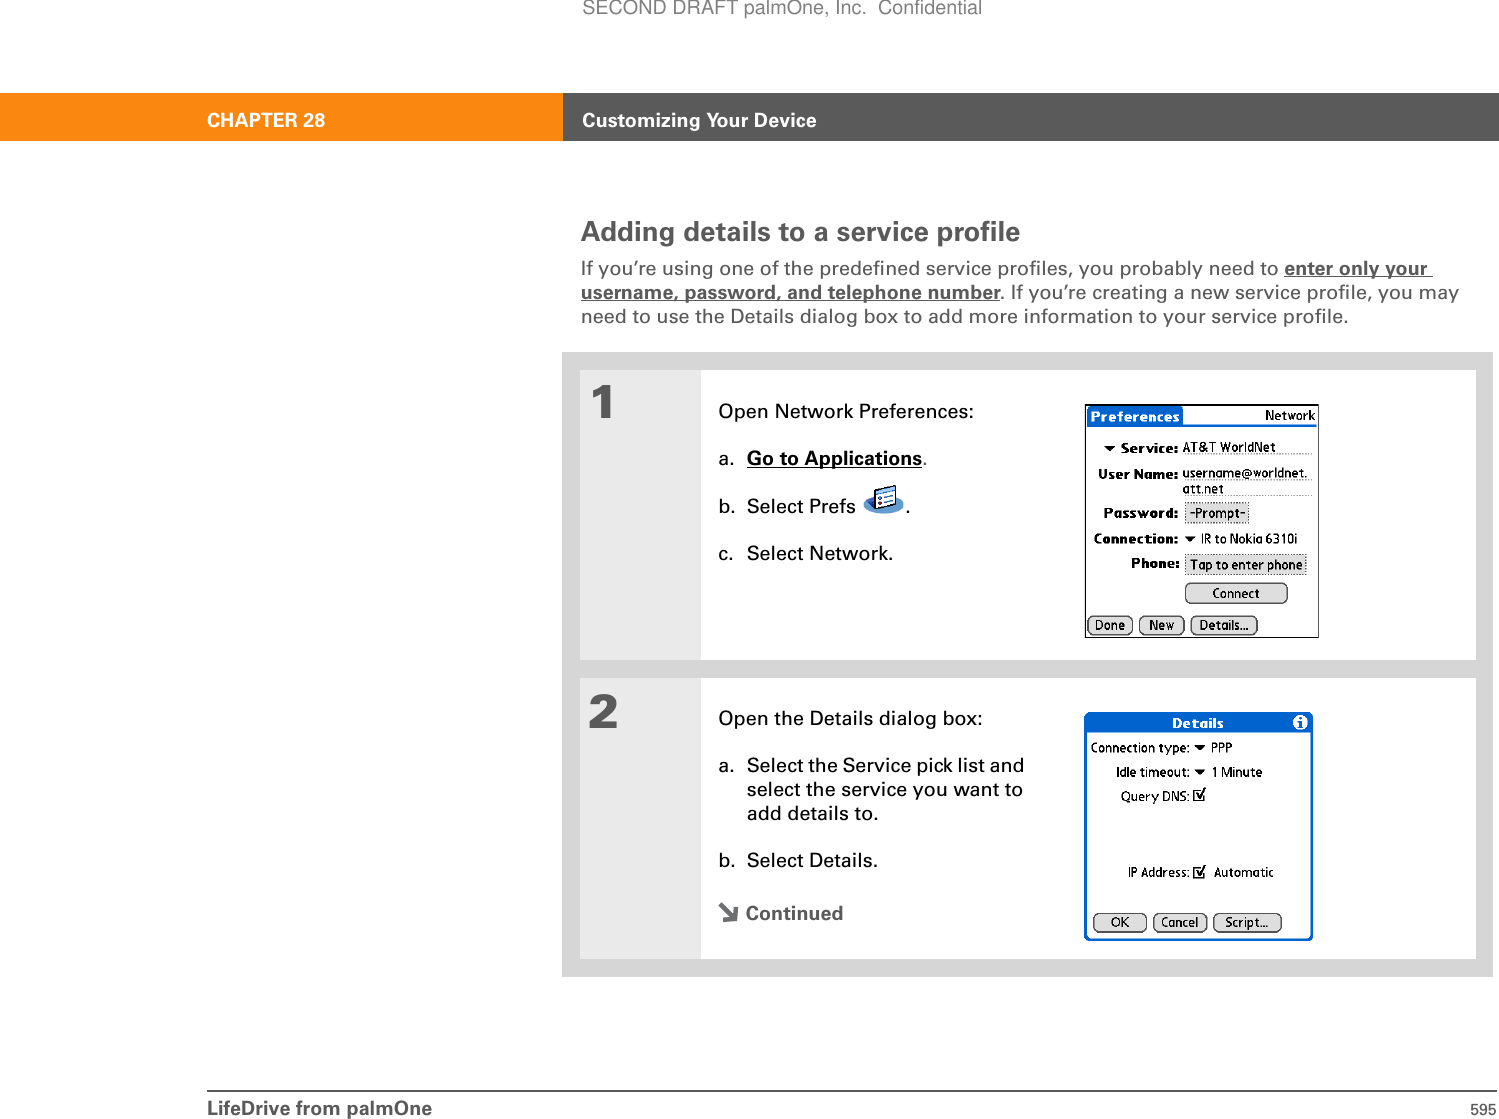
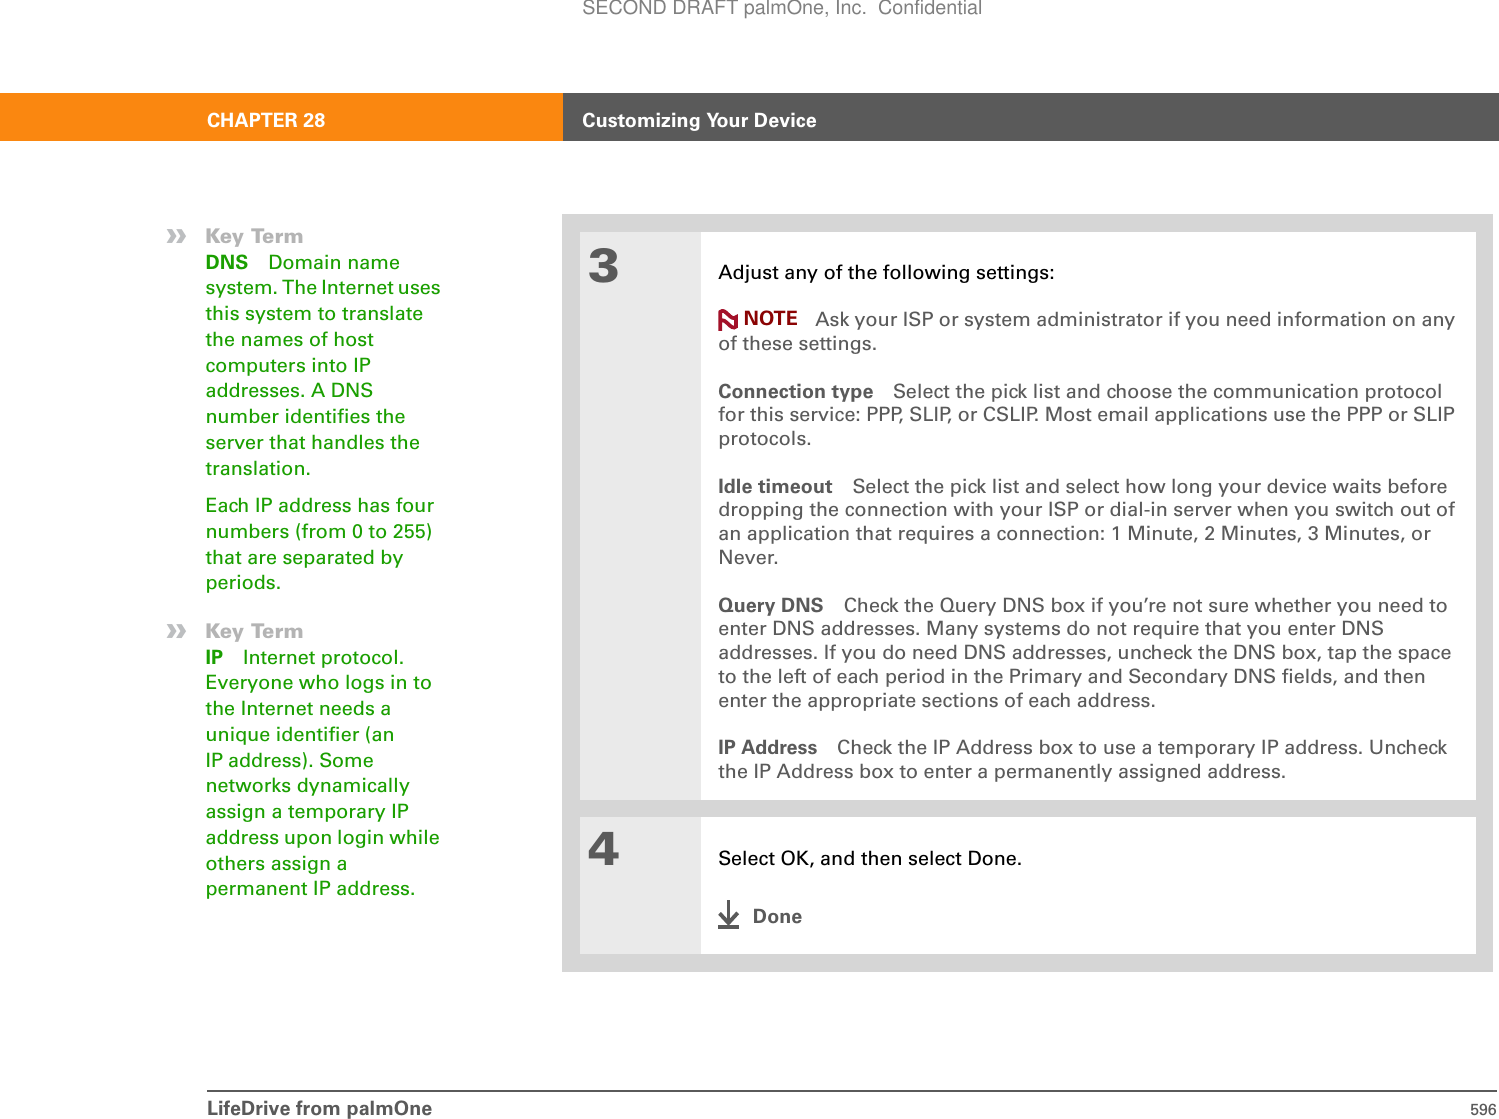
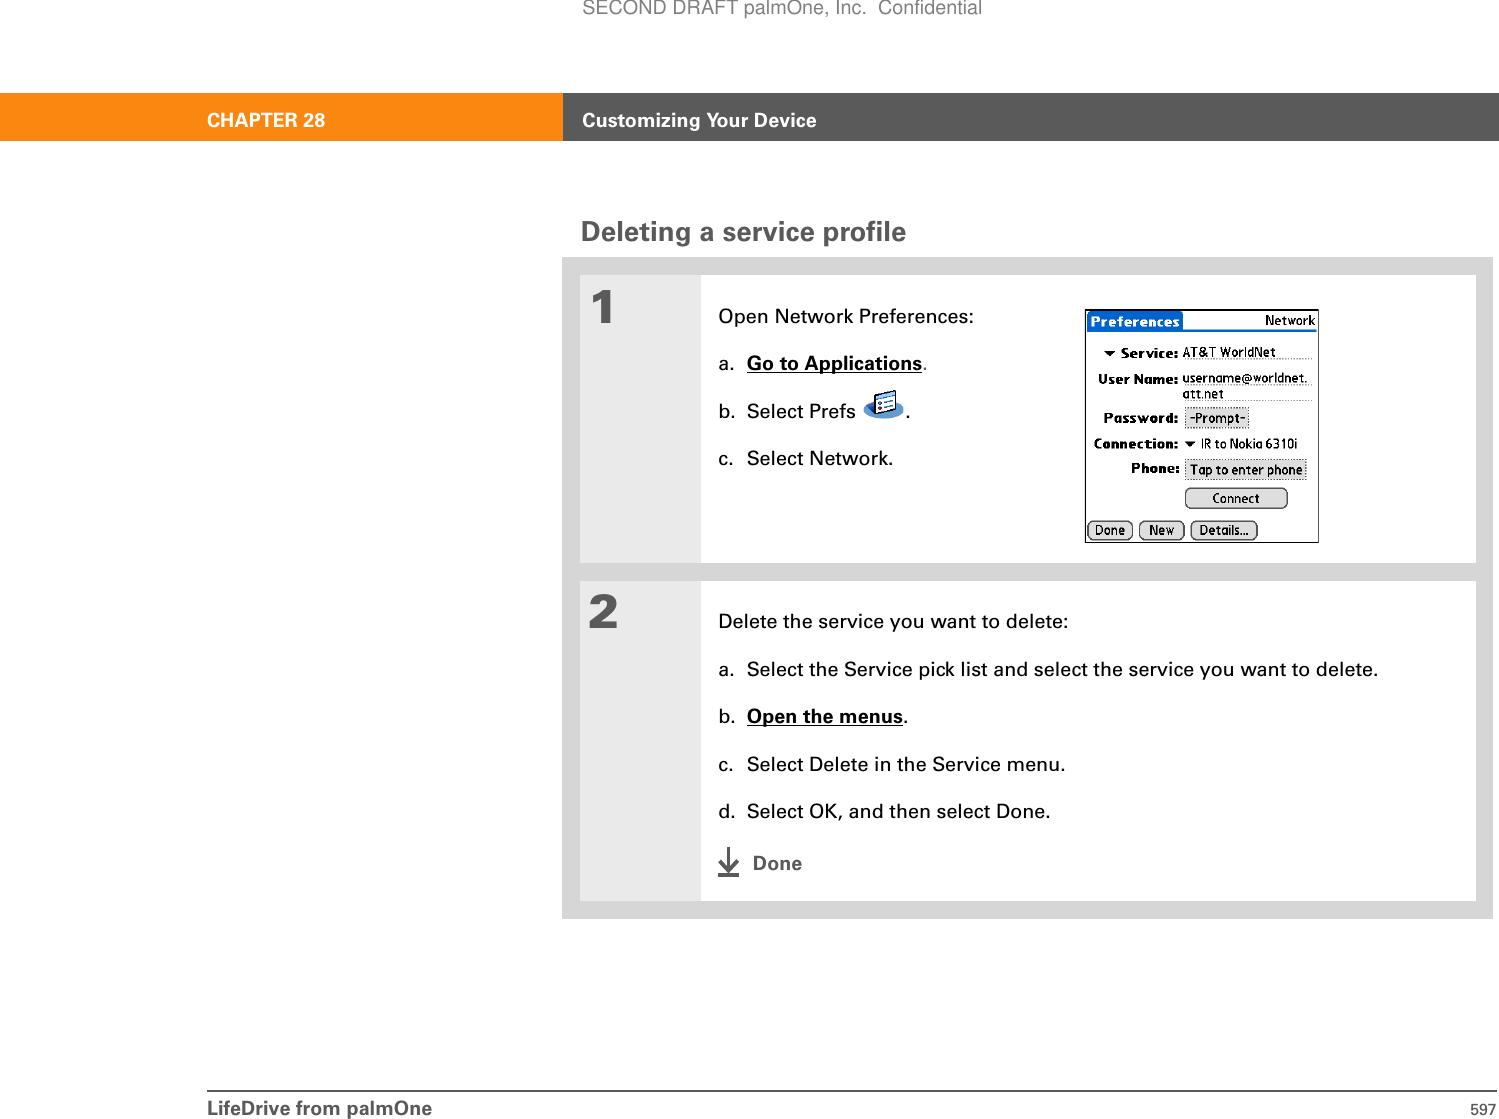
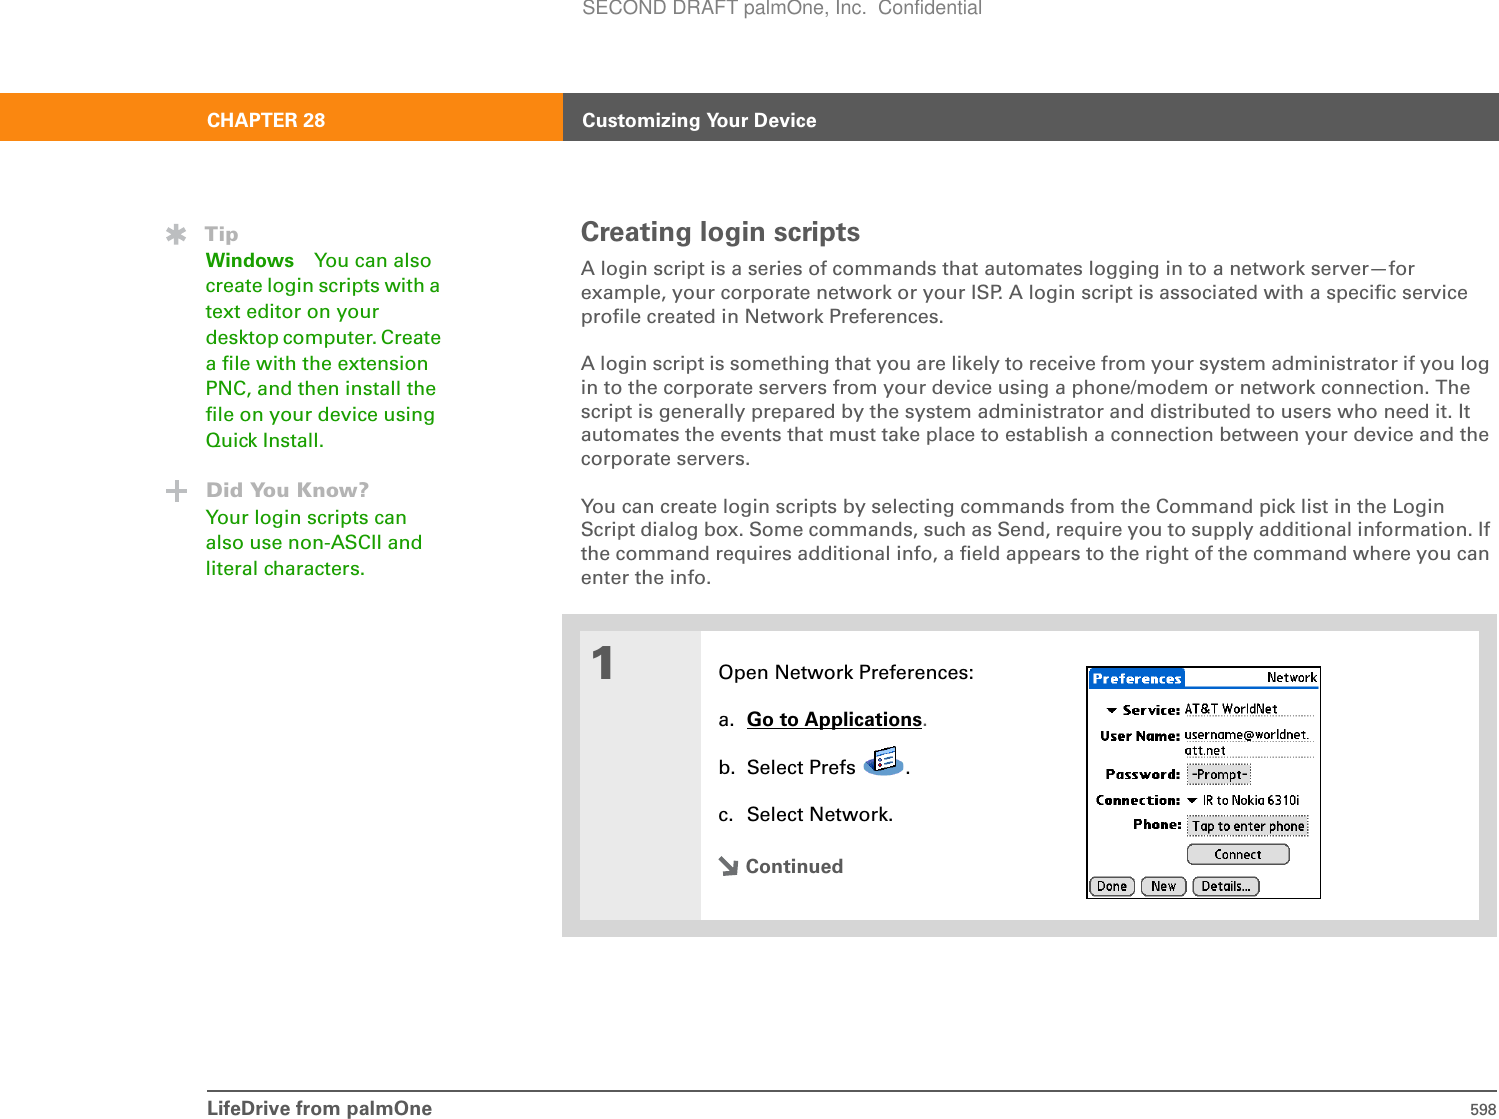
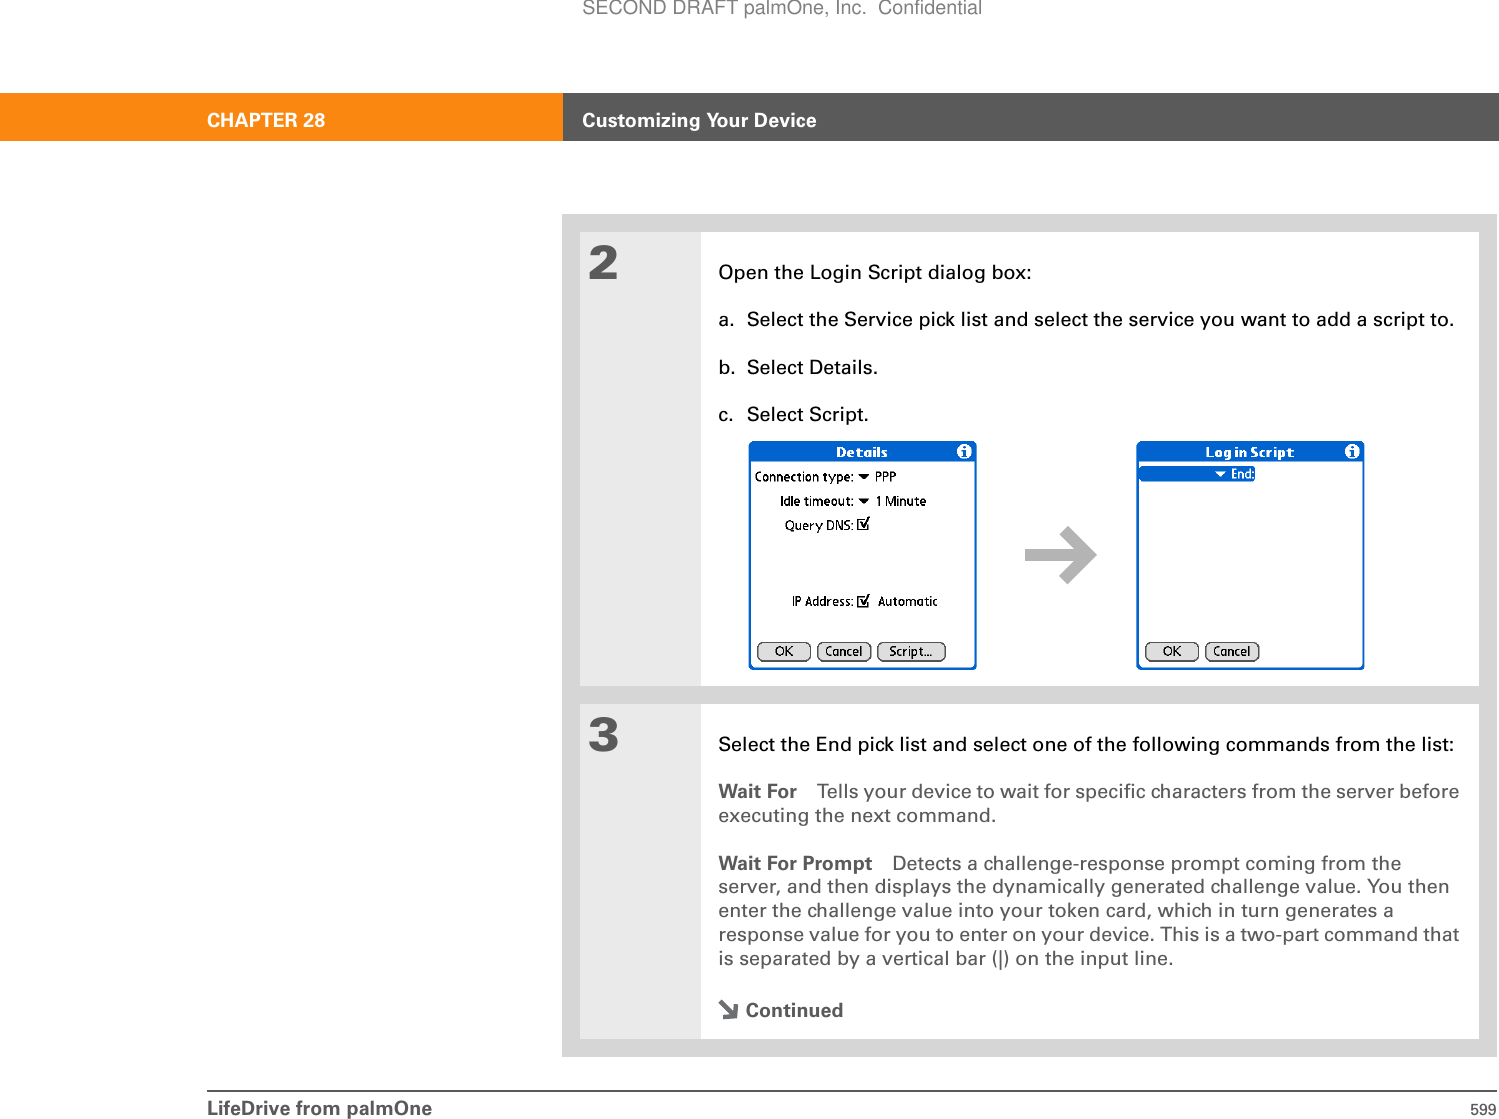
![LifeDrive from palmOne 591CHAPTER 28 Customizing Your DeviceCustomizing network settingsYour device includes software that lets you connect your device to your Internet service provider (ISP) or to a dial-in (remote access) server using a mobile phone. After you configure your network settings, you can establish a connection either by using the menus from the Network Preferences screen or by using a third-party application. Setting up a service profileService profiles store the network settings for your ISP or dial-in server. You can create, save, and reuse service profiles. You can create additional service profiles from scratch or by duplicating an existing profile and editing the information.01Open Network Preferences:a. Go to Applications.b. Select Prefs .c. Select Network.ContinuedBefore You Begin[!]You need the following:• A mobile phone with a Bluetooth radio or an IR port (sold separately)• A wireless service provider account that includes high-speed data services or that supports dial-up connections (additional fees may apply)• An ISP account or a corporate remote access account (additional fees may apply)• Connection Preferences settings for your mobile phone enabled with IR or Bluetooth wireless technologySECOND DRAFT palmOne, Inc. Confidential](https://usermanual.wiki/Palm/830.User-Manual-2-of-2/User-Guide-543160-Page-214.png)
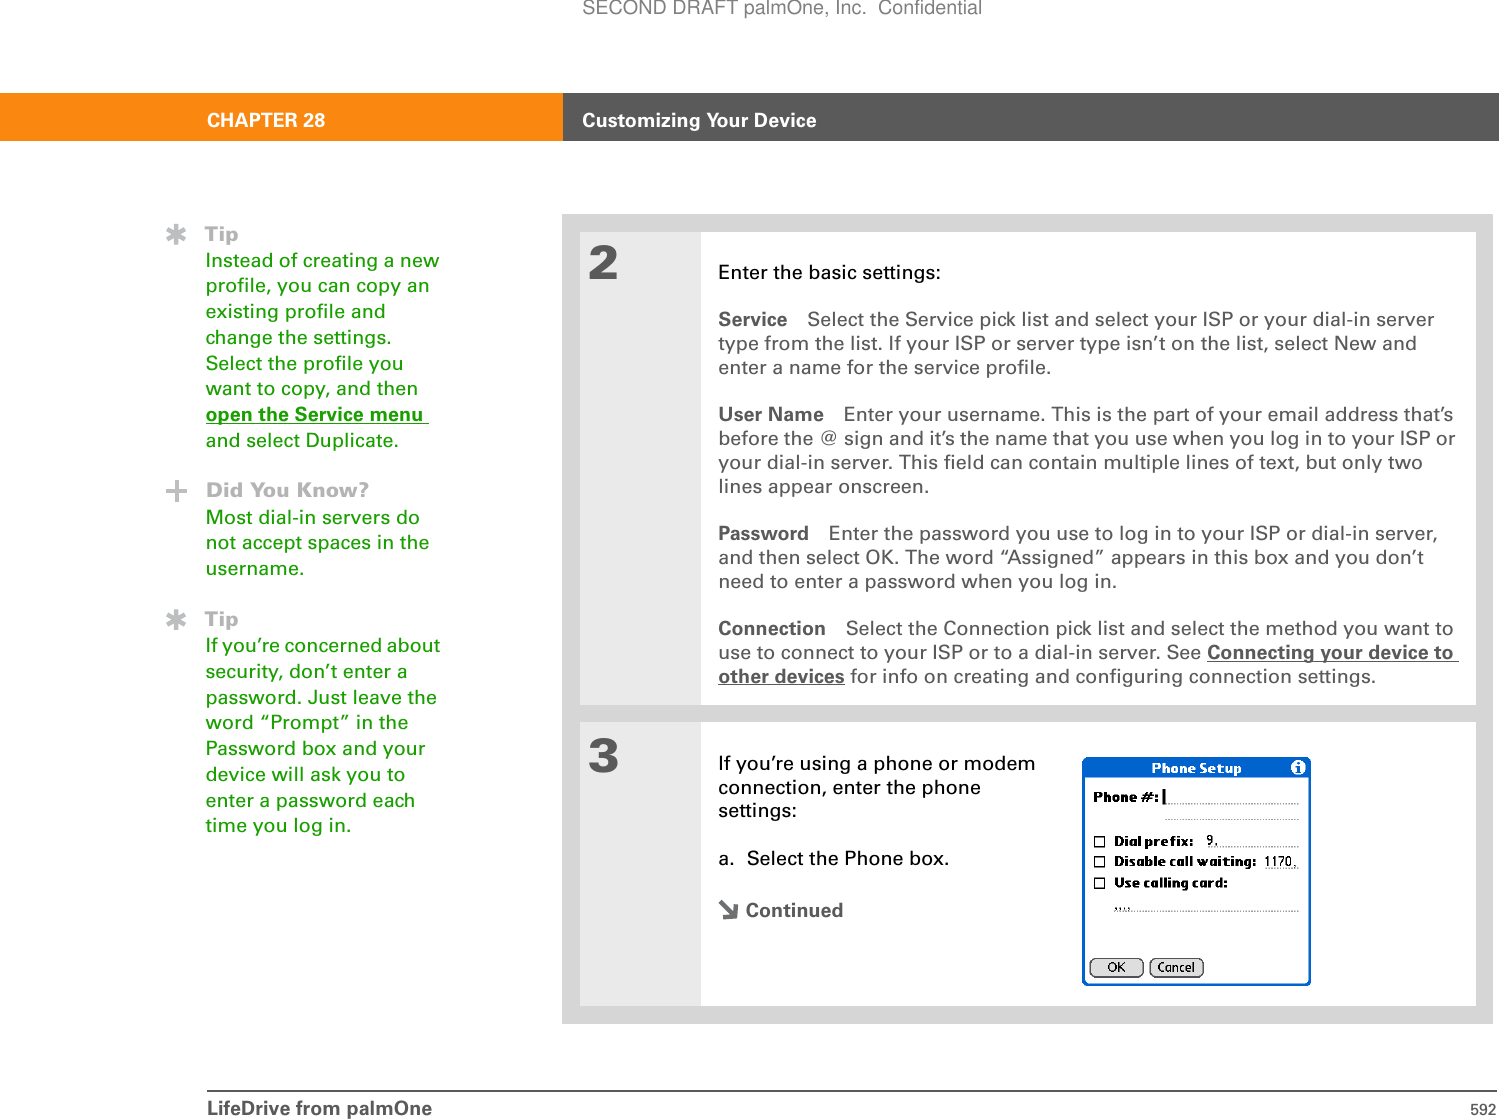
![LifeDrive from palmOne 593CHAPTER 28 Customizing Your DeviceCont’d. b. Enter any of the following settings, and then select OK:Phone # Enter the phone number for your ISP or dial-in server.Dial prefix Check the Dial prefix box, and then enter the number that you dial before the telephone number to access an outside line. For example, many offices require that you first dial 9 to dial a number outside the building.Disable call waiting If your phone has Call Waiting, check the Disable call waiting box, and then enter the code to disable Call Waiting. Call Waiting can cause your session to end if you receive a call while you are connected. Contact your local phone company for the code that is appropriate for you. Use calling card If you want to use your calling card when dialing your ISP or dial-in server, check the Use calling box to select it. Enter your calling card number on the Use calling card line.Because MCI works differently, enter the MCI calling card number in the Phone # field and the phone number in the Use calling card field.4Select Done.DoneTipIt’s a good idea to add at least three commas before your calling card number to allow for the cue delay. Each comma delays transmission of your calling card number for two seconds.IMPORTANT[!]SECOND DRAFT palmOne, Inc. Confidential](https://usermanual.wiki/Palm/830.User-Manual-2-of-2/User-Guide-543160-Page-216.png)

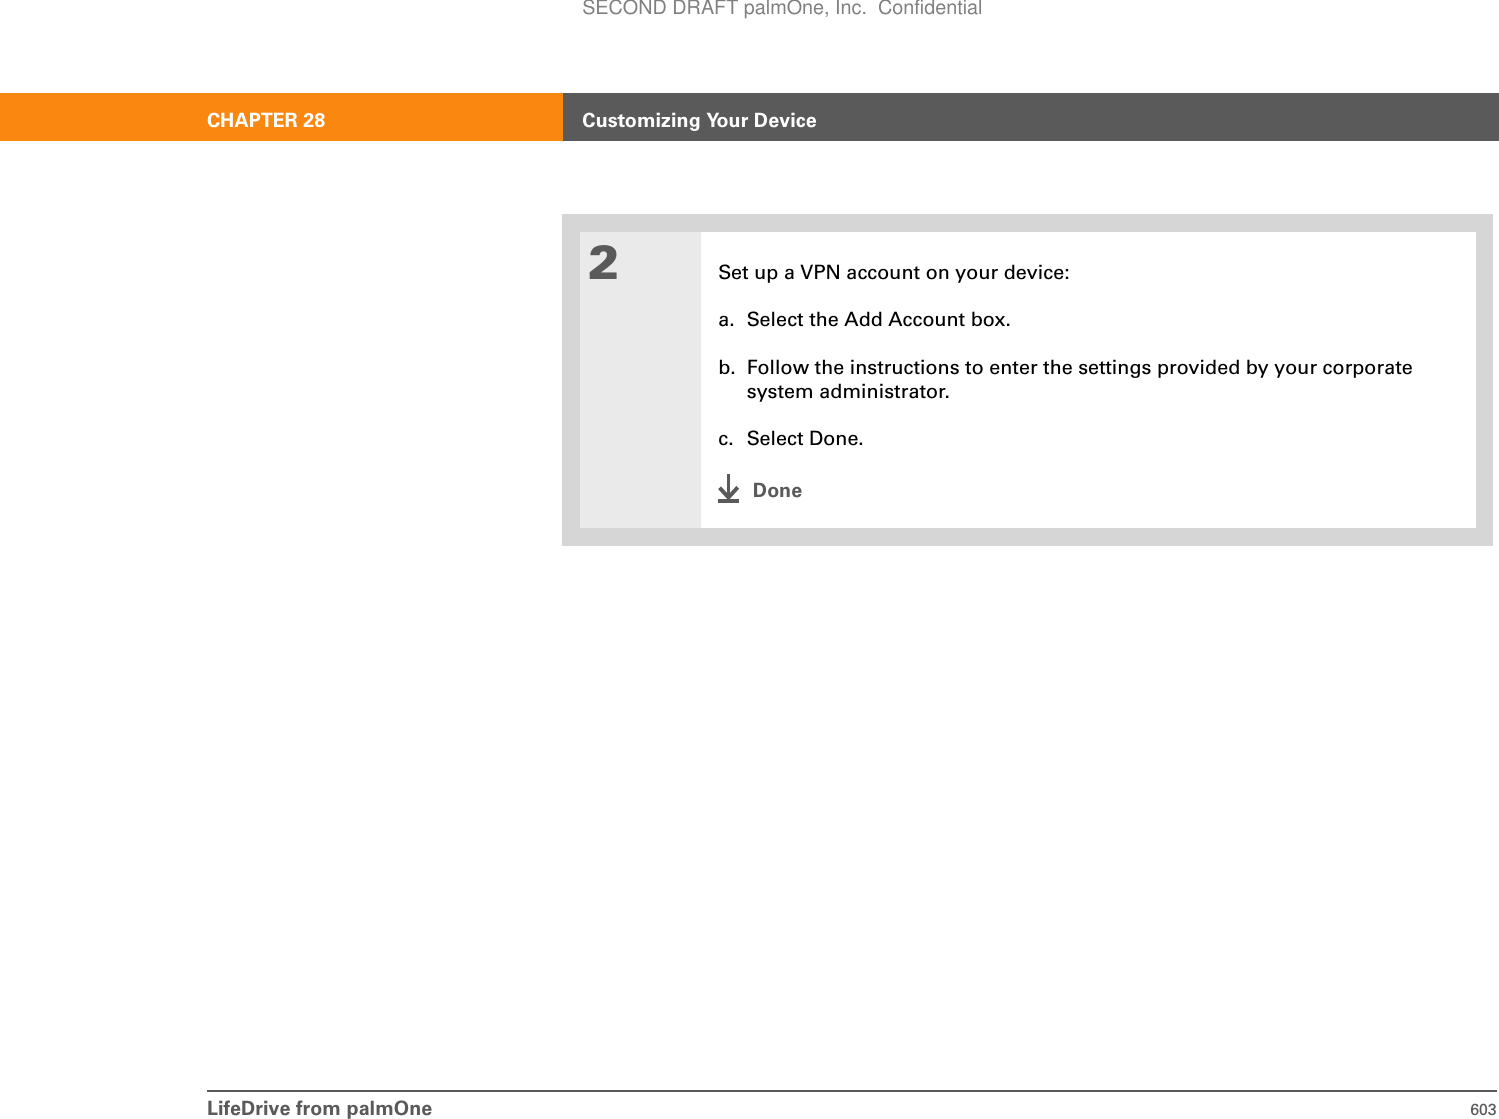
![LifeDrive from palmOne 602CHAPTER 28 Customizing Your DeviceSetting up a VPNIf you want to use your device to access your corporate email account or other files on your corporate server, you may need to set up a virtual private network (VPN) on your device. A VPN enables you to log in to your corporate server through the company’s firewall (security layer). Without a VPN, you cannot pass through the firewall to gain access to the server. You need to set up a VPN to access a corporate server in either of the following situations:• Your company’s wireless local area network (LAN) is located outside the firewall.• Your company’s wireless LAN is located inside the firewall, but you are trying to access the network from outside the firewall (for example, from a public location or at home).Check with your company’s system administrator to see if a VPN is required to access the corporate network. If you need a VPN, you must either use the Enterprise Software link on the software installation CD to download and purchase a VPN client, or purchase and install a third-party VPN client, to use this feature.Setting up a VPN account on your device01Open VPN Preferences:a. Go to Applications.b. Select Prefs .c. Select VPN.ContinuedBefore You Begin[!]You must purchase and install a compatible VPN client onto your device. You also need the VPN settings from your corporate system administrator.Did You Know?Once you have installed and set up a VPN, you can connect or disconnect VPN from within the web browser.SECOND DRAFT palmOne, Inc. Confidential](https://usermanual.wiki/Palm/830.User-Manual-2-of-2/User-Guide-543160-Page-225.png)

![LifeDrive from palmOne 616CHAPTER 29 Expanding Your DeviceRemoving all information from a cardFormatting a card removes all of its info and prepares it to accept new applications and files.We do not recommend formatting backup cards. Formatting removes the backup application and turns the card into a blank memory card. 01Insert an expansion card.2Go to Applications and select Card Info .3Format the card:a. Open the menus.b. Select Format Card on the Card menu.c. When asked if you want to format the card, select OK.DoneIMPORTANT[!]SECOND DRAFT palmOne, Inc. Confidential](https://usermanual.wiki/Palm/830.User-Manual-2-of-2/User-Guide-543160-Page-239.png)
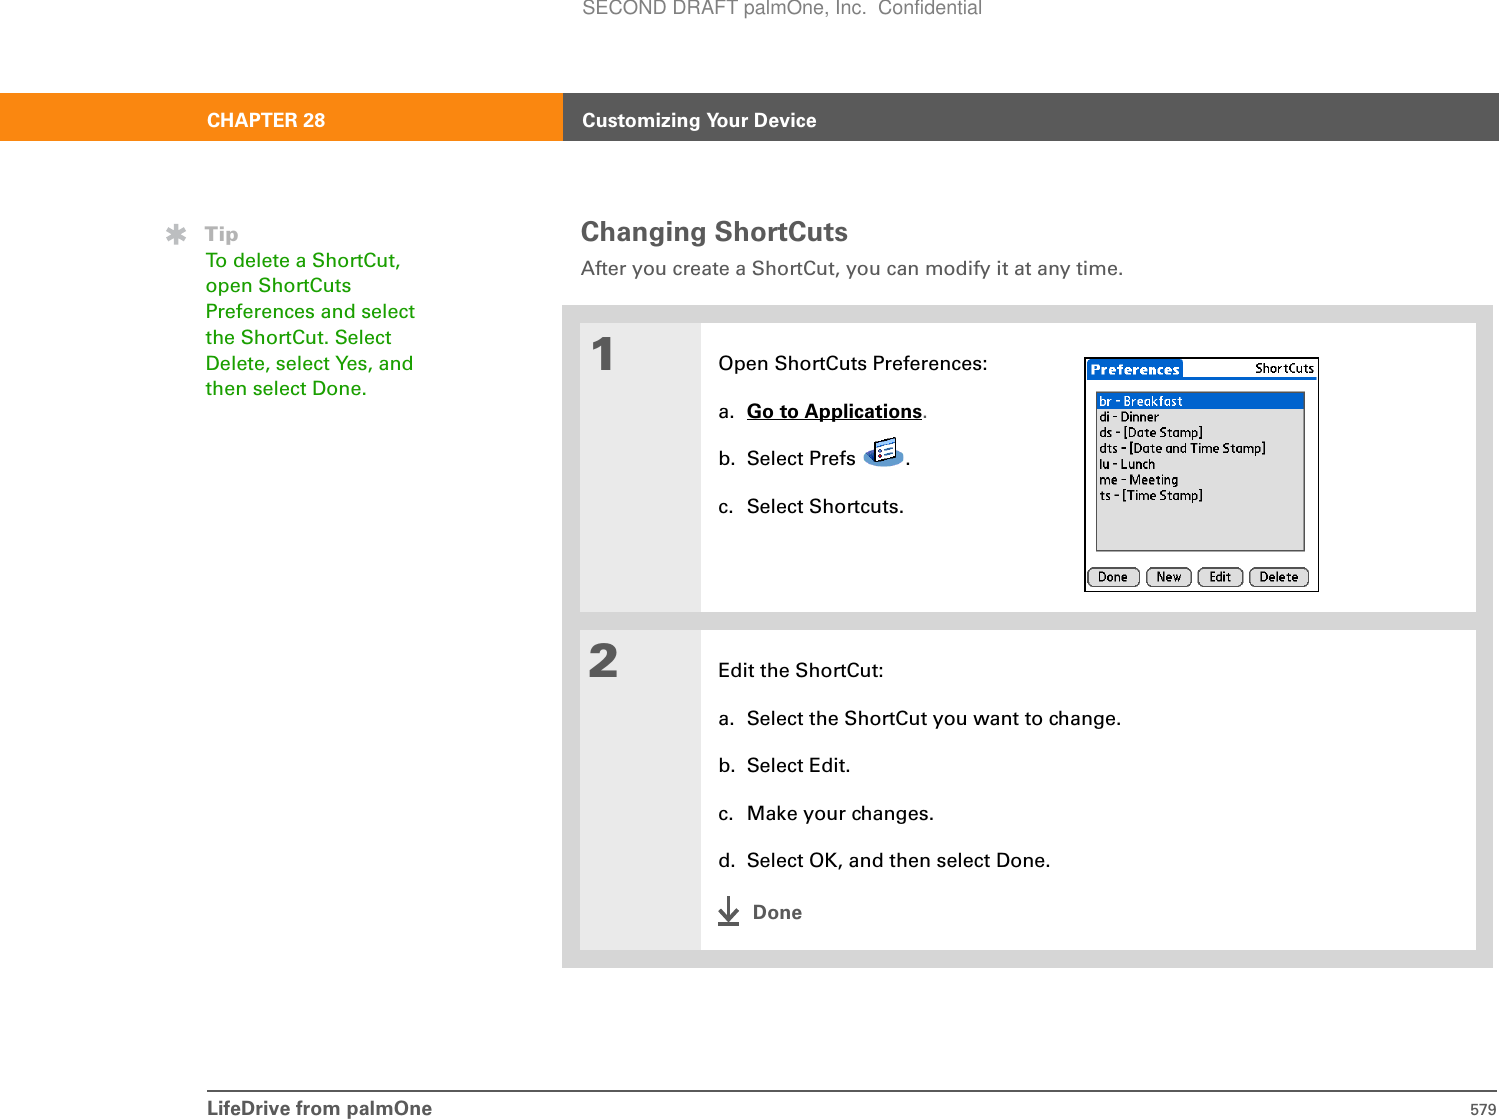
![LifeDrive from palmOne 619CHAPTER 30 Maintaining Your Device• Be sure to get rid of any static electricity buildup before you connect your device to any cable or accessory.• If you are using your device in Drive Mode for an extended period of time or you are using the Camera Companion application, or if the battery is low while in Drive Mode or while using Camera Companion, keep your device connected to the AC charger plugged into a power outlet.•Synchronize often to maintain a backup copy of your important information on your computer.Device don’ts Do not open your device for any reason. There are no user-serviceable parts inside. Attempting to remove the hard drive voids the warranty on your device.• Do not drop, bang, or otherwise cause a strong impact to your device. If you drop the device while the amber indicator light is flashing—indicating that the hard drive is processing information—you may damage the hard drive.• Do not carry your device in your back pocket; you might sit on it by mistake.• Do not let your device get wet; don’t even leave it in a damp location.• Do not expose your device to very hot or cold temperatures, including placing it near a heater, leaving it in the trunk of a car, or setting it by a window in direct sunlight.• Do not carry or use your device at extremely high altitudes, unless you’re in an airplane.• Do not place your device near strong magnetic fields such as wireless modems. This could cause loss of information on the hard drive.IMPORTANT[!]SECOND DRAFT palmOne, Inc. Confidential](https://usermanual.wiki/Palm/830.User-Manual-2-of-2/User-Guide-543160-Page-242.png)
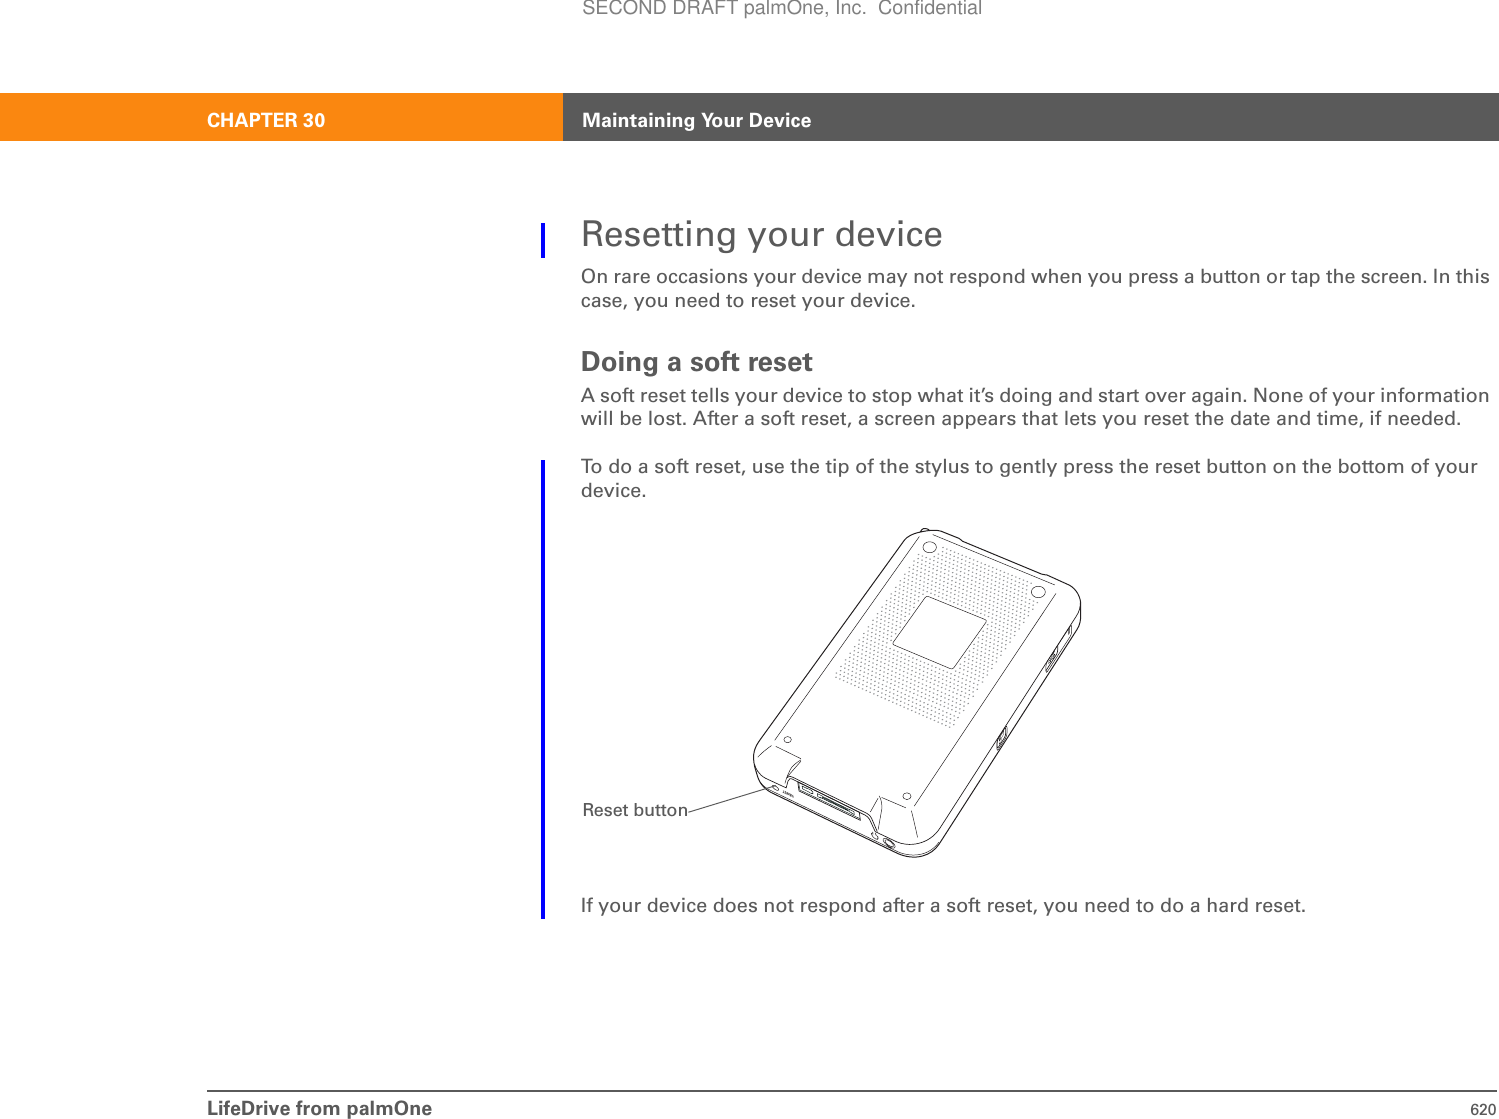
![LifeDrive from palmOne 621CHAPTER 30 Maintaining Your DeviceDoing a hard resetOnly do a hard reset if a soft reset doesn’t solve your problem, or if you want to clear all of your information from your device. A hard reset deletes all records and entries stored on your device, including the username that identifies the device. This is another reason why it's important to synchronize often, so you have an up-to-date backup available. Before you do a hard reset, be sure to synchronize. Applications, files, and folders moved to your device's internal drive with File Transfer are not automatically backed up during synchronization. Use File Transfer to copy or move the updated files and folders to your computer, or to back up the contents of your device's entire internal drive to your computer.01Slide the power switch to the right and hold it in that position.2While holding the switch to the right, use the tip of the stylus (or a similar object without a sharp tip) to gently press and release the reset button on the bottom of your device.3Wait for the Palm Powered™ logo to appear, and then release the power switch.4When you see the message that warns you about erasing all of the info on your device, do one of the following:• Press Up on the 5-way navigator to finish the reset and show the touchscreen.• Press any other button to do a soft reset.DoneIMPORTANT[!]SECOND DRAFT palmOne, Inc. Confidential](https://usermanual.wiki/Palm/830.User-Manual-2-of-2/User-Guide-543160-Page-244.png)
![LifeDrive from palmOne 627CHAPTER 31 Common QuestionsDevice Do not open your device; there are no serviceable parts inside. Opening your device voids the warranty and is not recommended under any circumstances.I want to see how much battery life I have left.A battery icon appears at the top of Favorites and Applications views. Check the icon periodically to see if your device needs to be recharged. If the battery becomes low, a message appears on the screen prompting you to recharge the battery.I’m not sure when I need to recharge my device.We recommend that you recharge your device for at least half an hour every day. Ideally, connect your device to a power source every night and recharge it while you sleep. My battery is drained.The memory on your device is designed to store your information even if the battery becomes drained completely. When you recharge your device, all of your existing information, both in program memory and on the hard drive, should appear.My battery drains too quickly.You can conserve battery life by doing any of the following:•Adjust the screen brightness.•Reduce the Auto-off setting.•Use Keylock to prevent your device from turning on by accident.•Stop music or video playback when not in use.IMPORTANT[!]SECOND DRAFT palmOne, Inc. Confidential](https://usermanual.wiki/Palm/830.User-Manual-2-of-2/User-Guide-543160-Page-250.png)

![LifeDrive from palmOne 634CHAPTER 31 Common QuestionsWhen I synchronize, nothing happens on Palm Desktop software, and my device times out.•Perform a soft reset.• Make sure that HotSync Manager is running on your computer.• Make a copy of the folder containing your information. This folder is named with either your full username or a shortened version of the name. Uninstall and then reinstall Palm Desktop software.• Turn on your device, and go to Applications. Select HotSync , and then select Local.I want to change from synchronizing my device with Palm Desktop software to synchronizing with Outlook.WINDOWS ONLYDuring CD installation, you chose a desktop software application to synchronize with your device. You may have chosen Palm Desktop software at that time. But if Microsoft Outlook already contains all of your contacts, appointments, tasks, and notes, you can change your synchronization method so that your device synchronizes with Outlook instead. You can also change from Outlook to Palm Desktop software. If you choose to synchronize with Outlook, info from Contacts, Calendar, Tasks, and Memos is synchronized with info in Outlook. You can also set up the VersaMail® application to synchronize email messages on your device with email in Outlook. Other info, such as voice memos and notes, is synchronized with info in Palm Desktop software.1. Insert the CD into your computer.2. Select Change your synchronization method.3. Follow the onscreen instructions for the desktop software you want to use.NOTEBefore You Begin[!]You must have completed CD installation and chosen Palm Desktop software as your desktop application for synchronization in order to switch to Outlook. Note that you can choose Outlook as your synchronization software for Contacts, Calendar, Tasks, and Memos during CD installation.SECOND DRAFT palmOne, Inc. Confidential](https://usermanual.wiki/Palm/830.User-Manual-2-of-2/User-Guide-543160-Page-257.png)


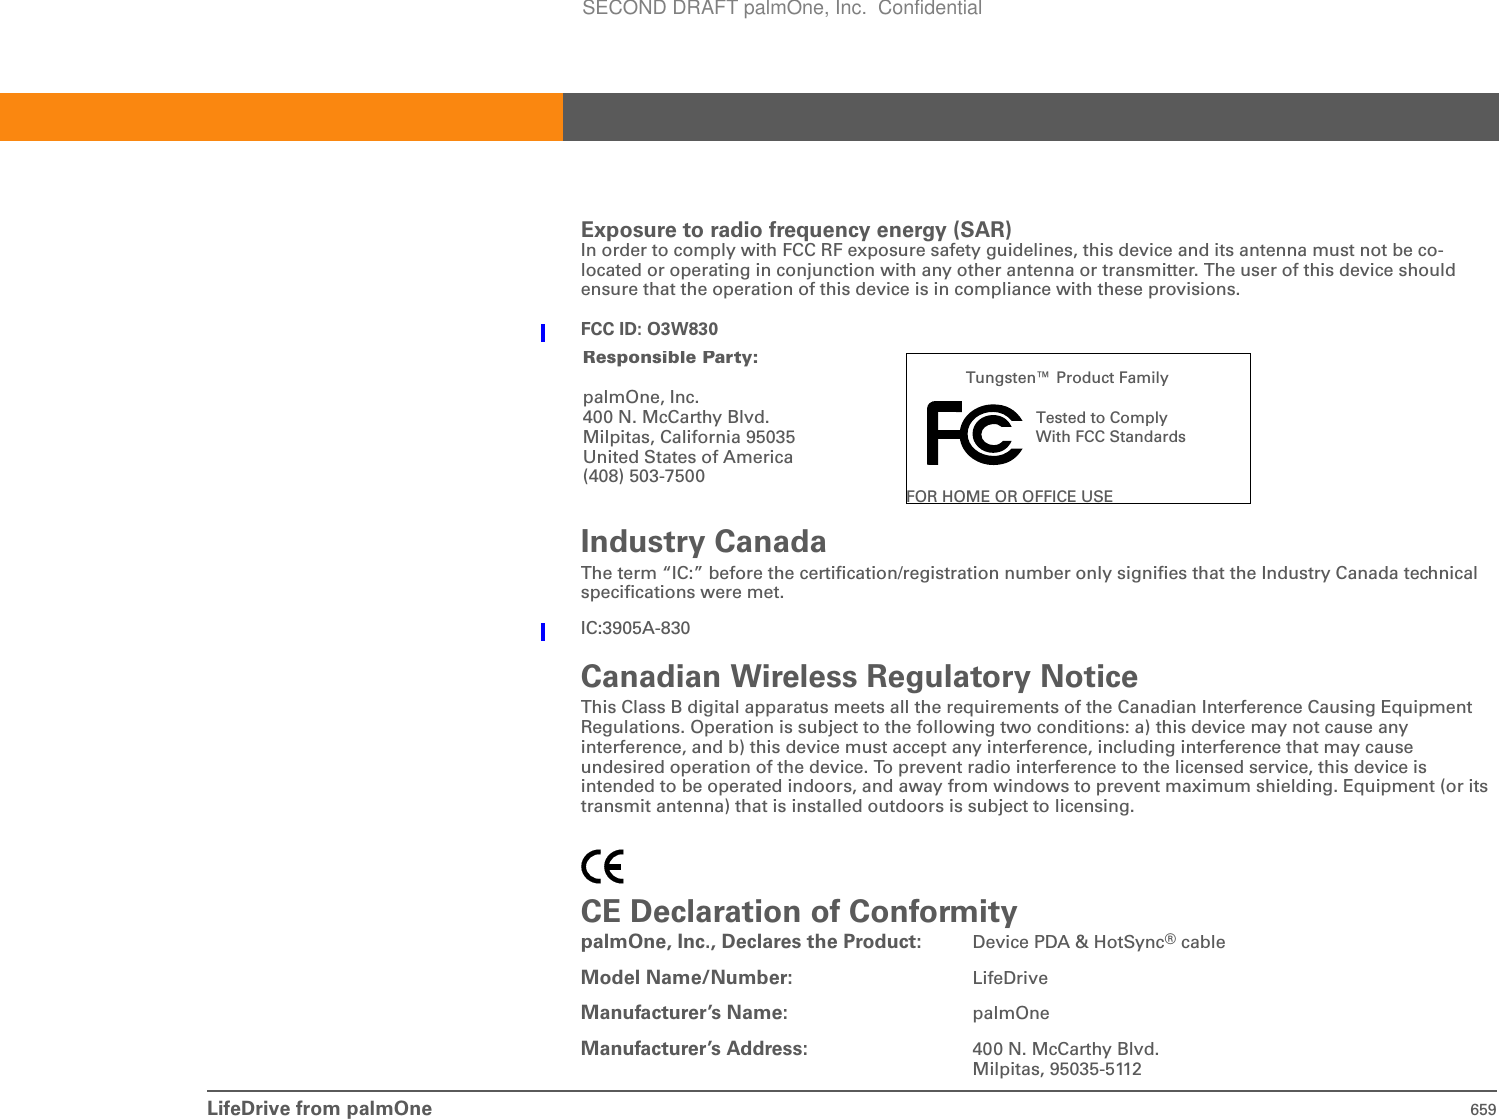
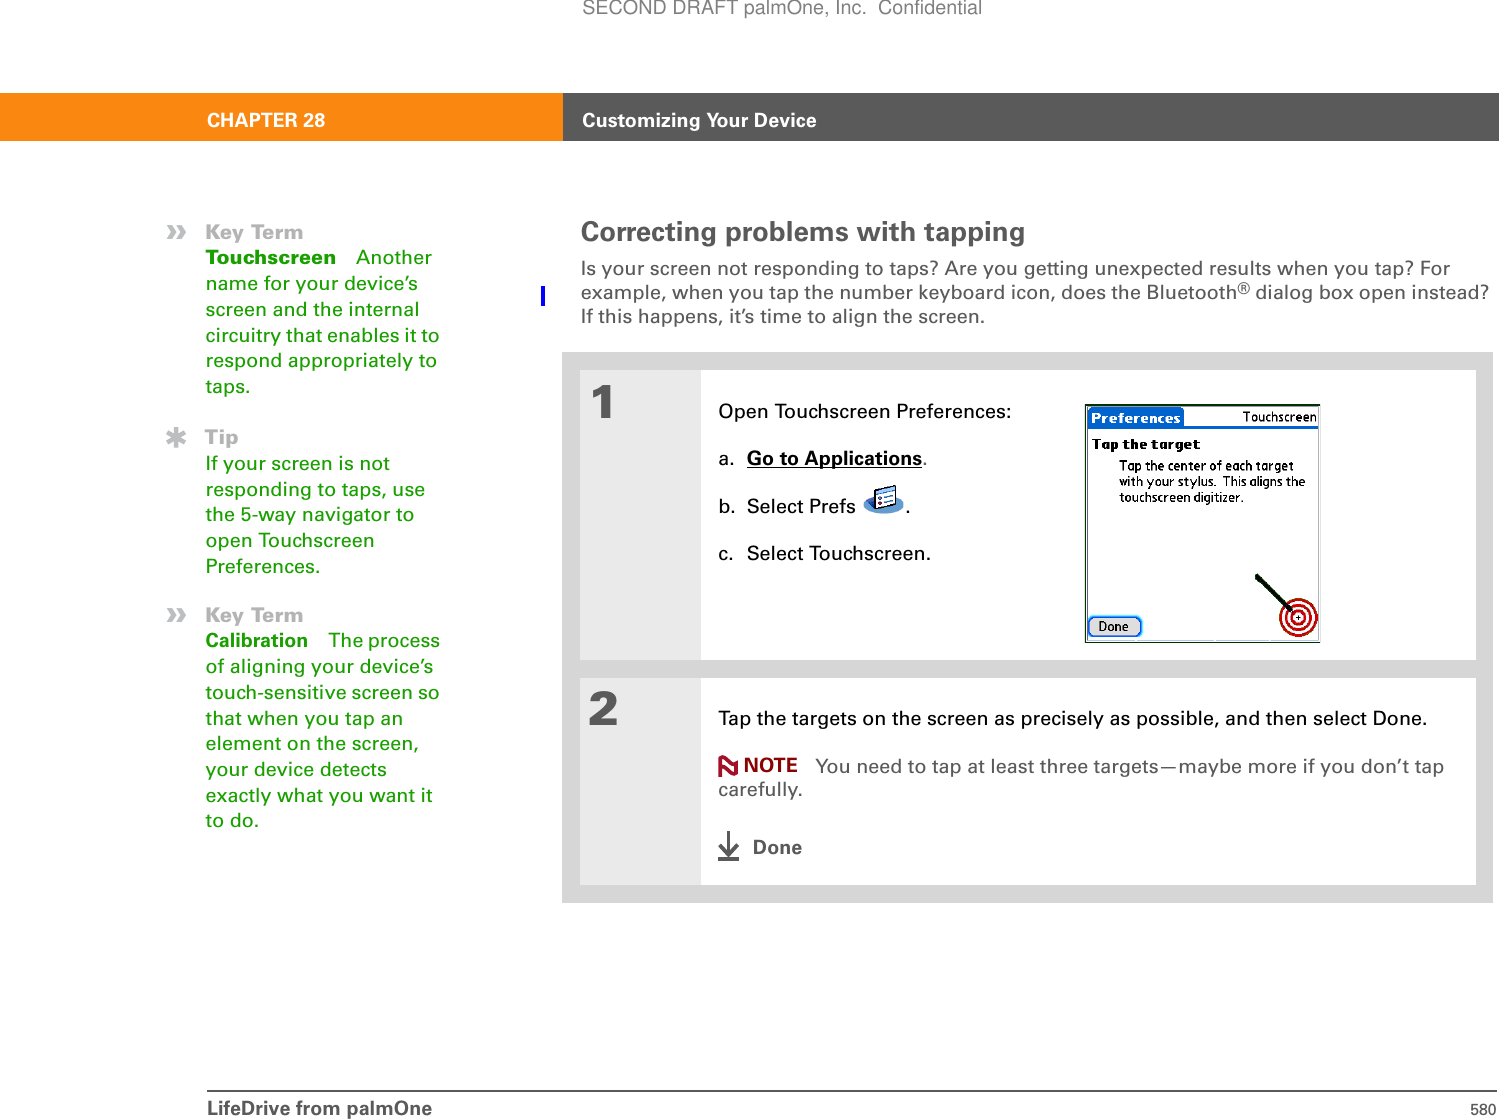
![LifeDrive from palmOne 658Product Regulatory InformationFCC StatementThis device complies with part 15 of the FCC rules. Operation is subject to the following two conditions: (1) This device may not cause harmful interference, and (2) this device must accept any interference received, including interference that may cause undesired operation.This equipment has been tested and found to comply with the limits for a Class B digital device, pursuant to Part 15 of the FCC rules. These limits are designed to provide reasonable protection against harmful interference in a residential installation. This equipment generates, uses, and can radiate radio frequency energy and, if not installed and used in accordance with the instructions, may cause harmful interference to radio communications. However, there is no guarantee that interference will not occur in a particular installation. If this equipment does cause harmful interference to radio or television reception, which can be determined by turning the equipment off and on, the user is encouraged to try to correct the interference by one or more of the following measures:• Reorient or relocate the receiving antenna.• Increase the separation between the equipment and receiver.• Connect the equipment into an outlet on a circuit different from that to which the receiver is connected.• Consult the dealer or an experienced radio/TV technician for help.The use of shielded I/O cables is required when connecting this equipment to any and all optional peripheral or host devices. Failure to do so may violate FCC rules.Changes or modifications not covered in this manual must be approved in writing by the manufacturer’s Regulatory Engineering Department. Changes or modifications made without written approval may void the user’s authority to operate this equipment.In August 1996, the FCC of the United States with its action in Report and Order FCC 96-326 adopted an updated safety standard for human exposure to radio frequency electromagnetic energy emitted by FCC regulated transmitters. Those guidelines are consistent with the safety standard previously set by both U.S. and international standards bodies. The design of this product complies with the FCC guidelines and these international standards.IMPORTANT[!]SECOND DRAFT palmOne, Inc. Confidential](https://usermanual.wiki/Palm/830.User-Manual-2-of-2/User-Guide-543160-Page-281.png)