Palm AOKI Wireless PDA User Manual Devon Getting Started Guide
Palm Inc Wireless PDA Devon Getting Started Guide
UserManual.wiki
>
Palm
>
AOKI User Manual
>
Users Manual Original
Contents
1.
Users Manual Original
2.
Updated Regulatory Information
Users Manual Original
Navigation menu
Upload a User Manual
Namespaces
Wiki Guide
HTML
PDF
Info
Views
User Manual
Discussion / Help
Navigation

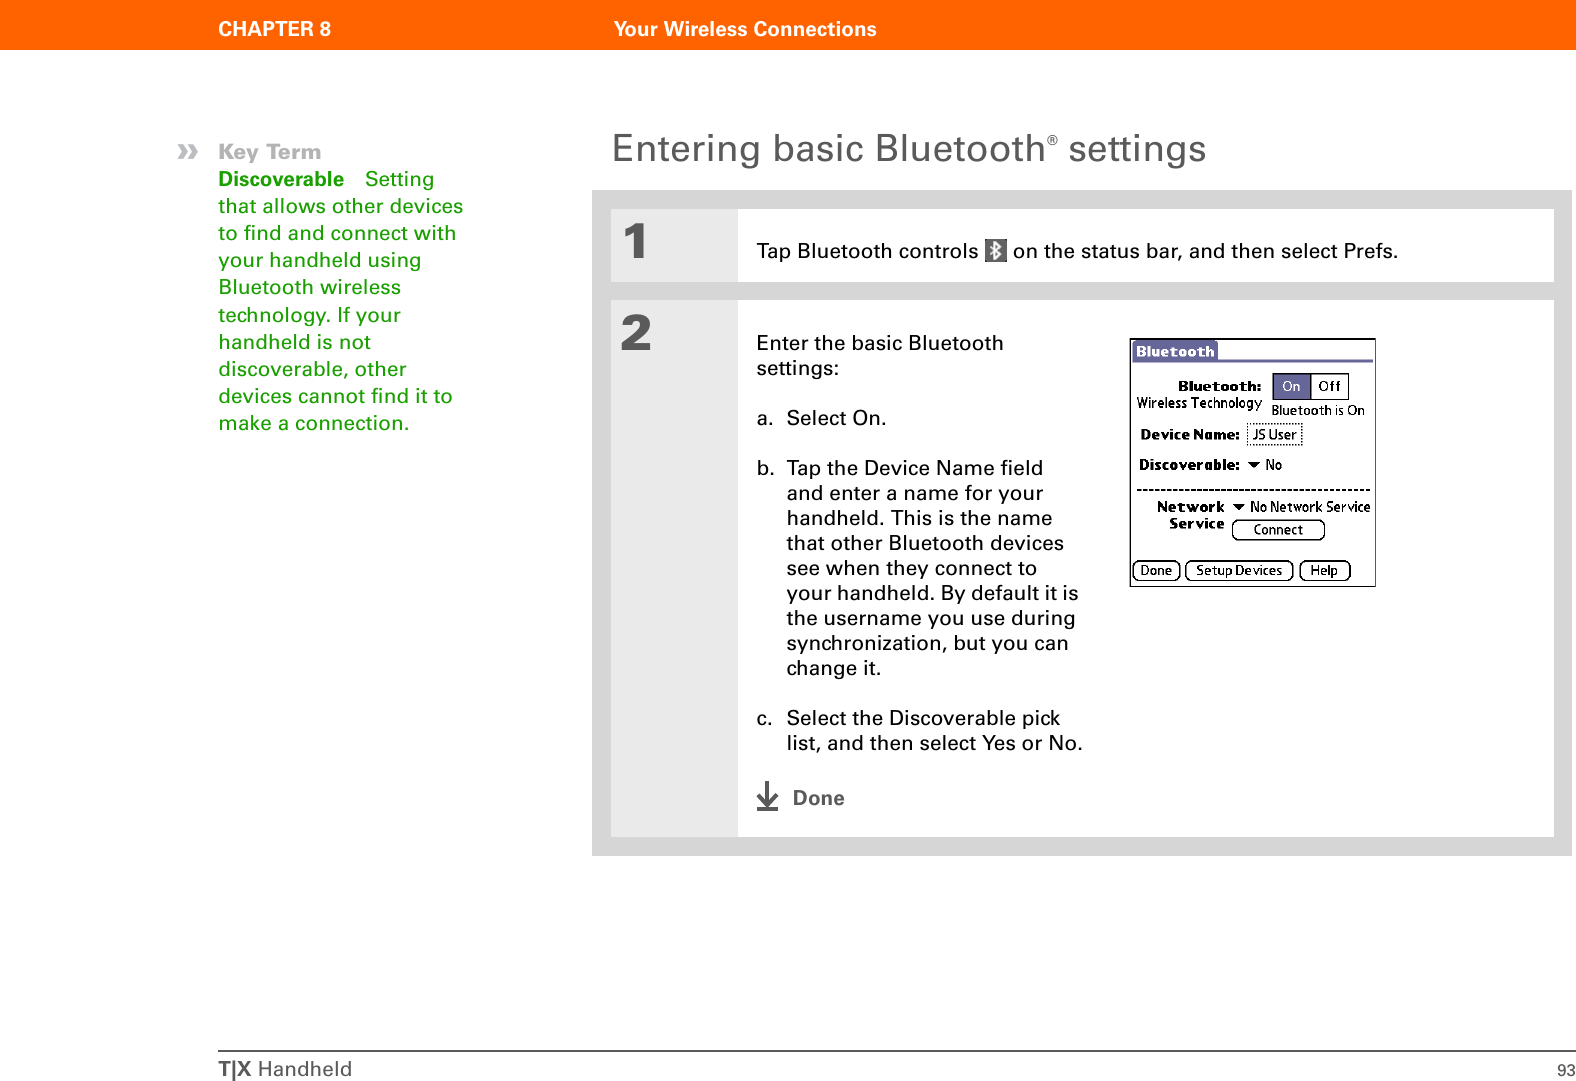
![T|X Handheld iiCopyright and Trademark© 2005 Palm, Inc. All rights reserved. Palm, Addit, Blazer, Graffiti, HotSync, Palm Powered, Palm OS, the Palm logo, and VersaMail are among the trademarks or registered trademarks owned by or licensed to Palm, Inc. All other brand and product names are or may be trademarks of, and are used to identify products or services of, their respective owners.Wi-Fi is a registered certification mark of the Wi-Fi Alliance. This product contains ACCESS Co., Ltd.’s NetFront 3.0 Internet browser software. Copyright © 1996-2003 ACCESS Co., Ltd. and ACCESS Systems America, Inc. NetFront is the trademark or registered trademark of ACCESS Co., Ltd. in Japan and in other countries except the United States of America. NetFront is a registered trademark of NetFront Communications, Inc. in the United States of America and is used under a license. A portion of this software includes software modules developed by the Independent JPEG Group. RealNetworks is the owner of all right, title, and interest in the RealNetworks Marks and RealNetworks logos. No person or entity may reproduce or use (or authorize the reproduction or use of) the RealNetworks Marks or RealNetworks logos in any manner other than expressly authorized by RealNetworks. Unauthorized use of RealNetworks Marks or RealNetworks logos is strictly prohibited.Disclaimer and Limitation of LiabilityPalm, Inc. assumes no responsibility for any damage or loss resulting from the use of this guide.Palm, Inc. assumes no responsibility for any loss or claims by third parties which may arise through the use of this software. Palm, Inc. assumes no responsibility for any damage or loss caused by deletion of data as a result of malfunction, dead battery, or repairs. Be sure to make backup copies of all important data on other media to protect against data loss.Please read the End User Software License Agreement with this product before using the accompanying software program(s). Using any part of the software indicates that you accept the terms of the End User Software License Agreement.IMPORTANT[!]PN: 406-10454-00](https://usermanual.wiki/Palm/AOKI.Users-Manual-Original/User-Guide-591106-Page-2.png)
![T|X Handheld viiAbout This GuideThis guide tells you everything you need to know to start using your handheld— from the things you’ll do every day, to the things that make your handheld not only useful, but fun.Tips for viewing this guideHere are some helpful tips for making it easier to read and find information in this guide as you view it in Adobe® Reader®:• To magnify the page, click the magnifying glass , move the cursor (which is now a magnifying glass) over the page, and click repeatedly. Click Previous View ( or depending on your version of Reader) to return to the original view.• Click an entry in the Table of Contents or Index to go directly to that section of the guide.• If you click a link and go to a page in the guide, to return to the page you were on before you clicked the link, click Previous View ( or depending on your version of Reader).• When selecting the page(s) to print, be sure to use the file page number shown at the bottom of your computer screen, not the printed page number. For example, to print the first page of the Your Handheld chapter, select page 10 (the file page), not page 1 (the printed page).Before You Begin[!]Complete the steps in Read This First in your handheld package to set up your handheld and install the software on your computer and your handheld.](https://usermanual.wiki/Palm/AOKI.Users-Manual-Original/User-Guide-591106-Page-7.png)
![T|X Handheld viiiWhat’s in this guide?The info in this guide includes step-by-step instructions, links to cross-references, and sidebars.Step-by-step instructionsHere you’ll find how-to information. Look for these cues in instructions:LinksLinks appear as underlined words throughout this guide. Links in body text or sidebars take you to other sections of this guide or to the User Guide on the web. The In this chapter list on the first page of each chapter contains links that send you to a specific section.Cue that means the procedure continues on the next page.Cue that signals the end of the procedure. You’re done.A step that you must follow; otherwise, you could experience an error or even lose information.[ & ] OPTIONAL A step you might find useful.Information that applies only in certain cases or that tells more about a procedure step.WINDOWS ONLYMAC ONLYA procedure or text that applies to one platform only. In most cases, if you see one heading, check the following or preceding sections for the other. Sometimes there is no Mac counterpart for a Windows procedure or text; this feature is not available to Mac users.ContinuedDoneIMPORTANT[!]NOTE](https://usermanual.wiki/Palm/AOKI.Users-Manual-Original/User-Guide-591106-Page-8.png)
![T|X Handheld ixSidebarsBefore You Begin[!]Things you must complete before you can do the steps described in a procedure or group of procedures.TipA suggestion on how to use a feature more fully; a shortcut; a pointer to a related feature.Did You Know?An interesting fact about the topic being described; may include a link to more information.»Key TermA technical term related to the topic being described. The term may appear in this guide or only on your handheld.User GuideA pointer to the User Guide on the web where you can learn about more things you can do with an application or feature. Tips & TricksA pointer to a website where you can share info with other handheld users and learn the latest tips, tricks, and more.SupportA pointer to the web where you can find help if you experience problems with the features discussed in the chapter or with your handheld.TipTo access the User Guide, you need to be connected to the Internet.](https://usermanual.wiki/Palm/AOKI.Users-Manual-Original/User-Guide-591106-Page-9.png)
![T|X Handheld 20CHAPTER 1 Your HandheldEntering information using desktop software Use Palm Desktop or Microsoft Outlook (Windows only) to enter information on your computer in applications such as Calendar, Contacts, Tasks, and Memos. The info is transferred to the corresponding handheld application when you synchronize. Information entered in these applications on the handheld is likewise synchronized with the application in the desktop software.4[ & ] OPTIONAL Select from among four separate keyboards.DoneTipIf you have a lot of information to enter, a portable wireless keyboard accessory makes data entry fast and easy. Visit www.palm.com/myTX and click the Accessories link.BackspaceEnterTabCaps shiftTap here to display lowercase keyboard Tap here to display uppercase keyboard Tap here to display international keyboard abc - lowercaseABC - uppercase int. - international123 - numericTap here to display numeric keyboard](https://usermanual.wiki/Palm/AOKI.Users-Manual-Original/User-Guide-591106-Page-29.png)
![T|X Handheld 26CHAPTER 1 Your HandheldDon’ts Do not open your handheld for any reason. There are no user-serviceable parts inside.• Do not drop, bang, or otherwise cause a strong impact to your handheld. • Do not carry your handheld in your back pocket; you might sit on it by mistake.• Do not let your handheld get wet; don’t leave it in a damp location.• Do not expose your handheld to very hot or cold temperatures, including placing it near a heater, leaving it in the trunk of a car, or setting it by a window in direct sunlight.• Do not carry or use your handheld at extremely high altitudes, unless you’re in an airplane.IMPORTANT[!]](https://usermanual.wiki/Palm/AOKI.Users-Manual-Original/User-Guide-591106-Page-35.png)

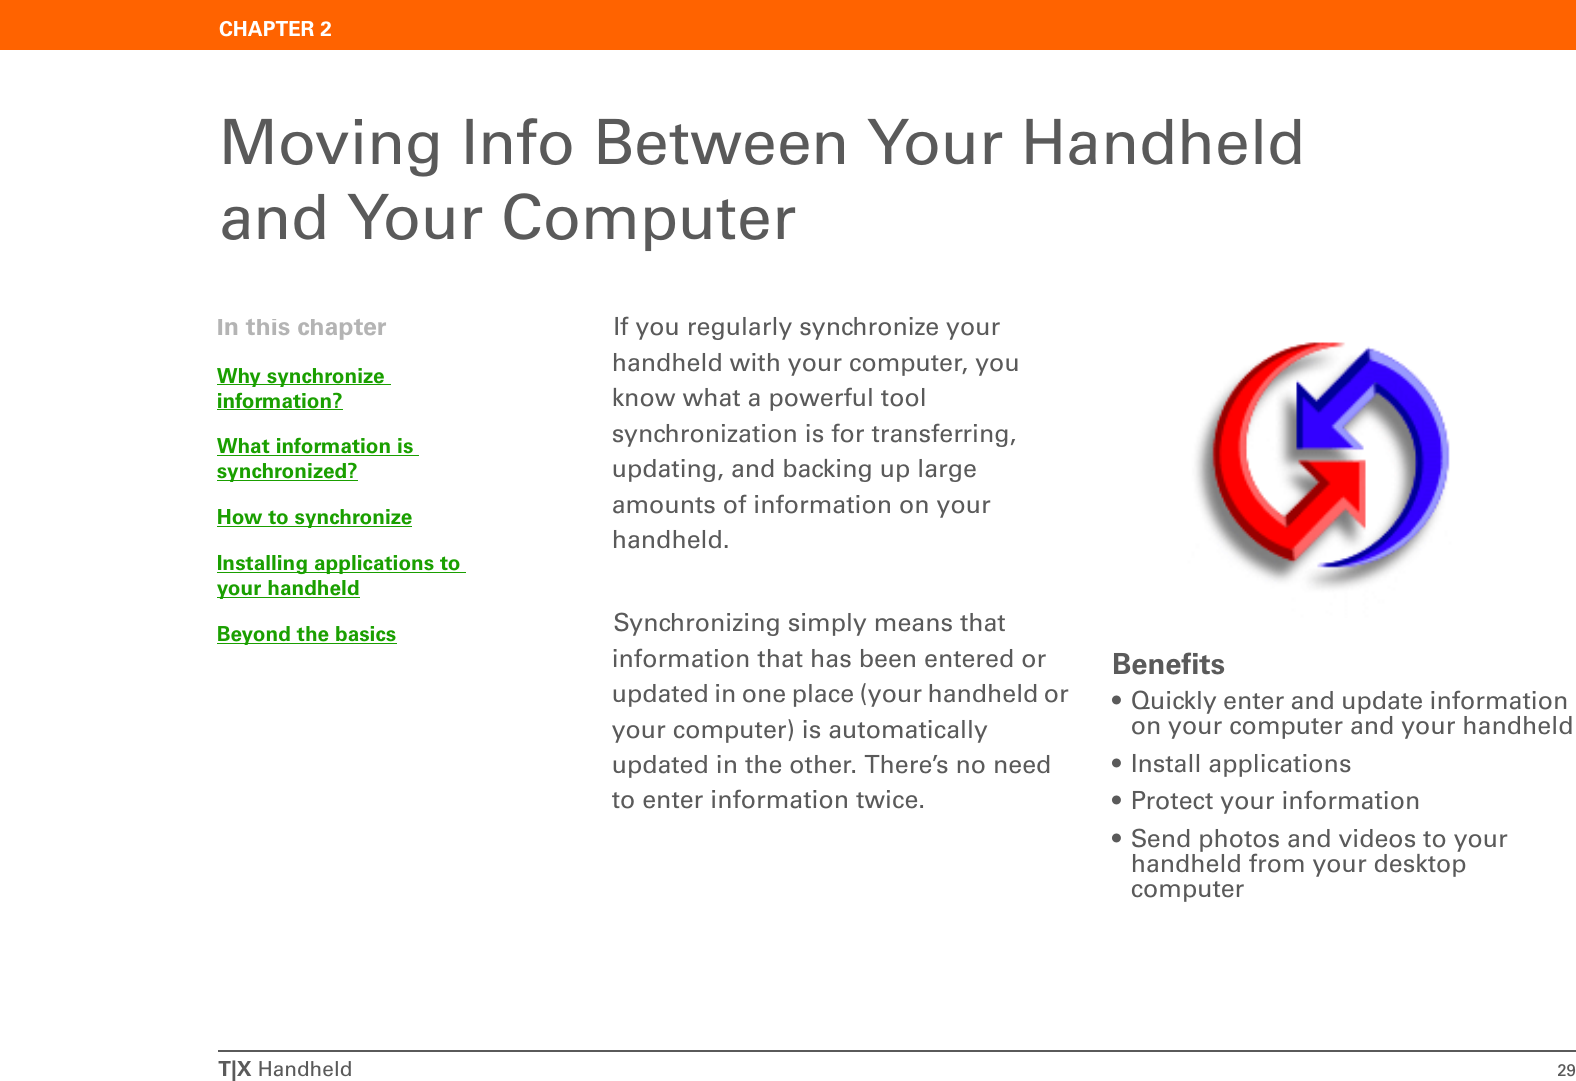
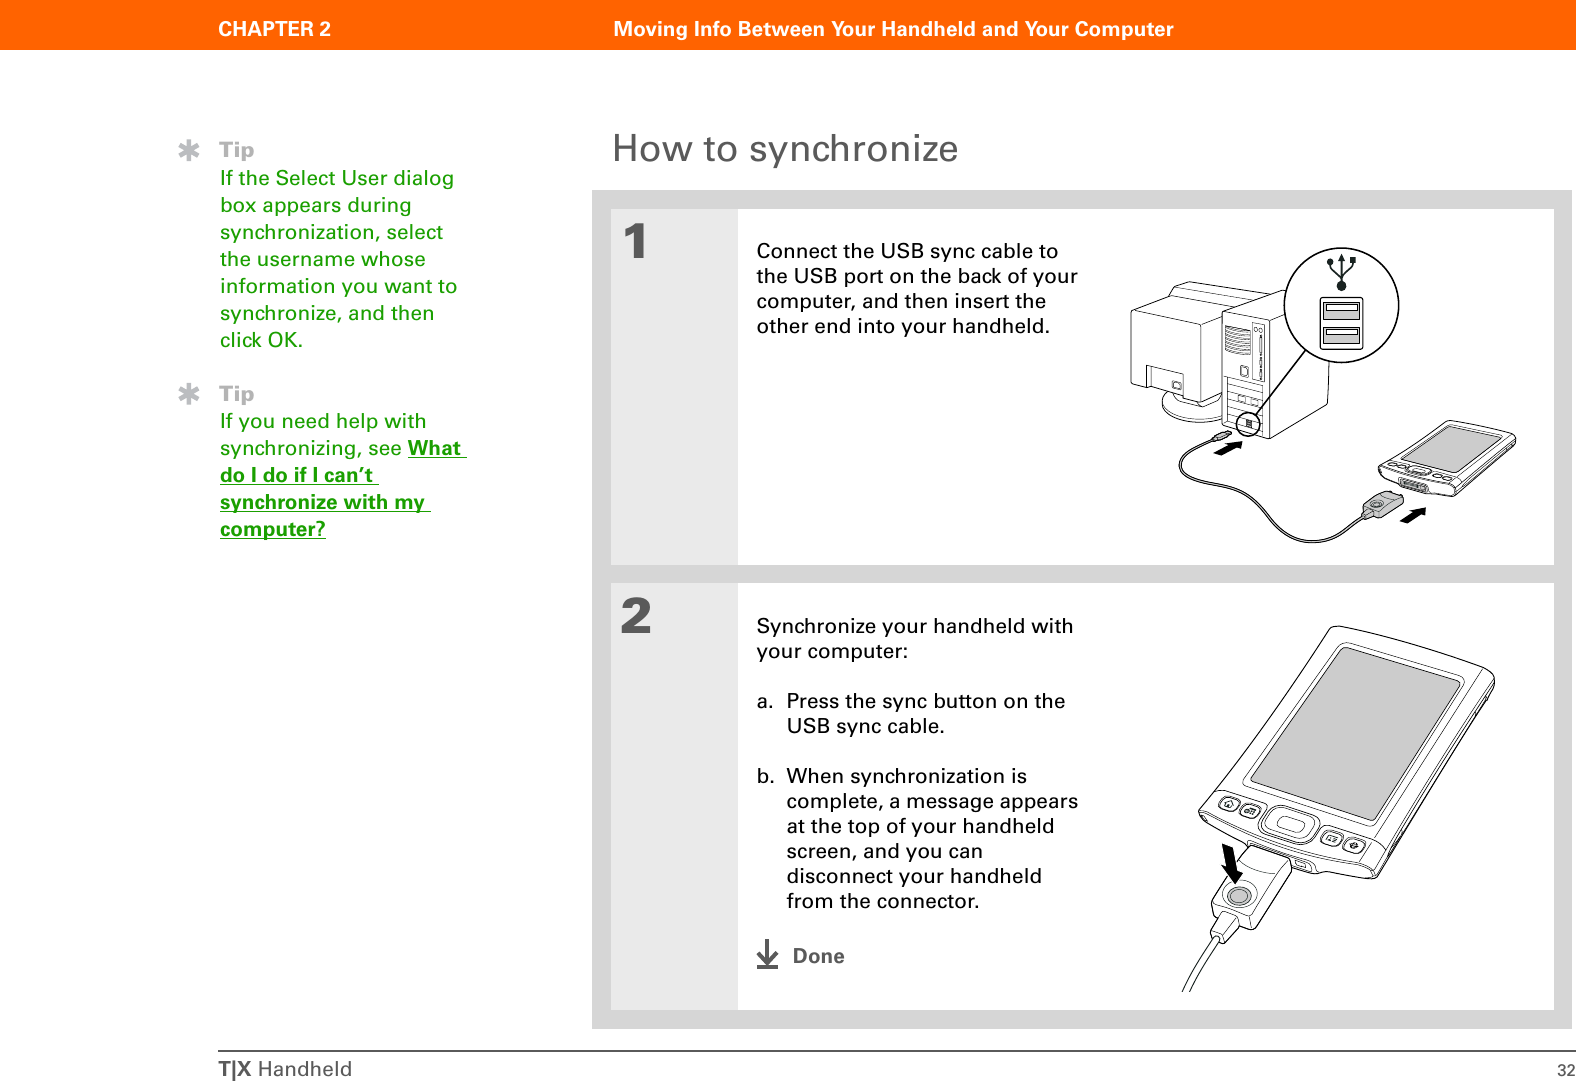
![CHAPTER 2 Moving Info Between Your Handheld and Your ComputerT|X Handheld 30Why synchronize information?Quickly enter and update information. Synchronizing updates and exchanges information between your handheld and Palm® Desktop software on your computer. For example, you can quickly enter a contact list on your computer and then send it to your handheld—no re-entering necessary! During CD installation, you can choose to synchronize your handheld with Microsoft Outlook on your computer (Windows only).Install applications. With just a few clicks, you can use Quick Install (Windows) or the Send To Handheld droplet (Mac) to install applications on your handheld or to copy certain types of files to your handheld.Protect your information. Nothing is worse than losing important information. When you synchronize information, you create a backup copy. If something happens to your handheld or your computer, the information is not lost; one tap restores it in both places. Be sure to synchronize information frequently so that you always have an up-to-date backup copy of important information.TipSynchronize Microsoft Word, PowerPoint, or Excel files from your computer and open them in the Documents application on your handheld to view and edit them at your convenience.NOTEIMPORTANT[!]](https://usermanual.wiki/Palm/AOKI.Users-Manual-Original/User-Guide-591106-Page-39.png)
![CHAPTER 2 Moving Info Between Your Handheld and Your ComputerT|X Handheld 31What information is synchronized?When you install Palm Desktop software from the software installation CD, a conduit is installed to your computer for each of the following applications. The conduits allow you to transfer information between the application on your handheld and the corresponding application in Palm Desktop software when you synchronize: Information from Expense and Media is synchronized on Windows computers only.During CD installation, you can choose to synchronize your handheld with Microsoft Outlook on your computer (Windows only). If you do, info from Contacts, Calendar, Tasks, and Memos is synchronized with info in the same application in Outlook (Memos is called Notes in Outlook). Information for Expense, Note Pad, and Media is still synchronized with the same application in Palm Desktop software. You can insert the CD at any time to choose synchronization with Outlook if you did not do so during the initial installation. You can also set up the VersaMail® application to synchronize with Outlook.You can synchronize more than one handheld with your computer. For example, family members can all synchronize their handhelds with the same copy of Palm Desktop software. Just make sure that each handheld has its own username; the desktop software reads the username and recognizes the handheld during synchronization. Loss of info may occur from sharing the same username. Before You Begin[!]Complete the following:• Perform initial handheld setup.• Install Palm Desktop software and additional software from the CD.For setup and installation procedures, see Read This First included in your handheld package.»Key TermConduit The synchronization software that links an application on your computer with the same application on your handheld.TipYou can synchronize your handheld with your computer wirelessly using the built-in Wi-Fi® or Bluetooth® technology on your handheld.NOTENOTE](https://usermanual.wiki/Palm/AOKI.Users-Manual-Original/User-Guide-591106-Page-40.png)
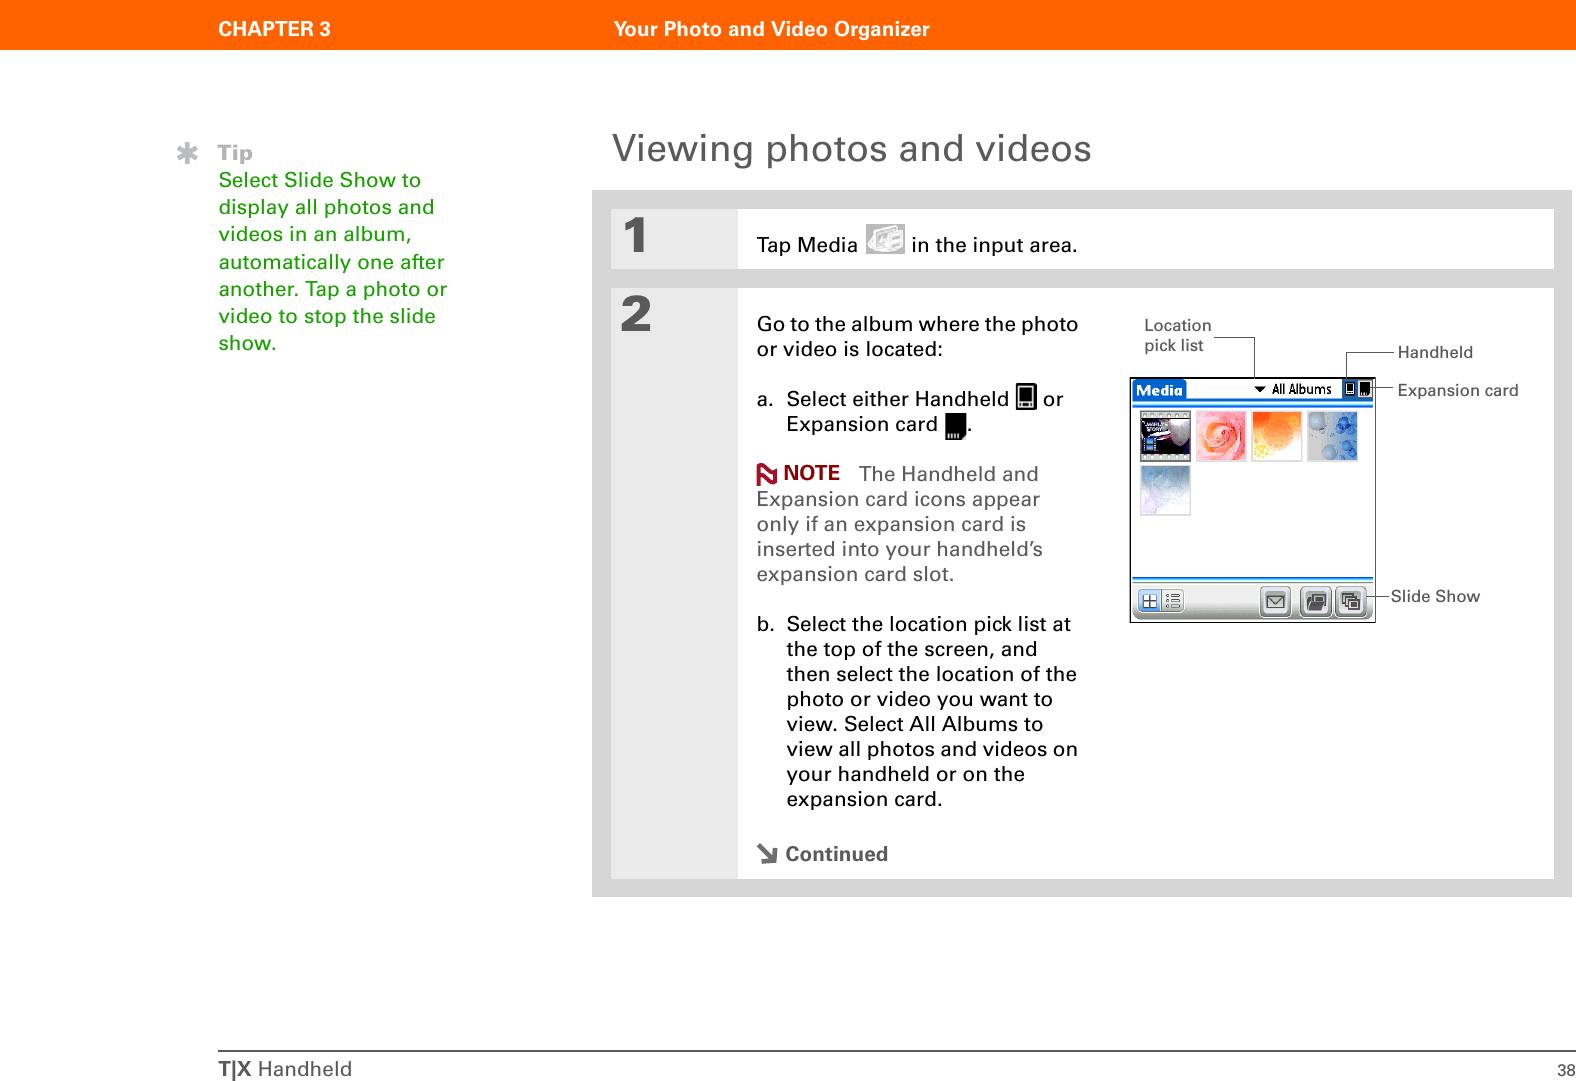
![T|X Handheld 37CHAPTER 3 Your Photo and Video OrganizerCopying photos and videosYou can copy photos and videos to your handheld in the following ways:• On a Windows computer, open the Media application from within Palm® Desktop software, drag the photos or videos into the Media window, and then synchronize.• On a Mac computer, drag the photos or videos onto the Send To Handheld droplet icon, and then synchronize.On a Windows computer, when you copy a photo in a popular format—such as JPG, BMP, TIFF (uncompressed), and GIF—to your handheld, the photo is saved on your handheld in its original format. If you copy a photo in a different format, it is saved on your handheld in JPG format.On a Mac computer, all photos you copy using the Send To Handheld droplet icon are saved on your handheld in JPG format.When you copy a video from your Windows or Mac computer, the video is converted to a format your handheld can play and is optimized for viewing on the handheld. Note, however, that there are numerous video formats, and not all types can be converted to a format that’s viewable on your handheld. To test a video on your Windows computer, try to open and view the video in the desktop Media application; if you can’t view the video on your computer, you won’t be able to view the video on your handheld.Before You Begin[!]You must synchronize your handheld with your computer once before you can copy photos and videos to your handheld.TipYou can also copy photos and videos to an expansion card, and then view them by inserting the card into your handheld’s expansion card slot.](https://usermanual.wiki/Palm/AOKI.Users-Manual-Original/User-Guide-591106-Page-46.png)
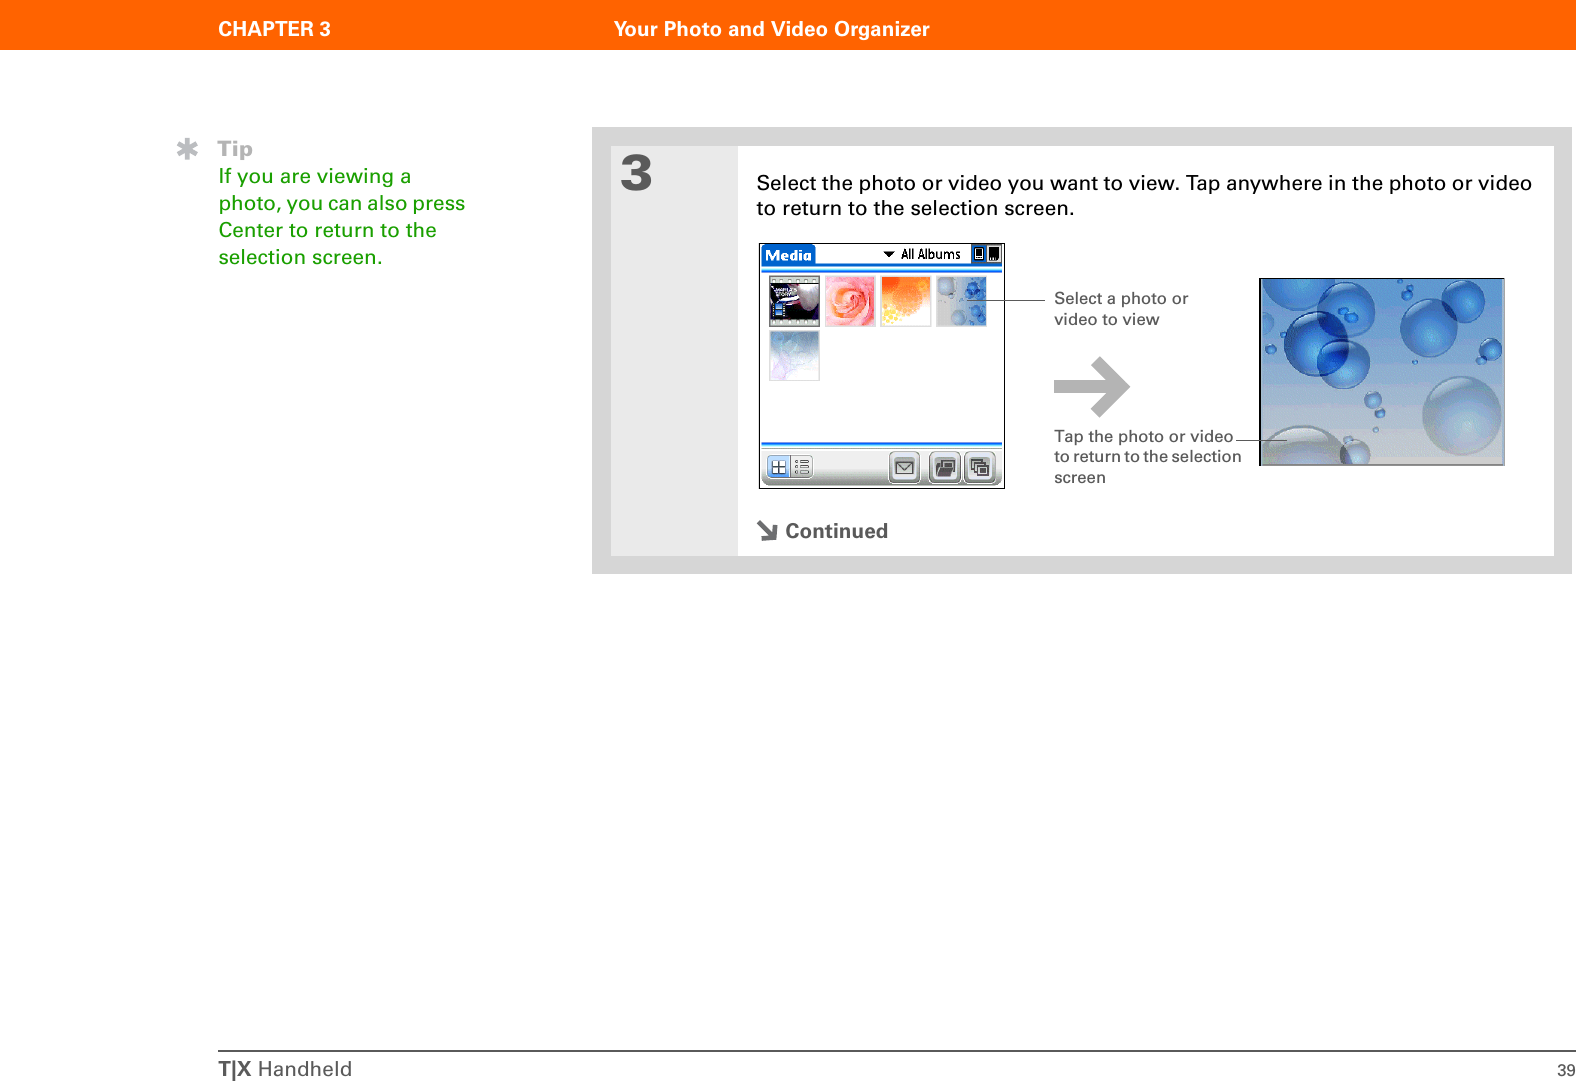
![T|X Handheld 40CHAPTER 3 Your Photo and Video Organizer4[ & ] OPTIONAL Access controls:• For photos, press Up on the 5-way navigator to zoom in. Press Down to access the photo controls.• For videos, press Center to access video controls.DoneTipIf a video appears cropped in portrait view, tap the video to return to the selection screen, rotate the screen to landscape view, and then select the video again to get a full-screen view.Did You Know?The input area is automatically hidden when you view a video.Photo Video VolumePlay or PauseRotateSendProgress indicatorFull-screen viewSend](https://usermanual.wiki/Palm/AOKI.Users-Manual-Original/User-Guide-591106-Page-49.png)
![T|X Handheld 44CHAPTER 3 Your Photo and Video OrganizerSending a photo or video using Bluetooth® wireless technologyYou can easily share photos with family and friends. Use your handheld’s built-in Bluetooth wireless technology to send photos and videos to other wireless devices within range. Sending a file using wireless technology can take some time, so be patient.01Tap Media in the input area.2Send a photo or video:a. Select the pick list at the top of the screen, and then select the album containing the photos and/or videos you want to send.b. Highlight the photo or video you want to send.c. Select Send .d. Select Bluetooth, and then select OK.e. Select the device to which you want to send the photo or video, and then select OK. The file is sent automatically.DoneBefore You Begin[!]Set up a Bluetooth® connection on your handheld.Did You Know?There are other ways to send photos and videos wirelessly. Attach the items to an email message. Beam the items to other Palm Powered™ devices. Copy the items to an expansion card and then insert the card into another device.TipTo send a photo to a device with which you have formed a partnership, select the Show pick list and then select Trusted devices on the Discovery Results screen.](https://usermanual.wiki/Palm/AOKI.Users-Manual-Original/User-Guide-591106-Page-53.png)
 Do the following:• Install Windows Media Player on your computer. Insert the software installation CD and select the Windows Media Player link to download and install the software.• After you install the software, synchronize your handheld with your computer so that Windows Media Player can recognize your handheld.NOTE](https://usermanual.wiki/Palm/AOKI.Users-Manual-Original/User-Guide-591106-Page-56.png)
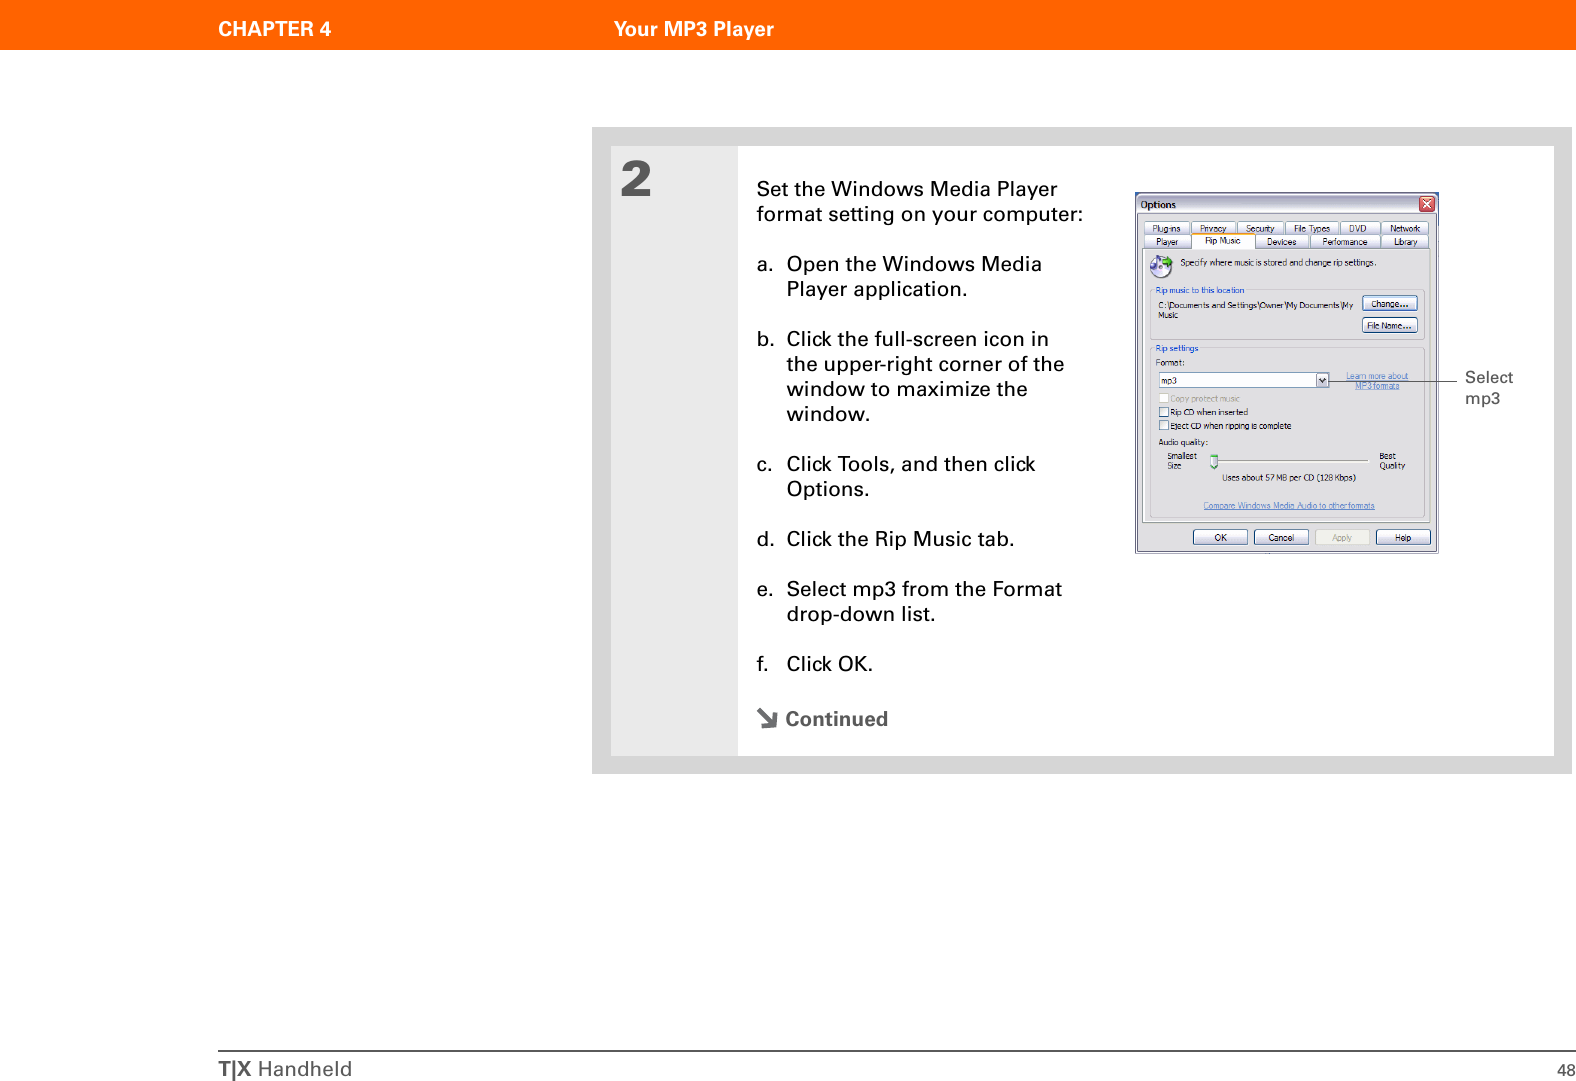
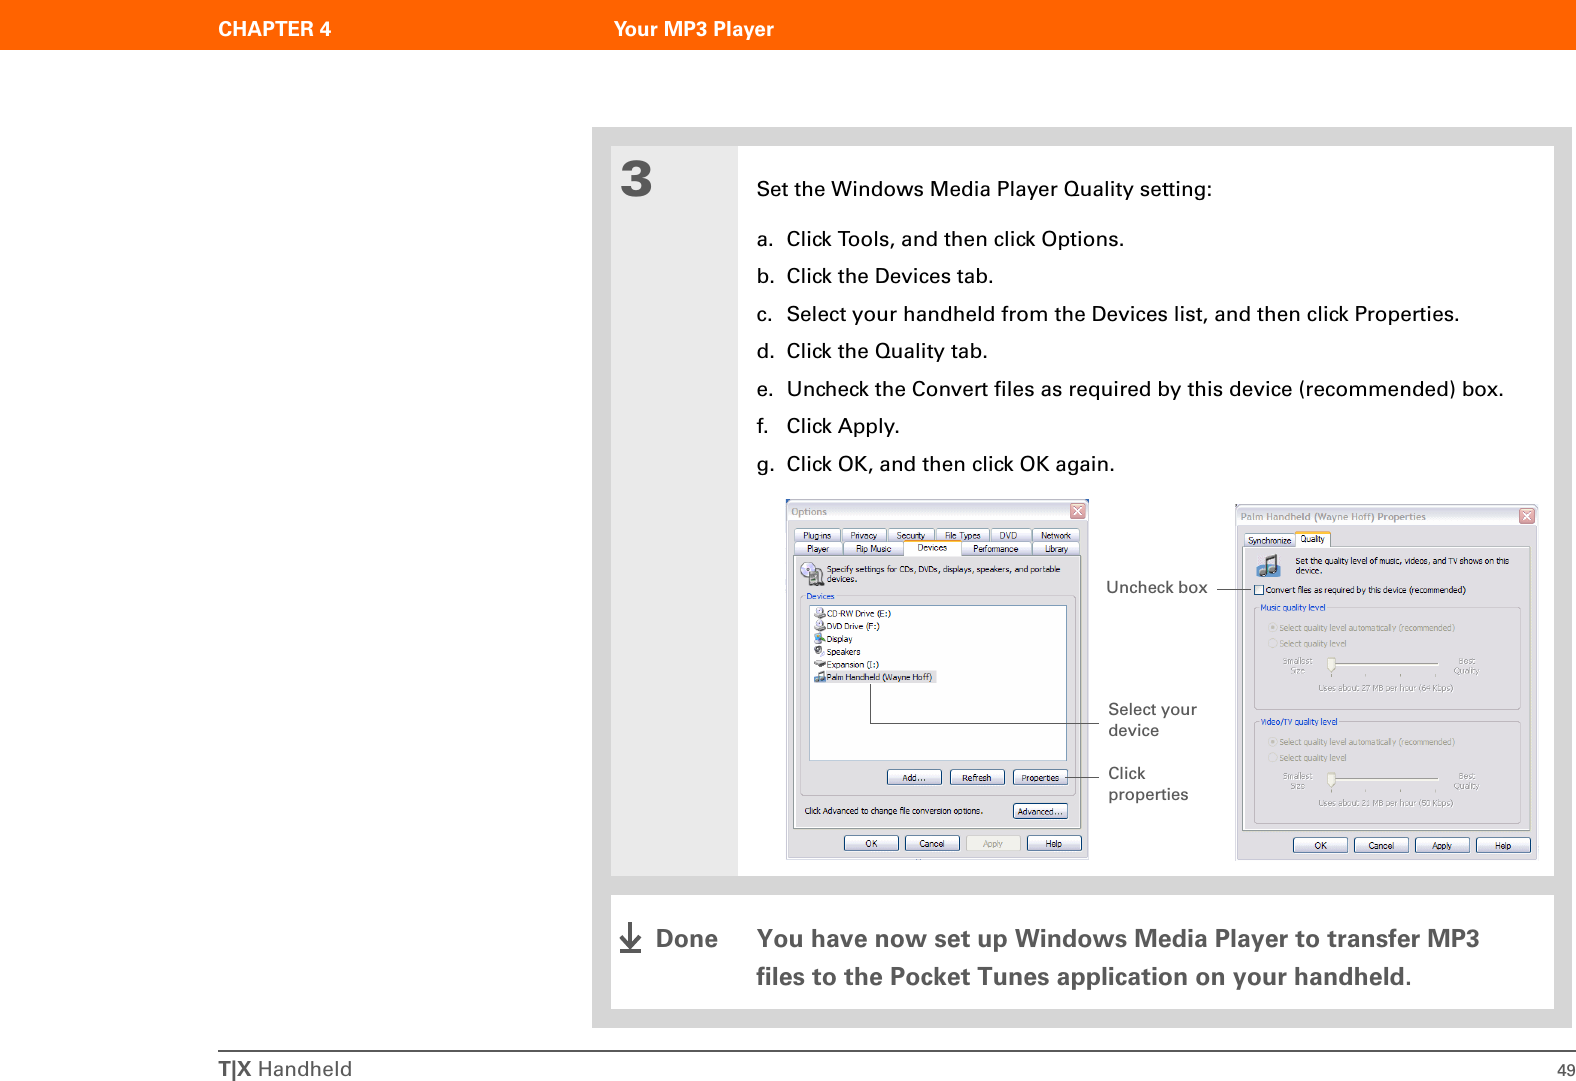
 You must set up Windows Media Player to transfer MP3 files.](https://usermanual.wiki/Palm/AOKI.Users-Manual-Original/User-Guide-591106-Page-60.png)
![T|X Handheld 52CHAPTER 4 Your MP3 Player02Select your device:a. Open Windows Media Player on your computer.b. Select the Sync tab.c. Select Palm Handheld from the device drop-down list.3Select Start Sync. The files are transferred to your handheld.Do not press the sync button on your cable. Windows Media Player is transferring the files, so there’s no need to do anythingDoneSelect Palm HandheldStart SyncTipYou can also use a card reader accessory (sold separately) to transfer MP3 files from your computer to your handheld.TipIf Palm Handheld does not appear in the drop-down list in step 2, close Windows Media Player, install the Pocket Tunes plug-in from the CD, and then open Windows Media Player again.IMPORTANT[!]](https://usermanual.wiki/Palm/AOKI.Users-Manual-Original/User-Guide-591106-Page-61.png)
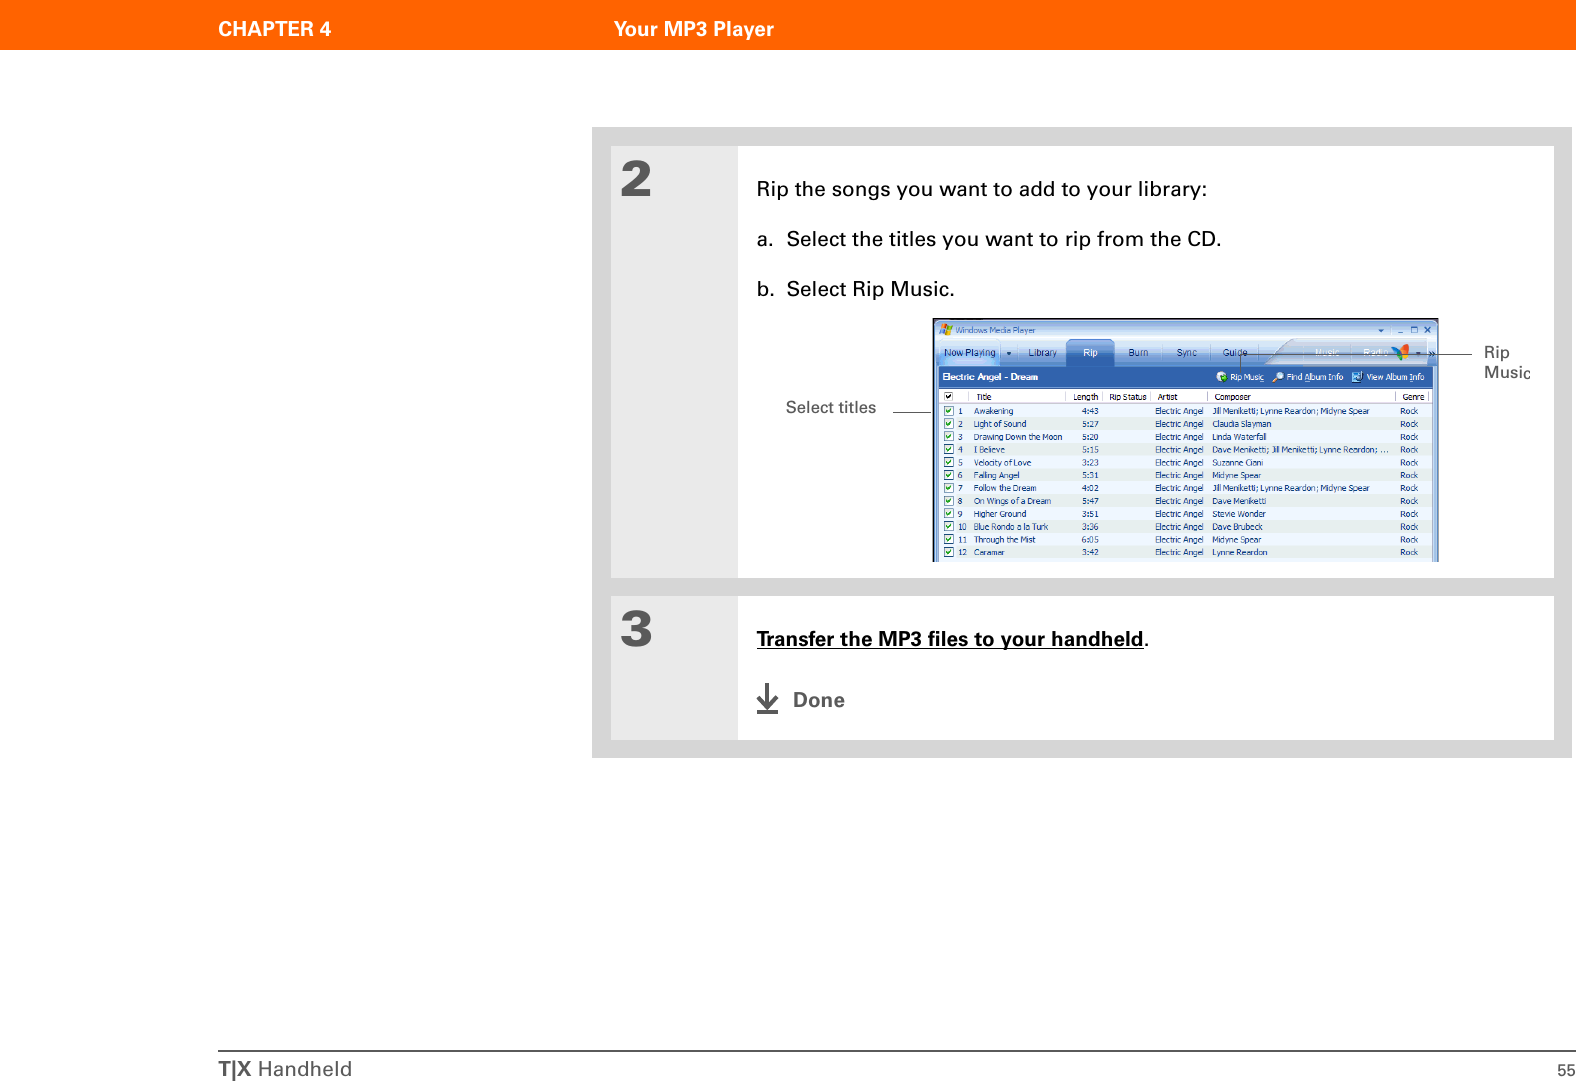
 You must set up Windows Media Player to transfer MP3 files.Did You Know?An interactive tutorial on the software installation CD guides you through adding music. Insert the CD, go to the My Music section of the tutorial, and then select Add music from a CD.](https://usermanual.wiki/Palm/AOKI.Users-Manual-Original/User-Guide-591106-Page-63.png)


![T|X Handheld 64CHAPTER 6 Your Personal Information OrganizerManaging your contactsEnter and organize all of your contact information for easy access and sharing with others. Adding a contact01Press Contacts .2Add your contact information:a. Select New.b. Select each field in which you want to enter information, and enter it. Tap the scroll arrows to view more fields.ContinuedTipIf the first character you enter in the Last Name or Company field is an asterisk (*) or another symbol, that contact always appears at the top of the Contacts list. That’s useful for an entry like “If Found Call [your phone number].”Did You Know?You can also enter one or more contacts on your desktop computer, and then copy them to your handheld by synchronizing.](https://usermanual.wiki/Palm/AOKI.Users-Manual-Original/User-Guide-591106-Page-73.png)
![T|X Handheld 65CHAPTER 6 Your Personal Information Organizer3[ & ] OPTIONAL Add a photo:a. Select the Picture box.b. Select and add a photo from the Media application.4[ & ] OPTIONAL Add a birthday:a. Select the Birthday box.b. Select the birth year, month, and date.5After you finish entering all the information you want, select Done.That's it. Your handheld automatically saves the contact. Make sure you have a current backup. Synchronize often.Did You Know?If you want a reminder about a birthday, select the Reminder box, enter the number of days before the birthday that you want to see the reminder, and then select OK.TipBirthdays you enter in Contacts appear as untimed events in Calendar. If you update the birthday in Contacts, it is automatically updated in Calendar as well.Tap hereTap hereDone](https://usermanual.wiki/Palm/AOKI.Users-Manual-Original/User-Guide-591106-Page-74.png)
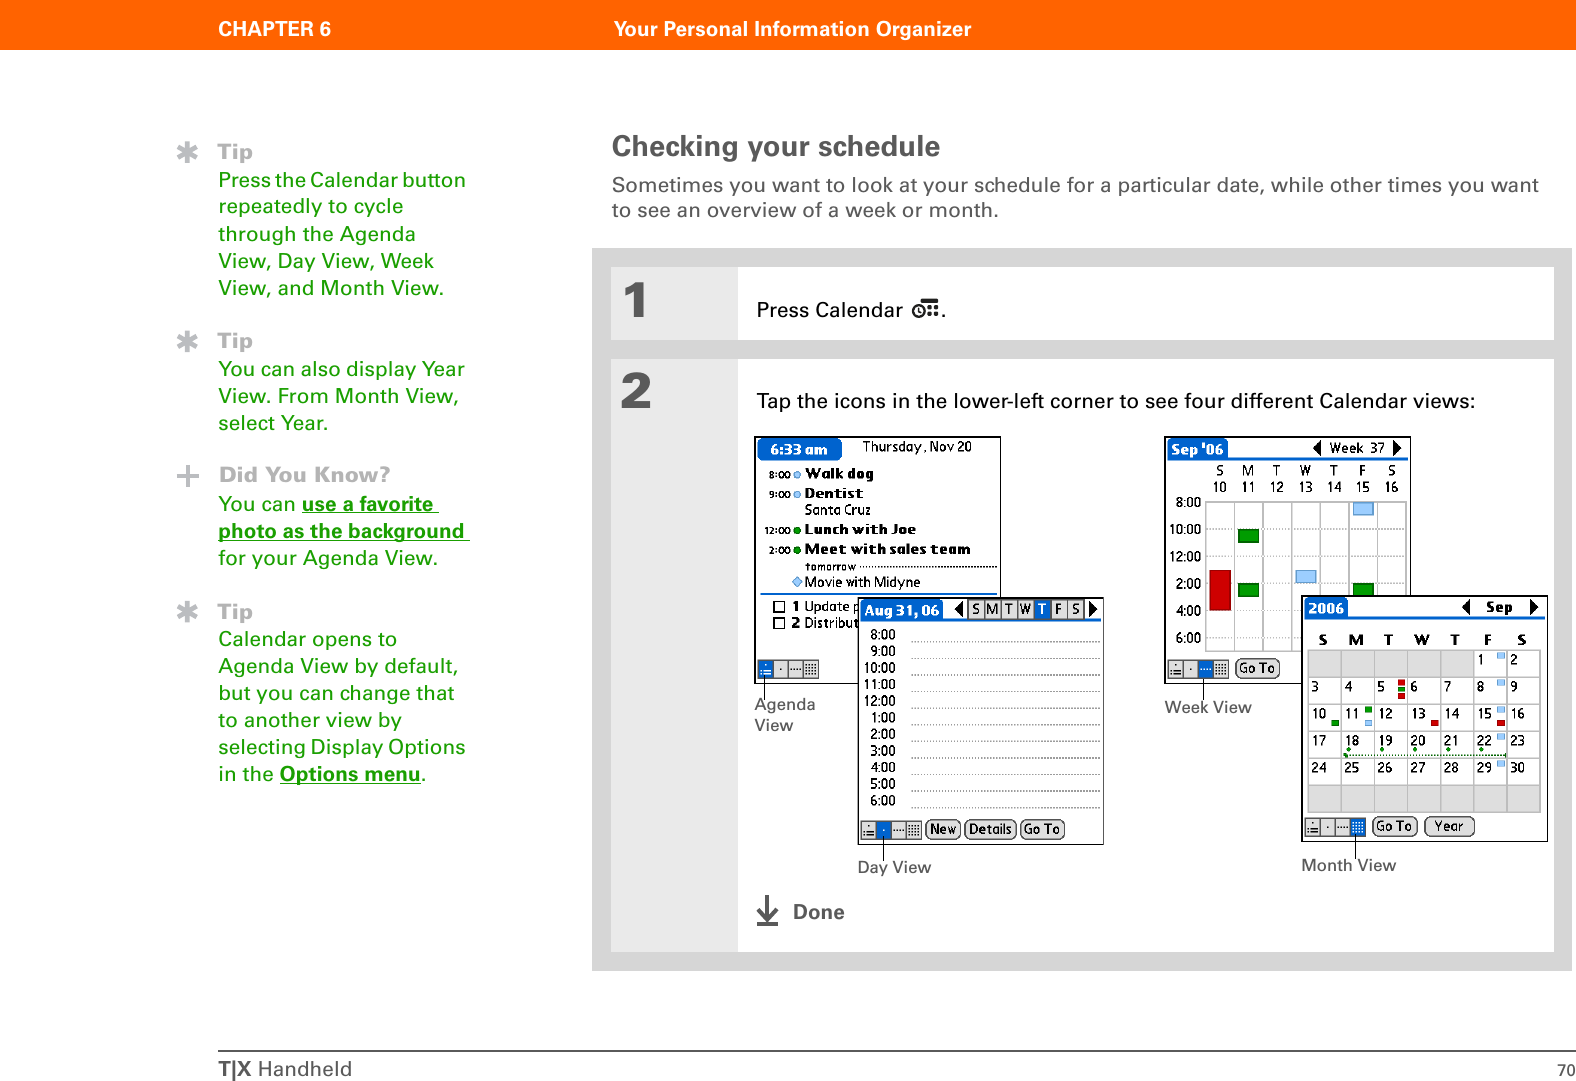
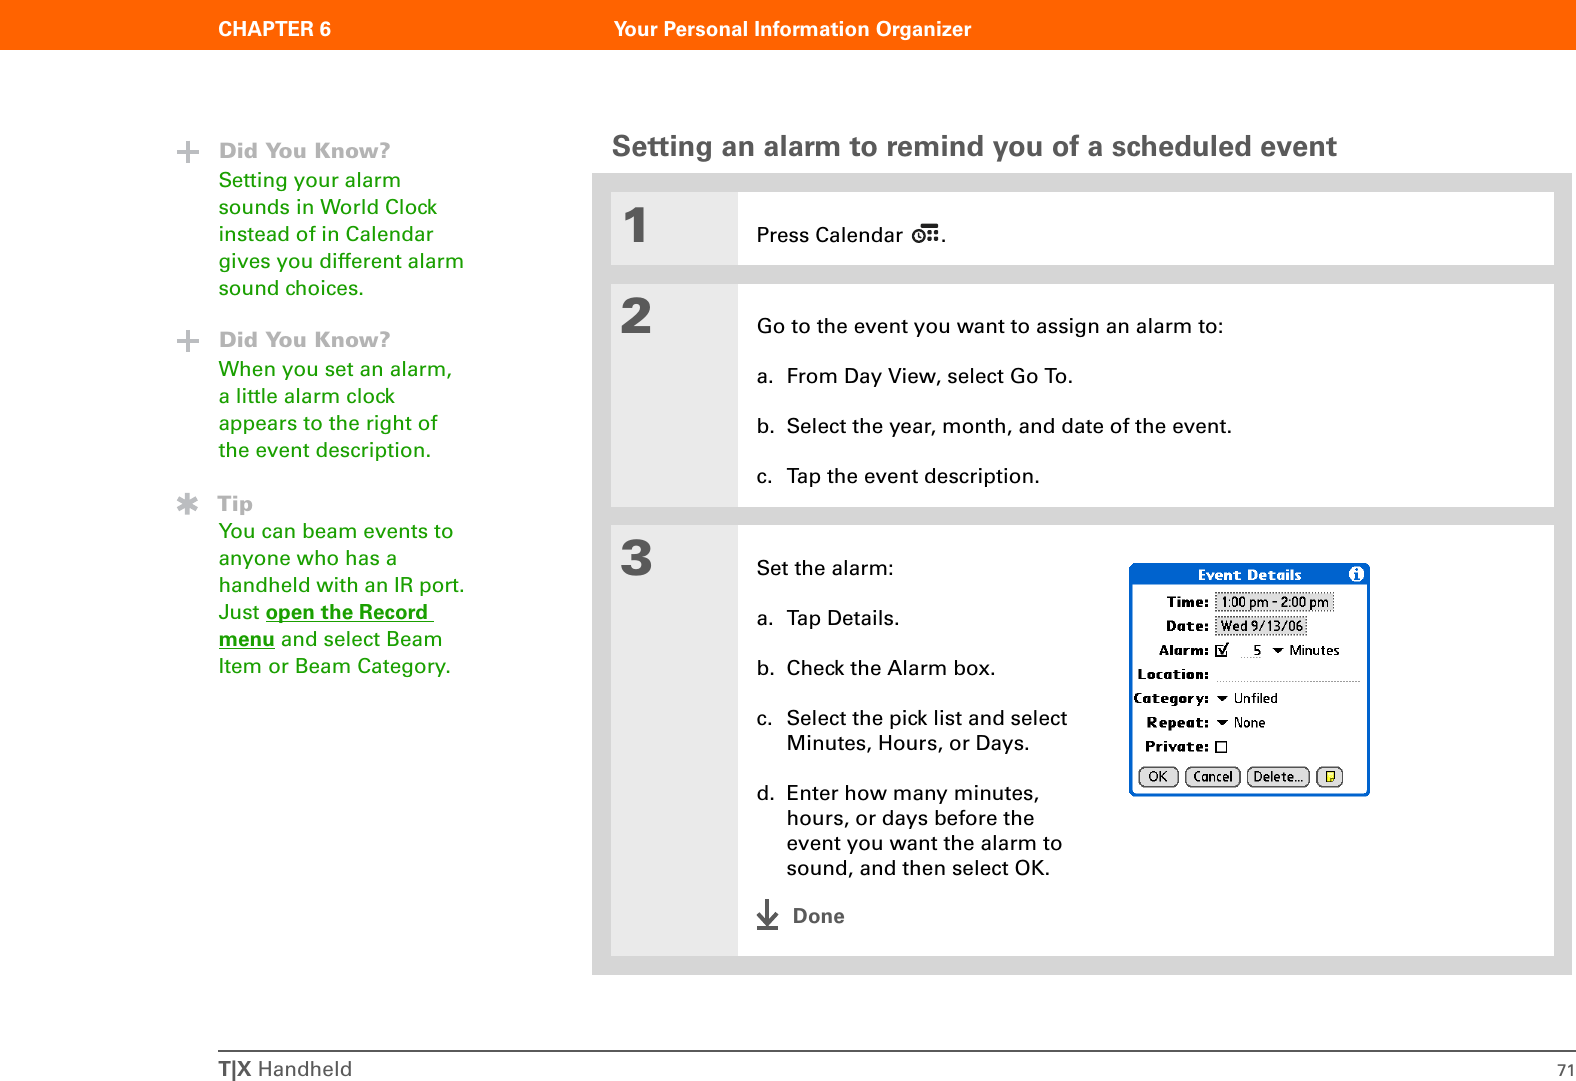
![T|X Handheld 68CHAPTER 6 Your Personal Information OrganizerManaging your calendarEnter appointments to help you organize your time, and then set alarms to remind you before the event so that you have time to prepare.Scheduling an appointment01Open Day View:a. Press Calendar .b. Tap the Day View icon 2[ & ] OPTIONAL If the appointment is not for today, select the date of the appointment:a. Select Go To.b. Select the year, month, and date.Continued»Key TermEvent The name for an entry in the Calendar application, including appointments, birthdays, reminders, recurring meetings, and so on.TipYou can also scroll to a date by pressing Left or Right on the 5-way navigator or by tapping the arrows at the top of the Day View.Did You Know?If you are synchronizing with Outlook, you can add time zones to your appointments to keep your calendar current no matter where you are traveling.Day View iconGo To](https://usermanual.wiki/Palm/AOKI.Users-Manual-Original/User-Guide-591106-Page-77.png)

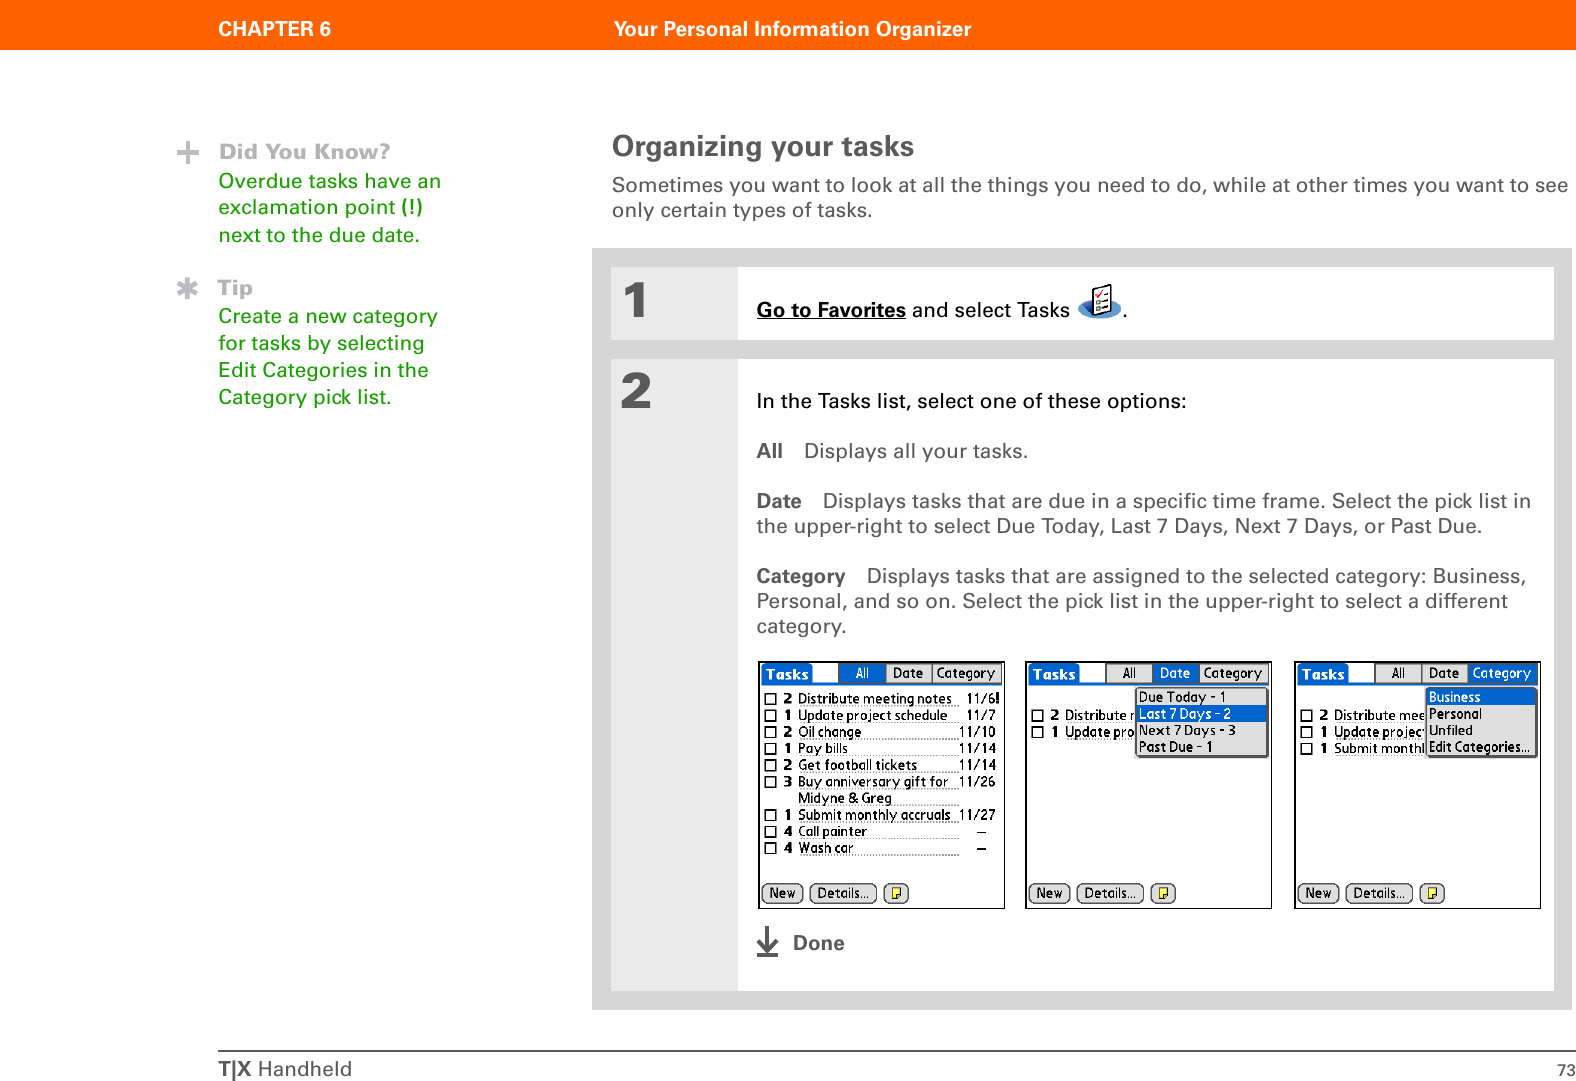
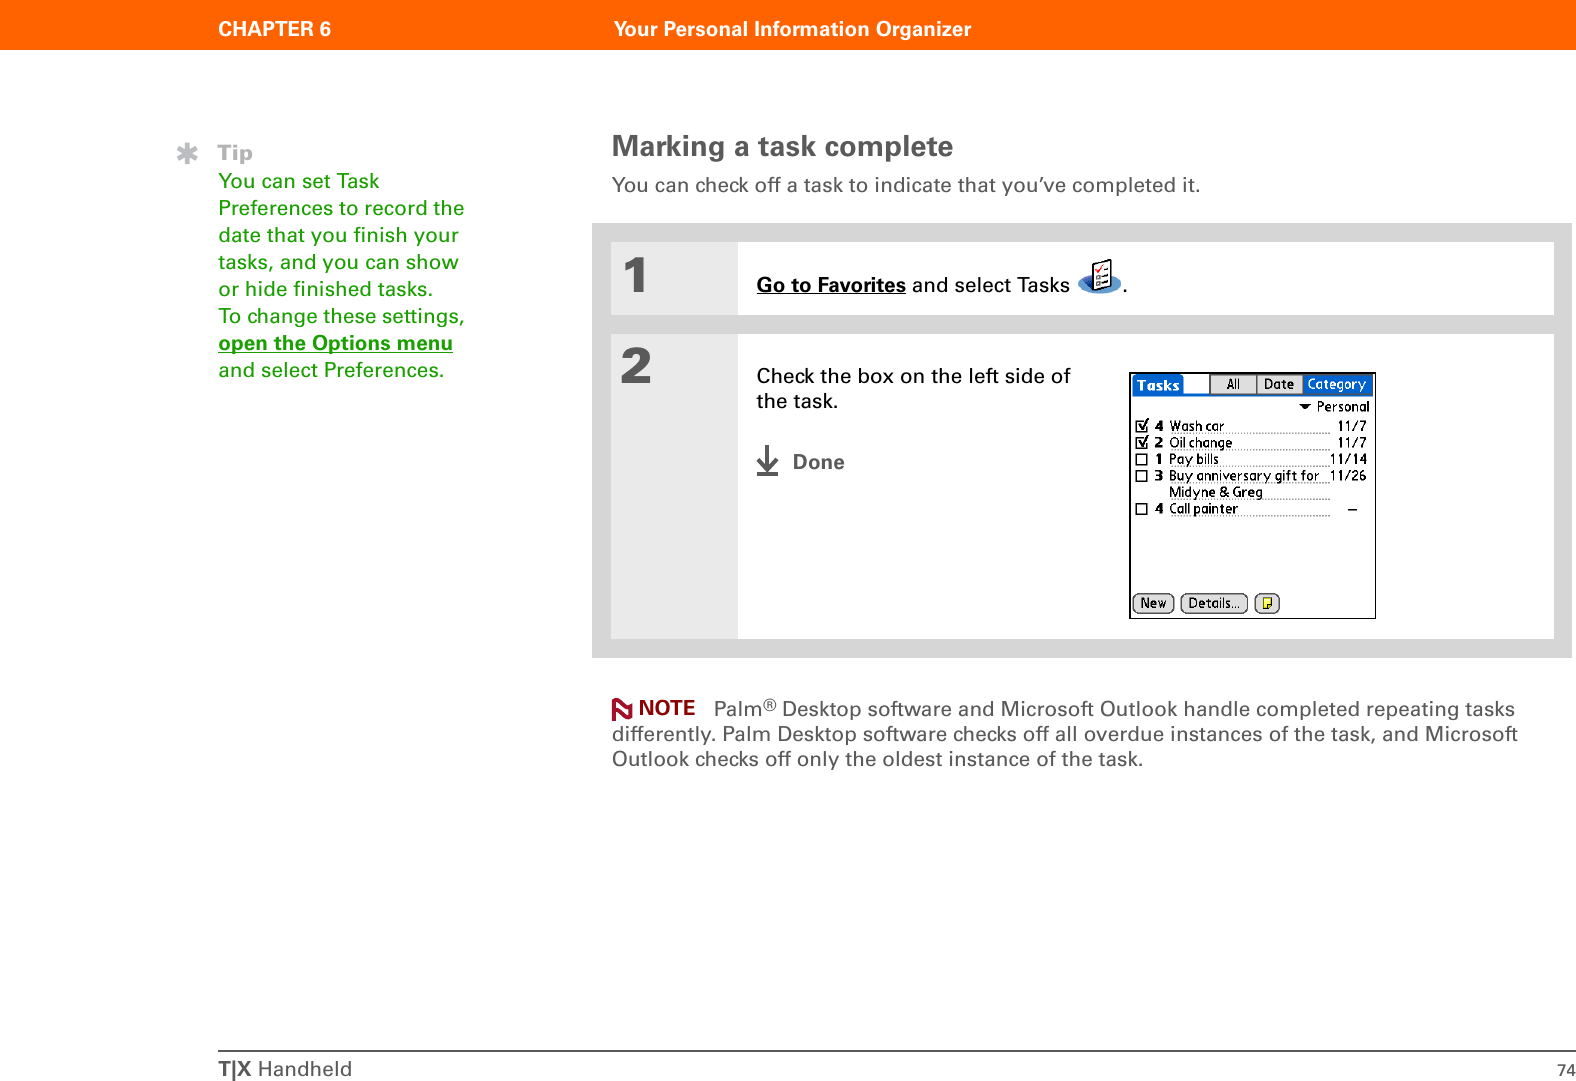
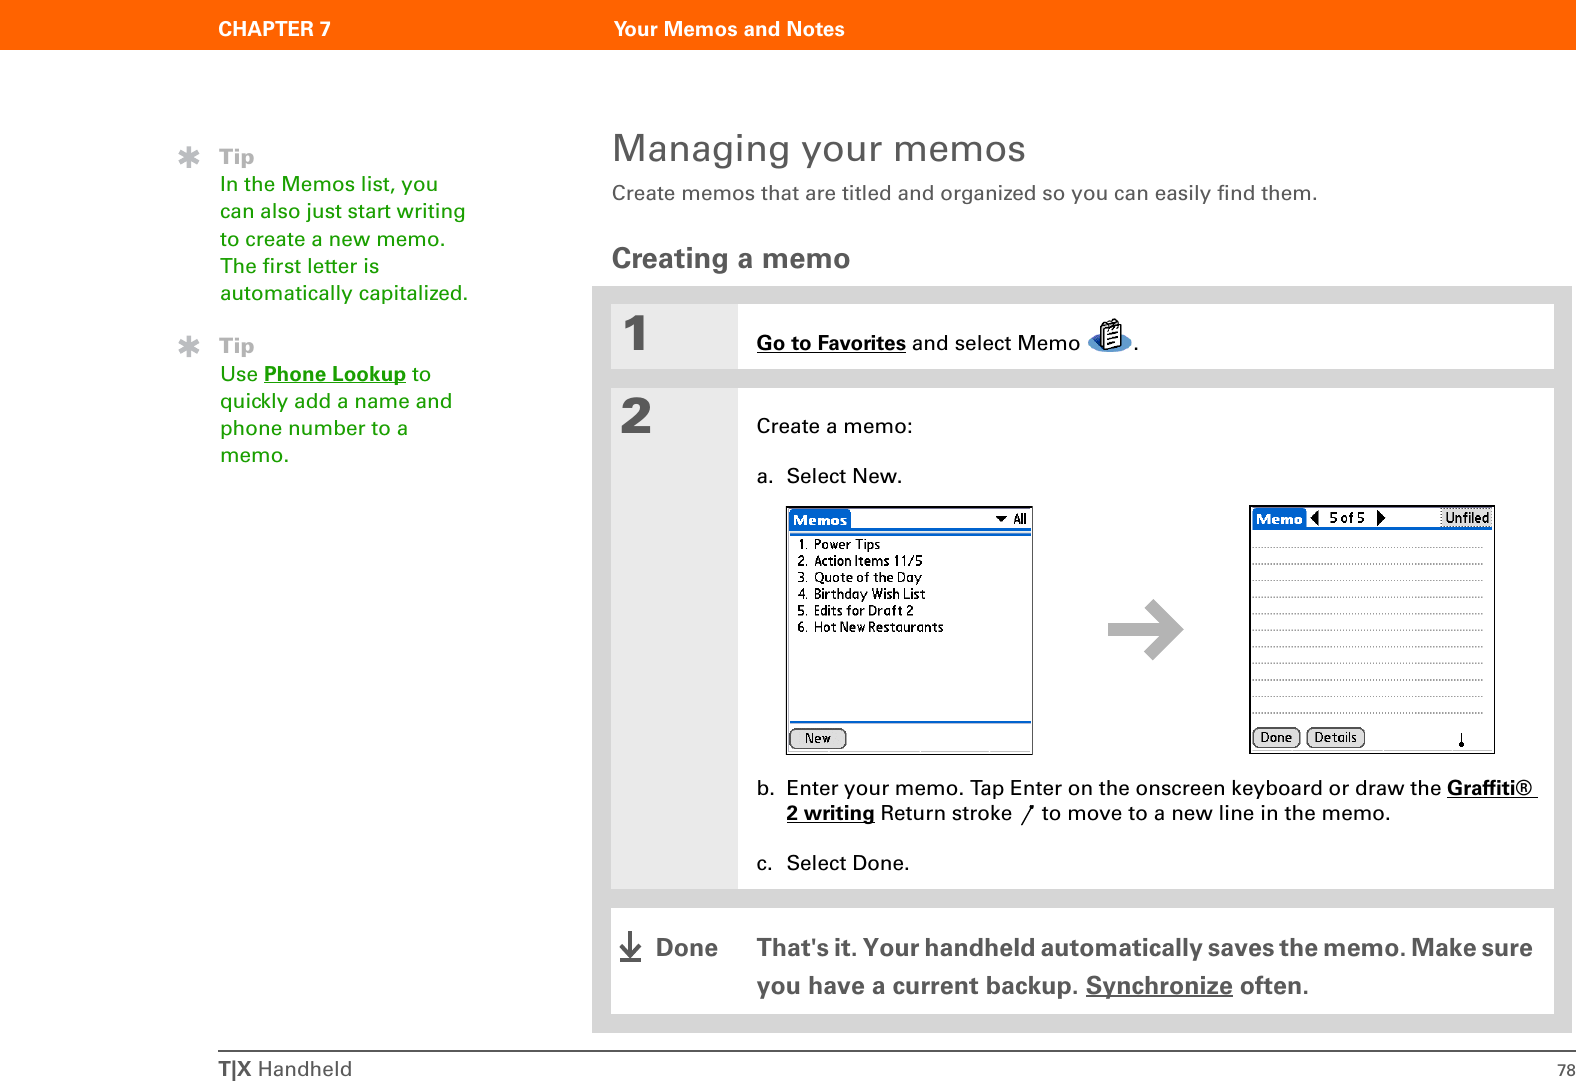
![T|X Handheld 72CHAPTER 6 Your Personal Information OrganizerManaging your tasksCreate and organize your to-do list, and then track your progress.Creating a task01Go to Favorites and select Tasks .2Create a task:a. Select New.b. Enter a description of the task. 3[ & ] OPTIONAL Assign a priority and due date:a. Select a priority number (1 is the most important).b. Select the Due Date pick list, and then select a date from the list, or select Choose Date to select a date from the calendar.That’s it. Your handheld automatically saves the task. Make sure you have a current backup. Synchronize often.TipIf no task is currently selected, you can create a new task simply by starting to write in the input area.TipSet an alarm for a task with a due date. Select the task, tap Details, select the Alarm box, check the Alarm box, enter the alarm settings, and then select OK.New task Priority numberDue dateLong descriptionNote buttonDone](https://usermanual.wiki/Palm/AOKI.Users-Manual-Original/User-Guide-591106-Page-81.png)
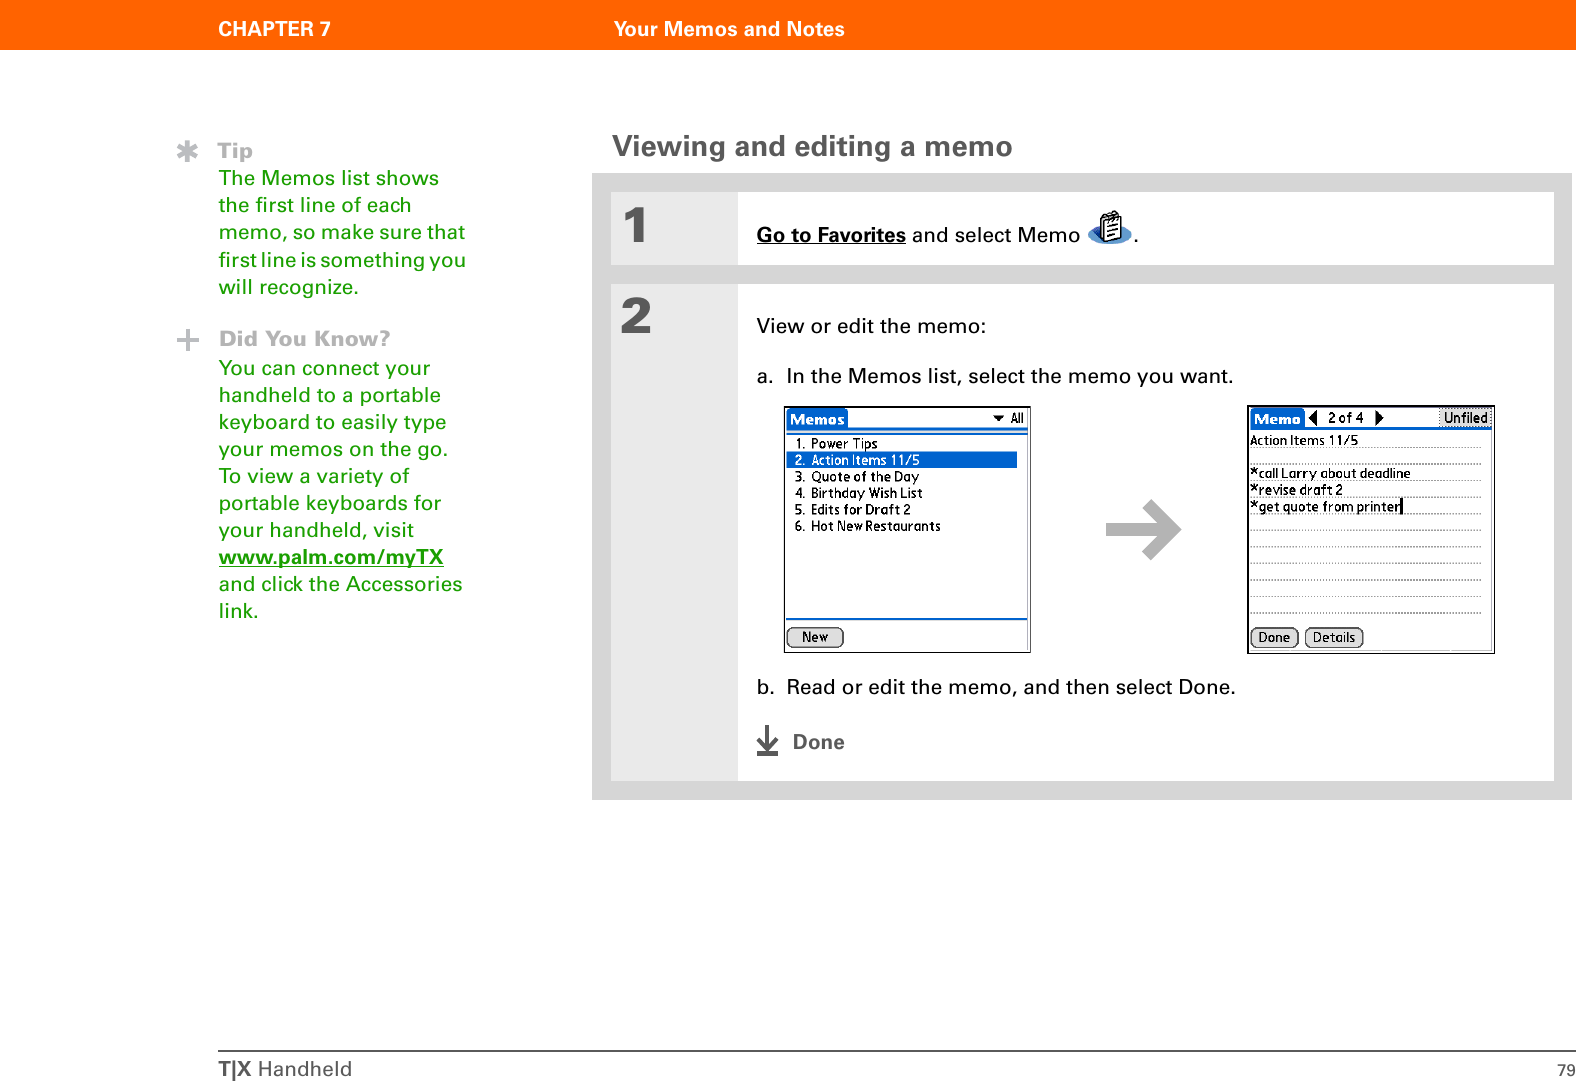
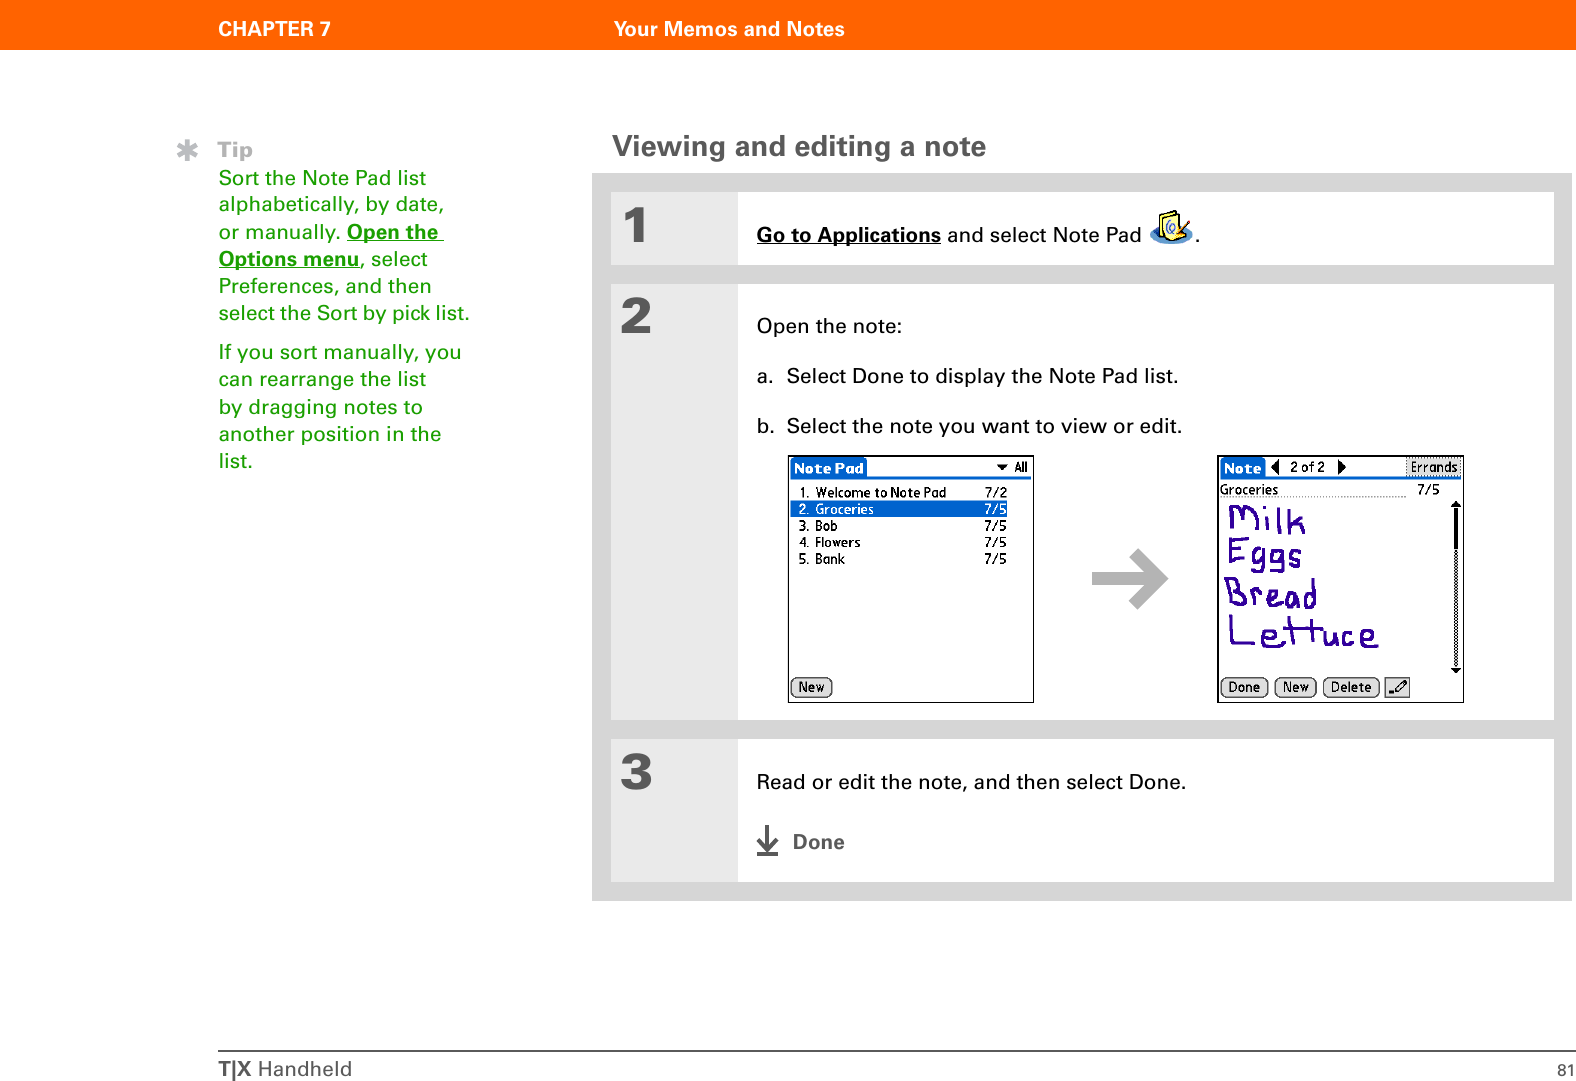
![T|X Handheld 80CHAPTER 7 Your Memos and NotesManaging your notesYou can quickly create handwritten notes and sketches of your thoughts and ideas.Creating a note01Go to Applications and select Note Pad .2Create a note:a. Use the stylus to write your note directly on the handheld screen.b. Select the time at the top of the screen and enter a title using Graffiti 2 writing or the onscreen keyboard.c. Select Done.That’s it. Your handheld automatically saves the note. Make sure you have a current backup. Synchronize often.Before You Begin[!]Make sure full-screen writing is turned off. You cannot create or edit notes in Note Pad when full-screen writing is on.TipYou can change the color of the pen and paper (background). From the Note Pad list screen, open the Options menu, select Preferences, and then select Color.TipTap the pen selector to change the pen width or to select the eraser.Pen selectorScroll barTime or titleEraserCategory boxDone](https://usermanual.wiki/Palm/AOKI.Users-Manual-Original/User-Guide-591106-Page-89.png)
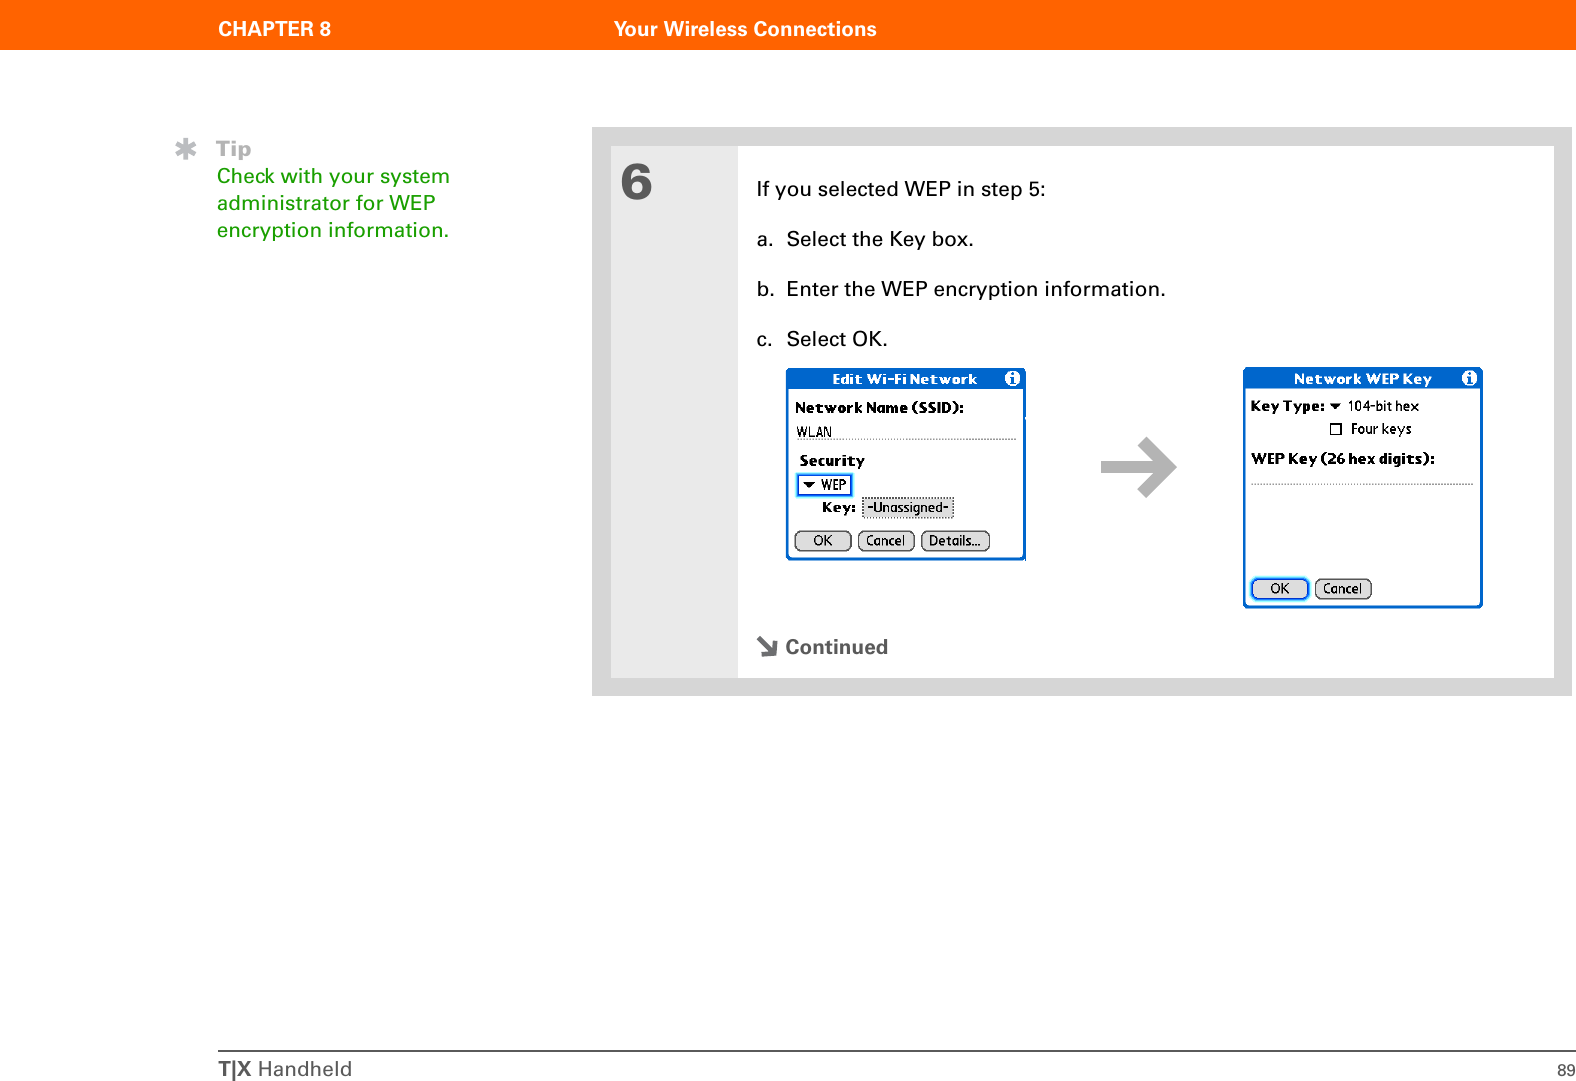
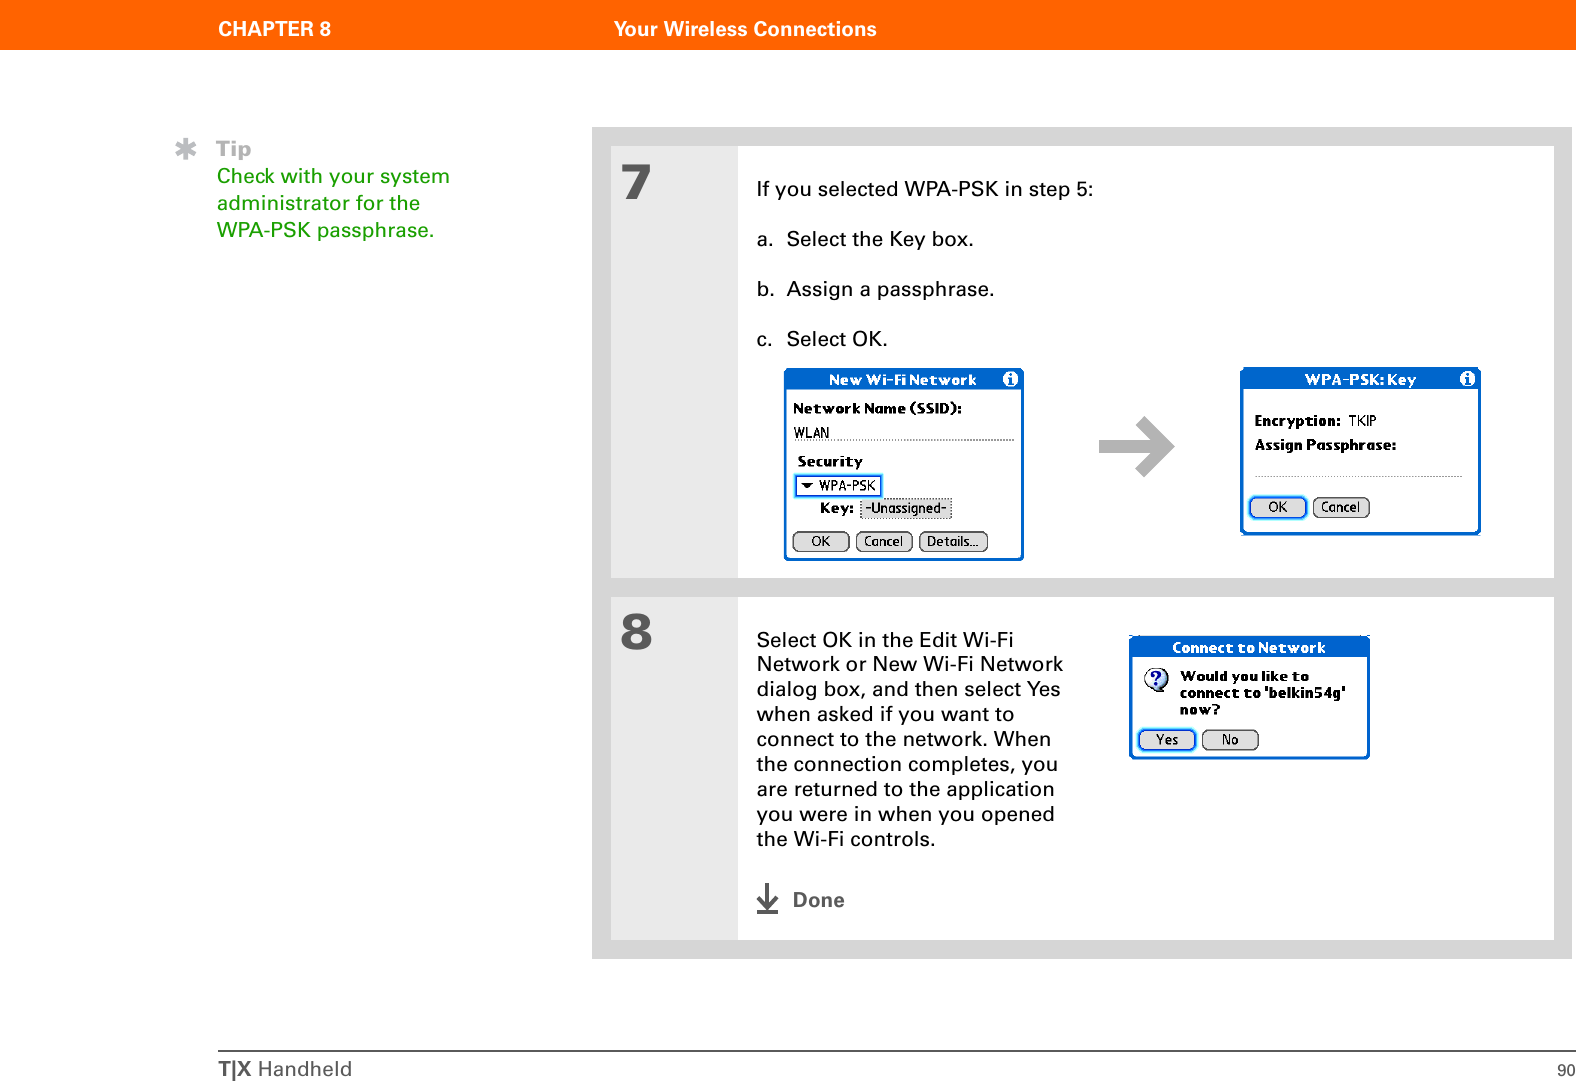
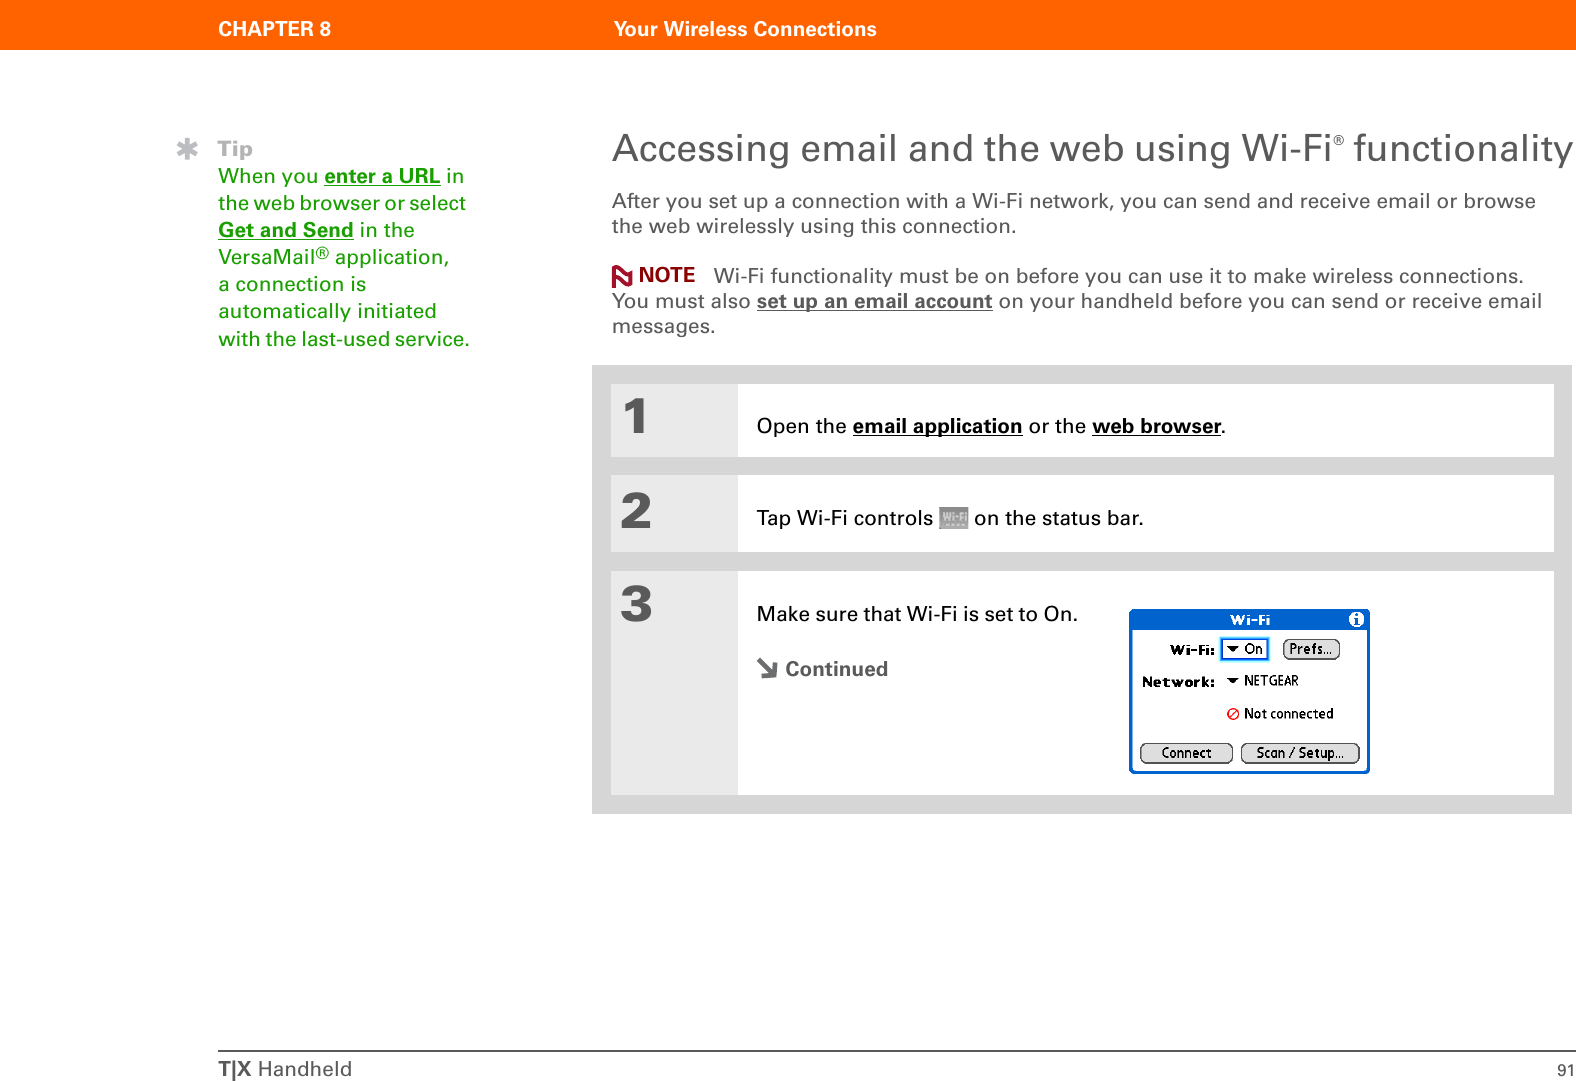
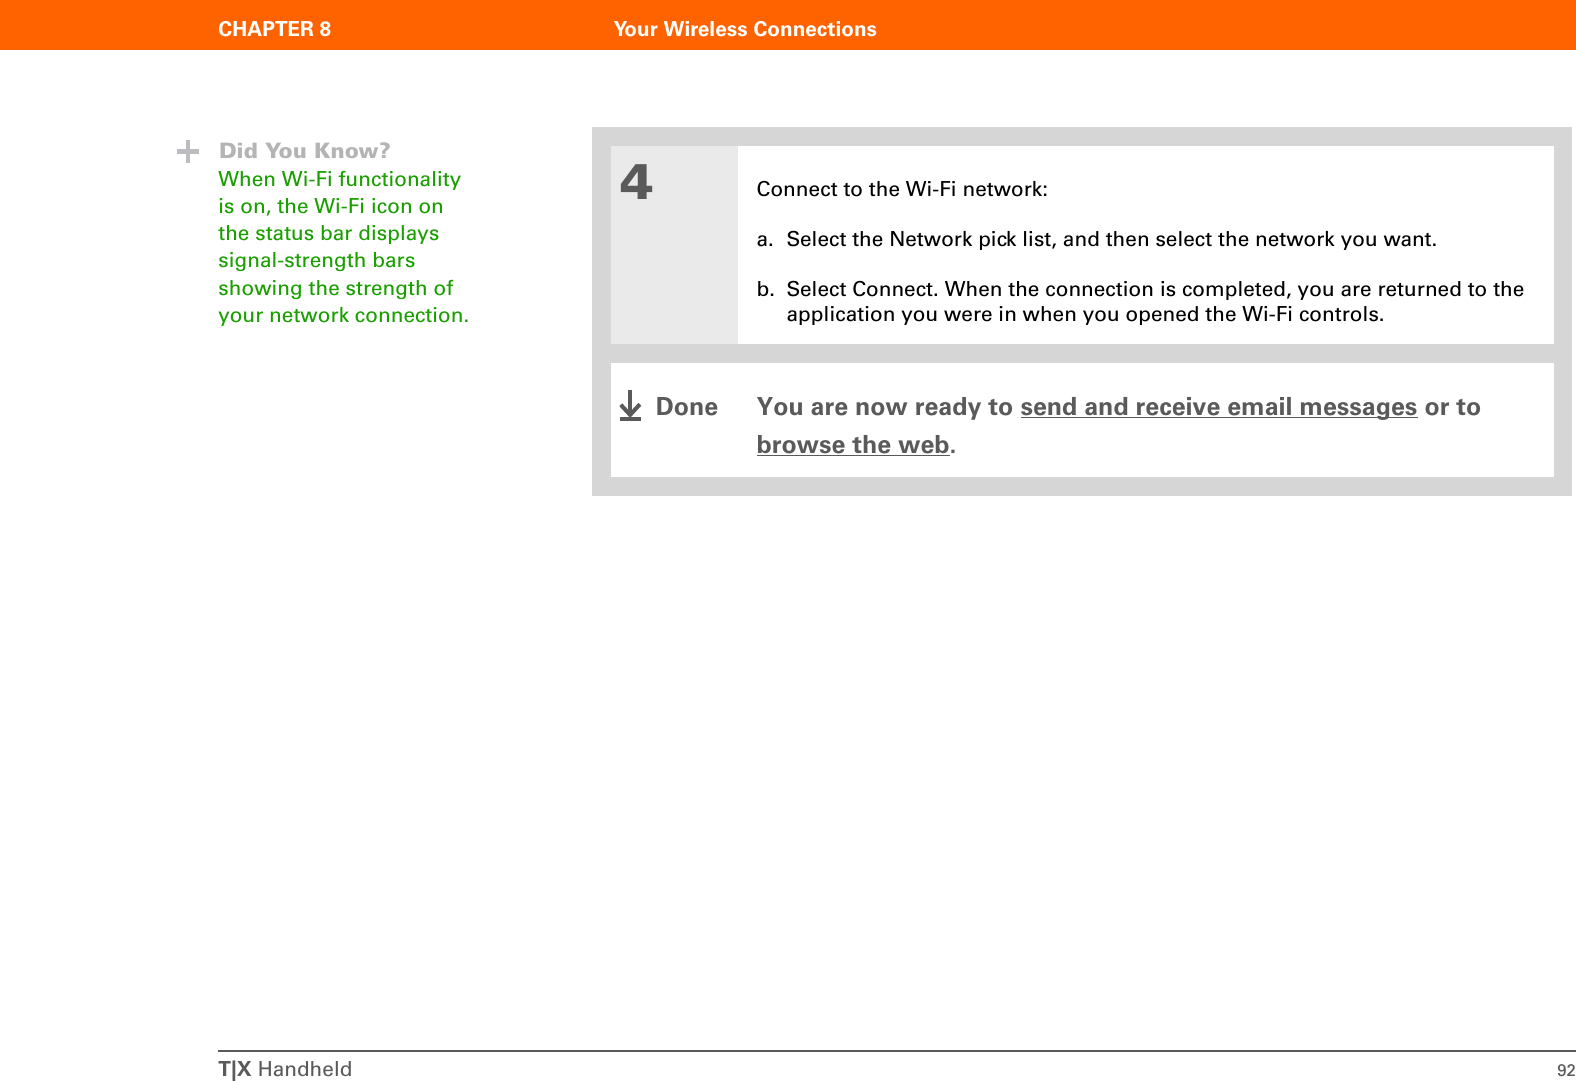
![T|X Handheld 86CHAPTER 8 Your Wireless ConnectionsSetting up a Wi-Fi network connection0O1Tap Wi-Fi controls on the status bar.2Do one of the following:• If this is the first time you are setting up a Wi-Fi network connection, select Yes. • If you have previously set up any network connections and are setting up a new connection, select the Wi-Fi pick list, select On, and then select Scan/Setup. Your handheld scans for available networks.ContinuedBefore You Begin[!]Check with your system administrator to get the name of the network, also known as an SSID, and the security information, such as WEP or WPA-PSK keys.TipOnce you have set up a connection to a network, connect to it at any time by opening Wi-Fi controls, selecting the network from the Network pick list, and then selecting Connect.](https://usermanual.wiki/Palm/AOKI.Users-Manual-Original/User-Guide-591106-Page-95.png)
![T|X Handheld 94CHAPTER 8 Your Wireless ConnectionsSetting up a Bluetooth® phone connection To set up a phone connection, you must have a GSM or GPRS mobile phone enabled with data services.0O1Tap Bluetooth controls on the status bar.2Select Setup Devices, select Phone Setup, select Phone Connection, and then select Next.3Select the phone you want to connect to:a. Select the Manufacturer and Model pick lists, select the correct entries for your phone, and then select Next.If the phone does not appear on the list, check for phone compatibility at www.palm.com/us/support/downloads/phonelink.html.b. The Connection Setup screen displays all Bluetooth phones within range. If your phone is not listed on the discovery results, check whether your phone is discoverable. Select Find More to search again. c. Select the phone you want, select OK, and then select Next. Not all features are available if your specific phone model is not in the pick list.ContinuedBefore You Begin[!]If you have an IR phone, you must download the Phone Link application from the web. Go to www.palm.com/us/support/downloads/phonelink.html to download the software. TipIf you receive a message that your phone is not ready to accept a connection, check to make sure that your phone is prepared to make a Bluetooth connection. See the documentation included with your phone for instructions.»Key TermGPRS Acronym for General Packet Radio Service, a method of sending information wirelessly at high speeds. IMPORTANT[!]NOTE](https://usermanual.wiki/Palm/AOKI.Users-Manual-Original/User-Guide-591106-Page-103.png)
![T|X Handheld 95CHAPTER 8 Your Wireless Connections4Enter a passkey:a. Enter a passkey number. This can be any number you choose; it does not have to be, for example, a password you use to access a network or an email account. Entering a passkey creates a partnership between your handheld and your phone. You must enter the same passkey on your handheld and your mobile phone in order to connect to your phone. We recommend that you use a passkey of 16 digits where possible to improve the security of your handheld. The longer the passkey, the more difficult it is for the passkey to be deciphered.b. Select OK.5Finish phone connection setup and begin network setup:a. Select Done, and then select Yes.If you want to use your phone connection only to dial phone numbers from your handheld or to send text messages, select Done, and then select No. You have finished the setup.b. Select Next.Continued»Key TermPasskey Like a password, a passkey is a security measure. Connections can happen only between your handheld and a device that has the same passkey. »Key TermPartnership Two devices—for example, your handheld and your mobile phone—that can connect to each other because each device can find the same passkey on the other device. Once you form a partnership with a device, you do not need to enter a passkey to connect with that device again.IMPORTANT[!]NOTE](https://usermanual.wiki/Palm/AOKI.Users-Manual-Original/User-Guide-591106-Page-104.png)

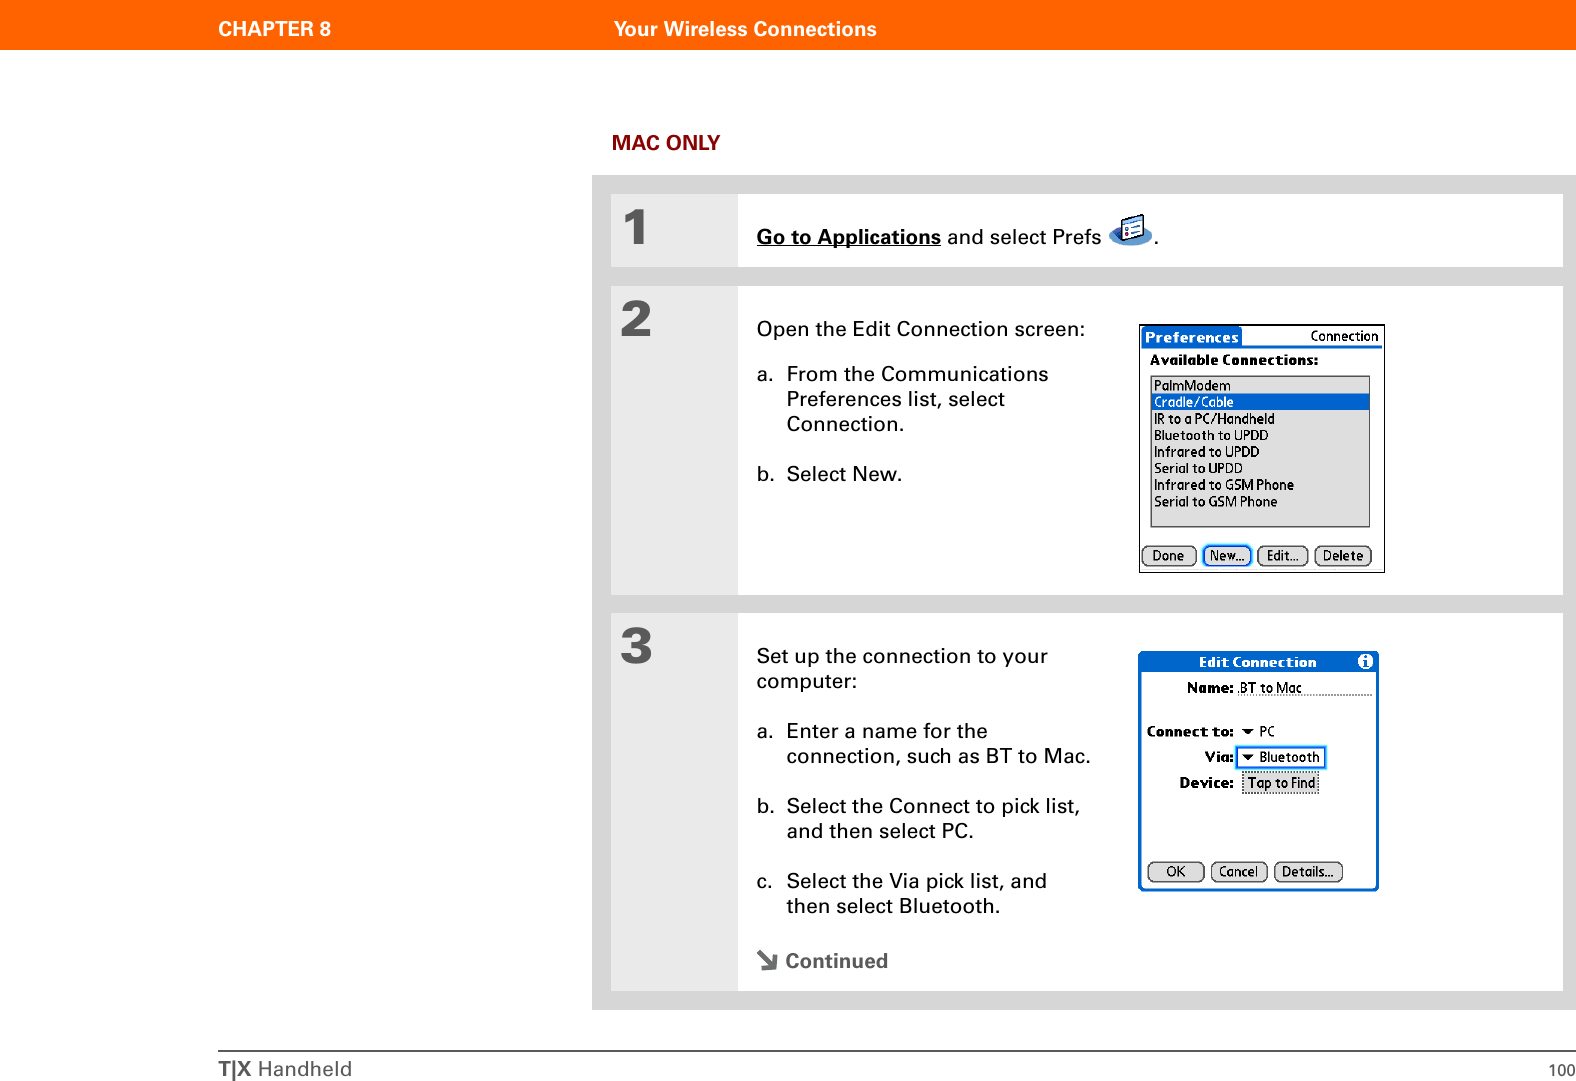
![T|X Handheld 101CHAPTER 8 Your Wireless ConnectionsCont’d.d. Make sure the computer is ready to accept a Bluetooth connection. See the documentation included with the computer for information on how to prepare it to accept a Bluetooth connection. The documentation might refer to a Bluetooth connection as a Bluetooth pairing or a Bluetooth link.e. Select the Device box. 4Select the computer:a. When the Discovery Results screen appears, select your computer. If your computer does not appear on the list, select Find More.b. Select OK.5[ & ] OPTIONAL If prompted, enter a passkey:a. Enter a passkey number. This can be any number you choose; it does not have to be, for example, a password you use to access a network or an email account. You must enter the same passkey on your handheld and your computer in order to wirelessly synchronize with your computer. We recommend that you use a passkey of 16 digits where possible to improve the security of your handheld. The longer the passkey, the more difficult it is for the passkey to be deciphered.b. Select OK.ContinuedNOTETipYour passkeys are more secure if you use a different passkey for each device with which you want to connect—one passkey for a connection to a phone, a different one for a connection to a computer, and so on.IMPORTANT[!]](https://usermanual.wiki/Palm/AOKI.Users-Manual-Original/User-Guide-591106-Page-110.png)
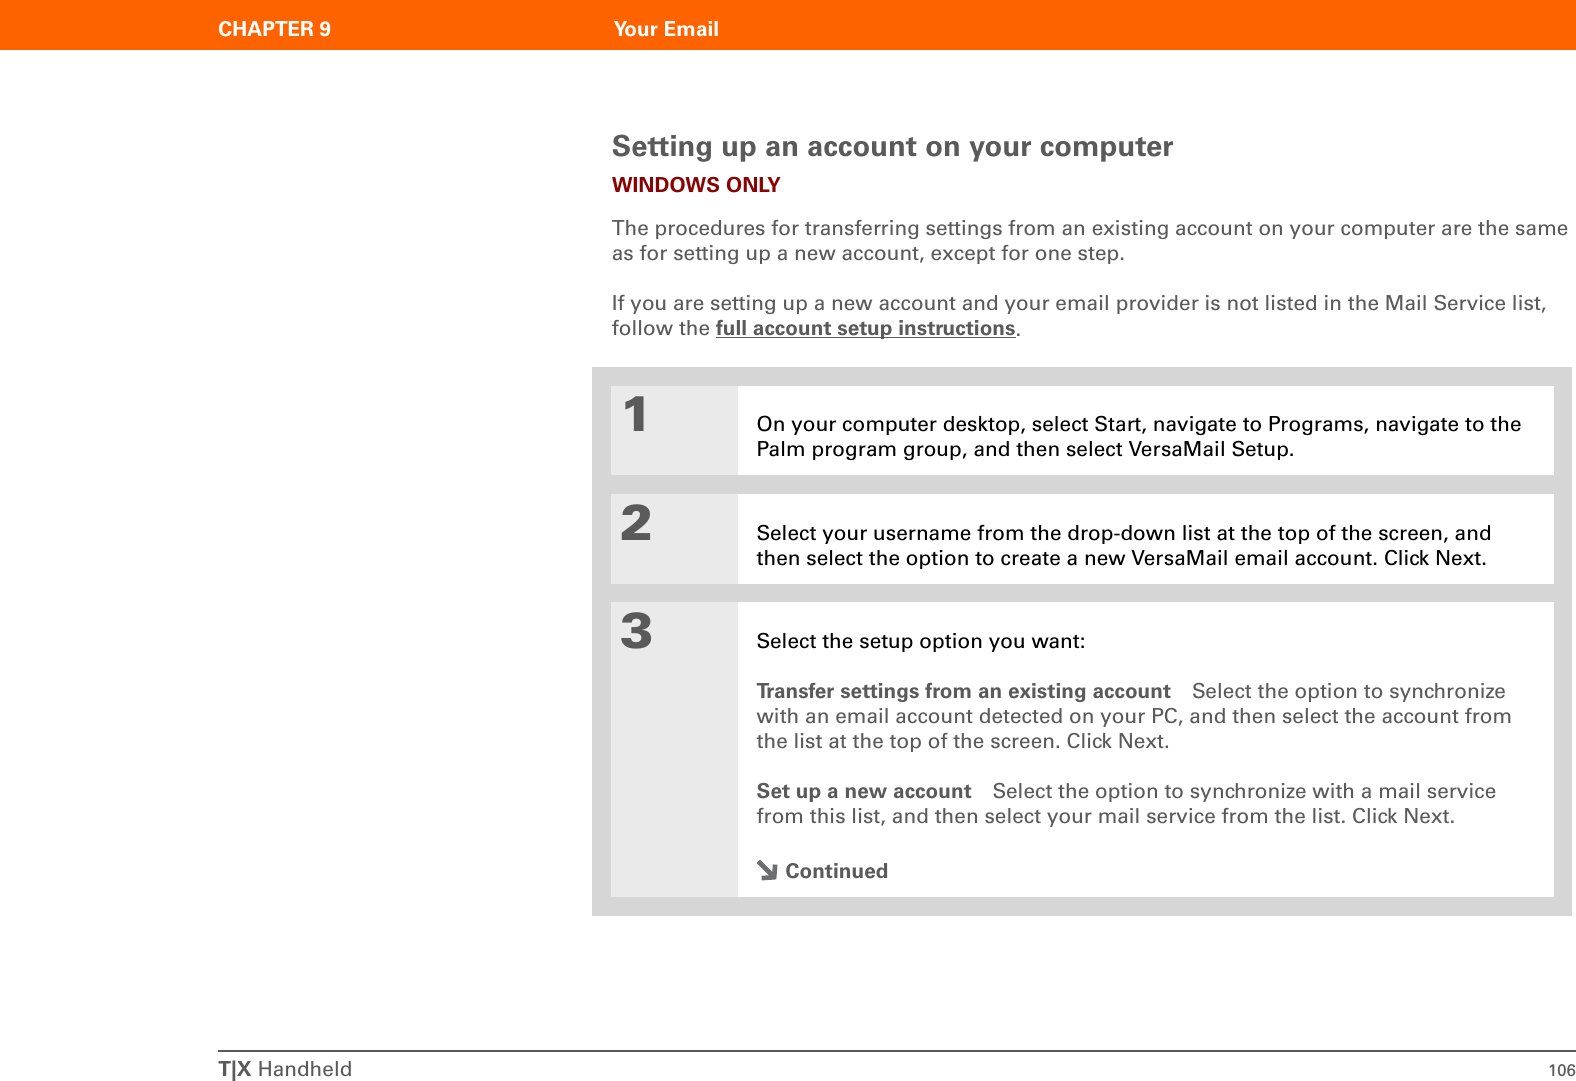
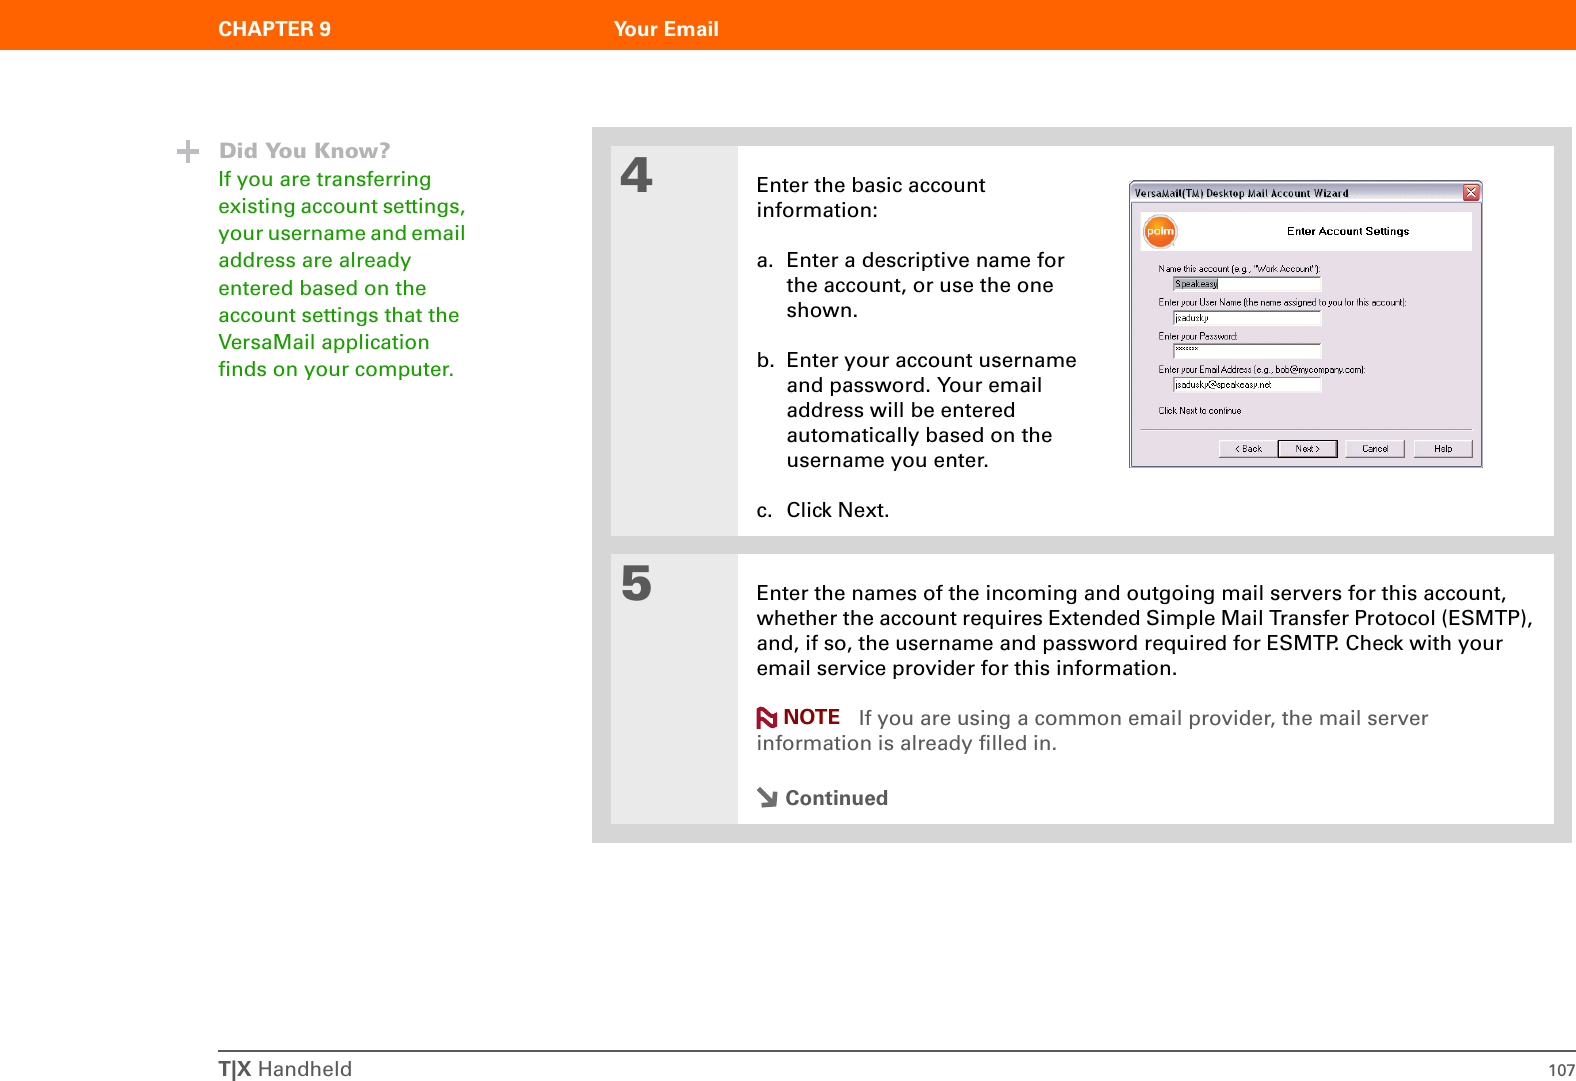
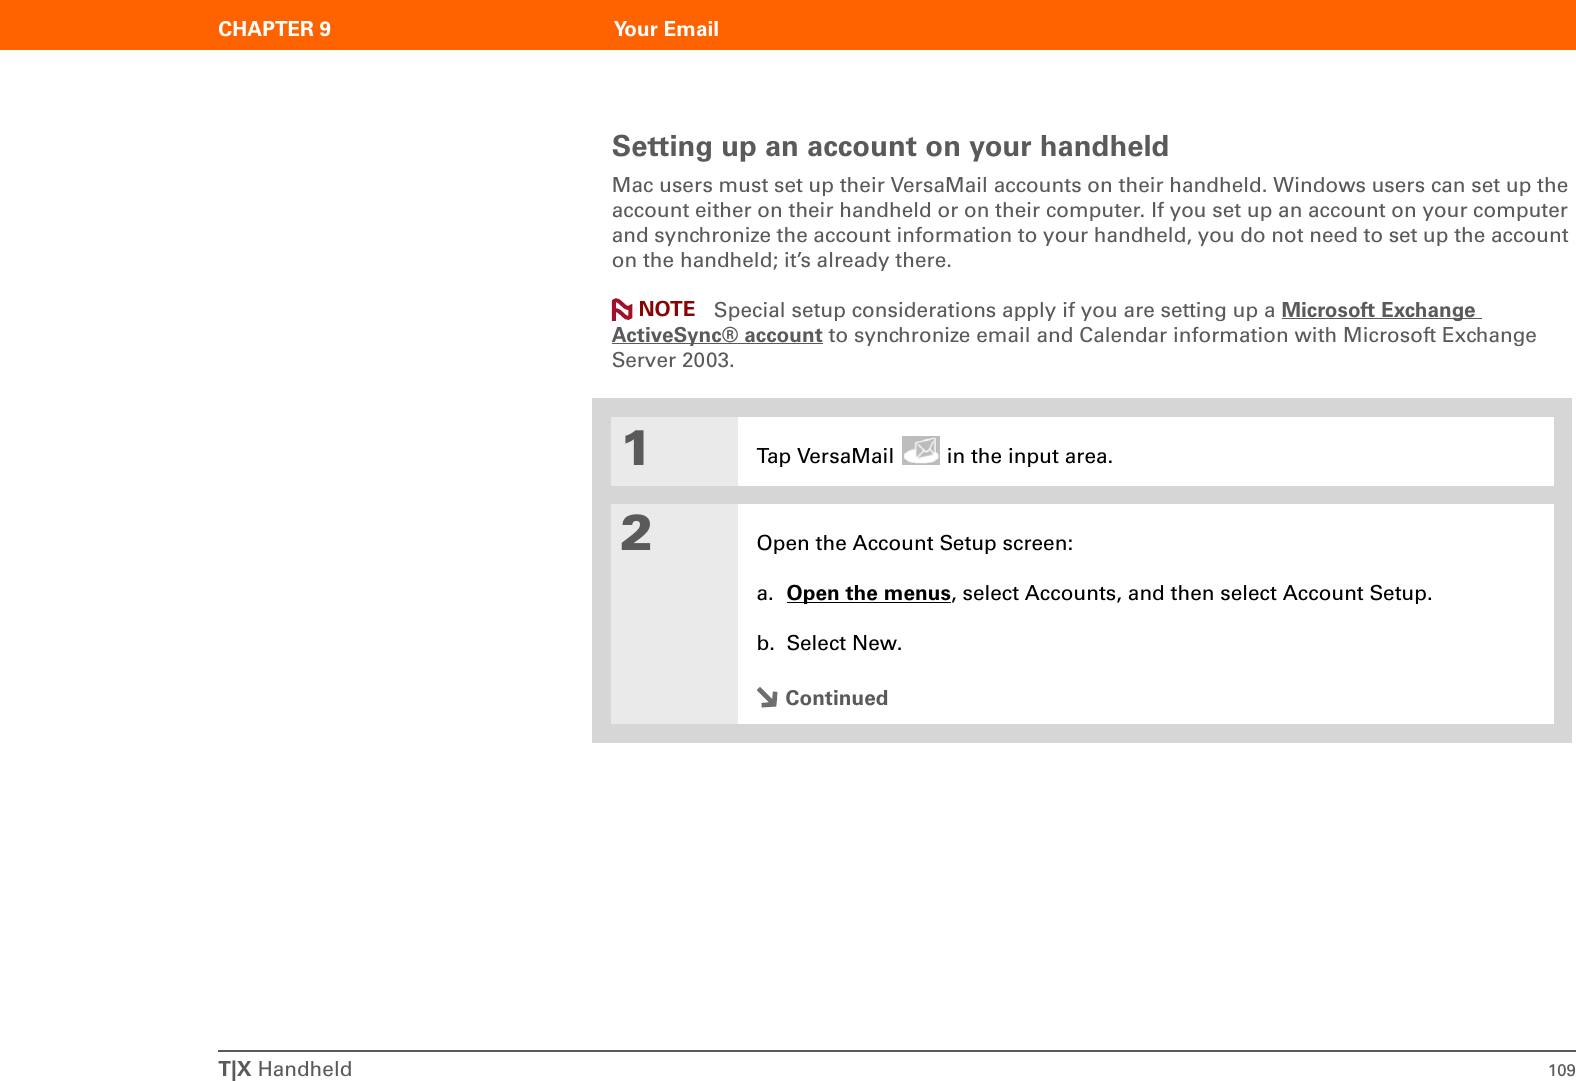
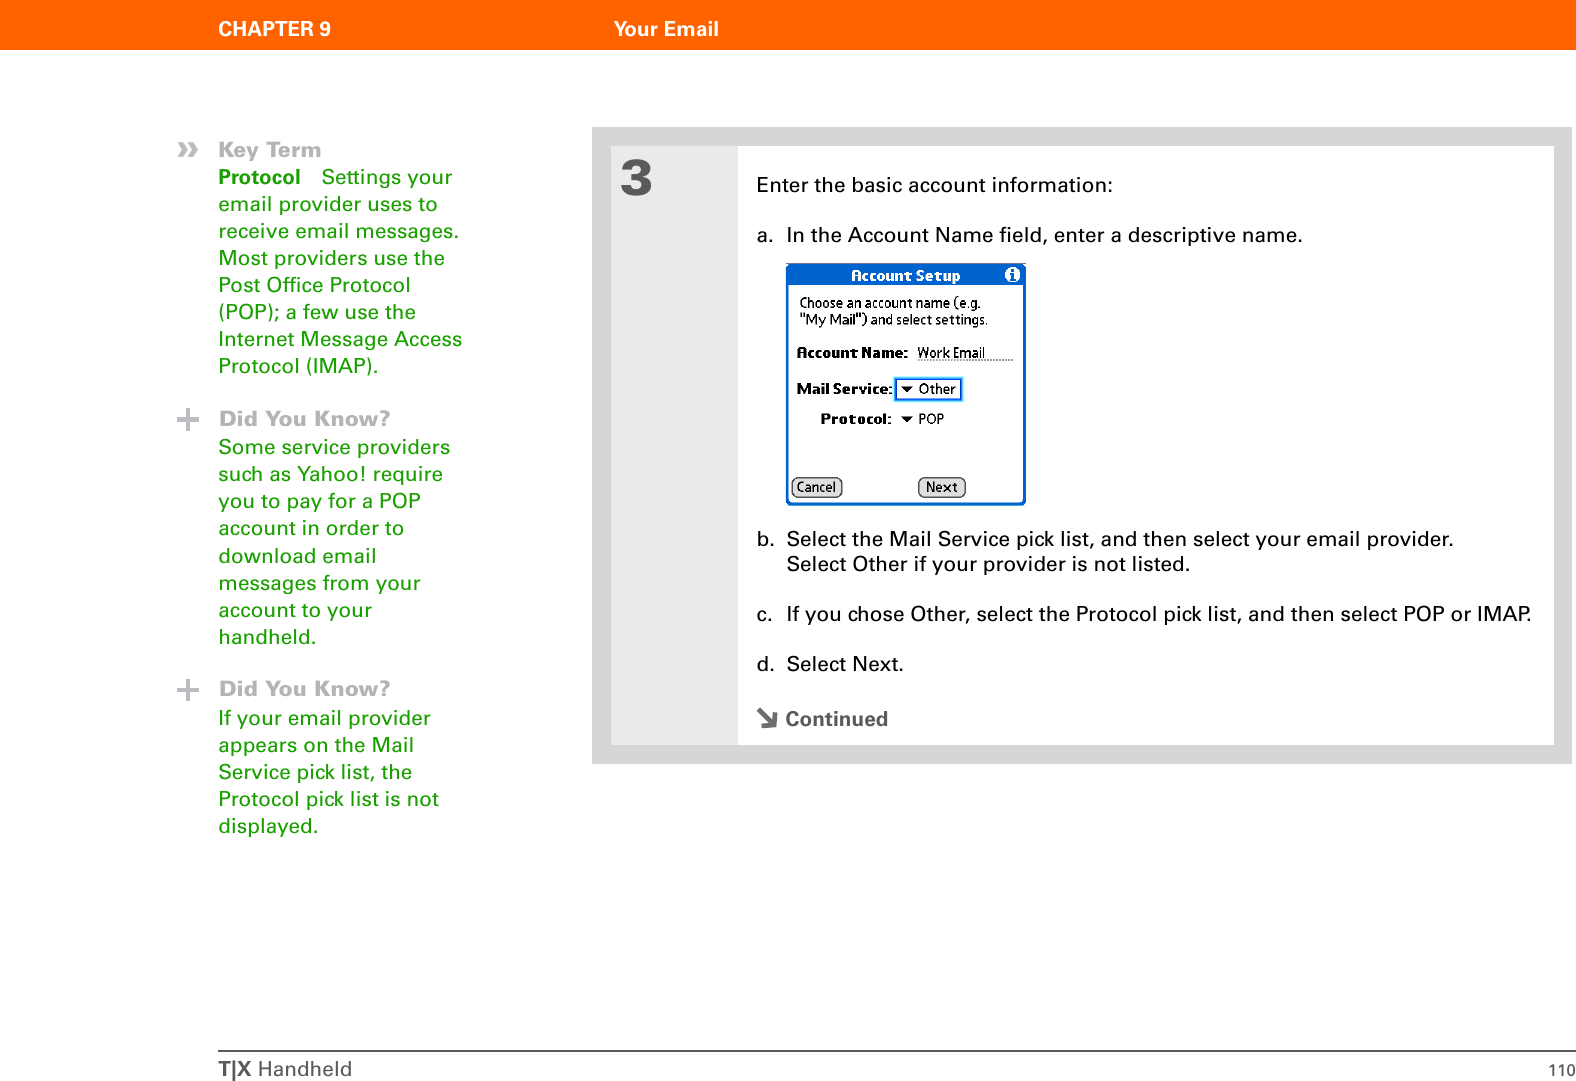
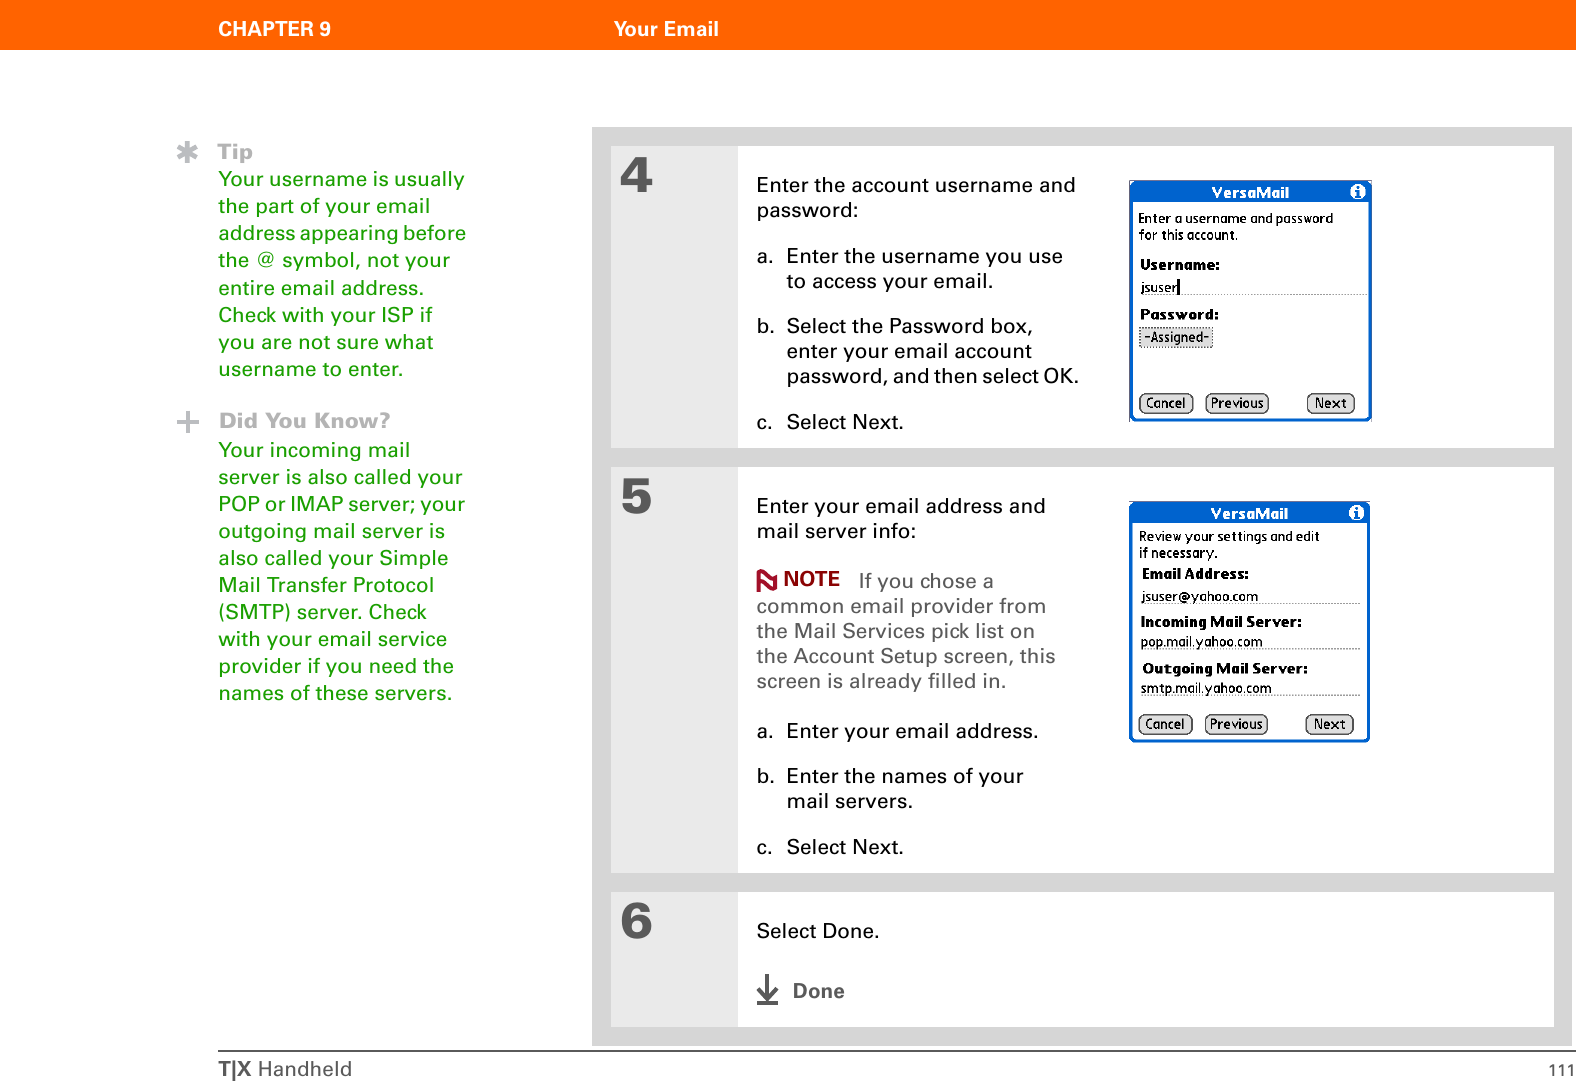
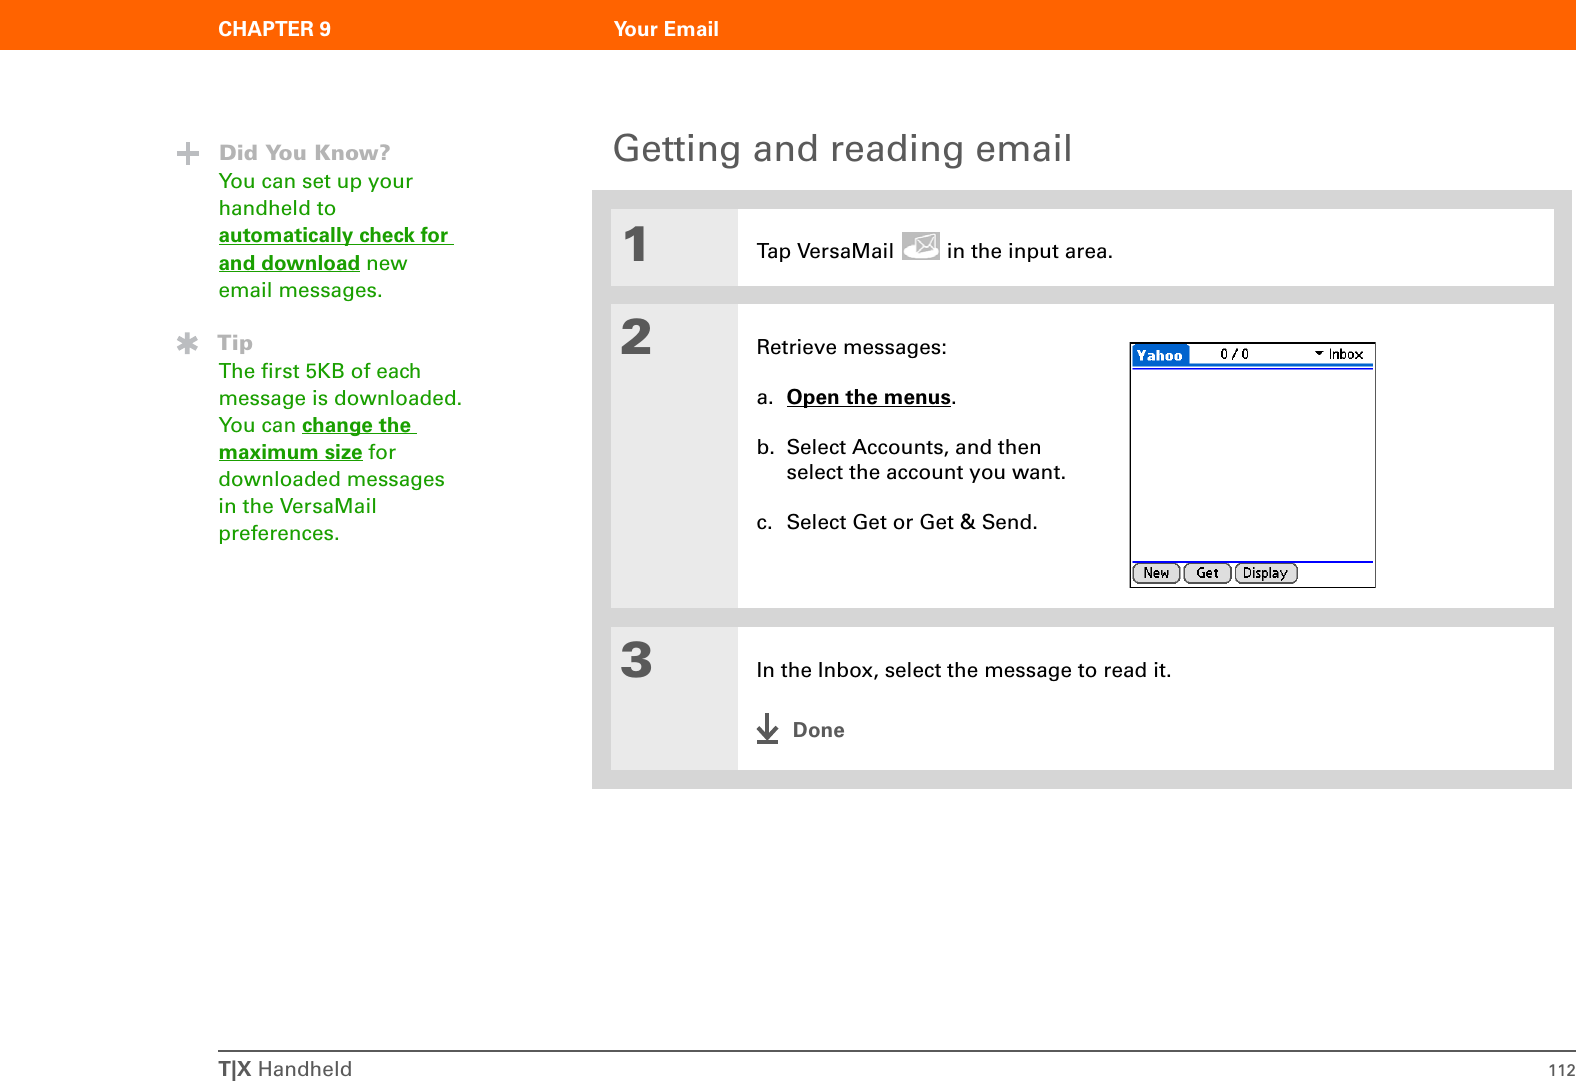
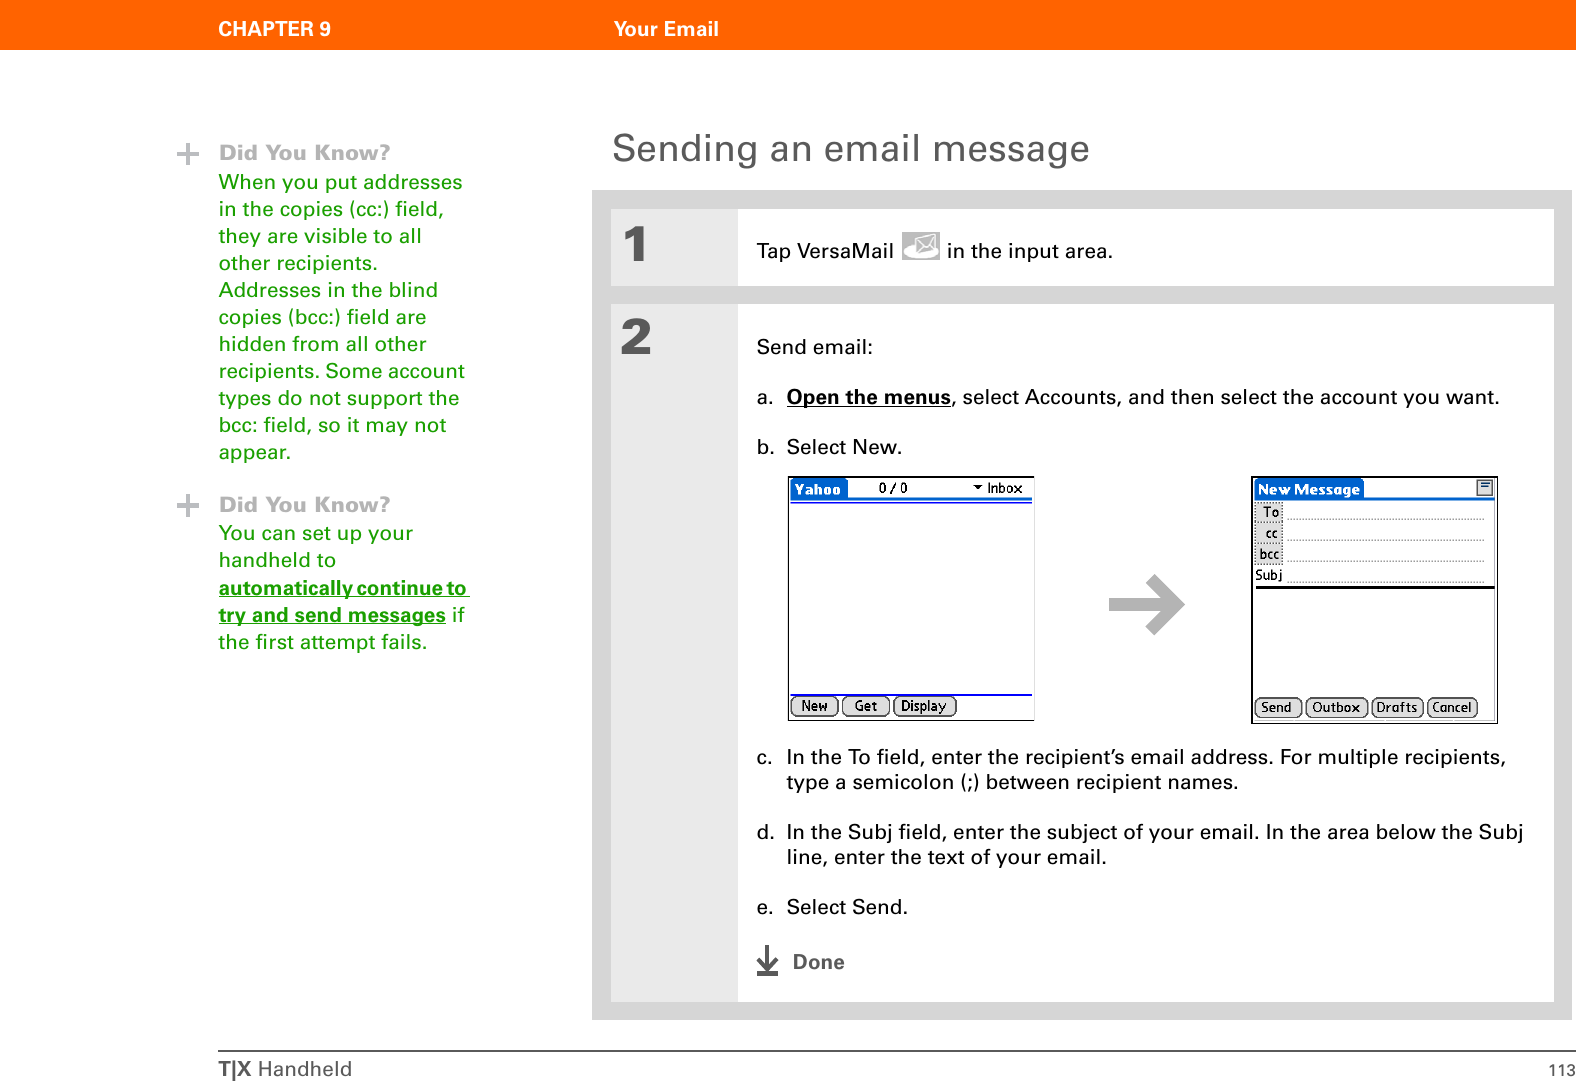
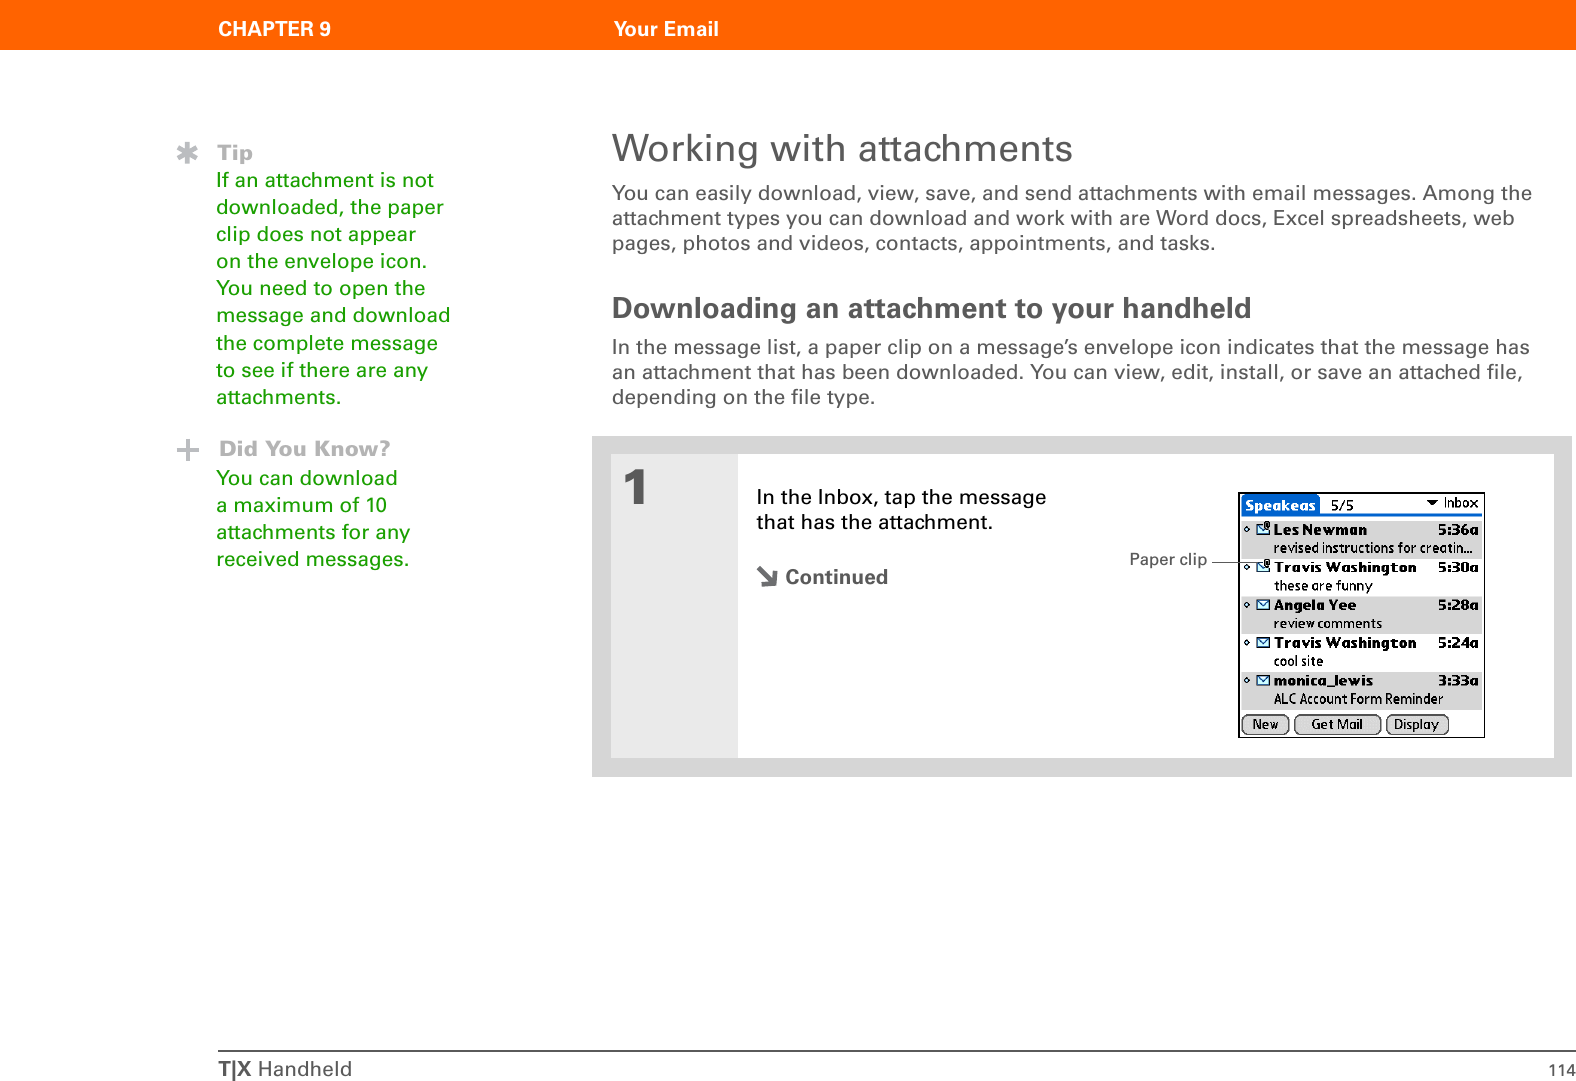
![T|X Handheld 105CHAPTER 9 Your EmailSetting up an account You must have an account with an email provider or a corporate account. VersaMail works with these accounts to transfer messages to and from your handheld. The application is not an email service provider.Before you can use the VersaMail application with a given email account, you need to set up the account in VersaMail. You can do this in one of three ways:• On a Windows computer, if the email account is already set up on your computer—for example, if you use Outlook Express on your computer to access your EarthLink account—you can transfer the account settings to your handheld in just a few steps.• On a Windows computer, if this is a new account, you can quickly set up the account on your computer and synchronize the information to your handheld.• If you are a Mac user, you can set up the account directly on your handheld. Windows users can also choose to set up either a new or existing account directly on the handheld. Special setup considerations apply if you are setting up a Microsoft Exchange ActiveSync® account to synchronize email and Calendar information with Microsoft Exchange Server 2003.IMPORTANT[!]NOTE](https://usermanual.wiki/Palm/AOKI.Users-Manual-Original/User-Guide-591106-Page-114.png)

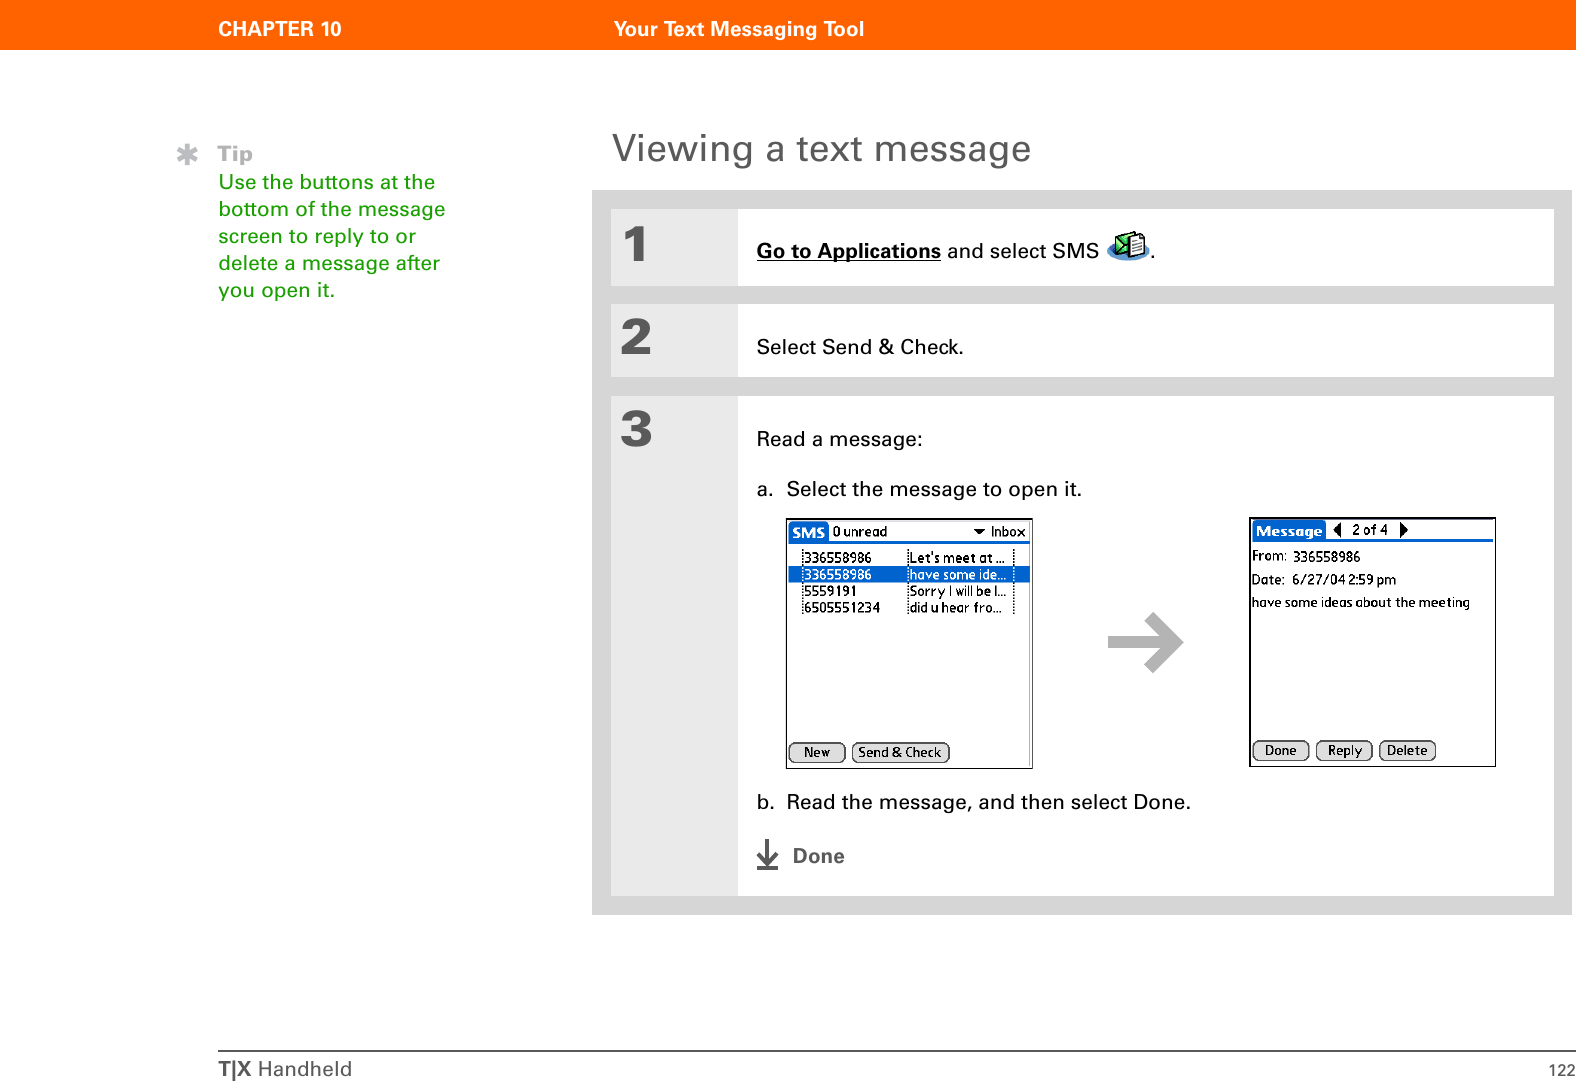
![CHAPTER 10 Your Text Messaging ToolT|X Handheld 121Sending a text message01Go to Applications and select SMS .2Send a text message:a. Select New.b. Select To. Select the recipient’s name if it appears on the Mobile Number Lookup list, and then select Add. If the name does not appear on the list, select Cancel and enter the recipient’s mobile phone number on the To line.c. In the area below the To line, enter the text of your message.d. Select Send.DoneBefore You Begin[!]Set up a phone connection on your handheld to send and receive information wirelessly.»Key TermSMS A type of message that can be received by most mobile phones. More commonly known as text messaging.](https://usermanual.wiki/Palm/AOKI.Users-Manual-Original/User-Guide-591106-Page-130.png)
![CHAPTER 11 Your Web BrowserT|X Handheld 125Accessing a web page01Press Web .2Go to the web page you want to view:a. Select Go to Web Page .b. Enter the address, or URL, of the web page you want to visit. Use the buttons in the Go to Web Page dialog box for quick entry of characters commonly used in web addresses. If you have previously visited a web page, the web browser recognizes the address when you begin entering it and automatically completes it.c. Select OK.DoneBefore You Begin[!]To browse the web, you must set up a connection to the Internet from your handheld.»Key TermURL Stands for “uniform resource locator,” the technical name for a web address. For example, the URL for Yahoo! is http://www.yahoo.com.](https://usermanual.wiki/Palm/AOKI.Users-Manual-Original/User-Guide-591106-Page-134.png)
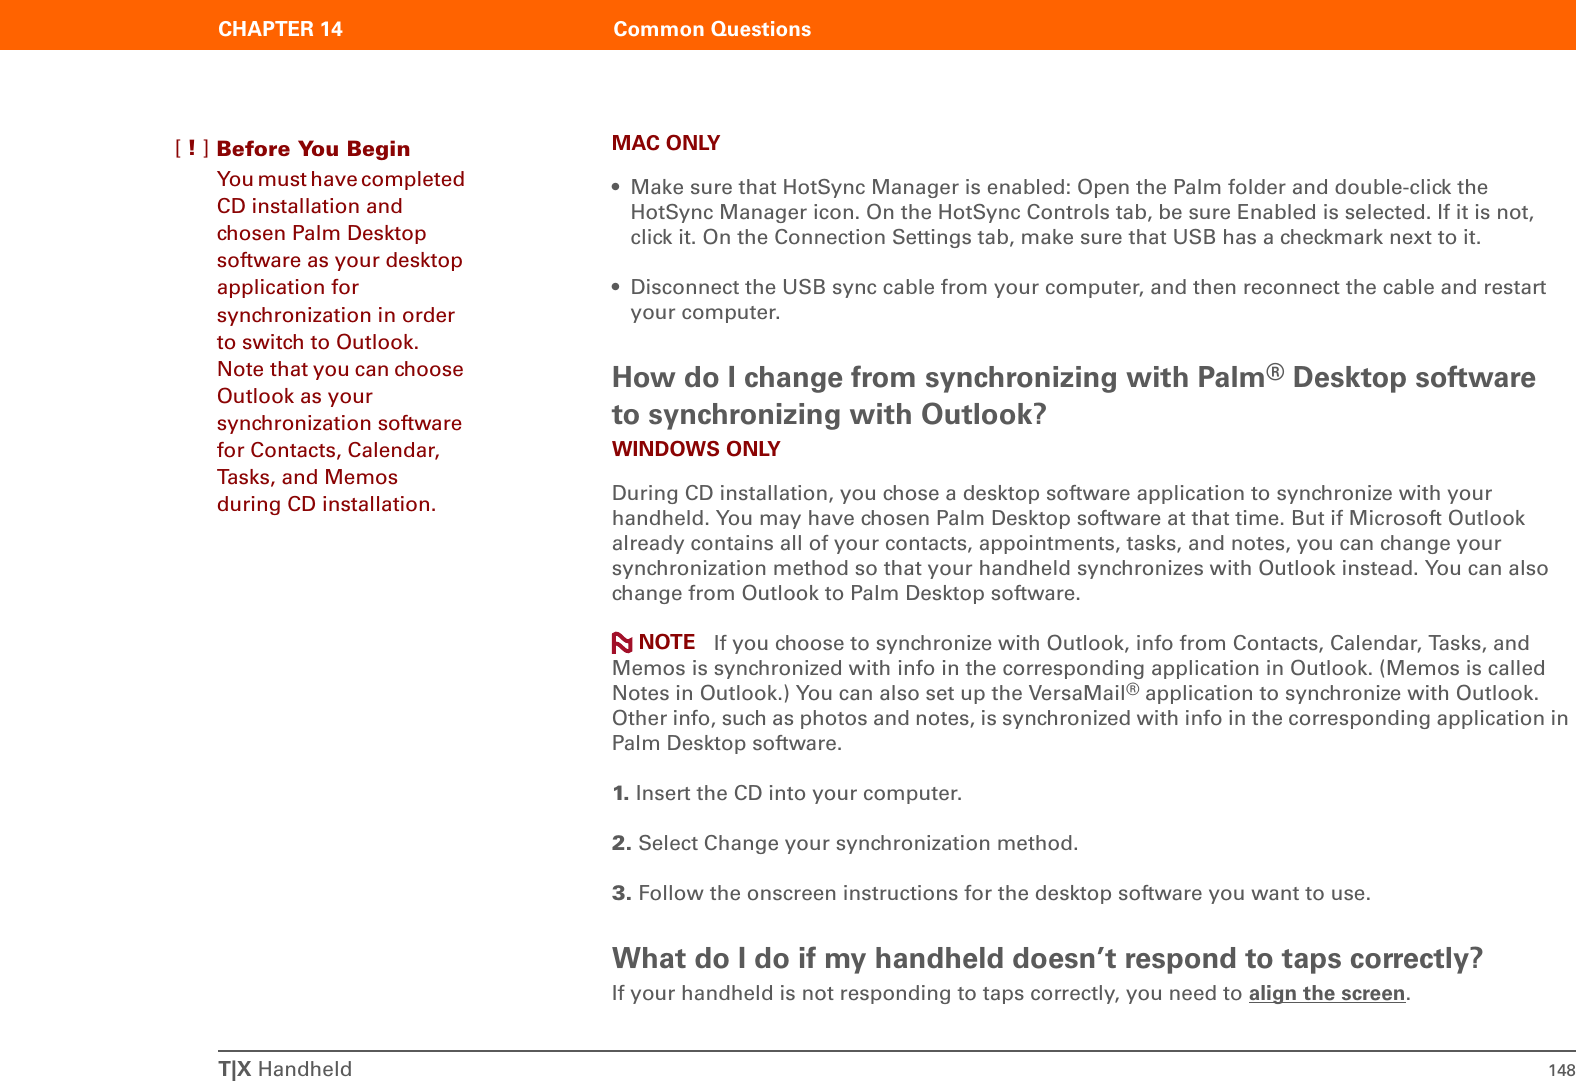
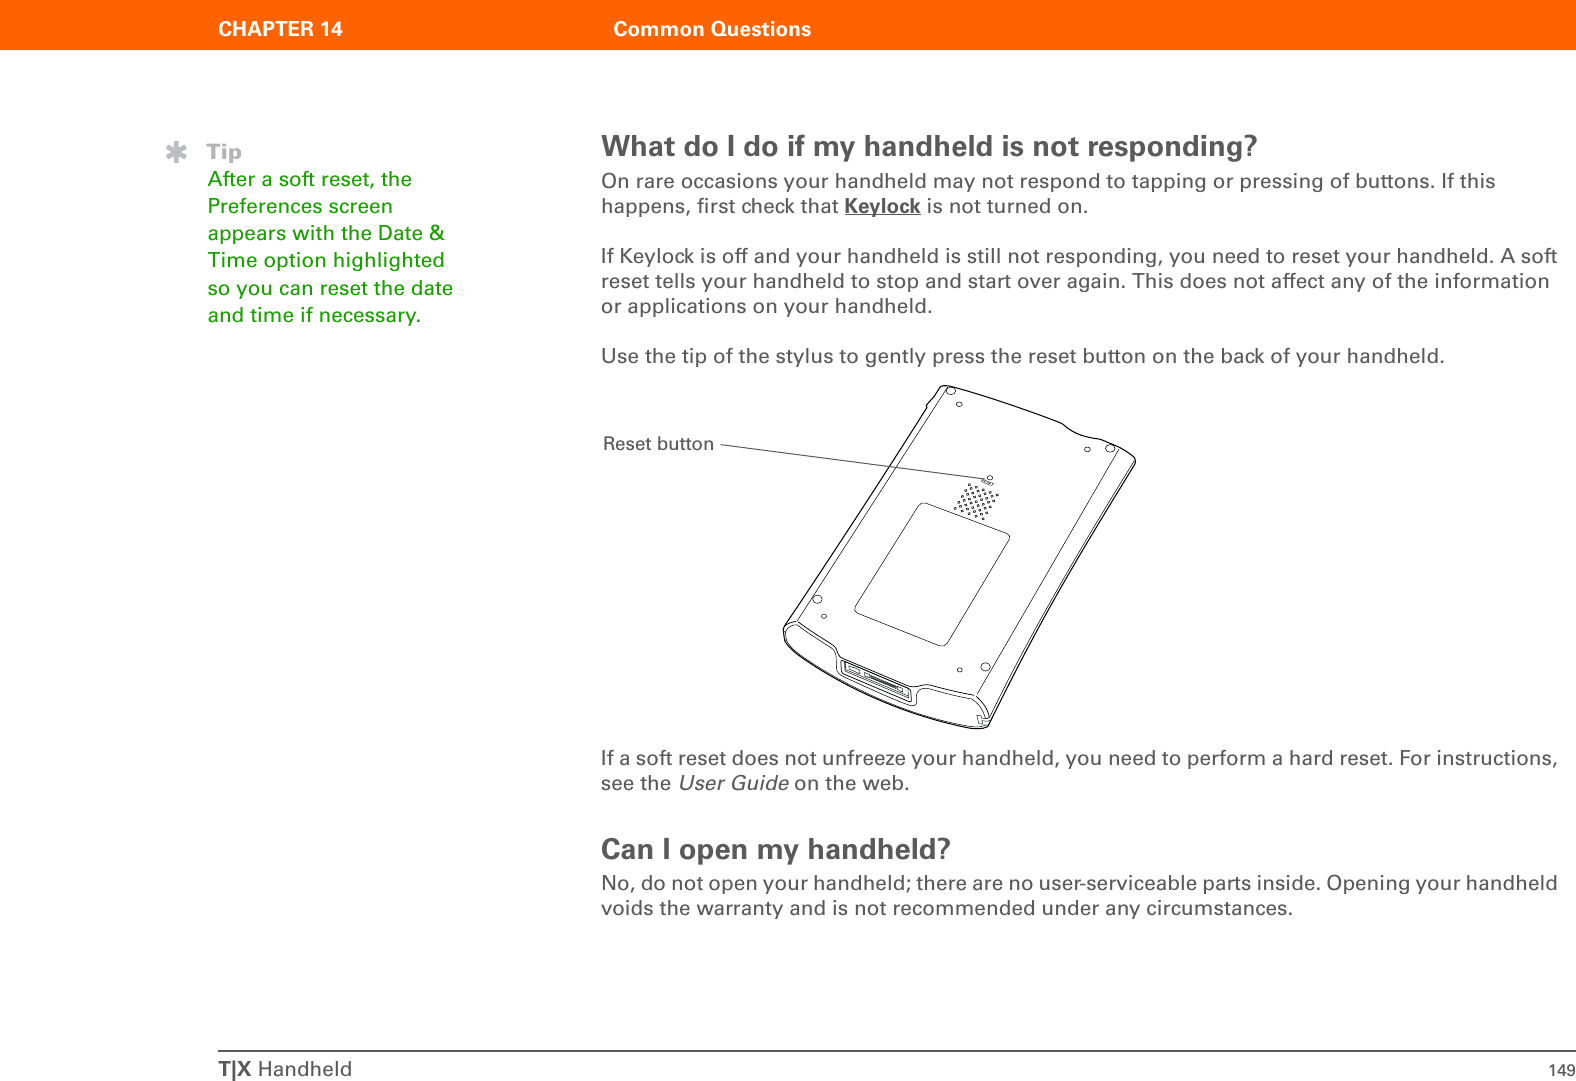
![CHAPTER 14 Common QuestionsT|X Handheld 148MAC ONLY• Make sure that HotSync Manager is enabled: Open the Palm folder and double-click the HotSync Manager icon. On the HotSync Controls tab, be sure Enabled is selected. If it is not, click it. On the Connection Settings tab, make sure that USB has a checkmark next to it.• Disconnect the USB sync cable from your computer, and then reconnect the cable and restart your computer.How do I change from synchronizing with Palm®Desktop software to synchronizing with Outlook?WINDOWS ONLYDuring CD installation, you chose a desktop software application to synchronize with your handheld. You may have chosen Palm Desktop software at that time. But if Microsoft Outlook already contains all of your contacts, appointments, tasks, and notes, you can change your synchronization method so that your handheld synchronizes with Outlook instead. You can also change from Outlook to Palm Desktop software. If you choose to synchronize with Outlook, info from Contacts, Calendar, Tasks, and Memos is synchronized with info in the corresponding application in Outlook. (Memos is called Notes in Outlook.) You can also set up the VersaMail® application to synchronize with Outlook. Other info, such as photos and notes, is synchronized with info in the corresponding application in Palm Desktop software.1. Insert the CD into your computer.2. Select Change your synchronization method.3. Follow the onscreen instructions for the desktop software you want to use.What do I do if my handheld doesn’t respond to taps correctly?If your handheld is not responding to taps correctly, you need to align the screen.NOTEBefore You Begin[!]You must have completed CD installation and chosen Palm Desktop software as your desktop application for synchronization in order to switch to Outlook. Note that you can choose Outlook as your synchronization software for Contacts, Calendar, Tasks, and Memos during CD installation.](https://usermanual.wiki/Palm/AOKI.Users-Manual-Original/User-Guide-591106-Page-159.png)

![T|X Handheld 151Product Regulatory InformationFCC StatementThis device complies with part 15 of the FCC rules. Operation is subject to the following two conditions: (1) This device may not cause harmful interference, and (2) this device must accept any interference received, including interference that may cause undesired operation.This equipment has been tested and found to comply with the limits for a Class B digital device, pursuant to Part 15 of the FCC rules. These limits are designed to provide reasonable protection against harmful interference in a residential installation. This equipment generates, uses, and can radiate radio frequency energy and, if not installed and used in accordance with the instructions, may cause harmful interference to radio communications. However, there is no guarantee that interference will not occur in a particular installation. If this equipment does cause harmful interference to radio or television reception, which can be determined by turning the equipment off and on, the user is encouraged to try to correct the interference by one or more of the following measures:• Reorient or relocate the receiving antenna.• Increase the separation between the equipment and receiver.• Connect the equipment into an outlet on a circuit different from that to which the receiver is connected.• Consult the dealer or an experienced radio/TV technician for help.The use of shielded I/O cables is required when connecting this equipment to any and all optional peripheral or host devices. Failure to do so may violate FCC rules.Changes or modifications not covered in this manual must be approved in writing by the manufacturer’s Regulatory Engineering Department. Changes or modifications made without written approval may void the user’s authority to operate this equipment.In August 1996, the FCC of the United States with its action in Report and Order FCC 96-326 adopted an updated safety standard for human exposure to radio frequency electromagnetic energy emitted by FCC regulated transmitters. Those guidelines are consistent with the safety standard previously set by both U.S. and international standards bodies. The design of this product complies with the FCC guidelines and these international standards.IMPORTANT[!]](https://usermanual.wiki/Palm/AOKI.Users-Manual-Original/User-Guide-591106-Page-162.png)