Palm CASY Phone User Manual Castle Plus EU UMTS mini User Guide
Palm Inc Phone Castle Plus EU UMTS mini User Guide
UserManual.wiki
>
Palm
>
CASY User Manual
Users Manual
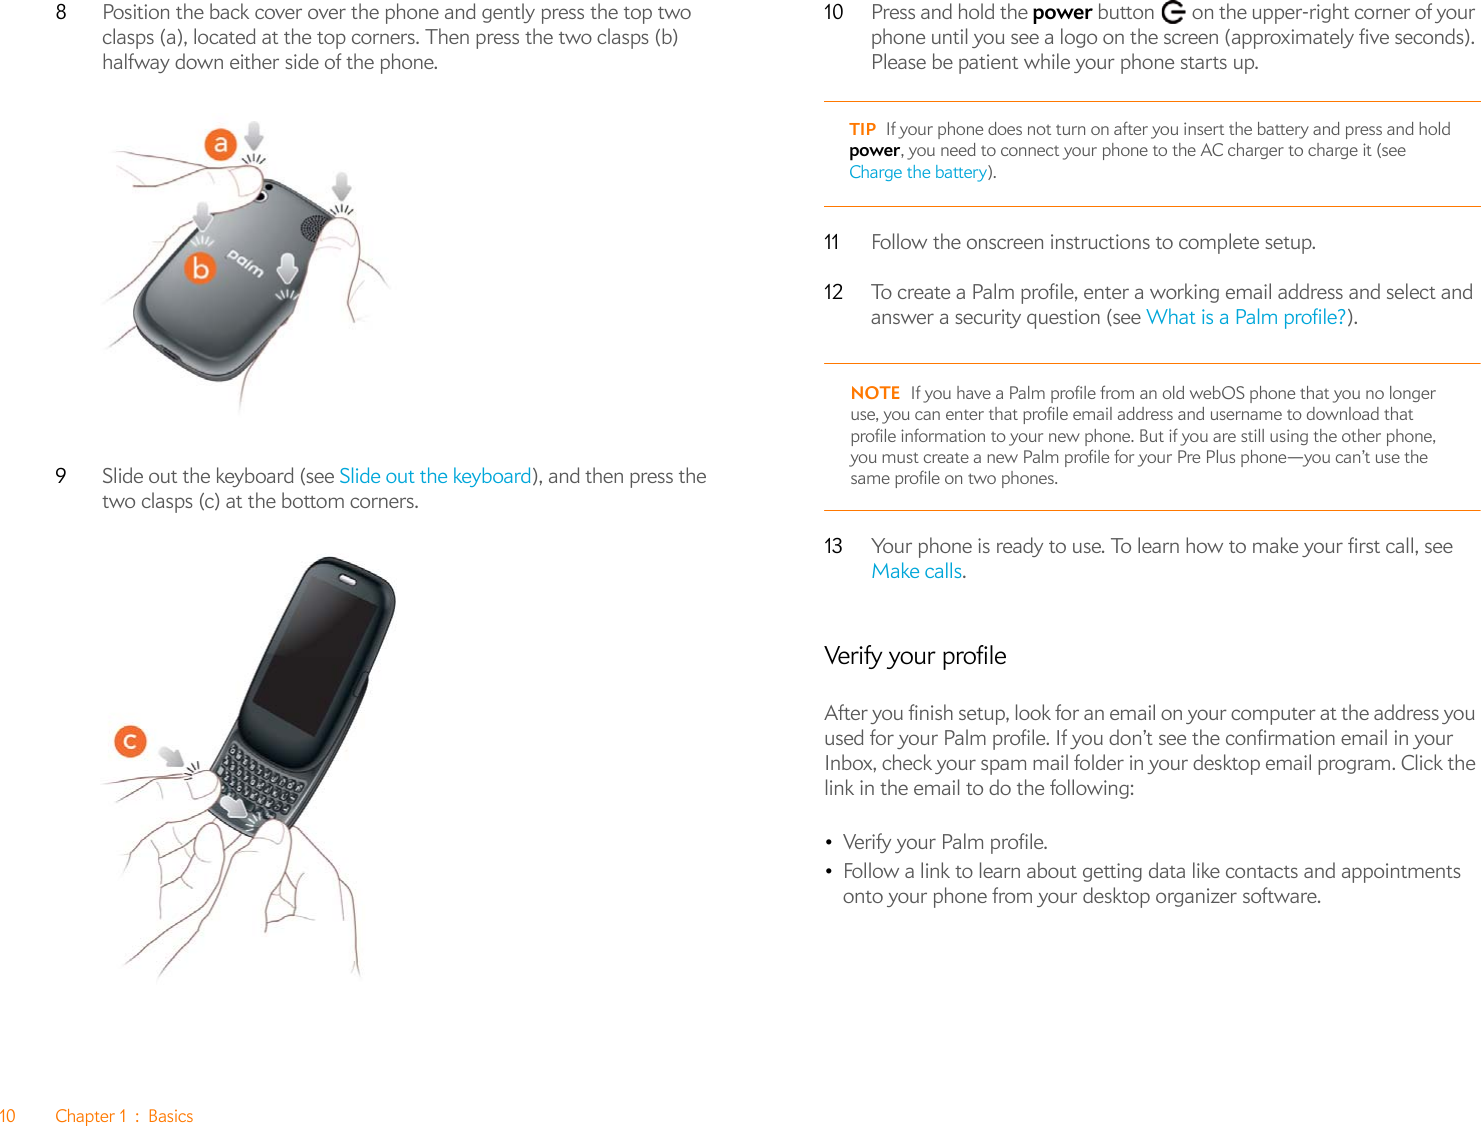
Navigation menu
Upload a User Manual
Namespaces
Wiki Guide
HTML
PDF
Info
Views
User Manual
Discussion / Help
Navigation


![24 Chapter 3 : Email and other messagesEmailSet up emailFollow this procedure if you have a common email provider, for example, AOL, EarthLink, or Yahoo! If you are setting up the Email application to work with your corporate email account that uses Microsoft Exchange. If the email account you set up takes advantage of the Synergy feature, then setting up email also synchronizes the provider's calendar and contacts.1Open Email .2The first time you open Email, do one of the following:•If this is the first email account you set up, the email address you used for your Palm profile is entered by default. Use that address, or enter an address for one of your other email accounts. Enter your password for the account, tap Sign In, and tap Done.•If you already set up an account that takes advantage of the Synergy feature and want to set up another one, tap Add An Account and enter the email address and password. Tap Sign In.3Any other time you open Email, open the application menu, tap Preferences & Accounts, and tap Add An Account. Enter the email address and password and tap Sign In.Create and send an email message1Open Email .2If this is the first time you have opened the Email application, and you have set up at least one email account, tap Done. If you have not set up an email account, see Set up email.3Ta p .4(Optional) Tap From to change the email account you are using to send the message. This option appears only if you have more than one email account set up on your phone.5In the To field, do one of the following to address the message:•Enter a contact name, initials, or email address. Tap the email address when it appears.•Tap to open the full contact list. Tap the contact you want, or enter a name or address to narrow the list.•Enter the full email address for a recipient who is not a contact.6(Optional) Tap To to open the Cc and Bcc fields, and enter an address.7(Optional) Repeat steps 5 and 6 to enter additional addresses.8Enter the subject, press Enter , and enter the body text.9(Optional) To format body text, do one of the following:•To enter bold, italic, or underlined text, open the application menu and tap Edit > [the option you want]. Enter the text. To turn off the formatting, open the application menu and tap Edit > [the option you want to turn off].•To enter colored text, open the application menu and tap Edit > scroll down > Te x t C olo r . Tap the color and enter the text.•To format text you already entered: Select the text (see Tex t se l e ctio n gestures), open the application menu, and tap Edit > [the option you want]. To turn off a formatting option, open the application menu and tap Edit > [the option you want to turn off]. For text color, tap the black square. 10 (Optional) To set the priority for the message, open the application menu and tap Set As Normal Priority or Set As High Priority. 11 Tap .](https://usermanual.wiki/Palm/CASY/User-Guide-1252938-Page-24.png)

![Chapter 4 : Personal information 31Assign a speed dial to a contactYou can assign a speed dial to any contact phone number. You can assign up to 26 speed dials.NOTE You cannot assign 1 (the E key) as a speed dial. The number 1 is reserved for dialing your voicemail system.1Open Contacts .2Search for a contact (see Find a contact), and tap the contact name.3Open the application menu and tap Set Speed Dial. 4Tap the phone number you want to assign a speed dial to, and then do one of the following:•To assign a speed dial: Tap the key to use as a speed dial.•To reassign a speed dial to the selected number: Tap the assigned speed dial and then tap Reassign To [Name].CalendarConnect to an online calendar: If you have a calendar in an online account that works with the Synergy™ feature (for example, Google or Microsoft Exchange), you can set up Calendar on your phone to synchronize and display events in the online calendar. Set up synchronization the first time you open Calendar (see Use Calendar for the first time) or anytime after that (see Customize Calendar). After you set up the connection to the online calendar, events you enter online show up automatically in Calendar, and events you enter on your phone sync to the online account, provided the account allows writing from the phone to the online account.Use Calendar for the first time1Open Calendar .2Do one of the following:•To set up your first online account to sync: Tap the account type, enter the account information, and tap Sign In.•To set up a second online account to sync: Ta p Add An Account, tap the account type, enter the account information, and tap Sign In.•To open Calendar without creating an online account: Tap Done. This opens your Palm profile account, and you can start creating events in this account.Create an eventIf you are using Calendar for the first time, you go through a few different steps to add or access the calendar events on your phone (see Use Calendar for the first time). Follow this procedure to add events directly on your phone after the first time you use Calendar. For information on managing your phone’s time settings, see Date & Time.1Open Calendar .2Ta p All or an online account name in the upper-right corner, and tap the calendar you want to use for this event. If you create an event in All Calendars view, the event is created in the calendar set as the default.3Go to the day you want and tap a blank time slot.4Enter the event name and press Enter .In Day view, available time slots between events are compressed and labeled X Hrs Free. To expand free time so you can enter an event, tap X Hrs Free.](https://usermanual.wiki/Palm/CASY/User-Guide-1252938-Page-31.png)