Palm KITT PDA Phone with GSM/GPRS/EDGE/WCDMA and Bluetooth User Manual 2 of 4
Palm Inc PDA Phone with GSM/GPRS/EDGE/WCDMA and Bluetooth 2 of 4
Palm >
Contents
- 1. User Manual 1 of 4
- 2. User Manual 2 of 4
- 3. User Manual 3 of 4
- 4. User Manual 4 of 4
- 5. User Manaul 4 of 4
User Manual 2 of 4
SYNCHRONIZING INFORMATION
SETTING UP WIRELESS SYNCHRONIZATION 73
4
CHAPTER
Server begins automatically. A status
bar appears onscreen, indicating sync
progress.
You can set a schedule for synchronization
to take place ny time info is updated on
either your smartphone or the server or at
certain intervals (see Setting the
synchronization schedule), or allow
synchronization to take place only when
you initiate it manually (see Initiating a
wireless sync manually).
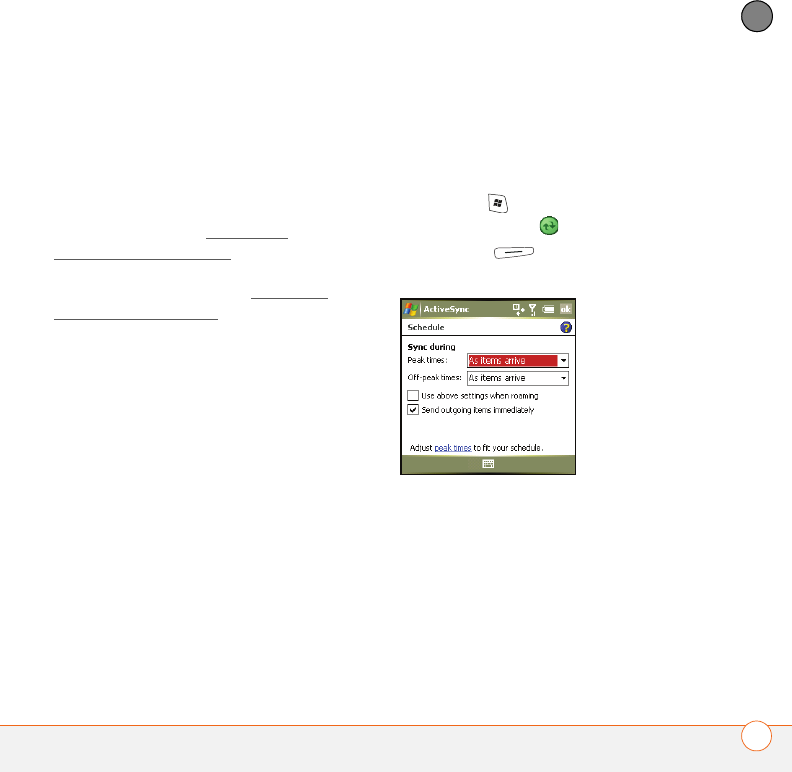
Setting the synchronization schedule
You can set a synchronization schedule in
either of the following situations:
•If your Microsoft Exchange Server
2003 is upgraded to Service Pack 2:
By default, wireless sync takes place
any time info is updated on either your
smartphone or the server using Direct
Push Technology. To save battery life,
however, you can set synchronization to
take place at intervals that you specify.
•If your Microsoft Exchange Server
2003 is not upgraded to Service
Pack 2: By default, wireless sync does
not take place automatically. Set a
synchronization schedule to have sync
take place either any time info is
updated on your smartphone or the
server, or at certain intervals.
1Press Start and select Programs.
2Select ActiveSync .
3Press Menu (right action key)
and select Schedule.
4Set any of the following options:
Peak times: Sets the frequency for
high-traffic time periods such as when
you are at work or when email volume
is high.
Off-peak times: Sets the frequency for
low-traffic time periods such as late at
night.
SYNCHRONIZING INFORMATION
SETTING UP YOUR COMPUTER FOR SYNCHRONIZATION
74
4
CHAPTER
Use above settings while roaming:
Sets the frequency while you are
roaming outside your wireless network.
To minimize roaming charges, uncheck
this box and synchronize manually while
roaming.
Send outgoing items immediately:
Sets whether items are sent as soon as
you select Send in the Inbox application,
or whether they are held until the next
synchronization.
5Press OK .
Initiating a wireless sync manually
If you want to control exactly when a
wireless sync takes place, or if it is not OK
to store your corporate email password on
your smartphone, you can initiate the sync
manually.
1To set up a manual sync, follow the
previous procedure, Setting the
synchronization schedule. In the Peak
times and Off-peak times lists, select
Manual.
2To initiate a manual sync, press Start
and select Programs.
3Select ActiveSync .
4Press Sync (left action key).
Setting up your
computer for
synchronization
Even if you are synchronizing email,
contacts, calendar events, and tasks
directly with Exchange Server 2003, we
recommend that you install the ActiveSync
desktop software from the Windows
Mobile Getting Started Disc so that you
can sync your smartphone directly with
your computer. Why? Using ActiveSync
enables you to synchronize additional info
such as pictures, videos, music files,
Microsoft Office files, and notes, so you
can create and work on files on your
smartphone and then sync changes to your
computer, where you then have a
backed-up and up-to-date copy of important
info.
SYNCHRONIZING INFORMATION
SETTING UP YOUR COMPUTER FOR SYNCHRONIZATION 75
4
CHAPTER
Before you can synchronize directly with
your computer, you need to install the
desktop synchronization software and
connect the sync cable to your computer.
Even if you have already installed a
previous version of ActiveSync desktop
software, you must install the software
that came with your smartphone on the
Windows Mobile Getting Started Disc.
System requirements
Your computer must meet the following
minimum system requirements:
•Windows 2000 or XP (later versions
may also be supported)
•32MB of available memory (RAM)
•170MB of free hard disk space
•CD drive
•Available USB port
Installing the desktop synchronization
software
BEFORE YOU BEGIN If you are installing
the software on a computer at work, make
sure your company allows you to install
new software. Contact your company’s
IT department for help.
1Close any applications that are currently
running on your computer, including
those running in the background. Your
computer needs to have all its
resources available to install the
software.
2Insert the Windows Mobile Getting
Started Disc into the CD drive on your
computer.
3Follow the installation instructions on
your computer.
During installation, you connect your
smartphone to your computer and sync
for the first time. Be sure to watch
what’s happening on both your
computer and your smartphone. For
more info, see Connecting your
smartphone to your computer and
Synchronizing information.
TIP
If you want to synchronize with a personal
information manager (PIM) other than
Microsoft Office Outlook, you must install a
third-party solution. Contact the PIM’s vendor
to learn if software is available for your Treo
750v smartphone.
SYNCHRONIZING INFORMATION
SETTING UP YOUR COMPUTER FOR SYNCHRONIZATION
76
4
CHAPTER
Using ActiveSync desktop software
After you install ActiveSync desktop
software, synchronization happens
automatically anytime you connect your
smartphone to your computer, as
described in the next section. However,
you can open the ActiveSync window on
your computer to do tasks such as the
following:
•Install applications from your computer
to your smartphone (see Installing
applications from your computer) or to
an expansion card inserted into your
smartphone’s expansion card slot (see
Installing applications onto an expansion
card)
•Change which applications synchronize
•Enter settings to synchronize wirelessly
with Microsoft Exchange Server 2003
To open the ActiveSync window,
double-click the ActiveSync icon in the
taskbar in the lower-right corner of your
computer screen.
DID
YOU
KNOW
?
During software installation,
you can select an option to synchronize email,
contacts, calendar events, and tasks directly
with Microsoft Exchange Server 2003. If you
choose this option, you are prompted to enter
your mail server address and domain name
and your Exchange Server account username
and password.
TIP
You can also install additional software
from the Windows Mobile Getting Started
Disc; see Installing bonus software from the
CD.
DID
YOU
KNOW
?
You can also change which
applications synchronize (see Changing which
applications sync) and enter settings to
synchronize wirelessly (see Setting up
wireless synchronization) in the ActiveSync
app on your smartphone. Whether you enter
changes on your smartphone or your
computer, the changes are transferred to the
other location the next time you synchronize.
TIP
If the ActiveSync icon does not appear in
the taskbar, go to Start, navigate to
Programs, and select Microsoft ActiveSync
to open the ActiveSync window.
SYNCHRONIZING INFORMATION
SETTING UP YOUR COMPUTER FOR SYNCHRONIZATION 77
4
CHAPTER
Desktop software installation also creates
a Mobile Device folder on your computer,
which you can see when you open My
Computer or Windows Explorer. When
your smartphone is connected to your
computer, opening the Mobile Device
folder displays an icon representing your
smartphone. It also displays folders
containing items you synchronized, such as
music files, pictures, and videos.
Connecting your smartphone to your
computer
1Prepare the AC charger by inserting the
adapter that fits the wall outlet you’re
going to use.
2Plug the AC charger into a wall outlet.
3Plug the USB sync cable into an
available USB port or into a powered
USB hub on your computer.
4Connect the sync cable to your
smartphone by inserting it into the two
sockets to the left on the bottom of the
smartphone.
5Connect the charger cable to the
remaining socket on the bottom of your
smartphone.
TIP
For best performance, plug your sync
cable directly into a USB port on your
computer. If your computer has USB ports on
both the front and back, we suggest using the
back port. If you use a USB hub, make sure it’s
a powered hub.
DID
YOU
KNOW
?
The AC charger contains an
indicator light that glows when the charger is
connected to a power source.
SYNCHRONIZING INFORMATION
SYNCHRONIZING USING THE SYNC CABLE
78
4
CHAPTER
Synchronizing using
the sync cable
After you install ActiveSync desktop
software, synchronization takes place
automatically anytime your smartphone is
connected to your computer and info is
updated in either location.
1Connect your smartphone to your
computer. You should hear the
ActiveSync® tone.
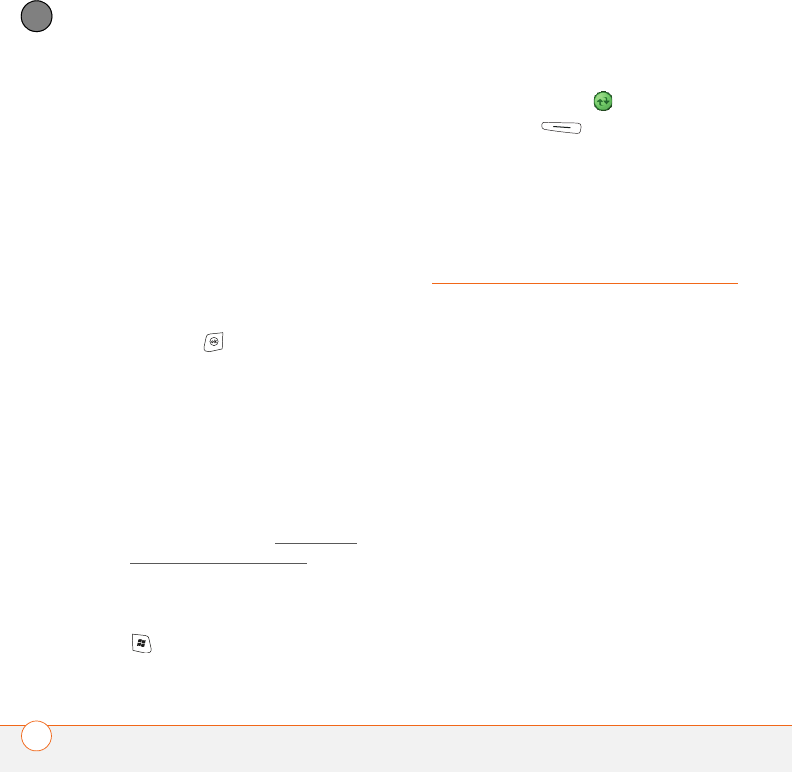
USB sync
cable
This button has no
function with your
Treo 750v smartphone
SYNCHRONIZING INFORMATION
OTHER WAYS TO SYNCHRONIZE 79
4
CHAPTER
2Look for the ActiveSync icon at the
top of your smartphone’s screen and
the ActiveSync icon in the taskbar
on your computer.
•If you don’t see the ActiveSync icon,
make sure the desktop
synchronization software that came
with your smartphone is running on
your computer.
•If you have any problems
synchronizing, see Synchronization for
troubleshooting suggestions.
Other ways to
synchronize
Synchronizing over a Bluetooth
connection
You can wirelessly synchronize your
computer and smartphone using Bluetooth
wireless technology.
BEFORE YOU BEGIN Do the following:
•Make sure your computer is equipped
with Bluetooth® wireless technology.
•If you did not do so during initial setup,
install the ActiveSync Plug-in for
Bluetooth wireless technology from the
Windows Mobile Getting Started Disc.
This button has no
function with your
Treo 750v
smartphone
TIP
We recommend that you install the backup
and restore app from the Windows Mobile
Getting Started Disc. A backup and restore
app preserves your data and settings if your
smartphone is ever lost or stolen, and it
protects your data during a hard reset.
SYNCHRONIZING INFORMATION
OTHER WAYS TO SYNCHRONIZE
80
4
CHAPTER
1On your computer, right-click the
ActiveSync icon in the taskbar in
the lower-right corner of the screen, and
select Connection Settings.
2Check the Allow connections for one
of the following box, and then select
Bluetooth.
3On your smartphone, press Start
and select Settings.
4Select the Connections tab, and then
select Bluetooth .
5Check the Turn on Bluetooth box to
turn on your smartphone’s Bluetooth
feature.
6Press Start and select Programs.
7Select ActiveSync .
8Press Menu (right action key)
and select Connect via Bluetooth.
9If this is the first time you’re making a
Bluetooth connection to this computer,
follow the onscreen prompts to set up a
Bluetooth partnership with this
computer. See Connecting to devices
with Bluetooth® wireless technology for
more information on partnerships.
10 Select Sync.
11 When synchronization has finished,
press Menu (right action key)
and select Disconnect Bluetooth.
Synchronizing over an infrared
connection
If your computer has an IR (infrared) port,
you can synchronize with your computer
wirelessly using your smartphone’s IR port.
BEFORE YOU BEGIN Make sure your
computer is equipped with an IR port.
1Set up your computer to receive
infrared beams. See ActiveSync Help on
your computer for details.
2Point your smartphone’s IR port directly
at the IR port on your computer.
3On your smartphone, press Start
and select Programs.
TIP
To install the plug-in for Bluetooth
technology, insert the Windows Mobile
Getting Started Disc into your computer’s CD
drive, and then select Add Programs. Select
the plug-in option on the Add Programs
screen and follow the onscreen instructions.
SYNCHRONIZING INFORMATION
SETTING SYNCHRONIZATION OPTIONS 81
4
CHAPTER
4Select ActiveSync .
5Press Menu (right action key)
and select Connect via IR.
6Select Sync.
Synchronizing with multiple computers
You can set up your smartphone to
synchronize with up to two computers as
well as with Exchange Server 2003. When
synchronizing with multiple computers, the
items that you synchronize appear on all
the computers.
For example, if you set up to sync your
smartphone with two computers named
C1 and C2, when you sync Contacts and
Calendar on your smartphone with both
computers, you get the following results:
•The contacts and calendar
appointments that were on C1 are now
also on C2.
•The contacts and calendar
appointments that were on C2 are now
also on C1.
•The contacts and calendar
appointments from both computers are
on your device.
NOTE Microsoft® Office Outlook® E-mail
can synchronize with only one computer.
Setting
synchronization
options
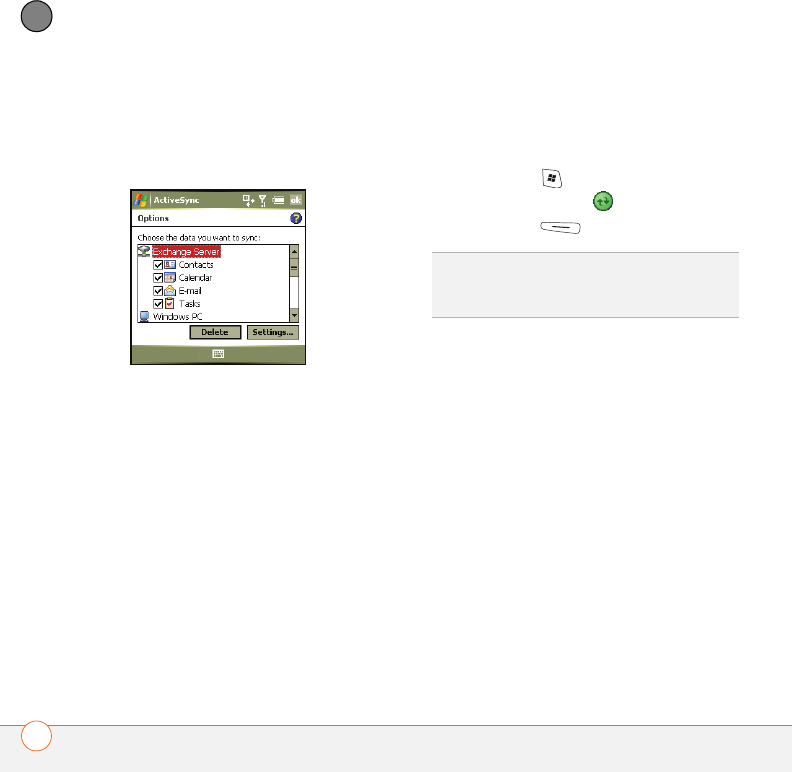
Changing which applications sync
You must select sync options if you want to
synchronize notes, pictures, and other
types of files.
1Press Start and select Programs.
2Select ActiveSync .
3Press Menu (right action key)
and select Options.
4Do any of the following:
•Check the box next to any items you
want to synchronize. If you cannot
check a box, you might have to
uncheck a box for the same
information type elsewhere in the list.
•Uncheck the box next to any items
you want to stop synchronizing.
SYNCHRONIZING INFORMATION
SETTING SYNCHRONIZATION OPTIONS
82
4
CHAPTER
•Select an item and then select
Settings to customize the settings for
that item. Settings are not available
for all items.
Stopping synchronization
If you ever need to manually stop
synchronization, follow these steps:
1Press Start and select Programs.
2Select ActiveSync .
3Press Stop (left action key).
TIP
To stop synchronizing all items on a
computer, select the computer name and
then select Delete.

CHAPTER
5
Your email
You already know how efficient email is for staying in touch.
Now your smartphone brings you a new level of convenience:
email on the go. Enjoy the ease and speed of communicating
with friends, family, and colleagues anywhere you can access
your network operator’s data network.
You can send photos to your friends and family, or create
Microsoft Word or Excel files and send them to your
colleagues. You can also receive attachments to view and edit
at your convenience.
Benefits
•Receive photos, sound files, Word
and Excel files, and more
•Attach and send files of almost any
type
•Save messages from your
computer to view at a convenient
time

In this chapter
Setting up. . . . . . . . . . . . . . . . . . . . . . . . . . . . . . . . . . . . . . . . . . . . . 85
Sending and receiving messages . . . . . . . . . . . . . . . . . . . . . . . . . . 89
Working with email messages. . . . . . . . . . . . . . . . . . . . . . . . . . . . . 93
Sending email messages from within another application. . . . . . . . 97
YOUR EMAIL
SETTING UP 85
5
CHAPTER
Setting up
You can use the Inbox application to send
and receive email. Before you use your
smartphone to send or receive messages,
consult your network operator for pricing
and availability of email services and data
rate plans.
BEFORE YOU BEGIN Do the following:
•Make sure your phone is on before you
send or receive messages.
•If you want delivery of Outlook email
using Direct Push Technology, make
sure that your IT organization has
upgraded your Exchange Server 2003 to
Service Pack 2.
Entering settings for an email account
You can use your smartphone to access
the many kinds of email you may use:
corporate, ISP (like EarthLink and
Comcast), and web-based (like Gmail and
Yahoo! Mail Plus). Before you can send and
receive email on your smartphone, you
need to decide which type of email
account you want to access. The setup
process is different for each email account
type, so it is very important that you select
the correct type.
NOTE Once you go through the setup
process for your email account, you use
the Inbox application on your smartphone
to send and receive email. The Inbox
application is the home base for viewing
and sending messages for all your email
accounts.
DID
YOU
KNOW
?
You can enter settings for
more than one email account, and you can
use different email setup applications on your
smartphone to enter settings for different
accounts, depending on which app best
meets your needs.
DID
YOU
KNOW
?
Operator-provided push mail is
different from the Direct Push Technology
used to synchronize email wirelessly with an
Exchange Server.
YOUR EMAIL
SETTING UP
86
5
CHAPTER
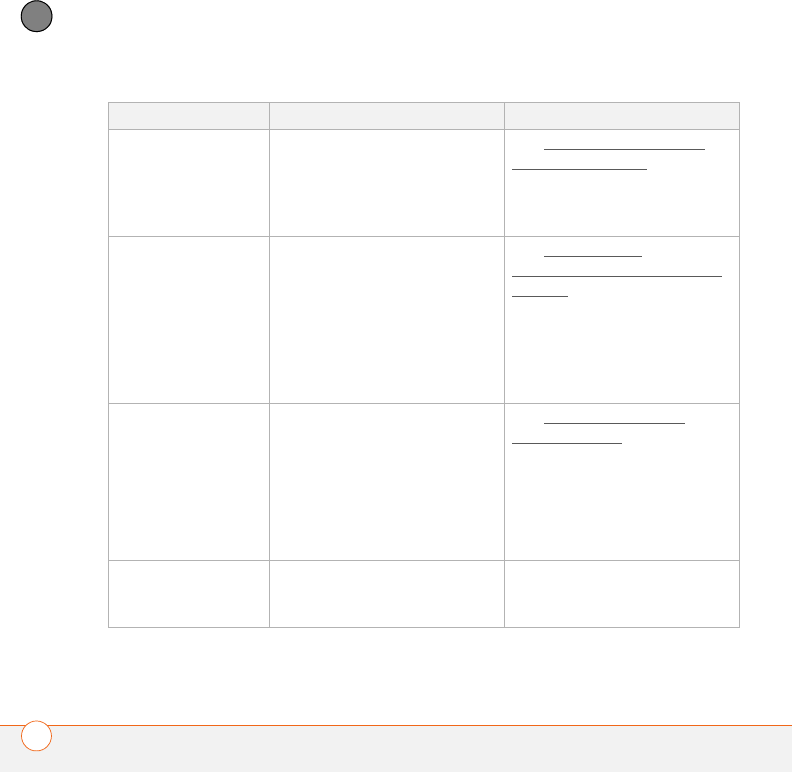
Email account type Type of email you can access How to set up
POP/IMAP You can obtain mail from an
ISP or Internet mail account
such as EarthLink, or from a
small business or corporate
Internet mail account.
See Setting up an IMAP or
POP email account.
Operator-provided
push mail
Your network operator most
likely offers services for
accessing personal and
corporate email accounts.
Please refer to your network
operator or IT organization for
additional information about
these email services.
See Setting up an
operator-provided push email
account.
You may need to contact your
network operator to check if
your subscription is enabled for
push email.
Microsoft Exchange
Server
You can retrieve corporate
email using a Microsoft
Exchange Server. Wireless
email access can be supported
if your company is using the
Microsoft Exchange
ActiveSync®.
See Setting up wireless
synchronization.
You may need to check with
your IT organization to ensure
that Exchange ActiveSync is
supported and to obtain the
configuration settings.
Free web-based
email
You can access mail from
Hotmail and other free
web-based systems.
Access the email website
directly using your
smartphone’s web browser.
YOUR EMAIL
SETTING UP 87
5
CHAPTER
Setting up an operator-provided push
email account
Your push email account provides secure,
remote access to corporate and personal
email, contacts, calendar, tasks, and
desktop files directly from your
smartphone.
BEFORE YOU BEGIN Make sure your
phone is on.
1Press Start and select Programs.
2Select Email Setup .
3Follow the onscreen instructions for
downloading and installing the
software.
Setting up an IMAP or POP email account
You can send and receive email messages
using an email account that you have with
an Internet service provider (ISP), an email
account that you access using a VPN
server connection (such as a work
account), or any other IMAP or POP email
account.
BEFORE YOU BEGIN Work with your
email provider or system administrator to
gather the following info:
•Account type (POP3 or IMAP)
•Mail server name for receiving mail
•Mail server name for sending mail
•Your username and password
•Any special security requirements
1Go to your Today screen.
2Press E-mail (left action key).
3Press Menu (right action key)
and select To o l s > New Account.
4Enter the email address that you want
to set up, and then press Next
(right action key).
TIP
Use the web browser to view your free
Yahoo! mail account on the web.
TIP
If you have problems configuring your
account, go to www.palm.com/emailsetup for
more information.
DID
YOU
KNOW
?
On the Accounts tab in
Messaging Options, an asterisk appears next
to the accounts you create.
YOUR EMAIL
SETTING UP
88
5
CHAPTER
5The setup process searches an online
database to obtain the settings for your
account. When the Status box displays
Completed, press Next (right
action key). If no settings are returned,
enter the settings you obtained from
your email provider, and then press
Next (right action key).
6Enter your name, username, and
password.
7If you want to enter your password each
time you access this account, do not
check the Save password box. If you
want your password entered
automatically, check this box.
8Press Next (right action key).
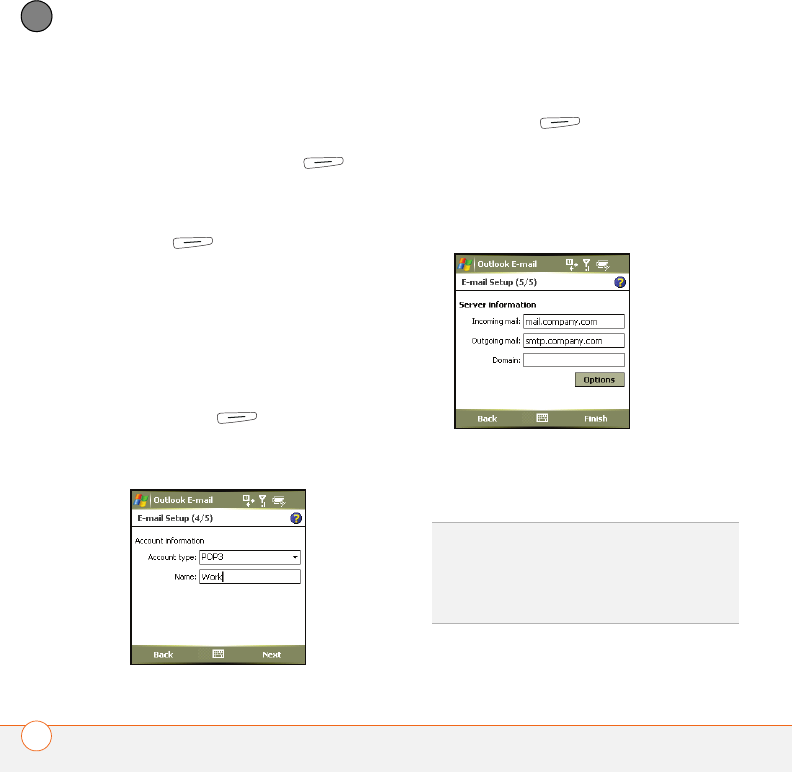
9Select the Account type list, and then
select POP3 or IMAP.
10 Enter a name for this account, and then
press Next (right action key). For
example, if this is your work email
account, enter “Work” or your
company’s name.
11 Enter the name of the Incoming mail
and Outgoing mail servers.
NOTE Do not enter anything in Domain. It
is not needed for POP3 or IMAP accounts.
TIP
If you are unable to send mail using your
email provider’s or corporate mail system’s
outgoing mail server, contact your network
operator to see if you are required to use their
server and, if so, to obtain the server name.
YOUR EMAIL
SENDING AND RECEIVING MESSAGES 89
5
CHAPTER
12 (Optional) Select Options to select
download settings for this account.
13 Press Finish (right action key).
Sending and
receiving messages
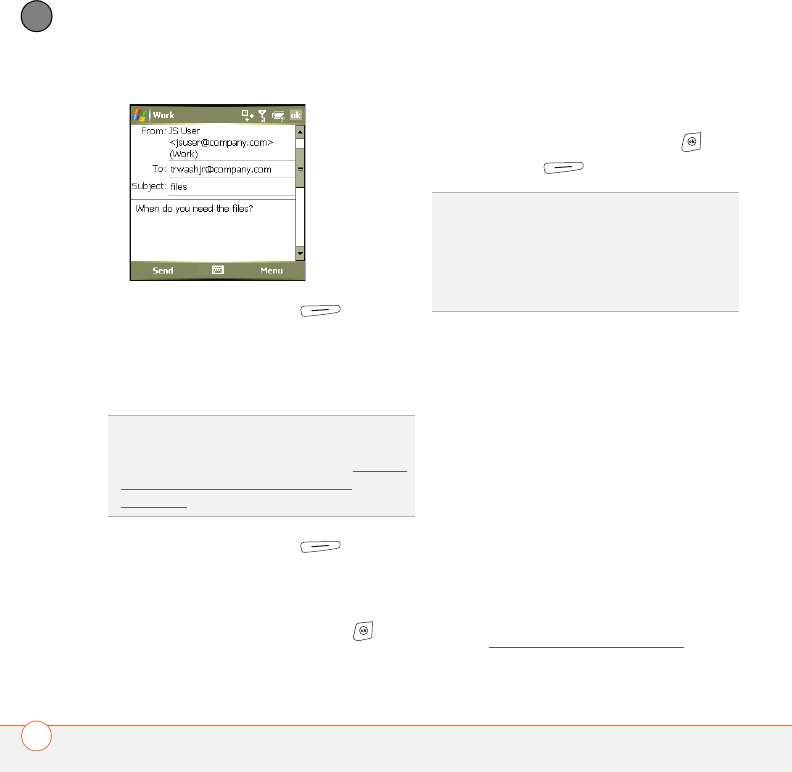
Creating and sending an email message
1Go to your Today screen.
2Press E-mail (left action key).
3Press Left to cycle through your
Inbox accounts until you see the right
email account name in the title bar.
4Press New (left action key).
5Enter the recipient’s email address.
Here are some shortcuts:
•If the recipient’s name and email
address are in your Contacts list,
enter the first few letters of the
recipient’s first or last name, and then
select the recipient’s name.
•If the recipient’s name is in an online
address book, you can find the name
and add it. See Using an online
address book.
6Select Subject and enter a title for the
message.
7Press Down to go to the body of the
message. Enter your message, or press
Menu (right action key), select
My Text, and then select a predefined
phrase you want to insert.
TIP
To delete an email account or to edit
account settings—for example, if you need to
change the name of the outgoing mail
server—press Menu (right action key) and
select Tools > Options. To delete an account,
highlight the account you want press and hold
Center on the 5-way, and then select Delete.
To edit an account, select the account and
change the settings you want to edit.
DID
YOU
KNOW
?
You can also access the Inbox
application from the Start menu.
DID
YOU
KNOW
?
When addressing a message,
you can enter the contact’s first and last
initials separated by a space.
YOUR EMAIL
SENDING AND RECEIVING MESSAGES
90
5
CHAPTER
8(Optional) Press Menu (right
action key) and select Insert. Select the
type of item you want to attach, and
then select the file or record a voice
note.
9(Optional) Press Menu (right
action key) and do one or both of the
following:
•Select Spell Check. When the spell
check is complete, press OK .
•Select Message Options. Select the
Priority list, select a setting for the
message, and then press OK .
10 Press Send (right action key).
Receiving email messages
How you receive email messages depends
on the type of account you are using and
how you synchronize:
•If you set up a push email account, new
email messages are sent to your
smartphone as they appear on the
server.
•If you synchronize wirelessly with your
Exchange Server using Microsoft
Exchange ActiveSync, new email
messages are sent to your smartphone
when they appear on the server,
according to the schedule you set up
(see Setting the synchronization
TIP
You can send an email message with a file
attached from directly within other
applications on your smartphone; see Sending
email messages from within another
application.
TIP
To save memory on your smartphone, turn
off the option to save sent messages in the
Saved folder. In the Inbox, press Menu (right
action key) and select Tools > Options. Select
Message, and then uncheck the Keep copies
of sent items in Sent folder box.
YOUR EMAIL
SENDING AND RECEIVING MESSAGES 91
5
CHAPTER
schedule), or when you manually initiate
a sync (see Initiating a wireless sync
manually.
•If you use ActiveSync desktop software
to synchronize your smartphone with
your computer, messages in Outlook on
your computer are transferred to your
smartphone when you connect your
computer and your smartphone (see
Connecting your smartphone to your
computer).
•For all other types of accounts,
including ISP accounts and accounts
you access using a VPN server
connection (typically a work account),
follow these steps to send and receive
messages:
1Go to your Today screen.
2Press E-mail (left action key).
3Press Left to cycle through your
accounts until the name of the account
you want to synchronize appears in
the title bar.
4Press Menu (right action key)
and select Send/Receive to
synchronize your smartphone with your
email server.
Receiving attachments
1Scroll to the attachment name (below
the subject) to highlight it and mark it
for download.
2Synchronize the email account that
contains the message as described in
the previous sections.
3Scroll to and select the attachment
name (below the subject) to open the
attachment.
TIP
If you sync email with Microsoft Exchange
Server 2003, you can synchronize messages
in subfolders you create. In the Inbox, press
Menu (right action key) and select Tools >
Manage Folders. Folders containing
subfolders display a +. Select the + to view
the subfolders. Check the box to the left of
any subfolder you want to sync.
YOUR EMAIL
SENDING AND RECEIVING MESSAGES
92
5
CHAPTER
If you are synchronizing with Outlook on
your computer and want to download
attachments automatically, do the
following:
1Press Start and select Programs.
2Select ActiveSync .
3Press Menu (right action key)
and select Options.
4Select E-mail, and then select
Settings.
5Check the Include file attachments
box.
6Press OK .
To automatically download attachments
from an IMAP4 email account (typically an
ISP account) or an account that you access
using a VPN server connection (typically a
work account), do the following:
1Go to your Today screen.
2Press E-mail (left action key).
3Close any open messages.
4Press Menu (right action key)
and select To o l s > Options
5On the Accounts tab, select the IMAP4
account name.
6Press Next (right action key) until
you reach Server information, and then
select Options.
7Press Next twice, and then select Get
full copy of messages and When
getting full copy, get attachments.
DID
YOU
KNOW
?
You can receive and open
attachments in a number of different formats,
including PDF. PDF file attachments open in
Picsel PDF Viewer on your smartphone.
TIP
To store attachments on an expansion
card, press Menu (right action key) and select
Tools > Options. Select Storage and then
check the Store attachments on a storage
card box.
DID
YOU
KNOW
?
Embedded images and objects
cannot be received as attachments, unless
you have an IMAP4 email account with TNEF
disabled. Note that TNEF must be enabled to
receive meeting requests.
YOUR EMAIL
WORKING WITH EMAIL MESSAGES 93
5
CHAPTER
Working with email
messages
Adding an online address book
Many email servers, including servers
running Exchange Server, can verify names
with an online address book, also called a
directory service or a Global Address List.
After you create and enable an email
account, the Inbox application checks your
contacts list and then the directory service
to verify names that you enter in the To,
Cc, and Bcc fields.
BEFORE YOU BEGIN Do the following:
•Ask your system administrator for the
name of the directory service and the
server, and whether authentication is
required for accessing an online address
book.
•If your company is using an Exchange
Server, you must first synchronize with
the Exchange Server to enable the
Global Address List to find a Contact.
1In the message list, press Menu
(right action key) and select To o l s >
Options.
2Select the Address tab.
3Select the address book you want to
check for email addresses, and then
select Add.
4Enter the name of the Directory service.
5Enter the server name.
6If your server requires authentication,
check the box, and then enter your
username and password.
7(Optional) Check the Check name
against this server box to enable this
directory service.
8Select OK.
Using an online address book
You can access contact information, such
as an email address or phone number, from
your organization’s online address book or
Global Address List (GAL). To access a
TIP
To delete a directory service, highlight it,
press and hold Center on the 5-way, and then
select Delete.
YOUR EMAIL
WORKING WITH EMAIL MESSAGES
94
5
CHAPTER
GAL, make sure you are accessing an
Exchange Server 2003 upgraded to Service
Pack 2. This feature is useful only if you
know the exact name as it appears in the
directory.
BEFORE YOU BEGIN Add an online
address book to your smartphone. See
Adding an online address book.
1In a new message, tap the To box.
2Press Menu (right action key),
and select Add Recipient.
3Press Menu (right action key),
and select Find Online.
4Enter the contact name as it appears in
the directory and tap Find. You must
spell the contact name correctly.
Forwarding a message
1Open the message you want to
forward.
2Press Menu (right action key)
and select Forward.
3Address the message and enter any
text you want to add.
4Press Send (left action key).
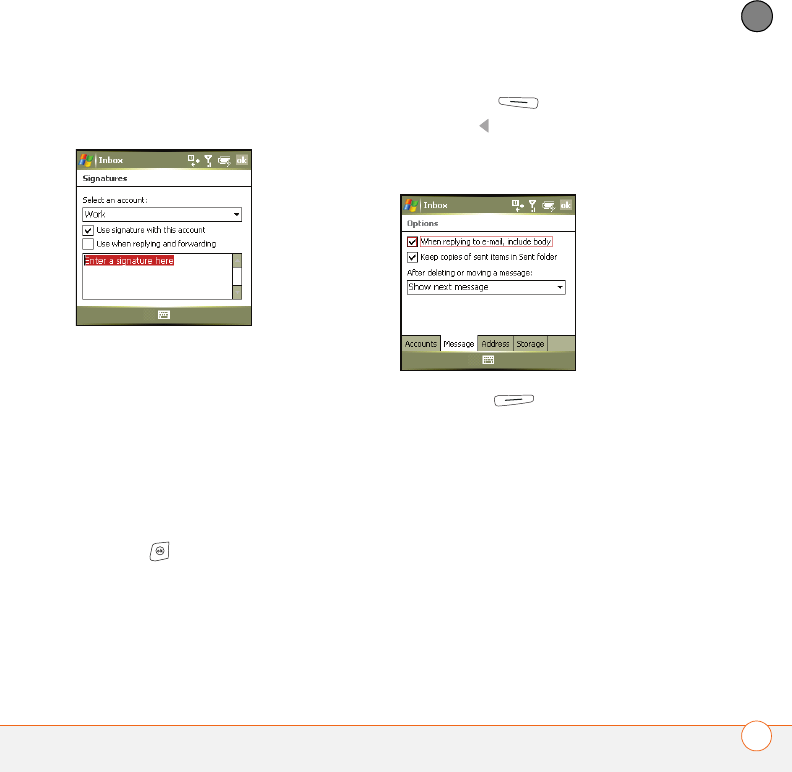
Adding a signature to your messages
You can use a different signature with each
email account.
1Press E-mail (left action key).
2Press Menu (right action key)
and select To o l s > Options.
3On the Accounts tab, select
Signatures.
DID
YOU
KNOW
?
You can use the Global
Address List to find a contact. In Contacts,
press Menu (right action key), and then select
Find Online. When sending a meeting
request, select Attendees, press Menu (right
action key), and then select Find Online.
TIP
When you sync with Outlook on your
computer, disable your online address books
to avoid errors. Press Menu (right action key)
and select Tools > Options. Select Address,
select each online address book, and then
uncheck the Check name against this server
box. Be sure to turn this option back on if you
synchronize other email accounts.
YOUR EMAIL
WORKING WITH EMAIL MESSAGES 95
5
CHAPTER
4Select the account for which you want
to create a signature.
5Check the box to add this signature to
new messages you create with this
account.
6(Optional) Check the box to add this
signature to messages you reply to or
forward with this account.
7Select the default signature text and
enter the signature text you want to
use.
8Press OK .
Customizing your email settings
When you customize settings for an email
account, the options you choose apply to
that account only.
1Press E-mail (left action key).
2Press Left to cycle through your
accounts until the name of the account
you want appears in the title bar.
3Press Menu (right action key)
and select To o l s > Options.
4Select the Message tab and set any of
the following options:
When replying to e-mail, include
body: Indicates whether the body of a
message you received appears in your
response to that message.
Keep copies of sent items in Sent
folder: Indicates whether messages
you send are stored in the Sent folder.
YOUR EMAIL
WORKING WITH EMAIL MESSAGES
96
5
CHAPTER
After deleting or moving a message:
Specifies what you want to see after
you delete or move an email message.
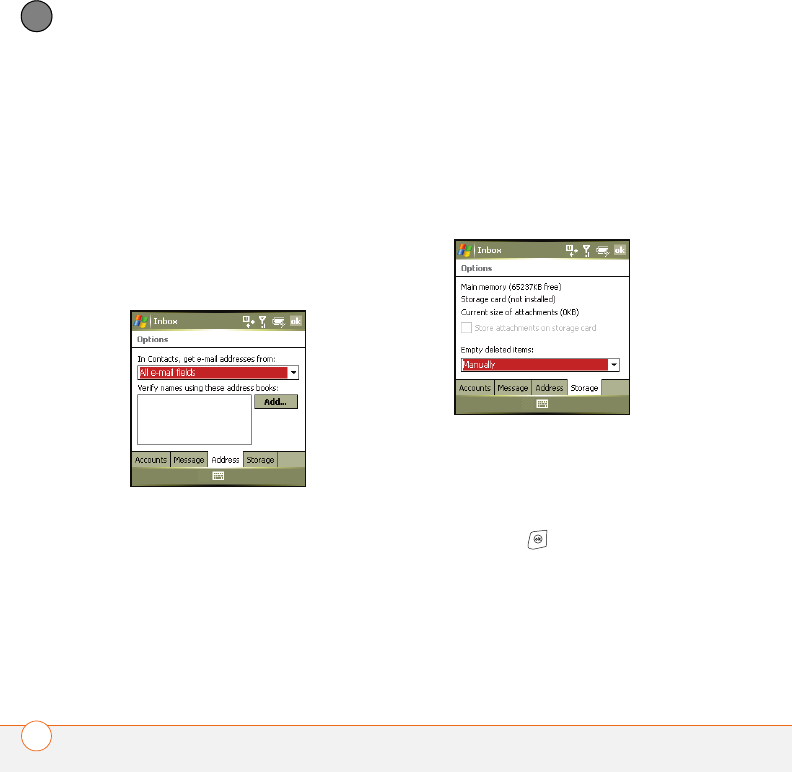
5Select the Address tab and set any of
the following options:
In Contacts, get e-mail addresses
from: Indicates whether you want to
check Contacts in addition to any
directory services for email addresses.
Verify names using these address
books: Indicates which directory
services you want to check for email
addresses.
Add: Enables you to add directory
services to the list of online address
books.
6Select the Storage tab and set any of
the following options:
Store attachments on storage card:
Indicates whether you want to
automatically store email attachments
on an expansion card.
Empty deleted items: Indicates
whether you want to automatically
empty the Deleted folder, and when you
want this to occur.
7Press OK .
YOUR EMAIL
SENDING EMAIL MESSAGES FROM WITHIN ANOTHER APPLICATION 97
5
CHAPTER
Sending email
messages from
within another
application
You can send files such as pictures, videos,
and ringtones as attachments to email
messages; see Creating and sending an
email message for instructions.
You can send certain files as attachments
from within the application where the file is
created or stored. For example, if you take
a picture with your smartphone’s built-in
camera, you can select an option to send
the picture as an attachment to an email
message. This feature can be used with
videos and sound files as well. For details,
see the chapter on the specific application.

YOUR EMAIL
SENDING EMAIL MESSAGES FROM WITHIN ANOTHER APPLICATION
98
5
CHAPTER

CHAPTER
6
Your text and multimedia
messages
If you need to get a short message to a friend or a co-worker
fast, send a text message from your smartphone to their
mobile phone or email address.
If you need more than text to express yourself, use multimedia
messaging to give your message extra impact by adding a
photo, video, or sound file.
Benefits
•Enjoy quick communication
•Use text messaging to chat with
friends
•Be as simple or as creative as you
want

In this chapter
Using the Messaging application . . . . . . . . . . . . . . . . . . . . . . . . . . . 101
Customizing the Messaging application. . . . . . . . . . . . . . . . . . . . . . 110
YOUR TEXT AND MULTIMEDIA MESSAGES
USING THE MESSAGING APPLICATION 101
6
CHAPTER
Using the Messaging
application
You can use the Messaging application to
send and receive brief text messages
(SMS) and multimedia messages (MMS).
Before you use your smartphone to send or
receive messages, consult your network
operator for pricing and availability of text
and multimedia messaging services.
Creating and sending a text message
Each text message can have up to 160
characters. You can send a message of
more than 160 characters, but the
message will automatically be split into
several messages. (If you send a text
message to an email address, the email
address is deducted from the
160-character count.)
1Press Start and select Messaging.
2Press New (left action key).
3Enter the recipient’s mobile phone
number or email address. Here are
some shortcuts:
•If the recipient’s name and mobile
number are in your Contacts list, type
the first few letters of the first or last
name or simply enter the first initial,
followed by a space, and then the last
initial to find a name.
•Press Center to view a list of
recently used addresses, and select
the recipient from the list. Select Add
Recipient to add a recipient from your
Contacts list.
DID
YOU
KNOW
?
You can send and receive text
messages even while you are on a phone call.
This is easiest when using a hands-free
headset or the speakerphone.
TIP
To address a message to multiple
recipients, separate the addresses by
pressing Enter or entering a semicolon (;). You
can send a message to up to 20 addresses.
TIP
To send a message to a different number
for a contact, select the contact in the To field,
and then edit the number that appears in the
box directly below the contact number. You
can also select a number by pressing Center
on the 5-way, and then edit it.

YOUR TEXT AND MULTIMEDIA MESSAGES
USING THE MESSAGING APPLICATION
102
6
CHAPTER
4Enter your message, or tap and
then select a predefined phrase you
want to insert.
5(Optional) Tap and then select an
emoticon to add to your message.
6Press Send (left action key).
Creating and sending a multimedia
message
Multimedia messages consist of pictures,
videos, text, and sounds presented as one
or more slides. You can include any of the
following items:
•Ringtones
•MIDI
•Sound clips
•AMR
•QCELP
•Pictures
•JPEG
•GIF
•WBMP
•Videos
•3GPP
•3GPP2
•MPEG4
Outgoing multimedia messages can be up
to 300KB by default, but your network
operator may change the maximum
message size.
TIP
You can also access predefined phrases
and emoticons by pressing Menu (right action
key) on the message compose screen.
TIP
Some symbols can’t be used in text
messages. Invalid characters are automatically
replaced by the Messaging application.
YOUR TEXT AND MULTIMEDIA MESSAGES
USING THE MESSAGING APPLICATION 103
6
CHAPTER
BEFORE YOU BEGIN Not all service plans
support multimedia messaging. If you’re
not sure, check with your network operator
to confirm that your service plan includes
this feature.
1Press Start and select Messaging.
2Press Menu (left action key) and
select New MMS.
3Enter the recipient’s mobile phone
number or email address. Here are
some shortcuts:
•If the recipient’s name and mobile
number are in your Contacts list, type
the first few letters of the first or last
name or simply enter the first initial,
followed by a space, and then the last
initial to find a name.
•Press Center to view a list of
recently used addresses, and select
the recipient from the list. Select Add
Recipient to add a recipient from your
Contacts list.
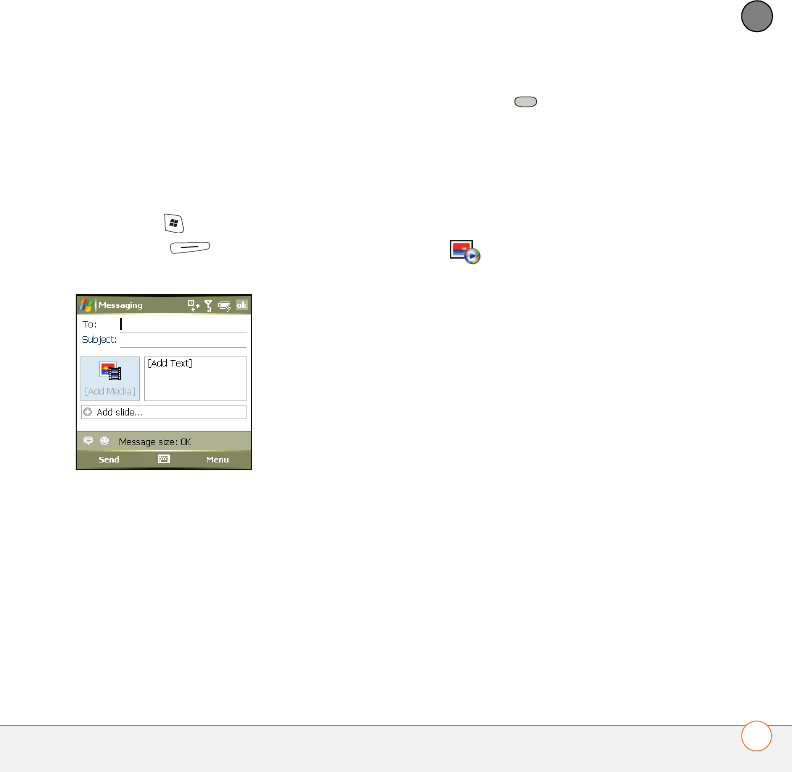
4Select Subject and enter a title for the
message.
5Select and select one of the
following:
Add Picture: Enables you to insert a
picture. You can take a new picture with
the built-in camera or insert an existing
picture.
Add Video: Enables you to insert a
video. You can capture a new video with
the built-in camera or insert an existing
video clip.
Add Sound: Enables you to record a
message, such as a voice caption for a
picture, or insert an existing sound, such
as a ringtone. You can add one sound
per slide; to send more than one sound
in a message, add another slide to your
message.
YOUR TEXT AND MULTIMEDIA MESSAGES
USING THE MESSAGING APPLICATION
104
6
CHAPTER
6(Optional) Select Add Text and enter a
text caption or message for the slide
you inserted. Tap to insert a
predefined phrase. Tap to insert an
emoticon.
7(Optional) Select Add slide and repeat
steps 5–6 to add another slide in this
message.
8(Optional) To add a vCard (contact file)
to a message, press Menu (left
action key), select Add Media, and then
select Add vCard.
9Press Send (left action key).
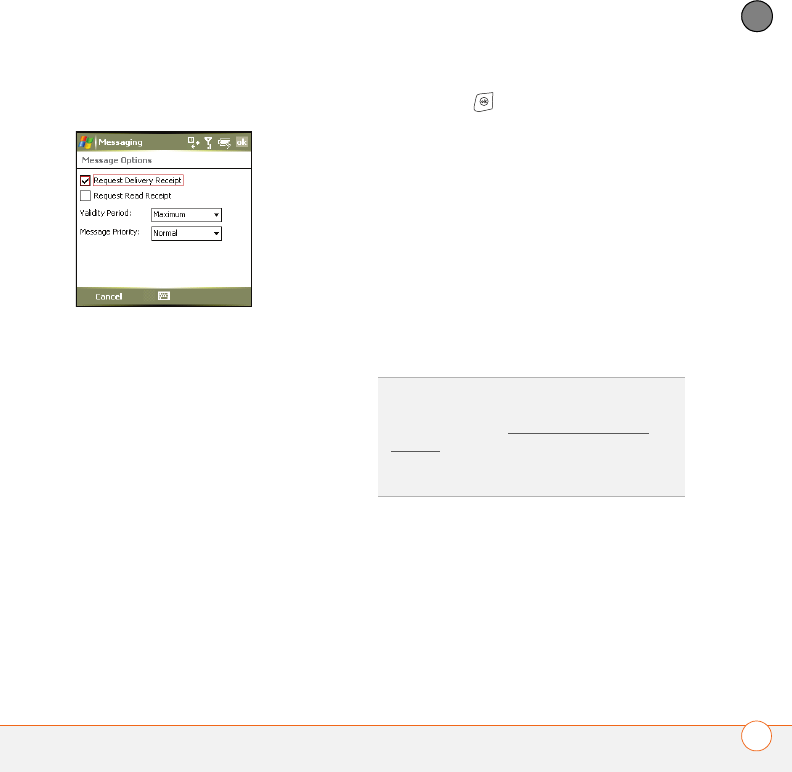
Setting message options
You can set options for individual text and
multimedia messages you send.
1On the message compose screen,
press Menu .
2Select Message Options.
TIP
You can add both a picture and a sound
clip to the same slide in a message. To add a
sound to a picture, select the picture
thumbnail and select Add Sound. To add a
picture to a sound, select the sound icon
thumbnail and select Add Picture.
DID
YOU
KNOW
?
If you add more than one slide
to a message, you can set the length of time
each slide is displayed. Press Menu (right
action key) and then select Slide Timing.
TIP
To preview a multimedia message as the
recipient will see it, press Menu (right action
key) and then select Preview Message.
DID
YOU
KNOW
?
You can set general
preferences that apply to all incoming and
outgoing messages; see Customizing
message settings. If you set options for an
individual message, those options override
your general preferences for that message
only.
YOUR TEXT AND MULTIMEDIA MESSAGES
USING THE MESSAGING APPLICATION 105
6
CHAPTER
3Select any of the following options:
Request Delivery/Read Receipt:
Indicates whether you want to receive
confirmation that the message has
been delivered or has been read.
Validity Period: Indicates how long the
message remains available to be sent if
the recipient’s phone or email address is
not available when you originally send
the message. For example, if a
message contains information that will
not be useful to the recipient after an
hour, you can set the validity for one
hour.
Message Priority (multimedia
messages only): Indicates the priority
for this message.
4Press OK .
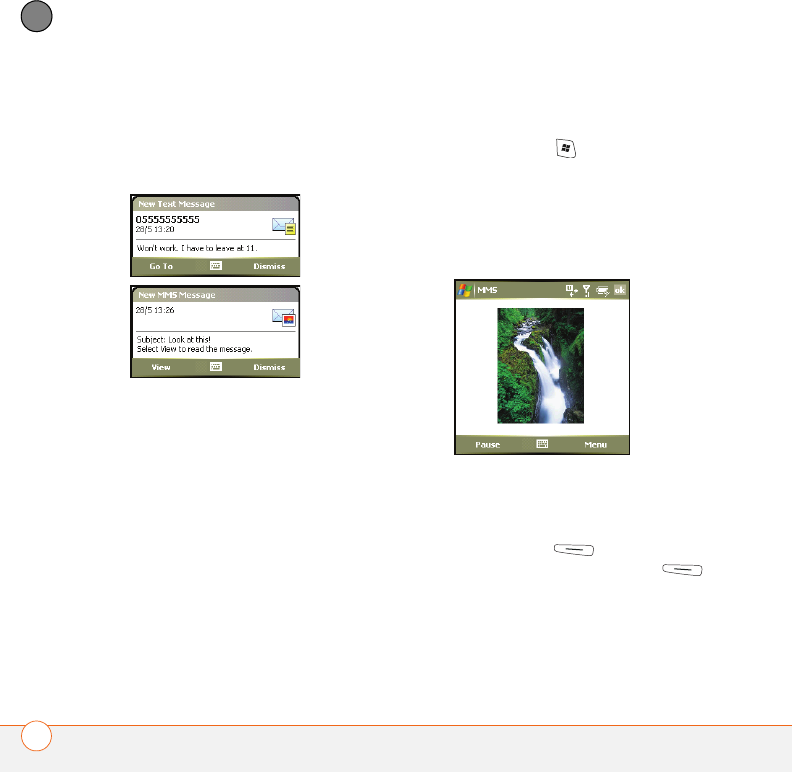
Receiving text and multimedia messages
When your phone is on and you are in a
wireless coverage area, you automatically
receive new text messages. For
multimedia messages, you can set your
smartphone to automatically download
new messages or to notify you that
messages are ready to download. You can
also set your smartphone to notify you
when a new text or multimedia message
arrives.
The new message notification may include
any of the following options:
•Go To: Opens a text message so you
can view its full contents.
•View: Opens a multimedia message
and plays the included media.
DID
YOU
KNOW
?
Message notifications include
the message text unless you have turned on
privacy mode (see Customizing message
settings). If privacy mode is on, the
notification states only the type of incoming
message.
YOUR TEXT AND MULTIMEDIA MESSAGES
USING THE MESSAGING APPLICATION
106
6
CHAPTER
•Download: Downloads the full content
of a multimedia message.
•Dismiss: Closes the notification and
puts the message into your Inbox.
If you have multiple messages, the
notification includes the number of
messages and the type (text or multimedia).
Viewing/playing a message
You can open a message from a
notification or from the Inbox of the
Messaging application. When you open a
multimedia message, playback starts
automatically.
1Do one of the following to open the
message:
•Press Start and select
Messaging. From the Inbox, select
the message you want to view.
•From a notification, select Go To (for
text messages) or View (for
multimedia messages).
2Do any of the following:
Pause or resume playback
(multimedia message only):
Select Pause (left action key). To
resume playback, select Play (left
action key).
YOUR TEXT AND MULTIMEDIA MESSAGES
USING THE MESSAGING APPLICATION 107
6
CHAPTER
Save the item that is playing
(multimedia message only): Press
Menu (right action key) and
select Save.
See a summary of the message,
including sender, date, and time:
Press Menu (right action key)
and select Message Details.
Reply to the message: Press Menu
(right action key) and select
Reply or Reply All.
NOTE If the message is a single picture
with no audio, select Reply (left
action key) to reply to the message.
Forward the message: Press Menu
(right action key) and select
Forward.
Call the sender: Press Menu
(right action key) and select Call
Sender.
Add the sender’s information to your
Contacts list: Press Menu (right
action key) and select Add to Contacts.
Save the message as a template for
other messages: Press Menu
(right action key) and select Save as
Te m p l a t e .
3Press OK .
Using Messaging to chat
When you exchange more than one
message with a single contact, the
messages you exchange with that person
are grouped into a chat session. When you
select a chat session from your message
list, the upper part of the screen displays all
messages you’ve exchanged with this
contact, and the lower part provides a text
entry area.
1Press Start and select Messaging.
DID
YOU
KNOW
?
When viewing a message
containing multiple slides, you can press
Right on the 5-way to move to the next slide,
or press Left on the 5-way to move to the
previous slide.
YOUR TEXT AND MULTIMEDIA MESSAGES
USING THE MESSAGING APPLICATION
108
6
CHAPTER
2Do one of the following:
Start a new chat: Select a message
and reply to it.
Continue an existing chat: Select a
message with the Chat icon.
3Enter your message.
4Press Send (left action key).
5In a received message, select to
open a media file, or click a link to
download and open a new multimedia
message.
Using links in messages
When you receive a text message that
contains a telephone number, email
address, or URL, you can dial the number,
send an email message, or go to the web
page immediately. Your smartphone
automatically opens the appropriate
application from the link.
1Open a message in the Inbox or another
folder.
2Select the phone number, email
address, or URL (appears as underlined
blue text).
Message status icons
The status icons that appear next to each
message in the Inbox, Outbox, and Sent
folders indicate the following:
TIP
Only the last 50 messages in a chat
session are displayed. Select View older
messages near the top of the screen to see
earlier messages.
An unread text message.
An unread message with pictures or
videos.
An unread message with sound.
A read text message.
YOUR TEXT AND MULTIMEDIA MESSAGES
USING THE MESSAGING APPLICATION 109
6
CHAPTER
Sorting your messages
You can sort the messages in any folder by
date or by sender.
1Go to the Inbox or other folder you want
to sort.
2Press Menu (right action key)
and select Sort.
3Select By Name or By Date.
Deleting a single message
1Go to the Inbox or other folder
containing the message you want to
delete.
2Highlight the message.
3Press Menu (right action key)
and select Delete.
4Select Ye s to confirm the deletion.
Deleting multiple messages
1Go to the Inbox or other folder
containing the messages you want to
delete.
2Press Menu (right action key)
and select Purge.
3Select the age of messages to be
deleted, or select to delete all
messages.
A read message with pictures or
videos.
A read message with sound.
A message that was delivered with
delivery confirmation turned on
(Sent folder only).
Multiple messages exchanged with
a single recipient (chat).
An urgent message. This icon
appears below the message size on
the right side of the screen.
TIP
Unread messages appear in bold.
Messages you’ve read appear in plain text.
YOUR TEXT AND MULTIMEDIA MESSAGES
CUSTOMIZING THE MESSAGING APPLICATION
110
6
CHAPTER
4Select Purge (left action key).
Customizing the
Messaging
application
Customizing message settings
1Press Start and select Messaging.
2Press Menu (right action key)
and select Options.
3On the Messages tab, set any of the
following options:
Confirm message deletions: Indicates
whether you want deletion confirmation
messages to appear.
Automatically download MMS
messages: Indicates whether you want
to automatically receive multimedia
messages. Check the Even when
roaming box to download multimedia
messages both on your home network
and while roaming.
NOTE You might incur additional charges if
you download multimedia messages while
roaming.
Message validity period: Indicates
how long messages remain available to
be sent if the recipient’s phone or email
address is not available when you
originally send the message. For
example, if your messages generally
contain information that will not be
useful to recipients after an hour, you
can set the validity for one hour.
YOUR TEXT AND MULTIMEDIA MESSAGES
CUSTOMIZING THE MESSAGING APPLICATION 111
6
CHAPTER
Signature: Enables you to add a
signature to outgoing messages. Select
the button; then, on the Signature
screen, check the Use signatures with
new messages box, enter your
signature text, and press OK .
4Press OK .
Customizing chat settings
1Press Start and select Messaging.
2Press Menu (right action key)
and select Options.
3Select the Chat tab.
4Select either of the following options:
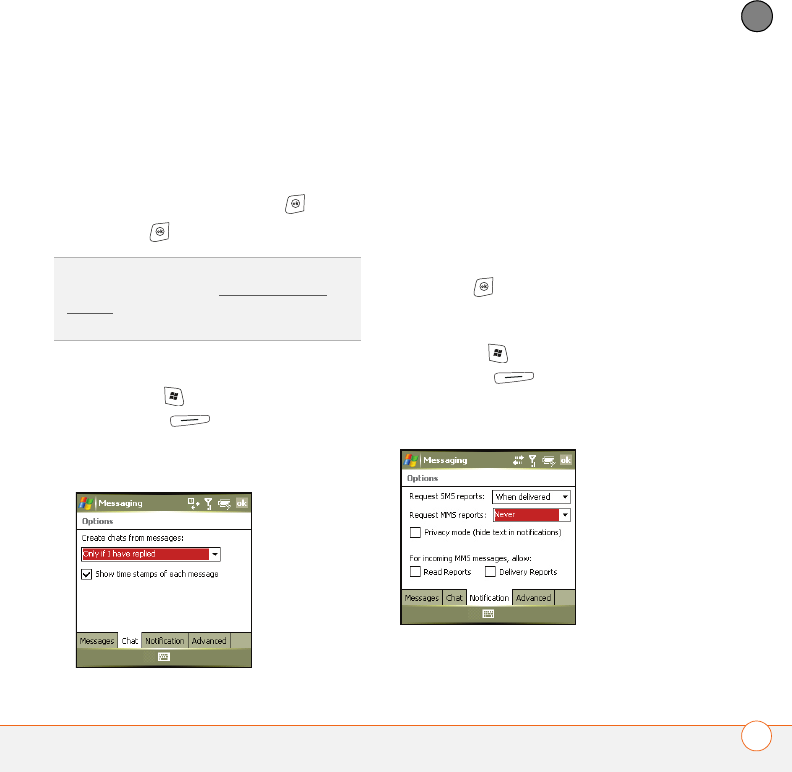
Create chat from messages: Indicates
the conditions under which a chat
session starts.
Show time stamps of each message:
Indicates whether you want chat
session items to display a date and time
indicator.
5Press OK .
Customizing notification settings
1Press Start and select Messaging.
2Press Menu (right action key)
and select Options.
3Select the Notification tab.
DID
YOU
KNOW
?
Options you select for an
individual message (see Setting message
options) override the general preferences you
set for messages.
YOUR TEXT AND MULTIMEDIA MESSAGES
CUSTOMIZING THE MESSAGING APPLICATION
112
6
CHAPTER
4Select any of the following options:
Request SMS/MMS receipts:
Indicates whether you want to receive a
confirmation when a message is
delivered or (for multimedia messages
only) when it is read.
Privacy mode: Indicates whether you
want only the message type displayed
on a notification for a single incoming
message. If the box is unchecked, the
notification displays the text of the
message.
Allow Read Reports/Delivery
Reports: Indicates whether you want a
confirmation sent to the sender when
you read a multimedia message or a
message is delivered.
5Press OK .
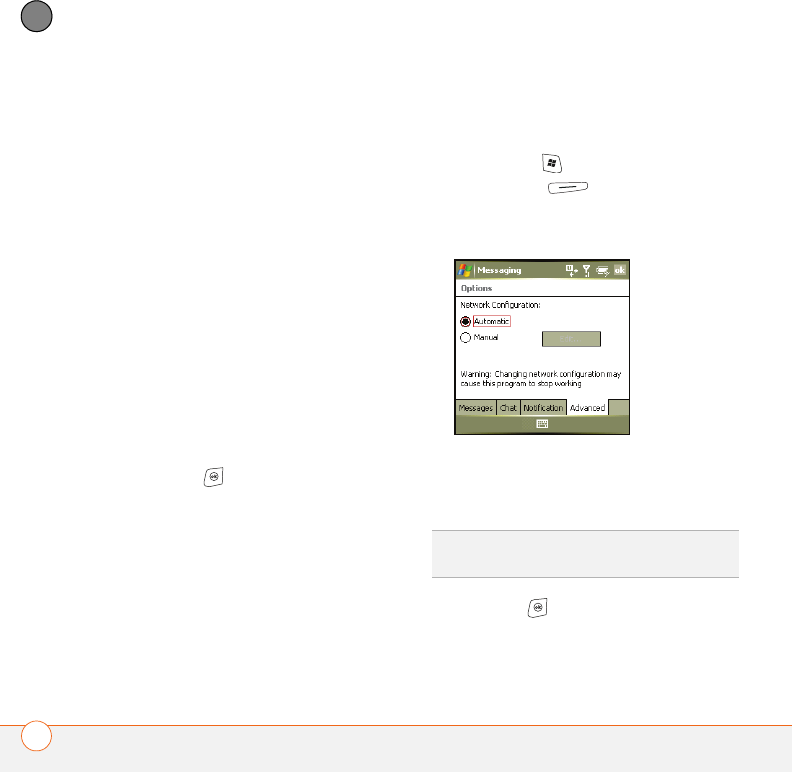
Customizing network settings
IMPORTANT Changing the network
settings can cause the Messaging
application to stop working correctly. We
recommend that you keep the default
network settings.
1Press Start and select Messaging.
2Press Menu (right action key)
and select Options.
3Select the Advanced tab.
4Select Manual, and then select Edit.
5Edit the network settings you want to
change.
6Press OK twice.
TIP
Select Automatic on the Advanced tab to
restore the default settings.

CHAPTER
7
Your connections to the web
and wireless devices
You use the web for so many things: finding driving directions,
getting news, buying gifts, checking web-based email. Now, with
your network operator’s network and the built-in web browser,
you can take the web with you almost anywhere you go.
Your smartphone’s built-in Bluetooth
®
wireless technology helps
you easily set up wireless connections to a number of devices,
so you can enjoy the convenience of cable-free connectivity. You
can also use your smartphone to connect your computer to the
Internet and to share contacts or your favorite photos with other
people.
Benefits
•Carry the web with you
•Store web pages for offline
viewing
•Connect to Bluetooth headsets
and car kits
•Connect your computer to the
Internet through your smartphone

In this chapter
Browsing the web . . . . . . . . . . . . . . . . . . . . . . . . . . . . . . . . . . . . . . 143
Connecting to devices with Bluetooth® wireless technology. . . . . . 149
Using your device as a wireless modem . . . . . . . . . . . . . . . . . . . . . 153
YOUR CONNECTIONS TO THE WEB AND WIRELESS DEVICES
BROWSING THE WEB 115
7
CHAPTER
Browsing the web
Internet Explorer Mobile provides quick and
easy access to web pages. You can view
most sites you use on your computer,
including those with security and advanced
features, such as JavaScript and frames.
Internet Explorer Mobile supports
JavaScript, Secure Sockets Layer (SSL),
and cookies, but does not support plug-ins
(Flash, Shockwave, and so on) or Java
applets.
BEFORE YOU BEGIN Do the following:
•Be sure to subscribe to data services
from your network operator. This is
necessary for browsing the web.
•Make sure your phone is on (see
Turning your smartphone on/off).
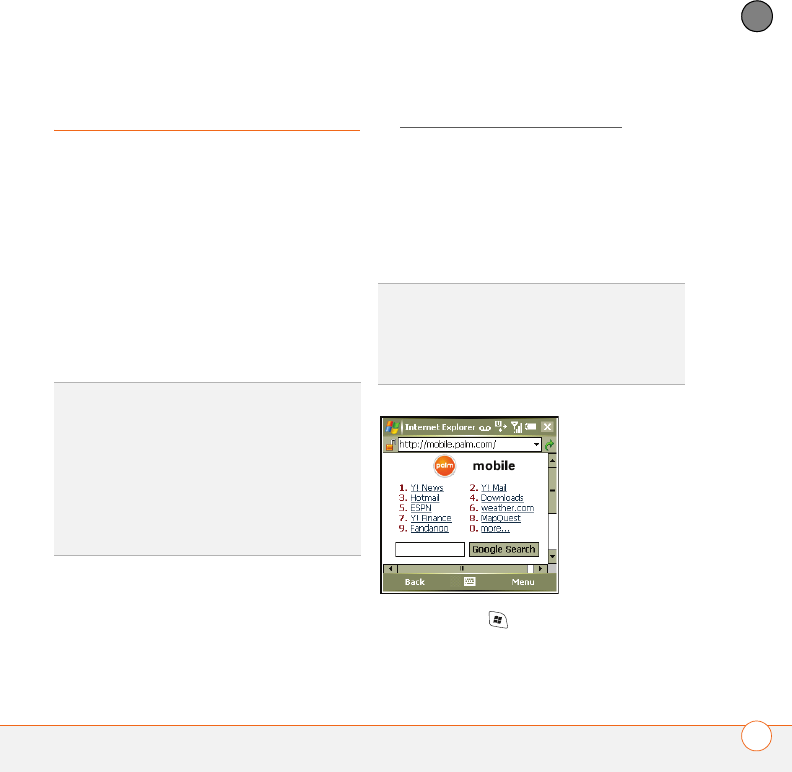
Viewing a web page
By default, Internet Explorer Mobile scales
web page content to fit your smartphone
screen so that you can view most of the
information without scrolling left or right.
1Press Start and select Internet
Explorer.
DID
YOU
KNOW
?
The security certificates and
128-bit SSL strong encryption enables you to
browse secure sites, such as online shopping,
banking, and email. Remember, some secure
sites also require a specific browser and may
not work with Internet Explorer Mobile. Ask
the organization for an alternate access point
that is compatible with Internet Explorer
Mobile.
DID
YOU
KNOW
?
You can also start a web
search from your Today screen by selecting
the Web search field, entering the item you
want to find, and then pressing Center on the
5-way.
YOUR CONNECTIONS TO THE WEB AND WIRELESS DEVICES
BROWSING THE WEB
116
7
CHAPTER
2Highlight the address line, enter the
address of the web page you want to
view, and then press Center . To
return to a recently viewed page, select
the address line list, and then select the
web address.
3Press Menu (right action key),
select View, and then select one of the
following:
One Column: Arranges web pages into
one column that is as wide as the
screen, so that you don’t have to scroll
horizontally.
Default: Maintains a layout similar to
what you see on a desktop computer,
but it makes items smaller and arranges
the content so that you can see most of
it without scrolling horizontally.
Desktop: Keeps the same layout and
size as on a desktop computer, which
requires both horizontal and vertical
scrolling.
Full Screen: Hides the status and
navigation areas and fills the entire
screen with the web page. To exit full
screen mode, press (right action
key), or tap and hold anywhere on the
screen and uncheck Full Screen.
Show Pictures: Shows or hides
pictures on web pages. Hiding pictures
speeds up the time it takes to load
pages.
4Here are some tips on viewing web
pages and moving around in them:
•To view the previous page, press
Back (left action key) or
Backspace .
•To refresh the page with the latest
content from the Internet, press
Menu (right action key) and
select Refresh.
•To scroll through the page in One
Column View or Default View, press
Up or Down . In Desktop View,
press Up , Down , Left , or
Right to scroll in all directions.
•To follow a link to another web page,
press Up or Down to highlight
the link, and then press Center to
DID
YOU
KNOW
?
If you browse to a secure web
page, the Lock icon in the address line
appears closed instead of open.

YOUR CONNECTIONS TO THE WEB AND WIRELESS DEVICES
BROWSING THE WEB 117
7
CHAPTER
go to the selected page. You can also
tap the link on the screen with your
stylus.
•To send email from a web page,
select the address link. You need to
configure an email application on your
smartphone before you can use this
feature. See Your email.
•To adjust the size of the text on web
pages, press Menu (right
action key), select Zoom, and then
select the size you want.
•To view a web page’s properties,
press Menu (right action key)
and select Tools > Properties.
•To view each item in a list, select the
list and scroll using Up or Down
.
•In a list, press Left or Right to
cycle between items, and press
Center to accept the change.
•In a form, such as a browser search
field, press Center to interact
with the form, and then press Center
to stop interacting with the form.
5Press OK to close Internet Explorer
Mobile.
Creating a favorite
Favorites let you bookmark a web page so
that you can instantly access it without
entering the web address.
BEFORE YOU BEGIN Create the folders
where you want to store your favorites
first. Once you create a favorite, you can’t
move it to another folder.
1Go to the page you want to mark as
a favorite.
TIP
To send a link, press Menu and select
Tools > Send Link via E-mail. Select the
Messaging account you want to use to send
the link.
YOUR CONNECTIONS TO THE WEB AND WIRELESS DEVICES
BROWSING THE WEB
118
7
CHAPTER
2Press Menu (right action key)
and select Add to Favorites.
3(Optional) Select Name and enter a
different description.
4(Optional) Select the folder where you
want to create the favorite.
5Select Add.
Viewing a favorite
1Press Start and select Internet
Explorer.
2Press Favorites (left action key).
3Select the page you want to view in the
list.
Organizing your favorites
You can create folders to organize your
favorites. For example, you can store travel
links in one folder, stock links in another,
and business links in a third folder.
1Press Start and select Internet
Explorer.
2Press Menu (right action key)
and select Favorites.
3Select the Add/Delete tab.
4Select New Folder.
5Enter a name for this folder, and then
select Add.
6Press OK .
Downloading files and images from a web
page
You can download files that are usable on
your smartphone, such as new
applications, MIDI ringtones, or pictures
that are specifically tagged for download.
1Go to the page that contains the link to
the file you want to download.
2Press Left or Right to highlight the
link to the file.
3Press and hold Center , and then
select Save As to download a file, or
TIP
To delete a favorite or folder, press Menu
and select Favorites. Select the Add/Delete
tab, highlight the item you want to delete, and
then select Delete. Select Ye s to confirm
deletion, and then press OK.
DID
YOU
KNOW
?
You can select the Downloads
favorite to access the network operator
downloads page.
YOUR CONNECTIONS TO THE WEB AND WIRELESS DEVICES
BROWSING THE WEB 119
7
CHAPTER
tap and hold, and then select Save
Image to download an image.
4Select Name and enter a new name for
the file.
5Select the Folder list, and then select
the folder where you want to save the
file.
6Select the Location list, and then select
where you want to store the file: Main
memory or Storage card.
7Press OK .
Copying text from a web page
You can copy text from a web page and
paste it in other applications.
1Use the stylus to highlight the text you
want to copy.
2Press Menu (right action key)
and select Edit > Copy.
3Go to the application in which you want
to paste, and then position the cursor
where you want to paste the text.
4Press Menu (right action key)
and select Edit > Paste.
Returning to recently viewed pages
The History list stores the addresses of the
pages you visited recently.
1Press Menu (right action key)
and select History.
2(Optional) Select the Show list in the
upper-left, and then select how you
want to sort the History list.
3Select the web page you want to view.
DID
YOU
KNOW
?
You can access specially
formatted streaming content by pressing
Menu (right action key), selecting Favorites,
and then selecting WindowsMedia.com.
TIP
You can copy the text from the entire web
page. Tap and hold on the page, and tap
Select All Text. Tap and hold on the page
again, and tap Copy.
TIP
If Internet Explorer Mobile does not
recognize a smartphone number as dialable,
you can copy the phone number (as text) and
paste it into the Phone Dial Pad.
YOUR CONNECTIONS TO THE WEB AND WIRELESS DEVICES
BROWSING THE WEB
120
7
CHAPTER
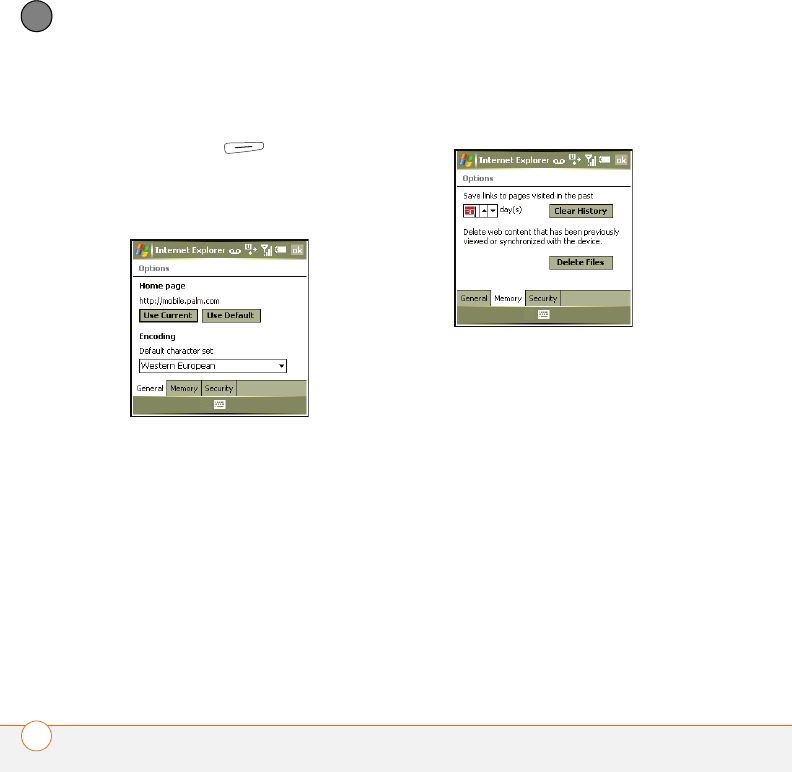
Customizing your Internet Explorer
Mobile settings
1Press Menu (right action key)
and select To o l s > Options.
2On the General tab, set any of the
following options:
Home Page: Sets the page that appears
when you open Internet Explorer
Mobile. To use the page you were on
when you opened the menu, select Use
Current. To select the original home
page, select Use Default.
Encoding: Sets the character set for
the web pages you view.
3Select the Memory tab and set any of
the following options:
Save links to pages visited in the
past: Sets how many days of activity
the History list stores.
Clear History: Empties the History list.
Delete Files: Removes web files that
you synchronized with your computer.
4Select the Security tab and set any of
the following options:
Allow cookies: Sets whether your
smartphone accepts cookies (small files
containing info about your identity and
preferences). The page sends the file
and stores it on your smartphone.
YOUR CONNECTIONS TO THE WEB AND WIRELESS DEVICES
CONNECTING TO DEVICES WITH BLUETOOTH® WIRELESS TECHNOLOGY 121
7
CHAPTER
Clear Cookies: Deletes any cookies
stored on your smartphone.
Warn when changing to a page that
is not secure: Sets whether a message
appears when you switch from a secure
page to one that is not secure.
Warn when page content is blocked
due to security settings: Sets whether
a message appears when you attempt
to open a page that does not meet your
smartphone’s security standards.
5Press OK .
Connecting to
devices with
Bluetooth®
wireless technology
With your smartphone’s built-in Bluetooth®
wireless technology, you can connect to a
number of Bluetooth devices such as a
headset or hands-free car kit, as well as to
other phones, handhelds, or piconets.
When you connect to another device, you
create a partnership (also referred to by
terms such as trusted pair, trusted device,
or pairing) with that device. If your
computer is enabled with Bluetooth
wireless technology, you can also
synchronize wirelessly or use your phone
as a wireless modem.
You can create a list of Bluetooth devices
that you trust to communicate with your
smartphone. When communicating with
trusted devices, your smartphone skips the
discovery process and creates a secure link
as long as the device is within range.
Bluetooth range is up to 10 meters (30
YOUR CONNECTIONS TO THE WEB AND WIRELESS DEVICES
CONNECTING TO DEVICES WITH BLUETOOTH® WIRELESS TECHNOLOGY
122
7
CHAPTER
feet) in ideal conditions. Performance and
range are affected by physical obstacles,
radio interference from nearby electronic
equipment, and other factors.
When you configure a headset (see
Connecting to a Bluetooth® hands-free
device), the headset is automatically added
to your trusted device list. Follow the steps
in this section to add other devices to your
trusted device list, such as your computer.
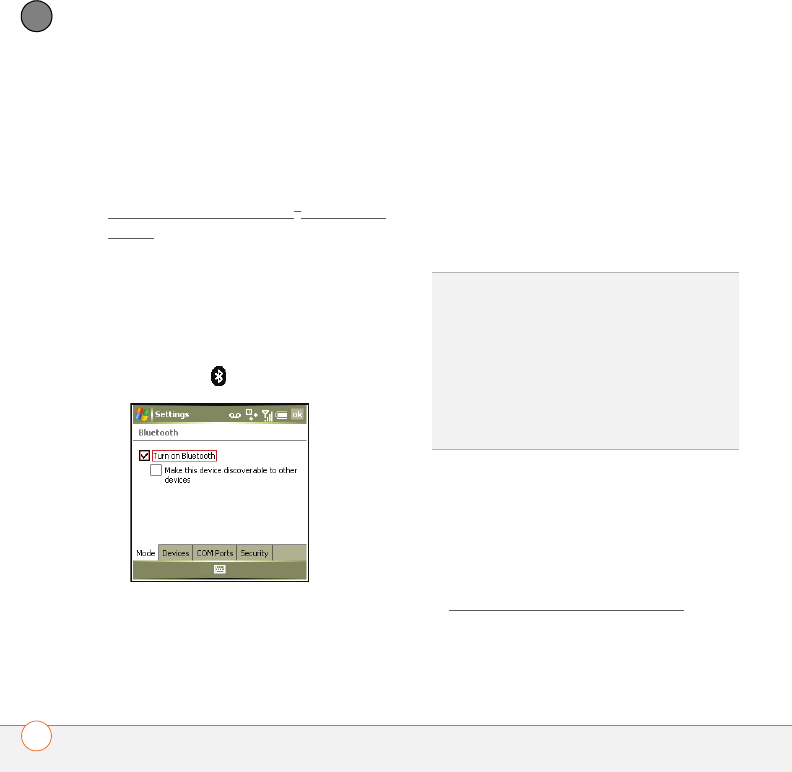
Entering basic Bluetooth settings
1Go to your Today screen, and then tap
Bluetooth .
2Check the Turn on Bluetooth box to
turn on your smartphone’s Bluetooth
feature.
3Check or uncheck the Make the device
discoverable to other devices box.
4When this box is checked, this enables
Bluetooth devices that are not on your
Trusted Device list to request a
connection with your device. Your
device remains accessible to other
devices until you uncheck the box.
Requesting a connection with another
Bluetooth device
BEFORE YOU BEGIN To prepare your
smartphone to be able to accept a
connection from a requesting device, enter
the basic Bluetooth settings as described
in Entering basic Bluetooth settings.
DID
YOU
KNOW
?
The Bluetooth icon on your
Today screen indicates the status of your
smartphone’s Bluetooth feature:
Gray = Bluetooth off.
Blue = Bluetooth on.
White = Connected to a Bluetooth device.
Headset = Call in progress with a Bluetooth
headset or car kit.
YOUR CONNECTIONS TO THE WEB AND WIRELESS DEVICES
CONNECTING TO DEVICES WITH BLUETOOTH® WIRELESS TECHNOLOGY 123
7
CHAPTER
IMPORTANT Some devices have a
predefined passkey; if so, you can find the
passkey in the documentation for that
device. Other devices provide a screen
where you enter a passkey that you make
up. In either case, you must use the same
passkey on both your smartphone and the
other device. We recommend that where
possible, you make up a passkey of 16
alphanumeric characters (letters and
numerals only) to improve the security of
your smartphone. The longer the passkey,
the more difficult it is for the passkey to be
deciphered.
1Go to your Today screen, and then tap
Bluetooth .
2Check the Turn on Bluetooth box to
turn on your smartphone’s Bluetooth
feature.
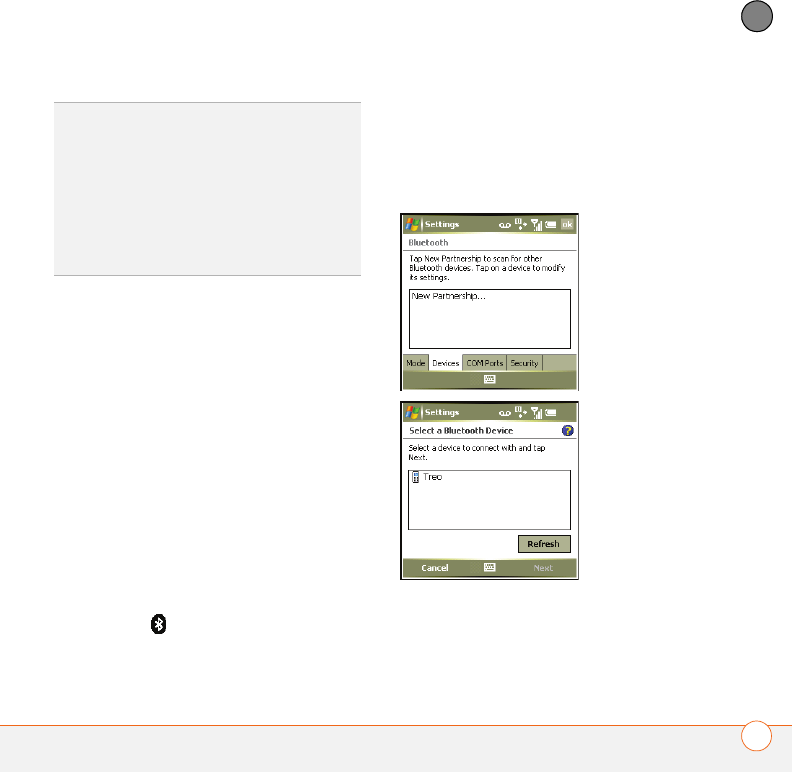
3Select the Devices tab, and then select
New Partnership.
4Wait for your smartphone to search for
devices and to display the device list.
KEY
TERM
Partnership Two devices—for
example, your smartphone and a hands-free
device— that can connect because each
device finds the same passkey on the other
device. Once you form a partnership with a
device, you don’t need to enter a passkey to
connect with that device again. Partnership is
also known as paired relationship, pairing,
trusted device, and trusted pair.
YOUR CONNECTIONS TO THE WEB AND WIRELESS DEVICES
CONNECTING TO DEVICES WITH BLUETOOTH® WIRELESS TECHNOLOGY
124
7
CHAPTER
5Select the device you want to connect
with, and then press Next (right
action key).
6Enter an alphanumeric passkey
between 1 and 16 characters long, and
then press Next (right action
key).
7If the passkey is not built-in, enter the
same passkey on the smartphone and
the other Bluetooth device, and then
press Finish (right action key)
8If you’re connecting to a headset or
hands-free car kit, check the Hands
Free box, and then press Finish
(right action key).
9Press OK .
You can now communicate with this device
whenever it is within range and your
smartphone’s Bluetooth feature is turned
on. The range varies greatly depending on
environmental factors; maximum is about
10 meters or 30 feet.
Accepting a connection from another
Bluetooth device
BEFORE YOU BEGIN To prepare your
smartphone to be able to accept a
connection from a requesting device, enter
the basic Bluetooth settings as described
in Entering basic Bluetooth settings.
1Go to your Today screen, and then tap
Bluetooth .
2Check the Turn on Bluetooth box to
turn on your smartphone’s Bluetooth
feature.
TIP
To delete the established partnership with
a device, go to the Bluetooth Settings screen
and select Devices. Highlight the connection
you want to remove, press and hold Center
on the 5-way, and then select Delete. The
deleted device can no longer automatically
connect with your smartphone.
TIP
Check your battery level before
establishing a Bluetooth connection. If the
battery level is low, you can’t make a
Bluetooth connection.
YOUR CONNECTIONS TO THE WEB AND WIRELESS DEVICES
USING YOUR DEVICE AS A WIRELESS MODEM 125
7
CHAPTER
3If you have already set up a partnership
with the transmitting device, your
smartphone is ready to receive the info.
If you haven’t set up a connection,
check the Make this device
discoverable to other devices box to
let the device find your smartphone and
request a connection. Enter the same
passkey on your smartphone and on the
Bluetooth device.
4When your smartphone is receiving
info, a notification tells you that a
transmission is in progress. To stop the
transmission, press Cancel (left
action key); to close the notification,
press Dismiss (right action key).
Using your device as
a wireless modem
Dial-up networking (DUN) is the feature
that converts your smartphone into a
modem so that you can access the Internet
from your computer.
You can set up DUN in one of two ways:
•You can use ModemLink (USB).
•If your computer is enabled with
Bluetooth wireless technology, you can
set up your device as a wireless modem
using the built-in Bluetooth technology.
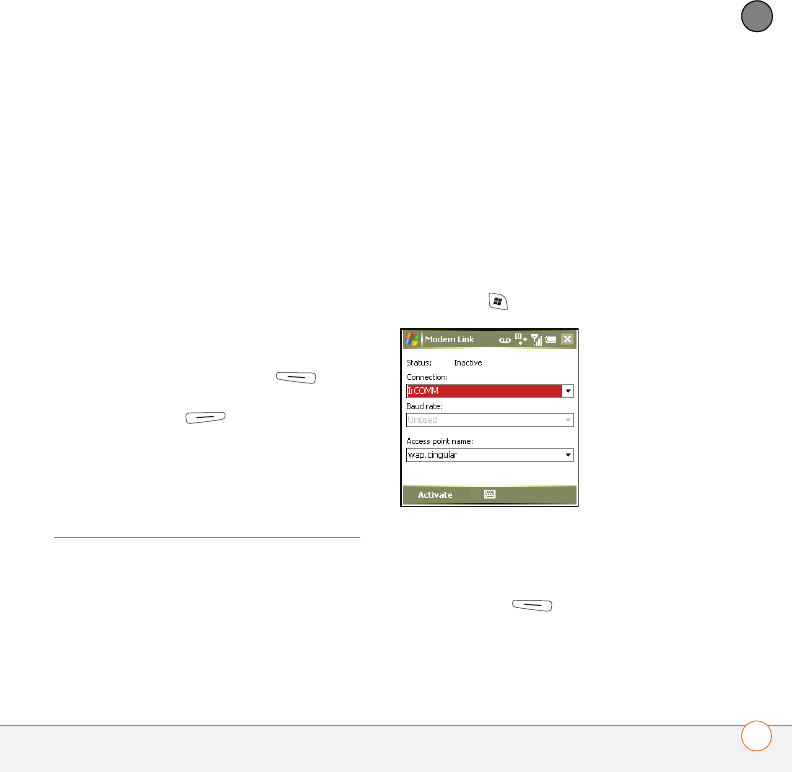
Setting up Modem Link for a USB
connection
1Press Start and select Programs.
2Select Modem Link.
3Select the Connection list and select
USB.
4Press Activate (left action key)
and follow the wizard to set up Modem
Link.
YOUR CONNECTIONS TO THE WEB AND WIRELESS DEVICES
USING YOUR DEVICE AS A WIRELESS MODEM
126
7
CHAPTER
Creating a DUN connection using
Bluetooth technology
To configure DUN using Bluetooth
technology, complete the following
procedures:
•Create a partnership between your
device and your computer as described
in Requesting a connection with
another Bluetooth device.
•Setting up your computer for a
Bluetooth DUN connection
•Accessing the Internet using a
Bluetooth DUN connection
Setting up your computer for a Bluetooth
DUN connection
Dial-up networking must be enabled or
installed on your computer. Follow the
instructions from the manufacturer of your
Bluetooth adapter to enable DUN. Your
wireless service provider may provide
customized software programs that walk
you through the DUN setup process. Check
with your wireless service provider to see
if such a program is available.
Accessing the Internet using a Bluetooth
DUN connection
The steps for accessing the Internet on
your computer may vary depending on your
operating system and how Bluetooth
wireless technology is set up on your
computer—for example, if it is built in
versus if you are using a wireless
Bluetooth adapter. If the following
procedure does not work with your
computer, check your computer’s
documentation for how to set up Bluetooth
technology to access the Internet using a
DUN connection.
BEFORE YOU BEGIN You may need to
use a virtual private network (VPN) to
access corporate email. Check with your
system administrator for more information.
1Open the Bluetooth screen on your
computer and look for the option for
paired devices. Check your computer’s
documentation for how to open this
screen and for the name of the paired
devices option.
2Double-click the icon or option
representing your smartphone. Your
computer connects to your smartphone

YOUR CONNECTIONS TO THE WEB AND WIRELESS DEVICES
USING YOUR DEVICE AS A WIRELESS MODEM 127
7
CHAPTER
and shows that DUN services are
available.
3Double-click the DUN icon.
4Enter the following in the Dial field:
*99# or *99***1#. You do not need to
enter anything in the User Name or
Password field.
5Click Dial. Once the connection is
successfully established, you can
browse the Internet on your computer
or download your email.
6You may be asked if you want to
remember this dial text for this
connection. We recommend that you
choose to remember the dial text to
avoid errors and the inconvenience of
entering it for every session.
7To verify that you are connected, look
for a network connection icon in the
taskbar at the bottom of your computer
screen. To check the status of the
connection, right-click the Bluetooth
network icon.
Terminating a DUN Internet session
To terminate the DUN connection,
right-click the icon or option representing
your smartphone on your computer, and
then click Disconnect.

YOUR CONNECTIONS TO THE WEB AND WIRELESS DEVICES
USING YOUR DEVICE AS A WIRELESS MODEM
128
7
CHAPTER

CHAPTER
8
Your photos, videos, and
music
Do you have a wallet bulging with photos of friends, family,
pets, and your most recent vacation?
Are you tired of carrying both your MP3 player and your phone?
Your smartphone solves both problems. You can keep your
favorite photos right on your smartphone—videos, too. And
there's no need to carry an expensive MP3 player; you can play
music on your smartphone. Simply transfer songs onto your
smartphone or an expansion card and then listen through your
stereo headphones.
Benefits
•Never be far from your favorite
people, places, and songs
•Arrange your photos, videos, and
songs
•No separate photo viewer, MP3,
CD, or mini-disc player required

In this chapter
Camera. . . . . . . . . . . . . . . . . . . . . . . . . . . . . . . . . . . . . . . . . . . . . . . 131
Pictures & Videos. . . . . . . . . . . . . . . . . . . . . . . . . . . . . . . . . . . . . . . 136
Windows Media Player Mobile . . . . . . . . . . . . . . . . . . . . . . . . . . . . 140
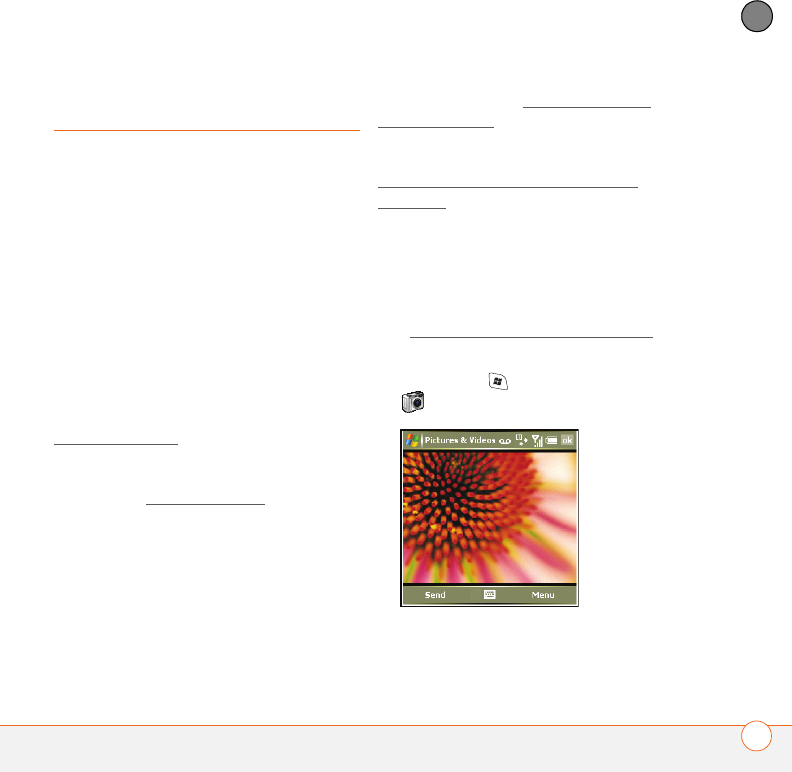
YOUR PHOTOS, VIDEOS, AND MUSIC
CAMERA 131
8
CHAPTER
Camera
Your Palm® Treo™ 750v smartphone comes
with an easy-to-use, built-in, 1.3-megapixel
camera with 2x digital zoom. You can use
the camera to take and view pictures and
videos and send them to your friends and
family. To add a personal touch to your
smartphone, use your pictures as your
Today screen background, and as caller ID
images, or use your videos to create video
ringtones.
You can receive and view pictures and
videos, and send pictures and videos as
attachments or multimedia messages; see
Pictures & Videos. You can also personalize
your smartphone by using a picture as a
background or by adding a picture to a
contact; see Adding a contact for details.
You can also move pictures and videos to a
computer by synchronizing your
smartphone with your computer.
Taking a picture
By default, pictures are stored in the My
Pictures folder on your smartphone. If you
want to store your pictures on an
expansion card, see Customizing your
Camera settings to change where pictures
are stored. For information on accessing
your pictures on your computer, see
Viewing pictures and videos on your
computer.
Pictures are captured and stored in 16-bit
color, JPG format. Resolution settings
range from 1280 x 1024 to 160 x 120 pixels;
1.3-megapixels to QQVGA (160 x 120
pixels). You can change the default setting.
See Customizing your Camera settings for
details.
1Press Start and select the Camera
icon.
2Adjust the position of your smartphone
until you see the subject you want to
photograph on the screen. Your
YOUR PHOTOS, VIDEOS, AND MUSIC
CAMERA
132
8
CHAPTER
smartphone has a self-portrait mirror
next to the camera lens on the back of
your smartphone. Use the mirror when
you’re taking a picture and you want to
be in the picture too.
3(Optional) Adjust any of the following:
Zoom: Press Up , to zoom in or
Down to zoom out.
Brightness: Press Right to increase
the brightness or Left to decrease
the brightness.
Resolution: Press Menu (right
action key) and select Resolution to
change the image quality.
4(Optional) Set a five-second timer:
Press Menu (right action key),
select Mode, and then select Timer.
5Press Center to capture the picture
or start the timer.
6Hold your smartphone still until the
picture renders, and then do one of the
following:
•Press Camera (left action key)
to take another picture.
•Press OK to return to Thumbnails
View.
Taking pictures in burst mode
Burst mode takes five pictures in quick
succession, with one button press.
1Press Start and select Pictures &
Videos.
2Press Camera (left action key).
3Press Menu (right action key)
and select Mode > Burst.
4Press Center .
Recording a video
Videos can be any length, provided you
have enough storage space available. By
default, videos are stored in the My
Pictures folder on your smartphone. If you
want to store your videos on an expansion
DID
YOU
KNOW
?
After three minutes of
inactivity when previewing an image, the
camera goes into standby mode. Press any
key or tap the screen to return to the image
preview. If the camera goes to standby while
the recording is paused, the recording is
stopped and the video clip is saved.
YOUR PHOTOS, VIDEOS, AND MUSIC
CAMERA 133
8
CHAPTER
card, see Customizing your Camera
settings to change where videos are
stored. For information on accessing your
videos on your computer, see Viewing
pictures and videos on your computer.
1Press Start and select Pictures &
Videos.
2Select Camera .
3Press Menu (right action key)
and select Video Mode.
4Adjust the position of your smartphone
until you see the subject you want to
record on the screen. Your smartphone
has a self-portrait mirror next to the
camera lens on the back of your
smartphone. Use the mirror when
you’re taking a picture video and you
want to be in the picture too.
5(Optional) Adjust any of the following:
Brightness: Press Right to increase
the brightness or Left to decrease
the brightness.
Resolution: Press Menu and
select Quality to change the video
resolution.
6Press Center to start recording.
7When you’re finished recording, press
Stop (left action key) or Center
to stop recording.
8(Optional) To review the video in
Windows Media Player Mobile, press
Thumbnails (left action key),
highlight the video, and then press
Center . Press OK to return to
Thumbnail View.
Customizing your Camera settings
1Press Start and select Pictures &
Videos.
TIP
If you see a camcorder icon below the
preview image, video mode is on. To turn on
the still camera, press Menu and select Still
Mode.
TIP
If you don’t like a video you recorded,
delete it. See Deleting a picture or video for
details.
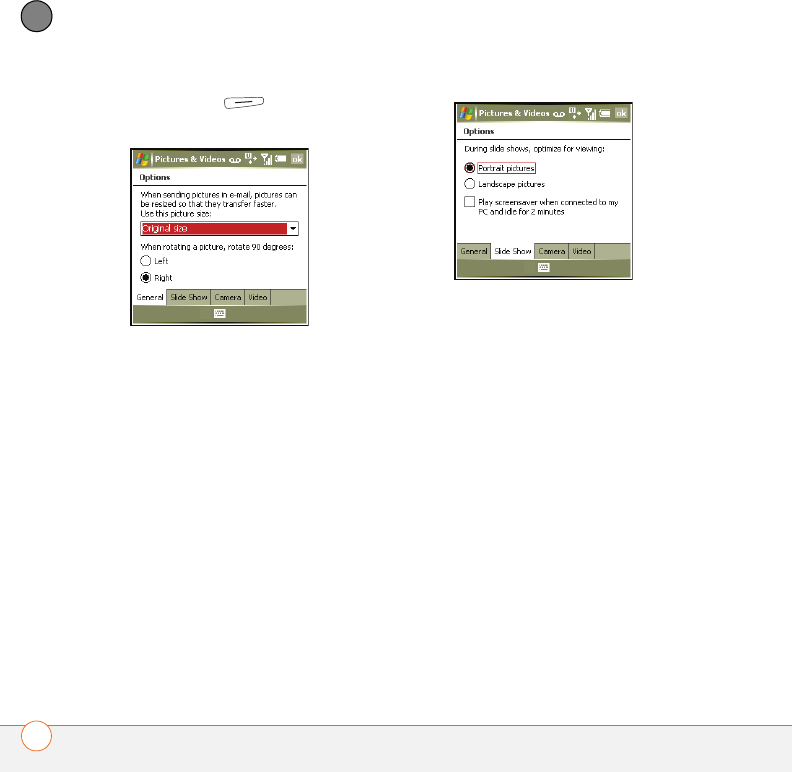
YOUR PHOTOS, VIDEOS, AND MUSIC
CAMERA
134
8
CHAPTER
2Press Menu (right action key)
and select Options.
3On the General tab, set any of the
following options:
Use this picture size: Sets the size of
pictures you send with the Messaging
application.
When rotating a picture, rotate 90
degrees: Sets the direction in which
pictures rotate.
4Select the Slide Show tab and set any
of the following options:
During slide shows, optimize for
viewing: Sets whether pictures are
optimized for portrait or landscape
format during slide shows.
Play screensaver when connected to
my PC and idle for 2 minutes: Sets
whether the pictures in your My
Pictures folder are used as a
screensaver when your smartphone is
connected to your computer and
ActiveSync® desktop software is not
running.
5Select the Camera tab and set any of
the following options:
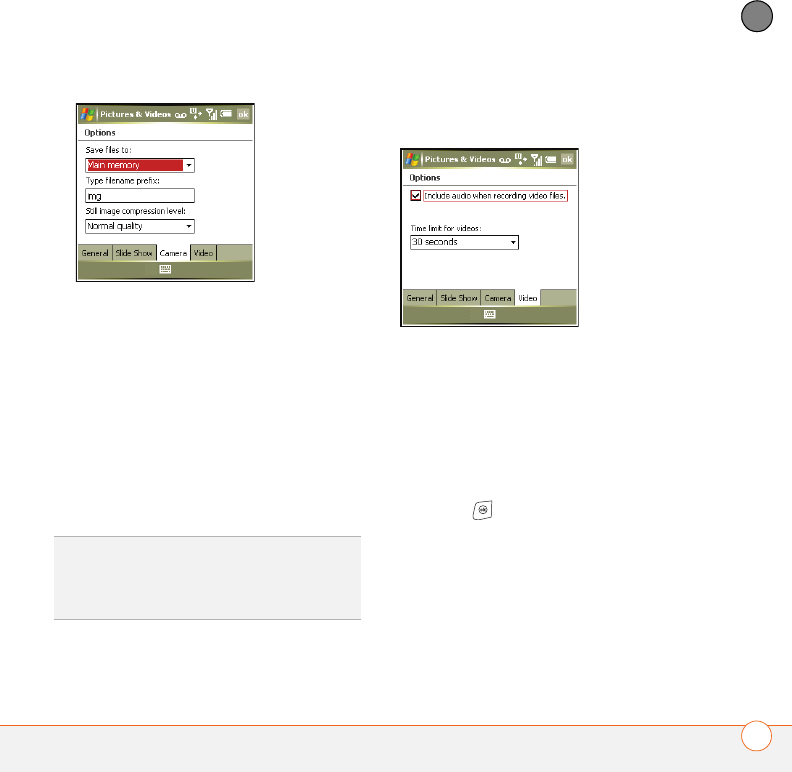
YOUR PHOTOS, VIDEOS, AND MUSIC
CAMERA 135
8
CHAPTER
Save files to: Specifies whether
pictures and videos are stored on your
smartphone or on an expansion card.
Type filename prefix: Assigns a name
to a series of pictures to be captured,
such as Seattle001, Seattle002, and so
on.
Still image compression level:
Sets the default size for newly
captured pictures.
6Select the Video tab and set any of the
following options:
Include audio when recording video
files: Turns the microphone on and off
so that you can record videos with or
without sound.
Time limit for videos: Limits the length
of videos you record. You can also
select the No limit option.
7Press OK to return to the
Thumbnail View.
DID
YOU
KNOW
?
Videos are captured and
stored in 3GP format. Video resolution
settings range from 352 x 288 to 176 x 144
pixels.
YOUR PHOTOS, VIDEOS, AND MUSIC
PICTURES & VIDEOS
136
8
CHAPTER
Pictures & Videos
Viewing a picture
In addition to viewing the pictures you
capture with the built-in camera, you can
view pictures captured on many popular
digital cameras or downloaded from the
Internet. Your smartphone supports the
following picture formats:
•JPG
•PNG
•BMP
•GIF
1Press Start and select Pictures &
Videos.
2Select the picture you want to view.
3Press OK to return to Thumbnail
View.
Viewing a video
In addition to viewing the videos you
capture with the built-in camera, you can
view videos captured on many popular
digital cameras streamed from websites.
Your smartphone supports and streams the
following types of video files:
•MPEG-4
•3GPP2
•3GPP
•WMV, WMA, ASF
•RTSP
•SDP Streaming
1Press Start and select Pictures &
Videos.
2Select the video you want to view. For
more info on viewing videos, see
Playing media files on your smartphone.
3Press OK to return to Thumbnail
View.
Viewing a slide show
1Press Start and select Pictures &
Videos.
2Press Menu (right action key)
and select Play Slide Show. The slide
show plays automatically.
TIP
To view pictures or videos in a different
folder, select the Show list in the upper-left,
and then select the album you want to view.
YOUR PHOTOS, VIDEOS, AND MUSIC
PICTURES & VIDEOS 137
8
CHAPTER
3Press Center to display the slide
show toolbar, which you can use to
Rotate , Play , Pause , Reverse
, Forward , and Stop the slide
show.
Sending a picture or video
You can send a picture or video to other
picture-enabled mobile smartphones or to
an email address as an attachment.
You cannot send copyrighted pictures or
videos that appear with a Lock icon in
Thumbnail View.
1Press Start and select Pictures &
Videos.
2Highlight the picture or video you want
to send.
3Press Menu (right action key)
and select Send.
4Select the email or MMS account you
want to use to send the picture or
video.
5When the Messaging application opens,
address and send the message.
(See Creating and sending a multimedia
message for details.)
Creating a video ringtone
You can save a video that you record as a
ringtone.
1Press Start and select Pictures &
Videos.
2Highlight the video you want to use as a
ringtone.
3Press Menu (right action key)
and select Save to Contact Ring Tone.
4Select the contact to whom you want to
assign the ringtone.
Organizing pictures and videos
You can move or copy pictures and videos
to other folders or between your
smartphone and an expansion card.
1Press Start and select Pictures &
Videos.
2Highlight the picture or video you want
to move or copy.
3Do one of the following:
•To move the picture or video to
another location, press Menu
(right action key) and select Edit >
Cut.
YOUR PHOTOS, VIDEOS, AND MUSIC
PICTURES & VIDEOS
138
8
CHAPTER
•To keep the picture or video in two
locations, press Menu (right
action key) and select Edit >Copy.
4Select the Show list in the upper-left,
and select the location where you want
to place the picture or video you
selected in step 3.
5Press Menu (right action key)
and select Edit > Paste.
You can also view a specific folder or
expansion card and arrange the pictures
and videos by name, date, or size.
1Press Start and select Pictures &
Videos.
2Select the Show list in the upper-left,
and then select the folder you want to
view.
3Select the Sort By list in the upper-right,
and then select the sort method:
Name, Date, or Size.
Using a picture as the Today screen
background
1Press Start and select Pictures &
Videos.
2Highlight the picture you want to use.
3Press Menu (right action key)
and select Set as Today Background.
4Select the Transparency level list and
select the appropriate level. Use a
higher percentage for a more
transparent picture and a lower
percentage for a more opaque picture.
5Press OK to return to Thumbnail
View.
Editing a picture
For more extensive edits, just download
your picture or video to your computer and
edit it in your favorite graphics program.
Then sync the picture or video back on your
smartphone.
1Press Start and select Pictures &
Videos.
2Highlight the picture you want to edit.
3Press Menu (right action key)
and select Edit.
4Do any of the following:
•To rotate a picture 90 degrees
counterclockwise, select Rotate.
•To crop a picture, press Menu
(right action key) and select Crop. Tap
YOUR PHOTOS, VIDEOS, AND MUSIC
PICTURES & VIDEOS 139
8
CHAPTER
and drag the stylus to highlight the
area to crop. Tap outside the box to
stop cropping.
•To adjust the brightness and contrast
levels of a picture, press Menu
(right action key) and select
AutoCorrect.
•To undo an edit, press Menu and
select Undo.
•To cancel all unsaved edits you made
to the picture, select Revert to
Saved.
Deleting a picture or video
1Press Start and select Pictures &
Videos.
2Highlight the picture or video you want
to delete.
3Press Menu (right action key)
and select Delete.
4Select Ye s .
Viewing pictures and videos on your
computer
BEFORE YOU BEGIN You must install
ActiveSync® desktop software from the
Windows Getting Started Disc (see
Installing the desktop synchronization
software) and select the option to
synchronize media (see Changing which
applications sync).
When you synchronize your smartphone,
your pictures and videos are copied to your
desktop computer. You can view the
pictures and videos, and you can also send
them to friends using your desktop email
application.
To find all synchronized pictures and
videos, look in C:\Documents and
Settings\<Username>\My Documents\Treo
My Documents.
IMPORTANT You must have QuickTime
Player version 6.5 or later installed on your
computer to play videos recorded by your
smartphone. You can download the videos
from an expansion card or you can click the
video thumbnail after synchronizing the
files.
DID
YOU
KNOW
?
You can also download
animated GIF files and view them in Internet
Explorer Mobile.
YOUR PHOTOS, VIDEOS, AND MUSIC
WINDOWS MEDIA PLAYER MOBILE
140
8
CHAPTER
Windows Media
Player Mobile
Windows Media Player Mobile can play
music, audio, and video files that are
stored on your smartphone or on an
expansion card (sold separately) in any of
the following file formats:
•WMA
•WMV
•MP3
• 3GP
You can listen to these music, audio, and
video files through the speaker on the back
of your smartphone or through stereo
headphones.
Transferring media files to your
smartphone
Use the Sync feature in the desktop
version of Windows Media Player 10 to
transfer digital music, audio, video, and
playlist files from your computer to an
expansion card or your smartphone. Using
Sync ensures that the files are transferred
correctly.
BEFORE YOU BEGIN Do the following:
•Be sure you have Windows Media
Player 10 or later installed on your
computer. Windows Media Player 10
must be installed on your computer
before you install the ActiveSync
desktop software. See My video and
music files won’t sync.
•To sync media files with your computer,
set the Media sync option on your
smartphone. See Setting
synchronization options.
1On your computer, open Windows
Media Player 10.
2(Optional) Insert a 32MB or larger
expansion card into your smartphone.
TIP
For tips on using the desktop version of
Windows Media Player, go to the Help menu
in Windows Media Player on your computer.
YOUR PHOTOS, VIDEOS, AND MUSIC
WINDOWS MEDIA PLAYER MOBILE 141
8
CHAPTER
3Connect your smartphone to your
computer with the USB sync cable.
4When the Device Setup Wizard opens
on your computer, click Automatic.
5Check the Customize the playlists
that will be synchronized box.
6Select the playlists you want to sync.
7Click Finish to begin the transfer. The
next time you connect your smartphone
to your computer while the desktop
version of Windows Media Player 10 is
running, synchronization starts
automatically. Be patient; transferring
media files to an expansion card can
take several minutes.
Playing media files on your smartphone
1Press Start and select Windows
Media.
2Press Menu (right action key)
and select Library.
3Select the Library list in the upper-left,
and then select the library you want to
use. If you can’t find a media file on your
expansion card, update the library (see
Working with libraries).
4Select the item you want to play (such
as a song, album, or artist name).
5Press Play (left action key). See
the next page for playback controls.
6Press Menu (right action key)
and select any of the following during
playback:
Library: Displays the Library screen so
you can select a different song to play.
Shuffle/Repeat > Shuffle: Plays the
Now Playing playlist in random order. A
check appears next to this command
when it is on.
DID
YOU
KNOW
?
If you close the Windows
Media Player Mobile window, your music
continues to play in the background.
TIP
To play a file that is not in a library, go to
the Library screen, press Menu, and select
Open File.
TIP
To repeat the current song, press Menu
and select Repeat Song.
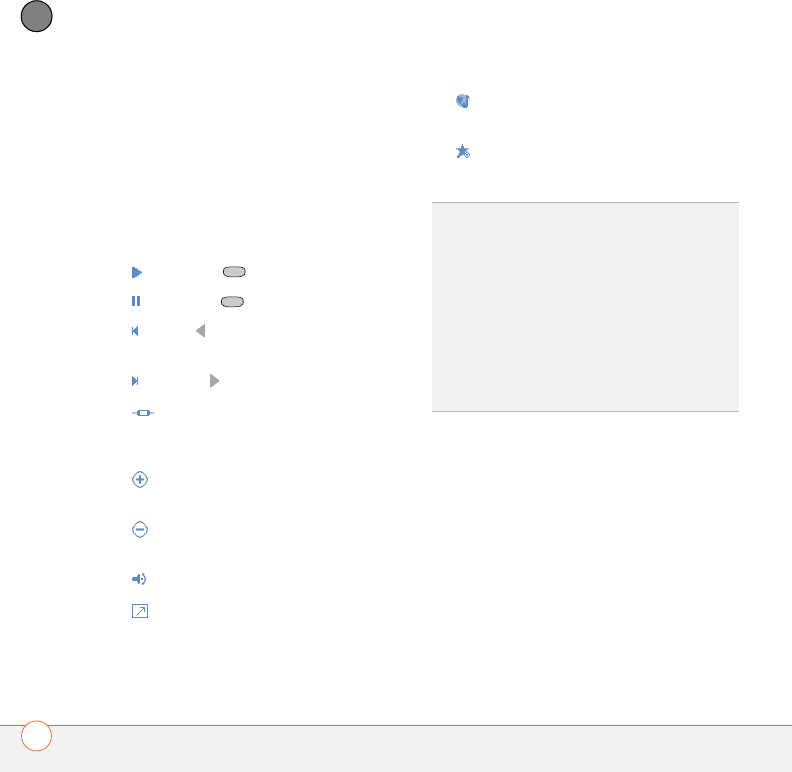
YOUR PHOTOS, VIDEOS, AND MUSIC
WINDOWS MEDIA PLAYER MOBILE
142
8
CHAPTER
Shuffle/Repeat > Repeat: Plays the
Now Playing playlist repeatedly. A check
appears next to this command when it
is on.
Stop: Ends playback.
Use any of the following onscreen controls
during playback:
or Center plays the current file.
or Center pauses the current file.
or Left skips to the beginning of the
current file or to the previous file.
or Right skips to the next file.
sets the point from which playback
begins. Tap and drag the slider to
change the current position.
or Volume button increases the
volume level.
or Volume button decreases the
volume level.
turns the sound on or off.
displays a video using the full
screen.
displays a website where you can
find music and videos to play.
indicates the rating of the current
file. Select the star to change the rating.
Working with libraries
A library represents each of the storage
locations available to Windows Media
Player Mobile, so you should have two
libraries: My Device and My Storage Card.
Each library contains links to the media
files in that location. Windows Media
Player Mobile usually updates the My
Device library automatically, but you must
manually update the My Storage Card
library.
DID
YOU
KNOW
?
You can play streaming files
from the web. To play a MMS (Microsoft
Media Streaming) file, press Menu on the
Library screen, and then select Open URL.
Select URL and enter the website address, or
select History and select a site you’ve visited
before. To play a RTSP or SDP streaming file,
using the Streaming Media application. Press
Start, select Programs, and then select
Streaming Media. Select Connect and add
the URL.
YOUR PHOTOS, VIDEOS, AND MUSIC
WINDOWS MEDIA PLAYER MOBILE 143
8
CHAPTER
1Press Start and select Windows
Media.
2Press Menu (right action key)
and select Library.
3Press Menu (right action key)
and select Update Library.
4Wait for the files to be added, and then
select Done.
Working with playlists
A playlist is a list of media files that play in
a specific order. You can use playlists to
group audio files together or video files
together for convenient playback. For
example, in the desktop Player, you can
create a playlist of upbeat songs for when
you exercise and a playlist of soothing
songs for a long flight. When you
synchronize, your favorite playlists are
automatically copied to your smartphone.
Your playlists appear in your libraries (in the
My Playlists category).
A temporary playlist, called Now Playing,
appears on the Now Playing menu. It lists
the currently playing file, as well as any
files that are queued up to play next. You
can add to, modify, or clear the files on the
Now Playing playlist.
1Go to the Now Playing screen:
•If you are on the Library screen,
select the Now Playing category.
•If you are on the Playback screen,
select Now Playing.
2Do any of the following:
TIP
If you don’t see a media file that you
added, manually update the library.
TIP
To delete an item from a library: Highlight
the item and then press and hold Center on
the 5-way to open the shortcut menu. Then
select Delete from Library. Select Ye s to
confirm the deletion.
YOUR PHOTOS, VIDEOS, AND MUSIC
WINDOWS MEDIA PLAYER MOBILE
144
8
CHAPTER
•To move a file up or down one slot,
highlight the file, and then select
Move Up or Move Down .
•To add a file, select Add , press
Menu (right action key), and
then select Queue Up.
•To delete a file from the playlist,
highlight the file, and then select
Remove .
•To view more info about a file,
highlight the file and select
Properties .
•To remove all items from the Now
Playing playlist, press Menu
(right action key) and select Clear
Now Playing.
Customizing Windows Media Player
Mobile
1If necessary, go to the Playback screen
by pressing OK to close the current
screen.
2Press Menu (right action key)
and select Options.
3On the Playback tab, set any of the
following options:
Show time as: Sets whether the time
remaining or time elapsed appears in
the Playback screen.
TIP
You can also move a file in the Now
Playing playlist by tapping and dragging it to a
new position.
DID
YOU
KNOW
?
If you move files between your
smartphone and an expansion card, be sure to
update your libraries, or you won’t be able to
see the files in their new location.
DID
YOU
KNOW
?
You can also customize your
smartphone so that pressing and holding the
Side button on the side of your smartphone
opens Windows Media Player Mobile. See
Reassigning buttons for details.
YOUR PHOTOS, VIDEOS, AND MUSIC
WINDOWS MEDIA PLAYER MOBILE 145
8
CHAPTER
Pause playback while using another
program: Sets whether playback
continues if you switch to another
application.
Resume playback after a phone call:
Sets whether playback continues after
you finish a phone call.
4Select the Video tab and set any of the
following options:
Play video in full screen: Sets whether
videos automatically play in full screen
format.
Scale to fit window: Sets whether
videos are automatically scaled to fit the
Playback screen.
5Select the Network tab and set the
following options:
Protocol: Enables and disables the
available protocols. You must select at
least one protocol. You can also set a
UDP Port.
Internet Connection Speed: Specifies
the speed of your network connection,
and specifies whether you want the
device to detect connection speed.
6Select the Library tab and set whether
you want to see the Library or Playback
screen when you open Windows Media
Player Mobile.
7Select the Skins tab and select
Previous or Next to set the player’s
background.
8Select the Buttons tab to change any of
the available button settings:
•To assign a button, highlight the item
you want to set, select Assign, and
then press the button you want to use
for that item.
•To restore an item’s factory setting,
highlight the item and select Reset.
•To unassign an item, highlight the
item and select None.
9Press OK .

YOUR PHOTOS, VIDEOS, AND MUSIC
WINDOWS MEDIA PLAYER MOBILE
146
8
CHAPTER

CHAPTER
9
Your personal information
organizer
Say good-bye to paper calendars and throw away those
scribbled to-do lists. Your smartphone is all you need to
organize your personal information and keep it with you
wherever you go.
You never lose your information, even if your battery is
completely drained. All your personal information is backed up
each time you synchronize, and your information is kept private
when you use your smartphone’s security features. Also, you
can easily share info with others electronically.
Benefits
•Track current, future, and past
appointments
•Make to-do lists that get done
•Set reminders for appointments,
birthdays, important tasks, and
more

In this chapter
Contacts. . . . . . . . . . . . . . . . . . . . . . . . . . . . . . . . . . . . . . . . . . . . . . 149
Calendar . . . . . . . . . . . . . . . . . . . . . . . . . . . . . . . . . . . . . . . . . . . . . . 151
Tasks . . . . . . . . . . . . . . . . . . . . . . . . . . . . . . . . . . . . . . . . . . . . . . . . 157
Notes . . . . . . . . . . . . . . . . . . . . . . . . . . . . . . . . . . . . . . . . . . . . . . . . 159
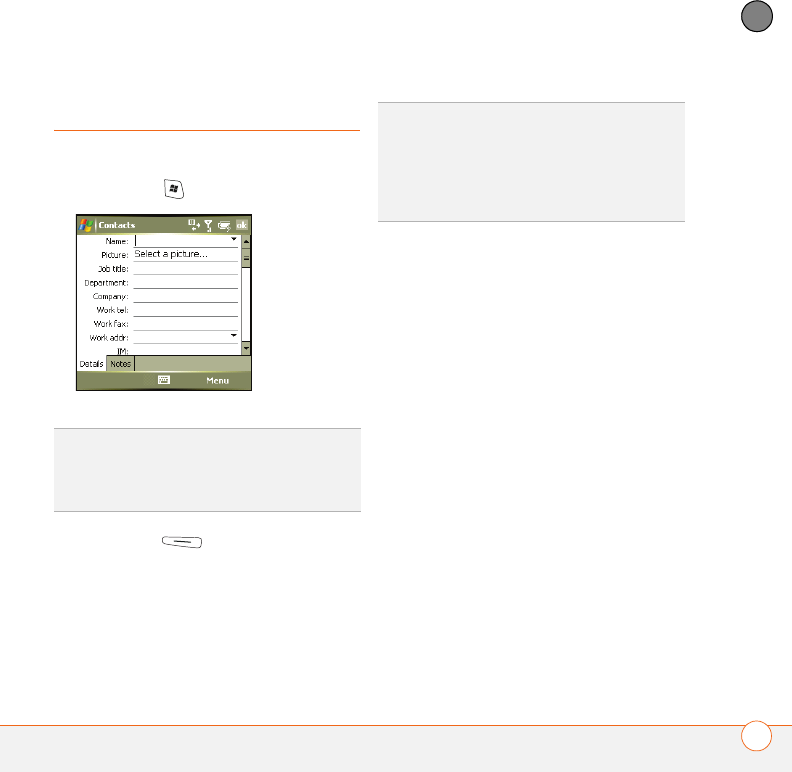
YOUR PERSONAL INFORMATION ORGANIZER
CONTACTS 149
9
CHAPTER
Contacts
Adding a contact
1Press Start and select Contacts.
2Press New (left action key).
3Use the 5-way navigator to move
between fields as you enter
information.
Here are some helpful tips for entering
info:
•To enter complete name or address
(work, home, or other) information,
tap the arrow on the right side of the
line and enter the information in the
box that appears. When finished, tap
outside the box to accept the
information and close the box.
•To add a caller ID picture that displays
when that person calls, select
Picture, and then select Camera and
take a picture, or select an existing
picture from Thumbnails view.
•To assign the entry to one or more
categories, select Categories and
then check the categories under
which you want this entry to appear.
4To add a note to an entry, select the
Notes tab.
TIP
Take some time to scroll down through all
the fields in a new contact. There are fields for
multiple addresses, phone numbers, email
addresses, and much more.
TIP
Be sure to enter mobile numbers and
email addresses in the correct fields so that
Inbox and Messaging can find this info when
you address a message and Calendar can find
your contacts when you want to invite them
to meetings.
YOUR PERSONAL INFORMATION ORGANIZER
CONTACTS
150
9
CHAPTER
5To assign a ringtone to the entry, select
Ring tone and select a tone.
6After you enter all the information, press
OK .
Viewing or changing contact information
The contacts list displays contacts stored
on you smartphone, followed by contacts
stored on your SIM card.
1In the Contacts list (viewed by name),
begin entering one of the following for
the contact you want to view or edit:
•First name
•Last name
•First initial and last initial separated by
a space
•Phone number (be sure to press
Option twice to turn on Option
Lock before entering a phone number)
2Select the entry you want to open.
3Press Menu (right action key)
and select Edit.
4Make changes to the entry as
necessary.
5Press OK .
Deleting a contact
1In the Contacts list, highlight the
contact you want to delete.
2Press Menu (right action key)
and select Delete Contact.
3Select Ye s .
DID
YOU
KNOW
?
You can find a contact by
company name. Press Menu (right action key)
and select View By > Company. Select a
company name to see the contacts who work
there.
TIP
To view a particular group of contacts,
press Menu (right action key), select Filter,
and then select the category you want to
view. To view contacts on the SIM card only,
press Menu (right action key) and select SIM
Manager.
YOUR PERSONAL INFORMATION ORGANIZER
CALENDAR 151
9
CHAPTER
Customizing Contacts
1Go to the Contacts list.
2Press Menu (right action key)
and select Options.
3 Set any of the following options:
Show alphabetical index: Displays the
alphabet at the top of the Contacts list.
You can use this index to find a contact.
Show contact names only: Enables
you to fit more names on the Contacts
list by hiding everything but the
contact’s name.
Area code: Specifies the default area
code for new contact entries.
4Press OK .
Finding a contact in an online address
book
In addition to having contacts on your
device, you can also access contact
information from your organization’s online
address book or Global Address List (GAL).
BEFORE YOU BEGIN Do the following:
•Make sure you are accessing an
Exchange Server 2003 upgraded to
Service Pack 2.
•Add access to the online address book
to your smartphone. See Adding an
online address book.
•After adding the online address book,
you must synchronize with the
Exchange Server in order for the Find
Online option to appear.
1Press Start and select Contacts.
2Press Menu (right action key)
and select Find Online.
Calendar
Displaying your calendar
1Press Start and select Calendar.
2Press Menu (right action key)
and select View.
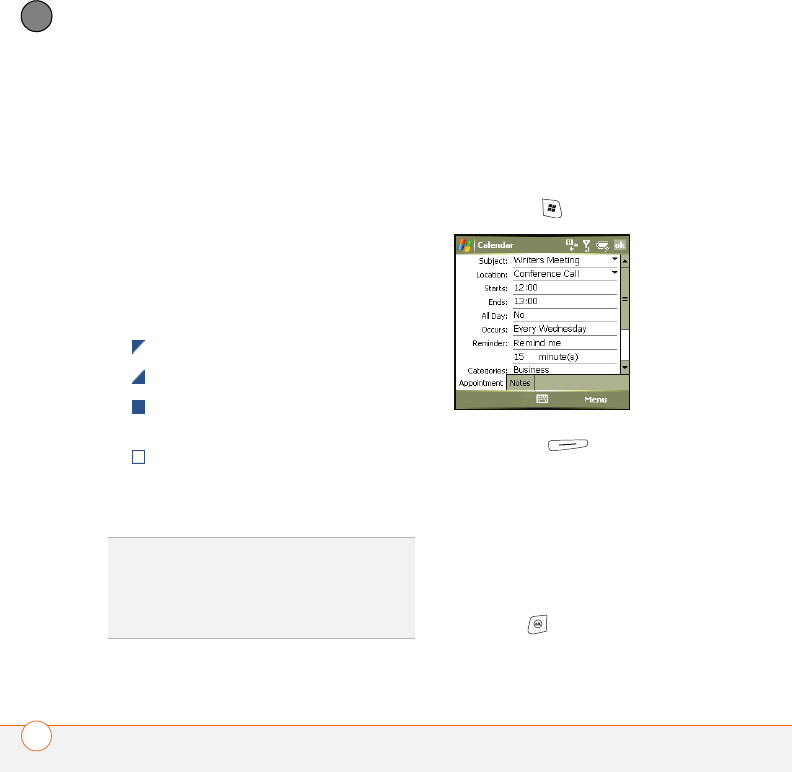
YOUR PERSONAL INFORMATION ORGANIZER
CALENDAR
152
9
CHAPTER
3Select one of the following views:
Agenda: Shows your daily schedule in
list format. Upcoming appointments are
bold; past appointments are dimmed.
Day: Shows your daily schedule in
day-planner format.
Week: Shows your schedule for an
entire week.
Month: Shows your schedule for a
whole month.
A morning appointment
An afternoon appointment
Both morning and evening
appointments
An all-day event
Year: Shows a calendar for a six-month
period.
4Use the 5-way to move to another day,
week, month, or year (based on the
current view).
Creating an appointment
1Press Start and select Calendar.
2Press Menu (right action key)
and select New Appointment.
3Enter a subject (description) and a
location.
4Select Starts and select the starting
date and time.
5Select Ends and select the ending date
and time.
6Press OK .
TIP
Don’t confuse the view name displayed
above the left action key with the current
view. The left action key displays the name of
the next view you see when you press the
key.