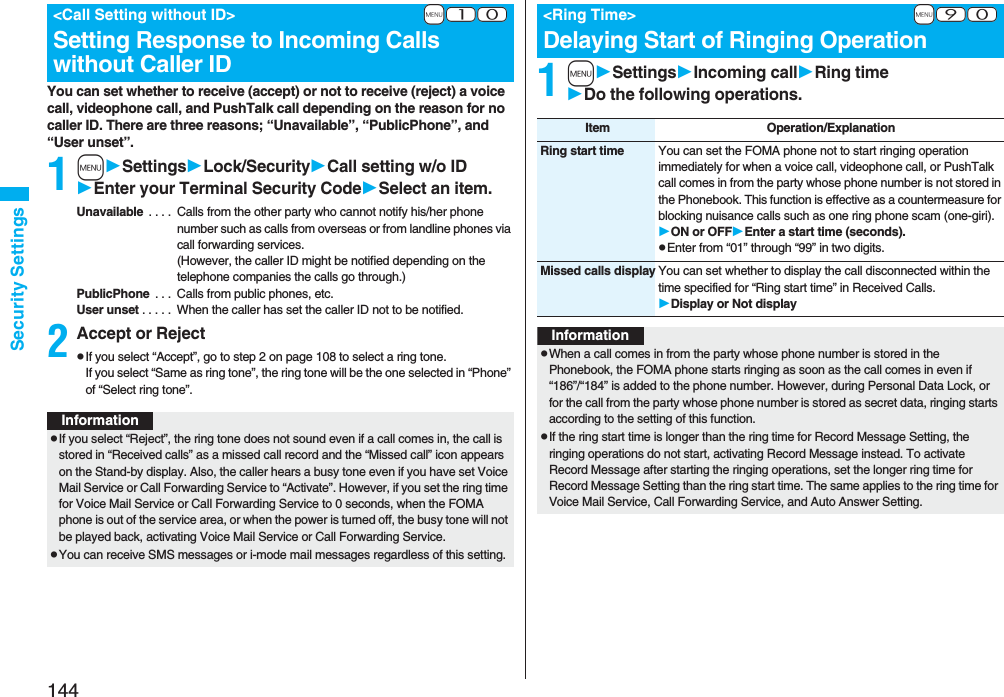
Panasonic Connect 208006A UMTS/ GSM Cellular Mobile with Bluetooth® and RFID User Manual 000 P906i
Panasonic Mobile Communications Development of Europe Ltd UMTS/ GSM Cellular Mobile with Bluetooth® and RFID 000 P906i
Contents
- 1. User Manual Part 1
- 2. User Manual Part 2
- 3. User Manual Part 3
User Manual Part 1
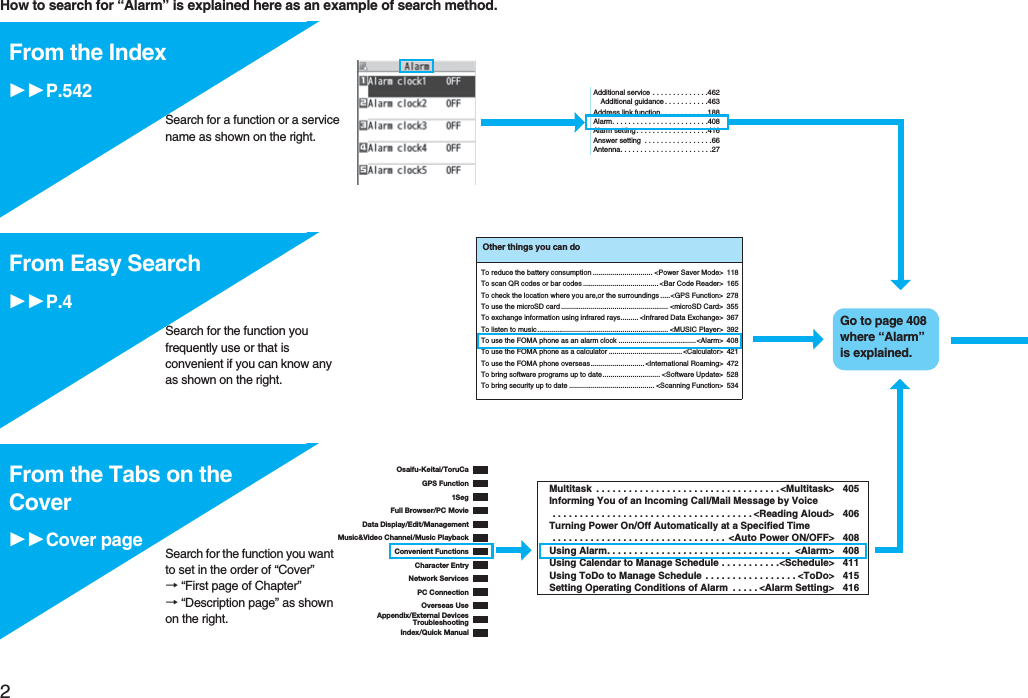
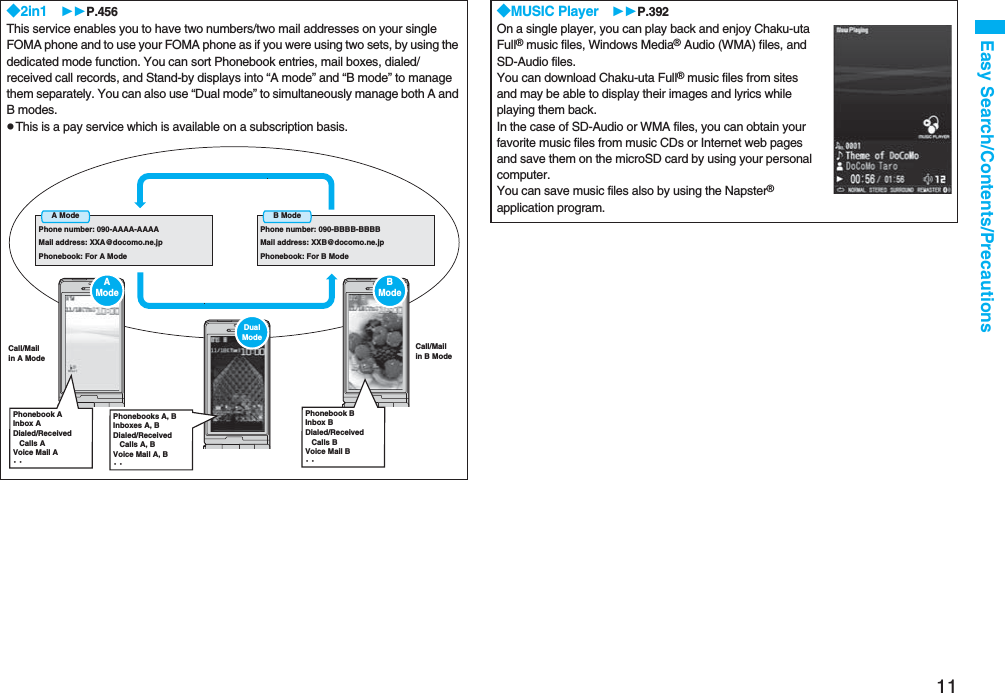
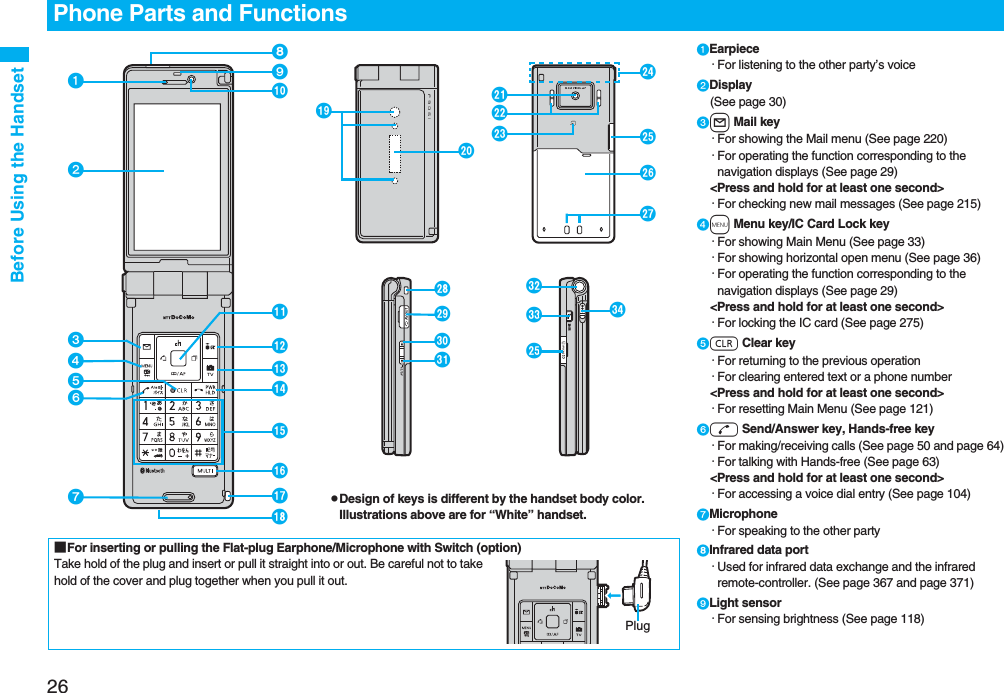
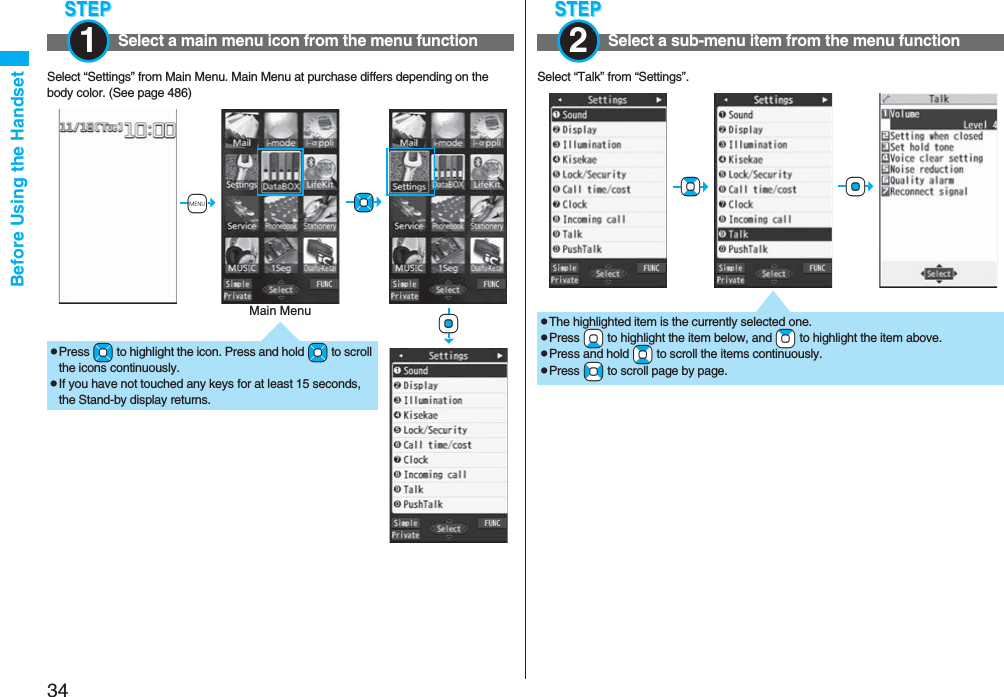
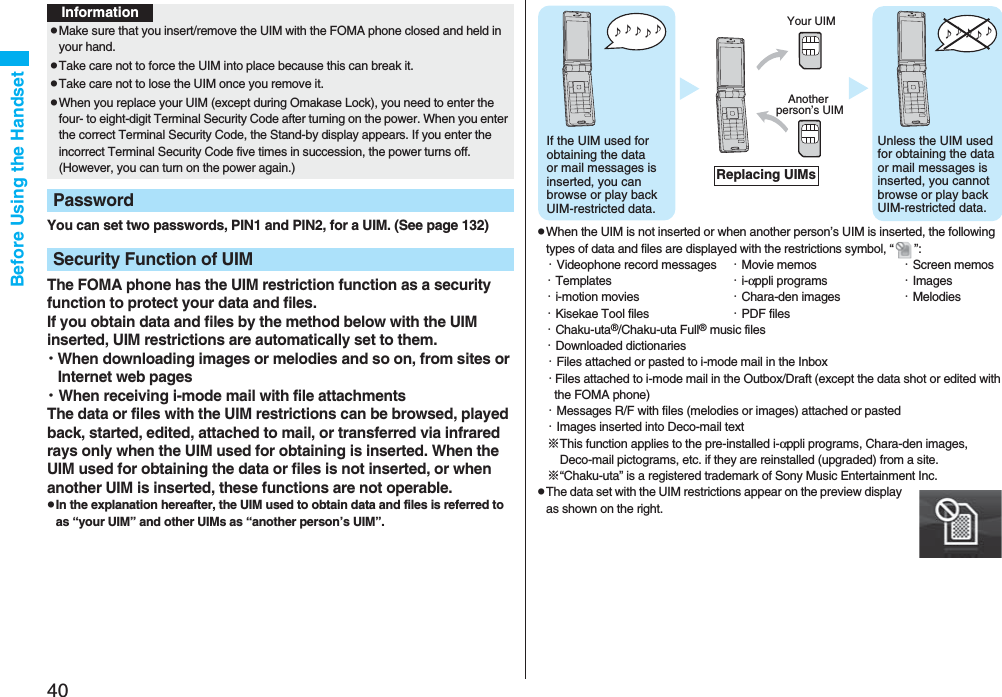
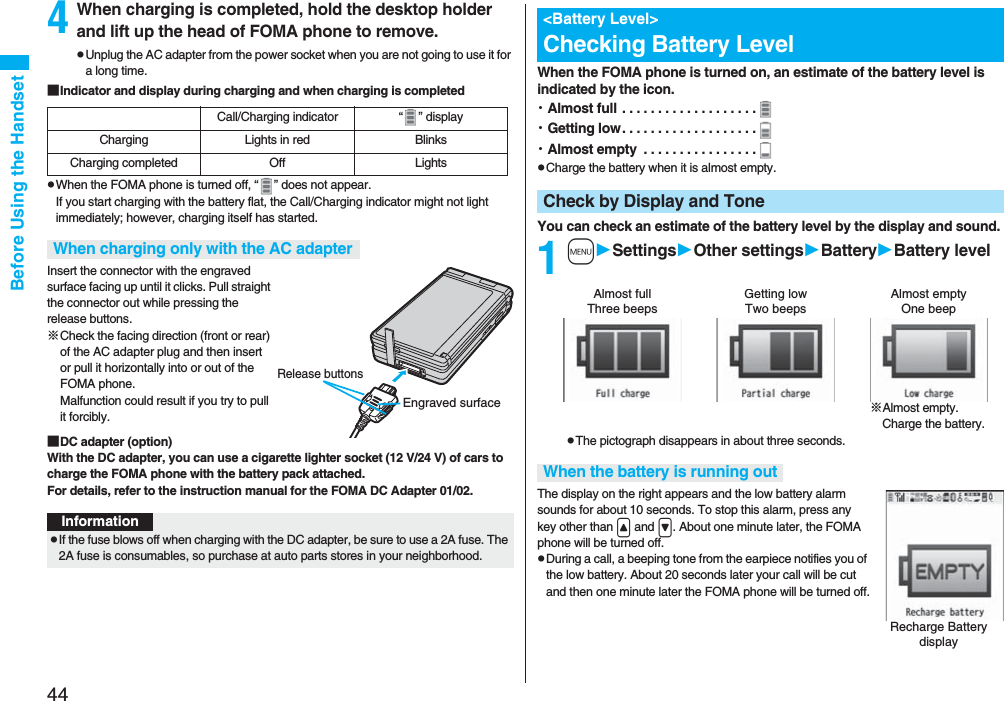
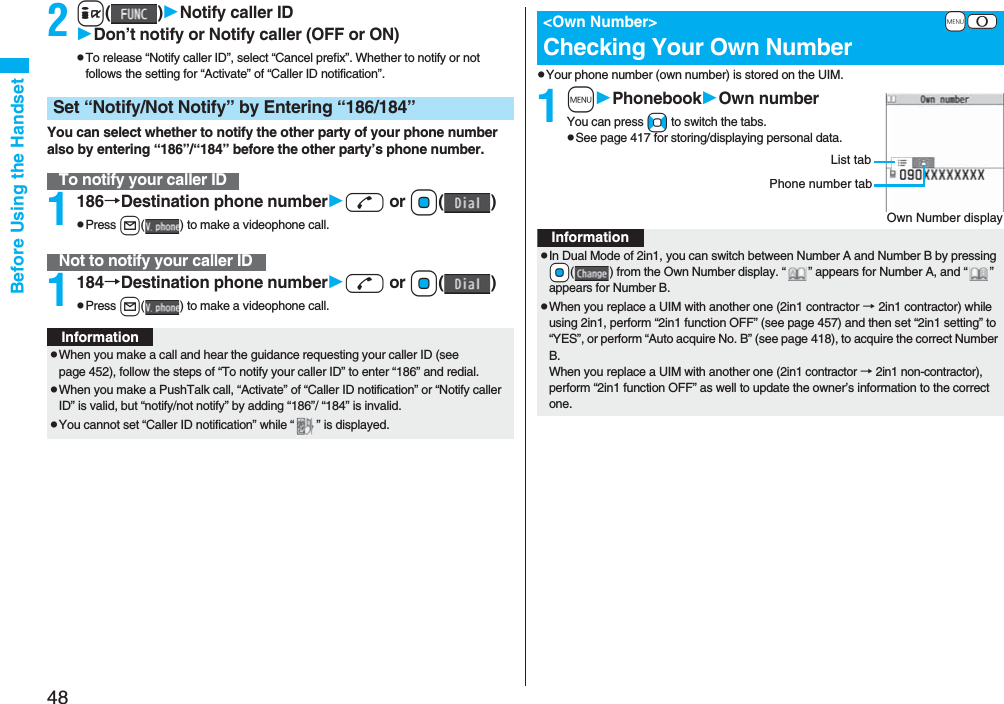
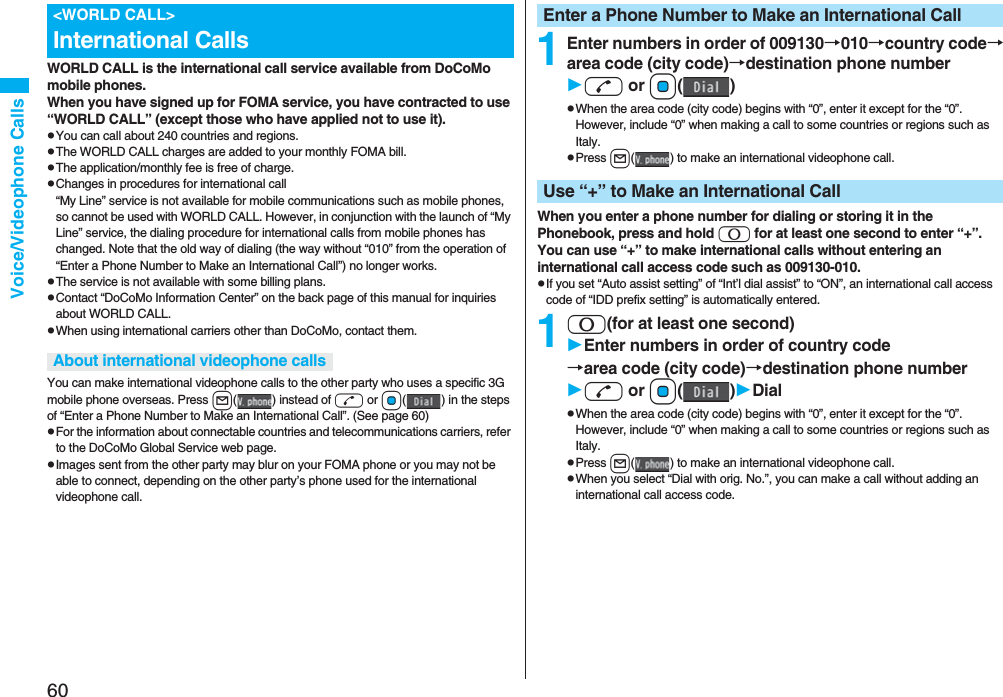
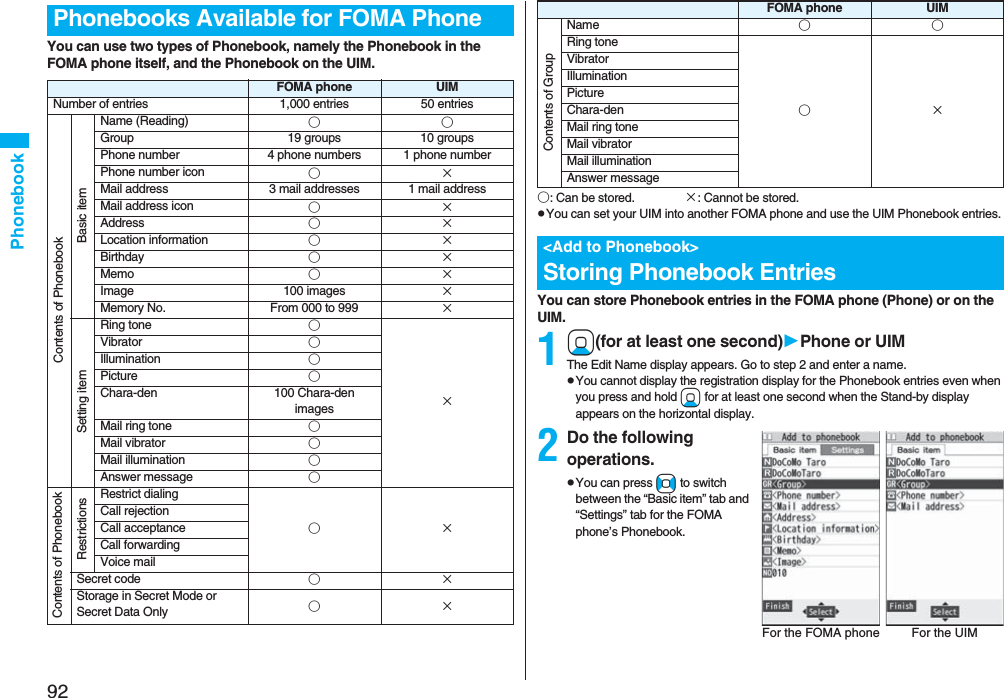
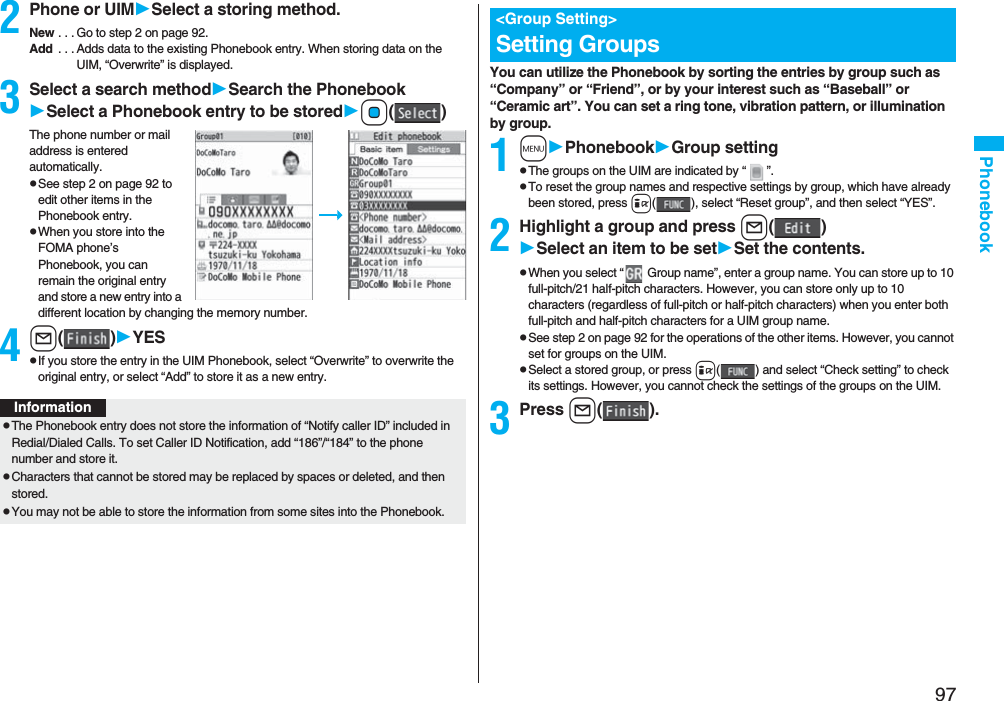
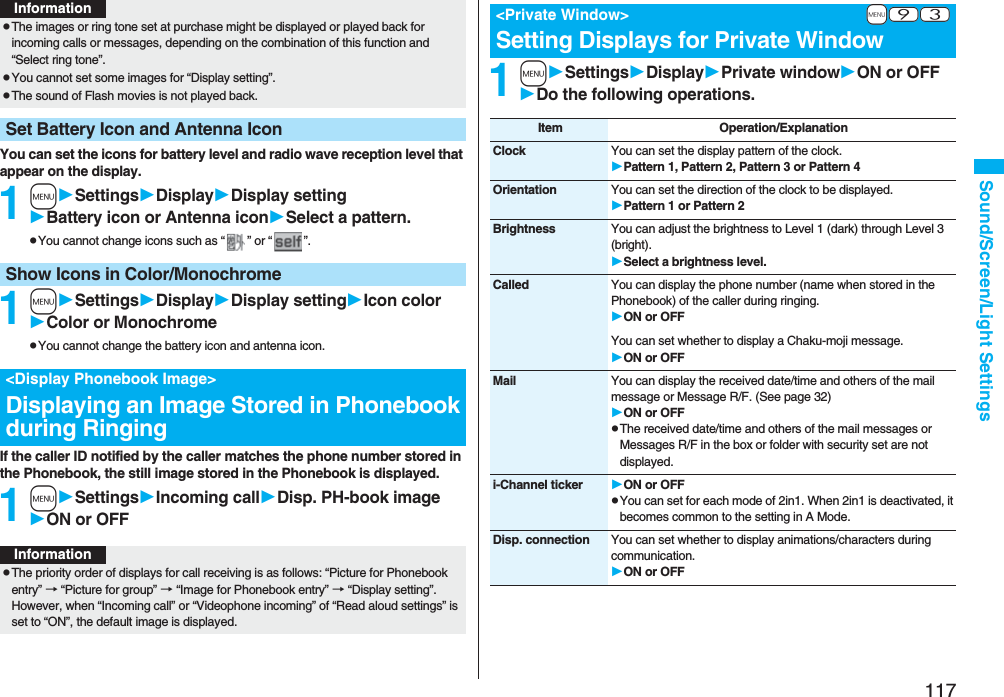
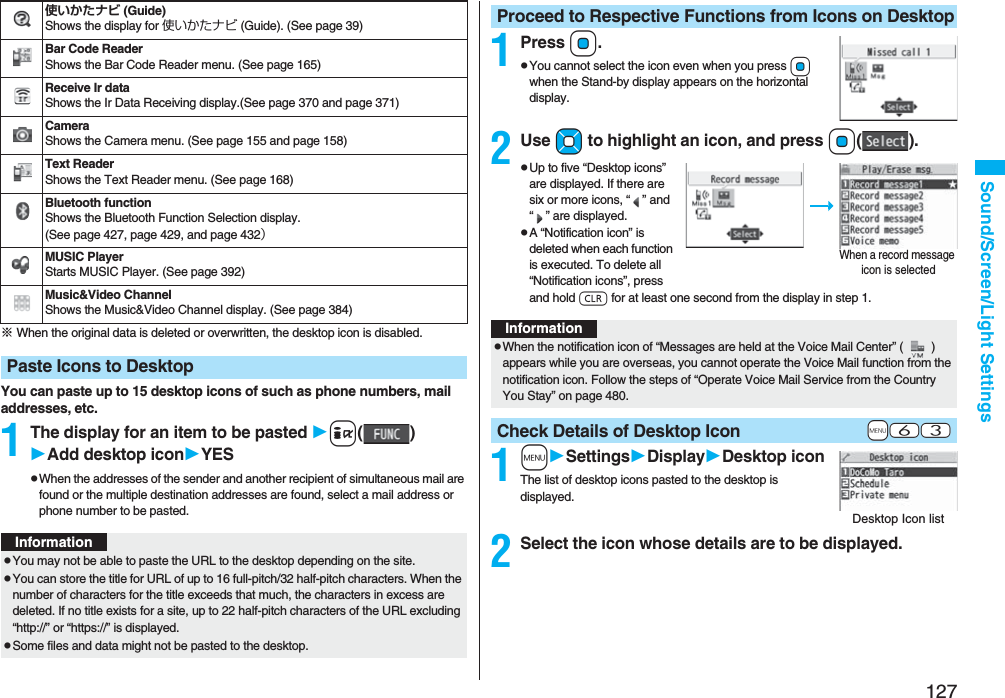
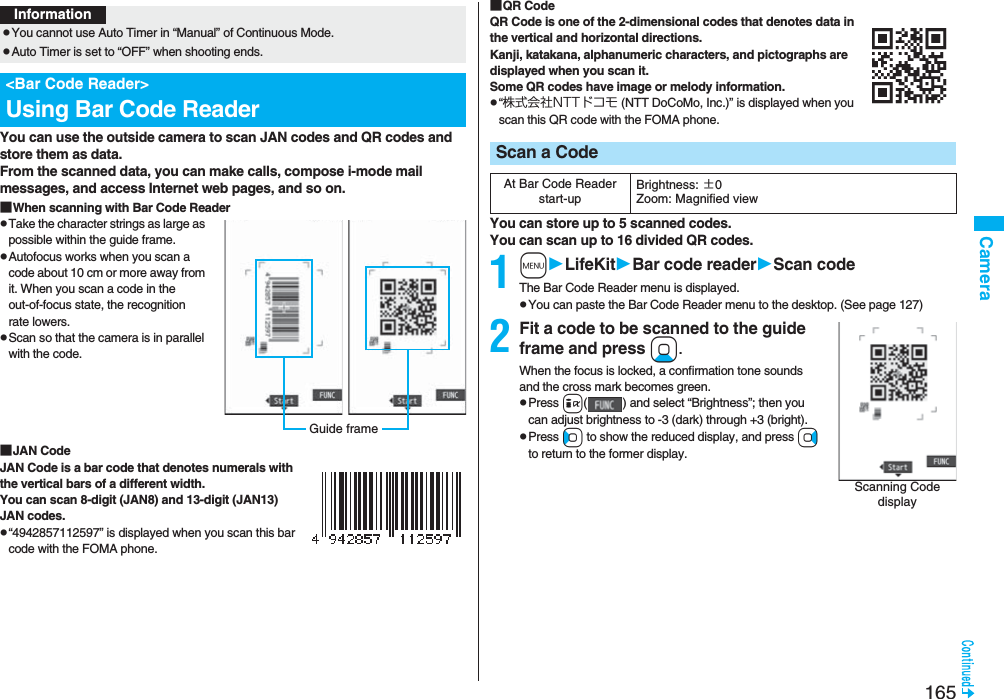
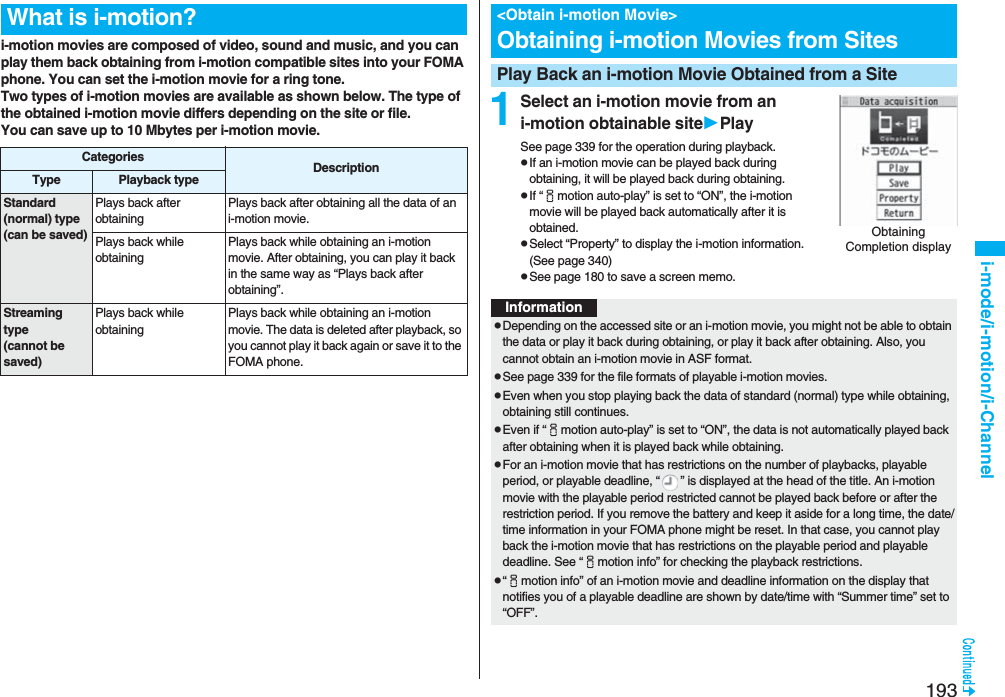
![9Easy Search/Contents/Precautions◆Bluetooth Function P.425The wirelessly-connected FOMA phone and a Bluetooth device enable you to talk or listen to music while you are carrying the FOMA phone in your bag. ◆Feel*Mail P.122Animation of 45 characters and illumination reproduce the atmosphere of mail messages. Pleasant animation appears or illumination lights according to the contents of mail message.◆Wide VGA DisplayYou can display still or moving images in the Wide VGA (480 dots x 854 dots) display of approx. 3.1 inches, and you can enjoy watching 1Seg programs on the impressive display.Also, the light sensor automatically adjusts the backlight in accordance with the ambient brightness, and the LCD AI compensates the image quality in accordance with the brightness.◆Horizontal Open Style P.28You can watch 1Seg programs and videos on the horizontal full display in Horizontal Open Style. Further, you can see the Internet web pages with Full Browser without scrolling sideways.◆One-push Open P.28■One-push Answer P.66When a call comes in, just press the one-push open button, and you can open the FOMA phone to answer the call.■Recv. Mail/Call at Open P.118When a missed call or new mail message is found, just press the one-push open button, and you can open the FOMA phone to display the detailed Missed Call display or the Inbox list.◆View Blind P.119You can make the display hard to see from an angle. You can use the FOMA phonewithout being gazed at by others.◆Face Detection P.160You can shoot still images adjusting the camera focus on person’s face automatically.◆Document Viewer P.378On your FOMA phone, you can display Microsoft Word files, Microsoft Excel files, and Microsoft PowerPoint files created by personal computers.◆Voice Recorder P.373You can record your voice as a substitute for taking notes. You can repeatedlyplay it back, so it is convenient to record the proceedings at a meeting, etc.◆Security Settings P.131Various settings such as the lock functions and security settings for “safety” are available.■Omakase Lock P.135When you have lost the FOMA phone, you can lock the FOMA phone and release it by contacting DoCoMo.For inquiries, see the back page of this manual.Omakase Lock is a pay service※.※You are not charged if you apply for this service at the same time as applying for the suspension of the use or during the suspension.pNote that Omakase Lock might be activated by an offer from the contractor of the FOMA phone when the contractor and the user of the FOMA phone differ.■Data Security Service P.145This service enables you to save Phonebook entries, images, and mail messages from your FOMA phone to the Data Storage Center, and restore the saved data, when you lost your FOMA phone or in other cases, to your FOMA phone from the Data Storage Center. Further, you can edit or manage data held at the Data Storage Center using your personal computer and can reflect the edited data to your FOMA phone.For details on Data Security Service, refer to “Mobile Phone User’s Guide [i-mode] FOMA version”. For inquiries, see the back page of this manual.Data Security Service is a pay service that is available on a subscription basis.◆Network Services P.445pVoice Mail Service (Charged)・A separate subscription is required.pCall Forwarding Service (Free)・A separate subscription is required.pDual Network Service (Charged)・A separate subscription is required.p2in1 (Charged)・A separate subscription is required.pCall Waiting Service (Charged)・A separate subscription is required.pNuisance Call Blocking Service (Free)・No subscription is required.pMulti Number (Charged)・A separate subscription is required.pSMS (Free)・No subscription is required.](https://usermanual.wiki/Panasonic-Connect/208006A.User-Manual-Part-1/User-Guide-920754-Page-11.png)
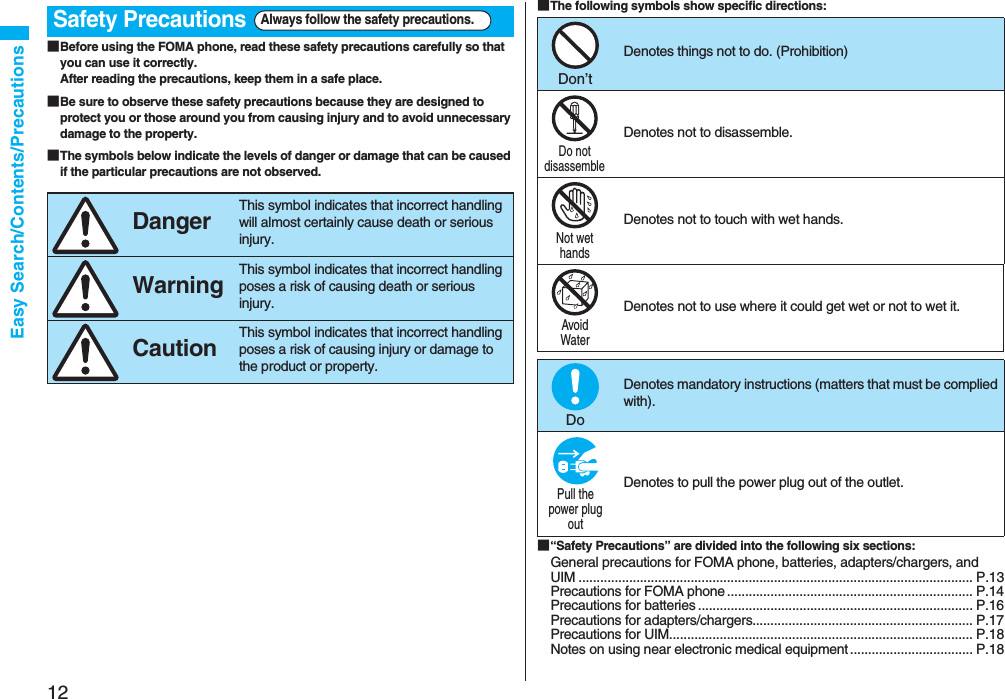
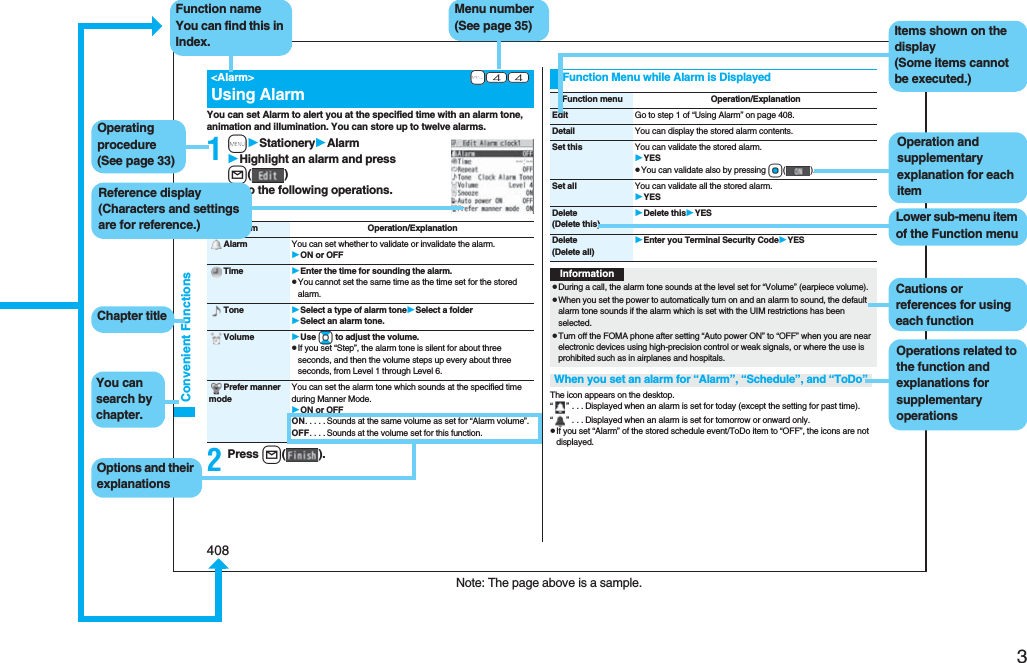
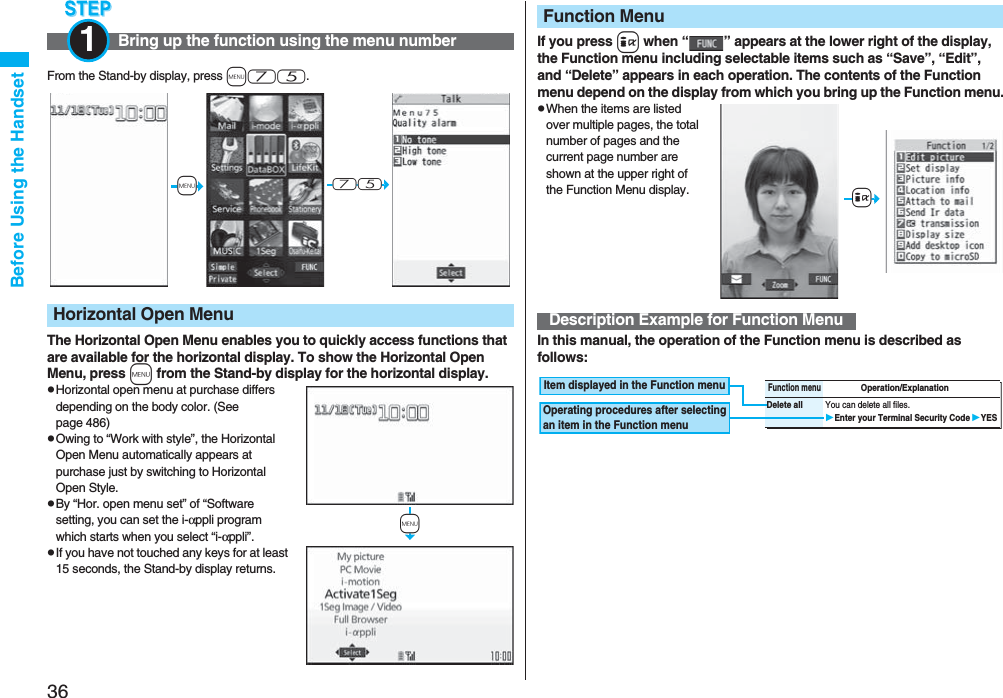
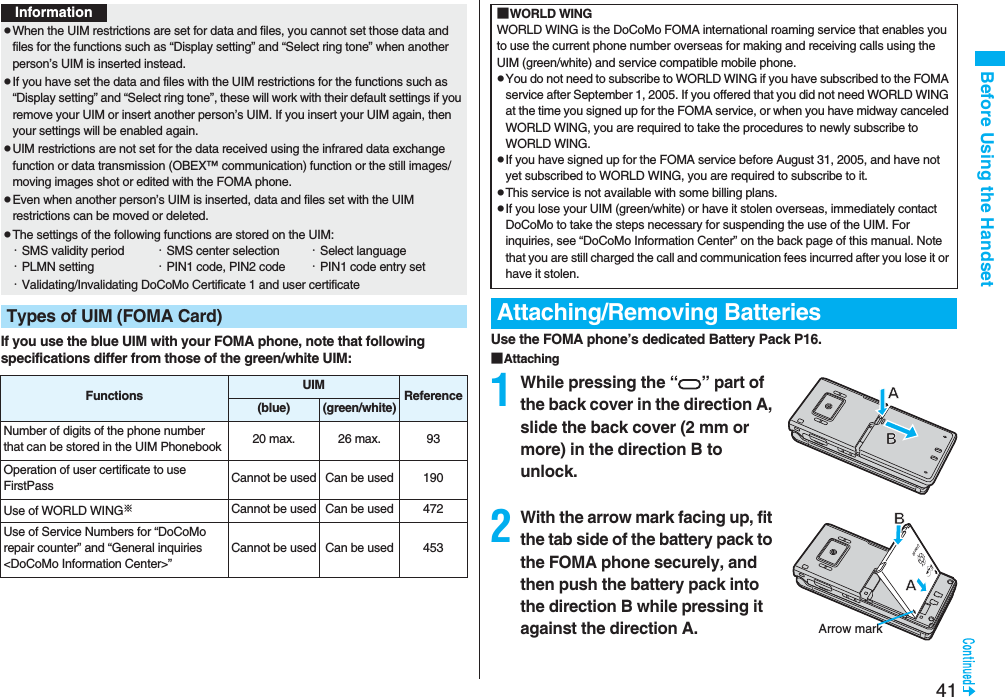
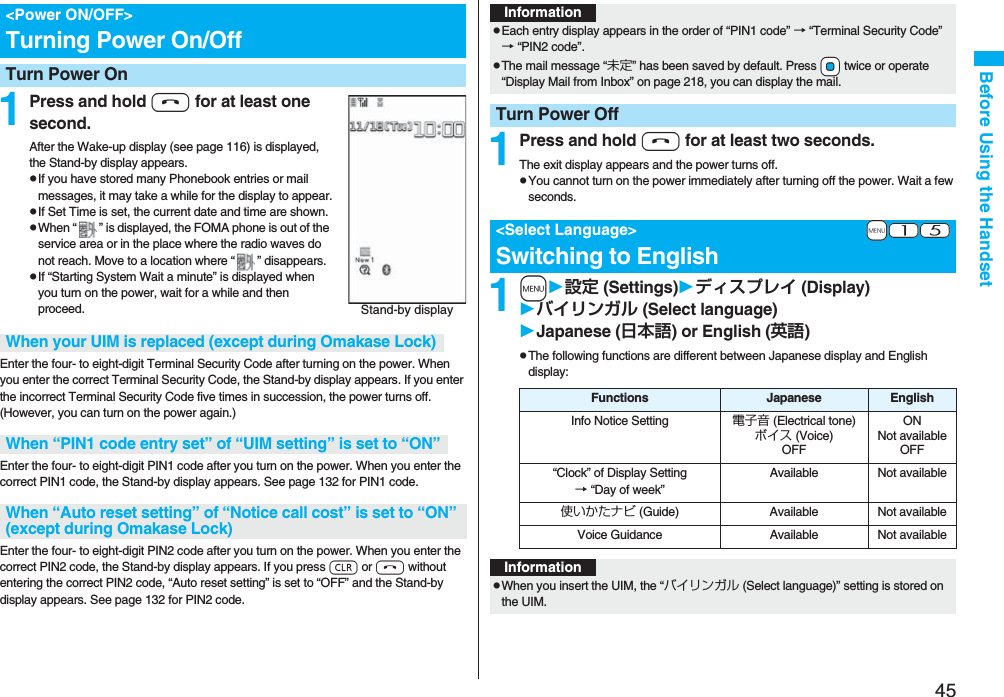
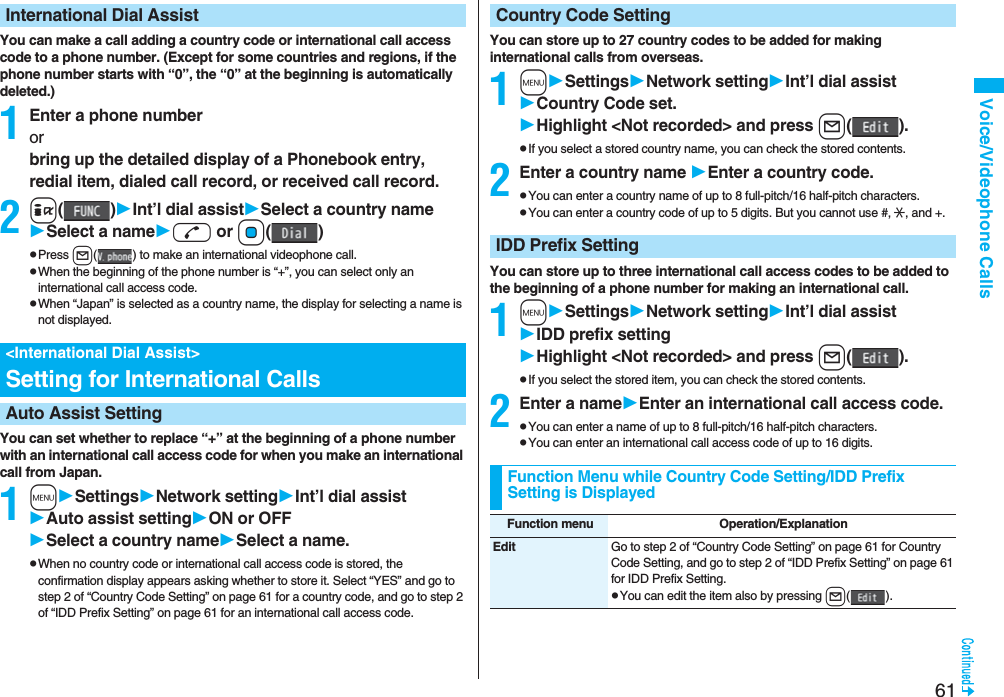
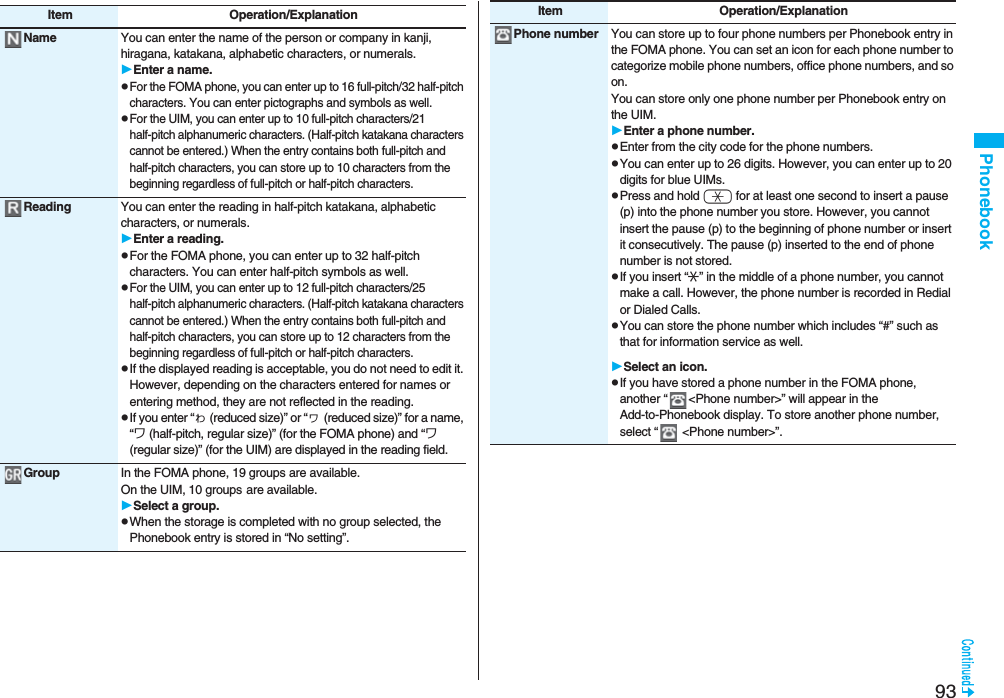
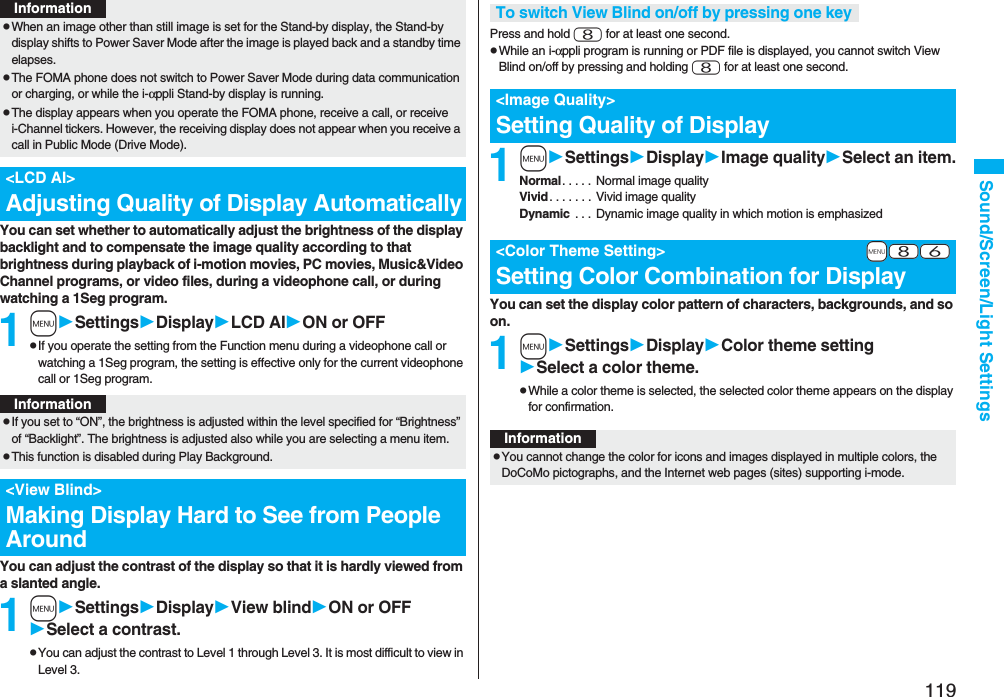
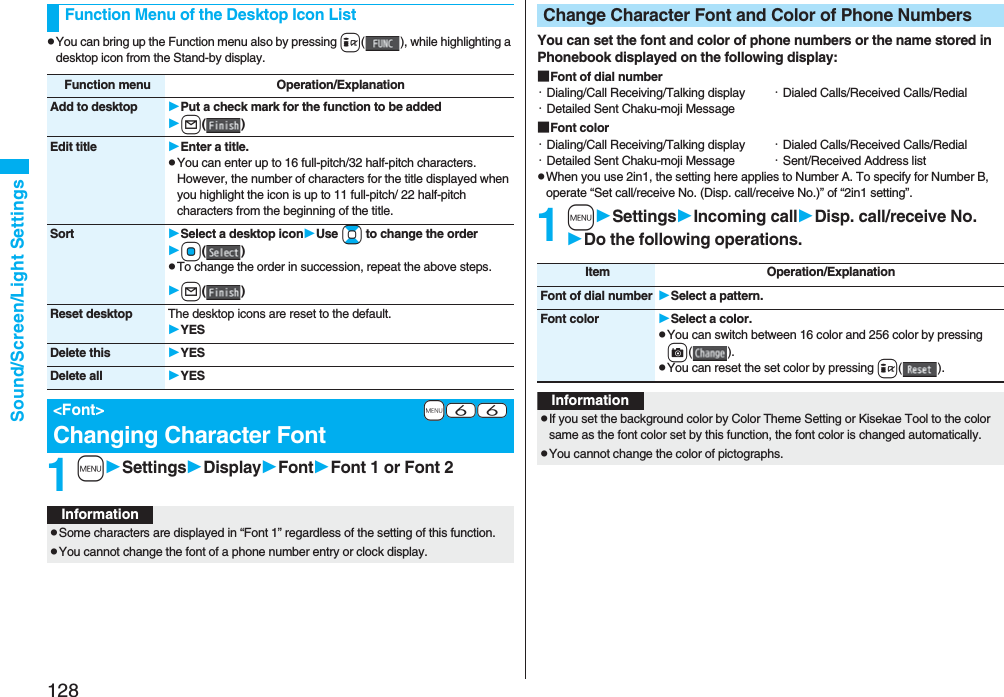
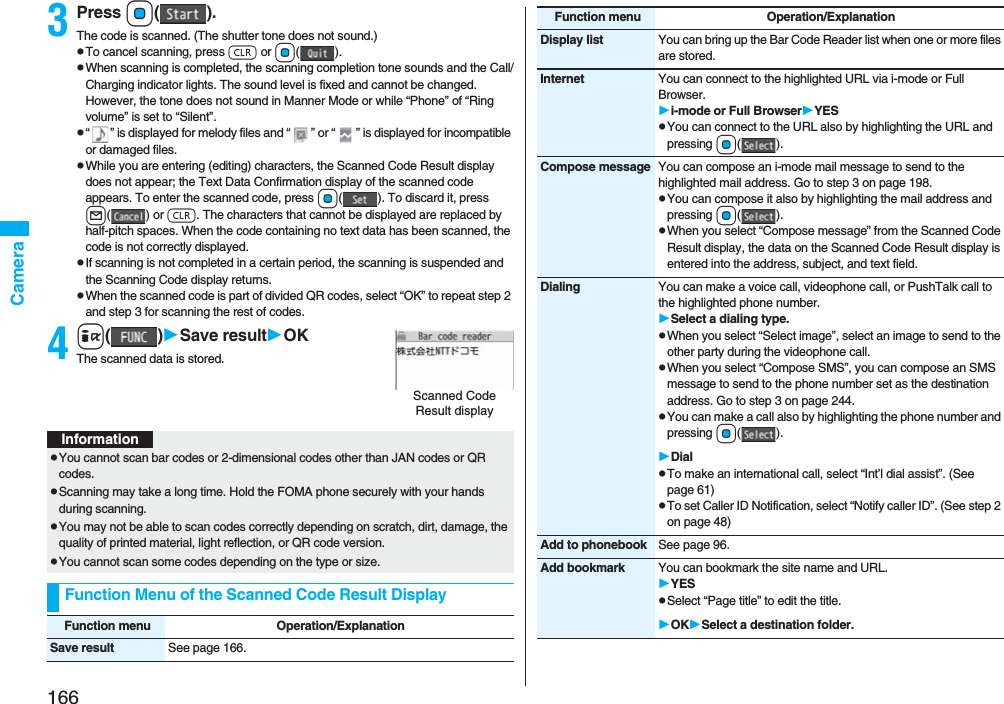
![17Easy Search/Contents/PrecautionsAn exhausted battery should not be disposed of with other waste.The battery may catch fire or damage the environment. After insulating the battery terminals with tape, take the unneeded battery to a handling counter such as a DoCoMo shop or dispose of it in accordance with local waste disposal regulations.Do not charge the wet battery. The battery pack may overheat, catch fire, or burst.If the battery fluid comes in contact with skin or clothes, immediately stop using, then rinse it out thoroughly with clean water.Skin injury may result.Do not use a damaged adapter/charger cord or power cord.Electric shock, overheating or fire may result.Do not use the AC adapter and desktop holder in steamy places such as a bathroom.Electric shock may occur. CautionPrecautions for adapters/chargers WarningDon’tDon’tDoDon’tDon’tThe DC adapter is for use only in a negative (-) grounded vehicle. Do not use it in a positive (+) grounded vehicle.Fire may result.If it starts to thunder, do not touch the FOMA phone and adapter/charger.You might be struck by lighting or suffer an electric shock.Never short-circuit the charging terminal when the adapter is plugged into the power outlet or cigarette lighter socket. Also, never touch the charging terminal with fingers or other bare skin.Fire, malfunction, electric shock or injury may result.Place the charger and desktop holder on a stable location during charging. Do not cover or wrap the charger and desktop holder in cloth or bedding.The FOMA phone may drop off, or the charger and desktop holder may overheat, causing fire or malfunction.Do not place something heavy on the adapter/charger cord and power cord.Electric shock or fire may result.Do not touch the power cord of the adapter/charger, or power outlet with wet hands.Electric shock may result.Don’tDon’tDon’tDon’tDon’tNot wethandsUse the adapter/charger at the specified V AC.If you use it at a wrong voltage, fire or malfunction may result. When using the FOMA phone overseas, use FOMA AC adapter available overseas.AC adapter: 100 V ACDC adapter: 12/24 V DC[For negative (-) grounded vehicles only]AC adapter available overseas: 100 V to 240 V AC[Connect only to household AC outlet]If a fuse of the DC adapter has blown, replace it with a specified fuse.If you use an unspecified fuse, fire or malfunction may result. For the specified fuse, refer to each instruction manual.Keep the power plugs dust-free.Otherwise, fire may result.When pulling the AC adapter into the power outlet, firmly plug it in, taking care not to contact with metal straps or the like.Otherwise, electric shock, short-circuit or fire may result.DoDoDoDo](https://usermanual.wiki/Panasonic-Connect/208006A.User-Manual-Part-1/User-Guide-920754-Page-19.png)


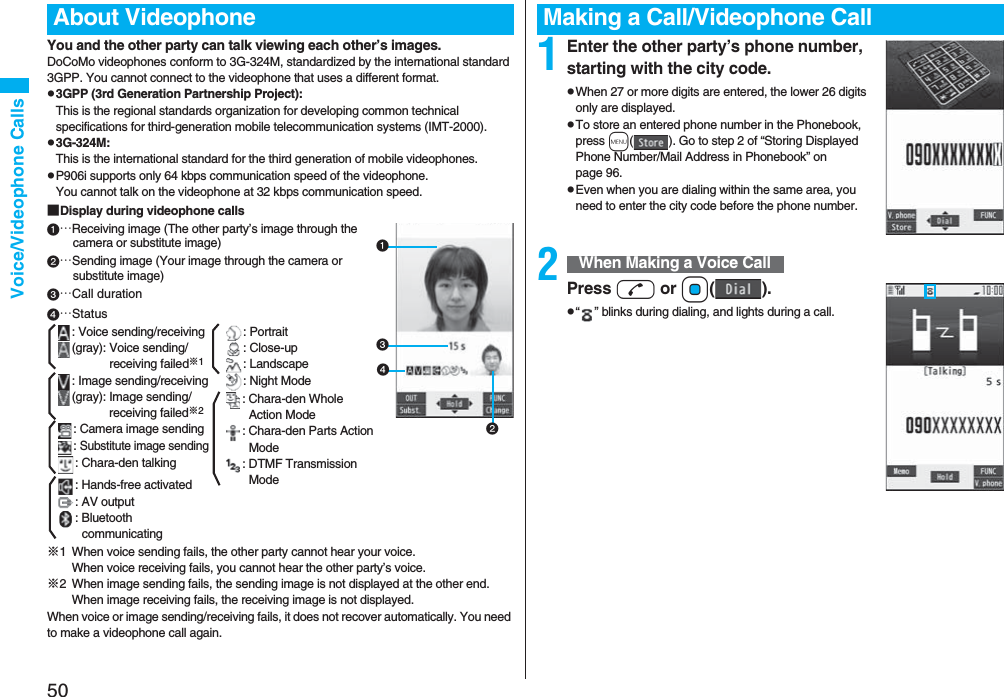

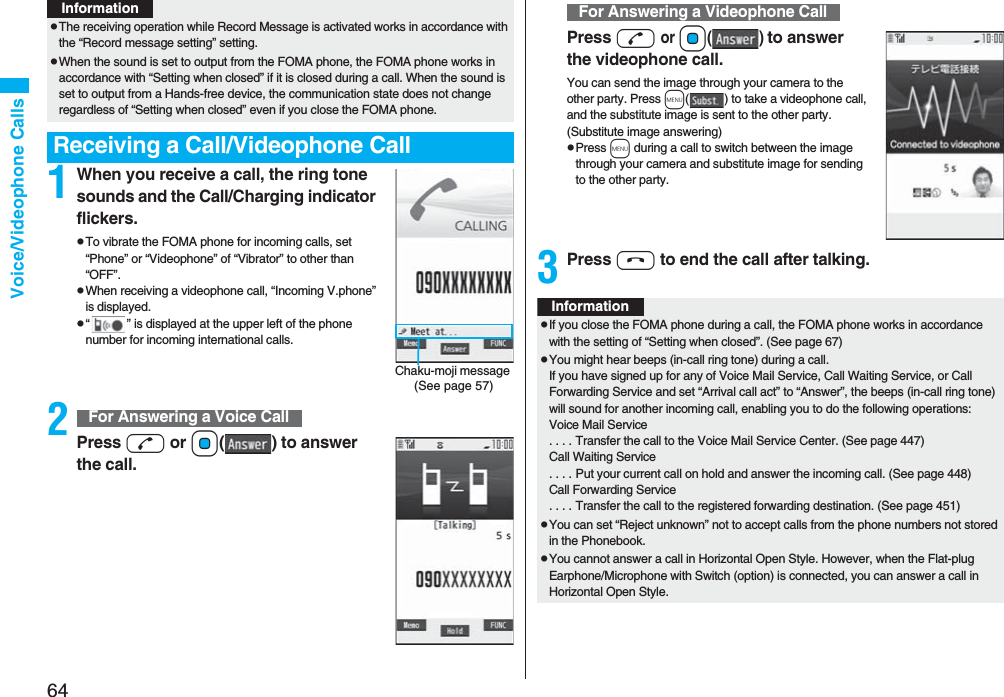
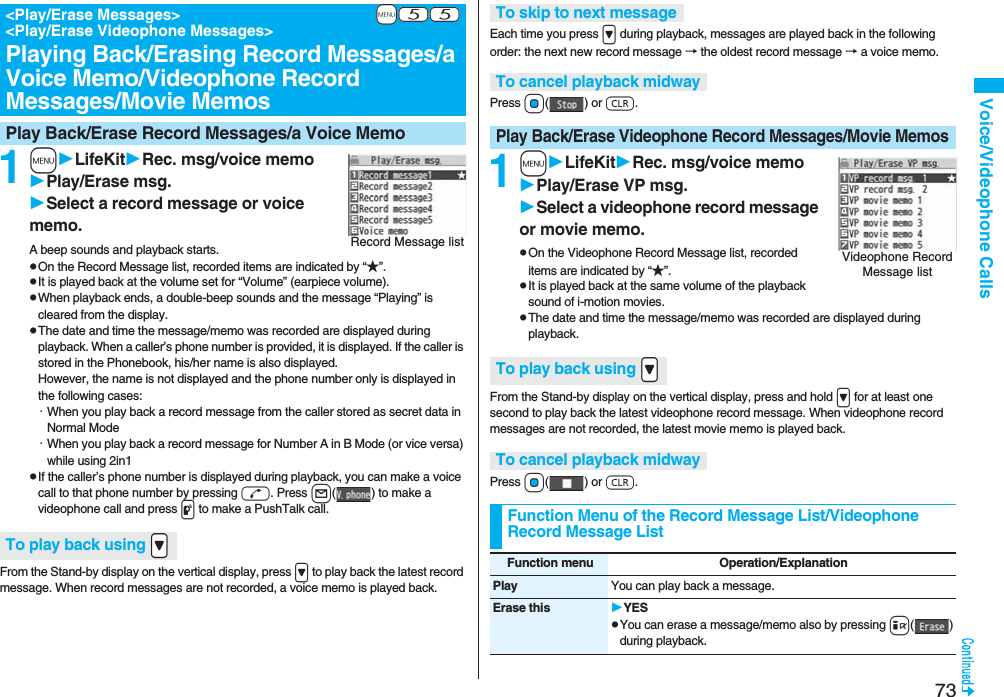
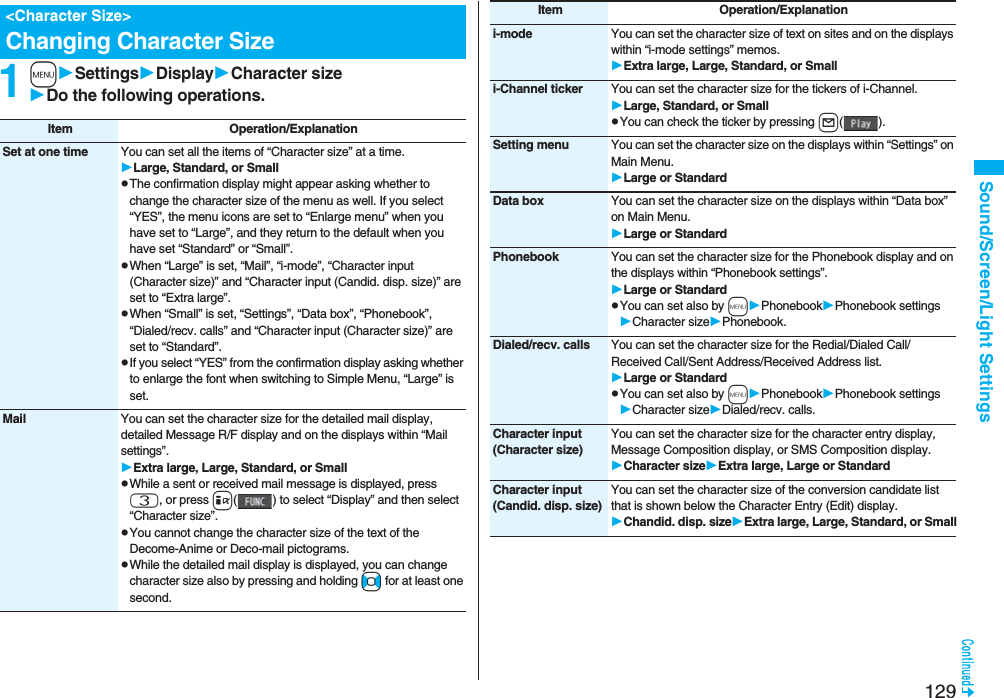
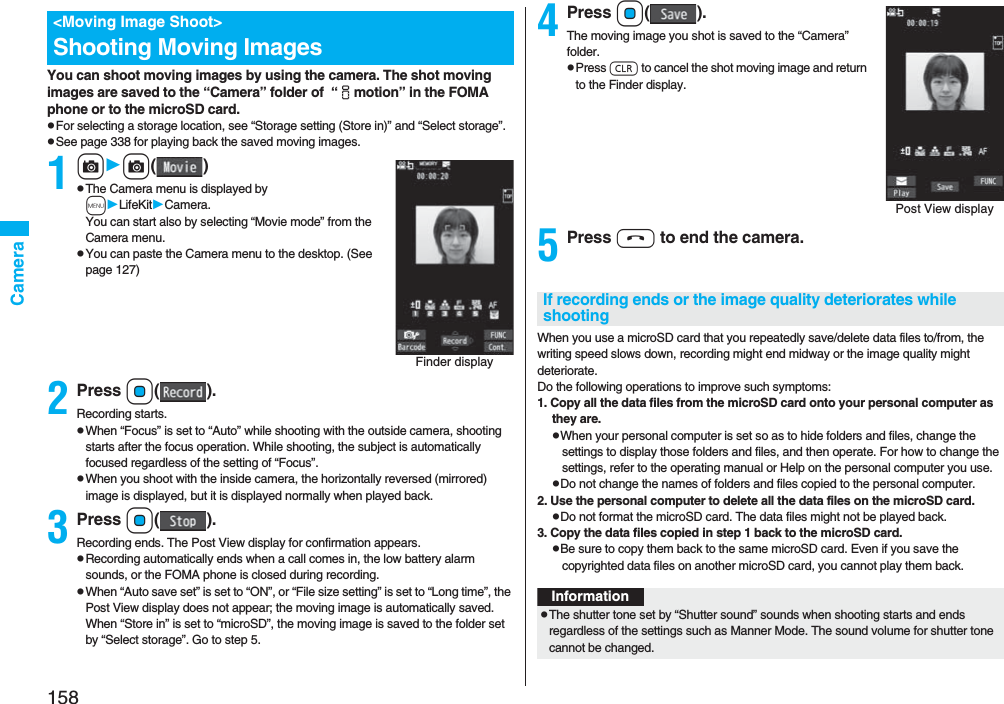
![56Voice/Videophone CallsFunction Menu while Redial/Dialed Calls/Received Calls is DisplayedFunction menu Operation/ExplanationNotify caller ID See page 47.Prefix numbers See page 62.Int’l dial assist See page 61.2in1 dial You can select a phone number to be notified to the other party in Dual Mode of 2in1. (See page 458)Multi number You can select a phone number to notify the other party. (See page 456)Chaku-moji See page 57.Character size You can switch the character size for the list. (See “Dialed/recv. calls” on page 129)Add to phonebook See page 96.pYou can store the phone number in the Phonebook also by pressing m( ) from the detailed display. Go to step 2 of “Storing Displayed Phone Number/Mail Address in Phonebook” on page 96.Ring time[Received Call list only]You can display the ring time for missed calls. Even if you have set “Missed calls display” of “Ring time” to “Not display”, the missed calls which stopped ringing within the ring start time and their ring times are displayed.Add desktop icon See page 127.Compose message You can compose a mail message to send to the phone number set as the destination address.Go to step 3 on page 198.Compose SMS You can compose an SMS message to send to the phone number set as the destination address.Go to step 3 on page 244.Sent address[Redial/Dialed Calls only]See page 229.Received address[Received Calls only]See page 229.Delete this YESDelete selected Put a check mark for redial items, dialed call records, or received call records to be deletedl()YESDelete all Enter your Terminal Security CodeYESSelect image See page 78.Store in P-Talk PB YESStore P-Talk group Select a group.pWhen members who are not stored in the PushTalk Phonebook are found, the confirmation display appears asking whether to store them.Enter a group name.pYou can enter up to 16 full-pitch/32 half-pitch characters.Function menu Operation/ExplanationInformation<Delete this> <Delete selected> <Delete all>pIf you execute “Delete all” from the Function menu of Redial/Dialed Calls, all records in both Redial and Dialed Calls are deleted. Even if you execute “Delete this” or “Delete selected” of Redial, the records are not deleted from Dialed Calls and they are retained. To delete the dialed call records, delete them from the Function menu while “Dialed calls” is displayed.<Store in P-Talk PB>pYou cannot store from the call record for the party who is not stored in the Phonebook.<Store P-Talk group>pYou cannot store in a PushTalk group unless all the members are stored in the FOMA phone’s Phonebook.](https://usermanual.wiki/Panasonic-Connect/208006A.User-Manual-Part-1/User-Guide-920754-Page-58.png)
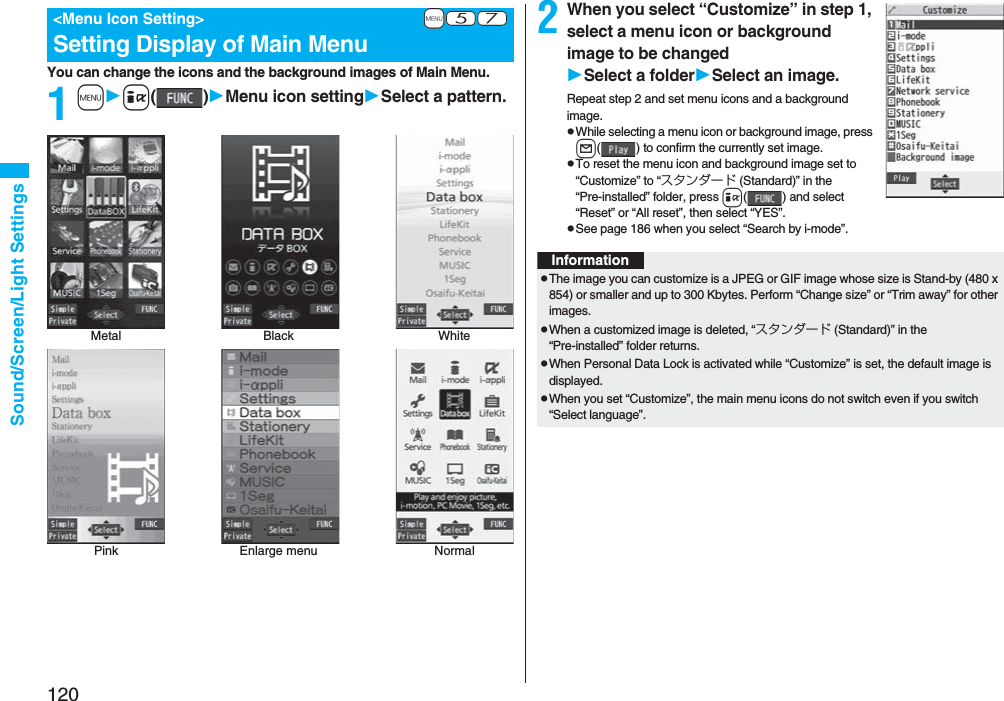
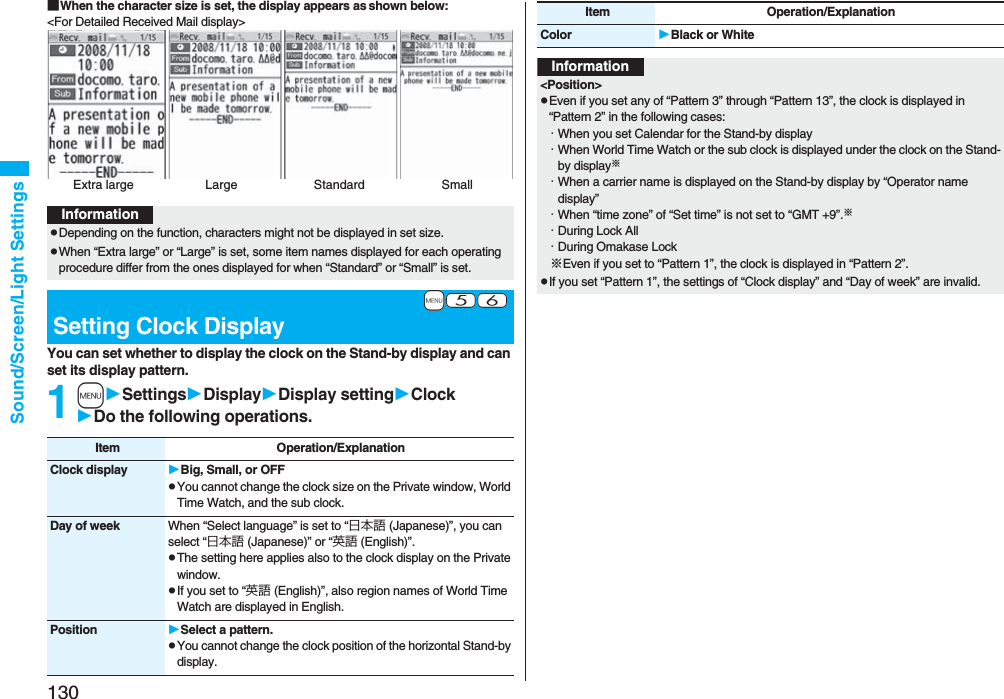
![57Voice/Videophone CallsWhen making a voice call or videophone call, you can send your text message to tell the subject during calling.pFor details on Chaku-moji or compatible models, refer to DoCoMo web page or “Mobile Phone User’s Guide [Network Services]”.pThe sending end is charged, but the receiving end is not charged.A Chaku-moji message is displayed below a caller. The Chaku-moji message is stored in Received Calls as well.pThe Chaku-moji message is displayed only during ringing. It is not displayed during a call.pEven when a Chaku-moji message comes in within the ring start time set by “Ring time”, it is received and recorded in Received Calls.pThe Chaku-moji message is displayed on the Private window when “Chaku-moji” of “Called” on page 117 is set to “ON”.pThe Chaku-moji message is not displayed during Lock All, Omakase Lock, or Personal Data Lock. However, you can check the Chaku-moji message from Received Calls after the lock is released.You can store up to 10 Chaku-moji messages in the Message list.1mServiceChaku-mojiCreate messageHighlight <Not stored> and press l()Enter a message.pTo edit a stored message, highlight it and press l().pYou can enter up to 10 characters regardless of whether they are pictographs, symbols, or full-pitch/half-pitch characters.1Enter a phone numberorbring up the detailed display of a Phonebook entry, redial item, dialed call record, or received call record.<Chaku-moji>Using Chaku-mojiWhen a Chaku-moji message is receivedStore MessagesMake a Call with a Message2i()Chaku-mojiDo the following operations.3Press d or Oo().pPress l( ) to make a videophone call.pThe Chaku-moji message being sent is displayed during dialing.Function menu Operation/ExplanationCreate message You can create a Chaku-moji message just before dialing.Enter a message.pYou can enter up to 10 characters regardless of whether they are pictographs, symbols, or full-pitch/half-pitch characters.pThe Chaku-moji message created using this function is not stored in the Message list.Select message From the Message list, you can select a stored message.Select a message.Sent messages From the Sent Message list, you can select a Chaku-moji message to be sent. Up to 10 sent Chaku-moji messages only are stored in the Sent Message list. If you send the same Chaku-moji message, the older one is deleted. When the number of sent Chaku-moji messages exceeds 10, the messages are deleted from the oldest one.Select a sent message.InformationpWhen a Chaku-moji message has arrived at the other party’s phone, “Transmission completed” is displayed, and you are charged a transmission fee. pWhen a Chaku-moji message does not arrive at the other party’s phone such as when the other party’s phone is not a Chaku-moji compatible mobile phone or the call is not allowed by “Message disp. settings” at the receiving end, “Transmission failed” is displayed. In this case, you are not charged a transmission fee.pDepending on the radio wave conditions, the transmission result may not be displayed at the sending end even if a Chaku-moji message has arrived at the other party’s phone. In this case, you are charged a transmission fee.pEven if you make a call sending a Chaku-moji message, the Chaku-moji message is not displayed and you are not charged a transmission fee (the call is not recorded in Received Calls at the receiving end) when the other party’s phone is out of the service area, turned off, during Public Mode (Drive Mode), or the ring time for Record Message Setting is set to zero seconds. Also, the transmission result is not displayed at the sending end.](https://usermanual.wiki/Panasonic-Connect/208006A.User-Manual-Part-1/User-Guide-920754-Page-59.png)


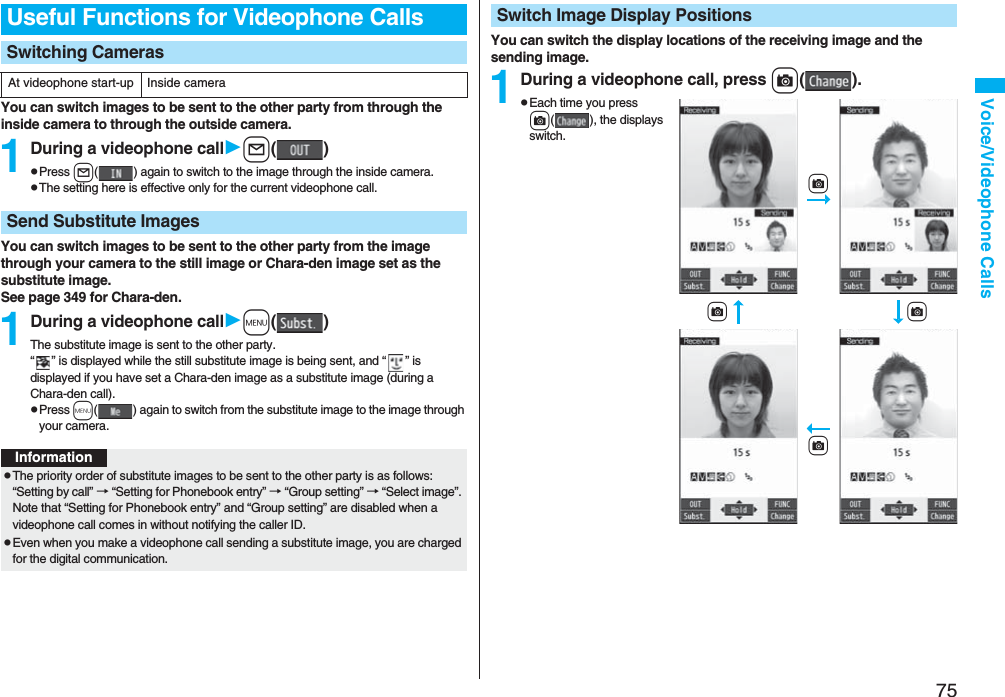
![74Voice/Videophone CallsYou can perform the setting for sending a Chara-den image to the other party.pSee page 349 for Chara-den images.You can set a Chara-den image to be sent to the other party for making a videophone call.1Chara-den display/Chara-den listl()Enter the destination phone number and press l( ) to make a videophone call.pWhen the other party’s phone number is stored in the Phonebook, you can retrieve it selecting from the Search Phonebook display by pressing Bo.pYou can search for the phone number also from Received Calls by pressing Co or from Redial by pressing Vo.Erase rec. msg. You can erase all record messages from the Record Message list, and can erase all videophone record messages from the Videophone Record Message list.YESErase movie memo[Videophone Record Message list only]You can erase all movie memos.YESErase all You can erase all record messages and a voice memo from the Record Message list, and can erase all videophone record messages and movie memos from the Videophone Record Message list.YESUsing Chara-denSet by CallFunction menu Operation/ExplanationInformationpThe priority order of substitute images to be sent to the other party is as follows: “Setting by call” → “Setting for Phonebook entry” →“Group setting” → “Select image”.You can set a Chara-den image for “Substitute image” of “Select image”.1Chara-den display/Chara-den list/Chara-den Recording displayi()Substitute imagepFrom the Chara-den list, you can set it also by pressing m().You can perform settings for a Chara-den call. These settings are effective only for during a videophone call.1During a Chara-den calli()Chara-den setupDo the following operations.Substitute ImageChara-den SetupItem Operation/ExplanationSwitch Chara-den Select a Chara-den image.pIf you switch Chara-den images, the action mode switches to Whole Action Mode.Action list You can display the list for actions that you can operate.pHighlight an action and press Oo( ) to execute the action. Press l( ) to check the details of the action.pYou can display the Action list also by pressing a.Change action You can switch the action mode between Whole Action Mode ( ) and Parts Action Mode ( ).pYou can switch modes also by pressing l.SW substitute img. You can switch a substitute image to be sent to the other party to the still image set for “Pre-installed” of “Select image”.SW org. subst. img. You can switch a substitute image to be sent to the other party to the still image set for “Original” of “Select image”.At videophone start-upWhole Action Mode](https://usermanual.wiki/Panasonic-Connect/208006A.User-Manual-Part-1/User-Guide-920754-Page-76.png)

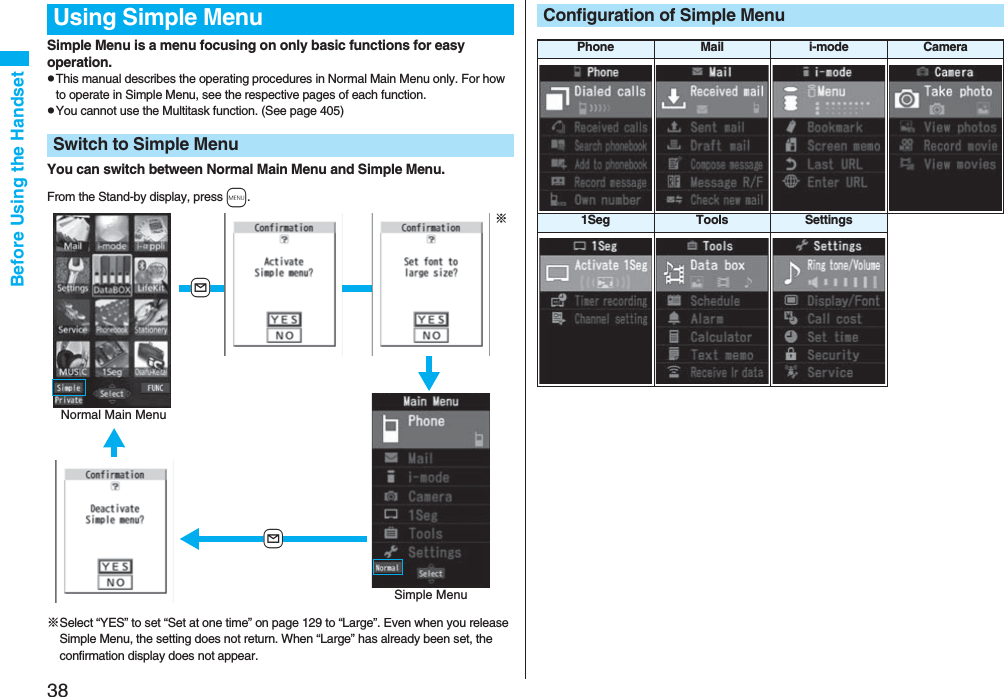
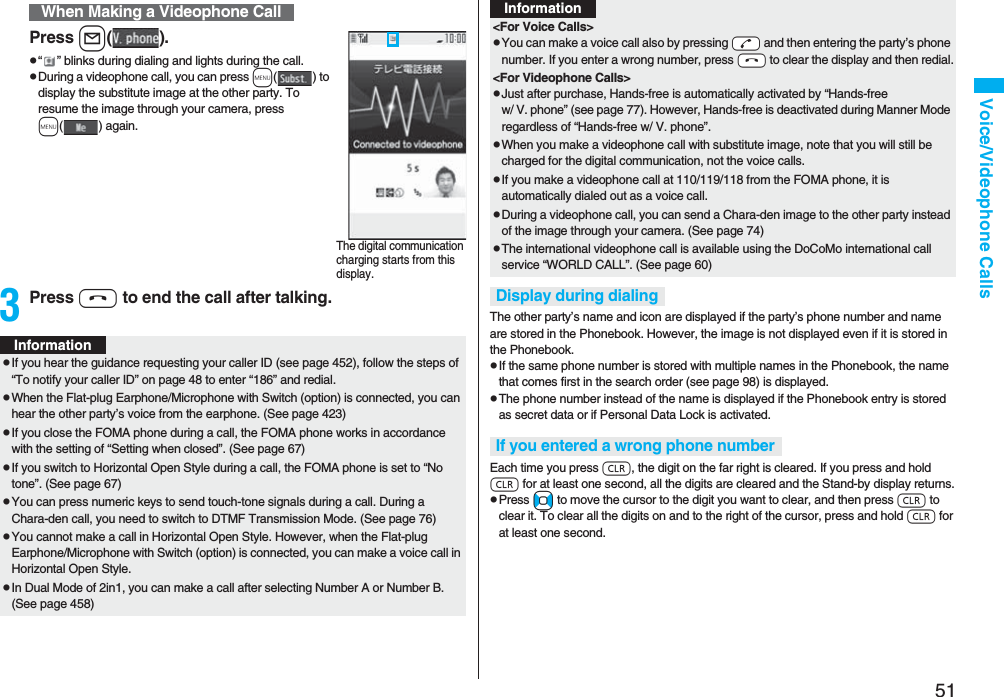
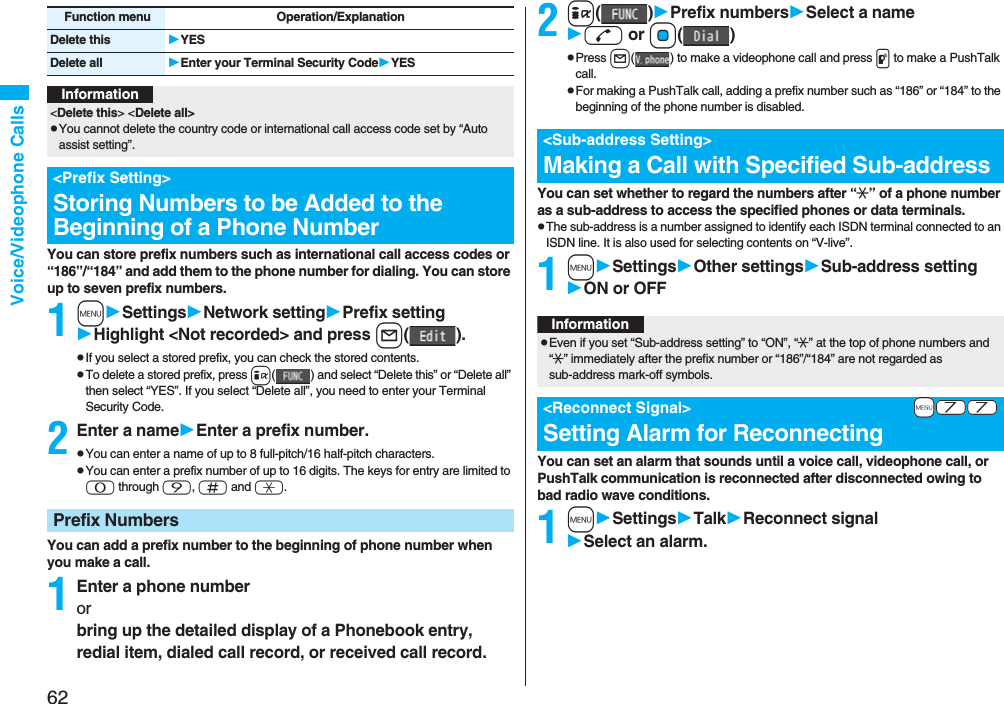
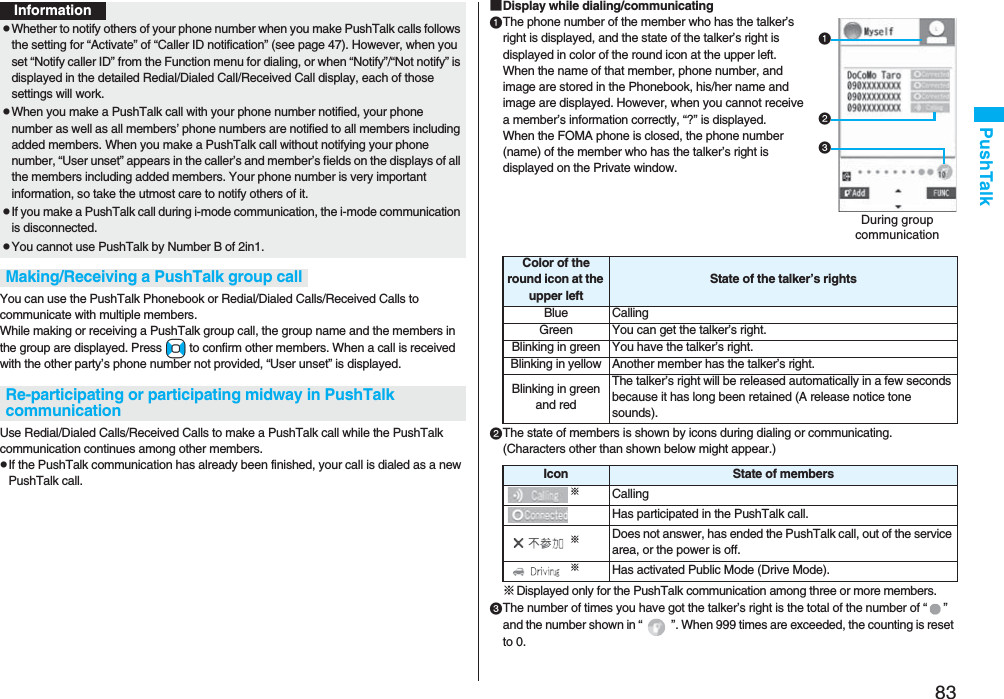
![82PushTalkYou can communicate with multiple persons (up to five persons including yourself); press the PushTalk key to access the PushTalk Phonebook, select the persons you want to talk with, and press the PushTalk key. You are charged a PushTalk communication fee each time you press (talk) the PushTalk key. pFor details on PushTalk or compatible models, refer to DoCoMo web page or “Mobile Phone User’s Guide [Network Services]”.■PushTalkPlus※This service enables you to have a PushTalk call with up to 20 persons including you. You can use the shared Phonebook on the network, and can check the members for their status, thus PushTalk becomes more useful.※You need to subscribe separately.pFor details such as how to operate, refer to the booklet which is supplied at subscription.1Enter the other party’s phone numberpWhen you are dialing, a confirmation tone for starting a PushTalk call sounds for a few seconds, and then the same ring tone as the voice (videophone) call sounds.pYou can make a group call to multiple persons using the PushTalk Phonebook. (See page 85 and page 86)What is PushTalk?Making a PushTalk Call2When the other party answers, talk while pressing p.When the other party answers, a confirmation tone for starting communication sounds. p“ ” blinks during dialing and lights during communication.pWhen you get the talker’s right, the talker’s right obtained tone sounds. The other party hears your voice only while you are pressing p and having the talker’s right. When you release p, the talker’s right is released, and a confirmation tone sounds.pYou cannot get the talker’s right and an error tone sounds even if you press p when another member has it.pPress l( ) or press i( ) and select “Add member” to add a member. Go to step 1 of “Adding a Member during PushTalk Communication” on page 84.3Press h to end the communication after talking.A tone to notify the disconnection of communication sounds at the other end.pWhen the call you made is a group call, the PushTalk communication itself continues even if you press h, and the icon indicating that you are not participating appears on each member’s display and a confirmation tone sounds. However, when all the members exit, the PushTalk communication itself ends.InformationpThe talker is charged a communication fee from when he/she presses .p and the talker’s right obtained tone sounds. pYou cannot make emergency calls at 110/119/118 from PushTalk.pThe duration you can talk per talker’s right is limited. The talker’s right release notice tone sounds before the limited time arrives, and the talker’s right is released. In addition, the PushTalk communication itself ends when no one gets the talker’s right in a certain period of time.pJust after purchase, Hands-free is automatically activated by “Hands-free w/ PushTalk”. (See page 88) However, Hands-free is deactivated during Manner Mode regardless of “Hands-free w/ PushTalk”.pThe FOMA phone works according to “Setting when closed” if you close it during communication. You can set also by pressing +i( ) and selecting “Set. when closed”. (See page 67)](https://usermanual.wiki/Panasonic-Connect/208006A.User-Manual-Part-1/User-Guide-920754-Page-84.png)
![87PushTalk2Put a check mark for members you want to make a call top or l()pWhen you do not check any members, the call is made to the highlighted member.1PushTalk Phonebook listi()DEL from P-Talk PBDo the following operations.1PushTalk Group listi()DEL from PT groupYESGroup Member listInformationpWhen five or more members are stored in a group, you cannot make a call to all the members by selecting the group.<Delete from PushTalk Phonebook>Deleting PushTalk Phonebook EntriesItem Operation/ExplanationDelete this Select a deleting method.DEL from P-Talk PB. . . Deletes an entry in the PushTalk Phonebook only. Does not delete the entry in the FOMA phone’s Phonebook.DEL from all PBs. . . Deletes an entry in both the PushTalk Phonebook and FOMA phone’s Phonebook.YESDelete all Enter your Terminal Security CodeYESpThe FOMA phone’s Phonebook entries are not deleted.Delete from PushTalk Group1Group Member listi()DEL group membersDo the following operations.Delete Group MembersItem Operation/ExplanationDelete this YESDelete all Enter your Terminal Security CodeYESInformationpEven when you delete PushTalk groups or group members, the PushTalk Phonebook entries and FOMA phone’s Phonebook entries are not deleted.Making Full Use of PushTalk PhonebookFunction Menu of the PushTalk Phonebook List/PushTalk Group List/Group Member ListFunction menu Operation/ExplanationMembers to call When the PushTalk Phonebook list or Group Member list is displayed, you can display the checked members only.pPress p or Oo( ) to make a PushTalk call.pPress i( ) to select “Notify caller ID” and then you can select whether to notify your phone number. When “Cancel prefix” is selected, the FOMA phone works according to the setting by “Caller ID notification”.Search PushTalk PB[Phonebook list only]Select a search method.Reading? . . . See page 98.Group? . . . . . See page 98.Select a member.You can display the PushTalk Phonebook list with the searched members selected.](https://usermanual.wiki/Panasonic-Connect/208006A.User-Manual-Part-1/User-Guide-920754-Page-89.png)
![88PushTalkStore in P-Talk PB[Phonebook list only]See page 85.DEL from P-Talk PB[Phonebook list only]See page 87.Edit group members[Group list/Member list]You can edit the members in the group.Go to step 2 on page 86.Edit group name[Group list only]Enter a group name.pYou can enter up to 16 full-pitch/32 half-pitch characters.DEL from PT group[Group list only]See page 87.DEL group members[Member list only]See page 87.Sound setting See page 88.Vibration setting See page 89.Auto answer set. See page 88.Ring time setting See page 88.Hands-Free See page 88.Set. when closed See page 67.i-mode arrival act See page 89.P-Talk arrival act See page 88.Function menu Operation/Explanation1mSettingsPushTalkDo the following operations.Network connection You can connect to the network to use PushTalkPlus. This is available only when you have singed up for PushTalkPlus. (See page 82)Setting PushTalk Calling/ReceivingFunction menu Operation/ExplanationItem Operation/ExplanationAuto answer settingSelect an item.ON . . . . . Automatically answers immediately after receiving regardless of “Ring time setting”.OFF . . . . Does not answer automatically.Ring time setting Enter a ring time (seconds).pEnter two digits from “01” through “60”.p“Disconnected” is displayed at the other end after the ring time has elapsed.Hands-free w/ PushTalkYou can set whether to hear the other party’s voice from the speaker or from the earpiece for when PushTalk communication starts.ON or OFFpSee page 63 for how the FOMA phone works while Hands-free is activated and how to switch to Hands-free during communication.PushTalk arrival act Select an item.Voice mail . . . . . . . Connects an incoming voice call to the Voice Mail Service Center.Call forwarding . . . Forwards an incoming voice call to the forwarding destination.Call rejection . . . . . Rejects an incoming voice call and does not answer.Answer . . . . . . . . . . Shows the Voice Call Receiving display.Sound setting You can set a ringing pattern for the sounds during PushTalk communication.Select a pattern.](https://usermanual.wiki/Panasonic-Connect/208006A.User-Manual-Part-1/User-Guide-920754-Page-90.png)


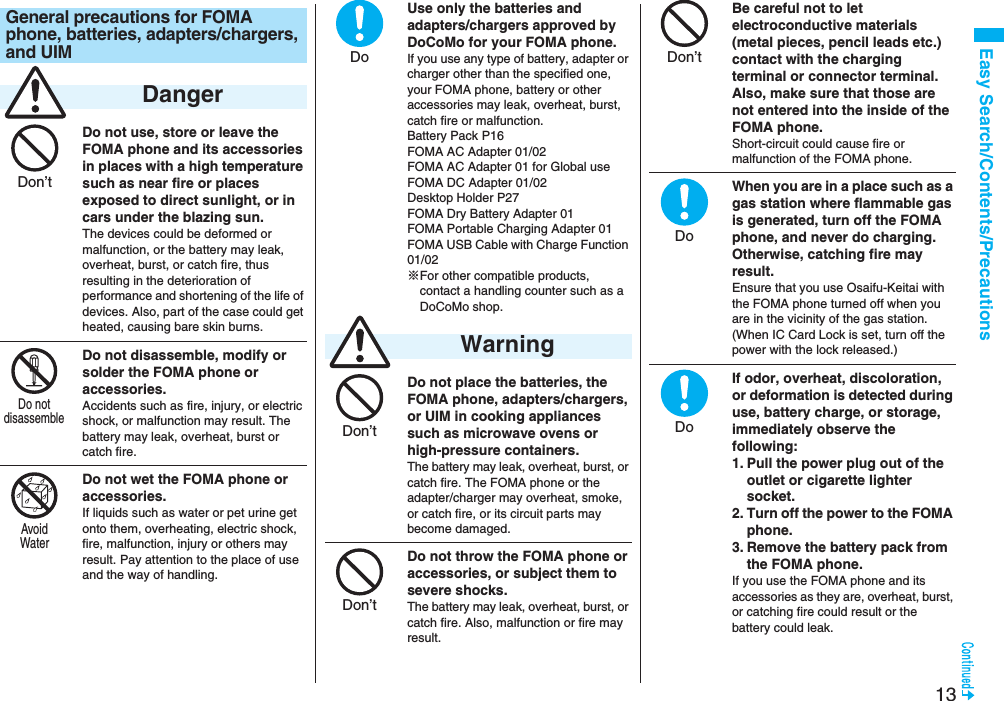
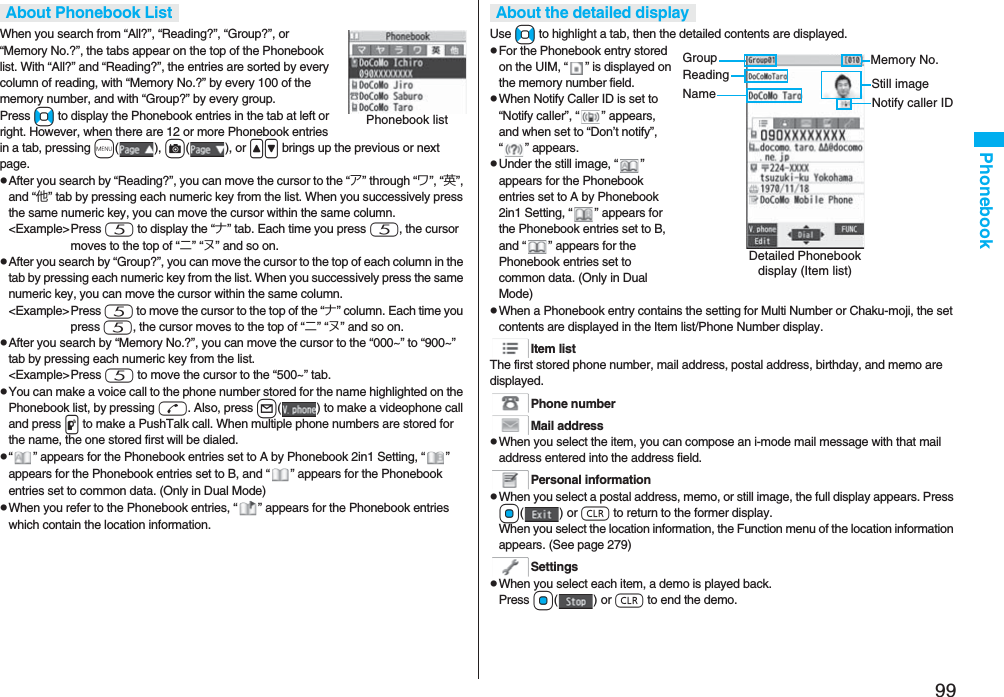
![98PhonebookYou can retrieve stored Phonebook entries by eight search methods.1XoDo the following operations.pThe display for the same search method as the previous one appears once you have carried out a search. Press r to show the Search Phonebook display.pYou cannot display the Search Phonebook display even when you press Xo when the Stand-by display appears on the horizontal display.<Search Phonebook>Dialing from PhonebooksSearch Phonebook display Item Operation/ExplanationAll? You can bring up all Phonebook entries.pThe tabs appear on the top of the Phonebook list. (See page 99)Reading? You can enter the reading of the other party’s name from the first character and search. You do not need to enter the full reading.Enter a part of the readingBopThe tabs appear on the top of the Phonebook list. (See page 99)Group? You can bring up Phonebook entries stored in the specified group.Select a group.pThe tabs appear on the top of the Phonebook list. (See page 99)pIf you press i( ) on the Group list, the Function menu for “Group setting” is displayed.Memory No.?[FOMA phone only]You can search for the entry by the memory number assigned when it was stored in the Phonebook.Enter the memory number.pEnter from “000” through “999” in three digits.pThe tabs appear on the top of the Phonebook list. (See page 99)pFrom the Stand-by display, you can press d and then press Bo to display the Memory No. Dial display. From there you can make a voice call by entering the memory number of the phone number.Name? You can enter the other party’s name from the first character and search. You do not need to enter the full name.Enter a part of the nameBo2Select an entryd or Oo()pWhen the entry contains multiple phone numbers, or when you searched by “Mail address?”, press Mo from the detailed display to select a phone number.pYou can make a videophone call by pressing l( ) or PushTalk call by pressing p.The Phonebook entries are searched in the order of readings you entered for storing, as follows: “Space at the beginning of the reading” → “Japanese syllabary (ア、イ、ウ、エ、オ、... ン)” → “Alphabet (A, a, B, b, ...Z, z)” → “Numerals (0 through 9)” → “Symbols” → “No reading”.For “All?” and “Reading?”, searching is done in the following order:“Japanese syllabary (ア、イ、ウ、エ、オ、... ン)” → “Alphabet (A, a, B, b, ...Z, z)” → “Space at the beginning of the reading” → “Numerals (0 through 9)” → “Symbols” → “No reading”.※The Memory No. Search searches in the order of the memory numbers.Phone number? You can enter a part of the other party’s phone number and search. You can search for the entry even from the middle of phone number.Enter a part of the phone numberBopYou can display the Phonebook list also by entering a part of the phone number from the Stand-by display or the “Talking” display, and pressing Bo.Mail address?You can enter a part of the other party’s mail address and search. You can search for the entry even from the middle of mail address.Enter a part of the mail addressBo2-touch dial?[FOMA phone only]You can bring up the list of Phonebook entries in memory number 000 through 009.pPhonebook entries not yet stored or being set with secret are displayed as <−−−>.Item Operation/ExplanationInformationpIn a search method other than “Group?” and “2-touch dial?”, enter nothing and press +Bo; then you can search all through the Phonebook.pWhen no Phonebook entry is found that matches the condition you entered by “Reading?” or “Memory No.?”, the entry that is the closest to the condition is displayed.Search order](https://usermanual.wiki/Panasonic-Connect/208006A.User-Manual-Part-1/User-Guide-920754-Page-100.png)
![105Phonebook2Access a voice dial entry following the voice guidance.Once the voice is recognized as a voice dial entry, the detected result is displayed.pThe FOMA phone automatically dials out about two seconds after the voice guidance informing of dialing finishes.1mSettingsOther settingsVoice settingsDo the following operations.Voice SettingsItem Operation/ExplanationAuto voice dial You can automatically make a call to the phone number accessed by voice.ON or OFFVoice earphone dial You can access the voice dial entries by using the Flat-plug Earphone/Microphone with Switch (option) or Wireless Earphone Set 02 (option).ON or OFFRead aloud settings See page 406.Read aloud volume See page 407.Read aloud speed See page 407.Read aloud output See page 407.Read aloud valid set.See page 407.You can save the Phonebook stored in your FOMA phone to the Data Storage Center. You can use restoration of the saved Phonebook and automatic update settings from “Data Security Service Site” [iMenu→English iMenu→My Menu→電話帳お預かり (Data Security Service)] on the i-mode.Data Security Service is a pay service that is available on a subscription basis.pYou cannot use Data Security Service when you are out of the service area.pFor details on Data Security Service, refer to “Mobile Phone User’s Guide [i-mode] FOMA version”.1mLifeKitData Security ServiceDo the following operations.<Data Security Service>Saving (Restoring/Updating) Phonebook to Data Storage CenterItem Operation/ExplanationConnect to Center Enter your Terminal Security CodeYESSent/recv. PB data listYou can display the records of communication such as saving the Phonebook, mail messages, or images to the Data Storage Center.Select a record.pSelect a communication completion time in the list to switch to the detailed display.PB image sending You can set whether to save images set for the Phonebook entries to the Data Storage Center.ON or OFFInformation<Connect to Center>pYou cannot save the UIM Phonebook.pWhen the Phonebook entries saved to the Data Storage Center exceeds the number of Phonebook entries storable in the FOMA phone’s Phonebook, the excess entries cannot be updated.](https://usermanual.wiki/Panasonic-Connect/208006A.User-Manual-Part-1/User-Guide-920754-Page-107.png)
![106PhonebookOn the site of the Data Storage Center, you can set so as to periodically update and save the Phonebook entries in your FOMA phone to the Data Storage Center.pFor details, refer to “Mobile Phone User’s Guide [i-mode] FOMA version”.Note that if you delete the Phonebook entries from your FOMA phone and execute auto-update, the Phonebook entries on the Data Storage Center are also deleted. When you download the Phonebook entries from the Data Storage Center to your FOMA phone, do the following operations to restore them.1.iiMenuEnglish iMenuMy Menu電話帳お預かり (Data Security Service)お預かりセンター (Data Storage Center)Enter the i-mode password.2. Select “ケータイへダウンロード (Download to mobile phone)” from the Phonebook entries on the Data Storage CenterOKpAbout 15 seconds later, download starts.<Sent/recv. PB data list>pUp to 30 records are saved. When more than 30 records are saved, the older records are overwritten.<PB image sending>pYou cannot save the images whose output from FOMA phone is prohibited.Auto-updateDownloading the Phonebook entries from the Data Storage Center to your FOMA phoneInformationInformationpThe Phonebook is not automatically updated while another function is working at the time of Auto-update.pIf the Phonebook cannot be updated, the notification icon of “ ” (PB in Center updated) appears on the Stand-by display. Select “ ”, and the update display appears if Auto-update is set. If Auto-update is not set, the update display appears after you enter your Terminal Security Code.](https://usermanual.wiki/Panasonic-Connect/208006A.User-Manual-Part-1/User-Guide-920754-Page-108.png)
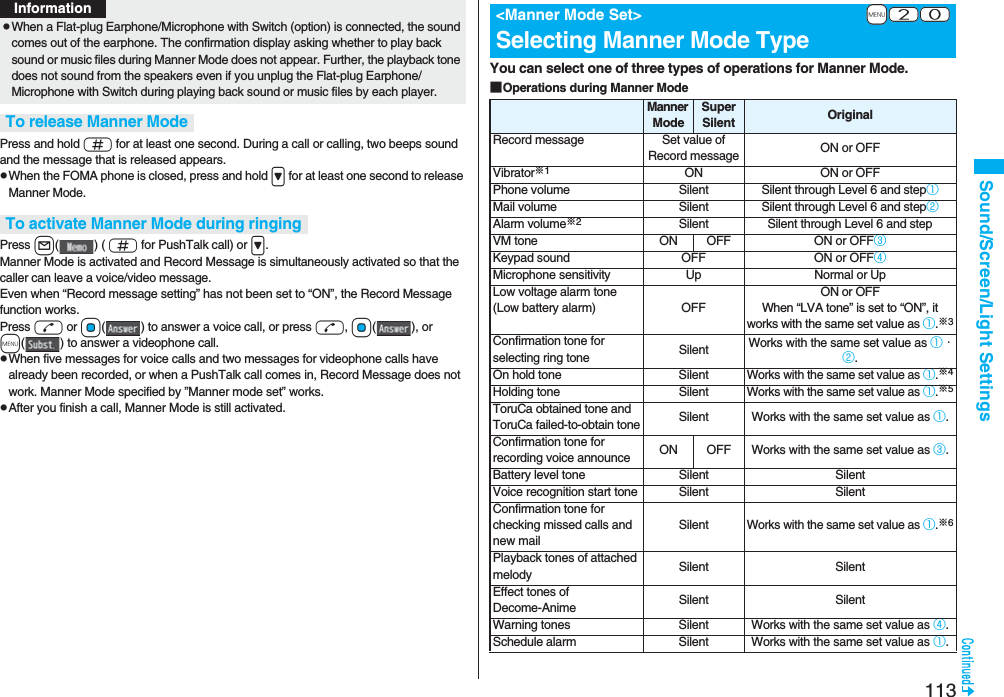
![110Sound/Screen/Light SettingsYou can set the vibrator to notify you of incoming calls and mail.1mSettingsIncoming callVibratorSelect an incoming typeSelect a vibration pattern.Pattern 1. . . . . . . . . Alternates between vibration on (about 0.5 second) and off (about 0.5 second).Pattern 2. . . . . . . . . Alternates between vibration on (about 1 second) and off (about 1 second).Pattern 3. . . . . . . . . Alternates between vibration on (about 3 seconds) and off (about 1 second).Melody linkage . . . Vibrates in time with the vibration pattern stored in the melody.OFF . . . . . . . . . . . . .Does not vibrate.pWhile you are selecting a pattern, the FOMA phone vibrates by the selected pattern for confirmation. However, it does not vibrate if you select “Melody linkage”.pThe following icons are displayed on the Stand-by display while the vibrator is set:: Vibrates for incoming voice calls, PushTalk calls or videophone calls.: Vibrates for incoming mail, chat mail or Messages R/F.: Vibrates for incoming voice calls, PushTalk calls or videophone calls, and vibrates for incoming mail, chat mail or Messages R/F.+m-5-4<Vibrator>Informing You of an Incoming Call by VibrationInformationpThe priority order of vibrators is as follows: “Setting for Phonebook entry” → “Group setting” → “Vibrator”.pThe vibrator vibrates at a regular strength, regardless of the ring volume level.pEven when “Melody linkage” is set, the FOMA phone vibrates with “Pattern 2” if an i-motion movie or melody with no vibration pattern is set for the ring tone.pBe careful not to leave the FOMA phone on a desk or similar places with the vibrator activated; when a call comes in, the FOMA phone might move and fall by vibration.You can set the sound you recorded with the FOMA phone for a ring tone (including a ring tone for Number B of 2in1), On hold tone/Holding tone, alarm for “Alarm”, “Schedule”, “ToDo”, and “Book program”, and an answer message for Record Message.You can record only one item for about 15 seconds.1mLifeKitRec.msg/voice memoVoice announceRecordpTo suspend recording midway, press Oo(), h, or r. The contents recorded to that point are saved.pThe tone beeps about 5 seconds before the recording time (for about 15 seconds) ends. When recording ends, the tone beeps twice, and the former display returns.pThe recording is suspended when a call comes in, when an alarm for “Alarm”, “Schedule”, “ToDo”, “Book program”, or “Timer recording” sounds, or when you switch displays using Multitask during recording. (The contents recorded to that point are saved.)pTo play back the recorded sound, select “Play”. To suspend playback midway, press Oo(), h, or r.pTo erase the recorded sound, select “Erase”, then select “YES”.Melody Call is a service that changes the ringing tone phone callers hear, to a melody you like.For details, refer to “Mobile Phone User’s Guide [Network Services]”.pMelody call is a pay service which is available on a subscription basis.1mSettingsMelody Call settingYESOperate following the instructions on the display.+m-5-5<Voice Announce>Using Recorded Sound as Ring Tone<Melody Call Setting>Changing Calling Tone](https://usermanual.wiki/Panasonic-Connect/208006A.User-Manual-Part-1/User-Guide-920754-Page-112.png)


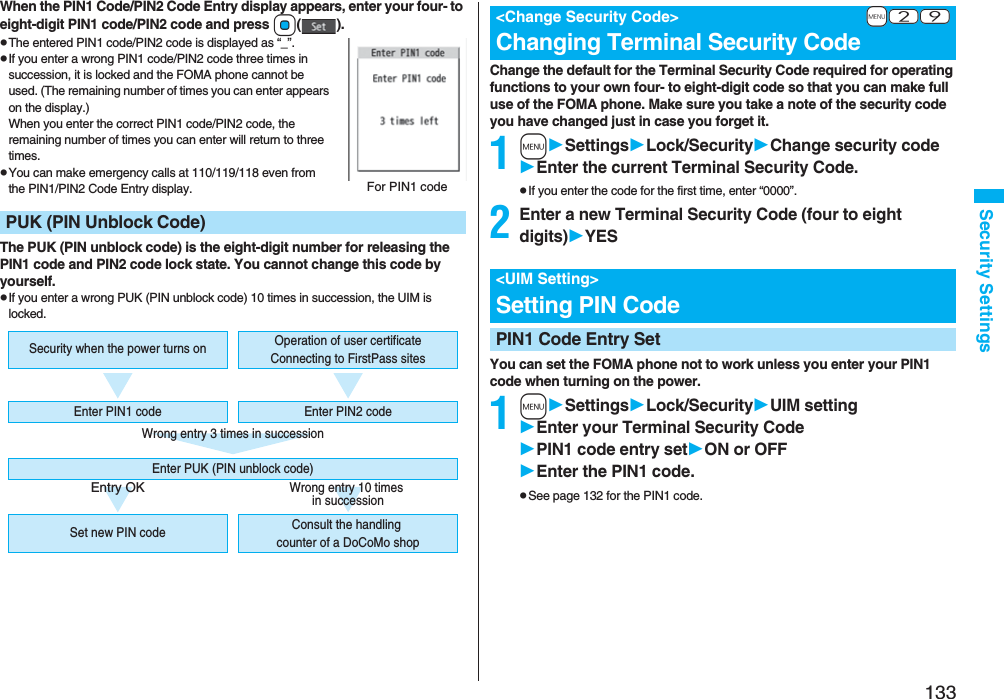
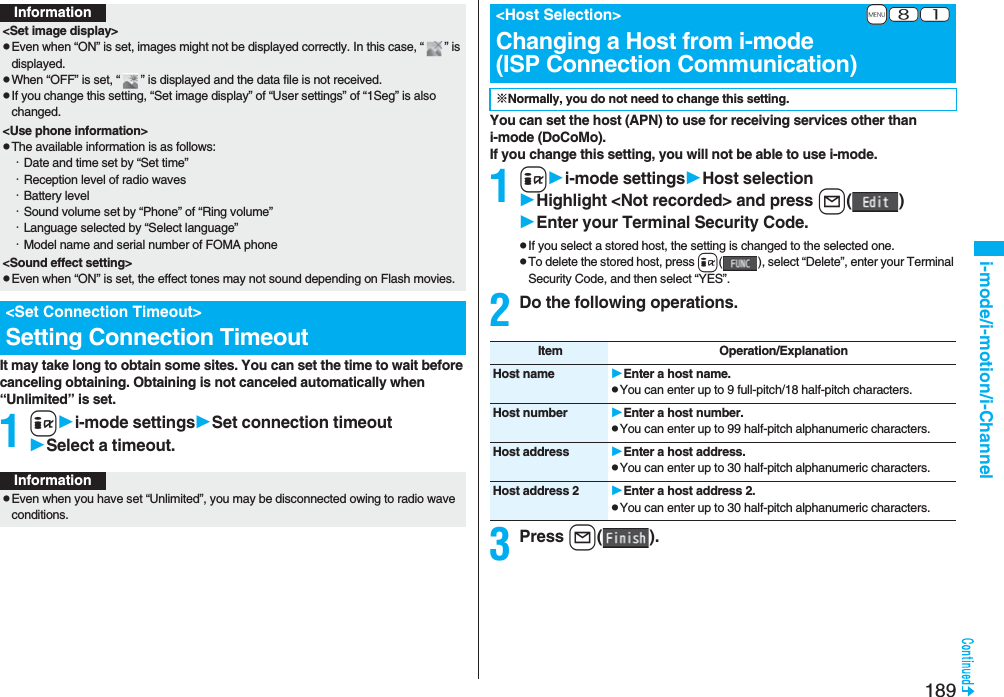
![135Security SettingsWhen you have lost your FOMA phone or in other cases, you can use this service to remotely lock the FOMA phone in which your contracted UIM is inserted by contacting DoCoMo or by operating from My DoCoMo.To release the lock, contact DoCoMo by phone, etc.※Omakase Lock is a pay service. However, you are not charged if you apply for this service at the same time as applying for the suspension of the use or during the suspension.※Even during Omakase Lock, your FOMA phone corresponds to the location provision request of GPS function if “Location request menu” is set to “ON”.pFor details on Omakase Lock, refer to “Mobile Phone User’s Guide [i-mode] FOMA version”.“Omakase lock” is displayed on the Stand-by display and Omakase Lock is set.pDuring Omakase Lock, all the key operations are locked and respective functions (including IC card functions) are disabled, except for answering voice calls/videophone calls, putting them on answer-hold (On Hold), turning on/off the power, adjusting the earpiece volume and adjusting the ring volume.pYou can receive voice calls and videophone calls (except PushTalk calls), but the callers’ data such as names and images stored in the Phonebook are not displayed except for their phone numbers. In addition, the ring image, ring tone, and vibrator are reset to the default.When you release Omakase Lock, the former settings return.pMail messages received during Omakase Lock are held at the Mail Center.pYou can turn on/off the power, however, Omakase Lock is not released by turning off the power.pGPS Location Provision is available even during Omakase Lock.pNote that neither the UIM nor the microSD card is locked.<Omakase Lock>Using Omakase Lock■Setting/Releasing Omakase Lock0120-524-360 Business hours: 24 hours※You can set/release also from My DoCoMo site via a personal computer or other devices. InformationpEven while another function is working, Omakase Lock applies after finishing that function.You can disable all phone calls and communication functions.During Self Mode, the caller hears the guidance to the effect that radio waves do not reach or the power is turned off. If you use DoCoMo Voice Mail Service or Call Forwarding Service, you can use these services in the same way as when the FOMA phone is turned off.1mSettingsLock/SecuritySelf modeYESOK“ ” appears and Self Mode is set.pTo release Self Mode, perform the same operation.pOmakase Lock can be set even when another lock function is set. However, if you have set Public Mode (Drive Mode) before setting Omakase Lock, you cannot receive voice calls and videophone calls.pOmakase Lock cannot be set when the FOMA phone is out of the service area, turned off, or during Self Mode.pWhen you have signed up for Dual Network Service and are using the mova phone, Omakase Lock cannot be set.pEven when the contractor and the user of the FOMA phone differ, the FOMA phone will be locked if the contractor offers to DoCoMo.<Self Mode>Using Self ModeInformationInformationpYou can make emergency calls at 110/119/118 even during Self Mode. In this case, Self Mode is released.pYou cannot receive mail messages, Area Mail messages, or Messages R/F during Self Mode.pEven if a call comes in during Self Mode, the “Missed call” icon does not appear after releasing Self Mode.](https://usermanual.wiki/Panasonic-Connect/208006A.User-Manual-Part-1/User-Guide-920754-Page-137.png)
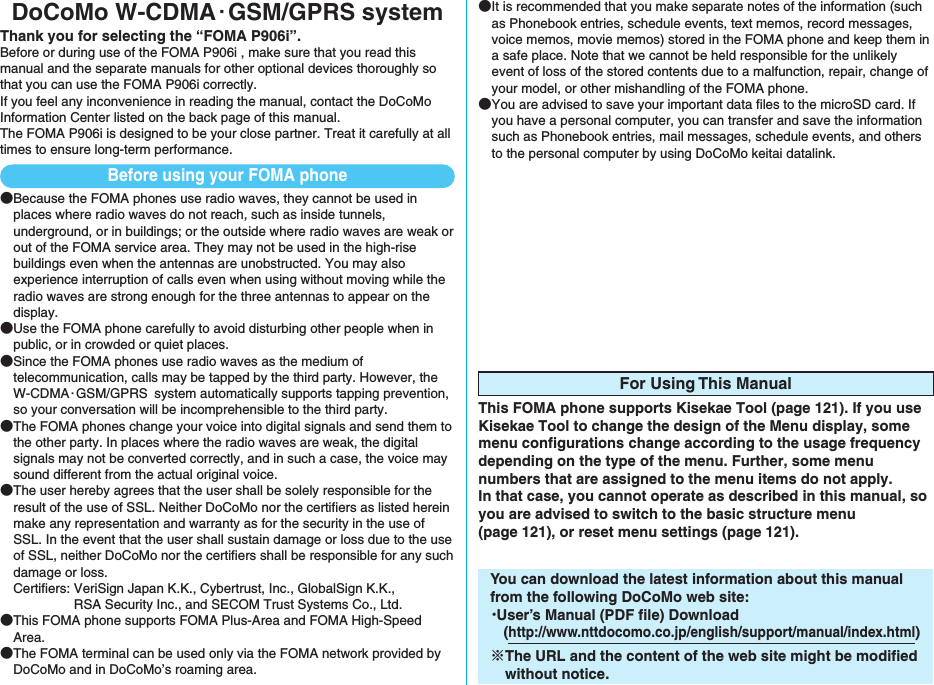
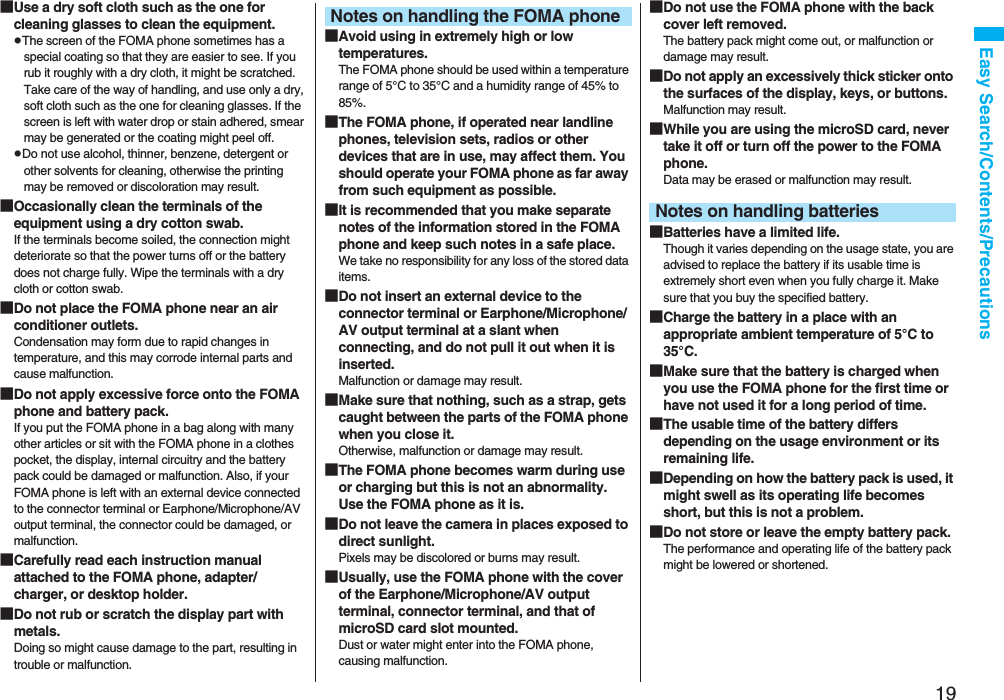
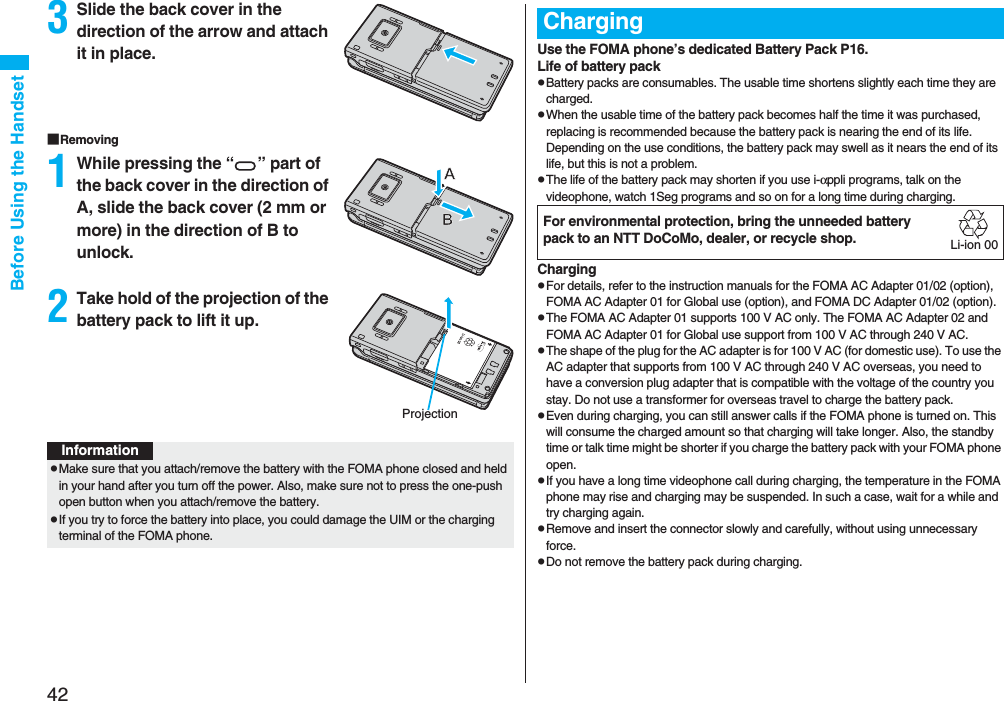
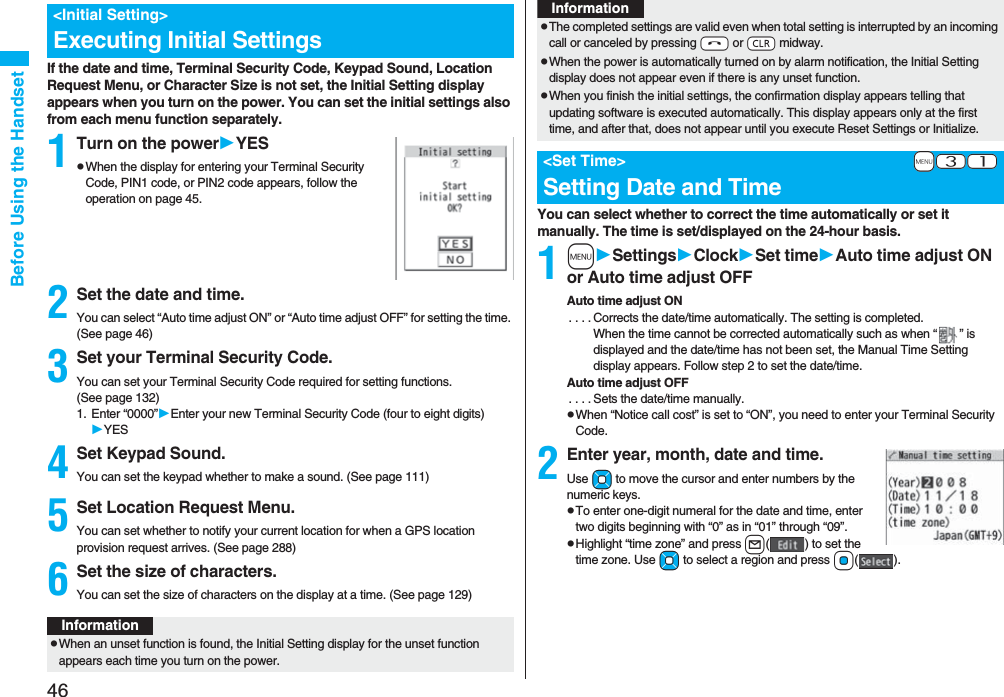
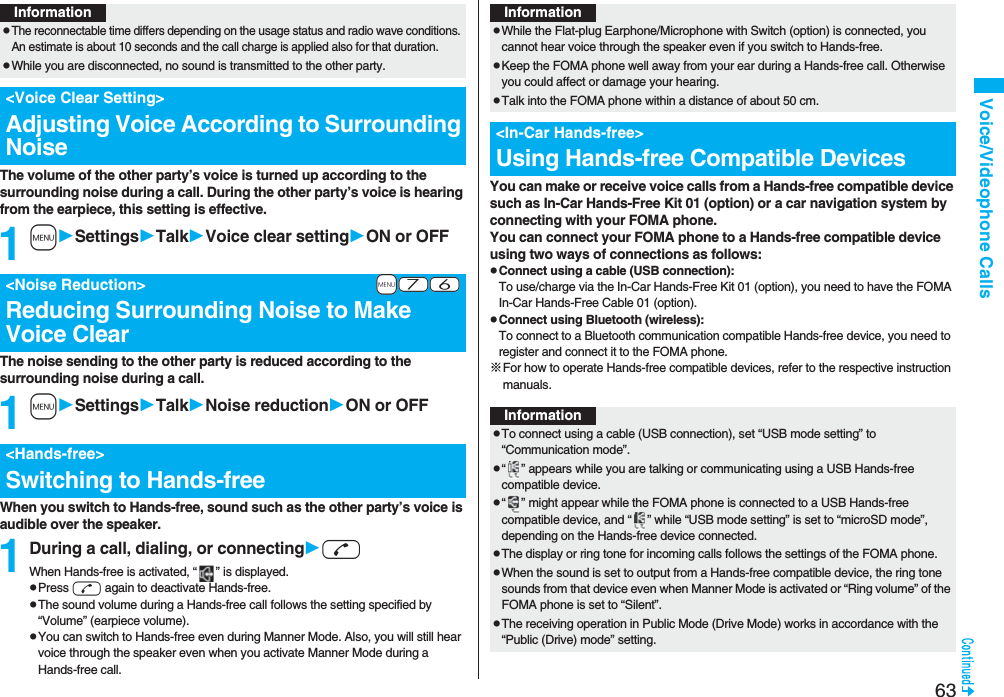
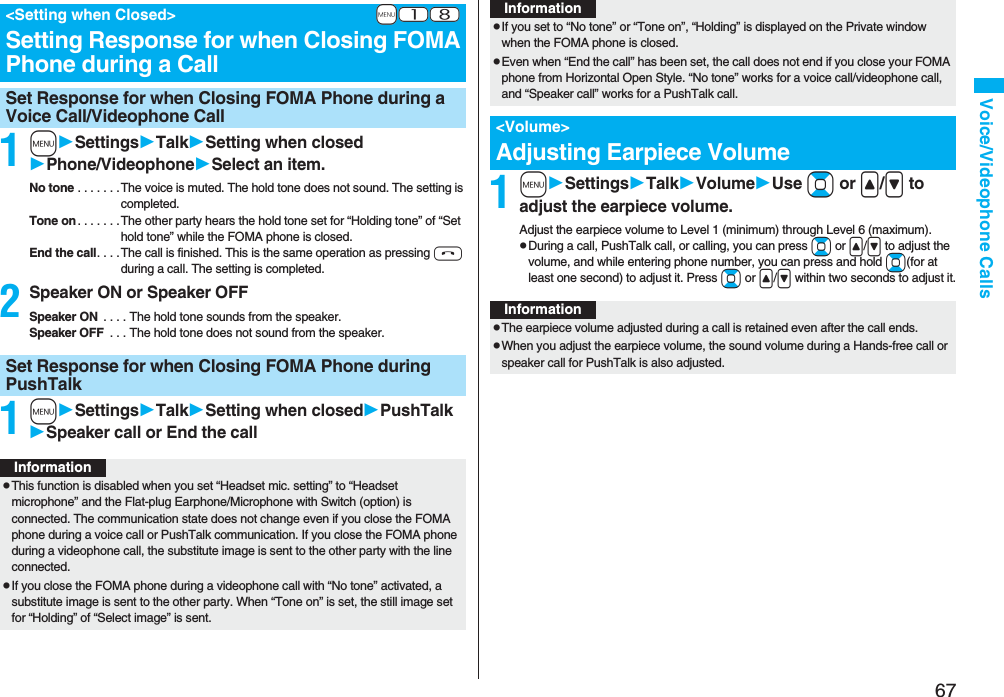
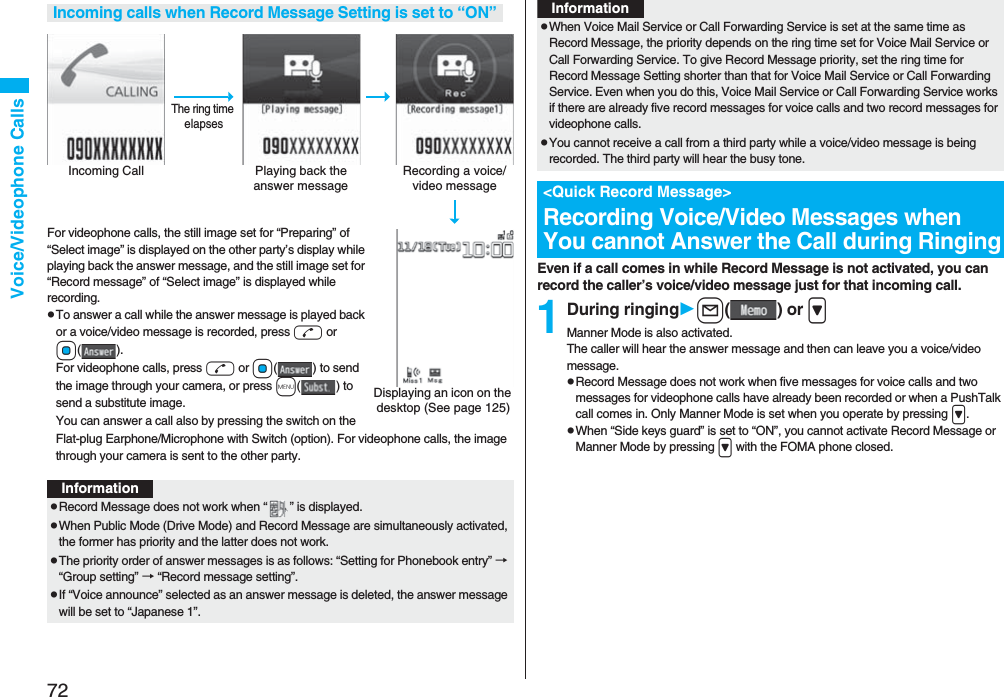
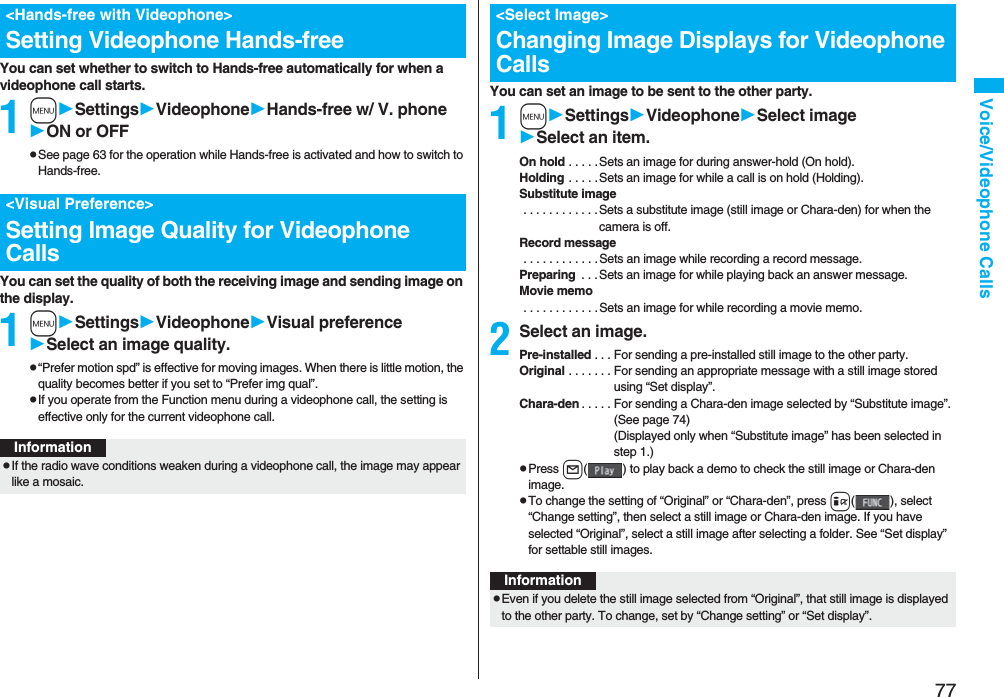
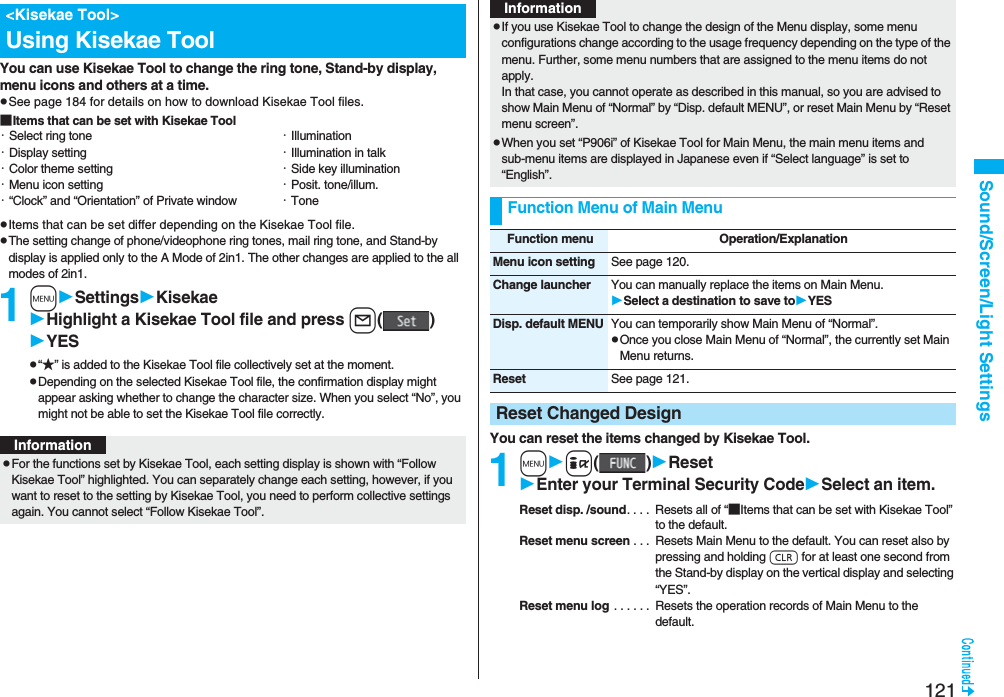
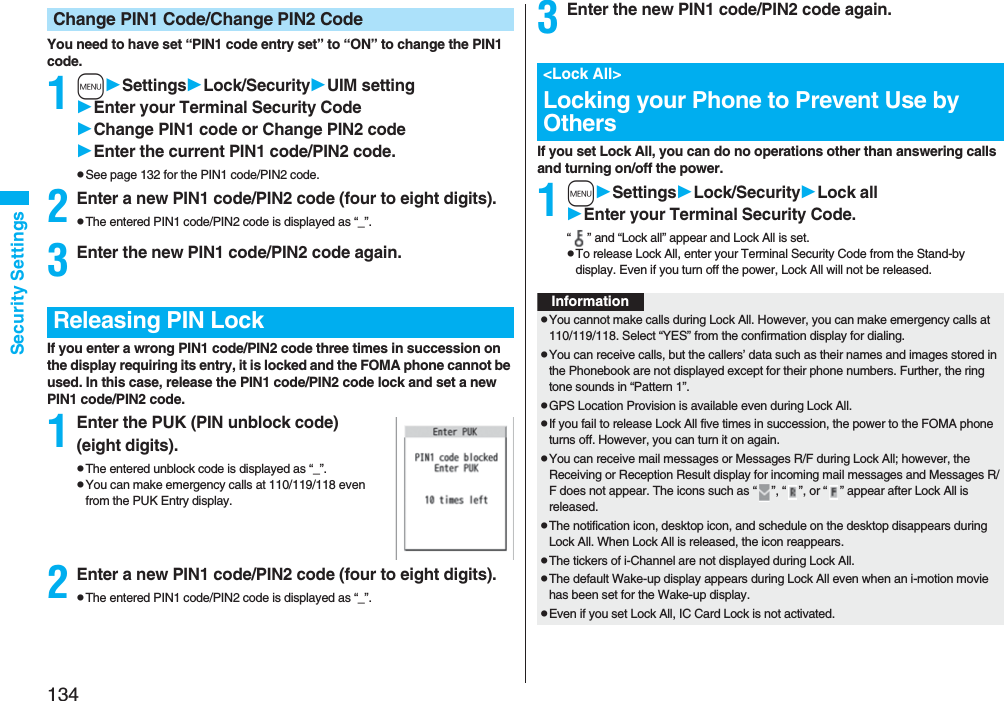
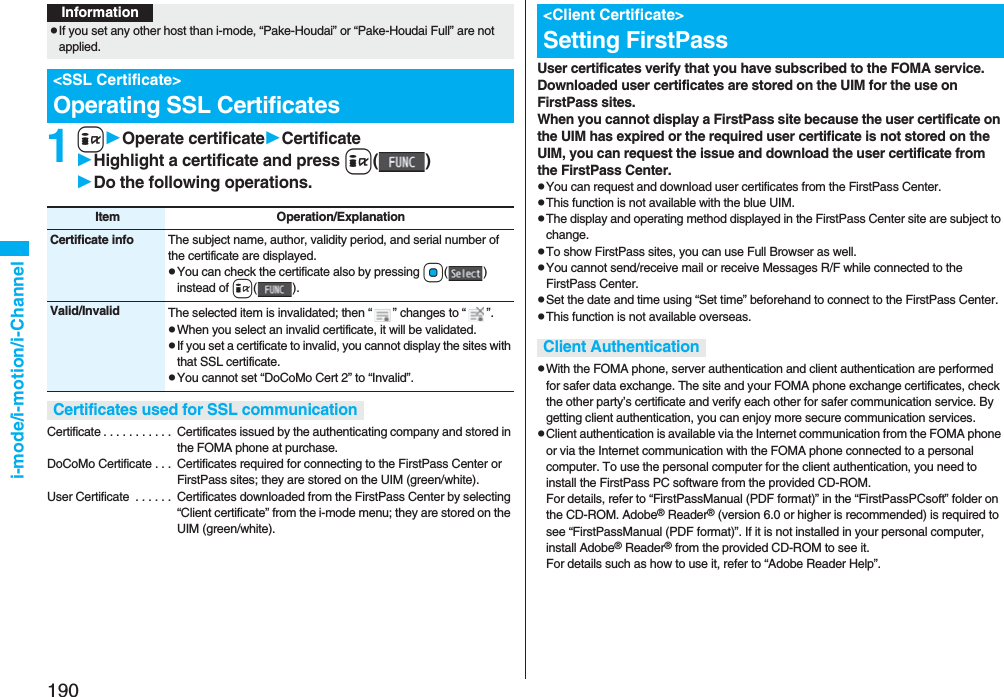
![145Security SettingsYou can reject voice calls, videophone calls, and PushTalk calls from the party whose phone number is not stored in the Phonebook. This function is valid only when the other party notifies his/her phone number. It is advisable to activate “Caller ID request” and “Call setting w/o ID” simultaneously.1mSettingsLock/SecurityReject unknownEnter your Terminal Security CodeAccept or Reject<Reject Unknown>Rejecting Incoming Calls from Phone Numbers which are not Stored in PhonebooksInformationpIf a call comes in from the party whose phone number is stored as secret data, the call is not rejected, regardless of this setting.pIf you simultaneously activate “Reject unknown” and “Call acceptance” of “Restrictions”, the latter has priority.pWhen a call comes in from anyone whose phone number is not stored in the Phonebook while you set this function to “Reject”, the call is stored in “Received calls” as a missed call record, and the “Missed call” icon appears on the Stand-by display. Also, the caller hears a busy tone even if you have set Voice Mail Service or Call Forwarding Service to “Activate”. However, if you set the ring time for Voice Mail Service or Call Forwarding Service to 0 seconds, when the FOMA phone is out of the service area, or when the power is turned off, the busy tone will not be played back, activating Voice Mail Service or Call Forwarding Service.pEven when this function is set to “Reject”, your FOMA phone follows the settings specified by “Call setting w/o ID” if each setting of “Call setting w/o ID” is set to “Accept”.pYou can receive SMS messages or i-mode mail regardless of this setting.pYou cannot set “Reject unknown” to “Reject” while “Ring start time” of “Ring time” is set to “ON”.You can back up the Phonebook by auto-updating. Data Security Service enables you to save the Phonebook entries, images, and mail messages stored in your FOMA phone to the Data Storage Center and to restore the saved data files even when the FOMA phone is lost or exposed to water. Further, you can notify of your mail address change to multiple addresses at a time. You are not charged a packet communication fee for mail sending. If any personal computer (My DoCoMo) is available, you can use this service more conveniently.pFor details on Data Security Service, refer to “Mobile Phone User’s Guide [i-mode] FOMA version”.pData Security Service is a pay service that is available on a subscription basis. (You need to subscribe to i-mode to apply for Data Security Service.)What is Data Security Service?InternetData Storage CenterBrowse/Edit the saved dataPersonal computer etc.Easily restores the data when the FOMA phone is lost or exposed to water, or when the time of phone model changeSaves/Downloads the Phonebook entries, images, mail messagesFOMA phoneReflects the contents edited on the personal computer](https://usermanual.wiki/Panasonic-Connect/208006A.User-Manual-Part-1/User-Guide-920754-Page-147.png)
![146Security SettingsOther than introduced in this chapter, the following functions/services for the Security Settings are available:Other “Security Settings”If you want Functions/Service nameReference pageTo protect the IC card function from being used illegallyIC Card Lock 275To prevent crank calls or vicious sales calls from incomingNuisance Call Blocking Service 451To prevent the incoming call that does not notify a caller IDCaller ID Request 452To ensure safe and reliable data communication by using electronic authentication services※Limited to FirstPass sitesFirstPass190To update software programs in the FOMA phone when necessarySoftware Update 528To protect the FOMA phone from data liable to cause troubleScanning Function 534To receive necessary mail only from among the large volume of incoming mailReceive Option 214※Refer to “Mobile Phone User’s Guide [i-mode] FOMA version”To store/check safety information using i-mode when a disaster occursi-mode Disaster Message Board Service※To change the mail address Change Mail AddressTo reject mail with URL Spam Mail Prevention (Reject Mail with URL)To accept or reject mail from the specified domainSpam Mail Prevention (Reject/Receive Mail Settings)To accept or reject mail between i-mode mobile phones onlyTo accept or reject mail from the specified addressTo set the recommended Spam Mail Prevention easilySpam Mail Prevention (Easy Mail Setting)To reject the 500th and succeeding i-mode mail messages sent from a single i-mode phone on the same daySpam Mail Prevention (Reject Mass i-mode Mail Senders)To reject SMS messages Spam Mail Prevention (SMS Rejection Settings)To reject advertising mail that is sent unilaterally Reject Unsolicited Ad MailTo restrict the file size of incoming mail Limit Mail SizeTo confirm the settings for the mail function Confirm SettingsTo stop the mail function temporarily Suspend MailTo check whereabouts of lost mobile phone Keitai-Osagashi ServiceIf you want Functions/Service nameReference pageInformationpThe priority order of functions simultaneously set to prevent nuisance calls is as follows: “Nuisance Call Blocking Service” → “Call rejection” → “Reject unknown/Call setting w/o ID” → “Ring time”.](https://usermanual.wiki/Panasonic-Connect/208006A.User-Manual-Part-1/User-Guide-920754-Page-148.png)
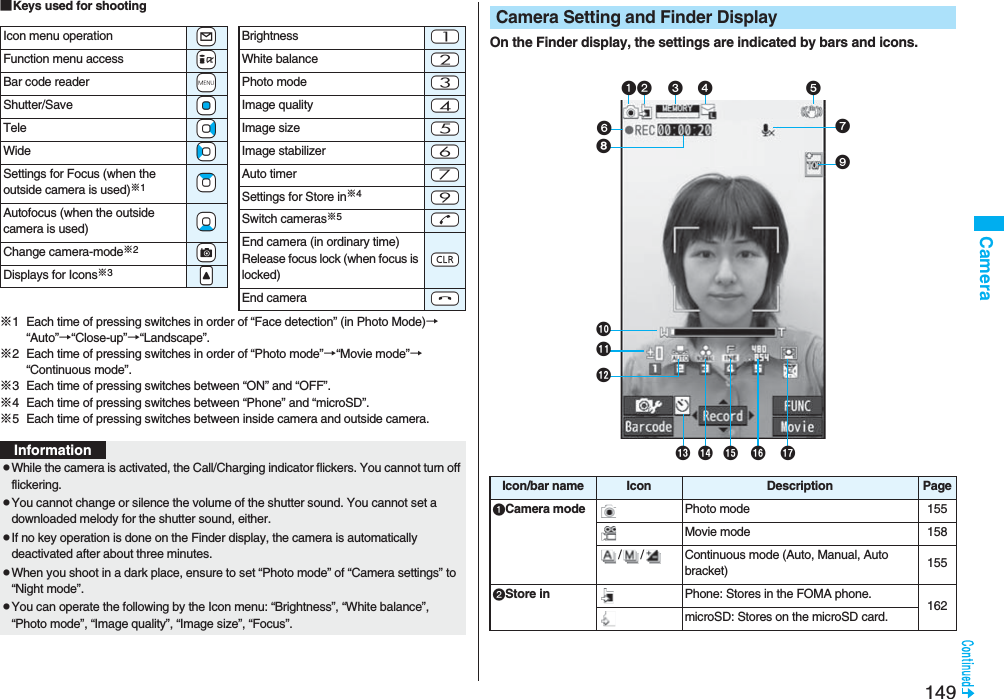
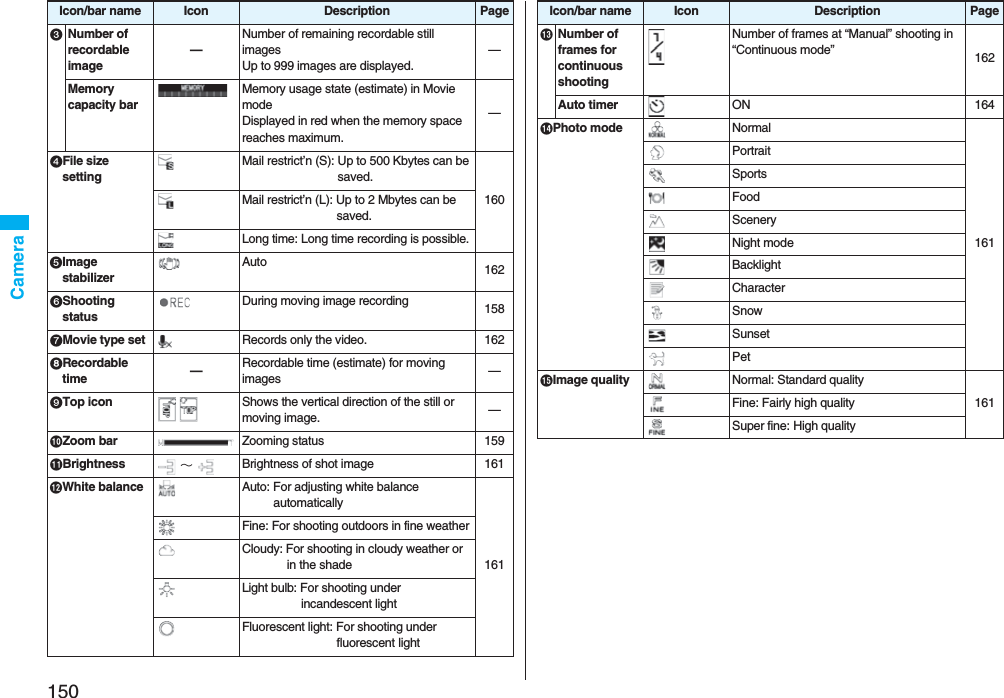
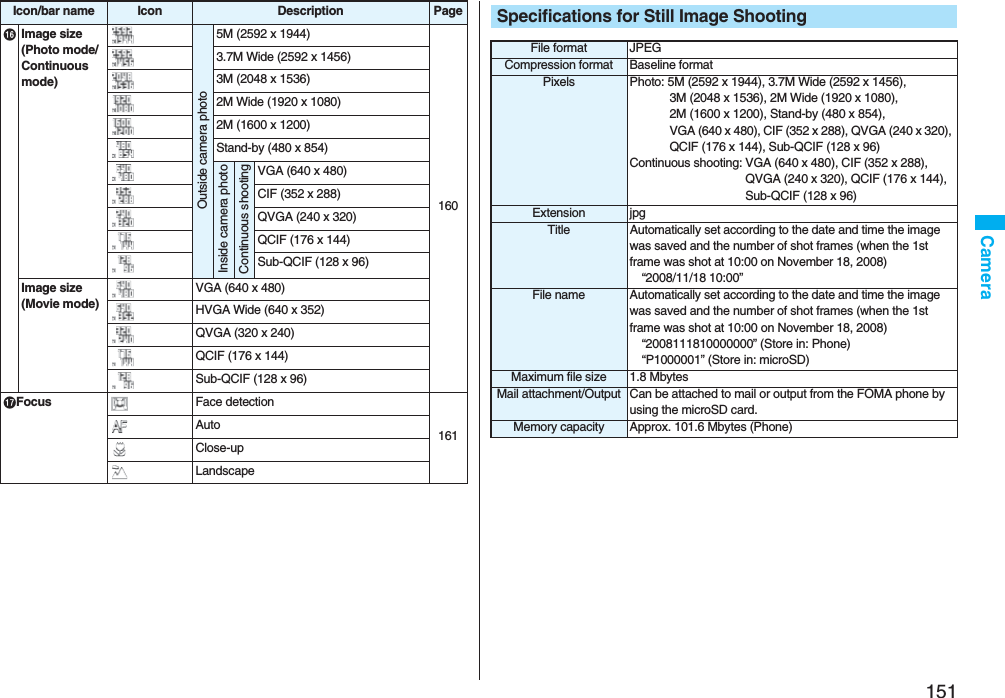
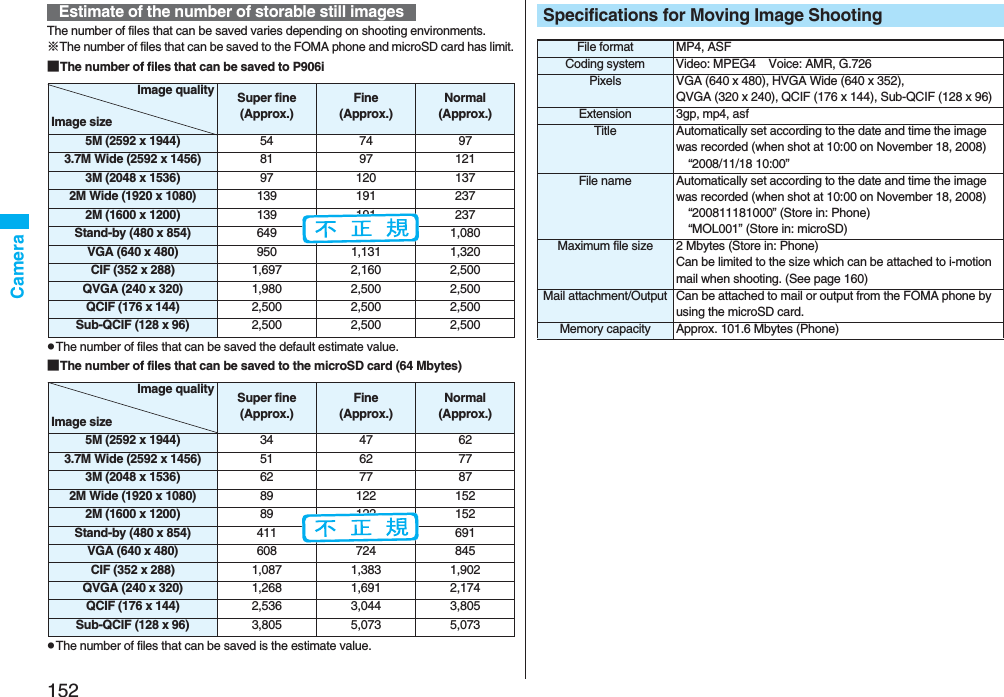
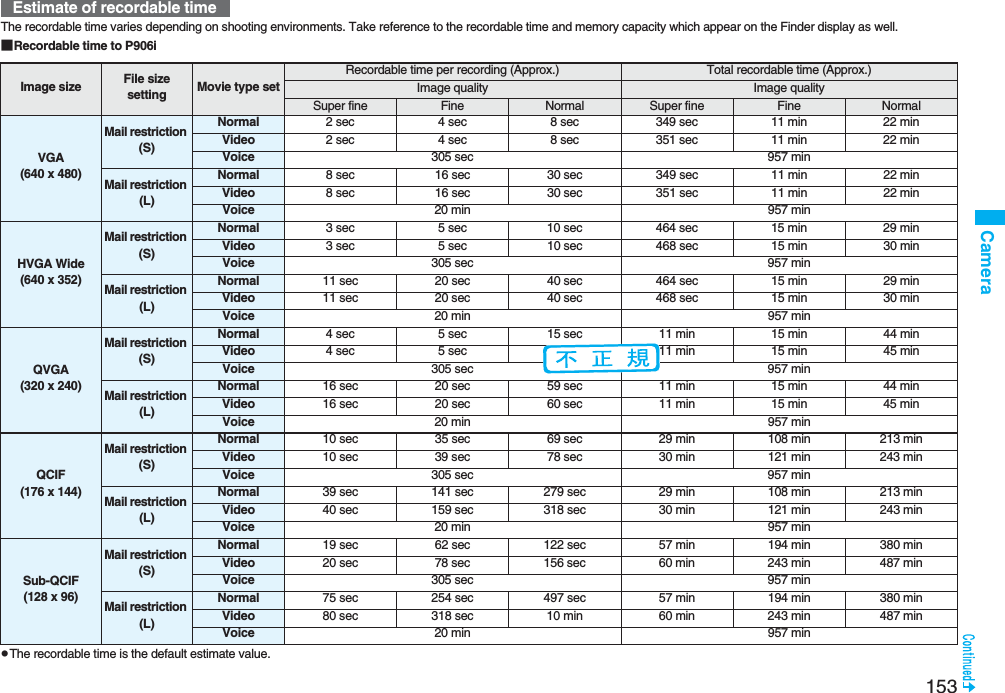
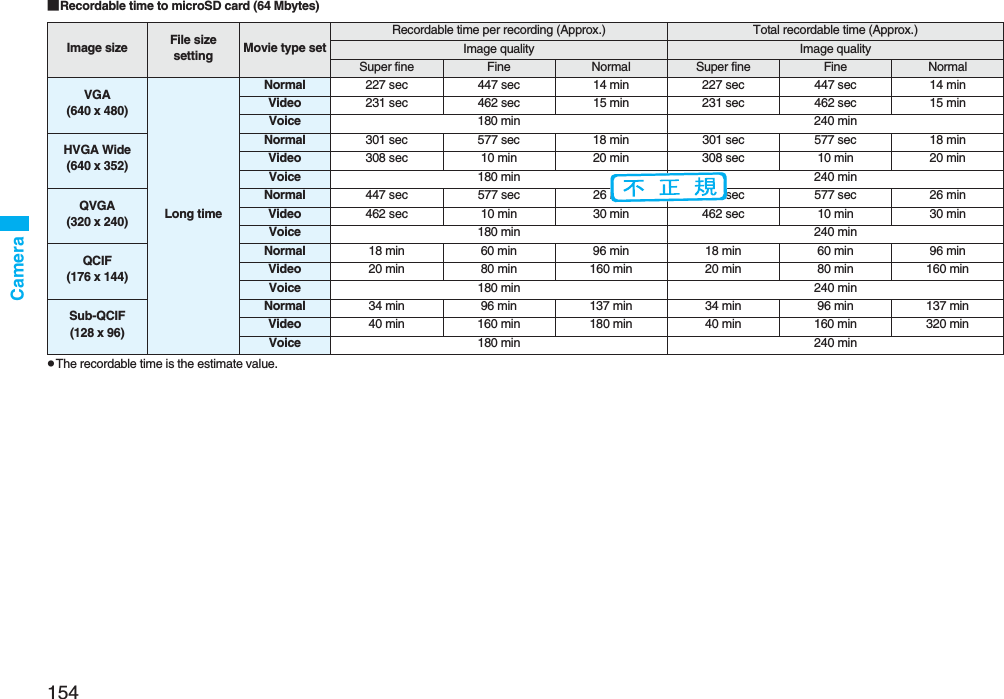

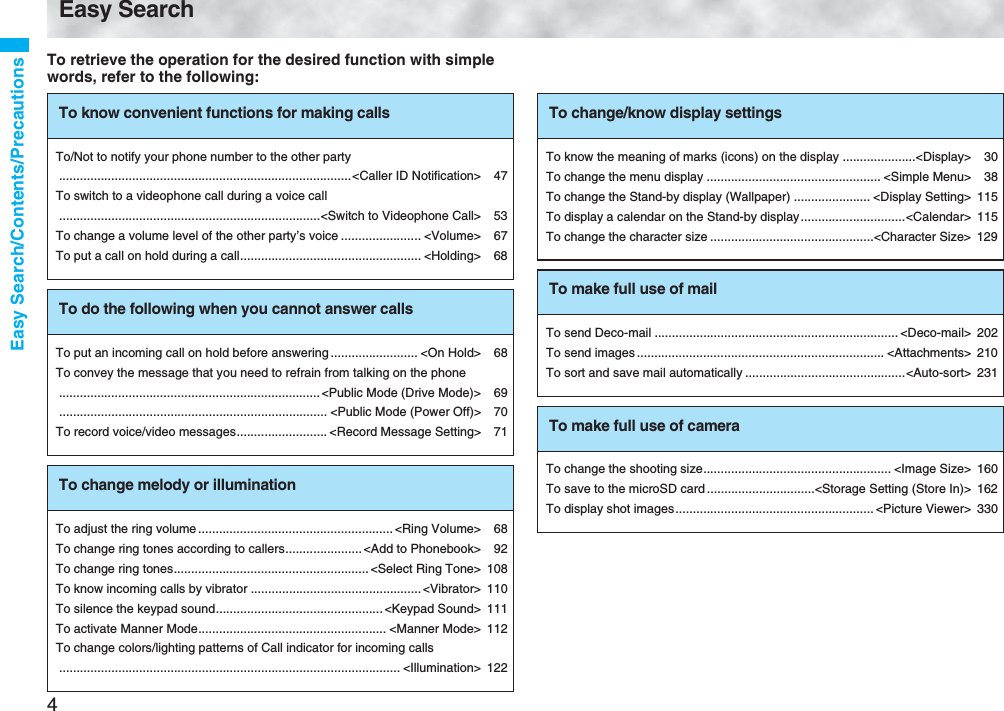
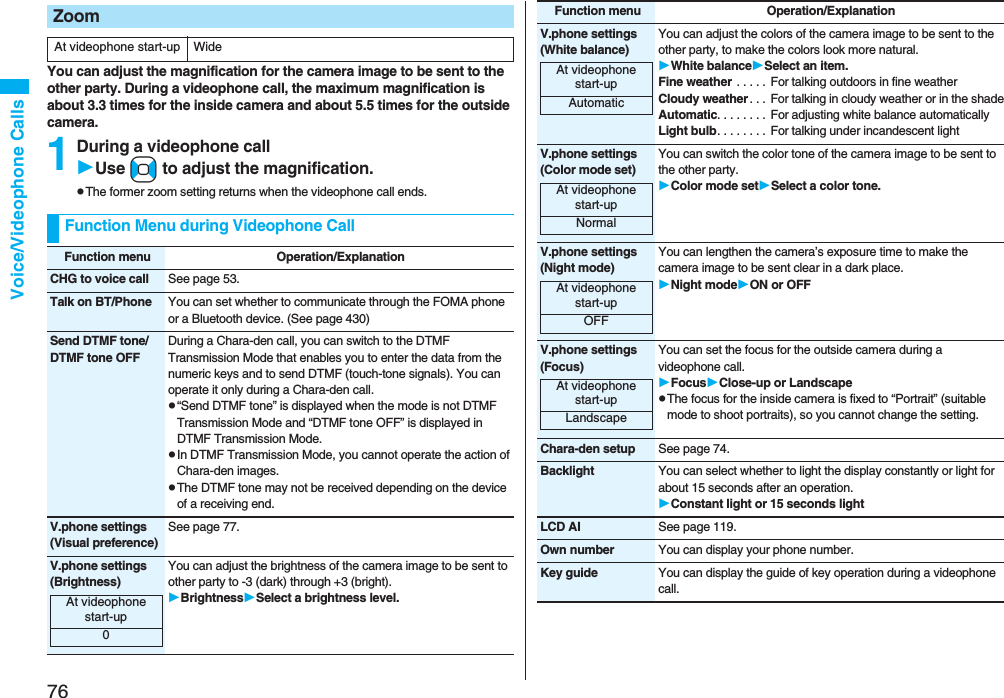
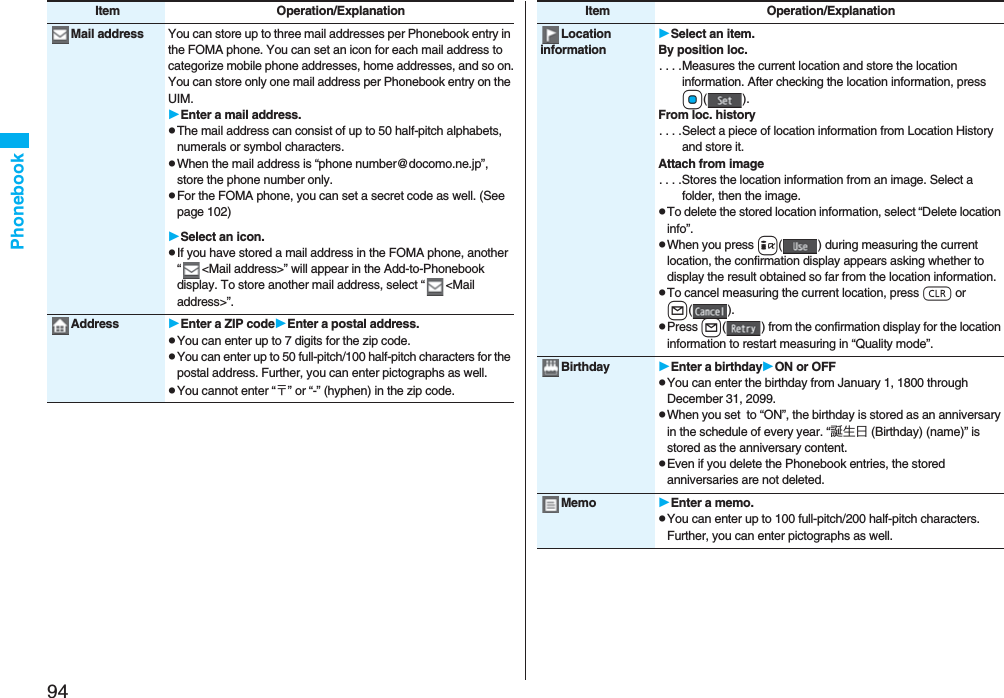
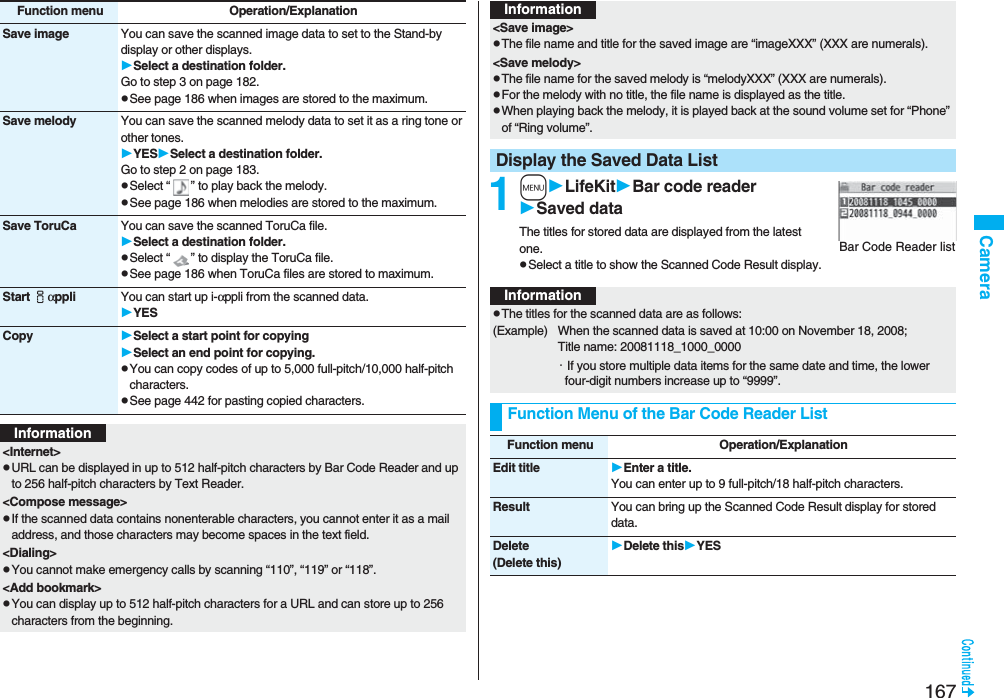
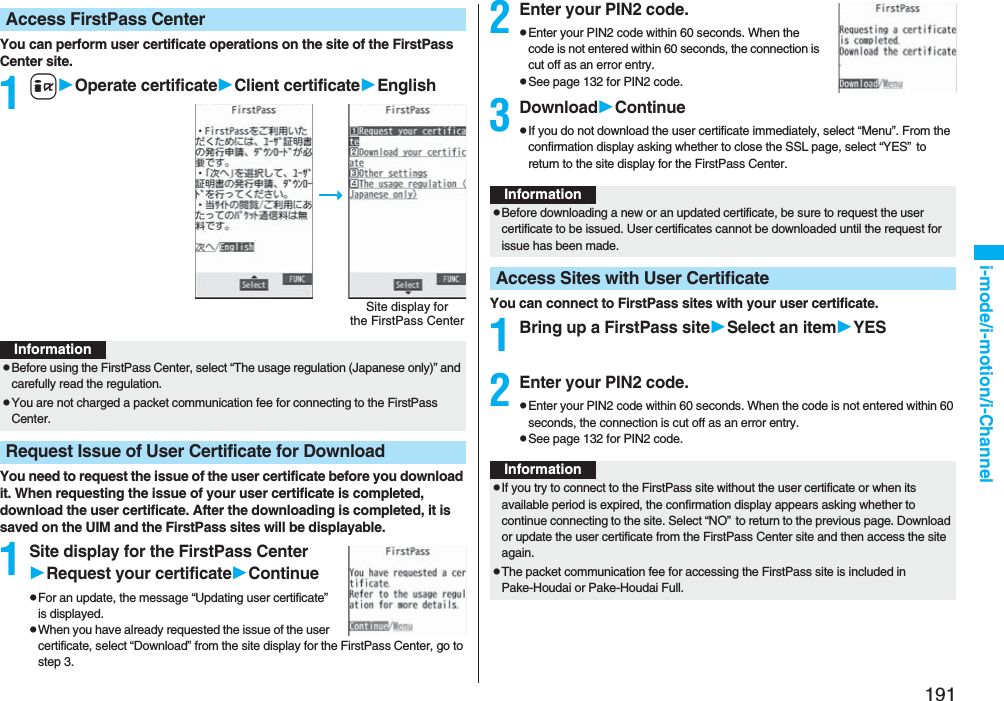
![160Camera■Inside camera 1Finder displayUse No to adjust the magnification.You can shoot with the outside camera focused on a subject.pWhen “Focus” is set to “Face detection”, faces are detected in the first place. Up to five faces are detected, and the image is shot with a single face of those faces is focused. When the detection fails, the auto-focus function works and then the image is shot.1Finder displayXoWhen the subject is focused, a confirmation tone sounds, then the frame becomes green and the focus is locked.When the subject is not focused, the frame becomes red.pPress r to focus again.Camera mode Size Level of zoomThe maximum magnifications(Approx.)Photo/ContinuousVGA (640 x 480) 1 level 1.0 timesCIF (352 x 288) 11 levels 1.6 timesQVGA (240 x 320) 11 levels 1.5 timesQCIF (176 x 144) 31 levels 3.3 timesSub-QCIF (128 x 96) 31 levels 5.0 timesMovieVGA (640 x 480) 1 level 1.0 timesHVGA Wide (640 x 352) 1 level 1.0 timesQVGA (320 x 240) 21 levels 2.0 timesQCIF (176 x 144) 31 levels 3.5 timesSub-QCIF (128 x 96) 31 levels 5.0 timesInformationpThe image quality may slightly change when you select “Wide” or “Tele”.p“Tele” is released in the following cases:・When you press -h to end the camera・When a size is changed・When camera mode is switchedUse Focus FunctionInformationpIf “Movie type set” is set to “Voice” in Movie Mode, you cannot use Autofocus.p“Face detection” is available only in Photo Mode.pWhen “Face detection” is set, you cannot paste a cushy mark in the image.pEven when “Focus” is set to “Face detection”, you might not be able to detect the face in the following cases:・When the face faces sideway or askew・When the face is at a slant・When part of the face is covered by glasses, a cap, or shadows・When the face is extremely small, large, or dim when compared to overall screen size・When the face is placed at the edges of the displaypWhen “Focus” is set to “Face detection”, you are advised to shoot images within 2.5 m of the distance from the face.Setting Image Size and Image QualityFunction Menu of the Finder DisplayFunction menu Operation/ExplanationInside camera/Outside cameraYou can switch between the inside camera and outside camera.CHG camera-mode Select a mode.pWhen you select “Continuous mode”, the camera starts in the mode you used last time, “Auto”, “Manual”, or “Auto bracket”.Image size Select an image size.pWhen you shoot a photo for sending during a voice call, you can select only “QCIF (176 x 144)” and “Sub-QCIF (128 x 96)”.File size setting[Movie Mode only]Select an item.Mail restrict’n (S). . . You can shoot up to 500 Kbytes.Mail restrict’n (L) . . . You can shoot up to 2 Mbytes.Long time. . . . . . . . . You can shoot for a long time. The moving image is saved to the microSD card.](https://usermanual.wiki/Panasonic-Connect/208006A.User-Manual-Part-1/User-Guide-920754-Page-162.png)
![162CameraStorage setting(Store in)You can set the storage location for the still or moving images you shot.Store inPhone or microSDStorage setting(Auto save set)You can set whether to automatically save the image after shooting. When “Store in” is “Phone”, the image is saved to the “Camera” folder. When “Store in” is “microSD”, the image is saved to the folder set by “Select storage”.Auto save setON or OFFStorage setting(File restriction)See page 164.Img. stabilizer[Photo/Movie Mode]You can correct camera shake for when shooting with the outside camera.Auto or OFFAuto timer See page 164.Shooting effect(Shoot with frame)[Photo Mode only]You can shoot a still image with a frame.Shoot with frameON or OFFSelect a frame.Shooting effect(Cushy mark)[Photo/Movie Mode]You can shoot a person’s face with a cushy mark pasted. The cushy mark is automatically pasted in an appropriate position.Cushy markON or OFFSelect a cushy mark.Function menu Operation/ExplanationAt Camera start-upOFFAt Camera start-upOFFCont. shooting set.(Continuous mode)[Continuous Mode only]Continuous modeSelect a mode.Auto . . . . . . . . . . Shoots automatically at an interval and with the number of frames as specified by “Shot interval” and “Shot number”.Manual . . . . . . . . Shoots one by one manually with the number of frames specified by “Shot number”.Auto bracket . . . Shoots automatically nine still images at an interval of about 0.3 second while changing the brightness and color tone one by one.pSelect “Manual” to display the number of frames for continuous shooting.Cont. shooting set.(Shot interval)[Continuous Mode only]Shot intervalSelect a shooting interval.pYou can set this only in “Auto” of Continuous Mode.Cont. shooting set.(Shot number)[Continuous Mode only]Shot numberEnter the number of photos.pWhen “Image size” is set to “VGA (640 x 480)” or “CIF (352 x 288)”, you cannot change “Shot number”.pYou can set this only in “Auto” or ”Manual” of Continuous Mode.Movie type set[Movie Mode only]You can select whether to record both the video and voice, or one of them when you shoot the moving image.Normal, Video, or VoiceDisplay size You can set whether to display a moving image or still image in the original size (Actual size) or to fit to the screen size on the Finder display.Actual size or Fit in displayCommon replay mode[Movie Mode only]You can set a shooting size appropriate for attaching to i-mode mail. YESpImage Size is set to “QCIF”, File Size Setting is set to “Mail restrict’n (S)”, and Image Quality (Movie Mode) is set to “Normal”.Function menu Operation/ExplanationAt Camera start-upNormal](https://usermanual.wiki/Panasonic-Connect/208006A.User-Manual-Part-1/User-Guide-920754-Page-164.png)
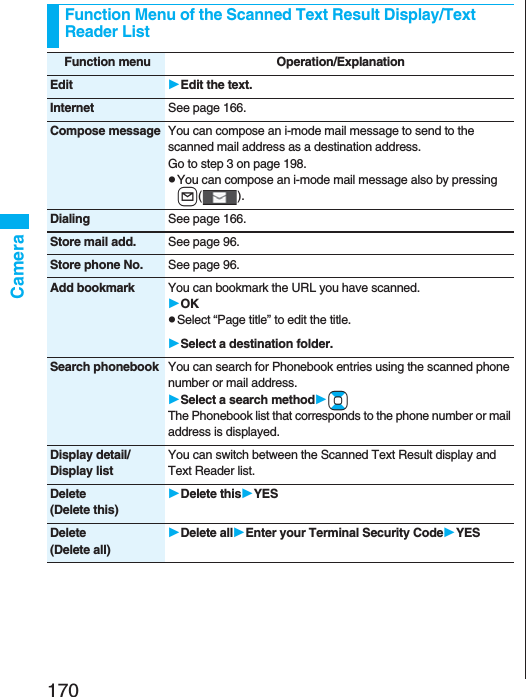
![169Camera6Press Oo().The scanned characters are set.pTo link characters, repeat step 2 through step 6.pTo release the set characters, press r.7i()StoreThe scanned characters are stored.pWhen scanned text contains “tel”, “@”, or “http://”, you can execute Phone To or Web To function by selecting the text. (See page 187) You can select only first item even if multiple items are found.pPress l( ) to overwrite the scanned characters and activate Text Reader. Go to step 2.1mLifeKitText readerSaved dataUp to 22 half-pitch characters are displayed for each stored data.pSelect a data item to show the Scanned Text Result display.Scanned Text Result displayInformationpHold the FOMA phone securely with your hands during scanning so that you can scan characters correctly.pCharacters you can scan are alphabet letters (uppercase and lowercase), numerals, and symbols (#, &, (, ), -, ., /, :, @, [, ], _, ~, ?, =, %, and +). You cannot scan kanji and hiragana characters. You might not be able to scan those correctly depending on the surroundings such as lighting.pYou cannot scan handwritten characters correctly.pYou might not be able to scan the following:Characters received by a FAX/Copied characters/Designed characters/Characters having no certain space between characters/Characters difficult to identify from the background.Display the Saved Data ListText Reader listFunction Menu of the Scanning Text Display/Scanned Text Confirmation DisplayFunction menu Operation/ExplanationStore See page 169.Edit You can edit and store the scanned character string.Edit the text.Recognition mode You can set this mode according to the type of the character string you want to scan.Select an item.Auto setting . . . . . . Automatically recognizes the type of characters.URL . . . . . . . . . . . . . Select this when you scan a URL. “http://” or “https://” is automatically entered to the head of the character string when it is stored.Mail address. . . . . . Select this when you scan a mail address.Phone number . . . . Select this when you scan a phone number.Number . . . . . . . . . . Select this when you scan numerals.Free character . . . . Select this when you scan alphabetic characters that are not especially specified.NEGA/POSI mode You can set this mode to fit to the printing conditions of the character string you want to scan.Select an item.Auto setting . . . .Automatically recognizes printing conditions.Positive fix . . . . .Select this when deep color characters are printed over faint color ground.Negative fix. . . . .Select this when faint color characters are printed over deep color ground.At Text Reader start-upAuto settingAt Text Reader start-upAuto setting](https://usermanual.wiki/Panasonic-Connect/208006A.User-Manual-Part-1/User-Guide-920754-Page-171.png)
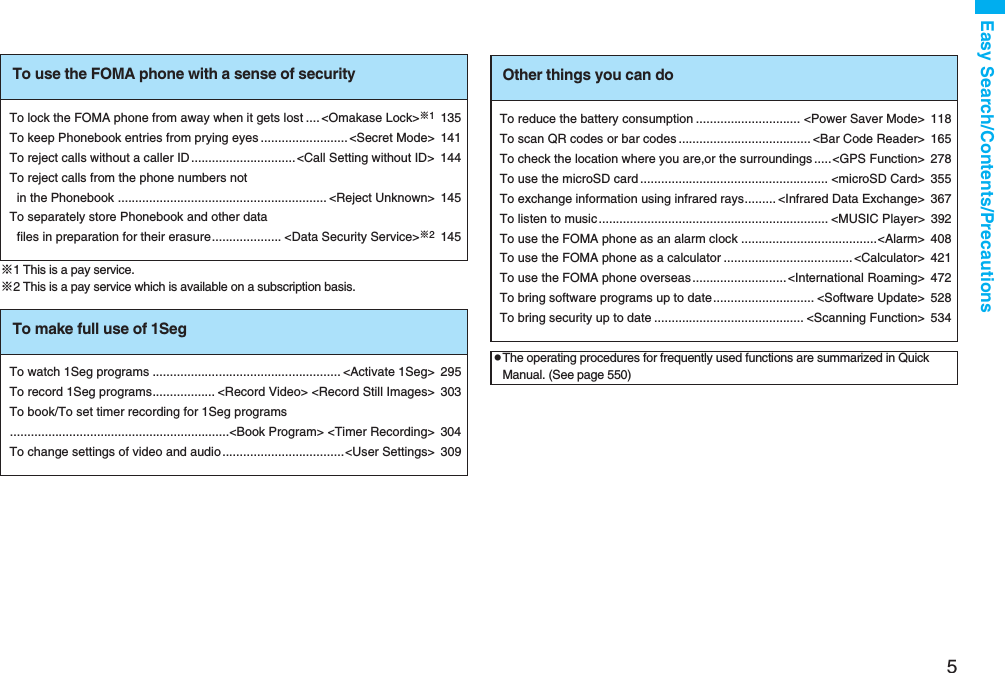
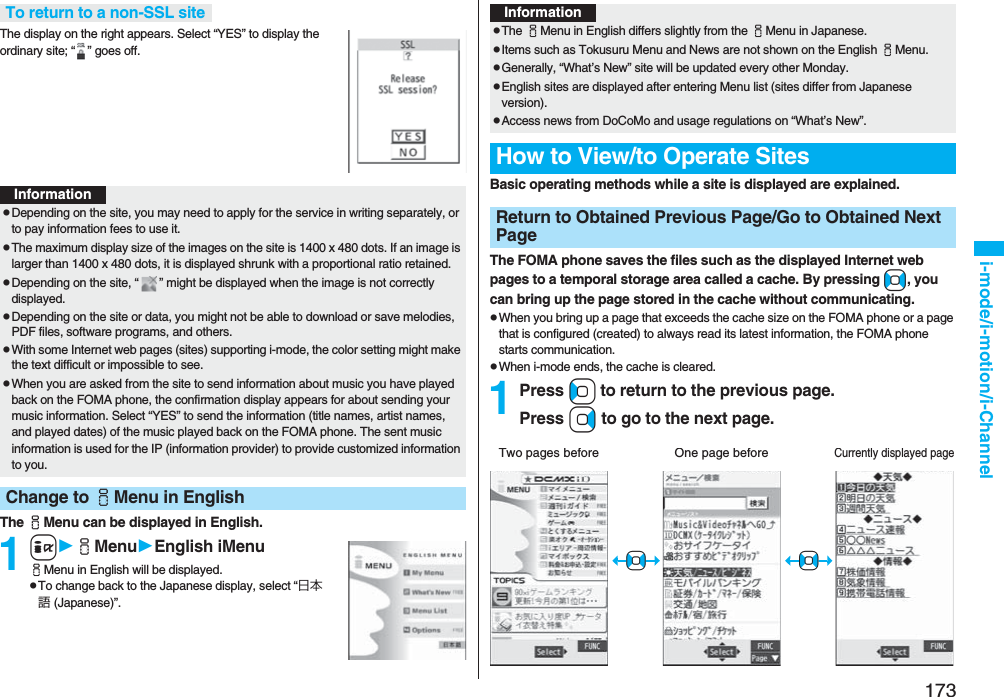
![172i-mode/i-motion/i-Channeli-mode is the service that makes use of the display of the FOMA phone supporting i-mode (i-mode phone) to enable you to use online services such as site (program) access, Internet access, and i-mode mail.pi-mode is a pay service that is available on a subscription basis.pFor details on i-mode, refer to the “Mobile Phone User’s Guide [i-mode] FOMA version”.You can use a variety of services offered by IPs (Information Providers). From the display of the FOMA phone, you can check your bank balance, reserve tickets, and do similar tasks. (IPs offer different types of services. Some of them need to be applied for separately.)What is i-mode?■Before Using i-modepContents of sites (programs) and web pages (Internet web pages) are generally protected by copyrights law. Data such as text and images that you obtained to the i-mode phone from sites (programs) and Internet web pages can be used for personal entertainment but cannot be used in whole or in part, as it is or after modification, for commercial purposes or sent as e-mail attachments or output from your i-mode phone to other devices, unless you have permission from the copyright holders.pIf you replace the UIM with another one or turn on the power with the UIM not inserted, you cannot display/play back files depending on the model, such as still images/moving images/melodies obtained from sites, attached files (still images/moving images/melodies and other files) sent/received by mail, screen memos, or Messages R/F.pWhen the file whose display and/or playback is restricted by the UIM is set for the Stand-by display or specified ring tone, the FOMA phone works with the default contents when you replace the existing UIM with new one or turn on the power with the UIM not inserted.<iMenu>Accessing Sites1iiMenuWhile you are online, “ ” blinks.p“ ” blinks while you are using the i-mode service (during i-mode standby).pTo cancel during the connection, select “Cancel”. To cancel while obtaining a page, press l().pTo end i-mode, press hand select “YES” while the site is displayed. “ ” goes off and i-mode ends.It may take longer to end i-mode.2Select an item (link).Repeat selecting items (links) to display the desired site.pYou can select underscored items on the displayed site. When you select an item, it is highlighted.pIf there is a number at the head of the item showing the link, you can connect to that link directly by pressing the numeric key corresponding to that number. (Some sites cannot be connected.)pWhile the site is displayed, press Bo to scroll through line by line. Press m()/c() or </> to scroll through page by page.The display on the right appears. When obtaining is completed, the SSL page appears and “ ” lights.pTo cancel during authentication, select “Cancel”. To cancel obtaining the SSL page after authentication, press l().i-mode menuTo obtain an SSL site (SSL pages)](https://usermanual.wiki/Panasonic-Connect/208006A.User-Manual-Part-1/User-Guide-920754-Page-174.png)
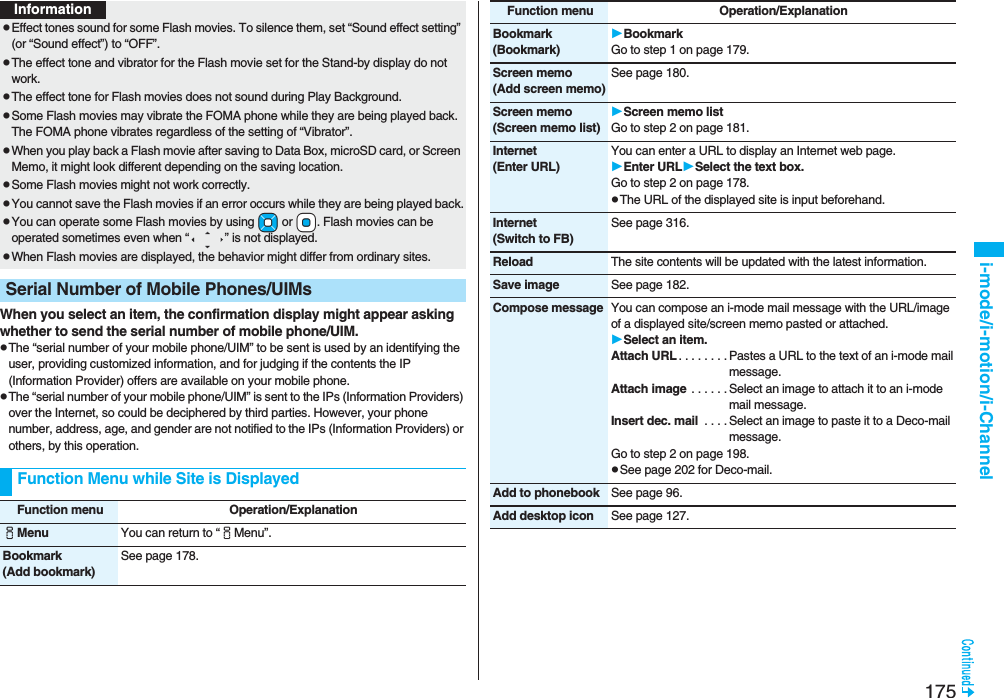
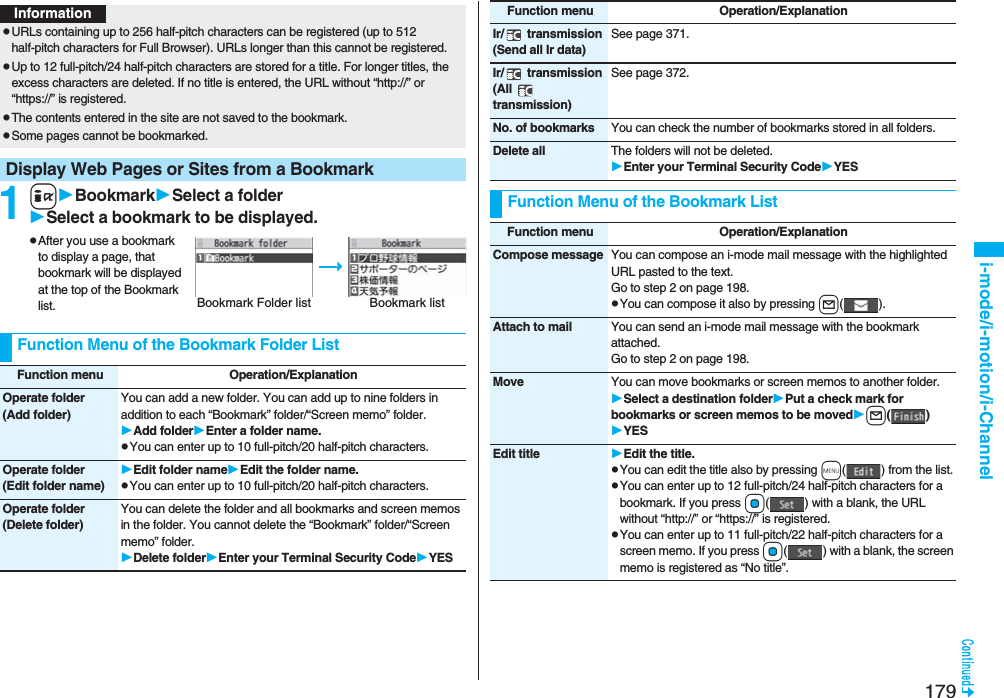
![178i-mode/i-motion/i-Channel1iGo to location<NEW>2Enter a URLOKpYou can enter up to 256 half-pitch alphanumeric characters and symbols (up to 512 half-pitch characters for Full Browser).pFor Full Browser, the confirmation display appears telling that the web page might not be displayed.Up to 10 entered URLs can be stored in URL History.1iGo to locationSelect a URL to be displayedOKpExcluding “http://” and “https://”, up to 22 half-pitch characters can be displayed.pYou can edit the URL by selecting the URL’s text box.<Enter URL>Displaying Internet Web PagesInformationpFor i-mode, Internet web pages not supporting i-mode or some type of internet web pages to be connected might not be displayed correctly.pWhen the file size of the page you have received exceeds the maximum obtainable size of a page, receiving is suspended. The data obtained so far might be displayable by selecting “OK”.Displaying Web Pages from URL HistoryURL History listInformationpWhen the entered URLs exceed 10 items, the URL histories are overwritten automatically, starting from the oldest one.pWhen you newly enter a URL to access a site, that URL is saved as a different record even if you access the same URL.Once you bookmark a frequently accessed site, you can display the page directly. You can register 100 bookmarks each for i-mode and Full Browser.1From the page to be registeredi()BookmarkAdd bookmarkYESSelect a destination folder.Function Menu of the URL History ListFunction menu Operation/ExplanationCompose message You can compose an i-mode mail message with the highlighted URL pasted to the text.Go to step 2 on page 198.pYou can compose it also by pressing l().Add desktop icon See page 127.Set as home URL You can store the site as Home URL of Full Browser.YESpYou can operate this only from the URL History list of Full Browser.Delete[Delete (Delete this)]Delete (Delete this)YESDelete(Delete selected)Delete selectedPut a check mark for URL histories to be deletedl()YESDelete(Delete all)Delete allEnter your Terminal Security CodeYES<Bookmark>Bookmarking Web Pages or Sites for Quick AccessAdd Bookmark](https://usermanual.wiki/Panasonic-Connect/208006A.User-Manual-Part-1/User-Guide-920754-Page-180.png)
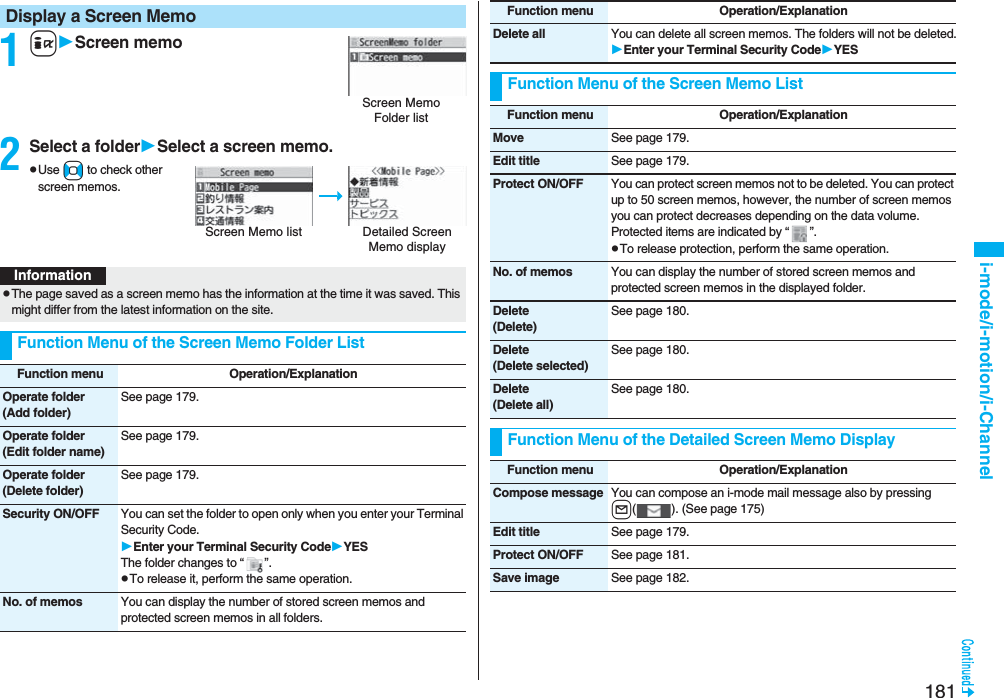
![180i-mode/i-motion/i-ChannelCopy(Copy URL)You can copy the URL of the bookmark.Select a start point for copyingSelect an end point for copying.pSee page 442 for how to paste copied characters.Copy(Copy to microSD)See page 357.Set as home URL You can store the site as Home URL of Full Browser.YESpYou can operate this only from the Bookmark list of Full Browser.Add desktop icon See page 127.Ir/ transmission(Send Ir data)See page 370.Ir/ transmission( transmission)See page 372.No. of bookmarks You can display the number of bookmarks stored in the displayed folder.Delete[Delete (Delete this)]Delete (Delete this)YESDelete(Delete selected)Delete selectedPut a check mark for bookmarks or screen memos to be deletedl()YESDelete(Delete all)You can delete all bookmarks or screen memos stored in the folder.Delete allEnter your Terminal Security CodeYESFunction menu Operation/ExplanationYou can save a displayed page as a screen memo to the FOMA phone. You can display the page saved as a screen memo without connecting to i-mode.You can save up to 100 screen memos, however, the number of screen memos you can save decreases depending on the data volume.1From a page to be savedi()Screen memoAdd screen memoYESSelect a destination folder.pSee page 186 when screen memos are stored to the maximum.<Screen Memo>Saving Site ContentsSave as a Screen MemoInformationpUp to 11 full-pitch/22 half-pitch characters are stored for a title. For longer titles, the excess characters are deleted.pIf you save the Obtaining Completion display, its data file is saved as well. (The Obtaining Completion display for Chaku-uta Full® music files, for i-motion movies with playable deadline, or for the ToruCa files whose output from the FOMA phone is prohibited cannot be saved.) Some Obtaining Completion displays cannot be saved as screen memos. The display except the Obtaining Completion display is saved with a URL of that page of up to 256 half-pitch characters.pWhen you save SSL pages, their SSL certificates are saved as well.pThe contents entered in the text box, or selected with the pull-down menu, check box, or radio button are not saved to screen memos.pYou can save up to 100 Kbytes per page. However, you can save up to 500 Kbytes of the i-motion Obtaining Completion display, up to 200 Kbytes of the Deco-mail Template Obtaining Completion display, up to 100 Kbytes of the Decome-Anime Template Obtaining Completion display, up to 1 Kbyte of the ToruCa Obtaining Completion display, and up to 20 Kbytes of the Download Dictionary Obtaining Completion display.](https://usermanual.wiki/Panasonic-Connect/208006A.User-Manual-Part-1/User-Guide-920754-Page-182.png)
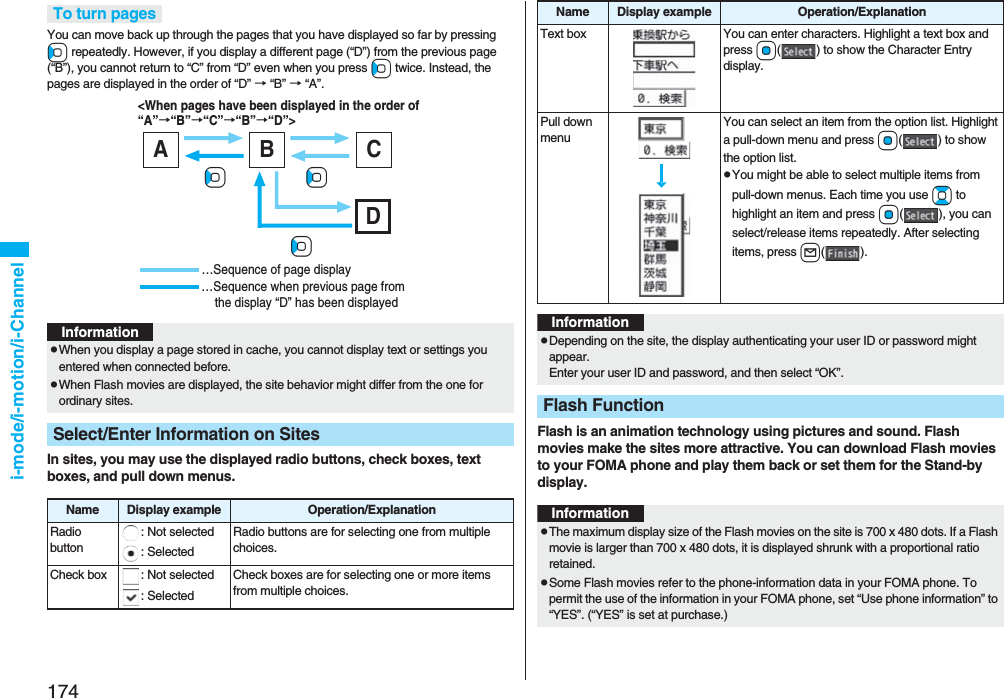
![195i-mode/i-motion/i-Channeli-Channel is a service that news, weather forecast and others are distributed to i-Channel mobile phones as graphical information. Information is periodically received and tickers flow on the Stand-by display for the latest information. You can press the i-Channel key to show the Channel list. (See page 195)Also, two types of channels are available, “Basic channel” which is provided by DoCoMo and “Favorite channel” which is provided by IPs (Information Providers). The packet communication fee that is charged for auto-updates of information distributed through “Basic channel” is not charged.For “Favorite channel” which is enabled by registering your favorite channels, you are separately charged a packet communication fee for when information is automatically updated. Note that you are separately charged a packet communication fee for browsing detailed information. When you use the international roaming service, you are charged a packet communication fee for both auto-update and browsing detailed information.pi-Channel is a pay service which is available on a subscription basis. (You need to subscribe to i-mode to apply for i-Channel.)pFor details on i-Channel, refer to the “Mobile Phone User’s Guide [i-mode] FOMA version”.pThe i-Channel service is provided in Japanese only.What is i-Channel?InformationpWhen the FOMA phone is turned off or if radio wave conditions are bad such as when it is out of the service area, you may not be able to receive information even if you have contracted to the i-Channel service. In that case, select the channel for unsigned subscribers that appears by pressing +Zo; then you can now receive information, and tickers flow on the Stand-by display. If your FOMA phone remains in the default state, you may not be able to receive information. Press +Zo, and then information is received and tickers flow on the Stand-by display.pTo receive i-Channel information overseas, you are charged a communication fee by channel (domestic talk-free service does not apply).pAfter you cancel the contract for the i-Channel service, the ticker setting is automatically set to off.pIf you cancel the contract for the i-mode service before you cancel the contract for the i-Channel service, the ticker setting remains on.When “Ticker ON/OFF” is set to “ON”, up to 10 ticker files for the latest information flow repeatedly on the Stand-by display. If you want to know more about the information, you can obtain the details from the Channel list.1Press Zo.The Channel list appears regardless of the “Ticker ON/OFF” setting.p“” blinks during receiving information.pYou cannot display the Channel list even when you press Zo when the Stand-by display appears on the horizontal display.2Select an item (link).Using i-ChannelChannel listInformationpThe ring tone does not sound and the vibrator does not work even when information comes in. In addition, the Call/Charging indicator does not light or flicker.pTickers are not displayed in the following cases:When the information is automatically updated after that or when you press +Zo to receive the latest information, tickers automatically flow.・When the UIM is replaced.・When “Host selection” is changed.・When “Reset i-Channel” is executed.・When “Reset settings” is executed.・When “Initialize” is executed.However, the information might not be automatically updated when “Host selection” is changed. To receive the latest information, press +Zo to display the Channel list.pWhen “Host selection” is changed, the i-Channel connecting end is also changed. (In ordinary, you do not need to change the setting.)](https://usermanual.wiki/Panasonic-Connect/208006A.User-Manual-Part-1/User-Guide-920754-Page-197.png)
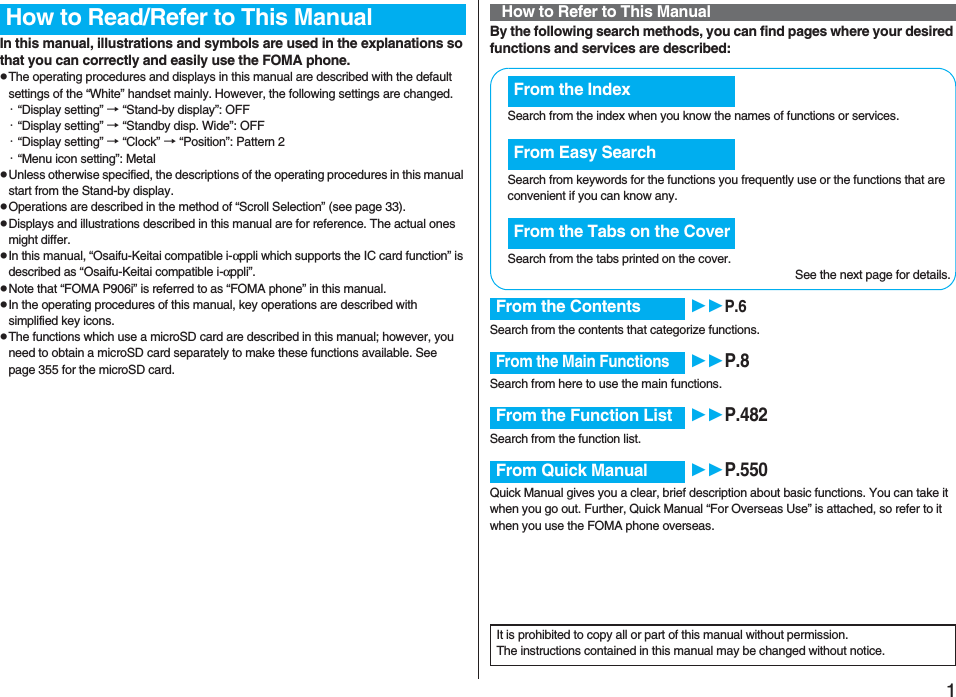
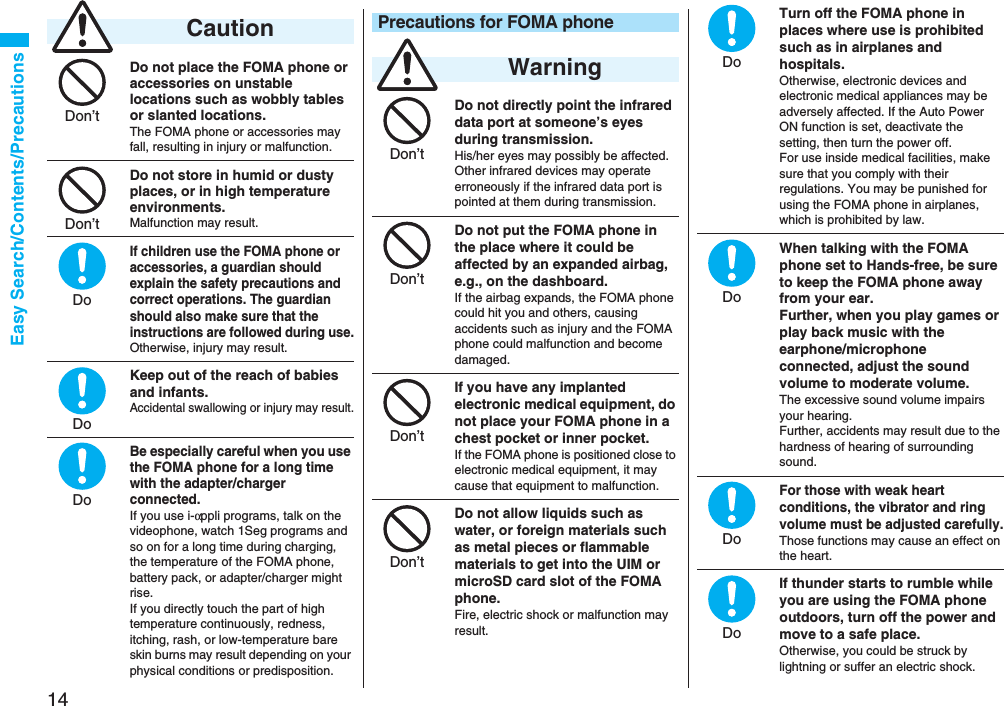
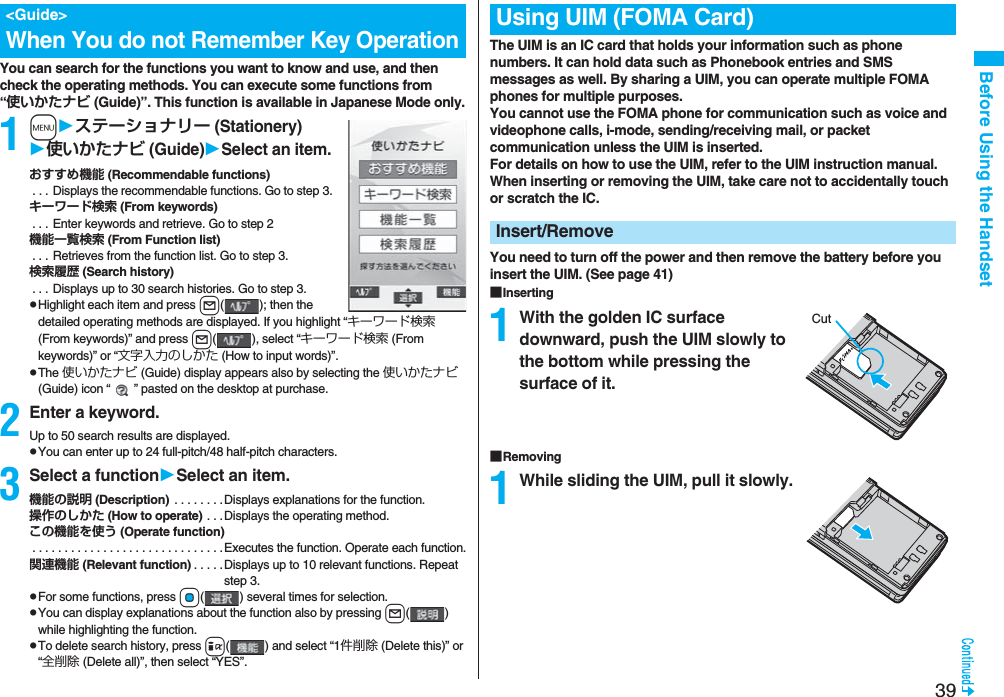
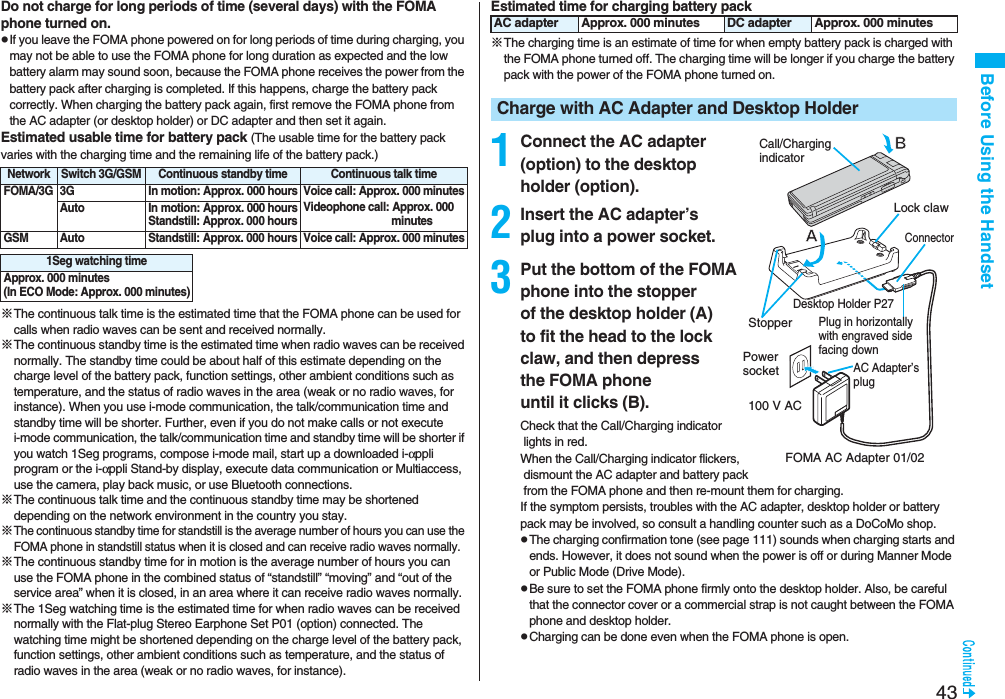
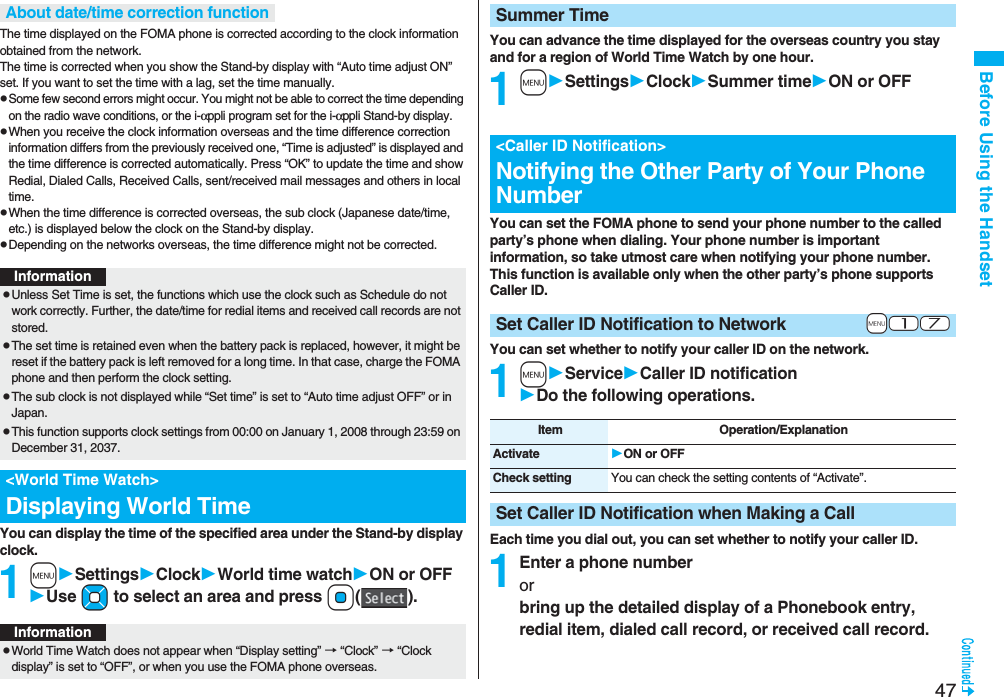
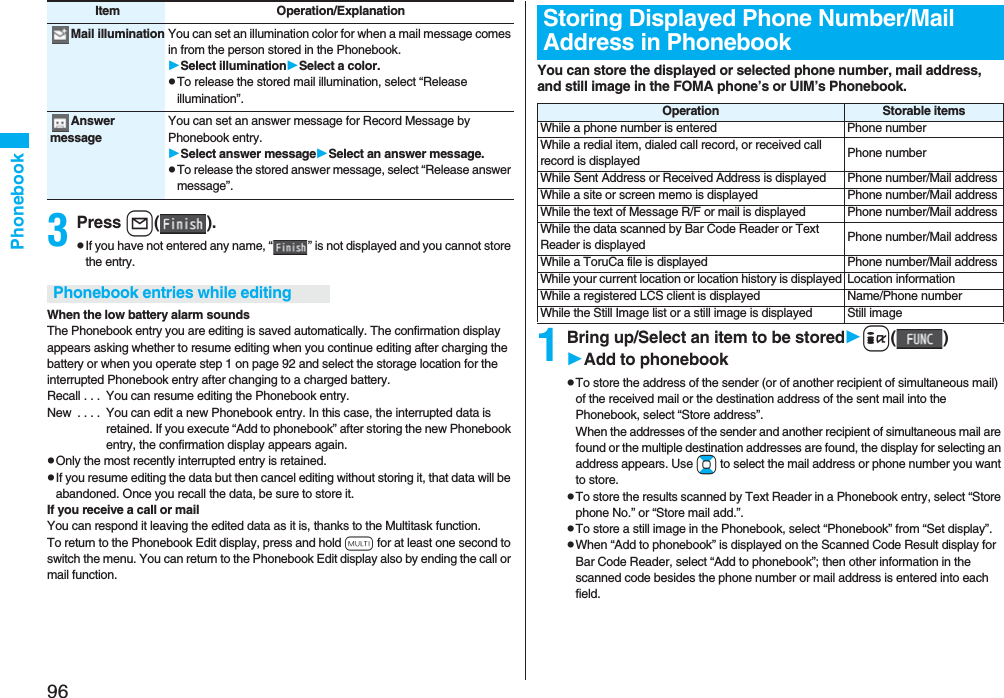
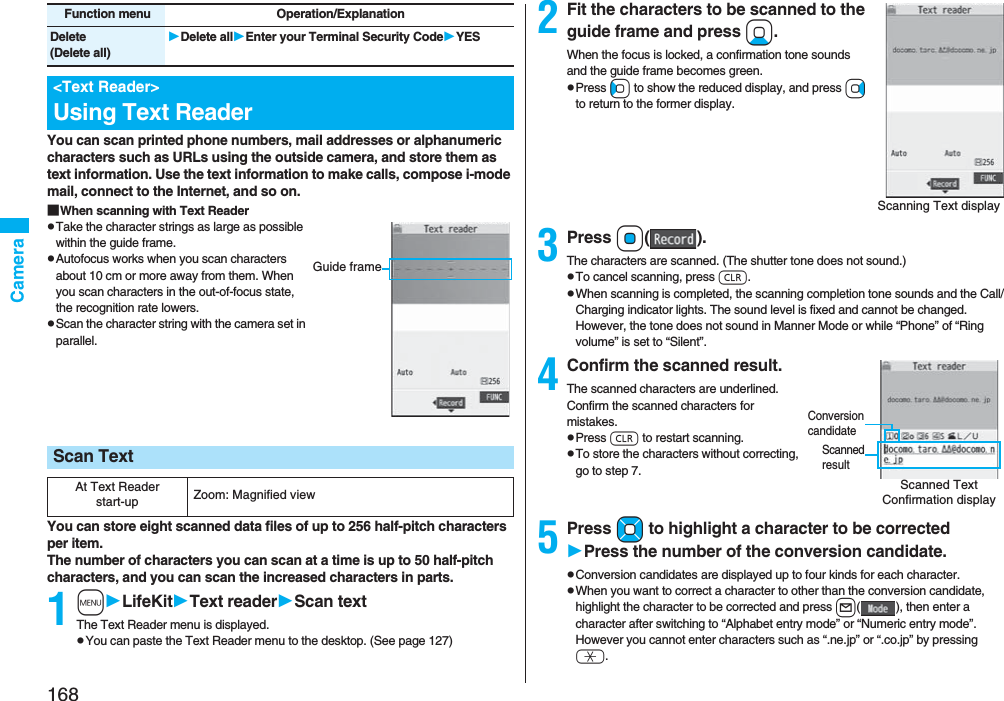
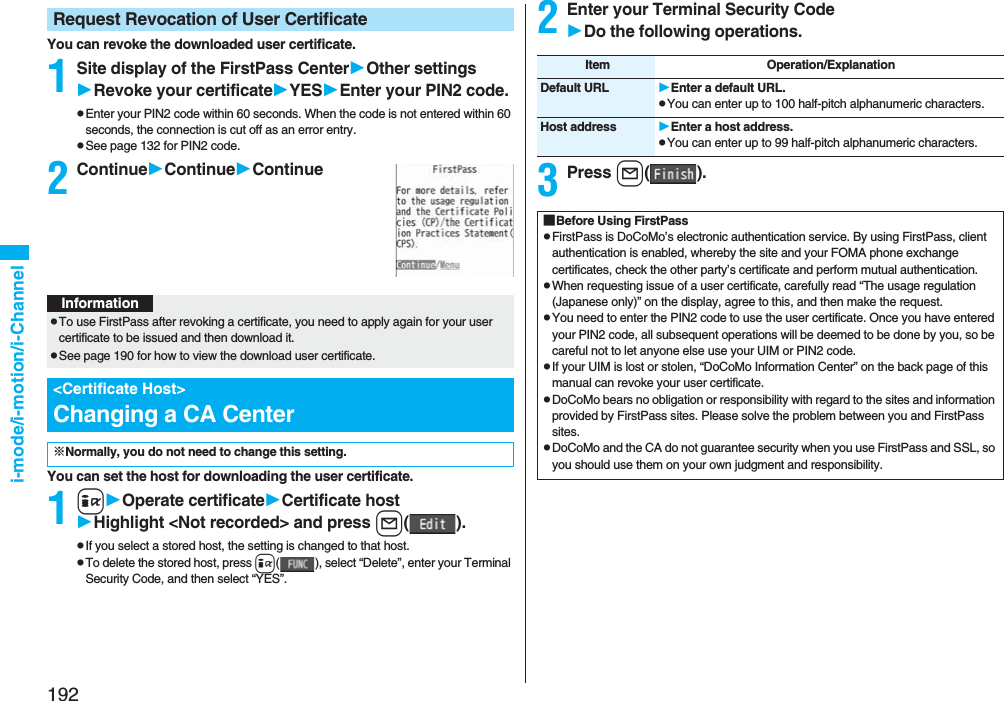
![198MailOnce you subscribe to i-mode, you can exchange e-mails over the Internet as well as with other i-mode phones.You can attach up to 10 files (photo or movie file, etc.) within 2 Mbytes in total besides mail text. The i-mode mail also supports Deco-mail, so you can change the character color, character size, and background color of mail text. Further, you can use the Deco-mail pictograms, so you can easily send pleasant messages.pFor details on i-mode mail, refer to the “Mobile Phone User’s Guide [i-mode] FOMA version”.You can compose and send i-mode mail messages.You can save up to 1,000 sent i-mode mail messages including SMS messages to the Outbox.See page 202 for composing Deco-mail.1ll()What is i-mode Mail?<Compose Message>Composing i-mode Mail to SendMessage Composition displayAddress fieldSubject fieldText field(When you enter text, the number of bytes is displayed.)Attachment field2Select the address fieldSelect an item.Phonebook. . . . . . . . . Call up a Phonebook entry and select a phone number or mail address.Sent address . . . . . . . Select a phone number or mail address and press Oo().Received address . . . Select a phone number or mail address and press Oo().Mail group . . . . . . . . . Select a mail group.Enter address . . . . . . Enter a mail address or phone number.pYou can enter up to 50 half-pitch characters.pIf the destination is an i-mode phone, you can send mail also by entering only the part preceding the “@” mark of a mail address.pSee page 199 for sending to multiple destination addresses.pSee page 199 for deleting an added address.3Select the subject fieldEnter a subject.pYou can enter up to 100 full-pitch/200 half-pitch characters.4Select the attachment fieldSelect an item.pSee page 210 for how to select an attachment.5Select the text fieldEnter text.pYou can enter up to 5,000 full-pitch/10,000 half-pitch characters.pSee page 200 for pasting a header or signature.pYou can select a Deco-mail picture by pressing and holding d for at least one second.6Press l().The animation display during transmission appears and the mail message is sent.pTo cancel sending midway, press Oo( ) or press and hold r(for at least one second). However, the mail message might be sent depending on the timing.Message Entry display](https://usermanual.wiki/Panasonic-Connect/208006A.User-Manual-Part-1/User-Guide-920754-Page-200.png)