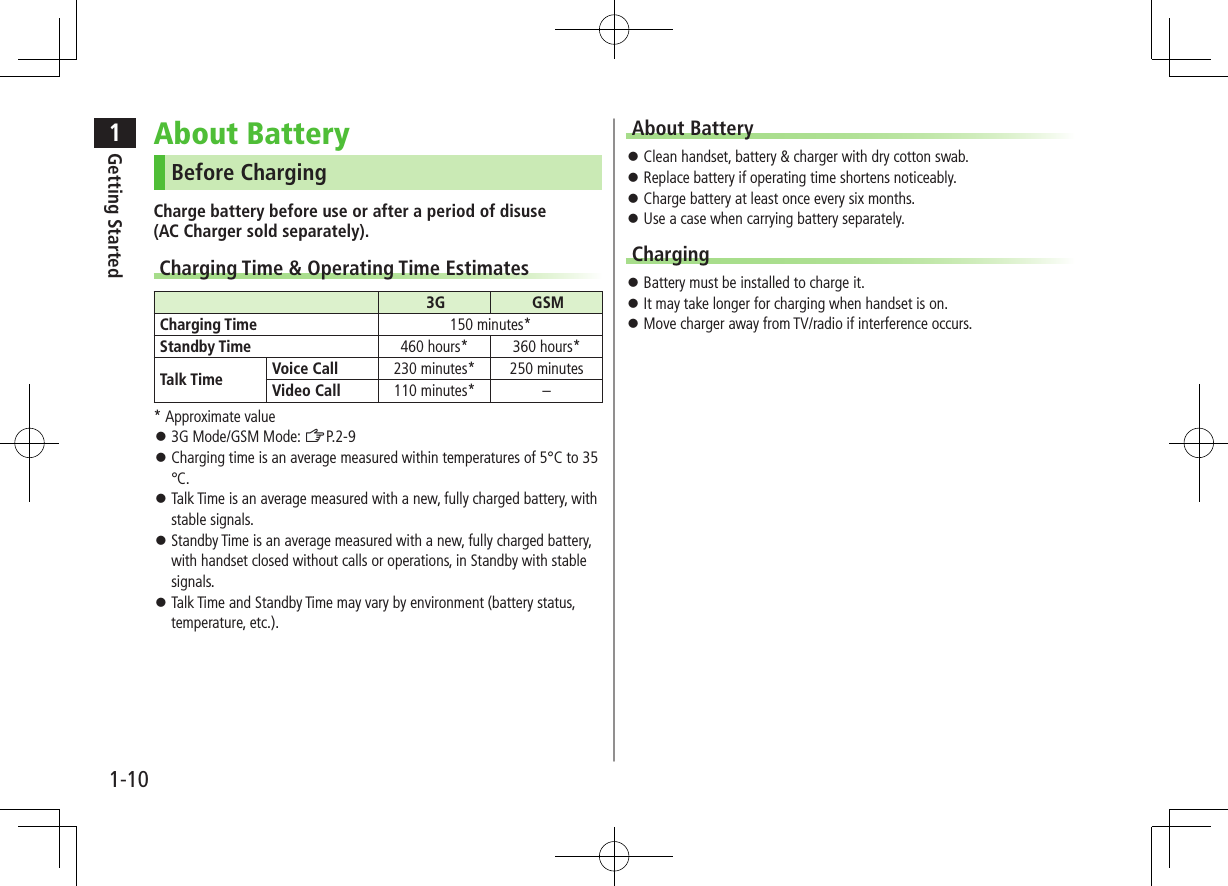
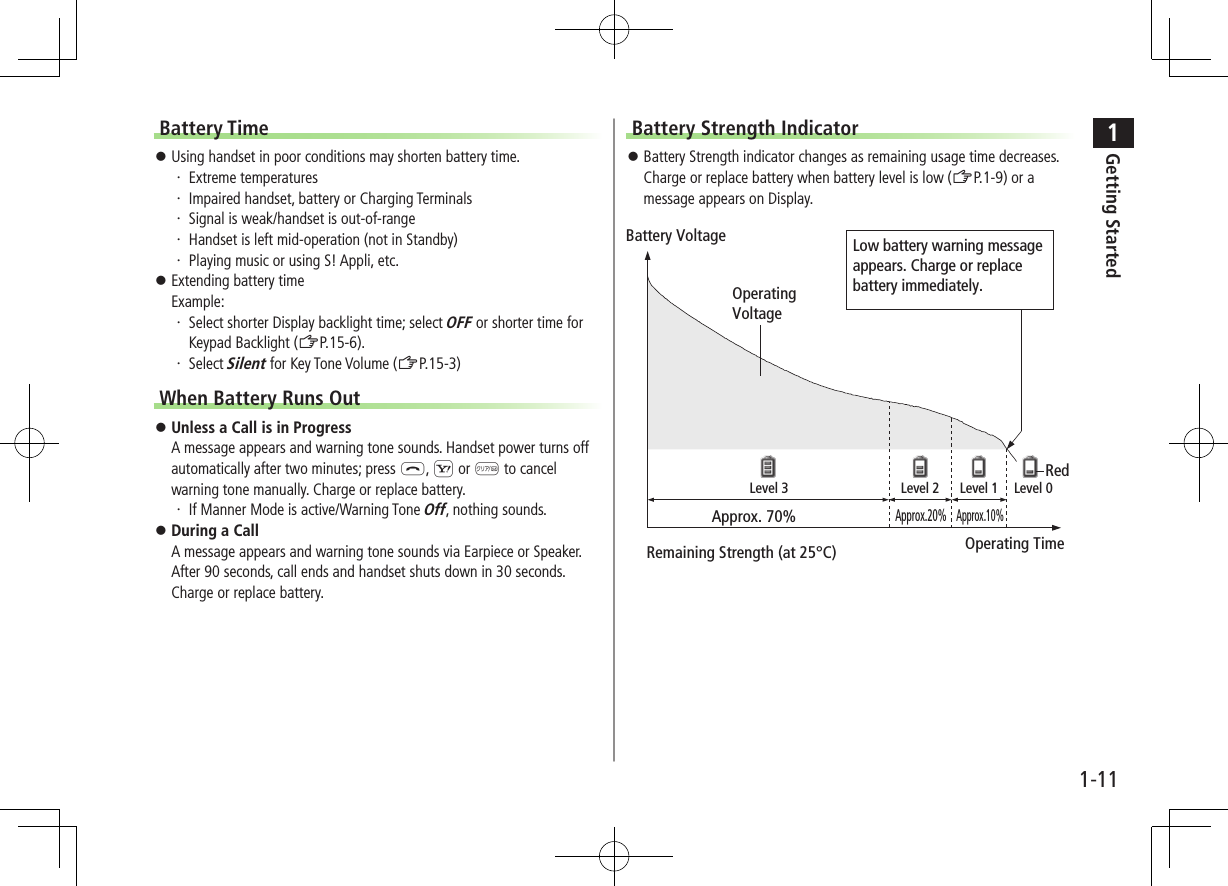
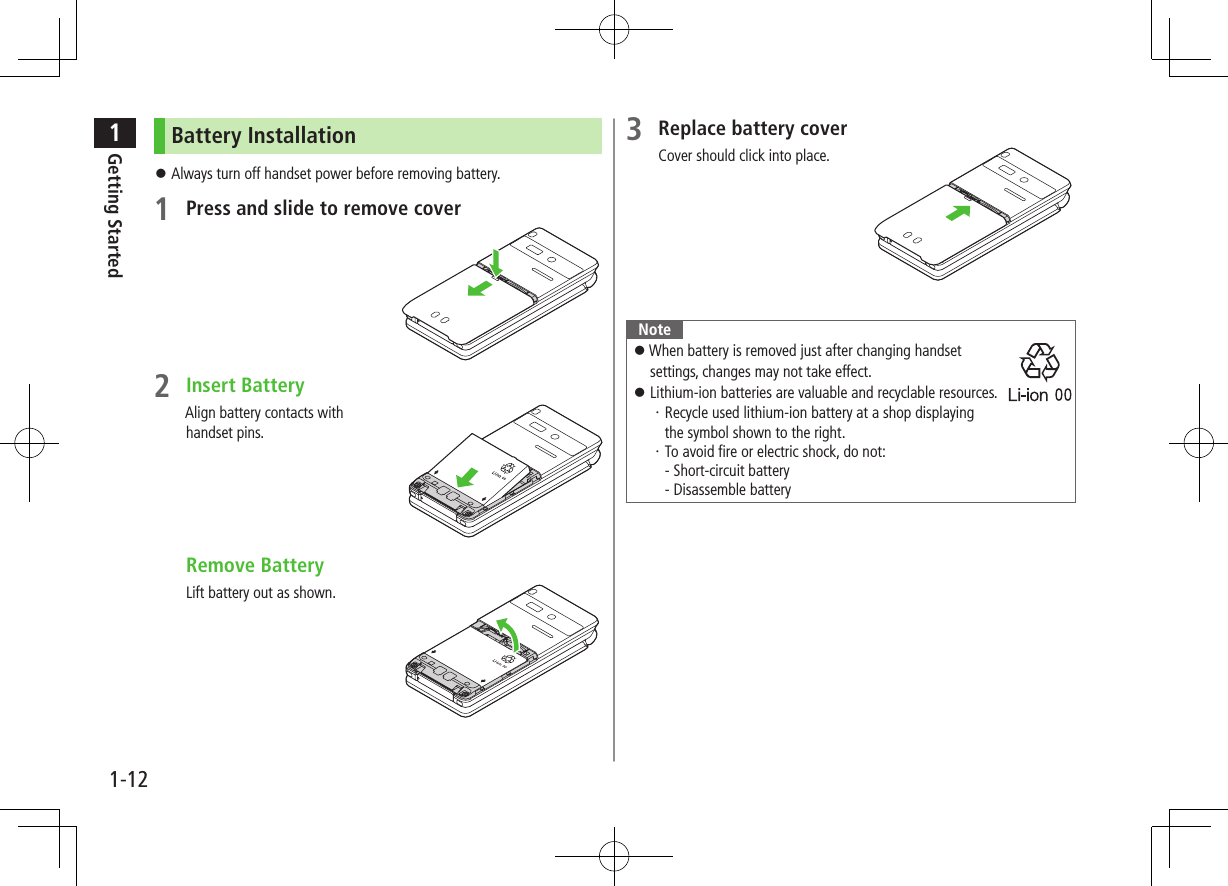
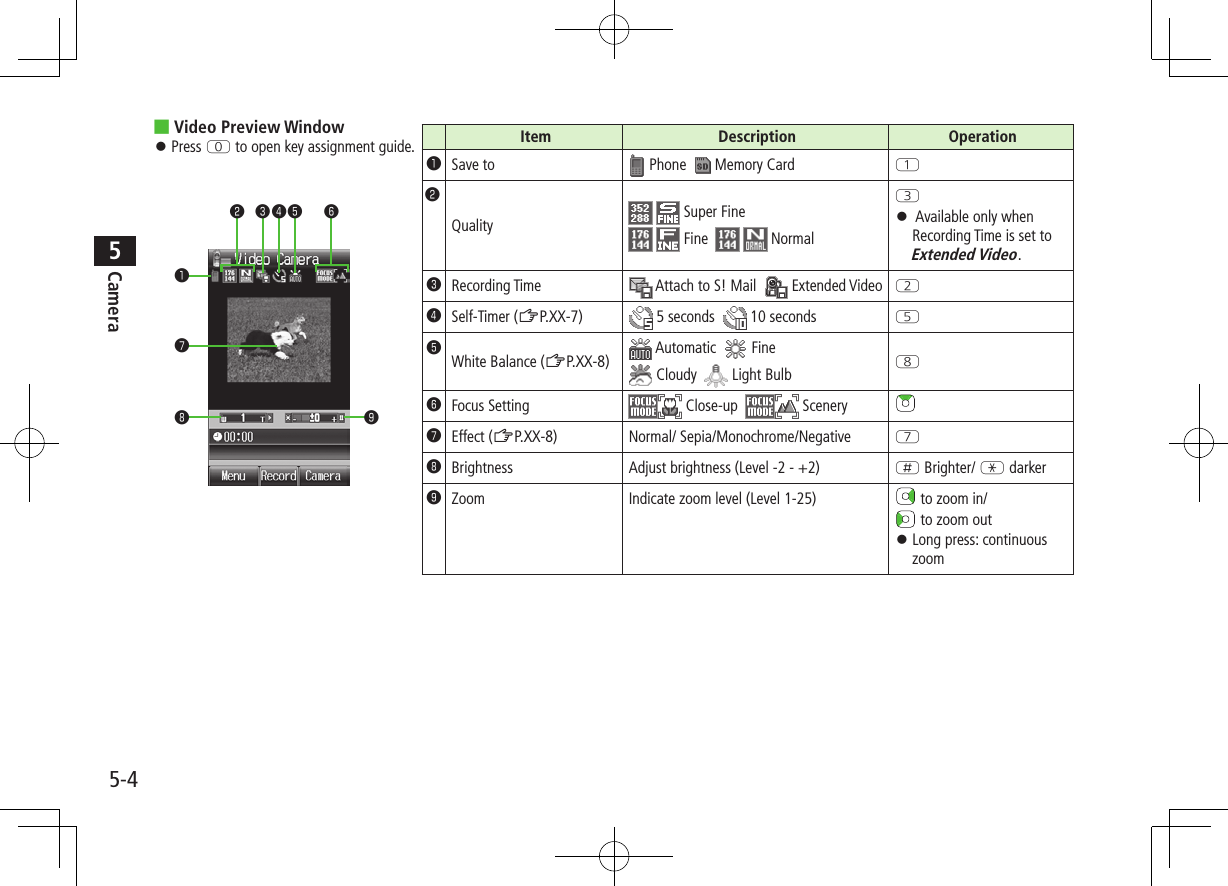
Panasonic Connect 209019A UMTS/ GSM Cellular Mobile Radio User Manual 1
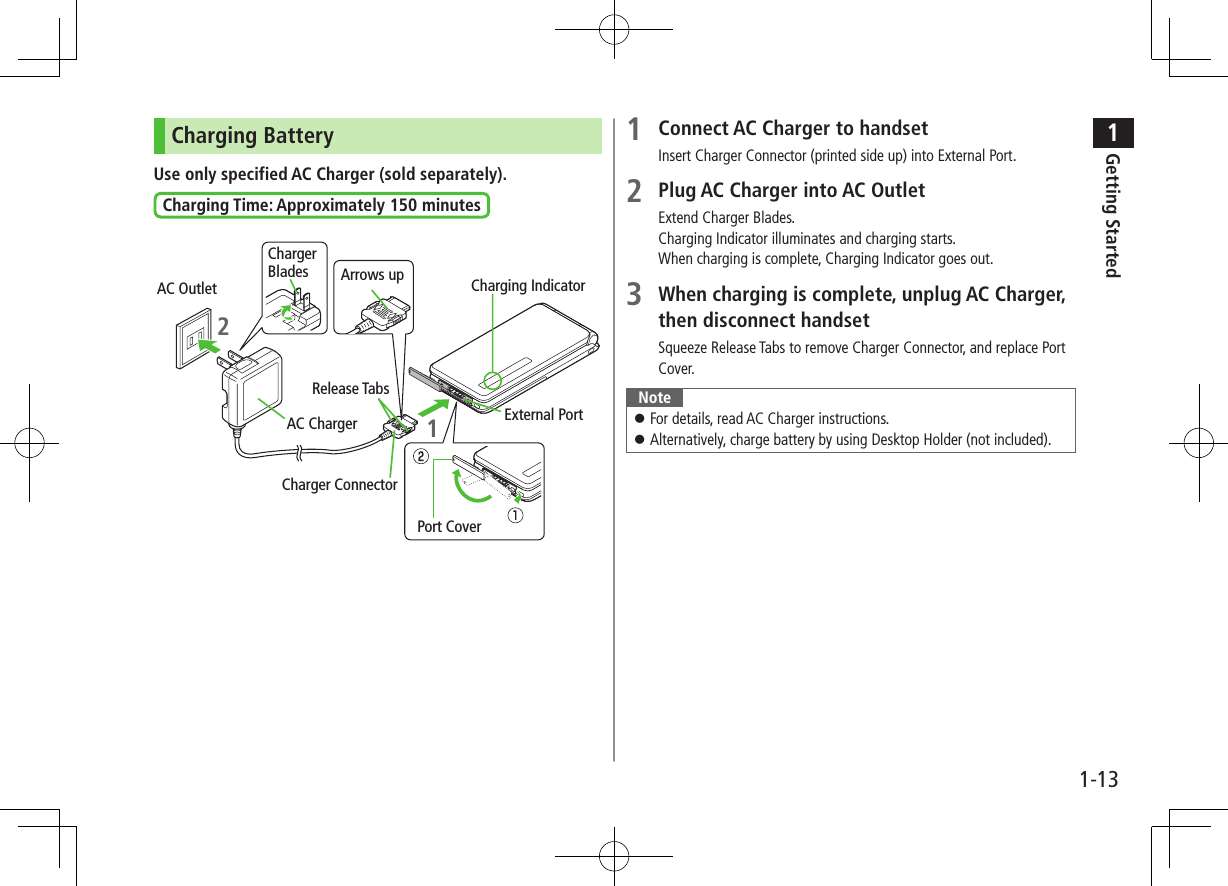
Panasonic Mobile Communications Development of Europe Ltd UMTS/ GSM Cellular Mobile Radio 1
Contents
- 1. User Manual 1
- 2. User Manual 2
- 3. User Manual 3
- 4. User Manual 4
User Manual 1
![ixGuide SymbolsPress the corresponding key to execute the function or operation indicated at the bottom of Display.Example: Softkey labels vary by menu.Multi Selector (❶)Use Multi Selector to select items, navigate menus, etc. In this guide, Multi Selector operations are indicated as shown below.Softkeys (❷❸)In this guide, Softkey operations are indicated as shown below.Example ❷❸: A [Chg.Menu], S [Back][Chg.Menu] and [Back] are Softkey label examples; Softkey labels vary by menu.Japanese Functions & ServicesWhen "(Japanese)" appears in a title, Japanese ability is required to use full range of the function or service.UpUp/Down Up/Down/Left/RightDownLeftLeft/Right CenterRightLeft RightUpDown Center](https://usermanual.wiki/Panasonic-Connect/209019A.User-Manual-1/User-Guide-1191107-Page-11.png)
![xOperation Descriptions Following are examples of operation descriptions. Please note, actual operations may differ.Basic OperationsOperations are expressed as shown here.Example:Main Menu 4 Phone Book 4 Group1 Highlight a group 7 A[Menu] 7 Rename 7 Enter group nameAMenu Selection BStepsAMenu Selection❶.Press in Standby to open Main Menu.❷.Use to highlight Phone Book; then press .❸.Use to highlight Group; then press .BSteps❶.Use to highlight a group.❷.Press A[Menu].❸.Use to highlight Rename; then press .❹.Enter a Group name.Advanced OperationsFor advanced features and settings, go to pages indicated under Tip.Example:Tip#Operations Available during a Voice Call (ZP.2-9)#Making Calls from Call Log (ZP.2-8)#Save Entered Phone Number (ZP.4-5)#Making Calls from Phone Book (ZP.4-6)#Speed Dial (ZP.4-8)Settings #Call Time & Call Cost (ZP.XX-9)#End Calls by Closing Handset (ZP.XX-10)Settings Refer to Chapter 17 "Settings."](https://usermanual.wiki/Panasonic-Connect/209019A.User-Manual-1/User-Guide-1191107-Page-12.png)
![xiAbbreviated DescriptionsFor advanced settings (Chapter 15), initial operations may be abbreviated or omitted.Example:From Main Menu 4 Entertainment 4Answer Phone ■Delete Playlists >Follow the steps belowItem Operation/DescriptionOne >Highlight a Playlist 7 A[Menu] 7 Delete 7 One 7 A[YES]AAbbreviated StepsInitial steps are abbreviated.BStepsFollow these steps after Abbreviated Steps.COmitted StepsInitial steps are omitted. Start operations from specified window. ■Mail & Web Extensions >In text entry window (in alphanumerics mode), 0→Select an extension](https://usermanual.wiki/Panasonic-Connect/209019A.User-Manual-1/User-Guide-1191107-Page-13.png)


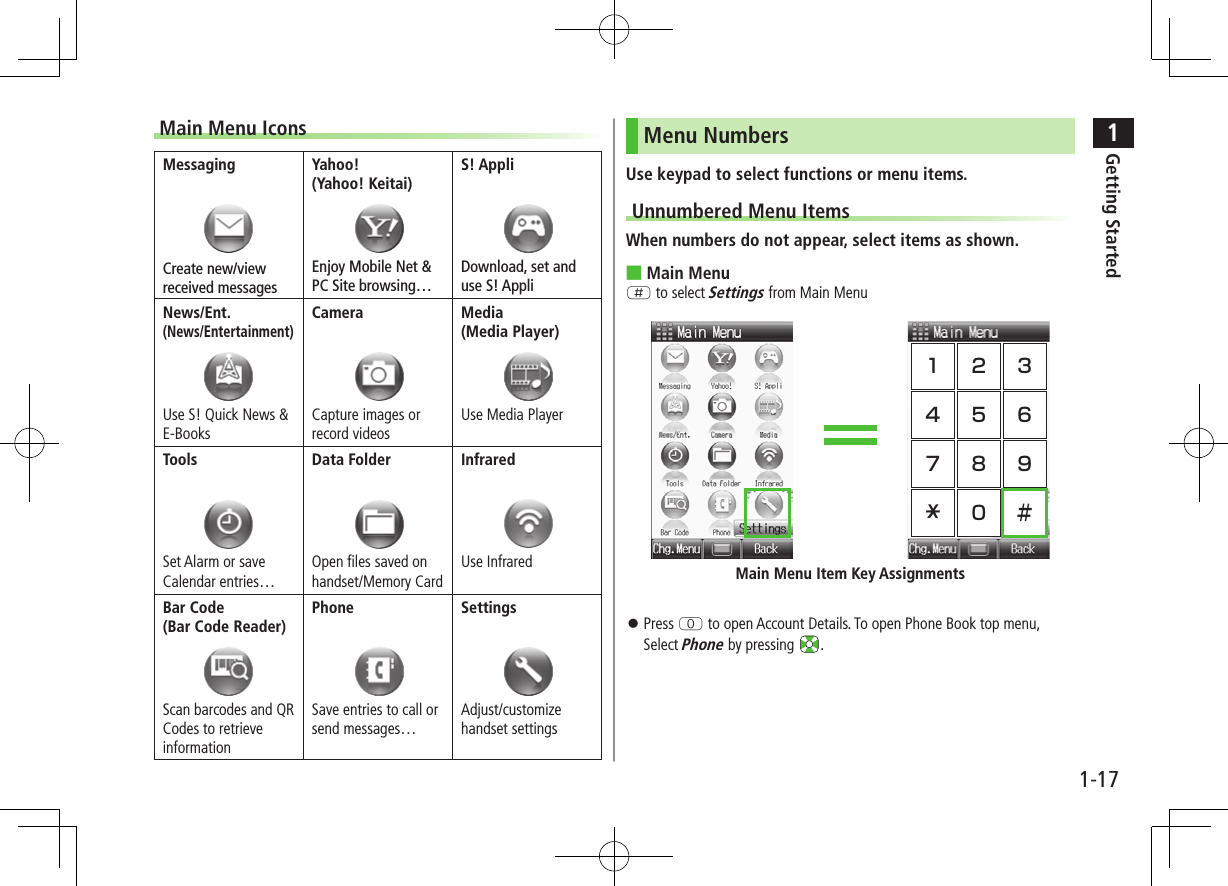
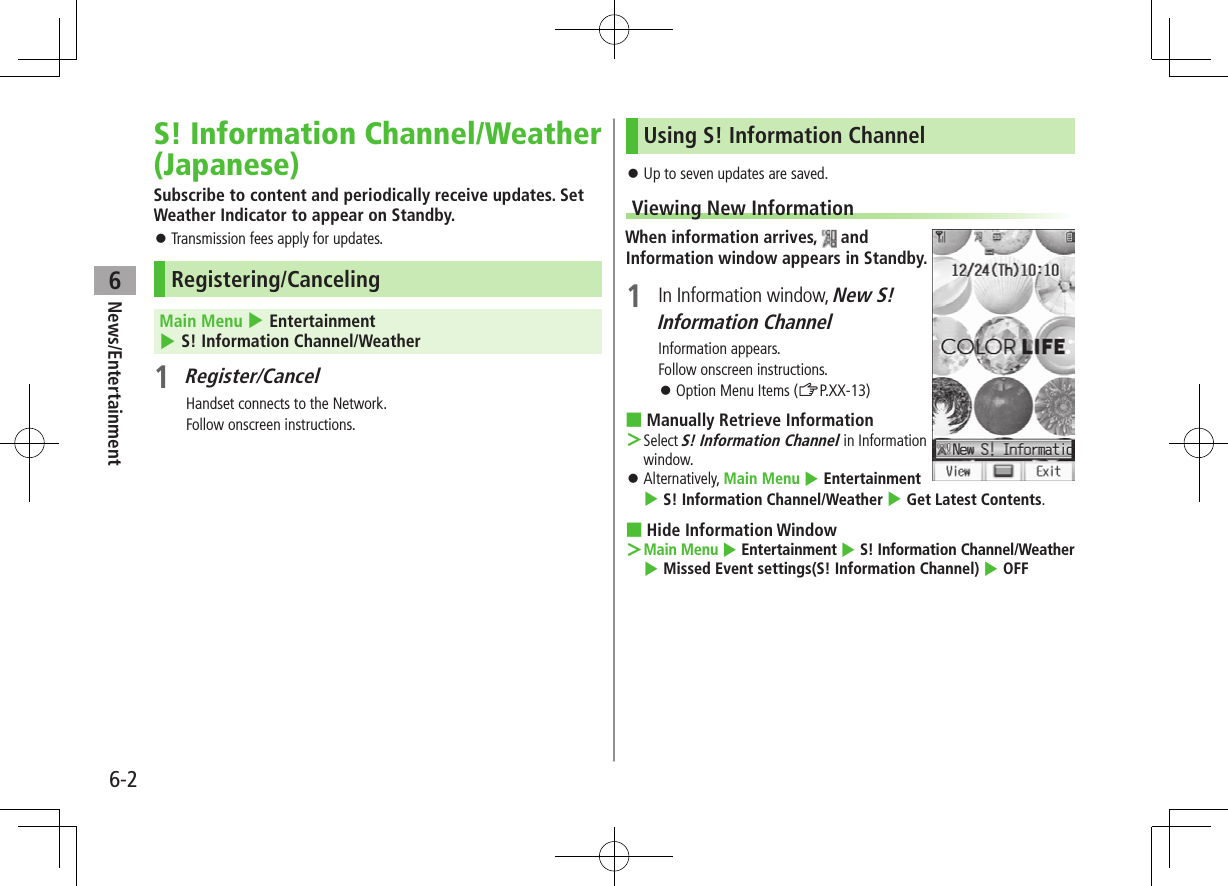
![1Getting Started1-18Numbered Menu ItemsPress key corresponding to menu number to select a menu.In Display Settings (from Settings Top Menu), press U to select ThemesStandby OptionsInformation WindowIn Standby, Information window opens for missed calls, messages, etc.1 to select an item To close Information window: L, S[Exit] or K ■EventsCall Missed calls (ZP.2-10)MessageNew messages (ZP.12-12) When Feeling Mail is received, a pictograph that shows emotion set by sender, and sender name, mail address or phone number appearAnswer Phone Recorded caller messages (ZP.2-13)Voice Mail New Voice Mail messages (ZP.2-16)Missed CallIf Missed Call Notification is active, Information window opens for calls missed while handset is off,out-of-range, engaged, etc. (ZP.2-16)Update Results Received software update results (ZP.16-10)New S! Information ChannelReceived S! Information Channel updates (ZP.6-2)S! Information ChannelFailed to receive S! Information Channel updates (ZP.6-2)New Weather Received weather forecast updates (ZP.6-3)Weather Failed to receive weather forecast updates (ZP.6-4)](https://usermanual.wiki/Panasonic-Connect/209019A.User-Manual-1/User-Guide-1191107-Page-44.png)
![1Getting Started1-19Standby WindowAccess S! Quick News or Shortcuts from Standby Window. S! Quick News: ZP.XX-2Show/Hide Standby WindowPress L to show/hide Standby Window. When hidden, press to show Standby Window. Press K to deselect a shortcut icon or ticker. Set Standby Window On/Off: ZP.XX-4Changing Templates<Default> S! Quick NewsSet to appear both or either S! Quick News/Shortcuts.1 In Standby, 7 A[Menu] 7 Change Templates2 Select an item ■TransparencySet transparency level of Standby Window. >In Standby, 7 A[Menu] 7 Background of Panel 7 Select a levelAdding Content & Changing SettingsAdd or Set S! Quick News in Standby Window.1 In Standby, 7 highlight ticker 7 A[Menu]S! Quick News2 Add ContentAdd S! Quick NewsHandset connects to the Network.Follow onscreen instructions. SettingsS! Quick News Settings 7 Auto Refresh or Display SettingGo to P.15-17 and follow steps.Accessing Functions from Shortcuts1 In Standby, 7 Select an iconThe selected function name appears at top of panel. To deselect: K2 to access function](https://usermanual.wiki/Panasonic-Connect/209019A.User-Manual-1/User-Guide-1191107-Page-45.png)
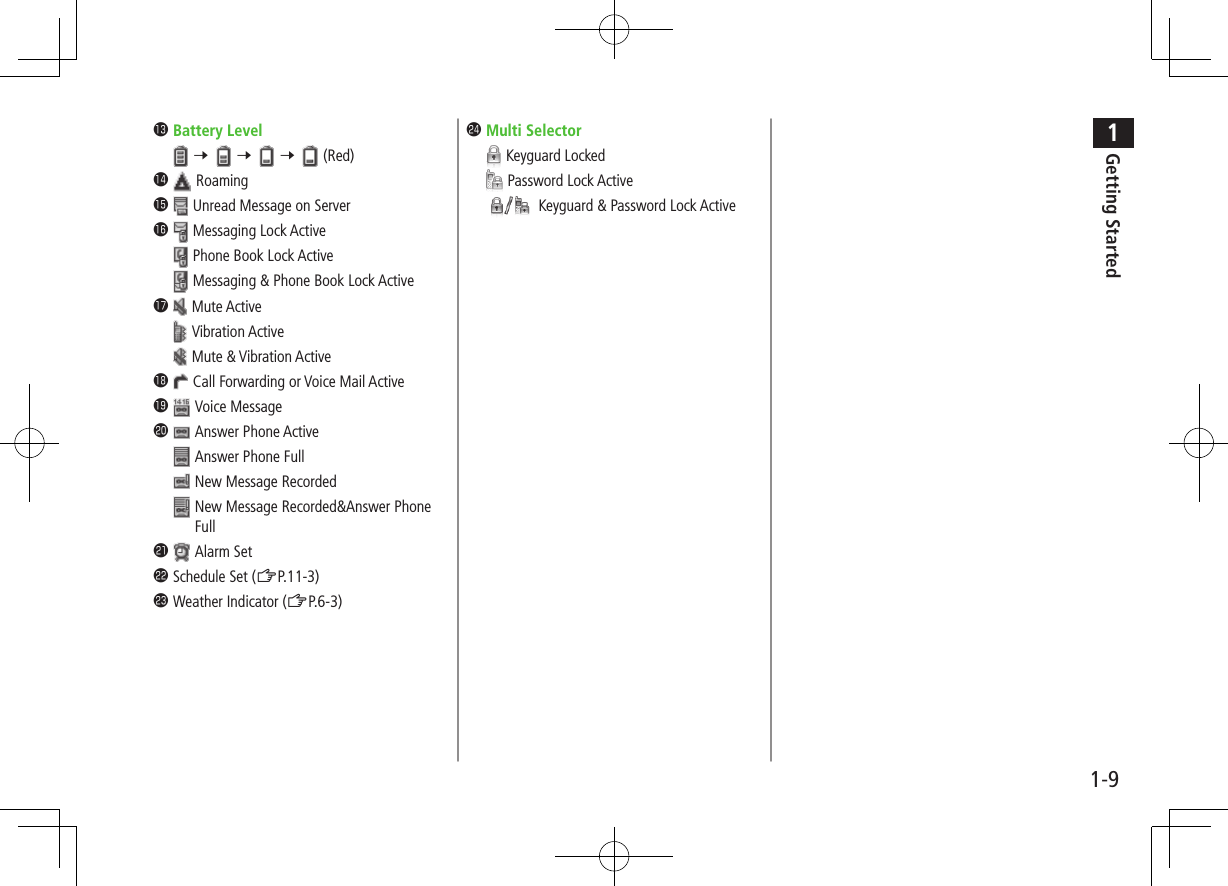
![1Getting Started1-20Adding ShortcutsAdd frequently used functions to Shortcuts. Preset items are as follows: Panasonic Site; Sound Settings; Display Settings; Pictures (Data Folder); Alarms; Calculator; Calendar1 In Standby, 7 highlight target 7 A[Menu] 7 Set Shortcut2 Applications, Bookmarks or Phone Book 7 highlight an item 7 A[Entry] ■Move Icons >In Step 1, highlight an icon to move 7 A[Menu] 7 Move Shortcut 7 Select a position ■Delete Icons >In Step 1, highlight an icon to move 7 A[Menu] 7 Remove Shortcut 7 Private MenuSave frequently used functions in Private Menu. Up to 12 items can be saved. Change preset functions as needed.Opening Private Menu1 In Standby, press and hold Private Menu appears. To return to Standby: S[Back]2 Select a menuPrivate Menu](https://usermanual.wiki/Panasonic-Connect/209019A.User-Manual-1/User-Guide-1191107-Page-46.png)
![1Getting Started1-21Customizing Private Menu 1 In Standby, press and hold 2 Highlight target 7 A[Menu] 7 Set Shortcut3 Select an item4 Highlight an item 7 A[Entry] ■Change Menu Order >After Step 1, highlight a function 7 A[Menu] 7 Move Shortcut 7 Select a position ■Delete Functions >After Step 1, highlight a function 7 A[Menu] 7 Remove Shortcut 7 ■Reset Private Menu >After Step 1, A[Menu] 7 Reset Defaults7 Simple ModeActivate Simple menu to limit mode options to basic ones. Enlarge fonts in Messaging, Phone Book, Call Log and Browser menus, and maximize volume. Handset is limited to basic operations (ZP.1-22). Font size cannot be changed. To change volume: ZP.1-22Font Size: LargeEarpiece Volume: Volume 6Normal Mode WindowSimple Mode Window](https://usermanual.wiki/Panasonic-Connect/209019A.User-Manual-1/User-Guide-1191107-Page-47.png)
![1Getting Started1-22Activating Simple Mode1 In Standby, press and hold G 7 To cancel: Press and hold G 7 again ■Change Earpiece Volume >In Standby, press and hold or (short press during a call). ■Position Clock in Standby >In Simple Mode, Main Menu 4 Settings 4 Standby Display Clock 4 Lower Center ■Cancel from Main Menu >In Standby, 7 A[Normal] 7 Note While switching between modes, other functions are not available. For approximately 30 seconds after mode switching is complete, all calls/messages are blocked. Turning off the power does not cancel Simple Mode. Standby Window and Private Menu is not available in Simple Mode. Alternatively, Main Menu 4 Settings 4 Phone Settings 4 Change Simple Mode 4 .Simple ModeSimple Mode Menu PagePhoneView Phone Book XX-XXCreate New Entry XX-XXCall Log XX-XXMessage List XX-XXVoice Mail XX-XXAccount Details XX-XXMessagingIncoming Mail XX-XXCreate New S! Mail XX-XXDrafts XX-XXRetrieve New XX-XXSent Messages XX-XXUnsent Messages XX-XXCreate New SMS XX-XXYahoo! KeitaiYahoo! Keitai XX-XXBookmarks XX-XXSaved Pages XX-XXEnter URL XX-XXCameraTake Photos XX-XXView Photos XX-XXRecord Movies XX-XXView Movies XX-XXSimple Mode Menu PageToolsCalendar XX-XXAlarms XX-XXBar Code Reader XX-XXCalculator XX-XXNotepad XX-XXVoice Recorder XX-XXInfrared XX-XXSettingsRinger Volume XX-XXAssign Ringtone XX-XXVibration Alert XX-XXWallpaper XX-XXStandby Display Clock XX-XXDate & Time XX-XXData FolderView Photos XX-XXView Movies XX-XXRing Songs&Tones XX-XXAmusement XX-XXS! Familiar Usability XX-XXOther Documents XX-XXMemory Status XX-XX](https://usermanual.wiki/Panasonic-Connect/209019A.User-Manual-1/User-Guide-1191107-Page-48.png)
![Call22-2Making/Answering Voice CallsMaking Voice CallsBefore Calling Confirm signal strength (ZP.1-8) If any of these indicators appear: (red) 7Calls cannot be made (ZP.1-8, P.18-9)1 Enter a phone number Include area code for all numbers.2 Confirm the number, then J To adjust volume: or 3 L to end callCall Time appears.Correcting MisentriesUse to place cursor after digit(s) to delete, then press K.Press and hold K to delete all digits.Note Do not cover antenna area (ZP.1-6) with hand or sticker; may weaken signal strength and cause calls/transmissions to be unavailable.Tip#Operations Available during a Voice Call (ZP.2-9)#Making Calls from Call Log (ZP.2-11)#Save Entered Phone Number (ZP.4-5)#Making Calls from Phone Book (ZP.4-6)#Speed Dial (ZP.4-8)Settings #Call Time & Call Cost (ZP.XX-9)#End Calls by Closing Handset (ZP.XX-10)Outgoing Call FunctionsShowing/Hiding Caller ID1 Enter a phone number 7 A[Menu] 7 My Caller ID2 Show or Hide To always show/hide Caller ID: ZP.2-18Sending Touch-tone SignalsSend touch-tone signals for services such as reserving tickets, checking bank balance, etc. Save number strings to be sent as a touch-tone signal.1 When entering a phone number, press and hold H 7 Enter a number string](https://usermanual.wiki/Panasonic-Connect/209019A.User-Manual-1/User-Guide-1191107-Page-52.png)
![Call22-4Answering Voice CallsWhen a Call Arrives…Handset rings; Notification Light flashes.If Caller ID is sent, number appears in Display; if saved in Phone Book, caller's name appears.1 J to talk To adjust volume: or 2 L to end callCall Time appears.Note When Caller ID is not sent, Withheld appears.Tip#Operations Available during a Voice Call (ZP.2-9)#Rejecting Unknown Callers #Rejecting Specific Numbers (ZP.XX-5)Settings #Press Any Key to Answer Calls #Answer Calls by Opening Handset #End Calls by Closing Handset (ZP.XX-10)Incoming Call Functions ■Operations Available when Incoming Call ArrivesMute Ringtones >[Mute]Place Calls on Hold >LAnswer Phone* >KCall Rejection >S[Reject]Call Forwarding >A[Forward] Activate Call Forwarding (ZP.2-14) beforehand to forward incoming calls to a preset number. If Call Forwarding is not active, call is rejected.* Voice Call only](https://usermanual.wiki/Panasonic-Connect/209019A.User-Manual-1/User-Guide-1191107-Page-54.png)
![Call22-6Making Video CallsBefore Calling Confirm signal strength (ZP.1-8) If any of these indicators appear: (red) 7 Video Calls cannot be made (ZP.1-8, P.18-9)1 Enter a phone number2 Confirm the number, then DWhen answered, outgoing (alternative) and incoming images appear; other party’s voice sounds via Speaker. To adjust volume: 3 L to end callNote Other party’s voice sounds via Earpiece in Manner Mode; activate Speaker (ZP.2-9).Tip#Outgoing Call Functions (ZP.2-2)#Operations Available during a Video Call (ZP.2-9)#Making Calls from Call Log (ZP.2-11)#Save Entered Phone Numbers (ZP.4-5)#Making Calls from Phone Book (ZP.4-6)Settings #Change Alternative Picture (ZP.XX-12)Answering Video CallsWhen a Video Call Arrives…If Caller ID is sent, number appears in Display; if saved in Phone Book, caller's name appears.1 J or D2 Send Video ImageA[YES]Video Image is sent.](https://usermanual.wiki/Panasonic-Connect/209019A.User-Manual-1/User-Guide-1191107-Page-56.png)
![Call22-7 Send Alternative PictureS[NO]Alternative Picture is sent.3 L to end call Note When no image is selected in Step 2, Alternative Picture is sent. Other party’s voice sounds via Earpiece in Manner Mode; activate Speaker (ZP.2-9).Tip#Incoming Call Functions (ZP.2-4)#Operations Available during a Video Call (ZP.2-9)Settings #Change Alternative Picture (ZP.XX-12)International Calls Calling Abroad from Japan Application not required. For details, go to: http://mb.softbank.jp/en/global_services/call/1 Enter a phone number2 A[Menu] 7 International CallCountry/region code list appears.3 Select a country/region4 Voice CallJ Video CallD ■Enter Country/Region Code Directly >J 7 Press and hold P to display "+(IDD Prefix)" 7 Enter a country/region code 7 Enter a number (omit first 0) 7 Voice Call: J / Video Call: D International Code is set to 0046010 by default. The number can be changed if required (ZP.XX-8). Do not omit leading 0 to call to Italy (country code: 39).](https://usermanual.wiki/Panasonic-Connect/209019A.User-Manual-1/User-Guide-1191107-Page-57.png)
![Call22-9Global Roaming Settings ■Add to Country/Area Number List >Enter a number 7 A[Menu] 7 International Call 7 A[Menu] 7 Add 7 Enter a country/region name 7 Enter country/region code ■Select Operator<Default> Automatic >Main Menu 4 Settings 4 Call Settings 4 Optional Services 4 International Setting 4 Select Network 4 Select an item (See below)Item Operation/DescriptionManual3G/GSM : 3G/GSM service area in Japan or abroad.Handset selects an available network automatically using area (network condition). 3G : 3G service area in Japan or abroad.GSM : GSM service area abroad. Unavailable in Japan.Automatic 3G/GSM service area in Japan or abroad. Handset selects 3G service area in Japan, and selects available network automatically using area (network condition) abroad. Automatic is recommended.Tip#Change International Code #Edit Country/Region Code #Select Operator #Set Operator Priority for Automatic Search #Deactivate Roaming Dial Assist (ZP.15-9)Engaged Call FunctionsOperations Available during a Voice CallItem Operation/DescriptionAdjust Volume >/ Adjust volume within two seconds. Adjusted volume is retained even after calls end or handset is turned off.Place Call on Hold >J To resume call:J Call Waiting or Group Calling subscription required to use Hold (ZP.2-16).Speaker ON/OFFToggle Speaker or Earpiece >A[Menu] 7 Speaker ON or Speaker OFFRecord ConversationRecord up to 60 seconds of a call > To end recording: Recorded data is saved to Ring Songs&Tones (ZP.XX-2). Alternatively, A[Menu] 7 Record.Send Touch TonesUse keypad to send touch tones for Voice Mail or othertouch tone activated services >P to O, G or HOpen Phone Book >A[Menu] 7 Phone Book 7 Select a Phone Book entrySend SMS >A[Menu] 7 Create New SMS 7 Create an SMS 7 S[Send]](https://usermanual.wiki/Panasonic-Connect/209019A.User-Manual-1/User-Guide-1191107-Page-59.png)
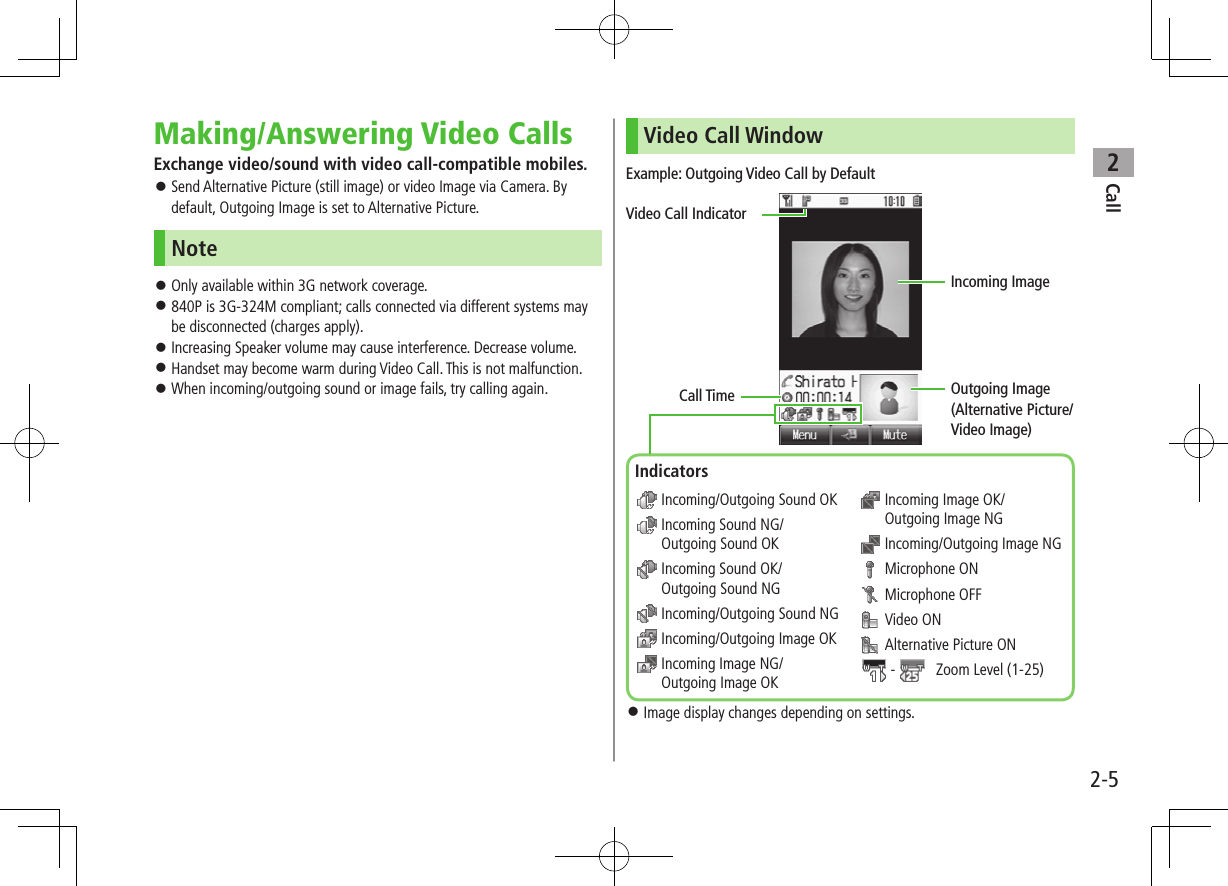
![Call22-10Operations Available during a Video CallItem Operation/DescriptionAdjust Volume > Adjust volume within two seconds. Adjusted volume is retained even after calls end or handset is turned off.Speaker ON/OFFToggle Speaker or Earpiece >A[Menu] 7 Speaker ON or Speaker OFFSwitch Image PriorityToggle between Incoming and Outgoing Images >A[Menu] 7 Image Priority 7 Priority Incoming or Priority OutgoingImage & Sound SettingsChange Outgoing Image and sound settings > 7 Select an item (See below)・Send Voice & Video : Send video image and sound・Alternative Picture : Send Alternative Picture and sound・Mute Voice : Send video image only・Alt. Picture & Mute Voice : Send Alternative Picture onlyMute >S[Mute] appears. To cancel Mute: S[Mute OFF]Zoom >(zoom in) or (zoom out)Open Phone Book >A[Menu] 7 View Phone Book 7 Select a Phone Book entryCall LogIncoming and outgoing call records appear here. Use these records to call back.All Calls: All dialed/received callsIncoming: All received calls (up to 50 records)Outgoing: All dialed calls (up to 50 records)Status Indicators Answered Voice Call Missed Voice Call Rejected Voice Call Outgoing Voice Call Answered Video Call Missed Video Call Rejected Video Call Outgoing Video Call](https://usermanual.wiki/Panasonic-Connect/209019A.User-Manual-1/User-Guide-1191107-Page-60.png)
![Call22-11Viewing Call Logs1 7 Select a Call Log2 To see record details, select oneNote Newest record appears at top of list. Names appear if saved in Phone Book. When a number is called more than once, only last record appears. Call Log records remain even if handset is turned off. When the maximum number of records are saved, oldest is deleted first. Call Log can also be opened from Main Menu 4 Phone Book 4 Call Log.TipSettings #Open Incoming Call Log for Missed Calls by Opening Handset (ZP.XX-10)Making Calls from Call Log1 to select a Call Log2 Highlight a record 7 A[Menu] 7 Call3 Voice CallsVoice Call Video CallsVideo Call International CallsInternational Call 7 Select a country/region 7 Voice Calls: J / Video Calls: D ■Show/Hide Caller ID >In Step 3, Show Number or Hide Number 7 A[Menu] 7 Call 7 Voice Call or Video Call](https://usermanual.wiki/Panasonic-Connect/209019A.User-Manual-1/User-Guide-1191107-Page-61.png)
![Call22-12Call Log FunctionsPress A[Menu] in individual records for following operations.Item Operation/DescriptionView View Call Log detailsCall Make calls from recorded numberCreate Message >S! Mail or SMS 7 Create a message (S! Mail: ZFrom Step 4 on P.XX-4/SMS: ZFrom Step 4 on P.XX-8) Message can be sent to SoftBank handsets only.Add to Phone Book >Create New Entry or Select an entry to add 7 (ZFrom Step 2 on P.4-3)Delete >One or All 7 A[YES] (7 For All , Enter Phone Password)Answer PhoneRecord up to eight voice messages on handset. When Answer Phone is active, appears in Standby. Unavailable when: handset is off or in Emission OFF Mode; appears. Use Voice Mail (ZP.2-12).Activating/Canceling Answer Phone<Default> OFF1 Press and hold K To cancel: Press and hold K again.Redirecting a Call to Answer PhoneWhen a call arrives while Answer Phone is not active, press K to activate Answer Phone. Recording starts. Answer Phone remains active.Note Alternatively, activate/cancel from Main Menu 4 Tools 4 Answer Phone 4 Settings 4 ON/OFF. When full, new messages cannot be recorded even if Answer Phone is activated. Delete old messages. Answer Phone does not respond to Video Calls.](https://usermanual.wiki/Panasonic-Connect/209019A.User-Manual-1/User-Guide-1191107-Page-62.png)
![Call22-13Playing MessagesWhen a new message is recorded, Information window opens (ZP.1-17) and appears in Standby.1 In Information window, Answer Phone2 Select a messagePlayback starts.After playback ends, Information window and disappear.Note Alternatively, press K in Standby, or Main Menu 4 Tools 4 Answer Phone 4 Message List 4 Select a message.Answer Phone FunctionsFrom Main Menu 4 Tools 4 Answer Phone ■Set Answer Time<Default> 18 secondsSet time before which call is redirected to Answer Phone. >Settings 7 Answer Time 7 Enter ring time When Answer Phone and Voice Mail or Call Forwarding are both active, function with shorter ring time takes priority.For example, if Answer Phone ring time is 18 seconds and Optional Service is 20 seconds, Answer Phone responds first. (Priority may change due to signal conditions.) Even if Answer Phone takes priority, call is forwarded to Voice Mail or forwarding number when Answer Phone is full. ■Call Sender >Message List 7 Highlight a message 7 A[Menu] 7 Call ■Delete Messages >Message List 7 Highlight a message 7 A[Menu] 7 Delete or Delete All 7 A[YES] 7 For Delete All, enter Phone Password ■Save to Phone Book >Message List 7 Highlight a message 7 A[Menu] 7 Add to Phone Book 7 Create New Entry or select an entry to add 7 (ZFrom Step 2 on P.4-3)](https://usermanual.wiki/Panasonic-Connect/209019A.User-Manual-1/User-Guide-1191107-Page-63.png)
![Call22-15 ■Check Call Forwarding Status >Main Menu 4 Settings 4 Call Settings 4 Optional Services 4 Voice Mail/Call Forwarding 4 Confirm Status ■Cancel Call Forwarding >Main Menu 4 Settings 4 Call Settings 4 Optional Services 4 Voice Mail/Call Forwarding 4 Cancel All 4 Note Toll free numbers and international call numbers cannot be saved as a destination number. When using Call Forwarding together with Answer Phone, the function with shorter ring time takes priority. (Priority may change due to signal conditions.) When Ringer On is set, press J to answer calls while handset is ringing/vibrating (within ring time). To forward calls immediately while handset is ringing/vibrating, press A[Forward].Voice Mail Calls are forwarded to Voice Mail Center via Call Forwarding function; Call Forwarding and Voice Mail cannot be set simultaneously. Voice Mail is not available for Video Calls.Activating Voice MailMain Menu 4 Settings 4 Call Settings 4 Optional Services 4 Voice Mail/Call Forwarding 4 Voice Mail ON1 Select an item (See below)Item Operation/DescriptionRinger Off Forward all calls without ringing/vibratingRinger On Forward missed calls >Select a ring time ■Check Voice Mail Status >Main Menu 4 Settings 4 Call Settings 4 Optional Services 4 Voice Mail/Call Forwarding 4 Confirm Status ■Cancel Voice Mail >Main Menu 4 Settings 4 Call Settings 4 Optional Services 4 Voice Mail/Call Forwarding 4 Cancel All 4](https://usermanual.wiki/Panasonic-Connect/209019A.User-Manual-1/User-Guide-1191107-Page-65.png)
![Call22-16Note When using Voice Mail together with Answer Phone, the function with shorter ring time takes priority. (Priority may change due to signal conditions.) When Ringer On is set, press J to answer calls while handset is ringing/vibrating (within ring time). To forward calls immediately while handset is ringing/vibrating, press A[Forward].Checking Voice Mail MessagesInformation window (ZP.1-17) and appear in Standby when new messages are recorded.1 In Information window, select Voice Mail Follow voice guidance.Information window and disappear after messages are checked. ■View DetailsView callers' phone numbers and date/time Voice Mail messages were left before playing messages. Activate Missed Call Notification beforehand. (ZP.2-16) > to open Incoming Call Log 7 Select a Voice Mail notification 7 View details 7 A[Menu] 7 Listen to Voice MailNote Alternatively, follow these steps to check Voice Mail: Main Menu 4 Settings 4 Call Settings 4 Optional Services 4 Voice Mail/Call Forwarding 4 Listen to Voice MailMissed Call NotificationWhen Missed Call Notification function is active, Information window appears for calls missed while handset was off, out-of range, engaged etc. Available only when Voice Mail is active.Main Menu 4 Settings 4 Call Settings 4 Optional Services 4 Missed Call Notification1 Handset connects to the Network. Follow voice guidance.When Calls are Received while Missed Call Notification is Active…Information window appears for missed calls when handset is turned on or comes into range.Press to view Incoming Call Log. Voice Mail appears in Information window when Voice Mail messages were recorded (ZP.2-15).](https://usermanual.wiki/Panasonic-Connect/209019A.User-Manual-1/User-Guide-1191107-Page-66.png)
![Call22-17Call WaitingActivating/Canceling Call Waiting Main Menu 4 Settings 4 Call Settings 4 Optional Services 4 Call WaitingCurrent status appears.1 A[Menu] 7 Activate or Deactivate ■Check Call Waiting Status >Main Menu 4 Settings 4 Call Settings 4 Optional Services 4 Call WaitingAnswering Second Call1 When tone sounds, J Press J to alternate between calls. When the party hangs up, active call ends. Press J to re-engage the party on hold. Press L to disconnect active call. ■Reject Second Call >When tone sounds, S[Reject]Note When Voice Mail or Call Forwarding is set to Ringer On while Call Waiting is active, unanswered calls are transferred to Voice Mail Center or the forwarding number. When Voice Mail or Call Forwarding is set to Ringer Off, Call Waiting is disabled.](https://usermanual.wiki/Panasonic-Connect/209019A.User-Manual-1/User-Guide-1191107-Page-67.png)
![Call22-18Group Calling Separate subscription is required for this service.Dialing New Number during a Call1 Enter a phone number during a call 7 JThe line switches. The other line is placed on hold. ■Use Phone Book >During a call, A[Menu] 7 Phone Book 7 Select an entry 7 Select a number 7 JSwap Calls1 During a call, J Press J to toggle lines. When the party hangs up, the call ends. Press J to re-engage the line on hold. Press L to disconnect all lines.Connecting to Multiple Parties1 While switching between two lines, A[Menu] 7 Speak with All Connect up to six lines simultaneously. Press L to disconnect all lines. ■Add a New Party to a Call >Enter a number during Group Calling 7 J 7 After the party is connected, A[Menu] 7 Speak with All ■Check Members >Enter a number during Group Calling 7 A[Menu] 7 Member ■Talk with One Party >Highlight a member 7 A[Menu] 7 Split ■End Calls Individually >Highlight a member 7 S[End]](https://usermanual.wiki/Panasonic-Connect/209019A.User-Manual-1/User-Guide-1191107-Page-68.png)
![Call22-19Call Barring When Call Forwarding or Voice Mail is active, Bar All Outgoing Calls or Bar All Incoming Calls is not available. (Call Forwarding or Voice Mail takes priority.) Call Barring Password specified at initial subscription (ZP.1-23) is required to change Call Barring settings.Activating/Deactivating Call BarringMain Menu 4 Settings 4 Call Settings 4 Optional Services 4 Call Barring1 Outgoing Calls or Incoming Calls 7 Select an item (See below)Item Operation/DescriptionBar All Outgoing Calls Restrict all non-emergency callsBar All International CallsAllow only domestic callsBar International Calls Restrict all international calls except to JapanBar All Incoming Calls Reject all callsBar All If Roamed Reject calls when outside Japan2 A[Menu] 7 ON or OFF3 Enter Call Barring Password ■Check Call Barring Status >In Step 1, Confirm Status 7 Select an item (Zabove) ■Cancel All Call Barring >In Step 1, Cancel All Barring 7 Enter Call Barring Password ■Change Call Barring Password >In Step 1, Call Barring Password 7 Enter current Call Barring Password 7 Enter new Call Barring Password 7 Reenter new Call Barring PasswordNote Emergency numbers (110, 119, 118) are dialable when Call Barring for outgoing calls is active. If call is attempted when Call Barring is active, warning message appears. It may take longer to appear in some areas. Check Call Barring settings if the message does not appear.](https://usermanual.wiki/Panasonic-Connect/209019A.User-Manual-1/User-Guide-1191107-Page-69.png)

![Text Entry33-2Text EntryEnter alphanumerics, hiragana, kanji, katakana, symbols and pictographs. ■HelpHelp describes text entry operations. >In text entry window, A[Menu] 7 Help 7 Select an item❶.Input ModesPress D to toggle input modes.漢: Kanji (Hiragana)カナ: Katakanaabc: Alphanumerics123: Numbers Alternatively, follow the steps below to toggle input modes. A[Menu] 7 Input Options 7 Change Input Mode❷.Double-byte/Single-bytePress and hold D to toggle double-/single-byte.1/1: Double-byte1/2: Single-byte❸.Character/Byte Count Remaining number of enterable characters appears, regardless of input mode. Remaining number of enterable byte appears.❶❷❸Entering TextEntering CharactersExample: Enter 鈴木1 In alphanumerics mode, Dtwice to switch to kanji (hiragana) modeす: E three timeず: * 7 E three times 7 Gき: W twice*When the next character is on the same key, press first to move cursor.2 to enter Forecast List To change word before converting, press K. There are four types of word suggestion list: Forecast, Normal, E-1-Kana and Prediction (ZP.3-5)3 to select 鈴木](https://usermanual.wiki/Panasonic-Connect/209019A.User-Manual-1/User-Guide-1191107-Page-72.png)
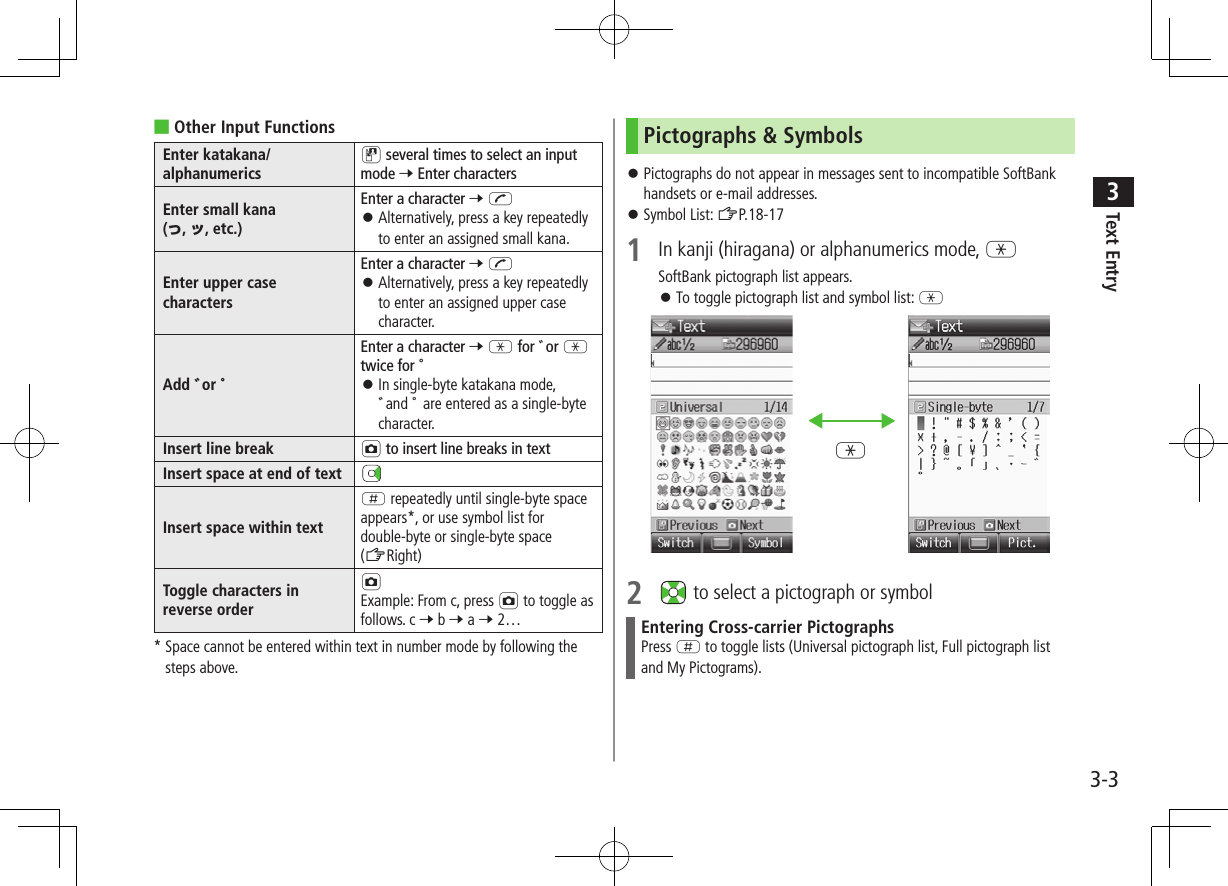
![Text Entry33-4 ■Functions Available in Pictograph/Symbol ListEnter same pictograph or symbol again S[Besides]Toggle pictograph/symbol list GJump to previous page DJump to next page A[Next] / FToggle double-/single-byte [symbol list only] HClose list K Press H to toggle pictograph/symbol list while List Log is open. To open List Log, press G.XXXXXXXX XXXXX XXXXX XXXXXNote Alternatively, follow the steps below to access pictograph or symbol: A[Menu] 7 Pictograph or SymbolAdditional Features ■Mail & Web Extensions >In text entry window (in alphanumerics mode), 0 7 Select an extension ■Emoticons >In text entry window, A[Menu] 7 Emotions 7 Select an emoticon ■Copy from Phone Book/Account Details/Notepad >In text entry window, A[Menu] 7 Insert 7 Select an item (See below)Item Operation/DescriptionPhone Book Data* >Select an entry 7 Select an itemAccount Details* >Select an itemNotepad >Highlight a note 7 A[Set] Alternatively, in kanji (hiragana), katakana and alphanumerics (double-/single-byte) mode, press and hold G 7 Highlight a note 7 A[Set].* Last Name/First Name, Reading, Phone Number, Email Address, Address or Note can be inserted. ■Enter Kuten Code >In text entry window, A[Menu] 7 Input Options 7 Kuten Code 7 Enter a character code (4 digits) (ZP.XX-16)](https://usermanual.wiki/Panasonic-Connect/209019A.User-Manual-1/User-Guide-1191107-Page-74.png)
![Text Entry33-5Conversion Methods (Japanese)Predictive ConversionThe following suggestion lists appear while entering text orafter a word is fixed.While Entering TextForecastLists likely conversions (Predictive Candidates) and matching conversions (Normal Candidates) Predictive Candidates: わ 7 私, わたし, etc.Normal Candidates: わ 7 和, 輪, etc.Normal Suggests matching conversions Example: わ 7 和, 輪, etc.E-1-Kana Lists alphanumerics/katakana assigned to key (ZP.3-6)After a Word is FixedPrediction Suggests words likely to follow Example: 私 is fixed 7 です, の, は, etc. Predictions change with each letter entered. Press A[Forecast]/[Normal] to toggle Forecast List and Normal List. ■Cancel Prediction List >In text entry window, A[Menu] 7 Input Options 7 Context Prediction 7 OFFNote Handset learns entered characters and suggests them for future conversions.Example: Enter 私の鼻1 In kanji (hiragana) mode, Pわ is entered and Forecast List appears.2 to move to Forecast List 7 to select 私私 is entered and Prediction List appears.3 to move to Prediction List 7 to select のの is entered and Prediction List appears.4 Y 7 Tはな is entered and Forecast List appears.5 A[Normal]Normal List appears.](https://usermanual.wiki/Panasonic-Connect/209019A.User-Manual-1/User-Guide-1191107-Page-75.png)
![Text Entry33-66 to move to Normal List 7 to select 鼻If the Word is Not ListedPress K to return to hiragana, and segment hiragana to convert separately.Example: Segment はるか into はる and か, then convert to 春香① Move cursor to る, then convert はる to 春 7 ② Convert か to 香 7 Using Previously Entered WordsEnter the first one or two hiragana to access previously enteredwords in the list.Converting Hiragana to Katakana/AlphanumericsEnter katakana and alphanumerics in kanji (hiragana) mode. Date and time can be entered quickly.Example 1: Enter OKStep 1 2 3 4Key Y(3 times)T(twice) S[E-1-Kana]Display ふ ふに E-1-Kana List OK Press after highlighting OK.Example 2: Enter 10:30 or 10/30 To enter: or /, enter 、 by pressing H.Step 1 2 3Key QPEP S[E-1-Kana]Display あわさわ E-1-Kana List10:30or10/30 Press after highlighting 10:30 or 10/30.](https://usermanual.wiki/Panasonic-Connect/209019A.User-Manual-1/User-Guide-1191107-Page-76.png)
![Text Entry33-7ConversionSetting Learning Future Off<Default> ON1 In text entry window, A[Menu] 7 Input Options2 Learning 7 Enter Phone Password3 OFF or OFF in Secret Mode ■Delete All Learned Words >In Step 2, Reset Learned Words 7 A[YES] 7 Enter Phone PasswordChanging Candidate Font Size<Default> Normal1 In text entry window, A[Menu] 7 Input Options2 Candidate Display Size 7 Select a sizeCanceling Prediction List<Default> ON1 In text entry window, A[Menu] 7 Input Options2 Prediction Setting 7 OFFFixing Entered Characters Automatically<Default> OFFFix character automatically after specified time elapses.1 In text entry window, A[Menu] 7 Input Options2 Character Set Time 7 Select a speed](https://usermanual.wiki/Panasonic-Connect/209019A.User-Manual-1/User-Guide-1191107-Page-77.png)
![Text Entry33-8Editing TextDeleting & Replacing1 Delete Characters within LinesPlace cursor before a character 7 KA character after cursor is deleted. Press and hold K to delete all characters after cursor. Delete Characters from the End of TextPlace cursor at the end of text 7 KA character before cursor is deleted. Press and hold K to delete all characters before cursor.2 Enter another characterCopy/Cut & PasteCopy or cut text and paste to another place.1 In text entry window, A[Menu] 7 Copy or Cut2 Select Text to Copy/CutPlace cursor before (or after) text to select 7 7 Place cursor after (or before) text 7 Select AllS[All] 73 Place cursor at target location 7 A[Menu] 7Paste](https://usermanual.wiki/Panasonic-Connect/209019A.User-Manual-1/User-Guide-1191107-Page-78.png)
![Text Entry33-9User's DictionarySave frequently used words/phrases (up to 100 entries). Saved words/phrases appear among word suggestions.Saving User's Dictionary Entries1 In text entry window, A[Menu] 7 Input Options 7 User's Dictionary2 A[Create]** When saved items exist: A[Menu] 7 Create3 Enter a word 7 Enter reading ■Edit User's Dictionary Entries >Highlight a word 7 A[Menu] 7 Edit 7 Edit word 7 Edit readingDeleting User's Dictionary Entries1 In text entry window, A[Menu] 7 Input Options 7 User's Dictionary2 A[Menu] 7 Delete 7 Select an item (See below)Item Operation/DescriptionOne >Selected Words >Select an entry* 7 A[OK] 7 * Repeat as required to select multiple entries. (When selected, appears.) To cancel selection, press again.All >A[YES] 7 Enter Phone Password](https://usermanual.wiki/Panasonic-Connect/209019A.User-Manual-1/User-Guide-1191107-Page-79.png)

![Phone Book44-3Saving to Phone BookPhone Book Entry ItemsSave up to 1000 entries in Phone Book. Save phone numbers or mail addresses etc. in USIM Card Phone Book. Savable number of entries varies by USIM Card.Phone Book Entry Items Handset USIM CardLast Name/First Name ○ ○Reading ○ ○Phone Number 3 2Email Address 3 1Birthday ○ ×Address ○ ×Note ○ ×Voice Call Ringtone ○ ×Video Call Ringtone ○ ×Message Ringtone ○ ×Notification Light ○ ×Picture ○ ×Group ○ ○Secret Setting ○ ×○: Can be saved ×: Cannot be saved Phone Book entries in USIM Card can also be used in another SoftBank handset.Creating New EntrySave new entries to handset or USIM Card Phone Book. When saving to USIM Card Phone Book, set Save Settings to USIM or Ask Each Time beforehand (ZP. X X - 1 1 ) .1 7 A[Menu] 7 New Entry When no Phone Book entries exist: 7 A[Create] When Save Settings is set to Ask Each Time : Select Phone or USIM2 Select an item (See below)Item Operation/DescriptionLast Name1Save last name. For USIM Card Phone Book, enter both first name and last name in Name >Enter Last NameFirst Name1 Save first name >Enter First NameReading Automatically entered when Last Name and First Name are entered >To edit Reading, [Edit] 7 Edit readingHandset Phone Book](https://usermanual.wiki/Panasonic-Connect/209019A.User-Manual-1/User-Guide-1191107-Page-83.png)
![Phone Book44-4Item Operation/DescriptionPhone Number 1-31 >Enter phone number (7 For handset, select an icon)Email Address 1-31 >Enter mail address (7 For handset, select an icon)Birthday >Enter birthdayAddress Enter postal code, country/region, state/province, city, street address or additional information >Select an item 7 Enter text 7 A[Decide] to exit Address fieldNote >Enter noteVoice Call RingtoneSet Incoming call/message ringtone >Follow General Setting2orSelect a folder in Data Folder 7 Highlight a file 7 A[Set]Video Call RingtoneMessage RingtoneNotification LightSet Incoming call/message light color >Follow General Setting3 or select a color Picture Save a still image. Captured still images can be set >Pictures 7 Highlight a file 7 A[Set]orTake Picture 7 to shoot 7 (To delete the image: No Pictures) Saved still image appears for incoming calls. (Saved still image may not appear while using other functions.)Group >Select a group Sort Phone Book entries by groups.Item Operation/DescriptionSecret Setting Set to show or hide saved entries >Show or Hide When Secret Setting is set to Hide, active Secret Mode to open Secret Mode entries. (ZP.XX-6)1 To save an entry, enter at least one of the fields2 Follows General Ringtone settings (ZP.XX-2)3 Follows General Notification Light settings (ZP.XX-11)3 A[Save]](https://usermanual.wiki/Panasonic-Connect/209019A.User-Manual-1/User-Guide-1191107-Page-84.png)
![Phone Book44-5Other Ways to Add New EntriesSave currently displayed phone numbers or mail addresses to Phone Book.1 Save Entered Phone NumberEnter a phone number 7 A[Menu] 7 Add to Phone Book Save from Call Log 7 Select a Call Log 7 Highlight a record 7 A[Menu] 7 Add to Phone Book Save from Sent/Received MessagesA [ ] 7 Sent Messages or Incoming Mail (7 Select a folder) 7 Highlight a message 7 A[Menu] 7 Add Destination to Phone Book or Add Sender to Phone Book2 New EntryCreate New Entry 7 Enter details (From Step 2 on P.4-3) Add to Existing EntrySelect an existing entry 7 Enter details (From Step 2 on P.4-3)3 A[Save]Setting GroupsSort entries by Group. Custom set ringtones/notifications per group. Phone Book or USIM Card Phone Book Groups appear according to Change View setting. Assign Phone Book entries to Groups (ZP.4-4); otherwise, entries will be automatically assigned to Ungrouped. Main Menu 4 Phone Book 4 Group1 Highlight a group 7 A[Menu] 7 Rename 7 Enter group name When Change View is set to USIM : Highlight a group 7 A[Rename]2 A[Menu] 7 Sound & Notification Light3 Set RingtoneVoice Call Ringtone, Video Call Ringtone or Message Ringtone 7 Follow General Setting or select a folder in Data Folder 7 Highlight a file 7 A[Set] Selecting Follow General Setting applies Ringtone settings (ZP.XX-2). Set Notification LightNotification Light 7 Follow General Setting or select a color](https://usermanual.wiki/Panasonic-Connect/209019A.User-Manual-1/User-Guide-1191107-Page-85.png)
![Phone Book44-6 Selecting Follow General Setting applies Notification Light settings (ZP.XX-11).4 A[Set] ■Switch Between Handset & USIM CardWhen Change View is set to Phone & USIM (ZP.XX-11), follow these steps to switch view. >Main Menu 4 Phone Book 4 Group 4 A[Menu] 4 Change to Group(Phone) or Change to Group(USIM) ■Reset Group Setting >Highlight a group 7 A[Menu] 7 Reset Defaults 7 Note Ringtones/Notification Light settings are unavailable for USIM Card Phone Book Groups. Ringtone/Notification Light settings for each Phone Book entry take priority.Searching/Using Phone BookChanging Phone Book Search Method<Default> A-KA-SA-TA…Search for an entry using one of these search methods: A-KA-SA-TA-NA, Reading or Group.Main Menu 4 Phone Book 4 Settings 4 Search Method1 Select a search method Note Alternatively, for A-KA-SA-TA... and Reading, 7 A[Menu] 7 Search Method. Making Calls from Phone Book To change search method: ZAbove1 2 Search Phone Book (See below)Search Method Operation/DescriptionA-KA-SA-TA... >Select a page of the required reading Alternatively, select a page by entering reading.Reading >Enter a required readingGroup >Select a group3 Select an entry](https://usermanual.wiki/Panasonic-Connect/209019A.User-Manual-1/User-Guide-1191107-Page-86.png)
![Phone Book44-74 Voice CallsHighlight a phone number 7 J Video CallsHighlight a phone number 7 D International CallsHighlight a phone number 7 A[Menu] 7 Call 7 International Call 7 Select a country/region 7 Voice Call: J / Video Call: D ■Show/Hide Caller ID >In Step 4, highlight a number 7 A[Menu] 7 Call 7 Show Number or Hide Number 7 Voice Call: J / Video Call: D ■Open Phone Book Entries in Standby (Quick Phone Book Search) >In Standby, press and hold P - O to open entries assigned to that key.Example: "NA" page: Press and hold T When pressing key for page without any entry, the next page with entries appears. Change One Touch Key setting to Speed Dial. (ZP.XX-5)Sending Messages from Phone Book1 7 Select an entry2 Use Mail AddressSelect a mail address Use Phone Number*Highlight a phone number 7 A[Menu] 7 Create Message 7 S! Mail or SMS* SoftBank handset numbers only3 Create a message (S! Mail: ZFrom Step 4 on P.XX-4/SMS: ZFrom Step 4 on P.XX-8)](https://usermanual.wiki/Panasonic-Connect/209019A.User-Manual-1/User-Guide-1191107-Page-87.png)
![Phone Book44-8Speed DialSet phone numbers to Speed Dial for easy dialing. Set One Touch Key setting to Speed Dial beforehand (ZP.XX-5). Main Menu 4 Phone Book 4 Speed Dial1 Select a key number [1] - [9] To enter phone number directly: Highlight a key number [1] - [9] 7 A[Edit] 7 Enter a number2 Select a Phone Book entry 7 Select a phone number Note When Secret setting is set to Show, Secret Mode entry numbers can be set to Speed Dial. While Secret setting is set to Hide, the numbers assigned to Secret Mode entries appear as Empty, and may be overwritten.Using Phone Book ■Using Phone Book Entries Some functions may not be available depending on entries/entry items. > 7 (Highlight an entry 7 ) A[Menu] 7 Select an item (See below)or > 7 Select an entry 7 (Highlight an item 7 ) A[Menu] 7 Select an item (See below)Item Operation/DescriptionView View detailsCall Make calls >Select an item 7 Operate selected item (ZFrom Step 3 on P.2-11)Create MessageCreate New S! Mail/SMS >S! Mail or SMS 7 Create a message (S! Mail: ZFrom Step 4 on P.XX-4/SMS: ZFrom Step 4 on P.XX-8)Edit >Select an item 7 Edit entry 7 A[Save] Deleting Birthday/Address/Picture (ZP.4-9)New Entry (ZP.4-3)Send Send Phone Book entries via S! Mail/Infrared >Attach to S! Mail or Infrared 7 Operate selected item (S! Mail: ZFrom Step 2 on P.XX-4/Infrared: ZP.XX-3)Change View Select Phone Book to open >Select an itemSearch Method (ZP.4-6)](https://usermanual.wiki/Panasonic-Connect/209019A.User-Manual-1/User-Guide-1191107-Page-88.png)
![Phone Book44-9Item Operation/DescriptionSpeed Dial Set phone numbers to Speed Dial (ZP.4-8) for easy dialing >(Select a number 7) Select a key number ([1] - [9])Copy to USIM/Copy to Phone (ZP.4-10)Delete >A[YES]Managing Phone BookEditing Phone Book Entries1 7 Highlight a Phone Book entry 7 A[Menu] 7 Edit2 Edit entry 7 A[Save] ■Delete Birthday >Highlight Birthday field 7 A[Menu] 7 Clear Birthday ■Delete All Items in Address Field >Highlight Address field 7 A[Menu] 7 Clear Address ■Delete Picture >Select Picture field 7 No PicturesDeleting Phone Book EntriesDeleting a Phone Book Entry1 7 Highlight a Phone Book entry 7 A[Menu]2 Delete 7](https://usermanual.wiki/Panasonic-Connect/209019A.User-Manual-1/User-Guide-1191107-Page-89.png)
![Phone Book44-10Deleting All Phone Book Entries Main Menu 4 Phone Book 4 Memory Manager 4 Delete All(Phone) or Delete All(USIM)1 A[YES] 7 Enter Phone PasswordCopying Phone Book Entries Entry items unsupported by USIM Card are not copied.Copying One by One1 7 Highlight a phone Book entry 7 A[Menu] 7 Copy to Phone or Copy to USIM** Warning message appears when copying entry items unsupported by USIM Card.Copying All Entries Main Menu 4 Phone Book 4 Memory Manager 4 Copy All from USIM or Copy All to USIM1 Phone Book Lock<Default> OFFWhile Phone Book Lock is active, saving new entries, viewing, changing settings, etc. are restricted. When Phone Book Lock is active, appears. When Phone Book Lock and Messaging Lock are both active, appears. Main Menu 4 Settings 4 Security 4 Phone Book Lock1 ON or OFF For ON, press 2 Enter Phone Password Note Call Log, My Details, S! Address Book and Phone Book backup to Memory Card are available while Phone Book Lock is active.Phone Book Memory Status Main Menu 4 Phone Book 4 Memory StatusView handset/USIM Card Phone Book memory status.](https://usermanual.wiki/Panasonic-Connect/209019A.User-Manual-1/User-Guide-1191107-Page-90.png)
![Phone Book44-12Manual SynchronizationMain Menu 4 Phone Book 4 S! Addressbook Back-up 4 Start Sync1 7 Enter Phone Password2 Select an item (See below)Item Operation/DescriptionSynchronize Synchronize handset Phone Book with S! AddressbookSync from PhoneSend edited data to S! AddressbookSync from ServerReceive edited data from S! AddressbookBackup to ServerBack up handset Phone Book to S! AddressbookRestore from ServerRestore S! Addressbook to handset Phone Book3 Auto Synchronization Main Menu 4 Phone Book 4 S! Addressbook Back-up 4 Auto Sync Settings1 Enter Phone Password 7 ON/OFF 7 ON2 Start Time 7 Set start time3 Repetition 7 Select a repetition type (See below)Item Operation/DescriptionWeekly Synchronize weekly at specified time of the day >Select a dayMonthly Synchronize monthly at specified time of the date >Enter a dateAfter Modification of Phone BookSynchronize ten minutes after entries are edited4 Sync Mode 7 Select a Sync type 7 7 A[Save]View Sync LogView synchronization/back-up/restoration logs.Main Menu 4 Phone Book 4 S! Addressbook Back-up 4 Sync Log1 Select a log](https://usermanual.wiki/Panasonic-Connect/209019A.User-Manual-1/User-Guide-1191107-Page-92.png)
![Phone Book44-13Account DetailsSave phone number, mail address, street address, etc. in Account Details.Editing Account Details1 7 P2 A[Menu] 7 Edit 7 Select an item 7 Edit Phone Number 1 cannot be edited or deleted.3 Enter required items 7 A[Save] ■Delete Items Except Phone Number 1 >After Step 1, A[Menu] 7 Reset 7 Account Details Functions ■Send Account Details via S! Mail/Infrared >In Standby, 7 P 7 A[Menu] 7 Send 7 Attach to S! Mail or Infrared 7 Operate selected item (S! Mail: ZFrom Step 2 on P.XX-4/Infrared: ZP.XX-3) Images cannot be sent.](https://usermanual.wiki/Panasonic-Connect/209019A.User-Manual-1/User-Guide-1191107-Page-93.png)
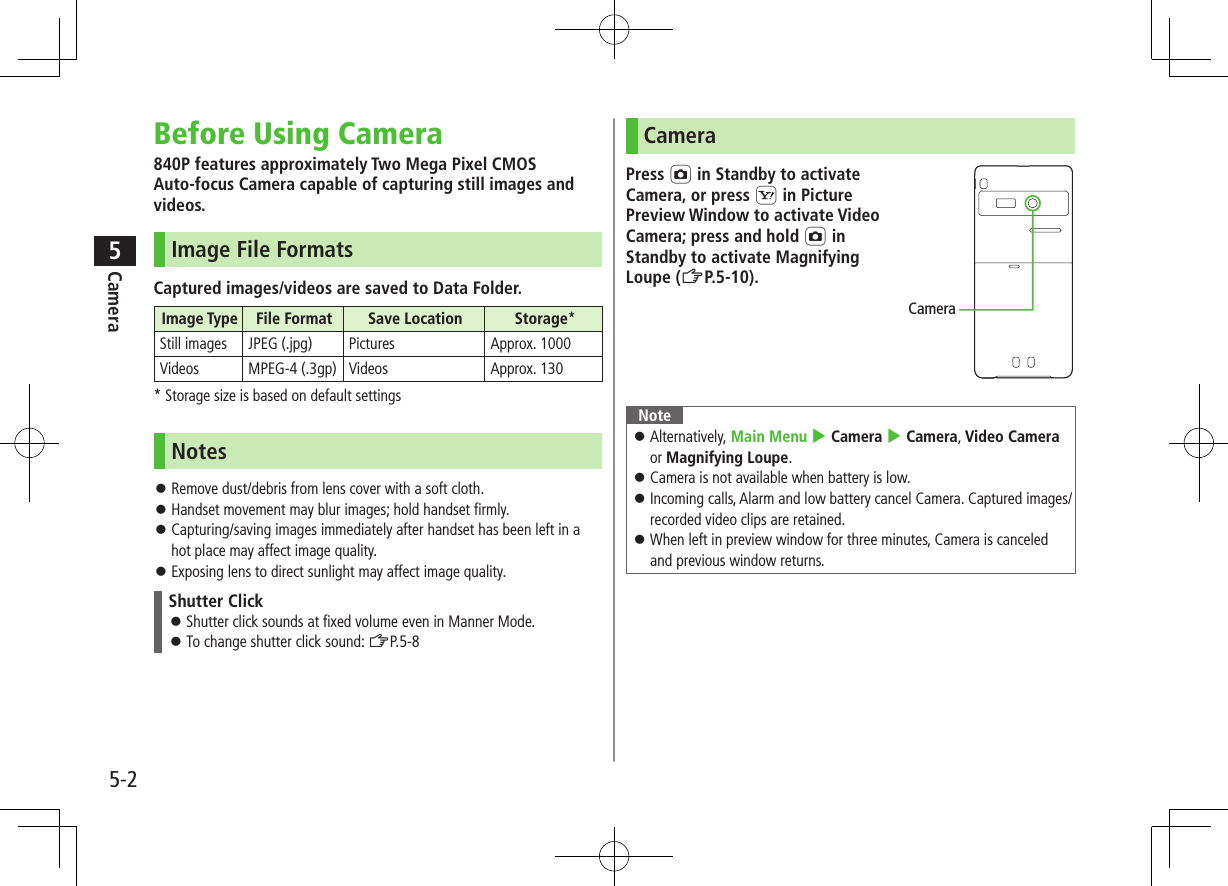

![5-5Camera5Pictures/Videos Confirm battery strength (ZP.1-9) and memory (ZP.6-8) before recording. When battery is low, video cannot be recorded.Capturing Still Images1 Press F to activate Camera2 Frame subject3 [Shoot] to capture the imageCamera automatically focuses on subject before capturing image.Shutter click sounds at fixed volume.4 [Save] To return to preview window without saving the image: K5 L to exitReturn to Standby.Note Data Folder opens when Phone memory becomes full. Delete files; image is automatically saved. If save location is set to Memory Card (ZP.6-9) and memory becomes full, image is saved to Phone memory automatically.Picture Preview WindowContinuous ShootingCapture a succession of 15 still images automatically with a single press. Picture size is fixed to QVGA (240x320). When Multi Shot is ON, Night Mode is set to OFF automatically.1 In Picture Preview Window, R2 Frame subject 7 [Shoot]Image thumbnails appear. To stop shooting halfway: K To return to preview window without saving the image: S[Delete] 7 Go to Step 13 To view captured images, to highlight an imageFull-size image appears. to toggle full-size images.4 When Viewing a Full-size ImageA[Save All] or [Save] Press [Save] to save the full-size image. When Viewing Thumbnailed ImagesA[Menu] 7 Save All Pictures or Save This One Only](https://usermanual.wiki/Panasonic-Connect/209019A.User-Manual-1/User-Guide-1191107-Page-99.png)
![5-6Camera5Recording Videos1 F 7 S to activate Video Camera2 Frame subject3 [Record] to start recordingTone sounds.4 [Stop] to end recordingTone sounds. Recording stops automatically at maximum recording time. To return to preview window without saving the image: S[Back] To review clip: Playback5 To save the video clip, select Save to Data Folder6 L to exitReturn to Standby.Note If Phone memory becomes full, Data Folder opens. Delete files; image is automatically saved. If Save to is set to Memory Card (ZP.5-9), file is saved to Memory Card automatically. To delete the saved file, select Delete.Video Preview WindowFunctions Available while ShootingFrom Camera: FVideo Camera: F 7 S ■Auto Focus LockTo focus on an off-centered subject, lock focus on the subject and recompose your picture. Check if Focus Setting is set to Auto Focus (ZP.5-3). >Adjust Focus Guide to subject 7 7 When focus is on subject, recompose your picture 7 [Shoot] 7 [Save] When in focus, handset sounds and Focus Guide turns green. To try again: K ■Self-Timer >T 7 Frame subject 7 [Shoot]/[Record] ( 7 For Video Camera, [Stop]) 7 [Save] or Save to Data Folder Self-Timer tone sounds. After set period of time, shutter is released and capturing starts. Press T to toggle 5 seconds, 10 seconds and OFF. When Self-Timer is active, press S[Cancel] to return to preview window without canceling Self-Timer. Incoming calls or Alarm cancel image capture. Self-Timer is canceled and previous menu returns.](https://usermanual.wiki/Panasonic-Connect/209019A.User-Manual-1/User-Guide-1191107-Page-100.png)

![6-5News/Entertainment6Opening S! Quick News List/S! Loop ListMain Menu 4 Entertainment 4 S! Quick News 4 S! Quick News List or S! Loop List1 Select an itemContent list appears.2 Select informationDetailed information appears.3 To connect to the Network, select a title ■Update Manually >In Step 1, A[Menu] 7 Update 7 One or All 7 ■View Summary >In Step 1, highlight information 7 A[Menu] 7 Summary Display ■Delete Registered Items >In Step 1, (highlight information 7 ) A[Menu] 7 Delete 7 One or All ( 7 For All, enter Phone Password)TipSettings #Automatically Update S! Quick News List #Delete S! Quick News Information (ZP.17-12)E-Books (Japanese)Use BookSurfing® to acquire/view e-books, comics, photo books, etc.), or e-Book Viewer to view XMDF files on handset. BookSurfing® and e-Book Viewer are S! Appli. Download Content Keys (ZP.XX-6) to read CCF/XMDF files. Some copy protected files have extensions different from the ones below.Application File FormatBookSurfing®CCF (.ccf)e-Book Viewer XMDF (.zbf, .zbk, .zbs) Some PC content may not be viewable via e-Book Viewer.](https://usermanual.wiki/Panasonic-Connect/209019A.User-Manual-1/User-Guide-1191107-Page-107.png)
![6-6News/Entertainment6Main Menu 4 Entertainment1 BookSurfing or e-Book Viewer See application Help menu for usage information. Note When an S! Appli is paused, Confirmation appears; A[YES] to end it and launch BookSurfing® or e-Book Viewer. Launch BookSurfing®/e-Book Viewer via S! Appli, or select a file from Books in Data Folder. Compatible file titles appear in Books; appears next to incompatible files. For Option menu details: ZP.XX-8 When purchasing a new handset, move CCF/XMDF files via Memory Card. However, if CCF/XMDF files are copy protected, Content Keys backup may be needed (ZP.XX-17). Some contents require another Content Key after being moved/copied to a new handset or can not be moved/copied at all.](https://usermanual.wiki/Panasonic-Connect/209019A.User-Manual-1/User-Guide-1191107-Page-108.png)
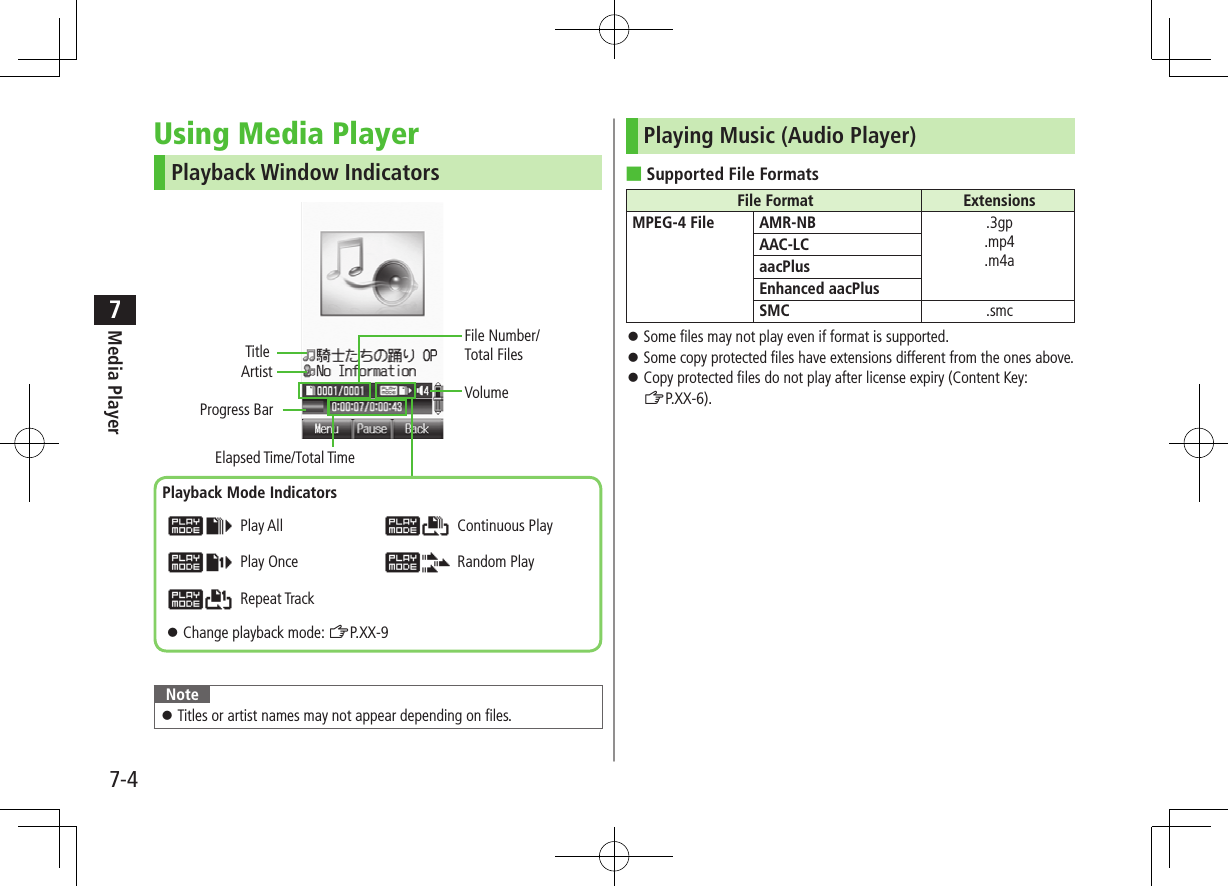
![7-5Media Player7Main Menu 4 Entertainment 4 Media Player 4 Audio1 Select an item (See below)Item Operation/DescriptionAll Select files from handset & Memory CardMusic Select files from Music folderRing Song Select files from Ring Song folderPlaylist Select group of files saved to a Playlist >Select a Playlist Press to select files from Memory Card.2 Select a fileSelected file plays. Playback Window Operations: ZP.7-93 To end playback, L or S[Back] 7 S[NO] To return to Playback window: K ■Change Playback Position >During playback, A[Menu] 7 Set Playback Position 7 Enter time to start playbackBackground MusicListen to music while using other handset functions.1 While music plays, K/S[Back] 7 To cancel Background Music: In Standby, L 7 Note S! Appli, etc. are unavailable. While Background Music plays, volume level and playback mode settings cannot be changed. Alternatively, Main Menu 4 Entertainment 4 Media Player 4 Audio 4 Display playback Screen 4 K/S[Back] 4 S[NO].Playing SMC FilesPlay SMC (Softbank Music Content) files; CD jackets and lyrics appear during playback.The first jacket appears when playback starts. When appears, press P to toggle jacket window and lyric window. To view next or previous jacket/lyric window, press H or G.](https://usermanual.wiki/Panasonic-Connect/209019A.User-Manual-1/User-Guide-1191107-Page-113.png)
![7-8Media Player7 ■Options >During playback, A[Menu] 7 Select an item (See below)Item Operation/DescriptionPlayback/Pause Play or pause filesPlayback Mode Select playback mode (ZP.XX-9)Display Jacket/Display Lyric1Show lyric or jacketNext Jacket/Next Lyric1Show next jacket or lyricPrevious Jacket/Previous Lyric1Show previous jacket or lyricFull Screen (Video)/Normal Screen2Select display size for video playbackUpside down(Full Screen)2Rotate Full Screen Playback 180°Set Playback PositionStart playback from specified pointConnect to URL3Open site link; music plays as BGMProperty Show file detailsHelp Show Playback window key assignments1 Supports during SMC file playback only2 Supports video playback only3 May not be available for some filesUsing PlaylistUse Playlists to organize Data Folder music/video files. Select Ring Songs&Tones, Music or Videos folder files to create Playlist links to each file in its original folder.Note A single Playlist cannot contain both music and video files, or files from both handset and Memory Card. Some files can not be added to Playlist.](https://usermanual.wiki/Panasonic-Connect/209019A.User-Manual-1/User-Guide-1191107-Page-116.png)
![7-9Media Player7Creating New Playlists Create up to 30 Playlists on handset and Memory Card each. Add up to 99 files to a single Playlist. Main Menu 4 Entertainment 4 Media Player 4 Audio or Video 4 Playlist1 A[Menu] 7 Create Playlist2 Enter a Playlist nameA new Playlist is added to top of list.3 Select a Playlist 7 A[Menu] 7 Add4 Add Files to Music PlaylistsMusic or Ring Song 7 Select a file Add Files to Video PlaylistsSelect a file To play back Playlist: ZP.XX-7, P.XX-8Playlists WindowPlaylist Functions ■Functions Available in Playlist WindowMain Menu 4 Entertainment 4 Media Player 4 Audio or Video 4 Playlist 4 (highlight a Playlist 4) A[Menu] 4 Select an item (See below)Item Operation/DescriptionSelect Select a PlaylistPlayback Mode Change playback mode (ZP.XX-9)Create Playlist Create new Playlists (ZLeft)Edit Playlist NameChange Playlist name >Edit nameDelete Delete Playlists (ZP.XX-12) ■Change Playlist OrderMain Menu 4 Entertainment 4 Media Player 4 Audio or Video 4 Playlist 4 Select a Playlist 4 Highlight a file 4 A[Menu] 4 Change Order 4 Select new playback order The Playlist moves to above the selected order](https://usermanual.wiki/Panasonic-Connect/209019A.User-Manual-1/User-Guide-1191107-Page-117.png)
![7-10Media Player7Deleting Playlists/FilesFrom Main Menu 4 Entertainment 4 Media Player 4 Audio or Video4 Playlist ■Delete Playlists >Follow the steps belowItem Operation/DescriptionOne >Highlight a Playlist 7 A[Menu] 7 Delete 7 One 7 A[YES]Selected items >A[Menu] 7 Delete 7 Selected Files 7 (Select Playlists)* 7 A[OK] 7 A[YES]* To cancel selection: All >A[Menu] 7 Delete 7 All 7 A[YES] 7 Enter Phone Password ■Delete Files in a Playlist >Select a Playlist 7 Follow the steps belowItem Operation/DescriptionOne >Highlight a file 7 A[Menu] 7 Delete 7 One 7 A[YES]Selected items >A[Menu] 7 Delete 7 Selected Files 7 (Select files)* 7 A[OK] 7 A[YES]* To cancel selection: All >A[Menu] 7 Delete 7 All 7 A[YES] 7 Enter Phone Password](https://usermanual.wiki/Panasonic-Connect/209019A.User-Manual-1/User-Guide-1191107-Page-118.png)

![8-5Managing Files8Changing Memory View In List view, to switch views, Phone, Memory Card, DigitalCamera1 or Video Camera2. In Thumbnail view, select (Memory Card), (Digital Camera)1 or (Video Camera)2. To return to handset memory, select (Phone).1 In Pictures folder only2 In Videos folder only ■Change Folder ViewSelect Thumbnail or List for Pictures or Videos view. >In Step 1, Pictures or Videos 7 A[Menu] 7 More 7 Change View 7 Thumbnail or ListNote Some still images may not appear, or may be reduced in size depending on image or file size. 840P supports MPEG-4 and H.263 formats, and Sub-QCIF, QCIF, QVGA and CIF size. Video files that were recorded by SoftBank handsets and can be sent via S! Mail are also supported. Some files may not play even if format and size are supported.Tip#Playback Window Operations (ZP.XX-9)#Viewing e-Books & Documents (ZP.XX-12)#Using S! Appli (ZP.XX-3)Changing Playback MethodMain Menu 4 Data Folder 4 Ring Songs&Tones, Music or Videos1 Highlight a file 7 A[Menu] 7 Playback Method2 Select a methodContinuous Play Repeat all files in selected folderRandom Play Play all files in selected folder randomlyRepeat Track Repeat selected file Confirm playback method settings in Playback window (Playback Mode Indicators ZP.XX-6). Note When selecting Continuous Play or Random Play, playback starts from the file selected in Step 1.](https://usermanual.wiki/Panasonic-Connect/209019A.User-Manual-1/User-Guide-1191107-Page-123.png)
![8-6Managing Files8Content KeyIf Content Key is expired, a message appears when the file is opened. To obtain a new Key, press A[YES]. Handset connects to Content Key site. Copy Protected Files: ZP.9-4 or (Silver) appear for files requiring Content Keys. files are inaccessible. appears on images in Thumbnail view of expired files.Note Alternatively, obtain Content Key as follows: Highlight a file 7 A[Menu] 7 More 7 Download Content Key 7 . Depending on contents, some Content Keys may not be obtained from websites even when warning for expired contents appears. When 1000 Content Keys have been saved, a message appears. Delete old Keys; otherwise downloads may fail (transmission fees apply).Tip#Backing up Content Keys to Memory Card (ZP.XX-17)File Display/Playback FunctionsFrom Main Menu 4 Data Folder ■View Still Images at Original Size >Pictures 7 Select a file 7 [Zoom] 7 to change the position Press K to return. Still images larger than VGA (480x640) appear at VGA (480x640). ■Rotate Still Images >Pictures 7 Select a file 7 S[Rotate R] 7 A[Rotate L] or S[Rotate R] Press K to return. ■View File Properties >Select a file 7 Highlight a file 7 A[Menu] 7 More 7 Property Available information varies by file.](https://usermanual.wiki/Panasonic-Connect/209019A.User-Manual-1/User-Guide-1191107-Page-124.png)
![8-7Managing Files8OptionsHighlight a file in Data Folder, and press A[Menu] for the following operations. ■PicturesItem Operation/DescriptionView Open fileSend1Send files via S! Mail (ZP.8-10) or Infrared (ZP.9-3)Send S! Mail2Send files via S! MailSet as1Set as wallpaper (ZP.8-9), Phone Book image, Main Menu Icons (ZP.8-10), etc.Edit1Resize files, trim files, rotate files, add frame, clear shadow, etc. (ZP.8-10)Rename Change file names (ZP.8-12)New Folder1Create new folders (ZP.8-11)Move Move files to other folders (ZP.8-13)Copy Copy files (ZP.8-13)Delete Delete files (ZP.8-12)More Change folder view1 (ZP.8-5), obtain Content Key1 (ZP.8-6), open Memory Card folder/Phone folder/Digital Camera folder1, view file properties1 Ring Songs&Tones and Music only2 Videos only ■Ring Songs&Tones, Music VideosItem Operation/DescriptionPlay Play filesSend Send files via S! Mail (ZP.8-10) or Infrared (ZP.9-3)Set as1Set ringtone (Voice Call, Video Call and messages) (ZP.8-9) or save to Phone Book (ZP.8-10)Playback MethodSelect playback method (ZP.8-5)Rename Change file names (ZP.8-12)New Folder Create new folders (ZP.8-11)Move Move files to other folders (ZP.8-13)Copy Copy files (ZP.8-13)Delete Delete files (ZP.8-12)More Change folder view2 (ZP.8-5), obtain Content Key (ZP.8-6), open Memory Card folder/Phone folder/ Video Camera folder2, view file properties (ZP.8-6)1 Ring Songs&Tones and Music only2 Videos only](https://usermanual.wiki/Panasonic-Connect/209019A.User-Manual-1/User-Guide-1191107-Page-125.png)
![8-9Managing Files8 ■Other DocumentsItem Operation/DescriptionRename Change file names (ZP.8-12)New Folder Create new folders (ZP.8-11)Move Move files to other folders (ZP.8-13)Copy Copy files (ZP.8-13)Delete Delete files (ZP.8-12)More Open Memory Card folder/Phone folder, view file properties (ZP.8-6)Using/Editing FilesUsing FilesWallpaperFrom Main Menu 4 Data Folder ■Select from Pictures Folder >Pictures 7 Highlight a file 7 A[Menu] 7 Set as 7 Wallpaper ■Select from Flash(R) >Flash(R) 7 Highlight a file 7 A[Menu] 7 Set as WallpaperRingtonesFrom Main Menu 4 Data Folder ■Select from Ring Songs&Tones/Music Folder >Ring Songs&Tones or Music 7 Highlight a file 7 A[Menu] 7 Set as 7 Select an item ( 7 When selecting an SMC file, highlight a Play Point 7 A[Set]) ■Select from Flash(R) >Flash(R) 7 Flash(R) Ringtones 7 Highlight a file 7 A[Menu] 7 Set as 7 Select an item Flash® Ringtones cannot be set as Message Ringtone.](https://usermanual.wiki/Panasonic-Connect/209019A.User-Manual-1/User-Guide-1191107-Page-127.png)
![8-10Managing Files8Saving to Phone BookFrom Main Menu 4 Data Folder ■Save a Still Image to a Phone Book Entry Unavailable when Change View is USIM. >Pictures 7 Highlight a file 7 A[Menu] 7 Set as 7 Phone Book Picture 7 Select a Phone Book entry ( 7 When warning message appears, 7 Enter file name) 7 A[Save] ■Save Sound/Music Files to a Phone Book Entry >Ring Songs&Tones or Music 7 Highlight a file 7 A[Menu] 7 Set as 7 Add to Phone Book ( 7 For SMC files, highlight a Playback Position 7 A[Set]) 7 Select a Phone Book entry 7 Select a ringtone ( Voice Call Ringtone/ Video Call Ringtone/ Message Ringtone) 7 A[Save] ■Save Flash® Sound Files to a Phone Book Entry >Flash(R) 7 Flash(R) Ringtones 7 Highlight a file 7 A[Menu] 7 Set as 7 Add to Phone Book 7 Select a Phone Book entry 7 Select a ringtone ( Voice Call Ringtone/ Video Call Ringtone) 7 A[Save]Main Menu IconsFrom Main Menu 4 Data Folder 4 Pictures 4 Highlight a file 4 A[Menu] 4 Set as 4 Main Menu Icons ■Change Background >Change Full Image 7 S[Back] 7 S[Back]** Handset returns to Data Folder top menu. ■Change Menu Icons >Change Image 7 Select an icon 7 S[Back] 7 S[Back]** Handset returns to Data Folder top menu.Sending a File via S! MailMain Menu 4 Data Folder 4 Select a folder 4 Highlight a file 4 A[Menu] 4 Send 4 Attach to S! Mail 4 Enter information 4 S[Send]Note When set as Wallpaper or Ringtones, license expiry or inserting a different USIM Card may reset default. Limited use files cannot be set as Wallpaper or Ringtones. Sounds recorded by Voice Recorder cannot be set as Alarm, Ringtone or Schedule Tone.Editing Still ImagesFrom Main Menu 4 Data Folder 4 Pictures 4 Highlight a file 4 A[Menu] 4 Edit ■Resize >Resize 7 Select an image size 7 7 Enter a file name Try again: After selecting file size, S[Back]](https://usermanual.wiki/Panasonic-Connect/209019A.User-Manual-1/User-Guide-1191107-Page-128.png)
![8-11Managing Files8 ■Rotate & Save Still Images >Rotate* ( 7 When warning message appears, ) 7 A[Rotate L] or S[Rotate R] 7 7 Enter file name* Images captured by handset Camera may rotate 90° on cross-carrier handsets or PC. ■Add a Frame >Add Frame 7 Select a frame 7 Enter file name To change frame: to toggle frames Available only for Wallpaper(240x427), QQVGA(120x160) and QVGA(240x320). ■Trimming >Trimming ( 7 When warning message appears, ) 7 Follow the steps below 7 7 Enter a file nameItem Operation/DescriptionTrim to Preset Size >Select a size 7 to move rectangle to crop point 7 Trim to Selected Size >Free Size 7 to move [┌] to specify the area7 7 to adjust crop point 7 Try again: After setting crop point, S[Back] ■Super Clear Shadow >Super Clear Shadow ( 7 When warning message appears, ) 7 7 Enter file nameManaging Folders & FilesThe following operations are available in Pictures, Ring Songs&Tones, Music, Videos, Books, Flash(R) and Other Documents. Digital Camera, Video Camera, S! Appli, My Pictograms, Graphic Mail Pictures, S! Familiar Usability and Templates do not support new folders. Only names of created folders and files can be changed. Digital Camera and Video Camera folder names are fixed.Main Menu 4 Data Folder1 Select a folder 7 (Highlight a folder 7 ) A[Menu] 7 Select an item (See below)Item Operation/DescriptionOpen Open foldersPlayback Method1Select playback method (ZP.XX-5)Rename Change folder names >Enter folder nameNew Folder Create new folders >Enter folder nameDelete Delete folders (ZP.XX-12)More2Change folder view (ZP.XX-5), open Memory Card folder, open Digital Camera folder/Video Camera folder, open Phone folderMemory Card/Phone3Open Memory Card folder/Phone folder](https://usermanual.wiki/Panasonic-Connect/209019A.User-Manual-1/User-Guide-1191107-Page-129.png)
![8-12Managing Files81 Ring Songs&Tones, Music and Videos only2 Pictures and Videos only3 Ring Songs&Tones, Music, Books, Flash(R) and Other Documents onlyManaging Folders/FilesFrom Main Menu 4 Data Folder 4 Select a folder ■Change File Name >Highlight a file 7 A[Menu] 7 Rename 7 Enter a file name Only created files can be changed. Digital Camera, Video Camera and S! Appli folder names are fixed. ■Delete Folders/Files >Highlight a folder or file 7 A[Menu] 7 Delete 7 Select an item (See below)Item Operation/DescriptionOne >A[YES] ( 7 If confirmation appears, A[YES] orS[NO] 7 When selecting a folder, enter PhonePassword)Selected Files >(Select a file 7)* A[Menu] 7 Delete 7 A[YES] 7 A[YES] ( 7 If confirmation appears, A[YES] or S[NO])* Checkmarks indicate files are selected. Repeat the step as required. (To release checkmark, press .) To select all files or release all checkmarks: A[Menu] 7 Check All or Uncheck AllAll >A[YES] 7 in confirmation window, A[YES] or S[NO] 7 Enter Phone Password Only created folders can be deleted. Some files may not be deleted. Folders including undeleted files cannot be deleted. appear by copy protected files and indicate that handset holds Content Keys required to use the files. When deleting files or folders containing files, corresponding Content Keys are also deleted, and other files requiring deleted Content Keys may become unusable. When confirmation appears, press S[NO] to keep Content Keys. Multiple folders cannot be selected.](https://usermanual.wiki/Panasonic-Connect/209019A.User-Manual-1/User-Guide-1191107-Page-130.png)
![8-13Managing Files8 ■Move/Copy Files >Highlight a file 7 A[Menu] 7 Move or Copy 7 Select an item (See below) 7 Select a folder ( 7 For Selected Files or All, A[YES])Item Operation/DescriptionOne Move/Copy a fileSelected Files Move/Copy multiple files >(Select a file 7 )* A[Menu] 7 Move or Copy* Checkmarks indicate files are selected. Repeat the step as required. (To release checkmark, press .) To select all files or release all checkmarks: A[Menu] 7 Check All or Uncheck AllAll Move/copy all the folders/files in a folder Copy/forward protected files cannot be copied. Some pre-installed S! Appli cannot be moved. Only JPEG files saved in handset memory can be moved/copied to Digital Camera folder. Only Video files saved in handset memory can be moved/copied to Video Camera folder. In Other Documents folder, copy protected files can be copied, but handset does not recognize copyright. Files may not be forwarded/copied depending on file format or data. Forward protected files may be moved to other folders by retrieving Network information (ZP.1-15). After being copied/moved between handset and Memory Card, some files may be unusable on other SoftBank handsets or PCs, etc.](https://usermanual.wiki/Panasonic-Connect/209019A.User-Manual-1/User-Guide-1191107-Page-131.png)
![8-18Managing Files8Notes Backup is not available when battery is low. Change/charge battery before backup. Backup/restoration activates Emission OFF Mode. When backup/restoration starts in Emission OFF Mode, Emission OFF Mode is not canceled automatically even when backup/restoration is complete. When restoring files other than Content Keys from Memory Card, the same type files are all deleted from handset before restoration. Back up files saved on handset beforehand. Depending on contents, Phone Book/Schedule entries, messages or bookmarks may not be backed up/restored, or may be altered beyond the parameters. Backup files created on other SoftBank handsets may not be restored or usable on 840P.Backup/Restore Check memory beforehand (ZP.XX-4). Main Menu 4 Settings 4 Memory Card Manager 4 Memory Card Backup1 Enter Phone Password2 Select an item For Messaging, select a messaging folder3 BackupCopy to Memory Card 7 7 RestoreOverwrite to Phone 7 7 Select a file 7 Backup date serves as file name. Example: "090202000.vcf" indicates that the file was backed up on 2 February 2009 ■Delete a Backup File >In Step 3, select Overwrite to Phone 7 7 Highlight a file 7 A[Menu] 7 Delete 7 Content Key backup files cannot be deleted.](https://usermanual.wiki/Panasonic-Connect/209019A.User-Manual-1/User-Guide-1191107-Page-136.png)
![9-3Connectivity9Note Depending on their content, some incoming Phone Book/Schedule entries, messages or bookmarks may not be received, or may be altered beyond the parameters. If memory becomes full, remaining entries are truncated. (Memory List: ZP.18-23) Images captured by handset Camera may rotate 90° on cross-carrier handsets or PC.One File Transfer Transferable Files: ZP.10-2Sending1 Highlight a file 7 A[Menu]2 Prepare recipient device3 Send Phone Book Entry/Data Folder FileSend 7 Infrared Send Message/Schedule Entry/BookmarkSend via Infrared Send SMSLocal Connectivity 7 InfraredTransfer starts.ReceivingMain Menu 4 Connectivity 4 Infrared 4 ON1 L to return to Standby appears. Acquire signal within three minutes.2 When receiving transfer request from sender, confirmation appearsFile name and size appear.3 4 Receive Data Folder FilesPhone or Memory CardTransfer starts. Receive Phone Book/Schedule EntryA[Save] Receive Messages/BookmarksMessages are saved in messaging folders, and bookmarks added to Bookmark List automatically.Note Handset receives files only in Standby. Infrared is canceled if no transmission is made within three minutes or handset power is turned off.](https://usermanual.wiki/Panasonic-Connect/209019A.User-Manual-1/User-Guide-1191107-Page-141.png)
![10-3Handset Security10Changing PIN/PIN2 Activate PIN entry before changing PIN (ZP.XX-2).Main Menu 4 Settings 4 Security 4 Change PIN or Change PIN21 Enter current PIN/PIN22 Enter new PIN/PIN23 Reenter new PIN/PIN2PIN/PIN2 Lock & Cancellation (PUK/PUK2)PIN Lock or PIN2 Lock is activated if PIN or PIN2 is incorrectly entered three times. Cancel PIN Lock or PIN2 Lock by entering Personal Unblocking Key (PUK/PUK2). For information about PUK/PUK2, contact SoftBank Mobile Customer Center, General Information (ZP.18-32).1 In PIN lock mode, enter PUK/PUK22 Enter new PIN/PIN23 Reenter new PIN/PIN2Note If PUK/PUK2 is incorrectly entered ten times, USIM Card is locked and handset is disabled. Write down PUK/PUK2. For procedures required to unlock USIM Card, contact SoftBank Mobile Customer Center, General Information (ZP.18-32).KeyguardLock handset keys to prevent accidental operation. While locked, appears in Standby.1 In Standby, press and hold 7 To cancel: When appears in Standby, 7 A[YES]Note Alternatively, Main Menu 4 Settings 4 Phone Settings 4 Keyguard 4 . Emergency numbers (110, 119, 118) are dialable even if Keyguard is activated (number does not appear on Display). To correct misentries, press L, then re-enter number. If Keyguard is activated, handset will not power down. Cancel Keyguard then press and hold L.](https://usermanual.wiki/Panasonic-Connect/209019A.User-Manual-1/User-Guide-1191107-Page-147.png)
![10-5Handset Security10Reject Incoming CallsRejecting Unknown Callers<Default> OFFReject calls from unknown numbers (numbers not saved in Phone Book, blocked Caller ID, pay phones, etc.).Main Menu 4 Settings 4 Call Settings 4 Reject Incoming Calls1 Select an item2 ON or OFFRejecting Specific NumbersAdd numbers to Reject List to reject specific incoming calls, then set Activate Reject List to ON.Adding Numbers to Reject List Main Menu 4 Settings 4 Call Settings 4 Reject Incoming Calls 4 Reject List 4 Edit Reject List1 A[Menu] 7 Add 7 Select an item2 Highlight a phone number in Phone Book/Call Log 7 A[Select], or enter a phone number directly ■Edit/Delete Numbers in Reject List >Highlight a number in the list 7 A[Menu] 7 Edit or Delete ( 7 For Delete, )Activating Reject List<Default> OFFMain Menu 4 Settings 4 Call Settings 4 Reject Incoming Calls 4 Reject List 4 Activate Reject List1 ON or OFFCalls from Rejected NumbersHandset does not ring/vibrate, but Information window appears. Press to confirm. If call is rejected because Caller ID was not sent (Withheld), caller is instructed via voice message or Picture to send ID.Note Set handset to reject all incoming calls or incoming calls while abroad (Call Barring: ZP.2-18).](https://usermanual.wiki/Panasonic-Connect/209019A.User-Manual-1/User-Guide-1191107-Page-149.png)
![11-2Tools11CalendarView by day, week or month; set Alarms for events.Opening Calendar1 DCurrent month appears. When a date with schedule events is selected, up to four events appear. Press D or F to display previous/next month calendar. To switch Monthly/Weekly view ZP.XX-5 Note Alternatively, Main Menu 4 Tools 4 Calendar.One Month WindowCreating Schedule EventsSave up to 100 entries.1 D2 to highlight a date 7 A[Menu] 7 New Entry3 Follow the steps belowItem Operation/DescriptionSummary Enter content >Enter titleCategory Select an event type; icon appears in Standby >Select categoryStart Set date and time the schedule event starts/ends >Enter date 7 Enter timeEndDescription Enter event description >Enter content in detail](https://usermanual.wiki/Panasonic-Connect/209019A.User-Manual-1/User-Guide-1191107-Page-154.png)
![11-3Tools11Item Operation/DescriptionRepetition Set entry to appear again at regular Intervals >Select a repetition ( 7 Enter repeating time)Reminder Set schedule alarm time >Select an alarm typeLocation Enter location >Enter locationSchedule ToneSet schedule alarm ringtone ><Schedule Tone>orRing Songs&Tones or Music 7 Highlight a file 7 A[Set]Schedule VolumeSet schedule alarm volume > to adjust volumeNotification LightSet schedule alarm notification light color >Select a color or OFF4 A[Save]Schedule IconSelected icon in Category appears in Standby.Example: (Meeting), (Anniversary), (Birthday) If nothing selected, appears.Copy Protected Files When set as Schedule Tone, license expiry, or inserting a different USIM Card may reset default. Limited use files cannot be set as Schedule Tone.Note Schedule events between 00:00 on 2008/01/01 and 23:59 on 2099/12/31 can be saved on handset.At Reminder TimeSchedule Tone sounds and Notification Light flashes.1 When Schedule Tone sounds, Schedule Tone stops and Schedule Event List appears.2 to view detailsCanceling Schedule Tone L to return to Standby. Press S[Stop] to return to previous menu. Press any key except for L, S[Stop], A[View] or to cancel Schedule Tone without returning to Standby. Press to view detailed schedule.Note Schedule Tone does not sound in the following cases:・ During a call (Notification appears and handset vibrates)・ In Manner Mode (Manner Mode settings take priority)・ When handset power is turned off・ For entries invalidated by Time Correction](https://usermanual.wiki/Panasonic-Connect/209019A.User-Manual-1/User-Guide-1191107-Page-155.png)
![11-4Tools11Setting Day Off Day Off dates appear in red.1 D2 (Highlight a date 7 ) A[Menu] 7 Set Day Off3 Specify Day of WeekWeekly ( 7 Repeat: Highlight a day 7 )* 7 A[OK]* To cancel selection, press Specify Current DateToday* 7 Once or Yearly* To cancel selection: Reset Holiday Reset AllReset All 7 Viewing/Editing Schedule Events1 D 7 Select a date2 Select a schedule eventDetailed schedule appears. to switch Schedule tab and Contents tab.3 S[Back] to exitSchedule Event ListSchedule Event Details](https://usermanual.wiki/Panasonic-Connect/209019A.User-Manual-1/User-Guide-1191107-Page-156.png)
![11-5Tools11Calendar FunctionsFrom D ■Switch Calendar View<Default> One Month >A[Menu] 7 View Format 7 One Month or One Week Select One Week view to see daily schedules. ■Search Specific Day >A[Menu] 7 Go to Date 7 Enter a date ■Set Week Start Day >A[Menu] 7 Start Week From 7 Select a day ■Delete Schedule Events >Follow the steps belowItem Operation/DescriptionDelete >Select a date 7 Highlight an event 7 A[Menu]7 Delete 7Delete Scheduled Events* >Highlight a date 7 A[Menu] 7 Delete 7 Day 7 7Delete Past Events* > Highlight a date 7 A[Menu] 7 Delete 7 Past 7 7Delete All Events >A[Menu] 7 Delete 7 All 7 A[YES] 7 Enter Phone Password* Repetitive entries cannot be deleted ■Calendar Memory Status >A[Menu] 7 Memory StatusTip#Infrared (ZP.XX-3)](https://usermanual.wiki/Panasonic-Connect/209019A.User-Manual-1/User-Guide-1191107-Page-157.png)
![11-6Tools11AlarmsWhen scheduled time arrives, alarm tone sounds and animation appears on Display. Notification Light illuminates. Setting AlarmSet up to five alarms. Alarm tone sounds at the specified time once, everyday or weekly as set.Main Menu 4 Tools 4 Alarms1 Select an Alarm2 Follow the steps belowItem Operation/DescriptionAlarm ON/OFF Activate or cancel Alarm >ON or OFFTime Set Alarm time >Enter timeItem Operation/DescriptionRepetition Select repetition >Select a repetition ( 7 For Weekly, select a day (Repeat as required) 7 A[OK])Alarm Tone1Set Alarm Tone sound ><Alarm Tone>orRing Songs&Tones or Music 7 Highlight a file2 7 A[Set]Set Alarm SnoozeAlarm Tone sounds for 60 seconds, repeating up to five times at specified intervals >ON or OFF ( 7 For ON, enter interval)Alarm Volume Set Alarm Tone volume > to adjust volumePictures Select image to appear >Highlight a still image 7 A[Set]Set Alarm VibrationSelect Vibration type >Select pattern or OFFNotification LightSelect Notification Light color >Select a color or OFFSet Alarm PrioritySet Manner Mode or Alarm priority >Manner Mode Prioritized or Alarm Prioritized1 Copy Protected Files (ZP.XX-4)2 When selecting an SMC file, highlight a Play Point 7 A[Set]3 A[Save]](https://usermanual.wiki/Panasonic-Connect/209019A.User-Manual-1/User-Guide-1191107-Page-158.png)
![11-7Tools11At Alarm TimeAlarm Tone sounds, Notification Light flashes and image appears on Display.1 Press any keyAlarm stops and confirmation window appears.(When pressing L, confirmation does not appear.) Alarm stops automatically after 60 seconds of inactivity, and confirmation window appears.. ■Cancel/Reactivate Alarm >Main Menu 4 Tools 4 Alarms 4 Highlight an alarm 4 A[Menu] 4 Alarm ON or Alarm OFF Activate a canceled Alarm to apply previous settings. appears for set alarms; for unset/canceled ones.Snooze FunctionIf ON, press any key except L; confirmation appears. To cancel Alarm, press A[Stop]. When pressing L to stop alarm, confirmation does not appear.(Snooze function is still active.)Note Alarm Tone does not sound in the following cases:・ During a call (notification appears and handset vibrates)・ In Manner Mode Prioritized (Manner Mode settings take priority)・ When handset power is turned off・ For entries invalidated by Time CorrectionCalculatorComplete basic mathematical calculations up to ten digits.Main Menu 4 Tools 4 CalculatorOperation Assigned keyNumber (0 - 9) P - O+–x÷=Decimal point AClear SorKToggle + and – D ■Enter Negative Numbers >Enter a number, then press D to toggle negative/positive value.Example:-17+28.5=11.5Q U D W I A T](https://usermanual.wiki/Panasonic-Connect/209019A.User-Manual-1/User-Guide-1191107-Page-159.png)
![11-8Tools11NotepadMain Menu 4 Tools 4 Notepad1 A[Menu] 7 New2 Enter textNew note is added to the top of the list. Up to 64 characters can be entered.Notepads WindowNotepad FunctionsFrom Main Menu 4 Tools 4 Notepad ■Edit Notes >Select a note 7 [Edit] 7 Edit text Edited note is overwritten. ■Delete Notes >Highlight a note 7 A[Menu] 7 Delete 7 One or All 7 A[YES] 7 When selecting All, enter Phone Password ■Note Property >Highlight a note 7 A[Menu] 7 Property ■Insert Notes into Message Text >Highlight a note 7 A[Menu] 7 Send 7 Send via S! Mail or Send via SMS 7 Enter mail address, etc. 7 S[Send]](https://usermanual.wiki/Panasonic-Connect/209019A.User-Manual-1/User-Guide-1191107-Page-160.png)
![11-9Tools11Voice RecorderRecord voice memos of up to 60-seconds. Recording during a call: ZP.2-9Main Menu 4 Tools 4 Voice Recorder1 Recording starts.2 to stop recording To play: 3 A[Save]Recorded sounds are saved in RingSongs&Tones folder. Note Sounds recorded by Voice Recorder cannot be set as Alarm, Ringtone or Schedule Tones.Bar Code ReaderScan barcodes (JAN) or QR Codes with built-in camera. Access websites, send messages, etc. from QR Codes.JAN CodesJAN Code is a one-dimensional bar code denoting numerals with bars and spaces of different widths.QR CodesQR Code is a two-dimensional bar code containing information.Scanning BarcodesUp to ten items can be saved. For split data, up to 16 QR Codes can be scanned at a time and saved as one item.Main Menu 4 Bar Code Reader 4 Scan Barcodes1 Frame barcode in the center of Display To adjust display brightness: G or H To zoom: To use Focus Lock:](https://usermanual.wiki/Panasonic-Connect/209019A.User-Manual-1/User-Guide-1191107-Page-161.png)
![11-10Tools112 Scanning starts, and scanned results appear when completed. For split data, 7 Repeat Step 1 and 23 S[Save] To start over: K 7 7 Go to Step 2Note Handset cannot read barcodes or two-dimensional codes other than JAN/QR Codes. If recognition stalls, adjust display brightness and retry. Brightness can be adjusted while scanning; however, zoom level can not be changed. Saved items are automatically named "yymmdd_hhmmss" unless changed. (yy: year, mm: month, dd: day, hh: hour, mm: minute, ss: second) When memory is full, warning appears. Delete old data. Barcodes may not be correctly read owing to scratch, dirt, damage, quality of printed material, light reflection, or QR code version.Viewing/Editing Scanned Data Main Menu 4 Bar Code Reader 4 Saved Data List1 View Saved DataSelect an item Edit TitleHighlight an item 7 A[Menu] 7 Rename 7 Edit title ■Delete Saved Data >In Step 1, highlight an item 7 A[Menu] 7 Delete One 7](https://usermanual.wiki/Panasonic-Connect/209019A.User-Manual-1/User-Guide-1191107-Page-162.png)
![11-11Tools11Using Barcode DataFrom Main Menu 4 Bar Code Reader 4 Saved Data List ■Use URLs/Mail Addresses/Phone Numbers >Select an item 7 Follow the steps belowItem Operation/DescriptionURL (http:// or https://)Connect to websites; add to Bookmarks (ZP.XX-8)URL (rtsp://) Streaming; add to BookmarksMail Address Create S! Mail (ZP.XX-4); save to Phone Book (ZP.4-3)Phone Number Make calls; create messages* (S! Mail: ZP.XX-4/SMS: ZP.XX-8); save to Phone Book (ZP.4-3) Phone Book Data(MEMORY: text)Save to Phone Book Save MEMORY: text only Saved to Phone regardless of Save Settings selection* SoftBank handset numbers only ■Insert Scanned Text into Messages > Select an item 7 A[Menu] 7 Paste Data & Create Mail 7 S! Mail or SMS ■Copy Text from Scanned Results >Select an item 7 A[Menu] 7 Copy 7 Follow the steps belowItem Operation/DescriptionCopy All Text >S[All] 7 Copy Selected Text >Place cursor before (or after) text to copy 7 7 Place cursor after (or before) text to copy 7](https://usermanual.wiki/Panasonic-Connect/209019A.User-Manual-1/User-Guide-1191107-Page-163.png)
![12-2Messaging12BasicsSend messages via S! Mail or SMS.S! Mail[Separate subscription required]Exchange text messages with SoftBank or e-mail compatible handsets, PCs, etc.; attach image or sound files etc. 840P is compatible with Graphic Mail (ZP.13-5) and Feeling Mail (ZP.XX-5).SMS Exchange short text messages with SoftBank handsets. For more information, visit SOFTBANK MOBILE Corp. Website (http://www.softbank.jp).Tip#Messaging Lock (ZP.XX-19)Available Entry Items & Character Entry LimitsItem S! Mail SMSAddressE-mailaddress ○Up to 246 single-byte alphanumerics/ Up to 20 recipients×–Phonenumber1○ ○Up to 20 single-byte alphanumerics/ten recipientsSubject ○Up to 256 double-/ single-byte alphanumerics×–Text ○30 KB2○Up to 70 double-/single-byte alphanumerics 3Attachment ○Up to 20 files ×–1 SoftBank handset numbers only2 S! Mail Entry Limit decreases when mail attachments exceed 260 KB.3 When Input Character Settings is set to English(160characters) (ZP.XX-17), up to 160 single-byte alphanumerics can be entered.Note Send up to 300 KB including subject, message text and attachment via S! Mail. Message text character limit differs by attachment size. SMS messages can be converted to S! Mail (ZP.12-8), but not in the following cases:・ 、S! Mail memory is full (ZP.XX-3)・ 、During a call (S! Mail messages cannot be created during a call) S! Mail cannot be converted to SMS.](https://usermanual.wiki/Panasonic-Connect/209019A.User-Manual-1/User-Guide-1191107-Page-166.png)
![12-3Messaging12Messaging Folders & Memory StatusMessages are organized in folders by message type.* Set Mail Delivery Rule to sort received messages automatically (ZP.XX-17).Deleting Messages AutomaticallyWhen memory for messaging folders is low, read messages and sent messages are automatically deleted one by one. Protect important messages from unintentional deletion (ZP.XX-20), or set Auto Delete Incoming Messages/Auto Delete Sent Messages to OFF (ZP.XX-15).When Messaging Memory is Full (Received Full) appears in Standby and no more new incoming messages are received. Delete old messages in Incoming Mail folder (ZP.XX-19).Retrieve new messages after deleting some S! Mail (ZP.XX-16).Create MessagesReceive MessagesSave as DraftsSend MessagesCompleteNot completeUnsent MessagesSent MessagesDraftsMessaging FoldersIncoming MailReceivedFolder 1-10* ■View Memory Status >A 7 Memory Status 7 Phone or USIM 7 For Phone, Sent or IncomingTipSettings #Require Phone Password Entry when Opening Messaging Folders/Retrieving Server Mail (ZP.XX-15)Customizing Handset AddressChange your handset mail address (alphanumerics before @) to reduce the risk of receiving spam. Default account name is random alphanumerics. For details, visit SOFTBANK MOBILE Corp. Website (http://www.softbank.jp). Handset mail address cannot be changed in Emission OFF Mode. For operations while using Internet: ZP.14-61 A[ ]7 Settings 7 Custom Mail AddressHandset connects to the Network.Follow onscreen instructions.abc123-xyz @ softbank.ne.jpCustomize hereDomainNameAccountName](https://usermanual.wiki/Panasonic-Connect/209019A.User-Manual-1/User-Guide-1191107-Page-167.png)
![12-4Messaging12Sending S! Mail & SMSSending S! MailExample: Select a Phone Book entry to send S! Mail.1 Press and hold A[ ]2 <Add Address> 7 Phone Book3 Select a Phone Book entry 7 Select a SoftBank handset number or mail addressComposition WindowAddress fieldSubject fieldText fieldAttachment field4 <Add Subject> 7 Enter subject5 <Input Text>6 Enter text7 S[Send]Tip#Addresses #Message Preview (ZP.XX-9) #Sending Messages (ZP.13-16)Settings #Confirm Message Delivery (ZP.17-12)Text Entry Window](https://usermanual.wiki/Panasonic-Connect/209019A.User-Manual-1/User-Guide-1191107-Page-168.png)
![12-5Messaging12Adding AttachmentsExample: Attach image files to S! Mail.1 After Step 6 on page XX-4, <Add Attachment>2 Select an item 7 Highlight an item 7 A[Set]/[Select] After selecting Account Details, go to Step 3.3 S[Send]Note Some files can not be attached depending on the file format or size. Some copy protected files can not be sent.Tip#Attachments (ZP.13-15)Sending Feeling MailApply Feeling Mail setting to S! Mail; recipient handset responds according to link to Feeling settings. Send Feeling Mail to compatible SoftBank handsets only. Ringtone, vibration and notification light settings vary depending on Feeling Expression of recipient handset (ZP.XX-16).1 After Step 6 on page XX-4, A[Menu] 7 Sending Options 7 Feeling Expression2 Select an item 7 Select an iconSelected icon appears in Subject field.3 S[Send]](https://usermanual.wiki/Panasonic-Connect/209019A.User-Manual-1/User-Guide-1191107-Page-169.png)
![12-6Messaging12Graphic MailCreate HTML messages; select font color/size, background color, or insert images, etc.Example: Use various Templates to create Graphic Mail Change font size Scroll text1 After Step 4 on page XX-4, A[Menu] 7 Insert Template 7 Select a template 7 A[Set] To preview the template: Select a template 7 S[Back]2 Select Text field 7 Delete "ココに文字をいれてネ"3 J to open Graphic PaletteGraphic Palette4 Font Size 7 select a font size 7 Enter text5 Select Mail Art Area 7 Place cursor before a sentence to scroll 7 A[Start] 7 Move cursor to end of sentence 7 A[End] Text is highlighted. To cancel selection: [Cancel Mail Art Area]6 Start Scrolling 7 S[Close]7 8 S[Send]](https://usermanual.wiki/Panasonic-Connect/209019A.User-Manual-1/User-Guide-1191107-Page-170.png)
![12-7Messaging12 ■Reset Operations To cancel previous operation: Close Graphic Palette 7 A[Menu] 7 Undo To reset all Graphic operations: J 7 Reset All Graphic Mail 7 Note In Simple Mode, text in composition window appears in Large Size regardless of Font Size setting. When placing cursor at text, Font Size icon ( : Large Size, : Small Size) appears. (When Normal Size is selected, Font Size icon does not appear.) In preview window, text appears in selected font size.Using My Pictograms1 After Step 5 on page XX-4, in a text entry window, G 7 H[Full] 7 H[My Pict.]My Pictogram list appears.If previously used, press G 7 A[My Pict.].2 Select a My Pictogram 7 My Pictogram is entered.3 Enter text 7 S[Send] ■Use My Pictograms from Graphic Palette >In a text entry window, J 7 My Pictograms 7 Highlight a My Pictogram 7 A[Set] 7 S[Close] ■Use My Pictograms Saved in Memory Card >In a text entry window, J 7 My Pictograms 7 Switch to Memory Card 7 Highlight a My Pictogram 7 A[Set] 7 S[Close]Tip#Graphic Mail Functions (ZP.XX-10)](https://usermanual.wiki/Panasonic-Connect/209019A.User-Manual-1/User-Guide-1191107-Page-171.png)
![12-8Messaging12Sending SMS MessagesExample: Select a Phone Book entry to send SMS.1 A[ ] 7 Create New SMS2 <Add Address> 7 Phone Book3 Select a Phone Book entry 7 Select a SoftBank handset numberAddress fieldText fieldComposition Window4 <Input Text>5 Enter text When number of entered character exceeds limit, S! Mail conversion option message appears.6 A[Send] ■Manual Mail Conversion >In SMS Composition window, A[Menu] 7 Switch Message TypeTip#Addresses (ZP.13-14) Settings #Confirm Message Delivery (ZP.17-12) #SMS Settings (ZP.XX-17)Text Entry Window](https://usermanual.wiki/Panasonic-Connect/209019A.User-Manual-1/User-Guide-1191107-Page-172.png)
![12-9Messaging12Creating MessagesAddressesFrom In composition window, select Address field ■Enter Address Directly >Enter Number or Enter Address* 7 Enter a SoftBank handset number or mail address* S! Mail only ■Select Address from Send Logs >Send Logs 7 Select a log ■Add/Edit/Delete Address >Follow the steps (See below)Item Operation/DescriptionAdd Recipients >A[Menu] 7 Add 7 Select an address selection method 7 Select an address or enter directlyEdit >Highlight an address 7 A[Menu] 7 Edit 7 Edit addressDelete >Highlight an address 7 A[Menu] 7 Delete ■Change To/Cc/Bcc (S! Mail only) >Highlight an address 7 A[Menu] 7 Change To/Cc/Bcc 7 Select a typeAttachmentsFrom After attaching a file, select Attachment field ■Add Attachments >A[Menu] 7 Add 7 Select an item 7 Highlight an item 7 A[Set]/[Select] ■Delete Attachments >Highlight a file 7 A[Menu] 7 Delete](https://usermanual.wiki/Panasonic-Connect/209019A.User-Manual-1/User-Guide-1191107-Page-173.png)
![12-10Messaging12Graphic Mail Functions ■Use Other Graphic Mail Settings >In text entry window, J 7 Select an arrange item (See below)Item Operation/DescriptionSelect Mail Art AreaSpecify text to be arranged >Place cursor before (or after) text 7 A[Start] 7 Place cursor after (or before) text 7 A[End] 7 Select an icon 7 Follow the steps for selected itemsFont Color >Select a colorStart Blink Flash textBackground Color >Select a colorInsert Files Insert images, BGM or Flash® >Select File 7 Select a folder 7 Select a file 7 A[Set] To delete BGM, Delete BGMReset All Graphic MailCancel all Graphic Mail settings >Font Size >Select font sizeAlignment >Select a typeStart Scrolling Scroll textStart Swing Swing textInsert Line Insert separator lineMy Pictograms Insert My Pictograms >Highlight a My Pictogram 7 A[Set] One file of BGM or Flash®, and up to 40 types of My Pictograms or images can be inserted per Graphic Mail. To delete inserted images, lines, My Pictograms, etc.: Close Graphic Palette 7 Move cursor before images, etc. 7 K ■Save Templates >In S! Mail Composition window, A[Menu] 7 Save as Template ■Download Templates via Internet >A 7 Templates 7 Download TemplatesSending MessagesFrom In composition window, A[Menu] ■Delivery Report >Sending Options 7 Delivery Report 7 ON Confirm Message Delivery (ZP.XX-15) ■Set Priority >Sending Options 7 Set Priorities 7 Select a level ■Set SMS Expiry Time >Sending Options 7 Expiry 7 Select a limit Set a Time Limit to Store All Sent SMS at the Center (ZP.XX-17) ■Save to Drafts >Save as Drafts](https://usermanual.wiki/Panasonic-Connect/209019A.User-Manual-1/User-Guide-1191107-Page-174.png)
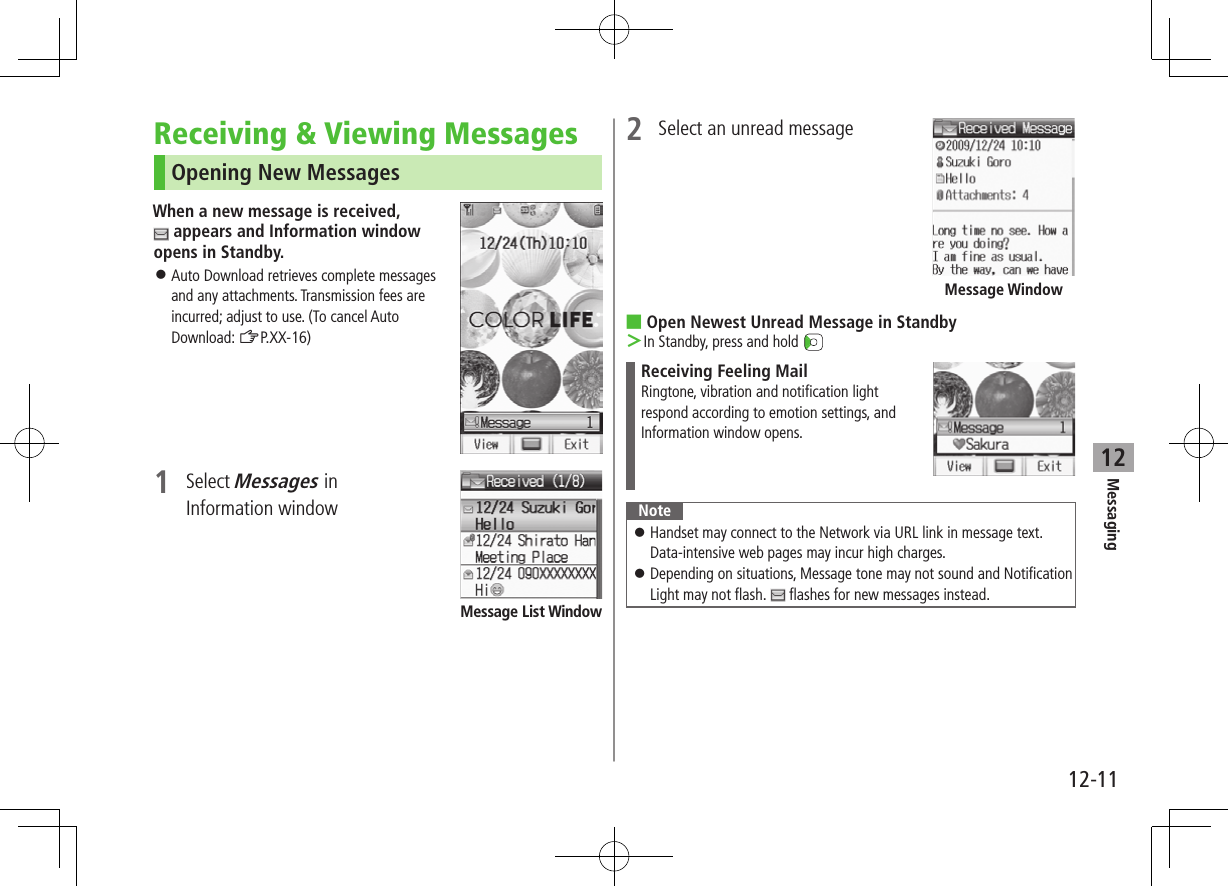
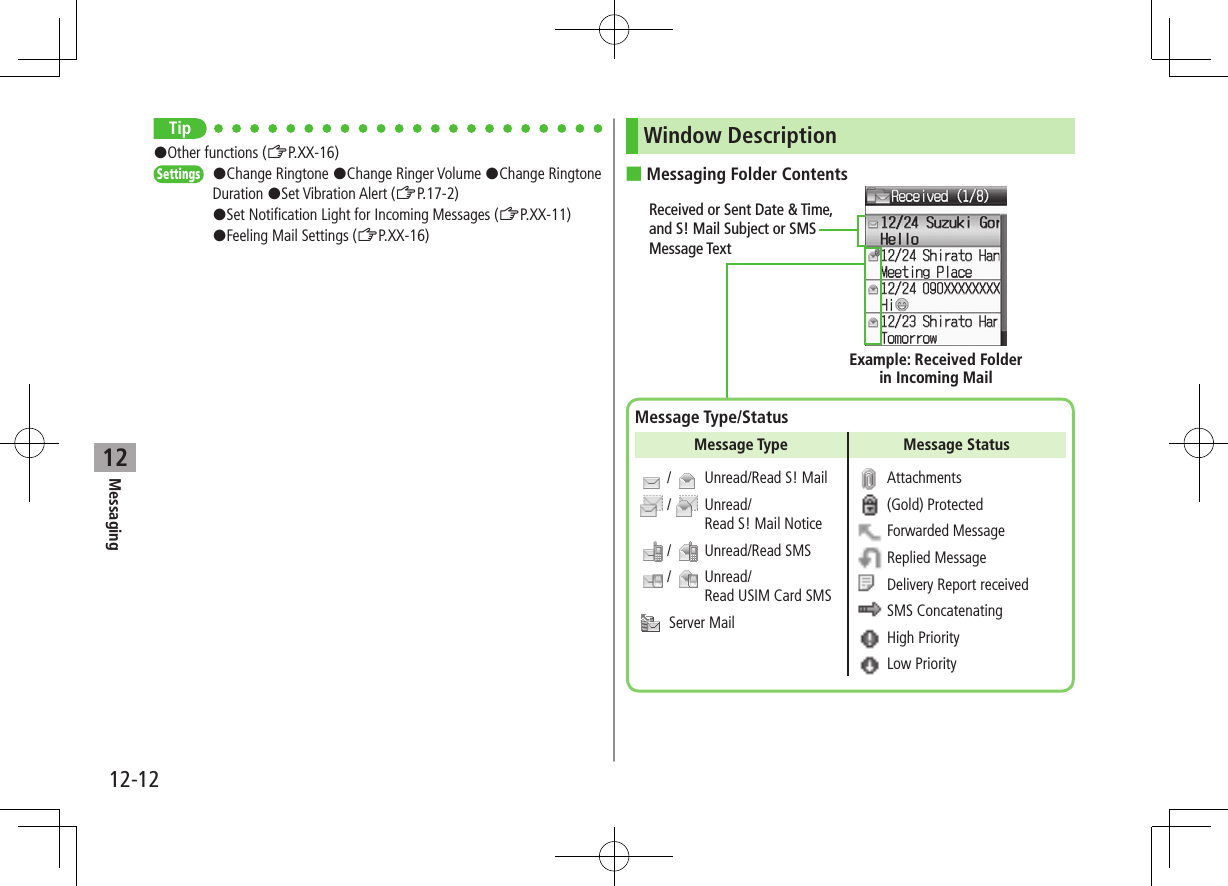
![12-13Messaging12 ■Message Contents* For Sent Messages, recipient appearsNote Status icons for protected/forwarded/replied SMS messages saved in USIM Card do not appear. After retrieving complete messages, S! Mail Notice icons with (Forwarded) or (Replied) change to / (S! Mail). Messages remain protected after complete messages are retrieved via protected S! Mail Notices.Tip#Message Display (ZP.XX-19)Sender*SubjectNumber of AttachmentsThe number of files (images, sounds, videos, text, etc.) appears.Example: Received MessageMessage TextSystem Message Icon (ZP.XX-16)Retrieving Complete S! Mail1 At the end of message text, There are sequels ■Retrieve from Message List >In received message list, A[Menu] 7 Retrieve 7 One ■Retrieve Multiple Messages >In received message list, highlight an S! Mail Notice 7 A[Menu] 7 Retrieve 7 Selected Messages 7 (Repeat: Select a message)* 7 A[Retrieve] 7 * To cancel selection, press again.Note S! Mail may not be downloaded automatically while out of Standby. When the Center sends the initial portion of Mail (S! Mail Notice), retrieve the complete Mail.](https://usermanual.wiki/Panasonic-Connect/209019A.User-Manual-1/User-Guide-1191107-Page-177.png)
![12-14Messaging12Opening & Saving Attachments1 In Message window, A[Menu] 7 Attachment List2 Select a file 7 S[Back]3 To save the file, highlight a file 7 A[Save] 7 Phone or Memory CardNote When messages are opened, attached image files appear/play automatically. (Silver) appears with file requiring a Content Key. If Content Key has expired, warning appears when opening a file. Acquire new Content Key (ZP.9-6).File formats Supported by Auto Playback Picture files (JPEG, GIF, PNG) Music files (SMAF, AMR, SMF, SP-MIDI)TipSettings #Open Image Files Manually #Play Music Files Automatically (ZP.17-13)Viewing Received Messages1 Press and hold Incoming Mail folder is opened.2 Select a folder 7 Select a message ■Open an Unread Message >In Standby, press and hold to open newest unread message.Viewing Sent Messages1 Press and hold Sent Messages folder is opened.2 Select a message](https://usermanual.wiki/Panasonic-Connect/209019A.User-Manual-1/User-Guide-1191107-Page-178.png)
![12-15Messaging12 XXXXXXXXXXXX XXXXXXXXXXXXXX XXXXXX XXXXXXXXXXX XXXXXXXXXXXXXX XXXXXXXXXXXXX:XXXXXXXXXXXXXX:XXXXXXXXXXXXXX:XXXXXXXXXXXXXX:XXXXXXXX3D PictogramsMessage text appears in 3D animation. Incomplete S! Mail text does not appear animated.1 In Message window, A[Menu]2 3D PreviewThe first 150 characters of message text appear animated. To pause/resume: To cancel: A[Stop]TipSettings #Enable 3D Pictograms when Opening Messages #Change Font/Background Color (ZP.XX-15)](https://usermanual.wiki/Panasonic-Connect/209019A.User-Manual-1/User-Guide-1191107-Page-179.png)
![12-16Messaging12Using Server MailRetrieve mail list stored at the Center to view Server Mail.Viewing Server Mail1 A[ ] 7 Server Mail Box2 Mail List 7 A[Update] 7 ■Update Server Mail List >After Step 1, Mail List 7 A[Menu] 7 Update Mail List 7 Retrieving Server Mail1 A[ ] 7 Server Mail Box 7 Mail List2 (Highlight an S! Mail 7 ) A[Menu] 7 Retrieve3 Retrieve a New MessageOne Retrieve Multiple MessageSelected Messages 7 (Repeat: Select a message)* 7 A[Retrieve] 7 * To clear, repeat same operation. ■Retrieve All Messages >A 7 Server Mail Box 7 Mail List 7 A[Menu] 7 Retrieve 7 All 7 A[YES]Other functions ■Manually Retrieve New Messages >A 7 Retrieve New Retrieve S! Mail messages saved on Server while handset is off/out-of-range. ■View System Messages indicates a problem with incoming message (e.g., undelivered attachments). >A 7 Incoming Mail 7 Select a folder 7 Select a message 7 A[Menu] 7 System MessageServer Mail FunctionsFrom A 7 Server Mail Box ■Delete One/Selected Server Mail >Mail List 7 (Highlight an S! Mail 7 ) A[Menu] 7 Delete Server Mail 7 One or Selected Files 7 (For Selected Files, select messages* 7 A[Delete]) 7 * To clear, repeat same operation. Alternatively, in Message List window, select an S! Mail Notice 7 A[Menu] 7 Delete 7 Delete Server Mail 7 ■Delete All Server Mail >Mail List 7 (Highlight an S! Mail 7 ) A[Menu] 7 Delete Server Mail 7 All 7 A[YES] 7 Enter Phone Password Alternatively, from Main Menu, Messaging 7 Server Mail Box 7 Delete Server Mail All 7 A[YES] 7 Enter Phone Password](https://usermanual.wiki/Panasonic-Connect/209019A.User-Manual-1/User-Guide-1191107-Page-180.png)
![12-17Messaging12 ■Forward Server Mail >Mail List 7 Highlight an S! Mail 7 A[Menu] 7 Forward Server Mail 7 <Add Address> 7 Select/Enter a number or mail address 7 S[Send] To forward Server Mail via S! Mail Notice: In Message List window, highlight an S! Mail Notice 7 A[Menu] 7 Forward 7 Forward Server Mail 7 <Add Address> 7 Select/Enter a number or mail address 7 S[Send] Forwarded Server Mail messages remain in Mail List. appears for forwarded Server Mail messages in Drafts, Unsent Messages and Sent Messages folders. ■Sort Server Mail >Mail List 7 A[Menu] 7 Sort 7 Date or From ■View Server Mail Property >Mail List 7 Highlight an S! Mail 7 A[Menu] 7 PropertyOrganizing/Using MessagesChecking Messages in Messaging Folders1 A[ ] 7 Incoming Mail, Drafts, Sent Messages or Unsent Messages In Incoming Mail folder, select a folder then message. Messaging Folders: ZP.13-32 Select a message To toggle back and forth between messages in Message window: G or HTip#Organizing Messages (ZP.XX-19)#Using Messages (ZP.XX-20)](https://usermanual.wiki/Panasonic-Connect/209019A.User-Manual-1/User-Guide-1191107-Page-181.png)
![12-18Messaging12Mail Delivery Rule Previously received messages are not sorted. If the same address or subject is set to multiple folders, lowest numbered folder has priority. Either address or mail subject can be specified per folder.1 A[ ] 7 Incoming Mail2 Highlight a folder 7 A[Menu] 7 Mail Delivery Rule3 A[Menu] 7 Select an item (See below)Item Operation/DescriptionAdd Address Sort received messages by sender’s address >Select an address selection method 7 Select an address or enter directly Save up to 10 addresses per folder.Add Subject Sort received messages by mail subject >Enter subject Save one subject per folder. SMS cannot be sorted by mail subject. To edit saved address/subject: Select address/subject 7 Edit address/subject ■Delete Mail Delivery Rule Settings >A 7 Incoming Mail 7 Highlight a folder 7 A[Menu] 7 Mail Delivery Rule 7 Highlight a condition 7 A[Menu] 7 DeleteReplying to Messages1 In Message window, S[Reply] Re: appears before Subject of replay2 Complete message 7 S[Send] ■Reply to All Addresses >In Message window, A[Menu] 7 Reply 7 Reply to All 7 Complete message 7 S[Send]Note Alternatively, in Message List window, highlight a message to reply to 7 A[Menu] 7 Reply 7 To Sender or Reply to All. When replying/forwarding a message, words used in received message take priority in Forecast list (ZP.3-5).TipSettings #Change Word Prediction Priority (ZP.XX-15)#Set Not to Quote Message Text when Replying (ZP.XX-16)](https://usermanual.wiki/Panasonic-Connect/209019A.User-Manual-1/User-Guide-1191107-Page-182.png)
![12-19Messaging12Mail Security SettingActivate Mail Security to require Phone Password when opening Mail box and operating Server Mail.1 A[ ] 7 Settings2 Universal Settings 7 Mail Security Setting3 Enter Phone Password 7 (Repeat: Select an item)* 7 A[OK]* To cancel selection, press again. ■Set/Cancel Mail Security on Folders in Incoming Mail >A[ ] 7 Incoming Mail 7 Highlight Received or a folder 7 A[Menu] 7 Set Mail Security or Cancel Mail Security 7 Enter Phone PasswordMessaging Lock[Default] OFFWhile Messaging Lock is active, creating messages, viewing Mail Boxes, changing settings, etc. are restricted. When Messaging Lock is active, appears. When Phone Book Lock and Messaging Lock are both active, appears. Main Menu 4 Settings 4 Security 4 Messaging Lock1 ON or OFF For ON, press .2 Enter Phone PasswordNote When Messaging Lock is active, templates can be backed up to Memory Card or downloaded, but cannot be edited or used for S! Mail messages.](https://usermanual.wiki/Panasonic-Connect/209019A.User-Manual-1/User-Guide-1191107-Page-183.png)
![12-20Messaging12Message DisplayFrom In Message List window ■Sort Messages >A[Menu] 7 Sort 7 Select a sorting method ■Change Font Size >Select a message 7 A[Menu] 7 Font Size 7 Select a sizeOrganizing MessagesFrom In Message List window ■Delete Messages >Follow the steps (See below)Item Operation/DescriptionDelete >Highlight a message 7 A[Menu] 7 Delete 7 One 7 Delete Selected Messages >A[Menu] 7 Delete 7 Selected File 7 (Repeat: Select a message)* 7 A[Delete] 7 * To cancel selection: press again.Delete All Messages >A[Menu] 7 Delete 7 All 7 A[YES] 7 Enter Phone Password SMS in USIM cannot be deleted. ■Protect Messages >Highlight a message 7 A[Menu] 7 Protect or Unprotect 7 Follow the steps (See below)Item Operation/DescriptionProtect/Unprotect One message >OneProtect/Unprotect Selected Messages >Protect Selected Items or Unprotect Selected Items 7 (Repeat: Select a message)* 7 A[Execute]* To cancel selection: press again. ■Move Messages to Specific Folders >In Message List window, (Highlight a message 7 ) A[Menu] 7 Move 7 One or Selected Files 7 (For Selected Files, select messages* 7 A[Move]) 7 Select a folder ( 7 For Selected Files, )* To clear, repeat same operation. SMS saved on USIM Card cannot be moved. ■Copy SMS to USIM Card/Handset >A 7 Incoming Mail 7 Select a folder 7 Highlight an SMS 7 A[Menu] 7 Local Connectivity 7 Copy to USIM or Copy to Phone ■View Message Property >In Message List or Message window, A[Menu] 7 Property Check subject, sender (From), address (To, Cc, Bcc), Reply-to, date, size, message type, attachment, priority, etc. Details differ by messaging folder and message type.](https://usermanual.wiki/Panasonic-Connect/209019A.User-Manual-1/User-Guide-1191107-Page-184.png)
![12-21Messaging12Using Messages ■Forward Messages >A 7 Incoming Mail 7 Select a folder 7 Select a message 7 A[Menu] 7 Forward 7 <Add Address> 7 Select a method 7 Select an address or enter directly 7 S[Send] To forward Server Mail: ZP.XX-16 Attachments are also forwarded. (Copy protected attachments are not forwardable.) ■Send Drafts >A 7 Drafts 7 Highlight a message 7 [Edit] 7 S[Send] ■Use Linked Information >In Message List window, select a message 7 Follow the steps (See below)Item Operation/DescriptionMake Calls >Select a number (highlighted) 7 Call 7 Voice Call or Video Call 7 Send Messages >Select a number or address (highlighted) 7 Create Message 7 S! Mail or SMS 7 Create a message 7 S[Send] Selecting S! Mail or SMS is not available when using addresses.Add to PhoneBook >Select a number or address (highlighted) 7 Add to Phone Book 7 Create New Entry or select an existing entry 7 Add to Phone Book (Zfrom Step 2 on P.4-3)Access Website >Select a URL (highlighted) 7 Connect with Yahoo! Keitai or Connect with PC Site Browser 7 Item Operation/DescriptionAdd to Bookmarks >Select a URL (highlighted) 7 Add to Bookmark 7 <Title> 7 Enter a title 7 Select Folder field 7 Select a folder 7 A[Save] ■Use Sender's/Recipient's Information >In Message List window, select a message 7 A[Menu] 7 Follow the steps (See below)Item Operation/DescriptionMake Calls >Call 7 Voice Call or Video CallSave to Phone Book >Add Sender to Phone Book or Add Destination to Phone Book 7 Create New Entry or select an existing entry 7 Add to Phone Book (ZFrom Step 2 on P.4-3) ■Send Unsent Messages >A 7 Unsent Messages 7 Highlight a message 7 A[Menu] 7 Send ■Use Sent Messages >A 7 Sent Messages 7 Highlight a message 7 A[Menu] 7 Edit 7 Edit message 7 S[Send]](https://usermanual.wiki/Panasonic-Connect/209019A.User-Manual-1/User-Guide-1191107-Page-185.png)