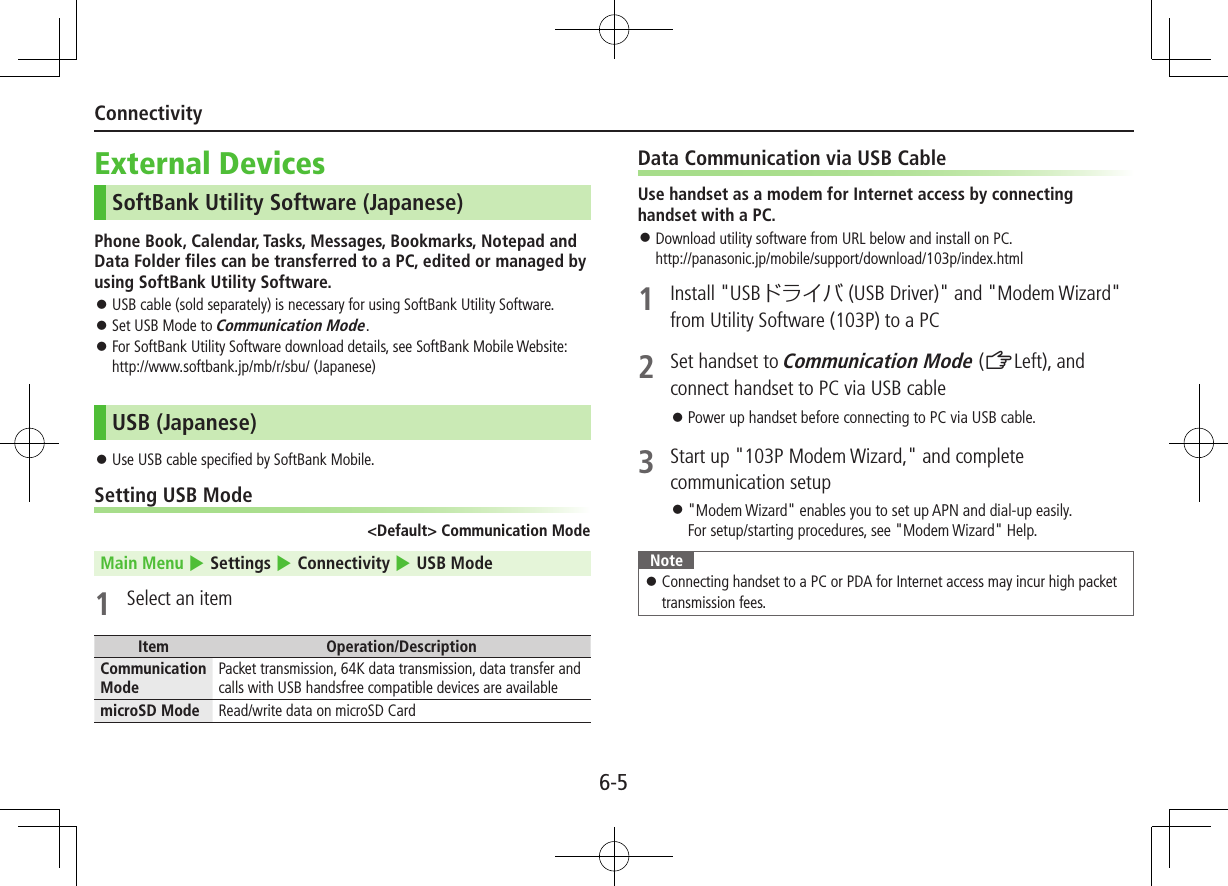
Panasonic Connect 211049A Dual Mode UMTS / GSM Cellular Mobile Radio with Bluetooth User Manual Part 1 of 2
Panasonic Mobile Communications Development of Europe Ltd Dual Mode UMTS / GSM Cellular Mobile Radio with Bluetooth Part 1 of 2
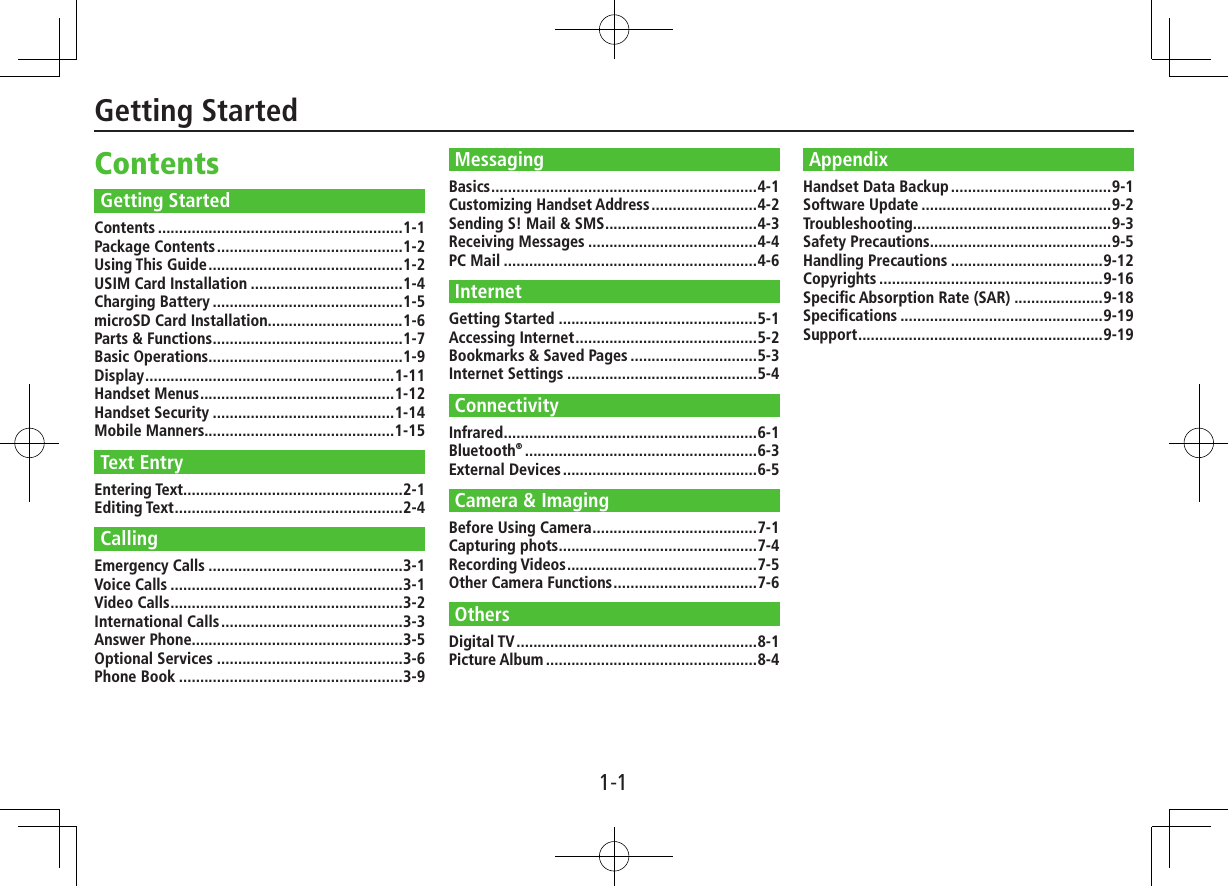
Contents
- 1. User Manual Part 1 of 2
- 2. User Manual Part 2 of 2
User Manual Part 1 of 2

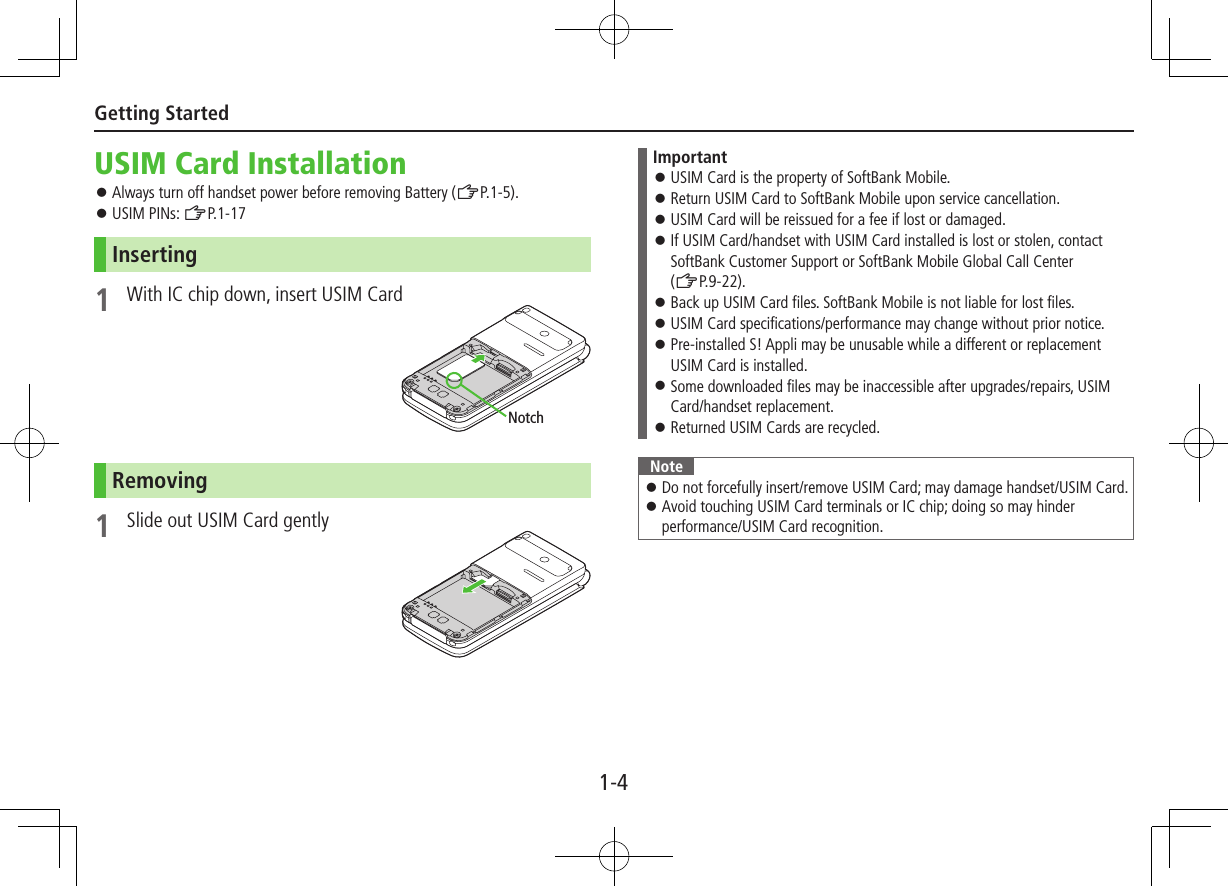

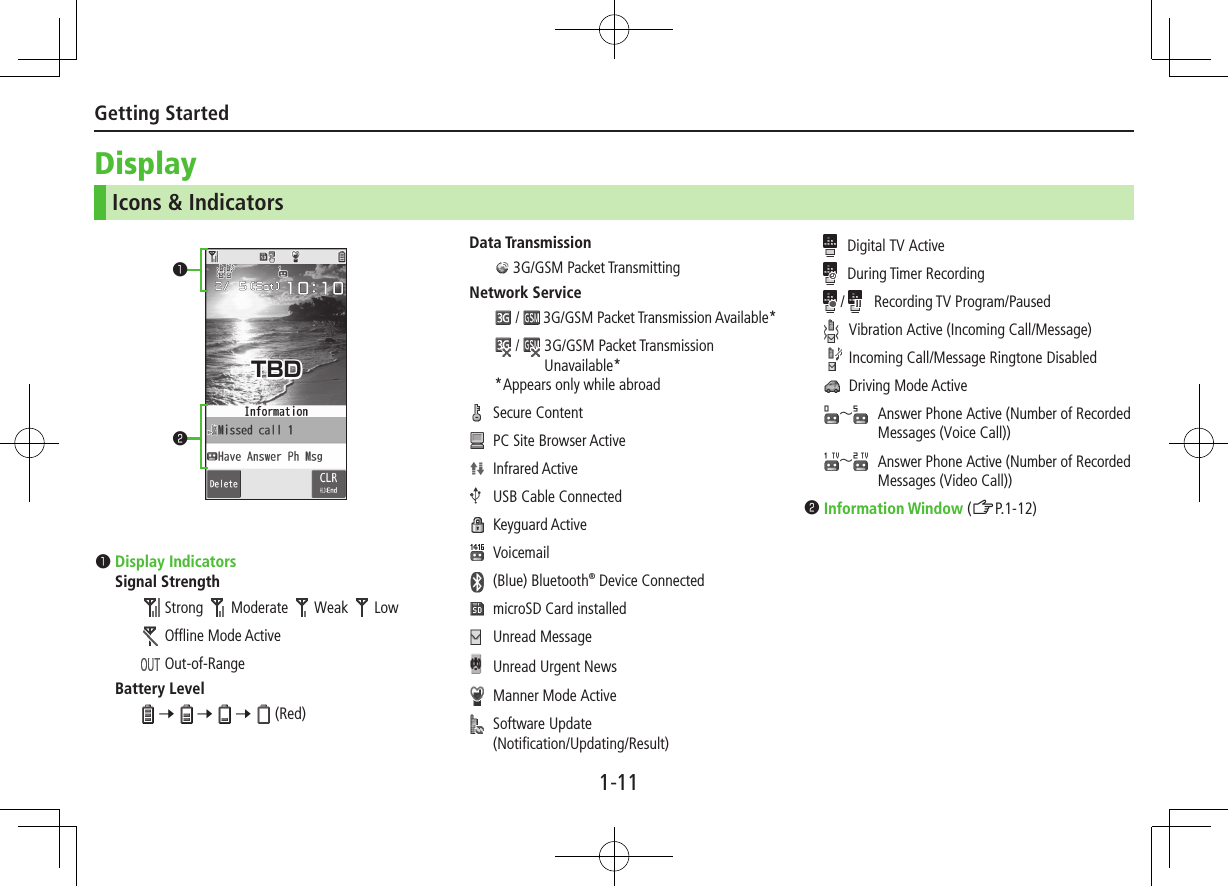
![1-6Getting StartedCharging BatteryUse only specified AC Charger (sold separately).1 Connect AC Charger to handset2 Extend Charger Blades, and plug AC Charger into AC OutletCharging Indicator illuminates and charging starts.When charging is complete, Charging Indicator goes out.3 When charging is complete, unplug AC Charger, then disconnect handsetSqueeze Release Tabs to remove Charger Connector, and replace Port Cover.Port CoverCharging IndicatorExternal Device PortArrows upRelease TabsCharger ConnectorAC ChargerCharger BladesAC Outlet321 microSD Card Installation Power off handset before inserting/removing microSD Card. Handset Data Backup: ZP.9-1Inserting1 Insert microSD Card until it clicks ■Format microSD Card >Main Menu 4 Tools 4 microSD Backup 4 Refer Data 4 S[Menu] 4 microSD format 4 Enter Phone Password 4 YES Formatting microSD Card deletes all saved files/data. Do not power off handset or remove microSD Card while formatting; may damage handset or microSD Card.Removing1 Push microSD Card in microSD Card pops out with a light push.](https://usermanual.wiki/Panasonic-Connect/211049A.User-Manual-Part-1-of-2/User-Guide-1712698-Page-8.png)
![1-10Getting StartedEnglish InterfaceMain Menu 4 4 4 Language 4 EnglishDate & TimeMain Menu 4Settings 4 Date & Time 4 Date & Time1 Enter year 7 Enter date 7 Enter time ■World Clock >After Step 1, Highlight time zone 7 A[Edit] 7 Xz to select a time zone 7 *z[Select] Alternatively, in Step 1, World Clock 7 ON or OFF (7 For ON, Xz to select an area).My Number1 *z 7 P ■Edit Account DetailsSave phone number, mail address, street address, etc. in Account Details. Handset phone number cannot be edited or deleted. >After Step 1, A[Edit] 7 Enter Phone Password 7 Edit 7 A[Finish] ■Send Account Details via Infrared >After Step 1, F[Ir]](https://usermanual.wiki/Panasonic-Connect/211049A.User-Manual-Part-1-of-2/User-Guide-1712698-Page-12.png)
![1-12Getting StartedInformation WindowIn Standby, Information Window opens for missed events.Select a notification to view/access information.1 Highlight an item 7 *zFollow onscreen instructions. Handset Menus1 In Standby, *zMain Menu appears.2 Xz to highlight an icon 7 *z[Select]Selected function menu appears. To return to Standby: LMain MenuStandbyL*zTBDTBD TBD](https://usermanual.wiki/Panasonic-Connect/211049A.User-Manual-Part-1-of-2/User-Guide-1712698-Page-14.png)
![2-1Entering TextEnter alphanumerics, hiragana, kanji, katakana, symbols and pictographs. There are two character input methods: 5-touch and 2-touch In this guide, examples are described for 5-touch.2-touchPress two numeric keys to enter a character.Touch KeypadTouch Keypad is available when text entry window is opened via Touch Menu or handset is closed during Keypad operation. Using Touch Keypad: ZP.2-5 ■Text Entry Window Character Input Methods Operations5-touch/2-touch Press and hold A[Mode] Input Modes (Double-byte/Single-byte) Operations5-touch1/1: Kanji (hiragana) (double-byte)1/11/2: Katakanaabc1/1abc1/2: Uppercase alphanumericsabc1/1Smabc1/2Sm: Lowercase alphanumerics1/11/2: NumbersA[Mode] 7 Select a character type2-touch1/1 1/2: Uppercase alphanumerics/Regular kana1/1Sm 1/2Sm: Lowercase alphanumerics/Small kana To toggle double-/single-byte: A[Mode] To toggle Small kana/Regular kana: IP Remaining BytesText Entry TBD](https://usermanual.wiki/Panasonic-Connect/211049A.User-Manual-Part-1-of-2/User-Guide-1712698-Page-18.png)
![2-2Text EntryEntering CharactersExample: Enter 1 In alphanumerics mode, A[Mode] 7 す: E three timesず: Nz* 7 E three times 7 Gき: W twice* When the next character is on the same key, press Nz first to move cursor.2 Cz to enter Suggestion List To exit list: K3 Xz to select 鈴木 ■Other Input FunctionsEnter katakana/alphanumericsA[Mode] 7 Select input mode (character type) 7 Enter charactersEnter small kana (っ, ッ, etc.)Enter a character 7 J Alternatively, press a key repeatedly for assigned small kana.Enter uppercase lettersEnter a character 7 J Alternatively, press a key repeatedly for assigned uppercase letter.Add ゛or ゜Enter a character to add ゛or ゜ 7 G for ゛or G twice for ゜ In single-byte katakana mode, enter ゛or ゜ as a single-byte character.Insert line feed F[Line FD] to insert line feeds in textAdd space at end of text NzInsert space within textH repeatedly until single-byte space appears*, or S[Menu] 7 Input Space (Double-byte (single-byte) space is entered in 2 bytes (1 byte) input mode.)Reverse toggleF[Rev.]Example: From c, press to toggle as follows: c 7 b 7 a 7 2…Move cursor to beginning/end of sentenceS[Menu] 7 Jump 7 To beginning or To endUndo 1[Undo]* Space cannot be entered in number mode. Use symbol list.TBDTBD](https://usermanual.wiki/Panasonic-Connect/211049A.User-Manual-Part-1-of-2/User-Guide-1712698-Page-19.png)
![2-3Text EntryPictographs/Symbols/Smileys/URLs Pictographs do not appear in messages sent to incompatible SoftBank handsets or most e-mail addresses.1 In text entry window, GList Log may appear first.1 Only in S! Mail text entry window2 Only for S! Mail2 To toggle tabs, A[] or S[]3 Xz to select a pictograph/symbol/smiley/URL To close list: KTemplatesInsert templates (greetings, URLs, emoticons, etc.).1 In text entry window, press and hold G Not available in number mode.2 Select a category 7 Select a templateAdditional Features1 In text entry window, S[Menu] 7 Templates/Quote2 Select an itemItem Operation/DescriptionKuten code Enter a character code >Enter a character code (4 digits)Quote phone bookQuote Phone Book entry details >Select an entry 7 Check items 7 A[Finish] Quote accnt detlsQuote Account Details >Enter Phone Password 7 Check items 7 A[Finish]Bar code reader Activate Bar Code Reader to insert scanned resultMy Pict.1: My PictogramsUnivrsl.2: Universal (cross-carrier) pictographsFull: All pictographsSymbol: SymbolsSmiley: SmileysURL: URLsTBD](https://usermanual.wiki/Panasonic-Connect/211049A.User-Manual-Part-1-of-2/User-Guide-1712698-Page-20.png)
![2-4Text EntryEditing TextDeleting & Replacing1 Delete Characters within LinesPlace cursor before a character 7 KA character after cursor is deleted. Press and hold K to delete all characters after cursor. Delete Characters from the End of TextPlace cursor at the end of text 7 KA character before cursor is deleted. Press and hold K to delete all characters before cursor.2 Enter another characterCopy/Cut & Paste1 In text entry window, S[Menu] 7 Copy or Cut2 Select Text to Copy/CutPlace cursor before (or after) text to select 7 *z[Start] 7 Place cursor after (or before) text 7 *z[End] Select All (In S! Mail Message Text Entry Window Only)S[All] 7 *z[End]3 Place cursor at target location 7 S[Menu] 7Paste](https://usermanual.wiki/Panasonic-Connect/211049A.User-Manual-Part-1-of-2/User-Guide-1712698-Page-21.png)
![3-1Emergency CallsCall 110 (Police), 119 (Fire & Ambulance) or 118 (Coast Guard) even when some handset restrictions are active. Calls cannot be made in PIN/PIN2, PUK/PUK2 entry window.Emergency Positioning RequestWhen an emergency call is made from a mobile phone, location is reported to first response agencies such as the police. Location information may be inaccurate due to location or signal conditions. Describe location or nearby landmarks. Base Station Positioning System is accurate within 100 meters to 10 kilometers. Location information from distant base stations may be inaccurate. Function available wherever system is installed by first response agencies. Dialing 184 before 110, 119 or 118, cancels location report. However, first responders may obtain location information for immediate and serious threats to life. Not available for international roaming. Requires no separate subscription or transmission fees.Voice CallsMaking Voice Calls1 Enter number with area code 7 J To adjust volume: ?z or 562 L to end call ■Call from Call Logs ><z 7 Select a record 7 J ■Make Calls from Phone Book >Cz 7 <z to select a page of the required reading 7Select an entry 7 Nz 7 Select a phone number ■Show/Hide Caller ID >Enter number 7 S[Menu] 7 Notify caller ID 7 OFF or ON To always show/hide Caller ID: Main Menu 4 Settings 4 Call Settings 4 Caller ID 4 Activate 4 ON, OFF or Network Set** Network Set Caller ID setting varies by subscription.Answering Voice Calls1 When a call is received, J to talk To adjust volume: ?z or 562 L to end callCalling](https://usermanual.wiki/Panasonic-Connect/211049A.User-Manual-Part-1-of-2/User-Guide-1712698-Page-22.png)
![3-2CallingVideo Calls ■Video Call WindowExample: Display appearance may vary by settings/conditions.Making Video Calls1 Enter number with area code 7 A[V.Call]Alternative Image is sent. To send Video Image: 1[image] To adjust volume: ?z2 L to end call ■Call from Call Logs ><z 7 Select a record 7 A[V.Call] ■Make Calls from Phone Book >Cz 7 <z to select a page of the required reading 7Select an entry 7Nz 7 Highlight a phone number 7 A[V.Call]Answering Video Calls1 When a video call is received, J to talk To send Video Image: 1[image] To adjust volume: ?z2 L to end callVideo Call IndicatorCall TimeIncoming ImageOutgoing Image (Alternative Image/Video Image)Indicators : Incoming/Outgoing Sound OK (Gray): Incoming/ Outgoing Sound NA : Incoming/Outgoing Image OK (Gray): Incoming/ Outgoing Image NA : Video ON : Alternative Image ON : Speaker ON : During Bluetooth® handsfree call : Close-up : Landscape : Night modeTBD](https://usermanual.wiki/Panasonic-Connect/211049A.User-Manual-Part-1-of-2/User-Guide-1712698-Page-23.png)
![3-3CallingInternational CallsCalling Abroad from Japan No application required. See SoftBank Mobile Website: http://mb.softbank.jp/en/global_services/call/1 Enter a phone number2 S[Menu] 7 Int'l dial assistCountry/region code list appears.3 Select a country/region4 Voice CallJ Video CallA[V. Call] ■Enter Country/Region Code Directly >P 7 Press and hold P for + (IDD Prefix) 7 Enter a country/region code 7 Enter number (omit first 0) 7 Voice Call: J/Video Call: A[V. Call] Do not omit leading 0 when calling Italy (country code: 39).Global Roaming May require Global Roaming Service application. See SoftBank Mobile Website:http://mb.softbank.jp/en/global_services/global_roaming/Example: When Roaming Dial Assistant is ON Roaming Dial Assistant (ZP.3-4) is ON and Japan by default.1 Voice CallEnter a phone number 7 J Video CallEnter a phone number 7 A[V. Call]2 Select an itemItem Operation/DescriptionCall to Japan* Call Japan Call to set code* Call a country/region set for Roaming Dial AssistantAs is Call Manually enter number to callSelect when calling within the country/region* First 0 is replaced by IDD Prefix and country/region code (e.g. +81). (When calling Italy, +39 is added before first 0.) Confirmation window appears the first time. Select NO to set Roaming Dial Assistant to OFF.Note IDD Prefix and country/region code can be manually entered in Step 1. Alternatively, save IDD Prefix and country/region code in Phone Book entries.](https://usermanual.wiki/Panasonic-Connect/211049A.User-Manual-Part-1-of-2/User-Guide-1712698-Page-24.png)
![3-4CallingInternational Call SettingsFrom Main Menu 4 Settings 4 International Call ■International Dial Assist Settings >Int’l Dial Assist 7 Select an itemItem Operation/DescriptionRoaming Dial AssistantAutomatically inserts prefixes (IDD Prefix and country code) >ON or OFF (7 For ON, select a country/region)Country/Area CodeSave country/region codes >Highlight <Not Recorded> 7 A[Edit] 7 Enter country/region name 7 Enter country/region code To view an entry: Select a saved country/region To delete: Highlight a country/region 7 S[Menu] 7 Delete this or Delete all (7 For Delete all, enter Phone Password) 7 YESIDD Prefix Edit IDD Prefix. IDD Prefix is set to 0046010 by default >S[Menu] 7 Edit 7 Edit IDD Prefix ■Network Mode<Default> Automatic >Select Network 7 Select an itemItem Operation/DescriptionAutomatic Handset automatically selects 3G network in Japan, and available network (3G or GSM) abroad.Manual >Select an item・ 3G/GSM: 3G service area in Japan or 3G/GSM abroad.Handset selects an available network automatically.・ 3G: 3G service areas in Japan or abroad.・ GSM: GSM service areas abroad. Unavailable in Japan. Automatic is recommended. ■Select Operator<Default> Auto >Select Operator 7 Select an itemItem Operation/DescriptionAuto Select an operator automaticallyManualSelect an operator manually >Select an operator Operators with X are not available. To view operator list: A[Update]Network Re-searchSearch available networks When Auto, handset selects an available operator automatically. When Manual, operator list appears.](https://usermanual.wiki/Panasonic-Connect/211049A.User-Manual-Part-1-of-2/User-Guide-1712698-Page-25.png)
![3-5CallingAnswer Phone When Answer Phone is active, – (Voice Call) or – (Video Call) appears in Standby (Voice Calls are prioritized). Unavailable when: handset is off or in Offline Mode; appears. Use Voicemail (ZP.3-7).Activating/Canceling Answer Phone<Default> OFF1 Press and hold K To toggle settings, repeat operation. ■Redirect a Call to Answer Phone >A[Ans. Ph]Note When full, new messages cannot be recorded even if Answer Phone is activated. Delete old messages (ZRight).Playing MessagesWhen a new message is recorded,Information Window opens in Standby.1 In Information Window, Have Answer Ph Msg 2 Select a messageDeleting MessagesMain Menu 4 Tools 4 Sound Recorders 4 Voice Call Data or Video Call Data 1 (Highlight a message 7) S[Menu] 7 Select an item2 YES ■Delete a message during playback >During playback, S[Erase] 7 YES TBD](https://usermanual.wiki/Panasonic-Connect/211049A.User-Manual-Part-1-of-2/User-Guide-1712698-Page-26.png)
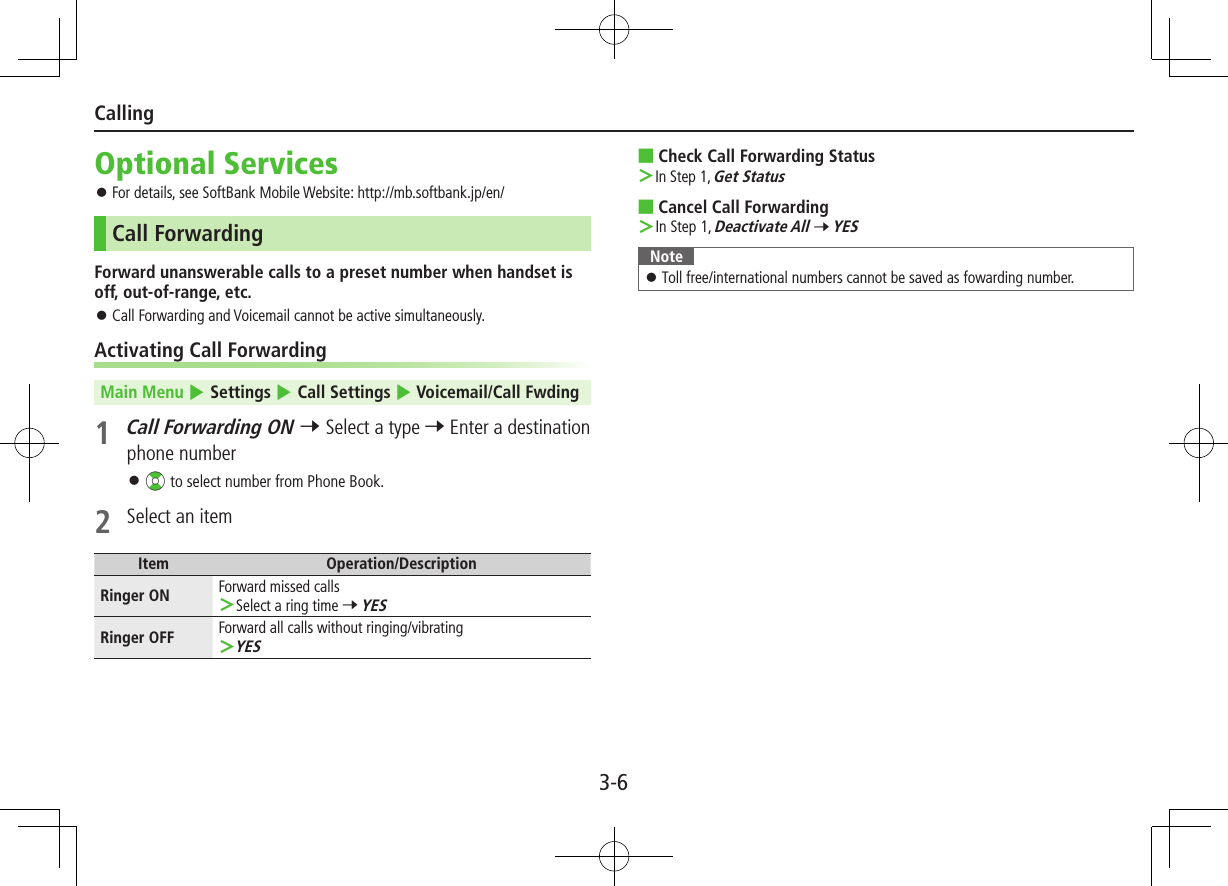
![3-7CallingVoicemailUnanswered calls are forwarded to Voicemail Center as set or when handset is off, out-of-range, engaged, etc. Calls are forwarded to Voicemail Center via Call Forwarding function; Call Forwarding and Voicemail cannot be active simultaneously. Voicemail is not available for Video Calls.Activating VoicemailMain Menu 4 Settings 4 Call Settings 4 Voicemail/Call Fwding1 Voicemail ON2 Select an itemItem Operation/DescriptionRinger ON Forward missed calls >Select a ring time 7 YESRinger OFF Forward all calls without ringing/vibrating >YES ■Check Voicemail Status >In Step 1, Get Status ■Cancel Voicemail >In Step 1, Deactivate All 7 YESPlaying Voicemail MessagesInformation Window and appear in Standby when new messages are recorded.1 In Information Window, Voicemail 7 YESFollow voice guidance. When Information Window does not appear, Main Menu 4 Settings 4 Call Settings 4 Voicemail/Call Fwding 4 Play Voicemail 4 YES. ■View DetailsView callers' phone numbers and date/time Voicemail messages were left before playing messages. Activate Missed Call Notification beforehand (ZBelow). >Vz 7 Voice Mail Notif. 7 F[]Missed Call NotificationWhen Missed Call Notification function is active, Information Window appears for calls missed while handset was off, out-of range, engaged etc. Available only when Voicemail is active.Main Menu 4 Settings 4 Call Settings 4 Missed Call Notifi.1 YESHandset connects to the Network. Follow voice guidance.TBD](https://usermanual.wiki/Panasonic-Connect/211049A.User-Manual-Part-1-of-2/User-Guide-1712698-Page-28.png)
![3-8CallingCall WaitingPlace the current call on hold and answer a second, or alternate between calls. Separate subscription is required for this service.Activating/Canceling Call WaitingMain Menu 4 Settings 4 Call Settings 4 Call Waiting1 Activate or Deactivate 7 YES ■Check Call Waiting Status >In Step 1, Get StatusAnswering Second Call1 When tone sounds, J Press J to alternate between calls. When a second call comes in while first call is on hold, hold status is canceled and first call resumes. ■Reject Second Call >When tone sounds, S[Menu] 7 Call RejectionNote When Voicemail or Call Forwarding is set to Ringer ON while Call Waiting is active, unanswered calls are transferred to Voicemail Center or the forwarding number. When Voicemail or Call Forwarding is set to Ringer OFF, Call Waiting is disabled.Call BarringRestrict incoming/outgoing Voice Calls, Video Calls or SMS messages. Bar All Outgoing and Bar All Incoming are not available when Call Forwarding or Voicemail is active. (Call Forwarding or Voicemail takes priority.) Emergency numbers (110, 119, 118) are dialable even while Call Barring for outgoing calls is active.Activating/Deactivating Call BarringMain Menu 4 Settings 4 Call Settings 4 Call Barring1 Select an itemItem Operation/DescriptionBar All Outgoing Restrict all non-emergency callsBar All Int'l Allow only domestic callsBar Int'l Restrict all international calls except to JapanBar All Incoming Reject all callsBar All Roaming Reject calls when outside Japan2 Activate or Deactivate 7 YES 7 Enter Center Access Code ■Check Call Barring Status >After Step 1, Get Status ■Cancel All Call Barring >In Step 1, Cancel All Barring 7 Enter Center Access Code](https://usermanual.wiki/Panasonic-Connect/211049A.User-Manual-Part-1-of-2/User-Guide-1712698-Page-29.png)
![3-9CallingPhone BookSaving to Phone BookCreating New Entries1 Press and hold Cz 7 Enter Last name 7 Enter First name 7 Select an item 7 Enter information 7 A[Finish]Saving Numbers from Call Logs1 <z 7 Highlight a record 7 S[Menu] 7 Add to Phone Book2 New EntryNew 7 Enter other details Add to Existing EntryAdd 7 Select entry 7 Enter other details When saving to USIM Card, Overwrite appears instead of Add.3 A[Finish] (7 YES)Note Press S[Menu] from a function. If Add to Phone Book appears, the information is savable to Phone Book. From a message window, select Add Address to save entries; from photo list/photos, select Set display 7 Phone Book to save entries.Changing Save SettingsMain Menu 4 Phone 4 Settings 4 Save Settings1 Phone, USIM or Ask Every TimeManaging Phone BookEditing Phone Book Entries1 Cz 7 Select an entry 7 1[Edit] 7 Edit entry 7 A[Finish] 7 YES ■Delete Phone Book Entries >Cz 7 Highlight an entry 7 S[Menu] 7 Delete phone book 7 Select an item 7 Follow steps for selected itemPhone Book Memory StatusMain Menu 4 Phone 4 Memory Status](https://usermanual.wiki/Panasonic-Connect/211049A.User-Manual-Part-1-of-2/User-Guide-1712698-Page-30.png)
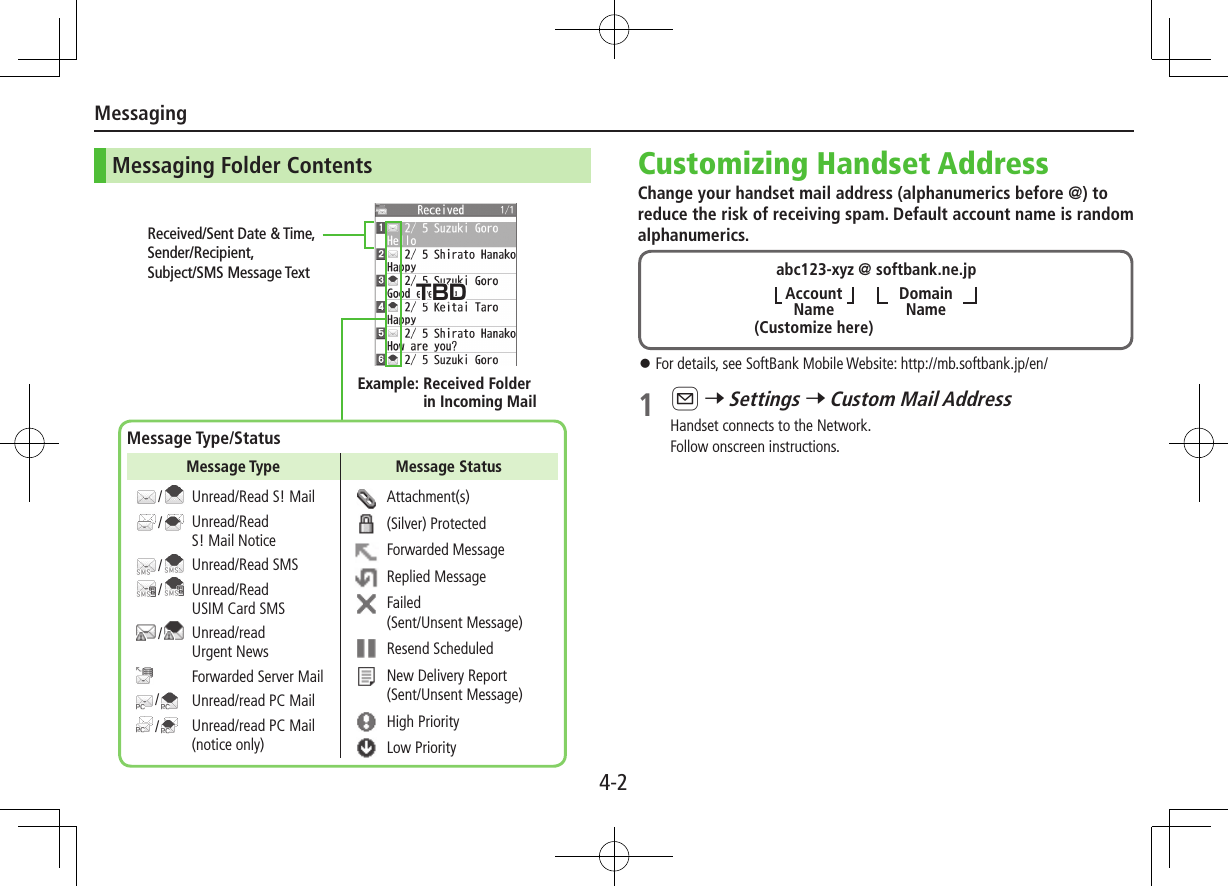
![4-1BasicsSend messages via S! Mail, SMS or PC Mail. SoftBank Mobile messaging services are available in Japan and overseas. For more information, see SoftBank Mobile Website: http://mb.softbank.jp/en/Messaging FoldersOperations while Using PC MailSetting PC Mail accounts creates account folders in Messaging Folders. S! Mail/SMS operations may change as a result.Sent/UnsentSent/Unsentユーザーフォルダ 1-3DraftsMessaging FoldersIncoming MailReceivedSpam FolderUrgent Newsユーザーフォルダ 1-3Create MessagesReceive Urgent NewsReceive MessagesSave as DraftsSend MessagesComplete/Not CompleteAuto ResendWhen handset is out-of-range or in Offline Mode, unsent messages are saved as Unsent and protected from auto deletion.When signal returns, messages are automatically sent. Once sent, messages are unprotected. To cancel Auto Resend: A 7 Sent/Unsent 7 Select a folder 7 Highlight a message 7 S[Menu] 7 Release Resending When Auto Resend function is set to OFF, unsent messages are not automatically sent. However, messages saved as Unsent while Auto Resend was active are sent automatically. To deactivate Auto Resend function, A 7 Settings 7 Universal Settings 7 Auto Resend 7 OFF.Deleting Messages AutomaticallyWhen memory for Messaging Folders is low, old messages are automatically deleted one by one. Protect important messages from unintentional deletion, or set message deletion settings to OFF. Messages in Drafts and SMS on USIM Card are not deleted automatically. To protect messages: In message list, select/highlight a message 7 S[Menu] 7 Protect 7 This one or Selected (7 For Selected, check messages 7 A[Finish]) To deactivate Auto Delete: A 7 Settings 7 Universal Settings 7 Auto Delete 7 Auto Sent Msg Del or Auto Received Msg Del 7 OFF ■View Memory Status >A 7 Memory StatusMessaging](https://usermanual.wiki/Panasonic-Connect/211049A.User-Manual-Part-1-of-2/User-Guide-1712698-Page-31.png)
![Messaging4-3Sending S! Mail & SMSSending S! Mail1 Press and hold A2 Select Address field3 Select from Phone BookPhone Book 7 Select a Phone Book entry 7 Select a mail address or SoftBank handset number Enter DirectlyEnter Mail Address or Enter Phone Number 7 Enter a mail address or SoftBank handset number Select from Sent/Received LogsSent Address or Received Address 7 Select a record 7 *z[Select]4 Select Subject field 7 Enter subject5 Select Text field 7 Enter text6 A[Send]Address fieldMail sizeSubject fieldAttachment fieldText field ■Add Address >Select Address field 7 <Not entered> 7 Search/enter address 7 Select an address/SoftBank handset number or enter directly 7 A[Finish] ■Use Templates >In Composition window, S[Menu] 7 Load Template 7 Highlight a template (7 A[View]) 7 *z[Select] ■Manual Mail Conversion >In Composition window, S[Menu] 7 Change mail type 7 Select an itemAdding AttachmentsFrom Composition window, select Attachment field ■Add Attachments >Select a folder in Data Folder 7 Select a file ■Capture Pictures/Videos to Attach >Activate Camera 7 Photo mode or Video mode 7 Frame subject 7 *z[Record] or P (7 For video, *z[Stop] or P) 7 *z[Save] or PComposition WindowTBD](https://usermanual.wiki/Panasonic-Connect/211049A.User-Manual-Part-1-of-2/User-Guide-1712698-Page-33.png)
![Messaging4-4Sending SMS Messages1 A 7 Create New SMS2 Select Address field3 Select from Phone BookPhone Book 7 Select a Phone Book entry 7 Select a SoftBank handset number Enter DirectlyDirect Entry 7 Enter a SoftBank handset number Select from Sent/Received LogsSent Address or Received Address 7 Select a record 7 *z[Select]4 Select Text field 7 Enter text When number of entered character exceeds limit, S! Mail conversion option message appears.5 A[Send] ■Manual Mail Conversion >In Composition window, S[Menu] 7 Change mail type 7 Select an itemAddress fieldText fieldComposition WindowReceiving MessagesRetrieving S! Mail AutomaticallyAuto download retrieves up to 1 MB messages. Transmission fees are incurred; adjust to use. (To disable auto download/limit message size for auto download: ZP.4-5)When a new message is received, appears and Information Window opens in Standby.1 In Information Window, New message When Information Window does not appear, A 7 Incoming Mail 7 Select a folder 7 Select a message.TBDTBD](https://usermanual.wiki/Panasonic-Connect/211049A.User-Manual-Part-1-of-2/User-Guide-1712698-Page-34.png)
![Messaging4-5Retrieving Complete S! MailWhen Center sends initial portion of message (S! Mail Notice), retrieve the complete message manually.1 Select a message with or 7 Select continue (xxxKB) at the end of message textIncoming Options (S! Mail Only)From Main Menu 4 Messaging 4 Settings 4 S! Mail Settings 4 Incoming Options1 Select an itemItem Operation/DescriptionDownload Size LimitLimit maximum incoming message size >300KB or 2MBAuto Retrieve SizeDeactivate/limit Auto retrieval >Select an itemAuto Retrieve forLimit Auto retrieval by Message Type >All Messages or Selected Messages (7 For Selected Messages, Check Address Stored in PB or SoftBank Domain Only 7 A[Finish])Setting Filters (Auto-sort)1 A 7 Incoming Mail or Sent/Unsent2 Highlight a folder 7 S[Menu] 7 Auto-sort Setting3 S[Menu] 7 Select an itemItem Operation/DescriptionAdd SubjectFilter messages by subject >Enter a subject SMS cannot be sorted by subject.Add AddressFilter messages by address >Search/enter address 7 Select/enter an address/SoftBank handset numberAdd Group Filter messages by Group in Phone Book >Select a groupAdd Mail group Filter messages by Mail Group >Select a Mail Group ■Edit Sort Conditions >After Step 2, highlight an item 7 *z[Edit] 7 Edit ■Delete Auto-sort Settings >After Step 2, (highlight an item 7) S[Menu] 7 Delete or Delete All (7 For Delete All, enter Phone Password) 7 YES ■Re-sort Set Folders >To re-sort messages in a specific folder: After Step 1, highlight a folder 7 S[Menu] 7 Re-sort in This 7 YES >To re-sort messages in all folders: After Step 1, S[Menu] 7 Sort in All 7 YESTBD](https://usermanual.wiki/Panasonic-Connect/211049A.User-Manual-Part-1-of-2/User-Guide-1712698-Page-35.png)
![Messaging4-6PC Mail Using auto-receive settings may incur high packet transmission fees. Be careful when using handset abroad. (To disable auto download: ZRight)PC Mail Account Setup Check ISP information in advance. PC Mail services may not be available depending on services, settings, contract details for PC mail account.1 A 7 Settings 7 PC Mail Settings 7 Account Settings2 <Not Recorded> 7 Select an itemItem Operation/DescriptionAccount Name >Enter an account nameIncoming Options >Select an item 7 Enter/select an item 7 K User Name, Password and Receiving Server are required.Sending Options >Select an item 7 Enter/select an item 7 K Mail Address and Sender Server are required. 3 A[Finish] 7 OK ■Quick Yahoo! Mail Address Setup >After Step 1, Set Quick Yahoo! Mail 7 YES or NO Follow onscreen instructions. ■Set Default Account >After Step 1, highlight an account 7 S[Menu] 7 Default account ★ appears for selected account. ■Delete Account >After Step 1, highlight an account 7 S[Menu] 7 Delete account 7 Enter Phone Password 7 YES Sending PC Mail1 Press and hold A 7 PC Mail2 Compose a message and send(ZFrom Step 2 on P.4-3) ■Change Account >After Step 1, select Account field 7 Select an accountPC Mail SettingsFrom Main Menu 4 Messaging 4 Settings 4 PC Mail Settings 4 Auto Check ■Auto Retrieve for New Messages >Mail Account 7 Select an account (*z to toggle on/off) 7 A[Finish] ■Set Auto Retrieve Interval/Condition >Interval 7 Select an item ■Auto Retrieve (while Abroad) >Roaming 7 ON or OFFAccount fieldPC Mail Composition WindowTBD](https://usermanual.wiki/Panasonic-Connect/211049A.User-Manual-Part-1-of-2/User-Guide-1712698-Page-36.png)
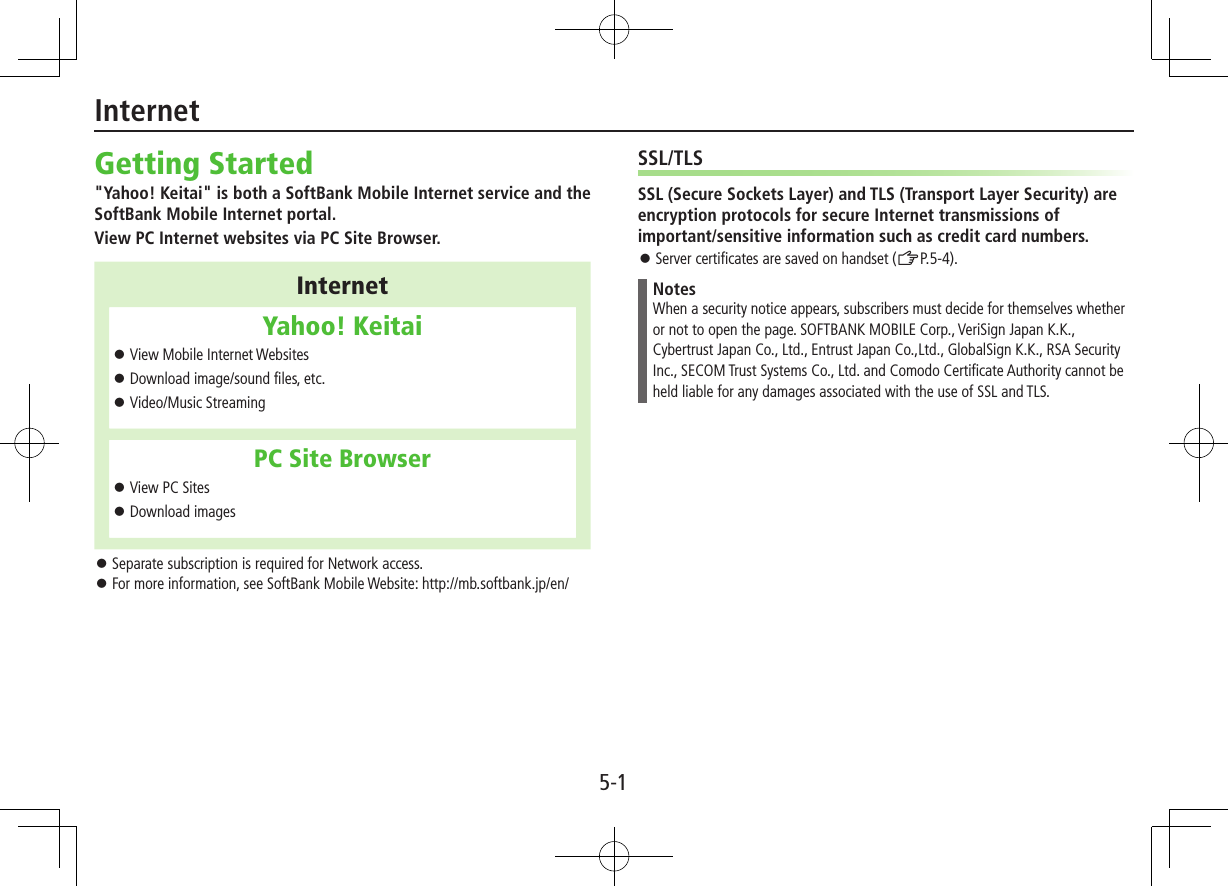
![5-2InternetAccessing InternetYahoo! KeitaiFrom Main Menu 4 Yahoo!Opening Yahoo! Keitai Menu1 Open Top MenuYahoo! Keitai Open Menu ListMenu List2 Select a menu item Repeat Step 2 as required.Web Search1 Web Search 7 Enter text 7 S[OK]Entering URL1 Enter URL2 Enter URL DirectlyDirect Entry 7 Enter URL Use URL HistoryURL History List 7 Select a URL record ■Delete URL History Records >After Step1, URL History List 7 (Highlight a URL 7) S[Menu] 7 Delete or Delete All 7 YESUsing Access History1 History2 Select a history record ■Delete Access History Records >After Step 1, (highlight a record 7) S[Menu] 7 Delete or Delete All 7 YES (7 For Delete All, enter Phone Password) ■View Access History URLs >After Step 1, highlight a record 7 S[Menu] 7 Display URLExiting Mobile Internet1 L 7 YES](https://usermanual.wiki/Panasonic-Connect/211049A.User-Manual-Part-1-of-2/User-Guide-1712698-Page-38.png)
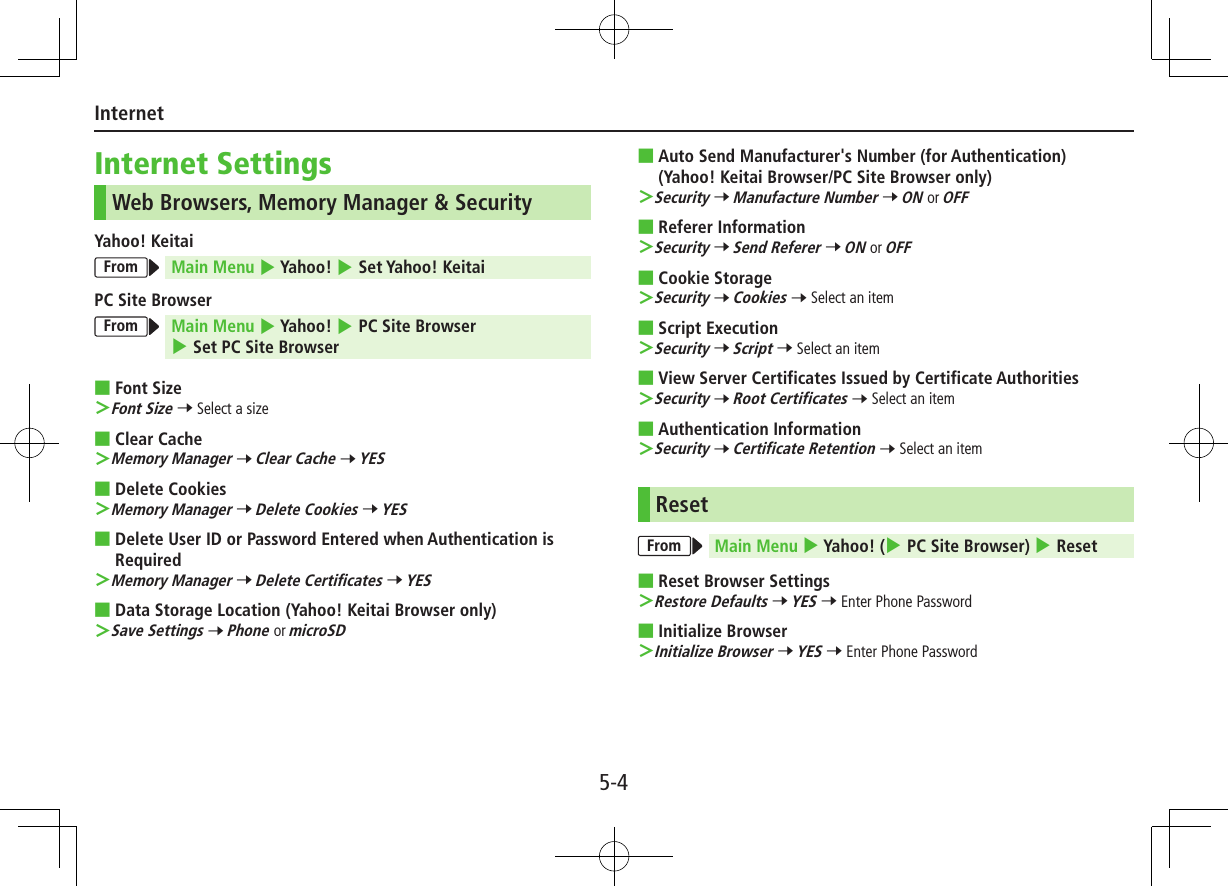
![5-3InternetBrowsing PC Sites Some pages may not be viewable. Viewing PC websites via PC Site Browser may incur high charges.From Main Menu 4 Yahoo! 4 PC Site BrowserOpening Menu1 Homepage2 Select a menu item Repeat Step 2 as required.Web SearchFollow Step 1 of "Web Search" for Yahoo! Keitai (ZP.5-2).Entering URLFollow Steps 1 & 2 of "Entering URL" for Yahoo! Keitai (ZP.5-2).Using Access HistoryFollow Steps 1 & 2 of "Using Access History" for Yahoo! Keitai (ZP.5-2).Exiting Internet1 L 7 YESBookmarks & Saved PagesBookmarks Save links to websites. Handset connects to the Network to open the link.Saved Pages Save page content. Handset opens saved pages without connecting to the Network.Saving Webpages1 Open a webpage 7 S[Menu] 7 Bookmarks or Saved Pages 7 Add2 Select title 7 Edit title3 OK 7 OKViewing Bookmarks & Saved PagesMain Menu 4 Yahoo! (4 PC Site Browser)1 Bookmarks or Saved Pages 7 Select an item](https://usermanual.wiki/Panasonic-Connect/211049A.User-Manual-Part-1-of-2/User-Guide-1712698-Page-39.png)
![6-1InfraredTransfer Phone Book/Schedule entries, Messages, Bookmarks and Data Folder files wirelessly between handset and compatible devices, including PCs and other mobiles. Align infrared ports within 20 cm of one another and make sure no objects are placed between them. Do not move the devices until transfer is complete.Note Following files cannot transfer:・ Files prohibited for transfers from 103P・ Phone Book entries and SMS on USIM Card If memory becomes full, remaining entries are truncated. 赤外線ポート20cm以内20cm以内赤外線ポートSendingOne/Multiple File Transfer1 Open/highlight a file, and follow steps below:Files to Send Operation/DescriptionPhone Book >S[Menu] 7 Send Ir data 7 Send phonebookAccount Details >F[Ir]Messages >S[Menu] 7 Send Ir data 7 Send ThisBookmarks >S[Menu] 7 Send to ExtrnlDvcs 7 Send Ir data 7 Send ThisPhotos/Videos/Widgets >S[Menu] 7 Send Ir data To send multiple files: S[Menu] 7 Multiple-choice 7 Check files to send 7 S[Menu] 7 Send Ir data Other Files >S[Menu] 7 Send Ir data2 YESConnectivity](https://usermanual.wiki/Panasonic-Connect/211049A.User-Manual-Part-1-of-2/User-Guide-1712698-Page-41.png)
![6-2ConnectivityAll File TransfersPrecaution Receiving all files overwrites all saved files including secret/protected files. Sending all Phone Book entries transfers Account Details as well. User-saved Account Details is overwritten on receiving handset (handset number remains). Session NumberSession number (4 digits) is required for all file transfers via Infrared. Sender and recipient must enter same Session number to complete transfers.1 In list, S[Menu] 7 follow steps below:Files to Send Operation/DescriptionPhone BookSend Ir data 7 Send all phonebookMessagesSend Ir data 7 Send AllBookmarksSend to ExtrnlDvcs 7 Send Ir data 7 Send AllOther FilesSend all Ir data2 Enter Phone Password 7 Enter Session number 7 YESReceivingMain Menu 4 Tools 4 Receive via Infrared1 One/Multiple File TransferReceive 7 When a file is received, YES All File TransfersReceive All 7 Enter Phone Password 7 Enter same Session number as sender's 7 YES 7 YES](https://usermanual.wiki/Panasonic-Connect/211049A.User-Manual-Part-1-of-2/User-Guide-1712698-Page-42.png)
![6-3ConnectivityBluetooth® For details about headset/handsfree devices, see the device manuals. Bluetooth® and Wi-Fi devices share the same frequency band. Use of both devices in close proximity may cause interference, affecting transmission speed, clarity or connection quality.Searching & Pairing DevicesMain Menu 4 Tools 4 Bluetooth 4 Search&Paired Device1 YES*Device search starts and names of found devices appear. To search again: A[Search]* If there are already paired devices in list, select a device 7 Select a function2 Select a device 7 YES 7 Enter Phone Password3 Select text entry field 7 Enter Bluetooth® Passkey 4 Select a Bluetooth® function Handset connects to Bluetooth® device. When complete, flashes in blue. After no Bluetooth® connection is made for a certain time, appears in black and Power saver mode starts. While connected, (Blue) appears. While in Standby, (Gray) appears. ■Search&Paired Device List❶ Device Type❷ Device Name When no names are found, Bluetooth® addresses appear.❸ Connection Status: Connected : Not connected : Not found : Not paired❹ Protection Indicator appears when registered contents are protected.❺ Profile StatusIconLetter ColorBackground ColorFrame ColorStatusBlue Gray —Not connected (Not paired)Blue Gray Blue Not connected (Paired)White Green —ConnectedGreen White Green Standby for connectionWhite Light green —Preferred deviceGray Gray —Not supportedSearch&PairedDevice List❷❺❸❹❶TBD](https://usermanual.wiki/Panasonic-Connect/211049A.User-Manual-Part-1-of-2/User-Guide-1712698-Page-43.png)
![6-4ConnectivitySuspending Bluetooth® FunctionsSuspend all Bluetooth® functions connected or on standby for connection, and disable Bluetooth®.Main Menu 4 Tools 4 Bluetooth1 Bluetooth OFF 7 YES To return to standby for previously connected function: Bluetooth ONPlacing Bluetooth® Devices on Standby for ConnectionMain Menu 4 Tools 4 Bluetooth 4 Accept Registered1 Check functions to be on standby for connection 7 A[Finish] To uncheck, select functions to remove check marks.Sending/Receiving Phone BookSending1 Open Phone Book 7 S[Menu] 7 Send to Bluetooth2 One File TransferSend phonebook 7 Select a recipient device All File TransferSend all phonebook 7 Select a recipient device 7 Enter Phone Password3 YESReceivingMain Menu 4 Tools 4 Bluetooth 4 Receive via Bluetooth1 One File TransferReceive 7 YES All File TransferReceive All 7 Enter Phone Password 7 YES 7 YES](https://usermanual.wiki/Panasonic-Connect/211049A.User-Manual-Part-1-of-2/User-Guide-1712698-Page-44.png)
![7-1Before Using Camera Notification Light/Charging Indicator illuminates while Camera is active. Shutter click sounds at fixed volume even in Manner Mode.File Formats & Save LocationPhotos/videos are saved to Data Folder.Image Type File Format Save LocationPhotos JPEG (.jpg) Pictures (Data Folder)Videos MPEG-4 (.3gp, .mp4), ASF (.asf) Videos (Data Folder)Changing Save LocationFrom Main Menu 4 Camera 4 Photo Mode or Video Camera1 S[Menu] 7 Storage setting 7 Store in2 Phone or microSDCamera](https://usermanual.wiki/Panasonic-Connect/211049A.User-Manual-Part-1-of-2/User-Guide-1712698-Page-46.png)
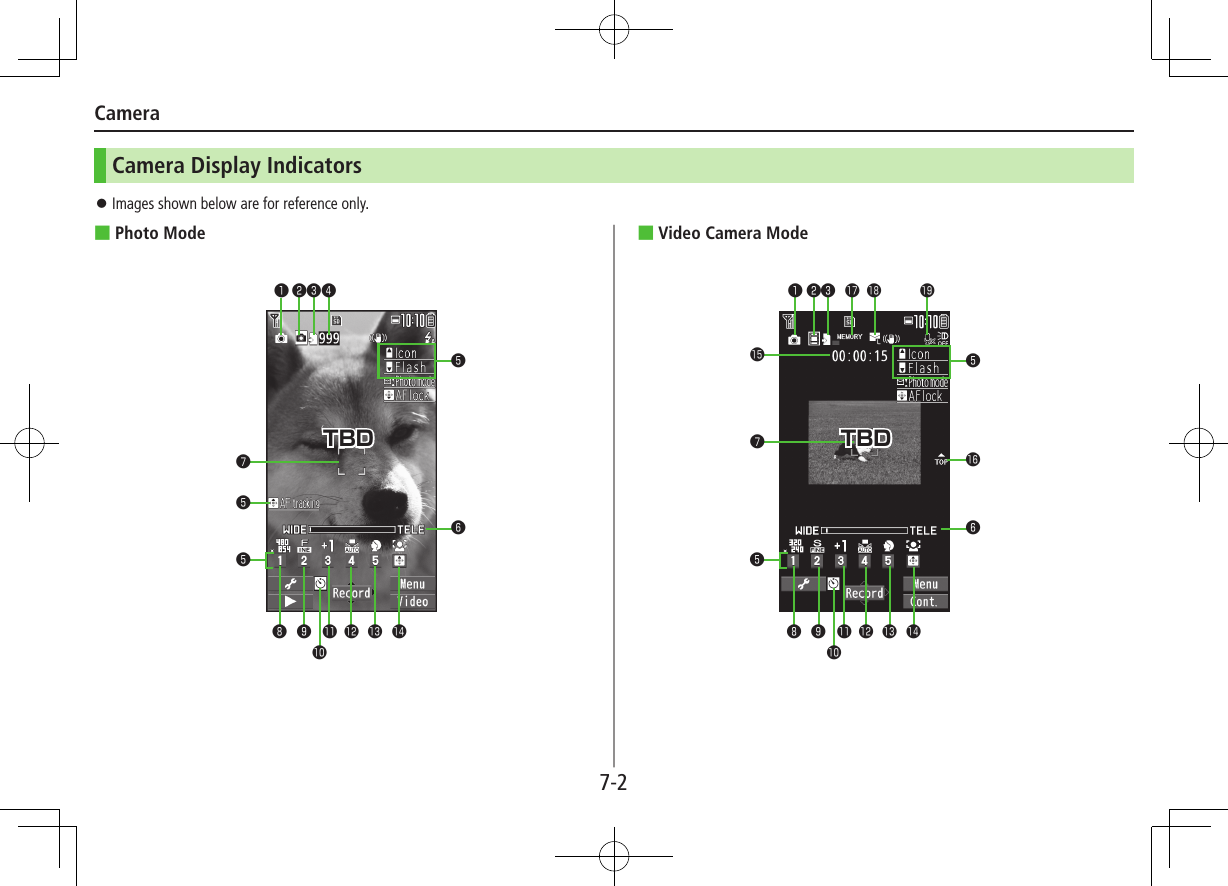
![Camera7-3Item Description❶Photo mode iA (Intelligent Auto) Normal Scene MyOriginal (For Scene/MyOriginal, indicators vary by setting.)❷Camera mode Photo Mode Video Camera / / Action mode (Auto/Manual/Auto bracket)❸Store in Phone microSD❹No. of frames Show number of remaining frames❺Key guidance Show key operation guidance❻Zoom bar Indicate zoom level❼Focus Guide Auto focus guide AF tracking guide❽Image size Indicate image size❾Quality Standard Fine SuperAuto timerExposure Adjust brightness (Level -3 to +3)White balance Auto Fine Cloudy Bulb LightScene Portrait Sports Food Scenery Nightscape Backlight Character Snow Sunset PetFocus mode Face Detect Auto Macro Landscape AF trackingRecordable time Indicate recordable timeTop indicator Indicate vertical directionMemory capacity bar Indicate memory status (appears in red when memory is full)File size Mail restrict'n(S) Mail restrict'n(L) Long timeMovie type set Record video without audioKey Guidance Follow the steps below to change settings:・ Press keys indicated by ❺ (7 ?z to select an item)・ A[] 7 <z to select a setting 7 ?z to select an item](https://usermanual.wiki/Panasonic-Connect/211049A.User-Manual-Part-1-of-2/User-Guide-1712698-Page-48.png)
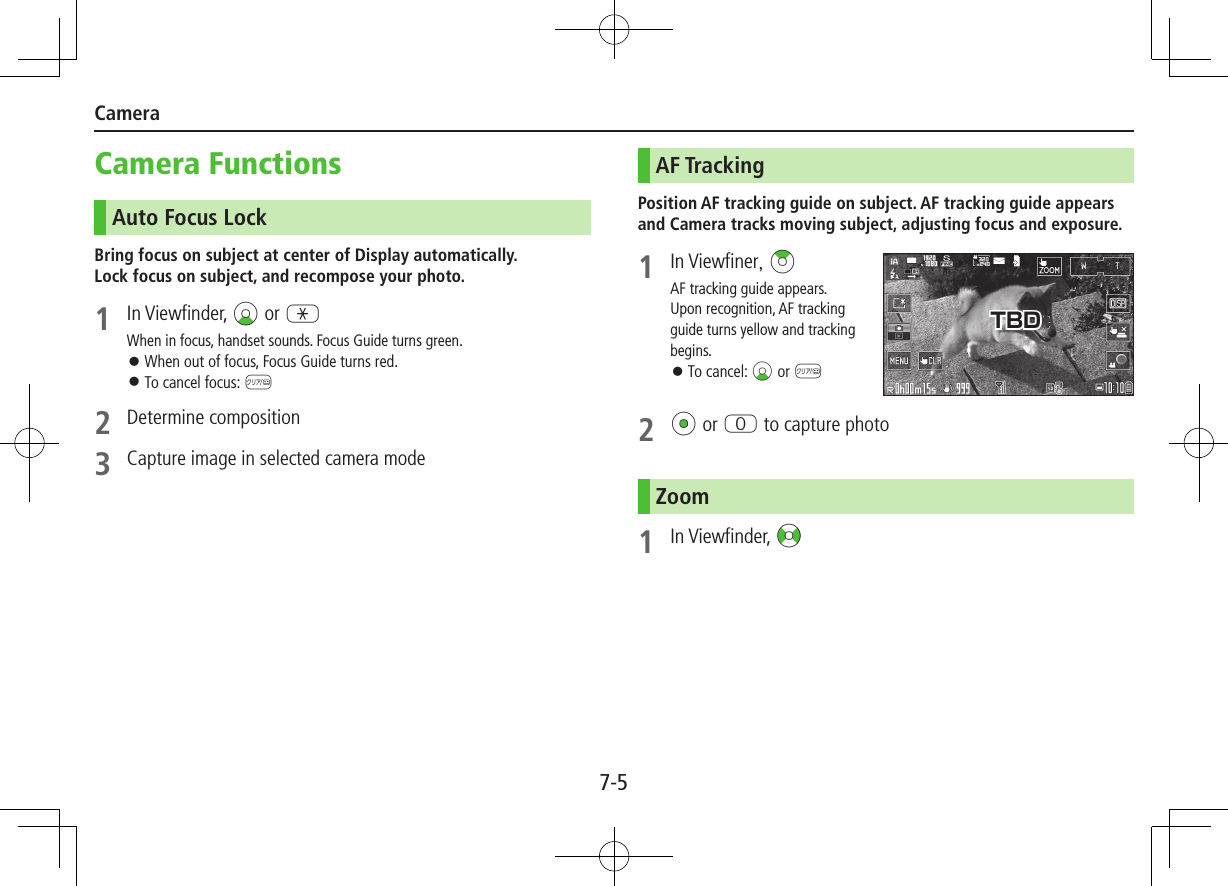
![7-4CameraCapturing Photos1 FPhoto Viewfinder appears.2 Frame subject 7 *z[Record] or PShutter click sounds. To return to Viewfinder without saving the image: K3 *z[Save] To view the photo immediately after capturing: 1[Folder] 7 K to return to Viewfinder4 L to exitReturn to Standby. ■Send Photo via S! Mail >After Step 2, A[] 7 Create message (ZP.4-3)Photo ViewfinderTBDRecording Videos1 F 7 FVideo Viewfinder appears.2 Frame subject 7 *z[Record] or P to start recordingTone sounds and appears. To return to Viewfinder without saving the image: K3 *z[Stop] to end recordingTone sounds. To view the video immediately after recording: 1[Folder] 7 K to return to Viewfinder4 L to exitReturn to Standby. ■Send Video via S! Mail >After Step 2, A[] 7 Create message (ZP.4-3)Video ViewfinderTBD](https://usermanual.wiki/Panasonic-Connect/211049A.User-Manual-Part-1-of-2/User-Guide-1712698-Page-49.png)
![7-6CameraSelf-Timer1 In Viewfinder, S 7 Auto timer2 ON 7 Enter time (seconds)3 *z[Record]Auto timer tone sounds. After set period of time, shutter is released and recording starts. While Auto timer is active, press A[Quit] or K to return to Viewfinder without canceling Auto timer.Note Auto timer is not available when Action mode is set to Manual. Auto Timer is set to OFF after capturing.Continuous ShootingCapture a succession of up to 20 still images automatically with a single press.1 In Photo Viewfinder, F[Video] 7 F[Cont.] appears. (Icon may change depending on modes.)2 Frame subject 7 *z[Record] or P To stop shooting halfway: K3 Save AllA[STO all] Save Selected ImagesSelect images 7 A[Save] Check mark appears on selected images. To cancel selection, select the image again. Check mark disappears. To view a Full-size Image: Select an image, then press F[Detail] 7 K to return to thumbnail view (<z to view other images while viewing full-size image.)](https://usermanual.wiki/Panasonic-Connect/211049A.User-Manual-Part-1-of-2/User-Guide-1712698-Page-51.png)
![7-7CameraViewing Photos & VideosMain Menu 4 Camera1 S[Menu] 7 Folder jump 2 Select a fileFile appears/plays. To toggle list/thumbnail view: F[Change]TBD](https://usermanual.wiki/Panasonic-Connect/211049A.User-Manual-Part-1-of-2/User-Guide-1712698-Page-52.png)