Panasonic Mobile Communications Development of USA 26C001A GSM Cellular Mobile Radio User Manual VS3 VF AAA
Panasonic Mobile Communications Development Corporation of USA GSM Cellular Mobile Radio VS3 VF AAA
Contents
- 1. User Manual Part 1
- 2. User Manual Part 2
User Manual Part 1


![9Getting StartedHow to read this manual<Example> Fixed dial in Settings menu on page 109.This function is SIM card dependent. For other symbols, refer to page 8.d Menu navigationBefore following the steps, you need to enter Main menu, then move through the sub menus, described next to the d icon. “>” means “scroll through the menu and select”.In the example:From Main menu, press Navigation key (up/down/left/right) to scroll to Settings and press Navigation key (centre). Press Navigation key (up/down) to scroll to Security and press Navigation key (centre) or Left Soft key (Select)*1. Press Navigation key (up/down) to scroll to Fixed dial and press Navigation key (centre) or Left Soft key (Select)*1. You can also select Fixed dial by pressing [D].Now you can continue onto the step 1:1. Press Navigation key (up/down) to scroll to Enable or Disable, then press Navigation key (centre) or Left Soft key (Select)*12. Enter the PIN2 code (4-8 digits), then press Navigation key (centre) or Left Soft key (Ok)*1*1 The word is shown in the lower left hand corner of the display, indicating a command that the key gives to the phone when you press it. Note: There are several ways to select items from menu lists. See “Menu selection method” on page 24.VS3_VF_AAA.book Page 9 Monday, May 23, 2005 11:25 AM](https://usermanual.wiki/Panasonic-Mobile-Communications-Development-of-USA/26C001A.User-Manual-Part-1/User-Guide-551460-Page-17.png)
![14Getting StartedSwitching the phone on/off1. Press and hold [Y] for several seconds to switch the phone onA greeting may be displayed and the phone enters standby mode.2. Press and hold [Y] for several seconds to switch the phone offNote: If your SIM card is PIN protected, your PIN code will be requested. Enter the PIN code and [0]9[5] (Ok). See “Security” on page 108.DO NOT switch the phone off while resetting/downloading/deleting a file and running/terminating a JAVATM application.VS3_VF_AAA.book Page 14 Monday, May 23, 2005 11:25 AM](https://usermanual.wiki/Panasonic-Mobile-Communications-Development-of-USA/26C001A.User-Manual-Part-1/User-Guide-551460-Page-22.png)
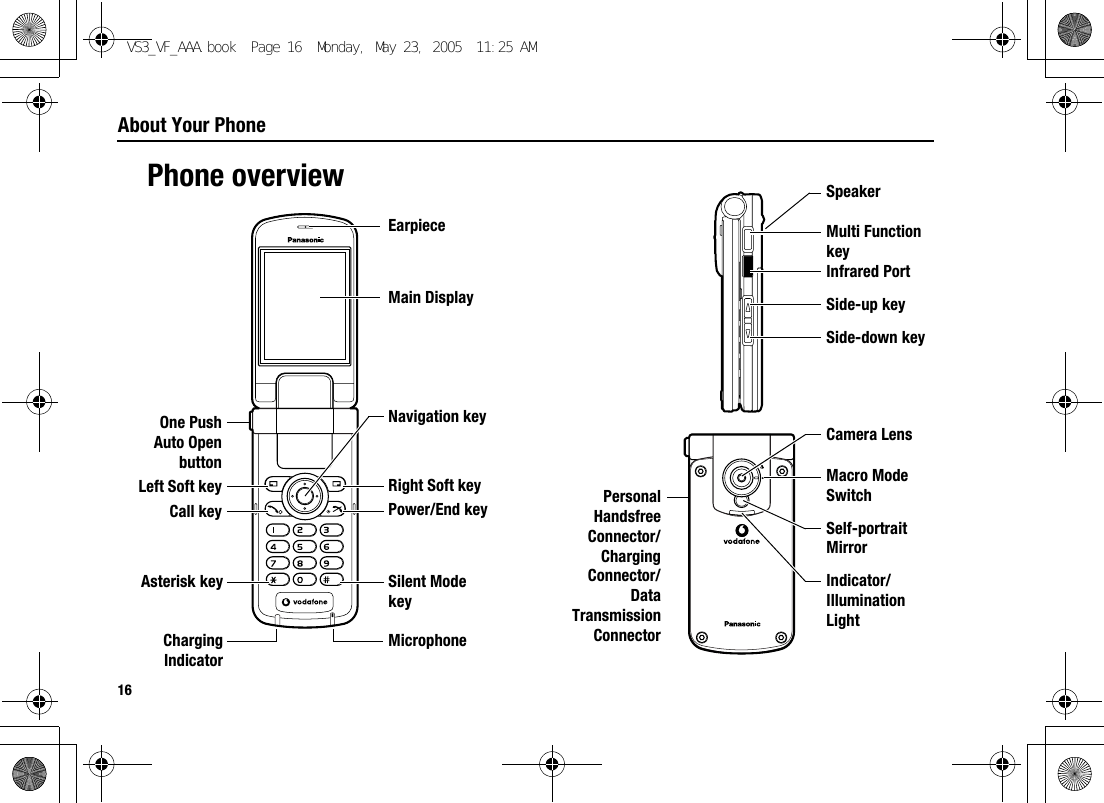
![17About Your PhoneKey functionsKey name Function Key icon*1Navigation keyPress outside edges to scroll up [1], down [2], left [3] or right [4] to move through menus and text. Press centre [0] to select option, perform Alert mute, or take a picture or record a video clip in Camera mode.[1] [2][3] [4][0]Left Soft keyPerform the functions indicated by text shown in the lower left-hand corner of the display. [5]Right Soft keyPerform the functions indicated by text shown in the lower right-hand corner of the display.[6]Call key Make or answer a call. [q]Power/End keyPress and hold to switch the phone on/off. End or reject a call. Return to standby mode.[Y]Numeric keysEnter numbers and characters. Press and hold [S]-[K] for Speed dialling. Press and hold [L] to enter the international prefix (+).[L] to [K]Asterisk keyEnter “e”. In text entry mode, press to change the letter case, or press and hold to change the input method.[e]Silent Mode keyEnter “r”. Press and hold to switch the Silent mode on/off. While entering a phone number, press and hold to enter a pause (p).[r]Key name Function Key icon*1VS3_VF_AAA.book Page 17 Monday, May 23, 2005 11:25 AM](https://usermanual.wiki/Panasonic-Mobile-Communications-Development-of-USA/26C001A.User-Manual-Part-1/User-Guide-551460-Page-25.png)
![18About Your Phone*1The key icons given in the table represent the actual keys on the phone.*2Located on the right side of the phone.Quick keysYou can easily access features instead of navigating through the menus.Side-up key*2Scroll page up. Increase volume or zoom level. Perform Alert mute.[O]Side-down key*2Scroll page down. Decrease volume or zoom level. Perform Alert mute.[P]Multi Function key*2Take a picture or record a video clip in Camera mode. Perform Alert mute.[U]Key name Function Key icon*1Key FunctionIn standby modeShort press[0]Open Main menu/Keyguard off[5] Open Main menu[6] Open Vodafone live![1]9[2]9[3]9[4]Open the shortcut menu[q] Open Call log[O]9[P]Increase/decrease the volumeLong press[0] Keyguard on[A] Dial your voice mailbox[S]-[K] Speed dial[r] Silent mode on/off[U] Switch to Picture modeVS3_VF_AAA.book Page 18 Monday, May 23, 2005 11:25 AM](https://usermanual.wiki/Panasonic-Mobile-Communications-Development-of-USA/26C001A.User-Manual-Part-1/User-Guide-551460-Page-26.png)
![19About Your PhoneDisplayStandby displayDuring a callShort press[1]9[O] Increase the volume[2]9[P] Decrease the volume[U]Start/stop sound recording[q]Switch between hold and unhold on one call or switch between one active and one held callIn Menu listShort press[A]-[K] Select Menu A-K[e] Select Menu e[L] Select Menu L[r] Select Menu rKey FunctionWallpaperBattery charge level iconLeft SoftkeyselectionareaRight Soft key selection areaDateTimeSignal strength iconVS3_VF_AAA.book Page 19 Monday, May 23, 2005 11:25 AM](https://usermanual.wiki/Panasonic-Mobile-Communications-Development-of-USA/26C001A.User-Manual-Part-1/User-Guide-551460-Page-27.png)
![22About Your PhoneMenu navigationDisplaying the menuThe menu system allows you to access functions which do not have their own dedicated buttons on the keypad.In standby mode:1. [0]9[5] (Menu)Main menu appears with 9 menu options. (See “Main menu structure” on page 23.)2. [1929394] to scroll to the required menu 7 [0]9[5] (Select)To go back to Main menu:1. [6] (Back) repeatedly until Main menu screen appearsShortcut: To jump to and open one of the 9 application items, simply press the Numeric key corresponding to the required item’s location. The numbering system is: 123456789VS3_VF_AAA.book Page 22 Monday, May 23, 2005 11:25 AM](https://usermanual.wiki/Panasonic-Mobile-Communications-Development-of-USA/26C001A.User-Manual-Part-1/User-Guide-551460-Page-30.png)
![24About Your PhoneNavigating the applicationsCurrent settingsWhen you highlight an item in the menu list, the current setting of the item is displayed in the bar just above the menu list.<Example>In the case shown to the right, the current setting of Warning tone is “Off”.Menu selection methodThere are several ways to select items: by using Navigation key or Left Soft key, or by entering the required number, e or r given to the item.<Example>To select Warning tone in the display shown to the left:•[192] to scroll to Warning tone 7 [0]•[192] to scroll to Warning tone 7 [5] (Select)• Press the menu number [G]Keys corresponding to the menu numbers•[A]-[K]: Menu A-K•[e]: Menu e•[L]: Menu L•[r]: Menu rNote: Direct access keys to the menus with no menu numbers/symbols are not available.VS3_VF_AAA.book Page 24 Monday, May 23, 2005 11:25 AM](https://usermanual.wiki/Panasonic-Mobile-Communications-Development-of-USA/26C001A.User-Manual-Part-1/User-Guide-551460-Page-32.png)

![26BasicsMaking callsTo make a call, your phone must be within the range of a network with adequate signal strength.Standard diallingIn standby mode:1. Enter the area code and phone number 7 [q]9[0]2. When the other party answers, talk into Microphone3. [Y]9[6] (End) to hang upThe duration of the call is displayed.If Max cost is on, the remaining units are displayed. See “Max cost” on page 99.Auto redialYour phone will automatically redial the number up to 10 times under certain conditions, such as no answer, destination number is busy, network busy, or some connection errors.When your call is rejected:1. “Would you like to auto redial?” 7 [0]9[5] (Yes) to start Auto redial2. To stop Auto redial while redialling, [Y]9[6] (Cancel)Note: To erase a digit: [6] (Clear)To increase the earpiece volume: [1]9[O]To decrease the earpiece volume: [2]9[P]If Active flip is set to On (see page 97), you can answer the call by opening the phone and end the call by closing the phone.VS3_VF_AAA.book Page 26 Monday, May 23, 2005 11:25 AM](https://usermanual.wiki/Panasonic-Mobile-Communications-Development-of-USA/26C001A.User-Manual-Part-1/User-Guide-551460-Page-34.png)
![27BasicsContacts diallingYou can make calls using the numbers in Contacts.d Main menu > Contacts > Contacts list1. [192] to scroll to the required contactOREnter letters to find a contact beginning with the specific letters2. [q]3. If the card has several phone numbers stored, [192] to scroll to the required number 7 [0]9[5] (Call)Recent call diallingYou can make calls using the numbers in Call log.In standby mode:1. [q]2. [394] to switch to Dialled numbers, Answered calls or Missed calls screen3. [192] to scroll to the required number 7 [q]International diallingThe international prefix (+) and the destination country/region code should be entered, followed by the area code and phone number.1. Press and hold [L] until “+” is displayed2. Enter the country/region code3. Enter the area code and phone number 7 [q]Note: Many countries/regions include an initial “0” in the area code. This should, in most cases, be omitted when dialling international numbers. For further help, contact Vodafone.VS3_VF_AAA.book Page 27 Monday, May 23, 2005 11:25 AM](https://usermanual.wiki/Panasonic-Mobile-Communications-Development-of-USA/26C001A.User-Manual-Part-1/User-Guide-551460-Page-35.png)
![28BasicsEmergency callTo make an emergency call, the antenna symbol ( ) must be present.When SIM card is inserted:1. Enter the local emergency number 7 [q]9[0]When SIM card is not inserted:1. [5] (Options) 7 Select SOSAnswering callsWhen there is an incoming call, the phone rings and/or vibrates (depending on your phone setting). (See “Sounds & alerts” on page 95.)When the phone is ringing and/or vibrating:1. [q]9[5] (Accept)Rejecting callsWhen the phone is ringing and/or vibrating:1. [Y]9[6] (Cancel)Note: Most countries support the international emergency number 112. If you find the number does not work on your phone, contact Vodafone. Note: If Any key answer is set to On (see page 97), you can answer the call by pressing any key except [Y], [0], [6] (Cancel), [U], [O] and [P].If Active flip is set to On (See page 97), you can answer the call by opening the phone and end the call by closing the phone.VS3_VF_AAA.book Page 28 Monday, May 23, 2005 11:25 AM](https://usermanual.wiki/Panasonic-Mobile-Communications-Development-of-USA/26C001A.User-Manual-Part-1/User-Guide-551460-Page-36.png)
![29BasicsMissed call notificationIf you cannot answer a call, Missed call notification appears on the standby screen.To view the Missed call list:1. [0]9[5] (View)2. To call back, [192] to scroll to the required log 7 [q]Alert muteYou can turn the ringing tone and/or vibration off before answering a call.When the phone is ringing and/or vibrating:1. When the phone is closed: [U]9[O]9[P]When the phone is open: [0]2. [q] to answer the callAnswering a second callWhen on an active call, you may receive another call.To enable this service, Call waiting must be active. (See “Call waiting” on page 97.)If you hear an alert tone during a call:1. [q]9[5] (Accept)The first call is placed on hold.2. [q] to switch between the two calls if requiredTo reject another call:1. [6] (End)To end the active call and answer the incoming call:1. [Y] to end the active call2. [q] to answer the callAuto answerWhen you use the optional Personal Handsfree earpiece, you can answer a call automatically. To enable this service, Auto answer must be on. (See “Auto answer” on page 97.)VS3_VF_AAA.book Page 29 Monday, May 23, 2005 11:25 AM](https://usermanual.wiki/Panasonic-Mobile-Communications-Development-of-USA/26C001A.User-Manual-Part-1/User-Guide-551460-Page-37.png)
![30BasicsSilent modeTo use your phone in a quiet situation, you can activate the Silent mode. You can personalise the Silent mode setting. (See “Profiles” on page 88.)In standby mode:1. Press and hold [r] to activate/deactivate the Silent modeVoicemailVoicemail is a network service which allows callers, who could not reach you, to leave voice messages. You may need to subscribe to this service through Vodafone. For further details, see “Voicemail” on page 73.Retrieving stored voice messagesWhen a new voice message is stored, an alert sounds and ( ) appears on the display and you receive an SMS notification.1. Press and hold [A] to call your voice mailboxIf the number is not valid, contact Vodafone.2. Follow the recorded instructions3. [Y] when finishedIn-call operationsIn-call options (while connected to an active call)When on a call, the following options are available.1. [5] (Options) 7 Select the required optionHold Call/Resume Put or resume a call on hold.From contacts Access the Contacts list.Create SMS Create a new SMS message.Inbox(SMS) Access Inbox(SMS).Calendar Access Calendar.Speaker mode/Handheld modeSwitch to Speaker or Handheld talking mode.Record Record the conversation. The sound clip is saved to My Files.VS3_VF_AAA.book Page 30 Monday, May 23, 2005 11:25 AM](https://usermanual.wiki/Panasonic-Mobile-Communications-Development-of-USA/26C001A.User-Manual-Part-1/User-Guide-551460-Page-38.png)
![31BasicsHoldYou can put a call on hold.During a call:1. [q] to switch between Hold Call and ResumeOR[5] (Options) 7 Select Hold Call or ResumeHandsfree talkingYou can have a conversation without holding the phone to your ear.Swapping between Speaker and Handheld mode1. [5] (Options) 7 Select Speaker mode or Handheld modeVolume controlYou can adjust the volume of the phone earpiece, speaker or headset if attached.To increase the volume:1. [1]9[O]To decrease the volume:1. [2]9[P]DTMFDTMF (Dual Tone Multi Frequency) can be sent during a conversation. These are often used to access voicemail, paging and computerised home banking. For example, you may need to enter a number to remotely access voicemail messages. A phone number may be stored in the Contacts card together with a DTMF sequence, allowing the number to be dialled upon recall and the DTMF sequence to be sent automatically.To send DTMF during a call:1. Enter digits [L]-[K], [e] or [r]Pause dialUsing pauses allows you to send DTMF automatically.1. Enter the phone number2. Press and hold [r] until a “p” is displayed3. Enter the DTMF digits after the pause, e.g. enter the number to access voicemail messages4. [q]9[0]When the call is connected, the DTMF sequence is sent after 3 seconds.VS3_VF_AAA.book Page 31 Monday, May 23, 2005 11:25 AM](https://usermanual.wiki/Panasonic-Mobile-Communications-Development-of-USA/26C001A.User-Manual-Part-1/User-Guide-551460-Page-39.png)
![32BasicsMaking a second call You can make another call while on a call.During a call:1. Enter the second phone number or select a phone number from the Contacts listTo access Contacts list, see “In-call operations” on page 30.2. [q]The first call is put on hold.3. [q] to switch between the two calls if requiredMultiple calls operationsIn-call options (while on multiple calls)When on more than one call, the following options are available.1. [5] (Options) 7 Select the required optionSwap Switch between one active and one held call.MergeEnable multi-party conversation when two calls are connected (one active, one on hold). See “Conference” on page 33.From contacts Access the Contacts list.Create SMS Create a new SMS message.Inbox(SMS) Access Inbox(SMS).Calendar Access Calendar.Speaker mode/Handheld modeSwitch to Speaker or Handheld talking mode.Record Record the conversation. The sound clip is saved to My Files.VS3_VF_AAA.book Page 32 Monday, May 23, 2005 11:25 AM](https://usermanual.wiki/Panasonic-Mobile-Communications-Development-of-USA/26C001A.User-Manual-Part-1/User-Guide-551460-Page-40.png)
![33BasicsConferenceYou can have a conversation with up to 5 different parties at the same time.During a call (one active call and one call on hold):1. [5] (Options) 7 Select MergeThe 2 calls are joined into a Conference call.To add new participants:2. Call the next person or answer an incoming call3. [5] (Options) 7 Select MergeTo end the Conference call:4. [Y]To split the caller from the Conference call and talk privately:During a Conference call:1. [5] (Options) 7 Select Option2. [192] to scroll to the required caller you wish to talk to3. [5] (Options) 7 Select SplitThe remaining callers can continue with the Conference call.4. To end the private call and rejoin the Conference call, [5] (Options) 7 Select MergeVS3_VF_AAA.book Page 33 Monday, May 23, 2005 11:25 AM](https://usermanual.wiki/Panasonic-Mobile-Communications-Development-of-USA/26C001A.User-Manual-Part-1/User-Guide-551460-Page-41.png)
![34BasicsText entryInput methodYour phone provides three text input methods to enter characters.An icon on the upper left of the screen shows the current input method and letter case.Changing the input methodPress and hold [e] to cycle through the input methods as follows.T9 (T9y) 7 Multi-tap (Abc) 7 Numeric (123)Changing the letter casePress [e] repeatedly until the icon for the required letter case mode appears.Auto capital changeWhen the letter case is set to Automatic (T9y and Abc), the first character is entered as upper case and subsequent letters as lower case.When one of the following characters [. (Period) ! ? ] is entered, the next character is entered as upper case.T9®A predictive text entry system. You can enter a word with fewer key presses.Multi-tap A traditional way to type in a letter. Press a key several times until the required letter appears.Numeric You can enter numbers (0-9), e and r.Input method Icon Letter caseT9®T9yAutomaticT9uUpper caseT9 Lower caseMulti-tapAbc AutomaticABC Upper caseabc Lower caseNumeric 123 -VS3_VF_AAA.book Page 34 Monday, May 23, 2005 11:25 AM](https://usermanual.wiki/Panasonic-Mobile-Communications-Development-of-USA/26C001A.User-Manual-Part-1/User-Guide-551460-Page-42.png)
![35BasicsT9® text input methodThe T9® text input method enables you to enter text faster and easier. You only need to press a key once for any letter you require on that key. The program searches its built-in dictionary to predict the word that most closely matches your key presses.1. In text entry screen, press a key once for any letter you require on that key2. Continue pressing other keys until the end of a word is reached3. Select the required wordORIf the required word is not in the dictionary, “?” is displayed after the word.[5] (Spell) 7 Enter the correct word 7 [0]9[5] (Add)The word is added to the internal dictionary automatically.For example, to enter “Hello!”, press keys as follows.My dictionaryWords that you enter are added to the internal dictionary automatically so that they are suggested next time. You can also add new words to the dictionary manually.To add words to My dictionary:1. In text entry screen, [5] (Options) 7 Select My dictionary2. Enter a word 7 [0]9[5] (Add)Key [F][D][G][G][H][A][2] x 4Display I He Hel Hell Hello Hello. Hello!VS3_VF_AAA.book Page 35 Monday, May 23, 2005 11:25 AM](https://usermanual.wiki/Panasonic-Mobile-Communications-Development-of-USA/26C001A.User-Manual-Part-1/User-Guide-551460-Page-43.png)
![36BasicsEditing textInserting/deleting textMove the cursor by pressing [1929394] to the position you want to insert or delete a letter. Press [6] (Clear) to delete a character. Press and hold [6] (Clear) to delete all the characters.Copying/cutting/pasting text1. [5] (Options) 7 Select Copy or Cut2. [1929394] to move to the left of text you wish to copy or cut3. [0]9[5] (Start) 7 [1929394] to highlight the text 7 [0]9[5] (Stop)4. [1929394] to move to a new required location5. [5] (Options) 7 Select PasteOptionsWhen entering text, the following options may be available by pressing [5] (Options).*1Depend on each application.Use contacts*1Access Contacts menu to use Contacts data.Copy/Cut/Paste See “Copying/cutting/pasting text” on page 36.Add symbolShow the Symbol list from which you can select any symbol available on your phone.Input method Select the input method.T9 on/off*1Turn On or Off the predictive dictionary.Input language*1Select a language you wish to write in.My dictionary Add words to the internal dictionary.Exit Exit the text edit mode.VS3_VF_AAA.book Page 36 Monday, May 23, 2005 11:25 AM](https://usermanual.wiki/Panasonic-Mobile-Communications-Development-of-USA/26C001A.User-Manual-Part-1/User-Guide-551460-Page-44.png)
![37BasicsThe following table shows characters available on your phone.The characters vary depending on the Input language setting (see page 36).Key Input method (Input language: English)T9® (T9y, T9u or T9) Multi-tap (Abc, ABC or abc) Numeric (123)[L]Space 0[A]. , - ? ! ’ @ : ; / 1 . , ? 1 ! " - : ; @ / * ( ) # + _ = [ ] { } ' ¡ ¿ & % \ ^ ~ | < > f ¢ £ $ ¥ ¤ § ` (Space) * (Linefeed) 1[S]A B C 2 (a b c 2) A B C 2 Γ Á Ä Å Â Ã Æ Ç (a b c 2 α β γ á ä å æ à â ã) 2[D]D E F 3 (d e f 3) D E F 3 ∆ É Ê (d e f 3 δ ε ζ é è ê) 3[F]G H I 4 (g h i 4) G H I 4 Θ Í (g h i 4 η θ ι ì í) 4[G]J K L 5 (j k l 5) J K L 5 Λ (j k l 5 κ λ µ)5[H]M N O 6 (m n o 6) M N O 6 Ξ Ñ Ó g Ö Ø Ô Õ (m n o 6 ν ξ ó h ñ ö ø ò ô õ) 6[I]P Q R S 7 (p q r s 7) P Q R S 7 Π Σ (p q r s 7 π ρ l σ ß) 7[J]T U V 8 (t u v 8) T U V 8 Φ Ú j Ü (t u v 8 τ υ φ ú k ü ù) 8[K]W X Y Z 9 (w x y z 9) W X Y Z 9 Ψ Ω (w x y z 9 χ ψ ω)9[e]Letter case change e(Press and hold) Input method change[r]. , ? ! " - : ; @ / * ( ) # + _ = [ ] { } ' ¡ ¿ & % \ ^ ~ | < > f ¢ £ $ ¥ ¤ § ` (Space) * (Linefeed) r(Press and hold) LinefeedShortcut: To enter numbers while in T9 or Multi-tap method, press and hold the required numeric key [L]-[K].VS3_VF_AAA.book Page 37 Monday, May 23, 2005 11:25 AM](https://usermanual.wiki/Panasonic-Mobile-Communications-Development-of-USA/26C001A.User-Manual-Part-1/User-Guide-551460-Page-45.png)
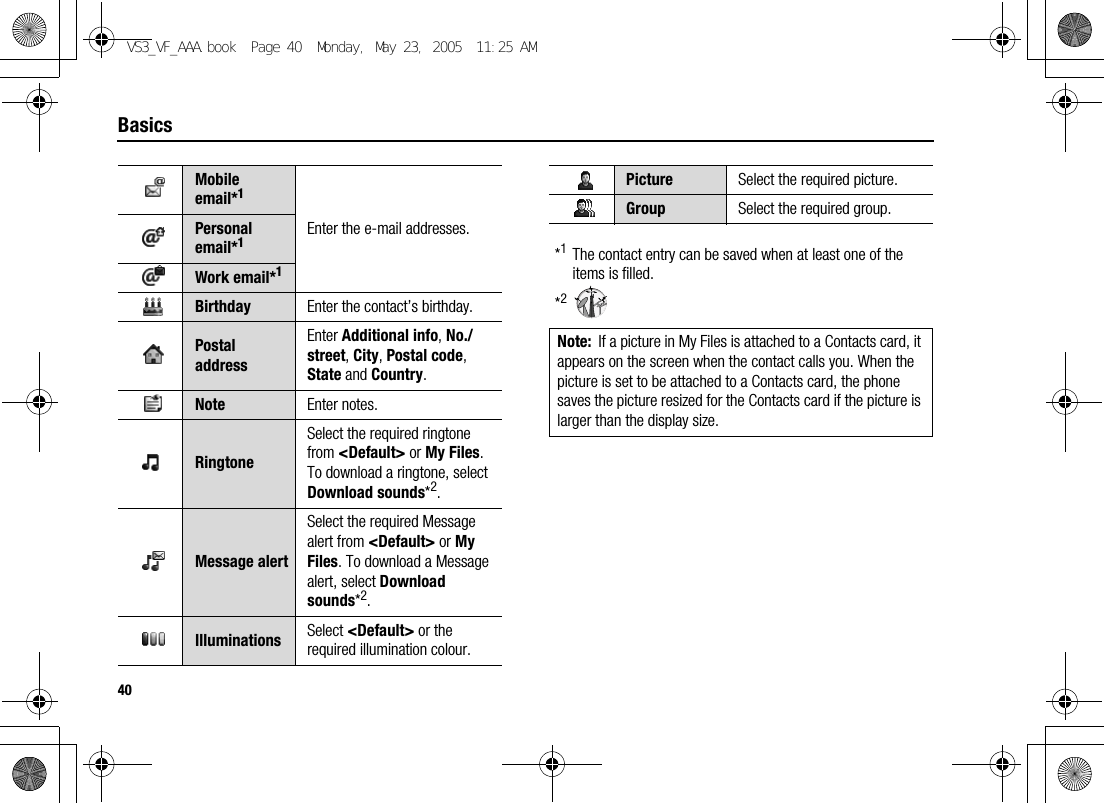
![38BasicsContactsViewing the Contacts listYou can search for a phone number in the Contacts list. All the numbers stored in the phone and SIM card are displayed.Searching for a contactd Main menu > Contacts > Contacts list6. [192] to scroll to the required contactOREnter letters to find a contact beginning with the specific letters7. To view the Contacts card, [0]OptionsIn the Contacts list, the following options are available by pressing [5] (Options).View View the selected Contacts card.Call Call the selected contact.Create messageCreate an MMS, SMS or Postcard*1, and send it to the selected contact. See “Creating a new message” on page 60.EditEdit the selected contact. See “Editing a Contacts card” on page 41.Search Search a contact by entering characters.Add contact Add a new contact. See “Adding contacts” on page 39.Delete Delete the selected contact.Speed dialAssign the selected contact to a Speed dial. See “Assigning speed dial keys” on page 43.VS3_VF_AAA.book Page 38 Monday, May 23, 2005 11:25 AM](https://usermanual.wiki/Panasonic-Mobile-Communications-Development-of-USA/26C001A.User-Manual-Part-1/User-Guide-551460-Page-46.png)
![39Basics*1Making a call from Contactsd Main menu > Contacts > Contacts list1. [192] to scroll to the required contactOREnter letters to find a contact beginning with the specific letters2. [q]3. If the card has several phone numbers stored, [192] to scroll to the required number 7 [0]9[5] (Call)Adding contactsStoring a contact in your phoneIn the phone, you can store detailed information for each contact.The entries are retained even if you damage your SIM card.d Main menu > Contacts > Add contact > Phone1. [192] to scroll to the required field 7 [0]2. Enter information 7 [0]To enter characters, see “Text entry” on page 34.3. When entries are completed, [5] (Save)Copy to phone/SIM Copy the selected contact to the phone or the SIM card.Send via infraredSend the selected contact to another device via infrared. See “Infrared” on page 102.First name*1Enter the first name.Last name*1Enter the last name.Mobile number*1Enter the phone numbers.Home number*1Work number*1VS3_VF_AAA.book Page 39 Monday, May 23, 2005 11:25 AM](https://usermanual.wiki/Panasonic-Mobile-Communications-Development-of-USA/26C001A.User-Manual-Part-1/User-Guide-551460-Page-47.png)
![41BasicsStoring a contact in your SIM cardYou can store some information for each contact in your SIM card.d Main menu > Contacts > Add contact > SIM1. [192] to scroll to the required field 7 [0]2. Enter information 7 [0]3. [5] (Save)Storing a contact from Call logSee “Saving a phone number from Call log” on page 42.Editing a Contacts cardd Main menu > Contacts > Contacts list1. Highlight the required Contacts card (See “Searching for a contact” on page 38.)2. [5] (Options) 7 Select Edit3. Edit the required entry 7 [5] (Save)Name Enter the name.Tel number Enter the phone number.Note: The length of name and number, and the total amount of data are SIM dependent.VS3_VF_AAA.book Page 41 Monday, May 23, 2005 11:25 AM](https://usermanual.wiki/Panasonic-Mobile-Communications-Development-of-USA/26C001A.User-Manual-Part-1/User-Guide-551460-Page-49.png)
![42BasicsCall logRecently dialled phone numbers, answered calls and missed calls are stored in Call log. The numbers in the Call log list can be used to call, send a message or add to Contacts.Viewing/Dialling from Call logd Main menu > Contacts > Call log1. [394] to move to Dialled numbers, Answered calls or Missed calls2. [192] to scroll to the required log 7 [0]3. [0] to callSaving a phone number from Call logd Main menu > Contacts > Call log1. [394] to move to Dialled numbers, Answered calls or Missed calls2. [192] to scroll to the required phone number3. [5] (Options) 7 Select Add to contacts4. Select New or Add5. If New is selected: Enter other informationIf Add is selected: Highlight the required contact 7 [5] (Select) 7 If there is no empty field, “Would you like to replace?” 7 [0]9[5] (Yes) 7 Select the number you want to replace in Phone Contacts6. [5] (Save)Shortcut: You can directly view the Dialled numbers list by pressing [q] in standby mode.VS3_VF_AAA.book Page 42 Monday, May 23, 2005 11:25 AM](https://usermanual.wiki/Panasonic-Mobile-Communications-Development-of-USA/26C001A.User-Manual-Part-1/User-Guide-551460-Page-50.png)
![43BasicsOptionsIn each Call log list, the following options are available by pressing [5] (Options).Speed dialYou can quickly dial phone numbers by pressing keys 2-9.Assigning speed dial keysd Main menu > Contacts > Speed Dial list1. [192] to scroll to the required key 7 [0]2. Enter phone number 7 [0]9[5] (Ok)To assign a speed dial key to a contact:d Main menu > Contacts > Speed Dial list1. [192] to scroll to the required key 7 [5] (LookUp)2. Highlight the required contact 7 [5] (Select)3. If the card has several phone numbers stored, [192] to scroll to the required number 7 [0]9[5] (Select)Using the speed dial keysIn standby mode:1. Press and hold a speed dial key ([S]-[K]) 7 [5] (Call)Call Call the selected number.Create message Create an MMS or SMS message to the selected number.Add to contactsStore the selected number to Contacts. See “Saving a phone number from Call log” on page 42.Delete Delete the selected number.Delete all Delete all the logs in the list.VS3_VF_AAA.book Page 43 Monday, May 23, 2005 11:25 AM](https://usermanual.wiki/Panasonic-Mobile-Communications-Development-of-USA/26C001A.User-Manual-Part-1/User-Guide-551460-Page-51.png)
![44BasicsGroupsYou can categorise the Contacts list stored in your phone into 20 groups.Viewing group membersd Main menu > Contacts > View groups1. Select the required groupThe contacts in the selected group are displayed.Renaming a groupd Main menu > Contacts > View groups1. [192] to scroll to the required group 7 [5] (Rename)2. Enter a new group name 7 [0]AdvancedSynchronisationYou can synchronise your Contacts list with your network server. You can just send changes or send all your records to the network server. For further details, see “Synchronisation” on page 104.To send only changes to the network server:d Main menu > Contacts > Advanced > Synchronisation > Sync. contactsThe phone confirms completion.To send all your records to the network server:d Main menu > Contacts > Advanced > Synchronisation > Restore contactsThe phone confirms completion.VS3_VF_AAA.book Page 44 Monday, May 23, 2005 11:25 AM](https://usermanual.wiki/Panasonic-Mobile-Communications-Development-of-USA/26C001A.User-Manual-Part-1/User-Guide-551460-Page-52.png)
![45BasicsMy numbersYou can store your own numbers in the phone and SIM card.To store numbers in Mobile profile:d Main menu > Contacts > Advanced > My Numbers > Mobile profile1. [0]9[5] (Create)2. Repeat steps [192] to scroll to the required field 7 [0]39-When entries are completed, [5] (Save)39 in “Storing a contact in your phone” on page 39To store numbers in SIM profile:d Main menu > Contacts > Advanced > My Numbers > SIM profile1. When the profile is empty: [0]9[5] (Create)When the profile has the stored number(s): [5] (Options) 7 Select Create2. Repeat steps [192] to scroll to the required field 7 [0]41-[5] (Save)41 in “Storing a contact in your SIM card” on page 41OptionsWhen viewing My numbers, the following options are available by pressing [5] (Options).*1Available only for SIM profile.Displaying the Contacts list sorted by last name/first nameYou can choose to sort the Contacts list by contact’s last name or first name.d Main menu > Contacts > Advanced > Display by1. Select First name or Last nameEdit Edit the profile.Create*1Create a new profile.Delete Delete the profile.Send via infrared Send the profile via infrared.VS3_VF_AAA.book Page 45 Monday, May 23, 2005 11:25 AM](https://usermanual.wiki/Panasonic-Mobile-Communications-Development-of-USA/26C001A.User-Manual-Part-1/User-Guide-551460-Page-53.png)
![46BasicsMemory statusYou can see the amount of memory available in the Contacts list.d Main menu > Contacts > Advanced > Memory statusCopying contactsYou can copy all the contacts from SIM card to phone, or from phone to SIM card.To copy all the contacts from SIM card to phone:d Main menu > Contacts > Advanced > Copy all from SIM1. “Would you like to copy?” 7 [0]9[5] (Yes)To copy all the contacts from phone to SIM card:d Main menu > Contacts > Advanced > Copy all to SIM1. “Only Name and Number fields can be copied. Continue?” 7 [0]9[5] (Yes)Deleting Phone ContactsYou can delete all the contacts stored in your phone.d Main menu > Contacts > Advanced > Delete phone1. “Would you like to delete all Phone contacts?” 7 [0]9[5] (Yes)2. “Really?” 7 [0]9[5] (Yes)Service numbersIf your SIM card includes SDN (Service Dialling Number), you can call a service number by selecting from the list.SDN enables you to access special services provided by your network operator, such as customer support, emergency services, etc.d Main menu > Contacts > Service numbers1. [192] to scroll to the required item 7 [0]9[5] (Call)Note: The amount of memory for SIM storage depends on your SIM card.To decrease the amount of phone memory used, delete unwanted data or store data on your PC (see “USB” on page 107).VS3_VF_AAA.book Page 46 Monday, May 23, 2005 11:25 AM](https://usermanual.wiki/Panasonic-Mobile-Communications-Development-of-USA/26C001A.User-Manual-Part-1/User-Guide-551460-Page-54.png)
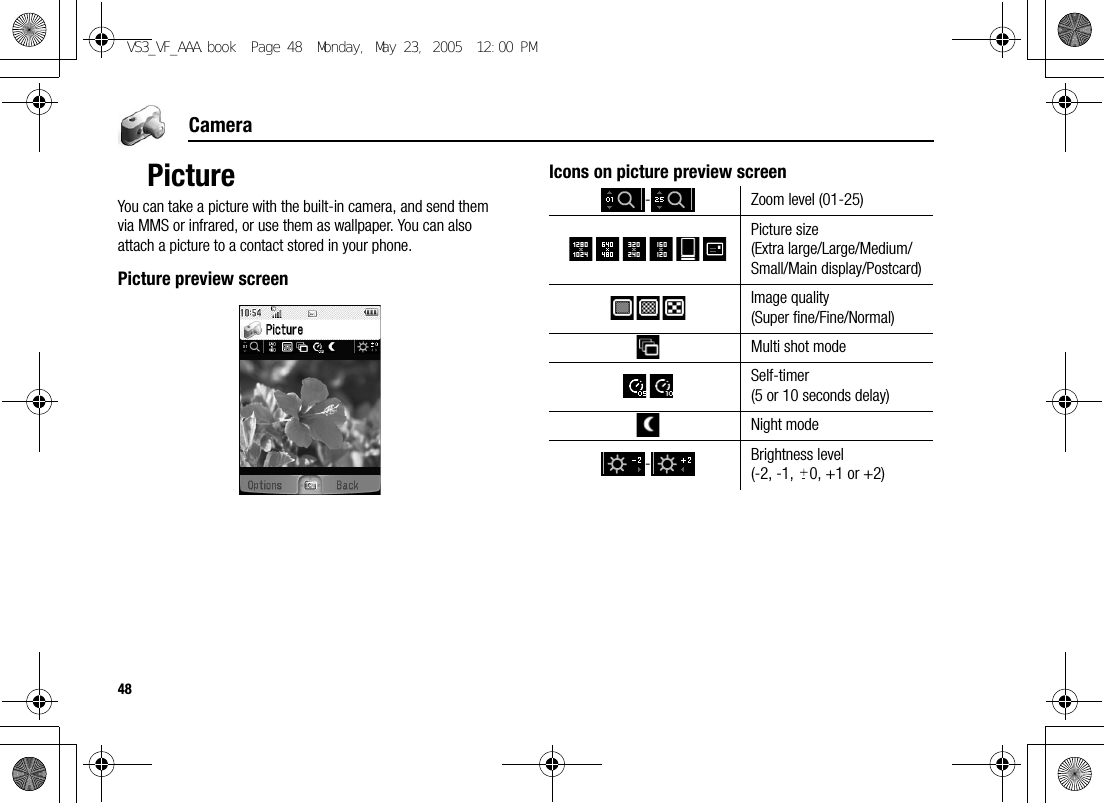
![49CameraTaking a pictured Main menu > Camera > Picture1. The display acts as a viewfinder. Move the phone around to frame your subject2. [0]9[U] to capture the imageOperations after taking a pictureTo save the image to My Files: [5] (Save)To return to the preview screen without storing the image: [6] (Delete)To send the captured image: See “Sending pictures” on page 51Taking a self-portraitYou can take your self-portrait using Self-portrait Mirror.d Main menu > Camera > Picture1. Close the flip. Look at yourself in Self-portrait Mirror2. [U] on the side of the phone3. Open the flip. The image appears on the display. For further operation, see “Operations after taking a picture” on page 49Shortcut: To directly open the picture preview screen, press and hold [U] in standby mode.Caution: To avoid impairing the camera performance, DO NOT leave the phone with the camera facing direct sunlight.Note: To send a picture via infrared or use as wallpaper, save the image once, and then go to My Files. (See “Pictures” on page 122.)If My Files is full, you cannot take a picture.If the camera is left in certain conditions including in the preview screen and capture screen for 3 minutes, the phone automatically exits Picture mode. If left in the preview screen, but with the options menu displayed, the phone remains in this state.If certain situations such as receiving calls occur during camera operation, the phone exits Camera mode. If a captured image is on the screen, it is saved to My Files.VS3_VF_AAA.book Page 49 Monday, May 23, 2005 11:25 AM](https://usermanual.wiki/Panasonic-Mobile-Communications-Development-of-USA/26C001A.User-Manual-Part-1/User-Guide-551460-Page-57.png)
![50CameraZoom[1]9[O] to zoom in one level[2]9[P] to zoom out one levelYou can also press and hold keys to quickly reach the required zoom level.*1Adjusting the brightness levelThe picture brightness indicator shows the current brightness level.[4] to increase the brightness level[3] to decrease the brightness levelTaking close-up picturesYou can take sharp pictures from a close distance by using Macro Mode. (Macro focus range: 10 cm)Turn the Macro Mode switch anticlockwise to ( ) before taking close-up pictures.Viewing picturesPictures taken with the built-in camera are saved to My Files. To view the saved pictures, see “Viewing pictures” on page 122.Note: Zoom function may not be available when the picture size is set to Extra large 1280 x 1024 or Postcard*1.VS3_VF_AAA.book Page 50 Monday, May 23, 2005 11:25 AM](https://usermanual.wiki/Panasonic-Mobile-Communications-Development-of-USA/26C001A.User-Manual-Part-1/User-Guide-551460-Page-58.png)
![51CameraSending pictures1. With the captured image on the screen, [0]2. Select the required function*1Picture settingsIn the preview screen, the following options are available by pressing [5] (Options).Send as MMS Send the captured image via MMS.Send as postcard*1Attach the captured image to a postcard.Send to Media Album*1Send the captured image to Media Album.Picture sizeSelect the required size from Extra large 1280 x 1024, Large 640 x 480, Medium 320 x 240, Small 160 x 120, Main display 240 x 320 or Postcard*1.Image quality Select the required quality from Super fine, Fine or Normal.Night mode Select On to take a picture in low light conditions.Multi shot mode15 continuous shots is available. See “Continuous shooting” on page 53.EffectSelect the required colour from Normal, Sepia, Monochrome or Negative.Self-timerSelect the amount of time delay you require for shooting from Off, 5 seconds or 10 seconds.VS3_VF_AAA.book Page 51 Monday, May 23, 2005 11:25 AM](https://usermanual.wiki/Panasonic-Mobile-Communications-Development-of-USA/26C001A.User-Manual-Part-1/User-Guide-551460-Page-59.png)
![52Camera*1Direct key operationYou can change the picture settings by pressing one of the numeric keys which correspond to the functions as follows. Some functions are depicted by the icon. See “Icons on picture preview screen” on page 48.[A]: Switch to video[S]: Picture size[D]: Image quality[F]: Multi shot mode[G]: Self-timer[H]: Night mode[I]: Effect[L]: HelpAdding a picture to Contacts cardIf a picture is attached to a Contact card, it appears on the screen when the contact calls you.To attach a picture to a contact, save the image once, and then go to Contacts. See “Adding contacts” on page 39.Shutter sound Select the required sound from Pattern 1-5.Switch to video Switch from Picture mode to Video mode.Available spaceShow the number of files which can be saved in the current picture size and image quality. You can see the number of files which can be saved in other image qualities by pressing [5] (Quality), and in other picture sizes by pressing [192].Set to default Reset the current picture settings to default.Help Show direct key operation in the preview screen.VS3_VF_AAA.book Page 52 Monday, May 23, 2005 11:25 AM](https://usermanual.wiki/Panasonic-Mobile-Communications-Development-of-USA/26C001A.User-Manual-Part-1/User-Guide-551460-Page-60.png)
![53CameraContinuous shootingIn Multi shot mode, you can capture a succession of 15 images with just one press. When you set Multi shot mode on, the picture size is set to Medium 320 x 240 and Night mode off.d Main menu > Camera > Picture1. [5] (Options) 7 Select Multi shot mode2. Select On3. [0]9[U] to shootThe captured images are displayed as thumbnails.To view the captured images:[1929394] to scroll to the required thumbnail 7 [0]You can view the next image by pressing [4] or [2], and the previous image by pressing [3] or [1].To save one or all the captured images:1. When the required thumbnail is highlighted or the required image is displayed on the screen, [5] (Options)2. Select Save all pictures or Save this one onlyOne or all pictures are stored to My Files.Note: You cannot take pictures in Multi shot mode when the phone is closed.VS3_VF_AAA.book Page 53 Monday, May 23, 2005 11:25 AM](https://usermanual.wiki/Panasonic-Mobile-Communications-Development-of-USA/26C001A.User-Manual-Part-1/User-Guide-551460-Page-61.png)
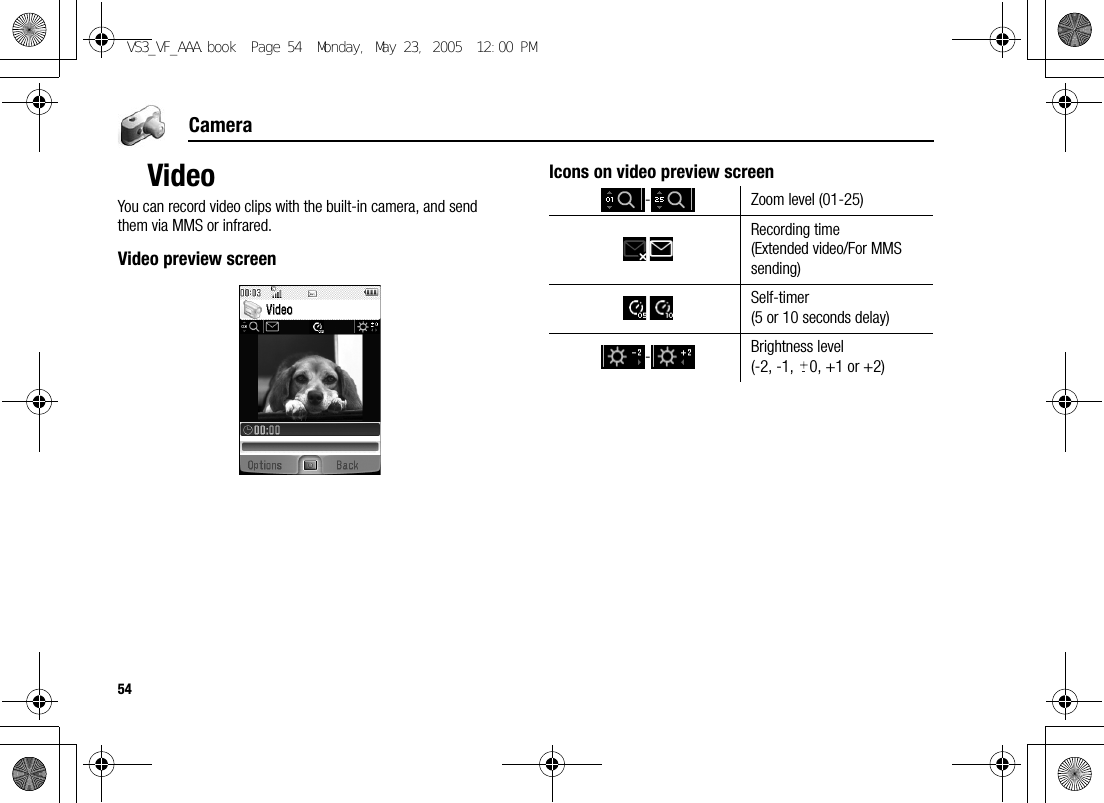
![55CameraRecording a video clipd Main menu > Camera > Video1. Main display acts as a viewfinder. Move the phone around to frame your subject2. [0]9[U] to start recording3. Video recorder records until reaching the clip size limit or until you press [0]9[U]9[5] (Stop)4. Select the required action*1Playback Playback the recorded video clip.Save to My Files Save the recorded video clip to My Files.Send as MMS Send the recorded video clip via MMS.Send to Media Album*1Send the recorded video clip to Media Album.Caution: To avoid impairing the camera performance, DO NOT leave the phone with the camera facing direct sunlight.Note: To send a video clip via infrared, save the video clip once, and then go to My Files. (See “Videos” on page 128.)If My Files is full, you cannot record a video clip.If the video is left in the preview screen or a recorded video clip is displayed for 3 minutes, the phone automatically exits Video mode. If left in preview screen, but with the options menu displayed, the phone remains in this state.If certain situations such as receiving calls occur during camera operation, the phone exits Camera mode. The recording ends automatically, and the already recorded video clip is saved to My Files.VS3_VF_AAA.book Page 55 Monday, May 23, 2005 11:25 AM](https://usermanual.wiki/Panasonic-Mobile-Communications-Development-of-USA/26C001A.User-Manual-Part-1/User-Guide-551460-Page-63.png)
![56CameraZoom[1]9[O] to zoom in one level[2]9[P] to zoom out one levelYou can also press and hold keys to quickly reach the required zoom level.Adjusting the brightness levelThe video clip brightness indicator shows the current brightness level.[4] to increase the brightness level[3] to decrease the brightness levelPlaying video clipsRecorded video clips are saved to My Files. To play the saved video clips, see “Playing video clips” on page 128.Video settingsIn the preview screen, the following options are available by pressing [5] (Options).Note: You cannot change the zoom level while recording.Note: You cannot change the brightness level while recording.Recording timeSelect the video recording time from Extended video or For MMS sending.EffectSelect the required colour from Normal, Sepia, Monochrome or Negative.Self-timerSelect the amount of time delay you require for recording from Off, 5 seconds or 10 seconds.Switch to picture Switch from Video mode to Picture mode.Available spaceShow the number of files which can be saved in the current recording time. You can see the number of files which can be saved in other recording time by pressing [5] (RecTime).Help Show direct key operation in the preview screen.VS3_VF_AAA.book Page 56 Monday, May 23, 2005 11:25 AM](https://usermanual.wiki/Panasonic-Mobile-Communications-Development-of-USA/26C001A.User-Manual-Part-1/User-Guide-551460-Page-64.png)
![57CameraDirect key operationYou can change the video settings by pressing one of the numeric keys which correspond to the functions as follows. Some functions are depicted by the icon. See “Icons on video preview screen” on page 54.[A]: Switch to picture[S]: Recording time[G]: Self-timer[I]: Effect[L]: HelpVS3_VF_AAA.book Page 57 Monday, May 23, 2005 11:25 AM](https://usermanual.wiki/Panasonic-Mobile-Communications-Development-of-USA/26C001A.User-Manual-Part-1/User-Guide-551460-Page-65.png)
![61MessagingCreating an MMS messaged Main menu > Messaging > Create new > MMS message1. Select Add picture, Add text, Add sound or Add video2. If Add text is selected: Create text message 7 [0]See “Text entry” on page 34 for entering text.If Add picture/Add sound/Add video is selected: Select the required item stored to My Files 7 [5] (Select)You can also download new files, take new pictures, record new sound or video clips for the MMS message.3. To add more than one picture, text, sound or video clip, [192] to scroll to Slide 7 [0] 7 [0]9[5] (Yes)4. Repeat steps 1-3 if requiredTo send the message:5. [5] (Options) 7 Select Send6. [192] to scroll to Add subject 7 [0]7. Enter subject 7 [0]8. [192] to scroll to Add recipient 7 [0]9. Select From contact list, Enter number or Enter address10. If From contact list is selected: Highlight the required contact 7 [5] (Select) 7 If the card has several numbers stored, [192] to scroll to the required number 7 [0]9[5] (Select)If Enter number/Enter address is selected: Enter number/address 7 [0]11. [192] to scroll to Send 7 [0]Slide optionsWhen Slide is highlighted, the following options are available by pressing [5] (Options).Add new Add a new slide.SendSend the MMS message after entering subject and recipient number or address.Slide duration Specify duration of the slide.Remove slide Remove the slide from the MMS message.Preview slide Preview the MMS message as a slide.VS3_VF_AAA.book Page 61 Monday, May 23, 2005 11:25 AM](https://usermanual.wiki/Panasonic-Mobile-Communications-Development-of-USA/26C001A.User-Manual-Part-1/User-Guide-551460-Page-69.png)
![62MessagingCreating an SMS messaged Main menu > Messaging > Create new > SMS message1. Create text message 7 [0]See “Text entry” on page 34 for entering text.2. To enter recipient’s phone number directly: Enter numberTo select recipient’s phone number from Contacts: [0] 7 Highlight the required contact 7 [5] (Select) 7 If the card has several phone numbers stored, [192] to scroll to the required number 7 [0]9[5] (Select)3. [0] to send the messageCreating an Illumination message with emoticonsWith the Illumination feature, you can express special feelings in a message. The Indicator/Illumination Light responds to the pictographs in an Illumination message and light in combinations of colours and light patterns when you receive and view an Illumination message.d Main menu > Messaging > Create new > SMS message1. Create text message2. [5] (Options) 7 Select Templates3. Select Illumination templates4. Select the required emoticonSee “Emoticon list” on page 63.To preview the Illumination of the messages you create:[5] (Options) 7 Select Preview illuminationNote: Only recipients who have Illumination message capable phone can view the Illumination of the messages.VS3_VF_AAA.book Page 62 Monday, May 23, 2005 11:25 AM](https://usermanual.wiki/Panasonic-Mobile-Communications-Development-of-USA/26C001A.User-Manual-Part-1/User-Guide-551460-Page-70.png)
![63MessagingEmoticon list• Pattern A: [Firefly] flickers slowly for about 2 seconds.• Pattern B: [Flash] flickers fast for about 1 second.• Pattern C: [Beam] lights for about 1 second (2 seconds in Colour 8).Emoticon Indicator ColourLight Pattern Emoticon Indicator ColourLight Pattern Emoticon Indicator ColourLight Pattern:-)Colour 3A=:-)Colour 4 B(T_T) Colour 1 A:-D :-O (?_?)Colour 5>:-<B:() C(>_<) B:-|| :-I Colour 7 (-_-; C:eColour 6I-( A(^w^) Colour 2 A0:-) A;-) Colour 8 C ^&^B:-P C\^o^/Colour 3A(@_@)Colour 4:’( Colour 1 B(^-^) (*o*):-( A\(>o<)/Bp(^-^)p A:-/Colour 5(>-<#) (-_-) Colour 7 C:-S B^3^Colour 6(_ _)Zzz A:-[ C(o^-^o) A(^_~)" Colour 8 C:-> Colour 2 A(*~o~*)8-) B(;_;) Colour 1 BVS3_VF_AAA.book Page 63 Monday, May 23, 2005 11:25 AM](https://usermanual.wiki/Panasonic-Mobile-Communications-Development-of-USA/26C001A.User-Manual-Part-1/User-Guide-551460-Page-71.png)
![64MessagingOptionsWhen creating a text message, the following options are available by pressing [5] (Options).Send Send the text as an SMS message.Send to many Send the text to more than one recipients.Preview illumination Preview illumination message.TemplatesSelect Illumination templates to create an illumination message or User templates to use the stored text templates.Count messageThe long message may be divided into several messages. You can check the concatenated message number.Save Save the message in Unsent folder.Use contacts Access Contacts menu to use Contacts data.Copy/Cut/Paste Copy, cut or paste the text.Add symbolShow the Symbol list from which you can select any symbol available on your phone.Input method Select the input method.T9 on/off Turn On or Off the predictive dictionary.Input language Select a language you wish to write in.My dictionary Add words to the internal dictionary.Exit Exit the text edit mode.VS3_VF_AAA.book Page 64 Monday, May 23, 2005 11:25 AM](https://usermanual.wiki/Panasonic-Mobile-Communications-Development-of-USA/26C001A.User-Manual-Part-1/User-Guide-551460-Page-72.png)
![65MessagingCreating a voice messaged Main menu > Messaging > Create new > Voice messageSound recorder is activated.1. [0]9[5] (Start) to start recording2. [0]9[5] (Stop) to stop recordingTo send the voice message:3. [5] (Options) 7 Select Send as MMSIf you select Save, the sound clip is saved to My Files.4. Repeat steps 1-11 in “Creating an MMS message” on page 61Creating a postcardCreating a postcard by using the stored picture or by downloading a pictured Main menu > Messaging > Create new > PostcardTo add a picture:1. Select Add picture2. Select Stored pictures or Download pictures3. Select the required pictureTo add text:4. Select Add text5. Create text message 7 [0]See “Text entry” on page 34 for entering text.To send the postcard:6. [5] (Options) 7 Select Send7. [192] to scroll to the required content 7 [0]8. Enter information 7 [0]Send appears on the bottom of the address list when at least Name, No./street, City and Postal code are entered.9. [192] to scroll to Send 7 [0]VS3_VF_AAA.book Page 65 Monday, May 23, 2005 11:25 AM](https://usermanual.wiki/Panasonic-Mobile-Communications-Development-of-USA/26C001A.User-Manual-Part-1/User-Guide-551460-Page-73.png)
![66MessagingCreating a postcard by taking a pictured Main menu > Messaging > Create new > PostcardTo take a picture:1. Select Add picture2. Select Take new picture3. [0]9[U] to capture the image4. [0] 7 Select Send as postcardTo add text and send the postcard:5. [6] (Back)6. Repeat steps 4-9 in “Creating a postcard by using the stored picture or by downloading a picture” on page 65OptionsWhile editing the recipient’s information, the following options are available by pressing [5] (Options).*1Available only when Name is highlighted.Edit Edit the selected field.From contacts*1Select the required contact. The contact’s name and the information stored in Postal address field are pasted into the postcard.Last address Paste the address of the last sent postcard.Edit postcard Edit the picture or the text message.Save address Save the address to Contacts.VS3_VF_AAA.book Page 66 Monday, May 23, 2005 11:25 AM](https://usermanual.wiki/Panasonic-Mobile-Communications-Development-of-USA/26C001A.User-Manual-Part-1/User-Guide-551460-Page-74.png)
![67MessagingReceiving messagesReceiving MMS messagesWhen you receive a new MMS message, the message icon ( ) is displayed along with a tone, illumination, and/or vibration. The received MMS messages are stored in Inbox.Reading MMS messagesTo read the received MMS messages, see “Inbox” on page 68.Receiving SMS messagesWhen you receive a new SMS message, the message icon ( ) is displayed along with a tone, illumination, and/or vibration. The SMS notification also appears on the standby screen.Reading SMS messagesWhen an SMS notification is displayed on the standby screen:1. [0]9[5] (View)If there is more than one notification, [192] to scroll to New SMS before step 1.If there is one SMS message, the message is automatically displayed.2. If there is more than one SMS message, [192] to scroll to the required message header in SMS Inbox 7 [0]3. When the message is displayed, [0] to show the message details (sender’s number, date, message centre’s number) if requiredNote: If you do not want to receive MMS messages automatically, select Never in Auto download setting (see page 75). In this case, you will receive a message notification first, and then you will need to receive messages manually.VS3_VF_AAA.book Page 67 Monday, May 23, 2005 11:25 AM](https://usermanual.wiki/Panasonic-Mobile-Communications-Development-of-USA/26C001A.User-Manual-Part-1/User-Guide-551460-Page-75.png)
![68MessagingInboxInbox stores received MMS and SMS messages.d Main menu > Messaging > InboxNumbers in brackets show the number of unread messages and the total number of messages in each inbox.MMS InboxMMS message iconsReading MMS messagesd Main menu > Messaging > Inbox > MMS1. [192] to scroll to the required message header 7 [0]Options in the message listWhen viewing the list of messages, the following options are available by pressing [5] (Options).Unread message MMS notificationRead messageReply Create reply message by MMS or SMS.Reply to all Create reply message to all recipients.Forward Forward the selected message.Copy to album*1Copy the selected message to Media Album.Call Call the sender’s number.Add to contacts Store the sender’s number or e-mail address to Contacts.Delete Delete the selected message.Delete all Delete all the MMS messages and notifications.VS3_VF_AAA.book Page 68 Monday, May 23, 2005 11:25 AM](https://usermanual.wiki/Panasonic-Mobile-Communications-Development-of-USA/26C001A.User-Manual-Part-1/User-Guide-551460-Page-76.png)
![69Messaging*1Options while viewing messagesWhen viewing the message, the following options are available by pressing [5] (Options).*1Protect/Unprotect Protect or unprotect the selected message.Details Show details for the selected message.Reply Create a reply message by MMS or SMS.Reply to all Create a reply message to all the recipients.Forward as postcard*1Select the required text or picture file to create a postcard. For further operation, see “Creating a postcard” on page 65.Play again Play the selected message.Message font size Select the required font size.Save picture Save the attached picture to My Files.Save sound Save the attached sound clip to My Files.Save video Save the attached video clip to My Files.Use detailUse the phone number, e-mail or web address in the selected message to call, create message, add to Contacts, etc.Attached files Show the attached files.VS3_VF_AAA.book Page 69 Monday, May 23, 2005 11:25 AM](https://usermanual.wiki/Panasonic-Mobile-Communications-Development-of-USA/26C001A.User-Manual-Part-1/User-Guide-551460-Page-77.png)
![70MessagingOptions for notificationWhen the notification is highlighted, the following options are available by pressing [5] (Options).SMS InboxSMS message iconsReading SMS messagesd Main menu > Messaging > Inbox > SMS1. [192] to scroll to the required message header 7 [0]2. [0] to show the message details (sender’s number, date, message centre’s number) if requiredOptionsWhen viewing the list of messages or the selected message, the following options are available by pressing [5] (Options).Receive Receive new messages.Forward Forward the message.RejectDelete the notification from the message list and the message from the server.Call Call the sender’s number.Delete all Delete all the MMS messages and notifications.Protect/Unprotect Protect or unprotect the message.Details Show details for the selected message.Unread message Read messageReply Create reply message in MMS or SMS.Forward Forward the selected message.Call Call the sender’s number.Add to contacts Store the sender’s number to Contacts.VS3_VF_AAA.book Page 70 Monday, May 23, 2005 11:25 AM](https://usermanual.wiki/Panasonic-Mobile-Communications-Development-of-USA/26C001A.User-Manual-Part-1/User-Guide-551460-Page-78.png)
![71Messaging*1Available only when viewing the selected message.*2Available only when viewing the list of messages.ArchiveArchive stores MMS and SMS messages that are sent or waiting to be sent.Viewing messagesd Main menu > Messaging > Archive > MMS or SMS1. Select the required folder2. [192] to scroll to the required message 7 [0]Use detail*1Use phone number, e-mail or web address in the selected message to call, create message, add to Contacts, etc.Delete Delete the selected message.Delete all*2Delete all the SMS messages.View illumination*1Check the illumination of the message.MMSSent Store sent MMS messages.Outbox Store undelivered MMS messages.Drafts Store unfinished MMS messages.SMSSent Store sent SMS messages.Unsent Store undelivered and unfinished SMS messages.VS3_VF_AAA.book Page 71 Monday, May 23, 2005 11:25 AM](https://usermanual.wiki/Panasonic-Mobile-Communications-Development-of-USA/26C001A.User-Manual-Part-1/User-Guide-551460-Page-79.png)
![72MessagingOptions for MMSIn Sent, Outbox and Drafts folders, the following options are available by pressing [5] (Options).*1Available only in Sent folder.*2Available only in Outbox and Drafts folder.*3Options for SMSIn Sent and Unsent folders, the following options are available by pressing [5] (Options).*1Available only when viewing the selected message.*2Available only when viewing the list of messages.Edit Edit the selected message.Forward*1Forward the selected message.Send*2Send the selected message.Copy to album*3Copy the selected message to Media Album.Delete Delete the selected message.Delete all Delete all the messages in the folder.Protect/Unprotect Protect or unprotect the selected message.Details Show details for the selected message.Send Send the selected message.Call Call the sender’s number.Use detail*1Use phone number, e-mail or web address in the selected message to call, create message, add to Contacts, etc.Delete Delete the selected message.Delete all*2Delete all the SMS messages in the folder.View illumination*1Check the illumination of the message.VS3_VF_AAA.book Page 72 Monday, May 23, 2005 11:25 AM](https://usermanual.wiki/Panasonic-Mobile-Communications-Development-of-USA/26C001A.User-Manual-Part-1/User-Guide-551460-Page-80.png)