Panasonic Mobile Communications 209020A UMTS/ GSM Cellular Mobile with Bluetooth® and RFID User Manual BAILA E OI
Panasonic Mobile Communications Development of Europe Ltd UMTS/ GSM Cellular Mobile with Bluetooth® and RFID BAILA E OI
Contents
User Manual 3
7
7-1
Mobile Widget
Mobile Widget (Japanese) .................................... 7-2
Using Widgets ....................................................... 7-2
Pasting Widgets to Standby ........................................................7-2
Activating Widgets......................................................................7-3
Downloading Widgets ................................................................7-4
Arranging Widgets in Standby .....................................................7-4
Mobile Widget
7-2
7
Mobile Widget (Japanese)
Paste widgets to Standby to access information or tools
from Standby.
Network Widget
Some widgets may periodically connect to network, incurring packet
transmission fees.
During transmission, other functions (e.g. Video Calls) may be disabled.
Show/Hide Widget
■
In Standby,
>
Using Widgets
Pasting Widgets to Standby
Paste up to five widgets per sheet. Select from four sheets
and organize sheets by theme.
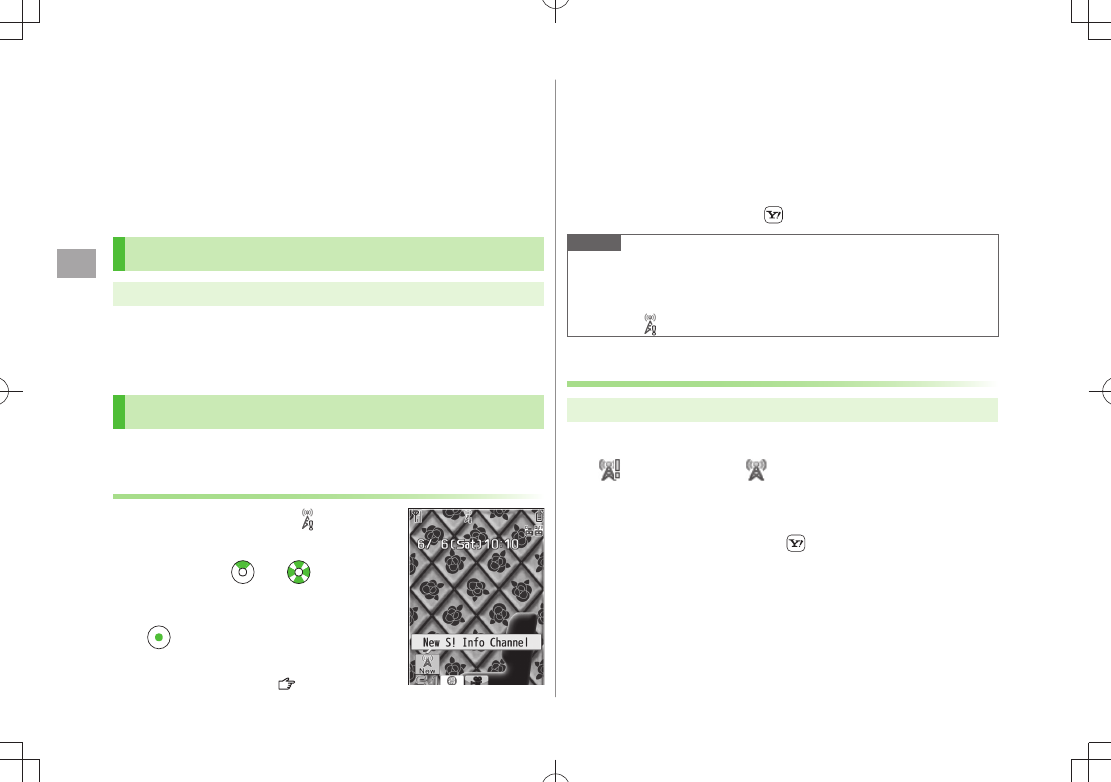
1 Press and hold
Widget List appears.
2 Select a widget [Menu]
Paste on Stand-by
Select a sheet
3 to move to target location
Delete Widgets on Standby Display
■
Main Menu
> Widget Settings Delete Content
Select a sheet Check Contents to delete [Release] YES
Note
Alternatively,
Main Menu Widget
Widget Contents or Main Menu Data Folder
Widget to select widgets
When saving widgets from microSD to Standby, do not remove microSD
Card.
Mobile Widget
7-3
7
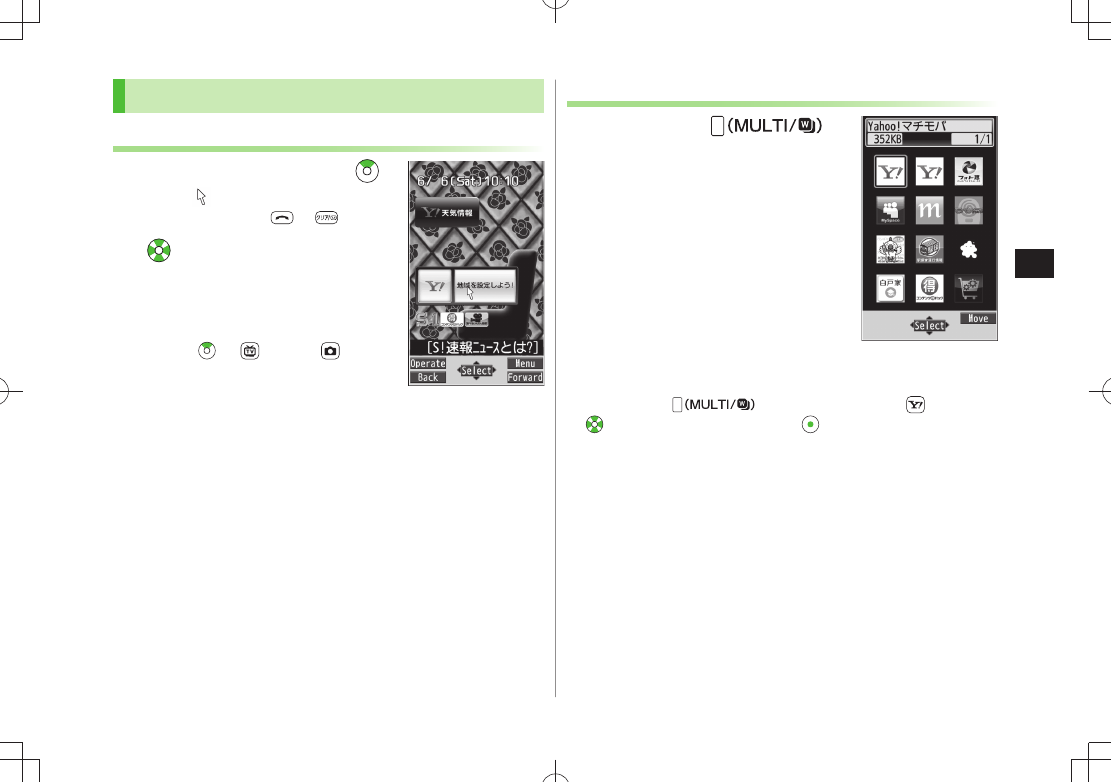
Activating Widgets
Selecting Widgets in Standby
1 In Standby (widgets shown),
Pointer ( ) appears.
To disable pointer:
or
2 to move pointer Select a
widget
Follow onscreen instructions.
Toggle Sheets
■
In Standby,
>
[Back] or [Forward]
Selecting Widgets from Widget List
1 Press and hold
Widget List appears.
2 Select a widget
Move Widgets in List
■
Press and hold
>
Highlight a widget
[Move]
to determine a target location
[OK]
Widget List
TBD
TBD
Mobile Widget
7-4
7
Downloading Widgets
Main Menu Widget
1
Widget Store
940P connects to the Network, and download site appears.
Follow onscreen instructions.
Installing Widgets
Some widgets may require you install them manually; follow steps below:
In download completion window,
>[Menu]
Install
Once installation is completed, widgets appear in Widget List. Widget
folder in Data Folder includes widgets that are not yet installed.
Note
Alternatively,
Main Menu Data Folder Widget
Download Widget YES to download
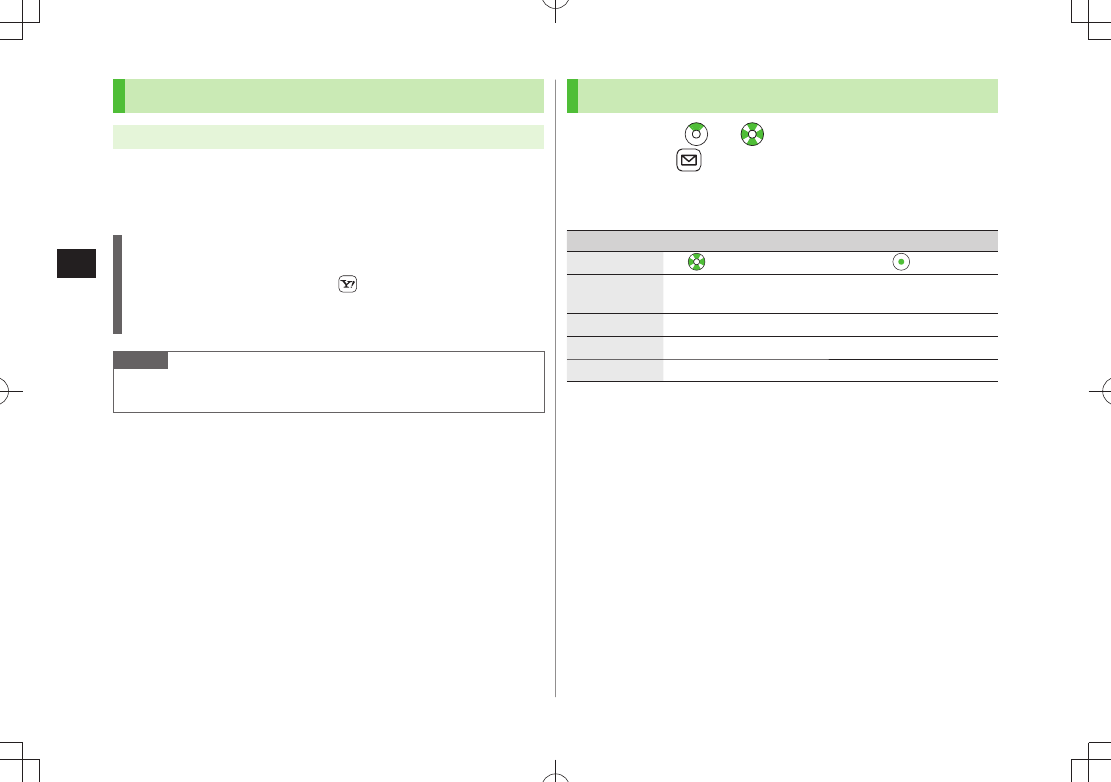
Arranging Widgets in Standby
1 In Standby, to move pointer Highlight a
widget [Operate]
2 Select an item (See below)
Item Operation/Description
Move
> to move to a target location
Delete frm
Standby
YES
>
Forward Move overlapping widget to foreground
Rear Move overlapping widget to background
Reload Update widget
8
8-1
News/Entertainment
S! Information Channel/Weather (Japanese) ........ 8-2
Registering/Canceling ................................................................. 8-2
Using S! Information Channel .....................................................8-2
Using Weather Indicator .............................................................8-3
Option Menu Items .....................................................................8-4
S! Quick News (Japanese) .................................... 8-4
Registering S! Quick News Items ................................................8-4
Opening New Information ..........................................................8-5
Saving Blog Details .....................................................................8-7
Posting to Blogs .........................................................................8-7
Blogging Functions .....................................................................8-8
News/Entertainment
8-2
8
S! Information Channel/Weather
(Japanese)
Subscribe to content and periodically receive updates. Set
Weather Indicator to appear on Standby.
Transmission fees apply for updates.
Auto download is not available overseas.
Registering/Canceling
Main Menu News/Entertainment S! Info Ch./Weather
1
Register/Cancel
YES
940P connects to the Network.
Follow onscreen instructions.
Using S! Information Channel
Up to seven updates are saved.
Viewing New Information
When information arrives, and Event
Indicator appear in Standby.
1 In Standby, to move
pointer Select Event Indicator
2 [Select]
Follow onscreen instructions.
Option Menu Items (
P.7-8)
Manually Retrieve Information
■
Select Event Indicator "
Failed to download
"
Alternatively,
Main Menu News/Entertainment
S! Info Ch./Weather Get Latest Contents YES
Delete Information
■
Main Menu
> News/Entertainment S! Info Ch./Weather
Highlight What's New? [Menu] Delete YES
Note
Alternatively,
Main Menu News/Entertainment
S! Info Ch./Weather What's New? to retrieve information
If there is unread information in both S! Quick News and S! Information
Channel, does not appear. Only Event Indicator appears.
Viewing Previously Received Information
Main Menu News/Entertainment S! Info Ch./Weather
1
History
Select a date
for unread news and for read news appear.
Delete History
■
Main Menu
> News/Entertainment S! Info Ch./Weather
History (Highlight a History) [Menu] Delete or Delete all
YES
( For Delete all, enter Phone Password)
TBD
News/Entertainment
8-3
8
Using Weather Indicator
Weather Indicator for current forecast area appears.
Viewing New Information
Event Indicator and Weather Indicator appear for weather
updates.
1 In Standby, to move pointer Select Event
Indicator or Weather Indicator
2 [Select]
Information appears.
Follow onscreen instructions.
Option Menu Items (
P.7-8)
Weather Indicator
Indicators are updated periodically.
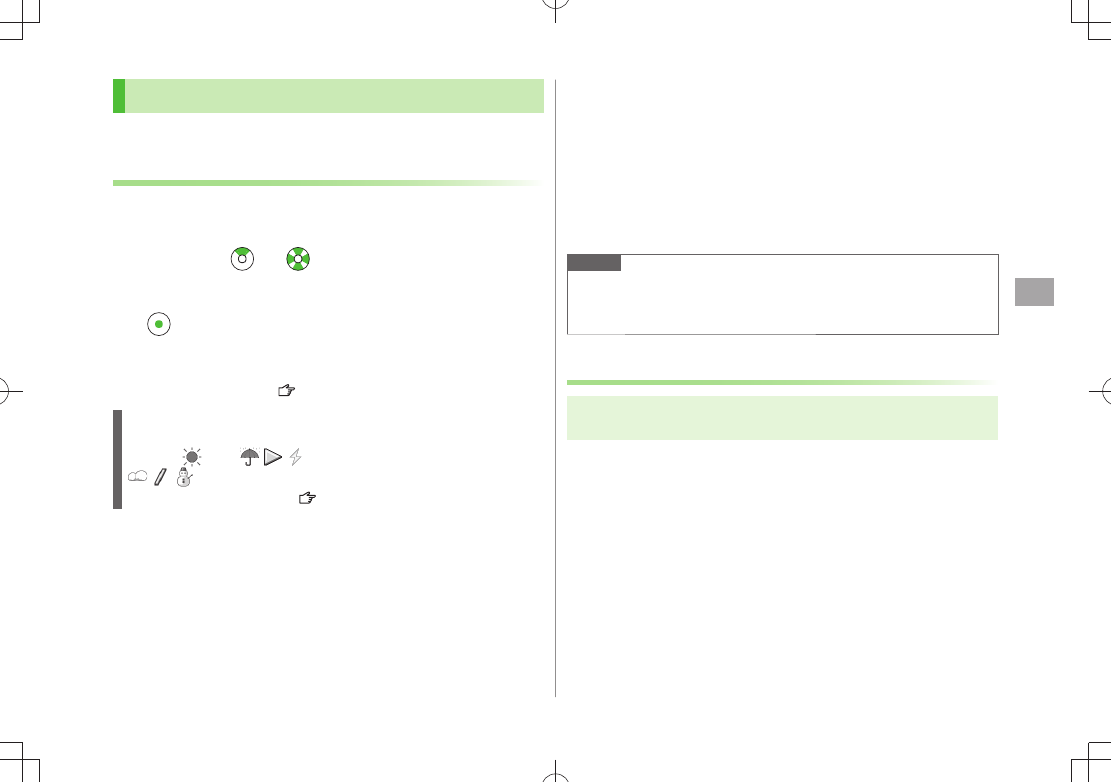
Example: Clear, Rain later thunderstorm,
Cloudy with occasional snow, etc.
See Weather Indicator List (
P.19-24) for a complete list of indicators.
Manually Update Weather Indicator
■
Select Event Indicator “
Failed to download
”
Alternatively,
Main Menu News/Entertainment
S! Info Ch./Weather Weather Indicator Manual Update
YES
Hide Event Indicator
■
Main Menu
> News/Entertainment S! Info Ch./Weather
Weather Indicator Missed Event Settings OFF
Note
Alternatively, view forecast details from
Main Menu
News/Entertainment S! Info Ch./Weather
Weather Indicator Weather
Hiding Weather Indicator
Main Menu News/Entertainment S! Info Ch./Weather
Weather Indicator Display Settings
1
OFF
When Display Settings is set to
OFF
, update is also deactivated.
News/Entertainment
8-4
8
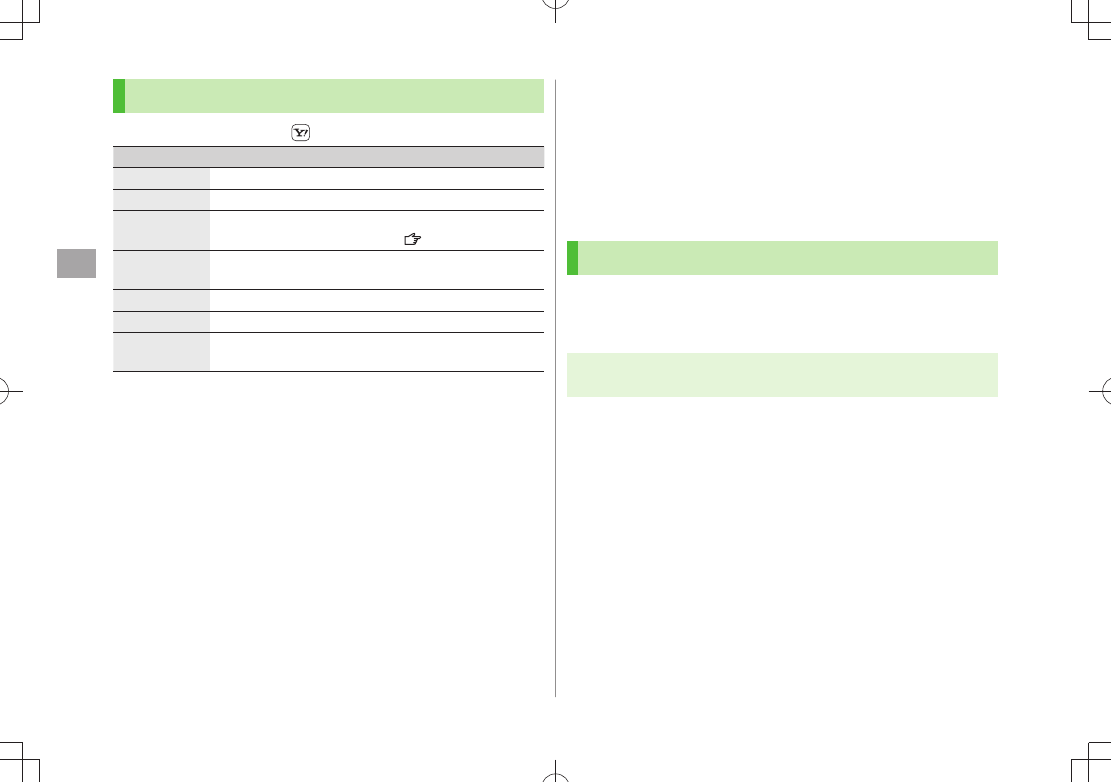
Option Menu Items
While viewing a content, press [Menu] for these options.
Item Operation/Description
Forward Go to next page
Text Copy Copy page text
Select File View, play or save file to Data Folder (From Step 2 in
Downloading Image/Sound Files: P.14-11)
Jump in this
page
Jump to top/end of page
Yahoo! Keitai View top menu
Font Size* Change character size
Exit viewing
this
Exit content
* Linked with Font Size setting in Internet option menu.
S! Quick News (Japanese)
Add news headlines, weather forecasts, etc. via S! Quick
News List to scroll across Standby Window.
Registering or viewing S! Quick News incurs transmission fees. No fees
apply for viewing ticker information. For more information, visit
SOFTBANK MOBILE Corp. Website (http://www.softbank.jp).
Registering S! Quick News Items
Register one
Quick
news, up to four
General
news and one
Special
news.
Auto download is not available overseas.
Main Menu News/Entertainment S! Quick News
S! Quick News List
1
Add News
YES
Yahoo! Keitai connects and contents list appears.
2 Select an item
Follow onscreen instructions.
News/Entertainment
8-5
8
Opening New Information
Viewing New Information in Standby
When new information is received, appears in Standby.
1 In Standby, to move pointer Select ticker
2 [Select]
Content list appears.
3 Select information
Details appear.
Tip
Settings
●Turn Back Light Off after All S! Quick News Viewed ( P.18-6)
●Show Only Unread Items in Standby ●Change Marquee Speed
●Hide S! Quick News ●Show Image Data ( P.18-16)
Opening S! Quick News List
Main Menu News/Entertainment S! Quick News
S! Quick News List
1 Select an item
Content list appears.
2 Select information
Detailed information appears.
3 To connect to the Network, select a title
YES
Update Manually
■
In Step1,
>[Menu]
Update
or
All Update
YES
View Summary
■
In Step 1, highlight information
>
[Menu]
Summary Display
Delete Registered Items
■
In Step 1, (highlight information
>) [Menu]
Delete
or
All Delete
YES
(
For
All Delete
, enter Phone Password)
Note
Alternatively,
Main Menu News/Entertainment
S! Quick News Settings Del S! Quick News List
YES to delete all information
Tip
Settings
●Automatically Update S! Quick News List
●Delete S! Quick News Information ( P.18-16)
News/Entertainment
8-6
8
E-Books (Japanese)
Use BookSurfing® to acquire/view e-books, comics, photo
books, etc. or e-Book Viewer to view XMDF files on 940P.
BookSurfing
® and e-Book Viewer are S! Appli.
Download Content Keys (
P.9-5) to read CCF/XMDF files.
Some copy protected files have extensions different from the ones below.
Application File Format
BookSurfing®CCF (.ccf)
e-Book Viewer XMDF (.zbf, .zbk, .zbs)
Some PC content may not be viewable via e-Book Viewer.
Main Menu News/Entertainment
1
BookSurfing
or
e-Book Viewer
See application Help menu for usage information.
Note
Launch BookSurfing
®/e-Book Viewer via S! Appli, or select a file from
Books in Data Folder.
When purchasing a new handset, move CCF/XMDF files via microSD
Card. However, if CCF/XMDF files are copy protected, Content Keys
backup may be needed ( P.10-22). Some contents require another
Content Key after being moved/copied to a new handset or can not be
moved/copied at all.
News/Entertainment
8-7
8
Blogging
Save blog details to update or view blogs.
Save up to 20 blog details.
Saving Blog Details
Main Menu News/Entertainment Post Blog
1 [New] Select an item (See below)
Item Operation/Description
Service name Save a blog service name
Enter a service name
>
Blogger
address
Save a mail address for posting by mail
Enter a mail address
>
Mail title Save a title to enter automatically when posting by mail
Enter a title
>
Yahoo! Keitai
URL
Save a URL for posting from Yahoo! Keitai
Enter a mail address
>
PC Site
Browser
Save a URL for posting from PC Site Browser
Enter a mail address
>
2 [Finish]
Posting to Blogs
Main Menu News/Entertainment Post Blog
1 Posing by Mail
Highlight a service
[Post]
Compose a
message ( From Step 4 on P.14-4)
[Send]
Posing from Yahoo! Keitai/PC Site Browser
Highlight a service
[To site]
By Yahoo!
Keitai
or
By PC Site Browser
YES
940P connects to the Network and website appears.
Follow onscreen instructions.
Post Captured Images to Blogs
■
While a captured image is shown, or highlight an image in Data Folder
>
[Menu]
Post blog*
Follow Step 1 above
* Some images may not be posted (e.g. images opened from Data Folder by
pressing [Folder] in Picture Viewfinder)
Set
Auto save set
( P.18-16) in Camera menu to
OFF
to post images
to blogs easily.
News/Entertainment
8-8
8
Blogging Functions
From Main Menu Settings Post Blog
Edit Service Information
■
Highlight a service
> [Edit] Edit
Delete Service Information
■
Highlight a service
> [Menu]
Delete
Select an item (See below)
Item Operation/Description
Delete this
YES
>
Delete
selected
Check services
> [Finish]
YES
Delete all Enter Phone Password
>
YES
9
9-1
Music Player
Overview .............................................................. 9-2
Saving Music ........................................................ 9-2
Downloading Chaku-Uta Full® ...............................................................................................................9-3
Saving Music Files by Using SD Audio .........................................9-3
Transferring WMA Files ...............................................................9-4
Using Music Player ............................................... 9-5
Playback Window Indicators .......................................................9-5
Playing Music .............................................................................9-6
Playback Window Operations ......................................................9-7
Functions while Playing Files .......................................................9-8
Chaku-Uta Full®/WMA List ..........................................................9-9
Using Play List ..........................................................................9-10
Play List ...................................................................................9-11
Music Player
9-2
9
Overview
Play music saved on 940P/microSD Card.
Play List:
P.8-10
Notes
Files may not play due to file support issues or microSD Card status, etc.
When playback starts with low battery, confirmation appears.
When battery is low during playback, confirmation appears.
Playback pauses for incoming calls or Alarm. Playback resumes after calls
are received or Alarm sounds.
Music Illumination
Notification Light illuminates when playback starts. When playback
starts during charging, Music Illumination lights before Charging
Indicator.
To turn off light, set
Music
to
OFF
in Notification Light setting
(P.18-10).
Tip
●Use Bluetooth® Device for Wireless Playback ( P.10-10)
Saving Music
Save Music to play on Music Player.
Download
Chaku-Uta Full®
(P.8-3)
Open site link to download and save songs
Supported file format: SMC, MPEG-4
(MPEG-4 AAC, MPEG-4 AAC+ (HE-AAC),
Enhanced aacPlus)
Save Music via
SD Audio (P.8-3)
Save music CD songs via PC to microSD Card in
AAC format
Supported file formats: MPEG-2 AAC,
MPEG-2 AAC+SBR
Save WMA files
(P.8-4)
Save Windows Media® Audio (WMA) files in PC
to microSD Card via Windows Media® Player
Supported file formats: WMA
Some files may not play even if format is supported.
Copy Protected Files
Copy protected files may not play, be saved or forwarded.
To play a copy protected file, obtain Content Key ( P.9-5).
Confirm file expiry date or usage limitations (Music info: P.8-8).

Music Player
9-3
9
Saving Music Files on PCs
When saving music files for use with 940P, observe the following
guidelines:
Copyrighted Works
Do not infringe on third party/intellectual property rights.
・
Music files are limited to private use.
・
Obtain software to convert file format.
Refer to websites providing software.
・
Performance of some software types is not guaranteed.
・
Downloading Chaku-Uta Full®
Access websites directly from Music Player to download
Chaku-Uta Full® files.
View details (price, expiry date, etc.) on source website.
Main Menu Music Player Data Manager Main Folder
Download Music
1
YES
940P connects to the Network and Download site appears.
Follow onscreen instructions to download files.
Note
Alternatively, follow these steps to access Download site:
Main Menu Data Folder Music Main Folder
Download Music YES
Saving Music Files by Using SD Audio
Note
Saving music files requires following:
940P
・
microSD Card (commercial item)
・
USB cable (not included)
・
PC (Windows
・ ® XP, Windows Vista®)
Software for PC (commercial item)
・
Panasonic brand "SD-Jukebox" is recommended. Purchase
SD-Jukebox from website below:
http://club.panasonic.jp/mall/sense/ (Japanese only)
Music CD to save
・
Main Menu Settings Connectivity USB Mode
microSD Mode
1 Connect 940P to a PC via USB cable
2 Activate SD-Jukebox on PC
3 Set a music CD on PC
4 Save music files to micro SD Card
See SD-Jukebox manual for usage information.
After saving, release USB cable from 940P.

Music Player
9-4
9
Transferring WMA Files
Transfer WMA files from PC to microSD Card via Windows
Media® Player. Up to 1000 files can be saved per microSD
Card.
Use PC with Windows Media
® Player installed.
When using Windows Media
® Player 10 (10.00.00.3802 or later)/11 on
Windows® XP, use Windows® XP Service Pack 2 or later.
When using Windows Vista
®, use Windows Media® Player 11.
Insert microSD Card into 940P before preparing USB cable (Transferring
Data via USB Cable: P.10-12)
Main Menu Settings Connectivity USB Mode
MTP Mode
1 Connect 940P to a PC via USB cable
Follow Windows Media® Player operations to transfer WMA files from
PC to microSD Card.
Refer to Windows Media
® Player Help for operations.
Terminate all software applications before disconnecting USB cable.
Note
Do not remove microSD Card while transferring files to microSD Card.
Files may be damaged.
WMA files overwrite existing files with same name in handset when
copied from PC. To check file names, refer to Windows Media® Player
Help.
940P may not recognize WMA files saved to a microSD on a different
handset. Handset may not recognize WMA files from PCs if
USB Mode
is set to
MTP Mode
. Delete WMAudio and WMSystem folders in My
Items (MY FOLDER) on microSD, or format microSD Card ( P.9-18) via
PC. Formatting microSD deletes all saved files.
To play WMA files on handset, save files to WMFile (
P.9-20) on
microSD Card and play the files from PC Movies folder in Data Folder.
9-5
Music Player
9
Using Music Player
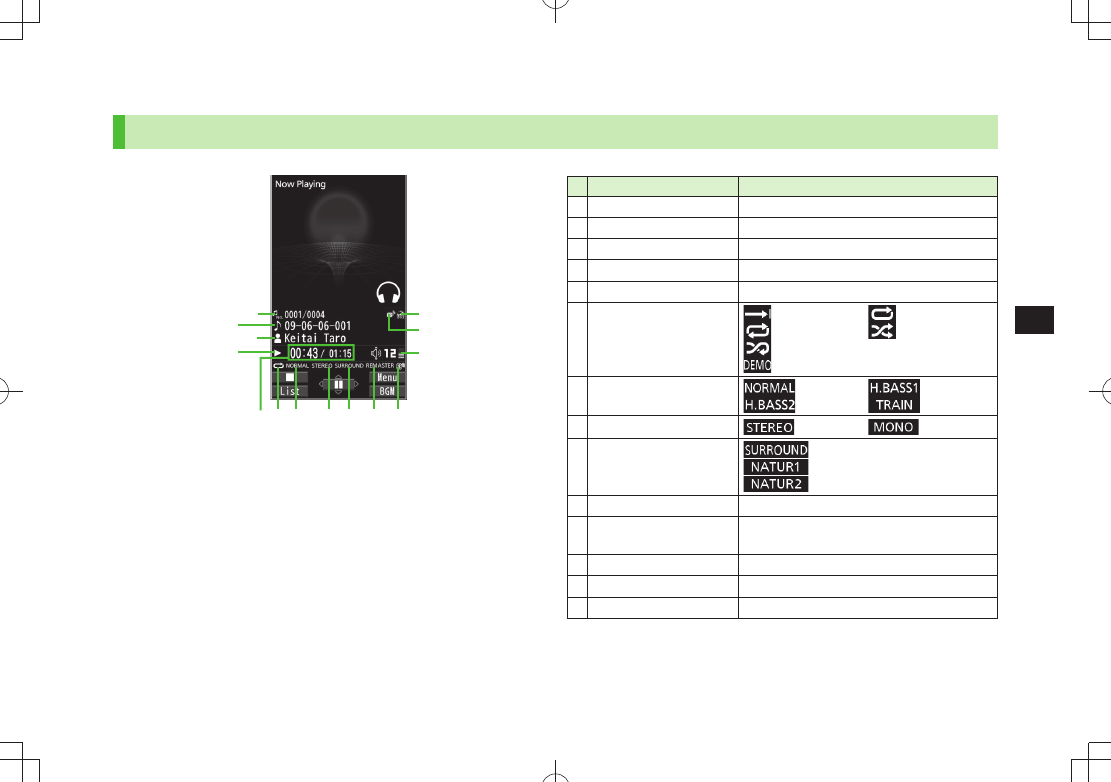
Playback Window Indicators
❶
❷❸
❹
❻❼ ❽❾
❺
Item Description
❶
File Number/Total Number
—
❷Title —
❸Artist —
❹Status —
❺Elapsed Time/Total Time —
❻Play Mode Indicators
Play only one
Repeat one
Repeat all
Random
Random play&repeat
DEMO
❼Equalizer Setting
Normal
H.BASS1
H.BASS2
Train
❽Stereo/Monaural
Stereo
Monaural
❾Listening Setting
Surround-sound
Natur 1
Natur 2
Remaster Setting ON —
Bluetooth® Device
Connected
—
Volume —
Lyric —
URL —
TBD
Music Player
9-6
9
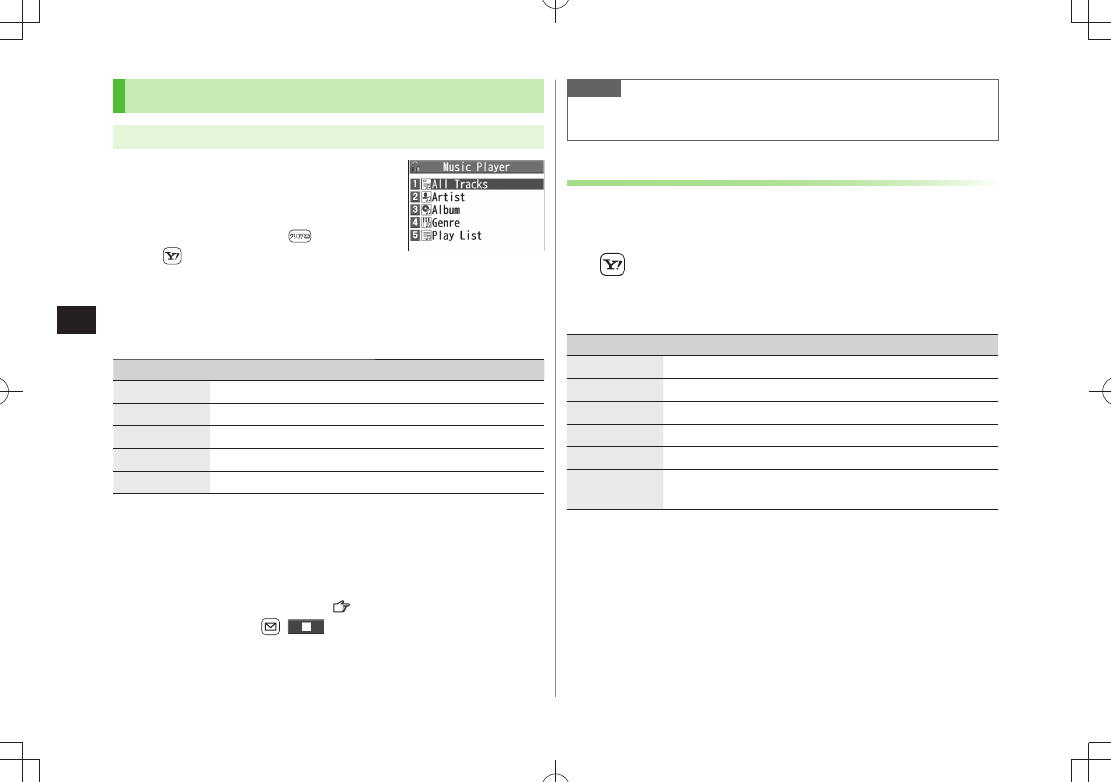
Playing Music
Main Menu Music
1
Player
Player Menu window appears.
Last playback window appears.
To open Player menu: twice.
[Menu]
Player menu
to show
Player Menu window.
2 Select a category (See below)
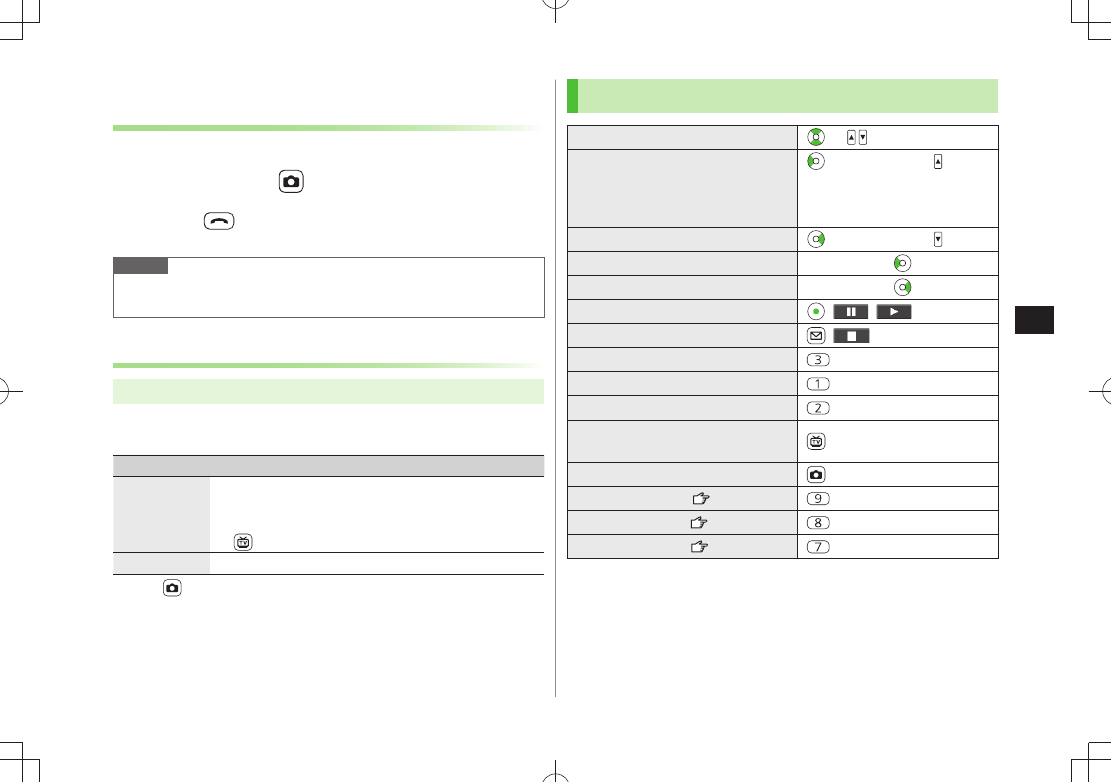
Item Operation/Description
All Tracks Select files from 940P & microSD Card
Play List Select group of files saved to Play List
Artist Select files from Artist folder
Album Select files from Album folder
Genre Select files from Genre folder
★
appears for currently/previously played Play List.
3 Select a file
Selected file plays.
★
appears for currently/previously played file.
Playback Window Operations:
P.8-7
To end playback,
[ ]
Player Menu Window
Note
mp4/3gp files in Ring Songs&Tones folder can also be played in Music
Player.
Changing Play Mode
1
Player
Player Menu window or Playback window appears.
2 [Menu]
Play mode setting
3 Select an item (See below)
Item Operation/Description
Normal Play all files in selected category/Play List
Play only one Play selected file
Repeat one Repeat selected file
Repeat all Repeat all files in selected category/Play List
Random Play selected category/Play List files randomly
Random
play&repeat
Repeat selected category/Play List files randomly
TBD
Music Player
9-7
9
Using Other Functions while Listening to Music
(Play Background)
Use Phone Book, Messaging, Internet, etc. while listening to music.
1 While playing file, [BGM]
2 To end, in Standby
End player
Note
Some functions cannot operate simultaneously.
Volume or play mode change is not available during Play Background.
Playing Chaku-Uta Full®/WMA Files as Demo
Main Menu Music Data Manager
1 Select an item (See below)
Item Operation/Description
Main Folder View Chaku-Uta Full® list
Select a folder
>
To view file list in handset/microSD Card:
[Phone/microSD]
WMA View WMA list
[Change] to toggle display view in Chaku-Uta Full® and WMA
list.
2 Select a Chaku-Uta Full® or WMA file
Demonstration playback starts.
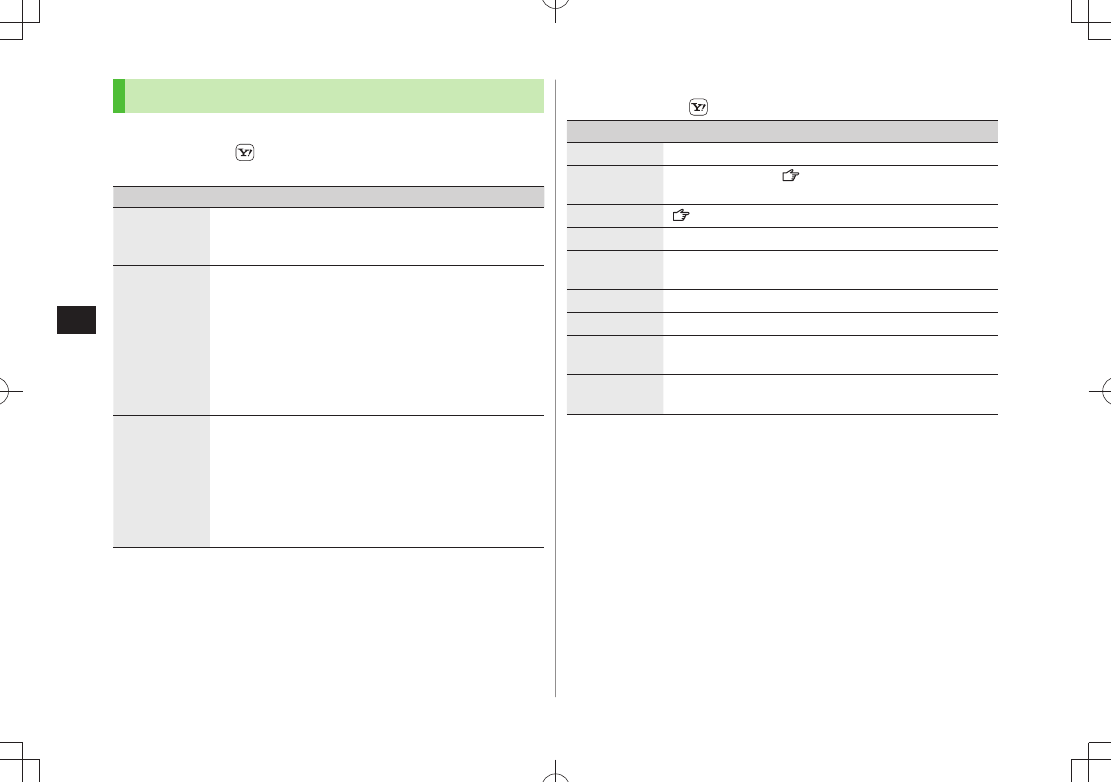
Playback Window Operations
Adjust Volume or
Play Previous*
or press and hold
When playback time is over
three seconds, previous file
plays from beginning.
Play Next* or press and hold
Rewind Press and hold
Forward Press and hold
Pause/Resume [ / ]
Stop [ ]
View Next Jacket/Lyric
View Previous Jacket/Lyric
Switch Jacket/Lyric Display
Switch Playlist/Playback
Window*[List/Player]
Play Background*[BGM]
Switch Remaster ( P.8-8)
Switch Listening ( P.8-8)
Switch Equalizer ( P.8-8)
* Not available for playback as a demo
Music Player
9-8
9
Functions while Playing Files
Set Sound Effect
■
While playing file,
>[Menu]
Sound effect
Select an item
(See below)
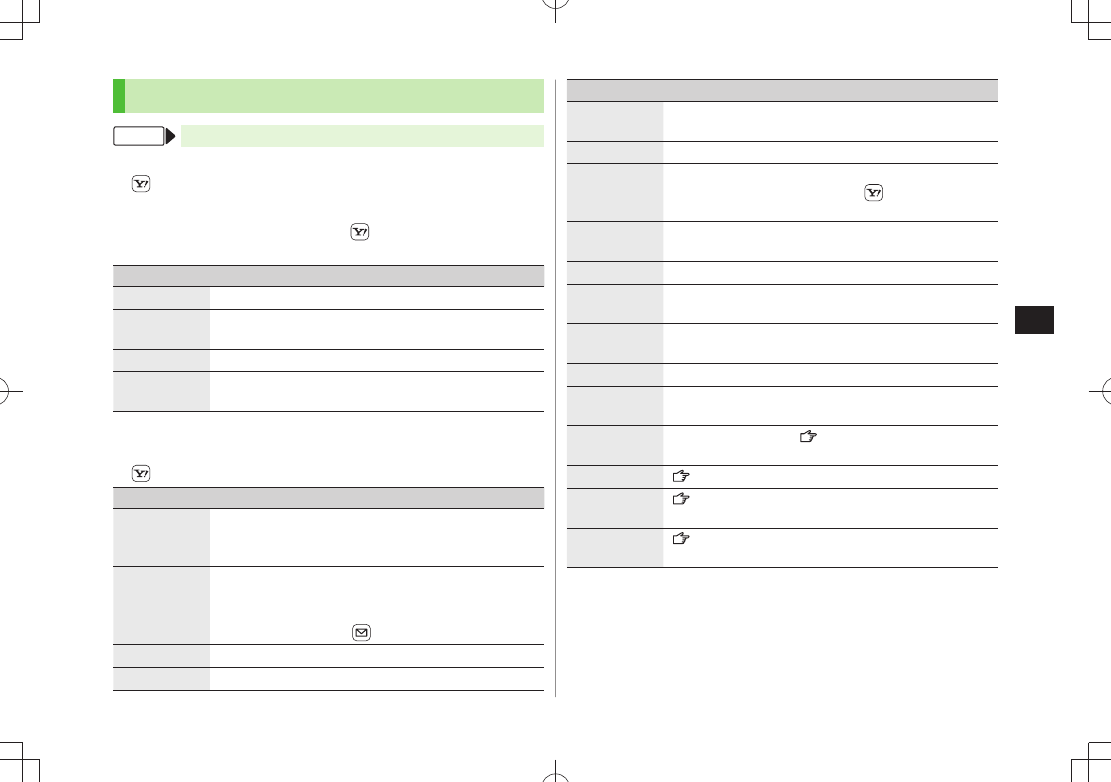
Item Operation/Description
Remaster Complement sound from earphone or Bluetooth® device
to bring close to original sound
ON
> or
OFF
Listening Add listening effect to sound from earphone or Bluetooth®
device
Select an item
>
Surround-sound
・ : Reproduce natural and
stereophonic sound
Natur 1 or Natur 2
・ : Complement sound specific to
earphone to reproduce natural sound
OFF
・ : Turn off Listening setting
Equalizer Change quality of sound from earphone or Bluetooth®
device
Select an item
>
Normal
・ : Reproduce normal sound
H. BASS1
・ : Enhance low-pitched sound
H. BASS2
・ : Enhance low-pitched sound even more
Train
・ : Minimize sound leakage
Functions Available in Playback Window
■
While playing file,
>[Menu] Select an item (See below)
Item Operation/Description
Player menu Show Player menu
Play mode
setting
Change play mode ( P.8-6)
Sound effect (Left)
Music info Show song title, artist and playback time
Connect to
Website
Open site link
YES
>
Display Image
Show jacket
Display lyric
Show lyric
Previous image/
Previous lyric
Show previous jacket or lyric
Next image/
Next lyric
Show next jacket or lyric
Music Player
9-9
9
Chaku-Uta Full®/WMA List
From Main Menu Music Data Manager
Confirm Memory Status
■
>[Menu]
Memory Status
Functions Available in Chaku-Uta Full
■® Folder List
Main Folder
> Highlight a folder [Menu] Select an item
(See below)
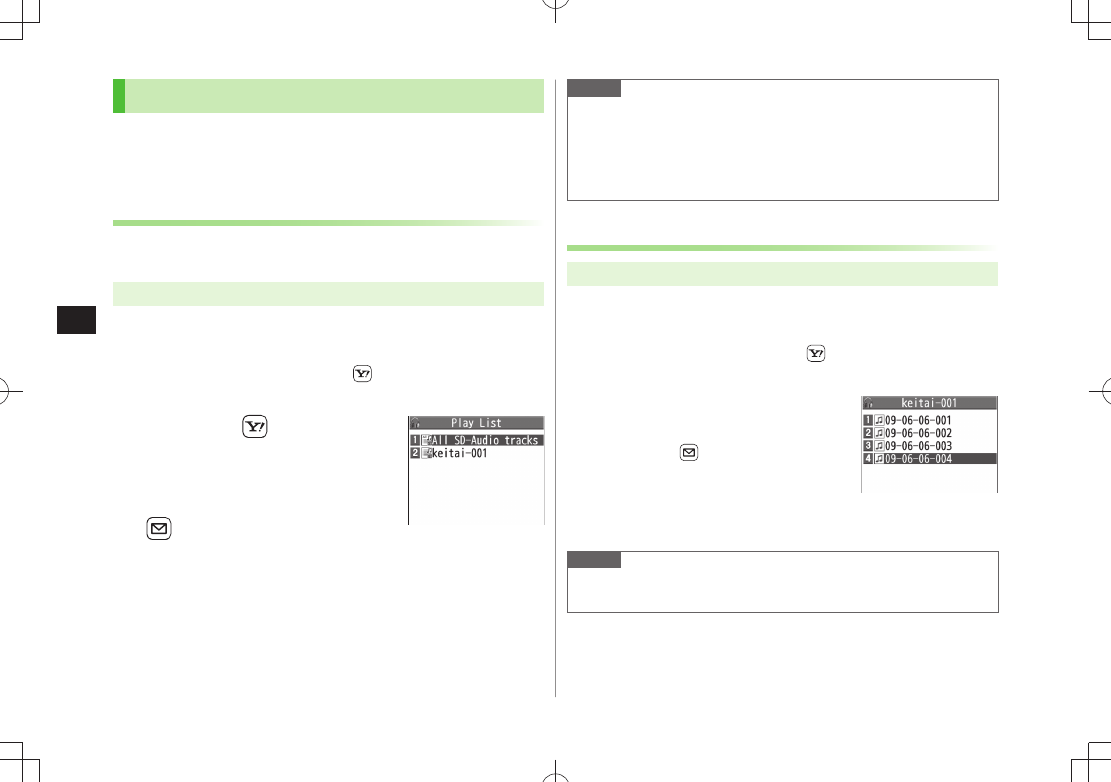
Item Operation/Description
Add folder Enter folder name
>
Edit folder
name
Enter folder name
>
Delete folder Enter Phone Password
>
YES
Memory
Status
Confirm memory status/total files
>
Functions Available in Chaku-Uta Full
■®/WMA File List
Main Folder
>or
WMA
( Select a folder) Highlight a file
[Menu] Select an item (See below)
Item Operation/Description
Set as ring
tone (Fullsong
ring tone) 1
Set Chaku-Uta Full® as ringtone
Fullsong ring tone
> Select an item
Set as ring
tone (Point
ring tone) 1
Set a segment of Chaku-Uta Full® as ringtone
Point ring tone
> Select a segment Select an
item
To confirm segment:
[Play]
Music info Show song title, artist and playback time
Move 1Select a storage
>
Item Operation/Description
Move to
microSD 1
Move a Chaku-Uta Full® to microSD Card
Add folder 1Enter folder name
>
Multiple-
choice 1
Select multiple Chaku-Uta Full® files
Check Chaku-Uta Full
>® files [Menu]
Delete
,
Move
or
Send Ir data
Operate selected item
Connect to
Website 1
Open site link
YES
>
Display image
Show jacket
Memory
Status
Memory status/total number of files appears
DEL all
licenses 2
Delete all WMA licenses
Enter Phone Password
>
YES
Delete this
YES
>
Delete all Delete all files in folder
Enter Phone Password
>
YES
Attach to
S! Mail 1
Send a file via S! Mail ( From Step 2 on P.13-4)
Send Ir data 1( P.10-3)
IC
transmission
1
( P.10-5)
Take contents
key 1
( P.9-5)
1 Chaku-Uta Full® files only
2 WMA files only
Music Player
9-10
9
Using Play List
Use Play List to organize Data Folder music files.
Select Music folder files to create Play List links to each file
in its original folder.
Creating New Play Lists
Save up to 30 Play Lists with up to 100 songs per list.
Music files saved on microSD Card are also savable.
Main Menu Music
1
Player
Player Menu window or Playback window appears.
When Playback window appears,
[Menu]
Player menu
to
show Player Menu window
2
Play List
[Menu]
Create play list
Select a
category and show file list Check
files to save to Play List
[Finish]
3 Enter a Play List name
Play List Window
Note
Create WMA Play Lists (using Windows Media
® Player) or SD Audio Play
Lists (using SD-Juke Box) on PC. Maximum number of Play Lists to
create and songs to save is as follows:
WMA Play Lists: 100 Play Lists; 250 songs per list
SD Audio Play Lists: 99 Play Lists; 99 songs per list
Playing Songs from Play List
Main Menu Music
1
Player
Player Menu window or Playback window appears.
When Playback window appears,
[Menu]
Player menu
to
show Player Menu window
2
Play List
Select a Play List
To play back selected Play List from the
beginning: [Play]
3 Select a file
Selected file plays back.
Note
mp4/3gp files in Ring Songs&Tones folder can also be added to Play
List.
Play List Contents
Window
TBD TBD
Music Player
9-11
9
Play List
Main Menu Music Player
( [Menu] Player menu) Play List
Functions Available in Play List Window
■
(Highlight a Play List)
>[Menu] Select an item (See below)
Item Operation/Description
Player menu Open Player menu
Play mode
setting
Change play mode ( P.8-6)
Create
play list
Create a new Play List ( P.8-10)
Copy play list Copy Play List
Enter a Play List name
>
Edit pl. list
name
Edit Play List name
Edit Play List name
>
Add Add files to Play List
Select a category, and open a Play List
> Check files
to add [Finish]
Delete
play list
Select an item
> Operate selected item
Functions Available in Play List Contents Window
■
Select a Play List
> (Highlight a file) [Menu] Select an item
(See below)
Item Operation/Description
Player menu Open Player menu
Play mode
setting
Change play mode ( P.8-6)
Item Operation/Description
Music info Show song title, artist and playback time
Add Add files to Play List
Select a category, and show contents window
>
Check files to add [Finish]
DEL from
play list
Delete files from Play List
Select an item
> Operate selected item
Order to play Select a file from Play List to change playing order
>
to change order [Select]
Repeat steps above to change order
[Set]
Add to
play list
Add files to another Play List
Add one
> or
Add some
( For
Add some
, check
files [Finish]) Select a Play List
Display image Show jacket

9-12
Music Player
9
10
10-1
Managing Files
Data Folder ......................................................... 10-2
Data Folder Structure ................................................................10-2
Opening Files ...................................................... 10-4
Viewing & Playing Files .............................................................10-4
Copy Protected Files .................................................................10-5
File Display/Playback Functions .................................................10-6
Options .................................................................................... 10-7
Using/Editing Still Images ................................ 10-12
Editing Still Images .................................................................10-12
Creating Animations ...............................................................10-13
Saving Still Images to Phone Book ..........................................10-14
Managing Folders/Files .................................... 10-14
Managing Folders ...................................................................10-14
Using Play List ........................................................................10-15
microSD Card .................................................... 10-16
microSD Card Installation .......................................................10-17
Format microSD Card ..............................................................10-18
Viewing microSD Card Files ....................................................10-18
Handset Data Backup .............................................................10-19
PC File Transfers .....................................................................10-20
microSD Card Functions ..........................................................10-21
10-2
Managing Files
10
Data Folder
Save, play and manage files downloaded from Internet, etc.
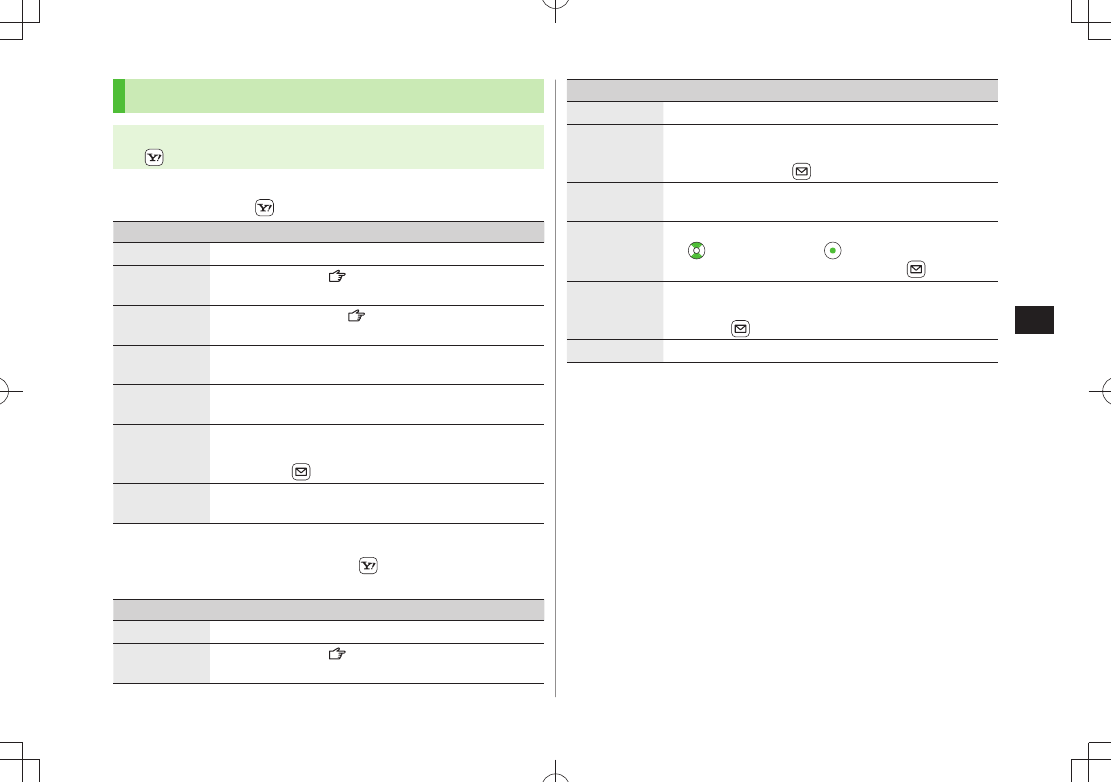
Save still images/videos captured by Camera, downloaded data or data copied/moved from SoftBank handset to microSD Card.
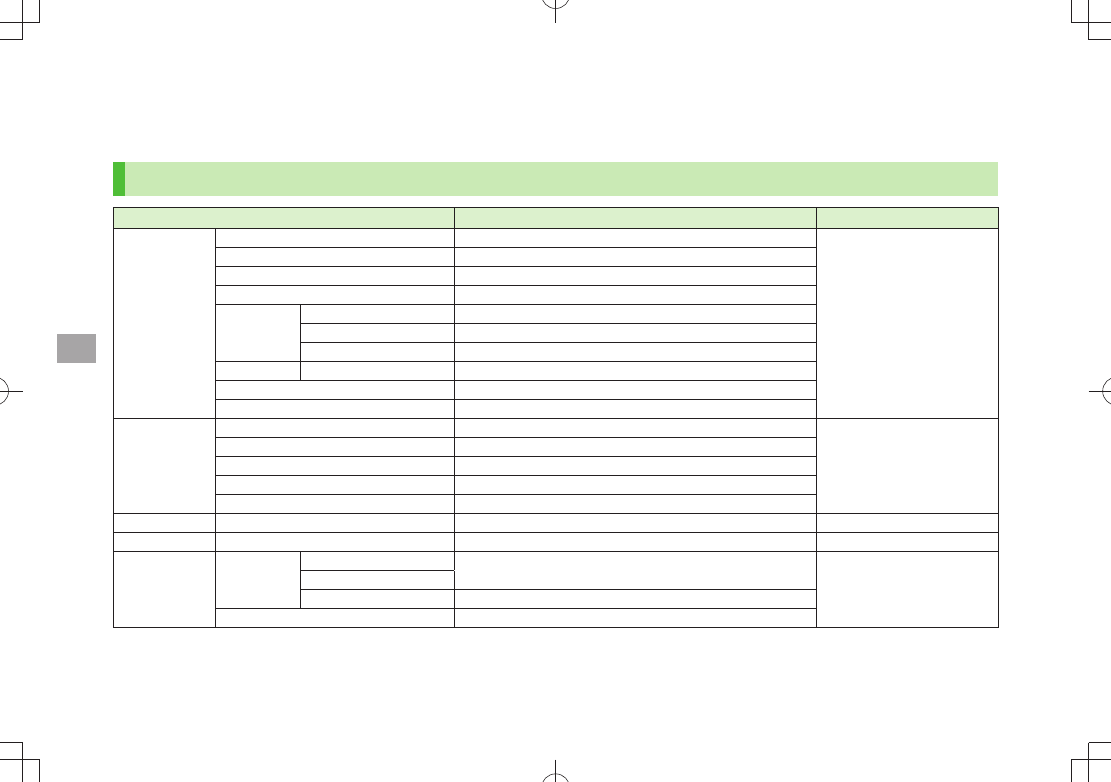
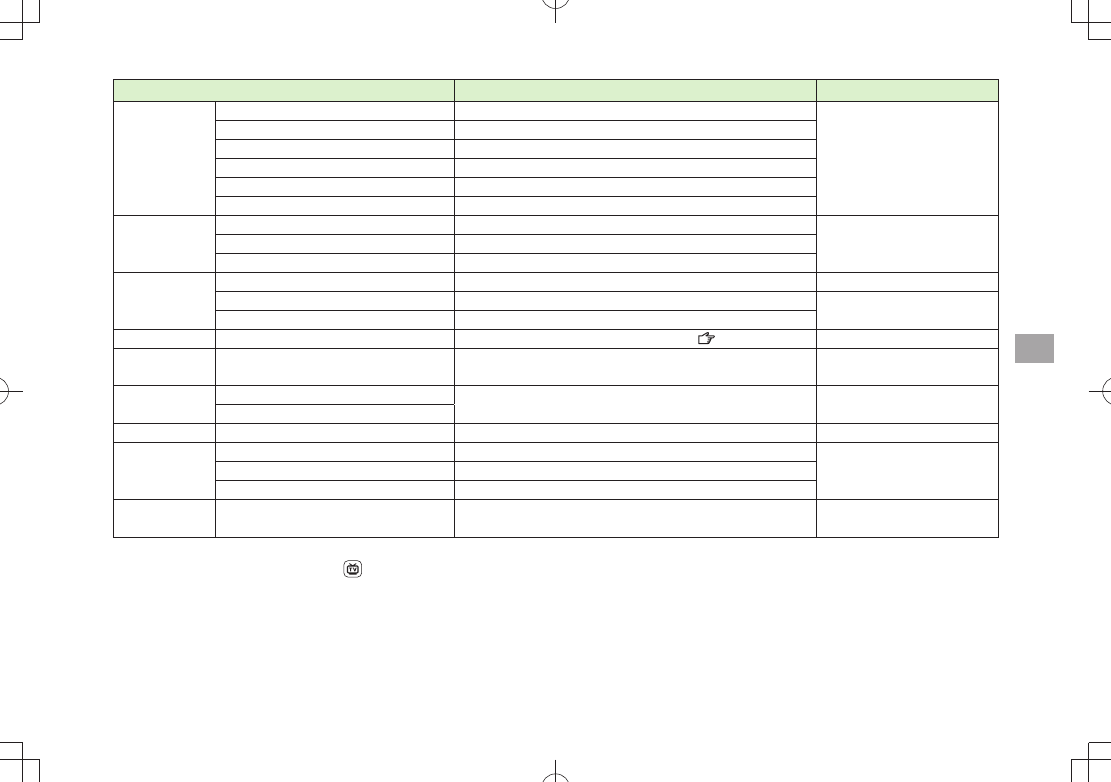
Data Folder Structure
Folder Function/Saved Data File Format 1
Pictures 2Download Pictures Connect to download site JPEG, GIF (.gif including
Interlaced GIF),
GIF Pictogram Package File
(.gpk), SWF (.swf Flash
Animation),
PNG (.png including Interlaced
PNG)
Album-Touch Activate Album-Touch
Main Folder Downloaded still images, etc.
Camera Still images captured by Camera, etc.
My
Pictograms
Download My Pict. Connect to download site
お気に入り Downloaded pictograms, etc.
顔文字, 装飾, etc. Preinstalled pictograms
Mail Art Mail Art (download) Connect to download site
Pre-installed Preinstalled still images
Original Animation Display still images continuously
Ring
Songs&Tones
2
DL Ring Songs&Tones Connect to download site SMF, SP-MIDI, AMR, SMAF
and MPEG-4 formatted files
(.mid, .midi, .amr, .mmf, .3gp,
.mp4)
Main Folder Downloaded ring songs/tones, etc.
Pre-installed Preinstalled ring songs/tones
Voice Announce Data recorded by Voice Announce
Play List Play back Play List
S! Appli 2Download S! Appli Connect to download site –
Widget 2Download Widget Connect to download site WGT (.wgt), SWGT (.swgt)
Music Main Folder 2Download Music Connect to download site MP4, SMC, WMA (.3gp, .mp4,
.smc, .wma)
Music Search
Initial Folder Downloaded Chaku-Uta Full®
WMA 3WMA Files transferred from PC
10-3
Managing Files
10
Folder Function/Saved Data File Format 1
Videos 2Download Videos Connect to download site MP4 (including .mp4, .3gp,
SDV), ASF (.asf)
Main Folder Downloaded video files, etc.
Camera Video files recorded by Camera
Pre-installed Preinstalled video files
Play List Play back Play List
Position Memory Play back video files from saved resume position
PC Movies microSD 3PC movies saved using PC WMA (.wma), WMV (.wmv),
ASF (.asf)
Position Memory Play back PC movies from saved resume position
Play History Playback records of PC movies
TV Image Still images recorded by Digital TV JPEG (.jpg)
Video 3Copy-protected video files (One-Seg compatible) TOD (.tod), MOI (.moi),
MAI (.mai), PGI (.pgi)
Position Memory Play back video files from saved resume position
Lifestyle-Appli Download Connect to download site (Osaifu-Keitai®: P.16-2) –
Books 2Download Books Connect to download site CCF (.ccf), XMDF (.zbf, .zbk,
.zbs)
Customized
Screen 2
Customized Screen Connect to download site CUSR (.xcsf)
Familiar Usability
Templates Download Templates Connect to download site –
Font Download Font Connect to download site MTF (.mtf)
Main Folder Downloaded fonts
Pre-installed Pre-installed fonts
Other
Documents 2
Main Folder Incompatible files attached to mail 4–
1 Some copy protected files have extensions different from above.
2 When microSD Card is installed, press [microSD] in Folder list to view data saved in microSD Card.
3 Available only when microSD Card is installed.
4 Some attachment files cannot be saved in Other Documents.
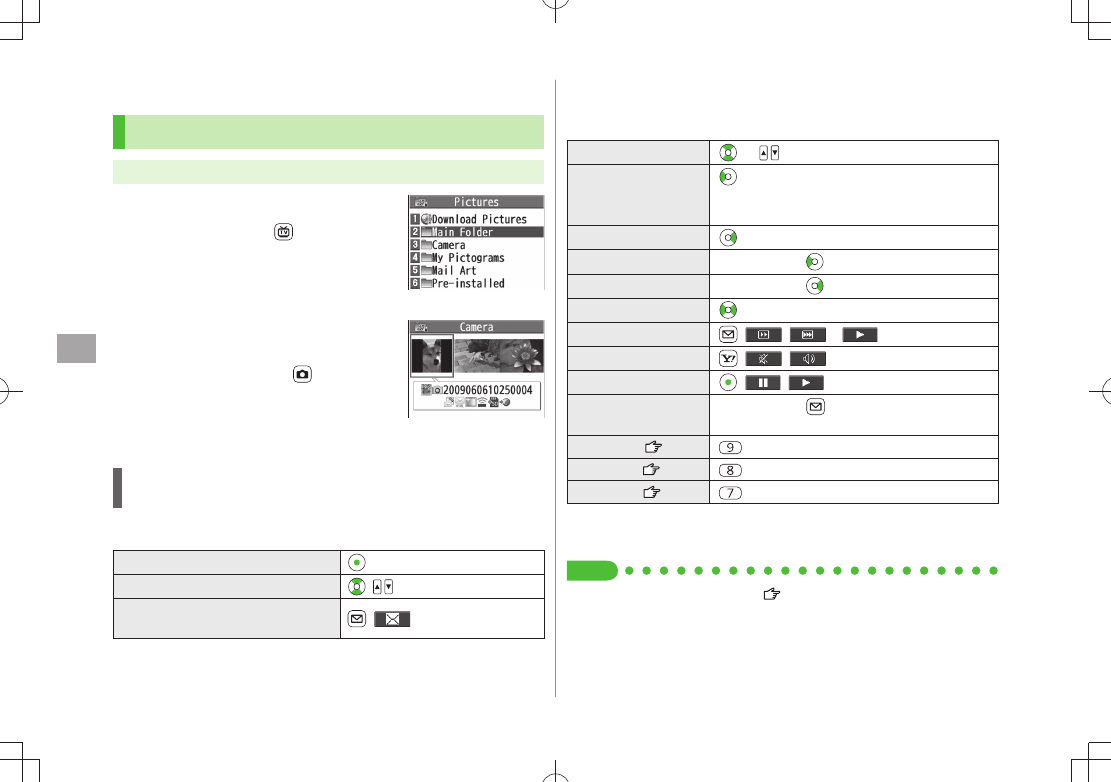
Managing Files
10-4
10
Opening Files
Viewing & Playing Files
Main Menu Data Folder
1 Select a folder
In Folder List, press
to toggle handset
folder and microSD Card folder.
2 Select a folder Select a file
File appears/plays.
To toggle file list view:
[Change]
When Shortcut to a Download Site is Selected
Handset connects to a download site on Internet.
Operations while Playing Back Ring Songs&Tones
■
Stop [Stop]
Volume /
Attach files (during playback)
to S! Mail [ ]
Pictures Folder
Still Image List
Window
Videos/PC Movies Playback Operation
■
Some operations are not available depending on files.
Operation descriptions are based on Portrait View.
Adjust Volume or
Play Previous Starts from beginning when playback time is
over three seconds.
Play Next
Rewind 1Press and hold
Forward 1Press and hold
Select Position 2 repeatedly
Change Speed [ / 1/ ]
Mute/Resume [ / ]
Pause/Resume [ / ]
Play Frame by
Frame 1
While pausing, [Frame]
Play back frame by frame
Remaster ( P.8-8)
Listening ( P.8-8)
Equalizer ( P.8-8)
1 Videos only
2 PC Movies only
only Tip
●File Display/Playback Functions ( P.9-6)
TBD
TBD
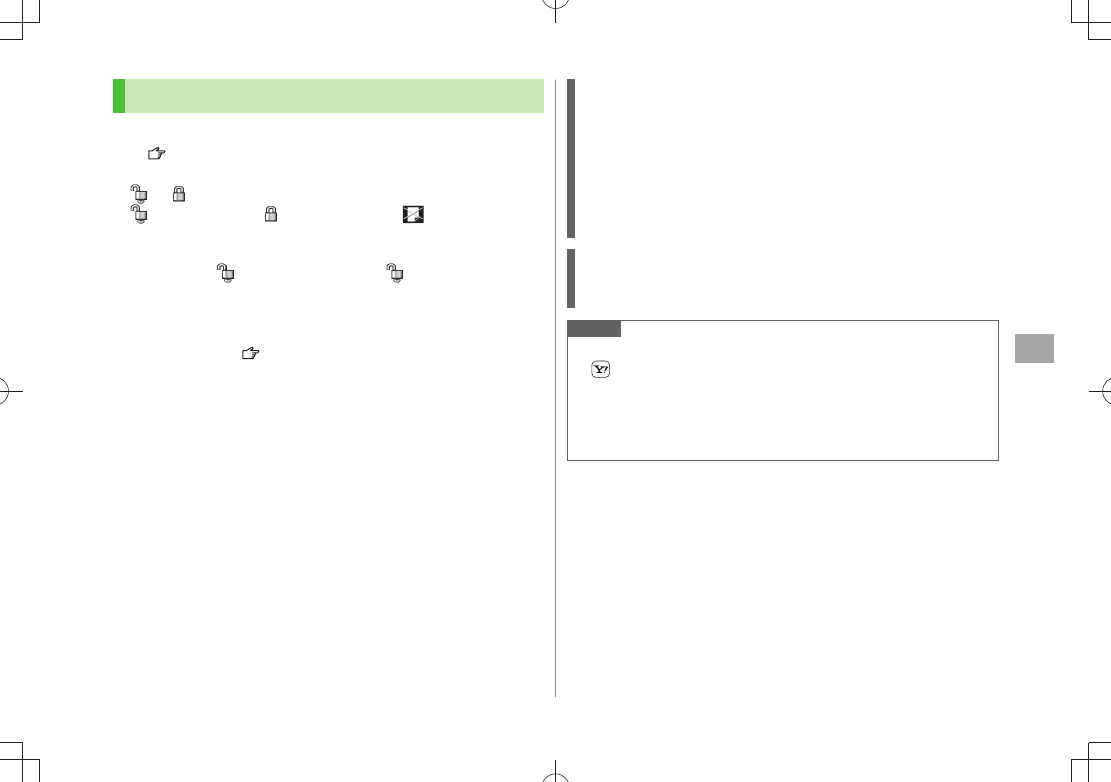
Managing Files
10-5
10
Copy Protected Files
Playing/forwarding/saving may be restricted and Content
Key ( P.9-5) may be required for usage.
If Content Key is expired, obtain a new Key to use file.
or (Silver) appears for copy protected files requiring Content Keys.
files are accessible. files are inaccessible. appears on images
in Thumbnail view of expired files (Original icon appears for Books
folder.).
When deleting
files or folders containing files, confirmation
appears asking whether to delete corresponding Content Key. Other files
requiring same Content Key may become unusable.
See File Properties to confirm restrictions such as expiry term or usage
limitation (Options: P.10-7)
940P holds up to 1000 Content Keys. Multiple Keys may be required to
use a file.
Interrupted playback (by incoming calls or Alarm) of copy protected WMA
files with limited usage in Data Folder is also counted as one usage.
Using Copy Protected Files
Files downloaded on 940P cannot be used on PCs.
Network setting may be required for usage.
File usage may require insertion of USIM Card in use at time of
download.
When set as wallpaper or ringtone, settings may return to defaults if
license has expired or different USIM Card is inserted.
Limited use files cannot be set as wallpaper or ringtone.
Content Key
If Content Key is expired, a message appears when the file is opened. To
obtain a new Key, select
YES
. 940P connects to Content Key site.
Note
Alternatively, obtain Content Key as follows: Highlight a file
[Menu]
Take contents key
Depending on contents, some Content Keys may not be obtained from
websites even when warning for expired contents appears.
When 1000 Content Keys have been saved, a message appears. Delete
old Keys; otherwise downloads may fail (Connection fees apply).
Managing Files
10-6
10
File Display/Playback Functions
Enlarge Still Images
■
Main Menu
> Data Folder Pictures Select a folder Select a
file [Menu] Display size Fit in display
Play Back from a Resume Position
■
Resume playback (videos/PC Movies) from a saved position.
Main Menu
> Data Folder Videos or PC Movies
Position Memory Select an item
Save a resume position:
Right
Marker to resume
is a resume position automatically saved when a
call comes in, alarm goes off, battery runs low, or playback is terminated.
Functions Available in Video/PC Movie Playback Window
■
Some operations are not available depending on files.
While playback is paused,
>[Menu] Select an item (See below)
Item Operation/Description
Normal play
1
Play at normal speed
Slow 1Play at slow speed
Quick View
(1.25x) 1
Play 1.25 times faster than normal
Quick
View(2x) 1
Play at double speed
Fast 2Forward
Rewind 2Rewind
Stop Return to Videos/PC Movies List window
Position to
play
Start playback from specified point
> to highlight a play point [Set]
Connect to
Website 1
Open site link
YES
>
Item Operation/Description
Sound effect
Remaster
,
Listening
or
Equalizer
( P.8-8)
Contents info
2
Show title, file name, etc.
Position
memory
Save resume position
Select a resume position
>
To play back from a saved position:
Left
Attach to
S! Mail/
Post blog 1
Send file via S! Mail or post on a blog
Select an item
>
Attach to S! Mail
・ ( From Step 2 on P.14-4)
Post blog
・ ( Step 1 on P.8-7)
Register
(Ringtones) 1
Set as ringtone
Ringtones
> Select a type
★
appears for item set as ringtone.
Register
(Stand-by
Display/Start-up
Window)
1
Save a file as Standby Display or Start-up Window
Select an item
>
YES
Video info 1Show title, file name, etc.
Send Ir data 1Send file via Infrared ( P.10-3)
IC transmission
1
Send file via IC transmission ( P.10-5)
Add shortcut
icon 1
Create a shortcut ( P.1-22)
Description 2Show file information
The words view
> or
Description view
Copy URL 2Copy URL
Display size Select a display size
Actual size
> or
Fit in display
Change to
full 1
Switch to Landscape View. Full screen playback starts.
To toggle views:
1 Video files only
2 PC movies only
Managing Files
10-7
10
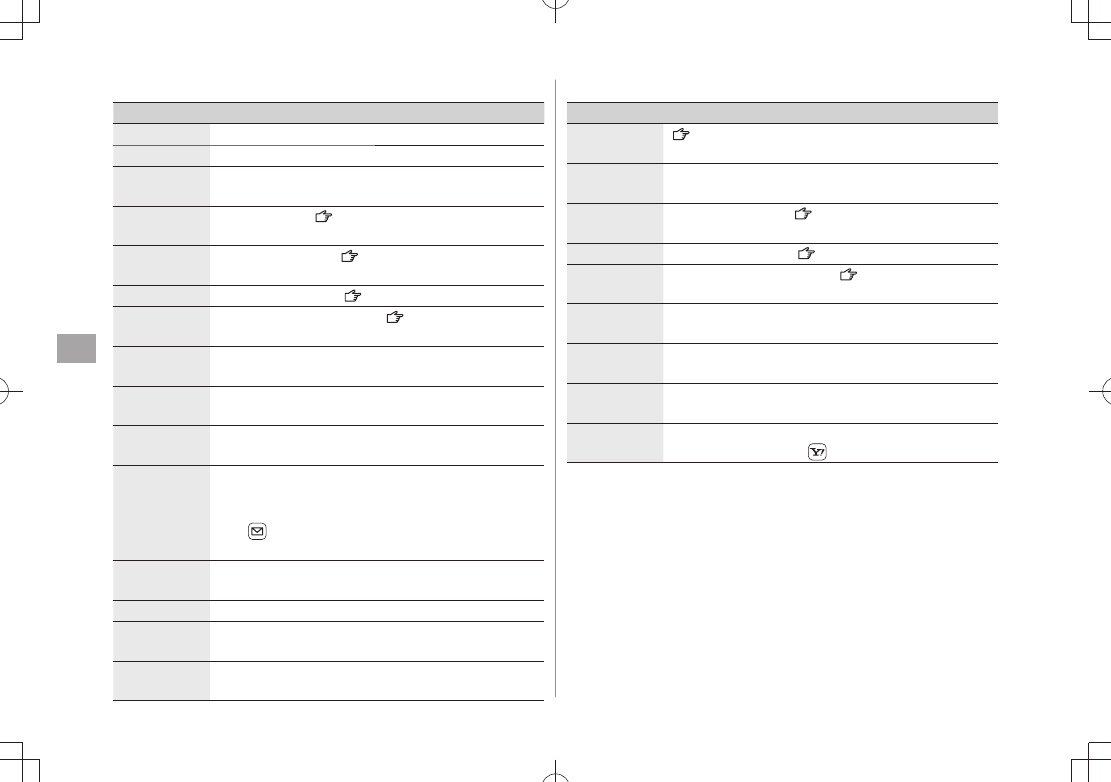
Options
Highlight a file in Data Folder [Menu] for the following operations.
Some functions may not be available depending on files.
Pictures
■
Item Operation/Description
Edit picture Edit files ( P.9-12)
Display picture
Open files
Set display* Set as wallpaper, Phone Book image, Menu Icons, etc.
Select an item
>
★
appears for item.
Picture info Show file name, file size, etc.
Attach to
S! Mail
Send files via S! Mail ( From Step 2 on P.13-4)
Graphic mail Add selected files to Graphic Mail ( P.13-9)
Post blog Post file on a blog ( P.8-7)
Send Ir data Send files via Infrared ( P.10-3)
IC transmission
Send files via IC transmission ( P.10-5)
Add shortcut
icon
Create shortcuts ( P.1-22)
Copy to
microSD
Copy files to microSD Card
Move to
microSD
Move files to microSD Card
Positioning Set where to paste files in Standby
Select a position
>
Edit file name Edit file names
Move Move files to other folders
Item Operation/Description
Slideshow Show files in a folder continuously. Select display speed
Normal
> or
Slow
Delete this Delete a file
YES
>
Delete all Delete all files
Enter Phone Password
>
YES
Multiple-
choice
Select multiple files to use
Check files to use
> [Menu] Select an item
Memory
Status
Show memory information
Sort Change display order of files
Select an order
>
Pictures/
File names
Toggle list view
Alternatively,
[Change] to toggle
Take contents
key
Connect to site for Content Key
*
Before setting a file as Video Call related item (except for Incoming/
Outgoing Video Calls), set
Select Images
to
Original
(Change Outgoing
Image: P.18-12).
To set a file as Menu Icon related item, set
Menu Icons
to
Customize
(P.18-4).
If incoming calls arrive or handset is turned off while My Pictograms
package file (.gpk) is being uncompressed, some pictograms in package
file may not open. Retry uncompressing.
Tip
●Enlarge Still Images ( P.9-6)
●Editing Still Images ( P.9-12)
●Creating Animations ( P.9-13)
●Saving Still Images to Phone Book ( P.9-14)
Managing Files
10-8
10
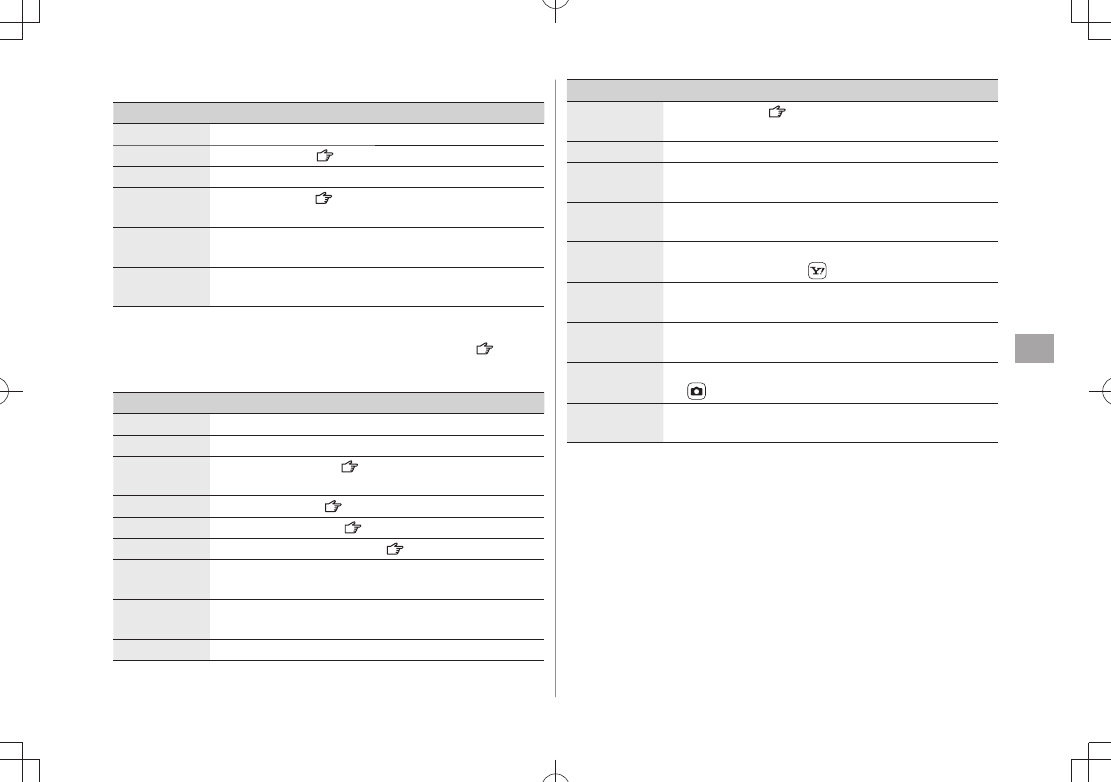
Ring Songs&Tones
■
Item Operation/Description
Edit file name Edit file names
Play melody Play back files
Set as ring
tone
Set as
>ringtone
★
appears for item.
Add shortcut
icon
Create shortcuts ( P.1-22)
Attach to
S! Mail
Send files via S! Mail ( From Step 2 on P.13-4)
Send Ir data Send files via Infrared ( P.10-3)
IC
transmission
Send files via IC transmission ( P.10-5)
Copy to
microSD
Copy files to microSD Card
Song·Tone
info
Show titles, file names, etc.
Memory
Status
Show memory information
Delete Select a type
>
Delete this
・
YES
Delete select
・ Check files to delete
[Finish]
YES
Delete all
・ Enter Phone Password
YES
Sort Change display order of files
Select an order
>
Move Move files to other folders
Move to
microSD
Move files to microSD Card
Take contents
key
Connect to site for Content Key
Widget
■
Item Operation/Description
Paste on
Stand-by
(P.7-2)
Widget
Information
Show file names, sizes, etc.
Attach to
S! Mail
Send files via S! Mail ( From Step 2 on P.13-4)
Send Ir data Send files via Infrared ( P.10-3)
IC
transmission
Send files via IC transmission ( P.10-5)
Move to
microSD
Move files to microSD Card
Delete this Delete a file
YES
>
Delete all Delete all files
Enter Phone Password
>
YES
Multiple-
choice
Select multiple files to use
Check files to use
> [Menu] Select an item
Managing Files
10-9
10
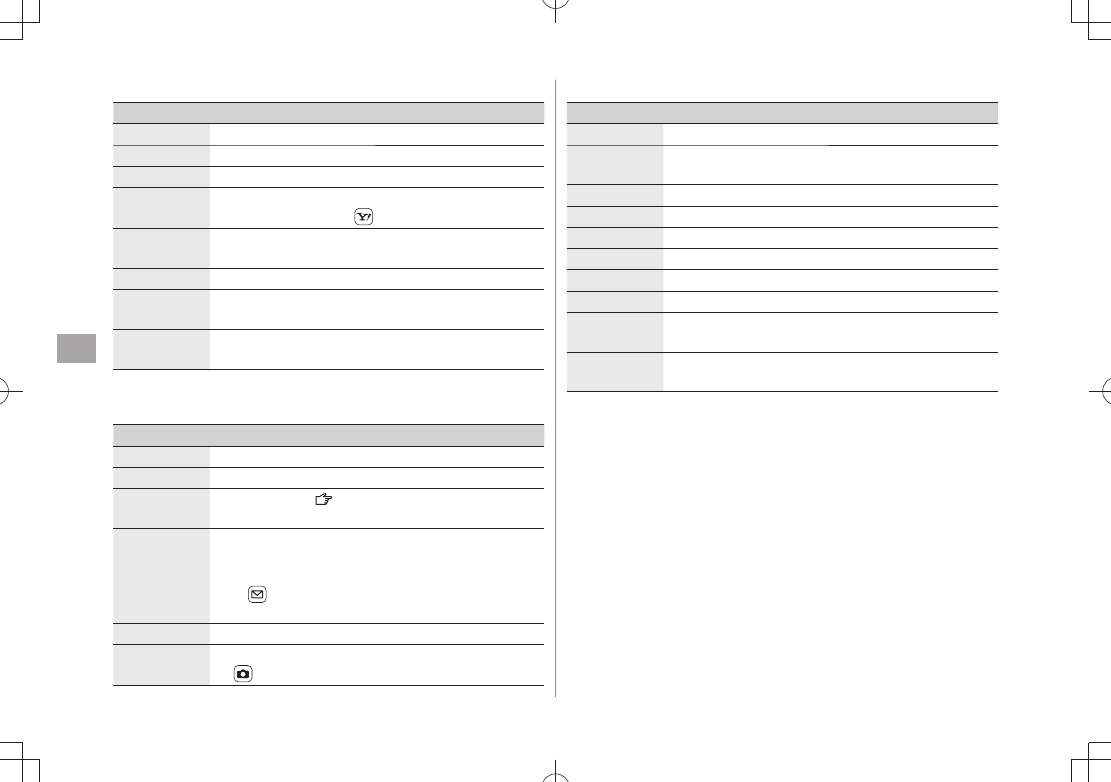
S! Appli/Lifestyle-Appli
■
Item Operation/Description
Start Activate S! Appli or Lifestyle-Appli
Security level Set security level ( P.15-4)
S! Appli info Show file names, file sizes, etc.
Add shortcut
icon
Create shortcuts ( P.1-22)
Move to
microSD
Move files to microSD Card
(Lifestyle-Appli cannot be moved)
Delete Delete files
YES
>
Music
■
See "Functions Available in Chaku-Uta Full
®/WMA File List" ( P.8-9)
Videos
■
Item Operation/Description
Register Set as ringtones, Standby Display or Start-up display
Video info Show titles, file names, etc.
Attach to
S! Mail
Send files via S! Mail ( From Step 2 on P.13-4)
Post blog Post file on a blog ( P.8-7)
Send Ir data Send files via Infrared ( P.10-3)
IC transmission Send files via IC transmission ( P.10-5)
Copy to
microSD
Copy files to microSD Card
Move to
microSD
Move files to microSD Card
Move Move files to other folders
Item Operation/Description
Add shortcut
icon
Create shortcuts ( P.1-22)
Edit file name
Edit file names
Delete this Delete a file
YES
>
Delete all Delete all files
Enter Phone Password
>
YES
Multiple-
choice
Select multiple files to use
Check files to use
> [Menu] Select an item
Memory
Status
Show memory information
Sort Change display order of files
Select an order
>
Listing Change list view
[Change] to toggle views
Take contents
key
Connect to site for Content Key
Managing Files
10-10
10
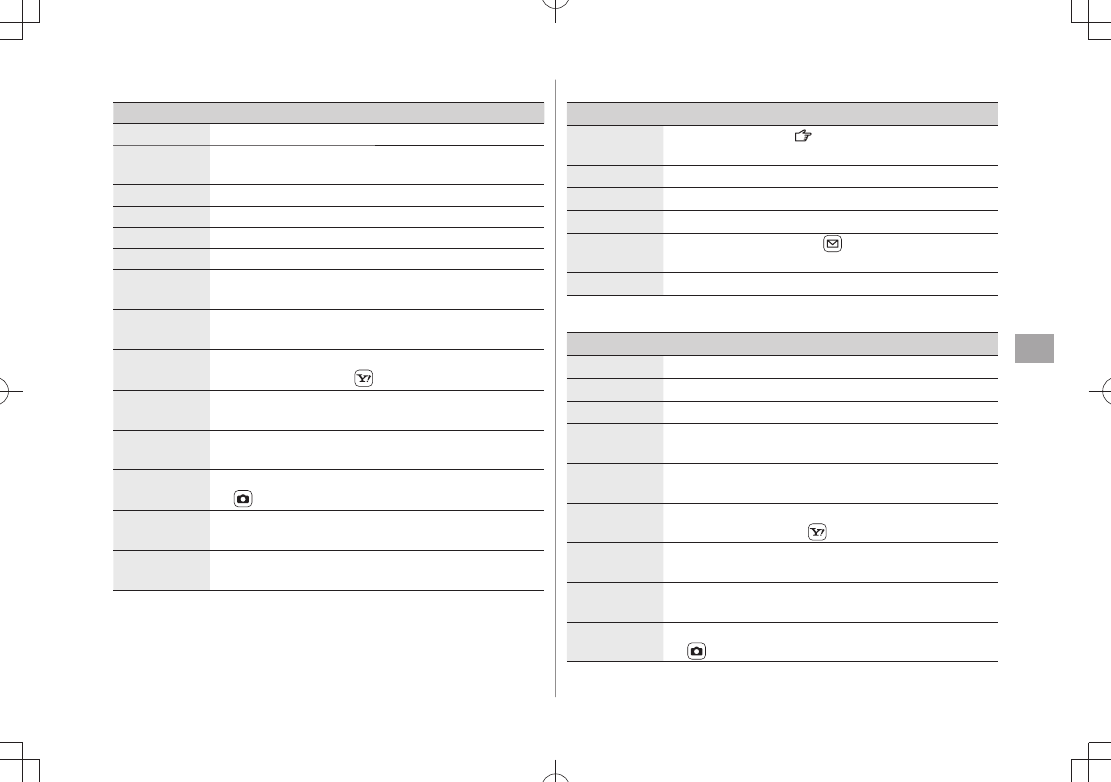
PC Movies
■
Item Operation/Description
Contents info Show titles, file names, etc.
Move Move files to other folders
Copy Copy files to other folders
Multiple-
choice
Select multiple files to use
Check files to use
> [Menu] Select an item
Comment
view
Show descriptions
Memory Status
Show memory information
Delete this Delete a file
YES
>
Delete all Delete all files
Enter Phone Password
>
YES
TV
■
See Pictures folder for still images.
Item Operation/Description
Edit title Enter titles
>
Video info Show titles, channel names, etc.
Add shortcut
icon
Create shortcuts ( P.1-22)
Delete Select an item
>
Delete this
・
YES
Delete selected
・ Check files to delete
[Finish]
YES
Delete all
・ Enter Phone Password
YES
Memory Status
Show memory information
Listing Change list view
[Change] to toggle views
Books
■
Item Operation/Description
Play Play back files
Connect to
Website
Open site link
Book info Show file names, file sizes, etc.
Copy to microSD
Copy files to microSD Card
Move to microSD
Move files to microSD Card
Add folder Add folders
Edit file name
Edit file names
Move Move files to other folders
Take contents
key
Connect to site for Content Key
Delete Delete files
YES
>
Managing Files
10-11
10
Customized Screen
■
Item Operation/Description
Preview Preview files
Collective
Setting
Set Customized Screen all at once
File info Show titles, file names, etc.
Copy to microSD
Copy files to microSD Card
Move to microSD
Move files to microSD Card
Edit file name Edit file names
Delete this Delete a file
YES
>
Delete all Delete all files
Enter Phone Password
>
YES
Multiple-
choice
Select multiple files to use
Check files to use
> [Menu] Select an item
Memory
Status
Show memory information
Sort Change display order of files
Select an order
>
Listing Change list view
[Change] to toggle views
Take contents
key
Connect to site for Content Key
Connect to
Website
Open site link
Templates
■
Item Operation/Description
Compose
S! Mail
Send files via S! Mail ( P.13-5)
Edit title Edit titles
Template Info Show title and file size
Delete this
YES
>
Delete
selected
Check files to delete
> [Finish]
YES
Delete All Enter Phone Password
>
YES
Font
■
Item Operation/Description
Set Apply selected font
File info Show file names, file sizes, etc.
Edit title Edit titles
Delete this Delete a file
YES
>
Delete all Delete all files
Enter Phone Password
>
YES
Multiple-
choice
Select multiple files to use
Check files to use
> [Menu] Select an item
Memory
Status
Show memory information
Sort Change display order of files
Select an order
>
Listing Change list view
[Change] to toggle views
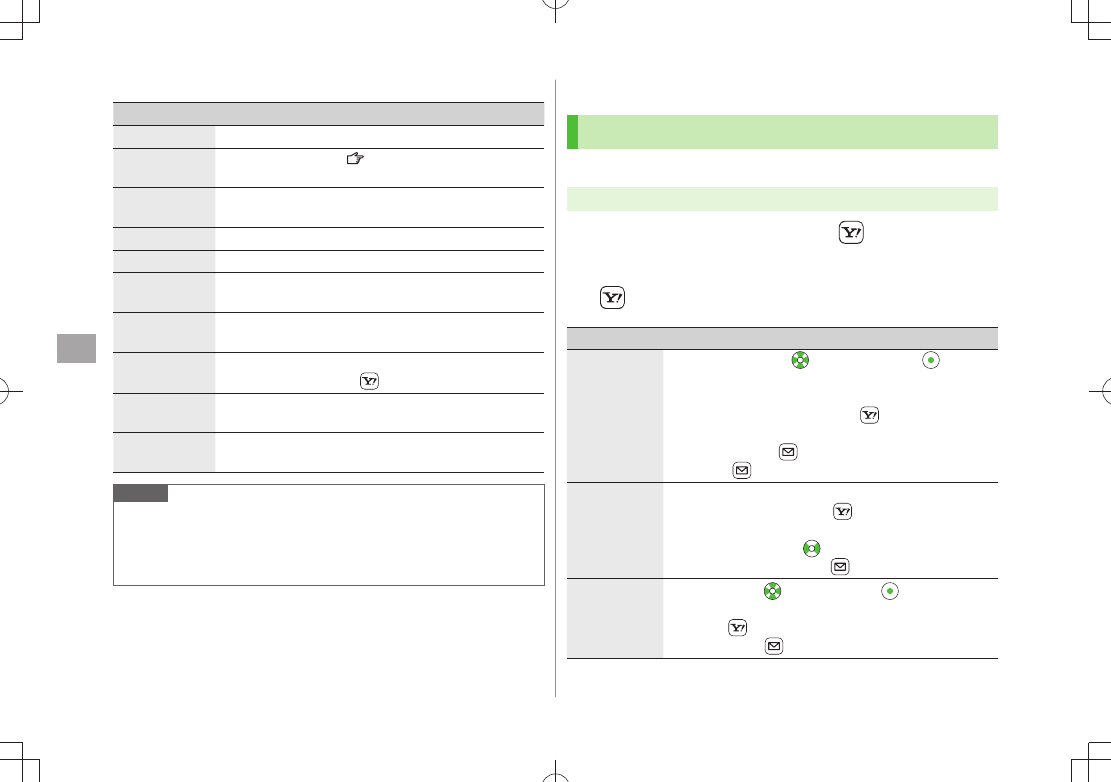
Managing Files
10-12
10
Other Documents
■
Item Operation/Description
File info Show file names, file sizes, etc.
Attach to
S! Mail
Send files via S! Mail ( From Step 2 on P.13-4)
Copy to
microSD
Copy files to microSD Card
Edit file name Edit file names
Move Move files to other folders
Delete this Delete a file
YES
>
Delete all Delete all files
Enter Phone Password
>
YES
Multiple-
choice
Select multiple files to use
Check files to use
> [Menu] Select an item
Memory
Status
Show memory information
Sort Change display order of files
Select an order
>
Note
Titles of mp4/3gp Ring Songs&Tones files and Videos/Music/Customized
Screen files appear in respective lists. Files without titles appear with
file names (created when files are saved to handset). Titles cannot be
changed; edited file names may not appear in lists.
Using/Editing Still Images
Editing Still Images
Edit features are not available for all file types.
Main Menu Data Folder Pictures
1 Select a folder Select a file [Menu]
Edit picture
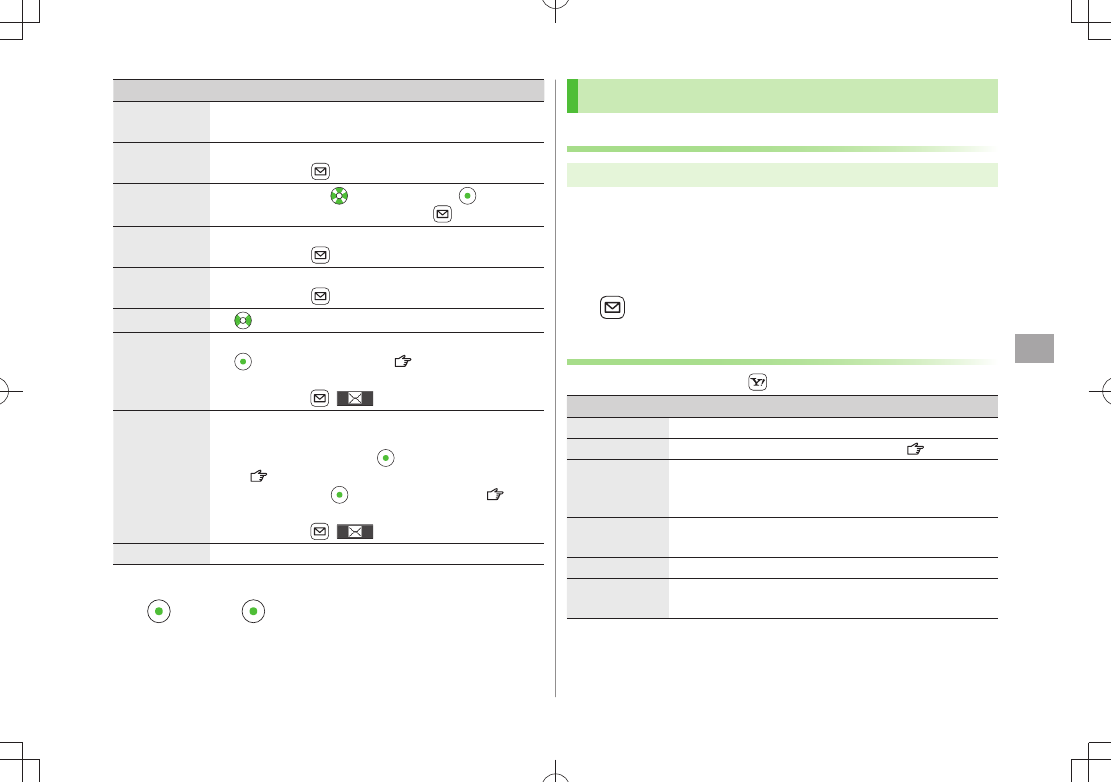
2 [Menu] Select an item (See below)
Item Operation/Description
Marker stamp Select a stamp
> to move stamp [Put]
Following options are available when positioning a
stamp:
To rotate or scale up/down:
・ [Menu]
Select an item
To start over:
・ [Cancel]
To add:
[Add]
Frame Select a frame
>
To rotate 180 degrees:
・ [Menu]
180° rotation
To change frame:
・
To return to frame list:
・ [Cancel]
Character
stamp
Enter text
> to move text [Put]
To change content/color/font/size: When positioning
stamp, [Menu] Operate selected item
To start over:
[Cancel] after positioning
Managing Files
10-13
10
Item Operation/Description
Fit in screen Change image size to Standby (480 x 854)
YES
>
Change size Select a size
>
To start over:
[Cancel]
Trim away Specify a size
> to specify area [Set]
To start over: After specifying area,
[Cancel]
Retouch Select an item
>
To start over:
[Cancel]
Rotate
90° to right
>,
90° to left
or
180°
To start over:
[Cancel]
Brightness
> to adjust brightness
Attach to
S! Mail*
Create S! Mail with edited still images
>[Set] Create S! Mail ( From Step 2 on P.13-4)
Edited files are automatically saved.
Alternatively,
[ ] to attach pictures to S! Mail
Attach to
S! Mail/
Post blog*
Send file via S! Mail or post on a blog
Select an item
>
Attach to S! Mai
・ [Set] Create S! Mail
(From Step 2 on P.14-4)
Post blog
・ [Set] Post on a blog( P.8-7)
File is automatically saved with another file name
Alternatively,
[ ] to attach to S! Mail
Save* Overwrite/rename to save edited files
* Available after other editing operations.
3 [Set] [Save]
4
YES
(Overwrite) or
NO
(Save as)
Creating Animations
Saving Original Animation
Main Menu Data Folder Pictures Original Animation
1
<New>
<1st>
-
<20th>
2 Select a folder Select a file
Repeat Step 2.
3 [Finish]
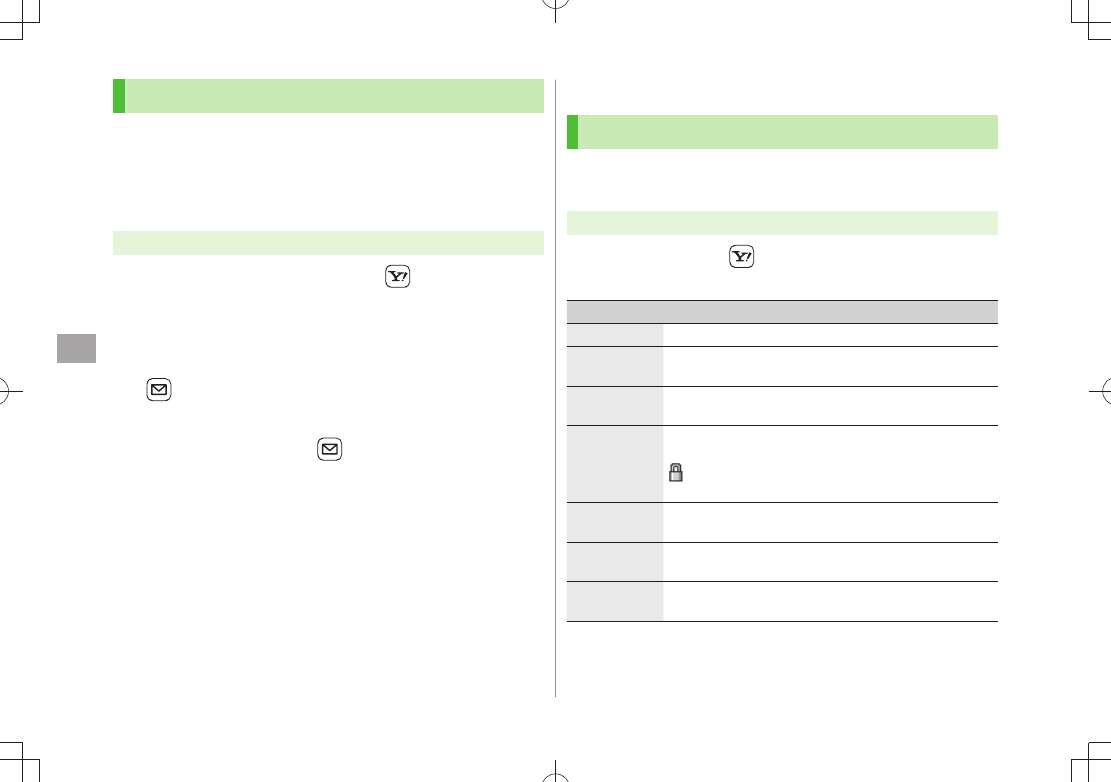
Functions Available in Original Animation List
In Original Animation list, press [Menu] for following operations.
Item Operation/Description
Edit title Enter title
>
Org. animation Add more files to an Original Animation ( Above)
Display
picture
Play back an Original Animation
Alternatively, select an Original Animation from list to
play back.
Set display Set an Original Animation as Standby display, etc.
Select item to set Original Animation as
>
Picture info View item set for
Set display
Release
animation
Cancel a saved Original Animation
YES
>
Managing Files
10-14
10
Saving Still Images to Phone Book
Savable sizes:
・
Standby (480 x 854) or smaller in JPEG or GIF format (up to 300 Kbytes)
VGA (640 x 480) or smaller in PNG format
・
Save images to up to 100 Phone Book entries.
Still images cannot be saved to USIM Card Phone Book entries.
Main Menu Data Folder Pictures
1 Select a folder Select a file [Menu]
Set display
Phone Book
2 New Entry
New
Enter details ( From Step 3 on P.4-4)
[Finish]
Add to Existing Entry
Add
Select entry [Finish]
YES
Managing Folders/Files
Managing Folders
The following operations are available in Pictures, Music,
Books, Videos, Ring Songs&Tones and Other Documents.
Main Menu Data Folder
1 Select a folder [Menu] Select an item
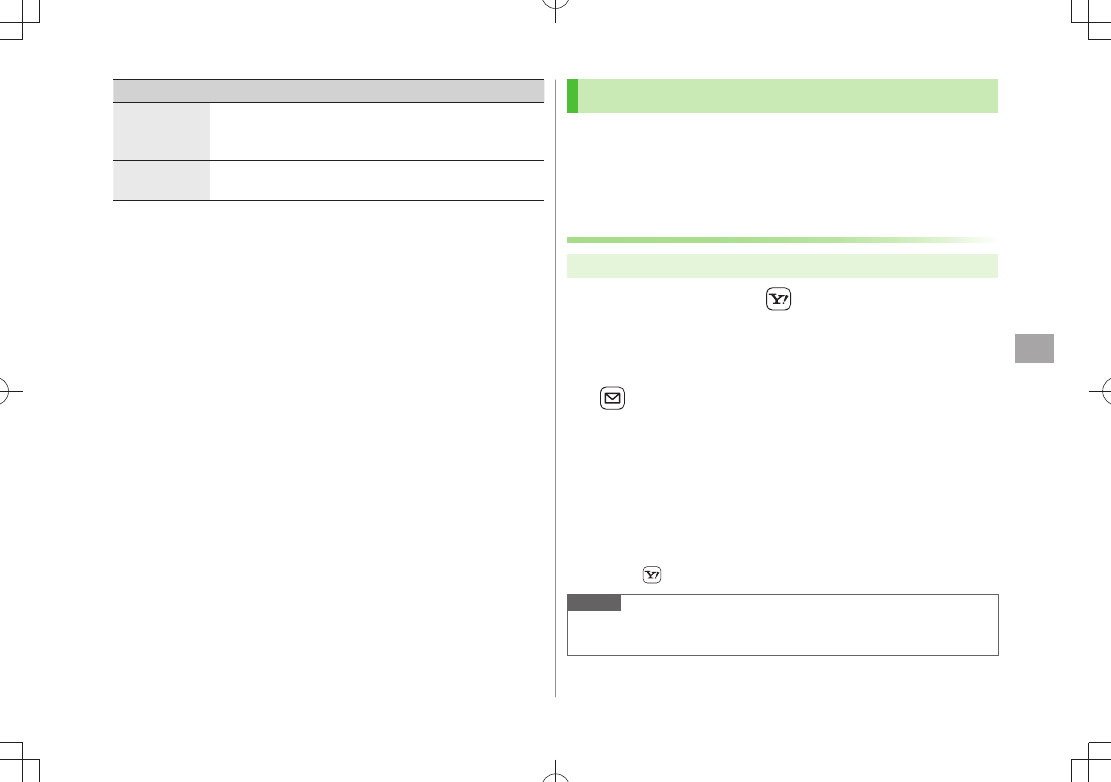
(See below)
Item Operation/Description
Add folder Create user folders
Edit folder
name
Edit user folder names
Delete folder Delete a user folder
Enter Phone Password
>
YES
YES
Folder
security 1
Hide files in folder unless Phone Password is entered
Enter Phone Password
>
YES
appears for folder.
To cancel: Repeat the step
Delete all
image 2
Enter Phone Password
>
YES
YES
Edit Play
List 3
Edit Play Lists
Release Play
List 3
Cancel edited Play Lists
YES
>
Managing Files
10-15
10
Item Operation/Description
Select
storage 4
Specify folders on microSD Card to save files to
YES
>
Folders cannot be specified when saving Books files.
Memory
Status 5
View memory capacity/number of saved files
1 Pictures/Videos folders only
2 Pictures folder only
3 Play List folder in Ring Songs&Tones folder only
4 microSD Card only
5 Music folder only
Using Play List
Use Play List to organize Data Folder Ring Songs&Tones/
Videos files.
Select Ring Songs&Tones, Music or Videos folder files to
create Play List links to each file in its original folder.
Creating Ring Songs&Tones Play Lists
Main Menu Data Folder Ring Songs&Tones
1 Highlight
Play List
[Menu]
Edit Play List
2 Select a number Select a folder Select a file
Repeat Step 2.
3 [Finish]
Play Back Play List
■
Main Menu
> Data Folder Ring Songs&Tones Play List
Files are played back in the saved order.
Delete a File
■
After Step 1, select a file
>
Release this
Delete All Files
■
In Step 1,
>[Menu]
Release Play List
YES
Note
mp4/3gp files cannot be added to Play List except in Music Player Play
List.

Managing Files
10-16
10
Creating Video Play Lists
Main Menu Data Folder Videos Play List
1 Select a Play List
2 Select a number Select a folder Select a file
Repeat Step 2.
3 [Finish]
Play Back Play Lists
■
Main Menu
> Data Folder Videos Play List Highlight a
Play List [Play]
Files are played back in the saved order.
Delete a File
■
After Step 1, (highlight a file
>) [Menu]
Delete this
or
DEL all from list
YES
Change Order
■
After Step 1,
>[Menu]
Oder to play
Select a file Select a
target [Finish] [Finish]
microSD Card
940P is compatible with up to 2 GB commercial microSD Cards and up
to 16 GB commercial microSDHC Cards (as of May 2009).
For information on memory card compatibility, visit the website
below (Japanese). Note that microSD Cards not listed on the website
may not function properly.
From Yahoo! Keitai
・
P-egg (as of October 2009)
Main Menu Yahoo! Bookmarks
Panasonic top page (P-egg)
From PC
・
http://panasonic.jp/mobile/
Not all operations are guaranteed by the microSD/microSDHC Cards
listed.
Format new microSD/microSDHC Cards for use with 940P (
P.9-18).
Note
SoftBank is not liable for damages from accidental loss/alteration of
microSD Card information. Keep a copy of Phone Book entries, etc. in a
separate place.
microSD Card has no write protect feature; there is a risk of accidental
erasure/overwriting of files.
Managing Files
10-17
10
microSD Card Installation
Turn off handset before inserting/removing microSD Card.
Battery Installation:
P.1-13
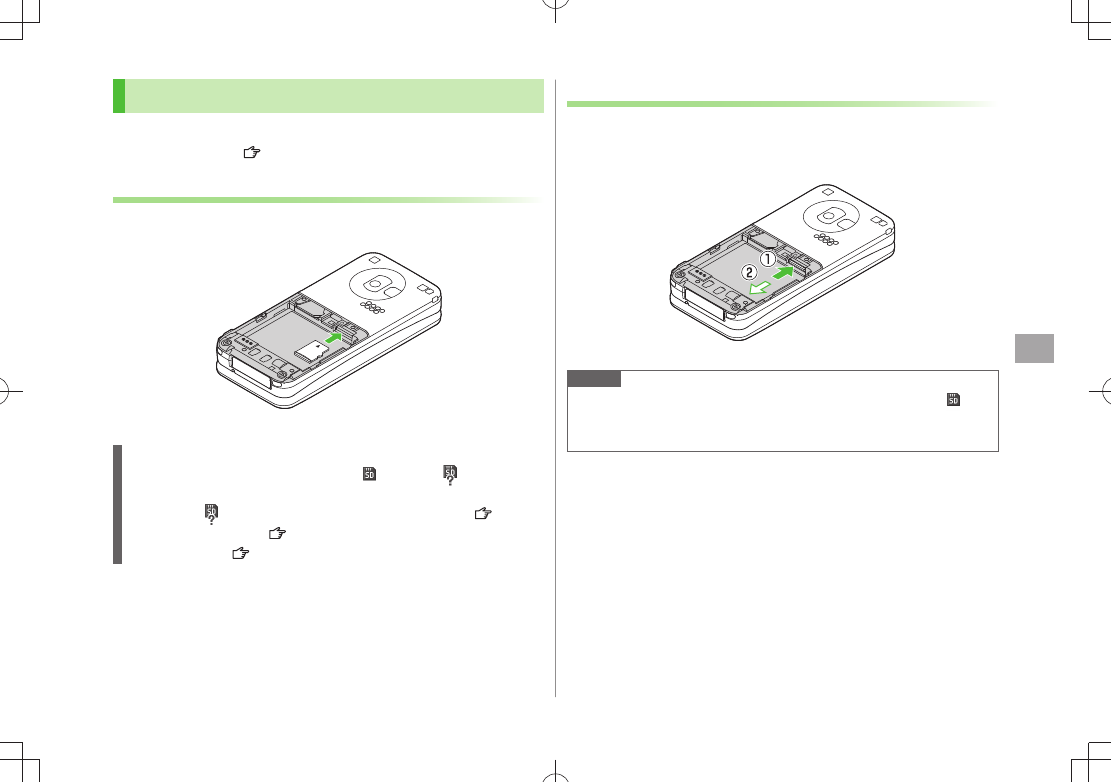
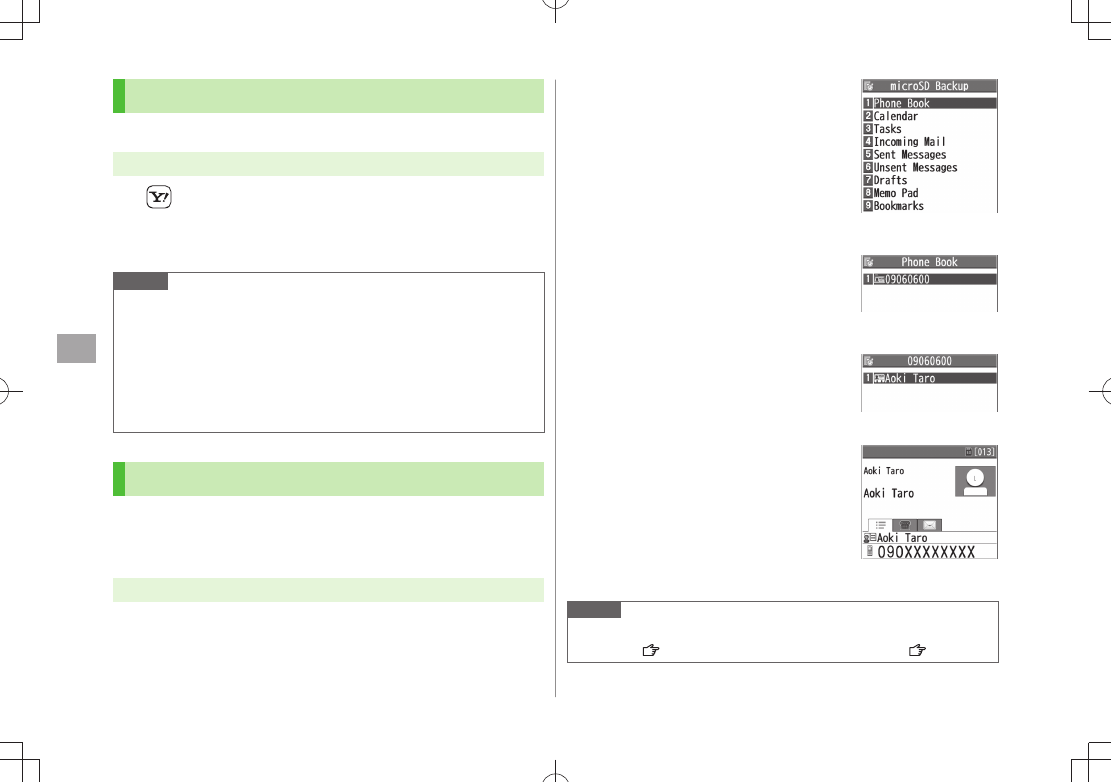
Inserting
1 Insert microSD Card until it clicks
microSD Card Check
When microSD Card is installed correctly, appears. If appears,
microSD Card cannot be used. Remove microSD Card from handset, and
re-insert it. If does not disappear, execute Check microSD ( P.9-21)
or format microSD Card ( P.9-18).
(Display Indicator: P.1-10)
Removing
1 Push microSD Card in
microSD Card pops out with a light push.
Note
Do not turn off handset or remove battery/microSD Card while
flashes. microSD Card may be damaged or files lost.
microSD Card may pop out when inserting/removing it.
Managing Files
10-18
10
Format microSD Card
Formatting microSD Card deletes all saved files/data.
Main Menu Tools microSD Backup
1 [Menu]
microSD format
2 Enter Phone Password
YES
Note
Do not turn handset power off or remove microSD Card or battery while
formatting; may damage handset or microSD Card.
microSD Cards formatted on other devices may not be used. Format
microSD Card on 940P before use.
940P cannot format incompatible microSD Cards.
If format fails, turn power off and remove microSD Card from 940P.
Reinsert microSD Card and format it again.
Viewing microSD Card Files
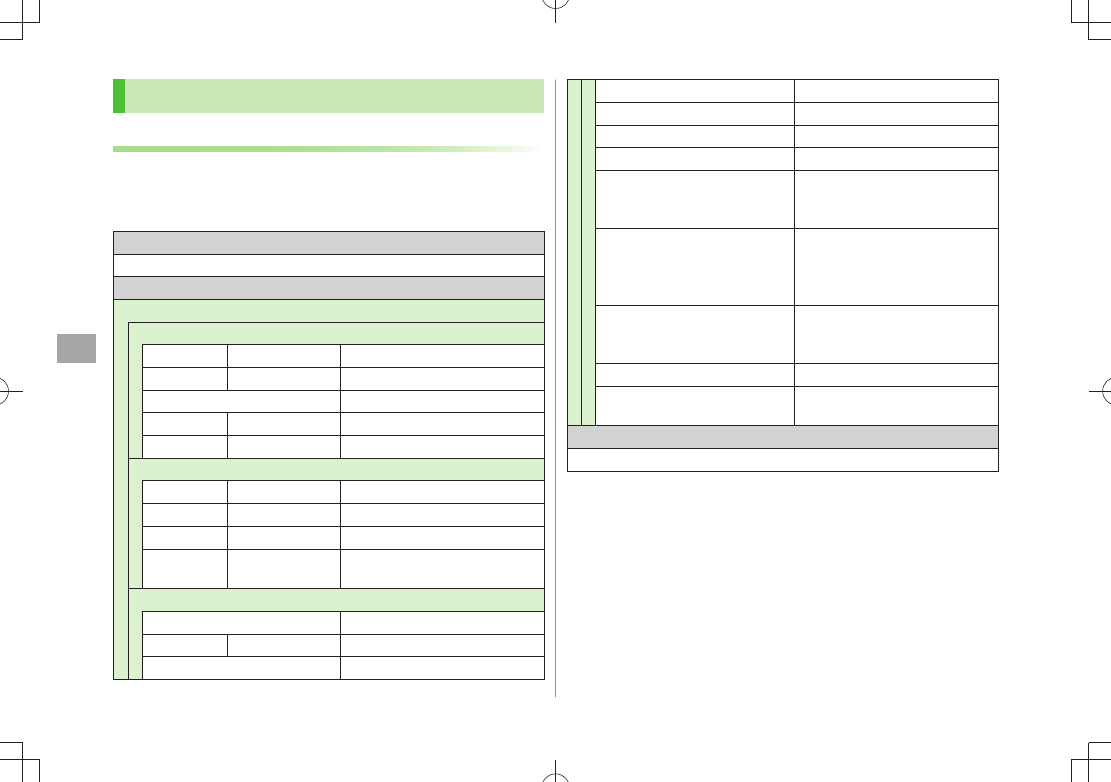
View Phone Book entries, Calendar events, Tasks, mail
messages, Notepads and Bookmarks backed up on microSD
Card.
Main Menu Tools microSD Backup
1 Select a category
2 Select a file
Backup date appears as file name.
3 Select a data
Note
If messages on microSD Card do not appear correctly, copy messages to
handset ( P.9-19) and execute
Charset Conversion
( P.13-22).
Category List
File List
Detailed Data
Data List
TBD
TBD
TBD
TBD

Managing Files
10-19
10
Handset Data Backup
Back up handset data (Phone Book, Calendar, Tasks, Messages,
Notepad, Bookmarks, Content Keys) to microSD Card; restore
handset data after accidental loss/alteration.
Back up Content Key:
P.9-22
Backing up to microSD Card
Main Menu Tools microSD Backup
1 Highlight a category [Menu]
Copy to microSD
( For
Bookmarks
, select an
item)
2 Enter Phone Password
YES
All files of selected category are backed up to microSD Card.
One File Backup
■
Open a file
> [Menu]
Copy to microSD
YES
Restoring from microSD Card
Main Menu Tools microSD Backup
1 Select a category
2 Restore One Item
Select a file Highlight an item [Menu]
Add to phone
Restore One File
Highlight a file [Menu]
Add to phone
or
Overwrite to phone
Enter Phone Password
Restore All Files
[Menu]
Add all to phone
or
Overwr. all to ph.
Enter Phone Password
3
YES
Note
Note that
Overwrite to phone
or
Overwr. all to ph.
erases all files
of same category on handset.
Files of 10 MB or larger cannot be moved/copied from microSD Card to
handset.
Data backed up in other SoftBank handsets may not be restored in
940P depending on type and size.
Tip
●Delete Items from microSD Card ●View microSD Card Memory Capacity
(P.9-21)
Managing Files
10-20
10
PC File Transfers
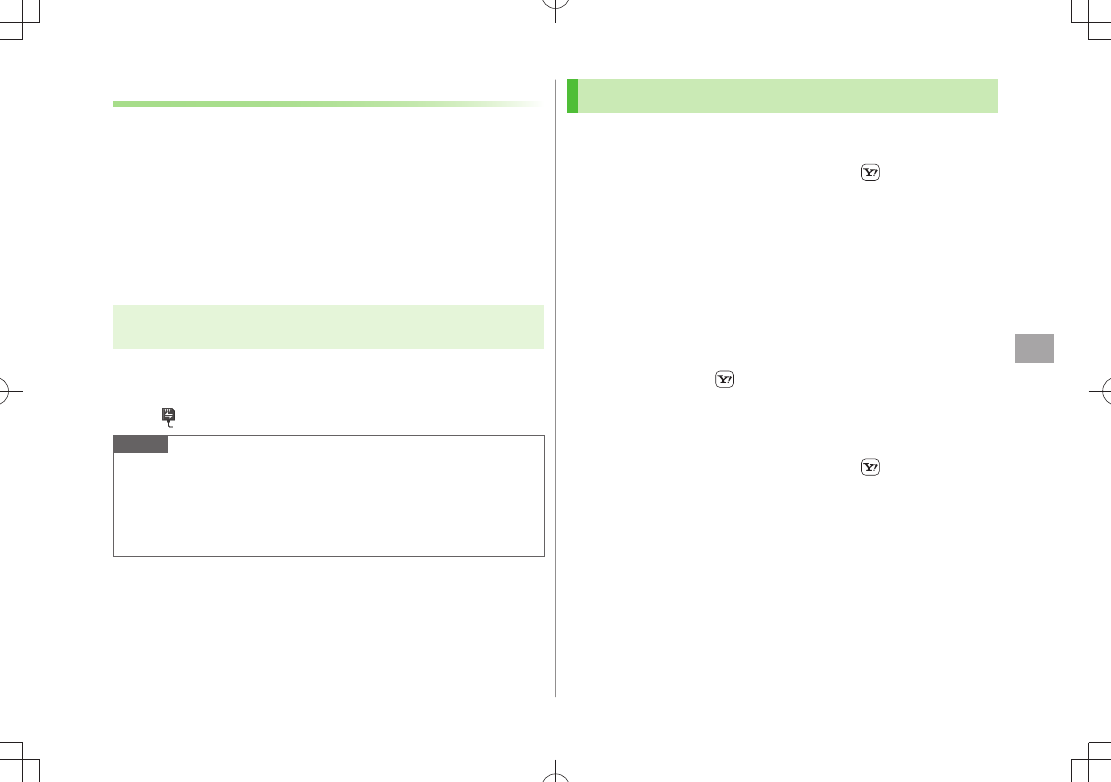
Folder Structure
Files moved or copied from 940P to microSD Card are
managed as shown below:
Save files in folders by file type.
DCIM
Still images saved to microSD Card
PRIVATE
MYFOLDER
Utility
Calendar Calendar.BCK Calendar Backup files
Contacts Contacts.BCK Phone Book Backup files
Rights Content Key Backup files
Tasks Tasks.BCK Tasks Backup files
Memo Memo.BCK Notepad Backup files
Mail
Drafts Drafts.BCK Drafts Backup files
Inbox Inbox.BCK Incoming Mail Backup files
Outbox Outbox.BCK Unsent Messages Backup files
Sent
Messages
Sent Messages.
BCK Sent Messages Backup files
My Items
Book E-comics
Bookmarks Bookmarks.BCK Bookmarks Backup files
Flash(R) Flash® files
Games and More S! Appli
Music Sound files with .3gp, .mp4, .smc
Other Documents Other files
Pictograms My Pictograms
Pictures
Still images moved/copied from
handset to Main Folder in microSD
Card
Sounds & Ringtones
Sound files of:
up to 10 MB with .3gp, .mp4,
up to 300 KB with .mid, .midi,
.amr
Videos
Videos moved/copied from
handset to Main Folder in microSD
Card
Widget Widget contents
WMFile* PC Movies saved from PC to
microSD Card
SD_VIDEO
Videos saved to microSD Card
Some copy protected files have extensions different from above.
When moving/copying videos from microSD Card to handset, file format
or file size may change.
* If WMFile does not appear in My Items (MYFOLDER), create and save a
folder titled WMFile.
Managing Files
10-21
10
Using Data on microSD Card
With a microSD Card inserted, connect handset with a PC
via USB cable (not included) to read/write data from/onto
microSD Card.
Following equipment is required:
Connector Cable: USB cable
PC: PC with USB port (Universal Serial Bus Specification Rev 1.1
compliant)
Compatible Operating Systems: Windows
® XP, Windows Vista® (Japanese
version in each)
Main Menu Settings Connectivity USB Mode
microSD Mode
1 Connect handset to PC via USB cable while 940P is on
PC recognizes microSD Card.
appears in Standby (handset).
Note
Even if incoming call arrives, reading/writing data continues during
calls. After calls, check indicators on PC to see if reading/writing is
complete.
File names saved in microSD Card may not properly appear if changed
on PC.
microSD Card Functions
Restore microSD Card items (Check microSD)
■
Use Check microSD to repair microSD Card data errors.
Main Menu
> Tools microSD Backup [Menu]
Check microSD YES
Do not turn handset power off or remove microSD Card or battery while
formatting; may damage handset or microSD Card.
It may take 30 seconds or longer to complete Check microSD depending
on data volume on microSD Card.
940P cannot check incompatible or unformatted microSD Cards.
940P may delete files and folders that fail to be restored.
Delete Items from microSD Card
■
Main Menu
> Tools microSD Backup Select a category
(Highlight a file ) [Menu] Delete this or Delete all ( For
Delete all, enter Phone Password) YES
Content Key cannot be deleted.
View microSD Card Memory Capacity
■
Main Menu
> Tools microSD Backup [Menu]
microSD info

Managing Files
10-22
10
Back Up Content key
■
Copy Content Keys to microSD Card from handset or to handset from
microSD Card.
Main Menu
> Settings Security Content Key
Copy to microSD or Copy from microSD Enter Phone
Password
Content Keys with expiration dates or usage limits cannot be backed up.
USIM Card inserted when Content Keys were moved to microSD Card
must be inserted to move Content Keys from microSD Card.
Some applications are made for use on specific models. Some models
move Content Keys to microSD Card instead of backing up. Contact
SoftBank Mobile Customer Center, General Information for more
information( P.19-34).
11
11-1
Connectivity
Infrared ............................................................... 11-2
Before Using Infrared ................................................................11-2
One/Multiple File Transfer .........................................................11-3
All File Transfers........................................................................11-3
IC Transmission ................................................... 11-4
One File Transfer .......................................................................11-5
All File Transfers........................................................................11-5
Bluetooth® ............................................................................................................................. 11-6
Before Using Bluetooth® ..............................................................................................................................11-6
Using Bluetooth® ....................................................................................................................................................11-7
Suspending Bluetooth® Functions .............................................11-8
Placing Bluetooth® Devices on Standby for Connection ..............11-9
Sending/Receiving Phone Book .................................................11-9
Bluetooth® Functions ..............................................................11-10
SoftBank Utility Software (Japanese) ............... 11-11
USB (Japanese) ................................................. 11-11
Setting USB Mode ..................................................................11-11
Transferring Data via USB Cable ..............................................11-11
Data Communication via USB Cable........................................11-12
AV Output ......................................................... 11-13
Connecting Handset to TV ......................................................11-13
Connectivity
11-2
11
Infrared
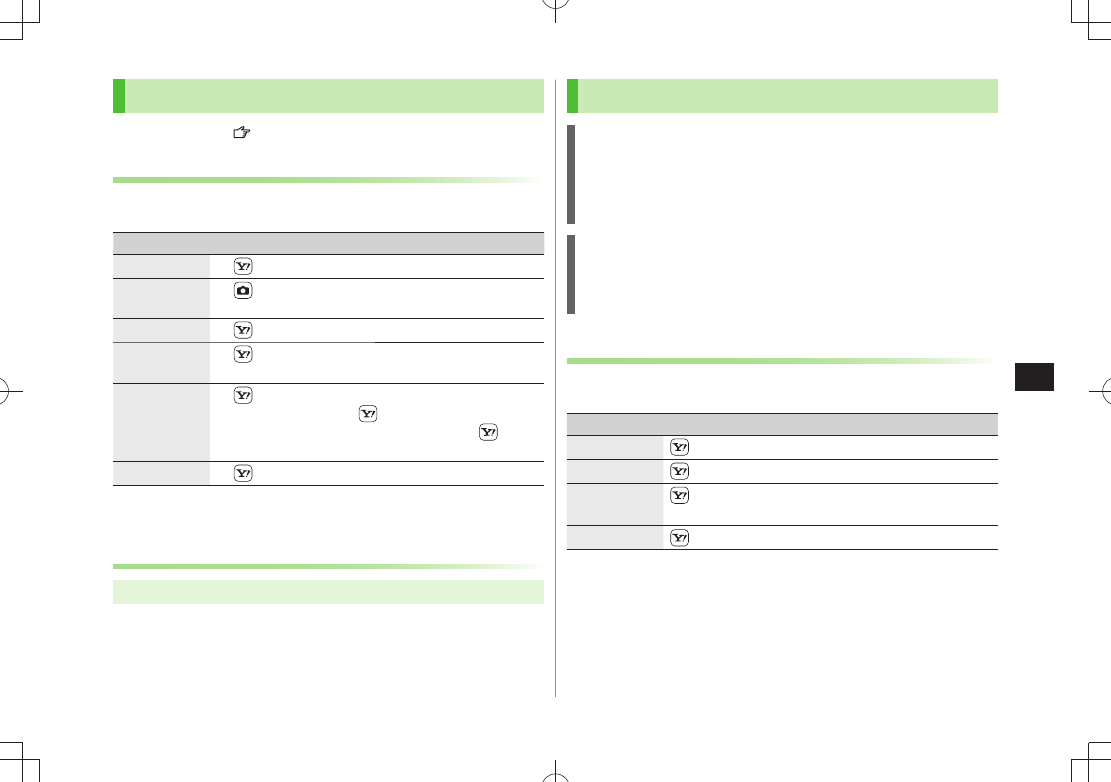
Before Using Infrared
Transfer Phone Book/Calendar events, messages, bookmarks
and Data Folder files wirelessly between 940P and
compatible devices, including PCs and other mobiles.
940P infrared function is based on IrMC1.1, however, some IrMC1.1-
based device transmissions may not be transmitted/received within
specification.
Debris may inhibit infrared transfers; clean infrared ports with a soft cloth
beforehand.
Direct sunlight/fluorescent light may inhibit transfers.
Align infrared ports within 20 cm of one another and make sure no
objects are placed between them. Do not move the devices until transfer
is complete.
Within 20 cm
Infrared Port
Transferable Files
Condition
Transferable file One file All files
Phone Book (Account Details) ○Up to 1000
Calendar events 1○Up to 1000
Tasks ○Up to 100
Received message ○Up to 3000
Sent message ○Up to 1000
Drafts ○Up to 10
Notepad ○Up to 20
Ring Songs&Tones ○̶
Still image 2 3○̶
Video 3○̶
Bookmark
(Yahoo! Keitai, PC Site Browser) ○Up to 100 each
Widget 3○̶
○: Transferable ̶: Not transferable
1 Saved Holidays/Memorial days not transferable
2 Including Flash® files
3 Multiple files transferable
Note
Following files cannot transfer:
Files prohibited for transfers from 940P
・
Phone Book entries and SMS on USIM Card
・
If memory becomes full, remaining entries are truncated (Memory List:
P.19-25).
Connectivity
11-3
11
One/Multiple File Transfer
Transferable Files:
P.10-2
Sending
1 Highlight a file, and follow the steps below
Files to Send Operation/Description
Phone Book
>[Menu]
Send Ir data
Send phonebook
Account
Details
>[Ir]
Messages
>[Menu]
Send Ir data
Send This
Bookmarks
>[Menu]
Send to ExtrnlDvcs
Send Ir data
Send This
Still Images/
Videos/
Widgets
>[Menu]
Send Ir data
To send multiple files:
[Menu]
Multiple-choice
Select files to send [Menu]
Send Ir data
Other Files
>[Menu]
Send Ir data
2
YES
Receiving
Main Menu Tools Receive via Infrared Receive
1 When a file is received,
YES
Send files from sender side within 30 seconds.
To receive subsequent files, select
YES
.
All File Transfers
Precaution
Receiving all files overwrites all saved files including secret/protected
files.
Sending all Phone Book entries sends Account Details as well.
User-edited information is overwritten (handset number remains).
Session Number
Session number (4 digits) is required for all file transfers via Infrared and
IC transmission. Sender and recipient must enter same Session number to
complete transfers.
Sending
1 Highlight a file, and follow the steps below
Files to Send Operation/Description
Phone Book [Menu]
Send Ir data
Send all phonebook
Messages [Menu]
Send Ir data
Send All
Bookmarks [Menu]
Send to ExtrnlDvcs
Send Ir data
Send All
Other Files [Menu]
Send all Ir data
2 Enter Phone Password Enter Session number
YES
Recipient must enter the same Session number to start transfers.
Connectivity
11-4
11
Receiving
Main Menu Tools Receive via Infrared Receive All
1 Enter Phone Password Enter same Session number
as sender's
YES
YES
Saved files are deleted, and transfer starts.
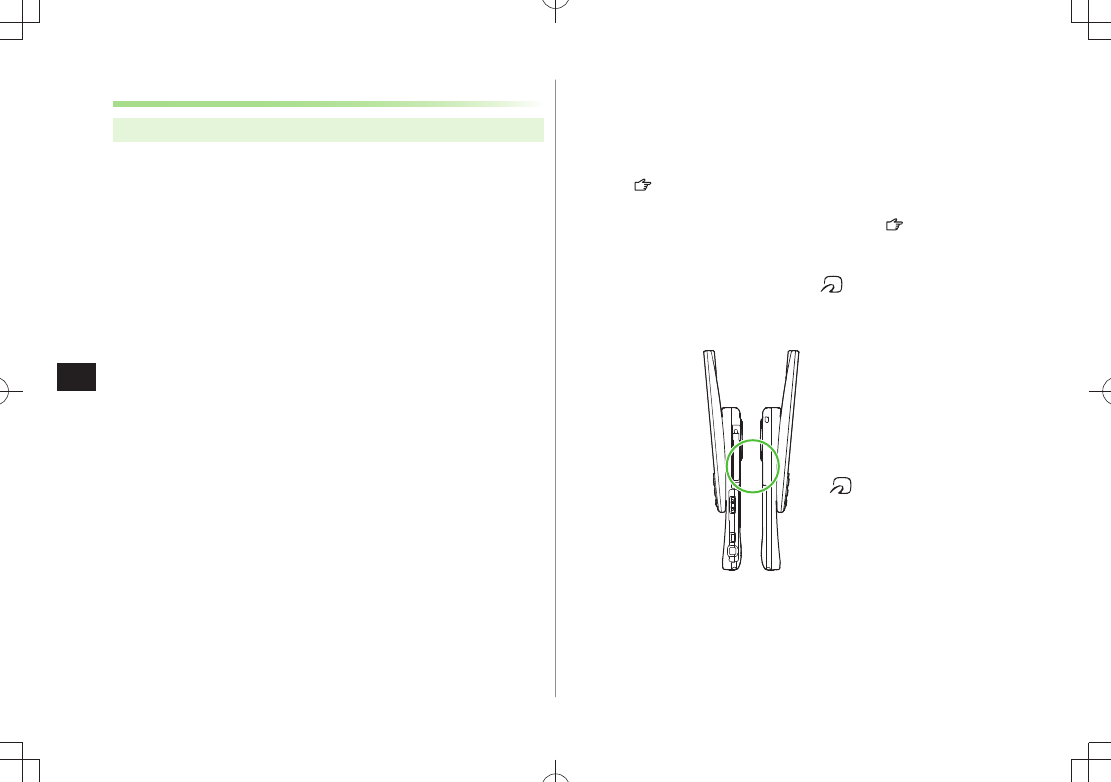
IC Transmission
Exchange files with another IC compatible handset using
reader/writer function.
Type of files and transfer conditions are same as those for infrared file
transfer ( P.10-2).
Multiple file transfer is not available.
IC transmission is not available when
IC Card Lock
( P.16-5) is
activated.
When receiving dada, end all active functions.
If there is difficulty in file transfer, move a
logo close to or away from
the other logo or move each side up, down, left, or right.
Data cannot be sent during charging battery.
Align logos of both handsets
Connectivity
11-5
11
One File Transfer
Before Receiving a File
Receive IC Datum
is set to
ON
by default. When
Receive IC Datum
is
OFF
, One File Transfer is unavailable.
To set
Receive IC Datum
on:
Main Menu Tools or S! Appli Osaifu-Keitai
IC Card Settings Receive IC Datum ON
Sending
1 Highlight a file, and follow the steps below
Files to Send Operation/Description
Phone Book
>
[Menu]
IC transmission
Send phonebook
Account
Details
>[ICtrans]
Messages
>[Menu]
IC Transmission
Send This
Bookmarks
>[Menu]
Send to ExtrnlDvcs
IC transmission
Send This
Other Files
>[Menu]
IC transmission
2
YES
Receiving
1 Align logo on sender side with 940P (recipient)
YES
All File Transfers
Precautions/Session number (
P.10-3)
Sending
1 Highlight a file, and follow the steps below
Files to Send Operation/Description
Phone Book
>[Menu]
IC transmission
Send all phonebook
Messages
>[Menu]
IC Transmission
Send All
Bookmarks
>[Menu]
Send to ExtrnlDvcs
IC transmission
Send All
Other Files
>[Menu]
AllIC transmission
2 Enter Phone Password Enter Session number
YES
Recipient must enter the same Session number to start transfers.
Receiving
1 Align logo on sender side with 940P (recipient)
2
YES
Enter Phone Password Enter same Session
number as sender's
Saved files are deleted. Transfer starts.
Connectivity
11-6
11
Bluetooth®
Connect handset to Bluetooth® devices to use functions
below.
Function Device Description
Handsfree Calls
(P.10-10)
Headsets
Handsfree devices Talk handsfree on handset
Wireless Playback
(P.10-10) Audio devices
Play back sounds (Digital TV/
Video) or music (Music Player)
wirelessly from external
speaker
Internet
Connection
(P.10-10)
PC
Connect wirelessly to Internet
using handset as external
modem
Sending/Receiving
Phone Book
(P.10-9)
PC
Handsets
Send/receive Phone Book
entries wirelessly
Tip
Settings
●Stop Ringtone Output to Headset/Handsfree Device
●Continue Calls on Handset when Bluetooth® is Disconnected
from Headset/Handsfree Device ●Always Make Calls from 940P
even when Headset is Connected ●Always Use Handsfree Device
to Make/Receive Calls ( P.18-17)
Before Using Bluetooth®
Bluetooth® Specifications
Version Bluetooth® specification Ver.2.0+EDR
Supported Profiles 1
HSP (Headset Profile)
HFP (Hands-Free Profile)
A2DP: Advanced Audio Distribution
Profile
AVRCP: Audio Video Remote Control
Profile
DUNP: Dial-up Networking Profile
OPP (Object Push Profile)
Output Bluetooth® Power Class2
Frequency Bands 22.4GHz (2.402GHz-2.480GHz)
Communication Distance 3Approximately ten meters
1 Bluetooth® connections are available with compatible devices supporting
the same profile.
2 Bluetooth® operates in the 2.4 GHz unlicensed frequency band.Depending
on other devices in use in the spectrum, Bluetooth® connection may slow
down/terminate, or range may decrease.
3 Affected by distance between devices, obstructions, signal conditions,
handset status, etc.

Connectivity
11-7
11
Notes
940P may not be able to establish a Bluetooth
® connection with some
Bluetooth® devices.
Establish connections with certified Bluetooth
® devices that meet the
specification standards developed by Bluetooth® SIG.
Due to the unique characteristics/specifications of a certified Bluetooth
®
device, connections or transfers may fail; procedures, displayed results or
operations may vary from those described in the manual.
When data transfer is interrupted, it may take some time for process to
complete.
Noise may interfere with wireless or handsfree conversations depending
on the status of connected devices or signal conditions.
For details about headset/handsfree devices, see the device manuals.
Using Bluetooth®
Pair Bluetooth® devices with 940P beforehand to establish
connections for different Bluetooth® functions.
Searching & Pairing Devices
Search other Bluetooth® devices.
Paired devices appear in Search&Paired Device list.
Bluetooth
® Passkey is not necessary for paired devices.
Search up to 20 Bluetooth
® devices at one time; pair with up to ten
Bluetooth® devices.
Place Bluetooth
® devices on standby for connection.
Main Menu Tools Bluetooth Search&Paired Device
1
YES
*
Device search starts and names of found devices appear.
To search again:
[Search]
* If there are already paired devices in list, select a device Select a
function
2 Select a device
YES
Enter Phone Password
3 Select text entry field Enter Bluetooth® Passkey
4 Select a Bluetooth® function
Next Page
Connectivity
11-8
11
940P connects to Bluetooth® device. When complete, flashes in
blue. After no Bluetooth® connection is made for a certain time,
appears in black and Power saver mode starts.
When Bluetooth
® device can connect to multiple services,
confirmation appears asking whether to connect to another service.
While connected,
(Blue) appears. While in Standby, (Gray)
appears.
When
Dial-up
is selected, 940P stands by for connection requests
from other Bluetooth® devices.
Dial-up
can be selected regardless of profile types.
Bluetooth® Passkey
Bluetooth® Passkey (1 to 16 digits) is required to connect
Bluetooth® devices; sender and recipient must input the same code to
complete file transfers.
Bluetooth
® Passkey is not necessary for paired devices.
Search&Paired Device List
■
❶ Device Type
Indicators appear for different
types of devices.
❷ Device Name
Device names appear.
When no names are found,
Bluetooth® addresses appear.
❸ Connection Status
: Connected : Not connected : Not found : Not paired
Search&Paired Device
❷
❺
❸
❹
❶
❹ Protection
Indicator appears when registered contents are protected.
❺ Profile Status
Indicators appear to show profile status.
Icon
Letter Color
Background Color
Frame Color
Status
Blue Gray –
Not connected (Not paired)
Blue Gray Blue Not connected (Paired)
White Green – Connected
Green White Green Standby for connection
White Light green – Preferred device
Gray Gray – Not supported
Tip
Settings
●Set Duration to Search for Bluetooth® Devices ( P.18-17)
Suspending Bluetooth® Functions
Suspend all Bluetooth® functions connected or on standby
for connection, and disable Bluetooth®.
Main Menu Tools Bluetooth
1
Bluetooth OFF
YES
To return to standby for previously connected function:
Bluetooth ON
TBD
Connectivity
11-9
11
Placing Bluetooth® Devices on Standby for
Connection
Main Menu Tools Bluetooth Accept Registered
1 Check functions to be on standby for connection
[Finish]
To uncheck, select functions to remove check marks.
Sending/Receiving Phone Book
Sending
1 Open Phone Book [Menu]
Send to Bluetooth
2 One File Transfer
Send phonebook
Select a recipient device
All File Transfer
Send all phonebook
Select a recipient device
Enter Phone Password
3
YES
Receiving
Main Menu Tools Bluetooth Receive via Bluetooth
1 One File Transfer
Receive
YES
All File Transfer
Receive All
Enter Phone Password
YES
YES
If memory becomes full, remaining entries are truncated (Memory
List: P.19-25).
Tip
Settings
●Set Authentication/Encryption to Send Phone Book Entries
●Enter Password when Sending All Phone Book Entries
(P.18-17)
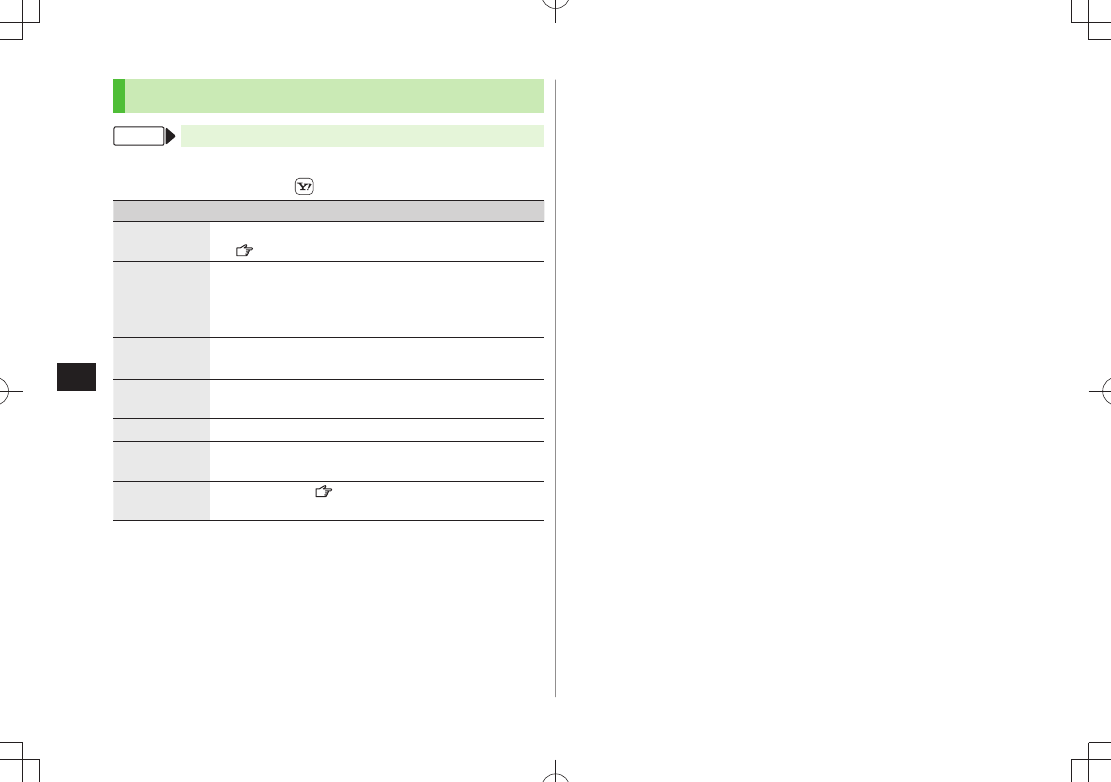
Connectivity
11-10
11
Bluetooth® Functions
From Main Menu Tools Bluetooth
Functions Available in Search&Paired Device Window
■
Search&Paired Device
> [Menu] Select an item (See below)
Item Operation/Description
Register
devices
Enter Phone Password
> Pair devices
(From Step 3 on P.10-7)
Preferred
device
Set a preferred Bluetooth® device for incoming calls
Available only for headset function compatible
Bluetooth® devices.
To cancel, perform same operation.
Protect/
release
Protect/cancel devices. Protection prevents devices from
being deleted or overwritten
Change
device name
Enter a device name
>
Delete
YES
>
Description Show device name, Bluetooth® address, device class and
supported profile
Add shortcut
icon
Create shortcuts ( P.1-22)
Make/Receive Calls via Bluetooth
■®
Search&Paired Device
> Select a device
Headset
or
Hands-free
YES
Make/receive a call using Bluetooth® device
Use Bluetooth
■® Device for Wireless Playback
Search&Paired Device
> Select a device
Audio
Watch Digital
TV or play back videos or music
Digital TV/Video sounds are played only by A2DP profile compatible
Bluetooth® devices compliant with SCMS-T copyright protection
standard.
Connect to Internet Using Bluetooth
■® Device
Search&Paired Device
> Select a device
Dial-up
940P waits for dial-up connection.
Refer to a manual for Bluetooth
® device for details.
Download utility software (940P) "Modem Wizard" from website below
to PC and install software.
http://panasonic.jp/mobile/support/download/940p/index.html
To establish a dial-up connection, see Help on "Modem Wizard."
Connecting handset to a PC or PDA for Internet access may incur high
packet transmission charges.
Place Bluetooth
■® Device on Standby for Dial-up
Dialup Rgstry Standby
> Enter Phone Password
YES
Select
Bluetooth® Passkey text box Enter Bluetooth® Passkey
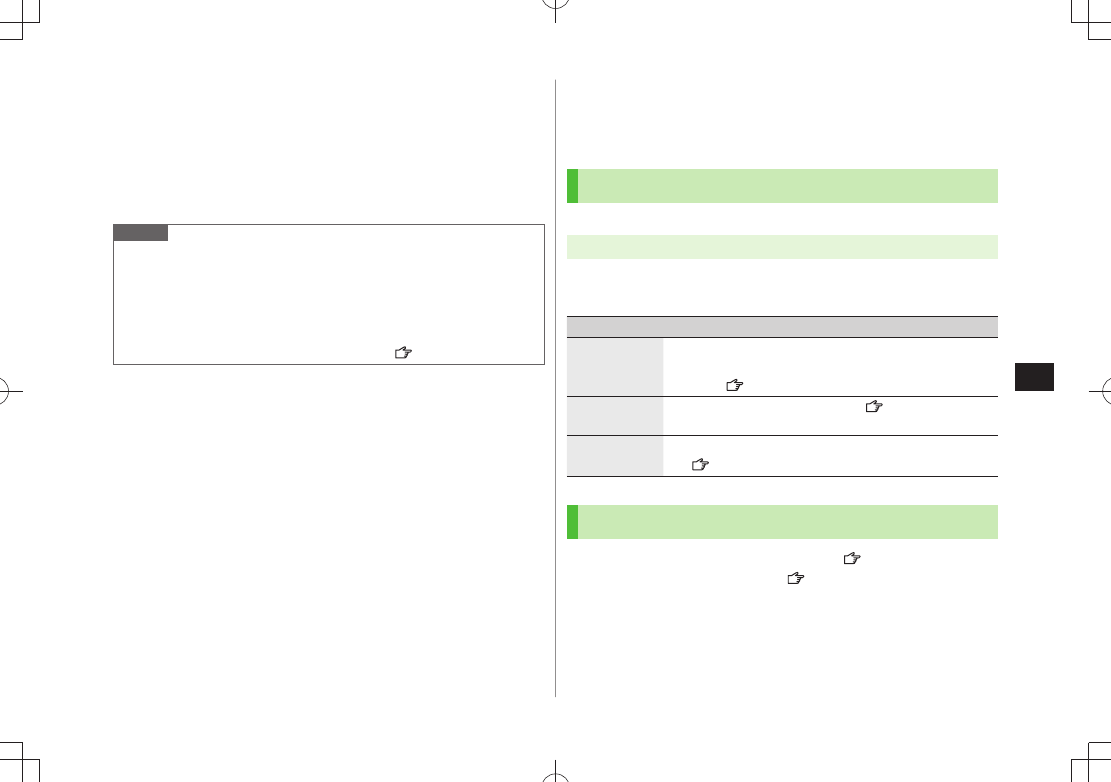
Connectivity
11-11
11
SoftBank Utility Software (Japanese)
Phone Book, Calendar, Tasks, messages, Bookmarks,
Notepads and Data Folder can be transferred to a PC, edited
or managed by using SoftBank Utility Software.
For details on and downloading SoftBank Utility Software, visit
http://www.softbank.jp/mb/r/sbu/ (Japanese)
Note
USB cable (not included) is necessary for using SoftBank Utility
Software.
S! Appli, PC Movies, TV, Lifestyle-Appli, Books, Customized Screen,
Templates and Other Documents cannot be backed up.
Copy protected files may not be backed up.
Set
USB Mode
to
Communication Mode
( Right).
USB (Japanese)
Connect 940P to a PC via USB cable (not included) specified
by SoftBank for data transfer or data communication.
Setting USB Mode
<Default> Communication Mode
Main Menu Settings Connectivity USB Mode
1 Select an item (See below)
Item Operation/Description
Communication
Mode
Packet transmission, 64K data transmission, data transfer
and calls with USB handsfree compatible devices are
available ( Left)
microSD
Mode
Read/write data on microSD Card ( P.9-21)
MTP Mode Transfer/delete music data via Windows Media® Player on
PC ( P.8-4)
Transferring Data via USB Cable
Transfer data using SoftBank Utility Software (
Left).
Transferring data in microSD Mode (
P.9-21)

Connectivity
11-12
11
Data Communication via USB Cable
Use 940P as a modem for Internet access by connecting
940P with a PC.
Download utility software from URL below and install on PC.
http://panasonic.jp/mobile/support/download/940p/index.html
1 Install "USBドライバ (USB Driver)" and "Modem
Wizard" from Utility Software (940P) to a PC
2 Set 940P to
Communication Mode
( P.10-11), and
connect 940P to PC via USB cable
Power up 940P before connecting to PC via USB cable.
3 Start up "Modem Wizard", and operate communication
setup
"Modem Wizard" enables you to set up APN and dial-up easily.
For setup/starting procedures, see "Modem Wizard" Help.
Note
Connecting handset to a PC or PDA for Internet access may incur high
packet transmission fees.
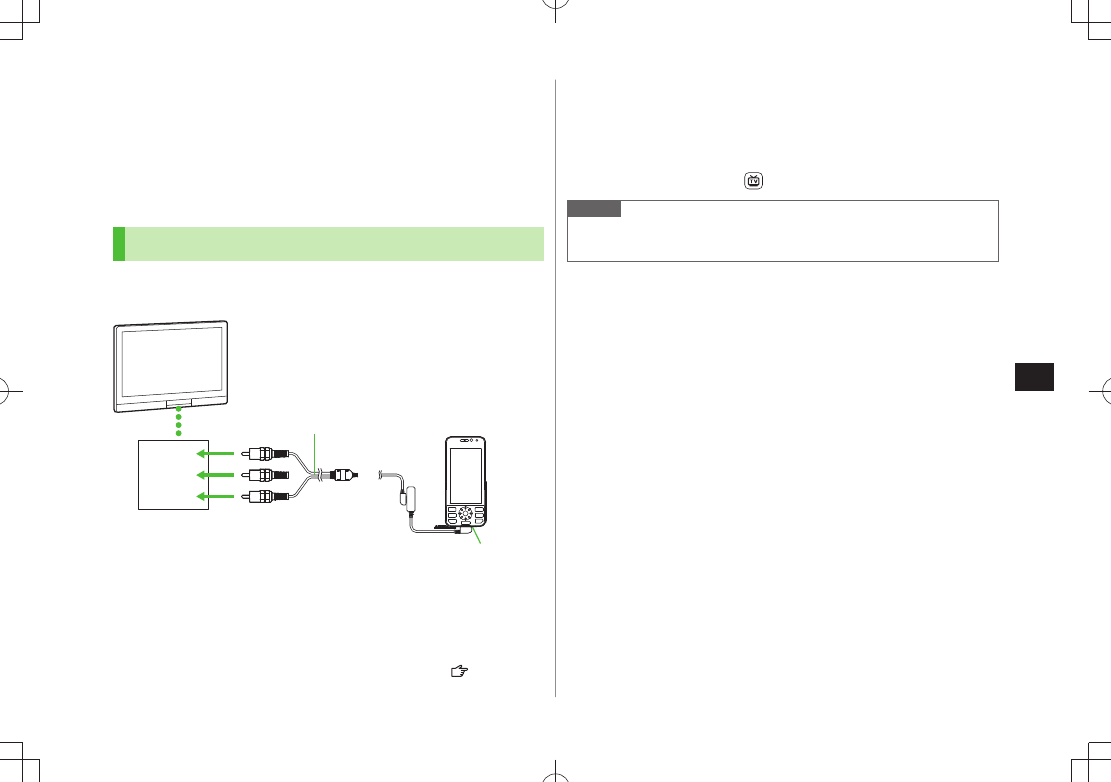
Connectivity
11-13
11
AV Output
View the following on a TV set or other devices using a
SoftBank-specified video output cable (not included): Video
Call images, Digital TV images, still images/videos saved on
940P.
View AV-output-compatible S! Appli on TV.
Connecting Handset to TV
To use video output cable (not included), Stereo Earphone Conversion
Cable (not included) is required.
1 Open External Port Cover
2 Connect video output cable to handset using
conversion cable
To connect video output cable to conversion cable:
P.1-4
External Port
Yellow
White
Red
Video output cable
Video ◎
Audio L
◎
Audio R
◎
3 Connect video output cable to video/audio input
terminal on TV set
4 Open an image file on 940P
To toggle display size:
Note
Some images cannot be displayed on TV.
Display size setting is not available for some TV sets.

11-14
Connectivity
11
12
12-1
Handset Security
Changing Phone Password ................................. 12-2
Security Functions .............................................. 12-2
USIM PINs ................................................................................12-2
Keyguard ..................................................................................12-4
Privacy Key Lock .......................................................................12-5
Personal Data Lock ...................................................................12-5
Activating Personal Data Lock when Closing Handset ................12-7
Secure Remote Lock .................................................................12-8
Key Pad Dial Lock .....................................................................12-9
Additional Lock Functions .........................................................12-9
Restricting Calls/Messages ............................... 12-10
Hiding Call Logs and Sent/Received Address List......................12-10
Secret Mode/Secret Data Only .................................................12-10
Setting Secret Mail .................................................................12-11
Mail Security ..........................................................................12-12
Call Restrictions ......................................................................12-12
Delaying Ringtone ..................................................................12-13
Rejecting Unknown Callers .....................................................12-13
Rejecting Calls without Caller ID .............................................12-13
Reset ................................................................. 12-14
Reset Settings ........................................................................12-14
All Reset ................................................................................12-14
12-2
Handset Security
12
Changing Phone Password
<Default> 9999
Change Phone Password as required.
For Phone Password details:
P.1-28
Main Menu Settings Security Change Phone Password
1 Enter current 4-8-digit Phone Password
2 Enter new 4-8-digit Phone Password
YES
Security Functions
USIM PINs
For more information about PINs:
P.1-3
Note
Emergency numbers (110, 119, 118) are not dialable in PIN/PIN2,
PUK/PUK2 entry window.
PIN Authentication
Activate to require PIN entry each time handset is turned
on.
Main Menu Settings Security PIN Authentication
1 Enter Phone Password
PIN Authentication
2
ON
or
OFF
3 Enter PIN

Handset Security
12-3
12
Changing PIN/PIN2
Set
PIN Authentication
to
ON
before changing PIN ( Above).
Main Menu Settings Security PIN Authentication
1 Enter Phone Password
Change PIN
or
Change PIN2
2 Enter current PIN/PIN2
3 Enter new PIN/PIN2
4 Reenter new PIN/PIN2
PIN Lock & Cancellation (PUK/PUK2)
PIN Lock or PIN2 Lock is activated if PIN or PIN2 is
incorrectly entered three times. Cancel PIN Lock or PIN2
Lock by entering PIN Unblocking Key (PUK/PUK2).
For information about PUK/PUK2, contact SoftBank Mobile Customer
Center, General Information ( P.19-34).
1 In PIN lock mode, enter PUK/PUK2
2 Enter new PIN/PIN2
3 Reenter new PIN/PIN2
Note
If PUK/PUK2 is incorrectly entered ten times, USIM Card is locked and
handset is disabled (Even turning off power is counted as one incorrect
entry.). Write down PUK/PUK2.
For procedures required to unlock USIM Card, contact SoftBank Mobile
Customer Center, General Information ( P.19-34).
12-4
Handset Security
12
Keyguard
Lock handset keys to prevent accidental operation except
when turning power on/off or answering incoming calls.
While set,
appears in Standby.
By default, Keyguard temporarily cancels when handset opens (Keyguard
Setting: Right).
Activate Keyguard in specified time after closing handset (Timer Lock at
Close: P.12-7)
1 In Standby, press and hold
To toggle Keyguard settings, repeat operation.
While Keyguard is Active
Emergency numbers (110, 119, 118) are dialable even when Keyguard
is set to
Lock Even Slide Open
. Entered numbers do not appear on
Display. Once numbers are dialed, Keyguard is canceled.
Press
to disable Calendar event tone or Alarm.
Keyguard can be canceled even during a call.
Note
Alternatively,
Main Menu
Settings
Security Settings
Keyguard
ON or OFF to activate/deactivate Keyguard
Turning off power cannot cancel Keyguard.
Keyguard Setting
<Default> Unlock When Slide Open
Activate to cancel Keyguard temporarily when opening
handset.
Main Menu Settings Security Settings
Keyguard Setting
1
Lock Even Slide Open
or
Unlock When Slide Open
Handset Security
12-5
12
Privacy Key Lock
<Default> OFF
Set Privacy Key Lock to require Phone Password for using
940P except for turning handset on/off and answering calls.
While locked,
appears in Standby.
Main Menu Settings Security Privacy Key Lock
1 Enter Phone Password
To cancel Privacy Key Lock, enter Phone Password in Standby. If
Phone Password is incorrectly entered five times, 940P turns off.
While Privacy Key Lock is Active
Emergency numbers (110, 119, 118) are dialable even when Privacy
Key Lock is active.
Only phone numbers appear on Display for incoming calls.
Calls cannot be received by Bluetooth
® headsets or handsfree devices.
Message ringtones or Alarm tones are disabled.
Calendar event tone or Alarm is disabled.
S! Quick News and some indicators do not appear. They appear after
Privacy Key Lock is canceled.
Note
Turning off power cannot cancel Privacy Key Lock.
Personal Data Lock
Set Personal Data Lock to prevent others from reading or
tampering with your personal information in Phone Book or
Data Folder. Activate to require Phone Password for
accessing personal data.
Locked Functions/Data
■
Messaging
・
S! Appli
・
Phone Book search/saving/setting
・
Memory Manager/ Memory Status
・
(Phone Book)
Account Details
・
Restrictions (Phone Book)
・
Notepad
・
Calendar
・
Tasks
・
Shortcuts
・
Event Indicators
・
Camera/Video Camera
・
Album-Touch
・
Lifestyle Appli
・
microSD Backup
・
Answer Phone
・
Voice Recorder
・
Customized Screen
・
Voice Announce
・
Post blog
・
Yahoo! Keitai viewing/setting
・
PC Site Browser viewing/setting
・
Bookmarks/ Saved Pages
・
BookSurfing
・ ®/e-Book Viewer
Mobile Widget
・
S! Quick News
・
S! Information Channel/Weather
・
Content Key obtaining/backup
・
Voice Dial
・
S! GPS Navi
・
Data Folder*
・
Music Player
・
Digital TV
・
Bar Code Reader
・
Receive via Infrared/Bluetooth
・ ®
IC Data transmission
・
Alarm
・
Dictionary
・
Pedometer
・
Reset Settings/All Reset
・
Software Update
・
* Font setting is available.
12-6
Handset Security
12
Activating/Canceling Personal Data Lock
<Default> Deactivate
While locked,
appears in Standby.
Main Menu Settings Security Personal Data Lock
1 Enter Phone Password
Activate/Deactivate
To cancel Personal Data Lock, repeat operation. If Timer Lock at
Close is set, password entry is requested when 940P is opened.
Canceling Personal Data Lock Temporarily
When Phone Password is entered, disappears and disabled functions
become temporarily available.
Once handset returns to Standby while no functions are active,
Personal Data Lock is active again.
Some functions remain unavailable. Deactivate Personal Data Lock to
use the following:
Receiving IC data
・ ・ Reject unknown
Note
While Personal Data Lock is set, some indicators do not appear in
Standby. They appear after lock is canceled.
Turning off power does not cancel Personal Data Lock.
Customizing Personal Data Lock
Enable/disable Alarm, incoming message notification, etc.
while Personal Data Lock is active.
Main Menu Settings Security Personal Data Lock
1 Enter Phone Password
Customize
Select an
item (See below)
Item Operation/Description
Alarm Tone Enable/disable Alarms (Calendar, TV timer, or other alerts)
or TV Timer Recording.
Select an item
>
Accept
(Enable) or
Not Accept
(Disable)
Incoming Call
Act
Show/hide Event Indicator (incoming messages) or Phone
Book entry information (incoming calls).
Select an item
>
Incoming Message
・
Accept
(Show indicator) or
Not Accept
(Hide indicator)
Phone Book Available
・
Accept
(Show Phone
Book Entry information) or
Not Accept
(Hide
information)
Display/Tone Enable/disable Display settings, ringtones or indicators.
Select an item
>
Internal Display
・
Accept
(Enable Display
Settings) or
Not Accept
(Disable)
Ring Tones
・
Accept
(Enable Sound Settings) or
Not Accept
(Disable)
S! Quick News
・
Accept
(Show information) or
Not Accept
(Hide information)
S! Info Ch./Weather
・
Accept
(Show indicators)
or
Not Accept
(Hide indicators)
Widget Contents
・
Accept
(Show widgets) or
Not Accept
(Hide widgets)
Handset Security
12-7
12
Showing Personal Data Lock OFF Window when
Opening Handset
<Default> OFF
Main Menu Settings Security Lock OFF at Open
1 Enter Phone Password
2
Personal Data Lock
ON
Note
When Timer Lock at Close and Lock OFF at Open are both active,
canceling Personal Data Lock when opening handset temporarily
cancels lock. However, lock activates again when specified time elapses
after closing 940P.
Activating Personal Data Lock when Closing
Handset
<Default> Keyguard: OFF
Personal Data Lock: OFF
Set Timer Lock at Close to automatically activate Keyguard
or Personal Data Lock when specified time has elapsed after
940P is closed.
While locked,
appears in Standby.
Main Menu Settings Security Timer Lock at Close
1 Enter Phone Password
2
Keyguard
or
Personal Data Lock
Select a time
When
Personal Data Lock
is selected, confirmation
When
OFF
is selected, setting is canceled.
12-8
Handset Security
12
Secure Remote Lock
If handset is lost or stolen, remotely lock handset from a PC
or mobile. If Secure Remote Lock is active, all operations are
unavailable except to turn handset on.
For service details and user agreement/registration, visit SOFTBANK
MOBILE Corp. Website (http://www.softbank.jp) or My SoftBank.
Accessing My SoftBank from Handset (Japanese)
For service details, visit SOFTBANK MOBILE Corp. Website.
Main Menu Yahoo! メニューリスト My SoftBank
English
Follow onscreen instructions.
Note
Emergency numbers (110, 119, 118) are dialable even while Secure
Remote Lock is set.
Showing Messages during Secure Remote Lock
<Default> OFF
Set Display message to appear when Secure Remote Lock is
active.
Use preset message or create a message.
Main Menu Settings Security Lock Message
1 Enter Phone Password
2
Display Setting
ON
Save Lock Messages
■
After Step 1,
>
Message
Enter a message
Handset Security
12-9
12
Key Pad Dial Lock
<Default> Deactivate
Allow dialing only from Phone Book entries and lock dialing
with keypad. Unauthorized use of 940P can be prevented.
While locked,
appears in Standby.
Unavailable Operations
■
Dialing with keypad
・
Phone Book (saving, editing, deleting, copying from microSD Card, and
・
sending/receiving via Infrared, IC transmission and Bluetooth®)
Sending S! Mail (by typing in address)/SMS
・
Available Operations
■
・ Dialing from Phone Book or Voice Dial
・ Dialing from Redial, Outgoing Call Logs, Incoming Call Logs, Sent
address, or Received address (only phone numbers/mail addresses saved
in Phone Book)
Main Menu Settings Security Key Pad Dial Lock
1 Enter Phone Password
While Key Pad Dial Lock is set, appears in Standby.
To cancel Key Pad Dial Lock, repeat operation.
Note
Emergency numbers (110, 119, 118) are dialable even while Key Pad
Dial Lock is set.
Additional Lock Functions
IC Card Lock
■
Deactivate Osaifu-Keitai® functions ( P.16-5).
Remote Lock
■
Deactivate Osaifu-Keitai® functions remotely ( P.16-5).
12-10
Handset Security
12
Restricting Calls/Messages
Hiding Call Logs and Sent/Received Address List
<Default> ON
Main Menu Settings Incoming Settings Call Logs
1 Enter Phone Password
2 Select an item (See below)
Item Operation/Description
Incoming Show/hide Incoming Call Logs/Received address list
Outgoing Show/hide Redial/Outgoing Call Logs/Sent address list
3
OFF
Note
While Incoming Call Logs is OFF, Answer Phone (Voice Calls) does not
play. Selecting Missed Call indicator does not show Incoming Call Logs.
Secret Mode/Secret Data Only
<Default> Deactivate
Phone Book entries and calendar events saved as secret
data appear only when 940P is in Secret Mode/Secret Data
Only.
Set Phone Book or Calendar events as secret data (Phone Book:
P.4-7,
4-8 / Calendar events: P.12-5)
Main Menu Settings Security
1 Select an item (See below)
Item Operation/Description
Secret Mode View all data including secret data
While set,
appears in Standby.
Secret Data
Only
View only secret data
While set,
flashes in Standby.
2 Enter Phone Password
For Secret Data Only, number of saved secret data appears.
Cancel Secret Mode/Secret Data Only
■
In Standby,
> or follow Step 1 above
disappears.
When widgets are shown,
to hide and press again.
Handset Security
12-11
12
Cancel Secret Mode/Secret Setting
■
In Phone Book/Calendar event window,
>[Menu]
Release secret
Note
Select whether to save data edited/saved in Secret Mode as secret data.
Data saved/edited in Secret Data Only are saved as secret data.
Turn off handset to cancel secret setting.
only Tip
Settings
●Set Learning Feature Off for Secret Mode/Secret Data Only
(P.18-10)
Setting Secret Mail
<Default> ON
Forbid showing messages from secret Phone Book entries.
Secret mail can be viewed in Secret Mode/Secret Data Only even when
Secret Mail Display is set to
OFF
.
1
Settings
2
Universal Settings
Secret Mail Display
3 Enter Phone Password
4
OFF
Note
When both Spam Filter and Secret Mail Display are set, messages from
Phone Book entries saved as secret mode are sorted into Spam Folder
(Safe List: P.13-17).
12-12
Handset Security
12
Mail Security
Set handset to require Phone Password for opening mail
boxes or operating Server Mail.
appears for set mail boxes and menus.
1
Settings
2
Universal Settings
Mail Security
3 Enter Phone Password Select items* [Finish]
* To cancel: press again.
Set/Cancel Mail Security by Incoming Mail or Sent/Unsent
■
Folder
>
Incoming Mail
or
Sent/Unsent
Highlight a folder
[Menu]
Mail Security
Enter Phone Password
appears for set folders.
Call Restrictions
Reject/accept/forward calls from specified phone numbers,
or restrict calling unspecified phone numbers.
1 Search Phone Book
2 Select an entry [Menu]
Restrictions
3 Enter Phone Password
4 Select an item (See below)
Item Operation/Description
Restrict
Dialing
Allow calls only to specified numbers
Call Rejection Reject specified numbers
Call
Acceptance
Accept from specified numbers only
Call
Forwarding
Automatically forward specified numbers
Set destination numbers (Call Forwarding:
P.2-17)
To cancel, repeat operation.
View/Cancel Phone Book Restrictions
■
>
Main Menu Phone Book Restrictions Enter Phone Password
Select an item* Select a Phone Book entry Select a number
YES
* ★ appears for set item.
Highlight an item,
[Menu]
Release Settings
YES
to cancel
restriction on all specified numbers.
Handset Security
12-13
12
Note
Missed call indicator appears in Standby for calls from rejected
numbers.
Delaying Ringtone
<Default> OFF
Delay ringtone/vibration for Voice/Video Calls from unknown
numbers.
Main Menu Settings Incoming Settings
Ring Time Settings Ring Starting Time
1
ON
Enter start time
Hide Missed Call Records (Disconnected during Ringtone
■
Delay)
Main Menu
> Settings Incoming Settings
Ring Time Settings Missed Calls Display Not Display
Rejecting Unknown Callers
<Default> Accept
Main Menu Settings Security Reject Unknown
1 Enter Phone Password
Reject
Rejecting Calls without Caller ID
<Default> Accept
Reject calls without Caller ID or from pay phones.
Main Menu Settings Security Call Setting w/o ID
1 Enter Phone Password
2 Select an item
Reject
12-14
Handset Security
12
Reset
Reset Settings
Cancel custom settings and return handset functions to their
default settings.
Main Menu Settings Security Reset Settings
1 Enter Phone Password
YES
Note
Some default settings may not be restored.
Reset Settings cancels Navi Appli settings in S! GPS Navi. Set a
Navi Appli to activate from
Select Navi Appli
( P.18-22).
All Reset
Cancel custom settings and return handset functions to their
default settings; clear all Phone Book/Data Folder entries
etc.
Main Menu Settings Security All Reset
1 Enter Phone Password
YES
YES
940P automatically turns off and restarts.
Note
Fully charge battery (
) beforehand.
Phone Password is reset to default.
USIM Card/microSD Card files are not affected.
Data transmission settings (set via PC) are not affected.
Non-restorable items when deleted by All Reset:
Customized settings, Call Logs, downloaded S! Appli, etc.
・

13
13-1
Tools
Calendar ............................................................. 13-2
Opening Calendar ....................................................................13-2
Creating Calendar Events .........................................................13-2
Saving Holidays/Memorial Days ................................................13-3
Viewing/Editing Calendar Event Details .....................................13-4
Calendar Functions ...................................................................13-4
Tasks ................................................................... 13-5
Saving a Task ............................................................................13-5
Using Tasks ..............................................................................13-6
Alarms ................................................................ 13-6
Alarm Tone ...............................................................................13-6
Setting Alarm ...........................................................................13-7
Calculator ........................................................... 13-8
Notepad .............................................................. 13-8
Saving a Note ...........................................................................13-8
Notepad Functions ...................................................................13-9
Osaifu Keitai® ..................................................... 13-9
Downloading Lifestyle-Appli ...................................................13-10
Activating Lifestyle-Appli ........................................................13-10
Reader/Writer Transactions .....................................................13-11
IC Card Lock ...........................................................................13-12
Dictionary (Japanese) ....................................... 13-13
Sound Recorders ............................................... 13-14
Voice Recorder .......................................................................13-14
Voice Announce ......................................................................13-14
Bar Code Reader ............................................... 13-15
Scanning Barcodes .................................................................13-15
Viewing/Editing Scanned Data ................................................13-16
Using Scanned Data ...............................................................13-16
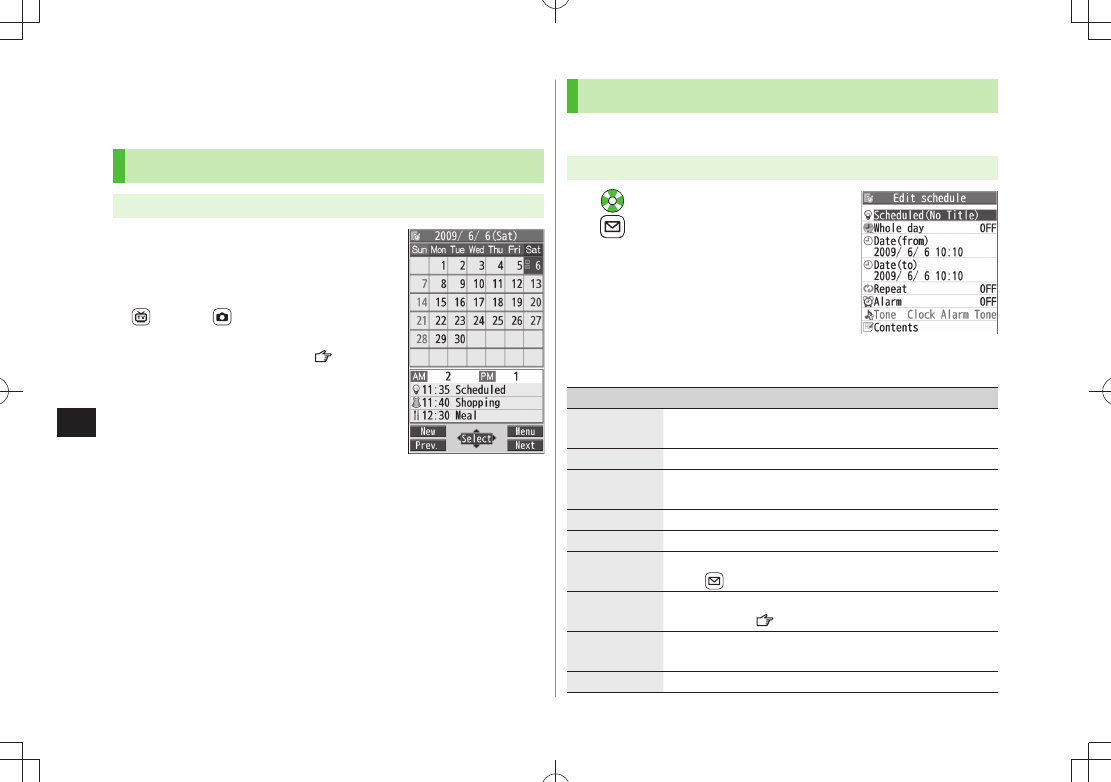
Tools
13-2
13
Calendar
View by day, week or month; set Alarms for events.
Opening Calendar
Main Menu Tools Calendar
Current month appears.
When a date with Calendar events is selected,
number of AM and PM events and up to three
contents appear.
[Prev.] or [Next] to show previous/
next month calendar.
To switch Monthly/Weekly view:
P.12-4
Monthly View
Creating Calendar Events
Save up to 1000 entries.
Main Menu Tools Calendar
1 to highlight a date
[New]
Schedule
2 Select an item (See below)
Item Operation/Description
Select icon/
Edit summary
Select an icon
> Edit subject
Edit location Enter location
>
Whole day
setting
OFF
> or
ON
When
ON
is set, Alarm goes off at 0:00 a.m.
Date (from) Enter start date and time
>
Date (to) Enter end date and time
>
Repeat Select a repetition
> (For
Select day
, check days
[Finish])
Alarm Select an Alarm type (
> For
ON/Set time
, enter time)
Alarm Tone:
P.12-6
Alarm tone Select an Alarm tone type
> Select a folder Select
an Alarm tone
Contents Enter event description
>
TBD
TBD
Tools
13-3
13
3 [Finish]
Note
Calendar events between 00:00 on 2000/01/01 and 23:59 on
2037/12/31 can be saved on 940P.
Alarm tone does not sound when Privacy Key Lock or Personal Data
Lock is set. However, settings can be changed even while Personal Data
Lock is set ( P.11-5).
Calendar Event Indicators
Following indicators appear in Calendar Window.
(Blue): Morning event
(Orange): Afternoon event
_ (Underscore): Event that lasts for two days or longer
Following indicators appear on Display.
: Alarm : Monthly
: Daily : Yearly
: Weekly
Saving Holidays/Memorial Days
Save up to 100 entries (one entry a day) each for Holidays
or Memorial days.
Main Menu Tools Calendar
1 (Highlight a date ) [New]
Holidays
or
Memorial days
2 Select an item (See below)
Item Operation/Description
Date setting Enter a date
>
Repeat Select a repetition type
>
1 time
does not repeat Holidays/Memorial days
events.
Edit holiday/
anniversary
Enter description
>
3 [Finish]
Indicators
Holidays appear in red.
Memorial days are marked with a red circle.
Following indicators appear in Calendar/Calendar Event List Window:
: Holidays : Memorial days : Yearly repeat
Tools
13-4
13
Viewing/Editing Calendar Event Details
Main Menu Tools Calendar
1 to select a date
2 Select an event
Detailed schedule appears.
To edit:
[Edit] Edit selected item
(Schedule: From Step 2 on P.12-2/
Holiday, Anniversary: From Step 2 on
P.12-3)
Calendar Functions
From Main Menu Tools Calendar
Functions Available in Calendar Window
■
Highlight a date
> [Menu] Select an item (See below)
Item Operation/Description
New Create a new entry ( P.12-2, P.12-3)
Calendar Event List
Calendar Event Details
Item Operation/Description
Weekly
display/
1 Month
Toggle Monthly/Weekly view
Icon display Entries in category of selected icon appear
Select an icon
>
No. of
schedules
Display number of saved Schedule, Holiday or Anniversary
entries
Add shortcut
icon
Create a shortcut ( P.1-22)
Send all Ir
data
(P.10-3)
AllIC
transmission
(P.10-5)
Delete past Delete past entries/items, prior to highlighted date
Select a category to delete
>
YES
Delete all Enter Phone Password
> Select an item
YES
Reset
holidays
Restore deleted Holidays
YES
>
Functions Available in Calendar Events List/Details
■
Select a date (
> Select a Schedule, Holiday or Anniversary)
[Menu] Select an item (See below)
Item Operation/Description
New Create a new entry ( P.12-2, P.12-3)
Edit Edit selected item ( Left)
Copy Copy an entry to another day
Enter date and time to copy an entry to
>
Calendar
display
Switch from Icon display to Calendar display
TBD
TBD
Tools
13-5
13
Item Operation/Description
Icon display Entries in category of selected icon appear
Select an icon
>
Set secret
mode/
Release
secret
Activate/deactivate Secret Mode
YES
>( For
Set secret mode
, enter Phone Password)
Secret entries appear only in
Secret Mode
or
Secret Data Only
( P.11-9).
Compose
S! Mail
Create S! Mail by copying event date and content to
message text ( From Step 2 on P.13-4)
Send Ir data (P.10-3)
Send all Ir
data
(P.10-3)
IC
transmission
(P.10-5)
AllIC
transmission
(P.10-5)
Copy to
microSD
Copy an entry to microSD Card
YES
>
To display data on microSD Card:
P.9-18
Delete this
YES
>
Delete past Delete past entries/items, prior to highlighted date
Select a category to delete
>
YES
Delete select Check entries to delete
> [Finish]
YES
Tasks
Make quick notes of task to manage in Task list.
Saving a Task
Main Menu Tools Tasks
1 [New] Select an item (See below)
To check saved Tasks, select a Task. To edit, press
[Edit] in detail
window.
Item Operation/Description
Edit Tasks Enter content
>
Due date Select how to enter due date
> Enter due date
Select
No date
to enter none.
Priority Select a priority level
>
Category Select a category
>
Alarm Select an Alarm type (
> For
ON/Set time
, enter time)
Alarm Tone:
P.12-6
Alarm tone Select an Alarm tone type
> Select a folder
Select an Alarm tone
2 [Finish]
When content is not entered, Tasks cannot be saved.
Note
Alarm tone does not sound when Privacy Key Lock or Personal Data
Lock is set. However, settings can be changed even while Personal Data
Lock is set ( P.11-5).
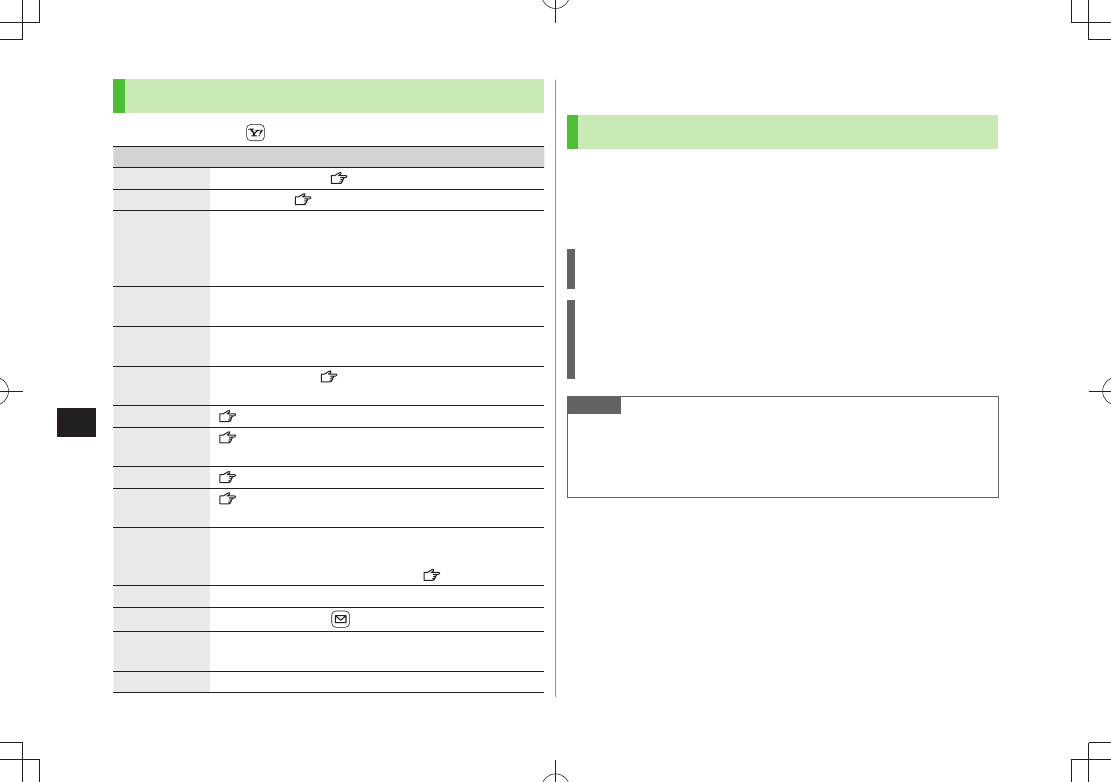
Tools
13-6
13
Using Tasks
In Tasks window, press [Menu] for following operations.
Item Operation/Description
New Create a new entry ( P.12-5)
Edit Edit an entry ( P.12-5)
Change
status
Change status indicator shown in Tasks list
Select a status (
> For
Completion
, select an item
Enter Completion date)
Overdue status indicator turns red.
Show by
category
Select a category
>
Sort/Filter Sort list by due date, entry order, status, etc.
Select a condition
>
Add shortcut
icon
Create a shortcut ( P.1-22)
Send Ir data (P.10-3)
Send all Ir
data
(P.10-3)
IC transmission
( P.10-5)
AllIC
transmission
(P.10-5)
Copy to
microSD
Copy a Task to microSD Card
YES
>
To display data on microSD Card:
P.9-18
Delete this
YES
>
Delete select Check entries
> [Finish]
YES
Delete
completed
Delete an entry in
Completion
status
YES
>
Delete all Enter Phone Password
>
YES
Alarms
Alarm Tone
When scheduled time arrives, alarm tone sounds and
Notification Light illuminates.
For Calendar events and Tasks, alarm message and animation
corresponding to selected icon appear on Display.
To Stop Alarm Tone for Calendar Events, Tasks or Alarm
Press any key.
Missed Alarm
"Missed Alarm" Event Indicator appears in Standby for alarms missed
during Privacy Key Lock, Personal Data Lock or Infrared transmission once
locks are canceled or transmission ends. Select indicator to view content.
Note
When one or more Alarms are set to the same time, alarm sounds in
the order of : "Alarm" "Timer Recording" "Tasks" "Calendar"
"Timer Watching"
For Tasks, "Missed Alarm" indicator appears.
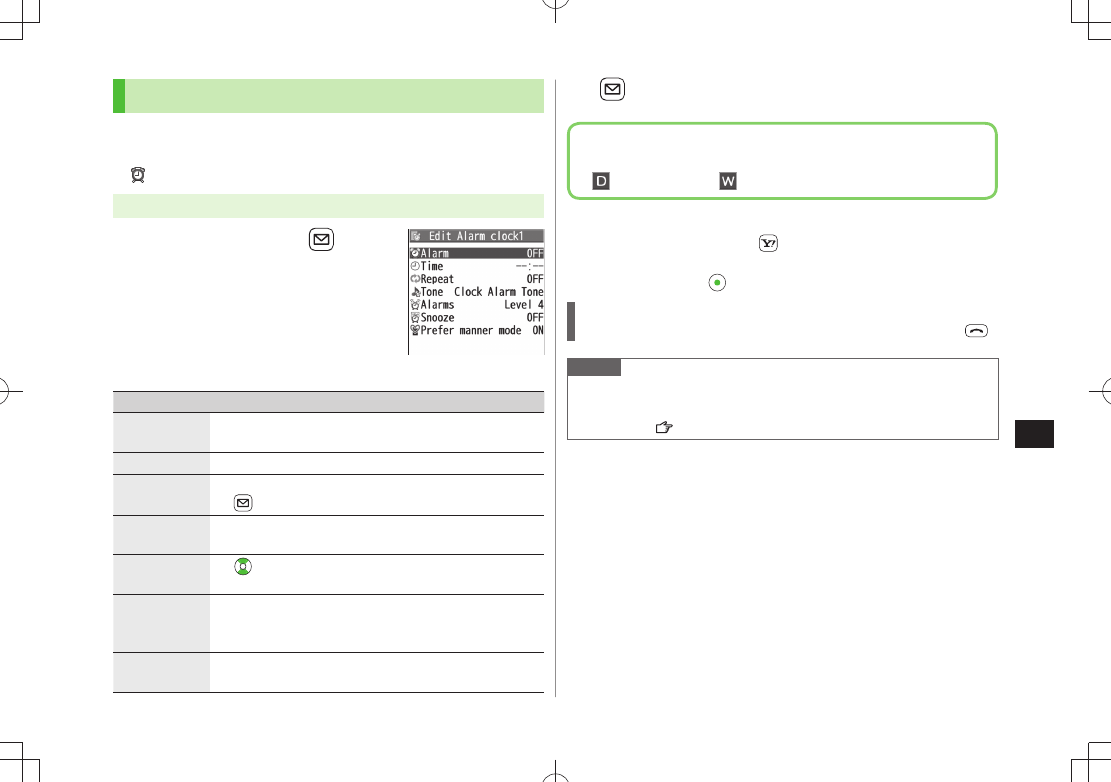
Tools
13-7
13
Setting Alarm
Set up to 12 alarms. Alarm tone sounds at the specified time
once, everyday or weekly as set.
appears in Standby when Alarm is set.
Main Menu Tools Alarms
1 Highlight an Alarm [Edit]
2 Select an item (See below)
Item Operation/Description
Alarm (Alarm
on/off)
Activate or cancel Alarm
ON
> or
OFF
Time setting Set Alarm time
>
Repeat Select a repetition
>
(
For
Select day
, check days
[Finish]
)
Alarm tone Select an Alarm tone type
>
Select a folder
Select an Alarm tone
Alarms (Alarm
volume)
> to set Alarm tone volume
Snooze
setting
When Snooze is set to
ON
, Alarm tone sounds for 60
seconds, repeating up to six times at five minute intervals.
ON
> or
OFF
( For
OFF
, enter time)
Prefer
manner mode
Set Manner Mode or Alarm priority.
ON
> or
OFF
3 [Finish]
Cancel & Reactivate Alarm
■
In Step 1 (highlight an Alarm),
>[Menu] Select an item
Cancel or reactivate an alarm entry as required.
Highlight an entry
to reactivate/cancel Alarm.
Snooze Function
If
ON
, press any key; Snooze window appears. To cancel Alarm, press .
Note
Alarm tone does not sound when Privacy Key Lock or Personal Data
Lock is set. However, settings can be changed even while Personal Data
Lock is set ( P.11-5).
Alarm Indicators
Following indicators appear:
: Repeats daily : Repeats weekly
TBD
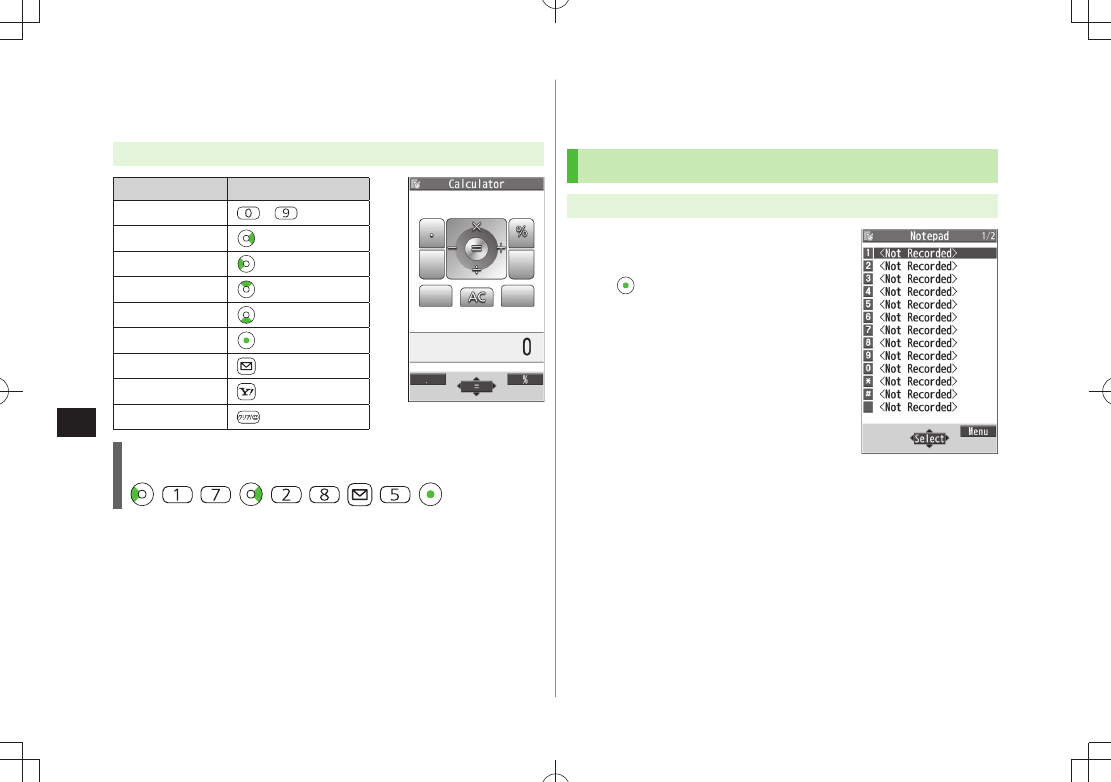
Tools
13-8
13
Calculator
Up to 10 digits can be shown.
Main Menu Tools Calculator
Operation Assigned key
Number (0 - 9) -
+
–
x
÷
=
Decimal point
%
Clear
Example:
-17+28.5=11.5
Notepad
Save up to 20 notes.
Saving a Note
Main Menu Tools Notepad
1
<Not Recorded>
Select a saved note to view content.
[Edit] to edit.
2 Enter text
Up to 256 double-byte or 512 single-byte
characters can be entered.
Notepads Window
TBD
TBD
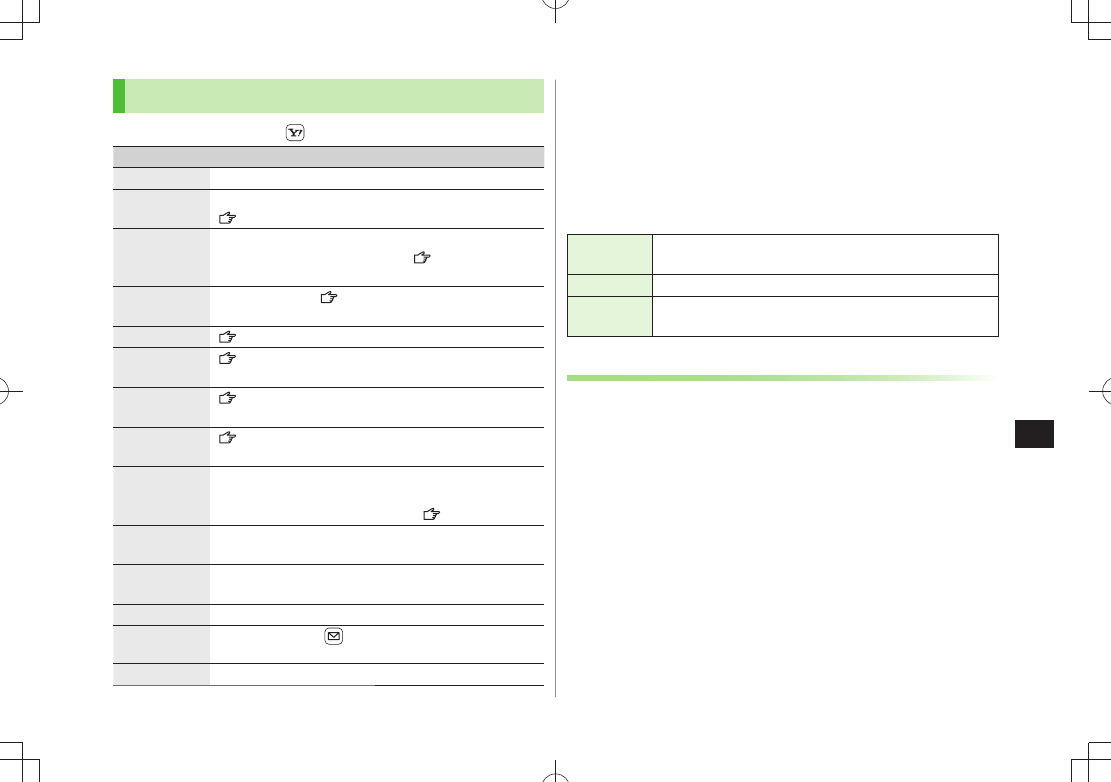
Tools
13-9
13
Notepad Functions
In Notepad list window, press [Menu] for following operations.
Item Operation/Description
Edit Edit a saved note
Compose
S! Mail
Create S! Mail by copying content to message text
(From Step 2 on P.13-4)
Edit schedule Copy a note to Schedule to create a Calendar event
Schedule
> Save a new note ( From Step 2 on
P.12-2)
Add shortcut
icon
Create a shortcut ( P.1-22)
Send Ir data (P.10-3)
Send all Ir
data
(P.10-3)
IC
transmission
(P.10-5)
AllIC
transmission
(P.10-5)
Copy to
microSD
Copy a note to microSD Card
YES
>
To display data on microSD Card:
P.9-18
Notepad Info Display entry date, latest modified date and category of
note
Category Select a category
>
When no category applies, select
None
.
Delete this
YES
>
Delete
selected
Check notes
> [Finish]
YES
Delete all Enter Phone Password
>
YES
Osaifu Keitai®
"Osaifu-Keitai®" is a range of IC Card-based services used
by Osaifu-Keitai® compatible handsets. Make purchases
using e-money or e-ticketing. Hold handset up to a reader/
writer to pay for your purchase.
Osaifu-Keitai
■® Terms
Osaifu-
Keitai®
A contactless IC Card technology to read/write data by
holding an IC card up to a reader/writer
IC Card An IC chip embedded in Osaifu-Keitai®-compatible handsets
Lifestyle-
Appli
Applications to use Osaifu-Keitai®. Some applications are
preinstalled.
Precautions
Data saved in IC Card vary by service content and usage history.
Procedures to delete IC Card data vary by Lifestyle-Appli. Contact
Osaifu-Keitai® service providers for details.
SoftBank is not liable for damages from accidental loss or alteration of IC
Card data or settings.
IC Card data can be misused if your Osaifu-Keitai
® compatible handset is
lost or stolen. SoftBank is not liable for any resulting damages.
Downloading Lifestyle-Appli and using applications may incur high
packet transmission charges.
Tools
13-10
13
Getting Started
Download Lifestyle-Appli via Internet website.
Activate Lifestyle-Appli to complete registration or customize
settings.
Make deposit into account, check payment records or balance, etc.
Note
Keep a copy of service passwords/customer service contact, etc. in a
separate place.
Downloading Lifestyle-Appli
Registration/Settings
Downloading Lifestyle-Appli
Main Menu Tools Osaifu-Keitai Lifestyle-Appli
1
Download
YES
2 Select a Lifestyle-Appli
Lifestyle-Appli is saved to Data Folder.
Activating Lifestyle-Appli
Lifestyle-Appli cannot be activated during a call or while another
S! Appli is active.
Main Menu Tools Osaifu-Keitai Lifestyle-Appli
1 Select a Lifestyle-Appli
2 To exit,
Stopped
Note
Alternatively,
Main Menu S! Appli Osaifu-Keitai
Lifestyle-Appli
or
Main Menu Data Folder Lifestyle-Appli
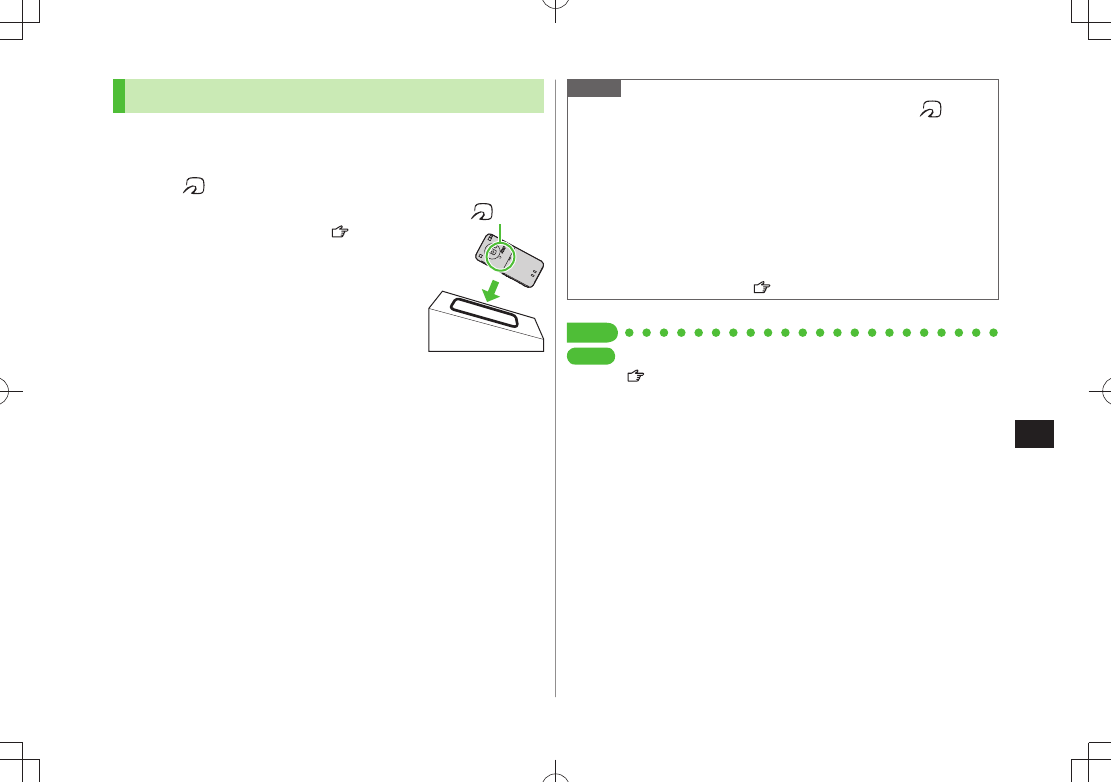
Tools
13-11
13
Reader/Writer Transactions
Complete registration/settings and charge your account beforehand.
There is no need to activate a Lifestyle-Appli during transaction.
1 Hold logo up to reader/writer
When IC Card Notification Light is
ON
,
Notification Light illuminates ( P.18-10).
Hold handset parallel to reader/writer.
Try moving handset around if recognition is
slow.
Check scan result on reader/writer display.
Osaifu-Keitai
® can be used during a call or
Internet transmission (May require extra
time.).
logo
Note
Data may be unreadable if a metal object, etc. is between
logo and
reader/writer.
Even though Osaifu-Keitai
® is available while handset is off, Lifestyle-
Appli does not activate. However, if battery is left uncharged after
warning tone sounds, Osaifu-Keitai® may become disabled. Charge
battery beforehand.
When handset is held up to reader/writer, handset may show a message
or vibrate depending on service. S! Appli, Messaging or Internet may
also activate automatically. To avoid such cases, set the functions not to
activate during transactions ( P.18-21).
Tip
Settings
●Disable Handset Response to Commands from Reader/Writer
(P.18-21)
Tools
13-12
13
IC Card Lock
Activating IC Card Lock
<Default> OFF
While set,
appears in Standby.
1 Press and hold Enter Phone Password
Repeat the step as required to unlock.
Note
Alternatively,
Main Menu Tools Osaifu-Keitai
IC Card Settings IC Card Lock or Main Menu Settings
Security IC Card Lock
Remote Lock
<Default> OFF
Save up to three phone numbers to enable Remote Lock.
Main Menu Tools Osaifu-Keitai IC Card Settings
Remote Lock
1 Enter Phone Password
ON
2 Select an item (See below)
Item Operation/Description
Numbers to
Permit
Save numbers to activate Remote Lock
<Not Recorded>
> Enter phone numbers
[Return]
To save numbers from Phone Book/Incoming Call
Logs or to use a payphone number: [Menu]
Refer to or Payphone
# of Incoming
Call
Specify the number of incoming calls for activating IC
Card Lock
Enter a number
>
3 [Set]
Tools
13-13
13
Activating Remote Lock
①
Call 940P from one of the specified numbers (Send Caller ID)
②
Hang up after 940P receives the call
③
Repeat ①-② until specified number of incoming calls is reached (within
three minutes)
After specified number of incoming calls, IC Card Lock is set and a
message informs you IC Card Lock is activated.
Note
When setting IC Card Lock, call 940P from the same specified phone
number. Incoming calls from different phone numbers cannot be
counted.
Specified incoming calls may not be counted when Call Forwarding is
active.
Remote Lock is not available when ring time for Answer Phone is set to
0 or Driving Mode is active.
When Answer Phone activates, counted number of incoming calls are
reset.
Dictionary (Japanese)
Use ケータイTOOL<辞書> to access dictionaries (学研 辞スパ
英和・和英辞書 and 学研 国語辞書).
ケータイTOOL<辞書>
is an S! Appli.
Main Menu Tools Dictionary
1 Read
免責
(disclaimer)
OK
ケータイTOOL<辞書> activates.
To disable
免責
:
Uncheck
アプリ起動時に常に表示する。
(Always show
disclaimer when accessing dictionaries)
2 Enter a word
Search results appear.
To scroll pages:
/
To switch dictionaries:
/
To search again:
[戻る]
3 Select a word
Details appear.
4 To end,
Stopped
Note
While Dictionary application is active, press
[メニュー] for useful
functions.

Tools
13-14
13
Sound Recorders
Voice Recorder
Set recorded sounds for ringtones.
Record for about 60 seconds each.
Main Menu Tools Sound Recorders Voice Recorder
1
YES
Recording starts.
2 [Stop]/ / (
OK
) to stop recording
Recorded sounds are saved in Ring Songs&Tones folder.
Voice Announce
Set recorded sound for on hold tone/holding tone, Alarm,
Calendar event alarm, Tasks alarm, ringtones, Answer Phone
message, Timer Watching (Digital TV), Ring Songs&Tones
Play List.
Record only one item for about 15 seconds.
Select
Voice Announce
in individual window to set Voice Announce as
specific tone.
Main Menu Tools Sound Recorders Voice Announce
1
Record
Recording starts.
Tone beeps five seconds before recording ends.
2 [Stop] to end recording
Tone beeps twice and previous screen returns.
To play back:
Play
To delete:
Erase
YES
Tools
13-15
13
Bar Code Reader
Scan barcodes (JAN) or QR Codes with built-in camera.
Access websites, send messages, etc. from QR Codes.
JAN Codes
JAN Code is a one-dimensional bar code denoting numerals with bars
and spaces of different widths.
QR Codes
QR Code is a two-dimensional bar code containing
information.
Example: SoftBank mobile phones
Scanning Barcodes
Up to five items can be saved.
For split data, up to 16 QR Codes can be scanned at a time and saved as
one item.
Main Menu Tools Bar Code Reader Scan Barcodes
1 Frame barcode in the center of Display
To adjust Display brightness:
[Menu]
Brightness
Adjust to -3 (dark) - +3 (light)
To zoom:
To use Focus Lock:
2 [Start]
Scanning starts, and scanned results appear when completed.
For split data,
OK
Repeat Step 1 and 2
To use scanned data:
Step 2 on P.12-12
3 [Menu]
Save result
OK
To start over:
YES
Note
940P cannot read barcodes or two-dimensional codes other than JAN/
QR Codes.
Some barcodes cannot be read depending on code type or size.
Barcode recognition may be slow. Hold handset steady while scanning.
Barcodes may not be correctly read owing to scratch, dirt, damage,
quality of printed material, light reflection, or QR code version.
Tools
13-16
13
Viewing/Editing Scanned Data
Main Menu Tools Bar Code Reader Saved Data List
1 View
Select an item
Edit Title
Highlight an item [Menu]
Edit title
Edit
Delete Saved Data
■
In Step 1, (highlight an item
>) [Menu]
Delete
Delete this
or
Delete all
( For
Delete all
, enter Phone Password)
YES
Using Scanned Data
Main Menu Tools Bar Code Reader Saved Data List
1 Select an item
2 [Menu] Select an item (See below)
Item Operation/Description
Save result Save scanned results
Display list Display Saved Data List
Internet Connect to URL
Yahoo! Keitai
> or
PC Site Browser
YES
Alternatively, select URL to connect to Internet.
Compose
S! Mail
Create S! Mail to selected address ( From Step 4 on
P.13-4)
Alternatively, select address to create S! Mail.
Dialing Call selected phone number
Select a dialing method
>
Dial
Alternatively, select phone number to dial.
Add to
Phone Book
Save scanned results to Phone Book ( From Step 2 on
P. 4-5)
Add
bookmark
Save URL to Bookmark
YES
> [OK]
Copy Copy selected characters to another place ( From Step 2
on P.3-9)

Tools
13-17
13
TBD

Tools
13-18
13