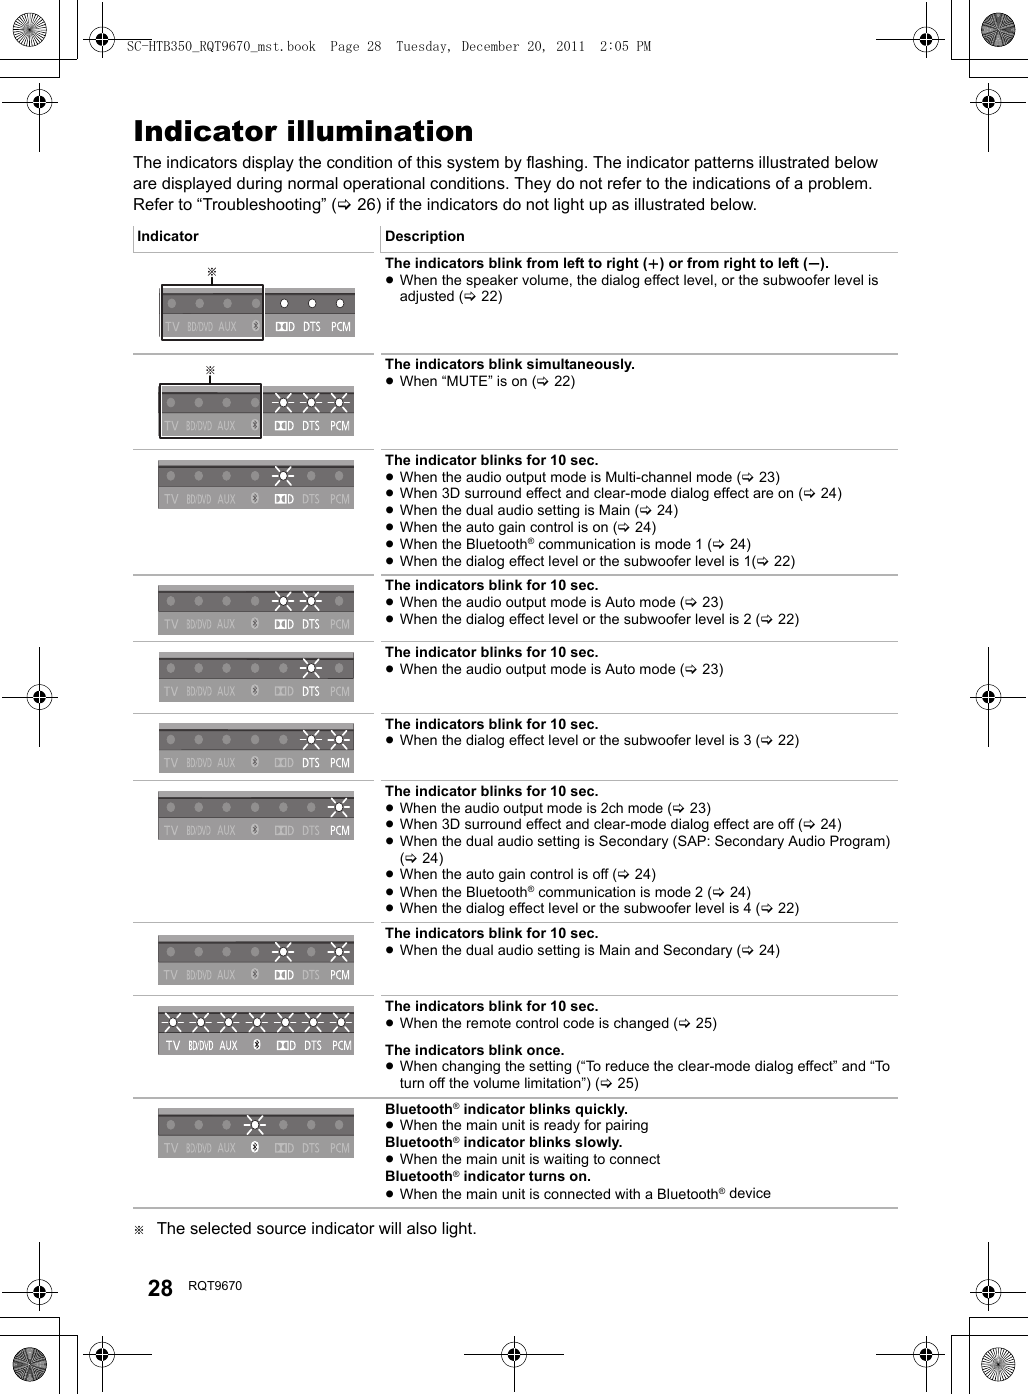
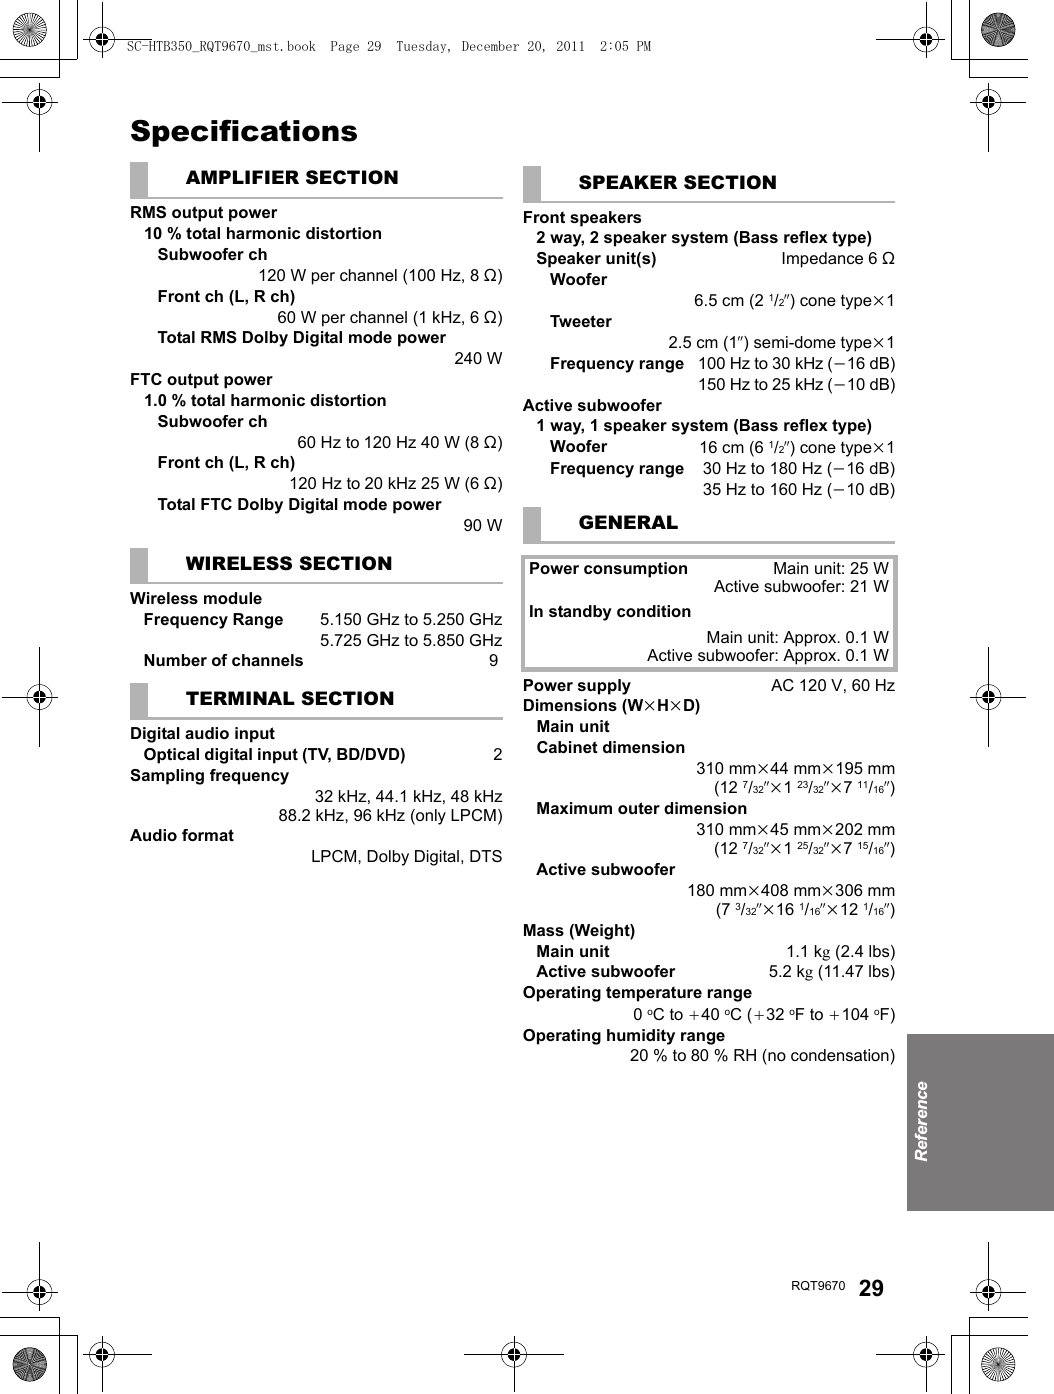
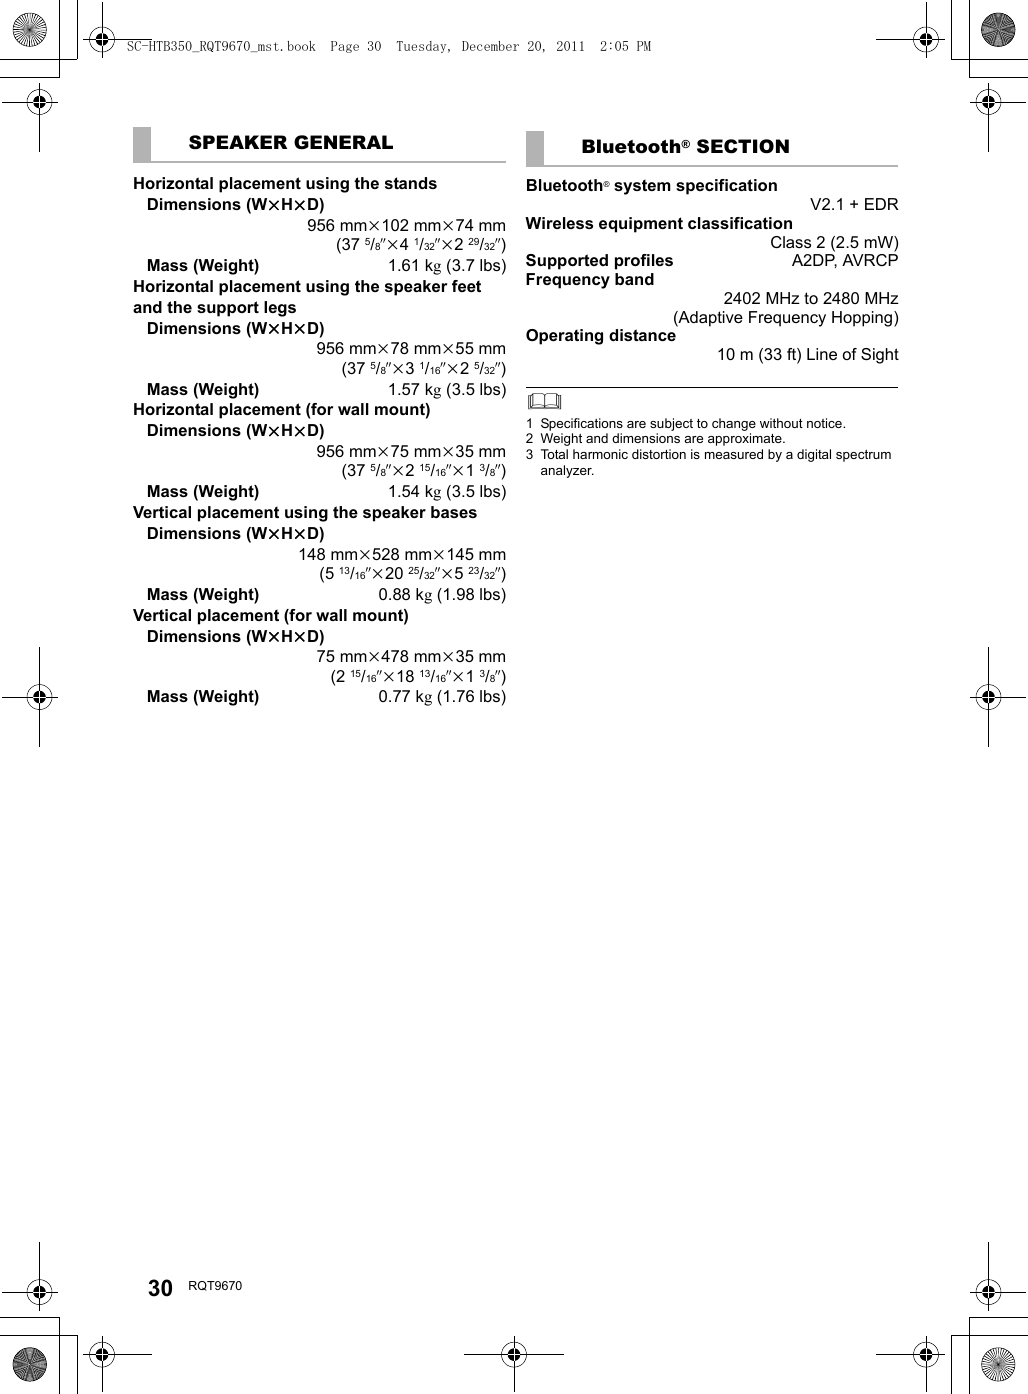
Panasonic of North America 11AR1201 ACTIVE SUBWOOFER User Manual SB HWA350 Part 2
Panasonic Corporation of North America ACTIVE SUBWOOFER SB HWA350 Part 2
UserManual.wiki
>
Panasonic of North America
>
11AR1201 User Manual
>
User Manual_SB-HWA350_(Part 2)
Contents
1.
User Manual(SC-HTB550) Part 1
2.
User Manual(SC-HTB550) Part 2
3.
User Manual_SB-HWA350_(Part 1)
4.
User Manual_SB-HWA350_(Part 2)
5.
User Manual_SB-HWA550_(Part 1)
6.
User Manual_SB-HWA550_(Part 2)
User Manual_SB-HWA350_(Part 2)
Navigation menu
Upload a User Manual
Namespaces
Wiki Guide
HTML
PDF
Info
Views
User Manual
Discussion / Help
Navigation
![Getting startedRQT9670 21Preparation≥Turn on the main unit.Press [BÍ CI].Check that the wireless link is activated.WIRELESS LINK indicator lights≥Red:The wireless link is not activated.≥Green:The wireless link is activated.The unit will still consume a small amount of power even when it is turned off (B, Í)With the Bluetooth® connection you can output the audio from the connected wireless device.Preparation≥Turn on the Bluetooth® feature of the device and place the device near this unit.Press [, j PAIRING].≥“” indicator will blink quickly.Select “SC-HTB350” from the Bluetooth® device’s Bluetooth® menu.≥Refer to the operating instructions of the Bluetooth® device for further instruction on how to connect a Bluetooth® device.≥Once the Bluetooth® device is connected, the “ ” indicator stops flashing and lights up.≥If prompted for the passkey on the Bluetooth® device, enter “0000”.Press [, j PAIRING].Press and hold the [ , j PAIRING] until the “ ” indicator flashes quickly.Repeat step 2 of “Pairing a device”.≥You can register up to 6 devices with this unit. If a 7th device is paired, the device that has not been used for the longest time will be replaced.≥This unit can only be connected to one device at a time.≥To change the sound quality, refer to “Bluetooth® communication mode” on page 24. Active subwoofer wireless connectionBluetooth® connectionPairing a devicePairing additional devicesSC-HTB350_RQT9670_mst.book Page 21 Tuesday, December 20, 2011 2:05 PM](https://usermanual.wiki/Panasonic-of-North-America/11AR1201.User-Manual-SB-HWA350-Part-2/User-Guide-1620234-Page-5.png)
![22 RQT9670Operatio nsUsing this unitPreparation≥Turn on the TV and/or connected device.Press [Í] to turn on the main unit.Select the source.≥This remote control cannot be used to control the operations of the connected devices.∫When “ ” is selected as the sourceOn the Bluetooth® device:Select this unit as the output source of the Bluetooth® device and start the playback.≥Make sure that the Bluetooth® device is already paired with this unit. (>21)≥Playback may pause when a different source is selected.∫When “BD/DVD” is selected as the sourceOn the connected device:Select the TV’s input for this unit and start the playback on the connected device.∫When “AUX” is selected as the sourceOn the connected device:Select the TV’s input for the device connected to “AUX” terminal and start the playback on the connected device.Adjust the volume and sound effect level.∫To adjust the volume of the systemPress [iVOL j].≥Volume range: 1 to 100§∫To adjust the dialog effect levelThis setting will change the level of the Clear-mode dialog effect. (>23)1Press [iDIALOG LEVEL j] to display the current level.2 While the level is displayed:Press [iDIALOG LEVEL j] to adjust the level.§∫To adjust the subwoofer level1Press [iSUBWOOFER j] to display the current level.2 While the level is displayed:Press [iSUBWOOFER j] to adjust the level.§≥The level indication pattern is the same as dialog effect level.∫To mute the soundPress [MUTE]≥While muting, the audio format indicators blink simultaneously.≥To cancel, press the button again or adjust the volume.≥Muting is canceled if the main unit is turned off.§The audio format indicators blink from left to right (i) or from right to left (s) while adjusting.The indicators will not blink when it has reached the maximum or minimum.≥If there is sound coming out of the TV’s speakers, reduce the volume of the TV to its minimum.≥If the main unit is turned off with the volume setting in the greater half (above 50), the main unit will automatically lower the volume to the middle (50) when the main unit is turned on (Volume limitation). To turn this function off, refer to page 25.Press To select[TV] “TV”[] “ ” (Bluetooth®)[INPUT SELECTOR]“TV”# “BD/DVD”#“AUX”^-------------- “”(----------}DIALOG LEVELLINK MODEPAIRING----INPUTSELECTORIndication Effect level4Highest321LowestIf the main unit does not operate as expected or sound is unusual, return the settings to the factory preset and operate the system again. (>26)SC-HTB350_RQT9670_mst.book Page 22 Tuesday, December 20, 2011 2:05 PM](https://usermanual.wiki/Panasonic-of-North-America/11AR1201.User-Manual-SB-HWA350-Part-2/User-Guide-1620234-Page-6.png)
![OperationsRQT9670 23This system provides a feeling that the sound and the image are as one. The 3D sound effect will be applied to Multi-channel audio sources as a factory preset.Dolby Virtual Speaker and the 3D surround effects can be turned off and on by changing the audio output mode settings.As a factory preset, Dolby Virtual Speaker and the 3D surround effects will be applied to Multi-channel audio sources, such as those from a Blu-ray Disc playerTM or DVD player, etc.By changing the audio output setting, it is possible to apply the Dolby Virtual Speaker and 3D surround effects to 2ch audio sources, such as the audio from the TV.Press and hold [MUTE] for more than 2 sec.≥The indicator for the current setting blinks for 10 sec.While the indicator is blinking, press [MUTE] again to change the setting.≥The setting changes each time [MUTE] is pressed.§1 Depending on the audio source, Dolby Virtual Speaker and 3D surround effect settings are automatically adjusted.§2 This indicator will also light when the audio source is Multi-channel audio.When using the optical digital audio cable, Dolby Virtual Speaker and the 3D surround effect will be temporarily canceled if the audio signal’s sampling frequency is greater than 48 kHz.3D sound3D soundDolby Virtual SpeakerWith this effect you can enjoy a surround sound effect similar to 5.1ch.3D surround effectAdding to the Dolby Virtual Speaker effect, Panasonic has applied its own sound field controlling technology to expand the sound field forwards, backwards, upwards, and downwards, providing a sound with depth and force that better matches 3D images.Clear-mode dialogSports commentary and dialogs from TV dramas are heard as if the sound is coming from the TV, giving the feeling that the sound and the image are one.Also, the dialog will stand out from the other sounds during normal volume playback and when the volume is lowered for night time viewing.e.g., Image of 3D sound fieldAudio output modesTo change the audio output modeAudio output modeDolby Virtual Speaker and 3D surround effectMulti-channel mode The effects are applied to all audio sources.Auto mode (Direct mode)§1(Factory preset)The effects are applied to Multi-channel audio sources.The effects are not applied to 2 channel audio sources.2ch mode The effects are not applied to any audio source.2SC-HTB350_RQT9670_mst.book Page 23 Tuesday, December 20, 2011 2:05 PM](https://usermanual.wiki/Panasonic-of-North-America/11AR1201.User-Manual-SB-HWA350-Part-2/User-Guide-1620234-Page-7.png)
![24 RQT9670Advanced operationsChange the dual audio from main to secondary.Confirm the digital audio output setting on the connected TV or player, etc. is set to “Bitstream”.Press and hold [TV] for more than 2 sec.While the indicator of the current setting is blinking, press [TV] to change the setting.≥The indicator for the current setting blinks for 10 sec.≥The setting works only when the dual audio is available in the audio source.≥The setting is maintained until it is changed again.≥The same setting is used for all digital audio sources.With this function, you can prevent sudden loud sounds. The output will be reduced automatically when the input exceeds a certain level. Press and hold [INPUT SELECTOR] on remote controller for more than 2 sec.≥The indicator for the current setting blinks for 10 sec.While the indicator is blinking, press [INPUT SELECTOR] to change the setting.≥The setting changes each time [INPUT SELECTOR] is pressed.≥The setting is maintained until it is changed again.≥Default setting of this function is OFF.You can select different modes to suit the type of connections which emphasis on connectivity or high quality audio.≥Make sure that a Bluetooth® device is already paired with this unit. (>21)Disable the Bluetooth® connection of the device.≥“” indicator will blink slowly.Press [LINK MODE, ] to display the current mode.≥The indicator for the current setting blinks for 10 sec.While the mode is displayed, press [LINK MODE, ] to select the mode.≥The setting changes each time [LINK MODE, ] is pressed.≥The setting is maintained until it is changed again.Depending on your preference, It is possible to use only the Dolby Virtual Speaker effect by turning off the 3D surround effect and the clear-mode dialog effect.Press and hold [TV] on the remote control and [VOL r] on the main unit for more than 2 sec.≥The indicator for the current setting blinks for 10 sec.While the indicator is blinking, press [TV] to change the setting.≥The setting changes each time [TV] is pressed.≥This setting will be reset to on when this system is turned off.≥When off is selected, the dialog effect level cannot be adjusted.Changing the dual audio: Main: Secondary (SAP: Secondary Audio Program), : Main and secondaryAuto gain controlDolby Digital indicator blinks:Auto gain control is on.PCM indicator blinks:Auto gain control is off.Bluetooth® communication modeMODE1: (Factory preset)Emphasis on connectivityMODE2: Emphasis on audio qualityTo turn off the 3D surround effect and clear-mode dialog effectDolby Digital indicator blinks:3D surround effect and clear-mode dialog effect is on.PCM indicator blinks:3D surround effect and clear-mode dialog effect is off.SC-HTB350_RQT9670_mst.book Page 24 Tuesday, December 20, 2011 2:05 PM](https://usermanual.wiki/Panasonic-of-North-America/11AR1201.User-Manual-SB-HWA350-Part-2/User-Guide-1620234-Page-8.png)
![OperationsRQT9670 25∫Remote control codeWhen other Panasonic devices respond to this system’s remote control, change the remote control code on the main unit and the remote control.Preparation≥Turn off all other Panasonic products.≥Turn on the main unit.Change the remote control code to code 2:1 Aim the remote control at this system’s remote control sensor.2 Press and hold [MUTE] and [ ] on the remote control for more than 4 sec.≥All the indicators will blink for 10 sec when the code of this system is changed.≥The setting is maintained until it is changed again.≥If this system does not operate after changing the code, repeat steps 1 and 2.≥To change the remote control code to code 1, repeat the steps above, but replace [] with [TV]. ∫To reduce the clear-mode dialog effectWhen the dialog does not sound natural while the volume is set low, for example, It is possible to reduce the dialog enhancing effect as follows:Press and hold [TV] on the remote control and [sVOL] on the main unit for more than 2 sec.≥All the indicators will blink once when the clear-mode dialog effect is reduced.≥Even if clear-mode dialog effect is reduced, dialog effect level is still adjustable.∫To turn off the volume limitationIf a state of the lowered volume disturbs you every time this system turns on, for example, it is possible to turn off this function as follows:Press and hold [MUTE] on the remote control and [VOL r] on the main unit for more than 2 sec.≥All the indicators will blink once when the volume limitation is turned off.The settings of the clear-mode dialog effect and the volume limitation remain intact even if you switch this system to standby mode. To turn these 2 functions back on, this system must be set back to the factory preset. (>26)OthersThe following settings are unnecessary under general usage conditions of the system.SC-HTB350_RQT9670_mst.book Page 25 Tuesday, December 20, 2011 2:05 PM](https://usermanual.wiki/Panasonic-of-North-America/11AR1201.User-Manual-SB-HWA350-Part-2/User-Guide-1620234-Page-9.png)
![26 RQT9670Referenc eTroubleshootingBefore requesting service, make the following checks. If you are in doubt about some of the check points, or if the solutions indicated in the following guide do not solve the problem, refer to “Customer Services Directory (United States and Puerto Rico)” on page 31.No power.≥Insert the AC power supply cord securely. (>20)≥After turning the main unit on, if the indicators blink and the main unit immediately turns off, unplug the AC power supply cord and consult your dealer.The remote control does not work properly.≥The battery is depleted. Replace it with a new one. (>7)≥It is possible that the insulation sheet has not been removed. Remove the insulation sheet. (>7)≥It may be necessary to set the code of the remote control again after changing the battery of the remote control. (>25)≥Use the remote control within the correct operation range. (>7)The “TV” indicator blinks.Remove the AC power supply cord and consult your dealer. If there are any other indicators blinking, be sure to inform your dealer about the blinking indicators.The main unit is automatically switched to standby mode.The main unit will automatically switch to standby mode when no signal is input and no operation is performed for approx. 30 minutes. (>20)Pairing cannot be done.Check the Bluetooth® device condition.The device cannot be connected.≥The pairing of the device was unsuccessful. Try pairing the device again.≥The pairing of the device has been replaced. Pair the device again. (>21)≥The system might be connected to a different device. Disconnect the other device and try pairing the device again.The device is connected but audio cannot be heard through the system.For some built-in Bluetooth® devices, you have to set the audio output to “SC-HTB350” manually. Read the operating instructions for the device for details.Sound from the device is uneven.≥The device is out of the 10 m (33 ft) communication range. Bring the device closer to the main unit.≥Remove any obstacle between the main unit and the device.≥Switch off any wireless LAN device.≥Select “MODE 1” for stable communication. (>24)No sound (or image).≥Turn muting off. (>22)≥Check the connections to the other devices. (>19) ≥Make sure that the received audio signal is compatible with this system. (>29)≥Turn this system off and then on again.≥If the connections are correct, there might be a problem with the cables. Redo the connections with different cables.≥Check the audio output settings on the connected device.The dual audio cannot be changed from main to secondary.If the audio received from the connected device is not “Dolby Dual Mono” or the output setting is not “Bitstream”, the setting cannot be changed from this system. Change the setting on the connected device.The volume is lowered when this system is turned on.If the main unit is turned off with the volume setting in the greater half (above 50), the main unit will automatically lower the volume to the middle (50) when the main unit is turned on. (>25)To return to the factory preset.While the main unit is on, press [Í/I] on the main unit for more than 4 sec.(All the indicators will blink twice when the main unit is reset.)If the system does not operate as expected, returning the settings to the factory preset may solve the problem.≥The remote control code will return to “1” when the main unit is returned to the factory preset. To change the remote control code, refer to page 25.General operationBluetooth®SoundSC-HTB350_RQT9670_mst.book Page 26 Tuesday, December 20, 2011 2:05 PM](https://usermanual.wiki/Panasonic-of-North-America/11AR1201.User-Manual-SB-HWA350-Part-2/User-Guide-1620234-Page-10.png)
![ReferenceRQT9670 27The dialog is too persistent or the dialog does not sound natural.This system has a function to make the dialog stand out when the volume is low. (>25)There is no audio.The power of the main unit turns off automatically.(When the main unit detects a problem, a safety measure is activated and the main unit automatically switches to standby mode.)≥There is a problem with the amplifier.≥Is the volume extremely high?If so, lower the volume.≥Is this system placed in an extremely hot place?If so, move this system to a cooler place and wait a few moments and then try to turn it on again.If the problem persists, confirm the TV indicator and AUX indicator blink, turn the system off, remove the AC power supply cord and consult your dealer. Please be sure to remember the indicators that were blinking and inform the dealer.No power.Ensure the AC power supply cord of the active subwoofer is connected properly.After turning the subwoofer on, it immediately turns off.Unplug the AC power supply cord and consult your dealer.No sound from the subwoofer.≥Check that the active subwoofer is turned on.≥Check that the wireless link indicator lights green. (>21)The wireless link indicator lights red.≥There is no link between this unit and the active subwoofer.jCheck that this unit is turned on.jTurn the active subwoofer off and then back on. Alternatively, turn the active subwoofer off, disconnect the AC power supply cord and then reconnect it.≥The active subwoofer and the main unit may not be paired correctly. Try the following operation. (Wireless pairing)1Turn on the main unit and active subwoofer.2Press [ID SET] on the rear of the active subwoofer. (The WIRELESS LINK indicator will light red and green alternately.)3Press and hold [INPUT SELECTOR] on remote control and [VOL r] on the main unit for more than 2 sec. (The BD/DVD indicator will blink and audio format indicators light up in sequence.)≥When the wireless pairing is successful, BD/DVD indicator will stop flashing and WIRELESS LINK indicator lights green. 4Turn the main unit off and on.≥Consult your dealer if the problem persists.About Bluetooth®∫Frequency band usedThis unit uses the 2.4 GHz frequency band.∫Certification of this device≥This system conforms to frequency restrictions and has received certification based on frequency laws. Thus, a wireless permit is not necessary.≥The action below are punishable by law in some countries:jTaking apart or modifying the unit.jRemoving specification indications.∫Restrictions of use≥Wireless transmission and/or usage with all Bluetooth® equipped devices is not guaranteed.≥All devices must conform to standards set by Bluetooth SIG, Inc.≥Depending on the specifications and settings of a device, it can fail to connect or some operations can be different.≥This system supports Bluetooth® security features. But depending on the operating environment and/or settings, this security is possibly not sufficient. Transmit data wirelessly to this system with caution.≥This system cannot transmit data to a Bluetooth® device.∫Range of useUse this device at a maximum range of 10 m (33 ft).The range can decrease depending on the environment, obstacles or interference.∫Interference from other devices≥When other devices use the same frequency as this system, this system may operate incorrectly or the sound may be distorted.≥To prevent interference from other devices:jKeep the system away from other devices that emit radio frequency interference.jDo not use this system and a wireless LAN device at the same time. Switch off any wireless LAN device.∫Intended usage≥This unit is for normal, general use only.≥Do not use this system near an equipment or in an environment that is sensitive to radio frequency interference (example: airports, hospitals, laboratories, etc).Active SubwooferPanasonic bears no responsibility for data and/or information that is compromised during a wireless transmission.SC-HTB350_RQT9670_mst.book Page 27 Tuesday, December 20, 2011 2:05 PM](https://usermanual.wiki/Panasonic-of-North-America/11AR1201.User-Manual-SB-HWA350-Part-2/User-Guide-1620234-Page-11.png)