Panasonic of North America 927130TX FM Transmitter used With TV/VCR User Manual Amended Pgs 32 to 37
Panasonic Corporation of North America FM Transmitter used With TV/VCR Amended Pgs 32 to 37
Contents
- 1. User Manual
- 2. Amended User Manual Pgs 2 to 10
- 3. Amended User Manual Pgs 32 to 37
- 4. Amended User Manual Pages 32 to 37
Amended User Manual Pgs 32 to 37

32 For assistance, call 1-800-211-PANA(7262)
VIDEO IN
VIDEO IN
AUDIO IN
AUDIO IN
POWER
POWER
VOL
VOL
CH
CH
STOP/EJECT
STOP/EJECT
REW/
REW/
PLAY/REPEAT
PLAY/REPEAT
FF/
FF/
REC
REC
TIMER/FM
TIMER/FM
ACTION
ACTION
REC
REC
ON TIMER
ON TIMER
PROG TIMER
PROG TIMER
Weak Signal Display ON/OFF
1Display MAIN MENU.
Press ACTION*.
Display SET UP CH
screen. 1) Press
to select “CH.”
2) Press ACTION
to display.
Select WEAK SIGNAL
DISPLAY.
1) Press to
select.
2) Press to
set “ON” or
“OFF.”
Return to the normal
screen.
Press ACTION twice.
2
When “ON” is selected, picture is displayed even when
broadcast signal is weak or nonexistent.
4
3
• “ON” = Picture is displayed regardless of signal condition, and
may not always be clearly visible.
“OFF” = Screen turns solid blue when signal is absent or weak.
• If unit is connected to equipment which has blue back feature,
selecting “ON” will have no effect on the other equipment.
VCR Lock
All operations are prohibited except Timer recording and tape
eject. Useful for families with small children.
To turn “ON.”
In stop mode, hold
down REC on the
unit without a
cassette inserted for
7 seconds.
To turn “OFF.”
Repeat above with
or without cassette.
• VCR Lock is canceled automatically
after about 24 hours if clock is set.
REC
Special VCR Features (continued)
Notes
C H
+
VOL
VOL
C H
C H
+
VOL
VOL
C H
ANT
ENN
A
:
C
ABLE
A
U
T
O
S
E
T
C
H
A
NNE
L
CAP
T
I
ON
W
EAK S
I
GNAL
GNAL
D
I
SPLAY
SPLAY
:
OFF
OFF
C
ABLE
B
O
X SET UP
V
CR
P
l
u
s
+
C
H SET UP
SELE
C
T
:
KEY
SET
:
KEY
END
:
ACT
I
O
N
KEY
SET UP
CH
A
NNE
L
C H
+
VOL
VOL
C H
V
C
R
+
ACTION
2
•
3
SET
SELECT
:CH UP
:CH DOWN
:VOL UP
:
VOL DOWN
1
•
2
•
4
Model PV-C2060 unit is shown here.
REC
REC
V
C
R L
OCK
A
C
T
I
VAT
E
D
V
C
R L
OCK
O
FF
M
A
I
N
M
EN
U
C
L
OC
K
C
H
SET
:
ACT
I
O
N
KEY
SE
L
E
C
T
:
KEY
VCR
T
V
EX I T
LANGUAGE
C2060- P32-33 99.12.14, 11:33 PM32
33
Advanced Operation
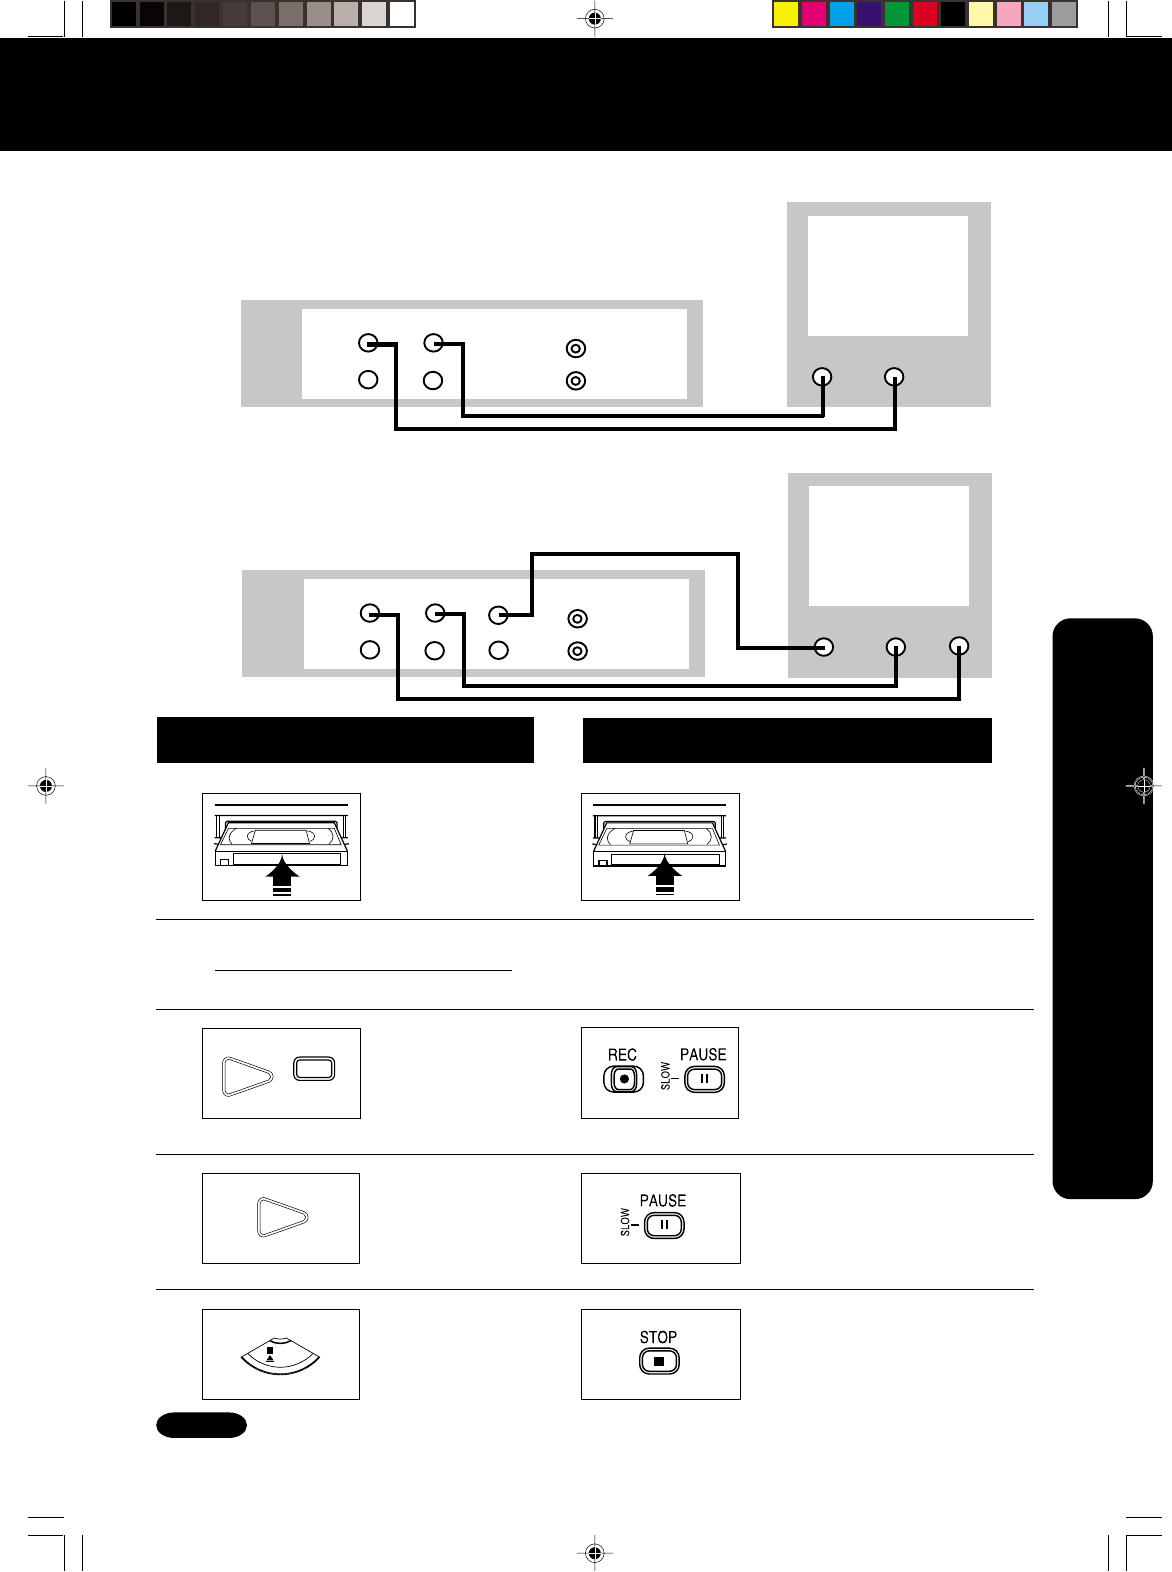
Copy Your Tapes (Dubbing)
Connections you’ll need to make.
Playback (Source) VCR
1
Recording (Editing) unit
Insert pre-
recorded tape.
Put in Standby
mode.
Press PLAY then
PAUSE at starting
point.
Start dubbing.
Press PLAY.
Stop dubbing.
Press STOP/
EJECT.
Insert blank tape with
record tab.
• Dubbing tapes protected with Copy
Guard will have poor quality results.
Put in Standby mode.
Press REC, then
PAUSE/SLOW immediately.
Start dubbing.
Press PAUSE/SLOW.
Stop dubbing.
Press STOP.
Our Vacation
2Select “LINE” mode.
See “Selecting Input Mode” section on page 13.
3
4
5EJECT
STOP
PAUSE
PLAY
•Unauthorized exchanging and/or copying of copyrighted recordings may be copyright infringement.
OUT
IN
IN FROM
ANT.
OUT TO
TV
AUDIO IN
AUDIO
VIDEO IN
Playing (Source) VCR
OUT
IN
IN FROM
ANT.
OUT TO
TV
L-AUDIO IN-R
VIDEO
R-AUDIO-L
VIDEO IN
Playing (Source) VCR
MONO
<Model PV-C2060 unit is shown here.>
Caution
<Model PV-C2080 unit is shown here.>
VIDEO
Recording (Editing) unit
if the remote control POWER, CH Up/Down, NUMBERED keys,
ACTION, PROG/VCR+, DISPLAY, SEARCH, R-TUNE, FM/TV,
or ADD/DLT button does not work when pressed, press COMBO
button on the remote and try the button again.
*Important:
Recording (Editing) unit
PLAY
C2060- P32-33 99.12.14, 11:33 PM33
34 For assistance, call 1-800-211-PANA(7262)
VIDEO IN
VIDEO IN
AUDIO IN
AUDIO IN
POWER
POWER
VOL
VOL
CH
CH
STOP/EJECT
STOP/EJECT
REW/
REW/
PLAY/REPEAT
PLAY/REPEAT
FF/
FF/
REC
REC
TIMER/FM
TIMER/FM
ACTION
ACTION
REC
REC
ON TIMER
ON TIMER
PROG TIMER
PROG TIMER
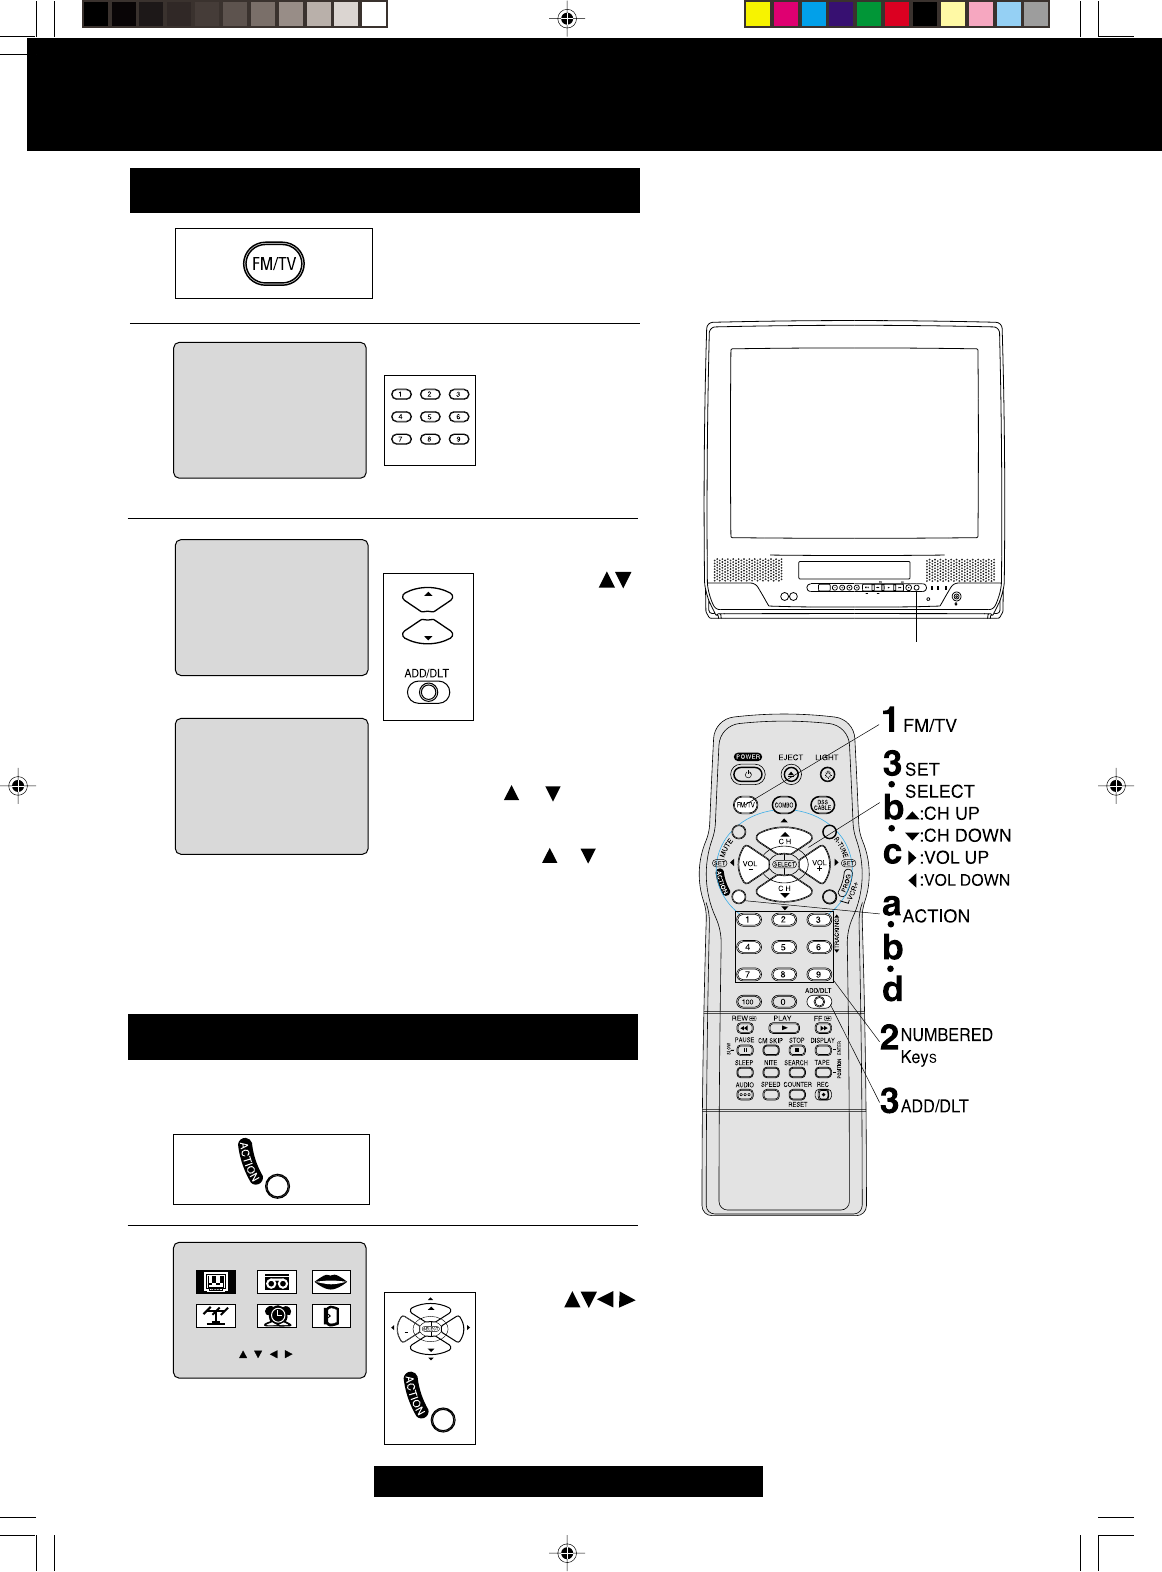
FM Radio
2
FM Radio is ...
This unit has an FM radio with built-in
antenna, 9 station preset, and a band range
of 87.5 ~ 108.1 MHz. You can even set the
On-Timer (page 20) to wake up to your
favorite radio station.
Display FM radio mode.
Press FM/TV* on the remote or
TIMER/FM twice on the unit.
Select the FM number.
1
Continued on the next page...
TIMER/FM
Press a
NUMBERED key
(1~9.)
To Make Corrections,
select station with a NUMBERED key, then do step 3 again.
To exit FM mode, press FM/TV on the remote or
TIMER/FM twice on the unit.
Set the radio station.
1) Press CH
to select the
desired radio
station.
(Each press changes
frequency 200 kHz.)
2) Press ADD/DLT
to set.
Quick Station Scan
Hold down CH or for a few
seconds, then release to
scan for FM stations in your area.
• To cancel, press CH or while
in search mode.
3
C H
C H
FM ANTENNA Setup
aDisplay MAIN MENU.
Press ACTION.
Display SET UP TV
screen.
1) Press
to select “TV.”
2) Press ACTION
to display.
b
C H
+
VOL
VOL
C H
Make sure FM tuning is done correctly
(See FM Radio Setup.)
1
Model PV-C2060 unit is shown here.
FM Radio Setup
F
M
1 87. 5
M
Hz
1
2
:
0
0
P
M
F
M
1 8
7.
7
M
Hz
MEM
O
RY
:
PUSH
ADD
/
DLT
KEY
1
2
:
0
0
P
M
F
M
1 8
7.
7
M
Hz
MEM
O
R
I
ZED
1
2
:
0
0
P
M
M
A
I
N
M
EN
U
T
VVCR
EX I T
C
L
OC
K
C
H
LANGUAGE
SET
:
ACT
I
O
N
KEY
SE
L
E
C
T
:
KEY
C2060- FM TRANSMITTER(P34-37) 99.12.14, 11:32 PM34
35
Advanced Operation
LOCK
CA
PT
I
O
N
INPUT SELCT
:
TUNER
V
I
D
E
O
A
D
J
U
ST
F
M
ANTENNA
ANTENNA
:
I
NT
NT
SELE
C
T
:
KEY
SET
:
KEY
END
:
ACT
I
O
N
KEY
SET
UP TV
VIDEO IN
VIDEO IN
AUDIO IN
AUDIO IN
POWER
POWER
VOL
VOL
CH
CH
STOP/EJECT
STOP/EJECT
REW/
REW/
PLAY/REPEAT
PLAY/REPEAT
FF/
FF/
REC
REC
TIMER/FM
TIMER/FM
ACTION
ACTION
REC
REC
ON TIMER
ON TIMER
PROG TIMER
PROG TIMER
TIMER/FM
B
Display FM radio mode.
Press FM/TV on the remote or
TIMER/FM twice on the unit.
A
To cancel, press FM/TV on the remote or TIMER/FM
twice on the unit.
•FM radio cannot be recorded on a Video
cassette.
•You may get better reception by
repositioning the unit.
•You cannot select FM Radio mode during
playback or record, or while a blue back
(PROG, ACTION, MENU) screen is
displayed.
To select Audio Mode for FM Radio
Select “STEREO” or “MONO.”
Press AUDIO
repeatedly in FM
Radio mode.
Notes
c
d
C H
+
VOL
VOL
C H
Select FM ANTENNA.
1) Press to
select.
2) Press to
select
“INT
(INTERNAL)”
or
“EXT (EXTERNAL)”
whichever
sounds the best.
End setup.
Press ACTION twice to exit.
Select the FM number.
Press a
NUMBERED key
(1~9) to select a
preset station
(see steps 2 and
3 on the previous
page.)
A
C H
+
VOL
VOL
C H
FM/TV
NUMBERED
Keys
AUDIO
A
B
V
C
R
+
DISPLAY
Model PV-C2060 unit is shown here.
Once stations are set, the selected station and current time are displayed
when FM Radio mode is entered. To remove time, press DISPLAY.
If DISPLAY is pressed, the unit status screen appears.
Notes
<For Model PV-C2060 only>
Using FM Radio
F
M
1 87. 5
M
Hz
1
2
:
0
0
P
M
STERE
O
M
ONO
F
M
1 8
7.
7
M
Hz
1
2
:
0
0
P
M
■For cable TV users ➔ “INT”
■For antenna users ➔ “EXT”
*
Important: if the remote control POWER, CH Up/Down, NUMBERED keys, ACTION, PROG/VCR+,
DISPLAY, SEARCH, R-TUNE, FM/TV, or ADD/DLT button does not work when pressed,
press COMBO button on the remote and try the button again.
C2060- FM TRANSMITTER(P34-37) 99.12.14, 11:32 PM35

36 For assistance, call 1-800-211-PANA(7262)
1) Press
to select the
desired
frequency
range.
(93-97 or
99-103MHz)
2) Press
to select
the Carry
Frequency.
3) Press
ACTION to set.
(Then screen
in step 4 is
redisplayed.)
1) Press
to select.
2) Press
to display.
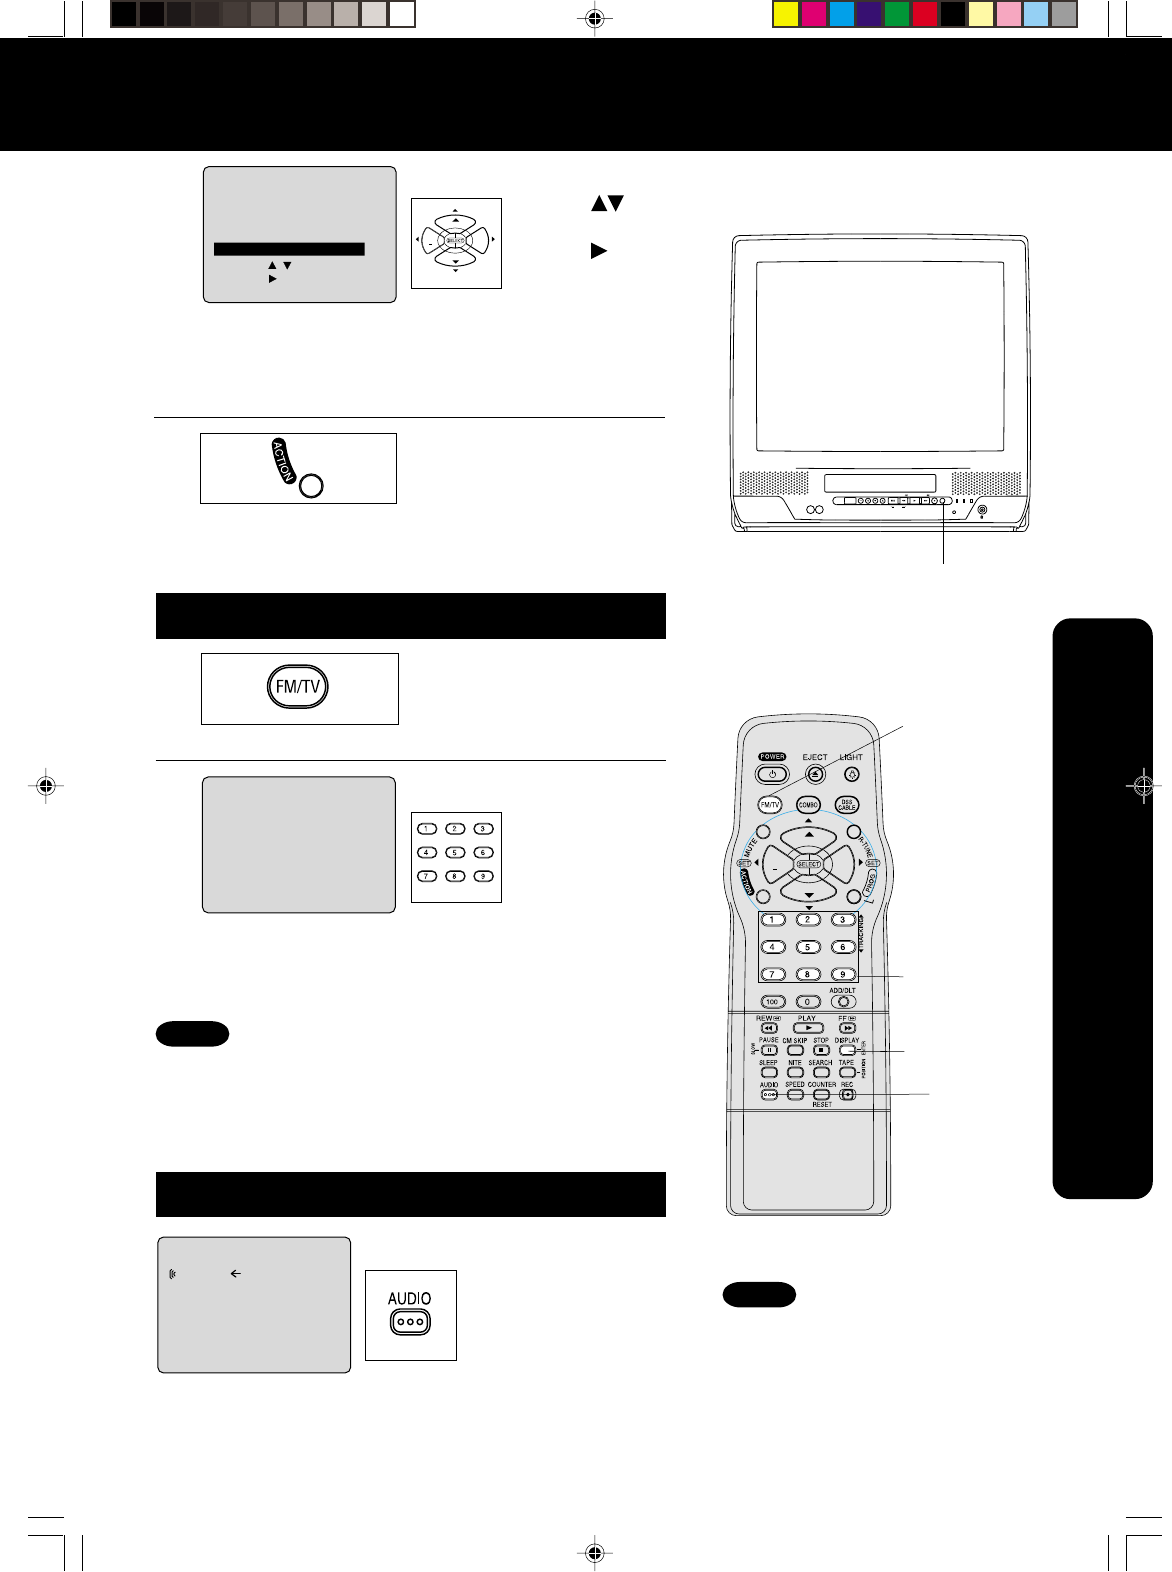
FM Transmitter
FM Transmitter is ...
a feature whereby this unit’s sound signal can be heard on your
FM Radio. First, tune your radio to a frequency (93 ~ 97, 99 ~
103 MHz) that is not being broadcast on by a radio station.
Then, set this unit to the same carry frequency (see below.)
Now, fine-tune your radio so the sound comes in clearly.
2
Display MAIN MENU.
Press ACTION*.
1
Select SET UP FM.
3
M
A
I
N
M
EN
U
T
VVCR
EX I T
C
L
OC
K
C
H
LANGUAGE
SET
:
ACT
I
O
N
KEY
SE
L
E
C
T
:
KEY
1) Press
to select
“TV”.
2) Press
ACTION
to display.
C H
+
VOL
VOL
C H
Select SET UP FM
TRANSMITTER.
4
5
RAUDIO IN
AUDIO IN
POWER
POWER
VOL
VOL
CH
CH
STOP/EJECT
STOP/EJECT
REW/
REW/
PLAY/REPEAT
PLAY/REPEAT
FF/
FF/
REC
REC
TIMER/FM
TIMER/FM
ACTION
ACTION
REC
REC
ON TIMER
ON TIMER
PROG TIMER
PROG TIMER
VIDEO IN
VIDEO IN
L
Send Wireless
Audio equipment
with FM Radio
FM Transmitter ON/OFF
Display SET UP TV
screen.
C H
+
VOL
VOL
C H
1) Press
to select.
2) Press to
display.
<For Model PV-C2080 only>
SELE
C
T
:
KEY
SET
:
KEY
END
:
ACT
I
O
N
KEY
SET
UP TV
LOCK
CA
PT
I
O
N
I
NP
U
T
SELE
C
T
:
T
UNER
V
I
D
E
O
A
D
J
U
ST
SET UP FM
SPE
AKER
:
ON
SELE
C
T
:
KEY
SET
:
KEY
END
:
ACT
I
O
N
KEY
SET
UP FM
FM ANTENNA
:
INT
FM TRANSMITTER : ON
SET UP FM TRANSMITTER
SPKR W/FM TRANS
: OFF
End setup
Press ACTION three times.
6
To Make Corrections,
select frequency with CH
, then repeat step 5.
1
Do “FM Transmitter Carry Frequency”
steps 1~3. (See left.)
Select SET UP FM
TRANSMITTER.
2
C H
+
VOL
VOL
C H
1) Press
to select.
2) Press to
set “ON”
or “OFF.”
SELE
C
T
:
KEY
SET
:
KEY
END
:
ACT
I
O
N
KEY
SET
UP FM
FM ANTENNA
:
INT
FM TRANSMITTER
FM TRANSMITTER
: ON
: ON
SET UP FM TRANSMITTER
SPKR W/FM TRANS
: OFF
End setup
Press ACTION three
times.
3
Notes
Speaker with FM Transmitter ON/OFF
•The Carry Frequency shown by the selector bar is a guide
only. Please listen to the sound and adjust accordingly.
•The unit will transmit sound when unit power is on and
“FM TRANSMITTER : ON” is selected.
•When unit power is turned off, “FM TRANSMITTER”
returns to “OFF” setting.
•Please put your FM Radio within 157 inch of the unit.
•Interference occurs when you select CATV channels
95, 96, or 97, while FM Transmitter is operating.
•FM Transmitter will not work in FM Radio Mode.
1
Do “FM Transmitter Carry Frequency”
steps 1~3. (See left.)
2
C H
+
VOL
VOL
C H
1) Press
to select.
2) Press to
set “ON”
or “OFF.”
End setup
Press ACTION three
times.
3
Select Speaker with
Transmitter.
SELE
C
T
:
KEY
SET
:
KEY
END
:
ACT
I
O
N
KEY
SET
UP FM
FM ANTENNA
:
INT
FM TRANSMITTER : ON
SET UP FM TRANSMITTER
SPKR W/FM TRANS
SPKR W/FM TRANS
: ON
: ON
If you select...
■ “ON”
➔ Internal Speaker ON with Transmitter
■ “OFF” ➔ Internal Speaker MUTE with Transmitter
Notes
• This operation has effect only when
“FM TRANSMITTER : ON” (see above.)
• If “SPKR W/FM TRANS : OFF”, the MUTE and VOLUME
key will not function.
FM Transmitter Carry Frequency Setup
Within 157 inch
SELE
C
T
:
KEY
SET
:
KEY
END
:
ACT
I
O
N
KEY
SET
UP FM TRANSMITTER
93
M
Hz 97MHz
93MHz
-
97MHz
99MHz
-
103MHz
SELE
C
T
:
KEY
SET
:
KEY
END
:
ACT
I
O
N
KEY
SET
UP FM TRANSMITTER
99
M
Hz 103MHz
93MHz
-
97MHz
99MHz
-
103MHz
Carry Frequency : 93
~
97, 99
~
103 MHz
•When step 4 is done, FM TRANSMITTER
is automatically set to “ON.”
Set the Carry Frequency.
• The selector bar returns
to center position when
frequency range is
switched.
C H
+
VOL
VOL
C H
C H
+
VOL
VOL
C H
C2060- FM TRANSMITTER(P34-37) 99.12.14, 11:32 PM36
37
Advanced Operation
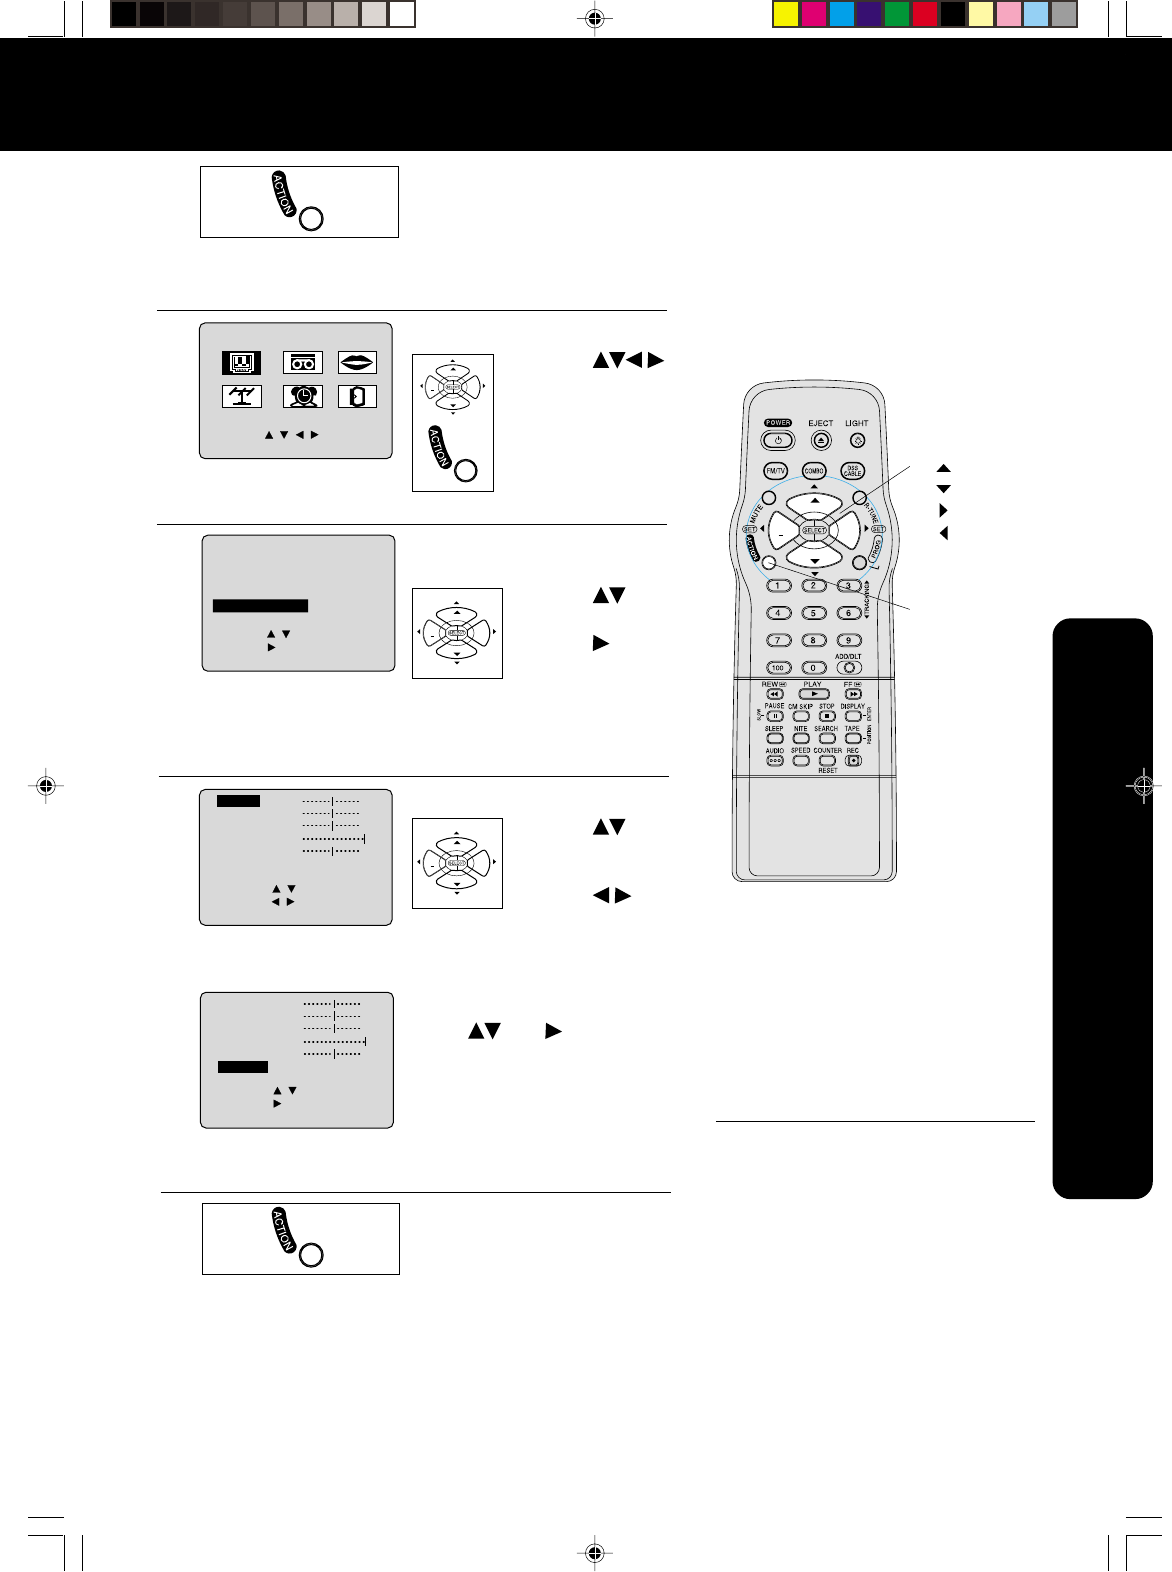
Picture Adjustment
1Display MAIN MENU.
Press ACTION.
Display SET UP TV screen.
1) Press
to select “TV.”
2) Press ACTION
to display.
Display VIDEO ADJUST
screen.
1) Press to
select.
2) Press to
display.
Adjust desired item.
1) Press to
select an item.
(See below right.)
2) Press to
adjust.
To Reset Picture Controls.
Press and to select
and set “NORMAL.”
All controls return to their
factory settings.
End setup.
Press ACTION three times
to exit.
2
3
4
5
Picture Adjustment
■ COLOR Control
Adjust color intensity.
■ TINT Control
Adjust for natural flesh tones.
■ BRIGHTNESS Control
Adjust picture brightness.
■ PICTURE Control
Adjust picture intensity by adjusting
both contrast and color level in the
proper balance.
■ SHARPNESS Control
Adjust picture sharpness.
C H
+
VOL
VOL
C H
C H
+
VOL
VOL
C H
C H
+
VOL
VOL
C H
V
C
R
+
ACTION
1
•
2
•
5
SET
SELECT
:CH UP
:CH DOWN
:VOL UP
:
VOL DOWN
2
•
3
•
4
LOCK
CA
PT
I
O
N
I
NP
U
T
SELE
C
T
:
T
UNER
V
I
D
E
O
A
D
J
U
ST
F
M
ANTENNA
:
I
NT
SELE
C
T
:
KEY
SET
:
KEY
END
:
ACT
I
O
N
KEY
SET
UP TV
M
A
I
N
M
EN
U
T
VVCR
EX I T
C
L
OC
K
C
H
LANGUAGE
SET
:
ACT
I
O
N
KEY
SE
L
E
C
T
:
KEY
CO
L
OR
T
I
NT
B
R
I
GH
T
N
E
SS
P
I
C
T
UR
E
SH
A
R
P
N
E
SS
NOR
M
AL
ADJUST
:
KEY
SE
L
E
C
T
:
KEY
END
:
ACT
I
O
N
KEY
CO
L
OR
T
I
NT
B
R
I
GH
T
N
E
SS
P
I
C
T
UR
E
SH
A
R
P
N
E
SS
NOR
NOR
M
AL
AL
SET
:
KEY
SE
L
E
C
T
:
KEY
END
:
ACT
I
O
N
KEY
if the remote control POWER, CH Up/Down, NUMBERED keys,
ACTION, PROG/VCR+, DISPLAY, SEARCH, R-TUNE, FM/TV,
or ADD/DLT button does not work when pressed, press COMBO
button on the remote and try the button again.
*Important:
<For Model PV-C2060 only>
C H
+
VOL
VOL
C H
C2060- FM TRANSMITTER(P34-37) 99.12.14, 11:32 PM37