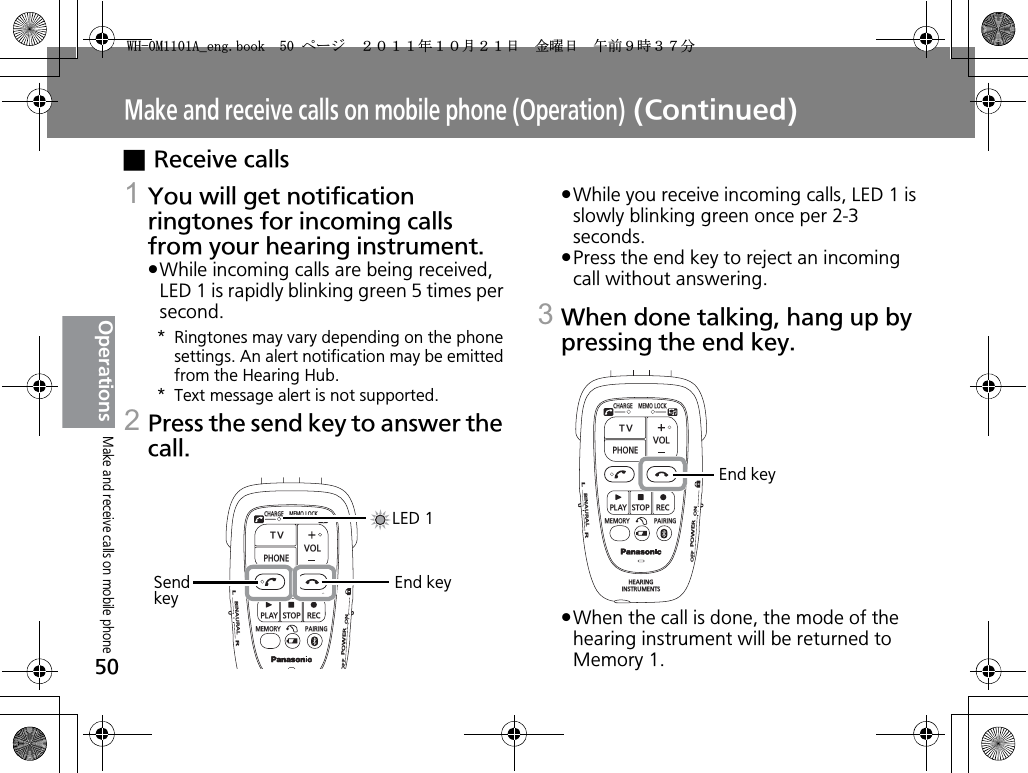
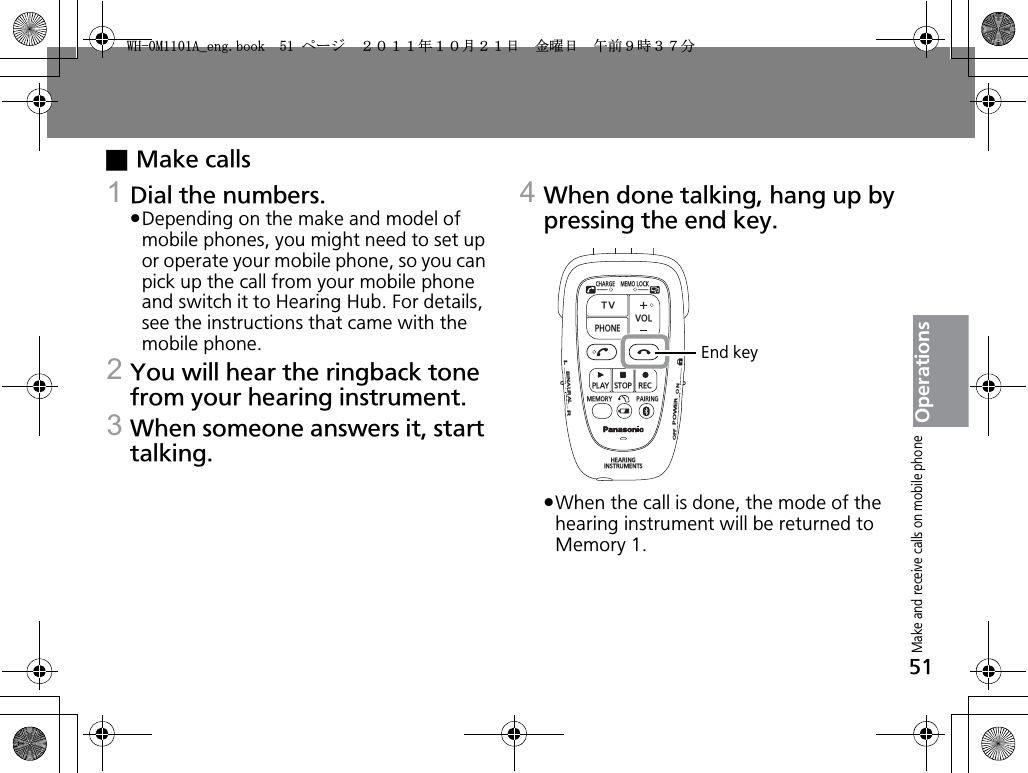
Panasonic of North America 927152TX Hearing Hub User Manual
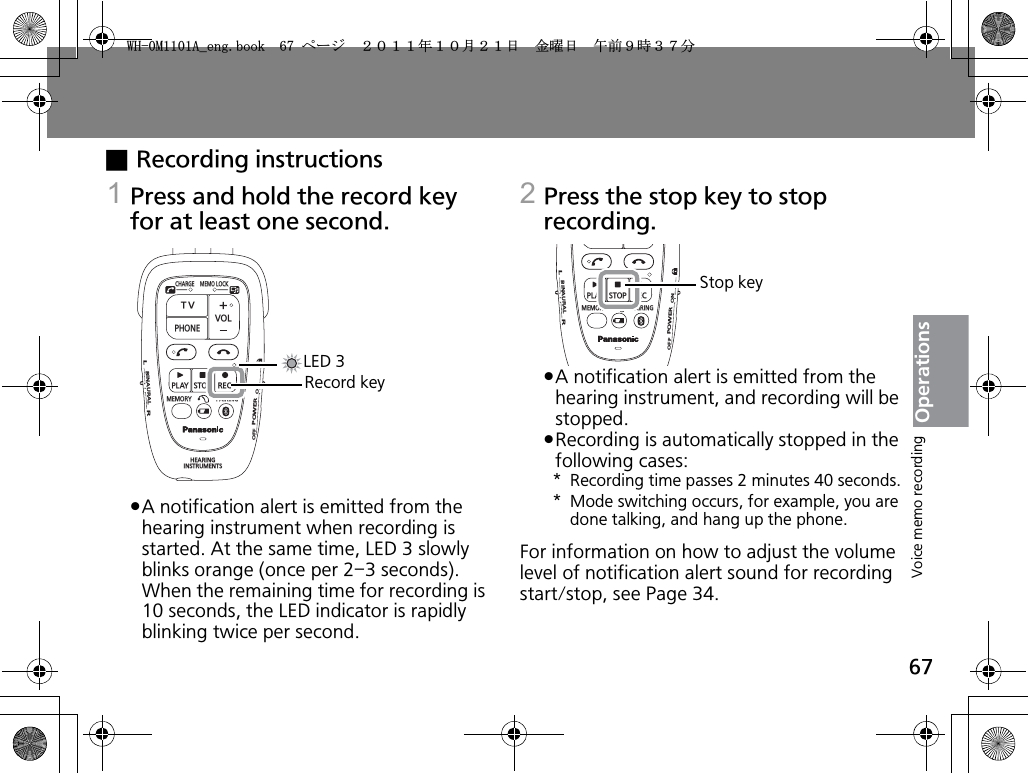
Panasonic Corporation of North America Hearing Hub
UserManual.wiki
>
Panasonic of North America
>
927152TX User Manual
>
User Manual
Contents
1.
User Manual
2.
User manual
User Manual
Navigation menu
Upload a User Manual
Namespaces
Wiki Guide
HTML
PDF
Info
Views
User Manual
Discussion / Help
Navigation


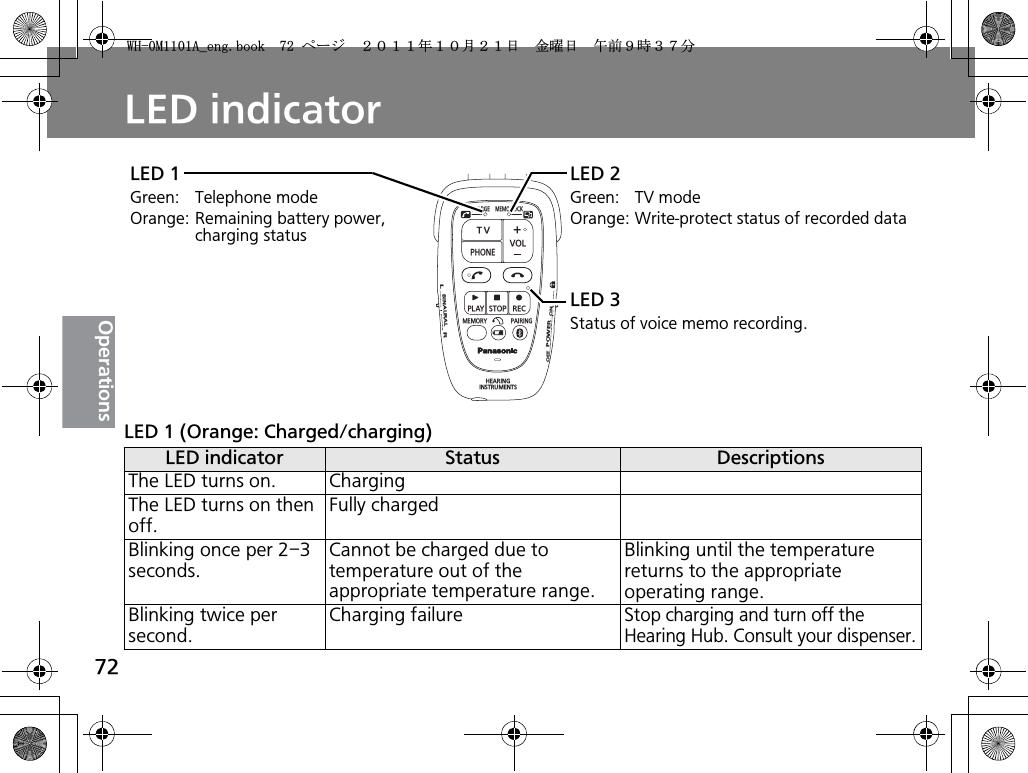
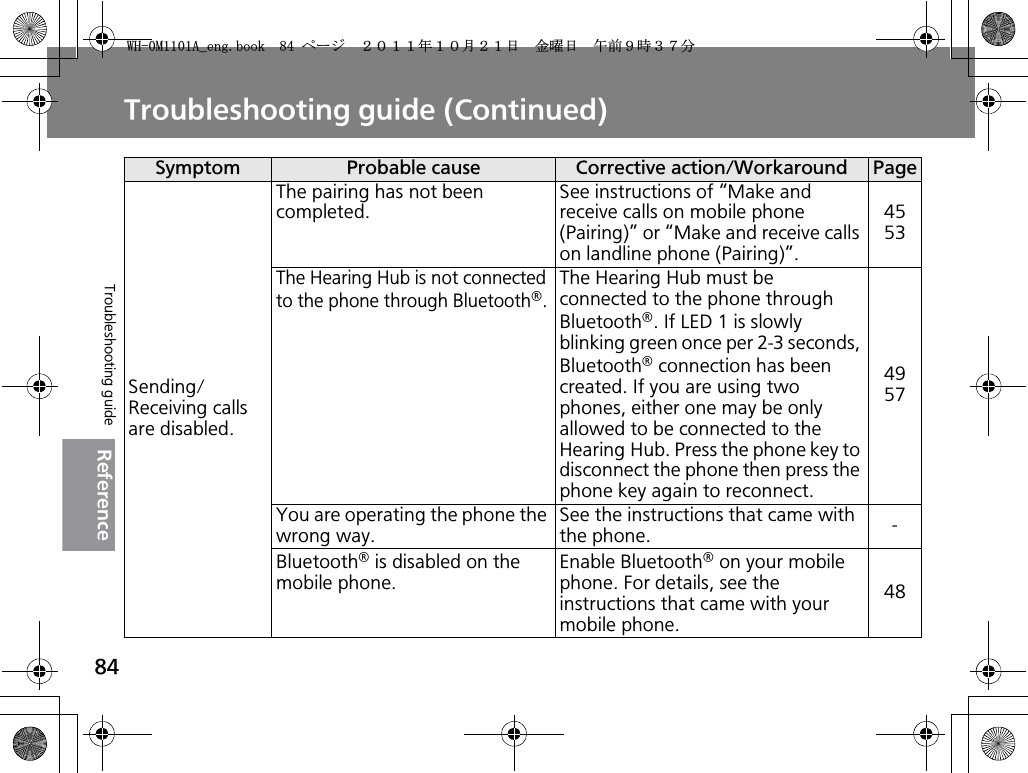
![85ReferenceSymptom Probable cause Corrective action/Workaround PageSending/Receiving calls are disabled.The phone is OFF. Turn on the Bluetooth® enabled device. -The battery is running low. Recharge the battery. 26Your voice cannot be heard.The surrounding is noisy. Position the microphone close to your mouth.4856When the microphone is positioned close to your mouth, the voice gets distorted or intermittent.Your hearing instrument or Hearing Hub is placed in the location subject to radio frequency interference.Change the position of your Hearing Hub.4856The Hearing Hub does not charge.The surrounding temperature is too high or too low.If the surrounding temperature is out of the appropriate charge temperature range (7 °C to 40 °C[44.6 °F to 104 °F]), charging may be disabled.* In that case, LED 1 is blinking orange once per 2-3 seconds.72The battery life is short.Your battery has reached its charge capacity.Replace your rechargeable battery.Consult your dispenser. 27Troubleshooting guide9*/#AGPIDQQMࡍࠫ㧞㧜㧝㧝ᐕ㧝㧜㧞㧝ᣣޓ㊄ᦐᣣޓඦ೨㧥ᤨ㧟㧣ಽ](https://usermanual.wiki/Panasonic-of-North-America/927152TX.User-Manual/User-Guide-1579421-Page-85.png)
![86ReferenceSpecificationsAccording to UL 60601-1:2003 R6.03Transport/Storage temperature -10 °C to 50 °C [14 °F to 122 °F]Transport/Storage relative humidity 20 % to 85 %Classification Internally powered equipmentBattery Built-in rechargeable battery: DC 3.6 VBattery charge time Approx. 3 hours(Varies depending on operating conditions and other factors)Battery run time Continuous TV watching Approx. 8 hours(Varies depending on operating conditions and other factors)Bluetooth®Version Bluetooth® Ver.2.1+EDRRF power output Class1 (Approx. 6 mW)Profile Telephone: HFP (Hands-Free Profile)HSP (Headset Profile)Wireless communication 2.4 GHz FH-SS (Frequency-hopping spread spectrum)QDID (Qualification design ID)Bluetooth® qualification/CertificationB017883Available distanceWireless communication between the Hearing Hub and other Bluetooth® enabled devices.Approx. 98.4 feet (30 m) Wireless communication is affected by obstacles such as walls, buildings, human bodies or other in-between electronic devices. The communication distance can be shorter when they cause interference with the Hearing Hub.* For Bluetooth® Class 2, the available communication is up to a 32.8 feet (10 m) line-of-sight distance.9*/#AGPIDQQMࡍࠫ㧞㧜㧝㧝ᐕ㧝㧜㧞㧝ᣣޓ㊄ᦐᣣޓඦ೨㧥ᤨ㧟㧣ಽ](https://usermanual.wiki/Panasonic-of-North-America/927152TX.User-Manual/User-Guide-1579421-Page-86.png)
![87ReferenceOperating temperature 0 °C to 40 °C [32 °F to 104 °F]Charging temperature 7 °C to 40 °C [44.6 °F to 104 °F]Dimensions (excluding neckloop antenna) 59 mm (W) j 101 mm (H) j 28 mm (D)[ビハピ÷(W) j フハパ÷(H) j ヒハヒ÷(D)]Mass (including neckloop antenna) Approx. 123 䏊 (4.3 oz)AC adaptor Power source AC 110 V – 240 V, 50 Hz/60 HzInput 0.22 AOutput DC 5.0 V 1.6 AStandby power Less than 0.3 W9*/#AGPIDQQMࡍࠫ㧞㧜㧝㧝ᐕ㧝㧜㧞㧝ᣣޓ㊄ᦐᣣޓඦ೨㧥ᤨ㧟㧣ಽ](https://usermanual.wiki/Panasonic-of-North-America/927152TX.User-Manual/User-Guide-1579421-Page-87.png)

![Printed in JapanYAH0M1101A-0F1011-0 Panasonic Healthcare Co., Ltd. 2011*The serial number is printed on the package label.[Distributor]Panasonic Corporation of North AmericaHealthcare GroupOne Panasonic Way, 1H-6, Secaucus, NJ 07094Telephone No. 1-888-422-6309[Manufacturer]247 Fukutake-ko, Saijo, Ehime 793-8510, JapanFor your reference (Fill out when you purchase your Hearing Hub)Name of owner:Model number: Serial number*:Dispenser: Purchase date:Dispenser address:Dispenser phone:9*/#AGPIDQQMࡍࠫ㧞㧜㧝㧝ᐕ㧝㧜㧞㧝ᣣޓ㊄ᦐᣣޓඦ೨㧥ᤨ㧟㧣ಽ](https://usermanual.wiki/Panasonic-of-North-America/927152TX.User-Manual/User-Guide-1579421-Page-92.png)