Panasonic of North America 927152TX Hearing Hub User Manual
Panasonic Corporation of North America Hearing Hub
Contents
- 1. User Manual
- 2. User manual
User Manual
Operating Instructions
Hearing Hub
Model No. WH-0M1101A
Thank you for purchasing a Panasonic Hearing Hub. This product is a Bluetooth® device, designed to act as a
medium between Panasonic’s wireless digital hearing instruments and other electronic devices like
Bluetooth® enabled mobile phones and external audio sources. The two main purposes of audio streaming
are phone usage and audio entertainment including digital audio players and TV. The Hearing Hub delivers
crystal-clear sound directly to your hearing instruments wirelessly. Further, the Hearing Hub allows you to
change the volume level and switch memory programs of your hearing instrument wirelessly.
Please be aware that you cannot use your wireless digital hearing instrument and Hearing Hub in the
following cases:
•Outside the United States •While in flight •If you are fitted with a cardiac pacemaker.
For safe and reliable operation, it is important that you read this manual thoroughly and fully understand the
operating procedures before attempting to set up and operate the Hearing Hub. Failure to follow the
operating instructions may result in poor performance of the product or even can result in serious and
sometimes permanent bodily injury.
If you have any questions, consult the dispenser where you purchased your hearing instrument and Hearing Hub.
The Limited Warranty document is enclosed together in the package. Keep it in a secure place. Make sure
that it is properly completed, signed with the authorized dispenser’s name, and filled in with date of original
purchase, name of dispenser and other important information.
TV
VOL
PHONE
CHARGE
MEMO LOCK
PLAY
STOP
REC
MEMORY PAIRING
HEARING
INSTRUMENTS
POWER
ON
OFF
Before Use
Operations
Reference
9*/#AGPIDQQMࡍࠫ㧞㧜㧝㧝ᐕ㧝㧜㧞㧝ᣣޓ㊄ᦐᣣޓඦ೨㧥ᤨ㧟㧣ಽ
2
Before Use
Wireless connection
For wireless connection between the
Hearing Hub and hearing instrument, be
aware of the following:
pUse 1 (one) for the wireless device
identification of the hearing instrument and
Hearing Hub.
pIf more than one person is using a Panasonic
wireless device sharing the same wireless ID
in the same area, the performance of the
hearing instruments can be affected.
pContact your dispenser to configure the
device identification number for you.
Product Model
R1-W
series WH-R17C, WH-R15C, WH-R13C
To dispensers
A wireless connection between the Hearing Hub
and hearing instrument must be adjusted and
configured by the dispenser on an individual
basis. Inappropriate wireless connection setup
may cause damage to your clients or result in
poor performance of the product.
If you have any questions, contact the
Panasonic Sales Division below.
Panasonic Corporation of North America
Healthcare Group
One Panasonic Way, 1H-6, Secaucus, NJ 07094
Telephone No. 1-888-422-6309
Wireless Device Identification No.:
9*/#AGPIDQQMࡍࠫ㧞㧜㧝㧝ᐕ㧝㧜㧞㧝ᣣޓ㊄ᦐᣣޓඦ೨㧥ᤨ㧟㧣ಽ

3
Before Use
Table of contents
Before Use
Package contents........................................5
Safety precautions.......................................6
Care and handling instructions ..................17
Product description ...................................18
General Bluetooth® description..................20
Device description .....................................22
Neckloop antenna .....................................24
Operations
Charging (Charge the battery immediately
after purchase)..........................................26
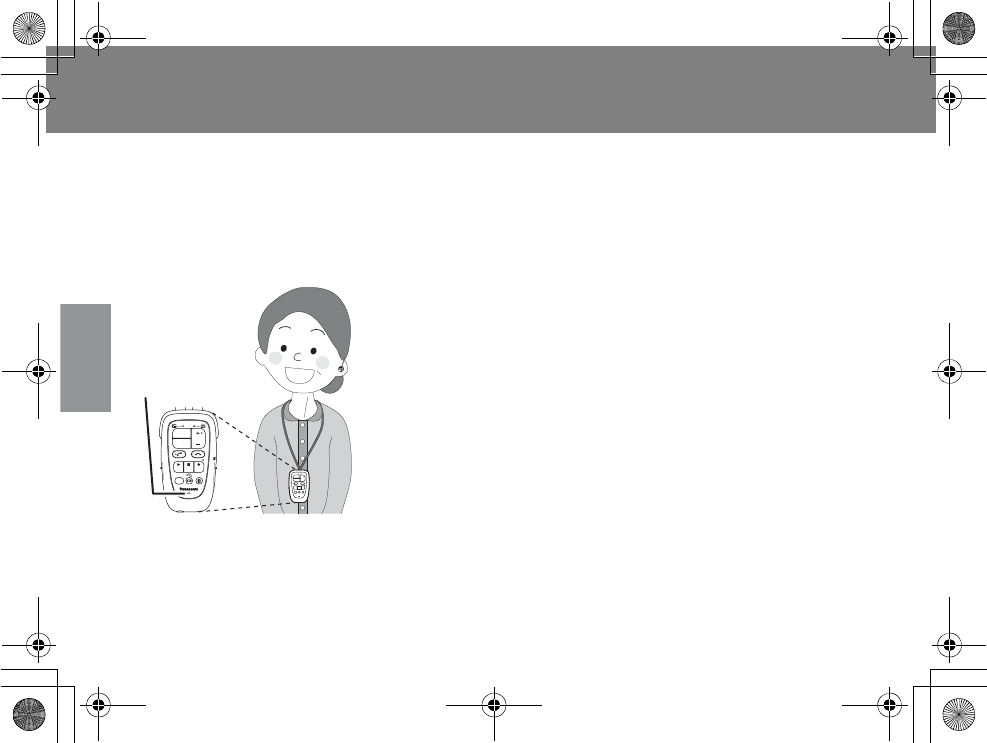
Proper way to wear or carry
your Hearing Hub......................................28
Turn on/off Hearing Hub...........................30
Put Hearing Hub in key lock mode .............31
Operate your hearing instrument
Monaural/Binaural switch ......................32
Volume adjustment................................33
Memory switch ......................................35
Remaining battery power of the hearing
instrument .............................................36
Hearing instrument reset........................37
Listen to TV audio
Listen to TV audio (Pairing) ....................39
Listen to TV audio (Prerequisite) .............42
Listen to TV audio (Operation)................43
Make and receive calls on mobile phone
Make and receive calls on mobile phone
(Pairing) .................................................45
Make and receive calls on mobile phone
(Prerequisite)..........................................48
Make and receive calls on mobile phone
(Operation) ............................................49
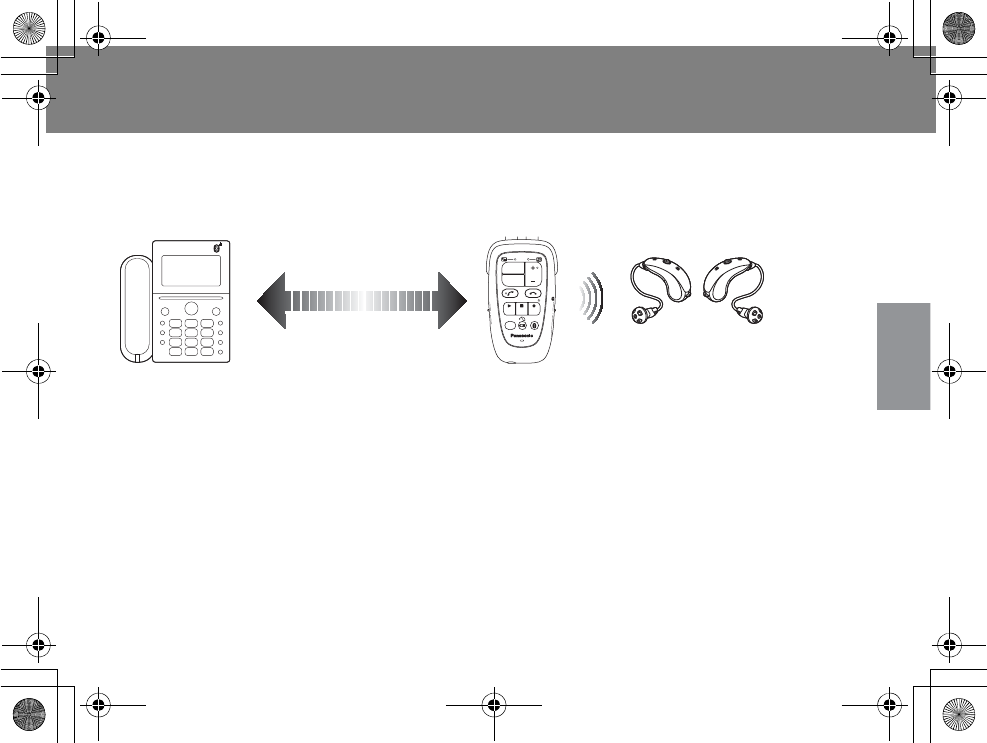
Make and receive calls on landline phone
Make and receive calls on landline phone
(Pairing) .................................................53
Make and receive calls on landline phone
(Prerequisite)..........................................55
Make and receive calls on landline phone
(Operation) ............................................57
9*/#AGPIDQQMࡍࠫ㧞㧜㧝㧝ᐕ㧝㧜㧞㧝ᣣޓ㊄ᦐᣣޓඦ೨㧥ᤨ㧟㧣ಽ
Table of contents (Continued)
4
Before Use
Listen to music
Listen to music
(External input terminal) ........................ 61
Voice memo recording
Record audio data
(Voice memo recording) ........................ 64
Listen to recorded audio data ................ 68
Protect audio files .................................. 70
Hearing Hub reset ..................................... 71
LED indicator............................................. 72
Reference
Maintenance............................................. 77
Bluetooth® operation instructions.............. 78
Troubleshooting guide .............................. 80
Specifications............................................ 86
Warranty and customer service ................. 88
Information............................................... 89
FCC compliance ........................................ 91
9*/#AGPIDQQMࡍࠫ㧞㧜㧝㧝ᐕ㧝㧜㧞㧝ᣣޓ㊄ᦐᣣޓඦ೨㧥ᤨ㧟㧣ಽ
5
Before Use
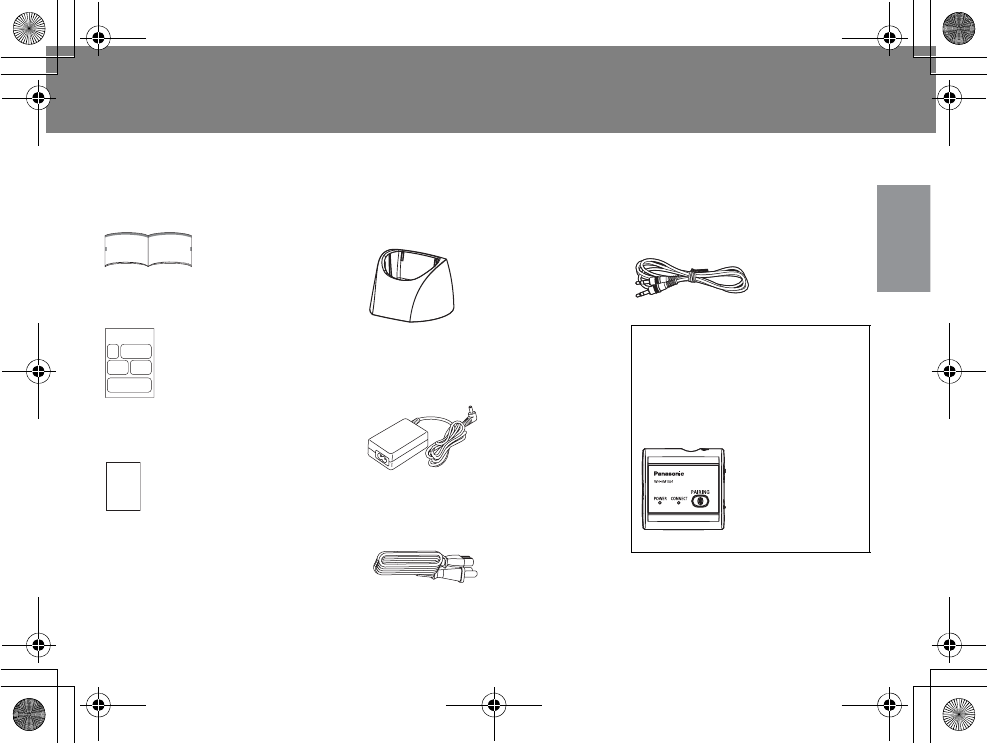
Package contents
The Panasonic Hearing Hub comes with the following items.
If there are any missing or defective items, please inform your dispenser.
Operating Instructions
Easy Guide
Limited Warranty
Charger cradle
QTY: 1
AC adaptor
QTY: 1
AC cord
QTY: 1
Audio cable (Length 1.0 m)
QTY: 1
Option (sold-separately)
Consult your dispenser.
Audio Transmitter for
hearing instruments
(WH-0M1301A)
9*/#AGPIDQQMࡍࠫ㧞㧜㧝㧝ᐕ㧝㧜㧞㧝ᣣޓ㊄ᦐᣣޓඦ೨㧥ᤨ㧟㧣ಽ
6
Before Use
Safety precautions
Follow the instructions below to reduce the risk of personal injury or damage to your Hearing Hub.
ƛThe following symbols are used throughout this document, and contain important
differences regarding the probability of serious injury. These definitions are as follows:
ƛThe following symbols specify behavior or actions which are not allowed and an
instruction that must be carried out.
Indicates a potentially hazardous situation that could result
in death or serious injury.
Indicates a possible hazard which if not avoided may result
in minor to moderate injury. It is also used to alert against
unsafe practices that can result in property damage.
Not allowed
Mandatory Attention, consult
ACCOMPANYING DOCUMENT
WARNING
CAUTION
9*/#AGPIDQQMࡍࠫ㧞㧜㧝㧝ᐕ㧝㧜㧞㧝ᣣޓ㊄ᦐᣣޓඦ೨㧥ᤨ㧟㧣ಽ
7
Before Use
WARNING
This device is equipped with a high-capacity rechargeable lithium-ion
battery.
Do not expose to fire or extreme heat. Do not use or leave in a high
temperature environment.
Failure to follow this warning can result in battery leakage, overheating,
ignition, or explosion.
The charging system consists of an AC cord, AC adaptor and charger
cradle. Use the charger cradle provided specifically designed to charge the
Hearing Hub.
pUse of any other device could result in battery leakage, overheating, ignition, or
explosion.
If the battery is completely drained, it needs to be replaced. Promptly consult your
dispenser.
pDo not attempt to replace the battery yourself. Incorrect replacement can lead to
battery leakage, overheating, ignition or explosion.
9*/#AGPIDQQMࡍࠫ㧞㧜㧝㧝ᐕ㧝㧜㧞㧝ᣣޓ㊄ᦐᣣޓඦ೨㧥ᤨ㧟㧣ಽ
Safety precautions (Continued)
8
Before Use
WARNING
Do not let others use your Hearing Hub.
Inappropriate use of the Hearing Hub could trigger the hearing instrument to emit
loud sounds, which may result in serious damage to the ear.
pDo not let children play with your wireless device and other components.
pKeep them out of reach of children.
Turn off your wireless device on airplanes.
This device is designed in compliance with FCC rules, for use only within the
United States. Its use aboard an airplane is subject to individual airlines rules.
Typically, the airline responsible person (pilot) will announce all electronic
equipment and wireless devices should be turned off during take-off and
landing. As a general rule, it is recommended not to use this device while
aboard the airplane.
9*/#AGPIDQQMࡍࠫ㧞㧜㧝㧝ᐕ㧝㧜㧞㧝ᣣޓ㊄ᦐᣣޓඦ೨㧥ᤨ㧟㧣ಽ
9
Before Use
WARNING
Do not use your wireless device in the hospital or near medical equipment.
Electromagnetic interference (EMI) emitted by your Hearing Hub can interfere
with the normal operation of medical monitors and other hospital devices.
Medical device malfunction can inadvertently affect the various medical devices
and consequently disrupt operations or cause accidents.
Do not use your wireless device near automatic control equipment systems.
Electromagnetic interference (EMI) emitted by your Hearing Hub can affect the
functionality of automatic control equipment such as automatic doors and fire
alarms. They are vulnerable to other electromagnetic energy.
Medical device malfunction can disrupt operations or cause serious accidents.
Do not use your Hearing Hub while driving.
It introduces a significant form of distraction. Violation of this warning can
cause serious traffic accidents.
pGive full attention to driving and to the road. Be alert of your surroundings even
while walking. If you are too focused on your Hearing Hub in certain situations, like
crossing a train track, a street, walking along a busy street, through a parking lot,
etc., you could actually be putting yourself at great risk.
9*/#AGPIDQQMࡍࠫ㧞㧜㧝㧝ᐕ㧝㧜㧞㧝ᣣޓ㊄ᦐᣣޓඦ೨㧥ᤨ㧟㧣ಽ
Safety precautions (Continued)
10
Before Use
WARNING
Do not use the Hearing Hub if you are fitted with a pacemaker. Your
Hearing Hub may affect pacemaker functioning.
Pacemakers can be susceptible to interference from radio waves.
pTurn off the Hearing Hub if you are around somebody wearing a pacemaker or
while in hospitals, where an active wireless device could interfere with other
equipment and pacemakers.
Turn off your device in places where people are close to each other, such
as in trains.
This is to prevent your device from inadvertently affecting pacemakers and
other medical devices when the device is in close proximity with people
wearing them.
Keep out of reach of children and pets.
A length adjustment mechanism (rubber slider) for a neckloop antenna (P. 24)
may be accidentally removed. It can be swallowed and pose a choking hazard
and possibly cause internal injury. To prevent accidental ingestion, secure your
Hearing Hub in a safe place where it is not accessed by infants, small children,
pets, or others who might accidentally swallow it.
pIf swallowed, seek immediate medical treatment.
9*/#AGPIDQQMࡍࠫ㧞㧜㧝㧝ᐕ㧝㧜㧞㧝ᣣޓ㊄ᦐᣣޓඦ೨㧥ᤨ㧟㧣ಽ
11
Before Use
WARNING
Do not modify or disassemble your wireless device.
Violation of this warning could cause a fire, personal injury or seriously damage
your Hearing Hub.
pConsult with your dispenser if your Hearing Hub needs to be adjusted or repaired.
pContact your dispenser if you have encountered unexpected behavior of your
Hearing Hub.
Do not touch the AC cord plug with wet hands.
It can result in a shock hazard.
Avoid overloading an electrical circuit.
Do not plug in and run too many appliances on the same circuit at one time and
overload the circuit. The AC cord plug must be connected to an AC 120 V only.
Failure to heed to this warning may result in overheating and/or even a fire.
Do not damage the AC cord or plug.
Do not use a damaged AC cord.
Do not modify, forcibly bend, twist, pull, or heat the AC cord. Do not use the
plug if the blades are loose as it may cause an electric shock or fire.
pDo not place any heavy items on the AC cord. Do not allow the AC cord to be
crimped as it may cause an electric shock or fire. Contact your dispenser for repair.
9*/#AGPIDQQMࡍࠫ㧞㧜㧝㧝ᐕ㧝㧜㧞㧝ᣣޓ㊄ᦐᣣޓඦ೨㧥ᤨ㧟㧣ಽ
Safety precautions (Continued)
12
Before Use
WARNING
Only use the supplied AC cord and AC adaptor.
The use of any other AC cord and AC adaptor can cause a shock hazard or fire.
In the event of an abnormal event or a malfunction such as those listed
below, disconnect the AC cord plug from the outlet or turn off the
Hearing Hub.
It can result in a fire or electric shock.
pA short circuit due to any foreign substance such as water, liquid, metals or other
matters.
pA mechanical impact or dropping the instrument, or any damages to the
instrument.
pUnusual situations such as abnormal odor, emission of smoke or unusual sound.
Insert the AC cord plug into the outlet until it is fully inserted.
pFire or electric shock due to overheating may result if it is not plugged in all the
way.
pDo not use a damaged AC cord plug.
pDo not plug the AC cord plug in a damaged outlet. It can cause a fire.
Clean the AC cord plug periodically.
pIf dust accumulates on the AC cord plug or outlet, it may cause a fire.
Unplug and wipe clean with a dry cloth.
pUnplug the AC cord plug when it is not to be used for an extended period.
9*/#AGPIDQQMࡍࠫ㧞㧜㧝㧝ᐕ㧝㧜㧞㧝ᣣޓ㊄ᦐᣣޓඦ೨㧥ᤨ㧟㧣ಽ
13
Before Use
WARNING
Do not touch the AC adaptor during a thunderstorm.
Unplug the AC cord and charger cradle during lightning storms to avoid electric
shock or fire.
Do not connect the positive “+” and negative “-” terminals of the charger
cradle with a metal object.
Do not leave the charger cradle in places subject to extremely high
temperatures.
Failure to heed this caution may cause a fire or seriously damage your Hearing Hub.
When connecting your Hearing Hub to other external devices via an audio
cable, be sure to connect only to devices compliant with electric safety
standards.
pNon-safety compliant devices may pose a shock hazard when inter-connected if
their insulation is inadequate.
pDo not use broken or modified devices.
9*/#AGPIDQQMࡍࠫ㧞㧜㧝㧝ᐕ㧝㧜㧞㧝ᣣޓ㊄ᦐᣣޓඦ೨㧥ᤨ㧟㧣ಽ
Safety precautions (Continued)
14
Before Use
WARNING
Handle the neckloop antenna carefully.
When you are hanging the Hearing Hub around your neck, choking and
strangulation can occur when the neckloop antenna accidentally gets caught
on something or get tangled around the neck and cause you to choke.
pDo not twirl, spin, or play with your neckloop antenna to avoid the possibility of
accidentally hitting someone with your neckloop antenna.
Do not insert the connector pin of the neckloop antenna into any
terminals of other devices.
It can cause a shock hazard.
CAUTION
Make sure the volume level is safe and appropriate before use.
Exposure to loud sounds or excessive sound levels can cause damage to your
hearing. Adjust the volume to the most appropriate level.
9*/#AGPIDQQMࡍࠫ㧞㧜㧝㧝ᐕ㧝㧜㧞㧝ᣣޓ㊄ᦐᣣޓඦ೨㧥ᤨ㧟㧣ಽ

15
Before Use
CAUTION
Keep your wireless device away from excessive moisture and extreme
temperatures.
Do not leave your wireless device inside a vehicle including a trunk or in places
where the temperature may exceed 140 °F (60 °C), such as on a car
dashboard, window sill, or behind a glass that is exposed to direct sunlight or
strong ultraviolet light for extended periods of time. If you park outside during
the summer months, your car will heat up quickly. The temperature inside the
car can reach 140 °F (60 °ヤ). The heat will deteriorate the coating on the outer
surface of the Hearing Hub and materials of the parts and components.
This may damage the product, overheat the battery, or pose a risk to the
vehicle.
Do not let your wireless device come into contact with skin for an
extended period of time.
The prolonged, intense contact between skin and the Hearing Hub can cause
thermal injury or thermal burn.*1
*1 Individuals who have difficulties in any of the following areas tend to burn easily:
blood vessel, blood circulation, diabetes, high blood pressure and haptic sense.
9*/#AGPIDQQMࡍࠫ㧞㧜㧝㧝ᐕ㧝㧜㧞㧝ᣣޓ㊄ᦐᣣޓඦ೨㧥ᤨ㧟㧣ಽ
Safety precautions (Continued)
16
Before Use
CAUTION
Do not use your wireless device near any equipment that emits high
frequency radio waves or generates a strong magnetic field.
Your hearing instrument may emit acoustic feedback, which can result in damage to the
ear. Stop using your wireless device or get them out of electromagnetic fields.
Turn off your wireless device while undergoing any kind of electromagnetic treatment
such as X-Rays, Magnetic Resonance Imaging (MRI), Computerized Axial Tomography
(CAT), Electroencephalogram (EEG), Electrocardiogram (ECG), Short-Wave Diathermy,
or other electrical or magnetic treatment.
Inspect your wireless device before each use. Do not use it if damaged.
Rugged projection like sharp edges and rough burrs protruding from the
surface of the Hearing Hub can cause cuts and nicks to the skin.
pWhen cleaning the Hearing Hub, wipe it gently with a soft cloth. Never use organic
solvents such as alcohol, paint thinner, or benzene. Failure to heed this caution
may result in deformation of the hearing instrument or cracking on the surface.
If the safety mechanism of your neckloop antenna is removed, put the
neckloop antenna back together.
Incomplete connection could result in accidents that might hurt yourself and
others by dropping the device or letting the connector pin exposed.
For example, the device might drop on your foot or the connector pin might
scratch someone's body.
9*/#AGPIDQQMࡍࠫ㧞㧜㧝㧝ᐕ㧝㧜㧞㧝ᣣޓ㊄ᦐᣣޓඦ೨㧥ᤨ㧟㧣ಽ
17
Before Use
Care and handling instructions
For proper care and handling of your Hearing Hub, be sure to read and follow the instructions
below. Preventive maintenance can help extend the life span of the Hearing Hub.
q
Do not drop, hit or shake the Hearing Hub. Do not subject it to high impact, vibration, or shock loads. Drops
and impacts can cause scratches, cracks and physical damage.
q
Ask the dispenser to perform the wireless configuration setup between your hearing instrument and Hearing Hub.
q
After using hair styling products and skin care products, do not touch the Hearing Hub without washing your
hands.
q
Avoid high temperatures, moisture, humidity and dust.
q
Do not use the Hearing Hub in the shower or swimming.
q
Do not touch the Hearing Hub with wet hands.
q
Do not leave or store the Hearing Hub in a damp location like bathroom, dusty environment or in direct
sunlight, high temperature or humidity. For example, do not leave it in an unventilated automobile, exposed to
direct sunlight with its all doors and windows shut.
q
Do not use the Hearing Hub near any device that emits high frequency radio waves or generates a strong magnetic field.
There is a possibility that the volume adjustment or memory change by the Hearing Hub does not work.
Your hearing instrument may emit acoustic feedback, which can result in damage to the ear.
q
Check your pockets to ensure that your Hearing Hub will not accidentally get thrown in the wash before doing
the laundry.
-The Hearing Hub has no special protection against ingress of water.
-Degree of protection against harmful ingress of water is ordinary equipment (IPX0).
q
The Hearing Hub is not suitable for use in the presence of a flammable anesthetic mixture with air or with
oxygen or nitrous oxide.
q
The Hearing Hub is designed to comply with United States regulations and is intended for use in the United States.
q
After using the Hearing Hub, avoid exposure to direct sunlight, and high humidity and temperature. Keep the
Hearing Hub at room temperature.
CAUTION
9*/#AGPIDQQMࡍࠫ㧞㧜㧝㧝ᐕ㧝㧜㧞㧝ᣣޓ㊄ᦐᣣޓඦ೨㧥ᤨ㧟㧣ಽ
18
Before Use
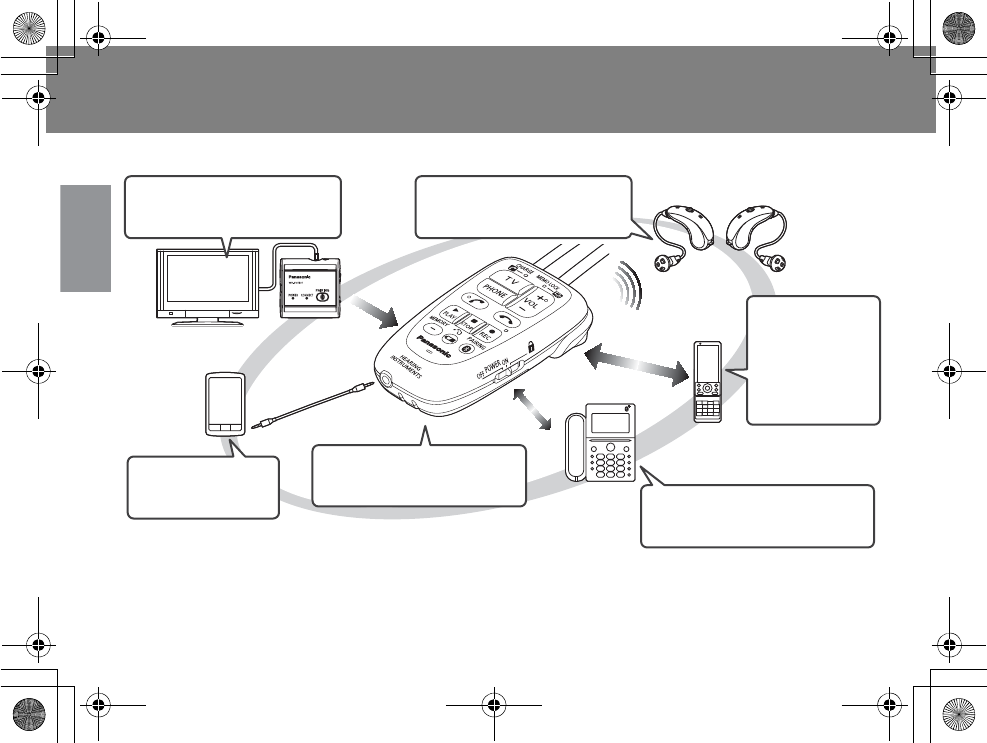
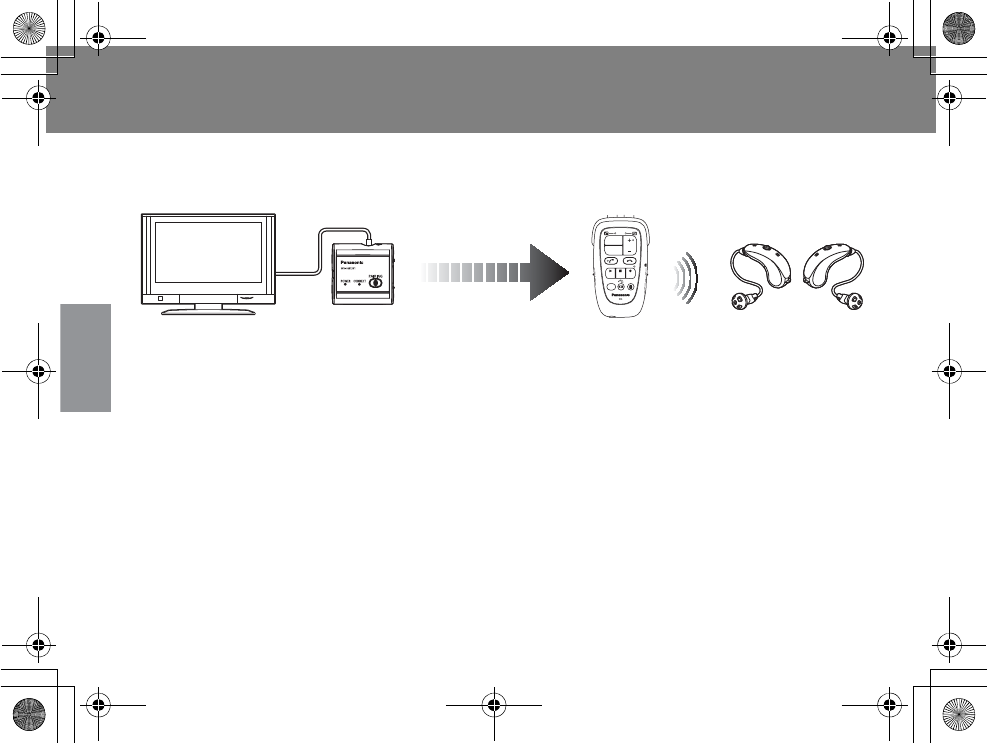
Product description
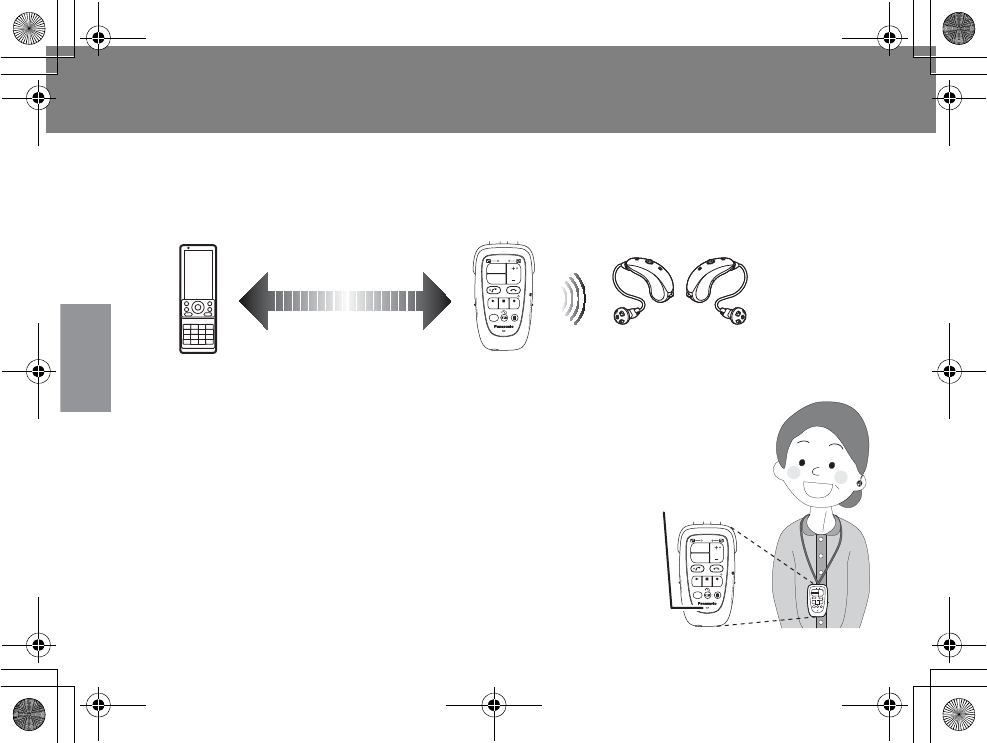
The features, benefits and functions of the Hearing Hub are outlined below.
*1 The Audio Transmitter is an optional accessory sold separately.
Bluetooth®
Bluetooth®
Bluetooth®
TV Audio
Transmitter*1
Audio
device
Hearing
instrument
Operate your hearing
instrument (P. 32)
Listen to TV audio
(P. 39)
Voice memo recording
(P. 64)
Make and
receive calls
on mobile
phone
(P. 45)
Listen to music
(P. 61) Make and receive calls on
landline phone (P. 53)
Mobile phone
Bluetooth®
landline
phone
9*/#AGPIDQQMࡍࠫ㧞㧜㧝㧝ᐕ㧝㧜㧞㧝ᣣޓ㊄ᦐᣣޓඦ೨㧥ᤨ㧟㧣ಽ

19
Before Use
1. Operate the hearing instrument
pVolume adjustment (P. 33)
pMemory switch (P. 35)
pRemaining battery power of the hearing instrument (P. 36)
2. The Hearing Hub allows you to hear the audio from TV and phones clearly.
2-1. Listen to TV audio (Pairing is required) (P. 39)
2-2. Make calls on your mobile phone (Pairing is required) (P. 45)
2-3. Make calls from your landline (Pairing is required) (P. 53)
2-4. Listen to music (External input terminal) (P. 61)
3. Record and save audio data with voice memo recording (P. 64)
The Hearing Hub allows you to record your voice or someone's voice through its microphone.
Audio from TV or external devices and conversation on mobile or landline phones can be
recorded.
Priority mode
An operation mode switch is performed in the order indicated below.
1. Make calls from your landline or mobile phone
2. Listen to music
3. Listen to TV audio
If you get a call on a mobile phone while watching TV, the Incoming calls is automatically
switched to the mobile phone mode.
9*/#AGPIDQQMࡍࠫ㧞㧜㧝㧝ᐕ㧝㧜㧞㧝ᣣޓ㊄ᦐᣣޓඦ೨㧥ᤨ㧟㧣ಽ

20
Before Use
General Bluetooth® description
Bluetooth® is a short range wireless radio technology that allows electronic devices to
communicate with each other. It eliminates the need for the cables that connect devices
together.
You need a Bluetooth® enabled device.
To use your Bluetooth® mobile phone and landline phone through the Hearing Hub, they need
to have either Bluetooth® profile:
pHands-Free Profile
pHeadset Profile
If your phone has both the profiles, select “Hands-Free Profile”.
Bluetooth® pairing process
Pairing is a special process used when two devices connect for the first time. The pairing process
is used to generate a link key that is used for authentication purposes during subsequent
Bluetooth® connections between the two devices. Normally, once a Bluetooth® accessory has
been paired with the device, it can be used with the device, without the need for re-pairing,
assuming the appropriate profile exists for the required service. However, some devices may
require pairing process each time they are used. Refer to the manual that came with your
Bluetooth® device for further details.
The battery power drain does not affect information on the established connection. In other
words, pairing is remembered and preserved regardless of the remaining power.
The Bluetooth® word mark and logos are owned by the Bluetooth SIG, Inc. and any use of such
marks by Panasonic Corporation is under license. Other trademarks and trade names are those
of their respective owners.
9*/#AGPIDQQMࡍࠫ㧞㧜㧝㧝ᐕ㧝㧜㧞㧝ᣣޓ㊄ᦐᣣޓඦ೨㧥ᤨ㧟㧣ಽ

21
Before Use
Bluetooth® device name
The Bluetooth® device name is used to identify a device when searched and registered.
The Bluetooth® device name of Hearing Hub is HABT01.
The name may vary depending on device model.
HABT01
pThe name may vary depending by device model.
pFor example, only part of the name is displayed due to limited space of the field, or a device
name was changed due to the name change function.
Bluetooth® Passkey (PIN)
A Bluetooth® passkey is a password that is used for pairing process of enabling devices to
securely communicate with each other.
The default passkey is “0000”.
Connection with Bluetooth® devices
You can connect the Hearing Hub to an Audio Transmitter*1 and up to two phones.
* During talking on the phone through Hearing Hub, Hearing Hub cannot receive any call from the other phone.
It is recommended to get your dispenser to perform the Bluetooth® pairing when they adjust
and program your hearing instrument.
*1 The Audio Transmitter is an optional accessory sold separately.
9*/#AGPIDQQMࡍࠫ㧞㧜㧝㧝ᐕ㧝㧜㧞㧝ᣣޓ㊄ᦐᣣޓඦ೨㧥ᤨ㧟㧣ಽ
22
Before Use
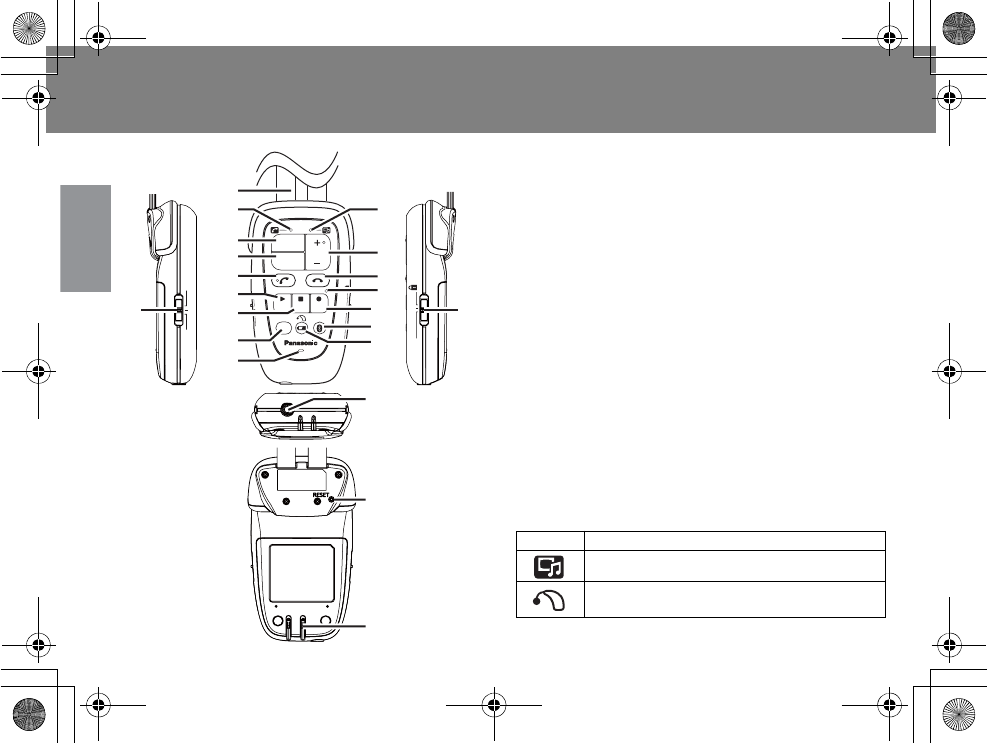
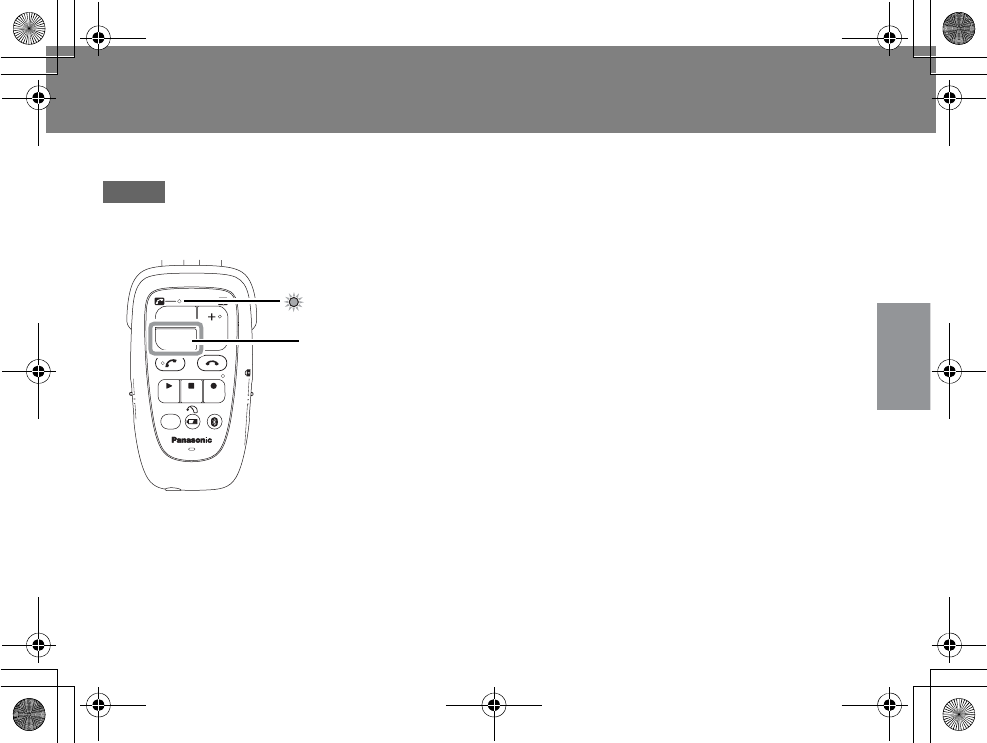
Device description
1. Neckloop antenna
pIt is a built-in antenna (intermediary device
around the neck) that stabilizes the
communication with the hearing instrument
and enhances the sound quality.
2. LED 1
pThe green LED indicates the status that the
Hearing Hub is in phone mode.
pThe orange LED allows you to check the
remaining battery power and charging status
of the Hearing Hub.
3. LED 2
pThe green LED indicates that the Hearing Hub
is in TV mode.
pThe orange LED indicates that the recorded
data is protected.
4. TV key
p
I
t enables or disables TV listening.
5. Phone key
pIt enables or disables a Bluetooth® connection
to the phone.
POWER
OFF ON
BINAURAL
LR
CHARGE
MEMO
LOCK
TV
VOL
PHONE
PLAY
STOP
REC
MEMORY PAIRING
HEARING
INSTRUMENTS
ON
POWER
OFF
BINAURAL
LR
17
2
1
3
4
5
7
6
11
12
13
16
14
8
9
10
15
20
21
18
19
Symbol Description
The symbol indicates TV mode.
The symbol indicates the hearing
instrument.
9*/#AGPIDQQMࡍࠫ㧞㧜㧝㧝ᐕ㧝㧜㧞㧝ᣣޓ㊄ᦐᣣޓඦ೨㧥ᤨ㧟㧣ಽ
23
Before Use
6. Volume key
pIt adjusts the volume level.
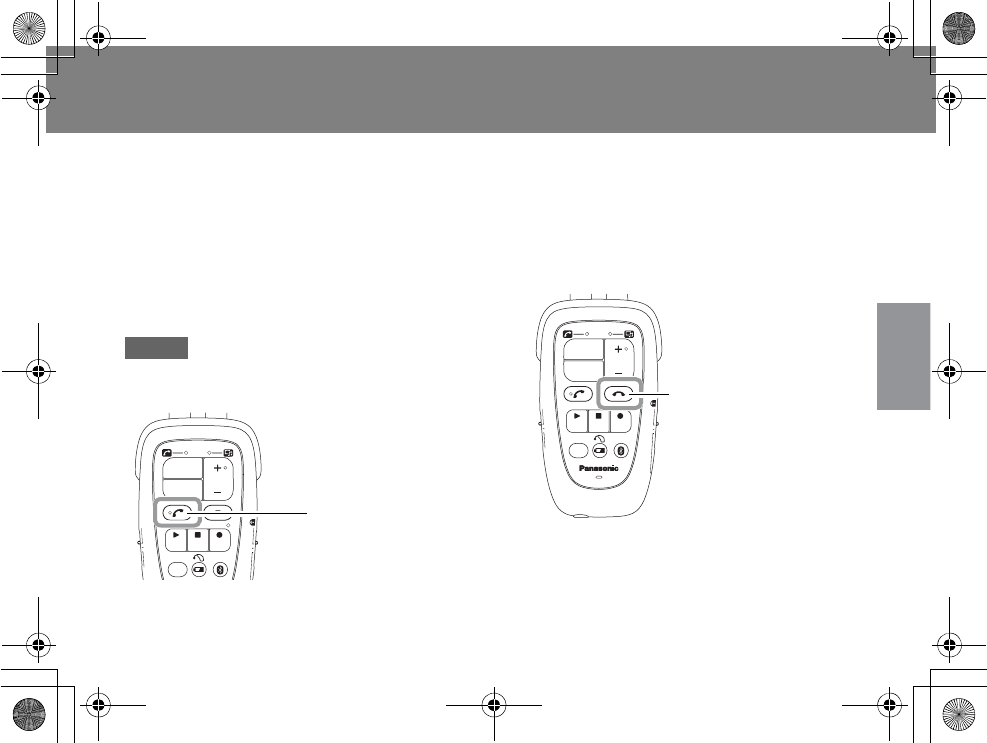
7. Send key
pIt answers incoming calls or makes calls.
8. End key
pIt ends calls or rejects incoming calls.
9. LED 3
pIt notifies you of the status of voice memo
recording.
10. Record key
pIt records audio data with voice memo
recording.
11. Play key
pIt plays audio data recorded with the voice
memo recording function.
12. Stop key
pIt stops recording and playing with voice
memo recording.
13. Memory key
pIt switches between tones of the hearing
instrument.
pIt write-protects audio data recorded with
voice memo recording and removes the write-
protection.
14. Pairing key
pIt pairs the Hearing Hub and Bluetooth
®
enabled devices.
15. Battery power-left notification key
pIt notifies you of the remaining battery power
of the hearing instrument with a sound. The
alert sound differs depending on how much
battery power is left.
16. Microphone
pIt is the sound input unit when you use a
phone or voice memo recording.
17. Monaural/Binaural switch
pIt selects the hearing instrument for the left
ear, right ear, or both ears for volume control,
memory switch and battery power-left
notification.
18. Power/Hold switch
pIt turns on and off the Hearing Hub. It puts
the Hearing Hub into key lock mode.
19. External input terminal
pIt allows you to listen to music or audio data
by connecting to external audio devices.
20. Reset key
pIt resets the Hearing Hub.
21. Charging terminal
pIt is used for charging the battery.
9*/#AGPIDQQMࡍࠫ㧞㧜㧝㧝ᐕ㧝㧜㧞㧝ᣣޓ㊄ᦐᣣޓඦ೨㧥ᤨ㧟㧣ಽ
24
Before Use
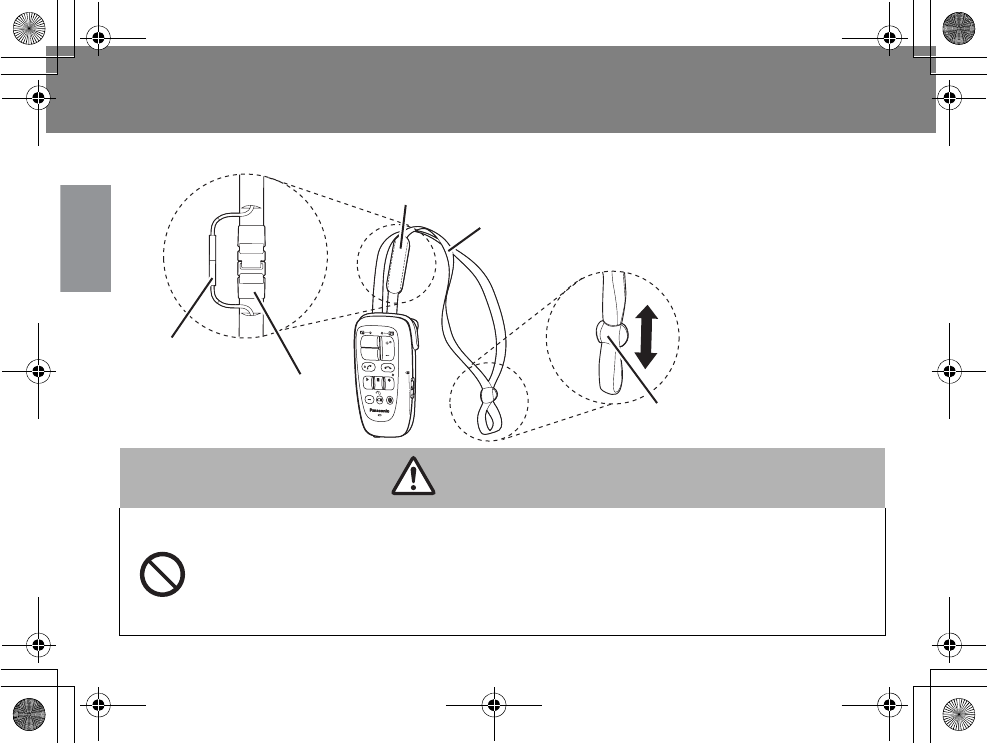
Neckloop antenna
CAUTION
The neckloop antenna has a safety mechanism that reduces the risk of tangled
neckloop antenna and associated risks. The hook of the neckloop antenna will
uncouple when the neckloop antenna is pulled strongly, or gets caught on
something.
Do not shorten or modify the neckloop antenna in any way, for example, tie a knot,
cut or fold the neckloop antenna.
TV
VOL
PHONE
CHARGE
MEMO LOCK
PLAY
STOP
REC
MEMORY PAIRING
HEARING
INSTRUMENTS
POWER
ON
OFF
Neckloop
antenna
Connector pin
Hook
Safety mechanism
Cover
Length adjustment mechanism
(rubber slider)
Length adjustment mechanism
(rubber slider)
ƛLength adjustment
Slide the rubber slider up or
down to the proper length.
9*/#AGPIDQQMࡍࠫ㧞㧜㧝㧝ᐕ㧝㧜㧞㧝ᣣޓ㊄ᦐᣣޓඦ೨㧥ᤨ㧟㧣ಽ
25
Before Use
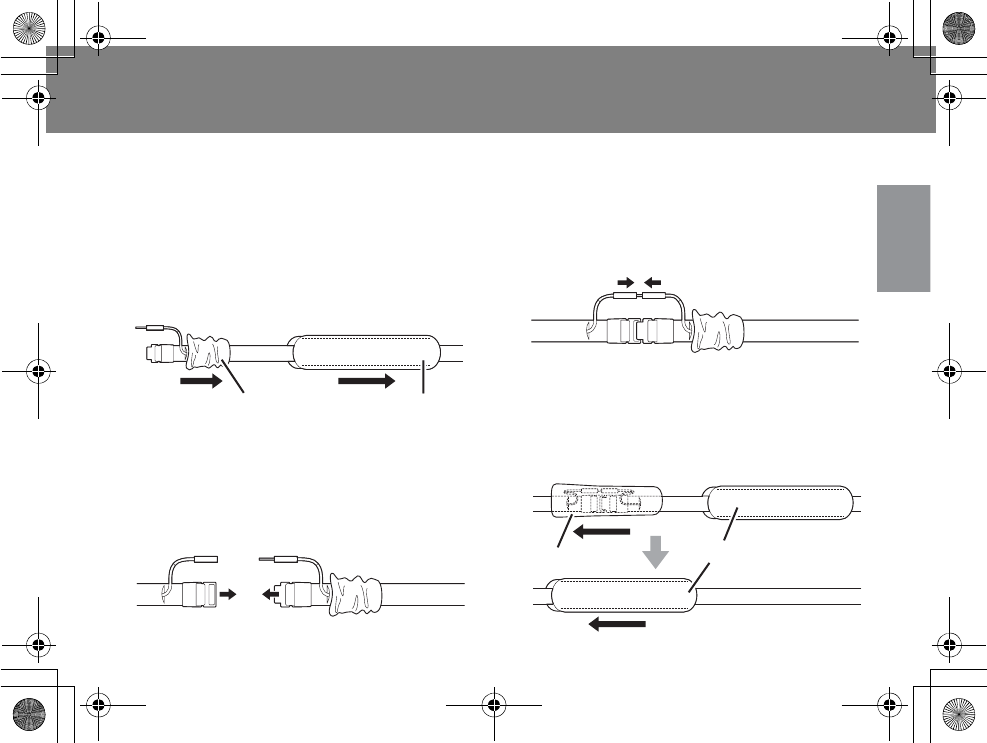
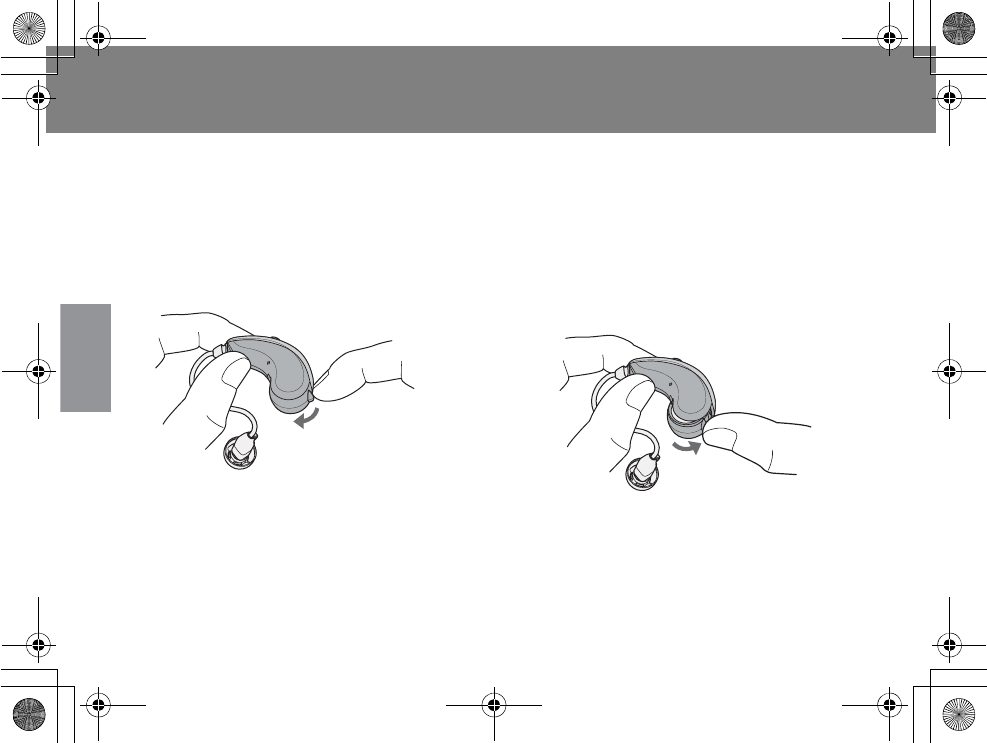
xHow to attach the hook to put the neckloop antenna ends back
together
1Move the outer cover.
pMove the outer cover to the right side, so
the safety mechanism comes out.
2Connect the joints until they
snap into place.
pConnect the hook until it clicks into place,
as shown in the illustration.
3Attach the connector pins to
each other.
pInsert completely.
4Put the covers back in place.
pPut back the inner cover first and then the
outer cover.
Toward the Hearing Hub
main unit
Toward the rubber
slider
Inner cover Outer cover
Toward the Hearing Hub
main unit
Outer cover
Inner cover
9*/#AGPIDQQMࡍࠫ㧞㧜㧝㧝ᐕ㧝㧜㧞㧝ᣣޓ㊄ᦐᣣޓඦ೨㧥ᤨ㧟㧣ಽ
26
Operations
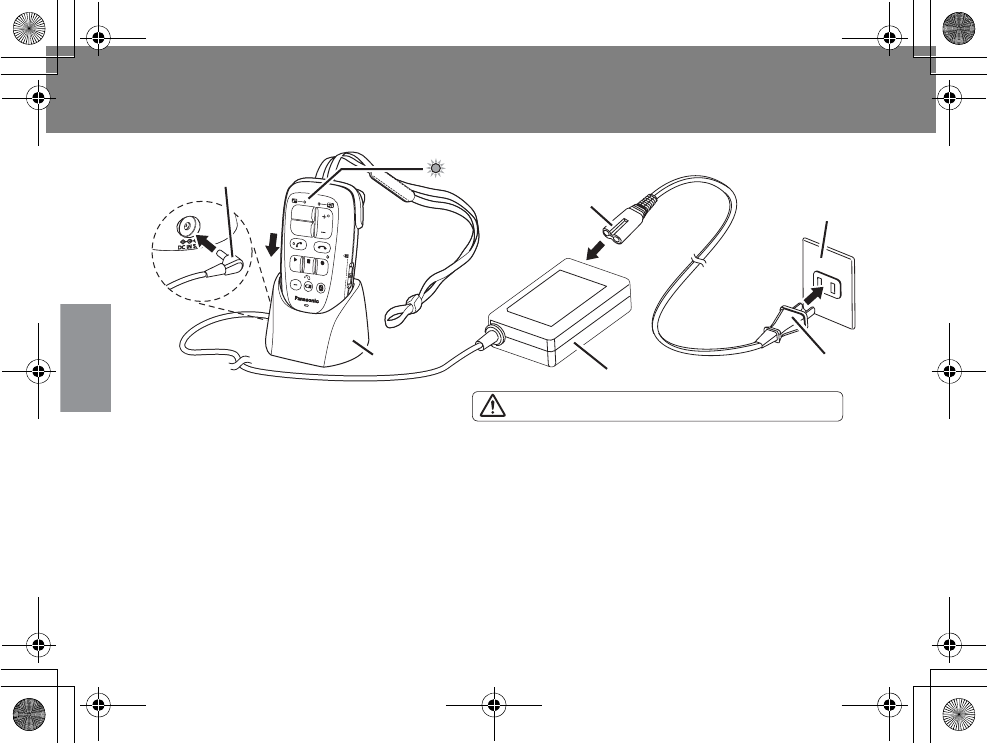
Charging (Charge the battery immediately after purchase)
1Insert the DC plug into the
charger cradle.
2Insert the AC cord connector
into the AC adaptor.
3Insert the AC cord plug into the
outlet.
4Put your Hearing Hub into the
charger cradle.
pInsert completely.
pLED 1 turns orange while charging.
pWhen charging is completed, LED 1 will shut
off.
* All function keys are disabled during the charging
process.
* It is recommended to unplug the AC cord when
the charger cradle is not going to be used for an
extended period of time.
TV
VOL
PHONE
CHARGE
MEMO LOCK
PLAY
STOP
REC
MEMORY PAIRING
POWER
ON
OFF
Charger
cradle
DC plug
AC adaptor
AC cord
connector
AC cord plug
Outlet
LED 1
1
2
3
4
WARNING: Use only specified AC adaptor.
9*/#AGPIDQQMࡍࠫ㧞㧜㧝㧝ᐕ㧝㧜㧞㧝ᣣޓ㊄ᦐᣣޓඦ೨㧥ᤨ㧟㧣ಽ
27
Operations
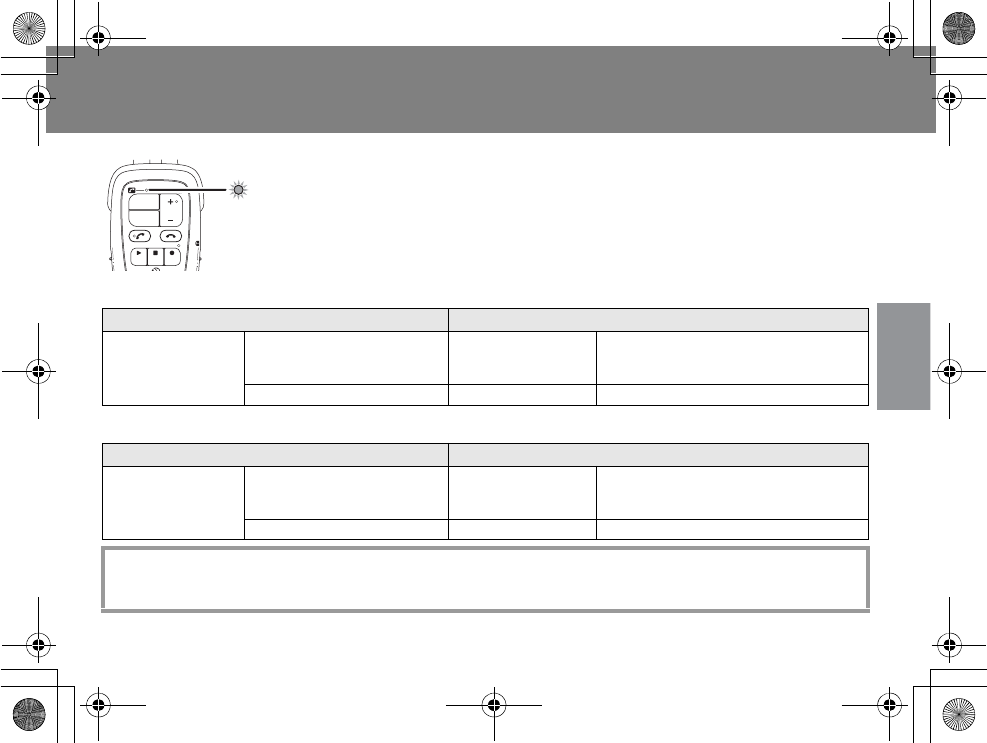
Hearing Hub in use
Hearing Hub in charging mode
When the battery of the Hearing Hub is running low, LED 1
is blinking orange.
Recharge your Hearing Hub according to the instructions in
Page 26.
LED indicator Status
LED 1
(Using)
Blinking once per 2–3
seconds
Running low on
power
You have 7 minutes of power
remaining (Varies depending on
operating conditions).
Blinking twice per second Completely drained
Recharge your Hearing Hub immediately.
LED indicator Status
LED 1
(Charging)
The LED turns on. Charging Full charge can be completed in 3
hours (Varies depending on
operating conditions).
The LED turns on then off. Fully charged Charging is complete.
* If you are getting shorter battery life after completing a full charge cycle, the battery needs to be
replaced. Ask your dispenser for assistance. The Hearing Hub is not designed to allow you to replace the
battery.
CHARGE
MEMO
LOCK
TV
VOL
PHONE
PLAY
STOP
REC
MEMORY PAIRING
ON
R
BINAURA
L
LED 1 (orange)
9*/#AGPIDQQMࡍࠫ㧞㧜㧝㧝ᐕ㧝㧜㧞㧝ᣣޓ㊄ᦐᣣޓඦ೨㧥ᤨ㧟㧣ಽ
28
Operations
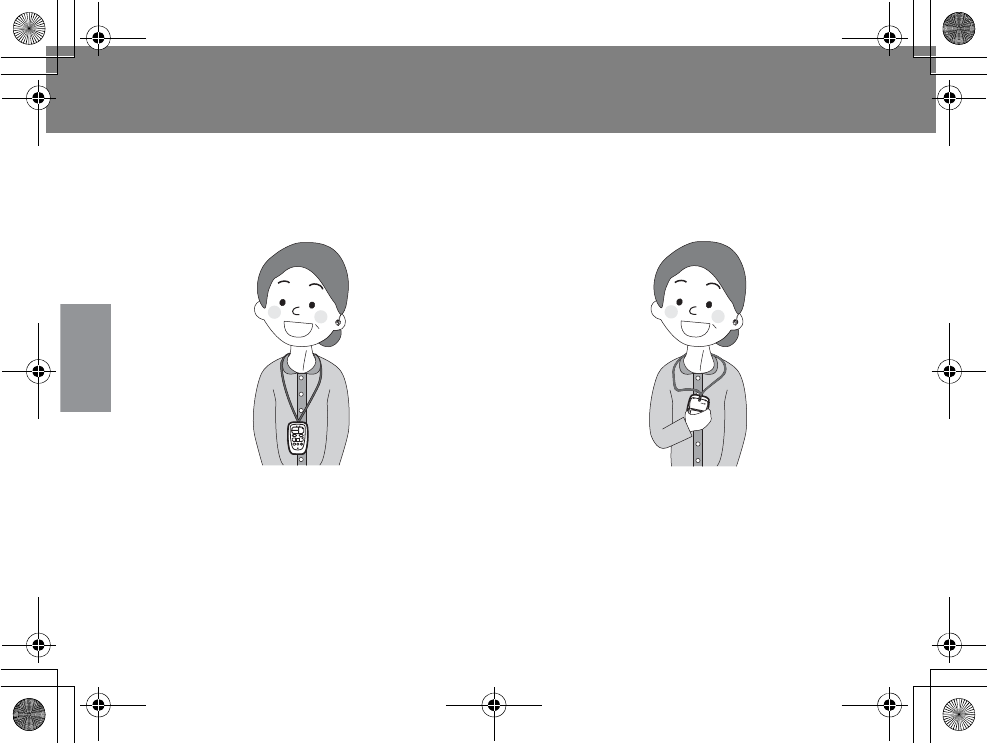
Proper way to wear or carry your Hearing Hub
Put the neckloop antenna around your neck.
Use your Hearing Hub as shown in the illustrations below.
Hanging loosely around your neck
Following cases
pListen to TV audio
pMake and receive calls
pListen to music (external input terminal)
Holding in your hand
Following cases
pAdjust your hearing instrument
pRecord audio data with voice memo
recording
9*/#AGPIDQQMࡍࠫ㧞㧜㧝㧝ᐕ㧝㧜㧞㧝ᣣޓ㊄ᦐᣣޓඦ೨㧥ᤨ㧟㧣ಽ

29
Operations
For wireless connection between the Hearing Hub and hearing instrument, very weak radio
waves are used.
The low-intensity radio waves get even weaker with distance from the source. Signal quality
between the hearing instrument and the Hearing Hub can vary depending on where they are
placed, the direction they are facing, or the presence of electromagnetic noise and
interference.
If you do not wear the neckloop antenna, keep the distance between the Hearing Hub and
your hearing instrument within 14.7 inches (40 cm). It is recommended to wear the neckloop
antenna to stabilize the wireless connection.
9*/#AGPIDQQMࡍࠫ㧞㧜㧝㧝ᐕ㧝㧜㧞㧝ᣣޓ㊄ᦐᣣޓඦ೨㧥ᤨ㧟㧣ಽ
30
Operations
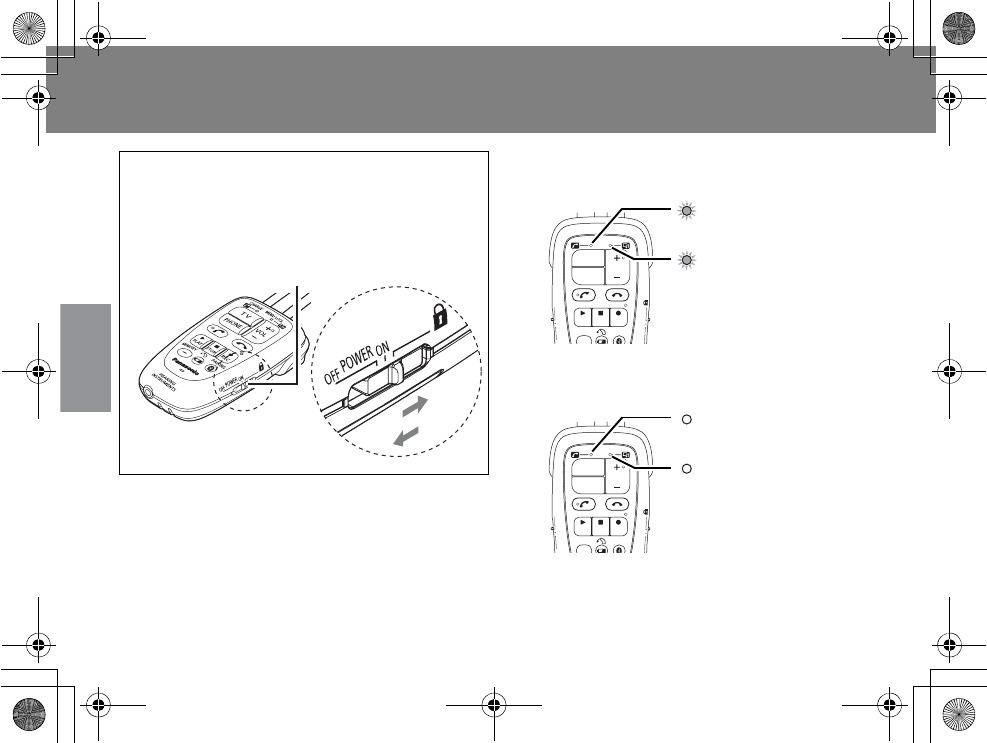
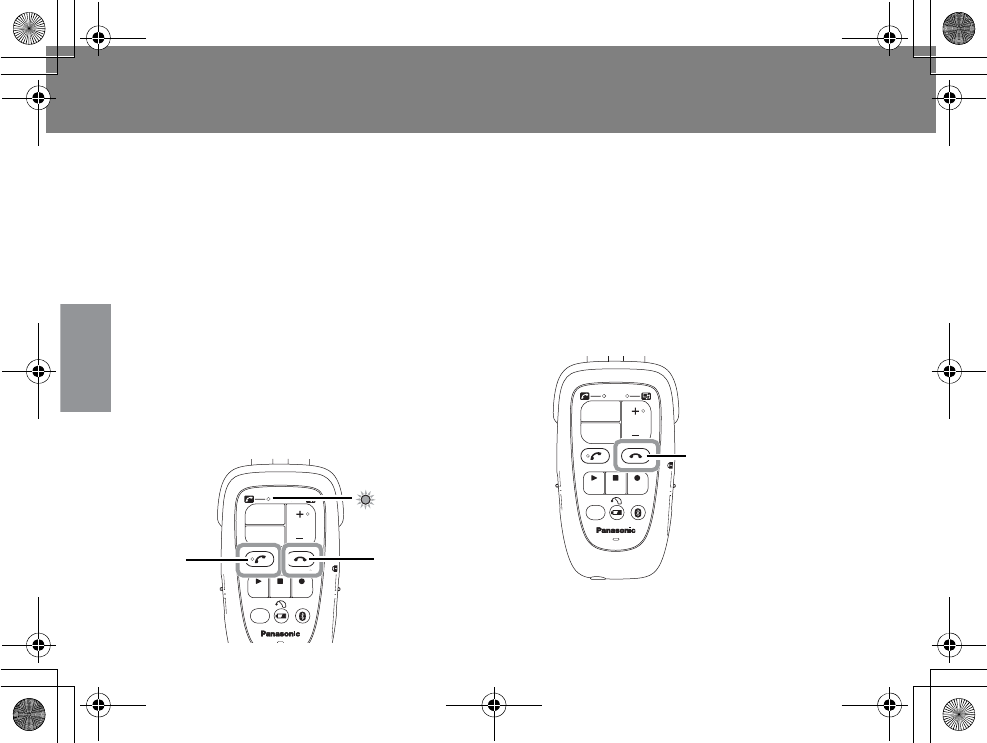
Turn on/off Hearing Hub
pWhen the Hearing Hub is powered on, LED 1
and LED 2 will turn orange simultaneously.
pOnce the function keys are working, LED1
and LED2 will shut off.
To turn on the Hearing Hub, slide the
power/hold switch to POWER ON.
To turn off the Hearing Hub, slide the
power/hold switch to POWER OFF.
Power/Hold switch
ON
OFF
CHARGE
MEMO
LOCK
TV
VOL
PHONE
PLAY
STOP
REC
MEMORY PAIRING
ON
W
ER
BINAURAL
L
R
LED 1
LED 2
CHARGE
MEMO
LOCK
TV
VOL
PHONE
PLAY
STOP
REC
MEMORY PAIRING
ON
W
ER
BINAURAL
L
R
LED 1
LED 2
9*/#AGPIDQQMࡍࠫ㧞㧜㧝㧝ᐕ㧝㧜㧞㧝ᣣޓ㊄ᦐᣣޓඦ೨㧥ᤨ㧟㧣ಽ
31
Operations
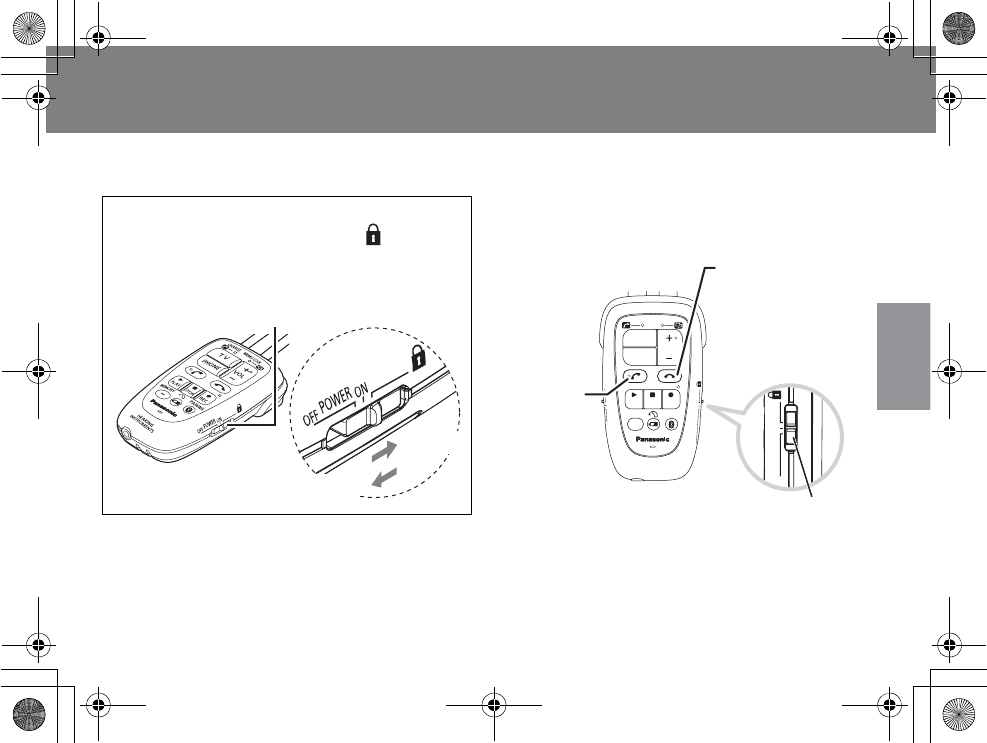
Put Hearing Hub in key lock mode
The hold function (Power/Hold switch) helps prevent unintentional operation or adjustment.
The volume key and memory key are disabled in key lock mode.
pIf the Hearing Hub is in key lock mode, the
operation keys will be disabled. Cancel the
key lock mode to enable the Hearing Hub
functions.
pThe send key and end key still function to
answer and end calls while the Hearing Hub
is in key lock mode.
pWhen the hearing instrument is turned off
and then back on again while the
Hearing Hub is in key lock mode, the volume
levels will be reset to the original settings,
and the program will be reset to Memory 1.
To put the Hearing Hub in key lock mode
Slide the power/hold switch to .
To cancel the key lock mode
Slide the power/hold switch to POWER ON.
Power/Hold switch
HOLD ON
HOLD OFF
POWER
OFF ON
CHARGE
MEMO
LOCK
TV
VOL
PHONE
PLAY
STOP
REC
MEMORY PAIRING
HEARING
INSTRUMENTS
ON
POWER
OFF
BINAURAL
LR
Send key
Answer calls
End key
Reject incoming calls
/
End calls
Power/Hold switch
9*/#AGPIDQQMࡍࠫ㧞㧜㧝㧝ᐕ㧝㧜㧞㧝ᣣޓ㊄ᦐᣣޓඦ೨㧥ᤨ㧟㧣ಽ
32
Operations
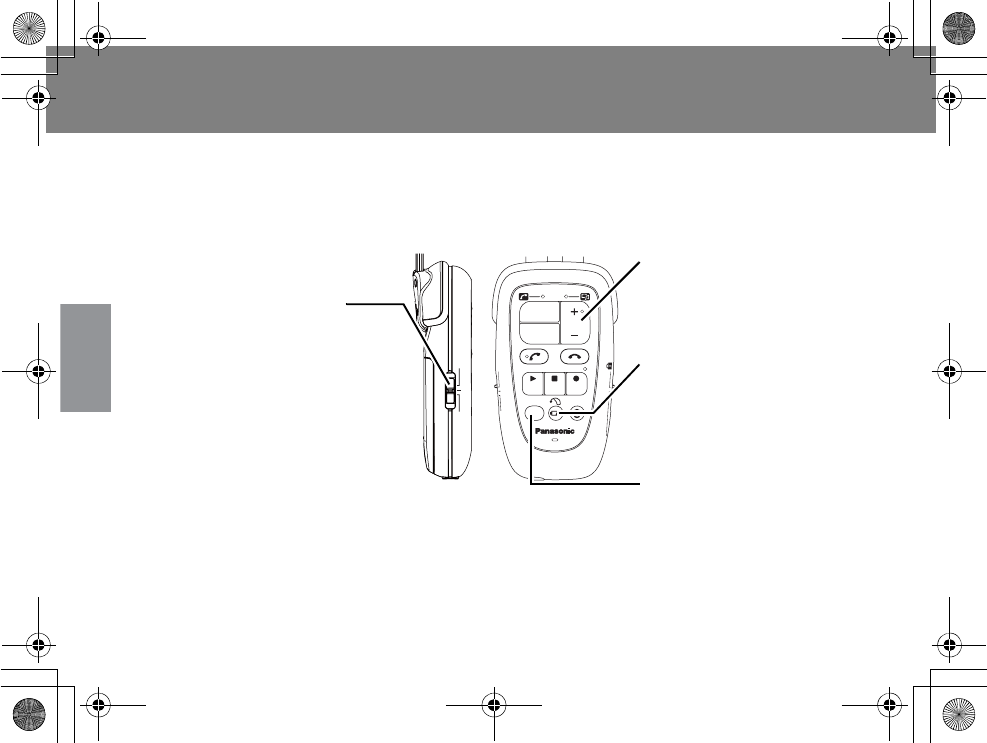
Monaural/Binaural switch
You can select the left ear, right ear, or both ears for the following operations on your hearing
instrument:
pVolume control
pMemory program
pBattery power-left notification
When you want to use in monaural mode, make sure that you set the position of the
switch to the ear you need to operate the instrument for.
BINAURAL
LR
CHARGE
MEMO
LOCK
TV
VOL
PHONE
PLAY
STOP
REC
MEMORY PAIRING
HEARING
INSTRUMENTS
ON
POWER
OFF
BINAURAL
LR
Memory key
pSwitches between memory
programs
Volume key
pAdjusts the volume
Battery power-left
notification key
pNotifies you of the
remaining battery power of
the hearing instrument
Monaural/Binaural switch
L: The above operations
are enabled for the
left ear.
BINAURAL: The above operations
are enabled for both
ears.
R: The above operations
are enabled for the
right ear.
Operate your hearing instrument
9*/#AGPIDQQMࡍࠫ㧞㧜㧝㧝ᐕ㧝㧜㧞㧝ᣣޓ㊄ᦐᣣޓඦ೨㧥ᤨ㧟㧣ಽ

33
Operations
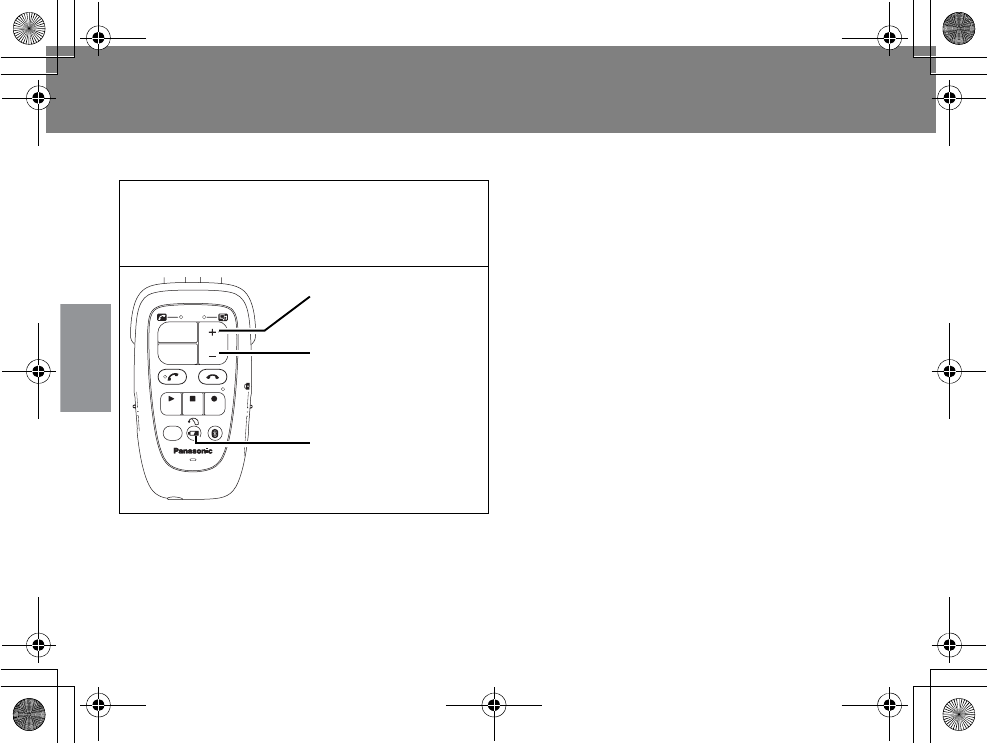
Volume adjustment
xVolume adjustment while hearing through the microphone of the
hearing instrument
* The volume control is not available during the
following operations:
pListening to TV audio
pMaking calls, receiving calls, or talking on mobile
phone
pMaking calls, receiving calls, or talking on landline
phone
pListening to music (external input terminal)
pRecording or playing the recorded audio data
with voice memo recording
pThe volume control provides 24 adjustable
volume levels. Each time the volume key is
pressed, the hearing instrument makes a
buzzing sound for every notification. When
the hearing instrument reaches its
maximum/minimum level, it does not emit a
notification sound.
pPress and hold the volume key, so the
volume is consecutively changing by itself at
1-second interval.
pWhen the hearing instrument is turned off
and then back on again, the volume level
will be reset to the original setting.
Use the volume keys to turn the volume
up or down.
CHARGE
MEMO
LOCK
TV
VOL
PHONE
PLAY
STOP
REC
MEMORY PAIRING
HEARING
INSTRUMENTS
ON
POWER
OFF
BINAURAL
LR
Turn the volume up by
pressing the upper part
(+).
Turn the volume down
by pressing the lower
part (-).
Operate your hearing instrument
9*/#AGPIDQQMࡍࠫ㧞㧜㧝㧝ᐕ㧝㧜㧞㧝ᣣޓ㊄ᦐᣣޓඦ೨㧥ᤨ㧟㧣ಽ
Volume adjustment (Continued)
34
Operations
xAdjust the notification alert sound
* Once the battery power-left notification key is
pressed, you can hear the alert sound to notify you
how much power is left on the hearing instrument
then you can hear the sound to assure that the
volume setup has been completed.
pYou can adjust the volume level of the
notification alert for the following functions:
The remaining battery power of the
hearing instrument is notified.
Recording is started or stopped with
voice memo recording.
p
The volume control provides 17 adjustable volume
levels. Each time the volume key is pressed, the
hearing instrument makes a notification sound.
pPress and hold the volume key, so the
volume is consecutively changing itself.
pWhen the hearing instrument or
Hearing Hub is turned off and then back on
again, the volume level of the notification
alert will not be reset to the original setting.
* The alert sound adjustment is not available during
the following operations:
pListening to TV audio
p
Making calls, receiving calls, or talking on mobile phone
p
Making calls, receiving calls, or talking on landline phone
p
Listening to music (external input terminal)
pRecording or playing the recorded audio data
through voice memo recording
Pressing and holding the battery power-
left notification key for at least 3 seconds,
press the volume keys to turn the volume
up or down.
CHARGE
MEMO
LOCK
TV
VOL
PHONE
PLAY
STOP
REC
MEMORY PAIRING
HEARING
INSTRUMENTS
ON
POWER
OFF
BINAURAL
LR
Turn the volume up by
pressing the upper part
(+).
Turn the volume down
by pressing the lower
part (-).
Battery power-left
notification key
Operate your hearing instrument
9*/#AGPIDQQMࡍࠫ㧞㧜㧝㧝ᐕ㧝㧜㧞㧝ᣣޓ㊄ᦐᣣޓඦ೨㧥ᤨ㧟㧣ಽ
35
Operations
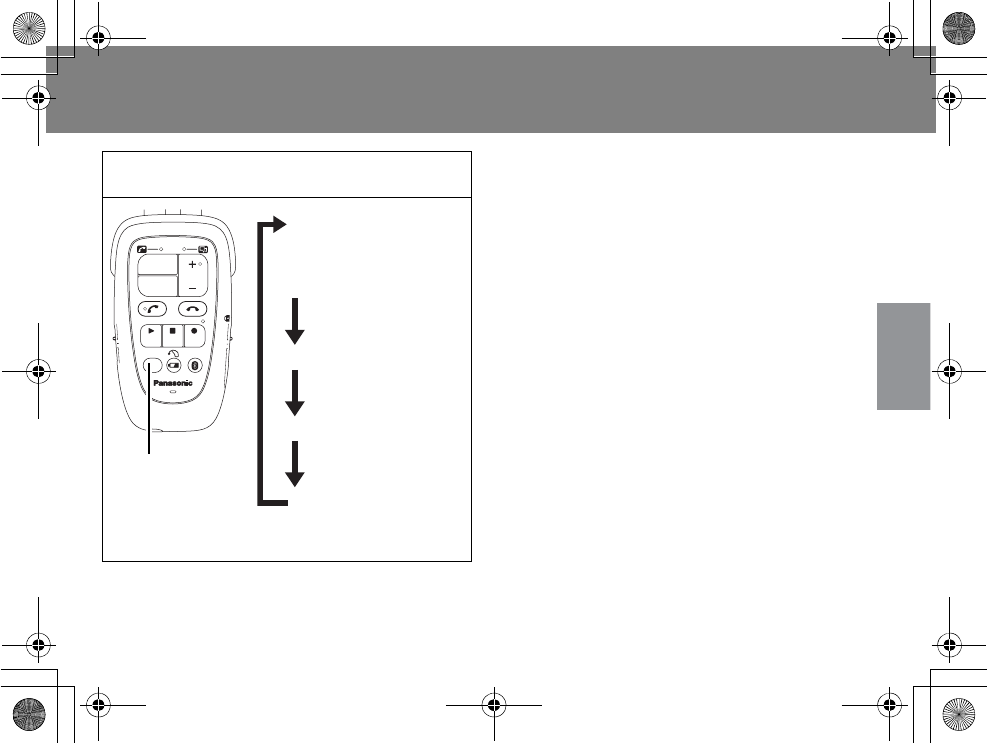
Memory switch
pThe memory key allows you to switch
between situations (programs) depending
on surrounding conditions.
pThe number of memory programs varies
depending on the type of hearing
instrument. For details, ask your dispenser.
pWhen the hearing instrument is turned off
and then back on again, the program will be
reset to Memory 1.
* Memory switch is not available during the
following operations:
pListening to TV audio
pMaking calls, receiving calls, or talking on mobile
phone
pMaking calls, receiving calls, or talking on landline
phone
pListening to music (external input terminal)
pRecording or playing the recorded audio data
through voice memo recording
The memory key is used to switch
between memory programs.
CHARGE
MEMO
LOCK
TV
VOL
PHONE
PLAY
STOP
REC
MEMORY PAIRING
HEARING
INSTRUMENTS
ON
POWER
OFF
BINAURAL
LR
Memory key
Memory 1
(The hearing
instrument is
turned on)
Memory 3
Warning chime
Chimes twice
Warning chime
Chimes 3 times
Memory 2
Warning chime
Chimes 4 times
Memory 4
Warning chime
Chimes once
Operate your hearing instrument
9*/#AGPIDQQMࡍࠫ㧞㧜㧝㧝ᐕ㧝㧜㧞㧝ᣣޓ㊄ᦐᣣޓඦ೨㧥ᤨ㧟㧣ಽ
36
Operations
Remaining battery power of the hearing instrument
pThe alert notification for the left ear is made
from the hearing instrument for the left ear.
pThe alert notification for the right ear is
made from the hearing instrument for the
right ear.
pIn case of binaural use, the alert notification
is made from the left ear to the right ear.
* The battery power-left notification is not available
during the following operations:
pListening to TV audio
p
Making calls, receiving calls, or talking on mobile phone
p
Making calls, receiving calls, or talking on landline phone
pListening to music (external input terminal)
pRecording or playing the recorded audio data
through voice memo recording
For information on how to adjust the volume level of
notification alert sound, see Page 34.
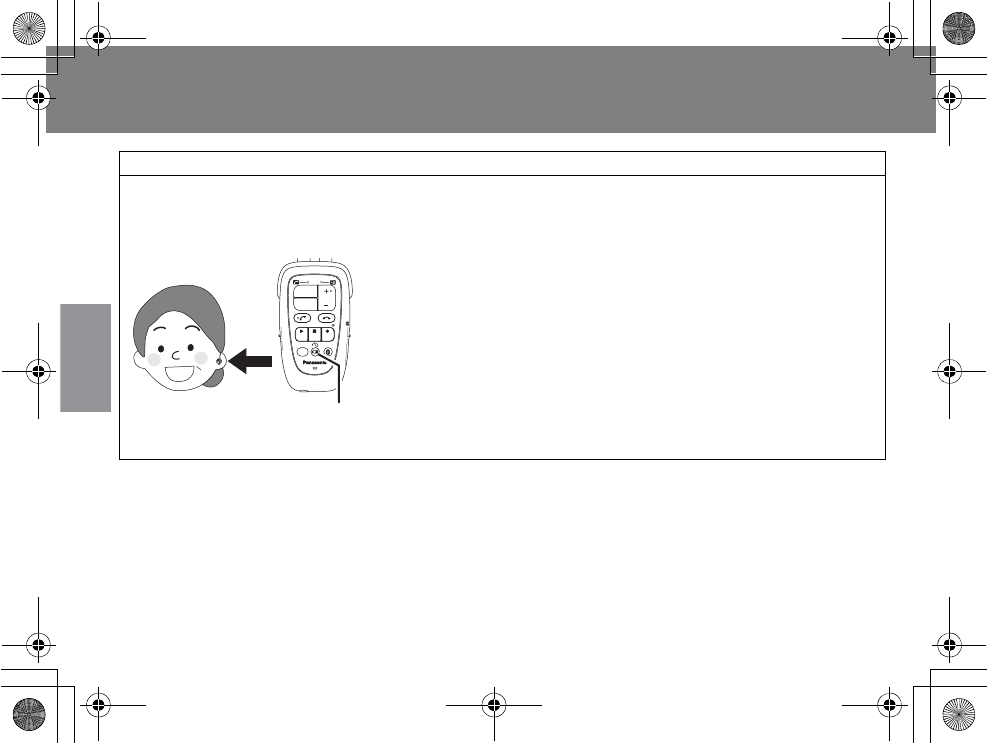
How you get to know the remaining battery power of your hearing instrument
Press the battery power-left notification key near your ear, so you can check the remaining
battery power of your hearing instrument.
Almost full
Chimes once
Half
Chimes twice*1
Low
Chimes three times*1
Improper connection with the hearing instrument
Warning alarm (once)*2
*1 Chimes will sound continuously.
*2 When the warning sound is emitted, get the Hearing Hub closer to
the hearing instrument then press the battery power-left
notification key again.
CHARGE
MEMO
LOCK
TV
VOL
PHONE
PLAY
STOP
REC
MEMORY PAIRING
HEARING
INSTRUMENTS
ON
POWER
OFF
BINAURAL
LR
Battery power-left notification Key
Operate your hearing instrument
9*/#AGPIDQQMࡍࠫ㧞㧜㧝㧝ᐕ㧝㧜㧞㧝ᣣޓ㊄ᦐᣣޓඦ೨㧥ᤨ㧟㧣ಽ

37
Operations
Hearing instrument reset
In case of binaural hearing instruments, the memory switch and volume control may work only
on one ear depending on the communication status of the Hearing Hub. If this occurs, reset
your hearing instrument by following the instructions below.
xReset the hearing instrument on the Hearing Hub
1Wearing the neckloop antenna, press and hold the memory key for
about 10 seconds.
When the hearing instrument emits alert sounds
(to notify the completion of memory switch or
volume setup) for a few seconds, the reset
operation is complete.*1
*1 The alert sound varies depending on the
volume and memory program settings.
PLAY
STOP
REC
MEMORY PAIRING
HEARING
INSTRUMENTS
ON
POWER
OFF
BINAURAL
LR
Memory key
Operate your hearing instrument
9*/#AGPIDQQMࡍࠫ㧞㧜㧝㧝ᐕ㧝㧜㧞㧝ᣣޓ㊄ᦐᣣޓඦ೨㧥ᤨ㧟㧣ಽ
Hearing instrument reset (Continued)
38
Operations
xReset with your hearing instrument
1Turn off your hearing
instrument.
pFully open up the battery compartment
by pulling the edge of the swing-out door
outward.
2Turn the hearing instrument
back on again.
pCompletely close the battery
compartment by swinging the door until
it snaps securely. Once powered on, the
reset operation has been completed.*1
*1 When reset has completed, the memory
program and volume level will be reset to
the original settings. You need to set them
up again to properly function according to
your needs.
Operate your hearing instrument
9*/#AGPIDQQMࡍࠫ㧞㧜㧝㧝ᐕ㧝㧜㧞㧝ᣣޓ㊄ᦐᣣޓඦ೨㧥ᤨ㧟㧣ಽ
39
Operations
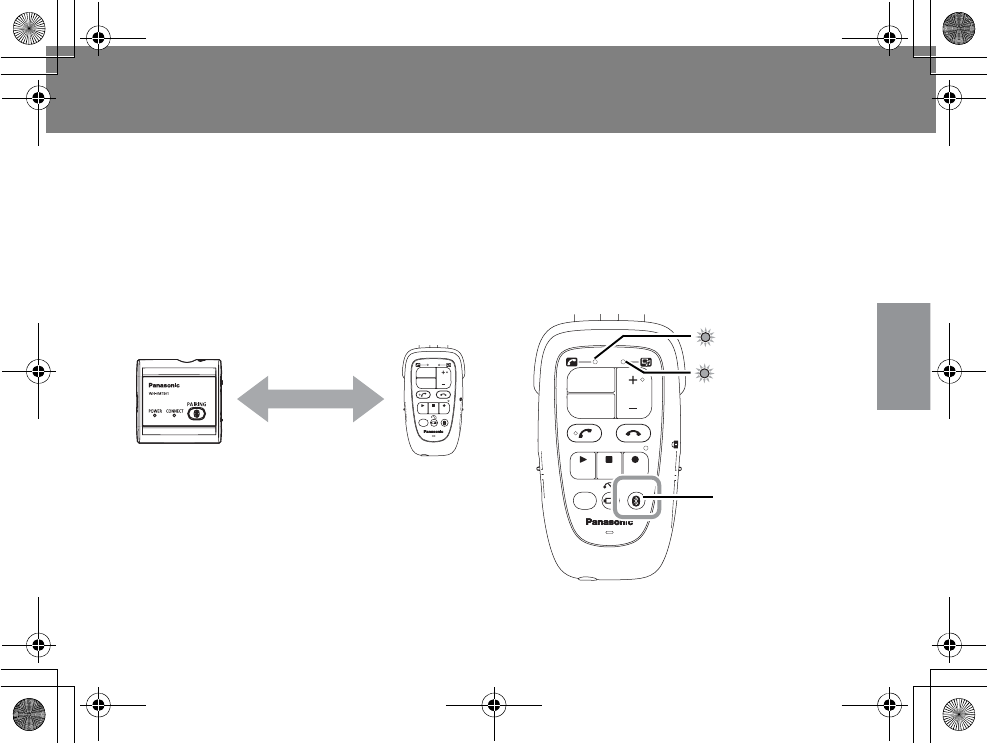
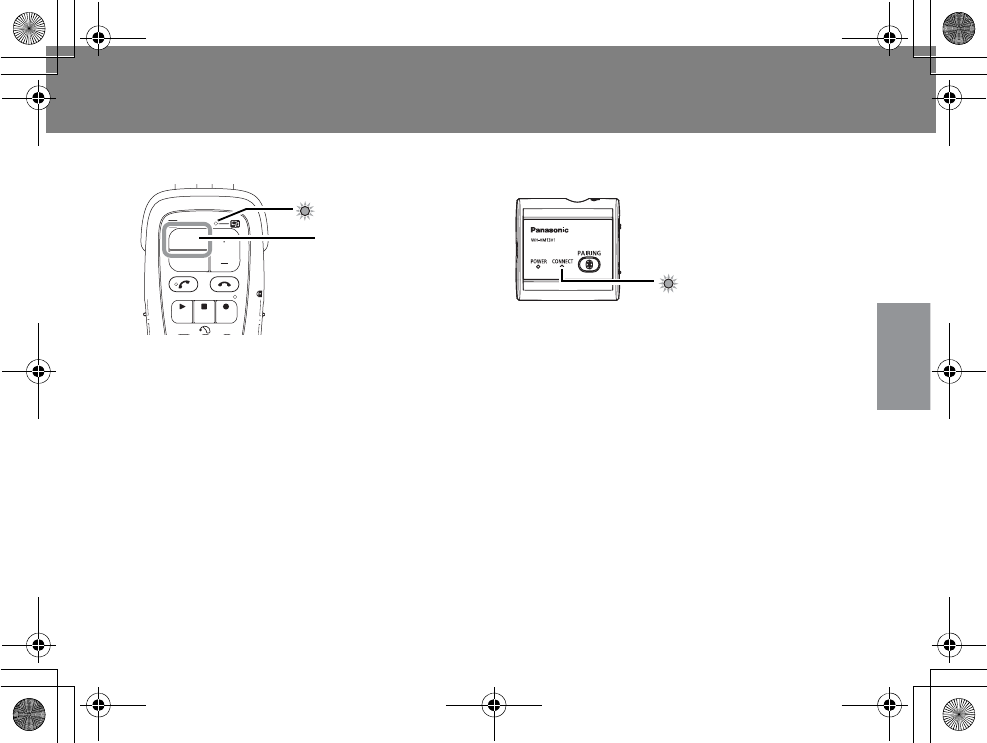
Listen to TV audio (Pairing)
To listen to TV audio, you need to complete the Bluetooth® pairing procedure between the
Hearing Hub and Audio Transmitter*1 as a prerequisite.
xPairing procedure
1Place the Hearing Hub within
19.7 inches (50 cm) from the
Audio Transmitter*1 and turn
them on, respectively.
pTurn off other Bluetooth® devices around
that have already been paired with the
Hearing Hub.
2Press and hold the paring key of
the Hearing Hub for about 5
seconds.
pLED 1 and LED 2 are rapidly blinking green
simultaneously (5 times per second).
*1 The Audio Transmitter is an optional accessory sold separately.
CHARGE
MEMO
LOCK
TV
VOL
PHONE
PLAY
STOP
REC
MEMORY PAIRING
HEARING
INSTRUMENTS
ON
POWER
OFF
BINAURAL
LR
Within 19.7 inches
(50 cm)
Audio
Transmitter*1
CHARGE
MEMO
LOCK
TV
VOL
PHONE
PLAY
STOP
REC
MEMORY PAIRING
HEARING
INSTRUMENTS
ON
POWER
OFF
BINAURAL
LR
LED 1
LED 2
Pairing key
Listen to TV audio
9*/#AGPIDQQMࡍࠫ㧞㧜㧝㧝ᐕ㧝㧜㧞㧝ᣣޓ㊄ᦐᣣޓඦ೨㧥ᤨ㧟㧣ಽ
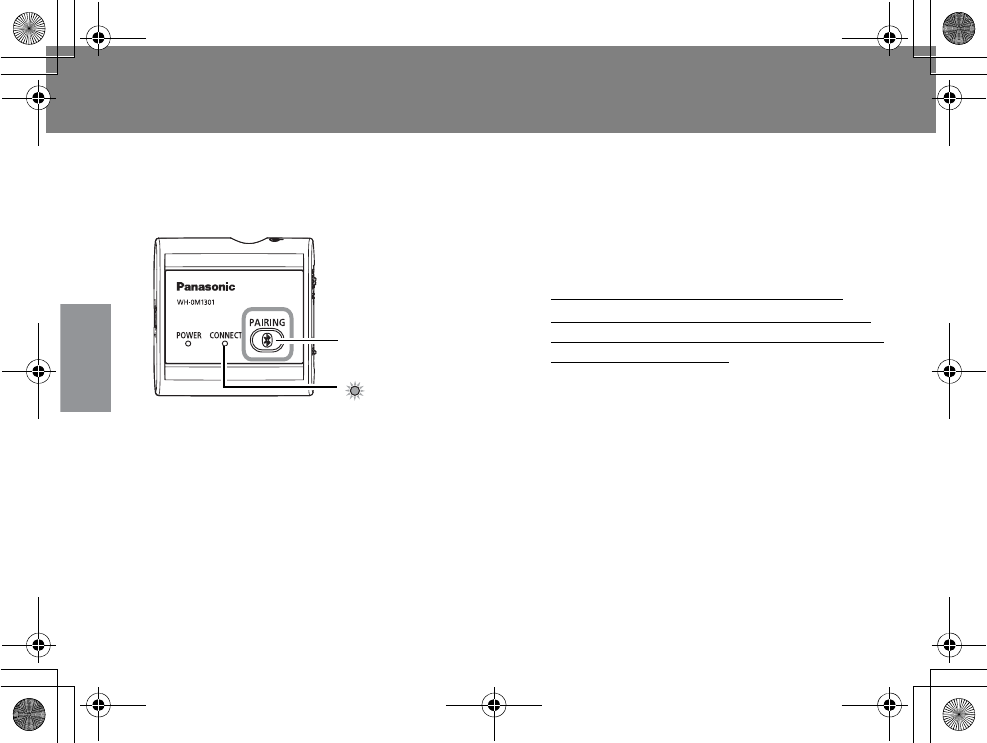
Listen to TV audio (Pairing) (Continued)
40
Operations
3Press and hold the paring key of
the Audio Transmitter*1 for
about 5 seconds.
pThe connection indicator LED of the
Audio Transmitter*1 is rapidly blinking (5
times per second).
4Make sure that the pairing
procedure has been completed.
pThis process may take up to 45 seconds
to complete.
pThe rapid blinking (5 times per second) of
LED 1 and LED 2 will shut off.
pThe connection indicator LED of the
Audio Transmitter*1 will be blinking for
about 15 seconds, come on for about 30
seconds then shut off.
Pairing two wireless devices is a one-
time operation using a Bluetooth®
connection. After the Audio
Transmitter*1 has been successfully
registered (paired) with the
Hearing Hub, pairing does not need to
be repeated for subsequent usage.
* If you have any questions about pairing or
need assistance, ask your dispenser.
*1 The Audio Transmitter is an optional accessory sold separately.
Audio Transmitter*1
Pairing key
Connection
indicator
Listen to TV audio
9*/#AGPIDQQMࡍࠫ㧞㧜㧝㧝ᐕ㧝㧜㧞㧜ᣣޓᧁᦐᣣޓඦᓟ㧠ᤨ㧡㧜ಽ

41
Operations
xPairing instructions
pPairing failed.
If the Hearing Hub cannot find the Bluetooth® device within 120 seconds, the pairing
procedure will be cancelled. For the connection timeout, see the instructions that came with
the Bluetooth® enabled device.
pTo cancel the pairing procedure, press the paring key again.
pTo delete the registered information, first hold the paring key down, turn on the Hearing Hub
then keep holding the paring key for approximately 10 seconds. LED 1 and LED 2 will turn solid
green for 3 seconds during deletion.
Once pairing information is deleted, the Bluetooth® device that has already been paired will be
disabled.
Listen to TV audio
9*/#AGPIDQQMࡍࠫ㧞㧜㧝㧝ᐕ㧝㧜㧞㧝ᣣޓ㊄ᦐᣣޓඦ೨㧥ᤨ㧟㧣ಽ
42
Operations
Listen to TV audio (Prerequisite)
Bluetooth® pairing with the Audio Transmitter*1 must be completed.
pYou can hear the sound on TV through the Audio Transmitter*1.
xConnection instructions
1Connect the Audio Transmitter*1 to the television.
pSee the instructions that came with the Audio Transmitter*1.
2Turn on the Audio Transmitter*1.
*1 The Audio Transmitter is an optional accessory sold separately.
Bluetooth®
CHARGE
MEMO
LOCK
TV
VOL
PHONE
PLAY
STOP
REC
MEMORY PAIRING
HEARING
INSTRUMENTS
ON
POWER
OFF
BINAURAL
LR
Audio Transmitter*1
TV
Hearing
instrument
Listen to TV audio
9*/#AGPIDQQMࡍࠫ㧞㧜㧝㧝ᐕ㧝㧜㧞㧝ᣣޓ㊄ᦐᣣޓඦ೨㧥ᤨ㧟㧣ಽ
43
Operations
Listen to TV audio (Operation)
xListening to TV audio
1Press the TV key.
pYou can hear TV audio from your hearing instrument in several seconds.
pDuring Bluetooth® connection process, both LED 1 and LED 2 simultaneously blink green
once per second. Likewise, the connection indicator LED of the Audio Transmitter*1 blinks
once per second.
pWhile you are listening to TV audio, LED 2 slowly blinks green once per 2-3 seconds. The
connection indicator LED of the Audio Transmitter*1 comes on green.
xStop listening to TV audio
1Press the TV key.
pLED 2 and the connection indicator LED of the Audio Transmitter*1 will shut off.
pThe mode of the hearing instrument will be returned to Memory 1 so you get back to the
normal hearing environment.
*1 The Audio Transmitter is an optional accessory sold separately.
CHARGE
MEMO
LOCK
TV
VOL
PHONE
PLAY
STOP
REC
MEMORY PAIRING
ON
R
BINAURA
L
L
TV key
LED 2
Connection indicator
Audio Transmitter*1
Listen to TV audio
9*/#AGPIDQQMࡍࠫ㧞㧜㧝㧝ᐕ㧝㧜㧞㧝ᣣޓ㊄ᦐᣣޓඦ೨㧥ᤨ㧟㧣ಽ

Listen to TV audio (Operation) (Continued)
44
Operations
x
Volume adjustment
You can adjust the TV audio volume by
following the instructions below.
Use the volume keys to turn the volume up
or down.
p
The volume control provides 17 adjustable volume
levels. A notification sound is not made from the
hearing instrument.
p
Press and hold the volume key, so the volume is
consecutively changing by itself at 1-second interval.
p
When the hearing instrument or Hearing Hub is
turned off and then back on again, the volume
remains unchanged since it was last adjusted.
p
Adjusting TV volume does not affect the volume of
the hearing instrument.
p
The TV volume is the same as that for music through
the external input terminal.
Volume adjustment through the Audio
Transmitter*1
pSee the instructions that came with the
Audio Transmitter*1.
*1 The Audio Transmitter is an optional
accessory sold separately.
x
Mix left and right audio channels
You can switch between stereo binaural
hearing and L/R mix. In binaural stereo
hearing, one channel is differentiated from
the other. The split audio is directed from one
stereo channel to one ear and from the other
channel to the other ear. In the Hearing Hub,
the binaural stereo mode is set as default.
Those who are wearing a monaural hearing
instrument can only hear the sound from one
stereo channel in one ear because the other
channel is disabled. In L/R mix, multiple sound
sources are merged together to create a
multi-dimensional sound, rich in depth and
complexity. Regarding L/R mix setup, ask your
dispenser for assistance.
xHearing instrument microphone
You can set up the microphone of your
hearing instrument as you can simultaneously
listen to the sound from a television through
your hearing instrument’s microphone.
For enabling or disabling the microphone, ask
your dispenser for assistance.
Listen to TV audio
9*/#AGPIDQQMࡍࠫ㧞㧜㧝㧝ᐕ㧝㧜㧞㧝ᣣޓ㊄ᦐᣣޓඦ೨㧥ᤨ㧟㧣ಽ
45
Operations
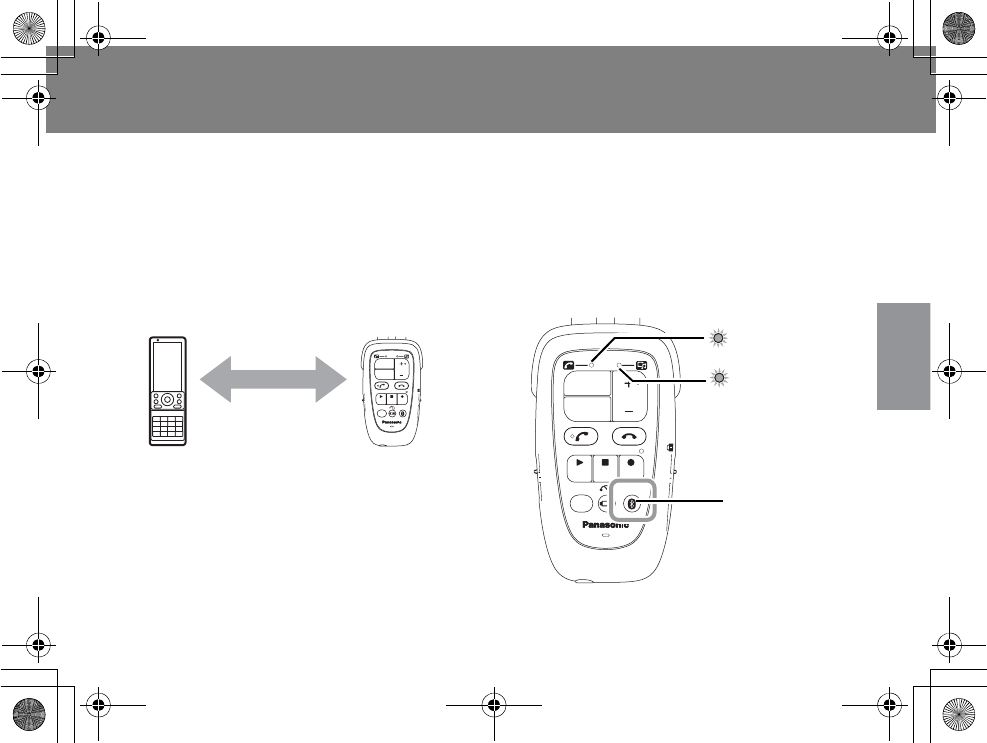
Make and receive calls on mobile phone (Pairing)
To use with your Bluetooth® mobile phone, you need to complete the Bluetooth® pairing
procedure between the Hearing Hub and your Bluetooth® mobile phone as a prerequisite.
xPairing procedure
1Place the Hearing Hub within
19.7 inches (50 cm) from your
mobile phone and turn them
on, respectively.
pPower your phone on and choose
“Settings”. Access the “Bluetooth”
options menu and choose “On” to power
on Bluetooth®. See the instructions that
came with the mobile phone.
pTurn off other Bluetooth® devices around
that have already been paired with the
Hearing Hub.
2Press and hold the paring key of
the Hearing Hub for about 5
seconds.
pBoth LED 1 and LED 2 are rapidly blinking
green (5 times per second).
CHARGE
MEMO
LOCK
TV
VOL
PHONE
PLAY
STOP
REC
MEMORY PAIRING
HEARING
INSTRUMENTS
ON
POWER
OFF
BINAURAL
LR
Within 19.7 inches
(50 cm)
Mobile phone
CHARGE
MEMO
LOCK
TV
VOL
PHONE
PLAY
STOP
REC
MEMORY PAIRING
HEARING
INSTRUMENTS
ON
POWER
OFF
BINAURAL
LR
LED 1
LED 2
Pairing key
Make and receive calls on mobile phone
9*/#AGPIDQQMࡍࠫ㧞㧜㧝㧝ᐕ㧝㧜㧞㧝ᣣޓ㊄ᦐᣣޓඦ೨㧥ᤨ㧟㧣ಽ
Make and receive calls on mobile phone (Pairing)
(Continued)
46
Operations
3Open the “Settings” or “Tools”
option on your mobile phone.
Choose “Bluetooth”, then select
“Add New Device” or “Search”.
pSee the instructions that came with the
mobile phone.
4Your mobile phone will search
for nearby Bluetooth® devices.
This may take several seconds.
pSee the instructions that came with the
mobile phone.
pOn your mobile phone, when searching
for device, “HABT01” will appear in the
device list.
The name may vary depending on the
make or model of the mobile phone.
pSelect the name of the Hearing Hub,
“HABT01”, from the list of discovered
devices displayed on your phone’s screen.
pEnter “0000” when you are asked to
enter the PIN or passkey. Press “OK”.
5Your mobile phone will confirm
pairing and automatically
connect to the Hearing Hub.
Make sure that the Bluetooth®
pairing procedure has been
completed.
pLED 1 will slowly blink green once per 2-3
seconds to indicate that your mobile
phone is connected to the Hearing Hub
through Bluetooth®.
* If your phone has both the Bluetooth®
Hands-Free Profile and Headset Profile, select
Hands-Free Profile for “Profile” options.
Make and receive calls on mobile phone
9*/#AGPIDQQMࡍࠫ㧞㧜㧝㧝ᐕ㧝㧜㧞㧜ᣣޓᧁᦐᣣޓඦᓟ㧠ᤨ㧡㧜ಽ

47
Operations
After the mobile phone has been successfully registered (paired) with the Hearing Hub,
the Hearing Hub will automatically reconnect to your phone.
Normally, the first time a Bluetooth® device is used with the Hearing Hub, a one-time
pairing connection must be established. The pairing connection is only required for the
first use, and does not need to be repeated for subsequent usage.
xPairing instructions
See the “Pairing instructions” in Page 41.
* Music playing on the mobile phone is not supported.
* If you have any questions about pairing or need assistance, ask your dispenser.
Make and receive calls on mobile phone
9*/#AGPIDQQMࡍࠫ㧞㧜㧝㧝ᐕ㧝㧜㧞㧝ᣣޓ㊄ᦐᣣޓඦ೨㧥ᤨ㧟㧣ಽ
48
Operations
Make and receive calls on mobile phone (Prerequisite)
Bluetooth® pairing with your mobile phone must be completed.
pYou can make and receive calls from your mobile phone through Hearing Hub.
pYou can talk on the phone by using your hearing instrument and the microphone of the
Hearing Hub.
xPhone setup
1Enable Bluetooth® in your mobile phone.
pSee the instructions that came with the mobile phone.
xProper use of a microphone
When you talk, hang your Hearing Hub around your neck, as
shown in the illustration.
If the surrounding is noisy, position the microphone close to your
mouth.
* Depending on where the microphone is located or facing, voice
communications might be interrupted.
Try changing the position of the microphone if you experience poor
communication.
CHARGE
MEMO
LOCK
TV
VOL
PHONE
PLAY
STOP
REC
MEMORY PAIRING
HEARING
INSTRUMENTS
ON
POWER
OFF
BINAURAL
LR
Bluetooth®
Mobile
phone
Hearing
instrument
CHARGE
MEMO
LOCK
TV
VOL
PHONE
PLAY
STOP
REC
MEMORY PAIRING
HEARING
INSTRUMENTS
ON
POWER
OFF
BINAURAL
LR
Microphone
Make and receive calls on mobile phone
9*/#AGPIDQQMࡍࠫ㧞㧜㧝㧝ᐕ㧝㧜㧞㧝ᣣޓ㊄ᦐᣣޓඦ೨㧥ᤨ㧟㧣ಽ

49
Operations
Make and receive calls on mobile phone (Operation)
xPut the Hearing Hub into standby mode.
The Hearing Hub is connected to the mobile
phone through Bluetooth®.
1Connect your mobile phone to
the Hearing Hub through
Bluetooth®.
pSee the instructions that came with the
mobile phone.
pThe two devices must be paired. Turn on
the Hearing Hub, so it will automatically
connect to the mobile phone through
Bluetooth®, and the phone will go into
standby mode.
pIf Bluetooth® connection is disabled due
to poor signal reception, press the phone
key for reconnection.
pOnce the Hearing Hub and mobile phone
are connected to each other through
Bluetooth®, LED 1 will be slowly blinking
green once per 2-3 seconds.
Note:
CHARGE
MEMO
LOCK
TV
VOL
PHONE
PLAY
STOP
REC
MEMORY PAIRING
HEARING
INSTRUMENTS
ON
POWER
OFF
BINAURAL
LR
LED 1
Phone key
Make and receive calls on mobile phone
9*/#AGPIDQQMࡍࠫ㧞㧜㧝㧝ᐕ㧝㧜㧞㧝ᣣޓ㊄ᦐᣣޓඦ೨㧥ᤨ㧟㧣ಽ
Make and receive calls on mobile phone (Operation)
(Continued)
50
Operations
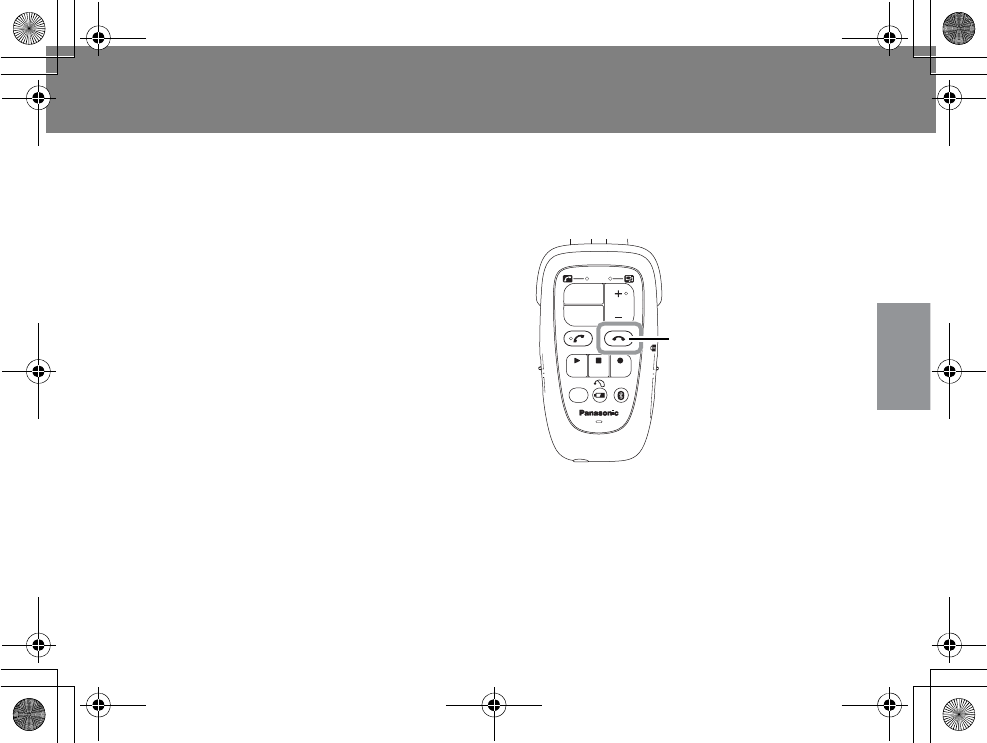
xReceive calls
1You will get notification
ringtones for incoming calls
from your hearing instrument.
pWhile incoming calls are being received,
LED 1 is rapidly blinking green 5 times per
second.
* Ringtones may vary depending on the phone
settings. An alert notification may be emitted
from the Hearing Hub.
* Text message alert is not supported.
2Press the send key to answer the
call.
pWhile you receive incoming calls, LED 1 is
slowly blinking green once per 2-3
seconds.
pPress the end key to reject an incoming
call without answering.
3When done talking, hang up by
pressing the end key.
pWhen the call is done, the mode of the
hearing instrument will be returned to
Memory 1.
CHARGE
MEMO
LOCK
TV
VOL
PHONE
PLAY
STOP
REC
MEMORY PAIRING
ON
POWER
O
FF
BINAURAL
LR
LED 1
Send
key End key
CHARGE
MEMO
LOCK
TV
VOL
PHONE
PLAY
STOP
REC
MEMORY PAIRING
HEARING
INSTRUMENTS
ON
POWER
OFF
BINAURAL
LR
End key
Make and receive calls on mobile phone
9*/#AGPIDQQMࡍࠫ㧞㧜㧝㧝ᐕ㧝㧜㧞㧝ᣣޓ㊄ᦐᣣޓඦ೨㧥ᤨ㧟㧣ಽ
51
Operations
xMake calls
1Dial the numbers.
pDepending on the make and model of
mobile phones, you might need to set up
or operate your mobile phone, so you can
pick up the call from your mobile phone
and switch it to Hearing Hub. For details,
see the instructions that came with the
mobile phone.
2You will hear the ringback tone
from your hearing instrument.
3When someone answers it, start
talking.
4When done talking, hang up by
pressing the end key.
pWhen the call is done, the mode of the
hearing instrument will be returned to
Memory 1.
CHARGE
MEMO
LOCK
TV
VOL
PHONE
PLAY
STOP
REC
MEMORY PAIRING
HEARING
INSTRUMENTS
ON
POWER
OFF
BINAURAL
LR
End key
Make and receive calls on mobile phone
9*/#AGPIDQQMࡍࠫ㧞㧜㧝㧝ᐕ㧝㧜㧞㧝ᣣޓ㊄ᦐᣣޓඦ೨㧥ᤨ㧟㧣ಽ

Make and receive calls on mobile phone (Operation)
(Continued)
52
Operations
xVolume adjustment
You can adjust the phone volume such as ringtone, ringback tone and conversation by
following the instructions below.
Use the volume keys to turn the volume up or down.
pThe volume control provides 17 adjustable volume levels. A notification sound is not made
from the hearing instrument.
pPress and hold the volume key, so the volume is consecutively changing by itself at 1-second
interval.
pWhen the hearing instrument or Hearing Hub is turned off and then back on again, the
volume remains unchanged since it was last adjusted.
pAdjusting the phone volume such as ringtone, ringback tone and conversation does not affect
the volume of the hearing instrument.
Adjust the volume on mobile phone
pSee the instructions that came with the mobile phone. Some mobile phone models may not
allow you to adjust the volume.
Make and receive calls on mobile phone
9*/#AGPIDQQMࡍࠫ㧞㧜㧝㧝ᐕ㧝㧜㧞㧝ᣣޓ㊄ᦐᣣޓඦ೨㧥ᤨ㧟㧣ಽ
53
Operations
Make and receive calls on landline phone (Pairing)
To use with your Bluetooth® landline phone, you need to complete the Bluetooth® pairing
procedure between the Hearing Hub and your Bluetooth® landline phone as a prerequisite.
xPairing procedure
1Place the Hearing Hub within
19.7 inches (50 cm) from the
Bluetooth® landline phone and
turn them on, respectively.
pヵㄖㄓㄏチㄐㄇㄇチㄐㄕㄉㄆㄓチャㄍㄖㄆㄕㄐㄐㄕㄉ®チㄅㄆㄗㄊㄆㄔチㄓㄐㄖㄏㄅチ
ㄕㄉㄕチㄉㄗㄆチㄍㄓㄆㄅㄚチㄆㄆㄏチㄑㄊㄓㄆㄅチㄘㄊㄕㄉチㄕㄉㄆチ
ラㄆㄓㄊㄏㄈ ラㄖハ
2Press and hold the paring key of
the Hearing Hub for about 5
seconds.
pBoth LED 1 and LED 2 are rapidly blinking
green (5 times per second).
CHARGE
MEMO
LOCK
TV
VOL
PHONE
PLAY
STOP
REC
MEMORY PAIRING
HEARING
INSTRUMENTS
ON
POWER
OFF
BINAURAL
LR
Within 19.7 inches
(50 cm)
Bluetooth®
landline
phone
CHARGE
MEMO
LOCK
TV
VOL
PHONE
PLAY
STOP
REC
MEMORY PAIRING
HEARING
INSTRUMENTS
ON
POWER
OFF
BINAURAL
LR
LED 1
LED 2
Pairing key
Make and receive calls on landline phone
9*/#AGPIDQQMࡍࠫ㧞㧜㧝㧝ᐕ㧝㧜㧞㧝ᣣޓ㊄ᦐᣣޓඦ೨㧥ᤨ㧟㧣ಽ

Make and receive calls on landline phone (Pairing)
(Continued)
54
Operations
3Put the Bluetooth® landline phone into pairing mode.
pSee the instructions that came with the Bluetooth® landline phone.
pIf you are prompted for passkey, enter “0000”.
4
Make sure that the Bluetooth
®
pairing procedure has been completed.
pLED 1 will slowly blink green once per 2-3 seconds to indicate that the phone is connected
to the Hearing Hub through Bluetooth®.
pSee the instructions that came with the Bluetooth® landline phone.
After the Bluetooth® landline phone has been successfully registered (paired) with the
Hearing Hub, the Hearing Hub will automatically reconnect to the phone.
Normally, the first time a Bluetooth® device is used with the Hearing Hub, a one-time
pairing connection must be established. The pairing connection is only required for the
first use, and does not need to be repeated for subsequent usage.
xPairing instructions
See the “Pairing instructions” in Page 41.
If you have any questions about pairing or need assistance, ask your dispenser.
Make and receive calls on landline phone
9*/#AGPIDQQMࡍࠫ㧞㧜㧝㧝ᐕ㧝㧜㧞㧜ᣣޓᧁᦐᣣޓඦᓟ㧠ᤨ㧡㧜ಽ
55
Operations
Make and receive calls on landline phone (Prerequisite)
Bluetooth® pairing with your landline phone must be completed.
pYou can make and receive calls from your landline phone through Hearing Hub.
pYou can talk on the phone by using your hearing instrument and the microphone of the
Hearing Hub.
xPhone setup
Directly plug the Bluetooth
®
landline phone into a telephone wall mount
jack.
pSee the instructions that came with the Bluetooth® landline phone.
Bluetooth®
CHARGE
MEMO
LOCK
TV
VOL
PHONE
PLAY
STOP
REC
MEMORY PAIRING
HEARING
INSTRUMENTS
ON
POWER
OFF
BINAURAL
LR
Bluetooth® landline
phone
Hearing
Instrument
Make and receive calls on landline phone
9*/#AGPIDQQMࡍࠫ㧞㧜㧝㧝ᐕ㧝㧜㧞㧝ᣣޓ㊄ᦐᣣޓඦ೨㧥ᤨ㧟㧣ಽ
Make and receive calls on landline phone (Prerequisite)
(Continued)
56
Operations
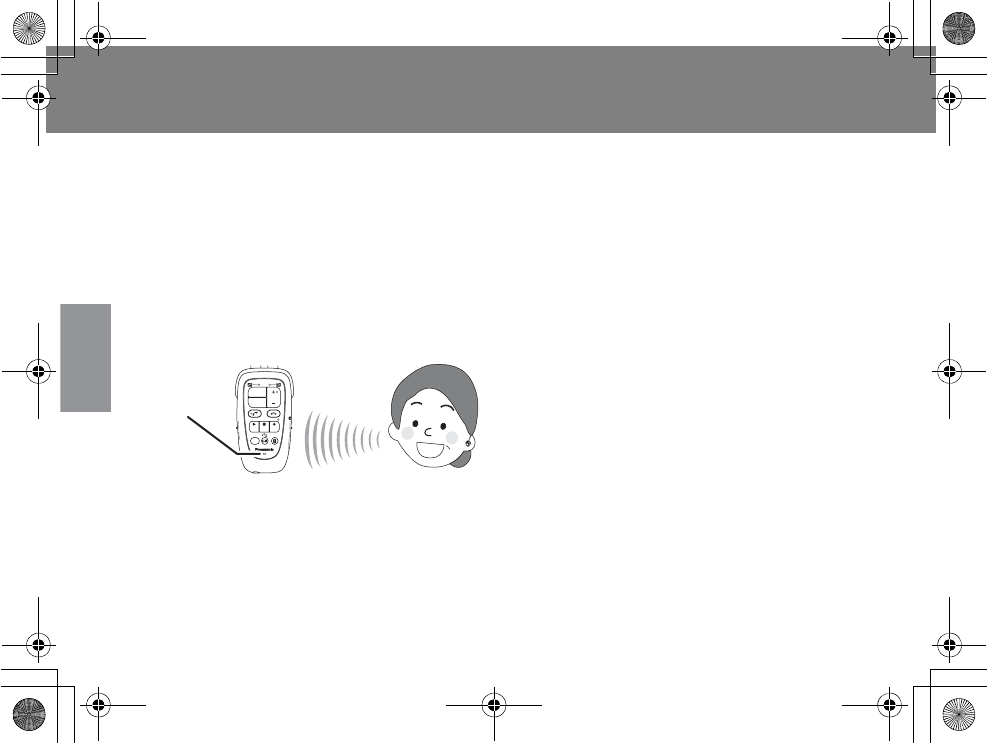
xProper use of a microphone
When you talk, hang your Hearing Hub around your neck, as shown in the illustration.
If the surrounding is noisy, position the microphone close to your mouth.
Depending on where the microphone is located or facing, voice communications might be
interrupted.
Try changing the position of the microphone if you experience poor communication.
CHARGE
MEMO
LOCK
TV
VOL
PHONE
PLAY
STOP
REC
MEMORY PAIRING
HEARING
INSTRUMENTS
ON
POWER
OFF
BINAURAL
LR
Microphone
Make and receive calls on landline phone
9*/#AGPIDQQMࡍࠫ㧞㧜㧝㧝ᐕ㧝㧜㧞㧝ᣣޓ㊄ᦐᣣޓඦ೨㧥ᤨ㧟㧣ಽ
57
Operations
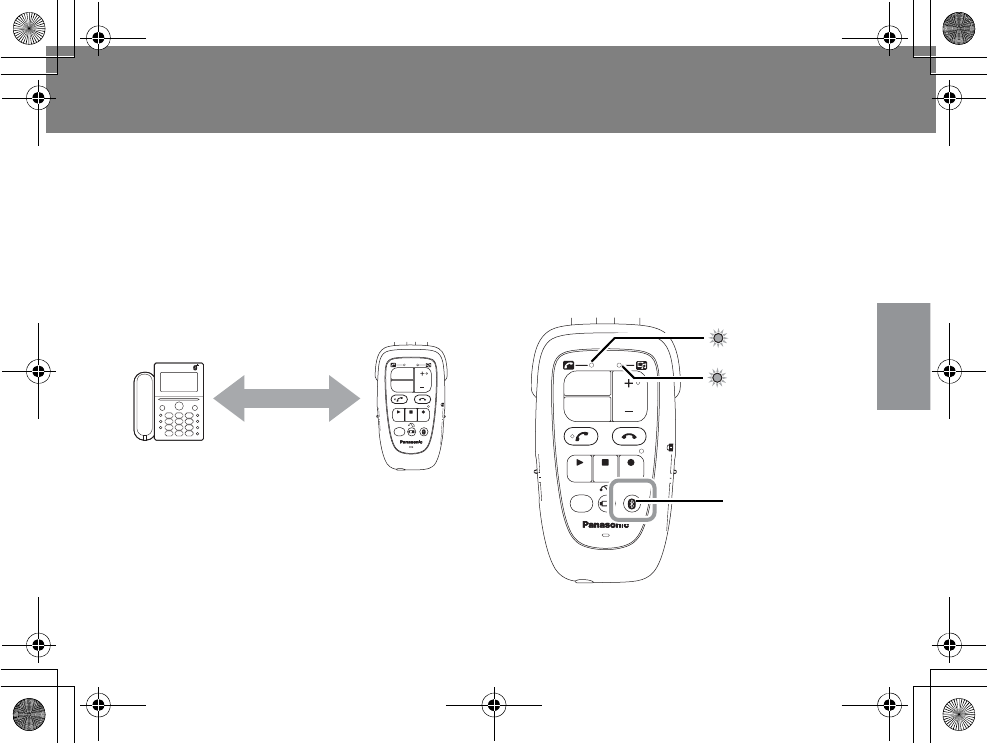
Make and receive calls on landline phone (Operation)
xPut the Hearing Hub into standby mode.
The Hearing Hub is connected to the landline
phone through Bluetooth®.
1
Connect the Bluetooth
®
landline
phone to the Hearing Hub.
pSee the instructions that came with the
Bluetooth® landline phone.
pThe two devices must be paired. Turn on
the Hearing Hub, so it will automatically
connect to the Bluetooth® landline
phone, and the phone will go into
standby mode.
pIf Bluetooth® connection is disabled due
to poor signal reception, press the phone
key for reconnection.
pOnce the Hearing Hub and Bluetooth®
landline phone are connected to each
other through Bluetooth®, LED 1 will be
slowly blinking green once per 2-3
seconds.
Note:
CHARGE
MEMO
LOCK
TV
VOL
PHONE
PLAY
STOP
REC
MEMORY PAIRING
HEARING
INSTRUMENTS
ON
POWER
OFF
BINAURAL
LR
LED 1
Phone key
Make and receive calls on landline phone
9*/#AGPIDQQMࡍࠫ㧞㧜㧝㧝ᐕ㧝㧜㧞㧝ᣣޓ㊄ᦐᣣޓඦ೨㧥ᤨ㧟㧣ಽ

Make and receive calls on landline phone (Operation)
(Continued)
58
Operations
xReceive calls
1You will get notification alert
from the Hearing Hub.
pWhile incoming calls are being received,
LED 1 is rapidly blinking green 5 times per
second.
2Press the send key to answer the
call.
pWhile you receive incoming calls, LED 1 is
slowly blinking green once per 2-3
seconds.
pPress the end key to reject an incoming
call without answering.
3When done talking, hang up by
pressing the end key.
pWhen the call is done, the mode of the
hearing instrument will be returned to
Memory 1.
CHARGE
MEMO
LOCK
TV
VOL
PHONE
PLAY
STOP
REC
MEMORY PAIRING
ON
POWER
OFF
BINAURAL
LR
LED 1
Send
key End key
CHARGE
MEMO
LOCK
TV
VOL
PHONE
PLAY
STOP
REC
MEMORY PAIRING
HEARING
INSTRUMENTS
ON
POWER
OFF
BINAURAL
LR
End key
Make and receive calls on landline phone
9*/#AGPIDQQMࡍࠫ㧞㧜㧝㧝ᐕ㧝㧜㧞㧝ᣣޓ㊄ᦐᣣޓඦ೨㧥ᤨ㧟㧣ಽ
59
Operations
xMake calls
1Dial the numbers on the
Bluetooth® landline phone.
2When you hear the ringback
tone from your hearing
instrument, go to the next step.
3Press the send key.
This step might not be required depending
on the make or model of the phone.
pWhen you hear the ringback tone from
your hearing instrument, put down the
receiver. This will not hang up the phone.
4Wait until someone answers the
call.
5When done talking, hang up by
pressing the end key.
pWhen the call is done, the mode of the
hearing instrument will be returned to
Memory 1.
Note:
CHARGE
MEMO
LOCK
TV
VOL
PHONE
PLAY
STOP
REC
MEMORY PAIRING
ON
O
WER
BINAURAL
LR
Send key
CHARGE
MEMO
LOCK
TV
VOL
PHONE
PLAY
STOP
REC
MEMORY PAIRING
HEARING
INSTRUMENTS
ON
POWER
OFF
BINAURAL
LR
End key
Make and receive calls on landline phone
9*/#AGPIDQQMࡍࠫ㧞㧜㧝㧝ᐕ㧝㧜㧞㧝ᣣޓ㊄ᦐᣣޓඦ೨㧥ᤨ㧟㧣ಽ

Make and receive calls on landline phone (Operation)
(Continued)
60
Operations
xVolume adjustment
You can adjust the phone volume such as ringtone, ringback tone and conversation by
following the instruction below.
Use the volume keys to turn the volume up or down.
pThe volume control provides 17 adjustable volume levels. A notification sound is not made
from the hearing instrument.
pPress and hold the volume key, so the volume is consecutively changing by itself at 1-second
interval.
pWhen the hearing instrument or Hearing Hub is turned off and then back on again, the
volume remains unchanged since it was last adjusted.
pAdjusting the phone volume such as ringtone, ringback tone and conversation does not affect
the volume of the hearing instrument.
Make and receive calls on landline phone
9*/#AGPIDQQMࡍࠫ㧞㧜㧝㧝ᐕ㧝㧜㧞㧝ᣣޓ㊄ᦐᣣޓඦ೨㧥ᤨ㧟㧣ಽ
61
Operations
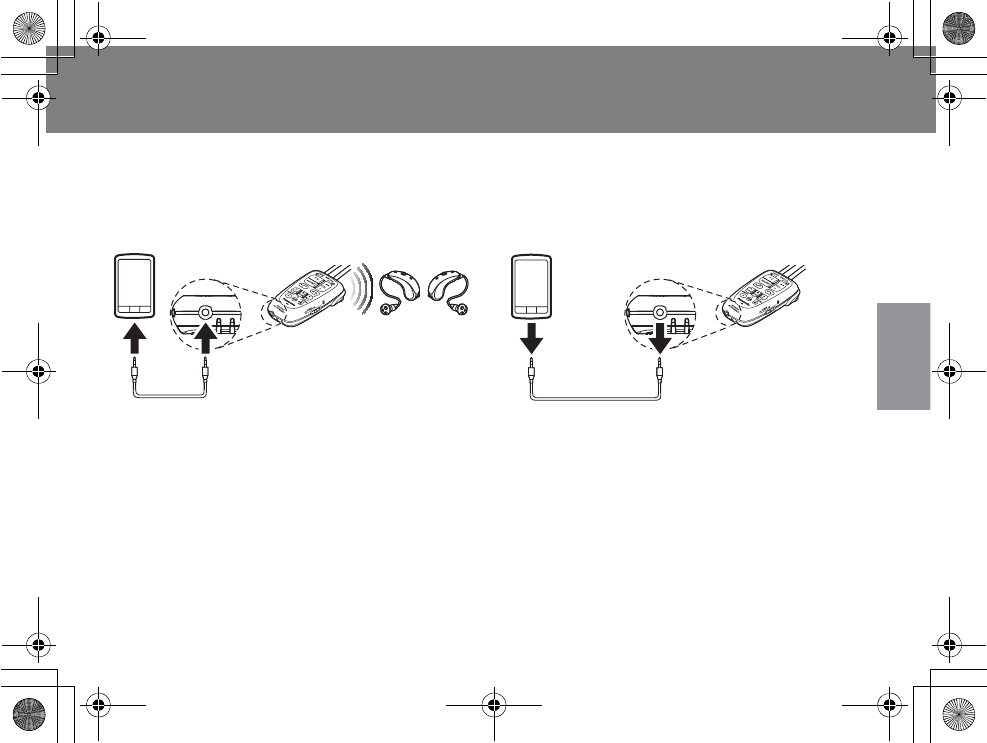
Listen to music (External input terminal)
You can listen to music on your hearing instrument by connecting an audio device to the
Hearing Hub. For connection, use the supplied audio cable (M3 plug). If the cable jack does not
fit into the terminal of the audio device, you need to purchase a compatible plug separately.
xListening to music
1Insert one end of the audio
cable into the terminal of the
audio device.
2Insert the other end of the
audio cable into the input
terminal of the Hearing Hub.
3Play audio, so you can listen to
music from the hearing
instrument.
xStop listening to music
1Press stop on the audio device.
2Disconnect the audio cable from
the audio device.
3Disconnect the audio cable from
the Hearing Hub.
pThe mode of the hearing instrument will
be returned to Memory 1.
Audio cable (supplied)
Audio device
Hearing
Instrument
Audio cable (supplied)
Audio device
Listen to music
9*/#AGPIDQQMࡍࠫ㧞㧜㧝㧝ᐕ㧝㧜㧞㧝ᣣޓ㊄ᦐᣣޓඦ೨㧥ᤨ㧟㧣ಽ

Listen to music (External input terminal) (Continued)
62
Operations
xVolume adjustment
Adjust the music volume by following the instructions below.
Use the volume keys to turn the volume up or down.
pThe volume control provides 17 adjustable volume levels. A notification sound is not made
from the hearing instrument.
pPress and hold the volume key, so the volume is consecutively changing by itself at 1-second
interval.
pWhen the hearing instrument or Hearing Hub is turned off and then back on again, the
volume remains unchanged since it was last adjusted.
pAdjusting music volume does not affect the volume of the hearing instrument.
pThe volume level is the same as TV.
Adjust the volume of audio devices
pSee the instructions that came with the audio device.
Listen to music
9*/#AGPIDQQMࡍࠫ㧞㧜㧝㧝ᐕ㧝㧜㧞㧝ᣣޓ㊄ᦐᣣޓඦ೨㧥ᤨ㧟㧣ಽ

63
Operations
xMix left and right audio channels
You can switch between stereo binaural hearing and L/R mix. In binaural stereo hearing, one
channel is differentiated from the other. The split audio is directed from one stereo channel to
one ear and from the other channel to the other ear. In the Hearing Hub, the binaural stereo
mode is set as default. Those who are wearing a monaural hearing instrument can only hear the
sound from one stereo channel in one ear because the other channel is disabled. In L/R mix,
multiple sound sources are merged together to create a multi-dimensional sound, rich in depth
and complexity. Regarding L/R mix setup, ask your dispenser for assistance.
xHearing instrument microphone
You can set up the microphone of your hearing instrument as you can simultaneously listen to
the sound from an audio device through your hearing instrument’s microphone.
For enabling or disabling the microphone, ask your dispenser for assistance.
Listen to music
9*/#AGPIDQQMࡍࠫ㧞㧜㧝㧝ᐕ㧝㧜㧞㧝ᣣޓ㊄ᦐᣣޓඦ೨㧥ᤨ㧟㧣ಽ
64
Operations
Record audio data (Voice memo recording)
The following audio data can be recorded in the Hearing Hub.
pMicrophone sound of the Hearing Hub*1
pPhone conversation
pTV audio*2
pAudio from external devices*2
Number of audio files: Up to 5 files*3
Recording time: 2 minutes 40 seconds per file
Write-protection: Up to 4 files
*1 The microphone should be located toward the sound source.
*2 Stereo audio is recorded in monaural.
*3 When the number of recording files exceeds the maximum, the oldest file will be replaced
with a new one (audio files are purged in chronological order). If the files are protected, they
will not be overwritten.
CHARGE
MEMO
LOCK
TV
VOL
PHONE
PLAY
STOP
REC
MEMORY PAIRING
HEARING
INSTRUMENTS
ON
POWER
OFF
BINAURAL
LR
Microphone
Voice memo recording
9*/#AGPIDQQMࡍࠫ㧞㧜㧝㧝ᐕ㧝㧜㧞㧝ᣣޓ㊄ᦐᣣޓඦ೨㧥ᤨ㧟㧣ಽ
65
Operations
Privacy laws and notice requirements for electronic recording of telephone conversations
Copyright notice
There are both federal and state statutes governing the use of electronic, mechanical or other
device recordings. The Federal Communications Commission (FCC) and many states have strict
rules about recording telephone conversations. When the person answers, let the caller know
right away that you are recording the call.
Music and lyrics are subject to copyright protection in the United States. Copyright law applies
to recorded music - the musical work and the sound recording of that work. The musical work
refers to the notes and lyrics of a song. The performance of the lyrics and melody fixed in a
variety of formats, such as compact discs, vinyl records and digital downloads, are protected
as the sound recording. The public performance of music includes broadcast radio
transmissions or digital transmissions, such as AM or FM radio or satellite radio, digital,
satellite television, Internet and live concerts.
You may not modify, copy, reproduce, republish, upload, post, transmit, distribute or
broadcast in anyway any material without the prior written permission of the owner of that
content. You may not alter or remove any trademark, copyright or other notice from copies of
the content.
You may record any materials with voice memo recording for your personal, non-commercial
use only, provided you keep intact all copyright and other proprietary notices.
Voice memo recording
9*/#AGPIDQQMࡍࠫ㧞㧜㧝㧝ᐕ㧝㧜㧞㧝ᣣޓ㊄ᦐᣣޓඦ೨㧥ᤨ㧟㧣ಽ

Record audio data (Voice memo recording)
(Continued)
66
Operations
Indemnity
Panasonic is not liable for any recording failures resulting from Hearing Hub malfunction.
Voice memo recording
9*/#AGPIDQQMࡍࠫ㧞㧜㧝㧝ᐕ㧝㧜㧞㧝ᣣޓ㊄ᦐᣣޓඦ೨㧥ᤨ㧟㧣ಽ
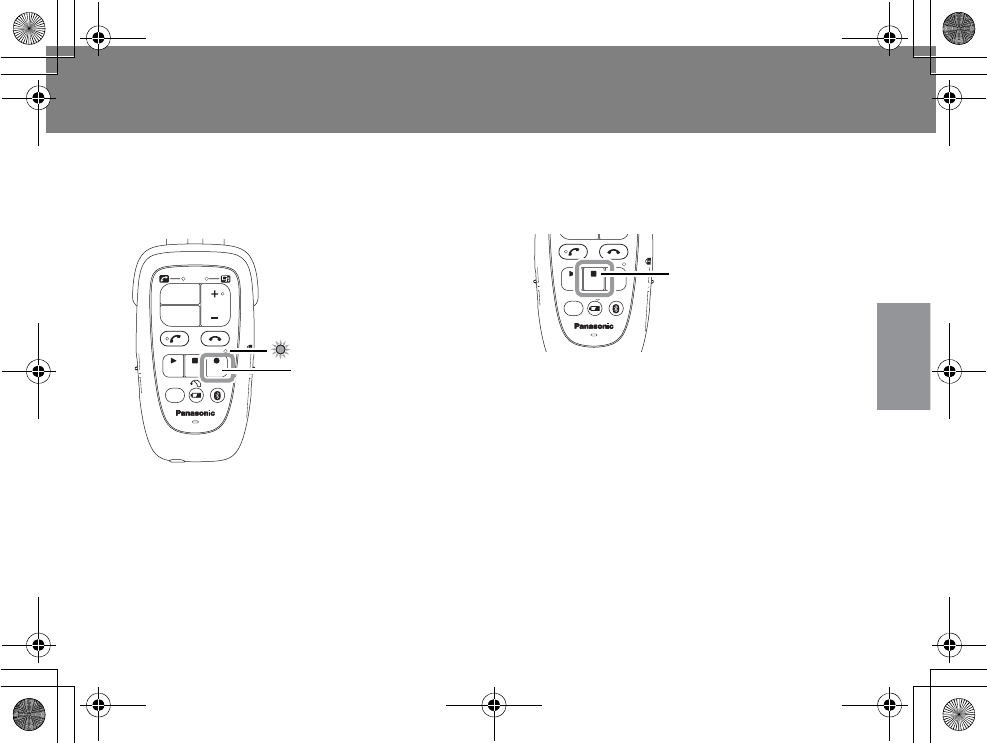
67
Operations
xRecording instructions
1Press and hold the record key
for at least one second.
pA notification alert is emitted from the
hearing instrument when recording is
started. At the same time, LED 3 slowly
blinks orange (once per 2–3 seconds).
When the remaining time for recording is
10 seconds, the LED indicator is rapidly
blinking twice per second.
2Press the stop key to stop
recording.
pA notification alert is emitted from the
hearing instrument, and recording will be
stopped.
pRecording is automatically stopped in the
following cases:
* Recording time passes 2 minutes 40 seconds.
* Mode switching occurs, for example, you are
done talking, and hang up the phone.
For information on how to adjust the volume
level of notification alert sound for recording
start/stop, see Page 34.
CHARGE
MEMO
LOCK
TV
VOL
PHONE
PLAY
STOP
REC
MEMORY PAIRING
HEARING
INSTRUMENTS
ON
POWER
OFF
BINAURAL
LR
LED 3
Record key
PLAY
STOP
REC
MEMORY PAIRING
ON
POWER
OFF
BINAURAL
LR
Stop key
Voice memo recording
9*/#AGPIDQQMࡍࠫ㧞㧜㧝㧝ᐕ㧝㧜㧞㧝ᣣޓ㊄ᦐᣣޓඦ೨㧥ᤨ㧟㧣ಽ
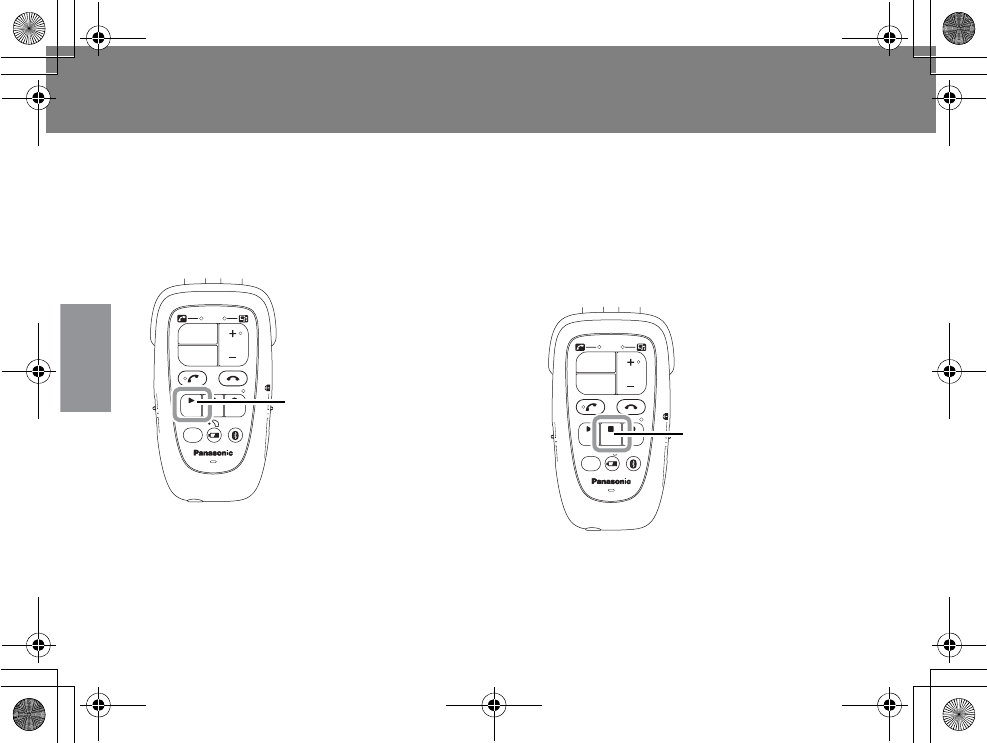
68
Operations
Listen to recorded audio data
You can listen to recorded audio data through the Hearing Hub.
If you want to play a specific audio file, just press the play key, so you can skip the current audio
file.
xInstructions
1Press the play key.
pYou can hear the latest audio file from
the hearing instrument.
pWhile playing audio data, just press the
play key, so you can skip the current
audio file.
2To stop playing, press the stop
key.
pAfter audio files such as phone
conversation, TV sound and audio from
external devices are played, the mode of
the hearing instrument will be returned to
Memory 1.
CHARGE
MEMO
LOCK
TV
VOL
PHONE
PLAY
STOP
REC
MEMORY PAIRING
HEARING
INSTRUMENTS
ON
POWER
OFF
BINAURAL
LR
Play key
CHARGE
MEMO
LOCK
TV
VOL
PHONE
PLAY
STOP
REC
MEMORY PAIRING
HEARING
INSTRUMENTS
ON
POWER
OFF
BINAURAL
LR
Stop key
Voice memo recording
9*/#AGPIDQQMࡍࠫ㧞㧜㧝㧝ᐕ㧝㧜㧞㧝ᣣޓ㊄ᦐᣣޓඦ೨㧥ᤨ㧟㧣ಽ

69
Operations
xVolume adjustment
You can adjust the playing sound volume by following the instruction below.
Use the volume keys to turn the volume up or down.
pThe volume control provides 17 adjustable volume levels. A notification sound is not made
from the hearing instrument.
pPress and hold the volume key, so the volume is consecutively changing by itself at 1-second
interval.
pWhen the hearing instrument or Hearing Hub is turned off and then back on again, the
volume remains unchanged since it was last adjusted.
pAdjusting the playing sound volume does not affect the volume of the hearing instrument.
Voice memo recording
9*/#AGPIDQQMࡍࠫ㧞㧜㧝㧝ᐕ㧝㧜㧞㧝ᣣޓ㊄ᦐᣣޓඦ೨㧥ᤨ㧟㧣ಽ
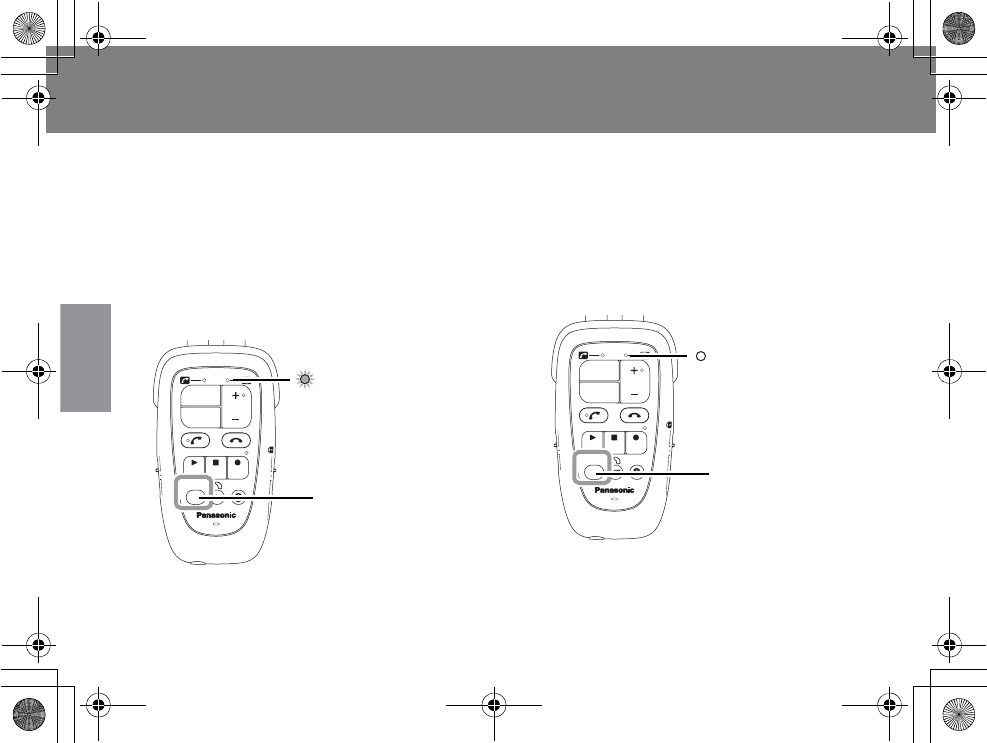
70
Operations
Protect audio files
You can write-protect your recorded audio data.
xWrite-protect recorded audio
data
1Press and hold the memory key
for at least one second while
playing audio data that is not
write-protected.
pWhen the audio file that is being played is
write-protected, LED 2 turns solid orange.
* Up to 4 files can be protected.
xCancel write-protection
1Press and hold the memory key
for at least one second while
playing audio data that is write-
protected.
pWhen write-protection is canceled, LED 2
will shut off.
CHARGE
MEMO
LOCK
TV
VOL
PHONE
PLAY
STOP
REC
MEMORY PAIRING
HEARING
INSTRUMENTS
ON
POWER
OFF
BINAURAL
LR
LED 2
Memory key
CHARGE
MEMO
LOCK
TV
VOL
PHONE
PLAY
STOP
REC
MEMORY PAIRING
HEARING
INSTRUMENTS
ON
POWER
OFF
BINAURAL
LR
Memory key
LED 2
Voice memo recording
9*/#AGPIDQQMࡍࠫ㧞㧜㧝㧝ᐕ㧝㧜㧞㧝ᣣޓ㊄ᦐᣣޓඦ೨㧥ᤨ㧟㧣ಽ
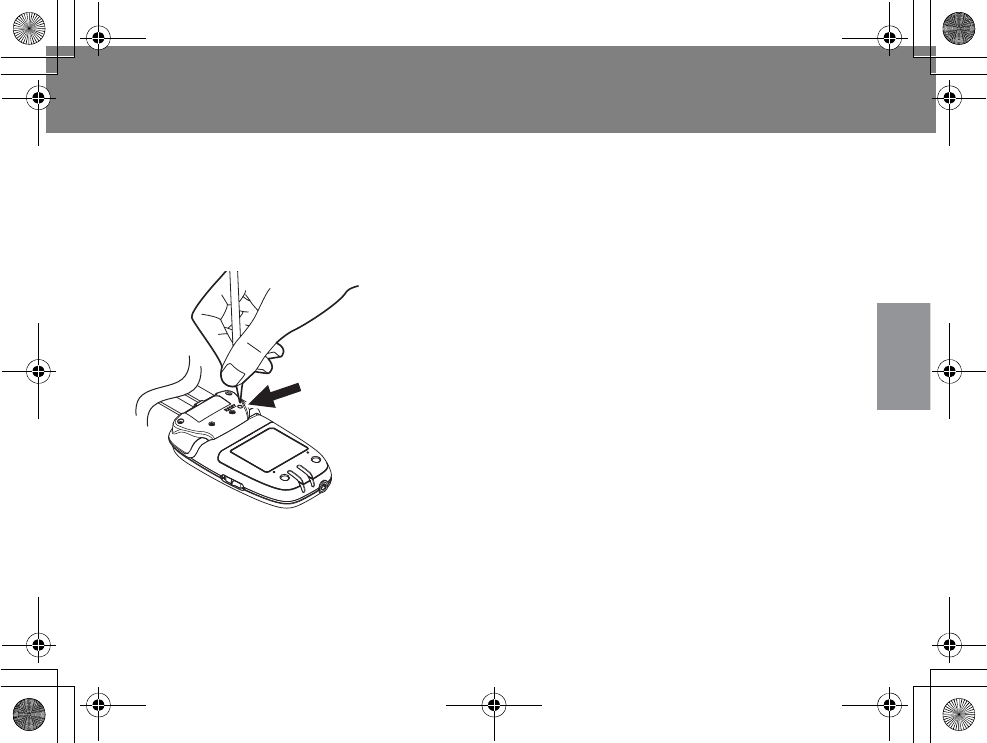
71
Operations
Hearing Hub reset
If the Hearing Hub suddenly does not work for some reason, reset it by following the
instructions below.
1Press the reset button on the back of the Hearing Hub.
pPress the reset button until it clicks by poking a toothpick or something sharp, as shown in
the illustration.
2Turn off the Hearing Hub and then back on again.
Hearing Hub reset does not affect Bluetooth® pairing (registered) information.
9*/#AGPIDQQMࡍࠫ㧞㧜㧝㧝ᐕ㧝㧜㧞㧝ᣣޓ㊄ᦐᣣޓඦ೨㧥ᤨ㧟㧣ಽ
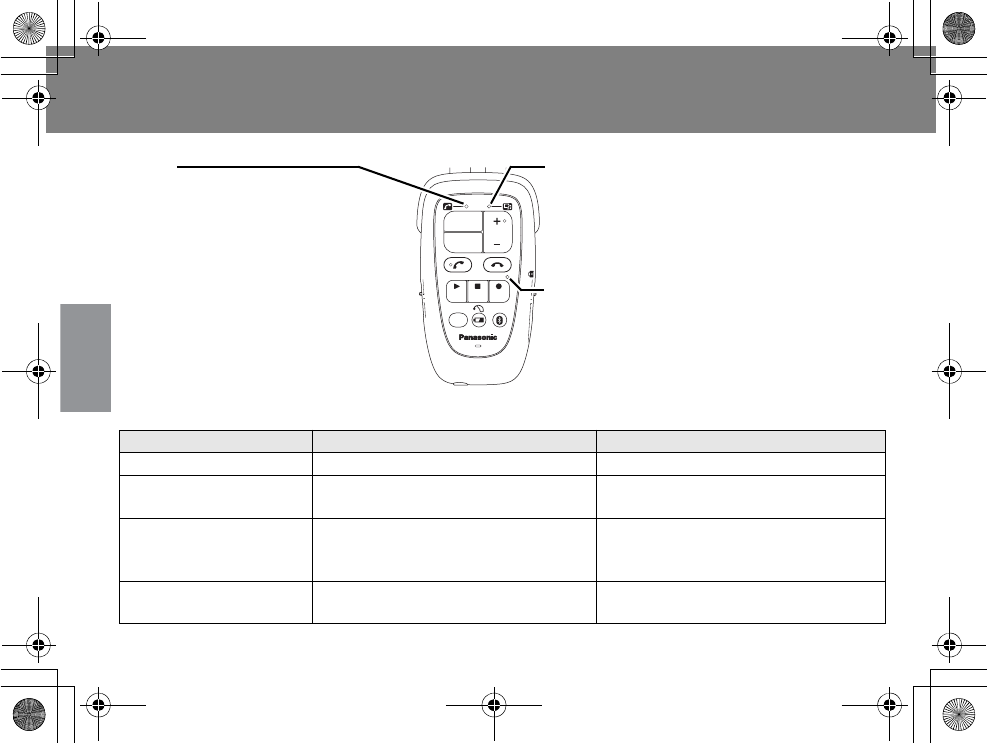
72
Operations
LED indicator
LED 1 (Orange: Charged/charging)
LED indicator Status Descriptions
The LED turns on. Charging
The LED turns on then
off.
Fully charged
Blinking once per 2–3
seconds.
Cannot be charged due to
temperature out of the
appropriate temperature range.
Blinking until the temperature
returns to the appropriate
operating range.
Blinking twice per
second.
Charging failure
Stop charging and turn off the
Hearing Hub. Consult your dispenser.
CHARGE
MEMO
LOCK
TV
VOL
PHONE
PLAY
STOP
REC
MEMORY PAIRING
HEARING
INSTRUMENTS
ON
POWER
OFF
BINAURAL
LR
LED 1
Green: Telephone mode
Orange: Remaining battery power,
charging status
LED 2
Green: TV mode
Orange: Write-protect status of recorded data
LED 3
Status of voice memo recording.
9*/#AGPIDQQMࡍࠫ㧞㧜㧝㧝ᐕ㧝㧜㧞㧝ᣣޓ㊄ᦐᣣޓඦ೨㧥ᤨ㧟㧣ಽ

73
Operations
LED 1 (Orange: Remaining battery power/In use)
LED 2 (Orange: Write-protection)
LED indicator Status Descriptions
Blinking once per 2–3
seconds.
Running low on power. You have 7 minutes of power
remaining (Varies depending on
operating conditions).
Blinking twice per
second.
Completely drained. Recharge your Hearing Hub
immediately.
LED indicator Status Descriptions
The LED turns on. Recorded data is being played
(Protected).
The LED shuts off. Recorded data is being played
(Not protected).
Blinking 5 times per
second for 3 seconds.
The number of recording files
reaches a maximum.
You have already write-protected
the maximum number of files.
9*/#AGPIDQQMࡍࠫ㧞㧜㧝㧝ᐕ㧝㧜㧞㧝ᣣޓ㊄ᦐᣣޓඦ೨㧥ᤨ㧟㧣ಽ
LED indicator (Continued)
74
Operations
LED 1 (Green: Phone mode)
LED indicator Status Descriptions
Blinking once per 2–3
seconds.
Connected with a phone through
Bluetooth®.
Sending a call
Talking
Either a mobile or landline phone is
being connected through
Bluetooth®.
Sending a call or talking on either a
mobile or landline phone.
Blinking 5 times per
second.
Receiving a call. Receiving a call on either a mobile
or landline phone.
The LED shuts off. Not connected with a phone
through Bluetooth®.
Neither a mobile or landline phone
is connected through Bluetooth®.
Blinking twice per
second.
Connected with a phone through
Bluetooth® (Poor reception).
The Hearing Hub is too far away
from a phone.
9*/#AGPIDQQMࡍࠫ㧞㧜㧝㧝ᐕ㧝㧜㧞㧝ᣣޓ㊄ᦐᣣޓඦ೨㧥ᤨ㧟㧣ಽ
75
Operations
LED 2 (Green: TV mode)
LED 1 and LED 2 are simultaneously blinking orange
*1 The Audio Transmitter is an optional accessory sold separately.
LED indicator Status Descriptions
Blinking once per 2–3
seconds.
Connected with the Audio
Transmitter*1 through
Bluetooth®.
The LED shuts off. Not connected with the Audio
Transmitter*1 through
Bluetooth®.
Blinking twice per
second.
Connected with the Audio
Transmitter
*1
through Bluetooth
®
(Poor reception)
The Hearing Hub is too far away
from TV.
LED indicator Status Descriptions
The LED comes on for
3 seconds.
The Hearing Hub is ON. Once the Hearing Hub is activated,
the LED will shut off.
9*/#AGPIDQQMࡍࠫ㧞㧜㧝㧝ᐕ㧝㧜㧞㧝ᣣޓ㊄ᦐᣣޓඦ೨㧥ᤨ㧟㧣ಽ
LED indicator (Continued)
76
Operations
LED 1 and LED 2 are simultaneously blinking green
LED 3 (Orange: recording)
*1 The Audio Transmitter is an optional accessory sold separately.
LED indicator Status Descriptions
The LED is blinking 5
times per second.
Pairing
The LED comes on
solid green for 3
seconds.
Registered information is being
deleted.
The LED is blinking
once per second.
Connecting to the Audio
Transmitter*1 or telephone
through Bluetooth®.
The LED comes on
solid green for 2
seconds.
Connection with the Audio
Transmitter*1 or telephone
through Bluetooth® has been
completed.
LED indicator Status Descriptions
The LED is blinking
once per 2–3 seconds.
Recording
The LED is blinking
twice per second.
The remaining recording time is
10 seconds.
9*/#AGPIDQQMࡍࠫ㧞㧜㧝㧝ᐕ㧝㧜㧞㧝ᣣޓ㊄ᦐᣣޓඦ೨㧥ᤨ㧟㧣ಽ
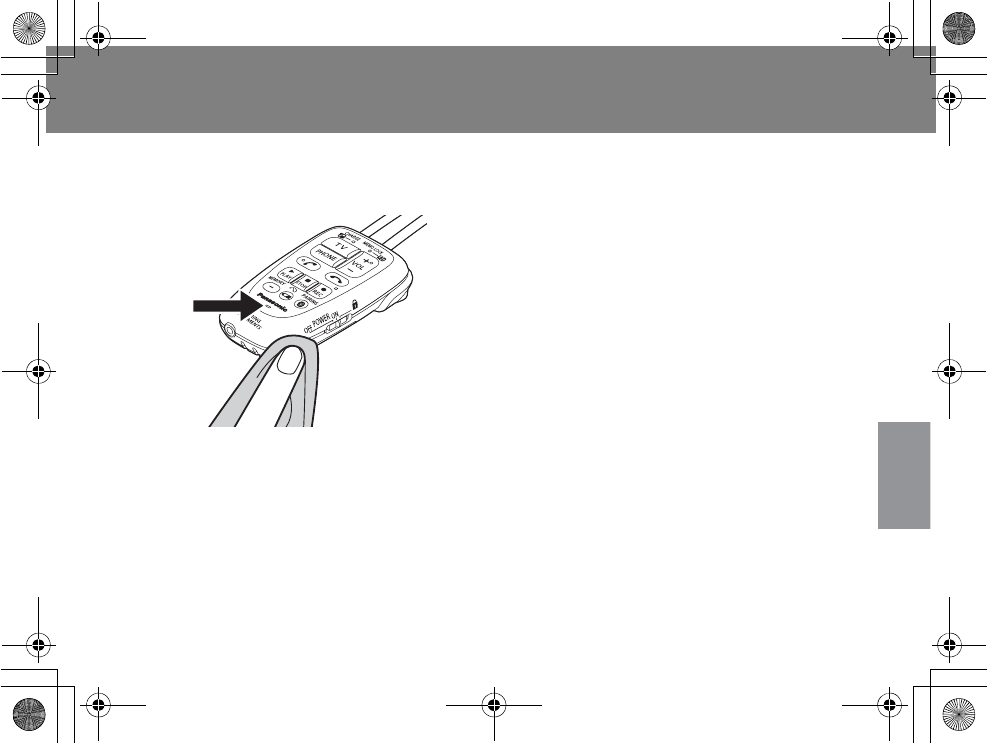
77
Reference
Maintenance
Wipe clean with a dry cloth.
When cleaning the Hearing Hub, wipe it gently with a soft cloth.
Make sure that your cloth is clean and free of dirt and dust.
pUse enough caution when cleaning the microphone. Never poke it with a needle, toothpick or
the like.
pNever use organic solvents such as alcohol, paint thinner, or benzene.
pWhen you clean a charger cradle, unplug the AC cord first.
Microphone
9*/#AGPIDQQMࡍࠫ㧞㧜㧝㧝ᐕ㧝㧜㧞㧝ᣣޓ㊄ᦐᣣޓඦ೨㧥ᤨ㧟㧣ಽ

78
Reference
Bluetooth® operation instructions
This product uses Bluetooth
®
module transmitter (Ver.2.1+EDR) with 79 channel operation within
2402–2480 MHz frequency band and has rated RF output power of class1. This transmitter is
designed for compliance with FCC rules and for usage only within the United States.
wRestrictions
pThe Hearing Hub is designed to comply with United States regulations and is intended for use
in the United States.
pWireless Bluetooth® connection with any Bluetooth® enabled devices is not necessarily
supported.
pBluetooth® enabled mobile phone needs to be certified by the Bluetooth SIG, Inc. and be
compliant with the standard. However, Bluetooth® certification does not guarantee the
operation method, display, or behavior of the phone that fulfills the Bluetooth® requirements.
The phone may not be able to be connected wirelessly due to the specifications and settings.
pThe Hearing Hub meets the security requirements of Bluetooth® standards. However, security
may not be enough due to usage conditions or settings.
pPanasonic is not responsible or liable for information leaks due to Hearing Hub malfunction or
improper wireless connection.
wAvailable distance
The Hearing Hub should be located within 98.4 feet (30 m) of audio sources (Bluetooth
®
enabled
devices). However, this distance cannot be guaranteed. Wireless communication is affected by
obstacles such as walls, buildings, human bodies or other in-between electronic devices. The
communication distance can be shorter when they cause interference with the Hearing Hub.
9*/#AGPIDQQMࡍࠫ㧞㧜㧝㧝ᐕ㧝㧜㧞㧝ᣣޓ㊄ᦐᣣޓඦ೨㧥ᤨ㧟㧣ಽ

79
Reference
wInterference from other devices
pSome electronic devices, if located nearby, may interfere with proper behavior of the
Hearing Hub. When you use your Hearing Hub, keep a distance of at least 16.4 feet (5 m)
from a microwave oven and wireless LAN devices.
pThe Hearing Hub may not work properly if there is a broadcast station in your area.
pIf wireless LAN devices is placed within 16.4 feet (5 m) of your Hearing Hub and still the
Hearing Hub behaves abnormally, disable LAN connection.
This Product is designed, developed and manufactured as contemplated for general use,
including without limitation, general office use, personal use, household use, and ordinary
industrial use, but is not designed, developed and manufactured as contemplated for use
accompanying fatal risks or dangers that, unless extremely high safety is secured, could lead
directly to death, personal injury, severe physical damage or other loss (hereinafter “High Safety
Required Use”), including without limitation, nuclear reaction control in nuclear facility, aircraft
flight control, air traffic control, mass transport control, medical life support system, missile
launch control in weapon system. If customer’s product possibly falls under the category of High
Safety Required Use, consult with our sales representatives in charge before such use. In
addition, FDTC shall not be liable against the Customer and/or any third party for any claims or
damages arising in connection with the High Safety Required Use of the Product without
permission.
9*/#AGPIDQQMࡍࠫ㧞㧜㧝㧝ᐕ㧝㧜㧞㧝ᣣޓ㊄ᦐᣣޓඦ೨㧥ᤨ㧟㧣ಽ

80
Reference
Troubleshooting guide
This section discusses a general approach to solving problems related to Hearing Hub handling
and operations. The following table will help you narrow down the problem area, identify the
source of the issue, and provide workarounds. If your problem is particularly sensitive or
persistent, write down any error conditions encountered and detailed description, so your
dispenser will figure out what’s going on with your Hearing Hub.
Symptom Probable cause Corrective action/Workaround Page
No sound is
produced.
If the remaining battery power of
the hearing instrument is low,
Hearing Hub operation and audio
signal reception will be disabled.
Replace the battery.
-
A neckloop antenna is not worn. Wear a neckloop antenna around
your neck. 28
Noise is
continuous or
sound is
intermittent.
A neckloop antenna is not worn. Wear a neckloop antenna around
your neck. 28
There are facilities or devices
that emit strong electromagnetic
wave located nearby.
Go out of that area.
-
Your hearing instrument or
Hearing Hub is placed in the
location subject to radio
frequency interference.
Change the position of your
Hearing Hub. -
Troubleshooting guide
9*/#AGPIDQQMࡍࠫ㧞㧜㧝㧝ᐕ㧝㧜㧞㧝ᣣޓ㊄ᦐᣣޓඦ೨㧥ᤨ㧟㧣ಽ
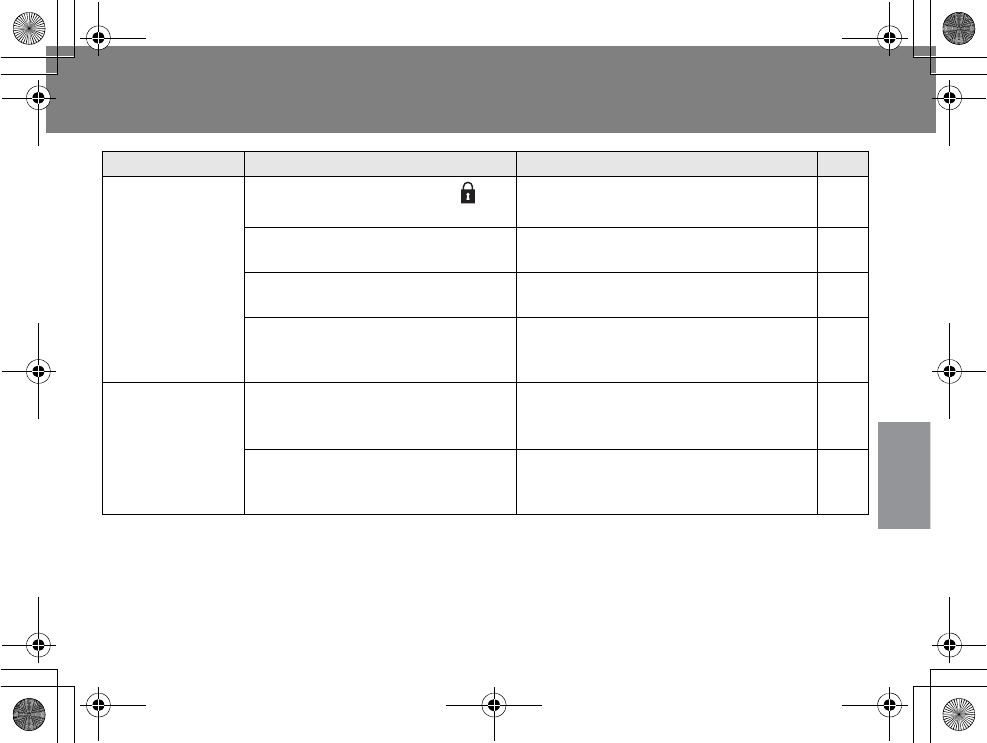
81
Reference
Symptom Probable cause Corrective action/Workaround Page
The hearing
instrument does
not work.
The power/hold switch is or
POWER OFF.
Slide the switch to POWER ON. 30
31
The battery is running low on
charge.
Recharge the battery. 26
A neckloop antenna is not worn. Wear a neckloop antenna around
your neck. 28
There are facilities or devices
that emit strong electromagnetic
wave located nearby.
Go out of that area.
-
Pairing fails
The Hearing Hub is too far away
from the Bluetooth® enabled
device.
Keep a distance of 19.7 inches
(50 cm) between the Hearing Hub
and Bluetooth® enabled device.
39
45
53
There are facilities or devices
that emit strong electromagnetic
wave located nearby.
Go out of that area and perform
pairing again.
39
45
53
Troubleshooting guide
9*/#AGPIDQQMࡍࠫ㧞㧜㧝㧝ᐕ㧝㧜㧞㧝ᣣޓ㊄ᦐᣣޓඦ೨㧥ᤨ㧟㧣ಽ
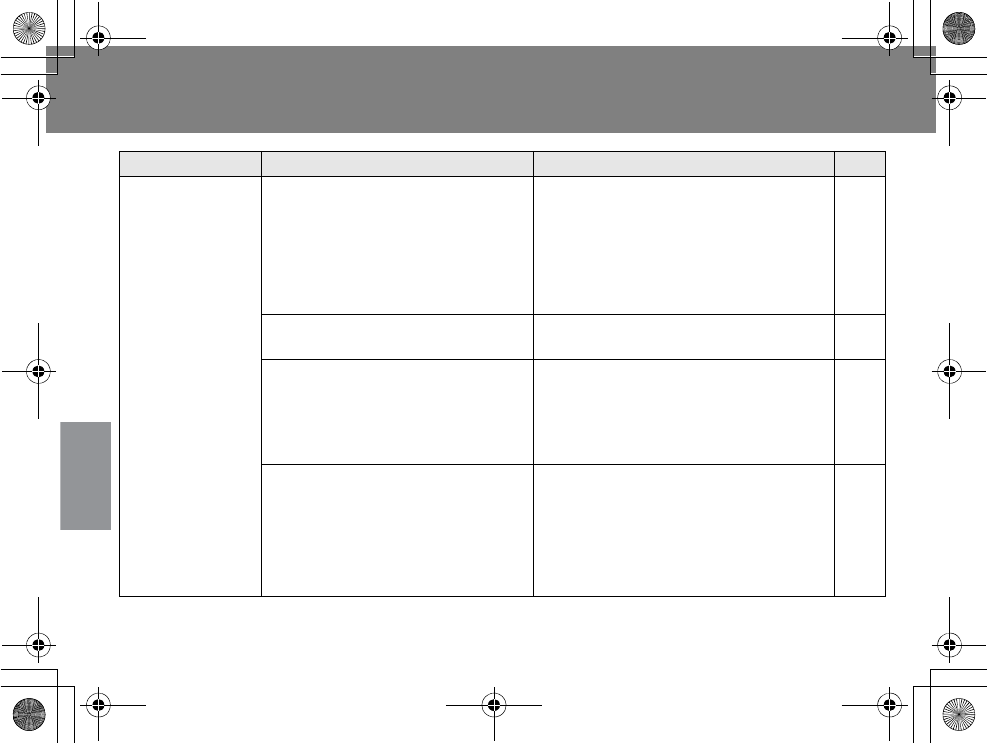
Troubleshooting guide (Continued)
82
Reference
Symptom Probable cause Corrective action/Workaround Page
Pairing fails
You are not operating the
Bluetooth® enabled device
properly.
Perform pairing again by referring to
the manual that came with your
Bluetooth® device.
* If the device allows you to use the
Advanced Audio Distribution Profile
(A2DP) of the Bluetooth® profile,
disable A2DP.
-
You have entered the wrong
passkey.
The correct passkey is “0000”. -
The Hearing Hub is not put into
pairing mode.
See instructions of “Listen to TV
audio (Pairing)”, “Make and receive
calls on mobile phone (Pairing)” or
“Make and receive calls on landline
phone (Pairing)”.
39
45
53
Pairing was performed as soon as
the Hearing Hub was turned on.
Wait at least 30 seconds after
turning on the Hearing Hub.
* If the Hearing Hub has been paired with
the mobile or landline phone, and it is
turned on, a Bluetooth® connection will
be prioritized. A new pairing may be
cancelled.
-
Troubleshooting guide
9*/#AGPIDQQMࡍࠫ㧞㧜㧝㧝ᐕ㧝㧜㧞㧝ᣣޓ㊄ᦐᣣޓඦ೨㧥ᤨ㧟㧣ಽ

83
Reference
*1 The Audio Transmitter is an optional accessory sold separately.
Symptom Probable cause Corrective action/Workaround Page
You cannot hear
any TV audio
from your
hearing
instrument via
Hearing Hub.
The Hearing Hub is too far away
from the Audio Transmitter*1.
Make sure that your Hearing Hub is located
within 98.4 feet (30 m) of the Audio
Transmitter*
1
. Wireless communication is
affected by indoor obstacles such as walls,
furniture and other objects.
-
The pairing has not been
completed.
See instructions of “Listen to TV
audio (Pairing)”. 39
The Audio Transmitter*1 has
been powered off.
Turn on the Audio Transmitter*1.42
The battery is running low. Recharge the battery. 26
Sending/
Receiving calls
are disabled.
The Hearing Hub is too far away
from the mobile phone.
Make sure that your Hearing Hub is
located within 32.8 feet (10 m) of your
mobile phone. Wireless communication
is affected by indoor obstacles such as
walls, furniture and other objects.
-
The Hearing Hub is too far away
from the Bluetooth
®
landline phone.
Make sure that your Hearing Hub is
located within 32.8 feet (10 m) of the
Bluetooth
®
landline phone. Wireless
communication is affected by indoor
obstacles such as walls, furniture and
other objects.
-
Troubleshooting guide
9*/#AGPIDQQMࡍࠫ㧞㧜㧝㧝ᐕ㧝㧜㧞㧝ᣣޓ㊄ᦐᣣޓඦ೨㧥ᤨ㧟㧣ಽ
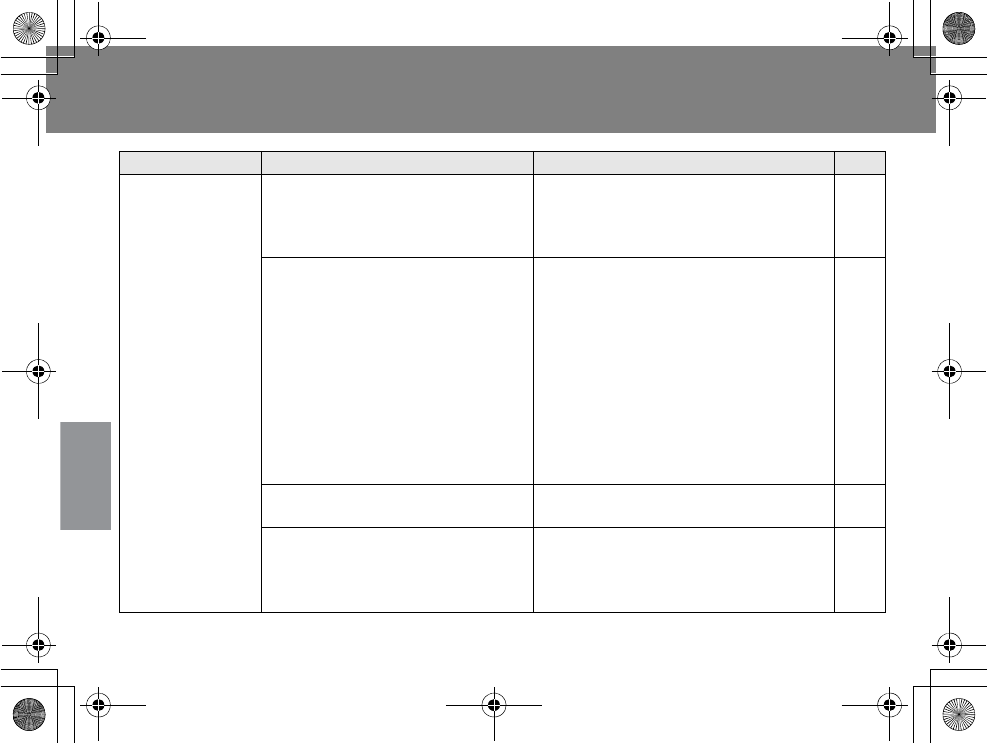
Troubleshooting guide (Continued)
84
Reference
Symptom Probable cause Corrective action/Workaround Page
Sending/
Receiving calls
are disabled.
The pairing has not been
completed.
See instructions of “Make and
receive calls on mobile phone
(Pairing)” or “Make and receive calls
on landline phone (Pairing)”.
45
53
The Hearing Hub is not connected
to the phone through Bluetooth
®
.
The Hearing Hub must be
connected to the phone through
Bluetooth®. If LED 1 is slowly
blinking green once per 2-3 seconds,
Bluetooth® connection has been
created. If you are using two
phones, either one may be only
allowed to be connected to the
Hearing Hub. Press the phone key to
disconnect the phone then press the
phone key again to reconnect.
49
57
You are operating the phone the
wrong way.
See the instructions that came with
the phone. -
Bluetooth® is disabled on the
mobile phone.
Enable Bluetooth® on your mobile
phone. For details, see the
instructions that came with your
mobile phone.
48
Troubleshooting guide
9*/#AGPIDQQMࡍࠫ㧞㧜㧝㧝ᐕ㧝㧜㧞㧝ᣣޓ㊄ᦐᣣޓඦ೨㧥ᤨ㧟㧣ಽ

85
Reference
Symptom Probable cause Corrective action/Workaround Page
Sending/
Receiving calls
are disabled.
The phone is OFF. Turn on the Bluetooth® enabled
device. -
The battery is running low. Recharge the battery. 26
Your voice
cannot be heard.
The surrounding is noisy. Position the microphone close to
your mouth.
48
56
When the
microphone is
positioned close
to your mouth,
the voice gets
distorted or
intermittent.
Your hearing instrument or
Hearing Hub is placed in the
location subject to radio
frequency interference.
Change the position of your
Hearing Hub.
48
56
The Hearing Hub
does not charge.
The surrounding temperature is
too high or too low.
If the surrounding temperature is
out of the appropriate charge
temperature range (7 °C to 40 °C
[44.6 °F to 104 °F]), charging may
be disabled.
* In that case, LED 1 is blinking orange
once per 2-3 seconds.
72
The battery life
is short.
Your battery has reached its
charge capacity.
Replace your rechargeable battery.
Consult your dispenser. 27
Troubleshooting guide
9*/#AGPIDQQMࡍࠫ㧞㧜㧝㧝ᐕ㧝㧜㧞㧝ᣣޓ㊄ᦐᣣޓඦ೨㧥ᤨ㧟㧣ಽ
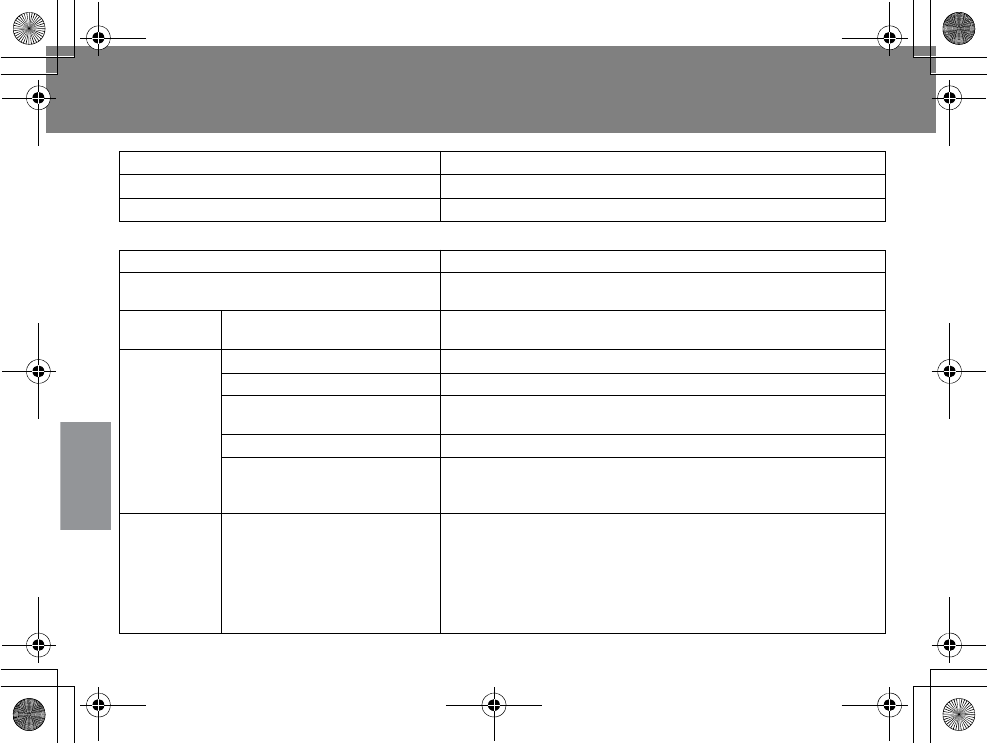
86
Reference
Specifications
According to UL 60601-1:2003 R6.03
Transport/Storage temperature -10 °C to 50 °C [14 °F to 122 °F]
Transport/Storage relative humidity 20 % to 85 %
Classification Internally powered equipment
Battery Built-in rechargeable battery: DC 3.6 V
Battery charge time Approx. 3 hours
(Varies depending on operating conditions and other factors)
Battery run
time Continuous TV watching Approx. 8 hours
(Varies depending on operating conditions and other factors)
Bluetooth®
Version Bluetooth® Ver.2.1+EDR
RF power output Class1 (Approx. 6 mW)
Profile Telephone: HFP (Hands-Free Profile)
HSP (Headset Profile)
Wireless communication 2.4 GHz FH-SS (Frequency-hopping spread spectrum)
QDID (Qualification design ID)
Bluetooth
®
qualification/
Certification
B017883
Available
distance
Wireless communication
between the Hearing Hub and
other Bluetooth® enabled
devices.
Approx. 98.4 feet (30 m)
Wireless communication is affected by obstacles such as walls,
buildings, human bodies or other in-between electronic
devices. The communication distance can be shorter when they
cause interference with the Hearing Hub.
* For Bluetooth® Class 2, the available communication is up to a
32.8 feet (10 m) line-of-sight distance.
9*/#AGPIDQQMࡍࠫ㧞㧜㧝㧝ᐕ㧝㧜㧞㧝ᣣޓ㊄ᦐᣣޓඦ೨㧥ᤨ㧟㧣ಽ

87
Reference
Operating temperature 0 °C to 40 °C [32 °F to 104 °F]
Charging temperature 7 °C to 40 °C [44.6 °F to 104 °F]
Dimensions (excluding neckloop antenna) 59 mm (W) j 101 mm (H) j 28 mm (D)
[ビハピ÷(W) j フハパ÷(H) j ヒハヒ÷(D)]
Mass (including neckloop antenna) Approx. 123 䏊 (4.3 oz)
AC adaptor
Power source AC 110 V – 240 V, 50 Hz/60 Hz
Input 0.22 A
Output DC 5.0 V 1.6 A
Standby power Less than 0.3 W
9*/#AGPIDQQMࡍࠫ㧞㧜㧝㧝ᐕ㧝㧜㧞㧝ᣣޓ㊄ᦐᣣޓඦ೨㧥ᤨ㧟㧣ಽ

88
Reference
Warranty and customer service
Warranty
The Limited Warranty document is enclosed together in the package.
Make sure that it is filled in with date of original purchase, name of dispenser, and other
important information.
Keep it in a secure place.
Customer Services Directory (United States)
Obtain product information and operating assistance and locate the nearest dispenser by
visiting our website at: http://www.panasonic.com/hearing
You may also contact us directly at: 1-888-422-6309
9*/#AGPIDQQMࡍࠫ㧞㧜㧝㧝ᐕ㧝㧜㧞㧝ᣣޓ㊄ᦐᣣޓඦ೨㧥ᤨ㧟㧣ಽ
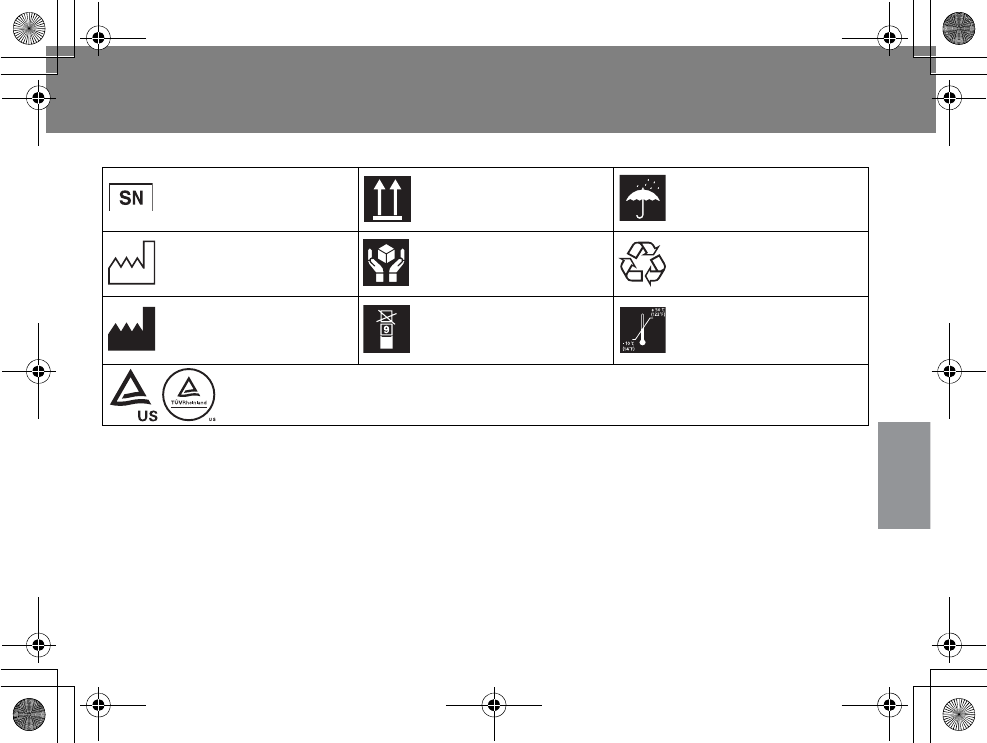
89
Reference
Information
wSymbol Indications
wBattery disposal
Your Hearing Hub must be disposed of properly according to local laws and regulations.
©ª´aproduct contains a battery that can be recycled: Do not dispose in household waste.
When your Hearing Hub reaches its end of life, contact your dispenser for assistance.
The Hearing Hub is not designed to allow you to remove the battery.
Symbol for “SERIAL
NUMBER“
Symbol for “THIS WAY
UP“
Symbol for “KEEP
DRY”
Symbol for “DATE OF
MANUFACTURE“
Symbol for “HANDLE
WITH CARE”
General symbol for
recovery/recyclable
Symbol for
“MANUFACTURER“
Symbol for
“STACKING LIMIT BY
NUMBER”
Symbol for
“TEMPERATURE
LIMITATION”
aaaSymbol for “TUVus LICENCED TEST MARK“
9*/#AGPIDQQMࡍࠫ㧞㧜㧝㧝ᐕ㧝㧜㧞㧝ᣣޓ㊄ᦐᣣޓඦ೨㧥ᤨ㧟㧣ಽ
Information (Continued)
90
Reference
wAC adaptor
The rated input voltage of the AC adaptor is AC 110 V - AC 240 V.
The AC adaptor must be used under the following condition:
pIn the USA, the AC cord plug must be connected to an AC 120 V only.
9*/#AGPIDQQMࡍࠫ㧞㧜㧝㧝ᐕ㧝㧜㧞㧝ᣣޓ㊄ᦐᣣޓඦ೨㧥ᤨ㧟㧣ಽ
91
Reference
FCC compliance
This device complies with Part 15 of the FCC Rules.
Operation is subject to the following two conditions:
(1) This device may not cause harmful interference, and
(2) this device must accept any interference received, including interference that may cause
undesired operation.
Changes or modifications not expressly approved by the party responsible for compliance could
void the user’s authority to operate the equipment.
NOTE: This equipment has been tested and found to comply with the limits for a Class B digital
device, pursuant to part 15 of the FCC Rules. These limits are designed to provide reasonable
protection against harmful interference in a residential installation. This equipment generates,
uses and can radiate radio frequency energy and, if not installed and used in accordance with
the instructions, may cause harmful interference to radio communications. However, there is no
guarantee that interference will not occur in a particular installation. If this equipment does
cause harmful interference to radio or television reception, which can be determined by turning
the equipment off and on, the user is encouraged to try to correct the interference by one or
more of the following measures:
- Reorient or relocate the receiving antenna.
- Increase the separation between the equipment and receiver.
- Connect the equipment into an outlet on a circuit different from that to which the receiver is
connected.
- Consult the dealer or an experienced radio/TV technician for help.
FCC ID: ACJ927152TX
Contains FCC ID: ACJ927153TX
9*/#AGPIDQQMࡍࠫ㧞㧜㧝㧝ᐕ㧝㧜㧞㧝ᣣޓ㊄ᦐᣣޓඦ೨㧥ᤨ㧟㧣ಽ
Printed in Japan
YAH0M1101A-0
F1011-0
Panasonic Healthcare Co., Ltd. 2011
*The serial number is printed on the package label.
[Distributor]
Panasonic Corporation of North America
Healthcare Group
One Panasonic Way, 1H-6, Secaucus, NJ 07094
Telephone No. 1-888-422-6309
[Manufacturer]
247 Fukutake-ko, Saijo, Ehime 793-8510, Japan
For your reference (Fill out when you purchase your Hearing Hub)
Name of owner:
Model number: Serial number*:
Dispenser: Purchase date:
Dispenser address:
Dispenser phone:
9*/#AGPIDQQMࡍࠫ㧞㧜㧝㧝ᐕ㧝㧜㧞㧝ᣣޓ㊄ᦐᣣޓඦ೨㧥ᤨ㧟㧣ಽ