Panasonic of North America 932CQ-SM5559U Bluetooth Modular User Manual
Panasonic Corporation of North America Bluetooth Modular
UserManual.wiki
>
Panasonic of North America
>
932CQ SM5559U User Manual
User Manual
Navigation menu
Upload a User Manual
Namespaces
Wiki Guide
HTML
PDF
Info
Views
User Manual
Discussion / Help
Navigation
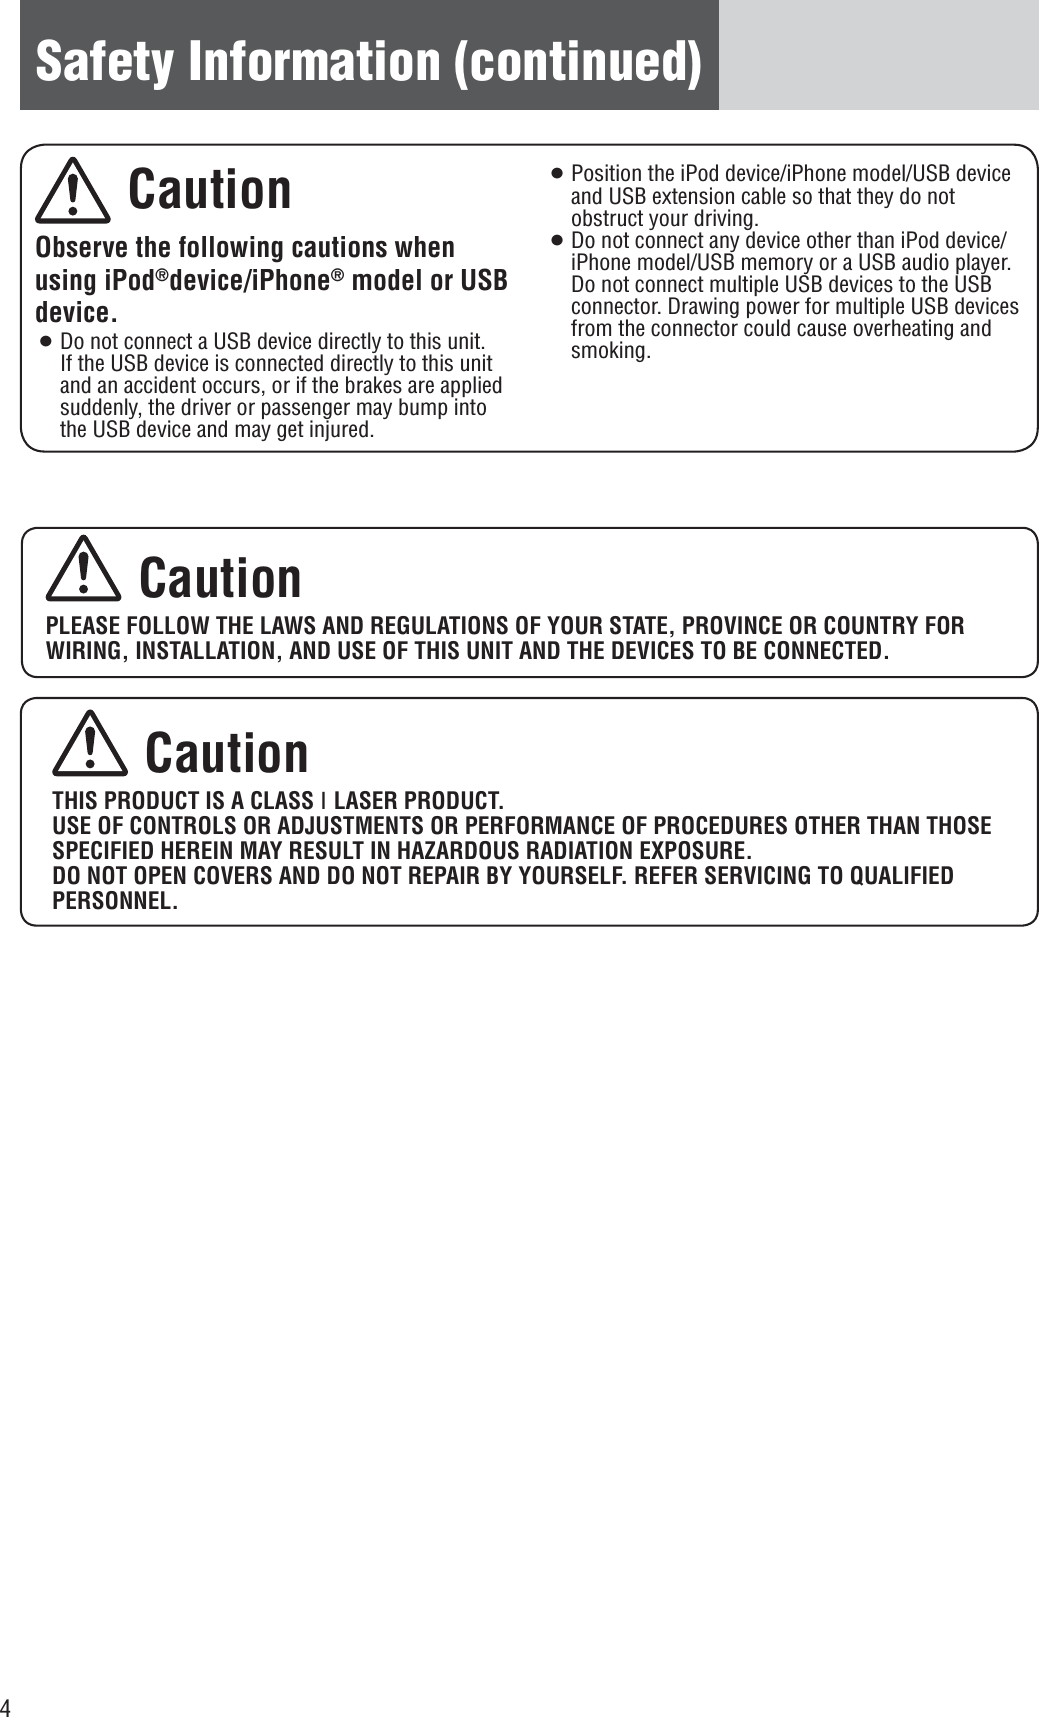
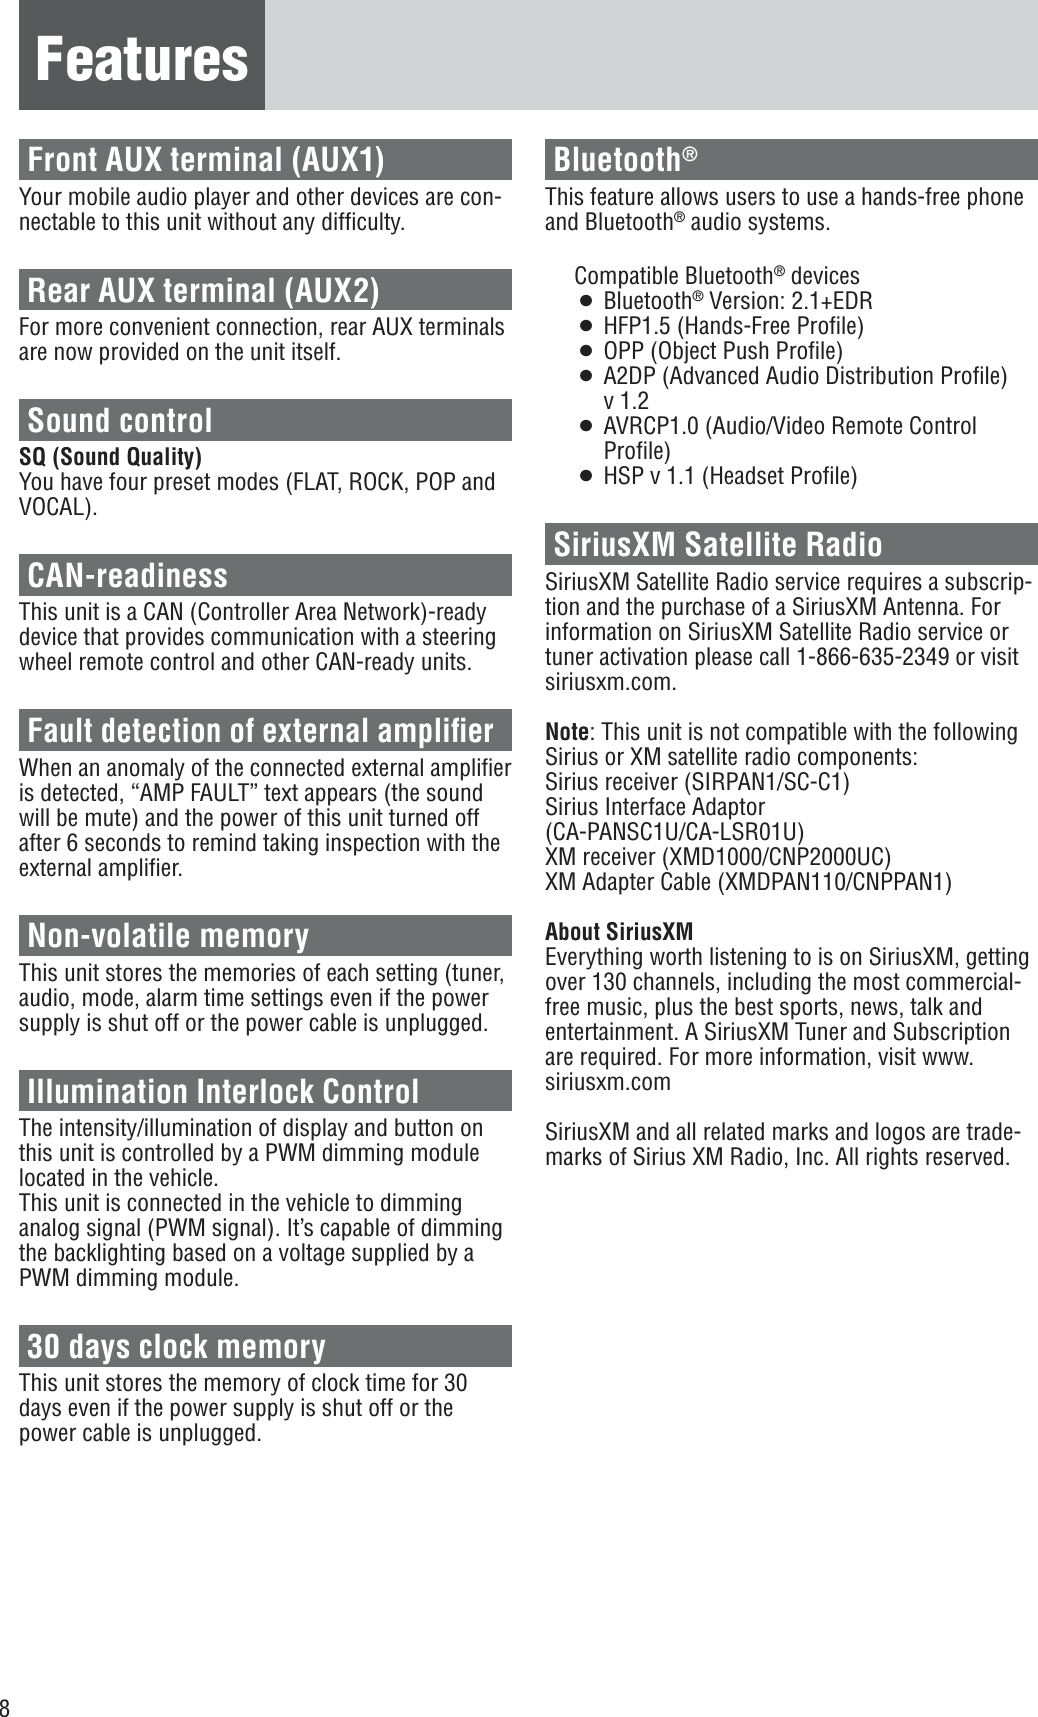
![11Preparation First time power on1 Turn the key in the ignition until the ac-cessory indicator lights.2 Press [PWR] (Power).Clock adjustment*The 12-hour system is used for example.1 Press [DISP](CLK).(Clock display)2 Hold down [DISP](CLK) for more than 2 seconds. *Indicator for AM or PM timeHour blinks3 Adjust the hour.[d] : Sets ahead.[s] : Sets back.Hour entered4 Press [DISP](CLK).Minute blinks5 Adjust the minute.[d] : Sets ahead.[s] : Sets back.Minute entered6 Press [DISP](CLK).CompletedNotes:¡ Clock time is displayed when the unit is power off.¡ “CLOCK ADJUST” is displayed when the clock is not adjusted.¡ Hold down [d] or [s] to change numbers rapidly.¡ When you want to readjust the time, repeat steps 2 to 6.Clock Display Setting1 Hold down [DISP](CLK) for more than 2 seconds to adjust clock setting. 2 Press [SEL] to open the clock display setting display. 3 Press [d] or [s] to adjust.the 24-hour system used (default) cdthe 12-hour system used4 Press [SEL] to determine the setting. Notes:¡ If no operation takes place for more than 5 seconds in the clock display setting, the display returns to the regular mode.¡ Selection of the 12-hour system displays “AM” during AM hours and “PM” during PM hours.¡ To exit from the clock display setting, press [DISP].](https://usermanual.wiki/Panasonic-of-North-America/932CQ-SM5559U/User-Guide-1873590-Page-11.png)
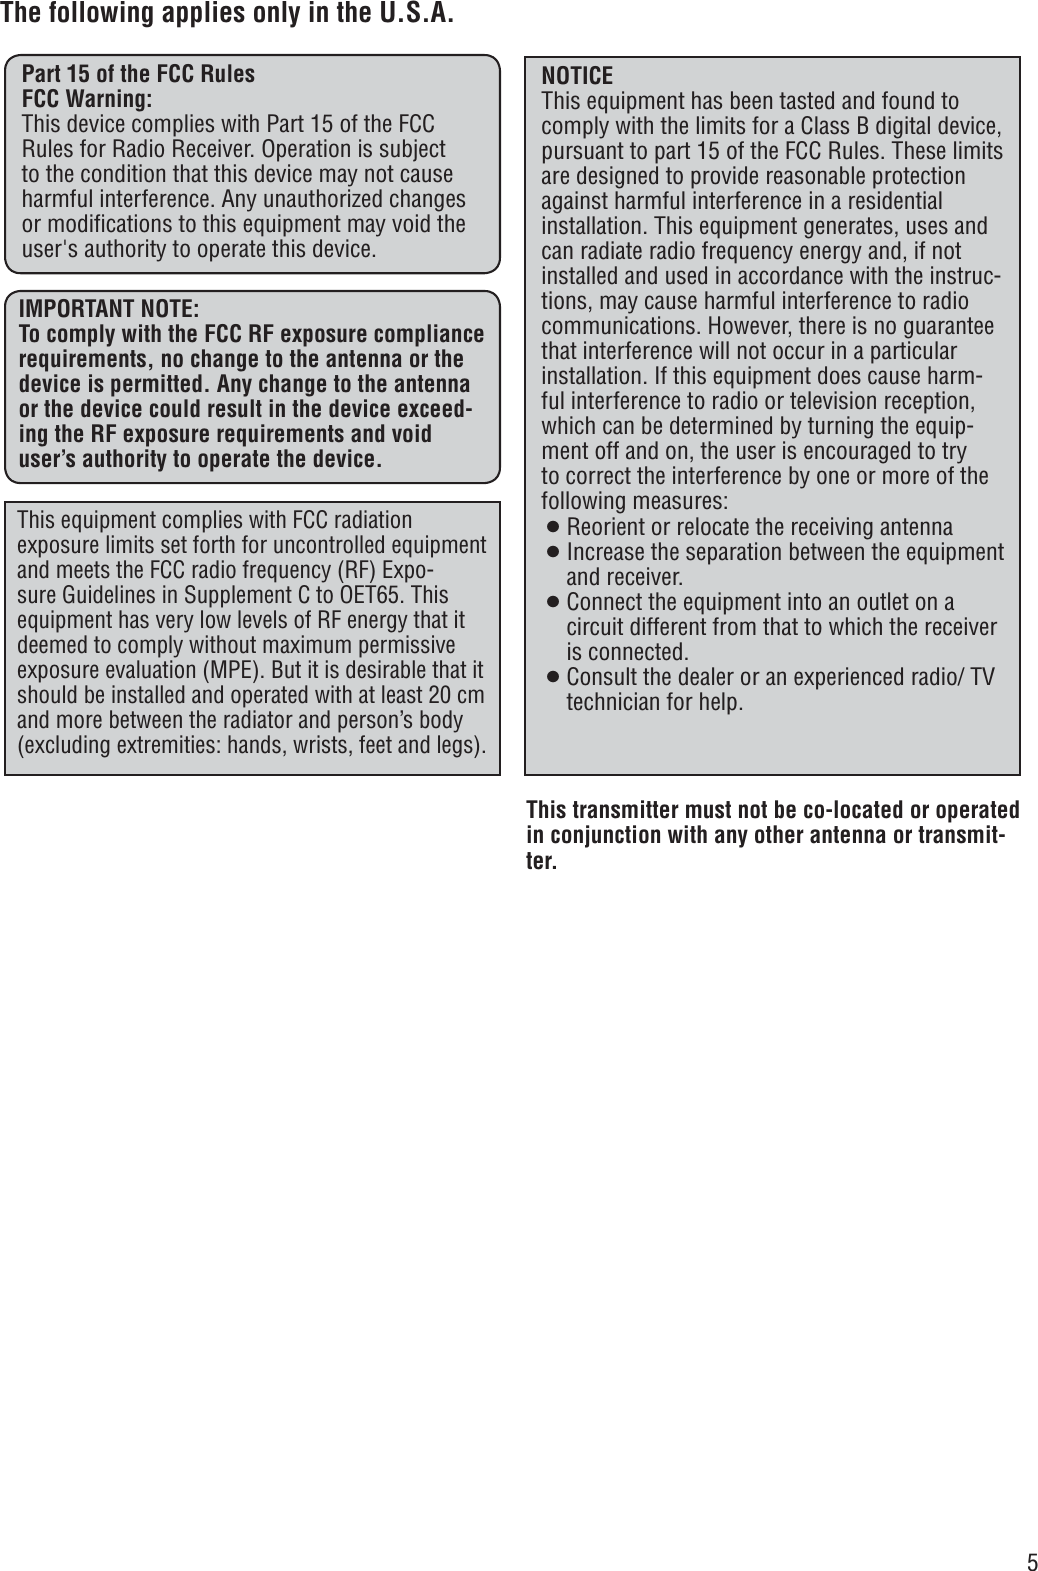
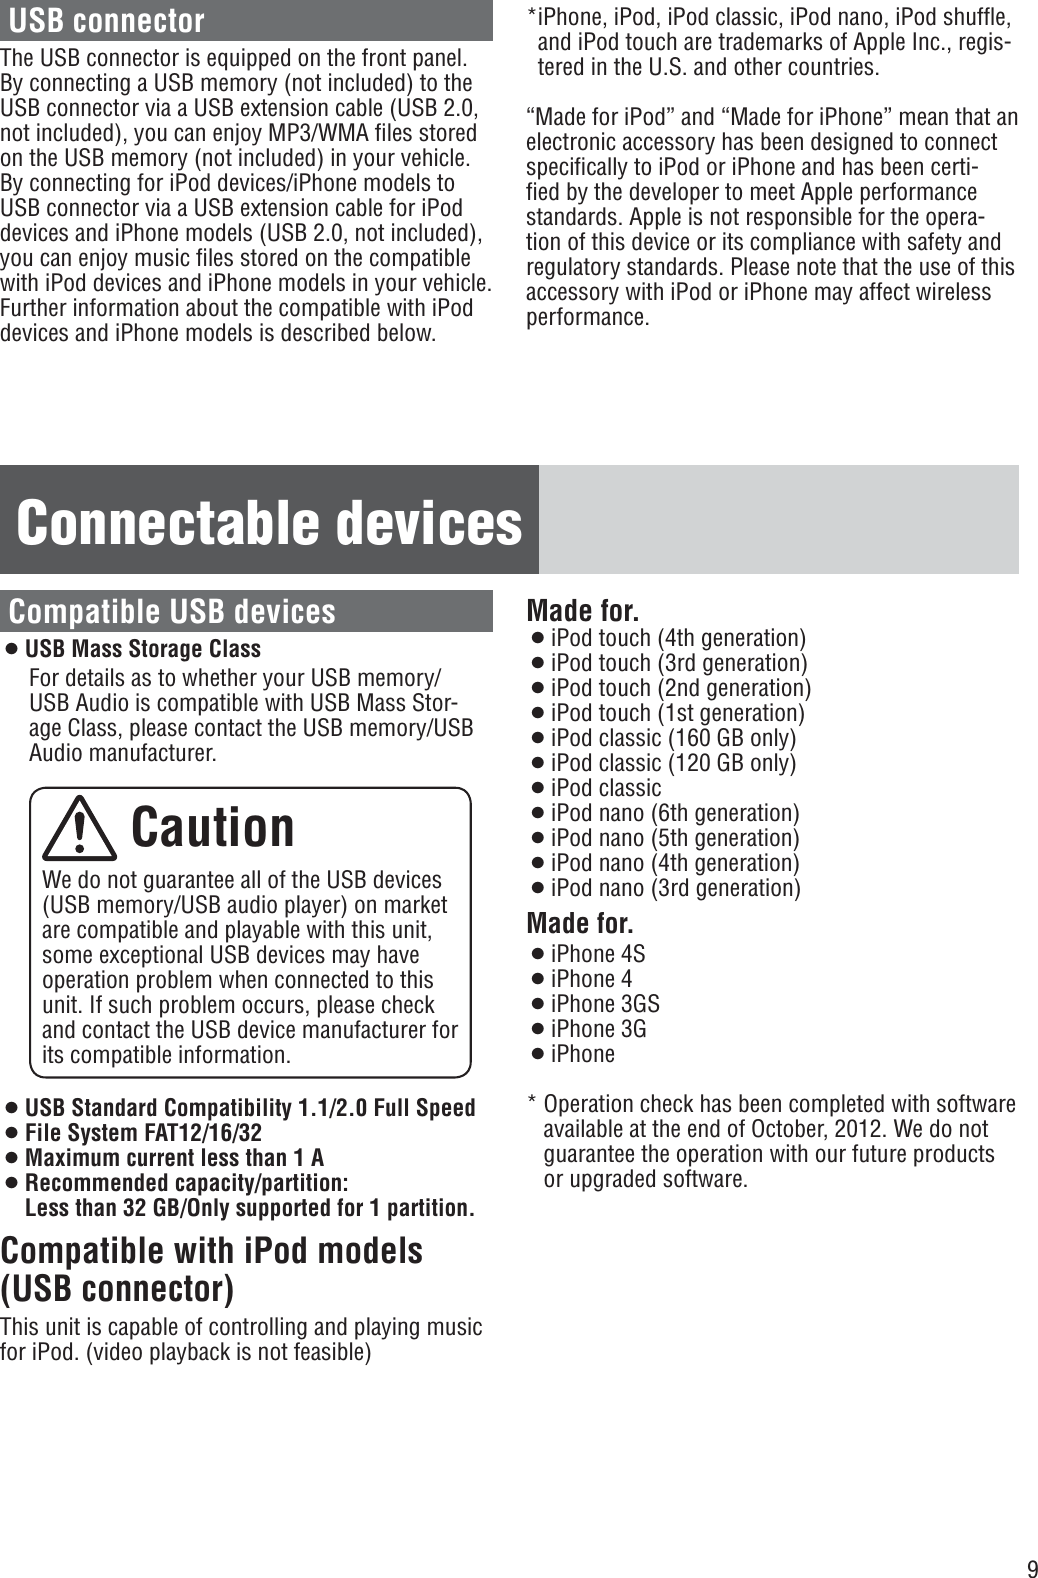
![12GeneralPower On/Off Set your car’s ignition switch to the ACC or ON position.Power on: Press [PWR] (Power).Power off: Hold down [PWR] for more than 1 second.One-Hour Timer With the ignition off, pressing the [PWR] on this unit will turn on the receiver and activate the receiver’s one-hour timer. The receiver will turn off automati-cally after one hour.Source Selection Press [SRC] to change the source. When device connected to the front AUX terminal of this unit, the sound of connected audio device can be output from car speakers.AUX2When device connected to the rear AUX terminal of this unit, the sound of connected audio device can be output from car speakers.Bluetooth®(a page 28)SiriusXM(a page 34)(Return to “RADIO”)Notes:¡ When an output signal from the rear AUX terminal is detected, this unit automatically changes the source to AUX2. If this unit no longer detects this input signal, the source immediately before AUX2 resumes.¡ When an output signal from the rear AUX terminal is detected in the power-off mode of this unit, the power is turned on with the AUX2 source selected. If this unit no longer detects this input signal be-fore manually selecting other sources, the power of this unit is turned off.AUX Connector (3.5 mm ø stereo) From line output of external sound/audio device (ex. Silicon audio player, HDD player, etc.) [SRC]selects a source. [PWR] (Power) toggles power on/off. [VOL] (Volume) When no external device is connected to rear AUX terminal, “AUX” is displayed, and press [SRC] to return to “RADIO”d Radio(a page 16) Disc player (a page 18) USB (a page 21) iPod (a page 24) AUX1dddddd](https://usermanual.wiki/Panasonic-of-North-America/932CQ-SM5559U/User-Guide-1873590-Page-12.png)
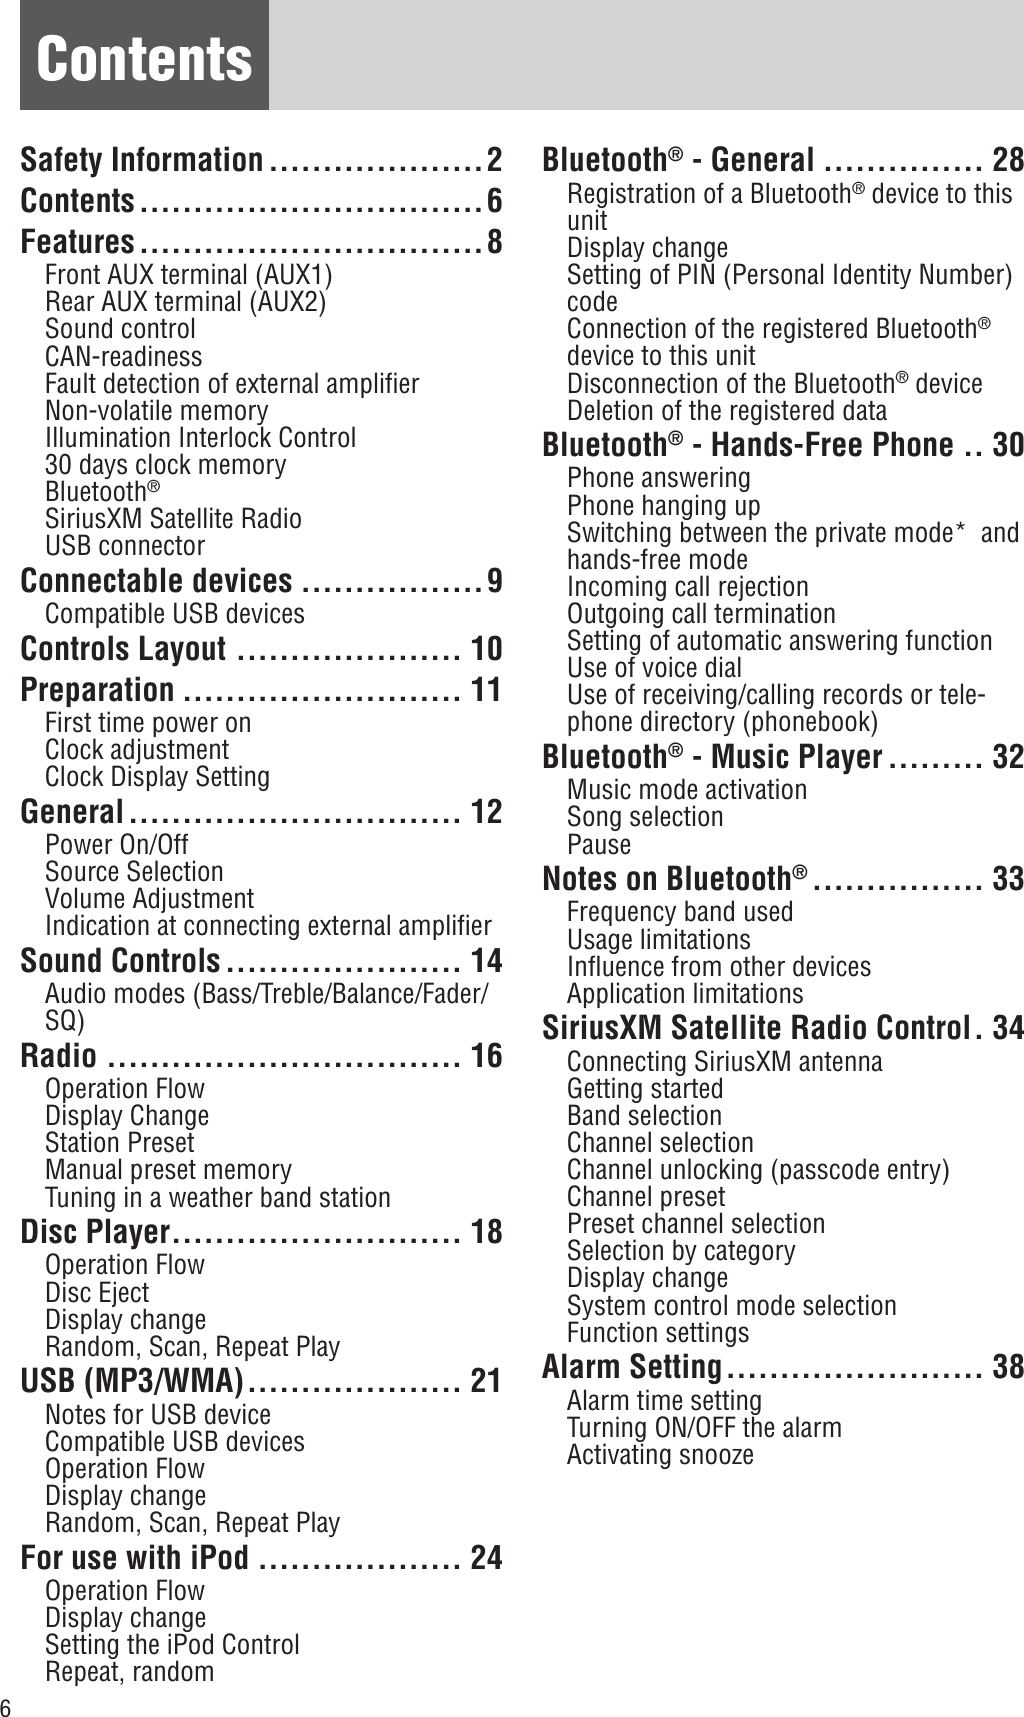
![13Volume Adjustment (Setting Range: 0 to 40, Default: 18) Turn [VOL] clockwise to increase the vol-ume, and counterclockwise to decrease the volume.Indication at connecting external amplifierlights when an external amplifier is con-nected.Note: When an anomaly of the external amplifier is detected, “AMP FAULT” appears (the sound will be mute/ blinks repeatedly) and the power of this unit is turned off after 6 seconds. When an external amplifier is connected, the adjust-able volume level: 0 to 33 (Maximum).UpDown](https://usermanual.wiki/Panasonic-of-North-America/932CQ-SM5559U/User-Guide-1873590-Page-13.png)
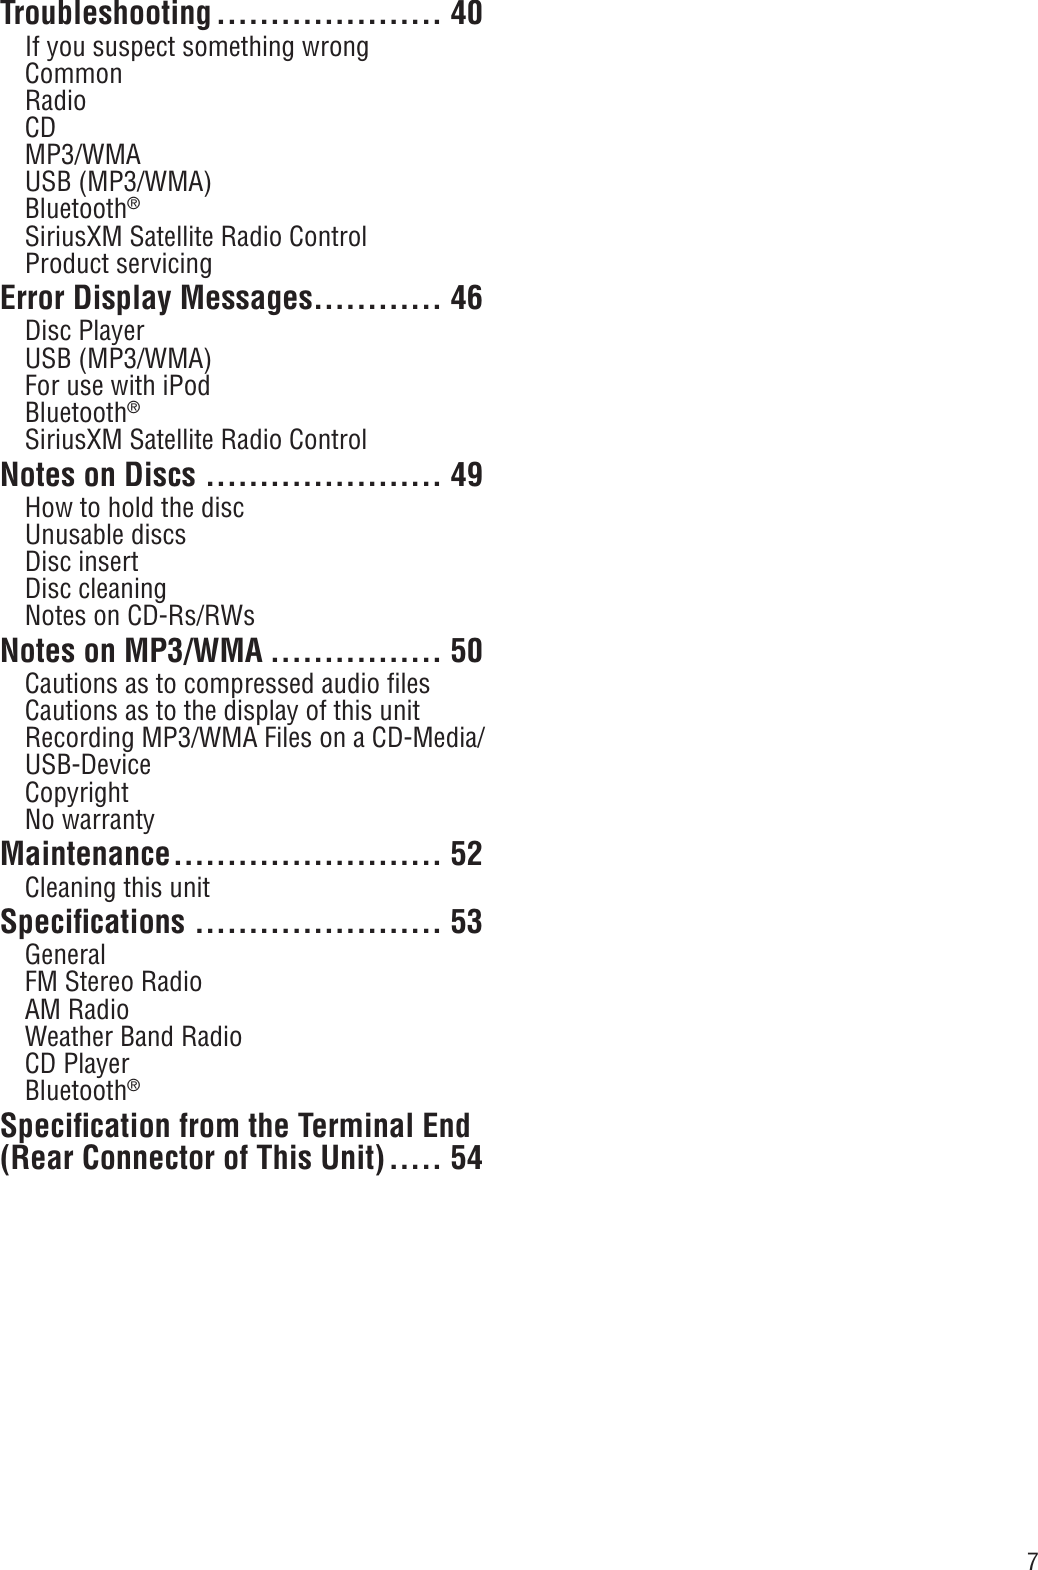
![14Sound Controls[VOL]selects a value in the audio menu. (PUSH SEL: Select)selects items in the audio menu. Audio modes (Bass/Treble/Balance/Fader/SQ)1 Push [SEL] (Select) to select the audio mode in sequence. 2Turn [VOL] (Volume) clockwise or counterclockwise to change each level or select a setting.Volume Bass Treble Balance Fader q: Upw: Down q: Increasedw: Decreased q: Increasedw: Decreased q: Right enhancedw: Left enhanced q: Front enhancedw: Rear enhanced (Setting Range: 0 to 40, default: 18) (Setting Range: –12 dB to +12 dB by 2 dB, default: 0 dB) (Setting Range: –12 dB to +12 dB by 2 dB, default: 0 dB) (Setting Range: 15 levels each and CENTER, default: CENTER) (Setting Range: 15 levels each and CENTER, default: CENTER)Note: If no operation takes place for more than 5 seconds in audio mode (2 seconds in volume mode), the display returns to the regular mode.](https://usermanual.wiki/Panasonic-of-North-America/932CQ-SM5559U/User-Guide-1873590-Page-14.png)
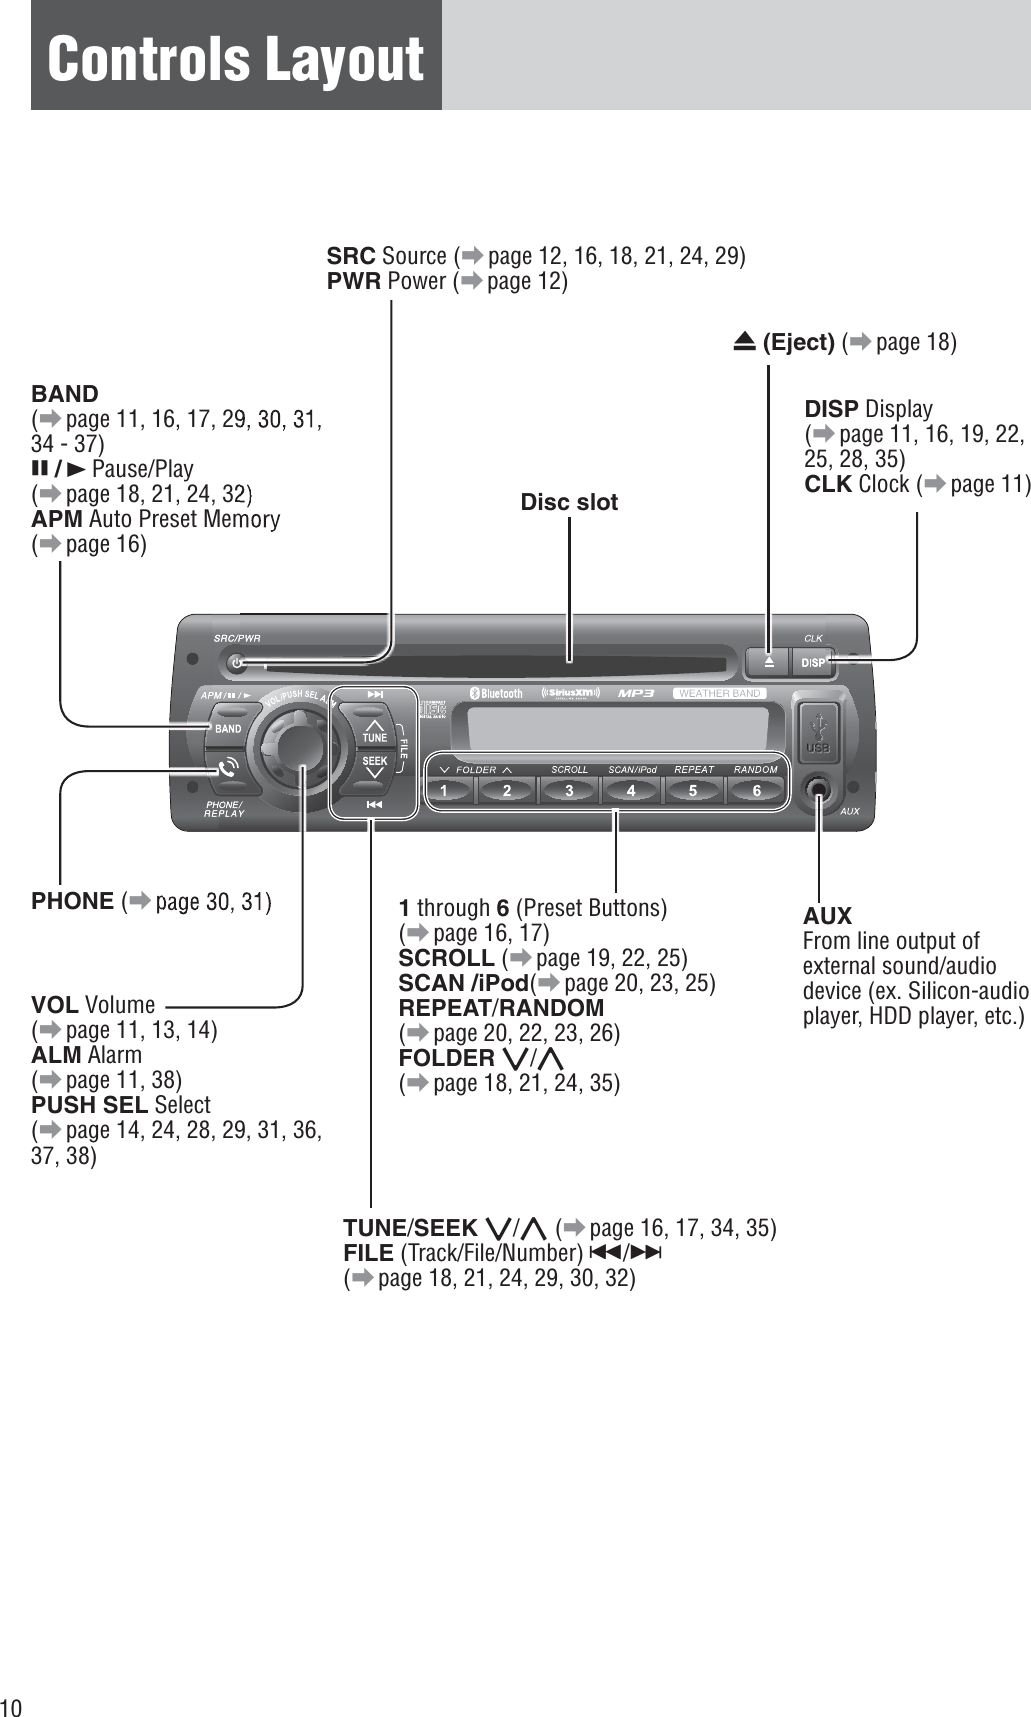
![16Radio(FM stereo) indicatorlights while receiving an FM stereo signal.Operation Flow 1 Press [SRC] to select the radio source. 2 Press [BAND] to select a band.Weather Band(a page 17)3 Select a station. Frequency Adjustment [TUNE{]: Lower / [TUNE}]: Higher Note: For station search, hold down either of the but-tons for more than 0.5 seconds and release it.Preset Station Selection Press the corresponding preset button from [1] through [6] to tune in a preset station.Display Change Press [DISP] to change the display. Radio mode display (Frequency) Clock display Station Preset The 6 stations with good reception will be automati-cally saved in the memory under preset buttons [1]through [6].Preset stations can be simply called up by pressing [1] through [6].Auto Preset Memory (APM) With this operation, stations with good receiving conditions can be automatically stored in the preset memory. 1 Select a band. 2 Hold down [BAND] (APM) for more than 2 seconds. The preset stations under best receiving condi-tions are received for 5 seconds each after preset-ting the stations (SCAN). To stop scanning, press one of the buttons from [1] through [6].Note: New stations overwrite existing saved stations. Caution To ensure safety, never at-tempt to preset stations while you are driving.[SRC]selects a source. [DISP] (Display) switches the information on the display. [BAND]selects a band in the radio source. (APM) (Auto Preset Memory) executes APM in the radio source (by hold-ing it down for more than 2 seconds).[TUNE}] / [TUNE{]increases/decreases the fre-quency. (For seek tuning, hold it down for more than 0.5 seconds and release it.)Preset buttons [1] through [6]select a preset station in the radio source, preset the current station (by holding it down for more than 2 seconds).cd](https://usermanual.wiki/Panasonic-of-North-America/932CQ-SM5559U/User-Guide-1873590-Page-16.png)
![17 Manual preset memory1 Use manual or seek tuning to fi nd a station.2 Press and hold one of the preset but-tons [1] through [6] until the display blinks once.Preset Number blinks onceNote: New stations overwrite existing saved stations Tuning in a weather band station1 Press [BAND] to select WB (Weather Band). (a page 16)2 Press any of the buttons [1] through [6]to monitor the preset station.Note: The weather band (CH1-6) has been preset. CH7 is selected by pressing [TUNE}] or [TUNE{]. Weather Band Frequency (channel) Number Weather Band Frequency Weather Band StationsNational Weather Radio Broadcasts from over 380 Iocations throughout the U.S. on seven VHF/FM frequencies.Tune to weather band to receive continuous weather information 24 hours a day on one of the following frequencies.1. 162.400 MHz2. 162.425 MHz3. 162.450 MHz4. 162.475 MHz5. 162.500 MHz6. 162.525 MHz7. 162.550 MHzNote: Further and updated information about the National Weather Radio station listing, please visit the web site: http://www.nws.noaa.gov/nwr/nwrbro.htmOccasionally the frequency of an existing or planned station must be changed because of unexpected radio frequency interfere with adjacent NOAA weather Radio Stations and/or with other Government or commercial Operations within the area. If you have a question concerning NOAA Weather Radio, please contact your nearest National Weather Service Offi ce. Warning Any NOAA broadcast weather report, includ-ing current and forecasts, may not refl ect your actual weather conditions at your exact time and location. You should always pay attention to your actual weather conditions to make safe decisions accordingly.](https://usermanual.wiki/Panasonic-of-North-America/932CQ-SM5559U/User-Guide-1873590-Page-17.png)
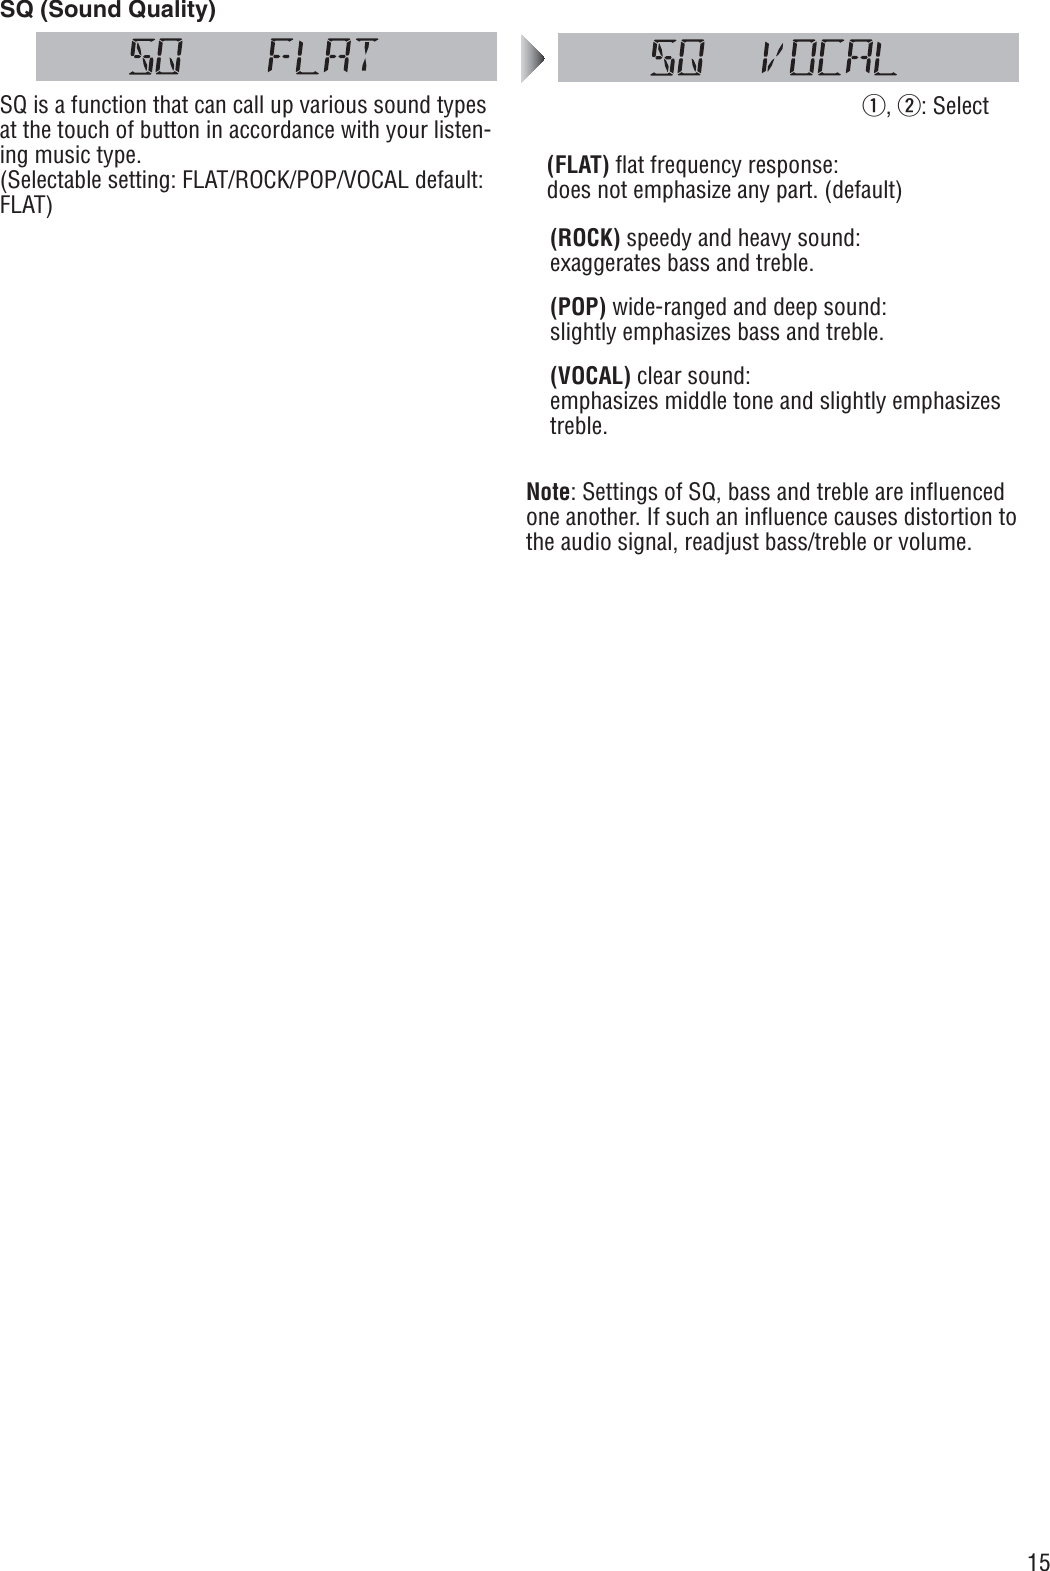
![18Disc Player Caution¡ A disc which has both CD-DA data and MP3/WMA data on it may not be reproduced normally. ¡Do not insert a disc when the indicator lights.¡Refer to the sections of “Notes on Discs” (a page 49) and “Notes on MP3/WMA” (a page 50).¡This unit does not support 8 cm {3”} discs.¡ Do not insert foreign objects into the disc slot. [4] (SCAN)/[5] (REPEAT)/[6] (RANDOM)toggles on/off each play mode. [3] (SCROLL)scrolls the information on the display. Disc slot takes a disc in with the printed side facing up. [u] (Eject) ejects the disc. [SRC] (Source) selects a source. [BAND] (h/5)(Pause/Play)toggles between pause and play with the player source. [6] [7]skips to the previous/next track/fi le in the player mode. For fast reverse/fast forward, hold down either of them. (DISC) indicator (Repeat)/ (Random)/ (Folder) indicatorOperation Flow 1 Press [SRC] to select the Disc Player source.Notes:¡The unit recognizes the disc and starts play-ing automatically.¡The power will be turned on automatically when a disc is loaded.Disc Eject Press [u] (Eject) to eject the disc.2 Select a desired portion.Track/File Selection Press [6] / [7].Note: To perform fast reverse/forward, hold down either of them. Disc Player (CD-DA disc): Previous/next track Disc Player (MP3/WMA disc): Previous/next fi le Folder Selection (MP3/WMA) [}] (FOLDER): Next folder [{] (FOLDER): Preceding folder PausePress [BAND] (h/5).Press again to cancel. [DISP] (Display) switches the information on the display. [{] [}] (FOLDER)skips to the previous/next folder.](https://usermanual.wiki/Panasonic-of-North-America/932CQ-SM5559U/User-Guide-1873590-Page-18.png)
![19Display changeTrack number/Play timeDisc title*Track title*ClockCD-DA* CD TEXT DisplayDisc title and Track title name are displayed.Press [DISP] to change the display.Notes:¡For scrolling text, press [3](SCROLL).¡“NO TEXT” is displayed when there is no information on the disc.MP3/WMA* ID3 Tag ON/OFFHold down [3](SCROLL) for more than 2 seconds.TAG ON: album title and song title/artist name are displayed.TAG OFF: folder name/file name are displayed. (Default)Folder number/File numberPlay timeFolder name/ Album*File name/Title, artist*Clock( lights.)(lights.)(lights.)(lights.)](https://usermanual.wiki/Panasonic-of-North-America/932CQ-SM5559U/User-Guide-1873590-Page-19.png)
![20Disc Player (continued)Random, Scan, Repeat PlayRandom Play SettingPress [6] (RANDOM) to select the random play setting.Random playAll the available songs (tracks/files) are played in a random sequence. ( lights.) dPress [6] (RANDOM) again to select the folder random play.Folder random play(only for MP3/WMA)All the available files in the current folder are played in a random sequence. ( ,lights.) dPress [6] (RANDOM) again to turn off random play.Random offReturn to regular play.Scan Play SettingPress [4] (SCAN) to select the scan play setting.Scan playThe first 10 seconds of each song (each track/file) is played in sequence. dPress [4] (SCAN) again to select the folder scan play. Folder scan play(only for MP3/WMA)From the next folder, the first 10 seconds of the first file in each folder is played in sequence. (lights.) dPress [4] (SCAN) again to turn off scan play.Scan offReturn to regular play.Repeat Play SettingPress [5] (REPEAT) to select the repeat play setting.Repeat play The current song (track/file) is repeated. (lights.) dPress [5] (REPEAT) again to select the folder repeat play.Folder repeat play (only for MP3/WMA)The current folder is repeated. (,lights.) dPress [5] (REPEAT) again to turn off repeat play.Repeat offReturn to regular play.](https://usermanual.wiki/Panasonic-of-North-America/932CQ-SM5559U/User-Guide-1873590-Page-20.png)
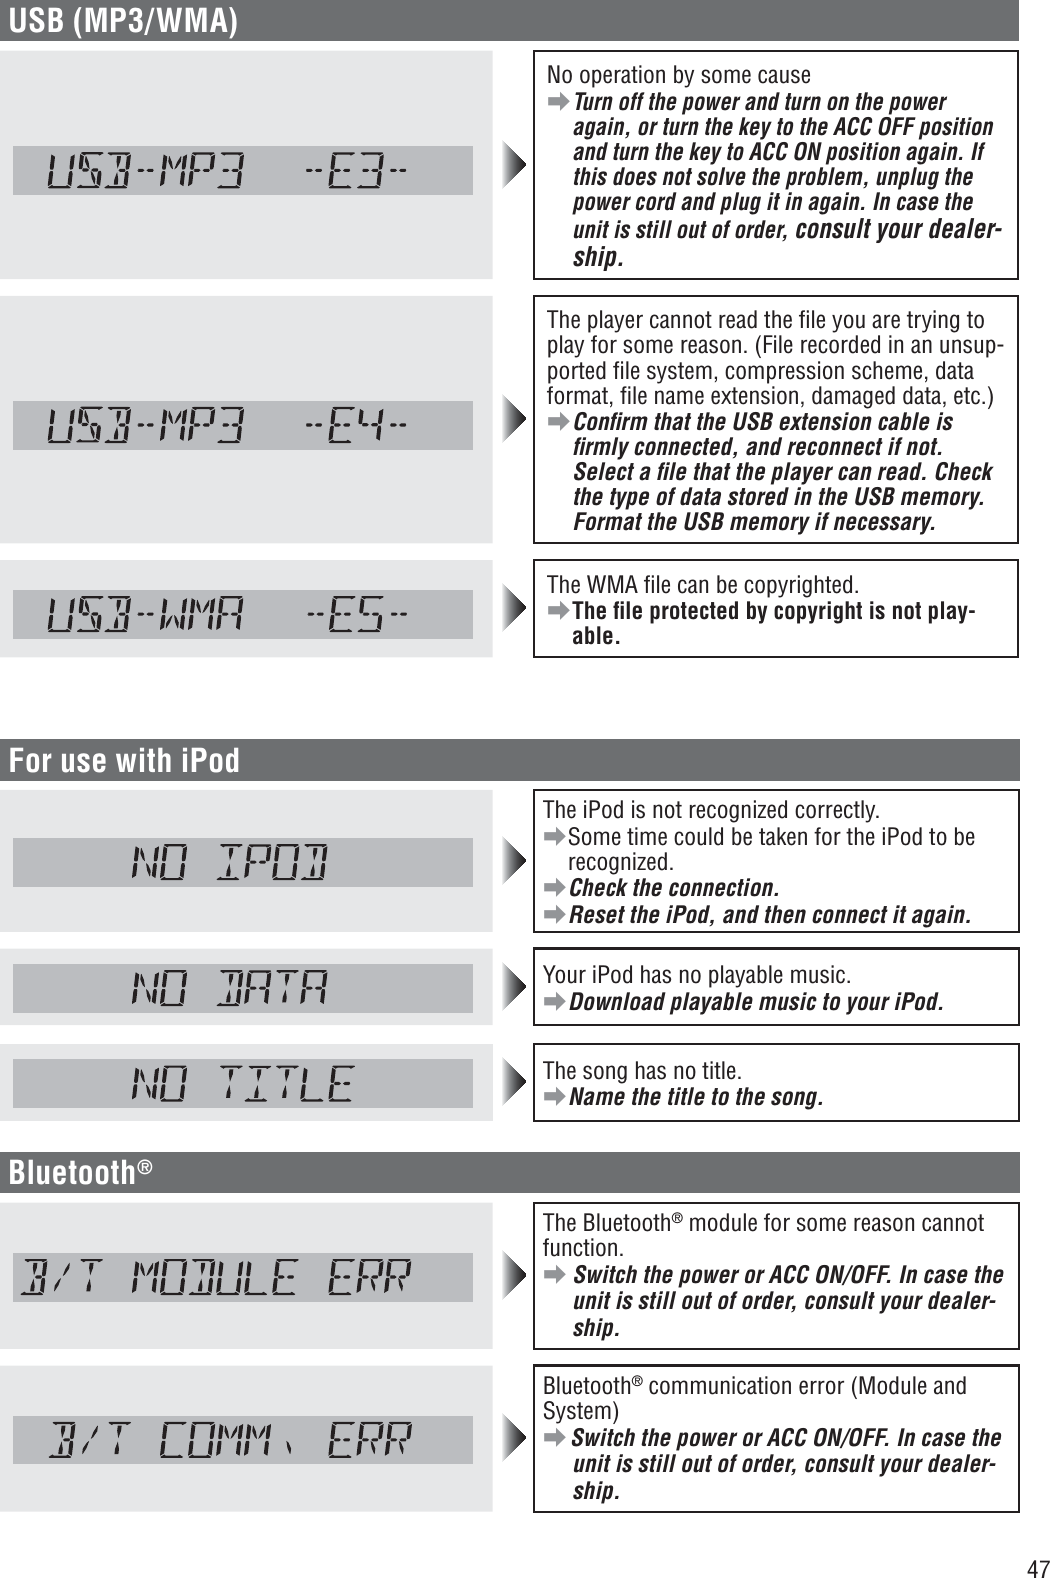
![21USB (MP3/WMA)Notes for USB device¡This unit plays back MP3/WMA files stored on a USB memory. ¡Back up any important data beforehand. We can-not accept responsibility for any lost data. ¡Refer to the section on “Compatible USB devices” (a below). ¡Refer to the section on “Notes on MP3/WMA”. ¡Connect your USB device to your car audio using a standard USB extension cable. Use of a 2 m or shorter USB 2.0 cable is recommended.Caution for USB Device¡Do not connect a USB device directly to this unit. If the USB device is connected directly to this unit and an accident occurs, or if the brakes are applied suddenly, the driver or pas-senger may bump into the USB device and may get injured. ¡Position the USB device and USB extension cable/ optional adaptor so that they do not obstruct your driving. ¡Do not connect any USB device other than a USB memory or a USB audio player. Do not connect multiple USB devices to the USB con-nector. Drawing power for multiple USB devices from the connector could cause overheating and smoking. Compatible USB devices ¡USB Mass Storage Class This refers to a type of USB device, which when connected to a PC can be used as a storage device without the need for specialized drivers or software.For details as to whether your USB memory/USB Audio is compatible with USB Mass Storage Class, please contact the USB memory/USB Audio manufacturer. ¡USB Standard Compatibility 1.1/2.0 Full Speed ¡File system is FAT12/16/32 ¡Maximum current less than 1 A ¡Recommended capacity/partition:Less than 32 GB/Only supported for 1 partition.Notes:¡The use of USB devices that contain data files other than MP3/WMA stored is not recommended. ¡Playback or display may not be possible depend-ing on the type of the USB device or the condition of the recording. ¡Even if PC playback is possible, it may not be pos-sible on this product, because some USB devices are not compliant with the USB standard. ¡Even with a USB device in the Mass Storage Class, playback may not be possible in some cases. Operation Flow1Press [SRC] to select the USB mode. 2Open the USB connector cover. 3Using a USB extension cable, connect the USB memory to this unit. Notes:¡When connecting (disconnecting) the USB memory, turn down the volume of the unit. ¡When connecting the cables, make sure the con-nector is pushed all the way into the socket. ¡This unit may not operate correctly, depending on USB cable’s quality and length. Use of a 2 m or shorter USB 2.0 cable is recommended. Notes:¡MP3/WMA files recognized by the unit are played back automatically. ¡If the USB memory is connected to this unit when the power is turned on, playback starts automati-cally.4Select a desired portion. Folder Selection [}] (FOLDER): Next folder [{] (FOLDER): Preceding folder File Selection [7]: Next file [6]: Preceding file (press twice) Note: For fast forward/reverse, hold down either of them.PausePress [BAND] (h/5).Press again to cancel.](https://usermanual.wiki/Panasonic-of-North-America/932CQ-SM5559U/User-Guide-1873590-Page-21.png)
![22USB (MP3/WMA) (continued)USB (Universal Serial Bus) Con-nector (inside of the cover)[4] (SCAN)/[5] (REPEAT)/[6](RANDOM)toggles on/off each play mode.[3] (SCROLL)scrolls the information on the display. [{] [}] (FOLDER)skips to the previous/next folder. [SRC]selects a source. [DISP] (Display) switches the information on the display. [BAND] (h/5)(Pause/Play)toggles between pause and play with the USB source. [6] [7]skip to the previous/next fi le in the USB mode. For fast reverse/fast forward, hold down either of them. (Repeat)/ (Random)/ (Folder)indicator indicatorlights when a USB device is loaded.Display changePress [DISP] to change the display.Notes:¡ For scrolling text, press [3](SCROLL).¡ “NO TEXT” is displayed when there is no informa-tion on the USB. * ID3 Tag ON/OFFHold down [3](SCROLL) for more than 2 seconds.TAG ON: album title and song title/artist name are displayed.TAG OFF: folder name/fi le name are displayed. (Default)Folder number/File numberPlay time Folder name/ Album* File name/Title, artist* Clock( lights.)( lights.)](https://usermanual.wiki/Panasonic-of-North-America/932CQ-SM5559U/User-Guide-1873590-Page-22.png)
![23Random, Scan, Repeat PlayRandom Play SettingPress [6] (RANDOM) to select the random play setting.Random playAll the available songs (files) are played in a random sequence. ( lights.) dPress [6] (RANDOM) again to select the folder random play.Folder random play All the available files in the current folder are played in a random sequence. ( ,lights.) dPress [6] (RANDOM) again to turn off random play.Random offReturn to regular play.Scan Play SettingPress [4] (SCAN) to select the scan play setting.Scan playThe first 10 seconds of each song (each file) is played in sequence. dPress [4] (SCAN) again to select the folder scan play. Folder scan playFrom the next folder, the first 10 seconds of the first file in each folder is played in se-quence. ( lights.) dPress [4] (SCAN) again to turn off scan play.Scan offReturn to regular play.Repeat Play SettingPress [5] (REPEAT) to select the repeat play setting.Repeat play The current song (file) is repeated. (lights.) dPress [5] (REPEAT) again to select the folder repeat play.Folder repeat play The current folder is repeated. (,lights.) dPress [5] (REPEAT) again to turn off repeat play.Repeat offReturn to regular play.](https://usermanual.wiki/Panasonic-of-North-America/932CQ-SM5559U/User-Guide-1873590-Page-23.png)
![24 For use with iPodOperation Flow1 Connect an iPod. 2 Press [SRC] to select the iPod (USB) mode. Playback starts. Note: If playback does not start, press [BAND](h/5).File Selection [7]: Next fi le [6]: Beginning of the current fi le For the preceding fi le, press twice. Notes:¡ Hold down for fast forward/reverse. ¡ When fast forward comes to the end of a fi le or fast reverse comes to the beginning of a fi le, regular playback starts when the fast forward or reverse button is released. PausePress [BAND] (h/5).Press again to cancel. Playing Mode Selection 1 Press [2] (FOLDER}) to activate the Playing Mode Selection mode. 2 Turn [VOL] clockwise or counterclock-wise to adjust. PLAYLIST: Playback by playlist (Default) ARTIST: Playback by artist ALBUM: Playback by album GENRE: Playback by genre 3 Press [VOL] (PUSH SEL) to determine the selection. 4 Turn [VOL] clockwise or counterclock-wise to select a portion to be played. 5 Press [VOL] (PUSH SEL) to determine the selection. Notes:¡ To exit the selection, press [DISP].¡ Files without an album name or an artist name are not playable in the playing mode of the album or artist display respectively. ¡ Playing Mode Selection is not available when this unit is switch to iPod control mode. By connecting compatible with iPod devices to USB connector via a USB extension cable for iPod (USB 2.0, not included), you can enjoy music fi les stored on the compatible with iPod devices in your vehicle.Note: Refer to the section on “USB (MP3/WMA)” for connection.[VOL]selects a value in the Playing Mode Selection mode.(PUSH SEL :Select)selects items in the Playing Mode Selection mode.USB (Universal Serial Bus) Con-nector (inside of the cover)[2] (FOLDER})activates the Playing Mode Selection mode.[3] (SCROLL)scrolls the information on the display. [4](SCAN/iPod)toggles iPod control mode between head unit and iPod.[5] (REPEAT)/[6] (RANDOM)toggles on/off each play mode. [SRC]selects a source. [DISP] (Display) switches the information on the display. [BAND] (h/5)(Pause/Play)toggles between pause and play with the iPod source.[6] [7]skip to the previous/next fi le in the player mode. For fast reverse/fast forward, hold down either of them. (Repeat)/ (Random) indicator / indicatorlights when a USB extension cable for iPod and iPod devices is con-nected with USB connector and the USB source is selected.](https://usermanual.wiki/Panasonic-of-North-America/932CQ-SM5559U/User-Guide-1873590-Page-24.png)
![25Display changePress [DISP] to change the display.Notes:¡For scrolling text, press [3](SCROLL).¡“NO TEXT” is displayed when there is no informa-tion on iPod.Setting the iPod ControlWhen an iPod/iPhone is connected, operate it from its own controls or from this head unit can be select-able.Press [4] (SCAN) to switch iPod control mode between this head unit and iPod.iPod mode (Default):Operate the iPod/iPhone playback via this head unit. cdiPod control mode:Operate the iPod/iPhone playback using its own controls.Note: The iPod control mode (function) may not be operated/supported on the models other than compatible models listed on page 9. Please note the controllable function under “iPod Mode” and “iPod Control Mode” on head unit may vary with iPod models.Song number/Total songPlay timeSong nameArtist nameClockAlbum name( lights.)(lights.)(lights.)](https://usermanual.wiki/Panasonic-of-North-America/932CQ-SM5559U/User-Guide-1873590-Page-25.png)
![26Shuffle Play SettingThe shuffle function of an iPod corresponds to the RANDOM function of this unit. Press [6] (RANDOM) to select the shuffle play setting.SongsAll the available files are played in a random se-quence. ( lights.) dPress [6] (RANDOM) again to select the album shuffle play.AlbumsAll the playable albums are played in a random sequence. ( blinks.)Notes:¡The Album shuffle play function is only available when the unit is switch to iPod control mode or controlled directly by iPod devices. Album shuffle function is available depending on the connected iPod/iPhone equipped with album shuffle function.¡When the last selected play list with the iPod is song, song shuffle play is activated, and when it is album, album shuffle play is activated. dPress [6] (RANDOM) again to turn off shuffle play.Shuffle offReturn to regular play.Note: Depending on the connected iPod/iPhone, repeat play or random play function or display may differ from this unit and your iPod/iPhone.For use with iPod (continued)Repeat, Shuffle PlayRepeat Play SettingPress [5] (REPEAT) to select the repeat play setting.One song repeat playThe current file is repeated. ( lights.) dPress [5] (REPEAT) again to select the all songs repeat play.All songs repeat playThe all playable songs are repeated.( blinks.) dPress [5] (REPEAT) again to turn off repeat play.Repeat play offReturn to regular play.Note: When using iPod nano (4th generation) and this unit is under iPod control mode, the “IPOD CTRL <IPOD>” is always displayed on this unit when select repeat play setting from this unit. The repeat play setting is functional even without above corresponded display.](https://usermanual.wiki/Panasonic-of-North-America/932CQ-SM5559U/User-Guide-1873590-Page-26.png)
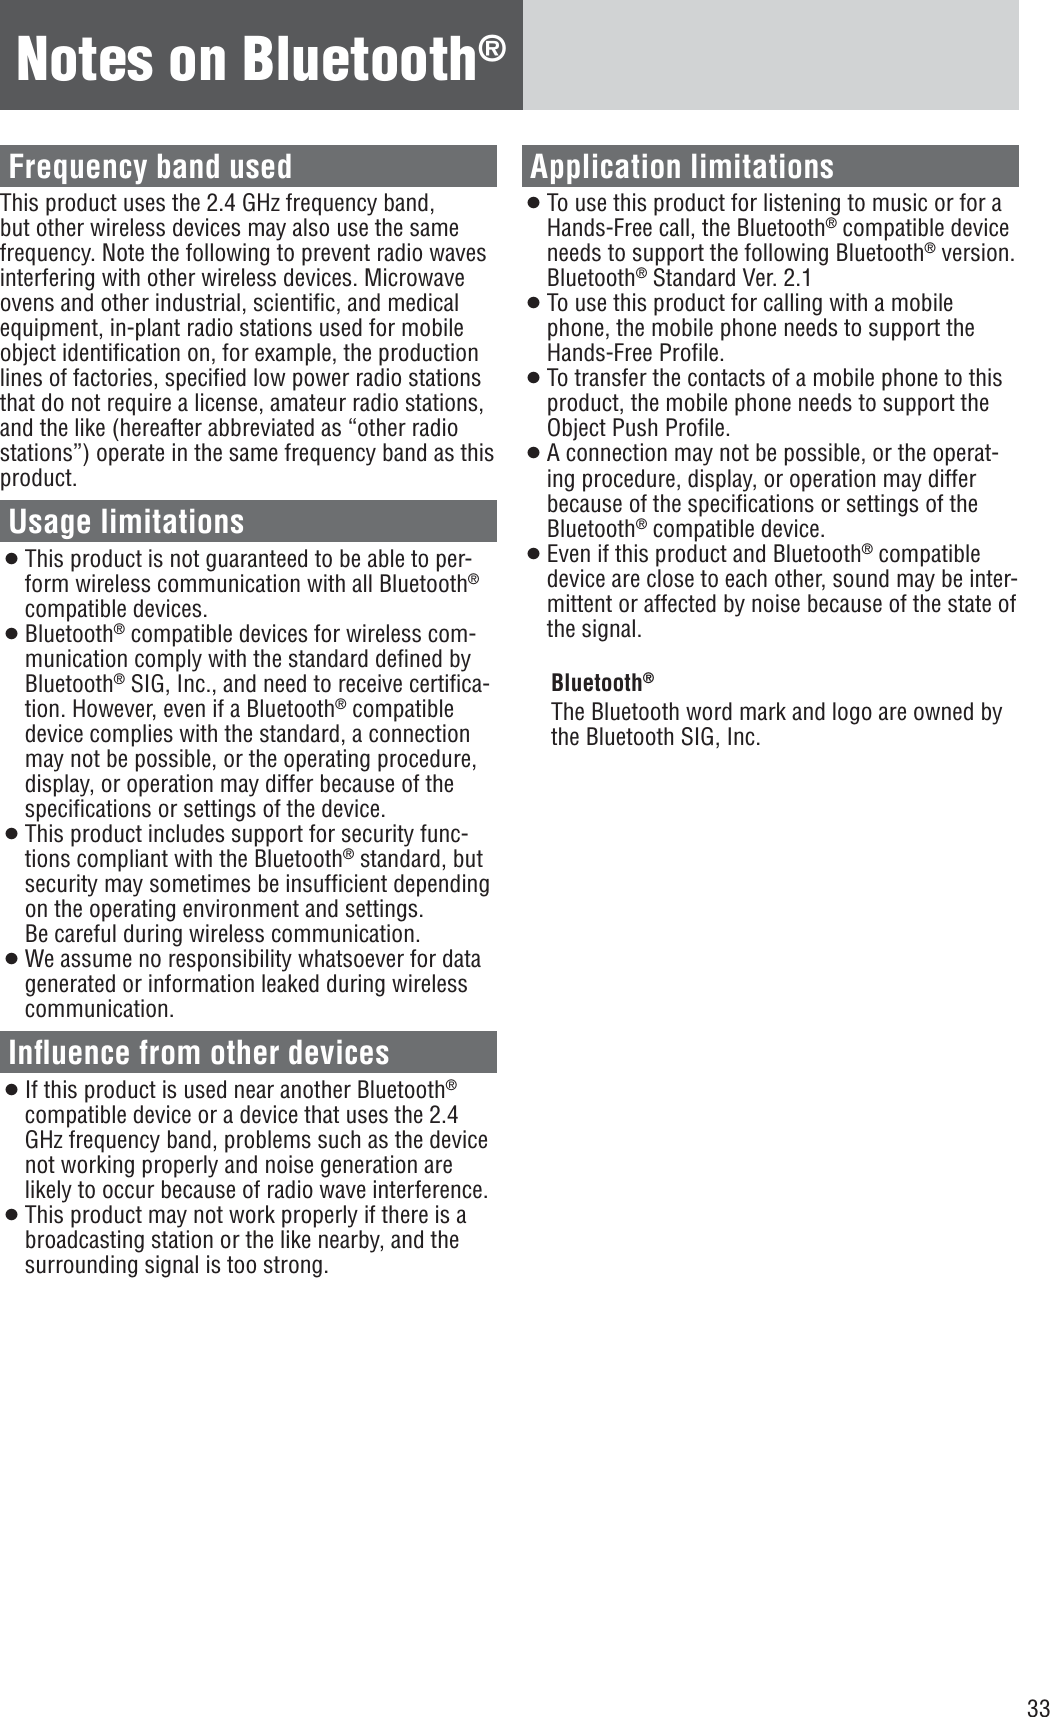
![28Bluetooth® - General (Bluetooth®) indicatorlights when a Bluetooth® device is con-nected, and blinks during a call. Registration number(M1 – M8) Registration of a Bluetooth® device to this unit1 Press one of the preset buttons from [1] through [6] to select a registration number assigned to the Bluetooth®device to be registered.Note: Up to 8 devices memory registered with preset buttons.[1] – [5] : Selects a registration number (1st page: 1 – 5, 2nd page: 6 – 8)[6] : Turns the registration pagesFor registration No.6: press [6], then press [1].For registration No.7: press [6], then press [2].For registration No.8: press [6], then press [3].2 Hold down the selected preset button for more than 2 seconds.3 Push [SEL] (Select) to make this unit standby for registration with waiting status.Note: To exit waiting status, press [DISP].4 Operate your Bluetooth® device to input the PIN code for connection. (Default PIN code is “0000”) Once pairing/registration is successful, the registered Bluetooth® device can automatically communicate with this unit.Notes:¡The text display of Bluetooth® device name and telephone directory on this unit is only sup-ported with English characters, other languages and undisplayable characters/symbols will be converted into an asterisk (*).¡ If registration is not successfully completed within 1 minute, “TIME OUT” appears and the screen for registration number selection resumes. ¡ If registration fails because of mismatched PIN code, “B/T PIN ERR” appears and the screen for registration number selection resumes. ¡ Depending on the communication status, it may takes 5 to 40 seconds for device connection.Note on operation:Some Bluetooth® devices/Phones may not connect to this unit or, even when connected, the operation method, displays, and functions may differ from the instructions within this manual. For the Bluetooth® devices/Phones to be supported with this unit, please visit/consult your dealer to verify compatibility of your Bluetooth® devices or phones.Display changePress [DISP] (Display) to change the display.Registered device name (Example) Clock[DISP] (Display) switches the information on the display. [SRC]selects a source. [BAND]connect, or discon-nect a Bluetooth®device.[(PUSH SEL :Select)deletes the registration data.makes this unit standby for registration.[1] through [6] (preset buttons)selects a registration number of a Bluetooth® device.[6]: sets the PIN code.[s]/[d]selects a number.](https://usermanual.wiki/Panasonic-of-North-America/932CQ-SM5559U/User-Guide-1873590-Page-28.png)
![29Notes:¡We shall not guarantee all the functions of the Bluetooth® device to be connected. When opera-tions cannot be performed via this unit, operate the system via the Bluetooth® device. ¡Be aware that the battery of a Bluetooth® device drains faster if the Bluetooth® device is con-nected to this unit.¡Even when the Bluetooth® device that is con-nected to this unit is located near this unit, sound may be interrupted or noise may be generated.¡The Bluetooth® device with over 5-digit PIN code is not operated with this unit.¡“B/T DISCOND is displayed when the Bluetooth®device is disconnected.Setting of PIN (Personal Identity Number) code1Hold down [6] for more than 2 seconds to call the PIN code entry mode.2Press [6] to prepare for adjustment.1st digit blinks3Enter a number for each digit.[s]/[d]: Selects number (0 – 9).[6] : Selects next digit to be entered.Digit entered4Press [6] to determine the PIN code entry when last digit is entered. CompletedNote: To check the Bluetooth® address of this head unit, press [SEL] after step 1.Connection of the registered Bluetooth®device to this unit1Press the preset button(s) [1] through [6] to select the registration number of the Bluetooth® device of interest. (Refer to the above.) 2Hold down [BAND] for more than 2 seconds for connection. The Bluetooth® indicator ( ) lights. Notes:¡Even if [SRC] (Source) is pressed to change the source, the connection stays connected. ¡Depending on the communication status, it may takes 5 to 40 seconds for device connection.Disconnection of the Bluetooth® deviceHold down [BAND] for more than 2 seconds.The Bluetooth® indicator ( ) turns off. Note: When the Bluetooth® device is out of reception range or encounter serious interference by outer signal, “ERROR” appears and this unit will automati-cally disconnect the connections.Deletion of the registered data1Press the preset button(s) [1] through [6] to select a registration number as-signed to the Bluetooth® device whose data is to be deleted. (Refer to the above.)2Hold down the preset button [1]through [5] selected above for the registration number for more than 2 seconds.3Press the preset button that was pressed at the step above again. 4Push [SEL]. Deletion completed](https://usermanual.wiki/Panasonic-of-North-America/932CQ-SM5559U/User-Guide-1873590-Page-29.png)
![30Bluetooth® - Hands-Free PhonePhone answering Press [PHONE] during a call incoming. The Bluetooth® indicator ( ) blinks during a call incoming/making a call. Notes:¡ During a call incoming, the volume of this unit automatically switches to 18, it restores to the original volume setting when phone answering or call rejecting.¡ If the automatic answering function is activated, conversation can be automatically started after receiving a call. (Refer to the below.)Phone hanging upPress [PHONE] during a call. Switching between the private mode* and hands-free modePress [BAND] during a call. The private mode and hands-free mode switch alter-nately every time [BAND] is pressed. (Private mode)(Hands-free mode)* The private mode is defi ned as the mode where conversation is conducted with the mobile phone in a usual manner without the hands-free function. Incoming call rejectionHold down [PHONE] for more than 2 sec-onds during a call incoming. Outgoing call termination Hold down [PHONE] for more than 2 sec-onds during making a call. (When other party does not answer the call.)Setting of automatic answering function Hold down [PHONE] for more than 2 sec-onds at the standby state. The automatic answering function toggles between ON and OFF every time [PHONE] is held down for more than 2 seconds. (Automatic answering deactivated) (Automatic answering activated) Use of voice dial 1 Hold down [d] for more than 2 sec-onds at the standby state.2 Pronounce the name registered on the telephone directory. If the name matches with a piece of data on the telephone directory registered with the mobile phone, the telephone number of the name is dialed.Note: The Bluetooth® mobile phone itself must be equipped and support voice dial function.[PHONE]picks up the phone, makes a call, or rejects the call.[VOL]switch the record(PUSH SEL :Select)selects items in the selection mode.[BAND]switches between the private mode and hands-free mode.[d]activates the voice dial.](https://usermanual.wiki/Panasonic-of-North-America/932CQ-SM5559U/User-Guide-1873590-Page-30.png)
![31Note: To have a mobile phone conversation with use of this unit, the mobile phone shall be compatible with the Hands-Free Profile.Use of receiving/calling records or telephone directory (phonebook)1Press [BAND] at the standby state. 2Push [SEL] (Select).The display changes as follows: The record of receiving calls (up to 5 records) that have not been taken is displayed. Rotation of [VOL] allows users to switch the record to be displayed. Pressing [PHONE] allows users to make a call to the displayed record.The record of receiving calls (up to 5 records) that have been taken is displayed. Rotation of [VOL] allows users to switch the record to be displayed. Pressing [PHONE] allows users to make a call to the displayed record.The calling record (up to 5 records) is displayed. Rotation of [VOL] allows users to switch the record to be displayed. Pressing [PHONE] allows users to make a call to the displayed record. The telephone directory is displayed. Rotation of [VOL] allows users to switch the data registered on the tele-phone directory to be displayed. (up to 6 entries)Pressing [PHONE] allows users to make a call to the displayed data. Pressing [BAND] allows the deletion mode to be activated to delete the displayed data on the telephone directory. If [BAND] is pressed again af-ter “SURE TO DEL?” appears, the currently displayed one piece of data on the telephone directory is deleted. Note: To use this function, the telephone directory must be imported from Bluetooth®mobile phone to this unit. (Refer to the below)This unit becomes standby for importing the telephone directory from a Bluetooth® mobile phone. (Each time for single directory data transmission)Operate the Bluetooth® mobile phone to transmit the telephone directory data to this unit. Notes:¡To use this function, the mobile phone must be compatible with the Object Push Profile.¡“IMPORT ERROR” is displayed and the regular mode is restored if 1 minute elapses in the “IMPORT” flashing period without importing the telephone directory from mobile phone.Receiving record with no respondingReceiving record with conversation madeCalling recordTelephone directoryTelephone directory manually import mode](https://usermanual.wiki/Panasonic-of-North-America/932CQ-SM5559U/User-Guide-1873590-Page-31.png)
![32Bluetooth® - Music PlayerPausePress [h / 5] (Pause/Play)Press again to cancel.Note: Some mobile phones automatically switch to energy saving mode or sleep mode when pause the music playback, and automatically disconnected the Bluetooth® connection (“B/T DISCOND” is displayed on this unit).But if you want to reconnect the Bluetooth® connec-tion, performing playback on the mobile phone itself. Music mode activationHold down [s] for more than 2 seconds. (Music mode)If [s] is held down for more than 2 sec-onds again, the phone mode is activated.(Phone mode)Note: “INVALID” is displayed and the Phone mode is restored if 1 minute elapse in the Music mode without detecting A2DP compatible device. Song selection[FILE d]: Next fi leHold down for fast forward. Release to resume the regular play.[FILE s]: Back to the beginning of the current fi le.Back to the previous fi le. (press twice)Notes:¡ The control of pressing [FILE d] / [FILE s]in music mode depends on the key defi nitions of connected device.¡ Depending on the specifi cations of the connectedaudio device, operations may not work.Note: The Bluetooth® audio devices that can be played with this unit must be compatible with A2DP (Advanced Audio Distribution Profi le) or AVRCP (Audio/Video Remote Control Profi le).[BAND] (h/5)(Pause/Play)toggles between pause and play with the player source. [FILE 6] [FILE 7]skip to the previous/next fi le in the player mode.](https://usermanual.wiki/Panasonic-of-North-America/932CQ-SM5559U/User-Guide-1873590-Page-32.png)
![34 SiriusXM Satellite Radio ControlConnecting SiriusXM antennaConnect the optional SiriusXM antenna.Getting startedA SiriusXM subscription (sold separately) is required to receive programming. You can subscribe by call-ing SiriusXM listener care or by going on line - see below for details.1 Check the Radio ID.¡ To show the Radio ID on the display, tune to channel 0. (Refer to “Channel Selection”.)Radio ID display (example)2 Activate the SiriusXM Satellite Radio by calling or going on-line:¡ Web site: http://www.siriusxm.com/activatenow¡ Phone number: 1-866-635-2349Note:The Radio ID does not use the letter I, O, S, or F.Band selectionPress [BAND] to change the band.Channel selection[TUNE }]:Next available/subscribed chan-nel[TUNE {]: Preceding available/sub-scribed channelHold down for seek forward/reverse.Note: “CHAN*** LOCKED” is displayed if a channel is selected that has been locked by the parental lock setting, follow the procedure next on “Channel unlocking” to unlock the channel.Channel unlocking (passcode entry)To receive a channel locked by a parental lock, a passcode needs to be entered after tuning to the channel. (Refer to page 37 for parental lock setting.)1 Tune to a channel locked by a parental lock. 2 Press [d] or [s] to select a number. 3 Press [BAND] to shift to the right adja-cent digit. A digit where entry is determined is indicated as “*”.Signal strength indicator[BAND]selects a band in the SiriusXM source. Preset buttons [1] through [6]select a preset channel in the SiriusXM source, preset the cur-rent channel (by holding it down for more than 2 seconds).[{] [}] (FOLDER)skip to the previous/next category.[TUNE {] [TUNE }]selects an available/sub-scribed channel.[DISP] (Display) switches the information on the display.](https://usermanual.wiki/Panasonic-of-North-America/932CQ-SM5559U/User-Guide-1873590-Page-34.png)
![354Repeat the steps 2 and 3 to enter a 4-digit number code. When a 4-digit number code is correctly entered and [BAND] is finally pressed, the all locked channels are unlocked and start to be received. (Once turns ACC ON/OFF, the channels return to previous locked status) Notes:¡If a wrong number code is entered when selects a locked channel, “WRONG CODE” is displayed and returns to Channel 1.¡If 10 seconds elapse before determining the entry of the number code, “TIME OUT” is displayed and returns to previous channel.¡To exit the passcode entry, press [DISP] andreturns to previous channel.¡To change the parental lock passcode, refer to page 37 for setting.Channel presetUp to 6 channels can be preset in SXM1 to SXM3 respectively.1Use manual or seek tuning to tune into a channel.2Press and hold one of the preset but-tons [1] through [6] until the display blinks once.Preset Numberblinks onceNote: New channels overwrite existing saved channel after this procedure.Preset channel selectionPress the corresponding preset button [1]through [6] to tune in a preset channel.Selection by categoryCategory settingYou can toggle the category selection mode ON and OFF every time you hold down [BAND] for more than 2 seconds. If the category is set to ON, the unit oper-ates as follows for each button:Notes:¡When category is set to ON, the letter “c” is displayed followed by channel number.¡When category selection mode is active, as indicated by “c”, the preset buttons are disabled. Turn off category selection mode to re-enable the preset buttons.Category selection[FOLDER }]: Next category[FOLDER {]: Preceding categoryChannel selection[TUNE }]: Next available/subscribed channel in current category[TUNE {]: Preceding available/sub-scribed channel in current categoryNote: The simulate category of “All Channel” is selectable in category selection.Display changePress [DISP] (Display) to change the dis-play of different metadata information.Band/channel numberChannel name Artist nameInformation of contentsCategory nameSong titleClockNote: “– – – –” is displayed when there is no infor-mation on the selected channel.](https://usermanual.wiki/Panasonic-of-North-America/932CQ-SM5559U/User-Guide-1873590-Page-35.png)
![36 SiriusXM Satellite Radio Control (continued)System control mode selection Function settingsSiriusXM radio displayHold down [SEL] for more than 2 seconds to open SXM function setting screen.Turn [VOL] to open alarm time setting screen.Turn [VOL] back to SXM function setting screen.SiriusXM function setting mode Note: See below “Function settings” for its inside setting.Alarm time setting modeNote: Refer page 38 and follow its steps from 2 to 6 to set alarm time if needed.Channel direct selection modeA channel is directly selected with the channel number entry.1 Hold down [SEL] for more than 2 seconds to open SXM function setting screen.2 The radio automatically enters the SXM direct channel selection mode af-ter 2 seconds when entering the SXM function setting screen.Channel direct selection mode3 Press [d] or [s] to select a number. 4 Press [BAND] to enter the next digit. 5 If necessary, repeat steps 3 and 4 to enter more digits of the channel num-ber.6 Push [SEL] when done entering the channel number digits and the radio tunes to the desired channel.Notes:¡ ”CHAN*** UNAVAIL” is displayed when the re-quested channel is not valid. Visit www.siriusxm.com to see the list of channels available. ¡ ”CHAN*** UNSUB” is displayed when the requested channel is not part of the current subscription package. Visit www.siriusxm.com for information on subscription packages.Signal strength indicator[DISP] (Display) switches the information on the display. [d][s]selects a number.[VOL]opens the function setting. (PUSH SEL :Select)opens or exits the function setting. determines the selection.[BAND]shifts to the next digit.selects the code entry mode.exits code entry mode.changes a channel to be locked or unlocked.](https://usermanual.wiki/Panasonic-of-North-America/932CQ-SM5559U/User-Guide-1873590-Page-36.png)
![37Parental lock setting modeThis function disables the audience from selecting the locked channel. 1Hold down [SEL] for more than 2 seconds to open SXM function setting screen.2When “DIRECT TUNING” is dis-played, push [SEL] to select parental lock setting mode.(Parental lock setting mode)3Enter a 4-digit passcode, then press [BAND] when finished.qPress [d] or [s] to select a number. wPress [BAND] to shift to the right adjacent digit.A digit where entry is determined is indicated as “*”.eRepeat the steps q and w to enter a 4-digit number. Note: (Default: 1111). If you want to initialize the passcode, hold down [DISP] for more than 10 seconds while passcode entry, the 4-digit passcode will return to the default.4Press [TUNE }] or [TUNE {] to select a channel. 5Press [BAND] to switch a select chan-nel to be locked or unlocked.unlocked lockedNote: Channel 0 (CH 0) and Channel 1 (CH 1) can not be locked.6When done selecting the locked chan-nels, press [DISP] to exit the function setting or push [SEL] to change the parental lock ON/OFF setting.ORTo set parental lock ON/OFF:4Push [SEL] to open lock ON/OFF mode after step 3.5Turn [VOL] to switch between lock ON or OFF.(Default) 6When done selecting the parental lock ON/OFF setting, push [SEL] to exit the function setting mode.ORTo change the parental lock passcode: 4Hold down [BAND] for more than 2 seconds after step 3.(New code entry mode)5Enter a new 4-digit code, then press [BAND] when finished.qPress [d] or [s] to select a number. wPress [BAND] to shift to the right adjacent digit.A digit where entry is determined is indicated as “*”.eRepeat the steps q and w to enter a 4-digit number. 6Repeat step 5 to confirm the new code.“NEW PASSCODE SET” is displayed for 2 seconds and the new code setting is finished, then returns to channel locked/unlocked setting display.Function settings (continued)](https://usermanual.wiki/Panasonic-of-North-America/932CQ-SM5559U/User-Guide-1873590-Page-37.png)
![38Alarm Setting Alarm time setting*The 12-hour system is used for example.1 Hold down [ALM] (Alarm) for more than 2 seconds.(Alarm time display)“ALARM ADJUST” is displayed when the alarm time is not adjusted.2 Hold down [ALM] for more than 2 sec-onds after the above display is shown.Hour blinks3 Adjust the hour.[d] : Sets ahead.[s] : Sets back.Hour entered4 Push [ALM].Minute blinks5 Adjust the minute.[d] : Sets ahead.[s] : Sets back.Minute entered6 Push [ALM] to complete.CompletedThe alarm is set to ON automatically after com-plete alarm time setting.Alarm indicator ( ) lights.Notes:¡ When the clock (a page 11) is not set, perform and complete the alarm time setting, the clock time will set to “13:00” automatically. Please read-just the clock time depending on the actual clock time.¡ Hold down [d] or [s] to change numbers rapidly.¡ When you want to readjust the alarm time, repeat steps 1 to 6.[s]/[d]sets the hour and minute[ALM]selects items in the alarm time setting.](https://usermanual.wiki/Panasonic-of-North-America/932CQ-SM5559U/User-Guide-1873590-Page-38.png)
![39Turning ON/OFF the alarm1Hold down [ALM] for more than 2 sec-onds.(Alarm time display)2Push [ALM].(Alarm ON/OFF setting)3Turn [VOL] (Volume) clockwise or counterclockwise to select alarm ON or OFF, then push [ALM] again to confirm the setting.(Select alarm ON, lights.)Notes:¡Before turn ON the alarm, make sure the alarm time is set. Failure to heed this will cause invalid selection of alarm ON.¡Hold down [ALM] for more than 2 seconds when the alarm is sounding also turns off the alarm.¡Access of alarm ON/OFF is available by push [ALM] in the “Alarm time display”.Activating snoozePress any button on this unit when the alarm is sounding.The alarm will sound again in 9 minutes.Notes:¡ If you do not turn the alarm off when the alarm is sounding, the alarm sound will shut off after an hour. (Including the amount of time the alarm was postponed (snooze))¡ If you connect with the optional wired remote control unit (RSA-300), please notice the ALARM button on RSA-300 only reflect the function of Display Alarm Time. (It’s not feasible for long key operation)](https://usermanual.wiki/Panasonic-of-North-America/932CQ-SM5559U/User-Guide-1873590-Page-39.png)
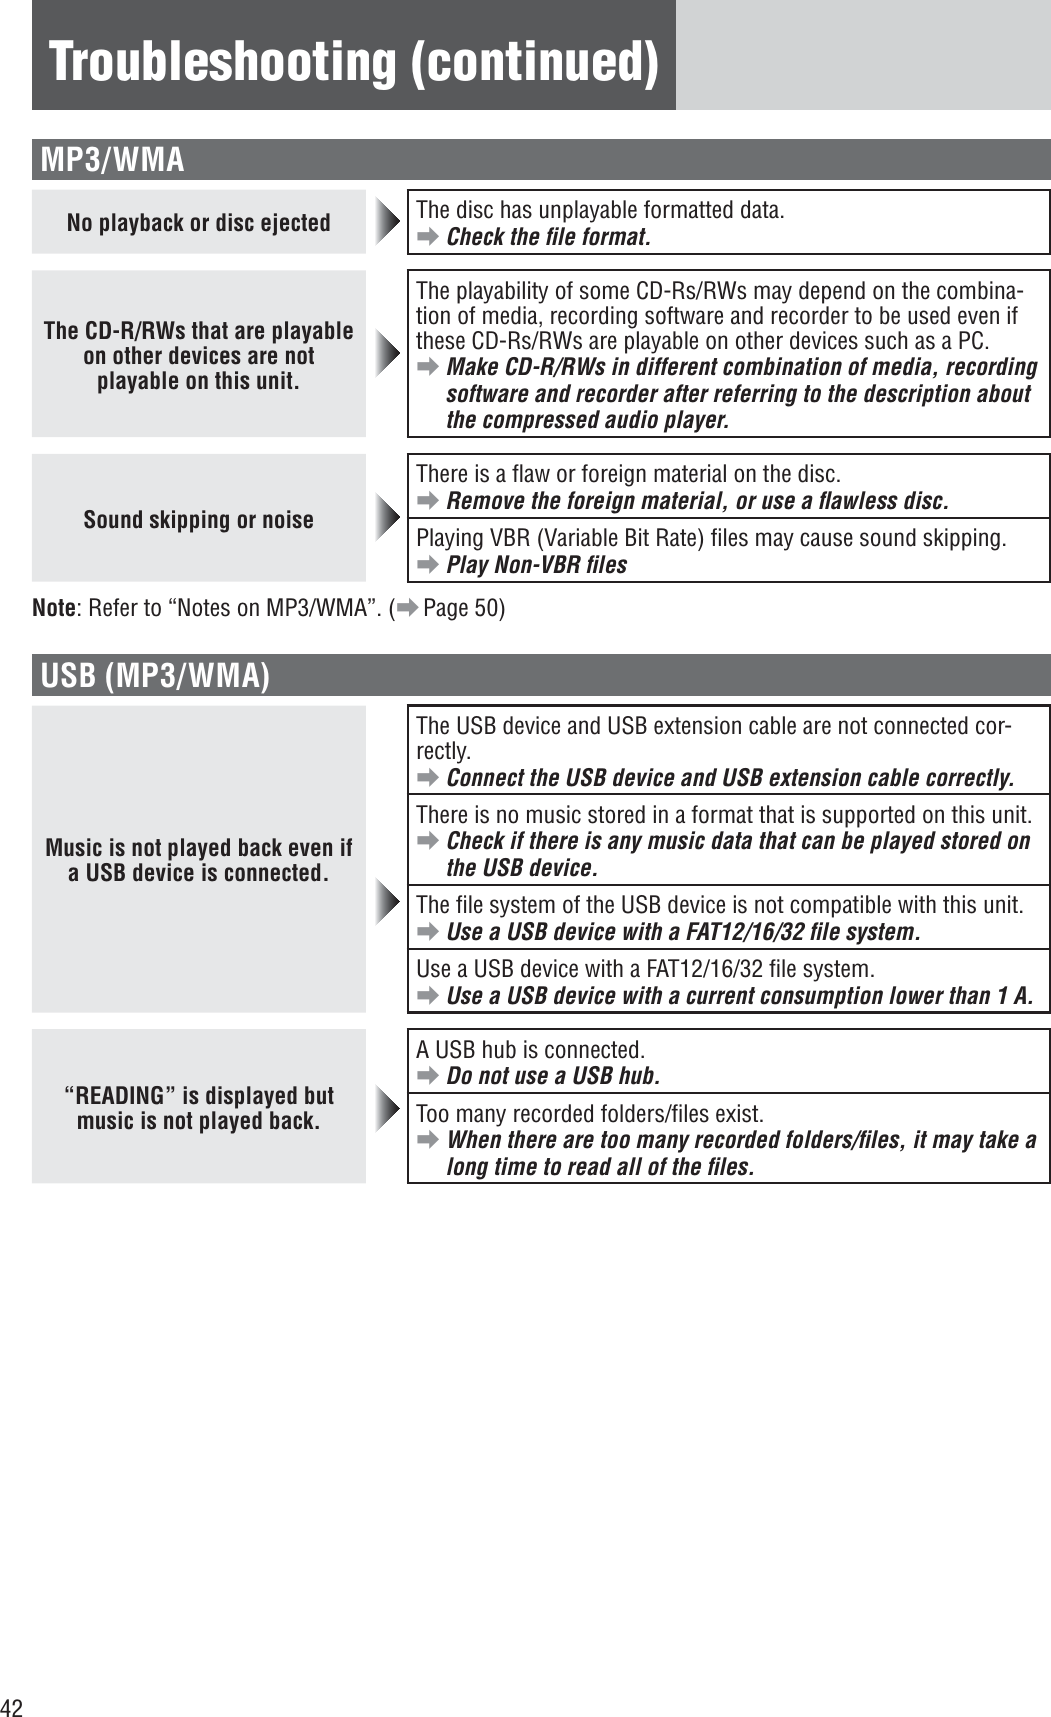
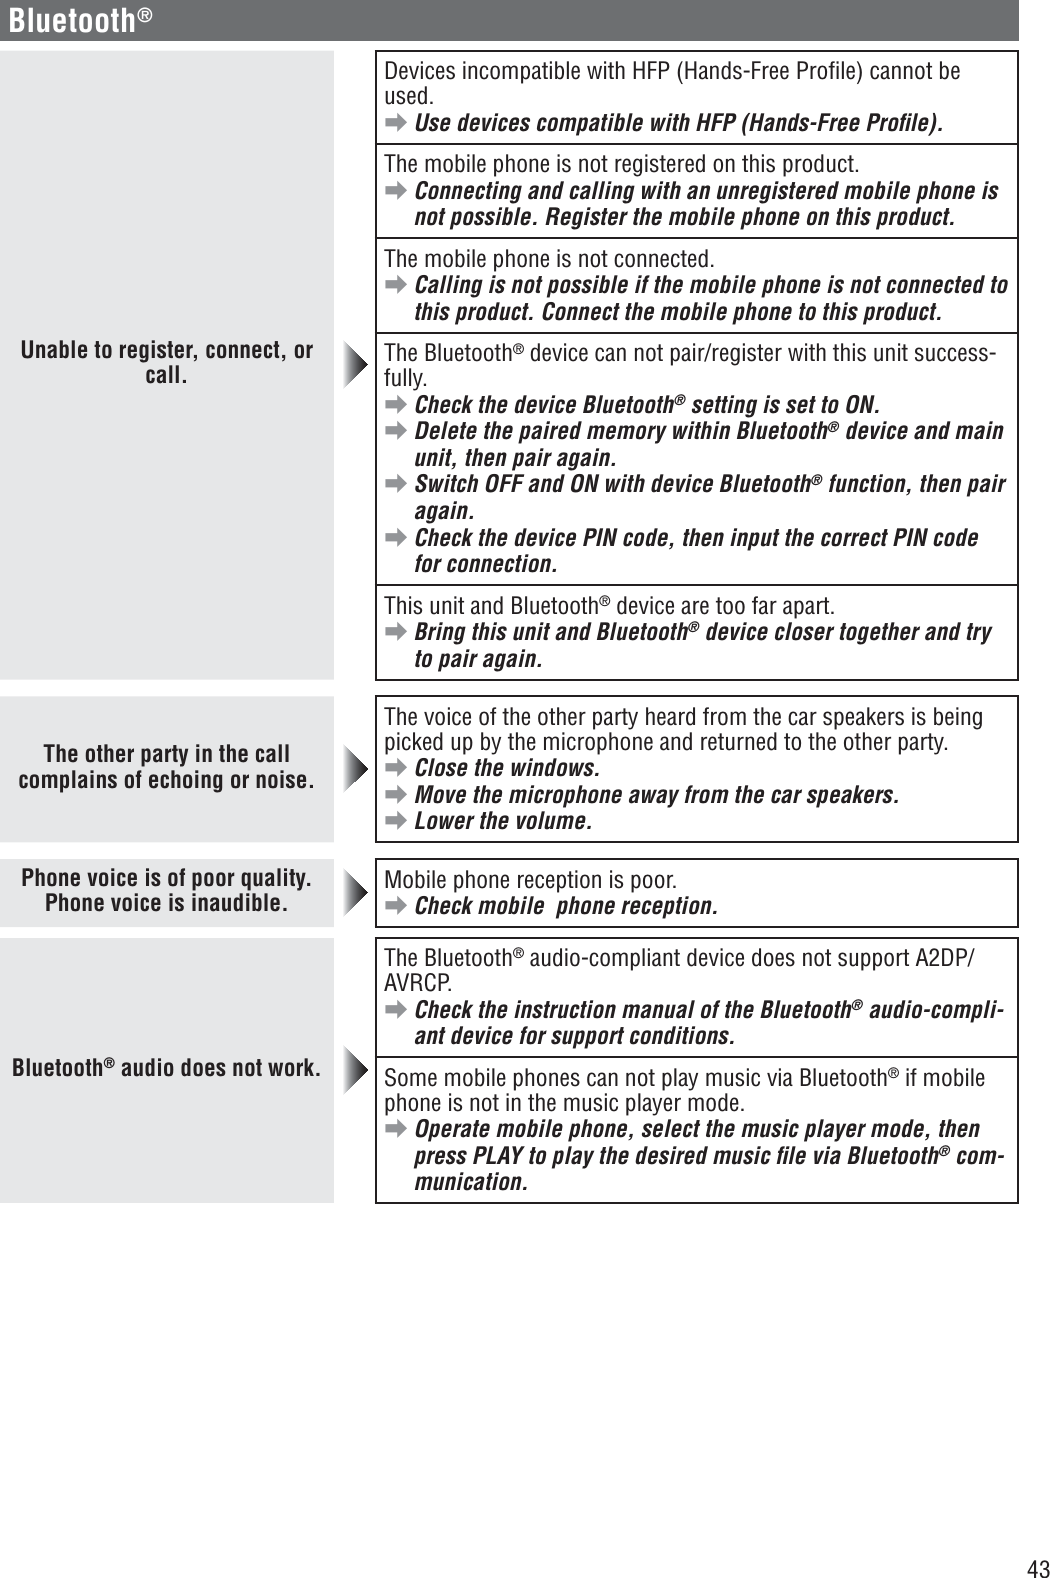
![44Troubleshooting (continued)Bluetooth®Bluetooth® audio cannot be heard.The main unit is not in the Bluetooth® music mode.aCheck and switch to the Bluetooth® music mode.The Bluetooth® audio is not output from mobile phone or Blue-tooth® audio device.aSwitch OFF and ON with mobile phone or Bluetooth® audio device for reestablish the communication.The music is paused temporarily.aPress [BAND] button on this unit to resume music play.Some mobile phones can not restore the A2DP communication with music mode after ended phone conversation.aPress [BAND] button twice on this unit to restore the A2DP communication.Telephone voice dial does not work.The mobile phone does not support the voice dial function.aChange to another mobile phone which supports the voice dial function. The distance between user and microphone is too far apart, the sound is low, or the surrounding is noisy.aSpeak toward the microphone closer and keep the surround-ing quiet.Sound skipping with Bluetooth®audioThis unit and Bluetooth® device are too far apart.aBring the Bluetooth® device closer to this unit.There is another wireless device near this unit and interference occurs.aSwitch off the other wireless device and keep it away from this unit.Other wireless device is using the Bluetooth® profile excluding from main unit. (Ex. All phonebook transmission)aSwitch off the transmission with wireless device.Unable to import the telephone directory.The mobile phone dose not support Bluetooth® OPP (Object Push Profile) function. aChange to another mobile phone which supports Bluetooth®OPP function. There is no telephone or name information within exported direc-tory. aConfirm the directory information is completely and correctly. The mobile phone is too far apart or communication interference occurs.aBring the mobile phone closer to this unit or switch off the other wireless device and keep it away from this unit.](https://usermanual.wiki/Panasonic-of-North-America/932CQ-SM5559U/User-Guide-1873590-Page-44.png)
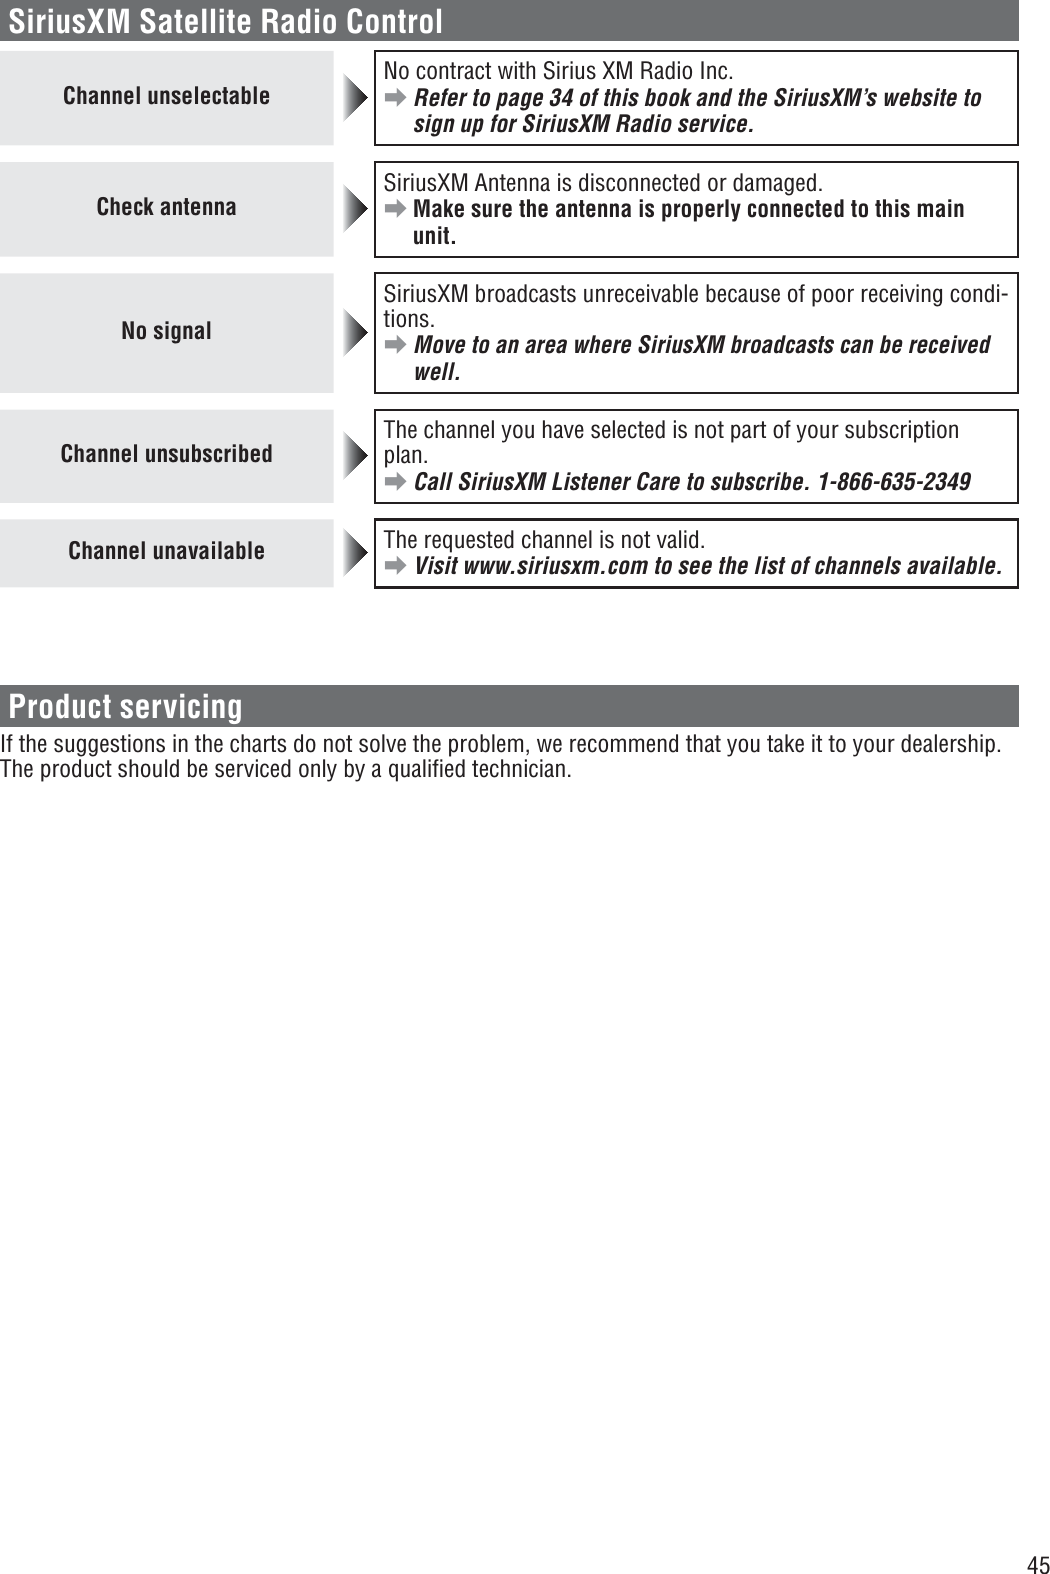
![48Error Display Messages (continued)SiriusXM Satellite Radio ControlNo operation by some cause.aSwitch the power or ACC ON/OFF. If this does not solve the problem or this unit is still out of order, consult your dealer to ask repairs. d d d d (Return to “SUBSCRIPTION”)The subscription information was updated.aPressing [SEL] returns to the previous screen.SiriusXM Antenna is disconnected or damaged.aMake sure the antenna is properly connected to this main unit.SiriusXM broadcasts unreceivable because of poor receiving conditions.aMove to an area where SiriusXM broadcasts can be received well.The channel you have selected is not part of your subscription plan.aCall SiriusXM Listener Care to subscribe. 1-866-635-2349The requested channel is not valid.aVisit www.siriusxm.com to see the list of channels available.](https://usermanual.wiki/Panasonic-of-North-America/932CQ-SM5559U/User-Guide-1873590-Page-48.png)
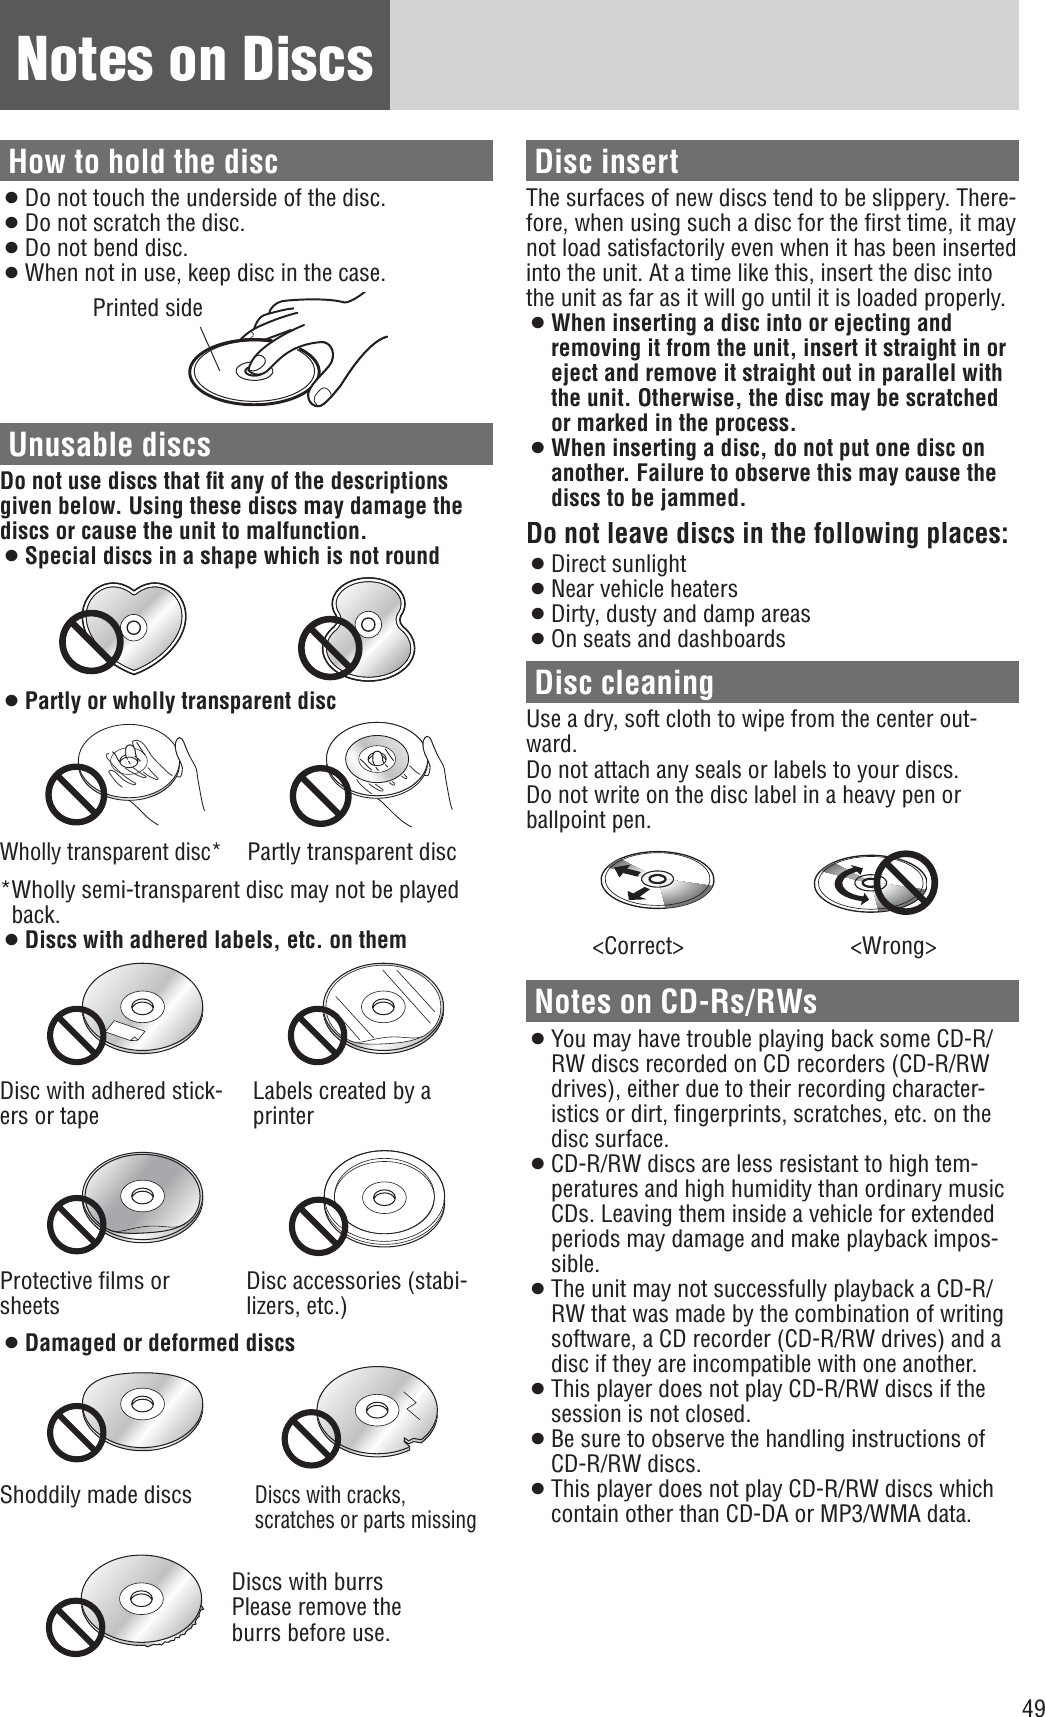
![50Notes on MP3/WMAMP3 (MPEG Audio Layer-3) is a format for compressed audio file. These formats allow users to save all the files contained in approximately 10 pieces of existing CDs on one piece of CD-R/RW.Note: Each of encoding software is not included with this unit.*MPEG Layer-3 audio coding technology licensed from Fraunhofer IIS and Thomson.Cautions as to compressed audio files¡High bit rate and high sampling frequency are recommended for high quality sounds.¡Selecting VBR (Variable Bit Rate) is not recom-mended because playing time is not displayed properly and sound may be skipped.¡The playback sound quality differs depending on the encoding circumstances. For details, refer to the user manual of your own encoding software and writing software.¡Be sure to put an extension compatible with the format.¡It is recommended to set the bit rate to “128 kbps or more” and “fixed”. CautionNever put an extension indicating compressed audio (such as “.mp3”) to files other than compressed audio files. This may not only produce noise from the speaker damage, but also damage your hearing.Display Information¡CD-TEXTDisc title Track title¡MP3Folder name, File name¡MP3 (ID3 tag)Album name, Title name/artist name¡WMA (WMA tag)Album name, Title name/artist nameDisplayable characters¡Displayable length of file name/folder name: within 30 characters. (Unicoded file and folder names are reduced by half in the number of displayable characters.)¡Name files and folders in accordance with the standard of each file system. Refer to the instruc-tions of writing software for details.¡ASCII character set and special characters in each language can be displayed.ASCII character setA to Z, a to z, digits 0 to 9, and the following symbols: (space) ! ” # $ % & ’ ( ) * + , - . / : ; < = > ? @ [ \ ] ˆ _ ` { | } ~Notes:¡Characters may be garbled depending on encod-ing software to be used¡Undisplayable characters and symbols will be converted into an asterisk (*).Cautions as to the display of this unitCompression formatsCompression method Bit rate VBR Sampling fre-quencyMPEG 1 audio layer 3 (MP3) 32 k – 320 kbps Yes 32, 44.1, 48 kHzMPEG 2 audio layer 3 (MP3) 8 k – 160 kbps Yes 16, 22.05, 24 kHzMPEG 2.5 audio layer 3 (MP3) 8 k – 160 kbps Yes 8, 11.025, 12 kHzWindows Media Audio Ver. 2, 7, 8, 9* 64 k – 160 kbps Yes 32, 44.1, 48 kHz* WMA 9 Professional/LossLess/Voice are not supported.](https://usermanual.wiki/Panasonic-of-North-America/932CQ-SM5559U/User-Guide-1873590-Page-50.png)