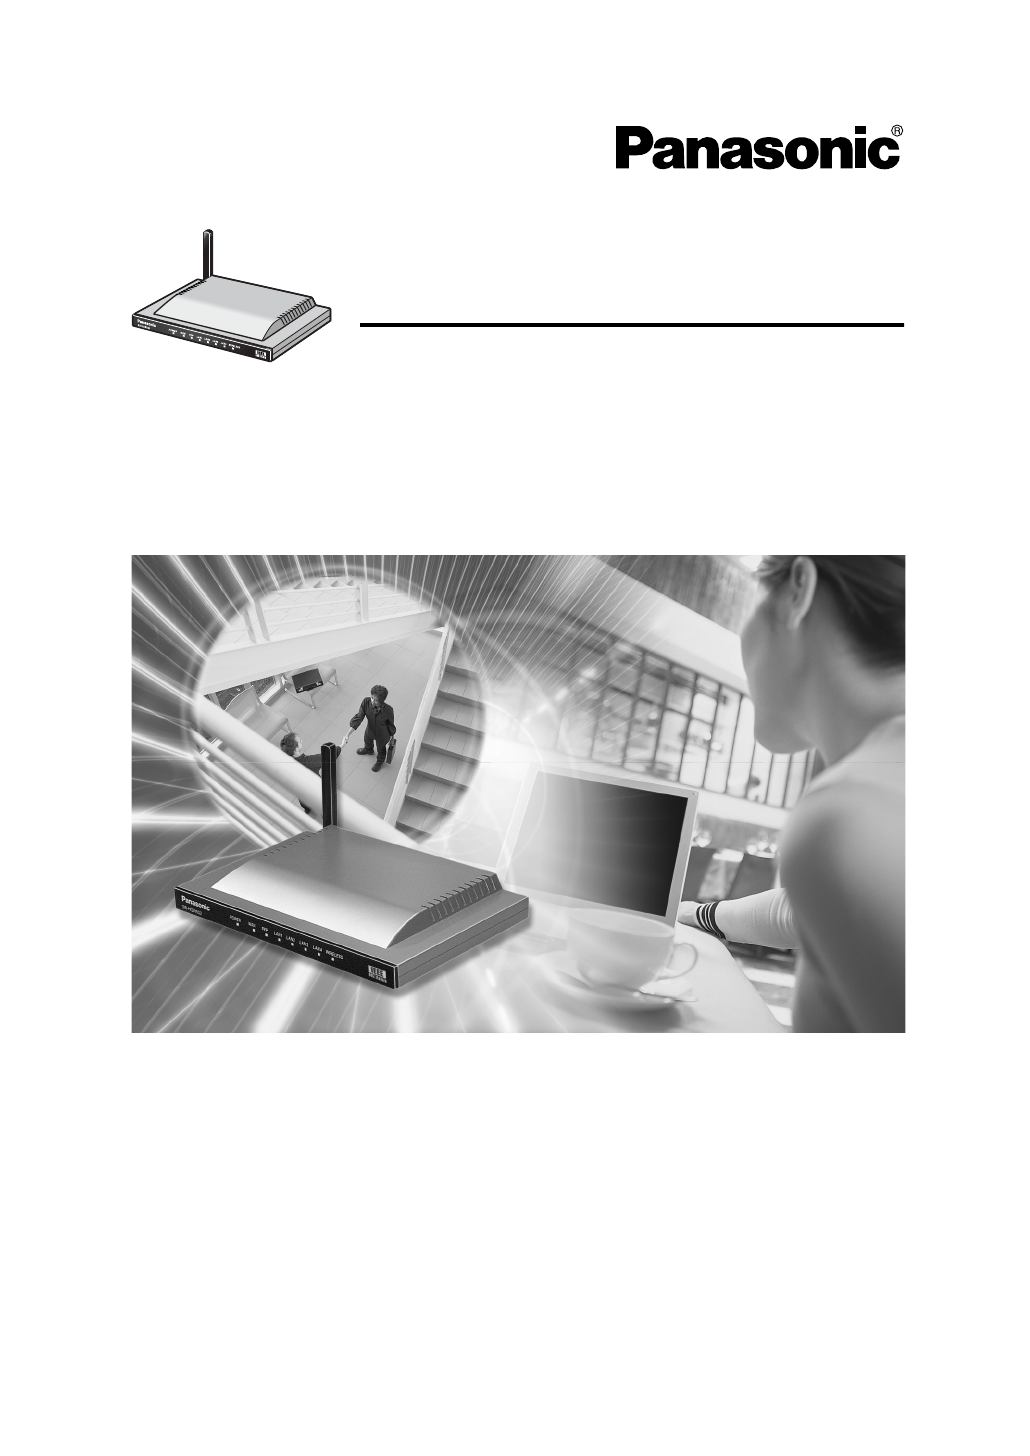
Panasonic of North America 96NBB-HGW700 802.11b/g Wireless Router User Manual BBHGW700 OI
Panasonic Corporation of North America 802.11b/g Wireless Router BBHGW700 OI
Contents
- 1. Users Manual
- 2. Operating Instruction Summary
Operating Instruction Summary
Network Camera Management System
Operating Instructions
Model No. BB-HGW700A
Please read this manual before using and save this manual for your future reference.
Panasonic Web Site: http://www.panasonic.com
for customers in the USA or Puerto Rico
BBHGW700_OI.book 1 ページ 2004年9月27日 月曜日 午後6時58分

Operating Instructions
2
Introduction
Thank you for purchasing the Panasonic Network Camera Management System.
Please check the following items when unpacking.
Before using
Please read the Important Safety Instructions on Page 4 before using.
Read and understand all instructions.
For Operation Assistance
•Call 1-800-272-7033
•Refer to
the Panasonic web site
http://www.panasonic.com
Operating Instructions
AC adaptor
Ethernet cable
(Category 5 straight cable)
Cable clamper
Screws and Washers
— 1 pc.
— 1 pc.
— 1 pc.
— 1 pc.
— 2 pcs.
BBHGW700_OI.book 2 ページ 2004年9月27日 月曜日 午後6時58分

[For assistance, please call: 1-800-272-7033]
Operating Instructions
3
Abbreviations
•UPnP is the abbreviation for Universal Plug and Play.
Trademarks
•Ethernet is a registered trademark of Xerox Corporation in the United States and/or other
countries.
• Microsoft, MSN, Windows and DirectX are either registered trademarks or trademarks of Microsoft
Corporation in the United States and/or other countries.
•Screen shots reprinted with permission from Microsoft Corporation.
•All other trademarks identified herein are the property of their respective owners.
Network Camera Management System Memo
Serial Number MAC Address
Name and address of dealer
Date of purchase
For your future reference
Attach your purchase receipt here.
BBHGW700_OI.book 3 ページ 2004年9月27日 月曜日 午後6時58分

Operating Instructions
4
IMPORTANT SAFETY INSTRUCTIONS
When using this unit, basic safety precautions should always be followed to reduce the risk of fire,
electric shock, or personal injury.
1. Read and understand all instructions.
2. Keep these instructions.
3. Heed all warnings.
4. Follow all instructions.
5. Do not install this product near any heat sources such as radiators, heat registers, stoves, or other
apparatus (including amplifiers) that produce heat.
6. Protect the AC adaptor cord from being walked on or pinched particularly at plugs, convenience
receptacles, and the point where they exit from the apparatus.
7. Do not touch the unit or the AC adaptor during lightning storms.
8. Unplug this apparatus when unused for long periods of time.
9. Refer all servicing to qualified service personnel. Servicing is required when the apparatus has
been damaged in any way, such as when the AC adaptor cord or plug is damaged, the apparatus
does not operate normally, or it has been dropped.
SAVE THESE INSTRUCTIONS
BBHGW700_OI.book 4 ページ 2004年9月27日 月曜日 午後6時58分

[For assistance, please call: 1-800-272-7033]
Operating Instructions
5
Table of contents
1 Product Introduction ..............................................................................7
1.1 Main Features ................................................................................................................7
1.2 Feature Locations ..........................................................................................................8
1.2.1 Front View................................................................................................................................... 8
1.2.2 Rear View................................................................................................................................... 8
1.2.3 Indicators.................................................................................................................................... 9
2 Accessing This Product.......................................................................10
2.1 Functions .....................................................................................................................10
2.1.1 Top page................................................................................................................................... 10
2.1.2 Setup........................................................................................................................................ 12
2.1.3 IPv6 Setup................................................................................................................................ 14
2.1.4 Camera Portal .......................................................................................................................... 15
3 Functions...............................................................................................19
3.1 Using the Functions .....................................................................................................19
3.1.1 Registering ISPs....................................................................................................................... 19
3.1.2 Confirming Connection to the Internet...................................................................................... 27
3.1.3 Managing the Connection Mode............................................................................................... 28
3.1.4 Using Camera........................................................................................................................... 30
3.1.5 Registering a Camera Automatically ........................................................................................31
3.1.6 Using Wireless.......................................................................................................................... 37
3.1.7 Using Viewnetcam.com............................................................................................................ 44
3.2 Using Advanced Setup.................................................................................................46
3.2.1 Accessing this Product from the Internet..................................................................................46
3.2.2 Improving Security.................................................................................................................... 52
3.2.3 Using Options........................................................................................................................... 58
3.2.4 Using VPN................................................................................................................................ 65
3.3 Managing This Product ................................................................................................67
3.3.1 Changing The Password .......................................................................................................... 67
3.3.2 Updating Firmware................................................................................................................... 68
3.3.3 Saving Settings......................................................................................................................... 70
3.3.4 Restarting................................................................................................................................. 71
3.3.5 Initializing The Settings............................................................................................................. 71
3.3.6 Using PPPoE Connection......................................................................................................... 72
3.3.7 Confirming Network Connection............................................................................................... 73
3.4 Getting Information ......................................................................................................74
3.4.1 Getting Network Information..................................................................................................... 74
3.4.2 Viewing Logs ............................................................................................................................ 77
3.4.3 Support..................................................................................................................................... 80
3.4.4 Help.......................................................................................................................................... 80
4 Other Information .................................................................................81
BBHGW700_OI.book 5 ページ 2004年9月27日 月曜日 午後6時58分

Operating Instructions
6
4.1 Factory Default.............................................................................................................81
4.1.1 Factory Default ......................................................................................................................... 81
4.1.2 Restart...................................................................................................................................... 81
4.2 UPnP™........................................................................................................................82
4.3 PPTP Setup when Using VPN: Windows XP...............................................................86
4.4 Web Browser Setup when Using a Proxy Server.........................................................87
4.5 Checking the PC's IP Address and MAC Address.......................................................88
4.5.1 Using Windows XP/2000.......................................................................................................... 88
4.5.2 Using Windows Me/98SE......................................................................................................... 89
4.6 Stabilizing the PC's IP Address....................................................................................90
4.6.1 Using Windows XP/2000.......................................................................................................... 91
4.6.2 Using Windows Me/98SE......................................................................................................... 92
4.7 Factory Default Settings List ........................................................................................93
4.8 Specifications...............................................................................................................97
Index .......................................................................................................101
BBHGW700_OI.book 6 ページ 2004年9月27日 月曜日 午後6時58分

7[For assistance, please call: 1-800-272-7033]
Operating Instructions
Product
Introduction
1Product Introduction
1.1 Main Features
This product is a Camera Control Unit with the following features:
Wireless network device with an expanded range due to the repeater function
(relay function)
By using Panasonic's Wireless LAN Adaptor (BB-HGA102) to connect this product and a wireless
network device, radio waves can be relayed to far and hard to reach places.
Data such as camera images can be sent safely using VPN
Security is ensured by encrypting all camera and PC data connected to this product before it is sent.
High speed wireless LAN for IEEE 802.11b/g (conversion)
It is possible to convert between 2.4 GHz 54 Mbps* (IEEE 802.11g) and 2.4 GHz 11 Mbps* (IEEE
802.11b). 802.11g has 2 modes: 1. the 802.11g only mode, and 2. the 802.11g and 802.11b
simultaneous mode. Also, the wireless LAN function can be suspended.
* The numbers displayed are a theoretical maximum for the standard wireless LAN, and not
necessarily the speed when data is actually sent.
High speed throughput
FTTH can also be used, with maximum WAN - LAN wired connection speeds of 93.0 Mbps
(FTP[Static]), 92.1 Mbps (FTP[PPPoE]), and 16.3 Mbps (FTP[PPTP]).
Automatic wireless setup (with security settings)
Panasonic's Wireless LAN Adaptor (BB-HGA102) (Customer-provided) is set up automatically.
Wireless security settings are set up at the same time, so that wireless LAN can be used safely.
Automatic camera registration (with security settings)
By using this product with Panasonic's network camera (Customer-provided), the camera's automatic
registration function can automatically set up wireless security (encryption WEP setup etc) and camera
network related settings (port forwarding setup etc)
Camera Portal
By using this product with Panasonic's network camera (Customer-provided), the camera portal can
list up to 16 camera names and their still images on a monitoring screen. Also, the camera portal page
is set up automatically.
BBHGW700_OI.book 7 ページ 2004年9月27日 月曜日 午後6時58分
Operating Instructions
8
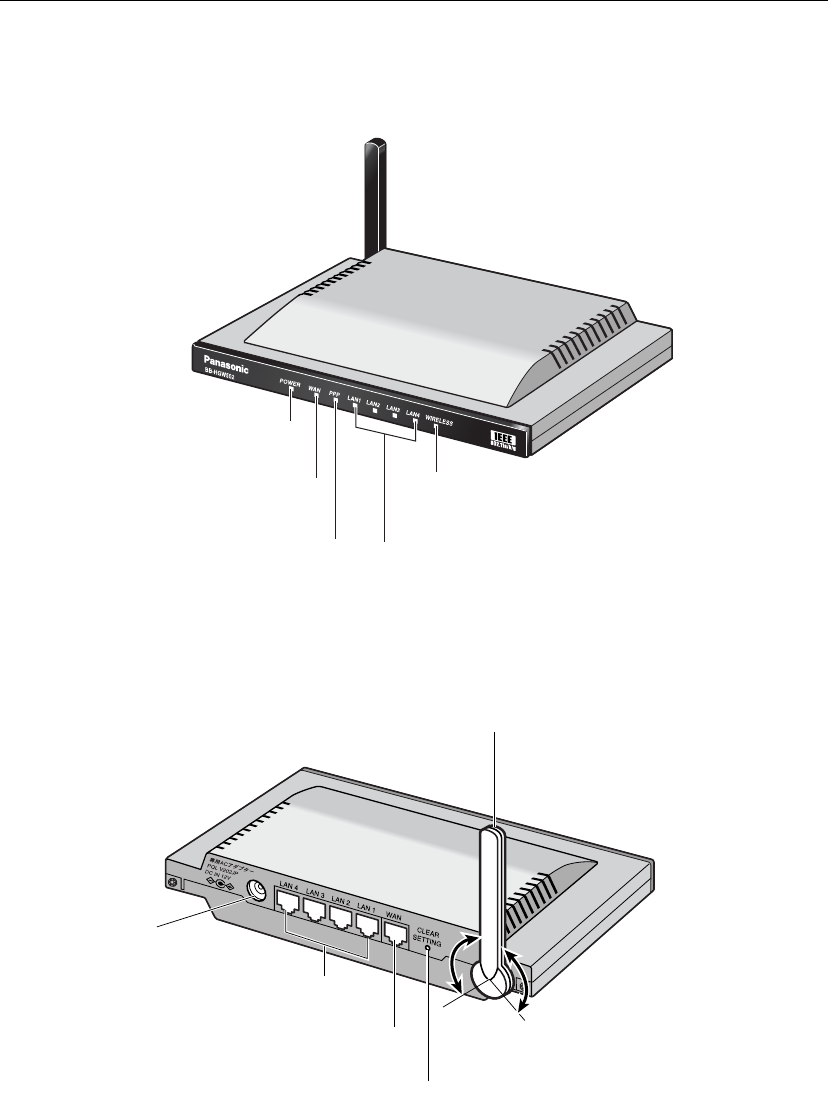
1.2 Feature Locations
1.2.1 Front View
1.2.2 Rear View
POWER Indicator
(see page 9)
WAN Indicator
(see page 9)
PPPoE Indicator
(see page 9)
WIRELESS Indicator
(see page 9)
LAN1-LAN4 Indicators
(see page 9)
100 ˚
Diversity Antenna
The antenna rotates 100 degrees
clockwise and anticlockwise,
200 degrees in total.
DC IN Jack
(see Getting Started)
LAN1-LAN4 Jacks
(see Getting Started)
WAN Jack
(see Getting Started)
CLEAR SETTING Button (see page 81)
100 ˚
BBHGW700_OI.book 8 ページ 2004年9月27日 月曜日 午後6時58分
9[For assistance, please call: 1-800-272-7033]
Operating Instructions
Product
Introduction
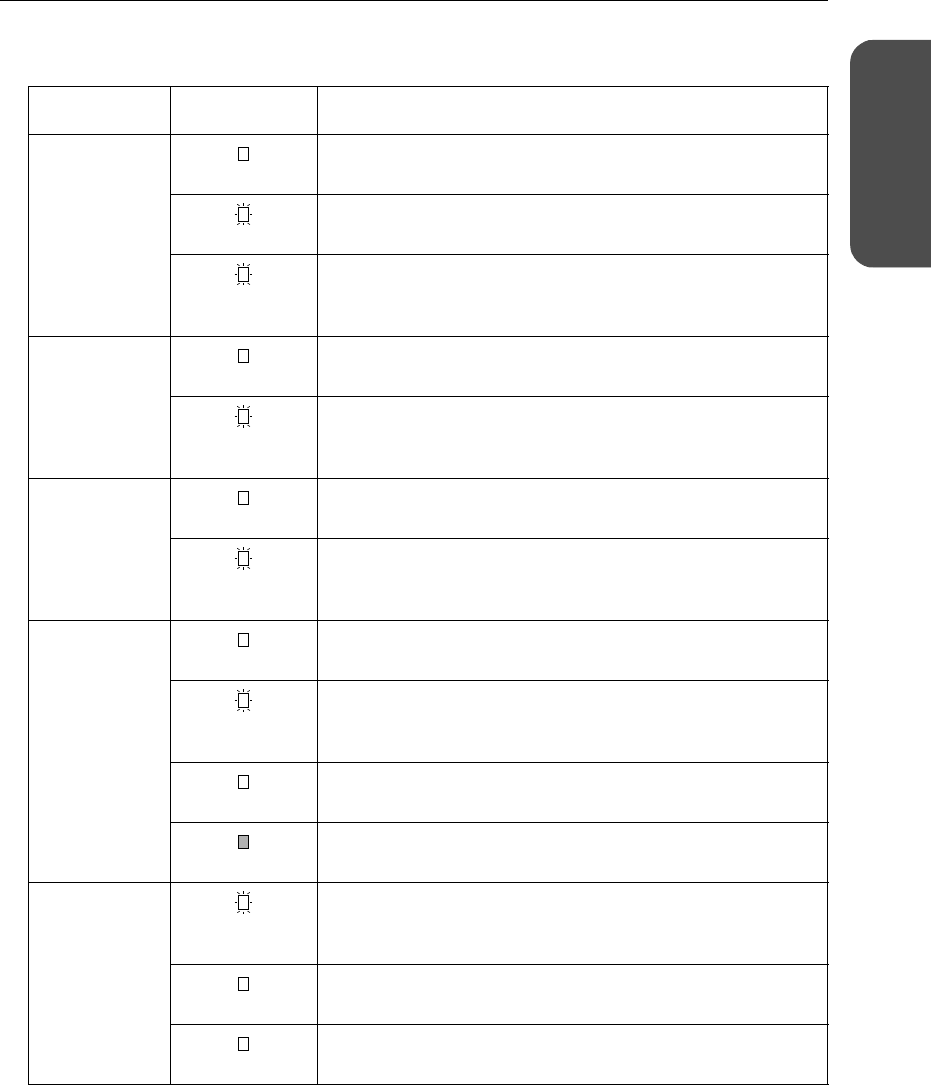
1.2.3 Indicators
Indicators Light Color Description
POWER Green This product is turned on.
Red (Blinking) There is a problem with this product.
Remove the AC adaptor from the outlet, and insert again.
Green
(Blinking)
The firmware is damaged.
Download a firmware file (see page 9 - Installation/
Troubleshooting).
WAN Green This product is successfully connected to a modem (or ONU)
or an Ethernet® hub etc.
Green
(Blinking)
This product is connected and sending or receiving data.
LAN 1—LAN4 Green This product is successfully connected to a PC or Ethernet
hub.
Green
(Blinking)
This product is sending or receiving data.
WIRELESS Green This product is successfully connected to a wireless terminal.
Green
(Blinking)
This product is sending or receiving data in a wireless
network.
Orange This product is not connected to a wireless terminal.
No light The communication mode is set to disabled, and the wireless
network is not being used.
PPPoE Green
(Blinking)
PPPoE connection is being tested.
Green PPPoE connection is complete.
Orange A PPPoE authentication error has occurred.
BBHGW700_OI.book 9 ページ 2004年9月27日 月曜日 午後6時58分
Operating Instructions
10
2 Accessing This Product
2.1 Functions
2.1.1 Top page
The top page allows you to select the Setup page or Camera Portal page.
The Camera Portal page displays the images of the camera connected to this product.
Notes
• It is important to always use your user name and password for authentication when using
this product.
• Access information (user name/password), this product's setup information, application
setup information, logs and other system management information is the responsibility of
the customer. Access to this information should be limited to users or user groups, and third
parties should not be allowed to refer to, modify, delete or copy this information. Information
such as user name, password, setup and management information should be kept
confidential.
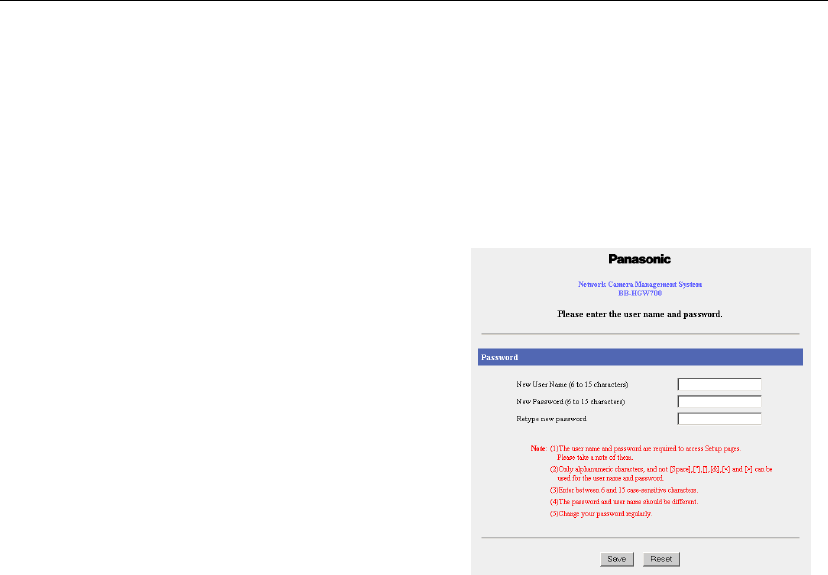
1. Enter "http://bbhgw.webpage:8080" into the
web browser's address bar (the factory default
port number is 8080)
• The user name and password window is
displayed.
2. Enter New User Name, New Password, and
Retype New Password and click [Save].
• The top page is displayed.
BBHGW700_OI.book 10 ページ 2004年9月27日 月曜日 午後6時58分

11[For assistance, please call: 1-800-272-7033]
Operating Instructions
Accessing
This Product
Notes
• In the factory default settings, it is possible to display the top page by entering "http://
192.168.0.254:8080" into the web browser's address bar.
• When accessing Setup from the top page, an authentication window is displayed (after starting the
web browser, first time only). Log in by entering your user name and password and clicking [OK].
• In order to view the camera images on the Camera Portal page of this product, it is necessary to
have completed a connection with a compatible network camera (Customer-provided). Refer to the
camera's instruction manual for more details.
.
Setup (see page 12)
Camera Portal
(see page 15)
If the top page is not displayed...
• Check that "http://bbhgw.webpage:8080" is entered correctly in the address bar (the factory
default port number is 8080). If the address is correct and the top page is still not displayed
enter "http://192.168.0.254:8080".
• Check that the LAN indicator supported by the LAN jack connected to this product is on.
• Check that the this product's power was turned on before the PC's power was.
• Sometimes it is necessary to set up the web browser's proxy server to access the top page
(see page 87).
BBHGW700_OI.book 11 ページ 2004年9月27日 月曜日 午後6時58分
Operating Instructions
12
2.1.2 Setup
This function allows you to set up using your PC's web browser.
The heading selected on the menu page is displayed on the main page.
The help page describes the operations of each heading.
Top: Displays the top page. (see page 10)
Setup: Displays the setup page. It is possible to set up all operations on this
page. (see this page)
IPv6 Setup: Displays the IPv6 setup page. (see page 14)
Camera Portal: Allows you to view images from the camera connected to this
product. (see page 15)
Basic Setup
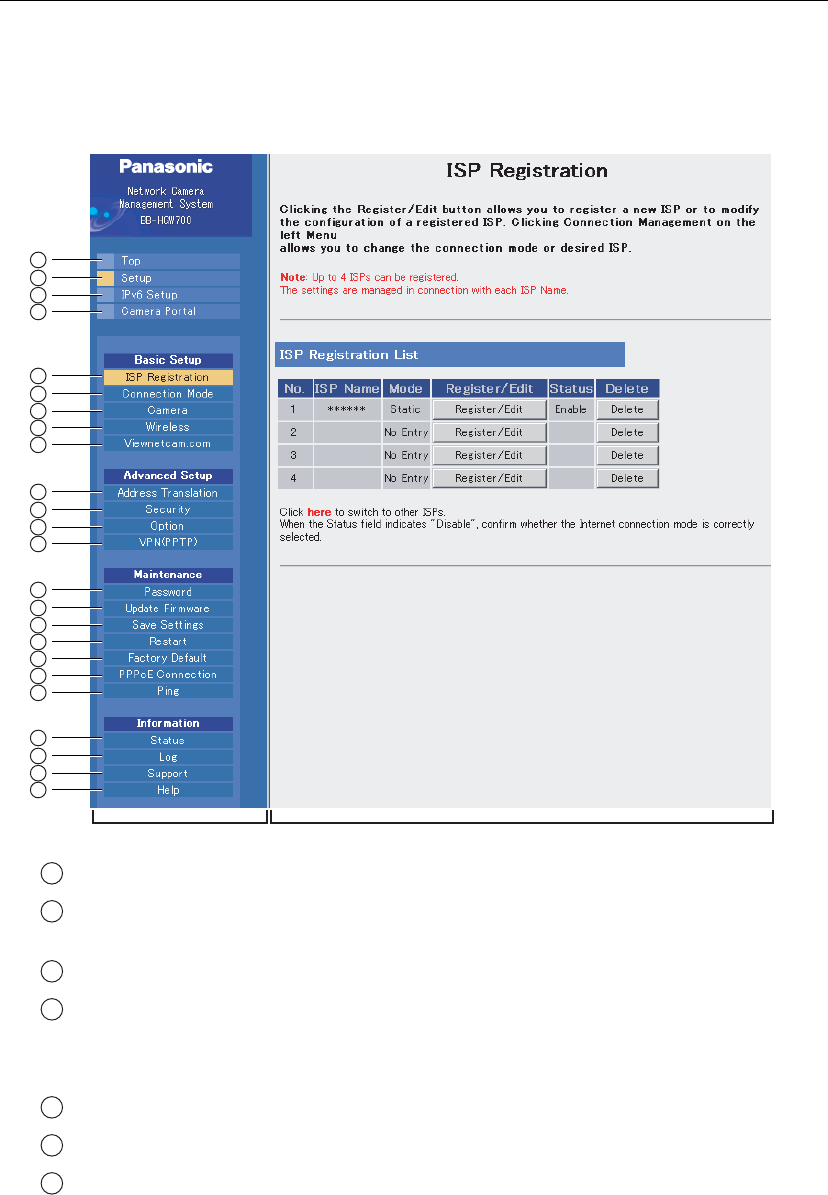
ISP Registration: Basic setup to connect to the Internet. (see page 19)
Connection Mode: Sets the connecting ISP. (see page 28)
Camera: Performs automatic camera registration setup and manual
registration adding and deletion. (see page 30)
Menu Main
1
2
3
4
5
6
7
8
9
14
15
16
17
18
19
20
10
11
12
13
21
22
23
24
1
2
3
4
5
6
7
BBHGW700_OI.book 12 ページ 2004年9月27日 月曜日 午後6時58分

13[For assistance, please call: 1-800-272-7033]
Operating Instructions
Accessing
This Product
* To download the latest version of the firmware from Panasonic's support website, it is necessary
to connect to the Internet.
Wireless: Sets up wireless LAN motion mode and wireless security. (see page
37)
Viewnetcam.com: Sets up Viewnetcam.com. (see page 44)
Advanced Setup
Address Translation: Translates both the global address on the WAN side (Internet) and
private address on the LAN side, and also performs setup to access
this product's network from an Internet terminal. (see page 46)
Security: Allows you to set up filtering, and control access to this product at
the touch of a button, and automatically saves a log. (see page 52)
Option: Sets up access on the LAN side, and also connection to the Internet.
(see page 58)
VPN (PPTP): This product allows you to create a VPN (Virtual Private Network)
using PPTP (Point-to-Point Tunneling Protocol). A VPN is private
network that is as safe as an exclusive line and travels through the
Internet. Using this function, camera images from PCs in far away
places can be viewed safely. (see page 65)
Maintenance
Password: Modifies the user name and password to access the setup page.
(see page 67)
Update Firmware*: Updates to the latest version of firmware. (see page 68)
Save Settings: Saves and loads settings. (see page 70)
Restart: Restarts this product. (see page 71)
Factory Default: Initializes this product. The settings are returned to the preset factory
default. (see pages 71 and 81)
PPPoE Connection: Manually starts or stops the PPPoE connection to the ISP. (see page
72)
Ping: Checks that each device with an IP address is connected. (see page
73)
Information
Status: Displays information such as connection status. (see page 74)
Log: Displays filtering log, UPnP™ log (general), UPnP™ log (CP),
connect/disconnect log, Viewnetcam.com log, and VPN (PPTP) log.
(see page 77)
Support: Product and support information can be found on the Internet. (see
page 80)
Help: Explains about commands and functions on the setup pages. (see
page 80)
8
9
10
11
12
13
14
15
16
17
18
19
20
21
22
23
24
BBHGW700_OI.book 13 ページ 2004年9月27日 月曜日 午後6時58分
Operating Instructions
14
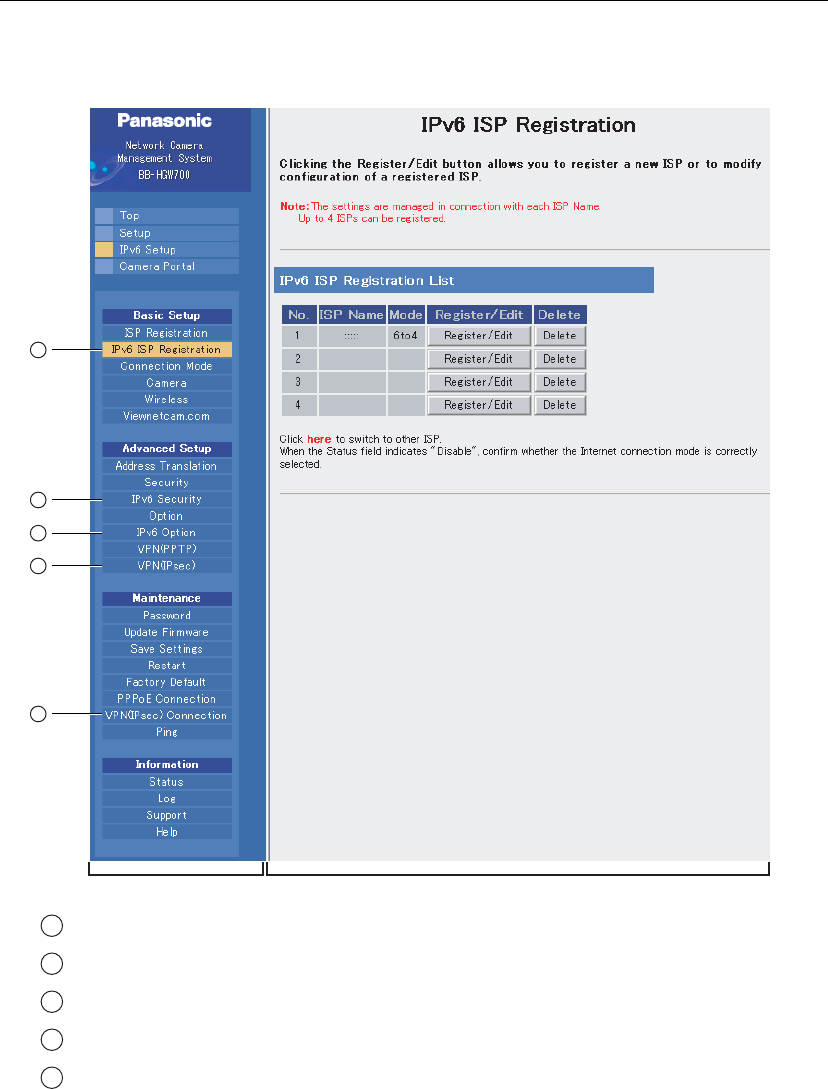
2.1.3 IPv6 Setup
This function allows you to set up an IPv6 network.
IPv6 ISP Registration: Allows you to register a IPv6 ISP.
IPv6 Security: Allows you to ensure security of the unit on an IPv6 network.
IPv6 Option: Allows you to access various IPv6 options.
VPN(IPsec): Allows you to set basic settings of IPsec connection.
VPN(IPsec) Connection: Allows you to set VPN(IPsec) connection.
Menu Main
1
2
3
4
5
1
2
3
4
5
BBHGW700_OI.book 14 ページ 2004年9月27日 月曜日 午後6時58分

15[For assistance, please call: 1-800-272-7033]
Operating Instructions
Accessing
This Product
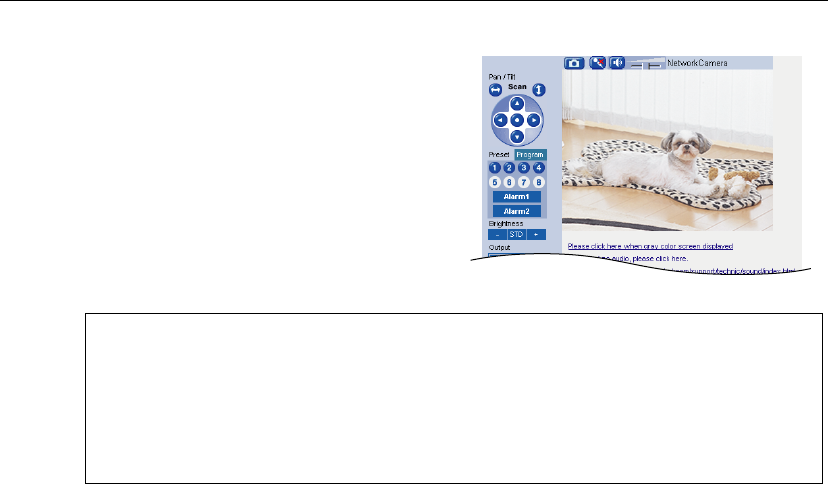
2.1.4 Camera Portal
This product has an inbuilt web server function. Camera Portal allows you to list up to 16 cameras
names and their still images.
Viewing Camera Images from the LAN (Home) Side
It is possible to view camera images by accessing the camera portal.
1. Start the web browser.
2. Enter "http://bbhgw.webpage:"port
number"" into the web browser's address bar.
(The factory default port number is 80. If the
port number is 80 there is no need to enter it.)
• The camera portal is displayed.
• By clicking on the still image, a single
moving image can be displayed.
Notes
• If a key mark is displayed, click on it and
enter that camera's user name and
password.
(If camera authentication has been set up,
the key mark will be displayed.)
• If a blue unmarked window is displayed,
click [Refresh Camera].
Sometimes a blue unmarked window is
displayed when the camera's
authentication setup cannot be verified or
the IP address and port number overlap.
Check the camera's settings.
• If an exclamation mark is displayed, click on
it and the camera's original password
window is displayed.
(It is displayed when a newly purchased
camera is connected.)
• If the camera and this product are
disconnected while sending or receiving
data, a key mark (when camera
authentication is setup) or a blue unmarked
window is displayed. In this case, after
checking that the camera's power supply
and connections are correctly inserted,
click [Refresh Camera]
BBHGW700_OI.book 15 ページ 2004年9月27日 月曜日 午後6時58分

Operating Instructions
16
Notes
• When refreshing the camera portal, click [Refresh Camera] on the setup page. If you click
the refresh button on the web browser the camera image changes back to a key mark.
• After entering the camera's user name and password and displaying the camera image
once, the camera image, and not the key mark, will be displayed on the camera portal.
When displaying other pages such as setup, the key mark will return, but by clicking on it,
the camera image and not the authentication window will be displayed.
Privacy and Image Right
When installing and using this camera, it is the customers responsibility to not infringe on
privacy or copyright rules and regulations.
* It is generally accepted that " Privacy is the legal right to not have one's private life displayed
in public, and the right to have control over one's own personal information. Image right is
the right to not have portraits or photographic images of one's self created by a stranger or
displayed in public.
3. Click the camera frame you want to access. If
an authentication window is displayed, enter
the camera's user name and password. Then
the camera image is displayed.
When camera images are not displayed on the camera portal...
• Check that the WAN indicator and the LAN indicator supported by the LAN jack
connected to this product are on.
• Sometimes it is necessary to set up the web browser's proxy server to access the
camera portal (see page 87).
• Check that the power supply was turned on in the following order: modem (or ONU),
this product, PC.
• When a camera name, an X mark, a blue unmarked window, or a white page is
displayed on the camera portal, click [Refresh Camera].
• When an exclamation mark is displayed on the camera portal, double-click on it. The
camera's original password window is displayed.
BBHGW700_OI.book 16 ページ 2004年9月27日 月曜日 午後6時58分

17[For assistance, please call: 1-800-272-7033]
Operating Instructions
Accessing
This Product
Viewing Camera Images from the WAN (Internet) Side
This function allows you to view camera images by accessing the camera portal from the WAN side.
Note
To view camera images from the WAN (Internet) side, it is necessary to connect this product to
WAN. Regarding how to connect to the Internet refer to Getting Started and Using the Functions
(see page 19 onwards)
1. Start the web browser.
2. Enter "http:// IP address(WAN) or URL : port
number" into the web browser's address bar.
• (e.g. http://10.75.68.251:80
http://www.example.com:80
The factory default port number is 80. If the
port number is 80 there is no need to enter
it.)
Notes
• It is possible to check the status of the IP address (WAN) on the setup pages. (see page 74)
• When using this product with a service that is not a static IP service, the IP address
changes. It is recommended that you use the Viewnetcam.com service. (see page 44)
3. Press [Enter].
• The camera portal is displayed.
Notes
• If a key mark is displayed, click on it and
enter that camera's user name and
password.
(If camera authentication has been set up,
the key mark will be displayed.)
• If a blue unmarked window is displayed,
click [Refresh Camera].
Sometimes a blue unmarked window is
displayed when the camera's
authentication setup cannot be verified or
the IP address and port number overlap.
Check the camera's settings.
• If an exclamation mark is displayed, click on
it and the camera's original password
window is displayed.
(It is displayed when a newly purchased
camera is connected.)
• If the camera and this product are
disconnected while sending or receiving
data, a key mark (when camera
authentication is setup) or a blue unmarked
window is displayed. In this case, after
checking that the camera's power supply
and connections are correctly inserted,
click [Refresh Camera].
BBHGW700_OI.book 17 ページ 2004年9月27日 月曜日 午後6時58分
Operating Instructions
18
Notes
• All user information (video images, still images, Internet contents etc.) is the responsibility
of the customer. Access to this information should be limited to users or user groups, and
third parties should not be allowed to refer to, modify, delete or copy this information.
• When changing the setup of the camera or camera portal, refer to Using the Camera. (see
page 30)
Privacy and Image Right
When installing and using this camera, it is the customers responsibility to not infringe on
privacy or copyright rules and regulations.
* It is generally accepted that " Privacy is the legal right to not have one's private life displayed
in public, and the right to have control over one's own personal information. Image right is
the right to not have portraits or photographic images of one's self created by a stranger or
displayed in public.
4. Click the camera frame you want to access. If
an authentication window is displayed, enter
the camera's user name and password. Then
the camera image is displayed.
If the camera portal is not displayed...
• Check that "http:// IP address(WAN) or URL : port number" was entered correctly
into the address bar.
• Sometimes it is necessary to set up the web browser's proxy server to access the
website. (see page 87)
• When a camera name, an X mark, or a white page is displayed on the camera portal,
click [Refresh Camera].
BBHGW700_OI.book 18 ページ 2004年9月27日 月曜日 午後6時58分

97[For assistance, please call: 1-800-272-7033]
Operating Instructions
Other
Information
4.8 Specifications
Main Unit
Heading Specifications
Power Supply Special AC Adaptor:
(Part Number: PQLV202JP) AC100 V (50 Hz/60 Hz), DC12 V
DC Cord: approx 1.8m
AC Cord: approx 55cm (attached
separately)
Power Consumption Maximum: approx 6W
Dimensions (Width ×
Height × Depth) approx 204 × 36 × 140 mm (8 × 1.4 × 5.5 inches)
(when the antenna is stored)
Weight approx 330g (11.6 oz)
Environmental
Requirements Temperature (°C):
Humidity (%): 0 - 40 (32 - 104°F)
20 - 85 (non-condensing)
WAN Interface Number of Ports:
Connector Shape:
Physical Interface:
1
8 pin modular jack (RJ-45)
IEEE 802.3 (10Base-T)
IEEE 802.3u (100Base-TX)
Throughout between WAN
and LAN (value measured at
Panasonic):
Maximum of 93.0Mbps (FTP[Static])
Maximum of 92.1Mbps (FTP[PPPoE])
Maximum of 16.3Mbps (FTP[PPTP])
LAN Interface Number of Ports:
Connector Shape:
Physical Interface:
4
8 pin modular jack (RJ-45)
IEEE 802.3 (10Base-T)
IEEE 802.3u (100Base-TX)
Wireless Interface Wireless Chip: made by Atheros Communications
BBHGW700_OI.book 97 ページ 2004年9月27日 月曜日 午後6時58分

Operating Instructions
98
Wireless Interface IEEE 802.11b
Transmission Method: DS-SS, half-duplex
Transmission Speed
([Standard value]Mbps): 11/5.5/2/1* (complying to IEEE
802.11b): automatic fallback
Frequency Range (MHz): 2400 - 2472 (center frequency)
Number of Channels: 13
Security: WEP64 bit/128 bit/152 bit, SSID,
stealth SSID (hidden SSID, permitting/
not permitting connection using the
ANY key), MAC address filtering
IEEE 802.11g
Transmission Method: OFMD (complying to IEEE 802.11g)/
DS-SS (compatible with IEEE
802.11b), half-duplex
Transmission Speed
([Standard value]Mbps): 54/48/36/24/18/12/9/6* (complying to
IEEE 802.11g): automatic fallback
Frequency Range (MHz): 2412 - 2472 (center frequency)
Number of Channels: 13
Security: WEP64 bit/128 bit/152 bit, SSID,
stealth SSID (hidden SSID, permitting/
not permitting connection using the
ANY key), MAC address filtering
Transmitting Distance: Indoor - approx 120m (when
transmitting to/from a BB-HGW102)
Outdoor - approx 600m (when
transmitting to/from a BB-HGW102)
• The transmitting distance varies
according to the environment.
It is reduced when transmitting
close to reinforced concrete
buildings, large metallic objects,
microwaves, or crime prevention
devices.
The transmitting range is also
reduced if an obstacle such as a
wall or furniture is in the immediate
environment.
• The use of the IEEE 802.11a
outdoors is prohibited by law.
* The figures shown are theoretical maximums and not the actual
figures when using the product.
Heading Specifications
BBHGW700_OI.book 98 ページ 2004年9月27日 月曜日 午後6時58分

99[For assistance, please call: 1-800-272-7033]
Operating Instructions
Other
Information
Software
User Interface CLEAR SETTING button: Returns the product to factory default
settings.
Status Indicators
POWER:
WAN:
PPP:
LAN1-LAN4:
WIRELESS:
Displays the power/main unit status
Displays the WAN link status
Displays the PPP link status
Displays the Ethernet link status
Displays the wireless link status
Radio Wave
Interference
Prevention
VCCI class B
Heading Specifications
Router Function WAN Side Connection
Mode: PPPoE/DHCP/Static
PPPoE Connection: Always/Manual
RIP: Yes (RIPv2)
DHCP Server: Yes (128 client setup is possible)
DNS Relay (DNS proxy
answering): Ye s
IP Packet Filtering: Yes (64 setup)
Address Translation Method: IP masquerade, port forwarding, static
NAT
Wireless Terminal
Function Security: WEP (64 bit/128 bit/152 bit), stealth
SSID (hidden SSID, permitting/not
permitting connection using the ANY
key), MAC address filtering
Access Control ID/Password
Web Browser Setup Yes
Firmware Update Yes
Heading Specifications
BBHGW700_OI.book 99 ページ 2004年9月27日 月曜日 午後6時58分

Operating Instructions
100
BBHGW700_OI.book 100 ページ 2004年9月27日 月曜日 午後6時58分