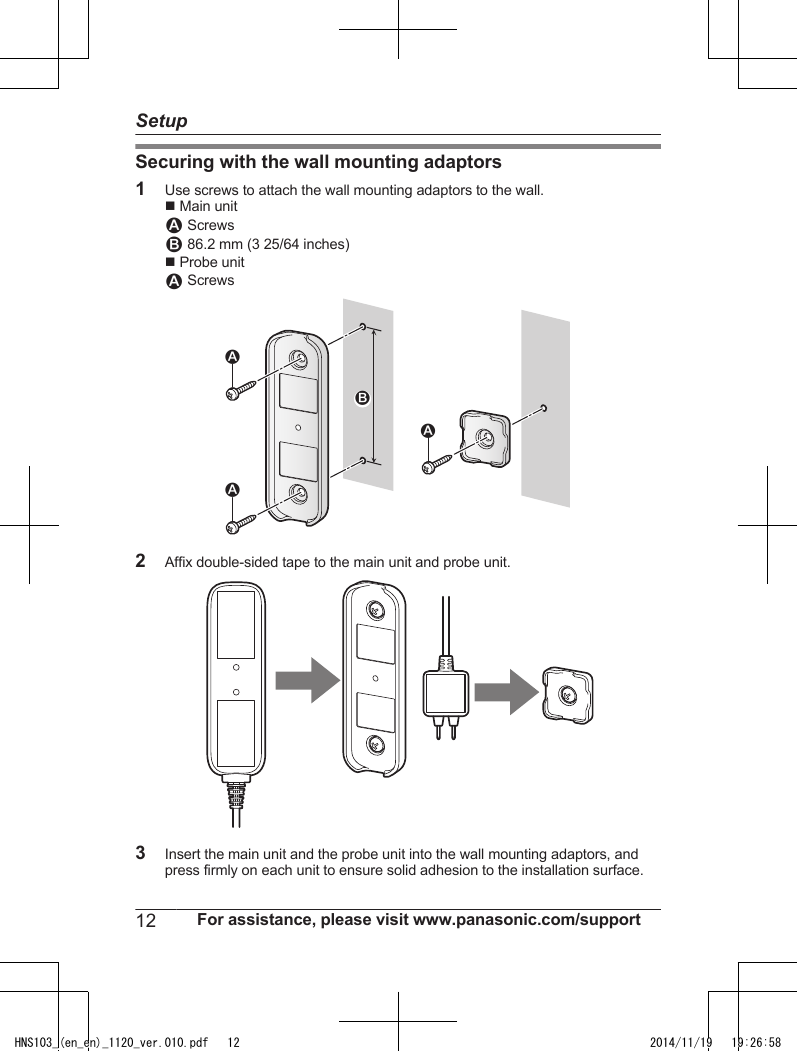
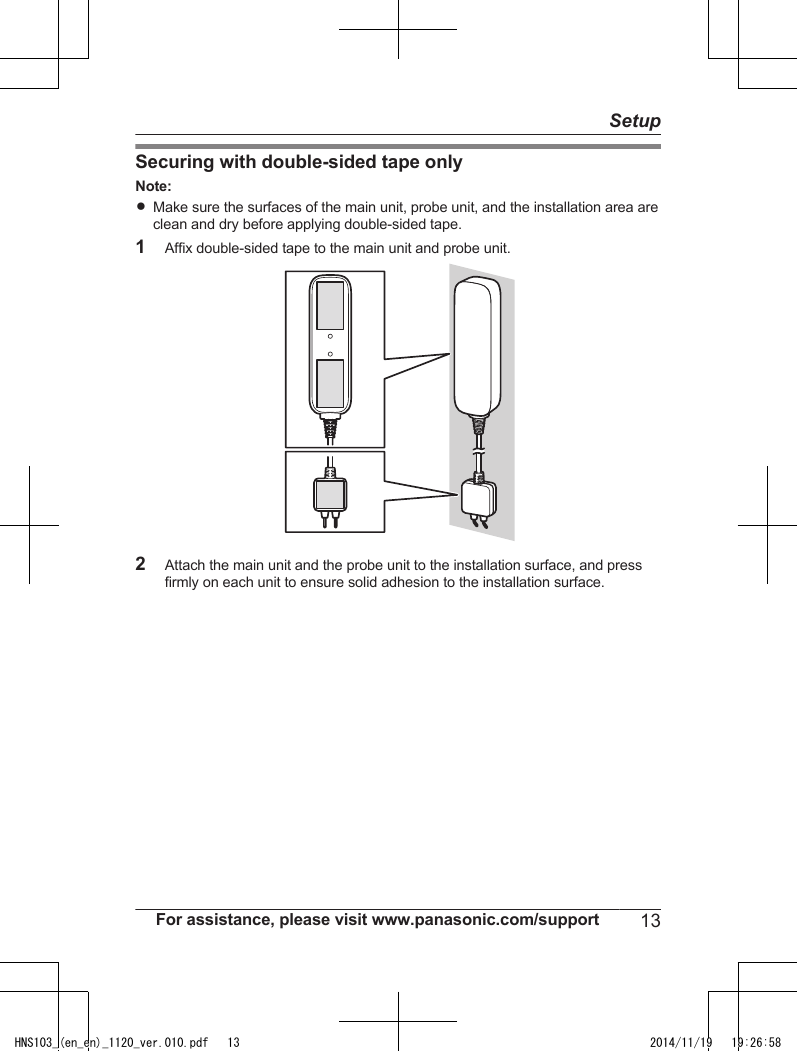
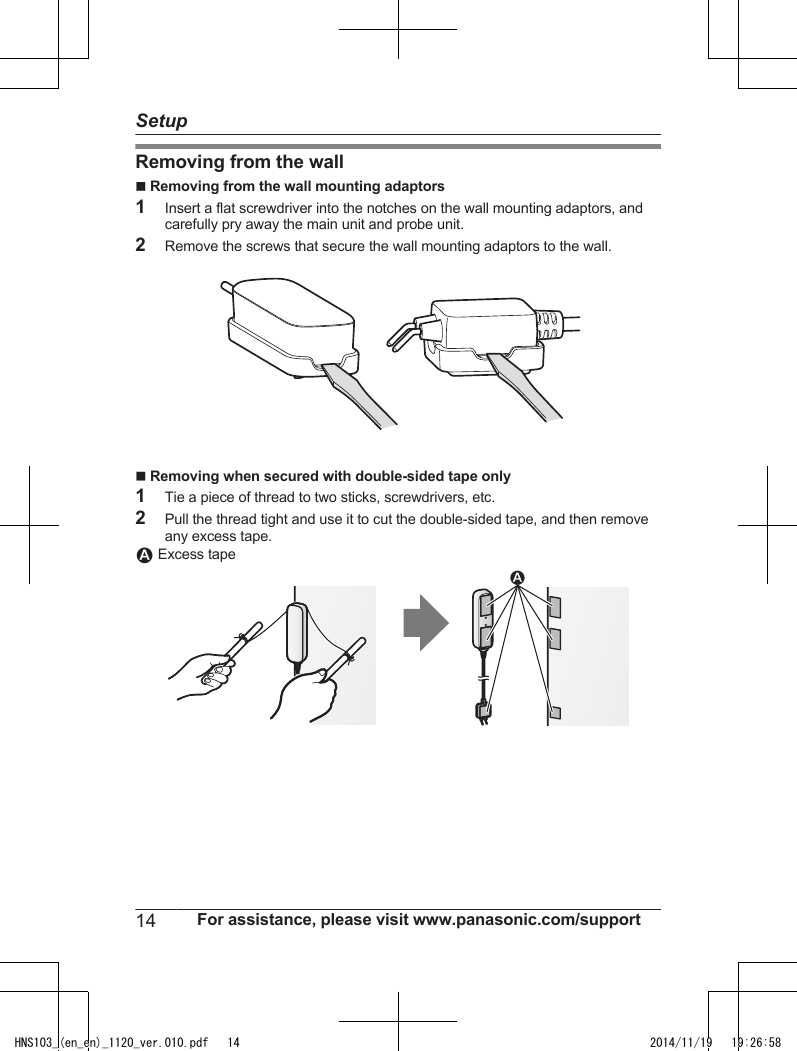
Panasonic of North America 96NKX-HNS103 DECT 6.0 Water Leak Sensor User Manual Installation Manual English

Panasonic Corporation of North America DECT 6.0 Water Leak Sensor Installation Manual English

Users Manual

Installation GuideHome Network SystemWater Leak SensorModel No.    KX-HNS103Thank you for purchasing a Panasonic product.This document explains how to install the water leak sensor properly.For details about how to use the system, refer to the User’s Guide(page 15).Please read this document before using the unit and save it for futurereference.For assistance, please contact us at 1-800-272-7033 or visit our Website: www.panasonic.com/support for customers in the U.S.A. orPuerto Rico.Please register your product: www.panasonic.com/prodregPrinted in ChinaHNS103_(en_en)_1120_ver.010.pdf   1 2014/11/19   19:26:58
IntroductionAccessory information ...............3Important InformationAbout this system ......................4For your safety ...........................4Important safety instructions ......5For best performance ................5Other information .......................6SetupPart names and functions ..........8About the LED indicator .............8Setup overview ..........................8Inserting the battery ...................9Registering the sensor ...............9Information about sensorfeatures ....................................10Wireless communicationrange .......................................10Installation ...............................11AppendixFeatures available when using the[Home Network] app ................15Accessing the User’s Guide ....15Specifications ..........................16FCC and other information ......17Customer services ...................18Warranty (For United States andPuerto Rico) .............................192Table of ContentsHNS103_(en_en)_1120_ver.010.pdf   2 2014/11/19   19:26:58
Accessory informationSupplied accessoriesNo. Accessory item/Part number QuantityABattery*11BWall mounting adaptors*22CWall mounting screws (25 mm (1 inch))*3/XTB4+25AVW 3*1 When replacing the battery, see “Power source” of “Specifications”, page 16for battery information.*2 1 adaptor for the main unit: PNHR2107Z1 adaptor for the probe unit: PNHR2108Z*3 2 screws for the main unit and 1 screw for the probe unitAB COther informationRDesign and specifications are subject to change without notice.RThe illustrations in these instructions may vary slightly from the actual product.TrademarksRiPhone and iPad are registered trademarks of Apple Inc.RAndroid is a trademark of Google Inc.For assistance, please visit www.panasonic.com/support 3IntroductionHNS103_(en_en)_1120_ver.010.pdf   3 2014/11/19   19:26:58
About this systemThis system is an auxiliary system; it isnot designed to provide completeprotection from property loss.Panasonic will not be held responsiblein the event that property loss occurswhile this system is in operation.For your safetyTo prevent severe injury and loss of life/property, read this section carefullybefore using the product to ensureproper and safe operation of yourproduct.WARNINGPower connectionRUse only the power source markedon the product.RDo not connect non-specifieddevices.InstallationRTo prevent the risk of fire orelectrical shock, do not expose theproduct to rain.RDo not place or use this productnear automatically controlleddevices such as automatic doorsand fire alarms. Radio wavesemitted from this product may causesuch devices to malfunctionresulting in an accident.RDo not allow the cable to beexcessively pulled, bent or placedunder heavy objects. Keep the mainunit upright at all times.RKeep small parts (screws, etc.) outof the reach of children. There is arisk of swallowing. In the event theyare swallowed, seek medical adviceimmediately.Operating safeguardsRDo not disassemble the product.MedicalRConsult the manufacturer of anypersonal medical devices, such aspacemakers or hearing aids, todetermine if they are adequatelyshielded from external RF (radiofrequency) energy. DECT featuresoperate between 1.92 GHz and1.93 GHz with a peak transmissionpower of 115 mW.RDo not use the product in healthcare facilities if any regulationsposted in the area instruct you not todo so. Hospitals or health carefacilities may be using equipmentthat could be sensitive to externalRF energy.CR Lithium batteryRDo not recharge, disassemble,remodel, heat or throw it into fire.RDo not touch the terminals   and with metal objects.RRisk of explosion if battery isreplaced by an incorrect type.Dispose of used battery according tolocal regulations.RIf any electrolyte should come intocontact with your hands or clothes,wash it off thoroughly with water.RIf any electrolyte should come intocontact with your eyes, never rubyour eyes. Rinse your eyes4For assistance, please visit www.panasonic.com/supportImportant InformationHNS103_(en_en)_1120_ver.010.pdf   4 2014/11/19   19:26:58
thoroughly with water, and thenconsult a doctor.CAUTIONInstallation and locationRAlthough this unit conforms to theIPX4*1 specification, do notintentionally expose it to water.*1 IPX4 indicates that the unit isnot harmfully affected by watersprayed on it from any direction.CR Lithium batteryRUse only the battery noted onpage 3.RInsert the battery correctly.RDo not leave the battery in anautomobile exposed to directsunlight for a long period of time withthe doors and windows closed.RRemove the battery if you do notuse the product for a long period oftime. Keep it in a cool, dark area.RDo not replace a battery with wethands.RKeep out of the reach of smallchildren. There is a risk ofswallowing. If the battery isswallowed, seek medical attentionimmediately.RRemove the battery if it becomesunusable. There is a risk of leakage,overheating, and rupture. Do notattempt to use a battery if it isleaking.RExercise care when handling thebatteries. Do not allow conductivematerials such as rings, bracelets, orkeys to touch the batteries,otherwise a short circuit may causethe batteries and/or the conductivematerial to overheat and causeburns.Important safetyinstructionsWhen using your product, basic safetyprecautions should always be followedto reduce the risk of fire, electric shock,and injury to persons, including thefollowing:1. Use only the batteries indicated inthis document. Do not dispose ofbatteries in a fire. They mayexplode. Check with local codes forpossible special disposalinstructions.SAVE THESE INSTRUCTIONSFor best performanceHub location/avoiding noiseThe hub and other compatiblePanasonic devices use radio waves tocommunicate with each other.RFor maximum coverage andnoise-free communications, placeyour hub:– at a convenient, high, and centrallocation with no obstructionsbetween the product and hub inan indoor environment.– away from electronic appliancessuch as TVs, radios, personalcomputers, wireless devices, orother phones.– facing away from radio frequencytransmitters, such as externalantennas of mobile phone cellstations. (Avoid putting the hubon a bay window or near awindow.)For assistance, please visit www.panasonic.com/support 5Important InformationHNS103_(en_en)_1120_ver.010.pdf   5 2014/11/19   19:26:58
RIf the reception for a hub location isnot satisfactory, move the hub toanother location for better reception.EnvironmentRKeep the product away fromelectrical noise generating devices,such as fluorescent lamps andmotors.RThe product should be kept freefrom excessive smoke, dust, hightemperature, and vibration.RThe product should not be exposedto direct sunlight.RDo not place heavy objects on top ofthe product.RThe product should be kept awayfrom heat sources such as heaters,kitchen stoves, etc. It should not beplaced in rooms where thetemperature is less than 0 °C (32 °F)or greater than 40 °C (104 °F).ROperating the product near electricalappliances may cause interference.Move away from the electricalappliances.Other informationCAUTION: Risk of explosion if batteryis replaced by an incorrect type.Dispose of used batteries according tothe instructions.Routine careRWipe the outer surface of theproduct with a soft moist cloth.RDo not use benzine, thinner, or anyabrasive powder.RIf the probe unit’s metal probesbecome dirty or oily, the productmay not detect water. Clean themetal probes with detergent ifnecessary.Information on Disposal in otherCountries outside the EuropeanUnion123These symbols (A, B, C) are onlyvalid in the European Union. If youwish to discard these items, pleasecontact your local authorities or dealerand ask for the correct method ofdisposal.Note for the battery removalprocedureRefer to “Inserting the battery” onpage 9.6For assistance, please visit www.panasonic.com/supportImportant InformationHNS103_(en_en)_1120_ver.010.pdf   6 2014/11/19   19:26:58
NoticeFor assistance, please visit www.panasonic.com/support 7Important InformationHNS103_(en_en)_1120_ver.010.pdf   7 2014/11/19   19:26:58
Part names andfunctionsn Main unitBCAn Probe unitMain unit coverM NUsed to confirm the status of thesensor or register the sensor tothe hub.LED indicatorAbout the LEDindicatorYou can press M N and check theLED indicator to confirm the sensor’sstatus.Indicator StatusGreen, lit No water detectedRed, lit Water detectedRed,blinkingSensor is out of rangeof the hubGreen,blinkingRegistration mode(You pressed and heldMN)Off No battery powerNote:RThe LED indicator does not indicatesensor status if the sensor has notbeen registered (page 9).Setup overview1Initial setupMake sure you can access thesystem using your mobile device.For details, refer to the SystemSetup Guide included with yourhub.2Insert the batteryThe sensor is battery powered.3RegistrationRequired only if the sensor waspurchased separately (i.e., not aspart of a bundle).4Confirm the installation areaRead the information in thisdocument to confirm that the8For assistance, please visit www.panasonic.com/supportSetupHNS103_(en_en)_1120_ver.010.pdf   8 2014/11/19   19:26:58
desired installation area is suitableto proper operation.5InstallationInstall the sensor in the desiredlocation.Inserting the batteryRUSE ONLY a CR2 Lithium battery.RConfirm the polarities ( ,  ).1Remove the main unit cover.RLift from the indented area (A)and open the main unit cover(B).122Insert the battery.3Attach the main unit cover.Registering thesensorThis procedure is not required fordevices that were included as part ofa bundle.Before you can use the sensor, it mustbe registered to the hub.If you purchased devices separately(i.e., not as part of a bundle), you mustregister each device to the hub.You can register each device by usingthe registration buttons or the [HomeNetwork] app.Using registration buttons1Hub:Press and hold M OTHERDEVICEN until the LED indicatorblinks in green.2Sensor:Remove the main unit cover andpress and hold MN until theLED indicator blinks in green(page 8).RWhen registration is complete,the hub sounds one long beep.Note:RTo cancel registration, press MNon the hub and on the sensor.RIf registration fails, the hub soundsseveral short beeps.Using the appWhen you register the sensor by usingthe [Home Network] app, you canassign a name to your devices andgroup them by location. For moreFor assistance, please visit www.panasonic.com/support 9SetupHNS103_(en_en)_1120_ver.010.pdf   9 2014/11/19   19:26:58ケーブルが取り外し可能の誤解を与える可能性がありますので、次校にてケーブル有りの状態に修正致します。
information, refer to the User’s Guide(page 15).Information aboutsensor featuresPlease read the following informationbefore deciding where to install thesensor.Note:RThe sensor is not designed to beused in situations that require highreliability. We do not recommenduse of the sensor in these situations.RPanasonic takes no responsibility forany injury or damage caused by theuse of this product.WirelesscommunicationrangeThe wireless communication range ofeach device in the system from the hubis approximately 50 m (160 feet)indoors and approximately 300 m(1,000 feet) outdoors. Wirelesscommunication may be unreliablewhen the following obstacles arelocated between the hub and otherdevices.RMetal doors or screensRWalls containing aluminum-sheetinsulationRWalls made of concrete orcorrugated ironRDouble-pane glass windowsRMultiple wallsRWhen using each device onseparate floors or in differentbuildingsNote:RYou can check the sensor’scommunication status by pressingM N. If the LED indicator is lit ingreen or red, the sensor iscommunicating properly with thehub. If the LED indicator blinks inred, it is out of range of the hub.10 For assistance, please visit www.panasonic.com/supportSetupHNS103_(en_en)_1120_ver.010.pdf   10 2014/11/19   19:26:58
InstallationWhen the metal probes on the probe unit come in to contact with water, a smallamount of electrical charge flows between the probes, which the main unitrecognizes as a water leak.Note:RWhen installing, make sure the battery is inserted properly and the unit cover iscompletely closed.RWhen installing on a wooden surface, use the included wall mounting adaptors.When securing the wall mounting adaptors to the wall, use screws (notdouble-sided tape).RMount the sensor on the stable location where the sensor can be adequatelysupported when mounting.RDo not mount the sensor on a soft material. It may fall down, break or causeinjury.RDo not mount the sensor on the following places: gypsum board, ALC(autoclaved lightweight cellular concrete), concrete block, plywood less than25.4 mm (1 inch) thick, etc.Installation locationInstall the sensor in a basement, kitchen, utility room, or anywhere you want todetect a water leak. Common installation examples include near a washingmachine, hot water heater, or a location where a water leak has occurred in thepast.Note:RThe sensor may make false detections when its metal probes are touching thefloor. Mount the probe unit so that its metal probes do not touch the floor.RMount the main unit 1 m (3 feet 3 inches) or higher above the floor so that it willnot become wet in the event of a water leak.For assistance, please visit www.panasonic.com/support 11SetupHNS103_(en_en)_1120_ver.010.pdf   11 2014/11/19   19:26:58
Securing with the wall mounting adaptors1Use screws to attach the wall mounting adaptors to the wall.n Main unit1 Screws2 86.2 mm (3 25/64 inches)n Probe unit1 Screws21112Affix double-sided tape to the main unit and probe unit.3Insert the main unit and the probe unit into the wall mounting adaptors, andpress firmly on each unit to ensure solid adhesion to the installation surface.12 For assistance, please visit www.panasonic.com/supportSetupHNS103_(en_en)_1120_ver.010.pdf   12 2014/11/19   19:26:58
Securing with double-sided tape onlyNote:RMake sure the surfaces of the main unit, probe unit, and the installation area areclean and dry before applying double-sided tape.1Affix double-sided tape to the main unit and probe unit.2Attach the main unit and the probe unit to the installation surface, and pressfirmly on each unit to ensure solid adhesion to the installation surface.For assistance, please visit www.panasonic.com/support 13SetupHNS103_(en_en)_1120_ver.010.pdf   13 2014/11/19   19:26:58
Removing from the walln Removing from the wall mounting adaptors1Insert a flat screwdriver into the notches on the wall mounting adaptors, andcarefully pry away the main unit and probe unit.2Remove the screws that secure the wall mounting adaptors to the wall.n Removing when secured with double-sided tape only1Tie a piece of thread to two sticks, screwdrivers, etc.2Pull the thread tight and use it to cut the double-sided tape, and then removeany excess tape.1 Excess tape114 For assistance, please visit www.panasonic.com/supportSetupHNS103_(en_en)_1120_ver.010.pdf   14 2014/11/19   19:26:58
Features availablewhen using the[Home Network] appSome of the sensor’s features that areavailable when using the [HomeNetwork] app are listed below. Formore information, refer to the User’sGuide (page 15).–Alarm systemYou can use the app to arm anddisarm the alarm system, confirmthe current status of the sensor, andview a log of previous events.–Sensor integrationYou can configure the sensor totrigger other system events, such ascamera recording, turning on anelectric device (such as a lamp), etc.(Appropriate device required.)–Telephone alertYou can configure the system to calla preprogrammed phone numberwhen the sensor is triggered.Accessing the User’sGuideThe User’s Guide is a collection ofonline documentation that helps youget the most out of the [HomeNetwork] app.1iPhone®/iPad®Tap   in the app’s home screen.Android™ devicesTap   or press your mobiledevice’s menu button in the app’shome screen.2Tap [User’s Guide].Note:RYou can also access the User’sGuide at the web page listed below.www.panasonic.net/pcc/support/tel/homenetwork/manual/For assistance, please visit www.panasonic.com/support 15AppendixHNS103_(en_en)_1120_ver.010.pdf   15 2014/11/19   19:26:58
SpecificationsRStandardsDECT 6.0 (Digital EnhancedCordless Telecommunications 6.0)RFrequency rangeDECT: 1.92 GHz – 1.93 GHzRRF transmission powerDECT: 115 mW (max.)RPower sourceLithium battery CR2 (1 ´ 3.0 V,850 mAh)ROperating conditions0 °C – 40 °C (32 °F – 104 °F)RSensor detection methodxxRBattery lifeApprox. 3 to 4 years (when thesensor is triggered once a month, inan environment of 25 °C (77 °F))RIP ratingIPX4RDimensionsMain unit (not includingdouble-sided tape):Approx. 106 mm ´ 31 mm ´ 22 mm(4 3/16 inches ´ 1 1/4 inches ´7/8 inches)Probe unit (not includingdouble-sided tape):Approx. 44 mm ´ 24 mm ´ 10 mm(1 3/4 inches ´ 15/16 inches ´3/8 inches)Cable:Approx. 1214 mm ´ 3.4 mm(47 13/16 inches ´ 1/8 inches)RMass (weight)Approx. xx g (xx lb), excluding thebattery16 For assistance, please visit www.panasonic.com/supportAppendixHNS103_(en_en)_1120_ver.010.pdf   16 2014/11/19   19:26:58電気ご担当者様 定格表には記載されていませんが、DR0資料の「4-1. 機構設計方針」に、「防水性能:IPX4相当」の記載がありました。 こちらの記載は必要でしょうか?電気ご担当者様 検知方式について、ベースとしたHNS101には記載はありませんでしたが、HNS102は検知方式についての記載がありました。 検知方式について記載は必要でしょうか? 検知方式について、記載が必要な場合は、検知方式の名称を教えて頂けないでしょうか?
FCC and otherinformationThis device complies with Part 15 ofthe FCC Rules. Operation is subject tothe following two conditions:(1) This device may not cause harmfulinterference, and (2) this device mustaccept any interference received,including interference that may causeundesired operation.Privacy of communications may not beensured when using this device.CAUTION:Any changes or modifications notexpressly approved by the partyresponsible for compliance could voidthe user’s authority to operate thisdevice.NOTE:This equipment has been tested andfound to comply with the limits for aClass B digital device, pursuant to Part15 of the FCC Rules. These limits aredesigned to provide reasonableprotection against harmful interferencein a residential installation. Thisequipment generates, uses, and canradiate radio frequency energy and, ifnot installed and used in accordancewith the instructions, may causeharmful interference to radiocommunications. However, there is noguarantee that interference will notoccur in a particular installation. If thisequipment does cause harmfulinterference to radio or televisionreception, which can be determined byturning the equipment off and on, theuser is encouraged to try to correct theinterference by one or more of thefollowing measures:– Reorient or relocate the receivingantenna.– Increase the separation between theequipment and receiver.– Connect the equipment into anoutlet on a circuit different from thatto which the receiver is connected.– Consult the dealer or anexperienced radio/TV technician forhelp.Some devices operate at frequenciesthat may cause interference to nearbyTVs and VCRs. To minimize or preventsuch interference, the devices shouldnot be placed near or on top of a TV orVCR. If interference is experienced,move this device away from the TV orVCR. This will often reduce or eliminateinterference.FCC RF Exposure Warning:RThis product complies with FCCradiation exposure limits set forth foran uncontrolled environment.RTo comply with FCC RF exposurerequirements, the device must beinstalled and operated 20 cm(8 inches) or more between theproduct and all person’s body.RThis product may not be collocatedor operated in conjunction with anyother antenna or transmitter.RFor body-worn operation, the devicemust be used only with anon-metallic accessory. Use of otheraccessories may not ensurecompliance with FCC RF exposurerequirements.Notice:RFCC ID can be found inside themain unit.For assistance, please visit www.panasonic.com/support 17AppendixHNS103_(en_en)_1120_ver.010.pdf   17 2014/11/19   19:26:58
Customer servicesCustomer Services Directory (United States andPuerto Rico) www.panasonic.com/supportor, contact us via the web at:www.panasonic.com/contactinfoFor hearing or speech impaired TTY users, TTY: 1-877-833-8855For hearing or speech impaired TTY users, TTY: 1-866-605-1277www.pstc.panasonic.comor, send your request by E-mail to:npcparts@us.panasonic.comAccessory Purchases (United States and Puerto Rico)Obtain Product Information and Operating Assistance; locate your nearestDealer or Service Center; purchase Parts and Accessories; or make CustomerService and Literature requests by visiting our Web Site at:You may also contact us directly at: 1-800-272-7033,Monday - Friday 9 am to 9 pm; Saturday - Sunday 10 am to 7 pm, EST.Purchase Parts, Accessories and Owner’s Manual online for all Panasonic Products by visiting our Web Site at:You may also contact us directly at:1-800-237-9080 (Fax Only)(Monday - Friday 9 am to 9 pm, EST.)Panasonic National Parts Center20421 84th Avenue S., Kent, WA 98032(We accept Visa, MasterCard, Discover Card, American Express.)18 For assistance, please visit www.panasonic.com/supportAppendixHNS103_(en_en)_1120_ver.010.pdf   18 2014/11/19   19:26:58
Warranty (For United States and Puerto Rico)Limited Warranty CoverageLaborOne (1) YearPartsOne (1) YearOnline Repair RequestTo submit a new repair request and for quick repair status visit our Web Site atwww.panasonic.com/repairPROOF OF PURCHASE.Panasonic Home Network System ProductsLimited WarrantyMail-In Service--OnlineIf your product does not work properly because of a defect in materials or workmanship, Panasonic Corporation of North America (referred to as “the warrantor”) will, for the length of the period indicated on the chart below, which starts with the date of original purchase (“Limited Warranty period”), at its option either (a) repair your product with new or refurbished parts, or  (b) replace it with a new or a refurbished equivalent value product, or (c) refund your purchase price. The decision to repair, replace or refund will be made by the warrantor.During the “Labor” Limited Warranty period there will be no charge for labor. During the “Parts” Limited Warranty period, there will be no charge for parts. You must mail-in your product prepaid during the Limited Warranty period. This Limited Warranty excludes both parts and labor for batteries, antennas, and cosmetic parts (cabinet). This Limited Warranty only applies to products purchased and serviced in the United States or Puerto Rico. This Limited Warranty is extended only to the original purchaser and only covers products purchased as new.Home Network System ProductsmicroSD card (Included model only)       90 days              N/AWhen shipping the unit carefully pack in a padded shipping carton, include all accessories, and send it prepaid. Include a letter detailing the complaint, a return address and provide a day time phone number where you can be reached. P.O. Boxes are not acceptable. Keep the tracking number for your records. A copy of valid registered receipt is required under the 1 year parts and labor Limited Warranty.For Limited Warranty service for headsets if a headset is included with this product please follow instructions above.IF REPAIR IS NEEDED DURING THE LIMITED WARRANTY PERIOD THE PURCHASER WILL BE REQUIRED TO FURNISH A SALES RECEIPT/PROOF OF PURCHASE INDICATING DATE OF PURCHASE, AMOUNT PAID AND PLACE OF PURCHASE. CUSTOMER WILL BE CHARGED FOR THE REPAIR OF ANY UNIT RECEIVED WITHOUT SUCH For assistance, please visit www.panasonic.com/support 19AppendixHNS103_(en_en)_1120_ver.010.pdf   19 2014/11/19   19:26:58
Limited Warranty Limits And ExclusionsThis Limited Warranty ONLY COVERS failures due to defects in materials or workmanship,and DOES NOT COVER normal wear and tear or cosmetic damage. The Limited WarrantyALSO DOES NOT COVER damages which occurred in shipment, or failures which arecaused by products not supplied by the warrantor, or failures which result from accidents,misuse, abuse, neglect, bug infestation, mishandling, misapplication, alteration, faultyinstallation, set-up adjustments, misadjustment of consumer controls, improper maintenance,power line surge, lightning damage, modification, introduction of sand, humidity or liquids,commercial use such as hotel, office, restaurant, or other business or rental use of theproduct, or service by anyone other than a Factory Service Center or other AuthorizedServicer, or damage that is attributable to acts of God.THERE ARE NO EXPRESS WARRANTIES EXCEPT AS LISTED UNDER "LIMITEDWARRANTY COVERAGE". THE WARRANTOR IS NOT LIABLE FOR INCIDENTAL ORCONSEQUENTIAL DAMAGES RESULTING FROM THE USE OF THIS PRODUCT, ORARISING OUT OF ANY BREACH OF THIS LIMITED WARRANTY. (As examples, thisexcludes damages for lost time, lost calls or messages, cost of having someone remove orre-install an installed unit if applicable, travel to and from the servicer. The items listed are notexclusive, but are for illustration only.) ALL EXPRESS AND IMPLIED WARRANTIES,INCLUDING THE WARRANTY OF MERCHANTABILITY, ARE LIMITED TO THE PERIODOF THE LIMITED WARRANTY.Some states do not allow the exclusion or limitation of incidental or consequential damages,or limitations on how long an implied warranty lasts, so the exclusions may not apply to you.This Limited Warranty gives you specific legal rights and you may also have other rightswhich vary from state to state. If a problem with this product develops during or after theLimited Warranty period, you may contact your dealer or Service Center. If the problem is nothandled to your satisfaction, then write to the warrantor's Consumer Affairs Department at theaddresses listed for the warrantor.PARTS AND SERVICE, WHICH ARE NOT COVERED BY THIS LIMITED WARRANTY, AREYOUR RESPONSIBILITY.When you ship the productȷCarefully pack your unit, preferably in the original carton.ȷAttach a letter, detailing the symptom.ȷSend the unit to Panasonic Exchange Center, prepaid and adequately insured.ȷDo not send your unit to Panasonic Corporation of North America listed on the back    cover or to executive or regional sales offices. These locations do not repair consumer    products.20 For assistance, please visit www.panasonic.com/supportAppendixHNS103_(en_en)_1120_ver.010.pdf   20 2014/11/19   19:26:59
21NotesHNS103_(en_en)_1120_ver.010.pdf   21 2014/11/19   19:26:59
22NotesHNS103_(en_en)_1120_ver.010.pdf   22 2014/11/19   19:26:59
23NotesHNS103_(en_en)_1120_ver.010.pdf   23 2014/11/19   19:26:59
1 Use CR2 Lithium battery.2 Use the Home Network app to access the User’s Guide and refer to the Troubleshooting section.IMPORTANT!If your product is not working properly. . .Visit our Web site: www.panasonic.com/supportLFAQ and troubleshooting hints are available.For your future referenceWe recommend keeping a record of the following information to assistwith any repair under warranty.Serial No. Date of purchase(found inside the main unit)Name and address of dealerAttach your purchase receipt here.Two Riverfront Plaza, Newark, NJ 07102-5490© Panasonic System Networks Co., Ltd. 2015   HNS103_(en_en)_1120_ver.010.pdf   24 2014/11/19   19:26:59

Navigation menu