Panasonic of North America 96NKX-HNS103 DECT 6.0 Water Leak Sensor User Manual Installation Manual English
Panasonic Corporation of North America DECT 6.0 Water Leak Sensor Installation Manual English
Users Manual
Installation Guide
Home Network System
Water Leak Sensor
Model No. KX-HNS103
Thank you for purchasing a Panasonic product.
This document explains how to install the water leak sensor properly.
For details about how to use the system, refer to the User’s Guide
(page 15).
Please read this document before using the unit and save it for future
reference.
For assistance, please contact us at 1-800-272-7033 or visit our Web
site: www.panasonic.com/support for customers in the U.S.A. or
Puerto Rico.
Please register your product: www.panasonic.com/prodreg
Printed in China
HNS103_(en_en)_1120_ver.010.pdf 1 2014/11/19 19:26:58

Introduction
Accessory information ...............3
Important Information
About this system ......................4
For your safety ...........................4
Important safety instructions ......5
For best performance ................5
Other information .......................6
Setup
Part names and functions ..........8
About the LED indicator .............8
Setup overview ..........................8
Inserting the battery ...................9
Registering the sensor ...............9
Information about sensor
features ....................................10
Wireless communication
range .......................................10
Installation ...............................11
Appendix
Features available when using the
[Home Network] app ................15
Accessing the User’s Guide ....15
Specifications ..........................16
FCC and other information ......17
Customer services ...................18
Warranty (For United States and
Puerto Rico) .............................19
2
Table of Contents
HNS103_(en_en)_1120_ver.010.pdf 2 2014/11/19 19:26:58
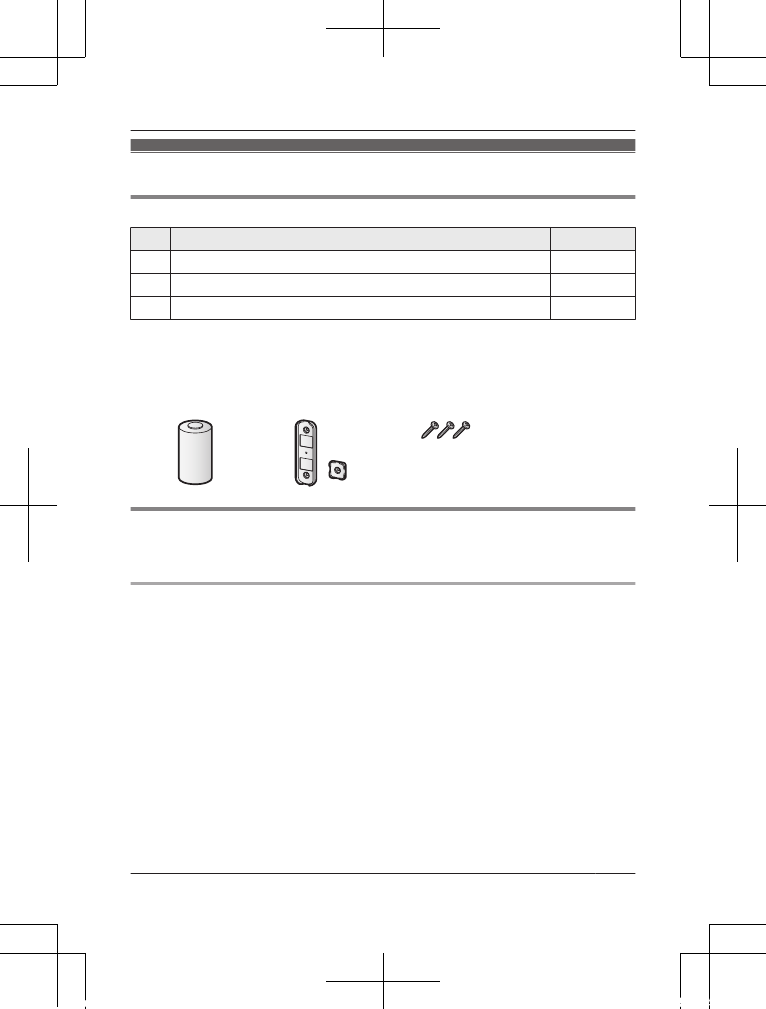
Accessory information
Supplied accessories
No. Accessory item/Part number Quantity
ABattery*11
BWall mounting adaptors*22
CWall mounting screws (25 mm (1 inch))*3/XTB4+25AVW 3
*1 When replacing the battery, see “Power source” of “Specifications”, page 16
for battery information.
*2 1 adaptor for the main unit: PNHR2107Z
1 adaptor for the probe unit: PNHR2108Z
*3 2 screws for the main unit and 1 screw for the probe unit
AB C
Other information
RDesign and specifications are subject to change without notice.
RThe illustrations in these instructions may vary slightly from the actual product.
Trademarks
RiPhone and iPad are registered trademarks of Apple Inc.
RAndroid is a trademark of Google Inc.
For assistance, please visit www.panasonic.com/support 3
Introduction
HNS103_(en_en)_1120_ver.010.pdf 3 2014/11/19 19:26:58
About this system
This system is an auxiliary system; it is
not designed to provide complete
protection from property loss.
Panasonic will not be held responsible
in the event that property loss occurs
while this system is in operation.
For your safety
To prevent severe injury and loss of life/
property, read this section carefully
before using the product to ensure
proper and safe operation of your
product.
WARNING
Power connection
RUse only the power source marked
on the product.
RDo not connect non-specified
devices.
Installation
RTo prevent the risk of fire or
electrical shock, do not expose the
product to rain.
RDo not place or use this product
near automatically controlled
devices such as automatic doors
and fire alarms. Radio waves
emitted from this product may cause
such devices to malfunction
resulting in an accident.
RDo not allow the cable to be
excessively pulled, bent or placed
under heavy objects. Keep the main
unit upright at all times.
RKeep small parts (screws, etc.) out
of the reach of children. There is a
risk of swallowing. In the event they
are swallowed, seek medical advice
immediately.
Operating safeguards
RDo not disassemble the product.
Medical
RConsult the manufacturer of any
personal medical devices, such as
pacemakers or hearing aids, to
determine if they are adequately
shielded from external RF (radio
frequency) energy. DECT features
operate between 1.92 GHz and
1.93 GHz with a peak transmission
power of 115 mW.
RDo not use the product in health
care facilities if any regulations
posted in the area instruct you not to
do so. Hospitals or health care
facilities may be using equipment
that could be sensitive to external
RF energy.
CR Lithium battery
RDo not recharge, disassemble,
remodel, heat or throw it into fire.
RDo not touch the terminals and
with metal objects.
RRisk of explosion if battery is
replaced by an incorrect type.
Dispose of used battery according to
local regulations.
RIf any electrolyte should come into
contact with your hands or clothes,
wash it off thoroughly with water.
RIf any electrolyte should come into
contact with your eyes, never rub
your eyes. Rinse your eyes
4For assistance, please visit www.panasonic.com/support
Important Information
HNS103_(en_en)_1120_ver.010.pdf 4 2014/11/19 19:26:58
thoroughly with water, and then
consult a doctor.
CAUTION
Installation and location
RAlthough this unit conforms to the
IPX4*1 specification, do not
intentionally expose it to water.
*1 IPX4 indicates that the unit is
not harmfully affected by water
sprayed on it from any direction.
CR Lithium battery
RUse only the battery noted on
page 3.
RInsert the battery correctly.
RDo not leave the battery in an
automobile exposed to direct
sunlight for a long period of time with
the doors and windows closed.
RRemove the battery if you do not
use the product for a long period of
time. Keep it in a cool, dark area.
RDo not replace a battery with wet
hands.
RKeep out of the reach of small
children. There is a risk of
swallowing. If the battery is
swallowed, seek medical attention
immediately.
RRemove the battery if it becomes
unusable. There is a risk of leakage,
overheating, and rupture. Do not
attempt to use a battery if it is
leaking.
RExercise care when handling the
batteries. Do not allow conductive
materials such as rings, bracelets, or
keys to touch the batteries,
otherwise a short circuit may cause
the batteries and/or the conductive
material to overheat and cause
burns.
Important safety
instructions
When using your product, basic safety
precautions should always be followed
to reduce the risk of fire, electric shock,
and injury to persons, including the
following:
1. Use only the batteries indicated in
this document. Do not dispose of
batteries in a fire. They may
explode. Check with local codes for
possible special disposal
instructions.
SAVE THESE INSTRUCTIONS
For best performance
Hub location/avoiding noise
The hub and other compatible
Panasonic devices use radio waves to
communicate with each other.
RFor maximum coverage and
noise-free communications, place
your hub:
– at a convenient, high, and central
location with no obstructions
between the product and hub in
an indoor environment.
– away from electronic appliances
such as TVs, radios, personal
computers, wireless devices, or
other phones.
– facing away from radio frequency
transmitters, such as external
antennas of mobile phone cell
stations. (Avoid putting the hub
on a bay window or near a
window.)
For assistance, please visit www.panasonic.com/support 5
Important Information
HNS103_(en_en)_1120_ver.010.pdf 5 2014/11/19 19:26:58
RIf the reception for a hub location is
not satisfactory, move the hub to
another location for better reception.
Environment
RKeep the product away from
electrical noise generating devices,
such as fluorescent lamps and
motors.
RThe product should be kept free
from excessive smoke, dust, high
temperature, and vibration.
RThe product should not be exposed
to direct sunlight.
RDo not place heavy objects on top of
the product.
RThe product should be kept away
from heat sources such as heaters,
kitchen stoves, etc. It should not be
placed in rooms where the
temperature is less than 0 °C (32 °F)
or greater than 40 °C (104 °F).
ROperating the product near electrical
appliances may cause interference.
Move away from the electrical
appliances.
Other information
CAUTION: Risk of explosion if battery
is replaced by an incorrect type.
Dispose of used batteries according to
the instructions.
Routine care
RWipe the outer surface of the
product with a soft moist cloth.
RDo not use benzine, thinner, or any
abrasive powder.
RIf the probe unit’s metal probes
become dirty or oily, the product
may not detect water. Clean the
metal probes with detergent if
necessary.
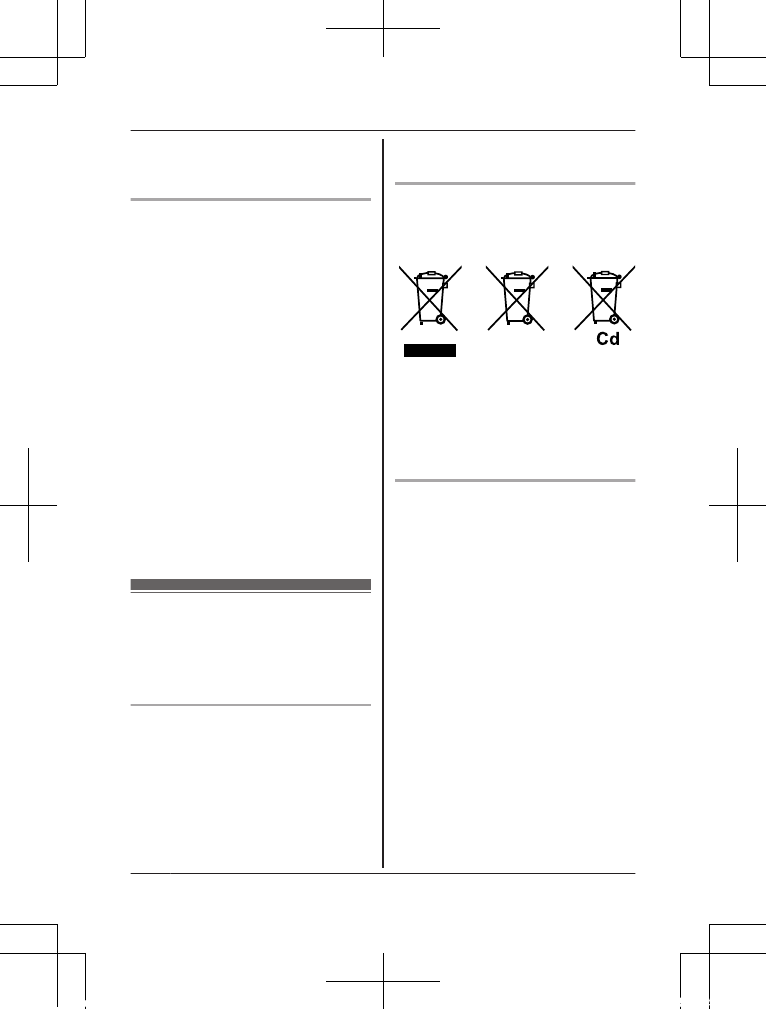
Information on Disposal in other
Countries outside the European
Union
123
These symbols (A, B, C) are only
valid in the European Union. If you
wish to discard these items, please
contact your local authorities or dealer
and ask for the correct method of
disposal.
Note for the battery removal
procedure
Refer to “Inserting the battery” on
page 9.
6For assistance, please visit www.panasonic.com/support
Important Information
HNS103_(en_en)_1120_ver.010.pdf 6 2014/11/19 19:26:58
Notice
For assistance, please visit www.panasonic.com/support 7
Important Information
HNS103_(en_en)_1120_ver.010.pdf 7 2014/11/19 19:26:58
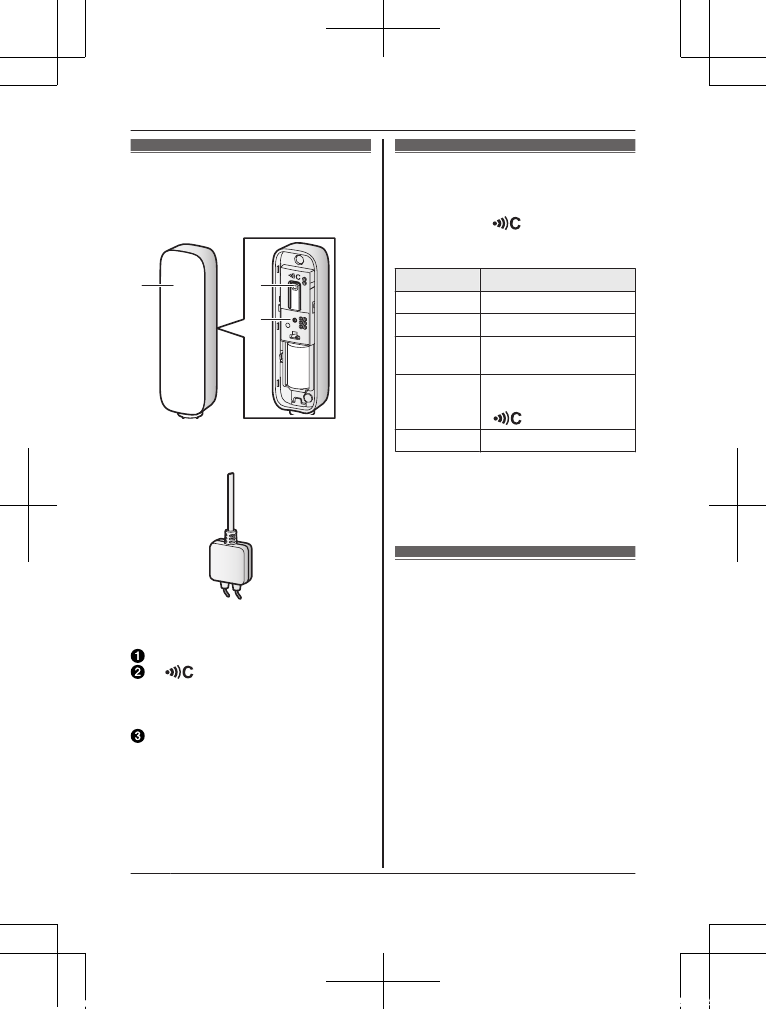
Part names and
functions
n Main unit
B
C
A
n Probe unit
Main unit cover
M N
Used to confirm the status of the
sensor or register the sensor to
the hub.
LED indicator
About the LED
indicator
You can press M N and check the
LED indicator to confirm the sensor’s
status.
Indicator Status
Green, lit No water detected
Red, lit Water detected
Red,
blinking
Sensor is out of range
of the hub
Green,
blinking
Registration mode
(You pressed and held
MN)
Off No battery power
Note:
RThe LED indicator does not indicate
sensor status if the sensor has not
been registered (page 9).
Setup overview
1Initial setup
Make sure you can access the
system using your mobile device.
For details, refer to the System
Setup Guide included with your
hub.
2Insert the battery
The sensor is battery powered.
3Registration
Required only if the sensor was
purchased separately (i.e., not as
part of a bundle).
4Confirm the installation area
Read the information in this
document to confirm that the
8For assistance, please visit www.panasonic.com/support
Setup
HNS103_(en_en)_1120_ver.010.pdf 8 2014/11/19 19:26:58
desired installation area is suitable
to proper operation.
5Installation
Install the sensor in the desired
location.
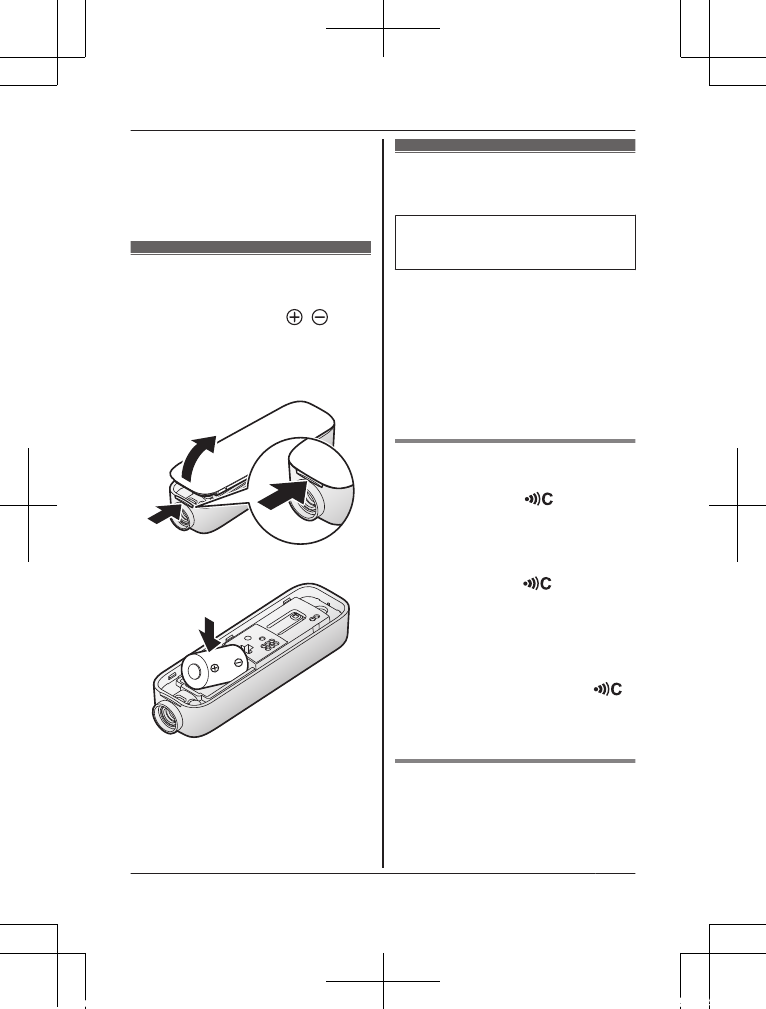
Inserting the battery
RUSE ONLY a CR2 Lithium battery.
RConfirm the polarities ( , ).
1Remove the main unit cover.
RLift from the indented area (A)
and open the main unit cover
(B).
1
2
2Insert the battery.
3Attach the main unit cover.
Registering the
sensor
This procedure is not required for
devices that were included as part of
a bundle.
Before you can use the sensor, it must
be registered to the hub.
If you purchased devices separately
(i.e., not as part of a bundle), you must
register each device to the hub.
You can register each device by using
the registration buttons or the [Home
Network] app.
Using registration buttons
1Hub:
Press and hold M OTHER
DEVICEN until the LED indicator
blinks in green.
2Sensor:
Remove the main unit cover and
press and hold MN until the
LED indicator blinks in green
(page 8).
RWhen registration is complete,
the hub sounds one long beep.
Note:
RTo cancel registration, press MN
on the hub and on the sensor.
RIf registration fails, the hub sounds
several short beeps.
Using the app
When you register the sensor by using
the [Home Network] app, you can
assign a name to your devices and
group them by location. For more
For assistance, please visit www.panasonic.com/support 9
Setup
HNS103_(en_en)_1120_ver.010.pdf 9 2014/11/19 19:26:58
ケーブルが取り外
し可能の誤解を与
える可能性があり
ますので、次校に
てケーブル有りの
状態に修正致しま
す。
information, refer to the User’s Guide
(page 15).
Information about
sensor features
Please read the following information
before deciding where to install the
sensor.
Note:
RThe sensor is not designed to be
used in situations that require high
reliability. We do not recommend
use of the sensor in these situations.
RPanasonic takes no responsibility for
any injury or damage caused by the
use of this product.
Wireless
communication
range
The wireless communication range of
each device in the system from the hub
is approximately 50 m (160 feet)
indoors and approximately 300 m
(1,000 feet) outdoors. Wireless
communication may be unreliable
when the following obstacles are
located between the hub and other
devices.
RMetal doors or screens
RWalls containing aluminum-sheet
insulation
RWalls made of concrete or
corrugated iron
RDouble-pane glass windows
RMultiple walls
RWhen using each device on
separate floors or in different
buildings
Note:
RYou can check the sensor’s
communication status by pressing
M N. If the LED indicator is lit in
green or red, the sensor is
communicating properly with the
hub. If the LED indicator blinks in
red, it is out of range of the hub.
10 For assistance, please visit www.panasonic.com/support
Setup
HNS103_(en_en)_1120_ver.010.pdf 10 2014/11/19 19:26:58
Installation
When the metal probes on the probe unit come in to contact with water, a small
amount of electrical charge flows between the probes, which the main unit
recognizes as a water leak.
Note:
RWhen installing, make sure the battery is inserted properly and the unit cover is
completely closed.
RWhen installing on a wooden surface, use the included wall mounting adaptors.
When securing the wall mounting adaptors to the wall, use screws (not
double-sided tape).
RMount the sensor on the stable location where the sensor can be adequately
supported when mounting.
RDo not mount the sensor on a soft material. It may fall down, break or cause
injury.
RDo not mount the sensor on the following places: gypsum board, ALC
(autoclaved lightweight cellular concrete), concrete block, plywood less than
25.4 mm (1 inch) thick, etc.
Installation location
Install the sensor in a basement, kitchen, utility room, or anywhere you want to
detect a water leak. Common installation examples include near a washing
machine, hot water heater, or a location where a water leak has occurred in the
past.
Note:
RThe sensor may make false detections when its metal probes are touching the
floor. Mount the probe unit so that its metal probes do not touch the floor.
RMount the main unit 1 m (3 feet 3 inches) or higher above the floor so that it will
not become wet in the event of a water leak.
For assistance, please visit www.panasonic.com/support 11
Setup
HNS103_(en_en)_1120_ver.010.pdf 11 2014/11/19 19:26:58
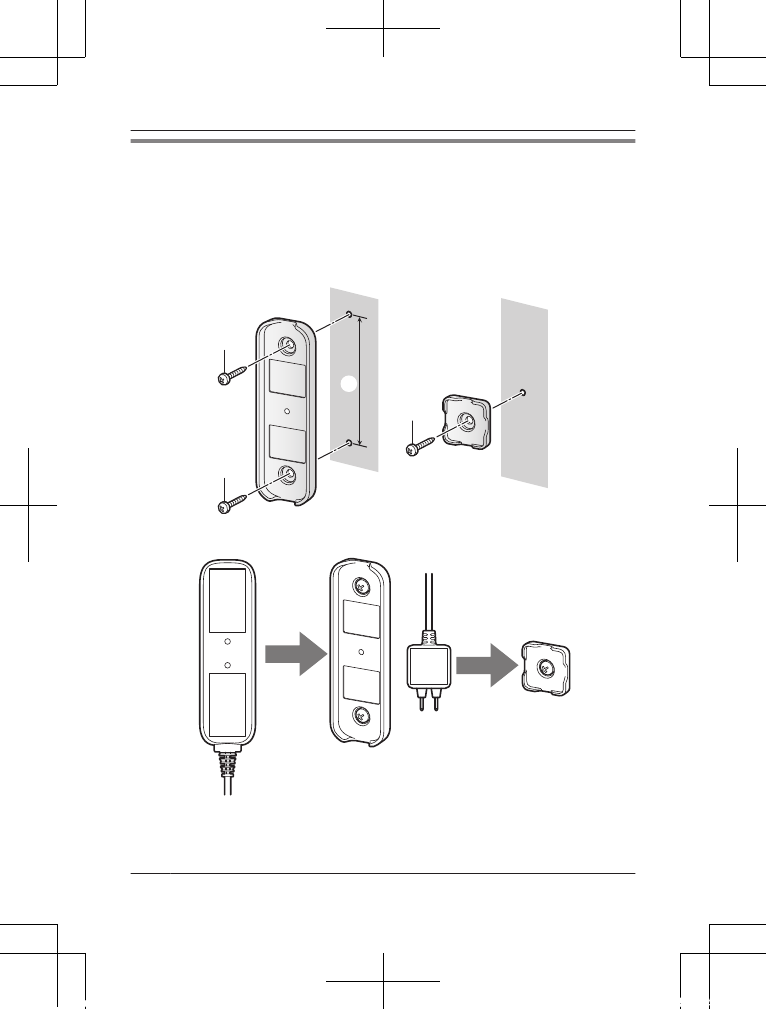
Securing with the wall mounting adaptors
1Use screws to attach the wall mounting adaptors to the wall.
n Main unit
1
Screws
2
86.2 mm (3 25/64 inches)
n Probe unit
1
Screws
2
1
1
1
2Affix double-sided tape to the main unit and probe unit.
3Insert the main unit and the probe unit into the wall mounting adaptors, and
press firmly on each unit to ensure solid adhesion to the installation surface.
12 For assistance, please visit www.panasonic.com/support
Setup
HNS103_(en_en)_1120_ver.010.pdf 12 2014/11/19 19:26:58
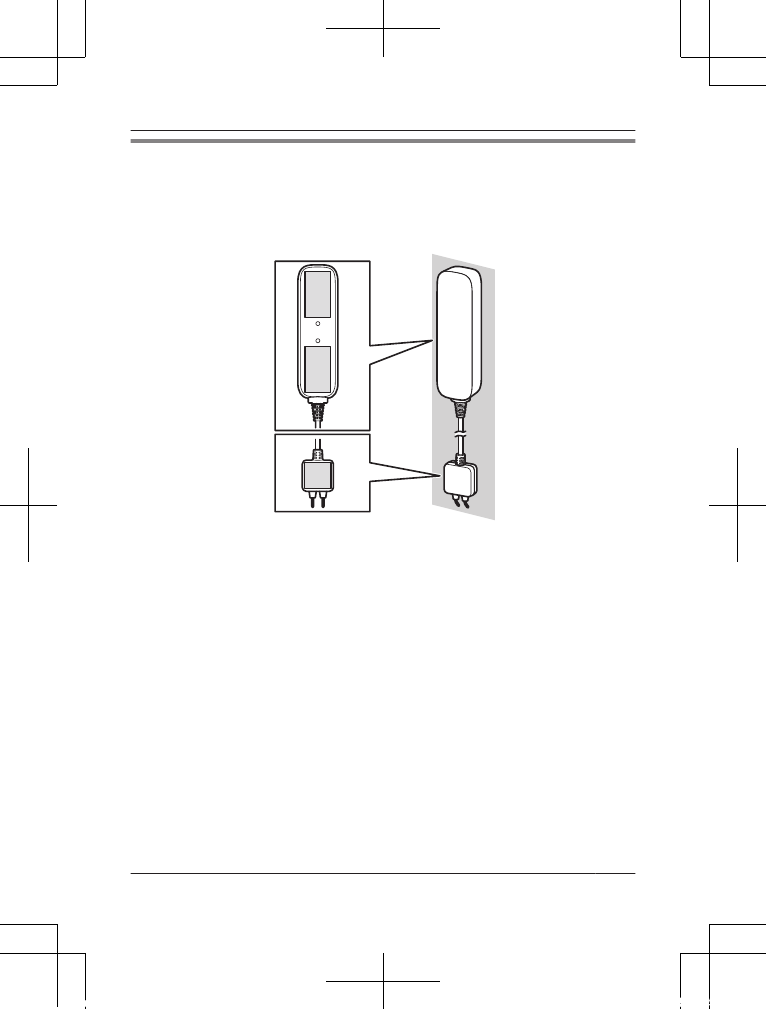
Securing with double-sided tape only
Note:
RMake sure the surfaces of the main unit, probe unit, and the installation area are
clean and dry before applying double-sided tape.
1Affix double-sided tape to the main unit and probe unit.
2Attach the main unit and the probe unit to the installation surface, and press
firmly on each unit to ensure solid adhesion to the installation surface.
For assistance, please visit www.panasonic.com/support 13
Setup
HNS103_(en_en)_1120_ver.010.pdf 13 2014/11/19 19:26:58
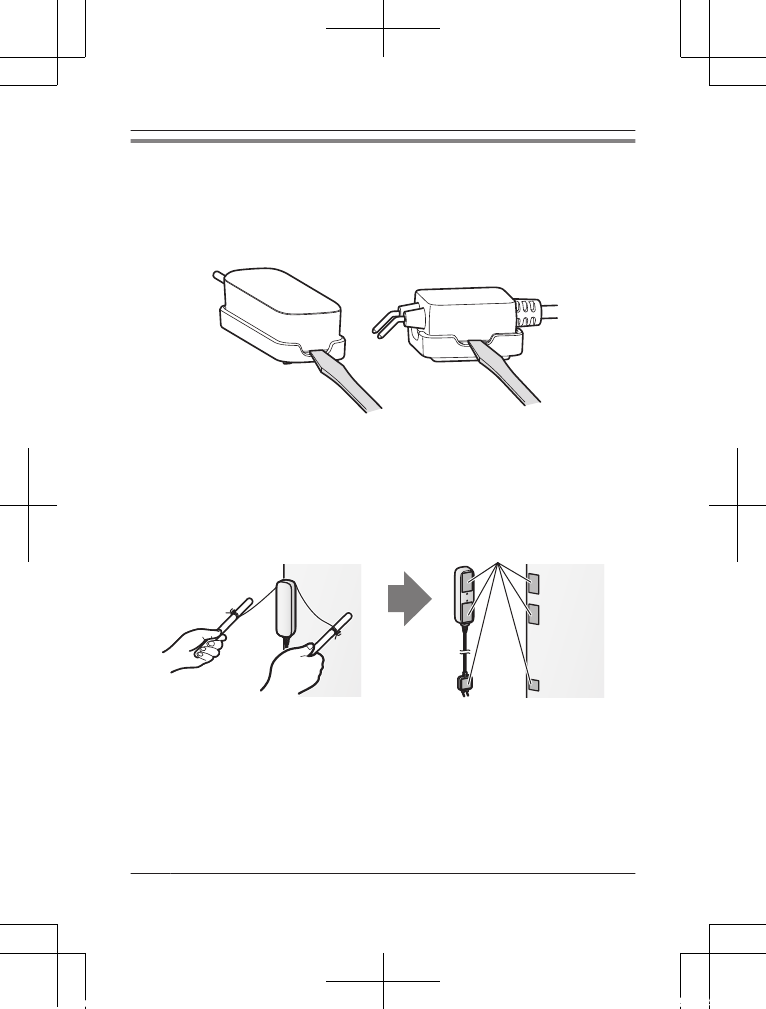
Removing from the wall
n Removing from the wall mounting adaptors
1Insert a flat screwdriver into the notches on the wall mounting adaptors, and
carefully pry away the main unit and probe unit.
2Remove the screws that secure the wall mounting adaptors to the wall.
n Removing when secured with double-sided tape only
1Tie a piece of thread to two sticks, screwdrivers, etc.
2Pull the thread tight and use it to cut the double-sided tape, and then remove
any excess tape.
1
Excess tape
1
14 For assistance, please visit www.panasonic.com/support
Setup
HNS103_(en_en)_1120_ver.010.pdf 14 2014/11/19 19:26:58
Features available
when using the
[Home Network] app
Some of the sensor’s features that are
available when using the [Home
Network] app are listed below. For
more information, refer to the User’s
Guide (page 15).
–Alarm system
You can use the app to arm and
disarm the alarm system, confirm
the current status of the sensor, and
view a log of previous events.
–Sensor integration
You can configure the sensor to
trigger other system events, such as
camera recording, turning on an
electric device (such as a lamp), etc.
(Appropriate device required.)
–Telephone alert
You can configure the system to call
a preprogrammed phone number
when the sensor is triggered.
Accessing the User’s
Guide
The User’s Guide is a collection of
online documentation that helps you
get the most out of the [Home
Network] app.
1iPhone®/iPad®
Tap in the app’s home screen.
Android™ devices
Tap or press your mobile
device’s menu button in the app’s
home screen.
2Tap [User’s Guide].
Note:
RYou can also access the User’s
Guide at the web page listed below.
www.panasonic.net/pcc/support/tel/
homenetwork/manual/
For assistance, please visit www.panasonic.com/support 15
Appendix
HNS103_(en_en)_1120_ver.010.pdf 15 2014/11/19 19:26:58
Specifications
RStandards
DECT 6.0 (Digital Enhanced
Cordless Telecommunications 6.0)
RFrequency range
DECT: 1.92 GHz – 1.93 GHz
RRF transmission power
DECT: 115 mW (max.)
RPower source
Lithium battery CR2 (1 ´ 3.0 V,
850 mAh)
ROperating conditions
0 °C – 40 °C (32 °F – 104 °F)
RSensor detection method
xx
RBattery life
Approx. 3 to 4 years (when the
sensor is triggered once a month, in
an environment of 25 °C (77 °F))
RIP rating
IPX4
RDimensions
Main unit (not including
double-sided tape):
Approx. 106 mm ´ 31 mm ´ 22 mm
(4 3/16 inches ´ 1 1/4 inches ´
7/8 inches)
Probe unit (not including
double-sided tape):
Approx. 44 mm ´ 24 mm ´ 10 mm
(1 3/4 inches ´ 15/16 inches ´
3/8 inches)
Cable:
Approx. 1214 mm ´ 3.4 mm
(47 13/16 inches ´ 1/8 inches)
RMass (weight)
Approx. xx g (xx lb), excluding the
battery
16 For assistance, please visit www.panasonic.com/support
Appendix
HNS103_(en_en)_1120_ver.010.pdf 16 2014/11/19 19:26:58
電気ご担当者様
定格表には記載されていませんが、DR0資料の「4-1. 機
構設計方針」に、「防水性能:IPX4相当」の記載がありま
した。
こちらの記載は必要でしょうか?
電気ご担当者様
検知方式について、ベースとしたHNS101には記載はあり
ませんでしたが、HNS102は検知方式についての記載があ
りました。
検知方式について記載は必要でしょうか?
検知方式について、記載が必要な場合は、検知方式の名
称を教えて頂けないでしょうか?
FCC and other
information
This device complies with Part 15 of
the FCC Rules. Operation is subject to
the following two conditions:
(1) This device may not cause harmful
interference, and (2) this device must
accept any interference received,
including interference that may cause
undesired operation.
Privacy of communications may not be
ensured when using this device.
CAUTION:
Any changes or modifications not
expressly approved by the party
responsible for compliance could void
the user’s authority to operate this
device.
NOTE:
This equipment has been tested and
found to comply with the limits for a
Class B digital device, pursuant to Part
15 of the FCC Rules. These limits are
designed to provide reasonable
protection against harmful interference
in a residential installation. This
equipment generates, uses, and can
radiate radio frequency energy and, if
not installed and used in accordance
with the instructions, may cause
harmful interference to radio
communications. However, there is no
guarantee that interference will not
occur in a particular installation. If this
equipment does cause harmful
interference to radio or television
reception, which can be determined by
turning the equipment off and on, the
user is encouraged to try to correct the
interference by one or more of the
following measures:
– Reorient or relocate the receiving
antenna.
– Increase the separation between the
equipment and receiver.
– Connect the equipment into an
outlet on a circuit different from that
to which the receiver is connected.
– Consult the dealer or an
experienced radio/TV technician for
help.
Some devices operate at frequencies
that may cause interference to nearby
TVs and VCRs. To minimize or prevent
such interference, the devices should
not be placed near or on top of a TV or
VCR. If interference is experienced,
move this device away from the TV or
VCR. This will often reduce or eliminate
interference.
FCC RF Exposure Warning:
RThis product complies with FCC
radiation exposure limits set forth for
an uncontrolled environment.
RTo comply with FCC RF exposure
requirements, the device must be
installed and operated 20 cm
(8 inches) or more between the
product and all person’s body.
RThis product may not be collocated
or operated in conjunction with any
other antenna or transmitter.
RFor body-worn operation, the device
must be used only with a
non-metallic accessory. Use of other
accessories may not ensure
compliance with FCC RF exposure
requirements.
Notice:
RFCC ID can be found inside the
main unit.
For assistance, please visit www.panasonic.com/support 17
Appendix
HNS103_(en_en)_1120_ver.010.pdf 17 2014/11/19 19:26:58
Customer services
Customer Services Directory (United States and
Puerto Rico)
www.panasonic.com/support
or, contact us via the web at:
www.panasonic.com/contactinfo
For hearing or speech impaired TTY users, TTY: 1-877-833-8855
For hearing or speech impaired TTY users, TTY: 1-866-605-1277
www.pstc.panasonic.com
or, send your request by E-mail to:
npcparts@us.panasonic.com
Accessory Purchases (United States and
Puerto Rico)
Obtain Product Information and Operating Assistance; locate your nearest
Dealer or Service Center; purchase Parts and Accessories; or make Customer
Service and Literature requests by visiting our Web Site at:
You may also contact us directly at: 1-800-272-7033,
Monday - Friday 9 am to 9 pm; Saturday - Sunday 10 am to 7 pm, EST.
Purchase Parts, Accessories and Owner’s Manual online for all
Panasonic Products by visiting our Web Site at:
You may also contact us directly at:1-800-237-9080 (Fax Only)
(Monday - Friday 9 am to 9 pm, EST.)
Panasonic National Parts Center
20421 84th Avenue S., Kent, WA 98032
(We accept Visa, MasterCard, Discover Card, American Express.)
18 For assistance, please visit www.panasonic.com/support
Appendix
HNS103_(en_en)_1120_ver.010.pdf 18 2014/11/19 19:26:58
Warranty (For United States and Puerto Rico)
Limited Warranty Coverage
Labor
One (1) Year
Parts
One (1) Year
Online Repair Request
To submit a new repair request and for quick repair status visit our Web Site at
www.panasonic.com/repair
PROOF OF PURCHASE.
Panasonic Home Network System Products
Limited Warranty
Mail-In Service--Online
If your product does not work properly because of a defect in materials or workmanship,
Panasonic Corporation of North America (referred to as “the warrantor”) will, for the length
of the period indicated on the chart below, which starts with the date of original purchase
(“Limited Warranty period”), at its option either (a) repair your product with new or
refurbished parts, or (b) replace it with a new or a refurbished equivalent value product, or
(c) refund your purchase price. The decision to repair, replace or refund will be made by
the warrantor.
During the “Labor” Limited Warranty period there will be no charge for labor. During the
“Parts” Limited Warranty period, there will be no charge for parts. You must mail-in your
product prepaid during the Limited Warranty period. This Limited Warranty excludes both
parts and labor for batteries, antennas, and cosmetic parts (cabinet). This Limited
Warranty only applies to products purchased and serviced in the United States or Puerto
Rico. This Limited Warranty is extended only to the original purchaser and only covers
products purchased as new.
Home Network System Products
microSD card (Included model only) 90 days N/A
When shipping the unit carefully pack in a padded shipping carton, include all
accessories, and send it prepaid. Include a letter detailing the complaint, a return
address and provide a day time phone number where you can be reached. P.O. Boxes
are not acceptable. Keep the tracking number for your records. A copy of valid
registered receipt is required under the 1 year parts and labor Limited Warranty.
For Limited Warranty service for headsets if a headset is included with this
product please follow instructions above.
IF REPAIR IS NEEDED DURING THE LIMITED WARRANTY PERIOD THE
PURCHASER WILL BE REQUIRED TO FURNISH A SALES
RECEIPT/PROOF OF PURCHASE INDICATING DATE OF PURCHASE,
AMOUNT PAID AND PLACE OF PURCHASE. CUSTOMER WILL BE
CHARGED FOR THE REPAIR OF ANY UNIT RECEIVED WITHOUT SUCH
For assistance, please visit www.panasonic.com/support 19
Appendix
HNS103_(en_en)_1120_ver.010.pdf 19 2014/11/19 19:26:58
Limited Warranty Limits And Exclusions
This Limited Warranty ONLY COVERS failures due to defects in materials or workmanship,
and DOES NOT COVER normal wear and tear or cosmetic damage. The Limited Warranty
ALSO DOES NOT COVER damages which occurred in shipment, or failures which are
caused by products not supplied by the warrantor, or failures which result from accidents,
misuse, abuse, neglect, bug infestation, mishandling, misapplication, alteration, faulty
installation, set-up adjustments, misadjustment of consumer controls, improper maintenance,
power line surge, lightning damage, modification, introduction of sand, humidity or liquids,
commercial use such as hotel, office, restaurant, or other business or rental use of the
product, or service by anyone other than a Factory Service Center or other Authorized
Servicer, or damage that is attributable to acts of God.
THERE ARE NO EXPRESS WARRANTIES EXCEPT AS LISTED UNDER "LIMITED
WARRANTY COVERAGE". THE WARRANTOR IS NOT LIABLE FOR INCIDENTAL OR
CONSEQUENTIAL DAMAGES RESULTING FROM THE USE OF THIS PRODUCT, OR
ARISING OUT OF ANY BREACH OF THIS LIMITED WARRANTY. (As examples, this
excludes damages for lost time, lost calls or messages, cost of having someone remove or
re-install an installed unit if applicable, travel to and from the servicer. The items listed are not
exclusive, but are for illustration only.) ALL EXPRESS AND IMPLIED WARRANTIES,
INCLUDING THE WARRANTY OF MERCHANTABILITY, ARE LIMITED TO THE PERIOD
OF THE LIMITED WARRANTY.
Some states do not allow the exclusion or limitation of incidental or consequential damages,
or limitations on how long an implied warranty lasts, so the exclusions may not apply to you.
This Limited Warranty gives you specific legal rights and you may also have other rights
which vary from state to state. If a problem with this product develops during or after the
Limited Warranty period, you may contact your dealer or Service Center. If the problem is not
handled to your satisfaction, then write to the warrantor's Consumer Affairs Department at the
addresses listed for the warrantor.
PARTS AND SERVICE, WHICH ARE NOT COVERED BY THIS LIMITED WARRANTY, ARE
YOUR RESPONSIBILITY.
When you ship the product
ȷCarefully pack your unit, preferably in the original carton.
ȷAttach a letter, detailing the symptom.
ȷSend the unit to Panasonic Exchange Center, prepaid and adequately insured.
ȷDo not send your unit to Panasonic Corporation of North America listed on the back
cover or to executive or regional sales offices. These locations do not repair consumer
products.
20 For assistance, please visit www.panasonic.com/support
Appendix
HNS103_(en_en)_1120_ver.010.pdf 20 2014/11/19 19:26:59

21
Notes
HNS103_(en_en)_1120_ver.010.pdf 21 2014/11/19 19:26:59
22
Notes
HNS103_(en_en)_1120_ver.010.pdf 22 2014/11/19 19:26:59

23
Notes
HNS103_(en_en)_1120_ver.010.pdf 23 2014/11/19 19:26:59
1 Use CR2 Lithium battery.
2
Use the Home Network app to access the User’s Guide
and refer to the Troubleshooting section.
IMPORTANT!
If your product is not working properly. . .
Visit our Web site: www.panasonic.com/support
LFAQ and troubleshooting hints are available.
For your future reference
We recommend keeping a record of the following information to assist
with any repair under warranty.
Serial No. Date of purchase
(found inside the main unit)
Name and address of dealer
Attach your purchase receipt here.
Two Riverfront Plaza, Newark, NJ 07102-5490
© Panasonic System Networks Co., Ltd. 2015
HNS103_(en_en)_1120_ver.010.pdf 24 2014/11/19 19:26:59