Panasonic of North America 96NKX-TD7895 900 MHz DSS Cordless Telphone System User Manual PSQX2106ZA 7895
Panasonic Corporation of North America 900 MHz DSS Cordless Telphone System PSQX2106ZA 7895
UserManual.wiki
>
Panasonic of North America
>
96NKX TD7895 User Manual
Exhibit H User Manual
Navigation menu
Upload a User Manual
Namespaces
Wiki Guide
HTML
PDF
Info
Views
User Manual
Discussion / Help
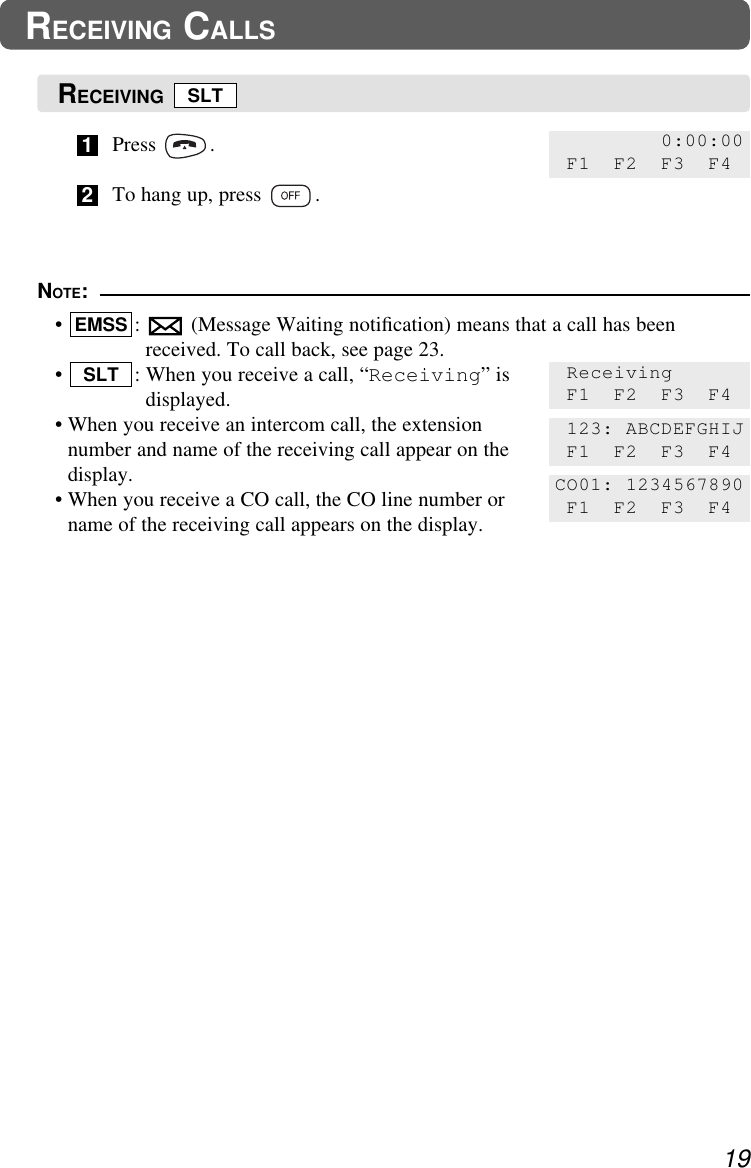
Navigation
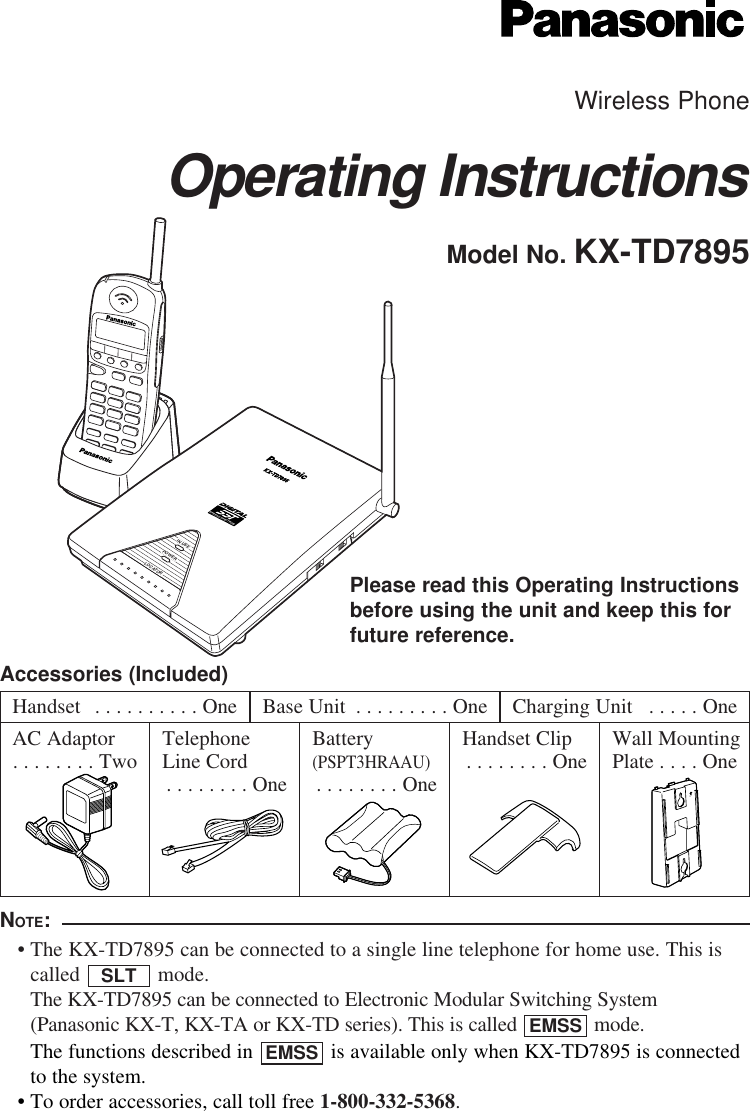
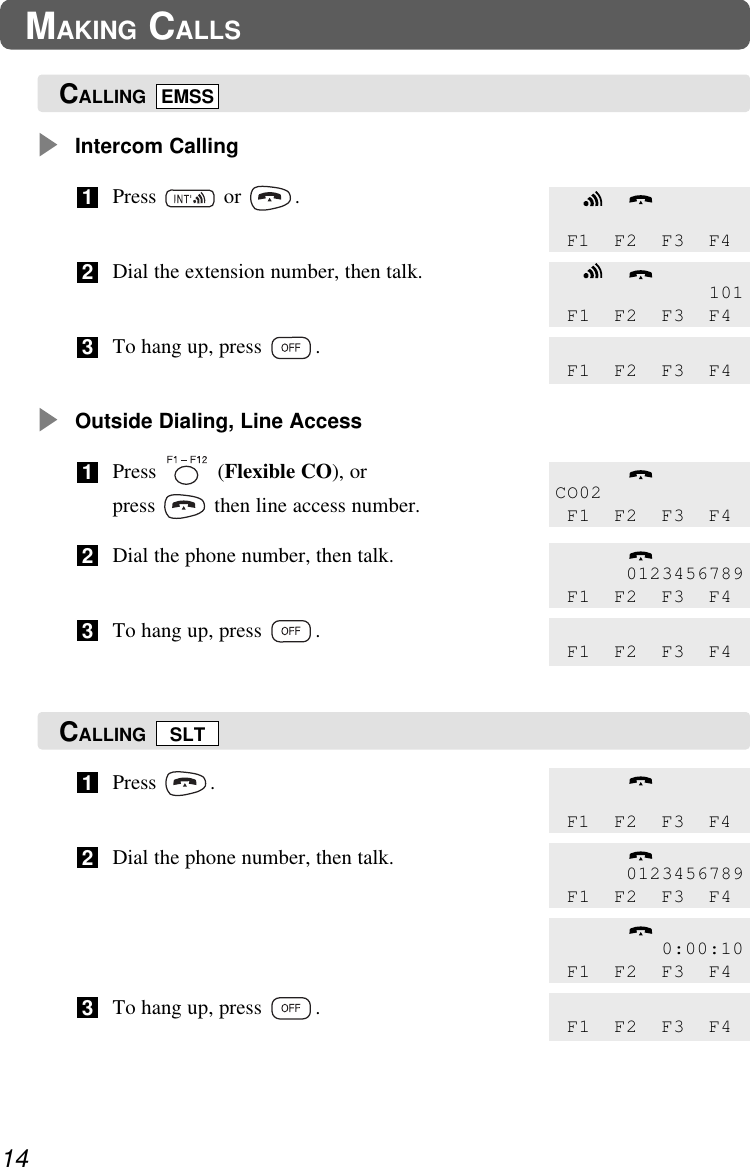
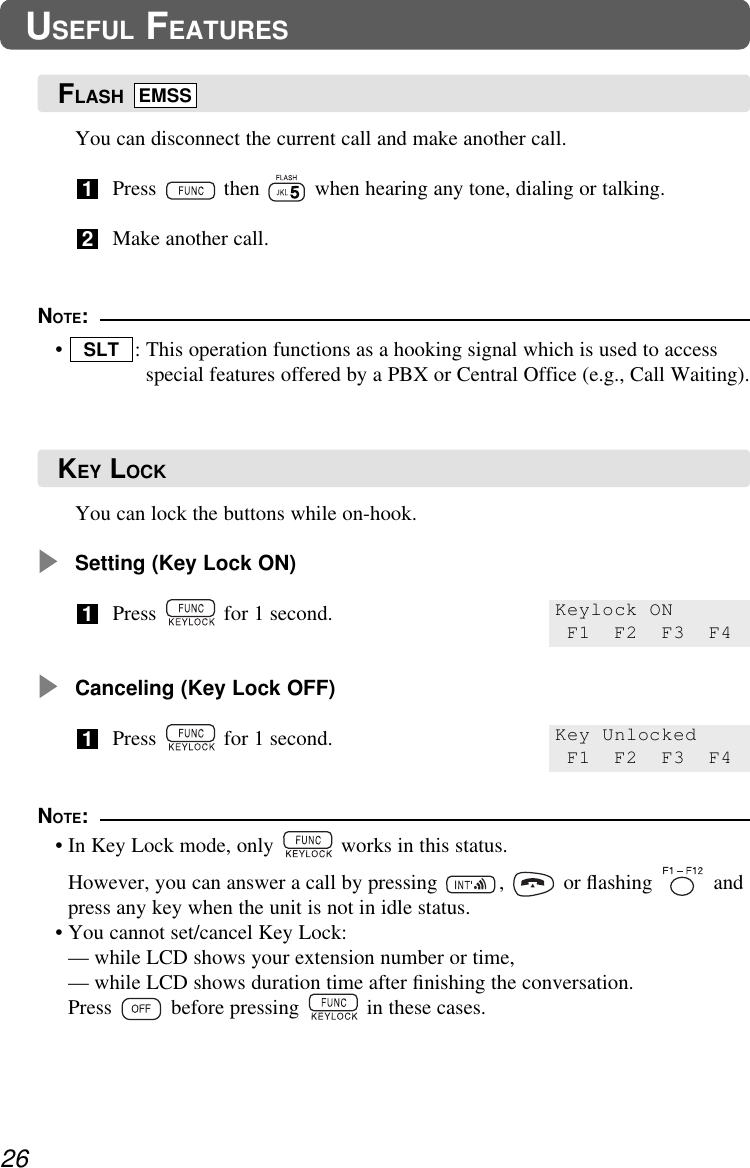
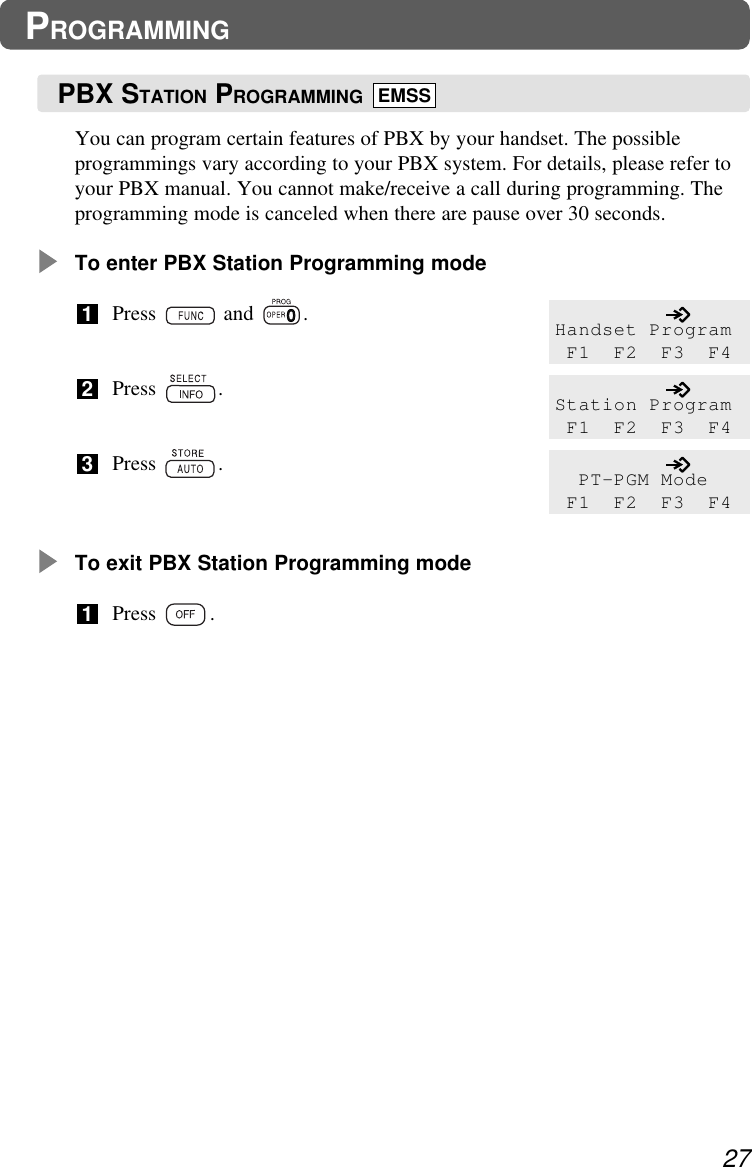
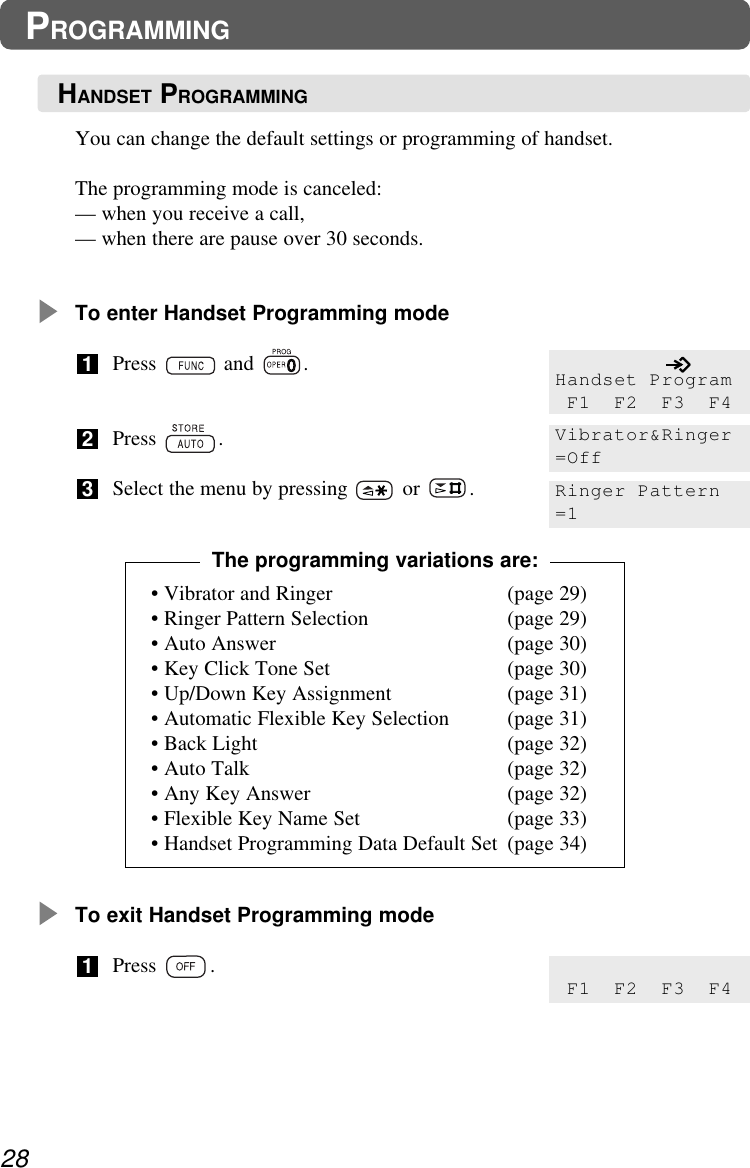
![3Location of Controls and Connection ............................................................4Handset ........................................................................................................................4Base Unit ......................................................................................................................6Getting Started .................................................................................................7Battery ..........................................................................................................................7Before using KX-TD7895 in EMSS mode ....................................................................9Power ON/OFF .............................................................................................................10Liquid Crystal Display (LCD) ........................................................................................11Controlling the Volume .................................................................................................12Making Calls .....................................................................................................14Calling (EMSS) .............................................................................................................14Calling (SLT) ................................................................................................................14Dialing the last number you dialed (Last Number Redial) ...........................................15Speed Dialing ...............................................................................................................16One-touch Dialing .........................................................................................................17Receiving Calls .................................................................................................18Receiving (EMSS) ........................................................................................................18Receiving (SLT) ............................................................................................................19During a Conversation ....................................................................................20Placing a call on hold ...................................................................................................20Three-party Conversation (Conference) ......................................................................20Transferring a call ........................................................................................................21Message Waiting ..............................................................................................22Leaving a call notification .............................................................................................22Call back when you receive a notification ....................................................................23Useful Features.................................................................................................24Forwarding your calls (Call Forwarding [FWD]) ...........................................................24Preventing others from disturbing you (Do Not Disturb [DND]) ...................................25Flash .............................................................................................................................26Key Lock .......................................................................................................................26Programming ....................................................................................................27PBX Station Programming ...........................................................................................27Handset Programming .................................................................................................28Vibrator and Ringer ......................................................................................................29Ringer Pattern Selection ..............................................................................................29Auto Answer .................................................................................................................30Key Click Tone Set .......................................................................................................30Up/Down Key Assignment ...........................................................................................31Automatic Flexible Key Selection .................................................................................31Back Light .....................................................................................................................32Auto Talk ......................................................................................................................32Any Key Answer ...........................................................................................................32Flexible Key Name Set .................................................................................................33Handset Programming Data Default Set ......................................................................34Others ................................................................................................................35Wall Mounting ...............................................................................................................35Installing the Handset Clip ...........................................................................................36Locating the Handset From the Base Unit ...................................................................36Troubleshooting ...............................................................................................37Important Safety Instructions .........................................................................38Features List .....................................................................................................43CONTENTS](https://usermanual.wiki/Panasonic-of-North-America/96NKX-TD7895/User-Guide-112007-Page-3.png)
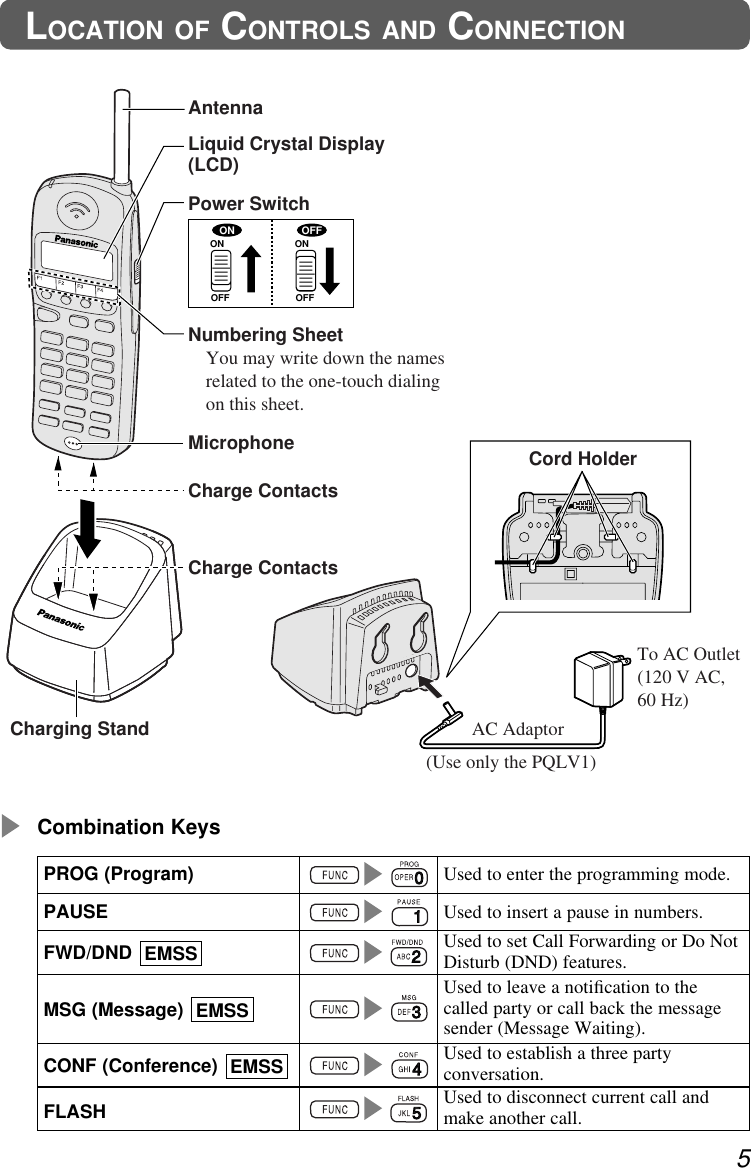
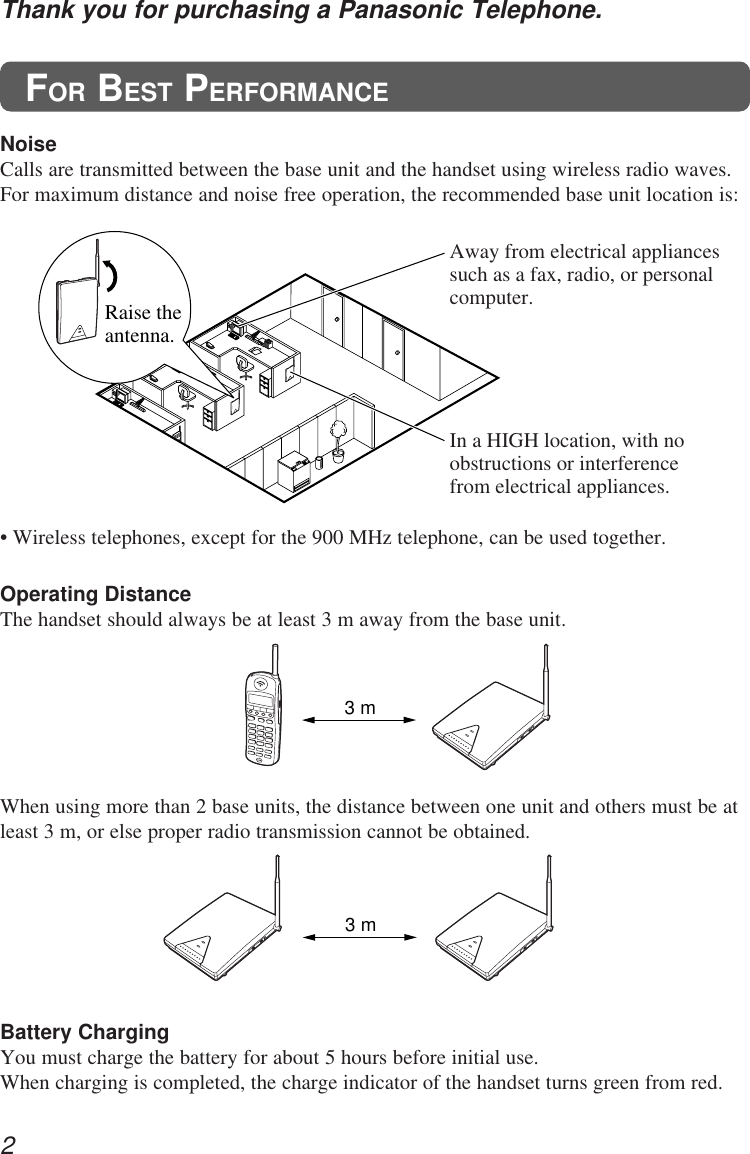
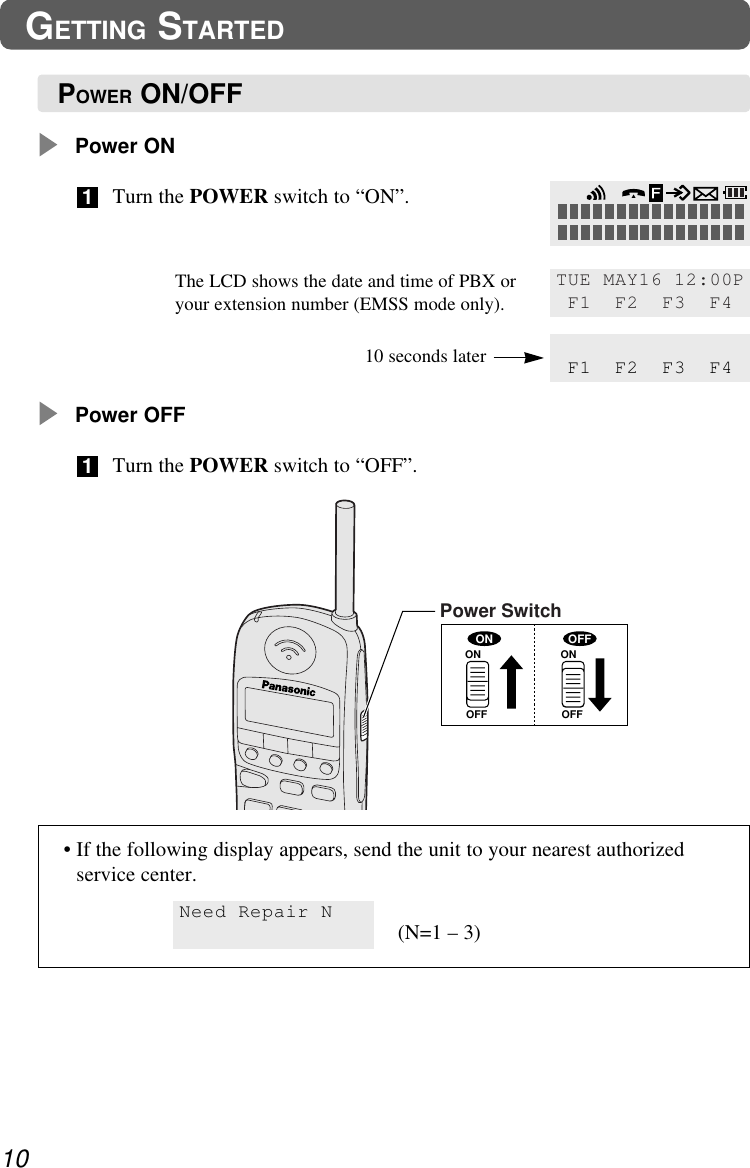
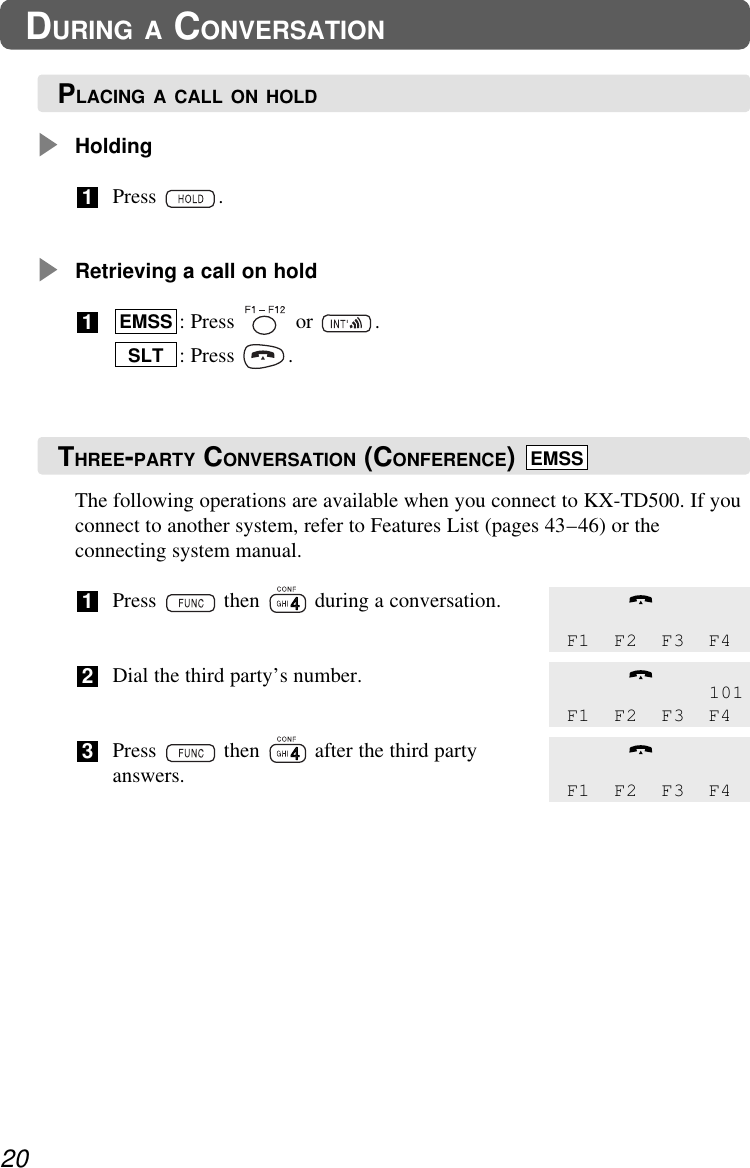
![ChargingYou need to charge the battery before initial use and when the battery strengthbecomes low.Put the handset with the battery in the charging stand (see page 5).Charge the battery for about 5 hours. When charging is completed, the chargeindicator turns green from red.Standard Battery LifeIf your Panasonic battery is fully charged [at 25 ˚C (77 ˚F)]:7GETTING STARTEDInstallingOpen the battery cover.Connect the battery cord and install thebattery.Close the cover.321Cord (Black)Cord (Red)In Talk mode Up to about 5 hoursIn Stand-by mode Up to about 7 daysBATTERYNOTE:• Time to recharge the battery:— when beep tones sound every 15 seconds,— when BATT-LOW indicator flashes.• When the battery strength becomes low, a call gets hang up within 3 minutes.• If the charge indicator is green, even before charging the battery, remove thebattery and reinsert it after 5 seconds.• The battery is used even while the handset’s power is OFF.• Battery life may vary depending on usage conditions and ambient temperature.• Please use only Panasonic PSPT3HRAAU battery (see page 1).](https://usermanual.wiki/Panasonic-of-North-America/96NKX-TD7895/User-Guide-112007-Page-7.png)
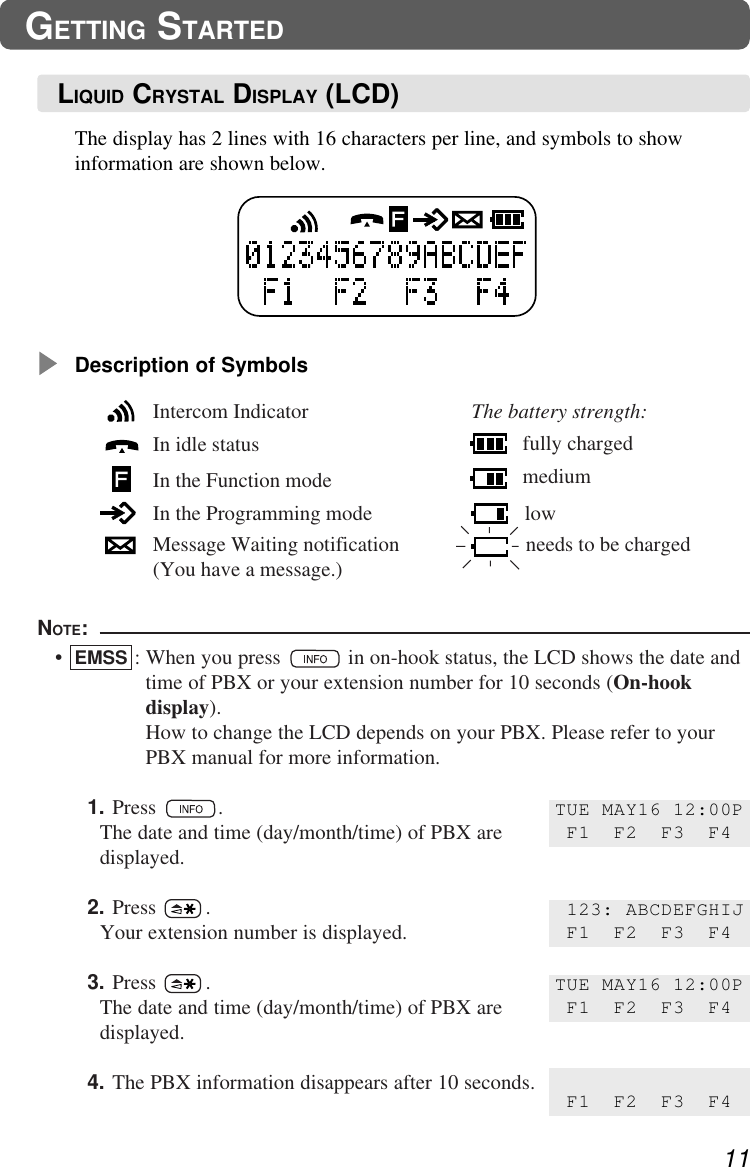
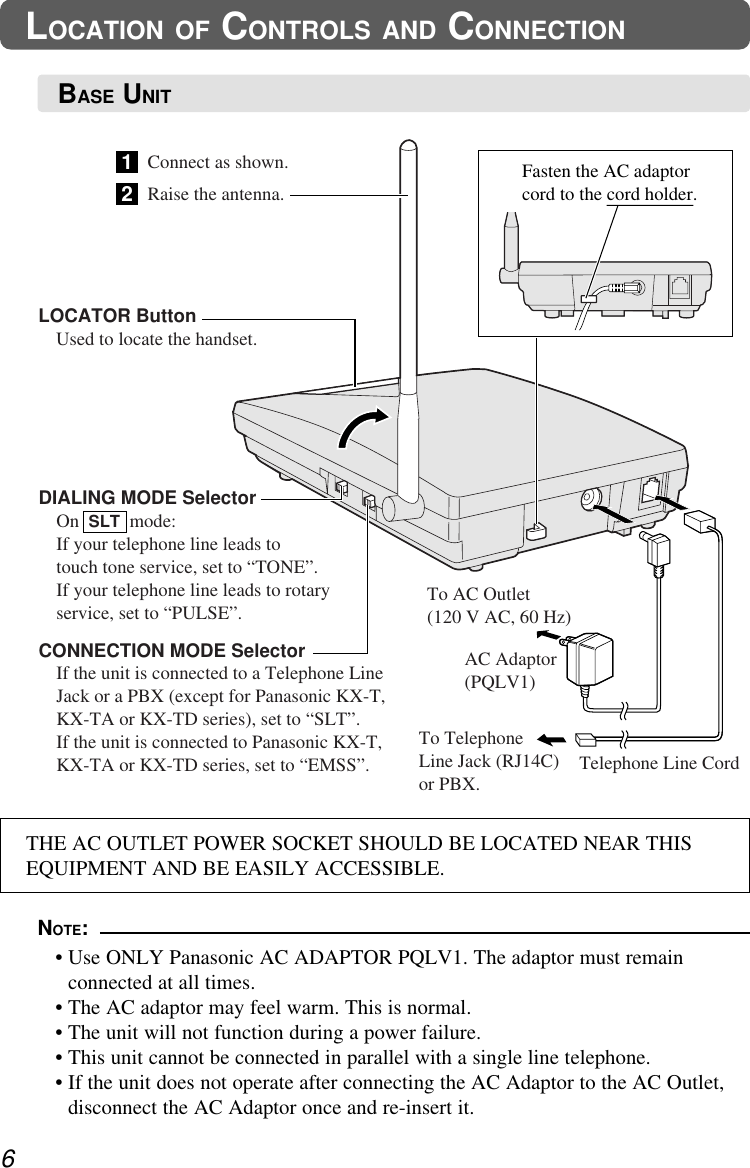
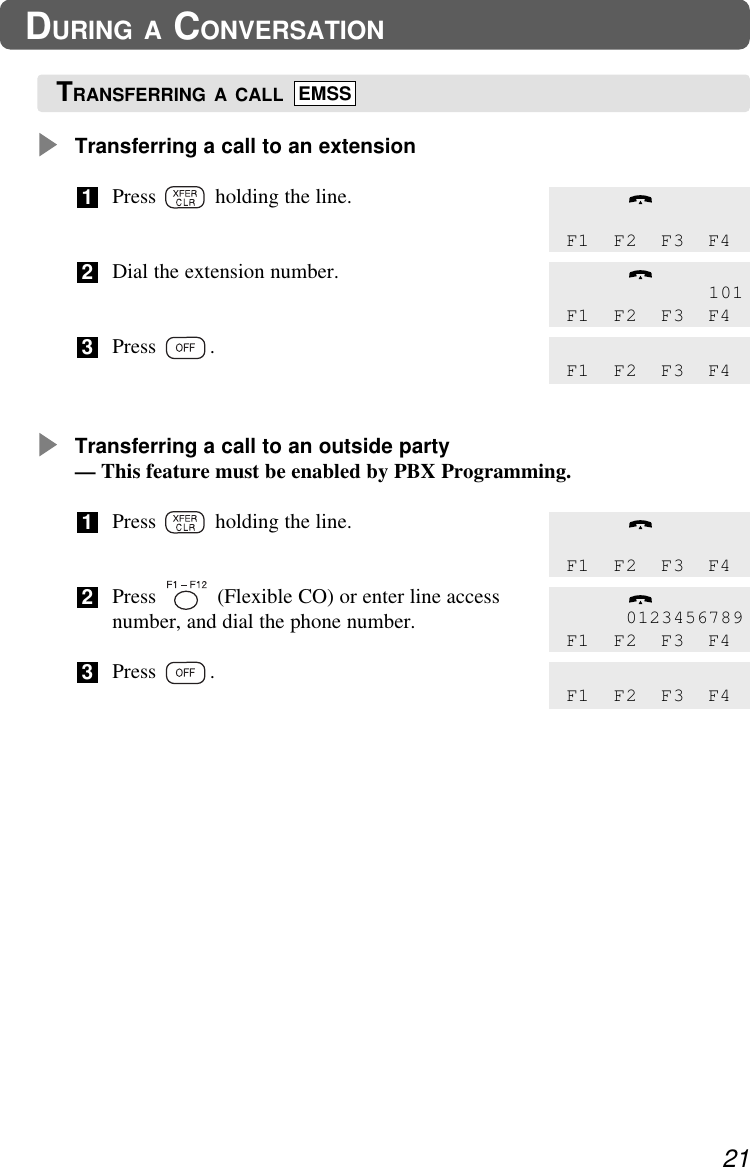
![12GETTING STARTEDRinger VolumeThe ringer volume has three levels (Low/Middle/High). Moreover, you canselect the Step Ringer mode, Vibrator mode or Off mode. [Default: Middle]Press or repeatedly to selectthe desired mode.• Step Ringer mode:Rings progressively louder.• Vibrator mode:Does not ring but vibrates.• Off mode:Does not ring or vibrate. Only the indicator flashes green.1Ringer Volume=HighHighMiddleLowOff modeVibratormodeStep RingermodeRinger Volume=MiddleRinger Volume=LowRinger Volume=StepRinger Volume=VibrateRinger Volume=OffNOTE:• If and are set to “F-Key Select”, press first (see page 31).• If you select Vibrator mode, the display shows “Vibrate” while on-hook.If you select Off mode, the display shows “Ringer OFF” while on-hook.This is not available:— when FWD/DND is set,— while display shows your extension number or time,— while display shows duration time after finishing the conversation,— : when you set Auto Answer “On” with the headset.• When charging, the handset rings for incoming calls (except Off mode).• Vibrator and Ringer mode (vibrates several times and then rings) is alsoavailable (see page 29).EMSSVibrateF1 F2 F3 F4Ringer OFFF1 F2 F3 F4CONTROLLING THE VOLUME(Press for more than 1 second.)](https://usermanual.wiki/Panasonic-of-North-America/96NKX-TD7895/User-Guide-112007-Page-12.png)
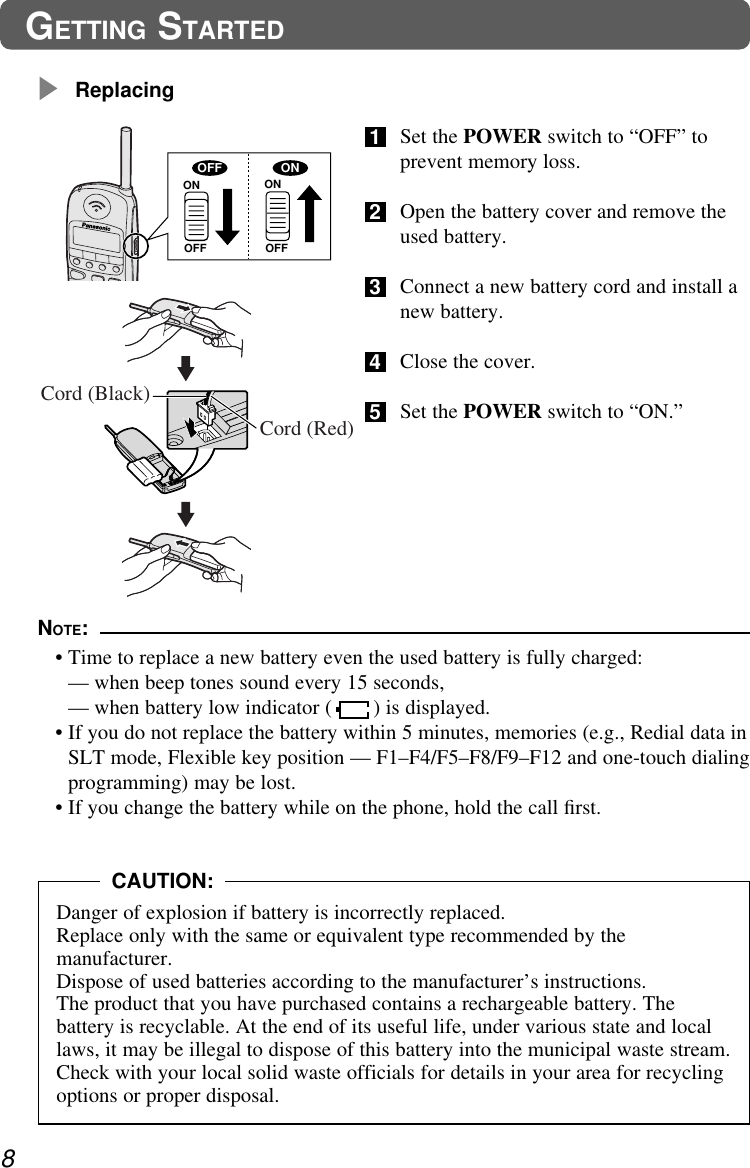
![13GETTING STARTEDReceiver/Headset VolumeThe receiver/headset volume has three levels (Low/Middle/High). This can bechanged during a conversation. [Default: Middle]Receiver volume: except when using a headsetHeadset volume: when using a headsetPress or repeatedly during a conversation.1Receiver Volume=HighReceiver Volume=MiddleReceiver Volume=LowHeadset Volume=HighHeadset Volume=MiddleHeadset Volume=LowHighMiddleLowRinger volume Headset volumeNOTE:• If and are set to “F-Key Select”, press first (see page 31).](https://usermanual.wiki/Panasonic-of-North-America/96NKX-TD7895/User-Guide-112007-Page-13.png)
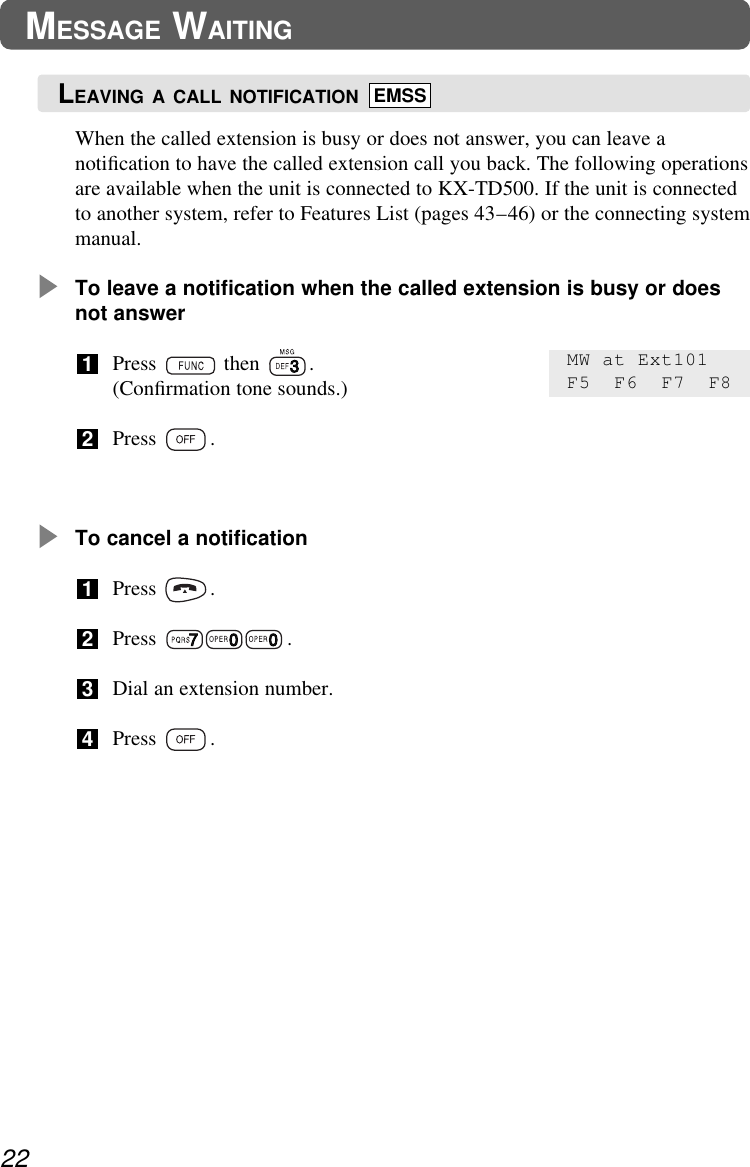

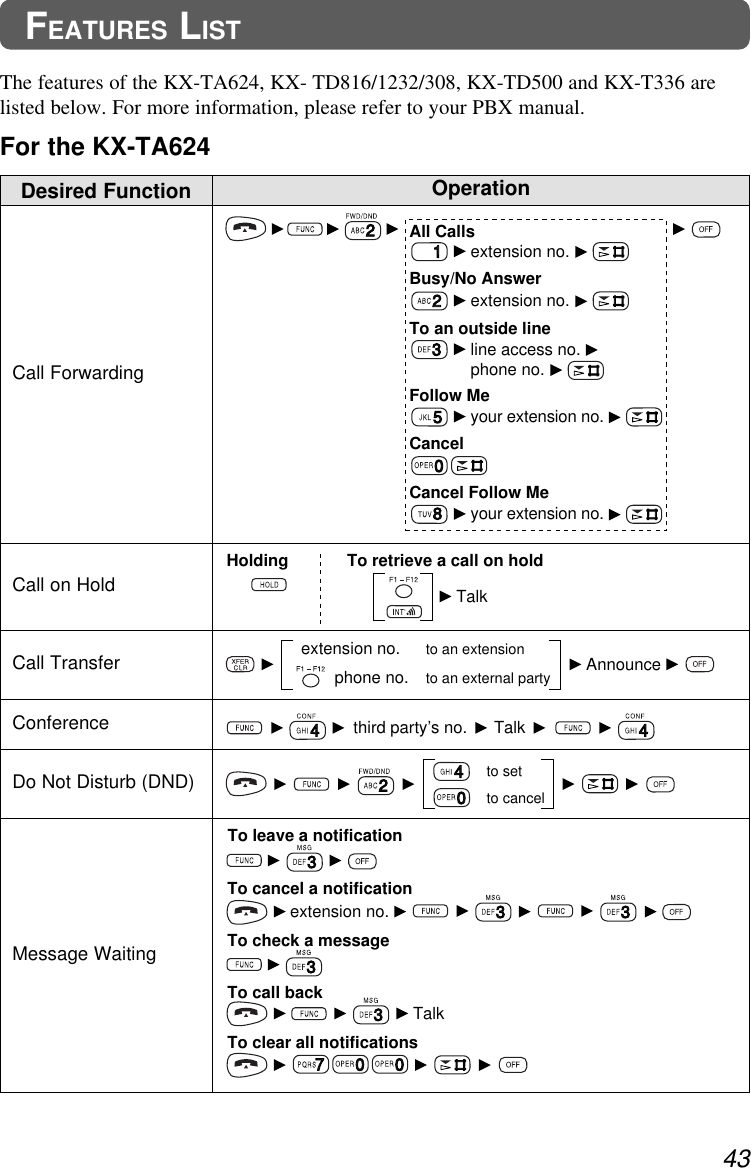
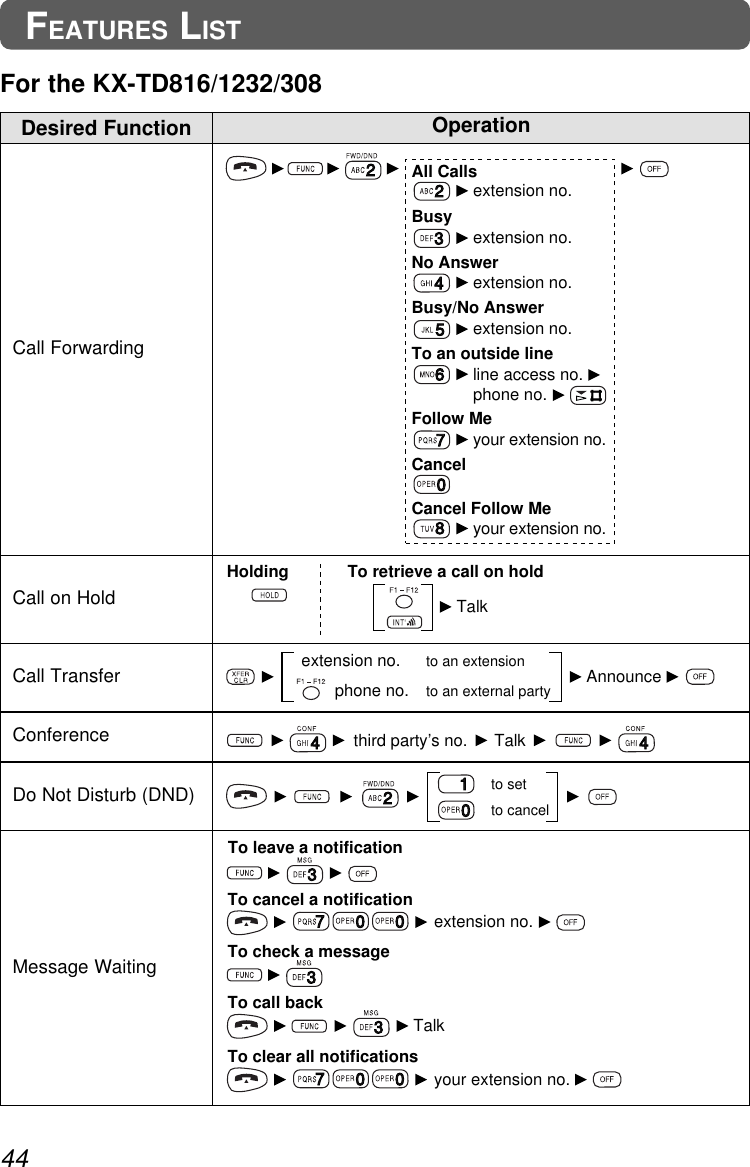
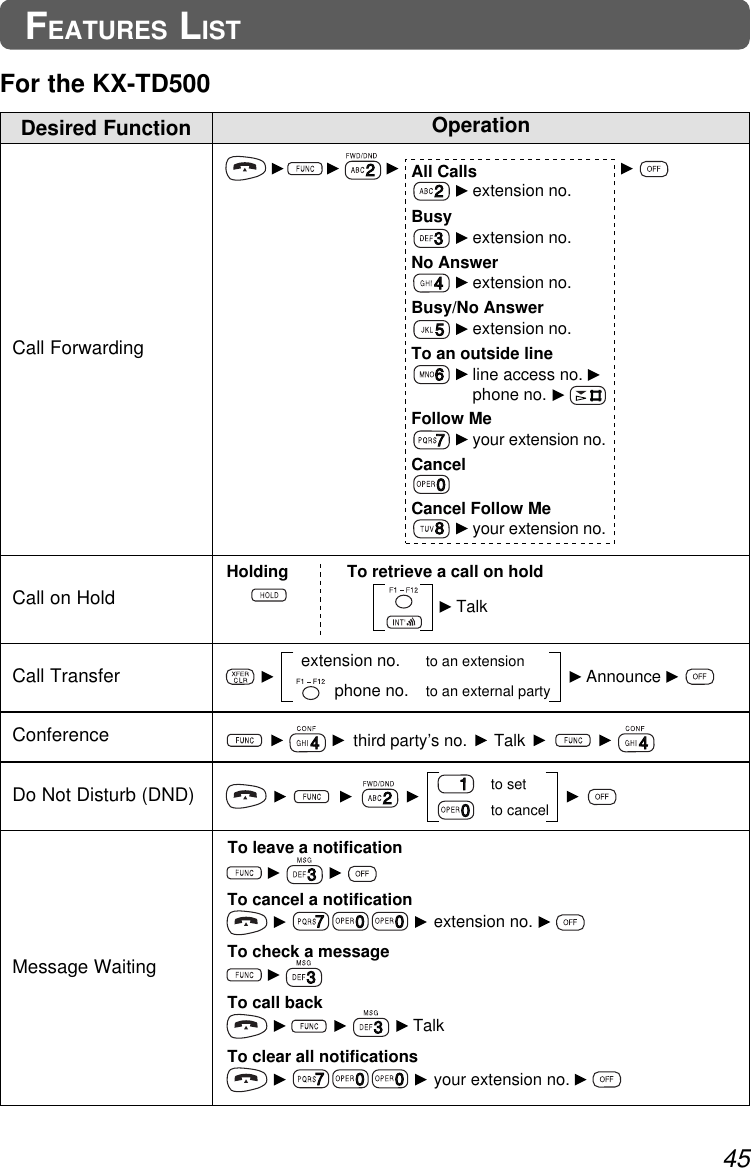
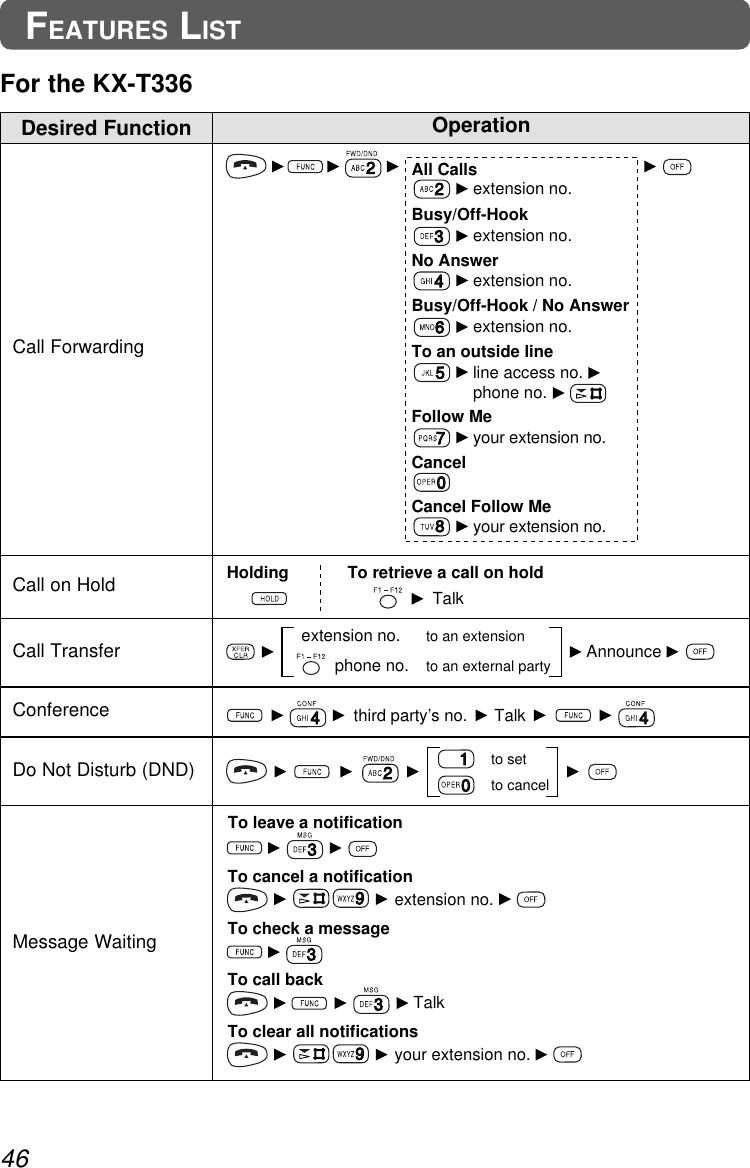
![Specified calls to your telephone are automatically forwarded to another presetextension. The following operations are available when the unit is connected toKX-TD500. If the unit is connected to another system, refer to Features List(pages 43–46) or the connecting system manual.SettingPress .Press then .Select the desired feature.Dial extension number. — All CallsDial extension number. — BusyDial extension number. — No AnswerDial extension number. — Busy/No AnswerDial , line access number (0/9) phone number . — To an outside lineDial your own extension number. — Follow MePress .CancelingPress .Press then .Dial . — To cancelDial your extension number. — To cancel Follow MePress .4321432124USEFUL FEATURESFWD(ALL) Ext101F1 F2 F3 F4FWD/DND CancelF1 F2 F3 F4FORWARDING YOUR CALLS (CALL FORWARDING [FWD]) EMSSNOTE:• If FWD is set, the display flashes “FWD/DND” in idle status. Except:— while LCD shows your extension number or time, — while LCD shows duration time after finishing the conversation.](https://usermanual.wiki/Panasonic-of-North-America/96NKX-TD7895/User-Guide-112007-Page-24.png)
![Your extension can shut out any calls. The following operations are availablewhen the unit is connected to KX-TD500. If unit is connected to anothersystem, refer to Features List (pages 43–46) or the connecting system manual.SettingPress .Press then .Press .Press .CancelingPress .Press then .Press .Press .4321432125USEFUL FEATURESNOTE:• If DND is set, “FWD/DND” is displayed in the idle status. Except:— while LCD shows your extension number or time, — while LCD shows duration time after finishing the conversation.FWD/DND CancelF1 F2 F3 F4Do Not DisturbF1 F2 F3 F4PREVENTING OTHERS FROM DISTURBING YOU(DONOT DISTURB [DND]) EMSS](https://usermanual.wiki/Panasonic-of-North-America/96NKX-TD7895/User-Guide-112007-Page-25.png)
![You have 6 ringer types (1 through 6). [Default: 1]Enter the Handset Programming mode and select“Ringer Pattern”.To select the desired ringer pattern, press – ,orpress repeatedly.To program other items, press or .orTo exit, press .321When you receive a call, your handset vibrates 4 times then rings. [Default: Off]Enter Handset Programming mode and select“Vibrator&Ringer”.To select “On” or “Off”, press .To program other items, press or .orTo exit, press .32129PROGRAMMINGVibrator&Ringer=OffVibrator&Ringer=OnRinger Pattern=1Ringer Pattern=2VIBRATOR AND RINGERRINGER PATTERN SELECTION](https://usermanual.wiki/Panasonic-of-North-America/96NKX-TD7895/User-Guide-112007-Page-29.png)
![When you put a headset, the handset answers calls automatically. [Default: Off]Enter the Handset Programming mode and select“Auto Answer”.To select “Off” or “On”, press .To program other items, press or .orTo exit, press .321You can turn off the key tone which sounds by pressing. [Default: On]Enter the Handset Programming mode and select“Key Click”.To select “On” or “Off”, press .To program other items, press or .orTo exit, press .32130PROGRAMMINGAuto Answer=OffAuto Answer=OnNOTE:• This function is available when handset is equipped with headset.• When this feature is set to “On”,“Auto Answer ON” is displayed in idle status. Auto Answer ONF1 F2 F3 F4Key Click=OnKey Click=OffAUTO ANSWER EMSSKEY CLICK TONE SET](https://usermanual.wiki/Panasonic-of-North-America/96NKX-TD7895/User-Guide-112007-Page-30.png)
![31PROGRAMMINGYou can select the and key function as “Volume” key or “F-Key Select”key. [Default: Volume]Enter the Handset Programming mode and select“Vol Key Assign”.To select “Volume” or “F-Key Select”, press .To program other items, press or .orTo exit, press .321NOTE:• By pressing before / , • — / work as “F-Key Select” key, even if / are assigned as “Volume”key.• — / work as “Volume” key, even if / are assigned as “F-Key Select”key.Vol Key Assign=VolumeVol Key Assign=F–Key SelectWhen you make or receive a call, the green F-Key is displayed. [Default: Off]Enter the Handset Programming mode and select“Auto FKey Select”.To select “On” or “Off”, press .To program other items, press or .orTo exit, press .321Auto FKey Select=OffAuto FKey Select=OnUP/DOWN KEY ASSIGNMENTAUTOMATIC FLEXIBLE KEY SELECTION EMSS](https://usermanual.wiki/Panasonic-of-North-America/96NKX-TD7895/User-Guide-112007-Page-31.png)
![32PROGRAMMINGYou can answer a call by pressing any key. [Default: Off]Enter the Handset Programming mode and select“Any Key Answer”.To select “Off” or “On”, press .To program other items, press or .orTo exit, press .321Any Key Answer=OffAny Key Answer=OnYou can answer a call just lift up the handset from the charging stand. [Default: On]Enter the Handset Programming mode and select“Auto Talk”.To select “On” or “Off”, press .To program other items, press or .orTo exit, press .321Auto Talk=OnAuto Talk=OffYou can turn off the LCD and keypad back lights to save battery. [Default: On]Enter the Handset Programming mode and select“Back Light”.To select “On” or “Off”, press .To program other items, press or .orTo exit, press .321Back Light=OnBack Light=OffBACK LIGHTAUTO TALKANY KEY ANSWER](https://usermanual.wiki/Panasonic-of-North-America/96NKX-TD7895/User-Guide-112007-Page-32.png)
![You can name the 12 F-keys (three characters max per key).[Default: FXX (XX = 1–12)]Enter the Handset Programming mode and select“F-Key Name Set”.To show a F-Key you want to name, press or .To choose the F-Key, press or .Press .Enter a name (up to 3 characters).(Refer to the Character Combination Table below.)To store the name, press .the next F-Key is displayed.To name the next F-Key, repeat steps through .To program other items, press or .orTo exit, press .Character Combination TableNumbered buttons can be also used as letters and symbols for character inputkeys. Use (Next) or (Previous) to move the cursor to change or entera character.863765432133PROGRAMMINGKeys 123456789Pressing times 1.,:12ABCabc23DEF d e f 34GHIghi45JKLjkl56MNOmno67PQRSpq r s 78TUVtuv89WXYZwxyz90(space) – #&$ ( ) 0NOTE:• Space × 3 is not acceptable.F–Key Name SetF1 F2 F3 F4F–Key Name SetF5 F6 F7 F8F–Key Name SetF1 =F1F–Key Name SetF1 =F–Key Name SetF1 =CF–Key Name SetF1 =CO1 StoredFLEXIBLE KEY NAME SET](https://usermanual.wiki/Panasonic-of-North-America/96NKX-TD7895/User-Guide-112007-Page-33.png)