Panasonic of North America 96NKX-TG2356 2.4GHz FHSS Cordless Telephone System User Manual KX TG2356S
Panasonic Corporation of North America 2.4GHz FHSS Cordless Telephone System KX TG2356S
UserManual.wiki
>
Panasonic of North America
>
96NKX TG2356 User Manual
Users manual
Navigation menu
Upload a User Manual
Namespaces
Wiki Guide
HTML
PDF
Info
Views
User Manual
Discussion / Help
Navigation
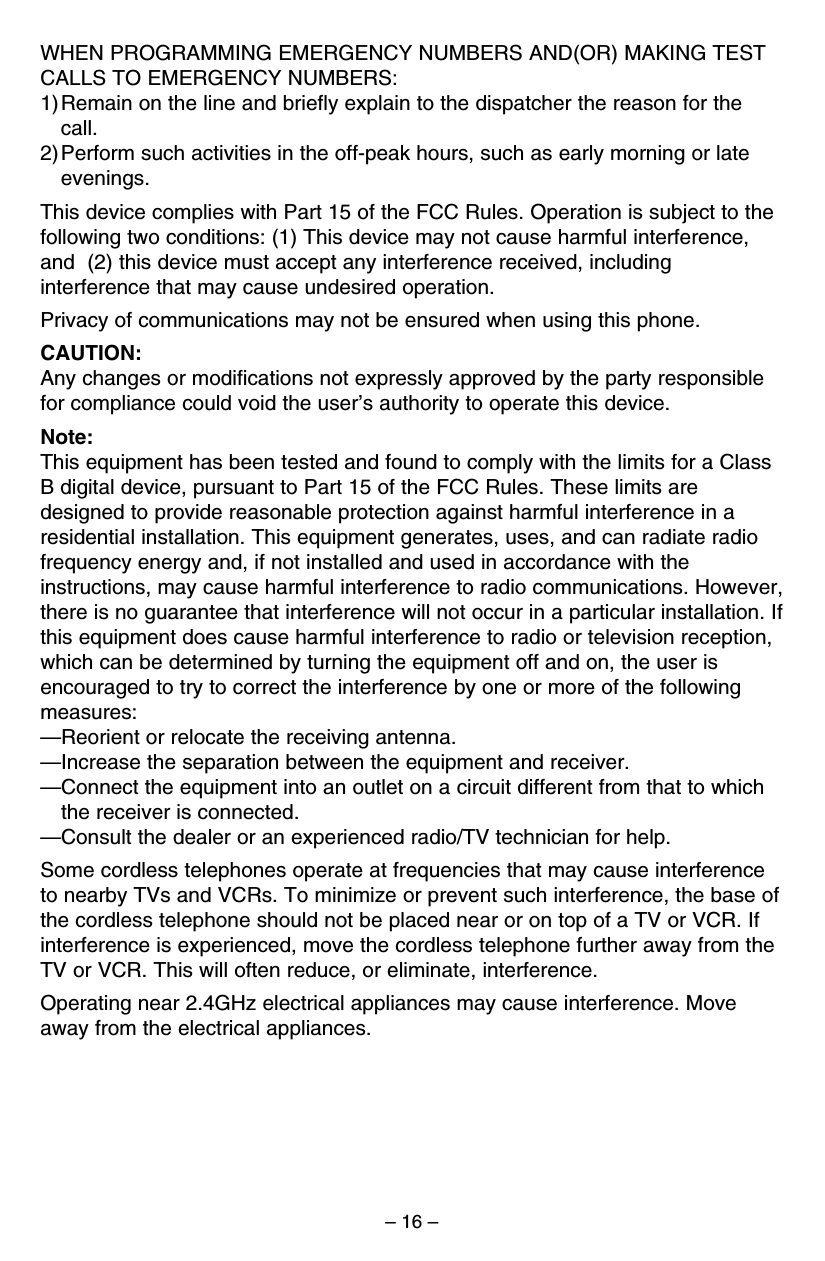
![– 2 –Location of ControlsPlease read IMPORTANT SAFETYINSTRUCTIONS on pages 13 before use.Read and understand all instructions.∫Base unit[SP-PHONE] (Speakerphone) and Indicator[REDIAL][FLASH/CALL WAIT][MUTE]VOLUME [ ], [ ][HOLD/CONF] (Conference)CHARGE Indicator[LOCATOR/INTERCOM]AntennaDisplayCharge Contacts[ ] (TONE)[MESSAGE][STOP][SKIP][MEMO] [ERASE][GREETING CHECK][REPEAT][ANSWER ON] and IndicatorMIC (Microphone)NEW MESSAGEIndicator[GREETING REC] (Record)Hook](https://usermanual.wiki/Panasonic-of-North-America/96NKX-TG2356/User-Guide-386693-Page-2.png)
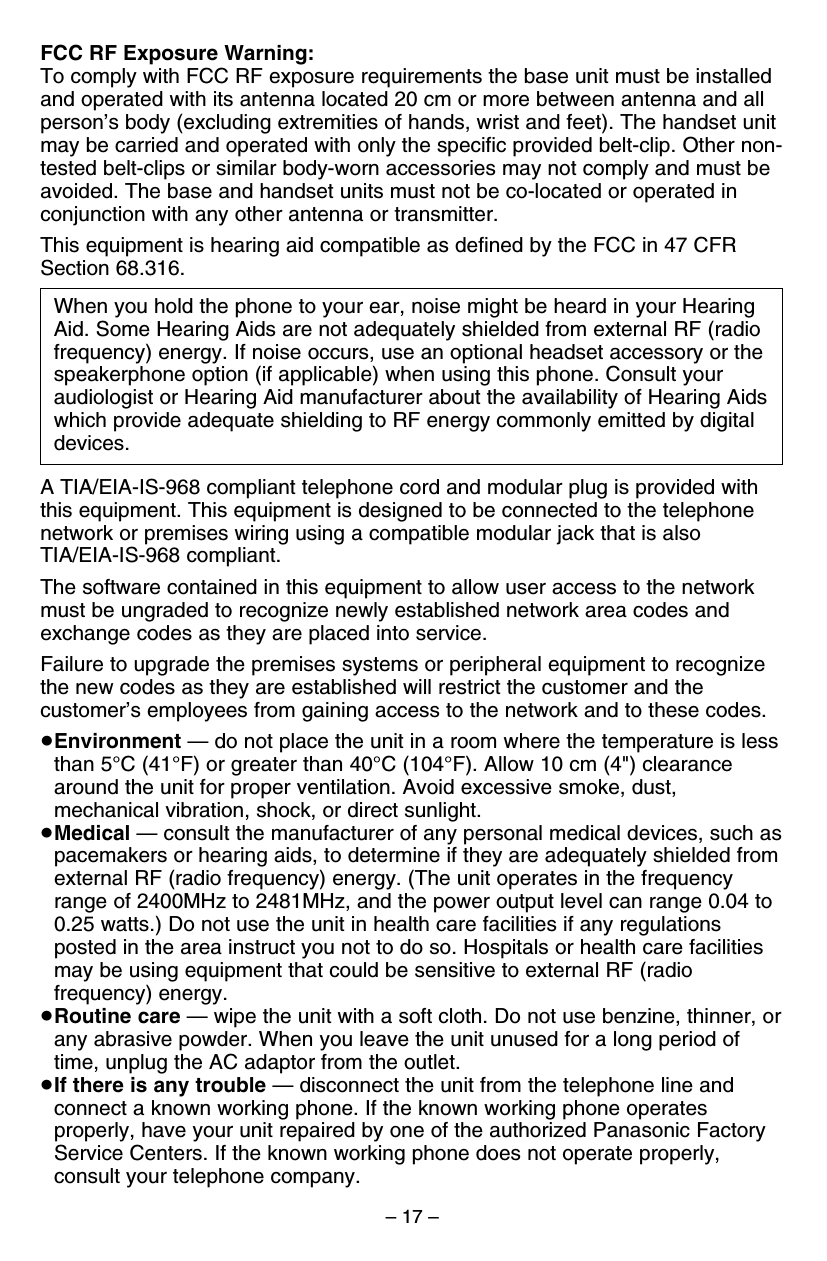
![– 3 –∫Handset[OFF]Display[MENU][HOLD/INTERCOM][ ] (TALK)[FLASH/CALL WAIT][ ] (Speakerphone)AntennaHeadset Jack[REDIAL]Charge Contacts[ ] (TONE)ReceiverRinger IndicatorSoft KeysBack sideSpeakerMicrophoneNavigator Key([ ], [ ])](https://usermanual.wiki/Panasonic-of-North-America/96NKX-TG2356/User-Guide-386693-Page-3.png)
![– 6 –Recording a Greeting Message1 Press [GREETING REC].≥“To record greeting, press RECORD again” is heard.2 Within 10 seconds, press [GREETING REC] again to record your greeting.3 After the long beep, talk clearly, about 20 cm (8 inches) away from the MIC(microphone).≥The base unit display shows the elapsed recording time.≥If you record for over 2 minutes, the unit will automatically stop recording.4 When finished, press [GREETING REC] or [STOP].≥To change the message, start again from step 1.You can record a personal greeting message of up to 2 minutes. If you do notrecord your own message, one of two pre-recorded greetings will be played forcallers.All messages (greeting, incoming and voice memo) are stored in digitalmemory. The total recording time is about 16 minutes. We recommend yourecord a brief greeting message in order to leave more time for recording newmessages.](https://usermanual.wiki/Panasonic-of-North-America/96NKX-TG2356/User-Guide-386693-Page-6.png)
![– 7 –∫To make a call1 Press [].2 Dial a telephone number.≥After a few seconds, the display will show the length of the call.3 To hang up, press [OFF] or place the handset on the base unit.To have a hands-free phone conversation1 Press [].2 Dial a telephone number.≥After a few seconds, the display will show the length of the call.3 When the other party answers, talk into the microphone.4 To hang up, press [OFF] or place the handset on the base unit.To dial after confirming the entered number1 Dial a phone number.≥If you misdial, press Clear. Enter the correct number.≥If a pause is required when dialing, press Pause where needed.≥To cancel, press [OFF].2 Press []or [].3 To hang up, press [OFF] or place the handset on the base unit.To redial the last number dialed on the handset, press []or [] andpress [REDIAL].Making/Answering Calls with the Handset](https://usermanual.wiki/Panasonic-of-North-America/96NKX-TG2356/User-Guide-386693-Page-7.png)
![– 8 –To redial using the redial list (Memory Redial)The last 5 phone numbers dialed with the handset are stored in the redial list.1 Press [REDIAL].≥The last number dialed is displayed.2 Scroll to the desired number by pressing []or [].≥You can also scroll through the list by pressing [REDIAL].≥To exit the list, press [OFF].3 Press []or [].≥To erase an item, scroll to the desired item then press Erase.≥If “No items stored” is displayed, the list is empty.To adjust the receiver volume (HIGH, MEDIUM or LOW) or speaker volume(6 levels) while talking:To increase, press []. To decrease, press [].To put a call on hold, press [HOLD/INTERCOM] twice during a conversation.To return to the hold;From the handset, press [] or [].From the base unit, press [SP-PHONE].∫To answer a callIf the handset is off the base unit, press [].ORPress [], and when the other party answers, talk into the microphone.](https://usermanual.wiki/Panasonic-of-North-America/96NKX-TG2356/User-Guide-386693-Page-8.png)
![– 9 –∫To make a call1 Press [SP-PHONE].≥The SP-PHONE indicator lights.2Dial a telephone number.3 When the other party answers, talk into the MIC (microphone).4 To hang up, press [SP-PHONE].≥The indicator light goes out.To redial the last number dialed on the base unit, press [SP-PHONE] andpress [REDIAL].To adjust the speaker volume:To increase, press VOLUME [ ]. To decrease, press VOLUME [ ].To put a call on hold, press [HOLD/CONF] during a conversation.To return to the hold; From the base unit, press [SP-PHONE].From the handset, press [] or [].∫To answer a call1 Press [SP-PHONE].2 Talk into the MIC (microphone).3 To hang up, press [SP-PHONE].Making/Answering Calls with the Base Unit](https://usermanual.wiki/Panasonic-of-North-America/96NKX-TG2356/User-Guide-386693-Page-9.png)
![– 11 –Automatic Answering Operation∫Setting the unit to answer callsPress [ANSWER ON] to turn on the answering system.≥The indicator lights and “Answer set” is heard.≥The unit will announce the remaining recording time if it is less than 3 minutes.≥If you hear “Memory full”, “” is displayed on the base unit and the ANSWER ONindicator flashes rapidly, erase some, or all, of the messages.≥If you do not want the unit to answer calls, press [ANSWER ON] again to turn off theanswering system. The indicator light goes out and “Answer off” is heard.≥You can also turn on the answering system remotely using any other phone.FULLListening to MessagesYou can see the total number of recorded messages on the base unit display. IfMESSAGE indicator flashes on the base unit and “New message” is displayedon the handset, new messages have been recorded.To play back messages, press [MESSAGE].When you have new messages;the unit announces the number of new messages and only new messages areplayed back.When you have no new messages;the unit announces “No new messages. All message playback” and plays back allmessages.When you have no messages;the unit announces “No messages”.](https://usermanual.wiki/Panasonic-of-North-America/96NKX-TG2356/User-Guide-386693-Page-11.png)