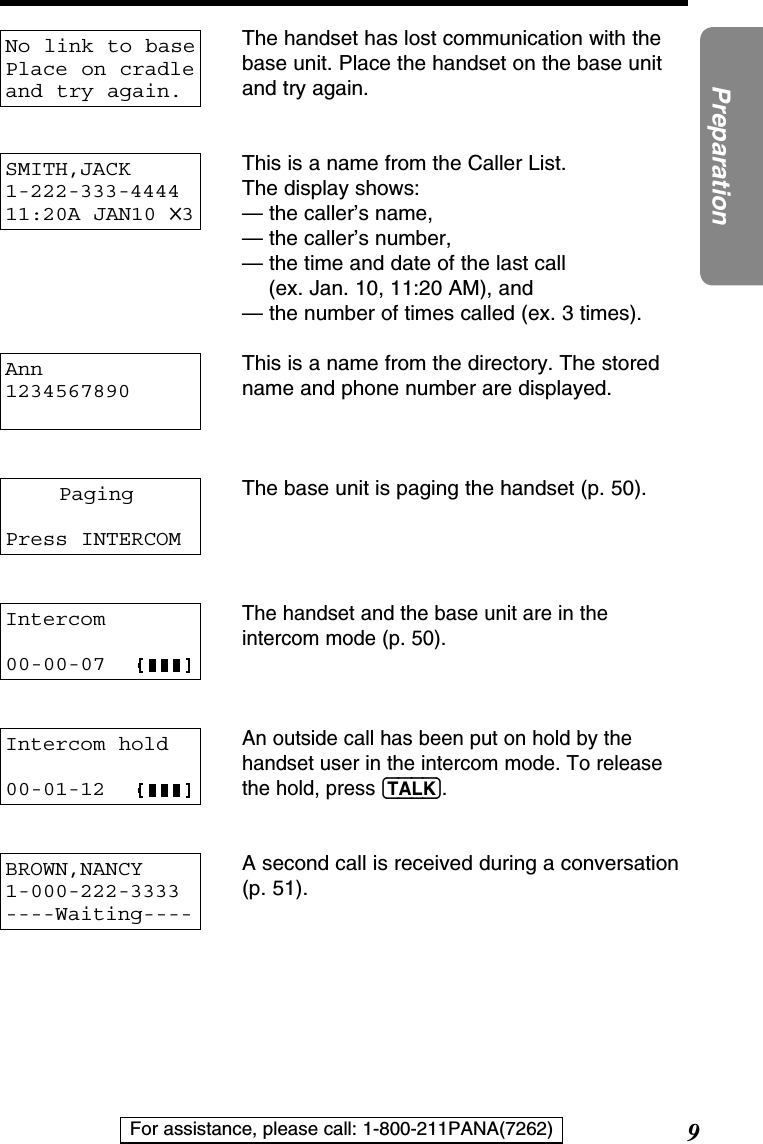
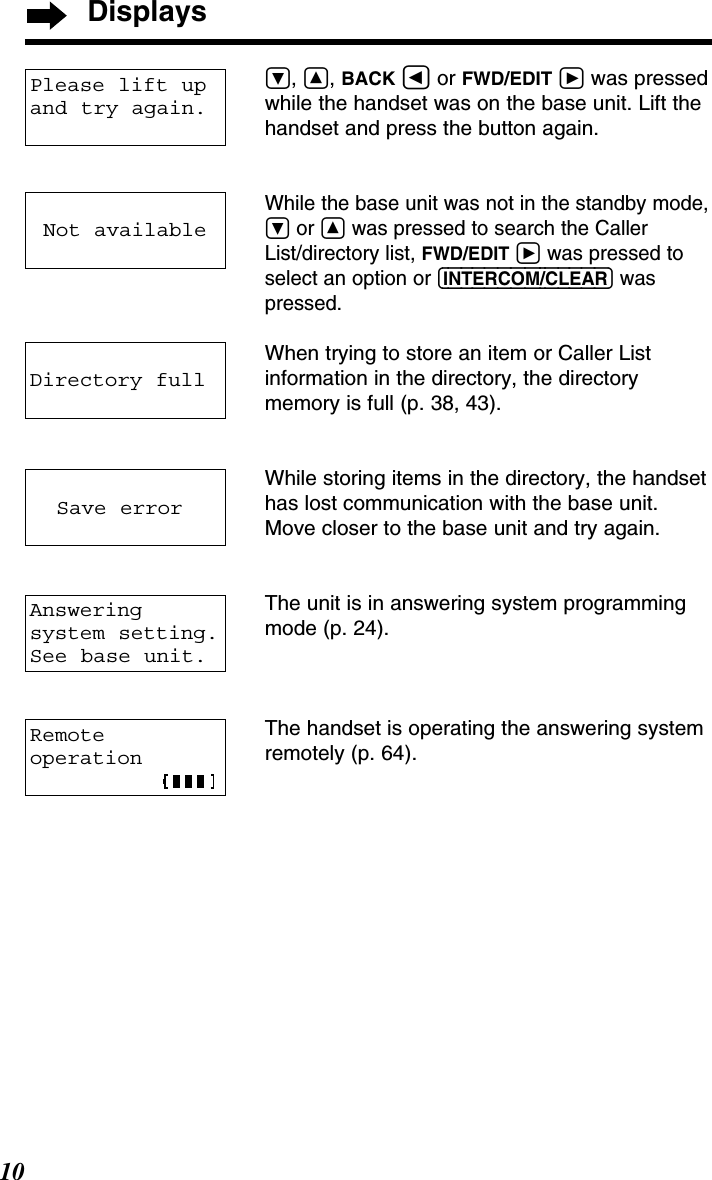
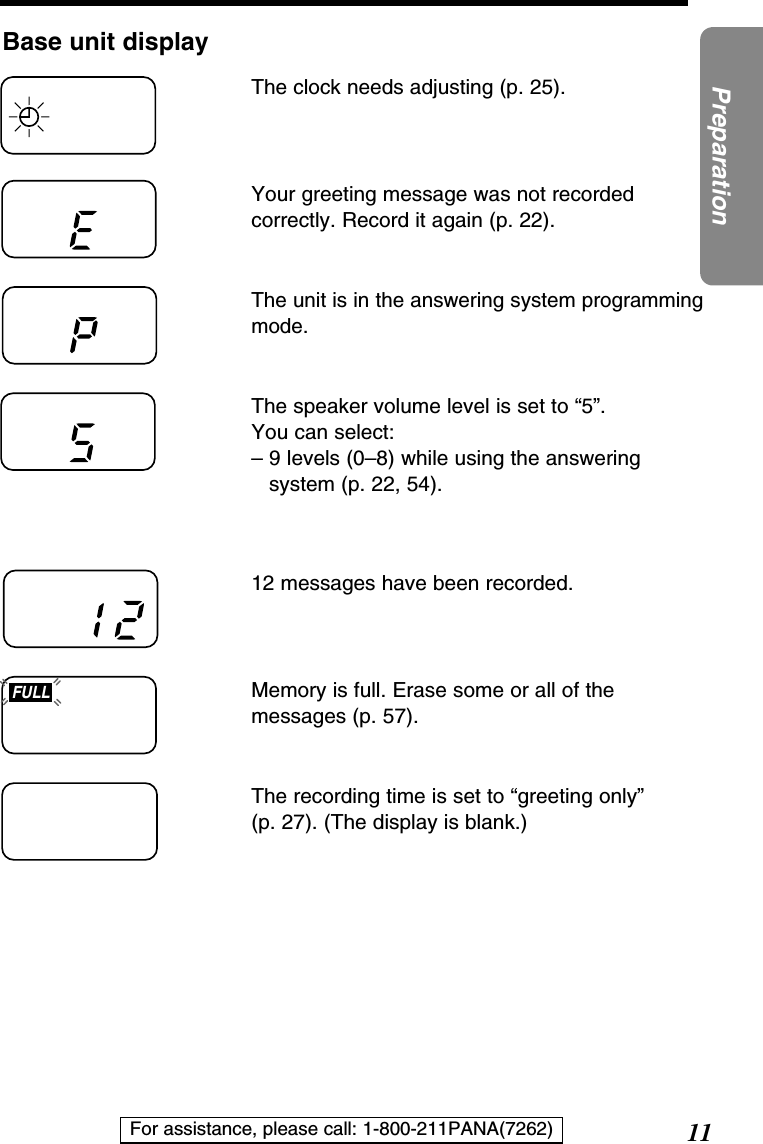
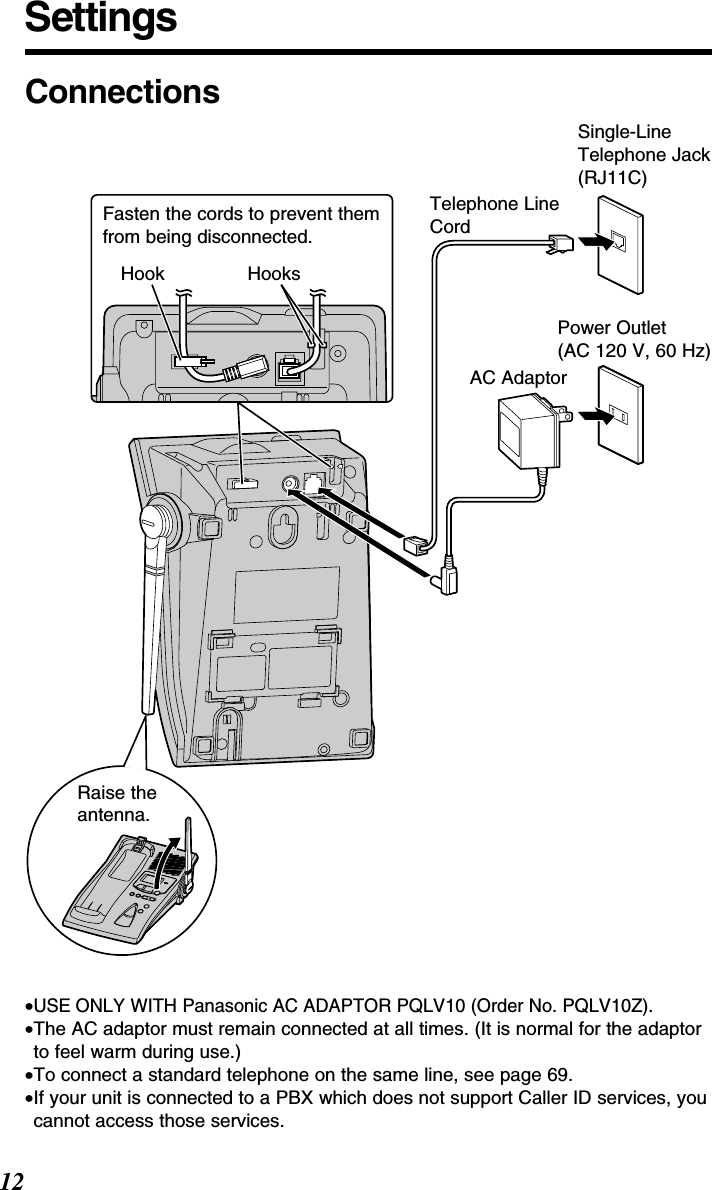
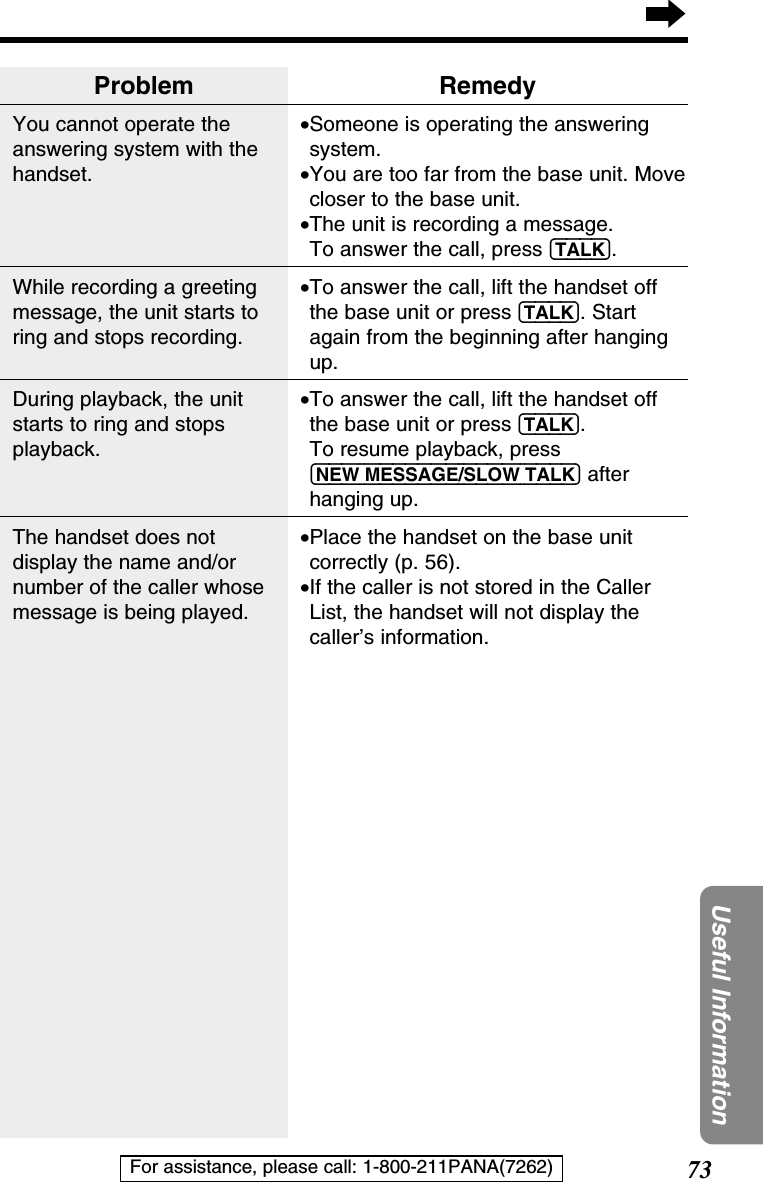
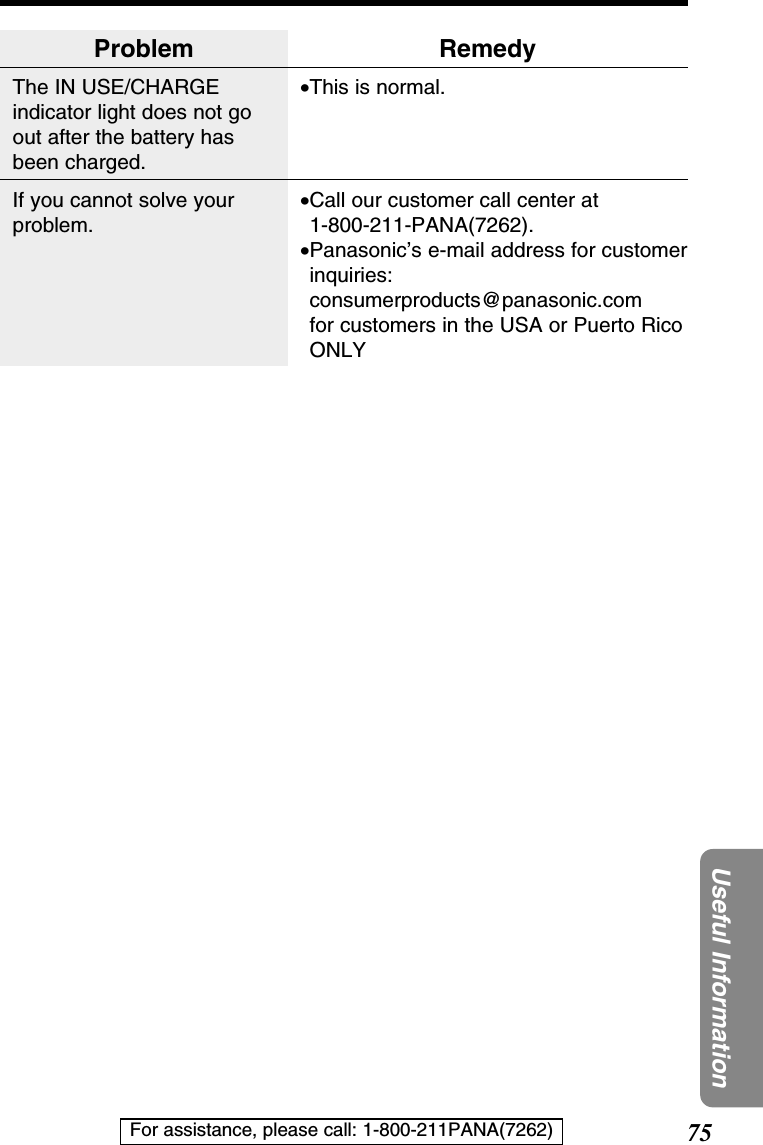
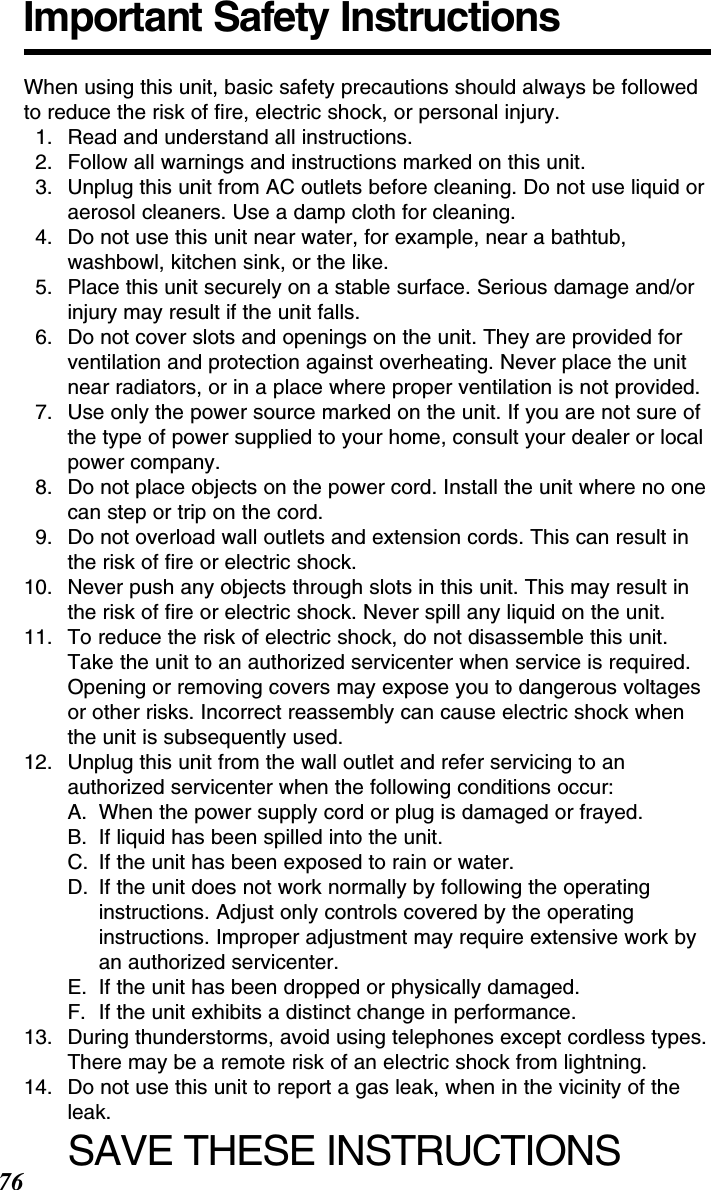
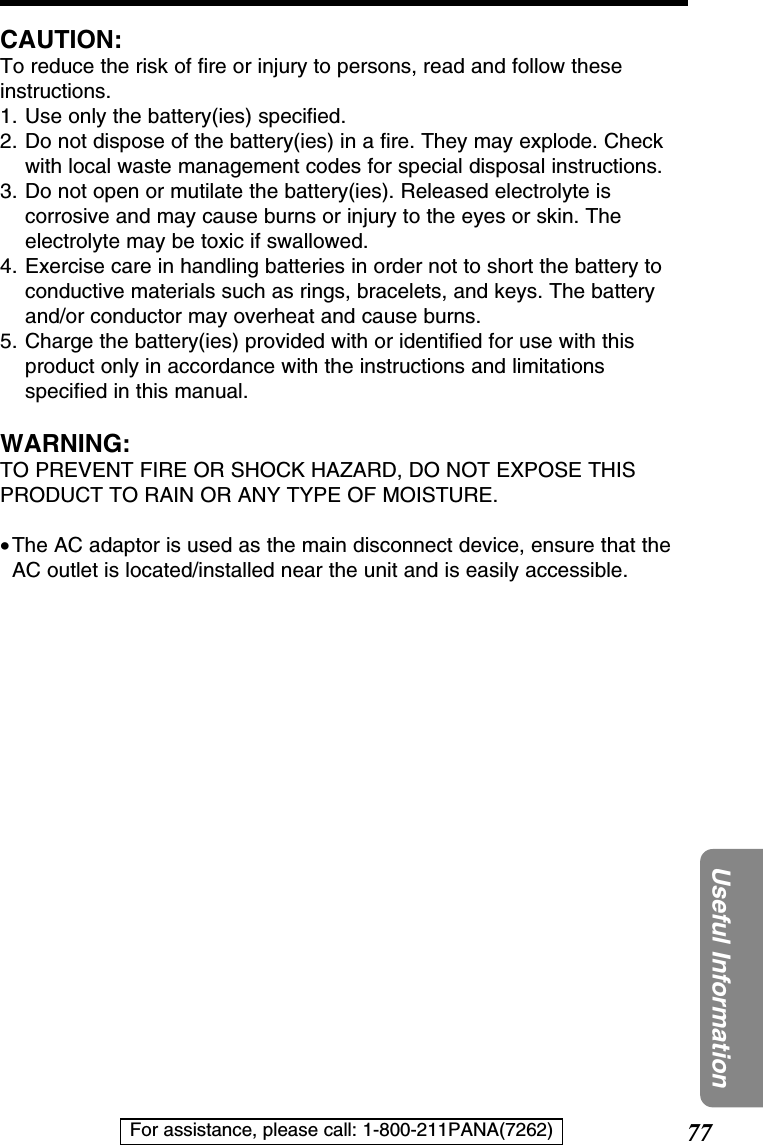
Panasonic of North America 96NKX-TG2481 2.4GHz DSS cordless phone with answering system User Manual TG2481 01 05

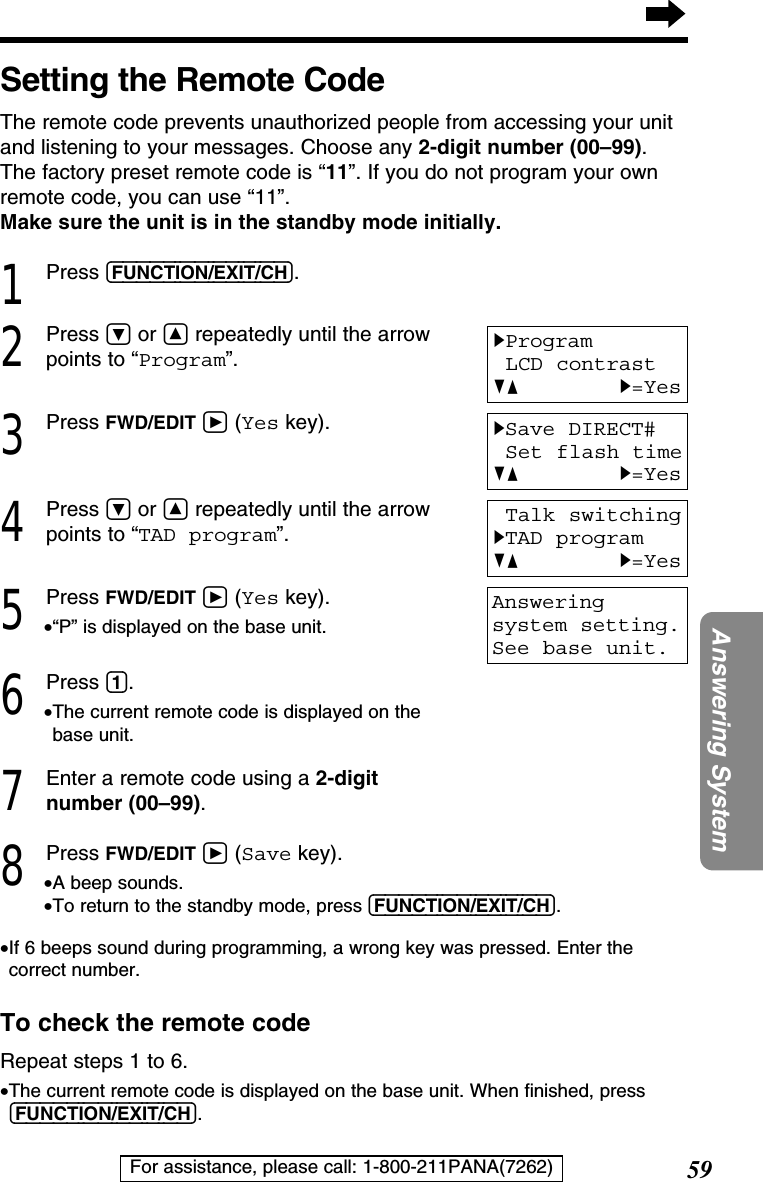
Panasonic Corporation of North America 2.4GHz DSS cordless phone with answering system TG2481 01 05

users manual

2.4GHz Cordless Answering SystemModel No. KX-TG2481BPulse-or-tone dialing capabilityOperating InstructionsPLEASE READ BEFORE USE AND SAVE.Panasonic World Wide Web address:  http://www.panasonic.comfor customers in the USA or Puerto RicoCharge the battery for about 6 hours before initial use.Preparation Cordless Telephone Answering System Useful InformationCaller ID Compatible
Before Initial Use2Please read IMPORTANT SAFETYINSTRUCTIONS on page 76 before use.Read and understand all instructions.Thank you for purchasing your new Panasonic cordlesstelephone.Attach your purchase receipt here.Caller ID and Call Waiting Service, where available, are telephonecompany services. After subscribing to Caller ID, this phone will display acaller’s name and phone number. Call Waiting Caller ID, which displays asecond caller’s name and phone number while the user is on anothercall, requires a subscription to both Caller ID and Call Waiting.Accessories (included) For extra orders, call 1-800-332-5368.AC Adaptor (p. 12)Order No. PQLV10ZoneTelephone Line Cord (p. 12)oneWall Mounting Adaptor (p. 66)Order No. PQKL10035Z1oneBelt Clip (p. 15)Order No.PQKE10337Z1oneFor your future referenceSerial No. Date of purchase(found on the bottom of the unit)Name and address of dealer
For assistance, please call: 1-800-211PANA(7262)For Best Performance3Battery ChargeA rechargeable Ni-Cd battery powers thehandset. Charge the battery for about 6hours before initial use (p. 13).Base Unit Location/NoiseCalls are transmitted between the base unit and the handset usingwireless radio waves. For maximum distance and noise-freeoperation, the recommended base unit location is:Note:While using the handset:•If you are near a microwave oven which is being used, noise may be heard fromthe receiver. Move away from the microwave oven and closer to the base unit.•If more than one cordless phone is being used and your handset is near anothercordless phone’s base unit, noise may be heard. Move away from the othercordless phone’s base unit and closer to your base unit.The batteryis beneaththis cover.Raise theantenna.Away from electrical appliancessuch as a TV, personal computer oranother cordless phone.In a HIGH and CENTRAL locationwith no obstructions such as walls.
PreparationLocation of Controls . . . . . . . . . . . . . . . . . . .  6Displays . . . . . . . . . . . . . . . . . . . . . . . . .  8Settings . . . . . . . . . . . . . . . . . . . . . . . . .  12Connections . . . . . . . . . . . . . . . . . . . . . .  12Battery Charge . . . . . . . . . . . . . . . . . . . . .  13Using the Belt Clip. . . . . . . . . . . . . . . . . . . .  15Using an Optional Headset . . . . . . . . . . . . . . . .  15Selecting the Dialing Mode . . . . . . . . . . . . . . . .  16Selecting the Line Mode . . . . . . . . . . . . . . . . .  17Programmable Functions . . . . . . . . . . . . . . . . .  18Setting the Auto Talk Feature . . . . . . . . . . . . . . .  19Selecting the Ringer Volume . . . . . . . . . . . . . . .  20Selecting the LCD Contrast . . . . . . . . . . . . . . . .  21Preparing the Answering System . . . . . . . . . . . . .  22Greeting Message . . . . . . . . . . . . . . . . . . . .  22Programming Summary for the Answering System. . . . . .  24Day and Time Adjustment . . . . . . . . . . . . . . . .  25Selecting the Caller’s Recording Time . . . . . . . . . . .  27Selecting the Number of Rings . . . . . . . . . . . . . .  28Cordless TelephoneMaking Calls . . . . . . . . . . . . . . . . . . . . . . .  29Answering Calls . . . . . . . . . . . . . . . . . . . . .  31Caller ID Service . . . . . . . . . . . . . . . . . . . . .  32Using the Caller List . . . . . . . . . . . . . . . . . . .  34Viewing the Caller List . . . . . . . . . . . . . . . . . .  34Calling Back from the Caller List. . . . . . . . . . . . . .  36Editing the Caller’s Phone Number . . . . . . . . . . . .  37Storing Caller List Information in the Directory. . . . . . . .  38Erasing Caller List Information . . . . . . . . . . . . . .  39One-Touch Dialer . . . . . . . . . . . . . . . . . . . .  40Storing a Phone Number in the DIRECT Button . . . . . . .  40Dialing the Stored Number in the DIRECT Button . . . . . .  41Using the Directory. . . . . . . . . . . . . . . . . . . .  42Storing Names and Numbers in the Directory . . . . . . . .  42Selecting Characters to Enter Names  . . . . . . . . . . .  44Finding Items in the Directory . . . . . . . . . . . . . . .  46Dialing from the Directory  . . . . . . . . . . . . . . . .  47Editing an Item in the Directory  . . . . . . . . . . . . . .  48Erasing an Item from the Directory  . . . . . . . . . . . .  49Contents4
5Preparation Cordless Telephone Answering System Useful InformationFor assistance, please call: 1-800-211PANA(7262)Intercom. . . . . . . . . . . . . . . . . . . . . . . . .  50Special Features . . . . . . . . . . . . . . . . . . . . .  51Automatic Security Code Setting . . . . . . . . . . . . .  51For Call Waiting Service Users . . . . . . . . . . . . . .  51How to Use the PAUSE Button (For Analog PBX Line/Long Distance Service Users). . . .  51Temporary Tone Dialing (For Rotary or Pulse Service Users)  . . . . . . . . . . .  52FLASH Button . . . . . . . . . . . . . . . . . . . . .  52Answering SystemAutomatic Answering Operation . . . . . . . . . . . . .  53Setting the Unit to Answer Calls . . . . . . . . . . . . . .  53Listening to Messages . . . . . . . . . . . . . . . . . .  54Slow Talk Message Playback . . . . . . . . . . . . . . .  54From the Handset . . . . . . . . . . . . . . . . . . . .  56Erasing Messages . . . . . . . . . . . . . . . . . . . .  57Remote Operation from a Touch Tone Phone . . . . . . .  58Setting the Remote Code. . . . . . . . . . . . . . . . .  59Voice Menu. . . . . . . . . . . . . . . . . . . . . . .  60Direct Remote Operation . . . . . . . . . . . . . . . . .  62Remote Operation with the Handset . . . . . . . . . . . .  64Useful InformationWall Mounting . . . . . . . . . . . . . . . . . . . . . .  66Battery Replacement . . . . . . . . . . . . . . . . . . .  68Adding Another Phone . . . . . . . . . . . . . . . . . .  69Before Requesting Help . . . . . . . . . . . . . . . . .  70Important Safety Instructions . . . . . . . . . . . . . . .  76FCC and Other Information . . . . . . . . . . . . . . . .  78
Location of Controls6HandsetNavigator Key  (     ,     , BACK     ,FWD/EDIT     ) (p. 18, 24, 30, 34, 43)REDIALREDIALPAUSEPAUSETONETONE0STOPANS OFFOFFANS S ONFLASHCALL WAL WAITPLPLAYBABACK789FUNCTION  EXITFUNCTION  EXITINTERCOM/CLEARINTERCOM/CLEAR123456ALL MSGSKIPNEW MSGREPEATCHCHLOUD LOUD SESEARCRCHBACKFWD EDITEDITONOFF(FUNCTION/EXIT/CH) (Channel) Button (p. 18, 24, 29, 34, 43, 46) Charge Contacts (p. 14)AntennaDisplay (p. 8)(DIRECT) Button (p. 40, 41)(INTERCOM/CLEAR) Button (p. 39, 44, 49, 50)(REDIAL/PAUSE) Button(p. 30, 51)(TONE) Button (p. 52) (TALK) Button (p. 29, 31) (FLASH/CALL!WAIT/PLAYBACK) Button (p. 51, 52, 64) Headset Jack (p. 15)
7PreparationFor assistance, please call: 1-800-211PANA(7262)Base unitGREETINGGREETING REPEATREPEAT SKIPSKIPERASEERASEVOLUMEVOLUMEIN USE IN USE CHARGECHARGEMICMICSPREAD SPECTRUMSTOPANSWERANSWERONONSLOW TALKSLOW TALKNEW MEW MESSAGE/E/ (REPEAT) Button (p. 55)(SKIP) Button (p. 55)(NEWÒMESSAGE/SLOW!TALK) Button (p. 55)(LOCATOR/INTERCOM) Button (p. 50)(ERASE) Button (p. 23, 57)(GREETING) Button (p. 22)(STOP) Button (p. 22, 54, 55)(ANSWERÒON) Button (p. 53)Antenna (p. 3, 12) IN USE/CHARGE Indicator (p. 13)Display (p. 11)Charge Contacts(p. 14)VOLUME       ,       Buttons (p. 22)MIC (Microphone) (p. 22, 50)Hook (p. 66)ANSWER ON Indicator (p. 53)
Displays8Both the handset and the base unit show you instructions and informationon the displays. These display prompts are shown below.Ringer offThe Caller List is empty or there are no storeditems in the directory.The battery needs to be charged. Place thehandset on the base unit to charge the battery (p. 14).The display shows the number of new calls andthe battery strength while the handset is on thebase unit.This display shows the number of new callswhen Öor Ñis pressed while the handset isoff the base unit.To search from the most recent call, press Ö.To search from the oldest call, press Ñ(p. 34).To go to the directory list, press FWD/EDIT á(Directory key).When the handset ringer volume is set to OFF (p. 20), “Ringer off” will flash for about 45seconds before the handset returns to thestandby mode (p. 14).When a call is received, the display shows thecaller’s name and number after the first ring.During a conversation, the display shows thelength of the call (ex. 1 hour, 6 minutes and 35seconds). The battery strength is also displayed(p. 13).No items stored12 new callsGF H=DirectoryROBINSON,TINA1-000-222-333312 new callsRecharge Talk01-06-35
For assistance, please call: 1-800-211PANA(7262) 9PreparationThe handset has lost communication with thebase unit. Place the handset on the base unitand try again.This is a name from the Caller List. The display shows:— the caller’s name,— the caller’s number,— the time and date of the last call (ex. Jan. 10, 11:20 AM), and — the number of times called (ex. 3 times).This is a name from the directory. The storedname and phone number are displayed.The base unit is paging the handset (p. 50).The handset and the base unit are in theintercom mode (p. 50).An outside call has been put on hold by thehandset user in the intercom mode. To releasethe hold, press (TALK).A second call is received during a conversation (p. 51).No link to basePlace on cradleand try again.SMITH,JACK 1-222-333-444411:20A JAN10 ✕3Ann1234567890PagingPress INTERCOMBROWN,NANCY 1-000-222-3333----Waiting----Intercom00-00-07Intercom hold00-01-12
10Ö, Ñ, BACK Üor FWD/EDIT áwas pressedwhile the handset was on the base unit. Lift thehandset and press the button again.While the base unit was not in the standby mode,Öor Ñwas pressed to search the CallerList/directory list, FWD/EDIT áwas pressed toselect an option or (INTERCOM/CLEAR) waspressed.When trying to store an item or Caller Listinformation in the directory, the directorymemory is full (p. 38, 43). While storing items in the directory, the handsethas lost communication with the base unit.Move closer to the base unit and try again.The unit is in answering system programmingmode (p. 24).The handset is operating the answering systemremotely (p. 64).DisplaysPlease lift upand try again.Remote operationNot availableDirectory fullSave errorAnsweringsystem setting.See base unit.
11PreparationFor assistance, please call: 1-800-211PANA(7262)Base unit displayThe clock needs adjusting (p. 25).Your greeting message was not recordedcorrectly. Record it again (p. 22).The unit is in the answering system programmingmode.The speaker volume level is set to “5”. You can select:– 9 levels (0–8) while using the answeringsystem (p. 22, 54).12 messages have been recorded.FULLMemory is full. Erase some or all of themessages (p. 57).The recording time is set to “greeting only” (p. 27). (The display is blank.)
Settings12Connections•USE ONLY WITH Panasonic AC ADAPTOR PQLV10 (Order No. PQLV10Z).•The AC adaptor must remain connected at all times. (It is normal for the adaptorto feel warm during use.)•To connect a standard telephone on the same line, see page 69.•If your unit is connected to a PBX which does not support Caller ID services, youcannot access those services.Single-LineTelephone Jack(RJ11C)Telephone Line CordAC AdaptorRaise theantenna.Fasten the cords to prevent themfrom being disconnected.Power Outlet (AC 120 V, 60 Hz)Hook Hooks
13PreparationFor assistance, please call: 1-800-211PANA(7262)Needs to be recharged.Battery ChargePlace the handset on the base unit and charge for about 6 hours beforeinitial use.•The IN USE/CHARGE indicator lights and a beep sounds. Battery strengthYou can check the battery strength on the handset display while thehandset is on the base unit, while it is in use (making/answering a calletc.), or after viewing the Caller List or directory items, programming etc.The battery strength will remain for a few seconds after using thehandset, then the display will return to the standby mode (p. 14).The battery strength is as shown in the chart below.Display prompt Battery strengthFully chargedMediumLow(flashing)IN USE/CHARGE Indicator
Settings14Up to 3.5 hoursUp to 11 daysOperation Approx. battery lifeWhile in use(TALK)Up to 4.5 hoursWhile not in use (Standby)near the base unit*away from the base unit*Within about 10 feet (3 m)•Battery life may be shortened depending on usage conditions, such as viewingthe Caller ID Caller List or directory list, and ambient temperature.•Clean the handset and the base unit charge contacts with a soft, dry clothonce a month. Clean more often if the unit is subject to grease, dust orhigh humidity. Otherwise the battery may not charge properly.•If the battery is fully charged, you do not have to place the handset on the baseunit until “Recharge” is displayed and/or “ ” flashes. This will maximize thebattery life.•The battery cannot be overcharged.Standby Mode (While the handset is off the base unit)The handset goes into the standby mode after you finish using thehandset (making/answering a call, viewing the Caller List or directory listetc.). The display is blank, but the handset can receive calls. The batterylife is conserved in this mode.RechargeRecharge the battery when:—“Recharge” is displayed on the handset,—“ ” flashes on the display, or—the handset beeps intermittently while it is in use.•If you DO NOT recharge the handset battery for more than 15 minutes, thedisplay will keep indicating “Recharge” and/or “ ” will continue to flash.Battery informationAfter your Panasonic battery is fully charged (p. 13):Recharge
15PreparationFor assistance, please call: 1-800-211PANA(7262)Using an Optional HeadsetPlugging an optional headset into the handset allows a hands-free phoneconversation. Please use only the Panasonic KX-TCA88 headset. To ordercall the accessories telephone number on page 2.Connecting the headset to the handsetOpen the headset jack cover, and connect the headset to the headsetjack as shown below.HWhen the optional headset is connected to the handset, make sure to use theheadset to talk with the caller. If you want to have a normal cordless phoneconversation, disconnect the headset.Using the Belt ClipYou can hang the handset on your belt or pocket using the belt clip.To attach the belt clip To remove the belt clipHeadset Jack
16SettingsSelecting the Dialing ModeYou can program the dialing mode using the handset near the baseunit.If you have touch tone service, set to “Tone”. If rotary or pulse service isused, set to “Pulse”. Your phone comes from the factory set to “Tone”.Make sure the unit is in the standby mode initially. 1Press (FUNCTION/EXIT/CH).2Press Öor Ñrepeatedly until the arrowpoints to “Program”.3Press FWD/EDIT á(Yes key).4Press Öor Ñrepeatedly until the arrowpoints to “Set dial mode”.5Press FWD/EDIT á(Yes key).6Press Öor Ñto select “Pulse” or“Tone”.7Press FWD/EDIT á(Save key).•A beep sounds.•To return to the standby mode, press (FUNCTION/EXIT/CH).•You can exit the programming mode any time by pressing (FUNCTION/EXIT/CH).•If the handset has lost communication with the base unit, 3 beeps sound and “Nolink to base Place on cradle and try again.” is displayed.HSave directoryRinger volumeGF H=YesHProgramLCD contrastGF H=YesHSave DIRECT#Set flash timeGF H=YesSet line modeHSet dial modeGF H=YesDial mode:ToneGF H=SaveDial mode:PulseDial mode:PulseGF H=Save
For assistance, please call: 1-800-211PANA(7262) 17PreparationSelecting the Line ModeIf the line is connected to a low voltage system such as a PBX, set to “B”.Otherwise the Call Waiting Caller ID Feature may not be used (p. 51).Your phone comes from the factory set to “A”. Use the handset near the base unit.Make sure the unit is in the standby mode initially. 1Press (FUNCTION/EXIT/CH).2Press Öor Ñrepeatedly until the arrowpoints to “Program”.3Press FWD/EDIT á(Yes key).4Press Öor Ñrepeatedly until the arrowpoints to “Set line mode”.5Press FWD/EDIT á(Yes key).6Press Öor Ñto select “B” or “A”.7Press FWD/EDIT á(Save key).•A beep sounds.•To return to the standby mode, press (FUNCTION/EXIT/CH).•You can exit the programming mode any time by pressing (FUNCTION/EXIT/CH).•If the handset has lost communication with the base unit, 3 beeps sound and “Nolink to base Place on cradle and try again.” is displayed.HSet line modeSet dial modeGF H=YesLine mode:AGF H=SaveLine mode:BLine mode:BGF H=SaveHSave directoryRinger volumeGF H=YesHProgramLCD contrastGF H=YesHSave DIRECT#Set flash timeGF H=Yes
Programmable Functions18HSave DIRECT#Set flash timeSet line modeSet dial modeTalk switchingTAD programYou can program the following function items using the handset nearthe base unit. The display shows the programming instructions. See thecorresponding pages for function details.Make sure the unit is in the standby mode initially. During programming:*To select a desired function item, press Öor Ñrepeatedly until thearrow points to the item. Then press FWD/EDIT áto go to the next step.•You can exit the programming mode any time by pressing (FUNCTION/EXIT/CH).•If you do not press any buttons for 60 seconds, the unit will return to the standbymode.•If the handset has lost communication with the base unit, 3 beeps sound and “Nolink to base Place on cradle and try again.” is displayed.Press (FUNCTION/EXIT/CH).<Function menu>*To store an item in the directory (p. 43).To select the ringer volume (p. 20).To select the LCD contrast (p. 21).Press FWD/EDIT á.To store a phone number in the DIRECT button(p. 40).To select the flash time (p. 52).To select the line mode (p. 17).To select the dial mode (p. 16).To set the auto talk feature (p. 19).To program answering system functions (p. 24).HSave directoryRinger volumeProgramLCD contrast<Function menu>*
19PreparationFor assistance, please call: 1-800-211PANA(7262)Setting the Auto Talk FeatureThe Auto Talk feature allows you to answer a call by lifting the handset offthe base unit without pressing (TALK). If you want to use this feature, turnthe feature ON by programming. Your phone comes from the factory setto OFF.Make sure the unit is in the standby mode initially. 1Press (FUNCTION/EXIT/CH).2Press Öor Ñrepeatedly until the arrowpoints to “Program”.3Press FWD/EDIT á(Yes key).4Press Öor Ñrepeatedly until the arrowpoints to “Talk switching”.5Press FWD/EDIT á(Yes key).6Press Öor Ñto select “On” or “Off”. 7Press FWD/EDIT á(Save key).•A beep sounds.•To return to the standby mode, press(FUNCTION/EXIT/CH).•You can exit the programming mode any time by pressing (FUNCTION/EXIT/CH).•In order to view Caller ID information before answering a call, leave the Auto Talkfeature OFF.Auto talk:OnHProgramLCD contrast GF H=YesHTalk switchingTAD programGF H=YesAuto talk:OffGF H=SaveAuto talk:OnGF H=Save
Programmable Functions20Selecting the Ringer VolumeYou can program the ringer volume to HIGH, LOW or OFF. If set to OFF,the unit will not ring. Your phone comes from the factory set to HIGH.Make sure the unit is in the standby mode initially. 1Press (FUNCTION/EXIT/CH).2Press Öor Ñrepeatedly until thearrow points to “Ringer volume”.3Press FWD/EDIT á(Yes key).4Press Öor Ñto select thedesired volume.•The selected volume is displayed and rings.•To turn the ringer OFF, press andhold Öuntil 2 beeps sound. To turn the ringer ON, press Ñor Öin step 4.•The ringer will sound at the LOW level.•You can also select the ringer volume while a call is being received. Press ÖorÑwhile the unit is ringing.•When set to OFF, “Ringer off” will flash for about 45 seconds before thehandset returns to the standby mode.•When you replace the battery, the selected ringer volume setting will return to thefactory set (HIGH). Reprogram if necessary.Save directoryHRinger volumeGF H=YesRingerLow ❚❚❚❚❚❚ HighGFRingerLow ❚❚❚❚❚❚ HighGFHIGHLOWRinger offGFOFFÖÑÖÑ
21PreparationFor assistance, please call: 1-800-211PANA(7262)Selecting the LCD ContrastYou can program the handset LCD contrast (5 levels). To make thehandset display clearer, set to high level. Your phone comes from thefactory set to level 3.Make sure the unit is in the standby mode initially. 1Press (FUNCTION/EXIT/CH).2Press Öor Ñrepeatedly until the arrowpoints to “LCD contrast”.3Press FWD/EDIT á(Yes key).4Press Öor Ñto select the desiredcontrast.•Each time you press Öor Ñ, the LCDcontrast will change. 5Press FWD/EDIT á(Save key).•A beep sounds.•To return to the standby mode, press(FUNCTION/EXIT/CH).•You can exit the programming mode any time by pressing (FUNCTION/EXIT/CH).ProgramHLCD contrast GF H=YesLCD contrastLow ❚❚❚❚❚ HighLCD contrastLow ❚❚❚❚❚HighGF H=Save
Preparing the Answering System22Greeting message sample“Hello, this is (your name and/or number). Sorry I cannot take yourcall. Please leave a message after the beep. Thank you.”Greeting MessageYou can record a personal greeting message of up to 2 minutes. If agreeting message is not recorded, one of two pre-recorded greetings willbe played when a call is received (p. 23).All messages (greeting, incoming, etc.) are stored in digital memory (p. 23). The total recording time is about 15 minutes. We recommend you record a brief greeting message (see samplebelow) in order to leave more time for recording new messages.To record a greeting message1Press and hold (GREETING) untila long beep is heard.2Talk clearly, about 8 inches(20 cm) away from the MIC(microphone).•The base unit display shows theelapsed recording time.•If you record for over 2 minutes,the unit will automatically stoprecording.3When finished, press (STOP).•To check the recorded greeting, press (GREETING) briefly.•To change the message, start again from step 1.(GREETING)(STOP)(ERASE)To increase the volume, press VOLUME Ñ.To decrease, pressVOLUME Ö.MIC
23PreparationFor assistance, please call: 1-800-211PANA(7262)To erase the recorded greeting messagePress (GREETING) briefly \press (ERASE) while the message is beingplayed.•The unit will answer a call with a pre-recorded greeting.Pre-recorded greeting messageIf you do not record a greeting message (p. 22), one of two messages willbe played when a call is received, depending on the caller’s recordingtime (p. 27).To check the pre-recorded greeting, press (GREETING) briefly.•A pre-recorded greeting will be played as follows:■ When the recording time is set to “1 minute” or “3 minutes”: “Hello, we are not available now. Please leave your name and phone numberafter the beep. We will return your call.”■ When the recording time is set to “Greeting only”: “Hello, we are not available now. Please call again. Thank you for your call.”Flash Memory Message BackupMessages are stored on a “flash memory” IC chip and will not beaffected by power failures. All messages are saved until you erasethem.
24Preparing the Answering SystemProgramming Summary for the Answering SystemYou can program the following functions using the handset near thebase unit. Make sure the unit is in the standby mode initially.•You can exit the programming mode any time by pressing (FUNCTION/EXIT/CH).•If you do not press any buttons for 60 seconds, the unit will return to the standbymode.•If 6 beeps sound on the base unit during programming, a wrong key waspressed. Enter the correct number.•If the handset has lost communication with the base unit, 3 beeps sound and “Nolink to base. Place on cradle and try again.” is displayed on thehandset.Press (FUNCTION/EXIT/CH).Press FWD/EDIT á(Save key).Press Öor Ñto select “TAD program”, and press FWD/EDIT á(Yes key).•“Answering system setting. See base unit.” is displayed on thehandset.GGGPress Öor Ñto select “Program”, and press FWD/EDIT á(Yeskey).GTo adjust the time and day, press (0). (page 25)To set the remote code, press (1). (page 59)To select the number of rings, press (2). (page 28)To select the caller’s recording time, press (5). (page 27)•The base unit display shows numbers related to the adjustment or settings.
25PreparationFor assistance, please call: 1-800-211PANA(7262)1Press (FUNCTION/EXIT/CH).2Press Öor Ñrepeatedly until the arrowpoints to “Program”.3Press FWD/EDIT á(Yes key).4Press Öor Ñrepeatedly until the arrowpoints to “TAD program”.5Press FWD/EDIT á(Yes key).•“P” is displayed on the base unit.6Press (0).•“Set time” is announced. If previously adjusted, the day/time will be heard.7Enter the time (hour and minute) using a 4-digit number. (Ex. To set 9:30, enter “0930”.)•The entered number is displayed on the base unit.8Press (*) to select “AM” or “PM”. Press (#) repeatedly to set the day.9Press FWD/EDIT á(Save key).•The unit announces the day/time. The clock starts working.•If 6 beeps sound, the setting is not correct. Start again from step 5.•To return to the standby mode, press (FUNCTION/EXIT/CH).Day and Time AdjustmentVoice Time/Day Stamp: During playback, a synthesized voice willannounce the day and time that each message was recorded.Talk switchingHTAD programGF H=YesAnsweringsystem setting.See base unit.HSave directoryRinger volumeGF H=YesHProgramLCD contrastGF H=YesHSave DIRECT#Set flash timeGF H=Yes
26Preparing the Answering System•In step 7, you cannot enter numbers greater than 12. Do not use military time.(To set 13:00 hours, enter “0100”, and select “PM” by pressing (*).)If a power failure occurs, “ ” will flash on the base unit display andsynthesized voice may announce the incorrect time/day. Readjust theday/time.For Caller ID service users (p. 32)•The Caller ID information will re-set the clock after the first ring if the adjustedtime is incorrect. However, the day will not be re-set. Set the day following theprocedures on pages 25.•If the time has not previously been set, the Caller ID information will not adjustthe clock.•The Caller ID information will automatically adjust the clock for daylight savingtime.To check the time/dayRepeat steps 1 to 6 on page 25.•The current time/day is heard. When finished, press (FUNCTION/EXIT/CH).
27PreparationFor assistance, please call: 1-800-211PANA(7262)Selecting the Caller’s Recording Time You can select “1 minute”, “3 minutes” or “Greeting only” for the caller’srecording time. Your phone comes from the factory set to “3 minutes”.1Press (FUNCTION/EXIT/CH).2Press Öor Ñrepeatedly until the arrowpoints to “Program”.3Press FWD/EDIT á(Yes key).4Press Öor Ñrepeatedly until the arrowpoints to “TAD program”.5Press FWD/EDIT á(Yes key).•“P” is displayed on the base unit.6Press (5).•The current setting is displayed on the base unit.1: 1 minute2: 3 minutes3: Greeting only7Press (1), (2) or (3) to select the recording time.•The setting is displayed on the base unit.8Press FWD/EDIT á(Save key).•A beep sounds.•To return to the standby mode, press (FUNCTION/EXIT/CH).If you select “Greeting only”, the unit will answer a call with the greetingmessage, and then hang up. The unit will not record any incomingmessages. Talk switchingHTAD programGF H=YesAnsweringsystem setting.See base unit.HSave directoryRinger volumeGF H=YesHProgramLCD contrastGF H=YesHSave DIRECT#Set flash timeGF H=Yes
28Selecting the Number of RingsYou can select the number of times the unit rings before the answeringsystem answers a call, from “2” to “7” or “Toll saver”*. Your phone comes from the factory set to “Toll saver”*.1Press (FUNCTION/EXIT/CH).2Press Öor Ñrepeatedly until the arrowpoints to “Program”.3Press FWD/EDIT á(Yes key).4Press Öor Ñrepeatedly until the arrowpoints to “TAD program”.5Press FWD/EDIT á(Yes key).•“P” is displayed on the base unit.6Press (2).•The current setting is displayed on the baseunit.7Press (0), or (2) to (7) to set the number of rings.0: Selects “Toll saver”*.2–7: The unit will answer after the selected number of rings.8Press FWD/EDIT á(Save key).•A beep sounds.•To return to the standby mode, press (FUNCTION/EXIT/CH).*Toll saverWhen you call the unit from a touch tone telephone:If the unit answers on the 2nd ring, there is at least one new message.If the unit answers on the 4th ring, there are no new messages.Hang up when you hear the 3rd ring. This will save you the tollcharge for the call.Preparing the Answering SystemTalk switchingHTAD programGF H=YesAnsweringsystem setting.See base unit.HSave directoryRinger volumeGF H=YesHProgramLCD contrastGF H=YesHSave DIRECT#Set flash timeGF H=Yes
Making Calls29Cordless TelephoneFor assistance, please call: 1-800-211PANA(7262)1Press (TALK).2Dial a phone number.•The dialed number is displayed.•After a few seconds, the display will show thelength of the call and the battery strength.3To hang up, press (TALK) or place thehandset on the base unit.•If the handset has lost communication with the base unit, 3 beeps sound and “Nolink to base Place on cradle and try again.” is displayed.If noise interferes with the conversationPress (FUNCTION/EXIT/CH) to select a clearer channel or move closer tothe base unit.To redial the last number dialed on the handsetPress (TALK) and press (REDIAL/PAUSE).Talk1112222Talk(TALK)(FUNCTION/EXIT/CH) (INTERCOM/CLEAR)(REDIAL/PAUSE)Talk00-00-00Off00-01-08
Making Calls30To dial after confirming the entered number1Dial a phone number.•If you misdial, press (INTERCOM/CLEAR) anddial again.2Press (TALK).•After a few seconds, the display will show thelength of the call and the battery strength.3To hang up, press (TALK) or place thehandset on the base unit.To redial after confirming the last number dialedPress (REDIAL/PAUSE) and press (TALK).To adjust the receiver volume while talkingTo increase, press Ñ.To decrease press Ö.•Each time you press Öor Ñ, thevolume level will change.•The display will return to the length ofthe call.LoudLow ❚❚❚❚❚❚ HighMEDIUMHIGHLOWLoudLow ❚❚❚❚ HighLoudLow ❚❚ HighÖÑÖÑTalk33344443334444Talk00-00-00Off00-01-08
31Cordless TelephoneFor assistance, please call: 1-800-211PANA(7262)Answering CallsWhen a call is received, the unit rings, “Incoming call” is displayed onthe handset and the IN USE/CHARGE indicator on the base unit flashesquickly. If you subscribe to a Caller ID service, the calling party information will bedisplayed after the first ring (p. 32). In order to view the Caller IDinformation, please wait until the second ring to answer a call.If the handset is off the base unit, press (TALK).•You can also answer a call by pressing any dialingbutton (0) to (9), (*) or (#) (—Any Key Talk).Auto TalkIf you set the Auto Talk feature to ON (p. 19), you can answer a call by liftingthe handset off the base unit withoutpressing (TALK).(TALK)Lighted handset keypadThe handset dialing buttons will light when you press a button or lift thehandset off the base unit, and flash when a call is received. The lights will go out a few seconds after pressing a button, lifting thehandset, answering a call, hanging up a call, leaving the programmingmode or ending the intercom.Backlit LCD displayThe lighted handset display will stay on for a few seconds after pressing ahandset button, lifting the handset off the base unit, hanging up a call,leaving the programming mode or ending the intercom.IN USE/CHARGE Indicator
32Caller ID ServiceThis unit is compatible with a Caller ID service offered by your telephonecompany. If you subscribe to a Caller ID service, the calling party’sinformation will be shown on the handset after the first ring.The unit can record information of up to 50 different callers, including thetime and date received and the number of times called, in the Caller List.The Caller List information is sorted by the most recent to the oldest call.When the 51st call is received, the first call is deleted.Using the list, you can automatically call back a caller. You can store thecallers’ names and numbers from the Caller List into the directory.If you subscribe to both Caller ID and Call Waiting services, when asecond call is received while talking, the new caller’s name and phonenumber will be displayed (p. 51).How caller information is displayed when a call isreceivedThe handset display shows the caller’sphone number after the first ring.After you answer the call, the displaywill show the length of the call and thebattery strength.Talk00-00-00ROBINSON,TINA 1-000-222-3333The IN USE/CHARGE indicatorlight will flash quickly when a call is being received.
33Cordless TelephoneFor assistance, please call: 1-800-211PANA(7262)To check the number of new calls•If “No items stored” is displayed, the Caller List is empty.•Caller information cannot be displayed in the following cases:•—If the caller dialed from an area which does not provide a Caller ID service, thedisplay will show “Out of area”.•—If the caller has requested not to display his/her information, the display willshow “Private caller”.•If your unit is connected to a PBX which does not support Caller ID services, youcannot access those services.•The name display service may not be available in some areas. For furtherinformation, please contact your telephone company.While the handset is off the base unit:Press Öor Ñto turn the display on.If you have received 10 new calls, the display will show the following:While the handset is on the base unit:If you have received 10 new calls, the display will show the following:10 new calls10 new callsGF H=Directory
34Using the Caller List1Lift the handset off the base unitand press Öor Ñto enter theCaller List.•The display will show, for example, the following.•You can go to the directory list bypressing FWD/EDIT á(p. 46).2To search from the mostrecent call, press Ö.To search from the oldestcall, press Ñ.•To scroll between callers, press Öor Ñ.3To exit the list, press(FUNCTION/EXIT/CH).•The handset will return to the standby mode.2 new callsGF H=Directory•Once new calls have been checked, “√” will be added.•If “No items stored” is displayed, the Caller List is empty.•If more than one call is received from the same caller, the date and time of thelast call will be recorded. If the same caller calls again, the call entry with “√” willbe deleted. Viewing the Caller ListTo check who has called, follow the steps below.Make sure the unit is in the standby mode initially. (FUNCTION/EXIT/CH),
35Cordless TelephoneFor assistance, please call: 1-800-211PANA(7262)Ex. When you search from the most recent call:SMITH,JACK 1-222-333-44443:10P JUN10 Lift the handset off the base unit and press Öor Ñ.Press Ö.Press Ö.Press Ö.Press Ö.Press Ö.To return to the previous caller,press Ñ.To exit the Caller List,press (FUNCTION/EXIT/CH).•The handset will return to the standbymode.•If there is no name information for acaller, the display will only show thephone number.2 new callsGF H=DirectoryBROWN,NANCY 222-33331:54P JUN 9 ✕3TURNER,CINDY 1-234-456-789010:38A JUN 9 √0 new callsGF H=DirectoryDisplay meaning:√: You have checked this caller information, answered the call  or called back the caller or played back the message.✕2-✕9: The number of times the same caller called (up to 9).After checking, “✕2” – “✕9” will be replaced with “√”.
Using the Caller List361Lift the handset off the base unit andpress Öor Ñto enter the Caller List.2Press Öor Ñrepeatedly to find thedesired caller.3Press (TALK).•The displayed phone number is dialedautomatically.TURNER,CINDY 1-234-456-789011:20A JAN12 ✕3Talk12344567890Calling Back from the Caller List•In some cases, you may have to edit the number before dialing (p. 37). (Ex. You may have to delete “1” and the area code.)•If a phone number is not displayed in the caller information, you cannot call backthat caller.3 new callsGF H=Directory(TALK)Talk00-00-00
37Cordless TelephoneFor assistance, please call: 1-800-211PANA(7262)Editing the Caller’s Phone NumberYou can edit a phone number into one of 4 patterns.Make sure the unit is in the standby mode initially. 1Lift the handset off the base unit andpress Öor Ñto enter the Caller List.2Press Öor Ñrepeatedly to find thedesired caller, and press FWD/EDIT á.3While the arrow points to “Edit”,press FWD/EDIT á(Yes key).4Press FWD/EDIT á(Edit key) toselect a pattern.•Each time you press FWD/EDIT á, thenumber is rearranged into one of4 different patterns.ab– c1 – d1 –  – •The order in which patterns a–daredisplayed depends on how the telephonenumber is displayed in step 2.5After editing the number, you can continue with calling back orstoring procedures. To call back, press (TALK) (p. 36).To store the number in the directory, press Ö(Next key), and press FWD/EDITá(Save key). (If the caller has no nameinformation, see page 38, from step 3.)•The number edited in step 4 will not be maintained in the Caller List.Phone no.Area codePhone no.Phone no.Area codePhone no.PARKER,FRED 1-234-321-555511:20A JAN12 √aHEditSave directoryGF H=YesPARKER,FRED 1-234-321-5555G=NextH=Edit321-5555G=NextH=Edit5 new callsGF H=Directoryb234-321-5555G=NextH=Editc1-321-5555G=NextH=Editd1-234-321-5555G=NextH=EditPARKER,FRED 321-5555F=EditH=Save
38Storing Caller List Information in the DirectoryYou can store names and phone numbers that are in the Caller List intothe directory. Make sure the unit is in the standby mode initially. 1Lift the handset off the base unit andpress Öor Ñto enter the Caller List.2Press Öor Ñrepeatedly to find thecaller you want to store in the directory,and press FWD/EDIT á(Yes key).•If the number requires editing, see page 37.3Press Öor Ñto select “Savedirectory”, and press FWD/EDIT á(Yes key).If there is no name information for thecaller, “Enter name” will be displayed.a) If a name is not required, press Ö(Next key) and press FWD/EDIT á(Save key).b) If a name is required, enter the name(p. 45). When finished, press Ö(Next key) and press FWD/EDIT á(Save key).•A beep sounds.•To continue storing other items, repeat from step 2.•To return to the standby mode, press(FUNCTION/EXIT/CH).•You can exit the programming mode any time by pressing (FUNCTION/EXIT/CH).•If the display shows “Directory full” in step 3, press (FUNCTION/EXIT/CH)to exit the list. To erase other stored items from the directory, see page 49.•After the maximum of 50 items has been stored, “Directory full” is also displayed.•You cannot store caller information in the directory if a phone number is notdisplayed.•If 3 beeps sound and the display shows “Save error” in step 3, move closer tothe base unit and start again from step 2.TURNER,CINDY 1-234-456-789011:20A JAN12 ✕310 new callsGF H=DirectoryHEditSave directoryGF H=YesEditHSave directoryGF H=YesEnter nameTURNER,CINDYIH G=NextUsing the Caller ListEnter nameIH G=NextTURNER,CINDY12344567890
39Cordless TelephoneFor assistance, please call: 1-800-211PANA(7262)1Lift the handset off the base unit and pressÖor Ñto enter the Caller List.2Press Öor Ñrepeatedly to find the calleryou want to erase from the Caller List.3Press (INTERCOM/CLEAR).•A beep sounds and the information is erased.•To erase other items, repeat from step 2.•To return to the standby mode, press (FUNCTION/EXIT/CH). To erase all entries in the Caller ListBefore erasing all entries, make sure that “0 new call” is displayed.1Lift the handset off the base unit and pressÖor Ñto enter the Caller List.2Press (INTERCOM/CLEAR).3Press Öor Ñto select “All clear”.4Press FWD/EDIT á(Yes key) or (INTERCOM/CLEAR).•A beep sounds and all entries are erased.Erasing Caller List InformationAfter checking the Caller List, you can erase some or all of the entries.Make sure the unit is in the standby mode initially. To erase a specific caller from the Caller ListREAGAN,TOM 1-888-777-666612:20A JAN12 √Clear10 new callsGF H=DirectoryExitHAll clearGF H=YesAll clear0 new callGF H=DirectoryHExitAll clearGF H=Yes
One-Touch Dialer40You can store a phone number in the (DIRECT) button of the handset. Thestored number is dialed with a one-touch operation.Storing a Phone Number in the DIRECT ButtonMake sure the unit is in the standby mode initially.1Press (FUNCTION/EXIT/CH).2Press Öor Ñrepeatedly until the arrowpoints to “Program”.3Press FWD/EDIT á(Yes key).4While the arrow points to “SaveDIRECT#”, press FWD/EDIT á(Yes key).5Enter a phone number, up to 22 digits.•Each time you press (INTERCOM/CLEAR) thedigit to the left of the cursor is erased. To eraseall digits, press and hold (INTERCOM/CLEAR).•To move the cursor, press BACK ÜorFWD/EDIT á.6Press Ö(Next key).•If you want to edit the entered number, pressÑ(Edit key) and return to step 5.7Press FWD/EDIT á(Save key).•A beep sounds.•To return to the standby mode, press(FUNCTION/EXIT/CH).•You can exit the programming mode any time by pressing (FUNCTION/EXIT/CH).•If a pause is required for dialing, (REDIAL/PAUSE) can be stored in a phonenumber in step 5. This counts as one digit (p. 51).IH G=Next1234567890123456789012F=EditH=Save1234567890123456789012Save DIRECT#HProgramLCD contrastGF H=YesHSave DIRECT#Set flash timeGF H=Yes1234567890123456789012IH G=Next
41Cordless TelephoneFor assistance, please call: 1-800-211PANA(7262)Dialing the Stored Number in the DIRECTButton1Press (DIRECT).•The stored number is displayed.2Press (TALK).•The number is dialed.•You can also dial the stored number by pressing (TALK) then pressing(DIRECT). (If your line has rotary or pulse service, any access numbers storedafter pressing (TONE) will not be dialed.)1234567890123456789012Talk1234567890123456789012
Using the Directory42You can store up to 50 names and phone numbers in the directory usingthe handset. All directory items are sorted by the first word in alphabeticalorder. Using the directory, you can make a call by selecting a name onthe handset display. Storing Names and Numbers in theDirectoryMake sure the unit is in the standby mode initially. (INTERCOM/CLEAR)(REDIAL/PAUSE)    ,      , BACK      , FWD/EDIT(FUNCTION/EXIT/CH)The dialing buttons canbe used to enter lettersand symbols.
43Cordless TelephoneFor assistance, please call: 1-800-211PANA(7262)1Press (FUNCTION/EXIT/CH).2While the arrow points to “Savedirectory”, press FWD/EDIT á(Yes key).•The display shows the number of stored itemsin the directory.3Enter a name, up to 15 characters usingthe dialing buttons (p. 45).•To move the cursor, press BACK ÜorFWD/EDIT á.•If a name is not required, press Ö(Next key)and go to step 5.4Press Ö(Next key).5Enter a phone number, up to 22 digits.•If you misdial, press (INTERCOM/CLEAR).Digits are erased from the right. To erase alldigits, press and hold (INTERCOM/CLEAR).6Press Ö(Next key).•If you want to change the storing name ornumber, press Ñ(Edit key) repeatedly toreach the desired display and change it.7Press FWD/EDIT á(Save key).•A beep sounds.•To continue storing other items, repeat from step 2.•To return to the standby mode, press(FUNCTION/EXIT/CH).•If a pause is required for dialing, (REDIAL/PAUSE) can be stored in a phonenumber in step 5. This counts as one digit (p. 51).•You can exit the programming mode any time by pressing (FUNCTION/EXIT/CH).•If the display shows “Directory full” in step 2, press (FUNCTION/EXIT/CH).To erase other stored items from the directory, see page 49.•After the maximum of 50 items has been stored, “Directory full” is alsodisplayed.HSave directoryRinger volumeGF H=YesEnter nameTom JonesIH G=NextDirectory=20 itemsEnter nameIH G=NextEnter phone no.0987654321IH G=NextTom Jones0987654321F=EditH=SaveTom Jones0987654321
44Using the Directory#& ’() ,–./1ABCabc2DEFdef3GHIghi4JKLjkl5MNOmno6PQRSp q r s 7TUVt uv8WXYZwxyz90BlankTo move the cursor to the leftTo move the cursor to the right(1)(2)(3)(4)(5)(6)(7)(8)(9)(0)BACKÜFWD/EDITá1234567891011Number of times key is pressedSelecting Characters to Enter NamesThe handset dialing buttons ((0) to (9)), BACK Üand FWD/EDIT ácan be used to enter lettersand symbols. The letters are printed on thedialing buttons.Pressing each button selects a character asshown below.Keys•To enter another character using the same dialing button, press FWD/EDIT áto move the cursor to the next space.If you make a mistake while entering a nameUse BACK Üor FWD/EDIT áto move the cursor to the incorrectcharacter, press (INTERCOM/CLEAR) to delete and enter the correctcharacter. Each time you press (INTERCOM/CLEAR), a character is erasedfrom the right. To erase all characters, press and hold(INTERCOM/CLEAR).LOUD LOUD SESEARCRCHONOFFBACKREDI LREDIALPAUSEFWD EDITEDITFUNCTION  EXITFUNCTION  EXITTONETONEINTERCOM/CLEARINTERCOM/CLEARTALKDIRECT1234567890CHSTOPALL L MSGANS OFFANS S ONSKIPKIPNEW W MSGREPEPEATFLFLA HSHCCALLWL WAITPLAYBACK
For assistance, please call: 1-800-211PANA(7262) 45Cordless TelephoneFor example, to enter “Tom Jones”:1Press (FUNCTION/EXIT/CH).2While the arrow points to “Savedirectory”, press FWD/EDIT á(Yes key).3Press (8).4Press (6) six times, then press FWD/EDITáto move the cursor to the right.5Press (6) four times.6Press FWD/EDIT átwice to enter a blank.7Press (5).8Press (6) six times, then press FWD/EDITáto move the cursor to the right.9Press (6) five times.10Press (3) five times.11Press (7) eight times.12When finished, press Ö(Next key).•To enter a phone number and continuestoring, see page 43, from step 5.Enter nameTom JonesIH G=NextTToTomTom Tom JTom JoTom JonTom JoneDirectory=20 itemsEnter nameIH G=NextEnter phone no.HSave directoryRinger volumeGF H=Yes
46Using the DirectoryFinding Items in the DirectoryYou can search the directory using the handset.Make sure the unit is in the standby mode initially.1Press BACK Üor FWD/EDIT áto enter the directory list.2Press Öor Ñ.•The first item is displayed.3Press Öor Ñrepeatedly until the desired item is displayed..•All directory items are stored in theorder shown on the right.To search for a name by initial#Press the dialing button for thefirst letter of the desired nameuntil any name with the sameinitial is displayed (see theIndex table on page 47).Ex. To find “Frank”, press (3)repeatedly until the first itemunder “F” is displayed.$Press Örepeatedly until thename is displayed.Alphabet letterSymbolTelephone numberNumber(If no name is stored)Press Ö.Press Ñ.•You can leave the directory list any time by pressing (FUNCTION/EXIT/CH). •If “No items stored” is displayed in step 2, the directory is empty. •In step 1, you can go to the Caller List by pressing FWD/EDIT á(p. 34).    ,      , BACK      , FWD/EDIT(FUNCTION/EXIT/CH)Directory listGFH=Caller’s listAnn1234567890
47Cordless TelephoneFor assistance, please call: 1-800-211PANA(7262)1Press BACK Üor FWD/EDIT áto enterthe directory list.2Press Öor Ñ.•The first item is displayed.3Press Öor Ñrepeatedly to find thedirectory item that you want to dial.•To search for the item by initial, see page 46.•To exit the directory, press(FUNCTION/EXIT/CH).4Press (TALK).•The number is dialed automatically.5To hang up, press (TALK) or place thehandset on the base unit.Other symbols, 1A, B, C, 2D, E, F, 3G, H, I, 4J, K, L, 5Directory listGFH=Caller’s listDialing from the DirectoryMake sure the unit is in the standby mode initially.(1)(2)(3)(4)(5)(6)(7)(8)(9)(0)IndexKeys IndexKeysM, N, O, 6P, Q, R, S, 7T, U, V, 8W, X, Y, Z, 90Index tableFrank4567890Talk4567890
48Using the DirectoryEditing an Item in the DirectoryMake sure the unit is in the standby mode initially.1Press BACK Üor FWD/EDIT áto enter the directory list.2Press Öor Ñ.•The first item is displayed.3Press Öor Ñrepeatedly to find thedirectory item you want to change, andpress FWD/EDIT á.•To search for the item by initial, see page 46.•If you do not need to change the name, go tostep 5.4Edit the name using the dialing buttons,BACK Üor FWD/EDIT á(p. 45), up to 15characters.5Press Ö(Next key).•If you do not need to change the number, go tostep 7.6Add a number to the current number.•Each time you press (INTERCOM/CLEAR), a digit is erased from the right. To erase alldigits, press and hold (INTERCOM/CLEAR).7Press Ö(Next key).•If you want to change the storing name ornumber, press Ñ(Edit key) repeatedly toreach the desired display and change it.8Press FWD/EDIT á(Save key).•A beep sounds.•To continue editing other items, repeat fromstep 3.•To return to the standby mode, press(FUNCTION/EXIT/CH).•You can exit the programming mode any time by pressing (FUNCTION/EXIT/CH).Jane1234567Enter nameJane WalkerIH G=Next1234567IH G=Next0981234567IH G=NextEnter nameJaneIH G=NextDirectory listGFH=Caller’s listJane Walker0981234567F=EditH=SaveJane Walker0981234567
49Cordless TelephoneFor assistance, please call: 1-800-211PANA(7262)Erasing an Item from the DirectoryMake sure the unit is in the standby mode initially.1Press BACK Üor FWD/EDIT áto enterthe directory list.2Press Öor Ñ.•The first item is displayed.3Press Öor Ñrepeatedly to find thedirectory item you want to erase.•To search for the item by initial, see page 46.4Press (INTERCOM/CLEAR).•To stop erasing, press BACK Ü(No key).5Press FWD/EDIT á(Yes key) or(INTERCOM/CLEAR).•A beep sounds and the item is erased.•To erase other items, repeat from step 3.•To return to the standby mode, press(FUNCTION/EXIT/CH).•You can exit the programming mode any time by pressing (FUNCTION/EXIT/CH).Helen1234567890Clear?I=No     H=YesClearDirectory listGFH=Caller’s list
50During an intercom call:•Intercom calls can only be ended with the handset.•If the handset user has difficulty hearing the base unit user, decrease thebase unit speaker volume by pressing VOLUME Ö.•If an incoming call is received, the intercom call stops and the unit starts toring. To answer, press (TALK).IntercomA 2-way intercom is possible between the handset and the base unit.Paging the base unit from the handset1Handset:Press (INTERCOM/CLEAR).Talk to the paged party afterthe beeps.•“Intercom” is displayed.2Base unit:When the other party’svoice is heard, answerusing the MIC.3Handset:To end the intercom, press(INTERCOM/CLEAR).Paging the handset from the base unit (Handset locator)Using this feature, you can locate a misplaced handset.1Base unit:Press (LOCATOR/INTERCOM).•The handset beeps for 1 minute and “Paging Press INTERCOM” isdisplayed.•To stop paging, press (LOCATOR/INTERCOM) again.2Handset:Press (INTERCOM/CLEAR) to answer.•“Intercom” is displayed.3Base unit:Talk into the MIC.4Handset:To end the intercom, press (INTERCOM/CLEAR).(INTERCOM/CLEAR)(LOCATOR/INTERCOM) MIC
Special Features51Cordless TelephoneFor assistance, please call: 1-800-211PANA(7262)Automatic Security Code SettingEach time you place the handset on the base unit, the unit automaticallyselects one of more than a million security codes. These codes helpprevent the unauthorized use of your telephone line by another cordlesstelephone user.For Call Waiting Service UsersPress (FLASH/CALL!WAIT/PLAYBACK) if you hear a call-waiting tone whiletalking.•The first call is put on hold and you can answer the second call.•To return to the first caller, press (FLASH/CALL!WAIT/PLAYBACK) again.•The call waiting service cannot be used when:—the answering system is recording someone’s message, or—a parallel connected telephone is in use.•If this function does not operate properly, consult your telephone company fordetails.Call Waiting Caller ID FeatureCall Waiting Caller ID Feature allows yourhandset to display the second caller’sinformation. After you hear a call-waiting tonewhile talking, the handset will display the caller’sname with the phone number and“----Waiting----”.•Please contact your telephone company for details and availability in your area.How to Use the PAUSE Button(For Analog PBX Line/Long Distance Service Users)We recommend you press (REDIAL/PAUSE) if a pause is required fordialing with a PBX or to access a long distance service.Ex. Line access number (9) (PBX)(9) \(REDIAL/PAUSE) \•Pressing (REDIAL/PAUSE) once creates a 3.5 second pause. This preventsmisdialing when you redial or dial a stored number.•Pressing (REDIAL/PAUSE) more than once increases the length of the pausebetween numbers.Phone numberBROWN,NANCY 1-000-222-3333----Waiting----
52Flash time:700msGF H=SaveSave DIRECT#HSet flash timeGF H=YesSpecial FeaturesTemporary Tone Dialing(For Rotary or Pulse Service Users)Press (TONE) before entering access numbers which require tone dialing.•The dialing mode changes to tone. You can enter numbers to access ananswering service, electronic banking service, etc. When you hang up, the modewill return to pulse.•Access numbers entered after pressing (TONE) will not be included whenredialing.FLASH ButtonPressing (FLASH/CALL!WAIT/PLAYBACK) allows you to use specialfeatures of your host PBX such as transferring an extension call oraccessing special telephone services (optional) such as call waiting.Selecting the flash timeThe flash time depends on your telephone exchange or host PBX. You can select the following flash times: “700, 600, 400, 300, 250, 110,100 or 90 ms (milliseconds)”. Your phone comes from the factory set to“700 ms”. Make sure the unit is in the standby mode initially. 1Press (FUNCTION/EXIT/CH).2Press Öor Ñrepeatedly until the arrow points to “Program”, andpress FWD/EDIT á(Yes key).3Press Öor Ñrepeatedly until the arrowpoints to “Set flash time”, and pressFWD/EDIT á(Yes key).4Press Öor Ñrepeatedly until the desired time is displayed, andpress FWD/EDIT á(Yes key).•A beep sounds. •To return to the standby mode, press (FUNCTION/EXIT/CH).•You can exit the programming mode any time by pressing(FUNCTION/EXIT/CH).•If you are connected via a PBX, a longer flash time may be necessary to usePBX functions (transferring a call etc.). Consult your PBX supplier for the correctsetting.
53Answering SystemAutomatic Answering OperationFor assistance, please call: 1-800-211PANA(7262)When the unit answers a call, a greeting message is played and thecaller’s message is recorded. •The total recording time (including greeting message) is about15 minutes. If messages are recorded in noisy rooms, the time maybe shortened by up to 3 minutes.•A maximum of 64 messages (including greeting message) can berecorded.Setting the Unit to Answer CallsPress (ANSWER!ON) to turn on the answering system.•The indicator lights and “Answer set” isheard.•The unit will announce the remainingrecording time if it is less than 5minutes. •If you hear “Memory full”, “ ” isdisplayed on the base unit and theANSWER ON indicator flashes rapidly,erase some, or all, of the messages(p. 57).FULL•If you do not want the unit to answer calls, press (ANSWER!ON) again to turn offthe answering system. The indicator light goes out and “Answer off” is heard.•You can also turn on the answering system remotely using any other phone(p. 63).Monitoring incoming callsWhile a call is being recorded, you can monitor it through the speaker. To answer the call with the handset, lift the handset off the base unit orpress (TALK). The unit stops recording.(ANSWER!ON)and Indicator
54Listening to MessagesYou can see the total number of recorded messages on the base unitdisplay. If the ANSWER ON indicator flashes, new messages have beenrecorded.Listening to only newmessagesPress (NEW!MESSAGE/SLOW!TALK)briefly.•The unit announces thenumber of new messages andplays them back.Listening to all recordedmessagesPress and hold(NEW!MESSAGE/SLOW!TALK) untilplayback starts.•At the end of the lastmessage, “End of finalmessage” is heard. The unitwill announce theremaining recording time ifit is less than 5 minutes.(STOP)(REPEAT)(SKIP)(NEW!MESSAGE/SLOW!TALK)ANSWER ON IndicatorDuring playback, the display shows the message number.To increase the volume, press VOLUME Ñ.To decrease, pressVOLUME Ö.Slow Talk Message PlaybackFor easier listening of recorded messages, you can slow down theplayback speed by pressing (NEW!MESSAGE/SLOW!TALK) duringplayback. Each time you press the button, the playback speed will changeto slow/normal.Press (NEW!MESSAGE/SLOW!TALK) during playback.•The playback speed will slow down by 30%.•To return to the normal speed, press (NEW!MESSAGE/SLOW!TALK) againduring playback.•The playback speed will return to normal after playing back all messages.
55Answering SystemFor assistance, please call: 1-800-211PANA(7262)For Caller ID service users (p. 32)During playback, when the handset is on the base unit, the handsetdisplay will show the name and/or number of the caller whose messageis being played.To call back the displayed number:During playback, lift the handset and press (TALK) within 10 seconds.•The unit stops playback and automatically dials the displayed phone number.•After listening to new incoming messages, “√” will be added to the call entriesin the Caller ID Caller List (p. 35).To stopoperationPress (STOP).•To resume playback, press (NEW!MESSAGE/SLOW!TALK).•If you do not press any button for 60 seconds or if you press(STOP) again, the unit will return to the standby mode.To repeat from the beginning of the messagePress (REPEAT). •If you press within 5 seconds of playback, the previousmessage will be played.To skip to the next messagePress (SKIP).During playbackTo repeatmessageTo skipmessage
56From the HandsetIf someone else is in the room and you want to listen to the recordedmessages privately, you can use the handset.1Handset:Press(FLASH/CALL!WAIT/PLAYBACK).•The number of new messages is heard on the handset.2Base unit:To listen to new messages, press(NEW!MESSAGE/SLOW!TALK)briefly. To listen to all messages,press and hold(NEW!MESSAGE/SLOW!TALK) untilplayback starts.•The messages will be heardon the handset.•(REPEAT), (SKIP) and(STOP) can also be usedduring playback (p. 55).3When finished, press(FLASH/CALL!WAIT/PLAYBACK)or place the handset on thebase unit.•You can also listen to messages without using the base unit. See page 64.Listening to Messages
57Answering SystemErasing MessagesFor assistance, please call: 1-800-211PANA(7262)The unit will announce the remaining recording time after playback, if it isless than 5 minutes. New messages cannot be recorded when:—“Memory full” is heard.—“ ” is displayed on the base unit.—the ANSWER ON indicator flashes rapidly.Erase some, or all, of the messages. We recommend you eraseunnecessary messages after each playback.Erasing a specific messagePress (ERASE) while the message you want to erase is being played.•The unit erases the message.•A short beep will sound and the unit will continue to play the next message.Erasing all messagesAll recorded messages, except the greeting message, can be erased atone time.1Press (ERASE).•“Press ERASE again to erase allmessages” is heard.2Within 5 seconds, press (ERASE)again.•A beep sounds and “No messages” isheard.•The base unit display shows “0”.•The information in the Caller List will not be erased. To erase Caller Listinformation, see page 39.FULL(ERASE)ANSWER ON Indicator
58Remote Operation from a Touch Tone PhoneYou can operate the answering system from any touch tone phone. A synthesized voice menu will guide you on how to operate the unit(p. 60).•To skip the voice menu and operate theunit directly, see page 62.Summary of remote operationCall your unit from a touch tone phone.Enter your remote code (p. 59) during or after the greeting message.•The number of new messages is heard.After 3 seconds, the voice menu will start (p. 60).Follow the menu or enter the direct commands (p. 62).To end remote operation, hang up.•The messages are saved.•The unit will announce the remaining recording time after playback, if it is lessthan 5 minutes.
59Answering SystemFor assistance, please call: 1-800-211PANA(7262)Setting the Remote CodeThe remote code prevents unauthorized people from accessing your unitand listening to your messages. Choose any 2-digit number (00–99). The factory preset remote code is “11”. If you do not program your ownremote code, you can use “11”. Make sure the unit is in the standby mode initially. 1Press (FUNCTION/EXIT/CH).2Press Öor Ñrepeatedly until the arrowpoints to “Program”.3Press FWD/EDIT á(Yes key).4Press Öor Ñrepeatedly until the arrowpoints to “TAD program”.5Press FWD/EDIT á(Yes key).•“P” is displayed on the base unit.6Press (1).•The current remote code is displayed on thebase unit.7Enter a remote code using a 2-digitnumber (00–99).8Press FWD/EDIT á(Save key).•A beep sounds.•To return to the standby mode, press (FUNCTION/EXIT/CH).•If 6 beeps sound during programming, a wrong key was pressed. Enter thecorrect number.To check the remote code Repeat steps 1 to 6.•The current remote code is displayed on the base unit. When finished, press(FUNCTION/EXIT/CH).Talk switchingHTAD programGF H=YesAnsweringsystem setting.See base unit.HProgramLCD contrastGF H=YesHSave DIRECT#Set flash timeGF H=Yes
60Remote Operation from a Touch Tone PhoneVoice MenuThe shaded boxes are voice prompts.Press 1 to play back all messages.Press 2 for other functions.Press 1 to play back new messages.Press 2 for other functions.Press 1 to record your message.Press 2 for other functions.Press 1 to erase all messages.Press 2 for other functions.Press 1 to record your greeting.Press 2 for other functions.All messageplayback.New messageplayback.Please leaveyour message.Press 7 to recordyour greeting.Press 9 to endrecording.Press (2).Press (2).Press (2).Press (2).Press (2).Press (1).Press (1).Press (1).Press (1).Press (1).
61Answering SystemFor assistance, please call: 1-800-211PANA(7262)All Message PlaybackAll recorded messages are played back. At the end of the lastmessage, “End of final message” is heard. The unit willannounce the remaining recording time if it is less than 5 minutes.New Message PlaybackOnly new messages are played back. At the end of the lastmessage, “End of final message” is heard. The unit willannounce the remaining recording time if it is less than 5 minutes.Recording a Memo MessageYou can leave a personal message.1. Talk after you hear “Please leave your message”.2. When you finish recording, hang up.Erasing All MessagesAll recorded messages (except greeting message) areerased.Recording a Greeting MessageYou can re-record your greeting message.1. Press (7).You will hear a voice prompt followed by a long beep.2. After the beep, talk for up to 2 minutes.3. When you finish recording, press (9).4. Your greeting will be played back for confirmation.•3 seconds after playback, the voice menu will start again from the beginning.•If you hear “Memory full” after playback, erase some, or all, of the messages(p. 63).
62[Remote Operation from a Touch Tone PhoneDirect Remote OperationOnce you have entered the remote code, you can also control your unitby direct commands instead of using the voice menu. To end the remoteoperation, hang up anytime.Direct commandsNEW MESSAGEPLAYBACKALL MESSAGEPLAYBACKREPEAT (During playback)SKIP(During playback)CHANGINGPLAYBACKSPEED(During playback)STOPGREETINGMESSAGERECORDING(4)(5)(1)(2)(9)(7)(9)•Only new messages are played back.•All messages are played back.•The current message is repeated.•The current message is skipped.The next message is played.•Each time you press the button, theplayback speed will change toslow/normal.•Operation is stopped temporarily.•To resume operation, enter a directcommand within 15 seconds, or thevoice menu will start.•A long beep sounds.•After the beep, talk immediately for up to2 minutes.•The recording is stopped.•The recorded message is played.RECORD[(3)
63Answering SystemFor assistance, please call: 1-800-211PANA(7262)ERASING ASPECIFICMESSAGE(During playback)ERASING ALLMESSAGESANSWERINGSYSTEM OFF (0)•The current message is erased.•A short beep will sound and the nextmessage will be played.•All recorded messages are erased.•A long beep sounds and “No messages” isheard.•The unit hangs up and will not answercalls until turned on again.Turning on the answering systemCall your unit and wait for 15 rings.•The unit will answer and the greeting message will be played.•The answering system will turn on. Hang up or enter the remote code for otheroptions.•When turning on the answering system using a rotary or pulse service telephone,you cannot enter the remote code for other options.Skipping the greeting messageAfter calling your unit, press (*) during the greeting message.•The unit skips the rest of the greeting message and you can start recording yourmessage after the long beep.(*) (4)(*) (5)
64Remote Operation with the HandsetVoice menuIf no commands are entered after you press(FLASH/CALL!WAIT/PLAYBACK), the unit will start the following voicemenu.“Press 4 to play back new messages. Press 5 to play back all messages.”•You can enter direct commands even if the voice menu has started.You can operate your answering systemwith the handset. The announcements and recordedmessages can only be heard with thehandset.Summary of remote operationPress (FLASH/CALL!WAIT/PLAYBACK).•The number of new messages is heard.•“Remote operation” is displayed on the handset.Enter the desired direct commands (p. 65).•If you do not enter a command, the voice menu will start (see below).•After the voice menu, all message playback will start.To end remote operation, press (FLASH/CALL!WAIT/PLAYBACK).•The messages are saved.•The unit will announce the remaining recording time after playback, if it is lessthan 5 minutes.•If the unit starts to ring during the remote operation, press (TALK) to answer thecall. The remote operation is ended.•If you hear “Memory full” after playback, erase some, or all, of the messages(p. 65).(FLASH/CALLÒWAIT/PLAYBACK)
65Answering SystemFor assistance, please call: 1-800-211PANA(7262)Direct commandsNEW MESSAGEPLAYBACKALL MESSAGEPLAYBACKREPEAT (During playback)SKIP(During playback)CHANGINGPLAYBACKSPEED(During playback)STOPERASING ASPECIFICMESSAGE(During playback)ERASING ALLMESSAGESANSWERINGSYSTEM OFFANSWERINGSYSTEM ON(4)(5)(1)(2)(9)(*) (4)(*) (5)•Only new messages are played back.•All messages are played back.•The current message is repeated.•You can also press BACK Üto repeat amessage.•The current message is skipped.The next message is played.•You can also press FWD/EDIT áto skipa message.•Each time you press the button, theplayback speed will change toslow/normal.•Operation is stopped temporarily.•To resume operation, enter a directcommand within 15 seconds, or thevoice menu will start (p. 64).•The current message is erased.•A short beep will sound and the nextmessage will be played.•All recorded messages are erased.•A long beep sounds and “No messages” isheard.•“Answer off” is heard and the answeringsystem is turned off.•“Answer set” is heard and the answeringsystem is turned on.(0)(8)(3)
66Wall MountingThis unit can be mounted on a wall phone plate.2Connect the AC adaptor.3Tuck the telephone line cord insidethe wall mounting adaptor, thenpush it in the direction of the arrow.•The word “UP” should face upward.1Push the hook and turn it around.Turn the hook until a click is heard.To PowerOutlet
67Useful InformationFor assistance, please call: 1-800-211PANA(7262)4Connect the telephone line cord.Mount the unit, then slide down.•Raise the antenna.•Fasten the telephone line cord toprevent it from being disconnected.5To charge the handset battery:Fix the charge contacts (#) and insertthe hook to the handset hole ($).•The IN USE/CHARGE indicator lights.21HookHoleHook
68Battery ReplacementA nickel cadmium battery that is recyclable powers theproduct you have purchased. At the end of its useful life,under various state and local laws, it is illegal to dispose ofthis battery into your municipal waste stream. Please call 1-800-8-BATTERY for information on how to recycle thisbattery.If “Recharge battery” is displayed and/or “” flashes after beingfully charged, replace the battery with a new Panasonic P-P510(N4HKGMB00001) battery. To order, call the accessories telephonenumber on page 2.1Press the notch on thebattery cover firmly and slideit as indicated by the arrow.2Remove the old battery. Then install the new one.•Insert the battery plug into theconnector as shown.3Close the cover. Make sure you chargethe new battery for about 6 hours inorder to display the battery strengthprompt correctly (p. 13).RedLeadBlack LeadBlackLead
For assistance, please call: 1-800-211PANA(7262) 69Useful InformationAdding Another PhoneThis unit will not function during a power failure. To connect a standardtelephone on the same line, use the Panasonic T-adaptor KX-J66.To order, call the accessories telephone number on page 2.Standard TelephoneSingle-LineTelephone JackT-Adaptor (KX-J66)TelephoneLine Cord
70Before Requesting HelpProblem“No link to basePlace on cradle andtry again.” is displayedand an alarm tone sounds.Static, sound cuts in/out,fades. Interference fromother electrical units.The handset does not ring.The handset display isblank.The handset display is stillblank after pressing Ö, Ñ,BACK Üor FWD/EDIT á.You cannot store a nameand phone number in thedirectory.While programming orsearching, the unit starts toring and stops the program/search.Remedy•You are too far from the base unit. Movecloser and try again.•Place the handset on the base unit andtry again.•Plug in the AC adaptor.•Raise the base unit antenna.•Locate the handset and the base unitaway from other electrical appliances(p. 3).•Move closer to the base unit.•Raise the base unit antenna.•Press (FUNCTION/EXIT/CH) to select aclearer channel.•The ringer volume is set to OFF. Set toHIGH or LOW (p. 20).•The handset is in the standby mode(p. 9). Press Ö, Ñ, BACK ÜorFWD/EDIT áto turn the display on.•Charge the battery fully (p. 13).•You cannot store an item in the directorywhile the unit is in the talk mode orintercom mode, or while the answeringsystem is in use.•Do not pause for over 60 seconds whilestoring.•To answer the call, press (TALK). Startagain from the beginning after hangingup.Cordless Telephone
71Useful InformationFor assistance, please call: 1-800-211PANA(7262)ProblemThe unit does not display thecaller’s name and/or phonenumber.The handset display goes tothe standby mode whileviewing the Caller List.When a second call isreceived during aconversation, the unit doesnot display the new caller’sname and/or phone number.(LOCATOR/INTERCOM) doesnot function.You cannot redial bypressing (REDIAL/PAUSE).Remedy•You need to subscribe to a Caller IDservice from a telephone company.•Other telephone equipment may beinterfering with your phone. Disconnectit and try again.•Other electrical appliances connected tothe same outlet may be interfering withthe Caller ID information.•Telephone line noise may be affectingthe Caller ID information.•Do not pause for over 60 seconds whilesearching.•The line mode selection is incorrect. Seepage 17.•The handset is too far from the base unit.•The handset is engaged in an outsidecall, viewing the Caller List/directory listor listening to messages. Wait until theIN USE/CHARGE indicator light goesout.•If the last number dialed was more than32 digits long, the number will not beredialed correctly.•Access numbers entered after pressing(TONE) will not be included whenredialing.•The button has a double function aseither redial or pause. It will redial thelast number dialed if pressed at theoutset of a call (p. 29). If anothernumber has been dialed first, it willoperate as a pause button (p. 51).
72Before Requesting HelpProblemThe answering system is on,but incoming messages arenot recorded.You cannot listen to therecorded messages.“” is displayed and theANSWER ON indicatorflashes rapidly, and no newmessages are recorded.You cannot operate theanswering system at thebase unit.You cannot operate theanswering system from atouch tone phone.FULLRemedy•The recording time is set to “Greetingonly”. Select “1 minute” or “3 minutes”(p. 27).•Memory is full. Erase some, or all, of themessages (p. 57).•Make sure that the unit is in the standbymode.•Memory is full. Erase some, or all, of themessages (p. 57).•The handset user is operating theanswering system, or is engaged in anoutside call. Wait until the INUSE/CHARGE indicator light goes out.•Make sure you enter the correct remotecode.•The answering system may not respondif the tones are too short to activate theunit. Press each button firmly.•The answering system is off. Turn it on(p. 63).Answering SystemProblemYou cannot have aconversation using thehandset.You cannot have aconversation using theheadset.Remedy•When the headset is connected (p. 15),you must use the headset to talk withthe caller. To have a normal cordlessphone conversation, disconnect theheadset.•Make sure that the headset is connectedproperly (p. 15).
73Useful InformationFor assistance, please call: 1-800-211PANA(7262)ProblemYou cannot operate theanswering system with thehandset.While recording a greetingmessage, the unit starts toring and stops recording.During playback, the unitstarts to ring and stopsplayback.The handset does notdisplay the name and/ornumber of the caller whosemessage is being played.Remedy•Someone is operating the answeringsystem.•You are too far from the base unit. Movecloser to the base unit.•The unit is recording a message. To answer the call, press (TALK).•To answer the call, lift the handset offthe base unit or press (TALK). Startagain from the beginning after hangingup.•To answer the call, lift the handset offthe base unit or press (TALK). To resume playback, press(NEW!MESSAGE/SLOW!TALK) afterhanging up.•Place the handset on the base unitcorrectly (p. 56).•If the caller is not stored in the CallerList, the handset will not display thecaller’s information.
74Before Requesting HelpGeneralProblemThe unit does not work.You cannot program items,such as the dialing mode.Previously programmedinformation is erased.“Recharge” is displayed onthe handset, “” flashesor the unit beepsintermittently.You charged the batteryfully, but “Recharge” is stilldisplayed and/or “”continues to flash.Remedy•Check the settings (p. 12–17).•Charge the battery fully (p. 13).•Clean the charge contacts and chargeagain (p. 14).•Install the battery properly (p. 68).•Place the handset on the base unit andunplug the AC adaptor to reset. Plug in,and try again.•Re-install the battery and place thehandset on the base unit (p. 68). Tryagain.•Programming is not possible while theunit is in the talk or speakerphone mode,when viewing the Caller List/directorylist, or while the answering system is inuse.•Do not pause for over 60 seconds whileprogramming.•Move closer to the base unit.•Make sure that the unit is in the standbymode.•If a power failure occurs, programmedinformation may be erased. Reprogramif necessary.•Charge the battery fully (p. 13).•Clean the charge contacts and chargeagain (p. 14).•Install a new battery (p. 68).
75Useful InformationFor assistance, please call: 1-800-211PANA(7262)ProblemThe IN USE/CHARGEindicator light does not goout after the battery hasbeen charged.If you cannot solve yourproblem.Remedy•This is normal.•Call our customer call center at1-800-211-PANA(7262).•Panasonic’s e-mail address for customerinquiries:consumerproducts@panasonic.com for customers in the USA or Puerto RicoONLY
76Important Safety InstructionsWhen using this unit, basic safety precautions should always be followedto reduce the risk of fire, electric shock, or personal injury.11. Read and understand all instructions.12. Follow all warnings and instructions marked on this unit.13. Unplug this unit from AC outlets before cleaning. Do not use liquid oraerosol cleaners. Use a damp cloth for cleaning.14. Do not use this unit near water, for example, near a bathtub,washbowl, kitchen sink, or the like.15. Place this unit securely on a stable surface. Serious damage and/orinjury may result if the unit falls.16. Do not cover slots and openings on the unit. They are provided forventilation and protection against overheating. Never place the unitnear radiators, or in a place where proper ventilation is not provided.17. Use only the power source marked on the unit. If you are not sure ofthe type of power supplied to your home, consult your dealer or localpower company.18. Do not place objects on the power cord. Install the unit where no onecan step or trip on the cord.19. Do not overload wall outlets and extension cords. This can result inthe risk of fire or electric shock.10. Never push any objects through slots in this unit. This may result inthe risk of fire or electric shock. Never spill any liquid on the unit.11. To reduce the risk of electric shock, do not disassemble this unit.Take the unit to an authorized servicenter when service is required.Opening or removing covers may expose you to dangerous voltagesor other risks. Incorrect reassembly can cause electric shock whenthe unit is subsequently used.12. Unplug this unit from the wall outlet and refer servicing to anauthorized servicenter when the following conditions occur:A. When the power supply cord or plug is damaged or frayed.B. If liquid has been spilled into the unit.C. If the unit has been exposed to rain or water.D. If the unit does not work normally by following the operatinginstructions. Adjust only controls covered by the operatinginstructions. Improper adjustment may require extensive work byan authorized servicenter.E. If the unit has been dropped or physically damaged.F. If the unit exhibits a distinct change in performance.13. During thunderstorms, avoid using telephones except cordless types.There may be a remote risk of an electric shock from lightning.14. Do not use this unit to report a gas leak, when in the vicinity of theleak.SAVE THESE INSTRUCTIONS
77Useful InformationFor assistance, please call: 1-800-211PANA(7262)CAUTION:To reduce the risk of fire or injury to persons, read and follow theseinstructions.1. Use only the battery(ies) specified.2. Do not dispose of the battery(ies) in a fire. They may explode. Checkwith local waste management codes for special disposal instructions.3. Do not open or mutilate the battery(ies). Released electrolyte iscorrosive and may cause burns or injury to the eyes or skin. Theelectrolyte may be toxic if swallowed.4. Exercise care in handling batteries in order not to short the battery toconductive materials such as rings, bracelets, and keys. The batteryand/or conductor may overheat and cause burns.5. Charge the battery(ies) provided with or identified for use with thisproduct only in accordance with the instructions and limitationsspecified in this manual.WARNING:TO PREVENT FIRE OR SHOCK HAZARD, DO NOT EXPOSE THISPRODUCT TO RAIN OR ANY TYPE OF MOISTURE. •The AC adaptor is used as the main disconnect device, ensure that theAC outlet is located/installed near the unit and is easily accessible.
78FCC and Other InformationIf requested by the telephone company, inform them as follows:FCC Registration No.  . . . . . . . . . . . .  (found on the bottom of the unit)Ringer Equivalence  . . . . . . . . . . . . . . . . . . . . . . . . .  0.1BThe particular telephone line to which the equipment is connected.This unit must not be connected to a coin operated line.If you are on a party line, check with your local telephone company.Ringer Equivalence No. (REN):The REN is useful in determining the quantity of devices you may connect to yourtelephone line and still have all of those devices ring when your telephone numberis called. In most, but not all areas, the sum of the REN’s of all devices connectedto one line should not exceed five (5.0). To be certain of the number of devicesyou may connect to your line, as determined by the REN, you should contact yourlocal telephone company to determine the maximum REN for your calling area. In the event terminal equipment causes harm to the telephone network, the telephonecompany should notify the customer, if possible, that service may be stopped.However, where prior notice is impractical, the company may temporarily ceaseservice providing that they:(a) Promptly notify the customer.(b) Give the customer an opportunity to correct the problem with their equipment.(c) Inform the customer of the right to bring a complaint to the FederalCommunication Commission pursuant to procedures set out in FCC Rules andRegulations Subpart E of Part 68.The Telephone Company may make changes in its communications facilities,equipment, operations or procedures, where such action is reasonably required inthe operation of its business and is not inconsistent with the rules and regulationsin FCC Part 68.If such changes can be reasonably expected to render any customer terminalequipment incompatible with telephone company communications facilities, orrequire modification or alteration of such terminal equipment, or otherwise materiallyaffect its use or performance, the customer shall be given adequate notice inwriting, to allow the customer an opportunity to maintain uninterrupted service.When programming emergency numbers and/or making test calls to emergencynumbers:1. Remain on the line and briefly explain to the dispatcher the reason for the callbefore hanging up.2. Perform such activities in the off-peak hours, such as early morning hours orlate evenings.This device complies with Part 15 of the FCC Rules. Operation is subject to thefollowing two conditions: (1) This device may not cause harmful interference, and(2) this device must accept any interference received, including interference thatmay cause undesired operation.Privacy of communications may not be ensured when using this phone.
79Useful InformationFor assistance, please call: 1-800-211PANA(7262)CAUTION:Any changes or modifications not expressly approved by the party responsible forcompliance could void the user’s authority to operate this device.Note:This equipment has been tested and found to comply with the limits for a Class Bdigital device, pursuant to Part 15 of the FCC Rules. These limits are designed toprovide reasonable protection against harmful interference in a residentialinstallation. This equipment generates, uses, and can radiate radio frequencyenergy and, if not installed and used in accordance with the instructions, maycause harmful interference to radio communications. However, there is noguarantee that interference will not occur in a particular installation. If thisequipment does cause harmful interference to radio or television reception, whichcan be determined by turning the equipment off and on, the user is encouraged totry to correct the interference by one or more of the following measures:—Reorient or relocate the receiving antenna.—Increase the separation between the equipment and receiver.—Connect the equipment into an outlet on a circuit different from that to which thereceiver is connected.—Consult the dealer or an experienced radio/TV technician for help.Some cordless telephones operate at frequencies that may cause interference tonearby TVs and VCRs. To minimize or prevent such interference, the base of thecordless telephone should not be placed near or on top of a TV or VCR. Ifinterference is experienced, move the cordless telephone further away from theTV or VCR. This will often reduce, or eliminate, interference.Operating near 2.4GHz electrical appliances may cause interference. Move awayfrom the electrical appliances and/or press the CH (Channel) button.CAUTION:To comply with FCC RF exposure requirements, the base unit should be installedwith its antenna located at 20 cm or more from persons and handset should becarried with the specific belt-clip provided for the handset to ensure compliance.Other non-tested belt-clips or similar body-worn accessories may not comply,therefore, should be avoided.•Environment — do not place the unit in a room where the temperature is lessthan 5°C (41°F) or greater than 40°C (104°F). Allow 10 cm (4") clearancearound the unit for proper ventilation. Avoid excessive smoke, dust, mechanicalvibration, shock, or direct sunlight.•Medical —consult the manufacturer of any personal medical devices, such aspacemakers, to determine if they are adequately shielded from external RF(radio frequency) energy. (The unit operates in the frequency range of 2401MHzto 2472MHz, and the power output level can range from 0.001 watts to 0.10watts.) Do not use the unit in health care facilities if any regulations posted in thearea instruct you not to do so. Hospitals or health care facilities may be usingequipment that could be sensitive to external RF (radio frequency) energy.•Routine care — wipe the unit with a soft cloth. Do not use benzine, thinner, orany abrasive powder. When you leave the unit unused for a long period of time,unplug the AC adaptor from the outlet.•If there is any trouble — disconnect the unit from the telephone line and connecta known working phone. If the known working phone operates properly, have yourunit repaired by one of the authorized Panasonic Factory Service Centers. If theknown working phone does not operate properly, consult your telephone company.
For product service•Call 1-800-211-PANA(7262) for the location of an authorized servicenter.•Panasonic’s e-mail address for customer inquiries:consumerproducts@panasonic.com for customers in the USA or Puerto Rico ONLYWhen you ship the product•Carefully pack your unit, preferably in the original carton.•Attach a letter, detailing the symptom, to the outside of the carton.Symptom•Send the unit to an authorized servicenter, prepaid and adequatelyinsured.•Do not send your unit to the Panasonic Consumer Electronics Companylisted below or to executive or regional sales offices. These locations donot repair consumer products.Panasonic Consumer Electronics Company,Division of Matsushita Electric Corporation of AmericaOne Panasonic Way, Secaucus, New Jersey 07094Panasonic Sales Company,Division of Matsushita Electric of Puerto Rico, Inc.Ave. 65 de Infantería, Km. 9.5, San Gabriel Industrial ParkCarolina, Puerto Rico 00985PQQX13152ZB-BM SM0501HT0

Navigation menu