Panasonic of North America 96NKX-TG5240 KX-TG5240(xx), 5.8 GHz FHSS Cordless Telephone User Manual EXHIBIT H 1
Panasonic Corporation of North America KX-TG5240(xx), 5.8 GHz FHSS Cordless Telephone EXHIBIT H 1
UserManual.wiki
>
Panasonic of North America
>
96NKX TG5240 User Manual
User Manual
Navigation menu
Upload a User Manual
Namespaces
Wiki Guide
HTML
PDF
Info
Views
User Manual
Discussion / Help
Navigation
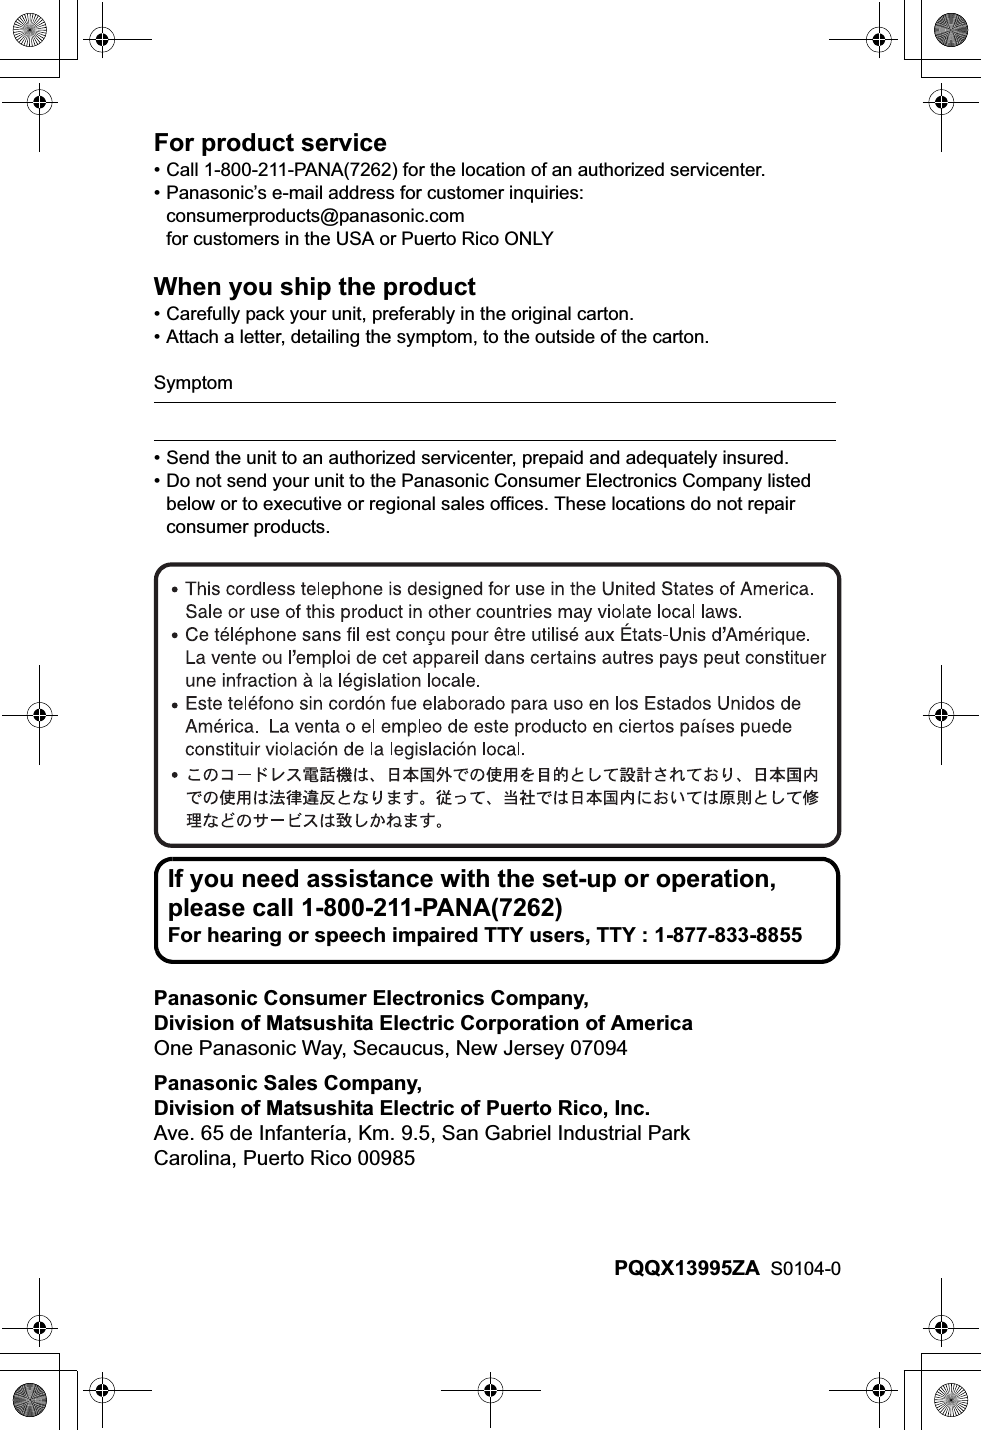
![Useful InformationAnswering SystemTelephone System7For assistance, please call: 1-800-211-PANA(7262)PreparationLocation of ControlsBase unitAntenna (p. 6)Antenna(p. 6)MIC (Microphone) (p. 30)[SP-PHONE] (Speakerphone) Button and Indicator (p. 30)[HOLD] Button (p. 31) [CONF] (Conference)Button (p. 52)CHARGE Indicator (p. 13) Charge Contacts (p. 14) SpeakerNavigator Key([B],[d],[H],[G]) (p. 9)[PROGRAM] Button (p. 46)[AUTO] Button(p. 46)IN USE Indicator (p. 31)[MUTE] Button and Indicator (p. 55)[FLASH/CALL WAIT]Button (p. 56, 60)[](TONE) Button (p. 56)[LOCATOR/INTERCOM/TRANSFER]Button andIndicator (p. 47) [REDIAL/PAUSE]Button (p. 30, 55)Display (p. 11)[STOP] Button (p. 68)[GREETING REC] Button (p. 23)[MEMO] Button (p. 70)[ERASE] Button(p. 24, 69)[ANSWER ON] Button and Indicator (p. 65) MAILBOX Buttons (p. 66)[GREETING CHECK] Button (p. 24)](https://usermanual.wiki/Panasonic-of-North-America/96NKX-TG5240/User-Guide-382212-Page-7.png)
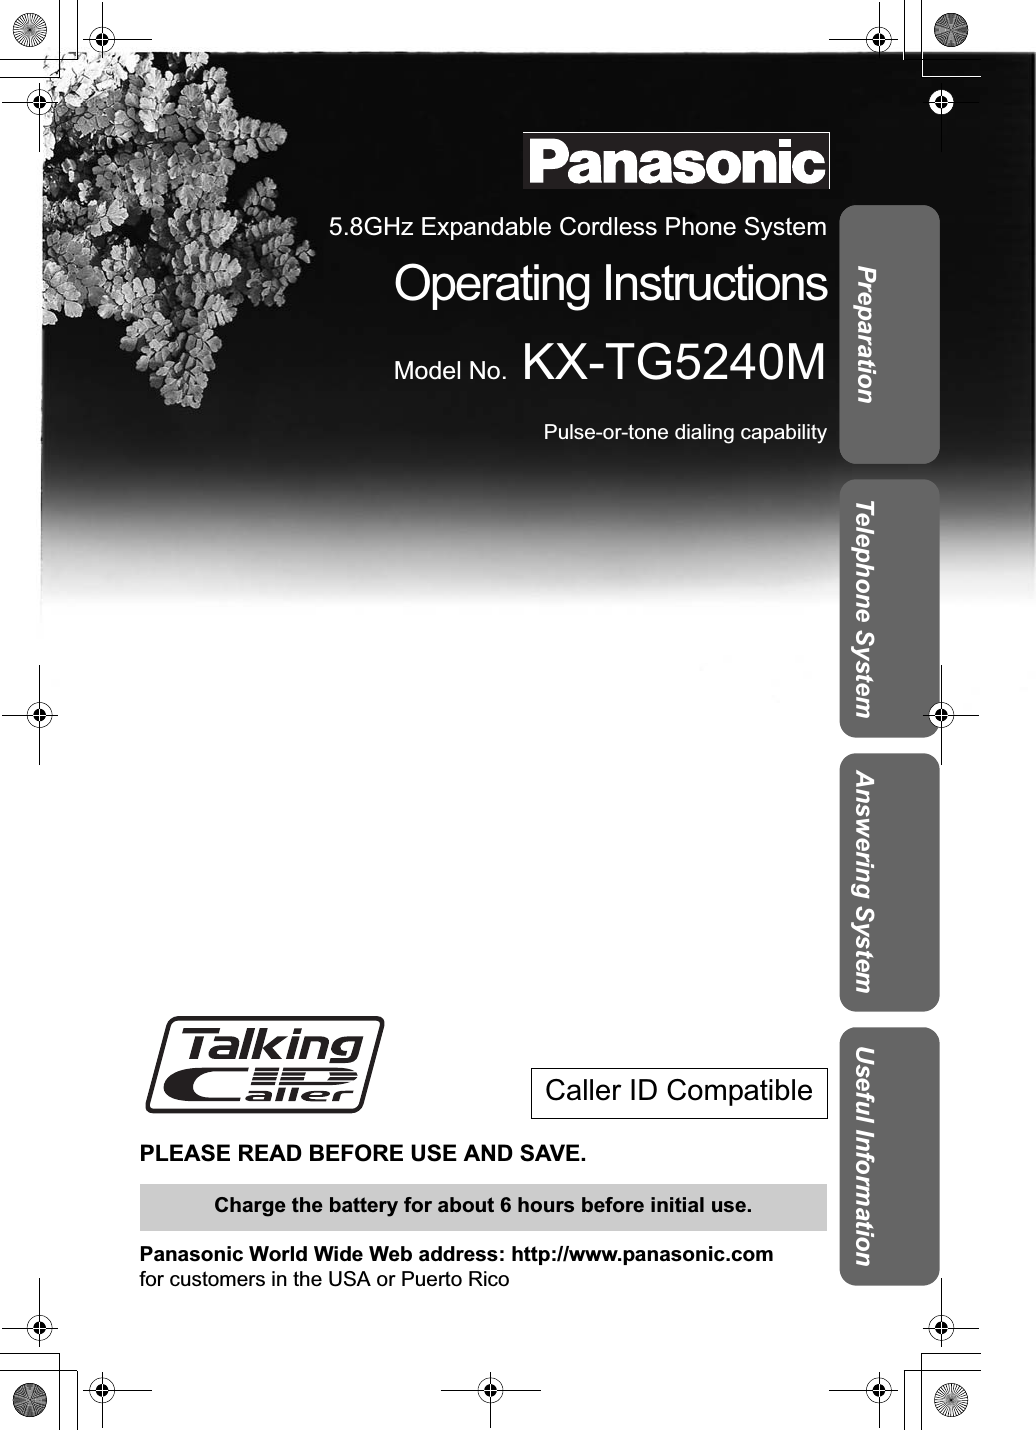
![Location of Controls8HandsetBack sideSpeakerHeadset Jack (p. 75)[] (TALK) Button (p. 27)[ ] (Speakerphone) Button (p. 27)[MENU]Button (p. 15)Microphone (p. 27)Charge Contacts (p. 14)AntennaDisplay (p. 10)[OFF] Button (p. 15, 27) [HOLD/INTERCOM]Button (p. 28, 47)[REDIAL] Button (p. 28)Soft Keys (p. 9)Receiver[FLASH/CALL WAIT]Button (p. 56, 60)Navigator Key([d],[B]) (p. 9)Ringer Indicator (p. 26, 31)[](TONE) Button (p. 56)](https://usermanual.wiki/Panasonic-of-North-America/96NKX-TG5240/User-Guide-382212-Page-8.png)
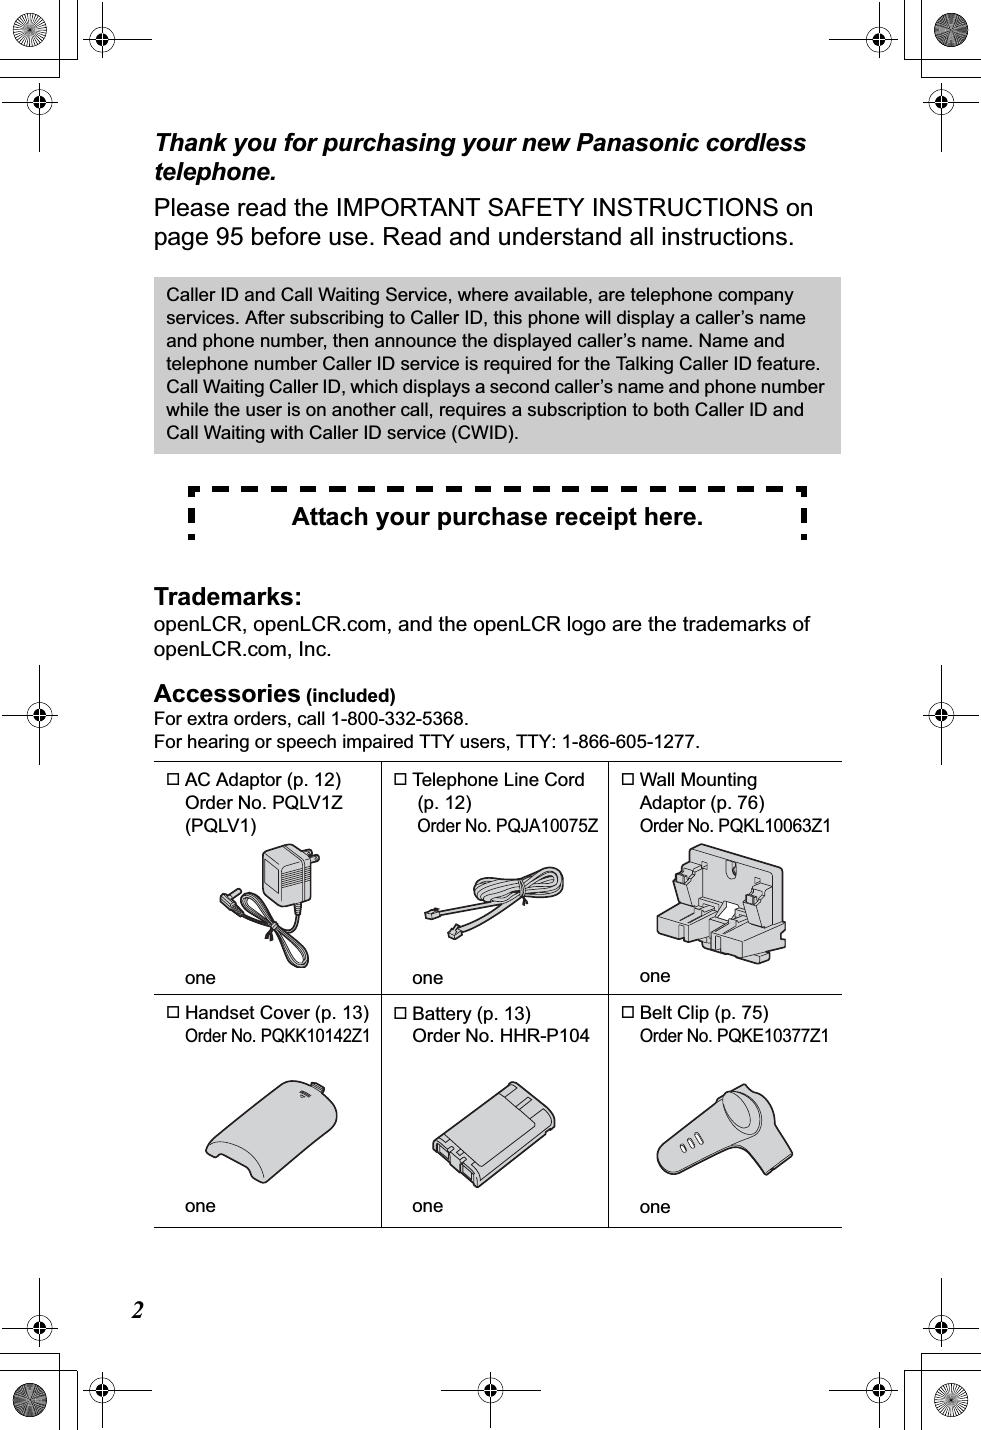
![Useful InformationAnswering SystemTelephone System9Location of ControlsFor assistance, please call: 1-800-211-PANA(7262)PreparationHandset navigator keyScrolls up [B] and down [d] the function menu, the Caller List and the phone book.Increases [B] or decreases [d] the handset ringer and receiver/speaker volumes.Base unit navigator keyIncreases [B] or decreases [d] the base unit ringer and speaker volumes.Selects the base unit ringer tone [H]and [G].Skips [H] or repeats [G] recorded messages.Lighted handset keypadThe dialing buttons will light for a few seconds when you press a button or lift the handset off the base unit. Throughout these Operating Instructions, the soft keys are indicated by their icons, such as , and C.Throughout these Operating Instructions, the handset navigator key is indicated by the arrows [d]or [B].Throughout these Operating Instructions, the base unit navigator key is indicated by the arrows [d],[B],[H]or [G].How to use the soft keys/navigator keysHandset soft keysThree soft keys are used to select functions displayed directly above each key. Functions displayed above each key will change depending on the state of use.On this sample display, “ ”, “ ” and “C”are displayed above the soft keys.Pressing the right soft key selects the Phone Book “C”.Pressing the middle soft key selects message playback “ ”.Pressing the left soft key selects the Caller List “ ”.•When a function name does not appear above a soft key, the soft key has no function.SPIPRIVACY1IN USE[1]CID PLAYCCIDPLAYPLAYCIDCIDPLAY](https://usermanual.wiki/Panasonic-of-North-America/96NKX-TG5240/User-Guide-382212-Page-9.png)
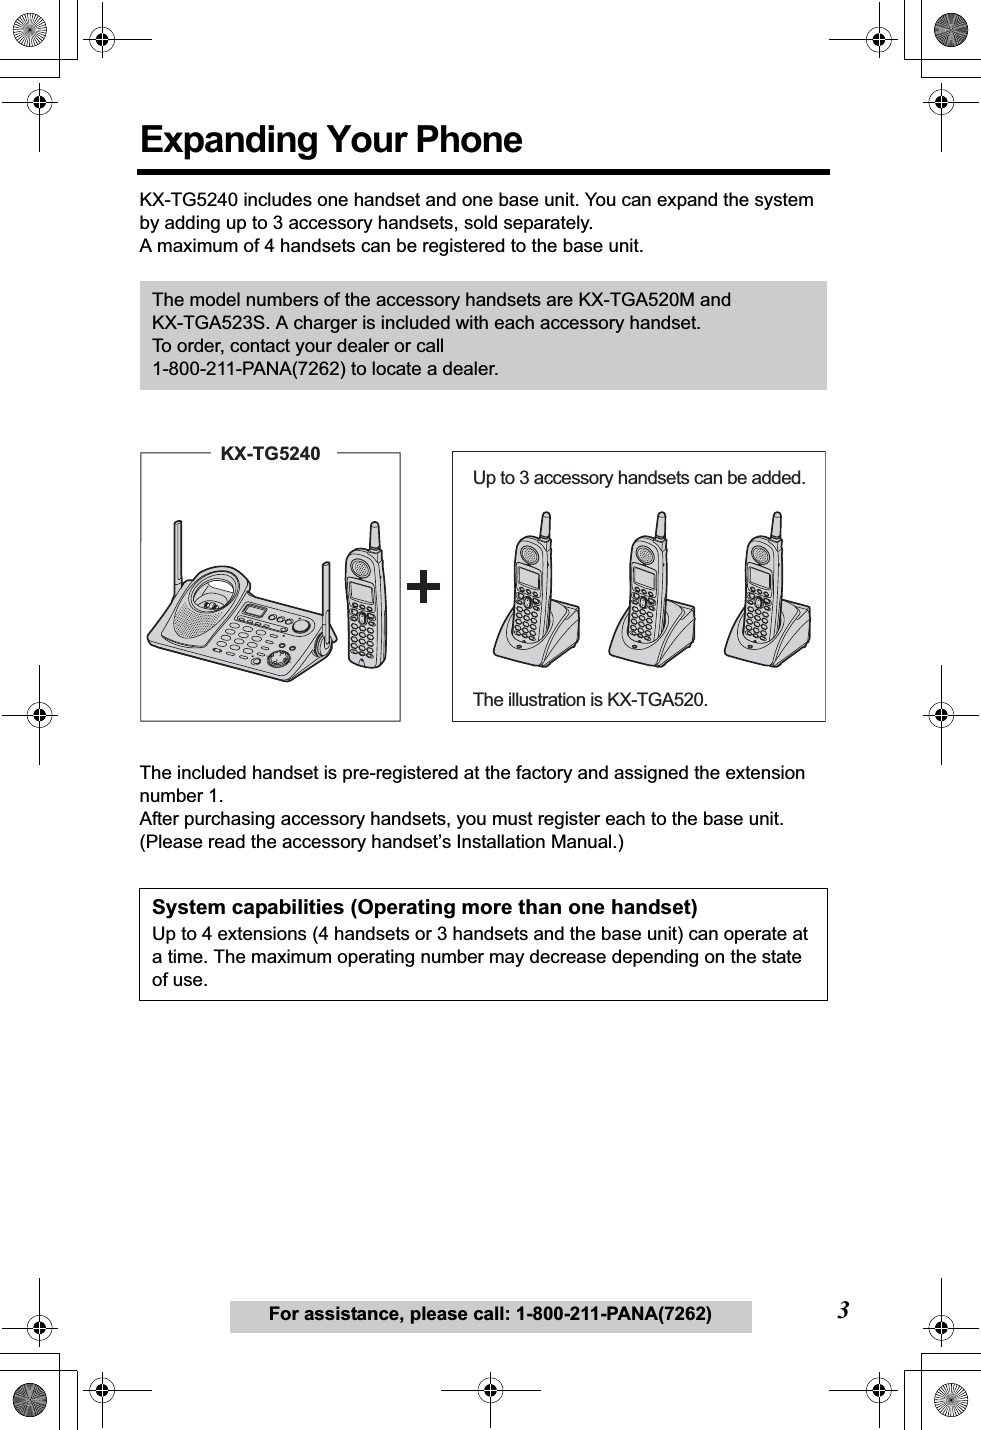
![10DisplaysHandset1“ ” functions as follows.2“SP” is shown when you are using the handset speakerphone.3“ ” indicates Voice Enhancer mode is on (p. 29). 4“PRIVACY” indicates Call Privacy mode is on (p. 55). Other extension users cannot join your conversation.5The battery icon indicates battery strength (p. 13).6The extension number of your handset is displayed if it has been registered to the base unit (p. 3, 82).7The display shows the dialed number, call status, programming options, phone book items, Caller ID information, etc.8The icons on the bottom line indicate the functions of the corresponding soft keys which are located directly below the display (p. 9).Ex. The soft key below “C” (phone book icon) is used when storing or viewing phone book items (p. 39, 41).9“D” (extension icon) and extension numbers are displayeda) during an intercom call (p. 47) or a conference call (p. 52); b) while monitoring a room (p. 54).Backlit LCD displaysThe lighted handset display will light for a few seconds after pressing a button or lifting the handset off the base unit.Off (invisible) The line is free.On The line is being used.Flashing A call is on hold within this system (handset or base unit) or the Answering System is answering a call (p. 65).Flashing quickly A call is being received.SPIPRIVACY1Received callsD01IN USE[1]CID PLAYC1234 56 789IN USEVE](https://usermanual.wiki/Panasonic-of-North-America/96NKX-TG5240/User-Guide-382212-Page-10.png)
![Useful InformationAnswering SystemTelephone System11DisplaysFor assistance, please call: 1-800-211-PANA(7262)PreparationBase unit1“ ” indicates the base unit ringer is off (p. 21).2“ ” flashes when no new messages can be recorded. Erase unnecessary messages (p. 69).3“E” flashes when you have not set the clock yet or a power failure may have occurred. The clock needs adjusting (p. 17).4Message counter shows: — the total number of recorded messages in all mailboxes. If the recording time is set to “Greeting only”, “ ” will be displayed (p. 25). — the selected volume level while you are adjusting the volume (p. 24, 30). — “ ” when [PROGRAM] is pressed to store a phone number (p. 46). — “ ” when your greeting message or memo message was not recorded correctly (p. 23, 70). — “ ” while downloading data from openLCR (p. 92).5If there are new messages in a mailbox, its icon will flash. If there are only old messages, the icon will be lit. If there are no messages in a mailbox, its icon will not be shown.12 3 4RRIN GERFULLBOXBOX1BOXBOX2BOXBOX3OFFOFF5RINGEROFFFULL](https://usermanual.wiki/Panasonic-of-North-America/96NKX-TG5240/User-Guide-382212-Page-11.png)
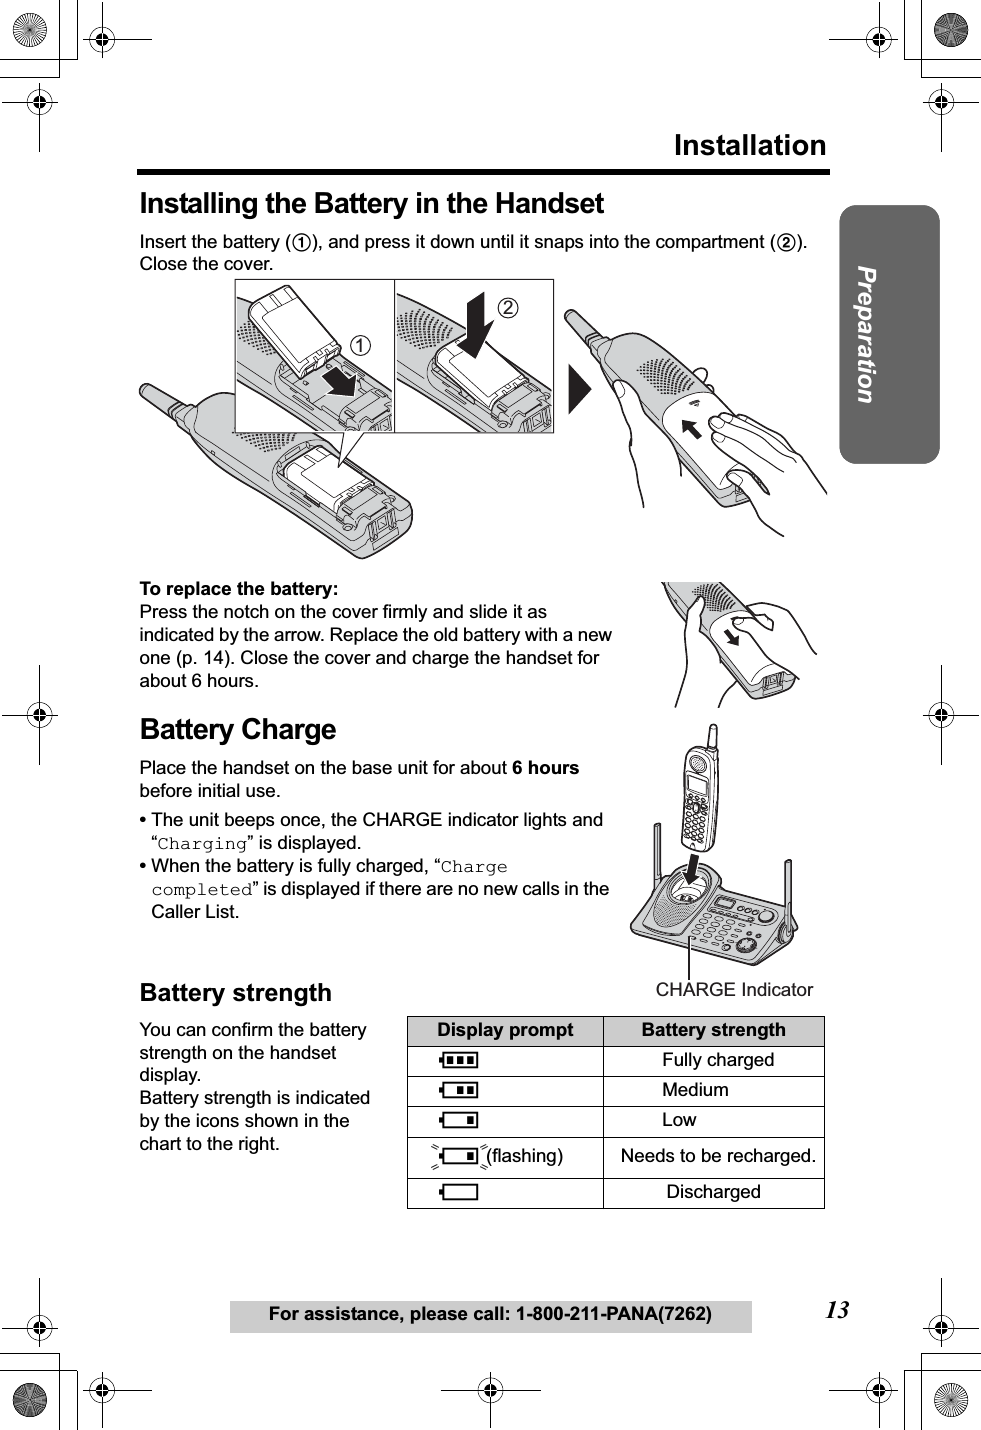
![Installation14RechargeRecharge the battery when:— “Recharge battery” is displayed on the handset,— “3” flashes, or— the handset beeps intermittently while it is in use.•If you DO NOT recharge the battery for more than 15 minutes, the display will continually indicate “Recharge battery” and/or “3” will flash when the handset is lifted off the base unit.•If the battery has been discharged, the handset will display “Charge for 6 HRS”and “4” when you place the handset on the base unit. The handset will not work unless the battery is charged. Keep charging.A nickel metal hydride battery that is recyclable powers the product you have purchased. Please call 1-800-8-BATTERY for information on how to recycle this battery.Battery informationAfter your Panasonic battery is fully charged, you can expect the following performance:•Battery operating time may be shortened depending on usage conditions and ambient temperature.• Clean the charge contacts of the handset and the base unit with a soft, dry cloth once a month. Clean more often if the unit is subject to grease, dust or high humidity. Otherwise the battery may not charge properly.•If the battery is fully charged, you do not have to place the handset on the base unit until “Recharge battery” is displayed and/or “3” flashes. This will maximize the battery life.•The battery cannot be overcharged.Battery replacement:After recharging the battery, if after a few telephone calls:— “Recharge battery” is displayed or “3” flashes, or— “Charge for 6 HRS” and “4” are displayed. Clean the charge contacts. If the battery still does not hold its charge, the battery needs to be replaced. Please order a new Panasonic HHR-P104 battery at the telephone number shown on page 2. To replace the battery, see page 13.Operation Operating timeWhile in use (TALK) Up to 5 hoursWhile not in use (Standby) Up to 11 daysWhile using the Clarity Booster feature (p. 29) Up to 3 hoursSPIPRIVACY3Recharge batteryIN USE[1]](https://usermanual.wiki/Panasonic-of-North-America/96NKX-TG5240/User-Guide-382212-Page-14.png)
![Useful InformationAnswering SystemTelephone System15For assistance, please call: 1-800-211-PANA(7262)PreparationProgrammable SettingsProgramming Guidelines The unit has several programmable functions which can be selected from the function menu on the display (p. 16).How to select a function item from the menu•To go back to the previous menu, press the soft key ( ), or press the soft key ( ) while “---(Go back)----” is displayed. If you press this key in the main menu, the unit will exit programming mode.•After programming is complete, the display will return to the main menu or the sub-menu depending on which menu the selected item is located. (See the menu table on page 16.)•You can exit programming mode at any time by pressing [OFF].•If you do not press any buttons for 60 seconds, the unit will exit programming mode.•If the unit detects a problem, an error message will be displayed (p. 83–85).Make sure the handset and the base unit are not being used. The handset must be operated near the base unit and while off the base unit.1Press [MENU].•The main menu is displayed (p. 16).2Scroll to the desired item by pressing [d]or [B].3Press the soft key ( ) to select the desired item. 4If the item has a sub-menu, select the menu item (p. 16). Repeat steps 2 and 3 until the desired item is displayed.5Select the desired setting by pressing [d]or [B], then press the soft key ( ).•A confirmation tone will be heard and the setting will be saved. 6Press [OFF] to exit programming mode.HandsetSAVE[OFF] exits programming.Navigator key scrollsthrough the menu.[MENU] enters thefunction menu.The soft key works asthe or key.The soft key worksas the key.BACK SAVESAVEBACKBACKSAVESELECT BRinger setting dBACKPLAYSELECTSELECTSAVEdBBACKPLAY SAVEBACKSELECT](https://usermanual.wiki/Panasonic-of-North-America/96NKX-TG5240/User-Guide-382212-Page-15.png)
![Programmable Settings16Function Menu TableYou can use the following functions to customize your unit. See the corresponding pages for function details.•After pressing [MENU], you can also program menu items directly by pressing ([0]to [9],[*] and [#]) instead of using the soft keys (p. 79–80).•If you program the date and time, dialing mode, flash time, line mode, number of rings, recording time, recording mode, mailbox passwords or the remote code using one of the handsets, you will not need to program the same item using another handset.Ringer volumeRinger toneIncoming call.View Info.?Get new Info.?Set answeringLCD contrastKey toneAuto talkRoom monitorSet flash timeSet line modeC.WTG optionsRegistration HS registrationDeregistration*Message alertTurn CIQ off?Set dial modeIncoming call.Room monitorTalk Caller IDRinger toneChange language DisplayMain menu Sub-menuIRinger settingDate and timeCaller IQInitial settingSub-menuIIVoice enhancerCopy 1 itemCopy all itemsCopy phone bookTalk Caller IDNumber of ringsRemote codeSet mailbox2&3Recording modeRecording timeCaller ID editSet tel lineSet base unitp. 25p. 24p. 72p. 64p. 26p. 18p. 60p. 19p. 57p. 22p. 61p. 53p. 33p. 82p. 81p. 20p. 21p. 61p. 94p. 93p. 91p. 44p. 45p. 26p. 22p. 62p. 19p. 53p. 37p. 18p. 17p. 29p. 33*“Active CIQ?” is displayed before you subscribe to openLCR service.“Turn CIQ on?” is displayed when Caller IQ is set to off (p. 91).](https://usermanual.wiki/Panasonic-of-North-America/96NKX-TG5240/User-Guide-382212-Page-16.png)
![Useful InformationAnswering SystemTelephone System17Programmable SettingsFor assistance, please call: 1-800-211-PANA(7262)PreparationDate and Time •When entering the time, you cannot enter numbers greater than 12. Do not use military time. (To set 13:00 hours, enter “0100”, and select “PM”.)To confirm the date/time, repeat steps 1 and 2. •The current date/time is displayed. When finished, press [OFF].1Press [MENU].2Scroll to “Date and time” by pressing [d]or [B], then press the soft key ( ).3(1) Enter 2 digits each for month, day and year. (Ex. To set May 15, 2004, enter “05 15 04”.)(2) Enter 4 digits for time (hour and minute). (Ex. To set 9:30, enter “0930”.)•If you enter a wrong number, press the soft key () or (), or press [d]or [B] to move the cursor to the incorrect number. Enter the correct number.4Select “AM” or “PM” by pressing [*].5Press the soft key ( ).•The clock is set and “E” disappears from the base unit display.•If 3 beeps sound, the setting is not correct. Start again from step 3.6Press [OFF].The displayed time may be incorrect after a power failure. When “E” flashes on the base unit display, adjust the date/time.For Caller ID service users (p. 32)•When a call is received, Caller ID information adjusts the date/time if the time is incorrect.•Caller ID information will automatically adjust the clock for daylight saving time.•If the date/time has not been previously set, Caller ID information will not adjust the date/time.HandsetSELECT BDate and time dBACKPLAYSELECTf gDate:|12.31.2004Time:12:00 AM 0-9=Date&Time@=AM/PMf g SAVEDate:05.15.2004Time:09:30 ||A||M 0-9=Date&Time@=AM/PMf g SAVESAVE](https://usermanual.wiki/Panasonic-of-North-America/96NKX-TG5240/User-Guide-382212-Page-17.png)
![Programmable Settings18Display Language You can select either “English” or “Spanish” as the display language. The factory preset is “English”.Dialing Mode If you have touch tone service, set to “Tone”. If rotary or pulse service is used, set dialing mode to “Pulse”. The factory preset is “Tone”.1Press [MENU].2Scroll to “Initial setting” by pressing [d]or [B], then press the soft key ( ). 3Scroll to “Change language” by pressing [d]or [B], then press the soft key ( ). 4Select the language by pressing the soft key () or ().•You can also select the display language by pressing [d]or [B].5Press the soft key ( ) or ( ).1Press [MENU].2Scroll to “Initial setting” by pressing [d]or [B], then press the soft key ( ). 3Scroll to “Set tel line” by pressing [d]or[B], then press the soft key ( ).4Press the soft key ( ) at “Set dial mode”.5Select “Pulse” or “Tone” by pressing [d]or [B].6Press the soft key ( ), then press [OFF].HandsetSELECTInitial settingSELECTChange languageESPAÑOL ENGLISHDisplay:EnglishGUARDARSAVEHandsetSELECTInitial settingSELECTSet tel lineSELECTSet dial modeSet dial mode:ToneSAVE](https://usermanual.wiki/Panasonic-of-North-America/96NKX-TG5240/User-Guide-382212-Page-18.png)
![Useful InformationAnswering SystemTelephone System19Programmable SettingsFor assistance, please call: 1-800-211-PANA(7262)PreparationLine Mode The line mode is preset to “B” and generally should not be adjusted. If a Panasonic customer call center representative or service person recommends changing the line mode, change it to “A”.Auto Talk The Auto Talk feature allows you to answer a call by lifting the handset off the base unit or the charger (for accessory handset users, p. 3) without pressing [C]or [s].To use this feature, turn the feature ON. The factory preset is OFF.•In order to view Caller ID information after you lift the handset to answer a call, leave the Auto Talk feature OFF.1Press [MENU].2Scroll to “Initial setting” by pressing [d]or [B], then press the soft key ( ). 3Scroll to “Set tel line” by pressing [d]or [B], then press the soft key ( ).4Scroll to “Set line mode” by pressing [d]or [B], then press the soft key ( ).5Select “A” or “B” by pressing [d]or [B].6Press the soft key ( ), then press [OFF].1Press [MENU].2Scroll to “Initial setting” by pressing [d]or [B], then press the soft key ( ). 3Scroll to “Auto talk” by pressing [d]or [B], then press the soft key ( ).4Select “On” or “Off” by pressing [d]or [B].5Press the soft key ( ), then press [OFF].HandsetSELECTInitial settingSELECTSet tel lineSELECTSet line modeSet line mode:BSAVEHandsetSELECTInitial settingSELECTAuto talkAuto talk:OffSAVE](https://usermanual.wiki/Panasonic-of-North-America/96NKX-TG5240/User-Guide-382212-Page-19.png)
![Programmable Settings20Ringer VolumeYou can set the handset and base unit ringer volumes to HIGH, MEDIUM, LOW or OFF. The factory preset is HIGH. If set to OFF, the handset and base unit will not ring for outside calls and a caller’s name will not be announced even if the Talking Caller ID feature is ON (p. 33). For intercom calls the unit will ring at the LOW level when the ringer volume is set to OFF.Handset ringer volume•If set to OFF, the handset displays “Ringer off” while not in use. •You can also adjust the ringer volume while an outside call is ringing. Press [d]or[B] while the handset is ringing. To set to OFF, press and hold [d] until “Ringervolume off” is displayed.1Press [MENU].2Press the soft key ( ) at “Ringer setting”.3Press the soft key ( ) at “Ringer volume”.4Select the desired volume by pressing [d]or [B].•The volume will change and ring.•The number of steps indicates the volume level.• To turn the ringer OFF, press [d] repeatedly until “Off ?” is displayed.5Press the soft key ( ).HandsetSELECTRinger settingSELECTRinger volumeRinger volume Low HighEx. HIGHRinger volume Off ?Ex. OFFSAVE](https://usermanual.wiki/Panasonic-of-North-America/96NKX-TG5240/User-Guide-382212-Page-20.png)
![Useful InformationAnswering SystemTelephone System21Programmable SettingsFor assistance, please call: 1-800-211-PANA(7262)PreparationBase unit ringer volume Make sure the base unit is not being used.To select HIGH (preset), MEDIUM or LOW, press [d]or [B].•To increase volume, press [B]. To decrease volume, press [d].To turn the ringer OFF, press and hold [d] until 2 beeps sound.•“ ” is displayed.To turn the ringer ON, press [d]or [B].•The ringer will sound at the LOW level.•You can adjust the ringer volume while an outside call is ringing. Press [d]or [B]while the base unit is ringing. To set to OFF, press and hold [d] until “ ” is displayed.Ringer Tone You can select one of 7 ringer patterns for outside calls. “Tone 1” to “Tone 3” are bell ringer patterns. “Melody 1” to “Melody 4” are preset melody patterns. The factory preset is “Tone 1”.Handset ringer tone1Press [MENU].2Press the soft key ( ) at “Ringer setting”.3Press the soft key ( ) at “Ringer tone”.4Select the desired ringer tone by pressing [d]or [B].•The handset will ring and the ringer tone will change. If the ringer volume has been set to OFF, the unit will not ring (p. 20).•You can also select the ringer tone by pressing [1] to [7].5Press the soft key ( ), then press [OFF].Base UnitRINGEROFFRINGEROFFHandsetSELECTRinger settingSELECTRinger toneRinger tone1:Tone 1SAVE](https://usermanual.wiki/Panasonic-of-North-America/96NKX-TG5240/User-Guide-382212-Page-21.png)
![Programmable Settings22Base unit ringer tone (use either the handset or the base unit)Make sure the base unit is not being used.Selecting the base unit ringer tone by using the LCD Contrast There are 6 levels of LCD contrast. The factory preset is level 3.1Press [H]or [G].•The base unit will ring at the current ringer tone.2Within 30 seconds, select the desired ringer tone by pressing [H]or [G].•The base unit will ring and the ringer tone will change.•You can also select the ringer tone by pressing [1] to [7].1Press [MENU].2Scroll to “Initial setting” by pressing [d]or [B], then press the soft key ( ). 3Scroll to “Set base unit” by pressing [d]or [B], then press the soft key ( ).4Follow steps 4 and 5 of “Handset ringer tone” on page 21.•When selecting the ringer tone, the base unit will ring. If the base unit ringer volume has been set to OFF (p. 21), the base unit will not ring.1Press [MENU].2Scroll to “Initial setting” by pressing [d]or [B], then press the soft key ( ). 3Scroll to “LCD contrast” by pressing [d]or [B], then press the soft key ( ).4Select the desired contrast by pressing [d]or [B].•The contrast will change.•The number of steps indicates the contrast level.5Press the soft key ( ), then press [OFF].Base UnitHandsetSELECTSELECTHandsetSELECTInitial settingSELECTLCD contrastLCD contrast Low HighEx. Level 3SAVE](https://usermanual.wiki/Panasonic-of-North-America/96NKX-TG5240/User-Guide-382212-Page-22.png)
![Useful InformationAnswering SystemTelephone System23For assistance, please call: 1-800-211-PANA(7262)PreparationPreparing the Answering SystemGreeting Message You can record a personal greeting message of up to 2 minutes. If you do not record your own message, one of two pre-recorded greetings will be played for callers (p. 24).•You can use the enhanced recording mode for clearer sound, if necessary (p. 26).To record a greeting message•If “ ” is displayed, 6 beeps sound and “Your greeting was not recorded. Record your greeting again.” is announced, start again from step 1.The total recording time of all messages (greeting, incoming and voice memo) is about 16 minutes. We recommend you record a brief greeting message in order to leave more time for recording new messages.Greeting message samplesN“Hello, this is (your name and/or number). Sorry, I cannot take your call. Please leave a message after the beep. Thank you.”NTo instruct callers to leave a message in a specific mailbox (Mailbox 1, Mailbox 2 or Mailbox 3) (for mailboxes see page 63):“Hello, this is (your name and/or number). Sorry, we cannot take your call. If you have a message, for John press [#] and [1], for Jane press [#] and [2], for Jack press [#] and [3]. Or just stay on the line and leave a message after the beep. Thank you.”1Press [GREETING REC].•“To record greeting, press RECORD again” is heard.2Within 10 seconds, press [GREETINGREC] again to record your greeting.3After the long beep, talk clearly, about 20 cm (8 inches) away from the MIC(microphone).•The elapsed recording time is displayed.•If you record for over 2 minutes, the unit will stop recording.4When finished, press [GREETING REC]or [STOP].•To change the greeting, start again from step 1.Base Unit[GREETING REC][STOP][GREETING CHECK][ERASE]MIC[ ], [ ]](https://usermanual.wiki/Panasonic-of-North-America/96NKX-TG5240/User-Guide-382212-Page-23.png)
![Preparing the Answering System24To adjust the speaker volume, press [d]or [B] during playback.•9 levels (0–8) are available while using the Answering System.To play the greeting Press [GREETING CHECK].To erase the greeting Press [GREETING CHECK], then press [ERASE] while the recorded message is being played.•The unit will answer calls with a pre-recorded greeting (see below).Pre-recorded greetingIf you do not record a greeting (p. 23), one of two greetings will be played when a call is received, depending on the caller’s recording time (see below).To play the pre-recorded greeting, press [GREETING CHECK].•A pre-recorded greeting will be played as follows:NWhen the recording time is set to “1 minute”, “2 minutes” or “3 minutes”: “Hello, we are not available now. Please leave your name and phone number after the beep. We will return your call.”•If recording time runs out, the unit will automatically switch to the “Greeting only” mode (see below), and no new messages will be recorded.NWhen the recording time is set to “Greeting only”: “Hello, we are not available now. Please call again. Thank you for your call.”Caller’s Recording Time You can select “1 minute”, “2 minutes”, “3 minutes” or “Greeting only” for the caller’s recording time. The factory preset is “3 minutes”.Flash Memory Message Backup (Message storage)Messages stored in memory will not be affected by power failures. All messages are saved until you erase them.1Press [MENU].2Scroll to “Initial setting” by pressing [d]or [B], then press the soft key ( ). 3Press the soft key ( ) at “Setanswering”.HandsetSELECTInitial settingSELECTSet answering](https://usermanual.wiki/Panasonic-of-North-America/96NKX-TG5240/User-Guide-382212-Page-24.png)
![Useful InformationAnswering SystemTelephone System25Preparing the Answering SystemFor assistance, please call: 1-800-211-PANA(7262)PreparationNumber of Rings You can select the number of times the unit rings before the Answering System answers a call, from “2” to “7” or “Toll saver”*. The factory preset is “4”.4Scroll to “Recording time” by pressing [d]or [B], then press the soft key ( ). 5Select the recording time by pressing [d]or [B].•You can also select the recording time by pressing [1],[2],[3], or [0] (Greeting only).6Press the soft key ( ), then press [OFF].If you select “Greeting only”, the unit will answer a call with the greeting message, and then hang up. The unit will not record any incoming messages. The base unit will display “ ” instead of the number of messages.1Follow steps 1 to 3 of “Caller’s Recording Time” on page 24.2Press the soft key ( ) at “Number of rings”.3Select the number of rings by pressing [d]or [B].•You can also select the number of rings by pressing [0] (Toll saver*), or [2] to [7].4Press the soft key ( ), then press [OFF].*Toll saverWhen you call the unit from a remote location, the number of rings will tell you if there are any new messages. If the unit answers on the 2nd ring, there is at least one new message. If the unit answers on the 4th ring, there are no new messages. To save the toll charges for the call, hang up immediately when you hear the 3rd ring. The 3rd ring indicates that there are no new messages.SELECTRecording timeRecording time:3minSAVEHandsetSELECTNumber of ringsNumber of rings:4SAVE](https://usermanual.wiki/Panasonic-of-North-America/96NKX-TG5240/User-Guide-382212-Page-25.png)
![Preparing the Answering System26Recording Mode Two recording modes are available. The factory preset is “Standard recording (16 min.)”, which provides more recording time (16 min.) and standard sound quality. “Enhanced recording (8 min.)” provides less recording time (8 min.) but clearer sound quality.Message Alert You can select whether or not the Ringer indicator on the handset will flash when new messages have been recorded (p. 66). The factory preset is OFF.•The Ringer indicator will flash when a call is received whether this feature is on or off.•Battery operating time will be shortened when using this feature (p. 14).1Follow steps 1 to 3 of “Caller’s Recording Time” on page 24.2Scroll to “Recording mode” by pressing [d]or [B], then press the soft key ( ).3Select the recording mode by pressing [d]or [B].•You can also select the recording mode by pressing [1] (Standard) or [2] (Enhanced).4Press the soft key ( ), then press [OFF].1Press [MENU].2Scroll to “Initial setting” by pressing [d]or [B], then press the soft key ( ). 3Scroll to “Message alert” by pressing [d]or [B], then press the soft key ( ).4Select “On” or “Off” by pressing [d]or [B].5Press the soft key ( ), then press [OFF].HandsetSELECTRecording modeRecording mode:Standard recording 16minSAVEHandsetSELECTInitial settingSELECTMessage alertMessage alert:OffSAVE](https://usermanual.wiki/Panasonic-of-North-America/96NKX-TG5240/User-Guide-382212-Page-26.png)
![Useful InformationAnswering SystemPreparation27For assistance, please call: 1-800-211-PANA(7262)Telephone SystemMaking CallsUsing the Handset 1Press [C].•“Talk” is displayed.2Dial a phone number.•The dialed number is displayed.•After a few seconds, the display will show the length of the call.3To hang up, press [OFF] or place the handset on the base unit.To have a hands-free phone conversation1Press [s].•“SP-phone” is displayed.2Dial a phone number.•The dialed number is displayed.•After a few seconds, the display will show the length of the call.3When the other party answers, talk into the microphone.4To hang up, press [OFF] or place the handset on the base unit.Hands-free Digital Duplex SpeakerphoneFor best performance, please note the following:•Talk alternately with the other party in a quiet room.•If you or the other party has difficulty hearing, press [d]to decrease the speaker volume.•While talking using [C], you can switch to a hands-free phone conversation by pressing [s]. To switch back to the receiver, press [C].Handset[REDIAL][ ][ ][OFF][HOLD/INTERCOM]Microphone[ ], [ ]](https://usermanual.wiki/Panasonic-of-North-America/96NKX-TG5240/User-Guide-382212-Page-27.png)
![Making Calls28To dial after confirming the entered number1. Dial a phone number.•If you misdial, press the soft key ( ). Enter the correct phone number.•If a pause is required when dialing, press the soft key ( ) where needed (p. 55).•To cancel, press [OFF].2. Press [C]or [s].3. To hang up, press [OFF] or place the handset on the base unit.To adjust the receiver/speaker volume during a conversationThere are 3 volume levels for the receiver and 6 volume levels for the speaker.To increase volume, press [B].To decrease volume, press [d].•The display shows the current volume setting.•If you try to increase/decrease volume when it is at the maximum/minimum level, the handset will beep 3 times.To redial the last number dialedPress [C]or [s], then press [REDIAL].To redial using the redial list (Memory Redial)The last 5 phone numbers dialed with the handset are stored in the redial list.1. Press [REDIAL].•The last number dialed is displayed.2. Scroll to the desired number by pressing [d]or [B].•You can also scroll down through the list by pressing [REDIAL].•To exit the list, press [OFF].3. Press [C]or [s].• To erase an item, scroll to the item then press the soft key ( ).•If “No items stored” is displayed, the list is empty.To put a call on holdPress [HOLD/INTERCOM] twiceduring a conversation.•“Hold” is displayed.•To transfer the call to the base unit or another handset, see page 49; to transfer to a mailbox to allow the outside party to leave a message, see page 70.To return to the call, press [C]or [s].•The base unit user can take the call by pressing [SP-PHONE].•Another handset user can take the call by pressing [C]or [s].•If another phone is connected on the same line (p. 12), you can also take the call by lifting its handset.•If a call is kept on hold for 6 minutes, an alarm tone will start to sound and the Ringer indicator will start to flash rapidly. After 4 additional minutes on hold the call will be disconnected.3334444|CLEARPAUSEVolume Low HighdBEx. Receiver volume: HighSpeaker volume: Level 6ERASE](https://usermanual.wiki/Panasonic-of-North-America/96NKX-TG5240/User-Guide-382212-Page-28.png)
![Useful InformationAnswering SystemPreparation29Making CallsFor assistance, please call: 1-800-211-PANA(7262)Telephone SystemVoice Enhancer Technology Panasonic’s Voice Enhancer technology clarifies the voice of the person you are talking to, reproducing a more natural-sounding voice that is easier to hear and understand.Voice Enhancer Technology can be switched on or off. The factory preset is off.•Depending on the condition and quality of your telephone line, this feature may emphasize existing line noise. If it becomes difficult to hear, turn this feature off.To turn the feature on, press the soft key ( ) during a conversation. • “ ” is displayed.• To turn the feature off, press the soft key ( ) again. “ ” disappears from the display.You can also turn the feature on or off by programming as follows:1. Press [MENU].2. Scroll to “Voice enhancer” by pressing [d]or [B], then press the soft key ().3. Select “On” or “Off” by pressing [d]or [B].4. Press the soft key ( ), then press [OFF].Clarity BoosterThis feature combines two voice paths helping the handset to improve clarity in an area where there may otherwise be interference. When you use the handset in an area with interference, this feature is automatically turned on. If required, you can manually turn it on as follows. 1. Press [MENU] during a conversation.2. Press [2] to select “2=Booster on”.•You can also select “2=Booster on” by pressing [d] then pressing the soft key ( ).•“Booster on” will flash while this feature is turned on.•To turn this feature off, press [MENU], then press [2] to select “2=Booster off”.You can also select it by pressing [d] then pressing the soft key ( ).•This feature will be turned off after hanging up, when putting a call on hold, or when making a conference call.•Battery operating time will be shortened when using this feature (p. 14).SPIPRIVACY1Talk00-00-32IN USE[1](VE)PRIVACYMUTE(VE)VE(VE)VESELECTSAVE1=Phone book2=Booster on3=Caller IQSELECTSELECT](https://usermanual.wiki/Panasonic-of-North-America/96NKX-TG5240/User-Guide-382212-Page-29.png)
![Making Calls30Using the Base Unit •To switch to the handset while using the base unit speakerphone:— If the handset is off the base unit, press [C]or [s] on the handset, then press [SP-PHONE] on the base unit.— If the handset is on the base unit, just lift up.To adjust the speaker volume during a conversationTo increase volume, press [B].To decrease volume, press [d].•There are 8 volume levels. If you try to increase/decrease volume when it is at the maximum/minimum level, the base unit beeps 3 times.To redial the last number dialed Press [SP-PHONE], then press [REDIAL/PAUSE].1Press [SP-PHONE].•The SP-PHONE indicator lights.2Dial a phone number.•If you misdial, press [SP-PHONE]and start again from step 1.3When the other party answers, talk into the MIC (microphone).4To hang up, press [SP-PHONE].•The indicator light goes out.Hands-free Digital Duplex SpeakerphoneFor best performance, please note the following:•Talk alternately with the other party in a quiet room.•If you or the other party has difficulty hearing, press [d] to decrease the speaker volume.Base Unit[ERASE]MIC[REDIAL/PAUSE][HOLD][SP-PHONE]and Indicator[],[][STOP]](https://usermanual.wiki/Panasonic-of-North-America/96NKX-TG5240/User-Guide-382212-Page-30.png)
![Useful InformationAnswering SystemPreparation31Answering CallsFor assistance, please call: 1-800-211-PANA(7262)Telephone SystemTo put a call on holdPress [HOLD] during a conversation.•The SP-PHONE indicator flashes.To return to the call, press [SP-PHONE].•Handset users can take the call by pressing [C]or [s].•If another phone is connected on the same line (p. 12), you can also take the call by lifting its handset.•If a call is kept on hold for 6 minutes, an alarm tone will start to sound and the Ringer indicator on the handset will start to flash rapidly. After 4 additional minutes on hold the call will be disconnected.Answering CallsWhen a call is received, the unit rings, “Incoming call” is displayed on the handset, and the Ringer indicator and the IN USE indicator flash rapidly. 1Press [C]or [s].•You can also answer a call by pressing any button except [d], [B] and [OFF].2To hang up, press [OFF] or place the handset on the base unit. Auto TalkIf you set the Auto Talk feature to ON (p. 19), you can answer a call by lifting the handset off the base unit or the charger (for accessory handset users, p. 3).1Press [SP-PHONE].2Talk into the MIC.3To hang up, press [SP-PHONE].• To transfer the call to the base unit or handset, see page 49. • To transfer the call to a mailbox to allow the caller to leave a message, see page 70.•When the ringer volume is set to OFF, the unit will not ring (p. 20, 21). Handset[ ][ ][OFF]RingerIndicatorBase UnitMIC[SP-PHONE]and IndicatorIN USEIndicator](https://usermanual.wiki/Panasonic-of-North-America/96NKX-TG5240/User-Guide-382212-Page-31.png)
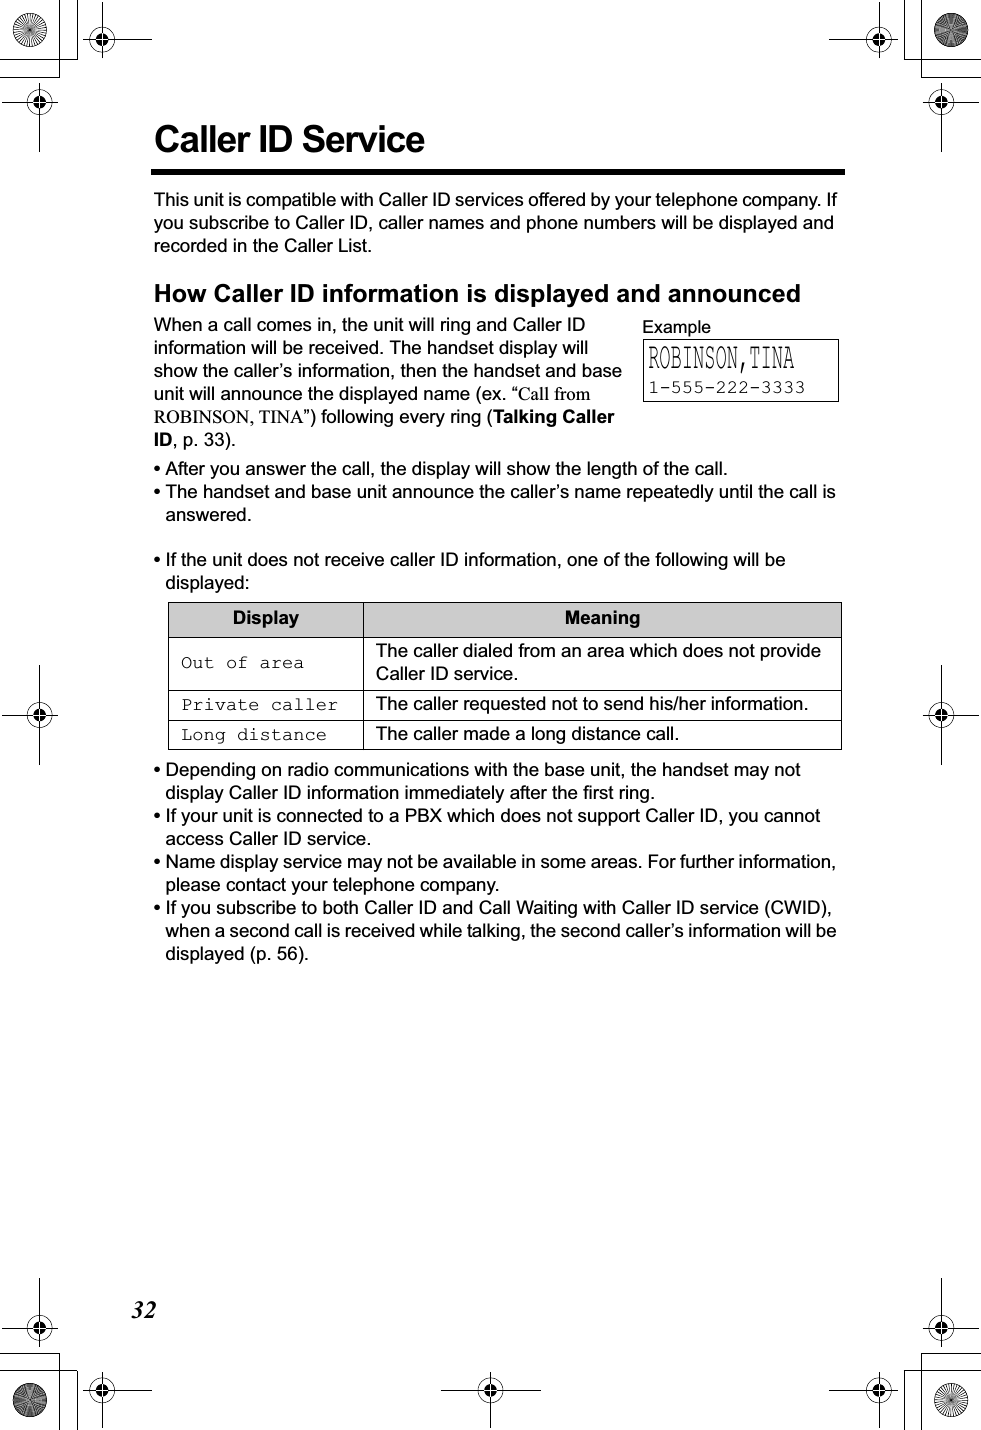
![Useful InformationAnswering SystemPreparation33Caller ID ServiceFor assistance, please call: 1-800-211-PANA(7262)Telephone SystemTalking Caller ID To use this feature, you need to subscribe to Caller ID. For further information, please contact your telephone company.•If a caller dialed from an area which does not provide a name display service, the unit will announce “Call from out of area”, “Call from private caller”, “Call from long distance” or “Number available”.•If the ringer volume of the handset and the base unit is off, caller names will not be announced. Announcement volume depends on the handset or base unit ringer setting (p. 20, 21).•If this feature is off, caller names will not be announced.•If an outside call is received while on an intercom call between the handset and base unit, other handsets will ring, but the caller’s name will not be announced.•If you have Call Waiting service, the second caller’s information will be displayed but not announced (For Call Waiting Service Users, p. 56).•Name pronunciation may vary. Name pronunciation quality is based on names most commonly used in the United States.•The unit will announce each letter of abbreviations, such as “Co.” and “Inc.”.•Caller ID supports names of up to 15 letters. If the caller’s name has more than 15 letters, the name will not be displayed or announced correctly.•If you subscribe to a Distinctive Ring Service (such as IDENTA-RING) from your telephone company with 2 or 3 consecutive rings, your unit may mute one or more of the rings in order to announce the name of the caller.To turn this feature ON/OFFYou can turn Talking Caller ID on or off. If the feature is off, the unit will not announce caller names. Both the handset and the base unit are preset to ON.Handset Talking Caller ID feature 1Press [MENU].2Scroll to “Talk Caller ID” by pressing [d]or [B], then press the soft key ( ).3Select “On” or “Off” by pressing [d]or [B].4Press the soft key ( ), then press [OFF].Handset Base UnitHandsetSELECTTalk Caller IDTalk Caller ID:OnSAVE](https://usermanual.wiki/Panasonic-of-North-America/96NKX-TG5240/User-Guide-382212-Page-33.png)
![Using the Caller List34Base unit Talking Caller ID feature This feature must be turned on or off for the base unit by using the handset.Using the Caller ListThe unit can record information up to 50 different callers and store this information in the Caller List. Caller information is sorted by the most recent call to the oldest. When the 51st call is received, the information from the 1st call is deleted.The unit will also tell you how many calls you missed while you were out or unavailable to answer the phone. 1Press [MENU].2Scroll to “Initial setting” by pressing [d]or [B], then press the soft key ( ). 3Scroll to “Set base unit” by pressing [d]or [B], then press the soft key ( ).4Scroll to “Talk Caller ID” by pressing [d]or [B], then press the soft key ( ).5Select “Off” or “On” by pressing [d]or [B].6Press the soft key ( ), then press [OFF].1The display will show the number of calls you missed.2Press the soft key ( ), or [d]or [B] to review other calls logged in the Caller List.•If there are no items in the Caller List, “ ” will not be displayed.•After viewing the missed call entries, “missed calls” will disappear from the display.HandsetSELECTInitial settingSELECTSet base unitSELECTTalk Caller IDTalk Caller ID:OnSAVE10 missed callsCID PLAYC2 Stands for Caller ID1CIDCID](https://usermanual.wiki/Panasonic-of-North-America/96NKX-TG5240/User-Guide-382212-Page-34.png)
![Useful InformationAnswering SystemPreparation35Using the Caller ListFor assistance, please call: 1-800-211-PANA(7262)Telephone SystemViewing the Caller List •If there is no name information for a caller, the display will only show the phone number.•Each handset has its own Caller List. If you viewed the Caller List on one handset, the same information in the other handsets will be displayed as “missed”.•If you do not press any buttons for 60 seconds, the unit will exit the Caller List.What “” means“” indicates you have already viewed this calling information or answered the call. If the same caller calls again, the call entry with the “” will be replaced with the new call entry.If a caller calls more than onceThe number of times the same caller called is displayed (“u2” to “u9”). The date and time of the most recent call will be recorded. After viewing a caller’s information, “u2”to “u9” will be replaced with “”.Calling Back from the Caller List •In some cases, you may have to edit the number before dialing (p. 36). (Ex. You may have to delete “1” and the area code.)•If a phone number is not displayed in the caller information, you cannot call that caller back from the Caller List.1Press the soft key ( ), [d], or [B] to enter the Caller List.2To search from the most recent call, press [d].To search from the oldest call, press [B].•The caller’s name, number and the time and date of the call are displayed.3Press [OFF] to exit the list.1Press the soft key ( ), [d], or [B] to enter the Caller List.2Scroll to the desired caller by pressing [d]or [B].3Press [C]or [s].•The phone number is dialed.HandsetCID Ex. 10 calls missed Caller list10 missed callsdB=Scroll listSMITH,JACK1-555-333-4444 3:10P JUN.10ExampleSMITH,JACK1-555-333-4444 3:10P JUN.10 TURNER,CINDY1-555-456-789011:20A JAN.12 u3Ex. Called 3 times. HandsetCID](https://usermanual.wiki/Panasonic-of-North-America/96NKX-TG5240/User-Guide-382212-Page-35.png)
![Using the Caller List36Editing the Caller’s Phone Number You can edit a phone number in the Caller List by removing its area code and/or the long distance code “1”. Numbers can be edited automatically by the Auto Edit feature (p. 37) when you receive a call.1Press the soft key ( ), [d], or [B] to enter the Caller List.2Scroll to the desired caller by pressing [d]or [B].3Press the soft key ( ) repeatedly until the number is shown in the desired format.•Each time you press the soft key ( ), the number is rearranged into one of 3 patterns.FG – H 1– – •The order in which patterns F–H are displayed depends on how the telephone number is displayed in step 2.4To call the number, press [C]or [s].•If Caller ID Number Auto Edit is turned on (factory preset=on), phone numbers with the same area code as the number you edited will now be edited in the Caller List and each time you receive a call.To save the number into the phone book, press the soft key ( ).•If there is no name information, see “Storing Caller Information in the Phone Book” on page 38.HandsetCIDPARKER,FRED1-555-321-5555EDITEDITPhone no.Area code Phone no.Area code Phone no.555-321-5555G321-5555F1-555-321-5555HSAVE](https://usermanual.wiki/Panasonic-of-North-America/96NKX-TG5240/User-Guide-382212-Page-36.png)
![Useful InformationAnswering SystemPreparation37Using the Caller ListFor assistance, please call: 1-800-211-PANA(7262)Telephone SystemCaller ID Number Auto Edit This unit can automatically edit incoming phone numbers. For example, it can ignore the area code of calls originating from your area code, so that you can call these numbers from the Caller List without dialing the area code.To activate this feature, you must edit a caller’s phone number in the Caller List (p. 36) by selecting pattern F,G, or H, then make an outgoing call to that number. Calls from numbers in that area code will be edited automatically. The unit can remember up to 4 area codes to be edited according to patterns F and G.You can turn on and off this feature using the handset. The factory preset is ON.To turn this feature ON/OFF•If you fail to reach your destination when making a call, the phone number you dialed might have an incorrect pattern. Edit the phone number with another pattern (p. 36).•When this feature is set to OFF the unit will still be able to display Caller ID, but incoming Caller ID numbers will not be automatically edited.•If you move to another area you may need to turn this feature off to erase the previously edited area codes. To use this feature again, turn it on and reprogram the area codes you want to be edited once again.1Press [MENU].2Scroll to “Initial setting” by pressing [d]or [B], then press the soft key ( ). 3Scroll to “Caller ID edit” by pressing [d]or [B], then press the soft key ( ).4Select “Off” or “On” by pressing [d]or [B].5Press the soft key ( ), then press [OFF].HandsetSELECTInitial settingSELECTCaller ID editAuto edit:OnSAVE](https://usermanual.wiki/Panasonic-of-North-America/96NKX-TG5240/User-Guide-382212-Page-37.png)
![Using the Caller List38Storing Caller Information in the Phone BookCaller names and phone numbers that are in the Caller List can be stored in the phone book.•You cannot store Caller List items in the phone book if a phone number is not displayed.Erasing Caller InformationTo erase a specific caller To erase all entries1Press the soft key ( ), [d], or [B] to enter the Caller List.2Scroll to the desired caller by pressing [d]or [B].•If the number requires editing, see page 36.3Press the soft key ( ).•If there is no name information for the caller, “Enter name” will be displayed. — You can enter a name by performing the following steps:(1) enter the name (p. 40), (2) press [d], and (3) press the soft key ( ).— If a name is not required, press [d], then press the soft key ( ).•To continue storing other items, repeat from step 2.•To exit programming mode, press [OFF].HandsetCIDSAVESAVESAVEHandset1Press the soft key ( ), [d], or [B] to enter the Caller List.2Scroll to the desired caller by pressing [d]or [B].3Press the soft key ( ).•“Erased” is displayed.•To erase other items, repeat from step 2.•To exit the Caller List, press[OFF].CIDERASE1Press the soft key ( ), [d], or [B] to enter the Caller List.•Before erasing all items, make sure that “0 missed call” is displayed.2Press the soft key ( ).•“All erase?” is displayed.3Press the soft key ( ).•“All erased” is displayed and all items in your Caller List are erased.CIDERASEYES](https://usermanual.wiki/Panasonic-of-North-America/96NKX-TG5240/User-Guide-382212-Page-38.png)
![Useful InformationAnswering SystemPreparation39For assistance, please call: 1-800-211-PANA(7262)Telephone SystemPhone BookThe handset can store up to 50 names and phone numbers in its phone book. You can make a call by selecting a name or number from the phone book, and copy phone book items from one handset to another (p. 44, 45).Storing Names and Numbers•If a pause is required when dialing, press the soft key () in step 4. A pause is stored in a phone number as one digit (p. 55).1Press the soft key (C).•The display will show the number of stored items.2Press the soft key ( ).3Enter a name of up to 16 characters with the dialing buttons (0 to 9) (p. 40), then press [d].•To move the cursor, press the soft key () or ().•If a name is not required, press [d] then go to step 4. 4Enter a phone number of up to 32 digits. •To delete a digit, press the soft key ().To erase all of the digits, press and hold the soft key().5Press [d].•If you need to edit the name and number, press the soft key ( ), then change them.•You can also press [B] to reach the desired display and change it.6Press the soft key ( ).•To continue storing other items, repeat from step 2.7Press [OFF].Handset Phone book 10 items0-9=Name searchdB=Scroll listADDfgEnter nameTo|md=NextCLEARCLEAREnter phone no.5557654321|d=NextEDITTom555-765-4321SAVEPAUSE](https://usermanual.wiki/Panasonic-of-North-America/96NKX-TG5240/User-Guide-382212-Page-39.png)
![Phone Book40Selecting characters to enter namesEnter names using the dialing buttons. Press each button until the desired character is displayed. •Pressing each button selects a character in the order shown below.For example, to enter “Tom”:1. Press [8] four times.2. Press [6] three times, then press the soft key () to move the cursor.3. Press [6] once.If you make a mistake while entering a name or number1. Press the soft key () or () to move the cursor to the incorrect character.2. Press the soft key () to delete the character.•Each time you press the soft key (), a character is erased.•To erase all characters, press and hold the soft key ().3. Enter the correct character. Keys Characters Keys Characters[1] #& ’ ( );,–. /1 [6] mn oMNO6[2] abcABC2 [7] pq r sPQRS7[3] de fDEF3 [8] tuvTUV8[4] gh iGHI 4 [9] wxyzWXYZ9[5] jklJKL5 [0] 0SpaceMoves the cursor to the left.Moves the cursor to the right. (To enter another character using the same number key, move the cursor to the next space.)fg|TTo|gTo|mf gCLEARCLEARCLEAR](https://usermanual.wiki/Panasonic-of-North-America/96NKX-TG5240/User-Guide-382212-Page-40.png)
![Useful InformationAnswering SystemPreparation41Phone BookFor assistance, please call: 1-800-211-PANA(7262)Telephone SystemDialing from the Phone Book•If “No items stored” is displayed in step 1, the phone book is empty.•To exit the phone book, press [OFF].•To quickly search for the desired item, press [d]or [B] after step 1.To search for a name by initial1. Press the soft key (C).2. Press the dialing button for the first letter of the desired name until any name with the same initial is displayed (see the Index table below).Ex. To find “Frank”, press [3] repeatedly until the first item under “F” is displayed.•If there are no items beginning with the character you selected, the first item in the next alphabetical index will be displayed.3. Press [d] repeatedly until the desired name is displayed.Index table1Press the soft key (C).•The display shows the number of stored items.•You can press the soft key () to view the first item.2Scroll to the desired item. To scroll down, press [d]. To scroll up, press [B].3Press [C]or [s].•The phone number is dialed.Keys Index Keys Index[1] Symbols, 1 [6] M, N, O, 6[2] A, B, C, 2 [7] P, Q, R, S, 7[3] D, E, F, 3 [8] T, U, V, 8[4] G, H, I, 4 [9] W, X, Y, Z, 9[5] J, K, L, 5 [0] 0, SpaceHandsetSEARCH Phone book 10 items0-9=Name searchdB=Scroll listPhone book items are sorted in the following order:1Alphabet letters (Alphabetical)2Space & ’ ( ) , – . /3Numbers 0 to 94# ;5Telephone numbers (If no name is stored)Frank555-456-7890](https://usermanual.wiki/Panasonic-of-North-America/96NKX-TG5240/User-Guide-382212-Page-41.png)
![Phone Book42Chain DialingChain dialing allows you to dial numbers stored in the phone book while you are on a call. This feature can be used, for example, to dial a calling card access number that you have stored in the phone book, without having to dial manually.•If you have rotary or pulse service, you need to press [*] before pressing [MENU] in step 1 to change the dialing mode temporarily to tone.1While you are on a call;Press [MENU].2Press the soft key ( ) at “1=Phone book”, or press [1].•The display shows the number of stored items.3Search for the desired item by pressing [d]or [B].•To search for an item by initial, see page 41.4Press the soft key ( ).•The phone number is dialed.•If required, repeat steps 1 to 4 for any remaining numbers.Handset1=Phone book2=Booster on3=Caller IQSELECT Phone book 30 items0-9=Name searchdB=Scroll listCALL](https://usermanual.wiki/Panasonic-of-North-America/96NKX-TG5240/User-Guide-382212-Page-42.png)
![Useful InformationAnswering SystemPreparation43Phone BookFor assistance, please call: 1-800-211-PANA(7262)Telephone SystemEditing an Item in the Phone BookErasing an Item in the Phone Book1Press the soft key (C), then scroll to the desired item by pressing [d]or [B].•To search for the item by initial, see page 41.2Press the soft key ( ).3Edit the name (p. 40), then press [d].•If you do not need to change the name, press[d] then go to step 4.•To move the cursor, press the soft key () or ().4Edit the phone number, then press [d].•If you do not need to change the number, press [d] then go to step 5.•To delete a digit, press the soft key ().To delete all of the digits, press and hold the soft key().5Press the soft key ( ).6Press [OFF].1Press the soft key (C), then scroll to the desired item by pressing [d]or [B].•To search for the item by initial, see page 41.2Press the soft key ( ).•To cancel erasing, press the soft key ().3Press the soft key () again.4Press [OFF].HandsetJane456-7890EDITEnter name|Janed=NextfgEnter nameJane Walke|rd=NextCLEARCLEAREnter phone no.5554567890|d=NextSAVEHandsetERASENOErase?YES Erased](https://usermanual.wiki/Panasonic-of-North-America/96NKX-TG5240/User-Guide-382212-Page-43.png)
![Phone Book44Copying Items in the Phone Book(When the System Has Two or More Handsets)You can copy one or all phone book items between two handsets. The destination handset will save the items in its phone book. •If an outside call is received during the phone book copy, copying will stop. You will need to re-send the item(s) later.•After the copy has started, do not place your handset on the base unit or charger until copying finishes, otherwise copying will stop.To copy one phone book item to another handset1Make sure the destination handset is not in use.Press [MENU].2Scroll to “Copy phone book” by pressing [d]or [B], then press the soft key ( ).3Press the soft key ( ) at “Copy 1 item”.4Select the destination extension number (1 to 4) by pressing [d]or [B].•You can also select the extension number by pressing [1] to [4].5Press the soft key ( ).6Scroll to the desired phone book item by pressing [d]or [B].•To search for the item by initial, see page 41.7Press the soft key ( ).•You can continue by copying other items.8Press [OFF].HandsetSELECTCopy phone bookSELECTCopy 1 itemEnter extension#:2dBNEXTSelect itemSENDComplete](https://usermanual.wiki/Panasonic-of-North-America/96NKX-TG5240/User-Guide-382212-Page-44.png)
![Useful InformationAnswering SystemPreparation45Phone BookFor assistance, please call: 1-800-211-PANA(7262)Telephone SystemTo copy all of the items in your phone book to another handset•You can exit phone book copying mode by pressing [OFF].1Make sure the destination unit is not in use.Press [MENU].2Scroll to “Copy phone book” by pressing [d]or [B], then press the soft key ( ).3Scroll to “Copy all items” by pressing [d]or [B], then press the soft key ( ).4Select the destination extension number (1 to 4) by pressing [d]or [B].•You can also select the extension number by pressing [1] to [4].5Press the soft key ( ).•When all items have been copied, “Complete” is displayed.•The destination handset displays “Phone book Receiving” then “Phone book Received”.•You can continue copying items to another extension.6Press [OFF].SELECTCopy phone bookSELECTCopy all itemsEnter extension#:2dBSENDTom Jones555-765-4321 01/10Ex. Copying 1st item outof 10 items](https://usermanual.wiki/Panasonic-of-North-America/96NKX-TG5240/User-Guide-382212-Page-45.png)
![46Speed DialerStoring Phone Numbers You can store up to 10 phone numbers in the base unit. The dialing buttons ([0] to [9]) function as memory stations.Make sure the base unit is not being used.•If a pause is required when dialing, press [REDIAL/PAUSE] where needed.A pause counts as one digit (p. 55).•When [*] is entered, “ ” is displayed. When [#] is entered, “ ” is displayed.To erase a stored number1. Press [PROGRAM], then press [AUTO].2. Press the memory station number ([0] to [9]) for the phone number to be erased.Dialing a Stored Phone Number •Speed dial numbers stored in the base unit can only be dialed from the base unit.1Press [PROGRAM].•The IN USE indicator flashes and “” is displayed.2Enter a phone number of up to 32 digits.•The last digit of the entered number is displayed.•If you misdial, press [PROGRAM],and start again from step 1.3Press [AUTO].4Press a memory station number ([0] to [9]).•To store other numbers, repeat from step 1.1Press [SP-PHONE].2Press [AUTO].3Press a memory station number ([0] to [9]).•To stored number is dialed.Base Unit[SP-PHONE][PROGRAM][AUTO]IN USE IndicatorMemoryStationNumbers[REDIAL/PAUSE]Base Unit](https://usermanual.wiki/Panasonic-of-North-America/96NKX-TG5240/User-Guide-382212-Page-46.png)
![Useful InformationAnswering SystemPreparation47For assistance, please call: 1-800-211-PANA(7262)Telephone SystemIntercomA 2-way intercom can be set up between a handset and the base unit, and between two handsets (when the system has two or more handsets, p. 3). You can page all handsets at once from the base unit, and announce the page to all handsets (Voice Paging, p. 49).Page the desired unit(s) by entering the extension number, shown in the top right of each handset’s display. The base unit’s extension number is 0.PagingFromFromUsing this feature, you can also locate a misplaced handset.1Press [HOLD/INTERCOM].2To page the base unit, press [0].To page another handset, press its extension number ([1] to [4]).•The paged unit will ring for 1 minute.•To stop paging, press [OFF].3When the paged party answers, start talking.•You can switch to the speaker by pressing [s].To switch back to the receiver, press [C].4To disconnect the intercom, press [OFF].1Press [LOCATOR/INTERCOM/TRANSFER].•The LOCATOR/INTERCOM/TRANSFER and SP-PHONE indicators light.2To page all handsets, press [0].To page a specified handset, press its extension number ([1] to [4]).•The handset(s) will ring for 1 minute.•To stop paging, press [SP-PHONE] or [LOCATOR/INTERCOM/TRANSFER].3When the paged party answers, talk into the MIC.4To disconnect the intercom, press [SP-PHONE] or [LOCATOR/INTERCOM/TRANSFER].•The indicator lights go out.HandsetPress extension# to call1-4=Handset0=BaseCalling BaseEx. Calling Base unitCalling HS[2]Ex. Calling Handset 2 Intercom00-00-05D01Base Unit](https://usermanual.wiki/Panasonic-of-North-America/96NKX-TG5240/User-Guide-382212-Page-47.png)
![Intercom48Answering a PageWhen a handset is paged, it rings and the Ringer indicator flashes rapidly. The display shows the calling extension.Auto TalkIf you set the Auto Talk feature to ON (p. 19), you can answer a call by lifting the handset off the base unit or the charger (for accessory handset users, p. 3).When the base unit is being paged, it rings and the LOCATOR/INTERCOM/TRANSFER indicator flashes.During an intercom call:•If you have difficulty hearing, decrease the speaker volume by pressing [d].•If an incoming call is being received, you will hear two tones (incoming call tone, p. 61) and the IN USE indicator on the base unit will flash rapidly. To answer the call;— if using the handset, press [OFF], then press [C] or [s].— if using the base unit, press [SP-PHONE] twice.1Press [C],[s] or [HOLD/INTERCOM].•You can also answer a call by pressing any button except [d], [B], and [OFF].2To disconnect the intercom, press [OFF].1Press [SP-PHONE] or [LOCATOR/INTERCOM/TRANSFER].2To disconnect the intercom, press [SP-PHONE] or[LOCATOR/INTERCOM/TRANSFER].•When the ringer volume is off (p. 20, 21), the handset and the base unit will ring at the LOW level for intercom calls.•You cannot change the ringer tone for intercom calls.•When the base unit user pages all handsets, only the handset user who answers first can talk with the base unit user.HandsetEx. Base pagingCall from BaseEx. Handset 2 pagingCall from HS[2]Base Unit](https://usermanual.wiki/Panasonic-of-North-America/96NKX-TG5240/User-Guide-382212-Page-48.png)
![Useful InformationAnswering SystemPreparation49For assistance, please call: 1-800-211-PANA(7262)Telephone SystemIntercomVoice PagingThe base unit user can make a voice announcement that is heard through the speakers of all handsets.•Only the handset user who answers first can talk with the base unit user.•To answer the page from the handsets, see “Answering a Page” on page 48.•It is not possible to specify which handset(s) will hear the voice announcement.Transferring a CallYou can transfer an outside call to the base unit or a handset.From the to the 1Press [LOCATOR/INTERCOM/TRANSFER].•The LOCATOR/INTERCOM/TRANSFER and SP-PHONE indicators light.2To make a voice announcement to all handsets, press [5].•You will hear a ringback tone and all registered handsets will beep.•To stop paging, press [SP-PHONE] or [LOCATOR/INTERCOM/TRANSFER].3After the ringback tones stop, announce the page through the MIC.•All handset users will hear your voice through the speakers after beeps, and “Call from Base” will be displayed on the handsets.4After one of the handsets answers, talk into the MIC.1Handset:(1) During a call, press [HOLD/INTERCOM].•The call is put on hold.(2) To page the base unit, press [0].(3) Wait for the paged party to answer, then you can announce the transfer. •If the paged party does not answer, press [C] or [s] to return to the outside call.2Base unit: Press [SP-PHONE] or [LOCATOR/INTERCOM/TRANSFER] to answer the page.3Handset: To complete the transfer, press [OFF].Base UnitHandset Base UnitHandset Base UnitPress extension# to transfer1-4=Handset0=Base 9=Mailbox](https://usermanual.wiki/Panasonic-of-North-America/96NKX-TG5240/User-Guide-382212-Page-49.png)
![Transferring a Call50From the to the •When the base unit user calls all handsets, only the handset user who answers first can take the transferred call.From a to another (when the system has two or more handsets)•The paged handset user can also answer the page by lifting the handset off the base unit or charger (for accessory handset users, p. 3) if the Auto Talk feature has been set to ON (p. 19).•Any user can answer a transferred call by pressing [C],[s]or [SP-PHONE].1Base unit:(1) During a call, press [LOCATOR/INTERCOM/TRANSFER].•The call is put on hold.(2) To page a specified handset, press its extension number ([1] to [4]).To page all handsets, press [0].To make a voice announcement to all handsets, press [5], then speak into the MIC after the ringback tones stop.(3) Wait for the handset user to answer, then you can announce the transfer.•If the paged party does not answer, press [SP-PHONE] twice to return to the outside call.2Handset: Press [C],[s] or [HOLD/INTERCOM] to answer the page.3Base unit: To complete the transfer, press [SP-PHONE].1During a call, press [HOLD/INTERCOM], then page another handset by pressing its extension number ([1] to [4]).2Wait for the paged party to answer, then you can announce the transfer.•The paged handset user can answer by pressing [C],[s] or [HOLD/INTERCOM]. (Any button except [d],[B] and [OFF] can be pressed to answer the page.)3To complete the transfer, press [OFF].Base Unit HandsetHandset Handset](https://usermanual.wiki/Panasonic-of-North-America/96NKX-TG5240/User-Guide-382212-Page-50.png)
![Useful InformationAnswering SystemPreparation51Transferring a CallFor assistance, please call: 1-800-211-PANA(7262)Telephone SystemQuick call transferYou can hang up a call before the paged party answers your page.During a call, press [HOLD/INTERCOM], press the extension number ([0]for the base unit, [1] to [4] for the handset), and press [OFF] to hang up.1. During a call, press [LOCATOR/INTERCOM/TRANSFER].2. Press the extension number ([1] to [4]),press [0] to page all handsets, or press [5] then announce the transfer into the MIC after the ringback tones stop.3. Press [SP-PHONE] to hang up.•The call will be transferred directly.•The paged party can answer the transferred call by pressing [C],[s] or [SP-PHONE].•After the paged party answers, the transfer is complete.•If the paged party does not answer:— for the handset, press [C] or [s] to return to the outside call. — for the base unit, press [SP-PHONE] to return to the outside call.•If the paged party does not answer within 60 seconds after you hang up, your phone will ring and the call will be returned to your phone. You may speak to the caller again by pressing [SP-PHONE],[C] or [s].If you do not answer the call within 4 minutes, the call will be disconnected. After speaking to the caller, you may also transfer the caller to a mailbox by performing the following three steps: (1) Tell the caller to press the # (pound sign) and the mailbox number of the person they want to leave a message for after you end the call (p. 63).(2) Press [HOLD/INTERCOM] on the handset or [LOCATOR/INTERCOM/TRANSFER] on the base unit.(3) Press [9] to transfer the caller to the Answering System greeting (p. 70). (The caller will hear the greeting and can select the appropriate mailbox.)HandsetBase Unit](https://usermanual.wiki/Panasonic-of-North-America/96NKX-TG5240/User-Guide-382212-Page-51.png)
![52Conference CallsWhile you are talking with an outside caller, the base unit user or a handset user can join the conversation and establish a conference call.•To leave the conference, press [OFF] on the handset or press [SP-PHONE] on the base unit. The two other parties can continue the conversation.•During a conference, the outside call can be placed on hold by pressing [HOLD/INTERCOM] on the handset or [HOLD] on the base unit. Internal communications between extensions are not suspended. Only the person who placed the call on hold can resume the full conference by pressing the soft key ( ) on the handset or [CONF] on the base unit.•One more extension can join the conference call. To join the conference call, press [C],[s] or [SP-PHONE]. A maximum of four parties including the outside party can take part in a conference call.Call ShareThis feature allows the base unit or the handset to join an existing outside call.•To prevent other users from joining your conversation, turn the Call Privacy feature on (p. 55).To join a conversation (Call Share) Press [C]or [s].•“Conference” is displayed. Press [SP-PHONE].•A maximum of four parties including the outside party can join a conversation.1During a call, press [HOLD/INTERCOM].•The call is put on hold.2To page the base unit, press [1].To page another handset, press the extension number ([1] to [4]).3When the paged party answers, press the soft key ( ) on your unit to make a conference call.HandsetCONF1During a call, press [LOCATOR/INTERCOM/TRANSFER].•The call is put on hold.2To page a handset, press the extension number ([1] to [4]).3When the paged party answers, press [CONF] on your unit to make a conference call.Base UnitCONFHandsetBase Unit](https://usermanual.wiki/Panasonic-of-North-America/96NKX-TG5240/User-Guide-382212-Page-52.png)
![Useful InformationAnswering SystemPreparation53For assistance, please call: 1-800-211-PANA(7262)Telephone SystemRoom MonitorThis feature allows you to monitor a room by using the intercom feature. For example, you can monitor a baby from different areas of the house. You can call the destination unit to monitor the room. The called unit will not ring. When the system has two or more handsets (p. 3), you can monitor one handset using another. To allow other users to monitor through your unit, turn the feature on. If you want to prevent your unit from being monitored by other extensions, leave this feature off (factory preset). You can turn on this feature on the handset or the base unit separately using the handset.To turn on the handset Room Monitor feature (to allow other users to monitor through your handset)•To prevent your handset from being monitored, select “Off” in step 4.To turn on the base unit Room Monitor feature (to allow other users to monitor through your base unit)•To prevent your base unit from being monitored, select “Off” in step 4.1Press [MENU].2Scroll to “Initial setting” by pressing [d]or [B], then press the soft key ( ). 3Scroll to “Room monitor” by pressing [d]or [B], then press the soft key ( ). 4Select “On” by pressing [d]or [B].5Press the soft key ( ), then press [OFF].1Follow steps 1 and 2 of “To turn on the handset Room Monitor feature” above.2Scroll to “Set base unit” by pressing [d]or [B], then press the soft key ( ). 3Scroll to “Room monitor” by pressing [d]or [B], then press the soft key ( ).4Select “On” by pressing [d]or [B].5Press the soft key ( ), then press [OFF].HandsetSELECTInitial settingSELECTRoom monitorRoom monitor:OnSAVEHandsetSELECTSet base unitSELECTRoom monitorRoom monitor:OnSAVE](https://usermanual.wiki/Panasonic-of-North-America/96NKX-TG5240/User-Guide-382212-Page-53.png)
![Room Monitor54To monitor with The destination unit must not be in use and the destination handset must be off the base unit.•The monitored user can stop being monitored by:— on the handset, press [OFF] or place the handset on the base unit.— on the base unit, press [LOCATOR/INTERCOM/TRANSFER] or [SP-PHONE].•“Room monitor” is also displayed on the monitored handset.•While the base unit is monitoring or being monitored, the LOCATOR/INTERCOM/TRANSFER indicator flashes and the SP-PHONE indicator lights.To monitor with The destination handset must not be in use and off the base unit.1Press [HOLD/INTERCOM], then press the soft key ( ).2To call the base unit, press [0].To call another handset, press its extension number ([1] to [4]).•To monitor from the speaker, press [s]. You can place the handset on the charger but you cannot place it on the base unit and continue monitoring. Placing the handset on the base unit will disconnect room monitoring. To switch back to the receiver, press [C].3To end monitoring, press [OFF].1Press [LOCATOR/INTERCOM/TRANSFER], then press [MUTE].2To call the handset, press its extension number ([1] to [4]).3To end monitoring, press [LOCATOR/INTERCOM/TRANSFER] or [SP-PHONE].HandsetMONITORPress extension# to room monitor1-4=Handset0=BaseRoom monitor00-00-05D01Base Unit](https://usermanual.wiki/Panasonic-of-North-America/96NKX-TG5240/User-Guide-382212-Page-54.png)
![Useful InformationAnswering SystemPreparation55For assistance, please call: 1-800-211-PANA(7262)Telephone SystemSpecial FeaturesMuting Your Conversation During a call, you can mute your phone so the other party cannot listen to you. When muting your conversation, you can hear the other party. Press the soft key ( ).•“Mute” will be displayed for a few seconds and “ ” will flash.• To release the mute, press the soft key () again.•If you press [C]or [s] to switch between the receiver and speaker, the mute will be released. Press [MUTE].•The SP-PHONE indicator flashes.• To release the mute, press [MUTE] again.Call Privacy Call Privacy allows you to prevent other users from joining your conversation with an outside caller. To allow other users to join your conversation, leave this feature off. This feature is only available for the handset.To turn on the Call Privacy feature:Press the soft key () during a conversation.•“PRIVACY” will be displayed.•To turn the feature off, press the soft key ( ) again during a conversation. •While the Call Privacy feature is turned on, other users cannot join the conversation. Call Privacy will turn off after you hang up the call.Using the PAUSE Button (For PBX Line/Long Distance Calls)We recommend you press the soft key () on the handset or press [REDIAL/PAUSE] on the base unit if a pause is required for dialing with a PBX or to make a long distance call.Ex. Line access number [9] (PBX)[9] N Soft key () or[REDIAL/PAUSE] N•Pressing the soft key () on the handset or [REDIAL/PAUSE] on the base unit once creates a 3.5 second pause. This prevents misdialing when you dial after confirming the entered number (p. 28) or dial a stored number (p. 41, 46).•Pressing the soft key () on the handset or [REDIAL/PAUSE] on the base unit more than once increases the length of the pause between numbers.HandsetMUTEMUTEMUTEBase UnitHandsetPRIVACYPRIVACYHandset Base UnitPAUSEPAUSEPhone numberPAUSEPAUSE](https://usermanual.wiki/Panasonic-of-North-America/96NKX-TG5240/User-Guide-382212-Page-55.png)
![Special Features56Temporary Tone Dialing(For Rotary or Pulse Service Users) Press [*] (TONE) before entering access numbers which require tone dialing.•The dialing mode changes to tone. You can enter numbers to access an answering service, electronic banking service, etc. When you hang up, the dialing mode will return to pulse.For Call Waiting Service Users Press [FLASH/CALL WAIT] if you hear a call waiting tone during a conversation.•The first call is put on hold and you can answer the second call.•To return to the first caller, press [FLASH/CALL WAIT] again.•Call Waiting service cannot be used when the first call is put on hold or the Answering System is handling a call.•If this function does not operate properly, consult your telephone company for details.Call Waiting Caller IDIf you subscribe to both Caller ID and Call Waiting with Caller ID services (CWID), when a second call is received while talking, the second caller’s information will be displayed. After you hear a call waiting tone while talking, the display shows the caller’s name with the phone number and “Waiting”.•Contact your telephone company for details and availability in your area.•The caller’s information will only be shown on the display of the handset which is on the outside call.•The second caller’s name will not be announced even if the Talking Caller ID feature is on (p. 33).Handset Base UnitHandset Base UnitHandsetBROWN,NANCY1-555-666-7777----Waiting-----](https://usermanual.wiki/Panasonic-of-North-America/96NKX-TG5240/User-Guide-382212-Page-56.png)
![Useful InformationAnswering SystemPreparation57Special FeaturesFor assistance, please call: 1-800-211-PANA(7262)Telephone SystemCall Waiting Deluxe Service This unit is compatible with the Call Waiting Deluxe Service offered by your telephone company.After subscribing, Call Waiting Deluxe not only allows your handset to display a second caller’s information, but also offers you a variety of ways to deal with the second call (p. 58).Before using Call Waiting Deluxe, turn the “C.WTG (Call Waiting) options” mode on by using the handset.•Please contact your telephone company for details and availability in your area.To turn the “C.WTG (Call Waiting) options” mode onTo turn the “C.WTG (Call Waiting) options” mode off, select “Off” by pressing [d]or [B] in step 5.1Press [MENU].2Scroll to “Initial setting” by pressing [d]or [B], then press the soft key ( ).3Scroll to “Set tel line” by pressing [d]or [B], then press the soft key ( ).4Scroll to “C.WTG options” by pressing [d]or [B], then press the soft key ( ).5Select “On” by pressing [d]or [B].6Press the soft key ( ), then press [OFF].HandsetSELECTInitial settingSELECTSet tel lineSELECTC.WTG optionsC.WTG options:OnSAVE](https://usermanual.wiki/Panasonic-of-North-America/96NKX-TG5240/User-Guide-382212-Page-57.png)
![Special Features58To use Call Waiting Deluxe ServiceYou can choose from the options on the display as shown below.Display SignificationAns (Answer) Answers the second call, while keeping the first call on hold.Hold The second call is put on hold. The caller will hear the pre-recorded hold message played by the telephone company.Annc(Announcement)Plays the pre-recorded busy message from the telephone company for the second caller (e.g. “We are not available now.”) and hangs up the second call.Fwd (Forward)Forwards the second call to a voice mail service provided by your telephone company, if applicable. Consult your telephone company about voice mail services.Drop Hangs up the current call and answers the waiting call.Conf(Conference)Answers the second call and combines it with the first call to make a conference call.During a conference call, you can choose either“Drop caller1” or “Drop caller2” to hang up the first or second call.Return Returns to the waiting caller while keeping the current call on hold. 1When you hear a call waiting tone while talking, the second caller’s information is displayed.Press [FLASH/CALL WAIT].•The option menu is displayed.2Enter a displayed option number (1 to 6) to select the desired option.•The length of the call is displayed.•You can also select the desired option by pressing [d]or [B] until the option flashes, then pressing [FLASH/CALL WAIT].BROWN,NANCY555-666-7777----Waiting-----1=Ans 4=Fwd2=Hold 5=Drop3=Annc 6=ConfdB CALLWAIT=OK04](https://usermanual.wiki/Panasonic-of-North-America/96NKX-TG5240/User-Guide-382212-Page-58.png)
![Useful InformationAnswering SystemPreparation59Special FeaturesFor assistance, please call: 1-800-211-PANA(7262)Telephone SystemAfter selecting “Ans” (Answer) or “Hold”:You can choose one of the following options: “Return”—to return to the waiting call. “Drop”—to hang up the current call and answer the waiting call.“Conference”—to make a conference call.1. Press [FLASH/CALL WAIT] to display the option menu. 2. Enter a displayed option number (1 to 3) to select the desired option.•If “Return” is selected, you will return to the waiting call. Repeat steps 1 and 2 on page 58 to select another option.After selecting “Conf” (Conference) or “Conference”:You can choose one of the following options: “Drop caller1”—to hang up the first call. “Drop caller2”—to hang up the second call.1. Press [FLASH/CALL WAIT] to display the option menu. 2. Enter a displayed option number (1 or 2) to select the desired option.•In step 2, you can also select the desired option by pressing [d]or [B] until the option flashes, then pressing [FLASH/CALL WAIT].•To cancel the option menu, wait for 20 seconds. The handset display will return to the length of the call.•Call Waiting cannot be used when a parallel connected telephone is in use.•If this function does not operate properly, consult your telephone company for details.1=Return2=Drop3=ConferencedB CALLWAIT=OK041=Drop caller12=Drop caller2dB CALLWAIT=OK04](https://usermanual.wiki/Panasonic-of-North-America/96NKX-TG5240/User-Guide-382212-Page-59.png)
![Special Features60FLASH Button Pressing [FLASH/CALL WAIT] allows you to use special features of your host PBX such as transferring an extension call, or accessing optional telephone services such as call waiting. •Pressing [FLASH/CALL WAIT] cancels the Temporary Tone Dialing mode or the mute (p. 56).Selecting the flash time The flash time depends on your telephone exchange or host PBX. You can select the following flash times: “700, 600, 400, 300, 250, 110, 100 or 90 ms (milliseconds)”. The factory preset is “700 ms”.•If PBX functions do not work correctly, consult your PBX supplier for the correct settings. 1Press [MENU].2Scroll to “Initial setting” by pressing [d]or [B], then press the soft key ( ).3Scroll to “Set tel line” by pressing [d]or[B], then press the soft key ( ).4Scroll to “Set flash time” by pressing [d]or [B], then press the soft key ( ).5Select the flash time by pressing [d]or [B].6Press the soft key ( ), then press [OFF].Handset Base UnitHandsetSELECTInitial settingSELECTSet tel lineSELECTSet flash timeSet flash time:700msSAVE](https://usermanual.wiki/Panasonic-of-North-America/96NKX-TG5240/User-Guide-382212-Page-60.png)
![Useful InformationAnswering SystemPreparation61Special FeaturesFor assistance, please call: 1-800-211-PANA(7262)Telephone SystemIncoming Call Tone During an intercom call, or while using the Room Monitor feature, you can be informed by two tones if a call arrives. If you set incoming call tone to ON, this tone will be heard for as long as the line rings. To bypass the incoming call tone, set it to OFF. To set the incoming call tone to sound twice, set to “2”. The factory preset is “2”.You can set the incoming call tone on the handset and base unit separately using the handset.Handset incoming call tone Base unit incoming call tone 1Press [MENU].2Press the soft key ( )at “Ringersetting”.3Scroll to “Incoming call.” by pressing [d]or [B], then press the soft key ( ).4Select “On”, “Off” or “2” by pressing [d]or[B].5Press the soft key ( ), then press [OFF].1Press [MENU].2Scroll to “Initial setting” by pressing [d]or [B], then press the soft key ( ).3Scroll to “Set base unit” by pressing [d]or [B], then press the soft key ( ).4Scroll to “Incoming call.” by pressing [d]or [B], then press the soft key ( ).5Select “On”, “Off” or “2” by pressing [d]or[B].6Press the soft key ( ), then press [OFF].Handset Base UnitHandsetSELECTRinger settingSELECTIncoming call.Incoming calltone :2SAVEHandsetSELECTRinger settingSELECTSet base unitSELECTIncoming call.Incoming calltone :2SAVE](https://usermanual.wiki/Panasonic-of-North-America/96NKX-TG5240/User-Guide-382212-Page-61.png)
![Special Features62Key Tone You can select whether or not the handset keys will sound tones (key tone, confirmation tone, error tone). The factory preset is ON.1Press [MENU].2Scroll to “Initial setting” by pressing [d]or [B], then press the soft key ( ).3Scroll to “Key tone” by pressing [d]or [B],then press the soft key ( ).4Select “Off” or “On” by pressing [d]or [B].5Press the soft key ( ), then press [OFF].HandsetSELECTInitial settingSELECTKey toneKey tone:OnSAVE](https://usermanual.wiki/Panasonic-of-North-America/96NKX-TG5240/User-Guide-382212-Page-62.png)
![Telephone System Useful InformationAnswering SystemPreparation63For assistance, please call: 1-800-211-PANA(7262)Mailbox FeaturesThe Answering System provides three voice mailboxes. You can share these mailboxes with other members of your family or office as you wish. Callers from touch tone phones can a specify mailbox in which to leave a message. If callers do not specify a mailbox or call from rotary telephones, messages will be recorded into Mailbox 1.When someone callsWhen the Answering System is on (p. 65), callers will hear a greeting message (p. 23). — While or after hearing the greeting, callers can specify a mailbox by pressing [#][1] (Mailbox 1), [#][2] (Mailbox 2) or [#][3] (Mailbox 3). They will then hear “Please leave your message”, and they can start recording a message.• If you would like callers to leave messages in a specific mailbox, we recommend you record a greeting message such as: “Hello, this is (your name and/or number). Sorry, we cannot take your call. If you have a message, for John press [#] and [1], for Jane press [#] and [2], for Jack press [#] and [3]. Or just stay on the line and leave a message after the beep. Thank you.”— Callers wait until the greeting ends, then they can leave a message. Messages will be automatically recorded into Mailbox 1 if no mailbox is specified.Useful information•You can leave a memo message for other users in a mailbox with the base unit (p. 70).•You can transfer a call to one of the mailboxes, in which callers can leave a message (p. 70).•If you want to prevent unauthorized people from listening to messages in Mailbox 2 or 3, you can assign a password to each mailbox (p. 64).•The total recording time of all messages (greeting, incoming and memo) is about 16 minutes. If messages are recorded in noisy rooms, the time may be shortened by up to 3 minutes.•To select the caller’s recording time, see page 24.•A maximum of 64 messages (including the greeting and memo messages) can be recorded.IncomingVoice MessagesMailbox1Mailbox2Mailbox3If not specifiedCallerpresses[#][2].Callerpresses[#][1].Callerpresses[#][3].](https://usermanual.wiki/Panasonic-of-North-America/96NKX-TG5240/User-Guide-382212-Page-63.png)
![Mailbox Features64Setting the Mailbox Password (for Mailbox 2 and 3) You can use Mailbox 2 or 3 as personal mailboxes. To prevent unauthorized people from accessing your mailbox and listening to your messages, assign a 2-digit password (00–99) to Mailbox 2 or 3. Each password and the remote code (p. 72) must be unique. Once a password is assigned to Mailbox 2 or 3, no one can listen to messages without entering the password.To confirm the password, repeat steps 1 to 5.•The password is displayed. When finished, press [OFF].To erase the passwordPress the soft key ( ) in step 6, press the soft key ( ), and press [OFF].•You can access the mailbox without entering the password.1Press [MENU].2Scroll to “Initial setting” by pressing [d]or [B], then press the soft key ( ).3Press the soft key ( ) at “Setanswering”.4Scroll to “Set mailbox2&3” by pressing [d]or [B], then press the soft key ( ).5Select the mailbox by pressing [B] (Mailbox 2) or [d] (Mailbox 3).6Enter a 2-digit password (00–99).•If you entered the wrong password, re-enter the correct one.7Press the soft key ( ).•If 3 beeps sound, you entered the same password as the other mailbox or the remote code (p. 72), or you entered a one-digit password. Start again from step 6 and select another password.8Press [OFF].HandsetSELECTInitial settingSELECTSet answeringSELECTSet mailbox2&3Set password^=Mailbox2V=Mailbox3Set passwordMailbox2 :22Ex. Entered 22.SAVECLEARSAVE](https://usermanual.wiki/Panasonic-of-North-America/96NKX-TG5240/User-Guide-382212-Page-64.png)
![Telephone System Useful InformationAnswering SystemPreparation65For assistance, please call: 1-800-211-PANA(7262)Automatic Answering OperationThe Answering System allows the unit to answer calls with a greeting message. Callers can then leave a message in a mailbox (p. 63). Setting the Unit to Answer Calls Press [ANSWER ON] to turn on the Answering System.•The indicator lights and the unit announces “Answer set” and the current day and time. If “Answer set. Set time” is heard, set the date and time(p. 17).•The unit will announce the remaining recording time if it is less than 3 minutes. •When the remaining recording time is 0, “ ” will be displayed on the base unit, the ANSWER ON indicator will flash rapidly and the unit will announce “Memory full”. You will need to erase any unnecessary messages before new messages can be recorded (p. 69).•If you do not want the unit to answer calls, press [ANSWER ON] again to turn off the Answering System. The indicator goes out and “Answer off” is heard.•You can also turn on the Answering System remotely from an outside (p. 74).•If you turn the Answering System on when “E” is flashing, “E” will disappear but the clock is still incorrect. Adjust the date and time (p. 17). If you subscribe to Caller ID service (p. 32), Caller ID information will adjust the clock automatically. Monitoring incoming callsWhile a call is being recorded, you can monitor it through the base unit speaker.•To increase the speaker volume, press [B]. To decrease volume, press [d].To answer the call with the base unit, press [SP-PHONE].For the handset, press [C] or [s]. The unit will stop recording.Base Unit[ANSWER ON] and Indicator FULL](https://usermanual.wiki/Panasonic-of-North-America/96NKX-TG5240/User-Guide-382212-Page-65.png)
![66Listening to MessagesYou can see the total number of recorded messages on the base unit display. If the ANSWER ON indicator flashes, new messages have been recorded. The mailbox icons (, and ) which have new messages also flash on the base unit display. •If only old messages exist in a mailbox, the mailbox icon will be displayed but will not flash.•If the Message Alert is turned on (p. 26), the Ringer indicator on the handset will flash when new messages have been recorded.Using the Base UnitTo play back messagesPress the MAILBOX button ([MAILBOX 1],[MAILBOX 2] or [MAILBOX 3]).•The unit announces “Mailbox (No.)” and the number of new messages in the mailbox, and plays back the new messages.•If the mailbox also contains old messages, only new messages will be played back.• When the mailbox has no new messages, the unit announces “Mailbox (No.)”and “No new messages. All message playback”, and plays back all messages in the mailbox.When Mailbox 2 or 3 has a password1. Press [MAILBOX 2] or [MAILBOX 3].•“Enter Mailbox password” will be heard.2. Enter the Mailbox password (p. 64).•The unit announces “Mailbox (No.)” and the number of new messages in the mailbox, and plays back the new messages. If there are no new messages, all messages in the mailbox will be played back.•During playback, the display shows the mailbox number and message number. •At the end of the last message of the mailbox, “End of final message” is heard. The unit will announce the remaining recording time if it is less than 3 minutes.•When the mailbox has no messages, the unit announces “Mailbox (No.)” and “Nomessages”.•If a call is received during playback, the unit rings and playback stops. To answer the call, press [SP-PHONE]. For playback, start again from the beginning after hanging up.Voice Day/Time Stamp: During playback, the unit will announce the day and time when each message was recorded (p. 17).BOXBOX3BOXBOX1BOXBOX2Ex. Mailbox 1 has new messages; Mailbox 2 has old messages; Mailbox 3 has no messages.BOX 1BOX 2 BOX 3Base UnitBOXBOX2Ex. Mailbox 2](https://usermanual.wiki/Panasonic-of-North-America/96NKX-TG5240/User-Guide-382212-Page-66.png)
![Useful InformationAnswering SystemPreparation67Listening to MessagesFor assistance, please call: 1-800-211-PANA(7262)Telephone SystemUsing the Handset (Remote Operation) If “ ” flashes, there are new messages. If there are only old messages “ ” is displayed but will not flash.To play back messages•If you do not select a mailbox in step 2, new messages in Mailbox 1 will be played.•“ ” will remain on the display after listening to messages.•You can switch to another mailbox by pressing [#] and the mailbox number ([1] to [3]) during the remote operation.•If a call is received during playback, the unit rings and playback stops. To answer the call, press [C] or [s]. For playback, start again from the beginning after hanging up. •At the end of the last message, “End of final message” is heard. The unit will announce the remaining recoding time if it is less than 3 minutes.•If you hear “Memory full” after playback, erase unnecessary messages (p. 69). 1Press the soft key ( ).•A beep sounds and “Please select Mailbox” will be heard from the speaker. To switch to the receiver, press [C]. To switch back to the speaker, press [s].•The icons for mailboxes that have new messages will flash.2Press the soft key ( , or ).•If “Enter Mailbox password” is announced and displayed, Mailbox 2 or 3 has a password. Enter the password (p. 64).•“Mailbox (No.)” and the number of new messages will be announced, and new messages will be played.•When the mailbox has no new messages, the unit announces “Mailbox (No.)” and “No new messages. All message playback”, and plays back all messages in the mailbox.•To play all messages in the mailbox, press [5].•If you do not press any buttons, the voice menu will start (p. 68).3To end remote operation, press [OFF].HandsetPLAYPLAYPLAY 7 missed callsCID PLAYCEx. New messages exist.BOX 1 BOX 2 BOX 3Remote operationBOX 1BOX 2 BOX 3Ex. Mailbox 1 has newmessages.PLAY](https://usermanual.wiki/Panasonic-of-North-America/96NKX-TG5240/User-Guide-382212-Page-67.png)
![Listening to Messages68Voice menuIf you do not press any buttons at the end of the last message, the unit will announce “End of final message” and the voice menu will begin. The unit announces, “Press 4 to play back new messages. Press 5 to play back all messages.”•You can press buttons for other playback options (see below) or select another mailbox by pressing [#] and the mailbox number ([1] to [3]) even if the voice menu has begun.During playback For Caller ID service users (p. 32)During playback, the handset display shows the name and/or number of the caller whose message is being played.To call the displayed number:1. Press the soft key ( ).•If you need to edit the phone number to call back, see page 36.2. Press the soft key ( ), [C] or [s].•The unit stops playback and dials the phone number.To adjust the speaker volumeTo increase, press [B]. To decrease, press [d].•You can also adjust the receiver volume on the handset.To repeat a message Base unit: Press [H].Handset: Press the soft key ( ) or [1].•If pressed within the first 5 seconds of playback, the previous message will be played.To skip a message Base unit: Press [G].Handset: Press the soft key ( ) or [2].To stop playback Base unit: Press [STOP].•To resume playback, press the MAILBOX button ([MAILBOX 1],[MAILBOX 2] or [MAILBOX 3]) of the message that is being played.•If you do not press any button for 60 seconds or if you press[STOP] again, playback mode will be canceled.Handset: Press [9].•If you do not press any button within 15 seconds after stopping playback, the voice menu will start (see above).CALLCALLBase Unit HandsetREPEATSKIP](https://usermanual.wiki/Panasonic-of-North-America/96NKX-TG5240/User-Guide-382212-Page-68.png)
![Telephone System Useful InformationAnswering SystemPreparation69For assistance, please call: 1-800-211-PANA(7262)Erasing MessagesThe unit will announce the remaining recording time after playback if it is less than 3 minutes. New messages cannot be recorded when:— “Memory full” is heard.—“” is displayed on the base unit.— ANSWER ON indicator flashes rapidly (when the Answering System is on).Erase unnecessary messages. We recommend you erase unnecessary messages after each playback.Erasing a specific message Press [ERASE] while the message you want to erase is being played.•The unit beeps, then plays the next message.Press [*][4] while the message you want to erase is being played.•The unit beeps, then plays the next message.Erasing all messages in the mailbox1Press [ERASE] while the base unit is not being used.•“To erase all messages, please select Mailbox” is heard.2Within 10 seconds, press the MAILBOX button ([MAILBOX 1],[MAILBOX 2] or [MAILBOX 3]). •You can also select the mailbox by pressing the mailbox number ([1] to [3]).•If Mailbox 2 or 3 has a password, enter it (p. 64).•The unit beeps and “Mailbox (No.)” and “No messages” will be heard.1Press the soft key ( ).2Press the soft key ( , or ).•If Mailbox 2 or 3 has a password, enter it (p. 64).3Press [*][5] to erase all messages in the mailbox.•The unit beeps, then announces “Mailbox (No.)” and “No messages”.•To end remote operation, press [OFF].FULLBase UnitHandsetBase UnitHandsetPLAYBOX 1 BOX 2 BOX 3](https://usermanual.wiki/Panasonic-of-North-America/96NKX-TG5240/User-Guide-382212-Page-69.png)
![70Recording a Memo MessageBase UnitYou can record a voice memo message of up to 3 minutes in the desired mailbox for other users or yourself.•If you record for over 3 minutes in step 2, the unit will stop recording. •If “ ” is displayed, 6 beeps sound and “Your message was not recorded. Record your message again.” is announced, start again from step 1.Transferring a Call to a MailboxWhen you answer a call and the caller wants to talk to someone who is not available, you can place the caller into one of the mailboxes, where the caller can leave a message. Tell the outside caller you will transfer him or her to the desired party’s mailbox. Remind the caller to press # (the pound sign) and the mailbox number of the desired party (if necessary).•Even if you subscribe to Caller ID service (p. 32), Caller ID information will not be displayed while the caller is recording a message or while the message is being played. The Caller ID information will be recorded in the Caller List (p. 34) if the transferred call is an incoming call.1Press [MEMO].•“Please select Mailbox” is heard.2Within 10 seconds, press a MAILBOX button ([MAILBOX 1],[MAILBOX 2] or [MAILBOX 3]).•You can also select a mailbox by pressing the mailbox number ([1] to [3]).After the long beep, talk clearly 20 cm (8 inches) away from the MIC.•The base unit display shows the elapsed recording time.3When finished, press [MEMO] or [STOP].1Base unit:Press [LOCATOR/INTERCOM/TRANSFER].Handset: Press [HOLD/INTERCOM].•The call is put on hold.2Press [9] to hang up the call. The caller will then hear the greeting (p. 23), and while that message is playing the caller can press [#] and the mailbox number ([1]to [3]). Then the caller will hear “Please leave your message”. The caller can leave a message in the mailbox.ORIf the caller does not specify the mailbox, the caller can leave a message in Mailbox 1 after the greeting.Base Unit HandsetHandset displayPress extension# to transfer1-4=Handset0=Base 9=MailboxAfter you press [9]:](https://usermanual.wiki/Panasonic-of-North-America/96NKX-TG5240/User-Guide-382212-Page-70.png)
![Telephone System Useful InformationAnswering SystemPreparation71For assistance, please call: 1-800-211-PANA(7262)Transferring a Call to a MailboxRemote Operation from a Touch Tone PhoneWhile outside, you can operate the Answering System from any touch tone phone. A synthesized voice menu will guide you through the Answering System (p. 73).•To skip the voice menu and operate the unit directly, see page 74.Summary of remote operation•The unit will announce the remaining recording time after playback if it is less than 3 minutes.•The messages are saved.* If the unit announces “No new messages”, the mailbox has only old messages. If “Nomessages” is announced, the mailbox has no messages.Interrupting remote operationIf another user is calling from a remote location to check mailboxes and you answer the call, repeat steps 1 and 2 of “Transferring a Call to a Mailbox” on page 70.•The user can then access a mailbox, by entering the remote code or the mailbox password (see “Remote Operation from a Touch Tone Phone”).Call your unit from a touch tone phone.To access Mailbox 1, enter the remote code (p. 72) during or after the greeting.•“Mailbox 1” and the number of new messages of Mailbox 1 are heard, and the new messages will be played.*If Mailbox 2 or 3 has a password (p. 64), enter the password during or after the greeting to access the mailbox.•“Mailbox 2 or 3” and the number of new messages of the mailbox are heard, and the new messages will be played.*After 3 seconds, the voice menu will start (p. 73).Follow the menu or enter direct commands (p. 74).To end remote operation, hang up.To listen to messages in another mailbox, press [#][1] (Mailbox 1), [#][2] (Mailbox 2) or [#][3] (Mailbox 3).•If you hear “Enter Mailbox password”, enter the password for the mailbox you have selected.](https://usermanual.wiki/Panasonic-of-North-America/96NKX-TG5240/User-Guide-382212-Page-71.png)
![Remote Operation from a Touch Tone Phone72Remote Code The remote code prevents unauthorized people from accessing your unit and listening to your messages. Choose any 2-digit number (00–99) for your remote code.The factory preset remote code is “11”. If you do not program your own remote code, you can use “11”. To check the remote code, repeat steps 1 to 4.•The remote code is displayed. When finished, press [OFF].1Press [MENU].2Scroll to “Initial setting” by pressing [d]or [B], then press the soft key ( ).3Press the soft key ( ) at “Setanswering”.4Scroll to “Remote code” by pressing [d]or [B], then press the soft key ( ).5Enter a 2-digit remote code (00–99).6Press the soft key ( ).•If 3 beeps sound, the entered remote code is the same as the password (p. 64) and cannot be used. Start again from step 5 and select another code.7Press [OFF].HandsetSELECTInitial settingSELECTSet answeringSELECTRemote codeRemote code:35Ex. Entered 35.SAVE](https://usermanual.wiki/Panasonic-of-North-America/96NKX-TG5240/User-Guide-382212-Page-72.png)
![Useful InformationAnswering SystemPreparation73Remote Operation from a Touch Tone PhoneFor assistance, please call: 1-800-211-PANA(7262)Telephone SystemPress [1].Press [1].Press [1].Press [1].Press [1].Press [2].Press [2].Press [2].Press [2].Press [2].Voice MenuThe shaded parts are voice prompts.•3 seconds after playback, the voice menu will start again from the beginning.•The unit will announce the remaining recording time after playback if it is less than 3 minutes.•If you hear “Memory full” after playback, erase unnecessary messages (p. 74).•To switch to another mailbox to listen to messages, press [#] and the mailbox number ([1] to [3]) during remote operation. If you hear “Enter Mailbox password”,Mailbox 2 or 3 has a password (p. 64) which must be entered.•If you do not press any buttons within 10 seconds after a voice prompt, “Thank you for your call” will be heard and the call will be disconnected.Press 1 to play back all messages.Press 2 for other functions.All Message Playback.All recorded messages in the mailbox are played back. At the end of the last message, “Endof final message” is heard.Press 1 to play back new messages.Press 2 for other functions.New Message Playback.Only new messages in the mailbox are played back. At the end of the last message, “Endof final message” is heard.Press 1 to record your message.Press 2 for other functions.Please leave your message.1. Talk after the long beep.2. When you finish recording a voice memo message, hang up.Press 1 to erase all messages.Press 2 for other functions.“Mailbox (No.)” and “Nomessages” are heard, and all recorded messages in the mailbox are erased.Press 1 to record your greeting.Press 2 for other functions.Press 7 to record your greeting.Press 9 to end recording.1. Press [7].2. After the long beep, talk for up to 2 minutes.3. Press [9] to finish.•Your greeting will be played back for confirmation.](https://usermanual.wiki/Panasonic-of-North-America/96NKX-TG5240/User-Guide-382212-Page-73.png)
![Remote Operation from a Touch Tone Phone74Direct Remote OperationOnce you have accessed one of the mailboxes (p. 71), you can also control your unit by direct commands instead of using the voice menu. To end the remote operation, hang up at anytime.Direct commandsTurning on the Answering SystemCall your unit and wait for 15 rings.•The unit will answer and the greeting will be played.•The Answering System will be turned on. Hang up or enter the remote code for other options.•When turning on the Answering System using a rotary or pulse service telephone, you cannot enter the remote code for other options.Skipping the greetingAfter calling your unit, press [*] during the greeting.•The unit skips the rest of the greeting and you can start recording your message after the long beep.[4]: Plays back new messages.[5]: Plays back all messages.[1]: Repeats the current message.•If pressed within the first 5 seconds of playback, the previous message will be played.[2]: Skips the current message.[9]: Stops the current operation.•To resume, enter a direct command within 15 seconds, or the voice menu will start (p. 73).[7] : Records a greeting message.After the long beep, talk for up to 2 minutes.[9]: Recording is stopped. •The greeting is played.[*] [4]: Erases the current message.[*] [5]: Erases all messages in the mailbox.[#] [1]: [#] [2]:[#] [3]:Selects Mailbox 1.Selects Mailbox 2.Selects Mailbox 3.•If Mailbox 2 or 3 has a password (p. 64), enter it.[0]: Turns off the Answering System.•The unit hangs up.](https://usermanual.wiki/Panasonic-of-North-America/96NKX-TG5240/User-Guide-382212-Page-74.png)
![Answering SystemPreparation75For assistance, please call: 1-800-211-PANA(7262)Telephone System Useful InformationBelt ClipHandsetYou can hang the handset on your belt or pocket using the included belt clip.To attach the belt clip To remove the belt clip Optional HeadsetConnecting an optional headset to the handset allows hands-free phone conversation. Please use only a Panasonic KX-TCA60, KX-TCA86, KX-TCA88, KX-TCA91, KX-TCA92, or KX-TCA98 headset. To order, call the accessories telephone number on page 2.Connecting an optional headsetOpen the headset jack cover, and insert the headset plug into the headset jack as shown below. •Headset sold separately. Model shown here is KX-TCA88.To switch to the speakerphone while using the headset:Press [s]. To return to the headset, press [C].BAWhile pressing the top of the clip (1), pull the right edge in the direction of the HandsetHeadset Jack](https://usermanual.wiki/Panasonic-of-North-America/96NKX-TG5240/User-Guide-382212-Page-75.png)
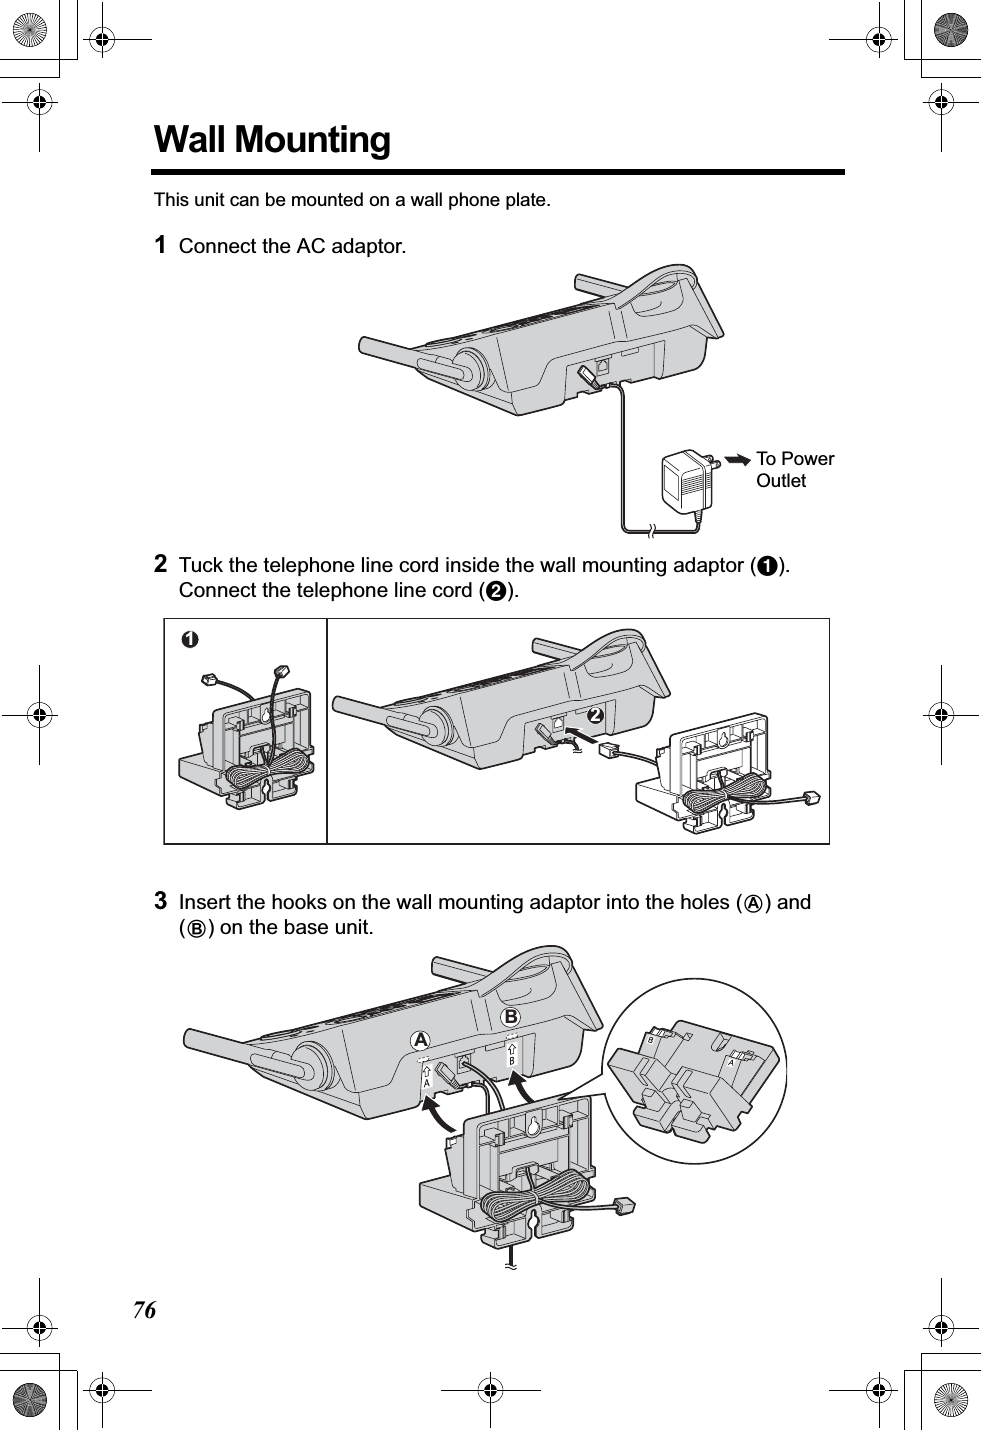
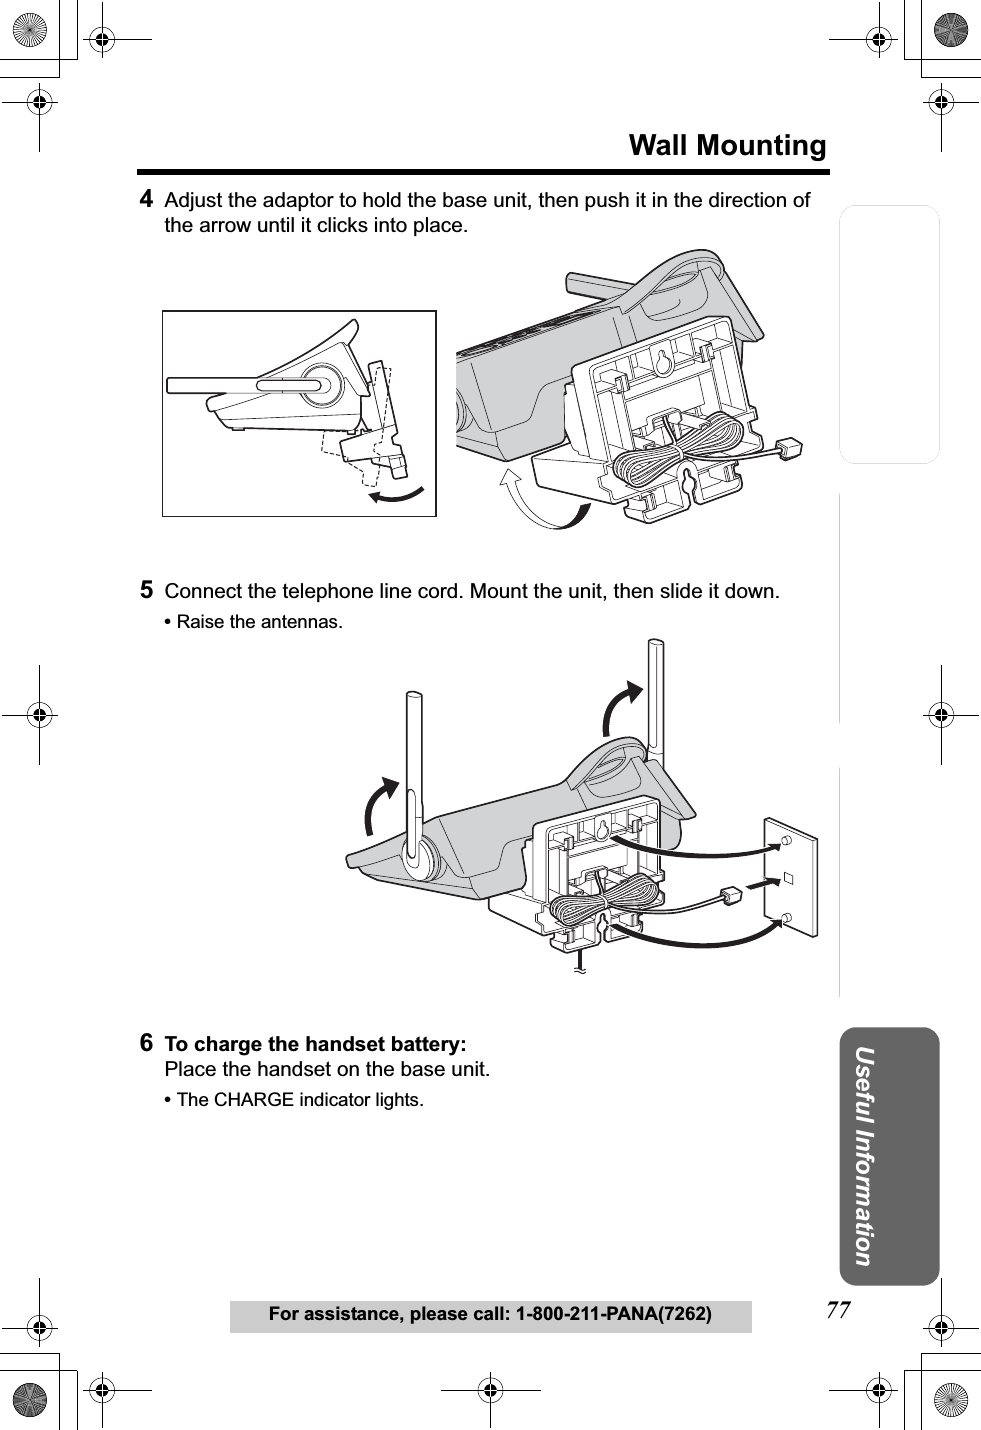
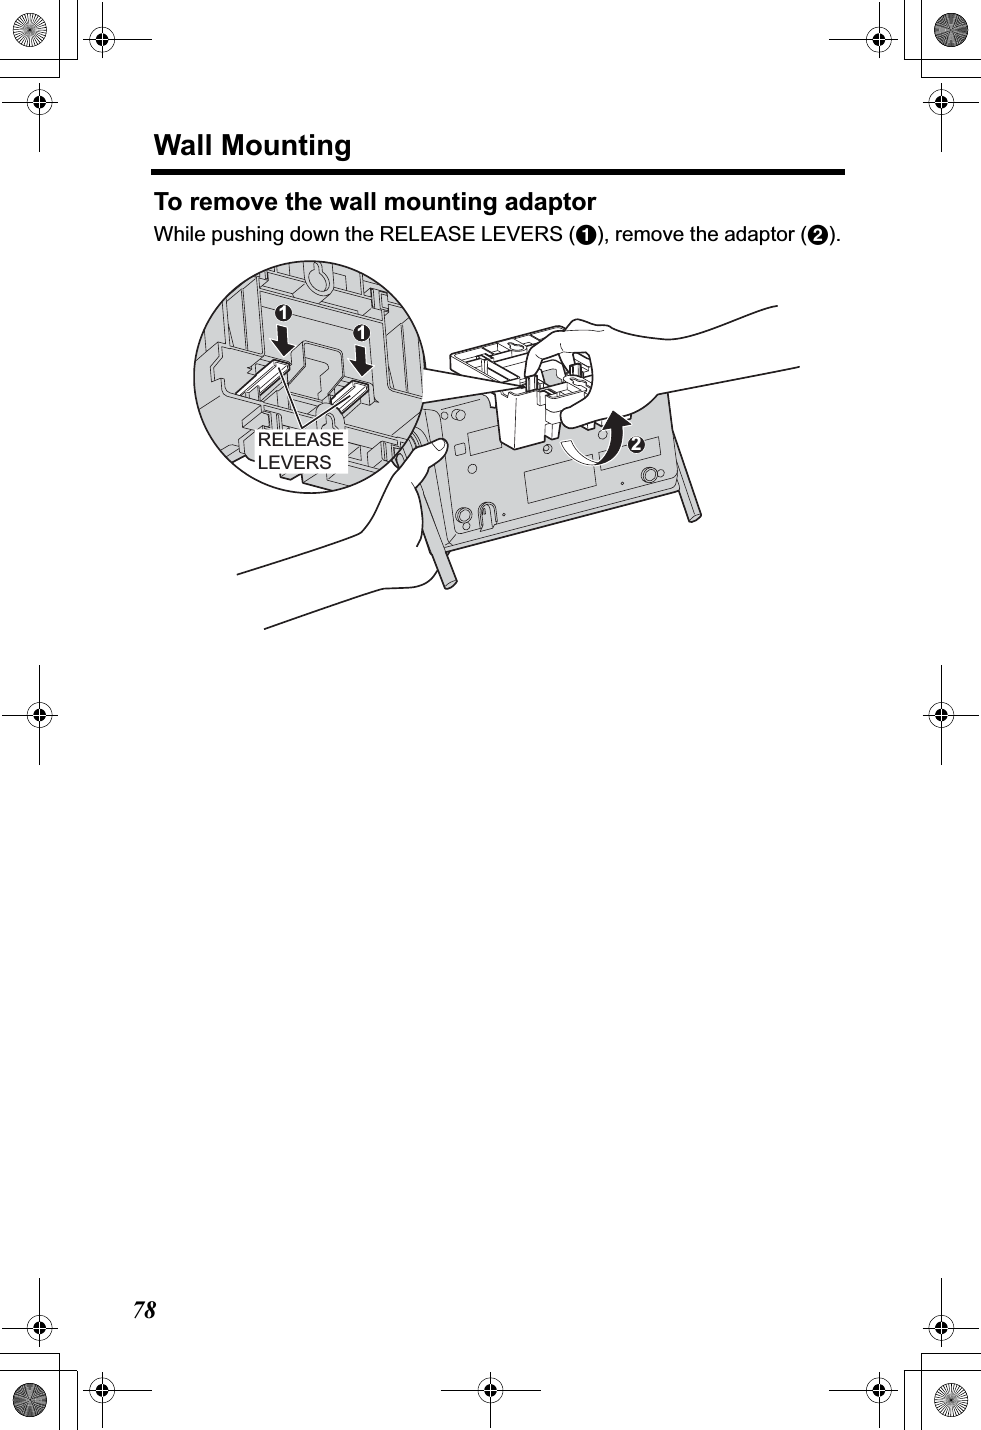
![Answering SystemPreparation79For assistance, please call: 1-800-211-PANA(7262)Telephone System Useful InformationDirect CommandsAfter pressing [MENU], you can also program menu items directly by pressing ([0]to [9],[*] and [#]) instead of using the soft keys.Menu item Command Selection items PageRinger volume [1] [1] [0] : Off [1] : Low [2] : Medium [3] : Highp. 20Ringer tone (Handset)[1] [2] [1]–[3] : Tone pattern 1–3[4]–[7] : Melody pattern 1–4[8]–[9] : Downloaded melodypattern 1–2 *1p. 21Incoming call tone (Handset)[1] [3] [1] : On [2] : Twice [0] : Off p. 61Date and time [4] Go to Step 3 on page 17.Voice enhancer [5] [1] : On [0] : Off p. 29Activate Caller IQ *2[7] [1] –View information *3[7] [2] Go to Step 4 on page 94.Get new information *3[7] [3] Go to Step 4 on page 93.Turn Caller IQ off *3[7] [4] p. 91Turn Caller IQ on *3[7] [5] p. 91Talking Caller ID(Handset)[9] [1] : On [0] : Off p. 33Copy phone book –Copy 1 item[#] [1] p. 44Copy phone book–Copy all items[#] [2] p. 45LCD contrast [0] [1] [1]–[6] : Level 1–6 p. 22Key tone [0] [2] [1] : On [0] : Off p. 62Auto talk [0] [3] [1] : On [0] : Off p. 19Caller ID edit [0] [4] [1] : On [0] : Off p. 37Set dial mode [0] [5] [1] [1] : Pulse [2] : Tone p. 18Set flash time [0] [5] [2] [1] : 700 ms [2] : 600 ms [3] : 400 ms [4] : 300 ms [5] : 250 ms [6] : 110 ms [7] : 100 ms [8] : 90 msp. 60Set line mode [0] [5] [3] [1] : A [2] : B p. 19Handset](https://usermanual.wiki/Panasonic-of-North-America/96NKX-TG5240/User-Guide-382212-Page-79.png)
![Direct Commands80During programming:To complete the operation, press the right soft key ( , , , or ).To exit programming, press [OFF].•If you press the direct command incorrectly, press [OFF], then re-enter programming mode by pressing [MUTE].• For function details, see the corresponding pages.*1You need to first download melody data from the openLCR web site.*2This feature can be used to activate Caller IQ. See the leaflet included with this unit for more information.*3For openLCR subscribers only.Call Waiting Options [0] [5] [4] [1] : On [2] : Off p. 57Number of rings [0] [6] [1] [2]–[7] : 2–7 rings[0] : Toll saverp. 25Recording time [0] [6] [2] [1] : 1 minute [2] : 2 minutes[3] : 3 minutes [0] : Greeting onlyp. 24Remote code [0] [6] [3] [0] [0]–[9] [9] : 00–99 p. 72Recording mode [0] [6] [4] [1] : Standard recording[2] : Enhanced recordingp. 26Set mailbox 2&3 [0] [6] [5] Go to Step 5 on page 64Change language [0] [8] [1] : English [2] : Spanish p. 18Room monitor(Handset)[0] [9] [1] : On [0] : Off p. 53Message alert [0] [#] [1] : On [0] : Off p. 26Ringer tone (Base unit)[0] [*] [1] [1]–[3] : Tone pattern 1-3[4]–[7] : Melody pattern 1-4[8]–[9] : Downloaded melody pattern 1-2 *1p. 22Incoming call tone(Base unit)[0] [*] [2] [1] : On [2] : Twice [0] : Off p. 61Room monitor(Base unit)[0] [*] [3] [1] : On [0] : Off p. 53Handset registration [0] [0] [1] Go to Step 5 on page 82.Handset deregistration [0] [0] [2] [3] [3] [5] p. 81Talking Caller ID(Base unit)[0] [*] [4] [1] : On [0] : Off p. 33Menu item Command Selection items PageSAVESENDYESOK](https://usermanual.wiki/Panasonic-of-North-America/96NKX-TG5240/User-Guide-382212-Page-80.png)
![Answering SystemPreparation81For assistance, please call: 1-800-211-PANA(7262)Telephone System Useful InformationCanceling Registration/Re-registrationCanceling the Handset RegistrationIf you no longer need to use the handset or if you want to use the handset with a different base unit of the same model, it is necessary to cancel the handset’s registration from the current base unit.Only one handset can be canceled at a time.Make sure the handset and the base unit near each other and are not being used.•“[-]” is shown on the top right of the display. •After canceling registration, the handset cannot be used. If you want to use it again, register the handset to the base unit by performing steps 5 and 6 on page 82. 1Press [MENU].2Scroll to “Initial setting” by pressing [d]or [B], then press the soft key ( ).3Scroll to “Registration” by pressing [d]or [B], then press the soft key ( ).4Scroll to “Deregistration” by pressing [d]or [B], then press the soft key ( ).5Press [3][3][5] to delete the registration memory.•If you enter a wrong code, re-enter [3][3][5].6Press the soft key ( ).•The registration memory will be erased on both the handset and the base unit.•If 3 beeps sound, you entered a wrong code.Enter “335”, then press the soft key ( ).•To register the handset to another base unit of the same model, start from step 5 on the next page.HandsetSELECTInitial settingSELECTRegistrationSELECTDeregistrationDeregistrationEnter code:335 :335OKOKSPIPRIVACY1Handset [2] DeregisteredIN USE[-]Ex. Extension number 2](https://usermanual.wiki/Panasonic-of-North-America/96NKX-TG5240/User-Guide-382212-Page-81.png)
![Canceling Registration/Re-registration82Re-registering the HandsetIf you want to re-register the handset to the base unit or a different base unit of the same model, you need to register it to that base unit. The handset will be given a new extension number of that base unit. Only one handset can be registered at a time near the base unit. Make sure the base unit and the other handsets are not being used. Have both the handset and base unit nearby during registration. Proceed through the steps below within 1 minute.•You can stop registration by pressing [OFF] on the handset and pressing [LOCATOR/INTERCOM/TRANSFER] on the base unit.If you have canceled handset registration at a previous base unit (p. 81), start from step 5. 1Press [MENU].2Handset: Scroll to “Initial setting” by pressing [d]or [B], then press the soft key ().3Handset: Scroll to “Registration” by pressing [d]or [B], then press the soft key ().4Handset: Press the soft key ( ) at “HSregistration”.5Base unit:Press and hold [LOCATOR/INTERCOM/TRANSFER] for 3 seconds.•The CHARGE indicator flashes.6Handset:(1) Press the soft key ( ).(2) Wait until a long beep sounds and the display shows the new extension number. •Registration is complete.If you have not canceled the handset’s registration at the previous base unit (p. 81), the handset number remains in that base unit’s memory. To erase the handset number from the previous base unit, see the base unit’s Operating Instructions. For the KX-TG5240 base unit: (1) Press and hold [LOCATOR/INTERCOM/TRANSFER] for 3 seconds, and (2) Press and hold that handset number (1 to 4) for 5 seconds.Handset & Base Unit SELECTInitial settingSELECTRegistrationSELECTHS registrationOKPress LOCATOR on base unit for 3 sec.Then press OKSPIPRIVACY1Handset [2] RegisteredIN USE[2]Ex. Extension number 2](https://usermanual.wiki/Panasonic-of-North-America/96NKX-TG5240/User-Guide-382212-Page-82.png)
![Answering SystemPreparation83For assistance, please call: 1-800-211-PANA(7262)Telephone System Useful InformationIf the Following Appear on Your Display...If the unit detects a problem, one of the following messages will be displayed on the handset. Error beeps or a busy tone will sound.Display message Cause & RemedyRecharge battery•The battery needs to be charged. Recharge the battery (p. 13).Charge for 6 HRS•The battery has been discharged. The handset will not work. Fully charge the battery (p. 13).No link to base. Move closer to base and try again.•The handset has lost communication with the base unit. Walk closer to the base unit, and try again.•Confirm the base unit’s AC adaptor is plugged in.•Raise the base unit antennas.•The handset’s registration may have been canceled. Re-register the handset (p. 82).Please lift up and try again.•A handset button was pressed while the handset was on the base unit or the charger (for accessory handset users, p. 3). Lift the handset and press the button again.Busy•The called unit is in use.•Privacy mode is on for the call you tried to join (p. 55).•The handset you tried to send phone book items to is in use.•The handset you are calling is too far from the base unit.Invalid•The called handset has not been registered to the base unit. •You selected your own extension number. Error!!•When you tried to register or deregister the handset, the handset and base unit could not link for some reason, such as interference from electrical appliances. Move the handset and base unit away from any electrical appliances and try again.•If more than one handset is in use, you may not be able to register/deregister. Try again later.•Another handset tried to send phone book items to you but copying stopped (p. 44, 45).Phone book full•When you tried to store an item in the phone book, the phone book memory was full. Press[OFF] to exit programming mode. To erase other items from the phone book, see page 43.](https://usermanual.wiki/Panasonic-of-North-America/96NKX-TG5240/User-Guide-382212-Page-83.png)
![If the Following Appear on Your Display...84System is busy. Please try again later.•If more than one unit is in use, such as conducting outside/intercom calls or listening to messages, you may not be able to use another unit. Try again later.•The Answering System is in use (answering a call or playing back messages). Try again later.---Incomplete---Tom Jones098-765-4321Phone book full•When the displayed item was being sent to the destination handset, the phone book memory was full and copying stopped. If you tried to send all of the items, the item displayed with “Incomplete” and items after it have not been copied to the destination handset. Press [OFF] to exit (p. 44, 45). To erase items from the destination handset phone book, see page 43. You can copy all of the items again or copy the items which have not been copied one by one (p. 44, 45).•If the copy is stopped and “Phone book full” is not displayed, it may indicate:— the destination handset is out of area, or—the destination unit user may have pressed [C]or[s].---Incomplete---Tom Jones098-765-4321(The name/number is an example.)•The destination unit is out of area.•The destination unit user may have pressed [C]or[s].Phone book No item stored•Your phone book is empty. No items were copied to the destination unit.Denied•The Room Monitor feature is turned off on the destination unit and cannot be monitored (p. 53)•The called handset was on the base unit. The handset must be off the base unit to be monitored.Invalid. Please register to the base unit•The handset you tried to call has not been registered to the base unit. Register the handset (p. 82, steps 5 and 6).Display message Cause & Remedy](https://usermanual.wiki/Panasonic-of-North-America/96NKX-TG5240/User-Guide-382212-Page-84.png)
![Useful InformationAnswering SystemPreparation85If the Following Appear on Your Display...For assistance, please call: 1-800-211-PANA(7262)Telephone System Error!! 4 handsets have already been registered.•4 handsets have already been registered to the base unit. To cancel a handset’s registration, see page 81. •You may have registered one of your handsets to another base unit without deleting its registration to this base unit. Erase the handset’s registration from the base unit. For the KX-TG5240 base unit: (1) Press and hold [LOCATOR/INTERCOM/TRANSFER] for 3 seconds, and (2) Press and hold that handset number (1 to 4) for 5 seconds.Download incomplete. Try again.•When you tried to download data from openLCR, the unit lost communication with openLCR. Re-access the openLCR web site, and try again (p. 93).Download incomplete. Phone book full•When you tried to download phone book data from openLCR, the phone book memory was full. Erase items which do not exist on the web from the phone book of the unit (p. 43). Re-access the openLCR web site, and try again (p. 94).Display message Cause & Remedy](https://usermanual.wiki/Panasonic-of-North-America/96NKX-TG5240/User-Guide-382212-Page-85.png)
![86TroubleshootingIf the handset display shows error messages, see “If the Following Appear on Your Display...” (p. 83–85) for the Cause & Remedy.Telephone SystemProblem Cause & RemedyStatic, sound cuts in/out, fades. Interference from other electrical units.•Move the handset and the base unit away from other electrical appliances (p. 6).•Walk closer to the base unit.•Raise the base unit antennas.•Turn on the Clarity Booster feature (p. 29).The base unit and/or handset does not ring.•The ringer volume is OFF. Set to HIGH, MEDIUM or LOW (p. 20, 21).•If more than one other unit is in use, the handset/base unit may not ring. Users will hear incoming call tones (p. 61).The handset display is blank. •If only the handset display is blank, fully charge the battery (p. 12).You cannot program any function items.•Programming is not possible while the unit is being used.•Do not pause for over 60 seconds while programming.•Walk closer to the base unit.•While another user is listening to messages or the Answering System is handling a call, you cannot program. Try again later.•If more than three other units are in use, you may not be able to program. Try again later.While programming or searching, the handset starts to ring and the program/search stops.•A call is coming in. To answer the call, press [C]or [s]. Start again from the beginning after hanging up.You cannot make an intercom/outside call.•If more than one other unit is in use, you may not be able to make a call. Try again later.•Your handset is in remote operation mode (p. 67). Exit by pressing [OFF].•The handset you called is too far from the base unit.](https://usermanual.wiki/Panasonic-of-North-America/96NKX-TG5240/User-Guide-382212-Page-86.png)
![Useful InformationAnswering SystemPreparation87TroubleshootingFor assistance, please call: 1-800-211-PANA(7262)Telephone SystemThe handset does not display the caller’s name and/or phone number.•You need to subscribe to Caller ID.•Other telephone equipment may be interfering with your phone. Disconnect it and try again.•Other electrical appliances connected to the same outlet may be interfering with Caller ID.•Telephone line noise may be affecting Caller ID.•The caller requested not to send his/her Caller ID information. See page 32.•If a call is being transferred to you, the Caller ID information will not be displayed.•If a (separate) Caller ID box is connected between the unit and the telephone wall jack, disconnect the Caller ID box or plug the unit directly into the wall jack.The handset display exits the Caller List or phone book.•Do not pause for over 60 seconds while searching.You cannot redial. •If the last number dialed was more than 48 digits long, the number will not be redialed correctly.•The [REDIAL/PAUSE] button on the base unit functions as either redial or pause. It will redial the last number dialed if pressed before dialing any digits (p. 30). If another number has been dialed first, it will operate as a pause button (p. 55).“” is not displayed properly.•The line mode selection is incorrect. Set line mode to “A” (p. 19).Problem Cause & RemedyIN USE](https://usermanual.wiki/Panasonic-of-North-America/96NKX-TG5240/User-Guide-382212-Page-87.png)
,— if a call is transferred to a mailbox and the caller leaves a message (p. 70), or— if the Caller List is renewed and the Caller List item is erased (p. 35).FULL](https://usermanual.wiki/Panasonic-of-North-America/96NKX-TG5240/User-Guide-382212-Page-88.png)
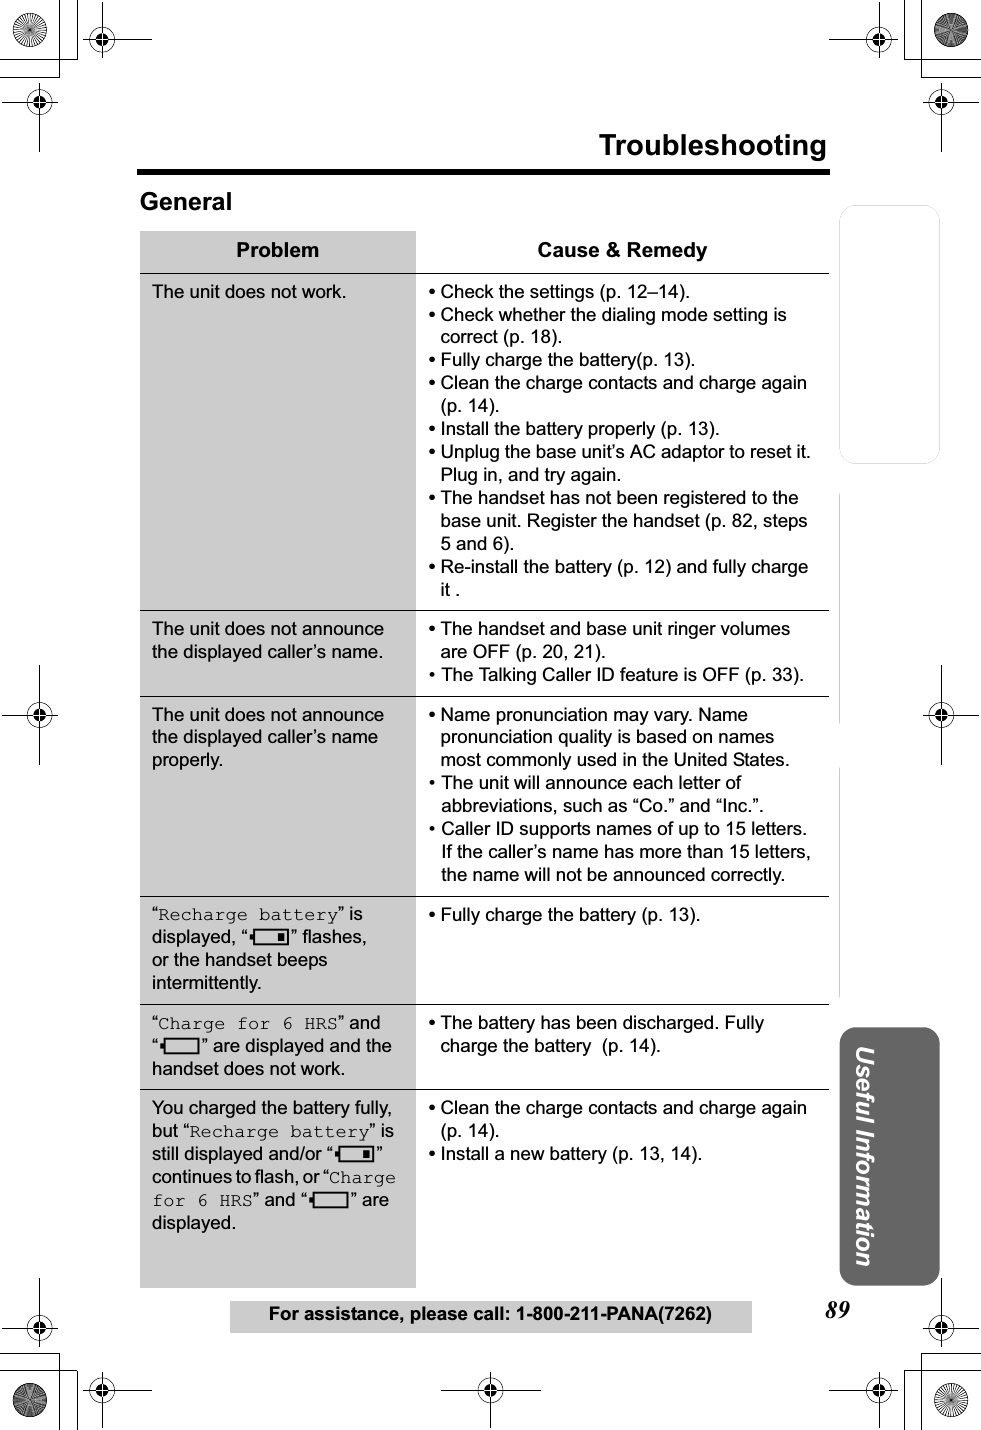
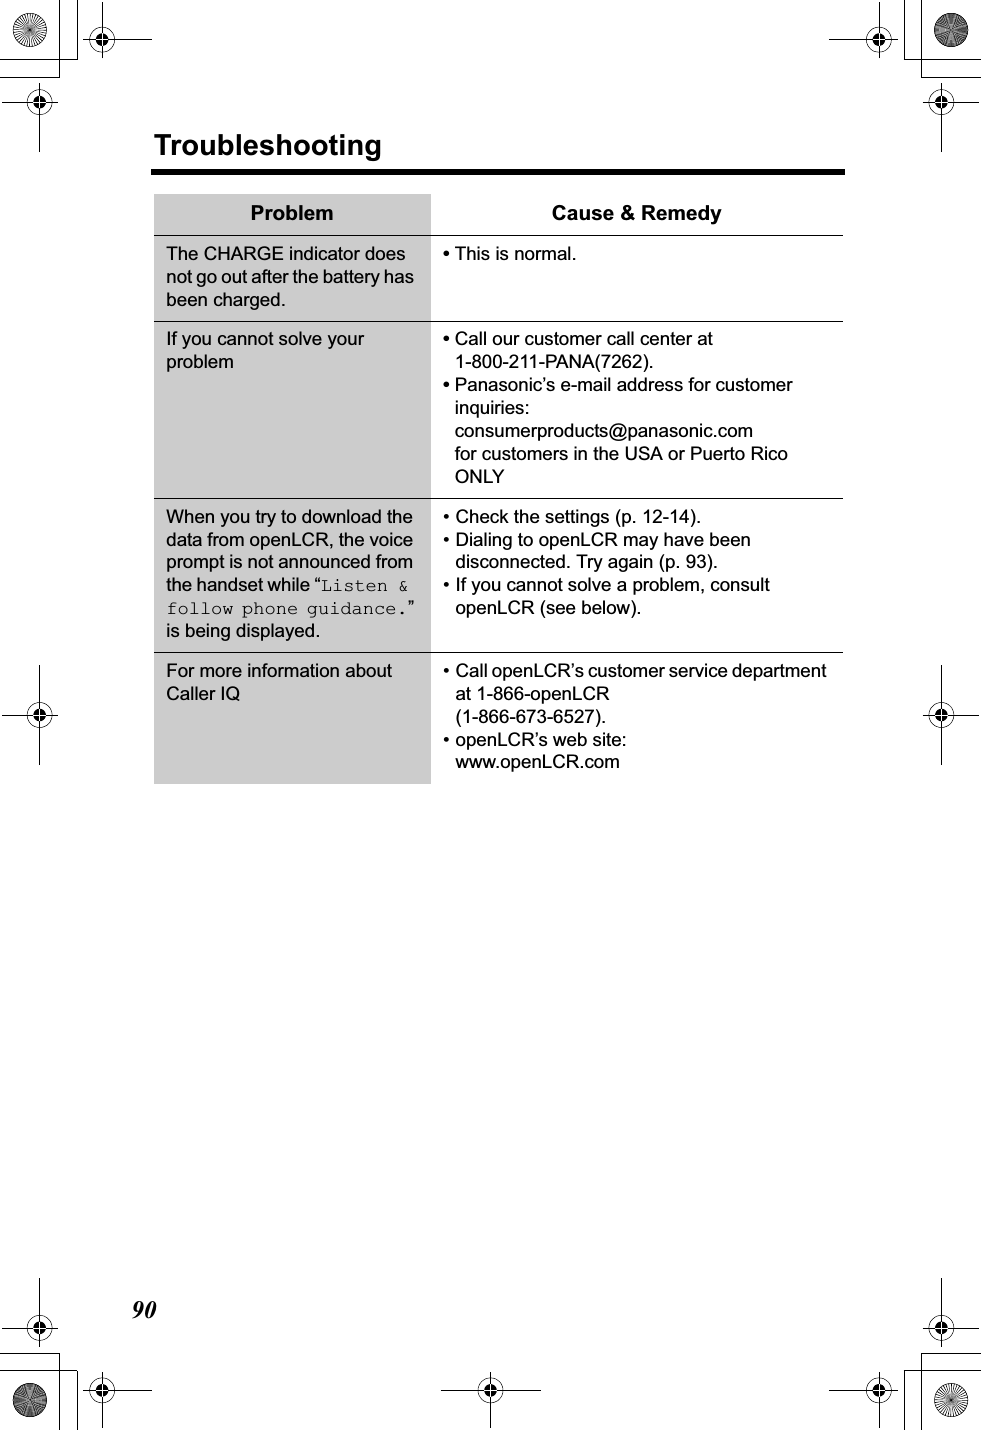
![Answering SystemPreparation91For assistance, please call: 1-800-211-PANA(7262)Telephone System Useful InformationopenLCR Service for Caller IQThe unit is compatible with services provided by openLCR.Important:• If you have any questions regarding the openLCR service, call openLCR’s customer service department at 1-866-openLCR (1-866-673-6527).• NEITHER PANASONIC COMMUNICATIONS CO., LTD. (PCC) NOR MATSUSHITA ELECTRIC CORPORATION OF AMERICA (MECA) IS IN ANY WAY AFFILIATED WITH, OR RESPONSIBLE FOR THE ACTS OR OMISSIONS OF, OPENLCR.COM, INC. (OPENLCR). NEITHER PCC NOR MECA NOR ANY OF THEIR EMPLOYEES OR AFFILIATES OR CUSTOMERS MAKE ANY WARRANTIES OR REPRESENTATIONS, EITHER EXPRESS OR IMPLIED, TO ANY CUSTOMER OR ANY OTHER THIRD PARTY WITH RESPECT TO ANY OF THE SERVICES PROVIDED BY OPENLCR, NOR ASSUME NOR CREATE ANY OTHER OBLIGATION OF ANY KIND ON BEHALF OF OPENLCR.Setting Caller IQ to OFF and ONAfter the first download to your phone, Caller IQ features are automatically turned on. If you wish, you can turn off Caller IQ.•When Caller IQ is ON, “[CIQ]” is displayed while talking.To set Caller IQ to OFF (When Caller IQ is ON.)To set Caller IQ from OFF to ON1Press [MENU].2Scroll to “Caller IQ” by pressing [d]or [B], then press the soft key ( ).3Scroll to “Turn CIQ off?” by pressing [d]or [B], then press the soft key ( ).•“Caller IQ off” is displayed.•If the handset beeps 3 times, Caller IQ is not set to OFF. Start again from step 1.4Press [OFF].1Follow steps 1 to 2 of “To set Caller IQ to OFF” above.2Press the soft key ( ) at “Turn CIQ on?”.•“Turn CIQ on” is displayed.•If the handset beeps 3 times, Caller IQ is not set to ON. Start again from step 1.3Press [OFF].HandsetSELECTCaller IQYESTurn CIQ off?YESTurn CIQ on?](https://usermanual.wiki/Panasonic-of-North-America/96NKX-TG5240/User-Guide-382212-Page-91.png)
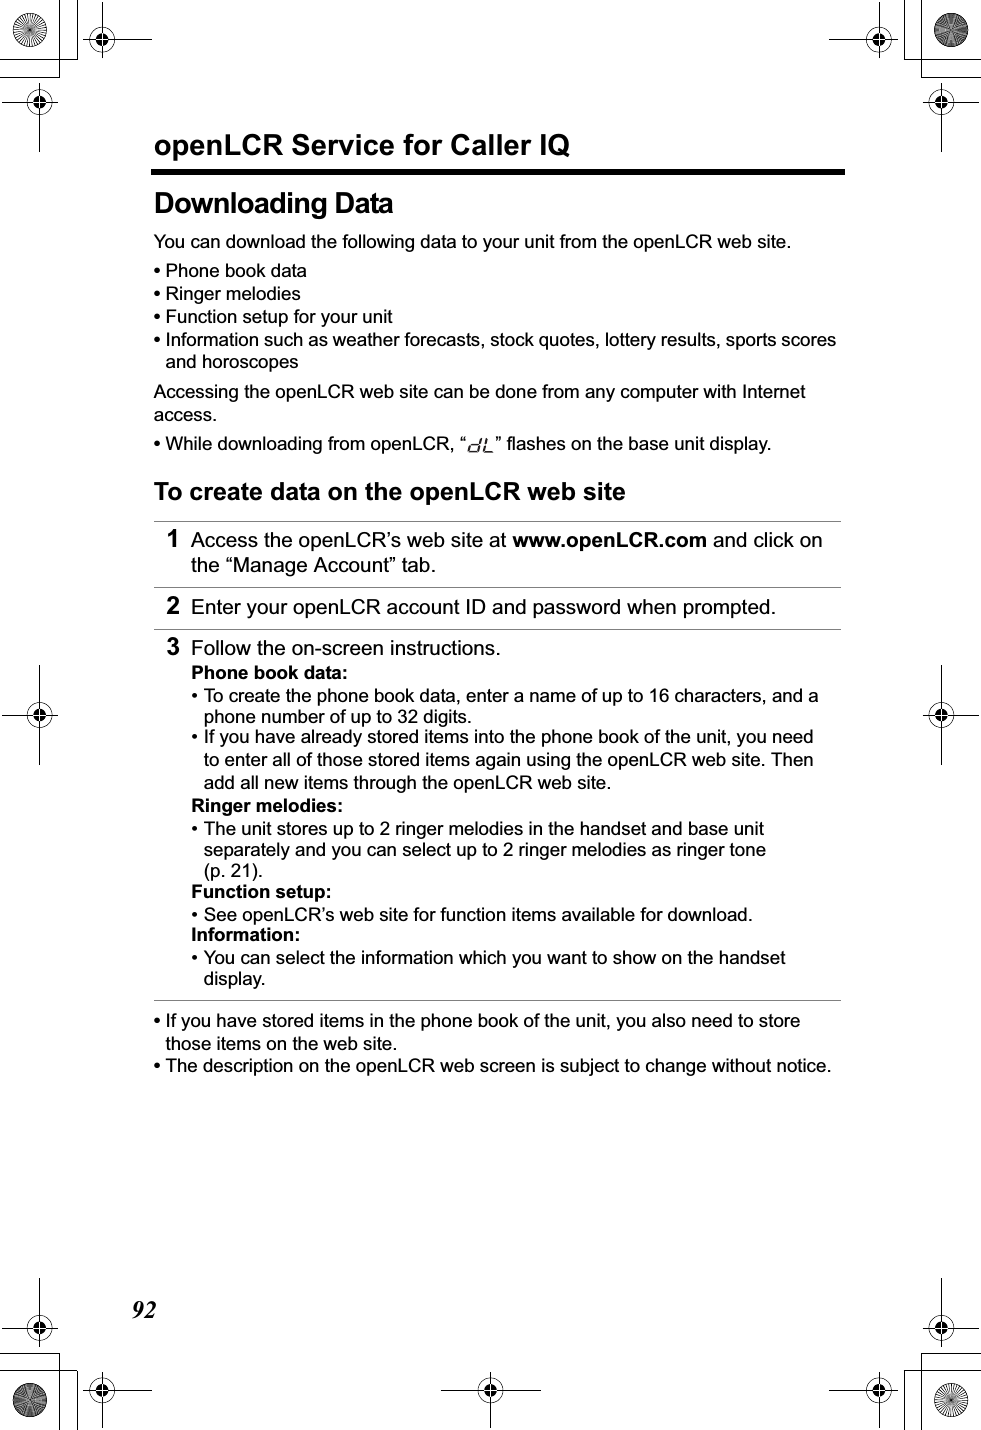
![Useful InformationAnswering SystemPreparationopenLCR Service for Caller IQTelephone System93For assistance, please call openLCR: 1-866-openLCR(1-866-673-6527)To download data from openLCREach time you download data (p. 92) from openLCR, the information stored in your unit will be updated. To view up-to-date information, you will need to download it to your unit.•You can select the items of information on the web site which you want to view. •Horoscopes are for entertainment purposes only.•You can also go to the Caller IQ menu after pressing [C]or [s]. Press [MENU],then [2] to select “2=Caller IQ”. Follow steps 3 to 5 above.•If the handset beeps 3 times and “Download incomplete. Try again.” is displayed, the unit has lost communication with openLCR. Store items by following the steps below.1. Access the openLCR web site.2. Go to the web screen to create the data.3. Click to download the phone book date, then go to step 3.4. Start again from step 1 (“To download data from openLCR”).1Press [MENU].2Scroll to “Caller IQ” by pressing [d]or [B], then press the soft key ( ).3Scroll to “Get new Info.?” by pressing [d]or [B], then press the soft key ( ) within 60 seconds.•The unit will dial openLCR automatically.•A voice prompt will be heard.4Follow the voice prompt to start downloading.•When downloading starts, the display will show the message on the right.•After downloading starts, the handset must be off-hook. DO NOT PLACE the handset on the base unit or charger (placing the handset on the base unit or charger will terminate the download process). DO NOT PRESS [OFF] (pressing [OFF] will terminate the download process).5When downloading is complete, a beep sounds.HandsetSELECTYESIf you live in or move from another area to Fort Collins, Colorado, press [#] before pressing the soft key ( ).YESGet new Info.?Listen & follow phone guidance.Download in process. Please wait[Caller IQ on] Download OK!Download All](https://usermanual.wiki/Panasonic-of-North-America/96NKX-TG5240/User-Guide-382212-Page-93.png)
![openLCR Service for Caller IQ94•If the handset beeps 3 times and “Download incomplete. Phone book full.” is displayed, some items could not be stored in the phone book. Store items by following the steps below.1. Erase items which do not exist on the web from the phone book of the unit (p. 43).2. Access the openLCR web site.3. Go to the web screen to create the phone book data.4. Click .5. Start again from step 1 (“To download data from openLCR” on page 93).•You cannot access the openLCR server if a telephone or fax machine on the same phone line is in use.•While the unit is downloading data from openLCR, the Call Waiting Service cannot be used.To use downloaded melodies as the ringer toneThe melody(ies) you download from openLCR are stored in the base unit and handsets and will be heard when you receive an outside call. The names of each melody (up to 14 characters) are also downloaded. To select the desired melody, go to the Ringer tone menu in the Ringer setting menu (p. 21). Downloaded melody 1 and 2 can also be selected by:— If using the handset, press [d],[B],[8] or [9].— If using the base unit, press [H],[G], [8] or [9].To view information 1Press [MENU].2Scroll to “Caller IQ” by pressing [d]or [B], then press the soft key ( ).3Press the soft key ( ) at “View Info.?”.•The items of information which you selected on the web are displayed.4Scroll to the desired information by pressing [d]or [B].•You can also select the desired information by pressing dialing buttons.5When finished, press [OFF] or place the handset on the base unit.Download AllSELECTTurn CIQ on?YESView Info.?](https://usermanual.wiki/Panasonic-of-North-America/96NKX-TG5240/User-Guide-382212-Page-94.png)